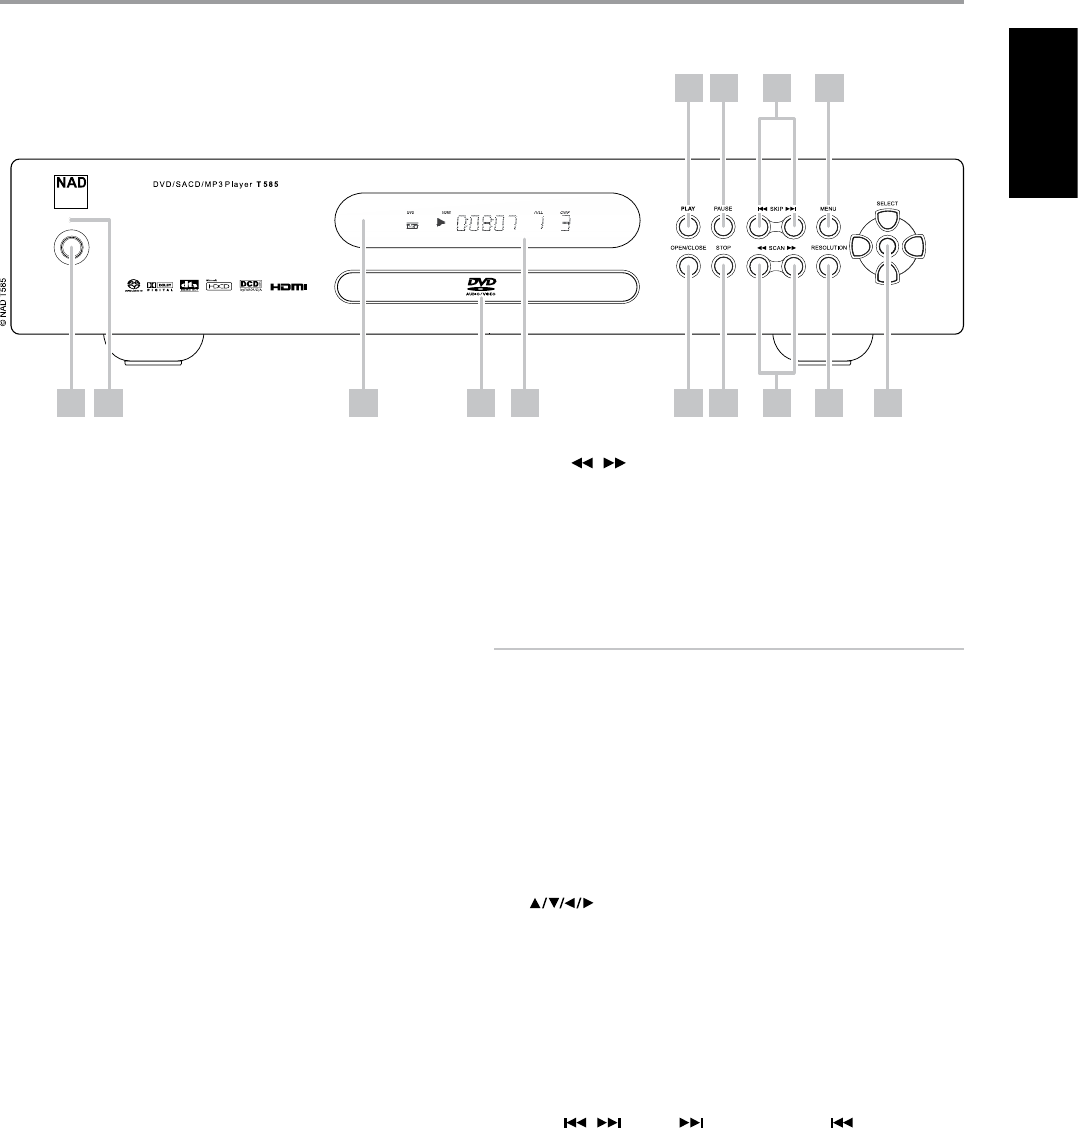
IDENTIFICATION OF CONTROLS
FRONT PANEL
1 POWER BUTTON: Press this button to switch ON the T 585. The LED
indicator will turn from amber to green and illuminate the VFD. Pressing
the power button again turns the unit back to standby mode.
The T 585 can also be turned ON from standby mode by pressing the
[OPEN/CLOSE] or [PLAY] button on the front-panel as well as on the
remote control.
2 LED INDICATOR: This indicator will light up amber when the T 585
is in standby state. When the T 585 is at ON state, this indicator will
illuminate green.
3 REMOTE SENSOR: Point the DVD 7 at the remote sensor and press
the buttons. Do not expose the remote sensor of the DVD 7 to a strong
light source such as direct sunlight or illumination. If you do so, you may
not be able to operate T 585 with the remote control.
Distance: About 23 ft (7 m) from the front of the remote sensor
Angle: About 30° in each direction of the front of the remote sensor
4 DISC TRAY: With the DISC TRAY open, insert a DVD, VCD, CD or other
compatible media disc face down onto the tray.
“NO DISC” appears on the T 585’s VFD if the disc is placed upside down
(and it is a single sided disc).
5 VFD: The Vacuum Fluorescent Display (VFD) provides playback
information, settings and other indicators.
6 OPEN/CLOSE: Press this button to open and close the disc tray. When
in standby, this button will also power ON the T 585 and at the same
time open the disc tray.
7 STOP: While a DVD disc is playing, press this button once to stop/pause
disc playback. When [PLAY] button is pressed, play will resume from the
spot it was stopped. If [STOP] button is pressed consecutively during
playback, disc playback will fully stop.
While an audio disc is playing, press this button to stop playback and
re-set the pickup to the beginning of the track. The display reverts
to showing the total number of tracks and total playing time of an
audio disc or total number of WMA/MP3/Audio les. If the T 585 was
programmed to play a selection of tracks, the program will be retained
in the memory.
8 SCAN [ / ] : Press these buttons to scan at fast-forward or
fast-reverse during playback. The speed of advance (reverse) is relatively
slow at rst. When the button is pressed again, the speed becomes
faster. Each time the button is pressed, the speed increases until the
maximum level is reached. The scanning speeding is shown in the OSD
and may vary by disc type. The speed will be retained even after the
button is released. To return to normal playback, press [PLAY].
NOTE
Not all media support maximum speeds for scanning.
9 RESOLUTION: Use this button to change the video RESOLUTION with
respect to the applicable video output. You can only change the video
RESOLUTION (480p/576p, 480i/576i, 720p or 1080i )within your
TV/Monitor’s resolution capabilities.
Refer also to the VIDEO OUTPUT TABLE section of REFERENCE -
VIDEO SETTING page.
10 NAVIGATION AND ENTER BUTTONS: The navigation buttons
[ ] in conjunction with the [ENTER] button allows one to
navigate the OSD, title and menu screens.
11 PLAY: Press this button to start playback. If the disc tray is open, press
this button to automatically close the tray and start playback if a disc is
loaded.
12 PAUSE: Press this button to toggle between Play and Pause of a DVD,
VCD, CD and other compatible media disc.
13 SKIP [ / ] : Press [ ] to skip forward or [ ] to skip
backward a track, le or chapter.
14 MENU: The MENU button is used to display via OSD the menus of the
DVD, SACD, VCD, SVCD with PBC and MP3/WMA/JPEG media when
available. The MENU button will also allow you to select between CD
and SACD layers of SACD media.
4 5 6 7 8 9 102 3
11 12 13 14
1
7
ENGLISHFRANÇAISESPAÑOLITALIANODEUTSCHNEDERLANDSSVENSKAРУССКИЙ
