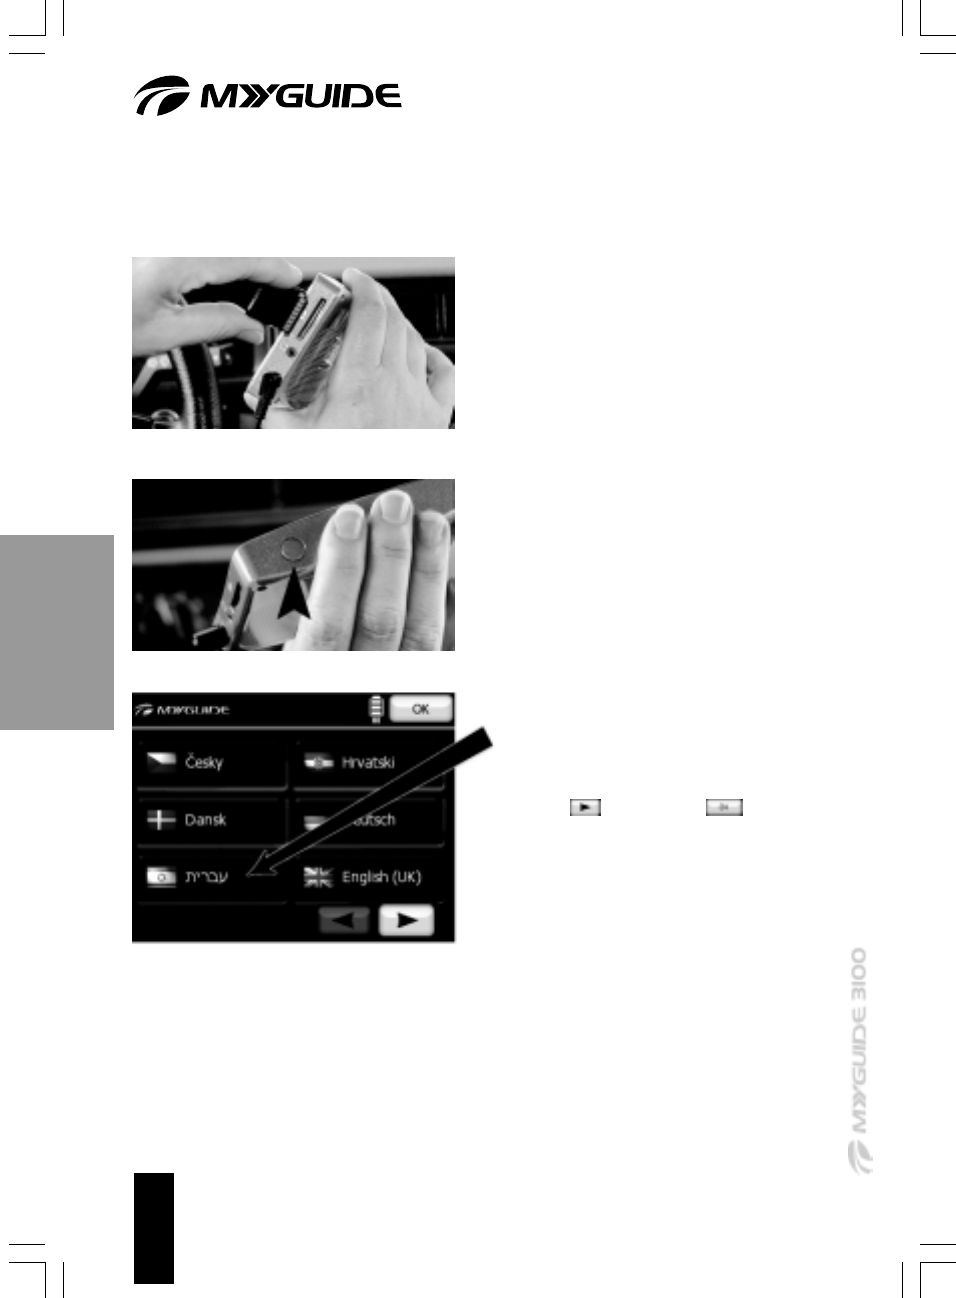
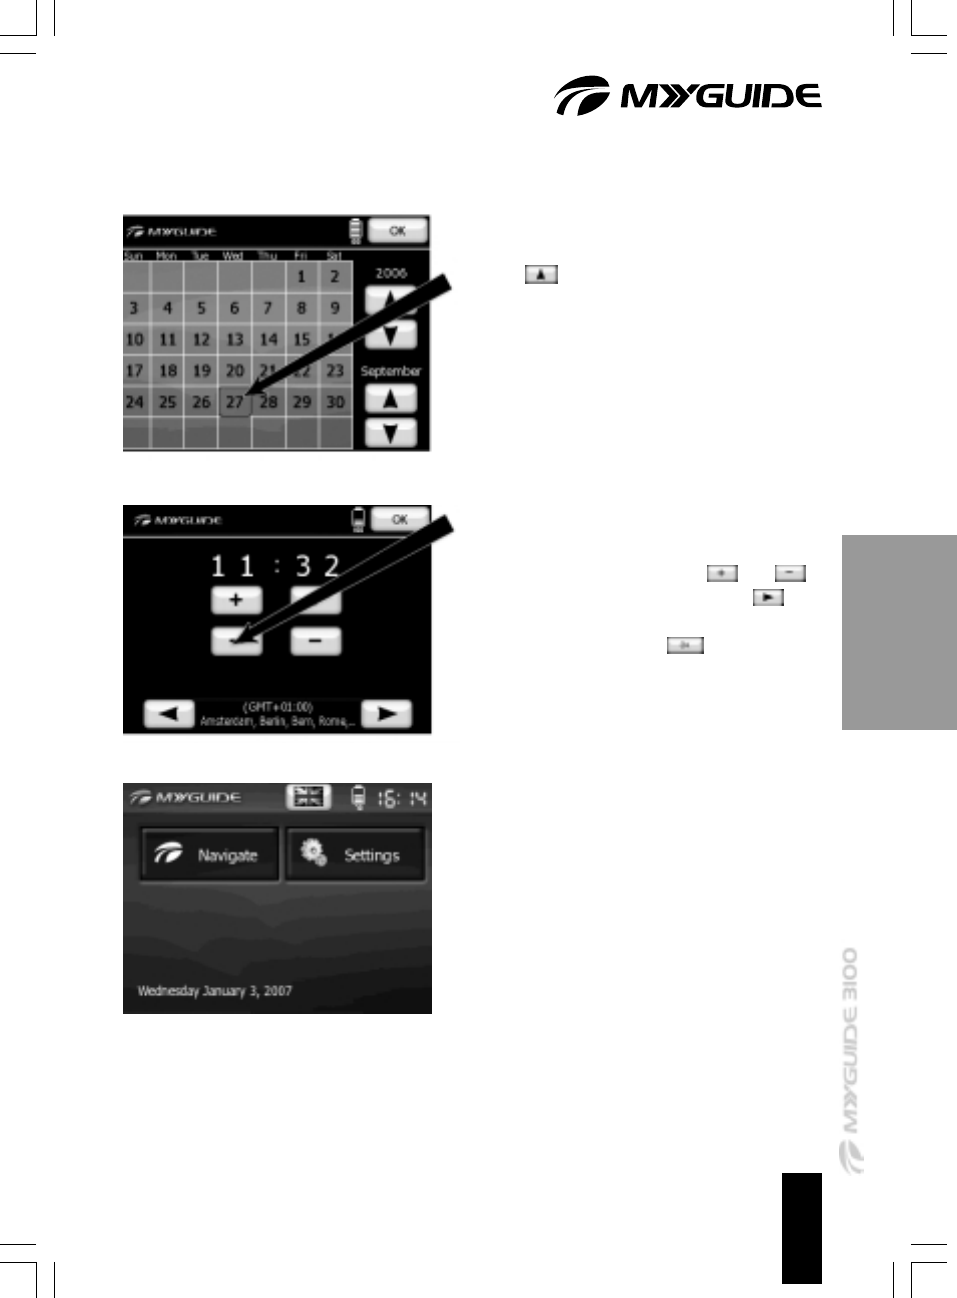
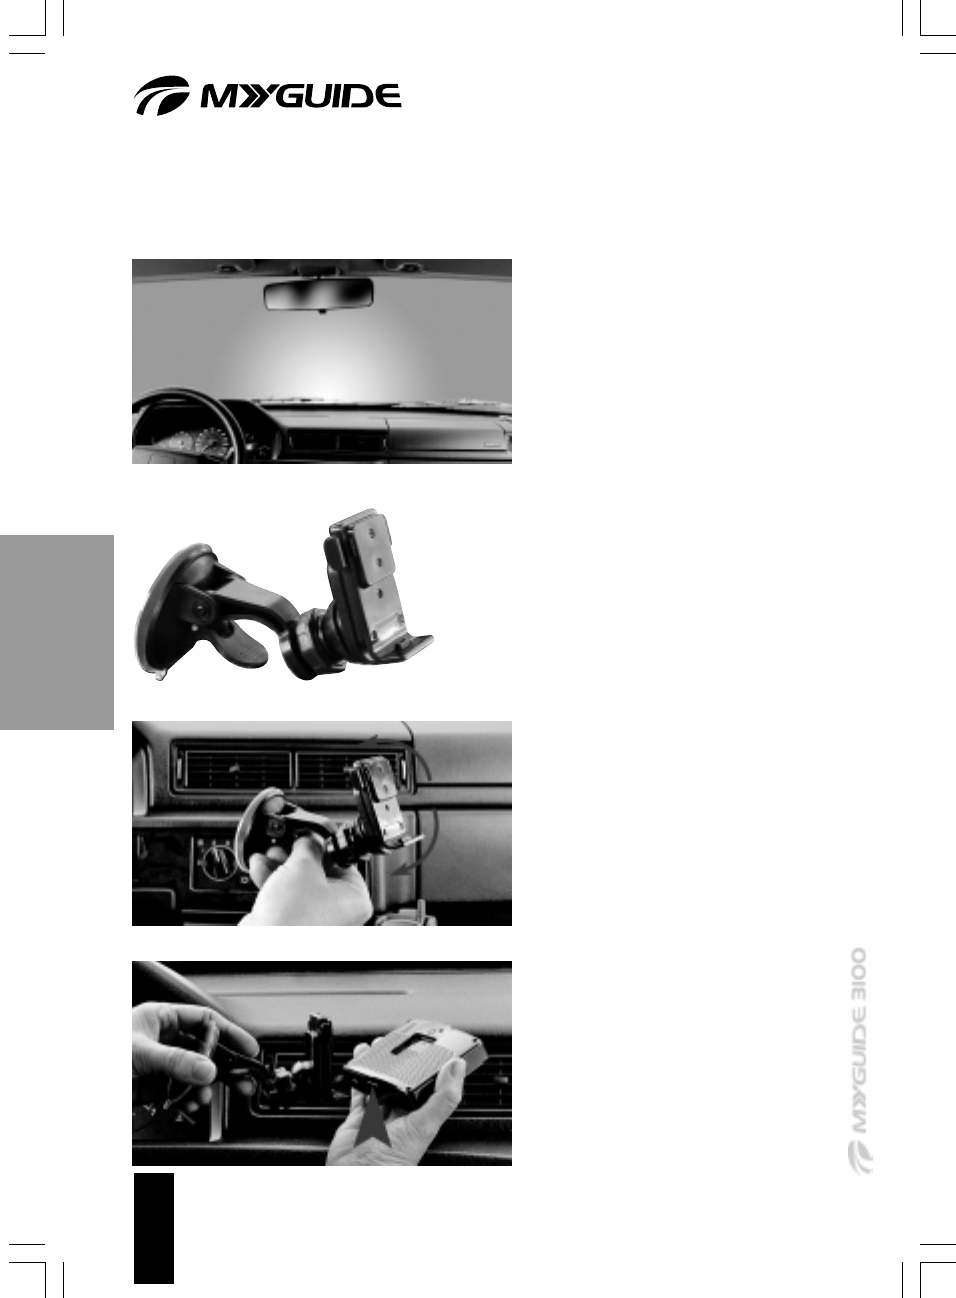
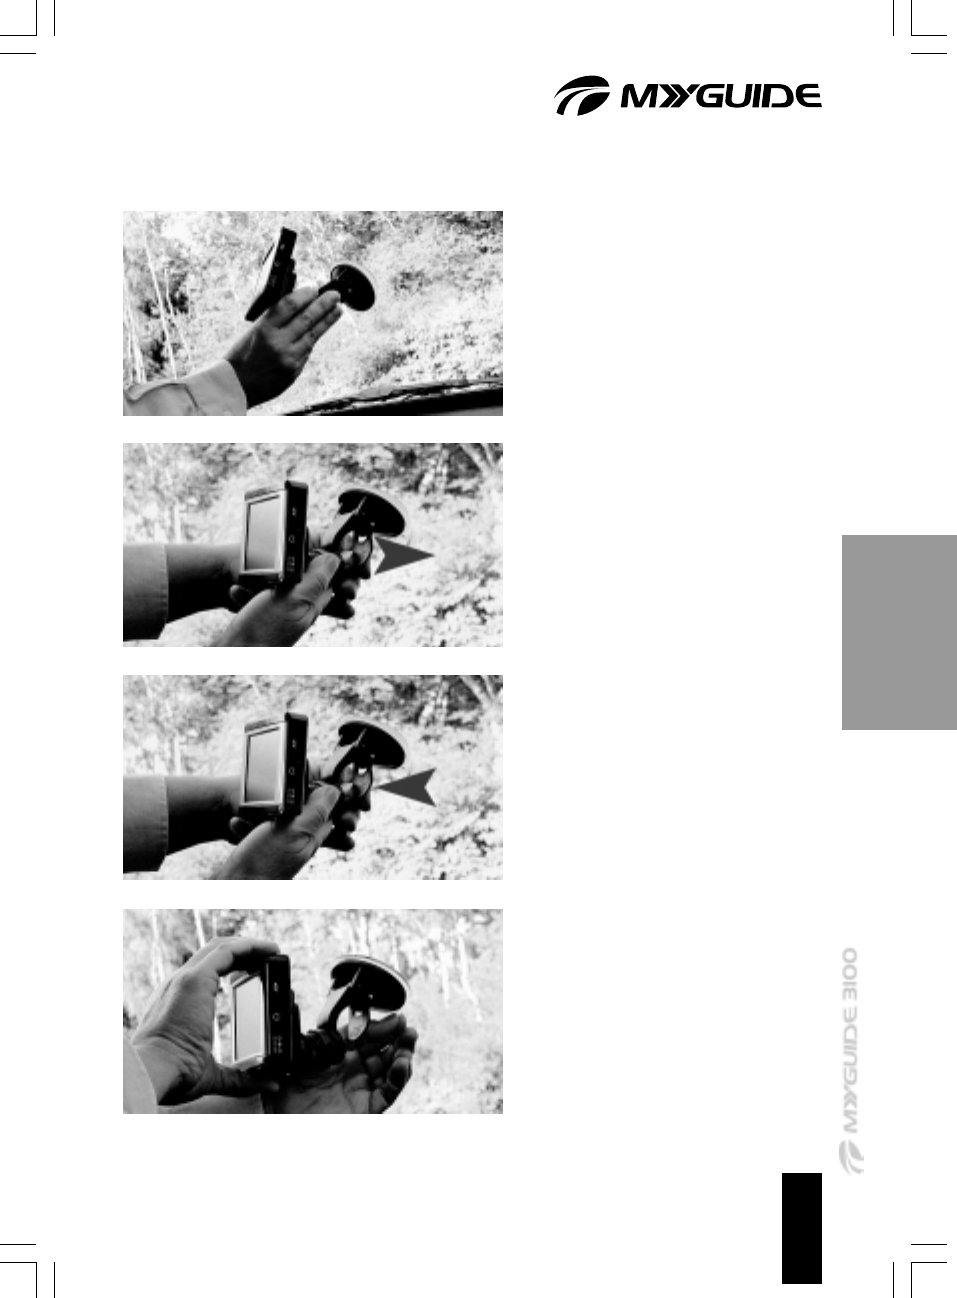
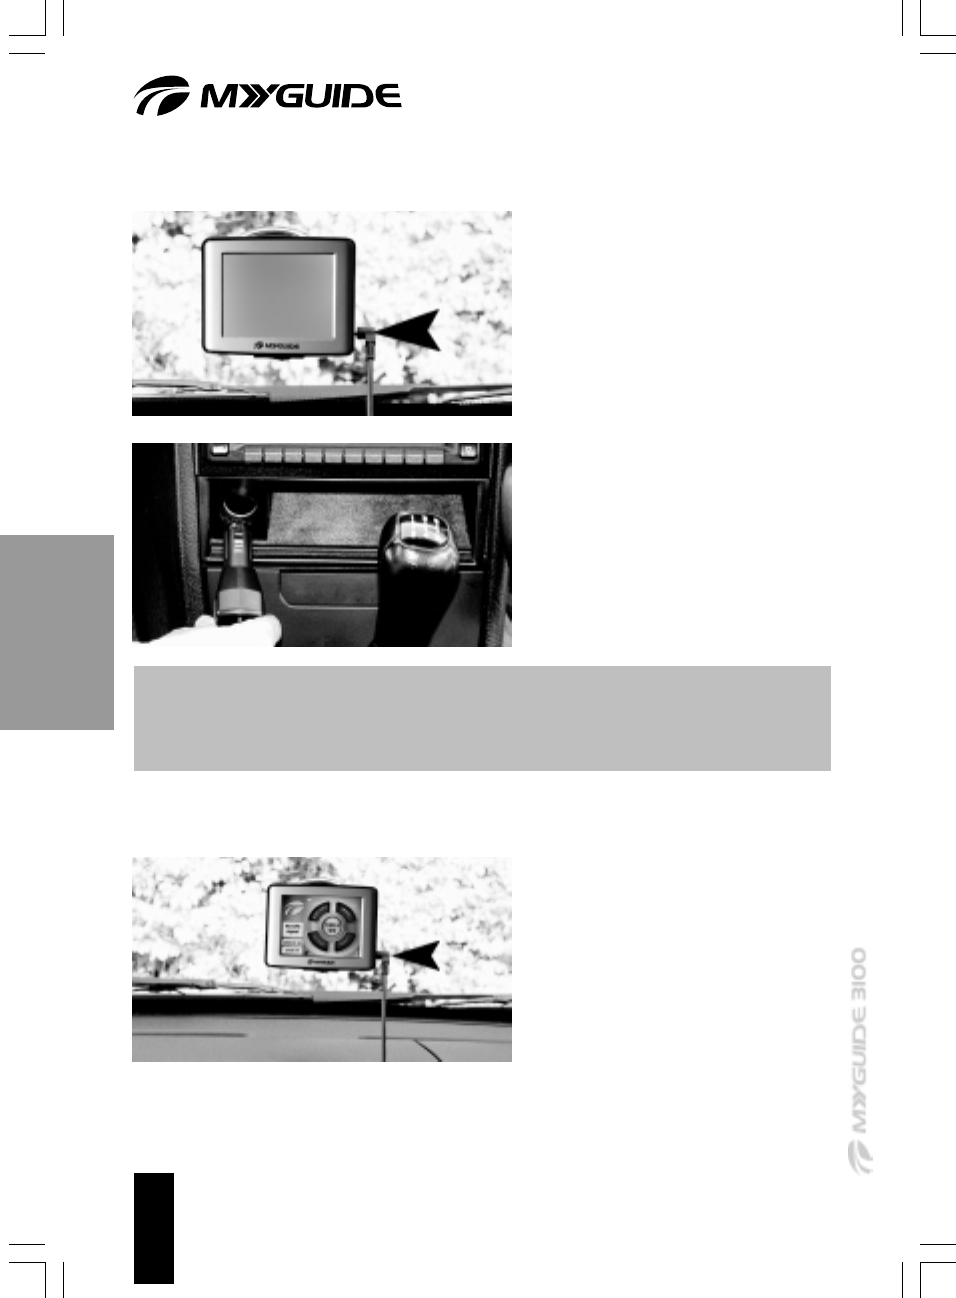
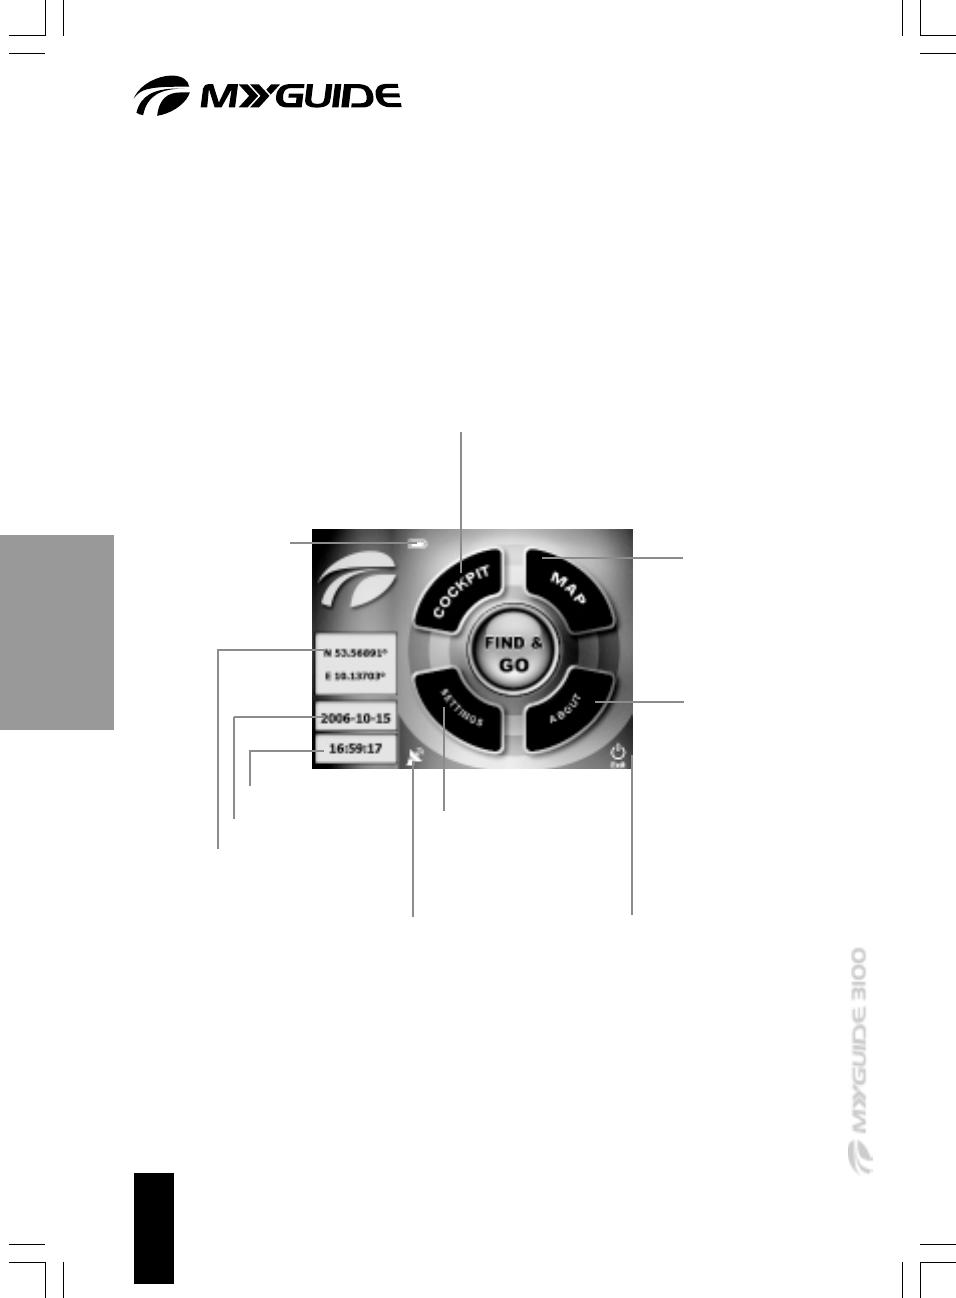
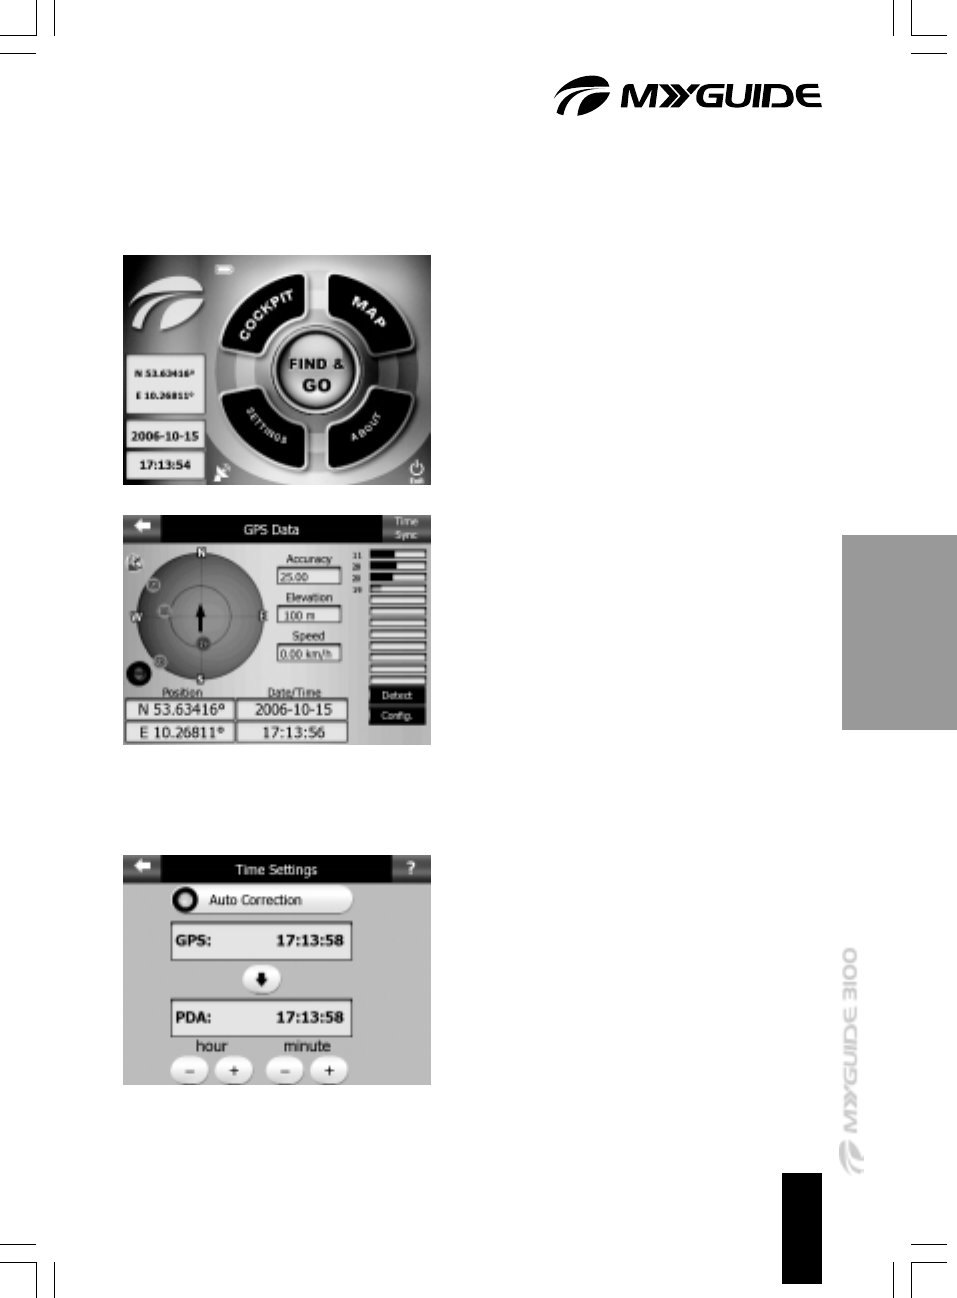
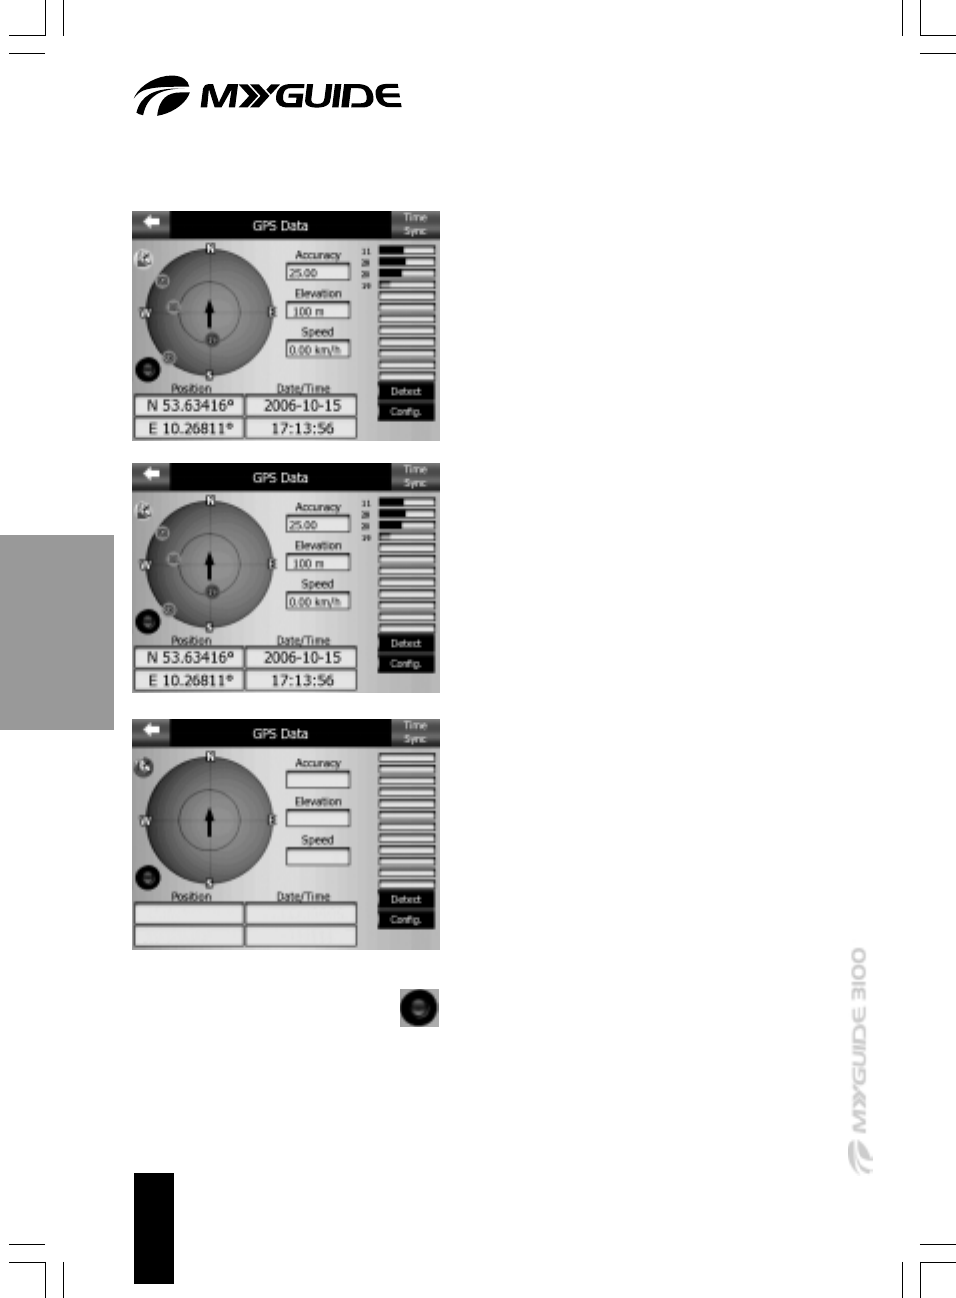
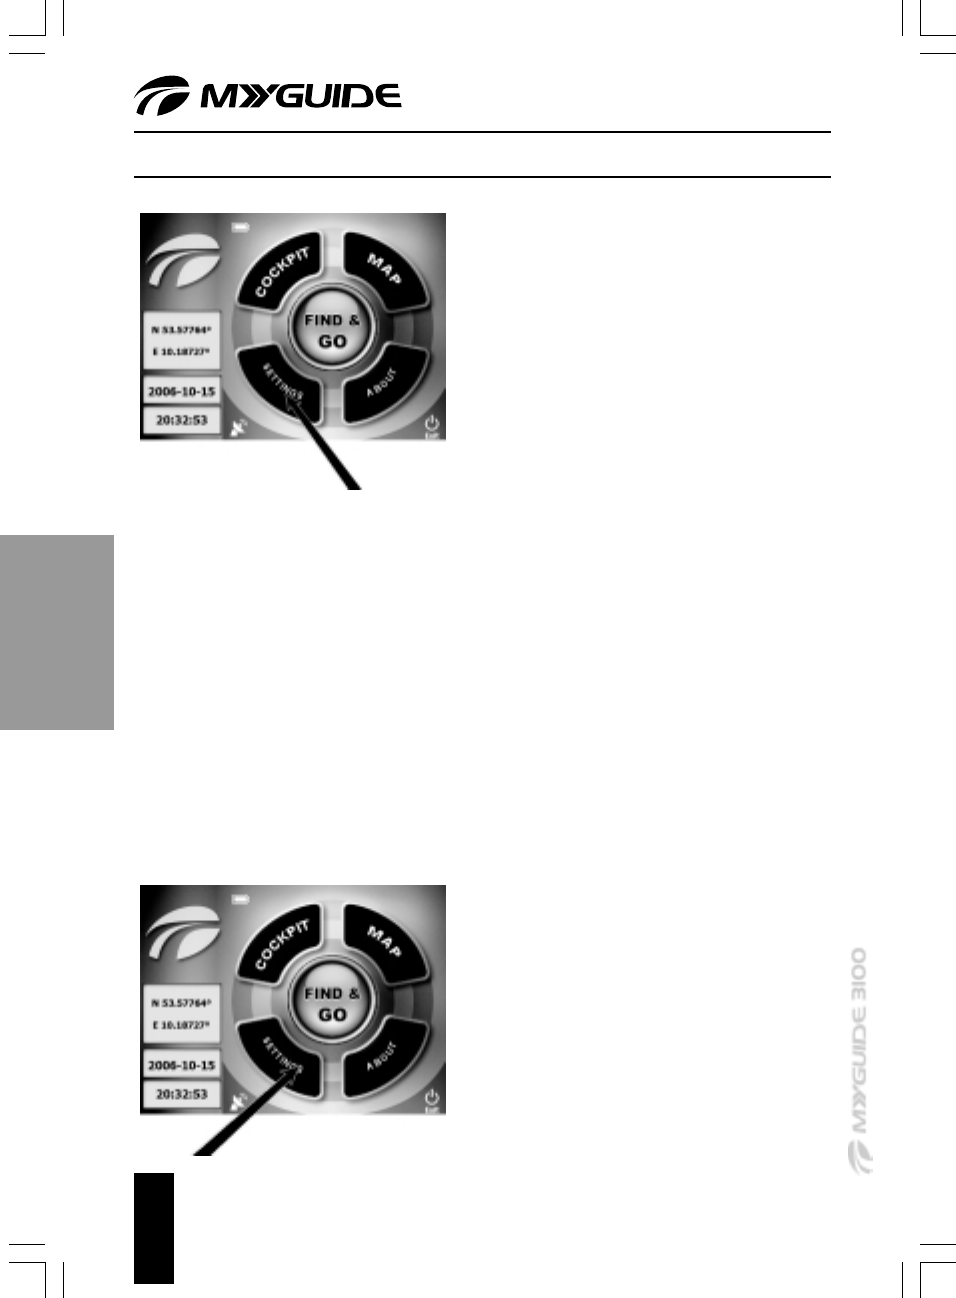
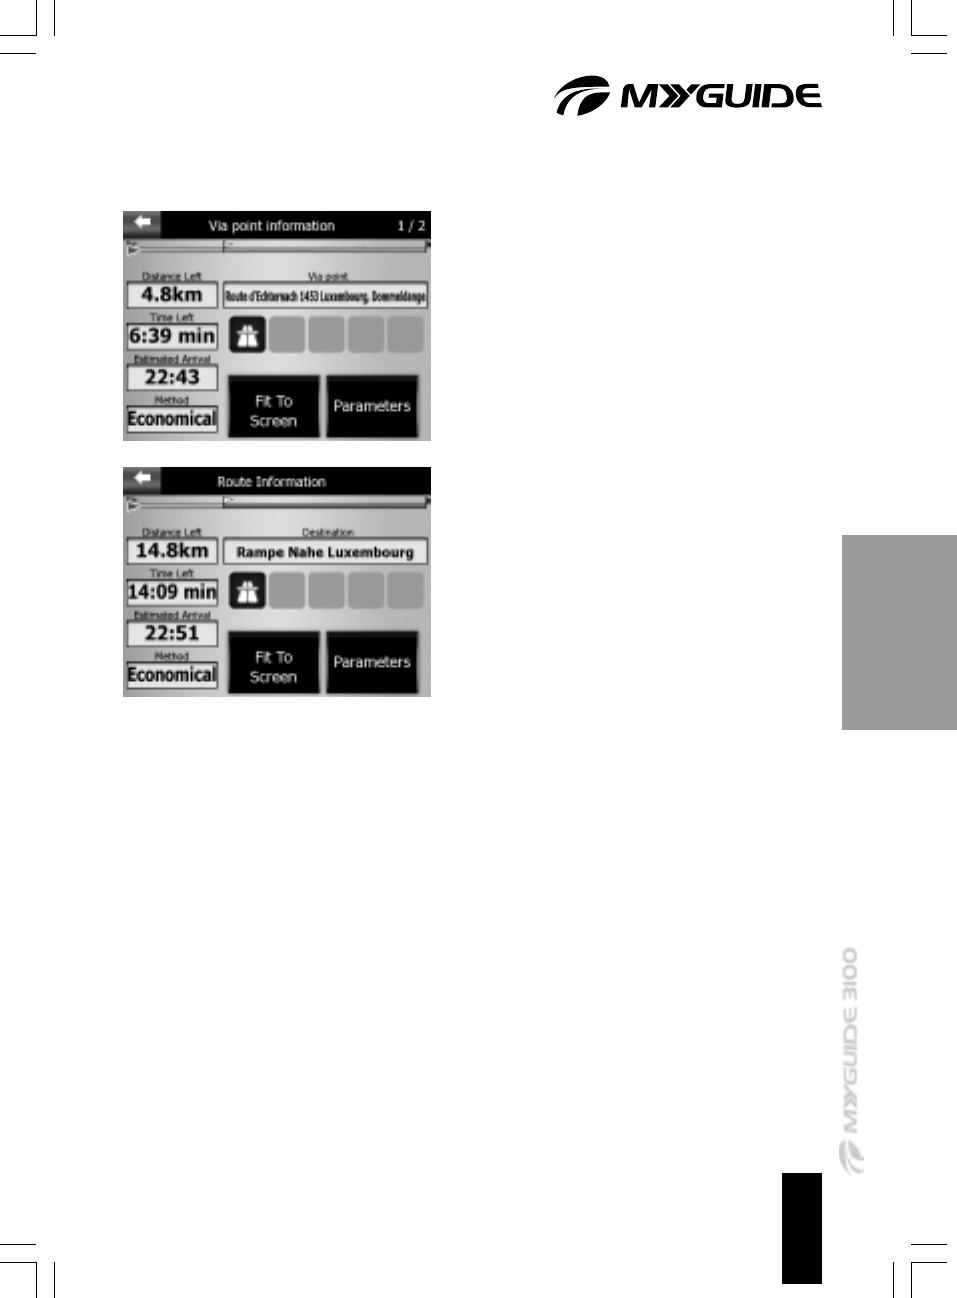
118720
1
Verklein
Vergroot
Pagina terug
1/108
Pagina verder
1
Safety Instructions and Warnings 3
Getting Started and Installing the Hardware 6
- Charging the Battery 6
- Getting Started 8
Using the Device 13
- Buttons and Controls 13
SD Card 15
System Setup 16
- Configuring System Parameters 16
Navigation 18
- Screen buttons and controls 18
- Important Special Keys 20
- Navigation Main Screen 22
- GPS – Reception and Configuration 23
General System Settings 26
- Setting the Language and Units of Measure 26
- Setting the Program language 27
- Guidance Language 28
- Route Settings 29
- Route 30
Advanced Settings 32
- Route Options 34
Maps 35
- 2D and 3D map display 35
Active Map Elements 41
Explanation of Map Display Contents and Features 43
Information 54
Find menu, Settings menu and Route menu 58
Settings Menu 59
- Manage My POI 61
- Editing the Route Track Logging 62
- Route Menu 63
2
Entering Destinations and Route Planning 71
- Direct Destination Selection by Tapping on the Map 71
- Selecting a Destination via "Find and Go" – Using the Find menu 73
- Entering a Destination via Address 74
- Destination Selection via "Recent Destinations", Route List 77
- Entering a Destination via Coordinates 78
- Entering a Destination via POI 81
- Entering a Destination via Favourites 86
Some Navigation Examples 87
- Navigating a Route with Two Waypoints 87
Offline Route Planning 92
- Planning a Route without GPS Position 92
Navigation Device and PC 95
Software 97
Troubleshooting 98
Care and Storage 101
Technical Specifications 103
CE Declaration of Conformity 104
Glossary and Index 105
3
SAFETY INSTRUCTIONS AND WARNINGS
Please follow all safety instructions and warnings!
This will help prevent damage and accidents.
Preface:
Before you use the device for the first time please read the corresponding instructions in this
manual, even if you are used to handling electronic devices.
Please pay special attention to the chapter IMPORTANT SAFETY INSTRUCTIONS.
Keep this manual safe for future reference. If you sell the device or pass it on, it is essential you
hand over this manual also.
Important Safety Notice
For your own safety, do not operate the controls of the product while driving.
Use this product prudently. The product is intended for use solely as a navigation aid. It is
not for precise measurement of direction, distance, location or topography.
The calculated route is for reference only. It is the user’s responsibility to follow the traffic
signs and local regulations along roads.
A car holder is needed when using the device in a car. Be sure that you place the device in
a suitable position, so as not to obstruct the driver’s view or deployment of airbags.
Use of devices with an antenna is prohibited on most aircraft, in many hospitals and in
many other locations. The device must not be used in these environments.
The device should not be exposed to sprayed or dripping water. No objects filled with
liquids such as vases or drinks should be placed on, above or near the device.
Only use a soft, dry and fluff-free cloth or brush. Do not use any detergents, alcohol,
benzene, furniture cleaner or any similar products.
GPS – Global Positioning System
GPS is operated by the United States government, which is solely responsible for the
performance of GPS. Any modification to the GPS system can affect the accuracy of all
GPS equipment.
GPS satellite signals cannot pass through solid materials (except glass). When you are
inside a tunnel or building, GPS positioning is not available.
A minimum of 4 GPS satellite signals is needed to determine the current GPS position.
Signal reception can be affected by conditions such as bad weather or dense overhead
obstacles (e.g. trees and tall buildings).
Other wireless devices in the vehicle might interfere with the reception of satellite signals
and cause the reception to be unstable.
4
Using the Car Charger
Do not use the power adapter or car charger in a high moisture environment. Never touch
the adapter when your hands or feet are wet.
Allow adequate ventilation around the adapter when using it to operate the device or
charge the battery. Do not cover the AC adapter with paper or other objects that will reduce
cooling. Do not use the AC adapter while it is inside a carrying case.
Connect the adapter to a proper power source. The voltage requirements are found on the
product case and/or packaging.
Do not use the adapter if the cord becomes damaged.
Do not attempt to open, repair or service the device yourself. There are no serviceable
parts inside. Replace the unit if it is damaged or exposed to excess moisture.
Never force a connector into a port. If the connector and port cannot be connected with
reasonable ease, they probably don’t match. Make sure that the connector matches the
port and that you have positioned the connector correctly in relation to the port.
When removing the connector from the port remove it by pulling on the connector, not the
cable. Do not place furniture, etc. on the power cord and take care that it does not
become tangled. Never make a knot in the power cord and do not tie it together with other
cables. The power cord should be positioned in such a way that nobody can stand on it. A
damaged power cord can cause fire or electric shock. Check the power cord from time to
time. If it is damaged, contact your nearest authorised customer service or dealer to
replace it. Make sure at least one end of the power cord is within easy reach so that you
can unplug the device when you need to.
Important Safety Notice
CAUTION: Notice on Mains Disconnection
The Power switch of this device does not fully cut off the device from the mains power supply.
Furthermore, the device still consuming current when in the Standby mode. In order to
disconnect the device fully from the mains power supply, the plug must be pulled out from the
wall outlet. Therefore the equipment should be set up in such a way that unobstructed access to
the wall outlet is always ensured, so that the plug can be immediately removed in an emergency
situation. To avoid the danger of fire, the plug should always be removed when not being used
for a long period of time from the wall outlet, such as during holidays.
5
Electrical Devices and Children
Do not allow children to use electrical devices when not under supervision. Children may
not comprehend the presence of potential risks. Keep the packaging away from children
too. There is danger of suffocation.
Using the Battery
Use a specified charger approved by the manufacturer (see Technical Specifications).
Using a different charger may cause malfunction and damage or accidents.
Only use the built-in battery.
When you get out of the car, do not leave your device on the dashboard subject to direct
sunlight. Overheating of the battery can cause malfunction and/or danger.
This product uses a Lithium-Ion battery. Do not use it in a humid, wet and/or corrosive
environment. Do not put, store or leave your product in or near a heat source, in a high
temperature location, in strong direct sunlight, in a microwave oven or in a pressurized
container, and do not expose it to temperatures over 60ºC (140ºF). Failure to follow these
guidelines may cause the Lithium-Ion battery to leak acid, become hot, explode or ignite
and cause injury and/or damage. Do not perforate, open or disassemble any batteries.
If a battery leaks and you come into contact with the battery fluid, apply plenty of water and
seek medical help immediately. For safety reasons, and to prolong the lifetime of the
battery, charging will not occur at low (below 0ºC/32ºF) or high (over 45ºC/110ºF)
temperatures.
Disposal of Old Devices
If the symbol of a crossed out trash can appears on a product, it means that this product is
subject to the European Directive 2002/96/EC.
All old electrical and electronic devices must be disposed of separately from household
rubbish at designates places.
With the proper disposal of old devices you avoid damage to the environment and your
personal health.
You can obtain more information on the disposal of old devices by contacting your
municipal administration, the disposal office or the place where you bought the product.
6
GETTING STARTED AND INSTALLING THE
HARDWARE
Unpack – Power on – Navigate:
Get started in just a few steps!
Charging the Battery
1. Insert the charger cable into the
DC/IN receptacle
Insert the mains adapter cable or the car
charger into the DC 5V IN jack. The
rechargeable battery will need at least
two hours to charge for the first time. An
optimal charging time is eight hours.
2. Connect to the mains power
Insert the power adapter into a wall outlet
(at home, in the hotel, in the office, etc.).
3. Connecting to the cigarette lighter
While travelling by car, insert the car
charger into the cigarette lighter of the
vehicle after the engine has been started.
7
Good to Know
The power adapter and car charger still consume power after they have been
disconnected from the navigation device and while plugged into the wall outlet or cigarette
lighter.
When charging the battery for the very first time, you should charge it for at least 8 hours.
When you connect the AC adapter to charge the battery after the battery power has been
fully depleted, wait for at least one minute if you need to turn on the device.
Your device uses a small amount of battery power to maintain its data when you switch it
off. If you don’t charge it for a prolonged period of time then you will lose this data and your
device will re-start with default configurations. Your settings will however, be maintained.
You can tell it’s time to charge your device when the battery indicator turns orange.
To protect your device against sudden surges in current, connect the car charger only after
the car engine has been started.
Safety first
Use a specified charger approved by the manufacturer. Using a different charger may
cause malfunction and damage or accidents.
This product is intended to be supplied by a LISTED Power Unit marked with “LPS”,
“Limited Power Source” and output rated + 5 V DC / 2 A”.
Use only the power adapter and charger as well as the battery supplied with your device.
8
Getting Started
2. Powering on
Power on the device by pressing
the "Power" button on the upper
side.
3. Setting language
Select the desired language. If your
language is not shown on the first
page, go to the next page tapping
. Confirm with .
1. SD Memory Card
Insert the SD memory card into the
memory card slot on the right-hand
side of the device. The gold
contacts of the card should face to
the back and to the left.
9
5. Setting Time and Selecting the
Time Zone
Set the current time with and .
For the United Kingdom, press to
select Greenwich Mean Time: “GMT +
1:00”. Confirm with .
6. Main menu
The Main menu appears on the display.
Power off the device before mounting it
in the vehicle. When it is restarted, the
same Menu will be displayed.
4. Setting the date
First set the current year and month with
. Next select the day.
10
Installing Your Device in a Vehicle
1. Optimal mounting
The device must be fitted with the car
holder on the windscreen (the lightest
areas of the windscreen) and must
under no circumstances obstruct the
vision of the driver or the functioning
of the airbags.
2. Car mount
The major components of the car
holder are:
Suction pad
Snap lever
Adjustable articulation
Device retaining plate
Clamps
3. Adjusting car holder
As the arm is quite rigid it is
recommended that you already put it
in its final shape prior to mounting the
holder.
4. Latching the car holder into
place
Put the hook of the car holder
retaining plate underneath and latch
the car holder on to the back of the
device.
11
5. Test by holding on windscreen
Hold the pre-assembled system on
the windscreen to test, note the
position if necessary and place the
arm in the desired position.
6. Closing the Snap Lever
After you have determined the best
position for the device, press the
suction pad strongly onto the
previously-cleaned position of the
windscreen and swing the snap lever
forwards. The suction pad will adhere
firmly.
7. Opening the Snap Lever
To uninstall your navigation device,
open the snap lever by pulling it
backwards (see arrow).
8. Releasing the Suction Pad
Pull from the rubber latch to release
the suction pad from the window.
12
9. Power supply
Plug the car charger into the DC 5V
IN receptacle of your navigation
device.
10. Connecting to the cigarette
lighter
Plug the car charger into the cigarette
lighter of your vehicle.
Good to Know
To protect your device against sudden surges in current, connect the car charger
only after the car engine has been started.
11. Ideal position
You should be able to see the display
optimally from the driver's seat.
Position the charging cable so that it
does not disturb.
13
USING THE DEVICE
Upper side
On the upper side you can find the
On/Off switch.
Front side
The device is controlled via a
touchscreen.
Use your finger.
This allows you to select objects on
screen and to navigate.
The following options are available:
Tap: Touch the screen once with
the stylus to open items or select
options.
Drag: Touch the screen and drag
your finger up/down/left/right or
across the screen.
Tap and hold: Tap and hold the
finger until an action is complete,
or a result or menu is shown.
Bottom
In the centre there is a receptacle to
fix the car holder (1). Next to it you'll
find the USB port (2).
1
2
BUTTONS AND CONTROL
14
Left side Right
side
Left side
There are no control buttons on the
left side.
Right side
On the right side you'll find the
following ports (from top to bottom):
1. SD card slot
2. Headphones connector
3. DC IN 5V power receptacle
Back
In the centre there is a receptacle to
fix the car holder to (1). Next to it
you'll find the port for connecting an
optional GPS antenna (2).
1
2
3
1
2
15
SD CARD
1. Inserting the SD Memory Card
Insert the SD memory card into the
memory card slot on the right-hand
side of the device. The gold contacts
of the card should face to the back
and to the left.
2. Removing the SD Memory Card
To remove the card, gently press the
card in with your fingernail. The card
unlocks and protrudes slightly. Then
remove the card.
Good to Know
To protect your device against sudden surges in current, connect the car charger
only after the car engine has been started. Prior to removing the SD memory card
make sure that no applications are accessing it and that the device has been turned
off. Otherwise you risk losing data.
Your device features an SD/MMC card reader where you can insert the SD memory card.
Carefully remove the SD card from its box. Make sure you don't touch the contacts and
that they don't become dirty. Don't apply any pressure onto the card.
Make sure that no foreign objects enter the card reader.
When not using it, store the SD card in its box to protect it against dust and moisture.
16
SYSTEM SETUP
Configuring System Parameters
1. Main menu
From the main menu you have
access to the entire software package
of your system.
Navigation
System Settings optimisation
2. Settings Menu
The Settings menu offers the
following adjustments:
Changing the Date
Setting the Time
Calibrating the Touchscreen
Selecting the Language
Setting the Brightness
3. Display Backlight
Use a finger to drag the Brightness
slider to the left to darken the display.
Drag it to the right to increase
brightness.
17
4. Calibrating the Touchscreen
Tap the centre of the cross with your
finger. When the cross moves to
another position, tap and hold the
centre of the new target. Repeat each
time to complete the calibration
process. When tapping the screen on
the final step the new settings will be
stored and you are returned to the
Settings menu.
Good to Know
There are more language settings described in the "Navigation" chapter, in the
"Settings" section.
18
NAVIGATION
Direct Selection Buttons
Some of the settings can be selected from a
short list of possible values. The current
selection is highlighted in colour. Tap one of
the icons to change the value.
Slider
You can choose between two options or
between minimum and maximum on a
sliding scale of values: by dragging the
button or tapping the slider to the required
position.
List Selection Button
If the values in the list require a designation
only the current value is displayed in a
horizontal bar with arrows at both ends. The
arrows serve as buttons through which you
can scroll in the Menu display by tapping
them. As soon as you exit the screen, the
selected value becomes effective.
Always arrive hassle-free, fast and safely at your destination – this navigation system assists
you on your journey. Get to know its functionality – fun and interactive.
Screen buttons and controls
The primary input medium of your navigation system is the touchscreen. The screen not only
serves as a display for information, but also for command input by tapping gently with the finger.
Below you will find a list of the most frequent operation controls.
19
Switch
Where a function can only have two values
(enabled or disabled), a switch is used. A small
lamp on the left side lights to show whether the
function is enabled or disabled. If the lamp is off,
the function has not been selected. If it lights,
the function is enabled. The whole bar acts like
a button.
Switches in Settings Menu
Although they look different, the Settings Menu
switches act like a normal switch to coincide
with the other menu buttons. You can switch
between enabled and disabled by tapping.
QWERTY keyboard
The QWERTY keyboard has letters as well as
numbers. The name comes from the first six
keys on the keyboard: Q-W-E-R-T-Y
Special Switch
Some switches behave in a different way.
Instead of the lamp being off when in a disabled
state, a red lamp shows and the light has a
cross through it to highlight a forbidden
application. Furthermore, when planning your
route, allowed routes (green lamp) or street
types to avoid (the whole row is disabled and
the lamp is off) for different vehicle types is
displayed.
20
Important Special Keys
Keys...:
tap this key to change the keyboard (see
following keyboard settings)
Arrow left / Backspace key:
use this to delete any last-entered letter
Done:
Press this key to conclude entering text
AZERTY Keyboard
The AZERTY keyboard is the French standard.
The name comes from the first six keys on the
keyboard: A-Z-E-R-T-Y
ABC Keyboard
By switching further you come to the ABC
keyboard. This has no numbers.
Space
Pressing the "Space" key on the ABC keyboard
to make a blank space.
21
Character sets of the ABC Keyboard
The ABC keyboard has the following character
sets: Latin, Hebrew, Greek and Cyrillic. Here is
an example of the Greek. You may only enable
foreign characters when you have configured
the language settings of the corresponding
language: Hebrew, Greek or Russian.
Numerical Keypad
The numerical keypad exclusively has numbers
for the comfortable entry of street numbers.
22
Navigation Main Screen
Initially the navigation program displays in the Main menu. This is the starting point of the
display screen hierarchy where you will seldom have to return to. Many of the screens are
accessible between each other so that the number of operations is reduced. Most parts of the
navigation program are directly accessible from the main screen when the keys are used as
described below.
Button to open the
Cockpit display
Button to open the
Map display
Button to open the
menu showing
information on the
software
Exit navigation
Button to open the
Settings menu
Button to show the
GPS status and to
open the GPS data
screen
Time
Date
Current geographic
coordinates (latitude
and longitude)
Battery charge
indicator
23
GPS – Reception and Configuration
1. Opening the GPS Main Menu
When you tap on the satellite antenna icon in the
navigation Main menu, the GPS Main menu will
open. White satellite antenna: optimal GPS
reception is available.
2. GPS Main Menu
The "GPS Data" view contains all the information
concerning the GPS reception.
Geographical coordinates
Date and time
Speed
Elevation
Accuracy at current position
The circular image of a virtual sky over you
shows your position in the centre.
The GPS receives data from the green and
grey satellites, but not from the red ones.
3. Synchronising the Date
Tap the "Time Sync" button to go to the "Time
Settings" menu where the time can be
automatically synchronised with the satellite
time.
24
4. Connection Display
Yellow satellite antenna: the signal is weak: it is
diminishing.
5. Connection Display II
Green satellite antenna: the GPS signal is
optimal: it guarantees good position tracking.
6. Connection Display III
Red satellite antenna: no GPS signal available:
there is no position tracking at all.
GPS Connection Display
On the left there is a green lamp that displays a
correctly-functioning GPS device. This does not
mean that the device is receiving a GPS signal.
25
7. Connection Display IV
The red satellite antenna to the lower left of the
main screen: the satellite antenna is red: there is
no GPS connection.
8. Connection Display V
White satellite antenna with one or two wavey
lines: a weak or optimal GPS signal is being
received.
26
GENERAL SYSTEM SETTINGS
1. Selecting "Settings"
Select Settings from the main menu.
2. Settings Menu
The Settings menu contains six submenus allowing you to customise the navigation system.
You can change several settings on your navigation system. All menus contain a help function,
therefore only a few selected settings will be described here. To access the help, tap the
question mark in the upper-right corner of each submenu.
Setting the Language and Units of Measure
1. Selecting "Settings"
Select Settings from the main menu. To do so,
tap the corresponding button.
27
1. Program language
First you can set or modify the program
language. German is the default language, or
the language that you have selected after
powering on the device for the first time. To
change it, tap the button.
2. Selecting "Language & Units"
Open the Language & Units submenu.
Setting the Program language
2. Program languages
Examples (screens are for reference only)
The program languages appear in
alphabetical order – five language per
screen
Tap the arrows Next or Previous to
navigate through the different languages.
Once you have found the desired
language, tap on it and confirm with OK.
Then exit the menu.
28
Setting the Guidance Language
1. Guidance Language
Now you can select the voice guidance
language.
Good to Know
For some languages, the speaker will have a male or a female voice. You can
choose either of them.
Tap the arrows Next or Previous to navigate through the different languages.
2. Guidance Language
Tap the desired language with the finger. Your
selection will be highlighted in white. Tap OK to
confirm and exit the menu.
29
Route Settings
1. Selecting "Settings"
Select Settings from the main menu.
2. Selecting "Route Parameters"
This menu item is very important. These
settings determine how routes will be
calculated.
3. Route Parameters Menu
You can also access this screen via Route
Information.
Method:
Use the sliders to set the route calculation speed.
If the slider is moved to the left the route may not
be optimal but the calculation is very fast. If the
slider is moved to the right, route planning will be
very accurate but this will take longer.
30
Route:
Fastest
When using this setting, the route that takes
the least time will be displayed. Normally, this
route type is preferred for automobiles.
Shortest
When using Shortest, the route with the
shortest distance between two waypoints will
be shown. This will normally be the preferred
option for pedestrians, cyclists or low-speed
vehicles.
31
Economical
This setting is an intelligent combination of the
two previous route types. Generally the fastest
route is selected. However, if there is an
alternate route taking only a little more time but
being much shorter in distance, it will get higher
priority in order to save fuel.
Vehicles and Road Types:
Under Vehicle select from Car, Taxi, Bus,
Lorry, Bicycle, or Pedestrian.
Under Road you can use or avoid:
Motorways
Unpaved Roads:
will be excluded by default
Ferries: enabled by default
U-turns: disabled by default
Permit needed: permission required,
therefore disabled by default
Toll Roads: will be used for route planning
by default
32
ADVANCED SYSTEM SETTINGS
1. Selecting "Settings"
Select Settings from the main menu.
2. Selecting "Advanced"
These dialog boxes allow you to configure
many advanced settings and enable some
special features.
Smart Zoom
Smart Zoom offers some advanced features
compared to the automatic zoom.
While navigating along a route: When
approaching a road junction, Smart Zoom
enlarges the view and increases the
virtual height so you can easily see the
manoeuvre you are approaching.
When driving with any preset destination
Smart Zoom will enlarge the view at low
speed and reduce it at a higher speed.
33
Settings
You can set the Smart Zoom level when
approaching a road junction (lower zoom
limit) and the maximum level of reduction
(upper zoom limit) if the next road junction is
still far away.
Enabling Overview Mode:
Here you can set how the overview mode should
be activated if the next road junction is still far
away.
Restore Lock-to Position and Restore
Smart Zoom: Enable this function if you
want MyGuide to return to the current GPS
position and to restore Smart Zoom after
you have moved the map while navigating.
Delay in Seconds: Here you can set the
time delay for the functions «Restore Lock-to
Position" and "Restore Smart Zoom".
You are recommended to use a short delay.
34
Backlight Settings
Under Backlight you can determine how the
display backlight illumination should behave
during operation.
Backlight Always On
Here you can choose to have the backlight
always turned on.
"Set custom backlight value for daylight"
and "Set custom backlight value at night"
These functions allow you to set the display
backlight on a scale of relative values.
Smart Powersave
This feature increases the battery life. The
power-saving mode will enable the display
backlight only when pressing or tapping a button
or when the program displays a message. After
a few seconds the backlight intensity will dim
until it completely turns off after another few
seconds.
35
MAPS
1. 2D View
2D means two-dimensional (length x width). This
is the classic map view of an unfolded paper
map.
2D and 3D map display
2. Changing Mode
It is very easy to toggle between 2D and 3D map
view. There are two options:
Use the buttons from the Settings menu to
toggle between the two modes.
Use the semi-transparent icons for
increasing the virtual height to infinite
(equivalent to 2D view) or lower (3D view).
3. 3D View
3D means three-dimensional (length x width x
height). This is a perspective 3D view through the
windshield offering the possibility to looks very far
ahead.
36
Zoom Levels
Your MyGuide navigation device uses high-
quality vectorised maps. This allows you to view
the map at different zoom levels with optimised
contents. The detail density for the map and the
cockpit display can be set independently via
Settings => View Settings => Map Detail. Street
names and other text objects will always be
displayed with the same font size and never
flipped vertically, and you will only see as many
streets and objects as necessary for your
orientation on the map. Just test the different
zoom levels to see how the map changes in
both 2D and 3D views.
Daylight colour profile and Night colour
profile
The different colour settings allow you to
customise your navigation system to the
different environmental situations. Daylight
colours are similar to those used for printed
road maps while night colours use darker
colours in order to keep the overall screen
brightness dimmed. The system uses selected
colours for you to easily recognise all relevant
information. You can quickly toggle between the
daylight and night colour profiles via the
Settings menu.
Good to Know
The program offers different daylight and night
colours. Make the desired choice via Settings
=> View Settings.
37
Street names
Streets are given names or numbers for
identification. Of course you may display them
on the map. The program can display street
labels in two ways:
The traditional mode is equivalent to a
road map, the name appears parallel
along the street.
The alternate mode is a kind of virtual way
sign to be pinned onto the street.
You do not have to choose between the two
modes. The program will display the most
suitable mode depending on the virtual height
and zoom level. Zoom in to view a few streets
only and start increasing the virtual height to
observe how the program toggles between the
two modes.
Good to Know
If you don't want the street names to disturb
you while navigating, you can disable them via
Settings => View Settings.
Artificial Landmarks
To improve your orientation, the map also
includes objects to help you identify your
position on the map. These are water, large
buildings, forests, etc. The below screen shows
a river (blue) and a forest (green).
38
Cursor - selected map point
When tapping any point on the map or when
selecting a specific POI under Find, this point
will become selected on the map. It will be
marked by a small red dot and continuously
expanding red circles will make it well visible.
You may use this point as starting point,
waypoint or destination of your route.
Marked map point - Pin
You can place a pin at the cursor position. All
pins appear on the map. They will be visible at
any zoom level and until you delete them
individually or remove all pins at your position
via Advanced Settings.
Visible POIs
POIs (Point Of Interest) are represented by
icons on the map. The preset POIs have
subcategory icons similar to the real POI. Any
user-defined POIs allow you to select a POI
icon. These icons are large enough to be
identified but also semi-transparent in order to
avoid covering any roads or road junctions.
39
For reduced map views no icons are displayed.
Once you zoom in, at the POI position small dots
will appear. When zooming in further, the icons will
appear.
If two points are located too close to each other so
that the icons overlap, a Multi-POI icon will be
shown instead of several individual icons. Enlarge
the view in order to display the icons separately.
(If both POIs have the same icon, this icon will
appear instead of the Multi-POI icon.)
Active Route Elements
Your programme uses a routing system made
up of many waypoints. It consists of a starting
point, a destination, the line of the current
route segment as well as optional waypoints
and inactive partial routes. All these appear
on the map. The starting point, the waypoints
and the destination point are marked by flags.
Animated arrows will indicate any enroute
events apart from the above-mentioned
points. These arrows show the direction in
which the journey will continue.
An active route segment is the part of the
route where you are currently located. If no
additional waypoints have been defined, the
active route segment is equal to the entire
route. If waypoints have been defined, the
active route segment is the segment from
your present position to the next waypoint.
During the day, the active route segment will
appear in bright green, at night in red.
40
41
ACTIVE MAP ELEMENTS
1
2
3
4
5
6
7
8
9
10
11
12
13
14
15
16
3
2
1
19
20
21
22
6
5
4
17
14
7
8
9
10
11
12
13
18
Follow
Follow
42
Display Control
1
Route* / Road junction Preview
opens the Route menu
2
Zoom In button enlarges the view
3
Zoom Out button reduces the view
4
Reduce virtual height lowers the horizon in 3D view
5
Increase virtual height raises the horizon in 3D view
6
Menu Find menu, Settings menu, Route menu,
Main menu
7
Map Orientation and Overview toggles between driving direction, North
alignment and Overview
8
GPS tracking quality opens the GPS information display
9
Battery status opens the Settings menu
10
Sound on or Mute enables/disables the Mute function
11
Route track logging/playback Route track logging/playback
12
Lock-to Position button – go back to
programmed navigation display
After you have followed your route you can
return to your origin
13
Open Cursor menu opens the Cursor menu
14
Start and Itinerary -
15
(Map only) Map scale enlarge/reduce by dragging
16
Cursor/selected map point
opens the Popup Info and Cursor menu
17
(Cockpit only) next road -
18
(Cockpit only) next road -
19
(Cockpit only) Distance to next road
junction**
-
20
(Cockpit only) Distance to destination** -
21
(Cockpit only) Estimated time enroute**
-
22
(Cockpit only) Estimated time of arrival**
-
* only on map display while a route is active
** different contents, while a route is active
43
EXPLANATION OF MAP DISPLAY CONTENTS
AND FEATURES
Route / Road junction Preview (1)
While in Map view, this field also functions as a button. Here it shows a button labelled "Route",
while an active route exists. Tap the button to open the Route menu (for detailed explanation,
see page 63). While in Cockpit display, this field is a graphical illustration of the next
manoeuvre. When approaching a road junction, an arrow will show whether a gentle, medium or
sharp turn has to be made. When a roundabout is displayed, the number of exits are also
shown.
Zoom buttons (2+3)
These semi-transparent buttons will only appear while the Zoom function is enabled from the
Settings menu (see page 59). When reducing/enlarging the map scale will change accordingly.
Reducing shows a larger map portion while enlarging shows a smaller map portion. The
automatic smart Zoom function will take care of zooming in and out while you are navigating
(zooms out when the next road junction is still at a certain distance, zooms in when
approaching a traffic junction in order to allow a better detailed view of the manoeuvre). If you
set the zoom manually, automatic map scaling will not take place any more (although
automatic virtual height adjustment and rotation will still occur). However, you may set the
function to zoom in or out automatically a few seconds after you have manually changed the
zoom level. To do so, go to "Advanced Settings => Smart Zoom".
Because of their importance, the Cursor menu, Route Information display and the Find,
Settings, Route and Main menus are explained in separate chapters.
44
Adjusting the Virtual Height (4+5)
These transparent buttons only appear while the Zoom function is enabled in the Settings menu
(see page 59). As already explained, this function changes the vertical map viewing angle in 3D
mode. You may change the angle through a wide range, starting from a fully vertical view
(equivalent to 2D) to a low-height view giving a wide view ahead. The automatic smart Zoom
function will take care of setting the height while you are navigating (lower height when the next
road junction is still at a certain distance, higher when approaching a traffic junction in order to
allow a better detailed view of the manoeuvre). If you set the virtual height manually, automatic
height adjustment will not take place any more (although automatic zoom and rotation will still
occur). However, you may set the function to zoom in or out automatically a few seconds after
you have manually changed the zoom level. To do so, go to "Advanced Settings => Smart
Zoom".
Map alignment and Overview (7)
The map can be displayed in three different modes:
The common map orientation for navigating is the driving direction, i.e. the map
automatically orientates to the direction you are driving. In this mode, an arrow (compass)
will indicate North.
Tap this icon to switch the map view to North orientation. Now the map is aligned to North.
The icon changes accordingly to indicate the new mode.
Tap the icon again the switch to Overview (aircraft icon). This mode is equivalent to North
orientation with one exception: the zoom level is preset in this mode in order to give you a
better tracking of your current position on the map. The arrow representing your current
location is fixed in the centre of the screen. While moving the map in Overview mode the
Freeze button appears. When you press it, the map will move to indicate your current
location in the centre of the map.
You may customize the program so that it automatically toggles to Overview mode during
navigation when the next road junction is far away. To do so, go to Advanced Settings =>
Smart Zoom => Enable Overview Mode.
45
GPS tracking quality (8)
Analogue to the icon on the GPS information display (see page 24) the map display also gives
information on the GPS signal. They can show three identical values:
Red satellite antenna: There is GPS signal reception, but the signal is too weak or the
number of satellites are too few for position tracking. GPS navigation is not possible.
Black antenna with one wave: GPS tracking OK and navigation possible. When only one
wave is displayed, only 2D tracking is possible (no GPS height indication) and positioning
errors may be significant. However, the system allows navigation.
Black antenna with two waves: Optimum GPS tracking in 3D. The system allows full
navigation.
Battery status (9)
The navigation device also displays the PNA battery status. You can estimate the remaining
battery from the length of the displayed line. Below there are some examples:
Flashing in the battery indicates that the battery is being recharged.
The battery is fully charged.
The battery is not fully charged but there is enough energy remaining.
Whenever the battery interior lights red, the battery must be recharged immediately.
46
Mute on/off (10)
Press this button to mute the sound quickly. This does not change the volume level nor the
enabled/disabled status of voice instructions or button sound, only the sound output will be
switched off. While the Mute function is enabled, the loudspeaker icon is crossed out.
Tap the icon again to reactivate the sound (Mute off).
Note: You may also disable the sound in Settings => Sound => Master. The button Master
on this menu works together with the above button. This screen also contains a Master
slider. You can use it to reduce the overall volume output. Volume setting is different from
Mute, therefore no Mute icon will be shown here.
Route track logging/playback (11)
During route track logging a red recording icon appears on the map displays. This icon also
works like a button to access the Quick => Manage Track Logs, where you can stop the track
logging or play it back on the map.
During playback, a green icon will blink. Tap this icon at any time to stop the simulation.
Follow
Follow Button – Fixing the GPS Position and Driving Direction (12)
This semi-transparent icon will appear while GPS tracking is available and the map has been
moved or rotated manually. It also appears while scaling or changing the virtual height as long
as the Smart Zoom feature is enabled. Normally, the system will position the map in a way that
the GPS position will remain visible at any point on the map (whilst using map North orientation)
or always in the upper half of the map (whilst using driving direction orientation). When moving
the map manually, the map will become fixed at the new position. Press the Freeze button to go
back to the GPS position.
47
The scale indication will only appear on the map display. In 2D view it represents the map
scale. In 3D view it only represents the scale of the map section near the current position. The
map scale can be used to zoom the map both in 2D and 3D view. Dragging the slider to the
right increases the map scale, dragging it to the left decreases it.
Cursor (16)
When tapping any point on the map or when selecting a specific POI under Find, this point will
become selected on the map. It will be marked by a small red dot and continuously growing red
circles will make it well visible. You may use this point as starting point, waypoint or destination
of your route.
Tap the cursor to open the Cursor menu.
48
Next Street/Next Locality – Current Street (17 + 18)
This field indicates the next route on your itinerary. If you are yet not in the place the road
belongs to, the name of the locality instead of the street name will appear. The name of the
place will be marked with a dot in order to distinguish it from street names.
In Cockpit mode this field will show the name and number (if applicable) of the street
where you are currently driving.
Itinerary and Route Information (20 + 21 + 22)
The contents of these three fields varies depending on whether you are simply driving (without
using any active route) or if you are navigating (driving along an active route). When driving
without any active route, the fields will show your current speed, the local speed limitation and
the time. Under Advanced Settings => Display Options you can define the contents of these
fields for navigation mode. Below you will find a list of choices for these settings. The only
limitation on your choice is that you may not select a parameter if the same parameter has
already be chosen to be displayed in another field. Field contents choices are:
Distance to destination (default setting for the upper field)
Time to destination (estimated time enroute, default setting for middle field)
Distance to next waypoint
Time to next waypoint
Time to next manoeuvre (next route event)
Speed
Speed limit
Arrival at next waypoint
Estimated time of arrival at destination (default setting for the lower field)
49
Distance to next road junction (19)
This fields shows the distance to the next route event (road junction, roundabout, exit, etc.). This
field only appears while navigating, e.g. an active route has been selected.
The cursor is the selected point on the map (a
red dot emitting red circles) or the current GPS
position whenever available and position
tracking has been turned on. When tapping the
screen to set the cursor, the Cursor menu will
automatically appear below, offering a list of
available cursor functions. At the same time,
the popup information (street name, street
number and list of nearby POIs) will appear
next to the selected map point, as long as the
option Popup Info has been enabled in Settings
menu. If you don't use the Cursor menu within
the next few seconds, it will disappear
automatically.
To display the Cursor menu again, tap the
arrow in the lower-right corner.
After opening the menu manually, it will remain
visible until you close it.
Route To
You can set the Cursor position as the
destination of your route. This button will start a
new route. The previous route (if any) will be
deleted (a warning message will appear) and
replaced.
50
Start
You can set the Cursor position as the starting
point of your route. This menu item will only be
available in map mode and only when no active
route has been selected. In Cockpit mode, the
start point will always be the current GPS
position or – if no GPS position can be obtained
– the last known GPS position.
Inserting Waypoints
By inserting the selected map point as a
waypoint, you will have to go to this point before
going to your destination. This allows you to
define a route with several waypoints in
reversed order (this is useful when you want to
"go to A but refuel at B" or if you want to
influence the route itinerary). This menu item is
available only after a route has been activated.
Deleting Intermediate Points
Removes the intermediate point next to the
cursor. The route will be recalculated without
this point. This menu item will appear instead of
"Add Via" and is only available if the cursor is
located near an intermediate point.
51
Inserting Pins
Inserts a coloured pin at the selected point on the
map, allowing easy identification of this point later
on. This pin will be visible at any zoom level and
also appear together with all exact details in the
history list. The pin colour will be selected
automatically.
Unpin
Removes the pin next to the cursor. This menu
item will appear instead of "Pin" and is only
available if the cursor is located near a pin.
Continue
This allows you to set a new destination to go to
after the other intermediate points. The new
destination point will replace the previous
destination, and the previous destination will
become a waypoint. This allows you to plan an
itinerary with several intermediate destinations to
be driven to one after the other (when wanting to
go to several destinations following the principle:
"go to A, then go to B"). This menu item is
available only after the route has been activated.
The old route will display in bright green, the new
route in dark green.
52
Points of Interest (POI)
The POI command opens a list of points of
interest near the selected point. This is a POI list
in the popup information window. To insert a new
POI at the cursor position, tap New in the lower
left-hand corner. This menu item will appear
instead of "Add POI" and is only available in map
mode if at least one POI is located near the
cursor.
Add POI
POI opens a new POI data window allowing you
to add customised points of interest to the list.
This menu items is only available in map mode
and only if no POIs are located near the cursor
(for example, if there is only one address
displayed in the popup information window).
53
Display Route Information
Route data can be displayed only after a
route has been activated.
There are two ways to access this menu:
tap Info in the Route menu or tap any of the
route data fields in Cockpit mode (see
picture left).
The Route Information display contains all
data and some functions that are useful
during navigation. Some additional
information can be found in the Route menu.
If no route has been activated, all buttons except
one are disabled and the route data cannot be
displayed.
54
INFORMATION
The left part of the screen contains some information on the current route. The contents of
these fields is updated continuously. Tap on any field to view details of the different waypoints
until you reach your final destination.
Distance Left
This is the distance left to the final destination of
your journey. If you have defined any waypoints,
tap repeatedly on this field to view the distance to
the first, second, etc. waypoint.
Time Left
This is an estimated value. It represents the
estimated time necessary to reach the final
destination.
If you have defined any waypoints, tap repeatedly
on this field.
Estimated Arrival
This is an estimated value. It represents the
estimated time at which you'll reach the final
destination. If you have defined any waypoints, tap
repeatedly on this field.
Method
This field shows the method used to calculate the
route.
55
Destination/Waypoint
This field contains the exact address of your
destination. If you have defined any waypoints,
tap repeatedly on this field to find the address.
Route Line
The upper part of the screen represents the
planned route as a horizontal line. The left end
of this line is the virtual start of your route, the
right end the final destination. The waypoints
are represented by small flag icons. The blue
arrow (yellow at night) that represents your
position will move from left to right as you
advance. When reaching a waypoint, it will
automatically become the starting point for the
next route line, and the past route segment will
be deleted. Whenever the fields on the left
show information on the entire itinerary, the
route line will have the same colour as the route
on the map. Whenever data belonging to a
waypoint is displayed, the route will only be
coloured up to this waypoint and the remaining
route part will remain grey.
56
Warning Icons
Normally, the five fields containing warning icons are
grey. Some of them light up in red and show an icon
whenever warnings for the active route are being
displayed. These icons represent warnings for the
entire route. If you tap on one of these icons, a
description of its function will appear.
Below there are some examples:
1. This icon alerts you that toll is to be paid on the recommended route.
2. This icon means that the route uses motorways. Tap on this icon to show the total
motorway distance on your route.
3. This icon alerts you that a toll is to be paid on some roads of the recommended route.
4. This icon tells you that a ferry is to be used on your route.
5. The ferry is subject to additional costs.
6. This icon appears when no route could be planned taking into account all your
requirements regarding road types. Sometimes it is not possible to find a suitable road
near the starting point or the destination.
7. This icon alerts you that not all your preferences could be effected while planning the
route.
8. The recommended route contains segments that may only the reached by walking.
9. The recommended route includes unpaved roads.
10. The recommended route contains segments that may only be reached by obtaining special
authorisation.
11. Information – any kind of information that does not belong to one of the above categories.
Tap on the icon to view its contents.
57
Customising the Display
Tap on this button to obtain an overview of the
entire recommended route. This toggles to 2D
map view with North alignment allowing you to
quickly verify the route.
Parameters
This button opens the screen to set the route
parameters that you normally access via the
Settings => Route Settings menu.
New Parameter
Now under Route Information the new option
Fastest will appear instead of the previous
method Economic, and the route will be
recalculated immediately.
58
FIND MENU, SETTINGS MENU AND ROUTE
MENU
Cockpit Map Display
The Menu button opens the menu containing
the search engine, the Settings menu, the
Route menu and the General button allowing
you to switch to the Navigation Main menu.
Cockpit Map Display
The Menu button opens the menu containing
the search engine, the Settings menu, the
Route menu and the General button allowing
you to switch to the Navigation Main menu.
Settings
The Settings button opens the Settings menu.
Here you can access several customisable
information and display options.
Route
The Route button opens the Route menu. This
menu contains many route parameters setting
options.
59
SETTINGS MENU
Settings Menu Overview
3D Map
If the LED in the 3D Map switch lights up, the
map will be displayed in 3D. You may also
switch to 3D view by tapping on the Increase/
Decrease virtual height buttons. The Decrease
virtual height button will finally deliver a 2D
view.
Night Mode
Enable or disable the night mode if you don't
want to use the automatic switching of the
colour systems (in the above figure the option is
disabled).
Good to Know
When using this option, the Automatic Night
Colours feature will be disabled. You can
enable it again via Settings => General.
60
Popup Info
If this function is enabled, tapping a point in any
map display (activating the cursor) will also
display a popup box with information such as
street name, street number and name of the
nearby POIs (if any).
Zoom & Tilt
When the green Zoom LED lights up,
transparent buttons will appear on the left of the
map screen. You can use them to increase/
decrease the virtual height.
If the Zoom button is disabled, the transparent
buttons will disappear.
61
Manage My POI (POI = Point of Interest)
The maps of your navigation system contain
plenty of POIs. If all POIs would be displayed
simultaneously, the map view would be
confusing. In order to avoid this, you can set
the POIs to be shown and those to be hidden.
In the figure, the category Sports Recreation
is hidden and can be displayed by tapping
Show.
In this figure Services is an active category. It
can be hidden by tapping Hide.
The disabled category Transportation is
greyed-out, the other categories are enabled
and appear in blue.
Good to Know
For a very detailed description of POIs, see
the menu Find => POI.
62
Editing the Track Logs
The route track log contains your route
information. Their name is represented by the
date of the logging event. Tap Record to log the
current route. The button will change to Stop
Recording: tap to stop the track logging.
Track Log Options
In the top-right of the screen (see above figure) there is an option to access the Route Options
submenu. Here you can:
Update interval: The update interval
defines the time between two logging
events of the GPS position.
Current autosave track size: This value
shows the memory capacity that is used by
the automatically-logged routes.
Enable Auto-saving: Enables the
automatic track logging.
Limit Track DB Size: Limits the size of the
route database to the amount determined
by "Maximum track database size".
63
Create NMEA/SIRF Log: Logs the original GPS
data. The Info submenu offers tracking
information. Here you can:
Rename the route logging and assign a
descriptive name via the keypad.
Fit to screen, e.g. display the entire route on
the map.
Export the track logging data onto the SD
card.
Establish the colour for the track logging on
the map.
Route Menu
Route Menu
This menu contains many route parameters
setting options. It also features some options on
how to obtain information on routes.
From the map view you can access the
Route menu via the Route button in the
upper left-hand corner.
From the Cockpit view you can access the
Route menu via the Route button in the
Find, Settings or Route menu.
Route Recalculation
This menu item is available only when there is an active route and it is possible to determine the
GPS position. It opens a menu screen containing four options. Each of these options lets you
modify the active route.
64
Recalculate
This function repeats the route calculation based
on the same settings as before. This option is to
be used when the automatic Off-route
recalculation has been disabled. You can use
this function while driving parallel to a suggested
route.
In this case it can take a while for the program to
recalculate, so you can have it recalculate the
route manually.
Good to Know
This submenu opens automatically upon each route recalculation as long as the
option has been enabled under Settings => General => Off-route Recalculation.
Bypass
Whenever you encounter a traffic jam or a
closed road you can have the program
recalculate a route to circumnavigate this
situation as quickly as possible.
However, you must specify a minimum distance
after which you want to re-join the original route.
Choose a distance that is suitable for the
present traffic problem.
65
Good to Know
This function has been designed to offer an alternate route for the next route
segment. To modify route segments later on or to avoid certain roads or junctions,
use the function Avoid from the Itinerary menu. When using this function, the
program will avoid this section of the map until you delete the route manually or
restart the navigation device.
Delete Next Waypoint/Delete Route
You can change your route in a way that the next
waypoint will be ignored if you decide you don't
want to go there any more.
If no waypoints are available (only the
destination), the button label will change to Delete
Route. Clicking this button also stops navigation.
Good to Know
The function Delete Route has a special function when using the option Avoid. As
soon as you reach your destination the route will be deleted. But while planning a
route, all roads, manoeuvres and places that you had avoided in the previous route
will also be avoided. Therefore, tap Clear to erase the previous route with all
restrictions.
66
Cancel
This command brings you back to the map
screen without recalculating.
Itinerary
This functions opens an itinerary
description (list of route events) for the
active route. The menu Itinerary offers
three different detailed lists and two
functions. The different route event lists
differ by the number of events they contain.
The different list items always appear with
all available information, i.e. with icons of
the required manoeuvres as well as the
distance to the route event.
The itinerary description is updated
continuously while navigating. The list item
you are currently navigating on will be the
highlighted one until you tap on a different
item.
67
Detailed Instructions
This list will appear when you open the
Itinerary. It is a detailed event list.
Instructions
When tapping the Mode button once, a list of
events will open that requires greater attention
on your part, e.g. a list of manoeuvres along
the route. These events will appear in the
manoeuvre preview and will be announced
along with audible events.
Route Summary
Tap on Mode once again to obtain a route
summary that lists only the major roads and
road junctions.
Avoid
You can avoid a list item (for instance a
motorway segment that is prone to traffic jams
or a difficult road junction). Simply tap the
desired item on the route list. The following
options are available:
68
Show
When enabling a route segment and tapping on
Show…
... …the route segment will appear immediately
in Cockpit view.
Manoeuvre:
The Manoeuvre option avoids the marked place.
For instance, if you feel a turn will be too difficult
during rush hour traffic, the program will
recalculate your route without that turn.
Road:
If you exclude a specific road, MyGuide
recalculates the route without this road. This
function is very useful for going around traffic
jams or when you have heard a traffic message
broadcast announcing that the road has been
closed.
Distances:
The list also contains several distance buttons.
Their function is similar to those in the list
contained under the menu Recalculate =>
Bypass, but here you can use them for distant
route segments. In our example a 30km-long
motorway segment will be replaced by a national
road via Road => 30 km.
69
Edit
Tap Edit to show all routes. You can edit the list in
the following way:
Add:
This allows you to add a new route.
Delete:
This allows you to delete the selected route.
Warning: the program will delete it without
prompting you.
Optimise:
This will optimise the waypoint order. Up and
Down: these buttons allow you to sort the list by
moving the selected item up or down.
In our example a new route is added. After
tapping the Add button the Find menu will appear,
allowing you to define a new route.
70
Delete
Tap on Delete to permanently erase the active
route including all points (starting points,
waypoints and destination). The program will
prompt you prior to deleting. The function has a
special role when you have been using the option
Avoid. Once you have reached your destination
the route line will disappear from the map and the
navigation is cancelled. At this point, the route is
erased: however, when planning a new route, all
roads, manoeuvres and places that you had
avoided in the previous route will also be
avoided. Therefore, tap Clear to erase the
previous route with all restrictions.
71
ENTERING DESTINATIONS AND ROUTE
PLANNING
There are generally two ways to specify a destination:
"Find and Go" from the Main Menu
This is the most frequent method used offering the best possibilities to distinguish items when
entering the destination. The Find dialog box will appear and, as soon as you have specified
your destination, the program toggles to Cockpit view and starts navigating.
Direct Selection on the Map
You can also set the destination by using the map. Just browse to your destination and tap on it
to start navigation.
Direct Destination Selection by Tapping on the Map
1. Map View
Choose the Overview (aircraft icon) from the map
view.
2. Zooming out
Drag the scale on the left to zoom out the map
until you see your destination.
3. Set Cursor
Highlight your destination "Vienna" with the
cursor.
72
4. Activate the Route
Tap Route To to activate the route you have just
entered.
5. Start
Toggle to Cockpit view to start.
6. Route Information
Under Route Information you can view the most
important details of your journey.
73
Selecting a Destination via "Find and Go" – Using the Find
menu
Navigation Main Menu
The Navigation main menu contains all
necessary tools for comfortable navigation.
Find and Go => Find
Tap the button "Find and Go" to open the Find
menu. Here, the following options are available:
Address: This submenu allows you to enter
the exact destination address.
History: Here you can choose from a list of
destinations/routes and activate them.
Coordinates: Here you can enter the
geographic coordinates of your destination
or any point.
Points of Interest (POI): The POIs offer
plenty of default and user-defined
destinations.
Favourites Home and Work: The most
frequently used destinations can be
selected by simply tapping a button.
74
Entering a Destination via Address
1. Address
Open the Address submenu.
2. Select City
At this point you can choose a destination from
an already-existing route (called Recent
Destinations) or select a different city via Other
City in the top right.
3. Other City
If your destination is located in your country, enter
the name of the city via the keypad. If this is not
located in the country you are currently in, you
must first go to "Change Country" (top right).
75
4. Select Country
If behind the country name you see the code
"(MRE), Major Roads Europe", only the major
roads have been installed for this country.
5. Enter city
After you have typed a few letters of your
destination, a city list will appear. Here you can
browse the search results and also view the
Outskirts belonging to a selected (highlighted)
city (see the button in the lower left-hand
corner).
6. Enter Post Code
Tap Keys to toggle to the numeric keypad. Here
you enter the post code.
7. Select Post Code
Select the city with this post code.
76
8. Enter the Street
Enter the name of the street via the keypad. It is
sufficient to type a few letter only, even if the
name is composed of several words. For "Via 15
Novembre", type "V", "i", "a".
9. Enter the Street
Browse the search results and confirm your
selection to exit the list.
10. Enter the Street Number
Tap Keys to toggle to the numeric keypad.
Here you enter the street number. For "Via
15 Novembre" the street numbers 1 to 27
are available.
If you don't know the street number, select
Find Intersection in the top right.
11. Select an Intersection
The program will show you a list of intersections
with the previously selected street. After you
have selected the desired intersection, you have
entered your destination and are ready to go.
77
12. Start
... Toggles to Cockpit view to the beginning of
the route.
Destination Selection via "Recent Destinations", Route List
1. Recent Destinations
Enable the "Recent Destinations" button from
the Find menu. A list of already travelled routes,
pins and POIs will appear. Usually the
destination includes all data: post code, city,
street and street number as well as
coordinates. Tap the desired destination and
the view will change…
2. Destination View and Info
... to the destination view with a blinking cursor
and information. The Cursor menu (below) will
only appear for a few moments. Tap Route To
and the program starts navigation.
78
3. Start
When starting navigation the cockpit view with
the map section of the first route segment and
some route information will appear.
4. Warning Message
Under certain circumstances the following
warning may appear. For instance, this can
happen if you have selected a vehicle (Car,
Lorry, etc.) under Settings => Route Settings
but the destination lies in an area reserved for
pedestrians only.
Entering a Destination via Coordinates
1. Open Coordinates
You can enter your destination by entering its
geographic coordinates. These have to be
entered as longitude and latitude.
79
2. Pick Coordinates from Map
The easiest way is to use the cursor or a POI
(place the cursor on the POI) to pick up the
destination coordinates. The Coordinate menu
shows the current GPS position to the cursor
position.
3. Select the Destination
In this example we select the Cathedral in
Cologne.
4. Coordinates Window
The Coordinates window shows the longitude
(N/S) and latitude (E/W) of the values
determined by the cursor/POI.
5. Destination View
The program toggles to map view displaying
information and a blue destination flag. Tap
Route To to start navigating.
80
6. Pedestrian Precincts
Tap Route menu => Itinerary => Show to view
information about critical route segments. The
route segment in front of the destination in this
map is a pedestrian precinct not accessible to
vehicles.
1. Enter Coordinates
If you know the geographic coordinates of your
destination, enter the latitude in the left window
and the longitude in the right window. The "E/W"
switch toggles between latitude East (East of
Greenwich meridian, like Germany Austria,
Switzerland) and West (like Portugal, Spain and
part of France).
2. Destination View
After entering the coordinates the destination
will be presented on the map. Tap Route To to
start navigating.
81
Entering a Destination via POI
1. Points of Interest (POI)
You can choose a destination from one of the
many default or user-defined POIs.
2. Find POI
The search takes places in a radius around a
specific reference point (specified in the green
field on top). By default, the reference point for
Find POI is the current GPS position, if
available. Otherwise it is the the cursor, if no
accurate GPS tracking is available.
3. POI Location
To change the reference point tap "Change
ref." In the upper right-hand corner of the
screen (see figure in step 2). You can select
between the choices printed here. "Cursor"
requires you to have selected a point on the
map, "Current GPS" requires that GPS tracking
is available, "Destination" requires that a route
destination has been activated.
82
4. Address
If you select Address, enter an address via the
keypad to search for nearby POIs.
5. Coordinates Input
If you select Coordinate, enter the geographic
coordinates via the keypad to search for nearby
POIs.
6. History
If you select Recent Destinations, select a
destination from the list to search for nearby
POIs.
7. New POI Reference
For example, the upper-right field of the dialog
box will show Cursor as POI reference, thus all
POIs located near the present cursor position
will be listed to choose from.
83
8. New POI Reference
Here you see a POI reference that has been
selected from the Recent Destinations list. The
search takes place around the selected
destination.
9. Search
When tapping a main category like Shopping,
the corresponding sub-categories appear. The
active sub-category will be highlighted. Tap the
Search button in the lower left-hand corner to
search in this sub-category.
10. Search
The keypad will appear.
11. Search
Enter a search criterion and tap Done.
84
12. Search Category Listing
A list for the searched category will appear. The
search results are sorted by distance from your
reference point (the closest appears first).
13. Main Category
When tapping the main category…
14. Sub-categories
... a list of groups belonging to the main
category appears. Enable one of the sub-
categories (highlighted) and tap All.
15. List
The full list of this sub-category will appear.
85
16. Make Your Selection
Tap the desired item to select it. Information
about this destination will appear. Tap OK to
confirm your selection.
17. Start
The program starts navigating.
18. Route View
Under Route menu => Itinerary you can view
route segments. In this example it is the final
route segment.
19. Recent Destinations
The route will be added immediately to "Recent
Destinations", a route history list.
86
Entering a Destination via Favourites
1. Selecting Favourites
If you have already set up your favourite
destinations under General Settings you may
select any by tapping on it. If you use the
"Find and Go" function from the main menu,
tap twice on the screen to start navigating to
a favourite destination.
2. Home - Work
You can add an address for each of these two
favourites. To enter the address for Work, tap
Change address.
3. Entering the Work Address
The Find menu appears, assisting you in
finding your work address.
4. Home Address
The following screen shows the Home
favourite in 2D view.
87
SOME NAVIGATION EXAMPLES
Navigating a Route with Two Waypoints
1. Enter a Destination via "Find and Go"
First enter the destination city. If you only know
the post code, tap Keys to toggle to the numeric
keypad and enter the postcode.
2. Enter the Street
To enter the street name "Princess Grace
Palace" simply enter "P, space, G, space, P".
The program will locate the street in the
database.
3. Enter the Street Number
Next to the <House Number> field you'll find a
list of street numbers contained in the database.
4. Start Navigating
As you have defined your destination via "Search
and Find" the program will directly jump to the
route starting point and Cockpit view once you
have entered your destination. On the left you
can see important information on your route.
88
5. Finding Waypoints
While on the way to your destination you decide
to go to a pharmacy. To do so, search a
Pharmacy POI in the zoomed map view along or
near your route.
6. Inserting Waypoints
Place the cursor at the POI position on the map.
Detailed information will be shown. Tap on Add
Via and the pharmacy will be saved as a
waypoint. Don't tap Route To, otherwise you'll
delete your route to the destination.
7. Refreshing the Map View with Waypoint
The waypoint will be marked by a white flag on
the map.
8. Another Waypoint
And now you have to refuel on the way to your
destination. Again, you can use the POI
database. To do so, search a Petrol Station POI
in the zoomed map view along or near your
route. Tap on Add Via and the petrol station will
be saved as a waypoint.
89
9. Total Route Map View
The map view with the entire route contains a
blue flag for your starting position, two white flags
for the two waypoints and one red flag for your
destination.
10. Route Information
Before you go, read the Route Information (Menu
=> Route => Info). Here you can see a summary
of information on your route. The straight route
segment on top shows two waypoints.
Start (bottom left): detailed graphical
representation of the first manoeuvre (turn
right) with distance (84 m) to the manoeuvre.
If no critical items exist along the route
segment, the map automatically toggles to
Overview mode (see figure below).
At the same time, a voice will guide you.
90
11. First Waypoint
The bright green segment represents the active
route, the dark green segment represents the
route that is not active yet that comes after the
waypoint.
12. Second Waypoint
The second waypoint along your route leads
you to the petrol station.
13. Route Information
Read the Route Information for the last route
segment (Menu => Route => Info). Here you
can see a summary of information about your
remaining route. The straight route
representation on top does not show any
waypoints but only the remaining track to your
destination.
91
14. Roundabout
Just before reaching your destination you
approach a roundabout. The graphic
representation on the top left indicates that you
have to take the seventh exit (roundabout icon
with a 7 in the centre).
15. Arrival at Destination
Only 160 m left to destination: The destination
flag appears in the upper left-hand corner.
92
OFFLINE ROUTE PLANNING
Planning a Route without GPS Position
1. Set your Starting Point
You want to plan a route while at home. As for
offline route planning without any GPS signal
you only need the on-screen map. From the
main menu select the map mode and set the
cursor at the starting point on the map.
2. Find Your Destination
Search for the destination city in "Recent
Destinations" (or enter it via the keypad) and
enter the street name and number. Tap Route
To to enable the route from the cursor position
to the destination. As you have no GPS
reception and didn't enter you destination via
"Find and Go" the route will not be activated
automatically.
3. Inserting Waypoints
Instead of going directly to your destination
you want to visit St. Peter's Square in Rome.
Under POIs look for St. Peter's Square, tap
the POI and confirm by tapping Add Via. (Then
toggle to Remove Via in the menu). The last
segment is not allowed for vehicles (red
segment). The active route (bright green)
leads you to the waypoint.
93
4. Route Information
Under Route Information you'll see the
destination address in Rome. However, there is
more distance (km) to run because the waypoint
is located behind the destination and you will
have to go back to reach your destination. Thus,
the Distance in km is shown as the total trip
distance.
5. Swapping Destination and Waypoint
At this point you decide to go to the Colosseum
first and afterwards to St. Peter's Square in order
to have more time to visit St. Peter's Square. To
do so, edit the route segment order in Menu =>
Route => Edit. Simply move the route segment
Città del Vaticano "Down" to the last position
along the route.
94
6. Destination Set
Now St. Peter's Square (the earlier waypoint)
has become your destination. This status is
indicated by a red flag. The active bright green
route brings you to your waypoint, the
Colosseum (the earlier destination). As soon as
your device detects a GPS signal it starts
calculating the route automatically and you can
start navigating.
95
NAVIGATION DEVICE AND PC
To be able to copy data to the SD card, your PC must have access to this SD card.
The SD Card – Interface between the Navigation Device and the PC
You can transfer data to your navigation device via the SD card or via a USB connection. This
allows you to store additional maps, pictures, videoclips, movies and games. Simply establish a
connection between your SD card and the PC (the PC acts as a data source) or connect the
navigation device and the PC by using a USB cable. An SD card reader is required (unless your
PC or notebook already features a built-in card reader) or a Mini USB cable. To use a card
reader, perform the following steps.
Purchase an SD card reader for USB port.
Connect the card reader to the PC.
Insert the SD card into the card reader.
Copy the desired data onto the SD card.
Eject the SD card and insert it into the navigation device.
Now you can access the new data.
To use a USB connection, perform the following steps.
Connect the Mini USB cable.
Turn the PC and the navigation device on.
Copy the desired data onto the SD card.
Disconnect the USB cable.
96
1. Card Reader and PC
Connect the USB cable of the card reader to
your computer (see arrow).
2. Insert the SD Card
Insert the SD card into the card reader slot. In
our example, the card slot is labelled "SD/
MMC". Modern computers (especially
notebooks) already include a card so you don't
need to purchase an external card reader
device.
3. SD Card and PC
Now the SD card and PC are connected. The
SD card will appear as a disk drive on your
computer. You can copy data from your PC or
the supplied media onto the SD card, re-insert
the SD card into the navigation device and
access or play the new data.
97
SOFTWARE
The supplied media contains additional map
material for your device. These maps have a
high resolution up to street number and are
separated. The utility software "MapLoader" is
also contained on the disk media and assists you
in copying maps from the disk onto your device.
Please also read the corresponding description
under "Navigation Device and PC". The
MapLoader menu appears. It allows you to copy
map data from the disk media to the device.
Furthermore, it also allows you to delete data
from the device.
98
TROUBLESHOOTING
Device Problems
Possible Solutions
Unable to power on while working on
battery power.
The remaining battery power is not sufficient for powering
on the device. Connect the device to the power adapter/car
charger and connect it to a wall outlet/the car cigarette
lighter. Next, turn the device on.
The screen stays blank. If there is no display after pressing the On/Off button,
proceed as follows in sequence:
- Connect the device to the power adapter and connect it
to a wall outlet.
- Power the device off and back on.
The screen responds very slowly. Make sure that the battery is charged. If the problem
persists, reset the system. To do so, power the device off
and back on.
The device no longer responds to your
input.
Power the device off and back on.
The display is unreadable. Turn on the backlight and adjust the brightness.
Wrong command after tapping with the
finger.
Re-calibrate the touchscreen.
Cable connection problems Make sure that the power adapter or car charger is properly
connected to the wall outlet or car cigarette lighter.
Do you need to troubleshoot or get to know your system more in detail? Just read on.
Troubleshooting
Possible solutions for the most common questions and problems
99
Device Problems Possible Solutions
Bad or no GPS reception.
Make sure that the GPS antenna has a clear sight to the sky.
The GPS reception can be altered by the following:
- bad weather
- dense and high obstacles (e.g. trees or buildings)
- other devices installed in the car that use radio
frequency
- tinted or reflective windshields
No blue arrow appears indicating my
position. Navigation does not start.
Verify the GPS status icon on the main menu, the map
screen or the GPS data screen. It is likely that the system
cannot determine your GPS position. Drive on to go to a
place where a good GPS signal reception is guaranteed.
GPS calculates correct tracking data but I
don't see the blue arrow (yellow at night)
that normally indicates my position.
You see the large Follow icon on the screen. Tap on this
icon to enable the Lock-to Position function that restores the
map to your present position.
The blue arrow (yellow at night) indicates
my position but I don't see the route
(green or red line) and obtain no voice
guidance.
There may be no active route. Check the upper-left screen
corner in Cockpit view to see if the icon indicating the next
turn is shown. If this field is blank, no route has been
planned. You have to create a route first. It is a common
mistake to search for a destination, view it on the map but
forget to tap Route To from the Cursor menu to create the
route. Make sure you follow these steps or plan your route
via the "Find and Go" button. This will calculate the route
automatically as soon as the destination has been selected.
I cannot see the Follow icon on my
screen, however, the map doesn't turn
according to my driving direction.
Look for a small "N" on the compass icon or for an aircraft
icon. It is likely that you have toggled to North orientation
map mode or Overview mode accidentally. Tap this icon to
toggle to driving direction mode.
100
Device Problems Possible Solutions
To create a route including waypoints I
have tapped Route To for any waypoint,
but only the last route appears on the
list, all the others have disappeared.
The Route To button will create a new route only. You have
to tap this button after you have selected the destination for
each route. However, routes with waypoints may be created
after creating a single route with a destination. Add the
waypoints by tapping the buttons Add Via and Continue.
When tapping the Route To button again, the entire route
will be erased. In your case, you had only defined individual
routes and deleted them directly. If there is a route
containing waypoints, the program will display a warning
message when attempting to delete them.
The mute icon indicates that Mute is off,
however, I cannot hear any voice
guidance.
Mute is available from both map screens and is intended to
quickly mute the sound. The voice guidance and key
sounds must be enabled and the volume can be adjusted in
the Settings => Sound dialogue box.
I have enabled the Max. Overspeed
function upon first setup of my navigation
system. However, I had to pay a
speeding fine because the program didn't
warn me
For accurate speed limit warnings, speed limits must exist
for all roads on the map. This is a relatively new feature in
digital maps and not available for all countries or areas. It is
also possible that the accuracy needs to be improved
sometimes. This feature is designed to assist you on some
occasions but cannot be considered an accurate warning
system. Therefore you may enable or disable it
independently from the voice guidance.
I want to add a new POI while navigating
(Cockpit view) but there is no Add POI
button in the Cursor menu.
For safety reasons, Add POI is only available from the map
screen. Place a pin at the desired point and save it as POI
once you reach your destination.
I want to create a POI but there are other
POIs nearby this position and the POI
menu item opens the old POI list instead
of creating a new one.
Look for the New button in the lower left-hand corner of the
opened list. Tap this button to add a new POI just as you
would do from the Cursor menu.
101
CARE AND STORAGE
Important Notes Regarding Device Handling
Care
Caring for the device properly will contribute to a hassle-free operation and reduces the
risks of malfunction.
Keep the device away from moisture and extreme temperatures.
Do not expose the device to direct sunlight or ultraviolet radiation over a long period of
time.
Do not place or drop any objects onto the device.
Do not drop the device and avoid shocks.
Do not expose the device to sudden and high temperature variations. Otherwise moisture
may condense in the housing causing damage to the inner components. If you observe
moisture or condensation, wait until it has completely evaporated prior to powering the
device back on.
Do not sit on the device. For this reason, do not carry it in your trouser pocket.
The screen surface is sensitive to scratches. Only use the fingertip to tap on the screen.
Avoid touching it with your fingers, pens, pencils or any other sharp objects. You may use
non-adhesive protective films that have been developed for portable devices with LCD
screen to protect the display from light scratches.
Turn the device off prior to cleaning it. To clean the screen and housing, use a lint-free
cloth that has been slightly dampened with water.
Do not use paper tissues to clean the screen.
Do not attempt to open, repair or service the device yourself. Any opening, modifications or
repair may cause damage and accidents. Furthermore, you will also void your guarantee.
Do not store or carry flammable liquids, gases or explosive materials in the same
compartment as your device, its parts or accessories.
102
Storage
For daily storage as well as for long-term storage, a dry place is best. Keep the device away
from children. As loss of data will occur upon full discharge of the battery, recharge the battery
periodically, even when you are not going to use the device.
Disposal
Dispose of the device packaging material separately, sorted by material. Do no allow any
children to play with the packaging. Children must not be allowed to play with the plastic bags,
as they may cause a choking hazard. Batteries and rechargeable batteries must not be
disposed of in with domestic waste. According to the current legislation, the user must return
batteries and rechargeable batteries to public collecting centres or at any shops selling batteries
after they are exhausted. Batteries containing harmful substances are marked by an icon
showing a crossed-out trash container. Dispose of your navigation device (without the battery)
and its accessories according to local current regulations. For more information, contact your
local collection centre.
103
TECHNICAL SPECIFICATIONS
Summary of the Most Important Technical Specifications
Processor: 300 MHz
Memory: 64 MB Flash / 64 MB RAM
Screen: 3.5-inch colour LCD, 320 x 240
Rechargeable battery: Internal Lithium-Polymer battery, 1100 mAH
Dimensions: 100 mm (length) x 76 mm (width) x 22 mm (height)
Weight: 200 g
Built-in 20-channel GPS receiver, omnidirectional pattern, internal antenna
Power adapter
Manufacturer: MyGuide
Model Number: E-AWB100-050E
Input: 100-240VAC, 50/60Hz, 0.4A
Output: 5VDC, 2A
Country of origin: Made in China
Car charger
Manufacturer: MyGuide
Model Number: E-DWL100-050M
Input: 12-24VDC, 1.75A
Output: 5V, 2A
Country of origin: Made in China
104
Declaration of Conformity to the
Essential Requirements of the R&TT
Directive 1999/5/EC
We, as authorised representative, declare under our sole responsibility, that the product
Brand Name: MyGuide
Model Name: 3100
Model No.: 13300, 1330001, 1330002, 1330003, 1330004, 1330005, 1330006, 1330007,
1330008, 1330009, 1330010, 1330012, 1330013, 1330014, 1330015, 1330017,
1330018, 1330019, 1330020, 1330021, 1330022, 1330023, 1330024, 93300,
9330001, 9330002, 9330003, 9330004, 9330005, 9330006, 9330007, 9330008,
9330009, 9330010, 9330012, 9330013, 930014, 9330015, 9330017, 93300018,
9330019, 9330020, 9330020, 9330021, 9330022, 9330023, 9330024
is herewith confirmed to comply with the basic requirements set in the R&TT Directive 1999/5/EC.
This Declaration is based on the full compliance of the following European Standards:
ETSI EN 300 328
ETSI EN 301 489-1 / -17
ETSI EN 300,440-2
EN 60950-1: 2001 + A11 : 2004
Hamburg, November 22, 2006
MyGuide Ltd. (Europe), Ebertallee 19, 22607 Hamburg, Germany.
105
GLOSSARY AND INDEX
(Explanation of the most important technical terms)
2D/3D GPS tracking:
The GPS receiver uses satellite signals to track its (your) position. Depending on the current
position of the orbiting satellites in the sky and the objects located around you, the received
signal will be strong or weak. Your GPS unit requires strong signals from at least four satellites
to be able to calculate your position in three dimensions (including elevation). When only three
satellites are visible, position tracking is still possible, but the accuracy will be lower and no
elevation can be determined. This is called 2D tracking. The signal quality is shown in the
Navigation Main menu, the GPS data display and the two map displays of the navigation
device. 2D or 3D tracking does not influence the map display modes. The display mode is a way
to represent maps that does not depend on the GPS reception.
Accuracy at current position:
The difference between your real position and the position determined by GPS is affected by
several factors. You GPS receiver can estimate the error based on the number and position of
the satellites emitting the signals. This information is displayed on the GPS data display of your
device. A smaller value indicates a higher accuracy. An accuracy of 1.0 is the optimum. This will
be the reference value. Please note that the GPS accuracy depends on some additional factors
that cannot be corrected by your GPS receiver (signal delay through ionospheric effects,
reflective materials next to the GPS device, etc.).
Active route:
This route is an itinerary planned to reach the desired destinations. A route is called active when
used for navigation. Thus, the program will only have one single navigation route that will
remain active until you delete it, you reach your destination or you exit the program. If you want
to go to more than one destination, the route will be segmented (from one waypoint to the next
waypoint). Only one of these route segments can be active at any one time. The other
segments will remain inactive and are represented by a different colour on the map.
Automatic day and night colours:
MyGuide can calculate sunrise and sunset based on the local time and geographic coordinates.
Based on this information, the system will toggle from daylight to night colours a few minutes
after sunset and back to daylight colours prior to sunrise.
To improve the orientation, the 3D map view will also show the sun's position in the sky when
selecting a lower virtual height.
Automatic route planning:
(Autorouting): You simply need to specify your destination and the program will determine the
most suitable roads and road intersections to reach it, based on the built-in maps. MyGuide
offers different possibilities to select the destination as well as several route planning
parameters.
106
Automatic route recalculation:
When this function has been enabled, the navigation program will recalculate the route if you
deviate from the planned route. If you miss an exit or need to go around a closed road, the
program will wait for a few seconds and determine whether you are really no following your
planned route (this time can be defined in Advanced Settings), and recalculates the route based
on your current position and driving direction.
Driving direction:
A type of map orientation where the map is always aligned to the direction of travel. See also =>
North orientation and => Map orientation.
Elevation:
When receiving signals from four or more satellites the GPS receiver can calculate the position
in three dimensions. In this case, the elevation is calculated along with latitude and longitude.
Please note that elevation data is usually less accurate (at least twice) as the geographic
coordinates. See also 2D/3D GPS tracking.
ETA (Estimated Time of Arrival):
A commonly used term for navigation. It represents the local time at which you will arrive at your
destination. It is calculated based on the remaining distance and different information on the
roads to be used. This information is a reference value only. It does not take into consideration
your future driving speed nor any possible traffic jams, etc. Your navigation device will show this
value as "Estimated Arrival" on the Route Information display.
ETE (Estimated Time Enroute):
A commonly used term for navigation. It represents the time you will take to arrive at your
destination. It is calculated based on the remaining distance and different information on the
roads to be used. This information is a reference value only. It does not take into consideration
your future driving speed nor any possible traffic jams, etc. Your navigation device will show this
value as "Time Left" on the Route Information display.
GPS:
Acronym of Global Positioning System. This system is operated by the Department of Defense
of the United States of America. It consists of 24 satellites orbiting the Earth as well as several
ground stations controlling satellite synchronisation. The receiver calculates the satellite position
based on the almanac data contained in the signals they broadcast, as long as they can be
received at your present position. This service is free.
Keep Position On Road:
This function will always place the blue arrow (yellow at night) that indicates your current
position onto the next available road. This setting is necessary because the GPS position
calculated by the receiver is not 100% accurate. Under normal circumstances the Keep Position
on Road function will eliminate rarely-occurring positioning errors. However, whenever the error
rate becomes too high, it is likely for your position to appear on a different road on the map. The
Keep Position on Road function is enabled by default as soon as a GPS position can be
107
calculated. You may, however, disable it under Advanced Settings when moving by bicycle or in
pedestrian mode.
Lock-to Position:
If a GPS position can be obtained the program will move the map so that the blue arrow (yellow
at night) showing your current position will always stay within the display area. You can move or
rotate the map to restore the position. In this case a button labelled "Follow" will appear on
screen. When tapping this button or an entry the status "Lock-to Position" will be restored.
Map orientation:
The program can rotate the map. When selecting the driving direction orientation, the map will
always face the direction of travel. When selecting North orientation the map will be aligned
always with its top towards the North. Use the semi-transparent icon to move the map into the
desired position. This will disable the automatic orientation. A small compass in the upper right-
hand corner on the map will always display the map orientation. Please do not mix map
orientation with the display orientation which changes the display aspect.
NMEA (National Marine Electronics Association):
This is a standardised communications protocol. This association has defined a standard for
electronic marine equipment. One of these standards is NMEA-0183, which defines standards
for electronic signals as well as a communications protocol defining the time and position data.
Nowadays, this standard is not only used for marine applications but for most GPS devices.
Your navigation system – as well as many other GPS devices – use this protocols by default.
North orientation:
A map orientation where the northern border of the map is located at the top of the display. See
also Driving direction orientation and Map orientation.
POI (Point of interest):
A special destination: an exact map position of a specific point that is stored in a database with
its name, category and sub-category (e.g. service/gas etc.), address, phone and fax number as
well as further important information. Use the smart MyGuide search function to locate a
suitable POI close to you, near your destination or at any other place on the map. It is also
possible to save your favourite places as custom POIs.
SiRF:
This is the name of a popular GPS chipset manufacturer. Its special communications protocol
can be processed by any navigation device. GPS devices using SiRF can also communicate via
NMEA – the default communications protocol of your navigation device.
Track Log:
MyGuide is able to log your position once a second (or at different intervals, depending on the
GPS settings), thus providing a track log. Once you have enabled track logging, your position
details for a route are saved into a database until you stop logging. The logged GPS position
series is called track log. Each of these series has its own name (by default the logging time;
however, you may change the name if you want). It is also possible to choose a colour for the
108
track to be displayed on the map. This allows you to display the track on the screen at any time.
This feature is useful to show the route to other people or to analyse the manoeuvres performed
on that route.
Waypoint:
Your navigation device allows you to enter any number of destinations you may want to go one
after the other. All these points except of the last one (the final destination) are called waypoints.
Waypoints are marked by flags on the Route Information straight line showing the route. Each
waypoint will be announced by a voice message when approaching or reaching it. When
stopping at a waypoint, navigation resumes automatically once you continue your journey.
Navigation will also resume after turning the device off and back on or restarting the program.
Zoom in and out:
The zoom function is used to change the map scale. Zooming in provides a more detailed and
larger map view, but showing a smaller area. Zooming out provides a wider, but less detailed
area view.
1

Hulp nodig? Stel uw vraag in het forum

Spelregels
1

Forum

Myguide-3100

Misbruik melden

Gebruikershandleiding.com neemt misbruik van zijn services uitermate serieus. U kunt hieronder aangeven waarom deze vraag ongepast is. Wij controleren de vraag en zonodig wordt deze verwijderd.

Product:

Bijvoorbeeld antisemitische inhoud, racistische inhoud, of materiaal dat gewelddadige fysieke handelingen tot gevolg kan hebben.

Bijvoorbeeld een creditcardnummer, een persoonlijk identificatienummer, of een geheim adres. E-mailadressen en volledige namen worden niet als privégegevens beschouwd.

Spelregels forum

Om tot zinvolle vragen te komen hanteren wij de volgende spelregels:

Belangrijk! Als er een antwoord wordt gegeven op uw vraag, dan is het voor de gever van het antwoord nuttig om te weten als u er wel (of niet) mee geholpen bent! Wij vragen u dus ook te reageren op een antwoord.

Belangrijk! Antwoorden worden ook per e-mail naar abonnees gestuurd. Laat uw emailadres achter op deze site, zodat u op de hoogte blijft. U krijgt dan ook andere vragen en antwoorden te zien.

Abonneren

Abonneer u voor het ontvangen van emails voor uw Myguide 3100 bij:


U ontvangt een email met instructies om u voor één of beide opties in te schrijven.


Ontvang uw handleiding per email

Vul uw emailadres in en ontvang de handleiding van Myguide 3100 in de taal/talen: Engels als bijlage per email.

De handleiding is 3,55 mb groot.


U ontvangt de handleiding per email binnen enkele minuten. Als u geen email heeft ontvangen, dan heeft u waarschijnlijk een verkeerd emailadres ingevuld of is uw mailbox te vol. Daarnaast kan het zijn dat uw internetprovider een maximum heeft aan de grootte per email. Omdat hier een handleiding wordt meegestuurd, kan het voorkomen dat de email groter is dan toegestaan bij uw provider.

Stel vragen via chat aan uw handleiding

Stel uw vraag over deze PDF

Andere handleiding(en) van Myguide 3100

Myguide 3100 Gebruiksaanwijzing - Deutsch - 112 pagina's

Myguide 3100 Gebruiksaanwijzing - Dansk - 112 pagina's


Uw handleiding is per email verstuurd. Controleer uw email

Als u niet binnen een kwartier uw email met handleiding ontvangen heeft, kan het zijn dat u een verkeerd emailadres heeft ingevuld of dat uw emailprovider een maximum grootte per email heeft ingesteld die kleiner is dan de grootte van de handleiding.

Er is een email naar u verstuurd om uw inschrijving definitief te maken.

Controleer uw email en volg de aanwijzingen op om uw inschrijving definitief te maken

U heeft geen emailadres opgegeven

Als u de handleiding per email wilt ontvangen, vul dan een geldig emailadres in.

Uw vraag is op deze pagina toegevoegd

Wilt u een email ontvangen bij een antwoord en/of nieuwe vragen? Vul dan hier uw emailadres in.


Info