632575
8
Verklein
Vergroot
Pagina terug
1/30
Pagina verder
MPX-410DMP Bestellnummer 20.2850
BEDIENUNGSANLEITUNG • INSTRUCTION MANUAL • MODE D’EMPLOI
ISTRUZIONI PER L’USO • GEBRUIKSAANWIJZING • MANUAL DE INSTRUCCIONES • INSTRUKCJA OBSŁUGI
SIKKERHEDSOPLYSNINGER • SÄKERHETSFÖRESKRIFTER • TURVALLISUUDESTA
STEREO-DJ-MISCHPULT
MIT AUDIO-PLAYER
STEREO DJ MIXER WITH AUDIO PLAYER
TABLE DE MIXAGE STÉRÉO DJ AVEC LECTEUR AUDIO
MIXER STEREO PER DJ CON LETTORE AUDIO
2
wwwwww..iimmggssttaaggeelliinnee..ccoomm
Bevor Sie einschalten …
Wir wünschen Ihnen viel Spaß mit Ihrem neuen Gerät
von „img Stage Line“. Bitte lesen Sie diese Bedienungs-
anleitung vor dem Betrieb gründlich durch. Nur so lernen
Sie alle Funktionsmöglichkeiten kennen, vermeiden
Fehlbedienungen und schützen sich und Ihr Gerät vor
eventuellen Schäden durch unsachgemäßen Gebrauch.
Heben Sie die Anleitung für ein späteres Nachlesen auf.
Der deutsche Text beginnt auf der Seite 4.
Before switching on …
We wish you much pleasure with your new “img Stage
Line” unit. Please read these operating instructions care-
fully prior to operating the unit. Thus, you will get to know
all functions of the unit, operating errors will be pre-
vented, and yourself and the unit will be protected
against any damage caused by improper use. Please
keep the oper ating instructions for later use.
The English text starts on page 8.
Avant toute installation …
Nous vous souhaitons beaucoup de plaisir à utiliser cet
appareil “img Stage Line”. Lisez ce mode dʼemploi entiè-
rement avant toute utilisation. Uniquement ainsi, vous
pourrez apprendre lʼensemble des possibilités de fonc-
tionnement de lʼappareil, éviter toute manipulation erronée
et vous protéger, ainsi que lʼappareil, de dommages éven-
tuels engendrés par une utilisation inadaptée. Conser-
vez la notice pour pouvoir vous y reporter ultérieurement.
La version française se trouve page 12.
Prima di accendere …
Vi auguriamo buon divertimento con il vostro nuovo
apparecchio di “img Stage Line”. Leggete attentamente
le istruzioni prima di mettere in funzione lʼapparecchio.
Solo così potete conoscere tutte le funzionalità, evitare
comandi sbagliati e proteggere voi stessi e lʼapparecchio
da eventuali danni in seguito ad un uso improprio. Con-
servate le istruzioni per poterle consultare anche in
futuro.
Il testo italiano inizia a pagina 16.
D
A
CH
GB
Antes de la utilización …
Le deseamos una buena utilización para su nue vo apa-
rato “img Stage Line”. Por favor, lea estas in s trucciones
de uso atentamente antes de ha cer funcionar el aparato.
De esta manera conocerá todas las funciones de la uni-
dad, se pre vendrán errores de operación, usted y el apa-
rato estarán protegidos en contra de todo daño cau sado
por un uso inadecuado. Por favor, guarde las instruccio-
nes para una futura utilización.
La versión española comienza en la página 22.
Voor u inschakelt …
Wij wensen u veel plezier met uw nieuwe apparaat van
“img Stage Line”. Lees deze gebruikershandleiding gron-
dig door, alvorens het apparaat in gebruik te nemen.
Alleen zo leert u alle functies kennen, vermijdt u foutieve
bediening en behoedt u zichzelf en het apparaat voor
eventuele schade door ondeskundig gebruik. Bewaar de
handleiding voor latere raadpleging.
De Nederlandstalige tekst vindt u op pagina 19.
Przed uruchomieniem …
Życzymy zadowolenia z nowego produktu “img Stage
Line”. Dzięki tej instrukcji obsługi będą państwo w stanie
poznać wszystkie funkcje tego urządzenia. Stosując się
do instrukcji unikną państwo błędów i ewentualnego
uszkodzenia urządzenia na skutek nieprawidłowego
użytkowania. Prosimy zachować instrukcję.
Tekst polski zaczyna się na stronie 25.
Før du tænder …
Tillykke med dit nye “img Stage Line” produkt. Læs sik-
kerhedsanvisningerne nøje før ibrugtagning, for at
beskytte Dem og enheden mod skader, der skyldes for-
kert brug. Gem venligst denne betjeningsvejledning til
senere brug.
Sikkerhedsanvisningerne findes på side 28.
Innan du slår på enheten …
Vi önskar dig mycket glädje med din nya “img Stage
Line” produkt. Läs igenom säkerhetsföre skrifterna innan
en heten tas i bruk för att undvika skador till följd av
felaktig hantering. Behåll instruktionerna för framtida
bruk.
Säkerhetsföreskrifterna återfinns på sidan 28.
Ennen kytkemistä …
Toivomme Sinulle paljon miellyttäviä hetkiä uuden “img
Stage Line” laitteen kanssa. Ennen laitteen käyttöä pyy-
dämme Sinua huolellisesti tutustumaan turvallisuusoh-
jeisiin. Näin vältyt vahingoilta, joita virheellinen laitteen
käyttö saattaa aiheuttaa. Ole hyvä ja säilytä käyttöohjeet
myöhempää tarvetta varten.
Turvallisuusohjeet löytyvät sivulta 29.
F
B
CH
I
ENL
PL DK
S
FIN
B
3
123456 789
USB 0:03:52 RO
017 Title 1MP3
ab c d
ef g
22 23 24 25 26 27 28
10 11 12 13 14 15 16 17 18 19 20 21
4
D
A
CH
Auf der ausklappbaren Seite 3 finden Sie
alle beschriebenen Bedienelemente und An -
schlüsse.
1 Übersicht der Bedienelemente
und Anschlüsse
1.1 Frontseite
1 Display, Details siehe Abb. 2
a = Wiedergabe, = Pause,
kein Symbol = Stopp
b mit Taste MODE (10) gewählte Signal-
quelle
USB = USB-Anschluss (2)
SD = SD-Steckplatz (3)
Bluetooth = Bluetooth-Empfänger
AUX = keine Funktion
c bereits gespielte Zeit eines Titels
d mit Taste (10) gewählte Betriebsart
RA = wiederholtes Abspielen aller Titel
RR = zufällige Titelfolge
RO = Wiederholung des Titels
e Titelnummer (im angewählten Ordner)
f Name der Audiodatei (max. 6 Zeichen)
g Audiodatei-Typ
2 USB-Buchse zum Anschluss eines USB-
Speichermediums (z. B. USB-Stick, USB-Fest-
platte mit eigener Stromversorgung)
3 Steckplatz für eine Speicherkarte
Die Karte mit der abgeschrägten Ecke nach
unten und zum Gerät zeigend einstecken.
4 Regler GAIN zum Einstellen der Eingangsver-
stärkung (jeweils für die Eingänge CH 1 4)
5 Kanalfader für die Kanallautstärke und zum
Ein- und Ausblenden des Kanalsignals
(jeweils für die Eingänge CH 1 4)
6 Eingangswahlschalter
(jeweils für die Eingänge CH 1 4)
MP3 = Audio-Player und
Bluetooth-Empfänger
AUX / MIC / LINE / PHONO = Eingangs-
buchsen (28)
7 Lautstärkeregler BOOTH für eine am Aus-
gang BOOTH (24) angeschlossene Monitor-
anlage
8 Pegelanzeige für das Summensignal am
XLR-Ausgang (25) und am Ausgang MAS-
TER (26)
9 Lautstärkeregler MASTER für den XLR-Aus-
gang (25) und den Ausgang MASTER (26)
10 Bedientasten für den Audio-Player und den
Bluetooth-Empfänger:
MODE Umschalten zwischen
— USB-Buchse (2)
— SD-Steckplatz (3)
— Bluetooth-Empfänger
— AUX (ohne Funktion)
Zum Aus- oder Wiedereinschalten die
Taste 2 s lang drücken.
Wiedergabe starten und unterbrechen
Wiedergabe stoppen
Abspielmodus wählen (siehe Pos. d)
Sprung auf den vorherigen Titel;
für den schnellen Rücklauf innerhalb eines
Titels die Taste gedrückt halten
Sprung auf den nächsten Titel;
für den schnellen Vorlauf innerhalb eines
Titels die Taste gedrückt halten
F
-
Sprung zum vorherigen Ordner
F+ Sprung zum nächsten Ordner
EQ Klangeinstellung wählen:
NORM, ROCK, POP, CLAS … OPER
11 Buchse MIC (6,3-mm-Klinke, asym.) für ein
DJ-Mikrofon
12 Regler MIC LEVEL für die Lautstärke des
an der Buchse MIC (11) angeschlossenen
Mikrofons
13 Klangregler HIGH (Höhen) und LOW (Bässe)
für das an der Buchse MIC (11) angeschlos-
sene Mikrofon
14 Klangregler HIGH (Höhen) und LOW (Bässe)
(jeweils für die Eingänge CH 1 4)
15 Überblendregler (Crossfader)
16 Schiebeschalter zum Bestimmen zweier Ein-
gangskanäle, zwischen denen übergeblen-
det werden soll
Wird die Überblendfunktion nicht benutzt,
beide Schalter in die Position 0 stellen.
17 Tasten zur Auswahl der Signale, die über den
Kopfhörerausgang (19) vorgehört werden
sollen:
CH 1 … CH 4 = Signale der Eingangskanäle
MASTER = Summensignal
18 Lautstärkeregler PHONES LEVEL für den
Kopfhörerausgang (19)
19 6,3-mm-Klinkenbuchse für den Anschluss
eines Stereo-Kopfhörers (Impedanz min. 8 Ω)
20 Regler BALANCE für die Balanceeinstellung
des Stereosignals am XLR-Ausgang (25) und
am Ausgang MASTER (26)
21 Ein- / Ausschalter POWER mit darüberliegen-
der Betriebsanzeige
1.2 Rückseite
22 Netzbuchse zum Anschluss an eine Steck-
dose (230 V~/50 Hz) über das beiliegende
Netzkabel
23 Halterung für die Netzsicherung
Eine geschmolzene Sicherung nur durch
eine gleichen Typs ersetzen!
24 Ausgang BOOTH (6,3-mm-Klinkenbuchsen,
asym.) für den Anschluss einer Monitoran-
lage zum Abhören des Summensignals
25 XLR-Buchsen (sym.) zum Anschluss des
Verstärkers für die Publikumsbeschallung
26 Cinch-Buchsen MASTER zusätzlich oder
alternativ zu den XLR-Buchsen (25) zum An -
schluss eines Verstärkers
27 Cinch-Buchsen REC für ein Aufnahmegerät
An den Buchsen liegt das Summensignal
unabhängig von der Stellung des Reglers
MASTER (9) an.
28 Signaleingänge für die Kanäle CH 1 bis CH 4
MIC (6,3-mm-Klinke, asym.) für Mikrofone
LINE (Cinch) für Geräte mit Line-Ausgang
(z. B. CD-Spieler, Radio)
AUX (Cinch) für Geräte mit Line-Ausgang
PHONO (Cinch) für Plattenspieler mit Mag-
netsystem
2 Hinweise für den
sicheren Gebrauch
Das Gerät entspricht allen relevanten Richtlinien
der EU und ist deshalb mit gekennzeichnet.
Beachten Sie auch unbedingt folgende Punkte:
G
Verwenden Sie das Gerät nur im Innenbereich
und schützen Sie es vor Tropf- und Spritzwas-
ser, hoher Luftfeuchtigkeit und Hitze (zulässi-
ger Einsatztemperaturbereich 0 40 °C).
G
Stellen Sie keine mit Flüssigkeit gefüllten Ge -
fäße, z. B. Trinkgläser, auf das Gerät.
G
Nehmen Sie das Gerät nicht in Betrieb und
ziehen Sie sofort den Netzstecker aus der
Steckdose,
1. wenn sichtbare Schäden am Gerät oder am
Netzkabel vorhanden sind,
2. wenn nach einem Sturz oder Ähnlichem der
Verdacht auf einen Defekt besteht,
3. wenn Funktionsstörungen auftreten.
Geben Sie das Gerät in jedem Fall zur Repa-
ratur in eine Fachwerkstatt.
G
Ziehen Sie den Netzstecker nie am Kabel aus
der Steckdose, fassen Sie immer am Stecker an.
G
Verwenden Sie für die Reinigung nur ein tro-
ckenes, weiches Tuch, niemals Wasser oder
Chemikalien.
G
Wird das Gerät zweckentfremdet, nicht richtig
angeschlossen, falsch bedient oder nicht fach-
gerecht repariert, kann keine Haftung für
daraus resultierende Sach- oder Personen-
schäden und keine Garantie für das Gerät
übernommen werden. Ebenso kann keine
Haftung für durch Fehlbedienung oder durch
einen Defekt entstandene Datenverluste und
deren Folgeschäden übernommen werden.
3 Einsatzmöglichkeiten
Das Stereo-Mischpult mit eingebautem Audio-
Player und Bluetooth-Empfänger eignet sich
sowohl für beliebige DJ-Anwendungen im pro-
fessionellen oder privaten Bereich als auch für
den Einsatz in einer ELA-Anlage. Es ist mit vier
Stereo-Eingangskanälen sowie einem DJ-Mikro-
fonkanal ausgestattet. Zum Vorhören der Ein-
gangssignale oder des Summensignals kann ein
Kopfhörer angeschlossen werden.
Das Mischpult kann frei aufgestellt werden
oder in ein Rack (482 mm / 19″) eingebaut wer-
den. Für den Rackeinbau wird eine Höhe von
2 HE (Höheneinheiten) = 89 mm benötigt.
Soll das Gerät endgültig aus dem
Betrieb genommen werden, übergeben
Sie es zur umweltgerechten Entsor-
gung einem örtlichen Recyclingbetrieb.
WARNUNG Das Gerät wird mit lebensge -
fährlicher Netzspannung versorgt.
Nehmen Sie deshalb niemals
selbst Eingriffe am Gerät vor. Es
besteht die Gefahr eines elektri-
schen Schlages.
D
A
CH
5
4 Geräte anschließen
Um Störgeräusche zu vermeiden, vor dem Her-
stellen/Trennen von Verbindungen das Misch-
pult ausschalten oder folgende Regler ganz
zudrehen:
BOOTH (7)
MASTER (9)
PHONES LEVEL (18)
1) Die Tonquellen an die entsprechenden Ein-
gangsbuchsen (28) anschließen:
Buchsen LINE und AUX für den An -
schluss von Geräten mit Line-Pegel (z. B.
CD-Spieler, Radio)
Buchsen PHONO für den Anschluss von
Plattenspielern mit Magnetsystem
Buchsen MIC für den Anschluss von
Mikrofonen
An jeden Eingangskanal lassen sich bis zu drei
Tonquellen anschließen. Mit den zugehörigen
Eingangswahlschaltern (6) kann dann zwi-
schen den Tonquellen umgeschaltet werden.
2) Ein DJ-Mikrofon lässt sich an die Buchse
MIC (11) auf der Frontseite anschließen.
3) Den Verstärker für die Publikumsbeschallung
an die XLR-Buchsen (25) oder an die Cinch-
Buchsen MASTER (26) anschließen. Die zwei
Buchsenpaare können auch gleichzeitig be -
nutzt werden, z. B. für zwei Verstärker.
4) Eine Monitoranlage in einem gesonderten
Raum lässt sich an die Buchsen BOOTH (24)
anschließen. Für eine separate Einstellung
der Lautstärke ist der Regler BOOTH (7) vor-
handen.
5) Für Tonaufnahmen ein Aufnahmegerät an
die Ausgangsbuchsen REC (27) anschlie-
ßen. Der Aufnahmepegel ist unabhängig von
der Stellung des Reglers MASTER (9).
6) Über einen Kopfhörer lassen sich die Sig-
nale der einzelnen Eingangskanäle und das
Summensignal vorhören [d. h. die Signale
können auch abgehört werden, wenn der
zughörige Kanalfader (5) ganz zugezogen ist
oder der Regler MASTER (9) ganz zugedreht
ist]. Den Kopfhörer (Mindestimpedanz 8 Ω)
an die Buchse (19) anschließen.
7) Das Mischpult über die Netzbuchse (22) mit
dem beiliegenden Netzkabel an eine Steck-
dose (230 V~ / 50 Hz) anschließen.
5 Bedienung
5.1 Ein- und Ausschalten
Um Einschaltgeräusche und eine zu hohe Laut-
stärke zu vermeiden, vor der Inbetriebnahme fol-
gende Ausgangsregler auf Minimum stellen:
BOOTH (7)
MASTER (9)
PHONES LEVEL (18)
Zum Ein- und Ausschalten des Mischpults den
Netzschalter POWER (21) betätigen. Bei einge-
schaltetem Gerät leuchtet die Betriebsanzeige
über dem Schalter.
5.2 Aussteuerung der Eingangskanäle
Die folgenden Bedienschritte dienen nur als
Hilfestellung, es sind auch andere Vorgehens-
weisen möglich.
1) Zuerst folgende Grundeinstellung vornehmen.
a) Bei allen Eingangskanälen die Regler
GAIN (4), die Klangregler HIGH und LOW
(14) in die Mittelposition drehen sowie die
Kanalfader (5) ganz zuziehen.
b) Den Regler MIC LEVEL (12) ganz zudre-
hen.
c) Die beiden Schiebeschalter (16) für den
Überblendregler in die Position 0 stellen,
um die Überblendfunktion auszuschalten.
d) Den Regler BALANCE (20) in die Mittel-
position drehen.
2) Damit das Eingangssignal von der Pegelan-
zeige (8) angezeigt werden kann, den Regler
MASTER (9) ca.
2
3 aufdrehen.
3) Den Kanalfader des ersten verwendeten
Kanals ca.
2
3 aufziehen (Position 7), mit dem
Eingangswahlschalter (6) die Signalquelle
wählen und ein Tonsignal auf den Kanal
geben (z. B. Musikstück, Mikrofondurchsage).
Für den Kanal CH 1 kann als Signalquelle
der Audio-Player oder der Bluetooth-Emp-
fänger angewählt werden, deren Bedienung
in den Kapiteln 5.5 und 5.6 beschrieben ist.
Den Eingangswahlschalter des Kanals CH 1
dazu in die Position MP3 stellen.
4) Anhand der Pegelanzeige die Eingangsver-
stärkung optimal einstellen: Den Regler GAIN
so einstellen, dass bei lauten Passagen ein
Pegel im Bereich um 0 dB angezeigt wird.
5) Den Klang mit den Reglern HIGH für die
Höhen und LOW für die Bässe einstellen. Die
Aussteuerung des Kanals überprüfen und ggf.
die Eingangsverstärkung mit dem Regler
GAIN korrigieren.
6) Den Kanalfader wieder zuziehen und ge -
nauso die anderen Eingangskanäle nach -
einander einstellen.
5.3 Mischen der Tonquellen
Überblenden zwischen zwei Kanälen
1) Nach dem Aussteuern der Eingangskanäle
lassen sich deren Signale mit den Kanalfa-
dern (5) mischen oder ein- und ausblenden.
Die Fader nicht benutzter Kanäle immer ganz
zuziehen.
2) Mit dem Regler MASTER (9) die endgültige
Lautstärke des Summensignals einstellen
und mit dem Regler BALANCE (20) die Ste-
reobalance. Der Signalpegel lässt sich an der
Pegelanzeige (8) ablesen. In der Re gel wird
bei 0 dB eine optimale Aussteuerung er -
reicht. Ist der Ausgangspegel des Mischpults
jedoch für den angeschlossenen Verstärker
zu hoch oder zu niedrig, muss das Summen-
signal entsprechend niedriger oder höher
eingestellt werden, jedoch ohne dass Verzer-
rungen auftreten.
Für eine an den Buchsen BOOTH (24)
an geschlossene Monitoranlage die Laut-
stärke mit dem Regler BOOTH (7) separat
einstellen.
3) Für eine Durchsage über ein an der Buchse
MIC (11) angeschlossenes Mikrofon die
Lautstärke mit dem Regler MIC LEVEL (12)
einstellen und den Klang mit den Reglern
HIGH und LOW (13). Damit die Durchsage
verständlicher ist, ggf. die Lautstärke der Ein-
gangs kanäle CH 1 bis 4 mit den Fadern ver-
ringern.
4) Mit dem Crossfader (15) kann zwischen
zwei Kanälen übergeblendet werden. Dazu
mit den Zuordnungsschaltern (16) die beiden
Kanäle anwählen, zwischen denen überge-
blendet werden soll.
5.4 Vorhören der Kanäle CH 1 4 und
des Summensignals
Die Eingangskanäle CH 1 4 können einzeln
über einen Kopfhörer abgehört werden, auch
wenn der zugehörige Kanalfader (5) zugezogen
ist. Damit kann z. B. der nächste zu spielende
Titel ausgesucht werden. Außerdem lässt sich
das Summensignal abhören, auch wenn der
Regler MASTER (9) auf Minimum steht.
1)
Zum Vorhören eines Eingangskanals die zu -
gehörige Taste CH 1 4 (17) drücken oder
zum Abhören des Summensignals die Taste
MASTER.
2) Die Kopfhörerlautstärke mit dem Regler
PHONES LEVEL (18) einstellen.
VORSICHT Stellen Sie die Lautstärke der
Audioanlage und des Kopfhörers
nie sehr hoch ein. Hohe Lautstär-
ken können auf Dauer das Gehör
schädigen! Das Ohr gewöhnt sich
an hohe Lautstärken und empfin-
det sie nach einiger Zeit als nicht
mehr so hoch. Erhöhen Sie darum
eine hohe Lautstärke nach der
Gewöhnung nicht weiter.
6
D
A
CH
5.5 Bedienung des Audio-Players
Mit dem Audio-Player lassen sich von USB-Sticks,
USB-Festplatten mit eigener Stromversorgung
und Speicherkarten bis zu 32 GB Audiodateien im
Format MP3, WAVE und WMA abspielen.
1) Die Wiedergabe des Audio-Players erfolgt
über den Eingangskanal CH 1. Dazu den Ein-
gangswahlschalter (6) des Kanals CH 1 in die
Position MP3 stellen.
2) Zum Abspielen von Audiodateien auf einer
Speicherkarte diese in den Schlitz SD (3) ste-
cken. Die abgeschrägte Ecke der Karte muss
nach unten und zum Gerät zeigen.
3) Zum Abspielen von Audiodateien auf einem
USB-Speichermedium z. B. einen USB-Stick
in den USB-Anschluss (2) stecken oder
eine USB-Festplatte mit dem USB-Anschluss
verbinden.
4) Nach dem Einlesen des USB-Speichers bzw.
der Speicherkarte startet die Wiedergabe.
Das Display (1) zeigt verschiedene Informa-
tionen an, siehe Kap. 1.1, Position 1. Zur Be -
dienung des Audio-Players dienen die Tas-
ten (10) unter dem Display. Zeigt das Display
PLEASE PUSH PLAY an, zuerst die Taste
drücken, anderenfalls lässt sich der Player
nicht bedienen.
MODE Umschalten zwischen
— USB-Buchse (2)
— SD-Steckplatz (3)
— Bluetooth-Empfänger (Kap. 5.6)
— AUX (ohne Funktion)
Zum Aus- und Wiedereinschalten des
Players die Taste 2 s lang drücken.
Wiedergabe starten und unterbrechen
Wiedergabe stoppen
Abspielmodus wählen
Das Display zeigt in der ersten Zeile ganz
rechts den Modus an:
RA = wiederholtes Abspielen aller Titel
RR = zufällige Titelfolge
RO = Wiederholung des Titels
Sprung auf den vorherigen Titel;
für den schnellen Rücklauf innerhalb eines
Titels die Taste gedrückt halten
Sprung auf den nächsten Titel;
für den schnellen Vorlauf innerhalb eines
Titels die Taste gedrückt halten
F
-
Sprung zum vorherigen Ordner
F+ Sprung zum nächsten Ordner
EQ Klangeinstellung wählen
Das Display zeigt in der zweiten Zeile die
Einstellung kurz an:
NORM
ROCK
POP
CLAS
JAZZ
BLUE
HALL
BASS
SOFT
COUN
OPER
5.6 Bedienung
des Bluetooth-Empfängers
Mit dem Bluetooth-Empfänger kann eine Funk-
verbindung zu einer Bluetooth-Signalquelle
(z. B. Notebook, Smartphone, Tablet-PC) herge-
stellt werden, um die dort gespeicherten Audio-
Dateien über das Mischpult abzuspielen.
Hinweis: Die Bluetooth-Signalquelle muss nach dem
A2DP-Protokoll arbeiten (Advanced Audio Distribution
Profile). Anderenfalls ist keine Funkverbindung mög-
lich.
1) Die Wiedergabe des Bluetooth-Empfängers
erfolgt über den Eingangskanal CH 1. Dazu
den Eingangswahlschalter (6) des Kanals
CH 1 in die Position MP3 stellen.
2) Sollte das Display (1)
PLEASE PUSH PLAY
anzeigen, zuerst die Taste (10) drücken.
3) Zum Umschalten auf den Bluetooth-Empfän-
ger die Taste MODE (10) so oft drücken, bis
das Display
Bluetooth anzeigt.
4) Die Bluetooth-Funktion am Notebook, Smart -
phone oder Tablet-PC einschalten und die
Verbindung mit dem Mischpult herstellen
(siehe ggf. Anleitung des Gerätes).
Hinweis: Das Mischpult wird auf dem Display der
Bluetooth-Signalquelle mit „RST-02“ angezeigt.
5) Die Wiedergabe eines Titels an der Blue-
tooth-Signalquelle starten.
Hinweis: Die Player-Funktionen, wie z. B. Pause,
Weiterspielen oder Titelwahl, können nur an der
Bluetooth-Signalquelle ausgeführt werden.
6) Zum Umschalten auf die Audio-Wiedergabe
von einer Speicherkarte oder einem USB-
Speichermedium die Taste MODE mehrfach
drücken, bis das Display in der ersten Zeile
links
SD oder USB anzeigt.
6 Technische Daten
Eingänge
(Empfindlichkeit / Impedanz; Anschluss)
MIC: . . . . . . . . . . . . . . 1,5 mV/ 600 Ω;
6,3-mm-Klinke, asym.
LINE, AUX: . . . . . . . . 200 mV/ 6,6 kΩ;
Cinch
PHONO: . . . . . . . . . . 2 mV/ 480 kΩ;
Cinch
Ausgangspegel
XLR-Buchsen:
. . . . . . . 1,5 V
bei Anzeige 0 dB
Cinch-Buchsen MASTER:
1V
bei Anzeige 0 dB
Cinch-Buchsen REC:
. . . 0,4 V
Klinken-Buchsen BOOTH:
1V
Kopfhörerimpedanz: . . . ≥ 8 Ω
Frequenzbereich: . . . . . 20 20 000 Hz
Klirrfaktor: . . . . . . . . . . . < 0,15 %
Störabstand: . . . . . . . . . > 60 dB, unbewertet
Klangregler
CH 1 … CH 4
Bässe: . . . . . . . . . . ±15 dB / 50 Hz
Höhen: . . . . . . . . . . ±15 dB / 10 kHz
DJ-MIC
Bässe: . . . . . . . . . . ±12 dB / 100 Hz
Höhen: . . . . . . . . . . ±12 dB / 7 kHz
Stromversorgung: . . . . . 230 V~ / 50 Hz
Leistungsaufnahme: . . . max. 15 VA
Einsatztemperatur: . . . . 0 40 °C
Abmessungen
(B×H×T): . . . . . . . . . . . 482 × 88 × 105 mm,
2 HE (Höheneinheiten)
Gewicht: . . . . . . . . . . . . 2,2 kg
Änderungen vorbehalten.
Diese Bedienungsanleitung ist urheberrechtlich für MONACOR
®
INTERNATIONAL GmbH & Co. KG
geschützt. Eine Reproduktion für eigene kommerzielle Zwecke – auch auszugsweise – ist untersagt.
7
All operating elements and connections de -
scribed can be found on the fold-out page 3.
1 Operating Elements
and Connections
1.1 Front Panel
1 Display, please refer to fig. 2 for details
a = play, = pause,
no symbol = stop
b signal source selected with the button
MODE (10)
USB = USB connection (2)
SD = slot for SD card (3)
Bluetooth = Bluetooth receiver
AUX = no function
c time already played of a title
d operation mode selected with the button
(10)
RA = repeated replay of all titles
RR = random title sequence
RO = repeat of the title
e title number (in the selected folder)
f name of the audio file (max. 6 characters)
g audio file type
2 USB port to connect a USB storage device
(e. g. USB flash drive, USB hard disk with
separate power supply)
3 Slot for an SD card
Insert the card (notched corner downwards
and facing the unit).
4 Control GAIN to adjust the input amplification
(for each of the inputs CH 1 4)
5 Channel fader to adjust the volume of the
channel and to fade in and fade out the chan-
nel signal (for each of the inputs CH 1 4)
6 Input selector switch
(for each of the inputs CH 1 4)
MP3 = audio player and Bluetooth receiver
AUX / MIC / LINE / PHONO = input jacks (28)
7 Volume control BOOTH for a monitor system
connected to the output BOOTH (24)
8 Level indicators for the sum signal at the XLR
output (25) and at the output MASTER (26)
9 Volume control MASTER for the XLR output
(25) and the output MASTER (26)
10 Operating buttons for the audio player and
the Bluetooth receiver:
MODE switch between
— USB port (2)
— slot for SD card (3)
— Bluetooth receiver
— AUX (without function)
To activate or deactivate the audio
player, press the button for 2 s.
start and pause the replay
stop the replay
select the replay mode (please refer to
item d)
go to the previous title;
for fast reverse within a title, keep the but-
ton pressed
go to the next title;
for fast forward within a title, keep the but-
ton pressed
F
-
go to the previous folder
F+ go to the next folder
EQ select sound adjustment
NORM, ROCK, POP, CLAS … OPER
11 Jack MIC (6.3 mm jack, unbal.) for a DJ micro-
phone
12 Control MIC LEVEL to adjust the volume
of the microphone connected to the jack
MIC (11)
13 Tone controls HIGH (high frequencies) and
LOW (bass frequencies) for the microphone
connected to the jack MIC (11)
14 Tone controls HIGH (high frequencies) and
LOW (bass frequencies)
(for each of the inputs CH 1 4)
15 Crossfader
16 Sliding switches to define the two input chan-
nels to be used for crossfading
If the crossfader function is not used, set both
sliding switches to the position 0.
17 Buttons to select the signals for prefader lis-
tening via the headphone output (19):
CH 1 … CH 4 = signals of the input channels
MASTER = sum signal
18 Volume control PHONES LEVEL for the
headphone output (19)
19 6.3 mm jack to connect stereo headphones
(minimum impedance: 8 Ω)
20 Control BALANCE to adjust the balance of
the stereo signal at the XLR output (25) and
at the output MASTER (26)
21 POWER switch (with LED indicator above the
switch)
1.2 Rear panel
22 Mains jack for connection to a socket (230 V~/
50 Hz) via the mains cable provided
23 Support for the mains fuse
Always replace a blown fuse by a fuse of the
same type!
24 Output BOOTH (6.3 mm jacks, unbal.) to con-
nect a monitor system for monitoring the sum
signal
25 XLR jacks (bal.) to connect the amplifier for
PA applications
26 RCA jacks MASTER to be used additionally
or as an alternative to the XLR jacks (25) for
connecting an amplifier
27 RCA jacks REC to connect a recorder
Irrespective of the position of the control
MASTER (9), the sum signal is available at
the jacks.
28 Signal inputs for the channels CH 1 to CH 4
MIC (6.3 mm jack, unbal.) for microphones
LINE (RCA) for units with line output
(e. g. CD player, radio)
AUX (RCA) for units with line output
PHONE (RCA) for turntables with magnetic
system
2 Safety Notes
The unit corresponds to all relevant directives of
the EU and is therefore marked with .
Please observe the following items in any case:
G
The unit is suitable for indoor use only. Protect
it against dripping water and splash water,
high air humidity and heat (admissible ambient
temperature range: 0 40 °C).
G
Do not place any vessel with liquid on the unit,
e. g. a drinking glass.
G
Do not operate the unit and immediately dis-
connect the mains plug from the socket
1. if the unit or the mains cable is visibly dam-
aged,
2. if a defect might have occurred after the unit
was dropped or suffered a similar accident,
3. if malfunctions occur.
In any case the unit must be repaired by skilled
personnel.
G
Never pull the mains cable to disconnect the
mains plug from the socket, always seize the
plug.
G
For cleaning only use a dry, soft cloth; never
use water or chemicals.
G
No guarantee claims for the unit and no liabil-
ity for any resulting personal damage or mate-
rial damage will be accepted if the unit is used
for other purposes than originally intended, if it
is not correctly connected or operated, or if it is
not repaired in an expert way. Likewise, no lia-
bility will be accepted for any data loss result-
ing from a defect or from operating errors and
for any consequential damage that is due to
this data loss.
3 Applications
The stereo mixer with integrated audio player
and Bluetooth receiver is suited for professional
or private DJ applications as well as for a PA
system. The mixer is equipped with four stereo
input channels and a DJ microphone channel.
Headphones may be connected for prefader lis-
tening to the input signals or to the sum signal.
The mixer can be placed as desired or may
be installed in a rack (482 mm / 19″). Rack instal-
lation requires a height of 2 RS (rack spaces) =
89 mm.
If the unit is to be put out of operation
definitively, take it to a local recycling
plant for a disposal which is not harmful
to the environment.
WARNING This unit uses dangerous mains
voltage. Leave servicing to skilled
personnel. Inexpert handling or
modification may result in electric
shock.
8
GB
4 Connecting Units
To avoid interfering noise, switch off the mixer or
turn back the following controls to minimum prior
to connecting / disconnecting:
BOOTH (7)
MASTER (9)
PHONES LEVEL (18)
1) Connect the audio sources to the appropri-
ate input jacks (28):
jacks LINE and AUX to connect units with
line level (e. g. CD player, radio)
jacks PHONO to connect turntables with
magnetic system
jacks MIC to connect microphones
A maximum of three audio sources can be
connected to each input channel. Use the
appropriate input selector switches (6) to
switch between audio sources.
2) Connect a DJ microphone to the jack MIC
(11) on the front panel.
3) Connect the amplifier for PA applications to
the XLR jacks (25) or to the RCA jacks MAS-
TER (26). The two jack pairs may be used
simultaneously, e. g. for two amplifiers.
4) Connect a monitor system located in a sep-
arate control room to the jacks BOOTH (24).
Use the control BOOTH (7) to adjust the vol-
ume separately.
5) For audio recordings, connect a recorder to
the output jacks REC (27). The recording
level is irrespective of the position of the con-
trol MASTER (9).
6) Use headphones for prefader listening to the
signals of the individual input channels and to
the sum signal [i. e. the signals can also be
monitored when the appropriate channel
fader (5) is completely closed or the control
MASTER (9) is turned back to minimum].
Connect the headphones (minimum imped-
ance: 8 Ω) to the jack (19).
7) Use the mains cable provided to connect the
mains jack (22) of the mixer to a mains
socket (230 V~ / 50 Hz).
5 Operation
5.1 Switching on and off
To prevent switching noise and excessive vol-
ume, set the following output controls to mini-
mum prior to setting the mixer into operation:
BOOTH (7)
MASTER (9)
PHONES LEVEL (18)
Use the POWER switch (21) to switch the mixer
on and off. When the mixer is switched on, the
LED indicator above the POWER switch will light
up.
5.2 Level control of the input channels
The following steps merely serve as an aid; other
procedures are possible.
1) First, make the following basic adjustments:
a) In all input channels, set the control GAIN
(4) and the tone controls HIGH and LOW
(14) to mid-position and completely close
the channel fader (5).
b) Turn back the control MIC LEVEL (12) to
minimum.
c) To deactivate the crossfading function,
set the two sliding switches (16) for the
crossfader to position 0.
d) Set the control BALANCE (20) to mid-
position.
2) To make sure that the input signal can be
indicated ahead of the level indicators (8),
turn up the control MASTER (9) to approxi-
mately
2
3 of its maximum.
3) Advance the channel fader of the first chan-
nel used to approximately
2
3 of its maximum
(position number 7 of the fader), use the input
selector switch (6) to select the signal source
and then feed an audio signal to the channel
(e. g. piece of music, microphone announce-
ment).
For channel CH 1, the audio player or the
Bluetooth receiver can be selected as a sig-
nal source; please refer to chapters 5.5 and
5.6 for more information on how to operate
the audio player and the Bluetooth receiver.
Set the input selector switch of channel CH 1
to the position MP3.
4) Observe the level indicators for an optimum
adjustment of the input amplification: Adjust
the control GAIN so that a level of approxi-
mately 0 dB is indicated for music peaks.
5) Adjust the sound, using the tone controls
HIGH for high frequencies and LOW for low
frequencies. Check the level of the channel
and, if necessary, use the control GAIN to
correct the input amplification.
6) Close the channel fader. Repeat this proce-
dure for all the other input channels.
5.3 Mixing audio sources
Crossfading between two channels
1) After level control of the input channels has
been completed, the channel faders (5) can
be used to mix the signals of the input chan-
nels or to fade them in and out. Always com-
pletely close the faders of the channels that
are not used.
2) Use the control MASTER (9) to adjust the
definite volume of the sum signal, and use
the control BALANCE (20) to adjust the
stereo balance. The signal level is indicated
by the level indicators (8). Usually, the opti-
mum level is obtained at 0 dB. However, if the
output level of the mixer is too high or too low
for the amplifier connected, attenuate or
boost the sum signal accordingly, making
sure that no distortions occur.
Use the control BOOTH (7) to separately
adjust the volume of a monitor system that
has been connected to the jacks BOOTH
(24).
3) For an announcement via a microphone con-
nected to the jack MIC (11), use the control
MIC LEVEL (12) to adjust the volume, and
the tone controls HIGH and LOW (13) to
adjust the sound. If it is necessary to improve
the audibility of the announcement, use the
faders to attenuate the volume of the input
channels CH 1 to 4.
4) The crossfader (15) allows crossfading be -
tween two channels. Use the sliding switches
(16) to select the two channels that are to be
crossfaded.
5.4 Prefader listening to the channels
CH 1 4 and to the sum signal
The input channels CH 1 4 can be separately
monitored via headphones even when the corre-
sponding channel fader (5) is closed. Thus, it is
possible to choose the next title to be played, for
example. In addition, the sum signal can be
monitored even when the control MASTER (9)
has been set to minimum.
1) For prefader listening to an input channel,
press the appropriate button CH 1 4 (17), or
for monitoring the sum signal, press the but-
ton MASTER.
2) Use the control PHONES LEVEL (18) to
adjust the headphone volume.
CAUTION Never adjust the audio system
and the headphones to a very high
volume. Permanent high volumes
may damage your hearing! Your
ear will get accustomed to high
volumes which do not seem to be
that high any more after some
time. Therefore, do not further
increase a high volume after get-
ting used to it.
9
GB
5.5 Operating the audio player
Using the audio player, it is possible to replay
MP3, WAVE and WMA audio files from USB
flash drives, USB hard disks with separate
power supply, and memory cards of up to 32 GB.
1) To replay audio files by means of the audio
player, use the input channel CH 1: Set the
input selector switch (6) of the channel CH 1
to the position MP3.
2) To replay audio files from a memory card,
insert the memory card into the slot for the SD
card (3) [notched corner downwards and fac-
ing the unit].
3) To replay audio files from a USB storage
device, insert a USB flash drive, for example,
into the USB port (2) or connect a USB
hard disk to the USB port.
4) Replay of the audio files will start after the
USB storage device or the memory card has
been loaded. Various indications will appear
on the display (1) for information; please refer
to chapter 1.1, item 1. Use the buttons (10)
located beneath the display to operate the
audio player. If
PLEASE PUSH PLAY ap -
pears on the display, first press the button ;
otherwise, it will not be possible to operate
the player.
MODE switch between
— USB port (2)
— slot for SD card (3)
— Bluetooth receiver (chapter 5.6)
— AUX (without function)
To activate or deactivate the audio
player, press the button for 2 s.
start and pause the replay
stop the replay
select the replay mode
The mode will be indicated in the first line
to the right of the display:
RA = repeated replay of all titles
RR = random title sequence
RO = repeat of the title
go to the previous title;
for fast reverse within a title, keep the but-
ton pressed
go to the next title;
for fast forward within a title, keep the but-
ton pressed
F
-
go to the previous folder
F+ go to the next folder
EQ select sound adjustment
The selected adjustment will be briefly
indicated in the second line of the dis-
play:
NORM
ROCK
POP
CLAS
JAZZ
BLUE
HALL
BASS
SOFT
COUN
OPER
5.6 Operating the Bluetooth receiver
The Bluetooth receiver can be used to establish
a radio communication to a Bluetooth signal
source (e. g. notebook, Smartphone, tablet PC)
which allows the mixer to replay audio files
stored at the Bluetooth signal source.
Note: The Bluetooth signal source must be compatible
with the A2DP protocol (Advanced Audio Distribution
Profile); otherwise, no radio communication will be pos-
sible.
1) To replay audio files by means of the Blue-
tooth receiver, use the input channel CH 1:
Set the input selector switch (6) of the chan-
nel CH 1 to the position MP3.
2) If
PLEASE PUSH PLAY appears on the dis-
play (1), first press the button (10).
3) To switch to the Bluetooth receiver, press the
button MODE (10) repeatedly until
Blue-
tooth
appears on the display.
4) Activate the Bluetooth function at the note-
book, the Smartphone or the tablet PC and
establish the connection to the mixer (please
refer to the instructions of the respective
device, if necessary).
Note: On the display of the Bluetooth signal source,
the mixer is indicated by “RST-02”.
5) At the Bluetooth signal source, start the
replay of a title.
Note: Player functions such as pause, continue or
title selection are only available at the Bluetooth sig-
nal source.
6) To switch to audio replay from a memory card
or from a USB storage device, press the but-
ton MODE repeatedly until SD or USB ap -
pears in the first line to the left of the display.
6 Specifications
Inputs
(sensitivity/ impedance; connection)
MIC: . . . . . . . . . . . . . . 1.5 mV/ 600 Ω; 6.3 mm
jack, unbal.
LINE, AUX: . . . . . . . . 200 mV/ 6.6 kΩ; RCA
PHONO: . . . . . . . . . . 2 mV/480 kΩ; RCA
Output level
XLR jacks: . . . . . . . . . . . . 1.5 V at indication 0 dB
RCA jacks MASTER: . . . . 1 V at indication 0 dB
RCA jacks REC: . . . . . . . 0.4 V
6.3 mm jacks BOOTH: . . . 1 V
Headphone impedance: ≥ 8 Ω
Frequency range: . . . . . 20 20 000 Hz
THD: . . . . . . . . . . . . . . . < 0.15 %
S / N ratio: . . . . . . . . . . . . > 60 dB, unweighted
Tone controls
CH 1 … CH 4
bass frequencies: . . ±15 dB / 50 Hz
high frequencies: . . ±15 dB /10 kHz
DJ-MIC
bass frequencies: . . ±12 dB / 100 Hz
high frequencies: . . ±12 dB / 7 kHz
Power supply: . . . . . . . . 230 V~ / 50 Hz
Power consumption: . . 15 VA max.
Ambient temperature: . . 0 40 °C
Dimensions
(W×H×D): . . . . . . . . . 482 × 88 × 105 mm
2 RS (rack spaces)
Weight: . . . . . . . . . . . . . 2.2 kg
Subject to technical modification.
10
GB
All rights reserved by MONACOR
®
INTERNATIONAL GmbH & Co. KG. No part of this instruction
manual may be reproduced in any form or by any means for any commercial use.
11
Vous trouverez sur la page 3, dépliable, les
éléments et branchements décrits.
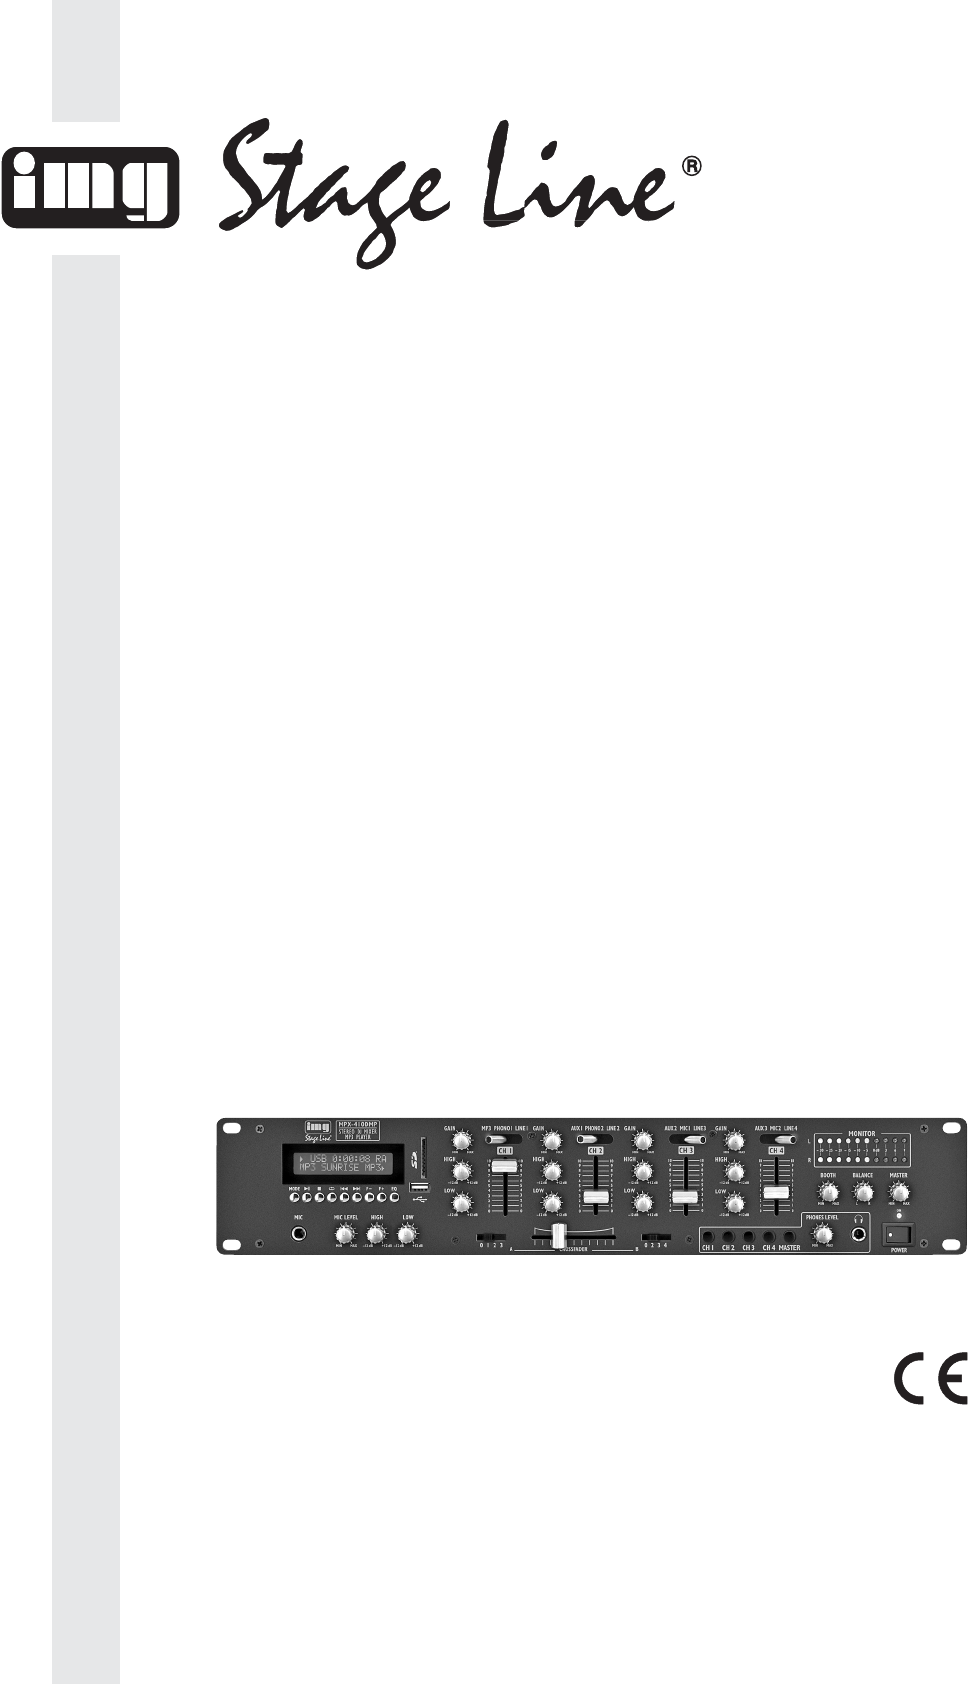
1 Eléments et branchements
1.1 Face avant
1 Affichage, détails voir schéma 2
a = lecture, = pause,
pas de symbole = stop
b source de signal sélectionnée avec la
touche MODE (10)
USB = port USB (2)
SD = emplacement pour une carte SD (3)
Bluetooth = récepteur Bluetooth
AUX = aucune fonction
c durée déjà lue dʼun titre
d mode de fonctionnement sélectionné
avec la touche (10)
RA = lecture répétée de tous les titres
RR = lecture aléatoire de titres
RO = répétition dʼun titre
e numéro du titre (dans le dossier sélec-
tionné)
f nom du fichier audio (6 caractères maxi-
mum)
g type de fichier audio
2 Port USB pour brancher un support de
stockage USB (par exemple une clé USB ou
un disque dur USB avec alimentation propre)
3 Emplacement pour une carte SD
Mettez la carte coin oblique vers le bas et diri-
gée vers lʼappareil.
4 Réglage GAIN pour régler lʼamplification
dʼentrée (respectivement pour les entrées
CH1– 4)
5 Faders de canal pour le volume des canaux
et le fondu enchaîné du signal du canal
(respectivement pour les entrées CH 1 4)
6 Sélecteur dʼentrée
(respectivement pour les entrées CH 1 4)
MP3 = lecteur audio et récepteur Bluetooth
AUX / MIC / LINE / PHONO = prises dʼentrée
(28)
7 Réglage de volume BOOTH pour une instal-
lation moniteur reliée à la sortie BOOTH (24)
8 Vu-mètre pour le signal master à la sortie
XLR (25) et à la sortie MASTER (26)
9 Réglage de volume MASTER pour la sortie
XLR (25) et la sortie MASTER (26)
10 Touches de commande pour le lecteur audio
et le récepteur Bluetooth :
MODE commutation entre
— port USB (2)
emplacement pour une carte SD (3)
— récepteur Bluetooth
— AUX (sans fonction)
Pour éteindre ou rallumer le lecteur
audio, appuyez sur la touche pendant
deux secondes.
démarrage et interruption lecture
arrêt lecture
sélection mode lecture (voir position d)
saut au titre précédent ;
pour le retour rapide au sein dʼun titre,
maintenez la touche enfoncée
saut au titre suivant ;
pour lʼavance rapide au sein dʼun titre,
maintenez la touche enfoncée
F
-
saut au dossier précédent
F+ saut au dossier suivant
EQ sélection du réglage de tonalité :
NORM, ROCK, POP, CLAS … OPER
11 Prise MIC (jack 6,35, asym) pour un micro DJ
12 Réglage MIC LEVEL pour le volume du micro
relié à la prise MIC (11)
13 Egaliseur HIGH (aigus) et LOW (graves) pour
le micro relié à la prise MIC (11)
14 Egaliseur HIGH (aigus) et LOW (graves)
(respectivement pour les entrées CH 1 4)
15 Crossfader pour fondu enchaîné
16 Potentiomètres à glissières pour déterminer
deux canaux dʼentrées entre lesquels le
fondu enchaîné doit être fait
Si la fonction de fondu enchaîné nʼest pas uti-
lisée, mettez les deux potentiomètres sur la
position 0.
17 Touches pour sélectionner les signaux de-
vant être préécoutés via la sortie casque
(19) :
CH 1 … CH 4 = signaux des canaux dʼentrée
MASTER = signal master
18 Réglage de volume PHONES LEVEL pour la
sortie casque (19)
19 Prise jack 6,35 pour brancher un casque
stéréo (impédance minimale 8 Ω)
20 Réglage BALANCE pour le réglage de ba -
lance du signal stéréo à la sortie XLR (25) et
à la sortie MASTER (26)
21 Interrupteur marche / arrêt POWER avec té -
moin de fonctionnement au-dessus
1.2 Face arrière
22 Prise secteur pour brancher à une prise
230 V~ / 50 Hz via le cordon secteur livré
23 Porte-fusible
Tout fusible fondu doit impérativement être
remplacé par un fusible de même type !
24 Sortie BOOTH (jack 6,35, asym) pour bran-
cher une installation moniteur pour écouter le
signal master
25 Prises XLR (sym) pour brancher lʼamplifica-
teur pour des applications de sonorisation
26 Prises RCA MASTER en plus ou à la place
des prises XLR (25) pour brancher un ampli-
ficateur
27 Prises RCA REC pour un enregistreur
Le signal master est présent à ces prises,
indépendamment de la position du réglage
MASTER (9).
28 Entrées signal pour les canaux CH 1 à CH 4
MIC (jack 6,35, asym) pour microphones
LINE (RCA) pour appareils avec sortie ligne
(par exemple lecteur CD, radio)
AUX (RCA) pour appareils avec sortie ligne
PHONO (RCA) pour platines disques avec
système magnétique
2 Conseils dʼutilisation
et de sécurité
Lʼappareil répond à toutes les directives néces-
saires de lʼUnion européenne et porte donc le
symbole .
Respectez scrupuleusement les points suivants :
G
Lʼappareil nʼest conçu que pour une utilisation
en intérieur. Protégez-le des éclaboussures,
de tout type de projections dʼeau, dʼune humi-
dité dʼair élevée et de la chaleur (température
ambiante admissible 0 40 °C).
G
En aucun cas, vous ne devez pas poser dʼob-
jet contenant du liquide ou un verre sur lʼappa-
reil.
G
Ne faites pas fonctionner lʼappareil et débran-
chez le cordon secteur immédiatement dans
les cas suivants :
1. lʼappareil ou le cordon secteur présente des
dommages visibles.
2. après une chute ou accident similaire, vous
avez un doute sur lʼétat de lʼappareil.
3. des dysfonctionnements apparaissent.
Dans tous les cas, les dommages doivent être
réparés par un technicien spécialisé.
G
Ne débranchez jamais lʼappareil en tirant sur
le cordon secteur ; retirez toujours le cordon
secteur en tirant la fiche.
G
Pour le nettoyage, utilisez un chiffon sec et
doux, en aucun cas de produits chimiques ou
dʼeau.
G
Nous déclinons toute responsabilité en cas de
dommages corporels ou matériels résultants
si lʼappareil est utilisé dans un but autre que
celui pour lequel il a été conçu, sʼil nʼest pas
correctement branché ou utilisé ou sʼil nʼest
pas réparé par une personne habilitée ; en
outre, la garantie deviendrait caduque. De
même, notre responsabilité ne saurait être
engagée en cas de pertes de données cau-
sées par une mauvaise manipulation ou par un
défaut et leurs conséquences.
3 Possibilités dʼutilisation
La table de mixage stéréo avec lecteur audio
intégré et récepteur Bluetooth est adaptée tant
pour des applications DJ dans le domaine pro-
fessionnel ou privé que pour une utilisation dans
une installation Public Adress. Elle est dotée de
quatre canaux dʼentrée stéréo et dʼun canal
micro DJ. Pour faire une préécoute des signaux
dʼentrée ou du signal master, on peut relier un
casque.
La table de mixage peut être posée libre-
ment ou placée dans un rack (482 mm / 19″).
Pour une installation dans un rack, une hauteur
de 2 unités = 89 mm est nécessaire.
Lorsque lʼappareil est définitivement retiré
du service, vous devez le déposer dans
une usine de recyclage de proximité pour
contribuer à son élimination non polluante.
AVERTISSEMENT Lʼappareil est alimenté par une
tension dangereuse. Ne tou-
chez jamais lʼintérieur de lʼap-
pareil car, en cas de mauvaise
manipulation, vous pouvez
subir une décharge électrique.
12
F
B
CH
4 Branchements des appareils
Pour éviter les bruits perturbateurs, éteignez la
table de mixage ou tournez les réglages suivants
entièrement vers la gauche avant dʼeffectuer les
branchements des appareils ou de modifier les
branchements existants :
BOOTH (7)
MASTER (9)
PHONES LEVEL (18)
1) Reliez les sources audio aux prises dʼentrée
correspondantes (28) :
prises LINE et AUX pour brancher des
appareils avec niveau ligne (par exemple
lecteur CD, radio)
prises PHONO pour brancher des pla-
tines disques avec système magnétique
prises MIC pour brancher des micro-
phones
On peut relier sur chaque canal dʼentrée
jusquʼà trois sources audio. Avec les sélec-
teurs dʼentrée correspondants (6), vous pou-
vez commuter entre les sources audio.
2) Reliez un micro DJ à la prise MIC (11) sur la
face avant.
3) Reliez lʼamplificateur pour applications de
sonorisation aux prises XLR (25) ou aux
prises RCA MASTER (26). Les deux paires
de prises peuvent être utilisées simultané-
ment par exemple pour deux amplificateurs.
4) On peut relier une installation moniteur
dans une pièce spécifique aux prises
BOOTH (24). Pour un réglage séparé du
volume, le réglage BOOTH (7) est prévu.
5) Pour des enregistrements audio, reliez un
enregistreur aux prises de sortie REC (27).
Le niveau dʼenregistrement est indépendant
de la position du réglage MASTER (9).
6) On peut faire une préécoute via un casque
des signaux de chacun des canaux dʼentrée
et du signal master [cʼest-à-dire les signaux
peuvent être écoutés si le fader du canal cor-
respondant (5) est fermé entièrement ou si le
réglage MASTER (9) est entièrement tourné
vers la gauche]. Reliez le casque (impédance
minimale 8 Ω) à la prise (19).
7) Reliez la table de mixage via la prise secteur
(22) avec le cordon secteur livré à une prise
230 V~ / 50 Hz.
5 Utilisation
5.1 Marche/arrêt
Pour éviter tout bruit fort de commutation et un
volume trop élevé, avant dʼallumer la table de
mixage, mettez les réglages de sortie suivants
sur le minimum :
BOOTH (7)
MASTER (9)
PHONES LEVEL (18)
Pour allumer et éteindre la table de mixage, acti-
vez lʼinterrupteur secteur POWER (21). Lorsque
lʼappareil est allumé, le témoin de fonctionne-
ment au-dessus de lʼinterrupteur brille.
5.2 Gestion des canaux dʼentrée
Les points décrits ci-dessous ne sont quʼune
aide, il existe dʼautres manières de procéder.
1) Effectuez tout dʼabord les réglages de base
suivants.
a) Sur tous les canaux dʼentrée, tournez les
réglages GAIN (4), les égaliseurs HIGH et
LOW (14) sur la position médiane et fer-
mez entièrement les faders de canal (5).
b) Tournez entièrement le réglage MIC
LEVEL (12) sur le minimum.
c) Mettez les deux potentiomètres à glis-
sières (16) pour le réglage de fondu en -
chaîné sur la position 0 pour désactiver la
fonction de fondu enchaîné.
d) Mettez le réglage BALANCE (20) sur la
position médiane.
2) Pour que le signal dʼentrée puisse être affi-
ché par le VU-mètre (8), tournez le réglage
MASTER (9) sur
2
3 environ.
3) Poussez le fader du premier canal utilisé sur
2
3 environ (position 7), sélectionnez la source
de signal avec le sélecteur dʼentrée (6) et
appliquez un signal audio sur le canal (par
exemple morceau de musique, annonce
micro).
Pour le canal CH 1, le lecteur audio ou le
récepteur Bluetooth peut être utilisé comme
source de signal, lʼutilisation est décrite dans
les chapitres 5.5 et 5.6. Mettez le sélecteur
dʼentrée du canal CH 1 sur la position MP3.
4) Selon les indications du VU-mètre, réglez
lʼamplification dʼentrée de manière optimale :
réglez le réglage GAIN de telle sorte que
pour des passages élevés un niveau dans la
plage de 0 dB est affiché.
5) Réglez la tonalité avec les égaliseurs HIGH
pour les aigus et LOW pour les graves. Véri-
fiez le réglage du canal et si besoin, corrigez
lʼamplification dʼentrée avec le réglage GAIN.
6) Fermez le fader du canal et réglez de la
même manière les autres canaux dʼentrée
les uns après les autres.
5.3 Mixage des sources audio
Fondu enchaîné entre deux canaux
1) Une fois les canaux dʼentrée réglés, vous
pouvez mixer leurs signaux avec les faders
de canal (5) ou faire un fondu-enchaîné. Fer-
mez toujours les faders des canaux inutilisés.
2) Avec le réglage MASTER (9), réglez le
volume définitif du signal master et avec le
réglage BALANCE (20), réglez la balance
stéréo. Vous pouvez voir le niveau de signal
sur le VU-mètre (8). En règle générale, on
obtient un réglage optimal pour 0 dB. Si le
niveau de sortie de la table de mixage est
trop fort ou trop faible pour lʼamplificateur
relié, il faut augmenter ou diminuer en consé-
quence le signal master en vous assurant de
ne pas créer de distorsions.
Pour une installation moniteur reliée aux
prises BOOTH (24), réglez séparément le
volume avec le réglage BOOTH (7).
3) Pour une annonce via un micro relié à la prise
MIC (11), réglez le volume avec le réglage
MIC LEVEL (12) et réglez la tonalité avec les
égaliseurs HIGH et LOW (13). Pour que lʼan-
nonce soit plus compréhensible, vous pou-
vez diminuer le volume des canaux dʼentrée
CH 1 à CH 4 avec les faders.
4) Avec le crossfader (15), vous pouvez faire un
fondu enchaîné entre deux canaux. Avec les
potentiomètres à glissières (16), sélection-
nez les deux canaux entre lesquels le fondu-
enchaîné doit être fait.
5.4 Préécoute des canaux CH 1 4
et du signal master
On peut écouter les canaux dʼentrée CH 1 4
séparément via un casque même si le fader du
canal correspondant (5) est fermé. Ainsi, on peut
p. ex. rechercher le prochain titre à lire. On peut
également écouter le signal master même si le
réglage MASTER (9) est sur le minimum.
1) Pour faire une préécoute dʼun canal dʼentrée,
appuyez sur la touche CH 1 4 (17) corres-
pondante ou pour écouter le signal master,
appuyez sur la touche MASTER.
2) Réglez le volume du casque avec le réglage
PHONES LEVEL (18).
AVERTISSEMENT
Ne réglez jamais le volume de
lʼinstallation audio et du casque
trop fort. Un volume trop élevé
peut, à long terme, générer des
troubles de lʼaudition. Lʼoreille
sʼhabitue à des volumes élevés
et ne les perçoit plus comme
tels au bout dʼun certain temps.
Nous vous conseillons donc de
régler le volume et de ne plus
le modifier.
13
F
B
CH
5.5 Utilisation du lecteur audio
Avec le lecteur audio, vous pouvez lire des
fichiers audio au format MP3, WAVE et WMA à
partir de clés USB, disques durs USB avec ali-
mentation propre et cartes mémoire jusquʼà
32 GO.
1) La lecture du lecteur audio sʼeffectue via
le canal dʼentrée CH 1 : mettez le sélecteur
dʼentrée (6) du canal CH 1 sur la position
MP3.
2) Pour lire des fichiers audio sur une carte
mémoire, mettez-la dans lʼemplacement SD
(3). Le coin oblique de la carte doit être dirigé
vers le bas et vers lʼappareil.
3) Pour lire des fichiers audio sur un support de
stockage USB, mettez par exemple une clé
USB dans le port USB (2) ou reliez un
disque dur USB au port USB.
4) Une fois le support de stockage USB ou la
carte mémoire chargé, la lecture démarre.
Lʼaffichage (1) indique différentes informa-
tions, voir chapitre 1.1 position 1. Pour utiliser
le lecteur audio, utilisez les touches (10) sous
lʼaffichage. Si lʼaffichage indique
PLEASE
PUSH PLAY
, appuyez tout dʼabord sur la
touche , sinon vous ne pouvez pas utiliser
le lecteur.
MODE commutation entre
— port USB (2)
emplacement pour une carte SD (3)
— récepteur Bluetooth (chapitre 5.6)
— AUX (sans fonction)
Pour éteindre et rallumer le lecteur,
appuyez sur la touche pendant deux
secondes.
démarrage et interruption lecture
arrêt lecture
sélection mode lecture
Lʼaffichage indique dans la première
ligne à droite le mode :
RA = lecture répétée de tous les titres
RR = lecture aléatoire de titres
RO = répétition dʼun titre
saut au titre précédent ;
pour le retour rapide au sein dʼun titre,
maintenez la touche enfoncée
saut au titre suivant ;
pour lʼavance rapide au sein dʼun titre,
maintenez la touche enfoncée
F
-
saut au dossier précédent
F+ saut au dossier suivant
EQ sélection du réglage de tonalité
Lʼaffichage indique brièvement dans la
seconde ligne le réglage :
NORM
ROCK
POP
CLAS
JAZZ
BLUE
HALL
BASS
SOFT
COUN
OPER
5.6 Utilisation du récepteur Bluetooth
Avec le récepteur Bluetooth, vous pouvez établir
une liaison sans fil vers une source de signal
Bluetooth (par exemple ordinateur portable,
Smartphone, tablette) pour lire, via la table de
mixage, les fichiers audio qui y sont stockés.
Conseil : la source de signal Bluetooth doit fonctionner
selon le protocole A2DP (Advanced Audio Distribution
Profile). Sinon, aucune liaison sans fil nʼest possible.
1) La lecture du récepteur Bluetooth sʼeffectue
via le canal dʼentrée CH 1 : mettez le sélec-
teur dʼentrée (6) du canal CH 1 sur la position
MP3.
2) Si lʼaffichage (1) devait indiquer PLEASE
PUSH PLAY
, appuyez tout dʼabord sur la
touche (10).
3) Pour commuter sur le récepteur Bluetooth,
appuyez sur la touche MODE (10) jusquʼà ce
que lʼaffichage indique
Bluetooth.
4) Activez la fonction Bluetooth sur lʼordinateur
portable, Smartphone ou tablette (voir notice
de lʼappareil) et établissez la liaison avec la
table de mixage.
Conseil : la table de mixage est signalée sur lʼaf -
fichage de la source de signal Bluetooth avec
“RST-02”.
5) Démarrez la lecture dʼun titre sur la source de
signal Bluetooth.
Conseil : les fonctions de lecteur comme pause,
lecture ou sélection de titre, ne peuvent être effec-
tuées que sur la source de signal Bluetooth.
6) Pour commuter sur la lecture audio dʼune
carte mémoire ou dʼun support de stockage
USB, appuyez plusieurs fois sur la touche
MODE jusquʼà ce que lʼaffichage indique
dans la première ligne à gauche SD ou USB.
6 Caractéristiques techniques
Entrées
(Sensibilité / Impédance ; branchement)
MIC : . . . . . . . . . . . . . 1,5 mV/ 600 Ω;
jack 6,35, asym
LINE, AUX : . . . . . . . . 200 mV/ 6,6 kΩ; RCA
PHONO : . . . . . . . . . . 2 mV/ 480 kΩ; RCA
Niveau de sortie
XLR : . . . . . . . . . . . . . 1,5 V
pour affichage 0 dB
Prises RCA MASTER :
. . 1 V
pour affichage 0 dB
Prises RCA REC :
. . . . . 0,4 V
Prises Jack 6,35
BOOTH :
. . . . . . . . . . . 1 V
Impédance casque : . . . ≥ 8 Ω
Bande passante : . . . . . 20 20 000 Hz
Taux de distorsion : . . . . < 0,15 %
Rapport signal / bruit : . . . > 60 dB, non pondéré
Egaliseur
CH 1 … CH 4
Graves : . . . . . . . . . ±15 dB / 50 Hz
Aigus : . . . . . . . . . . ±15 dB / 10 kHz
DJ-MIC
Graves : . . . . . . . . . ±12 dB / 100 Hz
Aigus : . . . . . . . . . . ±12 dB / 7 kHz
Alimentation : . . . . . . . . 230 V~ / 50 Hz
Consommation : . . . . . . 15 VA max.
Température fonc. : . . . . 0 40 °C
Dimensions
(L×H×P) : . . . . . . . . . . 482 × 88 × 105 mm,
2 unités
Poids : . . . . . . . . . . . . . . 2,2 kg
Tout droit de modification réservé.
14
F
B
CH
Notice dʼutilisation protégée par le copyright de MONACOR
®
INTERNATIONAL GmbH & Co. KG.
Toute reproduction même partielle à des fins commerciales est interdite.
15
16
I
A pagina 3, se aperta completamente, vedre-
te tutti gli elementi di comando e i collega-
menti descritti.
1 Elementi di comando
e collegamenti
1.1 Lato frontale
1 Display, per i dettagli vedi fig. 2
a = Riproduzione, = Pausa,
nessun simbolo = Stop
b Fonte dei segnali scelta con il tasto
MODE (10)
USB = porta USB (2)
SD = slot SD (3)
Bluetooth = ricevitore Bluetooth
AUX = nessuna funzione
c Tempo già trascorso di un titolo
d Modo di funzionamento scelto con il tasto
(10)
RA = riproduzione ripetuta di tutti i titoli
RR = sequenza casuale dei titoli
RO = ripetizione del titolo
e Numero del titolo (nella cartella scelta)
f Nome dei file audio (max. 6 caratteri)
g Tipo di file audio
2 Porta USB per il collegamento di un mezzo
di memoria USB (p. es. chiavetta USB, disco
rigido USB con alimentazione propria)
3 Slot per una scheda di memoria
Inserire la scheda con lʼangolo smussato ri -
volto verso il basso e verso lʼapparecchio.
4 Regolatore GAIN per impostare lʼamplifica-
zione dʼingresso (per i canali CH 1 4)
5 Fader dei canali per il volume dei canali e per
le dissolvenze in e out del segnale dei canali
(per gli ingressi CH 1 4)
6 Selettore degli ingressi
(per gli ingressi CH 1 4)
MP3 = lettore audio e ricevitore Bluetooth
AUX / MIC / LINE / PHONO = prese dʼingresso
(28)
7 Regolatore volume BOOTH per un impianto
di monitoraggio collegato con lʼuscita BOOTH
(24)
8 Indicazione del livello per il segnale delle
somme allʼuscita XLR (25) e allʼuscita
MASTER (26)
9 Regolatore volume MASTER per lʼuscita XLR
(25) e lʼuscita MASTER (26)
10 Tasti funzione per il lettore audio e per il rice-
vitore Bluetooth:
MODE Cambiare fra
— presa USB (2)
— slot SD (3)
— ricevitore Bluetooth
— AUX (senza funzione)
Per spegnere e per riaccendere pre-
mere il tasto per 2 sec.
Avviare e interrompere la riproduzione
Arrestare la riproduzione
Scegliere il modo di riproduzione (vedi
pos. d)
Salto al titolo precedente;
per il ritorno veloce allʼinterno di un titolo
tener premuto il tasto
Salto al titolo successivo;
per lʼavanzamento veloce allʼinterno di un
titolo tener premuto il tasto
F
-
Salto alla cartella precedente
F+ Salto alla cartella successiva
EQ Scegliere lʼimpostazione dei toni:
NORM, ROCK, POP, CLAS … OPER
11 Presa MIC (jack 6,3 mm, sbil.) per un micro-
fono DJ
12 Regolatore MIC LEVEL per il volume del
microfono collegato con la presa MIC (11)
13 Regolatore toni HIGH (alti) e LOW (bassi) per
il microfono collegato con la presa MIC (11)
14 Regolatore toni HIGH (alti) e LOW (bassi)
(per gli ingressi CH 1 4)
15 Crossfader
16 Commutatori a cursore per selezionare i due
canali dʼingresso fra i quali si deve effettuare
una dissolvenza
Se non si usa la funzione di dissolvenza, por-
tare tutti e due gli interruttori in posizione 0.
17 Tasti per selezionare i segnali che devono
essere ascoltati tramite lʼuscita cuffia (19):
CH 1 … CH 4 = segnali dei canali dʼingresso
MASTER = segnale delle somme
18 Regolatore volume PHONES LEVEL per
lʼuscita cuffia (19)
19 Presa jack 6,3 mm per il collegamento di
una cuffia stereo (impedenza min. 8 Ω)
20 Regolatore BALANCE per il bilanciamento
del segnale stereo allʼuscita XLR (25) e
allʼuscita MASTER (26)
21 Interruttore on / off POWER con spia sovra-
stante di funzionamento
1.2 Lato posteriore
22 Presa per il collegamento con una presa di
rete (230 V~ / 50 Hz) per mezzo del cavo in
dotazione
23 Portafusibile
Sostituire un fusibile difettoso solo con uno
dello stesso tipo!
24 Uscita BOOTH (prese jack 6,3 mm, sbil.) per
il collegamento di un impianto di monitorag-
gio per ascoltare il segnale delle somme
25 Prese XLR (bil.) per il collegamento di un
amplificatore per la sonorizzazione
26 Prese RCA MASTER supplementari o in
alternativa alle prese XLR (25) per il collega-
mento di un amplificatore
27 Prese RCA REC per un registratore
Alle prese è presente il segnale delle somme,
indipendentemente dalla posizione del rego-
latore MASTER (9).
28 Ingressi dei segnali per i canali CH 1 a CH 4
MIC (jack 6,3 mm, sbil.) per microfoni
LINE (RCA) per apparecchi con uscita Line
(p. es. lettori CD, radio)
AUX (RCA) per apparecchi con uscita Line
PHONO (RCA) per giradischi con sistema
magnetico
2 Avvertenze di sicurezza
Lʼapparecchio è conforme a tutte le direttive rile-
vanti dellʼUE e pertanto porta la sigla .
Si devono osservare assolutamente anche i
seguenti punti:
G
Usare lʼapparecchio solo allʼinterno di locali e
proteggerlo dallʼacqua gocciolante e dagli
spruzzi dʼacqua, da alta umidità dellʼaria e dal
calore (temperatura dʼimpiego ammessa fra
0 e 40 °C).
G
Non depositare sullʼapparecchio dei conteni-
tori riempiti di liquidi, p. es. bicchieri.
G
Non mettere in funzione lʼapparecchio e stac-
care subito la spina rete se:
1. lʼapparecchio o il cavo rete presentano dei
danni visibili;
2. dopo una caduta o dopo eventi simili sussi-
ste il sospetto di un difetto;
3. lʼapparecchio non funziona correttamente.
Per la riparazione rivolgersi sempre ad unʼoffi-
cina competente.
G
Staccare il cavo rete afferrando la spina,
senza tirare il cavo.
G
Per la pulizia usare solo un panno morbido,
asciutto; non impiegare in nessun caso acqua
o prodotti chimici.
G
Nel caso dʼuso improprio, di collegamenti sba-
gliati, dʼimpiego scorretto o di riparazione non
a regola dʼarte dellʼapparecchio, non si as -
sume nessuna responsabilità per eventuali
danni consequenziali a persone o a cose e
non si assume nessuna garanzia per lʼappa-
recchio. Nello stesso modo non si assume
nessuna responsabilità per la perdita di dati e
per i relativi danni consequenziali causati da
impiego sbagliato o da un difetto dellʼapparec-
chio.
3 Possibilità dʼimpiego
Il mixer stereo con lettore audio integrato e con
ricevitore Bluetooth è adatto per qualsiasi appli-
cazione DJ nellʼambito professionale o privato
come anche per lʼimpiego in un impianto PA. È
equipaggiato con quattro canali stereo dʼin-
gresso e con un canale microfono DJ. Per il
preascolto dei segnali dʼingresso o del segnale
delle somme si può collegare una cuffia.
Il mixer può essere collocato liberamente
oppure può essere montato in un rack (482 mm /
19″). Per il montaggio in un rack sono richieste
due unità dʼaltezza = 89 mm.
Se si desidera eliminare lʼapparecchio
definitivamente, consegnarlo per lo
smaltimento ad unʼistituzione locale per
il riciclaggio.
AVVERTIMENTO Lʼapparecchio è alimentato con
pericolosa tensione di rete.
Non intervenire mai personal-
mente al suo interno. Esiste il
pericolo di una scarica elet-
trica.
4 Collegare gli apparecchi
Per escludere rumori di commutazione, prima di
effettuare / staccare dei collegamenti, spegnere il
mixer oppure chiudere completamente i seguenti
regolatori:
BOOTH (7)
MASTER (9)
PHONES LEVEL (18)
1) Collegare le fonti audio con le relative prese
dʼingresso (28):
prese LINE e AUX per il collegamento di
apparecchi con livello Line (p. es. lettori
CD, radio)
prese PHONO per il collegamento di gira-
dischi con sistema magnetico
prese MIC per il collegamento di microfoni
A ogni canale dʼingresso si possono colle-
gare fino a tre fonti audio. Con i relativi selet-
tori degli ingressi (6) si può cambiare fra le
fonti audio.
2) Un microfono DJ può essere collegato con
la presa MIC (11) sul lato frontale.
3) Collegare lʼamplificatore per la sonorizza-
zione con le prese XLR (25) o RCA MASTER
(26). Le due coppie di prese possono essere
utilizzate anche contemporaneamente, p. es.
per due amplificatori.
4) Collegare un impianto di monitoraggio in
una sala separata con le prese BOOTH (24).
Per una regolazione separata del volume è
presente il regolatore BOOTH (7).
5) Per le registrazioni audio collegare un regi-
stratore con le prese dʼuscita REC (27). Il
livello di registrazione è indipendente dalla
posizione del regolatore MASTER (9).
6) Tramite una cuffia è possibile il preascolto
dei segnali dei singoli canali dʼingresso e del
segnale delle somme [cioè, i segnali possono
essere ascoltati anche se il relativo fader del
canale (5) o il regolatore MASTER (9) è com-
pletamente chiuso]. Collegare la cuffia (impe-
denza minima 8 Ω) con la presa (19).
7) Tramite la presa (22), collegare il mixer con
una presa di rete (230 V~ / 50 Hz), serven-
dosi del cavo in dotazione.
5 Funzionamento
5.1 Accendere e spegnere
Per escludere rumori di commutazione e un
volume troppo alto, prima della messa in fun-
zione portare sul minimo i seguenti regolatori
delle uscite:
BOOTH (7)
MASTER (9)
PHONES LEVEL (18)
Per accendere e spegnere il mixer, azionare lʼin-
terruttore di rete POWER (21). Con lʼapparec-
chio acceso, rimane accesa la spia di funziona-
mento sopra lʼinterruttore.
5.2 Impostazione dei canali dʼingresso
I seguenti passi di regolazione servono solo
come aiuto; infatti, sono possibili anche altri
modi di procedere.
1) Dapprima effettuare la seguente imposta-
zione base.
a) Per tutti i canali dʼingresso portare i rego-
latori GAIN (4) e i regolatori dei toni HIGH
e LOW (14) in posizione centrale e chiu-
dere completamente i fader (5) dei canali.
b) Chiudere completamente il regolatore
MIC LEVEL (12).
c) Portare i due commutatori a cursore (16)
per il regolatore delle dissolvenze in posi-
zione 0 per disattivare la funzione di dis-
solvenza.
d) Girare in posizione centrale il regolatore
BALANCE (20).
2) Perché il segnale dʼingresso possa essere
visualizzato dallʼindicazione del livello (8),
aprire a
2
3 ca. il regolatore MASTER (9).
3) Aprire il fader del primo canale usato a
2
3 ca.
(posizione 7), selezionare la fonte di segnali
con il selettore degli ingressi (6) e portare un
segnale audio sul canale (p. es. brano musi-
cale o avviso con il microfono).
Per il canale CH 1, come fonte di segnale
si può scegliere il lettore audio o il ricevitore
Bluetooth, il cui funzionamento è descritto nei
capitoli 5.5 e 5.6. In questo caso, portare il
selettore degli ingressi del canale CH 1 in
posizione MP3.
4) Sulla base dellʼindicazione del livello, impo-
stare in modo ottimale lʼamplificazione dellʼin-
gresso: impostare il regolatore GAIN in modo
tale che con i brani forti viene segnalato un
livello intorno a 0 dB.
5) Impostare i toni con i regolatori HIGH per gli
alti e LOW per i bassi. Controllare la regola-
zione del canale e correggere eventualmente
lʼamplificazione dʼingresso con il regolatore
GAIN.
6) Richiudere il fader dei canali e impostare,
uno dopo lʼaltro, gli altri canali dʼingresso.
5.3 Miscelare le fonti audio
Dissolvenze fra due canali
1) Dopo la regolazione dei canali dʼingresso,
con i fader dei canali (5) si possono miscelare
i loro segnali o si possono fare delle dissol-
venze in o out. Chiudere sempre completa-
mente i fader dei canali non utilizzati.
2) Con il regolatore MASTER (9) impostare il
volume definitivo del segnale delle somme e
con il regolatore BALANCE (20) il bilancia-
mento stereo. Il livello del segnale può
essere controllato con lʼindicazione (8). Di
regola, intorno a 0 dB si ottiene una regola-
zione ottimale. Se il livello dʼuscita del mixer
è troppo alto o troppo basso per lʼamplifica-
tore collegato, il segnale delle somme deve
essere impostato in corrispondenza, cioè più
alto o più basso, ma senza che si manifestino
delle distorsioni.
Per un impianto di monitoraggio collegato
con le prese BOOTH (24), impostare il volume
separatamente con il regolatore BOOTH (7).
3) Per un avviso tramite un microfono collegato
con la presa MIC (11), impostare il volume
con il regolatore MIC LEVEL (12) e i toni con
i regolatori HIGH e LOW (13). Perché lʼavviso
sia comprensibile meglio, eventualmente
ridurre con i fader il volume dei canali dʼin-
gresso CH 1 a 4
4) Con il crossfader (15) si possono fare delle
dissolvenze fra due canali. Per fare ciò, con i
commutatori di assegnazione (16) scegliere i
due canali fra i quale si vogliono fare delle
dissolvenze.
5.4 Preascolto dei canali CH 1 4 e del
segnale delle somme
I canali dʼingresso CH 1 4 possono essere
ascoltati singolarmente tramite una cuffia, anche
se il relativo fader (5) è chiuso. In questo modo è
possibile, per esempio, scegliere il titolo da ripro-
durre successivamente. Inoltre si può ascoltare
il segnale delle somme, anche se il regolatore
MASTER (9) è sul minimo.
1) Per il preascolto di un canale dʼingresso pre-
mere il relativo tasto CH 1 4 (17) oppure per
lʼascolto del canale delle somme premere il
tasto MASTER.
2) Impostare il volume della cuffia con il regola-
tore PHONES LEVEL (18).
AVVERTIMENTO Mai tenere molto alto il volume
dellʼimpianto audio e della cuf-
fia. A lungo andare, il volume
eccessivo può procurare danni
allʼudito! Lʼorecchio si abitua
agli alti volumi e dopo un certo
tempo non se ne rende più
conto. Perciò non aumentare il
volume successivamente.
17
I
5.5 Funzionamento del lettore audio
Con il lettore audio si possono riprodurre dei file
audio nei formati MP3, WAVE e WMA da chia-
vette USB, da dischi rigidi USB con alimenta-
zione propria e da schede di memoria fino a
32 GB.
1) La riproduzione del lettore audio avviene tra-
mite il canale dʼingresso CH 1: portare il
selettore degli ingressi (6) del canale CH 1 in
posizione MP3.
2) Per la riproduzione di file audio da una
scheda di memoria, inserirla nello slot SD (3).
Lʼangolo smussato della scheda deve essere
rivolto verso il basso e verso lʼapparecchio.
3) Per la riproduzione di file audio da un mezzo
di memoria USB, inserire p. es. una chiavetta
USB nella porta USB (2) oppure collegare
un disco rigido USB con la porta USB.
4) Dopo il caricamento della memoria USB o
della scheda di memoria, si avvia la riprodu-
zione. Il display (1) segnala varie informa-
zioni, vedi Cap. 1.1, posizione 1. Per coman-
dare il lettore audio si usano i tasti (10) sotto
il display. Se i display segnala
PLEASE
PUSH PLAY
, premere dapprima il tasto ,
altrimenti non funziona il lettore.
MODE Cambiare fra
— porta USB (2)
— slot SD (3)
— ricevitore Bluetooth (Cap. 5.6)
— AUX (senza funzione)
Per spegnere e riaccendere il lettore,
premere il tasto per 2 sec.
Avviare e interrompere la riproduzione
Arrestare la riproduzione
Scegliere il modo di riproduzione
Il display segnala nella prima riga tutto a
destra il modo:
RA = riproduzione ripetuta di tutti i titoli
RR = sequenza casuale dei titoli
RO = ripetizione del titolo
Salto al titolo precedente;
per il ritorno veloce allʼinterno di un titolo
tener premuto il tasto
Salto al titolo successivo;
per lʼavanzamento veloce allʼinterno di un
titolo tener premuto il tasto
F
-
Salto alla cartella precedente
F+ Salto alla cartella successiva
EQ Scegliere lʼimpostazione dei toni
Nella seconda riga, il display segnala
brevemente lʼimpostazione:
NORM
ROCK
POP
CLAS
JAZZ
BLUE
HALL
BASS
SOFT
COUN
OPER
5.6 Funzionamento
del ricevitore Bluetooth
Con il ricevitore Bluetooth è possibile creare un
collegamento wireless verso una fonte di segnali
Bluetooth (p. es. notebook, smartphone, tablet-
PC), per riprodurre i file audio memorizzati su
questi dispositivi.
N. B.: La fonte di segnali Bluetooth deve funzionare
secondo il protocollo A2DP (Advanced Audio Distribu-
tion Profile). Altrimenti non è possibile il collegamento
wireless.
1) La riproduzione del ricevitore Bluetooth av -
viene tramite il canale dʼingresso CH 1: por-
tare il selettore degli ingressi (6) del canale
CH 1 in posizione MP3.
2) Se il display (1) dovesse segnalare
PLEASE
PUSH PLAY
, premere dapprima il tasto
(10).
3) Per passare al ricevitore Bluetooth, premere
il tasto MODE (10) tante volte finché il display
segnala
Bluetooth.
4) Sul notebook, smartphone o tablet-PC atti-
vare la funzione Bluetooth e effettuare il col-
legamento con il mixer (vedi eventualmente
le istruzioni dellʼapparecchio).
N. B.: Il mixer viene indicato sul display della fonte
del segnale Bluetooth con “RST-02”.
5) Avviare la riproduzione di un titolo sulla fonte
di segnali Bluetooth.
N. B.: Le funzioni di un lettore, come p. es. pausa,
proseguimento o scelta di un titolo, possono essere
eseguite solo sulla fonte dei segnali Bluetooth.
6) Per passare alla riproduzione audio da una
scheda di memoria o da un mezzo di memo-
ria USB, premere più volte il tasto MODE fin-
ché il display nella prima riga a sinistra
segnala
SD o USB.
6 Dati tecnici
Ingressi
(Sensibilità / Impedenza; Contatto)
MIC: . . . . . . . . . . . . . . 1,5 mV/ 600 Ω;
jack 6,3 mm, sbil.
LINE, AUX: . . . . . . . . 200 mV/ 6,6 kΩ;
RCA
PHONO: . . . . . . . . . . 2 mV/ 480 kΩ;
RCA
Livello dʼuscita
Prese XLR:
. . . . . . . . . . 1,5 V
con indicazione 0 dB
P
rese RCA MASTER: . . .
1V
con indicazione 0 dB
Prese RCA REC:
. . . . . . 0,4 V
Prese jack BOOTH:
. . . . 1 V
Impedenza cuffia: . . . . . ≥ 8 Ω
Gamma di frequenze: . . 20 20 000 Hz
Fattore di distorsione: . . < 0,15 %
Rapporto S / R: . . . . . . . . > 60 dB, non valutato
Regolazione toni
CH 1 … CH 4
Bassi: . . . . . . . . . . ±15 dB / 50 Hz
Alti: . . . . . . . . . . . . ±15 dB / 10 kHz
DJ-MIC
Bassi: . . . . . . . . . . ±12 dB / 100 Hz
Alti: . . . . . . . . . . . . ±12 dB / 7 kHz
Alimentazione: . . . . . . . 230 V~ / 50 Hz
Potenza assorbita: . . . . max. 15 VA
Temperatura dʼesercizio: 0 40 °C
Dimensioni
(l×h×p): . . . . . . . . . . . . 482 × 88 × 105 mm,
2 unità dʼaltezza
Peso: . . . . . . . . . . . . . . . 2,2 kg
Con riserva di modifiche tecniche.
18
I
La MONACOR
®
INTERNATIONAL GmbH & Co. KG si riserva ogni diritto di elaborazione in qualsiasi forma
delle presenti istruzioni per lʼuso. La riproduzione – anche parziale – per propri scopi commerciali è vietata.
Op de uitklapbare pagina 3 vindt u een over-
zicht van alle bedieningselementen en de
aansluitingen.
1 Overzicht van de bedienings-
elementen en aansluitingen
1.1 Frontpaneel
1 Display, details zie afb. 2
a = Afspelen, = Pauze,
geen symbool = stop
b met toets MODE (10) geselecteerde sig-
naalbron
USB = USB-aansluiting (2)
SD = SD-slot (3)
Bluetooth = Bluetooth-ontvanger
AUX = geen werking
c reeds gespeelde tijd van een track
d met toets (10) geselecteerde bedrijfs-
modus
RA = herhaald afspelen van alle tracks
RR = willekeurige reeks tracks
RO = herhalen van de track
e Tracknummer (in de geselecteerde map)
f Naam van het audiobestand
(max. 6 tekens)
g Audiobestandstype
2 USB-jack voor het aansluiten van een
USB-opslagmedium (bv. USB-stick, USB-
schijf met autonome voeding)
3 Slot voor een geheugenkaart
Steek de kaart met de afgeschuinde hoek
naar onder en naar het apparaat gericht in de
slot.
4 Regelaar GAIN voor het instellen van de
ingangsversterking (telkens voor de ingan-
gen CH 1 4)
5 Kanaalfader voor regeling van het kanaalvo-
lume en in- en uitmengen van het kanaalsig-
naal (telkens voor de ingangen CH 1 4)
6 Ingangskeuzeschakelaar
(telkens voor de ingangen CH 1 4)
Mp3 = audiospeler en Bluetooth-ontvanger
AUX / MIC / LINE / PHONO = ingangsjacks (28)
7 Volumeregelaar BOOTH voor een op de uit-
gang BOOTH (24) aangesloten monitorin-
stallatie
8 Niveauleds voor het mastersignaal op de
XLR-uitgang (25) en op de uitgang MASTER
(26)
9 Volumeregelaar MASTER voor de XLR-uit-
gang (25) en de uitgang MASTER (26)
10 Bedieningstoetsen voor de audiospeler en de
Bluetooth-ontvanger:
MODE Omschakelen tussen
— USB-bus (2)
— SD-slot (3)
— Bluetooth-ontvanger
— AUX (zonder functie)
Om opnieuw uit en in te schakelen,
houdt u de toets gedurende 2 secon-
den ingedrukt.
afspelen starten en onderbreken
afspelen stoppen
afspeelmodus selecteren (zie pos. d)
naar de vorige track springen;
om binnen een track snel achteruit te
zoeken, houdt u de toets ingedrukt
naar de volgende track springen;
om binnen een track snel vooruit te zoe-
ken, houdt u de toets ingedrukt
F
-
naar de vorige map springen
F+ naar de volgende map springen
EQ instellen van de klank selecteren:
NORM, ROCK, POP, CLAS … OPER
11 Jack MIC (6,3 mm-jack, gebalanceerd) voor
een DJ-microfoon
12 Regelaar MIC LEVEL voor het volume van de
microfoon die op de jack MIC (11) aangeslo-
ten is
13 Klankregelaars HIGH (hoge tonen) en LOW
(lage tonen) voor de microfoon die op de jack
MIC (11) aangesloten is
14 Klankregelaars HIGH (hoge tonen) en LOW
(lage tonen) [telkens voor de ingangen
CH 1 – 4]
15 Crossfader
16 Schuifschakelaar voor het regelen van twee
ingangskanalen, waarvan de signalen ge -
mengd moet worden
Wanneer de regelfunctie niet wordt gebruikt,
plaats dan beide schakelaars in de stand “0”.
17 Toetsen voor selectie van de signalen die u
via de hoofdtelefoonuitgang (19) kunt voor-
beluisteren:
CH 1 … CH 4 = signalen van de ingangska-
nalen
MASTER = mastersignaal
18 Volumeregelaar PHONES LEVEL voor de
hoofdtelefoonuitgang (19)
19 6,3 mm-jack voor de aansluiting van een
stereohoofdtelefoon (impedantie ten minste
)
20 Regelaar BALANCE voor de balansregeling
van het stereosignaalbron op de XLR-uitgang
(25) en op de uitgang MASTER (26)
21 POWER-schakelaar met bedrijfsled erboven
1.2 Achterzijde
22 POWER-jack voor aansluiting op een stop-
contact (230 V~ / 50 Hz) met behulp van het
bijgeleverde netsnoer
23 Houder voor de netzekering
Vervang een gesmolten zekering uitsluitend
door een zekering van hetzelfde type!
24 Uitgang BOOTH (6,3 mm-jacks, ongebalan-
ceerd) voor de aansluiting van een monitorin-
stallatie om het mastersignaal te beluisteren
25 XLR-jacks (gebalanceerd) voor aansluiting
van de versterker om het geluid voor het
publiek te verzorgen
26 Cinch-jacks MASTER bijkomend of alterna-
tief voor de XLR-jacks (25) om een versterker
aan te sluiten
27 Cinch-jacks REC voor een opnameapparaat
Op de jacks is het mastersignaal beschikbaar
onafhankelijk van de stand van de regelaar
MASTER (9).
28 Signaalingangen voor de kanalen CH 1 tot
CH 4
MIC (6,3 mm-jack, ongebalanceerd) voor
microfoons
LINE (cinch) voor apparaten met lijnniveau-
uitgang, bv. cd-speler, radio
AUX (cinch) voor apparaten met lijnuitgang
PHONO (cinch) voor platenspelers met
magnetische cel
2 Veiligheidsvoorschriften
Het apparaat is in overeenstemming met alle
relevante EU-Richtlijnen en draagt daarom de
-markering.
Let bij ingebruikname ook zeker op het vol-
gende:
G
Het apparaat is enkel geschikt voor gebruik
binnenshuis; vermijd druip- en spatwater,
plaatsen met een hoge vochtigheid en uitzon-
derlijk warme plaatsen (toegestaan omge-
vingstemperatuurbereik: 0 40 °C).
G
Plaats geen bekers met vloeistof zoals drink-
glazen etc. op het apparaat.
G
Schakel het apparaat niet in resp. trek onmid-
dellijk de stekker uit het stopcontact,
1. wanneer het apparaat of het netsnoer zicht-
baar beschadigd is,
2. wanneer er een defect zou kunnen optreden
nadat het apparaat bijvoorbeeld is gevallen,
3. wanneer het apparaat slecht functioneert.
Het apparaat moet in elk geval worden her-
steld door een gekwalificeerd vakman.
G
Trek de stekker nooit met het snoer uit het
stopcontact, maar met de stekker zelf.
G
Verwijder het stof met een droge, zachte doek.
Gebruik zeker geen water of chemicaliën.
G
In geval van ongeoorloofd of verkeerd gebruik,
verkeerde aansluiting, foutieve bediening of
van herstelling door een niet-gekwalificeerd
persoon vervalt de garantie en de verantwoor-
delijkheid voor hieruit resulterende materiële
of lichamelijke schade. Zo kunnen wij ook niet
aansprakelijkheid worden gesteld voor gege-
vensverliezen als gevolg van foutieve bedie-
ning of een defect, noch voor de schade die
hieruit volgt.
3 Toepassingen
Het stereomengpaneel met ingebouwde audio-
speler en Bluetooth-ontvanger is zowel geschikt
voor willekeurige professionele als privé DJ-toe-
passingen als voor gebruik in een geluidsinstal-
latie. Het is uitgerust met vier stereo-ingangska-
nalen en met een DJ-microfoonkanaal. Om de
ingangssignalen of het mastersignaal voor te
beluisteren, kunt u een hoofdtelefoon aanslui-
ten.
Het mengpaneel kan als vrijstaand tafelmo-
del gebruikt worden of in een 19″-rack (482 mm)
gemonteerd worden. Voor montage in een rack
zijn 2 HE (= 89 mm) nodig.
Wanneer het apparaat definitief uit
bedrijf wordt genomen, bezorg het dan
voor milieuvriendelijke verwerking aan
een plaatselijk recyclagebedrijf.
WAARSCHUWING De netspanning van de appa-
raat is levensgevaarlijk. Open
het apparaat niet, want u loopt
het risico van een elektrische
schok.
NL
B
19
4 De apparatuur aansluiten
Schakel het mengpaneel uit of draai onder-
staande regelaars volledig dicht, voordat u ver-
bindingen tot stand brengt. Zo vermijdt u sto-
ringsgeluiden:
BOOTH (7)
MASTER (9)
PHONES LEVEL (18)
1) Sluit de geluidsbronnen aan op de overeen-
komstige ingangsjacks (28):
jacks LINE en AUX voor de aansluiting van
apparatuur met lijnniveau (b.v. cd-speler,
radio)
jacks PHONO voor de aansluiting van pla-
tenspelers met magnetische cel
jacks MIC voor het aansluiten van micro-
foons
Op elk ingangskanaal kunt u tot drie geluids-
bronnen aansluiten. Met de bijbehorende in -
gangskeuzeschakelaars (6) kunt u tussen de
geluidsbronnen omschakelen.
2) Op de jack MIC (11) aan de frontzijde kunt u
een DJ-microfoon aansluiten.
3) Sluit de versterker om het geluid voor het
publiek te verzorgen, aan op de XLR-jacks
(25) of op de cinch-jacks MASTER (26). De
twee stekkerparen kunnen ook tegelijk ge -
bruikt worden, bv. voor twee versterkers.
4) Op de jacks BOOTH (24) kunt u een moni-
torinstallatie in een afzonderlijke ruimte
aansluiten. Voor een afzonderlijke instelling
van het geluidsvolume is een regelaar
BOOTH (7) beschikbaar.
5) Sluit voor eventuele geluidsopnamen een
opnameapparaat aan op de uitgangsjacks
REC (27). Het opnameniveau is onafhanke-
lijk van de stand van de regelaar MASTER (9).
6) Via een hoofdtelefoon kunt u de signalen
van de individuele ingangskanalen en het
mastersignaal voorbeluisteren [d.w.z. de sig-
nalen kunnen ook voorbeluisterd worden,
wanneer de bijbehorende kanaalfader (5)
volledig dichtgeschoven of de regelaar MAS-
TER (9) volledig dichtgedraaid is. Sluit de
hoofdtelefoon (minimumimpedantie 8 Ω) aan
op de jack (19).
7) Verbind de netaansluiting (22) van het meng-
paneel via het bijgeleverde netsnoer met een
stopcontact (230 V~ / 50 Hz).
5 Bediening
5.1 In- en uitschakelen
Plaats volgende uitgangsregelaars in de mini-
mumstand, voordat u inschakelt. Zo vermijdt u
inschakelgeluiden en een te hoog volume:
BOOTH (7)
MASTER (9)
PHONES LEVEL (18)
Om het mengpaneel in en uit te schakelen, drukt
u op de netschakelaar POWER (21). Bij inge-
schakeld mengpaneel licht de bedrijfsled boven
de schakelaar op.
5.2 Uitsturing van de ingangskanalen
De volgende bedieningsstappen dienen alleen
als hulp, er zijn ook andere methoden mogelijk.
1) Zorg eerst voor de volgende basisinstelling.
a) Bij alle ingangskanalen draait u de regel-
aars GAIN (4), de klankregelaars HIGH en
LOW (14) in de middelste stand en schuift
u de kanaalfaders (5) volledig dicht.
b) Draai de regelaar MIC LEVEL (12) volle-
dig dicht.
c) Plaats de beide schuifregelaars (16) voor
de crossfader in de stand 0, om de meng-
functie uit te schakelen.
d) Draai de regelaars BALANCE (20) in de
middelste stand.
2) Om het ingangssignaal door de niveauleds
(8) weer te laten geven, draait u de regelaar
MASTER (9) ca.
2
3 open.
3) Schuif de kanaalregelaar van het eerste
gebruikte kanaal ca.
2
3 open (pos. 7), selec-
teer met de ingangskeuzeschakelaar (6) de
signaalbron en stuur een geluidssignaal naar
het kanaal (bv. muziekstuk, aankondiging via
de microfoon).
Voor kanaal CH 1 kunt u de audiospeler
of de Bluetooth-ontvanger als signaalbron
selecteren. De bediening van de respectieve
apparaten wordt beschreven in de hoofdstuk-
ken 5.5 en 5.6. Plaats de ingangskeuzescha-
kelaar van het kanaal CH 1 hiervoor in de
stand MP3.
4) Stel de ingangsversterking optimaal in aan
de hand van de niveauleds: Plaats de regel-
aar GAIN zo in dat bij luide fragmenten een
niveau in het bereik van 0 dB wordt weerge-
geven.
5) Stel de klank in met de regelaars HIGH voor
de hoge tonen en LOW voor de lage tonen.
Controleer aansluitend de uitsturing van het
kanaal en corrigeer de ingangsversterking
eventueel met de regelaar GAIN.
6) Schuif de kanaalfader opnieuw dicht en stel
ook de andere ingangskanalen achtereenvol-
gens in.
5.3 De geluidsbronnen mengen
Tussen twee kanalen regelen
1) Na het uitsturen van de ingangskanalen kunt
u de signalen ervan met de kanaalregelaars
(5) onderling mengen of in- en uitmengen.
Schuif de regelaars van ongebruikte kanalen
altijd volledig dicht.
2) Stel met de regelaar MASTER (9) het uitein-
delijke volume van het mastersignaal in en
met de regelaar BALANCE (20) de stereo -
balans. Het signaalniveau kunt u aan de hand
van de niveauleds (8) aflezen. In de regel
wordt bij 0 dB een optimale uitsturing bereikt.
Als het uitgangsniveau van het mengpaneel
voor de aangesloten versterker echter te
hoog of te laag is, moet het mastersignaal
overeenkomstig hoger of lager ingesteld wor-
den, maar zonder dat er vervormingen optre-
den.
Stel voor een monitorinstallatie die op
de jacks BOOTH (24) is aangesloten, het
geluidsvolume met de regelaar BOOTH (7)
afzonderlijk in.
3) Voor een aankondiging via een op de jack
MIC (11) aangesloten microfoon stelt u het
geluidsvolume in met de regelaar MIC LEVEL
(12) en de klank met de regelaars HIGH en
LOW (13). Om de aankondiging beter te ver-
staan, vermindert u met de regelaars het
volume van de ingangskanalen CH 1 tot 4.
4) Met de crossfader (15) kunt u tussen twee
kanalen mengen. Selecteer daarvoor met de
toewijzingsschakelaars (16) de beide kana-
len waarvan u de signalen wilt mengen.
5.4 De kanalen CH 1 4 en het
mastersignaal voorbeluisteren
De ingangskanalen CH 1 4 kunnen individueel
via een hoofdtelefoon beluisterd worden, ook als
de bijbehorende kanaalfader (5) dichtgeschoven
is. Zo kunt u bv. de volgende af te spelen track
geselecteerd worden. Bovendien kunt u het
mastersignaal beluisteren, ook als de regelaar
MASTER (9) in de minimumstand staat.
1) Om een ingangskanaal voor te beluisteren,
drukt u de bijbehorende toets CH 1 – 4 (17) in,
en om het mastersignaal voor te beluisteren,
drukt u op de toets MASTER.
2) Stel met de regelaar PHONES LEVEL (18)
het volume van de hoofdtelefoon in.
WAARSCHUWING Stel het volume van de ge-
luidsinstallatie en dat van de
hoofdtelefoon nooit zeer hoog
in. Langdurige blootstelling
aan hoge volumes kan het ge-
hoor beschadigen! Het gehoor
raakt aangepast aan hoge vo-
lumes die na een tijdje niet
meer zo hoog lijken. Draai het
volume daarom niet verder
open, zelfs nadat u eraan ge-
woon bent.
NL
B
20
5.5 De audiospeler bedienen
Met de audiospeler kunt u van USB-sticks, USB-
schijven met autonome voeding en geheugen-
kaarten tot 32 GB audiobestanden in de forma-
ten mp3, wave en wma afspelen.
1) Het afspelen van de audiospeler gebeurt via
het ingangskanaal CH 1. Plaats de ingangs-
keuzeschakelaar (6) van het kanaal CH 1 in
de stand mp3.
2) Om audiobestanden van een geheugenkaart
af te spelen, steekt u de kaart in de SD-
slot (3). De afgeschuinde hoek van de kaart
naar onder en naar het apparaat zijn gericht.
3) Voor het afspelen van audiobestanden op
een USB-opslagmedium, plugt u bv. een
USB-stick in de USB-aansluiting (2) of
verbindt u een USB-schijf met de USB-aan-
sluiting
4) Na het inlezen van het USB-opslagmedium of
de geheugenkaart start het afspelen. Op het
display (1) verschijnen diverse gegevens, zie
hoofdstuk 1.1, positie 1. Voor de bediening
van de audiospeler gebruikt u de toetsen (10)
onder het display. Als op het display
PLEASE
PUSH PLAY
verschijnt, drukt u eerst op de
toets , anders kunt u de speler niet bedie-
nen.
MODE Omschakelen tussen
— USB-bus (2)
— SD-slot (3)
Bluetooth-ontvanger (hoofdstuk 5.6)
— AUX (zonder functie)
Om de speler opnieuw uit en in te
schakelen, houdt u de toets gedu-
rende 2 seconden ingedrukt.
afspelen starten en onderbreken
afspelen stoppen
afspeelmodus selecteren
Op het display verschijnt in de eerste
regel helemaal rechts de modus:
RA = herhaald afspelen van alle tracks
RR = willekeurige reeks tracks
RO = herhalen van de track
naar de vorige track springen;
om binnen een track snel achteruit te
zoeken, houdt u de toets ingedrukt
naar de volgende track springen;
om binnen een track snel vooruit te zoe-
ken, houdt u de toets ingedrukt
F
-
naar de vorige map springen
F+ naar de volgende map springen
EQ instelling van de klank selecteren
Op het display verschijnt in de tweede
regel kort de instelling:
NORM
ROCK
POP
CLAS
JAZZ
BLUE
HALL
BASS
SOFT
COUN
OPER
5.6 Bediening
van de Bluetooth-ontvanger
Met de Bluetooth-ontvanger kan een radiover-
binding met een Bluetooth-signaalbron (bv. note-
book, smartphone, tablet-pc) tot stand gebracht
worden, om de daarop opgeslagen audiobestan-
den via het versterkersysteem af te spelen.
Opmerking: De Bluetooth-signaalbron moet volgens
het A2DP-protocol werken (Advanced Audio Distribu-
tion Profile). Anders is er geen radioverbinding moge-
lijk.
1) Het afspelen van de Bluetooth-ontvanger ge -
beurt via het ingangskanaal CH 1. Plaats de
ingangskeuzeschakelaar (6) van het kanaal
CH 1 in de stand mp3.
2) Als op het display (1)
PLEASE PUSH PLAY
weergegeven wordt, druk dan eerst op de
toets (10).
3) Om naar de Bluetooth-ontvanger om te scha-
kelen, drukt u enkele keren op de toets
MODE (10) tot op het display de melding
Bluetooth verschijnt.
4) Schakel de Bluetooth-functie op de note-
book, smartphone of tablet-pc in en breng de
verbinding met het mengpaneel tot stand (zie
evt. handleiding van het apparaat).
Opmerking: Het mengpaneel wordt op het display
van de Bluetooth-signaalbron met “RST-02” weer-
gegeven.
5) Start het afspelen van een track op de Blue-
tooth-signaalbron.
Opmerking: De spelerfuncties zoals pauze, verder
afspelen of trackselectie kunnen alleen op de Blue-
tooth-signaalbron uitgevoerd worden.
6) Om naar het afspelen van audiobestanden
op een geheugenkaart of een USB-opslag-
medium om te schakelen, drukt u enkele
keren op de toets MODE tot op het display in
de eerste regel links SD of USB weergegeven
wordt.
6 Technische gegevens
Ingangen
(gevoeligheid / impedantie; aansluiting)
MIC: . . . . . . . . . . . . . . 1,5 mV/ 600 Ω;
6,3 mm-jack, ongeba-
lanceerd
LINE, AUX: . . . . . . . . 200 mV/ 6,6 kΩ;
Cinch
PHONO: . . . . . . . . . . 2 mV/ 480 kΩ;
Cinch
Uitgangsniveau
XLR-jacks: . . . . . . . . . . . .
1,5 V
bij weergave 0 dB
Cinch-jacks MASTER: . . .
1V
bij weergave 0 dB
Cinch-jacks REC: . . . . . .
0,4 V
Aansluitingen BOOTH: . .
1V
Hoofdtelefoon-
impedantie: . . . . . . . . . . ≥ 8 Ω
Frequentiebereik: . . . . . 20 20 000 Hz
THD: . . . . . . . . . . . . . . . < 0,15 %
Signaal / Ruis-
verhouding: . . . . . . . . . . 60 dB, ongewogen
Klankregelaars
CH 1 … CH 4
Lage tonen: . . . . . . ±15 dB / 50 Hz
Hoge tonen: . . . . . . ±15 dB / 10 kHz
DJ-MIC
Lage tonen: . . . . . . ±12 dB / 100 Hz
Hoge tonen: . . . . . . ±12 dB / 7 kHz
Voedingsspanning: . . . . 230 V~ / 50 Hz
Opgenomen vermogen: max. 15 VA
Omgevings-
temperatuurbereik: . . . . 0 40 °C
Afmetingen
(B × H × D): . . . . . . . . . . 482 × 88 × 105 mm,
2 HE (rackeenheden)
Gewicht: . . . . . . . . . . . . 2,2 kg
Wijzigingen voorbehouden.
NL
B
21
Deze gebruiksaanwijzing is door de auteurswet beschermd eigendom van MONACOR
®
INTERNATIONAL
GmbH & Co. KG. Een reproductie – ook gedeeltelijk – voor eigen commerciële doeleinden is verboden.
Puede encontrar todos los elementos de fun-
cionamiento y las conexiones que se descri-
ben en la página 3 desplegable.
1 Elementos de Funcionamiento
y Conexiones
1.1 Panel Frontal
1 Visualizador, ver fig. 2 para más detalles
a = reproducción, = pausa,
Sin símbolo = paro
b Fuente de señal seleccionada con el
botón MODE (10)
USB = conexión USB (2)
SD = ranura para tarjeta SD (3)
Bluetooth = receptor Bluetooth
AUX = sin función
c Tiempo transcurrido de la pista
d Modo de funcionamiento seleccionado
con el botón (10)
RA = reproducción repetida de todas las
pistas
RR = secuencia de pistas aleatoria
RO = repetición de la pista
e Número de la pista (en la carpeta selec-
cionada)
f Nombre del archivo de audio
(máx. 6 caracteres)
g Tipo de archivo de audio
2 Puerto USB para conectar un medio de
almacenamiento USB (p. ej. unidad flash
USB, disco duro USB con alimentación sepa-
rada)
3 Ranura para tarjeta SD
Inserte la tarjeta (esquina biselada hacia
abajo y mirando hacia el aparato).
4 Control GAIN para ajustar la amplificación de
entrada (para cada una de las entradas
CH1– 4)
5 Fader de canal para ajustar el volumen del
canal y para fundir la señal del canal
(para cada una de las entradas CH 1 4)
6 Interruptor selector de entrada
(para cada una de las entradas CH 1 4)
MP3 = lector de audio y receptor Bluetooth
AUX / MIC / LINE / PHONO = tomas de entrada
(28)
7 Control de volumen BOOTH para un sistema
monitor conectado a la salida BOOTH (24)
8 Indicadores de nivel para la señal de la suma
en la salida XLR (25) y en la salida MASTER
(26)
9 Control de volumen MASTER para la salida
XLR (25) y para la salida MASTER (26)
10 Botones de funcionamiento para el lector de
audio y el receptor Bluetooth:
MODE conmutación entre
— Puerto USB (2)
— Ranura para tarjeta SD (3)
— Receptor Bluetooth
— AUX (sin función)
Para activar o desactivar el lector de
audio, pulse el botón durante 2 se -
gundos.
iniciar y pausar la reproducción
parar la reproducción
seleccionar el modo de reproducción (ver
el punto d)
ir a la pista anterior;
para retroceder rápidamente en una
pista, mantenga el botón pulsado
ir a la pista siguiente;
para avanzar rápidamente en una pista,
mantenga el botón pulsado
F
-
ir a la carpeta anterior
F+ ir a la carpeta siguiente
EQ seleccionar el ajuste de sonido:
NORM, ROCK, POP, CLAS … OPER
11 Toma MIC (jack 6,3 mm, asim.) para un
micrófono DJ
12 Control MIC LEVEL para ajustar el volumen
del micrófono conectado a la toma MIC (11)
13 Controles de tono HIGH (frecuencias agu-
das) y LOW (frecuencias graves) para el
micrófono conectado a la toma MIC (11)
14 Controles de tono HIGH (frecuencias agu-
das) y LOW (frecuencias graves)
[para cada una de las entradas CH 1 4]
15 Crossfader
16 Interruptores deslizantes para definir los dos
canales de entrada que se utilizan para el
crossfading
Si la función crossfader no se utiliza, ponga
ambos interruptores deslizantes en la posi-
ción 0.
17 Botones para seleccionar las señales para la
escucha prefader mediante la salida de auri-
culares (19):
CH 1 … CH 4 = señales de los canales de
entrada
MASTER = señal de la suma
18 Control de volumen PHONES LEVEL para la
salida de auriculares (19)
19 Toma jack 6,3 mm para conectar auricula-
res estéreo (impedancia mínima: 8 Ω)
20 Control BALANCE para ajustar el balance de
la señal estéreo en la salida XLR (25) y en la
salida MASTER (26)
21 Interruptor POWER (con indicador LED sobre
el interruptor)
1.2 Panel posterior
22 Toma de corriente para la conexión a un
enchufe (230 V~ / 50 Hz) mediante el cable de
corriente entregado
23 Soporte para el fusible de corriente
¡Cambie siempre un fusible fundido sólo por
otro del mismo tipo!
24 Salida BOOTH (jacks 6,3 mm, asim.) para
conectar un sistema monitor para monitorizar
la señal de la suma
25 Tomas XLR (sim.) para conectar el amplifica-
dor para aplicaciones de megafonía
26 Tomas RCA MASTER para utilizarse adicio-
nalmente o como alternativa a las tomas XLR
(25) para conectar un amplificador
27 Tomas RCA REC para conectar un grabador
Independientemente de la posición del con-
trol MASTER (9), la señal de la suma está
disponible en las tomas.
28 Entradas de señal para los canales CH 1 a
CH 4
MIC (jack 6,3 mm, asim.) para micrófonos
LINE (RCA) para aparatos con salida de línea
(p. ej. lector CD, radio)
AUX (RCA) para aparatos con salida de línea
PHONO (RCA) para giradiscos con sistema
magnético
2 Notas de Seguridad
El aparato cumple con todas las directivas rele-
vantes de la UE y por lo tanto está marcado con
el símbolo .
Preste atención a los siguientes puntos bajo
cualquier circunstancia:
G
El aparato está adecuado sólo para utilizarlo
en interiores. Protéjalo de goteos y salpicadu-
ras, elevada humedad del aire y calor (tempe-
ratura ambiente admisible: 0 40 ºC).
G
No coloque ningún recipiente con líquido
encima de los aparatos, p. ej. un vaso.
G
No utilice el aparato y desconecte inmediata-
mente la toma de corriente del enchufe si:
1. El aparato o el cable de corriente están visi-
blemente dañados.
2. El aparato ha sufrido daños después de una
caída o accidente similar.
3. No funciona correctamente.
Sólo el personal cualificado puede reparar el
aparato bajo cualquier circunstancia.
G
No tire nunca del cable de corriente para
desconectarlo de la toma, tire siempre del
enchufe.
G
Utilice sólo un paño suave y seco para la lim-
pieza; no utilice nunca ni agua ni productos
químicos.
G
No podrá reclamarse garantía o responsabili-
dad alguna por cualquier daño personal o
material resultante si el aparato se utiliza para
otros fines diferentes a los originalmente con-
cebidos, si no se conecta o se utiliza adecua-
damente o no se repara por expertos. Del
mismo modo, no se aceptará ninguna respon-
sabilidad por cualquier pérdida de datos pro-
vocada por un defecto o por errores de funcio-
namiento ni por cualquier daño producido a
consecuencia de esta pérdida de datos.
3 Aplicaciones
El mezclador estéreo con lector de audio inte-
grado y receptor Bluetooth está adecuado para
aplicaciones DJ privadas o profesionales y para
un sistema de megafonía. El mezclador está
equipado con cuatro canales de entrada estéreo
y un canal de micrófono DJ. Los auriculares se
pueden conectar para la escucha prefader de
las señales de entrada o de la señal de la suma.
El mezclador se puede colocar según con-
venga o se puede instalar en un rack (482 mm /
19″). La instalación en un rack necesita una
altura de 2 U (espacios rack) = 89 mm.
Si va a poner el aparato definitivamente
fuera de servicio, llévelo a la planta de
reciclaje más cercana para que su eli-
minación no sea perjudicial para el
medioambiente.
ADVERTENCIA El aparato utiliza un voltaje de co-
rriente peligroso. Deje el mante-
nimiento en manos del personal
cualificado. El manejo inexperto
o la modificación del aparato
pueden provocar una descarga.
E
22
4 Conexión de Aparatos
Para evitar ruidos de interferencias, desconecte
el mezclador o baje los siguientes controles
hasta el mínimo antes de la conexión / descone-
xión:
BOOTH (7)
MASTER (9)
PHONES LEVEL (18)
1) Conecte las fuentes de audio a las tomas de
entrada apropiadas (28):
Tomas LINE y AUX para conectar apara-
tos con nivel de línea (p. ej. lector CD,
radio)
Tomas PHONO para conectar giradiscos
con sistema magnético
Tomas MIC para conectar micrófonos
Se pueden conectar un máximo de tres fuen-
tes de audio a cada canal de entrada. Utilice
los interruptores selectores de entrada apro-
piados (6) para conmutar entre las fuentes de
audio.
2) Conecte un micrófono DJ a la toma MIC IN
(11) del panel frontal.
3) Conecte el amplificador para megafonía a
las tomas XLR (25) o a las tomas RCA MAS-
TER (26). Las dos parejas de tomas se pue-
den utilizar simultáneamente, p. ej. para dos
amplificadores.
4) Conecte un sistema monitor localizado en
una sala de control separada a las tomas
BOOTH (24). Utilice el control BOOTH (7)
para ajustar el volumen por separado.
5) Para grabaciones de audio, conecte un gra-
bador a las tomas de salida REC (27). El
nivel de grabación es independiente de la
posición del control MASTER (9).
6) Utilice auriculares para la escucha prefader
de las señales de los canales de entrada indi-
viduales y de la señal de la suma [es decir,
las señales también se pueden monitorizar
cuando el fader de canal apropiado (5) está
completamente cerrado o el control MASTER
(9) se ha bajado hasta el mínimo]. Conecte
los auriculares (impedancia mínima: 8 Ω) a la
toma (19).
7) Utilice el cable de corriente entregado para
conectar la toma de corriente (22) del mez-
clador a un enchufe (230 V~ / 50 Hz).
5 Funcionamiento
5.1 Conexión y desconexión
Para prevenir el ruido de conmutación y un volu-
men excesivo, ajuste los siguientes controles de
salida al mínimo antes de poner el mezclador en
funcionamiento:
BOOTH (7)
MASTER (9)
PHONES LEVEL (18)
Utilice el interruptor POWER (21) para conectar
o desconectar el mezclador. Cuando el mezcla-
dor está conectado, se ilumina el indicador LED
sobre el interruptor POWER.
5.2 Control de nivel de los canales
de entrada
Los siguientes pasos sirven simplemente como
ayuda, hay otros procedimientos posibles.
1) Primero, realice los siguientes ajustes bási-
cos.
a) En todos los canales de entrada, ajuste el
control GAIN (4) y los controles de tono
HIGH y LOW (14) en la posición interme-
dia y cierre completamente el fader del
canal (5).
b) Baje el control MIC LEVEL (12) hasta el
mínimo.
c) Para desactivar la función crossfading,
ajuste los dos interruptores deslizantes
(16) para el crossfader en la posición 0.
d) Ajuste el control BALANCE (20) en la
posición intermedia.
2) Para asegurarse de que la señal de entrada
se puede indicar antes de los indicadores de
nivel (8), aumente el control MASTER (9)
hasta aproximadamente
2
3 de su máximo.
3) Avance el fader de canal del primer canal
utilizado hasta aproximadamente
2
3 de su
máximo (posición número 7 del fader), utilice
el interruptor selector de entrada (6) para
seleccionar la fuente de señal y luego envíe
una señal de audio al canal (p. ej. pieza de
música, anuncio de micrófono).
Para el canal CH 1, se puede seleccionar
como fuente de señal el lector de audio o el
receptor Bluetooth; ver apartados 5.5 y 5.6
para más información sobre cómo utilizar el
lector de audio y el receptor Bluetooth. Ajuste
el interruptor selector del canal CH 1 hasta la
posición MP3.
4) Observe los indicadores de nivel para un
ajuste óptimo de la amplificación de entrada:
Ajuste el control GAIN para que se indique un
nivel de aproximadamente 0 dB para picos
de música.
5) Ajuste el sonido utilizando los controles de
tono HIGH para las frecuencias agudas y
LOW para las frecuencias graves. Com-
pruebe el nivel del canal y, si es necesario,
utilice el control GAIN para corregir la ampli-
ficación de entrada.
6) Cierre el fader de canal. Repita este procedi-
miento para el resto de canales de entrada.
5.3 Mezclar fuentes de audio
Crossfading entre dos canales
1) Después de completar el control de nivel de
los canales de entrada, los faders de canal
(5) se pueden utilizar para mezclar las seña-
les de los canales de entrada o para fundir-
los. Cierre siempre completamente los faders
de los canales que no se utilizan.
2) Utilice el control MASTER (9) para ajustar el
volumen definitivo de la señal de la suma y
utilice el control BALANCE (20) para ajustar
el balance estéreo. El nivel de señal se indica
mediante los indicadores de nivel (8). Nor-
malmente, el nivel óptimo se obtiene a 0 dB.
Sin embargo, si el nivel de salida del mezcla-
dor es muy alto o muy bajo para el amplifica-
dor conectado, atenúe o amplifique la señal
de la suma según corresponda, asegurán-
dose de que no aparezcan distorsiones.
Utilice el control BOOTH (7) para ajustar
por separado el volumen de un sistema
monitor que se haya conectado a las tomas
BOOTH (24).
3) Para un anuncio mediante un micrófono
conectado a la toma MIC (11), utilice el con-
trol MIC LEVEL (12) para ajustar el volumen,
y los controles de tono HIGH y LOW (13)
para ajustar el sonido. Si es necesario mejo-
rar la audibilidad del anuncio, utilice los
faders para atenuar el volumen de los cana-
les de entrada CH 1 a 4.
4) El crossfader (15) permite el crossfading
entre dos canales. Utilice los interruptores
deslizantes (16) para seleccionar los dos
canales para realizar el crossfading.
5.4 Escucha prefader de los canales
CH 1 4 y de la señal de la suma
Los canales de entrada CH 1 CH 4 se pueden
monitorizar por separado mediante los auricula-
res, incluso cuando el fader de canal correspon-
diente (5) está cerrado. De este modo se puede
elegir la siguiente pista que hay que reproducir,
por ejemplo. Además, la señal de la suma se
puede monitorizar incluso cuando el control
MASTER (9) se ha ajustado al mínimo.
1) Para la escucha prefader de un canal de
entrada, pulse el botón CH 1 4 (17) apro-
piado, o para monitorizar la suma de la señal,
pulse el botón MASTER.
2) Utilice el control PHONES LEVEL (18) para
ajustar el volumen de los auriculares.
ADVERTENCIA No ajuste nunca el sistema de
audio y los auriculares en un
volumen muy elevado. Los volú-
menes altos permanentes pue-
den dañar su oído. Su oído se
acostumbrará a los volúmenes
altos que no lo parecen tanto
después de un rato. Por lo tanto,
no aumente un volumen alto
después de acostumbrarse a él.
E
23
5.5 Funcionamiento del lector de audio
Utilizando el lector de audio, se pueden repro-
ducir archivos de audio MP3, WAVE y WMA
desde unidades flash USB, discos duros USB
con alimentación separada, y tarjetas de memo-
ria de hasta 32 GB.
1) Para reproducir archivos de audio mediante
el lector de audio, utilice el canal de entrada
CH 1: Ajuste el interruptor selector de entrada
(6) del canal CH 1 en la posición MP3.
2) Para reproducir archivos de audio desde una
tarjeta de memoria, inserte la tarjeta de
memoria en la ranura de tarjetas SD (3)
[esquina biselada hacia abajo y mirando
hacia el aparato].
3) Para reproducir archivos de audio desde un
medio de almacenamiento USB, inserte una
unidad flash USB, por ejemplo, en el puerto
USB (2) o conecte un disco duro USB al
puerto USB.
4) La reproducción de los archivos de audio
empezará después de que se haya cargado
el medio de almacenamiento USB o la tarjeta
de memoria. Aparecerán varias indicaciones
para información en el visualizador (1); ver
apartado 1.1, punto 1. Utilice los botones (10)
localizados bajo el visualizador para utilizar
el lector de audio. Si aparece
PLEASE
PUSH PLAY
en el visualizador, primero
pulse el botón , de lo contrario no se podrá
utilizar el lector.
MODE conmutación entre
— Puerto USB (2)
— Ranura para tarjeta SD (3)
— Receptor Bluetooth (apartado 5.6)
— AUX (sin función)
Para activar o desactivar el lector de
audio, pulse el botón durante 2 se -
gundos.
iniciar y pausar la reproducción
parar la reproducción
seleccionar el modo de reproducción
El modo se indicará en la primera línea
de la derecha del visualizador:
RA = reproducción repetida de todas las
pistas
RR = secuencia de pistas aleatoria
RO = repetición de la pista
ir a la pista anterior;
para retroceder rápidamente en una
pista, mantenga el botón pulsado
ir a la pista siguiente;
para avanzar rápidamente en una pista,
mantenga el botón pulsado
F
-
ir a la carpeta anterior
F+ ir a la carpeta siguiente
EQ seleccionar el ajuste de sonido
El ajuste seleccionado se indicará breve-
mente en la segunda línea del visualiza-
dor:
NORM
ROCK
POP
CLAS
JAZZ
BLUE
HALL
BASS
SOFT
COUN
OPER
5.6 Funcionamiento
del receptor Bluetooth
El receptor Bluetooth se puede utilizar para esta-
blecer una comunicación por radio con una
fuente de señal Bluetooth (p. ej. portátil, Smart-
phone, tableta) que permite al mezclador repro-
ducir archivos de audio guardados en la fuente
de señal Bluetooth.
Nota: La fuente de señal Bluetooth tiene que ser com-
patible con el protocolo A2DP (Advanced Audio Distri-
bution Profile]); de lo contrario no se podrá realizar la
comunicación por radio.
1) Para reproducir archivos de audio mediante
el receptor Bluetooth, utilice el canal de en -
trada CH 1: Ajuste el interruptor selector de
entrada (6) del canal CH 1 en la posición
MP3.
2) Si aparece
PLEASE PUSH PLAY en el vi-
sualizador (1), pulse primero el botón (10).
3) Para pasar al receptor Bluetooth, pulse el
botón MODE (10) repetidamente hasta que
aparezca BLUETOOTH en el visualizador.
4) Active la función Bluetooth en el portátil,
smartphone o tableta y establezca la cone-
xión con el mezclador (ver instrucciones del
aparato correspondiente, si es necesario).
Nota: En el visualizador de la fuente de señal Blue-
tooth, el mezclador se indica como “RST-02”.
5) Inicie la reproducción de una pista en la
fuente de señal Bluetooth.
Nota: Las funciones de reproductor como pausa,
continuar o selección de pista sólo están disponi-
bles en la fuente de señal Bluetooth.
6) Para cambiar a reproducción de audio desde
una tarjeta de memoria o desde un medio de
almacenamiento USB, pulse el botón MODE
hasta que aparezca
SD o USB en la primera
línea de la izquierda del visualizador.
6 Especificaciones
Entradas
(sensibilidad / impedancia; conexión)
MIC: . . . . . . . . . . . . . . 1,5 mV/ 600 Ω;
Jack 6,3 mm, asim.
LINE, AUX: . . . . . . . . 200 mV/ 6,6 kΩ; RCA
PHONO: . . . . . . . . . . 2 mV/ 480 kΩ; RCA
Nivel de salida
Tomas XLR:
. . . . . . . . . 1,5 V
en la indicación 0 dB
Tomas RCA MASTER:
. . 1 V
en la indicación 0 dB
T
omas RCA REC:
. . . . . 0,4 V
Jacks 6,3 mm BOOTH
: . . 1 V
Impedancia de
auriculares: . . . . . . . . . . ≥ 8 Ω
Banda pasante: . . . . . . . 20 20 000 Hz
THD: . . . . . . . . . . . . . . . < 0,15 %
Relación sonido / ruido: . > 60 dB,
no ponderada
Controles de tono
CH 1 … CH 4
Frecuencias graves: ±15 dB /50 Hz
Frecuencias agudas: ±1 5 dB / 10 kH z
DJ-MIC
Frecuencias graves: ±12 dB / 100 Hz
Frecuencias agudas: ±1 2 dB / 7 kHz
Alimentación: . . . . . . . . 230 V~ / 50 Hz
Consumo: . . . . . . . . . . . 15 VA máx.
Temperatura ambiente: . 0 40 °C
Dimensiones
(B×H×P): . . . . . . . . . . 482 × 88 × 105 mm
2 U (unidades de rack)
Peso: . . . . . . . . . . . . . . . 2,2 kg
Sujeto a modificaciones técnicas.
E
24
Manual de instrucciones protegido por el copyright de MONACOR
®
INTERNATIONAL GmbH & Co. KG.
Toda reproducción mismo parcial para fines comerciales está prohibida.
Proszę otworzyć niniejszą instrukcję na stro-
nie 3. Pokazano tam rozkład elementów ope-
racyjnych i gniazd połączeniowych.
1 Elementy operacyjne i złącza
1.1 Panel przedni
1 Wyświetlacz, szczegóły na rysunku 2
a = odtwarzanie, = pauza,
brak symbolu = stop
b źródło sygnału wybrane przyciskiem
MODE (10)
USB = złącze USB (2)
SD = czytnik kart SD (3)
Bluetooth = odbiornik Bluetooth
AUX = bez funkcji
c miniony czas odtwarzania utworu
d tryb pracy wybrany przyciskiem (10)
RA = powtarzanie wszystkich utworów
RR = losowa kolejność odtwarzania
RO = powtarzanie jednego utworu
e numer utworu (w wybranym folderze)
f nazwa pliku audio (max 6 znaków)
g typ pliku audio
2 Port USB do podłączania nośnika USB
(np. pamięci przenośnej USB, twardego dysku
USB z własnym zasilaniem)
3 Czytnik kart SD
Kartę należy wsuwać ściętym rogiem w dół,
w kierunku urządzenia.
4 Regulator GAIN wzmocnienia wejściowego
(dla danego kanału wejściowego CH 1 4)
5 Regulator poziomu (fader), do ustawiania
poziomu sygnału z danego kanału wejścio-
wego (dla każdego wejścia CH 1 4)
6 Przełącznik wybory wejścia
(dla każdego wejścia CH 1 4)
MP3 =
odtwarzacz audio oraz odbiornik Blue -
tooth
AUX / MIC / LINE / PHONO = gniazda wej-
ściowe (28)
7 Regulator głośności BOOTH do ustawiania
poziomu sygnału na wyjściu odsłuchowym
BOOTH (24)
8 Wskaźnik poziomu dla sumy sygnałów wysy-
łanych na wyjście XLR (25) oraz wyjście
MASTER (26)
9 Regulator głośności MASTER dla wyjść XLR
(25) oraz MASTER (26)
10 Przyciski do obsługi odtwarzacza audio oraz
odbiornika Bluetooth:
MODE do przełączania między
– portem USB (2)
– czytnikiem kart SD (3)
– odbiornikiem Bluetooth
– AUX (bez funkcji)
Aby włączyć lub wyłączyć odtwarzacz
audio, wcisnąć przycisk na 2 sek.
start i pauza odtwarzania
zatrzymywanie odtwarzania
wybór trybu powtarzania (patrz punkt d)
do przechodzenia do poprzedniego
utworu;
aby rozpocząć przewijanie do tyłu we-
wnątrz utworu przytrzymać wciśnięty
przycisk
do przechodzenia do następnego utworu;
aby rozpocząć przewijanie do przodu
wewnątrz utworu przytrzymać wciśnięty
przycisk
F
-
do przechodzenia do poprzedniego fol-
deru
F+ do przechodzenia do następnego folderu
EQ wybór korekcji barwy dźwięku
NORM, ROCK, POP, CLAS … OPER
11 Gniazdo MIC (6,3 mm, niesym.) do podłącza-
nia mikrofonu DJ
12 Regulator MIC LEVEL do ustawiania głośno-
ści sygnału z mikrofonu podłączonego do
gniazda MIC (11)
13 Regulatory barwy HIGH (wysokie tony) oraz
LOW (niskie tony) dla wejścia MIC (11)
14 Regulatory barwy HIGH (wysokie tony) oraz
LOW (niskie tony) dla wejść CH 1 4)
15 Crossfader
16 Przełączniki do przypisywania kanałów wej-
ściowych do obu stron crossfadera
Jeżeli funkcja przechodzenia nie jest pożą-
dana, ustawić oba przełączniki na pozycję 0.
17 Przyciski do wyboru sygnałów do odsłuchu
pre-fader przez wyjście słuchawkowe (19):
CH 1 … CH 4 = sygnały z kanałów wejścio-
wych
MASTER = zsumowany sygnał
18 Regulator poziomu PHONES LEVEL dla wyj-
ścia słuchawkowego (19)
19 Gniazdo 6,3 mm do podłączania do podłą-
czania słuchawek stereo (minimalna impe-
dancja: 8 Ω)
20 Regulator BALANCE do ustawiania balansu
sygnałów stereo wysyłanego na wyjścia XLR
(25) oraz MASTER (26)
21 Włącznik zasilania POWER (ze wskaźnikiem
diodowym)
1.2 Panel tylny
22 Gniazdo zasilania do łączenia z gniazdkiem
sieciowym (230 V~/50 Hz) za pomocą dołą-
czonego kabla zasilającego
23 Pokrywa bezpiecznika;
spalony bezpiecznik wymieniać na nowy o
identycznych parametrach!
24 Wyjście BOOTH (gniazda 6,3 mm, niesym.)
do podłączania systemu odsłuchowego do
monitorowania zsumowanego sygnału
25 Gniazda XLR (sym.) do podłączania wzmac-
niacza PA
26 Gniazda RCA MASTER jako dodatkowe wyj-
ście, alternatywne do gniazd XLR (25), do
podłączania wzmacniacza
27 Gniazda RCA REC do podłączania rejestra-
tora
Poziom sygnału na tym wyjściu nie zależy od
ustawień regulatora wyjściowego MASTER (9).
28 Wejścia sygnałowe dla kanałów CH 1 do CH 4
MIC (gniazdo 6,3 mm, niesym.) do podłą-
czania mikrofonów
LINE (RCA) do podłączania źródeł sygnału
z wyjściem liniowym
(np. odtwarzacza CD, radia)
AUX (RCA) do podłączania źródeł sygnału z
wyjściem liniowym
PHONE (RCA) do podłączania gramofonu z
systemem magnetycznym
2 Środki bezpieczeństwa
Urządzenie spełnia wszystkie wymagania norm
UE, dzięki czemu zostało oznaczone symbo -
lem .
Należy przestrzegać następujących zasad:
G
Urządzenie przeznaczone jest wyłącznie do
użytku wewnątrz pomieszczeń. Należy chro-
nić je przez wodą, dużą wilgotnością oraz
wysoką temperaturą (dopuszczalny zakres
wynosi 0 40 °C).
G
Na urządzeniu nie należy stawiać żadnych
pojemników z cieczą np. szklanek.
G
Nie wolno używać urządzenia lub natychmiast
odłączyć wtyczkę zasilającą z gniazdka
1. jeżeli stwierdzono istnienie widocznego
uszkodzenia urządzenia, lub kabla zasilają-
cego,
2. jeżeli uszkodzenie urządzenia mogło nastą-
pić w wyniku upadku lub innego podobnego
zdarzenia,
3. jeżeli urządzenie działa nieprawidłowo.
W każdym przypadku, naprawę należy zlecić
specjaliście.
G
Nie wolno odłączać urządzenia z gniazdka
sieciowego ciągnąc za kabel zasilania, należy
zawsze chwytać za wtyczkę.
G
Do czyszczenia należy używać suchej, mięk-
kiej tkaniny. Nie wolno stosować wody ani che-
micznych środków czyszczących.
G
Producent ani dostawca nie ponoszą odpo-
wiedzialności za wynikłe szkody: uszkodzenie
sprzętu lub obrażenia użytkownika, jeśli urzą-
dzenie było używane niezgodnie z ich prze-
znaczeniem, nieprawidłowo zamontowane,
podłączone lub obsługiwane bądź poddane
nieautoryzowanej naprawie. Nie ponosi się
także odpowiedzialności za utratę danych lub
uszkodzenie nośników.
3 Zastosowanie
Niniejszy mikser stereo z wbudowanym odtwa-
rzaczem audio oraz odbiornikiem Bluetooth,
przeznaczony jest do profesjonalnych oraz
domowych systemów DJ oraz do systemów PA.
Mikser wyposażony jest w cztery kanały wej-
ściowe stereo oraz kanał mikrofonu DJ. Możliwy
jest także odsłuch (pre-fader) sygnałów z
poszczególnych źródeł oraz zsumowanego syg-
nału, za pomocą słuchawek.
Urządzenie przystosowane jest do montażu
w stojaku rack (482 mm / 19″), ale może również
pracować jako wolnostojące. Po zamontowaniu
w stojaku rack, zajmuje przestrzeń 2 U = 89 mm.
Po całkowitym zakończeniu eksploata-
cji, urządzenie należy oddać do punktu
recyklingu, aby nie zaśmiecać środo-
wiska.
UWAGA Urządzenie zasilane jest niebez-
piecznym napięciem. Wszelkie na-
prawy należy zlecić osobie prze-
szkolonej. Nieprawidłowa napra-
wa oraz modyfikacje przeprowa-
dzane w urządzeniu mogą spowo-
dować porażenie prądem elek-
trycznym.
PL
25
4 Podłączanie urządzeń
Przed przystąpieniem do podłączania lub zmiany
połączeń należy wyłączyć mikser lub skręcić
następujące regulatory na minimum:
BOOTH (7)
MASTER (9)
PHONES LEVEL (18)
1) Podłączyć źródła sygnału audio do odpo-
wiednich gniazd wejściowych (28):
gniazda LINE oraz AUX służą do podłą-
czania urządzeń z wyjściem liniowym (np.
odtwarzacza CD, radia)
gniazda PHONO do podłączania gramo-
fonu z systemem magnetycznym
gniazda MIC do podłączania mikrofonów
Do każdego kanału wejściowego można pod-
łączyć maksymalnie trzy źródła audio. Do
przełączania kanałów wejściowych na
wybrane źródło sygnału służą odpowiednie
przełączniki (6).
2) Mikrofon DJ należy podłączyć do gniazda
MIC (11) na przednim panelu.
3) Do podłączania wzmacniacza PA służą
gniazda XLR (25) lub RCA MASTER (26).
Oba typy gniazd mogą być wykorzystywane
równocześnie, np. do podłączania dwóch
wzmacniaczy.
4) Wzmacniacz systemu odsłuchowego
można podłączać do wyjścia stereo BOOTH
(24). Regulacja głośności na tym wyjściu
odbywa się za pomocą pokrętła BOOTH (7).
5) Urządzenie rejestrujące stereo należy pod-
łączać do gniazd wyjściowych REC (27). Po-
ziom sygnału na tym wyjściu nie zależy od
ustawień regulatora wyjściowego MASTER
(9).
6) Za pomocą słuchawek można monitorować
pre-fader sygnał z poszczególnych wejść
oraz zsumowany sygnał [tzn. sygnał może
być odsłuchiwany nawet gdy fader danego
kanału (5) jest zsunięty lub gdy regulator
MASTER (9) jest skręcony na minimum]. Słu-
chawki (minimalna impedancja 8 Ω) należy
podłączać do gniazda (19).
7) Podłączyć kabel zasilający do gniazda (22), a
następnie do gniazdka sieciowego (230 V~/
50 Hz).
5 Obsługa
5.1 Włączanie i wyłączanie
Przed rozpoczęciem pracy po raz pierwszy
należy skręcić następujące regulatory na mini-
mum:
BOOTH (7)
MASTER (9)
PHONES LEVEL (18)
Do włączania i wyłączania miksera służy prze-
łącznik POWER (21). Podczas pracy świecić
będzie dioda nad przyciskiem POWER.
5.2 Regulacja poziomów kanałów
wejściowych
Poniższa kolejność działań jest tylko propozycją;
inna kolejność jest również możliwa.
1) W pierwszej kolejności dokonać podstawo-
wych ustawień:
a) Na wszystkich kanałach wejściowych,
ustawić regulator GAIN (4) oraz regula-
tory barwy HIGH i LOW (14) na środkową
pozycję i całkowicie zsunąć fader (5).
b) Skręcić regulator MIC LEVEL (12) na
minimum.
c) Aby wyłączyć funkcję crossfadera, usta-
wić oba przełączniki (16) na pozycję 0.
d) Ustawić regulator BALANCE (20) na środ-
kową pozycję.
2) Ustawić regulator głośności MASTER (9) na
około
2
3 zakresu, aby móc sprawdzić poziom
sygnału na wskaźniku (8).
3) Wysunąć fader pierwszego wykorzystywa-
nego sygnału na około
2
3 zakresu (pozycja
numer 7 fadera). Następnie za pomocą prze-
łącznika (6) wybrać podłączone źródło audio i
podać sygnał ze źródła (np. utwór muzyczny,
komunikat).
Dla kanału CH 1, jako źródło sygnału można
wybrać wbudowany odtwarzacz audio
lub
odbiornik Bluetooth; sposób obsługi odtwa-
rzacza oraz odbiornika Bluetooth opisano w
rozdz. 5.5 oraz 5.6. Ustawić przełącznik dla
kanału CH 1 na pozycję MP3.
4) Za pomocą regulatora GAIN na danym kana-
le, ustawić taki poziom sygnału, aby dioda
0 dB wskaźnika zapalała się tylko przy warto-
ściach szczytowych sygnału.
5) Ustawić barwę dźwięku regulatorami HIGH
oraz LOW. Jeżeli trzeba, ponownie ustawić
poziom regulatorem GAIN.
6) Po ustawieniu wzmocnienia oraz barwy
dźwięku, ustawić fader kanału na minimum.
Powtórzyć procedurę dla pozostałych wyko-
rzystywanych kanałów.
5.3 Miksowanie kanałów
Przechodzenie między kanałami
1) Po dokonaniu odpowiednich ustawień w
kanałach wejściowych, zmiksować poszcze-
gólne sygnały za pomocą faderów (5), usta-
wiając odpowiednie poziomy głośności.
Zamknąć fadery nieużywanych kanałów.
2) Za pomocą regulatora MASTER (9) ustawić
głośność całkowitą zsumowanego sygnału,
oraz balans stereo, za pomocą regulatora
BALANCE (20). Poziom sygnału pokazy-
wany jest na wskaźniku (8). Zazwyczaj, opty-
malną wartością jest 0 dB: jednakże, jeżeli
poziom wyjściowy sygnału z miksera jest zbyt
wysoki lub zbyt niski dla podłączonego
wzmacniacza, ustawić inną wartość.
Ustawić poziom głośności na wyjściu
odsłuchowym BOOTH (24), za pomocą regu-
latora BOOTH (7).
3) W przypadku nadawania komunikatów przez
mikrofon podłączony do gniazda MIC (11),
ustawić głośność regulatorem MIC LEVEL
(12) oraz barwę dźwięku – regulatorami
HIGH i LOW (13). Dla lepszej zrozumiałości
mowy komunikatów głosowych przy jedno-
czesnym odtwarzaniu muzyki, zsunąć odpo-
wiednie fadery kanałów CH 1 do 4.
4) Crossfader (15) służy do przechodzenia mię-
dzy sygnałami z dwóch kanałów. Za pomocą
przełączników (16) przypisać poszczególne
kanały do obu stron crossfadera.
5.4 Odsłuch pre-fader kanałów CH 1 4
oraz zsumowanego sygnału
Dzięki funkcji odsłuchu pre-fader, możliwe jest
kontrolowanie każdego kanału wejściowego
CH 1 4 za pomocą słuchawek, nawet gdy fader
danego kanału (5) został ustawiony na mini-
mum. Pozwala to np. wybrać odpowiedni utwór
do odtworzenia za chwilę. Możliwe jest również
odsłuchiwanie na słuchawkach zsumowanego
sygnału, niezależnie od ustawień regulatora
MASTER (9).
1) Aby odsłuchać sygnał z kanału wejściowego,
wcisnąć odpowiedni przycisk CH 1 4 (17).
Aby odsłuchać zsumowany sygnał, wcisnąć
przycisk MASTER.
2) Ustawić odpowiedni poziom głośności na słu-
chawkach regulatorem PHONES LEVEL (18).
UWAGA Nigdy nie ustawiać poziomu głoś-
ności dźwięku na bardzo dużą
wartość. Zbyt duże natężenie
dźwięku może uszkodzić słuch!
Ucho ludzkie dostosowuje się do
hałasu, który po pewnym czasie
nie wydaje się uciążliwy. Nie
wolno zwiększać głośności po
przyzwyczajeniu się do poprzed-
niego ustawienia.
26
PL
Instrukcje obsługi są chronione prawem copyright for MONACOR
®
INTERNATIONAL GmbH & Co. KG.
Przetwarzanie całości lub części instrukcji dla osobistych korzyści finansowych jest zabronione.
27
5.5 Obsługa odtwarzacza audio
Wbudowany odtwarzacz audio umożliwia
odtwarzanie plików MP3, WAVE oraz WMA z
pamięci przenośnej USB, twardego dysku USB
z własnym zasilaniem oraz kart pamięci do
32 GB.
1) Wbudowany odtwarzacz audio wykorzystuje
kanał wejściowy CH 1: ustawić przełącznik
(6) w kanale CH 1 na pozycję MP3.
2) Aby odtwarzać pliki audio z karty pamięci,
wsunąć ją do czytnika kart SD (3) [ściętym
rogiem w dół, w kierunku urządzenia].
3) Aby odtwarzać pliki audio z nośnika USB,
podłączyć go do portu USB (2).
4) Odtwarzanie rozpocznie się po wczytaniu
zawartości nośnika USB lub karty pamięci.
Na wyświetlaczu (1) pojawiają się różne infor-
macje; szczegóły patrz rozdz. 1.1, punkt 1.
Do obsługi odtwarzacza służą przyciski (10).
Jeżeli na wyświetlaczu pojawi się komunikat
PLEASE PUSH PLAY, wcisnąć najpierw
przycisk ; w przeciwnym razie sterowanie
odtwarzaczem nie będzie możliwe.
MODE do przełączania między
– portem USB (2)
– czytnikiem kart SD (3)
– odbiornikiem Bluetooth (rozdz. 5.6)
– AUX (bez funkcji)
Aby włączyć lub wyłączyć odtwarzacz
audio, wcisnąć przycisk na 2 sek.
start i pauza odtwarzania
zatrzymywanie odtwarzania
wybór trybu powtarzania
Wybrany tryb pokazywany jest w pierw-
szej linii wyświetlacza:
RA = powtarzanie wszystkich utworów
RR = losowa kolejność odtwarzania
RO = powtarzanie jednego utworu
do przechodzenia do poprzedniego utworu;
aby rozpocząć przewijanie do tyłu we-
wnątrz utworu przytrzymać wciśnięty
przycisk
do przechodzenia do następnego utworu;
aby rozpocząć przewijanie do przodu we -
wnątrz utworu przytrzymać wciśnięty
przycisk
F
-
do przechodzenia do poprzedniego fol-
deru
F+ do przechodzenia do następnego folderu
EQ wybór korekcji barwy dźwięku
Wybrane ustawienie zostanie pokazana
na krótko w drugiej linii wyświetlacza:
NORM
ROCK
POP
CLAS
JAZZ
BLUE
HALL
BASS
SOFT
COUN
OPER
5.6 Obsługa odbiornika Bluetooth
Odbiornik Bluetooth pozwala na bezprzewo-
dowe połączenie ze źródłem sygnału wyposażo-
nym w nadajnik Bluetooth (np. notebookiem,
smartfonem, tabletem PC) i odtwarzanie plików
audio znajdujących się w ich pamięci.
Uwaga: Nadajnik Bluetooth podłączanego urządzenia
musi być kompatybilny z protokołem A2DP (Advanced
Audio Distribution Profile); w przeciwnym razie połą-
czenie nie będzie możliwe.
1) Wbudowany odbiornik Bluetooth wykorzys-
tuje kanał wejściowy CH 1: ustawić przełącz-
nik (6) w kanale CH 1 na pozycję MP3.
2) Jeżeli na wyświetlaczu (1) pojawi się komuni-
kat
PLEASE PUSH PLAY, wcisnąć najpierw
przycisk (10).
3) Aby włączyć odbiornik Bluetooth, wcisnąć
przycisk MODE (10) kilka razy, aż na wyświet-
laczu pojawi się wskazanie
Bluetooth.
4) Aktywować funkcję Bluetooth w notebooku,
smartfonie lub tablecie PC i ustanowić połą-
czenie z modułem odbiornika (jeżeli trzeba,
patrz instrukcja obsługi urządzenia).
Uwaga: Na wyświetlaczu źródła Bluetooth, moduł
odbiornika będzie rozpoznany jako “RST-02”.
5) Rozpocząć odtwarzanie utworu ze źródła
Bluetooth.
Uwaga: Funkcje odtwarzania, takie jak: pauza,
odtwarzanie, wybór utworów dostępne są tylko z
poziomu źródła Bluetooth.
6) Aby odtwarzać pliki z karty pamięci lub noś-
nika USB, wcisnąć przycisk MODE kilka razy,
aż w pierwszej linii wyświetlacza pojawi się
wskazanie
SD lub USB.
6 Specyfikacja
Wejścia
(czułość / impedancja; złącze)
MIC: . . . . . . . . . . . . . . 1,5 mV/ 600 Ω; gniazdo
6,3 mm, niesym.
LINE, AUX: . . . . . . . . 200 mV/ 6,6 kΩ; RCA
PHONO: . . . . . . . . . . 2 mV/ 480 kΩ; RCA
Poziom wyjściowy
gniazda XLR:
. . . . . . . . 1,5 V
przy wskazaniu 0 dB
gniazda RCA MASTER:
. 1 V
przy wskazaniu 0 dB
gniazda RCA REC:
. . . . 0,4 V
gniazda 6,3 mm BOOTH:
1V
Impedancja słuchawek: . ≥ 8 Ω
Pasmo przenoszenia: . . 20 20 000 Hz
THD: . . . . . . . . . . . . . . . < 0,15 %
Stosunek S / N: . . . . . . . . > 60 dB, nie ważony
Korektory barwy
CH 1 … CH 4
niskie tony: . . . . . . ±15 dB / 50 Hz
wysokie tony: . . . . ±15 dB / 10 kHz
DJ-MIC
niskie tony: . . . . . . ±12 dB/ 100 Hz
wysokie tony: . . . . ±12 dB/ 7 kHz
Zasilanie: . . . . . . . . . . . . 230 V~ / 50 Hz
Pobór mocy: . . . . . . . . . 15 VA max
Zakres temperatur: . . . . 0 40 °C
Wymiary
(S×W×G): . . . . . . . . . 482 x 88 x 105 mm
2U
Waga: . . . . . . . . . . . . . . 2,2 kg
Z zastrzeżeniem możliwość zmian.
PL
28
Ge akt på säkerhetsinformationen innan enhe-
ten tas i bruk. Skulle ytterliggare information
behövas kan den återfinnas i Manualen för
andra språk.
Säkerhetsföreskrifter
Denna enhet uppfyller alla relevanta direktiv
inom EU och har därför fått märkning.
Ge ovillkorligen även akt på följande:
G
Enheten är endast avsedd för inomhusbruk.
Skydda enheten mot vätskor, hög luftfuktighet
och hög värme (tillåten omgivningstemperatur
0 – 40 °C).
G
Placera inte föremål innehållande vätskor,
t. ex. dricksglas, på enheten.
G
Använd inte enheten och ta omedelbart kontak-
ten ur eluttaget om något av följande fel uppstår:
1. Enheten eller elsladden har synliga skador.
2. Enheten är skadad av fall e. d.
3. Enheten har andra felfunktioner.
Enheten skall alltid lagas på verkstad av utbil-
dad personal.
G
Drag aldrig ut kontakten genom att dra i el slad-
den utan ta tag i kontaktkroppen.
G
Rengör endast med en mjuk och torr trasa,
använd aldrig kemikalier eller vatten vid ren-
göring.
G
Om enheten används för andra ändamål än
avsett, om den kopplas in felaktigt, om den an -
vänds på fel sätt eller inte repareras av aukto-
riserad personal upphör alla garantier att gälla
och inget ansvar tas heller för uppkommen
skada på person eller materiel. Likaså accep-
teras inget ansvar för driftsfel eller för dataför-
lust orsakad av en defekt och för följdskador
av denna dataförlust.
Om enheten skall kasseras bör de läm-
nas in till återvinning.
VARNING Enheten använder högspänning
in ternt. For att undvika en elektrisk
stöt, öppna aldrig chas sit på egen
hand utan överlåt all ser vice till
auktoriserad verkstad.
DK
S
Læs nedenstående sikkerhedsoplysninger op-
mærksomt igennem før ibrugtagning af enhe-
den. Bortset fra sikkerhedsoplysningerne henvi-
ses til den engelske tekst.
Sikkerhedsoplysninger
Denne enhed overholder alle relevante EU-
direktiver og er som følge deraf mærket .
Vær altid opmærksom på følgende:
G
Enheden er kun beregnet til indendørs brug.
Be skyt den mod vanddråber og -stænk, høj
luftfugtighed og varme (tilladt omgivelsestem-
peratur 0 40 °C).
G
Undgå at placere væskefyldte genstande, som
f. eks. glas, ovenpå enheden.
G
Tag ikke enheden i brug og tag straks stikket
ud af stikkontakten i følgende tilfælde:
1. hvis der er synlig skade på enheden eller
netkablet,
2. hvis der kan være opstået skade, efter at
enheden er tabt eller lignende,
3. hvis der forekommer fejlfunktion.
Enheden skal altid repareres af autoriseret
personel.
G
Tag aldrig netstikket ud af stikkontakten ved at
trække i kablet, tag fat i selve stikket.
G
Til rengøring må kun benyttes en tør, blød
klud; der må under ingen omstændigheder
benyttes kemikalier eller vand.
G
Hvis enheden benyttes til andre formål, end
den oprindeligt er beregnet til, hvis den ikke er
tilsluttet korrekt, hvis den betjenes forkert, eller
hvis den ikke repareres af autoriseret personel,
omfattes eventuelle skader ikke af ga rantien.
Der ydes ingen garanti ved betjeningsfejl eller
tab af data som følge af en defekt i pladespille-
ren og for den skade dette datatab vil udgøre.
Hvis enhederne skal tages ud af drift for
bestandigt, skal de bringes til en lokal
genbrugsstation for bortskaffelse.
ADVERSAL Enheden benytter livsfarlig net-
spænding. For at undgå fare for
elektrisk stød må kabinettet ikke
åbnes. Overlad servicering til
autoriseret personel.
29
Ole hyvä ja huomioi joka tapauksessa seuraavat
turvallisuuteen liittyvät seikat ennen laitteen käyt-
töä. Laitteen toiminnasta saa lisätietoa tarvitta-
essa tämän laitteen muunkielisistä käyttöohjeista.
Turvallisuudesta
Tämä laite täyttää kaikki siihen kohdistuvat EU-
direktiivit ja sille on myönnetty hyväksyntä.
Huomioi seuraavat seikat:
G
Tämä laite soveltuu vain sisätilakäyttöön. Suo-
jele laitetta kosteudelta, vedeltä ja kuumuu-
delta (sallittu ympäröivä lämpötila 0 40 °C).
G
Älä sijoita laitteen päälle mitään nestettä sisäl-
tävää, kuten vesilasia tms.
G
Irrota virtajohto pistorasiasta, äläkä käynnistä
laitetta jos:
1. virtajohdossa on havaittava vaurio
2. putoaminen tai muu vastaava vahinko on
saattanut aiheuttaa vaurion
3. laitteessa esiintyy toimintahäiriöitä
Kaikissa näissä tapauksissa laite tulee toimit-
taa valtuutettuun huoltoliikkeeseen.
G
Älä koskaan irrota virtajohtoa pistorasias ta
johdosta vetämällä.
G
Käytä puhdistamiseen pelkästään kuivaa,
pehmeää kangasta. Älä käytä kemikaaleja tai
vettä.
G
Laitteen takuu raukeaa, eikä valmistaja, maa-
hantuoja tai myyjä ota vastuuta mahdollisista
välittö mis tä tai välillisistä vahingoista, jos lai-
tetta on käytetty muuhun kuin alkuperäiseen
käyttötarkoitukseen, laitetta on taitamattomasti
käytetty tai kytketty tai jos laitetta on huollettu
muussa kuin valtuutetussa huollossa. Myös-
kään mitään vastuuta mahdollisista käyttövir-
heiden, tai muun vian aiheuttamista tietohävi-
keistä tai välillisistä vahingoista ei oteta.
Kun laite poistetaan lopullisesti käy-
tösta, vie se paikalliseen kierrätyskes-
kukseen jälkikäsittelyä varten.
VAROITUS Tämä laite toimii hengenvaaralli-
sella 230 V~ jännitteellä. Välttääk-
sesi sähköiskun, älä avaa laitteen
koteloa. Jätä huoltotoimet valtuu-
tetulle, ammattitaitoiselle huolto-
liikkeelle.
FIN
®
MONACOR INTERNATIONAL GmbH & Co. KG
Zum Falsch 36
28307 Bremen
Germany
Copyright
©
by MONACOR INTERNATIONAL. All rights reserved. A-1471.99.01.12.2013
8

Hulp nodig? Stel uw vraag in het forum

Spelregels

Misbruik melden

Gebruikershandleiding.com neemt misbruik van zijn services uitermate serieus. U kunt hieronder aangeven waarom deze vraag ongepast is. Wij controleren de vraag en zonodig wordt deze verwijderd.

Product:

Bijvoorbeeld antisemitische inhoud, racistische inhoud, of materiaal dat gewelddadige fysieke handelingen tot gevolg kan hebben.

Bijvoorbeeld een creditcardnummer, een persoonlijk identificatienummer, of een geheim adres. E-mailadressen en volledige namen worden niet als privégegevens beschouwd.

Spelregels forum

Om tot zinvolle vragen te komen hanteren wij de volgende spelregels:

Belangrijk! Als er een antwoord wordt gegeven op uw vraag, dan is het voor de gever van het antwoord nuttig om te weten als u er wel (of niet) mee geholpen bent! Wij vragen u dus ook te reageren op een antwoord.

Belangrijk! Antwoorden worden ook per e-mail naar abonnees gestuurd. Laat uw emailadres achter op deze site, zodat u op de hoogte blijft. U krijgt dan ook andere vragen en antwoorden te zien.

Abonneren

Abonneer u voor het ontvangen van emails voor uw Monacor MPX-410DMP bij:


U ontvangt een email met instructies om u voor één of beide opties in te schrijven.


Ontvang uw handleiding per email

Vul uw emailadres in en ontvang de handleiding van Monacor MPX-410DMP in de taal/talen: Nederlands, Duits, Engels, Frans, Italiaans, Spaans, Pools, Deens, Zweeds, Fins als bijlage per email.

De handleiding is 0,54 mb groot.


U ontvangt de handleiding per email binnen enkele minuten. Als u geen email heeft ontvangen, dan heeft u waarschijnlijk een verkeerd emailadres ingevuld of is uw mailbox te vol. Daarnaast kan het zijn dat uw internetprovider een maximum heeft aan de grootte per email. Omdat hier een handleiding wordt meegestuurd, kan het voorkomen dat de email groter is dan toegestaan bij uw provider.

Stel vragen via chat aan uw handleiding

Stel uw vraag over deze PDF

Uw handleiding is per email verstuurd. Controleer uw email

Als u niet binnen een kwartier uw email met handleiding ontvangen heeft, kan het zijn dat u een verkeerd emailadres heeft ingevuld of dat uw emailprovider een maximum grootte per email heeft ingesteld die kleiner is dan de grootte van de handleiding.

Er is een email naar u verstuurd om uw inschrijving definitief te maken.

Controleer uw email en volg de aanwijzingen op om uw inschrijving definitief te maken

U heeft geen emailadres opgegeven

Als u de handleiding per email wilt ontvangen, vul dan een geldig emailadres in.

Uw vraag is op deze pagina toegevoegd

Wilt u een email ontvangen bij een antwoord en/of nieuwe vragen? Vul dan hier uw emailadres in.


Info