When –6 is indicated, even if the button is pressed, the indicator does not change.
When the unit is not in AUTO mode:
Press MODE button.
Move the [ mark] to the (Auto) position.
Point the remote control toward the air-conditioner, and
Press the ON/OFF button.
1
2
When it is a little cold
Press the
button.
When it is a little hot
Press the
button.
Operation capacity by your choiceFAN SPEED
Set automatically by microcomputerAUTO
Powerful operation with high capacityHI
Standard operationMED
Energy-saving operationLO
FAN SPEED
Press the FAN SPEED button.
Move the [
mark] to the preferred fan speed position.
■You can choose the capacity of your air-conditioner
when heating mode, cooling mode or fan mode.
•
In case air is not blowing out during the operation.
Page 20
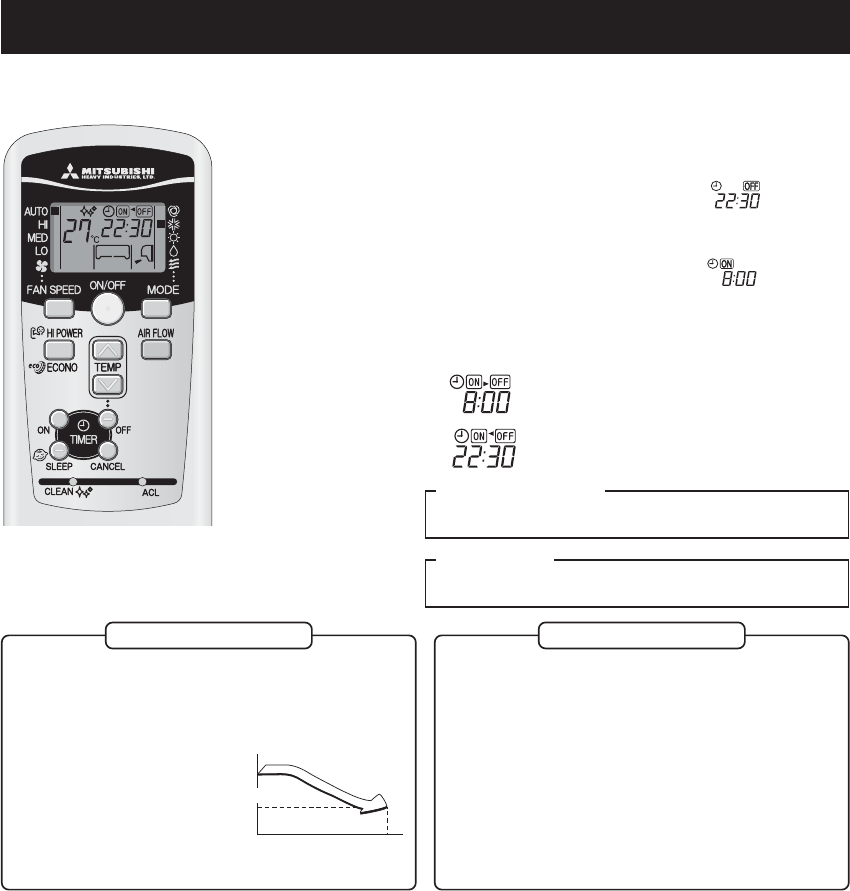
Display in OFF status
•
The current time and preset OPERA-
TION MODE are displayed while the
air conditioner is turned off.
Remote Control display
-6-5-4-3-2 -1
+
0+1+2+3+4+5+6
1819202122 2324252627282930
Setting
temp.(
°C
)
•
When changing FAN SPEED from HI to LO, the sound of
refrigerant flowing may be heard.
NOTE
RLC012A002A_EN_001-0224/8/14, 11:0110
–11–
COOL/HEAT/DRY/FAN mode operation
Airflow direction adjustment procedure. Page 12
Point the remote control toward the air-conditioner, and
Press the MODE select button.
Move the [ mark] to the required operation position.
(Cool), (Heat), (Dry), (Fan)
Press the ON/OFF button.
Press the TEMP button.
Press or button for the preferred temperature.
Recommendation
4
3
To stop:Press the ON/OFF button.
•
In case air is not blown out, when starting the heating operation.
Page20
•The operation program can also be set or changed when
the air-conditioner is not in operation.
NOTE
2
1
Air-conditioner operable temperature setting
■Use within the following operational range. Operating outside of this range may result in the protection devices being activated,
preventing the unit from working.
Cooling operationHeating operation
Outside temperature
Approximately -15 °C to 46 °CApproximately -15 to 24 °C
Inside temperature
Approximately 18 to 32 °CApproximately 15 to 30 °C
Below approximately 80%
The long-term use of the unit with a humidity level
Inside humidity
exceeding 80% may result in condensation forming
—
on the surface of the indoor unit, leading to water drips.
Characteristics of HEAT mode operation
Mechanism and capacity of HEAT mode operation
■Mechanism
•The unit draws heat from the cold outside air, transfers it to indoors and heats the room. As a characteristic of heat pump system, the
heating capacity reduces when the outside air temperature gets colder.
•It may take some time to supply hot air after turning on the air-conditioner.
•If the outside temperature becomes extremely low, it would be better to use an additional source of heating.
Defrosting
If the outside temperature becomes low and humidity is high, the heat exchanger in the outdoor unit may frost over, which prevents
efficient heating.
If this happens, the automatic defrost function is activated and during defrosting the heating operation stops for 5 to 15 minutes
during defrosting.
•Both indoor and outdoor fans stop and the RUN light blinks slowly (1.5 sec. ON, 0.5 sec. OFF) during defrosting.
•The outdoor unit may give off some steam during defrosting. This is to help the defrosting process and is not a defect.
•The HEAT operation resumes as soon as defrosting has been completed.
Press the FAN SPEED button
Set the fan speed as preferred.
RLC012A002A_EN_001-0224/8/14, 11:0111
–12–
Airflow direction adjustment
MEMORY FLAP (FLAP STOPPED)
When you press the AIRFLOW button once while the flap is operating, it stops swinging at the
position. Since this angle is memorized in the microcomputer, the flap will automatically be set
at this angle when the next operation is started.
WARNING
•Do not expose directly to airflow from the air-conditioner for a long time.
CAUTION
•When in COOL or DRY operation, do not operate for a long period with the
airflow blowing straight down. Otherwise, condensation may appear on
the outlet grill and drip down.
•Do not try to adjust the flaps by hand, as the control angle may change or
the flap may not be closed completely.
•
Recommended angle of the flap when stopping
HEAT
(Slant forward
blowing)
(Horizontal
blowing)
COOL, DRY
Adjusting airflow direction
■Up/down direction can be adjusted with the AIRFLOW button on the remote control. Every time you press this button the mode
changes as follows:
Change on AIRFLOW(UP/DOWN) mode.
•When operation starts, the flapdirection is fixed at the horizontalposition in order to avoid cold draft, and return to the set the position that was set
after the warm air supply is starting.
•The flapdirection will be controlled to the horizontalposition when the room temperature reaches the set temperature and compressor stops or when
defrosting is in operation.
•The airflow direction cannot be set during the period mentioned above. Change the airflow direction settings after the warm airis supplied and the
flap goes to the set position.
(Swing)
(Flap stopped)
NOTE FOR HEATING OPERATION
Adjusting left/right air flow direction
■Adjust the direction by moving the left/right louver by hand.
When you adjust the direction, touch the operation point of louver.
CAUTION
•Please stop the air conditioner when adjusting the air flow direction.
Flap
Louver
Operation point
RLC012A002A_EN_001-0224/8/14, 11:0112
–13–
■If it is pressed while the unit is off
SLEEP TIMER operation starts with the previous operation settings, and the air
conditioning is turned off after the set time elapses.
■If it is pressed while the unit is running
The air conditioner is turned off after the set time elapses.
Every time the button is pressed, the display changes as follows:
Example: You prefer it to stop after 7 hours.
Set to
The timer light (yellow) is on.
h
•The unit stops after the set time lapses.
SLEEP TIMER operation
■The unit stops automatically after the set time lapses.
The set temperature is automatically adjusted according to the elapsed time in order to avoid too much cooling or heating.
Page 15
Press the SLEEP button.
1
How to cancel
Press the CANCEL button to turn off the SLEEP
display.
Changing of set time
Set a new time by pressing SLEEP button.
•Cannot be set at the same time with OFF-TIMER.
NOTE
OFF-TIMER operation
■
The unit stops automatically when the set time comes.
With the air conditioner turned off, start the operation from Step 1. With the air conditioner running, start from Step 2.
Example: You prefer it to stop 22:30.
Press the ON/OFF button.
Press the OFF TIMER button.
OFF TIMER display is blinking.
Press the or button.
Every time the button is pressed, the display is switched in the order of:
0:00
0:100:20
...
(Units of ten minutes)
1:00
1:10
Every time the button is pressed, the display is switched in the order of:
0:0023:5023:40
...
(Units of ten minutes)
23:0022:50
Set at 22:30.
3
1
4
Press the OFF TIMER button.
The display changes from blinking to steady lighting and the setting is complete.
The timer light (yellow) is on.
2
How to cancel
Press the CANCEL button to turn off the timer
display.
•
The unit stops at the end of the set period of time.
•
Make sure to press the button within 60 seconds from the last operation in
step 3, otherwise the setting is not completed.
•
The current time is not displayed during OFF-TIMER operation.
•
Different from SLEEP TIMER operation, automatic set temperature adjust-
ment is not done during OFF-TIMER operation.
Changing of set time
Set a new time by using the OFF TIMER button.
NOTE
No indication
(canceled)
...
(Units of one hour)
RLC012A002A_EN_001-0224/8/14, 11:0113
–14–
ON-TIMER operation
1
2
How to cancel
Press the CANCEL button to turn off the timer
display.
Example: In the case the preferred room temperature is required at 8:00.
Press the ON-TIMER button.
ON TIMER display is blinking.
3
■
Operation starts 5 to 60 minutes before the set time so that the room temperature reaches the optimum temperature at the set time.
Page 15
ON-TIMER operation can be set regardless of whether the air-conditioner is running or not.
SLEEP TIMER + ON-TIMER operation
■Combined timer operation of SLEEP TIMER and ON TIMER.
Example:When it is required to stop after 3 hours and then start operation at
8:00, near the set temperature.
■SLEEP TIMER setting
Set by the procedures on page 13.
Set to
■ON TIMER operation setting
Set by the above procedure mentioned in ON TIMER.
Set to
The setting of the lighting of the timer light (yellow) of this unit is complete.
h
•After the SLEEP TIMER set time has elapsed, the operation stops, and
it starts from 5 to 60 minutes before the ON TIMER’s set time.
•The timer light is turned off when ON TIMER set time comes.
Changing of set time
Set a new time by using the SLEEP or ON TIMER button.
How to cancel
Press the CANCEL button to turn off the timer display.
Press the or button.
Every time the button is pressed, the display is switched in the order of:
0:00
0:100:20
...
(Units of ten minutes)
1:00
1:10
Every time the button is pressed, the display is switched in the order of:
0:0023:5023:40
...
(Units of ten minutes)
23:0022:50
Set at 8:00.
Press the ON TIMER button.
The display changes from blinking to steady lighting and the setting is com-
plete.
The timer light (yellow) is on.
The operation stops if it is set during operation.
Changing of set time
Set a new time by using the ON-TIMER button.
•
Operation starts 5 to 60 minutes before the set time.
•
The
timer
light
(yellow)
goes out at the set time.
•
Make sure to press the button within 60 seconds from the last operation in step
2, otherwise the setting is not completed.
•
The current time is not displayed during ON-TIMER operation.
NOTE
RLC012A002A_EN_001-0224/8/14, 11:0114
–15–
PROGRAM TIMER operation
■The timer operations of the combination of ON and OFF TIMER. Once this has been set the timer operations will be repeated at the
same time every day unless the ON/OFF button is pressed.
Example:When it is prefered to stop at 22:30, and then start operation at 8:00,
near the set temperature.
■OFF TIMER operation setting
Set by the procedures on page 13. Set to
■ON TIMER operation setting
Set by the procedures on page 14. Set to
Timer light (yellow) on the unit will light when the setting is completed.
The set time will be displayed on the remote control unit. The display will
change depending on the operational status.
How to cancel
Press the CANCEL button to turn off the timer display.
Changing of set time
Set a new time by using the OFF TIMER or ON TIMER button.
Comfort Start-up
In ON TIMER operation, the unit starts the operation a little earlier, so
that the room can approach optimum temperature at ON time. This is
so called “Comfort start-up”.
•Mechanism
The room temperature is
checked 60 minutes before the
ON time. Depending on the
temperature at that time, the
operation starts 5 to 60 minutes
before the timer is at ON.
•
The function is available for both
COOL and HEAT operation
mode (including AUTO). It does
not work for DRY mode.
SLEEP TIMER
In COOL operation
(Stop) Operation starts
▼
Check the room
temp. 60 mins.
before.
Set time
▼
When SLEEP TIMER is selected, the set temperature is automatically
adjusted after a while, ensuring that the room is not too cold during
cooling or too warm during heating.
•During cooling : The preset temperature is lowered by 1°C at the
start of SLEEP operation (when the timer is set). After that, the tem-
perature goes up by 1°C every an hour to become 1°C higher than
the present temperature.
•During heating: The preset temperature is lowered by 1°C at the
start of SLEEP operation (when the timer is set). After that the tem-
perature becomes 3°C lower in an hour and 6°C lower in two hours
than the present temperature.
(Operation)
Set temperature
With ON TIMER, the air conditioner starts running.
Then, with OFF TIMER, the air conditioner stops running.
With OFF TIMER, the air conditioner stops running.
Then, with ON TIMER, the air conditioner starts running.
RLC012A002A_EN_001-0224/8/14, 11:0115
–16–
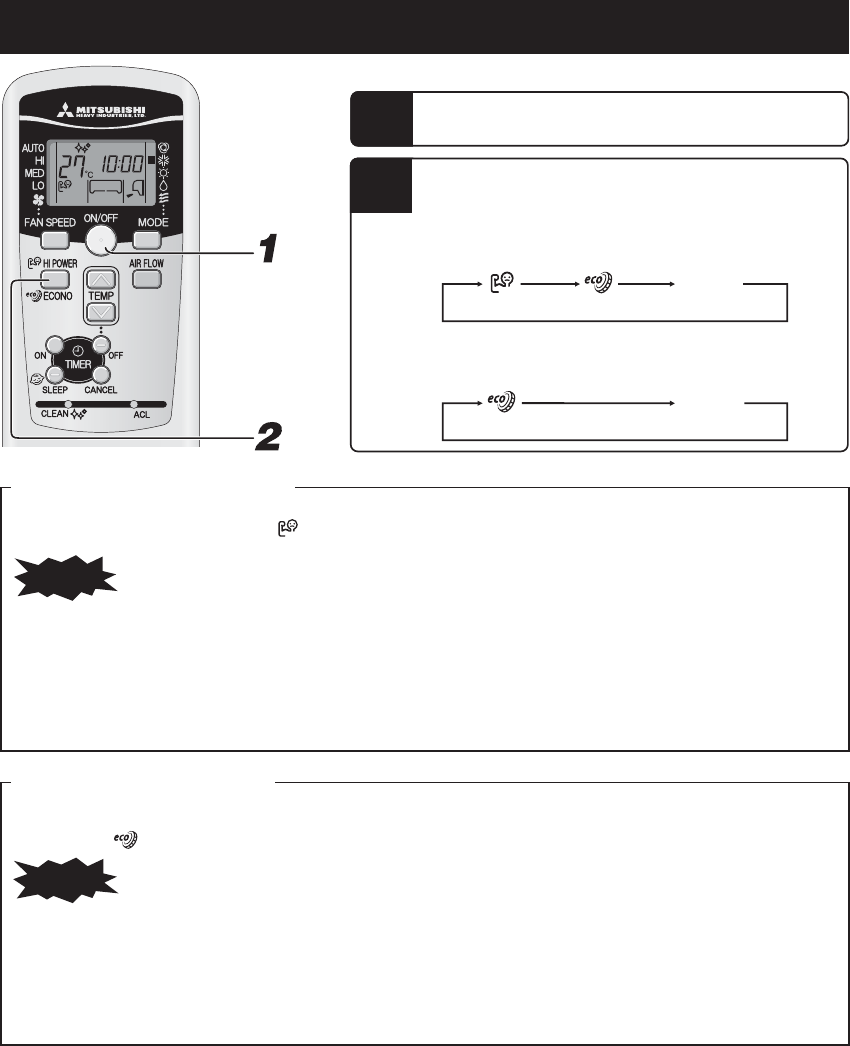
HIGH POWER/ECONOMY operation
2
If the air-conditioner is not operating, point the remote control toward the air conditioner, and
Press the ON/OFF button.
Press the HI POWER/ECONO button.
•When the operating mode is AUTO, COOL or HEAT
Every time the HI POWER/ECONO button is pressed, the display is
switched in the order of:
No display
•When the operating mode is DRY or PROGRAM TIMER
Every time the HI POWER/ECONO button is pressed, the display is
switched in the order of:
No display
1
(
HIGH POWER
)(
ECONOMY
)(Normal operation)
(
ECONOMY
)(Normal operation)
Concerning
ECONOMY
operation
Pressing the HI POWER/ECONO button initiates a soft operation with the power suppressed in order to avoid an excessive cooling or
heating. The unit operates 1.5°C higher than the setting temperature during cooling or 2.5°C lower than that during heating. The
remote control
displays and the FAN SPEED display disappears.
NOTE
•It will go into ECONOMY operation at the next time the air-
conditioner runs in the following case.
1
When the air-conditioner is stopped by ON/OFF button
during ECONOMY operation.
2
When the air-conditioner is stopped in SLEEP or OFF
TIMER operation during ECONOMY operation.
3
When the operation is retrieved from CLEAN operation.
•When the following operations are set, ECONOMY operation
will be canceled.
1When the HI POWER/ECONO button is pressed
again.
2When the operation mode is changed from DRY to
FAN.
•Not operable while the air conditioner is OFF.
Concerning
HIGH POWER
operation
Pressing the HI POWER/ECONO button intensifies the operating power and initiates powerful cooling or heating operation for 15
minutes continuously. The remote control
displays and the FAN SPEED display disappears.
•
During the HIGH POWER operation, the room temperature is
not controlled. When it causes an excessive cooling or heating,
press the HI POWER/ECONO button again to cancel the HIGH
POWER operation.
•HIGH POWER operation is not available during the DRY and
the program timer operations.
•
When HIGH POWER operation is set after ON TIMER operation,
HIGH POWER operation will start from the set time.
•
When the following operations are set, HIGH POWER operation
will be canceled.
1When the HI POWER/ECONO button is pressed again.
2When the operation mode is changed.
3
When it has been 15 min. since HIGH POWER
operation has started.
•Not operable while the air conditioner is OFF.
NOTE
RLC012A002A_EN_001-0224/8/14, 11:0116
–17–
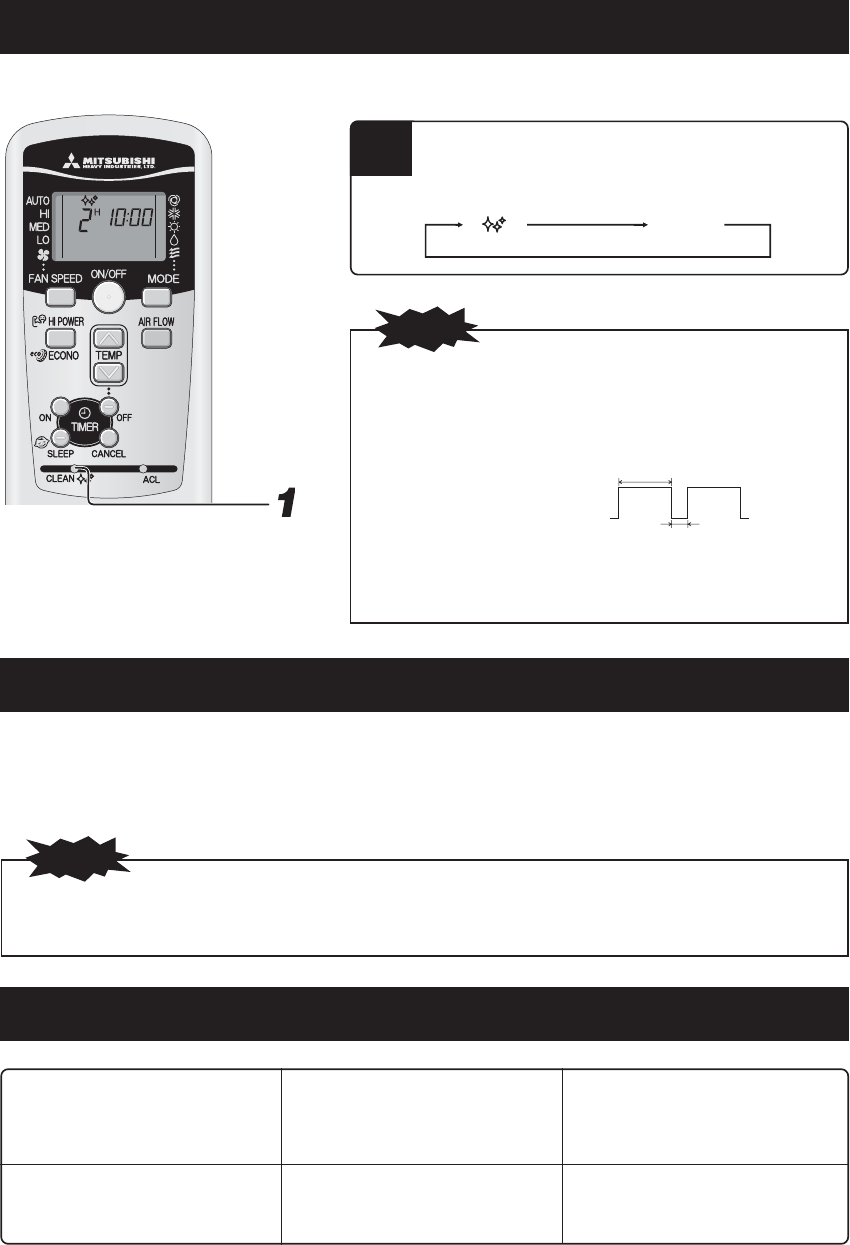
SELF CLEAN operation
1
In order to active CLEAN operation, press the CLEAN
switch with the tip of a ballpoint pen.
Every time the CLEAN switch is pressed, the display is
switched in the order of:
No display
■CLEAN operation should be run after AUTO, COOL and DRY operation to remove the moisture from inside the indoor unit and control
the growth of mold and bacteria.
(CLEAN on)
(CLEAN off)
NOTE
•Two hours later, the air conditioner stops running automatically. To stop
the air conditioner immediately, press the ON/OFF button.
•CLEAN operation is not operated after HEAT, FAN, OFF-TIMER and
SLEEP operations have finished.
•The indoor unit fan runs for about two hours in CLEAN operation.
•The RUN light illuminates during CLEAN operation.
•Pressing the SLEEP button during CLEAN operation cancels the CLEAN
operation and then the unit is set to SLEEP operation.
•This is not a function for removing mold, germs or grime that have al-
ready adhered to the unit.
Auto restart function
■What is auto restart function?
•Auto restart function records the operational status of the air-conditioner immediately prior to be switched off by a power cut, and then
automatically resumes operations after the power has been restored.
•The following settings will be canceled:
1Timer settings
2HIGH POWER operations
•Auto restart function is set at on when the air-conditioner is shipped from the factory. Consult with your dealer if this function needs
to be switched off.
•When power failure occurs, the timer setting is canceled. Once power is resumed, set the timer again.
NOTE
Tips for effective operation
■Please observe the following for the most economic and comfortable use of your unit.
Set a suitable room temperature.
Excessively high or low temperatures
are not good for your health and waste of
electricity.
Avoid direct sunlight and draught.
Cut out direct sunlight by drawing the cur-
tains or blinds when cooling. Keep windows
and doors shut, except when ventilating.
Operate the unit only when needed.
Use the timer properly to operate the unit
only when needed.
Clean the filter frequently.
Clogged filter may block the airflow and
cause less efficient operation.
Adjust the airflow direction properly.
Adjust the up/down and left/right airflow
to ensure a steady room temperature.
Keep heat source away when cooling.
Keep heat sources out of the room as
much as possible.
3 sec.
1 sec.
ON
OFF
RLC012A002A_EN_001-0224/8/14, 11:0117
–18–
Maintenance
Carefull matter during maintenance
Cleaning the air filter
Recommendation interval is once every two week
During the operational season
Turn off the power
supply.
Do not use the following articles:
•Hot water (40°C or more)
It may deform or discolour the unit.
•
Petrol, paint thinner, benzine or cleanser, etc.
They may deform or scratch the unit.
•Do not spill any liquid.
•Do not touch the aluminum fins on
the heat exchanger.
•
Stand firmly on a stepladder or other
stable object when removing the filter.
Wipe the unit with a
soft, dry cloth.
There's a danger
of electric shock.
1
•Hook fingers on this side of the top face of air filter.
Pull the air filter forward.
The air filter will separate from front panel.
Cleaning
•Insert the air filter's ditch to the rail of the front
panel and push it in the back.
Remove dirt from the air filter using a vacuum cleaner.
If the filter is very dirty, clean it with warm water (approx.
30°C), and dry it thoroughly.
2
3
Reinstall the air filter
Cleaning the unit
•Wipe the unit with a soft, dry cloth, or use a vacuum cleaner.
•If the unit is very dirty, wipe it with a cloth soaked in warm water.
Rail (both side)
Ditch (both side)
CAUTION
•Do not clean the filter with boiling water.
•Do not dry them over an open flame.
•Pull them out gently.
CAUTION
•Operating without putting back the air filter will
make the unit dusty, and may cause damage.
CAUTION
•When removing the air filter, pull it out gently
without tilting and with care not to shake off dirt
accumulated on the air filter.
•Be careful not to allow dirt shaken off the air filter
entering in the eyes or mouth.
RLC012A002A_EN_001-0224/8/14, 11:0118
–19–
Stop the unit and turn off the power supply.
The unit consumes approx. 2W even when the unit is not operat-
ing. Turning off the power supply will help saving energy con-
sumption and cost.
At the beginning of the season
Ensure that the earth wiring is not snapped
nor disconnected.
Make sure that there are no obstacles block-
ing the airflow around the air intake and outlet
openings of the indoor and outdoor units.
NOTE
Cooling/heating is affected by an air filter clogged up with dust etc., and the operation noise becomes louder. It
may also use extra electricity. Please clean the air filter at recommendation intervals.
1
2
Remove batteries from the remote control.
Clean both the indoor and outdoor units.
Clean and reinstall the air filter.
Perform the fan operation for a half day.
Dry the inside of the unit.
Cooling season only.
3
4
5
Check if there is no corrosion or rust on the
base frame of the outdoor unit.
Insert batteries in the remote control.
Turn on the power supply.
Ensure that the air filter are clean.
1
2
3
4
5
6
At the end of the season
Proper installation
Pay attention to operating noises!
•
When you install the unit, take care to choose a place that can comfortably stand the weight of the unit and does not increase the operating noise
or vibration. If vibration is transmitted through the house, fix the unit with the aid of vibration-proof pads between the unitand the fittings.
•Select a place where cold or hot air, operation noises from the indoor and outdoor units do not cause any inconvenience to your neighbours.
•Do not leave any obstacles near the outlet and inlet of the outdoor unit. This may cause malfunctioning and increased operating noise.
•If you hear an irregular noise during operation, contact your dealer.
Inspection and maintenance
Depending on operating environment, the inside of the air-conditioner may become dirty after a few year operations. This will reduce
performance. In addition to normal cleaning, we would recommend inspection and maintenance. (This may lead the air-conditioner to
having a longer life without any trouble.)
•Contact your dealer, or any distributor, for inspection and maintenance. (There will be a charge for this service).
•We would recommend inspection and maintenance to be carried out during the off-season.
•If the supply cord of this appliance is damaged, it must only be replaced by a repair shop appointed by the manufacturer, because
special purpose tools are required.
Suitable installation position
•Do not put any obstruction in front of the indoor unit, preventing proper ventilation and functioning.
•Do not install the unit in any of the following places:
•Where there is a danger of leaking flammable gases.
•Where there is substantial splashing of oil.
•Malfunctioning due to corrosion may occur if the unit is installed in a spa where sulfide gases are generated, or in a seaside resort
exposed to sea breezes. Contact your dealer.
•The air-conditioner and remote control must be at least 1 metre away from a TV set or radio.
•Drain the dehumidified liquid from the indoor unit into a spot that drains well.
RLC012A002A_EN_001-0224/8/14, 11:0119
–20–
Troubleshooting
Please carry out the following checks before making a service call.
Poor cooling
Poor cooling or heating
If the air-conditioner does not operate properly after you have checked the above points, or if any doubt still exists after you have
consulted page 20, or if things happen as shown on page 21, switch off the power and contact your dealer.
An alternative refrigerant (R410A) is used in this air-conditioner. When asking your
dealer for service or inspection and maintenance, explain the dealer about it.
Airflow is not blown out for 5 to 10 min. or blown out not
warm wind for a moment at HEATING operation.
RUN light blinks slowly
(1.5 sec ON, 0.5 sec OFF)
Notice
The unit does not restart immediately after you have
stopped it.
(RUN light is on)
Airflow is not blown out when starting the HEATING opera-
tion.
RUN light blinks slowly
(1.5 sec ON, 0.5 sec OFF)
Airflow has stopped to prevent blowing out of cold air until the
indoor heat exchanger has warmed up. (2 to 5 min.) (HOT
KEEP program)
When outdoor temperature is low and humidity is high, the unit
sometimes performs defrosting automatically. Please wait. Dur-
ing defrosting, water or steam may escape from the outdoor
unit.
Airflow is not blown out when starting the DRY operation.
(RUN light is on)
The indoor fan may stop to prevent re-evaporation of dehumified
moisture and to save energy.
Some steam escapes during COOL operation.
This may occur if the room's temperature and humidity are very high. It
disappears as soon as the temperature and humidity decrease.
Restart is blocked for 3 minutes after you have stopped the op-
eration to protect the unit.
The three-minute protection timer in the microcomputer auto-
matically starts it up again.
Is there a power failure or a blown fuse?
Did you leave any doors or windows
open?
Are there too many people in the room?Is there a heat source in the room?
Is the air filter clean? (Not clogged?)
Has the power switch been turned off?
Have you set the thermostat at a suitable
temperature?
Is there any direct sunlight entering the
room?
You hear a slight gurgling sound.
This is caused by refrigerating liquid moving within the unit.
You hear a slight cracking sound.This is caused by heat expansion or contraction.
There is a slight smell.
Air blown out during operation may smell. This is caused by
tobacco or cosmetics adhering to the unit.
You hear a hissing or clicking sound.
This is caused by the operation of the refrigerant control valves
or electric components.
The air-conditioner does not work at all.
Has the timer been set in the “ON”
position?
RLC012A002A_EN_001-0224/8/14, 11:0120
–21–
If the unit is operated for a long time in high humidity, moisture
may form on the air outlet grills and start dripping.
Remote control signals may not be received if the signal receiver
on the air-conditioner is exposed to direct sunlight or other bright
light.
If so, cut out the sunlight or reduce the other light.
After a power cut, the unit does not restart even if power
has been restored.
If the auto restart function is not set, the unit will not restart auto-
matically. Use the remote control to start the operation again.
Remote control signals are not received.
Moisture may form on the air outlet grills.
The noise means that the revolution speed of the compressor is
increasing or decreasing.
Whistling noise is heard from the outdoor unit.
Indoor fan:Fan will not stop after 2 hours if set to CLEAN operation.
Outdoor fan:Fan will not stop about a 1 minute period in order to
protect the unit.
Fan will not stop immediately after unit operation was
stopped.
The RUN light illuminates during CLEAN operation.
Run light turns off when CLEAN operation ends.
RUN light stays on even though operation was stopped.
Contact your dealer
■Turn off the power switch immediately and inform your dealer in any of the following situations:
The fuse or switch blows continuously.
The cable becomes extremely hot.
The covering of the cable is cracked.
The TV, radio or other equipment starts to malfunction.
When abnormalities occur, turn off the power supply imme-
diately and turn it on after 3 minutes. Restart the operation
with ON/OFF button of the remote control and the abnor-
malities still continue.
A switch does not activate properly.
You hear a strange noise during operation.
The RUN and TIMER lights on the unit display section blink
quickly (0.5 sec. ON; 0.5 sec. OFF) and do not work.
CAUTION
If the power cord becomes damaged, ask your dealer or a qualified engineer to
install the replacement to avoid accidents.
RLC012A002A_EN_001-0224/8/14, 11:0121
–22–
Self diagnosis function
■We are constantly trying to do better service to our customers by installing such judges that show abnormality of each function as follows:
Outdoor temperature sensor error•Broken outdoor sensor wire, poor connector connection
Gebruikershandleiding.com neemt misbruik van zijn services uitermate serieus. U kunt hieronder aangeven waarom deze vraag ongepast is. Wij controleren de vraag en zonodig wordt deze verwijderd.
Product:
Spelregels forum
Om tot zinvolle vragen te komen hanteren wij de volgende spelregels:
lees eerst de handleiding door;
controleer of uw vraag al eerder door iemand anders is gesteld;
probeer uw vraag zo duidelijk mogelijk te stellen;
heeft u een probleem en al geprobeerd om dit op te lossen, vermeld dit erbij aub;
heeft u een oplossing gekregen van een bezoeker dan horen wij dat graag in dit forum;
wilt u een reactie geven op een vraag of antwoord, gebruik dan niet dit formulier maar klik op de knop 'reageer op deze vraag';
uw vraag wordt direct op de website gezet; vermijd daarom persoonlijke gegevens in te vullen;
Belangrijk! Als er een antwoord wordt gegeven op uw vraag, dan is het voor de gever van het antwoord nuttig om te weten als u er wel (of niet) mee geholpen bent! Wij vragen u dus ook te reageren op een antwoord.
Belangrijk! Antwoorden worden ook per e-mail naar abonnees gestuurd. Laat uw emailadres achter op deze site, zodat u op de hoogte blijft. U krijgt dan ook andere vragen en antwoorden te zien.
Abonneren
Abonneer u voor het ontvangen van emails voor uw Mitsubishi DXK12Z5-S bij:
nieuwe vragen en antwoorden
nieuwe handleidingen
U ontvangt een email met instructies om u voor één of beide opties in te schrijven.
Ontvang uw handleiding per email
Vul uw emailadres in en ontvang de handleiding van Mitsubishi DXK12Z5-S in de taal/talen: Engels als bijlage per email.
De handleiding is 1,87 mb groot.
U ontvangt de handleiding per email binnen enkele minuten. Als u geen email heeft ontvangen, dan heeft u waarschijnlijk een verkeerd emailadres ingevuld of is uw mailbox te vol. Daarnaast kan het zijn dat uw internetprovider een maximum heeft aan de grootte per email. Omdat hier een handleiding wordt meegestuurd, kan het voorkomen dat de email groter is dan toegestaan bij uw provider.
Uw handleiding is per email verstuurd. Controleer uw email
Als u niet binnen een kwartier uw email met handleiding ontvangen heeft, kan het zijn dat u een verkeerd emailadres heeft ingevuld of dat uw emailprovider een maximum grootte per email heeft ingesteld die kleiner is dan de grootte van de handleiding.
Er is een email naar u verstuurd om uw inschrijving definitief te maken.
Controleer uw email en volg de aanwijzingen op om uw inschrijving definitief te maken
U heeft geen emailadres opgegeven
Als u de handleiding per email wilt ontvangen, vul dan een geldig emailadres in.
Uw vraag is op deze pagina toegevoegd
Wilt u een email ontvangen bij een antwoord en/of nieuwe vragen? Vul dan hier uw emailadres in.