All brand and product names are trademarks or registered trademarks of their respective companies.
Disclaimer
Specifications and documents are subject to change without notice. Mio Technology does not warrant this
document is error-free. Mio Technology assumes no liability for damage incurred directly or indirectly from
errors, omissions, or discrepancies between the device and the documents.
Notes
Not all models are available in all regions.
Depending upon the specific model purchased, the color and look of your device and accessories may not
exactly match the graphics shown in this document.
The screenshots and other presentations shown in this document are for reference only. They may differ from
the actual screens and presentations generated by the actual product.
1
Table of Contents
Getting to know your Mio ................................................................................................................................3
Performing the initial start-up.........................................................................................................................5
Charging the battery via the USB cable .........................................................................................................6
Using your Mio in a vehicle...............................................................................................................................7
Mounting Moov 200-Series in a vehicle....................................................................................................7
Mounting Moov 300-Series in a vehicle....................................................................................................7
Turning on and off.........................................................................................................................................9
Shutdown and hardware reset....................................................................................................................9
Navigating on the screen .............................................................................................................................9
Searching for a POI using Mio Connect...................................................................................................10
Bluetooth connectivity (Moov 330/360 only)............................................................................................12
Searching your Bluetooth mobile phone for connection (for Moov 330/360)................................12
Searching your Bluetooth headset for connection (for Moov 360)...................................................12
About shortcuts...........................................................................................................................................13
Bluetooth settings.......................................................................................................................................14
Using Bluetooth Hands-Free Calling (Moov 360 only) .............................................................................15
Placing a call using the onscreen keypad ................................................................................................15
Placing a call using the phonebook ..........................................................................................................16
Placing a call using the call history...........................................................................................................17
Receiving a call............................................................................................................................................. 17
Operations during a call.............................................................................................................................18
My Maps........................................................................................................................................................21
Installing maps onto your Mio..............................................................................................................21
Removing maps from your Mio............................................................................................................22
Searching for a POI using MioMore Services .....................................................................................22
Importing POIs from your computer to your Mio.............................................................................23
Deleting a POI from your Mio ..............................................................................................................24
Point of Interest...........................................................................................................................................24
Installing Points of Interest...................................................................................................................24
Uninstalling Points of Interest..............................................................................................................25
Copying NavPix or albums from your Mio to Photo Album ...........................................................27
Transferring pictures from Photo Album to your Mio......................................................................27
More to do with pictures and albums.................................................................................................28
Photo Album preferences......................................................................................................................28
Making backups of your Mio......................................................................................................................29
Restoring a backup to your Mio ...........................................................................................................29
Deleting a backup ...................................................................................................................................29
Caring for your Mio.....................................................................................................................................31
European Notice .....................................................................................................................................32
About charging........................................................................................................................................32
About the charger...................................................................................................................................32
About the battery...................................................................................................................................33
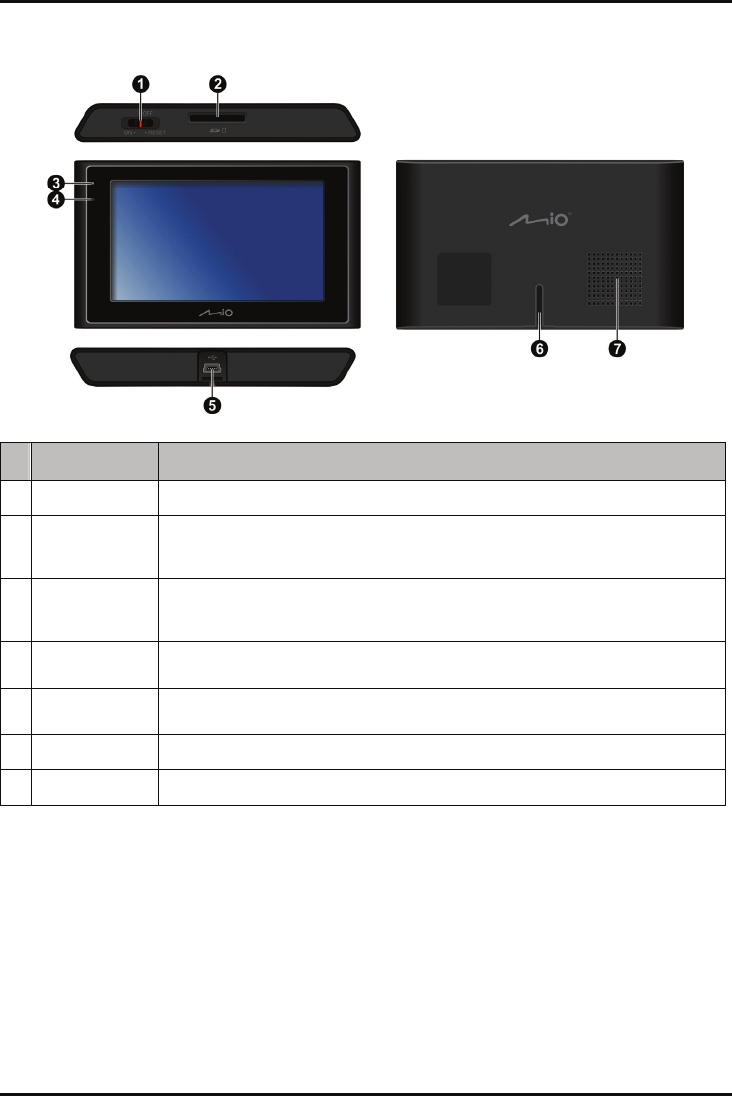
Getting to know your Mio
Moov 200-Series
Name Description
n
Power switch Turns your Mio on and off.
o
Memory card slot (Not available on all models)
Accepts a SD (Secure Digital), SDHC (Secure Digital High Capacity), or MMC (MultiMediaCard)
card for accessing data such as additional maps.
p
Charge indicator Indicates the level of battery charge:
Green - battery full
Amber - battery charging.
q
Mini-USB
connector
Connects to the charger or USB cable.
r
Holder socket For the holder.
s
Speaker Sends out sounds and voice.
3
Moov 300-Series
Name Description
n
Power switch Turns your Mio on and off.
o
Memory card slot (Not available on all models)
Accepts a SD (Secure Digital), SDHC (Secure Digital High Capacity), or MMC (MultiMediaCard)
card for accessing data such as additional maps.
p
Charge indicator Indicates the level of battery charge:
Green - battery full
Amber - battery charging.
q
Microphone (Not available on all models)
For Bluetooth hands-free calling.
r
Mini-USB
connector
Connects to the charger or USB cable.
s
Holder socket For the holder.
t
Speaker Sends out sounds and voice.
4
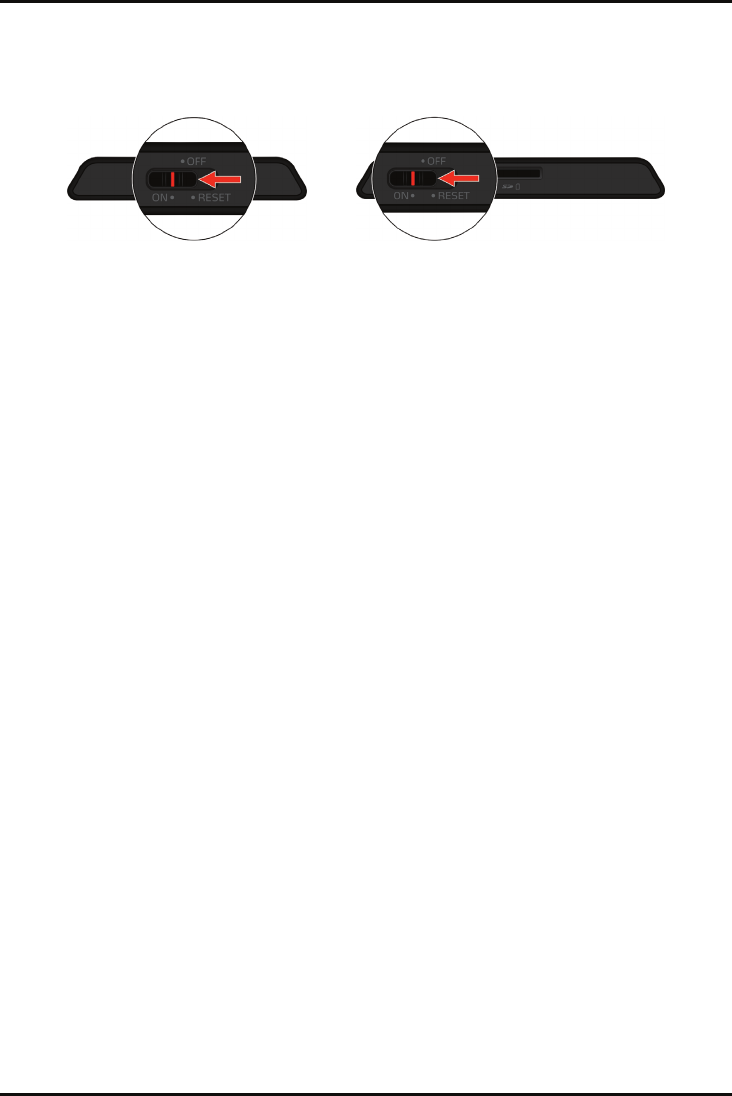
Performing the initial start-up
1.For the initial start-up, slide the power switch to the ON position.
Moov 200-Series Moov 300-Series
2.Your Mio turns on.
Note: The battery may not be fully charged when you use your Mio for the first time. To charge the battery, see the next
section.
3.Follow the prompts.
4.The map screen will display. You can now use your Mio.
5
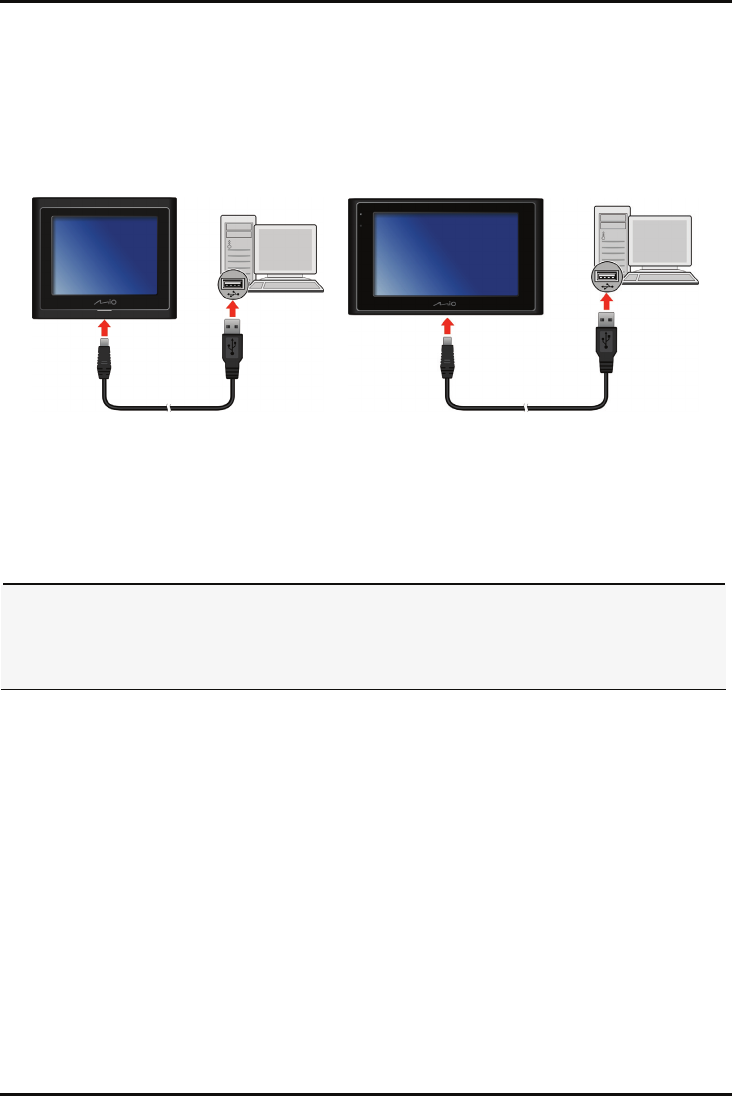
Charging the battery via the USB cable
If you intend to charge your Mio in this way, turn off your Mio so that it takes less time to charge the battery.
1.Turn on the computer.
2.Connect the mini-USB end of the USB cable to the bottom of your Mio and the other end to a USB port on
your computer.
Moov 200-Series Moov 300-Series
3.The charge indicator glows amber when charging is in progress. When the battery is fully charged, the
indicator turns green.
Note: If your Mio is on when connected to a computer, a screen appears to prevent you from using your Mio.
Note: When the Mio is connected to a computer, it is recognized as an external mass storage device. Do not delete any files
pre-installed in the Mio. Deleting files of which the function is unknown can cause programs or features to malfunction.
CAUTION: For optimal performance of the lithium battery:
Do not charge the battery where the temperature is high (e.g. in direct sunlight).
There is no need to fully discharge the battery before charging. You can charge the battery before it is discharged.
When storing the product for along period of time, be sure to fully charge the battery at least once every two weeks.
Over discharge of the battery can affect the charging performance.
6
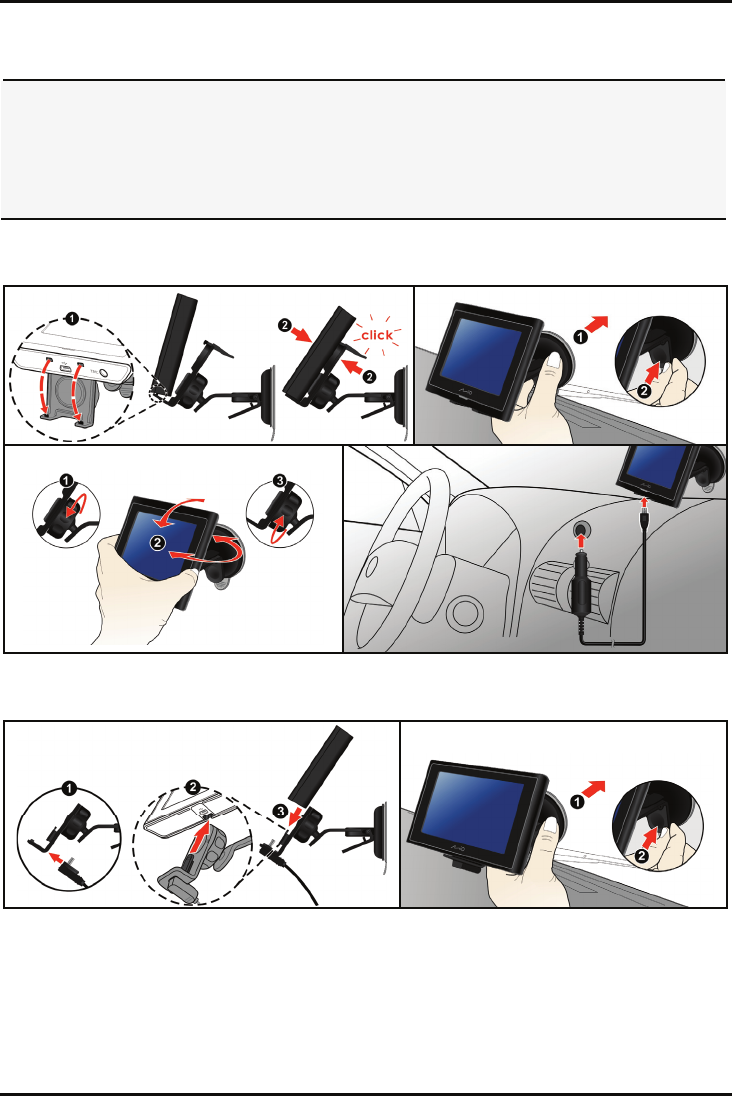
Using your Mio in a vehicle
CAUTION:
Select an appropriate location for mounting the Mio in a vehicle. Never place the Mio where the driver’s field of vision
is blocked.
If the car’s windscreen is tinted with a reflective coating, it may be athermic and impact the GPS reception. In this
instance, please mount your Mio where there is a “clear area.”
To protect your Mio against sudden surges in current, connect the car charger only after the car engine has been
Gebruikershandleiding.com neemt misbruik van zijn services uitermate serieus. U kunt hieronder aangeven waarom deze vraag ongepast is. Wij controleren de vraag en zonodig wordt deze verwijderd.
Product:
Spelregels forum
Om tot zinvolle vragen te komen hanteren wij de volgende spelregels:
lees eerst de handleiding door;
controleer of uw vraag al eerder door iemand anders is gesteld;
probeer uw vraag zo duidelijk mogelijk te stellen;
heeft u een probleem en al geprobeerd om dit op te lossen, vermeld dit erbij aub;
heeft u een oplossing gekregen van een bezoeker dan horen wij dat graag in dit forum;
wilt u een reactie geven op een vraag of antwoord, gebruik dan niet dit formulier maar klik op de knop 'reageer op deze vraag';
uw vraag wordt direct op de website gezet; vermijd daarom persoonlijke gegevens in te vullen;
Belangrijk! Als er een antwoord wordt gegeven op uw vraag, dan is het voor de gever van het antwoord nuttig om te weten als u er wel (of niet) mee geholpen bent! Wij vragen u dus ook te reageren op een antwoord.
Belangrijk! Antwoorden worden ook per e-mail naar abonnees gestuurd. Laat uw emailadres achter op deze site, zodat u op de hoogte blijft. U krijgt dan ook andere vragen en antwoorden te zien.
Abonneren
Abonneer u voor het ontvangen van emails voor uw Mio Moov 210 bij:
nieuwe vragen en antwoorden
nieuwe handleidingen
U ontvangt een email met instructies om u voor één of beide opties in te schrijven.
Ontvang uw handleiding per email
Vul uw emailadres in en ontvang de handleiding van Mio Moov 210 in de taal/talen: Engels als bijlage per email.
De handleiding is 7,23 mb groot.
U ontvangt de handleiding per email binnen enkele minuten. Als u geen email heeft ontvangen, dan heeft u waarschijnlijk een verkeerd emailadres ingevuld of is uw mailbox te vol. Daarnaast kan het zijn dat uw internetprovider een maximum heeft aan de grootte per email. Omdat hier een handleiding wordt meegestuurd, kan het voorkomen dat de email groter is dan toegestaan bij uw provider.
Uw handleiding is per email verstuurd. Controleer uw email
Als u niet binnen een kwartier uw email met handleiding ontvangen heeft, kan het zijn dat u een verkeerd emailadres heeft ingevuld of dat uw emailprovider een maximum grootte per email heeft ingesteld die kleiner is dan de grootte van de handleiding.
Er is een email naar u verstuurd om uw inschrijving definitief te maken.
Controleer uw email en volg de aanwijzingen op om uw inschrijving definitief te maken
U heeft geen emailadres opgegeven
Als u de handleiding per email wilt ontvangen, vul dan een geldig emailadres in.
Uw vraag is op deze pagina toegevoegd
Wilt u een email ontvangen bij een antwoord en/of nieuwe vragen? Vul dan hier uw emailadres in.