42287
2
Verklein
Vergroot
Pagina terug
1/45
Pagina verder
E
INSTRUCTION
MANUAL
BASIC
OPERATION
ADVANCED
OPERATION
ADDITIONAL
FEATURES
APPENDIX
Thank you for purchasing the Minolta Vectis S-100. The
Vectis S-100 is an ultra compact IX240 type system camera
with variable print-aspect-ratio and magnetic storage of date
and exposure information. The Vectis S-100 also incorporates
the revolutionary TTL side viewfinder. The side viewfinder
provides a high viewfinder magnification, high eyepoint, and
large diopter range, in addition to giving the camera its
distinctive profile.
This manual has been designed to help you understand the
operation of the camera more quickly. After familiarizing
yourself with the camera, read the Basic Operation section.
Refer to the Advanced Operation and Additional Features
sections as your familiarity with the camera increases.
Advanced Photo System™ is a trademark of the five system
developing companies.
New processing…
In addition to returning your prints in the format you
selected, certified photofinishers will return your Advanced
Photo System film in its
original cassette with an
index print. To order reprints,
simply choose the images
you want from the index print.
No more searching through
negatives to find the right
frame.
Easier to load…
Advanced Photo System cameras use the new IX240 type
film. This new film features drop-in-loading to make
loading your camera simple, the first time, every time.
Indicators on the
cassette tell you and
your camera if the
film is unexposed,
partially exposed,
exposed, or
processed.
1
New print formats…
Classic (C), wider (H), and
panorama (P) print formats are
available with Advanced Photo
System cameras.
Advantages of the Advanced Photo System
3
TABLE OF CONTENTS
2
FOR PROPER AND SAFE USE.............................................4
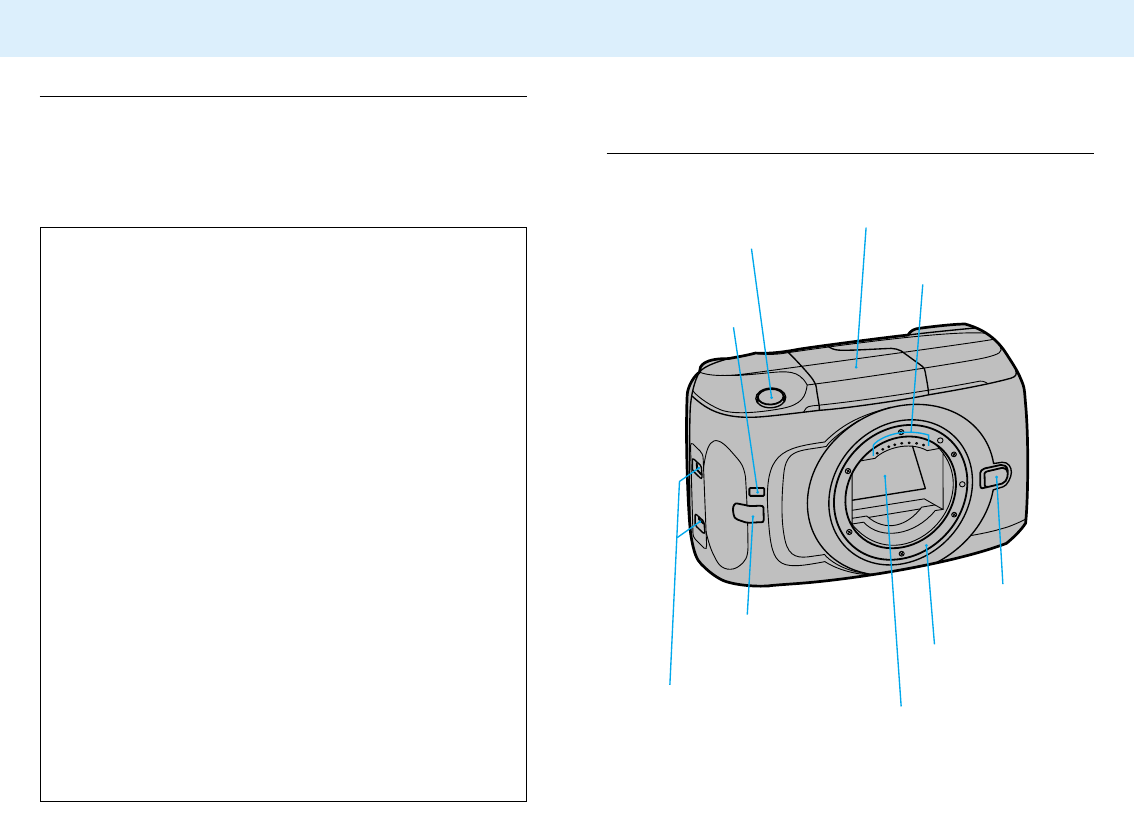
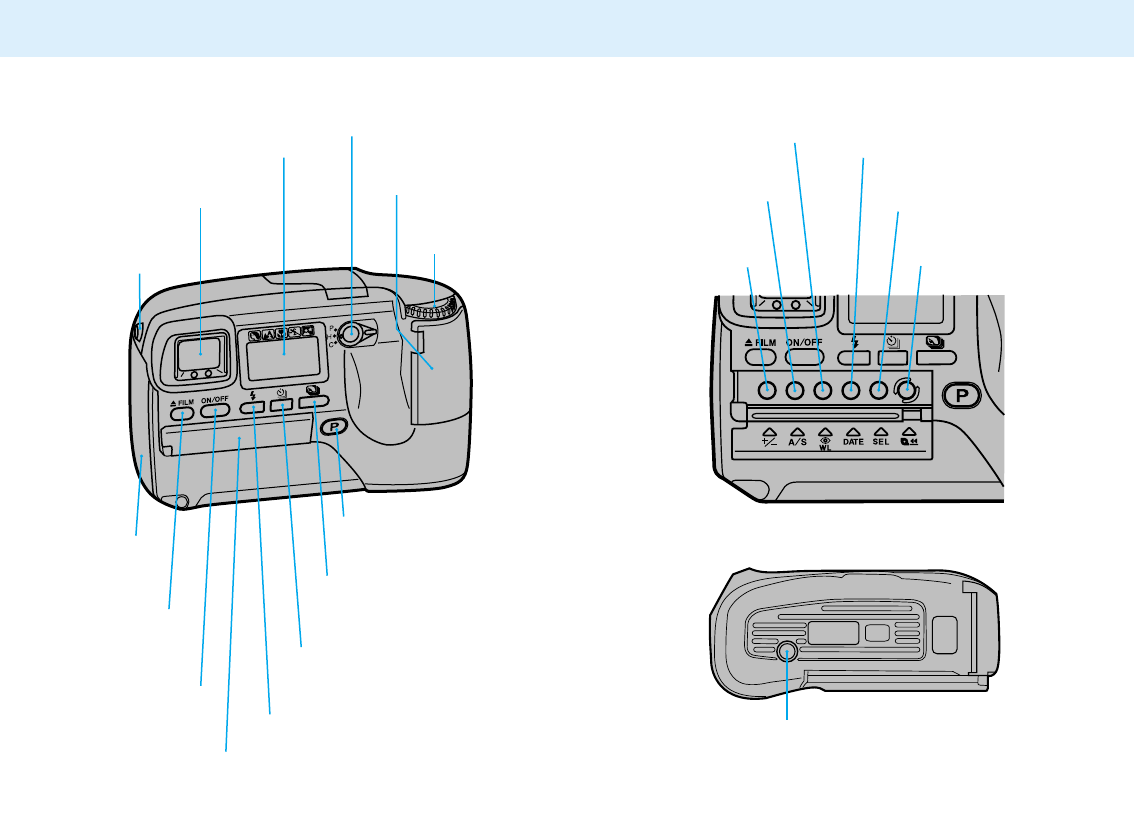
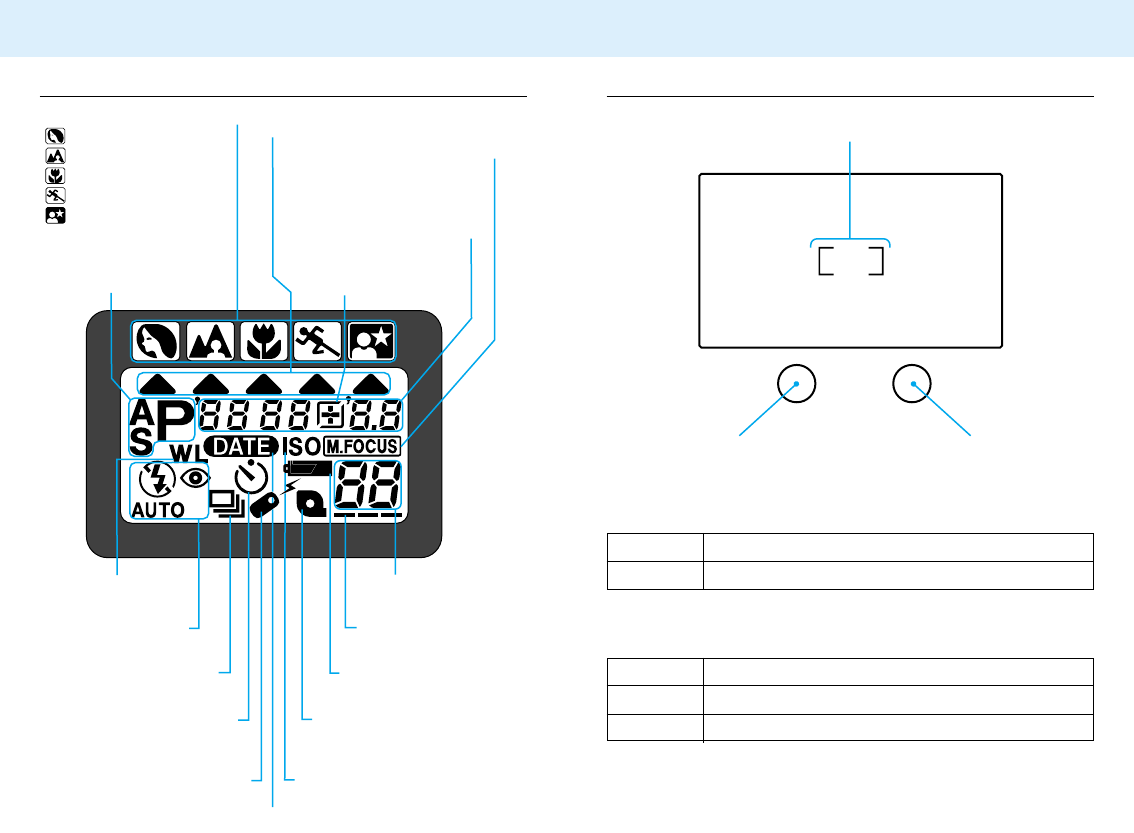
NAMES OF PARTS.................................................................9
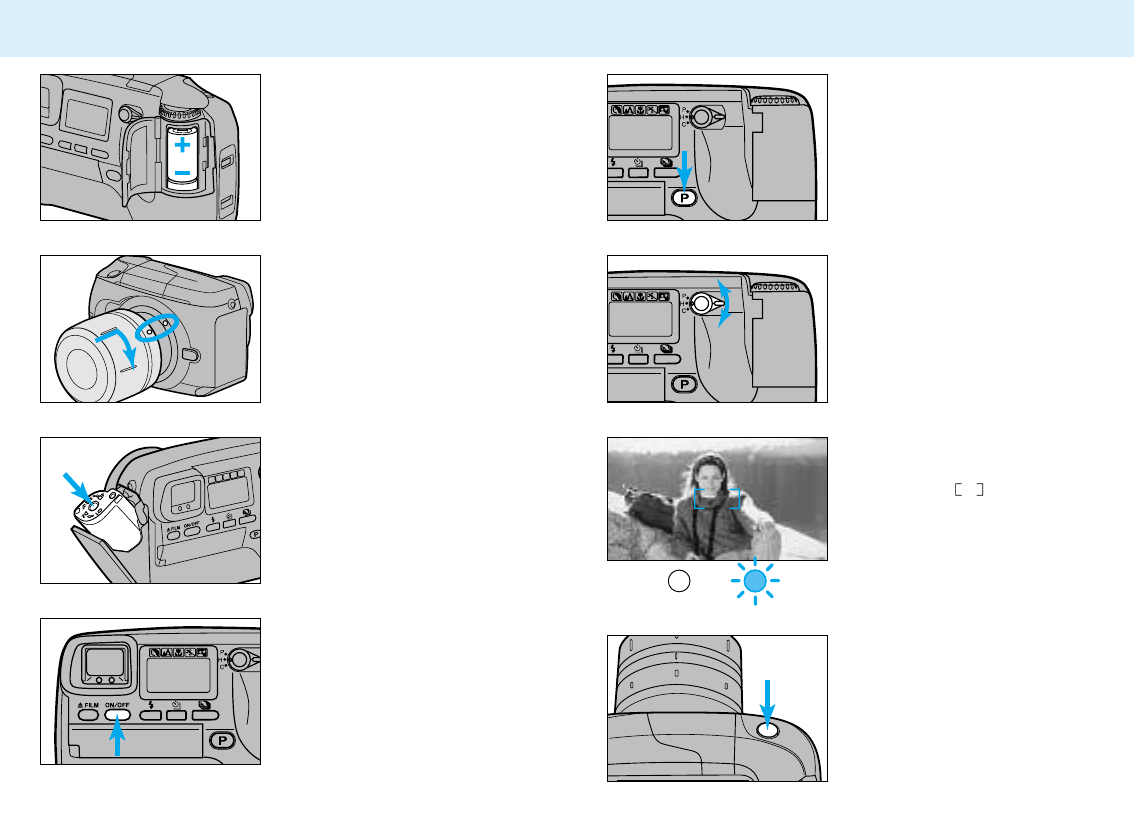
QUICK OPERATION.............................................................14
BASIC OPERATION
Attaching the Strap ........................................................17
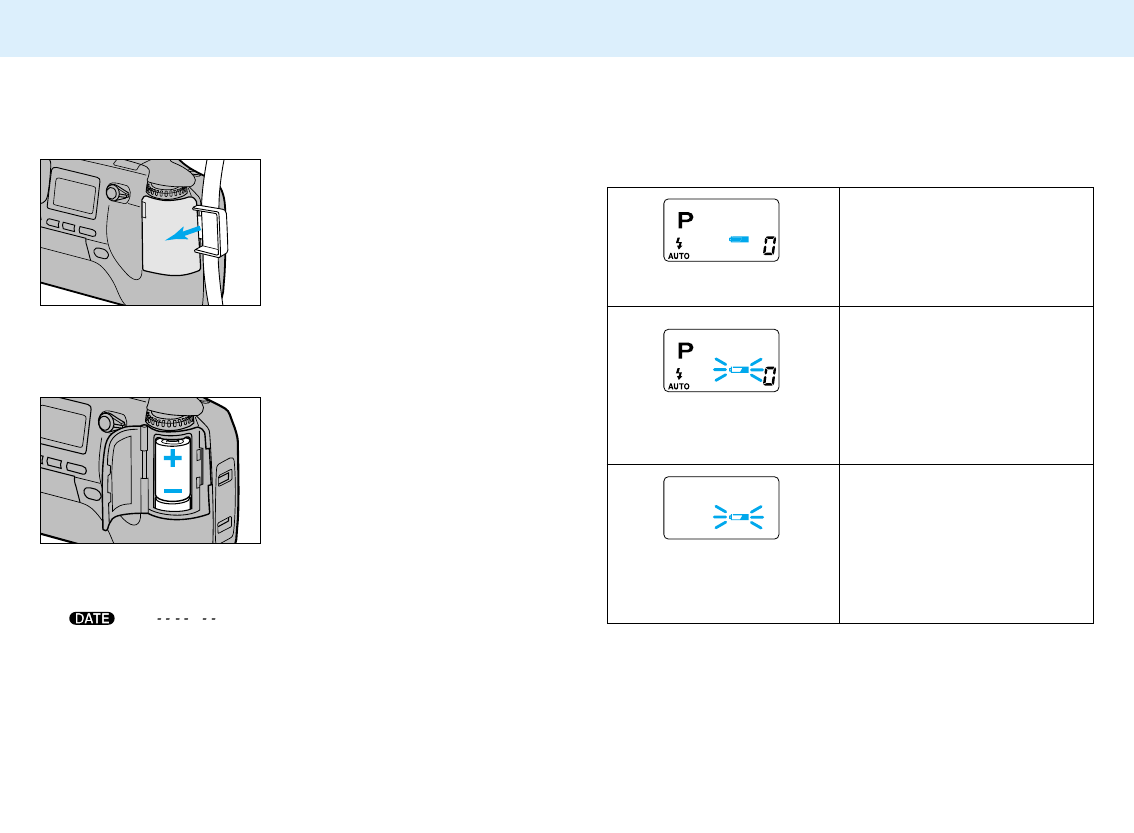
Installing the Batteries ...................................................18
Checking the Battery Power..........................................19
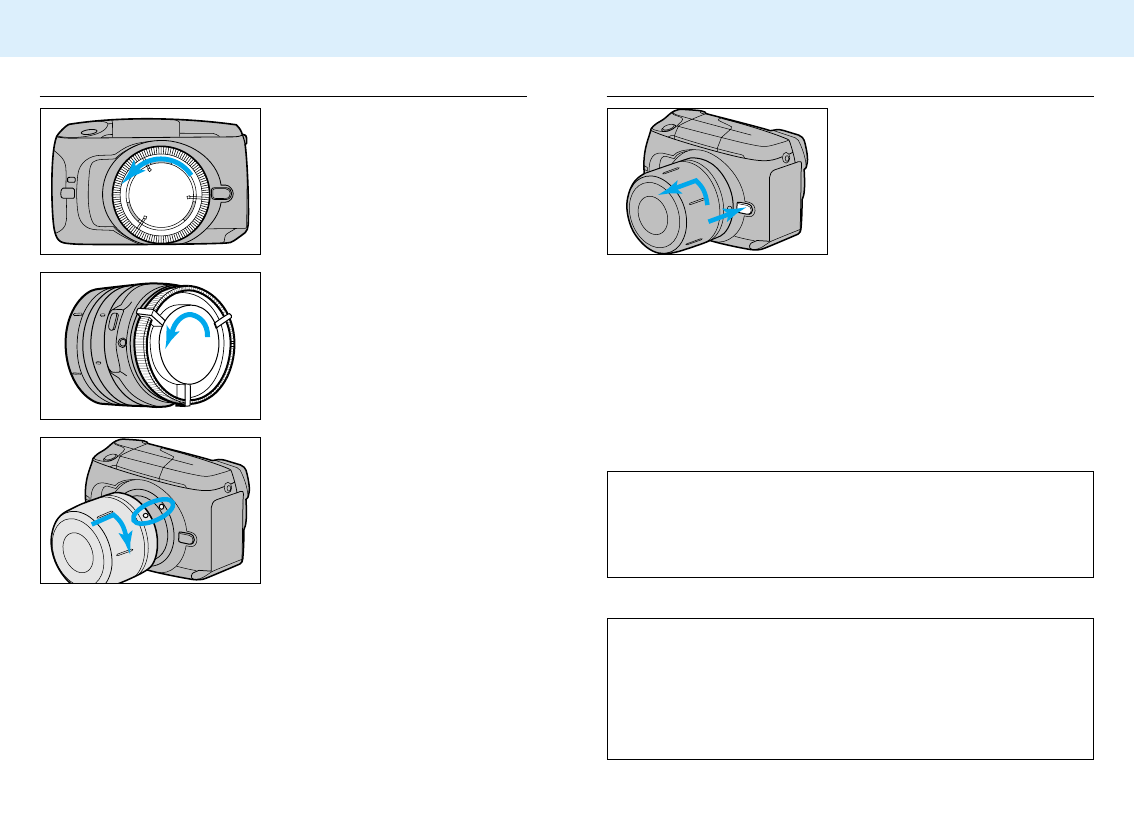
Attaching and Removing the Lens................................20
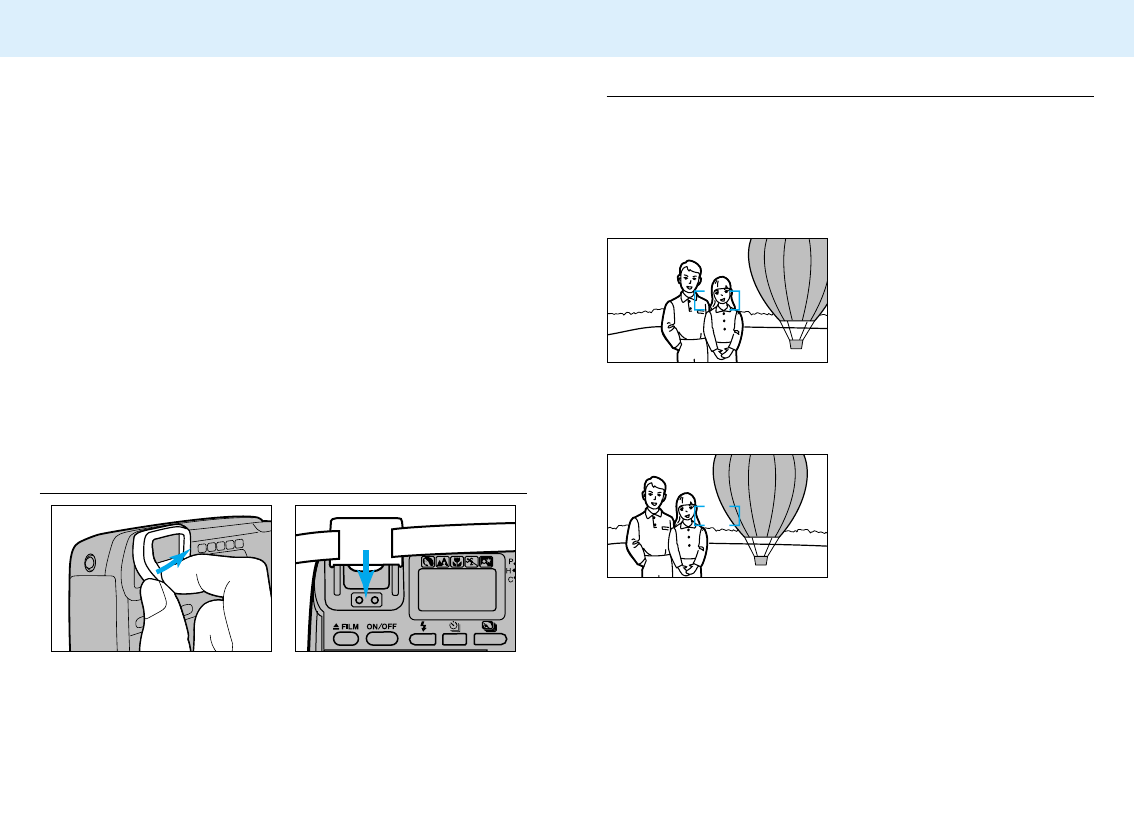
Diopter Adjustment ........................................................22
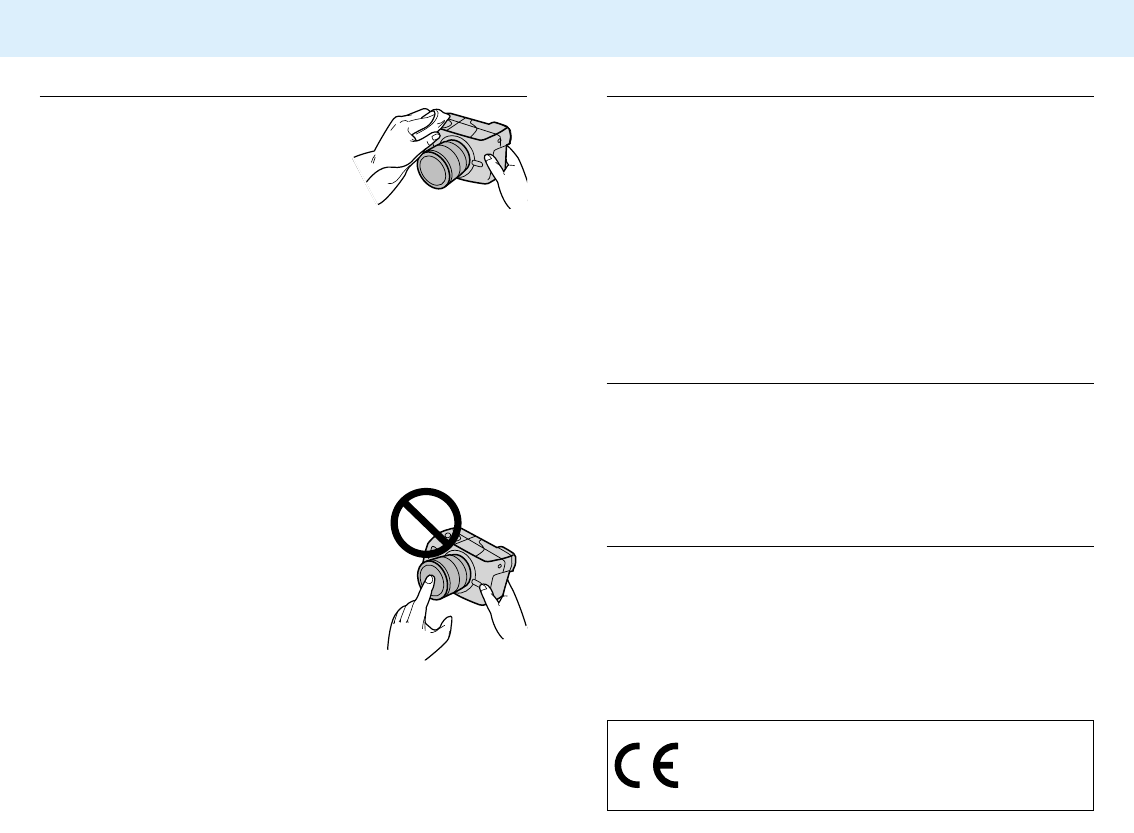
Handling the Camera.....................................................23
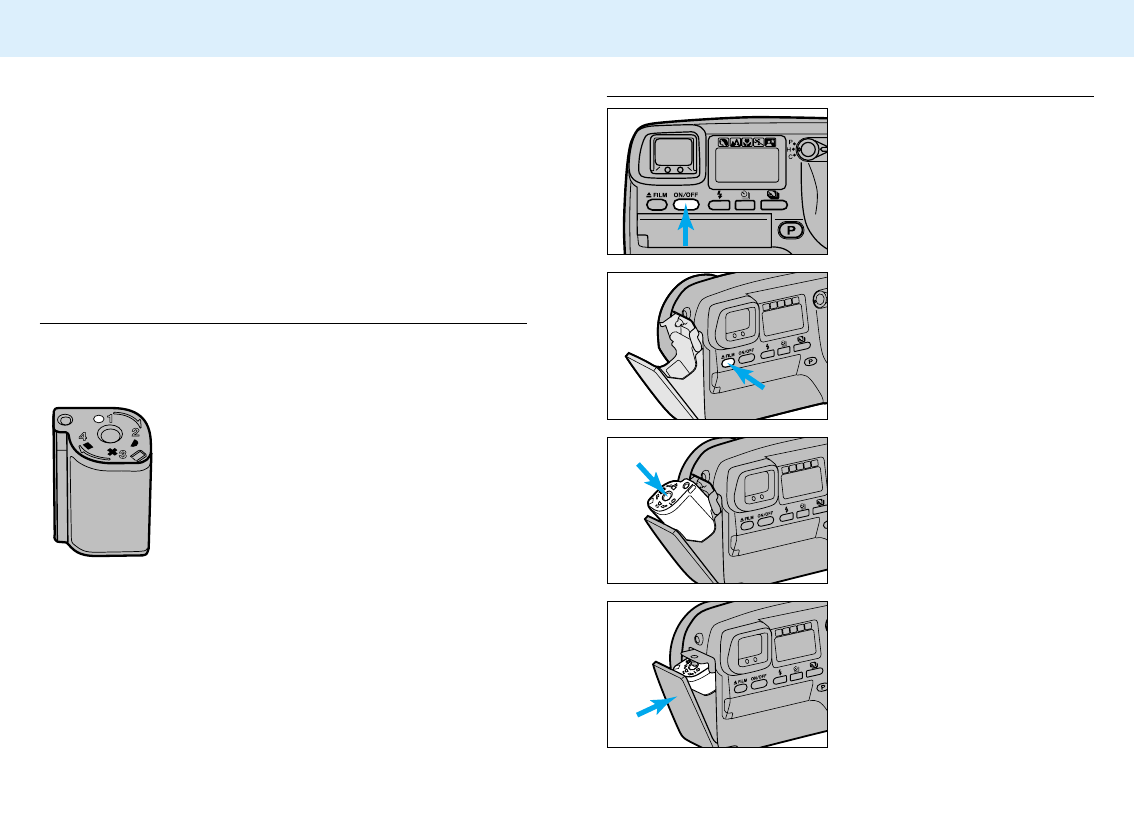
Loading Film ..................................................................24
Full Auto Operation........................................................28
Special Focusing Situations ..........................................30
Focus Hold.....................................................................31
Using the Built-In Flash
Flash Lamp............................................................32
Flash Range ..........................................................32
Manual Fill-Flash ...................................................33
Flash Cancel..........................................................33
Red-Eye Reduction ...............................................34
Rewinding the Film........................................................35
ADVANCED OPERATION
Subject Program Modes
Portrait Mode .........................................................38
Landscape Mode...................................................39
Close-up Mode ......................................................40
Sports Mode ..........................................................41
Night Portrait Mode................................................42
Photographing Night Scenes ................................43
Creative Exposure Modes
Aperture Priority Mode ..........................................45
Shutter Priority Mode.............................................48
ADDITIONAL FEATURES
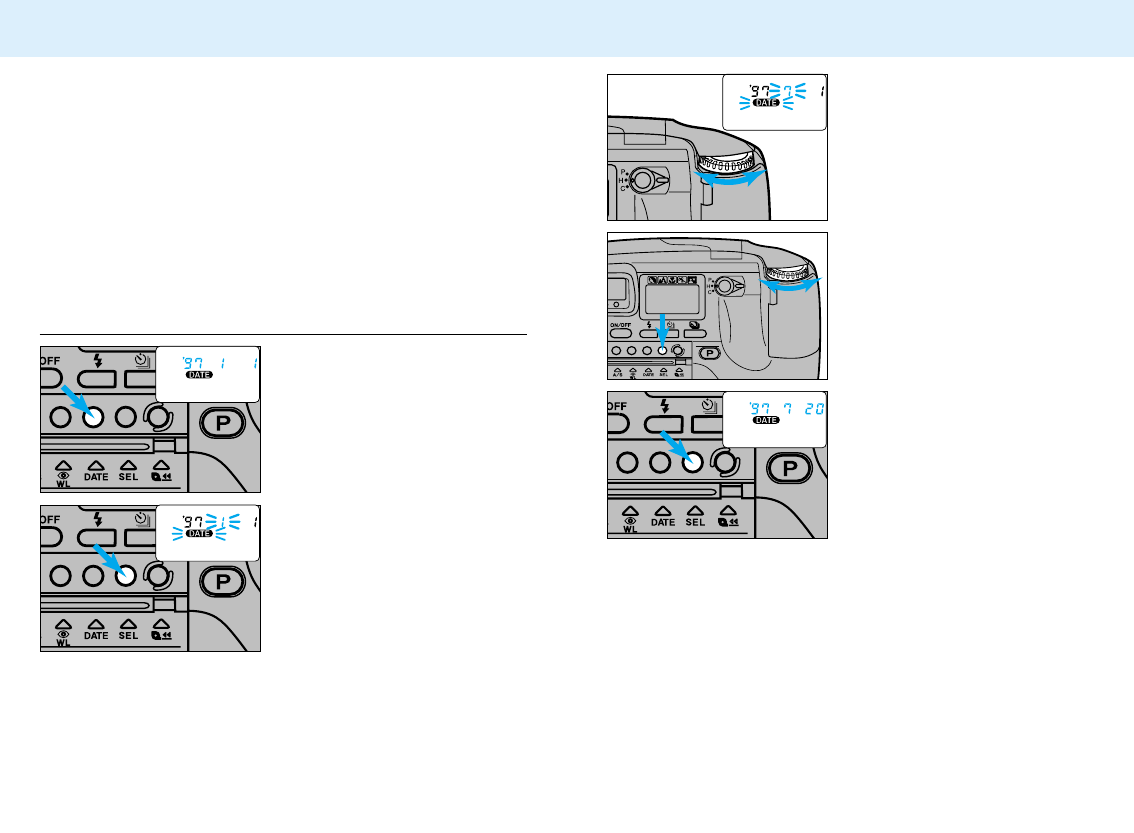
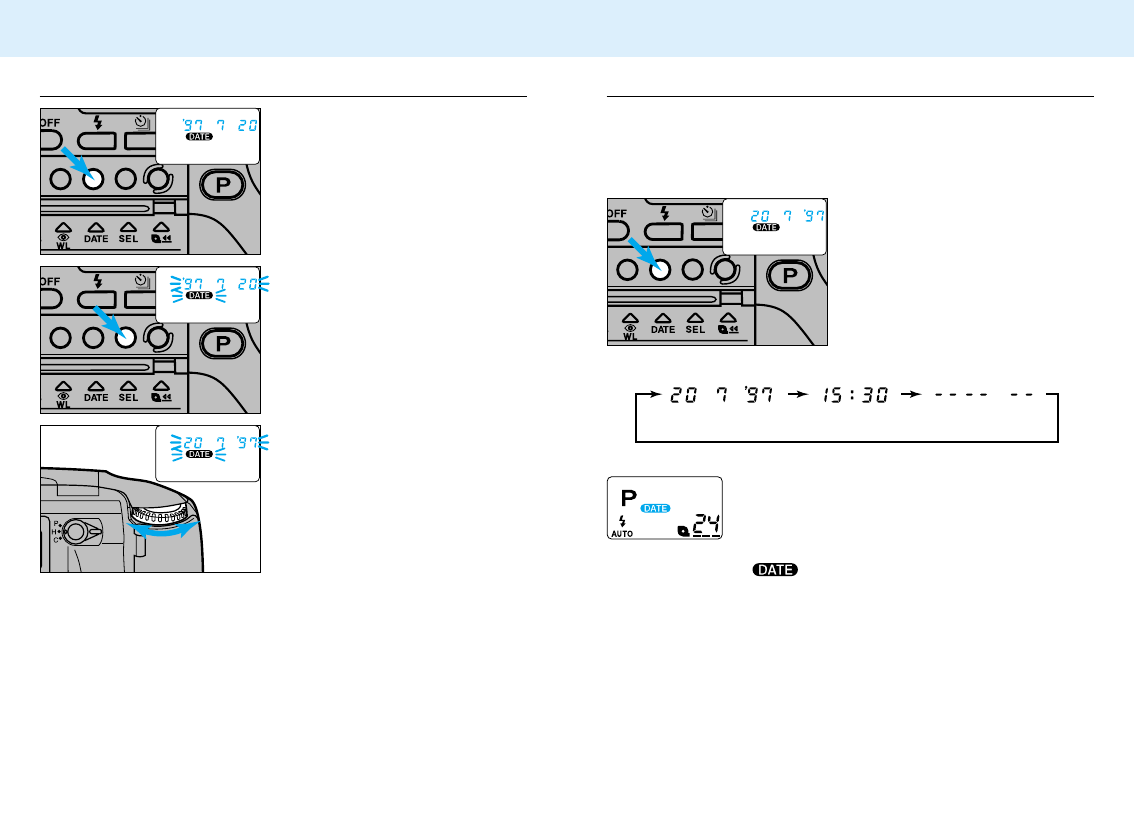
Date/Time Imprinting.....................................................52
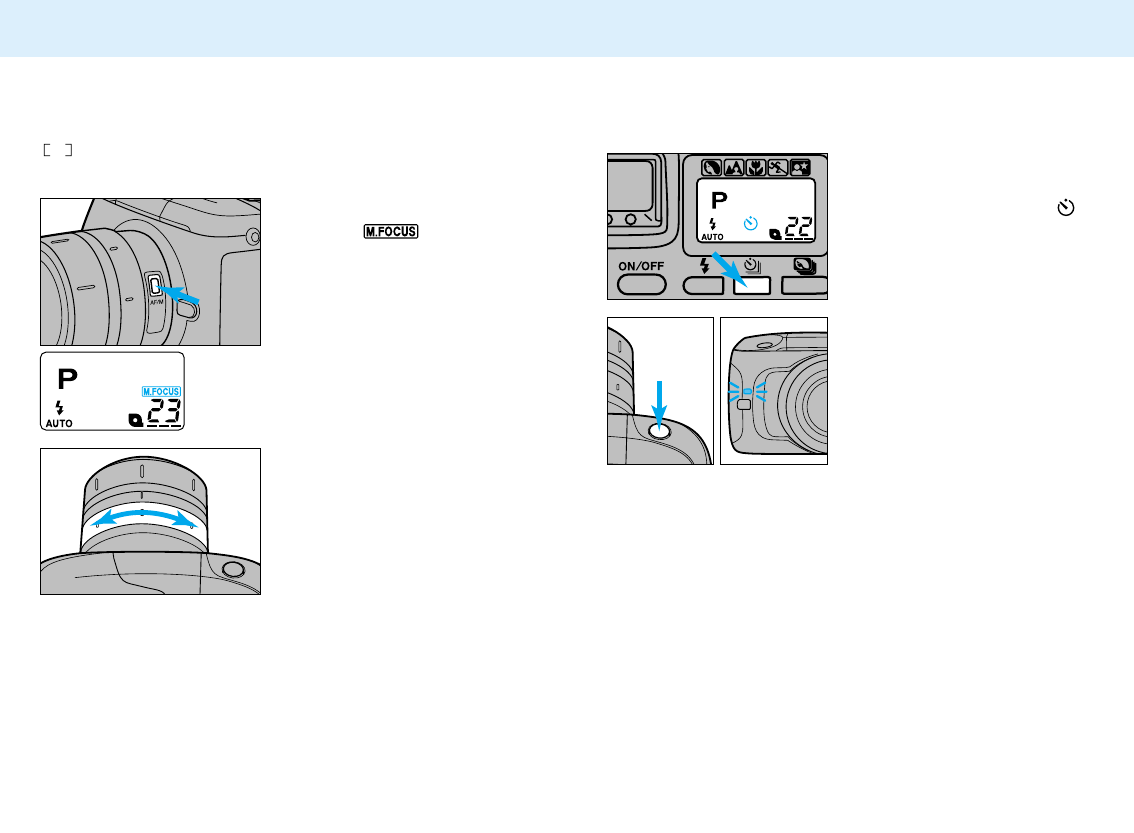
Manual Focus ................................................................56
Self-Timer.......................................................................57
Continuous-Drive Mode.................................................58
Remote Control (optional) .............................................59
AF Illuminator.................................................................63
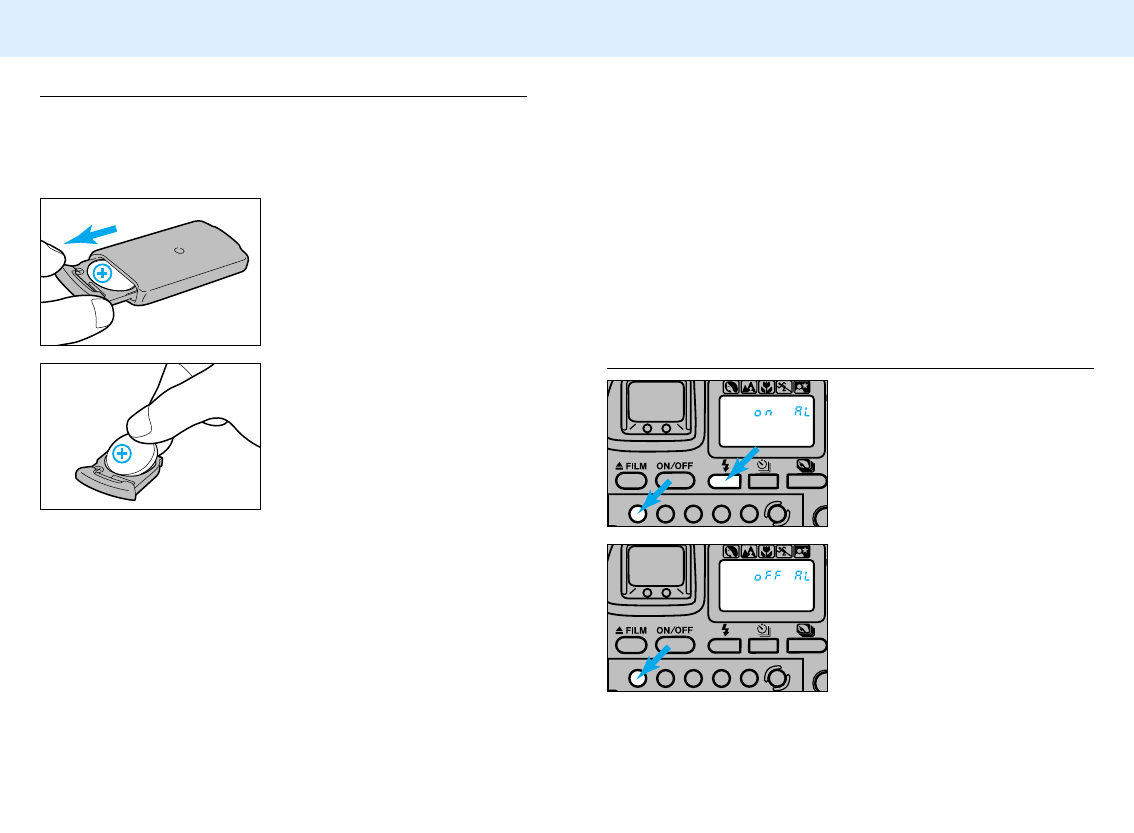
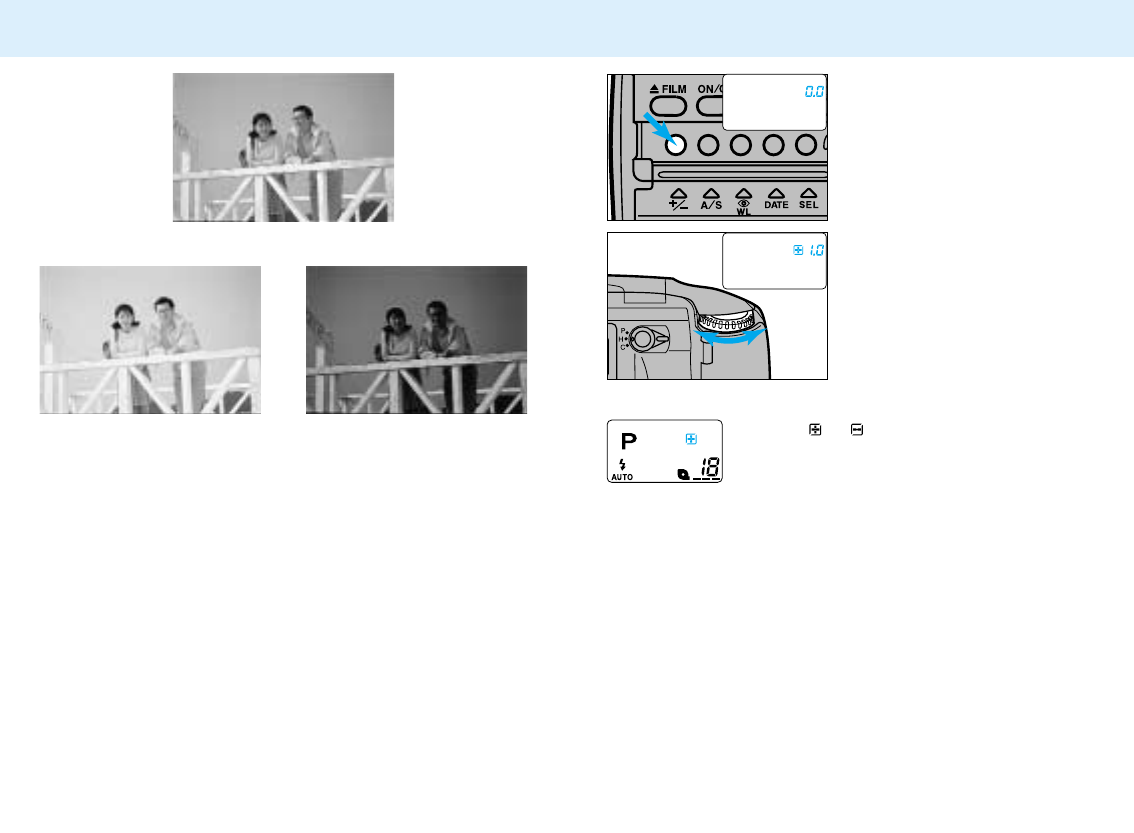
Exposure Compensation ...............................................64
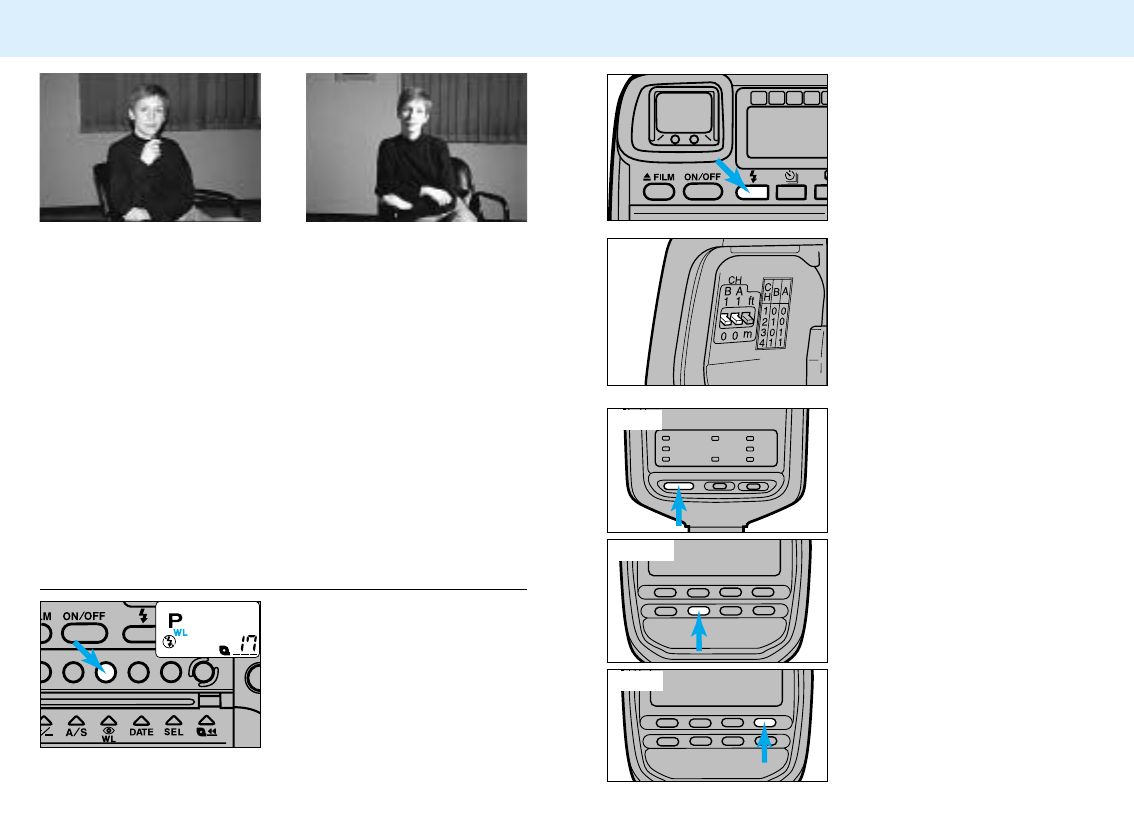
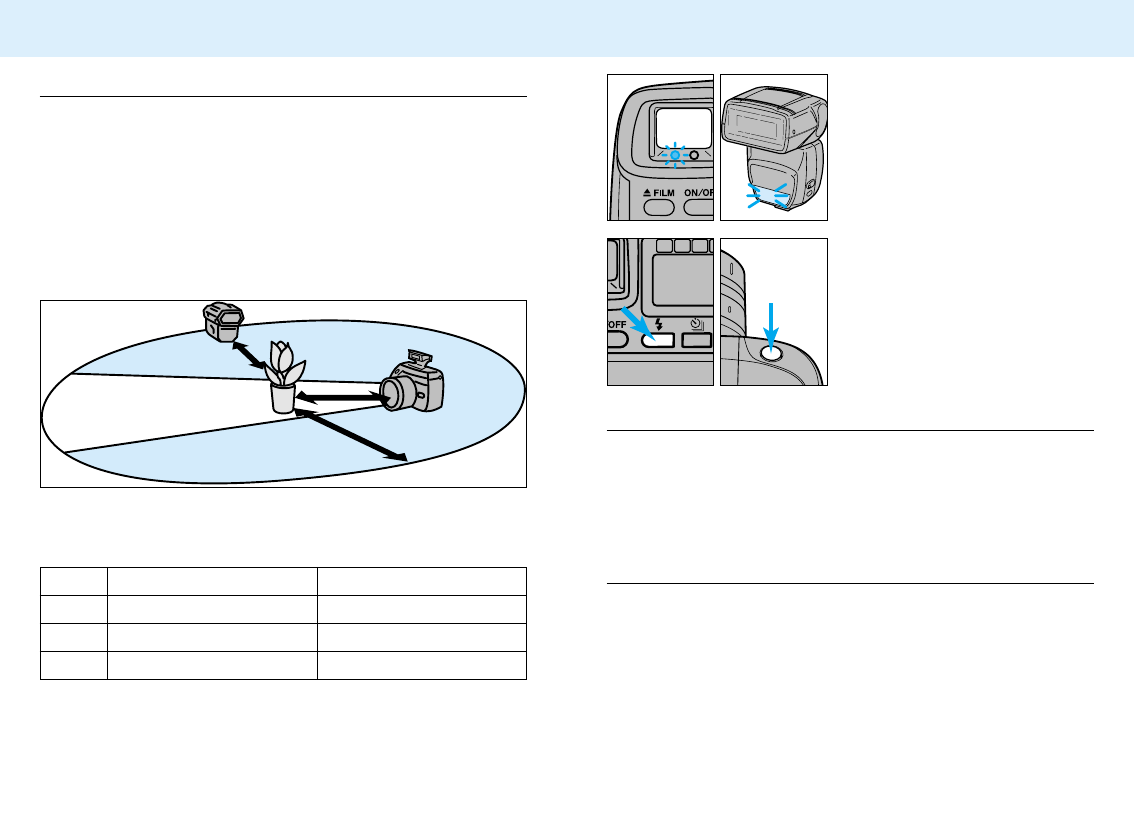
Wireless/Remote Off-Camera Flash ............................66
APPENDIX
Program Reset...............................................................71
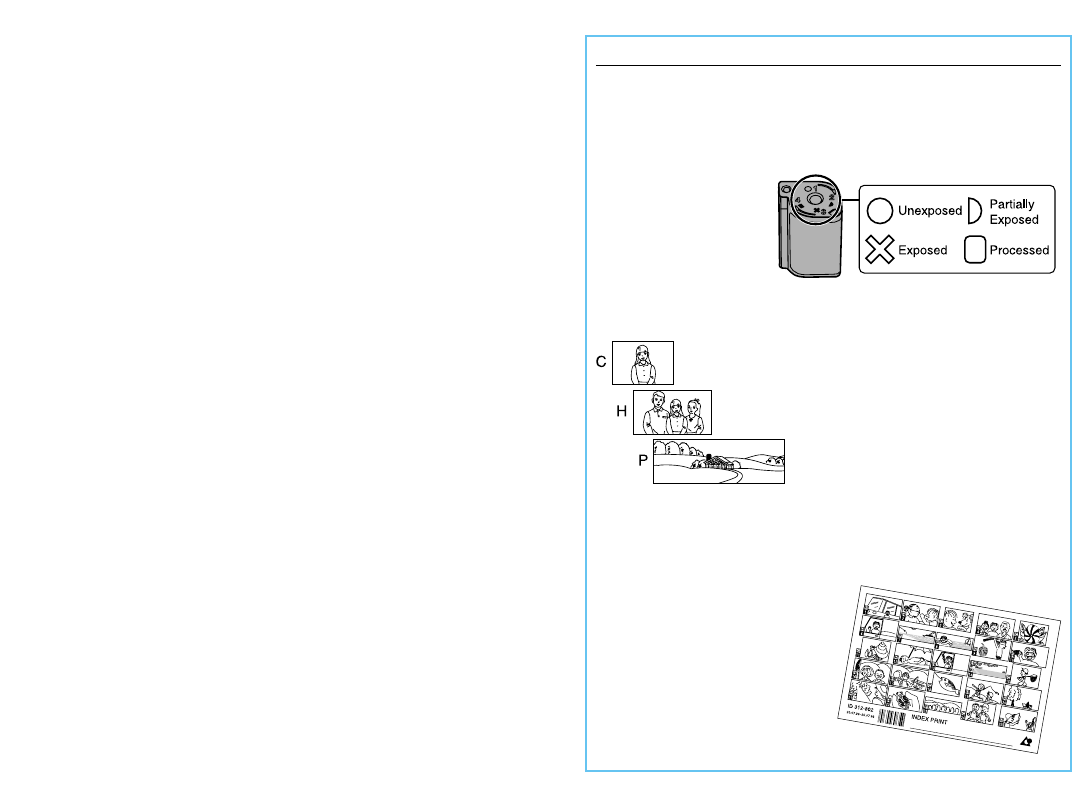
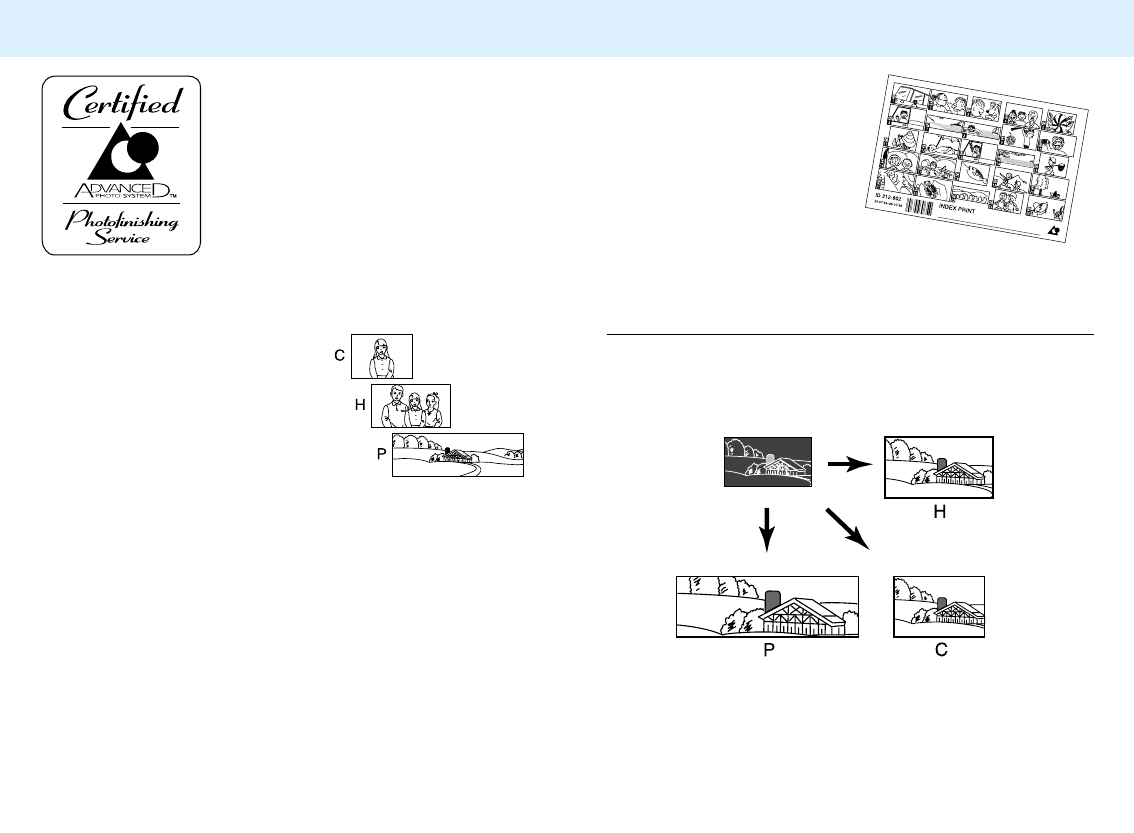
Lab Services ..................................................................72
Accessory Information ...................................................74
Care and Storage ..........................................................76
Specifications.................................................................78
Trouble Shooting............................................................80
Camera Warnings..........................................................82
Quick Reference............................................................84
5
FOR PROPER AND SAFE USE
4
Read and understand all warnings and cautions before using
this product.
WARNING
Batteries may become hot or explode due to improper
use.
• Use only the batteries specified in this instruction manual.
• Do not install the batteries with the polarity (+/-) reversed.
• Do not subject batteries to fire or high temperatures.
• Do not attempt to recharge, short, or disassemble.
• Do not mix batteries of different types, brands, or ages.
Use caution, accidents may occur when using this product
near young children.
Keep batteries or things that could be swallowed away
from young children. Contact a doctor immediately if an
object is swallowed.
Immediately remove the batteries and discontinue use if...
• the camera is dropped or subjected to an impact in which
the interior is exposed.
• the product emits a strange smell, heat, or smoke.
Do not disassemble. Electric shock may occur if a high
voltage circuit inside the camera is touched.
Take your camera to a Minolta Service Facility when
repairs are required.
Do not look directly at the sun through the viewfinder.
Fire may occur if the camera is subjected to focused
sunlight. Replace the lens cap when the product is not
being used.
WARNING
7
FOR PROPER AND SAFE USE
6
This camera is splashproof and can be
used in light rain or snow.
• Do not place the camera under running
water or immerse.
Please Note:
• When using the camera outdoors in
heavy rain, keep the camera protected from the rain.
• Do not leave the camera in the rain.
• The interior of the camera is not moisture
resistant.
- Dry the camera before changing lenses or
opening the film and battery chambers.
- Keep your hands dry when changing
lenses or opening the film and battery
chambers.
• Do not load film or replace batteries in
places where water, blowing sand, or dust can enter the
camera.
• This camera is not sandproof, do not place the camera
directly on the ground.
• Remove moisture from the camera.
• Do not expose the camera to salt water or liquids containing
sugar.
• If the rubber seals appear cracked or damaged, contact the
nearest Minolta Service Facility to have them replaced.
• Close the film and battery-chamber covers tightly. Clean the
rubber seals before closing covers.
• This camera is designed for use from -10 to 50 °C (14 to
122 °F).
• Never leave your camera where it may
be subjected to extreme temperatures
such as the glove compartment of a car.
• At colder temperatures, the data panel
response time will be slow. The display
will temporarily darken at higher temperatures, but will
restore when the temperature normalizes.
• Never subject the camera to extreme humidity.
• To prevent condensation from forming, place the camera in
a sealed plastic bag when bringing it from the cold exterior
into a warm building. Allow it to come to room temperature
before removing it from the bag.
• The low-battery symbol may appear even with fresh
batteries depending on the storage conditions. To restore
camera power, repeat turning the camera on and off.
• When photographing in cold weather, keep the camera and
spare batteries inside your coat to keep them warm when
you are not shooting. Cold batteries will regain some of their
charge when they warm up.
Operating Temperature and ConditionsSplashproof
NAMES OF PARTS
9
FOR PROPER AND SAFE USE
8
The film used in Advanced Photo System cameras stores
some data magnetically. Do not place the cassette on or near
anything that creates a magnetic field, such as a television or
stereo speakers.
This device complies with Part 15 of the FCC Rules. Operation is
subject to the following two conditions: (1) This device may not
cause harmful interference, and (2) this device must accept any
interference received, including interference that may cause
undesired operation. Changes or modifications not approved by the
party responsible for compliance could void the users authority to
operate the equipment. This equipment has been tested and found
to comply with the limits for a Class B digital device, pursuant to
Part 15 of the FCC Rules. These limits are designed to provide
reasonable protection against harmful interference in a residential
installation. This equipment generates, uses and can radiate radio
frequency energy and, if not installed and used in accordance with
the instructions, may cause harmful interference to radio
communications. However, there is no guarantee that interference
will not occur in a particular installation.
If this equipment does cause harmful interference to radio or
television reception, which can be determined by turning the
equipment off and on, the user is encouraged to try to correct the
interference by one or more of the following measures:
Reorient or relocate the receiving antenna.
Increase the separation between the equipment and the receiver.
Connect the equipment to an outlet on a circuit different from that
to which the receiver is connected.
Consult the dealer or an experienced radio/TV technician for
help.
This Class B digital apparatus meets all requirements of the
Canadian Interference-Causing Equipment Regulations.
For information on specific parts, refer to the page numbers
shown in parenthesis.
Body
Film Cassette Warning
* Do not touch
Remote-control
receiver
Shutter-release button
Lens mount
Built-in flash
Self-timer/Remote-
receiver indicator
Lens release
Strap eyelets
Lens contacts*
Mirror*
11
NAMES OF PARTS
10
Manual-rewind button
Exposure-
compensation
button (65)
Date button (52)
Red-eye-reduction (34)/
Wireless-flash button (66)
Select button
Exposure-mode button
Tripod socket
Diopter-
adjustment dial
Film chamber
Main switch
Film-chamber
release
Flash-mode button (33)
Viewfinder*
Control-panel door
Data panel
Format-selector switch
Program-reset
button (71)
Control dial
Self-timer (57)/Drive-mode
(58)/Remote-control button (59)
Subject-program-select
button
Battery chamber
* Do not touch
13
NAMES OF PARTS
12
Focus Lamp
Data Panel Viewfinder
Focus frame
Flash lamp (orange) Focus lamp (green)
glows
blinking
Focus is confirmed
Focus is not confirmed. Shutter cannot be released
Flash Lamp
glows Flash is charged
blinks fast Flash is charging. Shutter cannot be released
blinks slow Warning - light level is low, use flash or a tripod.
Subject-program pointer
Continuous-drive
indicator (58)
Flash-mode
indicators (32)
Remote-control indicator (59)
Date mark (52)
Self-timer indicator (57)
Exposure-mode
indicators (44)
Exposure-compen-
sation indicator (64)
Manual-focus indicator (56)
Wireless-flash
indicator (66)
Subject-program indicators
Portrait Mode (38)
Landscape Mode (39)
Close-up Mode (40)
Sports Mode (41)
Night Portrait Mode (42)
Shutter-speed/
Aperture/Film Speed/
Exposure-compensation/
Date/Time display
Frame counter
Film-transport signals
Cassette mark
Battery-condition indicator
(19)
Film-speed mark (26)
15
QUICK OPERATION
14
1. Insert battery
Open the battery-chamber
door using the eyepiece cap.
Insert the batteries into the
chamber, then snap the
battery-chamber door shut.
2. Attach lens
Align the red mounting dot on
the lens with the one on the
camera. Gently insert the lens
into the mount and turn it
clockwise until it clicks into the
locked position.
3. Insert film
Press the film-chamber
release. Insert the film
cassette. Close the film-
chamber door.
4. Turn on power
Press the main switch to turn
the camera on.
5. Set Full Auto Operation
Press the program-reset button
to set the camera to fully-
automatic operation.
6. Select print format
Turn the format-selector switch
to the desired format before
taking the picture.
7. Focus on the subject
Align the subject within the
focus frame , then press
the shutter-release button
partway down.
The focus lamp will light when
the subject is in focus. The
flash will pop-up and fire when
necessary.
8. Take the picture
Gently press the shutter-
release button all the way
down to take the picture.
ATTACHING THE STRAP
1716
BASIC
OPERATION
This section provides the information necessary to
operate your camera in most photographic
situations.
This section covers:
• Battery Installation
• Attaching and Removing the Lens
• Diopter Adjustment and Camera Handling
• Loading and Rewinding the Film
• Fully Automatic Camera Operation
• Special Focus Situations
• Basic Flash Operation
Once you fully understand the instructions in this
section, proceed to the Advanced Operation and
Additional Features sections to obtain more
enjoyment form your camera.
Attach the camera strap as
shown.
1
2
CHECKING THE BATTERY POWER
19
INSTALLING THE BATTERIES
18
Your camera uses two CR2 batteries to supply power for all
camera operations.
1. Using the eyepiece cap,
open the battery-chamber
door.
Turn the camera off before
removing the old batteries.
Remove dirt and moisture from
the camera and batteries
before opening the battery-
chamber door.
2. Insert the batteries as
indicated by the + and –
marks.
3. Snap the battery-chamber
door shut.
If the battery-chamber cover is not closed properly, moisture
may enter the camera.
If and blink in the data panel after the camera
is turned on, reset the date and time. See page 52.
Your camera is equipped with an automatic battery-power
indicator. Each time the camera is turned on, the battery
symbol will appear in the data panel to indicate the power
status of the batteries.
If no display appears, replace the battery or check that it is
inserted correctly.
Your camera shuts down if it is not operated for more than 30
minutes. Press the main switch to restore power.
Full-battery symbol
Power is sufficient for all
camera operations.
Blinking low-battery symbol
Power is extremely low, but all
functions are operational.
Battery will need to be
replaced very soon. Flash
recycling time may be slow.
Blinking low-battery symbol
appears alone and
the shutter locks
Power is insufficient for
camera operation.
21
ATTACHING AND REMOVING THE LENS
20
A
F
/M
8
0
80
5
6
56
1. Remove the body cap.
Attaching the Lens
3. Align the red mounting
dots on the lens and
camera body.
4. Gently insert the lens into
the mount, then turn
clockwise until it clicks
into the locked position.
Do not insert the lens at an angle.
Do not press the lens release when attaching the lens.
Removing the Lens
1. Press the lens release
and turn the lens counter-
clockwise until it stops.
2. Gently remove the lens
from the mount and
replace the caps, or
attach another lens.
Caution
Do not force the lens if it does not turn smoothly.
Do not touch the inside of the camera, especially the lens
contacts and mirror.
Remove dust and dirt from the lens mount before attaching or
removing a lens.
2. Remove the rear lens cap.
Lens Hood Note
Attach a lens hood (page 74) to reduce flare and ensure
maximum image quality. Flare reduces the contrast of the
final image.
HANDLING THE CAMERA
23
DIOPTER ADJUSTMENT
22
If you are near or far sighted, you can adjust the eyepiece for
your eyesight. The diopter adjustment range is from -3.0 to
+1.0 diopters.
1. Center your subject in the
focus frame.
2. Press the shutter-release
button partway down to
focus on the subject.
Adjusting the Diopter:
3. Turn the diopter-
adjustment dial until the
subject appears sharpest.
Holding the Camera
Pressing the shutter-release button
Grip the camera firmly with your right hand, while supporting
the lens with your left hand. Make sure your fingers dont
block the flash. Your fingers should fit securely around the
grip. Keep your elbows at your side and your feet shoulder-
width apart to hold the camera steady. Always keep the
camera strap around your neck or wrist in the event you
accidentally drop the camera.
Press the shutter-release button partway down to activate the
cameras autofocus and auto-exposure systems. Gently
press the shutter-release button all the way down to take the
picture.
25
LOADING FILM
24
Use IX240 type film in this camera.
The automatic transport system will load the film, set the film
speed, and advance the film after each exposure.
Once loaded, the film chamber cannot be opened until the film
is rewound into the cassette (Film Chamber Lock).
There is no need to worry about double exposure. The DEP
(Double Exposure Prevention) feature prevents the camera
from accepting exposed film.
The current VEI has a white indicator behind it.
This camera can only load film with the VEI current.
Visual Exposure Indicators
VEI MEANING
UNEXPOSED
PARTIALLY EXPOSED
EXPOSED
PROCESSED
Loading the Film
1. Press the main switch to
turn the camera on.
Film can be loaded when the
camera is on or off.
2. Press the film-chamber
release on the back of the
camera. The film-chamber
door will open.
3. Insert a new film cassette
into the film chamber with
the VEI on top.
4. Push the film chamber in
until it clicks shut.
27
LOADING FILM
26
The film speed appears in the data
panel, then the film is advanced to the
first frame.
If the shutter-release button is not pressed after loading, an
unexposed (
) roll can be removed by pressing the rewind
button, then the film-chamber release. The VEI will be
unchanged.
If film is loaded with the power off, all indicators in the data
panel will disappear after the number of frames remaining is
displayed.
After the film is loaded, pressing the film-chamber release will
display the film speed and the frame number in the data panel.
If slide film is loaded, CS will appear in the
data panel when the film-chamber door is
closed.
If blinks in the data panel, press the film-chamber release
and remove the film.
- Your camera cannot load a film cassette, if the current VEI is
, , or . Only load cassettes with the mark current.
- If a processed (
) or partially exposed (
) roll of film was
loaded into this camera, the VEI has been to (exposed).
- If the cassettes current VEI is , remove the film. Remove
and reinsert the batteries, then reload the film. If the film will
not load, contact the nearest authorized Minolta Service
Facility.
When the loading sequence is
complete, the frame counter displays the
number of frames remaining on the roll.
If black and white film is loaded, b will
appear in the data panel when the film-
chamber door is closed.
29
FULLY AUTOMATIC OPERATION
28
Full Auto is the cameras standard operating mode and is
suited for use in almost any situation.
Press the program-reset button to set the camera to fully
automatic operation (Full Auto) at any time. See page 71.
1. Press the main switch to
turn the camera on.
2. Press the program-reset
button to set the camera
to Full Auto.
3. Set the format-selector
switch to the desired print
format (C, H, or P).
4. Center your subject in the
focus frame and
press the shutter-release
button partway down to
activate autofocus. The
focus lamp will glow
when the subject is in
focus.
The built-in flash will pop-up
and fire when necessary.
5. When using a zoom lens,
rotate the zooming ring
on the lens to frame the
subject as desired.
6. Press the shutter-release
button all the way down
to take the picture.
In low-light conditions, the AF Illuminator (flash) will fire to
determine the focus distance.
If your subject is outside the focus frame , use focus hold.
See page 31.
FOCUS HOLD
31
SPECIAL FOCUSING SITUATIONS
30
The camera may not be able to focus in situations like those
described below. When the focus lamp blinks, use focus hold
(page 31) or manual focus (page 56). See page 13 for an
explanation of the focus signals.
If two subjects at different
distances overlap in the focus
frame .
If a subject composed of
alternating light and dark lines
completely fills the focus frame
.
If the subject within the focus
frame is very bright, or low
in contrast.
Use focus hold when your
subject is outside the focus
frame or when autofocus is
difficult to confirm.
1. Center your subject in the
focus frame , then
press the shutter-release
button partway down.
2. Continue to hold the
shutter-release button
partway down while you
compose your picture.
3. Press the shutter-release
button all the way down
to take the picture.
Focus hold cannot be used for moving subjects.
33
USING THE BUILT-IN FLASH
32
In P mode, the built-in flash will pop-up automatically when
the shutter is pressed partway down. Once the flash is up, it
will fire when necessary.
The shutter will not release until the flash is charged.
Select flash cancel ( ) when you dont want the flash to fire.
Do not touch the flash when it fires.
Manual Fill-Flash
Use flash cancel when photographing twilight scenes or to
capture the ambiance of existing light.
Press the flash-mode button
until appears in the data
panel.
Flash Cancel
If the flash lamp blinks slowly, the required shutter speed is
too slow to hand hold the camera. Turn the flash on or use
a tripod.
Press the program-reset button or flash-mode button to return
to autoflash mode.
REWINDING THE FILM
35
USING THE BUILT-IN FLASH
34
Light reflecting from your subjects eyes may produce the
effect known as red-eye. Use the built-in flashs red-eye-
reduction mode to produce more natural looking photographs
by reducing the red-eye effect.
1. Open the control-panel
door.
2. Press the red-eye-
reduction button until
appears in the data panel.
Red-Eye Reduction
Warn your subject that the flash will fire a few short flash bursts
just before the picture is taken.
To cancel, press the red-eye-reduction button until (and
WL) disappears from the data panel.
This camera automatically rewinds the film into the cassette
after the last exposure.
1. Wait for the film to completely
rewind into the cassette.
The frame counter will count down
during rewind.
0 will appear and the will blink in the
data panel when the film is rewound.
Automatic Rewind
2. Press the film-chamber
release to open the film-
chamber door.
3. Remove the film.
The VEI display will be .
Use manual rewind to rewind the film before the current roll is
finished.
1. Open the control-panel
door and press the
manual-rewind button.
2. Follow steps 1-3 from
Automatic Rewind.
Manual Rewind
Processing
For best results, take your film to a certified Advanced Photo
System photofinisher. See page 72.
SUBJECT PROGRAM SELECTION
37
ADVANCED
OPERATION
Refer to the individual sections as you increase
your familiarity with the camera. Each function can
be explored independently after the Basic
Operations section has been mastered.
Subject Program Selection
Portrait Mode 38
Landscape Mode 39
Close-up Mode 40
Sports Mode 41
Night Portrait Mode 42
Phtotgraphing Night Scenes 43
Creative Exposure Modes
A Mode Operation 45
S Mode Operation 48
36
Subject-program selection lets you to choose from the five
subject program modes listed below. Subject program modes
customize the exposure settings for the type of picture you
will be taking.
Press the program-reset button to return the camera to Full
Auto. Full-Auto operation is suitable for most photographic
situations. See page 28.
Portrait Mode for portrait photography
Landscape Mode
for scenic and travel photography
Close-up Mode
for close-up photography
Sports Mode
for sports and action photography
Night Portrait Mode
for night portrait and night scene
photography
LANDSCAPE MODE
39
PORTRAIT MODE
38
Portraits have the greatest
impact when the subject is
separated from the background.
Portrait mode sets the camera
to achieve this effect, leaving
you free to capture the perfect
expression.
Press the program-select
button until the subject-
program pointer is under
.
Landscape photography
requires a large depth of field to
make sure everything is in
focus. Landscape mode sets
the camera to obtain the
greatest depth of field possible,
while maintaining a shutter
speed fast enough to prevent
blur due to camera shake.
Press the program-select
button until the subject-
program pointer is under
.
Tips:
For best results use your lens in the mid-telephoto range
(56mm - 80mm).
Use flash when your subject is backlit or there are strong
shadows across the face.
Lock focus on your subjects eyes and be ready to
capture the perfect expression.
Tips:
Use a wide angle range lens to create a feeling of depth
in the picture.
Use flash when a foreground subject is backlit or has
strong shadows across the face. If there is no subject in
the foreground do not use flash.
Use a tripod, especially at slower shutter speeds.
SPORTS MODE
41
CLOSE-UP MODE
40
Accurate focusing and a large
depth of field are required for
good close-up photographs.
Close-Up mode sets the
camera to obtain the greatest
depth of field possible at a
shutter speed fast enough to
prevent blur due to camera
shake.
Press the program-select
button until the subject-
program pointer is under
.
Fast shutter speeds are needed
to stop action. In Sports mode,
the camera will set the fastest
possible shutter speed and
continually adjust the focus to
track fast-moving subjects.
Press the program-select
button until the subject-
program pointer is under
.
Focus hold cannot be selected in Sports mode.
Tips:
For best results use the V LENS 50mm f/3.5 MACRO.
Do not use the built-in flash if your subject is closer than
0.6 m (2.0 ft.). The lens may block the flash creating a
shadow at the bottom of your image (lens shadowing).
Use a tripod to reduce camera shake.
Tips:
The built-in flash is only effective when your subject is
within the flash range.
Use fast film and keep the focus frame on your subject.
Mount the camera on a tripod when using telephoto
lenses.
PHOTOGRAPHING NIGHT SCENES
43
NIGHT PORTRAIT MODE
42
Night portraits require the
cameras flash exposure to be
balanced with the background
exposure. In Night Portrait
mode, the camera sets the
largest possible aperture with a
longer shutter speed, allowing
the background to appear in the
photograph.
Press the program-select
button until the subject-
program pointer is under
.
Cancel the flash in Night
Portrait mode to photograph
night scenes. The longer
shutter speeds set in Night
Portrait mode let you capture
beautiful photographs of twilight
scenes and night skylines.
1. Set the camera to Night
Portrait mode.
2. Press the flash-mode
button until appears in
the data panel.
Tips:
Set the flash to or when using Night Portrait mode.
See page 33.
Use faster film and a tripod.
Focus on the main part of your subject.
Warn your subject not to move while the picture is taken.
Tips:
Use faster film and a tripod.
If you are photographing a dark night scene, it may be
difficult for the camera to focus, use manual focus or
focus hold.
A MODE - APERTURE PRIORITY
45
CREATIVE EXPOSURE MODES
44
Your camera has three exposure modes: Aperture Priority (A-
mode), Shutter Prioity (S-mode), and Program (P-mode). In
P-mode, the camera sets the aperture and shutter speed
automatically. P-mode is set when Full Auto operation is
selected.
Select A-mode to control the depth-of-field in your images
(see Aperture Control on page 47). Set S-mode to control the
way moving subjects appear in your images (see Shutter
Control on page 50).
Refer to Full Auto Operation on page 28 for operation in P-
mode.
Shutter Speed and Aperture in the Data Display
Shutter Speed Aperture
In A mode, you select the aperture and the camera
automatically sets the shutter speed required for proper
exposure. Set the camera to A mode when you want to
control the range of sharpness (depth-of-field) in an image.
See Aperture Control on page 47.
1. Open the control-panel
door.
2. Press the exposure-mode
button until A appears in
the data panel.
3. Turn the control dial to
select the aperture.
Press the program-reset button
to return to fully automatic
operation.
If 1000 or 30 blinks in the data panel, the
required setting is beyond the cameras
shutter speed range. Turn the control dial until
the blinking stops.
If the flash lamp blinks slowly, the
required shutter speed is too slow to
hand hold the camera. Turn the flash
on or use a tripod.
A Aperture Priority Mode
S Shutter Priority Mode
Manually select aperture
Manually select shutter speed
47
A MODE - APERTURE PRIORITY
46
A Mode Flash
When the built-in flash is up, it will fire each time a picture is
taken. When the built-in flash is down, it will not fire.
Press the flash-mode button
to turn the flash on.
The camera will automatically
set the shutter speed to 1/90
(flash sync. speed).
Refer to Flash Range (page 32)
to determine the aperture and
the flash range.
To cancel the flash, push
the flash down.
Aperture Control
The size of the aperture (lens opening) determines the depth-
of-field in the final image as well as the intensity of the light
falling on the film. Depth-of-field is the range in front of and
behind the focus point that appears sharp in the final image.
In the viewfinder, only the plane the camera is focused on will
appear sharp. The photographed image however, will have a
depth-of-field corresponding to the selected aperture.
Large apertures (small numbers) limit the depth of field to a
narrow range in front of and behind the point of focus. A
narrow depth of field is used when you want to place greater
visual emphasis on your main subject by blurring the
background, as in the case of portraits. Small apertures
(large numbers) provide greater depth of field, bringing an
increasingly greater range into focus. A large depth of field is
important when you are photographing landscapes to ensure
that the entire scene is sharp.
Usable apertures will depend on the aperture range of the
lens you are using.
Large Aperture Small Aperture
49
S MODE - SHUTTER PRIORITY
48
In S mode, you select the shutter speed and the camera
automatically sets the aperture required for proper exposure.
Use S mode when you want to control the blur caused by
subject movement.
1. Open the control-panel
door.
2. Press the exposure-mode
button until S appears in
the data panel.
3. Turn the control dial to
select the shutter speed.
Press the program-reset button
to return to fully automatic
operation.
If the aperture display in the data panel blinks,
the required setting is outside the aperture
range of the lens. Turn the control dial until
the blinking stops.
The number 60, or 125, displayed in the data panel stands for
1/60th or 1/125th of a second.
S Mode Flash
When the built-in flash is up, it will fire each time a picture is
taken. When the built-in flash is down, it will not fire.
Press the flash-mode button
to turn the flash on.
Flash operation in the S mode
is the same as P mode. The
camera automatically sets the
aperture and the shutter speed.
To cancel the flash, push
the flash down.
S MODE - SHUTTER PRIORITY
50
Shutter Speed Control
In addition to controlling the duration of the exposure, shutter
speed determines how moving subjects will appear in the
final image. Depending on the speed of your subject, slow
shutter speeds will make a moving subject appear to flow,
creating a feeling of motion. In addition to stopping action,
fast shutter speeds can help prevent blur caused by camera
movement during exposure, known as camera shake.
To stop the motion of your subject, use a fast shutter speed.
To blur the motion of your subject, set a slow shutter speed.
Fast Shutter Speed Slow Shutter Speed
51
ADDITIONAL
FEATURES
53
DATE/TIME IMPRINTING
52
Setting the Date/Time
Your camera records date and time information on the films
magnetic data strip. The recorded information is read at the
photo lab and imprinted on the back of your photographs.
Some labs cannot print date and/or time information on the
front of your photographs. See your photofinisher for a full
description of available services.
See your photofinisher for details on having date and time
information imprinted onto prints made from the slides.
1. Open the control-panel
door, then press the date
button.
2. Press the select button
until the item you want to
adjust blinks.
Each press of the select button
causes the next item to blink.
The sequence is as follows:
year month date hour
minute stops blinking
3. Turn the control dial to
adjust the blinking item.
4. Repeat steps 2 and 3 until
all items in the date and
time display are correct.
5. Press the select button
(or the date button) until
the display stops blinking
to set the updated
information.
Follow the sequence as stated above. If the wrong button is
pressed, the new data will not be entered.
After setting the date/time information, press the shutter-
release button partway down to return to the standard data-
panel display.
This camera has a quartz clock with an automatic calendar
through the year 2029.
55
DATE/TIME IMPRINTING
54
Changing the Date/Time Format
1. Open the control-panel
door, then press the date
button.
2. Press and hold the select
button until all items in
the date display blink.
3. Turn the control dial to
change the display
format.
4. Press the select button (or the date button) to set
the chosen format.
Follow the sequence as stated above. If the wrong button is
pressed, the new format will not be entered.
After changing the date/time format, press the shutter-release
button partway down to return to the standard data-panel
display.
Imprinting the Date or Time
2. Press the date button
until the data panel
displays the format you
want to see on the print.
After selecting the desired date/time format,
press the shutter-release button partway
down to return to the standard data-panel
display. If imprinting has been selected,
will remain in the data panel.
The same format will be printed on the front and the back of the
print.
If no front imprinting is selected, all the date and time
information will be printed on the back of the photograph.
Before taking the picture-
1. Open the control-panel
door.
The sequence is as follows:
Date Time (No Imprinting)
SELF-TIMER
57
MANUAL FOCUS
56
1. Press the focus-mode
button. will appear
in the data panel.
When autofocus is not suitable and focus hold is not
possible, focus the lens manually. The autofocus system will
monitor focus and indicate when a subject in the focus frame
is in focus.
2. Turn the focusing ring
until your subject appears
sharp and focused.
The green focus-lamp will glow
when the subject in the focus
frame is in focus.
Manual focus is not possible on lenses without a focusing ring.
Press the focus-mode button again to return to the autofocus
mode.
1. Place the camera on a
tripod, then press the
self-timer button until
appears in the data panel.
2. Center your subject in the
focus frame.
The self-timer will delay the release of the shutter for
approximately 10 seconds after the shutter-release button is
pressed.
3. Press the shutter-release
button all the way down
to start the timer. The self-
timer indicator on the
front of the camera will
blink, then glow just
before the shutter
releases.
Self-timer mode is canceled after the shutter is released.
Do not press the shutter-release button while standing in front
of the camera.
To cancel the self-timer before the shutter releases, press the
self-timer button or press the main switch to turn the camera
off.
Attach the eyepiece cap if there is a bright light source behind
the camera. See page 60.
REMOTE-CONTROL (optional)
59
CONTINUOUS-DRIVE MODE
58
1. Press the drive-mode
button until appears
in the data panel.
In this mode, the camera continues to release the shutter and
advance the film as long as the shutter-release button is held
down.
2. Press the shutter-release
button down and hold.
When taking flash pictures, the shutter will release after the
flash is charged.
When the subject is moving, the shutter will release after the
camera focuses on the subject.
To cancel continuous-drive mode, press the continuous-drive
mode button until the drive-mode indicator disappears from the
data panel, or turn the camera off.
1. Place the camera on a
tripod, then press the
remote-control button
until appears in the
data panel.
The IR Remote Control RC-3 is an optional accessory you
can purchase to operate your camera from up to 6 m (19.7ft.)
away.
2. Arrange the camera and
subject positions, then
compose your picture.
3. Point the emitter window
toward the front of the
camera and press the • or
2s button.
If the button is pressed, the lamp on the front of the camera
will blink once before the picture is taken.
If the 2s button is pressed, the lamp on the front of the camera
will blink for two seconds before the shutter releases.
Emitter window
2s delay button
Release button
61
REMOTE-CONTROL (optional)
60
To cancel, press the remote-control button again, or turn the
camera off.
If the cameras remote-control receiver does not blink, the
camera did not receive the signal.
If the flash pops-up when the release button on the remote
control is pressed, wait a few seconds for the flash to charge,
then press the release button again to take the picture.
If the flash is up and charged when the remotes release button
is pressed, the picture will be taken immediately.
To save power, remote-control mode is canceled if the remote
control is not operated for more than eight minutes.
Attach the eyepiece cap if there is a bright light source behind
the camera.
The remote control may not operate with backlit subjects or
under fluorescent light.
The IR Remote Control RC-3 is not splashproof.
Attaching the Eyepiece Cap
1. Remove the eyepiece
cup.
2. Slide the eyepiece cap
on.
The eyepiece cap prevents exposure problems caused by stray
light from entering the eyepiece.
Focus Hold in Remote Control Mode
2. Center your subject in the
focus frame, then press
the shutter-release button
partway down until the
green focus-lamp glows.
3. Lift your finger from the
shutter-release button.
When your subject is not centered in the focus frame, use
manual focus or focus hold.
4. Recompose the picture, if
necessary.
1. Set the camera to the
remote-control mode.
5. Point the remote toward the front of the camera and
press the • or 2s button.
Focus will remain locked until any button on the camera is
pressed.
AF ILLUMINATOR
63
REMOTE-CONTROL (optional)
62
Changing the Battery
The remote control uses a 3V lithium battery (CR2032).
When pressing the remote-control buttons does not release
the cameras shutter, the battery must be replaced.
1. Pull out the battery
chamber and remove the
old battery.
2. Insert a new battery into
the battery chamber with
its plus side up.
3. Slide the battery chamber
back into the remote
control.
The AF Illuminator is a secondary function of the built-in flash.
When the scene is too dark for the camera to focus
accurately, the built-in flash fires a few short bursts before
and after the lens is focused to provide the illumination
necessary for the camera to focus on your subject. If it will
interfere with your subject or is inappropriate, the AF
Illuminator can be canceled.
The range of the AF Illuminator flash is approximately 0.6 -
5.0m (2.0 - 16.4 ft.)
The AF Illuminator will not fire in Sports Mode.
Canceling the AF Illuminator
Press the shutter-release button partway down to return to the
normal data-panel display.
Repeat the procedure to turn the AF Illuminator back on.
1. Press the flash-mode and
exposure-compensation
buttons at the same time.
on AL appears in the data
panel.
2. Press the exposure-
compensation button.
oFF AL appears in the data
panel.
65
EXPOSURE COMPENSATION
64
This function lets you compensate exposure +/- 3 EV in 1/2
EV increments when the cameras metering system may not
be able to accurately determine exposure. More exposure is
recommended for very bright scenes, such as snow or beach
scenes. Less exposure is recommended when the scene is
composed of mostly darker tones.
Over Exposure Under Exposure
Metered Exposure
1. Open the control-panel
door.
2. Press the exposure-
compensation button
and…
3. turn the control dial until
the desired compensation
value appears in the data
panel.
Press the shutter-release
button partway down to return
the normal data-panel display.
or will remain in the data panel
as a reminder that exposure
compensation is set.
To cancel exposure compensation, repeat the above procedure
and select 0.0.
67
WIRELESS/REMOTE OFF-CAMERA FLASH
66
Built-in Flash Wireless/Remote Flash
Wireless/Remote Off-Camera Flash is available with the
Minolta 5400HS, 5400xi, and 3500xi accessory flashes.
Wireless/Remote flash give you access to the greater range
and creative control available with an accessory flash.
In Wireless/Remote flash mode, the off-camera flash is
triggered by a coded signal from the cameras built-in flash
when you press the shutter-release button. When proper
exposure has been received, another signal cuts the
accessory flash off.
Setting Wireless/Remote Flash Mode
2. Press the flash-mode
button to raise the built-in
flash.
3. Set the flash’s channel
selector to channel 1. See
your flash manual.
4. 3500xi
Turn the flash off.
Press and hold the ON/OFF
button until the wireless
indicator glows.
3500xi
5400HS
5400xi
5400HS
Press the mode button until
WIRELESS appears in the
flashs data panel.
5400xi
While in the main menu,
press the WIRELESS/RATIO
button until W.L - F.1
appears in the flashs data
panel.
1. Open the control-panel
door then press the
wireless-flash button until
WL appears in the
camera’s data panel.
69
WIRELESS/REMOTE OFF-CAMERA FLASH
68
Taking Pictures in Wireless/Remote Flash Mode
1. Position your camera and 3500xi flash unit using the
information on this page. If you are using a flash
unit other than the 3500xi off camera, refer to the
instruction manual for that flash to determine the
aperture, camera to subject distance, and the flash
to subject distance.
The off-camera flash may not detect the control signals if it is
placed behind the subject.
3500xi Subject
Distance
Camera Subject
Distance
The maximum flash subject
distance is 5.0 m (16.4 ft.).
Aperture Camera Subject Distance 3500xi Subject Distance
1.4 5.0 m (4.6 16 ft.)f/4.0 1.0 5.0 m (3.3 16 ft.)
1.2 5.0 m (3.9 16 ft.)f/4.8 0.85 5.0 m (2.8 16 ft.)
1.0 5.0 m (3.3 16 ft.)f/5.6 0.7 4.5 m (2.3 14.5 ft.)
Calculated for ISO 200 film only.
2. The orange flash-lamp
will glow when the built-in
flash is charged. When
the off-camera flash is
charged, its AF
illuminator will blink.
3. Press the flash-mode
button to test fire the
accessory flash.
4. Press the shutter-release
button all the way down
to take the picture.
Using the Optional Remote Control
To avoid underexposed images when using the remote
control with wireless/remote off-camera flash, keep the
remote control at least one meter away from, and do not
point the remote control at, the off-camera flash.
Canceling the Wireless/Remote Flash
1. Press the wireless-flash button.
WL will disappear from the data panel.
2. 3500xi: Turn the flash off. Press and hold the ON/OFF
button until the wireless indicator dissappears.
5400HS: Press the mode button until WIRELESS
disappears from the flashs data panel.
5400xi: While in the main menu, press the
WIRELESS/RATIO button until W.L - F.1 disappears from
the flashs data panel.
PROGRAM-RESET BUTTON
71
APPENDIX
70
The program-reset button
quickly returns the camera to
fully-automatic operation.
Pressing the program-reset
button will set the camera as
follows:
Exposure mode
Focus mode
Flash mode
Exposure Compensation
Film-drive mode
Self-timer
Wireless/Remote Flash
P mode
Autofocus
Auto-on
+/- 0
Single-frame advance
Canceled
Canceled
FUNCTION P-MODE SETTING
Date, red-eye reduction, and AF illuminator settings will not
change.
73
LAB SERVICES
72
To receive the best possible prints,
take your film to a photolab displaying
the Certified Advanced Photo System
Photofinishing Service logo.
Photofinishers displaying this logo
have been certified according to
Advanced Photo System guidelines.
The following is a list of services required for certification, see
your photolab for a full list of available services.
1. CHP - Print Format
Your film will be printed according to
the format set when the picture was
taken.
2. Date Imprinting
The date and time are printed on the
back of the picture in the chosen format.
3. PQI - Print Quality Improvement
The lab will compensate (or not compensate) printing
according to the data recorded on the magnetic data strips.
4. Film is returned in the cassette.
To keep the film dust free and aid in organization, film is
returned in its original film cassette. The VEI will be set to
to prevent accidental loading.
Reprints
Images are always captured in the H format (High-Vision), so
any of the three formats can be selected when ordering
reprints.
5. Index Print
An index print showing a
numbered image of each
frame is included with your
returned order.
75
ACCESSORY INFORMATION
74
This camera is designed to work specifically with lenses, and
accessories manufactured and distributed by Minolta. Using
incompatible accessories with this camera may result in
unsatisfactory performance or damage the camera and
accessories.
Lenses
All V-series lenses can be used with this camera.
Lens Hood
Use a lens hood to reduce flare and ensure maximum image
quality.
Remove the lens hood before using the cameras built-in flash.
To attach a bayonet mount lens hood, fit the lens hood
into the bayonet mount on the end of the lens barrel,
then turn the lens hood clockwise until it stops.
If your lens and lens hood
have guide marks, align the
red line on the lens hood
with the red line on the lens,
then turn the lens hood
clockwise until the dot on
the lens hood is lined up
with the line on the lens.
To store the lens hood, reverse it, attach it to the lens, then
replace the lens cap.
SPECIFICATIONS for the V LENS 28-56mm f/4–5.6
Construction 7 elements/7 groups
Angle of View 34° 10’– 63° 20
Minimum Focus Distance 0.35 m (5.5 in.)
Maximum Magnification 0.18X
Minimum f-stop f/32
Filter Diameter 40.5 mm
Dimensions Ø59 x 52 mm
Weight 115 g
The specifications are based on the latest information available
at the time of printing and are subject to change without notice.
Flashes
Minolta flashes 3500xi, 5400HS, and 5400xi are compatible
in wireless/remote flash mode only (see pages 66 - 69).
Other accessory flashes cannot be used on this camera.
This manual contains information regarding products
introduced before May, 1997. To obtain compatibility
information for products released after this date, contact the
nearest authorized Minolta Service Facility.
77
CARE AND STORAGE
76
Cleaning
If the camera or lens barrel is dirty,
wipe it gently with a soft, clean, dry
cloth. If the camera or lens comes in
contact with sand, gently blow away
loose particles - wiping may scratch
the surface.
To clean the lens surface, first brush away any dust or sand
then, if necessary, moisten a lens tissue with lens cleaning
fluid and gently wipe the lens in a circular motion, starting
from the center.
Never place lens fluid directly on the lens.
Never touch the interior of the camera, especially the
shutter and mirror, doing so may impair their alignment and
movement. Dust on the mirror will not affect the picture
quality.
Never use compressed air to clean the cameras interior, it
may cause damage to sensitive interior parts.
Never use organic solvents to clean the
camera.
Never touch the lens surface with your
fingers.
Storage
When storing your camera for extended periods,
Always attach the protective caps.
Store in a cool, dry, and well-ventilated area away from dust
and chemicals such as moth balls. For long periods, place
the camera in an airtight container with a silica gel drying
agent.
Periodically release the cameras shutter to keep it
operating properly.
Before using after prolonged storage, check the cameras
operation to make sure it is functioning properly.
Before Important Events
Check the cameras operation carefully, or take test
photographs.
Minolta is not responsible for any loss that may occur due to
an equipment malfunction.
Questions and Service
If you have questions about your camera, contact your local
camera dealer or write to the Minolta distributor in your
area.
Before shipping your camera for repair, please contact an
authorized Minolta Service Facility for details.
This mark certifies that this product meets the
requirements of the EU (European Union) concerning
interference causing equipment regulations. CE stands
for Conformité Européenne (European Conformity).
79
TECHNICAL DETAILS
78
Camera Type: IX240 type system camera
Lens: Minolta V lens
AF System: Type: TTL phase-detection system
Sensor: One CCD line sensor
Focus Modes: Autofocus/Manual focus
AF Mode Selection: Single-frame/Continuous
drive
Sensitivity: EV 1-19 (ISO 200)
AF Illuminator: Type: Flash
Range: 0.6 - 5m
Metering: Without Flash: 2-segment metering
With Flash: Direct TTL metering
Range: EV 4-20 (f/3.5 ISO 200)
Shutter: Type: Electronically controlled, vertical traverse
focal-plane
Range: 1/1000 - 30 sec.
Flash Sync: 1/90 sec. or slower (1/45 sec. or
slower with wireless flash)
Flash: Type: Built-in, pop-up type
Guide Number: 17 (at ISO 200)
Coverage: 22mm (Advanced Photo System
focal length)
Recycling time: 3.5 sec.
Modes: Autoflash, Manual Fill-flash, and Flash
Cancel
Viewfinder: Type: SLR type, TTL relay-optical
Field of view: 90%
Magnification: 0.7X
Diopter: -3 to +1 diopters
Eye relief: 29 mm from the eyepiece lens
Film Transport: Loading: Drop-in loading
Continuous Drive: Approx 1 frame per sec.
Frame counter: Backwards frame counter
Rewind: Automatic and manual
Film Speed Setting:Automatic: ISO 25 to ISO 6400 (ISO 25
1000 with flash)
Splashproof: Equivalent to IPX2 (IEC standard)
Power: Two 3-volt CR2 lithium batteries
Performance: Performance is based on Minoltas standard test
method using 25 exposure IX240 film, a V 28-
56 f/4 - 5.6 lens and fresh batteries. The lens is
focused from infinity to 2.0 m and back twice
and the shutter-release button held partway
down for ten seconds before the shutter is
released. Exposures are taken at a rate of two
rolls per month.
If more operations are performed during use,
battery performance will be lower. To maximize
battery performance, slide the main switch to
lock when the camera is not in use.
Dimensions: 24.5 x 78.5 x 55.5 mm
4.9 x 3.1 x 2.2 in.
Weight: 315 g
11.1 oz.
Specifications and accessories are based on the latest
information available at the time of printing and are subject to
change without notice.
Flash Use
# of Rolls at 20 °C
(approx.)
none 30
50% 13
100% 9
81
TROUBLE-SHOOTING
80
Refer to these pages to determine the cause of a problem
you are experiencing with your camera. If the information
does not cover the problem you are experiencing or the
condition continues, contact your nearest Minolta Service
Facility.
Problem Cause Solution Page
No display appears when
the camera is switched on
Batteries are loaded
incorrectly
Remove and reinstall the batteries.
Camera operation malfunction Remove and reinstall the batteries.
18
18
Autofocus does not work
when shutter-release
button is pressed partway
down
Situation is unsuitable for
autofocus
Use focus hold or manual focus.
Camera is set to the manual
focus mode
Set to the autofocus mode by pressing the focus
mode button.
31, 56
56
Subject is too close Check the minimum focus distance for your lens.
Shutter cannot be released
Focus cannot be confirmed Use focus hold, or manual focus.
Camera is attached to a
microscope or telescope
Contact a Minolta service facility for information.
31, 56
Flash fires when the
shutter-release button is
pressed partway down
The AF illuminator is on This is a normal camera operation.
63
Flash picture is too dark Subject is beyond flash range Make sure the subject is within the flash range.
32
Lower part of flash picture
is dark
Lens hood attached Remove lens hood.
74
83
CAMERA WARNINGS
82
MODE DISPLAY ACTION PAGECAUSE
and blink
All
Batteries have been
replaced.
Err appears
All
Camera operation
malfunction.
appears
All
Lens is not attached, or is
attached improperly.
1000 or 30 blinks
A
Required shutter speed is
beyond the range of the
camera.
Maximum or minimum
aperture blinks
S
Required aperture is
beyond the range of the
lens.
Reset the date and time.
52 53
Remove and reinstall the batteries.
18
Attach the lens, or disconnect and reattach the
lens.
20
Select a larger/smaller aperture until the display
stops blinking.
45 46
Select a faster/slower shutter speed until the
display stops blinking.
48 49
85
QUICK REFERENCE GUIDE
84
Program
Reset
Focus Hold
Setting
manual
fill-flash
Setting
flash cancel
Setting
red-eye
reduction
Selecting a
subject
program
mode
Taking
night
portraits
Taking
night
scenes
Imprinting
the
date/time
Manual
rewind
Portrait Mode
Landscape Mode
Close-up Mode
Sports Mode
Night Portrait Mode
Minolta Co., Ltd. 3-13, 2-Chome, Azuchi-Machi, Chuo-Ku, Osaka
541, Japan
Minolta GmbH Kurt-Fischer-Strasse 50, D-22923 Ahrensburg,
Germany
Minolta France S.A. 365 Route de Saint-Germain, F-78420 Carrieres-
Sur-Seine, France
Minolta (UK) Limited Rooksley Park, Precedent Drive, Rooksley, Milton
Keynes, MK13 8HF, England
Minolta Austria Ges. m.b.H. Amalienstrasse 59-61, A-1131 Wien, Austria
Minolta Camera Benelux B.V. Zonnebaan 39, P.O. Box 6000, NL-3600 HA
Maarssen, The Netherlands
Belgium Branch Kontichsesteenweg 38, B-2630 Aartselaar,
Belgium
Minolta (Schweiz) AG Riedstrasse 6 CH-8953 Dietikon, Switzerland
Minolta Svenska AB P.O.Box 9058, Albygatan 114, S-17109 Solna,
Sweden
Finland Branch Niittykatu 6 PL 37 SF-02201 Espoo, Finland
Minolta Portugal Limitada Rua Afonso Lopes Vieira 55-B P-1700 Lisboa,
Portugal
Minolta Corporation
Head Office 101 Williams Drive, Ramsey, New Jersey 07446,
U.S.A.
Los Angeles Branch 11150 Hope Street Cypress, CA 90630, U.S.A.
Minolta Canada Inc.
Head Office 369 Britannia Road East, Mississauga, Ontario
L4Z 2H5, Canada
Vancouver Branch 106-3850 Jacombs Road, Richmond, B.C. V6V
1Y6, Canada
Minolta Hong Kong Limited Room 208, 2/F, Eastern Center, 1065 Kings
Road, Quarry Bay, Hong Kong
Minolta Singapore (Pte) Ltd. 10, Teban Gardens Crescent, Singapore 608923
Shanghai Minolta Optical
Products Co., Ltd. 368 Minolta Road, Songjiang, Shanghai, China
© 1997 Minolta Co., Ltd. under the Berne Convention and
Universal Copyright Convention
9222-2102-31 (P9705-A705) Printed in Japan
2

Hulp nodig? Stel uw vraag in het forum

Spelregels

Misbruik melden

Gebruikershandleiding.com neemt misbruik van zijn services uitermate serieus. U kunt hieronder aangeven waarom deze vraag ongepast is. Wij controleren de vraag en zonodig wordt deze verwijderd.

Product:

Bijvoorbeeld antisemitische inhoud, racistische inhoud, of materiaal dat gewelddadige fysieke handelingen tot gevolg kan hebben.

Bijvoorbeeld een creditcardnummer, een persoonlijk identificatienummer, of een geheim adres. E-mailadressen en volledige namen worden niet als privégegevens beschouwd.

Spelregels forum

Om tot zinvolle vragen te komen hanteren wij de volgende spelregels:

Belangrijk! Als er een antwoord wordt gegeven op uw vraag, dan is het voor de gever van het antwoord nuttig om te weten als u er wel (of niet) mee geholpen bent! Wij vragen u dus ook te reageren op een antwoord.

Belangrijk! Antwoorden worden ook per e-mail naar abonnees gestuurd. Laat uw emailadres achter op deze site, zodat u op de hoogte blijft. U krijgt dan ook andere vragen en antwoorden te zien.

Abonneren

Abonneer u voor het ontvangen van emails voor uw Minolta Vectis S100 bij:


U ontvangt een email met instructies om u voor één of beide opties in te schrijven.


Ontvang uw handleiding per email

Vul uw emailadres in en ontvang de handleiding van Minolta Vectis S100 in de taal/talen: Engels als bijlage per email.

De handleiding is 1,17 mb groot.


U ontvangt de handleiding per email binnen enkele minuten. Als u geen email heeft ontvangen, dan heeft u waarschijnlijk een verkeerd emailadres ingevuld of is uw mailbox te vol. Daarnaast kan het zijn dat uw internetprovider een maximum heeft aan de grootte per email. Omdat hier een handleiding wordt meegestuurd, kan het voorkomen dat de email groter is dan toegestaan bij uw provider.

Stel vragen via chat aan uw handleiding

Stel uw vraag over deze PDF

Uw handleiding is per email verstuurd. Controleer uw email

Als u niet binnen een kwartier uw email met handleiding ontvangen heeft, kan het zijn dat u een verkeerd emailadres heeft ingevuld of dat uw emailprovider een maximum grootte per email heeft ingesteld die kleiner is dan de grootte van de handleiding.

Er is een email naar u verstuurd om uw inschrijving definitief te maken.

Controleer uw email en volg de aanwijzingen op om uw inschrijving definitief te maken

U heeft geen emailadres opgegeven

Als u de handleiding per email wilt ontvangen, vul dan een geldig emailadres in.

Uw vraag is op deze pagina toegevoegd

Wilt u een email ontvangen bij een antwoord en/of nieuwe vragen? Vul dan hier uw emailadres in.


Info