42277
14
Verklein
Vergroot
Pagina terug
1/40
Pagina verder
1
Thank you for purchasing the Minolta Vectis 2000. The Vectis 2000 is an easy
to operate lens shutter camera from Minolta’s line of Advanced Photo
System™ cameras. Your camera features Drop-in Loading, a 22.5 - 45mm
zoom lens, and a wide focus frame. The sleek and compact design gives the
Vectis 2000 a sophisticated appearance suitable for any occasion. This
manual is designed to help you understand the operation of your camera and
its functions. Please familiarize yourself with the names of the controls and
their locations on the camera, then read this manual thoroughly.
* Advanced Photo System™ is a trademark of the five system developing companies.
Advantages of the Advanced Photo System
New print formats…
Classic C print, wider H print, and panorama P print formats are available with
Advanced Photo System cameras.
New processing…
In addition to returning your prints in the format you
selected, certified photofinishers will return your
Advanced Photo System film in its original cassette
with an index print. To order reprints, simply choose
the images you want from the index print. No more
searching through negatives to find the right frame.
Easier to load…
Advanced Photo System cameras use the
new IX240 type film. This new film
features Drop-in Loading to make loading
your camera simple, the first time, every
time. Indicators on the cassette tell you
and your camera if the film is unexposed,
partially exposed, exposed, or processed.
2
FOR PROPER AND SAFE USE.....................................................................4
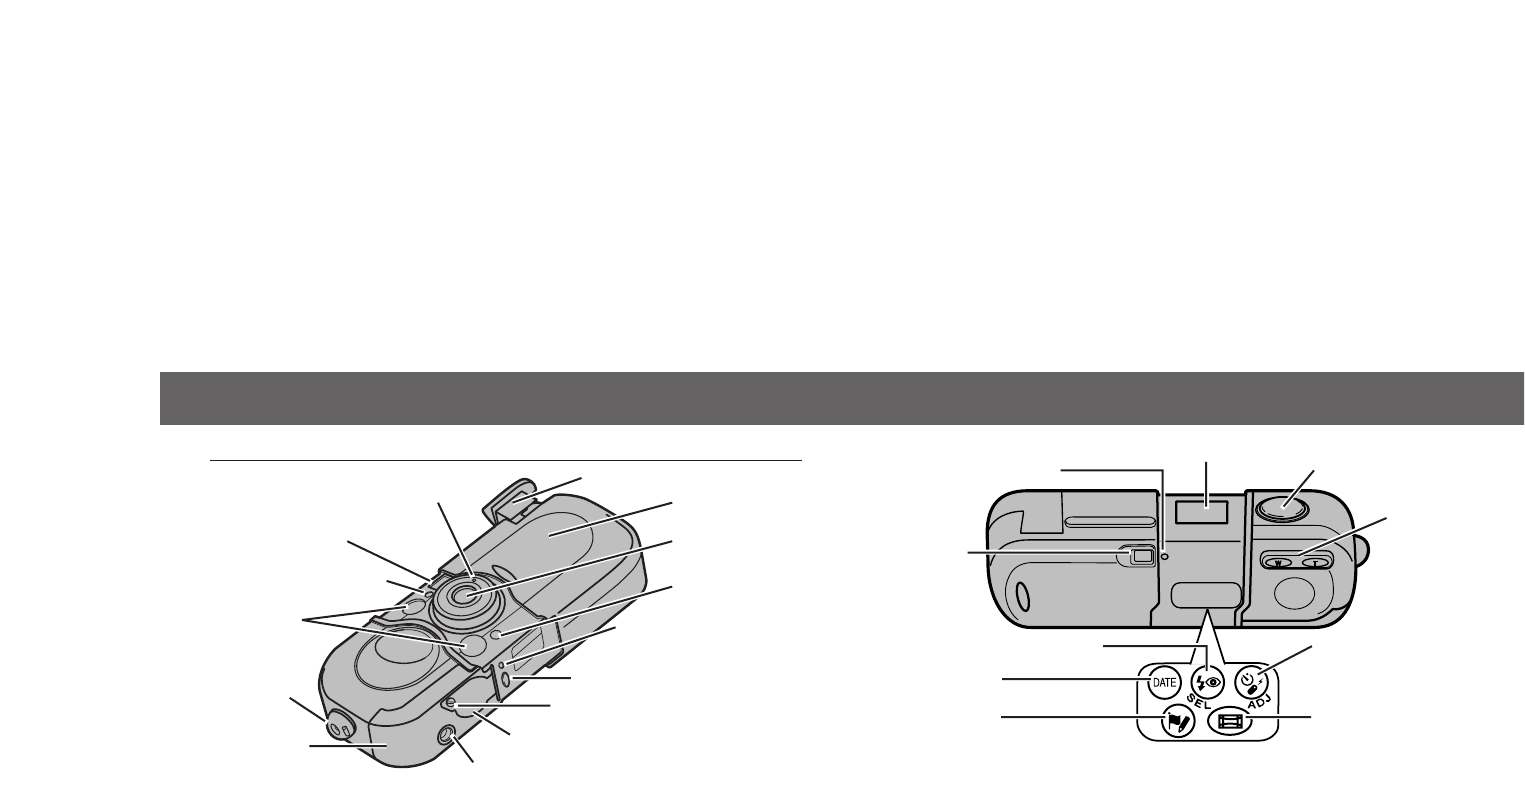
NAMES OF PARTS.........................................................................................6
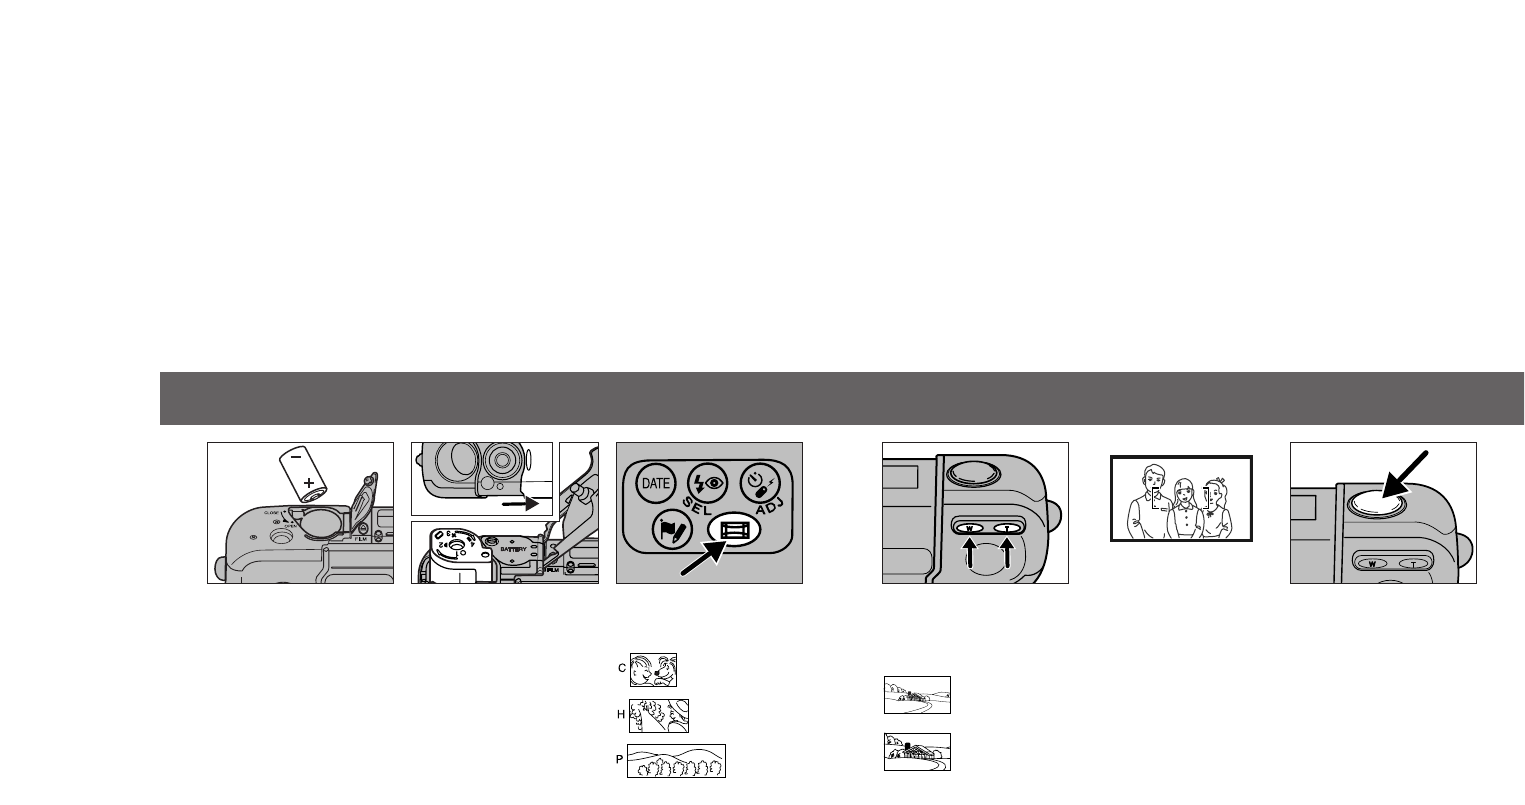
QUICK OPERATION.....................................................................................10
BASIC OPERA
TION
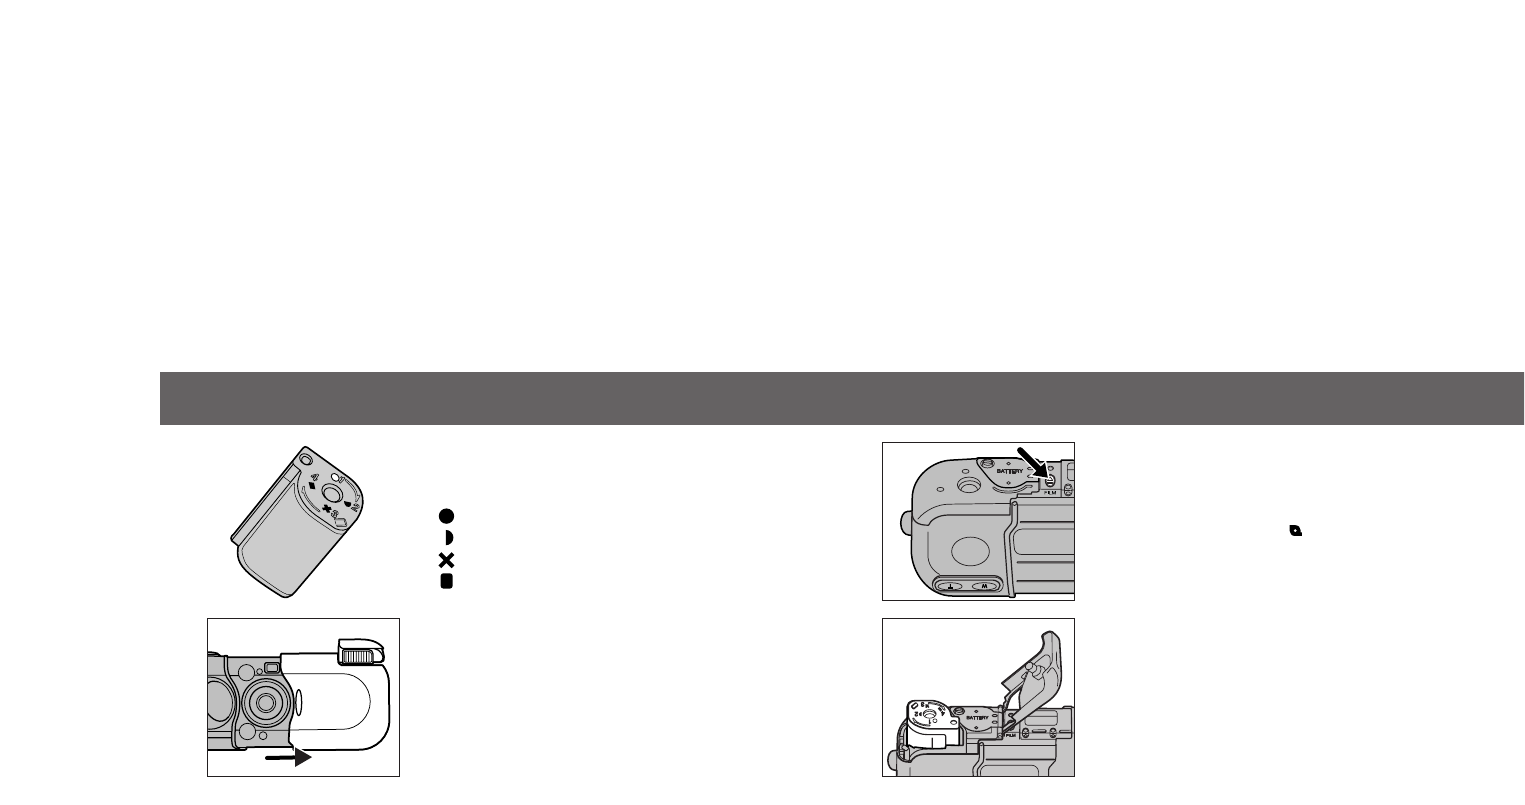
Attaching the Strap...................................................................................13
Installing the Battery.................................................................................14
Checking the Battery Power.....................................................................15
Loading Film.............................................................................................17
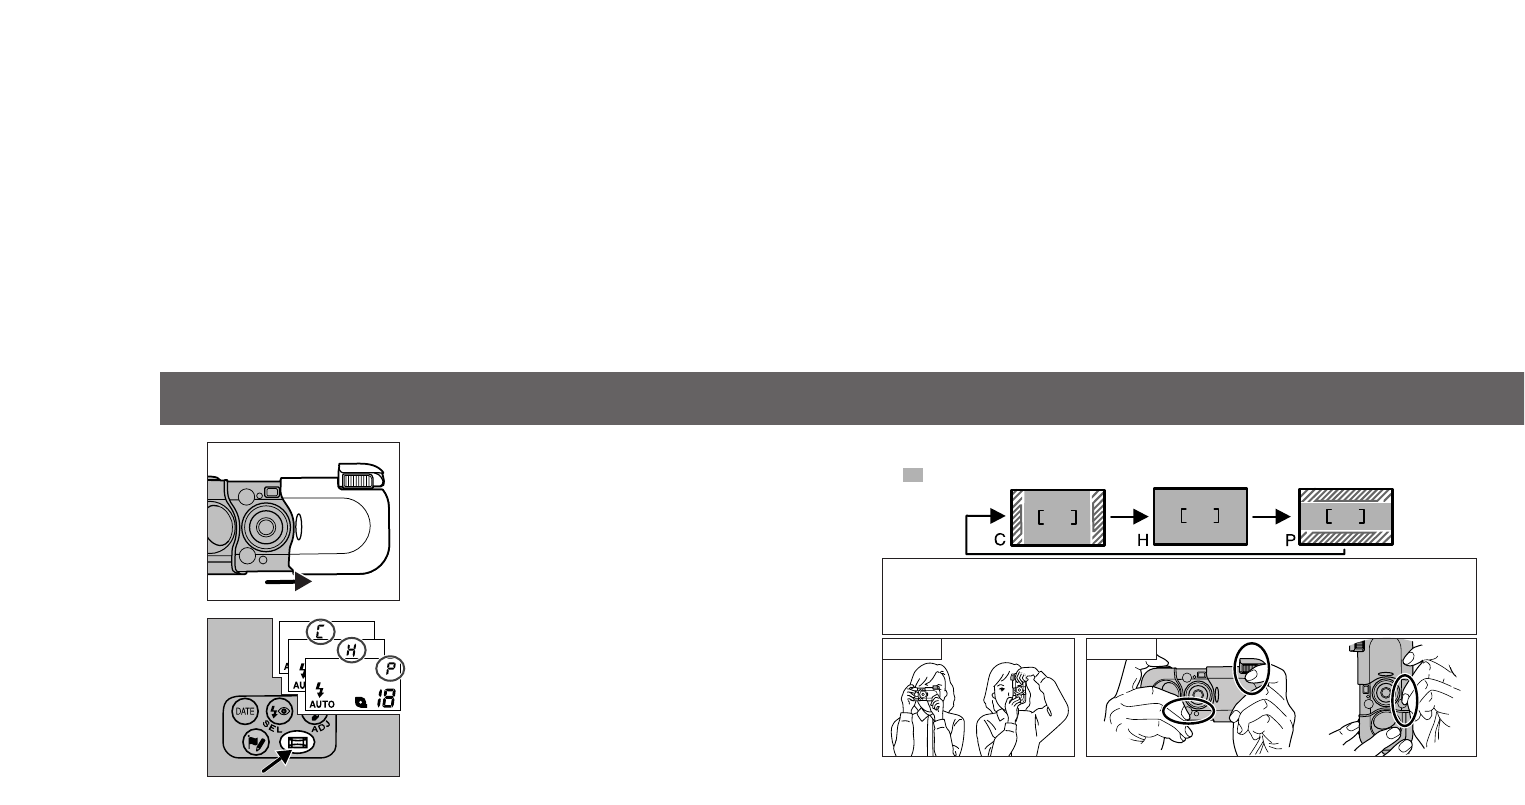
Full-Auto Operation ..................................................................................22
For Closer Subjects..................................................................................26
Close-framing Guide (C and H formats)............................................27
Special Focusing Situations .....................................................................28
Focus Hold ...............................................................................................29
Rewinding the Film...................................................................................31
Processing................................................................................................34
USING THE BUILT-IN FLASH
Selecting the Flash Mode.........................................................................36
Flash Range.............................................................................................37
Red-eye Reduction...................................................................................38
Fill Flash...................................................................................................39
Flash Cancel ............................................................................................40
Night Portrait ............................................................................................41
Landscape/Night View..............................................................................42
ADDITIONAL
FEATURES
Date Imprinting.........................................................................................44
Title Imprinting..........................................................................................50
Self-timer ..................................................................................................58
Remote Control (Sold Separately) ...........................................................60
APPENDIX
Lab Services.............................................................................................66
Caring For Your Camera ..........................................................................68
Technical Details ......................................................................................74
3
TABLE OF CONTENTS
CAUTION
4 5
FOR PROPER AND SAFE USE
Read and understand all warnings and cautions before using this product.
WARNING
Batteries may become hot or explode due to improper use.
Use only the batteries specified in this instruction manual.
Do not install the batteries with the polarity (+/–) reversed.
Do not subject batteries to fire or high temperatures.
Do not attempt to recharge, short, or disassemble.
Follow local codes for battery disposal. Tape over lithium battery
contacts before disposal.
Use caution, accidents may occur when using this product near young
children.
Keep batteries or things that could be swallowed away from young
children. Contact a doctor immediately if an object is swallowed.
Immediately remove the batteries and discontinue use if...
the product is dropped or subjected to an impact in which the interior
is exposed.
the product emits a strange smell, heat, or smoke.
Do not disassemble. Electric shock may occur if a high voltage circuit
inside the product is touched. Take your camera to a Minolta Service
Facility when repairs are required.
The lens retracts when the camera is turned off or Auto Power Off is
activated. Touching the lens barrel while it is retracting may cause injury.
6 7
NAMES OF PARTS
Flash-mode (36)/Select button Self-timer (58)/
Remote-control (60)/
Adjust button
Data panel
Shutter-release button
Title button (51)
Zoom
buttons (24)
Date button (44)
Format button (22)
*- Do not touch
Viewfinder window*
AF windows*
Meter window*
Remote-control receiver*
Flash* (35)
Self-timer/Remote-control lamp*
Lens*
Tripod socket
Film-chamber release (19)
Film chamber
Manual-rewind button (33)
Strap
eyelet (13)
Battery chamber (14)
Battery-chamber lock (14)
Lens cover
Ready lamp (green) (9)
Viewfinder*
For information on specific parts, refer to the page numbers shown in parenthesis.
Camera Body
8 9
NAMES OF PARTS - CONT’D
• Only the necessary indicators will appear in the data panel.
Flash-mode
indicators (36)
Self-timer indicator (58)
Remote-control
indicator (60)
Cassette mark Frame counter
Battery-condition
indicator (15)
Title marks
(50-56)
Title/Date/Time/ISO/Format display
Data Panel Viewfinder
Ready lamp (green) (25)
Close-framing guide (27)
Focus frame
With the shutter-release button pressed partway down -
Glows: Camera is ready
Blinks quickly: Subject is too close (shutter is locked)
Blinks slowly: Camera shake warning
Off: Flash is charging
10 11
QUICK OPERATION
W
T
3.Select the print
format (p. 22).
4.Frame the
subject as
desired (p. 24).
5.Center your
subject in the
focus frame
(p. 24).
6.Press the
shutter-release
button all-the-
way down to
take the picture
(p. 25).
1.Insert the battery
(p.14).
2.Open the lens
cover to turn the
camera on, then
insert the film
(p. 17).
12 13
ATTACHING THE STRAP
BASIC OPERATION
Attach the strap as shown.
Button keys are included on the strap. Use
the bigger key to turn the battery-chamber
lock, smaller key to push the manual-rewind
button.
Button keys
14 15
INSTALLING THE BATTERY CHECKING THE BATTERY POWER
Your camera uses one 3-volt CR-2 lithium
battery to supply power for all camera
operations.
1.Turn the camera upside down, then
open the battery chamber as shown,
using the bigger button key.
2.Insert the battery into the chamber as
indicated by the + and – marks.
3.Close the battery chamber, then turn
the lock until it stops at CLOSE.
After installing a new battery, reset the date
and time (p. 46).
Each time the lens cover is opened, a symbol will appear in the data
panel to indicate the power status of the battery.
Briefly appears. Power is sufficient for all
camera operations.
Power is sufficient, but the battery must be
replaced soon.
Replace the battery. The shutter will lock
until the battery is replaced.
Continued on following page.
16 17
CHECKING THE BATTERY POWER - CONT’D LOADING FILM
Your camera uses IX240 type film designed for use in Advanced Photo
System cameras.
Your camera’s automatic transport system loads the film, sets the film
speed, and advances the film after each exposure.
Use film from ISO25-3200. Your camera will automatically set the
proper ISO.
After loading, the film chamber cannot be opened until rewind has been
initiated.
DEP, Double Exposure Prevention, prevents the camera from
accepting exposed film.
This camera will only load film with the mark current.
If no display appears, replace the battery or check that it is inserted
correctly.
Auto Power Off: The data panel will shut off and the lens will retract if
the camera is not operated for more than eight minutes. Press the
shutter-release button partway down, or press either zoom button to
resume operation.
Do not obstruct the lens while it is retracting.
Continued on following page.
18 19
LOADING FILM - CONT’D
3.Insert the cassette into the film
chamber with the VEI on top.
Do not use force when opening the film-
chamber door.
2.Turn the camera upside down, then
press the film-chamber release. The
film-chamber door will open partway.
OPEn will appear and will blink in the data
panel.
Visual Exposure Indicators
The current VEI has a white indicator behind it.
VEI MEANING
UNEXPOSED
PARTIALLY EXPOSED
EXPOSED
PROCESSED
1.Open the lens cover to turn the
camera on.
The built-in flash pops up and the lens
extends.
Continued on following page.
20 21
LOADING FILM - CONT’D
If 0 blinks in the data panel, press the film-
chamber release, open the chamber, then
remove the film.
- If the film’s current VEI is , insert a new roll of
film.
- If a partially exposed roll of film was loaded into this
camera, the VEI has been changed from to .
- If a processed roll of film was loaded into this
camera, the VEI has been changed from to .
- If the film’s current VEI is , remove the film,
remove and reinsert the battery, then reload the
film. If the film will not load, contact the nearest
authorized Minolta Service Facility.
4.Press the film-chamber door closed
until it clicks.
The data panel will display the cassette mark
and the film’s ISO, then the number of frames
remaining on the roll .
After the film is loaded, pressing the film-
chamber release will display the film’s ISO in
the data panel . The display will disappear
2 seconds after the finger is released.
2
1
1
2
22 23
FULL-AUTO OPERATION
Hold the camera steady, making sure your fingers do not cover the
flash, AF windows, or meter window. If you are taking a vertically framed
picture, turn the camera so the flash is on top.
The viewfinder will change to match your selection. The area shown by
will be on the final print.
1.Open the lens cover to turn the
camera on.
The camera is set for fully-automatic operation
and the flash will fire automatically when
necessary.
The print format is set to C, H, or P, whichever
was selected last.
2.Press the format button to select the
print format.
Correct
Continued on following page.
Incorrect
24 25
FULL-AUTO OPERATION - CONT’D
5.When the green ready lamp glows,
press the shutter-release button all-
the-way down to take the picture.
Do not hold or obstruct the lens barrel.
If the ready lamp does not glow, the flash is not
charged. Wait until it glows, then take the
picture.
If the ready lamp blinks quickly and the
shutter is locked, your subject is too close
(p.26).
Press the shutter-release button with a slow
steady squeeze - never a quick jab.
After use, close the lens cover part way until
the lens retracts, then close completely.
3.Looking through the viewfinder, frame
the subject as desired.
Press the W zoom button to zoom out.
Press the T zoom button to zoom in.
4.Center your subject in the focus
frame, then press the shutter-release
button partway down.
When the picture needs to be recomposed due
to parallax, the close-framing guide will appear
in the viewfinder (p.27).
If the camera can not determine the focus distance, the green focus lamp will
glow or blink slowly and the picture may not be in focus.
C or HPrint Format P
Focal Length 22.5mmAll
Focus Distance
0.4m -
(1.3 ft. - )
0.48m -
(1.6 ft. - )
26 27
FOR CLOSER SUBJECTS
CLOSE-FRAMING GUIDE (C and H Formats )
The green ready lamp will blink rapidly and the shutter will lock when you
are closer than the focus distance indicated below.
For a subject within the focus distance but close enough to cause
parallax, the close-framing guide will appear in the viewfinder when you
press the shutter-release button partway down.
Without lifting your finger from the shutter-release button, move the
camera slightly upward to recompose the picture, then press the shutter-
release button all-the-way down to take the picture.
The area shown by will be on the final print.
45mm
1.0m -
(3.3 ft. - )
28 29
SPECIAL FOCUSING SITUATIONS FOCUS HOLD
Subjects outside the focus frame may not be
in focus. Use focus hold to ensure accurate
focusing.
1.Center your subject in the focus
frame.
Some scenes or subjects, like the examples below, are difficult for the
autofocus system to lock on to. In these shooting situations, focus hold
(p.29) on another object with the same brightness and the same distance
from you as your main subject, recompose, then press the shutter-
release button all-the-way down to take the picture.
Bright light sources such as the sun or neon
lights
Highly reflective surfaces such as water, mirrors,
etc.
Flame, fireworks, etc.
Dark objects and surfaces with low reflectance
Objects behind glass, bars, or other such as
partitions
Continued on following page.
Your camera automatically rewinds the film into the cassette after the last
exposure.
1.Wait for the film to completely rewind
into the cassette.
The lens will retract before rewind.
The frame counter will count down during
rewind.
0 will appear in the frame counter and will
blink when rewind is complete.
30 31
FOCUS HOLD - CONT’D REWINDING THE FILM
2.Press and hold the shutter-release
button partway down so the green
ready lamp glows.
3.Without lifting your finger,
recompose the picture and press
the shutter-release button all-the-
way down to take the picture.
Lift your finger from the shutter-release
button to cancel focus hold.
Continued on following page.
32 33
REWINDING THE FILM - CONT’D
1.Gently press the manual-rewind
button using the smaller button key.
2.Follow steps 1- 3 from automatic
rewind.
Use manual rewind to rewind the film before the roll is finished.
MANUAL REWIND
3.Open the film chamber and remove
the film.
OPEn will appear and will blink in the data
panel.
The film’s VEI indicator will be .
2.Turn the camera upside-down, then
press the film-chamber release to
open the film chamber.
34 35
PROCESSING
USING THE BUILT-IN FLASH
When you open the lens cover to turn the camera on, the built-in
flash is set to Autoflash or Autoflash with red-eye reduction. The
flash will fire automatically when necessary.
For best results, take your film to a Certified
Advanced Photo System photofinisher
displaying this symbol (p. 66).
36 37
SELECTING THE FLASH MODE FLASH RANGE
The range of the built-in flash depends on the film speed and the focal
length you are using. To ensure proper exposure, make sure your subject
is positioned within the flash range.
* The flash range with red-eye reduction
Press the flash-mode button until the
desired indicator appears in the data
panel.
Flash modes remain selected after the picture
is taken.
Autoflash mode , Autoflash with red-eye reduction , Fill-flash ,
Flash cancel , Night Portrait , or Landscape/Night View can
be selected.
Film Speed
ISO 100
Film Speed
ISO 200
Film Speed
ISO 400
0.4 – 2.5 / 2.3*m
(1.3 – 8.3 / 7.7* ft.)
0.4 – 3.6 / 3.3*m
(1.3 – 11.8 / 10.8* ft.)
0.4 – 5.1 / 4.7*m
(1.3 – 16.7 / 15.3* ft.)
0.4 – 2.0 / 1.9*m
(1.3 – 6.7 / 6.1* ft.)
0.4 – 2.9 / 2.65*m
(1.3 – 9.5 / 8.7* ft.)
0.4 – 4.1 / 3.7*m
(1.3 – 13.4 / 12.3* ft.)
Focal Length
45mm
Focal Length
22.5mm
38 39
RED-EYE REDUCTION FILL FLASH
Press the flash-mode button until
appears in the data panel.
When you turn the camera off, the flash mode
will be reset to Autoflash or Autoflash with
red-eye reduction, whichever mode was used
last.
The flash will fire when the shutter is released regardless of lighting. Use
fill flash to illuminate a backlit subject or to reduce harsh shadows on
your subject’s face.
Press the flash-mode button until
appears in the data panel.
Warn your subject that the flash will fire a few
short bursts just before the picture is taken.
The flash mode will remain selected after you
turn the camera off.
Use the built-in flash’s red-eye reduction mode to reduce the red-eye
effect when photographing people or animals at night or in low light
situations. The flash will fire a few short bursts before the main flash burst
to reduce the red-eye effect.
40 41
FLASH CANCEL NIGHT PORTRAIT
Press the flash-mode button until
appears in the data panel.
The shutter speed may be slow. Use of a
tripod is recommended.
When you turn the camera off, the flash mode
will be reset to Autoflash or Autoflash with
red-eye reduction, whichever mode was used
last.
In this mode, the camera balances the flash and existing light exposure
so you can take beautiful pictures of people at sunset or at night. The
flash is set to fill flash with red-eye reduction.
Press the flash-mode button until
appears in the data panel.
Shutter speeds may be slow in this mode.
Use of a tripod is recommended.
When you turn the camera off, the flash mode
will be reset to Autoflash or Autoflash with
red-eye reduction, whichever mode was used
last.
The flash will not fire in this mode. Use flash cancel when you want to
photograph subjects that are beyond the flash range or to capture the
ambiance of existing light.
42 43
LANDSCAPE/NIGHT VIEW
ADDITIONAL FEATURES
Press the flash-mode button until
appears in the data panel.
The shutter speed may be slow. Use of a
tripod is recommended.
When you turn the camera off, the flash mode
will be reset to Autoflash or Autoflash with
red-eye reduction, whichever mode was used
last.
The flash will not fire in this mode and the focus is set to infinity. It can be
used to photograph night scenes, ensure sharp focus for landscapes and
other distant subjects, and should be used when photographing through
glass.
The sequence is as follows:
44 45
DATE IMPRINTING
Your camera records date and time information on the film’s magnetic
strip that certified photofinishers can imprint in the front and back of your
photographs (Date/Time Imprinting).
Some labs can not imprint date and/or time information on the front of your
photographs. See your photofinisher for a full description of available services.
Before taking the picture:
Press the date button until the data
panel displays the format you want to
see on the print.
When is displayed in the data panel, no data will be printed on
the front of the print, but the date and time of exposure will be
imprinted on the back of the print.
If the date/time display is blinking, date/time information will not be
imprinted. The date/time information needs to be reset (p.46).
Date Time No display
46 47
DATE IMPRINTING - Setting the Date and Time
Each press of the select button causes the
next item to blink.
4.Press the select button until all items
stop blinking to set the updated
information.
The data panel shows the date display briefly,
then the camera exits the set date/time mode.
1.Open the lens cover to turn the
camera on.
2.Press and hold the date button for
two seconds.
The date display will appear in the data panel
and the year will blink.
3.Press the adjust button to adjust the
blinking item , then press the select
button to make the next item blink .
Press and hold the adjust button to change
the value rapidly.
2
1
This camera has a quartz clock and automatic
calendar through the year 2029.
1 2
Stops
blinking
48 49
DATE IMPRINTING - Changing the Format
2.Press and hold the date button for
two seconds.
The date display will appear in the data panel,
and the year will blink.
3.Press and hold the select button for
two seconds.
All items in the date display blink.
4.Press the adjust button to change the
display format.
The format sequences as follows:
5.Press the select button to set the
updated information.
The data panel shows the updated format for
five seconds, then the camera exits the
change format mode.
Pressing the select button during the five
seconds will make the year blink for setting
the date and time (p.46).
The format will remain after replacing the
battery.
1.Open the lens cover to turn the camera on.
50 51
TITLE IMPRINTING TITLE IMPRINTING - Preselecting Titles
3.Press the title button to display the
title code you want to change.
Three title codes have been set into memory. You can change one or all
three title codes at any time.
1.Open the lens cover to turn the camera on.
2.Select the code for the title you want from the title list.
Three titles from the title list can be preset for use while taking pictures.
Any one of the three preselected titles can be selected before the picture
is taken (User Select Title Imprinting). When selected, the title will be
recorded on the film’s magnetic data strip. At certified Advanced Photo
System labs, the selected title will be printed on the back of the print.
See your photofinisher for details. Some labs may not be able to print the
titles in all of the available languages.
Titles are displayed in the data panel as a title
code. Please refer to the Title List sheet for the
titles available with this camera.
When appears in the data panel, the title will
be recorded on the print.
Continued on following page.
52 53
TITLE IMPRINTING - Preselecting Titles
6.Press the select button to make the
next digit blink , change its value
using the adjust button .
2
1
7.Press the select button to make the
language code blink.
4.Press and hold the title button for two
seconds.
The last digit of the title code number will
blink.
5.Press the adjust button to change its
value.
Press and hold the adjust button to change
the value rapidly.
Continued on following page.
1 2
Before taking the picture:
1.Press the title button to display the
code for the title you want.
Each press of the title button changes the title
code to the next selection.
54
55
TITLE IMPRINTING - Preselecting Titles TITLE IMPRINTING - Frame Title
8.Press the adjust button to change the
language code.
9.When the title information is correct,
press the title button.
The updated title will be recorded on the print
if you press the shutter-release button.
The data panel shows the updated title
briefly, then the camera exits the title mode.
Date/time display
Pressing any other button replaces the title
code with date/time display.
2.Take the picture. The magnetic data is written and the
selection is cancelled for the next frame.
56 57
TITLE IMPRINTING - Filmstrip Title
2.Press the shutter-release button all-the-way down to set the
title.
The camera advances to write the data on the film’s leader, then
rewinds the film.
3.When blinks in the data panel again, press the film-
chamber release and remove the film.
Set the filmstrip title before removing the film.
Once a filmstrip title is set, it can not be changed or cancelled using the
camera.
An additional title for the entire roll of film can be selected. Both the
filmstrip title and the frame title will be printed on the back of the print.
1.Press the title button to display the
desired filmstrip title.
Each press of the title button changes the title
code to the next selection.
After the film has been rewound and
blinks in the data panel:
No imprinting
58 59
SELF-TIMER
3.Press the shutter-release button all-the-way down.
will blink in the data panel during countdown.
The self-timer lamp will blink slowly. Just before the shutter is released,
the self-timer lamp will blink rapidly, then glow.
To cancel the self-timer, press the self-timer button or close the lens
cover to turn the camera off.
The self-timer is automatically cancelled after the shutter releases.
Do not press the shutter-release button while standing in front of the
camera.
1.Place the camera on a tripod, then
press the self-timer button until
appears in the data panel.
2.Center your subject in the focus
frame.
Use Focus Hold for off-center subjects (p.29).
The self-timer delays release of the shutter for approximately 10 seconds
after you press the shutter-release button.
60 61
REMOTE CONTROL (Sold Separately)
2.Compose your picture.
3.Point the remote toward the front of
the camera and press • or 2s.
Release (
): the remote-control lamp will blink
once before the picture is taken.
Delay (2s): the remote-control lamp will blink
several times before the picture is taken.
The IR Remote Control RC-3 (not included) allows remote camera
operation from up to 5.5m (18 ft.) away.
The distance may be shorter or the remote control may not operate with backlit
subjects, under fluorescent light, or in extremely bright lighting conditions.
To save power, the data panel will shut off and the lens will retract if the remote
control is not operated for more than eight minutes.
Remote control mode will remain selected after the picture is taken.
1.Place the camera on a tripod, then
press the remote-control button until
appears in the data panel.
Continued on following page.
62 63
REMOTE CONTROL - CONT’D
3.Lift your finger from the shutter-
release button, then recompose the
picture.
4.Point the remote toward the front of the camera and
press • or 2s.
The focus will remain locked until the focus is reset, remote-control
mode is cancelled, or the camera is turned off.
2.Center your subject in the focus
frame, then press the shutter-release
button partway down so the green
ready lamp glows.
FOCUS HOLD IN REMOTE CONTROL MODE
1.Set the camera to remote control mode.
Continued on following page.
64 65
APPENDIX
1.Pull out the battery chamber and
remove the old battery.
2.Insert a new battery into the battery
chamber with its plus side up.
3.Slide the battery chamber back into
the remote control.
CHANGING THE BATTERY
The remote control uses a 3V lithium battery (CR2032). When pressing
the remote-control buttons does not release the shutter, the battery must
be replaced. (The supplied battery should be sufficient for approximately
ten years of operation).
REMOTE CONTROL - CONT’D
66 67
LAB SERVICES
3. PQI - Print Quality Improvement
The lab will compensate (or not compensate) printing according to the
data recorded on the magnetic data strips.
4. Film is returned in the cassette.
To keep the film dust free and aid in organization, film is returned in its
original film cassette. The VEI will be set to to prevent accidental
loading.
5. Index Print
An index print showing a numbered image of each frame is included
with your returned order.
Reprints
Images are always captured in the H format (High-Vision). You can
select any of the three formats when ordering reprints.
To receive the best possible prints, take your film to a
photolab displaying the Certified Advanced Photo System
logo. Photofinishers displaying this logo have been certified
according to Advanced Photo System guidelines.
Certified photolabs will be able to provide the following five services.
1. CHP - Print Format
Your film will be printed according to the format set when the picture
was taken.
2. Date and Title Imprinting
The date, time, and selected title are printed on the back of the picture
in the chosen format.
68 69
CARING FOR YOUR CAMERA
STORAGE
When storing the camera for extended periods, please follow these
guidelines:
Store the camera in a cool, dry, well-ventilated area away from dust
and chemicals. For very long periods, place the camera in an airtight
container with a silica gel drying agent.
Before using after prolonged storage, always check the camera’s
operation to make sure it is functioning properly.
CLEANING
Keep the AF and Meter windows clean or the focus and/or
exposure may not be accurate.
If the camera body is dirty, gently wipe it clean
with a soft, clean, dry cloth.
To clean the lens surface, first brush away any
dust or sand then, if necessary, moisten a lens
tissue with lens cleaning fluid and gently wipe the
lens in a circular motion, starting from the
center.
Never place lens fluid directly on the lens.
Never touch the lens surface with your fingers.
Never use alcohol or solvents to clean the
camera.
Continued on following page.
70 71
CARING FOR YOUR CAMERA - CONT’D
FILM CASSETTE WARNING
The film used in Advanced Photo System cameras stores some data
magnetically. Do not place the cassette on or near anything that creates a
magnetic field, such as a television or stereo speakers.
CAMERA ERROR
If all the indicators in the data panel blink or the data panel is blank and
the camera will not function with a fresh battery, remove and reinsert the
battery. If normal operation does not resume or the camera malfunctions
repeatedly, contact an authorized Minolta Service Facility.
QUESTIONS AND SERVICE
If you have questions about your camera, contact your local camera
dealer or write to the Minolta distributor in your area.
If the camera is damaged or the rewind motor does not operate, do not
open the film chamber or forcefully remove the cassette. Contact an
authorized Minolta Service Facility.
Before shipping your camera for repair, please contact an authorized
Minolta Service Facility for details.
BEFORE IMPORTANT EVENTS
Check camera operation carefully or take test photographs.
Minolta is not responsible for any loss which may occur due to an
equipment malfunction.
Continued on following page.
72 73
Never subject the camera to extreme humidity.
To prevent condensation from forming, place the camera in a sealed
plastic bag when bringing it from the cold environment into a warm
environment. Allow it to come to room temperature before removing it
from the bag.
When photographing in cold weather, it is recommend that you keep
the camera and spare batteries inside your coat to keep them warm
when you are not shooting. Cold batteries will regain some of their
charge when they warm up.
This camera is not water proof, dust-proof, or sand-proof; take care
when using it at the beach or near water. Costly or irreparable damage
may occur.
OPERATING TEMPERATURE AND CONDITIONS
This camera is designed for use from –10 to 40 °C (14 to 104 °F).
Never leave your camera where it may be subjected to extreme
temperatures such as in the glove compartment of a car.
At colder temperatures, the data panel response time will be slow. At
higher temperatures, the display will
temporarily darken, but will restore when the
temperature normalizes.
CARING FOR YOUR CAMERA - CONT’D
74 75
TECHNICAL DETAILS
Shutter Speed Range: 8 - 1/500 sec.
Battery: One CR-2 3V Lithium battery
Battery-condition indication: 3-stage indication
Battery performance: approx. 11 rolls based on
Minolta's standard test method using 25
exposure rolls with the flash for 50% of the
exposures.
Viewfinder: Magnification: 0.32X - 0.57X
Field of View (H format): 85% (for subject at 3m)
Dimensions: 102 x 55 x 28.5 mm
(4.0 x 2.2 x 1.1 in.)
Weight: 150g (5.29 oz.) without battery
Specifications are based on the latest information available at the time of
printing and are subject to change without notice.
Camera Type: IX240 Lens Shutter Camera
Lens: 22.5-45mm f/5.4 - 6.6 lens (approx. equivalent
to 28-56mm in 35mm format); 4 element/4
group construction
Focusing Range: C/H: Wide 0.4m - (1.3 ft. - )
Tele 0.4m - (1.3 ft. - )
P: Wide 0.48m - (1.6 ft. - )
Tele 1.0m - (3.3 ft. - )
Film Speed Setting: Automatic setting for DX-coded films
ISO 25-3200
Metering Range: EV 4.0 - 17 (ISO 200)
Flash Range (ISO 200): Wide:0.4 - 3.6m (1.3 - 11.8 ft.)
Tele: 0.4 - 2.9m (1.3 - 9.5 ft.)
(without red-eye reduction)
76 77
turning the equipment off and on, the user is encouraged to try to correct
the interference by one or more of the following measures:
• Reorient or relocate the receiving antenna.
• Increase the separation between the equipment and the receiver.
• Connect the equipment to an outlet on a circuit different from that to
which the receiver is connected.
• Consult the dealer or an experienced radio/TV technician for help.
This Class B digital apparatus complies with Canadian ICES-003.
This mark on the bottom of your camera is there to inform you
that this camera meets the requirements of the EU (European
Union) concerning interference causing equipment regulations.
CE stands for Conformité Européenne (European Conformity).
This device complies with Part 15 of the FCC Rules. Operation is subject
to the following two conditions: (1) This device may not cause harmful
interference, and (2) this device must accept any interference received,
including interference that may cause undesired operation. Changes or
modifications not approved by the party responsible for compliance could
void the user's authority to operate the equipment. This equipment has
been tested and found to comply with the limits for a Class B digital
device, pursuant to Part 15 of the FCC Rules. These limits are designed
to provide reasonable protection against harmful interference in a
residential installation. This equipment generates, uses and can radiate
radio frequency energy and, if not installed and used in accordance with
the instructions, may cause harmful interference to radio
communications. However, there is no guarantee that interference will not
occur in a particular installation. If this equipment does cause harmful
interference to radio or television reception, which can be determined by
14

Hulp nodig? Stel uw vraag in het forum

Spelregels

Misbruik melden

Gebruikershandleiding.com neemt misbruik van zijn services uitermate serieus. U kunt hieronder aangeven waarom deze vraag ongepast is. Wij controleren de vraag en zonodig wordt deze verwijderd.

Product:

Bijvoorbeeld antisemitische inhoud, racistische inhoud, of materiaal dat gewelddadige fysieke handelingen tot gevolg kan hebben.

Bijvoorbeeld een creditcardnummer, een persoonlijk identificatienummer, of een geheim adres. E-mailadressen en volledige namen worden niet als privégegevens beschouwd.

Spelregels forum

Om tot zinvolle vragen te komen hanteren wij de volgende spelregels:

Belangrijk! Als er een antwoord wordt gegeven op uw vraag, dan is het voor de gever van het antwoord nuttig om te weten als u er wel (of niet) mee geholpen bent! Wij vragen u dus ook te reageren op een antwoord.

Belangrijk! Antwoorden worden ook per e-mail naar abonnees gestuurd. Laat uw emailadres achter op deze site, zodat u op de hoogte blijft. U krijgt dan ook andere vragen en antwoorden te zien.

Abonneren

Abonneer u voor het ontvangen van emails voor uw Minolta Vectis 2000 bij:


U ontvangt een email met instructies om u voor één of beide opties in te schrijven.


Ontvang uw handleiding per email

Vul uw emailadres in en ontvang de handleiding van Minolta Vectis 2000 in de taal/talen: Engels als bijlage per email.

De handleiding is 0,7 mb groot.


U ontvangt de handleiding per email binnen enkele minuten. Als u geen email heeft ontvangen, dan heeft u waarschijnlijk een verkeerd emailadres ingevuld of is uw mailbox te vol. Daarnaast kan het zijn dat uw internetprovider een maximum heeft aan de grootte per email. Omdat hier een handleiding wordt meegestuurd, kan het voorkomen dat de email groter is dan toegestaan bij uw provider.

Stel vragen via chat aan uw handleiding

Stel uw vraag over deze PDF

Uw handleiding is per email verstuurd. Controleer uw email

Als u niet binnen een kwartier uw email met handleiding ontvangen heeft, kan het zijn dat u een verkeerd emailadres heeft ingevuld of dat uw emailprovider een maximum grootte per email heeft ingesteld die kleiner is dan de grootte van de handleiding.

Er is een email naar u verstuurd om uw inschrijving definitief te maken.

Controleer uw email en volg de aanwijzingen op om uw inschrijving definitief te maken

U heeft geen emailadres opgegeven

Als u de handleiding per email wilt ontvangen, vul dan een geldig emailadres in.

Uw vraag is op deze pagina toegevoegd

Wilt u een email ontvangen bij een antwoord en/of nieuwe vragen? Vul dan hier uw emailadres in.


Info