2333
37
Verklein
Vergroot
Pagina terug
1/37
Pagina verder
50
A
DVANCED RECORDING
EXPOSURE LOCK
EXPOSURE-MODE DIAL
The exposure-mode dial is used to select traditional exposure
modes as well as subject programs that optimize camera settings to
specific shooting conditions. Camera settings saved in the camera
can also be recalled with this dial. Simply turn the dial to the
appropriate position.
Manual exposure (p. 56)
Shutter priority (p. 55)
Aperture priority (p. 54)
Program exposure (p. 51)
Auto recording (p. 52)
Memory recall (p. 73)
Portrait subject program (p. 58)
Sports action subject program (p. 58)
Sunset subject program (p. 58)
Night portrait subject program (p. 58)
Exposure-mode
indicator
The AE lock button locks the automatic exposure
system. This function allows the exposure to be set by
a gray card or reference target outside the scene.
When using flash in the P or A exposure modes, slow-
shutter sync is active (p. 87). The operation of the AE
lock button can be customized in section 1 of the
recording menu (p. 94).
Press and hold the AE lock button to lock the
exposure; the shutter speed and aperture monitor
displays turns black; releasing the button cancels the
setting. Frame the subject and press the shutter-
release button partway down to lock focus.
51
PROGRAM - P
Program exposure is set with the exposure-mode dial (p. 50). The program AE uses
luminance and focal-length information to calculate exposures. This allows the
photographer to shoot without worrying about exposure settings. The shutter speed and
aperture values of the exposure are displayed on the monitors and data panel. If the
brightness level of the scene is outside the exposure control range of the camera, the
shutter-speed and aperture displays turn red on the monitors and blink on the data panel.
Program-shift function allows adjustment to the shutter-speed/aperture combination
determined by the camera. The built-in flash cannot be used with program shift. The
camera gives priority to the flash exposure; once the flash is raised, any changes made
with program shift will be canceled.
As described in the basic recording operation (p. 33), press the shutter-release button
partway down until the shutter speed and aperture value are displayed.
PROGRAM SHIFT - P
S/PA
Turn either the front or rear control dial to shift the shutter speed and
aperture combination; each combination gives the equivalent
exposure. The values are shifted in 0.3Ev or 1/3 stop increments.
The front dial changes the shutter speed (P
S) and the rear dial
changes the aperture (P
A). If the lighting changes, the shifted value
remains fixed and the other display changes to compensate for the
required exposure.
52
A
DVANCED RECORDING
AUTO RECORDING
Auto recording is set with the exposure-mode dial. Auto recording is the same as the
program exposure mode (p. 51), except that when the camera is on, if the exposure
mode dial is turned to or from the auto position, the auto exposure mode is reset. Turning
the camera off will not reset the mode. The following functions are reset:
Exposure compensation 0.0 p. 59
Flash compensation 0.0 p. 59
Drive mode Single-frame advance p. 61
Anti-shake On p. 37
White balance Auto p. 70
White-balance shift 0 p. 70
Custom white balance Memory reset to daylight p. 70
Camera sensitivity (ISO) Auto p. 74
Metering mode Multi-segment p. 69
Contrast compensation 0 p. 77
Color-saturation compensation 0 p. 77
Filter 0 p. 77
Focus area Wide focus frames p. 33
Image size 2560 X 1920 p. 82
Image quality Fine p. 82
Flash mode Fill flash p. 86
AEL button AE hold p. 94
Interval 1 minute p. 96
Number of frames (Interval) 2 p. 96
Start time (Interval) 0.0 hr p. 96
Bracket setup 0.3Ev step p. 96
Data imprinting Off p. 98
Imprint to Image and Exif p. 98
Flash metering mode ADI p. 92
Flash output (Manual) 1/4 p. 92
p. 45Display mode Standard
53
Instant playback Off p. 100
Voice memo Off p. 101
Color mode Natural color (sRGB) p. 102
Sharpness Normal p. 97
Noise reduction On p. 103
Monitor amplification Auto p. 104
Monitor amplification - Manual exp. Exposure priority p. 104
DSP setup DSP (Digital Subject Programs) p. 106
p. 106Subject tracking AF On
p. 107Spot AE area Center spot
p. 107Direct manual Focus (DMF) Off
p. 94AE Lock Off
Magnification button Digital zoom p. 105
54
A
DVANCED RECORDING
Aperture priority is set with the
exposure-mode dial (p. 50).
The photographer selects the
aperture and the camera sets
the appropriate shutter speed
to ensure the correct
exposure. When A mode is
selected, the aperture display
on the monitors turns blue.
APERTURE PRIORITY - A
Turn either the front or rear control dial to change the aperture. Press the shutter-release
button partway down to activate the exposure system; the corresponding shutter speed
is displayed.
The aperture values can be changed by 0.3Ev or 1/3 stop increments between f/2.8 and
f/11 at the lens’ wide-angle position and f/3.5 to f/11 at the lens’ telephoto position. If the
aperture value is beyond the shutter-speed range, the shutter-speed display will blink on
the data panel and turn red on the monitors.
With the camera sensitivity (ISO) set to auto (p. 74), the shutter speed may not change
when the aperture is adjusted because the shutter speeds can be adjusted in fine steps.
When photographing scenes with very bright objects such as the sun at large apertures (f/2.8 or
f/3.5), streaking may be apparent in the image. Black areas caused by a loss of data may result.
In these situations, stop down the aperture or use neutral density filters to minimize the effect.
Do not point the camera toward the sun for prolonged periods of time. The intensity of the sun
could damage the CCD. Between exposures, turn off the camera or cover the lens.
Camera Notes
55
Shutter priority is set with the exposure-mode dial (p. 50). The
photographer selects the shutter speed and the camera sets the
appropriate aperture to ensure correct exposure. When S mode is
selected, the shutter speed display on the monitors turns blue.
SHUTTER PRIORITY - S
The shutter speeds can be changed by 1/3 stop
increments from 30 to 1/16000 second. If the
shutter speed is beyond the aperture range, the
aperture display will blink on the data panel and
turn red on the monitors.
Turn either the front or rear
control dial to change the
shutter speed. Press the
shutter-release button partway
down to activate the exposure
system; the corresponding
aperture will be displayed.
When using flash, the shutter speed should be set to the flash duration of flash unit to
prevent underexposure. A maximum shutter speed of 1/1000s is recommended when
using the built-in flash and 1/250s when using a compatible Minolta flash unit.
The yellow and white Anti-shake indicators do not appear in S mode.
The self-timer drive mode (p. 68) can be used to minimize camera shake with long exposures.
When using the camera on a tripod, photographs of static subjects (landscapes, still-lifes, or
close-up photographs) can be made with the self-timer. Because no contact is made with the
camera during exposure, there is no risk of camera shake caused by the operator.
Shooting tips
56
A
DVANCED RECORDING
Manual exposure mode allows individual selection of shutter speeds and apertures. This
mode overrides the exposure system giving the photographer total control over the final
exposure. Manual exposure is set with the exposure-mode dial (p. 50).
The shutter speeds and aperture values can be changed in 1/3 stop increments. The
shutter speed range in manual exposure mode is 30 to 1/16000 second including bulb
(p. 57). The camera sensitivity is set to ISO 100, but can be changed with the function
dial (p. 74).
As changes are made to the exposure, the effect will be visible on the monitors. The
shutter-speed and aperture display will blink on the data panel and turn red on the
monitors if the image is extremely under or overexposed. If the monitors are black,
increase the exposure until the image is visible; decrease the exposure if the monitors
are white. The recording menu can be used to constantly display a live image regardless
of the exposure setting (p. 104).
MANUAL EXPOSURE - M
To set the shutter speed, turn the
front control dial. To set the aperture,
turn the rear control dial. The
appropriate display will turn blue as
the exposure is changed.
To use manual shift, press and hold
the AEL button while turning the
front control dial; both the shutter
speed and aperture are changed
without affecting the total exposure.
When using flash, the shutter speed should be set to the flash duration of flash unit to
prevent underexposure. A maximum shutter speed of 1/1000s is recommended when
using the built-in flash and 1/250s when using a compatible Minolta flash unit.
The operation of the manual exposure mode can be customized with the setup menu (p.
145). The yellow and white Anti-shake indicators do not appear in M mode.
57
Use the front control dial to decrease the shutter-speed until
“bulb” is displayed.
Use the rear control dial to set the appropriate aperture
required for the exposure.
To take the picture, press and hold the shutter-release
button for the duration of the exposure. Releasing the
shutter button will end the exposure.
The monitors will be blank during the exposure. The shutter
sound effect will signal the end of the exposure. The
monitors will remain blank for up to 30 seconds while noise-
reduction processing is applied to the image.
Bulb photographs can be taken in the manual-exposure mode (M). Exposures up to thirty
seconds can be made by pressing and holding the shutter-release button. The use of a
tripod and a remote cord is recommended for bulb exposures. The camera’s exposure
system cannot be used to calculate bulb exposures. The use of a separate light
meter is recommended.
BULB EXPOSURES
ATTACHING A REMOTE CORD (SOLD SEPARATELY)
The optional remote cords (RC-1000S or RC-1000L) can be
used to reduce vibrations from touching the camera during
long exposures. Before using the cord, attach the ferrite core
supplied with the camera as described on page 161.
Remove the remote-control terminal cover using the notch on
the right side of the cover. The cover is attached to the body
to prevent loss. Insert the plug of the cord into the terminal.
58
A
DVANCED RECORDING
DIGITAL-SUBJECT-PROGRAMS
Digital subject programs optimize the camera’s exposure, white-
balance, and image-processing systems for specific conditions and
subjects. Simply turn the exposure mode dial to select the
appropriate subject program.
Sports action - used to capture fast action by maximizing shutter speeds.
When using a flash, make sure the subject is within the flash range (p. 75). The
flash range can be extended by changing the camera sensitivity (p. 74). A
monopod is more flexible and compact than a tripod when shooting events.
Sunset - optimized to reproduce rich, warm sunsets. When the sun is above
the horizon, do not point the camera toward the sun for prolonged periods of
time. The intensity of the sun could damage the CCD. Between exposures, turn
off the camera or cover the lens.
Night portrait - for deep, subtle night scenes. When used with flash, the
subject and background exposures are balanced. Use a tripod to eliminate
blurring from camera shake. The flash can only be used with close subjects
such as with a portrait of a person. When using the flash, ask your subjects not
to move after the burst; the shutter will still be open for the background
exposure.
Not all recording functions, such as the metering mode, can be changed when using
Digital Subject Programs.
Portrait - optimized to reproduce warm, soft skin tones and
a slight defocusing of the background. Most portraits look
best at a telephoto setting; the longer focal length does not
exaggerate facial features and the shallower depth of field
softens the background. Use the built-in flash with strong
direct sunlight or backlight to reduce harsh shadows.
59
EXPOSURE AND FLASH COMPENSATION
The ambient light and flash exposure can be adjusted before the image is captured to
make the final picture lighter or darker. Exposure can be adjusted by as much as ±2Ev
in 1/3 increments (p. 111). The exposure and flash compensation will remain in effect until
it has been reset. For more on exposure and flash compensation, see page 110.
Adjustments to exposure must be set before the image is captured. When setting
exposure or flash compensation, the change in Ev is shown on the data-panel aperture
display and on the monitors. After the setting is made, the shutter-speed and aperture
displays will indicate the actual exposure.
Flash compensation
Exposure compensation
Press the exposure-compensation button (1).
Use the front control dial (2) to set exposure
compensation.
Use the rear control dial (3) to set flash
compensation.
Press the shutter-release button partway down or
press the exposure-compensation button to
complete the operation. The values will
automatically be set if a change is not made for a
few seconds. If any other value except 0.0 was set,
an indicator will be displayed on the monitor as a
warning. Also see camera notes on page 65.
1
2
3
60
A
DVANCED RECORDING
USING THE FUNCTION DIAL
The memory function, metering mode, drive mode, white balance, and camera sensitivity
are controlled by the function dial. The custom position is for a designate menu function
that can be set in section 2 of the setup menu. Only white balance can be set in the movie
recording mode.
Turn the function dial to the mode to be changed
(1).
Press the function button in the center of the dial
(2). Turn the front control dial to change the mode
(3). Use the rear control dial (4) to select between
options of various functions like a 10-second and
2-second self-timer, or a specific custom white-
balance register. Press the shutter-release button
partway down or press the function button to
complete the operation. Changes are displayed
on the monitors. Also see camera notes on page
65.
Memory set - to store camera settings (p. 72).
Metering mode - changes the metering pattern (p. 69).
Custom function - to set the function designated in section 2 of the setup
menu (p. 136).
Drive mode - changes the method of image capture (p. 61).
White balance - changes between automatic, preset, and custom white
balance (p. 70).
ISO - changes camera sensitivity (p. 74).
1
2
3
4
61
The drive modes control the rate and method images are captured.
Indicators showing the selected drive mode appear on the data panel
and monitors. The drive mode is set with the function dial (p. 60).
DRIVE MODES
Continuous advance - to take a series of images when the shutter-
release button is pressed and held (p. 64).
Bracketing - to take a series of images with differing exposure,
contrast, saturation, and color (p. 62).
Interval - to take a series of images over a period of time (p. 66).
All indicators have been shown for clarity. The single-frame
advance and continuous advance indicators occupy the same
area of the data panel. All the drive-mode indicators appear at the
same location in the monitors.
When a large amount of image data is captured in a short period,
the camera’s internal buffer memory becomes full; the frame
counter turns yellow on the monitors. Time must be given for this
data to be written to the memory card. Wait for the indicator to
turn white before capturing more images.
High-speed continuous advance - to take a series of images at
approximately 2.8 frames per second (p. 64).
Interval and time-lapse movie - to take a series of still images and a
movie clip of a slow moving event (p. 66).
Single-frame advance - to take a single image each time the shutter-
release button is pressed (p. 33).
Self-timer - to delay the release of the shutter by 10 or 2 seconds.
Used for self-portraits (p. 68).
62
A
DVANCED RECORDING
BRACKETING
This drive mode makes a three image bracket of a scene. Bracketing is a method of
taking a series of images of a static subject in which each image has a slight variation in
exposure. Contrast, saturation, and filter brackets can also be made.
3
4
2
1
Turn the function dial to the drive mode position
(1).
Press the function button in the center of the dial
(2). Turn the front control dial to select the
bracketing drive mode (3). Use the rear control
dial (4) to switch among continuous-advance,
single-frame advance, and Digital Effect brackets;
the Digital Effect bracket depends on the position
of the Digital Effect switch (p. 77). Press the
shutter-release button partway down or press the
function button to set the mode.
Continuous-advance bracket - the order of the exposure bracket series is
normal exposure (as indicated by the camera), underexposure, and
overexposure. The exposure bracket is set to 0.3Ev increments, but can be
changed to 0.5Ev increments in section 2 of the recording menu (p. 96). If the
memory card is filled or the shutter button is released before the series has
completed, the camera will reset and the entire bracket must be made again.
Digital Effect bracket - for filter, color saturation, or contrast brackets. Set the
contrast, color saturation or filter to the desired level; the bracket series is
from the Digital Effects Control setting to one unit under to one unit over. See
the Digital Effects Control section on page 77 to set the contrast, color
saturation, and filter.
Single-frame advance bracket - the same as the continuous-advance
bracket except that the shutter-release button must be pressed for each
exposure. Focus does not lock with the first frame.
63
To make a flash bracket, set the continuous-advance or single-frame advance bracketing
drive mode and raise the camera flash. The bracket will not advance automatically; the
shutter-release button must be pressed for each exposure. The ambient exposure is not
bracketed.
When exposure brackets are made in S exposure mode, the aperture controls the
bracket. In A and M modes, the shutter speed controls the bracket. The camera will use
both the aperture and shutter speed control the bracket in P mode.
With a Digital Effect bracket, if the contrast or color saturation is set to the maximum or
minimum level (±5), one bracket will be made at ± 6: +5, +4, +6. A RAW image cannot
exceed the maximum and minimum levels and will contain two identical brackets: +5, +4,
+5. A black and white Filter bracket is made to the settings before and after the set Filter
(p. 78). If Filter 10 is selected, the bracket series will be 10, 9, 0.
Compose the picture as described in the basic recording
section (p. 33). Press and hold the shutter-release button all
the way down (1) to make the bracket series; three
consecutive images will be captured. If single-frame advance
bracketing is selected, the shutter-release button must be
pressed for each exposure. If set to continuous AF (p. 46), the
camera will continue to focus during a continuous bracket.
Number of frames in
bracketing series
Frame counter
1
0.3 Ev
bracket
Normal
Under
Over
64
A
DVANCED RECORDING
Continuous-advance mode allows a series of images to be captured while holding down
the shutter-release button. Continuous advance acts like a motor drive on a film camera.
The number of images that can be captured at one time depends on the image-quality
setting; five with RAW images, and three with the other options. When the shutter-release
button is pressed and held, the camera will begin recording images until the maximum
number has been taken or the shutter button is released. The built-in flash can be used,
but the rate of capture is reduced because the flash must recharge between frames.
STANDARD AND HIGH SPEED CONTINUOUS ADVANCE
3
4
2
1
Turn the function dial to the drive mode position
(1). Press the function button in the center of the
dial (2). Turn the front control dial to select the
continuous-advance drive mode (3). Use the rear
control dial (4) to switch between standard and
high-speed continuous advance. Press the
shutter-release button partway down or press the
function button to set the mode.
Standard continuous advance
High-speed continuous advance
Continuous advance - captures a series of images at 2.0fps. When used with
continuous autofocus, the camera will adjust the focus during the series. The live image
will be briefly displayed between frames.
High-speed continuous advance - captures a series of full-size images at 2.8fps. The
rate of capture decreases with images smaller than 2560 X 1920. Focus is locked with
the first frame regardless of the focusing mode. The live image will freeze during the
series.
65
Compose the picture as described in the basic
recording section (p. 33). Press and hold the shutter-
release button all the way down (1) to begin taking
pictures. If the shutter-release button is continuously
held down after the series, a new series of images
will be capture after a short delay.
1
To change function dial or Digital Effects
Controller settings quickly, simply press
and hold the center dial or controller
button (1) and select the setting with the
front and rear control dials (2). Release
the center button of the function dial or
Digital Effects Controller to set the
change. The exposure-compensation
button can be operated the same way.
Camera Notes
2
2
1
1
66
A
DVANCED RECORDING
INTERVAL
The interval mode makes a series of still or moving images over a period of time. Similar
to time-lapse photography, a series of images of a slow moving event can be taken: the
blossoming of a flower, the construction of a building. The built-in flash can be used.
Instant playback (p. 100) is disabled.
The parameters of the interval series is set up in section 2 of the recording menu. The
length of the interval between frames, the number of frames in the series, and the start
time are set with the menu. See page 96.
Interval - to create a series of still images specified within the parameters set on the
recording menu.
Interval and time-lapse movie - to create a series of still images and a 640 X 480 movie
clip specified within the parameters set on the recording menu. The movie file is played
back at four frames per second.
3
4
2
1
Turn the function dial to the drive mode position
(1).
Press the function button in the center of the dial
(2). Turn the front control dial to select the interval
drive mode (3). Use the rear control dial (4) to
switch between the two interval modes. Press the
shutter-release button partway down or press the
function button to set the mode.
Interval
Interval and time-lapse movie
Number of frames in the interval series
Frame counter
67
The camera will stop recording images and reset to the first frame when the number of
frames set has been taken, or when the memory card is full. The use of an AC adapter
is recommended when recording with long intervals or a large number of frames. To
cancel the interval series, press the main switch or press the shutter-release button
partway down.
After mounting the camera on a tripod, compose the image so that the subject area falls
within the focus frames; the camera sets the focus, exposure, and white balance, and
charges the flash just before each exposure. Continuous AF can be used. Settings
locked with the AE lock button are canceled after the first frame. To override the
automatic systems, use manual focus (p. 46), manual exposure (p. 56), and preset or
custom white balance (p. 70).
Confirm the memory card has enough storage capacity for the series by comparing the
number of frames in the interval series with the number of recordable images displayed
on the frame counter. Image size and quality settings can be changed to increase the
number of pictures that can be saved on the memory card.
Press the shutter-release button to begin the series. During the interval series, the
monitors will be turned off to conserve power. “Int” will be displayed on the data panel
and the data-panel frame counter will countdown the remaining frames in the interval
series. The access lamp will glow when an image is being recorded.
68
A
DVANCED RECORDING
Used for self-portraits, the self-timer will delay the release of the shutter after the shutter
button is pressed. A ten second and two second self-timer is available.
SELF-TIMER
With the camera on a tripod, compose the picture as described in the basic
recording section (p. 33). Focus lock (p. 34) or the Flex Focus Point (p. 48)
can be used with off-center subjects. Press the shutter-release button
partway down (1) to lock the exposure and focus. Press the shutter-release
button all the way down (2) to begin the countdown. Because focus and
exposure are determined when the shutter-release button is pressed, do
not stand in front of the camera when taking a self-timer image. Always
confirm the focus with the focus signals before beginning the countdown (p.
35).
3
4
2
1
Turn the function dial to the drive mode position
(1). Press the function button in the center of the
dial (2). Turn the front control dial to select the
self-timer drive mode (3). Use the rear control dial
(4) to switch between a ten-second and two-
second delay. Press the shutter-release button
partway down or press the function button to set
the mode.
Ten-second self-timer
Two-second self-timer
1
2
The self-timer lamp on the front of the camera and the audio signals indicate the
countdown.The lamp will glow steadily just before the shutter fires. To stop the
countdown, press the menu or function button or change the position of the flash (lift it or
push it down). When using the ten-second self-timer, the drive mode is reset to single-
frame advance after the exposure. The audio signal can be turned off in section 3 of the
setup menu (p. 141).
69
METERING MODES
Metering mode indicators are displayed on the
monitors only. To lock the exposure while
pressing the shutter-release button partway
down, the AE lock option in section 4 of the
recording mode menu should be on. If the
luminance levels of the scene are outside the
metering range, the metering indicator turns red.
Turn the function dial to the metering mode
position (1). Press the function button in the
center of the dial (2). Turn the front or rear control
dials to select the metering mode (3). Press the
shutter-release button partway down or press the
function button to set the mode.
Spot - uses a small area within the image to calculate the
exposure. When this mode is selected, a small circle will
appear in the middle of the live image indicating the
measuring area. The spot allows precise exposure
measurements of a particular object without being
influenced by extremely bright or dark areas within the
scene. When using spot metering with the Flex Focus
Point (p. 48), the spot circle can move with the focus
point. This function is selected in section 4 of the
recording menu (p. 107).
Multi-segment - uses 300 segments to measure luminance and color. This data
is combined with distance information to calculate the camera exposure. This
advanced metering system will give accurate worry-free exposures in almost all
situations.
Center weighted - a traditional metering method in film cameras. The system
measures light values over the entire image area with emphasis given the
central region.
Spot metering display
3
3
2
1
70
A
DVANCED RECORDING
WHITE BALANCE
3
4
2
1
White balance is the camera’s ability to make
different types of lighting appear natural. Any
changes are immediately visible on the monitors.
Turn the function dial to the white-balance (WB)
mode position (1).
Press the function button in the center of the dial
(2). Turn the front control dial to select the white-
balance mode (3). Use the rear control dial (4) to
shift the color balance of the preset modes or to
select the custom white-balance register. Press
the shutter-release button partway down or press
the function button to set the mode.
Auto white balance - to automatically detect the type of light and adjust the white
balance accordingly. When the built-in flash is used, the white balance is set for the
color temperature of the flash. When set, no indicators appear on the data panel or
monitors.
Daylight
Tungsten
Fluorescent
Cloudy
Shade
Flash
Preset white balance - to set the white balance to a specific light
source. The rear control dial can be used adjust the white balance
in seven levels: +3 to –3 (+4 to –2 for fluorescent). Except for
fluorescent, the change of one unit is approximately equal to a 10
mired shift. When set, an indicator appears on the monitors and
WB on the data panel. For information on light sources, see page
111.
Custom white balance - to apply custom white-balance settings. The rear control
dial can be used to select one of three custom registers. When set, an indicator
appears on the monitors and WB on the data panel. See page 71 on how to make
custom white-balance calibrations.
71
Custom-white-balance function allows the camera to be calibrated to a specific lighting
condition. Three setting can be stored in the camera and used repeatedly. Custom white
balance is especially useful with mixed-lighting conditions or when critical control over
color is needed.
CUSTOM WHITE-BALANCE CALIBRATION
Select a white object and fill the the center of the live
image with it; the object does not need to be in focus.
Press and hold the custom white-balance button to
calibrate the camera; the measuring area is briefly
displayed before the shutter releases.
When making the calibration, the color of the object used is critical. The object should be white.
A colored object will cause the calibration to compensate for the object color rather than the color
temperature of the ambient light. A blank piece of white paper is an ideal surface and can easily
be carried in a camera bag.
Shooting tips
If an error occurs during calibration, a message will appear on the monitors. Press the
controller to cancel the message and press the menu button to cancel the register-
selection screen; the custom white-balance indicator will be yellow to indicate the error.
Recalibrate using a suitable reference target. A calibration error may occur under
extremely bright light sources, especially with flash units. Use a gray card as the
calibration target to reduce the intensity of the illumination.
On the register-selection screen use the control dials or
left/right keys of the controller (1) to select the custom
white-balance register in which to store the setting; any
previous setting is replaced. Press the central button of
the controller (2) to complete the operation. The menu
button cancels the operation without saving the setting.
:enter
Select register
:select
1
2
72
A
DVANCED RECORDING
MEMORY - STORING CAMERA SETTINGS
To save the current camera settings, turn the function dial to
the M SET position and press the function button to open the
register-selection screen; the current camera settings are
displayed.
Camera settings cannot be deleted from memory by turning the camera off. They are
erased with the reset function in section 3 of the setup menu.
On the register-selection screen, use the control
dials or left/right keys of the controller (1) to select
the memory register in which to store the settings;
any previous settings are replaced. Press the
central button of the controller (2) to complete the
operation. The menu button cancels the operation
without saving the settings.
:enter
Save to memory
:select
2
1
Five sets of camera settings can be saved. This saves time under frequently repeating
conditions by eliminating the need to set the camera. Except for functions like subject
programs, data imprinting, voice memo, and instant playback, most recording-mode
camera settings will be saved including the position of the Flex Focus Point, the display
mode, and changes made with the function dial and digital effects control. Setting are
displayed before being saved. Although the Digital Effects bracketing drive mode setting
can be saved, the type of bracket, contrast, color saturation, or filter, must be reset with
the Digital Effects Controller.
73
MEMORY RECALL
Camera settings saved with the function dial are recalled with
the exposure-mode dial. Simply turn the exposure mode dial to
the memory recall (MR) position (1); the register-selection
screen will open.
1
On the register-selection screen use the control dials or left/right keys of the controller (2)
to select the memory register in which the settings are stored; as the registers are
selected the camera settings are displayed on the screen. Press the central button of the
controller (3) to apply the settings to the camera. The menu button cancels the operation
without recalling the settings.
To recall another set of settings in a different register, turn the exposure-mode dial to
another position and then back to MR to open the memory-recall screen. Saved memory
settings can also be assigned to the digital-subject-program positions on the exposure
dial with section 4 of the recording menu. See page 106 for more information.
:enter
Memory recall
:select
3
2
74
A
DVANCED RECORDING
CAMERA SENSITIVITY - ISO
The auto setting automatically adjusts the camera sensitivity to the light conditions
between ISO 100 and 200. When any other setting than auto is used, “ISO” will appear
on the data panel, and “ISO” and the set value will be displayed on the monitors.
Photographers can select a specific sensitivity setting. Like grain in silver-halide film that
increases with speed, noise increases with sensitivity in digital imaging; an ISO setting of
100 will have the least noise and 800 will have the most. A change in ISO also affects the
flash range; the higher the ISO, the greater the range.
As the ISO value doubles, the camera sensitivity doubles; changing the ISO between 100
and 200, 200 and 400, or 400 and 800 changes the camera sensitivity by one stop or 1
Ev (p. 111). A change between 100 and 800 changes the camera sensitivity by a factor
of 8 or three stops. High ISO settings (400, 800) will allow the photographer to hand hold
the camera in low-light conditions without the need of a flash.
Five settings can be selected for camera
sensitivity: Auto, 100, 200, 400, and 800; the
numerical values are based on an ISO equivalent.
ISO is the standard used to indicate film
sensitivity: the higher the number, the more
sensitive the film.
Turn the function dial to the ISO position (1).
Press the function button in the center of the dial
(2). Turn the front or rear control dials to change
the camera sensitivity (3). Press the shutter-
release button partway down or press the function
button to set the mode.
3
3
2
1
75
FLASH RANGE AND CAMERA SENSITIVITY
Flash range (wide angle)ISO setting
AUTO
100
200
400
800
0.5m ~ 3.8m / 1.6 ft. ~ 12.5 ft.
Flash range (telephoto)
0.5m ~ 3.0m / 1.6 ft. ~ 9.8 ft.
0.5m ~ 2.7m / 1.6 ft. ~ 8.8 ft.
0.5m ~ 3.8m / 1.6 ft. ~ 12.5 ft.
0.5m ~ 5.4m / 1.6 ft. ~ 17.6 ft.
0.5m ~ 7.6m / 1.6 ft. ~ 25 ft.
0.5m ~ 2.1m / 1.6 ft. ~ 6.9 ft.
0.5m ~ 3.0m / 1.6 ft. ~ 9.8 ft.
0.5m ~ 4.2m / 1.6 ft. ~ 13.8 ft.
0.5m ~ 6.0m / 1.6 ft. ~ 19.6 ft.
For correct flash exposures, the subject must be within the flash range. The flash range
can be extended by changing the camera sensitivity. When the camera sensitivity is set
to auto, the ISO is set between ISO 100 and 200.
The flash range is measured from the CCD. Because of the optical system, the flash
range is not the same at the lens’ wide-angle position as it is at the telephoto position.
To extend the versatility of the camera, an accessory flash unit (sold separately) can be
used. Always remove the accessory flash when the camera is not in use, and replace the
accessory-shoe cap to protect the contacts.
ATTACHING A MINOLTA ACCESSORY FLASH UNIT
Slide the accessory-shoe cap off as shown. Mount
the flash unit on the accessory shoe by sliding it
forward until it stops.
The following Minolta flash units are compatible with this camera:
Maxxum/Program Flash 2500(D)
Maxxum/Program Flash 3600HS(D)
Maxxum/Program Flash 5600HS(D)
Macro Ring Flash 1200 with Macro Flash Controller
Macro Twin Flash 2400 with Macro Flash Controller
System Accessories
The flash sync terminal allows a studio or location flash system to be connected to the
camera with a standard PC cord. The terminal is compatible with both center positive
(normal polarity) and center negative (positive polarity) flash units with a voltage of 400V
or lower.
76
A
DVANCED RECORDING
USING THE FLASH SYNC TERMINAL
To ensure correct exposures, use the manual exposure mode (p. 56). Set the shutter
speed equal to or slower than the flash duration; refer to the flash unit’s instruction
manual. If the monitor image is too dark, change the manual-exposure option under
monitor amplification to display priority in section 3 of the recording menu (p. 104).
If the built-in flash is raised when another flash unit is connected to the flash sync
terminal, both flash units will fire. However, the camera’s automatic flash control systems
will not provide correct exposures. To use the built-in flash as a fill light, use manual flash
control (p. 92).
The use of custom white balance is recommended (p. 71). When calibrating the camera,
use the shutter speed and aperture settings require for the final exposure. A gray card
may have to be used as the reference target with powerful flash units to reduce the
intensity of the illumination. If custom white balance is not practical, use the preset
daylight or flash setting; auto white balance is not recommended.
Unscrew the terminal cover. Securely connect the
flash’s PC cord to the flash sync terminal. Confirm the
flash is off before connecting the cable to prevent it
from firing. Always replace the cover when the terminal
is not in use.
Turn the Digital Effect switch (1) to the image
characteristic to be adjusted.
Adjustments can be made repeatedly and in combination. Adjustments remain in effect
until manually reset. When set to any value other than zero, an indicator and value will
be displayed on the monitors as a warning.
77
DIGITAL EFFECTS CONTROL
Press the Digital Effects button (2) in the center of
the switch; the setting screen is displayed.
Turning the front or rear control dial (3) to make
adjustments. Press the Digital Effects button
again or press the shutter-release button partway
down to set the adjustment. Also see camera
notes on page 65.
The Digital Effects Controller can adjust image contrast, color, and saturation. Changes
are instantly visible on the monitors before the image is captured.
ContrastColor-saturationFilter
1
2
3
3
The color saturation of a scene can be adjusted within eleven levels
5) with the Digital Effects Controller. Colors can be accented,
positive value, or subdued, negative value.
COLOR-SATURATION COMPENSATION
Unlike the display on a computer monitor, changes to contrast and color saturation can be difficult
to judge on the monitor. To ensure the optimum level of contrast or color saturation, make a Digital
Effect bracket (p. 62) of the scene.
Shooting tips
78
A
DVANCED RECORDING
FILTER
The contrast of a scene can be adjusted within eleven levels (±5) with
the Digital Effects Controller (p. 77). The contrast must be set before
the image is captured. When changing the contrast setting, an
indicator is displayed to show an increase (+) or decrease (–) in
contrast. If contrast is set to any other value than zero, the indicator
and value remain on the displays as a warning.
CONTRAST COMPENSATION
Contrast decreased Contrast increasedContrast normal
When used with Natural Color, Vivid Color, or Adobe RGB, the Filter can be adjusted in
eleven levels (±5). A positive adjustment acts like a warming filter. A negative adjustment
makes the image cooler.
When used with the black-and-white color mode, the Filter can tone the neutral
monochrome image in eleven steps. The Filter effect cycles from neutral to red, to green,
to magenta, to blue, and returning to neutral. The zero position is neutral. Black and white
filter settings have no effect on RAW images.
The overall color of a scene can be adjusted with the Digital Effect
Controller. The Filter effects differ between the color mode in use, see
the color examples on page 171. The filter must be set before the
image is captured. When changing the setting, an icon and numeral
will indicate the filter in effect. If the Filter is set to any other setting
than zero, an indicator and value will remain on the displays as a
warning.
79
On February 20th, 1962, John Glenn became the first American to orbit the Earth. On
board his Friendship 7 spacecraft was a Minolta Hi-matic camera to record that historic
event. The 4 hour, 55 minute, and 23 second flight orbited the Earth three times at an
average speed of 28,000 kph (17,500 mph).
Mr. Glenn visited our Sakai camera factory in Japan on May
24th, 1963 to plant a palm tree to celebrate the occasion.
The palm tree is still in the courtyard of the factory and
stands over eight meters tall (26ft).
The camera? It was not lost. It is on display at the
Smithsonian Institution’s National Air and Space
Museum in Washington D.C. This and other
objects from John Glenn’s Friendship 7 Mercury
flight can be found in galley 210, “Apollo to the
Moon.”
Minolta History
Use the left/right keys of the controller to highlight the
appropriate menu tab; the menus will change as the tabs
are highlighted.
80 R
ECORDING MENU
In recording mode, press the menu button to activate the menu. The menu button also
closes the menu after making settings. The four-way key of the controller is used to move
the cursor in the menu. Pressing the central button of the controller will enter a setting.
When the desired menu section is displayed, use the
up/down key to scroll through the menu options. Highlight
the option whose setting needs to be changed.
Press the right controller key to display the settings; the current setting is
indicated by an arrow. To return to the menu options, press the left key.
Use the up/down key to highlight the new setting. If “Enter” is displayed, press
the central button of the controller to open the next screen.
Press the central button of the controller to select the highlighted setting.
Once a setting has been selected, the cursor will return to the menu options and the new
setting will be displayed. Changes can continue to be made. To return to the recording
mode, press the menu button.
NAVIGATING THE RECORDING MENU
Activate the recording menu with the menu button. Tab 1
at the top of the menu will be highlighted.
RECORDING MENU
81
Image size 2560x1920
Quality Fine
Flash mode Fill-flash
Flash control ADI flash
AEL button AE hold
Reset
DSP set DSP
Tracking AF On
AE lock On
Spot AE area Center spot
Direct MF Off
Int. set
Bracket set 0.3Ev
Data imprint Off
Imprint to Image + Exif
Inst.playback Off
Voice memo Off
Color mode Nat. (sRGB)
Sharpness Normal
Noise reductn On
Monitor amp. Auto
Manual exp. Exp.priority
Mag. button Digital zoom
To set image resolution (p. 82).
To set file type and compression (p. 82).
To set the flash mode of the built-in flash (p. 86).
To customize the operation of the AEL button (p. 94).
To set automatic or manual flash control (p. 92).
To reset the recording-mode functions (p. 95).
To set the interval drive mode parameters (p. 66)
To bracket with 0.3Ev or 0.5Ev steps (p. 96).
To imprint data on a recorded image (p. 98).
To play back images after they are recorded (p. 100).
To imprint to the image or Exif data (p. 98).
To attach audio to images after instant playback (p. 101).
To select color or B&W images, and color space (p. 102).
To increase or decrease image sharpness (p. 97).
To apply noise reduction to long exposures (p. 103).
To activate automatic monitor amplification (p. 104).
To set M exposure mode monitor preferences (p. 104).
To set the digital zoom or Digital Flex Magnifier (p. 105).
To use Digital Subject Programs for memory recall (p. 106).
To activate Subject Tracking AF (p. 106).
To activate AE lock with the shutter-release button (p. 106).
To select the spot metering area location with FFP(p. 107).
To activate Direct Manual Focus (p. 107).
82
R
ECORDING MENU
Image size and quality must be set before the picture is taken. Changes are displayed
on the LCD monitor and data panel. Image size and quality are set in section 1 of the
recording menu (p. 80).
2560
2080
1600
640
2560 X 1920
2080 X 1560
1600 X 1200
640 X 480
Image quality controls the file type and rate of compression, but has no effect on the
number of pixels in the image. TIFF and RAW are high-quality image files. The extra fine,
fine, and standard settings produce JPEG files at various rates of compression. The
higher the image quality, the lower the rate of compression and the larger the file sizes.
If economical use of the memory card is important, use the standard mode. The TIFF and
RAW mode will produce the highest quality image and the largest image files.
Only full-size images can be taken with RAW image quality. RAW images require special
processing before they can be used, refer to the DiMAGE Viewer software manual. Some
camera functions cannot be used with the RAW image-quality setting. See page 84 for
more information.
Extra fine - the highest quality JPEG file
A high-quality TIFF image.
Fine - the default setting. (JPEG)
Standard - the highest compression. (JPEG)
X.FIN
FINE
STD.
IMAGE SIZE AND IMAGE QUALITY
Minolta RAW - high-quality raw data.
Changing image size affects the number of pixels in
each image. The greater the image size, the larger the
file size. Choose image size based on the final use of
the image - smaller images will be more suitable for
web sites whereas larger sizes will produce higher
quality prints.
RAW
TIFF
83
TIFF
Extra fine
Fine
Standard
11215
24735
5 8 14 47
10 14 23 63
Approximate number of images that can be stored on a 16MB memory card.
Quality
Size
2560 X 1920 2080 X 1560 1600 X 1200 640 X 480
TIFF
Extra fine
Fine
Standard
14,520KB 9,506KB 5,625KB 900KB
4,920KB 3,289KB 1,995KB 420KB
2,520KB 1,704KB 1,058KB 320KB
1,491KB 1,025KB 656KB 240KB
Approximate file sizes.
The frame counter indicates the approximate number of images that can be stored on the memory
card at the camera’s image quality and size settings. If the settings are changed, the frame
counter adjusts accordingly. Because the counter uses approximate file sizes, the actual image
taken may not change the counter or may decrease it by more than one. When the frame counter
displays zero, it indicates no more images at the image size and quality settings can be captured.
Changing those settings may allow more images to be saved to the card.
Camera Notes
The number of images that can be stored on a memory card is determined by the size of
the card and the file size of the images. One memory card can contain images with
differing sizes and qualities. The actual file size is determined by the scene; some
subjects can be compressed further than others.
RAW
7,373KB
RAW
2––
84
A
SHORT GUIDE TO PHOTOGRAPHY
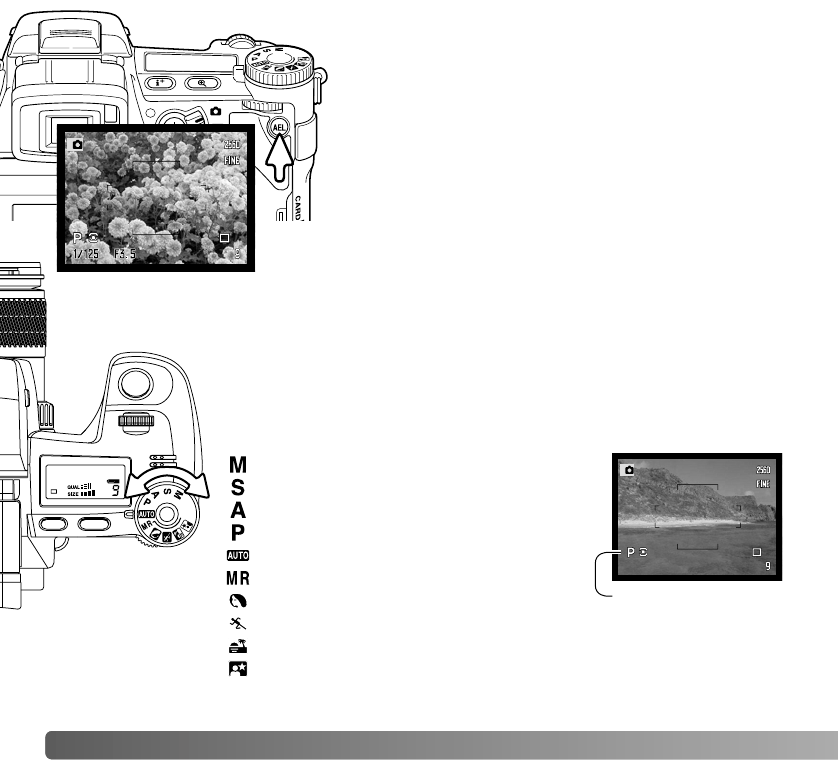
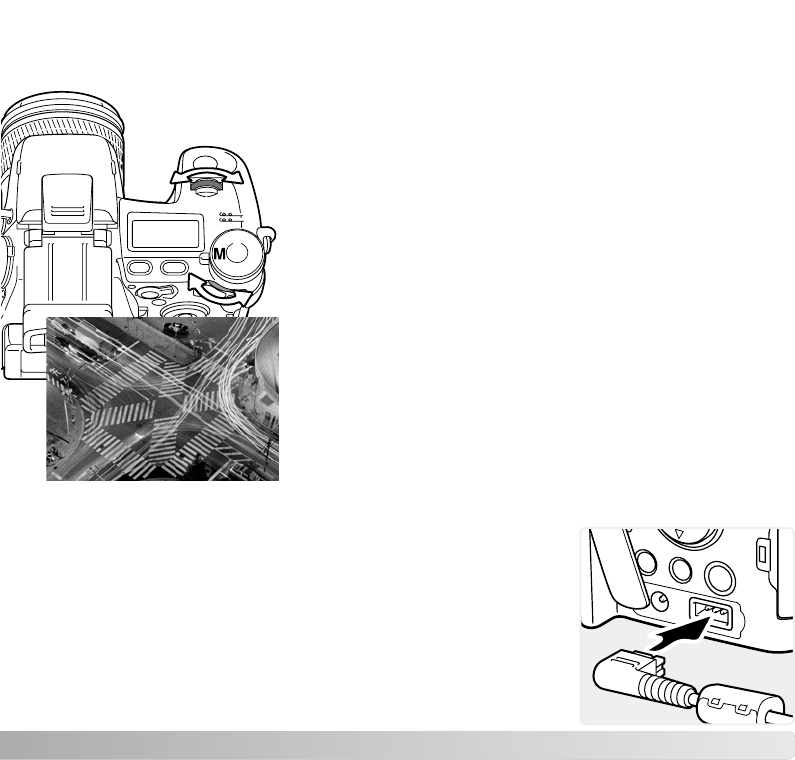
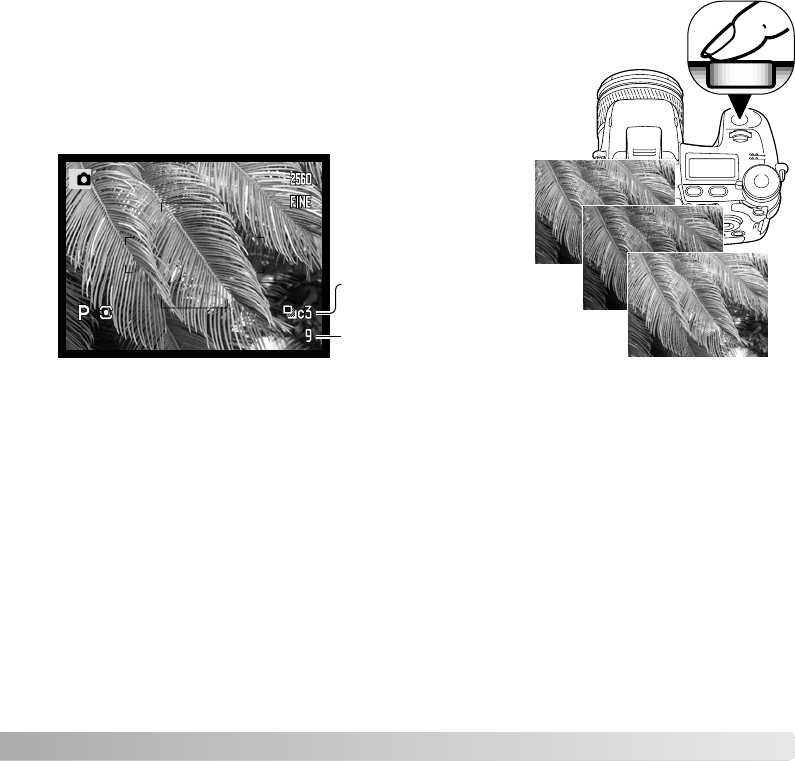
In the RAW image-quality mode, the image size is set at full and cannot be changed. The
image size will not be displayed on the monitors. The digital zoom, enlarged playback,
data imprinting, and print functions cannot be used.
Unlike the other image-quality modes, RAW image data is unprocessed and requires
image processing before it can be used. To view the RAW data, the DiMAGE Viewer
software is required. This software can reconstruct the image and apply the same image
processing controls as the camera. RAW data is saved as a 12-bit file; the DiMAGE
Viewer software can convert this data into 24-bit or 48-bit TIFF files.
A RAW image is stored with a file header that contains white-balance information,
changes made to contrast, saturation, and color with the Digital Effects Control, any
image processing applied in a subject-program setting, and changes to sharpness. The
changes in camera sensitivity are applied to the RAW data; ISO values can be manually
set to control noise (p. 74).
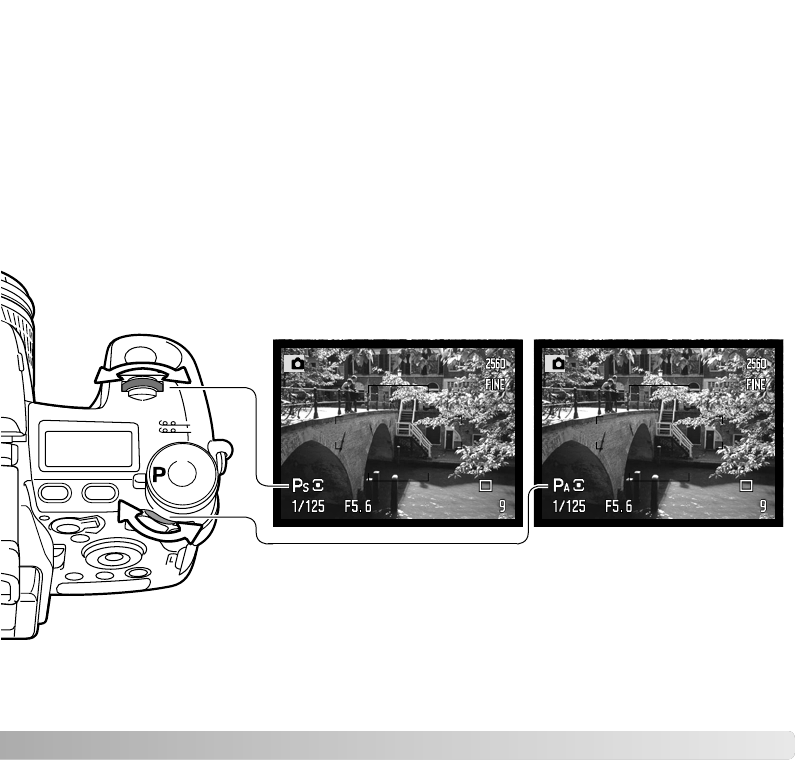
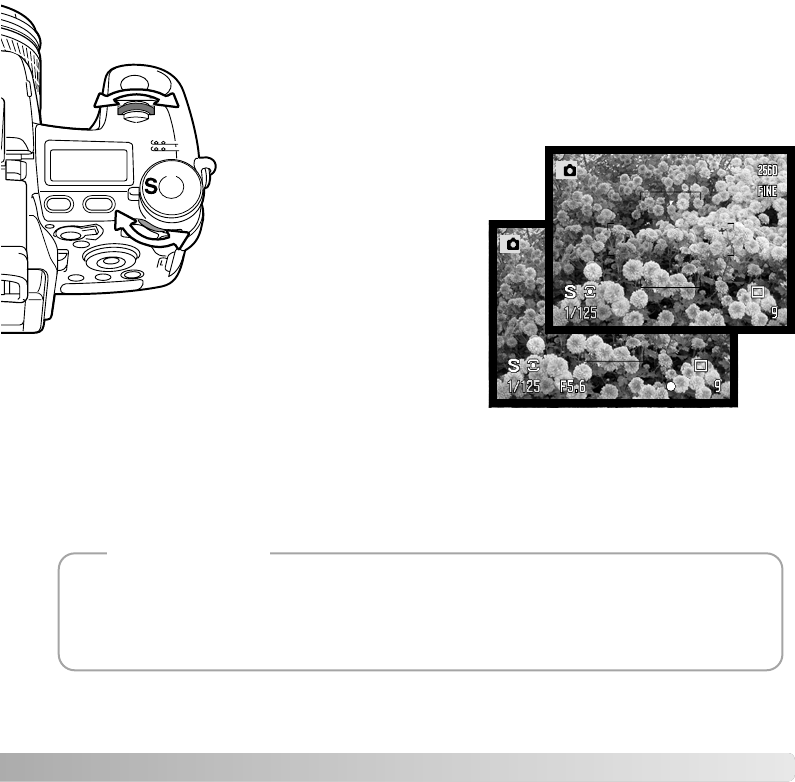
The camera’s image-processing controls apply the affect of the color modes to the live
image on the monitors, but the stored data may not be influenced by the setting. The
black and white color mode has no effect on the final image; a raw image taken in the
black-and-white color mode can be restored to a color picture. However, black and white
filter effects (p. 78) are not applied to a RAW image. The saturation difference between
the Natural Color and Vivid Color modes is preserved in the RAW data, but the
solarization color mode does not alter the image data. For more on color modes, see
page 102.
ABOUT RAW IMAGE QUALITY
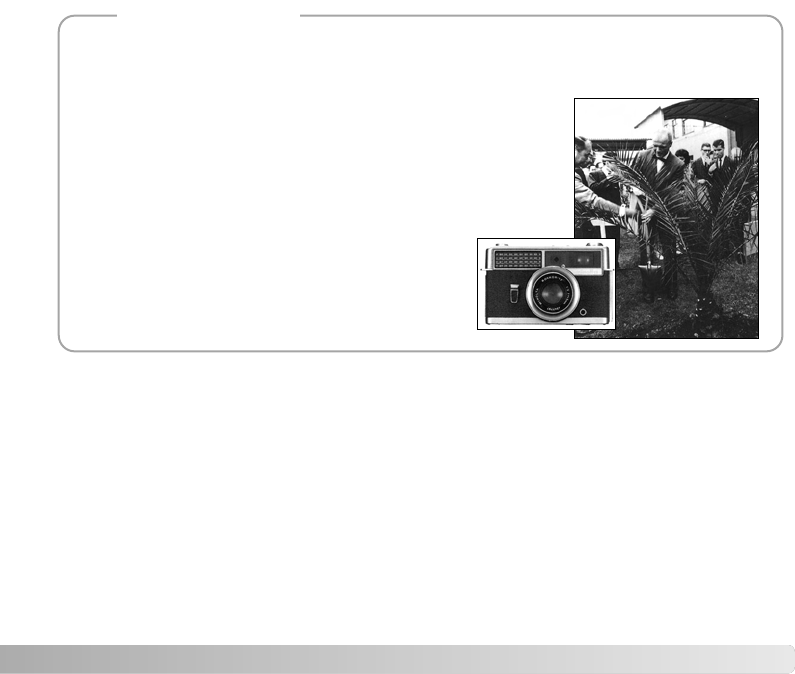
In the center of the Sakai plant in Japan is Okina bridge. In the 15th century, Sakai was a pros-
perous free city, and Okina bridge spanned the moat at one of the entrances into the walled town.
For centuries, this bridge carried pilgrims on their way to two of Japan’s sacred places: the moun-
tain monastery of Koyasan and the great Shinto shrine, Kumano Taisha. The bridge in the court-
yard dates from 1855, see photo on the next page. In 1968, Minolta offered to preserve the bridge
when the city government announced they would fill in the moat for a planned highway. The
bridge now spans a specially constructed goldfish pond. The writing on the stone bollard at the
front of the bridge prohibits vehicles from crossing.
Minolta history
85
NOTES ON IMAGE SIZE AND RESOLUTION
640 X 480 (Full image area)
1600 X 1200 (Cropped)
2080 X 1560 (Cropped)
2560 X 1920 (Cropped)
Image size changes the number of pixels in the image. When
displayed at the same resolution, images appear to have the
same amount of detail, but the dimensions of the image
increases with the number of pixels; except for the 640 X 480
image, the other pictures are too large to be displayed on this
page. When the images are enlarged to the same dimensions,
the difference in the recorded image size affects the resolution of
details.
86
FLASH MODES
The flash mode can be changed in section 1 of the recording menu (p. 80). For the flash
to fire, the built-in unit must be manually lifted. The flash will fire in the selected mode
regardless of the amount of ambient light. When the flash is used, the camera sensitivity
is automatically set between ISO 100 and 200. This setting can be changed using the
function dial (p. 74). The auto-white-balance setting will give priority to the flash’s color
temperature. If preset or custom white-balance settings are used, priority is given to the
active setting’s color temperature.
Fill-flash can be used as the main or
supplementary light. In low-light
conditions, the flash will act as the
main source of illumination and
overpower the ambient light. Under
strong sunlight or in backlit situations,
the fill-flash can reduce harsh
shadows.
FILL FLASH
RECORDING MENU
Red-eye reduction is used when taking photographs of people or animals in low-light
conditions. The red-eye effect is caused by light reflected from the retina of the eye. The
camera will fire two pre-flashes before the main flash burst to contract the pupils of the
subject’s eyes.
RED-EYE REDUCTION
Fill-flash
Red-eye reduction
Rear flash sync
Wireless
37

Hulp nodig? Stel uw vraag in het forum

Spelregels
1

Forum

Minolta-Dimage-A1
  • Soms als wij de camera aan doen zitten er gekleurde vlekkerige verfachtige strepen in beeld, zodat wij niet kunnen fotograferen. Andere keren is er niets aan de hand. Welke gebruikers van deze camera (minolta dimage a1 5mp) hebben dit ook en weten wat het is en of en waar het evt. te verhelpen is. Gesteld op 29-8-2011 om 16:33

    Reageer op deze vraag Misbruik melden
    • Had ik ook op een gegeven moment. Horizontale lijnen en roze, vlekken. Viel nog net onder de verlengde garantie en is kosteloos door Sony verholpen, echt prima service, ze hebben gelijk de laatste firmware eropgezet. Geantwoord op 3-2-2012 om 14:08

      Waardeer dit antwoord Misbruik melden
  • Heb ik ook last van. Als dat gebeurt zet ik de camera even op "naar foto's kijken" en daarna weer op "fotograferen" en dan kan ik weer gewoon fotograferen. Geantwoord op 23-10-2012 om 00:23

    Waardeer dit antwoord Misbruik melden

Misbruik melden

Gebruikershandleiding.com neemt misbruik van zijn services uitermate serieus. U kunt hieronder aangeven waarom deze vraag ongepast is. Wij controleren de vraag en zonodig wordt deze verwijderd.

Product:

Bijvoorbeeld antisemitische inhoud, racistische inhoud, of materiaal dat gewelddadige fysieke handelingen tot gevolg kan hebben.

Bijvoorbeeld een creditcardnummer, een persoonlijk identificatienummer, of een geheim adres. E-mailadressen en volledige namen worden niet als privégegevens beschouwd.

Spelregels forum

Om tot zinvolle vragen te komen hanteren wij de volgende spelregels:

Belangrijk! Als er een antwoord wordt gegeven op uw vraag, dan is het voor de gever van het antwoord nuttig om te weten als u er wel (of niet) mee geholpen bent! Wij vragen u dus ook te reageren op een antwoord.

Belangrijk! Antwoorden worden ook per e-mail naar abonnees gestuurd. Laat uw emailadres achter op deze site, zodat u op de hoogte blijft. U krijgt dan ook andere vragen en antwoorden te zien.

Abonneren

Abonneer u voor het ontvangen van emails voor uw Minolta Dimage A1 bij:


U ontvangt een email met instructies om u voor één of beide opties in te schrijven.


Ontvang uw handleiding per email

Vul uw emailadres in en ontvang de handleiding van Minolta Dimage A1 in de taal/talen: Engels als bijlage per email.

De handleiding is 2,35 mb groot.


U ontvangt de handleiding per email binnen enkele minuten. Als u geen email heeft ontvangen, dan heeft u waarschijnlijk een verkeerd emailadres ingevuld of is uw mailbox te vol. Daarnaast kan het zijn dat uw internetprovider een maximum heeft aan de grootte per email. Omdat hier een handleiding wordt meegestuurd, kan het voorkomen dat de email groter is dan toegestaan bij uw provider.

Stel vragen via chat aan uw handleiding

Stel uw vraag over deze PDF

Andere handleiding(en) van Minolta Dimage A1

Minolta Dimage A1 Gebruiksaanwijzing - Nederlands - 172 pagina's

Minolta Dimage A1 Gebruiksaanwijzing - Deutsch - 172 pagina's

Minolta Dimage A1 Gebruiksaanwijzing - English - 86 pagina's

Minolta Dimage A1 Gebruiksaanwijzing - English - 49 pagina's


Uw handleiding is per email verstuurd. Controleer uw email

Als u niet binnen een kwartier uw email met handleiding ontvangen heeft, kan het zijn dat u een verkeerd emailadres heeft ingevuld of dat uw emailprovider een maximum grootte per email heeft ingesteld die kleiner is dan de grootte van de handleiding.

Er is een email naar u verstuurd om uw inschrijving definitief te maken.

Controleer uw email en volg de aanwijzingen op om uw inschrijving definitief te maken

U heeft geen emailadres opgegeven

Als u de handleiding per email wilt ontvangen, vul dan een geldig emailadres in.

Uw vraag is op deze pagina toegevoegd

Wilt u een email ontvangen bij een antwoord en/of nieuwe vragen? Vul dan hier uw emailadres in.


Info