579694
36
Verklein
Vergroot
Pagina terug
1/36
Pagina verder
CT 890
Instruction guide
DUAL BAND VHF/UHF TRANSCEIVER |
Midland CT890 instruction guide
Index
Content of the packaging 1
Maintenance 1
Main functions 2
Main controls and parts of the radio 3
Lcd Display 3
Buttons and controls of the radio 4
Quick search 6
RPT- Single/Dual Band switch 6
A/B switch 6
‘* SCAN’ key 6
DTMF code 6
Reverse Frequency function 6
Low battery level 6
Working modes 7
Cloning function with the optional cable cod. R73727 7
Battery recharge 7
Functions 9
Frequency step (STEP) - MENU 1 9
Squelch level (SQL-LE) - MENU 2 9
Power save (SAVE) - MENU 3 10
High/low power selection (TXP) - MENU 4 10
Roger Beep at the beginning/end transmission (ROGER) - MENU
5 10
TOT (Time Out Timer) - MENU 6 10
VOX (VOX) - MENU 7 11
Wide/narrow bandwidth (WN) - MENU 8 11
Voice function (VOICE) - MENU 9 11
Midland CT890 instruction guide
TOA (Transmission Overtime Alarm) - MENU 10 12
Beep tone (BEEP) - MENU 11 12
Language of the MENU (LANGUAGE) - MENU 12 12
Busy channel lockout (BCL) - MENU 13 12
SCAN function(SC-REV) - MENU 14 13
Receiving with CTCSS tones (R-CTCSS) - MENU 15 13
Transmitting with CTCSS tones (T-CTCSS) --- MENU 16 13
Receiving with DCS codes (R-DCS) - MENU 17 14
Transmitting with DCS (T-DCS) - MENU 18 14
CALL/VFTX functions (side key PF1) - MENU 19 14
Scan / LAMP / SOS / Telealarm / Radio / Disable functions with
side key 3 (PF3) - MENU 20 15
Display backlight (ABR) - MENU 22 17
Frequency offset (OFF-SET) --- MENU 23 17
Frequency shift direction (SFT-D) - MENU 24 18
Stopwatch timer (SECOND) - MENU 25 18
Channel name (CHNAME) - MENU 26 18
Storing channels (MEM-CH) --- MENU 27 19
Deleting a channel (DEL-CH) ------ MENU 28 19
Scan of frequencies with CTCSS/DCS (SCNCD)
MENU 29 19
Welcome message (PONMSG) – MENU 30 20
Monitor (SP-MUTE) – MENU 31 20
Sending the ID code (ANI-SW) – MENU 32 21
Setting the ID ANI code (ani-edit) – MENU 33 21
DTMF (DTMF-ST) – MENU 34 21
Keypad lock (AUTOLOCK) - MENU 35 22
Setting the priority channel (PRICH-SW) - MENU 36 22
Repeater function / Full duplex (RPT-SET) - MENU 37 22
RPT-SPK - MENU 38 23
PTT - MENU 39 23
Adding a channel to scan (SCAN ADD) - MENU 40 23
Alert tone (ALERT) - MENU 41 23
ANI code tx delay (PTT-DLY) - MENU 42 24
Midland CT890 instruction guide
Transmitting the ID code (PTT-ID) – MENU 43 24
Ring time (INRG) – MENU 44 24
Group A Scan (SCG-A) - MENU 45 25
Group B Scan (SCG-B) - MENU 46 25
Repeater tone (RPT-TONE) - MENU 47 25
Mute on the secondary frequency (SMUTESET) - MENU 49 26
Setting of group selective call code (CALL CODE) – MENU 50 26
Reset ---- MENU 51 27
Troubleshooting 28
Technical specifications 29
Midland CT890 instruction guide | 1
Content of the packaging
1 CT890 transceiver
1 belt clip
1 antenna
1 Li-Ion battery pack 2600mAh
1 desktop charger
1 wrist belt
Quick guide
If any item is missing, please notify your Midland dealer.
Maintenance
Your Two Way Radio is an electronic product of exact design and should
be treated with care.
The suggestions below will help you to fulfill any warranty obligations
and to enjoy this product for many years.
Do not attempt to open the unit. Non-expert handling of the unit may
damage it.
Do not store the Radio under the sunshine or in hot areas.
High temperatures can shorten the life of electronic devices, and
warp or melt certain plastics.
Do not store the radio in dusty and dirty areas.
Keep the Radio dry. Rainwater or damp will corrode electronic circuits.
If it appears that the Radio diffuses peculiar smell or smoke, please
shut off its power immediately and take off the charger or battery
from the Radio.
Do not transmit without antenna.
2 | Midland CT890 instruction guide
Main functions
Dual band (VHF/UHF) displayed
Frequency band (to set according to the country/area of use): 144-146
MHz & 430-440MHz (Rx / Tx).
Working mode: UHF-VHF, VHF-VHF o UHF-UHF
Output power: 5W VHF /4W UHF
Memory channels: 999
Full Duplex
Repeater function
Wide colorful LCD display
Very high efficiency Li-Ion battery pack 2600mAh
Repeater tones
Individual/group selective calls
VOX function
Chronometer
105 + 105 DCS codes and 50 CTCSS tones
“VOICE” function
SOS function
Wide/narrow bandwidth selection 25kHz/12,5 kHz
Channel number, Channel + Frequency or Channel name display
mode available
Reverse frequency
Scan
Flashlight
FM Radio receiver
Frequency step: 5 kHz, 6.25 kHz, 10 kHz, 12.5 kHz, 25 kHz, 50 kHz or
100kHz
High/low power selection: high (4-5W) / low (1W)
Frequency offset
Repeater shift
“Busy Channel Lock Out” function
Tx power level indicator on the display
Low battery vocal indicator
Roger Beep
TOT (time out timer) function
Keypad lock
Function/channel reset
Midland CT890 instruction guide | 3
Main controls and parts of the radio
Lcd Display
1. Cross-band repeater
2. VOX
3. Power save mode
4. Keypad lock
5. Battery indicator
6. FM Radio frequency
7. Reverse frequency
8. Priority channel indicator
9. Indicates the latest reception
10. Band in use
11. Memory channel number
12. VHF/UHF frequency
13. Indicator of high (H)/Low (L)
power transmission or recep-
tion
14. UHF/VHF frequency
15. Narrow bandwidth (N = nar-
row / W = wide)
16. Shift (positive / negative)
17. Activation of QT+DTMF
18. DCS code
19. CTCSS tone
20. Repeater function ON
21. Function mode
22. FM radio band
MENU
A/B
RPT
VFO/MR
EXIT
1
STEP
4
TXP
7
VOX
2
SQL
5
ROGER
8
W/N
3
SAVE
6
TOT
9
VOICE
*
SCAN
0
#
LOCK
CT890
1 2 3 4 5
7
8
10
9
11
12
14
18
19
20
17
15
16
2221
6
13
4 | Midland CT890 instruction guide
Buttons and controls of the radio
A. Antenna
B. Flashlight
C. Rotary encoder for the channel selection
D. Power / Switch / Volume control: Rotate to switch on/off the radio and
adjust the volume
E. Transmission led (red)
F. Reception led (green)
G. LCD display
H. Microphone
I. EXIT: to exit menu and functions
J. VFO/MR: to change the frequency or the channel mode
K. */SCAN: Reverse frequency/SCAN. Press to activate the Reverse fre-
quency; keep it pressed to activate the SCAN function.
L. #/LOCK: Keypad lock/Chronometer key. Short press: this key is operative
only when the chronometer is activated. Long press: keypad lock.
M. Alphanumerical keypad
N. ▲/▼ keys: to select the functions/menu
O. RPT. Short press: Single/Dual display mode. Long press: Activate or exit
the repeater function.
P. A/B. Switch key on master frequency: to select the desired operating fre-
quency (VHF or UHF).
Q. MENU: enters the MENU functions and confirms the selection.
R. Side-key PF1: Selective call/Secondary frequency transmission key. Ac-
cording to the functions that you have set (menu 19 of the radio), it al-
lows the transmission of the selective call or the repeater tone 1750Hz.
S. PTT
T. Side-key PF2. Long press: to activate the Monitor function. Short press:
turns the flashlight on. Press it again to turn it off.
U. Side-key PF3: it allows the activation of the following functions (menu
20): Scan / Display backlight off / Alarm / Emergency / FM radio.
V. MIC/SP: External speaker/mike jacks.
W. 2600mAh Li-Ion battery pack
Midland CT890 instruction guide | 5
MENU
A/B
RPT
VFO/MR
EXIT
1
STEP
4
TXP
7
VOX
2
SQL
5
ROGER
8
W/N
3
SAVE
6
TOT
9
VOICE
*
SCAN
0
#
LOCK
CT890
MENU
A/B
RPT
VFO/MR
EXIT
1
STEP
4
TXP
7
VOX
2
SQL
5
ROGER
8
W/N
3
SAVE
6
TOT
9
VOICE
*
SCAN
0
#
LOCK
CT890
R
S
T
U
W
V
MENU
A/B
RPT
VFO/MR
EXIT
1
STEP
4
TXP
7
VOX
2
SQL
5
ROGER
8
W/N
3
SAVE
6
TOT
9
VOICE
*
SCAN
0
#
LOCK
CT890
A
C D
E
F
G
H
I
J
K
L
M
O
N
Q
B
P
6 | Midland CT890 instruction guide
Quick search
Press ▼/▲ keys to set functions/parameters.
By keeping pressed these keys, a quick search of the functions will be
done.
RPT- Single/Dual Band switch
To set the single/dual band switch, press RPT.
A/B switch
Press the A/B switch to select the master frequency. The master fre-
quency is the main frequency and is shown on the display with MAIN.
‘* SCAN’ key
Press slightly the *SCAN key to set/disable the reverse frequency. Keep it
pressed for 2 seconds to activate the Scan function.
DTMF code
Press PTT and push the key corresponding to the desired DTMF code.
RPT, , , VFO/MR correspond to A, B, C and D.
Reverse Frequency function
Using the Reverse frequency function, the transmitting and receiving
frequencies can be interchanged, as well as the CTCSS and DCS codes.
In standby mode, press *SCAN to turn on the Reverse frequency fun-
ction; press it again to turn it off.
NOTE: Ensure to set the frequency shift direction first (MENU 23 and 24).
Low battery level
When the battery pack has low power, you will hear a beep every 5 se-
conds and the battery icon shows the low level. If you press PTT, you will
hear a vocal message BATTERY LOW’.
Midland CT890 instruction guide | 7
Working modes
CT890 has 2 operating modes available: VFO (frequency mode) and MR
(channel mode).
In MR mode, the display can show:
Channel number
Frequency + channel number
Channel name
To switch from the frequency mode to channel mode can be done ma-
nually or by means of the optional programming software PRG-10.
You can also set a password for the working modes, but only by using the
optional programming software:
press MENU; the display shows
. Edit the password and press
MENU again.
If the password is composed of a series of 0, no password must be edited
to enter the working mode.
Cloning function with the optional cable cod. R73727
This function allows you to copy/transfer all data and settings from one
radio to another one; the procedure is very simple and does not need a
PC: just insert the two plugs of the cloning cable into the jack of the two
radios.
1. Connect the optional cable R73727 to both radios.
2. Turn on the radio ‘slave’ (radio to program).
3. Press PF3 key on the radio master (radio to be copied) and turn it on
at the same.
4. The red led on the radio master starts blinking and the display shows
COPYING’: the cloning function is being activated. At the end, the
led turns off and the display shows FINISHED!’; if the red led remains
steady, the cloning procedure failed.
5. On the radio slave the green led blinks while cloning and turns off
when the procedure is finished.
6. Both radios will make a reset and will be ready for use.
Battery recharge
Insert the AC plug into the 240V socket. The charger’s led starts blinking,
indicating that it is in charging stand-by. Insert the transceiver or only the
8 | Midland CT890 instruction guide
battery pack into the charger cradle. The red led turns on indicating that
the battery pack is being charged. Once the led turns green, the battery
pack is fully charged.
NOTE: If the battery pack is totally discharged, the red led will be blinking for
10/20 minutes, then it will be steady red. Once the led turns green, the battery
is fully charged.
Midland CT890 instruction guide | 9
Functions
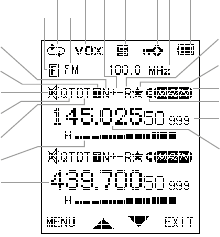
CT890 displays at the same time 2 frequency bands: the master frequency
(for transmission) that is indicated on the display with MAIN and the other
one is the secondary frequency and only can be used to receive.
To choose the desired frequency (master or secondary), press the A/B
key.
Under Frequency mode: the following 9 functions can be set on both
Bands: frequency step, output power, squelch level, channel ban-
dwidth, CTCSS, DCS, Frequency shift direction, frequency offset, and
Channel displaying mode.
Under Channel mode: the following 7 functions can be set on both
Bands: Busy channel lockout, CTCSS, DCS, channel bandwidth, fre-
quency step, frequency shift direction and frequency offset.
Frequency step (STEP) - MENU 1
In stand-by mode press MENU + 1; the display will show STEP
Press MENU to enter the function and then the ▼/▲ keys to select the
desired frequency step. Push MENU again to confirm you selection.
To return to standby mode press EXIT.
CT890 has 7 frequency steps available: 5.00KHz, 6.25KHz, 10.00KHz,
12.50KHz, 25.00KHz, 50.00KHz and 100KHz.
Squelch level (SQL-LE) - MENU 2
This function turns on the Squelch when the signal is strong; the Squelch
will stay off when the signal is weak. Set the same DCS codes of your
group and turn on the squelch.
By setting the level too high, you may not receive the weak signals; while
by setting it too low you may receive noises or undesired signals.
NOTE: This transceiver has 10 (0-9) available levels: 0 means that the Squelch
is turned on. From level 1 to level 9 you will have different levels of noises
reduction. The higher is the level, the louder will be the Squelch.
In standby mode, press MENU + 2. The screen displays SQL”.
Press MENU to enter to function. Press the ▲/▼ buttons or rotate the
encoder knob to select the desired Squelch level, then press MENU to
confirm. To return to the standby mode press EXIT.
10 | Midland CT890 instruction guide
Power save (SAVE) - MENU 3
To save battery power, this function can turn off the transceiver when no
signal is received.
In standby mode, press MENU + 3. The screen displays SAVE”.
Press MENU to enter the function. Press the ▲/▼ buttons or rotate the
encoder knob to select ON or OFF, then press MENU to confirm.
To return to the standby mode press EXIT.
High/low power selection (TXP) - MENU 4
You can choose between 5W (HIGH) or 1W (LOW) output power.
In frequency mode, press MENU + 4. The screen will display TXP ”.
Press MENU to enter the function. Press the ▲/▼ keys or rotate the enco-
der to select HIGH or LOW power, then press MENU to confirm.
To return to the standby mode press EXIT.
Roger Beep at the beginning/end transmission (RO-
GER) - MENU 5
Thanks to this function you can select the Roger Beep tone with the fol-
lowing options:
OFF: Roger Beep turned off (no tones).
BOT: Roger Beep tone heard when the PTT button is pressed (when
transmission begins)
EOT: Roger Beep tone heard when the PTT button is released (when
transmission ends)
BOTH: Roger Beep tone heard when you press and release the PTT
button
In standby mode, press MENU + 5. The screen will display ROGER”.
Press MENU to enter the function. Press the ▲/▼ keys or rotate the
encoder to select OFF/BOT/EOT/BOTH, then press MENU to confirm.
To return to the standby mode press EXIT.
TOT (Time Out Timer) - MENU 6
The TOT function is used to prevent a too long transmission. This function
temporarily blocks transmissions if the radio has been used beyond the
maximum time permitted. Once reached the preset timer, the radio will
Midland CT890 instruction guide | 11
be forced in reception mode. When a transmission exceeds the pre-set
time, you will hear a warning sound to remind you that the transmission
time is almost finished.
The transmission time can be set in 60 levels with 15 seconds each
(between 15 and 900 seconds).
In standby mode, press MENU + 6; the screen will display TOT”.
Press MENU to enter the function. Press the ▲/▼ buttons or rotate the
encoder to select the desired TOT level, then press MENU to confirm.
To return to the standby mode press EXIT.
VOX (VOX) - MENU 7
This function allows hands-free conversations: just speak in the direction
of the microphone and the communication will be automatically activa-
ted.
In standby mode, press MENU + 7. The screen will display VOX”.
Press MENU to enter the function. Press the ▲/▼ buttons or rotate the
encoder to turn off the VOX function or to select the VOX level (1-10),
then press MENU to confirm.
To return to the standby mode press EXIT.
NOTE: level 1 is the least sensitive while level 9 is the most sensitive. When the
radio is in Scan or FM Radio mode, the VOX is not enabled.
Wide/narrow bandwidth (WN) - MENU 8
In standby mode, press MENU + 8. The display will show WN”.
Press MENU to enter the function. Press the ▲/▼ keys or rotate the en-
coder to select WIDE/NAR (25/12,5KHz) bandwidth, then press MENU to
confirm. To return to the standby mode press EXIT.
Voice function (VOICE) - MENU 9
In standby mode, press MENU + 9; the screen will display VOICE”.
Press MENU to enter the function. Press the ▲/▼ buttons or rotate the
encoder to select OFF/ON. Confirm your selection by pressing MENU.
To return to the standby mode press EXIT.
12 | Midland CT890 instruction guide
TOA (Transmission Overtime Alarm) - MENU 10
With the TOA function enabled, if the TOT function (Time Out Timer) has
been turned on and your transmission reaches the pre-set end-transmis-
sion time, the transceiver will warn you and the TX red indicator starts
blinking.
You can set from 1 to 10 TOA levels. Level 1 means that the transceiver
warns you 1 second before the transmission reaches the TOT; level 2
warns you 2 seconds before the TOT and so on.
In standby mode, press MENU + 10. The display will show TOA”.
Press MENU to enter the function. Press the ▲/▼ buttons or rotate the
encoder to select OFF or 1 of the 10 levels, then press MENU to confirm.
To return to the standby mode press EXIT.
Beep tone (BEEP) - MENU 11
If you enable this function, every time a button is pressed, you will hear
a Beep tone.
In standby mode, press MENU + 11. The screen will display BEEP”.
Press MENU to enter the function. Press the ▲/▼ buttons or rotate the
encoder to turn ON/OFF the beep function.
Press MENU to confirm and EXIT to return to stand-by mode.
Language of the MENU (LANGUAGE) - MENU 12
This section shows the language of the MENU (english).
In standby mode press MENU + 12; the display will show LANGUAGE”.
Busy channel lockout (BCL) - MENU 13
When this function is active, if you select a busy channel and press the
PTT, the transceiver will not transmit.
In standby mode, press MENU + 13. The screen will display BCL”.
Press MENU to enter the function. Press the ▲/▼ buttons or rotate the
encoder to select ON/OFF, then press MENU to confirm.
To return to the standby mode press EXIT.
This function is not active when the Repeater function is enabled.
Midland CT890 instruction guide | 13
SCAN function(SC-REV) - MENU 14
This transceiver has 3 Scan modes:
TO - Time-operated Scan
Whenever a signal is detected, the radio will suspend the scan for 5 se-
conds, and then will continue to scan even if the signal is still present.
CO: Carrier-operated Scan
Whenever a signal is detected, the radio will stop scanning. It will re-
sume to scan once the signal will be no more present.
SE: Search Scan
The radio will stop scanning and EXIT the Scan mode once detected a
signal.
In standby mode, press MENU + 14. The screen displays SC-REV”.
Press MENU to enter the function. Press the ▲/▼ buttons or rotate the
encoder to select the desired Scan mode, then press MENU to confirm.
To return to the standby mode press EXIT.
To start the scan keep pressed *SCAN for 2 seconds.
Receiving with CTCSS tones (R-CTCSS) - MENU 15
CTCSS tones are similar to access codes and enable the radio to commu-
nicate with the users that are tuned on the same channel and have set
the same CTCSS tone.
In frequency mode, press MENU + 15. The screen displays R-CTC”.
Press MENU to enter the function. Press the ▲/▼ buttons or rotate the
encoder to turn OFF this function or to select a CTCSS tone from 67.0Hz
to 254.1Hz. Press MENU to confirm and EXIT to return to the standby
mode press.
NOTE: This transceiver has 50 CTCSS groups.
Transmitting with CTCSS tones (T-CTCSS) --- MENU 16
In standby mode, press MENU + 16. The screen displays T-CTC”.
Press MENU to enter the function. Press the ▲/▼ keys or rotate the en-
coder to turn OFF this function or to select a CTCSS tone from 67.0Hz to
254.1Hz, then press MENU to confirm.
To return to the standby mode press EXIT.
NOTE: This transceiver has 50 CTCSS groups.
14 | Midland CT890 instruction guide
Receiving with DCS codes (R-DCS) - MENU 17
DCS codes are similar to access codes and can be added to channels, so
as to create a sort of personal channel . They enable the radio to commu-
nicate with the users that are tuned on the same channel and have set
the same DCS code.
In frequency mode, press MENU + 17. The screen displays R-DCS”.
Press MENU to enter the function. Press the ▲/▼ buttons or rotate the
encoder to turn OFF this function or to select a DCS code from D023N
to D754I.
Press MENU to confirm and EXIT to return to the standby mode.
NOTE: You can set up to 105 DCS N and 105 DCS I codes.
Transmitting with DCS (T-DCS) - MENU 18
In standby mode, press MENU + 18. The screen displays T-DCS”.
Press MENU to enter the function. Press the ▲/▼ buttons or rotate the
encoder to turn OFF this function or to select a DCS code from D023N to
D754I, then press MENU to confirm.
To return to the standby mode press EXIT.
NOTE: You can set up to 105 DCS N and 105 DCS I codes.
CALL/VFTX functions (side key PF1) - MENU 19
The side key PF1 can be associated to one of the following functions:
CALL (selective calls) / VFTX (transmission on the secondary band).
NOTE: the selective call can be programmed by means of the optional pro-
gramming software PRG-10.
In Standby mode press MENU + 19; “PF1 will appear on the display.
Press MENU to enter the function. Press the ▼/▲ keys or rotate the en-
coder to activate one of the 2 functions and confirm by pushing MENU
again. Press EXIT to return to the standby mode.
Midland CT890 instruction guide | 15
Scan / LAMP / SOS / Telealarm / Radio / Disable fun-
ctions with side key 3 (PF3) - MENU 20
The side key PF3 can enable the following functions:
SCAN: Channel Scan
LAMP: display backlight off
SOS: SOS function
TELEALARM: tele-alarm function
RADIO: FM radio
DISABLE: disabling the functions
1. Channel Scan:
In standby mode, press MENU + 20. The screen displays PF3”.
Press MENU to enter the function. Press the ▲/▼ buttons or rotate
the encoder to select the desired function, then press MENU to con-
firm. To return to the standby mode press EXIT.
Once the function is enabled, press the Side key PF3 to enter the Scan
mode (Scan mode can be set through MENU + 14. To stop scanning,
press any key.
2. Display backlight off:
In standby mode, press MENU + 20. The screen displays PF3”.
Press MENU to enter the function. Press the ▲/▼ buttons or rotate
the encoder to select LAMP, then press MENU to confirm.
To return to the standby mode press EXIT.
3. SOS:
In emergency situations, the SOS function transmits an SOS signal/
emergency calls. You will hear a beep and the two leds will alternately
blink. The emergency signal will be transmitted every 5 minutes, la-
sting for 10 seconds each time.
To stop transmitting, press PTT.
If a carrier signal is detected during the transmission interval, the ra-
dio switches to reception.
In standby mode, press MENU + 20. The screen displays PF3”.
Press MENU to enter the function. Press the ▲/▼ buttons or rotate the
encoder to select SOS; the screen will display SOS”.
16 | Midland CT890 instruction guide
Press MENU again to confirm. You will hear a tone and the leds will alter-
nately blink. Now the SOS function is set.
Once the function has been enabled, if you press the PF3 side key, the
transceiver will transmit the SOS signal.
4. TELEALARM:
The radio transmits an ID code (ANI ID) followed by 110. Then, there
will be a sound and visual warning and the radio will switch to recep-
tion. This procedure is repeated more times.
In Standby mode press MENU + 20; the display will show PF3”.
Press MENU to enter the function. Press ▼/▲ keys or rotate the enco-
der to select Telealarm and confirm by pushing MENU.
With the EXIT key you return to standby mode.
5. RADIO:
Turn on the Radio: In standby mode, press the side key PF3 to turn on
the function. The display will show the frequency in use and the FM
radio frequency.
Tune the radio stations: In Radio mode, press *SCAN. The radio will
search the stations automatically and will stop once found the sta-
tion.
Manually searching an FM station: keep pressed the RPT key for 2 se-
conds, then edit the desired FM station. To EXIT FM Radio mode press
PF3.
NOTE: When you are listening to the radio, the current frequency/channel is
still in use.
To transmit, press the PTT button. Once the transmission ends, after 5 secon-
ds, the radio will return to FM Radio mode.
Midland CT890 instruction guide | 17
Working mode (CH-MDF) - MENU 21
CT890 has four working modes available:
1. Frequency mode (FREQ)
2. Channel mode (CH)
3. Frequency + channel number (CH FREQ)
4. Channel name (NAME)
To shift from one mode to another one:
In Standby mode press MENU + 21; select the desired working mode
with the ▼/▲ keys or with the encoder knob.
Push MENU again to confirm your selection.
Display backlight (ABR) - MENU 22
In standby mode, press MENU + 22. The screen will display ABR ”.
Press MENU to enter the function. Push the ▲/▼ buttons or rotate the
encoder to enable/disable (ON/OFF) the backlight of the display, then
press MENU to confirm.
To return to the standby mode press EXIT.
Frequency offset (OFF-SET) --- MENU 23
The offset is the frequency difference between transmission and recep-
tion. The frequency offset of this radio is between 0 and 599.995 MHz.
In standby mode, press MENU + 23. The screen will display OFFSET ”.
Press MENU to enter the function. Press the ▲/▼ buttons or rotate the
encoder to select the frequency offset or you can manually digit the of-
fset with the keypad. Press MENU to confirm.
To return to the standby mode press EXIT.
With the frequency offset, it is possible to transmit and receive in two
different frequencies.
You have to:
1. Set the working mode
2. Set the frequency shift direction and then the frequency offset
E.g.: if you want to receive on 430.025MHz frequency and transmit on
435.026MHz frequency: in Frequency mode, digit 4 3 0 0 2 5 then press
MENU + 24 + MENU to enter and set the frequency shift direction.
18 | Midland CT890 instruction guide
Select +(positive direction) and press MENU to confirm. Press EXIT to
EXIT the function.
Press MENU + 23 + MENU to enter the offset frequency function and
then digit the frequency deviation (5000).
Press MENU and then EXIT to exit the function.
Now the frequency shift direction and frequency offset have been set.
Frequency shift direction (SFT-D) - MENU 24
In standby mode, press MENU + 24. The screen will display SFT-D”.
Press MENU to enter the function. Press the ▲/▼ buttons or rotate the
encoder to select +/-/OFF, then press MENU to confirm.
To return to the standby mode press EXIT.
+ (positive offset): If the transmitting frequency is higher than the rx fre-
quency.
- (negative offset): If the transmitting frequency is lower than the rx fre-
quency.
OFF: frequency shift turned off.
NOTE: if the frequency offset is out of the allowed frequency band, the radio
cannot transmit. So please make sure that the frequency offset and the rx
frequency are within the allowed frequency range.
Stopwatch timer (SECOND) - MENU 25
In standby mode, press MENU + 25. The screen displays SECOND”.
Press MENU to enter the function. Press the ▲/▼ buttons or rotate the
encoder to enable/disable (ON/OFF) the function, then press MENU for
confirmation. To return to the standby mode press EXIT.
Using the stopwatch timer:
When this function is ON, press ‘#LOCK to start counting; to stop
counting you can press any key.
Press ‘#LOCK again to re-start counting.
To EXIT the function, stop the counting first, and then press the EXIT but-
ton.
Channel name (CHNAME) - MENU 26
To set the channel name you have at your disposal 26 letters (A-Z) and
10 numbers (0-9). You can use up to 8 characters for the channel name.
Midland CT890 instruction guide | 19
Procedure:
1. To display the name of the channels, press MENU + 21.
2. Select the desired channel, then press MENU+ 26 + MENU. The scre-
en displays eight ‘_’ symbols.
3. Edit the desired channel name with the keypad and then confirm by
pushing MENU. To exit the function press EXIT. The screen displays
the channel name and also the channel number on the right corner
of the display.
Storing channels (MEM-CH) --- MENU 27
In Frequency and in Standby mode, you can store frequencies and pa-
rameters.
Press MENU + 27; the screen will display MEM-CH”.
Press MENU to enter the function. Press the ▲/▼ buttons to select the
channel, then press MENU to store it. A sound tone will confirm that the
storing succeeded. Press EXIT to exit to return to standby mode.
NOTES
If you want to set CTCSS tones, DCS codes or the frequency offset, you have to
do it before storing the channel.
The channels already stored are displayed in black, while the others are blue.
Deleting a channel (DEL-CH) ------ MENU 28
In standby mode, press MENU + 28; the screen will display DEL-CH”.
Press MENU to enter the function. Press the ▲/▼ buttons or rotate the
encoder to select the channel you want to delete, then press MENU to
confirm. To return to the standby mode press EXIT.
NOTE: Channel 1 cannot be deleted.
Scan of frequencies with CTCSS/DCS (SCNCD)
MENU 29
This function enables the scan of frequencies with CTCSS or DCS codes.
When the transceiver is in receiving mode, press MENU + 29, the screen
displays “SCNCD”.
Press MENU to enter the function. Press the ▲/▼ buttons or rotate the
20 | Midland CT890 instruction guide
encoder to select Scan CTCSS or Scan DCS, then press MENU to confirm.
The transceiver starts scanning frequencies with CTCSS/DCS.
NOTES:
This function cannot work under channel mode.
The Scan will start only when the rx band detects signals.
Once the CTCSS and DCS frequencies are picked up, they will appear on the
display.
Welcome message (PONMSG) – MENU 30
In this section you can set a message that is displayed when you turn on
the radio.
You can choose between these two options:
BITMAP (default message. The Midland brands appears)
BATT-V (the display will show the battery level).
In Standby mode press MENU + 30; the display will show PONMSG”.
Press MENU to enter the function. Push the ▼/▲ keys or rotate the enco-
der to select the desired option and confirm with MENU.
To return to the standby mode, press EXIT.
Monitor (SP-MUTE) – MENU 31
With this function, the monitor opens if one of these options is detected:
QT: when CT890 is set in this mode, the monitor feature is activated only
when the radio receives the correct CTCSS tones.
QT + DTMF: with this option, the monitor is activated when the radio
receives the correct CTCSS tone and the correct DTMF code.
QT*DTMF: the monitor is activated when the radio receives the cor-
rect CTCSS tone or the correct DTMF code.
In Standby mode press MENU + 31; the display will show SP-MUTE”.
Press MENU to enter the function. Push the ▼/▲ keys or rotate the enco-
der to select the desired option and confirm with MENU. To return to the
standby mode, press EXIT.
Midland CT890 instruction guide | 21
Sending the ID code (ANI-SW) – MENU 32
With this function, you can send the identifier code of your radio.
In Standby mode press MENU + 32; the display will show ANI-SW”.
Press MENU to enter the function. Push the ▼/▲ keys or rotate the enco-
der to select ON/OFF and confirm with MENU. To return to the standby
mode, press EXIT.
Setting the ID ANI code (ani-edit) – MENU 33
The identifier code is composed of 10 digits (0-9); the first one cannot
be 0.
The ANI code must be composed of 3 digits to 6 max.
In Standby mode press MENU + 33; the display will show ANI-EDIT”.
Press MENU to enter the function. Edit the ANI code with the keypad and
confirm with MENU. To return to the standby mode, press EXIT.
DTMF (DTMF-ST) – MENU 34
With this MENU you can select the following options:
DT-ST: if you press any key on the keypad during transmission, the
speaker will send out the corresponding DTMF tone.
ANI-ST: when you press PTT, the speaker will send out the correspon-
ding ANI code.
DT+ANI: when transmitting, the ANI code and the DTMF tones will be
activated by the speaker of the radio.
OFF: DTMF disabled.
In Standby mode press MENU + 34; the display will show DTMF-ST”.
Press MENU to enter the function. Push the ▼/▲ keys or rotate the enco-
der to select ON/OFF and confirm with MENU.
To return to the standby mode, press EXIT.
22 | Midland CT890 instruction guide
Keypad lock (AUTOLOCK) - MENU 35
This transceiver has 2 types of Keypad lock available: Auto-lock and Ma-
nual-lock.
In standby mode, press MENU + 35. The screen will display AUTOLOCK”.
Press MENU to enter the function. Press the ▲/▼ buttons or rotate the
encoder to select ON/OFF, then press MENU to confirm and EXIT to re-
turn to the standby mode.
If you select:
ON: the keypad lock function will be activated. With this function ena-
bled, the keypad will be locked automatically if there is no operation
within 15 seconds. Keep pressed #LOCK for 2 seconds to unlock the
keypad.
OFF: the keypad lock function is not enabled.
Setting the priority channel (PRICH-SW) - MENU 36
The priority channel can be set by means of the optional programming
software.
The PRICH-SW function is associated to the scan feature; the options avai-
lable are two: OFF/ON.
In Standby mode press MENU + 36; the display will show PRICH-SW”.
Press MENU to enter the function. Push the ▼/▲ keys or rotate the en-
coder to select the desired option (ON/OFF ) and confirm with MENU.
To return to the standby mode, press EXIT.
OFF: function deactivated
ON: the radio will alternately scan the channels and the priority chan-
nel.
Repeater function / Full duplex (RPT-SET) - MENU 37
CT890 can operate in two different modes:
X-DIRPT: Cross band repeater (VHF / UHF or UHF / VHF)
X-TWRPT: Full Duplex TX/RX (default setting)
X-DIRPT: in this mode, the signal received in VHF or UHF band will be
automatically transmitted on the other band (VHFUHF / UHFVHF).
The display will show the
MENU
A/B
RPT
VFO/MR
EXIT
1
STEP
4
TXP
7
VOX
2
SQL
5
ROGER
8
W/N
3
SAVE
6
TOT
9
VOICE
*
SCAN
0
#
LOCK
CT890
icon to indicate that the radio is working in
this mode.
Midland CT890 instruction guide | 23
X-TWRPT: the radio transmits and receives at the same time, exactly as
in a phone conversation; keep pressed the RPT key and the full duplex
mode is active.
With the programming software you can set the tx delay when you rele-
ase the PTT.
RPT-SPK - MENU 38
This function deactivates the speaker when the repeater function is ena-
bled.
In Standby mode press MENU + 38; the display will show RPT-SPK”.
Press MENU to enter the function. Push the ▼/▲ keys or rotate the enco-
der to select ON/OFF and confirm with MENU.
To return to the standby mode, press EXIT.
PTT - MENU 39
In this MENU you can disable the PTT when the repeater function is ac-
tive.
In Standby mode press MENU + 39; the display will show RPT-PTT”.
Press MENU to enter the function. Push the ▼/▲ keys or rotate the en-
coder to select ON/OFF and confirm with MENU. To return to the standby
mode, press EXIT.
Adding a channel to scan (SCAN ADD) - MENU 40
With this function you add a channel to the scan channel list.
To enable it, you must first set the radio to CH mode.
In Standby mode press MENU + 40; the display will show SCAN-ADD”.
Press MENU to enter the function. Push the ▼/▲ keys or rotate the en-
coder to select ON/OFF and confirm with MENU. To return to the standby
mode, press EXIT.
Alert tone (ALERT) - MENU 41
In this section you set the alert tone; you can choose amongst the fol-
lowing alert tones: 1750Hz, 2100Hz, 1000Hz and 1450Hz.
In Standby mode press MENU + 41; the display will show ALERT”.
Press MENU to enter the function. Push the ▼/▲ keys or rotate the en-
coder to select one of above mentioned frequencies and confirm with
24 | Midland CT890 instruction guide
MENU. To return to the standby mode, press EXIT.
To send out the alert tone, press PTT and then keep pressed the side key
PF2.
ANI code tx delay (PTT-DLY) - MENU 42
This function allows you to set the delay in sending the ANI code once
the PTT is pressed (ANI delay).
You can set it between 100 and 3000ms (30 levels of 100ms each).
To set the delay press MENU + 42; “PTT-DLY will appear on the display.
Press MENU to enter the function. Select the desired level with the ▼/▲
keys or by rotating the encoder.
Press MENU again for confirmation and EXIT to return to standby mode.
Transmitting the ID code (PTT-ID) – MENU 43
With this function you can decide when sending the ANI code in tx mode.
The possibilities are 3:
BOT: the code is sent when you press the PTT
EOT: the code is sent when the PTT is released
BOTH: the code is sent when you press and release the PTT
In Standby mode press MENU + 43; the display will show PTT-ID”.
Press MENU to enter the function. Push the ▼/▲ keys or rotate the enco-
der to select the desired option and confirm with MENU.
To return to the standby mode, press EXIT.
Ring time (INRG) – MENU 44
With this MENU you can select the ring time that you hear when the radio
receives its ANI code.
To set the ring time MENU + 44; the display will show RING”.
Press MENU to enter the function. With the ▼/▲ keys or with the enco-
der selection the desired option:
from 1 to 10 seconds
OFF
Press MENU again for confirmation and EXIT to return to standby mode.
Midland CT890 instruction guide | 25
Group A Scan (SCG-A) - MENU 45
Scan can also be done on programmed channel groups; this section de-
scribes the scan of channels belonging to Group A.
You can set 10 groups of 100 channels each.
Press MENU + 45; “SCG-A will appear on the display.
Press MENU to enter the function. With the ▼/▲ keys or with the enco-
der select the desired option (ALL = all channels / G-10: group of chan-
nels). Press MENU again for confirmation and EXIT to return to standby
mode.
Channels must be added to the channel list with the procedure descri-
bed in MENU 40 or through the optional programming software.
Group B Scan (SCG-B) - MENU 46
With this MENU you make a scan of channels belonging to Group B.
You can set 10 groups of 100 channels each.
Press MENU + 46; the display will show SCG-B”.
Press MENU to enter the function. Select the desired option with the
▼/▲ keys or with the encoder (ALL = all channels / G-10: group of chan-
nels). Press MENU again for confirmation and EXIT to return to standby
mode.
Channels must be added to the channel list with the procedure descri-
bed in MENU 40 or through the optional programming software.
Repeater tone (RPT-TONE) - MENU 47
With this function you enable the repeater tone at the end of transmis-
sion; it is very useful for some repeaters.
In Standby mode press MENU + 47; the display will show RPT-TONE”.
Press MENU to enter the function. Press the ▼/▲ keys or rotate the en-
coder to select ON/OFF. Confirm with MENU and return to standby mode
with the EXIT key.
26 | Midland CT890 instruction guide
Scanned CTCSS/DCS tones (SC-QT) - MENU 48
This function is helpful to decode a CTCSS/DCS tone if you don’t know
the exact code:
ALL (ENCODER + DECODER)
ENCODER
DECODER
Press MENU + 48; the display will show SC-QT”.
Press MENU to enter the function. Select on of the 3 options with the
▼/▲ keys or with the encoder. Press MENU again for confirmation and
EXIT to return to standby mode.
To make a scan of these tones, see par. MENU 29.
Mute on the secondary frequency (SMUTESET) -
MENU 49
The Mute function deactivates the volume on the secondary frequency.
It is very useful, especially when you operate in dual band VHF/VHF; UHF/
VHF; UHF/UHF.
In Standby mode press MENU + 49; the display will show SMUTESET”.
Press MENU to enter the function. With the ▼/▲ keys or with the enco-
der select one of the following options:
OFF: function deactivated
TX: when the main frequency is transmitting, the reception volume of
the secondary frequency is disabled
RX: when the main frequency is receiving, the reception volume of
the secondary frequency is disabled
TX/RX: when the main frequency is transmitting and receiving, the
reception volume of the secondary frequency is disabled
Confirm with MENU and press EXIT to return to the standby mode.
Setting of group selective call code (CALL CODE) –
MENU 50
The selective calls can be programmed with the optional programming
software PRG-10.
Midland CT890 instruction guide | 27
With this MENU you can select the call groups previously set with PRG-10.
In Standby mode press MENU + 50; the display will show CALL CODE”.
Press MENU to enter the function. Press the ▼/▲ keys or rotate the enco-
der to select the desired code. Confirm with MENU and return to standby
mode with the EXIT key.
Reset ---- MENU 51
This transceiver has two Reset modes available: VFO and ALL.
RESET VFO: all the settings except channels will return to the default
settings.
RESET ALL: all settings will return to the default settings.
1. Reset (VFO)
In standby mode, press MENU + 51; the screen will display RESET”.
Press MENU to enter the function. Press the ▲/▼ buttons or rotate
the encoder to select VFO, then press MENU to confirm.
The display will show RESET SURE?. Press MENU again to confirm
and the screen will display PLEASE WAIT. Then, the transceiver will
turn off and reboot again.
2. Reset (ALL)
In standby mode, press MENU + 51. The screen displays RESET”.
Press MENU to enter the function. Press the ▲/▼ buttons or rotate
the encoder to select ALL, then press MENU to confirm.
The display will show RESET SURE?. Press MENU again to confirm;
the screen will display PLEASE WAIT. Then, the transceiver will turn
off and reboot again.
28 | Midland CT890 instruction guide
Troubleshooting
PROBLEM SOLUTION
The radio doesn’t switch on The battery may be exhausted. Re-
charge it.
Uncorrected installation. Re-install
it.
Battery recharge doesn’t last long The battery pack is over. Change it
with a new one. Battery pack is not
completely charged.
Reception led turns on but no
sound heard
Make sure the volume is not too
low. Make sure to have the same
CTCSS and DCS codes of your
group
The keypad doesn’t work Keypad lock function hasn’t been
enabled
Reception of other group signal
while transmitting
Change another CTCSS/DCS for
your group
Midland CT890 instruction guide | 29
Technical specifications
Frequency band 144-146MHz & 430-440MHz (Rx /
Tx)
Memory channels 999
Power supply Li-Ion battery pack 7.4V/2600 mAh
Operating temperature -25°C to + 55°C
Working mode monoband/dualband
Output power VHF: 5W / UHF:4W
Modulation F3E(FM)
Max. frequency deviation ≤ ±5KHz
Spurious radiation < -60dB
Frequency stability ±2.5 ppm
Rx sensitivity < 0.2uV
Audio output power ≥ 500mW
Dimensions 62x125x40mm (LxAxP)
Weight 278g
Specifications are subject to change without notice.
CTE International declares that the product is in compliance with the essen-
tial requirements and other relevant provisions of Directive 99/05/CE.
WARNING. Direct plug-in ac/dc power supply must be used for disconnecting
the transceiver from the mains; the desktop charger must be positioned close
to the unit and easily accessible.
Midland CT890 instruction guide
INFORMAZIONE AGLI UTENTI: Ai sensi dell’art. 13 del decreto legislativo
25 luglio 2005, n.151 Attuazione delle Direttive 2002/95/CE, 2002/96/CE
e 2003/108/CE, relative alla riduzione dell’uso di sostanze pericolose nel-
le apparecchiature elettriche ed elettroniche, nonché allo smaltimento
dei rifiuti”. Il simbolo del cassonetto barrato riportato sull’apparecchia-
tura indica che il prodotto alla fine della propria vita utile deve essere
raccolto separatamente dagli altri rifiuti. L’utente dovrà, pertanto, confe-
rire l’apparecchiatura giunta a fine vita agli idonei centri di raccolta diffe-
renziata dei rifiuti elettronici ed elettrotecnici, oppure riconsegnarla al ri-
venditore al momento dell’acquisto di una nuova apparecchiatura di tipo
equivalente, in ragione di uno a uno. Ladeguata raccolta differenziata per
l’avvio successivo dell’apparecchiatura dismessa al riciclaggio, al tratta-
mento e allo smaltimento ambientalmente compatibile contribuisce ad
evitare possibili effetti negativi sull’ambiente e sulla salute e favorisce il
riciclo dei materiali di cui è composta l’apparecchiatura. Lo smaltimento
abusivo del prodotto da parte dell’utente comporta l’applicazione delle
sanzioni amministrative di cui al dlgs. n.22/1997 (articolo 50 e seguenti
del dlgs. n.22/1997).
All articles displaying this symbol on the body, packaging or instruction
manual of same, must not be thrown away into normal disposal bins but
brought to specialised waste disposal centres. Here, the various materials
will be divided by characteristics and recycles, thus making an important
contribution to environmental protection.
Alle Artikel, die auf der Verpackung oder der Gebrauchanweisung die-
ses Symbol tragen, dürfen nicht in den normalen Mülltonnen entsorgt
werden, sondern müssen an gesonderten Sammelstellen abgegeben
werden. Dort werden die Materialien entsprechend ihrer Eigenschaften
getrennt und, um einen Beitrag zum Umweltschutz zu liefern, wieder-
verwertet.
Midland CT890 instruction guide
Todos los artículos que exhiban este símbolo en el cuerpo del producto,
en el embalaje o en el manual de instrucciones del mismo, no deben ser
desechados junto a los residuos urbanos normales sino que deben ser
depositados en los centros de recogida especializados. En estos centros,
los materiales se dividirán en base a sus características y serán reciclados,
para así poder contribuir de manera importante a la protección y conser-
vación del medio ambiente.
Tous les articles présentant ce symbole sur le corps, l'emballage ou le ma-
nuel d'utilisation de celui-ci ne doivent pas être jetés dans des poubelles
normales mais être amenés dans des centres de traitement spécialisés.
Là, les différents matériaux seront séparés par caractéristiques et recy-
clés, permettant ainsi de contribuer à la protection de l'environnement.
Todos os artigos que apresentem este símbolo no seu corpo, embalagem
ou manual de instruções, não devem ser eliminados juntamente com o
lixo normal mas sim conduzidos para contentores de eliminação de resí-
duos especializados. Aqui, os diversos materiais serão divididos por ca-
racterísticas e reciclados, realizando assim uma importante contribuição
para a protecção ambiental.
Όλα τα προϊόντα στα οποία εμφανίζεται το ακόλουθο σύμβολο στο σώμα,
τη συσκευασία ή το εγχειρίδιο χρήσης τους, δεν πρέπει να εναποθέτονται
στους κοινούς κάδους απορριμάτων αλλά να προσκομίζονται στα ειδικά
κέντρα αποκομιδής. Εκεί, τα διάφορα υλικά θα πρέπει να διαχωρίζονται
ανάλογα με τα χαρακτηριστικά και τα ανακυκλούμενα υκλικά,
συμμετέχοντας έτσι ουσιαστικά στην προστασία του περιβάλλοντος.
WWW.MIDLANDEUROPE.COM |
Prodotto o importato da:
CTE INTERNATIONAL s.r.l.
Via. R.Sevardi 7- 42124 Reggio Emilia Italia
www.midlandeurope.com
L’uso di questo apparato può essere soggetto a restrizioni nazionali. Prima dell’uso leg-
gere attentamente le istruzioni. Se il prodotto contiene batterie: non gettare nel fuoco,
non disperdere nell’ambiente dopo l’uso, usare gli appositi contenitori per la raccolta.
Produced or imported by:
CTE INTERNATIONAL s.r.l.
Via. R.Sevardi 7 42124 Mancasale Reggio Emilia Italy
Imported by:
ALANNEVADA UK
Unit 1 Fitzherbert Spur Farlington Portsmouth Hants. P06 1TT - United Kingdom
www.nevada.co.uk
The use of this transceiver can be subject to national restrictions. Read the instructions
carefully before installation and use. If the product contains batteries: do not throw the
battery into fire. To disperse after use, throw into the appropriate containers.
Importado por:
ALAN COMMUNICATIONS, SA
C/Cobalt, 48 - 08940 Cornellà de Llobregat Barcelona España
Tel: +34 902 384878 Fax: +34 933 779155 www.midland.es
El uso de este equipo puede estar sujeto a la obtención de la correspondiente autori-
zación administrativa. Lea atentamente las instrucciones antes de usar el equipo. si el
producto contiene pilas o baterías no las tire al fuego ni las disperse en el ambiente
después de su uso, utilice los contenedores apropiados para su reciclaje.
Vertrieb durch:
ALAN ELECTRONICS GmbH
Daimlerstraße 1K - D-63303 Dreieich Deutschland
www.alan-electronics.de
Die Benutzung dieses Handfunkgerätes ist von den landesspezifischen Bestimmungen
abhängig. Vor Benutzung Bedienungsanleitung beachten. Bei Verwendung von Batte-
rien beachten Sie bitte die Umweltbestimmungen. Batterien niemals ins offene Feuer
werfen, und nur in dafür vorgesehene Sammelbehälter entsorgen.
0678
36

Hulp nodig? Stel uw vraag in het forum

Spelregels

Misbruik melden

Gebruikershandleiding.com neemt misbruik van zijn services uitermate serieus. U kunt hieronder aangeven waarom deze vraag ongepast is. Wij controleren de vraag en zonodig wordt deze verwijderd.

Product:

Bijvoorbeeld antisemitische inhoud, racistische inhoud, of materiaal dat gewelddadige fysieke handelingen tot gevolg kan hebben.

Bijvoorbeeld een creditcardnummer, een persoonlijk identificatienummer, of een geheim adres. E-mailadressen en volledige namen worden niet als privégegevens beschouwd.

Spelregels forum

Om tot zinvolle vragen te komen hanteren wij de volgende spelregels:

Belangrijk! Als er een antwoord wordt gegeven op uw vraag, dan is het voor de gever van het antwoord nuttig om te weten als u er wel (of niet) mee geholpen bent! Wij vragen u dus ook te reageren op een antwoord.

Belangrijk! Antwoorden worden ook per e-mail naar abonnees gestuurd. Laat uw emailadres achter op deze site, zodat u op de hoogte blijft. U krijgt dan ook andere vragen en antwoorden te zien.

Abonneren

Abonneer u voor het ontvangen van emails voor uw Midland CT 890 bij:


U ontvangt een email met instructies om u voor één of beide opties in te schrijven.


Ontvang uw handleiding per email

Vul uw emailadres in en ontvang de handleiding van Midland CT 890 in de taal/talen: Engels als bijlage per email.

De handleiding is 0,75 mb groot.


U ontvangt de handleiding per email binnen enkele minuten. Als u geen email heeft ontvangen, dan heeft u waarschijnlijk een verkeerd emailadres ingevuld of is uw mailbox te vol. Daarnaast kan het zijn dat uw internetprovider een maximum heeft aan de grootte per email. Omdat hier een handleiding wordt meegestuurd, kan het voorkomen dat de email groter is dan toegestaan bij uw provider.

Stel vragen via chat aan uw handleiding

Stel uw vraag over deze PDF

Andere handleiding(en) van Midland CT 890

Midland CT 890 Gebruiksaanwijzing - Deutsch - 38 pagina's


Uw handleiding is per email verstuurd. Controleer uw email

Als u niet binnen een kwartier uw email met handleiding ontvangen heeft, kan het zijn dat u een verkeerd emailadres heeft ingevuld of dat uw emailprovider een maximum grootte per email heeft ingesteld die kleiner is dan de grootte van de handleiding.

Er is een email naar u verstuurd om uw inschrijving definitief te maken.

Controleer uw email en volg de aanwijzingen op om uw inschrijving definitief te maken

U heeft geen emailadres opgegeven

Als u de handleiding per email wilt ontvangen, vul dan een geldig emailadres in.

Uw vraag is op deze pagina toegevoegd

Wilt u een email ontvangen bij een antwoord en/of nieuwe vragen? Vul dan hier uw emailadres in.


Info