Principali caratteristiche ................................................................................................................................................................................................................................................2
Caratteristiche tecniche Midland BTX2 PRO ............................................................................................................................................................................................................2
Ricarica delle batterie ....................................................................................................................................................................................................................................................3
Descrizione dispositivo e sistema di fissaggio ...............................................................................................................................................................................................................3
Accensione e spegnimento del Midland BTX2 PRO .................................................................................................................................................................................................5
Come abbinare un altro dispositivo Midland BTX2 PRO ..........................................................................................................................................................................................5
Come abbinare più di due dispositivi ad un Midland BTX2 PRO .............................................................................................................................................................................6
Talk 2 All - Universal Intercom per dispositivi non Midland ......................................................................................................................................................................................8
Compatibilità con i BT Midland ...................................................................................................................................................................................................................................9
Utilizzo di altri dispositivi Bluetooth ............................................................................................................................................................................................................................9
Funzione Background ...................................................................................................................................................................................................................................................9
Telefono cellulare (abbinamento fino a due telefoni) .................................................................................................................................................................................................9
Condividere la musica ...................................................................................................................................................................................................................................................11
Utilizzo della funzionalita’ Radio FM ..........................................................................................................................................................................................................................12
Configurazione e aggiornamento firmware ................................................................................................................................................................................................................14
Certificazioni e Conformità di Sicurezza ....................................................................................................................................................................................................................15
I
I
2 www.midlandeurope.comwww.midlandeurope.com 3
MIDLAND BTX2 PRO
Multi rider intercom system
Grazie per aver acquistato Midland BTX2 PRO l’interfono wireless per comunicazioni
conference pensato per il motociclista. Midland BTX2 PRO è un dispositivo da applicare
al proprio casco per comunicare con dispositivi Bluetooth, quali Telefonino/MP3 player,
Navigatore GPS e, se abbinato ad un altro Midland BTX2 PRO, anche come sistema
intercom senza fili fino a 4 persone (di cui 1 di altre marche) e conference fino a 4 persone
ad una distanza massima di 1Km. Grazie al suo design sottile, aerodinamico ed ai suoi tre
tasti centrali grandi e ben riconoscibili Midland BTX2 PRO è la soluzione più avanzata e
ideale per il motociclista.
Principali caratteristiche
›Intercom Pilota/Passeggero oppure da moto a moto fino ad una distanza massima
di 1 Km.
›Connessione Conference fino a 4 persone
›Connessione intercom “Uno a Uno” fino a quattro persone
›Frequenza: 2.4 GHz - Potenza massima 100mW
›Funzionalità Talk2All - Universal Intercom per collegare intercom di altre marche
›Radio FM stereo con RDS
›Music Share (condivisione musica con il passeggero)
›Connessione al telefonino/MP3 player
›Supporto per 2 Telefoni
›Connessione a sistemi di navigazione GPS
›Connessione a Radio PMR446 con Bluetooth integrato o esterno
›Connessione AUX a filo per MP3 player (cavo opzionale)
›Configurazione ed aggiornamento firmware da PC via USB
Midland BTX2 PRO è disponibile in due versioni:
›Midland BTX2 PRO confezione singola con un solo dispositivo
›Midland BTX2 PRO TWIN confezione doppia con due dispositivi.
In base alla versione in vostro possesso nella confezione troverete:
BTX2 PRO single
›1 dispositivo BTX2 PRO
›1 kit di montaggio a slitta completo di speaker stereo Hi-Fi
›1 microfono a braccetto e 1 microfono a filo
›1 sistema di fissaggio bi-adesivo
›1 cavo di ricarica USB-Micro USB
BTX2 PRO Twin
›2 dispositivi BTX2 PRO
›2 kit di montaggio a slitta completi di speaker stereo Hi-Fi
›2 microfoni a braccetto e 2 microfoni a filo
›2 sistemi di fissaggio bi-adesivo
›1 cavo di ricarica USB-Micro USB con doppio connettore
I dispositivi della confezione TWIN sono già abbinati tra loro sul pulsante centrale per poter
Lungo: Cambio modalitàCorto : ricerca stazione indietro
Lungo: Scansione memorie indietro
I
I
14 www.midlandeurope.comwww.midlandeurope.com 15
Per ottenere il migliore risultato, è possibile decidere la soglia di attivazione, scegliendo
4 livelli di sensibilità del microfono: alta, media bassa e molto bassa.
Di fabbrica il Midland BTX2 PRO è preconfigurato con la sensibilità “alta”.
In aggiunta, è possibile anche disabilitare completamente la funzione VOX e quindi
attivare l’Intercom e la risposta alla telefonata solo in modalità manuale.
Regolazione della sensibilità del VOX
1. Spegnete il Midland BTX2 PRO
2. Tenere premuto il pulsante Centrale fino a che la luce non rimane di colore rosso
fisso. Ora il Midland BTX2 PRO è in modalità “Setup” .
3. Premete brevemente il pulsante “Indietro” fino a che la luce Blu si accenderà fissa.
4. Ora premete “Volume +” o “Volume -“ per aumentare o diminuire la sensibilità. La
luce Rossa lampeggerà indicando che il pulsante è stato premuto (quando raggiun-
gete il limite della regolazione la luce smette di lampeggiare).
5. Premete brevemente il pulsante “Indietro”, la luce Blu lampeggerà diverse volte in
base alla configurazione della sensibilità in quel momento attiva:
1 volta= Vox disattivo
2 volte=sensibilità bassa
3 volte=sensibilità media
4 volte= sensibilità alta (valore di default)
5 volte= sensibilità molto alta
Ora la luce rossa tornerà ad essere accesa fissa per indicare che le modifiche sono
state registrate e siete tornati alla modalità di setup.
6. Se dovete modificare ulteriormente la configurazione della sensibilità ripetete i passi
dal punto 2, altrimenti uscite dalla modalità di “Setup” facendo un doppio click sul
pulsante “Centrale” . La luce Rossa si spegne e al suo posto lampeggia la luce Blu.
Ora potete utilizzare il Midland BTX2 PRO.
Disattivazione della funzione VOX (per Intercom e Telefono)
Seguite tutta la procedura spiegata sopra ma selezionate l’opzione 1 del punto 5 cioè un
unico lampeggio (corrispondente al Vox disattivo).
Attenzione: ricordate che disattivando la funzione di Vox anche la risposta alla telefonata
potrà avvenire solo in modalità manuale (premendo il pulsante “Avanti”).
Connessione a filo sempre attiva
Questa funzione permette di avere la connessione audio sempre attiva, anche quando il
telefono o l’intercom sono aperti (tranne quando siete in modalità Radio FM).
Di default questa funzione è disabilitata.
Configurazione e aggiornamento firmware
Midland BTX2 PRO può essere configurato e aggiornato tramite connessione USB
al vostro PC, per migliorare la compatibilità con i dispositivi Bluetooth, quali telefoni e
GPS o per risolvere problematiche legate alla funzionalità. Il software per PC insieme
agli eventuali aggiornamenti del firmware sono disponibili per il download sul sito www.
midlandeurope.com nella pagina del prodotto stesso.
Attenzione: Non collegate il dispositivo al computer prima di aver scaricato ed installato il
software
Uso e avvertimenti specifici
L’uso assiduo di questi dispositivi può diminuire la vostra capacità di udire suoni esterni
e chi vi sta intorno. L’uso di questo dispositivo mentre si sta guidando può diventare
un pericolo per voi e per chi vi sta intorno e in alcuni paesi, l’utilizzo del dispositivo
potrebbe non essere consentito. L’uso ad un volume troppo alto può causare la perdita
permanente dell’udito. Se si avverte un qualsiasi dolore alle orecchie, o fastidio all’udito,
diminuite il volume o spegnete il dispositivo. L’uso continuativo ad alto volume, fa sì che
l’udito si abitui a tale volume, il quale a lungo andare può causare danni permanenti.
È fortemente consigliato l’utilizzo di tale apparato ad un volume adeguato.
Garanzia
La durata della garanzia è di 24 mesi per l’apparato e di 6 mesi per gli accessori (batterie,
caricatori, antenne, auricolari e microfoni).
Per maggiori informazioni visitate il sito www.midlandeurope.com
Certificazioni e Conformità di Sicurezza
CE/Informazioni generali
Questo prodotto è conforme alla direttiva RED 2014/53/UE e può essere liberamente
utilizzato nei paesi dell’UE.
Agli utenti non è permesso eettuare variazioni o modifiche di qualsiasi tipo all’appa-
recchio. Queste ultime, se non espressamente approvate dal produttore, annullano la
possibilità di utilizzo dell’apparecchio ed invalidano la garanzia.
Per ulteriori informazioni, fate riferimento al nostro sito web: www.midlandeurope.com
UK
www.midlandeurope.com 1
INDEX
Main features ..................................................................................................................................................................................................................................................................2
Technical specifications of Midland BTX2 PRO .........................................................................................................................................................................................................2
Unit and fixing system description ...............................................................................................................................................................................................................................3
Switching ON and OFF your Midland BTX2 PRO ...................................................................................................................................................................................................4
How to pair two Midland BTX2 PRO units ................................................................................................................................................................................................................5
How to pair the Midland BTX2 PRO to more than two units ..................................................................................................................................................................................6
Talk 2 All - Universal Intercom with dierent brand unit. .........................................................................................................................................................................................8
Compatibility with Midland BT line units ...................................................................................................................................................................................................................9
Pairing the Midland BTX2 PRO to Bluetooth devices ..............................................................................................................................................................................................9
Pairing with one or two phones ....................................................................................................................................................................................................................................9
How to listen to the FM Radio ....................................................................................................................................................................................................................................12
Setup and special configurations .................................................................................................................................................................................................................................13
Setup and Firmware update ........................................................................................................................................................................................................................................14
European CE Notice Certification and Safety Approval Information ....................................................................................................................................................................15
FCC Compliance Information ....................................................................................................................................................................................................................................15
UK
UK
2 www.midlandeurope.comwww.midlandeurope.com 3
MIDLAND BTX2 PRO
Multi rider intercom system
Midland BTX2 PRO is an intercom system solution with conference communication for
motor cyclists.The design is very slim and aerodynamic, all the main functions are easy
to operate thanks to the three big buttons placed on the front of the unit. Midland BTX2
PRO is fixed on the helmet using the adhesive plate or the screw mounting clamp. Thanks
to the audio kit with ultra slim speakers you can enjoy high quality stereo music while
riding.
Main features
›Intercom “one to one” up to 1 Km distance.
›Conference 4 people
›Connect up to 4 people for “one to one” intercom communication
›Talk2All feature to connect other brand intercom
›FM Radio Stereo with RDS
›Music Share (Driver and Passenger)
›Connect your phone to receive and place phone call and listen to stereo music
›Support for 2 phones
›Connect your GPS for voice street indications
›Connection for PMR466 radio with internal or external Bluetooth
›AUX wired connection for MP3 player (optional cable)
›Setup and Firmware update via USB connection to a PC
Midland BTX2 PRO is available in two versions:
›Single Midland BTX2 PRO Intercom kit with one unit only
›Twin Midland BTX2 PRO Intercom kit with with two units
Depending on the model purchased, the package contains the following parts:
Midland BTX2 PRO single
›1 BTX2 PRO communication unit
›1 Slide-in mounting kit with two Hi-Fi stereo speakers
›1 microphone with boom and 1 wired microphone
›1 plate with bi-adhesive strip to fix the unit onto the helmet
›1 USB cable
Midland BTX2 PRO Twin
›2 BTX2 PRO communication units
›2 Slide-in mounting kit with two Hi-Fi stereo speakers
›2 microphones with boom and 2 wired microphones
›2 plates with bi-adhesive strip to fix the unit onto the helmet
›1 USB cable with with double plug
The units included in the TWIN kit are already paired on Middle button and therefore can
Technische Daten des Midland BTX2 PRO .................................................................................................................................................................................................................2
Aufladen des Akkus ........................................................................................................................................................................................................................................................3
Ein-/Ausschalten des MIDLAND BTX2 PRO ..........................................................................................................................................................................................................5
Koppeln (Pairen) von Zwei BTX2 PRO- Geräten ......................................................................................................................................................................................................5
Kopplung des BTX2 PRO zwischen mehr als zwei Geräten ......................................................................................................................................................................................6
Talk 2 All - Universelles Gegensprechen mit einem Gerät einer anderen Marke....................................................................................................................................................8
Kompatibilität mit Geräten der Midland BT-Produktlinie ........................................................................................................................................................................................9
Koppeln von Bluetooth Geräten mit dem BTX2 PRO ..............................................................................................................................................................................................9
Verbindung zu einem oder zwei Telefonen .................................................................................................................................................................................................................10
Music Share (Musik weiterleiten) ...............................................................................................................................................................................................................................12
Kopplung mit einem GPS Navigator ..........................................................................................................................................................................................................................12
Verwenden eines PMR 446 Funkgeräts mit integriertem Bluetooth .....................................................................................................................................................................13
Setup und Firmware-Aktualisierung ..........................................................................................................................................................................................................................15
D
D
2 www.midlandeurope.comwww.midlandeurope.com 3
MIDLAND BTX2 PRO
Gegensprechanlage für mehrere Motorradfahrer
Das Midland BTX2 PRO ist eine Gegensprechanlage mit Konferenzfunktion für
Motorradfahrer. Alle wichtigen Funktionen sind dank der drei großen Tasten auf der
Vorderseite des Gerätes einfach zu bedienen.
Das BTX2 PRO wird mit einer Befestigungsplatte und Klebeband oder einer
angeschraubten Klemmhalterung am Helm fixiert. Dank seines Audiokits mit ultraflachen
Lautsprechern können Sie während der Fahrt hochwertige Stereo-Musik genießen.
Hauptmerkmale
›„Eins-zu eins“-Gegensprechen mit bis zu 1 km Reichweite.
›Bis zu 4 Personen mittels „Eins-zu eins“-Gegensprechen verbinden
›Verbindungsmöglichkeit für bis zu 4 Personen im „Eins zu Eins“ Intercom
›Talk2All Funktion zum Verbinden mit Freisprecheinrichtungen verschiedener
Hersteller
›Stereo UKW-Radio mit RDS
›Music Share (Musik weiterleiten)
›Anschluss eines Mobiltelefons, um Anrufe anzunehmen und zu tätigen, sowie für
die Wiedergabe von Stereo-Musik
›Kopplung von 2 Telefonen möglich
›Anschluss eines GPS-Navigationsgeräts zur Übertragung von
Navigationsanweisungen
›Anschluss eines PMR466 Funkgeräts mit eingebauter oder externer Bluetooth-
Verbindung
›Kabelgebundener AUX-Anschluss für MP3-Player (optionales Kabel)
›Setup und Firmware-Update über USB-Verbindung mit einem PC
Das Midland BTX2 PRO ist in zwei Versionen erhältlich:
›BTX2 PRO Einzel-Intercom Set mit nur einem Gerät
›BTX2 PRO Twin-Intercom Set mit zwei Geräten
›Je nach gekauftem Modell enthält die Packung folgenden Inhalt:
BTX2 PRO Einzel-Intercom Set
›1 BTX2 PRO-Kommunikationsgerät
›1 Slide-In Halterungssatz mit zwei Hi-Fi Stereolautsprechern
›1 Klapphelmmikrofon und 1 Integralhelmmikrofon
›1 Platte mit Klebestreifen, um das Gerät am Helm zu befestigen
›1 Micro-USB-Kabel
BTX2 PRO Twin- Intercom Set
›2 BTX2 PRO Geräte Sets
›2 Slide-In Halterungssätze mit zwei Hi-Fi Stereolautsprechern
›2 Klapphelmmikrofone und 2 Integralhelmmikrofone
›2 Platten mit Klebestreifen, um das Gerät am Helm zu befestigen
›1 doppel USB-Kabel
Die Gerätesets im TWIN-Kit sind bereits gekoppelt (gepairt) und können daher sofort als
Motorrad-Intercom (Gegensprech- Modus) benutzt werden.
Langer Tastendruck: Gespeicherte Sender aufwärtsKurzer Tastendruck: Ein- und Ausschalten
Langer Tastendruck: Modus wechselnKurzer Tastendruck: Gefundene Sender speichern
Langer Tastendruck: Gespeicherte Sender abwärts
D
D
14 www.midlandeurope.comwww.midlandeurope.com 15
UKW-Radio und Intercom betreiben
Während des Radiohörens können Sie das Intercom nicht manuell starten, sondern Sie
können nur die VOX Funktion benutzen. Das funktioniert durch einfaches Sprechen,
aber nur dann, wenn Sie vorher das jeweils gewünschte Partnergerät auf die mittlere
Taste gekoppelt hatten.
Für eine manuelle Intercomfunktion müssten Sie dann vorher erst in den Intercom -
Mode umschalten.
Setup und spezielle Konfiguration
Alle Pairing- (Kopplungs-) Informationen zurücksetzen
Wurde Ihr BT Next bereits öfter mit anderen Geräten gekoppelt, dann kann die Zahl
der gekoppelten Verbindungen irgendwann unübersichtlich werden und es kann
angebracht sein, alle im BTX2 PRO gespeicherten Kopplungsdaten zu löschen (Reset).
Für diese Prozedur rufen Sie zunächst den Setup-Modus auf:
›Schalten Sie das Gerät aus.
›Halten Sie die „mittlere“ Taste ca. 7 Sek. gedrückt, bis die rote LED ständig leuchtet.
›Halten Sie anschließend die „Lautstärke +“ und „Lautstärke –“ Tasten für 3
Sekunden gedrückt. Die blaue LED leuchtet für 1 Sekunde auf und anschließend
leuchtet ständig die rote LED.
›Doppelklicken Sie auf die „mittlere“ Taste, um den Setup-Modus zu verlassen und
das BTX2 PRO wieder zu verwenden.
Dieses Vorgehen löscht alle gespeicherten und gekoppelten Bluetooth-Geräte und
ermöglicht einen neuen „sauberen“ Kopplungsablauf.
Auf die Werkseinstellungen zurücksetzen
Manchmal kann es notwendig sein, zu den Werkseinstellungen zurückzukehren, um
alle Änderungen oder Setupeinstellungen zurückzusetzen und ein „sauberes“ Gerät zu
erhalten.
Zuerst schalten Sie wieder in den Setup-Modus:
›Schalten Sie das Gerät aus.
›Halten Sie die „mittlere“ Taste ca. 7 Sek. gedrückt, bis die rote LED ständig leuchtet.
›Anschließend halten Sie gleichzeitig alle 3 Tasten „Vorwärts“ – „mittlere Taste“ –
„Zurück“ für 3 Sekunden gedrückt. Die blaue LED leuchtet für 1 Sekunde auf und
anschließend leuchtet ständig die rote LED.
›Doppelklicken Sie auf die „mittlere“ Taste, um den Setup-Modus zu verlassen und
das BTX2 PRO zu verwenden.
Einstellen/Deaktivieren der VOX-Funktion (Gegensprechanlage und Telefon)
Die Gegensprechfunktion kann manuell oder durch Sprache (VOX) aktiviert werden.
Diese Funktion wird durch je nach Hemart verursachten Hintergrundgeräusche
beeinflusst und deshalb auch durch die Geschwindigkeit.
Für optimale Resultate kann einer der folgenden vier Mikrofon-Empfindlichkeitspegel
gewählt werden: hoch, mittel, niedrig und sehr niedrig. Die Werkseinstellung des
BTX2 PRO ist „niedrig“. Sie können die VOX Funktion auch deaktivieren, um die
Gegensprech- und Telefon-Antwortfunktion nur im manuellen Modus zu aktivieren.
Einstellen der Mikrofonempfindlichkeit (VOX)
Um diese Prozedur auszuführen, müssen Sie zuerst den Setup-Modus aufrufen:
›Schalten Sie das Gerät aus.
›Halten Sie die „mittlere“ Taste ca. 7 Sek. gedrückt, bis die rote LED ständig leuchtet.
Ihr BTX2 PRO befindet sich jetzt im „Setup-Modus“.
1. Drücken Sie kurz die „Zurück“-Taste, und die rote LED wechselt in ein dauerhaftes
blaues Licht.
2. Erhöhen oder verringern Sie jetzt die Empfindlichkeit mit den Tasten „Lautstärke
+“ oder „Lautstärke –“. Jedes Mal, wenn Sie die Lautstärketasten drücken, blinkt
die rote LED zur Bestätigung auf. Wenn Sie den oberen oder unteren Grenzwert
erreicht haben, blinkt die rote LED nicht mehr.
3. Drücken Sie erneut kurz die „Zurück“-Taste. Die blaue LED blinkt mehrmals auf,
um Ihnen die ausgewählte Empfindlichkeit anzuzeigen:
1x Aulinken = VOX deaktiviert
2x Aulinken = niedrige Empfindlichkeit
3x Aulinken= mittlere Empfindlichkeit
4x Aulinken= hohe Empfindlichkeit (Standard)
5x Aulinken = sehr hohe Empfindlichkeit
4. Nun leuchtet rote LED erneut ständig auf („Setup-Modus“) und die Änderungen
werden bestätigt.
5. Bei Bedarf kann die Empfindlichkeit durch Wiederholen der Schritte ab Punkt
1 erneut angepasst werden. Ansonsten können Sie den Einstellmodus durch
Doppelklicken der „mittleren“ Taste verlassen. Sobald die rote LED erlischt, beginnt
die blaue LED zu blinken. Jetzt ist Ihr BTX2 PRO betriebsbereit.
Deaktivieren der VOX-Funktion (Gegensprechanlage und Telefon)
Wiederholen Sie die Prozedur für die Empfindlichkeitseinstellung des Mikrofons (siehe
oben) und wählen Sie die Option, bei der LED nur einmal aulinkt (VOX deaktiviert).
Achtung:Wenn Sie die VOX-Funktion ausgeschaltet haben, können eingehende Anrufe nur
durch drücken der „Weiter“-Taste angenommen werden.
Kabelgebundene Verbindung immer im Hintergrund
Mit dieser Funktion können Sie die kabelgebundene Verbindung stets geönet halten,
auch wenn der Handy- oder Gegensprechen-Modus aktiv ist (jedoch nicht im UKW-
Radio-Modus). Die Hintergrundoption ist standarmäßig eingeschaltet.
Deaktivieren:
Rufen Sie den „Setup“-Modus auf:
›Schalten Sie das Gerät aus.
›Halten Sie die „mittlere“ Taste ca. 3 Sek. gedrückt, bis die rote LED ständig leuchtet.
›Halten Sie gleichzeitig die „Vorwärts“-Taste und die „mittlere“ Taste für ca. 3
Sekunden gedrückt. Die blaue LED blinkt dreimal auf.
›Doppelklicken Sie auf die „mittlere“ Taste, um den „Setup“-Modus zu verlassen und
das BTX2 PRO zu verwenden.
Aktivieren:
›Wiederholen Sie das oben beschriebene Verfahren. Jetzt blinkt die blaue LED
einmal auf.
›Doppelklicken Sie zum Verlassen des „Setup“-Modus auf die „mittlere“-Taste.
Setup und Firmware-Aktualisierung
Die Firmware Ihres BTX2 PRO kann mittels einer USB-Verbindung mit Ihrem PC
konfiguriert und aktualisiert werden. Auf der Website von Midland
www.midlandeurope.com oder unter www.btupdater.de finden Sie auf der BTX2
PRO-Seite die PC-Software und die neuen Firmware-Aktualisierungen, falls
verfügbar.
ACHTUNG DAS GERÄT NUR AN DEN PC ANSCHLIESSEN, WENN DIE SOFTWARE
HERUNTERGELADEN UND INSTALLIERT WURDE
Benutzung auf eigene Gefahr
Das Benutzen von beidseitigen Audiosets in Helmen kann kann Ihre Fähigkeit,
Geräusche und das Verkehrsgeschehen in Ihrer Umgebung wahrzunehmen,
beeinträchtigen. Benutzen Sie daher das Bluetooth Set nur, wenn die Verkehrssituation
es erlaubt.
Beim Motorradfahren kann das Hören von Musik oder das Führen von Telefonaten
oder das Benutzen des Intercoms Sie von anderen Ereignissen und vom sicheren
Fahren ablenken.
E
www.midlandeurope.com 1
D
16 www.midlandeurope.com
Das Benutzen des Bluetooth Sets beim Führen eines Fahrzeugs oder beim
Fahrradfahren kann ein ernsthaftes Risiko für Sie oder Ihre Mitmenschen bedeuten
und kann, von Land zu Land unterschiedlich, verboten sein.
Das Benutzen eines Headsets mit extremer Lautstärkeeinstellung kann bleibende
Gehörschäden hervorrufen.
Sollten Sie Klingeln in Ihren Ohren oder andere Hörprobleme feststellen, so verringern
Sie sofort die Lautstärke oder schalten Sie das Gerät aus. Bei ständigem Gebrauch
mit hohen Lautstärken kann sich Ihr Gehör and den erhöhten Lautstärkepegel so
gewöhnen, dass die Folge eine permanente Hörschädigung sein kann.
Bitte benutzen Sie dieses Gerät nur mit einer sicheren Lautstärke.
Gewährleistung
Gewährleistungsfrist beträgt 24 Monate ab Kauf-/Lieferdatum (bei Teilen mit
beschränkter Lebensdauer wie, Akkus, Ladegeräte, Headsets, mikrofone und
Antennen 6 Monate).
Für allen Informationen über die Garantie der Artikel, besuchen Sie bitte unsere www.
midlandeurope.com
Europäische CE Erklärung und Sicherheitshinweise
Hiermit erklärt MIDLAND EUROPE s.r.l., dass das Produkt die grundlegenden
Anforderungen und anderen relevanten Bestimmungen der Richtlinie 2014/53/UE
erfüllt.
Es ist gültig für alle EU Staaten.
Es ist nicht zulässig, nicht mit uns abgesprochene Veränderungen an den Geräten
vorzunehmen. Sie gefährden mit Änderungen nicht nur die Gewährleistung, sondern
auch das Einhalten der gesetzlichen Grenzwerte.
INDICE
Características principales .............................................................................................................................................................................................................................................2
Especificaciones técnicas Midland BTX2 PRO ...........................................................................................................................................................................................................2
Descripción del dispositivo y del sistema de montaje ..................................................................................................................................................................................................3
Encender y apagar el BTX2 PRO ................................................................................................................................................................................................................................4
Cómo sincronizar otro BTX2 PRO ..............................................................................................................................................................................................................................5
Cómo emparejar el Midland BTX2 PRO a más de dos unidades ..............................................................................................................................................................................6
Talk 2 All - Universal Intercom: sincronización con Intercomunicadores de otras marcas .....................................................................................................................................8
Compatibilidad con unidades de la línea Midland BT .................................................................................................................................................................................................8
Sincronizar BTX2 PRO a dispositivos Bluetooth........................................................................................................................................................................................................9
Emparejar uno o dos teléfonos .....................................................................................................................................................................................................................................9
Compartir Música ..........................................................................................................................................................................................................................................................11
Uso de la función Radio FM ........................................................................................................................................................................................................................................12
Setup y actualización de Firmware .............................................................................................................................................................................................................................14
Garantía Limitada de MIDLAND IBERIA ................................................................................................................................................................................................................15
E
E
2 www.midlandeurope.comwww.midlandeurope.com 3
Midland BTX2 PRO
Sistema Intercom Multi rider
Gracias por haber adquirido Midland BTX2 PRO, el intercomunicador inalámbrico para la
comunicación “conference” pensado para el motorista. Con un diseño fino y aerodinámico,
todas sus funciones principales son fáciles de manejar gracias a los tres grandes botones
situados en el frontal del dispositivo. Midland BTX2 PRO se fija al casco mediante la lám-
ina con biadhesivo o mediante mordaza. Gracias al kit de audio con auriculares ultrafinos
podrá disfrutar de su música en estéreo de alta calidad mientras conduce.
Características principales
›Intercom «uno a uno» hasta 1 km de distancia
›Función “Conference” conversación simultánea entre 4 dispositivos
›Conecte hasta a 4 personas para comunicación «uno a uno»
›Función Talk 2 All para conectar dispositivos de otras marcas
›Compartir Música (piloto y pasajero)
›Radio FM Estéreo con RDS
›Conexión al reproductor mp3 de su teléfono
›Soporta 2 teléfonos
›Conexión al Navegador GPS
›Conexión a un walkie talkie con Bluetooth integrado o externo
›Toma de audio auxiliar (AUX) para reproductor MP3 (cable opcional)
›Configuración y actualización de Firmware mediante conexión USB al PC
Midland BTX2 PRO está disponible en dos versiones:
›BTX2 PRO individual con una unidad Bluetooth.
›BTX2 PRO TWIN con dos unidades Bluetooth sincronizadas.
Dependiendo del modelo adquirido, el embalaje contiene lo siguiente:
BTX2 PRO SINGLE
›1 dispositivo de comunicación BTX2 PRO
›1 kit de montaje con dos altavoces estéreo Hi-Fi
›1 micrófono de varilla regulable y 1 micrófono de hilo
›1 sistema di fijación al casco con biadhesivo
›1 cable USB
BTX2 PRO TWIN
›2 dispositivos de comunicación BTX2 PRO sincronizados.
›2 kit de montaje con dos altavoces estéreo Hi-Fi
›2 micrófonos de varilla regulable y 2 micrófonos de hilo
›2 sistemas de fijación al casco con biadhesivo
›1 cable USB con doble conexión
Las unidades incluidas en el TWIN están sincronizadas y, por lo tanto, se pueden utilizar
Spécifications techniques du Midland BTX2 PRO .....................................................................................................................................................................................................2
Rechargement des batteries ..........................................................................................................................................................................................................................................3
Description du module et fixation ...............................................................................................................................................................................................................................3
Allumer et eteindre votre Midland BTX2 PRO ..........................................................................................................................................................................................................5
“Mode” de fonctionnement ..........................................................................................................................................................................................................................................5
Comment coupler deux modules BTX2 PRO ............................................................................................................................................................................................................5
Comment coupler le BTX2 PRO a plus de deux modules .........................................................................................................................................................................................6
Associez le Midland BTX2 PRO à un autre Midland BTX2 PRO .............................................................................................................................................................................6
Talk2All – Couplage avec un interphone d’une autre marque ...................................................................................................................................................................................8
Compatibilité avec modules de la gamme Midland BT ...................................................................................................................................................................................................9
Couplage du BTX2 PRO aux appareils Bluetooth ......................................................................................................................................................................................................9
Fonction arrière-plan ....................................................................................................................................................................................................................................................9
Couplage à un ou plusieurs téléphones ........................................................................................................................................................................................................................9
Partage de Musique .......................................................................................................................................................................................................................................................11
Couplage à un Navigateur GPS .........................................................................................................................................................................................................................................11
Comment ecouter la radio FM ...................................................................................................................................................................................................................................12
Installation et configuration speciale ..........................................................................................................................................................................................................................13
Configuration et mise à jour logiciel ...........................................................................................................................................................................................................................14
Technische specificaties van de Midland BTX2 PRO .................................................................................................................................................................................................2
De batterij opladen .........................................................................................................................................................................................................................................................3
Beschrijving van de unit en het bevestigingsysteem ...................................................................................................................................................................................................3
Je Midland BTX2 PRO AAN en UIT zetten ..............................................................................................................................................................................................................5
Twee Midland BTX2 PRO units aan elkaar koppelen ................................................................................................................................................................................................5
De Midland BTX2 PRO koppelen aan meer dan twee units .....................................................................................................................................................................................6
Talk2All – Universele Intercom met unit van een ander merk ..................................................................................................................................................................................8
De Midland BTX2 PRO koppelen aan Bluetooth apparaten ....................................................................................................................................................................................8
Koppelen aan een of twee mobiele telefoons ..............................................................................................................................................................................................................9
FM Radio luisteren .......................................................................................................................................................................................................................................................12
Installatie en aangepaste instellingen .........................................................................................................................................................................................................................13
Installatie en bijwerken van firmware .........................................................................................................................................................................................................................14
›AGC systeem dat het volume automatisch aanpast op omgevingsgeluid
›Spraakgestuurde (VOX) of handmatige inschakeling van de communicatiemodus
›Knoppen voor het inschakelen van telefoon, intercom, FM radio en via kabel aan-
gesloten apparatuur
›Volledig waterbestendig
›Lithium batterij met 30 uur spreektijd
›Opgeladen in ongeveer 2 uur
Bluetooth verbindingen: Met hetzelfde apparaat voor communicatie tussen bestuurder en
passagier of tussen twee voertuigen met een bereik van 1 km. zonder obstakels of interfe-
rentie (met de beide bestuurders binnen elkaars gezichtsbereik).
Bluetooth apparatuur:
›Mobiele telefoon met stereo MP3 speler (A2DP protocol voor hoogwaardig stere-
ogeluid) en GPS navigatie
›PMR446 transcievers (met ingebouwde of externe Bluetooth verbinding) voor gro-
epscommunicatie tussen verschillende motoren
Verbinding met kabel:
›Voor iPod of MP3 speler (met optionele kabel)
NB: het ontwerp van de Midland BTX2 PRO is waterbestendig en dus ook bestand tegen
regen. Let echter altijd wel goed op dat de laadpunten goed zijn afgedekt door het bescher-
mende rubberen kapje.
De batterij opladen
NB: voor eerste gebruik volledig opladen. Trek tenminste drie uur uit voor de eerste keer
opladen voorafgaand aan de eerste ingebruikname.
Om de unit op te laden, de muurlader in het laadstation pluggen (voor dit doel het
rubberen hoesje opzij schuiven). De rode LED op de unit zal beginnen te knipperen
als het laden is gestart. De headset is volledig opgeladen als het rode lampje stopt met
knipperen en de LED blauw oplicht. Gewoonlijk zal dit, bij de eerste keer opladen, zo’n
2 uur in beslag nemen. Haal de unit na het volledig opladen uit de lader.
NB: het apparaat wordt automatisch uitgeschakeld elke keer als het micro USB kabeltje
in of uit de oplader gaat. Als je het apparaat tijdens het opladen wil gebruiken, moet je dit
na bevestiging in de oplader (opnieuw) aanzetten.
Beschrijving van de unit en het bevestigingsysteem
Beschrijving van de BTX2 PRO
Op de voorkant van de BTX2 PRO zitten vijf knoppen; de grote drie zijn multifunctio-
neel: Vooruit (links), CTRL (midden) en Terug (rechts); met de twee andere, kleinere
knopjes pas je het volume aan (harder of zachter).
LED
Middle
Volume -Volume +
ForwardBackward
Beschrijving van de verbindingen via kabel
Aan de onderkant van de unit tref je de aansluiting voor de lader aan. Voor het laden
kun je gebruik maken van een standaard micro USB oplader. Van deze zelfde aansluiting
kan ook gebruik worden gemaakt voor het aansluiten van een audio apparaat, zoals een
iPod of MP3 speler.
NB: de hiervoor benodigde AUX kabel zit niet standaard in de verpakking.
Charger plug
Beschrijving van de audio kit
Het audiosysteem bevat twee ultraplatte stereospeakers en twee uitwisselbare mi-
crofoons, beide voorzien van een bevestigingshaakje en een bedrade verbinding. De
microfoons zijn voorzien van een miniconnector, zodat je zelf kunt kiezen welke van de
microfoons het beste past bij de helm die je draagt.
De stereospeakers bevestigen
De twee stereospeakers zijn voorzien van een plakstrip voor bevestiging aan je helm.
Zorg ervoor dat je oor niet volledig wordt afgesloten en dat je de verkeersgeluiden nog
steeds kunt horen. Je kunt de microfoon op twee manieren bevestigen:
NL
4 www.midlandeurope.comwww.midlandeurope.com 5
NL
Draadloze staafmicrofoon
Plaats het gedeelte met de plakstrip tussen de zachte binnenkant en de harde buiten-
kant van de helm, zodanig dat de microfoon precies voor de mond geplaatst is en dat
het witte tekentje zich tegenover de mond bevindt. Dit type microfoons is geschikt
voor modulaire helmen. Voor open helmen is een specifieke microfoon verkrijgbaar.
Microfoon met kabel
Maak gebruik van de plakstrip om de microfoon aan de binnenkant van de helm te
bevestigen ter hoogte van de mond. Dit type microfoon is vooral geschikt voor fullface
helmen. De microfoon is voorzien van een miniconnector, zodat je zelf kunt kiezen
welke microfoon het beste past bij de helm die je draagt.
Beschrijving van het schuifsysteem om de kit te bevestigen
Het bevestigen van de Midland BTX2 PRO aan de helm kan van het schuifsysteem met
het schroefplaatje. Met deze methode wordt de BTX2 PRO veilig aan je helm ‘bevesti-
gd’ en kan deze er op elk gewenst moment af worden gehaald om op te laden of om te
worden opgeborgen.
Plaatje met dubbelzijdige plakstrip
Het plaatje met de dubbelzijdige plakstrip is klaar voor gebruik en kan direct via het
schuifsysteem aan de kit worden bevestigd.
Maak de helm goed schoon op de plek waar je het plaatje wil bevestigen, verwijder de
folie van de dubbelzijdige tape en plaats het plaatje links op de helm, waarbij je dit enkele
seconden vasthoudt.
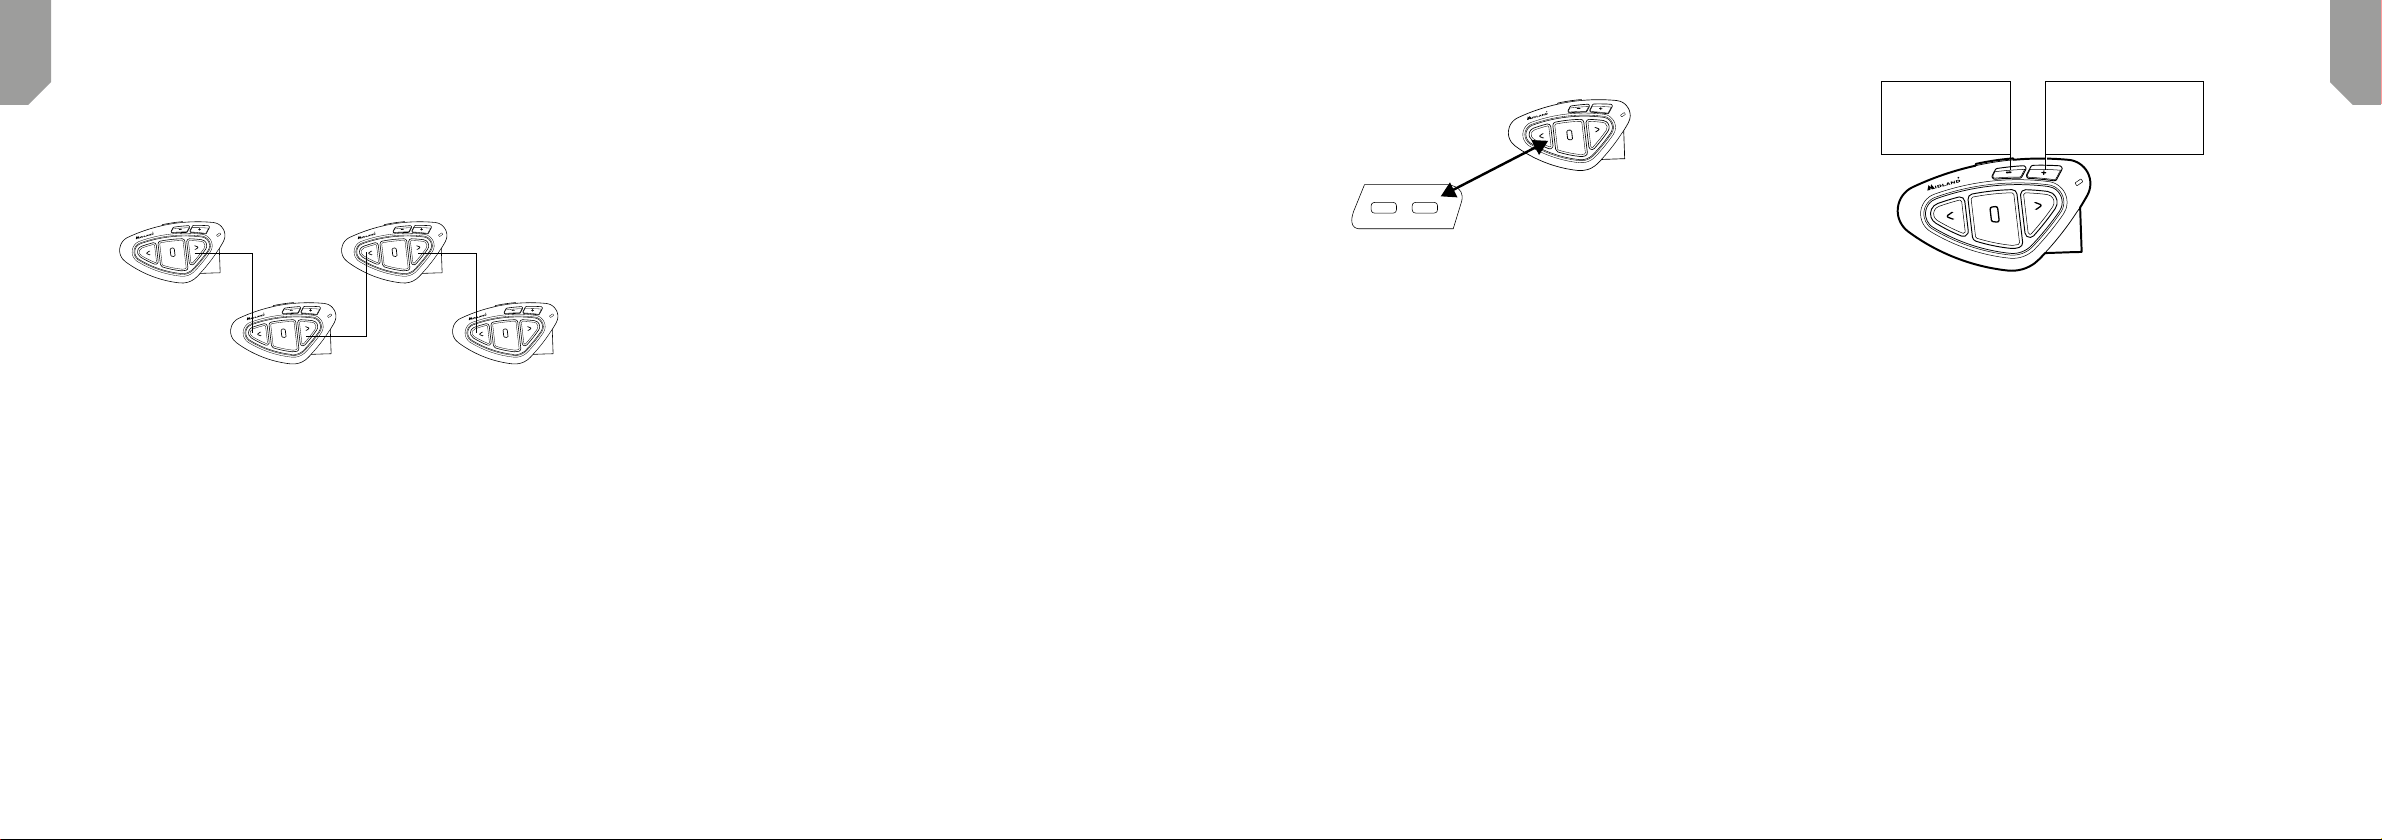
Aanbrengen en verwijderen van je Midland BTX2 PRO
De BTX2 PRO is eenvoudig op je helm aan te brengen door deze naar omlaag te schui-
ven op het schuifsysteem. De BTX2 PRO blijft op zijn plek dankzij de bevestigingsclip
aan de bovenkant (A). Om de BTX2 PRO weer los te maken, hoef je alleen maar op de
bevestigingsclip te drukken en de unit omhoog duwen.
A
UnlockLock
Je Midland BTX2 PRO AAN en UIT zetten
De unit inschakelen:
›Houd de CTRL-knop (de middelste knop) ongeveer 3 seconden ingedrukt tot de
LED blauw oplicht.
De unit uitschakelen:
›Houd de CTRL-knop en de Terug-knop ongeveer 3 seconden tegelijkertijd inge-
drukt tot de LED drie keer rood knippert. Zo voorkom je dat je (zeker wanneer je
handschoenen draagt) het systeem onbedoeld uitschakelt.
Verschillende standen
De BTX2 PRO kent drie standen: Intercom, Telefoon en FM Radio. De functionaliteit
van de drie knoppen is aankelijk van ingeschakelde stand.
›In de intercom-modus kun je met de drie knoppen de intercom communicatie re-
gelen tussen bestuurder en passagier of tussen de bestuurders van verschillende
motoren.
›In de telefoon-modus kun je via Bluetooth je telefoontoestel bedienen: uitbellen
of inkomende oproepen aannemen, in stereo genieten van muziek of luisteren naar
routeaanwijzingen vanuit de navigatie.
›In de FMradio-modus luister je in stereo naar je favoriete radiostation, kun je zoe-
ken naar specifieke zenders en deze als voorkeurszender bewaren (er is ruimte voor
zes voorkeurszenders).
Je kunt eenvoudig van de ene naar de andere modus wisselen door de CTRL-knop
drie seconden lang ingedrukt te houden. De systeemstem vertelt je in welke modus je
systeem staat.
De volgorde van de verschillende standen is als volgt:
›Intercom (als er is gekoppeld naar een andere unit)
›FMRadio
›Telefoon (als er een koppeling is naar een telefoon)
Elke keer als je de unit inschakelt, zal die nog in de laatst gebruikte stand staan.
De intercom- en telefoon-modus zijn alleen beschikbaar als er al is gekoppeld naar een
andere unit of een telefoon.
Als je wil nagaan in welke modus het systeem staat, druk dan tegelijkertijd op VOL+ en
VOL–: de systeemstem vertelt je dan in welke modus je systeem staat.
Maximale afstand
De intercom heeft een bereik van 1 km zonder obstakels of interferentie (met de beide
bestuurders binnen elkaars gezichtsbereik).
Twee Midland BTX2 PRO units aan elkaar koppelen
De twee units in dezelfde verpakking zijn vooraf al aan elkaar gekoppeld en zijn dus
direct klaar voor gebruik. Hiervoor hoeft de nu volgende procedure dus niet te worden
doorlopen. De beide units zijn al gekoppeld via de CTRL-knop.
Als de units uit verschillende kits komen of afzonderlijk van elkaar zijn aangeschaft, dan
zul je deze eerst aan elkaar moeten koppelen.
De Midland BTX2 PRO koppelen aan een andere Midland BTX2 PRO unit
Om de Midland BTX2 PRO te koppelen aan een andere Midland BTX2 PRO unit, ga
je naar de installatiemodus.
1. Schakel de unit uit.
2. Houd de CTRL-knop zo’n 7 seconden ingedrukt tot de LED ononderbroken rood
blijft branden.
3. Houd nu gedurende 3 seconden de CTRL-knop ingedrukt. Zowel het blauwe als het
rode lichtje zullen dan gaan knipperen.
4. Doorloop dezelfde drie stappen ook met de andere unit. Als het koppelen is gesla-
agd, zal op elk van beide units de LED een seconde lang blauw oplichten en wordt
er automatisch teruggekeerd naar de installatiemodus. (Het rode lichtje staat wel
nog aan).
5. Na het koppelen moet je de installatiemodus afsluiten om de units in gebruik te
kunnen nemen.
6. Dubbelklik op de CTRL-knop Het rode lichtje gaat uit, en het blauwe lichtje gaat
knipperen.
Je Midland BTX2 PRO is nu klaar voor gebruik.
NB: zet alleen de twee te koppelen units aan en schakel voor alle andere apparatuur die
je niét wil koppelen uit.
NL
6 www.midlandeurope.comwww.midlandeurope.com 7
NL
De intercom gebruiken met twee units
Om gebruik te maken van de intercom, moet je er eerst voor zorgen dat de beide units
staan ingeschakeld en vooraf ook al aan elkaar zijn gekoppeld.
Handmatig inschakelen
Vanuit de intercomstand druk je op de CTRL-knop. Communiceren via de intercom
is nu mogelijk totdat je opnieuw op CTRL drukt. Het activeren van de intercom duurt
enkele seconden en is geslaagd wanneer een pieptoon hoorbaar wordt.
Stemactivering/voice activation (VOX)
Zeg iets willekeurigs, en na enkele seconden zal de communicatie tot stand komen en
geactiveerd blijven zolang je blijft praten. Als er niet wordt gesproken, zal de intercom
na verloop van 40 seconden worden stopgezet. Desgewenst kun je de intercom ook
handmatig uitschakelen, zodat je niet eerst 40 seconden hoeft te wachten. Hiervoor
druk je op CTRL .
Het automatisch inschakelen via VOX kan worden verhinderd door gedurende 7 se-
conden de Terug-knop ingedrukt te houden. De systeemstem zal deze keuze bevesti-
gen. Om VOX wel weer automatisch in te schakelen houd je de Terug-knop opnieuw
ingedrukt. Ook dan weer zal de systeemstem je keuze bevestigen. De laatst gekozen
instelling blijft tot het volgende gebruik van de unit ongewijzigd staan.
NB: Communicatie via Voice Activation (VOX) is alleen mogelijk naar een unit die eerder
al via de CTRL-knop is gekoppeld. Bij gebruik van een andere knop (Vooruit of Terug) kun
je de intercom alleen handmatig inschakelen.
Het volume aanpassen
De Midland BTX2 PRO maakt gebruik van AGC technologie, waardoor het volume
automatisch wordt afgestemd op de omgevingsgeluiden. Het is echter ook mogelijk om
het volume handmatig aan te passen. Dit doe je met VOL+ en VOL–.
De afstelling van het volume geldt voor elke audiofunctie afzonderlijk: intercom, stereo
muziek, telefoongesprekken of FM radio.
NB: aanpassing van het volume is alleen mogelijk wanneer de audioverbinding actief is.
Installatie van het AGC systeem
Om de gevoeligheid van het AGC systeem aan te passen, kun je gebruik maken van de
BT UPDATER PC Software of de BT SET-APP smartphone-applicatie. Je kunt kiezen
voor een andere instelling, aankelijk van het soort motor (naked, touring, sport) of
wanneer je als passagier meerijdt. Je kunt het AGC systeem uitschakelen door 3 se-
conden lang VOL+ en VOL- ingedrukt te houden.
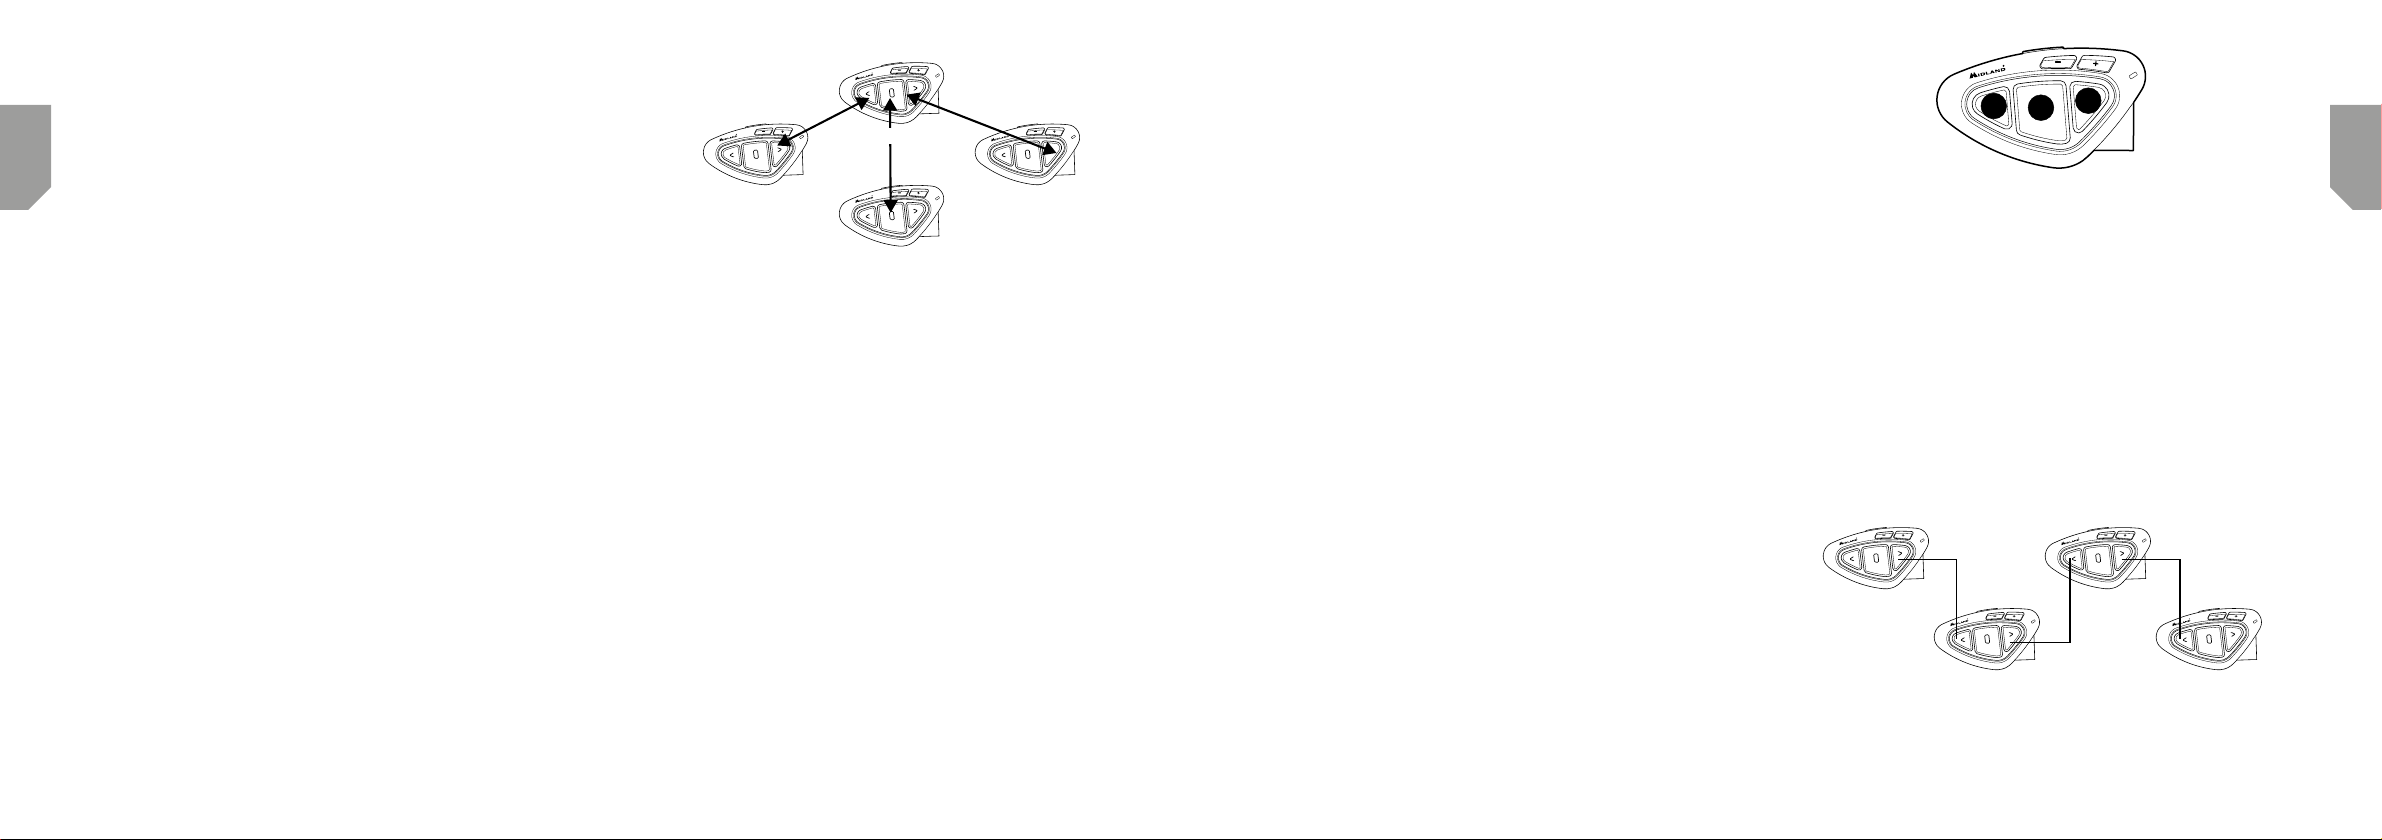
De Midland BTX2 PRO koppelen aan meer dan twee units
Een enkele Midland BTX2 PRO kan aan maximaal drie andere BT units worden gekop-
peld, dus vier in totaal.
De Midland BTX2 PRO heeft drie hoofdknoppen (Vooruit, CTRL en Terug). Je bepaalt
zelf welke knop je gebruikt voor het koppelen en om de intercom te activeren, dit mag
je zelf kiezen.
Dezelfde knop die je gebruikt om naar een andere unit te koppelen wordt ook de knop
waarmee je de communicatie via de intercom inschakelt. Je kunt bijvoorbeeld beslui-
ten de unit van je passagier koppelen via de Vooruit-knop, een tweede motorrijder via
CTRL en een derde via de Terug-knop. Op die manier kun je met alle anderen spreken,
een voor een, door dezelfde knop in te drukken via welke je de koppeling met de be-
treende unit tot stand hebt gebracht. Elke keer wanneer je de intercom activeert voor
een andere unit, wordt de vorige verbinding automatisch gesloten. De verbinding vor-
mt geen ‘reeks’, de communicatie tussen twee personen kan niet worden onderbroken
door een van de anderen.
Rider 2
Passenger
Rider 1
Rider 3
De intercom gebruiken met meer dan twee units
Om de intercom te kunnen gebruiken, moet je ervoor zorgen dat alle units staan inge-
schakeld en op de juiste manier aan elkaar zijn gekoppeld.
Handmatig activeren in de intercom-modus
Vanuit de intercom-modus druk je op de knop die correspondeert met de unit waarmee
je wil communiceren. Na enkele seconden komt de communicatie via de intercom tot
stand. De communicatie wordt gecontinueerd totdat je dezelfde knop opnieuw indrukt.
Om snel de intercom naar een andere persoon te openen, druk je op de knop aan wie
de unit van die persoon gekoppeld is. De eerdere verbinding wordt dan automatisch
verbroken en de nieuwe verbinding komt tot stand.
Stemactivering/voice activation (VOX)
De optie van stemactivering werkt alleen naar de unit die via de de CTRL-knop gekop-
peld is. Start met praten en de communicatie via de intercom wordt automatisch
geopend en gaat door zolang er gesproken wordt. Na 40 seconden stilte wordt de
communicatie automatisch afgebroken. Je kunt de communicatie ook handmatig af-
breken door op CTRL te drukken. Je kunt er ook voor kiezen om de VOX functiona-
liteit helemaal uit te schakelen en om het gebruik van de intercom en het aannemen
van inkomende oproepen volledig handmatig te laten verlopen. Hiervoor houd je de
Terug-knop 7 seconden lang ingedrukt. De systeemstem zal het uitschakelen van de
functionaliteit bevestigen. Om de functionaliteit weer te activeren, druk je opnieuw op
de terug-knop tot de systeemstem de gewijzigde instelling bevestigt. De laatst gekozen
instelling wordt automatisch onthouden.
Tip: VOX is handig als er iemand is die je vaker moet spreken dan de anderen (bijvoorbeeld
je passagier). Op deze manier hoef je niet steeds een knop in te drukken om de communi-
catie tot stand te brengen.
Unit is al in gesprek
Als je probeert om via de intercom verbinding te maken met iemand anders die al met
nog een ander in gesprek of aan de telefoon is, zul je een dubbele pieptoon horen die
aangeeft dat de lijn bezet is. Wacht dan en probeer het even later nog eens, wellicht is
de lijn dan wél vrij. De ander krijgt een signaal dat iemand anders verbinding zoekt en
zal het nummer van de knop te horen krijgen waar het verzoek vandaan komt. Zo kan
diegene gemakkelijk zelf contact opnemen zodra de andere conversatie beëindigd is: hij
of zij hoeft dan alleen de knop in te drukken waarvan zojuist het nummer genoemd is.
123
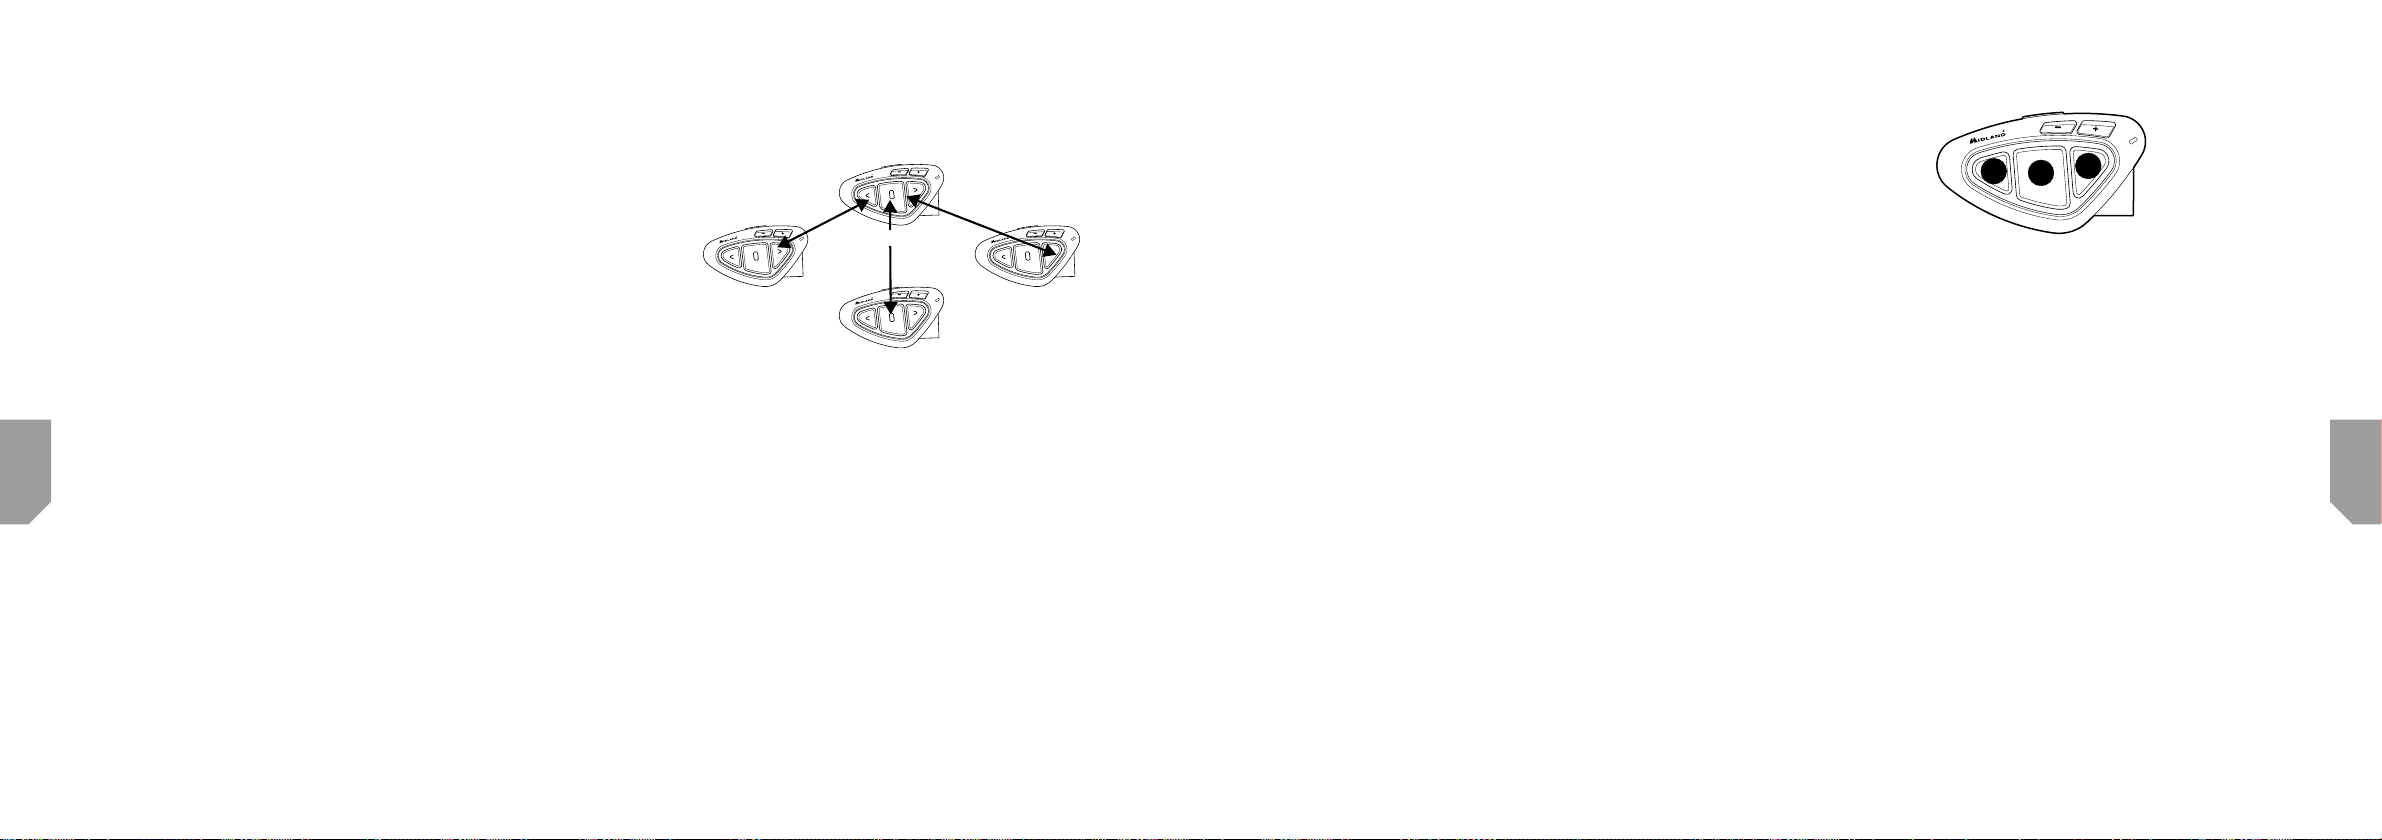
Conferentie-modus
In de conferentie-modus kun je met vier personen tegelijkertijd in gesprek. Met de
Midland BTX2 PRO kun je ook met tot vier personen een één op één gesprek voeren
(in de klassieke intercom-modus).
De conferentie-modus
Allereerst moeten de verschillende units in een reeks aan elkaar worden gekoppeld.
Daarnaast moet op alle gekoppelde units de intercom ingeschakeld staan.
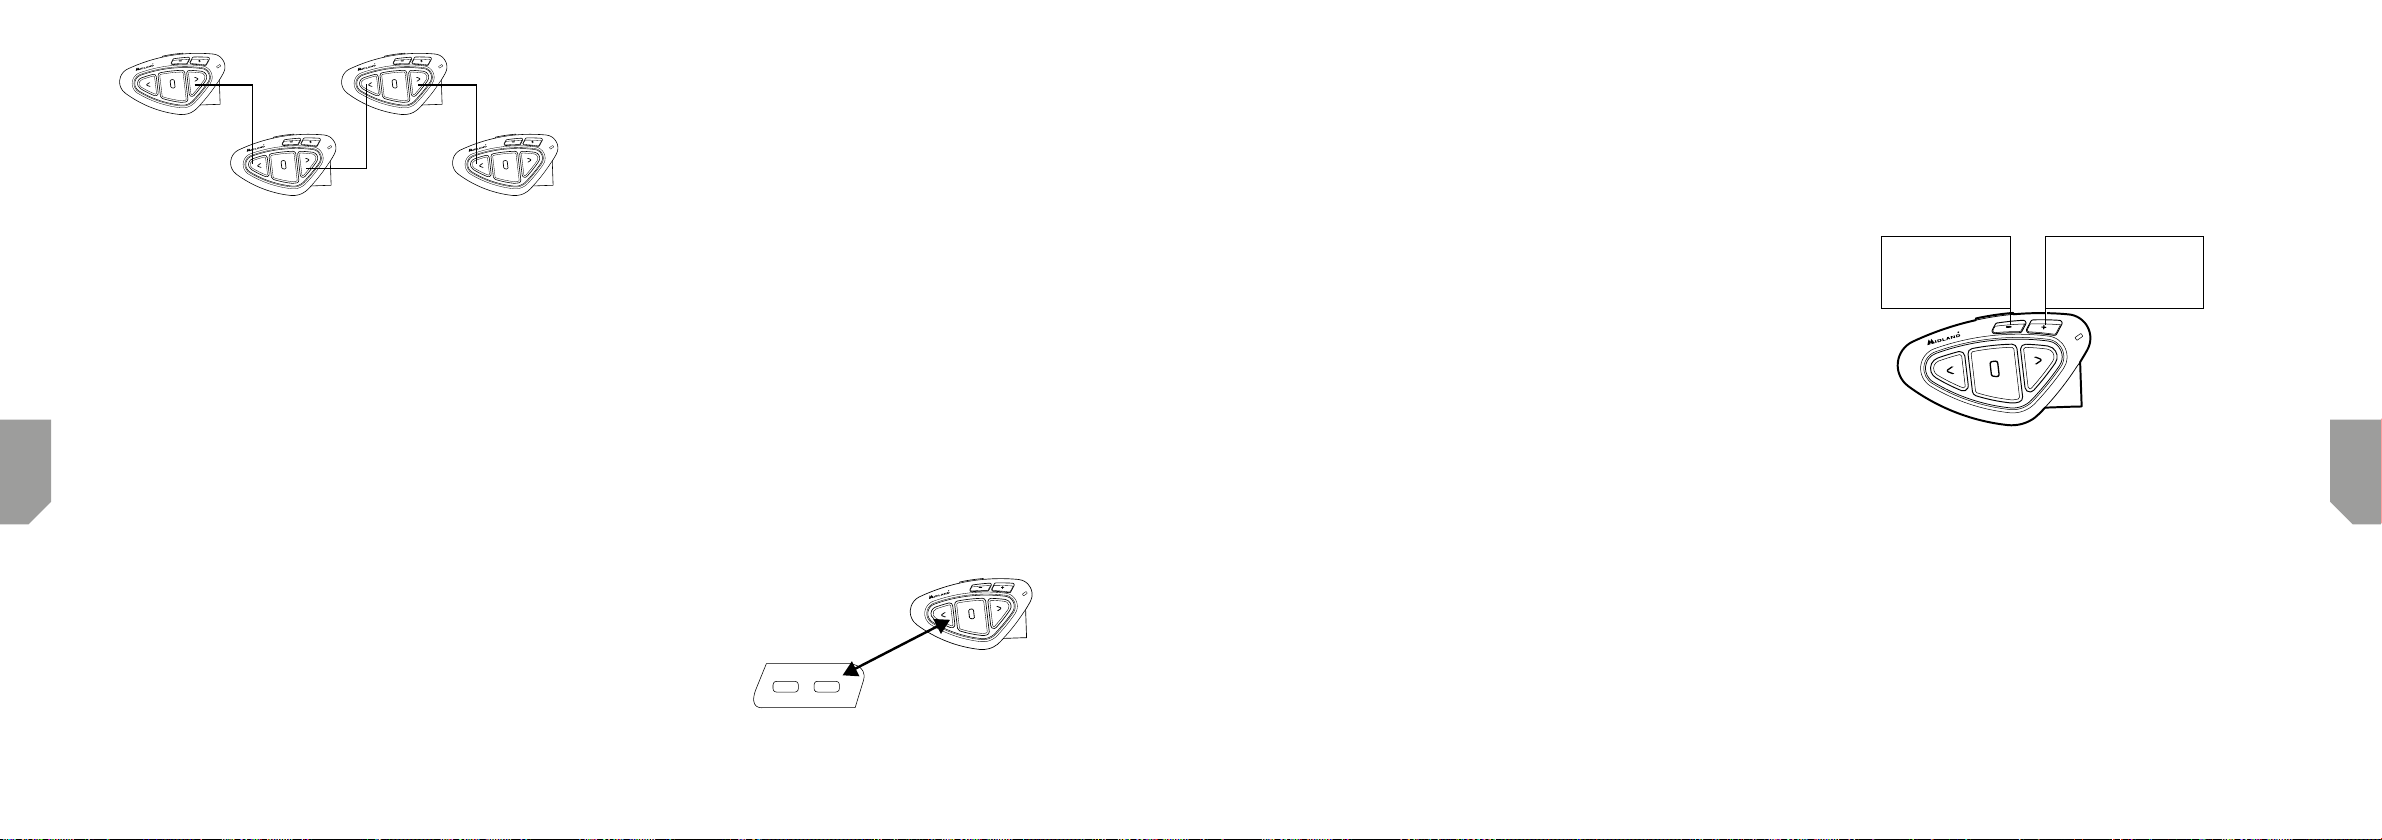
Koppelen
Om de units in een reeks aan elkaar te koppelen, ga je als volgt te werk: de Terug-knop
van de eerste unit moet gekoppeld worden aan de Vooruit-knop van de tweede unit.
De Terug-knop van de tweede unit koppel je aan de Vooruit-knop van de derde unit,
en zo voor, tot de vierde unit. De eerste en de laatste unit moeten niet aan elkaar
gekoppeld worden, de reeks moet open blijven. Unit 1 kan in gesprek met unit 4 via de
units 2 en 3. Voor een groepsgesprek met vier personen moeten alle units de intercom
ingeschakeld hebben.
123
1
2
3
4
NL
8 www.midlandeurope.comwww.midlandeurope.com 9
NL
De conferentie-modus activeren:
Vanuit de intercom-modus, zonder dat er audio wordt afgespeeld, houd je de Vooruit
en CTRL knoppen 3 seconden lang ingedrukt. De systeemstem geeft aan dat de con-
ferentie is geactiveerd. Wanneer de conferentie-modus is ingeschakeld, kan er niet
worden getelefoneerd. Dit omdat de verbinding voor alle apparaten die via VOL+ en
VOL- zijn gekoppeld, tijdelijk wordt verbroken om verzekerd te zijn van optimale stabi-
liteit voor de conferentie-modus.
De conferentie-modus afsluiten:
In de conferentie-modus, zonder actieve audio, houd je de Vooruit en CTRL knoppen
3 seconden lang ingedrukt. De systeemstem zal bevestigen dat je bent teruggekeerd
naar de ‘Een op een’-intercom-modus. Alle apparaten die via VOL+ of VOL- gekop-
peld zijn, zullen weer werken, net als de telefoon-modus en de Talk2All Universe Inter-
com-functionaliteit.
NB: In de conferentie-modus is de Talk2All Universele Intercom-functionaliteit (voor ge-
sprekken met intercoms van andere merken) niet beschikbaar.
Gebruik van de conferentie-modus
In de conferentie-modus kan de communicatie via de intercom worden geopend door
de Vooruit-knop en de Terug-knop in te drukken. Met een enkele druk op de knop
wordt de conversatie gestart, en via dezelfde knop wordt die ook weer beëindigd.
Om met vieren in gesprek te kunnen, is nodig dat de twee units in het midden van de
reeks (de units 2 en 3) de intercom ingeschakeld hebben staan op zowel de Vooruit-k-
nop als de Terug-knop.
‘One Click Talk’ functie
Als de conferentie-modus staat ingeschakeld, is het mogelijk om met een enkele klik
(‘one click’) een groepsgesprek tussen alle vier de gebruikers te starten. Druk kort op
CTRL in om het groepsgesprek automatisch te starten.
Talk2All – Universele Intercom met unit van een ander merk
Dankzij de ‘Talk2All – Universele Intercom’-specificatie is het nu ook mogelijk om je
Midland BTX2 PRO te koppelen aan een intercom van een willekeurig ander verkrij-
gbaar merk. Om te koppelen maak je gebruik van de Vooruit-knop.
›Ga op je Midland BTX2 PRO naar de installatie-modus door CTRL zo’n 7 seconden
ingedrukt te houden totdat de LED ononderbroken rood blijft branden.
›Houd de Vooruit-knop of de Terug-knop 3 seconden lang ingedrukt: het rode en
blauwe lichtje zullen snel gaan knipperen. Blijf de knop indrukken en laat pas los als
de lichtjes langzamer gaan knipperen.
Op de intercom van het andere merk doorloop je de stappen voor koppeling aan een
telefoon. Bij het koppelen wordt de BTX2 PRO namelijk waargenomen als een tele-
foon.
Als het koppelen geslaagd is, zullen het rode en het blauwe lampje stoppen met knippe-
ren en zal alleen het blauwe lampje nog langzaam aan en uit gaan.
NB: vergeet niet om alle andere Bluetooth apparaten in de buurt uit te schakelen voordat
je begint met koppelen. Alleen de twee aan elkaar te koppelen apparaten moeten aan
staan.
Als je de BTX2 PRO als ‘Talk2All Universele Intercom wil gebruiken, houd je in de inter-
com-modus 7 seconden lang de Vooruit-knop ingedrukt. Op de andere intercom hoef
je alleen te drukken op ‘redial’. Het kan zijn dat je hier nog een tweede keer op moet
drukken. Dit hangt af van het andere (niet Midland) apparaat.
Talk2All - Universal Intercom
Not Midland Unit
NB: Om gebruik te kunnen maken van de de Talk2All Universele Intercom-functionaliteit
moet de koppeling wel worden uitgevoerd als die voor een telefoon. Dit is voor het andere
merk intercom alleen mogelijk als dit apparaat de koppeling naar twee verschillende te-
lefoons ondersteunt.
De Midland BTX2 PRO koppelen aan Bluetooth apparaten
De Midland BTX2 PRO Conference kan worden gekoppeld aan andere Bluetooth ap-
paraten, zoals het navigatiesysteem of of een andere mono audiobron.
Koppeling via VOL+: voor een mobiele telefoon met A2DP stereo, navigatiesysteem
met A2DP audio of externe mono/stereo A2DP dongel.
Apparatuur die gekoppeld is via VOL+ heeft voorrang op alle overige communicatie,
zoals de intercomfunctie, de FM radio en het afspelen van muziek.
Koppeling via VOL-: voor een tweede telefoon met mono audio (Hands Free Proto-
col), navigatiesysteem, radardetectie en andere apparaten met mono audio.
Tijdens het koppelingsproces via VOL- of VOL+ is de telefoon-modus geactiveerd.
NB: A2DP audiobronnen worden alleen ondersteund na koppeling via VOL+. De tweede
gekoppelde telefoon ondersteunt alleen mono audio (HFP).
MONO
›Phone (HFP Mono)
›GPS mono
›PMR446 Transceiver
MONO and STEREO
›Phone (HFP/A2DP Stereo)
›GPS (HFP/A2DP Stereo)
›Dongle (HFP/A2DP Stereo)
Achtergrondfunctie
De audioverbinding met apparatuur die via VOL- gekoppeld is, kan op de achtergrond
altijd beschikbaar blijven. Zo hoeft de communicatie via de intercom niet te worden on-
derbroken voor, bijvoorbeeld, aanwijzingen vanuit het navigatiesysteem of een andere
mono audiobron.
Voor beschikbaarheid op de achtergrond houd je VOL- net zo lang ingedrukt totdat de
systeemstem ‘Background ON’ zegt.
Om de beschikbaarheid op de achtergrond uit te schakelen, druk je opnieuw op VOL-,
totdat de systeemstem ‘Background disabled’ zegt.
Standaard staat de achtergrondfunctie uitgeschakeld.
Koppelen aan een of twee mobiele telefoons
Koppeling van een mobiele telefoon verloopt via VOL+ (wanneer ondersteuning
gewenst is voor A2DP) of via VOL-.
›Bij koppeling via VOL- of VOL+ wordt automatisch de telefoon-modus geactive-
erd.Inkomende gesprekken krijgen altijd voorrang, dit betekent dat alle andere com-
municatie (intercom, FM radio, muziek) wordt gepauzeerd.
Wanneer er nog een tweede oproep binnenkomt, gaat hiervoor een waarschuwing-
stoon af.
De Midland BTX2 PRO koppelen aan een mobiele telefoon
Ga allereerst naar de installatie-modus.
1. Schakel de unit uit.
2. Houd CTRL zo’n 7 seconden lang ingedrukt totdat de LED zonder onderbreking
rood blijft branden.
3. Houd nu 3 seconden lang VOL+ of VOL- ingedrukt. Het blauwe en het rode lichtje
zullen gaan knipperen.
4. Schakel zichtbaarheid van en voor Bluetooth apparaten in op je telefoon.
5. Na enkele seconden verschijnt de tekst ‘Midland BTX2 PRO’ op het scherm van je
telefoon. Doorloop de stappen om je telefoon te koppelen. Als er wordt gevraagd
om een pincode, voer je ‘0000’ (4 nullen) in.
6. om een pincode, voer je ‘0000’ (4 nullen) in.
Na het koppelen licht de LED heel kort blauw op en wordt van de installatiemodus
overgeschakeld op de werkende stand (de LED begint blauw te knipperen). Je Midland
BTX2 PRO is nu klaar voor gebruik met je mobiele telefoon.
Het gebruik van de telefoon
Na koppeling aan de Midland BTX2 PRO schakel je naar de telefoon-modus om je
telefoon te kunnen gebruiken. Dit doe je door te drukken op CTRL totdat de syste-
emstem ‘Phone’ zegt. Alle drie de knoppen zijn er nu om je telefoon te bedienen (zie
tabel B).
Een inkomende oproep aannemen
Er zijn twee manieren om een oproep te beantwoorden wanneer je telefoon overgaat:
Via spraak: begin eenvoudigweg te praten.
Handmatig: door het intoetsen van Vooruit, waarna je begint te praten.
Een inkomende oproep weigeren
Als je een oproep niet wil aannemen, kun je de telefoon gewoon over laten gaan of de
Vooruit-toets 3 seconden lang ingedrukt houden (je krijgt ter bevestiging een toon te
horen).
NL
10 www.midlandeurope.comwww.midlandeurope.com 11
NL
Uitbellen
Dit kan op verschillende manieren:
›Toets het nummer in en bel uit op je mobiele telefoon.
Laatste oproep terugbellen:
Als je telefoon gekoppeld is via VOL+: houd Vooruit 3 seconden lang ingedrukt om het
laatst gekozen nummer te herhalen (je krijgt ter bevestiging een toon te horen).
Als je telefoon gekoppeld is via VOL-: houd Terug 3 seconden lang ingedrukt om het
laatst gekozen nummer te herhalen (je krijgt ter bevestiging een toon te horen).
Via spraak:
Als je telefoon gekoppeld is via VOL+: druk kort op Vooruit. Als je telefoon via spraak
te bedienen is, zal worden gevraagd om het contact te benoemen naar wie je wil bellen.
Als je telefoon gekoppeld is via VOL-: druk kort op Terug. Als je telefoon via spraak te
bedienen is, zal worden gevraagd om het contact te benoemen naar wie je wil bellen.
Voorrang: telefoongesprekken krijgen voorrang op alle andere communicatie, die dan ook
automatisch zal worden uitgeschakeld bij een inkomende oproep.
Een oproep beëindigen
Het beëindigen van een oproep kan op verschillende manieren:
›Wacht tot de persoon aan de andere kant van de lijn de oproep zelf beëindigt.
›Druk op Vooruit (je krijgt ter bevestiging een toon te horen).
›Druk op je telefoon zelf op de knop ‘verbinding verbreken’.
Snelkeuze
Je kunt één telefoonnummer in het geheugen van de unit opslaan en vandaar uit gebru-
iken. Hiervoor moet je het nummer eerst opslaan met behulp van de ‘BT UPDATER’
PC software of de ‘BT SET-APP’ applicatie voor smartphone. Vanuit de telefoonmodus
hoef je vervolgens alleen nog 7 seconden lang op Vooruit te drukken.
Gebruik van de MP3 speler van de telefoon
Je telefoon, wanneer die is gekoppeld via VOL+, kan worden gebruikt als stereo MP3
speler. De Midland BTX2 PRO biedt volledige ondersteuning voor de protocollen
A2DP en AVRCP om in stereokwaliteit muziek te luisteren en de muziekspeler van je
telefoon op afstand te bedienen. Je kunt de knoppen op de Midland BTX2 PRO zelfs
gebruiken om af te spelen, te pauzeren en vooruit- of terug te spoelen.
Play/PauseForwardBackward
Beschikbare functies
›Voor afspelen of pauzeren: CTRL
›Vooruit naar volgende track: Vooruit
›Terug naar vorige: Terug
Voorrang: het luisteren van muziek heeft niet de hoogste prioriteit. Het afspelen zal au-
tomatisch worden gepauzeerd zodra er andere audiocommunicatie binnen komt. Om
deze automatische voorrang te wijzigen, kun je gebruik maken van de ‘BT UPDATER’ PC
software of de ‘BT SET-APP’ applicatie voor smartphone.
NB: Bediening van de functies zoals hierboven beschreven kan alleen vanuit de telefo-
on-modus.
GPS navigatie
Koppeling van de GPS navigatie doe je met VOL+ of VOL-.
›VOL+ voor stereo A2DP audio en HFP mono: apparatuur die gekoppeld is via
VOL+ heeft voorrang op andere communicatie, waaronder intercom en FM radio,
en zal die onderbreken.
›VOL- voor ondersteuning van HFP mono apparatuur en voor beschikbaarheid op
de achtergrond.
Als de audio van je navigatie mono is, dan kun je koppelen via VOL-. Als de achter-
grondfunctionaliteit is ingeschakeld, zullen de navigatie-aanwijzingen op de achter-
grond worden afgespeeld en wordt de communicatie via de intercom hiervoor niet
onderbroken.
NB: We kunnen het correct functioneren van de achtergrondfunctie niet garanderen,
dit hangt af van het apparaat van het andere merk.
Als het mogelijk is om het navigatiesysteem rechtstreeks te koppelen aan de telefoon,
adviseren we om die koppeling als eerste tot stand te brengen en om vervolgens het
navigatiesysteem via VOL+ te koppelen aan de BTX2 PRO.
GPS navigatie-aanwijzingen in stereo (A2DP)
BTX2 PRO ondersteunt A2DP stereo navigatie-aanwijzingen van je GPS of smar-
tphone als deze is gekoppeld via VOL+. Navigatie-aanwijzingen hebben voorrang op
intercom en FM Radio, die hiervoor worden onderbroken. Dit is de standaardinstelling.
Deze standaardinstelling kun je wijzigen met de
BT Updater’ software voor de PC of de BT SET-APP applicatie voor smartphone.
GPS navigatie in combinatie met stereo MP3
Als je navigatiesysteem geïntegreerd is in een stereo MP3 speler en je wil je muziek in
stereokwaliteit afluisteren, dan koppel je via VOL+. In deze configuratie zal alle overi-
ge communicatie (intercom, FM Radio, muziek) worden onderbroken voor gesproken
navigatie-aanwijzingen.
Na koppeling via VOL- wordt de telefoon-modus geactiveerd.
NB: bediening van A2DP stereomuziek vanaf je navigatiesysteem is alleen omgeiljk in
de telefoon-modus.
De Midland BTX2 PRO koppelen aan GPS
In het algemeen is het mogelijk om de Midland BTX2 PRO te koppelen aan alle voor
motoren geschikte navigatiesystemen die voorzien zijn van Bluetooth. Om de koppe-
ling tot stand te brengen, ga je naar de installatiemodus.
1. Schakel de unit uit.
2. Houd 7 seconden lang CTRL ingedrukt totdat de LED zonder onderbreking rood
blijft branden.
3. Druk nu 3 seconden lang stevig op VOL+ of VOL-. Het blauwe en het rode lichtje
zullen gaan knipperen.
4. Zoek via je navigatiesysteem naar Bluetooth apparatuur in de buurt.
5. Na enkele seconden verschijnt ‘Midland BTX2 PRO’ op het scherm van je naviga-
tiesysteem.
6. Doorloop de stappen zoals aangegeven in de handleiding van je navigatiesysteem om
de koppeling tot stand te brengen. Als er wordt gevraagd om een pincode, toets je
‘0000’ (4 nullen) in.
Als het koppelen is afgerond, zal het blauwe lichtje heel even oplichten en wordt van
de installatiemodus automatisch overgeschakeld naar de werkende modus (het blauwe
lichtje gaat knipperen).
Je Midland BTX2 PRO is nu klaar voor gebruik en gesproken navigatie-aanwijzingen
vanuit je navigatiesysteem zijn op de achtergrond voortdurend beschikbaar.
Bij koppeling van de GPS via VOL+ (bijvoorbeeld wanneer VOL- al voor een andere
koppeling in gebruik is, kan je telefoon niet meer aan de Midland BTX2 PRO gekoppeld
worden. De oplossing is om je telefoon rechtstreeks te koppelen aan je navigatiesyste-
em, dat je vervolgens koppelt aan de Midland BTX2 PRO. Alle telefoonfuncties bedien
je dan via je navigatiesysteem.
B-Phone mode
ModeForward button (Phone on Vol+)Middle buttonBackward button (Phone on Vol-)
PhoneShort press: Voice dial /accept or close if it is in
progress
Long press: redial last number/ or reject
Long press: Change modeShort press: Voice dial /accept or close if it
is in progress
Long press: redial last number/ or reject
Phone (when music is plaing and paired on “Vol +”)Short press: Forward the songShort press: Play/pause
Long press: Change modeShort press:
Backward the song
NL
12 www.midlandeurope.comwww.midlandeurope.com 13
NL
Koppeling naar een PMR446 radio met geïntegreerde of externe Bluetooth
PMR446 radio koppelen doe je via VOL+ of VOL-. Bij de keuze voor VOL- blijft de
PMR446 radio altijd op de achtergrond werken, ook wanneer je gebruik maakt van de
intercom.
Koppelingsprocedure
›Schakel de unit uit.
›Houd 7 seconden lang CTRL ingetoetst tot de LED zonder onderbreking rood blijft
branden.
›Druk nu stevig VOL+ of VOL- in; het blauwe en het rode lichtje beginnen nu te
knipperen.
›Doorloop de procedure zoals beschreven in de handleiding van de transciever.
FM Radio luisteren
FM Radio is geïntegreerd in de unit zelf. Je hoeft enkel de FM Radio-modus in te
schakelen.
Houd CTRL ingedrukt tot je ‘FM Radio’ hoort via de systeemstem. Je kunt nu via de
drie knoppen gebruiken om de FM Radio te bedienen (zie tabel C).
Om radiostations te zoeken druk je kort op Vooruit of Terug om door zes voorkeurszen-
ders te navigeren. De systeemstem vertelt je bij welke van de zes je bent aangekomen.
Om het station waarnaar je luistert als voorkeurszender op te slaan, druk je 3 seconden
lang tegelijkertijd op Vooruit en Terug. Er volgt een pieptoon ter bevestiging. De even-
tuele eerdere voorkeurszender op deze positie is nu overschreven.
Dankzij de RDS functionaliteit zal de FM Radio altijd zelf op zoek gaan naar het sterkste
signaal. Standaard staat RDS uitgeschakeld. In- en uitschakelen doe je door VOL+ en
VOL- drie seconden lang ingedrukt te houden terwijl de radio speelt. De systeemstem
vertelt je of RDS aan of uit staat.
FM Radio in en uitschakelen
Standaard staat de FM Radio ingeschakeld. Om deze uit te schakelen:
›Vanuit de installatie-modus schakel je de unit uit en houd je CTRL 7 seconden lang
›FM Radio in combinatie met de intercom
›In de FM Radio-modus is het niet mogelijk om de intercom handmatig in te scha-
kelen. Dit is alleen mogelijk via de VOX functionaliteit: je begint eenvoudigweg te
praten tegen de unit die via de CTRL knop gekoppeld is. Om de intercom handmatig
in te schakelen, zul je eerst moeten overschakelen naar de intercom-modus. inge-
drukt totdat de LED ononderbroken rood blijft branden.
›Druk tegelijkertijd op CTRL en VOL+ gedurende 3 seconden. De LED knippert
drie maal blauw.
›Dubbelklik CTRL om de installatiemodus te verlaten en de Midland BTX2 PRO te
gebruiken.
Inschakelen:
›Doorloop de hierboven beschreven stappen, de blauwe LED zal één keer knipperen.
›Om de installatiemodus te verlaten, dubbelklik je op CTRL.
FM Radio in combinatie met de intercom
In de FM Radio-modus is het niet mogelijk om de intercom handmatig in te schake-
len. Dit is alleen mogelijk via de VOX functionaliteit: je begint eenvoudigweg te praten
tegen de unit die via de CTRL knop gekoppeld is. Om de intercom handmatig in te
schakelen, zul je eerst moeten overschakelen naar de intercom-modus.
Installatie en aangepaste instellingen
Alle gekoppelde apparaten terug naar de standaard instellingen
Soms kan het nodig zijn om alle koppelingen uit het geheugen van de Midland BTX2
PRO te wissen. Dit noemen we een Reset. Voor een Reset ga je naar de installa-
tie-modus.:
›Schakel de unit uit.
›Houd CTRL 7 seconden lang ingedrukt tot de LED ononderbroken rood blijft bran-
den.
›Tegelijkertijd houd je VOL+ en VOL- ingedrukt, zo’n 3 seconden lang. De LED licht
heel kort blauw op om daarna weer rood te gaan branden.
›Dubbelklik CTRL om de installatiemodus te verlaten en de Midland BTX2 PRO in
gebruik te nemen.
Met deze procedure wis je alle gekoppelde apparaten uit het geheugen en kun je weer
volledig van voor af aan beginnen met het koppelen van apparatuur. Na een volledige
reset is alleen de FM radiomodus nog beschikbaar.
Fabrieksinstellingen terugzetten
Soms kan het nodig zijn om de fabrieksinstellingen terug te zetten, om alle instellingen
en wijzigingen ongedaan te maken en de unit weer terug te zetten naar de beginstand.
Hiervoor ga je naar de installatiemodus:
›Schakel de unit uit.
›Houd CTRL 7 seconden lang ingedrukt tot de LED ononderbroken rood blijft bran-
den.
›Druk gedurende 3 seconden tegelijkertijd op Vooruit, CTRL en Terug. De LED zal
kort blauw oplichten en vervolgens weer rood gaan branden.
›Dubbelklik CTRL om de installatiemodus te verlaten en de Midland BTX2 PRO in
Met deze procedure wis je alle gekoppelde apparaten uit het geheugen en kun je weer
volledig van voor af aan beginnen met het koppelen van apparatuur. Na een volledige
reset is alleen de FM radiomodus nog beschikbaar.gebruik te nemen.
Aanpassen of uitzetten van de VOX functionaliteit (voor intercom en telefoon)
De intercomfunctionaliteit kan zowel handmatig als via spraak (VOX) worden geacti-
veerd. VOX is aankelijk van het type helm, achtergrondgeluid en dus ook van de
snelheid. Voor optimaal resultaat kun je ervoor kiezen om de gevoeligheid van je micro-
foon in te stellen op hoog, midden, laag en heel laag. Je kunt er ook voor kiezen om de
VOX functionaliteit helemaal uit te schakelen en om het gebruik van de intercom en
het aannemen van inkomende oproepen volledig handmatig te laten verlopen.
De gevoeligheid van de microfoon instellen (VOX)
Hiervoor ga je eerst naar de installatie-modus:
1. Schakel de unit uit.
2. Houd 7 seconden lang CTRL ingedrukt tot de LED lichtje ononderbroken rood blijft
branden.
3. Je Midland BTX2 PRO staat nu in de installatie-modus.
4. Druk kort op Terug; het rode lichtje gaat blauw branden.
5. Druk op VOL+ of VOL- om de gevoeligheid te verhogen of juist te verlagen.
Elke keer wanneer je de VOL+ of VOL- indrukt, zal ter bevestiging de LED rood
oplichten, totdat je niet meer verder omhoog of omlaag kunt.
6. Druk nogmaals kort op Terug. De LED zal enkele malen blauw oplichten om het
gekozen gevoeligheidsniveau te tonen.
1 keer oplichten betekent dat VOX is uitgeschakeld.
2 keer staat voor een lage gevoeligheid.
3 keer staat voor een normale gevoeligheid.
4 keer staat voor een hoge gevoeligheid.
5 keer staat voor maximale gevoeligheid.
7. Indien gewenst kun je de gevoeligheid opnieuw aanpassen, waarbij je de opeenvol-
gende stappen nog eens doorloopt. Zo niet, dan kun je de installatiemodus verlaten
door te dubbelklikken op CTRL. Zodra het rode lichtje dooft, begint het blauwe te
branden. Je Midland BTX2 PRO is nu klaar voor gebruik.
De VOX functionaliteit uitschakelen (voor intercom en telefoon)
Doorloop de stappen zoals hiervoor omschreven voor het instellen van de gevoeligheid
en kies voor de optie waarbij de LED 1 keer oplicht. VOX is nu uitgeschakeld.
Verbinding via kabel altijd op de achtergrond
Met deze functionaliteit blijft je verbinding via kabel steeds geactiveerd, zelfs wanneer
je gebruik maakt van de telefoon of de intercom (overigens niet wanneer de FM Radio
staat ingeschakeld).
De verbinding via kabel blijft standaard actief op de achtergrond. Om deze optie uit te
C-Radio FM mode
ModeForward buttonMiddle buttonRear button
FM RadioShort press: seek station up
Long press: Scan recordedShort press: On/o
Long press: Change modeShort press: seek station up
Long press: Scan recorded
14 www.midlandeurope.com
NL
schakelen, ga je als volgt te werk:
›Ga naar de installatie-modus.
›Schakel de unit uit.
›Houd CTRL 7 seconden lang ingedrukt tot het rode lichtje ononderbroken blijft
branden.
›Druk tegelijkertijd op CTRL en VOL+ gedurende 3 seconden. Het blauwe lichtje
knippert drie maal.
›Dubbelklik CTRL om de installatie-modus te verlaten en de Midland BTX2 PRO
te gebruiken.
Om de instelling weer terug te zetten doorloop je opnieuw dezelfde stappen, tot de
LED één maal blauw oplicht. Verlaat via een dubbelklik op CTRL de installatiemodus.
Installatie en bijwerken van firmware
Je kunt de firmware voor je Midland BTX2 PRO configureren en bijwerken met een
USB verbinding aan je PC. Via www.midlandeurope.com vind je de de software en
eventuele nieuwe firmware voor je BTX2 PRO op de productpagina.
LET OP: VERBIND JE UNIT PAS MET DE PC ALS DE SOFTWARE AL IS GE
DOWNLOAD EN KLAAR STAAT OM TE WORDEN GEÏNSTALLEERD!
Gebruik op eigen risico
Het gebruik van het apparaat zal de vermogen om andere geluiden en andere mensen
in de buurt verminderen. Muziek luisteren of telefoneren kan ertoe leiden dat je de
mensen om je heen niet goed verstaat en kan je aandacht afleiden van het verkeer.
Door tijdens het rijden gebruik te maken van dit apparaat kun je jezelf en anderen in
gevaar brengen. Er zijn gebieden waar het gebruik van dit apparaat niet is toegestaan.
Gebruik van het apparaat op hoog volume kan leiden tot blijvende gehoorschade. Als je
last hebt van oorsuizen of andere klachten aan het gehoor, doe je er verstandig aan het
volume naar beneden bij te stellen of zelfs het gebruik van het apparaat te staken. Bij
langdurig gebruik van het apparaat op hoog volume kan gewenning optreden. Dit kan
resulteren in permanente gehoorschade. Gebruik dit apparaat op een verstandige en
verantwoorde manier en stel het volume af op een veilig niveau.
Garantie
De garantie op de unit zelf geldt voor een duur van 24 maanden. Voor de accessoires
(batterijen, oplader, antennes, headsets, microfoons) geldt een garantieduur van zes
maanden.
Voor meer informatie over de garantie verwijzen we je naar www.midlandeurope.com.
Europese veiligheidsvoorschriften en informatie over goedkeuring van de
veiligheid
Dit product is voorzien van het Europese veiligheidskeurmerk CE, conform de RED
2014/53/EU regelgeving en mag vrijelijk worden gebruikt in landen binnen de Eu-
ropese Unie.
Het is gebruikers niet toegestaan om wijzigingen aan te brengen aan het apparaat.
Wijzigingen die niet nadrukkelijk zijn goedgekeurd door de producent gelden als uitslu-
itingsgrond voor de garantie.
Voor aanvullende informatie kun je terecht op www.midlandeurope.com.
RED
IT / RSM
Midland Europe s.r.l. dichiara che il prodotto è conforme ai requisiti essenziali e alle disposizioni della Direttiva 2014/53/UE. La Dichiarazione di conformità si può scaricare dal sito
Hereby Midland Europe s.r.l. declares that this product is in compliance with the essential requirements and other relevant provisions of Directive 2014/53/UE. The declaration of conformity is
available on the web site http://www.midlandeurope.com/it/pagina/10090-certifications
AT / DE / CH / LI
Hiermit erklärt Midland Europe s.r.l., dass das Produkt die grundlegenden Anforderungen und anderen relevanten Bestimmungen der Richtlinie 2014/53/UE. Die Konformitätserklärung ist unter
folgendem Link verfügbar: http://www.midlandeurope.com/it/pagina/10090-certifications
ES
Midland Europe s.r.l.. declara, bajo su responsabilidad, que este aparato cumple con lo dispuesto en la Directiva 2014/53/UE, del Parlamento Europeo. La Declaración de Conformidad está
Par la présente Midland Europe s.r.l. déclare que le modèle est conforme aux exigences essentielles et autres dispositions pertinentes de la directive 2014/53/UE. La déclaration de conformité est
disponible sur le site internet http://www.midlandeurope.com/it/pagina/10090-certifications
PT
A Midland Europe s.r.l. declara que este aparelho cumpre com o disposto na Directiva 2014/53/UE do Parlamento Europeu. A Declaração de Conformidade está disponível no sitio na Internet em
Με το παρών, η Midland Europe s.r.l. δηλώνει οτι το όνομα του μοντέλου συμμορφώνεται ως προς τις βασικές απαιτήσεις και άλλες σχετικές διατάξεις του Κανονισμού 2014/53/UE. Η δήλωση
συμμόρφωσης είναι διαθέσιμη στην ιστοσελίδα http://www.midlandeurope.com/it/pagina/10090-certifications
NL
Hierbij verklaard Midland Europe s.r.l. dat dit model voldoet aan de essentiële eisen en andere relevante bepalingen van richtlijn 2014/53/UE.
De verklaring van conformiteit is beschikbaar op de website http://www.midlandeurope.com/it/pagina/10090-certifications
BE
Midland Europe s.r.l. verklaart dat het product overeenstemt met de voorschriften en andere bepalingen van de richtlijn 2014/53/UE. De conformiteitsverklaring is voorhanden op de website
Midland Europe s.r.l. deklaruje, że ten model jest zgodny z wymaganiami zasadniczymi i innymi istotnymi postanowieniami Dyrektywy 2014/53/UE. Deklaracja Zgodności jest dostepna na stronie
Midland Europe s.r.l. declara ca acest model este in conformitate cu cerintele esentiale si alte prevederi ale Directivei 2014/53/UE. Declaratia de confomitate este disponibila si pe site-ul
С настоящото Midland Europe s.r.l. декларира, че продукта е в съответствие с основните изисквания и съответните модификации на 0Директива 2014/53/UE. Декларацията за
съвместимост е налична на сайта: http://www.midlandeurope.com/it/pagina/10090-certifications
NO
Midland Europe s.r.l. erklærer at produktet er i overensstemmelse med de viktigste kravene og andre relevante betingelser i Direktivet 2014/53/UE. Samsvarserklæringen finnes tilgjengelig på
Hermed erklærer Midland Europe s.r.l. , at dette apperat er i overensstemmelse med kravene og andre relevante bestemmelser i direktiv 2014/53/UE. Overensstemmelseserklæringen findes på
Midland Europe s.r.l. förkunnar att produkten överensstämmer med de väsentliga kraven och övriga bestämmelser i direktiv 2014/53/EU. Denna försäkran om överensstämmelse finns på
Midland Europe s.r.l. vakuuttaa, että tuote täyttää direktiivin 2014/53/UE. Vaatimuksenmukaisuusvakuutus on saatavilla http://www.midlandeurope.com/it/pagina/10090-certifications –
verkkosivuilla.
HR
Midland Europe s.r.l. ovime izjavljuje da je ime ovog modela u suglasnosti sa bitnim zahtjevima te ostalim relevantnim odredbama Propisa 2014/53/EU. Ova Izjava o suglasnosti je dostupna na web
Midland Europe s.r.l. patvirtina, kad šis modelis atitinka visus esminius Direktyvos 2014/53 / UE. Atitikties deklaracija yra pateikiama internetinėje svetainėje
Midland Europe s.r.l. deklarē, ka produkts atbilst pamatprasībām un citiem ar to saistītajiem Direktīvas 2014/53 / UE. Atbilstības deklarācija ir pieejama mājas lapā:
Týmto Midland Europe s.r.l. prehlasuje, že tento názov model je v zhode so základnými požiadavkami a ďalšími príslušnými ustanoveniami smernice 2014/53 /UE. Vyhlásenie o zhode je k dispozícii na
Midland Europe s.r.l. deklarira da je ta model skladen z bistvenimi zahtevami in drugimi relevantnimi določili EU direktive 2014/53/UE. Deklaracija o skladnosti je na voljo na spletni strani
Mi, a Midland Europe s.r.l.. saját felelősségre kijelentjük, hogy ezen elnevezésű termék megfelel az 2014/53 /UE. A megfelelőségi nyilatkozat elérhető weboldalunkon a
Gebruikershandleiding.com neemt misbruik van zijn services uitermate serieus. U kunt hieronder aangeven waarom deze vraag ongepast is. Wij controleren de vraag en zonodig wordt deze verwijderd.
Product:
Spelregels forum
Om tot zinvolle vragen te komen hanteren wij de volgende spelregels:
lees eerst de handleiding door;
controleer of uw vraag al eerder door iemand anders is gesteld;
probeer uw vraag zo duidelijk mogelijk te stellen;
heeft u een probleem en al geprobeerd om dit op te lossen, vermeld dit erbij aub;
heeft u een oplossing gekregen van een bezoeker dan horen wij dat graag in dit forum;
wilt u een reactie geven op een vraag of antwoord, gebruik dan niet dit formulier maar klik op de knop 'reageer op deze vraag';
uw vraag wordt direct op de website gezet; vermijd daarom persoonlijke gegevens in te vullen;
Belangrijk! Als er een antwoord wordt gegeven op uw vraag, dan is het voor de gever van het antwoord nuttig om te weten als u er wel (of niet) mee geholpen bent! Wij vragen u dus ook te reageren op een antwoord.
Belangrijk! Antwoorden worden ook per e-mail naar abonnees gestuurd. Laat uw emailadres achter op deze site, zodat u op de hoogte blijft. U krijgt dan ook andere vragen en antwoorden te zien.
Abonneren
Abonneer u voor het ontvangen van emails voor uw Midland BTX2 PRO 2020 bij:
nieuwe vragen en antwoorden
nieuwe handleidingen
U ontvangt een email met instructies om u voor één of beide opties in te schrijven.
Ontvang uw handleiding per email
Vul uw emailadres in en ontvang de handleiding van Midland BTX2 PRO 2020 in de taal/talen: Nederlands, Duits, Engels, Frans, Italiaans, Spaans als bijlage per email.
De handleiding is 5,95 mb groot.
U ontvangt de handleiding per email binnen enkele minuten. Als u geen email heeft ontvangen, dan heeft u waarschijnlijk een verkeerd emailadres ingevuld of is uw mailbox te vol. Daarnaast kan het zijn dat uw internetprovider een maximum heeft aan de grootte per email. Omdat hier een handleiding wordt meegestuurd, kan het voorkomen dat de email groter is dan toegestaan bij uw provider.
Stel vragen via chat aan uw handleiding
Stel uw vraag over deze PDF
Uw handleiding is per email verstuurd. Controleer uw email
Als u niet binnen een kwartier uw email met handleiding ontvangen heeft, kan het zijn dat u een verkeerd emailadres heeft ingevuld of dat uw emailprovider een maximum grootte per email heeft ingesteld die kleiner is dan de grootte van de handleiding.
Er is een email naar u verstuurd om uw inschrijving definitief te maken.
Controleer uw email en volg de aanwijzingen op om uw inschrijving definitief te maken
U heeft geen emailadres opgegeven
Als u de handleiding per email wilt ontvangen, vul dan een geldig emailadres in.
Uw vraag is op deze pagina toegevoegd
Wilt u een email ontvangen bij een antwoord en/of nieuwe vragen? Vul dan hier uw emailadres in.