163035
1
Verklein
Vergroot
Pagina terug
1/284
Pagina verder
Nederlands
Français English
Aanwijzingen m.b.t. deze handleiding
Deze handleiding is zo ingedeeld dat u te allen tijde via de inhoudsopgave de benodigde
informaties m.b.t. het desbetreffende onderwerp kunt nalezen.
Opmerking
Uitgebreide instructies voor de navigatie vindt u op de CD/DVD en de
online-hulp van het toestel.
Zie hoofdstuk „Vaak gestelde vragen“ om een antwoord te vinden op vragen die vaak aan
onze klantendienst gesteld worden.
Deze handleiding wil u in begrijpelijke taal leren werken met uw navigatiesysteem.
Persoonlijk
Gelieve uw eigendomsbewijs te noteren:
Seriennummer ....................................................................................
Wachtwoord ....................................................................................
Verwijstekst ....................................................................................
SuperPIN ....................................................................................
UUID ....................................................................................
Aankoopdatum ....................................................................................
Plaats van aankoop ....................................................................................
Het serienummer vindt u op de achterkant/onderkant van uw product. Neem dit nummer
eventueel ook op in uw garantiedocumenten.
Het wachtwoord en de verwijstekst voert u in via de Security-functie. De SuperPIN en de
UUID krijgt u dan na de activering van de Securityfunctie. Zie pagina 18.
ii
De kwaliteit
Bij de keuze van de componenten lieten wij ons leiden door hoge functionaliteit,
eenvoudige bediening, veiligheid en betrouwbaarheid. Door een uitgebalanceerd hard- en
softwareconcept zijn wij in staat om u een op de toekomst gerichte apparaat te
presenteren waarmee u bij uw werk en in uw vrije tijd veel plezier zult beleven.
De service
Door onze individuele klantenservice ondersteunen wij u bij uw dagelijks werk.
Neem gerust contact met ons op: wij helpen u met alle plezier.
In dit handboek bevindt zich een afzonderlijk hoofdstuk met betrekking tot het onderwerp
service, te beginnen op bladzijde 61.
Kopiëren, fotokopiëren en verveelvoudigen van dit handboek
Dit document bevat wettelijk beschermde informaties. Alle rechten voorbehouden. Niets
uit dit document mag worden gekopieerd, gefotokopieerd, verveelvoudigd, vertaald,
verzonden of opgeslagen op een elektronisch leesbaar medium zonder voorafgaande
schriftelijke toestemming van de fabrikant.
iii
Nederlands
Français English
Inhoud :
Veiligheid en onderhoud.................................................................................1
Veiligheidsadviezen ....................................................................................................... 1
Gegevensbeveiliging ..................................................................................................... 1
Voorwaarden van uw werkomgeving............................................................................ 2
Reparaties......................................................................................................................2
Omgevingstemperatuur................................................................................................ 2
Elektromagnetische tolerantie ....................................................................................... 3
Aansluiten ..................................................................................................................... 4
Stroomvoorziening via Auto-adapter.......................................................................... 4
Stroomvoorziening via netadapter (optioneel)........................................................... 4
Bekabeling .................................................................................................................... 4
Conformiteitsinformatie R&TTE ..................................................................................... 5
Accuwerking ................................................................................................................. 5
Onderhoud en reiniging................................................................................................ 5
Onderhoud van het display........................................................................................... 6
Afvalverwijdering .......................................................................................................... 6
Transport ...................................................................................................................... 7
In de levering begrepen ................................................................................................ 8
Componenten..................................................................................................9
Vooraanzicht ................................................................................................................. 9
Achteraanzicht ............................................................................................................ 10
Bovenaanzicht............................................................................................................. 10
Onderaanzicht............................................................................................................. 11
Linkerkant ................................................................................................................... 11
Eerste initialisatie..........................................................................................12
I. Accu laden................................................................................................................ 12
II. Stroomvoorziening.................................................................................................. 13
Autoadapter............................................................................................................. 13
Alternatieve oplaadmogelijkheid voor de batterij ..................................................... 13
Netadapter (optioneel)............................................................................................. 14
III. Toestel in- en uitschakelen...................................................................................... 15
IV. Navigatiesoftware installeren.................................................................................. 16
Algemene gebruiksaanwijzingen ..................................................................17
In- en uitschakelen ...................................................................................................... 17
iv
Security .........................................................................................................18
Wachtwoord en verwijstekst vastleggen...................................................................... 18
Instellingen regelen..................................................................................................... 19
SuperPIN en UUID ....................................................................................................... 20
Instellingen achteraf instellen ...................................................................................... 21
Opvragen van het wachtwoord................................................................................... 22
Navigatiesysteem terugstellen ......................................................................23
Reset ...........................................................................................................................23
Volledig uitschakelen / Hard Reset............................................................................... 24
Navigatie .......................................................................................................25
Veiligheidstips voor navigatie ...................................................................................... 25
Tip voor de navigatie................................................................................................ 25
Tips voor gebruik in een voertuig............................................................................. 26
Stand van de antenne ................................................................................................. 26
I. Montage van de autohouder.................................................................................... 27
II. Bevestiging van de navigatiesysteem....................................................................... 28
III. Autoadapter aansluiten........................................................................................... 29
IV. Navigatiesoftware starten ....................................................................................... 30
Informatie over verkeerscontroles (optioneel) ............................................................. 31
Spraakcommando’s (optioneel) ....................................................................34
Handsfree installatie via Bluetooth (optioneel) ............................................38
Bluetooth-toepassing opstarten................................................................................... 38
Overzicht van het hoofdscherm................................................................................... 39
Navigatiesysteem en gsm koppelen ......................................................................... 40
Inkomende oproepen aannemen............................................................................. 41
Een oproep doen ..................................................................................................... 41
Tijdens een oproep .................................................................................................. 42
MP3-speler (optioneel)..................................................................................43
Overzicht van het hoofdscherm................................................................................... 43
Nummer kiezen en opslaan in de favorietenlijst ....................................................... 44
Favorietenlijst........................................................................................................... 45
Lijst van de vastgelegde leestekens.............................................................................. 45
Picture Viewer (optioneel)............................................................................46
Bediening van de Picture Viewer ................................................................................. 46
Overzicht van het hoofdscherm................................................................................... 46
Grote foto ................................................................................................................ 47
Travel Guide (optioneel) ...............................................................................49
v
Nederlands
Français English
AlarmClock (Weckfunktion) (optioneel).......................................................51
Overzicht van het hoofdscherm................................................................................... 51
Beschrijving van de toetsen ......................................................................................... 52
Instellen van de systeemtijd ..................................................................................... 53
Keuze van een wektoon .............................................................................................. 54
Volume instellen ...................................................................................................... 55
Snoozefunctie .......................................................................................................... 56
Beëindigen van de Alarm Clock................................................................................ 56
Sudoku (optioneel) .......................................................................................57
Overzicht van het hoofdscherm................................................................................... 57
Beschrijving van de toetsen ......................................................................................... 57
Overzicht over het speelveld ....................................................................................... 59
Beschrijving van de toetsen ......................................................................................... 59
Dikwijls gestelde vragen................................................................................60
Service ...........................................................................................................61
Fouten en mogelijke oorzaken..................................................................................... 61
Als u nog verdere ondersteuning nodig heeft ? ........................................................... 61
Appendix .......................................................................................................62
Bijzondere functie CleanUp (Engelstalig programma) ................................................. 62
Synchronisatie met de PC............................................................................................ 65
I. Microsoft
®
ActiveSync
®
installeren........................................................................... 65
II. Aansluiten op de PC ............................................................................................. 66
Opslagmodus .......................................................................................................... 66
ActiveSync
®
-Modus................................................................................................... 67
Alternatieve oplaadmogelijkheid voor de batterij ..................................................... 67
III. Werken met Microsoft
®
ActiveSync
®
...................................................................... 68
GPS (Global Positioning System) ................................................................................. 69
TMC (Traffic Message Channel)................................................................................... 70
PayTMC (optioneel) .................................................................................................... 70
Installatie van een externe TMC-ontvanger / Externe FM-antenne aansluiten
(optioneel)............................................................................................................... 71
Werken met geheugenkaarten .................................................................................... 72
Geheugenkaarten invoeren...................................................................................... 72
Geheugenkaart verwijderen ..................................................................................... 72
Gebruik van geheugenkaarten ................................................................................. 72
Gegevens uitwisselen via kaartenlezer...................................................................... 73
Bijkomende Kaarten .................................................................................................... 73
Kaarten kopiëren op een geheugenkaart.................................................................. 73
Alternatieve installatie van de navigatiesoftware van een geheugenkaart ................. 74
Kopiëren van installatiebestanden en kaartengegevens naar het interne geheugen . 74
vi
Technische specificaties.................................................................................75
Modeloverzicht..............................................................................................76
Garantievoorwaarden voor Nederlands.........................................................77
Garantievoorwaarden voor België.................................................................81
Index .............................................................................................................87
Copyright © 2009, 24/08/09
Alle rechten voorbehouden.
Dit handboek is door de auteurswet beschermd.
Het copyright is in handen van de firma Medion
®
.
Handelsmerken:
MS-DOS
®
en Windows
®
zijn geregistreerde handelsmerken van de firma Microsoft
®
.
Pentium
®
is een geregistreerd handelsmerk van de firma Intel
®
.
Andere handelsmerken zijn het eigendom van hun desbetreffende houder.
Technische wijzigingen voorbehouden.
Nederlands
Français English
Veiligheid en onderhoud
Veiligheidsadviezen
Gelieve dit hoofdstuk aandachtig te lezen en alle adviezen die u hier vindt, goed op te
volgen. Op die manier bent u zeker van een langdurige werking van uw apparaat.
Bewaar ook het verpakkingsmateriaal en de handleiding, zodat u ze bij een eventuele
verkoop van uw apparaat aan een nieuwe eigenaar kunt doorgeven.
Laat in geen geval kinderen zonder toezicht van volwassenen met elektrische
toestellen spelen. Kinderen kunnen eventuele gevaren immers niet correct
inschatten.
Bewaar het verpakkingsmateriaal, zoals de folies, buiten het bereik van kinderen. Bij
verkeerd gebruik bestaat er verstikkingsgevaar.
Open nooit de behuizing van uw apparaat of van uw stroomadapter – ze bevatten
immers geen te onderhouden onderdelen! Meer nog, een geopende behuizing kan
levensgevaarlijke elektrische shocks veroorzaken.
Om beschadiging te voorkomen, mag u het scherm niet met scherpe objecten
aanraken. Gebruik uitsluitend de stylus of een andere botte stylus. Vaak kunt u het
toestel ook met de vinger bedienen.
U kunt zich verwonden, als het display breekt. Gebeurt er iets dergelijks, dan pakt u
de gebroken delen met beschermende handschoenen aan en zendt u ze naar uw
service center waar men op een correcte manier de afval kan verwerken.
Vervolgens wast u uw handen met zeep. Het zou namelijk kunnen dat u in
aanraking bent gekomen met chemische producten.
Onderbreek de stroomvoorziening, schakel uw apparaat onmiddellijk uit, of u zet hem
zelfs helemaal niet aan en u contacteert de dienst na verkoop in volgende gevallen
de behuizing van uw apparaat of van de netadapter er zijn vloeistoffen ingelopen.
U laat in dergelijke gevallen de onderdelen eerst door het service center
controleren, om eschadigingen te vermijden!
Gegevensbeveiliging
Het indienen van een eis tot schadevergoeding voor het verlies van gegevens en de
daardoor ontstane schade is uitgesloten. Maak na elke aanpassing in uw gegevens
veiligheidskopieën van die gegevens op externe opslagmedia (bv. CD-R).
Nederlands
2
Voorwaarden van uw werkomgeving
Het niet naleven van deze aanwijzingen kan storingen of beschadiging van het toestel tot
gevolg hebben. Voor deze gevallen geldt geen waarborg.
Laat uw navigatiesysteem en alle aangesloten apparatuur nooit in contact komen
met vocht. Verder vermijdt u ook stof, hitte en directe zonnestralen. Negeert u deze
raadgevingen, dan kan dat leiden tot storingen en beschadigingen van uw
apparaat.
Bescherm uw toestel in ieder geval tegen vocht bijv. door regen en hagel. Opgelet!
Vochtigheid kan door condensatie ook binnenin een beschermhoes ontstaan.
Vermijd sterke vibraties en schokken, zoals die b.v. bij veldrijden kunnen optreden.
Zorg ervoor, dat het toestel niet uit zijn houder los kan komen, b.v. bij het remmen.
Monteer het toestel zo loodrecht mogelijk.
Reparaties
Heeft u technische problemen met uw apparaat, dan kunt u hiermee steeds bij ons
service center terecht.
Is een reparatie noodzakelijk, dan wendt u zich uitsluitend aan onze gemachtigde
Servicepartner. Het adres vindt u op uw garantiekaart.
Omgevingstemperatuur
Uw apparaat kan bij een omgevingstemperatuur van 5° C tot 35° C en bij een
relatieve luchtvochtigheid van 10% - 90% (niet-condenserend) werken.
Staat uw apparaat uit dan kunt u hem bij 0° C tot +60° C wegzetten.
Het toestel dient veilig vervoerd te worden. Vermijd hoge temperaturen (bijv. bij
het parkeren of door rechtstreeks zonlicht).
Veiligheid en onderhoud
3
Nederlands
Français English
Elektromagnetische tolerantie
Bij het aansluiten van extra of andere componenten moet u rekening houden met
de „Richtlijnen voor elektromagnetische tolerantie“ (EMT). Gelieve er bovendien op
te letten, dat enkel bedekte kabels (max. 3 meter) voor de externe interfaces mogen
worden gebruikt.
Behoud minstens één meter afstand van hoogfrequente en magnetische
storingsbronnen (televisietoestel, luidsprekerboxen, GSM enz. ) om de goede
werking niet in gevaar te brengen en gegevensverlies te vermijden.
Elektronische apparaten veroorzaken tijdens het gebruik elektromagnetische
straling.
Deze straling is ongevaarlijk, maar kan wel storingen veroorzaken in andere
apparaten die in de onmiddellijke omgeving gebruikt worden.
Onze apparaten worden in het laboratorium op hun elektromagnetische
compatibiliteit getest en geoptimaliseerd.
Storingen aan het apparaat zelf of aan de elektronica in de buurt kunnen echter niet
volledig uitgesloten worden
Indien u een dergelijke storing vaststelt, probeert u dit te verhelpen door de afstand
tussen de apparaten te vergroten of door ze te verplaatsen.
Zorg er vooral voor dat de elektronica van de vrachtwagen geen storingen vertoont
vooraleer weg te rijden.
Nederlands
4
Aansluiten
Neem volgende raadgevingen in acht om uw apparaat op een correcte manier aan te
sluiten:
Stroomvoorziening via Auto-adapter
Gebruik de auto-adapter enkel in een sigarettenaansteker van een auto (autobatterij
= DC 12V of batterij vrachtwagen = 24V ). Als u niet zeker bent van het type
stroomvoorziening in uw voertuig, contacteer dan uw autofabrikant.
Stroomvoorziening via netadapter (optioneel)
Het stopcontact moet in de buurt van het apparaat en makkelijk toegankelijk zijn.
Wilt u de stroomtoevoer naar uw apparaat onderbreken, dan trekt u de
stroomadapter uit het stopcontact.
Met de stroomadapter werkt u enkel aan geaarde stopcontacten met
AC 100-240V~, 50/60 Hz. Bent u niet helemaal zeker hoeveel volt er op een
bepaalde plaats wordt gebruikt, dan contacteert u het energietoeleverings-bedrijf
in kwestie.
Gebruik enkel de meegeleverde stroomadapter.
Bedek de netadapter niet. Zo kan hij niet beschadigd worden, omdat de warmte
niet wegkan.
Gebruik de adapter niet meer, als de behuizing of de kabel van het toestel
beschadigd zijn. Vervang het door een adapter van hetzelfde type.
Wij raden u aan om voor extra veiligheid een beveiliging tegen overbelasting te
gebruiken om uw apparaat te beschermen tegen beschadiging ten gevolge van
stroomverschillen of blikseminslag.
Bekabeling
Leg uw kabel zo, zodat niemand erop kan trappen of erover struikelen.
Plaats niks op de kabel om hem niet te beschadigen.
Stekkers en kabels bij het aansluiten niet forceren. Altijd op de juiste oriëntatie van
de stekkers letten.
Er mogen geen grote krachten bv. van de zijkant op de aansluitingen inwerken. Die
kunnen uw toestel beschadigen.
Om kortsluiting of kabelbreuk te voorkomen, de kabel niet inklemmen of sterk
buigen.
Veiligheid en onderhoud
5
Nederlands
Français English
Conformiteitsinformatie R&TTE
Met deze apparaat wordt de volgende draadloze apparatuur meegeleverd:
Bluetooth (alleen bij de model E4445)
Hierbij verklaart MEDION AG dat deze toestel in overeenstemming is met de essentiële
eisen en de andere relevante bepalingen van richtlijn 1999/5/EG. Volledige
conformiteitsverklaringen vindt u onder www.medion.com/conformity
.
Accuwerking
Uw apparaat wordt door een ingebouwde accu gevoed. Om de levensduur en de
prestatiemogelijkheden van uw accu te optimaliseren en tevens een veilige werking te
garanderen, dient u de volgende raadgevingen te volgen:
Een accu kan niet tegen hitte. Legt u dit advies naast u neer, dan kan het tot
beschadiging, zelfs explosie van de accu komen. Zorg er dus voor dat u uw
apparaat en bijgevolg de ingebouwde accu niet te sterk te verhit.
Gebruik enkel de meegeleverde elektriciteitsvoorzieningen om de accu op te laden.
Accu’s / batterijen behoren tot het gevaarlijk afval. Wenst u uw
apparaat niet langer te gebruiken, dan brengt u hem naar een vakkundige
afvalverwerking. U kunt hieromtrent uw klantendienst na verkoop contacteren.
Onderhoud en reiniging
Opgelet!
Binnenin de behuizing van het apparaat zitten er geen delen die moeten
worden onderhouden of gereinigd.
De levensduur van uw apparaat kan door onderstaande maatregelen beduidend worden
verlengd:
Voordat u begint schoon te maken, trekt u altijd eerst de stekker uit en maak alle
verbindingskabels los.
Reinig uw apparaat enkel met een vochtige, pluisvrije doek.
Gebruik geen oplosmiddelen, bijtende of gasvormige reinigingsmiddelen .
Nederlands
6
Onderhoud van het display
Vermijd krassen op het beeldscherm. Het oppervlak kan immers vlug worden
beschadigd. Wij raden het gebruik aan van een display-beschermfolie, om zo
krassen en vuil te vermijden. U kunt dergelijke folie in de handel verkrijgen.
De folie die bij de levering op het display werd aangebracht, dient enkel als
transportbescherming!
Draag er goed zorg voor dat u geen waterdruppels op het beeldscherm achterlaat.
Water kan immers blijvende verkleuringen veroorzaken.
Reinig het beeldscherm steeds met een zachte, pluisvrije doek.
Zorg dat uw beeldscherm niet met direct zonlicht of ultraviolette straling in contact
komt.
Afvalverwijdering
Het toestel en zijn verpakking zijn geschikt voor recyclage.
Apparaat
Behandel het apparaat op het eind van de levensduur in geen geval als gewoon huisvuil.
Informeer naar de mogelijkheden om het milieuvriendelijk als afval te verwijderen.
Verpakking
Om uw product tijdens het transport tegen beschadiging te beschermen, wordt het in een
verpakking geplaatst. Verpakkingen zijn uit materialen vervaardigd die op een
milieuvriendelijke manier behandeld en op een correcte manier gerecycleerd kunnen
worden.
Veiligheid en onderhoud
7
Nederlands
Français English
Transport
Volg volgende tips als u uw apparaat wilt transporteren:
Bij grote temperatuurs- of vochtigheidsverschillen kan er zich door condensatie
vocht opladen binnenin het apparaat. Dit kan tot een elektrische kortsluiting leiden.
Gebruik een beschermhoes die uw apparaat beschut tegen vuil, vocht, schokken en
krassen.
Na een transport wacht u met het in werking stellen van uw apparaat totdat hij de
omgevingstemperatuur heeft aangenomen.
Voordat u op reis vertrekt, wint u inlichtingen in over de stroom- en
communicatievoorzieningen op de plaats van aankomst. Voorzie dan ook vóór
reisbegin de nodige adapters voor stroom of communicatie.
Gebruik bij verzending van uw apparaat steeds de originele verpakking waarin uw
product oorspronkelijk werd geleverd. Roep het advies in van uw transportfirma bij
het verzenden.
Als u aan de controle van de handbagage op de luchthaven voorbijgaat, is het aan
te raden om uw apparaat aan de röntgeninstallatie (de lopende band waarop u uw
handbagage zet, waarna ze wordt gescreend) af te geven. Vermijd de
magneetdetektor (de opening waardoor uzelf gaat) of de magneetknuppel (wat de
veiligheidsagent in de hand heeft), want die zouden uw gegevens kunnen
verstoren.
Nederlands
8
In de levering begrepen
Gelieve de volledigheid van de levering te controleren en ons binnen 14 dagen na
aankoop te contacteren, indien de levering niet compleet is. Gelieve hiervoor zeker het
serienummer op te geven. Met het product dat u verworven heeft, heeft u gekregen:
Navigatiesysteem
Kabel voor stroomvoorziening voor sigarettenaansteker
USB-kabel
Autohouder
CD/DVD met navigatiesoftware, gedigitaliseerd kaartmateriaal, ActiveSync®,
PC programma voor het snelle herstel van de gegevens
Handleiding en garantiekaart
Optioneel
Netadapter
Geheugenkaart
FM-antenne voor de TMC-ontvangst
Externe TMC-ontvanger
Koptelefoon
Autohouder met uitbreidingsstekker
Bewaartas
Componenten
9
Nederlands
Français English
Componenten
Vooraanzicht
Nr. Component Beschrijving
n
Microfoon (alleen bij de model E4245 en E4445)
o
Weergave
„Accu laden“
Knippert oranje, wanneer een extra accu
wordt geladen en licht op groen, wanneer de
bijkomende accu opgeladen is.
p
W
eergave Bluetooth Als Bluetooth geactiveerd is, knippert het
controlelampje al naargelang de
verbindingstoestand sneller of langzamer
(alleen bij de model E4445)
q
Touch Screen Toont de gegevensoutput van het apparaat. Tik
met de vinger of een gepaste stift met „stompe“
punt op het beeldscherm om menuopdrachten
te selecteren of gegevens in te voeren.
Opgelet!
Raak het display niet met puntige of hoekige
voorwerpen aan, om beschadigingen te
voorkomen. Gebruik bijvoorbeeld een stompe
stift. Vaak kunt u het toestel ook gewoon me de
vinger bedienen.
n
p
o
q
Nederlands
10
Achteraanzicht
Nr. Component Beschrijving
n
Luidspreker Geeft gesproken aanwijzingen en
waarschuwingen weer.
Bovenaanzicht
Nr. Component Beschrijving
n
Aan- en
uitschakelaar
Lang drukken schakelt het toestel in of uit. Door
kort te drukken gaat u naar de standbymodus
resp. haalt u het toestel weer uit de slaapstand. Het
apparaat wordt opnieuw “geactiveerd” door te
drukken op de aan/uit-schakelaar.
o
Geheugen sleuf
Sleuf voor de opname van een optionele
geheugenkaart.
GPS
Antenne
n
n
o
Componenten
11
Nederlands
Français English
Onderaanzicht
Nr. Component Beschrijving
n
Mini-USB-
aansluiting
Aansluiting voor de verbinding met een pc via de
USB-kabel (voor de gegevensafstemming)
aansluiting voor de externe stroomvoorziening.
Optioneel kunt u hier een TMC adapter aansluiten
(alleen bij de model E4145)
Linkerkant
Nr. Component Beschrijving
n
Koptelefoon Aansluiting voor koptelefoon
Het toestel gedurende lange tijd op
volle sterkte gebruiken, kan het
gehoor van de gebruiker
beschadigen.
Hier heeft u de mogelijkheid, een FM-antenne voor
de TMC-ontvangst aan te sluiten (alleen bij de
modellen E4245 en E4445).
n
n
Nederlands
12
Eerste initialisatie
Hierna wordt u stap voor stap door de eerste initialisatie van het navigatiesysteem
gevoerd.
Verwijder eerst de transportbeschermfolie van het scherm.
I. Accu laden
U kunt de batterij van uw navigatiesysteem op de volgende manieren opladen:
met behulp van een autoadapter
met behulp van een USB-kabel of
met behulp van een optionele netadapter.
Opgelet!
Naargelang de laadstatus van de ingebouwde accu kan het nodig zijn het
toestel eerst voor een bepaalde duur op te laden, voordat de initiële
installatie kan worden uitgevoerd.
Houd bij de behandeling van de accu rekening met volgende opmerkingen:
De weergave van de laadtoestand knippert oranje, tot uw apparaat opgeladen is.
Onderbreek indien mogelijk de laadprocedure niet, voordat de batterij volledig
opgeladen is. Het laadstatuslampje licht al groen op, wanneer de accu een hoge
laadcapaciteit heeft bereikt. Laat het toestel nog 20 minuten aangesloten aan de
oplaadkabel; om de volle oplaadcapaciteit te bereiken.
Tijdens het opladen kunt u met uw navigatiesysteem werken. U dient er echter
voor te zorgen dat de stroomtoevoer bij de eerste installatie niet wordt
onderbroken.
Laat de externe voeding continu op het apparaat aangesloten zodat de
ingebouwde batterij volledig opgeladen kan worden.
U kunt de externe voeding aangesloten laten, zodat u steeds kunt werken. Gelieve
er rekening mee te houden dat de autoadapter stroom verbruikt wanneer hij de
accu van het navigatiesysteem niet aan het laden is.
Bij een heel lage restlading van de oplaadbare batterij kan het meerdere minuten
duren, tot het toestel na aansluiting van de externe voeding opnieuw operationeel
wordt.
De accu wordt ook bij een volledig uitgeschakeld toestel opgeladen.
Eerste initialisatie
13
Nederlands
Français English
II. Stroomvoorziening
Autoadapter
(lijkende afbeelding)
1. Steek de stekker (n) van de verbindingskabel in de daarvoor voorziene aansluiting
van uw toestel.
2. Steek nu de stroomadapterstekker (o) in de sigarettenaansteker en zorg ervoor, dat
deze tijdens de rit het contact niet verliest. Dit zou immers tot een foutief
functioneren kunnen leiden.
Alternatieve oplaadmogelijkheid voor de batterij
Van zodra u uw navigatietoestel op een ingeschakelde pc of notebook heeft aangesloten
door middel van een USB-kabel, wordt de batterij opgeladen.
Daartoe hoeft er geen driver of software te worden geïnstalleerd. Onderbreek zo mogelijk,
bij de eerste ingebruikneming het laadproces niet.
Opmerking
Wanneer het toestel ingeschakeld is, wordt de helderheid eventueel
verminderd wanneer er een USB-verbinding tot stand komt.
Er wordt aanbevolen het toestel in de stand-bymodus te zetten om de
laadduur via USB te verkorten.
n
o
Nederlands
14
Netadapter (optioneel)
(lijkende afbeelding)
1. Schuif de adapterstekker in de sleuf aan de achterkant van de netadapter. Druk op
de Push toets, zodat de adapterstekker kan vergrendelen.
2. Steek de kabel van de netadapter (n) in de mini-USB-aansluiting van het
navigatiesysteem.
3. Steek de netadapter (o)in een gemakkelijk bereikbaar stopcontact.
Adapterstekker
n
o
Eerste initialisatie
15
Nederlands
Français English
III. Toestel in- en uitschakelen
Door lang (> 3 sec.) op de aan- / uitschakelaar te drukken zet u het navigatietoestel
aan en schakelt u het volledig uit. Het navigatiesysteem begint automatisch met de initiële
inrichting. Selecteer vervolgens de gewenste taal. Het logo van het merk verschijnt en na
enkele seconden toont het toestel het opstartscherm.
Knoppen Omschrijving Scherm
Menu
mappen
Navigatiemenu
Andere
toepassingen
Instellingen
Nederlands
16
Opmerking
Als het menu mappen niet beschikbaar is, dan kunt u nog het
navigatiemenu instellingen kiezen. Het menu “Andere toepassingen” zal
automatisch verschijnen.
Opmerking
Zolang uw navigatiesysteem op een extern voedingssysteem aangesloten
is of op accu werkt, volstaat een korte druk op de aan/uit-knop om het
apparaat in- of uit te schakelen (standby mode). Het apparaat wordt
opnieuw “geactiveerd” door te drukken op de aan/uit-schakelaar.
Via de button Instellingen op het hoofdscherm van uw apparaat kunt u
de bedrijfstijd aan uw behoeften aanpassen. Uw toestel wordt zo
afgeleverd, dat het zich, wanneer het niet aan staat ook bij niet-gebruik,
niet zelf uitschakelt.
Wilt u het toestel volledig uitzetten, dan drukt u langer dan 3 seconden op
de aan-/ uitschakelaar.
Doordat gegevens in het interne geheugen opgeslagen worden, gaan
daarbij geen gegevens verloren. Het opstarten kan alleen wat langer duren.
Ook in de stand-bymodus verbruikt uw navigatiesysteem weinig stroom en de batterij
wordt ontladen.
IV. Navigatiesoftware installeren
Indien uw apparaat reeds in de fabriek met de basisgegevens van de navigatiesoftware
uitgerust werd, gebeurt de uiteindelijke installatie van de navigatiesoftware automatisch
vanuit het interne geheugen tijden de initialisatie. Volg de instructies op het beeldscherm.
Als er zich gedigitaliseerde kaarten op een optionele geheugenkaart bevinden, dan moet
u die geheugenkaart tijdens het gebruik van het navigatiesysteem in het toestel steken.
Wordt de geheugenkaart tijdens het gebruik verwijderd, zelfs al is het voor een kort
ogenblik, dan moet een reset (zie pagina 23) worden uitgevoerd om het toestel opnieuw
op te starten.
Lees hiervoor het hoofdstuk Navigatie vanaf pagina 25, a.u.b.
Algemene gebruiksaanwijzingen
17
Nederlands
Français English
Algemene gebruiksaanwijzingen
In- en uitschakelen
1. Na de initiële inrichting is uw toestel in zijn normale toestand van gereedheid. Druk
kort (> ½ cek.) op de aan- en uitschakelaar om uw navigatietoestel aan te zetten.
Het controlelampje van de accu licht even op en het gebruikersscherm verschijnt.
Opmerking
Uw toestel wordt zo afgeleverd, dat het zich, wanneer het niet aan staat
ook bij niet-gebruik, niet zelf uitschakelt. Via de button Instellingen op het
hoofdscherm van uw apparaat kunt u de bedrijfstijd aan uw behoeften
aanpassen.
Ook in de stand-by modus verbruikt uw navigatiesysteem weinig stroom
en de batterij wordt ontladen.
2. Druk kort op de aan- en uitschakelaar, om uw navigatietoestel uit te zetten. Het
volgende krijgt u te zien:
U heeft nu drie opties:
Toets Beschrijving
Afbreken/terug
Als u per vergissing in deze scherm bent terechtgekomen, dan tikt u
op de pijl om weer naar het vorige scherm terug te gaan.
Standby modus
Als u op deze knop tikt, dan gaat uw toestel in de stand-by modus.
Reset
Als u op deze knop tikt, dan voert u een reset uit.
Nederlands
18
Wanneer u geen gebruik wilt maken van een van deze drie mogelijkheden, gaat het toestel
na enkele seconden automatisch in de stand-by modus.
Voor verdere instellingen in de stand-by modus, zie ook hoofdstuk Bijzondere functie
CleanUp (Engelstalig programma), pagina 62, Punt 8.
Heeft u de comfortfunctie DC AutoSuspend geactiveerd, dan verschijnt er na verloop van
de vertragingstijd van enkele seconden eveneens dit beeldscherm.
Security
Via deze functie kunt u uw toestel beschermen tegen toegang door vreemden. Vooraleer u
deze functie kunt gebruiken, moeten er eerst enkele eenmalige instellingen gedaan
worden. Ga daarbij als volgt te werk:
Wachtwoord en verwijstekst vastleggen
1. Geef via het hoofdscherm in de Instellingen en dann in de Toestelinstellingen.
2. Tik op Security, om de functie te starten. Het volgende scherm verschijnt:
3. Tik op
, om het Admin-wachtwoord te geven.
4. Er verschijnt een toetsenbord. Voer op deze manier uw wachtwoord in.
Opmerking
Het wachtwoord moet uit minstens 4 tekens bestaan. Gebruik een
combinatie van letters (A-Z) en cijfers (0-9). Bewaar het wachtwoord op
een veilige plaats.
5. Nadat u een wachtwoord heeft ingevoerd, bevestigt u dit met .
Security
19
Nederlands
Français English
6. Voer het wachtwoord in het tweede veld in, om het opnieuw te bevestigen en
eventuele fouten te vermijden.
Opmerking
Het wachtwoord wordt in de vorm van sterretjes aangeduid (****).
7. Nadat u het wachtwoord heeft ingevoerd, verschijnt er nog een tekstveld. Voer hier
de verwijstekst in, die als geheugensteuntje voor uw wachtwoord dient. Deze
verwijzing kunt u dan oproepen, als u uw wachtwoord vergeten bent, resp. het
verkeerd ingegeven heeft.
Instellingen regelen
Nadat u uw wachtwoord en de verwijzingstekst met succes heeft ingevoerd, verschijnt het
volgende keuzevenster waarmee u de instellingen voor de functie Security instelt.
Toets Beschrijving
Stel hier in of het toestel na een koude start (Hard Reset) het
wachtwoord moet vragen.
Stel hier in, of het toestel na opnieuw opstarten (reset) het
wachtwoord weer moet opvragen.
Stel hier in, of het toestel na het inschakelen vanuit de stand-by
modus het wachtwoord moet vragen.
Nederlands
20
Bevestig uw instellingen met . Het volgende scherm verschijnt:
SuperPIN en UUID
Nadat u de instellingen ingesteld heeft, verschijnt de SuperPIN en de UUID (Universally
Unique IDentifier = unieke toestelidentificatie)op het scherm.
Opmerking
Noteer deze gegevens in uw gebruiksaanwijzing (zie pagina 1) en
bewaar ze op een veilige plek.
Deze gegevens heeft u nodig wanneer u het wachtwoord tot drie keer
toe fout ingaf. Het navigatietoestel kan dan enkel met deze gegevens
opnieuw vrijgegeven worden.
Security
21
Nederlands
Français English
Instellingen achteraf instellen
Wanneer u al een wachtwoord hebt geregistreerd en nadien andere dingen wil instellen,
bijvoorbeeld wanneer u uw wachtwoord wil wijzigen, start u de Security-functie op. Dan
verschijnt het volgende beeldscherm.
Toets Beschrijving
Wachtwoord of verwijzingstekst veranderen
Instellingen authentificatie (blz. 19, Instellingen regelen)
SuperPIN en UUID aanduiden (blz. 20)
Reset de volledige beveiligingsfunctie. Na het uitvoeren
van deze functie worden alle beveiligingsinstellingen en
wachtwoorden gewist. Om deze functie te kunnen
uitvoeren, moet u uw wachtwoord nog een keer invoeren
en bevestigen.
Nederlands
22
Opvragen van het wachtwoord
Wanneer u een wachtwoord via de Security-functie heeft vastgelegd, wordt het
wachtwoord, afhankelijk van de instelling, gevraagd wanneer het toestel opnieuw
opgestart wordt.
1. Geef via het toetsveld het door u gekozen wachtwoord aan.
Opmerking
Het wachtwoord wordt in de vorm van sterretjes aangeduid (****).
2. De door u bepaalde informatie wordt weergegeven als u het vraagtekensymbool
aanraakt.
3. Klik op
om de invoer te bevestigen.
Opmerking
Wanneer u het wachtwoord 3 keer fout invoert, moet u de SuperPIN
ingeven. Wanneer u die ook kwijt bent, dan moet u zich met de UUID tot
uw Service Center wenden. De UUID komt onderaan het beeldscherm in
beeld.
Navigatiesysteem terugstellen
23
Nederlands
Français English
Navigatiesysteem terugstellen
Er bestaat een mogelijkheid om het navigatiesysteem te resetten indien het niet meer juist
reageert of werkt.
Bij deze mogelijkheid start het navigatiesysteem opnieuw op, zonder dat het nodig is een
nieuwe installatie te doen. De Reset wordt dikwijls gebruikt om het geheugen te
reorganiseren. Daarbij worden alle lopende programma’s afgebroken en wordt het
werkgeheugen opnieuw van zijn beginwaarden voorzien.
U gebruikt deze mogelijkheid wanneer uw navigatiesysteem niet meer correct reageert of
werkt.
Reset
Druk even op de in-/uitschakelaar. Dan verschijnt het volgende scherm:
Wanneer u een reset wilt uitvoeren, klikt u op de toets
.
Meer informatie over dit scherm vindt u in de paragraaf In- en uitschakelen, pagina 17.
Nederlands
24
Volledig uitschakelen / Hard Reset
Opgelet!
Een Hard Reset verwijdert alle gegevens in het tijdelijke geheugen.
Uw navigatiesysteem bevindt zich normaal gesproken in de stand-by modus, als u het
uitgeschakeld hebt door kort te drukken op de aan/uitschakelaar. Bovendien kan het
systeem ook helemaal uitgeschakeld worden, zodat het zo weinig mogelijk energie
verbruikt. Als u het toestel volledig uitschakelt, gaan alle gegevens in het tijdelijke
geheugen verloren (Hard Reset).
Zo schakelt u uw navigatiesysteem volledig uit:
1. Druk lang (> 3 sec.) op de aan-/uitschakelaar, om het toestel uit te schakelen.
2. Druk lang (> 3 sec.) op de aan-/uitschakelaar, om het toestel opnieuw in te
schakelen.
Als uw toestel in de fabriek al met de basisgegevens van de navigatiesoftware in het niet-
tijdelijke geheugen uitgerust is, dan dient u niet de software opnieuw te installeren.
Navigatie
25
Nederlands
Français English
Navigatie
Veiligheidstips voor navigatie
Een uitvoerige handleiding vindt u op de bijbehorende CD/DVD.
Tip voor de navigatie
Voer geen instellingen aan het navigatiesysteem uit tijdens het rijden, om uzelf en
anderen niet nodeloos in gevaar te brengen!
Als u een keer de gesproken aanwijzingen niet hebt verstaan of onzeker bent,
wat u bij het volgende kruispunt moet doen, dan kunt u zich met behulp van
de kaart- of pijlweergave snel oriënteren. Kijk enkel dan op de scherm, als u
zich in een veilige verkeersituatie bevindt!
Juridische opmerking
In sommige landen is het gebruik van toestellen verboden die voor
verkeerscontrolesystemen (bv. „flitspalen“) waarschuwen. Wij raden u
aan inlichtingen over de juridische situatie in te winnen en de
waarschuwingsfunctie enkel daar te gebruiken, waar ze is toegestaan.
We kunnen niet verantwoordelijk worden gesteld voor schade die het
gevolg is van het gebruik van de waarschuwingsfunctie.
Belangrijk
De aanleg van het wegennet een het verkeersreglement heeft voorrang
op de instructies van het navigatiesysteem. U mag de instructies enkel
volgen als de verkeerssituatie en het verkeersreglement dit toestaan!
Houd er ook rekening mee dat de snelheidswaar-schuwingen van uw
navigatiesysteem niet bindend zijn. U moet de snelheidsaanduidingen
op de verkeerborden volgen. Het navigatiesyteem zal u ook dan naar uw
doel leiden, mocht u van de vooraf berekende route moeten afwijken.
De richtlijnen van het navigatiesysteem ontslaan de bestuurder niet uit zijn plicht
tot zorgvuldigheid en verantwoordelijkheid.
Plan de routes voor u moet vertrekken. Als u tijdens het rijden een nieuwe route
moet invoeren, stop dan even.
Om het GPS-signaal correct te ontvangen, mogen geen metaalachtige
voorwerpen de radio-ontvangst verhinderen. Bevestig het toestel met de
zuignap aan de binnenkant van de voorruit of in de buurt van de voorruit.
Probeer meerdere plaatsen in uw voertuig uit om een optimale ontvangst te
verkrijgen.
Nederlands
26
Tips voor gebruik in een voertuig
Let tijdens de installatie van de houder erop, dat de houder bij ongevallen geen
veiligheidsrisico vormt.
Bevestig de componenten stevig in uw voertuig en let bij de installatie op een vrij
uitzicht.
Het beeldscherm van het toestel kan lichtreflecties veroorzaken. Let er dus op dat u
tijdens de werking niet verblind wordt.
Leg de kabel niet in de onmiddelijke nabijheid van componenten die belangrijk zijn
voor de veiligheid.
Monteer de houder niet binnen de actieradius van de airbags.
Controleer regelmatig de zekere zit van de zuigvoet.
De adapter voor stroomtoevoer verbruikt ook dan stroom als er geen toestel op is
aangesloten. Verwijder hem als hij niet wordt gebruikt om een ontlading van de
autobatterij te voorkomen.
Controleer na de installatie alle inrichtingen die belangrijk zijn voor de veiligheid.
Tip
Laat uw navigatiesysteem niet achter in de auto. Om veiligheidsredenen
dient u ook de autohouder te demonteren.
Stand van de antenne
De antenne moet een vrije zicht naar de hemel hebben voor de ontvangst van de signalen
van de GPS-satelieten. Probeer bij ontoereikende ontvangst verschillende mogelijkheden
uit voor montage en uitrichting van de antenne in uw voertuig.
Navigatie
27
Nederlands
Français English
I. Montage van de autohouder
Opgelet!
Monteer de houder van het navigatiesysteem enkel dan aan de voorruit
als uw zicht niet wordt belemmerd.
(lijkende afbeelding)
Opmerking
Afhankelijk van het type kan uw navigatiesysteem bij wijze van alternatief
ook met een andere autohouder uitgerust zijn.
Opmerking
Maak het raam met een glasreiniger zorgvuldig schoon. Als de
temperatuur beneden de 15° C is, dan moet u het raam en de zuignap een
beetje opwarmen.
Zet de autohouder met de zuigvoet rechtstreeks op de voorruit en druk de hendel naar
beneden. De zuigvoet zuigt zich op de ondergrond vast.
snaphebel
Nederlands
28
II. Bevestiging van de navigatiesysteem
1. Sluit de autoadapter en eventueel FM-antenne voor de TMC-ontvangst op uw
navigatiesysteem aan en breng de geheugenkaart in.
2. Zet het toestel in het midden onderaan op de schaal en druw het zachtjes naar
achter, totdat het erin sluit.
3. Nu schuift u het toestel lichtjes naar achteren (n) totdat het hoorbaar
vergrendelt (o).
(lijkende afbeelding)
4. U zet de houderschelp op de bevestigingspinnen van de autohouder.
5. Nu schuift u het toestel naar beneden totdat het hoorbaar vergrendelt.
6. Nu kunt u de volledige eenheid op de schoongemaakte voorruit of op de zuignap
zetten.
stift in
houder-
schaal
Navigatie
29
Nederlands
Français English
III. Autoadapter aansluiten
(lijkende afbeelding)
1. Steek de stekker (n) van de verbindingskabel in de daarvoor voorziene aansluiting.
2. Steek nu de stroomadapterstekker (o) in de sigarettenaansteker en zorg ervoor, dat
deze tijdens de rit het contact niet verliest. Dit zou immers tot een foutief
functioneren kunnen leiden.
Opmerking
Trek na de rit, of als u uw wagen gedurende langere tijd niet gebruikt, de
stroomadapterstekker uit de sigarettenaansteker. Op die manier kan de
accu van de auto zich niet ontladen. Schakel in dat geval het
navigatiesysteem via de aan/uitknop uit.
n
o
Nederlands
30
IV. Navigatiesoftware starten
Opmerking
Bevat uw geheugenkaart (extra) kaarten, dan moet de geheugenkaart
tijdens het gebruik van het navigatiesysteem steeds in het apparaat
zitten.
Als de geheugenkaart tijdens het gebruik verwijderd wordt, al is het
kortstondig, moet een reset uitgevoerd worden om het navigatiesysteem
opnieuw te starten (blz. 23). Naargelang het navigatiesysteem gebeurt
deze reset automatisch.
3. Schakel uw navigatiesysteem in.
4. Naargelang de uitvoering start de navigatiesoftware onmiddellijk of na aantikken
van de navigatieknop op het hoofdscherm.
5. Tik op het scherm Navigatie aan om de bestemming in te brengen en voer het
adres van uw navigatiedoel in. Door klikken op het symbool
bevestigt u uw
invoer en start u de navigatie op. Bij toereikende satellietontvangst verschijnt na
enige tijd de weginformatie op het scherm, aangevuld met gesproken
aanwijzingen.
Informatie over de verdere bediening van de navigatiesoftware vindt u in de uitgebreide
gebruikershandleiding op CD/DVD. Het gaat hierbij om een PDF-bestand, die u met
elke Acrobat Reader kunt lezen en printen.
Opmerking
De GPS-ontvanger heeft bij het eerste gebruik enige minuten nodig,
voordat hij geïnitialiseerd is. Ook wanneer het symbool aanduidt dat er
een GPS-signaal aanwezig is, kan de navigatie onjuist zijn. Bij verdere
ritten duurt het ca. 30-60 seconden, vóór er een correct GPS-signaal
komt, op voorwaarde dat er voldoende „zicht“ op de satelliet is.
Navigatie
31
Nederlands
Français English
Informatie over verkeerscontroles (optioneel)
Wanneer de waarschuwingsfunctie voor verkeerscontroleknooppunten geïnstalleerd is
verschijnt het volgende scherm:
Bevestig met
, wanneer u de navigatie met de waarschuwingsfunctie voor
verkeerscontroleknooppunten wil gebruiken.
Om de waarschuwingsfunctie te configureren, tikt u in het menu Instillingen de toets
Bijzondere functies configureren aan.
Dan verschijnt het volgende scherm. Tik hier POI Warner aan:
Nederlands
32
Tik hier Vaste (flitser) aan om de „vaste radars” in te stellen:
Hier heeft u de mogelijkheid, de verkeerscontroleknooppunten op een kaart te laten
voorstellen of deze niet aan te geven op het scherm. Hier kunt u ook instellen of u, voordat
u een verkeerscontroleknooppunt bereikt, door een geluidssignaal wil verwittigd worden.
De akoestische waarschuwing voor een verkeerscontrole gebeurt aan de hand van een
waarschuwingstoon op een afstand van ong. 15 seconden van het verkeerscontrolepunt.
Een dubbele waarschuwingstoon volgt dan op een afstand van ong. 7 seconden. Een
viervoudige waarschuwingstoon wijst op een te hoge snelheid. Bovendien wordt door een
benaderingsbalkje (onderaan links op uw scherm) de afstand tot het
verkeerscontroleknooppunt aangegeven.
Voorbeeld wanneer de kaartvoorstelling geactiveerd is:
Navigatie
33
Nederlands
Français English
Tip
Gelieve erom te denken dat de verkeerscontroleknooppunten niet in alle
landen ter beschikking staan.
* Juridische opmerking
In sommige landen is het gebruik van toestellen verboden die voor
verkeerscontrolesystemen (bv. „flitspalen“) waarschuwen. Wij raden u aan
inlichtingen over de juridische situatie in te winnen en de
waarschuwingsfunctie enkel daar te gebruiken, waar ze is toegestaan. We
kunnen niet verantwoordelijk worden gesteld voor schade die het gevolg
is van het gebruik van de waarschuwingsfunctie.
Opmerking
Wanneer het gebruik van de frequentie overbelast is, bijv. Door
radiozenders) moet u naar een andere frequentie uitwijken. U kunt tot 6
frequenties opslaan.
Nederlands
34
Spraakcommando’s (optioneel)
Tijdens het navigeren kan de spraakinvoermodus worden geactiveerd door gedurende
enkele seconden op het touchscreen te drukken. En korte signaaltoon duidt erop dat het
navigatiesysteem klaar is voor spraakopdrachten.
Tekenverklaring:
( ) optionele woorden;
[ ] Stopwoorden
„|“alternatieven;
< > aangeduide inhoud spreekbaar
Afhankelijk van het huidig aanzicht zijn daarbij de volgende opdrachten mogelijk:
Geldigheidsgebied Commando
steeds geldig
terug
[Dialoog] afbreken | Stopgezet
(Stad | Plaats) (invoeren) | Invoer stad
[nieuwe] bestemming invoeren | Invoer bestemming
[nieuwe] (PC | postcode) invoeren | Invoer postcode
Help
(algemene | globale) (hulp | "commando's")
[naar de] (kaart | kaartweergave | kaartafbeelding)
volume instelling
Volume verlagen | zachter
Volume verhogen | luider
geluid uit [ schakelen ]
geluid (aan | inschakelen)
Menu | Hoofdmenu | Navigatiemenu
[een] [nieuw] adres invoeren | [een] nieuwe bestemming
| [een] [nieuwe] bestemming (invoeren | kiezen | selecte-
ren) | bestemmingsinvoer
(Andere | Extra) mogelijkheden bestemmingsinvoer |
Andere bestemming (zoeken | invoeren) | Andere
bestemming
Routemanager | Routemennetsjer
In het hoofdmenu
In het hoofdmenu kan u uw
laatste bestemming door
middel van een
spraakcommando
oproepen. U doet dit door
de tekst in een van de
bovenste drie knoppen
(deze zijn dan omrand met
een tekstballon) hardop
Navigatie starten | Start | ja [aub] | Go | Route berekenen
Spraakcommando’s (optioneel)
35
Nederlands
Français English
Geldigheidsgebied Commando
(Navigatie) beëindigen | Beëindig (navigatie)
andere (toepassingen | applicaties)
voor te lezen. In het geval
dat er meerdere laatste
bestemmingen opgeslagen
zijn verschijnt de knop
"Laatste Bestemmingen".
Deze is ook met spraak aan
te sturen en hiermee opent
u dan een lijstweergave van
recente bestemmingen.
Instellingen | Opties
Op de kaart
[toon] bestemmingsgebied | toon (bestemming |
$<go_to_destination_DisplayedText>)
[toon] (kaartoverzicht | overzicht )
toon [actueel | eigentijdse] (positie | stand) | (actueel |
eigentijdse) (positie | stand) | toon
[ Aanzicht | gericht ] in Rijrichting
extra bestemming | volgende bestemming | naar onde-
ren | naar beneden | verder
vorige bestemming | hoog | naar boven | omhoog
Pijlaanzicht | Manoeuvreeraanzicht | pijlafbeelding
compas (weergave | aanzicht | perspectief | view)
dynamische (weergave | kaart | view) | dynamisch (aan-
zicht | perspectief)
volgende (Scherm | Kaartafbeelding | Kaart | Weergave)
Alleen kaart | kaartweergave
[toon] (pijl en kaart | kaart en pijl | kaart met pijlen |
kaart met pijl)
3 D [Scherm | Kaart | Weergave]
2 D [weergave | aanzicht | perspectief]
[2 D] noord (weergave | aanzicht | perspectief | view)
Autozoom
[Afbeelding | Kaart | Kaartafbeelding] centreren |
centreer [[de] kaart]
vergroten | inzoomen | op inzoomen
verkleinen | uitzoomen | er uitzoomen
Quickmenu
Nederlands
36
volgende pagina | lager | naar beneden
Bij lijsten
Afhankelijk van de
weergegeven
tekstballonnen zijn ofwel de
lijst van mogelijkheden
ofwel een toegewezen getal
als commando uit te
spreken. Ook de knoppen
onder de lijst zijn uit te
spreken wanneer deze met
een tekstballon zijn
omrand.
vorige pagina | hoog | naar boven
plaats wijzigen | plaats invoeren | plaats corrigeren | stad
wijzigen | stad invoeren | stad corrigeren | wijzig plaats |
wijzig stad | andere plaats | andere stad | corrigeer plaats
| corrigeer stad | stadinvoer | plaatsinvoer
postcode wijzigen | postcode invoeren | postcode corri-
geren | P C wijzigen | P C invoeren | P C corrigeren |
wijzig postcode | wijzig P C | andere postcode | andere P
C | corrigeer postcode | postcode-invoer | P C invoer
staat wijzigen | staat invoeren | staat corrigeren | provin-
cie wijzigen | provincie invoeren | provincie corrigeren |
regio wijzigen | regio invoeren | regio corrigeren | wijzig
staat | wijzig provincie | wijzig regio | andere staat |
andere provincie | andere regio
zoek in alle staten | zoek in alle provincies | zoek in alle
regio’s | zoek in het hele land | alle staten | alle provin-
cies | alle regio’s | hele land
Commandos bij
stadingave
Met de commando’s „Zip…
/ Stad… invoeren“ kunt u
tussen deze
invoermogelijkheden
wisselen. Het kiezen van
een aparte staat is in Europa
niet van toepassing.
land wijzigen | land invoeren | land corrigeren | wijzig
land | ander land | corrigeer land | landinvoer
plaats wijzigen | plaats invoeren | plaats corrigeren | stad
wijzigen | stad invoeren | stad corrigeren | wijzig plaats |
wijzig stad | andere plaats | andere stad | corrigeer plaats
| corrigeer stad | stadinvoer | plaatsinvoer
postcode wijzigen | postcode invoeren | postcode corri-
geren | P C wijzigen | P C invoeren | P C corrigeren |
wijzig postcode | wijzig P C | andere postcode | andere P
C | corrigeer postcode | postcode-invoer | P C invoer
Commandos bij
straatingave
Met de commando’s „Zip…
/ Stad… veranderen“ kunt u
een eerder opgegeven
waarde veranderen. De
commando’s "weet ik niet"
en "Navigatie starten" zullen
„centrum“ als keuze
opleveren.
stadscentrum | centrum | centrum van de stad | naar het
centrum | naar het centrum van de stad | naar stads-
Spraakcommando’s (optioneel)
37
Nederlands
Français English
centrum | naar centrum
ik heb geen idee | geen idee | weet ik niet | ik zou het
niet weten
straat wijzigen | straat invoeren | straat corrigeren | wij-
zig straat | corrigeer straat | andere straat | straatinvoer
kruisingen
straat midden | midden van de straat | naar midden van
de straat | naar het midden van de straat
ik heb geen idee | geen idee | weet ik niet | ik zou het
niet weten
Commandos bij ingave
van huisnummer
De commando’s "weet ik
niet" en "Navigatie starten"
zullen hier „Naar midden
v/d straat“ als keuze
opleveren.
beginnen navigatie | beginnen routebegeleiding | begin-
nen routegeleiding | navigatie starten | navigatie begin-
nen | routebegeleiding starten | routebegeleiding begin-
nen | starten navigatie | starten routebegeleiding
Opmerking
Spreek de spraakcommando’s klaar en duidelijk in de richting van het
navigatiesysteem in. Tijdens het invoeren van het gesproken bericht
mogen er geen bijgeluiden optreden (radio, airco, luide gesprekken).
Nederlands
38
Handsfree installatie via Bluetooth (optioneel)
De Bluetooth-technologie wordt gebruikt om korte afstanden draadloos te overbruggen.
Bluetooth-toestellen verstuurt gegevens via radiosignalen zodat andere toestellen die deze
technologie ook ondersteunen zonder kabels met elkaar kunnen communiceren.
Vooraleer u uw navigatiesysteem als handsfree installatie met uw Bluetooth gsm kunt
gebruiken, dienen de beide toestellen op elkaar afgestemd te worden (koppeling).
Opmerking
Gelieve in de handleiding van uw gsm op te zoeken hoe u de Bluetooth-
functie kunt inschakelen.
Bluetooth-toepassing opstarten
1. Klik op optie Bluetooth Dialer.
Opmerking
Als Bluetooth manueel werd gedeactiveerd, dient de functie ‚actief
gebruik’ eerst opnieuw te worden geactiveerd.
2. Nu verschijnt het Bluetooth hoofdscherm op uw navigatiesysteem.
Handsfree installatie via Bluetooth (optioneel)
39
Nederlands
Français English
Overzicht van het hoofdscherm
Toets Naam Beschrijving
Oproepproto
col
Toont een lijst van de uitgaande en ontvangen
gesprekken.
Bericht Toegang tot het postvak van uw mobieltelefoon.
U kunt berichten ontvangen, schrijven en versturen.
Contacten Raadplegen van de op de mobieltelefoon opgeslagen
contacten. De ondersteuning van deze functie is bij
elke mobieltelefoon anders.
Terug Vorige bladzijde van het hoofdscherm.
Wissen Wis met dit veld het via het toetsenveld ingegeven
nummer.
Oproep Kies met dit veld het via het toetsenveld ingegeven
nummer.
Toetsenbord Via het toetsenveld geeft u de cijfers van het op te
bellen nummer in.
Volume Regel het volume van de microfoon en de
luidsprekers.
Nieuw bericht – opties hoe nieuwe berichten
worden weergegeven
Connecties – navigatiesysteem en
mobieltelefoon koppelen
Sync. berichten – instellingen voor de
automatische SMS synchronisatie tussen
navigatietoestel en mobieltelefoon
Instelllingen
in de
handsfree
installatie
Bluetooth – aan- en uitzetten van de Bluetooth-
functie
Nederlands
40
Sync. telefoonboek – instellingen voor de
automatische synchronisatie tussen
navigatietoestel en mobieltelefoon
Instellen van het basisvolume van microfoon en
luidsprekers
Navigatiesysteem en gsm koppelen
1. Activeer de bluetooth-functie op uw gsm.
Opmerking
Elke gsm doet dit op een andere manier. Gelieve vooraf zeker de
handleiding van uw gsm te raadplegen.
2. Kies onder instellingen van de hands free modus van uw navigatietoestel de optie
(Pairing – Navigatietoestel en gsm koppelen). Het zoeken naar een toestel dat
compatibel os met de bluetooth-functie begint.
3. Kies uit de lijst de gepaste gsm.
4. Start de koppeling door het veld koppelen te gebruiken.
5. Uw gsm herkent het navigatietoestel. Er wordt gevraagd om een 4-cijferige PIN-
code in te voeren. Voor uw navigatietoestel luidt dit 1 2 3 4.
6. Uw gsm wordt herkend en u kunt nu beschikken over het hands free systeem via
het navigatiesysteem.
Opmerking
Van zodra u het navigatiesysteem uitschakelt of er een grotere afstand
ontstaat tussen uw gsm en het navigatiesysteem, dan moet deze
procedure herhaald worden.
Handsfree installatie via Bluetooth (optioneel)
41
Nederlands
Français English
Inkomende oproepen aannemen
Toets Beschrijving
Oproep aannemen
Oproep weigeren/beëindigen
Een oproep doen
1. Typ op het Bluetooth-hoofdscherm via het toetsenbord het gewenste nummer in.
2. Typ op om de oproep te doen..
Nederlands
42
Tijdens een oproep
Toets Beschrijving
Oproep beëindigen
Volume van de microfoon verhogen / verlagen
Gesprek doorschakelen naar de mobiele telefoon
MP3-speler (optioneel)
43
Nederlands
Français English
MP3-speler (optioneel)
Naargelang de softwareuitrusting beschikt uw navigatiesysteem ook over een MP3-speler.
Om deze toepassing te starten, klikt u in het menu “Andere toepassingen” op de knop
MP3-speler.
Alle Mp3-bestanden op de geheugenkaart kunnen in een favorietenlijst opgenomen
worden en kunnen afgespeeld worden.
Overzicht van het hoofdscherm
Toets Beschrijving
Reduceert de helderheid van het beeldscherm tot op een
minimum, om energie te besparen.
Leestekens vastleggen/toevoegen
of
Verhoogt of verlaagt het volume.
De indicator in de rechterbovenhoek van het scherm geeft het
huidige volume aan.
Actie afbreken / terug naar het vorige menu
of
Springt naar het vorige of volgende nummer. Tijdens de
weergave kan in het spelende nummer vooruit- of
teruggespoeld worden.
Weergave
Stopt het actuele nummer.
Toont de opgeslagen favorieten
Nederlands
44
Toont de bestanden op de flash disk en / of de geheugenkaart
Instellingen van de MP3-speler
Nummer kiezen en opslaan in de favorietenlijst
Om een nummer te kiezen, druk op en kies het nummer dat u in de favorietenlijst
wilt opslaan. U hebt hier drie mogelijkheden om de nummers te markeren.
U hebt hier drie mogelijkheden om de nummers te markeren:
Druk op
om alle nummers en alle ondergeschikte folders te markeren.
Druk op
om alle nummers in de huidige lijst te markeren.
Druk op
om alle markeringen binnen een map op te heffen.
De gekozen nummers worden door een
.
Om uw keuze te bevestigen, druk nu op
. Pas daarna worden de gemarkeerde titels
in de lijst van favorieten opgenomen.
Om titels in submappen uit te kiezen, opent u de map in kwestie en kiest u de gewenste
titel uit.
Als in een map niet alle titels zijn uitgekozen, dan wordt dit door het symbool
aangeduid.
MP3-speler (optioneel)
45
Nederlands
Français English
Favorietenlijst
Door op te drukken komt u in de favorietenlijst:
Alle nummers verwijdert u met
.
Afzonderlijke nummers verwijdert u met .
Bevestiging met
voor het opslaan van de nieuwe keuze in de favorietenlijst.
Lijst van de vastgelegde leestekens
Door te tippen op komt u in de lijst met de vastgelegde leestekens:
Alle leestekens wist u met
.
Afzonderlijke leestekens wist u met
.
Bevestiging met
voor de overname van de nieuwe keuze in de lijst.
Nederlands
46
Picture Viewer (optioneel)
Naargelang de softwareuitrusting beschikt uw navigatiesysteem over een Picture Viewer.
Met de Picture Viewer kunt u foto’s in jpg-formaat bekijken die zich op de
geheugenkaart van uw navigatiesysteem bevinden. Alle foto’s die zich op de
geheugenkaart bevinden zijn onmiddellijk te bekijken.
Bediening van de Picture Viewer
Om deze toepassing te starten, klikt u in het menu “Andere toepassingen” op de knop
Picture Viewer.
Overzicht van het hoofdscherm
Afb.: Kleine foto’s
Met de twee pijltoetsen beweegt u in de kleine foto’s naar rechts of links. Klik op een
bepaalde foto om hem als grote foto over het volledige scherm te bekijken. Door op
te drukken gaat u in de kleine foto’s terug naar het begin.
Door te klikken op het symbool verlaat u de toepassing.
U kunt de diashow starten door op het symbool te klikken.
Picture Viewer (optioneel)
47
Nederlands
Français English
Grote foto
Afb.: Grote foto zonder bedieningspaneel
Klik bij de grote foto onderaan op het beeldscherm om het bedieningspaneel te
activeren:
Afb.: Grote foto met bedieningspaneel
Toets Beschrijving
Vorige foto
Draaien 90° met de klok mee
Raster invoegen
Dia-Show starten
Diashow stopzetten
Draaien 90° tegen de wijzers van de klok in
Volgende foto
Nederlands
48
Door op het midden van de foto te klikken, keert u terug naar de kleine foto’s.
Door op het symbool (raster invoegen) te drukken, wordt de foto in 6 velden
onderverdeeld.
Afb.: Grote foto met raster
Door op een vierkant te klikken, wordt dat deel van de foto vergroot:
Afb.: Zoom in modus
Door op het midden van de foto te klikken, keert u terug naar de grote foto.
Travel Guide (optioneel)
49
Nederlands
Français English
Travel Guide (optioneel)
Naargelang de softwareuitrusting beschikt uw navigatiesysteem over een Travel Guide.
De Travel Guide geeft algemene informatie over verschillende aspecten van bepaalde
steden of regio’s in Europa, zoals bv. bezienswaardigheden, restaurants, cultuur en
reisinformatie.
Om deze toepassing te starten, klikt u in het menu “Andere toepassingen” op de knop
Travel Guide.
Als u informatie wilt opvragen, kies dan eerst het land, dan de stad (of de regio) en
daarna de categorie.
Afb. 1 Afb. 2
Afb. 3 Afb. 4
Afb. 5 Afb. 6
Nederlands
50
Afb. 7 Afb. 8
Als u een bepaald onderwerp hebt gekozen, bevestig dan door op
te
klikken. De navigatiesoftware kan dan naar het betreffende adres gaan.
Toets Beschrijving
Vorige Scherm
Toont het adres van de gekozen categorie
Toont beschikbare foto’s van de gekozen categorie
Door op deze knop te drukken, kunt u direct naar het gekozen
adres toe navigeren.
Opmerking
De keuzemogelijkheden in de Travel Guide kunnen naargelang de
software uitvoering afwijken.
AlarmClock (wekfunctie) (optioneel)
51
Nederlands
Français English
AlarmClock (wekfunctie) (optioneel)
Afhankelijk van de software is uw navigatiesysteem uitgerust met een AlarmClock /
wekfunctie.
Om deze toepassing te starten, klikt u in het menu “Andere toepassingen” op de knop
Alarm Clock.
De wekfunctie kan zowel als normale wekker fungeren wanneer het toestel uitgeschakeld
is (standbymodus/ energiebesparingsmodus) alsook als herinnering tijdens de lopende
navigatie.
Overzicht van het hoofdscherm
Dit beeld krijgt u, waanneer u nog geen wekuur heeft ingesteld. Geef het wekuur in in het
24-uur-formaat en bevestig uw invoering met
.
Nederlands
52
Beschrijving van de toetsen
Toets Beschrijving
Huidige systeemtijd
Instelmodus
(instellen van volume, systeemtijd en alarmgeluid)
Nachtmodus (stand-by modus)
Nieuwe instelling/Deactiveren van de wekfunctie
Instellen van de wekuur
Wissen van de invoer
Bevestigingstoets
Volume verminderen / vehogen
Terug naar het vorige menu
Sluit de toepassing
AlarmClock (wekfunctie) (optioneel)
53
Nederlands
Français English
Instellen van de systeemtijd
In de rechterbovenhoek van het scherm wordt het huidige uur aangegeven. Dat kunt u als
volgt aanpassen:
1. Toets op het hoofdscherm op
. Dan verschijnt het volgende
scherm:
2. Toets op
om het uur in te stellen.
Afb. 1 Afb. 2
Opmerking
De systeemtijd wordt ge-update bij GPS-ontvangst. Let daarbij ook op de
juiste instelling van de tijdzone.
Nederlands
54
Keuze van een wektoon
1. Om een wektoon uit te kiezen, tikt u op .
2. Kies de gewenste map en bevestig deze keuze met de -knop.
3. Wanneer u een andere wekkertoon op uw geheugenkaart wilt kiezen, kiest u de
map waarin deze zich bevindt onder de aanduiding Storage Card en wederom
bevestigd u uw keuze met .
4. Kies, zoals beschreven bij de MP3-speler, de gewenste wektoon uit en bevestig
deze met
.
5. De uitgekozen wektoon wordt door een
gekenmerkt.
6. Sluit de toepassing met .
AlarmClock (wekfunctie) (optioneel)
55
Nederlands
Français English
Volume instellen
Door de toets aan te toetsen kunt u het volume van het weksignaal aanpassen.
Opmerking
Het hier geconfigureerde volume heeft enkel betrekking op het weksignaal
en wijzigt het volume van de gesproken navigatie of van de andere
functies van het systeem niet.
Afb.: Volumeregeling
Nederlands
56
Snoozefunctie
Als de wekker afgaat op het aangeduide uur, kunt u het weksignaal via de snoozefunctie
op regelmatige tijdstippen laten herhalen:
1. Toets op om de snoozefunctie te activeren.
Afb.: Wekaanzicht
2. Om de dag nadien weer op het ingegeven tijdstip gewekt te worden, beëindigt u
de snoozefunctie via het schakelvlak
. Door te klikken op verlaat u de
wekaanduiding en keert u terug naar het scherm van voor het wektijdstip terug.
Beëindigen van de Alarm Clock
1. Om het ingestelde wekuur te deactiveren, toets u op .
2. U bevindt zich nu in de instellingsmodus.
3. Toets op
om de toepassing te verlaten. Er is geen wektijd ingesteld.
Huidige
systeemtijd
Ingestelde
wektijd
Sudoku (optioneel)
57
Nederlands
Français English
Sudoku (optioneel)
Afhankelijk van de software is uw navigatiesysteem uitgerust met het spel Sudoku.
Om deze toepassing te starten, klikt u in het menu “Andere toepassingen” op de knop
Sudoku.
Sudoku is een cijferraadsel. Het speelveld is vierkant en in negen blokken onderverdeeld.
Elk blokje bestaat dan weer uit 9 vakjes.
De bedoeling bij Sudoku is om alle 81 cijfervelden correct in te vullen met cijfers van 1
tot 9. Elk cijfer mag maar één keer in elk blokje voorkomen. Bovendien mag elk cijfer ook
maar één keer per rij en per kolom voorkomen.
Bij het begin van het spel worden enkele speelvelden al van een cijfer tussen 1 en 9
voorzien.
Overzicht van het hoofdscherm
Beschrijving van de toetsen
Toets Beschrijving
Spel starten
Deze toets toont u tips voor oplossingen. Duwt u nog
een keer op de toets, dan verdwijnen de tips weer.
Deze toets toont oplossingen voor de vakken met
getallen. Duwt u opnieuw op de toets, dan verdwijnen
de oplossingen.
Nederlands
58
Deze toets start een nieuw Sudoku-spel.
Instellingen
In het menu instellingen hebt u de volgende
mogelijkheden:
Met deze toets slaat u
het actuele spel op.
Met deze toets roept u
een opgeslagen spel
weer op het scherm.
Wissen
Wissen van een
opgeslagen spel.
Hier kunt u de
moeilijkheidsgraad
instellen.
Terug naar het huidige
spel
Sudoku (optioneel)
59
Nederlands
Français English
Overzicht over het speelveld
Beschrijving van de toetsen
Toets Beschrijving
Lijst voor de invoer van getallen
Keuzelijst van het invoeren van getallen in de getallen-
vakken. Het gekozen getal word gemarkeerd en kan
door het aantikken van een getallenvak in dit vak wor-
den ingevoerd.
Invoer
U markeert eerst een getal in de getallenlijst, dat in een
bepaald vak zou moeten verschijnen. Vervolgens kiest u
het gewenste vak.
Wissen
U kiest eerst het wissymbool uit en dan het getal.
De toepassing beëindigen.
Nederlands
60
Dikwijls gestelde vragen
Waar vind ik meer informatie over het navigatiesysteem.
Uitgebreide handleidingen voor de navigatie vindt u op de CD/DVD
die met uw apparaat worden meegeleverd.
Gebruik als bron voor extra hulp ook de uitgebreide hulpfuncties, die
u eenvoudigweg kunt intoetsen (veelal de F1-toets op de PC) of
aanstippen op het vraagteken (bij de navigatie-systeem). Deze
hulpfuncties worden tijdens het gebruik van de computer of het
apparaat ter beschikking gesteld.
Waarom heb ik de meegeleverde CDs/DVDs nodig?
De CDs/DVDs bevatten:
het programma ActiveSync
®
voor de gegevensafstemming
tussen het navigatiesysteem en de PC.
Extra programma’s (optionaal).
Deze gebruikshandleiding in digitale vorm.
gedigitaliseerd kaartmateriaal
PC programma voor het snelle herstel van de gegevens
Instructies voor het gebruik van de navigatiesoftware
Naargelang de uitvoering wordt er één of meerdere CDs/DVDs
meegeleverd.
Het navigatiesysteem reageert niet meer. Wat moet er gedaan worden?
Voer een Reset uit (blz. 23).
Hoe kan ik de belichting bijregelen?
Onder Settings.
Service
61
Nederlands
Français English
Service
Fouten en mogelijke oorzaken
Het navigatiesysteem reageert niet meer of gedraagt zich atypisch.
Voer een Reset uit (blz. 23).
Het navigatiesysteem wordt door ActiveSync® enkel als gast herkend.
Zie informatie op pagina 66.
De GPS-ontvanger kan niet geïnitialiseerd of gevonden worden.
Indien ondanks een correcte installatie van het systeem nog steeds geen signaal op het
beeldscherm ontvangen wordt, kan dat volgende oorzaken hebben:
Er is niet voldoende satellietontvangst mogelijk.
Oplossing:
Verander de positie van uw navigatiesysteem en zorg ervoor dat het „vrije“ zicht
van de antenne niet in het gedrang komt.
Er zijn geen gesproken aanwijzingen te horen.
Controleer de volume-instelling.
Als u nog verdere ondersteuning nodig heeft ?
Als onze adviezen uit de vooraangaande onderdelen het probleem niet hebben kunnen
oplossen, dan vragen wij u ons te contacteren. Als u ons volgende informatie zou kunnen
bezorgen, zou u ons enorm helpen:
Wat is u configuratie?
Welke randapparatuur gebruikt u?
Welke meldingen verschijnen er op de scherm?
Welke software gebruikte u, toen de fout zich voordeed?
Welke stappen hebt u reeds ondernomen om het probleem te verhelpen?
Als u reeds een klantnummer hebt, graag dit nummer meedelen.
Nederlands
62
Appendix
Bijzondere functie CleanUp (Engelstalig programma)
De CleanUp-functie dient voor het gericht wissen van pc-gegevens die niet langer gebruikt
worden.
Belangrijk
Gebruik deze functie zeer voorzichtig aangezien er gegevens gewist
kunnen worden die dan handmatig hersteld moeten worden.
De CleanUp-functie wordt geactiveerd wanneer onmiddellijk na de starttoon na een reset
kortstondig de „o“ in het GoPal-schrift van het hoofdmenu aangetikt wordt.
De CleanUp-functie bevat 9 opties:
1. Remove Installation Only
Verwijdert de geïnstalleerde SW uit het permanente geheugen „My Flash Disk“
[= onderdeel van het permanente geheugen waar na de eerste installatie de uitvoerbare
onderdelen van de navigatiesoftware zijn opgeslagen (\My Flash Disk\Navigation)].
2. Remove MAP Only
Verwijdert de digitale kaarten uit het permanente geheugen (\My Flash Disk\MapRegions).
3. Remove Preload Only
Verwijdert de voor de installatie van het navigatiesysteem noodzakelijke gegevens uit het
permanente geheugen (\My Flash Disk\Install).
4. Remove All
Wist de inhoud van het “My Flash Disk” geheugen. Het is niet nodig het scherm na het
uitvoeren van deze functie opnieuw te kalibreren.
Appendix
63
Nederlands
Français English
5. Factoryreset
Terugzetten in de leveringstoestand bij intacte hoofdinstallatie.
6. Format Flash
Formatteert het interne “My Flash Disk” geheugen. Bij een uitgebreide foutcorrectie kan
deze formattering eventueel noodzakelijk zijn. Na de uitvoering van de formatfunctie is het
noodzakelijk het scherm opnieuw te kalibreren. Ook worden alle gegevens in het interne
My Flash Disk” geheugen gewist, zonder kans op herstelling (kijk Remove All).
7. GPS Factory Reset
Bepaalt de toestand van de GPS-ontvanger bij levering. Bij gebruik van de GPS-functie
nadat de fabrieksinstellingen gereset werden, moet de GPS- ontvanger zich weer
oriënteren. Dat proces kan een poosje in beslag nemen.
8. DC AutoSuspend /Wakeup
Hier kunt u kiezen, wanneer uw navigatiesysteem automatisch in de stand-by-modus moet
gaan wanneer de externe stroomvoorziening onderbroken wordt. Deze functie is
bijvoorbeeld nuttig bij voertuigen waarbij de sigarettenaansteker uitgeschakeld wordt
wanneer het contact uitgeschakeld wordt.
De autoSuspend-functie wordt enkele seconden na het wegvallen van de externe
stroomvoorziening geactiveerd en voor de ingestelde tijd verschijnt het stand-by-scherm
(zie pagina 17).
Wanneer de stroomvoorziening binnen de totale tijd weer op gang komt (bijvoorbeeld
wanneer de motor even uitgeschakeld werd), wordt de DC autoSuspend-functie weer
gedeactiveerd. Zon iet, dan gaat het navigatiesysteem na afloop van de ingestelde tijd in
de stand-by-modus.
Stel de gewenste tijd in door aan te tikken en bevestig uw keuze met OK.
Opmerking
Bij levering en na een Hard Reset (zie pagina 24) is deze functie
gedeactiveerd en kan ze individueel ingesteld worden.
Nederlands
64
Exit
Verlaat de CleanUp-functie en herstart het apparaat (zoals een reset)
Opmerking
Vooraleer de gegevens werkelijk gewist worden, is er een bevestiging
nodig. Tik hiervoor op YES. Indien de te wissen niet (meer) voorhanden
zijn, krijgt u een bijhorende melding.
Om de gegevensbestanden in het interne geheugen (installatiebestanden
en kaartengegevens) te herstellen leest u a.u.b. het hoofdstuk ”Kopiëren
van installatiebestanden en kaartengegevens naar het interne
geheugen” op pagina 74.
Appendix
65
Nederlands
Français English
Synchronisatie met de PC
I. Microsoft
®
ActiveSync
®
installeren
Voor de overdracht van gegevens tussen uw pc en uw navigatiesysteem heeft u het
programma Microsoft® ActiveSync®
nodig.
U hebt samen met uw apparaat een licentie van dit programma verkregen. U vindt het op
de CD/DVD.
Opmerking
Gebruikt u het besturingssysteem Windows Vista/Windows®7, dan heeft u
de ActiveSync
®
-communicatiesoftware niet nodig. De systeem-bestanden
die nodig zijn voor de pure overdracht van gegevens zijn bij levering al
geïntegreerd in het besturingssysteem.
Sluit uw toestel met behulp van de USB-synchronisatiekabel op uw PC
aan. Nadat een nieuw toestel gevonden werd, worden alle noodzakelijke
drijvers automatisch geïnstalleerd.
Na een geslaagde installtie, vindt u uw nieuw toestel terug in het overzicht
van Windows Explorer, onder item „draagbare toestellen“.
Opgelet
Bij de installatie van software kunnen belangrijke bestanden overschreven
en gewijzigd worden. Om bij eventuele problemen na de installatie op de
originele bestanden te kunnen teruggrijpen, dient u voor de installatie een
back-up van de harde schijf te nemen.
Onder Windows
®
2000 of XP moet u de administratierechten hebben om de software te
installeren.
Belangrijk
De navigatiesysteem nog niet met uw PC verbinden.
7. Plaats de CD/DVD en wacht tot het programma automatisch start.
Opmerking
Indien dat niet werkt, is waarschijnlijk de zogenoemde Autorun functie
gedesactiveerd. Om de installatie manueel te starten, moet het
programma Setup op de CD/DVD gestart worden.
8. Selecteer eerst de taal en klik vervolgens op ActiveSync® installeren en volg de
aanwijzingen op het beeldscherm.
Nederlands
66
Opmerking
Bij de installatie van de GoPal Assistant wordt ActiveSync® automatisch
mee geïnstalleerd.
II. Aansluiten op de PC
1. U start het navigatietoestel door de aan-/uitschakelaar in te duwen
2. U sluit de USB-kabel op uw navigatiesysteem aan.
3. Het andere uiteinde van de USB-kabel sluit u aan op een vrije USB-poort van uw
computer.
4. Na de aansluiting van het navigatiesysteem verschijnt het volgende scherm:
Opmerking
Heeft u geen modus gekozen, dan laadt het systeem na enkele seconden
automatisch de ActivSync®-Modus.
5. U kiest de gewenste modus uit:
Opslagmodus
In het opslagmodus kunt u uw navigatietoestel gebruiken als een wisselmedium (bv. zoals
een USB-stick). Er verschijnen twee wisselmedia op het systeem: het interne geheugen van
het navigatiesysteem zelf en de (optionele) geheugenkaart, als die in het toestel aanwezig
is.
Opmerking
Zolang u zich in deze modus bevindt, kunt u op het toestel parallel geen
gegevens invoeren. Om verlies van gegevens te voorkomen, gebruikt u de
functie “hardware veilig verwijderen” van uw besturingssysteem. Nu kunt
u de kabel van uw navigatiesysteem verwijderen.
opslagmodus
ActiveSync-modus
Appendix
67
Nederlands
Français English
De assistent voor hardware-installatie herkent nu een nieuw toestel en installeert de
passende driver. Dit kan enkele minuten duren.
ActiveSync
®
-Modus
Wanneer u de ActiveSync®-Modus heeft gekozen, herhaalt u het zoeken naar een
verbinding mocht dit in eerste instantie niet succesvol zijn geweest.
Volg vervolgens de aanwijzingen op het scherm. Het programma zal nu een associatie
tussen uw PC en het Navigatie systeem aanmaken.
Aanwijzing
Om met de GoPal Assistant te kunnen werken, moet het Navigatie
systeem bij het de eerste keer koppellen in ActiveSync®-Modus staan.
Alternatieve oplaadmogelijkheid voor de batterij
Van zodra u uw navigatietoestel op een ingeschakelde pc of notebook heeft aangesloten
door middel van een USB-kabel, wordt de batterij opgeladen.
Daartoe hoeft er geen drijver of software te worden geïnstalleerd. Onderbreek zo mogelijk,
bij de eerste ingebruikneming het laadproces niet.
Opmerking
Wanneer het toestel ingeschakeld is, wordt de helderheid eventueel
verminderd wanneer er een USB-verbinding tot stand komt.
Er wordt aanbevolen het toestel in de stand-bymodus te zetten om de
laadduur via USB te verkorten.
Nederlands
68
III. Werken met Microsoft
®
ActiveSync
®
Zodra u uw navigatiesysteem met uw PC verbindt wordt ActiveSync
®
automatisch
opgestart. Het programma controleert, of het om een toestel gaat waarmee een
partnerschap is afgesloten. Als dat zo is, dan worden de wijzigingen op de PC en op het
navigatiesysteem, die sinds de laatste synchronisatie hebben plaatsgevonden, met elkaar
vergeleken en gecoördineerd. In de instellingen van het programma ActiveSync
®
kunt u
precies instellen, welke gegevens bij de synchronisatie prioriteit hebben. Om de effecten
van de verschillende instellingen te leren kennen, opent u de helpfunctie (met de toets F1)
van het programma. Als het navigatiesysteem niet als een partner wordt herkend, dan
wordt automatisch een beperkte gast-toegang geactiveerd, waarmee u b.v. gegevens
kunt uitwisselen. Indien dit voorkomt terwijl u over een geregistreerd partnertoestel
beschikt, dan verbreekt u de verbinding tussen navigatiesysteem en PC en zet u het
navigatiesysteem uit en weer aan. U verbindt dan het navigatiesysteem opnieuw met de
PC, om de herkenningsprocedure opnieuw op te starten. Wordt het toestel dan nog steeds
enkel als gast herkend, dan herhaalt u de procedure opnieuw en herstart u tevens uw PC.
Opmerking
Controleer altijd, dat u uw navigatiesysteem telkens op dezelfde USB-poort
van uw PC aansluit, omdat uw PC anders een nieuwe ID toekent en uw
toestel opnieuw installeert.
Appendix
69
Nederlands
Français English
GPS (Global Positioning System)
Het GPS is een satellietondersteund systeem voor de positiebepaling. Met behulp van 24
satellieten die rond de aarde cirkelen is een tot op enkele meters nauwkeurige
plaatsbepaling op aarde mogelijk.
De ontvangst van de satellietsignalen gebeurt via de antenne van de ingebouwde GPS-
ontvanger die daarvoor een „vrij zicht“ op minstens 4 van deze satellieten nodig heeft.
Opmerking
Bij beperkte zichtbaarheid (bijv. in een tunnel, in huizenrijen, in het bos of
ook in voertuigen met gemetalliseerde ruiten) is en plaatsbepaling niet
mogelijk. De satellietontvangst begint echter weer zodra de hindernis
overwonnen is en men weer een goede zichtbaarheid heeft.
De nauwkeurigheid van de navigatie is bij lage snelheden (bijv. langzaam
stappen) eveneens beperkt.
De GPS-ontvanger verbruikt extra energie. Dat is vooral belangrijk in batterijbedrijf. Om
energie te besparen, schakelt u het toestel niet onnodig in. Sluit daarom ook de
navigatiesoftware af, als deze niet gebruikt wordt of als satellietenontvangst voor een
langere duur niet mogelijk zou zijn. Tijdens een korte onderbreking van uw rit kunt u het
apparaat echter ook via de in-/uitschakelaar uitschakelen. Opnieuw starten gebeurt door
op dezelfde schakelaar te drukken. Bovendien wordt ook de GPS-ontvanger weer
geactiveerd als de navigatiesoftware nog actief is. Hierbij kan het naargelang de
ontvangstsituatie een tijdje duren vooraleer de positie opnieuw geactualiseerd wordt.
Opmerking
Zorg ervoor dat uw toestel zo vooringesteld dat het in batterijbedrijf bij
GPS-ontvangst niet automatisch na enkele minuten uitgeschakeld wordt.
Deze voorinstelling kan in de instellingen-modus veranderd worden.
Indien de GPS-ontvanger meerdere uren niet actief is, moet hij zich
opnieuw oriënteren. Dit proces kan enige tijd duren.
Nederlands
70
TMC (Traffic Message Channel)
Traffic Message Channel (TMC) is een digitale radio-datadienst, die op een
vergelijkbare manier als RDS werkt en gebruikt wordt voor het verzenden van informatie
over verkeersstoringen aan geschikte ontvangers.
De verkeersinformatie wordt voortdurend via FM verzonden.
Omdat dit signaal constant wordt uitgezonden is de gebruiker minder afhankelijk van de
verkeersinformatie, die enkel om het halve uur wordt uitgezonden. Bijkomend kan
belangrijke informatie, b.v. over spookrijders, meteen worden doorgegeven.
De uitzending is gepland voor heel Europa en wordt in veel landen reeds door
radiozenders aangeboden. De nauwkeurigheid van de TMC-berichten (Traffic Message
Channel) kan van land tot land sterk variëren.
Niet elke navigatiesoftware kan de informatie in de TMC-meldingen verwerken. U kunt
beter eerst informeren of uw systeem TMC ondersteunt, voordat u eventueel een TMC-
ontvanger aankoopt.
PayTMC (optioneel)
Onder PayTMC verstaat men TMC-diensten zoals bijvoorbeeld TMCpro in Duitsland,
Trafficmaster in Engeland of V-Trafic in Frankrijk, die TMC-informatie aanbieden tegen
betaling. Deze providers onderscheiden zich van het normale „Free-TMC“ door nog
actuelere verkeersinformatie.
Sensoren op snelwegbruggen, in het wegdek aangebrachte sensoren en een groot aantal
voertuigen uitgerust met de „Floating Car Data“-techniek leveren snel een nauwkeuriger
en actueler beeld van de verkeerssituatie op Duitse autosnelwegen, evenals prognoses.
Door de aankoop van uw navigatiesysteem zijn de licentiekosten voor het gebruik van
PayTMC-aanbiedingen al betaald. U kunt van deze diensten gebruik maken zolang zij door
de exploitant worden aangeboden.
Uw navigatiesysteem ondersteunt zowel Free-TMC als PayTMC. Beide functies zijn vooraf
ingesteld op het toestel.
Appendix
71
Nederlands
Français English
Installatie van een externe TMC-ontvanger / Externe FM-antenne
aansluiten (optioneel)
Installatie van een externe
TMC-ontvanger
1. Sluit de mini-USB-stekker op het
mini-USB-contact van uw toestel
aan (zie pagina 10).
2. Sluit de draadantenne op de TMC-
ontvanger aan en bevestig de
antenne met behulp van de
zuigvoeten b.v. op de rand van
uw voorruit.
3. Nadat u de TMC-ontvanger op uw
navigatietoestel hebt aangesloten,
sluit u de TMC-ontvanger op het
autoadapterkabel aan.
Externe FM-antenne aansluiten
1. Steek klinkerstekkers van de TMC-
antenne in de TMC-antenne-
aansluiting (zie pagina 10) van
uw navigatiesysteem.
2. Bevestig de antenne met behulp
van de zuignappen bijvoorbeeld
aan de rand van uw voorruit.
(lijkende afbeeldingen)
Uw navigatiesysteem is nu in staat om verkeersinformatie via de TMC-ontvanger te
ontvangen en u kunt zo eventuele verkeersopstoppingen vermijden.
Nederlands
72
Werken met geheugenkaarten
Geheugenkaarten invoeren
1. Neem de geheugenkaart (optioneel) voorzichtig uit de verpakking (indien
beschikbaar). Let er op, dat u de contacten niet aanraakt en dat ze niet vuil
worden.
2. Breng de geheugenkaart in de kaartensleuf in, waarbij de aansluiting naar de
contacten naar voren moeten wijzen. De kaart moet zich makkelijk laten
vastklikken.
Geheugenkaart verwijderen
Opmerking
U dient eerst de navigatiesoftware af te sluiten en het toestel met de aan-
/uittoets uit te schakelen, voordat u de geheugenkaart verwijdert. Anders
zou u gegevens kunnen verliezen.
1. Om de kaart te verwijderen, duwt u lichtjes tegen de bovenkant tot dat ze zich
ontgrendelt.
2. Trek de kaart eruit zonder de contacten aan te raken.
3. Bewaar de geheugenkaart in de verpakking of op een andere veilige plek.
Opmerking
Geheugenkaarten zijn heel gevoelig. Let erop, dat de contacten niet vuil
worden en dat de kaart niet geforceerd wordt.
Gebruik van geheugenkaarten
Het apparaat ondersteunt enkel geheugenkaarten, die in het gegevensformat
FAT16/32 werden geformatteerd. Indien u kaarten gebruikt die met een ander
format werden voorbereid (vb. in camera’s, MP-3-spellen), zal uw apparaat deze
mogelijk niet erkennen en zal u aanbieden deze opnieuw te formatteren.
Opgelet!
Het formatteren van de geheugenkaarten zal alle gegevens onherstelbaar
wissen.
Appendix
73
Nederlands
Français English
Gegevens uitwisselen via kaartenlezer
Wanneer u grote aantallen gegevens (MP3-bestanden, navigatiekaarten) naar de
geheugenkaart wenst te kopiëren, kunt u die ook onmiddellijk op de geheugenkaart
opslaan.
Vele computers beschikken reeds over een kaartlezer. Hierbij brengt u de kaart in en
kopieert u de gegevens direct naar de kaart.
Omwille van de directe toegang gebeurt de overdracht aanzienlijk sneller dan via het
gebruik van ActiveSync®.
Bijkomende Kaarten
Uw navigatiesysteem is standaard al met gedigitaliseerde kaarten in het interne geheugen
en/of op een geheugenkaart uitgerust.
Naargelang de uitvoering zijn er bijkomende gedigitaliseerde kaarten op uw CD/DVD.
Deze kaarten kunt u onmiddellijk naar een geheugenkaart kopiëren. Het gebruik van een
externe kaartlezer wordt hiervoor aanbevolen (zie ook pag. 73). De meegeleverde GoPal
Assistant laat een makkelijke en individuele samenstelling van het over te dragen
kaartmateriaal toe.
Afhankelijk van de hoeveelheid gegevens moet u eventueel geheugenkaarten met een
capaciteit van 256 MB, 512 MB, 1.024 MB of meer gebruiken. Extra geheugenkaarten zijn
bij gespecialiseerde handelaars te verkrijgen.
Kaarten kopiëren op een geheugenkaart
U kan bijkomende kaarten bij voorkeur met behulp van de Windows verkenner van uw PC
naar een geheugenkaart kopiëren. Dit gaat als volgt in zijn werk:
1. Breng de CD/DVD met de nodige kaarten erop in.
2. Open uw bureaublad en kies het CD/DVD-station uit.
3. U kopieert het bestand eindigend op ".psf" uit de map van de gewenste regio op
de CD/DVD naar de map "MapRegions" op uw geheugenkaart.
Naargelang de capaciteit van uw geheugenkaart kunt u meerdere bestanden met
mapgegevens op uw geheugenkaart kopiëren. Zorg ervoor dat u over voldoende ruimte
op uw geheugenkaart beschikt.
Als u gedigitaliseerde kaarten van meerdere landen of landengroepen op uw
geheugenkaart heeft gekopieerd, dan moet u de gewenste landenkaart in de
navigatietoepassing van uw toestel uitkiezen.
Nederlands
74
Alternatieve installatie van de navigatiesoftware van een
geheugenkaart
De software voor uw navigatiesysteem kan ook rechtstreeks van een daarvoor voorziene
geheugenkaart geïnstalleerd worden.
De voorgeïnstalleerde software moet eventueel vooraf verwijderd worden (zie Bijzondere
functie CleanUp, blz. 62).
Tijdens de initiële inrichting wordt u gevraagd de navigatiesoftware te installeren. U doet
dat zoals hieronder beschreven:
1. Verwijder de geheugenkaart voorzichtig uit de verpakking. Let er op, dat u de
kontakten niet aanraakt of dat ze vuil worden.
2. Stek de geheugenkaart in de geheugen sleuf tot ze vergrendelt.
3. Klik op OK om de toepassing te installeren.
Nadat alle gegevens naar uw navigatiesysteem gekopieerd zijn, kunt u via het
hoofdbeeldscherm de instellingen voor de navigatie vastleggen.
Kopiëren van installatiebestanden en kaartengegevens naar het
interne geheugen
Opmerking
Om gegevens te kunnen overdragen moet uw navigatietoestel via
ActiveSync
®
met de computer zijn verbonden (zie pagina 68).
Uw toestel beschikt over een intern, permanent geheugen in de map \My Flash Disk.
Met behulp van ActiveSync
®
kunt u met de optie Zoeken deze, maar ook andere mappen
weergeven. Wijzigingen aan mappen en bestanden kunnen net zoals in een verkenner
worden uitgevoerd.
Om de installatiegegevens en de kaartengegevens voor het toestel beschikbaar te stellen,
moeten de noodzakelijke mappen worden ingericht.
U maakt voor de installatiebestanden de map INSTALL aan (\My Flash Disk\INSTALL). De
kaartengegevens slaat u op in de map MapRegions (\My Flash Disk\MapRegions). Bij de
naamgeving van de mappen moet u de boven aangegeven spelling in acht nemen.
Als u nog andere gegevens op uw navigatietoestel hebt opgeslagen, dan moet u er op
letten, dat er voldoende capaciteit beschikbaar is om de gegevens te kunnen kopiëren. Is
dit niet het geval, dan verwijdert u eerst de bestanden, die u niet nodig heeft.
Technische specificaties
75
Nederlands
Français English
Technische specificaties
Parameter Gegevens
Stroomvoorziening
met stroomadapterkabel voor
sigarettenaansteker
ingang
uitgang
CA-051-00U-00 / CA-0511MH-2F
(Mitac)
12-24V DC, 800mA / zekering 2A
(T2AL/250V)
5V / 1A (max.)
Stroomvoorziening
Netadapter (optioneel)
ingang
uitgang
Phihong PSAA10R-050
100-240V ~0.4A (max.)
+5V
/ 2A (max.)
Accu Li-Ion, 3,7V
Bluetooth (alleen bij de model E4445)
(optioneel)
Class 2
Aansluiting koptelefoon Stereo koptelefoon (3,5 mm)
Type geheugenkaart SD
USB- aansluiting USB 2.0
Afmetingen ca. 130 mm x 80 mm x 19,5 mm
Gewicht incl. accu ca. 175 g (zonder verpakking)
In werking +5° C - +35° C
Temperatuur
Niet in werking 0° C - +60° C
Luchtvochtigheid
(niet condenserend)
10 – 90 %
Nederlands
76
Modeloverzicht
Model Microfoon Bluetooth
TMC via
externe
TMC-
ontvanger
(via mini-USB))
TMC via
geïntegreerde
TMC-
ontvanger en
werpantenne
E4145
{ { z {
E4245
z { { z
E4445
z z { z
z = Uitrusting voorhanden
{ = Uitrusting niet voorhanden
Garantievoorwaarden voor Nederlands
77
Nederlands
Français English
Garantievoorwaarden voor Nederlands
I. Algemene garantievoorwaarden
1. Algemeen
De garantie begint altijd op de dag dat het MEDION product bij MEDION of bij een
officiële MEDION handelspartner is gekocht (koopdatum aankoopbewijs of datum origele
afleveringsbon) en heeft betrekking op alle soorten materiaal- en productiefouten die bij
normaal gebruik kunnen ontstaan. Het type en de duur van de garantie voor uw product
treft u aan op de garantiekaart. De garantietermijn is geldig met de garantiekaart die bij
het product gevoegd is tezamen met de aankoopnota van de geautoriseerde MEDION
handelspartner en (indien van toepassing) de afleveringsbon.
Om aanspraak te kunnen maken op enige garantie dient u aan ons te kunnen overleggen:
het originele aankoopbewijs;
(indien van toepassing) de originele afleveringsbon;
de garantiekaart
Bewaart u a.u.b. het originele aankoopbewijs, de originele afleveringsbon en de
garantiekaart goed. MEDION en haar geautoriseerde handelspartners behouden zich het
recht voor om de garantie aanspraak te weigeren als dit aankoopbewijs en/of de
afleveringsbon en/of de garantiekaart niet overgelegd kunnen worden.
Indien u het product naar ons moet opsturen, bent u er zelf verantwoordelijk voor dat het
product transportzeker verpakt is. Voor zover niet anders op de garantiekaart is
aangegeven zijn de verzendkosten en het transportrisico voor uw rekening.
U dient het defecte product aan ons aan te bieden voorzien van een begeleidend schrijven
met daarin vermeld de duidelijke en zo gedetailleerd mogelijke omschrijving van de
klacht(en), uw naam en adresgegevens, uw telefoonnummer, en alle noodzakelijke
toebehoren voor de reparatie. Bij de uitvoering van de werkzaamheden gaat MEDION uit
van de klachten zoals beschreven zijn in uw begeleidend schrijven. MEDION kan in ieder
geval niet tot meer gehouden worden dan in deze beschrijving vermeld staat.
Om recht te hebben op de garantie dient u, voordat u het product aan ons opstuurt, altijd
contact op te nemen met onze hotline. In de hotline krijgt u een referentienummer (het
zgn. RMA-nummer) dat u aan de buitenzijde van het pakket dient te vermelden.
Het product moet compleet, d.w.z. met alle bij de aankoop meegeleverde accessoires
opgestuurd worden. Indien het product niet compleet is leidt, dat tot vertraging van de
reparatie/omruiling. Voor aanvullende ingestuurde producten die niet behoren bij de bij
de oorspronkelijke aankoop meegeleverde accessoires is MEDION op geen enkele wijze
verantwoordelijk.
Deze garantie heeft geen gevolgen voor uw wettelijke aanspraken en is onderworpen aan
het geldende recht in het betreffende land waar u als eerste het product heeft gekocht van
een door MEDION geautoriseerde handelspartner. Indien en voor zover deze
garantievoorwaarden inbreuk maken op uw wettelijke rechten gaan uw wettelijke rechten
natuurlijk voor.
Nederlands
78
Garantiegevallen leiden niet tot een vernieuwing en/of verlenging van de oorspronkelijke
garantietermijn.
2. Omvang en levering van garantieprestaties
In het geval er sprake is van een door deze garantie gedekt defect aan uw MEDION
product, garandeert MEDION met deze garantie de reparatie of de vervanging van het
MEDION product of een onderdeel hiervan. De beslissing tussen reparatie dan wel
vervanging van het product berust bij MEDION. In zoverre kan MEDION naar eigen inzicht
beslissen om het voor reparatie ingestuurde product te vervangen door een product van
dezelfde kwaliteit.
De garantie beperkt zich tot het herstel of de vervanging van de hardware-functionaliteiten
naar de toestand van het originele product voor het defect zich heeft voorgedaan. De
garantie omvat niet het herstellen van gegevens, data of software. U dient vóór het
opsturen van het product zelf ervoor zorg te dragen dat u een reserve-kopie (back-up)
maakt van eventuele in het product opgeslagen gegevens, data of software, inclusief
toepassings- en systeemsoftware. MEDION aanvaardt - behoudens aan MEDION
toerekenbare opzet of bewuste roekeloosheid - geen aansprakelijkheid voor het verlies van
deze gegevens en informatie.
De vervanging van defecte onderdelen gebeurt bij materiaal- of productiefouten door
nieuwe onderdelen. Eventueel wordt het volledige product vervangen door een gelijk of
functioneel gelijkwaardig product. In elk geval is de waarde van de garantieprestatie
beperkt tot de waarde van het defecte product.
Defecte onderdelen, die door ons worden vervangen worden ons eigendom.
In de garantie zijn de arbeidsuren van (medewerkers van) MEDION alsmede de kosten van
verpakking en van de verzending door MEDION naar de Afnemer begrepen.
Het is u – op straffe van verval van elke aanspraak – niet toegestaan zelf of door derden
reparatiewerkzaamheden aan door MEDION geleverde zaken te (laten) verrichten.
3. Uitsluitingen
Niet onder de garantie vallen:
normale slijtage;
verbruiksmaterialen;
zoals bv. projectielampen in beamers;
producten waarvan merk-, typeaanduiding en/of serienummer zijn veranderd of
verwijderd;
de beschikbaarstelling van driver- of software-updates/upgrades;
geringe afwijkingen die voor de functionaliteit van de zaak niet van belang zijn;
defecten als gevolg van onjuist of onoordeelkundig gebruik;
defecten als gevolg van verwaarlozing of gebrek aan of ondeugdelijk onderhoud;
gebruik, montage of installatie van de zaken of onderdelen in strijd met de
gebruiksaanwijzing/documentatie;
Garantievoorwaarden voor Nederlands
79
Nederlands
Français English
defecten als gevolg van niet aan MEDION toerekenbare computervirussen of
softwarefouten;
defecten of foutmeldingen die een gevolg zijn van een onjuiste voedingsspanning;
gebreken die een gevolg zijn van blootstelling aan vocht of van chemische of
elektrochemische inwerking van water;
gebreken die een gevolg zijn van gebruik van niet originele onderdelen,
randapparatuur en/of programmatuur;
producten die tweedehands in omloop zijn gebracht;
de afnemende capaciteit van batterijen en accu’s;
pixelfouten (defecte beeldpunten) binnen de in de gebruiksaanwijzing/handleiding
van uw product toegestane marge;
defecten als gevolg van inbranding of helderheidsverlies bij plasma- of LCD-producten
die ontstaan zijn door ondeskundig gebruik; de precieze handelwijze voor het gebruik
van het plasma- of LCD-product vindt u in de gebruiksaanwijzing/handleiding;
weergavefouten van datadragers die in een niet compatibel formaat dan wel met niet
geëigende software opgebouwd zijn;
defecten als gevolg van overmacht (zoals oorlog, oorlogsgevaar, burgeroorlog,
terrorisme, oproer, molest, brand, blikseminslag, waterschade, overstroming,
werkstaking, bedrijfsbezetting, staking, stiptheidsacties, in- en invoerbelemmeringen,
overheidsmaatregelen, defecten aan machines, storingen in de levering van gas, water-
en elektriciteit, vervoersproblemen);
Mocht tijdens het onderzoek naar het defecte product blijken dat het defect niet wordt
gedekt door de garantie, dan zal MEDION u hiervan op de hoogte stellen en u hierbij in de
gelegenheid stellen om aan de hand van een offerte een beslissing te nemen over de vraag
of u het defecte product toch gerepareerd/vervangen wenst te zien. In deze offerte zal een
opgave worden verstrekt van de met de reparatie/vervanging gemoeide kosten.
Nederlands
80
4. Servicehotline
Voordat u uw product aan MEDION opstuurt, dient u contact op te nemen met de service
hotline. Hier krijgt u alle noodzakelijke informatie hoe u aanspraak kunt maken op de
garantie.
(De service hotline staat u 365 dagen per jaar, ook op zon- en feestdagen ter beschikking.
De kosten bedragen 0,15 per minuut).
De service hotline ondersteunt in geen geval een gebruikerstraining voor soft- en
hardware, het opzoeken in de handleiding dan wel de ondersteuning van niet van
MEDION afkomstige producten.
II. Bijzondere garantievoorwaarden voor MEDION PC,
Notebook, Pocket PC (PDA) u verwijderen en producten
met navigatiefunctie (PNA)
Heeft een van de meegeleverde opties een defect dan heeft u ook aanspraak op een
reparatie of omruiling. De garantie dekt de materiaal- en arbeidskosten voor het herstel
van de functionaliteit van het betreffende MEDION product.
Gebruik van hardware bij uw product die niet door MEDION is geproduceerd dan wel
door MEDION is verkocht, is verwijderen kan de garantie doen vervallen als daardoor
bewijsbaar schade aan het MEDION product of de meegeleverde opties ontstaan is.
Voor meegeleverde software wordt een beperkte garantie verstrekt. Dat geldt voor de
voor-geïnstalleerde systeem- en besturingssoftware alsmede voor meegeleverde
toepassingsprogramma’s. Bij de door MEDION meegeleverde software garandeert
MEDION voor de gegevensdragers (bv. diskettes en CD-roms waarop de software geleverd
wordt ) een vrijheid van materiaal- en verwerkingsfouten voor de duur van zes maanden,
te rekenen vanaf de aankoopdatum van het MEDION product bij MEDION dan wel bij een
officiële handelspartner van MEDION.
Voor meegeleverd kaartmateriaal van producten met een navigatiefunctie wordt geen
garantie geleverd op de volledigheid.
Bij de levering van een defecte gegevensdrager vervangt MEDION deze zonder kosten.
III. Bijzondere garantiebepalingen voor de reparatie
aan huis respectievelijk de omruiling aan huis
Voor zover uit garantiekaart behorende bij het product blijkt dat u recht heeft op een
reparatie dan wel een omruiling aan huis gelden deze bijzondere garantiebepalingen
alleen voor de reparatie dan wel omruiling aan huis.
Om de reparatie/omruiling aan huis mogelijk te maken dient van uw zijde het volgende
zeker gesteld te worden:
De medewerker van MEDION moet onbeperkt, zeker en zonder vertraging toegang tot
het product geboden worden;
Garantievoorwaarden voor België
81
Nederlands
Français English
Telecommunicatiemiddelen die noodzakelijkerwijs gebruikt dienen te worden door de
MEDION medewerker om zijn opdracht uit te kunnen voeren, voor test- en
diagnosedoeleinden alsmede voor het oplossen van de klacht spatie verwijderen,
moeten door u kostenloos ter beschikking gesteld worden.
U bent zelf verantwoordelijk voor het herstel van uw eigen gebruikerssoftware na de
gebruikmaking van de dienstverlening van MEDION; .
U dient alle overige maatregelen te treffen die voor het uitvoeren van de opdracht
volgens de voorschriften benodigd zijn.
U bent zelf verantwoordelijk voor de configuratie en verbinding van de eventuele
beschikbare externe producten na de gebruikmaking van de dienstverlening van
MEDION;
De kostenvrije annuleringsperiode van de aan huis reparatie/omruilopdracht bedraagt
minimaal 24 uur, daarna worden de kosten veroorzaakt door de vertraagde annulering
aan u in rekening gebracht;
Garantievoorwaarden voor België
I. Algemene garantievoorwaarden
1. Algemeen
De garantie neemt steeds aanvang op de dag dat het MEDION product bij MEDION of bij
een officiële MEDION handelspartner is gekocht. De exacte datum van aanvang is deze
vermeld als koopdatum op het aankoopbewijs of de datum vermeld op de originele
afleveringsbon. De garantie heeft betrekking op alle soorten gebreken die het gevolg zijn
van materiaal-en productiefouten bij nromaal gebruik. Het type en duur van de garantie
wordt vermeld op de garantiekaart. Ingevolge geberek aan overeenstemming dat bestaat
bij de levering vanhet goed bedraagt de garantietermijn cfrm.art.1649 quater paragr. 1
B.W. twee (2) jaar.
Om aanspraak te kunnen maken op enige garantie dient u aan ons te kunnen overleggen:
het originele aankoopbewijs;
(indien van toepassing) de originele afleveringsbon;
de garantiekaart
Bewaart u a.u.b. het originele aankoopbewijs, de originele afleveringsbon en de
garantiekaart goed. MEDION en haar geautoriseerde handelspartners behouden zich het
recht voor om de garantie aanspraak te weigeren als dit aankoopbewijs en/of de
afleveringsbon en/of de garantiekaart niet overgelegd kunnen worden danwel in het geval
de gegevens onvolledig zijn, verwijderd of gewijzigd na de aanvankelijke aankoop door de
consument bij de handelaar terzake.
Indien u het product naar ons moet opsturen, bent u er zelf verantwoordelijk voor dat het
product transportzeker verpakt is. Voor zover niet anders op de garantiekaart is
aangegeven zijn de verzendkosten en het transportrisico voor uw rekening.
Nederlands
82
U dient het defecte product aan ons aan te bieden voorzien van een begeleidend schrijven
met daarin vermeld de duidelijke en zo gedetailleerd mogelijke omschrijving van de
klacht(en), uw naam en adresgegevens, uw telefoonnummer, en alle noodzakelijke
toebehoren voor de reparatie. Bij de uitvoering van de werkzaamheden gaat MEDION uit
van de klachten zoals beschreven zijn in uw begeleidend schrijven en geconstateerde
gebreken bij de herstelling zelf.
Om recht te hebben op de garantie dient u, voor dat u het product aan ons opstuurt, altijd
contact op te nemen met onze hotline. In de hotline krijgt u een referentienummer (het
zgn. RMA-nummer) dat u aan de buitenzijde van het pakket dient te vermelden.
Het product moet compleet, d.w.z. met alle bij de aankoop meegeleverde accessoires
opgestuurd worden. Indien het product niet compleet is leidt dat tot vertraging van de
reparatie/omruiling. Voor aanvullende ingestuurde producten die niet behoren bij de bij
de oorspronkelijke aankoop meegeleverde accessoires is MEDION op geen enkele wijze
verantwoordelijk.
Garantievoorwaarden voor België
83
Nederlands
Français English
Deze garantie doet geen afbreuk aan de rechten van de consument bepaald door de
nationale wetgeving van het land waar U de desbetreffende goederen (het eerst)
aankocht, noch aan de rechten waarover U, volgens dezelfde nationale regelgevingen,
beschikt ten overstaan van de door MEDION geautoriseerde handelspartner als gevolg van
de koop-verkoop overeenkomst.
Garantiegevallen leiden niet tot een vernieuwing en/of verlenging van de oorspronkelijke
garantietermijn.
2. Omvang en levering van garantieprestaties
In het geval er sprake is van een door deze garantie gedekt defect aan uw MEDION
product, garandeert MEDION met deze garantie de reparatie of de vervanging van het
MEDION product of een onderdeel hiervan. De beslissing tussen reparatie dan wel
vervanging van het product berust bij MEDION. In zoverre kan MEDION naar eigen inzicht
beslissen om het voor reparatie ingestuurde product te vervangen door een product van
dezelfde kwaliteit.
De garantie beperkt zich tot het herstel of de vervanging van de hardware-functionaliteiten
van de toestand van het originele product voor het defect zich heeft voorgedaan. De
garantie omvat niet het herstellen van gegevens, data of software. U dient vóór het
opsturen van het product zelf ervoor zorg te dragen dat u een reserve-kopie (back-up)
maakt van eventuele in het product opgeslagen gegevens, data of software, inclusief
toepassings- en systeemsoftware. MEDION aanvaardt - behoudens aan MEDION
toerekenbare opzet of grove schuld - geen aansprakelijkheid voor het verlies van deze
gegevens en informatie.
De vervanging van defecte onderdelen gebeurt bij materiaal- of productiefouten door
nieuwe onderdelen. Eventueel wordt het volledige product vervangen door een gelijk of
functioneel gelijkwaardig product. In elk geval is de waarde van de garantieprestatie
beperkt tot de waarde van het defecte product.
Defecte onderdelen die door ons worden vervangen worden ons eigendom.
In de garantie zijn de arbeidsuren van (medewerkers van) MEDION alsmede de kosten van
verpakking en van de verzending door MEDION naar de Afnemer begrepen.
Het is u – op straffe van verval van elke aanspraak – niet toegestaan zelf of door derden
reparatiewerkzaamheden aan door MEDION geleverde zaken te (laten) verrichten.
Nederlands
84
3. Uitsluitingen
Niet onder de garantie vallen:
normale slijtage.
verbruiksmaterialen.
zoals bv. projectielampen in beamers.
producten waarvan merk-, typeaanduiding en/of serienummer zijn veranderd of
verwijderd.
de beschikbaarstelling van driver- of software-updates/upgrades.
geringe afwijkingen die voor de functionaliteit van de zaak niet van belang zijn.
defecten als gevolg van onjuist of onoordeelkundig gebruik.
defecten als gevolg van verwaarlozing of gebrek aan of ondeugdelijk onderhoud.
gebruik, montage of installatie van de zaken of onderdelen in strijd met de
gebruiksaanwijzing/documentatie.
defecten als gevolg van niet aan MEDION toerekenbare computervirussen of
softwarefouten.
defecten of foutmeldingen die een gevolg zijn van een onjuiste
voedingsspanning.
gebreken die een gevolg zijn van blootstelling aan vocht of van chemische of
elektrochemische inwerking van water.
gebreken die een gevolg zijn van gebruik van niet originele onderdelen,
randapparatuur en/of programmatuur.
producten die tweedehands in omloop zijn gebracht.
de afnemende capaciteit van batterijen en accu’s en niet door MEDION
meegeleverde batterijen en accu’s.
pixelfouten (defecte beeldpunten) binnen de in de gebruiksaan-
wijzing/handleiding van uw product toegestane marge.
defecten als gevolg van inbranding of helderheidsverlies bij plasma- of LCD-
producten die ontstaan zijn door ondeskundig gebruik; de precieze handelwijze
voor het gebruik van het plasma- of LCD-product vindt u in de
gebruiksaanwijzing/handleiding.
weergavefouten van datadragers die in een niet compatibel formaat dan wel met
niet geëigende software opgebouwd zijn.
de niet-limitatieve opsomming van defecten als gevolg van overmacht (zoals oor-
log, oorlogsgevaar, burgeroorlog, terrorisme, oproer, molest, brand,
blikseminslag, waterschade, overstroming, werkstaking, bedrijfsbezetting,
staking, stiptheidsacties, in- en invoerbelemmeringen, overheidsmaatregelen,
defecten aan machines, storingen in de levering van gas, water- en elektriciteit,
vervoersproblemen).
Garantievoorwaarden voor België
85
Nederlands
Français English
Mocht tijdens het onderzoek naar het defecte product blijken dat het defect niet wordt
gedekt door de garantie, dan zal MEDION u hiervan op de hoogte stellen en u hierbij in de
gelegenheid stellen om aan de hand van een offerte een beslissing te nemen over de vraag
of u het defecte product toch gerepareerd/vervangen wenst te zien. In deze offerte zal een
opgave worden verstrekt van de met de reparatie/vervanging gemoeide kosten.
4. Servicehotline
Voordat u uw product aan MEDION opstuurt dient u contact op te nemen met de hotline.
Hier krijgt u alle noodzakelijke informatie hoe u aanspraak kunt maken op de garantie.
De service hotline ondersteunt in geen geval een gebruikerstraining voor soft-en
hardware, het opzoeken in de handleiding dan wel de ondersteuning van niet van
MEDION afkomstige producten.
II. Bijzondere garantievoorwaarden voor MEDION PC,
Notebook, Pocket PC (PDA) u en producten met
navigatiefunctie (PNA)
Heeft een van de meegeleverde opties een defect dan heeft u ook aanspraak op een
reparatie of omruiling. De garantie dekt de materiaal-en arbeidskosten voor het herstel van
de functionaliteit en intrinsieke elementen van het betreffende MEDION product.
Gebruik van hardware bij uw product die niet door MEDION is geproduceerd noch door
MEDION is verkocht, is kan de garantie doen vervallen indien aantoonbaar is dat daardoor
de schade aan het MEDION product of de meegeleverde opties ontstaan is.
Voor meegeleverde software wordt een beperkte garantie verstrekt. Dat geldt voor de
voor-geïnstalleerde systeem en besturingssoftware alsmede voor meegeleverde
toepassingsprogramma’s. Bij de door MEDION meegeleverde software garandeert
MEDION voor de gegevensdragers (bv. diskettes en CD-roms waarop de software geleverd
wordt ) een vrijheid van materiaal-en verwerkingsfouten voor de duur van zes maanden,
te rekenen vanaf de aankoopdatum van het MEDION product bij MEDION dan wel bij een
officiële handelspartner van MEDION.
Voor meegeleverd kaartmateriaal van producten met een navigatiefunctie wordt geen
garantie geleverd op de volledigheid.
Bij de levering van een defecte gegevensdrager vervangt MEDION deze zonder kosten.
Nederlands
86
III. Bijzondere garantiebepalingen voor de reparatie
aan huis respectievelijk de omruiling aan huis
Voor zover de betreffende garantiekaart bij het product uitdrukkelijk vermeldt dat u recht
hebt op en reparatie dan wel omruiling aan huis, gelden bijzondere garantiebepalingen
die uitsluitend in voornoemde gevallen toepasbaar zijn.
Om de reparatie/omruiling aan huis mogelijk te maken dient van uw zijde het volgende
zeker gesteld te worden :
De MEDION medewerker dient de onbeperkte en zekere toegang tot het product
te hebben en dit zo snel mogelijk, zonder enige vertraging.
Telecommunicatiemiddelen die noodzakelijkerwijs gebruikt dienen te worden
door de MEDION medewerker om zijn opdracht uit te kunnen voeren, voor test-
en diagnosedoeleinden alsmede voor het oplossen van de klacht , moeten door u
kostenloos ter beschikking gesteld worden.
U bent zelf verantwoordelijk voor het herstel van uw eigen gebruikerssoftware na
de gebruikmaking van de dienstverlening van MEDION.
U dient alle overige maatregelen te treffen die voor het uitvoeren van de opdracht
volgens de voorschriften en de gebruikelijke praktijken terzake benodigd zijnijn.
U bent zelf verantwoordelijk voor de configuratie en verbinding van de eventuele
beschikbare externe producten na de gebruikmaking van de dienstverlening van
MEDION.
De kostenvrije annuleringsperiode van de aan huis reparatie/omruilopdracht
bedraagt minimaal 24 uur, daarna worden de kosten veroorzaakt door de
vertraagde annulering aan u in rekening gebracht, tenzij U zich kan beroepen op
gebeurlijke overmacht in die specifieke gevallen.
Index
87
Nederlands
Français English
Index
A
Accuwerking.........................................5
Afvalverwijdering..................................6
Alarm Clock (Wekfunctie)
Beëindigen......................................56
Hoofdscherm..................................51
Keuze van een wektoon..................54
Snoozefunctie.................................56
Systeemtijd instellen .......................53
Toetsen...........................................52
Volume instellen.............................55
Alternatieve oplaadmogelijkheid
voor de batterij ...............................67
Autoadapter .......................................13
Autorun..............................................65
Autostart.............................................65
B
Bijkomende kaarten
Alternatieve installatie van de
navigatiesoftware van een
geheugenkaart............................74
Kopiëren op een geheugenkaart.....73
Kopiëren van installatiebestanden
en kaartengegevens naar het
interne geheugen .......................74
Bijzondere functie CleanUp ..........18, 62
Bluetooth
Een oproep doen ............................41
Hoofdscherm..................................39
Starten............................................38
C
CleanUp .......................................18, 62
Conformiteitsinformatie R&TTE ............5
Copyright ............................................ vi
D
DC AutoSuspend................................63
Dikwijls gestelde vragen .....................60
E
Eerste initialisatie
Accu laden ..................................... 12
Navigatiesoftware installeren ......... 16
Stroomvoorziening ........................ 13
Einführung........................................... 8
Elektromagnetische tolerantie .............. 3
EMT ..................................................... 3
Ersteinrichtung
Gerät ein- und ausschalten............. 15
F
FAQ.................................................... 60
Fouten en mogelijke redenen............. 61
G
Gegevensbeveiliging............................ 1
Geheugenkaarten .............................. 72
GPS.................................................... 69
H
Handelsmerk........................................vi
Hotline............................................... 61
I
In de levering begrepen ....................... 8
In- en uitschakelen ............................. 17
Informatie over verkeerscontroles ...... 31
K
Kaartenlezer....................................... 73
Koptelefoon ................................. 11, 75
Kwaliteit................................................ii
L
Luidspreker ........................................ 10
M
MP3-speler
Favorietenlijst................................. 45
Hoofdscherm ................................. 43
Nederlands
88
Leestekens ......................................45
Nummer kiezen en opslaan in de
favorietenlijst ..............................44
N
Navigatie
Bevestiging van de
navigatiesysteem ........................28
Montage van de autohouder ..........27
Navigatiesoftware starten ...............30
Stand van de antenne.....................26
Navigatiesysteem terugstellen
Hard Reset ......................................24
O
Onderhoud...........................................5
Onderhoud van het display ..................6
P
Persoonlijk.............................................i
Picture Viewer
Bediening .......................................46
Hoofdscherm..................................46
R
Reparaties.............................................2
S
Security ......................... i, 18, 19, 21, 22
Service............................................ ii, 61
Hotline............................................61
Spraakcommando’s............................34
Stand van de antenne.........................26
Stroomvoorziening.........................4, 13
Sudoku
Beschrijving van de toetsen ............59
Overzicht van het hoofdscherm ......57
SuperPIN ............................. i, 20, 21, 22
Synchronisatie met de PC
Microsoft
®
ActiveSync
®
installeren.... 65
Werken met Microsoft
®
ActiveSync
®
. 68
T
Technische specificaties...................... 75
TMC................................................... 70
Externe FM-antenne aansluiten ...... 71
Installatie van een externe TMC-
ontvanger .................................. 71
Touch Screen ....................................... 9
Transport ............................................. 7
Travel Guide ...................................... 49
U
UUID....................................i, 20, 21, 22
V
Veiligheidsraadgevingen
Gegevensbeveiliging........................ 1
Voorwaarden van uw
werkomgeving............................. 2
Reparaties ........................................ 2
Aansluiten........................................ 4
Bekabeling ....................................... 4
Accuwerking .................................... 5
Onderhoud ...................................... 5
Onderhoud van het display.............. 6
Transport ......................................... 7
Veiligheidstip voor Navigation............ 25
Verwijstekst................................i, 18, 19
Volledig uitschakelen /Hard Reset ...... 24
W
Wachtwoord ................................ 18, 19
Weergave „Accu laden......................... 9
Nederlands
Français
English
Recommandations concernant le présent mode d’emploi
Nous avons organisé ce mode d’emploi par thèmes, de sorte que vous puissiez toujours
retrouver les informations que vous cherchez.
Remarque
Vous trouverez un mode d’emploi détaillé concernant la navigation sur
les CDs/DVDs ainsi que dans l’aide en ligne de l’appareil.
Consultez le chapitre "Questions fréquemment posées" pour obtenir des réponses aux
questions qui sont souvent posées à notre service clientèle.
Le but de ce mode d’emploi est de vous expliquer le fonctionnement de votre appareil de
manière parfaitement compréhensible.
Identification
Pour conserver la preuve de l’origine de votre appareil, notez ici les informations suivantes
:
Numéro de série ....................................................................................
Mot de passe ....................................................................................
Indice ....................................................................................
SuperPIN ....................................................................................
UUID ....................................................................................
Date d’achat ....................................................................................
Lieu d’achat ....................................................................................
Vous trouverez le numéro de série au dos de votre appareil. Notez également le numéro
sur votre carte de garantie.
Introduisez le mot de passe et l’indice via la fonction Security. Le Super PIN et l’UUID vous
sont donnés après l’activation de la fonction Security. Voir page 18.
ii
La qualité
Dans le choix des composantes, nous avons privilégié la fonctionnalité, la convivialité et la
simplicité d’utilisation, la sécurité et la fiabilité. Grâce à un concept matériel et logiciel
adapté, nous pouvons vous présenter un appareil innovant, qui vous procurera beaucoup
de plaisir dans le travail et le loisir. Nous vous remercions pour la confiance que vous té-
moignez pour nos produits et nous réjouissons de vous accueillir parmi nos nouveaux
clients.
Le service
Dans le cadre de notre service personnalisé à la clientèle, nous vous soutenons dans votre
travail quotidien. Contactez-nous et nous nous ferons un plaisir de vous aider de notre
mieux. En page 61 du présent manuel, vous trouverez le chapitre consacré au service
clientèle.
Reproduction de ce manuel
Ce document contient des informations légalement protégées. Tous droits réservés. La
reproduction mécanique, électronique ou par n’importe quel moyen que ce soit est inter-
dite sans permission écrite du fabricant.
iii
Nederlands
Français
English
Sommaire
Sécurité et Enretien ...................................................................................... 1
Conseils de sécurité.....................................................................................................1
Sauvegarde des données.............................................................................................1
Conditions d'utilisation ...............................................................................................2
Réparations .................................................................................................................2
Température ambiante................................................................................................2
Compatibilité électromagnétique................................................................................3
Raccordement .............................................................................................................3
Alimentation électrique via l’adaptateur auto...........................................................3
Alimentation électrique via l’adaptateur secteur (en option) ....................................4
Câblage.......................................................................................................................4
Information sur la conformité R&TTE...........................................................................5
Utilisation de la batterie...............................................................................................5
Entretien......................................................................................................................5
Entretien de l’écran .....................................................................................................6
Recyclage ....................................................................................................................6
Transport ....................................................................................................................7
Contenu de l’emballage..............................................................................................8
Les différentes vues....................................................................................... 9
Vue de face..................................................................................................................9
Vue de derrière..........................................................................................................10
Vue de dessus............................................................................................................10
Vue de dessous..........................................................................................................11
Côté gauche..............................................................................................................11
Configuration initiale................................................................................. 12
I. Charger la batterie..................................................................................................12
II. Alimentation électrique .........................................................................................13
L’adaptateur de voiture..........................................................................................13
Possibilité alternative de chargement des accus......................................................13
L’adaptateur secteur (en option)............................................................................14
III. Démarrer l’appareil ..............................................................................................15
IV. Installer le logiciel de navigation...........................................................................16
Utilisation................................................................................................... 17
Allumer et éteindre....................................................................................................17
iv
Sécurité ...................................................................................................... 18
Définir le mot de passe et l’indice..............................................................................18
Effectuer des réglages................................................................................................19
SuperPIN et UUID......................................................................................................20
Effectuer des réglages ultérieurs ................................................................................21
Demande du mot de passe........................................................................................22
Réinitialiser la navigation GPS ................................................................... 23
Soft Reset (redémarrage) ...........................................................................................23
Arrêt complet/Hard Reset ..........................................................................................23
Navigation.................................................................................................. 24
Consignes de sécurité pour la navigation ..................................................................24
Conseils pour la navigation....................................................................................24
Consignes pour une utilisation dans un véhicule ...................................................25
Orientation de l’antenne ...........................................................................................26
I. Monter la fixation voiture .......................................................................................26
II. Fixation la navigation GPS .....................................................................................27
III. Brancher l’adaptateur voiture ...............................................................................28
IV. Démarrer le logiciel de navigation ........................................................................29
Informations relatives à la surveillance du trafic........................................ 30
Commandes vocales (en option)................................................................. 33
Commandes pour la saisie d’une ville......................................................... 35
Commandes pour la saisie d’une rue .......................................................... 36
Commandes pour la saisie d’un numéro de rue .......................................... 36
Système de communication sans fil Bluetooth............................................ 37
Démarrer l’application Bluetooth ..............................................................................37
Présentation de l’écran principal ............................................................................38
Coupler un système de navigation avec un téléphone portable .............................40
Accepter des appels ...............................................................................................41
Traiter des appels...................................................................................................41
En cours d’appel ....................................................................................................42
Lecteur MP3 (en option)............................................................................. 43
Présentation de l’écran principal ...............................................................................43
Sélection de titres et insertion dans la liste des favoris................................................44
Liste des favoris ......................................................................................................45
Liste des signets définis..............................................................................................45
v
Nederlands
Français
English
Picture Viewer (en option)......................................................................... 46
Utilisation de Picture Viewer ......................................................................................46
Présentation de l’écran principal ...............................................................................46
Affichage plein écran..............................................................................................47
Travel Guide (en option) ............................................................................ 49
Alarm Clock (fonction réveil) (en option) .................................................. 51
Aperçu de l'écran principal........................................................................................51
Description des boutons............................................................................................52
Réglage de l'heure du système...............................................................................53
Sélection d'une sonnerie........................................................................................54
Réglage du volume ................................................................................................55
Fonction Snooze ....................................................................................................56
Quitter Alarm Clock ...............................................................................................56
Sudoku (en option) .................................................................................... 57
Aperçu de l'écran principal........................................................................................57
Aperçu de la zone de jeu ...........................................................................................59
Description des boutons............................................................................................59
Questions fréquemment posées.................................................................. 60
Service après-vente..................................................................................... 61
Pannes et causes probables .......................................................................................61
Avez-vous besoin d'assistance supplémentaire ? .......................................................61
Appendice .................................................................................................. 62
Fonction spéciale CleanUp (interface en anglais).......................................................62
Synchronisation avec le PC........................................................................................65
I. Installer Microsoft
®
ActiveSync
®
............................................................................65
II. Raccorder au PC .................................................................................................66
Mode Mémoire de masse .......................................................................................66
Mode ActiveSync
®
...................................................................................................67
Possibilité alternative de chargement des accus......................................................67
III. Travailler avec Microsoft
®
ActiveSync
®
.................................................................67
GPS (Global Positioning System) ...............................................................................68
TMC (Traffic Message Channel).................................................................................69
PayTMC (en option) ..................................................................................................69
Raccorder un récepteur TMC externe / une antenne FM (en option)......................70
Manipuler les cartes mémoire....................................................................................71
Installer la carte mémoire.......................................................................................71
Retirer la carte mémoire .........................................................................................71
vi
Pour accéder à la carte mémoire ............................................................................71
Échange de données via un lecteur de cartes .........................................................72
Autres cartes..............................................................................................................72
Transférer une carte sur une carte mémoire ..............................................................72
Autre méthode d'installation du logiciel de navigation à partir d'une carte
mémoire ................................................................................................................73
Transfert de fichiers d'installation et de cartes dans la mémoire interne .................73
Informations techniques ............................................................................ 74
Présentation du modèle ............................................................................. 75
Conditions de garantie pour la France........................................................ 76
Conditions de garantie pour la Belgie ........................................................ 82
Conditions de garantie pour le Luxembourg .............................................. 87
Index .......................................................................................................... 93
Copyright © 2009, version 25/08/2009
Tous droits réservés.
Tous droits d'auteur du présent manuel réservés.
Le Copyright est la propriété de la société Medion
®
.
Marques déposées :
MS-DOS
®
et Windows
®
sont des marques déposées de l'entreprise Microsoft
®
.
Pentium
®
est une marque déposée de l'entreprise Intel
®
.
Les autres marques déposées sont la propriété de leurs propriétaires respectifs.
Sous réserve de modifications techniques, de présentations ainsi que d’erreurs
d’impression.
Nederlands
Français
English
Sécurité et Enretien
Conseils de sécurité
Veuillez lire attentivement ce chapitre et suivre tous les conseils de sécurité qui y figurent.
Vous garantirez ainsi le fonctionnement fiable et la longévité de votre appareil.
Conservez soigneusement l’emballage et le mode d’emploi de
l’appareil de manière à pouvoir les remettre au nouveau propriétaire en cas de vente de
l’appareil.
Ne laissez pas les enfants jouer sans supervision avec des appareils électriques. Les
enfants ne discernent pas toujours les dangers possibles.
Ne laissez pas de sacs plastiques en évidence auprès des enfants, ils pourraient
s’étouffer !
N’ouvrez jamais le boîtier de l’appareil ou des accessoires, ils ne contiennent au-
cune pièce à nettoyer ! L’ouverture du boîtier peut entraîner un danger de mort
par électrocution.
Ne déposez aucun objet sur l’appareil et n’exercez aucune pression sur l’écran.
Dans le cas contraire, vous risquez de briser la vitre de l’écran.
Afin d’éviter tout dégât, n’utilisez pas d'objet pointu sur l’écran. Utilisez par
exemple un crayon émoussé. Dans la plupart des cas, vous pouvez commander
l’appareil à l’aide de votre index.
La rupture de l’écran peut entraîner des risques de blessures. Le cas échéant, mu-
nissez-vous de gants de protection pour prendre la pièce endommagée et en-
voyez celle-ci au service après-vente. Lavez-vous soigneusement les mains au sa-
von car il est possible que vous soyez entré en contact avec des produits chimi-
ques.
Coupez l’alimentation électrique, débranchez immédiatement l’appareil (ou évitez de
l'allumer) et adressez-vous au service après-vente si :
le boîtier de l’appareil ou de l´un des accessoires est endommagé ou si des liquides
y ont pénétré. Faites d'abord examiner les pièces par le service après-vente afin
d’éviter tout dommage !
Sauvegarde des données
Après chaque mise à jour de vos données, effectuez une copie de sauvegarde sur
un support externe (CD-R). Aucune demande en dommages-intérêts ne
pourra être revendiquée en cas de perte de données et autres dégâts se-
condaires apparentés.
Français
2
Conditions d'utilisation
Le non respect de ces conseils peut entraîner des défaillances ou la détérioration de
l’appareil. La garantie ne s'applique pas dans ces cas de figure.
Conservez votre appareil ainsi que tous les périphériques et accessoires à l’abri de
l’humidité. Évitez la poussière, la chaleur et la lumière directe du soleil.
Protégez impérativement votre appareil de l’humidité, en cas de pluie ou de grêle
par exemple. Considérez le fait que de l'humidité peut également se former dans
un étui de protection par l'intermédiaire de la condensation.
Évitez les fortes vibrations et secousses qui peuvent par exemple se produire lors-
que vous roulez sur un terrain accidenté.
Veillez à ce que l'appareil ne se détache pas de son support lors d'un freinage par
ex. Montez l'appareil le plus vertical possible.
Réparations
Les adaptations et mises à niveau de votre appareil doivent être exclusivement
confiées à du personnel professionnel et qualifié.
Si une réparation s'avère nécessaire, veuillez vous adressez exclusivement à notre
service après-vente agréé. L’adresse figure sur votre coupon de garantie.
Température ambiante
L’appareil peut être utilisé dans des températures ambiantes comprises entre
5°C et +35°C et dans des conditions d’humidité comprises entre 10% et 90% (non
condensée).
Quand il est éteint, appareil résiste à des températures oscillant comprises entre
0°C et +60°C.
L’appareil doit être bien rangé. Évitez les températures élevées (en stationnement,
par exemple, ou par les rayons directs du soleil).
Sécurité et Enretien
3
Nederlands
Français
English
Compatibilité électromagnétique
Les directives concernant la compatibilité électromagnétique doivent être respec-
tées lors du raccordement de l’appareil et d’autres composantes. Veuillez noter en
outre que seul du câble blindé (max. 3 mètres) peut être utilisé pour les
connexions aux systèmes externes.
Conservez une distance d'au moins un mètre avec les sources de perturbations
magnétiques ou de hautes fréquences (téléviseurs, haut-parleurs, téléphones mo-
biles, etc.) pour éviter les éventuelles perturbations de fonctionnement ou pertes
de données.
Lorsqu'ils sont en cours d'utilisation, les appareils électroniques produisent des
rayons électromagnétiques. Ces rayons sont sans danger, mais peuvent perturber
d'autres appareils utilisés à proximité. La compatibilité électromagnétique de nos
appareils est testée et optimisée en laboratoire. Toutefois, des perturbations de
fonctionnement affectant l'appareil ainsi que l'électronique environnante ne sont
pas totalement exclues. Si vous êtes confronté à ce problème, tentez de le résou-
dre en modifiant le positionnement et la distance entre les différents appareils. Il
est particulièrement important de vérifier le parfait fonctionnement de l'électroni-
que de votre véhicule avant de démarrer.
Raccordement
Veuillez respecter les recommandations suivantes pour brancher correctement votre appa-
reil :
Alimentation électrique via l’adaptateur auto
Utilisez uniquement l’adaptateur auto sur l’allume-cigares d’un véhicule (batterie
voiture = DC 12V ou batterie camion = 24 V ). Si vous n’êtes pas sûr de
l’alimentation électrique de votre véhicule, demandez à votre constructeur auto-
mobile.
Français
4
Alimentation électrique via l’adaptateur secteur (en option)
La prise de courant doit se trouver à proximité de l’appareil et être facilement ac-
cessible.
Pour couper l’alimentation électrique (via l’adaptateur secteur) vers votre appareil,
retirez l’adaptateur secteur de la prise secteur.
Utilisez exclusivement l’adaptateur secteur sur des prises électriques connectées à
la terre, répondant aux normes AC 100-240V~, 50/60 Hz. En cas de doute sur les
caractéristiques de l’alimentation électrique sur le lieu d’utilisation, veuillez vous in-
former auprès de la compagnie d'électricité.
Utilisez exclusivement l’adaptateur secteur fourni.
Afin d'éviter tout risque d'endommagement suite à un échauffement, ne couvrez
pas l’adaptateur secteur.
N'utilisez pas l’adaptateur secteur si le boîtier ou l'alimentation de l'appareil sont
endommagés. Remplacez-le par un adaptateur secteur du même type.
Pour plus de sécurité, nous recommandons d’utiliser une protection contre la sur-
tension de manière à protéger votre appareil contre tout dégât éventuel causé par
des pics électriques ou des éclairs sur le réseau électrique.
Câblage
Disposez les câbles de telle sorte que personne ne puisse marcher ou trébucher
dessus.
Ne posez aucun objet sur les câbles pour éviter de les endommager.
N'employez pas la force pour raccorder câbles et connecteurs et faites attention à
l'orientation correcte des connecteurs.
Veillez à ce qu'aucune force importante, p. ex. latérale, ne soit exercée sur les
connecteurs. Cela pourrait causer des dommages sur et à l'intérieur de votre
appareil.
Ne tordez ni ne pliez fortement les câbles pour éviter tout risque de court-circuit
ou de rupture de câble.
Sécurité et Enretien
5
Nederlands
Français
English
Information sur la conformité R&TTE
Cet appareil est livré avec les accessoires sans fil suivants :
Bluetooth (seulement avec le modèle E4445)
Cet appareil est conforme aux exigences de la directive sur les équipements hertziens et les
équipements terminaux de télécommunication (1999/5/CE). Vous pourrez obtenir les
déclarations de conformité à l’adresse www.medion.com/conformity
.
Utilisation de la batterie
Votre appareil fonctionne avec une batterie intégrée. Afin de prolonger la durée de vie et
les performances de la batterie ainsi que d’assurer un fonctionnement en toute sécurité,
veuillez respecter les recommandations suivantes :
La batterie ne supporte pas la chaleur. Évitez tout risque de surchauffe de votre
appareil et donc de la batterie. Le non respect de cette recommandation peut
provoquer des dégâts et, dans certaines circonstances, causer une explosion de la
batterie.
Pour le chargement de la batterie, utilisez uniquement les sources d’alimentation
fournies.
La batterie constitue un déchet toxique. Pour jeter votre appareil,
veuillez respecter les dispositions appropriées d’évacuation des déchets. Contac-
tez votre service après-vente, qui vous informera de ces questions.
Entretien
Attention !
Le boîtier de votre appareil ne contient aucune pièce à entretenir ou à
nettoyer.
Vous pouvez prolonger la durée de vie de votre appareil en respectant les dispositions
suivantes :
Débranchez toujours tous les autres câbles de connexion avant de procéder au
nettoyage.
Nettoyez votre appareil exclusivement avec un chiffon légèrement humide qui ne
peluche pas.
N'utilisez pas de solvants ni de produits nettoyants acides ou gazeux.
Français
6
Entretien de l’écran
Évitez d’encrasser la surface de l’écran pour éviter tout risque de détérioration.
Nous recommandons l’utilisation de membranes de protection pour l’écran, afin
de prévenir les rayures et les salissures. Vous trouverez cet accessoire chez votre
revendeur spécialisé.
Veillez notamment à ne pas laisser des gouttes d’eau sécher sur l’écran. L’eau
peut entraîner une décoloration permanente.
Nettoyez votre appareil exclusivement avec un chiffon souple qui ne peluche pas.
N’exposez pas l’écran à la lumière du soleil ou à des rayonnements ultraviolets.
Recyclage
L’appareil et son emballage sont recyclables.
Appareil
Lorsque l’appareil arrive en fin de vie, ne le jetez jamais dans une poubelle classique. In-
formez-vous des possibilités d’élimination écologique.
Emballage
Les différents emballages usagés sont recyclables et doivent par principe être recyclés.
Sécurité et Enretien
7
Nederlands
Français
English
Transport
Veuillez respecter les recommandations suivantes lorsque vous voulez transporter votre
appareil.
En cas de fortes variations de température ou d'humidité, la condensation peut
provoquer une accumulation d'humidité dans l’appareil, qui peut entraîner un
court-circuit électrique.
Après avoir transporté l'appareil, attendez que celui-ci soit revenu à température
ambiante avant de le remettre en service.
Utilisez un étui de protection pour protéger l’appareil des saletés, de l’humidité,
des secousses et des griffures.
Pour l’expédition de votre appareil, utilisez toujours l’emballage en carton original
et demandez conseil à votre entreprise de transport ou à notre service après-
vente.
Avant tout voyage, renseignez-vous sur l´alimentation électrique et les moyens de
communications) en vigueur sur le lieu de destination. Avant tout départ en
voyage, renseignez-vous sur les exigences de l’adaptateur en termes de courant et
de communications.
Lorsque vous passez le contrôle des bagages à mains à l’aéroport, il est recom-
mandé de faire examiner l’appareil et tous les supports mémoire magnétiques
(disques durs externes) aux rayons X. Évitez le détecteur magnétique
(l’installation dans laquelle vous devez passer) ou le pistolet magnétique (appareil
manuel du personnel de sécurité) car ils pourraient perturber vos données.
Français
8
Contenu de l’emballage
Veuillez vérifier que le contenu de la livraison soit complet et, dans le cas contraire, nous
prévenir dans un délai de 14 jours suivant l’achat. Le produit que vous venez
d’acquérir comporte les éléments suivants :
Système de navigation
Câble d’alimentation électrique pour allume-cigares
Étriers de fixation de voiture
Câble USB
CD/DVD comportant le logiciel de navigation, les cartes digitalisées, ActiveSync
®
,
application PC pour un rétablissement rapide du matériel de données
Le présent mode d’emploi et la carte de garantie
En option
Adaptateur secteur
Carte mémoire
Antenne FM externe pour recevoir TMC
Récepteur TMC externe
Ecouteurs
Étui de protection
Les différentes vues
9
Nederlands
Français
English
Les différentes vues
Vue de face
N° Composants Description
n
Microphone (seulement avec les modèles E4245 et E4445)
o
L'affichage du
chargement
Au cours du chargement, le témoin de
chargement clignote orange. Il est vert lors-
que les accus sont complètement chargés.
p
L'affichage de Blue-
tooth (en otion)
Si le Bluetooth est activé, la LED clignote à un
rythme différent selon l’état de la connexion.
(seulement avec le modèle E4445)
q
Touch Screen Édite les données de l’appareil. Pour sélection-
ner des commandes de menu ou entrer des
données, pointez l'écran avec le stylet adapté
"émoussé".
Attention !
Ne touchez pas l’écran avec des objets angu-
leux ou pointus afin d’éviter d’abîmer
l’appareil. Utilisez par exemple un crayon
émoussé. Dans la plupart des cas, vous pouvez
commander l’appareil à l’aide de votre index.
n
p
o
q
Français
10
Vue de derrière
N° Composants Description
n
Haut-parleur Restitue de la musique, des instructions vocales
et des avertissements.
Vue de dessus
N° Composants Description
n
Bouton
marche/arrêt
Allumage ou arrêt de l’appareil par pression pro-
longée. Passage en mode veille ou en mode de
fonctionnement par pression brève.
o
Emplacement
de carte
mémoire
Connecteur pouvant accueillir une carte mémoire
en option.
Antenne
GPS
n
n
o
Les différentes vues
11
Nederlands
Français
English
Vue de dessous
N° Composants Description
n
Branchement
USB Mini
Branchement pour l’alimentation électrique externe
et raccordement avec un PC via le câble USB (pour
la synchronisation des données).
En option, vous pouvez aussi brancher un récepteur
TMC externe (seulement avec le modèle E4145)
Côté gauche
N° Composants Description
n
Ecouteurs Prise pour écouteurs
A pleine puissance l’écoute
prolongée du baladeur peut
endommager l’oreille de
l’utilisateur.
En option, vous pouvez aussi brancher une antenne
FM externe pour recevoir TMC (seulement avec les
modèles E4245 et E4445).
n
n
Français
12
Configuration initiale
Nous allons maintenant vous guider pas à pas pour la configuration initiale de votre navi-
gation GPS. Retirez d’abord la feuille de protection de l’écran.
I. Charger la batterie
Vous avez les possibilités suivantes pour recharger les accus de votre système de naviga-
tion:
via un adaptateur de voiture,
via un câble USB ou
via un adaptateur secteur optionnel
Attention !
Selon l’état de chargement des accus insérés, il peut être nécessaire de
charger d’abord l’appareil pendant quelque temps avant de pouvoir
procéder à la première installation.
Lorsque vous manipulez les accus, veuillez tenir compte des points suivants :
L'affichage de l'état du chargement clignote orange jusqu'à ce que l’appareil
soit chargé. Évitez d'interrompre le processus de chargement avant que la batterie
ne soit complètement chargée. Cela peut durer plusieurs heures. L’affichage de
l’état du chargement de la batterie clignote vert lorsque la batterie atteint un ni-
veau de charge élevé. Laissez le câble de recharge branché encore 20 minutes
pour atteindre la capacité de charge complète.
Vous pouvez travailler avec l’appareil au cours du processus de chargement, mais
l'alimentation en courant ne doit pas être interrompue lors de la configuration ini-
tiale.
L'appareil doit être constamment relié à l'alimentation électrique externe afin de
permettre le chargement complet de la batterie intégrée.
Vous pouvez laisser brancher l'alimentation électrique externe, ce qui est très pra-
tique pour le fonctionnement continu. Remarque : l'adaptateur de voiture
consomme de l'énergie même lorsqu'il n’est pas en train de charger la batterie du
système de navigation.
Si la batterie est très faible, l’appareil peut nécessiter plusieurs minutes après le
branchement à une source d’alimentation externe avant d’être de nouveau prêt à
fonctionner.
La batterie est chargée même lorsque l’appareil est complètement éteint.
Configuration initiale
13
Nederlands
Français
English
II. Alimentation électrique
L’adaptateur de voiture
(figure semblable)
1. Branchez la prise jack (n) du câble de connexion dans la prise prévue à cet effet de
votre navigation GPS et la prise d’alimentation électrique (o) dans l’allume-cigares.
2. Veillez à ce que le contact soit maintenu pendant la conduite. Sinon, des dysfonc-
tionnements peuvent apparaître.
Possibilité alternative de chargement des accus
Dès que vous raccordez votre appareil de navigation au moyen d’un câble USB à un ordi-
nateur ou à un Notebook branché, les accus se chargent. Il n’est pas nécessaire pour cela
d’installer un logiciel ou un pilote. Durant la première mise en marche, évitez si possible
d’interrompre le chargement.
Remarque
Lorsque l’appareil est allumé, la luminosité de l’écran diminue si vous
utilisez une connexion USB.
Il est conseillé de mettre l’appareil en mode veille pour raccourcir la durée
de charge par USB.
n
o
Français
14
L’adaptateur secteur (en option)
(illustration similaire)
1. Glissez la fiche de l’adaptateur (en option) dans le guide situé à l’arrière de
l’adaptateur secteur. Appuyez sur la touche Push pour permettre à la fiche de
l’adaptateur de s’enclencher.
2. Branchez le câble de l'adaptateur secteur (n) dans la prise Mini-USB.
3. Branchez l’adaptateur secteur (o) à une prise de courant facilement
accessible.
n
o
Configuration initiale
15
Nederlands
Français
English
III. Démarrer l’appareil
Par pression prolongée (> 3 sec.) du bouton Marche/Arrêt, vous allumez votre appa-
reil de navigation ou l’éteignez complètement.
Le système de navigation démarre à la première mise en marche et vous invite à respecter
le code de la route. Puis l'assistant de configuration démarre. Ce dernier exécute avec vous
les principaux réglages tels que langue, options de représentation, adresse de votre
domicile, etc. Ensuite, l'écran d'entrée suivant s'affiche :
Touche Description Écran
Menu
Affichage des cartes
Menu de navigation
Autres applications
Réglages
Français
16
Remarque
Si le logiciel de navigation ne trouve aucun fichier de cartes sur l'appareil
ou la carte mémoire, vous ne pouvez sélectionner ni le menu de
navigation ni les réglages. Le menu Autres applications s'affiche alors
automatiquement.
Remarque
Tant que votre système de navigation est relié à une alimentation élec-
trique externe ou est alimenté avec batterie, vous pouvez éteindre ou
allumer l’appareil en appuyant brièvement sur le bouton
marche/arrêt (mode Veille).
Le bouton Réglages sur l'écran principal de votre appareil vous per-
met d’adapter le temps de fonctionnement à vos propres besoins. À la
livraison, votre appareil est réglé de telle sorte qu’il ne s’éteint pas
automatiquement, même en cas de non utilisation.
Si l’appareil est complètement éteint, appuyez de manière prolongée
(> 3 sec.) sur le bouton Marche/Arrêt.
L’enregistrement des données dans la mémoire interne permet d’éviter
toute perte de données. Seul le processus de démarrage s'en trouve
légèrement rallongé.
Même en mode Veille, votre système de navigation consomme une quantité minime de
courant, provoquant ainsi le déchargement de la batterie.
IV. Installer le logiciel de navigation
Si les données de base du logiciel de navigation sont enregistrées d’origine dans votre
appareil, l'installation définitive du logiciel de navigation s'effectue automatiquement à
partir de la mémoire interne pendant l'installation initiale. Suivez les instructions sur
l’écran.
Lorsque le système de navigation est en cours d’utilisation, la carte mémoire (en op-
tion) doit toujours être insérée dans l’appareil.
Si la carte mémoire est retirée – même brièvement – en cours d’utilisation, un redémar-
rage par le logiciel (Reset) doit être effectué pour relancer le système de navigation (voir
page 23).
Veuillez lire le chapitre Navigation à partir de la page 24.
Utilisation
17
Nederlands
Français
English
Utilisation
Allumer et éteindre
La première installation une fois terminée, votre appareil se trouve dans son état de fonc-
tionnement normal. Le bouton marche/arrêt vous permet d’activer et de désactiver votre
appareil.
4. Appuyez brièvement sur le bouton marche/arrêt pour allumer votre système de na-
vigation.
Remarque
À la livraison, votre appareil est réglé de telle sorte qu’il ne s’éteint pas
automatiquement, même en cas de non utilisation. Le bouton Paramè-
tres sur l'écran principal de votre appareil vous permet d’adapter le
temps de fonctionnement à vos propres besoins.
Même en mode Veille, votre système de navigation consomme une
quantité minime de courant, provoquant ainsi le déchargement de la
batterie.
5. Appuyez brièvement sur le bouton marche/arrêt pour éteindre votre système de
navigation (mode Veille). L’écran suivant apparaît :
Vous avez alors trois possibilités de sélection :
Touche Description
Interruption/Retour
Si vous avez accédé à cet écran par erreur, appuyez sur le
flèche pour revenir à l’écran précédent.
Mode Veille (mode Économie d'énergie)
En appuyant sur cette touche, vous mettez l’appareil en
mode veille.
Reset (réinitialisation)
En appuyant sur la touche, vous effectuez la réinitialisation
(Reset).
Français
18
Si vous ne voulez sélectionner aucune de ces trois possibilités, l’appareil se met automati-
quement en mode veille après quelques secondes.
Pour d’autres réglages relatifs au mode veille, voir aussi le chapitre Fonction spéciale Clea-
nUp (interface en anglais), page 62, point 8.
Si vous avez activé la fonction de confort DC Auto Suspend, cet écran apparaît également
après l’écoulement du temps d’attente de quelques secondes.
Sécurité
Cette fonction vous permet de protéger votre appareil de l’utilisation par autrui. Avant de
pouvoir l’utiliser, certains réglages simples doivent être effectués. Procédez comme suit:
Définir le mot de passe et l’indice
1. Allez sur Réglages puis sur Réglages de l'appareil à partir de l'écran princip.
2. Appuyez sur Security pour lancer la fonction. L’écran suivant apparaît :
3. Appuyez sur
pour introduire un mot de passe administrateur.
4. Un clavier apparaît. Introduisez un mot de passe via celui-ci.
Remarque
Le mot de passe doit contenir au moins 4 signes. Utilisez une combi-
naison de lettres (A-Z) et de chiffres (0-9). Conservez le mot de passe
en un lieu sûr.
5. Après avoir introduit un mot de passe, confirmez-le en appuyant sur .
6. Introduisez le mot de passe dans le deuxième champ pour le confirmer à nouveau
et éviter d’éventuelles fautes de frappe.
Remarque
Le mot de passe apparaît sous forme d’astérisques (****).
Sécurité
19
Nederlands
Français
English
7. Après avoir introduit le mot de passe, un nouveau champ de texte apparaît. Intro-
duisez à présent un indice qui servira d’aide-mémoire pour votre mot de passe. Si
vous avez oublié ou égaré votre mot de passe, vous pouvez faire appel à cet indice.
Effectuer des réglages
Après que vous avez introduit avec succès le mot de passe et l’indice, la fenêtre de sélec-
tion suivante apparaît, dans laquelle vous pouvez effectuer les réglages pour la fonction
Security.
Touche Description
Indiquez ici si l’appareil doit demander le mot de passe après
un rétablissement de la configuration d’origine (Hard Reset).
Indiquez ici si l’appareil doit demander le mot de passe après
un redémarrage (Reset).
Indiquez ici si l’appareil doit demander le mot de passe après
l’allumage à partir du mode veille.
Français
20
Confirmez vos réglages avec . L’écran suivant apparaît :
SuperPIN et UUID
Après que vous avez effectué les réglages, le SuperPIN et l’UUID (Universally Unique IDen-
tifier = identifiant unique universel) apparaissent à l’écran.
Remarque
Notez ces données dans votre manuel d’utilisation et conservez-le en un
endroit sûr.
Vous avez besoin de ces informations si un mot de passe erroné a été
introduit. L’appareil de navigation ne peut être débloqué qu’à l’aide de
ces données.
Sécurité
21
Nederlands
Français
English
Effectuer des réglages ultérieurs
Si vous avez déjà entré un mot de passe et que vous voulez ensuite effectuer des réglages
ou modifier le mot de passe, démarrer la fonction Security. Indiquez votre mot de passe
actuel. L’écran suivant apparaît :
Touche Description
Attribuer un mot de passe ou un aide-mémoire
Réglages d’authentification (page 19, Effectuer des
réglages)
Montrer le SuperPIN et l’UUID (voir page 20)
Rétablit la fonction de sécurité complète. Après
l’exécution de cette fonction, tous les réglages de sécurité
et les mots de passe sont effacés. Pour pouvoir exécuter
cette fonction, vous devez à nouveau introduire et
confirmer votre mot de passe.
Français
22
Demande du mot de passe
Si vous avez déterminé un mot de passe via la fonction Security , la demande du mot de
passe apparaît, en fonction du réglage, lors du nouveau démarrage de l’appareil.
1. Entrez dans le clavier le mot de passe que vous avez défini.
Remarque
Le mot de passe est montré sous forme d’astérisques (****).
2. Si vous avez oublié le mot de passe et que vous avez besoin d’aide, appuyez sur le
point d’interrogation pour faire apparaître l’indice.
3. Appuyez sur le symbole
pour confirmer le mot introduit.
Remarque
Si vous avez introduit 3 fois de suite un mot de passe erroné, vous
devez introduire le SuperPIN. Si celui-ci a également été perdu,
adressez-vous à votre service après-vente en fournissant l’UUID.
L’UUID est affiché dans l’écran inférieur.
Réinitialiser la navigation GPS
23
Nederlands
Français
English
Réinitialiser la navigation GPS
Utilisez cette solution si votre navigation GPS ne réagit ou ne travaille plus correctement.
Elle permet de redémarrer le système de navigation sans avoir à effectuer de réinstallation.
Le Reset est souvent utilisé pour réorganiser la mémoire. Tous les programmes en cours
sont interrompus et la mémoire vive est réinitialisée.
Vous avez la possibilité de réinitialiser votre appareil de deux manières différentes.
Soft Reset (redémarrage)
En appuyant brièvement sur le bouton marche/arrêt, l’écran suivant apparaît:
Si vous voulez effectuer un redémarrage (Reset), appuyez sur le symbole .
D’autres informations sur cet écran figurent au chapitre Allumer et éteindre, page 17.
Arrêt complet/Hard Reset
Attention !
Un Hard Reset supprime toutes les données dans la mémoire volatile.
Si vous avez éteint votre système de navigation en appuyant brièvement sur le bouton
marche / arrêt, il se trouve normalement en mode veille. Le système peut aussi être tota-
lement éteint, ce qui permet une consommation d’énergie minimale. Cet arrêt complet
entraîne la perte de toutes les données de la mémoire volatile (Hard Reset).
Pour éteindre complètement votre système de navigation, procédez de la façon suivante :
1. Appuyez plus de 3 secondes sur le bouton marche/arrêt pour allumer
l’appareil.
2. Appuyez plus de 3 secondes sur le bouton marche/arrêt pour éteindre
l’appareil.
Si votre appareil est déjà équipé en usine des données de base du logiciel de navigation
dans la mémoire non volatile, une nouvelle installation n’est pas nécessaire après une
réinitialisation.
Français
24
Navigation
Consignes de sécurité pour la navigation
Pour un mode d’emploi plus détaillé, consultez votre DVD.
Conseils pour la navigation
Pour des raisons de sécurité, n’utilisez pas le système de navigation pendant la
conduite !
Si vous n’avez pas compris les informations vocales ou que vous n’êtes pas certain
de la direction à prendre au carrefour suivant, vous pouvez rapidement vous
orienter grâce aux cartes ou aux flèches. Ne consultez cependant l’écran que si la
circulation ne présente pas de danger !
Mention juridique
Dans certains pays, l’utilisation d’appareils signalant la présence
d’installations de surveillance du trafic (p.ex. les radars) est interdite.
Veuillez vous informer au sujet de la législation en vigueur et n'utilisez
la fonction d'avertissement que là où cela vous est permis. Nous ne
sommes pas responsables des dommages que peut occasionner l'utili-
sation de la fonction d'avertissement.
Attention !
L’itinéraire de la route et le code de la route sont prioritaires par rapport
aux indications du système de navigation. Ne suivez les indications du
système que si les circonstances et les règles de conduite le permettent.
Veuillez aussi noter que les indications de limite de vitesse de votre
système de navigation ne sont pas contraignantes ; veuillez suivre les
recommandations de vitesse indiquées sur les panneaux de signalisa-
tion. Le système de navigation vous amène à destination même si vous
êtes contraint de vous écarter de la route programmée.
Les consignes d'orientation délivrées par le système de navigation ne dégagent
pas le conducteur de ses devoirs et de sa responsabilité personnelle.
Prévoyez votre itinéraire avant de démarrer. Si vous souhaitez modifier votre itiné-
raire en cours de route, interrompez la conduite.
Pour réceptionner correctement le signal GPS, aucun objet métallique ne doit gê-
ner la réception radio. À L'aide du support ventouse, fixez l'appareil sur le côté in-
terne du pare-brise ou bien à proximité du pare-brise. Essayez différents empla-
cements dans votre véhicule jusqu'à obtenir une réception optimale.
Navigation
25
Nederlands
Français
English
Consignes pour une utilisation dans un véhicule
Lors de l’installation de l’étrier de fixation, veillez à ce que celui-ci ne présente au-
cun risque pour la sécurité même en cas d’accident.
Ne placez pas le câble à proximité immédiate d’éléments essentiels à la sécurité.
La prise d’alimentation électrique consomme également de l’électricité lorsque au-
cun appareil n’est branché. Si vous ne l'utilisez pas, débranchez-la afin d’éviter que
la batterie de la voiture se décharge.
Après l’installation, vérifiez également tous les dispositifs essentiels à la sécurité.
Ne placez pas l’étrier de fixation dans l’espace de déploiement de l’airbag.
Vérifiez régulièrement la bonne adhérence de la ventouse.
L’écran de votre appareil peut provoquer des « réflexions lumineuses ».
Faites attention à ne pas être « aveuglé » en le manipulant.
Remarque
Ne laissez pas votre système de navigation dans votre véhicule lorsque
vous le quittez. Pour des raisons de sécurité, il est conseillé de démon-
ter également la fixation voiture.
Français
26
Orientation de l’antenne
Pour assurer la réception des signaux satellites GPS, l’antenne doit bénéficier d’une vue
dégagée vers le ciel. Si la réception s’avère insuffisante dans le véhicule, essayez différentes
positions de montage et orientations de l’antenne.
I. Monter la fixation voiture
Attention !
Ne fixez l’étrier de fixation sur le pare-brise que si cela ne gêne pas la
visibilité.
(figure semblable)
Remarque
Selon la version, votre système de navigation peut aussi être équipé d’une
autre fixation voiture analogue.
Levier à ressort
Navigation
27
Nederlands
Français
English
Remarque
Nettoyez soigneusement la vitre à l’aide d’un produit de nettoyage
pour vitres. Si la température est inférieure à 15° C, chauffez légèrement
la vitre etla ventouse.
Placez la fixation voiture avec ventouse directement sur le pare-brise et abaissez le levier à
ressort. La ventouse colle au niveau du fond.
II. Fixation la navigation GPS
1. Reliez l’adaptateur voiture (voir page 13) et éventuellement l’antenne TMC à votre
système de navigation, insérez la carte mémoire.
2. Placez l’appareil en bas au centre du support.
3. Poussez-le légèrement à l’arrière (n), jusqu’à ce que vous l’entendiez
s’enclencher(o).
(figure semblable)
4. Poser la coque sur les crochets de fixation du support de voiture.
5. Faites glisser le tout vers le bas jusqu’à ce que vous entendiez le déclic.
6. Vous pouvez à présent fixer l’unité au pare-brise préalablement nettoyé ou au
support ventouse.
st
y
let
dans le
support
Français
28
III. Brancher l’adaptateur voiture
(figure semblable)
1. Branchez la prise jack (n) du câble de connexion dans la prise prévue à cet effet de
votre navigation GPS et la prise d’alimentation électrique (o) dans l’allume-cigares.
2. Veillez à ce que le contact soit maintenu pendant la conduite. Sinon, des dysfonc-
tionnements peuvent apparaître.
Remarque
Après la conduite ou lorsque vous arrêtez votre véhicule pendant un
certain temps, débranchez la prise d’alimentation électrique de
l’allume-cigares. Sinon, la batterie de la voiture pourrait se déchar-
ger. Éteignez dans ce cas le système de navigation avec le bouton de
marche/arrêt.
n
o
Navigation
29
Nederlands
Français
English
IV. Démarrer le logiciel de navigation
Remarque
Si votre carte mémoire contient du matériel cartographique (supplé-
mentaire), elle doit toujours être placée dans l’appareil pendant
l’utilisation du système de navigation.
Si la carte mémoire est retirée ne serait-ce que momentanément en
cours d'utilisation, une réinitialisation logicielle (Reset) doit être effec-
tuée pour redémarrer le système de navigation (voir page 23). Selon le
système de navigation, cette réinitialisation s’effectue automatique-
ment.
1. Allumez votre navigation GPS.
2. Selon le cas, le logiciel de navigation démarre immédiatement ou bien lorsque vous
pointez sur le bouton de navigation sur l’écran principal.
3. Pointez Navigation sur l'écran et indiquez l'adresse de votre lieu d'arrivée. Pour
démarrer la navigation, confirmez votre saisie en cliquant sur le symbole
. Si la
réception satellite est suffisante, vous obtenez rapidement sur l'écran des informa-
tions concernant le chemin, complétées par des instructions vocales.
Des informations sur d'autres utilisations du logiciel de navigation sont disponibles dans le
manuel détaillé de l’utilisateur, sur votre CD/DVD. Il s’agit là d’un fichier PDF
pouvant être lu et imprimé avec n’importe quelle version d’Acrobat Reader.
Remarque
Lors de la première utilisation, l’initialisation du récepteur GPS dure
quelques minutes. Même lorsque le symbole indique un signal GPS
disponible, la navigation peut être imprécise. Pour les trajets suivants, il
faut environ 30-60 secondes pour obtenir un signal GPS correct, à condi-
tion d'avoir une réception satellite suffisamment bonne.
Français
30
Informations relatives à la surveillance du trafic
Si la fonction d’avertissement est installée avant les points de surveillance du trafic
(en option), l’écran suivant s’affiche :
Si vous voulez utiliser la navigation avant les points de surveillance du trafic, confirmez
avec
. Pour configurer la fonction d'avertissement, cliquez sur le bouton Configura-
tion de points d’intérêt du menu Paramètres.
L’écran suivant s’affiche . Cliquez sur POI-Warner:
Informations relatives à la surveillance du trafic
31
Nederlands
Français
English
Cliquez ici sur (Radars) fixes pour procéder aux réglages des « radars fixes » :
Vous avez ici la possibilité de laisser les points de surveillance du trafic affichés sur une
carte ou de les masquer. Vous pouvez aussi indiquer ici si vous souhaitez que des signaux
sonores vous avertissent de l'imminence d'un point de surveillance du trafic.
Un point de surveillance du trafic est annoncé par un signal sonore env. 15 secondes avant
qu’il ne soit atteint. Le signal sonore retentit encore deux fois env. 7 secondes avant. Si le
signal sonore retentit quatre fois, cela signifie que la vitesse est trop élevée. La distance qui
vous sépare du point de surveillance est également représentée par une barre d’approche
(le long du bord inférieur gauche de l’écran).
Exemple d'affichage lorsque l'affichage de la carte est activé :
Français
32
Remarque
Notez que les points de surveillance du trafic ne sont pas disponibles dans
tous les pays.
* Mention juridique
Dans certains pays p.ex. en Autriche, en Allemagne, en Irlande et dans la
Suisse, l’utilisation d’appareils signalant la présence d’installations de
surveillance du trafic (p.ex. les radars) est interdite. Veuillez vous informer
au sujet de la législation en vigueur et n'utilisez la fonction d'avertisse-
ment que là où cela vous est permis. Nous ne sommes pas responsables
des dommages que peut occasionner l'utilisation de la fonction d'avertis-
sement.
Commandes vocales (en option)
33
Nederlands
Français
English
Commandes vocales (en option)
Durant la navigation, le mode Commandes vocales peut être activé en appuyant un peu
plus longtemps sur l’écran. Une courte tonalité signale que le système de navigation est
prêt à l’introduction des commandes vocales.
Explication des symboles :
( ) Mots optionnels
[ ] Explétives
„|“ Alternatives
< > Contenu indiqué prononçable
Selon l’écran affiché, les commandes suivantes sont possibles :
Applicabilité
Commande
Toujours valable
[en] (retour|arrière)
(interrompre | annuler | terminer) [dialogue]
(saisir|choisir) ([une] ville | [un] lieu) | Saisie de la ville
(choisir | entrer | saisir) [la|une] [nouvelle] destination |
nouvelle destination | saisie de la destination
(choisir | entrer | saisir) [le|un] [nouveau] code postal |
nouveau code postal | saisie du code postal
aide
(aide | commandes) (générales | globales)
[afficher la | affichage] carte | écran de la carte
contrôle du volume
(réduire [le] | réduction [du]) volume [sonore] | plus bas
| baisser le (son|volume)
(augmanter [le] | augmentation [du]) volume [sonore] |
plus fort | monter le (son|volume)
[ mettre en ] sourdine | couper le (son|volume) | silence
activer [le] (volume | son)
Menu | menu principal | menu de navigation
Français
34
Menu principal
saisir [une] [nouvelle] adresse | [une] nouvelle destination
| (saisir | choisir | sélectionner) [une] [nouvelle] destina-
tion | saisie de destination | $<DestEntrySe-
lect_EnterNew_Text>
(Autres) possibilités de saisie de destination | (rechercher
| saisir) autre destination | Autre destination | $<Other-
DestinationEntryOptions.DisplayedText>
Gestionnaire "d'itinéraire" | $<DestEntrySe-
lect_RouteInfo_Text>
démarrer guidage routier | en avant | oui ["s'il" vous
plaît] | go | calculer itinéraire
(arrêter | stopper | stoppe) (le guidage [routier] | [la]
navigation)
autre ( application | programme)
Dans le menu principal, on
peut demander oralement
la dernière destination. Pour
ce faire, il faut dire le texte
qui apparaît dans la bulle
sur l'un des trois boutons
du haut. S’il y a plusieurs
destinations récentes, le
bouton « Derniers lieux »
s’affiche. On peut aussi le
commander à la voix et
ainsi ouvrir une liste des
derniers lieux utilisés.
configuration | réglages | options
Sur la carte
(afficher | montrer) [la] (destination |
(aperçu | prévisualisation) [de la carte | carte | du trajet]
| (montrer | afficher) ([le] trajet | "l'itinéraire"
(afficher | montrer) ([la] position [actuelle]
(afficher | montrer | affichage | orientation) dans le sens
de la marche
autre destination | prochaine destination | descendre|
vers le bas | continuer
destination précédente | monter | vers le haut
[montre] (vue fléchée | écran de manoeuvres)
[afficher | montrer] (vue | affichage) (compas | G P S |
boussole)
[afficher | montrer] (vue | carte | affichage) dynamique
[afficher | montrer] (affichage suivant | (vue | vue carte |
carte) suivante)
[afficher | montrer] (vue | carte | affichage) (simple |
normale) | [afficher | montrer] seulement [la] carte
[affiche] (flèche et carte | carte et flèche | carte avec flè-
ches | carte avec flèche)
[afficher | montrer] [vue | carte | affichage] [en] (3 D |
trois dimensions | tridimensionnel)
[afficher | montrer] [affichage | carte | vue] (2 D | bidi-
mensionnelle)
Commandes vocales (en option)
35
Nederlands
Français
English
[afficher | montrer] [affichage | vue | carte] [toujours]
[orienté] (au | vers le) nord
Zoom automatique
centrer [vue | carte | écran de carte] | centre [[la] carte]
(grossir | agrandir) ["l'affichage" | affichage | [la] vue |
[la] carte] | zoomer vers "l'intérieur" | zoom avant
réduire [la] [affichage | vue | carte] | zoomer vers "l'exté-
rieur" | zoom arrière
Menu rapide
Dans les listes
page suivante | descendre | vers le bas
page précédente | monter | vers le haut
Suivant les bulles qui
s’affichent, vous devez lire
soit les entrées de la liste
elles-mêmes, soit le chiffre
qui leur est associé. Vous
pouvez aussi lire à haute
voix les boutons qui appa-
raissent sous la liste s’ils
sont signalés par une bulle.
modifier lieu | saisir lieu | corriger lieu | modifier ville |
saisir ville | corriger ville | modifie lieu | modifie ville |
autre lieu | autre ville | corrige lieu | corrige ville | saisie
de la ville | saisie du lieu
modifier code postal | saisir code postal | corriger code
postal | modifie code postal | autre code postal | corrige
code postal | saisie du code postal
modifier Etat | saisir Etat | corriger Etat | modifier pro-
vince | saisir province | corriger province | modifier ré-
gion | saisir région | corriger région | modifie Etat | mo-
difie province | modifie région | autre Etat | autre pro-
vince | autre région | cor
recherche dans tous les Etats | recherche dans toutes les
provinces | recherche dans toutes les régions | recherche
dans tout le pays | tous les Etats | toutes les provinces |
toutes les régions | tout le pays
Commandes pour la
saisie d’une ville
Avec les commandes
« Entrer la ville/le CP », on
peut choisir entre ces deux
possibilités. L’État n’est pas
pertinent en Europe.
modifier pays | saisir pays | corriger pays | modifie pays |
autre pays | corrige pays | saisie du pays
Français
36
centre ville | centre localité | centre d'activité | centre
urbain | vers le centre de localité | vers le centre-ville |
vers le centre d'activité | vers le centre de la localité | vers
le centre urbain
modifier code postal | saisir code postal | corriger code
postal | modifie code postal | autre code postal | corrige
code postal | saisie du code postal
point d'intérêt | lieu intéressant
Commandes pour la
saisie d’une rue
Avec les commandes
« Modifier la ville/le CP »,
on peut préciser la valeur
saisie. Les commandes « Je
ne sais pas » et
« Commencer le guidage »
utilisent le centre-ville
comme destination.
centre ville | centre localité | centre d'activité | centre
urbain | vers le centre de localité | vers le centre-ville |
vers le centre d'activité | vers le centre de la localité | vers
le centre urbain
je ne sais pas | aucune idée
modifier rue | saisir rue | corriger rue | modifie rue |
corrige rue | autre rue | saisie de la rue
croisement | intersection | carrefour | embranchement
milieu de la rue | vers le milieu de la rue
je ne sais pas | aucune idée
Commandes pour la
saisie d’un numéro de
rue
Les commandes « Je ne sais
pas » et « Commencer le
guidage » utilisent le milieu
de la rue comme
destination.
démarrer la navigation | lancer la navigation | entamer la
navigation | débuter la navigation
Remarque
Prononcez les commandes à voix haute et claire en direction de l’appareil
de navigation. Pendant l’introduction des commandes, évitez les bruits de
fond (radio, ventilateur, conversations à voix haute).
Système de communication sans fil Bluetooth
37
Nederlands
Français
English
Système de communication sans fil Bluetooth
(en option) La technologie Bluetooth sert à relier des appareils sans liaison filaire sur de
courtes distances. Les appareils Bluetooth transmettent des données par signal radio afin
que d’autres équipements qui sont également pourvus de cette technologie puissent
communiquer entre eux sans qu’aucune liaison filaire soit nécessaire.
Avant de pouvoir utiliser votre système de navigation comme système de communication
avec votre téléphone portable Bluetooth, les deux appareils doivent être reliés (couplage).
Remarque
Vous trouverez dans les instructions de votre téléphone portable comment
activer la fonction Bluetooth.
Démarrer l’application Bluetooth
1. Cliquez sur l’option Bluetooth Dialer.
Remarque
Si la fonction a été désactivée, appuyez sur le bouton Bluetooth pour la
réactiver ; le voyant Bluetooth s'allume alors.
2. L’écran principal Bluetooth s’affiche à présent sur votre appareil de navigation.
Français
38
Présentation de l’écran principal
Touche Nom Description
Appel en
cours
Montre le déroulement des appels passés et reçus.
Informations Vous voyez ici la boîte postale de votre téléphone
portable. Vous pouvez recevoir, écrire et envoyer
des informations.
Annuaire Appelez les contacts mémorisés sur votre télé-
phone portable. Le support de cette fonction
dépend chaque fois de votre portable.
Retour Page précédente de l’écran principal
Supprimer Effacez le numéro introduit via le pavé numérique.
Appeler Appelez le numéro introduit via le pavé numéri-
que.
Pavé numé-
rique
Introduisez les numéros de téléphone à appeler
via ce pavé numérique.
Système de communication sans fil Bluetooth
39
Nederlands
Français
English
Touche Nom Description
Volume Réglez le volume du microphone et du haut-
parleur.
Nouveau message – Options pour l’affichage
des nouveaux messages
Connexions – Coupler l’instrument de navi-
gation et le téléphone mobile
Sync. des messages – Configuration de la
synchronisation automatique des SMS entre
l’instrument de navigation et le téléphone
mobile
Bluetooth – Activation et désactivation de la
fonction Bluetooth
Sync. de l’annuaire téléphonique – Configu-
ration de la synchronisation automatique
entre l’instrument de navigation et le télé-
phone mobile
Réglages du
dispositif
mains-libres
Réglage du volume de base du microphone
et du haut-parleur
Français
40
Coupler un système de navigation avec un téléphone portable
1. Activez la fonction Bluetooth sur votre téléphone portable.
Remarque
Chaque téléphone portable emprunte pour ce faire différents chemins.
Lisez donc absolument les instructions de votre téléphone portable à ce
sujet.
2. Sélectionnez parmi les réglages du dispositif mains-libres de votre système de navi-
gation l’option (Pairing – couplage du système de navigation et du téléphone
portable). La recherche d’un appareil Bluetooth commence.
3. Sélectionnez dans la liste le téléphone portable correspondant.
4. Démarrez le couplage en activant le champ Pair.
5. Votre téléphone portable reconnaît l’appareil de navigation. Vous êtes invité à in-
troduire un code PIN à 4 chiffres. Ce code est 1 2 3 4 pour votre appareil de naviga-
tion.
6. Votre téléphone mobile est reconnu et le dispositif mains-libres est à présent dispo-
nible via votre système de navigation.
Remarque
Si vous éteignez l’appareil de navigation ou dès que votre téléphone por-
table est trop éloigné de votre appareil de navigation, la procédure doit
être recommencée.
Système de communication sans fil Bluetooth
41
Nederlands
Français
English
Accepter des appels
Touche Description
Accepter l’appel
Refuser/terminer l’appel
Traiter des appels
1. Introduisez via le pavé numérique de l’écran principal Bluetooth le numéro que
vous voulez appeler.
2. Commencez l'appel avec
.
Français
42
En cours d’appel
Touche Description
Terminer un appel
Augmenter/diminuer le volume pour le microphone /
l’ haut-parleur
Transmission vers le téléphone portable
Lecteur MP3 (en option)
43
Nederlands
Français
English
Lecteur MP3 (en option)
Selon l’équipement du logiciel votre système de navigation est équipé d’un lecteur MP3.
Démarrez le Picture Viewer à partir du menu Autres applications en appuyant sur le
bouton Picture Viewer. Tous les fichiers MP3 se trouvant sur la carte mémoire sont au-
tomatiquement inclus dans une liste des favoris, prêts à être reproduits (pour cela, la carte
mémoire ne doit pas être protégée en écriture).
Présentation de l’écran principal
Touche Description
Diminue la luminosité sur le minimum pour économiser du
courant.
Définir/ajouter un signet.
ou
Diminue ou augmente le volume.L’indicateur qui se trouve
dans le coin supérieur droit de l’écran indique le niveau du
volume.
Interruption de l’action / retour au menu précédent
ou
Passe au titre précédent ou suivant. En cours de lecture, vous
pouvez avancer ou reculer dans le titre actuel
Lance le titre sélectionné
Arrête le titre en cours de lecture
Ouvre la liste des favoris.
Affiche les fichiers enregistrés sur le disque flash ou sur la carte
mémoire.
Vous pouvez régler ici le lecteur MP3.
Français
44
Sélection de titres et insertion dans la liste des favoris
Pour sélectionner des titres, appuyez sur l’icône et choisissez les titres que vous vou-
lez ajouter à la liste des favoris.
Il existe trois façons de sélectionner les titres :
Appuyez sur l’icône
pour sélectionner tous les titres, y compris tous les sous-
dossiers.
Appuyez sur l’icône
pour sélectionner tous les titres de l’affichage actuel.
Appuyez sur l’icône pour annuler tous les titres sélectionnés dans un dossier.
Les titres sélectionnés sont signalés par l’icône
.
Pour confirmer votre sélection, appuyez à présent sur l’icône
. Ce n’est qu’alors que
les titres sélectionnés sont ajoutés à la liste des favoris.
Pour sélectionner des titres dans un sous-dossier, appuyez sur le dossier souhaité et sélec-
tionnez les titres désirés.
L’icône
indique que les titres du dossier correspondant ne sont pas tous sélectionnés.
Lecteur MP3 (en option)
45
Nederlands
Français
English
Liste des favoris
Appuyez sur l’icône pour accéder à la liste des favoris :
Pour supprimer tous les titres, utilisez l’icône
.
Pour supprimer un titre, utilisez l’icône .
Confirmation avec l’icône
pour intégrer la nouvelle sélection à la liste des
favoris.
Liste des signets définis
En appuyant sur , vous accédez à la liste des signets définis.
Pour effacer tous les signets, appuyez sur
.
Pour effacer un signet, appuyez sur .
Confirmez en appuyant sur
pour reprendre une nouvelle sélection dans la liste des
signets.
Français
46
Picture Viewer (en option)
Selon l’équipement du logiciel votre système de navigation est équipé d’un Picture
Viewer (visionneuse d'images).
Picture Viewer vous permet de visionner sur votre système de navigation des images au
format jpg se trouvant sur votre carte mémoire. Toutes les images contenues dans la carte
mémoire deviennent immédiatement disponibles.
Utilisation de Picture Viewer
Démarrez le Picture Viewer à partir du menu Autres applications en appuyant sur le
bouton Picture Viewer.
Présentation de l’écran principal
Fig. : affichage miniature
Les deux touches fléchées vous permettent de déplacer l’affichage miniature vers la
droite ou la gauche. Appuyez sur une image pour l’afficher en mode plein écran.
En appuyant sur l’icône
dans l’affichage miniature, vous retournez au début.
En appuyant sur l’icône vous quittez l’application.
Pour démarrer le diaporama,appuyez sur l’icône
.
Picture Viewer (en option)
47
Nederlands
Français
English
Affichage plein écran
Fig. : affichage plein écran sans la barre de service
Dans l’affichage plein écran, appuyez dans la zone inférieure de l’écran pour activer la
barre de service :
Fig. : affichage plein écran avec la barre de service
Touche Description
Image précédente
Rotation de 90° dans le sens des aiguilles d'une
montre
Affichage d’un quadrillage
Démarrage du diaporama
Interruption du diaporama
Rotation de 90° dans le sens contraire des aiguilles d'une montre
Image suivante
Français
48
En appuyant au centre de l’image, vous retournez à l’affichage miniature.
En appuyant sur l’icône (affichage d’un quadrillage), l’image affichée est divisée en 6
champs.
Fig. : mode plein écran avec un quadrillage
En appuyant sur un carré, cette zone de l’image est zoomée :
Fig.: Mode Zoom in
En appuyant au centre de l’image, vous retournez en mode plein écran.
Travel Guide (en option)
49
Nederlands
Français
English
Travel Guide (en option)
Selon l’équipement du logiciel votre système de navigation est équipé d’un Travel
Guide.
Le Travel Guide fournit des informations générales sur différents secteurs de certaines villes
ou régions d'Europe, comme p. ex. les curiosités touristiques, les restaurants, la culture et
des infos voyage. Démarrez le Travel Guide à partir du menu Autres applications en
appuyant sur le bouton Travel Guide. Si vous souhaitez obtenir des informations,
sélectionnez d'abord le pays, puis la ville (ou la région). Pour finir, choisissez la
catégorie.
Fig. 1 Fig. 2
Fig. 3 Fig. 4
Fig. 5
Français
50
Si vous voulez naviguer vers la destination affichée, confirmez avec l’icône
.
L’adresse devient alors une destination à la disposition du logiciel de navigation.
Touche Description
Image précédente / ferme l'application
Affiche l'adresse de la catégorie sélectionnée
Affiche les photos disponibles pour la catégorie sélectionnée
Appuyer sur ce bouton pour accéder directement à l'adresse
sélectionnée.
Remarque
Les sélections possibles à l'intérieur du guide de voyage peuvent varier
en fonction des logiciels utilisés.
Alarm Clock (fonction réveil) (en option)
51
Nederlands
Français
English
Alarm Clock (fonction réveil) (en option)
Selon la version du logiciel, votre système de navigation est doté d'une Alarm Clock /
fonction Réveil.
Lancez cette fonction à partir du menu Autres applications en appuyant sur le bouton
Alarm Clock. La fonction Réveil peut être utilisée comme un réveil classique lorsque
l'appareil est éteint (mode Veille / Économie d'énergie) ou comme rappel en cours de
navigation.
Aperçu de l'écran principal
Cet affichage apparaît lorsque l'heure de l'alarme n'a pas encore été réglée. Indiquez
l'heure de l'alarme au format 24 heures et confirmez votre saisie avec
.
Français
52
Description des boutons
Touche Description
Heure actuelle du système
Mode Configuration
(réglage du volume, de l'heure du système et son-
nerie)
Mode Nocturne
(fait basculer l'appareil en mode Veille)
Nouvelle installation/Désactivation de la fonction
Réveil
Régler l'heure de la sonnerie
Suppression de la saisie
Bouton de confirmation
Réduction du volume / Augmentation du volume
Retour au menu précédent / ferme l'application
Alarm Clock (fonction réveil) (en option)
53
Nederlands
Français
English
Réglage de l'heure du système
L'heure actuelle est affichée dans le coin supérieur droit de l'écran. Pour la régler, procé-
dez de la façon suivante :
1. Pointez dans l'écran principal. L'écran suivant apparaît :
2. Pointez
pour procéder ici au réglage de l'heure :
Remarque
L'heure du système est actualisée via la réception GPS. Veillez égale-
ment à ce que le fuseau horaire soit correctement réglé.
Français
54
Sélection d'une sonnerie
1. Pointez pour sélectionner une sonnerie
2. Sélectionnez la sonnerie désirée, de la même façon que pour le lecteur MP3, et
confirmez cette dernière avec
.
3. Si vous souhaitez sélectionner une sonnerie sur votre carte mémoire, appuyez sur le
dossier correspondant dans le répertoire « Storage Card » et confirmez à nouveau
avec
.
4. Appuyez alors sur la sonnerie souhaitée et confirmez avec .
5. La sélection est signalée par un .
6. Quittez le menu avec
.
Alarm Clock (fonction réveil) (en option)
55
Nederlands
Français
English
Réglage du volume
En pointant le bouton vous pouvez régler le volume de la sonnerie.
Remarque
Le volume configuré ici concerne uniquement la sonnerie et ne modifie
pas le volume de la voix de guidage de la navigation ou d'autres fonc-
tions du système.
Fig. : réglage du volume
Français
56
Fonction Snooze
Lorsque le réveil sonne à l'heure définie, la fonction Snooze vous permet de laisser la son-
nerie se répéter à intervalles réguliers :
1. Pointez pour activer la fonction Snooze.
Fig. : fonction Snooze désactivée
2. Pour que le réveil sonne à nouveau le lendemain à l'heure indiquée, quittez la fonc-
tion via le bouton . En cliquant sur encore une fois, vous quittez l'affi-
chage du réveil pour retourner à celui qui l'a précédé.
Quitter Alarm Clock
1. Pour désactiver l'alarme réglée, pointez .
2. Vous vous trouvez donc dans le mode Configuration.
3. Pointez maintenant sur pour quitter l'application. Aucune heure de réveil n'a
été définie.
Heure
actuelle
du système
Heure de
réveil
Sudoku (en option)
57
Nederlands
Français
English
Sudoku (en option)
Selon la version du logiciel, votre système de navigation est doté du jeu Sudoku.
Lancez le jeu à partir du menu Autres applications en appuyant sur le bouton Sudoku
sur l'écran principal.
Sudoku est un jeu de recherche de chiffres. La grille de jeu est carrée et subdivisée en 9
blocs. Chaque bloc est composé de 9 cases.
Le but du jeu du Sudoku consiste à remplir correctement les 81 cases avec les chiffres 1 à
9. Chaque chiffre ne peut apparaître qu’une seule fois par bloc, une seule fois pas ligne et
une seule fois par colonne.
Au début du jeu, certaines cases de la grille sont déjà préremplies avec différents chiffres
de 1 à 9.
Aperçu de l'écran principal
Touche Description
Lancer le jeu.
Appuyez sur ce bouton pour recevoir des indices de
solution. Réappuyez sur ce bouton pour masquer ces
indices.
Appuyez sur ce bouton pour recevoir des solutions de
champs numériques. Réappuyez sur ce bouton pour
masquer ces solutions.
Appuyez sur ce bouton pour ouvrir un nouveau jeu de
Sudoku.
Français
58
Réglages
Le menu Réglages vous donne les possibilités suivan-
tes :
Appuyez sur ce bouton
pour mémoriser le jeu en
cours.
Appuyez sur ce bouton
pour charger sur l'écran
une partie déjà com-
mencée.
Effacer un état de jeu
mémorisé.
Réglez ici le degré de
difficulté.
Retour au jeu en cours.
Sudoku (en option)
59
Nederlands
Français
English
Aperçu de la zone de jeu
Description des boutons
Touche Description
Barre de saisie des chiffres
Barre de sélection du chiffre à saisir dans les champs
numériques. Le chiffre sélectionné est mis en relief et
peut à présent être saisi en appuyant sur un champ
numérique.
Saisie
Dans la barre de saisie des chiffres, appuyez tout
d'abord sur le chiffre qui doit apparaître dans un
champ numérique précis puis sur le champ numérique
correspondant.
Mode Suppression
Appuyez sur le symbole de suppression puis sur le
chiffre à effacer.
Quittez l'application avec ce bouton.
Français
60
Questions fréquemment posées
Où puis-je trouver davantage d'informations sur la navigation GPS.
Vous trouverez des modes d'emploi détaillés relatifs à la navigation
sur les CDs/DVDs livrés avec votre navigation GPS.
En tant qu'aide supplémentaire, utilisez également les vastes fonc-
tions d'aide auxquelles vous accédez en appuyant sur une touche
(souvent F1 sur un PC) ou en sélectionnant l'option d'aide disponi-
ble. Ces aides vous sont proposées en cours d'utilisation de l'ordina-
teur ou de l'appareil.
À quoi servent les CDs/DVDs fournis ?
Les CDs/DVDs contiennent :
le programme ActiveSync® pour la synchronisation des
données
des programmes supplémentaires (en option)
cd mode d'emploi détaillé en forme digitale
les cartes digitalisées
application PC pour un rétablissement rapide du matériel de
données
mode d’emploi du logiciel de navigation
La navigation GPS ne réagit plus. Que dois-je faire ?
Effectuez un Reset (page 23).
Comment régler la luminosité ?
Sous Démarrer Ö Eclairage.
Service après-vente
61
Nederlands
Français
English
Service après-vente
Pannes et causes probables
Le système de navigation ne réagit plus ou se comporte anormalement.
Effectuez un Reset (voir p. 23).
Le système de navigation est reconnu uniquement en tant qu'hôte par
ActiveSync
®
.
Voir les informations à la page 65.
Le récepteur GPS ne peut pas être initialisé ou trouvé.
Si aucun signal GPS n'est annoncé sur l'écran malgré une installation correcte du système,
le problème peut avoir pour origine ceci:
Aucune réception satellite suffisante n'est possible.
Solution :
Modifiez la position de votre système de navigation et assurez-vous que la visibilité
de l'antenne est bonne et nullement gênée par quoi que ce soit.
Aucune instruction vocale n'est audible.
Vérifiez le réglage du volume.
Avez-vous besoin d'assistance supplémentaire ?
Au cas où les suggestions proposées aux paragraphes ci-dessus n'ont pas permis de ré-
soudre votre problème, veuillez nous contacter.
Les informations suivantes nous seraient très utiles :
Quelle est votre configuration d'ordinateur ?
Quels sont les appareils périphériques supplémentaires que vous utilisez ?
Quels sont les messages qui sont affichés à l'écran ?
Quel est le logiciel que vous avez utilisé lors de l'apparition de l'erreur ?
Qu'avez vous fait pour résoudre le problème ?
Lorsque vous avez déjà reçu un numéro de client, veuillez l'indiquer.
Français
62
Appendice
Fonction spéciale CleanUp (interface en anglais)
La fonction CleanUp sert à la suppression ciblée de données sans l’utilisation d’un PC.
Important
Utilisez cette fonction avec une extrême prudence : des données peuvent
être supprimées, données qui devront être ensuite rétablies manuelle-
ment.
La fonction CleanUp est activée lorsque le « o » du logo GoPal est sélectionné brièvement
dans le menu principal immédiatement après le son de démarrage qui suit un reset
logiciel.
La fonction CleanUp propose 9 options :
1. Remove Installation Only
La suppression dans la mémoire non volatile des logiciels installés „My Flash Disk“ [=
zone de la mémoire non volatile contenant les parties exécutables du logiciel de naviga-
tion après l'installation initiale (\My Flash Disk\Navigation)].
2. Remove MAP Only
La suppression dans la mémoire non volatile des cartes numériques (\My Flash
Disk\MapRegions).
3. Remove Preload Only
La suppression dans la mémoire non volatile des données
nécessaires à l'installation du logiciel de navigation (\My Flash Disk\Install).
4. Remove All
Supprime tout le contenu de la mémoire "My Flash Disk". Un nouveau calibrage de
l'écran n'est pas nécessaire après l'exécution de cette fonction.
Appendice
63
Nederlands
Français
English
5. Factoryreset
Retour aux réglages d’usine en conservant l’installation principale intacte.
6. Format Flash
Formate la mémoire "My Flash Disk" interne. Ce formatage peut être nécessaire pour la
résolution d'un problème important. Un nouveau calibrage de l'écran est nécessaire après
l'exécution de la fonction de formatage. En outre, toutes les données de la mémoire
"My Flash Disk" interne sont supprimées définitivement.
7. GPS Factory Reset
Rétablit les réglages d’usine du récepteur GPS. Lorsque vous utilisez la fonction GPS après
un GPS Factory Reset, le récepteur GPS doit à nouveau s’orienter. Cette procédure peut
prendre un moment.
8. DC AutoSuspend /Wakeup
Vous pouvez choisir ici quand votre système de navigation doit se mettre en mode veille
après l’interruption de l’alimentation électrique extérieure. Cette fonction est utile par
exemple pour les véhicules où l'alimentation de l’allume-cigares se coupe après le décro-
chage.
La fonction AutoSuspend s’active quelques secondes après l’interruption de l’alimentation
électrique extérieure, et l’écran de veille apparaît pour la durée réglée (voir page 17).
Si, durant cette durée, le courant est rétabli (par exemple après une courte interruption du
moteur), la fonction DC AutoSuspend est à nouveau désactivée. Autrement, le système de
navigation se met en mode veille après l’écoulement de la durée réglée.
Introduisez la durée désirée au moyen des touches et confirmez votre choix en appuyant
sur OK.
Remarque
Cette fonction est désactivée dans l’état de livraison et après un Hard
Reset (voir page 23) et peut être réglée individuellement.
Français
64
Exit
Fermeture de la fonction CleanUp et redémarrage de l’appareil (correspond à un reset).
Remarque
Avant que le processus de suppression des données ne soit réellement
démarré, il vous faut le confirmer. Pour ce faire, cliquez sur YES. Si les
données à supprimer n’existent pas (ou plus), un message correspon-
dant vous en avertira.
Pour restaurer les fichiers dans la mémoire interne (fichiers d'installation
et cartes), lisez le chapitre "Transfert de fichiers d'installation et de
cartes dans la mémoire interne" à la page 73.
Appendice
65
Nederlands
Français
English
Synchronisation avec le PC
I. Installer Microsoft
®
ActiveSync
®
Pour pouvoir exploiter vos données de façon optimale avec la navigation GPS, vous devez
utiliser le programme Microsoft
®
ActiveSync
®
.
A l’achat de cet appareil vous recevez une licence pour ce programme, qui se trouve éga-
lement sur le CD/DVD.
Remarque
Si vous utilisez déjà le système d'exploitation Windows Vista® /
Windows® 7, vous n'avez pas besoin du logiciel de communication
ActiveSync
®
. Les fichiers système nécessaires au bon transfert des don-
nées sont intégrés d'origine à votre système d'exploitation.
Veuillez relier l'appareil à votre PC à l'aide du câble de synchronisation
USB. Lorsqu'un nouvel appareil est trouvé, les pilotes nécessaires sont
installés automatiquement. L'installation une fois terminée, votre nouvel
appareil apparaît dans l'aperçu de l'Explorateur de Windows, sous le
point « Appareil mobile ».
Attention !
Lors de l'installation d'un logiciel, des fichiers importants peuvent être
écrasés et modifiés. Pour pouvoir accéder aux fichiers originaux en cas
de problèmes survenant après l'installation, vous devez créer une sau-
vegarde du contenu de votre disque dur avant l'installation.
Sous Windows
®
2000 ou XP, vous devez posséder des droits d'administrateur pour installer
le logiciel.
Important
Ne connectez pas encore l’appareil à votre ordinateur.
1. Insérez le DVD et attendez que le programme se lance automatiquement.
Remarque
Si cela ne fonctionne pas, la fonction Autorun est probablement désacti-
vée. Pour lancer l'installation manuellement, le programme Setup sur le
DVD doit être démarré.
2. Sélectionnez d'abord la langue, puis cliquez sur Installer ActiveSync
®
et suivez
les instructions à l'écran.
Français
66
II. Raccorder au PC
1. Démarrez votre système de navigation en appuyant sur le bouton marche/arrêt.
2. Raccordez le câble USB au système de navigation.
3. Insérez l’autre extrémité du câble USB dans un connecteur USB libre de votre ordi-
nateur.
4. Une fois le système de navigation raccordé, l'écran suivant apparaît.
Remarque
Si aucun mode n'est sélectionné, le mode ActivSync® est automatique-
ment chargé après quelques secondes.
5. Sélectionnez le mode souhaité :
Mode Mémoire de masse
Le mode Mémoire de masse vous permet d'utiliser votre appareil de navigation comme un
support de données amovible (p. ex clé USB). Pour cela, deux lecteurs sont intégrés : la
mémoire interne du système de navigation elle-même et la carte mémoire (optionnelle), si
cette dernière est insérée dans l'appareil.
Remarque
Lorsque vous vous trouvez dans ce mode, aucune autre saisie ne peut être
effectuée en parallèle sur l'appareil. Pour éviter toute perte de données,
utilisez la fonction « Retirer le périphérique en toute sécurité » de votre
système d'exploitation. Enlevez maintenant le câble de votre système de
navigation.
L'assistant « Nouveau matériel détecté » identifie alors un nouvel appareil et installe un
pilote approprié. Cette opération peut prendre quelques minutes.
Mode Mémoire de
masse
Mode ActiveSync
Appendice
67
Nederlands
Français
English
Mode ActiveSync
®
Une fois le mode ActiveSync® sélectionné, répétez la recherche de connexion si celle-ci
échoue la première fois.
Suivez les instructions à l'écran. Le programme établit alors un partenariat entre votre PC
et le système de navigation.
Remarque
Pour pouvoir travailler avec l'assistant GoPal, le système de navigation
doit être identifié lors de la configuration en mode ActiveSync®.
Possibilité alternative de chargement des accus
Dès que vous raccordez votre appareil de navigation au moyen d’un câble USB à un ordi-
nateur ou à un Notebook branché, les accus se chargent. Il n’est pas nécessaire pour cela
d’installer un logiciel ou un pilote. Durant la première mise en marche, évitez si possible
d’interrompre le chargement.
Remarque
Lorsque l’appareil est allumé, la luminosité de l’écran diminue si vous
utilisez une connexion USB.
Il est conseillé de mettre l’appareil en mode veille pour raccourcir la durée
de charge par USB.
III. Travailler avec Microsoft
®
ActiveSync
®
ActiveSync
®
se lance automatiquement lorsque vous raccordez votre système de naviga-
tion au PC. Le programme vérifie s'il s’agit de l’appareil avec lequel un partenariat a été
établi. Si tel est le cas, les modifications effectuées sur le PC et sur le système de navigation
depuis la dernière synchronisation sont comparées et accordées entre elles. Les réglages
du programme ActiveSync
®
vous permettent de définir précisément les données ayant
priorité lors de la synchronisation. Pour ce faire, invoquez l’aide (avec la touche F1) du
programme afin de connaître les conséquences des réglages correspondants. Si le système
de navigation n’est pas reconnu comme étant un partenaire, un accès invité limité est
automatiquement activé. Cet accès permet par exemple d’échanger des données. Si vous
vous trouvez dans ce cas alors qu’il s’agit bien de l’appareil partenaire enregistré, débran-
chez votre système de navigation du PC, éteignez-le puis rallumez-le. Raccordez à présent
votre système de navigation au PC afin de relancer le processus de reconnaissance. Si votre
appareil est toujours reconnu comme invité, répétez le processus et redémarrez également
votre PC.
Remarque
Veillez à toujours raccorder votre système de navigation au même
connecteur USB de votre PC, afin d’éviter que votre PC n’attribue un
autre ID et ne réinstalle l’appareil.
Français
68
GPS (Global Positioning System)
Le GPS est un système de positionnement par satellite. 24 satellites en orbite autour de la
terre permettent de définir une position avec une précision de quelques mètres. La récep-
tion du signal satellite se fait par l’intermédiaire de l’antenne du récepteur GPS intégré. Elle
doit être « en vue » d’au moins 4 de ces satellites.
Remarque
Lorsque la visibilité est réduite (par ex. dans les tunnels, dans les habita-
tions reculées, en forêt ou dans les avions équipés de disques métalli-
sés), la localisation n’est pas possible. La réception satellite se réactive
automatiquement dès que l’obstacle a disparu et que la visibilité est de
nouveau bonne. En cas de vitesse réduite (une marche lente par ex.), la
précision de navigation est également réduite.
Le récepteur GPS consomme beaucoup d’énergie. Cela est particulièrement important à
savoir pour le fonctionnement sur batterie. Afin d’économiser l’énergie, n’allumez pas le
récepteur GPS inutilement. Fermez donc également le logiciel de navigation si ce dernier
n’est pas nécessaire ou si aucune réception satellite n’est possible sur un laps de temps
prolongé. Lors d'une courte interruption de votre voyage, vous pouvez aussi éteindre
l'appareil par le biais du bouton marche/arrêt. Appuyez sur le même bouton pour le re-
démarrer. Cette action réactive également le récepteur GPS, dans le cas où un logiciel de
navigation est encore actif. Dans ce cas de figure et selon la situation de la réception, un
petit moment peut s'écouler jusqu'à ce que la position soit à nouveau actualisée.
Remarque
Veillez, lorsque votre navigation GPS est sur batterie, à ce qu’il soit
configuré de telle sorte qu’il ne s’éteigne pas automatiquement après
quelques minutes en réception GPS. Vous pouvez modifier ce réglage
dans le mode de paramètres. Si le récepteur GPS reste inactif pour plu-
sieurs heures, il doit se réorienter. Ce processus peut durer un certain
temps.
Appendice
69
Nederlands
Français
English
TMC (Traffic Message Channel)
Le système TMC (Traffic Message Channel) est un service radio numérique fonction-
nant comme le RDS et servant à transmettre à un appareil de réception adapté des infor-
mations relatives au trafic routier.
Les informations routières sont diffusées en permanence sur la bande FM.
Le signal étant émis en permanence, l'utilisateur devient moins dépendant des flashs d'in-
formations routières qui ne sont diffusés que toutes les demi-heures. En outre, les informa-
tions importantes (par ex. un automobiliste roulant à contresens sur une autoroute) peu-
vent être transmises immédiatement.
La diffusion du service est prévue pour l'ensemble de l'Europe et est déjà proposée par des
stations radio de nombreux pays. La précision des messages TMC peut varier fortement
selon les pays.
PayTMC (en option)
Il faut entendre par PayTMC les services TMC, tels que TMCpro en Allemagne, Trafficmas-
ter en Angleterre ou V-Trafic en France, qui proposent des informations TMC payantes. Par
rapport aux « Free-TMC » normaux, ces fournisseurs se distinguent pas la mise à disposi-
tion d’informations sur le trafic encore plus actuelles.
Des capteurs installés sur les ponts d’autoroutes, les bandes de capteurs situées sur le
revêtement des voies de circulation et un grand nombre de véhicules dotés de la techni-
que « Floating Car Data » donnent rapidement un aperçu plus précis et plus actuel de la
situation du trafic sur les autoroutes allemandes, y compris les possibilités de prévisions.
Le prix d’achat de votre système de navigation inclut le paiement de la redevance pour
l’utilisation des offres PayTMC, qui sont à votre disposition aussi longtemps qu’ils sont
proposés par le fournisseur.
Votre système de navigation supporte aussi bien les offres Free-TMC que PayTMC et est
préréglé au moment de la livraison pour la réception des deux types de services.
Français
70
Raccorder un récepteur TMC externe / une antenne FM (en option)
Raccorder un récepteur TMC
externe (seulement avec le modéle
E4145)
1. Branchez la fiche USB Mini à la prise
USB Mini de votre appareil.
2. Branchez l'antenne-fil au récepteur
TMC et fixez l'antenne à l'aide des
ventouses, sur le bord de votre pare-
brise par ex.
3. Le récepteur TMC une fois fixé à vo-
tre système de navigation, reliez le
récepteur TMC au câble de l'adapta-
teur voiture.
Raccorder une antenne FM (seu-
lement avec les modèles E4245 et E4445)
1. Branchez la fiche de l’antenne TMC
dans le port d’écouteurs de votre
système de navigation.
2. Fixez l'antenne à l'aide des ventou-
ses, p. ex. sur le bord de votre pare-
brise.
3. Disposez l’antenne de manière à
respecter une distance d'environ 10
cm par rapport au cadre métallique
de la vitre du véhicule.
(illustration similaire)
Appendice
71
Nederlands
Français
English
Manipuler les cartes mémoire
Installer la carte mémoire
1. Retirez soigneusement la carte mémoire (en option) de son emballage (le cas
échéant). Veillez à ne pas toucher ni salir les contacts.
2. Glissez la carte mémoire dans son emplacement – en veillant à diriger la fiche dans
la fente.
Retirer la carte mémoire
Remarque
Avant de retirer la carte mémoire, veillez à fermer le logiciel de naviga-
tion et éteindre l’appareil via la touche marche/arrêt. Sans cela, vous
risqueriez de perdre des données.
1. Pour retirer la carte, appuyez légèrement sur la tranche de la carte jusqu’à ce
qu’elle ressorte.
2. Retirez maintenant la carte sans toucher les contacts.
3. Conservez la carte mémoire dans son emballage ou dans tout autre emplacement
sûr.
Remarque
Les cartes mémoire sont très sensibles. Veillez à éviter toute salissure sur
les contacts ainsi que toute pression sur la carte.
Pour accéder à la carte mémoire
L’appareil ne prend en charge que les cartes mémoire qui ont été formatées au
format de fichier FAT16/32. Si vous introduisez des cartes utilisant un autre format
(par ex. ceux d’appareils photo ou de lecteurs MP3), il se peut que votre appareil
ne les reconnaisse pas et vous propose de les reformater.
Attention !
Le formatage des cartes mémoire efface définitivement toutes les don-
nées qu’elles contiennent.
Français
72
Échange de données via un lecteur de cartes
Si vous voulez copier de grandes quantités de données (fichiers MP3, cartes de navigation)
sur la carte mémoire, vous pouvez également les enregistrer directement sur la carte mé-
moire.
De nombreux ordinateurs sont livrés avec un lecteur de cartes intégré.
Placez-y la carte et copiez les données directement sur la carte.
En passant par l'accès direct, vous obtenez ainsi un transfert beaucoup plus rapide
qu'avec ActiveSync
®
.
Autres cartes
Votre système de navigation est livré d'origine avec des cartes numérisées dans la mémoire
interne.
Selon le modèle, votre CD/DVD contient d'autres cartes numérisées. Ces cartes peuvent
être transférées immédiatement sur une carte mémoire. Pour ce faire, l'utilisation d'un
lecteur de cartes externe est recommandée (voir aussi page 72). L'assistant GoPal fourni
permet de rassembler facilement les différentes cartes à transférer.
Selon la place occupée par la carte sur le CD/DVD, des cartes mémoire de 256 MB,512
MB,
1 024 MB ou plus sont nécessaires. Des cartes mémoire supplémentaires sont disponibles
dans les magasins spécialisés.
Transférer une carte sur une carte mémoire
Le transfert d'une autre carte sur une carte mémoire s'effectue de préférence via l'Explora-
teur de fichiers de votre PC. Procédez de la façon suivante :
1. Insérez le CD/DVD contenant la carte souhaitée.
2. Ouvrez votre Poste de travail et sélectionnez votre lecteur CD/DVD.
3. Le fichier du CD/DVD portant l’extension ".psf" et se trouvant dans le dossier cor-
respondant à la région souhaitée doit être copié dans le dossier "MapRegions" de
la carte mémoire.
Selon la taille de la carte mémoire, vous pouvez y transférer plusieurs fichiers contenant
des cartes. Veillez toutefois à ce que votre carte mémoire dispose de suffisamment de
place.
Si vous avez copié sur votre carte mémoire les cartes numérisées de plusieurs pays ou
groupes de pays, vous devez sélectionner la carte du pays souhaité dans le logiciel de
navigation de votre appareil.
Appendice
73
Nederlands
Français
English
Autre méthode d'installation du logiciel de navigation à partir
d'une carte mémoire
Le logiciel de votre système de navigation peut aussi être installé directement à partir
d’une carte mémoire préconfigurée.
Le cas échéant, le logiciel préinstallé doit être d’abord désinstallé (voir Fonction spéciale
CleanUp, page 62).
Lors de l'installation initiale, vous êtes invité à installer le logiciel de navigation. Veuillez
procéder de la façon suivante :
1. Sortez prudemment la carte mémoire de l’emballage. Veillez à ce que rien ne tou-
che ou ne salisse les contacts.
2. Insérez la carte mémoire dans l'emplacement prévu jusqu’à ce qu’elle
s’enclenche.
3. Cliquez sur OK pour installer l’application.
Une fois toutes les données copiées sur votre système de navigation, vous voyez apparaî-
tre un écran principal permettant de procéder aux réglages relatifs à la navigation.
Transfert de fichiers d'installation et de cartes dans la mémoire
interne
Remarque
Lors du transfert des données, le système de navigation doit être relié à
l'ordinateur via ActiveSync® (voir p. 66).
Votre appareil dispose d'une mémoire interne non volatile localisée dans le dossier \My
Flash Disk.
Avec ActiveSync
®
, l'option Parcourir vous permet de le rendre visible ainsi que d'autres
dossiers. Les dossiers et fichiers peuvent être manipulés comme dans un explorateur.
Pour que l'appareil puisse disposer des fichiers d'installation et des cartes, les dossiers
nécessaires doivent également être créés.
Pour les fichiers d'installation, créez le dossier INSTALL (\My Flash Disk\INSTALL). Placez
les cartes dans le dossier
MapRegions (\My Flash Disk\MapRegions). Lorsque vous nommez les dossiers, veillez à
respecter scrupuleusement les noms indiqués ci-dessus.
Si vous avez enregistré des données supplémentaires dans votre appareil de navigation,
vérifiez que la capacité est suffisante lors du transfert des données. Dans le cas contraire,
supprimez les fichiers inutiles.
Français
74
Informations techniques
Paramètres Indications
Alimentation électrique
Câble d’alimentation électrique pour
allume-cigares
Entrée
Sortie
CA-051-00U-00 /CA-0511MH-2F
(Mitac)
12-24V DC, 800mA /fusible 2A
(T2AL/250V)
5V / 1A (max.)
Alimentation électrique
Adaptateur secteur (en option)
Entrée
Sortie
Phihong PSAA05R-050
100-240V ~0.2A
+ 5V 1.0A max
Batterie Li-Ion, 3.7 V
Prise pour écouteurs Écouteurs stereo (3,5 mm)
Type de carte mémoire SD
Bluetooth (en option) Class 2
Interface USB USB 2.0
Dimensions env. 130 mm x 80 mm x 19,5 mm
Poids (batterie inclue) env. 175 g (sans emballage)
En service +5°C - +35°C
Températures
Stockage 0°C - +60°C
Humidité (pas de condensation) 10 – 90 %
Présentation du modèle
75
Nederlands
Français
English
Présentation du modèle
Modèle Microphone Bluetooth
TMC via un
récepteur
TMC externe
(via Mini-USB)
TMC via un
récepteur
TMC intégré
et une
antenne-fil
E4145
{ { z {
E4245
z { { z
E4445
z z { z
z = Équipement disponible
{ = Équipement non disponible
Français
76
Conditions de garantie pour la France
Garantie commerciale limitée
I. Conditions générales de la garantie commerciale
1. Dispositions générales
Les produits neufs MEDION, sauf ceux exclus aux sections 2 et 3 ci-dessous, bénéficient
d’une garantie commerciale limitée qui couvre les défauts de matériel et de fabrication
susceptibles de nuire à une utilisation normale du produit. La garantie commerciale
concerne l’acheteur agissant en qualité de consommateur à compter de la date d’achat
du produit.
Cette garantie commerciale vous est consentie par la société MEDION AG, Am Zehnthof
77, D-45307 Essen, Allemagne.
La garantie commerciale s’applique à tout achat des produits MEDION auprès de MEDION
ou de l’un de ses revendeurs agréés, en France ou à l’étranger. Elle est soumise au droit du
pays dans lequel a eu lieu le premier achat du produit par un client final.
La durée de la garantie commerciale dépend de la nature de votre produit. Elle est indi-
quée sur le bon de garantie fourni par MEDION. Le délai de garantie commence à courir le
jour de l'achat du produit auprès de MEDION.
Pour la mise en œuvre de la garantie commerciale, nous vous prions de bien conserver la
facture originale d’achat et le bon de garantie. MEDION et ses partenaires commerciaux se
réservent le droit de refuser la réparation au titre de la garantie commerciale ou la confir-
mation de la garantie commerciale si ces preuves d’achat ne sont pas produites.
Nous vous prions également de vous assurer que le produit que vous nous retournez est
suffisamment bien emballé pour ne pas être endommagé au cours du transport. Hormis
mise en œuvre de la garantie légale et sauf mention contraire sur votre bon de garantie,
vous devez prendre en charge les frais d’envoi et supporter le risque d'endommagement
du produit lors de l’envoi du produit à MEDION.
Pour la mise en œuvre de la garantie commerciale et avant l'envoi du produit, nous vous
prions de contacter l’assistance technique téléphonique de MEDION. Celle-ci vous donne-
ra un numéro de référence (numéro RMA) que vous devrez reproduire de manière bien
visible sur le paquet de retour. Nous vous prions également de joindre au produit retourné
une description complète et détaillée du défaut réclamé sur papier libre (ou le cas échéant,
en complétant un formulaire qui vous sera adressé).
Le produit défectueux doit nous être retourné de manière complète, c'est-à-dire que votre
envoi doit contenir toutes les pièces et accessoires faisant partie du lot initialement vendu.
Nous attirons votre attention sur le fait qu'un retour incomplet du produit peut entraîner
des délais de réparation et/ou d’échange. La société MEDION n’est pas responsable
d’objets envoyés par vous qui ne faisaient pas partie du lot initial.
En tout état de cause, indépendamment de la garantie commerciale, MEDION reste tenue
des défauts de conformité du bien au contrat et des vices rédhibitoires dans les conditions
Conditions de garantie pour la France
77
Nederlands
Français
English
prévues aux articles 1641 à 1649 du Code civil. La garantie légale oblige MEDION, en tant
que vendeur professionnel, à garantir l’acheteur contre toutes les conséquences des dé-
fauts ou vices cachés de la chose vendue ou du service rendu. (art. R211-4 du code de la
consommation).
Les articles L. 211-4, L. 211-5 et L. 211-12 du Code de la consommation ainsi que les arti-
cles 1641 et le premier alinéa de l’article 1648 du Code civil sont rappelés à la section IV
des présentes.
2. Étendue de la garantie commerciale
En cas de défaut d’un produit MEDION, couvert par la présente garantie, MEDION prendra
en charge sa réparation ou son remplacement. MEDION aura le choix entre la réparation et
le remplacement du produit et se réserve la possibilité de remplacer le composant défec-
tueux par un composant d'occasion remis à neuf de même qualité.
La présente garantie ne couvre pas les batteries et piles, ni les consommables, c'est-à-dire
les fournitures destinées à être remplacées régulièrement au cours de l'utilisation du pro-
duit MEDION par exemple: lampe pour vidéo projecteur.
La présence d’un pixel défectueux sur un écran (point de l'image constamment coloré,
clair ou foncé) ne constitue pas, en soi, un défaut couvert par la garantie commerciale. Le
nombre exact admissible de pixels défectueux figure dans les spécifications techniques
dans le manuel du produit.
La présente garantie commerciale ne couvre pas la détérioration du produit due à une
mauvaise utilisation, notamment pour les écrans plasma ou LCD. L'utilisation correcte de
votre écran plasma ou LCD figure dans le manuel d'utilisation.
En outre, la garantie ne couvre pas les erreurs de lecture de supports de données formatés
en un format incompatible ou qui sont provoquées par l’utilisation d’un logiciel inadapté.
Français
78
3. Exclusions de la garantie commerciale
La présente garantie commerciale ne couvre pas les défaillances et dommages provoqués
par des causes externes au produit telles que l’endommagement volontaire ou par négli-
gence du fait de l’utilisateur, l’utilisation inappropriée, l’usage abusif, la modification, la
transformation ou l’extension de l'appareil, le vol, l’utilisation de pièces provenant d’un
constructeur tiers, l’absence d'entretien nécessaire, les brûlures, l’humidité, les virus ou les
erreurs de logiciels, le transport ou l’emballage inappropriés ou la perte du colis lors de
l’envoi du produit à la société MEDION.
La présente garantie commerciale s'éteint si le défaut du produit a été provoqué par une
tentative de réparation ou d'entretien par une personne n’appartenant pas à la société
MEDION ou à l’un de ses partenaires commerciaux. De même, la garantie commerciale
s'éteint si des autocollants ou des numéros de série se trouvant sur le produit ou l’un des
accessoires sont altérés ou illisibles.
Après un retour du produit, en cas d’absence de défauts, MEDION facture au client titre de
maintenance, un forfait selon le barème préalablement défini.
Ordinateur de bureau
49,79
Ordinateur Portable 44,79
GPS et Assistant personnel 39,78
Electronique Grand Public 59
Télévision LCD 159
Télévision Plasma 299
En cas d’exclusion de garantie, MEDION facture un 29 , hors frais de transport,
l’établissement d’un devis. Cette somme est offerte en cas d’acceptation du devis.
Dans ce cas, le propriétaire devra s’acquitter des frais de réparation (pièce détachée, main
d’œuvre et frais de transport).
4. L’assistance téléphonique
Avant de nous retourner le produit, vous êtes priés de vous adresser à l’assistance télé-
phonique MEDION. Ce service vous indiquera les détails de la mise en œuvre de la garan-
tie contractuelle.
Notre assistance téléphonique est à votre disposition du lundi au vendredi, de 9h00 à
19h00 sans interruption. L’appel à ce service à partir d’un téléphone fixe en France coûte
0,15 EUR TTC par minute.
Pour les interventions ne relevant ni de la garantie contractuelle à de la garantie commer-
ciale, les appareils hors garantie, les problèmes liés à des logiciels ou mauvaises manipula-
tions, vous pouvez également joindre notre assistance téléphonique. Cette prestation vous
sera facturée 0.34 cts/mn (0 892 35 05 40).
Conditions de garantie pour la France
79
Nederlands
Français
English
II. Conditions particulières de garantie commerciale
pour les ordinateurs personnels, ordinateurs portables,
ordinateurs de bureau, ordinateurs de poche, appareil
de navigation GPS (PNA) :
En cas de défaut de l'une des options de votre produit, MEDION prendra en charge sa
réparation ou son remplacement. La garantie couvre les frais de matériel et le temps de
travail nécessaires à la remise en état du produit MEDION concerné.
L’utilisation d’accessoires qui n’ont pas été produits ou vendus par MEDION, peut entraî-
ner l’extinction de la garantie commerciale de votre produit MEDION s’il s’est avéré qu’un
dommage a été causé au produit MEDION ou à l’une de ses options par cet accessoire.
Les logiciels livrés avec le produit MEDION sont couverts par une garantie commerciale
limitée spéciale. Cette garantie commerciale couvre le système d’exploitation pré installé
et les programmes livrés avec le produit. Pour les logiciels livrés par MEDION et pour les
supports de données, par exemple les disquettes et les CD-ROM ou DVD-ROM sur lesquels
les logiciels sont livrés, MEDION garantit l’absence de défauts de fabrication et de matériau
du support physique de données pendant une durée de 90 jours suivant l’achat du pro-
duit auprès de MEDION ou de l’un de ses partenaires agréés. MEDION remplacera gratui-
tement les supports de données qui étaient défectueux lors de leur livraison. Cette garan-
tie commerciale ne couvre que les supports physiques de données et non le fonctionne-
ment des logiciels. Aucune garantie n’est donnée concernant l’aptitude du produit à satis-
faire à vos besoins, l’absence d’erreurs dans l’exploitation des logiciels, le fonctionnement
ininterrompu ou parfait les logiciels, la correction possible ou effective de défauts dans les
logiciels. MEDION ne garantit pas à 100 % l’exactitude des cartes fournies avec l’appareil
de navigation GPS (PNA).
Lors de la réparation du produit MEDION, il peut s’avérer nécessaire de supprimer toutes
les données qui y sont stockées. Par conséquent, avant le retour de l’appareil pour répara-
tion, assurez-vous que vous êtes en possession d’une sauvegarde de vos données. Nous
attirons tout particulièrement votre attention sur le fait que lors de la réparation le produit
est remis dans son état initial. La société MEDION ne pourra pas être tenue responsable
pour les frais éventuellement nécessaires pour une reconfiguration des logiciels, du gain
manqué, de la perte de vos données ou de logiciels et/ou de tout dommage consécutif.
Français
80
III. Conditions de garantie particulières pour les répara-
tions et/ou échanges sur site
Dans la mesure où le bon de garantie de votre produit MEDION stipule le service de répa-
ration et/ou d’échange sur site, il sera fait application des présentes conditions de garantie
pour la réparation et/ou les échanges sur site.
Pour la bonne mise en œuvre de la réparation et/ou l’échange sur site, veuillez prendre en
compte les points suivants :
Vous devez garantir à l’employé de MEDION l’accès sans restrictions, sûr et immé-
diat au produit défectueux.
Vous devez, à vos frais, mettre à disposition de l’employé de MEDION les installa-
tions de télécommunication nécessaires pour les tests, le diagnostic et la réparation
du produit.
Vous êtes seul responsable de restaurer vos logiciels d’application après avoir eu
recours aux services de MEDION.
Vous devez prendre toutes les mesures nécessaires à la bonne exécution de votre
demande de réparation.
Vous êtes seul responsable de la reconfiguration éventuellement nécessaire de vo-
tre connexion internet et des appareils périphériques existants après avoir eu re-
cours aux services de MEDION.
La période pendant laquelle vous pouvez annuler gratuitement une demande
d’intervention sur site est de 24 heures minimum avant le rendez-vous. Passé ce dé-
lai, nous vous facturerons les frais causés par l’annulation tardive ou le défaut
d’annulation.
IV. Rappel des dispositions légales
Garantie légale de conformité (extrait du Code de la consommation)
Article L. 211-4 Code de la consommation
Le vendeur est tenu de livrer un bien conforme au contrat et répond des défauts de
conformité existant lors de la délivrance. Il répond également des défauts de conformité
résultant de l'emballage, des instructions de montage ou de l'installation lorsque celle-ci a
été mise à sa charge par le contrat ou a été réalisée sous sa responsabilité.
Nota : Ordonnance 2005-136 2005-02-17 art. 5 : Les dispositions de la présente ordon-
nance s'appliquent aux contrats conclus postérieurement à son entrée en vigueur.
Article L. 211-5 Code de la consommation
Pour être conforme au contrat, le bien doit :
1° Etre propre à l'usage habituellement attendu d'un bien semblable et, le cas échéant :
correspondre à la description donnée par le vendeur et posséder les qualités que celui-ci a
présentées à l'acheteur sous forme d'échantillon ou de modèle présenter les qualités
qu'un acheteur peut légitimement attendre eu égard aux déclarations publiques faites par
le vendeur, par le producteur ou par son représentant, notamment dans la publicité ou
l'étiquetage
Conditions de garantie pour la France
81
Nederlands
Français
English
2° Ou présenter les caractéristiques définies d'un commun accord par les parties ou être
propre à tout usage spécial recherché par l'acheteur, porté à la connaissance du vendeur
et que ce dernier a accepté.
Nota : Ordonnance 2005-136 2005-02-17 art. 5 : Les dispositions de la présente ordon-
nance s'appliquent aux contrats conclus postérieurement à son entrée en vigueur.
Article L. 211-12 Code de la consommation
L'action résultant du défaut de conformité se prescrit par deux ans à compter de la déli-
vrance du bien.
Nota : Ordonnance 2005-136 2005-02-17 art. 5 : Les dispositions de la présente ordon-
nance s'appliquent aux contrats conclus postérieurement à son entrée en vigueur.
De la garantie des défauts et vices cachés (extrait du Code civil)
Article 1641 Code civil
Le vendeur est tenu de la garantie à raison des défauts cachés de la chose vendue qui la
rendent impropre à l'usage auquel on la destine, ou qui diminuent tellement cet usage,
que l'acheteur ne l'aurait pas acquise, ou n'en aurait donné qu'un moindre prix, s'il les
avait connus.
Article 1648 alinéa 1er Code civil
L'action résultant des vices rédhibitoires doit être intentée par l'acquéreur dans un délai de
deux ans à compter de la découverte du vice.
Français
82
Conditions de garantie pour la Belgie
I. Conditions générales de garantie
Généralités
La période de garantie commence toujours à courir le jour où le produit MEDION a été
acheté chez MEDION ou auprès d’un partenaire distributeur officiel de MEDION. La date
exacte de ce début de période de garantie est la date d’achat mentionnée sur le justificatif
d’achat ou la date indiquée sur l’original du bordereau de livraison. La garantie s’applique
à tous les défauts résultant d’un vice de matière ou de fabrication dans le cadre d’une
utilisation normale. Le type et la durée de la garantie sont indiqués sur la carte de garantie.
En cas de violation de contrat existant lors de la livraison de la marchandise, la période de
garantie est de deux (2) ans selon § 1649 quater alinéa 1 B.W. (Code civil)
Pour pouvoir réclamer des prestations de garantie, vous devez présenter les documents
suivants :
l’original du justificatif d’achat,
le cas échéant, l’original du bordereau de livraison,
la carte de garantie
Veuillez conserver précieusement l’original du justificatif d’achat, l’original du bordereau
de livraison et la carte de garantie. MEDION et ses partenaires distributeurs agréés se réser-
vent le droit de refuser des prestations de garantie s’il n’est pas possible de présenter le
justificatif d’achat, resp. le bordereau de livraison ou la carte de garantie ou lorsque les
données sont incomplètes, effacées ou ont été modifiées après l’achat initial par le
consommateur auprès du revendeur.
Si vous devez nous renvoyer le produit, vous êtes responsable de l’emballage adéquat du
produit pour le transport. Sauf mention contraire sur la carte de garantie, les frais
d’expédition et le risque du transport sont à votre charge.
Joignez au produit défectueux une description des défauts claire et aussi détaillée que
possible, avec votre adresse et votre numéro de téléphone ainsi que tous les accessoires
nécessaires à la réparation. Lors de la réalisation de la réparation, MEDION se base sur la
description des défauts contenue dans votre courrier d’accompagnement et des dysfonc-
tionnements constatés lors de la remise en état.
Pour avoir droit à la garantie, avant de nous envoyer un produit, vous devez toujours en
premier lieu prendre contact avec notre hotline. Cette hotline vous donnera un numéro de
référence (dit numéro RMA) que vous devrez inscrire à l’extérieur du paquet.
Le produit doit être envoyé complet, donc avec tous les accessoires fournis avec le produit
lors de l’achat. Si le produit est incomplet, cela entraîne des retards lors de la réparation
resp. lors du remplacement. MEDION n’assume aucune responsabilité pour des produits
envoyés en supplément qui ne font pas partie intégrante des accessoires fournis avec le
produit lors de l’achat.
La présente garantie ne limite ni vos droits au titre de consommateur selon la législation
nationale du pays dans lequel vous avez acquis les marchandises concernées (initiale-
Conditions de garantie pour la Belgie
83
Nederlands
Français
English
ment), ni vos droits à l’encontre du partenaire distributeur agréé de MEDION, selon les
mêmes dispositions légales nationales, comme conséquence du contrat d’achat.
Les cas de garantie n’entraînent pas un renouvellement resp. une prolongation de la pé-
riode de garantie initiale.
2. Etendue et fourniture des prestations de garantie
Si votre produit MEDION présente un défaut couvert par la présente garantie, MEDION
prend en charge, par la présente garantie, la réparation ou le remplacement du produit
MEDION en tout ou en partie. MEDION se réserve la décision de réparer ou de remplacer.
Dans cette mesure, MEDION peut décider discrétionnairement de remplacer le produit
renvoyé pour réparation par un produit de même qualité.
La garantie est limitée à la remise en état resp. au remplacement de la fonctionnalité du
matériel dans l’état du produit original avant la survenance du défaut. La garantie ne
s’étend pas à la restauration de données ou de logiciel. Avant d’envoyer le produit, vous
devez vous-même veiller à réaliser une copie de sauvegarde (backup) de données ou de
logiciel éventuellement mémorisés dans le produit, y compris le logiciel d’application et
d’exploitation. MEDION ne reconnaît aucune prétention en raison de la perte de ces don-
nées ou informations – à l’exception d’action délibérée ou de négligence grossière de la
part de MEDION –.
En cas de vices de matière ou de fabrication, les pièces défectueuses seront remplacées par
de nouvelles pièces. Eventuellement, l’ensemble du produit sera remplacé par un même
produit ou un produit dont la fonction est de même qualité. En tout cas, la valeur de la
prestation en garantie est limitée à la valeur du produit défectueux.
Les pièces défectueuses que nous remplaçons deviennent notre propriété.
La garantie englobe les heures de travail (du personnel) de MEDION ainsi que les frais
d’emballage et d’expédition par MEDION à l’acheteur.
Vous ne devez réaliser ou faire réaliser par des tiers aucune réparation sur des choses four-
nies par MEDION. Tout droit à la garantie s’éteint en cas de violation de cette clause.
Français
84
3. Exclusions de garantie
La garantie ne s’applique pas dans les cas suivants :
usure normale,
consommables,
produits dont la désignation de marque ou de type resp. le numéro de série a été
modifié ou enlevé,
la mise à disposition d’updates/upgrades de système de commande d’imprimante
ou de logiciel,
divergences minimes qui n’ont pas d’importance pour le fonctionnement de la
chose,
défauts suite à une utilisation incorrecte ou non conforme,
défauts suite à un manque de soin resp. un entretien incorrect ou inexistant,
utilisation, montage ou installation de choses ou de pièces en contradiction avec les
indications portées dans le mode d’emploi ou la documentation,
défauts dus à des virus d’ordinateur ou des défauts de logiciel dont MEDION n’est
pas responsable,
défauts ou messages de défauts suite à une tension d’alimentation incorrecte,
dommages dus à une protection insuffisante contre l’humidité ou l’effet chimique
ou électrochimique de l’eau,
défauts dus à l’utilisation de pièces de rechange, d’accessoires ou de programmes
qui ne sont pas d’origine,
produits qui ont été revendus de seconde main,
diminution de la capacité des batteries et des accumulateurs resp. de batteries et
accumulateurs qui n’ont pas été fournis par MEDION avec le produit,
lampe pour vidéo projecteur,
défauts de pixels (points d’image défectueux) dans les limites admises selon le
mode d’emploi ou le manuel de votre produit,
défauts suite à la brûlure ou à la perte de luminosité de produits au plasma ou LCD
causés par une utilisation non conforme. Dans le mode d’emploi ou le manuel,
vous trouverez des instructions précises sur l’utilisation de produits au plasma ou
LCD,
défauts de lecture de supports de données qui ont été réalisés dans un format in-
compatible ou avec un logiciel non inadéquat,
Tous les défauts suite à un cas de force majeure (p. ex. guerre, risque de guerre,
guerre civile, terrorisme, révolte, effet de guerre, incendie, foudre, dommage des
eaux, inondation, débrayage, occupation d’entreprise, grève, grève du zèle, restric-
tions d’importation et d’exportation, mesures gouvernementales, dysfonctionne-
ments des machines, perturbations dans l’alimentation en gaz, eau et électricité,
problèmes de transport).
Conditions de garantie pour la Belgie
85
Nederlands
Français
English
Au cas où, lors de l’examen du produit défectueux, il s’avèrerait que le défaut n’est pas
couvert par la garantie, MEDION vous en informera et vous soumettra une offre pour vous
permettre de décider si vous souhaitez quand même réparer le produit ou l’échanger.
Cette offre contient une indication des frais occasionnés par la réparation ou l’échange.
4. Service hotline
Avant d’envoyer un produit à MEDION, vous devez prendre contact avec notre hotline qui
comprend toutes les informations dont vous avez besoin pour faire valoir la garantie.
Le service hotline ne vous donne aucune aide en matière d’utilisation de logiciel ou de
matériel, de recherche dans le mode d’emploi resp. d’assistance pour des produits qui ne
viennent pas de chez MEDION.
II. Clauses de garantie spéciales pour MEDION PC, Note-
books, Pocket PCs (PDA) et appareil de navigation GPS
(PNA)
Si l’une des options fournies avec le produit présente un défaut, vous avez le droit à une
réparation resp. un échange. La garantie couvre les coûts de matériel et de main d’œuvre
pour le rétablissement de la fonctionnalité et des propriétés importantes du produit
MEDION concerné.
Si, avec votre produit, vous utilisez du matériel qui n’est ni fabriqué ni distribué par
MEDION, le droit à la garantie peut tomber en déchéance s’il est prouvé que le dommage
subi par le produit MEDION resp. les options fournies avec celui-ci a été causé par ces
options.
Une garantie restreinte est accordée pour le logiciel fourni avec le produit. Ceci s’applique
au logiciel d’exploitation et de commande préinstallé ainsi qu’aux logiciels d’application
fournis avec le produit. En ce qui concerne le logiciel fourni par MEDION avec le produit,
MEDION garantit que les supports de données (p. ex. disquettes et CD-ROM sur lesquels
le logiciel est livré) sont exempts de vice de matière et de fabrication pendant une durée
de six mois à partir de la date à laquelle le produit MEDION a été acheté chez MEDION ou
chez un partenaire distributeur officiel de MEDION. MEDION ne garantit pas à 100 %
l’exactitude des cartes fournies avec l’appareil de navigation GPS (PNA).
Si un support de données fourni avec le produit s’avère défectueux, MEDION le remplace
gratuitement.
Français
86
III. Clauses de garantie spéciales pour la réparation
resp. le remplacement sur place
Si la carte de garantie du produit indique expressément que vous avez le droit de réparer
resp. échanger celui-ci sur place, des conditions de garantie spéciales, applicables exclusi-
vement dans ce cas de figure, sont appliquées.
Pour permettre la réparation resp. le remplacement sur place, vous devez remplir les
conditions préalables suivantes :
Le collaborateur de MEDION doit avoir un accès illimité et sûr au produit, et cela
aussi rapidement que possible et sans retard.
Vous devez mettre gratuitement à la disposition des collaborateurs de MEDION les
équipements de télécommunication dont ils ont besoin pour exécuter leur tâche,
effectuer des contrôles et des diagnostics et éliminer le dysfonctionnement.
Après avoir eu recours à la prestation de service de MEDION, vous êtes vous-même
responsable de la restauration de votre propre logiciel d’application.
Vous devez prendre toutes les autres mesures nécessaires à l’exécution de la tâche
selon les prescriptions et les pratiques usuelles.
Après avoir eu recours à la prestation de service de MEDION, vous êtes vous-même
responsable de la configuration et du raccordement de produits externes éventuel-
lement disponibles.
Jusqu’à 24 heures avant la date prévue, dernier délai, vous pouvez annuler gratui-
tement la tâche de réparation/échange sur place. Passé ce délai, les frais occasion-
nés par l’annulation tardive vous seront facturés à moins que vous puissiez invo-
quer un cas de force majeure.
Conditions de garantie pour le Luxembourg
87
Nederlands
Français
English
Conditions de garantie pour le Luxembourg
I. Informations légales
MEDION SARL
Siége social : J. F. Kennedy Laan, 16 a, B-5981 SC Panningen
Téléphone : 0032.077-30.81.100
Fax : 0032.077-30.81.188
No d’immatricualtion au Registre de Commerce et des Sociétés de Limburg-Noord
(Belgique)
Matricule TVA (á préciser par MEDION BV)
No d’identification (á préciser per MEDION BV)
Représentatn légal : Peters Gerardus Joannes Andréas
II. Conditions générales de garantie
MEDION BV commercialise sur son site www.medion.com ainsi que dans des magasins
situés en Belgique et au Luxembourg, des produits de multimedias.
1. Généralités
La période de garantie commence toujours à courir le jour où le produit MEDION a été
acheté chez MEDION ou auprès d’un partenaire distributeur officiel de MEDION.
La date exacte de ce début de période de garantie est la date d’achat mentionnée sur le
justificatif d’achat ou la date indiquée sur l’original du bordereau de livraison.
La garantie s’applique à tous les défauts résultant d’un vice de matière ou de fabrication
dans le cadre d’une utilisation normale, ainsi qu’à tout d´faut de conformité du produit
vendu.
Le type et la durée de la garantie sont indiqués sur la carte de garantie.
Pour pouvoir réclamer des prestations de garantie, vous devez présenter les documents
suivants :
L’original du justificatif d’achat ;
Le cas échéant, l’original du bordereau de livraison ;
la carte de garantie.
Veuillez conserver précieusement l’original du justificatif d’achat, l’original du bordereau
de livraison et la carte de garantie.
MEDION et ses partenaires distributeurs agréés se réservent le droit de refuser des
prestations de garantie s’il n’est pas possible de présenter le justificatif d’achat,
respectivement le bordereau de livraison ou la carte de garantie ou lorsque les données
sont incomplètes, effacées ou ont été modifiées après l’achat initial par le consommateur
auprès du revendeur.
Français
88
Si vous devez nous renvoyer le produit, vous êtes responsable de l’emballage adéquat du
produit pour le transport. Sauf mention contraire sur la carte de garantie, les frais
d’expédition et le risque du transport sont à votre charge.
Joignez au produit défectueux une description des défauts claire et aussi détaillée que
possible, avec votre adresse et votre numéro de téléphone ainsi que tous les accessoires
nécessaires à la réparation. Lors de la réalisation de la réparation, MEDION se base sur la
description des défauts contenue dans votre courrier d’accompagnement et des
dysfonctionnements constatés lors de la remise en état.
Pour avoir droit à la garantie, vous devez toujours en premier lieu prendre contact avec
notre hotline. Cette hotline vous donnera un numéro de référence (dit numéro RMA) que
vous devrez inscrire à l’extérieur du paquet.
Le produit doit être envoyé complet, donc avec tous les accessoires fournis avec le produit
lors de l’achat. Si le produit est incomplet, cela entraîne des retards lors de la réparation
respectivement lors du remplacement. MEDION n’assume aucune responsabilité pour les
produits envoyés en supplément qui ne font pas partie intégrante des accessoires fournis
avec le produit lors de l’achat.
La présente garantie ne limite ni vos droits au titre de consommateur selon la législation
nationale du pays dans lequel vous avez acquis les marchandises concernées
(initialement), ni vos droits à l’encontre du partenaire distributeur agréé de MEDION, selon
les mêmes dispositions légales nationales, comme conséquence du contrat d’achat.
Les cas de garantie n’entraînent pas un renouvellement resp. une prolongation de la
période de garantie initiale.
Conditions de garantie pour le Luxembourg
89
Nederlands
Français
English
2. Etendue et fourniture des prestations de garantie
Si votre produit MEDION présente un défaut couvert par la présente garantie, vous avez le
choix, entre, rendre le produit et vous faire restituer le prix ou garder le produit vendu
comportant un défaut et vous faire restituer une partie du prix.
Vous disposez en outre de la faculté de remplacement, respectivement de réparation
(réparation à effectuer exclusivement auprés de MEDION BV).
MEDION prend en charge, par la présente garantie, la réparation ou le remplacement du
produit MEDION en tout ou en partie. MEDION se réserve la décision de réparer ou de
remplacer. Dans cette mesure, MEDION peut décider discrétionnairement de remplacer le
produit renvoyé pour réparation par un produit de même qualité.
La garantie est, dans le choix de l’option effecuée de remplacement, respectivement de
réparaiont par l’acheteur, á la remise en état, respectivement au remplacement de la
fonctionnalité du matériel dans l’état du produit original avant la survenance du défaut.
La garantie est limitée dans le cas de l’excercice de l’option par l’acheteur de la faculté de
remplacement en réparation.
La garantie ne s’étend pas à la restauration de données ou de logiciel. Avant d’envoyer le
produit, vous devez vous-même veiller à réaliser une copie de sauvegarde (back-up) de
données ou de logiciel éventuellement mémorisés dans le produit, y compris le logiciel
d’application et d’exploitation. La responsabilité de MEDION ne saurait étre engagée, en
raison de la perte de ces données ou informations, à l’exception d’action délibérée ou de
négligence grossière de la part de MEDION.
En cas de vices de matière ou de fabrication, les pièces défectueuses seront remplacées par
de nouvelles pièces. Eventuellement, l’ensemble du produit sera remplacé par un même
produit ou un produit dont la fonction est de même qualité. En tout cas, la valeur de la
prestation en garantie est limitée à la valeur du produit défectueux.
Les pièces défectueuses que nous remplaçons deviennent notre propriété.
La garantie englobe les heures de travail (du personnel) de MEDION ainsi que les frais
d’emballage et d’expédition par MEDION à l’acheteur.
En cas de défaut de conformité, le produit vendu sera remplacé par un produit semblable,
de valeur égale á celle du produit entaché de défaut de conformité.
Français
90
3. Exclusions de garantie
La garantie ne s’applique pas dans les cas suivants :
Les vices apparents non contestés lors de la réception du produit acheté,
usure normale,
consommables,
produits dont la désignation de marque ou de type resp. le numéro de série a été
modifié ou enlevé,
la mise à disposition d’updates/upgrades de système de commande d’imprimante
ou de logiciel,
divergences minimes qui n’ont pas d’importance pour le fonctionnement de la
chose,
défauts suite à une utilisation incorrecte ou non conforme,
défauts suite à un manque de soin resp. un entretien incorrect ou inexistant,
utilisation, montage ou installation de choses ou de pièces en contradiction avec les
indications portées dans le mode d’emploi ou la documentation,
défauts dus à des virus d’ordinateur ou des défauts de logiciel dont MEDION n’est
pas responsable,
défauts ou messages de défauts suite à une tension d’alimentation incorrecte,
dommages dus à une protection insuffisante contre l’humidité ou l’effet chimique
ou électrochimique de l’eau,
défauts dus à l’utilisation de pièces de rechange, d’accessoires ou de programmes
qui ne sont pas d’origine,
diminution de la capacité des batteries et des accumulateurs resp. de batteries et
accumulateurs qui n’ont pas été fournis par MEDION avec le produit,
lampe pour vidéo projecteur,
défauts de pixels (points d’image défectueux) dans les limites admises selon le
mode d’emploi ou le manuel de votre produit,
défauts suite à la brûlure ou à la perte de luminosité de produits au plasma ou LCD
causés par une utilisation non conforme. Dans le mode d’emploi ou le manuel,
vous trouverez des instructions précises sur l’utilisation de produits au plasma ou
LCD,
défauts de lecture de supports de données qui ont été réalisés dans un format
incompatible ou avec un logiciel non inadéquat,
Tous les défauts suite à un cas de force majeure (p. ex. guerre, risque de guerre,
guerre civile, terrorisme, révolte, effet de guerre, incendie, foudre, dommage des
eaux, inondation, débrayage, occupation d’entreprise, grève, grève du zèle,
restrictions d’importation et d’exportation, mesures gouvernementales,
dysfonctionnements des machines, perturbations dans l’alimentation en gaz, eau et
électricité, problèmes de transport).
Conditions de garantie pour le Luxembourg
91
Nederlands
Français
English
Au cas où, lors de l’examen du produit défectueux, il s’avèrerait que le défaut n’est pas
couvert par la garantie, MEDION vous en informera et vous soumettra une offre pour vous
permettre de décider si vous souhaitez quand même réparer le produit ou l’échanger.
Cette offre contient une indication des frais occasionnés par la réparation ou l’échange.
4. Service hotline
Avant d’envoyer un produit à MEDION, vous devez prendre contact avec notre hotline qui
comprend toutes les informations dont vous avez besoin pour faire valoir la garantie.
Le service hotline ne vous donne aucune aide en matière d’utilisation de logiciel ou de
matériel, de recherche dans le mode d’emploi resp. d’assistance pour des produits qui ne
viennent pas de chez MEDION.
III. Clauses de garantie spéciales pour MDEION PC,
Notebooks, Pocket PCs (PDA) et appareil de navigation
GPS (PNA)
Si l’une des options fournies avec le produit présente un défaut, vous avez le droit à une
réparation resp. un échange. La garantie couvre les coûts de matériel et de main d’œuvre
pour le rétablissement de la fonctionnalité et des propriétés importantes du produit
MEDION concerné.
Si, avec votre produit, vous utilisez du matériel qui n’est ni fabriqué ni distribué par
MEDION, le droit à la garantie peut tomber en déchéance s’il est prouvé que le dommage
subi par le produit MEDION resp. les options fournies avec celui-ci a été causé par ces
options.
Une garantie restreinte est accordée pour le logiciel fourni avec le produit.
Ceci s’applique au logiciel d’exploitation et de commande préinstallé ainsi qu’aux logiciels
d’application fournis avec le produit.
En ce qui concerne le logiciel fourni par MEDION avec le produit, MEDION garantit que les
supports de données (p. ex. disquettes et CD-ROM sur lesquels le logiciel est livré) sont
exempts de vice de matière et de fabrication pendant une durée de six mois à partir de la
date à laquelle le produit MEDION a été acheté chez MEDION ou chez un partenaire
distributeur officiel de MEDION. MEDION ne garantit pas à 100 % l’exactitude des cartes
fournies avec l’appareil de navigation GPS (PNA).
Si un support de données fourni avec le produit s’avère défectueux, MEDION le remplace
gratuitement.
Français
92
IV. Clauses de garantie spéciales pour la réparation
respectivement le remplacement sur place
Si la carte de garantie du produit indique expressément que vous avez le droit de réparer
respectivement échanger celui-ci sur place, des conditions de garantie spéciales,
applicables exclusivement dans ce cas de figure, sont appliquées.
Pour permettre la réparation, respectivement le remplacement sur place, vous devez
remplir les conditions préalables suivantes :
Le collaborateur de MEDION doit avoir un accès illimité et sûr au produit, et cela
aussi rapidement que possible et sans retard.
Vous devez mettre gratuitement à la disposition des collaborateurs de MEDION les
équipements de télécommunication dont ils ont besoin pour exécuter leur tâche,
effectuer des contrôles et des diagnostics et éliminer le dysfonctionnement.
Après avoir eu recours à la prestation de service de MEDION, vous êtes vous-même
responsable de la restauration de votre propre logiciel d’application.
Vous devez prendre toutes les autres mesures nécessaires à l’exécution de la tâche
selon les prescriptions et les pratiques usuelles.
Après avoir eu recours à la prestation de service de MEDION, vous êtes vous-même
responsable de la configuration et du raccordement de produits externes
éventuellement disponibles.
Jusqu’à 24 heures avant la date prévue, dernier délai, vous pouvez annuler
gratuitement la tâche de réparation/échange sur place. Passé ce délai, les frais
occasionnés par l’annulation tardive vous seront facturés à moins que vous puissiez
invoquer un cas de force majeure.
V. Droit de rétractation
Dans le cas d’achat d’un produit MEDION via le site web shop, l’acheteur dispose d’un
délai de rétractation d’une durée de 7 jours à compter de la réception des marchandises,
sans pénalités er sans indication du motif.
En cas d’exercice du droit, MEDION remboursera à celui-ci le prix de vente ainsi que les
frais d’envoi de la marchandise au domicile de l’acheteur.
En cas d’exercice du droit de rétractation de l’acheteur, les frais de retour de la
merchandise demeurent à sa seule charge ; tout retour de marchandise s’effectue par
ailleurs aux risques, périls et frais du client.
VI. Loi applicable et juridiction compétente
Les présentes conditions générales de vente sont soumises à l’application du droit
luxembourgeois, tant pour les produits achetés par des acheteurs luxembourgeois, via le
site web shop, que pour les produits achetés dans le magasins ALDI sis sur le terretoire
luxembourgeois.
Index
93
Nederlands
Français
English
Index
A
Adaptateur de voiture.........................13
Affichage de Bluetooth .........................9
AlarmClock (fonction réveil)
Boutons ..........................................52
Ecran principal................................51
Fonction Snooze.............................56
Quitter............................................56
Réglage de l’heure du système .......53
Réglage du volume.........................55
Sélection d'une sonnerie ................54
Allumer et éteindre .............................17
Autorun..............................................65
Autostart.............................................65
Autre méthode d'installation du
logiciel de navigation à partir
d'une carte mémoire ......................73
Autres cartes
Transférer sur une carte mémoire ...72
Transfert de fichiers d'installation
et de cartes dans la mémoire
interne ........................................73
Avez-vous besoin d'assistance
supplémentaire ? ............................61
B
Bluetooth Dialer
Démarrer ........................................37
Écran principal................................38
Pairing ............................................40
Traiter des appels............................41
Bouton marche/arrêt ..........................10
Branchement USB Mini.......................11
C
Câblage ................................................4
CleanUp........................................18, 62
Commandes vocales...........................33
Compatibilité électromagnétique......... 3
Conditions de garantie....................... 76
Conditions d'utilisation........................ 2
Configuration initiale
Alimentation électrique.................. 13
Charger la batterie ......................... 12
Démarrer l'appareil........................ 15
Installer le logiciel de navigation .... 16
Conseils de sécurité
Alimentation éléctrique................ 3, 4
Avertissement .................................. 5
Conditions d'utilisation.................... 2
Entretien de l'écran .......................... 6
Navigation ..................................... 24
Raccordement.................................. 3
Réparations ...................................... 2
Sauvegarde des données.................. 1
Température ambiante..................... 2
Transport ......................................... 7
Utilisation de la batterie.................... 5
Câblage............................................ 4
Consignes pour une utilisation dans
un véhicule .................................... 25
Contenu de l’emballage....................... 8
D
DC AutoSuspend ............................... 63
E
Échange de données .......................... 72
Entretien de l’écran.............................. 6
F
FAQ.................................................... 60
Fixation la navitagion GPS.................. 27
Fonction spéciale CleanUp........... 18, 62
G
GPS (Global Positioning System)........ 68
Français
94
H
Haut-parleur .......................................10
I
Indice .................................. i, 18, 19, 22
Informations relatives à la surveillance
du trafic ..........................................30
Informations techniques.....................74
Installer Microsoft
®
ActiveSync
®
............65
L
L’adaptateur secteur...........................14
L'affichage de l'état du chargement......9
Lecteur de cartes.................................72
Lecteur MP3
Écran principal................................43
Liste des favoris...............................45
Signets............................................45
M
Manipuler les cartes mémoire.............71
Mini-USB-Anschluss ............................11
Mot de passe ........... i, 18, 19, 20, 21, 22
N
Navigation
Démarrer le logiciel de navigation ..29
Fixation la navigation GPS...............27
Monter la fixation voiture................26
Orientation de l'antenne.................26
Numéro de série ....................................i
O
Orientation de l’antenne ....................26
P
Pannes et causes probables ................61
PayTMC..............................................69
Picture Viewer.....................................46
Utilisation .......................................46
Q
Qualité ................................................. ii
Questions fréquemment posées......... 60
R
R&TTE.................................................. 5
Recyclage............................................. 6
Réinitialiser la navigation GPS
Hard Reset...................................... 23
Reset .............................................. 23
Réparations.......................................... 2
Reproduction de ce manuel ..................ii
S
Sauvegarde des données ..................... 1
Security..........................i, 18, 19, 21, 22
Service ..................................................ii
Service après-vente ............................ 61
Sommaire ............................................iii
Sudoku
Description des boutons ................ 59
Ecran principal ............................... 57
SuperPIN..............................i, 20, 21, 22
Synchronisation avec le PC
Installer Microsoft
®
ActiveSync
®
....... 65
Raccorder au P'C............................ 66
Travailler avec Microsoft®
ActiveSync® ................................ 67
T
Température ambiante......................... 2
TMC (Traffic Message Channel) ......... 69
Touch Screen ....................................... 9
Transport ............................................. 7
Travel Guide ...................................... 49
U
Utilisation
Allumer et éteindre ........................ 17
Manipuler les cartes memoire ........ 71
Utilisation de la batterie........................ 5
UUID....................................i, 20, 21, 22
Nederlands Français
English
Notes on these Operating Instructions
The operating instructions and installation guidelines have been organized so that subject-
related information can be easily found using the contents list.
Note
You will find comprehensive Operating Instructions for navigation on
relevant CDs/DVDs and at the online help of the device.
The section "Frequently Asked Questions" contains answers to questions that are fre-
quently addressed to our customer service department.
Document Your Navigation Unit
It is important to record the details of your Navigation Unit and the purchase thereof. In
the event you require warranty support you may be asked for this information. The serial
number can be found on the back of the device:
Serial Number ....................................................................................
Password ....................................................................................
Information note ....................................................................................
SuperPIN ....................................................................................
UUID ....................................................................................
Date of Purchase ....................................................................................
Place of Purchase ....................................................................................
Please record the serial number into any appropriate guarantee documents.
You will enter your own password and information note using the Security Function.
The SuperPIN and the UUID will be provided following the activation of the Security Func-
tion. See Page 17.
ii
Quality
The components used have been selected to provide a product that has a high level of
functionality and is user friendly, safe and reliable. A well-balanced hardware and software
design allows us to offer you a technologically advanced navigation system, which is both
practical and enjoyable to use.
Service
Our customer care is there to provide support and assistance whenever you have ques-
tions or are experiencing problems.
This manual contains a section specific to Customer Service starting on page 41.
Copyright © 2009, version 24/08/2009. All rights reserved. Microsoft
®
, MS-DOS
®
, and Windows are
registered trademarks of Microsoft Corporation in the U.S. and other countries. Pentium
®
is a regis-
tered trademark of Intel Corporation. The names of actual companies and products mentioned herein
may be the trademarks of their respective owners. Information in this document is subject to change
without notice
.
iii
Nederlands Français
English
Contents
Safety and Maintenance ..................................................................................1
Safety Instructions......................................................................................................... 1
Data Security................................................................................................................. 1
Operating Environment................................................................................................. 2
Repair............................................................................................................................ 2
Ambient temperature.................................................................................................... 2
Electromagnetic Compatibility ...................................................................................... 3
Connection ................................................................................................................... 4
Power supply through Car Adapter............................................................................ 4
Power Supply through AC adapter (optional) ............................................................ 4
Cabling .........................................................................................................................4
Information about the Regulatory Compliance according to R&TTE.............................. 5
Battery Operation.......................................................................................................... 5
Cleaning and Maintenance............................................................................................ 5
Care of the Display ........................................................................................................ 6
Recycling and Disposal.................................................................................................. 6
Transport ...................................................................................................................... 7
Supplied Items .............................................................................................................. 8
Views ...............................................................................................................9
Front Components........................................................................................................ 9
Back Components ....................................................................................................... 10
Top Components ........................................................................................................ 10
Bottom Components................................................................................................... 11
Left Side ...................................................................................................................... 11
Initial Set up..................................................................................................12
I. Charging the Battery ................................................................................................ 12
II. Power Supply .......................................................................................................... 13
Car adapter.............................................................................................................. 13
Alternative possibility of charging the battery........................................................... 13
AC Adapter (optional) .............................................................................................. 14
III. Switching on the Device ......................................................................................... 15
IV. Installing the Navigation Software.......................................................................... 16
General Operating Instructions .....................................................................17
Switching on/off the device......................................................................................... 17
iv
Security .........................................................................................................18
Storing the password and the information note .......................................................... 18
Making settings........................................................................................................... 19
SuperPIN and UUID..................................................................................................... 20
Making subsequent settings........................................................................................ 21
Password Request ....................................................................................................... 22
Resetting the Navigation System ................................................................................. 23
Reset ...........................................................................................................................23
Switching the Device off Completely / Hard Reset ....................................................... 23
Navigation.....................................................................................................24
Safety Instructions for Navigation................................................................................ 24
General Instructions................................................................................................. 24
Notes for Use in a Vehicle ......................................................................................... 25
Aerial Orientation ........................................................................................................ 26
I. Mounting the Car Holder ......................................................................................... 26
II. Attaching the Navigation System............................................................................. 27
III. Connecting the Car Adapter ................................................................................... 28
IV. Starting the Navigation Software............................................................................ 29
Warning function for traffic monitoring points ............................................30
Speech commands (optional)........................................................................33
Handsfree Facility by means of Bluetooth (optional)........................................37
Starting the Bluetooth Application............................................................................... 37
Overview of the Main Screen ................................................................................... 38
Pairing the Navigation Device and the Mobile Phone ............................................... 39
Accepting incoming calls ......................................................................................... 40
Making Calls ............................................................................................................ 40
During a Call............................................................................................................ 41
MP3 Player (optional) ...................................................................................42
Main Screen Overview................................................................................................. 42
Select a Title and Move it into the List of Favourites.................................................. 43
List of Favourites ...................................................................................................... 44
List of the established bookmarks ................................................................................ 44
Picture Viewer (optional)..............................................................................45
Operating the Picture Viewer....................................................................................... 45
Main Screen ................................................................................................................ 45
Full Image View........................................................................................................ 46
Travelguide (optional) ..................................................................................48
v
Nederlands Français
English
AlarmClock (Wake up function) (optional)...................................................50
Overview of the main screen ....................................................................................... 50
Description of the Interfaces........................................................................................ 51
Setting the System Time........................................................................................... 52
Selecting an Alarm Signal......................................................................................... 53
Setting the Volume .................................................................................................. 54
Snooze Function ...................................................................................................... 55
Ending the Alarm Clock Application......................................................................... 55
Sudoku (optional) .........................................................................................56
Main Screen ................................................................................................................ 56
Description of the switch fields.................................................................................... 57
Overview of the game area.......................................................................................... 58
Description of the switch fields................................................................................. 58
FAQ................................................................................................................59
Customer Service ...........................................................................................60
Faults and Possible Causes .......................................................................................... 60
Additional Support...................................................................................................... 60
Appendix .......................................................................................................61
Special CleanUp Function............................................................................................ 61
Synchronisation with the PC........................................................................................ 64
I. Installing Microsoft
®
ActiveSync
®
............................................................................ 64
II. Connecting with the PC ....................................................................................... 65
Mass Storage Mode.................................................................................................. 65
ActiveSync
®
mode..................................................................................................... 66
Alternative possibility of charging the battery........................................................... 66
III. Working with Microsoft
®
ActiveSync
®
.................................................................... 67
GPS (Global Positioning System) ................................................................................. 68
TMC (Traffic Message Channel)................................................................................... 69
Pay TMC (optional) ..................................................................................................... 69
Installing the External TMC Receiver / Connecting an additional TMC Dipole
Aerial (optional) ....................................................................................................... 70
Working with Memory Cards....................................................................................... 71
Inserting Memory Cards........................................................................................... 71
Removing Memory Cards......................................................................................... 71
Accessing Memory Cards ......................................................................................... 71
Data Exchange via Card Reader ................................................................................ 71
Additional Card Material.............................................................................................. 72
Transfer of card material to a memory card .............................................................. 72
Alternate method of installing Navigation Software (using a Memory Card) ........... 73
Transferring Installation Files and Map Material to the Internal Memory .................. 73
vi
Specifications ................................................................................................74
Model Overview .............................................................................................75
Conditions of Warranty for the United Kingdom...........................................76
Index .............................................................................................................82
Safety and Maintenance
1
Nederlands Français
English
Safety and Maintenance
Safety Instructions
Please read this section carefully and follow all the instructions provided. This will help
ensure reliable operation and prolong the life for your appliance.
Keep the packaging and the user instructions for future reference or inquiries at a later
date. If you pass the article on to another person, you should pass on these instructions.
Never allow children to play with electrical equipment unsupervised.
Keep the packing materials, such as plastic bags away from children as there is a
danger of suffocation.
Never open up the housing of the appliance or the power adapter. These contain
no user-serviceable parts. If the housing is opened there is a danger of electric
shock.
Do not place any objects on the appliance and do not exert any pressure on the
display. Otherwise there is a danger that the screen will break.
To avoid damage, do not touch the screen with sharp objects. We recommend us-
ing only the stylus provided or finger when using the touch-screen functionality of
the product.
There is a risk of injury if the display breaks. If this should occur, use protective
gloves to pack the broken parts and contact customer support to arrange for dis-
posal. Then wash your hands with soap, since there is a possibility that chemicals
may have escaped.
Remove the power adapter from the outlet, switch the appliance off immediately, or do
not switch it on, and contact Customer Service.
If the housing of the appliance or the power pack becomes damaged or liquid may
have leaked into it the components must be checked by Customer Service in order
to avoid damage!
Data Security
Every time your data is updated or modified backup copies should be made on an
external storage medium. The supplier assumes NO liability for data loss or damage
to data storage units, and no claims can be accepted for damages resulting from
the loss of data or for consequential damages.
Safety and Maintenance
2
Operating Environment
Failure to follow these instructions may lead to your appliance being damaged. In cases
where products are damaged as a result of misuse of neglect the associated guarantee will
be considered void.
Keep your navigation System and all connected devices away from moisture and
avoid exposure to dust, heat and direct sunlight, especially in the car.
Make sure you prevent your appliance from getting wet, e.g. from rain and hail, at
all times. Please note that moisture can even build up inside a protective pouch as a
result of condensation.
Avoid heavy vibrations and shaking.
Please note the device should be installed vertically, this will ensure that the device
remains secured within its holder.
Repair
Please contact our Service Center if you encounter technical problems with your
appliance.
In the event repair becomes necessary, please use only our authorized Service
Partners. You will find the address on the back of your guarantee card.
Ambient temperature
The appliance will operate effectively at an ambient temperature of between +32°F
and +95°F (0° C and 35° C) and at a relative humidity of between 10% and 90%
(non-condensing).
In the powered down state the appliance can be stored at between -4°F and
+140°F (-20°C and +60°C).
Store the appliance in a safe location, away from high temperatures (e.g. when
parking or from direct sunlight).
Safety and Maintenance
3
Nederlands Français
English
Electromagnetic Compatibility
When connecting additional or other components the “Electromagnetic Compati-
bility Directive” (EMC) must be adhered to. Please note that only screened cable
(maximum 10ft) should be used with this appliance.
For optimal performance, maintain a distance of at least 10 ft. from sources of high-
frequency and magnetic interference (televisions, loudspeaker systems, mobile
telephones etc. This will help to avoid malfunctions and loss of data.
Electronic devices emit electromagnetic waves during operation.
These emissions are harmless, but can interfere with other devices operated in close
proximity.
While our devices are tested and optimized for electromagnetic compliance in our
laboratories, interference during operation may still occur in the device itself and
with other devices in its proximity.
Should such interference occur, try to eliminate it by adjusting the positions of and
the distances between the devices.
Before driving, please ensure that the electronic systems of the car are working
properly.
Safety and Maintenance
4
Connection
When connecting your appliance it is important to observe the following instructions:
Power supply through Car Adapter
The car adapter should only be connected to the lighter socket of a car
(car battery = DC 12V , truck battery = DC 24V ). If you are in any doubt about
the power source in your car, please contact your car manufacturer.
Power Supply through AC adapter (optional)
The outlet must be in the vicinity of the appliance and must be easily
accessible.
To disconnect your appliance from the power source, remove the mains adapter
from the power socket.
Only use the mains adapter on sockets at AC 100–240 V~ AC, 50/60 Hz. If you are
unsure about the power supply to the place of use, ask the relevant energy sup-
plier.
Use only the power adapter provided with your appliance.
Do not cover the power supply unit, in order to avoid damage through unaccept-
able warming.
Stop using the power supply unit if the housing or the feed line to the device is
damaged. Replace it with a power supply unit of the same type.
For additional safety, we recommend the use of a surge protector in order to pro-
tect your appliance from damage from spikes or lighting strikes on the power
network.
Cabling
Arrange cables so that they do not cause unnecessary obstruction or risk entangle-
ment or snaring. E.g. ensure that the cables cannot be trod on, or tripped over.
Do not put any objects on the cable, because it could be damaged if you do so.
Do not use any force and pay attention to the correct orientation of the plug when
connecting the cables and plugs.
Do not permit any great forces to be exerted on the plug connections, from the
side, for example. This will lead to damage in and to your device if you do so.
Avoid short circuiting and broken cable by not crushing or bending it sharply.
Safety and Maintenance
5
Nederlands Français
English
Information about the Regulatory Compliance according
to R&TTE
The following radio equipment has been supplied with this device (optional):
Bluetooth (only for model E4445)
The company declares that this device is in compliance with the essential requirements
and other relevant provisions of Directive 1999/5/EC. Complete declarations of conformity
are available under www.medion.com/conformity
.
Battery Operation
Your appliance is powered by an integrated battery. In order to prolong the life and effi-
ciency of your battery and ensure safe operation, follow the instructions below:
Batteries cannot withstand excessive heat. Take care to avoid overheating of appli-
ance and the integrated battery. Failure to comply with this instruction may lead to
damage to or, even explosion of the battery.
Only use the car adapter to charge the battery from the navigation kit.
The batteries are special category waste. When disposing of the appliance en-
sure that this is done correctly. Contact Customer Service for more details.
Cleaning and Maintenance
Warning
There are no user-serviceable or parts which require cleaning inside the
housing of the appliance.
You can prolong the life of the appliance by taking the following simple steps:
Always remove the power plug and all connecting cables before cleaning.
Clean the appliance only with a damp, lint-free cloth.
Do not use solvents, caustic or gaseous cleaners.
Safety and Maintenance
6
Care of the Display
Avoid scratching the display surface as this may be easily damaged. We recom-
mended using a display protection film (mylar) to prevent scratching to the screen.
Please contact your nearest dealer for this accessory.
The foil on the display at delivery is purely for protection during transportation!
Ensure that no traces of water remain on the screen. Water can cause irreversible
discoloration.
Use only a soft, lint-free cloth to clean the screen.
Do not expose the screen to strong sunlight or ultraviolet radiation.
Recycling and Disposal
The device and its packaging are recyclable.
Device
At the end of its life, the appliance must not be disposed of in household rubbish. Consult
your local waste disposal company to enquire about environmentally-friendly options for
disposal.
Packaging
To avoid damage during transport, the appliance is supplied in protective packaging. The
majority of packaging is manufactured from materials which can be disposed of in an
environmentally friendly manner and be recycled professionally.
Safety and Maintenance
7
Nederlands Français
English
Transport
When transporting the appliance please follow the instructions below:
In the event of large fluctuations in temperature or humidity, condensation or
moisture may form inside the appliance. This can cause an electrical short-circuit.
After transporting the appliance wait until the unit has acclimatised and adjusted to
surrounding conditions (e.g. room temperature and humidity) prior to use.
In order to protect the appliance from dirt, knocks and scratching, please use an
appropriate protective case.
Before travelling ensure that you are aware of the power and communications pro-
visions at your destination. Before travelling obtain any power or communications
adapters that may be required for the operation of your device.
When shipping your appliance we recommend using the original packaging. If the
original packaging isn’t available please contact customer service for advice.
When passing through baggage control at airports, it is recommended that you
pass the appliance and all magnetic storage media (external hard drives) through
the X-ray system (the machine on which your bags are placed). Avoid the magnetic
detector (the structure through which you yourself pass) or the magnetic wand
(the hand device that the security staff use), since this may corrupt your data.
Safety and Maintenance
8
Supplied Items
Please check the condition of items supplied and check for missing items using the list
below. If you find your package to be incomplete, please forward us all claims for missing
items within 14 days from the date of purchase.
The package should include the following:
Navigation system
Power cable for cigarette lighter
USB cable
Car holder
CDs/DVDs with navigation software, digital maps, ActiveSync®, data for rapidly re-
setting the contents of the memory card/internal memory
Instruction manual and warranty card
Optional
AC adapter
Memory card
TMC dipole antenna
External TMC receiver
Earphones
Protective case
Views
9
Nederlands Français
English
Views
Front Components
Ref Component Description
n
Microphone (only for models E4245 and E4445)
o
Battery charge
indicator
The LED will flash orange during the charging
process. It will shine constant green when the
accumulator is fully charged.
p
Bluetooth indicator This LED will blink at different speeds, according
to the connection status, if Bluetooth has been
activated (only for model P4445)
q
Touch Screen Displays the output of your appliance. Tap on
the screen with the stylus (found in the holder,
see page 27) to select menu commands or
enter data.
n
p
o
q
Views
10
Back Components
Ref Component Description
n
Loudspeaker Provides audible language statements and warn-
ings.
Top Components
Ref Component Description
n
On/Off button
Turn the device on or off by pressing and holding
the On/Off button. You will switch to the stand-
by mode or reactivate the device by quickly press-
ing the button.
o
Slot for mem-
ory card
Accepts an optional memory card for
removable storage.
GPS
aerial
n
n
o
Views
11
Nederlands Français
English
Bottom Components
Ref Component Description
n
Mini-USB-
Connector
Connection for connecting to a PC by means of a
USB cable (for data transfer) as well as connection to
external power supply.
You also have the possibility to connect an external
TMC receiver here (only for model E4145)
Left Side
Ref Component Description
n
Headphone
connection
Connection for a pair of stereo headphones
Using this appliance at full or
high volumes for extended
periods of time may cause
damage to the hearing of the
listener.
You also have the possibility to connect a TMC di-
pole antenna here (only for models E4245 and
E4445).
n
n
Initial Set up
12
Initial Set up
The following is a step by step guide to assist in the initial Set-up of the navigation system.
Start by removing the protective plastic sheet from the display.
I. Charging the Battery
The battery of your navigation system can be charged in the following ways:
Using the supplied car adapter,
using a suitable USB cable or
by using a mains adapter (purchased as an optional extra).
Attention!
It may be necessary to initially charge the battery for a considerable period
of time prior to commencing and running through the initial installation,
this is dependent on the level of charge held at the time by the internal
battery.
Please observe the following notes:
The charging status display LED will flash orange until the navigation system is
charged. If possible, do not interrupt the charging process until the
battery is fully charged. This may take a few hours. The charging status LED will
shine constant green if the battery has a high level of charge. Leave the device
charging for 20 further minutes, to ensure the battery is charged-up fully.
The navigation system can be used during the charging process, but the power
supply must not be interrupted during initial set-up.
Leave the external power supply connected to the navigation system for around
24 hours, so that the backup battery also charges-up fully.
The external power supply can remain connected; this is recommended for con-
tinuous operation.
Even after a power source has been connected to the device it may take several
minutes until the device is once again ready to operate again, this occurs if the
charging state of the battery is exceptionally low. The battery will continue to be
charged if the power supply is connected and the device is switched off.
Initial Set up
13
Nederlands Français
English
II. Power Supply
Car adapter
(similar picture)
1. Plug the jack (n) of the connection cable into the corresponding receptor at the
bottom of your navigation system.
2. Insert the power adapter (o) into the cigar lighter socket ensuring, that it will not
lose contact while driving. This could cause a malfunction.
Alternative possibility of charging the battery
The battery will charge as soon as you connect your navigation device to a switched-on PC
or notebook by means of a USB cable.
No additional software or updates are required for your PC to perform this function. Do
not interrupt the charging process if possible during the initial charge.
Note
The brightness will be adjusted downwards, if necessary, if a USB connec-
tion is being set up when the device is switched on.
It is recommended to set the device to the stand-by mode, in order to
shorten the charging time by USB.
n
o
Initial Set up
14
AC Adapter (optional)
(similar picture)
1. Push the adapter connector into the guide on the back of the AC adapter. Press the
push button at the same time, so that the adapter plug can engage.
2. Plug the cable of the mains adapter (n) into the mini-USB connection on of the
navigation system.
3. Push the AC adapter (o) into a power point that is easily accessible.
Adapter plug
n
o
Initial Set up
15
Nederlands Français
English
III. Switching on the Device
You will switch your navigation device on or off again completely by pressing the
On/Off key for a long time (> 3 sec.).
The Navigation System will start the initial installation automatically. First of all choose the
requested language. The brand logo will appear and after some seconds your device
shows the following screen:
Button Description Screen
Menu
Map overview
Navigation menu
Other applications
Settings
Initial Set up
16
Note
You will not be able to select the Navigation Menu or Settings, if the navi-
gation software has not found any map data in the device or on the mem-
ory card. Then, the ‘Other applications’ Menu will appear
automatically.
Note
Brief pressure on the On/Off button will be enough to switch the
device on or off, provided that your navigation system is connected to an
external source of electricity or is running in battery operation (standby
mode). The device will be reactivated by pressing the On/Off button
once .
You can adjust the period of operation to suit your needs using the
Settings button on the main screen of your device. Your device is deliv-
ered in a status in which it will not switch off independently.
Press and hold the On/Off key (> 3 sec.), to completely switch off the
device.
No data will be lost as data is stored in the internal memory. The starting
process will only take slightly longer.
Your navigation system will use a low amount of electricity and the batteries will be dis-
charged, even when in standby mode.
IV. Installing the Navigation Software
The final installation of the navigation software will take place automatically from the in-
ternal memory, during the initial setting up, if your device has already been equipped with
the basic data of the navigation software at the factory. Follow the instructions on the
screen.
An optional memory card must always be inserted in the device while the navigation sys-
tem is being used.
It will be necessary to carry out a Reset to restart the navigation system if the memory card
has been removed (see page 23).
Please also read the chapter Navigation starting on page 24.
General Operating Instructions
17
Nederlands Français
English
General Operating Instructions
Switching on/off the device
Your device will be in its normal operating state after the initial setting up. You can activate
and deactivate your device with the On/Off button.
1. To start your navigation system press briefly the On/Off button. The battery charge
indicator will blink briefly and the application screen will appear.
Note
Your device is delivered in a status in which it will not switch off independ-
ently. You can adjust the period of operation to suit your needs using the
Settings button on the main screen of your device.
Your navigation system will use a low amount of electricity and the batter-
ies will be discharged, even when it is in the standby mode.
2. To switch off your navigation system briefly press the Power button.
The following screen will appear:
You have three possible choices:
Button Description
Cancel/Back
Return to previous view with this key, if you have accidently called
up this screen.
Standby Mode
The device will go into Standby Mode if this key is clicked.
Reset
You can carry out a reset by tapping this key.
Security
18
The device will go into the Standby mode automatically after a few seconds if you do not
want to select any of these three possibilities.
For further settings within the Standby mode also see the chapter on “Special CleanUp
Function”, page 61, point 8.
This display will also appear after the delay period of a few seconds has expired, if you
have activated the DC AutoSuspend Comfort Function.
Security
You have the possibility of protecting your device against external access by means of this
function. Some one-off settings will have to be made before you will be able to use this
function. Proceed as follows to do this:
Storing the password and the information note
1. First tap on Settings in the main screen and then on Device settings.
2. Tap on Security, in order to start the respective function. The following display
will appear:
3. Tap on
, in order to enter a password.
4. A keyboard will appear. Enter a password with it.
Note
The password must consist of at least 4 symbols. Use a combination of
letters (A - Z) and numbers (0 - 9). Keep the password in a safe place.
5. Confirm the password with the symbol after you have entered it.
Security
19
Nederlands Français
English
6. Enter the password in the second field to reconfirm it and in order to avoid poten-
tial careless mistakes.
Note
The password will be displayed in the form of small stars (****).
7. An additional text field will appear after you have entered the password. Enter an
information note here that will serve as a support for remembering your password.
You will be able to call up this information if you have forgotten or mislaid the
password.
Making settings
The following selection window, through which you will make the settings for the Security
Function, will appear after you have entered the password and the information note
successfully.
Button Description
Set here whether the device should request the password after a
hard reset.
Set here whether the device should request the password after a
restart.
Set here whether the device should request the password after
the device has been switched on from the Standby mode.
Security
20
Confirm you settings with during the set-up. The following screen will appear:
SuperPIN and UUID
The SuperPIN and the UUID (Universally Unique IDentifier = definite device identification)
will appear on the display after you have confirmed the settings.
Note
Record this data in your Operating Instructions (see Page 1) and keep
them in a safe place.
You will need this information if you have entered the password incor-
rectly 3 times. The navigation device can then only be released with this
information.
Security
21
Nederlands Français
English
Making subsequent settings
Start the Security Function if you have already entered a password and would like to make
a subsequent setting or to change the password. The following display will appear:
Button Description
Change the password or the information text
Authentication settings (see Page 19, Making settings)
Display SuperPIN and UUID (see Page 20)
Reverses the complete security function. All security set-
tings and passwords will have been deleted after this func-
tion has been carried out. You will have to enter and con-
firm your password again to be able to carry out the secu-
rity function.
Security
22
Password Request
A password request will appear at the restarting of the device, according to the setting, if
you have established a password by means of the Security Function.
1. Enter the password stored by you by means of the keyboard.
Note
The password will be displayed in the form of small stars (****).
2. If you tap the question mark, the hint text you have established will be shown.
3. Tap on
to confirm the entry.
Note
You will have to enter the SuperPIN if you have entered the password
incorrectly 3 times. Contact your Service Center, giving the UUID, if you
have also mislaid it. The UUID will be faded out in the lower display.
Security
23
Nederlands Français
English
Resetting the Navigation System
You can reset your navigation system if it is no longer reacting or working properly.
This option restarts the navigation system, without reinstallation being necessary. A reset is
often used in order to reorganize the memory. In doing so all programs that are running
are interrupted and the working memory is reinitialized.
You can carry out two different Reset procedures with your device.
Reset
The following screen will appear if you press the On/Off switch for a short time. The fol-
lowing display appears:
1. If you want to carry out a Reset, tap on
.
You will find further information in the chapter “Switching on/off the device”, page 17.
Switching the Device off Completely / Hard Reset
Attention!
A hard reset will delete all data in the temporary memory.
Your navigation system will normally be in the Standby Mode, if you have switched it off
by pressing the on/off button briefly. In addition, the system can be switched off com-
pletely; the consumption of energy can be kept as low as possible through this. All the
data in the temporary memory will be lost if the device is switched off completely (hard reset).
To switch your navigation system off completely:
1. Press and hold the On/Off key (> 3 sec.), to switch off the device.
2. Press and hold the On/Off key (> 3 sec.), to switch the device on again.
A reinstallation will not be necessary after a hard reset if your device has already been
equipped with the basic data of the navigation software in the permanent memory at the
factory.
Navigation
24
Navigation
Safety Instructions for Navigation
The bundled product DVD contains a comprehensive instruction manual.
General Instructions
Do not manipulate the navigation system while driving to protect yourself and
others from accidents!
In the event that you do not understand the voice instruction or if you are in any
doubt about what to do at the next intersection, then the map or arrow display
will provide you with a quick orientation. Only look at the display when you are in
a safe driving situation!
Legal remark
The use of devices that warn for traffic monitoring systems (like „speed
traps”) is prohibited in some countries, like Germany, Ireland and Swit-
zerland. Please obtain information about the legal situation and apply
the waning function only where allowed. We cannot be held liable for
damages caused by the use of the warning function.
Attention!
The road layout and driving rules take precedence over the instructions
of the navigation system. Only follow the instructions when circum-
stances and driving rules permit it! The navigation system will guide you
to your destination even when you have to deviate from your planned
route.
The direction statements of the navigation system given do not release the driver of
the vehicle from his or her duty of care or personal responsibility.
Plan routes before you leave. If you want to plan a new route whilst on the road
pull over and stop driving.
In order to receive the GPS signal correctly, keep away from metal objects as they
may hinder reception. Attach the navigation system onto the inside of the wind-
screen or near the windscreen with the suction cup. Try out different positions in
your vehicle in order to find the best reception.
Navigation
25
Nederlands Français
English
Notes for Use in a Vehicle
Take care that the holder does not present any risk to safety, even in the case of an
accident, when installing it.
Take care that the cable does not impede any safety components.
The display of your navigation system may show “light reflections”. Please take
care of not being “blinded” during operation.
Do not mount the components within the operating range of any airbags.
Check the secure adherence of the suction cup at regular intervals.
The power plug will consume power, even if no device is connected. Remove it
when not in use to avoid draining the car battery.
Check all safety equipment in your car after installation.
Note
Do not leave your navigation software in the vehicle when you leave it.
You should also uninstall the holder for security reasons.
Navigation
26
Aerial Orientation
The aerial must have unrestricted access to the sky to receive GPS satellite signals. Place the
aerial as horizontally as possible for this reason. Try out aerial and installation possibilities
in the vehicle if the reception is inadequate.
I. Mounting the Car Holder
Attention!
Only fix the holder for the navigation system to the windscreen, if it does
not impede the view.
(similar picture)
Note
Your navigation device can also be equipped with a different but similar
vehicle attachment as an alternative, according to the version.
Note
Clean the disk thoroughly with a glass cleaner. Warm the disk and the
nipple slightly at temperatures below 59°F (15° C).
Place the holder with the suction head directly onto the wind screen and press the lever on
the suction head downwards. The sucker will attach itself to the background firmly.
Snap-in lever
Navigation
27
Nederlands Français
English
II. Attaching the Navigation System
1. Connect the car adapter and, if necessary, the TMC aerial to your navigation system
and insert the memory card.
2. Place the device below in the centre of the holder.
3. Press it gently backwards (n) until it engages audibly (o).
(similar picture)
4. Place the holder on the fixing catches of the car holder.
5. Now, push the unit downwards until it engages audibly.
6. Now you will be able to place the complete unit on the cleaned windscreen.
St
y
lus in
holder
Navigation
28
III. Connecting the Car Adapter
(similar picture)
1. Plug the jack (n) of the connection cable into the corresponding receptor at the
bottom of your navigation system (see Page 10).
2. Insert the power adapter (o) into the cigarette lighter socket and ensure, that it will
not lose contact while driving. This could cause a malfunction.
Note
Remove the power adapter from the cigarette lighter socket when end-
ing a trip or when parking the car for a extended period of time. Other-
wise the car battery could be drained. In this case use the power switch
to turn off the navigation system.
n
o
Navigation
29
Nederlands Français
English
IV. Starting the Navigation Software
Note
Your memory card will always have to be inserted into the device during
the use of the navigation system, if the card contains (additional) mapping
material.
It will be necessary to carry out a reset to restart the navigation system if
the memory card has been removed while the system was being used (see
page 23). According to the navigation system the reset is carried out
automatically.
1. Switch on your navigation system.
2. The Navigation software will start automatically or after tapping on the naviga-
tion control button on the main screen, according to the version.
3. Tap on Navigation on the screen for entering the destination. Enter the desti-
nation address. Confirm your entry by tapping the
symbol to start the
navigation. After a short time, if the satellite reception is adequate you will re-
ceive augmented language statements.
Further information regarding the navigation software can be found on the comprehensive
manual on your CD/ DVD. This is a PDF-file you can read and print with any Acrobat
Reader.
Note
The GPS-receiver will require some minutes for initialization when de-
ployed for the first time. Even when GPS signal reception is indicated the
navigation could be imprecise. In all future instances it will take about 30-
60 seconds until a correct GPS-signal is available, sufficient “sight” of the
satellite is a prerequisite.
Warning function for traffic monitoring points
30
Warning function for traffic monitoring points
The following display will appear if the warning function for traffic monitoring points
(optional) has been installed:
Confirm with , if you want to use navigation with the warning function for traffic
monitoring points.
Tap on the Configure special functions interface in the Settings Menu, in order to
configure the warning function.
The following screen appears. Tap on POI-Warner:
Warning function for traffic monitoring points
31
Nederlands Français
English
Tap on Speed cam (stationary) here, in order to make the settings for the ‘radar fixes’:
Here, you have the option of having the traffic monitoring points represented on a map or
faded out. You can also set whether you would like to be informed by acoustic signals
before reaching a traffic monitoring point.
Acoustic information about a traffic monitoring point will be given by a warning sound
approx. 15 seconds before it is reached. Then, another double warning sound will be
given approx. 7 seconds before it is reached. Four warning sounds will give information
that the speed is too high. In addition, the distance to a monitoring point will be indicated
by a bar indicating closeness (left lower edge of the display).
Sample view if map presentation has been activated:
Warning function for traffic monitoring points
32
Note
Please pay attention to the fact that traffic monitoring points are not preset
in all countries.
* Legal remark
The use of devices that warn about traffic monitoring systems (like “speed
traps”) is prohibited in some countries, i. e. Germany, Ireland and Switzer-
land. Please obtain information about the legal situation and apply the
warning function only where allowed. We cannot be held liable for dam-
ages caused by the warning function.
Speech commands (optional)
33
Nederlands Français
English
Speech commands (optional)
The Speech Entry mode can be activated by means of the function during navigation. A
short information sound will indicate that the navigation system is ready for the speech
entry.
Explanation of the symbol:
( ) optional words;
[ ] Fillers
„|“Alternatives;
< > Content displayed can be spoken
The following commands will be possible here according to the current view:
Range of validity
Command
Always applicable
[go] (back | backwards)
(cancel | abort) [ dialog ]
(enter | select | change) [the|a] [new] (city | town |
location)
( (enter | select) [a] [new] | new) destination
( (enter | select) [a] [new] | new) (zip [code] | postal
code)
help
(general | global) (Help| Commands)
[show] map [ view ]
volume settings | change volume
decrease volume
increase volume
mute volume | shut up
unmute volume
Menu | Main menu | Navigation menu
Speech commands (optional)
34
Main menu
Enter [a] [new] address | [a] new destination | (enter |
select | choose) [a] [new] destination | Destination entry
(Other | More) destination entry options | (Search | en-
ter) other destination | Other destination
Route manager
start navigation | yes [please] | go | calculate route
stop route guidance
(other | additional) applications
You will be able to call up
the most recent destination
by speech in the Main
Menu. To do this, you will
speak the text appearing in
the speech bubble above
one of the highest three
buttons. The ‘Most recent
place’ button will appear in
the case of more than one
most recent destination.
This can also be operated
by speech and will open a
list with the most recent
places.
In maps
[display|show] (destination [area]
[display|show] [map] overview | (display | show) (route
[display|show] ([the] [current] position
[display|show] [view|orientation] [in] (direction of (travel
| motion) | driving direction)
other destination | next destination | down| downwards
| more
previous destination | up | upwards
[display|show] (turn icons | arrows | arrow view | direc-
tion changes)
[display|show] (compass [view] | G P S view)
[display|show] (dynamic | smart) (view | map)
[display|show] next (view | map [view])
[display|show] (normal|simple) (map [view] | view) |
[display|show] only [the] map
[display|show] (Arrow and map | Map and arrow | Map
with arrows | Map with arrow)
[display|show] (3 D | three dimensional) [view | map |
perspective]
[display|show] (2 D | two dimensional) [view | map |
perspective]
[display|show] [2 D | two dimensional] (north | north-
ern) [view | map [view]]
Speech commands (optional)
35
Nederlands Français
English
In maps
Auto zoom
Centre [View | Map | Map view] | centre [[the] map]
enlarge | zoom in
reduce | zoom out
quick menu
In lists
next page | scroll down
previous page | scroll up
It will be possible to address
either the list entries them-
selves or the number allo-
cated to them with speech,
according to the speech
bubble displayed. The
buttons below the lists can
also be addressed with
speech if they are marked
with a speech bubble.
Change location | Enter location | Correct location |
Change city | Enter city | Correct city | Change location |
Change city | Other location | Other city | Correct loca-
tion | Correct city | Enter city | Enter location
Change postcode | Enter postcode | Correct postcode |
Other postcode | Correct postcode | Postcode entry |
Postcode entry
Change state | Enter state | Correct state | Change prov-
ince | Enter province | Correct province | Change region
| Enter region | Correct region | Other state | Other prov-
ince | Other region | Other state | Other province | Other
region | Correct state |
Search in all states | Search in all provinces | Search in all
regions | Search in the whole country | All states | All
provinces | All regions | Whole country
Commands during the
entering of a town
You will be able to alternate
between the two possibili-
ties of making an entry with
the ‘Enter place/post code’
command. The country
commands do not play any
role within Europe.
Change country | Enter country | Correct country | Enter
country
Speech commands (optional)
36
Change location | Enter location | Correct location |
Change city | Enter city | Correct city | Change location |
Change city | Other location | Other city | Correct loca-
tion | Correct city | Enter city | Enter location
Change postcode | Enter postcode | Correct postcode |
Change postcode | Change postcode | Other postcode |
Other postcode | Correct postcode | Postcode entry |
Postcode entry
points of interest | interesting sights | P O I
Commands during the
entry of a street
You will it be able to
change the value previously
entered with the ‘Change
place/post code’ command.
Use the ‘I don’t know’ or
‘Start destination guidance’
command as the entry.
centre | city centre | downtown | town centre | to centre
| to city centre | to town centre | central business district
I don't know | I've no idea
Change street | Enter street | Correct street | Change
street | Correct street | Other street | Enter street
crossroads | junction | intersection
middle of the road | middle of street
I don't know | I've no idea
Commandos during the
entry of a house num-
ber
Use the ‘I don’t know’ and
‘Start destination guidance’
commands, and ‘Street
centre’ as the entry.
start navigation | begin navigation
Note
Speak the commands loudly and clearly in the direction of the navigation
system. No incidental noises (radio, ventilation or loud conversation)
should arise during the speech entry.
Handsfree Facility by means of Bluetooth (optional)
37
Nederlands Français
English
Handsfree Facility by means of Bluetooth (optional)
The Bluetooth technology serves to bridge short distances wirelessly. Bluetooth devices
transmit data wirelessly, so that other devices that also support this technology can com-
municate with each other without cables.
Both devices will have to be adjusted to each other (pairing), before you will be able to use
your navigation system as handsfree equipment with your Bluetooth mobile phone.
Note
Please read how you switch on the Bluetooth function in the Operating
Instructions of your mobile phone.
Starting the Bluetooth Application
1. Tap on Bluetooth Dialer.
Note
The function for active use will have to be reactivated first if Bluetooth has
been deactivated manually.
2. Now the main Bluetooth screen will appear on your navigation device.
Handsfree Facility by means of Bluetooth (optional)
38
Overview of the Main Screen
Button Name Description
Course of
call
Displays the course of calls put through and received.
News View the postbox of your mobile phone through this
symbol. You will be able to receive, write and send
messages.
Telephone
Book
Call the contacts stored in the mobile phone through
this symbol. The support of this function depends on
the respective mobile.
Back Previous Page of the main display.
Delete Delete the number entered by means of the keyboard
with this field.
Calling Select the number entered by means of the keyboard
with this field.
Keypad Enter the digits of the telephone number to be called
by means of the keyboard.
Volume Set the volume of the microphone and the loud-
speaker by means of this symbol.
New message – Options for displaying new
messages
Pairing – Link the navigation device to the mo-
bile
Settings for automatic synchronization between
the navigation device and the mobile phone
Settings of
the hands-
free facility
Bluetooth – Activate or deactivate the Bluetooth
function
Handsfree Facility by means of Bluetooth (optional)
39
Nederlands Français
English
Synchronous telephone book – Settings for the
automatic synchronisation between the naviga-
tion device and a mobile phone telephone
Setting of the basic volume of the microphone
and the loudspeaker.
Pairing the Navigation Device and the Mobile Phone
1. Activate the Bluetooth function on your mobile phone.
Note
Each mobile phone uses different paths to do this. Read the instructions of
your mobile phone under all circumstances for this reason.
2. Select the option (Pairing – link the navigation device to the mobile phone) un-
der the settings of the open speech facility of your navigation device. The search for
a Bluetooth-enabled device will start.
3. Select the corresponding mobile phone from the list.
4. Start the link by operating the Pair field.
5. Your mobile phone will recognize the navigation device. You will be requested to
enter a 4-digit PIN code. This is 1 2 3 4 for your navigation device.
6. Your mobile phone will be recognized and the open speech facility through the
navigation system will now be available to you.
Note
This procedure will have to be repeated as soon as you have switched off
the navigation system or a spatial separation between your mobile phone
and the navigation device arises.
Handsfree Facility by means of Bluetooth (optional)
40
Accepting incoming calls
Button Description
Accept calls
Reject/terminate calls
Making Calls
1. Tap on the keypad in the main Bluetooth screen and enter the number that you
wish to call.
2. Start the call with
.
Handsfree Facility by means of Bluetooth (optional)
41
Nederlands Français
English
During a Call
Button Description
End call
Volume settings for microphone and loudspeaker
Return the conversation to your mobile
MP3 Player (optional)
42
MP3 Player (optional)
Depending on the software equipment your navigation system is equipped with a MP3
Player. Start the MP3 player from ‘Other applications’ Menu by tapping on the MP3
Player switch. All the MP3 files located on the memory card can be taken over into a List
of Favourites and will be ready to be played.
Main Screen Overview
Button Description
Reduces the screen brightness to a minimum, to save electricity.
Determine/add bookmarks
or
Increase or decrease the volume.
The display in the upper right corner of the screen will show the
current level of the volume.
Break off action / Back to the previous Menu
or
Move to the previous or next file. It will be possible to skip
backwards or forwards within the title playing while it is being
played.
Play the playback.
Stop the playback
Opens the List of Favourites
Displays the files stored on the flash disk and/or the memory
card.
You will make the settings of the MP3 player here.
MP3 Player (optional)
43
Nederlands Français
English
Select a Title and Move it into the List of Favourites
Tap on and select the title that you would like to move into the List of Favourites, in
order to select a title.
You will have three possibilities of marking the title here:
Tap on
in order to mark all the titles, including all sub-directories.
Tap on in order to mark all titles currently in view.
Tap on
to delete all marks within a directory.
The selected titles will be indicated by a
.
Tap on
, in order to confirm your selection. The titles marked will not be moved into
the List of Favourites until then.
Tap the file required and select the requisite title, in order to select a title in the sub-
directories.
The
symbol will be shown if not all the titles in a directory have not been selected.
MP3 Player (optional)
44
List of Favourites
You will reach the List of Favourites by tapping on the :
You will delete all titles with
.
You will delete individual titles with .
Confirm with
, in order to take over the new selection into the List of Favourites.
List of the established bookmarks
You will reach the list of the established bookmarks by tapping on the symbol :
You will delete all bookmarks with the
symbol.
You will delete an individual bookmark with the
symbol.
Operation with the
symbol to take over a new selection into the list of bookmarks.
Picture Viewer (optional)
45
Nederlands Français
English
Picture Viewer (optional)
Depending on the software equipment your navigation system is equipped with a
Picture Viewer.
You can view the jpg format images on your memory card on your navigation system,
with the Picture Viewer. All the images on the memory card will be available immedi-
ately.
Operating the Picture Viewer
Start the Picture Viewer from ‘Other applications’ Menu by tapping on the Picture
Viewer switch.
Main Screen
Fig.: Miniature view
Move the miniature view to the left or to the right with the arrow keys. Tap on a specific
images to display it in the Full Image Mode.
Return to the start in miniature view by tapping on
.
You can end the application by tapping on the symbol.
Start the slide show by tapping the symbol.
Picture Viewer (optional)
46
Full Image View
Fig.: Full image view without service strip
Tap in the lower area of the screen in the full image view, in order to activate the service
strip:
Fig.: Full image view with service strip
Button Description
Previous picture
Turn it clockwise by 90°
in stages
Fade in grid
Start the slide show
Pause the slide show
Turn it counter-clockwise by 90° in stages
Next picture
Picture Viewer (optional)
47
Nederlands Français
English
You can return to the miniature view by tapping in the centre of the image.
The image displayed will be subdivided into 6 fields by tapping on the symbol (fade
in grid).
Fig.: Full image mode with grid
Tap on a square in the grid to zoom in on that area of the picture:
Fig.: Zoom-in Mode
Tap on the centre of the image to go back to viewing the full picture.
Travelguide (optional)
48
Travelguide (optional)
Depending on the software equipment your navigation system is equipped with a Travel
Guide. The Travel Guide will supply general information about the different areas of indi-
vidual towns and cities or regions in Europe, such as sights, restaurants, culture and travel
information.
Start the Travel Guide from ‘Other applications’ Menu by tapping on the Travel Guide
switch.
Select the country initially, then the town or city (or the region). Then, select the cate-
gory.
Abb. 1 Abb. 2
Abb. 3 Abb. 4
Abb. 5 Abb. 4
Travelguide (optional)
49
Nederlands Français
English
Abb. 7
Confirm with
, if you want to navigate to the destination displayed. The address
will then be available to the navigation software as the destination
The address will then be available to the navigation software as the destination.
Button Description
Previous image
Shows the address of the selected category
Shows the available photos of the selected category
Tap on this switch to navigate to the selected address directly.
Note
You will be able to vary the potential selections within the Travel Guides
according to the software capacity.
AlarmClock (Waking function) (optional)
50
AlarmClock (Waking function) (optional)
Depending on the software equipment your navigation system is equipped with an
AlarmClock/ Waking function.
Start the Alarm Clock from ‘Other applications’ Menu by tapping on the Alarm Clock
switch.
The waking function can work both as normal when the device is switched off (Standby
Mode / Power Saving Mode) and as a reminder during the current navigation.
Overview of the main screen
This view will appear if you have not yet set up a waking time. Enter an alarm time in the
24-hour format and confirm your entry with .
AlarmClock (Waking function) (optional)
51
Nederlands Français
English
Description of the Interfaces
Button Description
Current system time
Setting-up mode (Setting volumes, system time and
alarm)
Night mode (Standby mode)
Reset/deactivate the waking function
Setting the alarm time
Delete the entry
Confirmation interface
Reduce / increase the volume
Back to the previous menu
Close the application
AlarmClock (Waking function) (optional)
52
Setting the System Time
The display of the current time will be located in the upper right corner of the screen. You
can adjust it as follows:
1. Tap on
in the main screen. The following screen will appear:
2. Tap on
to change the time setting:
Note
The system time is updated by GPS reception. Pay attention to the time
zone settings.
AlarmClock (Waking function) (optional)
53
Nederlands Français
English
Selecting an Alarm Signal
1. To select an alarm signal touch the symbol.
2. Select the required directory and confirm it with
.
3. Tap on the corresponding directory in the list in the memory card and confirm
again with , if you would like to select an alarm tone from your memory card.
4. Select the desired alarm sound and confirm the selection with .
5. The selected alarm signal is marked by a .
6. Close the application with
.
AlarmClock (Waking function) (optional)
54
Setting the Volume
You can adjust the volume of the alarm signal by tapping on the interface.
Note
The volume configured here only relates to the alarm signal and will not
change the volume of the language output of the navigation system or
other functions of the system.
AlarmClock (Waking function) (optional)
55
Nederlands Français
English
Snooze Function
You will have the possibility of making the waking signal repeat at regular intervals by
means of the Snooze function, once it has sounded at the alarm time set.
1. Tap on
to activate the Snooze function.
2. End the Snooze function with the
switch, to be awoken at the respective time
entered on the following day. You will leave the alarm display and return to the
view before the alarm time if you click on
..
Ending the Alarm Clock Application
1. Tap on to deactivate the alarm time set.
2. You will find yourself in the Setting-up mode.
3. Tap on
in order to leave the application. An alarm time is not set.
Current
system time
Waking time set
Sudoku (optional)
56
Sudoku (optional)
Depending on the software equipment your navigation system is equipped with the game
Sudoku.
Start the game Sudoku from Other applications’ Menu by tapping on the Sudoku
switch.
Sudoku is a number puzzle. The puzzle area is square and subdivided into nine sections.
Each section consists of 9 smaller squares.
When playing Sudoku, the aim is to fill all the 81 number fields using the numbers 1-9.
Each number must only appear once in each section at the same time. Each number must
only appear once in each row and column.
Some number fields will already have been populated prior to the start of the game.
Main Screen
Sudoku (optional)
57
Nederlands Français
English
Description of the switch fields
Button Description
Start a sudoku game
You will receive information about solutions by tapping
on this switch. Tap on the switch again to hide the
information.
You will receive the solutions of the number fields by
tapping on this switch. Tap on the switch again to hide
the solutions.
A new sudoku game will open by tapping this switch.
Settings
You will have the following possibilities in the Settings
Menu:
The current game will be
stored by tapping on this
switch.
You will load a started
game onto the screen by
tapping on this switch.
Delete a stored game
You can set the level of
difficulty here.
Back to the current
game.
Sudoku (optional)
58
Overview of the game area
Description of the switch fields
Button Description
Strip of numbers to be entered
Strip for the selection of the numbers to be entered in
the number fields. The selected number will stand out
and it will now be possible to enter it into a number
field.
Entry mode
First, tap on the number in the strip of numbers to be
entered that should appear in particular number field
and then on the corresponding number field.
Deletion mode
Tap on the number to be deleted.
Leave the application by means of this field.
FAQ
59
Nederlands Français
English
FAQ
Where can I find more information on the navigation
system?
Detailed operating instructions for navigation can be found on the
corresponding CDs/DVDs, which accompany your navigation system.
Also use the additional Help functions that are available with a single
touch of a button (usually F1 on the PC), or by selecting the Help
option, as additional assistance. These aids will be provided to you
while you are using the computer or the device.
What do I need the accompanied CDs/DVDs for?
The CDs/DVDs contain:
the ActiveSync
®
program for balancing data between the navi-
gation system and the PC.
Additional programs (optional).
This User manual in digital form.
digital maps
PC-application for rapidly resetting the data material
Manual of the navigation software
Depending on the configuration one or more CDs/DVDs may be
included in the package.
The navigation system is no longer responding. What should I do?
Carry out a reset (see page 23).
How can I adjust the lighting?
Under Settings.
Customer Service
60
Customer Service
Faults and Possible Causes
The navigation system no longer reacts or is behaving atypically.
Carry out a reset (see page 23).
The navigation system is recognized only as a guest by ActiveSync®.
See information on page 67.
The GPS receiver cannot be initialized or found.
If a GPS signal continues not to be reported on the screen, in spite of the correct installa-
tion of the system, this can be caused by the following factors:
Sufficient satellite reception is not possible.
Solution:
Change the position of your navigation system and ensure that unrestricted
“sight” of the aerial is not impaired.
No language statements can be heard.
Check the volume setting.
Additional Support
If the suggestions in the above section have not solved your problem, please contact our
customer service hotline. However, before you contact your customer service hotline,
please have the following information available:
How is your navigation unit configured?
What additional peripherals do you use?
What messages, if any, appear on your screen?
What software were you using when the error occurred?
What steps have you already undertaken to solve the problem?
If you have been given a customer number previously, please give this number to
the technician.
Appendix
61
Nederlands Français
English
Appendix
Special CleanUp Function
The CleanUp function serves the targeted deletion of data, without using a PC.
Note
Please use this function very carefully, because it is possible for data to be
deleted that can only be entered again manually afterwards.
The CleanUp function is activated when the ‘o’ is pressed in the Gopal lettering of the
Main Menu, immediately after the start tone following a reset.
The CleanUp function offers 9 options:
1. Remove Installation Only
Removes the software installed from the ‘My Flash Disk’
memory [= part of the permanent memory in which the executable parts of the navigation
software will be located following the initial alignment (\My Flash Disk\Navigation)].
2. Remove MAP Only
Removes the digital maps from the ‘My Flash Disk’ memory (\My Flash
Disk\MapRegions).
3. Remove Preload Only
Removes the data needed for the installation of the navigation software from the perma-
nent memory (\My Flash Disk\Install).
4. Remove All
Deletes the whole contents of the ‘My Flash Disk’ memory. It will not be necessary to
recalibrate the screen after this function has been carried out.
5. Factoryreset
Sets the device back to the delivery status in the case of an intact main installation.
Appendix
62
6. Format Flash
Formats the internal My Flash Disk’ memory. This formatting can be necessary in the
case of a prolonged removal of errors. It will be necessary to recalibrate the screen after the
formatting function has been carried out. All data will be deleted from the internal ‘My
Flash Disk’ memory irrevocably.
7. GPS Factory Reset
Performs a factory reset of the GPS receiver. When using the GPS function after having
performed a factory reset, the GPS receiver must orientate itself again. This process may
take a while.
8. DC AutoSuspend /Wakeup
You can select here when your navigation system should go into Standby mode automati-
cally after the withdrawal of the external power supply. For example, this function is useful
in the case of vehicles where the cigarette lighter also switches off when the ignition is
switched off.
The AutoSuspend function will be activated several seconds after the discontinuation of
the external power supply and the Standby display will appear for the time set (see
Page 17).
The DC AutoSuspend function will be deactivated again if the power has been recon-
nected within the total period (in the case that the engine has been switched off for a short
time, for example). Otherwise, the navigation system will go into the Standby mode after
the expiry of the time set.
Set the required time by tapping on it and confirm your selection with OK.
Note
This function is deactivated and can be set individually in the status at
delivery and after a hard reset (see Page 23).
Appendix
63
Nederlands Français
English
Exit
Leaving the CleanUp function and restarting the device (like reset).
Note
The deletion of the data must be confirmed before the action actually takes
place. To do this, press on YES. There will be a corresponding report if the
data to be deleted is no longer available.
Please read the “Transferring Installation Files and Map Material to
the Internal Memory“ chapter on Page 73, in order to recreate the files
(installation files and map material) in the internal memory.
Appendix
64
Synchronisation with the PC
I. Installing Microsoft
®
ActiveSync
®
In order to transfer data between your PC and your navigation system you need the Micro-
soft® ActiveSync® program. The cost of the navigation system includes a license for this
program which can be found on the CDs/DVDs.
Note
You will not need the ActiveSync® communications software, if you are a
user of the Windows Vista/Windows®7 operating system. The system files
necessary for the simple data transfer are already integrated into your
operating system.
Please connect your device to your PC with the help of the USB synchroni-
zation cable. The necessary drivers will be installed automatically, after the
new device has been found. Your new device will be listed under the
‘Portable Devices’ point in the Windows Explorer overview, following a
successful installation.
Attention!
Important files can be overwritten or changed during the installation of
software. You should create a hard disk backup, in order to be able to have
access to the original files in the case of possible problems following the
installation.
You must have administrator rights to install the software under Windows
®
2000 or XP.
Important
You should not connect the navigation system to your computer yet.
1. Insert the CD/DVD and wait until the program starts automatically.
Note
If it does not function, the Auto Run function is probably deactivated. The
Setup program on the CD/DVD must be started, to start installation
manually.
2. Choose the language, tap then Install ActiveSync® and follow the instructions on
the screen.
Note
When installing the GoPal Assistant, ActiveSync® will be installed automati-
cally.
Appendix
65
Nederlands Français
English
II. Connecting with the PC
1. Press the On/Off button to start your navigation system.
2. Connect the USB cable to your navigation system.
3. Push the USB connector into a free USB port on your computer.
4. The following screen will appear after the navigation system has been connected:
Note
The ActivSync® Mode will be loaded automatically after a few seconds if no
mode has been selected.
5. Select the required mode:
Mass Storage Mode
You will be able to use your navigation software as a removable disk (as a USB stick, for exam-
ple) in the Mass Storage Mode. Two drives will be connected to do this: the internal memory of
the navigation system itself and the (optional) memory card, provided that it has been inserted
into the device.
Note
No additional entries can be made on the device at the same time, if you
are in this Mode. Use the ‘Remove hardware safely’ function of your oper-
ating system to protect yourself against the loss of data. Then detach the
cable from your navigation system.
The Hardware Installation Assistant will now recognize a new device and will install a suit-
able driver. This can take several minutes.
mass storage
mode
ActiveSync
mode
Appendix
66
ActiveSync
®
mode
Repeat the search for a connection if it has failed the first time, if you have selected the
ActiveSync® Mode.
Follow the instructions on your screen. The program will now set up a co-operation be-
tween your PC and the navigation software.
Note
The navigation system must have been recognized during the setting up
in the ActiveSync® Mode, in order to be able to work with the GoPal Assis-
tant.
Alternative possibility of charging the battery
The battery will charge as soon as you connect your navigation device to a switched-on PC
or notebook by means of a USB cable.
No type of software or driver installation will be necessary for this. Do not interrupt the
charging process if possible during the initial charge.
Note
The brightness will be adjusted downwards, if necessary, if a USB connec-
tion is being set up when the device is switched on.
It is recommended to set the device to the stand-by mode, in order to
shorten the charging time by USB.
Appendix
67
Nederlands Français
English
III. Working with Microsoft
®
ActiveSync
®
ActiveSync
®
will be started automatically if you connect your navigation system to the PC.
The program will check whether the device is one with which a partnership has been en-
tered. If this is the case, the changes that have taken place on the PC and on the navigation
system since the last synchronisation will be compared and adjusted to each other. You
will be able to define exactly which data will have priority during the synchronisation in
the settings of the ActiveSync
®
Program. Call up the Help of the Program (with the F1 But-
ton), in order to become familiar with the effects of the respective settings. A restricted
Guest Access, with which you will be able to exchange data, for example, will become
active automatically if the navigation system has not been recognised as a partner. If this is
the case, although the process concerns the registered partner device, separate your navi-
gation system from the PC and switch it off and on again. Now connect your navigation
system to the PC, to restart the recognition process. Repeat the process and, restart your
PC in addition, if your device continues to be recognised as a guest.
Note
Make sure that you always connect your navigation system to your PC
with the same USB connection, otherwise your PC will allocate an
additional ID and reinstall the device.
Appendix
68
GPS (Global Positioning System)
GPS is a satellite-backed system for determining your position. With the help of 24 satel-
lites revolving around the earth, it is possible to determine your position on earth with the
accuracy of a few meters. The satellite signals are received by the antenna of the built-in
GPS receiver, which must have a "line of sight" to at least 4 of these.
Note
When the line of sight is interrupted (eg in tunnels, between houses, in
woods or also in vehicles with metal-coated windows) it is not possible to
determine the position. The satellite reception however automatically picks
up again as soon as the obstacle has been passed and the line of sight is re-
established. Moving slowly (e.g. slow walking) also limits the accuracy of
the navigation.
The GPS receiver consumes additional power. This is especially of concern when running
on batteries. To conserve power do not turn on the GPS receiver unnecessarily. Also ter-
minate the navigation software if it is not needed or satellite reception is not possible for a
longer period. You can also switch the device off by means of the On/Off switch if you
experience a short interruption in your journey, pressing the same switch again will reacti-
vate a restart. The GPS receiver will also be reactivated at the same time, if the navigation
software is still active. There may be a delay for the position to be updated again, this is
dependant on the reception situation.
Note
Please note that your appliance is preset to not shut down automatically
after a few minutes without activity. You can change this preset in the
Settings mode. If the GPS receiver has not been active for some hours, it
must orientate itself again. This process may take a while.
Appendix
69
Nederlands Français
English
TMC (Traffic Message Channel)
The Traffic Message Channel (TMC) is a digital radio data service that functions in a
similar way to RDS and is used to transmit disruptions to traffic to a suitable reception
device.
The traffic information is continuously transmitted across FM.
The user is less dependent on the half-hourly broadcast traffic information, because the
signal is continuously transmitted. Apart from this, important information, as in the case of
an accident in the road ahead, can be passed on immediately.
The transmission is planned for the whole of Europe and is already offered by radio trans-
mitters in many countries. The precision of the TMC messages can deviate greatly accord-
ing to the country. At time of printing a TMC service is not available in Ireland.
The evaluation of TMC messages is not supported by every type of navigation software.
Enquire whether your system supports TMC before the possible purchase of a TMC re-
ceiver.
Pay TMC (optional)
PayTMC is interpreted as TMC Services that offer TMC information free of charge, such as
TMCpro in Germany, Trafficmaster in the UK or V-Trafic in France, for example. These
providers are distinguished from normal ‘free TMC’ because of more up-to-date informa-
tion about the traffic flow.
Sensors in motorway bridges and set into the carriageway, and a large number of vehicles
equipped with ‘floating car’ data technology, supply a more precise and up-to-date pic-
ture of the traffic situation on German highways, inc. possible predictions, quickly.
The licence fees for the use of the PayTMC services will have already been settled with the
purchase of your navigation system and these services will be available to you for as long
as they are offered on the part of the provider.
Your navigation system will support both free TMC and PayTMC and will have been preset
for the reception of both services in the status at delivery.
Appendix
70
Installing the External TMC Receiver / Connecting an additional
TMC Dipole Aerial (optional)
Installing the External TMC
Receiver (only in case of model E4145)
1. Connect the mini-USB plug to the
mini-USB connection of your device.
2. Connect the projecting antenna to
the TMC receiver and attach that an-
tenna with the aid of the suckers, at
the edge of your windscreen, for ex-
ample.
3. Connect the TMC receiver to the car
adapter cable after you have at-
tached the TMC receiver to your
navigation system.
Connecting an additional TMC
Dipole Aerial (optional) (only in
case of models E4245 and E4445)
A TMC receiver and an active TMC dipole
aerial are already integrated into your navi-
gation system, to receive traffic informa-
tion. However, if the TMC signal is too
weak, you have the possibility to connect
an addition TMC dipole antenna.
1. Plug the jack plug of the TMC an-
gled aerial into the earphone con-
nection of your navigation system.
2. Attach the aerial, on the edge or
your windscreen, for example, with
the help of the sucker.
3. Place the aerial so that a distance of
approx. 10 cm from the metal frame
of the screen is maintained.
(similar pictures)
Your navigation system will now be able to receive traffic information through the TMC
receiver and thus direct you away from disruptions to traffic.
Appendix
71
Nederlands Français
English
Working with Memory Cards
Inserting Memory Cards
1. Carefully take the optional memory card out of its packing (if included). Take care
not to touch or dirty the contacts.
2. Insert the memory card carefully into the card bay with contacts pointing forward.
The card must lock easily.
Removing Memory Cards
Note
Only remove the memory card if the navigation software has been closed
and the device has been switched off by means of the On/Off button be-
forehand. Otherwise you will risk a loss of data.
1. To remove the card press lightly onto the upper edge until it ejects.
2. Pull the card out without touching the contacts.
3. Store the memory card in the packing or in another safe location.
Note
Memory cards are very fragile. Take care not to dirty the contacts and not
to force the card.
Accessing Memory Cards
The appliance only supports memory cards in the FAT16/32 file format. If you
insert a card prepared with a different format (e.g. in cameras, MP3 players),
your navigation system may not recognize it and will ask you to format it
again.
Attention!
Formatting the memory card irretrievably wipes out all data.
Data Exchange via Card Reader
If you wish to copy large quantities of data (MP3 files, navigation maps) to the memory
card, these can also be stored directly to the memory card.
Many computers already have memory card devices. Insert the card into your computer
and copy the data directly to the card.
Because of the direct access you can achieve a much higher transfer rate compared to
using ActiveSync®.
Appendix
72
Additional Card Material
Your navigation system is already equipped with digitalized map material in the internal
memory and/or memory card at the factory. Depending on the configuration, additional
maps may be included on your navigation CD/DVD. You will be able to transfer these
cards to a memory card immediately. It is recommended that you use an external card
reader (see also page 71). The GoPal Assistant supplied with the device enables a simple
and individual compilation of the map material to be transferred.
Depending on the amount of map data on the navigation CD/DVD, memory cards with
capacities of 256 MB, 512 MB, 1.024 MB or more may be required.
You can obtain additional memory cards in specialist stores.
Transfer of card material to a memory card
The transfer of additional card material to a memory card can take place through Explorer
on your PC via the following steps:
1. Insert the CD/DVD with the card material required.
2. Start your workstation and select your CD/DVD Drive.
3. Copy the file with the .psf ending out of the Directory of the region that you re-
quire to the MapRegions Directory on your memory card, from the CD/DVD.
You can transfer several files with map material to your memory card, depending on the
capacity of the memory card.
If you have copied digitized maps of several countries or country groups onto your mem-
ory card, you will be required to select the desired map in the navigation
application of your device.
Appendix
73
Nederlands Français
English
Alternate method of installing Navigation Software (using a
Memory Card)
The software for your navigation system can be installed directly from a memory card.
The pre-installed software may have to be uninstalled beforehand (see special Clean Up
function, Page 61).
You will be requested to install the navigation software during the initial adjustment.
Please proceed as follows:
1. Remove the memory card from the packaging carefully. Ensure the contacts are not
touched or soiled.
2. Push the memory card into the corresponding slot until it engages.
3. Tap on OK, in order to install the application.
The main screen, through which you will now be able to carry out the navigation settings,
will appear after all data has been copied to your navigation system.
Transferring Installation Files and Map Material to the Internal
Memory
Note
The navigation system must be connected to a computer by means of
ActiveSync® for the transfer of the data.
Your device has an internal, permanent memory, which is located in the \My Flash Disk
directory.
You will be able to make this directory, and others, visible with ActiveSync
®
, by means of
the Search option. Directories and files can be manipulated as in Windows Explorer.
The required directory must have been stored, in order to make the installation files and
the map material for the device available.
Deposit the INSTALL directory for the installation files at (\My Flash Disk\INSTALL). De-
posit the map material in the MapRegions directory (\My Flash Disk\MapRegions). Please
pay attention to the modes of lettering given above when naming the directories.
Pay attention to the fact that sufficient drive capacity must be available, if you have stored
additional data on your navigation device. Remove files not needed if sufficient drive ca-
pacity is not available.
Specifications
74
Specifications
Parameter Information
Power supply
Power supply cable for a cigarette
lighter
Input
Output
CA-051-00U-00 / CA-0511MH-2F
(Mitac)
12-24V DC, 800mA / fuse 2A
(T2AL/250V)
5V / 1A (max.)
Power supply
Mains adapter (optional)
Input
Output
Phihong PSAA10R-050
100-240V ~0.4A (max.)
+5V
/ 2A (max.)
Battery Li-Ion, 3.7 V
Earphone connection For stereo earphones (3.5 mm)
Memory card type SD
Bluetooth (optional) Class 2
USB interface USB 2.0
Dimensions approx. 130 mm x 80 mm x 19,5 mm
Weight incl. battery approx. 175 g (without packaging)
Operating
+32°F - +95°F
(+0° C - +35° C)
Temperatures
Storage
-4°F - +140°F
(-20°C - +60°C)
Humidity (without condensation) 10 – 90 %
Model Overview
75
Nederlands Français
English
Model Overview
Modell Mikrofon Bluetooth
TMC via
external
TMC receiver
(via Mini USB)
TMC via in-
tegrated
TMC receiver
and dipole
antenna
E4145
{ { z {
E4245
z { { z
E4445
z z { z
z = Equipment available
{ = Equipment not available
Conditions of Warranty for the United Kingdom
76
Conditions of Warranty for the United Kingdom
Restricted Warranty
I. General Conditions of Warranty
1. General
This warranty covers defects relating to workmanship and manufacture in MEDION prod-
ucts. The period during which this warranty is valid and during which claims against the
warranty can be made to MEDION must be in accordance with the following terms in
order to be considered eligible:
Is effective from the date of purchase or receipt of the MEDION product from an
authorised seller of MEDION products; and
expires at the end of the warranty period specified on the warranty card provided
with the product.
For the warranty to be valid, you must:
provide suitable evidence of purchase, a copy of the original purchase receipt from
an authorised seller of MEDION products is preferred; or
register your product within 28 days of purchase either online at
www.MEDION.co.uk
or by completing and returning the pre-paid registration card
included with the product.
Please keep the original purchase receipt and the warranty card in a safe place. MEDION
and its authorised sellers reserve the right to refuse a repair under warranty or a warranty
confirmation if a proof of purchase [or registration of purchase] cannot be established, or
has not been, submitted.
When it is necessary to return your product for repair please ensure that your product is
suitably packed for transportation.
Provided that your product is still within warranty (please check the duration of the war-
ranty period as described above) and is eligible for repair or replacement under the terms
of the warranty, to return your product, please telephone MEDION on the service hotline
number. You will be sent a pre-paid transportation box suitable for returning your product
to MEDION. PLEASE MAKE SURE THAT YOU HAVE A BACKUP COPY OF ALL DATA ON THE
PRODUCT BEFORE RETURNING THE PRODUCT TO MEDION. MEDION shall bear the costs
of postage and packaging for returning the product and the transportation risk. However,
if following examination of the defective product in question, MEDION, in its reasonable
opinion, considers that the defect has been caused by:
Conditions of Warranty for the United Kingdom
77
Nederlands Français
English
your operating and/or using the product other than as instructed in the accompa-
nying documentation;
damage caused in transit as a result of your negligence in packaging of the prod-
uct; and/or
otherwise than in accordance with the terms of this warranty;
This warranty shall be void and you may be required by MEDION to reimburse MEDION
for the reasonable costs of postage and packaging before MEDION will return the product
to you. If so and you would still like MEDION to repair or replace the product, MEDION
may do so but you will be charged MEDION’s standard rates for repair and replacement
for this service.
Before returning the product, please contact MEDION via the service hotline or via the
internet (www.MEDION.co.uk). You will receive a reference number (RMA No.) on the
warranty card. Please mark the outside of your package to ensure that this reference num-
ber is clearly visible. Please submit a letter containing as much detailed information as
possible and, a full description of the defect or fault.
This should include:
a description of the fault;
when it occurred, how long it has been evident and how frequently it occurs;
any errors message(s) displayed when using the product;
a description of the circumstance(s) and conditions in which the fault occurs; and
whether it is an intermittent or persistent fault;
This will greatly assist MEDION in identifying the defect, when submitted together with the
defective product.
Unless otherwise instructed by a MEDION representative in all cases, the product must be
returned complete with all parts which were included with the original product. Incom-
plete contents of the returned package may lead to a delay in the repair or replacement.
MEDION does not accept any liability for any additionally submitted material(s) which
were not supplied with the original MEDION product.
This warranty does not affect your statutory rights in any way and is subject to the appli-
cable legal statutes of the country where the product was sold to you by an authorised
MEDION seller.
Conditions of Warranty for the United Kingdom
78
2. Scope
Subject to any exclusions set out within this warranty, where there is a defect in your
MEDION product covered by this warranty, MEDION will repair or replace the MEDION
product. The decision whether to repair or replace the product will be made solely at the
discretion of MEDION. MEDION may, in its own discretion, replace the product returned
for repair under warranty with a replacement product that is either identical or, in the
event that such product(s) are no longer available, a product of equal or superior specifi-
cation and quality.
No warranty is given for batteries or rechargeable batteries or for consumable materials
subject to wear and tear, i.e. for parts which have to be replaced periodically during the
normal use of the product, such as video-projector lamp.
Non critical failures that fall within industry specified tolerances e.g. noise, LCD pixels are
not covered by this warranty. Please consult the appropriate section in your user or in-
struction manual for this product for exact specifications and tolerances.
To the extent which is permitted under law, MEDION will accept no liability for burnt-in
images on plasma or LCD products as a result of normal wear and tear during the opera-
tion of the product. Please refer to your user or instruction manual for this product for
detailed operating instructions for your plasma or LCD product.
The warranty does not cover errors relating to the playback of data media in an incom-
patible format or created with unsuitable software.
If it is found during repair or assessment that the defect concerned is not covered under
warranty, MEDION reserves the right to invoice you for all reasonable costs incurred by
MEDION. These costs will be in relation to the return of the product, including reasonable
administration costs, plus reasonable costs for materials used and labour provided when
repairing or replacing the product. This is subject to MEDION providing you with an esti-
mate for carrying out such work prior to costs being incurred and that you have accepted
the estimate.
You are entitled to seek independent advice or consultation relating to your product or
any of MEDION’s findings. MEDION will not be liable for any costs incurred to you when
doing so.
Conditions of Warranty for the United Kingdom
79
Nederlands Français
English
3. Exclusion from warranty
To the extent permitted by law, this warranty shall be void in the event that defects or loss
caused by:
a. failure and damage resulting from the operation of the product in an environment
other than that recommended in the accompanying user or instruction manual
(e.g. in direct sunlight or in a damp room);
b. accidental damage;
c. use other than in accordance with the accompanying user or instruction manual;
d. modifications, conversions, expansions, maintenance and/or repairs made to the
MEDION product by unauthorised repairers or use of unauthorised third party
parts;
e. negligence;
f. virus attack or software errors; or
g. improper transportation or packaging during return of the product.
This warranty will also be considered void if labels or serial numbers of the product or of a
component of the product are modified or made illegible.
To the extent permitted by law, MEDION shall; only be responsible for losses which are a
reasonably foreseeable consequence of the relevant defect in the product; MEDION will
not be responsible for any costs incurred in relation to software configuration; economic
loss; loss of opportunity; loss of income; or loss of data or software arising out of its repair
or replacement of a MEDION product under this warranty.
4. Service Hotline
Before returning the product to MEDION you must contact us using the service hotline or
via the internet (www.MEDION.co.uk). You will receive further instructions for making
your claim under warranty when you call.
The service hotline is available on 362 days in the year, including Sundays and bank holi-
days but excluding Christmas day, New Years Day and Easter day. The service hotline is
subject to [national rate] telephone call charges. These charges are subject to change. The
price of your call will be stated at the beginning of the call.
Conditions of Warranty for the United Kingdom
80
II. Special warranty conditions for MEDION PC, notebook,
pocket PC (PDA) and navigation devices (PNA)
The following terms apply to MEDION PC, notebook, desktop, pocket PC and laptop
products and optional items included with such products. If one of these items has a fault,
you also have a warranty claim for its repair or replacement, from MEDION. The warranty
covers the costs of materials and labour for repairing or replacing the defective MEDION
product or the optional item in question.
Hardware connected to your product that was not produced or marketed by MEDION can
invalidate the warranty if MEDION can reasonably demonstrate that damage to the
MEDION product or of the optional item included with the delivery was caused by such
hardware. You are entitled to seek independent advice or consultation relating to your
product or any of MEDION’s findings. MEDION will not be liable for any costs incurred to
you when doing so.
This warranty is restricted in relation to any pre-installed operating system as well as to
application programme software that is included with the MEDION product in question.
This warranty is restricted as follows:
For pre-installed operating system as well as to application programme software included
in the MEDION product, MEDION only guarantees the data media (e.g. the diskettes and
CD-ROMs) upon which this software is delivered and warrants that such data media shall
be free from material and processing defects for a period of 90 days from the date of pur-
chase of the MEDION product from an authorised seller of MEDION. MEDION will replace
defective data media free of charge.
Any claims in respect of defective pre-installed operating system as well as to application
programme software are hereby expressly excluded and you should contact the relevant
licensor or copyright owner of the defective software in question. MEDION does not guar-
antee that any software supplied with MEDION products will function without interrup-
tion, will be free from errors or that it will fulfil your requirements. MEDION does not
guarantee the 100% accuracy of the maps provided with the Navigation device.
It may be necessary to delete all data in the product in order to repair the MEDION prod-
uct. PLEASE MAKE SURE THAT YOU HAVE A BACKUP COPY OF ALL DATA ON THE
PRODUCT BEFORE RETURNING THE PRODUCT TO MEDION. To the extent permitted by
law, MEDION excludes all liability for loss of data and MEDION recommends in all cases
that you back up all data on your MEDION product before returning the product to
MEDION.
Conditions of Warranty for the United Kingdom
81
Nederlands Français
English
III. Special warranty conditions for repair on site or re-
placement on site
If a claim for repair or replacement on site is included within the terms of the warranty card
provided with the product, the special warranty conditions for repair or replacement of
your MEDION product on site apply.
The following provisions must be made by you for carrying out repairs or replacements on
site:
MEDION or its authorised personnel must have unrestricted, safe and immediate
access to the products.
Telecommunication facilities required by MEDION or its authorised personnel for
proper execution of your order, for testing and diagnostic purposes and for reme-
dying faults are provided by you at your own expense.
You are responsible yourself for restoring the application software after the repair
services have been carried out by MEDION or its authorised personnel.
You must take all other necessary steps to enable MEDION or its authorised per-
sonnel to carry out your order properly.
You are responsible yourself for connecting and configuring any existing external
peripheral products after MEDION or its authorised personnel have carried out their
repairs.
The free cancellation period for repairs or replacements on site is 24 hours, thereaf-
ter our reasonable costs resulting from late or missing cancellation shall be invoiced
at your expense.
Liability limitations
The contents of this manual are subject to unannounced changes caused by technical
progress. Manufacturer and sales shall not be responsible for any damages which have
been caused as a result of omissions or errors in the information provided in this manual.
Under no circumstances shall we be liable for any of the following:
1. Claims made against you by third parties based on loss or damage.
2. Loss or damage to your blanks, recordings or data.
3. Economic follow-on damage (including lost profit or savings) or associated dam-
age even in the case that we have been informed of the possibilities of this type of
damage.
In some countries the exclusion or limitation of accompanying or follow-on damage is not
legally accepted so that the above limitations do not come into force.
Index
82
Index
A
AC Adapter .........................................14
Accessing Memory cards ....................71
Additional card material......................72
Aerial orientation ................................26
Alarm Clock (Waking function)
Ending the application....................55
Interfaces........................................51
Main screen ....................................50
Selecting an alarm signal ................54
Setting the volume .........................54
Snooze function..............................55
Alternative installation of the
navigation software from a
memory card ..................................73
Ambient temperature ...........................2
Auto run.............................................64
Auto start............................................64
B
Battery Operation .................................5
Bluetooth
Accepting incoming calls................40
Main screen ....................................38
Making calls....................................40
Pairing ............................................39
Starting the application ..................37
C
Cabling.................................................4
Card reader.........................................71
Care of the Display ...............................6
Cleaning...............................................5
CleanUp .......................................18, 61
Contents.............................................. iii
Copyright ............................................. ii
Customer service ................................60
D
Data exchange....................................71
Data Security ........................................1
DC AutoSuspend................................62
E
Earphone connector........................... 11
Electromagnetic Compatibility ............. 3
EMC..................................................... 3
F
FAQ.................................................... 59
G
GPS.................................................... 68
H
Hard Reset.......................................... 23
Hotline............................................... 60
I
Initial set up
Charging the battery...................... 12
Installing the navigation software .. 16
Power supply ................................. 13
Switching on the device ................. 15
L
Liability limitations ............................. 81
Loudspeaker ...................................... 10
M
Memory cards.................................... 71
Microsoft
®
ActiveSync
®
........................ 64
Mini-USB-Connector .......................... 11
Mounting the car holder .................... 26
MP3 Player
List of favourites ............................. 44
Select title ...................................... 43
Bookmarks ..................................... 44
Main screen ................................... 42
N
Navigation
Attaching the navigation system .... 27
Mounting the car holder ................ 26
Safety instructions.......................... 24
Starting the navigation software..... 29
Note...................................................... i
Index
83
Nederlands Français
English
O
On/Off switch.....................................10
Operating
Switching on/off the device ............17
Operating Environment........................2
P
Password .........................................i, 18
Pay TMC .............................................69
Picture Viewer
Main screen ....................................45
Operation .......................................45
Q
Quality ................................................. ii
R
R&TTE ..................................................5
Recycling and Disposal .........................6
Repair ...................................................2
Resetting the navigation system
Hard Reset ......................................23
Soft Reset........................................23
S
Safety and Maintenance .......................1
Safety instructions
Navigation ......................................24
Connection.......................................4
Ambient temperature .......................2
Data security.....................................1
Operating environment ....................2
Repair ...............................................2
Power supply....................................4
Cabling.............................................4
Battery operation..............................5
Maintencance ...................................5
Care of the display ............................6
Transport..........................................7
Security ..............................................18
Serial Number....................................... i
Service ..................................................ii
Faults and possible causes.............. 60
Hotline........................................... 60
Specifications..................................... 74
Speech commands............................. 33
Standards
R&TTE.............................................. 5
Starting the navigation software ........ 29
Sudoku
Description of the switch fields....... 58
Main screen ................................... 56
SuperPIN....................................i, 20, 21
Supplied Items..................................... 8
Synchronisation with the PC .............. 64
T
TMC................................................... 69
Touch Screen ....................................... 9
Transfer of card material to a
memory card ..................................... 72
Transferring Installation Files and
Map Material to the Internal
Memory ......................................... 73
Transport ............................................. 7
Travel Guide ...................................... 48
U
UUID..........................................i, 20, 21
V
Views
Back components........................... 10
Front components ........................... 9
W
Warning function for traffic
monitoring points .......................... 30
Warranty............................................ 76
Index
84
1

Hulp nodig? Stel uw vraag in het forum

Spelregels
1

Forum

Medion-gopal-p4445
  • Ik wil graag een update maken, maar kan nergens gegevens vinden voor MD 98020 MSN 3001 0408 W 48/09
    Hoe kom ik er aan?

    mvg,
    AvK Gesteld op 15-7-2012 om 21:06

    Reageer op deze vraag Misbruik melden
  • Hallo,

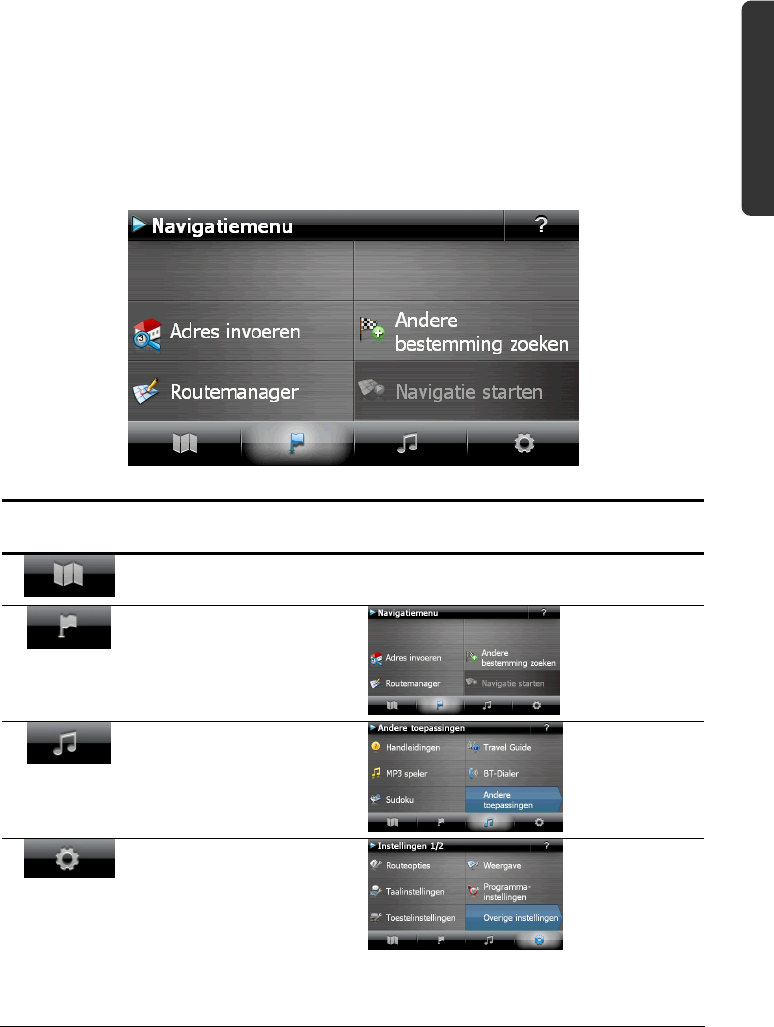
    Ik heb een Medion GoPAl 4.0 P4425 GPS-navigatiesysteem en ontbreek de Nederlandstalige handleiding.

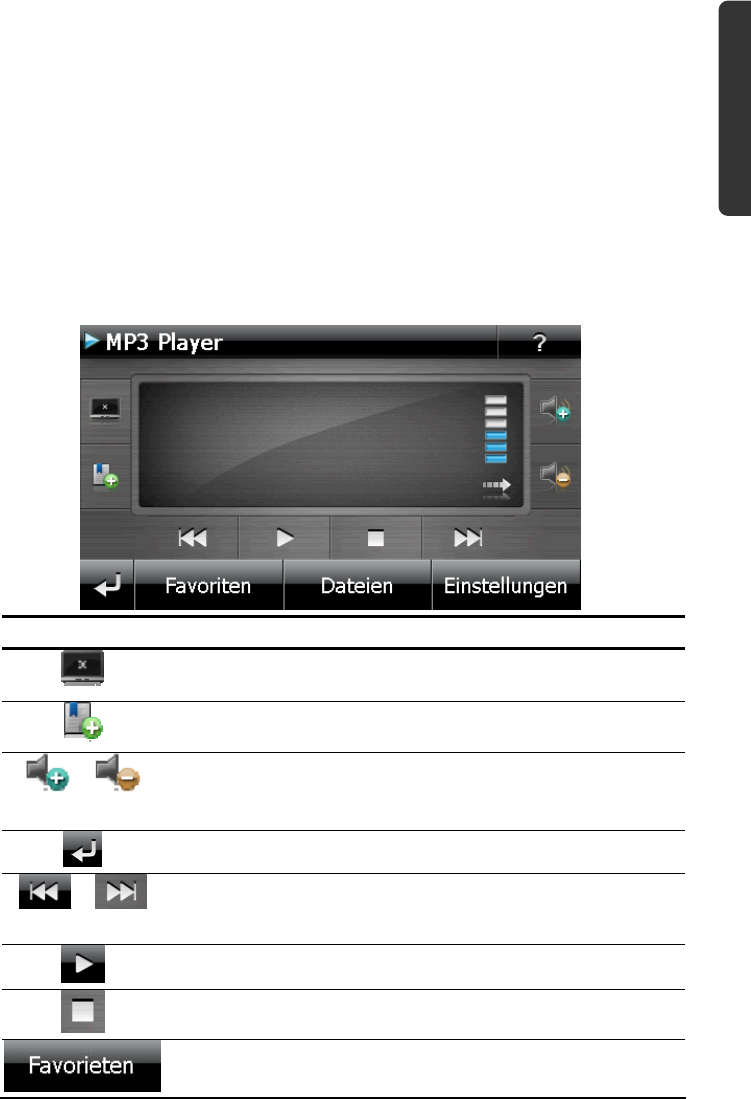
    Nu kan ik dit toestel uiteraard niet ten volle benutten en weet ik niet eens hoe ik de spreektaal van de dame kan wijzigen van Engelstalig naar Nederlandstalig.

    Wie kan me de handleiding voor de P4425 bezorgen (per mail)?

    Hartelijke dank voor tips en uitleg.

    Vriendelijke groeten,
    Gino
    België. Gesteld op 26-12-2011 om 17:30

    Reageer op deze vraag Misbruik melden
    • Gino.
      gewoon kontakt op nemen met medion in n.l
      vragen kan je stellen op de computer even de vragen lijst invullen.
      je kan ook bellen .helpen ze gelijk.
      mensen daar lossen altijd het probleem op.
      prima service vind ik.
      mg
      hans Geantwoord op 26-12-2011 om 18:29

      Waardeer dit antwoord Misbruik melden
  • Ik heb gedownload om te zoeken naar updates voor wegenkaart. Ik kreeg melding bij opstart van mijn medion dat mijn kaartgegevens minstens 12 maanden oud zijn. Hoe neem ik kontakt op met service centrum? Gesteld op 1-7-2011 om 12:40

    Reageer op deze vraag Misbruik melden
  • Dag Harold, Ik heb nooit een antwoord gekregen op mijn vraag maar op
    pag.61 van de te downloaden handleiding kom je wellicht wat verder.
    Ik heb mijn Nav. van Medion niet meer in gebruik omdat ik in m'n nieuwe auto een ingebouwde Na. heb. Succes met jouw Nav. Geantwoord op 14-5-2012 om 12:39

    Waardeer dit antwoord (2) Misbruik melden

Misbruik melden

Gebruikershandleiding.com neemt misbruik van zijn services uitermate serieus. U kunt hieronder aangeven waarom deze vraag ongepast is. Wij controleren de vraag en zonodig wordt deze verwijderd.

Product:

Bijvoorbeeld antisemitische inhoud, racistische inhoud, of materiaal dat gewelddadige fysieke handelingen tot gevolg kan hebben.

Bijvoorbeeld een creditcardnummer, een persoonlijk identificatienummer, of een geheim adres. E-mailadressen en volledige namen worden niet als privégegevens beschouwd.

Spelregels forum

Om tot zinvolle vragen te komen hanteren wij de volgende spelregels:

Belangrijk! Als er een antwoord wordt gegeven op uw vraag, dan is het voor de gever van het antwoord nuttig om te weten als u er wel (of niet) mee geholpen bent! Wij vragen u dus ook te reageren op een antwoord.

Belangrijk! Antwoorden worden ook per e-mail naar abonnees gestuurd. Laat uw emailadres achter op deze site, zodat u op de hoogte blijft. U krijgt dan ook andere vragen en antwoorden te zien.

Abonneren

Abonneer u voor het ontvangen van emails voor uw Medion gopal p4445 bij:


U ontvangt een email met instructies om u voor één of beide opties in te schrijven.


Ontvang uw handleiding per email

Vul uw emailadres in en ontvang de handleiding van Medion gopal p4445 in de taal/talen: Nederlands, Engels, Frans als bijlage per email.

De handleiding is 10,7 mb groot.


U ontvangt de handleiding per email binnen enkele minuten. Als u geen email heeft ontvangen, dan heeft u waarschijnlijk een verkeerd emailadres ingevuld of is uw mailbox te vol. Daarnaast kan het zijn dat uw internetprovider een maximum heeft aan de grootte per email. Omdat hier een handleiding wordt meegestuurd, kan het voorkomen dat de email groter is dan toegestaan bij uw provider.

Stel vragen via chat aan uw handleiding

Stel uw vraag over deze PDF

Uw handleiding is per email verstuurd. Controleer uw email

Als u niet binnen een kwartier uw email met handleiding ontvangen heeft, kan het zijn dat u een verkeerd emailadres heeft ingevuld of dat uw emailprovider een maximum grootte per email heeft ingesteld die kleiner is dan de grootte van de handleiding.

Er is een email naar u verstuurd om uw inschrijving definitief te maken.

Controleer uw email en volg de aanwijzingen op om uw inschrijving definitief te maken

U heeft geen emailadres opgegeven

Als u de handleiding per email wilt ontvangen, vul dan een geldig emailadres in.

Uw vraag is op deze pagina toegevoegd

Wilt u een email ontvangen bij een antwoord en/of nieuwe vragen? Vul dan hier uw emailadres in.


Info