761888
102
Verklein
Vergroot
Pagina terug
1/105
Pagina verder
USER MANUAL
GSM Mobile Telephone
Maxcom MM824
3
Introduction ........................................................ 9
Accessories ....................................................... 10
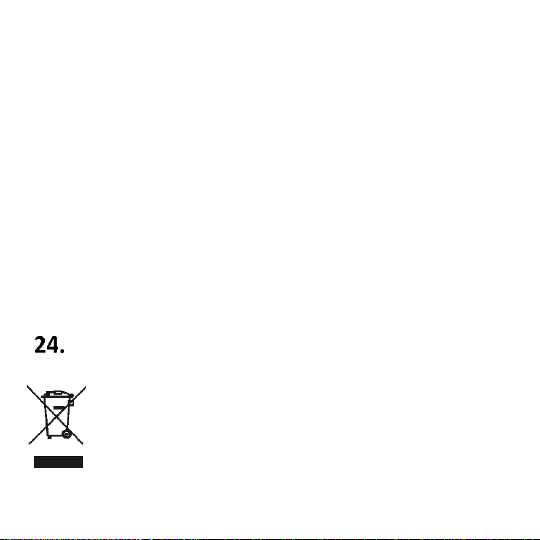
Safety Precautions ............................................ 11
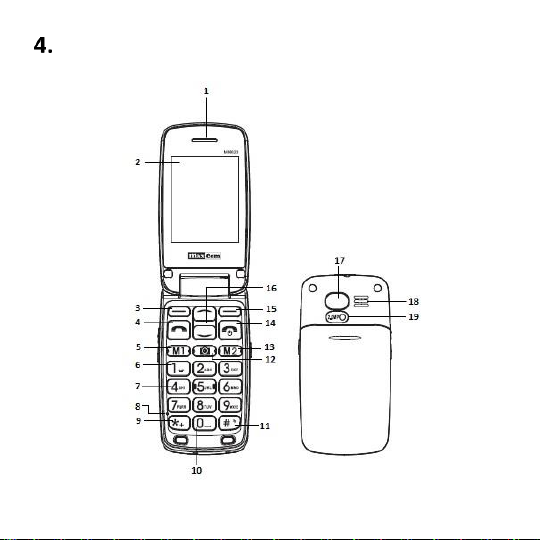
Phone Description ............................................ 14
SIM & MicroSD Card Installation ....................... 16
SIM Card Precautions ........................................ 20
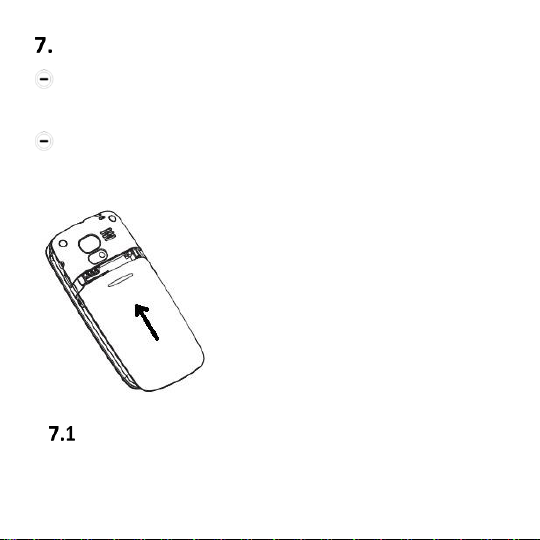
Battery & Back Cover Installation ..................... 22
Charging
................................................... 22
7.1.1 Desktop Charger (Option) ................... 24
External Display 1,44” ............................. 25
Entering Text ..................................................... 25
Using the Phone ................................................ 26
Switching on the Phone ........................... 26
Update Time &Date ................................. 27
Making Phone Calls ................................. 28
9.3.1 Dialing Number from Phone Book ...... 29
Answering Phone Calls ............................ 30
Adjusting Volume .................................... 30
Symbols on the Display Screen ................ 31
Additional Functions While Talking ......... 32
4
9.7.1 Speakerphone Mode .......................... 33
9.7.2 Call Waiting ......................................... 34
Phonebook ....................................................... 35
Entering a New Contact .......................... 35
Speed Dial ............................................... 36
10.2.1 Assigning Phone Number to Keys 2-9 . 37
10.2.2 Programming M1 & M2 Keys .............. 37
Managing Entries in the Phonebook ....... 38
Text Messages ................................................... 40
Creating and Sending Text Messages ...... 40
Inbox ....................................................... 43
Sentbox ................................................... 45
Drafts ....................................................... 45
Outbox .................................................... 46
Text & Multimedia Message Settings ...... 46
Message Memory Status......................... 49
Multimedia Messages MMS ................... 50
Emergency Phone Call ...................................... 50
Emergency Button ................................... 51
12.1.1 Emergency [SOS] Settings ................... 52
5
Call Log .................................................... 54
Radio FM ........................................................... 56
Multimedia ....................................................... 59
Photo & Video Camera ............................ 59
Audio Player ............................................ 60
Video Player ............................................ 61
Voice Recorder ........................................ 62
Tools .................................................................. 63
My Files ................................................... 63
Calendar .................................................. 64
Calculator ................................................ 65
Alarm Clock ............................................. 66
SIM Card Service ...................................... 67
Settings ............................................................. 67
Call Settings ............................................. 67
Phone Settings ......................................... 69
16.2.1 Setting Time &Date ............................. 69
16.2.2 Language ............................................. 70
16.2.3 Shortcut Settings ................................. 71
16.2.4 Automatic Phone Powering On/Off .... 72
6
16.2.5 Factory Settings .................................. 72
Display Screen ......................................... 73
16.3.1 Powering On/Off Animation ............... 73
16.3.2 Wallpaper Setting ............................... 73
16.3.3 Desktop Settings ................................. 74
16.3.4 Contrast .............................................. 74
16.3.5 Backlight ............................................. 75
16.3.6 Keypad Backlight ................................. 75
16.3.7 Clock While Charging .......................... 75
MENU Settings – basic/advanced ........... 76
Security ................................................... 76
16.5.1 PIN1 / PIN2 ......................................... 77
16.5.2 Phone Lock.......................................... 78
16.5.3 Update the Phone Password .............. 78
16.5.4 Black List ............................................. 78
Ringtone Settings .................................... 79
Connections ............................................ 81
16.7.1 Bluetooth ............................................ 81
16.7.2 Data Account ...................................... 82
16.7.3 GPRS Service ....................................... 83
7
16.7.4 Data Connection ................................. 83
16.7.5 Network Selection ............................... 84
Internet ............................................................. 84
Safe Use ............................................................ 86
FAQ (Troubleshooting) ...................................... 89
Technical Specs ................................................. 94
Battery Information .......................................... 95
SAR Information ................................................ 97
Protect Your Environment ................................. 98
Terms of Warranty .......................................... 101
Declaration of Conformity .............................. 103
8
If there is any technical assistance required, please call the
hotline at (+48) 32 325 07 00,
or email us at serwis@maxcom.pl
Our website:
http://www.maxcom.pl/
The Set Includes
GSM Mobile Phone
Charger
USB Cable
800mAh Battery
Headset
Desktop Charger
User Manual
Warranty Card
9
Keeping the original package is recommended as it
might be used for transport.
Keep the receipt as it is necessary for warranty.
Important The telephone works in the GSM
900/1800 MHz. Prior to switching on the phone, a SIM
Card must be correctly inserted.
Introduction
Thank you for choosing the Maxcom telephone.
This User Manual has been published by the
Manufacturer. Any corrections or modifications arising
from mistakes, inaccuracies, and the phone or
software upgrades might be made without prior
notifications; such changes, however, will be reflected
in the updated versions of the User Manual. To learn
more, or to get any form of assistance please go to the
10
website: www.maxcom.pl.
All and any content of this User Manual is the
copyright of the Manufacturer. Copyrights and
trademarks as mentioned in this documents are an
exclusive property of their owner. Copying,
distributing, storing or disseminating of the copyright
material, in part or in whole without prior written
consent of the author is strictly prohibited.
Accessories
Use only batteries, chargers, and other accessories
recommended by the phone’s Manufacturer. Check at
your point of sale what accessories are available in
your area.
11
Safety Precautions
Reading the guidelines below will minimize the risk of
misusing the phone.
USING The telephone emits electromagnetic field
that might negatively interfere with other electronic
devices including medical equipment.
Never use the phone wherever such use is
prohibited, in hospitals, airplanes, refueling points or
at proximity to flammable materials. Using the phone
in such places might expose others to danger.
Never use the phone without a headset while driving.
A device and its accessories might contain small
parts. Keep the phone and all parts out of reach of
children.
SERVICE - Never repair nor modify the phone on your
own; all repairs should be made by authorized
service only.
CLEANING - Never clean the phone with any
12
chemicals or corrosives.
TORCH – Never look directly into the beam of light.
HEARING AIDIf you have a hearing aid, the phone
volume should be carefully adjusted in line with the
hearing aid sensitivity.
ELECTRONIC MEDICAL EQUIPMENT – Your phone
is a radio transmitter, that might interfere with the
performance of electronic medical equipment or
implants, heart pace makers, insulin pumps, etc.
Keeping a distance no shorter than 15 cm between
the phone and the implant is recommended. To learn
more about it, contact your health care provider or
manufacturers of such medical equipment.
WATERPROOF The phone is NOT waterproof.
Keep it dry at all times.
DUSTPROOF The phone is NOT dustproof, never
use the phone in the area with increased level of dust.
Protect the phone against metal chips, that might
cause the device to malfunction.
DISPLAY SCREEN Avoid pressing too hard on the
13
LCD display screen and using sharp tools; otherwise
the display screen might be damaged.
Never use any metal objects to press the battery
contacts together as doing so might cause an
explosion.
Never expose the phone to either low or high
temperature, direct sunlight, and high humidity. Never
place the phone next to heating devices such as
radiators, heaters, ovens, furnaces, camp fires,
barbeque, etc.
PROTECT YOUR HEARING!
Prolonged exposure to sounds of high
volume might damage your hearing.
Listen to music at a moderate level, and
do not keep the phone too close to an ear, while using
a speakerphone. Lower the volume prior to using
headphones.
14
Phone Description
15
1. Speakerphone
2. LCD Display Screen
3. Left Function Key, LFK
4. Make Call Button
5. M1 / Left
6. Voicemail
7. Numeric Keypad
8. Microphone
9. Star
10. Profile: Outdoors
11. Profiles: Silent, Vibrations
12. Photo Camera
13. M2 / Right
14. End Call Button / Power On/Off
15. Right Function Key, RFK
16. Navigation Keys: Up & Down
17. Emergency Button
18. Ringtone Volume
19. Camera Lens
16
20. Charging Slot / USB
21. Torch Button
22. Desktop Charger Charging Slot
23. Volume Down
24. Volume Up
25. Torch Diode
26. Headset Slot
27. Flip LCD Screen
SIM & MicroSD Card Installation
The SIM Card slot is located under the battery.
Before installing the card, make sure the phone is
switched off, and it is not connected to an AC adapter
or any other accessories.
Place the phone face down, and slide down the
battery cover to remove it.
17
Carefully insert the SIM Card into the slot, and
close the slot with the metal contacts facing
downwards. Make sure the notch on the Card is
located on the right down corner.
18
There is a MicroSD memory card next to the SIM
Card slot. Move the pin towards OPEN (to the side
closer to the edge), and then lift it up. Insert the
microSD Card so that the microSD Card contacts will
touch the phone contacts, close the pin towards
LOCK.
19
Be careful while using memory cards especially while
inserting and removing the card. Some memory cards
must be formatted on a computer before the first use.
Regularly make backup copies of data stored on cards
used in other devices, if you use SD Cards! Misuse or
20
other factors might damage the card or make the
card lose its content.
Insert the battery so that the contacts +/- will go
to the front of the phone.
SIM Card Precautions
Switch off the phone and wait several seconds
prior to inserting or removing the SIM Card.
21
Be careful while handling the SIM Card, do not
bend it or scratch it.
If the SIM Card is not properly installed or
damaged, a message „Insert SIM Cardwill appear on
the screen after switching on the phone. Make sure
the Card is properly inserted and it is not damaged,
and then switch on the phone again. If the message
„Insert SIM Cardis still there, take the SIM Card back
to your GSM network service provider to have it
replaced.
22
Battery & Back Cover Installation
Gently insert the battery; make sure to properly
position its metal contacts.
To install the back cover, slide it upwards, until it
clicks.
Charging
Never use a charger or battery that is damaged or not
23
manufactured by the Manufacturer. Accessories of
different type or modifications might damage the
phone and might give basis for violation of regulations
pertaining to radio devices, and might void the
warranty.
When the battery is discharged, there will be an icon
of the empty battery displayed on the screen, and you
will hear a sound alert (if warning alerts are enabled).
To charge the battery, plug the charger to the power
outlet and to the phone.
The battery icon will keep blinking as long as the
battery is being charged. The blinking will stop as soon
as the phone is fully charged, or the phone is
disconnected from the charger.
24
Important!
While charging, the air temperature must be
between 0°C and +40°C.
After certain time, batteries wear out; therefore,
their performance time will get shorter and shorter
over time.
7.1.1 Desktop Charger (Option)
If you use a desktop charger, first you need to plug the
small plug into the desktop charger slot, and then plug
the other end of the charger into the power outlet. To
charge the battery, the only thing you need to do is to
place the phone onto the charger with its metal
contacts going downwards.
25
External Display 1,44”
There is a display screen on the external side of the flip
cover, displaying the most important information. To
backlight the display screen for a moment and to see
time, date, and the day of the week press the keys „+”
or „-”. If there is any missed phone call or an unread
text message, you will see a corresponding icon under
the clock.
While having an incoming phone call, the Callers
phone number (or name, if available) will be displayed.
Entering Text
You can enter any words, numbers, symbols, and
punctuation marks.
To select the size of letters to be entered and to enter
26
digits, while creating a text message, press “#, press
keys Up/Down to select the method you need and
press the Left Function Key to confirm. The selected
text input method will be visible in the right top
corner of the display screen.
To enter symbols:
Press“*” to access the symbol chart. To navigate
within the chart, press keys Up/Down. To enter a
selected symbol, press OK.
Using the Phone
Switching on the Phone
Press and hold the key on the keypad to switch
on/off the phone.
If the SIM Card is protected by the PIN Code, enter
27
the code, and press the LFK to confirm. Use the right
key to delete digits if you have entered any digits by
mistake.
Important!
If PIN & PUK codes were not provided along with
the SIM Card, contact your service provider.
If the PIN has been inserted incorrectly 3 times, the
SIM will be locked, and entering the PUK will be
required.
Enter PUK and press “OK” to confirm.
Enter a new PIN Code and press “OK” to
confirm.
Update Time &Date
The phone has a feature of updating the time and date
automatically, while switching on the phone, the time
28
and date will be automatically downloaded from the
GSM network. If, for whatever reason, the date and
time are not automatically updated, such information
might be manually entered. In menu select
Settings>Phone Settings>Time & Date. Use the
numeric keys to enter the correct time. If you make a
mistake, press keys M1 and M2 to navigate right/left
between characters. Press the key Down, enter the
correct date. Press the RFK to confirm.
Language should be automatically set. If you want to
change a language, go to Błąd! Nie można odnaleźć
źródła odwołania.
Making Phone Calls
Enter the phone number. Press “Delete” to delete a
digit entered by mistake.
29
Press to select a number you wish to call. Press
„End Call” to quit.
Press to end a phone call.
Important!
While making an international phone call, press “*”
twice in order to get an international prefix “+”
before the country code (instead of 00).
9.3.1 Dialing Number from Phone Book
In Idle mode, press the LFK Menu, to enter the main
Menu.
Use keys Up/Down, to go to the Phonebook and
press the LFK to select.
If you look for a certain number, enter the first letter
of the name and select the Contact you are looking
30
for.
Press to make a phone call.
Speed Dial : in Idle Mode press the RFK Phonebook
to enter the Phonebook.
Answering Phone Calls
Open a flip to answer a phone call (if such an option
is enabled). With the flip open, or when answering
phone by opening a flip cover is disabled, press
to answer a phone call. You can also reject a phone
call by pressing the red receiver .
Press to end a phone call, or close the flip (if
such an option is enabled).
Adjusting Volume
While talking, use the side key +/- to adjust the
31
conversation volume. Volume level indicator is visible
on the display screen.
Important!
Using a headset at high volume might damage your
hearing.
Carefully adjust volume while using the phone.
Symbols on the Display Screen
Signal
Strength
Headphones
On
Silent
Battery Level
Ringtone +
Vibration
Unread Text
Message
32
Vibration
Only
Roaming Active
Alarm Active
Missed Phone
Call
Additional Functions While Talking
While having a phone conversation, press the Left
Function Key to enter phone call options -in Options,
you can select the following:
Suspend/Hang Up
Suspending a Conversation
Speakerphone
Enabling the Speakerphone Mode
Enable BT headset
Enabling a connection while using
a headset
Enable/Disable
DTMF
Enabling/disabling a tone signaling
33
Phonebook
Searching the Phonebook to make
a phone call or to edit data
Call Log
Entering the list of made and
received phone calls
Messages
Entering Messages
Start Recording
Recording Conversation
Mute
Muting the Microphone
9.7.1 Speakerphone Mode
While having a phone conversation, press the RFK to
enable the speakerphone mode. The speakerphone
mode allows you to have a phone conversation
without holding a phone next to your ear. You can
34
talk to the mike from a distance of about 0,5 m for
your voice to be understandable. Use side keys +/- to
adjust volume.
Press this key again to return to the normal mode.
9.7.2 Call Waiting
It is a feature provided by your service provider. If,
while having a phone conversation, somebody tries
to call you, you will be notified about it by a special
beep. In such a case, you can suspend the current
phone call in Options. To enable such service, go to
Settings > Call Settings > Call Waiting.
While having a conversation, there is the Caller’s
number and phone call duration displayed on the
display screen.
35
If the Caller ID option is disabled, a message
„Unavailableor “Unknownor “Privatewill appear
on the screen.
Phonebook
You can store up to 300 Contacts in the Phonebook.
Entering a New Contact
Press Menu, there is the Phonebook at the top
of the list. Press OK.
Select Options>New
Select the location to save the new Contact,
either on the SIM Card or the phone memory.
Enter the Contact’s name and phone number.
If you save the Contact in the phone memory,
you can additionally enter his/her home phone
36
number, a special ringtone, or add him/her to the
group.
Use Up/Down to move on, and select Edit.
To save a Contact, select Save.
Press , to see a home screen, Delete, to
delete a letter/digit, Return to return to the previous
Menu.
Important!
While entering foreign numbers, always enter “+”
(instead of “00”) prior to entering the actual number.
Speed Dial
There are 8 numeric keys (2-9) available for speed
dialing.
Key 1 is for voicemail.
37
10.2.1 Assigning Phone Number to Keys 2-9
To assign phone numbers to keys 2-9 to be dialed in
speed dialing, follow the steps below:
Press Menu> Phonebook. Press OK.
Select Options>Other> Speed Dial. Press OK.
Use keys Up/Down to select the key you wish
to assign a phone number to, press Options>Edit
Enter the number or press Phonebook and find
the Contact you need using the keypad, keys
up/down, and press OK to confirm.
Follow the same procedure to assign the other keys.
10.2.2 Programming M1 & M2 Keys
To quick program the key M1 or M2, press and hold it.
Next, enter the name, use the key down to go to the
38
box Number, and enter the phone number. Press Save
(Left Function Key).
You can also program M1 and M2 keys in menu:
SOS>Family/Friend Phone Number M1/M2. Select the
key you wish to program, press Options, and select if
you want to add the Contacts from the Phonebook or
manually. Select the Contact or enter the number and
press the LFK to confirm.
Managing Entries in the Phonebook
Press Menu, there is the Phonebook on the top
of the list. Press OK.
Select any Contact and press Options.
New
See: Entering a New Contact
Details
Displays the Contact details
39
Edit
Gives you an opportunity to
update the Contact’s name or
phone number, or both
Create
Text/Multimedia
Message
Sending Message to Selected
Numbers
Make Call
Make a phone call to selected
numbers
Delete
Deleting a Selected Contact
Delete Selected
Delete Multiple Contacts
Copy
Copying Contact to SIM
Card/phone memory
Others>Family/Friend
no M1/M2
Assign numbers toM1 & M2
keys
Others>Speed Dial
Assign numbers to keys 2-9
40
Others>Service
Numbers
If available, service numbers
are displayed
Others>Memory
Status
A number of Contacts on the
SIM Card and in the phone
memory is displayed
Text Messages
Creating and Sending Text Messages
Select Menu and go to Messages
Select Create Message, and then New Text
Message.
To create a multimedia message, select Create
Message >New MMS
Enter the text, and then click Options
Select Send To to enter the Recipient's phone
41
number. Or you can get it from the Phonebook.
You can select multiple recipients for this
message. If you want to select the Recipient from
the Phonebook, use keys Up/Down to select the
Contact, press the Camera button to
mark/unmark the Contact. As soon as you mark
all Contacts, press Options>Done.
While entering the message, press Options and
select:
Send to, allows you to send a message to
recipients,
Use template, to enter ready-to-go text message
Enter Contact, to enter the Contact’s name and
phone number
Save in Drafts, to save a message draft
42
Quit, leaves the text input mode.
While creating a multimedia message, you can add:
Recipients
Message subject
Message content
Photos
Audio file
Other attachments: Text, Slide, Previous Slide,
Photo, Audio, Video
Important:
Polish diacritics (ą,ć,ę,ł,ń,ó,ś,ź,ż) take up more
memory, and therefore using them limits the number
of total characters you can send in a single text
43
message.
A text message might be sent even if it is longer than
the allowed number of characters for a single
message. Longer message are sent in two or more
messages. A charge for each message might apply as
per your service provider’s price list.
Inbox
Select Menu and go to Messages
Select Inbox.
Select a message from the list by clicking
Options and then Open.
Use the key Up/Down to scroll down the
message and read it in full.
Press Options > Reply>Text or Reply>MMS to
send a message to the Sender.
44
Press Options > Connect to dial the Sender’s
number.
Press Options > Forward to forward the
message.
Press Options> Delete to delete the message
Press Options> Transfer to transfer the message
to SIM Card or the phone
Press Options> Copy to copy the message to
SIM or phone
Press Options > Add Sender To to add the
message Sender to the Phonebook
Press Options > Details to see the message
details.
45
Sentbox
Select Menu and go to Messages
Select Sent.
Select Options>Open to see the entire message.
In Options you can forward, delete, transfer the
message, call the Sender and get details displayed.
Drafts
Select Menu and go to Messages
Select Drafts
Select the message from the list by clicking
Options and then Open
In Options you can send a message, insert a
template, insert the Contact or save a message.
46
Outbox
Select Menu and go to Messages
Select Outbox
Select the message from the list by clicking
Options and then Open
In Options you can send a message again, insert
a template, insert the Contact or save a message.
Text & Multimedia Message Settings
Select Menu and go to Messages
Select Message Settings.
Select SMS Settings to update Settings of text
messages. You can choose one of the following
options:
47
Message Center
You can update the Text Message
Center Number (provided by the
Service Provider)
Message
Priority
Set the time to prioritize your
messages
Delivery
Reports
Enable/disable message delivery
reports
Save sent
messages
Select whether you want sent
messages to be automatically
saved
Memory
Settings
Preferred location to save
messages
Select MMS Settings to update settings of
multimedia messages. You can choose one of the
48
following options:
MMS Account
Select an account you need. It is
necessary to receive/send
multimedia messages.
Receiving
Options
Enable/disable automatic
download, ads, receive report
Options
Set priority time, delivery report,
receive confirmation request, send
anonymously
File Storage
Select the location for messages to
be saved
49
Audio Player
Enable/Disable playing audio in
received messages
Restore Default
Restore factory settings for
multimedia messages
If there are any problems with sending multimedia
messages, please contact your service provider to
enter the required settings.
Message Memory Status
Select Menu>Messages>Memory Status, to see how
much of the phone memory has been taken up by
text and multimedia messages.
50
Multimedia Messages MMS
To create a multimedia message:
Select MENU, next Messages > Create
Message >New MMS
Multimedia message might include photos,
videos, and audio files. To add a selected file, use
keys Up/Down to select the symbol of a photo/music
note/plus, click Options>Edit and select an item.
Emergency Phone Call
When the phone is switched on, you can always
manually dial 112 and confirm by pressing the green
receiver .
Most networks– but not all – accept emergency
numbers (112, 999 etc.) even if the SIM Card is not
51
active or there is no SIM Card at all. To learn more,
contact your service provider.
If the phone is switched off, switch it back on. If you
don’t know the phone code or PIN Code, in the code
input box enter the number 112, and press the LFK.
Emergency Button
To make an emergency phone call, press and hold the
emergency key SOS on the back of the phone for 3
seconds. The phone will automatically dial previously
assigned numbers. If the phone call is not answered
within 25 seconds, the phone will dial the next
number. Calling is repeated three times until the
phone call is answered. If nobody picks up the phone,
the phone will send an emergency text message (if
such an option is enabled) to numbers listed as
52
Emergency Contacts and it will remain in the
emergency mode for an hour to automatically answer
the first incoming phone call. In emergency mode, to
call the next person listed as an Emergency Contact,
press the RFK. To finish the emergency procedure,
press and hold the emergency button again.
Automatic calls to 112 are not allowed. Do not list
this number as your Emergency Contact.
Remember, for this feature to work, first you must
enable it in MENU.
12.1.1 Emergency [SOS] Settings
To enter Emergency Settings go to MENU>SOS.
Select User Info to enter important information
about the User such as his/her diseases,
53
Select Emergency Contacts, to enter phone
numbers (Contacts) for the phone to dial in case
of emergency procedure. You can list up to 5
numbers. Select the entry number from the list,
press Options>From Phonebook to select a
number from the Phonebook, or Options>Enter
to manually enter the number using the keypad.
After entering, press Save.
Select Family/Friend No M1/M2 to assign phone
numbers to keys M1 & M2. Select the key to
assign a phone number to, whether you want to
get this number from the Phonebook or enter it
manually. After entering, press Save.
To enable this feature, select the SOS Button
and press the option Enable.
54
Select the Emergency SMS for the phone not
only to dial the listed phone numbers, but also to text
Emergency Contacts.
Click Edit Message to update the message content.
Select Alarm SOS, to enable/disable sound
signal.
Call Log
All received, missed, and dialed phone numbers are
recorded in the Call Log. The Call Log lists no more
than 50 most recent phone calls.
Dialing most recent phone calls
If you press the green receiver , all most recent
phone calls will be displayed.
If you go to the main Menu and you use the
arrows to find Call Log and you press OK, you will
55
view phone calls grouped into:
1. Missed phone calls
2. Dialed phone calls
3. Received phone calls
4. Restricted phone calls (attempted phone calls from
blacklisted phone numbers).
You can also clear Call Log and check duration of
phone calls.
Press to select the number or select
Options to view the following:
56
Details
Displays the phone call details
Connect
Makes a phone call to a selected
number
Create
SMS/MMS
Sends a text/multimedia message to
a selected number
Add to
Phonebook
Saves the number in the Phonebook
Add to Black List
Blacklists the number
Clear All
Deletes all phone calls from the list
Delete
Deletes selected phone calls from
the list
Mark
Allows to mark/unmark multiple
entries
Radio FM
57
The telephone can receive radio waves at frequencies
of 87.5 up to 108.0 MHz.
Important: If the reception is low, connect the
headset to the phone. The headset wire doubles as
an antenna.
In Idle mode, press Menu, use keys Up/Down
to find Radio FM.
Use the side keys +/- to adjust volume, keys
M1/M2 to go to the previous/next saved radio
station,
Press the key to pause playing the radio,
Press the LFK to select the following options:
- Search automatically and save
- Channel List
- Save
58
- Manual Search
- Use Speakers
- Play in Background
- Recording
- Playlist
- Memory
You can save selected radio stations under
numbers 1-40 and use keys M1/M2 to scroll up and
down, or enter the number and wait a moment to
choose.
To return to the main Menu press the red
receiver .
59
Multimedia
Photo & Video Camera
The phone can take photos and record videos. To
enable the camera, in Idle mode press the key
or select Menu>Multimedia>Camera. To take a
photo, press the key . If the feature Autosave is not
enabled, after taking a photo press the LFK (save) to
save the image.
To record a video, in Options select the option Video
Camera, or in Idle mode select
Menu>Multimedia>Camera.
To select the option Photos or Recording, press the
LFK. Recording starts as soon as you press the key
. Press again to pause. Press the RFK to stop.
60
To use this feature, installing MicroSD Card (not
included in the set) and selecting saving on the
memory card are required.
Options>Memory>select the option Memory Card.
Audio Player
Play audio files saved on the phone or in the phone
memory. The phone supports AAC, WAV, AMR files.
Some audio files can’t be played on the phone as the
phone “does not see” them. To open audio files from
the memory card, they must be saved in the Audio
folder.
While playing, press the dedicated keys - play/
pause; M1 – previous track; M2 – next track.
To adjust volume of the player, press the side key +/-.
61
Press the LFK [Options], to enter the player menu.
If the playlist is not empty, you can do the following:
- Set a playlist
- Set a track as a ringtone
- Set replay, random play, and playing in the
background.
Video Player
This menu allows you to play video files saved either
on the memory card or in the phone. The phone
supports 3GP, FLV and AVI files. Some formats can’t
be played on the phone. The phone has its limitations
if it comes to the size and length of video files.
To be able to view the video files from the memory
card, they must be saved in the folder Videos. To
62
start/pause playing a video file, press the camera key.
Enter the video file player, press the key Options to
do the following: Open, Full Screen, Brightness
Adjustment, Details, Settings Reset.
Voice Recorder
You can record phone conversations, music, and
other sounds.
Select Menu >Multimedia > Voice Recorder (or,
while talking, select Menu>Start Recording)
To start/pause recording, press the key . To
stop recording, press the key M2.
If no other destination has been selected, the
recorded files are saved in the folder File Manager
>Telephone>Audio.
63
You can change the location to save files to the
memory card; quality of recording might be also
changed. To do so, select Options>Memory or
Options>File Format.
Tools
My Files
To view files saved in the phone and on the memory
card, select: MENU > Tools > My files. After selecting
the file you wish, press Options to
- Open the file
- Delete the file
- Details– the file details
- Edit– rename or copy the file
- Mark – mark mulitple files
- Memory Status – see how much memory
you have left on the memory card and in the
64
phone; format a selected memory.
Calendar
The phone has a calendar available at MENU >
Tools > Calendar. Not only can you view the calendar,
but also you can add your own entries, set an exact
time, date, repeat, and sound alert. To plan a
task/event, use keys to go to the date
you need, and press the LFK to get the following
options:
- New Task
- Show Tasks
- All Tasks
- Clear Today Task
- Clear All
- Go to Date
To navigate between months, use keys * and #.
Entering a news task, you can set its type:
65
- Single – one time reminder about the task at
selected time and date,
- Every day – every day reminder about the task at
selected time and date
- Every week – every week reminder
- Every month – every month reminder
- Every year – every year reminder
Calculator
Press Menu>Tools>Calculator,
To enter digits, use the keypad,
Use the key„*”, to enter a comma, and arrows
Up/Down to select an operation (+, -, x, ÷),
Enter the second number,
To get a result, use arrows Up/Down to select
the equal sign and press OK.
66
Alarm Clock
It is possible to set 3 independent alarm clocks. They
might be either one time or repeated on selected
days. When the alarm clock goes off, press Dismiss to
stop it or Snooze to put it off in time.
To set the alarm clock:
Select Menu>Tools>Alarm Clock
Select one out of available alarms.
To enable the alarm clock, press Options>Enable.
To change the other settings, press Options>Edit
to enter the name of the alarm and time, to
select a ringtone and select days for the alarm
clock to go off.
67
SIM Card Service
Independently from the phone features, the SIM
Card offers additional service. Name and functions of
such menu depend on the type of available service.
Settings
Call Settings
Most of the features listed below are network
services, offered by a service provider. If the service
provider offers such features, they must be
configured.
68
Select Menu >
Settings>Call
Settings and
next select one
out of following
options:
Description
Call Waiting
Ability to enable Call Waiting
Call Forwarding
Ability to forward phone calls in certain
scenarios
Call Barring
Ability to restrict certain type of phone
calls
Number Withhold
Enable/disable the Caller ID to be
visible
Flight Mode
In the flight mode, all phone calls to
GSM network are disabled
Receiving Phone
Calls
You can select how to answer an
incoming phone call:
- Answering by Opening the Flip Cover –
an incoming phone call is answered as
69
soon the flip cover is open,
- Answering by Pressing Any Key – an
incoming phone is answered by
pressing any key,
- Automatic Answering When Bluetooth
On – an incoming phone call is
automatically answered if Bluetooth is
enabled
- End by Closing the Flip Cover – a
phone call will be ended as soon as the
flip cover is closed.
Phone Settings
16.2.1 Setting Time &Date
Select Menu > Settings > Phone Settings>Time
& Date
Use the numeric keypad to enter the correct time and
date. To navigate between digits (left/right) use keys
70
M1 and M2. To navigate between options, use keys
up/down. You can set the date and time format, or
enable/disable an automatic update. After correct
data has been entered, press the RFK (Do).
16.2.2 Language
Select Menu > Settings > Phone Settings>
Language
A default language for the phone Menu and spelling
checker are defined by the SIM Card. There are 7
languages for you to choose from.
Press:
1x Menu (Left Function Key - LFK)
1x Up
1x LFK
71
1x Down
1x LFK
1x Down
2x LFK
Press the language you need and press the LFK,
and then the RFK (right function key).
16.2.3 Shortcut Settings
Select Menu > Settings > Phone Settings>
Shortcut Settings
You can decide what options to assign to keys
Up/Down in Idle mode. Select the key whichever
options you want to update, press Select, select an
option, and press OK, and then Done.
72
16.2.4 Automatic Phone Powering On/Off
Select Menu > Settings > Phone Settings>
Phone Auto Power On/Off
This feature allows you to set time for the phone to
automatically switch on or off.
Select this feature, if you want to set time for the
phone to automatically switch on or off. Press
Options>Enable and then Options>Edit to set time. If
selected time to switch on and off concurs, none of
the actions will be performed.
16.2.5 Factory Settings
Select Menu > Settings > Phone Settings>
Restore Factory Settings.
Enter the code (default code: 1234) and press OK,
73
factory settings will be restored.
Display Screen
16.3.1 Powering On/Off Animation
Select Menu > Settings> Display Screen>
Animation
Default powering on/off animations might be
updated. A selected animation will be displayed on
the screen while powering the phone on or off.
16.3.2 Wallpaper Setting
Select Menu > Settings > Display Screen>
Set Wallpaper
You can choose 1 out of 6 available wallpapers,
photo/image from your own gallery or an animated
wallpaper.
74
Select a gallery to choose from, your own (more
images) or the system gallery.
Use keys Up/Down to view wallpapers. Confirm
your selection.
16.3.3 Desktop Settings
Select Menu > Settings > Display Screen>
Desktop Settings
You can decide for the date and time, and the Service
Provider name to be displayed or not on the display
screen.
16.3.4 Contrast
Select Menu > Settings > Display Screen>
Contrast
Use keys Up/Down to change the display screen
75
brightness.
16.3.5 Backlight
Select Menu > Settings > Display Screen>
Backlight
Select time for the display screen backlight to switch
off.
16.3.6 Keypad Backlight
Menu > Settings > Display Screen> Keypad
Backlight.
Select time for the keypad backlight to automatically
switch off.
16.3.7 Clock While Charging
Select Menu > Settings > Display Screen>
76
Clock While Charging
If this option is enabled, a clock will be displayed on
the small display screen (if the flip cover is closed) as
long as the phone is charged or on the big display
screen (if the flip cover is open).
MENU Settings – basic/advanced
Select Menu > Settings > MENU Settings
You can select what Menu options will be displayed:
whether all options (Advanced), or basic. Press OK to
confirm.
Security
The phone has various codes/passwords to prevent
unauthorized people from using the phone and the
SIM Card. Enter the password when prompted, and
77
then press the key OK to confirm.
If you enter the wrong password, press the Right
Function Key to delete characters you have entered
by mistake, and then enter the correct characters.
There are various PIN Code, phone password and
black list options in Menu > Settings > Security.
16.5.1 PIN1 / PIN2
Select Menu >
Settings >Security>PIN1/PIN2
You can enable/disable a request to enter the PIN
Code every time you switch on the phone, and you
can update codes PIN & PIN2. PIN Code is available
along the SIM Card.
78
16.5.2 Phone Lock
Select Menu > Settings>Security>Phone
Lock
You can enable/disable the phone lock code and
update the code. A default code is 1234.
16.5.3 Update the Phone Password
Select Menu > Settings >Security>Update
Phone Password to update the default
password.
16.5.4 Black List
Select Menu > Settings >Security>Black List
Any phone number can be blacklisted. To do so,
select Black List >Options>New if you want to
manually enter the number, or Import Contact if you
79
want to select it from the Phonebook. If the option is
enabled (Black List Settings>Reject Call), every
incoming phone call from the blacklisted number will
automatically be rejected. Additionally, messages
sent from the blacklisted number might be rejected
as well (Black List Settings>Never Show Messages).
Ringtone Settings
Select Menu > Settings >Profiles. Next, select
any profile.
Click Options and then Activate to activate a
certain profile. If you want to change the Profile
setting, go to Settings.
Select Rename to name the profile as you wish.
Select Ringtone Settings, to set the call ringtone
and the message alert.
80
Select Volume, to set volume for call ringtone,
message alert, phone power on/off, and keypad.
Select Ringtone Type to enable/disable a
ringtone and phone vibration.
Select Other Notification Alerts, to select
ringtone for keys, low battery alert, phone
powering on/off, dialing signal, flip
opening/closing beep.
To disable all ringtones in the phone, select the
profile Silent Mode.
You can press and hold the key "#" in Idle mode to
enable/disable ringtones.
81
Connections
16.7.1 Bluetooth
Bluetooth connectivity allows you to send and receive
files. You can also connect other devices such as
wireless headset.
Select Menu and go to Settings
Select Connections, and then Bluetooth
In Menu Bluetooth you can select one of the
following options:
82
Enable/Disable
Bluetooth
Enable or disable Bluetooth
Visibility
Enable, so that other people will find
your phone
My Devices
Devices you have been connected to
before. You can also add new
devices
Shared Settings
Select which file you wish to share
and what characteristics it is to have
My Name
Select a name for your device
Memory
Select where to save files received
via Bluetooth
16.7.2 Data Account
The telephone has pre-installed WAP/MMS and GPRS
connection settings of some providers. To
83
edit/delete/add an account, select:
Menu > Settings > Connections>Account
You can get the correct configuration from your
service provider. Some service providers allow a
remote configuration.
16.7.3 GPRS Service
Select: Menu > Settings > Connection>GPRS Service,
to enable or disable GPRS.
16.7.4 Data Connection
Select: Menu > Settings> Connections > Data
Connection Settings. Select data connection to be
permanently enabled or just on demand.
84
16.7.5 Network Selection
Select Menu > Settings >Connections>Network
Selection to Select Network and set Selecting Mode
between Manual and Automatic.
Internet
The Internet browser on the phone allows you to use
variety of WAP service.
The phone has preinstalled settings of certain service
providers. To activate, select:
Menu > Internet >Settings>Account and select the
service provider.
Due to the phone display screen size, websites
viewed on the phone might look different than
originals. Some details might be invisible.
85
To learn more about such service availability, pricelist
or manuals, contact your service provider.
Configuration settings necessary to browse the
Internet might be obtained from the Service Provider.
Some service providers allow a remote telephone
configuration.
86
Safe Use
Please read the following rules. Non-
compliance with such regulations might be
dangerous or illegal. Read the entire User
Manual to get more information.
Switch off the phone in proximity to chemical
plants, refueling points, and other places that
might store explosives.
Devices and accessories might contain small
parts. Keep the phone away from children
.
Use a headset while driving, for your safety.
Switch off the phone prior to boarding an
aircraft. Keep it off while in the air.
Be careful while using the phone in proximity
to devices such as heart pace makers, hearing
aids and other medical equipment if their work
might be interfered by the phone.
87
Only original accessories are covered under
warranty.
Never attempt to disassemble the phone on
your own. For any problems related to the
device, contact the Manufacturer.
Never charge the phone if the battery is not in
place. For your safety, never talk on the phone
while charging.
Charge the phone in well ventilated areas;
keep the device away from flammable and
explosive materials.
To prevent demagnetizing, keep the phone
away from any item containing magnet such as
credit card or magnetic discs.
Keep the phone dry at all times. If wet or
eroded, contact the Manufacturer.
Avoid using the phone in too low or high
temperature or exposing the device to direct
88
sunlight. Never place the phone next to
heating devices such as radiators, heaters,
ovens, furnaces, camp fire, barbeques, etc.
Never expose the phone to sun, high humidity
or dusted air. Keep it away from metal chips
that might cause the phone to malfunction.
Do not use liquids or rags soaked in detergents
to clean the phone.
Wireless phones might be easy to catch
interferences that might impact their
performance.
Use ONLY accessories and batteries
recommended by the Manufacturer. Never use
incompatible accessories nor batteries.
89
FAQ (Troubleshooting)
Only qualified service workers are authorized to repair
the phone. Any attempts of unauthorized repair and
modifications void the Manufacturer’s warranty!
„Cannot make a
phone call”
Make sure the number you are dialing
is correct. If you make an
international phone call, dial a
country code before the actual
number (eg. 0049 or +49 for
Germany).
If you have a prepaid card, make sure
there are sufficient funds available on
the card to place a phone call.
90
“SIM Card in
place,
emergency calls
only (112)”
Make sure the SIM Card is installed
correctly.
“The phone does
not work, the
phone does not
charge when
plugged in”
The phone might be switched off; to
switch on the phone, press and hold
the red receiver key for about 3
seconds.
If you have not used the phone for a
long time, the battery might be
“deeply-discharged”; to recover a
deeply-discharged battery leave your
charger plugged in, although there
will be no image on the display.
91
„Can I make a
phone call while
abroad?”
If you are out of the country and
ROAMING is enabled, your phone
automatically will use the foreign
telephone network. To learn more,
contact your service provider.
„Can I make an
emergency call if
there is no
reception or if
there are no
funds on my
account?”
If you are in the area with no
reception by any network, no phone
calls can be made.
If you have no funds available on the
account, emergency call to 112 can be
made.
92
„How to get the
most of
reception?”
If there is a message „Does not work
or “No Serviceon the display, it
means there is no signal or sufficient
funds on the account. In such a case,
only making emergency call 112 is
possible as long as the User is in the
area covered by another service
provider.
Reception might be weaker if you are
inside buildings. Move towards
windows or get outside.
93
What is the Text
Message
Center”?
It is the service provider’s center
number storing all text messages. The
number is stored on the SIM Card, but
you can change the number in the
phone MENU and enter another
number.
When is the fee
for making a
phone calls
charged?”
A fee for making a phone call is
charged as soon as a phone call is
made. To learn more about charging
details, contact your service provider.
94
“Is there any
way to make
sure my
message was
delivered to the
recipient?”
Enable Delivery Report option. As
soon as the text message is delivered
to the recipient, you will get a return
message (network service).
Technical Specs
Frequency: GSM: 900/1800MHz.
Weight: About 88g (including battery)
Dimensions: 50,5 x 100 x 19 mm
Battery Type: Li-ion 3,7V
Battery Capacity: 800 mAh
Conversation Time: up to 5 hrs.
Idle Time: up to 160 hrs.
95
Battery Information
There is a battery in the phone. The battery can be
recharged using a charger that is included in the set.
The battery life depends on conditions in which the
phone is used. Your distance from a relay transmitter,
number and the length of phone calls significantly
reduce the battery life. While on the go, the phone
switches between relay transmitters and such
switching also significantly affects the battery life.
After multiple charges and discharges, it is natural for
the battery to eventually lose its ability to hold charge.
Get a new battery if you notice a significant drop in the
battery performance.
Use only batteries recommended by the Manufacturer.
96
Never leave the charger connected longer than 2-3
days.
Never keep the phone in excessively hot places. High
temperatures might negatively impact both the
battery and the phone.
Never use a battery that is clearly damaged. Doing so
might cause a short circuit, and might damage the
phone. Check battery installation for proper
polarization.
Leaving the battery in excessively hot or cold places
will reduce the battery life. The recommended storage
temperature range is between 15°C and 25°C.
Installing a cold battery into the phone might cause
the phone to malfunction and might damage the
phone.
97
SAR Information
Information about the impact of radio waves and
Specific Absorption Rate [SAR]. This phone model has
been designed to meet all international standards
pertaining to the impact of radio waves as
recommended by international guidelines. These
guidelines were developed by the International
Commission on Non-Ionizing Radiation Protection
(ICNIRP), an independent scientific organization with a
safety margin to protect all people regardless their age
and health condition. Such guidelines use a unit of
measurement called Specific Absorption Rate (SAR)
actual absorption.
As recommended by ICNIRP, the border value of SAR
for portable equipment is 2,0 watts per kilogram
(W/kg), and it is an average value per 10g of tissue.
SAR value is determined at the maximum transmit
power and in the full spectrum of frequencies covered
by research; the actual SAR value while the product is
98
working might be much lower than the maximum level.
Such discrepancies result from automatic changes in
device power necessary to ensure that the device
operates at a minimum power level required to be
connected with network.
In case of this model, the highest SAR (10g) value in
tests is:
0.373W/kg – device next to head
0.456W/kg – device next to body.
SAR values might also vary due to various reporting
and testing requirements in different countries as well
as to different frequencies in a certain network.
Protect Your Environment
Important: The phone is marked in
compliance with the European Directive of
2012/19/EU and the Polish Act on Waste
Electrical and Electronic Equipment, and with
99
the symbol of waste electricals. Such a symbol tells us
that the device, after use, must not be disposed of in
the normal household waste stream.
Important: Never throw the phone nor accessories to
municipal solid waste!!! The product should be utilized
in authorized places only.
As the product contains hazardous components,
improper storage and use of such equipment might
lead to serious consequences harmful for both people
and natural environment. To avoid such consequences,
proper handling of waste electrical and electronic
equipment is essential.
To recycle materials used to produce the phone
packaging, follow the local recycling regulations in
your area.
100
The set contains a Li-ion battery. Old
batteries pose environmental risks.
They should be disposed of at a special
place in a special container in
compliance with current regulations. Never throw old
batteries or chargers to municipal solid waste, they
should be collected for disposal.
NEVER PUT BATTERIES AND CHARGERS INTO FIRE!
This Manual is for information purposes only. Some
features and options presented in this Manual might
vary depending on software installed and the country.
If any technical assistance is required, we strongly
encourage you to contact the technical department at
+48 32 325 07 00 or via email at serwis@maxcom.pl.
101
Terms of Warranty
The phone is covered under the warranty; proof of
purchase is necessary to use such warranty. There is a
charge for repair of phones damaged due to misuse,
electrostatic discharge or lightning strike. Any
attempts to fix or modify the phone by the User will
void the warranty!
The above information is presented for information
purposes only.
Our website:
http://www.maxcom.pl/
Important: The battery performance depends on
local network environment, SIM Cards, and the
conditions in which the phone has been used. The
Manufacturer shall not be liable for any problems or
issues arising from misuse, abuse, or using the phone
102
in violation of this User Manual.
Important: The Manufacturer reserves his right to
make updates or modification without prior
notification. Trademarks mentioned or used in this
material remain a sole property of their owners.
Complains or device defects can be reported via
website:
http://www.comtek.co.uk/maxcom-rma-service/
Mobile service address:
Comtek Network Systems
Unit 108, Tenth Avenue (Zone 3)
Deeside Industrial Estate
Deeside, Flintshire CH5 2UA
102

Hulp nodig? Stel uw vraag in het forum

Spelregels

Misbruik melden

Gebruikershandleiding.com neemt misbruik van zijn services uitermate serieus. U kunt hieronder aangeven waarom deze vraag ongepast is. Wij controleren de vraag en zonodig wordt deze verwijderd.

Product:

Bijvoorbeeld antisemitische inhoud, racistische inhoud, of materiaal dat gewelddadige fysieke handelingen tot gevolg kan hebben.

Bijvoorbeeld een creditcardnummer, een persoonlijk identificatienummer, of een geheim adres. E-mailadressen en volledige namen worden niet als privégegevens beschouwd.

Spelregels forum

Om tot zinvolle vragen te komen hanteren wij de volgende spelregels:

Belangrijk! Als er een antwoord wordt gegeven op uw vraag, dan is het voor de gever van het antwoord nuttig om te weten als u er wel (of niet) mee geholpen bent! Wij vragen u dus ook te reageren op een antwoord.

Belangrijk! Antwoorden worden ook per e-mail naar abonnees gestuurd. Laat uw emailadres achter op deze site, zodat u op de hoogte blijft. U krijgt dan ook andere vragen en antwoorden te zien.

Abonneren

Abonneer u voor het ontvangen van emails voor uw Maxcom MM824 bij:


U ontvangt een email met instructies om u voor één of beide opties in te schrijven.


Ontvang uw handleiding per email

Vul uw emailadres in en ontvang de handleiding van Maxcom MM824 in de taal/talen: Engels als bijlage per email.

De handleiding is 1,51 mb groot.


U ontvangt de handleiding per email binnen enkele minuten. Als u geen email heeft ontvangen, dan heeft u waarschijnlijk een verkeerd emailadres ingevuld of is uw mailbox te vol. Daarnaast kan het zijn dat uw internetprovider een maximum heeft aan de grootte per email. Omdat hier een handleiding wordt meegestuurd, kan het voorkomen dat de email groter is dan toegestaan bij uw provider.

Stel vragen via chat aan uw handleiding

Stel uw vraag over deze PDF

Uw handleiding is per email verstuurd. Controleer uw email

Als u niet binnen een kwartier uw email met handleiding ontvangen heeft, kan het zijn dat u een verkeerd emailadres heeft ingevuld of dat uw emailprovider een maximum grootte per email heeft ingesteld die kleiner is dan de grootte van de handleiding.

Er is een email naar u verstuurd om uw inschrijving definitief te maken.

Controleer uw email en volg de aanwijzingen op om uw inschrijving definitief te maken

U heeft geen emailadres opgegeven

Als u de handleiding per email wilt ontvangen, vul dan een geldig emailadres in.

Uw vraag is op deze pagina toegevoegd

Wilt u een email ontvangen bij een antwoord en/of nieuwe vragen? Vul dan hier uw emailadres in.


Info