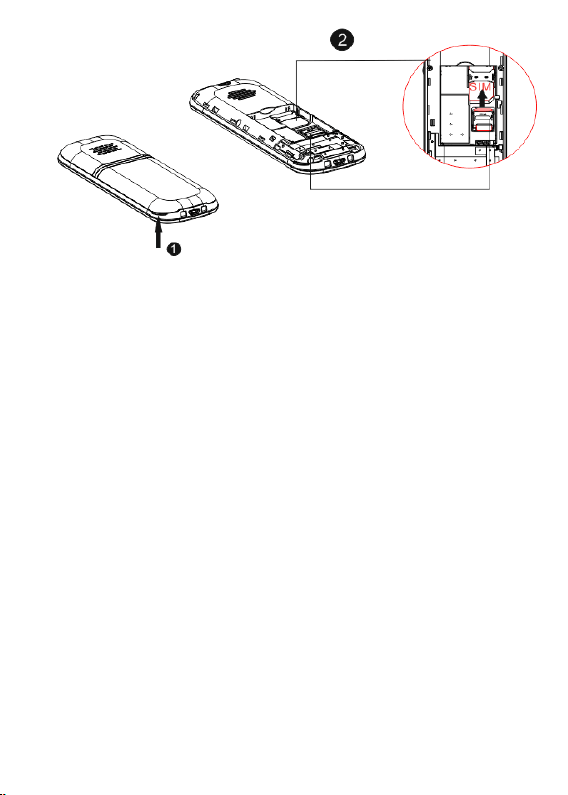
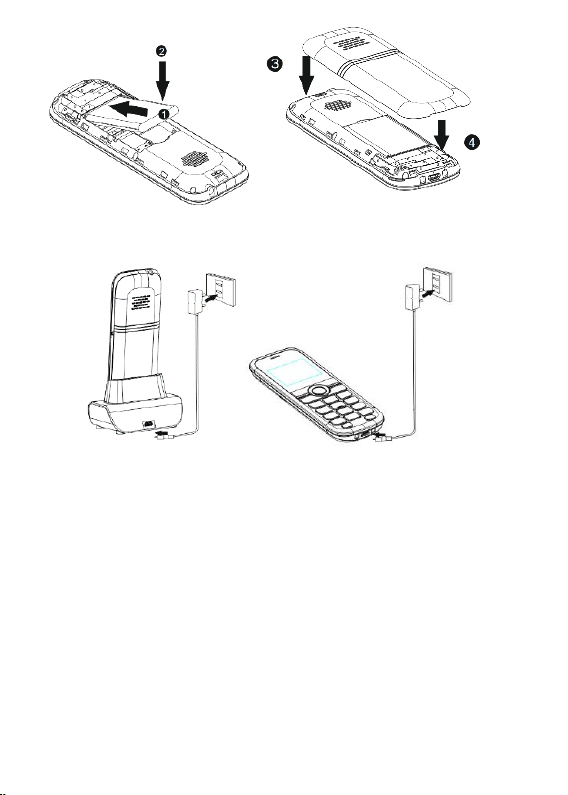
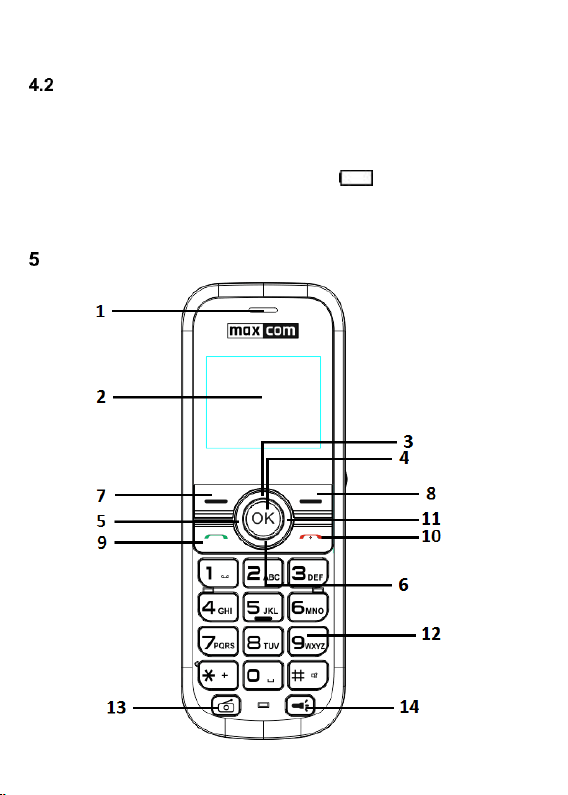
792149
51
Verklein
Vergroot
Pagina terug
1/51
Pagina verder
Mobile Telephone MM36D
USER MANUAL
Reading this Manual is highly recommended prior to using
the telephone.
3
CONTENTS:
Introduction ................................................................. 7
Accessories ................................................................ 8
Safety Precautions ...................................................... 8
Getting Started .......................................................... 10
SIM Card & Battery Installation ........................ 10
Desktop Charger ..................................... 13
Low Battery Alert .............................................. 14
Phone Description .................................................... 14
Display Screen Description .............................. 17
Keypad Lock .................................................... 18
MENU ....................................................................... 19
Phonebook ............................................................... 19
Saving Contacts ............................................... 19
Viewing Contacts ............................................. 20
Deleting Contacts ............................................. 20
Deleting a Single Contact ........................ 20
Deleting Multiple Contacts ....................... 20
Deleting All Contacts ............................... 21
Copying Contacts ............................................. 21
Copying a Single Contact ........................ 21
Copying All Contacts ............................... 21
Transferring Contacts ...................................... 22
Phonebook Settings ......................................... 22
Memory Status ........................................ 22
Speed Dial ............................................... 22
Phone Calls .............................................................. 22
Direct Dial ........................................................ 22
Dial Phone Number from Phonebook .............. 23
Dial Phone Numbers from Call Log .................. 23
Speed Dial ....................................................... 23
Call Volume Adjustment ................................... 23
4
Options While Calling ....................................... 23
Call Transfer ..................................................... 24
Answering Phone Calls..................................... 24
Call Log ..................................................................... 24
Text & Multimedia Messages .................................... 25
Creating & Sending .......................................... 26
Reading & Replying to Messages ..................... 26
Message Boxes ................................................ 27
Inbox ........................................................ 27
Drafts ....................................................... 27
Outbox ..................................................... 27
Sentbox .................................................... 28
Archive.............................................................. 28
Message Settings ............................................. 28
Voicemail .......................................................... 29
Applications ............................................................... 30
Calculator ......................................................... 30
Calendar ........................................................... 30
Image Viewer .................................................... 30
Voice Recorder ................................................. 31
File Manager ..................................................... 31
SIM Services .................................................... 32
Audio Player .............................................................. 32
Radio FM ................................................................... 33
Alarm Clock ............................................................... 33
Torch ......................................................................... 34
Settings ..................................................................... 34
Data & Time Settings ........................................ 34
Profiles.............................................................. 34
Language.......................................................... 35
Display Screen ................................................. 36
Wallpaper ................................................. 36
5
Backlight .................................................. 36
Brightness ............................................... 36
Network Settings .............................................. 36
Call Settings ..................................................... 36
Hiding Caller ID ....................................... 36
Call Waiting ............................................. 37
Call Forwarding ....................................... 37
Call Barring ............................................. 38
Black List ................................................. 38
Auto Redial .............................................. 38
Time Reminder ........................................ 38
Phone Receiving Notification .................. 39
Answering Phone Calls ........................... 39
Security Settings .............................................. 39
PIN Code ................................................. 39
Telephone Lock ....................................... 39
Auto Keypad Lock ................................... 39
Connectivity ..................................................... 39
Bluetooth ................................................. 39
APN Profiles ............................................ 40
Data Services .......................................... 40
Flight Mode ...................................................... 40
Restore Factory Settings.................................. 40
Computer Connection ............................................... 41
FAQ (Troubleshooting) ............................................. 41
Terms of Warranty .................................................... 43
Battery Information ................................................... 44
Protect Your Environment ......................................... 45
SAR Information ....................................................... 46
Frequency Range & Max Radio Frequency Power for
the Radio to Work .............................................................. 47
Declaration of Conformity ......................................... 48
6
Important: The telephone works in the GSM 900/1800 MHz
and WCDMA 900/2100MHz networks. At least one SIM
Card must be inserted prior to switching on the phone.
If there is a problem with the phone, please contact the
Maxcom technical assistance or return the item to the
point of sale.
Call us directly at:
+48 32 325 07 00
The Set Includes:
GSM Telephone
Charger
Desktop Charger
Battery
User Manual
Warranty Card
Important: Keeping the original package is
recommended as it might be used for transport.
Keep the receipt as it is necessary for warranty.
7
Mobile Telephone GSM 900/1800, WCDMA 900/2100
Color Display Screen TFT 1,77" (160x128)
Large Font, Easy Menu
Large Backlit Keys
Phonebook -1000 Entries
SMS Memory 500 Entries
Supports Micro SD Card up to 32 GB
Speakerphone
Radio FM
Alarm Clock
Audio Player
Battery: 1000mAh
Desktop Charger
Standby Time: up to 280 hrs.*
Call Time: up to 7 hrs (2G) & to 5.5 hrs (3G)*
Dimensions: 145 X 52 X 14mm
Weight: 89g
*depending on conditions and GSM network signal
INTRODUCTION
This User Manual has been published by the Manufacturer.
Any corrections or modifications arising from mistakes,
inaccuracies, and the phone or software upgrades might be
made without prior notifications; such changes, however, will
be reflected in the updated versions of the User Manual. To
learn more, or to get any form of assistance please go to the
website: www.maxcom.pl. The Manufacturer reserves all
rights to the content of this User Manual.
Copyrights and trademarks as mentioned in this document
are an exclusive property of their respective owners.
Copying, distributing, storing or disseminating of the
8
copyrighted material, in part or in whole, without prior written
consent of the author is strictly prohibited.
ACCESSORIES
Use only batteries, chargers, and accessories recommended
by the phone’s Manufacturer. Check at your point of sale what
accessories are available in your area.
SAFETY PRECAUTIONS
Reading the guidelines below will minimize the risk of
misusing the phone.
USING – The telephone emits electromagnetic field
that might negatively affect other electronic devices
including medical equipment.
Never use the phone in places where such use is
prohibited, in hospitals, airplanes, refueling points or
at proximity to flammable materials. Using the
phone in such places might expose others to
danger.
Never use the phone without driving accessories
while driving.
A device and its accessories might contain small
parts. Keep the phone and all parts out of reach of
children.
SERVICE - Never repair nor modify the phone on
your own; all repairs should be made by an
authorized service only.
CLEANING - Never clean the phone with any
chemicals or corrosives.
TORCH – Never look directly into the beam of light.
HEARING AID– If the User has a hearing assistance
9
device, the phone volume should be carefully
adjusted in line with the hearing aid sensitivity.
ELECTRONIC MEDICAL EQUIPMENT Your
phone is a radio transmitter that might interfere with
performance of electronic medical equipment or
implants, such as hearing aids, heart pace makers,
insulin pumps, etc. Keeping a distance no shorter
than 15 cm between the phone and the implant is
recommended. To learn more about it, contact your
health care provider or manufacturers of such
medical equipment.
ELECTRONIC EQUIPMENT: to avoid risk of
demagnetizing, do not keep your device in close
proximity to electronic devices for a longer time.
WATERPROOF The phone is NOT waterproof.
Keep it dry at all times.
DUSTPROOF The phone is NOT dustproof, never
use the phone in the area with increased level of
dust.
DISPLAY SCREEN Avoid pressing too hard on the
LCD screen and using sharp tools as doing so might
damage the display screen.
Never use any metal objects to press together the
battery contacts as doing so might cause an
explosion.
Never expose the phone to either low or high
temperature, direct sunlight, and high humidity.
Never place the phone next to heating devices such
as radiators, heaters, ovens, furnaces, camp fires,
barbeque, etc.
10
PROTECT YOUR HEARING!
Prolonged exposure to sounds of high volume
might damage your hearing. Listen to music at
a moderate level, and do not keep the phone
too close to an ear, while using a
speakerphone.
GETTING STARTED
A SIM Card must be installed prior to switching on the
telephone. Pay careful attention not to damage the SIM Card
while inserting it.
Keep SIM Card away from children.
SIM CARD & BATTERY INSTALLATION
Prior to inserting SIM Cards, make sure the phone is switched
off, and the battery is removed. The charger must be
disconnected. To insert the SIM Card, remove the battery
first, as shown in the text and illustration below:
When the phone is switched off, use your fingernail to lift
up the battery cover from the right bottom side of the
phone.
Remove the battery by lifting it up with your
fingernail, from the top side of the phone.
Insert the SIM Card onto the tray with its metal
contacts facing down. Make sure the notch on the
Card will go towards the bottom of the phone.
There is a slot for a MicroSD memory card below the
SIM Card tray. Insert the Card into the slot. A memory
card up to 32GB might be installed on the phone.
11
Pay careful attention while using the memory card, especially
while inserting and removing the card. Some memory cards
must be formatted on a computer prior to the initial use.
On the regular basis, make backup copies of data stored on
cards used in other devices, if you use the SD cards! Misuse
or other factors might damage the card or cause its content
to be lost.
Battery Installation:
Insert the battery so that the contacts +/- will go
towards the bottom of the phone.
After the battery is inserted, place the battery cover
back on the phone and slide it upwards.
12
Charging the battery:
Important! Use the battery included in the set. Using other
batteries might damage the phone and will void your
warranty!
Never connect the charger if the phone back cover is not in
place.
To charge the phone:
1. Plug the charger into the power outlet.
2. Plug the other end of the charger into the port located
at the bottom of the phone. A notification about
connecting the charger will appear on the display
13
screen, and the charger indicator will blink as long as
the battery is being charged.
3. As soon as the battery is fully charged, disconnect
the charger from the power outlet, and then
disconnect the charger from the telephone. As soon
as the battery is fully charged, the notification
„Battery Full will appear for a moment on the phone,
and the battery icon on the display screen will stop
blinking.
DESKTOP CHARGER
In case of using a desktop charger, first plug the small end of
the regular charger into the desktop charger port, and then
plug the power adapter into the power outlet. To charge the
phone, just place the phone on the desktop charger with
contacts facing down.
Important:
o Before you start charging, make sure the battery is
properly installed.
o Never remove the battery while charging the phone
doing so might damage the phone.
o If the battery level is too low for the phone to work
properly, the phone will show you a notification that the
phone is about to get automatically switched off, and the
phone will automatically switch off.
o If the battery is completely discharged, wait several
minutes after connecting the charger for the charging icon
to appear.
o If the phone has not been used for a long time, the battery
might be so called „deeply discharged”; to restore the
phone’s regular work, leave the charger plugged in
14
although there is nothing showing on the display screen.
It might take even up to an hour.
LOW BATTERY ALERT
The phone will warn you by the low battery alert (if warning
alerts are enabled in the profile) and the notification „Battery
Discharged” will appear on the display screen if the battery
level is too low. There will be the icon displayed on the
display screen. Charge the battery as soon as you see such
a notification.
PHONE DESCRIPTION
15
1
Speaker
8
Right Function Key -
RFK
2
Display Screen
9
Green Receiver
making phone calls
3
Key Up
10
Red Receiver
Ending phone calls
/returning to the main
screen
4
Key OK
11
Key Right
5
Key Left
12
Numeric Keypad
6
Key Down
13
Radio FM Key
7
Left Function Key -
LFK
14
Torch Key
Basic Functions of Keys
Key
Function
Red Receiver
Press: going back to standby mode,
ending a phone call.
Press & hold: switching on/off the phone
Green Receiver
Press: making phone calls; in standby
mode entering the Call Log.
Up
Keypad Volume Up
Down
Keypad Volume Down
Left
Audio
Right
Alarm
16
LFK
Option as shown on the display screen
RFK
Option as shown on the display screen
1
Press: digit 1
Press & hold: Voicemail
2-9
Press: digits 2 to 9
Press & hold: Dialing a previously
assigned Speed Dial number
*
Enter: *, +, P, W.
While typing text message: special
symbols
#
Press: Changing the text input mode
while typing text message; in standby
mode entering the symbol #
Press & hold: Activating/Deactivating
the Silent mode
Key OK
Confirmation Key, in most cases its
option concurs with options under the
LFK
17
DISPLAY SCREEN DESCRIPTION
1. Network Signal.
2. Icons Showing Functions:
Ringtone Only
Unread
SMS/MMS
Silent
Keypad
Locked
Alarm Active
Roaming
Active
Missed Phone
Call
Connected
to 2G
Network
3G
Menu Kontakty
Operator
10.09.2018
1
2
3
4
5
6
7
18
Connected
to 3G
Network
The icons might vary
depending on the software
* The icon appears
also in domestic
roaming if the User
uses the other service
provider’s network
3. Battery Level.
4. Service Provider’s Name.
5. Time.
6. Date.
7. Description of Function Keys.
Important: In order to save energy, the display screen will
automatically go into sleep mode after certain time has
passed. To enable the display screen backlighting, press any
key.
KEYPAD LOCK
To lock the keypad, in standby mode press the left function
key, and then press the star (*). To unlock the keypad, press
the left function key, and then the star (*). There is no need
to unlock the keypad in order to answer an incoming phone
call.
Important: The keypad will lock (automatically or manually)
only if the phone is in standby mode.
19
MENU
To go to MENU, in standby mode press the key OK or the
left function key.
To navigate within MENU, press the keys UP/DOWN.
To confirm the option you have just selected, press the key
OK.
To return to the previous MENU (go back), press the right
function key. To go to standby mode, press the red receiver.
PHONEBOOK
SAVING CONTACTS
There are three methods to save a new Contact:
1. You can save a phone number from the list of
missed and received phone calls (Call Log). To do
so, in standby mode press the green receiver, select
the number you want to save, and press „Options
(LFK). Select „Save in Phonebook”, press LFK, and
select where you want to save the Contact. Enter
the Contact’s name. Press the left function key to
save.
2. You can add a new Contact by entering in standby
mode the phone number you wish to save and
pressing „Options (LFK). Select „Save in
Phonebook”, press LFK, and select where you want
to save the Contact. Enter the Contact’s name.
Press the left function key to save.
3. You can add a new Contact directly to the
Phonebook. To do so, in standby mode press the
right function key, and then use the key Up to select
New Contact->Select. Decide where you wish to
save the Contact. Enter the Contact’s name, and
20
then use the key Down to go to the text input box,
enter the phone number, and press Save (LFK).
VIEWING CONTACTS
Method 1
1. Go to MENU and select the Phonebook.
2. Enter the first letter of the name you are looking for.
3. The phone will go to the list of names that start with this
letter. Press navigation keys UP/DOWN to scroll up and
down the list.
Press the key „#” to change the text input mode.
Method 2
1. In standby mode press the RFK.
2. Enter the first letter of the name you are looking for.
4. The phone will go to names that start with this letter.
Press navigation keys UP/DOWN to scroll up and down
the list
Press the key „#” to change the text input mode.
DELETING CONTACTS
DELETING A SINGLE CONTACT
If you want to delete a Contact from the SIM Card or the
phone, do as follows:
1. In MENU go to Phonebook
2. Select the Contact you wish to delete, press Options-
>Delete
3. Press the LFK to confirm.
DELETING MULTIPLE CONTACTS
If you want to delete multiple Contacts from the SIM Card or
the phone, do as follows:
21
1. In MENU select: Phonebook->Options->Mark Multiple.
2. Select the Contact you need, and next press: Options-
>Mark. You can mark other Contacts as well.
3. Then select: Options->Delete Multiple.
DELETING ALL CONTACTS
If you want to delete all Contacts from the SIM Card or the
phone, do as follows:
1. In MENU select: Phonebook->Options->Settings-
>Delete All Contacts
2. Select if you want to delete Contacts from the SIM Card
or the phone memory, and confirm.
COPYING CONTACTS
COPYING A SINGLE CONTACT
To copy a Contact from the SIM Card onto the phone, or from
the phone onto the SIM Card, you should:
1. In MENU select Phonebook
2. Mark the Contact you wish to copy
3. Press Options->Copy, and then select where you wish to
copy the Contact to, and press the Left Function Key.
COPYING ALL CONTACTS
If you want to copy all Contacts from the phone or SIM Card,
do as follows:
1. In MENU go to: Phonebook->Options->Settings->Copy
All
2. Select where you want to copy Contacts to and press
Yes to confirm.
3. Mark Contacts you wish to copy. To do so, press
Options->Mark. Repeat the same for other Contacts. If
you want to copy all Contacts, press Options->Mark All.
22
4. Press again Options->Copy Marked.
TRANSFERRING CONTACTS
You can transfer Contacts from the SIM Card to the phone
memory or from the phone memory to the SIM Card. To do
so, go to MENU->Phonebook->Options->Settings->Transfer
All. Next, follow the steps as in Copying All Contacts (chapter
Błąd! Nie można odnaleźć źródła odwołania.).
PHONEBOOK SETTINGS
MEMORY STATUS
This option allows you to check the Card and phone memory
status.
Select in MENU->Phonebook->Options->Settings->Memory
Status.
SPEED DIAL
Select in MENU: Phonebook->Options->Settings->Speed
Dial->Status, to enable or disable Speed Dial. If Speed Dial
is enabled, and there are phone numbers assigned to keys 2-
9, press and hold a certain key to dial its phone number. To
assign a phone number to a key, in MENU select Phonebook-
>Options->Settings->Speed Dial->Assign Keys. Next, select
the key you wish to assign the phone number to, press the
LFK, select the phone number from the Phonebook, and
press the LFK again.
PHONE CALLS
DIRECT DIAL
1. Dial the phone number you want to call.
To make a phone call internationally, entering„00” or
„+” prior to an actual number is required. To enter
„+”press the key „ ” twice.
23
2. Press the green receiver to call the dialed number.
3. To end the phone call, press the red receiver.
DIAL PHONE NUMBER FROM PHONEBOOK
In standby mode, press the red function key to go to the
Phonebook. Use keys UP/DOWN to mark the Contact you
need. If you want to quickly go to a Contact whose name
starts with the letter U, press the key 8 twice. To call the
marked phone number, press the green receiver.
DIAL PHONE NUMBERS FROM CALL LOG
Press the green receiver when the phone is in standby mode
to go to the list of recent phone calls. Use keys UP/DOWN to
scroll up and down in the Call Log. Press the green receiver
to make a phone call.
SPEED DIAL
If there are phone numbers already assigned to the keys 2-9
in standby mode press and hold the certain key of your choice
to make a phone call.
CALL VOLUME ADJUSTMENT
While having a phone call, press the key RIGHT or LEFT to
increase or decrease the phone call volume.
OPTIONS WHILE CALLING
To enable a speakerphone mode, while having a phone call
press the right function key. To disable the speakerphone
mode, press this key again.
While having a phone call, press Options to enable additional
options:
- Suspend: it suspends a phone call
24
- End Call: it ends a phone conversation
- New Call: it allows you to place a new phone call
- Main Menu it allows you to go to the main menu
- Voice Recorder: it starts recording the call
- Mute: enable/disable a mike
- DTMF: it enables/disables the DTMF
- Volume: it adjusts phone call volume.
CALL TRANSFER
It is a network service that must be activated with your service
provider. While having a phone call, press the left function
key (LFK) and mark the option New Call, dial the phone
number, and press the green receiver. After the call has been
placed, press the LFK, and press the option Forward. Confirm
by pressing the LFK “Yes” to forward the call.
ANSWERING PHONE CALLS
To answer an incoming phone call, press the green receiver.
To reject an incoming phone call, press the red receiver.
To mute an incoming phone call, press the right function key.
CALL LOG
To enter the Call Log, go to the main MENU, select Call Log,
and then select:
Missed (to view missed phone calls): If there is a phone call
you have missed, in Idle mode a receiver icon will appear at
the top right corner of the display screen.
Dialed (to view dialed phone numbers).
25
Answered (to view answered phone calls).
To view the phone call details (call duration, number of phone
calls, etc.), press the key OK.
There are symbols of different color for every type of phone
calls.
After a phone call you want to view has been selected, press
the left function key to view additional options:
- Preview, it allows you to check the phone call details
- Call, it calls a certain phone number
- Send Message, it allows you to send a message
- Save in Phonebook, it allows you to add a phone number
to the Phonebook
- Add to Black List, it allows you to add a phone number to
the list of blacklisted phone numbers
- Edit Before Call, it allows you to update the phone
number before calling it
- Delete, it deletes a certain entry.
TEXT & MULTIMEDIA MESSAGES
The telephone allows you to send and receive text messages
(SMS).
Multimedia messages (MMS) might be sent and received
providing the MMS account has been properly configured,
see chapter 16.8.2.
26
As soon as the symbol appears on the display screen,
there will be at least one unread message on the phone.
To go to MENU Messages, press the left function key in
standby mode, and then press Messages->Inbox.
CREATING & SENDING
1. Go to MENU, and then select: Messages->Create
Message to open a message editor.
2. Type the message if you want to send a text; you can
also add an attachment such as an image, sound clip,
video, etc.; adding an attachment will automatically
convert the message into an MMS.
Text Input Method Change: To change the text input
method (digits, upper and lower case letters) press the
key „#”; if you want to enter a symbol press the key ”.
3. Sending messages: After the message has been typed
(and attachments, if any, have been added), press
Options->Send and decide if you want to dial the phone
number manually or get it from the Phonebook. Mark the
number and press OK. If you want to send a message to
multiple recipients, you can add other phone numbers.
To send a message, press Options->Send.
4. Saving messages: To save a message you have just
typed, press Options->Save. The message will be saved
in Drafts. You can decide for sent messages to be
automatically saved; to do so, go to MENU and select:
Messages->Settings->SMS->Save Sent Messages.
READING & REPLYING TO MESSAGES
1. If an unread message icon appears on the display screen
or if you want to view received messages, in MENU go to:
Messages->Inbox. To read a message, press the key OK.
27
While reading, you can use additional options by pressing
Options.
2. The icon next to a message marks this message as
unread.
Press „Optionswhile reading a message to access the
additional options:
- Reply: Create a message to the Sender.
- Call: Call the Sender.
- Forward: It allows you to send a message to other
Recipient
- Delete: It allows you to delete a message
- Advanced: It allows you to use the number.
MESSAGE BOXES
INBOX
It lists received messages.
Use keys UP and DOWN to navigate within the Inbox.
DRAFTS
You can save unsent messages in the box Drafts”. To do it,
create a message, and after pressing the left function key,
press Save”.
Go to Drafts to send, delete, or edit saved messages.
OUTBOX
If you fail to send a message, it will be saved in the Outbox.
28
SENTBOX
If you use the option Save Sent Messages, the sent
messages will be saved in the Sentbox”.
Use keys UP and DOWN to navigate within the Sentbox.
ARCHIVE
An archive is a folder where you can save any messages
that are important for you.
MESSAGE SETTINGS
Go to MENU and select: Messages->Settings
Select SMS:
SIM
- Profiles: There is the Message Center No in profiles. It
works as an intermediary between subscribers while sending
text messages. To send a text message from a mobile phone,
having a correct Message Center Number on the phone is
required.
You will get this number from your Service Provider.
- Validity Period: Defines time when the message will be
deleted from the Provider’s network if it is not delivered. Do
not try to update anything if you are not sure how to do it, as
any doing so might disable this option by Provider.
- Delivery Report: you can set the phone to receive
confirmation as soon as your text message is delivered to a
recipient (network).
- Reply Path: it allows you to enable/disable the reply path.
Memory Status
It allows you to check the memory status on the SIM Card
and the phone.
Save Sent Messages
It allows you to enable/disable sent messages.
29
Select MMS:
Data Account
It allows you to select a data account necessary to send
multimedia messages.
Common
- Composition: it allows you to set for how long a slide will
be displayed and an automatic signature.
- Sending: it allows you to set delivery reports, priority, auto
save.
- Downloading: it allows you to download multimedia
messages in the home network and in roaming and set the
message filters.
- Preferred Storage: it allows you to select the preferred
location to save your messages.
- Memory Status: it allows you to check the memory status.
VOICEMAIL
Voicemail is provided by a Service Provider and allows a
Caller to leave a voice message if you don’t answer an
incoming phone call. To learn more, contact your Service
Provider. If you want to change your voicemail number in
MENU select: Messages->Settings->Voicemail, and enter
the number you want.
You can get the voicemail number from the Service Provider.
To get connected with your Voicemail, press and hold the key
30
APPLICATIONS
CALCULATOR
To enable the Calculator, in MENU select: Applications-
>Calculator. You can perform the following mathematical
operations: addition, subtraction, multiplication, and division.
Enter the first number using the keys 0-9; next, use keys
UP/DOWN/RIGHT/LEFT to select an operation, and enter
another number. Press OK.
CALENDAR
To enable the Calendar, in MENU select: Applications-
>Calendar.
Use keys Up/Down/Right/Left to navigate between certain
dates.
Press the left function key to access the additional options:
- Preview: it allows you to preview a scheduled event
- View All: it allows you to see all scheduled events
- Add Event: it allows you to add a new event.
- Delete Event: it allows you to delete an event.
- Go to Date: enter the date you want to go to.
- Go to Today: it allows you to go to the current date on the
calendar.
- Week View, changes the view of a calendar.
IMAGE VIEWER
In MENU select: Applications->Image Viewer.
31
Using this option allows you to access a list of images saved
on the memory card in the folder Photos. The phone does not
support some formats of images; the phone has also limited
abilities to display images of large sizes.
Press the key OK to open an image or press the left function
key Options to do the following: Preview, Image Details,
Preview Styles, Send, Use As, Rename, Delete, Sort By
Delete All, Memory.
VOICE RECORDER
You can record music or surrounding sounds.
- Select in MENU: Applications->Voice Recorder
- To start or pause recording, press OK.
- To stop recording, press the right function key.
Recordings are saved in the folder Audio. There is a
possibility to play recordings. To do so, press the left function
key Options->List, select the recording, and press the key
OK.
FILE MANAGER
Select in MENU: Applications->File Manager
Press the left function key Options:
Open: press, to open the folder of your choice.
Format: select, to format.
After the folder has been opened, there are the following
options available under the left program key:
Open
32
Create Folder: select, to open a new folder in the location
of your choice
Rename: it allows you to rename the folder
Delete: it allows you to delete the current folder
Sort by: name, type, time.
SIM SERVICES
Independently from the options offered by the phone, a SIM
Card might offer you additional options. Name and options of
such menu depend on type of available service.
Service that requires the Internet connection might be
unavailable.
AUDIO PLAYER
You can use the audio player to play recorded audio files.
They must be stored in the folder My Music. If there are new
files recorded, after the audio player has been enabled, go to
Playlist->Options->Refresh Playlist. To start or pause
playing, press the key OK. If you do not want files to be played
in background, before leaving the player stop playing by
pressing OK.
You can move between the previous and subsequent audio
files by using keys LEFT and RIGHT. To change the playing
options, go to:
Playlist ->Options->Settings.
Press the key UP to change replaying options.
Press keys * and # to adjust the volume.
The phone supports files in WAV, AMR formats.
33
RADIO FM
The telephone has a built-in FM radio.
To enable the radio, select in MENU: Radio FM. To switch
on/off the radio, press the key OK. Before you leave the radio,
stop its playing by pressing the key OK, and then press the
red receiver key.
Key functions while playing the radio:
RIGHT: subsequent channel
LEFT: previous channel
UP: frequency increases by 0,1 MHz
DOWN: frequency decreases by 0,1 MHz
#: volume up
*: voume down
Red receiver: return to menu
Keys 1 9: selecting the radio station from the list of
channels (radio stations must be saved)
ALARM CLOCK
You can select five independent alarms in the phone. To
activate the alarm in MENU press: Alarm. Select the alarm
you want, and press Edit. You can activate/deactivate an
alarm, set time for alarm to go off, snooze, repeat, alarm
ringtone. If the phone is switched off, the alarm clock will go
off as long as the battery level is sufficient. If the alarm goes
off, press the left function key to dismiss or right function key
Warning: Quality of reception depends on your location.
Reception of radio stations is affected by multiple external
factors that might cause poor quality of reception, but such
poor quality is not grounds for filing a complaint about the
product.
34
to snooze; the alarm will go off again as soon as the snooze
time is over.
TORCH
You can enable/disable the torch by pressing and holding a
dedicated torch key.
SETTINGS
Select in MENU: Settings, and then:
DATA & TIME SETTINGS
To set time and date, select in MENU: Settings->Time&Date.
Select Time Zone”, to select a right city, and then select Set
Time/Date” to enter time and date. Use keys
Up/Down/Right/Left to move between the date and time, use
keys 0-9 to enter the date and time.
You can also set time format (12h or 24h), date format
(DD/MM/YYYY, MM/DD/YYYY or YYYY/MM/DD) and the
date separator.
If you remove the battery from the phone, after placing the
battery back you will be required to set date and time (if it is
not automatically updated from the network).
Option Auto Time Update allows you to decide if, after
switching on the phone, time is to be updated automatically,
upon confirmation, or won’t be updated at all.
PROFILES
The telephone has a few profiles to adjust the phone to
different circumstances you might be under. You can activate
and customize each profile but Silent. Available profiles:
General, Silent, Outdoors, Customized.
35
In Profiles, use the option Adjust to change the following:
- Alert Type
- Ringtone
- Ringtone Volume
- Message Alert
- Message Alert Volume
- Keypad Alert
- Keys Volume
- Enable/disable warning alerts
In standby mode, press and hold the key # to activate the
profile Silent, press and hold the key # again so you can go
back to the previous profile.
LANGUAGE
It allows you to change the menu language. If you select a
foreign language by accident, to set a language of your
choice in standby mode, press:
- 1x OK
- 1x UP
- 1x OK
- 2x DOWN
- 1x OK
Select the language of your choice, and press OK.
36
DISPLAY SCREEN
WALLPAPER
Select a wallpaper for your phone (it will work as a display
screen background in standby mode).
BACKLIGHT
Display screen backlight: it allows you to set time for the
display screen to be backlit.
BRIGHTNESS
The option allows you to set the display screen brightness.
Use the key LEFT/RIGHT to adjust brightness.
NETWORK SETTINGS
Network Selection: you can select your Service Provider
either manually or automatically.
Service Selection: it allows you to select the service GSM,
WCDMA or Automatically.
Network Info: it allows you to check basic information about
the network.
CALL SETTINGS
HIDING CALLER ID
It is a network service. If your Service Provider offers such
service, configuration will be required. This option allows you
to hide your own number while having an outgoing phone call.
Select Detects Network”, Hide Numberor Send Number
and press „OK”.
37
CALL WAITING
It is a network service. If your Service Provider offers such
service, configuration will be required.
Go to MENU and select the option: Settings->Call Settings-
>Call Waiting to check the availability status and select if you
want to activate this option.
If Call Waiting is enabled, and you are talking on the phone,
you will be notified about another incoming phone call by a
special another incoming phone alert. You can answer
another incoming phone call and suspend the first one.
CALL FORWARDING
It is a network service. If your Service Provider offers such
service, configuration will be required. The User might direct
incoming calls to be forwarded directly to voicemail or another
number of his/her choice.
1. To set the option of Call Forwarding, go to MENU and go
to: Settings->Call Settings.->Call Forwarding.
2. Then select when you want to forward phone calls from
an available list: 1 All voice calls (all incoming phone calls
are forwarded to a selected number), 2 If unavailable
(incoming calls are forwarded if the phone is switched off or
out of reception), 3 If I don’t answer (incoming phone calls
are forwarded if you don’t answer the phone) 4 If busy
(incoming phone calls are forwarded if you are currently
talking on the phone), 5 Forward all phone calls 6 Annul
all forwards.
3. Press Enable and enter the phone number you wish to
forward the phone call to in order to enable this option or
Disable, to have this option disabled.
To see what is the current status of this option, go to: Check
Status.
38
CALL BARRING
It is a network service. If your Service Provider offers such
service, configuration will be required. This option allows you
to restrict certain types of phone calls.
1. In MENU go to:
Settings->Call Settings->Call Barring
2. From the list select the type of phone calls you want to
restrict. You can restrict all outgoing phone calls, all
international outgoing phone calls, international phone calls
(except to home), all incoming phone calls, and incoming
phone calls in roaming. You can also update the call barring
password.
BLACK LIST
You can add any number to the Black List. If the option to
restrict incoming phone calls and text messages in enabled
(selected option Reject), any phone call and a text message
from the blacklisted number will be automatically rejected.
AUTO REDIAL
If the option is enabled, and you fail to place a phone call, the
phone will automatically redial the phone number.
TIME REMINDER
You can set the phone to remind you about phone call
duration. Every predefined period (30-60sec) or after certain
time has passed (1-3000sec), while having a phone
conversation you will hear a beep to notify you about time
period that has just passed.
39
PHONE RECEIVING NOTIFICATION
If this option is enabled, after a phone call to a Recipient has
been successfully placed, you will hear a notification alert.
ANSWERING PHONE CALLS
You can set an incoming phone call to be answered by
pressing any key.
SECURITY SETTINGS
PIN CODE
You can enable/disable the phone to request the PIN Code
every time the phone is switched on, and update the PIN
Code.
TELEPHONE LOCK
You can enable the Phone Lock. To switch on the phone,
you will be prompted to enter the Lock Code. The default
Lock Code is 1122.
AUTO KEYPAD LOCK
This option allows you to enable and set time to pass before
the keypad will be automatically locked.
CONNECTIVITY
BLUETOOTH
Bluetooth connectivity allows you to send and receive files.
You can also connect other devices such as wireless
headset.
In Menu Bluetooth you can select one of the following options:
Bluetooth Status: press the key OK or the left
function key to enable/disable Bluetooth.
40
Visibility: decide for your device to be visible to other
Bluetooth devices.
My Device: this option displays names of all
detected Bluetooth devices. To get connected to a
certain device, activate the option and select:
Bluetooth->My Devices->Search for New Device.
Press the left function key „Pair”, and next enter the
password on both devices.
My Name: select the name for your device.
Advanced: allows you to change the advanced
settings.
APN PROFILES
You can add a MMS account to the phone.
You can get a correct configuration from the Service
Provider.
DATA SERVICES
Use this option to enable/disable data services.
FLIGHT MODE
You can enable Flight Mode. If this mode is enabled, there
will be no connection with the GSM network and no possibility
to make phone calls, receive/send messages, etc.
RESTORE FACTORY SETTINGS
Use this option to restore factory settings. Select in MENU:
Settings->Restore Factory Settings, and then enter the
security code. Press the green receiver button to confirm.
Warning: Default security code: 1122
41
COMPUTER CONNECTION
You can connect the phone to a computer using a USB cable,
and therefore you can copy and transfer files between the
phone and the computer.
Getting connected:
- plug the USB into the phone
- plug the other end of the USB cable into the USB port in the
computer
- there will be a message on the display screen: „USB
Memory” and „Port COM”. Select „USB Memory”
FAQ (TROUBLESHOOTING)
Only qualified service is authorized to repair the phone. Any
attempts of unauthorized repair and modifications void the
Manufacturer’s warranty!
„Cannot make a
phone call”
Make sure the number you are dialing is
correct. If you make an international phone
call, dial a country code before the actual
number (eg. 0049 or +49 for Germany).
If you have a prepaid card, make sure there
are sufficient funds available on the card to
place a phone call.
“SIM Card in
place,
emergency
calls only (112)”
Make sure the SIM Card is installed
correctly or is enabled in MENU.
42
“The phone
does not work,
the phone does
not charge
when plugged
in”
The phone might be switched off; to switch
on the phone, press and hold the red
receiver button for about 3 seconds.
If you have not used the phone for a long
time, the battery might be “deeply-
discharged”; to recover a deeply-discharged
battery leave your charger plugged in,
although there will be no image on the
display (even up to 1 hour).
„Can I make a
phone call while
abroad?”
If you are out of the country and ROAMING
is enabled, your phone will automatically use
the foreign telephone network. To learn
more, contact your Service Provider.
„Can I make an
emergency call
if there is no
reception or if
there are no
funds on my
account?”
If you are in the area with no reception by
any network, no phone calls can be made.
If you have no funds available on the
account, emergency call to 112 can be
made.
„How to get the
most of
reception?”
If there is a message „Does not work” or “No
Service” on the display, it means there is no
signal or sufficient funds on the account. In
such a case, only making emergency call
112 is possible as long as the User is in the
area covered by another service provider.
43
Reception might be weaker if you are inside
buildings. Move towards windows or get
outside.
There is a
message on the
display screen:
„Press * to
unlock; keys do
not work.
The keypad is locked. To unlock the keypad,
press the Left Function Key, and then the
key (*).
What is the
Text Message
Center?
It is the service provider’s center number
storing all text messages. The number is
stored on the SIM Card, but you can change
the number in the phone MENU and enter
another number.
When is the
fee for making a
phone calls
charged?
A fee for making a phone call is charged as
soon as a phone call is made. To learn more
about charging details, contact your service
provider.
Is there any
way to make
sure my
message has
been delivered
to the
recipient?
Enable Delivery Report option. As soon as
the text message is delivered to the
recipient, you will get a return message
(network service).
TERMS OF WARRANTY
The phone is covered under the warranty; proof of purchase
is required. There is a charge for repair of phones damaged
44
due to misuse, electrostatic discharge or lightning strike. Any
attempts to fix or modify the phone by the User will void the
warranty!
The above information is presented solely for information
purposes.
BATTERY INFORMATION
There is a battery in the phone that might be recharged with
the charger, that is included in the set.
Telephone performance depends on various conditions.
Your distance from a relay transmitter, number and length of
phone calls significantly reduce the battery life. While on the
go, the phone switches between relay transmitters and such
switching also significantly affects the battery life.
After multiple charges and discharges, it is natural for the
battery to eventually lose its ability to hold charge. Get a new
battery if you notice a significant drop in the battery
performance.
Only batteries recommended by the Manufacturer can be
used. Never leave the battery connected longer than 2-3
days.
Do not keep the phone in places of excessive high
temperature. Otherwise, it might negatively impact the battery
and the telephone.
Never use a battery that is clearly damaged. Doing so might
cause a short circuit, and might damage the phone. Check
battery installation for proper polarization.
Leaving a battery in places of excessively high or low
temperature will decrease its life. The battery should be kept
in temperature between 15°C do 25°C. If you install a cold
45
battery in the phone, it might not work as it should, and there
is some risk of damaging the phone.
The set contains a Li-ion battery. Old batteries pose
environmental risks. They should be disposed
of at a special place in a special container in
compliance with current regulations. Never
throw old batteries or chargers to municipal
solid waste, they should be collected for
disposal.
NEVER PUT BATTERIES AND CHARGERS
INTO FIRE!
PROTECT YOUR ENVIRONMENT
Important: The phone is marked in compliance with the
European Directive of 2012/19/EU and the Polish Act on
Waste Electrical and Electronic Equipment, and
with the symbol of waste electricals. Such a symbol
tells us that the device, after use, must not be
disposed of in the normal household waste stream.
Important: Never throw the phone nor accessories
to municipal solid waste!!! The product should be utilized in
authorized places only.
As the product contains hazardous components, improper
storage and use of such equipment might lead to serious
consequences harmful for both people and natural
environment. To avoid such consequences, proper handling
of waste electrical and electronic equipment is essential.
To recycle materials used to produce the phone packaging,
follow the local recycling regulations in your area.
46
SAR INFORMATION
This telephone model meets all international guidelines
pertaining to the impact of radio waves. The device is a radio
transmitter and receiver. It has been designed not to exceed
any limits of radio waves impacts, in compliance with
international guidelines. These guidelines were developed by
the International Commission on Non-Ionizing Radiation
Protection (ICNIRP), an independent scientific organization
with a safety margin to protect all people regardless their age
and health condition. Such guidelines use a unit of
measurement called Specific Absorption Rate (SAR) actual
absorption.
As recommended by ICNIRP, the border value of SAR for
portable equipment is 2,0 watts per kilogram (W/kg). SAR
value is determined at the maximum transmit power and in
the full spectrum of frequencies covered by research; the
actual SAR value while the product is working might be much
lower than the maximum level. Such discrepancies result
from automatic changes in device power necessary to ensure
that the device operates at a minimum power level required
to be connected with network.
Although SAR values might vary for different models of
phones or even for different positions of the same model, they
are all compliant with regulations pertaining to safe level of
radiation.
According to WHO current research, there is no need to apply
any special restrictions in using portable devices. According
to WHO, in order to reduce radiation, a length of conversation
should be reduced, or headphones or speakerphone should
47
be used, or the phone should not be held in proximity to head
or body.
The highest SAR value taken in tests
SAR device
next to head
GSM900: 0.423W/Kg 10g Head SAR
DCS 1800: 0.116W/Kg 10g Head SAR
WCDMA 900: 0.371W/Kg 10g Head SAR
WCDMA 2100: 0.465W/Kg 10g Head SAR
SAR device
next to body
GSM900: 0.677W/Kg 10g Body SAR
DCS 1800: 0.673W/Kg 10g Body SAR
WCDMA 900: 0.639W/Kg 10g Body SAR
WCDMA 2100: 0.906W/Kg 10g Body SAR
SAR values might also vary due to various reporting and
testing requirements in different countries as well as to
different frequencies in a certain network.
FREQUENCY RANGE & MAX RADIO FREQUENCY POWER FOR
THE RADIO TO WORK
Frequency Range:
E-GSM900: 880-915 MHz(TX); 925-960 MHz(RX)
DCS Band: 1710-1785 MHz(TX); 1805-1880 MHz(RX)
WCDMA900: 880-915 MHz(TX); 925-960 MHz(RX)
WCDMA2100: 1920-1980MHz(TX); 2110-2170MHz(RX)
Bluetooth: 2402-2480 MHz
FM: 87.5 - 108.0 MHz (Rx)
Max radio frequency power within the Frequency Range:
EGSM 900: 32,51 dBm, DCS 1800: 28,97 dBm
WCDMA 900: 23,04 dBm, WCDMA 2100: 22,54 dBm
Bluetooth: 3.38 dBm EIRP
48
DECLARATION OF CONFORMITY
Complains or device defects can be reported via website:
http://www.comtek.co.uk/maxcom-rma-service/
Mobile service address:
Comtek Network Systems
Unit 108, Tenth Avenue (Zone 3)
Deeside Industrial Estate
Deeside, Flintshire CH5 2UA
If there is any technical assistance required, contact our
technical department at:
+48 32 325 07 00 or email us at: serwis@maxcom.pl
Our website:
http://www.maxcom.pl/
MAXCOM S.A.
ul. Towarowa 23a
43-100 Tychy
Poland
tel.: +48 32 327 70 89
fax: +48 32 327 78 60
www.maxcom.pl
e-mail: office@maxcom.pl
MM36D PL Ver 2/2018
51

Hulp nodig? Stel uw vraag in het forum

Spelregels

Misbruik melden

Gebruikershandleiding.com neemt misbruik van zijn services uitermate serieus. U kunt hieronder aangeven waarom deze vraag ongepast is. Wij controleren de vraag en zonodig wordt deze verwijderd.

Product:

Bijvoorbeeld antisemitische inhoud, racistische inhoud, of materiaal dat gewelddadige fysieke handelingen tot gevolg kan hebben.

Bijvoorbeeld een creditcardnummer, een persoonlijk identificatienummer, of een geheim adres. E-mailadressen en volledige namen worden niet als privégegevens beschouwd.

Spelregels forum

Om tot zinvolle vragen te komen hanteren wij de volgende spelregels:

Belangrijk! Als er een antwoord wordt gegeven op uw vraag, dan is het voor de gever van het antwoord nuttig om te weten als u er wel (of niet) mee geholpen bent! Wij vragen u dus ook te reageren op een antwoord.

Belangrijk! Antwoorden worden ook per e-mail naar abonnees gestuurd. Laat uw emailadres achter op deze site, zodat u op de hoogte blijft. U krijgt dan ook andere vragen en antwoorden te zien.

Abonneren

Abonneer u voor het ontvangen van emails voor uw Maxcom MM36D bij:


U ontvangt een email met instructies om u voor één of beide opties in te schrijven.


Ontvang uw handleiding per email

Vul uw emailadres in en ontvang de handleiding van Maxcom MM36D in de taal/talen: Engels als bijlage per email.

De handleiding is 0.89 mb groot.


U ontvangt de handleiding per email binnen enkele minuten. Als u geen email heeft ontvangen, dan heeft u waarschijnlijk een verkeerd emailadres ingevuld of is uw mailbox te vol. Daarnaast kan het zijn dat uw internetprovider een maximum heeft aan de grootte per email. Omdat hier een handleiding wordt meegestuurd, kan het voorkomen dat de email groter is dan toegestaan bij uw provider.

Stel vragen via chat aan uw handleiding

Stel uw vraag over deze PDF

Uw handleiding is per email verstuurd. Controleer uw email

Als u niet binnen een kwartier uw email met handleiding ontvangen heeft, kan het zijn dat u een verkeerd emailadres heeft ingevuld of dat uw emailprovider een maximum grootte per email heeft ingesteld die kleiner is dan de grootte van de handleiding.

Er is een email naar u verstuurd om uw inschrijving definitief te maken.

Controleer uw email en volg de aanwijzingen op om uw inschrijving definitief te maken

U heeft geen emailadres opgegeven

Als u de handleiding per email wilt ontvangen, vul dan een geldig emailadres in.

Uw vraag is op deze pagina toegevoegd

Wilt u een email ontvangen bij een antwoord en/of nieuwe vragen? Vul dan hier uw emailadres in.


Info