• When using an exercise bike, basic precautions should always be followed, including the following: Read all instructions before using this equipment. It
is the responsibility of the owner to ensure that all users of this equipment are adequately informed of all warnings and precautions.
• This equipment is intended for commercial use. To ensure your safety and protect the equipment, read all instructions before operating.
DANGER!
TO REDUCE THE RISK OF ELECTRICAL SHOCK:
• Always unplug the equipment from the electrical outlet immediately after using, before cleaning, performing maintenance and putting on or taking off parts.
• Care should be taken when mounting or dismounting the
equipment. Before mounting or dismounting, move the
pedal on the mounting or dismounting side to its lowest
position and bring the machine to a complete stop.
• To maintain balance, it is recommended to
keep a grip on the handlebars while exercising,
mounting or dismounting the machine.
• Keep the topside of the foot support clean and dry.
• When exercising, always maintain a comfortable pace.
Do not sprint above 80 RPMs on this machine.
• Incorrect or excessive exercise may cause injury.
If you experience any kind of pain, including but
not limited to chest pains, nausea, dizziness, or
shortness of breath, stop exercising immediately
and consult your physician before continuing.
• This unit is not equipped with a free wheel. Pedal
speed should be reduced in a controlled manner.
• Do not turn pedal arms by hand.
• Do not wear clothes that might catch
on any part of the unit.
• Always wear athletic shoes while using this equipment.
• Do not jump on the unit.
• At no time should more than one person
be on unit while in operation.
• This unit should not be used by persons weighing more
than specied in the OWNER’S MANUAL SPECIFICATIONS
SECTION. Failure to comply will void the warranty.
• Disconnect all power before servicing or
moving the equipment. To clean, wipe surfaces
down with soap and slightly damp cloth only;
never use solvents. (See MAINTENANCE)
• The unit should never be left unattended when
plugged in. Unplug from outlet when not in use,
and before putting on or taking off parts.
• Do not operate under blanket or pillow.
Excessive heating can occur and cause re,
electric shock, or injury to persons.
• Connect this exercise product to a
properly grounded outlet only.
• At NO time should pets or children under the
age of 14 be closer to the unit than 10 feet.
• At NO time should children under
the age of 14 use the unit.
• Children over the age of 14 or disabled persons
should not use the unit without adult supervision.
• Use the unit only for its intended use as described
in the unit guide and owner’s manual.
• Do not use other attachments that are not recommended
by the manufacturer. Attachments may cause injury.
CAUTION!
CONSULT A PHYSICIAN BEFORE USING THIS EQUIPMENT. READ OWNER’S MANUAL BEFORE USE.
• It is essential that this equipment is used only indoors, in a climate controlled room. If this equipment has been exposed to colder temperatures or
high moisture climates, it is strongly recommended that the equipment is warmed up to room temperature before rst time use.
WARNING!
TO REDUCE THE RISK OF BURNS, FIRE, ELECTRICAL SHOCK OR INJURY TO PERSONS:
• Never operate the unit if it has a damaged cord
or plug, if it is not working properly, if it has been
dropped or damaged, or immersed in water. Call
Customer Tech Support for examination and repair.
• Keep power cord away from heated surfaces. Do not carry
this unit by its supply cord or use the cord as a handle.
• Never operate the unit with the air opening blocked. Keep
the air opening clean, free of lint, hair, and the like.
• To prevent electrical shock, never drop or
insert any object into any opening.
• Do not operate where aerosol (spray) products are
being used or when oxygen is being administered.
• To disconnect, turn all controls to the off
position, then remove plug from outlet.
• Do not use unit in any location that is not temperature
controlled, such as but not limited to garages,
porches, pool rooms, bathrooms, car ports or
outdoors. Failure to comply may void the warranty.
• Do not remove the console covers unless instructed
by Customer Tech Support. Service should only
be done by an authorized service technician.
• Heart rate monitoring systems may be inaccurate.
• Over exercising may result in serious injury or death.
• If you feel faint, stop exercising immediately.
ENGLISH
6
DEDICATED CIRCUIT AND ELECTRICAL INFO
A “Dedicated Circuit” means that each outlet you plug into should not have anything else
running on that same circuit. The easiest way to verify this is to locate the main circuit breaker
box, and turn off the breaker(s) one at a time. Once a breaker has been turned off, the only
thing that should not have power to it are the units in question. No lamps, vending machines,
fans, sound systems, or any other item should lose power when you perform this test.
Non-looped (isolated) neutral/grounding means that each circuit must have an individual
neutral/ground connection coming from it, and terminating at an approved earth ground.
You cannot “jumper” a single neutral/ground from one circuit to the next.
ELECTRICAL REQUIREMENTS
For your safety and to ensure good unit performance, the ground on this circuit must
be non-looped (isolated). Please refer to NEC article 210-21 and 210-23. Any alterations
to the standard power cord provided could void all warranties of this product.
The 1x cycles are designed to be self-powered and do not require an external power supply source to
operate. Without an external power supply, the console’s start-up time may be delayed. Add-on TV’s and
other console accessories will increase the time needed for start-up. An external power supply will ensure
power is provided to the console at all times and is recommended when add-on accessories are used.
For units with an integrated TV (1xe), the TV power requirements are included in the unit. An RG6
quad shield coaxial cable with ‘F Type’ compression ttings on each end will need to be connected
to the cardio unit and the video source. Additional power requirements are not needed for the
add-on digital TV. For units with an add-on PCTV, the TV power requirements are separate.
NOTE: All units with Virtual Active™ must be powered.
110 V UNITS
All Matrix 1x 110 V cycles require the use of a 100-125 V, 60 Hz and a 15 A “Dedicated
Circuit”, with a non-looped (isolated) neutral/ground for power. This outlet should
be a NEMA 5-15R and have the same conguration as the plug. No adapter should
be used with this product. These cycles can be daisy-chained together with up to 4
units per 15 A dedicated circuit. Matrix daisy-chain cord adapters are sold separately.
220 V UNITS
All Matrix 1x 220 V cycles require the use of a 216-250 V, 50 Hz and a 15 A “Dedicated
Circuit”, with a non-looped (isolated) neutral/ground for power. This outlet should
be a NEMA 6-15R and have the same conguration as the plug. No adapter should
be used with this product. These cycles can be daisy-chained together with up to 4
units per 15 A dedicated circuit. Matrix daisy-chain cord adapters are sold separately.
GROUNDING INSTRUCTIONS
The unit must be grounded. If it should malfunction or breakdown, grounding
provides a path of least resistance for electric current to reduce the risk
of electric shock. The unit is equipped with a cord having an equipment-
grounding conductor and a grounding plug. The plug must be plugged into
an appropriate outlet that is properly installed and grounded in accordance
with all local codes and ordinances. If the user does not follow these
grounding instructions, the user could void the Matrix limited warranty.
ADDITIONAL ELECTRICAL INFO
In addition to the dedicated circuit requirement, the proper gauge wire
must be used from the circuit breaker box, to each outlet that will have
the maximum number of units running off of it. If the distance from the
circuit breaker box to each outlet, is 100 ft (30.5 m) or less, then 12 gauge
wire should be used. For distances greater than 100 ft (30.5 m) from the
circuit breaker box to the outlet, a 10 gauge wire should be used.
ENERGY SAVING / LOW-POWER MODE
All units are congured with the ability to enter into an energy saving / low-
power mode when the unit has not been in use for a specied period of
time. Additional time may be required to fully reactivate this unit once it has
entered the low-power mode. This energy saving feature may be enabled
or disabled from within the ‘Manager Mode’ or ‘Engineering Mode.’
ADD-ON PCTV
A 15 A or 20 A “Dedicated Circuit” with a non-looped (isolated) neutral/
ground is required. Each PCTV requires at least 1.2 A of current. No more
than 12 PCTVs should be used for each 15 A circuit and no more than 16
PCTVs should be used for each 20 A circuit. The power outlet should have
the same conguration as the plug. No adapter should be used with this
product. An RG6 coaxial cable with ‘F Type’ compression ttings will need
to be connected between the video source and each add-on PCTV unit.
ADD-ON DIGITAL TV
Additional power requirements are not needed for the add-on digital TV.
An RG6 coaxial cable with ‘F Type’ compression ttings will need to be
connected between the video source and each add-on digital TV unit.
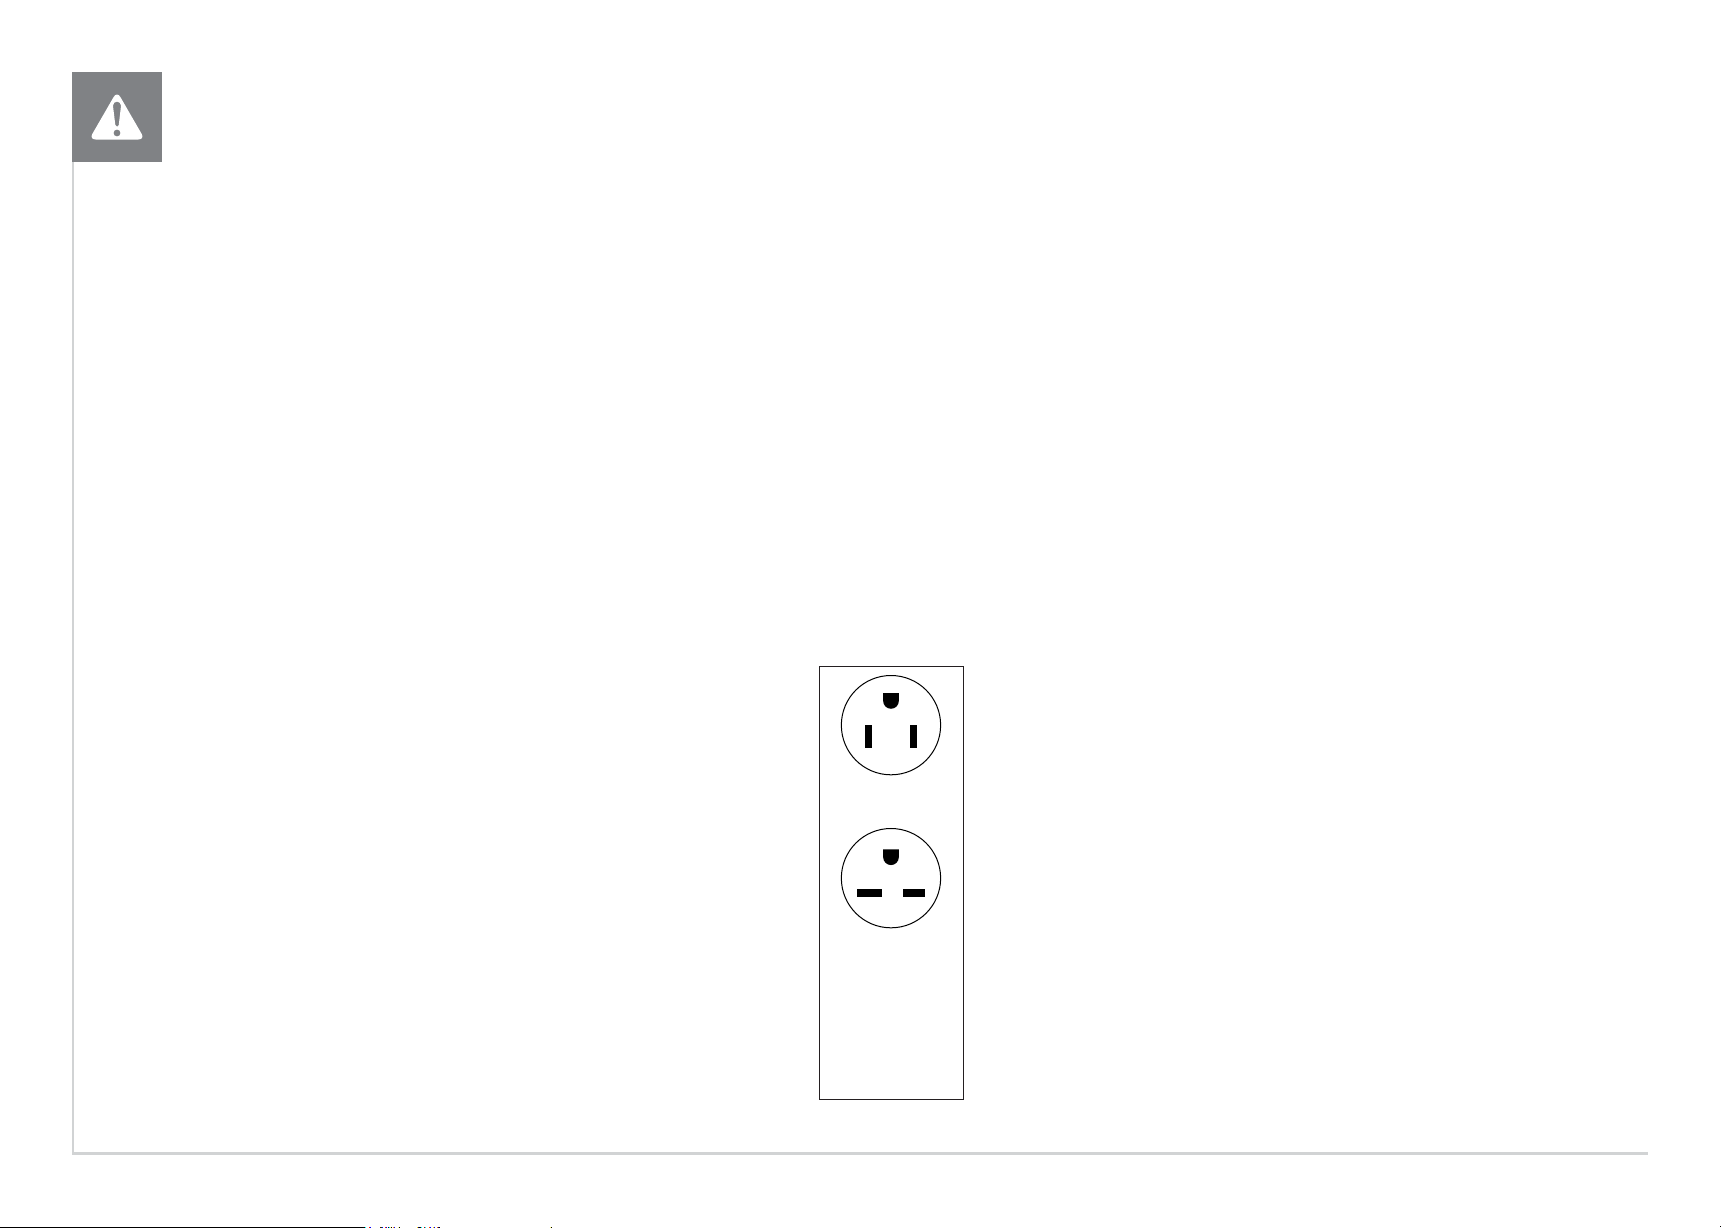
North American
power cord plugs
shown. Depending
on your country, the
plug type may vary.
110 NEMA 5-15P
PLUG
220 NEMA 6-15P
PLUG
POWER REQUIREMENTS
ENGLISH
7
ASSEMBLY
UNPACKING
Unpack the equipment where you will be using it. Place the carton
on a level at surface. It is recommended that you place a protective
covering on your oor. Never open box when it is on its side.
IMPORTANT NOTES
During each assembly step, ensure that ALL nuts and
bolts are in place and partially threaded.
Several parts have been pre-lubricated to aid in assembly and usage. Please do not wipe
this off. If you have diculty, a light application of lithium grease is recommended.
WARNING!
There are several areas during the assembly process that special attention must be
paid. It is very important to follow the assembly instructions correctly and to make
sure all parts are rmly tightened. If the assembly instructions are not followed
correctly, the equipment could have parts that are not tightened and will seem
loose and may cause irritating noises. To prevent damage to the equipment, the
assembly instructions must be reviewed and corrective actions should be taken.
NEED HELP?
If you have questions or if there are any missing parts, contact Customer
Tech Support. Contact information is located on the information card.
DANGER!
Improper connection of the equipment-
grounding conductor can result in a risk
of electric shock. Check with a qualied
electrician or serviceman if you are
in doubt as to whether the product is
properly grounded. Do not modify the
plug provided with the product. If it will
not t the outlet, have a proper outlet
installed by a qualied electrician.
WARNING!
• Connect this exercise product to a properly grounded outlet only.
• Never operate product with a damaged cord or plug even if it is working properly. Never operate any product if it
appears damaged, or has been immersed in water. Contact Customer Tech Support for replacement or repair.
Failure to follow these specications can cause damage to your product and can void the warranty:
• All video and power outlets must be functional the day of delivery / assembly of the product. The
client is responsible for any additional installation charges associated with return visits.
• Electrical supply may uctuate in your area. To ensure stable performance of the product, use the proper gauge wire.
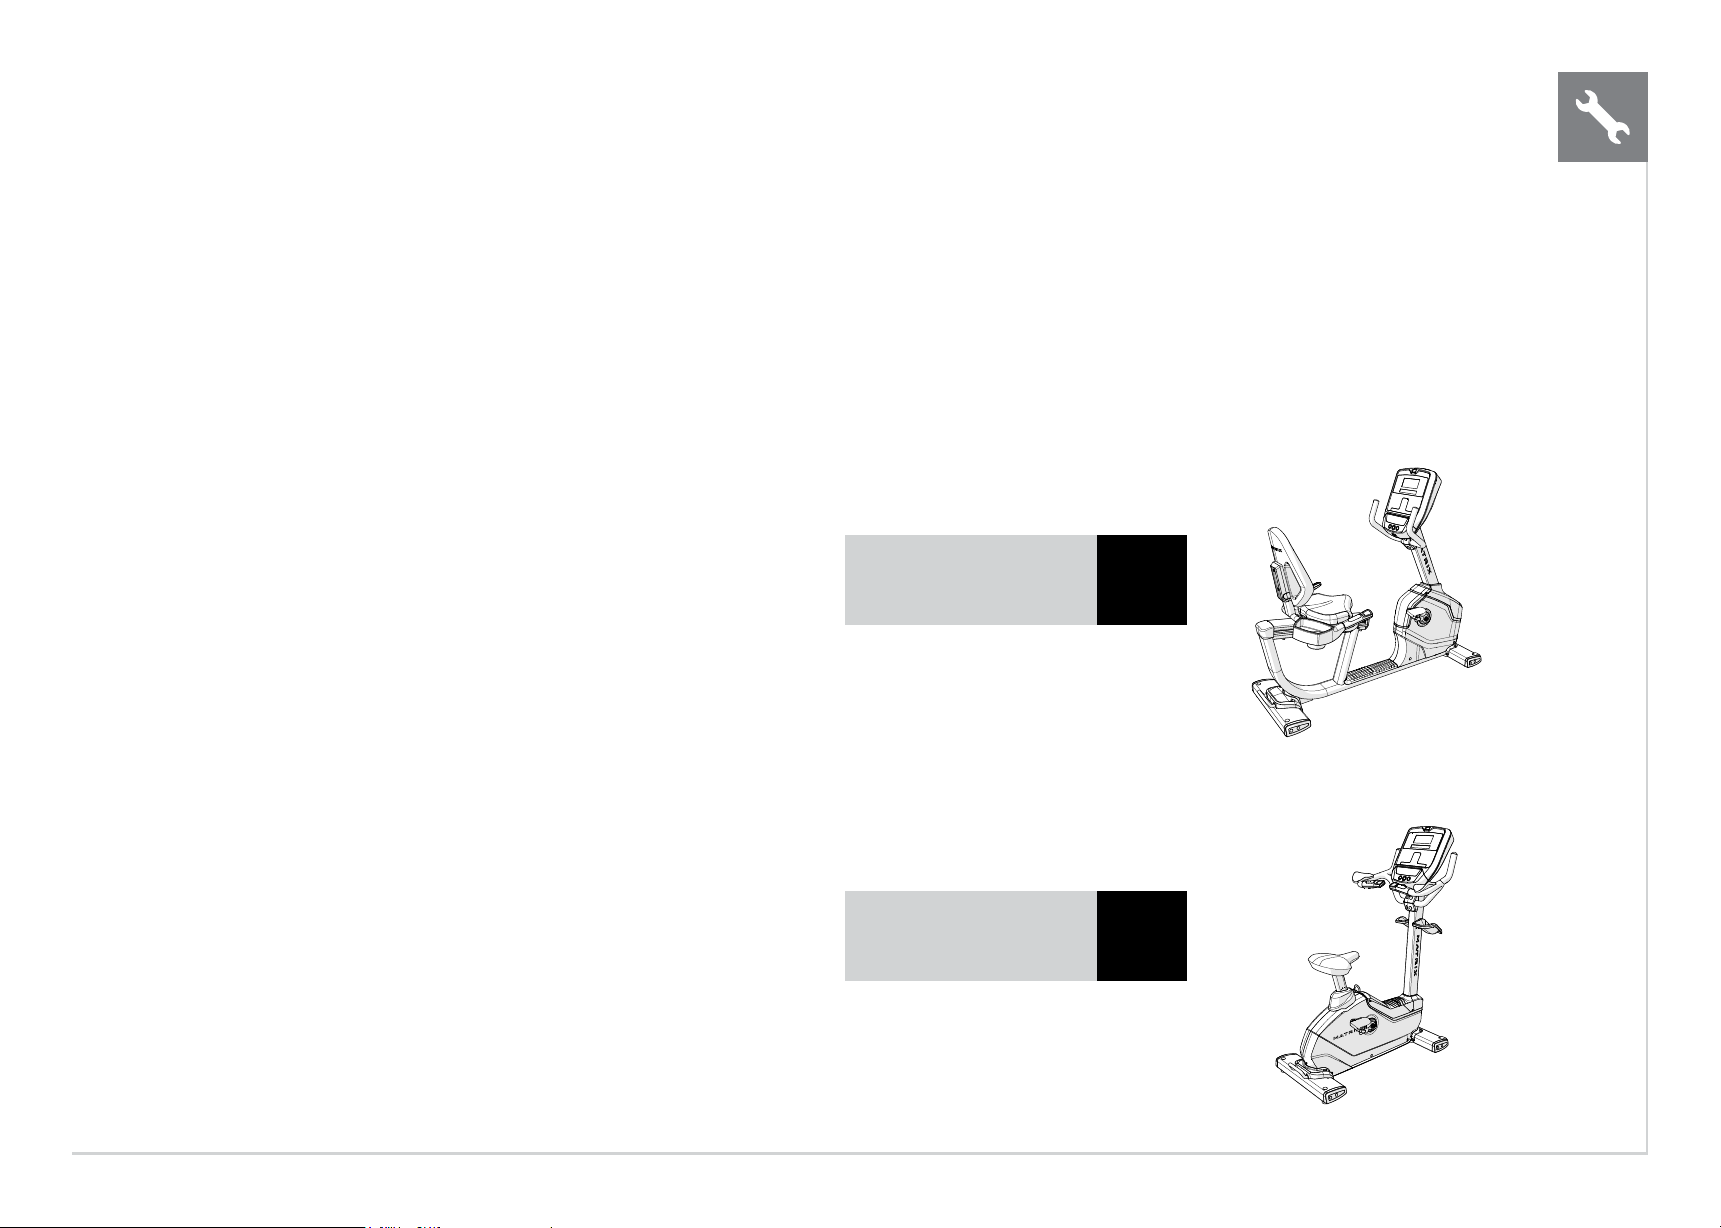
R1x RecumbentPage
8
U1x UprightPage
13
ENGLISH
8
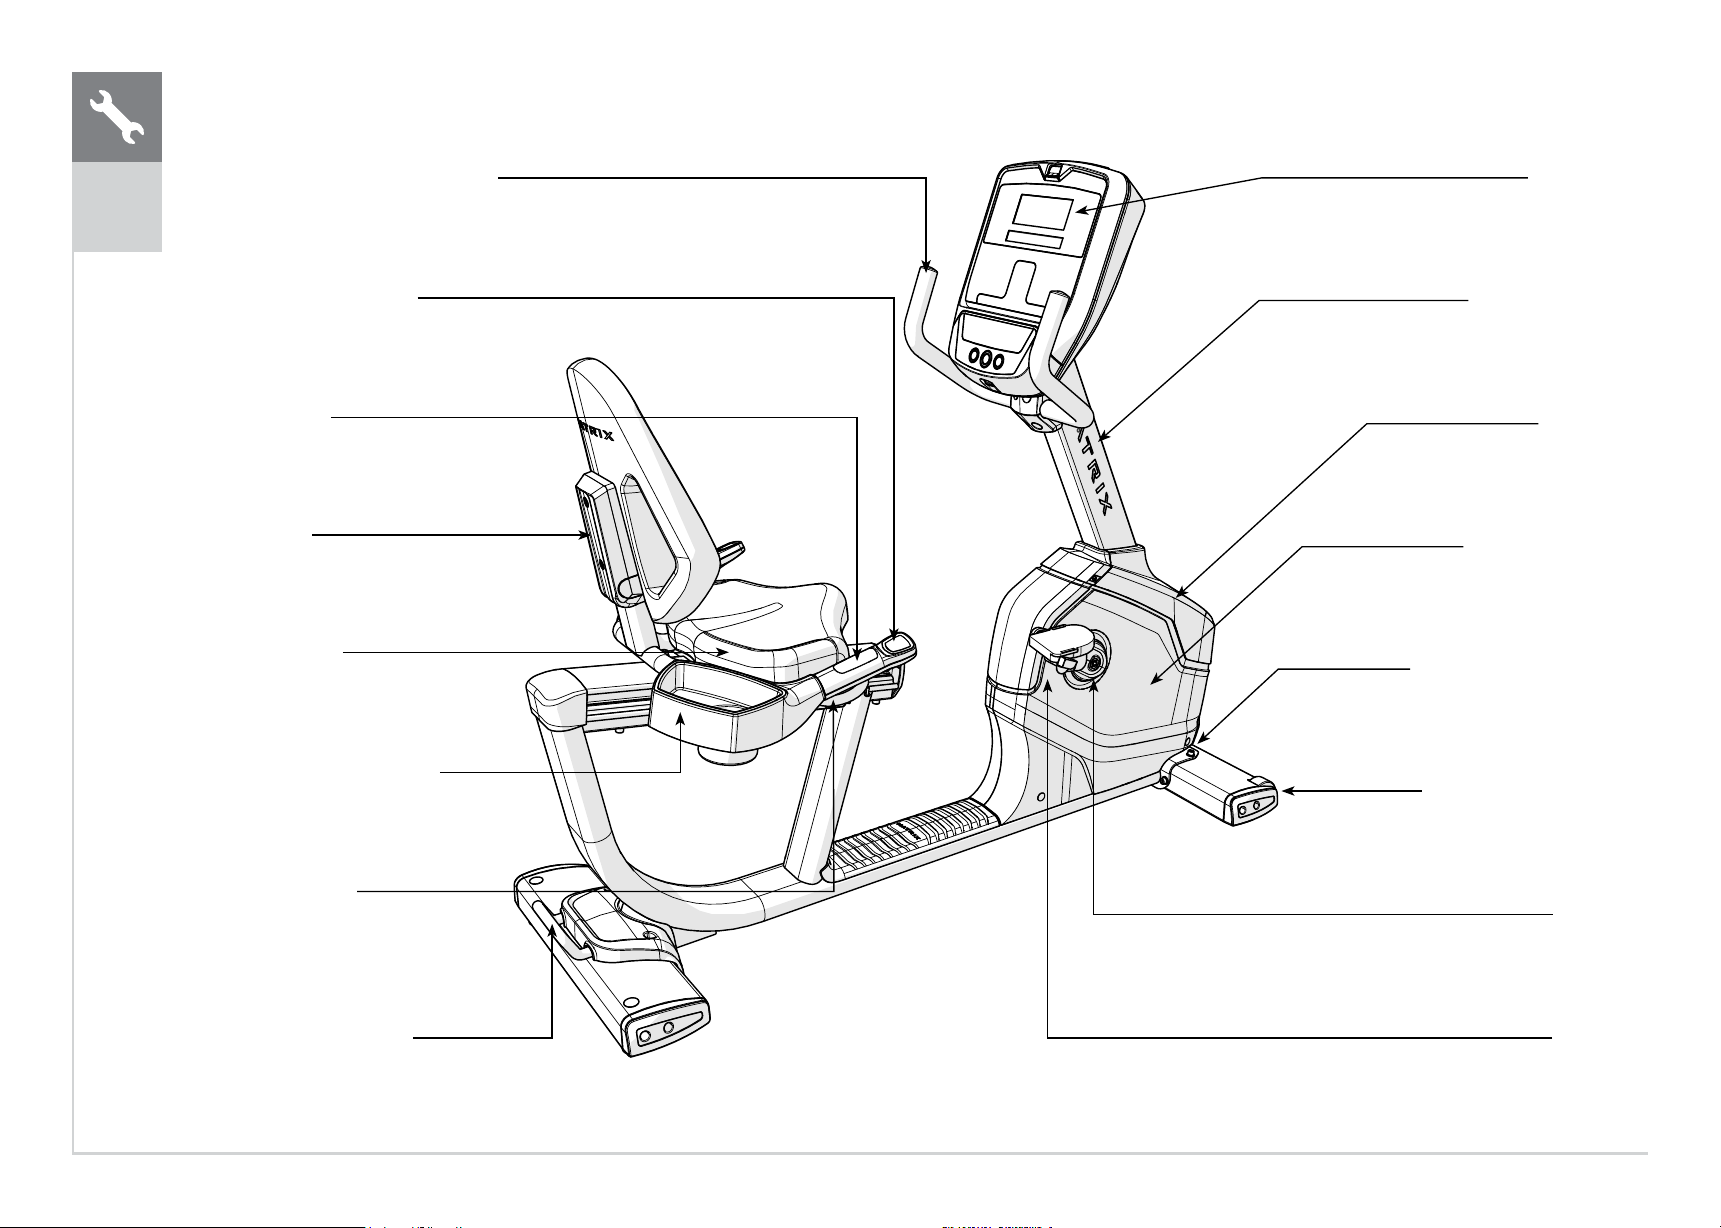
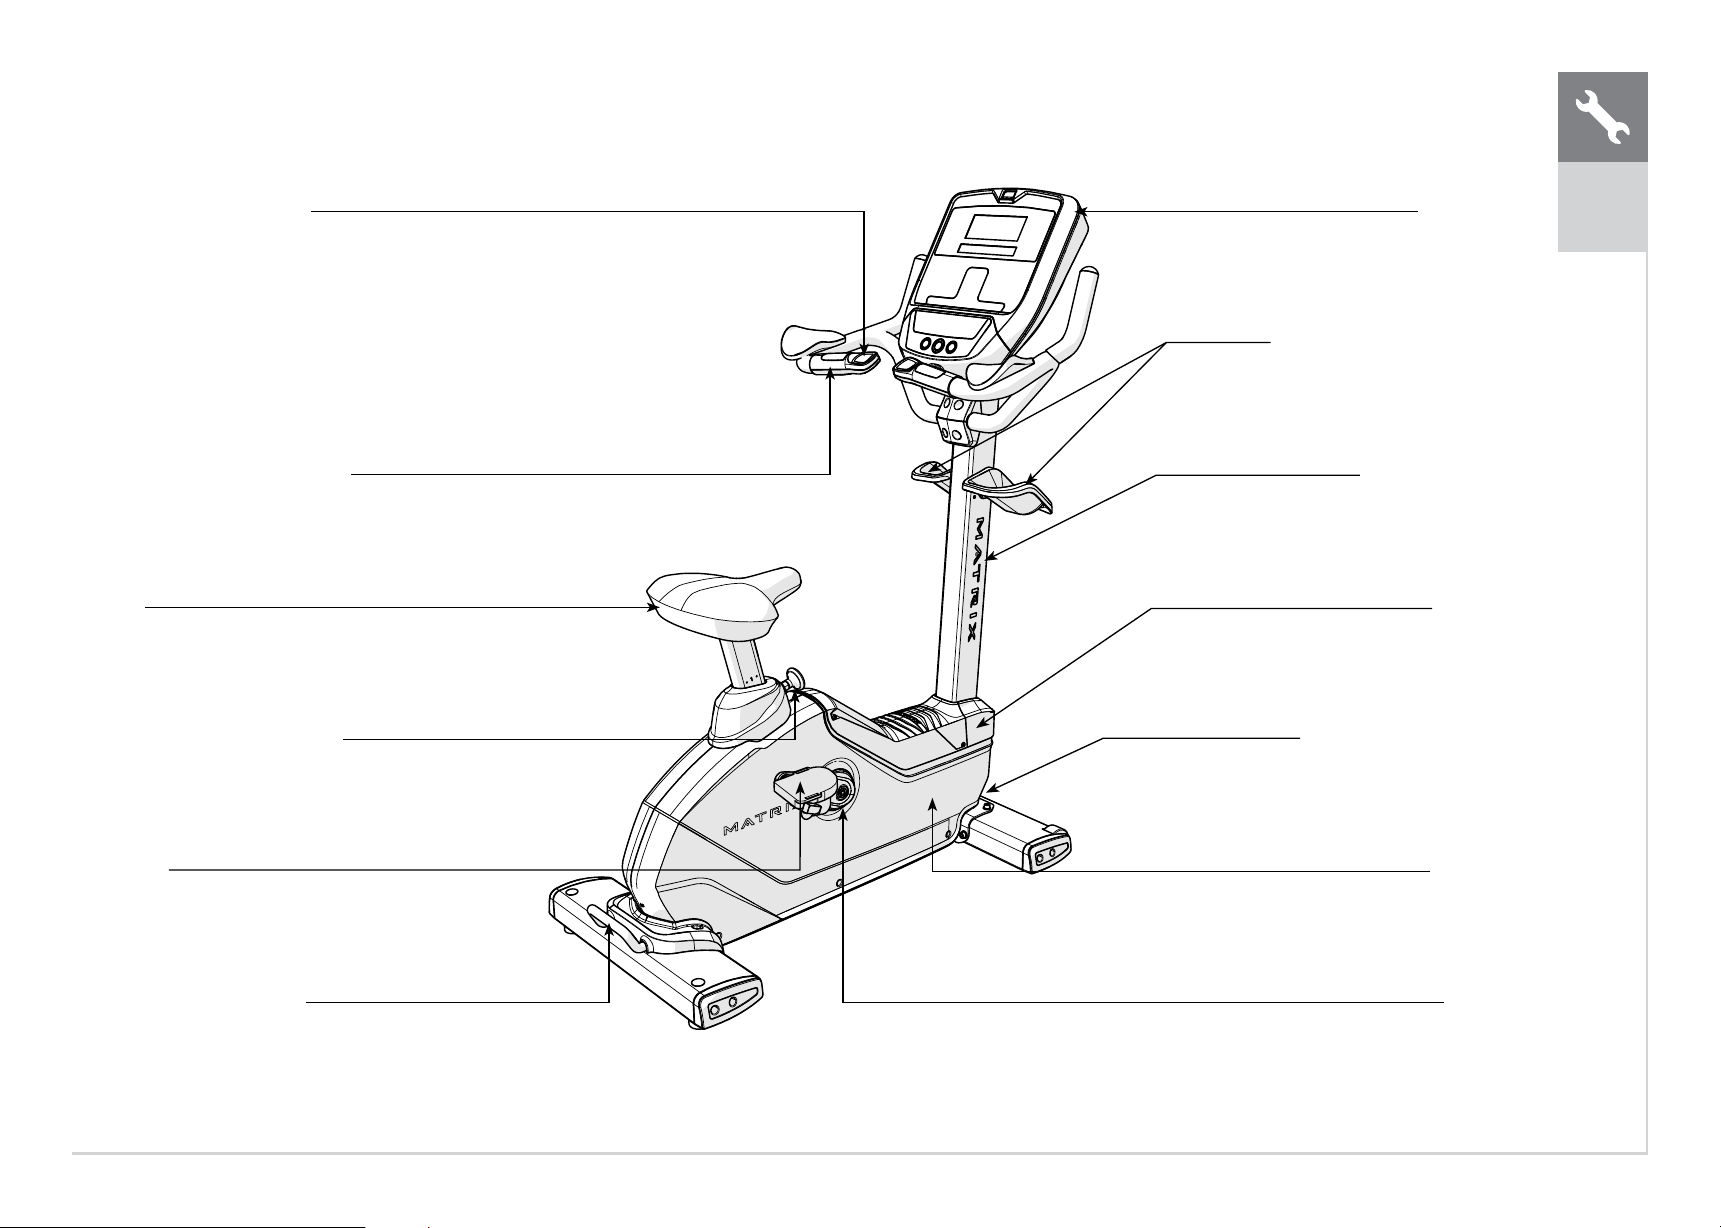
CONSOLE
CONSOLE MAST
TOP CAP
FRONT SHROUD
POWER CORD SOCKET
TRANSPORT WHEELS
CRANK
PEDALS
CONSOLE MAST HANDLEBARS
RESISTANCE TOGGLES
PULSE GRIPS
SEAT BACK
SEAT BOTTOM
WATER BOTTLE HOLDER
SEAT POSITION
ADJUSTMENT LEVER
TRANSPORT HANDLE
R1x
ENGLISH
9
R1x
1
TOOLS REQUIRED:
F4 mm Allen Wrench
F6 mm Allen Wrench
FFlat Wrench (15mm/17mm 325L)
FPhillips Screwdriver
PARTS INCLUDED:
F1 Main Frame
F1 Rear Stabilizer Tube
F1 Front Stabilizer Tube
F1 Rear Frame Handle
F1 Rear Frame Cover
F1 Console Mast
F1 Console Handlebars
F 2 Handlebar Covers
F1 Seat Frame
F1 Water Bottle Pocket
F1 Seat Base
F1 Seat Back
F1 Hardware Kit
F1 Power Cord (packaged with console)
Console sold separately
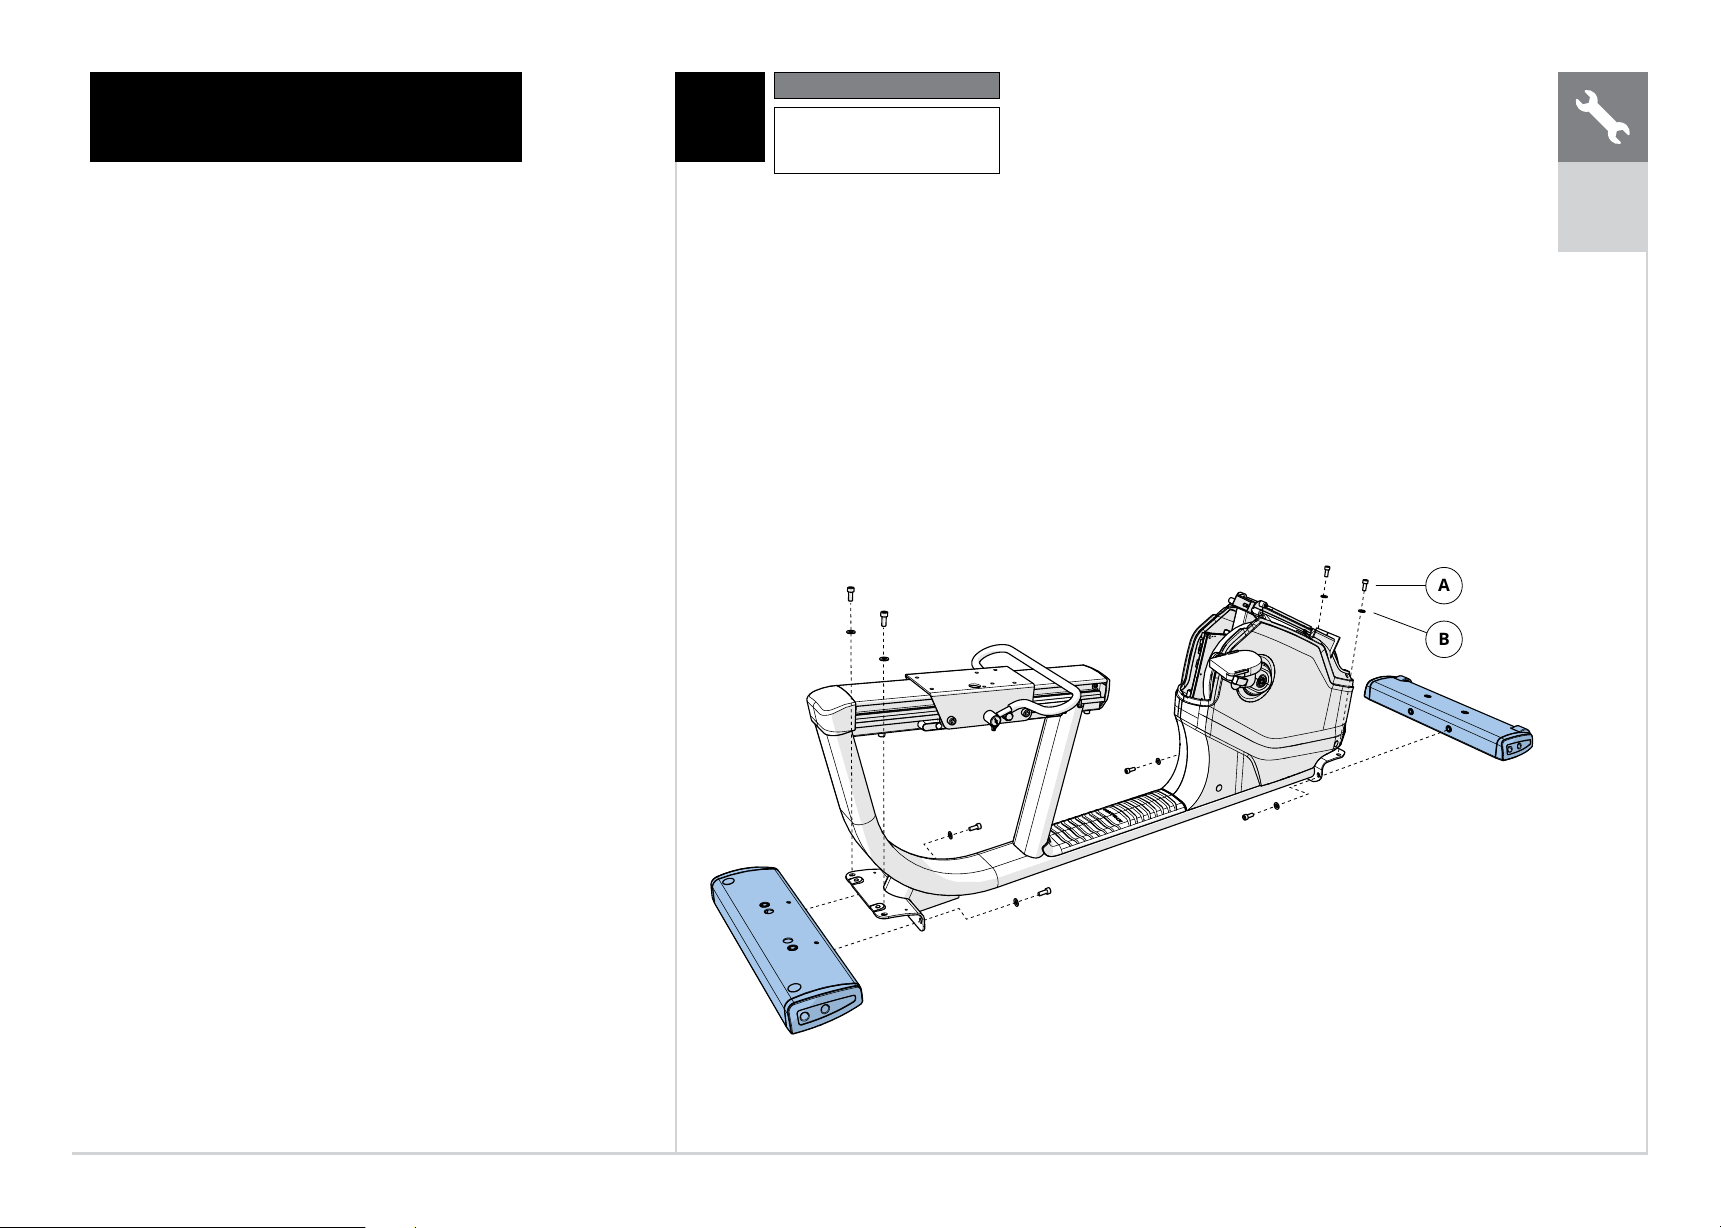
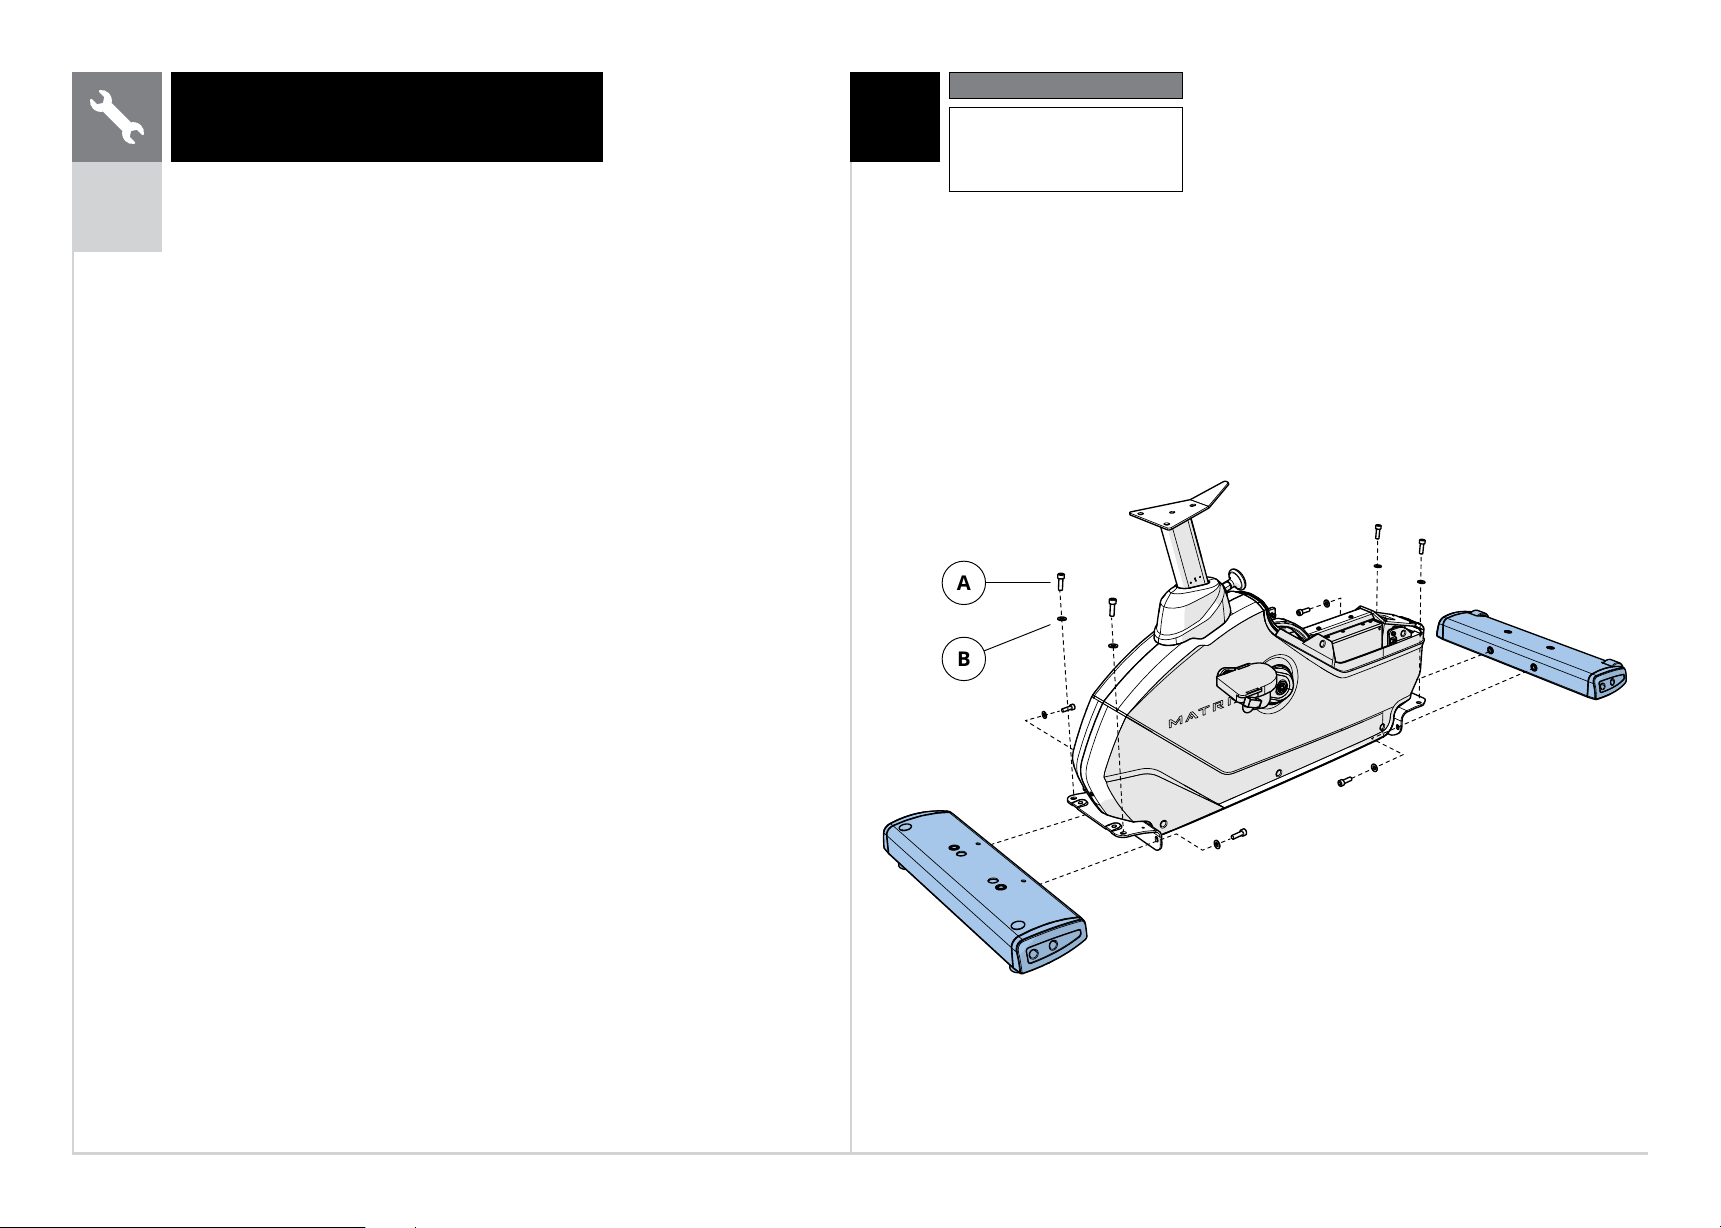
Recumbent Cycle Assembly
A
B
Pink Hardware Bag
DescriptionQty
A
B
Bolt
Spring Washer
8
8
ENGLISH
10
23
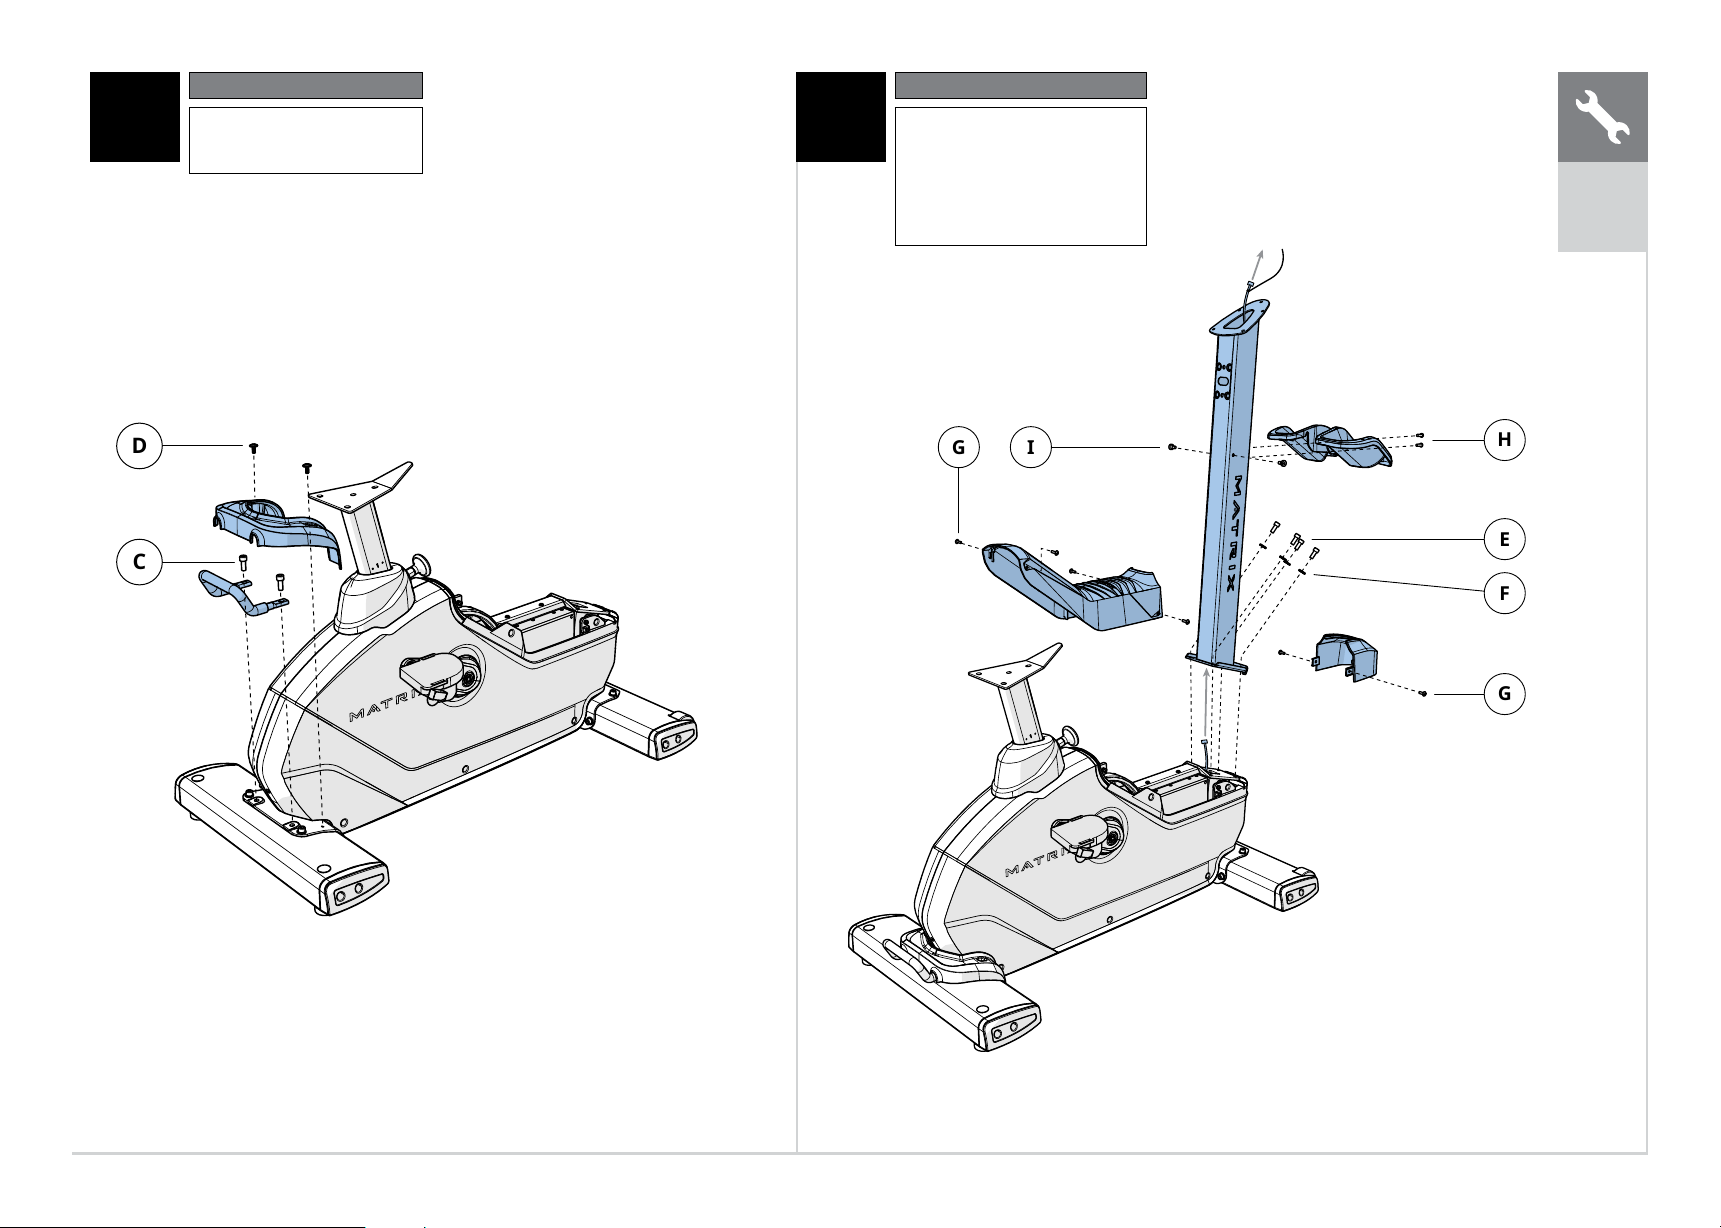
D
C
E
F
G
Yellow Hardware Bag
DescriptionQty
C
D
Bolt
Screw
2
2
Black Hardware Bag
DescriptionQty
E
F
G
Bolt
Tooth Washer
Screw (pre-installed)
4
4
4
R1x
ENGLISH
11
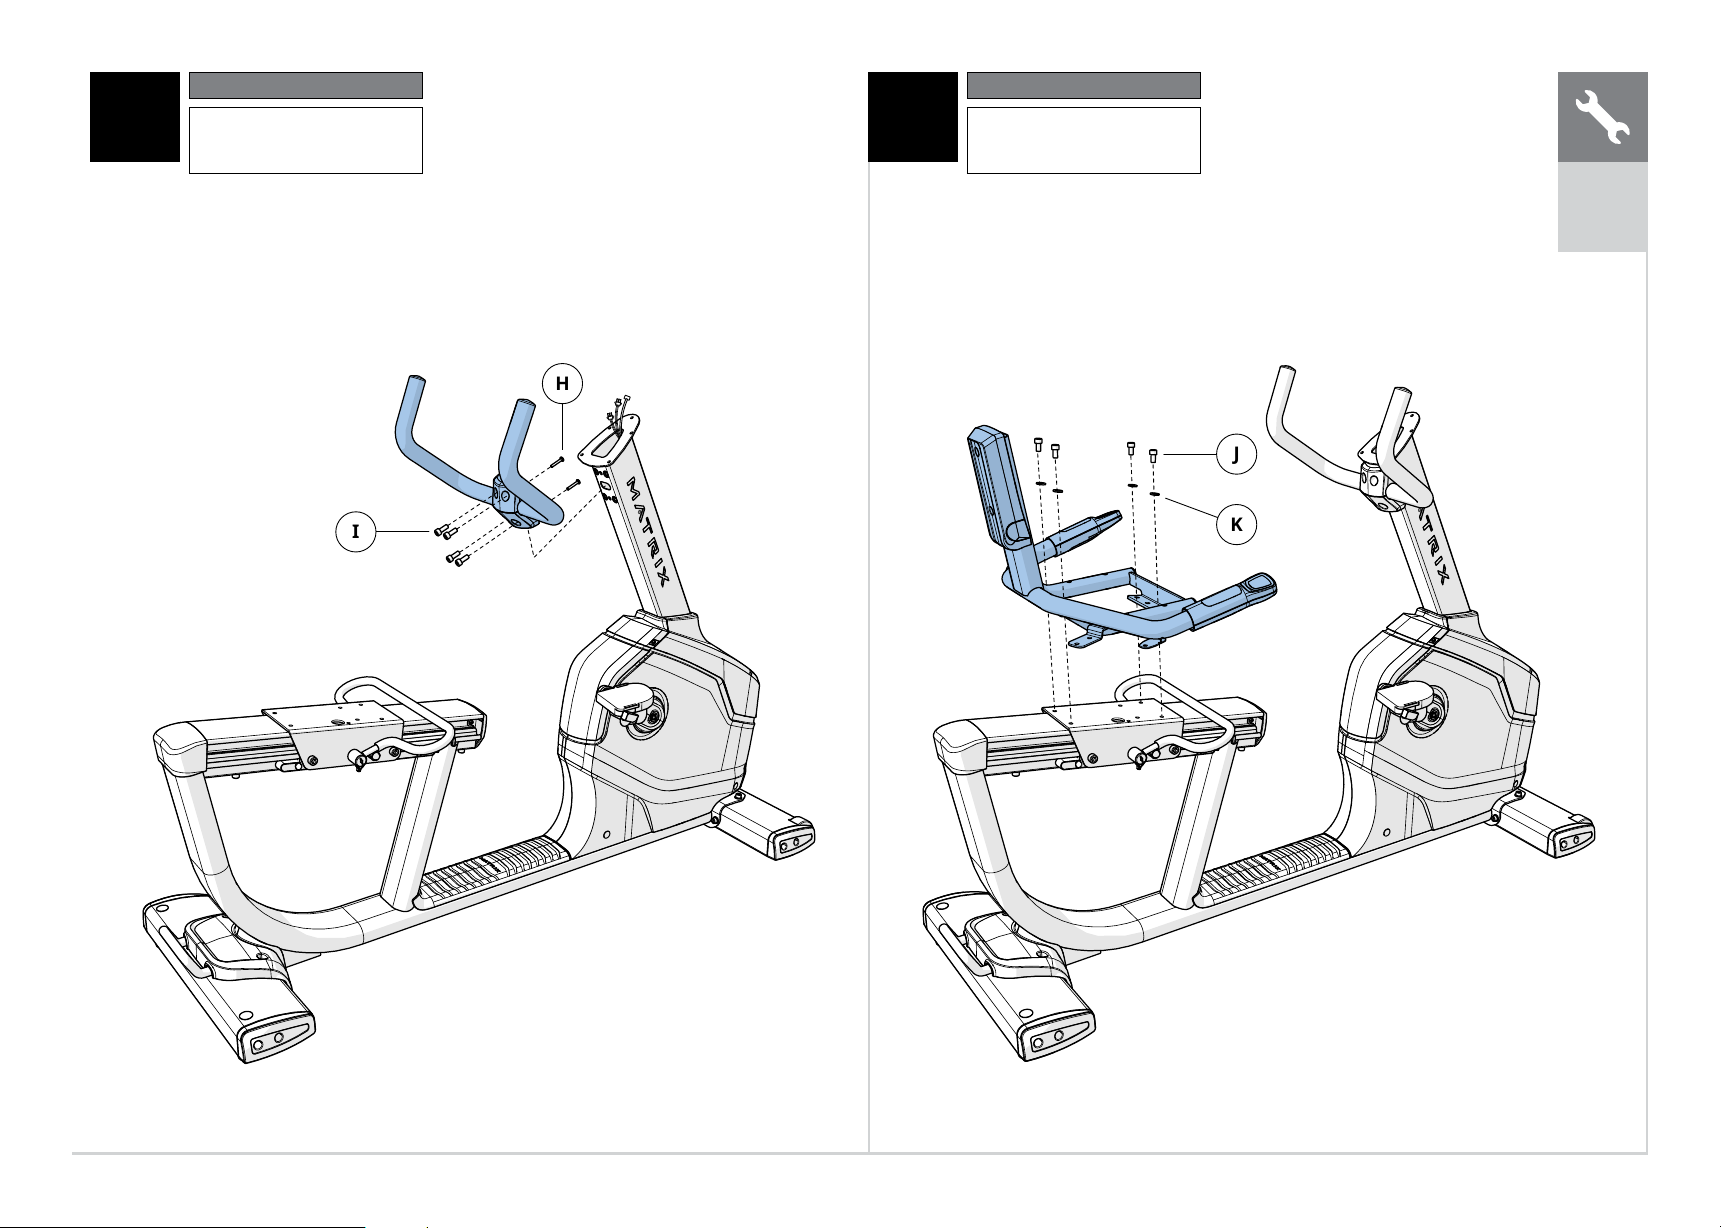
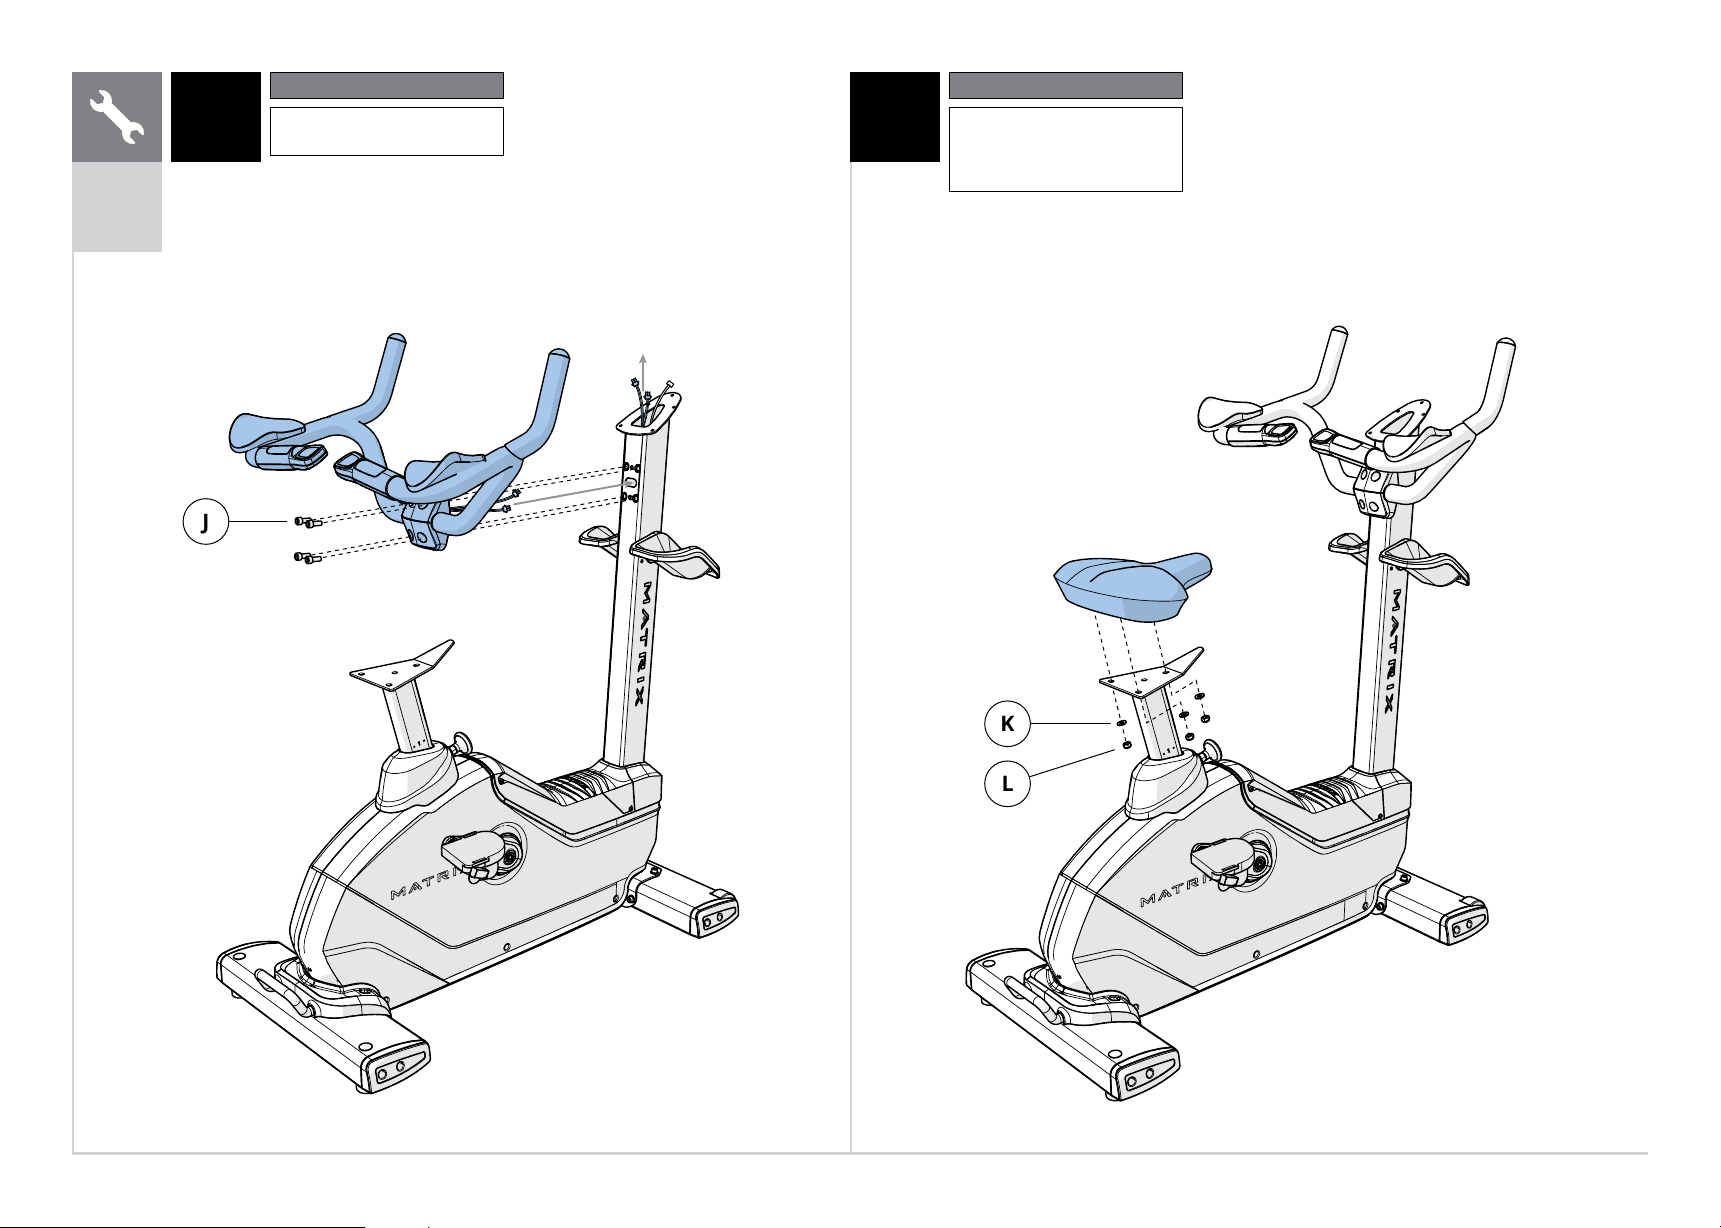
R1x
45
H
I
J
K
Red Hardware Bag
DescriptionQty
H
I
Screw
Bolt
2
4
White Hardware Bag
DescriptionQty
J
K
Bolt
Spring Washer
4
4
ENGLISH
12
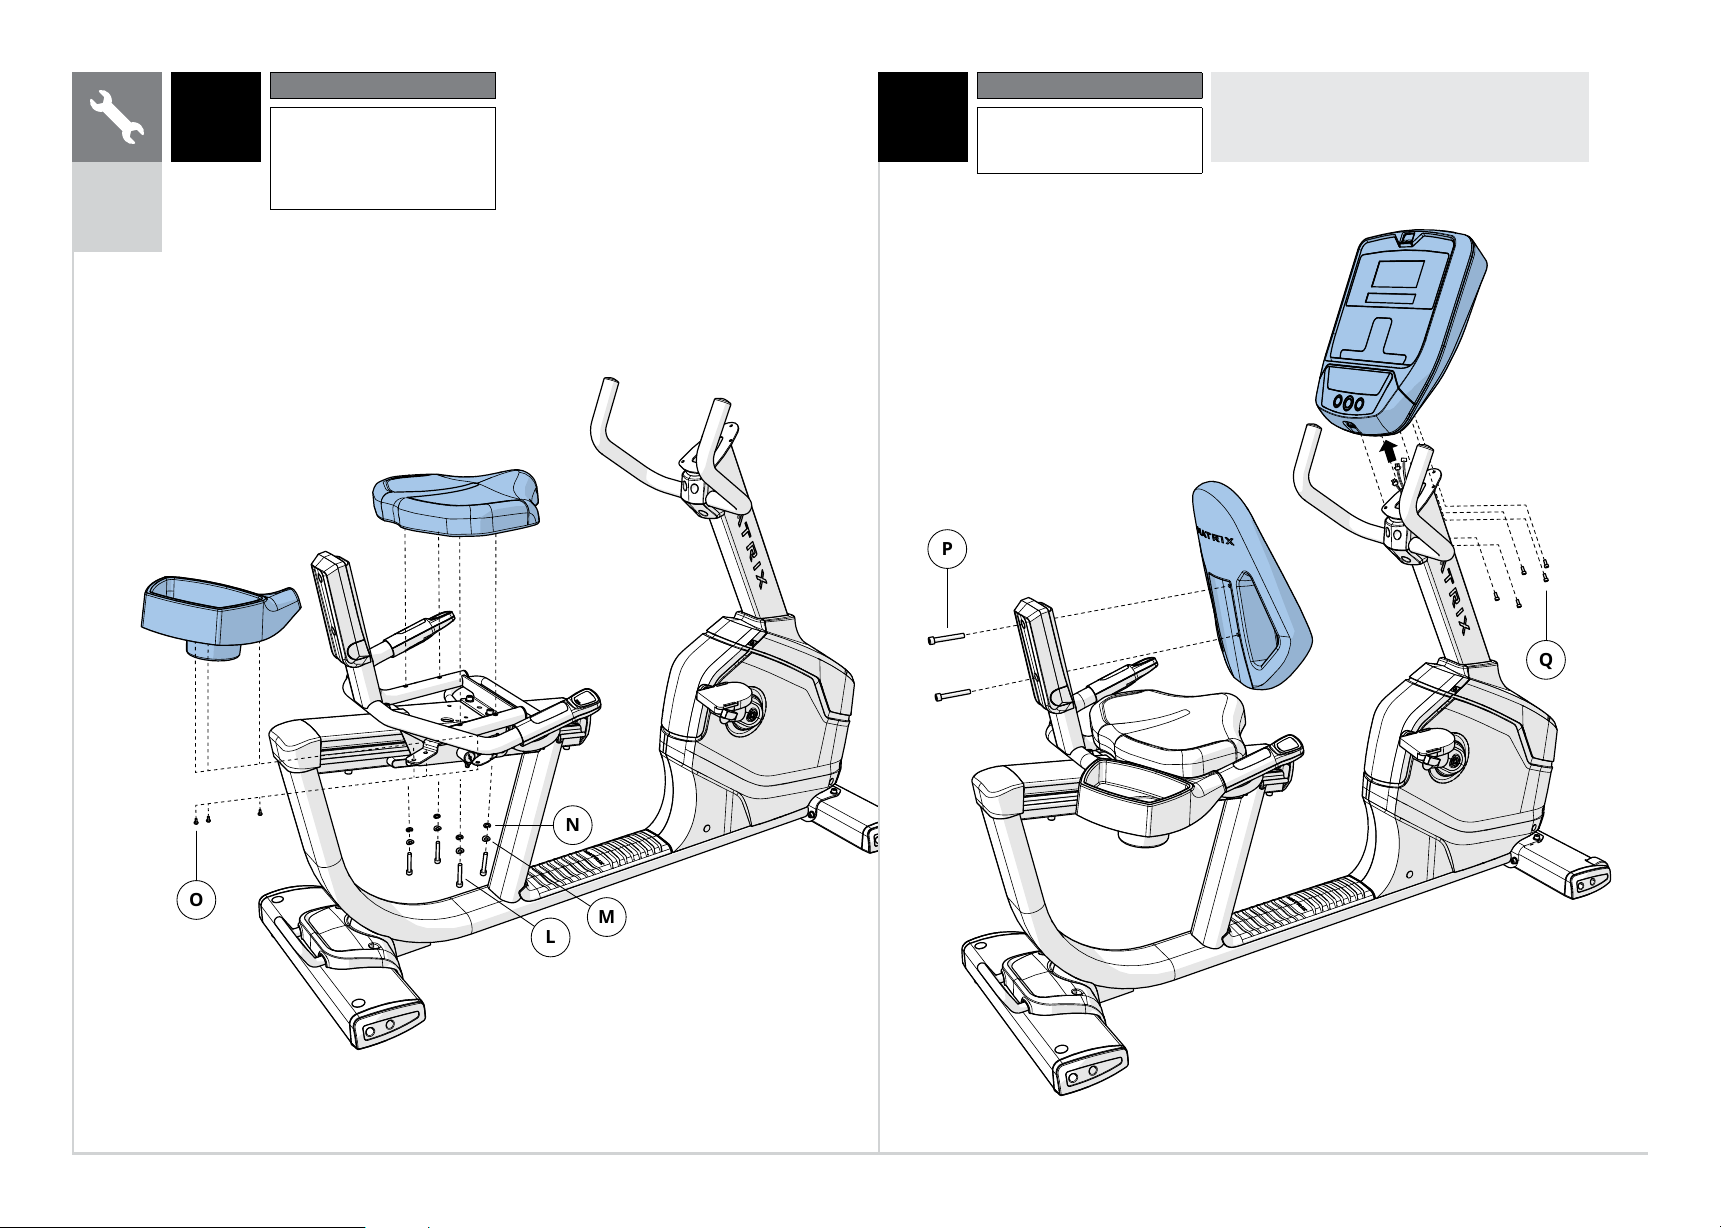
Q
P
67
O
N
M
L
R1X ASSEMBLY COMPLETE!
Blue Hardware Bag
DescriptionQty
L
M
N
O
Bolt
Arc Washer
Spring Washer
Screw
4
4
4
3
Purple Hardware Bag
DescriptionQty
P
Q
Bolt
Bolt (pre-installed)
2
5
R1x
ENGLISH
13
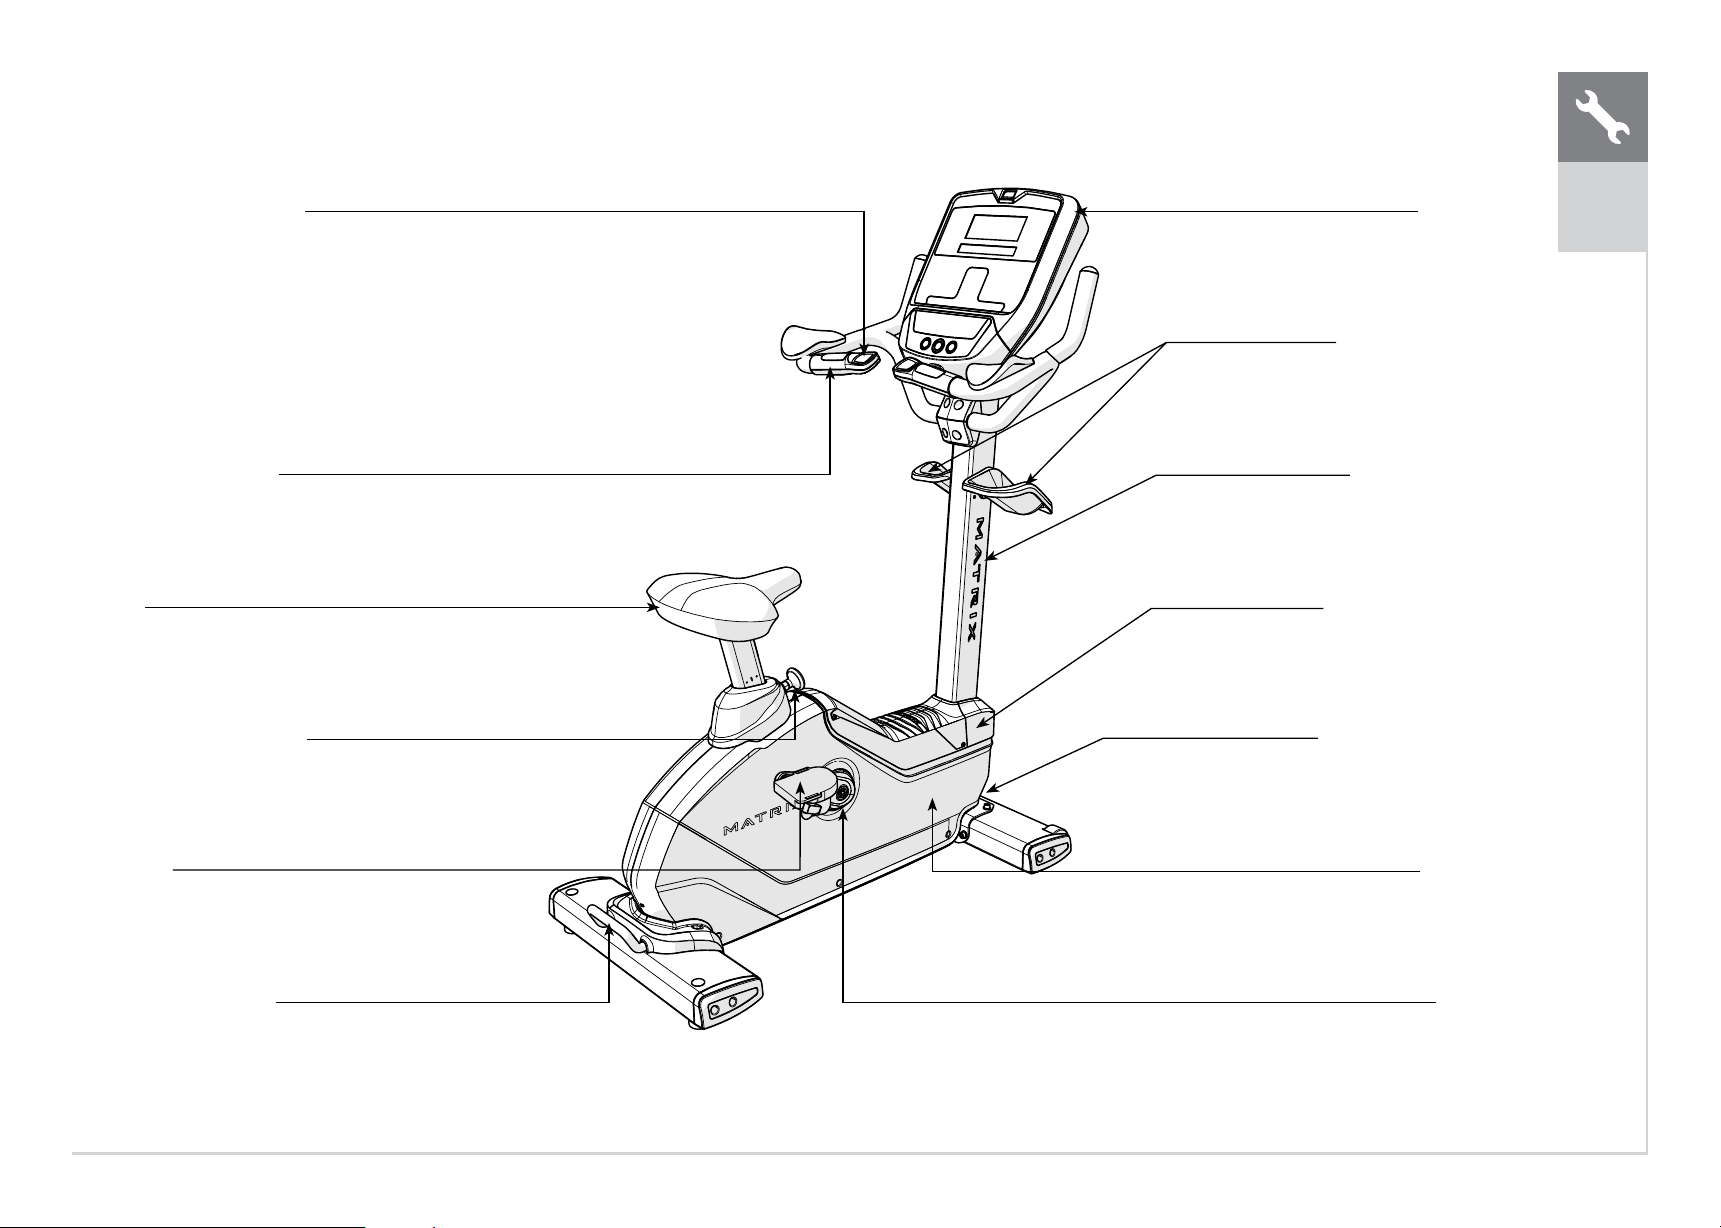
U1x
RESISTANCE TOGGLES
PULSE GRIP HANDLEBARS
SEAT
SEAT ADJUSTMENT KNOB
PEDALS
TRANSPORT HANDLE
CONSOLE
WATER BOTTLE HOLDERS
CONSOLE MAST
TOP CAP
POWER CORD SOCKET
SHROUD
CRANK
ENGLISH
14
TOOLS REQUIRED:
F4 mm Allen Wrench
F6 mm Allen Wrench
FFlat Wrench (13/15 mm)
FPhillips Screwdriver
PARTS INCLUDED:
F1 Main Frame
F1 Rear Stabilizer Tube
F1 Front Stabilizer Tube
F1 Rear Frame Handle
F1 Rear Frame Cover
F1 Console Mast
F1 Water Bottle Holder
F1 Seat Base
F1 Arm Rest Handlebars
F1 Front Shroud Cover (pre-installed)
F1 Rear Shroud Cover (pre-installed)
F1 Hardware Kit
F1 Power Cord (packaged with console)
Console sold separately
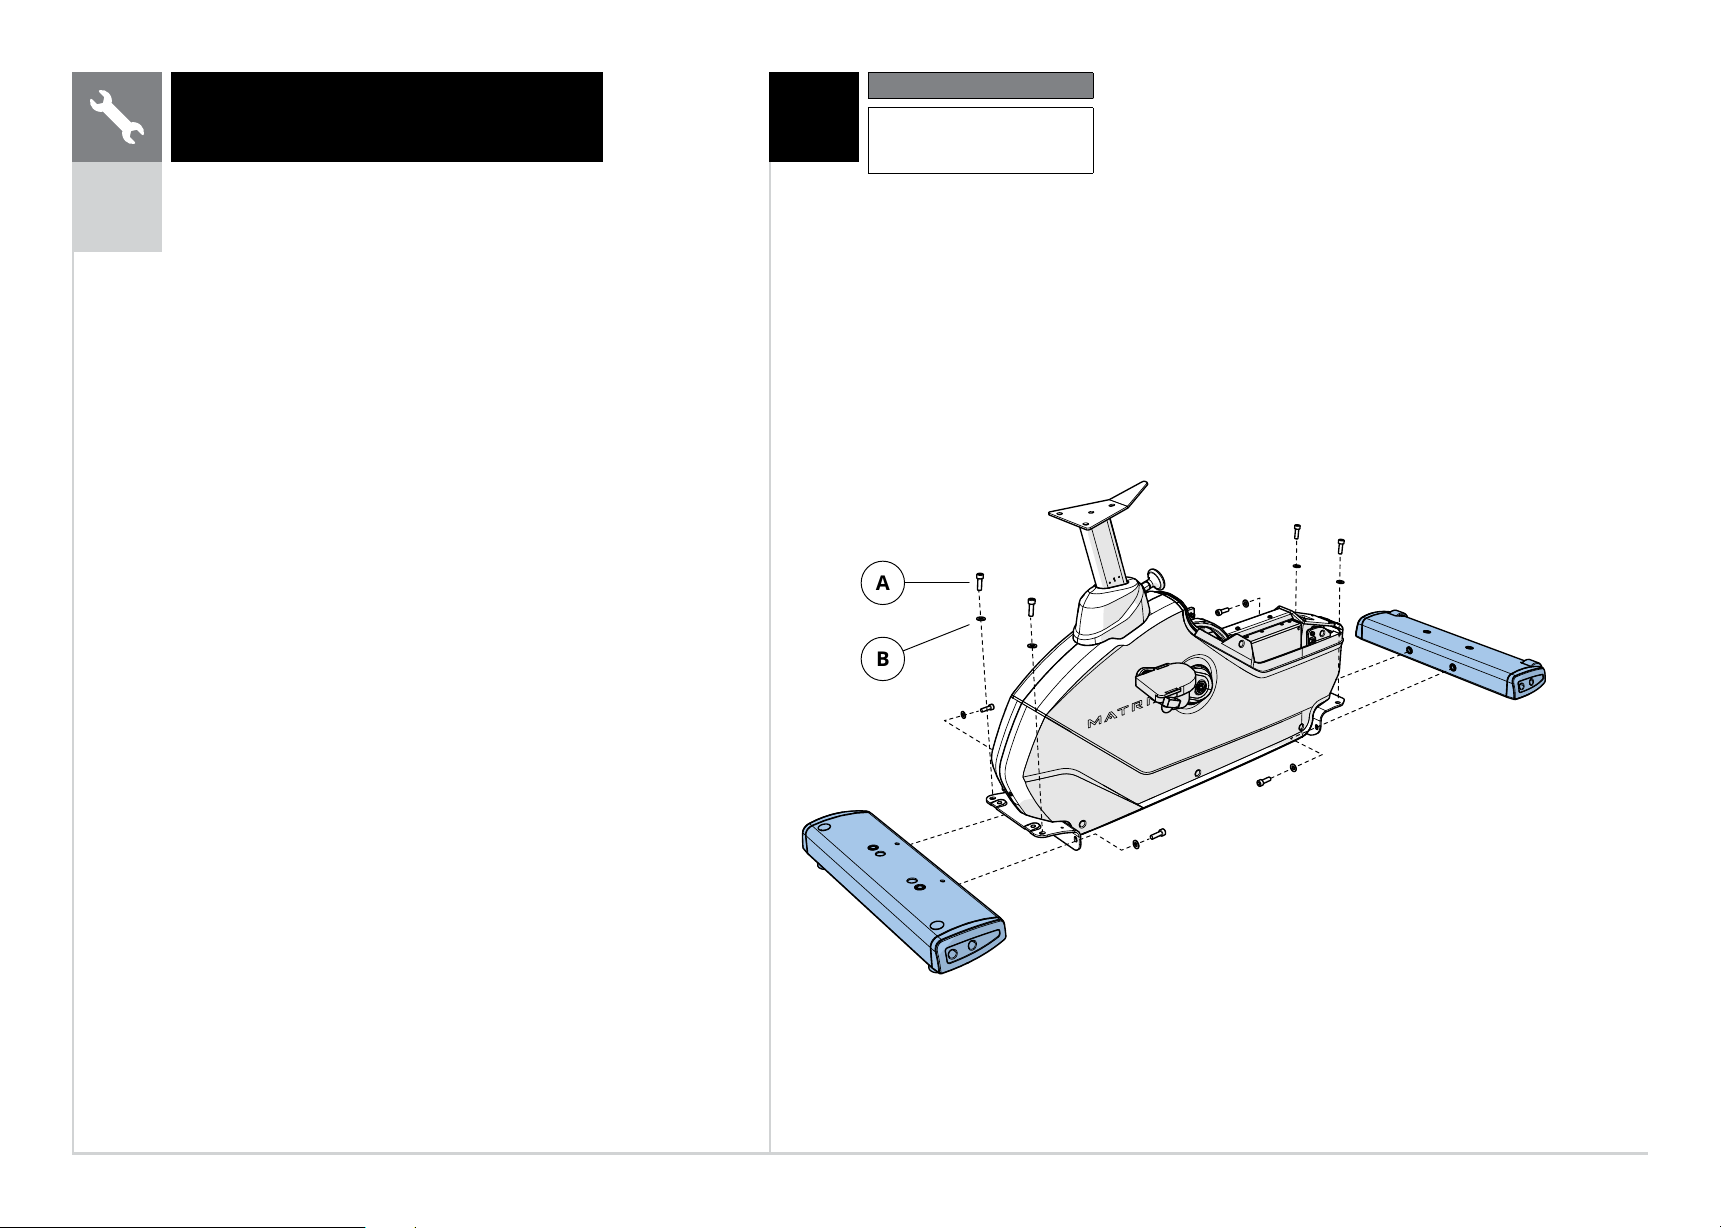
Upright Cycle Assembly
A
B
U1x
1
Red Hardware Bag
DescriptionQty
A
B
Bolt
Flat Washer
8
8
ENGLISH
15
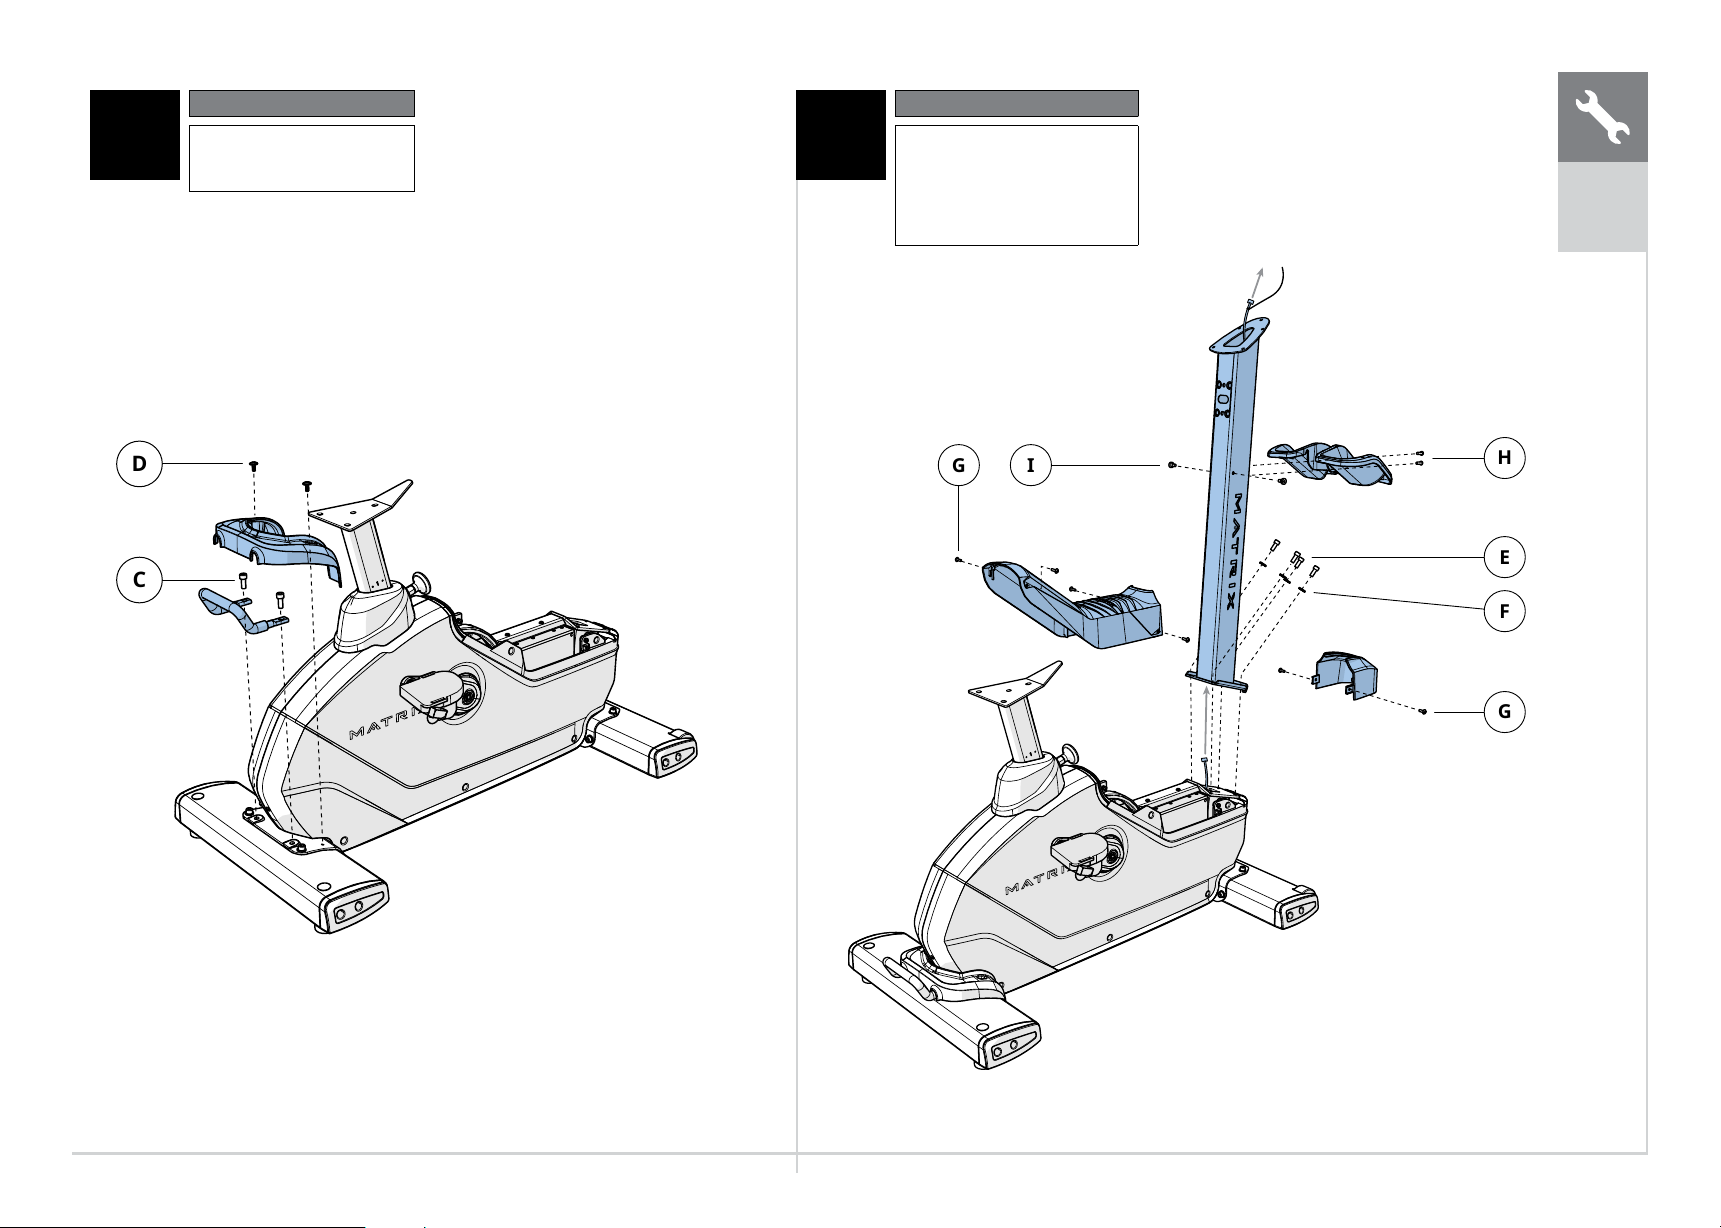
U1x
2
C
D
3
E
F
H
G
G
I
Pink Hardware Bag
DescriptionQty
C
D
Bolt
Screw
2
2
Green Hardware Bag
DescriptionQty
E
F
G
H
I
Bolt
Tooth Washer
Screw (pre-installed)
Screw
Bolt
4
4
6
2
2
ENGLISH
16
4
J
K
L
U1x
Yellow Hardware Bag
DescriptionQty
JBolt45
Pre-installed Hardware
DescriptionQty
K
L
Flat Washer
Nylon Nut
3
3
ENGLISH
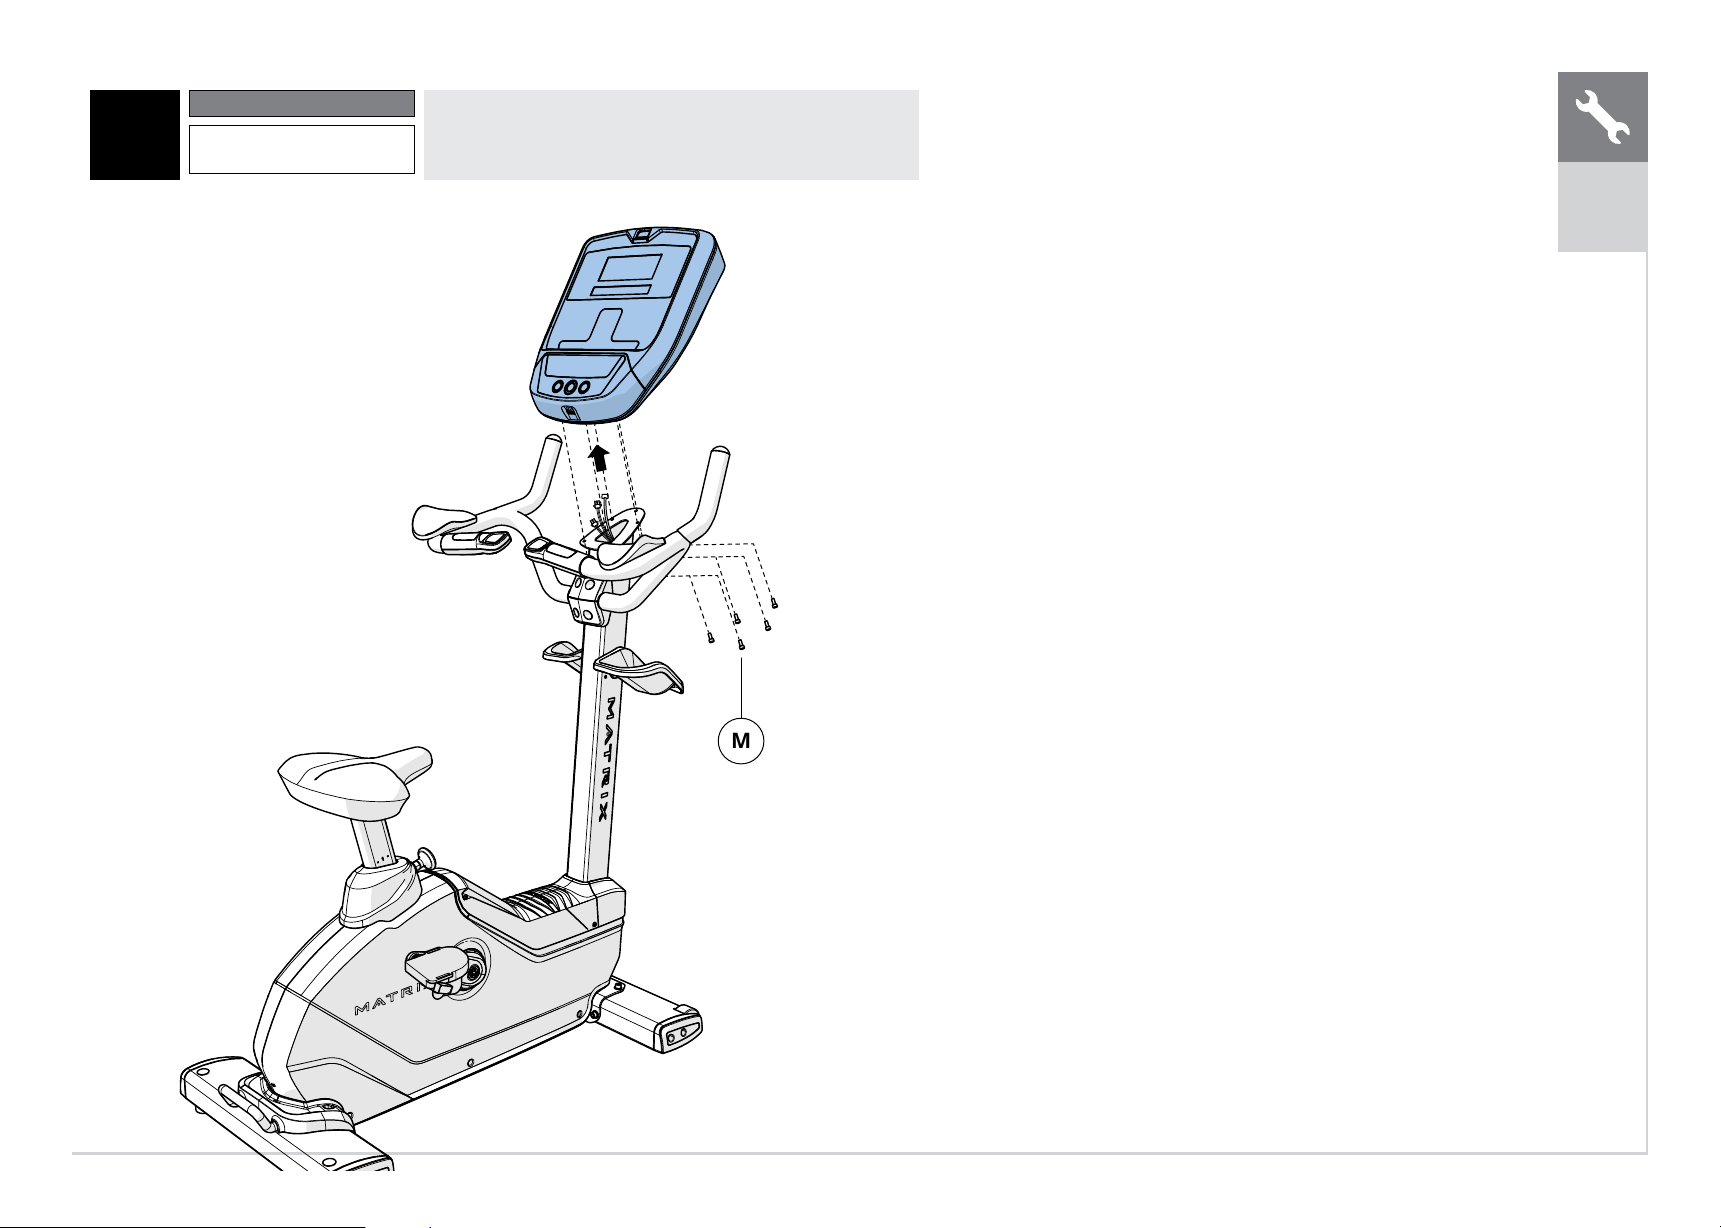
17
U1x
M
6U1X ASSEMBLY COMPLETE!
Pre-installed Hardware
DescriptionQty
MBolt4
ENGLISH
18
BEFORE YOU BEGIN
LOCATION OF THE UNIT
Place the equipment on a level and stable surface away from direct sunlight.
The intense UV light can cause discoloration on the plastics. Locate your
equipment in an area with cool temperatures and low humidity. Please
leave a clear zone on both sides of the equipment that is at least 24”
(600 mm). This zone must be clear of any obstruction and provide the
user a clear exit path from the machine. Do not place the equipment in
any area that will block any vent or air openings. The equipment should
not be located in a garage, covered patio, near water or outdoors.
LEVELING THE EQUIPMENT
The equipment should be level for optimum use. Once you have
placed the equipment where you intend to use it, raise or lower one
or both of the adjustable levelers located on the bottom of the frame.
Use 6mm hex key through the access hole (shown below).
A carpenter’s level is recommended.
NOTE: There are only two levelers on the equipment.
WARNING!
Our equipment is heavy, use care and additional help if necessary when
moving. Failure to follow these instructions could result in injury.
POWER
If the equipment is powered by a power supply, the power must be plugged
into the power jack, which is located in the front of the equipment near the
stabilizer tube. Some equipment has a power switch, located next to the power
jack. Make sure it is in the ON position. Unplug cord when not in use.
WARNING!
Never operate equipment if it has a damaged cord or plug, if it is not working properly, if it has been
damaged, or immersed in water. Contact Customer Tech Support for examination and repair.
RECUMBENT SEAT HEIGHT
To adjust the seat height on the Recumbent Cycle, locate the orange lever under the seat
before you mount the Cycle. Place your right hand on the orange adjustment handle
under the seat. Place feet on the ground while seated and slide forward if needed. Place
feet on pedals, gently lift lever under the seat. Using legs, slowly push and slide the seat
up or down to desired position. Release lever and allow to lock into place.
UPRIGHT SEAT HEIGHT
To raise or lower the seat height on the upright cycle, locate the orange pull pin at the
base of the seat post. Pull the pin out and set the seat to the desired height. Release the
pin to lock.
The seat height adjusts from level 1 to 23. Do not raise the seat past level 23.
FREE AREA
0.6 m
(2 ft)
0.6 m
(2 ft)
0.6 m
(2 ft)
ENGLISH
19
PROPER USAGE
To determine proper seat position, sit on the seat
and position the ball of your foot on the center of the
pedal. Your knee should bend slightly at the furthest
pedal position. You should be able to pedal without
locking your knees or shifting your weight from side
to side. Adjust pedal straps to deisired tightness.
USING THE HEART RATE FUNCTION
The heart rate function on this product is not a medical device.
While heart rate grips can provide a relative estimation of
your actual heart rate, they should not be relied on when
accurate readings are necessary. Some people, including
those in a cardiac rehab program, may benefit from using an
alternate heart rate monitoring system like a chest or wrist
strap. Various factors, including movement of the user, may
affect the accuracy of your heart rate reading. The heart rate
reading is intended only as an exercise aid in determining
heart rate trends in general. Please consult your physician.
PULSE GRIPS
Place the palm of your hands directly on the grip pulse handlebars.
Both hands must grip the bars for your heart rate to register. It
takes 5 consecutive heart beats (15-20 seconds) for your heart rate
to register. When gripping the pulse handlebars, do not grip tightly.
Holding the grips tightly may elevate your blood pressure. Keep
a loose, cupping hold. You may experience an erratic readout if
consistently holding the grip pulse handlebars. Make sure to clean
the pulse sensors to ensure proper contact can be maintained.
WIRELESS HEART RATE RECEIVER
When used in conjunction with a wireless chest transmitter, your heart rate
can be transmitted wirelessly to the unit and displayed on the console.
Prior to wearing the wireless chest transmitter on your chest, moisten the two rubber
electrodes with water. Center the chest strap just below the breast or pectoral muscles,
directly over your sternum, with the logo facing out. NOTE: The chest strap must be tight and
properly placed to receive an accurate and consistent readout. If the chest strap is too loose,
or positioned improperly, you may receive an erratic or inconsistent heart rate readout.
WARNING!
Heart rate monitoring systems may be inaccurate. Over exercising may result in
serious injury or death. If you feel faint, stop exercising immediately.
Backside of chest strap
Apply moisture here
ENGLISH
20
MAINTENANCE SCHEDULE
ACTIONFREQUENCY
Unplug the unit. Clean entire machine using water and a mild soap or
other Matrix approved solution (cleaning agents should be alcohol and
ammonia free).
DAILY
Inspect the power cord. If the power cord is damaged, contact Customer
Tech Support.DAILY
Make sure the power cord is not underneath the unit or in any other area
where it can become pinched or cut during storage or use.DAILY
Clean underneath the cycle, following these steps:
• Turn off the cycle.
• Move the cycle to a remote location.
• Wipe or vacuum any dust particles or other objects that may have
accumulated underneath the cycle.
• Return the cycle to its previous position.
WEEKLY
Inspect all assembly bolts and pedals on the machine for proper
tightness.MONTHLY
Clean any debris off of the seat guide rail.MONTHLY
For 7xe consoles, enter service mode and select ‘test’. Select ‘touch
calibration’ and then select ‘start’. Follow the on-screen prompts and touch
the screen where indicated.
QUARTERLY
MAINTENANCE
1. Any and all part removal or replacement must be
performed by a qualied service technician.
2. DO NOT use any equipment that is damaged and or has worn or broken parts.
Use only replacement parts supplied by your country’s local MATRIX dealer.
3. MAINTAIN LABELS AND NAMEPLATES: Do not remove labels for
any reason. They contain important information. If unreadable or
missing, contact your MATRIX dealer for a replacement.
4. MAINTAIN ALL EQUIPMENT: Preventative maintenance is the key to
smooth operating equipment as well as keeping your liability to a
minimum. Equipment needs to be inspected at regular intervals.
5. Ensure that any person(s) making adjustments or performing maintenance
or repair of any kind is qualied to do so. MATRIX dealers will provide
service and maintenance training at our corporate facility upon request.
WARNING
To remove power from the exercise cycle, the power cord
must be disconnected from the wall outlet.
PRODUCT SPECIFICATIONS
R1x / R1xeU1x / U1xe
Max User Weight182 kg / 400 lbs
Product Weight82 kg / 181 lbs65 kg / 143 lbs
Shipping Weight100 kg / 220 lbs75 kg / 165 lbs
Overall Dimensions
(L x W x H)*
154 x 68 x 116 cm /
60.8” x 26.7” x 45.6”
107 x 47 x 77 cm /
42” x 18.3” x 30.1”
* Ensure a minimum clearance width of 0.6 meters (24”) for access to and passage around MATRIX equipment.
Please note, 0.91 meters (36”) is the ADA recommended clearance width for individuals in wheelchairs.
ENGLISH
21
WICHTIGE VORSICHTSMASSNAHMEN
BEWAHREN SIE DIESE ANLEITUNG SORGFÄLTIG AUF
• Bei der Nutzung eines Ergometers müssen stets grundlegende Vorsichtsmaßnahmen ergriffen werden, darunter Folgendes: Lesen Sie vor der Nutzung dieses Geräts alle Anweisungen. Es liegt in der
Verantwortung des Eigentümers, sicherzustellen, dass alle Nutzer dieses Geräts über alle Warnungen und Vorsichtsmaßnahmen informiert werden.
• Dieses Gerät ist für den gewerblichen Gebrauch vorgesehen. Um Ihre Sicherheit zu gewährleisten und Schäden am Gerät zu vermeiden, lesen Sie sich vor dem Gebrauch alle Anweisungen durch.
GEFAHRENHINWEIS!
ZUR VERMEIDUNG VON STROMSCHLÄGEN:
• Ziehen Sie unmittelbar nach der Nutzung sowie vor der Reinigung, Wartung oder der Demontage oder Montage von Teilen den Stecker des Geräts aus der Steckdose.
• Beim Auf- und Absteigen vom Gerät ist besondere Vorsicht
geboten. Verschieben Sie vor dem Auf- und Absteigen das Pedal
auf der Auf- bzw. Abstiegsseite in die niedrigste Position, und
bringen Sie das Gerät vollständig zum Halten.
• Um das Gleichgewicht zu halten, wird empfohlen, beim Üben,
Aufsteigen oder Absteigen die Handgriffe festzuhalten.
• Halten Sie die Oberseite der Fußstütze sauber und trocken.
• Halten Sie beim Trainieren stets ein für Sie angenehmes Tempo.
Beschleunigen Sie auf diesem Gerät nicht auf über 80 UPM.
• Falsches oder übermäßiges Training kann Verletzungen zur Folge
haben. Sollten Sie Schmerzen haben, beispielsweise Schmerzen in
der Brust, Übelkeit, Schwindel oder Atemnot, beenden Sie sofort
das Training und stellen Sie sich vor dem Fortsetzen des Trainings
bei einem Arzt vor.
• Diese Einheit ist nicht mit einem freien Rad ausgestattet. Die
Pedalgeschwindigkeit sollte kontrolliert reduziert werden.
• Bewegen Sie die Pedalarme nicht von Hand.
• Tragen Sie keine weite Kleidung, die sich in Bauteilen der Einheit
verfangen kann.
• Tragen Sie bei der Verwendung dieses Geräts stets
Trainingsschuhe.
• Machen Sie auf dem Gerät keine Sprünge.
• Während des Betriebs darf sich zu keinem Zeitpunkt mehr als eine
Person auf dem Gerät benden.
• Dieses Gerät darf nicht von Personen verwendet werden,
deren Körpergewicht das im Abschnitt SPEZIFIKATIONEN der
Die Nichtbeachtung führt zum Erlöschen der Garantie.
• Trennen Sie die Stromversorgung vor Wartungsarbeiten oder vor
dem Bewegen des Geräts vollständig. Reinigen Sie die Oberächen
mit Seife und einem nur leicht feuchten Lappen; verwenden Sie
keine Lösemittel. (Siehe WARTUNG)
• Die Einheit darf bei angeschlossener Netzversorgung nicht
unbeaufsichtigt gelassen werden. Ziehen Sie bei einer
Nichtverwendung sowie vor einem Ein- oder Ausbau von Bauteilen
den Netzstecker.
• Betreiben Sie das Gerät nicht unter einer Decke oder einem Kissen.
Hierbei könnte es zu einer Überhitzung kommen, wodurch Brand,
Stromschlag oder Körperverletzungen verursacht werden können.
• Schließen Sie dieses Trainingsgerät ausschließlich an eine
ordnungsgemäß geerdete Netzsteckdose an.
• Zu KEINEM Zeitpunkt dürfen sich Tiere oder Kinder unter 14 Jahren
näher als 3 m zur Einheit aufhalten.
• Die Einheit darf zu KEINEM Zeitpunkt von Kindern unter
14 Jahren verwendet werden.
• Kinder über 14 Jahren oder körperbehinderte Personen dürfen die
Einheit nicht ohne Aufsicht eines Erwachsenen verwenden.
• Verwenden Sie die Einheit ausschließlich für den vorgesehenen
Zweck, wie in der technischen Anleitung und in der
Bedienungsanleitung beschrieben.
• Verwenden Sie ausschließlich Zubehörteile, die vom Hersteller
empfohlen sind. Zubehörteile können Verletzungen verursachen.
• Die Einheit darf nicht verwendet werden, wenn das Kabel oder der
Stecker beschädigt sind, es nicht ordnungsgemäß funktioniert oder
wenn es fallen gelassen oder beschädigt wurde oder in Wasser
steht. Wenden Sie sich für Prüfungen und Reparaturen an den
technischen Kundendienst (Customer Tech Support).
VORSICHT!
WENDEN SIE SICH VOR DER VERWENDUNG DES GERÄTS AN EINEN ARZT. LESEN SIE SICH VOR DER VERWENDUNG DIE BEDIENUNGSANLEITUNG DURCH.
• Sie müssen dringend beachten, dass dieses Gerät ausschließlich für den Gebrauch in klimatisierten Innenräumen vorgesehen ist. Wenn dieses Gerät niedrigeren Temperaturen oder hoher Feuchtigkeit
ausgesetzt wurde, wird dringend empfohlen, es auf Zimmertemperatur aufwärmen zu lassen, bevor es in Betrieb genommen wird.
WARNUNG!
BEACHTEN SIE DIE FOLGENDEN ANWEISUNGEN ZUR REDUZIERUNG DER GEFAHR VON VERBRENNUNGEN, BRÄNDEN, STROMSCHLÄGEN ODER ANDEREN
KÖRPERVERLETZUNGEN:
• Halten Sie das Netzkabel von heißen Oberächen fern. Tragen Sie
das Gerät niemals am Netzkabel und verwenden Sie das Netzkabel
nicht als Tragegriff.
• Nehmen Sie die Einheit niemals bei blockierter Lüftungsöffnung
in Betrieb. Halten Sie die Luftöffnung sauber und frei von Fusseln,
Haaren usw.
• Lassen Sie zur Vermeidung von Stromschlägen niemals Objekte
in eine der Öffnungen fallen und führen Sie keine Objekte in diese
ein.
• Betreiben Sie das Gerät nicht, wenn in der Nähe sprühbare
Produkte (Sprays) verwendet werden oder mit Sauerstoff
gearbeitet wird.
• Schalten Sie zum Trennen sämtliche Steuerelemente in die Aus-
Position, und ziehen Sie dann den Netzstecker.
• Verwenden Sie die Einheit nicht in unklimatisierten Räumen
wie beispielsweise Garagen, Vorhallen, Schwimmbädern,
Saunen, Badezimmern, Carports oder in Außenbereichen.
Die Nichtbeachtung kann zum Erlöschen der Garantie führen.
• Nehmen Sie die Konsolenabdeckungen nicht ab, es sei denn,
Sie wurden vom technischen Kundendienst dazu angewiesen.
Wartungsarbeiten dürfen ausschließlich von einem autorisierten
Wartungstechniker durchgeführt werden.
• Herzfrequenz-Überwachungssysteme sind ggf. ungenau.
• Eine Überlastung während des Trainings kann zu schweren
gesundheitlichen Problemen oder zum Tod führen!
• Beenden Sie das Training sofort, wenn Schwindelgefühle auftreten.
DEUTSCH
22
SEPARATER STROMKREIS UND ELEKTRISCHE DATEN
„Separater Stromkreis“ bedeutet, dass keine anderen Geräte über diesen Stromkreis und die verwendeten
Steckdosen laufen. Am einfachsten lässt sich das feststellen, indem Sie am Sicherungskasten des Hauptstromkreises
eine Sicherung nach der anderen ausschalten. Ist die richtige Sicherung ausgeschaltet, sollten alle anderen
Geräte außer der entsprechenden Einheit weiterlaufen. Bei diesem Test sollten keine Lampen, Automaten, Lüfter,
Soundsysteme oder andere Geräte im Studio ausgehen.
Nicht durchgeschleifter (isolierter) Neutralleiter/Schutzleiter bedeutet, dass jeder Stromkreis über einen eigenen
Neutralleiter/Schutzleiter verfügen muss, der beim Stromkreis beginnt und an einem zugelassenen Erdungspunkt
endet. Sie dürfen den Neutralleiter/Schutzleiter nicht von einem Stromkreis zum nächsten „durchschleifen“.
ELEKTRISCHE ANFORDERUNGEN
Zur Gewährleistung Ihrer Sicherheit und der Leistungsfähigkeit der Einheit darf die Erdung dieses Stromkreises nicht
durchgeschleift (isoliert) sein. Weitere Informationen nden Sie im NEC-Artikel 210-21 und 210-23. Änderungen am
mitgelieferten Standardnetzkabel führen zum Erlöschen der Garantie.
Die 1x-Fahrräder verfügen über einen Eigenantrieb und benötigen kein externes Netzteil. Ohne externes Netzteil
kann sich die Startzeit der Konsole u. U. verzögern. Integrierte Fernseher und anderes Konsolenzubehör verlängern
die erforderliche Startzeit zusätzlich. Eine externe Stromversorgung gewährleistet, dass die Konsole jederzeit mit
Strom versorgt wird; sie wird bei Verwendung von integriertem Zubehör empfohlen.
Bei Einheiten mit integriertem Fernseher (1xe) sind entsprechende Kabel im Lieferumfang enthalten. Ein RG6-Kabel
mit Koaxialstecker an jedem Ende muss an die Cardioeinheit und Videoquelle angeschlossen werden. Für den
zusätzlichen Digitalfernseher ist keine weitere Stromversorgung erforderlich. Bei Einheiten mit integriertem PCTV
ist die Stromversorgung für das TV separat.
HINWEIS: Alle Einheiten mit Virtual Active
™
müssen strombetrieben sein.
110 V-EINHEITEN
Für alle Matrix 1x-Fahrräder mit 110 V ist die Nutzung von 100-125 V, 60 Hz und einem
separaten Stromkreis von 15 A mit durchgeschleiftem (isoliertem) Neutralleiter/
Schutzleiter erforderlich. Bei der Steckdose sollte es sich um eine NEMA 5-15R handeln,
die die gleiche Konguration aufweist wie der Stecker. Adapter dürfen mit diesem
Produkt nicht verwendet werden. Diese Fahrräder können mit bis zu 4 Einheiten pro
separatem 15 A-Stromkreis verkettet werden. Matrix 4-er Kabel sind separat erhältlich.
220 V-EINHEITEN
Für alle Matrix 1x-Fahrräder mit 220 V ist die Nutzung von 216-250 V, 50 Hz und einem
separaten Stromkreis von 15 A mit durchgeschleiftem (isoliertem) Neutralleiter/
Schutzleiter erforderlich. Bei der Steckdose sollte es sich um eine SchuKo-Steckdose
(CEE 7/3,Typ F) handeln, die die gleiche Konguration aufweist wie der Stecker. Adapter
dürfen mit diesem Produkt nicht verwendet werden. Diese Fahrräder können mit bis
zu 4 Einheiten pro separatem 15 A-Stromkreis verkettet werden. Matrix 4-er Kabel sind
separat erhältlich.
ANWEISUNGEN ZUR ERDUNG
Diese Einheit muss geerdet werden. Wenn an der Einheit eine Störung oder ein
Defekt auftritt, bietet eine Erdleitung den geringsten Widerstand für elektrischen
Strom, damit die Stromschlaggefahr reduziert wird. Diese Einheit ist mit einem
Kabel mit Geräteerdungsleiter und Erdungsstecker ausgestattet. Der Stecker
muss in eine entsprechende Buchse eingesteckt werden, die gemäß den örtlichen
Bestimmungen und Gesetzen ordnungsgemäß installiert und geerdet ist. Befolgt
der Nutzer die Anweisungen zur Erdung nicht, kann das zum Erlöschen der
begrenzten Garantie von Matrix führen.
ZUSÄTZLICHE ELEKTRISCHE DATEN
Zusätzlich zum separaten Stromkreis muss am Sicherungskasten die richtige
Kabelstärke verwendet werden, damit von jeder Steckdose die maximale Anzahl
an Einheiten ausgeht. Beträgt die Entfernung vom Sicherungskasten zu einer
Steckdose maximal 30,5 m, dann sollte die Kabelstärke 12 verwendet werden.
Bei Entfernungen über 30,5 m vom Sicherungskasten zu einer Steckdose sollte
die Kabelstärke 10 verwendet werden.
ENERGIESPAR-/STANDBYMODUS
Alle Einheiten können in einen Energiespar-/Standbymodus versetzt werden, wenn
sie einen bestimmten Zeitraum nicht in Gebrauch waren. Wurde eine Einheit in den
Standbymodus versetzt, dauert es u. U. etwas länger, um sie wieder vollständig
zu aktivieren. Der Energiesparmodus kann über den ‚Manager-Modus‘ oder den
‚Technikmodus‘ aktiviert bzw. deaktiviert werden.
INTEGRIERTER PCTV
Es ist ein separater Stromkreis von 15 A oder 20 A mit durchgeschleiftem
Gebruikershandleiding.com neemt misbruik van zijn services uitermate serieus. U kunt hieronder aangeven waarom deze vraag ongepast is. Wij controleren de vraag en zonodig wordt deze verwijderd.
Product:
Spelregels forum
Om tot zinvolle vragen te komen hanteren wij de volgende spelregels:
lees eerst de handleiding door;
controleer of uw vraag al eerder door iemand anders is gesteld;
probeer uw vraag zo duidelijk mogelijk te stellen;
heeft u een probleem en al geprobeerd om dit op te lossen, vermeld dit erbij aub;
heeft u een oplossing gekregen van een bezoeker dan horen wij dat graag in dit forum;
wilt u een reactie geven op een vraag of antwoord, gebruik dan niet dit formulier maar klik op de knop 'reageer op deze vraag';
uw vraag wordt direct op de website gezet; vermijd daarom persoonlijke gegevens in te vullen;
Belangrijk! Als er een antwoord wordt gegeven op uw vraag, dan is het voor de gever van het antwoord nuttig om te weten als u er wel (of niet) mee geholpen bent! Wij vragen u dus ook te reageren op een antwoord.
Belangrijk! Antwoorden worden ook per e-mail naar abonnees gestuurd. Laat uw emailadres achter op deze site, zodat u op de hoogte blijft. U krijgt dan ook andere vragen en antwoorden te zien.
Abonneren
Abonneer u voor het ontvangen van emails voor uw Matrix R1x bij:
nieuwe vragen en antwoorden
nieuwe handleidingen
U ontvangt een email met instructies om u voor één of beide opties in te schrijven.
Ontvang uw handleiding per email
Vul uw emailadres in en ontvang de handleiding van Matrix R1x in de taal/talen: Nederlands, Duits, Engels, Frans, Italiaans, Portugees, Spaans, Pools, Deens als bijlage per email.
De handleiding is 23,1 mb groot.
U ontvangt de handleiding per email binnen enkele minuten. Als u geen email heeft ontvangen, dan heeft u waarschijnlijk een verkeerd emailadres ingevuld of is uw mailbox te vol. Daarnaast kan het zijn dat uw internetprovider een maximum heeft aan de grootte per email. Omdat hier een handleiding wordt meegestuurd, kan het voorkomen dat de email groter is dan toegestaan bij uw provider.
Uw handleiding is per email verstuurd. Controleer uw email
Als u niet binnen een kwartier uw email met handleiding ontvangen heeft, kan het zijn dat u een verkeerd emailadres heeft ingevuld of dat uw emailprovider een maximum grootte per email heeft ingesteld die kleiner is dan de grootte van de handleiding.
Er is een email naar u verstuurd om uw inschrijving definitief te maken.
Controleer uw email en volg de aanwijzingen op om uw inschrijving definitief te maken
U heeft geen emailadres opgegeven
Als u de handleiding per email wilt ontvangen, vul dan een geldig emailadres in.
Uw vraag is op deze pagina toegevoegd
Wilt u een email ontvangen bij een antwoord en/of nieuwe vragen? Vul dan hier uw emailadres in.