44
ENGLISH
SETTING THE MACRO TIMER
Setting the macro timer enables the macro
program to automatically turn the power for a
device on or off or perform other operations.
In the settings, you can select to execute the
macro timer everyday or only once.
Be sure to set the clock to the correct time before
using the timer. The macro timer can only be set
for one program a day.
This example shows how to use the timer only
once at 20:35 to execute a macro programmed to
M-01.
1.
Hold down the M button for three seconds or
more.
The menu is displayed.
2.
Press the > button to display the third page
TIMER menu.
3.
Press the D2 (ONCE?) direct button.
The M-TMR menu is displayed on the LCD.
• To cancel timer operation, press CANCEL.
4.
Press the D1 (M-01) direct button .
The time which is set previously is displayed.
5.
Press the 2 and 0 numeric button to set the
hour indicator to 20.
6.
Press the 3 and 5 numeric button to set the
minute indicator to 35.
7.
Press the OK cursor button.
This finalizes the time.
8.
To exit, press the M button.
To cancel the macro timer, return to the TIMER
menu and press the D5 (CANCEL) and then press
D1 (M-01).
EXECUTING THE MACRO TIMER
The macro program starts when the time that was
set is reached. The TIMER indicator lights up
whenever the macro timer is activated.
Note:
• To execute the macro timer, place the remote
control facing the infrared sensor of the device to
be operated. If the remote control is not in a
suitable position, it may not operate the device
properly.
CLONE MODE
CREATING COPIES USING CLONE MODE
All of the codes programmed to the RC8500SR
remote control can be copied to another
RC8500SR using a few simple operations.
• The remote control can copy the entire contents
or the contents for specific source buttons.
• When copying the entire contents, all
programmed codes, modified names,
programmed macros, and signal transmission
intervals are copied.
When copying the contents for source buttons, the
programmed codes and modified names are
copied.
Note:
• The clone function can only be used for copying
when using the same model (RC8500SR) for both
the transmitting and receiving remote control.
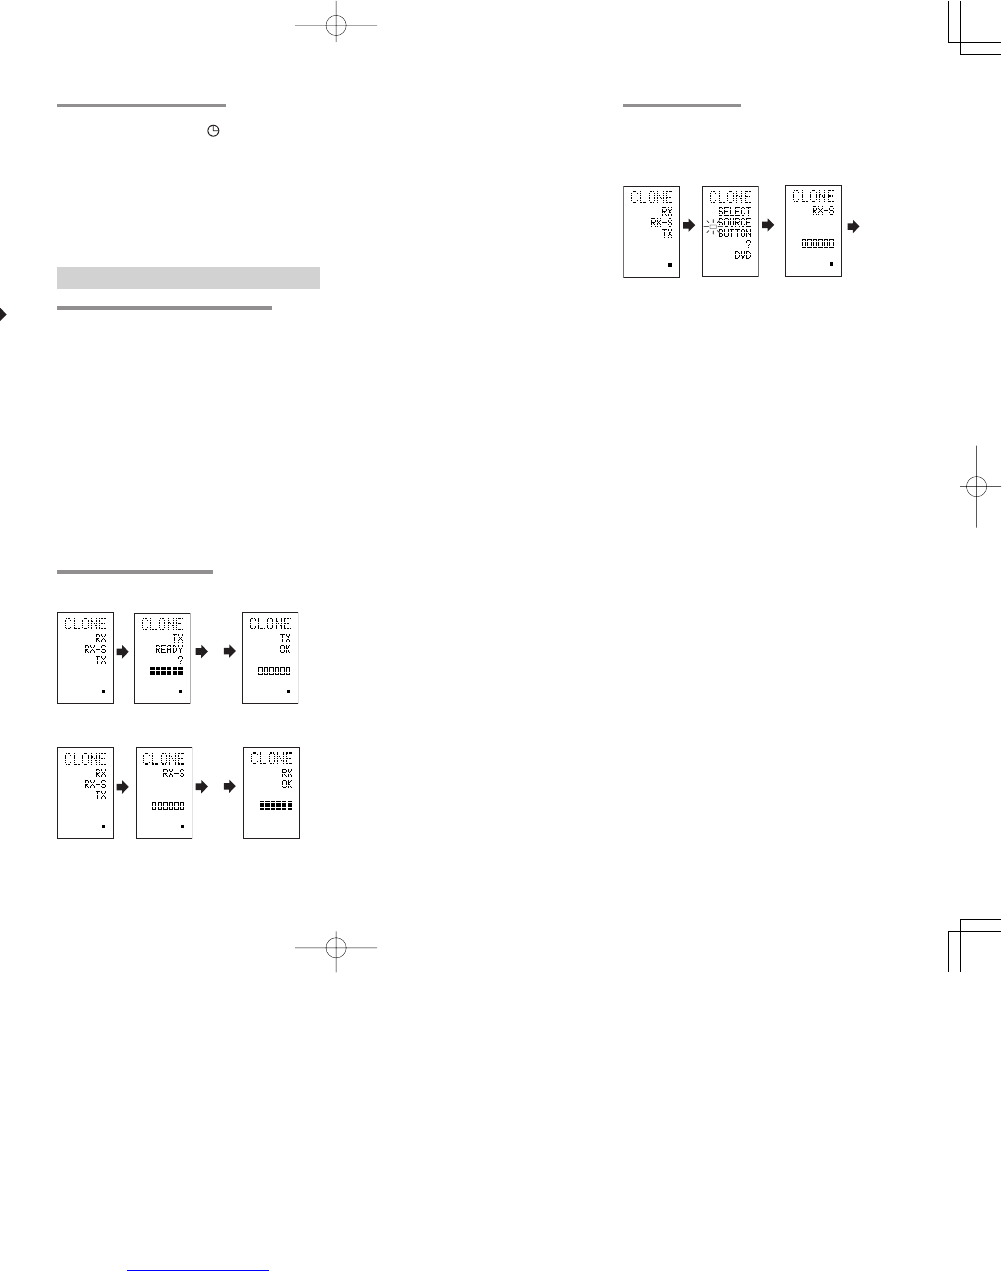
COPYING ENTIRE CONTENTS
<Transmitting remote control>
<Receiving remote control>
1.
Place the receiver sensor of the receiving
remote control (top) so that it is facing the
transmitter of the transmitting remote control
(top) at a distance of about 5 cm (2 inches).
2.
Hold down the M button of the transmitting
remote control for three seconds or more.
The menu is displayed.
3.
Press the > button to display the fourth page
CLONE menu.
4.
Press the D3 (TX) direct button.
The transmitting side is now ready.
5.
Hold down the M button of the receiving
remote control for three seconds or more.
The menu is displayed.
6.
Press the > button to display the fourth page
CLONE menu.
7.
Press the D1 (RX) direct button.
The receiving side is now ready.
8.
Press the OK cursor button on the receiving
remote control.
9.
Press the OK cursor button on the
transmitting remote control.
When copying is started, the bar indicators on both
LCDs start to move from the left to the right.
• When the copying operation is completed,
TX OK is displayed on the LCD of the
transmitting remote control, and RX OK is
displayed on the LCD of the receiving
remote control.
• Do not touch either of the remote controls
during the copying operation. Doing so
could cause copying to fail.
• If the copying fails in the middle of the
copying process, RX ERROR is displayed
on the receiving remote control. Check
and perform steps 1 to 7 again.
• Copying takes about three minutes to
complete when the transmitting remote
control has been programmed to 100%
capacity.
10.
Once copying is completed, press the M
button on both remote controls.
COPYING BY SOURCE
The 12 sources can be copied on a source by
source basis. You can select from up to 12 source
types.
<Receiving remote control>
1.
Place the receiver sensor of the receiving
remote control (top) so that it is facing the
transmitter of the transmitting remote control
(top) at a distance of about 5 cm (2 inches).
2.
Hold down the M button of the transmitting
remote control for three seconds or more.
The menu is displayed.
3.
Press the > button to display the fourth page
CLONE menu.
4.
Press the D3 (TX) direct button.
The transmitting side is now ready.
5.
Hold down the M button of the receiving
remote control for three seconds or more.
6.
Press the > button to display the fourth page
CLONE menu.
7.
Press the D2 (RX-S) direct button.
8.
Press the source button to be copied.
The receiving side is now ready.
The name of the source which was pressed is
displayed on the LCD.
• Each time the source button is pressed,
the name is displayed on the LCD.
9.
Press the OK cursor button on the receiving
remote control.
10.
Press the OK cursor button on the
transmitting remote control.
When copying is started, the bar indicators on both
LCDs start to move from the left to the right.
• When the copying operation is completed,
TX OK is displayed on the LCD of the
transmitting remote control, and RX OK is
displayed on the LCD of the receiving
remote control.
• Do not touch either of the remote controls
during the copying operation. Doing so
could cause copying to fail.
34 9