A period (“.”) is displayed instead of any character that
cannot be displayed by the player.
n
Files that can be played back
See “USB memory device” (v p. 33).
n
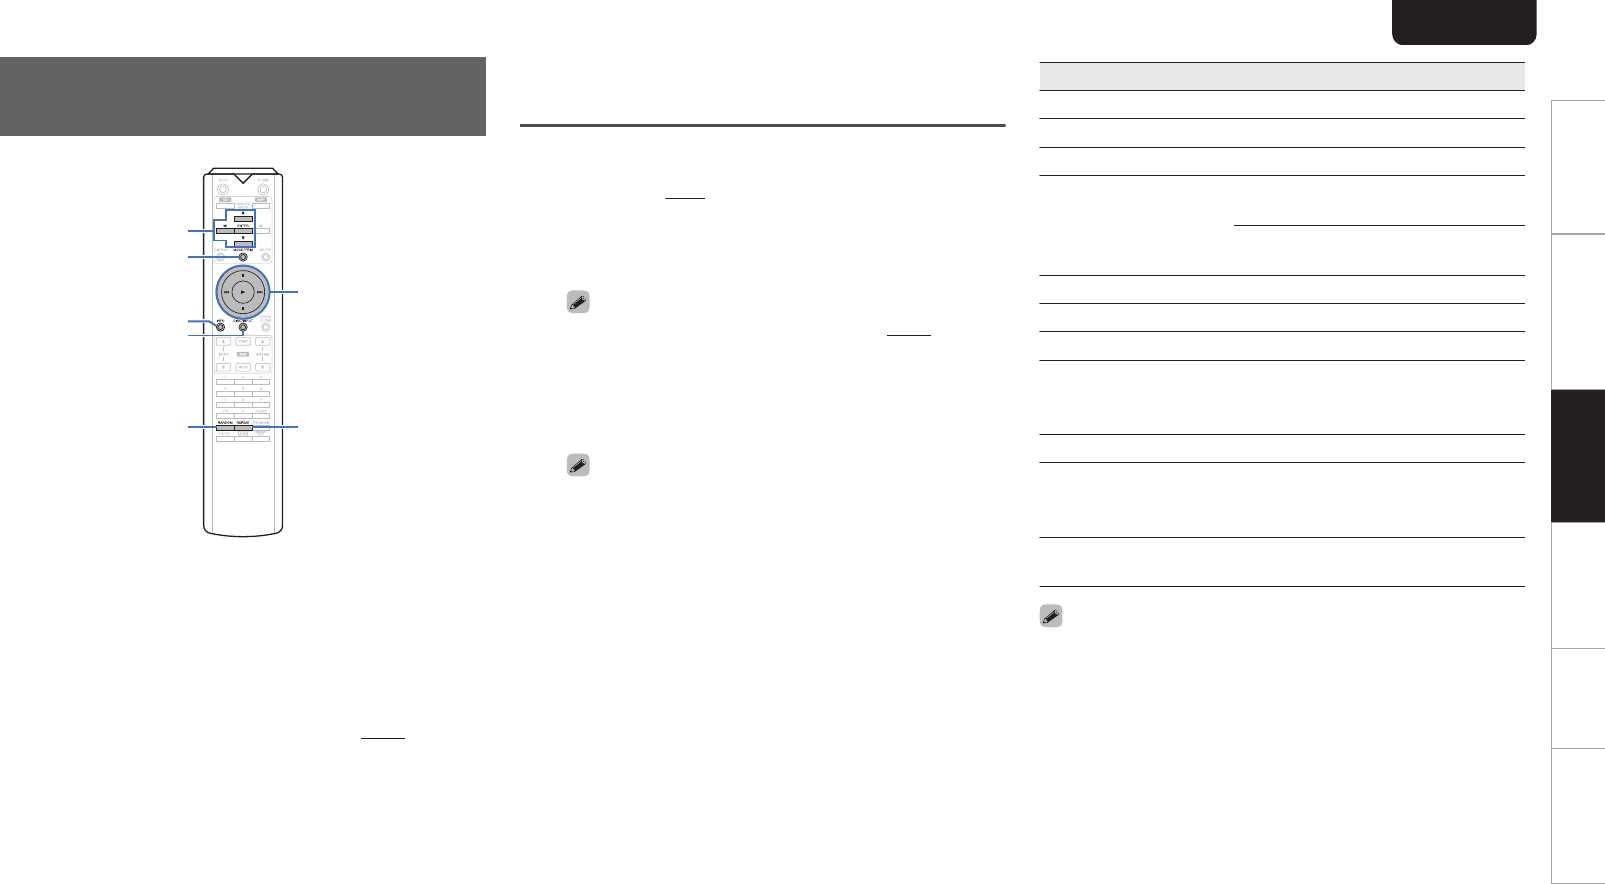
Switching the playback range
In the stop mode, press MODE/TRIM.
0
The playback range of a track can be set.
Folder mode:
All the files in the selected folder
are played.
All mode:
All the files in the USB memory
are played.
0
The folder hierarchy is not displayed when “All mode” is
set as the playback range.
ENGLISH
17
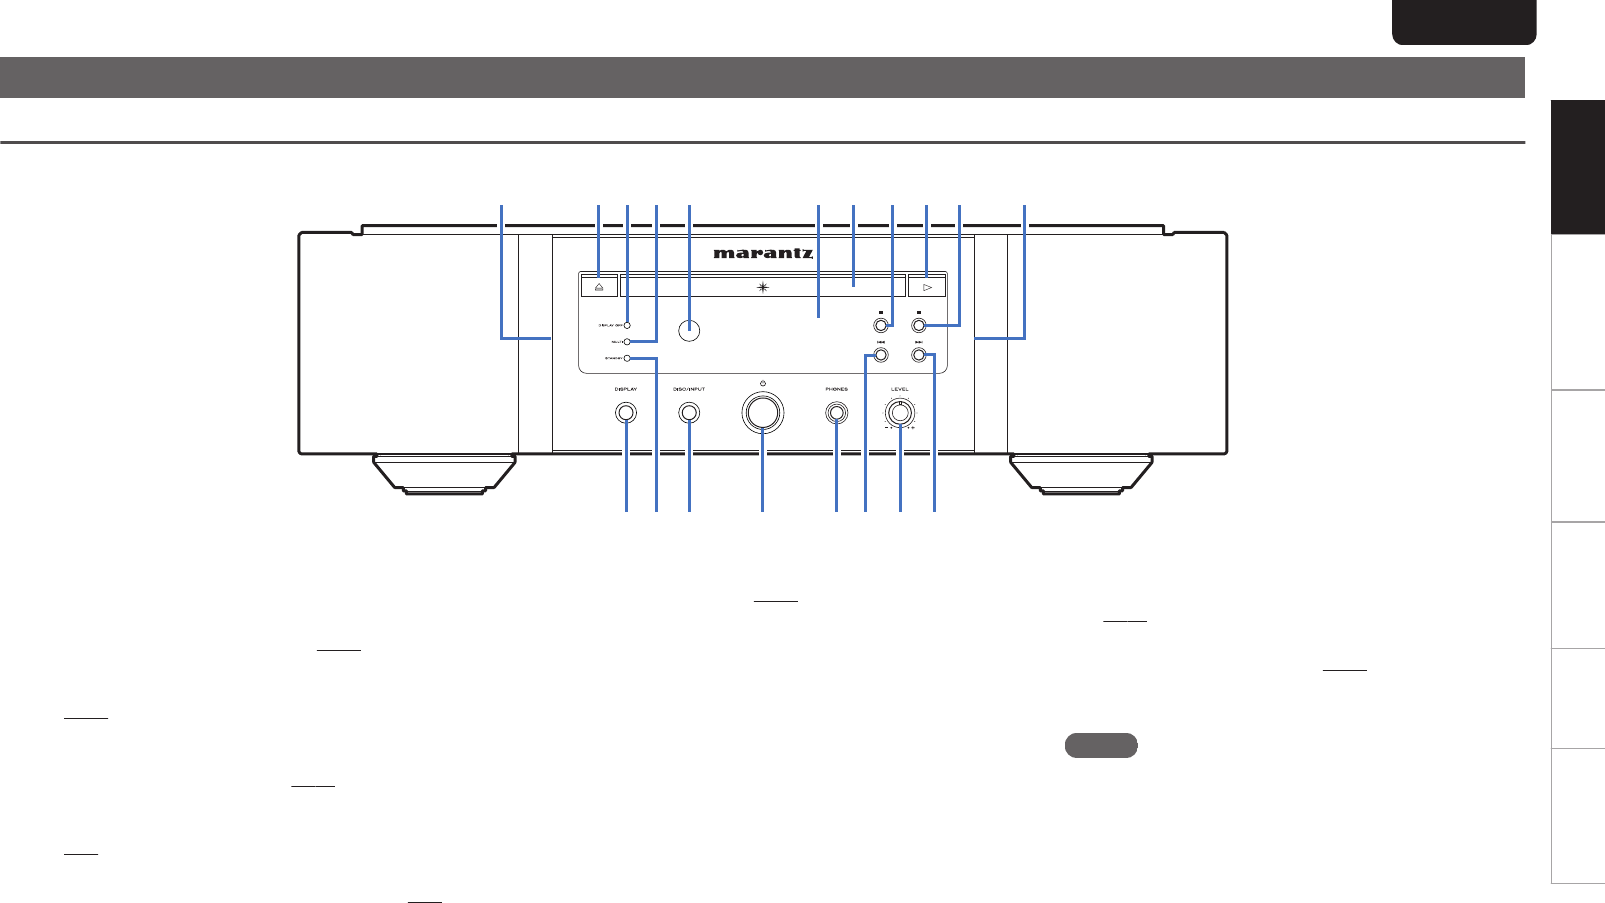
Using as a D/A converter
.
DISC/INPUT
CD
X
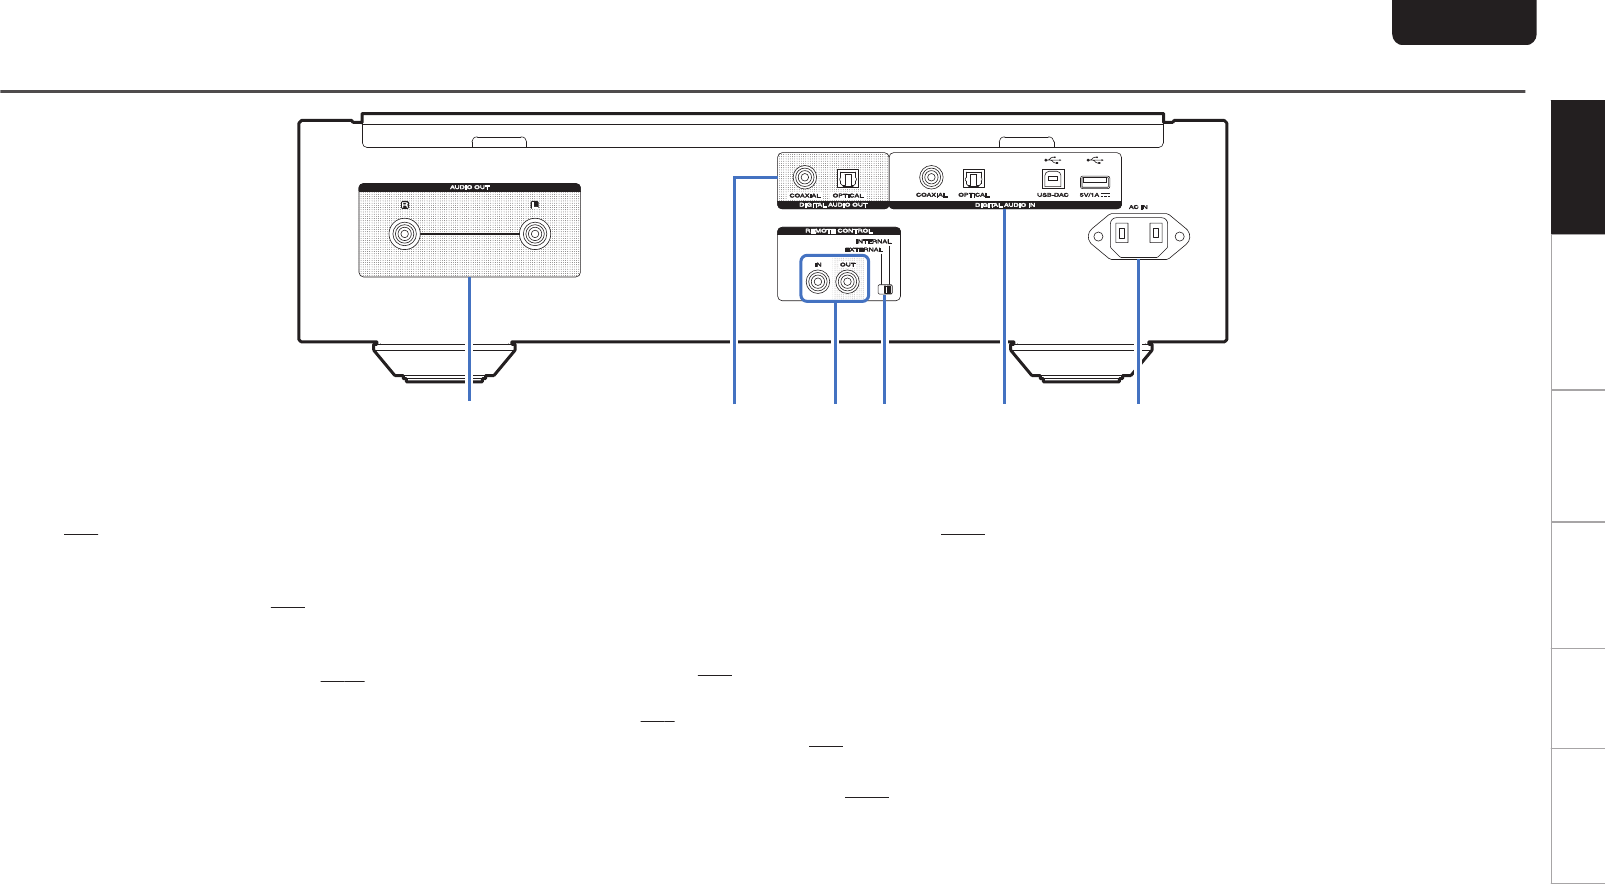
Digital audio signals input from an external device or
computer into this unit can be converted and output as analog
signals using this unit’s D/A converter. (D/A converter
function)
0
DSD is a registered trademark.
0
Microsoft, Windows 7, Windows 8, Windows 8.1 and
Windows 10 are either registered trademarks or
trademarks of Microsoft Corporation in the United
States and/or other countries.
0
ASIO is a trademark of Steinberg Media
Technologies GmbH.
0
Apple, Macintosh and Mac OS are trademarks of
Apple Inc., registered in the U.S. and other
countries.
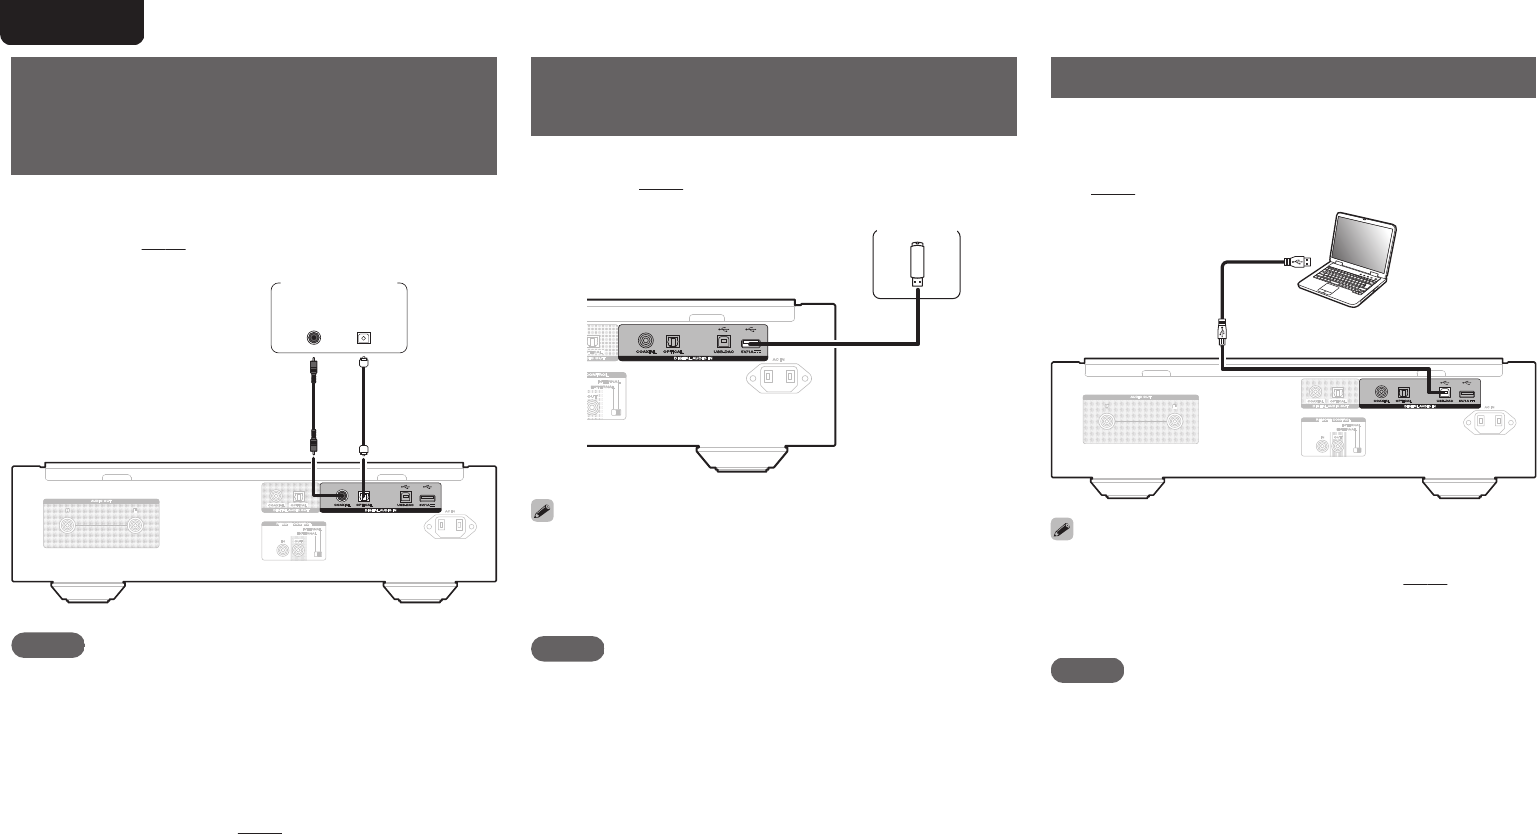
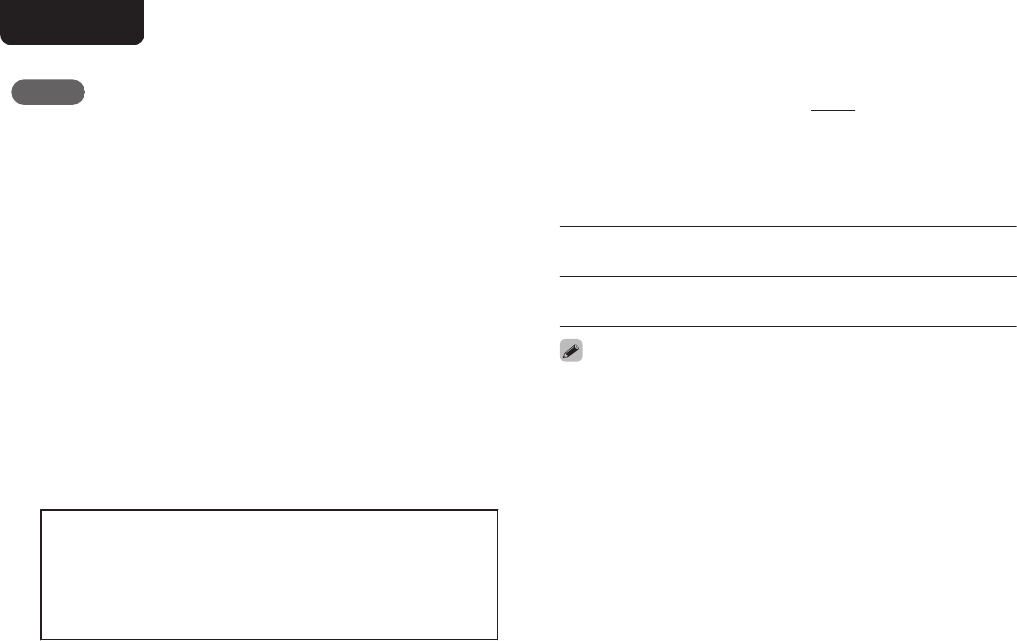
Connecting and playing back from a
computer (USB-DAC)
You can enjoy high-quality audio playback from the D/A
converter built in to this unit by inputting music files into this
unit from a computer via USB connection.
0
Before USB connecting this unit to your computer, install
the driver software in your computer.
0
Drivers do not need to be installed for Mac OS.
0
Also, you can use whichever commercially available or
downloadable player software you like to playback files on
your computer.
n
Computer (system requirements)
OS
0
Windows 7, Windows 8, Windows 8.1 or Windows 10
0
Mac OS X 10.10, 10.11 or macOS 10.12
USB
0
USB 2.0: USB High speed/USB Audio Class Ver. 2.0
NOTE
0
This unit was checked the operation using the system
requirements by us, but it does not guarantee the
operation of all systems.
Windows OS
Installing the dedicated driver (v p. 18)
Mac OS
Audio Device Settings (v p. 21)
n
Installing the dedicated driver
(Windows OS only)
n
Installing the driver software
1
Disconnect the USB cable between your PC
and the unit.
0
The driver software cannot be installed correctly if
your PC is connected to the unit by a USB cable.
0
If the unit and your computer are connected by a
USB cable and the computer is switched on before
installation, disconnect the USB and restart the
computer.
2
Download the dedicated driver from the
“Download” section of the SA-KI RUBY page
of the Marantz website onto your PC.
3
Unzip the downloaded file, and double-click
the exe file.
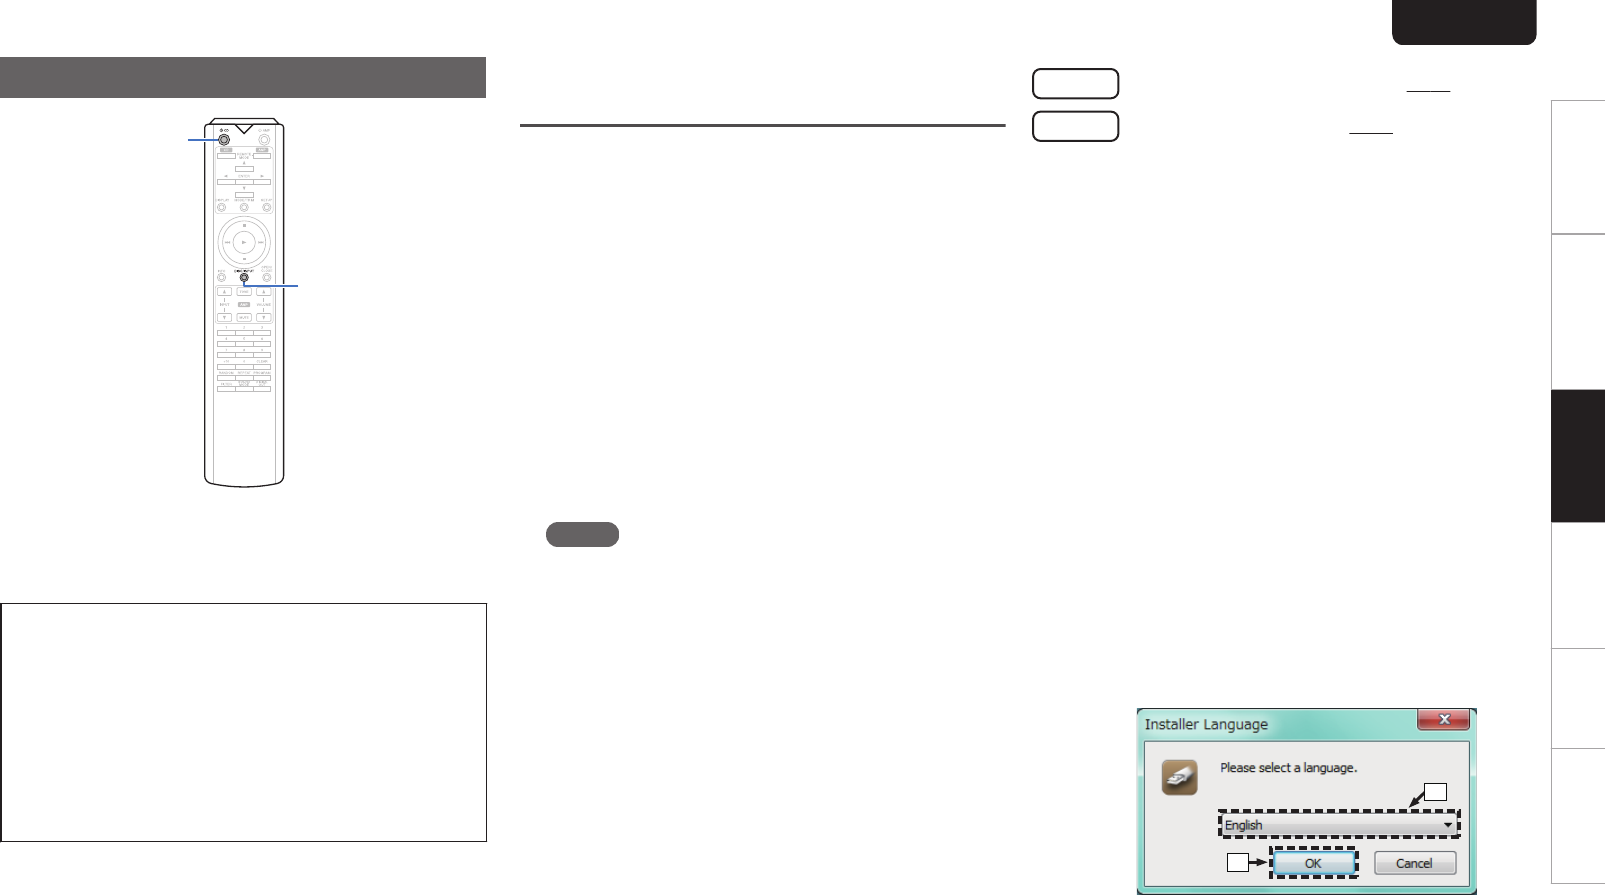
4
Install the driver.
A
Select the language to use for the installation.
B
Click “OK”.
.
q
w
ENGLISH
18
OverviewConnectionsPlaybackSettingsTipsAppendix
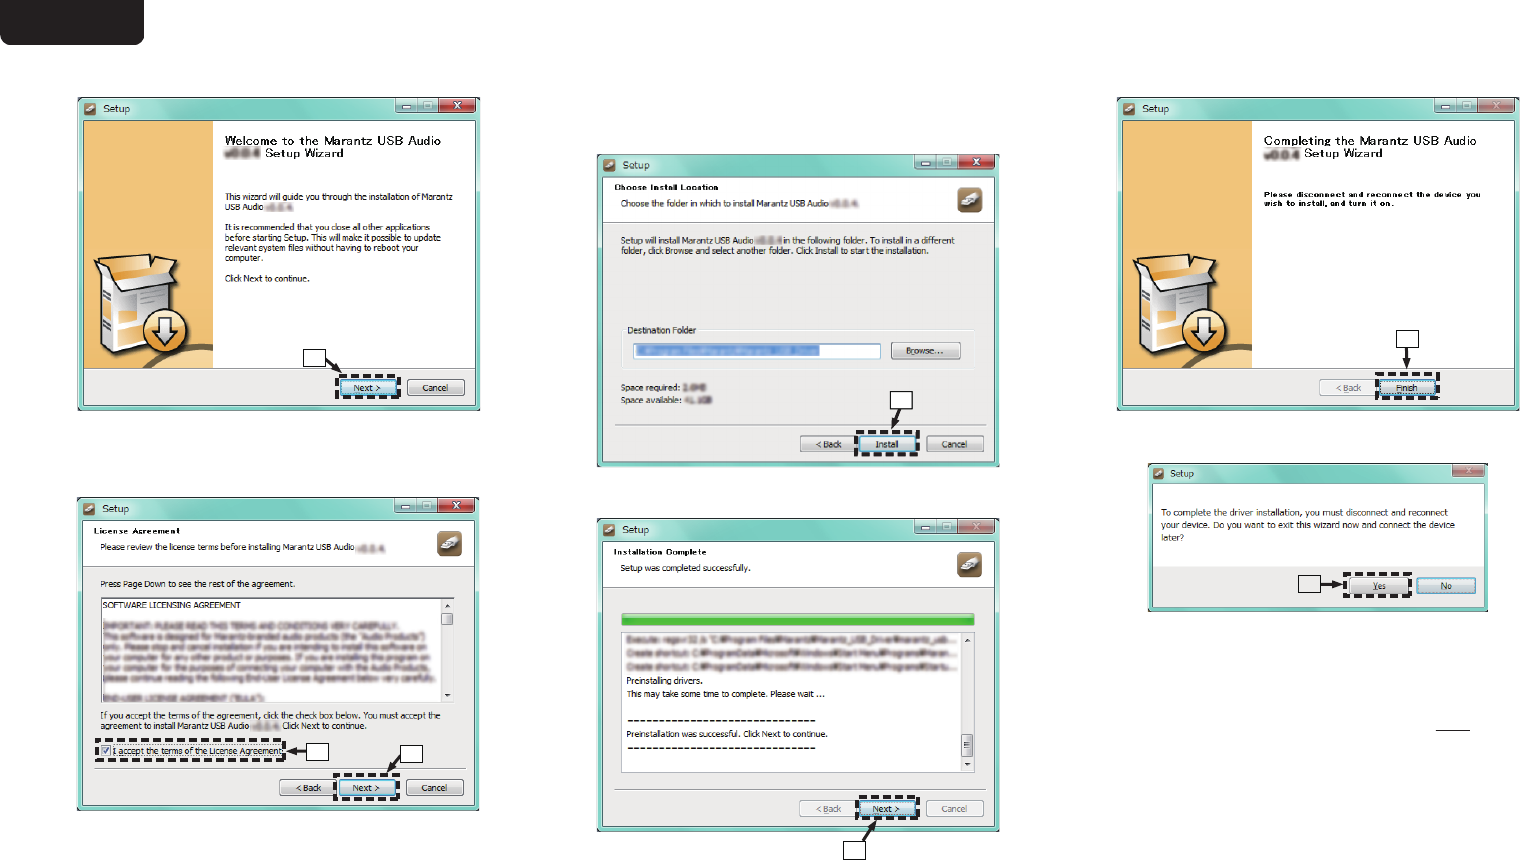
C
The wizard menu is displayed. Click “Next”.
.
e
D
Read the Software Licensing Agreement, and click
“I accept the terms of the License Agreement”.
E
Click “Next”.
.
t
r
F
Click “Install” on the installation start dialog.
0
The installation starts. Do not perform any
operation on the PC until the installation is
completed.
.
y
y
G
Click “Next”.
.
u
H
When the installation is completed, click “Finish”.
.
i
I
Click “Yes”.
.
o
5
With the unit power off, connect the unit and
PC using a USB cable (sold separately).
0
For the connection procedure, refer to the
“Connecting a PC or Mac” section. (v p. 9)
ENGLISH
19
6
Press the main unit’s X.
0
When the unit power is turned on, the PC
automatically finds and connects to the unit.
7
Press DISC/INPUT to switch the playback
media mode to “USB-DAC”.
8
Checking the installed driver.
A
Click the “Start” button and click “Control Panel” on
the PC.
0
The control panel setting list is displayed.
B
Click “Sound”.
0
The sound menu window is displayed.
C
Check that there is a checkmark next to “Default
Device” under in “SA-KI RUBY” of the “Playback”
tab.
0
When there is a checkmark for a different device,
click “SA-KI RUBY” and “Set Default”.
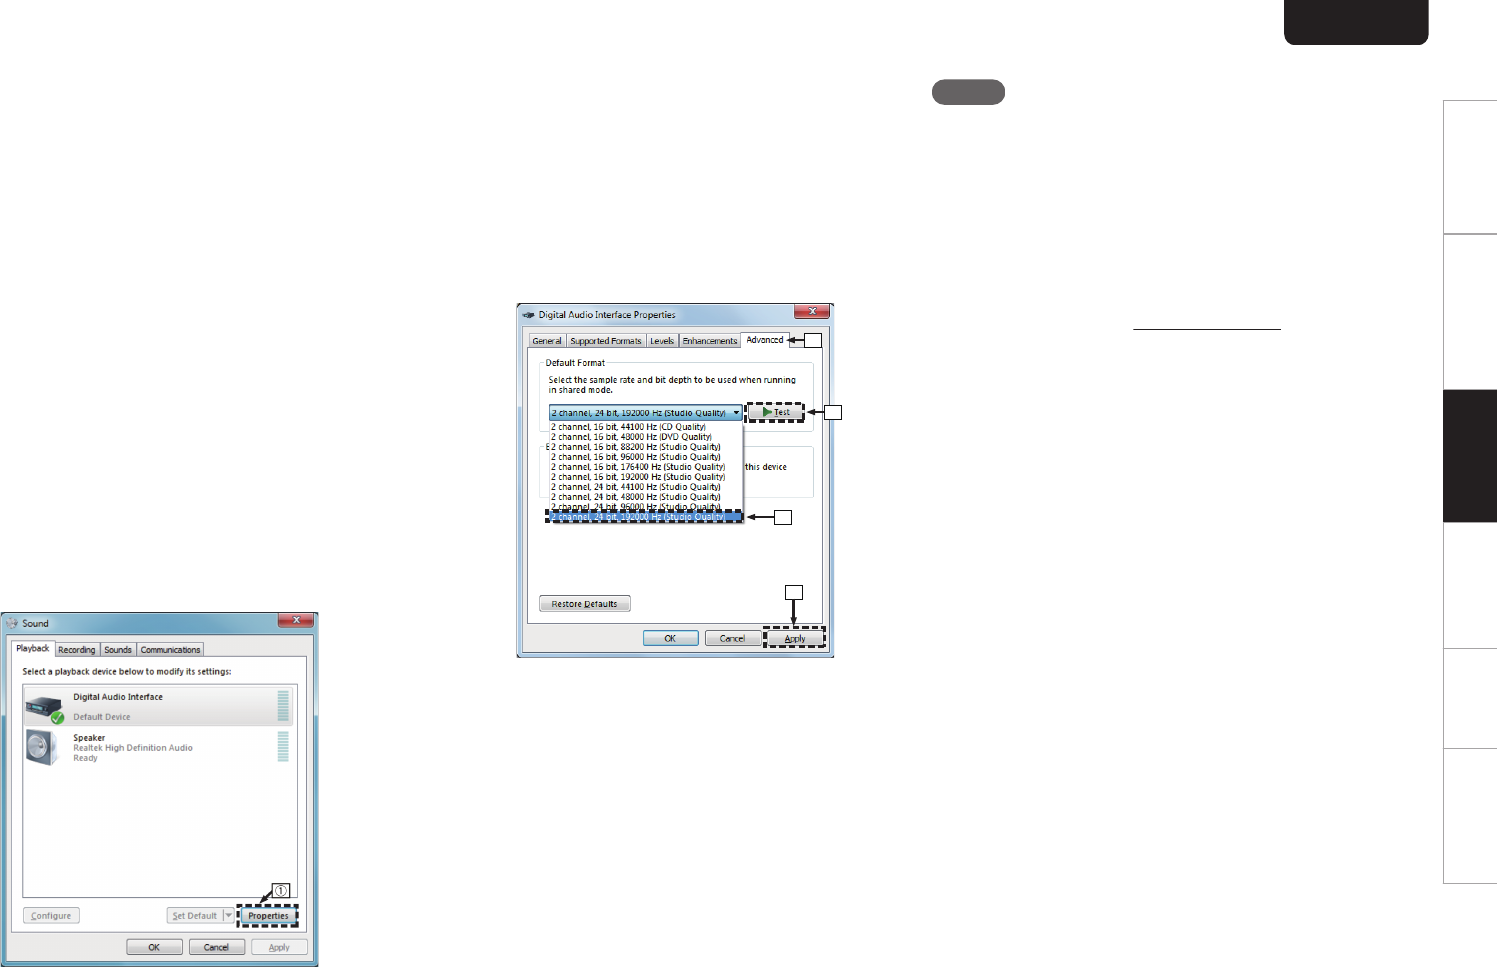
9
Checking audio output.
Outputs a TEST signal from the PC and checks the
audio output from the USB-DAC function.
A
Select “SA-KI RUBY” and click “Properties”.
0
The SA-KI RUBY Properties window is displayed.
.
SA-KI RUBY
B
Click the “Advanced” tab.
C
Select the sampling rate and bit rate to be applied to
the D/A converter.
0
It is recommended that “2 channel, 24 bit, 192000
Hz (Studio Quality)” is selected (Windows 7).
0
It is recommended that “2 channel, 32 bit, 192000
Hz (Studio Quality)” is selected (Windows 8/
Windows 8.1/Windows 10).
D
Click “Apply”.
E
Click “Test”.
0
Check that audio from this unit is output from the
PC.
.
w
e
r
t
NOTE
0
The dedicated driver must be installed in the PC before this
unit is connected to a PC. Operation will not occur correctly
if connected to the PC before the dedicated driver has
been installed.
0
Player software supporting the Audio Stream Input Output
(ASIO) driver is required to play files with a sampling
frequency of 352.8 kHz/384 kHz without downsampling.
Check your player software before playing files with the
ASIO driver.
0
Operation may fail in some PC hardware and software
configurations.
0
Please see the FAQ at www.marantz.com if you
experience any issues getting audio to play from your
computer through the this unit. You may also want to check
the support pages for your audio player application.
ENGLISH
20
OverviewConnectionsPlaybackSettingsTipsAppendix
n
Audio device settings (Mac OS only)
A
With the unit power off, connect the unit and Mac using a
USB cable (sold separately).
0
For the connection procedure, refer to the “Connecting a
PC or Mac” section. (v p. 9)
B
Press the main unit’s X.
C
Press DISC/INPUT to switch the playback media mode to
“USB-DAC”.
D
Move the cursor to “Go” on the computer screen, and then
click “Utilities”.
0
The utility list is displayed.
E
Double-click “Audio MIDI Setup”.
0
The “Audio Devices” window is displayed.
F
Check that “Use this device for sound output” is checked
in “SA-KI RUBY”.
0
If a different device is checked, select and “Secondary
click” on “SA-KI RUBY”, and then select “Use this device
for sound output”.
.
⑥
SA-KI RUBY
SA-KI RUBY
G
Select the “SA-KI RUBY” format.
0
It is normally recommended to set the format to
“384000.0 Hz” and “2ch-32 bit Interger”.
.
⑦
SA-KI RUBY
SA-KI RUBY
H
Quit Audio MIDI Setup.
n
Playback
Install the desired player software on your computer
beforehand.
Use the rear panel USB-DAC port to connect this unit to a
computer. (v p. 9)
1
Press DISC/INPUT to switch the playback
media mode to “USB-DAC”.
Start playback on the computer’s player software.
The digital audio signal that is being input is shown as
follows in the display.
0
When a linear PCM signal is input
GExampleHPCM176.4k/24
0
Files are displayed in order of sampling frequency
and bit length.
0
The displayed bit length is the bit count at the
time the audio signal is input from the computer to
the D/A converter of this unit.
0
When a DSD signal is input
GExampleHDSD 11.2M
0
Only the sampling frequency is displayed when a
DSD signal is input.
0
If the sampling frequency cannot be detected,
“Unlock” will be displayed.
0
“Unsupported” is displayed when audio signals that
are not supported by this unit are input.
ENGLISH
21
n
Audio signals that can be played back
See “D/A converter” (v p. 36).
NOTE
0
Perform operations such as playback and pause on the
computer. At this time, you cannot perform operations with
buttons on this unit or the remote control.
0
When this unit is functioning as a D/A converter, sound is
not output from the computer’s speakers.
0
If the computer is disconnected from this unit while the
computer music playback software is running, the playback
software may freeze. Always exit the playback software
before disconnecting the computer.
0
When an error occurs on the computer, disconnect the
USB cable and restart the computer.
0
The sampling frequency/bit length of the music playback
software and sampling frequency/bit length displayed on
this unit may differ.
0
Use a cable that is 3 m or less to connect to the computer.
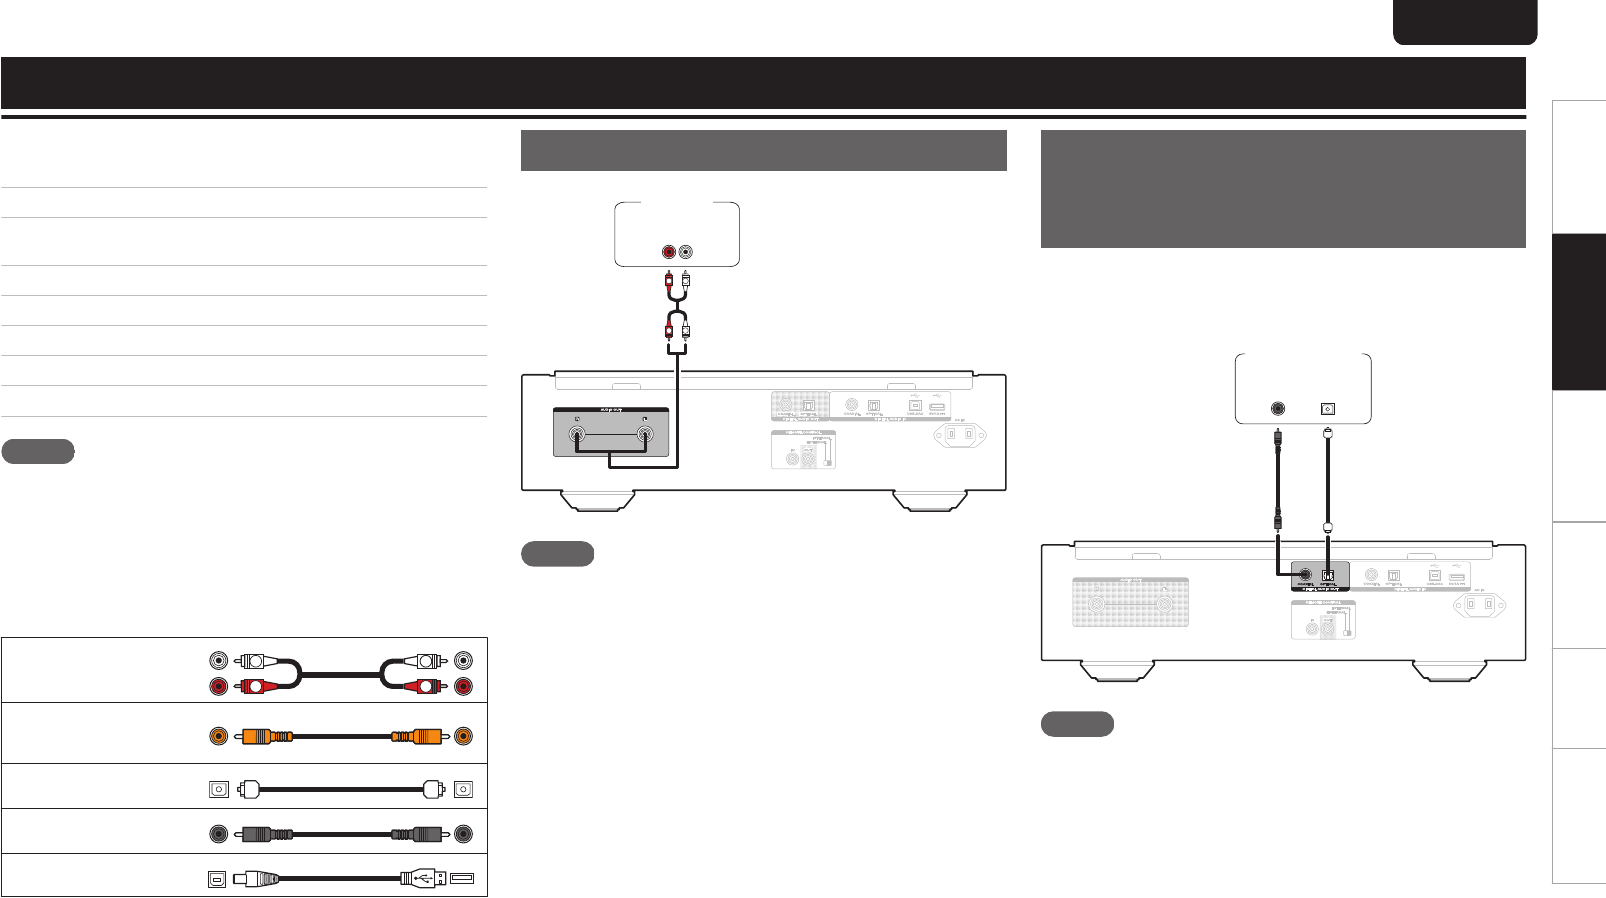
Connect and playback from a digital
device (Coaxial/Optical)
1
Press DISC/INPUT to switch the playback
media mode to “Coaxial” or “Optical”.
The digital audio signal that is being input is shown as
follows in the display.
0
When a linear PCM signal is input
GExampleHPCM176.4k/24
0
Files are displayed in order of sampling frequency
and bit length.
0
The displayed bit length is the bit count at the
time the audio signal is input from the external
device to the D/A converter of this unit.
0
If the sampling frequency cannot be detected,
“Unlock” will be displayed.
0
“Unsupported” is displayed when audio signals that
are not supported by this unit are input.
n
Specifications of supported audio
formats
See “D/A converter” (v p. 36).
NOTE
0
Do not input non-PCM signals, such as Dolby Digital and
DTS. This causes noise and could damage the speakers.
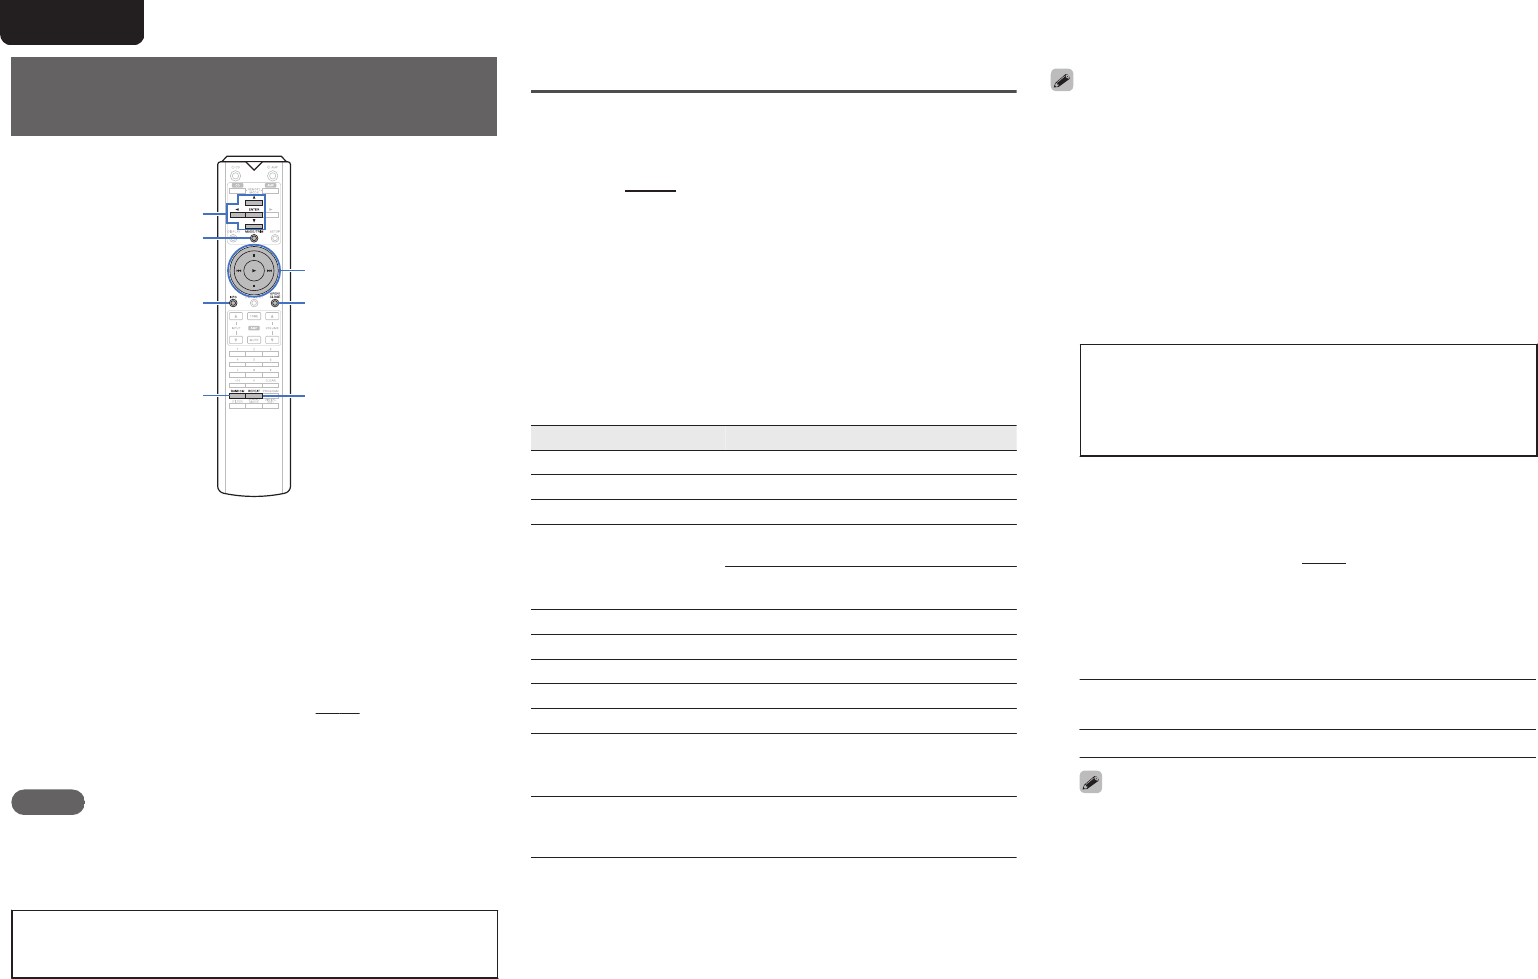
Specifying the desired sound
quality
Switching the filter characteristics
This unit is equipped with a sound quality adjusting function
which allows users to enjoy the desired playback sound
quality. The unit supports PCM signal.
The 2 filter characteristics types are explained below.
Filter TypeFeatures
Filter 1Very short but symmetrical impuls response.
Very precise soundstage and smooth tonal
balance.
Filter 2Very short pre-ringing - long post-ringing.
Neutral tonal balance - slightly brighter than
“Filter1”.
1
Press FILTER
The setting cycles through the 2 modes (Filter 1 / Filter
2) as shown below each time the button is pressed.
NOTE
0
The filter characteristics have a last memory function.
These settings remain in memory even if a disc change
occurs, or if the power is turned off.
0
The filter function does not work during playback of Super
Audio CDs or DSD audio sources.
ENGLISH
22
OverviewConnectionsPlaybackSettingsTipsAppendix
Settings
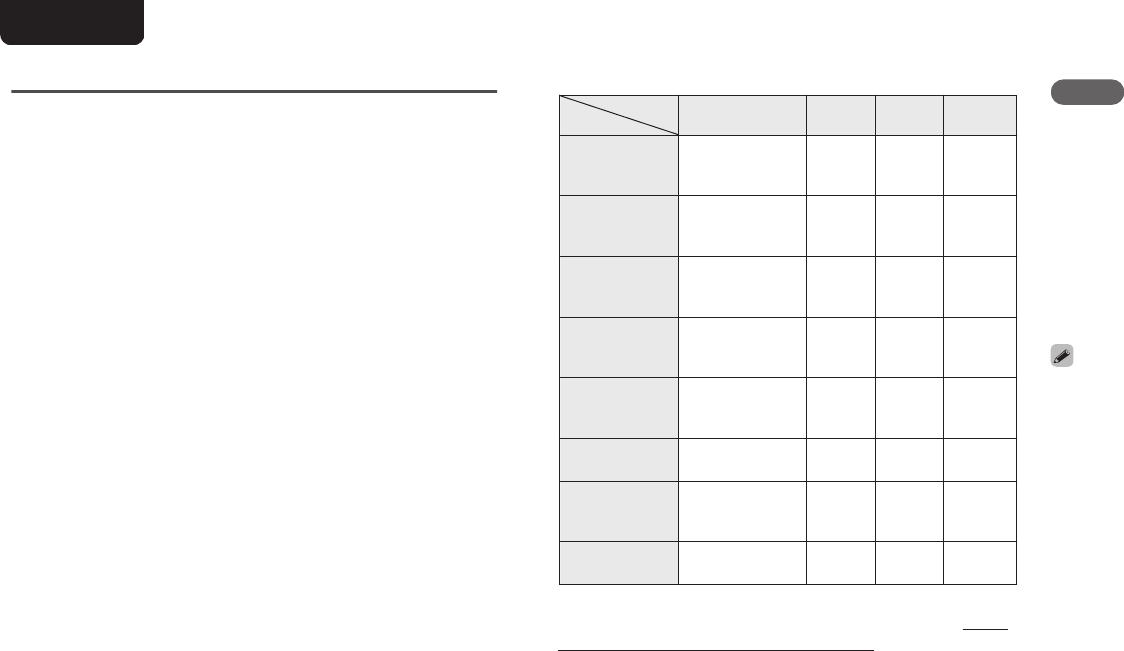
Menu map
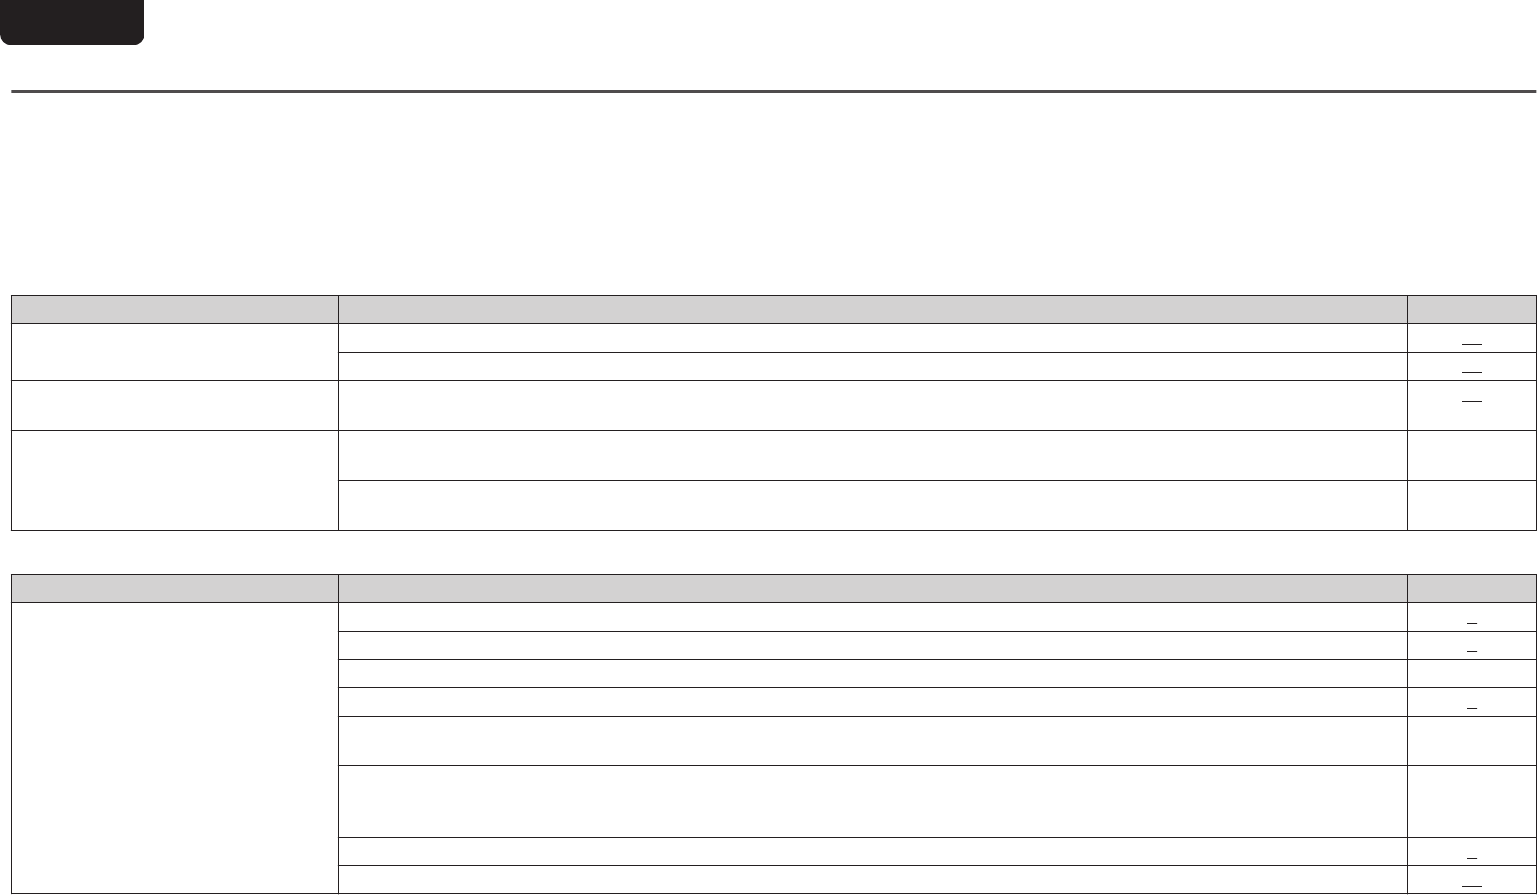
By default, this unit has recommended settings defined. You can customize this unit based on your existing system and your preferences.
Setting itemsDescriptionPage
PhonesSwitches the headphones output on/off.24
HP AMP GainSet the gain of the headphone amplifier.24
Resume PlayWhen the playback media mode is switched, the USB memory device is disconnected and then connected, or the power is
turned off and then back on during USB memory device playback, the unit memorizes the point where playback stopped so
that playback can resume from the beginning of that track.
24
AutoStandbySets whether to automatically switch the unit to the standby mode when the unit remains in the stop mode for more than 30
minutes.
24
Timer PlayThis unit can perform timer play by cooperating with your timer device.24
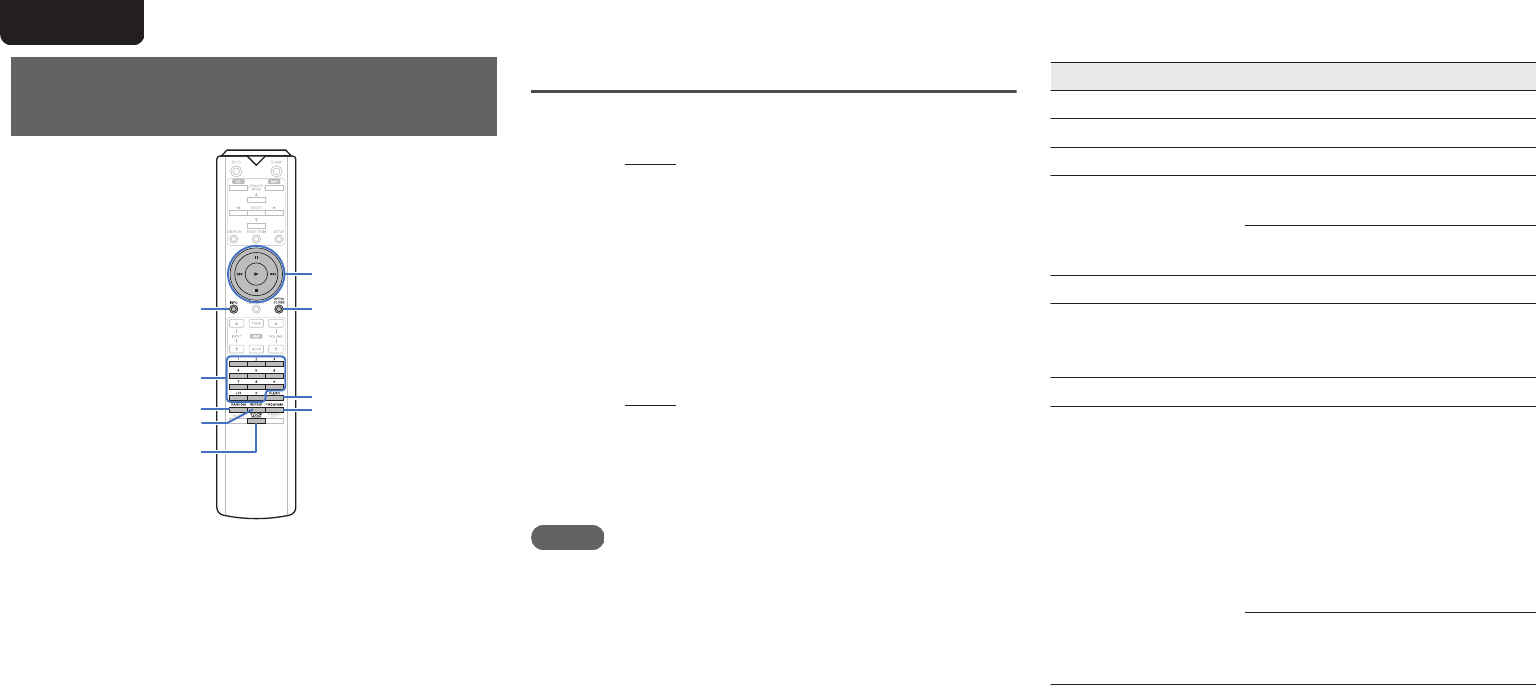
Menu operation
.
uio
ENTER
SETUP
1
Press SETUP.
The menu is displayed on the display.
2
Use ui to select the menu to be set or
operated, then press ENTER.
3
Use ui to change to desired setting.
4
Press ENTER to enter the setting.
0
To return to the previous item, press o.
0
Exiting the Menu, press SETUP while the menu is
displayed. The display returns to the normal display.
ENGLISH
23
Phones
The headphones circuit operation can be stopped to
minimize noise from the headphones circuit which could
interfere with the analog audio output signal.
On
(Default):
Enable the headphones output.
Off:Disable the headphones output.
0
When not using headphones, you can enjoy higher quality
sound with Off mode.
HP AMP Gain
Set the gain of the headphone amplifier. Set this according to
the impedance of the connected headphones. It is
recommended that this is set on the “Low” side if the
headphones have low impedance and on the “High” side if
they have high impedance.
Low
(Default):
Set the gain of the headphone
amplifier to “Low”.
Middle:
Set the gain of the headphone
amplifier to “Middle”. Set this if the
volume is too low at the factory
default setting.
High:
Set the gain of the headphone
amplifier to “High”. Set when there
is insufficient volume, even when
the gain setting is “Middle”.
NOTE
0
The headphone volume varies depending on the “HP AMP
Gain” setting. Decrease the volume or mute the audio first
if changing this setting while listening to audio.
Resume Play
When the playback media mode is switched, the USB
memory device is disconnected and then connected, or the
power is turned off and then back on during USB memory
device playback, the unit memorizes the point where
playback stopped (resume information) so that playback can
resume from the beginning of that track.
On
(Default):
Resume playback is set.
Off:Resume playback is not set.
NOTE
0
Resume playback works even if the USB memory device is
disconnected and then reconnected. However, if a
different USB memory device is connected, the resume
information for the previous USB memory device is
deleted.
0
The resume information may be deleted when the USB
memory device is removed and files are added or deleted.
0
Press 2 while playback is stopped to delete the resume
information. “Resume Off” is displayed.
0
Resume information is not recorded when the power is
turned off by pressing X during USB memory device
playback.
AutoStandby
Sets whether to automatically switch the unit to the standby
mode when the unit remains in the stop mode for more than
30 minutes.
On
(Default):
Enable Auto Standby mode.
Off:Disable Auto Standby mode.
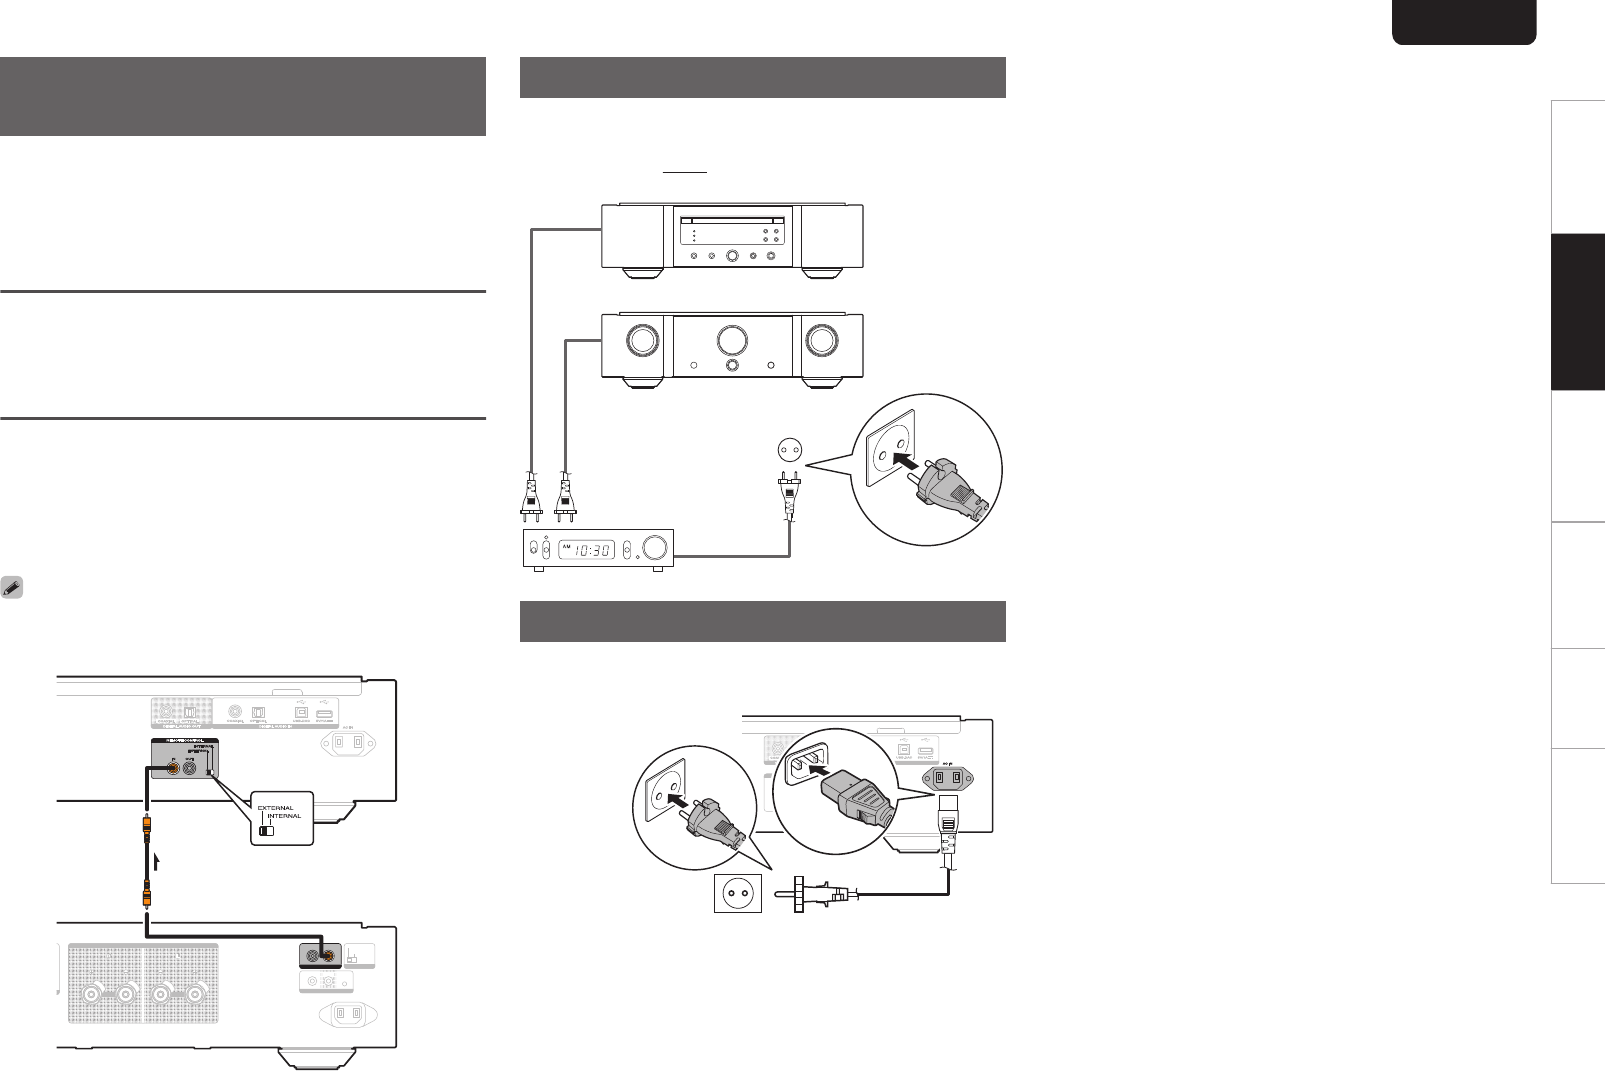
Timer Play
This unit can perform timer play by cooperating with your
timer device.
(“Connecting the timer device” (v
p. 10))
On:
Timer play is set. Select the
playback media mode to be used
for timer play.
Off
(Default):
Timer play is not set.
n
Using the timer play function
1.Turn on the power of the connected components.
2.Load a disc or connect a USB memory device.
3.Switch the media mode of this unit to the media to be
played using the timer.
4.Switch the amplifier’s function to input from the connected
unit.
5.Set the audio timer for the desired times.
6.Turn the timer on.
The power of the components connected to the timer turns
off.
When the set time is reached, the power of the different
components automatically turns on and playback starts
from the first track.
NOTE
0
For connection to audio timer and it’s operation, please
refer to the instruction manual of your audio timer.
0
The timer play does not support the random playback,
repeat playback or program playback.
ENGLISH
24
OverviewConnectionsPlaybackSettingsTipsAppendix
Tips
n
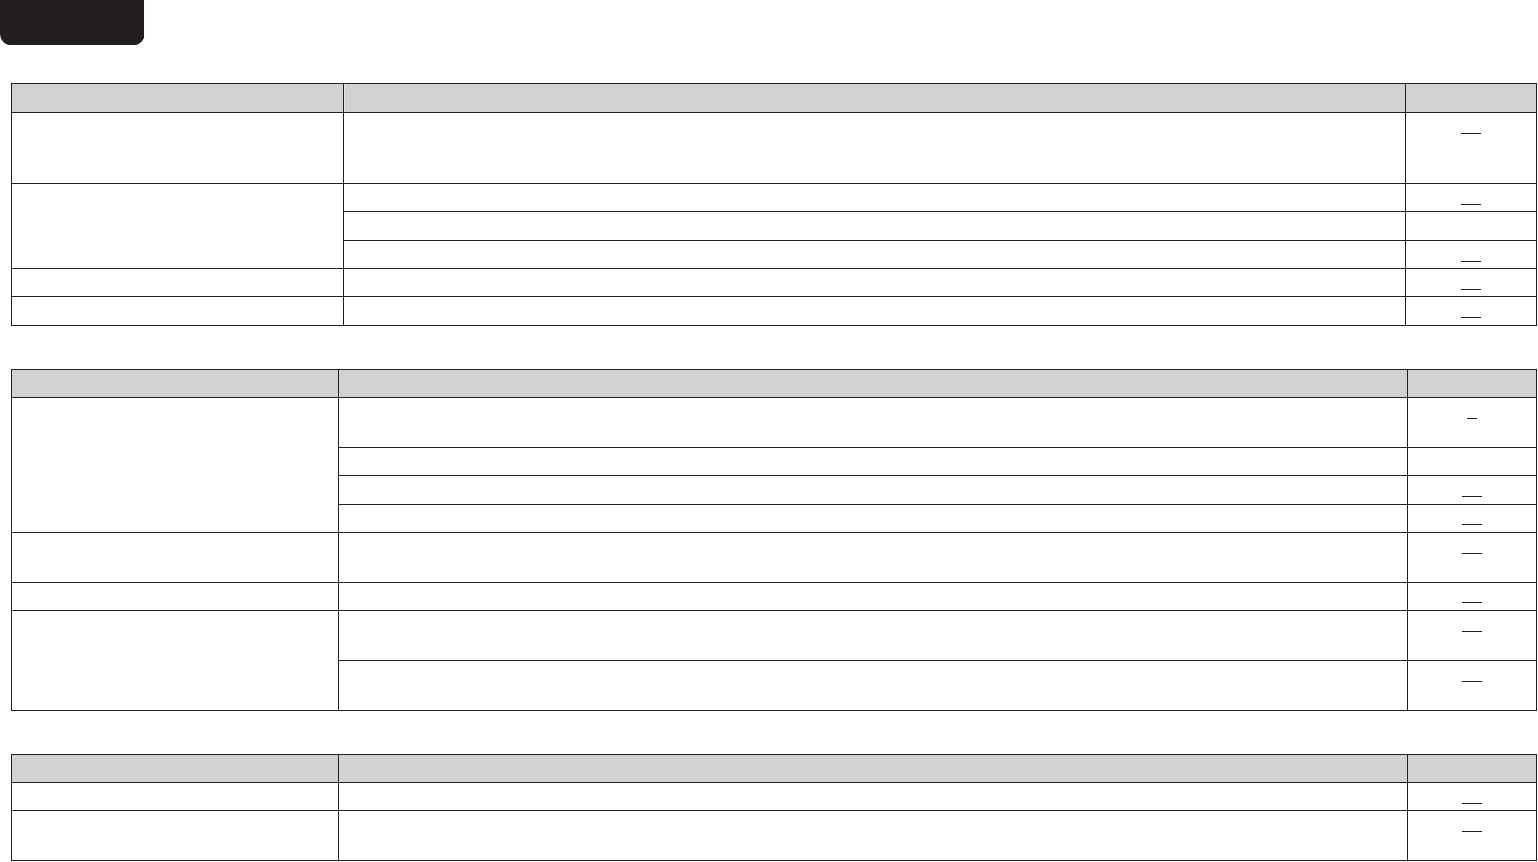
Contents
Tips
I want to switch the filter to change the desired sound
quality26
I want to enjoy analog output audio at higher quality26
I want to turn the illumination lamp off26
I want to display Super Audio CD text26
I want to play the multi-channel area of a Super Audio CD
is played26
I want to play all tracks on a DVD-R/-RW/+R/+RW or CD-
R/-RW at random26
I want to playback just the specified folder26
I want to stop the USB memory device from automatically
starting playback26
I want to use this unit’s remote control to operate a
Marantz amplifier26
Troubleshooting
Power does not turn on / Power is turned off27
Operations cannot be performed through the remote
control unit27
Display on this unit shows nothing28
No sound comes out28
Sound is interrupted or noise occurs28
Desired sound does not come out28
Cannot playback Discs29
PC or Mac files cannot be played back29
Audio from digital devices cannot be played back
(Coaxial/Optical)29
The bit length displayed for files played back from a
computer or external device is different from the bit length
displayed on this unit30
USB memory devices cannot be played back30
Text informations on the USB memory device are not
displayed properly30
ENGLISH
25
Tips
I want to switch the filter to change the desired sound quality
0
Switch the filter characteristics. (v p. 22)
I want to enjoy analog output audio at higher quality
0
Turn the display off to reduce the effects of the display and display circuit on the analog audio output signal. (v
p. 11)
0
Turn the digital output off to reduce the effects of the digital audio output circuit on the analog audio output signal. (v
p. 12)
0
The headphones circuit operation can be stopped to minimize noise from the headphones circuit which could interfere with the analog audio output signal. Set “Off” to the “Phones”.
(v
p. 24)
I want to turn the illumination lamp off
0
Change the settings so that the illumination lamp is always off. (v
p. 11)
I want to display Super Audio CD text
0
This unit supports Super Audio CD text. Press the INFO button to switch the display information. (v
p. 14)
I want to play the multi-channel area of a Super Audio CD is played
0
This unit can play multi-channel audio by downmixing to two channels. Press the SOUND MODE button and set “MULTI”. (v
p. 12)
I want to play all tracks on a DVD-R/-RW/+R/+RW or CD-R/-RW at random
0
Random playback can be set by pressing the MODE/TRIM button and setting “All Mode” as the playback mode before playback. (v
p. 15)
I want to playback just the specified folder
0
The MODE/TRIM button to set the playback range to “Folder mode”. ( (v p. 15), (v p. 17))
I want to stop the USB memory device from automatically starting playback
0
Set “Off” to the “Resume Play”. (v p. 24)
I want to use this unit’s remote control to operate a Marantz amplifier
0
Press the REMOTE MODE AMP button to switch the remote control to the amplifier operating mode. (v p. 7)
0
Also, refer to the instruction manual of the amplifier.
ENGLISH
26
OverviewConnectionsPlaybackSettingsTipsAppendix
Troubleshooting
If a problem should arise, first check the following.
1.Are the connections correct?
2.Is the unit being operated as described in the owner’s manual?
3.Are the other devices operating properly?
If this unit does not operate properly, check the items listed in the table below.
Should the problem persist, there may be a malfunction. In this case, disconnect the power immediately and contact your store of purchase.
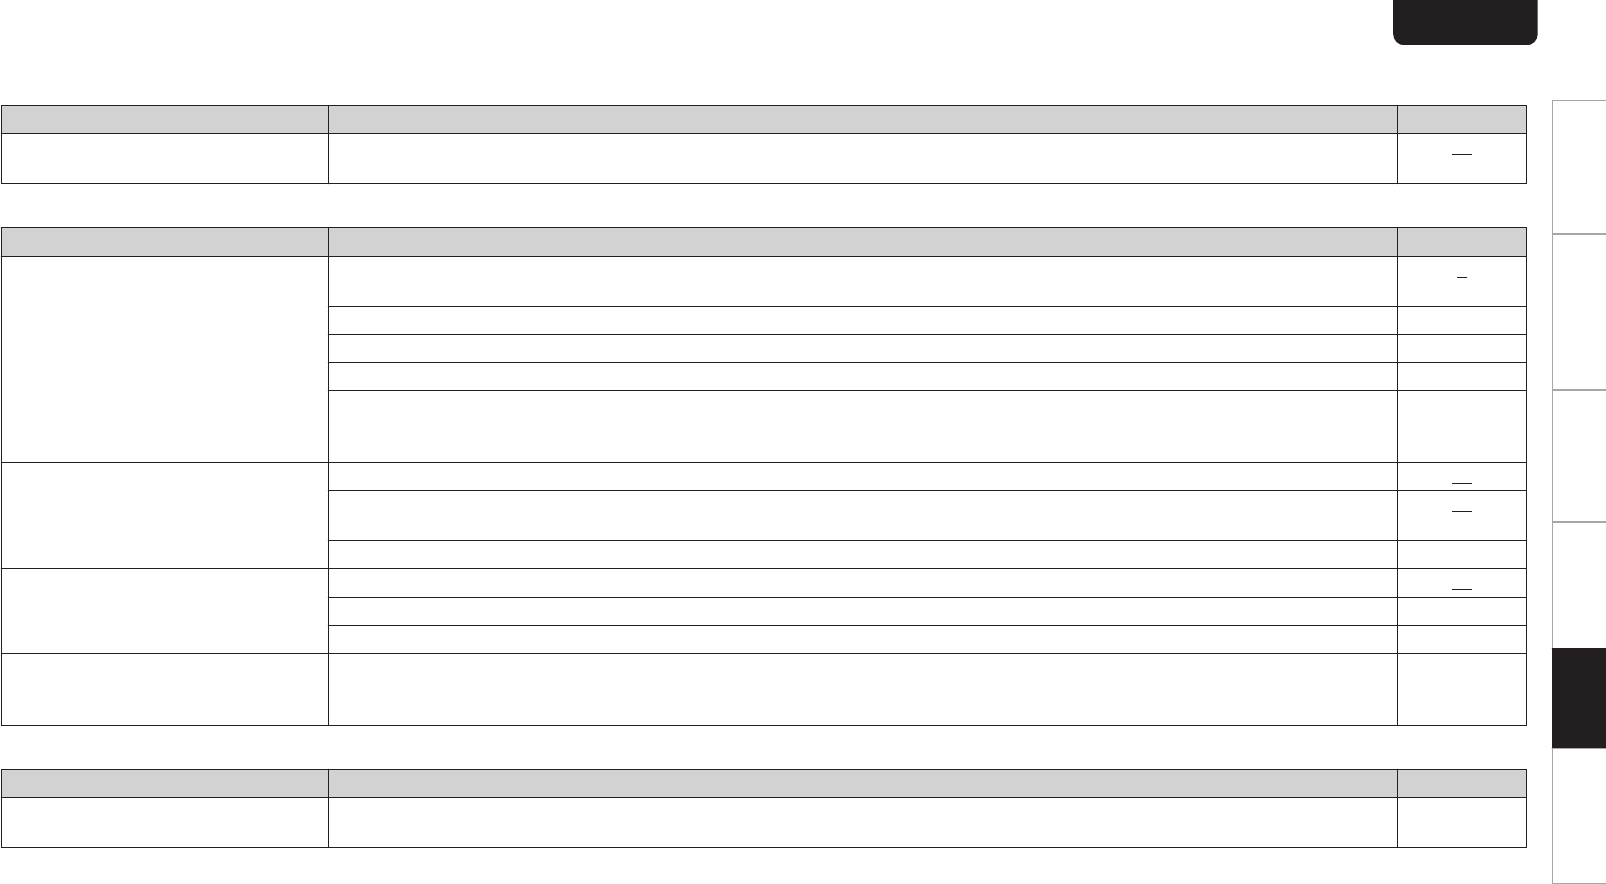
n
Power does not turn on / Power is turned off
SymptomCause / SolutionPage
Power is not turned on.
0
Check whether the power plug is correctly inserted into the power outlet.10
0
This unit is in standby mode. Press the X CD button on the remote control.
11
Power automatically turns off.
0
The Auto Standby mode is set. The Auto Standby mode switches the unit to standby mode when the unit is not operated for
approximately 30 minutes. To disable Auto Standby mode, set “Auto Standby” on the menu to “Off”.
24
The power turns off and the power
indicator blinks in red when a USB
memory device is connected.
0
The connected USB memory device is not supported. Please use a USB memory device with an operating current that is less than
1A.
-
0
The device requires more power than can be supplied by this unit via USB. Press X on this unit to turn the power off, remove the
USB memory device and then turn the power on again.
-
n
Operations cannot be performed through the remote control unit
SymptomCause / SolutionPage
Operations cannot be performed
through the remote control unit.
0
Batteries are worn out. Replace with new batteries.2
0
Operate the remote control unit within a distance of about 7 m from this unit and at an angle of within 30°.2
0
Remove any obstacle between this unit and the remote control unit.-
0
Insert the batteries in the proper direction, checking the q and w marks.
2
0
The unit’s remote control sensor is exposed to strong light (direct sunlight, inverter type fluorescent bulb light, etc.). Move the unit to
a place in which the remote control sensor will not be exposed to strong light.
-
0
When using a 3D video device, the remote control unit of this unit may not function due to effects of infrared communications
between units (such as TV and glasses for 3D viewing). In this case, adjust the direction of units with the 3D communications
function and their distance to ensure they do not affect operations from the remote control unit of this unit.
-
0
Press the REMOTE MODE CD button to switch the remote control operating mode to “CD”.7
0
When using this unit independently, set the switch to “INTERNAL”.10
ENGLISH
27
n
Display on this unit shows nothing
SymptomCause / SolutionPage
Display is off.
0
Press the DISPLAY button to turn on the display.11
n
No sound comes out
SymptomCause / SolutionPage
No sound is produced. Or sound is
distorted.
0
Check the connections for all devices.8
0
Insert connection cables all the way in.-
0
Check that input connectors and output connectors are not reversely connected.-
0
Check cables for damage.-
0
Check the amplifier’s functions and controls and adjust as necessary.-
0
When connecting to a device with digital audio input connectors, set “Digital Out” to “On”.12
0
Digital audio output stops when playing the HD layer of a Super Audio CD or a file with a DSD signal or a linear PCM signal with a
sampling frequency of 352.8 kHz or higher.
-
0
If using headphones, check that “Phones” is set to “On” in the menu. Sound is not output through the headphones jack if “Off” is set.24
n
Sound is interrupted or noise occurs
SymptomCause / SolutionPage
During playback from the CD-R/CD-RW/
DVD-R/DVD-RW/DVD+R/DVD+RW,
sound is occasionally interrupted.
0
The sound may skip during playback of a CD-R/CD-RW containing a high-resolution audio source.-
0
This may be caused by poor recording conditions, or the disc itself may be of poor quality. Use a correctly recorded disc.-
During playback from the USB memory
device, sound is occasionally
interrupted.
0
When the transfer speed of the USB memory device is slow, sound may occasionally be interrupted.-
Sound is interrupted during playback of
tracks saved on a computer.
0
Do not start applications other than the player software while playing music on your computer.-
0
The sound may be interrupted depending on the hardware or software configuration of the computer being used.-
n
Desired sound does not come out
SymptomCause / SolutionPage
Headphone volume is low.
0
Switch “HP AMP Gain” to “Middle” or “High” if using headphones with high impedance or low sensitivity.24
ENGLISH
28
OverviewConnectionsPlaybackSettingsTipsAppendix
n
Cannot playback Discs
SymptomCause / SolutionPage
Cannot playback when the play button is
pressed, or cannot correctly play back a
specific part of the disc.
0
The disc is dirty or scratched. Either clean the disc, or insert a different disc.35
Cannot playback DVD-R/-RW/+R/+RW
or CD-R/CD-RW.
0
Discs cannot be played back unless they have been finalized. Use a finalized disc.31
0
This may be caused by poor recording conditions, or the disc itself may be of poor quality. Use a correctly recorded disc.-
0
Files are created in a format that is not supported by this unit. Check the formats supported by this unit.31
“ No Disc” is displayed.
0
“ No Disc” is displayed if the disc is loaded upside-down or if no disc is loaded.34
“Unsupported” is displayed.
0
“Unsupported” is displayed if a disc that cannot be played is loaded.34
n
PC or Mac files cannot be played back
SymptomCause / SolutionPage
This unit is not recognized on the
computer.
0
Reconnect the USB cable to the USB port on your computer. When this unit is still not recognized after reconnection, connect to a
different USB port.
9
0
Restart your computer.-
0
Check the OS of your computer.18
0
When your computer is running on Windows, a dedicated driver software should be installed.18
This unit is not selected as the playback
device.
0
Select this unit as the playback device in the sound settings on the computer.18
“Unlock” is displayed.
0
When digital audio signals cannot be detected properly, “Unlock” is displayed.21
“Unsupported” is displayed.
0
“Unsupported” is displayed when audio signals that are not supported by this unit are input. Check the settings on your computer or
player software.
21
0
If the computer you use is “Mac OS”, please check if the “SA-KI RUBY” format is set below “384000.0 Hz” using the “Audio MIDI
Setup”.
21
n
Audio from digital devices cannot be played back (Coaxial/Optical)
SymptomCause / SolutionPage
“Unlock” is displayed.
0
When digital audio signals cannot be detected properly, “Unlock” is displayed.22
“Unsupported” is displayed.
0
“Unsupported” is displayed when audio signals that are not supported by this unit are input. Check the audio output signal format
from your digital device.
22
ENGLISH
29
n
The bit length displayed for files played back from a computer or external device is different from the bit length displayed on this
unit
SymptomCause / SolutionPage
16-bit is displayed, even for 24-bit file
playback.
0
The bit length displayed is the number of bits when input to this unit’s D/A converter. For a 24-bit file, it is possible that 16-bit data is
transferred. In this case, 16-bit is displayed.
21
n
USB memory devices cannot be played back
SymptomCause / SolutionPage
“No Device”, “Err1: Unsupported”, “Err3:
hub unsupported” or “Err1: no responce”
is displayed.
0
This unit may not recognize the USB memory device due to poor connection, etc. Make sure that the connection is made properly by
taking actions such as disconnecting and reconnecting the USB memory device.
9
0
Mass storage class compatible USB memory devices are supported.-
0
This unit does not support a connection through a USB hub. Connect the USB memory device directly to the USB port.-
0
The USB memory device must be formatted to FAT16 or FAT32.-
0
Not all USB memory devices are guaranteed to work. Some USB memory devices are not recognized. When using a type of
portable hard disc drive compatible with the USB connection that requires power from an AC adapter, use the AC adapter that came
with the drive.
-
Files on the USB memory device are not
displayed. Or “Err2: No playable files” is
displayed.
0
Files of a type not supported by this unit are not displayed.33
0
This unit can display a file structure with up to 8 levels, up to 1,000 folders and up to 2,000 files in 1 folder. Modify the folder structure
of the USB memory device.
33
0
When multiple partitions exist on the USB memory device, only files on the first partition are displayed.-
Files on a USB memory device cannot
be played.
0
Files are created in a format that is not supported by this unit. Check the formats supported by this unit.33
0
Files that are copyright protected cannot be played on this unit.-
0
If a file is unplayable, “Unsupported” is displayed and the next file is played.-
Files that begin with “.” cannot be
played.
0
When content created by Mac OS X is copied into a USB memory device, all contents as well as hidden files are copied. Although
the extension of this file is the same as the extension of the content, it is actually not the content. Delete this file using another OS
such as Windows.
-
n
Text informations on the USB memory device are not displayed properly
SymptomCause / SolutionPage
The text informations are not displayed
properly (“…”, etc.).
0
Characters that cannot be displayed have been used. On this unit, characters that cannot be displayed are replaced with a “.”
(period).
-
ENGLISH
30
OverviewConnectionsPlaybackSettingsTipsAppendix
Appendix
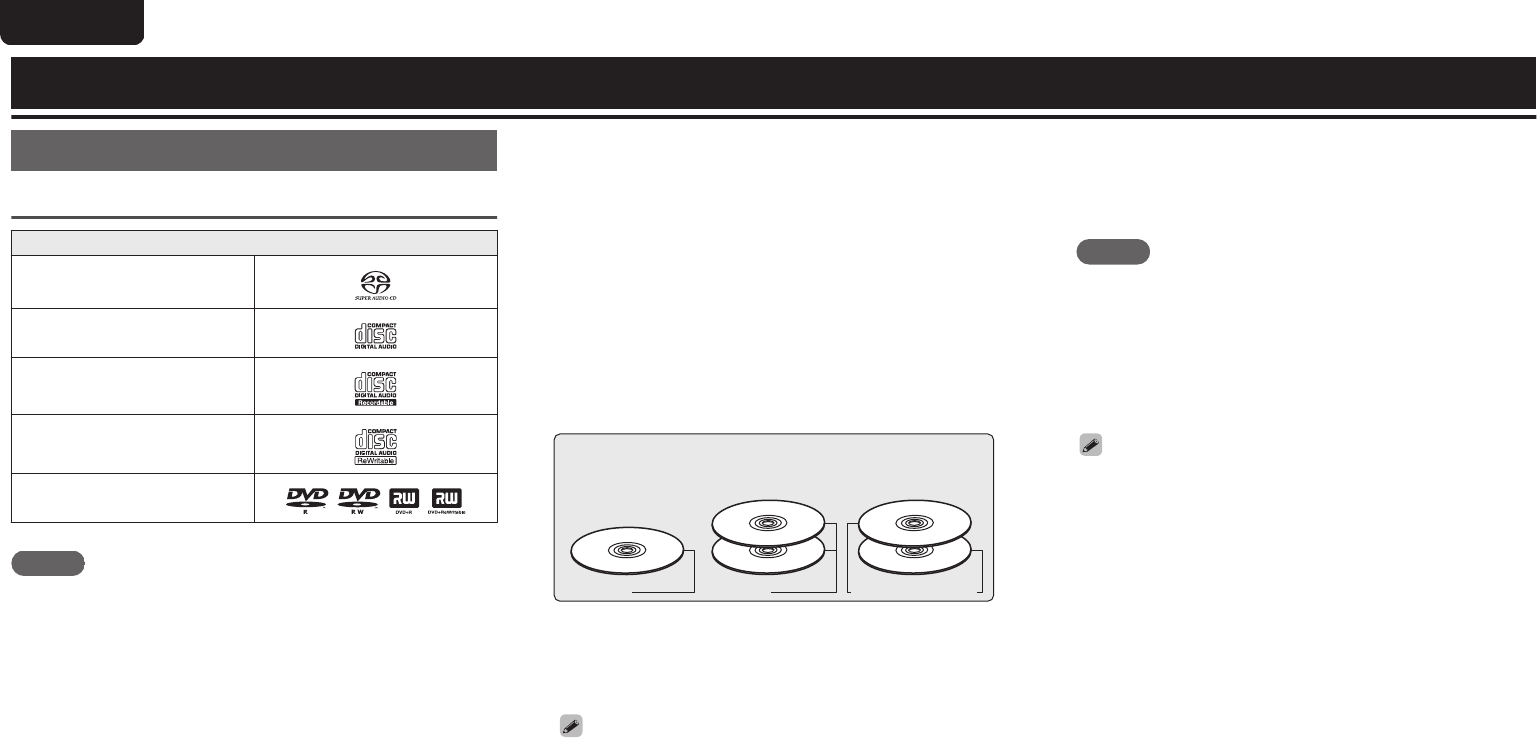
Playable media
Discs
Playable media
Super Audio CD
.
CD
.
CD-R
.
CD-RW
.
DVD-R/-RW/+R/+RW
.
NOTE
0
Some discs and some recording formats cannot be played.
0
Non-finalized discs cannot be played.
n
Super Audio CD
There are three types of Super Audio CDs:
1.Single layer disc
Single layer Super Audio CD with just an HD layer.
2.Dual layer disc
Super Audio CD with two HD layers. Enables long
playback at a high audio quality.
3.Hybrid disc
Two-layer Super Audio CD with an HD layer and a CD
layer.
The signals on the CD layer can be played on a regular
CD player.
.
Types of Super Audio CDs
Single layer discDual layer disc
Hybrid disc
HD layer
HD layerHD layer
CD layer
The HD layer is a layer of high density signals for Super
Audio CDs.
The CD layer is the layer of signals that can be read on a
regular CD player.
0
When you press SOUND MODE button and select
“MULTI”, down-mixed audio is output to the L and R
channels.
n
Maximum number of playable files and
folders
Maximum number of folders : 1,000
Maximum number of files in 1 folder : 2,000
NOTE
0
Be sure to give files the extension. Files with any other
extensions or files with no extensions cannot be
played.
0
Recordings you have made should only be used for
your personal enjoyment, and as per copyright laws
may not be used in other ways without permission of
the copyright holder.
0
Only music files that are not copyright-protected can be
played on this unit.
0
Content downloaded from pay sites on the Internet
are copyright protected. Also, files encoded in WMA
format when ripped from a CD, etc. on a computer
may be copyright protected, depending on the
computer’s settings.
0
The maximum number of files and folders that can be
played differs depending on conditions such as the
length of the file name or folder name or the number of
levels in the folder hierarchy.
ENGLISH
31
n
Compatible formats
Sampling frequencyBit rate
Bit length
Playable discs
Extension
CD-R/
CD-RW
DVD-R/
DVD-RW
DVD+R/
DVD+RW
MP344.1/48 kHz32 – 320 kbps-
PPP
.mp3
WMA44.1/48 kHz48 – 320 kbps-
PPP
.wma
AAC44.1/48 kHz16 – 320 kbps-
PPP
.aac/
.m4a
WAV
44.1/48/88.2/
96/176.4/192 kHz
-16/24 bits
P
z
2
PP
.wav
FLAC
44.1/48/88.2/
96/176.4/192 kHz
-16/24 bits
P
z
2
PP
.flac
Apple Lossless
z
1
44.1/48/
88.2/96 kHz
-16/24 bits
P
z
2
PP
.m4a
AIFF
44.1/48/88.2/
96/176.4/192 kHz
-16/24 bits
P
z
2
PP
.aif/
.aiff
DSD2.8/5.6 MHz-1 bit–
PP
.dsf/
.dff
z1
The Apple Lossless Audio Codec(ALAC) decoder is distributed under the Apache License, Version 2.0 (http://www.apache.org/licenses/LICENSE-2.0).
z2
This item can only be used to play files with a sampling frequency of 44.1/48 kHz.
ENGLISH
32
OverviewConnectionsPlaybackSettingsTipsAppendix
USB memory device
n
USB-compatible file systems
FAT16 or FAT32
0
If the USB memory device is divided into multiple
partitions, only the top drive can be selected.
n
Maximum number of playable files and
folders
Maximum number of folders : 1,000
Maximum number of files in 1 folder : 2,000
n
Tag data
ID3-TAG (Ver.1.x and 2.x)
WMA-TAG
(The title, artist, and album tag data are supported)
n
Compatible formats
Sampling
frequency
Bit
rate
Bit
length
Extension
MP344.1/48 kHz
32 –
320
kbps
–.mp3
WMA44.1/48 kHz
48 –
320
kbps
–.wma
AAC44.1/48 kHz
16 –
320
kbps
–
.aac/
.m4a
WAV
44.1/48/
88.2/96/
176.4/192 kHz
–
16/24
bits
.wav
FLAC
44.1/48/
88.2/96/
176.4/192 kHz
–
16/24
bits
.flac
Apple Lossless
z
44.1/48/
88.2/96 kHz
–
16/24
bits
.m4a
AIFF
44.1/48/
88.2/96/
176.4/192 kHz
–
16/24
bits
.aif/
.aiff
DSD2.8/5.6 MHz–1 bit
.dsf/
.dff
z
The Apple Lossless Audio Codec(ALAC) decoder is
distributed under the Apache License, Version 2.0 (
http://
www.apache.org/licenses/LICENSE-2.0).
NOTE
0
Be sure to give files the extension. Files with any other
extensions or files with no extensions cannot be played.
0
Recordings you have made should only be used for your
personal enjoyment, and as per copyright laws may not be
used in other ways without permission of the copyright
holder.
0
It is not compatible with an MP3 player, digital camera, a
USB device for a mobile phone, etc.
0
The unit does not support a card reader, USB extension
cable, or USB hub.
0
Only music files that are not copyright-protected can be
played on this unit.
0
Content downloaded from pay sites on the Internet are
copyright protected. Also, files encoded in WMA format
when ripped from a CD, etc. on a computer may be
copyright protected, depending on the computer’s
settings.
0
The maximum number of files and folders that can be
played differs depending on conditions such as the length
of the file name or folder name or the number of levels in
the folder hierarchy.
ENGLISH
33
Playback order of music files
When there are multiple folders containing music files, the
playback order of folders is automatically set when this unit
reads the media. The files in each folder are played back in
the order in which the files were recorded on the media, from
the oldest date and time.
DVD-R/-RW/+R/+RW, CD-R/-RW and USB memory device
For playback of files on DVD-R/-RW/+R/+RW, CD-R/-RW or
USB memory device, files in all folders on the first layer are
played first, next on the second layer, then next on the third
layer, and so on in this order.
0
The playback order displayed on a PC may differ from the
actual playback order.
0
The playback order with a DVD-R/-RW/+R/+RW and CD-
R/-RW may differ, depending on the writing software.
NOTE
0
The playback order may differ from the order in which the
folders or files were recorded if you delete or add a folder
or file on USB. This occurs because of data recording
specifications and is not a malfunction.
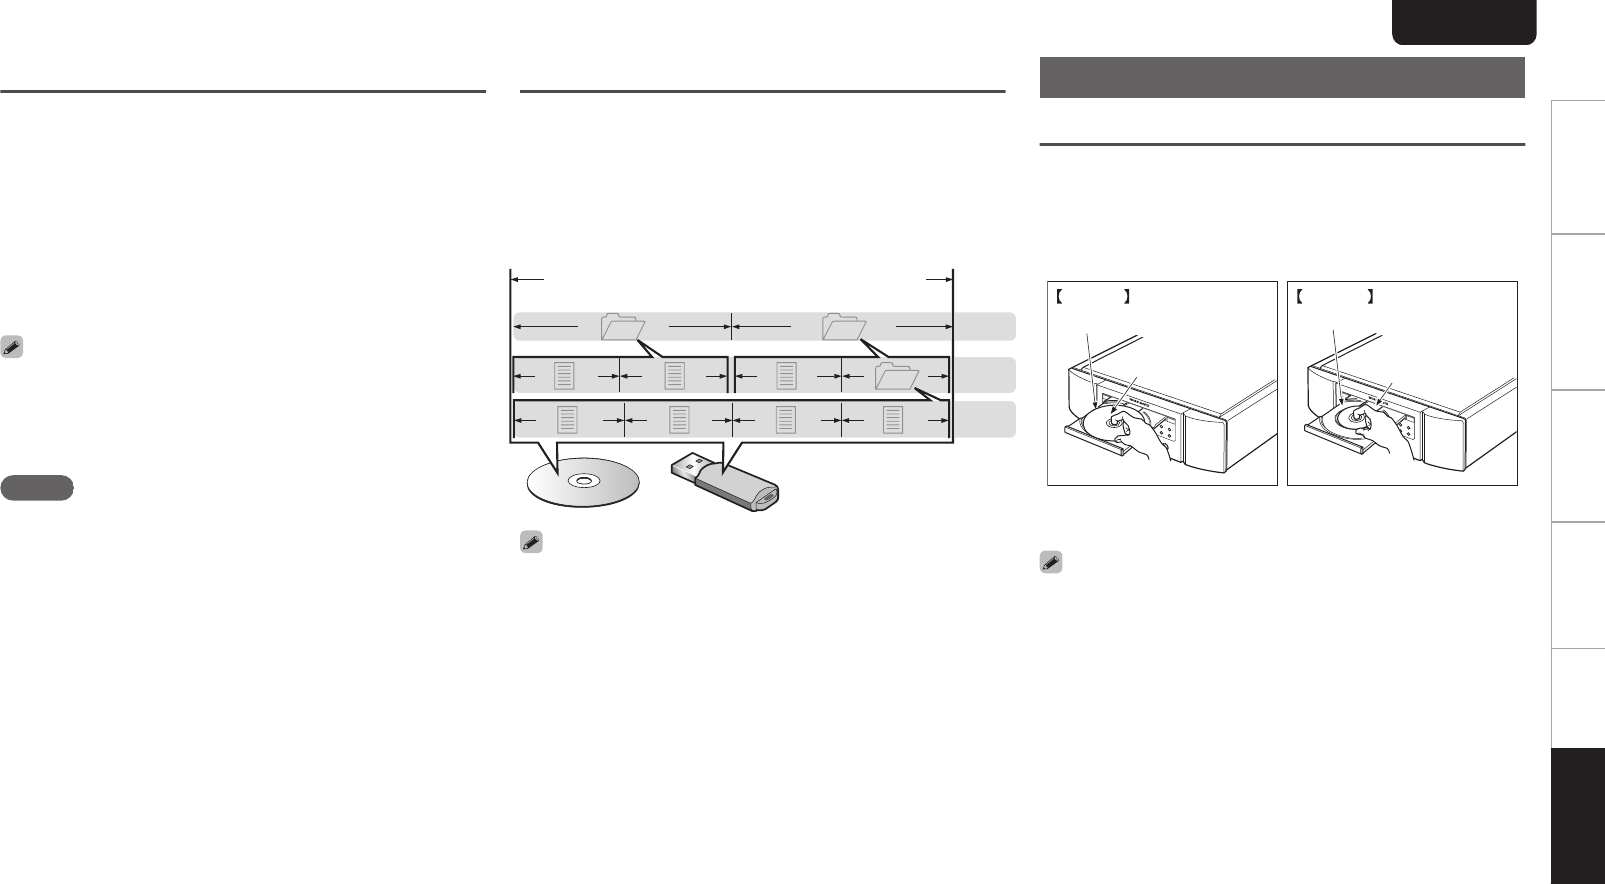
About discs and files
Music files recorded on CD-R/-RW, DVD-R/-RW/+R/+RW
and USB memory device are divided into large segments
(folders) and small segments (files).
Files are stored in folders, and folders can be placed for
storage in a hierarchy. The unit can recognize up to 8 levels
of folders.
.
3rd level
File 7
File 6
File 5
File 4
2nd level
Folder 3
File 3File 2
File 1
1st level
Folder 1Folder 2
CD-R/-RW, DVD-R/-RW/+R/+RW or USB memory device
0
When writing music files on a DVD-R/-RW/+R/+RW or CD-
R/-RW disc, set the writing software’s format to “ISO9660”.
The files may not play properly if they are recorded in other
formats. For details, refer to the instructions of your writing
software.
Cautions on using media
Loading discs
0
Set the disc in the tray label side up.
0
Make sure the disc tray is fully open when inserting the
disc.
0
Place the discs flatly, 12 cm discs in the outer tray guide
(Figure 1), 8 cm discs in the inner tray guide (Figure 2).
.
Outer tray guide
Inner tray guide
12 cm disc
8 cm disc
Figure 2Figure 1
0
Place 8 cm discs in the inner tray guide without using an
adapter.
0
“Unsupported” is displayed if a disc that cannot be played
is loaded.
0
“ No Disc” is displayed if the disc is loaded upside-down or
if no disc is loaded.
ENGLISH
34
OverviewConnectionsPlaybackSettingsTipsAppendix
NOTE
0
Only load one disc at a time. Loading two or more discs
can damage the unit or scratch the discs.
0
Do not use cracked or warped discs or discs that have
been repaired with adhesive, etc.
0
Do not use discs on which the sticky part of cellophane
tape or labels is exposed or on which there are traces of
where labels have been removed. Such discs can get
caught inside the player and damage it.
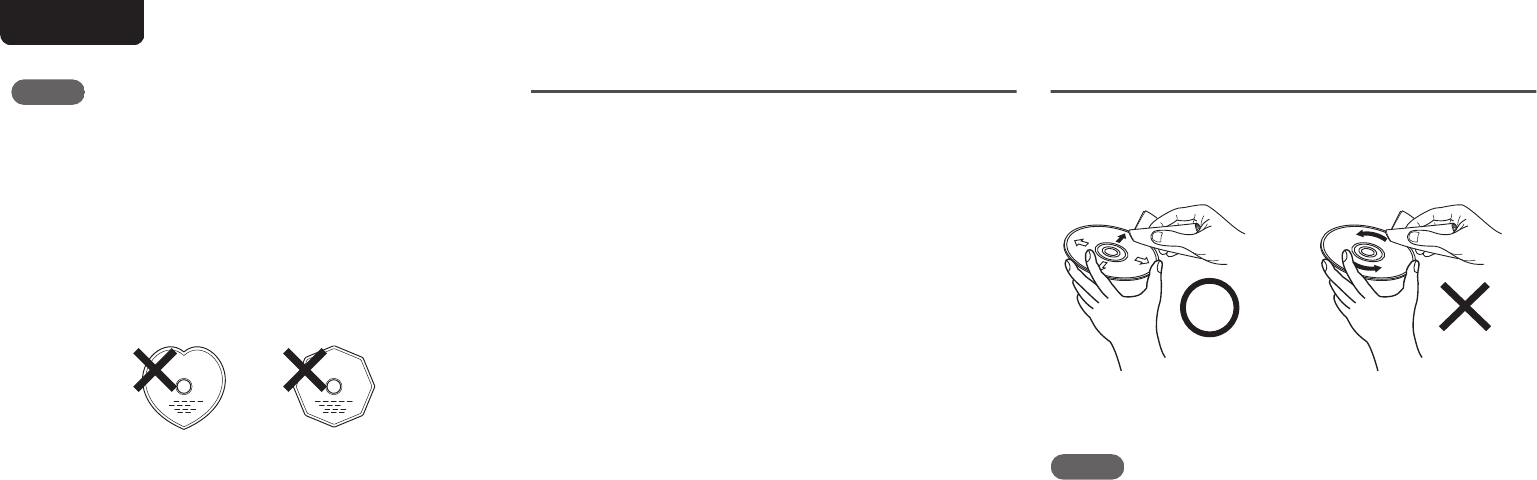
0
Do not use discs in special shapes, as they may damage
the unit.
.
0
Do not push the disc tray in by hand when the power is off.
Doing so could damage the unit.
0
If the unit is left in a room full of smoke from cigarettes, etc.,
for long periods of time, the surface of the optical pickup
may get dirty, preventing it from receiving signals properly.
How to handle media
0
Do not get fingerprints, oil or dirt on discs.
0
Take special care not to scratch discs when removing
them from their cases.
0
Do not bend or heat discs.
0
Do not enlarge the hole in the center.
0
Do not write on the labeled (printed) surface with ball-point
pens, pencils, etc., or stick new labels on discs.
0
Condensation may form on discs if they are moved
suddenly from a cold place (outdoors for example) to a
warm place, but do not try to dry discs with a hairdryer, etc.
0
Do not eject a USB memory device or turn off the unit while
a USB memory device is being played. This may result in
malfunction or loss of the USB memory device’s data.
0
Do not attempt to open or modify a USB memory device.
0
USB memory device and files can be damaged by static
electricity. Do not touch the metal contacts of a USB
memory device with your fingers.
0
Do not use warped USB memory device.
0
After use, be sure to remove any disc or USB memory
device, and store it in its proper case, to avoid dust,
scratches and deformation.
0
Do not store discs in the following places:
1.Places exposed to direct sunlight for long periods of
time
2.Dusty or humid places
3.Places exposed to heat from heaters, etc.
Cleaning discs
0
If there are fingerprints or dirt on a disc, wipe them off
before using the disc.
0
Use a commercially available disc cleaning set or a soft
cloth to clean discs.
.
Gently wipe the disc from the
inside towards the outside.
Do not wipe with a circular
motion.
NOTE
0
Do not use record spray, antistatic agents, benzene,
thinner or other solvents.
ENGLISH
35
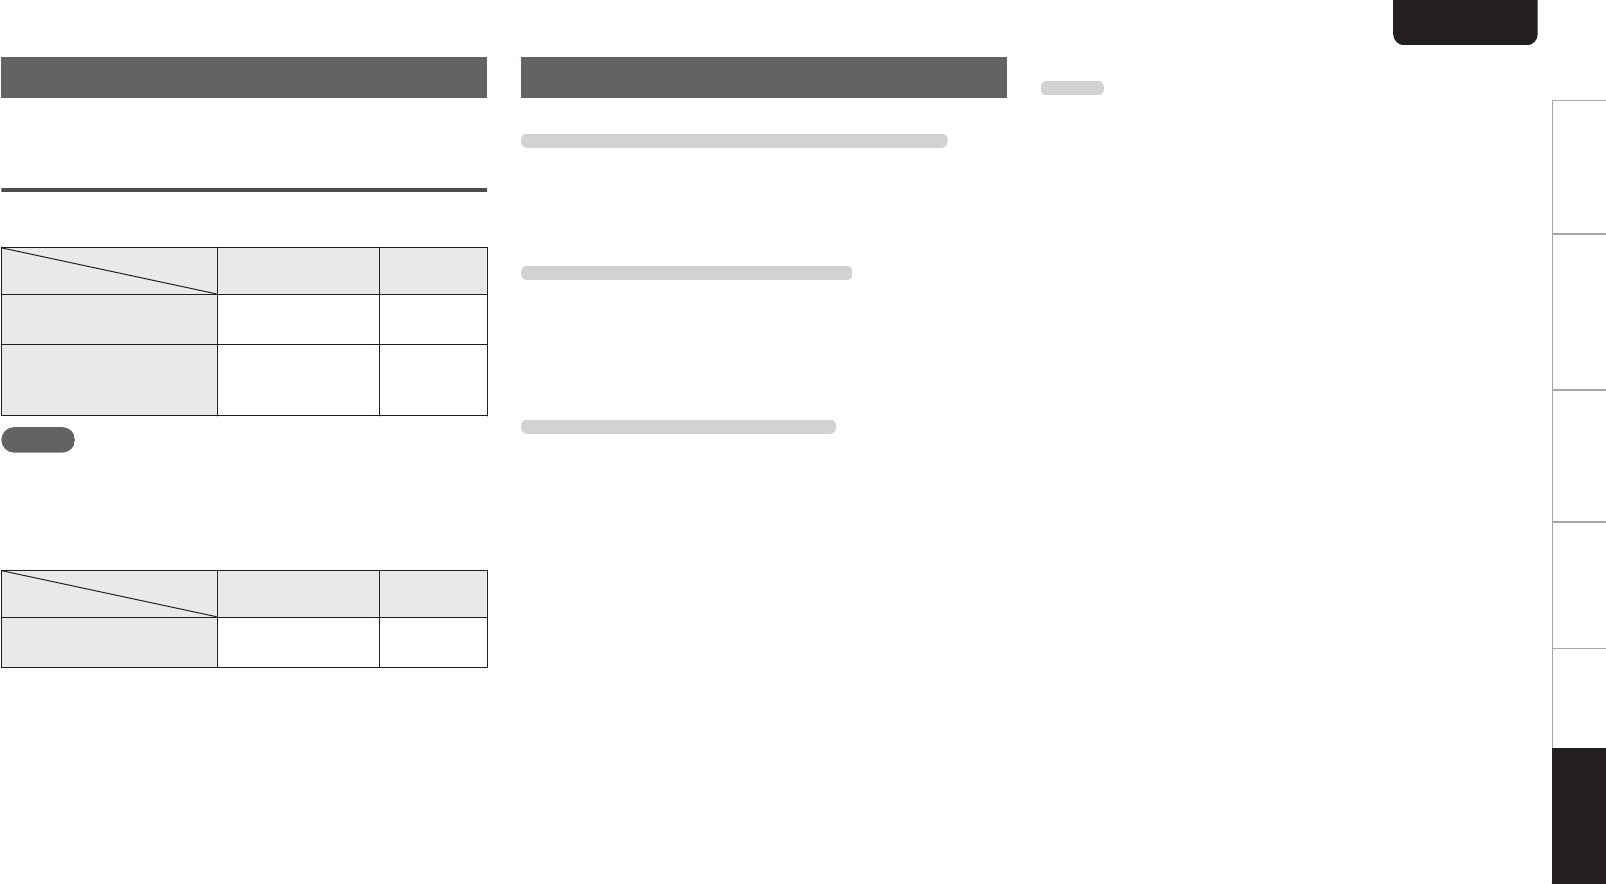
D/A converter
Specifications of supported audio
formats
n
USB-DAC
Sampling
frequency
Bit length
DSD
(2-channel)
2.8/5.6/
11.2 MHz
1 bit
Linear PCM
(2-channel)
44.1/48/88.2/96/
176.4/192/352.8/
384 kHz
16/24/32
bits
NOTE
0
Digital audio output stops during playback of the DSD files
and linear PCM signals with a sampling frequency of
352.8/384 kHz using this unit’s D/A converter.
n
Coaxial/Optical
Sampling
frequency
Bit length
Linear PCM
(2-channel)
44.1/48/88.2/96/
176.4/192 kHz
16/24 bits
Explanation of terms
AIFF (Audio Interchange File Format)
This is an uncompressed and lossless format for digital
audio. Use AIFF files to burn high-quality audio CDs from
imported songs. AIFF files use approximately 10 MB of disk
space per minute.
Apple Lossless Audio Codec
This is a codec for lossless audio compression method
developed by Apple Inc. This codec can be played back on
iTunes, iPod or iPhone. Data compressed to approximately
60 – 70 % can be decompressed to exactly the same original
data.
DSD (Direct-Stream Digital)
One of the audio data recording methods, it is the signal
aspect used to store audio signals on a super audio CD, and
is Δ-Σ modulated digital audio.
FLAC
FLAC stands for Free lossless Audio Codec, and is a lossless
free audio file format. Lossless means that the audio is
Gebruikershandleiding.com neemt misbruik van zijn services uitermate serieus. U kunt hieronder aangeven waarom deze vraag ongepast is. Wij controleren de vraag en zonodig wordt deze verwijderd.
Product:
Spelregels forum
Om tot zinvolle vragen te komen hanteren wij de volgende spelregels:
lees eerst de handleiding door;
controleer of uw vraag al eerder door iemand anders is gesteld;
probeer uw vraag zo duidelijk mogelijk te stellen;
heeft u een probleem en al geprobeerd om dit op te lossen, vermeld dit erbij aub;
heeft u een oplossing gekregen van een bezoeker dan horen wij dat graag in dit forum;
wilt u een reactie geven op een vraag of antwoord, gebruik dan niet dit formulier maar klik op de knop 'reageer op deze vraag';
uw vraag wordt direct op de website gezet; vermijd daarom persoonlijke gegevens in te vullen;
Belangrijk! Als er een antwoord wordt gegeven op uw vraag, dan is het voor de gever van het antwoord nuttig om te weten als u er wel (of niet) mee geholpen bent! Wij vragen u dus ook te reageren op een antwoord.
Belangrijk! Antwoorden worden ook per e-mail naar abonnees gestuurd. Laat uw emailadres achter op deze site, zodat u op de hoogte blijft. U krijgt dan ook andere vragen en antwoorden te zien.
Abonneren
Abonneer u voor het ontvangen van emails voor uw Marantz SA-KI Ruby bij:
nieuwe vragen en antwoorden
nieuwe handleidingen
U ontvangt een email met instructies om u voor één of beide opties in te schrijven.
Ontvang uw handleiding per email
Vul uw emailadres in en ontvang de handleiding van Marantz SA-KI Ruby in de taal/talen: Engels als bijlage per email.
De handleiding is 1,74 mb groot.
U ontvangt de handleiding per email binnen enkele minuten. Als u geen email heeft ontvangen, dan heeft u waarschijnlijk een verkeerd emailadres ingevuld of is uw mailbox te vol. Daarnaast kan het zijn dat uw internetprovider een maximum heeft aan de grootte per email. Omdat hier een handleiding wordt meegestuurd, kan het voorkomen dat de email groter is dan toegestaan bij uw provider.
Uw handleiding is per email verstuurd. Controleer uw email
Als u niet binnen een kwartier uw email met handleiding ontvangen heeft, kan het zijn dat u een verkeerd emailadres heeft ingevuld of dat uw emailprovider een maximum grootte per email heeft ingesteld die kleiner is dan de grootte van de handleiding.
Er is een email naar u verstuurd om uw inschrijving definitief te maken.
Controleer uw email en volg de aanwijzingen op om uw inschrijving definitief te maken
U heeft geen emailadres opgegeven
Als u de handleiding per email wilt ontvangen, vul dan een geldig emailadres in.
Uw vraag is op deze pagina toegevoegd
Wilt u een email ontvangen bij een antwoord en/of nieuwe vragen? Vul dan hier uw emailadres in.