690895
1
Verklein
Vergroot
Pagina terug
1/27
Pagina verder
DLM460
DLM461
EN
Cordless Lawn Mower INSTRUCTION MANUAL 8
FR
Tondeuse Sans Fil MANUEL D’INSTRUCTIONS 17
DE
Akku Rasenmäher BETRIEBSANLEITUNG 27
IT
Tosaerba a batteria ISTRUZIONI PER L’USO 38
NL
Accugrasmaaier GEBRUIKSAANWIJZING 49
ES
Cortadora de Cesped
MANUAL DE
INSTRUCCIONES
59
PT
Cortadora de Grama a Bateria MANUAL DE INSTRUÇÕES 69
DA
Akku-plæneklipper BRUGSANVISNING 79
EL
Μηχανή γκαζόν με μπαταρία ΕΓΧΕΙΡΙΔΙΟ ΟΔΗΓΙΩΝ 89
TR
Akülü Çim Biçme Makinesi KULLANMA KILAVUZU 100
1
2
3
6
5
4
Fig.1
1
2
3
6
45
Fig.2
12
3
Fig.3
1
Fig.4
1
2
Fig.5
1
Fig.6
2
1
2
Fig.7
1
Fig.8
13
2
Fig.9
1
2
Fig.10
1
2
Fig.11
1
2
Fig.12
1
2
Fig.13
1
2
Fig.14
3
1
Fig.15
1
Fig.16
1
2
Fig.17
2 31
4
5 6
Fig.18
1
3
2
Fig.19
1
Fig.20
4
1
2
Fig.21
1
2
3
21
Fig.22
Fig.23
Fig.24
12
33
Fig.25
Fig.26
Fig.27
5
1 2
3
Fig.28
1
2
Fig.29
1
3
2
Fig.30
1
2
2
Fig.31
1
2
3
Fig.32
1
2
3
Fig.33
6
1
2
Fig.34
1
2
3
Fig.35
1
2
3
Fig.36
1
2
Fig.37
7
8 ENGLISH
ENGLISH (Original instructions)
SPECIFICATIONS
Model: DLM460 DLM461
Mowing width (blade diameter) 460 mm
No load speed 2,500 min
-1
Maximum speed 3,300 min
-1
Part number of replacement mower blade 199367-2 199368-0
Dimensions
(L x W x H)
during operation L: 1,319 mm to 1,518 mm
W: 532 mm
H: 879 mm to 1,138 mm
when stored
(without grass basket)
L: 1,004 mm to 1,125 mm
W: 532 mm
H: 533 mm to 713 mm
Rated voltage D.C. 36 V
Net weight 25.3 - 27.6 kg 26.6 - 28.4 kg
Due to our continuing program of research and development, the specications herein are subject to change without notice.
Specications and battery cartridge may differ from country to country.
The weight may differ depending on the attachment(s), including the battery cartridge. The lightest and heavi-
est combination, according to EPTA-Procedure 01/2014, are shown in the table.
Applicable battery cartridge
BL1815N / BL1820 / BL1820B / BL1830 / BL1830B / BL1840 / BL1840B / BL1850 / BL1850B / BL1860B
Some of the battery cartridges listed above may not be available depending on your region of residence.
WARNING: Only use the battery cartridges listed above. Use of any other battery cartridges may cause
injury and/or re.
Symbols
The following show the symbols used for the equipment.
Be sure that you understand their meaning before use.
Take particular care and attention.
Read instruction manual.
Danger; be aware of thrown objects.
The distance between the tool and
bystanders must be at least 15 m.
Never put your hands and feet near the
blade under the mower. Blades continue to
rotate after the motor is switched off.
Remove the lock key before inspecting,
adjusting, cleaning, servicing, leaving and
storing the mower.
Ni-MH
Li-ion
Only for EU countries
Do not dispose of electric equipment or battery
pack together with household waste material!
In observance of the European Directives,
on Waste Electric and Electronic Equipment
and Batteries and Accumulators and Waste
Batteries and Accumulators and their imple
-
mentation in accordance with national laws,
electric equipment and batteries and battery
pack(s) that have reached the end of their life
must be collected separately and returned to an
environmentally compatible recycling facility.
Intended use
The tool is intended for lawn mowing.
Noise
The typical A-weighted noise level determined accord-
ing to EN60335-2-77:
Model DLM460
Sound pressure level (L
pA
) : 79 dB(A)
Sound power level (L
WA
) : 91 dB (A)
Uncertainty (K) : 3.4 dB(A)
The noise level under working may exceed 80 dB (A).
WARNING: Wear ear protection.
Vibration
The vibration total value (tri-axial vector sum) deter-
mined according to EN60335-2-77:
Model DLM460
Vibration emission (a
h
) : 2.5 m/s
2
or less
Uncertainty (K) : 1.5 m/s
2
NOTE: The declared vibration emission value has
been measured in accordance with the standard test
method and may be used for comparing one tool with
another.
NOTE: The declared vibration emission value
may also be used in a preliminary assessment of
exposure.
9 ENGLISH
WARNING: The vibration emission during actual
use of the power tool can differ from the declared
emission value depending on the ways in which the
tool is used.
WARNING: Be sure to identify safety measures
to protect the operator that are based on an estima-
tion of exposure in the actual conditions of use (taking
account of all parts of the operating cycle such as
the times when the tool is switched off and when it is
running idle in addition to the trigger time).
EC Declaration of Conformity
For European countries only
The EC declaration of conformity is included as Annex A
to this instruction manual.
SAFETY WARNINGS
Lawn Mower Safety Instructions
WARNING: Read all safety warnings and
all instructions. Failure to follow the warnings and
instructions may result in electric shock, re and/or
serious injury.
Save all warnings and instruc-
tions for future reference.
1. Do not insert the lock key into mower until it is
ready to be used.
2. Children should be supervised to ensure that
they do not play with the mower.
3. Never allow children or people unfamiliar with
these instructions to use the mower. Local
regulations can restrict the age of the operator.
4. Never operate the mower while people, espe-
cially children, or pets are nearby.
5. Keep in mind that the operator or user is
responsible for accidents or hazards occurring
to other people or their property.
6. While operating the mower, always wear sub-
stantial footwear and long trousers. Do not
operate the mower when barefoot or wearing
open sandals. Avoid wearing clothing or jew-
elry that is loose tting or that has hanging
cords or ties. They can be caught in moving
parts.
7. Always wear protective goggles to protect
your eyes from injury when using power tools.
The goggles must comply with ANSI Z87.1 in
the USA, EN 166 in Europe, or AS/NZS 1336
in Australia/New Zealand. In Australia/New
Zealand, it is legally required to wear a face
shield to protect your face, too.
It is an employer's responsibility to enforce
the use of appropriate safety protective equip-
ments by the tool operators and by other per-
sons in the immediate working area.
8. Operate the mower only in daylight or in good
articial light.
9. Avoid operating the mower in wet grass.
10. Battery tool use and care
- Recharge only with the charger specied by
the manufacturer. A charger that is suitable for
one type of battery cartridge may create a risk of
re when used with another battery cartridge.
- Use power tools only with specically desig-
nated battery cartridges. Use of any other bat-
tery cartridges may create a risk of injury and re.
- When battery cartridge is not in use, keep
it away from other metal objects, like paper
clips, coins, keys, nails, screws or other small
metal objects, that can make a connection
from one terminal to another. Shorting the bat-
tery terminals together may cause burns or a re.
- Under abusive conditions, liquid may be ejected
from the battery; avoid contact. If contact acci-
dentally occurs, ush with water. If liquid contacts
eyes, additionally seek medical help. Liquid ejected
from the battery may cause irritation or burns.
- Do not dispose of the battery(ies) in a re.
The cell may explode. Check with local codes for
possible special disposal instructions.
- Do not open or mutilate the battery(ies). Released
electrolyte is corrosive and may cause damage to the
eyes or skin. It may be toxic if swallowed.
- Do not charge battery in rain, or in wet locations.
11. Always keep a rm hold on the handle.
12. Always be sure of your footing on slopes.
13. Walk, never run.
14.
Don't grasp the exposed cutting blades or cutting
edges when picking up or holding the mower.
15. Physical condition - Do not operate mower
while under the inuence of drugs, alcohol, or
any medication.
16. Keep hands and feet away from rotating
blades. Caution - Blades coast after the mower
is switched off.
17. Use only the manufacturer genuine blades
specied in this manual.
18.
Check the blades or blade bolts carefully for cracks
or damage before operation. Replace cracked or
damaged blades or blade bolts immediately.
19. Be sure the area is clear of other people before
mowing. Stop mower if anyone enters the area.
10 ENGLISH
20. Remove foreign matters such as rocks, wire,
bottles, bones and large sticks from the work
area before mowing to prevent personal injury
or damage to the mower.
21. Stop operation immediately if you notice
anything unusual. Switch off the mower and
remove the key. Then inspect the mower.
22. Never attempt to make cutting height adjust-
ments while mower is running if the mower
has cutting height adjustment feature.
23. Release switch lever and wait for blade rota-
tion to stop before crossing driveways, walks,
roads, and any gravel-covered areas. Also
remove the lock key if you leave the mower,
reach to pick up or remove something out of
your way, or for any other reason that may
distract you from what you are doing.
24. Objects struck by the mower blade can cause
severe injuries to persons. The lawn should
always be carefully examined and cleared of
all objects prior to each mowing.
25. If the mower strikes a foreign object, follow
these steps:
- Stop the mower, release the switch lever and
wait until the blade comes to a complete stop.
- Remove the lock key and the battery cartridge.
- Thoroughly inspect the mower for any damage.
- Replace the blade if it is damaged in any way.
Repair any damage before restarting and con-
tinuing to operate the mower.
26.
Check the grass basket frequently for wear or
deterioration. For storage, always make sure
the grass basket is empty. Replace a worn grass
basket with a new factory replacement for safety.
27. Use extreme caution when reversing or pulling
the mower towards you.
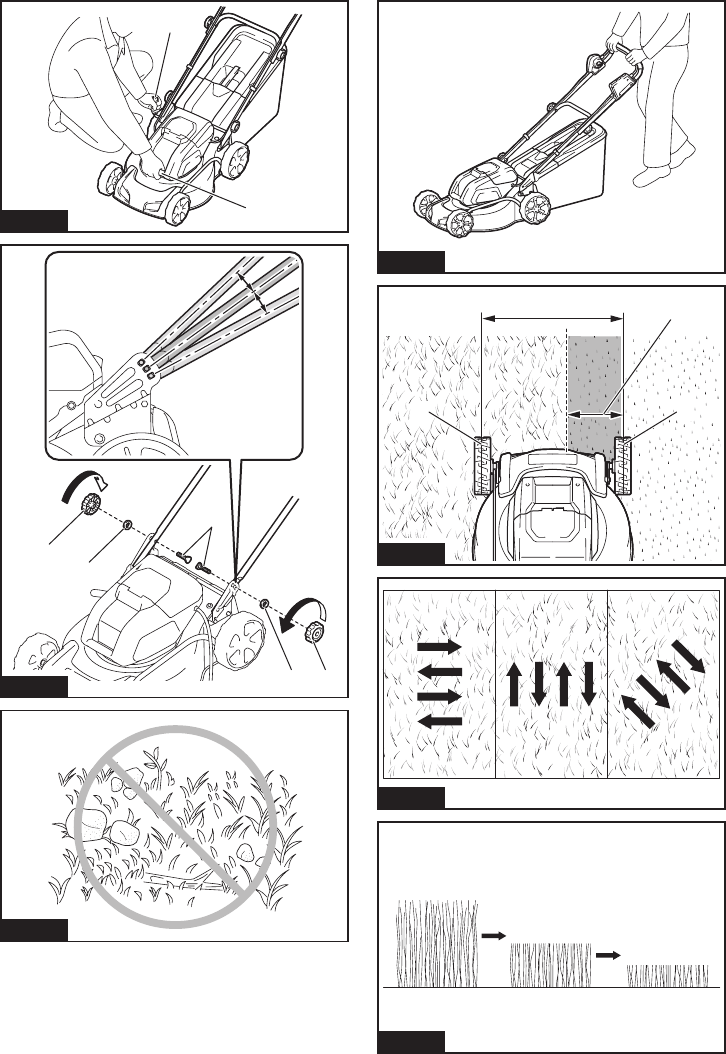
28. Stop the blade(s) if the mower has to be tilted
for transportation when crossing surfaces
other than grass, and when transporting the
mower to and from the area to be used.
29.
Never operate the mower with defective guards
or shields, or without safety devices, for exam-
ple deectors and/or grass basket, in place.
30.
Switch on the mower carefully according to instruc-
tions and with feet well away from the blade(s).
31. Do not tilt the mower when switching on the
motor, except if the mower has to be tilted for
starting. In this case, do not tilt it more than
absolutely necessary and lift only the part,
which is away from the operator.
32. Do not start the mower when standing in front
of the discharge opening.
33.
Do not put hands or feet near or under rotating parts.
Keep clear of the discharge opening at all times.
34. Do not transport the mower while the mower is
turned on.
35. Stop the mower, and remove the disabling
device. Make sure that all moving parts have
come to a complete stop
- whenever you leave the mower,
- before clearing blockages or unclogging chute,
- before checking, cleaning or working on the mower,
- after striking a foreign object. Inspect the
mower for damage and make repairs before
restarting and operating the mower.
36. If the mower starts to vibrate abnormally
(check immediately)
- inspect for damage,
- replace or repair any damaged parts,
- check for and tighten any loose parts.
37. Be careful during adjustment of the mower
to prevent entrapment of the ngers between
moving blades and xed parts of the mower.
38. Mow across the face of slopes, never up and
down. Exercise extreme caution when chang-
ing direction on slopes. Do not mow exces-
sively steep slopes.
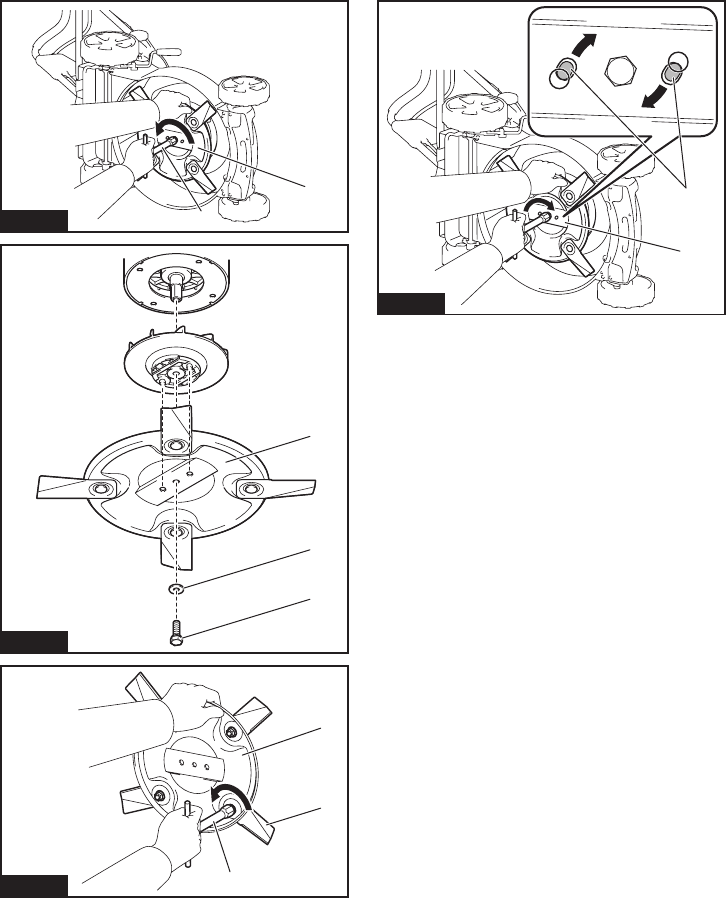
39. Check the blade mounting bolt at frequent
intervals for proper tightness.
40.
Keep all nuts, bolts, and screws tight to be sure
the equipment is in safe working condition.
41. Always allow the mower to cool down before
storing.
42. When servicing the blades be aware that, even
though the power source is switched off, the
blades can still be moved.
43. Replace worn or damaged parts for safety.
Use only genuine replacement parts and
accessories.
44. Do not use the machine when there is a risk of
lightning.
45. When you use the machine on muddy ground,
wet slope, or slippery place, pay attention to
your footing.
46. Avoid working in poor environment where
increased user fatigue is expected.
47. Do not use the machine in bad weather where
visibility is limited. Failure to do so may cause
fall or incorrect operation due to low visibility.
48. Do not replace the battery in the rain.
49. Do not submerge the machine into a puddle.
50. Do not leave the machine unattended outdoors
in the rain.
51.
Do not insert or remove the lock key in the rain.
52. When wet leaves or dirt adhere to the suc-
tion mouth (ventilation window) due to rain,
remove them.
53.
Do not wash the machine with high pressure water.
54. When washing the machine, be sure to remove
the battery and lock key and close the battery
cover, and pour water toward the bottom of the
machine to which the blade is attached.
55. When storing the machine, avoid direct sun-
light and rain, and store it in a place where it
does not get hot or humid.
56. Perform inspection or maintenance in a place
where rain can be avoided.
57. After using the machine, remove the adhered
dirt and dry the machine completely before
storing. Depending on the season or the area,
there is a risk of malfunction due to freezing.
58. Do not wet the terminal of battery with liquid
such as water, or submerge the battery. Do not
leave the battery in the rain, nor charge, use,
or store the battery in a damp or wet place. If
the terminal gets wet or liquid enters inside of bat-
tery, the battery may be short circuited and there is
a risk of overheat, re, or explosion.
11 ENGLISH
59. After removing the battery from the machine or
charger, be sure to attach the battery cover to
the battery and store it in a dry place.
60. Do not replace the battery with wet hands.
61. Do not use the machine in the snow.
62. If the cut-off grass is wet, it is likely to be
clogged inside of the machine. Check the con-
dition of the machine regularly, and remove the
adhered grass as necessary.
SAVE THESE INSTRUCTIONS.
WARNING:
DO NOT let comfort or familiarity
with product (gained from repeated use) replace strict
adherence to safety rules for the subject product.
MISUSE or failure to follow the safety rules stated in this
instruction manual may cause serious personal injury.
Important safety instructions for
battery cartridge
1.
Before using battery cartridge, read all instruc-
tions and cautionary markings on (1) battery char-
ger, (2) battery, and (3) product using battery.
2. Do not disassemble battery cartridge.
3. If operating time has become excessively
shorter, stop operating immediately. It may
result in a risk of overheating, possible burns
and even an explosion.
4.
If electrolyte gets into your eyes, rinse them out
with clear water and seek medical attention right
away. It may result in loss of your eyesight.
5. Do not short the battery cartridge:
(1) Do not touch the terminals with any con-
ductive material.
(2) Avoid storing battery cartridge in a con-
tainer with other metal objects such as
nails, coins, etc.
(3) Do not expose battery cartridge to water
or rain.
A battery short can cause a large current
ow, overheating, possible burns and even a
breakdown.
6. Do not store the tool and battery cartridge in
locations where the temperature may reach or
exceed 50 °C (122 °F).
7. Do not incinerate the battery cartridge even if
it is severely damaged or is completely worn
out. The battery cartridge can explode in a re.
8. Be careful not to drop or strike battery.
9. Do not use a damaged battery.
10. The contained lithium-ion batteries are subject
to the Dangerous Goods Legislation require-
ments.
For commercial transports e.g. by third parties,
forwarding agents, special requirement on pack-
aging and labeling must be observed.
For preparation of the item being shipped, consult-
ing an expert for hazardous material is required.
Please also observe possibly more detailed
national regulations.
Tape or mask off open contacts and pack up the
battery in such a manner that it cannot move
around in the packaging.
11. Follow your local regulations relating to dis-
posal of battery.
12. Use the batteries only with the products
specied by Makita. Installing the batteries to
non-compliant products may result in a re, exces-
sive heat, explosion, or leak of electrolyte.
SAVE THESE INSTRUCTIONS.
CAUTION: Only use genuine Makita batteries.
Use of non-genuine Makita batteries, or batteries that
have been altered, may result in the battery bursting
causing res, personal injury and damage. It will
also void the Makita warranty for the Makita tool and
charger.
Tips for maintaining maximum
battery life
1. Charge the battery cartridge before completely
discharged. Always stop tool operation and
charge the battery cartridge when you notice
less tool power.
2. Never recharge a fully charged battery car-
tridge. Overcharging shortens the battery
service life.
3.
Charge the battery cartridge with room tempera-
ture at 10 °C - 40 °C (50 °F - 104 °F). Let a hot
battery cartridge cool down before charging it.
4. Charge the battery cartridge if you do not use
it for a long period (more than six months).
ASSEMBLY
WARNING: Always be sure that the lock key
and battery cartridge are removed before carrying
out any work on the mower. Failure to remove the
lock key and the battery cartridge may result in seri-
ous personal injury from accidental start-up.
WARNING: Never start the mower unless it is
completely assembled. Operation of the tools in a
partially assembled state may result in serious per-
sonal injury from accidental start-up.
Installing the handle
NOTICE: When installing handles, position the
cords so that they are not caught by anything
between the handles. If the cord is damaged, the
mower switch may not work.
1. Attach the lower handle so that the holes in the
handle t in the protrusions on the mower body. Insert
the bolts from inside, then attach washer A from outside,
and then tighten the thumb nuts.
Fig.1: 1. Lower handle 2. Washer A 3. Thumb nut
4. Protrusion 5. Hole 6. Bolt
2. Align the hole in the lower handle with the hole
in the upper handle, then insert the bolts from inside,
then attach washer B from outside, and then tighten the
thumb nuts.
Fig.2: 1. Upper handle 2. Hole 3. Washer B
4. Thumb nut 5. Lower handle 6. Bolt
12 ENGLISH
CAUTION: Hold the upper handle rmly so
that it does not drop off your hand. Otherwise, the
handle may fall and cause an injury.
3. Attach holder A and holder B to the handle.
Position the cords as shown in the gure.
Fig.3: 1. Cord 2. Holder A 3. Holder B
NOTE: When attaching holder A, be sure to x the
cord with the holder as shown in the gure.
Removing the mulching attachment
For DLM460
1. Open the rear cover.
Fig.4: 1. Rear cover
2. Remove the mulching attachment while holding
down the lever.
Fig.5: 1. Lever 2. Mulching attachment
For DLM461
1. Open the rear cover.
Fig.6: 1. Rear cover
2. Remove the mulching attachment while pulling the
lever.
Fig.7: 1. Mulching attachment 2. Lever
Installing the grass basket
1. Open the rear cover.
Fig.8: 1. Rear cover
2. Hook the grass basket on the rod of the mower
body as shown in the gure.
Fig.9: 1. Rod 2. Guard 3. Grass basket
NOTICE: Make sure that the guard on the grass
basket is facing downward. Otherwise, the grass
basket may not catch all of cut-off grass.
Attaching the mulching attachment
For DLM460
1. Open the rear cover, and then remove the grass
basket.
Fig.10: 1. Rear cover 2. Grass basket
2. Attach the mulching attachment while holding
down the lever, and then release the lever to lock the
mulching attachment.
Fig.11: 1. Lever 2. Mulching attachment
For DLM461
1. Open the rear cover, and then remove the grass
basket.
Fig.12: 1. Rear cover 2. Grass basket
2. Attach the mulching attachment while pulling the
lever, and then release the lever to lock the mulching
attachment.
Fig.13: 1. Mulching attachment 2. Lever
FUNCTIONAL DESCRIPTION
Installing or removing battery cartridge
CAUTION: Always switch off the tool before
installing or removing of the battery cartridge.
CAUTION:
Hold the tool and the battery cartridge
rmly when installing or removing battery cartridge.
Failure to hold the tool and the battery cartridge rmly may
cause them to slip off your hands and result in damage to
the tool and battery cartridge and a personal injury.
CAUTION: Make sure that you lock the battery
cover before use. Otherwise, mud, dirt, or water may
cause damage to the product or the battery cartridge.
CAUTION: Always install the battery cartridge
fully until the red indicator cannot be seen. If not,
it may accidentally fall out of the tool, causing injury to
you or someone around you.
CAUTION: Do not install the battery cartridge
forcibly. If the cartridge does not slide in easily, it is
not being inserted correctly.
NOTE:
The tool does not work with only one battery cartridge.
To install the battery cartridge;
1.
Pull up the locking lever, and then open the battery cover.
Fig.14: 1. Battery cover 2. Locking lever
2. Align the tongue on the battery cartridge with the
slot on the mower then slide the cartridge until it locks in
place with a little click.
Fig.15: 1. Battery cartridge
3. Insert the lock key in the place shown in the gure
as far as it will go.
Fig.16: 1. Lock key
4. Close the battery cover and push it until it is
latched with the locking lever.
To remove the battery cartridge from the mower;
1. Pull up the battery cover locking lever and open
the battery cover.
2. Pull out the battery cartridge from the mower while
sliding the button on the front of the cartridge.
3. Pull out the lock key.
4. Close the battery cover.
Tool / battery protection system
The tool is equipped with a tool/battery protection sys-
tem. This system automatically cuts off power to the
motor to extend tool and battery life. The tool will auto-
matically stop during operation if the tool or battery is
placed under one of the following conditions:
Overload protection
When the battery is operated in a manner that causes
it to draw an abnormally high current, the tool automati-
cally stops and the main power lamp blinks in green. In
this situation, turn the tool off and stop the application
that caused the tool to become overloaded. Then turn
the tool on to restart.
13 ENGLISH
Overheat protection
When the tool or battery is overheated, the tool stops
automatically and the main power lamp lights up in red.
In this case, let the tool and battery cool before turning
the tool on again.
Overdischarge protection
When the battery capacity is not enough, the tool stops auto-
matically and the main power lamp blinks in red. In this case,
remove the battery from the tool and charge the battery car-
tridges or change the battery cartridges to fully charged ones.
Indicating the remaining battery
capacity
Only for battery cartridges with the indicator
Fig.17: 1. Indicator lamps 2. Check button
Press the check button on the battery cartridge to indi-
cate the remaining battery capacity. The indicator lamps
light up for a few seconds.
Indicator lamps Remaining
capacity
Lighted Off Blinking
75% to 100%
50% to 75%
25% to 50%
0% to 25%
Charge the
battery.
The battery
may have
malfunctioned.
NOTE: Depending on the conditions of use and the
ambient temperature, the indication may differ slightly
from the actual capacity.
Control panel
The control panel has the main power switch, the mode
switching button, and the indicator of remaining battery
capacity.
Fig.18: 1. Battery indicator 2. Mode switching
lamp 3. Main power lamp 4. Check button
5. Mode switching button 6. Main power
switch
Main power switch
WARNING: Always turn off the main power
switch when not in use.
To turn on the machine, press the main power switch.
The main power lamp lights up in green. To turn off the
machine, press the main power switch again.
NOTE: If the main power lamp lights up in red or
blinks in red or green, refer to the instructions for tool/
battery protection system.
NOTE: This machine employs the auto power-off
function. To avoid unintentional start up, the main
power switch will automatically shut down when the
switch lever is not pulled for a certain period after the
main power switch is turned on.
Mode switching button
You can switch the operating mode by pressing the
mode switching button. When the machine is turned on,
the machine starts up in the normal mode. When you
press the mode switching button, the machine shifts to
the energy-saving mode and the mode switching lamp
lights up in green. In the energy-saving mode, you can
decrease the noise at mowing. When you press the
mode switching button again, the machine returns to
the normal mode.
Indicating the remaining battery
capacity
Press the check button to indicate the remaining battery
capacities. The battery indicators correspond to each
battery.
Battery indicator status
Remaining battery
capacity
On
Off
50% - 100%
20% - 50%
0% - 20%
Switch action
WARNING: Before installing the battery car-
tridge, always check to see that the switch lever
actuates properly and returns to the original posi-
tion when released. Operating a tool with a switch
that does not actuate properly can lead to loss of
control and serious personal injury.
NOTE: The mower does not start without pressing the
switch button even the switch lever is pulled.
NOTE: Mower may not start due to the overload
when you try to mow long or dense grass at a time.
Increase the mowing height in this case.
14 ENGLISH
This mower is equipped with the interlock switch and han-
dle switch. If you notice anything unusual with either of
these switches, stop operation immediately and have them
checked by your nearest Makita Authorized Service Center.
1.
Install the battery cartridges. Insert the lock key into
the interlock switch and then close the battery cover.
2. Press the main power switch.
3. Press the switch button and hold it.
4. Grab the upper handle and pull the switch lever.
Fig.19: 1. Switch button 2. Upper handle 3. Switch
lever
NOTE: If the lock key is not inserted, the power lamp
blinks in green when you pull the switch lever.
5. Release the switch button as soon as the motor
starts running. The mower will continue to run until you
release the switch lever.
6. Release the switch lever to stop the motor.
Adjusting the mowing height
WARNING:
Never put your hand or leg under
the mower body when adjusting the mowing height.
WARNING: Always make sure that the lever
ts in the groove properly before operation.
For DLM460
The mowing height can be adjusted in the range of
between 20 mm and 75 mm.
For DLM461
The mowing height can be adjusted in the range of
between 16 mm and 71 mm.
Remove the lock key, and then pull the mowing height
adjusting lever outward of the mower body and move it
to your desired mowing height.
Fig.20: 1. Mowing height adjusting lever
Hold the front grip with one hand, and then move the
mowing height adjusting lever with the other hand.
Fig.21: 1. Mowing height adjusting lever 2. Front
grip
NOTE: The mowing height gures should be used
just as a guideline. Depending on the conditions of
the lawn or the ground, the actual lawn height may
become slightly different from the set height.
NOTE: Try a test mowing of grass in a less conspicu-
ous place to get your desired height.
Adjusting the handle height
CAUTION: Before removing the bolts, hold
the upper handle rmly. Otherwise, the handle may
fall and cause an injury.
The handle height can be adjusted in three levels.
1. Loosen the thumb nuts of the lower handle, and
then remove the bolts, washer, and thumb nuts.
Fig.22: 1. Thumb nut 2. Washer 3. Bolt
2. Adjust the handle height.
3. Insert the bolts from inside, then attach washers
from outside, and then tighten the thumb nuts.
Using mulching attachment
The mulching attachment allows you to return the cut
grass to the ground without gathering the cut grass in the
grass basket. When you operate the machine with the
mulching attachment, be sure to remove the grass basket.
Electronic function
The machine is equipped with the electronic functions
for easy operation.
Constant speed control
Electronic speed control for obtaining constant
speed. Possible to get ne nish, because the rotat-
ing speed is kept constant even under load condition.
Soft start
The soft-start function minimizes start-up shock,
and makes the machine start smoothly.
OPERATION
Mowing
WARNING: Before mowing, clear away sticks
and stones from mowing area. Furthermore, clear
away any weeds from mowing area in advance.
WARNING: Always wear the safety goggles or
safety glasses with side shields when operating
the mower.
CAUTION:
If the cut grass or foreign object
blocks up inside of the mower body, be sure to
remove the lock key and battery cartridge and wear
gloves before removing the grass or foreign object.
NOTICE: Use this machine for mowing lawn only.
Do not mow weeds with this machine.
Fig.23
Firmly hold the handle with both hands when mowing.
The mowing speed guideline is approximately 1 meter
per 4 seconds.
Fig.24
The center lines of the front wheels are guidelines to
mowing width. Using the center lines as guidelines,
mow in strips. Overlap by one half to one third the previ-
ous strip to mow the lawn evenly.
Fig.25: 1. Mowing width 2. Overlapping area
3. Center line
Change the mowing direction each time to prevent the
grass grain pattern from forming in just one direction.
Fig.26
Periodically check the grass basket for mowed grass.
Empty the grass before it becomes full. Before every
periodical check, be sure to stop the mower then
remove the lock key and the battery cartridge.
NOTE: Using the mower with the grass basket full
prevents smooth blade rotation and places an extra
load on the motor, which may cause breakdown.
15 ENGLISH
Mowing a long-grass lawn
Do not try to cut long grass all at once. Instead, mow
the lawn in steps. Leave a day or two between mowings
until the lawn becomes evenly short.
Fig.27
NOTE: Mowing long grass to a short length all at
once may cause the grass to die. The cut grass may
also block up inside of the mower body.
Emptying the grass basket
WARNING: To reduce a risk of accident, reg-
ularly check the grass basket for any damage or
weakened strength. Replace the grass basket if
necessary.
1. Release the switch lever.
2. Remove the lock key.
3. Open the rear cover and take out the grass basket
by holding the handle.
Fig.28: 1. Rear cover 2. Handle 3. Grass basket
4. Empty the grass basket.
MAINTENANCE
WARNING: Always be sure that the lock
key and battery cartridge are removed from the
mower before storing or carrying the mower or
attempting to perform inspection or maintenance.
WARNING: Always remove the lock key when
the mower is not in use. Store the lock key in a
safe place out of reach of children.
WARNING: Wear gloves when performing
inspection or maintenance.
WARNING: Always wear the safety goggles or
safety glasses with side shields when performing
inspection or maintenance.
NOTICE: Never use gasoline, benzine, thinner,
alcohol or the like. Discoloration, deformation or
cracks may result.
To maintain product SAFETY and RELIABILITY,
repairs, any other maintenance or adjustment should
be performed by Makita Authorized or Factory Service
Centers, always using Makita replacement parts.
Maintenance
1. Remove the lock key and battery cartridges, and
then close the battery cover.
2. Put the mower on its side and clean grass clip-
pings accumulated on the underside of mower deck.
3. Pour water toward the bottom of the machine to
which the blade is attached.
NOTICE: Do not wash the machine with high
pressure water.
4. Check all nuts, bolts, knobs, screws, fasteners etc.
for tightness.
5.
Inspect moving parts for damage, breakage, and wear.
Damaged or missing parts should be repaired or replaced.
6. Store the mower in a safe place out of the reach of
children.
Carrying the mower
When carrying the mower, hold the front grip and lower
handle with two people as shown in the gure.
Fig.29: 1. Lower handle 2. Front grip
Storing
Store mower indoors in a cool, dry and locked place.
Don't store the mower and charger in locations where
the temperature may reach or exceed 40 °C (104 °F).
1. Open the rear cover and take out the grass basket
by holding the handle.
Fig.30: 1. Rear cover 2. Handle 3. Grass basket
2. Loosen the thumb nuts and fold the upper handle.
Fig.31: 1. Upper handle 2. Thumb nut
Removing or installing the mower blade
WARNING: Always remove the lock key and
battery cartridge when removing or installing the
blade. Failure to remove the lock key and battery
cartridge may cause a serious injury.
WARNING:
The blade coasts for a few seconds
after releasing the switch. Do not start any opera-
tion until the blade comes to a complete stop.
WARNING: Always wear gloves when han-
dling the blade.
Removing the mower blade
For DLM460
1. Put the mower on its side so that the mowing
height adjusting lever comes to the upper side.
2. To lock the blade, insert a lumber or similar into
the mower.
3. Turn the bolt counterclockwise with the wrench.
Fig.32: 1. Mower blade 2. Wrench 3. Lumber
4. Remove the bolt, washer, mower blade in order.
Fig.33: 1. Mower blade 2. Washer 3. Bolt
For DLM461
1. Put the mower on its side so that the mowing
height adjusting lever comes to the upper side.
2. Turn the bolt counterclockwise with the wrench
while holding the base plate.
Fig.34: 1. Wrench 2. Base plate
3. Remove the bolt, washer, base plate in order.
Fig.35: 1. Base plate 2. Washer 3. Bolt
4.
To remove the individual blade, turn the bolt counter-
clockwise with the wrench while holding the base plate.
Fig.36: 1. Base plate 2. Mower blade 3. Wrench
16 ENGLISH
Installing the mower blade
To install the mower blade, take the removal procedure
in reverse.
WARNING: Install the blade carefully. It has
a top/bottom facing. Place the blade so that the
rotational direction arrow faces outward.
WARNING: Tighten the bolt clockwise rmly
to secure the blade.
WARNING: Make sure that the blade and all
the xing parts are installed correctly and tight-
ened securely.
WARNING: When you replace the blades,
always follow the instructions provided in this
manual.
For DLM461
NOTICE: When installing the mower blade, slide
the mower blade as shown in the gure so that
the protrusions touch the mower blade.
Fig.37: 1. Protrusion 2. Mower blade
TROUBLESHOOTING
Before asking for repairs, conduct your own inspection rst. If you nd a problem that is not explained in the manual,
do not attempt to dismantle the tool. Instead, ask Makita Authorized Service Centers, always using Makita replace-
ment parts for repairs.
State of abnormality Probable cause (malfunction) Remedy
Mower does not start. Two battery cartridges are not installed. Install the charged battery cartridges.
Battery problem (under voltage) Recharge the battery cartridge. If recharging is not
effective, replace battery cartridge.
The lock key is not inserted. Insert the lock key.
Motor stops running after a little use. Battery's charge level is low. Recharge the battery cartridge. If recharging is not
effective, replace battery cartridge.
Cutting height is too low. Raise the cutting height.
Motor does not reach maximum
RPM.
Battery cartridge is installed improperly. Install the battery cartridge as described in this
manual.
Battery power is dropping. Recharge the battery cartridge. If recharging is not
effective, replace battery cartridge.
The drive system does not work
correctly.
Ask your local authorized service center for repair.
Cutting tool does not rotate:
stop the mower immediately!
Foreign object such as a branch is
jammed near the blade.
Remove the foreign object.
The drive system does not work
correctly.
Ask your local authorized service center for repair.
Abnormal vibration:
stop the mower immediately!
Blade is imbalanced, excessively or
unevenly worn.
Replace the blade.
OPTIONAL ACCESSORIES
CAUTION: These accessories or attachments
are recommended for use with your Makita tool
specied in this manual. The use of any other
accessories or attachments might present a risk of
injury to persons. Only use accessory or attachment
for its stated purpose.
If you need any assistance for more details regard-
ing these accessories, ask your local Makita Service
Center.
Mower blade
Makita genuine battery and charger
NOTE: Some items in the list may be included in the
tool package as standard accessories. They may
differ from country to country.
49 NEDERLANDS
NEDERLANDS (Originele instructies)
TECHNISCHE GEGEVENS
Model: DLM460 DLM461
Maaibreedte (diameter van snijblad) 460 mm
Nullasttoerental 2.500 min
-1
Maximumtoerental 3.300 min
-1
Onderdeelnummer van vervangingssnijblad van grasmaaier 199367-2 199368-0
Afmetingen
(l x b x h)
tijdens gebruik L: 1.319 mm t/m 1.518 mm
B: 532 mm
H: 879 mm t/m 1.138 mm
tijdens opslag
(zonder grasmand)
L: 1.004 mm t/m 1.125 mm
B: 532 mm
H: 533 mm t/m 713 mm
Nominale spanning 36 V gelijkstroom
Nettogewicht 25,3 - 27,6 kg 26,6 - 28,4 kg
In verband met ononderbroken research en ontwikkeling, behouden wij ons het recht voor de bovenstaande
technische gegevens zonder voorafgaande kennisgeving te wijzigen.
De technische gegevens van de accu kunnen van land tot land verschillen.
Het gewicht kan verschillen afhankelijk van de hulpstukken, waaronder de accu. De lichtste en zwaarste com-
binatie, overeenkomstig de EPTA-procedure 01/2014, worden getoond in de tabel.
Toepasselijke accu’s
BL1815N / BL1820 / BL1820B / BL1830 / BL1830B / BL1840 / BL1840B / BL1850 / BL1850B / BL1860B
Sommige van de hierboven vermelde accu’s zijn mogelijk niet leverbaar afhankelijk van waar u woont.
WAARSCHUWING: Gebruik uitsluitend de accu’s die hierboven worden genoemd. Gebruik van enige
andere accu kan leiden tot letsel en/of brand.
Symbolen
Hieronder staan de symbolen die voor het gereedschap
worden gebruikt. Zorg ervoor dat u weet wat ze beteke-
nen alvorens het gereedschap te gebruiken.
Wees vooral voorzichtig en let goed op.
Lees de gebruiksaanwijzing.
Gevaar: let op weggeworpen voorwerpen.
Omstanders moeten een afstand van zeker
15 meter bewaren tot het gereedschap.
Breng nooit uw handen of voeten dichtbij
het snijblad onder de grasmaaier. Het
snijblad blijft nadraaien nadat de motor is
uitgeschakeld.
Verwijder de contactsleutel vóór het
inspecteren, bijstellen, reinigen, onder-
houden, achterlaten of opbergen van de
grasmaaier.
Ni-MH
Li-ion
Alleen voor EU-landen
Geef elektrisch gereedschap en accu’s niet
met het huisvuil mee!
Volgens de Europese richtlijn inzake oude
elektrische en elektronische apparaten,
en inzake batterijen en accu’s en oude
batterijen en accu’s, en de toepassing
daarvan binnen de nationale wetgeving,
dienen elektrisch gereedschap, accu’s en
batterijen die het einde van hun levensduur
hebben bereikt, gescheiden te worden
ingezameld en te worden afgevoerd naar
een recyclebedrijf dat voldoet aan de
geldende milieu-eisen.
Gebruiksdoeleinden
Het gereedschap is bedoeld om het gazon te maaien.
Geluidsniveau
De typische, A-gewogen geluidsniveaus zijn gemeten
volgens EN60335-2-77:
Model DLM460
Geluidsdrukniveau (L
pA
): 79 dB (A)
Geluidsvermogenniveau (L
WA
): 91 dB (A)
Onzekerheid (K): 3,4 dB (A)
Het geluidsniveau kan tijdens gebruik hoger worden
dan 80 dB (A).
WAARSCHUWING: Draag
gehoorbescherming.
50 NEDERLANDS
Trilling
De totale trillingswaarde (triaxiale vectorsom) zoals
vastgesteld volgens EN60335-2-77:
Model DLM460
Trillingsemissie (a
h
): 2,5 m/s
2
of lager
Onzekerheid (K): 1,5 m/s
2
OPMERKING: De opgegeven trillingsemissiewaarde
is gemeten volgens de standaardtestmethode en kan
worden gebruikt om dit gereedschap te vergelijken
met andere gereedschappen.
OPMERKING: De opgegeven trillingsemissiewaarde
kan ook worden gebruikt voor een beoordeling vooraf
van de blootstelling.
WAARSCHUWING: De trillingsemissie tijdens
het gebruik van het elektrisch gereedschap in de
praktijk kan verschillen van de opgegeven trilling-
semissiewaarde afhankelijk van de manier waarop
het gereedschap wordt gebruikt.
WAARSCHUWING: Zorg ervoor dat veilig-
heidsmaatregelen worden getroffen ter bescherming
van de operator die zijn gebaseerd op een schatting
van de blootstelling onder praktijkomstandigheden
(rekening houdend met alle fasen van de bedrijfscy-
clus, zoals de tijdsduur gedurende welke het gereed-
schap is uitgeschakeld en stationair draait, naast de
ingeschakelde tijdsduur).
EG-verklaring van conformiteit
Alleen voor Europese landen
De EG-verklaring van conformiteit is bijgevoegd als
Bijlage A bij deze gebruiksaanwijzing.
VEILIGHEIDSWAAR-
SCHUWINGEN
Veiligheidsinstructies voor een
grasmaaier
WAARSCHUWING: Lees alle veiligheids-
waarschuwingen en alle instructies. Het niet vol-
gen van de waarschuwingen en instructies kan leiden
tot elektrische schokken, brand en/of ernstig letsel.
Bewaar alle waarschuwingen en
instructies om in de toekomst te
kunnen raadplegen.
1. Steek de contactsleutel pas in de grasmaaier
wanneer die klaar voor gebruik is.
2. Houd toezicht op kinderen om te zorgen dat ze
niet met de grasmaaier gaan spelen.
3.
Laat nooit kinderen of anderen die niet vertrouwd
zijn met deze instructies de grasmaaier bedienen.
De toegestane leeftijd van gebruikers kan ook
zijn vastgelegd in de plaatselijke wetgeving.
4.
Gebruik de grasmaaier nooit met personen, in het
bijzonder kinderen, of huisdieren dicht in de buurt.
5. Onthoud dat de bediener of gebruiker aanspra-
kelijk is voor ongelukken met letsel aan andere
personen of schade aan hun eigendommen.
6.
Draag bij gebruik van de grasmaaier altijd
stevig schoeisel en een lange broek. Gebruik
de grasmaaier niet wanneer u op blote voeten
loopt of open sandalen draagt. Draag geen
juwelen of kleding die erg ruim valt of waarvan
koordjes of bandjes los bungelen. Deze kunnen
door de bewegende delen gegrepen worden.
7. Draag tijdens het gebruik van elektrisch
gereedschap altijd een veiligheidsbril om
uw ogen te beschermen tegen letsel. De bril
moet voldoen aan ANSI Z87.1 in de Verenigde
Staten, aan EN 166 in Europa, en aan AS/
NZS 1336 in Australië en Nieuw-Zeeland. In
Australië en Nieuw-Zeeland is het wettelijk
verplicht om tevens een spatscherm te dragen
om uw gezicht te beschermen.
Het is de verantwoordelijkheid van de werk-
gever om ervoor te zorgen dat geschikte
beschermingsmiddelen gebruikt worden door
de gebruikers van het gereedschap en anderen
in de onmiddellijke omgeving van de werkplek.
8. Gebruik de grasmaaier alleen bij daglicht of
helder kunstlicht.
9.
Gebruik de grasmaaier niet wanneer het gras nat is.
10. Gebruik en onderhoud van accugereedschap
- Gebruik voor het opladen uitsluitend de door de
fabrikant voorgeschreven acculader. Een acculader
die geschikt is voor een bepaald type accu kan brand-
gevaarlijk zijn bij gebruik met een ander type accu.
- Gebruik elektrisch gereedschap uitsluitend
met de speciek daarvoor geschikte accu. Het
gebruik van een ander type accu kan gevaar voor
brand of verwondingen opleveren.
- Wanneer de accu niet in gebruik is, dient u deze
uit de buurt te houden van metalen voorwerpen,
zoals paperclips, kleingeld, sleutels, spijkers,
schroeven of andere kleine metalen voorwerpen die
kortsluiting tussen de accucontacten kunnen ver-
oorzaken. Als de accucontacten kortgesloten worden,
kan dat brandgevaar of brandwonden veroorzaken.
- Bij misbruik kan er vloeistof uit de accu vrijkomen;
vermijd aanraking daarmee. Als u per ongeluk in
aanraking komt met accuvloeistof, wast u die dan met
water af. Als er accuvloeistof in uw ogen komt, roept
u dan bovendien medische hulp in. De vloeistof uit de
accu kan huidirritatie of brandwonden veroorzaken.
51 NEDERLANDS
- Werp de accu(’s) niet in een vuur. De accu kan
exploderen. Raadpleeg de lokale regelgeving voor
mogelijke speciale verwerkingsvereisten.
- Open of vervorm de accu(’s) niet. Het elek-
trolyt is agressief en kan letsel toebrengen aan de
ogen en huid. Het kan giftig zijn bij inslikken.
- Laad de accu niet op in de regen of op een natte plaats.
11. Houd de handgreep altijd stevig vast.
12. Zorg dat u stevig staat op hellingen.
13. Loop gewoon en ren niet.
14.
Raak het snijblad of andere scherpe randen niet
aan bij het optillen of dragen van de grasmaaier.
15.
Lichamelijke conditie - Gebruik de grasmaaier niet
onder de invloed van alcohol, stimulerende of verdo-
vende middelen, of na het innemen van medicijnen.
16.
Houd uw handen en voeten uit de buurt van het
draaiende snijblad. Let op - Het snijblad blijft
nadraaien nadat de grasmaaier is uitgeschakeld.
17. Gebruik uitsluitend de in deze handleiding
door de fabrikant voorgeschreven snijbladen.
18. Controleer vóór gebruik zorgvuldig de snijbla-
den en de bouten van de snijbladen op barsten
of andere beschadigingen. Vervang gebarsten
of beschadigde snijbladen of bouten van de
snijbladen onmiddellijk.
19. Zorg dat er geen andere personen in de buurt
zijn voordat u met maaien begint. Stop de
grasmaaier wanneer er iemand nadert.
20. Verwijder vóór het maaien eerst obstakels en
voorwerpen zoals stenen, ijzerdraad, glas,
botten en grote takken uit uw werkgebied, om
schade aan de grasmaaier en persoonlijk letsel
te voorkomen.
21. Stop het gebruik onmiddellijk wanner u iets
vreemds bemerkt. Schakel de grasmaaier uit
en verwijder de contactsleutel. Inspecteer
vervolgens de grasmaaier.
22. Als de grasmaaier is uitgerust met een maai-
hoogte-instelling, mag u nooit de maaihoogte
veranderen terwijl de grasmaaier draait.
23. Laat de schakelhendel los en wacht tot het
snijblad gestopt is voordat u een tuinpad,
trottoir, oprijlaan, straat of weg oversteekt, of
enig terrein waar grind ligt. Verwijder de con-
tactsleutel ook wanneer u de grasmaaier even
achterlaat, wanneer u een eindje verder iets
moet oprapen, of als u om enige andere reden
afgeleid bent van waar u mee bezig was.
24.
Als het snijblad van de grasmaaier een voor-
werp raakt, kan ernstig letsel worden veroor-
zaakt. Controleer altijd vóór het maaien het gras
op voorwerpen die hinder of gevaar kunnen
veroorzaken en verwijder ze op afdoende wijze.
25. Als de grasmaaier een vreemd voorwerp raakt,
gaat u als volgt te werk:
- Stop de grasmaaier, laat de schakelhendel
los en wacht tot het snijblad helemaal tot stil-
stand is gekomen.
- Verwijder de contactsleutel en de accu.
- Controleer de grasmaaier zorgvuldig op
beschadigingen.
- Vervang het snijblad als het op enige wijze
beschadigd is. Repareer alle beschadigingen
voordat u de grasmaaier opnieuw start en in
gebruik neemt.
26. Controleer veelvuldig de grasmand op slijtage
en beschadigingen. Voor de opslag, verzekert
u uzelf ervan dat de grasmand leeg is. Vervang
een versleten grasmand uit veiligheidsover-
wegingen altijd door een origineel, nieuw
vervangingsonderdeel.
27. Wees uiterst voorzichtig wanneer u de gras-
maaier achteruit laat rijden of naar u toe trekt.
28.
Stop de snijblad(en) wanneer u de grasmaaier moet
kantelen om hem te verplaatsen over een ander
oppervlak dan gras, en ook wanneer u de gras-
maaier vervoert van of naar het te maaien terrein.
29. Gebruik de grasmaaier in geen geval wanneer
de beveiligingskappen of schermen defect
zijn, of wanneer beveiligingsdelen zoals de
keerschotten en/of grasmand afwezig zijn.
30. Schakel de grasmaaier zorgvuldig in volgens
de voorschriften, met uw voeten op veilige
afstand van de snijblad(en).
31. Kantel de grasmaaier niet wanneer u de motor
inschakelt, behalve wanneer het noodzakelijk
is de grasmaaier iets te kantelen om de motor
te starten. In dat geval kantelt u hem niet ver-
der dan strikt noodzakelijk en tilt u alleen het
van u afgerichte deel iets omhoog.
32. Start de grasmaaier niet terwijl u recht voor de
uitwerpopening staat.
33. Plaats nooit uw handen of voeten onder of
vlakbij de draaiende onderdelen. Blijf steeds
uit de buurt van de uitwerpopening.
34. Vervoer de grasmaaier niet terwijl de gras-
maaier is ingeschakeld.
35. Stop de grasmaaier en verwijder de blokkade.
Let goed op dat alle bewegende onderdelen
volledig tot stilstand zijn gekomen
- wanneer u de grasmaaier achterlaat;
- voor het opheffen van een blokkering of het
vrijmaken van het uitwerpkanaal;
- voor het controleren, reinigen of werken aan
de grasmaaier;
- na het raken van een vreemd voorwerp.
Inspecteer de grasmaaier op schade en ver-
richt de nodige reparaties alvorens u de gras-
maaier opnieuw start en in gebruik neemt.
36. Als de grasmaaier abnormaal gaat trillen of
schudden (onmiddellijk controleren)
- inspecteer op schade;
- vervang of repareer alle beschadigde delen;
- controleer op loszittende delen en zet die goed vast.
37. Wees uiterst voorzichtig tijdens het bijstellen
van de grasmaaier om te voorkomen dat uw
vingers bekneld raken tussen het draaiende
snijblad en de vaste delen van de grasmaaier.
38. Maai altijd horizontaal langs een glooiing,
nooit omhoog en omlaag. Wees uiterst voor-
zichtig wanneer u op een hellend vlak van
richting verandert. Probeer niet om te maaien
op al te steile hellingen.
39. Controleer veelvuldig of de snijbladbevesti-
gingsbout stevig vast zit.
40. Zorg dat alle moeren, bouten en schroeven
stevig zijn aangedraaid, om het gereedschap
veilig te kunnen gebruiken.
41. Laat de grasmaaier altijd eerst afkoelen voor-
dat u hem opbergt.
52 NEDERLANDS
42. Onthoud goed bij onderhoud aan de snijbla-
den dat ook als de stroom is uitgeschakeld, de
snijbladen nog wel kunnen bewegen.
43.
Vervang alle versleten of beschadigde onderde-
len, voor uw veiligheid. Gebruik uitsluitend ori-
ginele vervangingsonderdelen en accessoires.
44. Gebruik het gereedschap niet wanneer de kans
op bliksem bestaat.
45. Als u het gereedschap op een modderige
ondergrond, natte helling of gladde plaats
gebruikt, let u erop dat u stevig staat.
46. Vermijd werken in een ongunstige omgeving
waarin een verhoogde vermoeidheid van de
gebruiker kan worden verwacht.
47. Gebruik het gereedschap niet bij slecht weer
waarin het zicht beperkt is. Als u dit toch doet,
kan dat een val of verkeerde bediening veroorza-
ken als gevolg van het slechte zicht.
48. Vervang de accu niet in de regen.
49. Dompel het gereedschap niet onder in een
waterplas.
50. Laat het gereedschap niet onbeheerd buiten in
de regen staan.
51. Terwijl het regent mag u de contactsleutel niet
erin steken of verwijderen.
52. Wanneer natte bladeren of vuil blijft kleven aan
de aanzuigmond (ventilatieopening) als gevolg
van de regen, verwijdert u deze.
53.
Was het gereedschap niet met water onder hoge druk.
54.
Als u het gereedschap wast, verwijdert u de
accu en contactsleutel en sluit u het accudeksel,
en giet u water op de onderkant van het gereed-
schap waaraan het snijblad is bevestigd.
55. Wanneer u de machine opbergt, vermijdt u
direct zonlicht en regen, en bergt u het op een
plaats op die niet heet of vochtig wordt.
56. Voer inspectie en onderhoud uit op een plaats
waar regen kan worden vermeden.
57.
Nadat u het gereedschap hebt gebruikt, verwij-
dert u het aanklevende vuil en laat u het gereed-
schap volledig drogen voordat u hem opbergt.
Afhankelijk van het seizoen of gebied, bestaat de
kans op een storing als gevolg van bevriezing.
58.
Laat de aansluitpunten van de accu niet nat
worden met een vloeistof, zoals water, en dom
-
pel de accu niet onder. Laat de accu niet in de
regen liggen en laad of berg de accu niet op een
vochtige of natte plaats op. Als de aansluitpunten
nat worden of vloeistof binnendringt in de accu, kan
kortsluiting ontstaan in de accu en bestaat de kans
op oververhitting, brand of explosie.
59. Nadat de accu vanaf het gereedschap of de
acculader is verwijderd, vergeet u niet het
accudeksel op de accu te bevestigen en deze
op een droge plaats op te bergen.
60. Vervang de accu niet met natte handen.
61. Gebruik het gereedschap niet in de sneeuw.
62. Als het maaisel nat is, hoopt het zich waar-
schijnlijk op aan de binnenkant van het
gereedschap. Controleer regelmatig de staat
van het gereedschap en verwijder zo nodig het
aanklevende gras.
BEWAAR DEZE VOORSCHRIFTEN.
WAARSCHUWING: Laat u NIET misleiden
door een vals gevoel van comfort en bekendheid
met het gereedschap (na veelvuldig gebruik) en
neem alle veiligheidsvoorschriften van het betref-
fende gereedschap altijd strikt in acht.
VERKEERD GEBRUIK of het niet naleven van de
veiligheidsvoorschriften in deze gebruiksaanwij-
zing kan leiden tot ernstige verwondingen.
Belangrijke veiligheidsinstructies
voor een accu
1. Lees alle voorschriften en waarschuwingen op
(1) de acculader, (2) de accu, en (3) het product
waarvoor de accu wordt gebruikt, alvorens de
accu in gebruik te nemen.
2. Neem de accu niet uit elkaar.
3. Als de gebruikstijd van een opgeladen accu
aanzienlijk korter is geworden, moet u het
gebruik ervan onmiddellijk stopzetten.
Voortgezet gebruik kan oververhitting, brand-
wonden en zelfs een ontplofng veroorzaken.
4. Als elektrolyt in uw ogen is terechtgeko-
men, spoelt u uw ogen met schoon water
en roept u onmiddellijk de hulp van een
dokter in. Elektrolyt in de ogen kan blindheid
veroorzaken.
5. Voorkom kortsluiting van de accu:
(1) Raak de accuklemmen nooit aan met een
geleidend materiaal.
(2) Bewaar de accu niet in een bak waarin
andere metalen voorwerpen zoals spij-
kers, munten e.d. worden bewaard.
(3) Stel de accu niet bloot aan water of regen.
Kortsluiting van de accu kan oorzaak zijn van
een grote stroomafgifte, oververhitting, brand-
wonden, en zelfs defecten.
6. Bewaar het gereedschap en de accu niet op
plaatsen waar de temperatuur kan oplopen tot
50°C of hoger.
7. Werp de accu nooit in het vuur, ook niet wan-
neer hij zwaar beschadigd of volledig versleten
is. De accu kan ontploffen in het vuur.
8. Wees voorzichtig dat u de accu niet laat vallen
en hem niet blootstelt aan schokken of stoten.
9. Gebruik nooit een beschadigde accu.
10. De bijgeleverde lithium-ionbatterijen zijn
onderhevig aan de vereisten in de wetgeving
omtrent gevaarlijke stoffen.
Voor commercieel transport en dergelijke door
derden en transporteurs moeten speciale vereis-
ten ten aanzien van verpakking en etikettering
worden nageleefd.
Als voorbereiding van het artikel dat wordt getrans-
porteerd is het noodzakelijk een expert op het gebied
van gevaarlijke stoffen te raadplegen. Houd u tevens
aan mogelijk strengere nationale regelgeving.
Blootliggende contactpunten moeten worden
afgedekt met tape en de accu moet zodanig
worden verpakt dat deze niet kan bewegen in de
verpakking.
11. Volg bij het weggooien van de accu de plaatse-
lijke voorschriften.
53 NEDERLANDS
12. Gebruik de accu’s uitsluitend met de gereed-
schappen die door Makita zijn aanbevolen. Als
de accu’s worden aangebracht in niet-compatibele
gereedschappen, kan dat leiden tot brand, bui-
tensporige warmteontwikkeling, een explosie of
lekkage van elektrolyt.
BEWAAR DEZE INSTRUCTIES.
LET OP: Gebruik uitsluitend originele Makita
accu’s. Het gebruik van niet-originele accu’s, of
accu’s die zijn gewijzigd, kan ertoe leiden dat de accu
ontploft en brand, persoonlijk letsel en schade veroor-
zaakt. Ook vervalt daarmee de garantie van Makita
op het gereedschap en de lader van Makita.
Tips voor een maximale levens-
duur van de accu
1. Laad de accu op voordat hij volledig ontladen
is. Stop het gebruik van het gereedschap en
laad de accu op telkens wanneer u vaststelt
dat het vermogen van het gereedschap is
afgenomen.
2. Laad een volledig opgeladen accu nooit
opnieuw op. Te lang opladen verkort de
levensduur van de accu.
3. Laad de accu op bij een omgevingstempe-
ratuur tussen 10°C en 40°C. Laat een warme
accu afkoelen alvorens hem op te laden.
4. Laad de accu op als u deze gedurende een
lange tijd (meer dan zes maanden) niet gaat
gebruiken.
MONTAGE
WAARSCHUWING: Zorg er altijd voor dat
de contactsleutel en de accu zijn verwijderd,
alvorens u enig werk aan de grasmaaier gaat
uitvoeren. Als u de contactsleutel en de accu niet
verwijdert, kan dat leiden tot ernstig persoonlijk letsel
als de grasmaaier plotseling zou starten.
WAARSCHUWING: Start nooit de grasmaaier
voordat het geheel naar behoren is gemonteerd.
Gebruik van het gereedschap in een deels gemon-
teerde staat kan leiden tot ernstig persoonlijk letsel in
geval van plotseling starten.
De handgreep aanbrengen
KENNISGEVING: Bij het aanbrengen van
de handgrepen leidt u de kabels zodat ze niet
bekneld raken door iets tussen de handgrepen.
Als de kabel beschadigd is, werkt mogelijk de
schakelaar van de grasmaaier niet.
1. Breng de onderste handgreep zodanig aan dat de
openingen in de handgreep om de uitstekende nokken
op het maaidek vallen. Steek de bouten vanaf de bin-
nenkant erdoor en plaats ring A vanaf de buitenkant
erop, en draai daarna de vingermoeren vast.
Fig.1: 1. Onderste handgreep 2. Ring A
3. Vingermoer 4. Uitstekende nok 5. Opening
6. Bout
2.
Lijn de opening in de onderste handgreep uit met de ope-
ning in de bovenste handgreep en steek vervolgens de bouten
vanaf de binnenkant erdoor, en plaats daarna ring B vanaf de
buitenkant erop en draai tenslotte de vingermoeren vast.
Fig.2:
1. Bovenste handgreep 2. Opening 3. Ring B
4. Vingermoer 5. Onderste handgreep 6. Bout
LET OP: Houd de bovenste handgreep stevig
vast, zodat deze niet uit uw hand valt. Anders kan
de handgreep vallen en letsel veroorzaken.
3.
Bevestig kabelklem A en kabelklem B aan de hand-
greep. Geleid de kabels zoals aangegeven in de afbeelding.
Fig.3: 1. Kabel 2. Kabelklem A 3. Kabelklem B
OPMERKING: Wanneer u kabelklem A bevestigt,
let u erop dat de kabel met de klem wordt beves-
tigd zoals aangegeven in de afbeelding.
Het mulch-hulpstuk verwijderen
Voor DLM460
1. Open de achterklep.
Fig.4: 1. Achterklep
2.
Verwijder het mulch-hulpstuk terwijl u de hendel omlaag houdt.
Fig.5: 1. Hendel 2. Mulch-hulpstuk
Voor DLM461
1. Open de achterklep.
Fig.6: 1. Achterklep
2.
Verwijder het mulch-hulpstuk terwijl u aan de hendel trekt.
Fig.7: 1. Mulch-hulpstuk 2. Hendel
De grasmand aanbrengen
1. Open de achterklep.
Fig.8: 1. Achterklep
2. Haak de grasmand aan de stang van het maaidek,
zoals aangegeven in de afbeelding.
Fig.9: 1. Stang 2. Beschermrand 3. Grasmand
KENNISGEVING:
Verzeker u ervan dat de
beschermrand op de grasmand omlaag wijst. Anders
vangt de grasmand mogelijk niet al het maaisel op.
Het mulch-hulpstuk aanbrengen
Voor DLM460
1. Open de achterklep en verwijder de grasmand.
Fig.10: 1. Achterklep 2. Grasmand
2. Breng het mulch-hulpstuk aan terwijl u de hendel
omlaag houdt en laat daarna de hendel los om het
mulch-hulpstuk te vergrendelen.
Fig.11: 1. Hendel 2. Mulch-hulpstuk
Voor DLM461
1. Open de achterklep en verwijder de grasmand.
Fig.12: 1. Achterklep 2. Grasmand
2. Breng het mulch-hulpstuk aan terwijl u aan de
hendel trekt en laat daarna de hendel los om het
mulch-hulpstuk te vergrendelen.
Fig.13: 1. Mulch-hulpstuk 2. Hendel
54 NEDERLANDS
BESCHRIJVING VAN DE
FUNCTIES
De accu aanbrengen en verwijderen
LET OP:
Schakel het gereedschap altijd uit
alvorens de accu aan te brengen of te verwijderen.
LET OP: Houd het gereedschap en de accu
stevig vast tijdens het aanbrengen of verwijderen
van de accu. Als u het gereedschap en de accu niet
stevig vasthoudt, kunnen deze uit uw handen glippen
en het gereedschap of de accu beschadigen, of kan
persoonlijk letsel worden veroorzaakt.
LET OP: Zorg dat u voor gebruik het accu-
deksel stevig afsluit. Anders zou er modder, vuil
en water in kunnen komen en het gereedschap of de
accu kunnen beschadigen.
LET OP: Schuif de accu altijd volledig naar
binnen totdat het rode deel niet meer zichtbaar is.
Als u dit nalaat, zou deze uit het gereedschap kunnen
vallen en uzelf of anderen kunnen verwonden.
LET OP: Druk de accu er niet met kracht in.
Als de accu er niet soepel in schuift, houdt u die waar-
schijnlijk in de verkeerde stand.
OPMERKING: Het gereedschap werkt niet met
slechts één enkele accu.
De accu aanbrengen:
1. Trek de vergrendelhendel omhoog en open
daarna het accudeksel.
Fig.14: 1. Accudeksel 2. Vergrendelhendel
2. Lijn de lip op de accu uit met de gleuf in de gras-
maaier en schuif daarna de accu erin tot deze met een
klikgeluid op zijn plaats wordt vergrendeld.
Fig.15: 1. Accu
3. Steek de contactsleutel in op de plaats die in de
afbeelding is aangegeven, zover de sleutel gaat.
Fig.16: 1. Contactsleutel
4. Sluit het accudeksel en duw erop totdat hij wordt
vergrendeld met de borghendel.
De accu uit de grasmaaier verwijderen:
1. Trek de accudeksel-vergrendelhendel omhoog en
open het accudeksel.
2. Trek de accu uit de grasmaaier terwijl u de knop
aan de voorkant van de accu verschuift.
3. Trek de contactsleutel eruit.
4. Sluit het accudeksel.
Gereedschap-/accubeveiligingssysteem
Het gereedschap is voorzien van een gereedschap-/
accubeveiligingssysteem. Dit systeem schakelt auto-
matisch de voeding naar de motor uit om de levensduur
van het gereedschap en de accu te verlengen. Het
gereedschap kan tijdens het gebruik automatisch stop-
pen als het gereedschap of de accu aan één van de
volgende omstandigheden wordt blootgesteld:
Overbelastingsbeveiliging
Als de accu wordt gebruikt op een manier waardoor
een abnormaal hoge stroom wordt getrokken, stopt
het gereedschap automatisch en knippert het bedrijfs-
lampje groen. In dat geval schakelt u het gereedschap
uit en stopt u met het gebruik waardoor het gereed-
schap overbelast raakte. Schakel daarna het gereed-
schap in om verder te gaan.
Oververhittingsbeveiliging
Wanneer het gereedschap of de accu oververhit is, stopt het
gereedschap automatisch en gaat het bedrijfslampje rood
branden. In dat geval laat u het gereedschap en de accu
afkoelen voordat u het gereedschap opnieuw inschakelt.
Beveiliging tegen te ver ontladen
Als de acculading onvoldoende is, stopt het gereedschap
automatisch en knippert het bedrijfslampje rood. Verwijder in
dat geval de accu vanaf het gereedschap en laad de accu’s
op of vervang de accu’s door volledig opgeladen accu’s.
De resterende acculading controleren
Alleen voor accu’s met indicatorlampjes
Fig.17: 1. Indicatorlampjes 2. Testknop
Druk op de testknop op de accu om de resterende
acculading te zien. De indicatorlampjes branden gedu-
rende enkele seconden.
Indicatorlampjes Resterende
acculading
Brandt Uit Knippert
75% tot 100%
50% tot 75%
25% tot 50%
0% tot 25%
Laad de accu
op.
Er kan een
storing zijn
opgetreden in
de accu.
OPMERKING: Afhankelijk van de gebruiksomstan-
digheden en de omgevingstemperatuur, is het moge-
lijk dat de aangegeven acculading verschilt van de
werkelijke acculading.
Bedieningspaneel
Op het bedieningspaneel bevinden zich de hoofdscha-
kelaar, de functieschakelknop en de indicatoren van de
resterende acculading.
Fig.18: 1. Accu-indicatorlampje
2. Functieschakellamp 3. Bedrijfslampje
4. Testknop 5. Functieschakelknop
6. Hoofdschakelaar
55 NEDERLANDS
Hoofdschakelaar
WAARSCHUWING: Zet altijd de hoofdscha-
kelaar uit indien niet in gebruik.
Om het gereedschap in te schakelen, drukt u op de
hoofdschakelaar. Het bedrijfslampje brandt groen. Om
het gereedschap uit te schakelen, drukt u nogmaals op
de hoofdschakelaar.
OPMERKING: Als het bedrijfslampje rood brandt, of
rood of groen knippert, raadpleegt u de instructies
voor het gereedschap-/accubeveiligingssysteem.
OPMERKING: Dit gereedschap maakt gebruik van
de automatische uitschakelfunctie. Om onbedoeld
starten te voorkomen wordt de hoofdschakelaar auto-
matisch uitgeschakeld wanneer de schakelhendel
niet wordt ingeknepen binnen een bepaalde tijdsduur
nadat de hoofdschakelaar is ingeschakeld.
Functieschakelknop
U kunt de bedieningsfunctie veranderen door op de func-
tieschakelknop te drukken. Wanneer het gereedschap
wordt ingeschakeld, start het gereedschap in de normale
functie. Als u op de functieschakelknop drukt, schakelt het
gereedschap om naar de energiebesparingsfunctie en gaat
de functieschakellamp groen branden. In de energiebespa-
ringsfunctie kunt u het geluidsniveau tijdens het grasmaaien
verlagen. Als u nogmaals op de functieschakelknop drukt,
keert het gereedschap terug naar de normale functie.
De resterende acculading controleren
Druk op de testknop om de resterende acculadingen
te zien. De accu-indicatorlampjes geven per accu de
resterende acculading aan.
Toestand van accu-indicator
Resterende
acculading
Aan
Uit
50% tot 100%
20% tot 50%
0% tot 20%
De trekkerschakelaar gebruiken
WAARSCHUWING: Alvorens u de accu aan-
brengt, controleert u eerst of de schakelhendel
goed werkt en bij loslaten automatisch naar de
oorspronkelijke stand terugkeert. Bediening van
het gereedschap met een schakelaar die niet goed
werkt kan leiden tot ongecontroleerde bewegingen,
met kans op ernstig lichamelijk letsel.
OPMERKING:
De grasmaaier start niet zonder dat u de
schakelknop indrukt, ook al trekt u de schakelhendel in.
OPMERKING:
De grasmaaier start mogelijk niet vanwege
overbelasting wanneer u lang of dicht gras in één keer pro-
beert te maaien. Stel in dat geval de maaihoogte hoger in.
Deze grasmaaier is voorzien van een contactslotscha-
kelaar en een handgreepschakelaar. Als er iets niet in
orde is met een van deze twee schakelaars, staakt u
dan onmiddellijk het gebruik en laat u ze controleren bij
uw dichtstbijzijnde erkende Makita-servicecentrum.
1. Breng de accu’s aan. Steek de contactsleutel in
het contactslot en sluit dan het accudeksel.
2. Druk op de hoofdschakelaar.
3. Druk op de schakelknop en houd deze ingedrukt.
4. Pak de bovenste handgreep vast en trek de scha-
kelhendel in.
Fig.19: 1. Schakelknop 2. Bovenste handgreep
3. Schakelhendel
OPMERKING: Als de contactsleutel niet is geplaatst,
knippert het bedrijfslampje groen wanneer u de scha-
kelhendel inknijpt.
5. Laat de schakelknop los zodra de motor begint te
draaien. De grasmaaier blijft draaien totdat u de scha-
kelhendel loslaat.
6. Laat de schakelhendel los om de motor te
stoppen.
De maaihoogte instellen
WAARSCHUWING: Plaats bij het instellen
van de maaihoogte nooit uw hand of voet onder
de grasmaaierbehuizing.
WAARSCHUWING: Controleer vóór het
gebruik zorgvuldig of de hendel juist in de gleuf
valt.
Voor DLM460
De maaihoogte is instelbaar binnen een bereik van 20
mm tot 75 mm.
Voor DLM461
De maaihoogte is instelbaar binnen een bereik van 16
mm tot 71 mm.
Verwijder de contactsleutel en trek vervolgens de maai-
hoogte-instelhendel tot buiten het maaidek en verplaats
deze naar de gewenste maaihoogte.
Fig.20: 1. Maaihoogte-instelhendel
Houd het voorhandvat met één hand vast en verplaats
vervolgens de maaihoogte-instelhendel met de andere
hand.
Fig.21: 1. Maaihoogte-instelhendel 2. Voorhandvat
OPMERKING: De waarden voor de maaihoogte
mogen slechts als richtlijn worden gebruikt.
Afhankelijk van de toestand van het gazon en de
ondergrond, kan de daadwerkelijke gazonhoogte iets
afwijken van de ingestelde hoogte.
OPMERKING: Met een maaiproef in een min-
der opvallende plaats kunt u door uitproberen de
gewenste hoogte vinden.
56 NEDERLANDS
De hoogte van de handgreep
afstellen
LET OP: Voordat u de bouten verwij-
dert, houdt u de bovenste handgreep stevig
vast. Anders kan de handgreep vallen en letsel
veroorzaken.
De hoogte van de handgreep kan worden afgesteld op
drie hoogten.
1. Draai de vingermoeren van de onderste hand-
greep los en verwijder vervolgens de bouten, ring en
vingermoeren.
Fig.22: 1. Vingermoer 2. Ring 3. Bout
2. Stel de hoogte van de handgreep af.
3. Steek de bouten vanaf de binnenkant erdoor en
plaats ringen vanaf de buitenkant erop, en draai daarna
de vingermoeren vast.
Het mulch-hulpstuk gebruiken
Het mulch-hulpstuk maakt het mogelijk om het maaisel
naar de grond terug te voeren zonder het maaisel op
te vangen in de grasmand. Wanneer u de machine
met het mulch-hulpstuk gebruikt, moet u de grasmand
verwijderen.
Elektronische functies
Het gereedschap is uitgerust met elektronische aanstu-
ring voor een gemakkelijke bediening.
• Constant-toerentalregeling
Elektronische toerentalregeling voor het aanhou-
den van een constant toerental. Maakt een onbe-
rispelijke afwerking mogelijk omdat het toerental
zelfs onder belasting constant blijft.
Zachte start
De functie zachte-start minimaliseert de start-
schok en laat het gereedschap geleidelijk starten.
BEDIENING
Maaien
WAARSCHUWING: Voor het maaien verwij-
dert u alle takken en stenen van het te maaien
terrein. Bovendien kunt u beter ook van tevoren
alle onkruid uit het te maaien grasveld wieden.
WAARSCHUWING: Draag bij het maaien
altijd een beschermende bril of een veiligheidsbril
met volledig gesloten zijkantbescherming.
LET OP: Als het maaisel of een vreemd voor-
werp zich ophoopt binnenin het maaidek, moet u
eerst de contactsleutel en accu verwijderen, en
handschoenen aantrekken voordat u het maaisel
of vreemde voorwerp verwijdert.
KENNISGEVING: Gebruik deze machine alleen
voor het maaien van een gazon. Maai geen
onkruid met deze machine.
Fig.23
Houd bij het maaien de handgreep met beide handen
stevig vast.
De richtlijn voor de maaisnelheid is ongeveer 1 meter
per 4 seconden.
Fig.24
De middellijnen van de voorwielen kunnen worden
gebruikt als richtlijn voor de maaibreedte. Gebruik
de middellijnen als richtlijn bij het maaien in banen.
Overlap elke baan met de helft of een derde van de
breedte van de vorige baan om het gazon gelijkmatig
te maaien.
Fig.25: 1. Maaibreedte 2. Overlapping 3. Middenlijn
Verander de maairichting bij elke baan om te voorko-
men dat het graspatroon in één richting wordt gevormd.
Fig.26
Controleer regelmatig het gemaaide gras in de gras-
mand. Leeg de grasmand voordat deze vol raakt. Vóór
elke periodieke inspectie dient u de grasmaaier uit te
schakelen en daarna de contactsleutel en de accu te
verwijderen.
OPMERKING: Als u de grasmaaier gebruikt met een
volle grasmand kan het snijblad niet soepel draaien,
hetgeen de motor overmatig belast, waardoor de
kans op defecten toeneemt.
Maaien van erg lang gras
Probeer niet om lang gras in één keer te maaien. Maai
in plaats daarvan het gazon in meerdere maaibeurten.
Laat een dag of twee tussen de maaibeurten, tot het
gazon gelijkmatig kort is.
Fig.27
OPMERKING: Als u erg lang gras in één keer hele-
maal kort maait, kan het gras afsterven. Tevens kan
de binnenkant van het maaidek verstopt raken door
het gemaaide gras.
De grasmand legen
WAARSCHUWING: Om ongelukken te voor-
komen, controleert u regelmatig de grasmand op
schade of verzwakking door slijtage. Vervang zo
nodig de grasmand.
1. Laat de schakelhendel los.
2. Verwijder de contactsleutel.
3. Open de achterklep en verwijder de grasmand
door het handvat vast te pakken.
Fig.28: 1. Achterklep 2. Handvat 3. Grasmand
4. Leeg de grasmand.
57 NEDERLANDS
ONDERHOUD
WAARSCHUWING: Zorg altijd dat de con-
tactsleutel en de accu uit de grasmaaier zijn
verwijderd voordat u de grasmaaier opbergt of
draagt, of voordat u inspectie of onderhoud gaat
verrichten.
WAARSCHUWING: Verwijder altijd de con-
tactsleutel wanneer de grasmaaier niet in gebruik
is. Bewaar de contactsleutel op een veilige plaats,
buiten bereik van kinderen.
WAARSCHUWING: Draag handschoenen bij
het verrichten van inspectie of onderhoud.
WAARSCHUWING: Draag bij het verrichten
van inspectie of onderhoud altijd een bescher-
mende bril of een veiligheidsbril met zijkappen.
KENNISGEVING: Gebruik nooit benzine, was-
benzine, thinner, alcohol en dergelijke. Hierdoor
kunnen verkleuring, vervormingen en barsten
worden veroorzaakt.
Om de VEILIGHEID en BETROUWBAARHEID van
het gereedschap te handhaven, dienen alle reparaties,
onderhoud of afstellingen te worden uitgevoerd bij een
erkend Makita-servicecentrum of de Makita-fabriek, en
altijd met gebruik van Makita-vervangingsonderdelen.
Onderhoud
1. Verwijder de contactsleutel en accu’s en sluit
daarna het accudeksel.
2. Leg de grasmaaier op zijn kant en verwijder het
maaisel dat zich heeft opgehoopt tegen de onderkant
van het maaidek.
3. Giet water op de onderkant van het gereedschap
waaraan het snijblad is bevestigd.
KENNISGEVING: Was het gereedschap niet met
water onder hoge druk.
4. Controleer of alle moeren, bouten, knoppen,
schroeven en andere bevestigingspunten stevig vast
zitten.
5. Inspecteer de bewegende onderdelen op schade,
defecten en slijtage. Beschadigde of ontbrekende
onderdelen moeten worden gerepareerd of vervangen.
6. Berg de grasmaaier op een veilige plaats op bui-
ten bereik van kinderen.
De grasmaaier dragen
Wanneer u de grasmaaier draagt, houdt u het voor-
handvat en de onderste handgreep met twee personen
vast zoals aangegeven in de afbeelding.
Fig.29: 1. Onderste handgreep 2. Voorhandvat
Opbergen
Berg de grasmaaier binnenshuis op, in een koele, droge
en afgesloten ruimte. Berg de grasmaaier en de accula-
der niet op op een plaats waar de temperatuur tot 40 °C
of hoger kan stijgen.
1. Open de achterklep en verwijder de grasmand
door het handvat vast te pakken.
Fig.30: 1. Achterklep 2. Handvat 3. Grasmand
2. Draai de vingermoeren los en klap de bovenste
handgreep dubbel.
Fig.31: 1. Bovenste handgreep 2. Vingermoer
Het snijblad van de grasmaaier
aanbrengen of verwijderen
WAARSCHUWING: Verwijder altijd eerst de
contactsleutel en de accu voordat u het snijblad
gaat verwijderen of aanbrengen. Als u de contact-
sleutel en de accu niet verwijdert, kan dat leiden
tot ernstig letsel.
WAARSCHUWING: Nadat de schakelhen-
del is losgelaten, blijft het snijblad nog enkele
seconden nadraaien. Voer geen enkele handeling
uit voordat het snijblad volledig tot stilstand is
gekomen.
WAARSCHUWING: Draag bij het hanteren
van het snijblad altijd handschoenen.
Het snijblad van de grasmaaier
verwijderen
Voor DLM460
1. Leg de grasmaaier zodanig op zijn zijkant dat de
maaihoogte-instelhendel bovenop komt.
2. Om het snijblad te blokkeren, steekt u een stuk
hout of iets dergelijks in de grasmaaier.
3. Draai de bout linksom los met de sleutel.
Fig.32: 1. Snijblad van de grasmaaier 2. Sleutel
3. Stuk hout
4. Verwijder de bout, de ring en het snijblad van de
grasmaaier, in die volgorde.
Fig.33: 1. Snijblad van de grasmaaier 2. Ring
3. Bout
Voor DLM461
1. Leg de grasmaaier zodanig op zijn zijkant dat de
maaihoogte-instelhendel bovenop komt.
2. Draai de bout met de sleutel linksom terwijl u de
grondplaat vasthoudt.
Fig.34: 1. Sleutel 2. Grondplaat
3. Verwijder de bout, de ring en de grondplaat, in die
volgorde.
Fig.35: 1. Grondplaat 2. Ring 3. Bout
4. Om één snijblad te verwijderen, draait u de bout
met de sleutel linksom terwijl u de grondplaat vasthoudt.
Fig.36: 1. Grondplaat 2. Snijblad van de grasmaaier
3. Sleutel
58 NEDERLANDS
Het snijblad van de grasmaaier monteren
Om het snijblad van de grasmaaier aan te brengen, volgt
u de verwijderingsprocedure in omgekeerde volgorde.
WAARSCHUWING: Breng het snijblad voor-
zichtig aan. Het heeft een boven- en onderkant.
Plaats het snijblad zodanig dat de draairichtings-
pijl naar buiten wijst.
WAARSCHUWING: Draai de bout rechtsom
stevig aan om het snijblad vast te zetten.
WAARSCHUWING: Zorg ervoor dat het snij-
blad en alle bevestigingsdelen correct zijn aange-
bracht en stevig zijn vastgezet.
WAARSCHUWING: Als u het snijblad ver-
vangt, volgt u altijd de instructies die in deze
handleiding worden gegeven.
Voor DLM461
KENNISGEVING: Bij het aanbrengen van het
snijblad van de grasmaaier, schuift u het snijblad
van de grasmaaier zoals aangegeven in de afbeel-
ding zodat de uitstekende nokken het snijblad van
de grasmaaier raken.
Fig.37: 1. Uitstekende nok 2. Snijblad van de
grasmaaier
PROBLEMEN OPLOSSEN
Alvorens u verzoekt om reparatie, kunt u zelf als volgt het probleem opsporen en oplossen. Als u met een
probleem kampt dat in deze handleiding niet wordt beschreven, probeer dan niet het gereedschap te demon-
teren. Laat reparaties over aan een erkend Makita-servicecentrum, uitsluitend met gebruik van originele
Makita-vervangingsonderdelen.
Probleemomschrijving Waarschijnlijke oorzaak (storing) Oplossing
De grasmaaier start niet. Er zijn nog niet twee volle accu’s
aangebracht.
Breng opgeladen accu’s aan.
Probleem met de accu (onvoldoende
spanning)
Laad de accu op. Als het opladen geen effect heeft,
vervangt u de accu.
De contactsleutel is niet ingestoken. Steek de contactsleutel er in.
Na kortstondig gebruik stopt de
motor al gauw.
De accu is bijna leeg. Laad de accu op. Als het opladen geen effect heeft,
vervangt u de accu.
De maaihoogte is te laag. Kies een grotere maaihoogte.
Het maximale motortoerental wordt
niet bereikt.
De accu is niet juist aangebracht. Breng de accu aan zoals beschreven in deze
handleiding.
De accuspanning valt weg. Laad de accu op. Als het opladen geen effect heeft,
vervangt u de accu.
Het aandrijfsysteem werkt niet goed. Vraag uw plaatselijke erkende servicecentrum om
reparatie.
Het snijgarnituur draait niet:
stop de grasmaaier onmiddellijk!
Een vreemd voorwerp, zoals een tak, is
vastgeraakt dichtbij het snijblad.
Verwijder het vreemde voorwerp.
Het aandrijfsysteem werkt niet goed. Vraag uw plaatselijke erkende servicecentrum om
reparatie.
Abnormale trillingen:
stop de grasmaaier onmiddellijk!
Het snijblad is niet meer gebalanceerd,
of overmatig of ongelijkmatig gesleten.
Vervang het snijblad.
OPTIONELE ACCESSOIRES
LET OP: Deze accessoires of hulpstukken
worden aanbevolen voor gebruik met het Makita
gereedschap dat in deze gebruiksaanwijzing is
beschreven. Bij gebruik van andere accessoires of
hulpstukken bestaat het gevaar van persoonlijke let-
sel. Gebruik de accessoires of hulpstukken uitsluitend
voor hun bestemde doel.
Wenst u meer bijzonderheden over deze acces-
soires, neem dan contact op met het plaatselijke
Makita-servicecentrum.
Snijblad van de grasmaaier
Originele Makita-accu en -acculader
OPMERKING: Sommige items op de lijst kunnen
zijn inbegrepen in de doos van het gereedschap als
standaard toebehoren. Deze kunnen van land tot land
verschillen.
www.makita.com
Makita Europe N.V.
Makita Corporation
3-11-8, Sumiyoshi-cho,
Anjo, Aichi 446-8502 Japa
n
Jan-Baptist Vinkstraat 2,
3070 Kortenberg, Belgium
885657-993
EN, FR, DE, IT, NL,
ES, PT, DA, EL, TR
20180716
1

Hulp nodig? Stel uw vraag in het forum

Spelregels

Misbruik melden

Gebruikershandleiding.com neemt misbruik van zijn services uitermate serieus. U kunt hieronder aangeven waarom deze vraag ongepast is. Wij controleren de vraag en zonodig wordt deze verwijderd.

Product:

Bijvoorbeeld antisemitische inhoud, racistische inhoud, of materiaal dat gewelddadige fysieke handelingen tot gevolg kan hebben.

Bijvoorbeeld een creditcardnummer, een persoonlijk identificatienummer, of een geheim adres. E-mailadressen en volledige namen worden niet als privégegevens beschouwd.

Spelregels forum

Om tot zinvolle vragen te komen hanteren wij de volgende spelregels:

Belangrijk! Als er een antwoord wordt gegeven op uw vraag, dan is het voor de gever van het antwoord nuttig om te weten als u er wel (of niet) mee geholpen bent! Wij vragen u dus ook te reageren op een antwoord.

Belangrijk! Antwoorden worden ook per e-mail naar abonnees gestuurd. Laat uw emailadres achter op deze site, zodat u op de hoogte blijft. U krijgt dan ook andere vragen en antwoorden te zien.

Abonneren

Abonneer u voor het ontvangen van emails voor uw Makita DLM461 bij:


U ontvangt een email met instructies om u voor één of beide opties in te schrijven.


Ontvang uw handleiding per email

Vul uw emailadres in en ontvang de handleiding van Makita DLM461 in de taal/talen: Nederlands, Duits, Engels, Frans, Italiaans, Portugees, Spaans, Turks, Deens als bijlage per email.

De handleiding is 5,95 mb groot.


U ontvangt de handleiding per email binnen enkele minuten. Als u geen email heeft ontvangen, dan heeft u waarschijnlijk een verkeerd emailadres ingevuld of is uw mailbox te vol. Daarnaast kan het zijn dat uw internetprovider een maximum heeft aan de grootte per email. Omdat hier een handleiding wordt meegestuurd, kan het voorkomen dat de email groter is dan toegestaan bij uw provider.

Stel vragen via chat aan uw handleiding

Stel uw vraag over deze PDF

Uw handleiding is per email verstuurd. Controleer uw email

Als u niet binnen een kwartier uw email met handleiding ontvangen heeft, kan het zijn dat u een verkeerd emailadres heeft ingevuld of dat uw emailprovider een maximum grootte per email heeft ingesteld die kleiner is dan de grootte van de handleiding.

Er is een email naar u verstuurd om uw inschrijving definitief te maken.

Controleer uw email en volg de aanwijzingen op om uw inschrijving definitief te maken

U heeft geen emailadres opgegeven

Als u de handleiding per email wilt ontvangen, vul dan een geldig emailadres in.

Uw vraag is op deze pagina toegevoegd

Wilt u een email ontvangen bij een antwoord en/of nieuwe vragen? Vul dan hier uw emailadres in.


Info