552534
9
Verklein
Vergroot
Pagina terug
1/35
Pagina verder
1
MANTA 150/250/350
DECT telephone with and hands-free
User manual
Non contractual photo
You must read this manual before using the device
You can download these instructions in pdf format at:
www.logicom-europe.com
2
We,
LOGICOM
55, rue de Lisbonne
75008 Paris
France
Declare that the LOGICOM MANTA 150, MANTA 250 and MANTA 350 DECT
telephone products with hands-free are in compliance with the essential requirements
applicable and in particular the requirements of guideline 1999/5/EC, which are as
follows:
Article 3.1a - (protection of the user's health and security):
- EN 60950-1/ A12:2011
Article 3.1b - (protection requirements concerning electromagnetic compatibility):
- EN 301 489-6 V1.3.1 (2008)
- EN 301 489-1 V1.9.2 (2011)
Article 3.2 (correct use of the radio frequency spectrum so as to avoid damaging
interferences):
- EN 301 406 V2.1.1 (2009)
- RoHS (2011/65/EU)
We declare that the MANTA 150, MANTA 250 and MANTA 350 products are in
compliance with the requirements related to European Standards for line interfaces.
This compliance applies as long as the product for which it is awarded is installed and
used following the instructions provided in the user manual.
Non-authorised modifications to the product cancel this declaration of compliance.
Paris, July 10
th
, 2012
Bernard Bessis
President
3
The device presentation
1 General characteristics
The general characteristics of your MANTA phone are:
Handset
• 3 line LCD screen (1 alphanumeric line + 2 icon lines)
• GAP compatible.
• Possibility of associating up to 5 handsets on 1 base.
• Automatic registration with additional MANTA handsets.
• Range: 50 metres inside and 300 metres in open field.
• Battery Life: 100 hours in standby mode. 10 hours of communication.
• Hands-free
• Alphanumeric directory with up to 20 contacts (names and numbers)
• Date and time settings.
• Inter-phone calling between 2 handsets.
• Conference calling up to 3 handsets (2 internal + 1 external).
• Call transfers to other handsets.
• Redial option for the last 5 numbers composed.
• Choice of 10 ringtones for the handset (5 classic and 5 polyphonic).
• Configurable handset ringtone volume (5 levels).
• Configurable handset listening volume (5 levels).
• Sound alerts (keypad, low battery, out of range tones)
• Keypad lock.
• Conversation time counter.
• Handset calling.
• Secret function.
• Clock or handset name displayed when idle.
• Customisation of handset name.
• Alarm function.
• Tone dialling (by default) or pulse dialling.
• Customisation of the 4 figure PIN code which grants access to certain functions.
Name and number presentation function
Name and number presentation (alternatively)
• Call timestamping
• Call log with up to 10 names and numbers
• Composition of numbers via the call log
• Selective or total deletion of calls
2 Precautions for use
•Carefully read through the instructions provided.
•Only use the power adaptor provided.
•Do not install in a dusty area or prone to vibrations or shocks.
•Do not place your device close to a magnetic source (television, speakers, etc.) as this
may cause interference.
4
•Do not pour liquid on the device as it may short-circuit.
Do not place the base in a damp area.
•Do not disassemble the device.
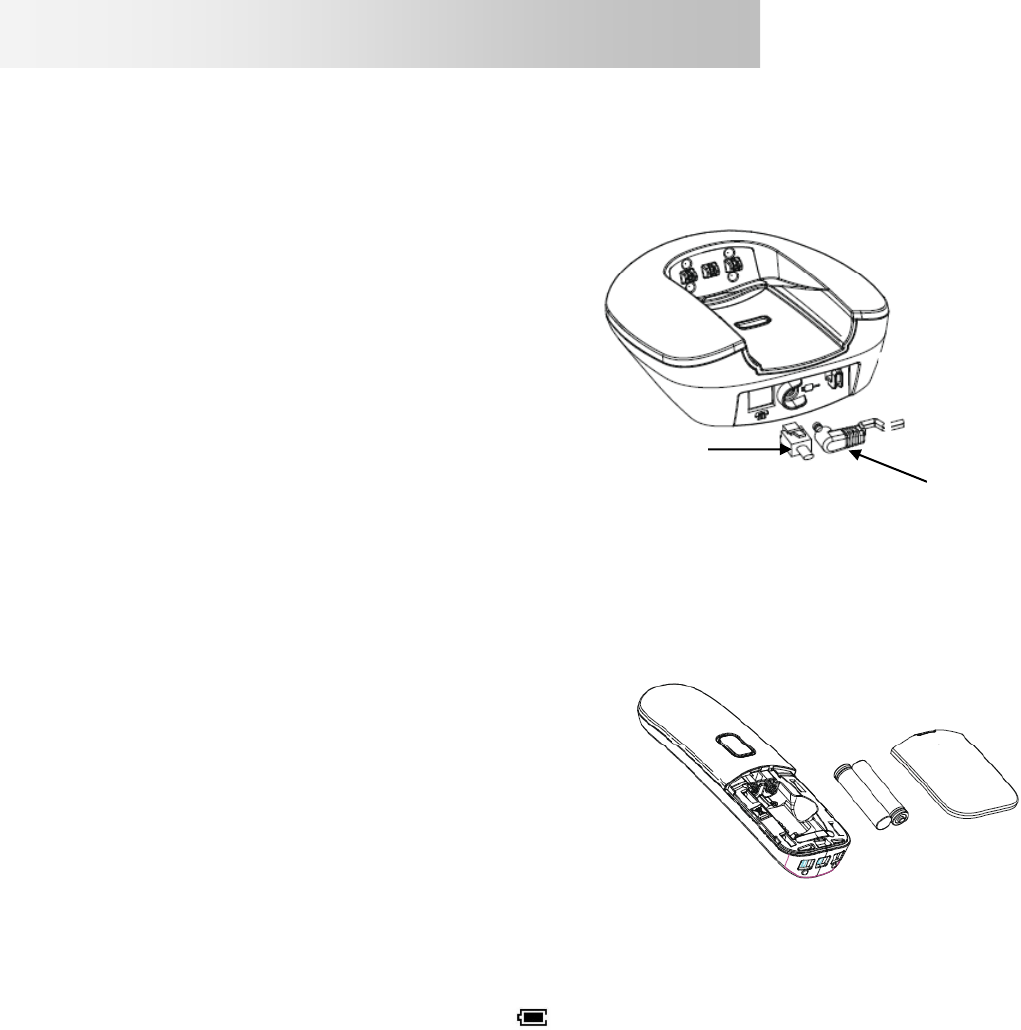
•Disconnect the telephone connection before disconnecting the power-supply.
•Immediately disconnect a faulty device and send it for repair in an approved after-sales
service.
•After moving the device, reconnect the power-supply first.
•Do not place objects or step on the electric cable.
•Avoid connecting too many devices to one same power-supply.
•Do not install during a storm.
•Do not touch exposed telephone wires, unless unplugged.
•Disconnect the device before cleaning, do not use cleaning products or aerosols,
prefer a moist cloth.5
•Do not place the device on an unstable surface, as a fall may cause severe damage.
•In the absence of a mains power-supply or in the event of a power cut, the devise is
not functional. This disables emergency calls both to and from the device.
For this reason, it is recommended that you use a complementary conventional
telephone.
•Keep this instruction manual in a safe place for future reference.
IMPORTANT:
1) Only use the type of battery provided.
2) Do not dispose of batteries in a fire or bin. Ask your local dealer for special
measures concerning recycling.
3) Do not open the batteries, the contained electrolyte is corrosive and may burn
hands, skins and eyes, and is toxic if swallowed.
Battery performance
In ideal conditions, a fully charged battery allows for 10 hours of communication or 100
hours in standby mode.
New batteries perform best after several days of use.
To optimise battery performance, do not leave the handset on the base all day. The
battery's life span will be prolonged by allowing it to fully deplete once per week.
The charge limit for rechargeable batteries decreases over time due to use, also
reducing the handset's communication and standby time. In this case, the batteries
should be replaced. .
After having charged the handset for the first time, the following recharges last 6 to 8
hours per day. It is perfectly normal for the battery and handset to become hot during
charging.
Are you using your MANTA with broadband?
If your telephone must use a broadband connection, ensure that it is connected through
a broadband filter. Using this product with a filter-less broadband connection can cause
problems with your telephone and your broadband connection.
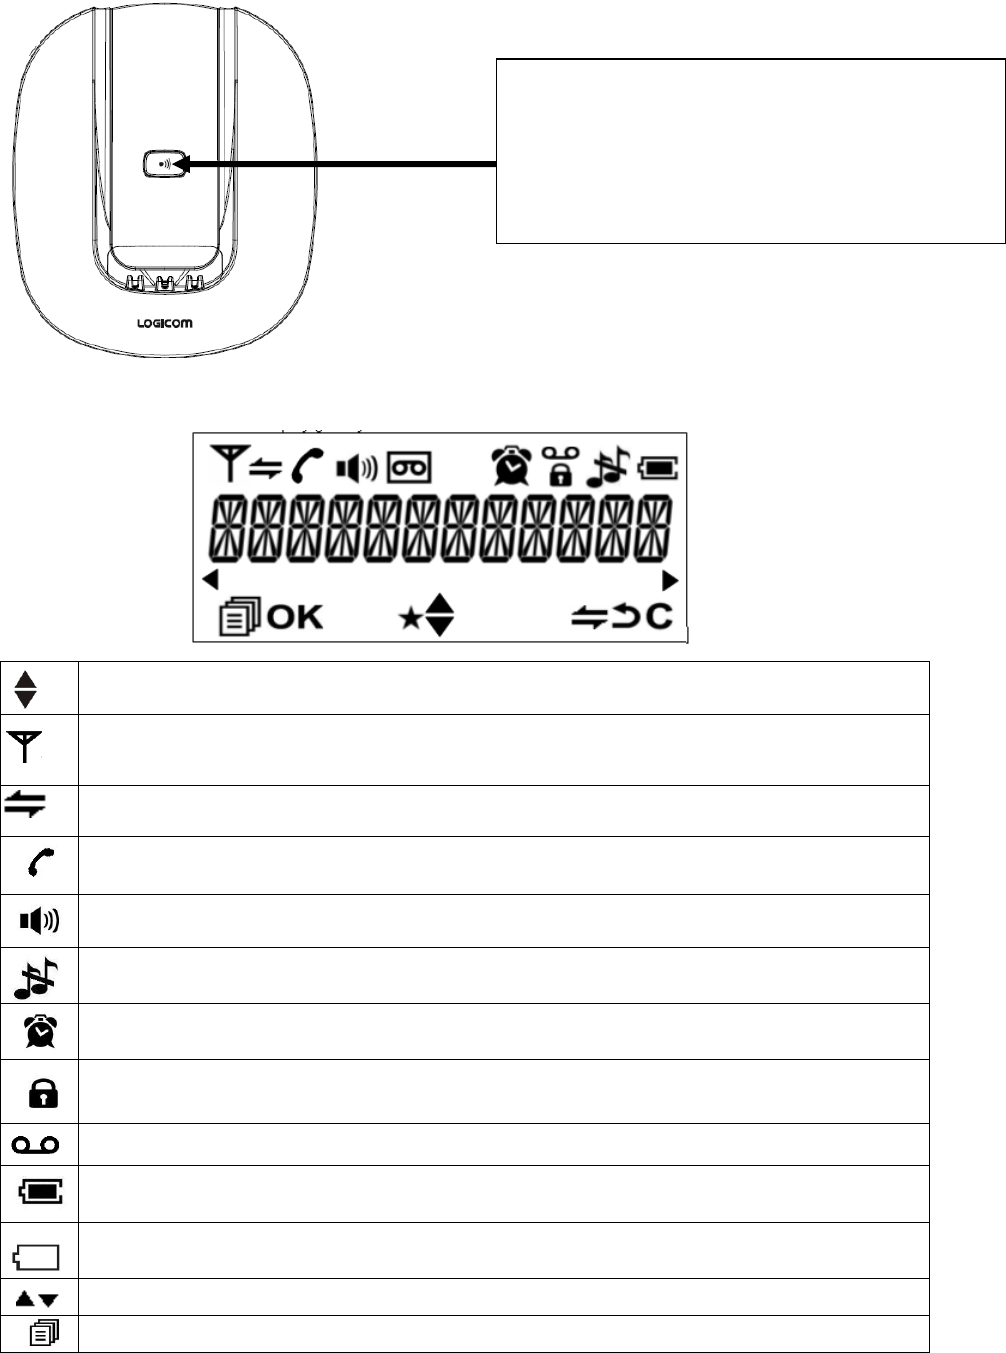
Time and date
If you subscribe to your operator name and number presentation, the date (day/month)
and time will automatically be displayed on all handsets when you receive your first call.
5
3 Included in box
1 handset
1 base
2 400mAh Ni-Mh rechargeable batteries
1 mains adaptor
1 telephone cable
Installation and start-up guide
Before use, choose an appropriate surface on which to place your telephone base.
Ensure that it is not close to another telephone or any other electric devices (computer,
television, etc.) to avoid interference.
1 Installing your telephone
2 Installing and charging rechargeable batteries
Installation:
- Insert the 2 batteries (Type AAA Ni-MH/400mAh)
into the compartment. Respect the polarity indication.
- Close the battery compartment using the
flap provided with the batteries in the packaging
Note: When the handset is charging the icon flashes permanently.
When the icon stops flashing, the batteries are fully charged.
Caution: If you do not leave the handset to charge for 24 hours for the first time, it will
never reach its full capacity.
The warranty does not cover problems relating to incomplete charging before first use.
A- Connect the mains input socket to the
modular slot behind the base. Then connect the
mains adaptor (VT04EUK06045 output 6V
DC/450mA) to the 100-240 V AC 50/60 Hz
power-supply.
Repeat the process with the other adaptors
(VT04EUK06045 output 6V
DC/450mA) on the charging bases.
B- Connect the telephone cable to the modular
slot behind the base and the other end to the
telephone wall socket
Charging the batteries:
Before use, batteries must be charged (for the first time)
for at least 24 hours.
- Place the handset on the charging base, a confirmation
signal will be heard.
- Leave the batteries to charge uninterrupted for at least
24 hours.
B
A
In MANTA 250 and 350 packs each
additional handset comes with the
following elements:
1 additional charger
2 rechargeable batteries
1 mains adaptor
6
Important: When batteries are low, the volume may vary; recharge the batteries to
reset the volume.
3 Basic set-up
3-1- Changing the language
Enter the menu and select the "HS SETTINGS" menu using the
DOWN key
Select "LANGUAGE"
Choose the language desired
Return to the home screen
3-2- Navigating through the menus
Set up and customise your telephone, display the menu by clicking
"OK".
Navigate through the list; click on UP and DOWN keys
Confirm your choice or display a sub-menu
Return to the previous menu
Exit the list and return to the home screen
3-3- Modifying the ringtone
You can select a ringtone from the 10 different ringtones available for
external calls and another for internal calls. There are 5 classic and 5
polyphonic ringtones to choose from.
Enter the menu and select the "HS SETTINGS" menu using the
DOWN key
Using the DOWN key, select "RING SETUP"
Select "EXT RING" to choose the external ringtone or "INT RING" for
the internal ringtone
Select a new ringtone
Return to the home screen
3-4 Modifying the ringtone volume
Enter the menu and select the "HS SETTINGS" menu using the
DOWN key
Using the DOWN key, select "RING SETUP"
Select "RING VOLUME"
7
Configure the ringtone volume (from 1 to 5) or select "VOLUME OFF"
to mute ringtone
Return to the home screen
Note: during a call, use keys to increase or decrease the ringtone
volume
3-5- Adding a contact to the directory
Enter the directory
Select "ADD"
"NAME" will be displayed on the screen, using the alphanumeric
keypad, enter the name of your new contact and click OK to confirm
"NUMBER" will be displayed on the screen, using the alphanumeric
keypad, enter the number of your new contact and click OK to confirm
Return to the home screen
4 Basic use of your telephone
4-1- Calling
Normal dialling:
Pick up the handset, then compose your correspondent's number
Pre-dialling:
Compose your correspondent's number, then pick up the handset
Calling a contact via the directory:
Enter the directory, then select a contact from the list
Pick up your handset
Once the call is finished, hang up your handset
4-2- Answering a call
When the telephone rings, pick up your handset
Once the call is finished, hang up your handset
You can also hang up the handset by placing it on the base (refer to
the "automatic answer" chapter for more information concerning this
function.)
ABC
123
123
123
8
Diagrams and functions of the telephone
1 Description of the keypad
- Allows you to
access a sub-
menu
- Allows you to
validate the
modification of a
function
- Allows you to directly
access the call log
- Allows you to increase
the volume during
communication
- Allows you to navigate
through the menu
- Allows you to return to
the previous menu
- Allows you to erase a
figure or character
- Allows inter-phone
calling
- During communication,
allows you to activate
(stop
the microphone) or
deactivate the secret
function
- Allows you to pick
up the line or answer
a call
- Allows you to directly
access the REDIAL
list
- Allows you to reduce
the volume during
communication
- Allows you to
navigate through the
menu
- Allows you to hang
up
- Allows you to turn off
the handset (press and
hold down)
- Allows you to
access certain
operator services
- Allows you to lock
and unlock the
keypad (press and
hold down)
- Alphanumeric keypad,
allows you to compose a
number and enter a name
in the directory
- Allows you to turn off
the ringtone (press
and hold down)
- Allows you to activate
or deactivate hands-
free
- Allows you to access
the directory
9
2 Description of the base
3 Description of the LCD display
Indicates that a function is accessible via the navigational keys
Flashes when the handset is out of range or not associated to the base
Flashes for incoming internal calls, and remains lit
Indicates an ongoing internal call
Indicates that hands-free is activated
Indicates that the ringtone has been muted
Is displayed when the alarm is activated
Indicates that the keypad is locked
Indicates the reception of a new message on your operator's voicemail
Indicates that the batteries are charged
Indicates that the batteries are depleted, and require recharging
Indicates that functions are accessible via the menu
Registration key:
- Allows you to set the base to handset
registration mode (press and hold down for
10 seconds)
- Allows you to call all the handsets
configured to the base (press down quickly)
9

Hulp nodig? Stel uw vraag in het forum

Spelregels

Misbruik melden

Gebruikershandleiding.com neemt misbruik van zijn services uitermate serieus. U kunt hieronder aangeven waarom deze vraag ongepast is. Wij controleren de vraag en zonodig wordt deze verwijderd.

Product:

Bijvoorbeeld antisemitische inhoud, racistische inhoud, of materiaal dat gewelddadige fysieke handelingen tot gevolg kan hebben.

Bijvoorbeeld een creditcardnummer, een persoonlijk identificatienummer, of een geheim adres. E-mailadressen en volledige namen worden niet als privégegevens beschouwd.

Spelregels forum

Om tot zinvolle vragen te komen hanteren wij de volgende spelregels:

Belangrijk! Als er een antwoord wordt gegeven op uw vraag, dan is het voor de gever van het antwoord nuttig om te weten als u er wel (of niet) mee geholpen bent! Wij vragen u dus ook te reageren op een antwoord.

Belangrijk! Antwoorden worden ook per e-mail naar abonnees gestuurd. Laat uw emailadres achter op deze site, zodat u op de hoogte blijft. U krijgt dan ook andere vragen en antwoorden te zien.

Abonneren

Abonneer u voor het ontvangen van emails voor uw Logicom MANTA 350 bij:


U ontvangt een email met instructies om u voor één of beide opties in te schrijven.


Ontvang uw handleiding per email

Vul uw emailadres in en ontvang de handleiding van Logicom MANTA 350 in de taal/talen: Engels als bijlage per email.

De handleiding is 1,12 mb groot.


U ontvangt de handleiding per email binnen enkele minuten. Als u geen email heeft ontvangen, dan heeft u waarschijnlijk een verkeerd emailadres ingevuld of is uw mailbox te vol. Daarnaast kan het zijn dat uw internetprovider een maximum heeft aan de grootte per email. Omdat hier een handleiding wordt meegestuurd, kan het voorkomen dat de email groter is dan toegestaan bij uw provider.

Stel vragen via chat aan uw handleiding

Stel uw vraag over deze PDF

Andere handleiding(en) van Logicom MANTA 350

Logicom MANTA 350 Gebruiksaanwijzing - Nederlands - 36 pagina's


Uw handleiding is per email verstuurd. Controleer uw email

Als u niet binnen een kwartier uw email met handleiding ontvangen heeft, kan het zijn dat u een verkeerd emailadres heeft ingevuld of dat uw emailprovider een maximum grootte per email heeft ingesteld die kleiner is dan de grootte van de handleiding.

Er is een email naar u verstuurd om uw inschrijving definitief te maken.

Controleer uw email en volg de aanwijzingen op om uw inschrijving definitief te maken

U heeft geen emailadres opgegeven

Als u de handleiding per email wilt ontvangen, vul dan een geldig emailadres in.

Uw vraag is op deze pagina toegevoegd

Wilt u een email ontvangen bij een antwoord en/of nieuwe vragen? Vul dan hier uw emailadres in.


Info