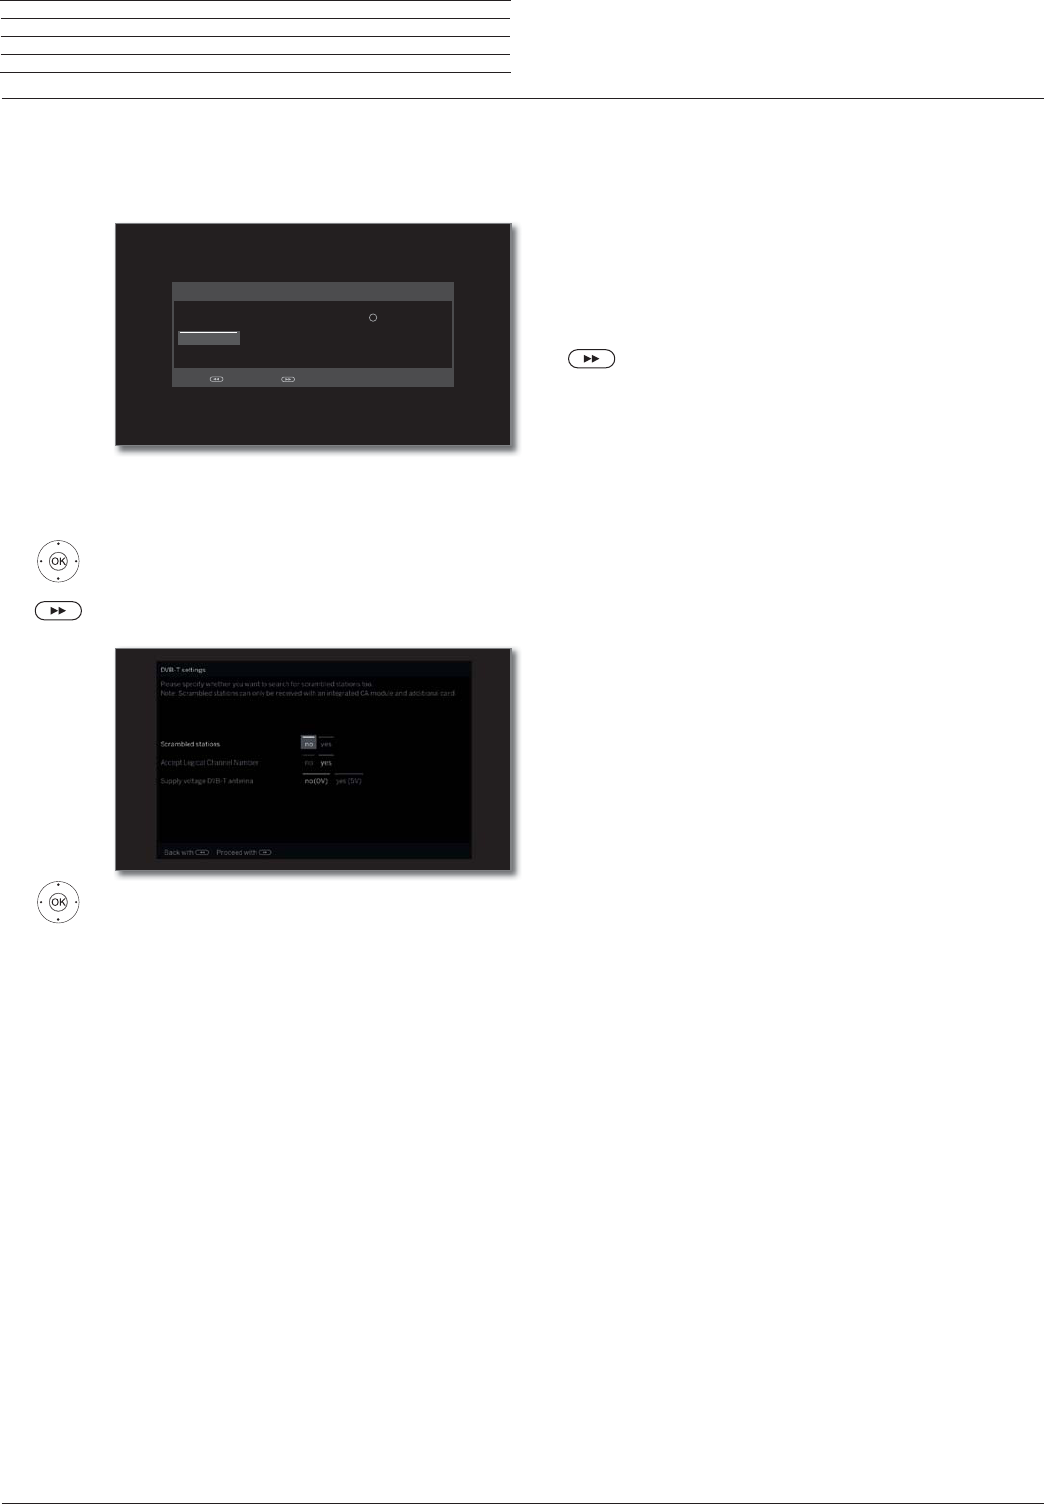
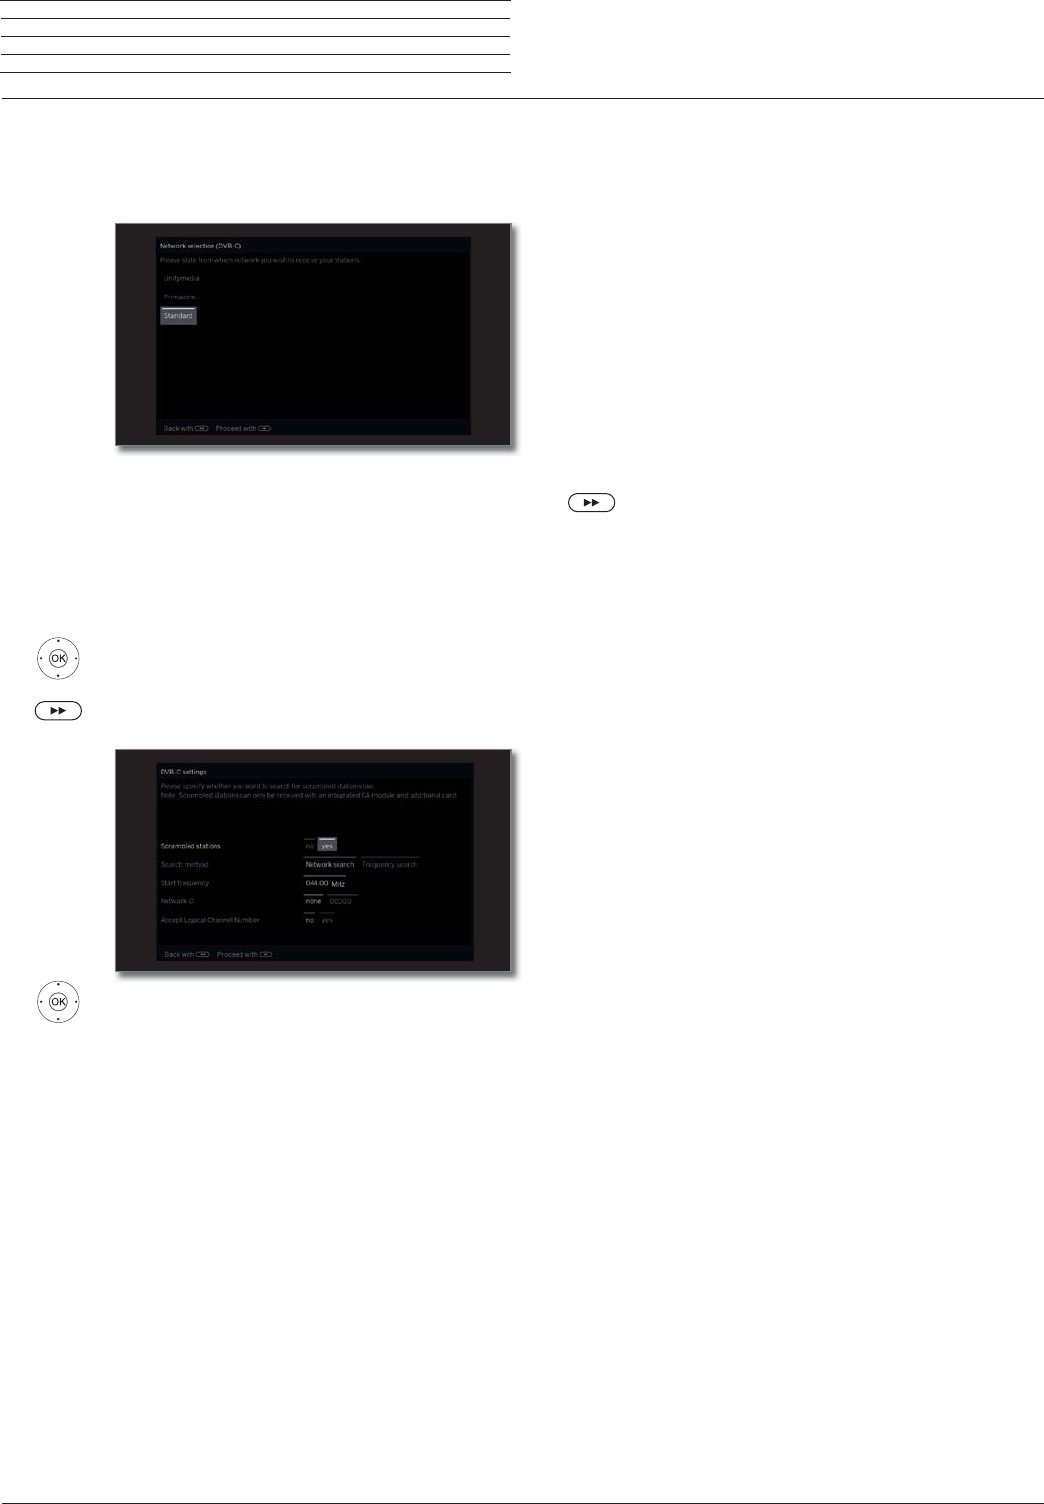
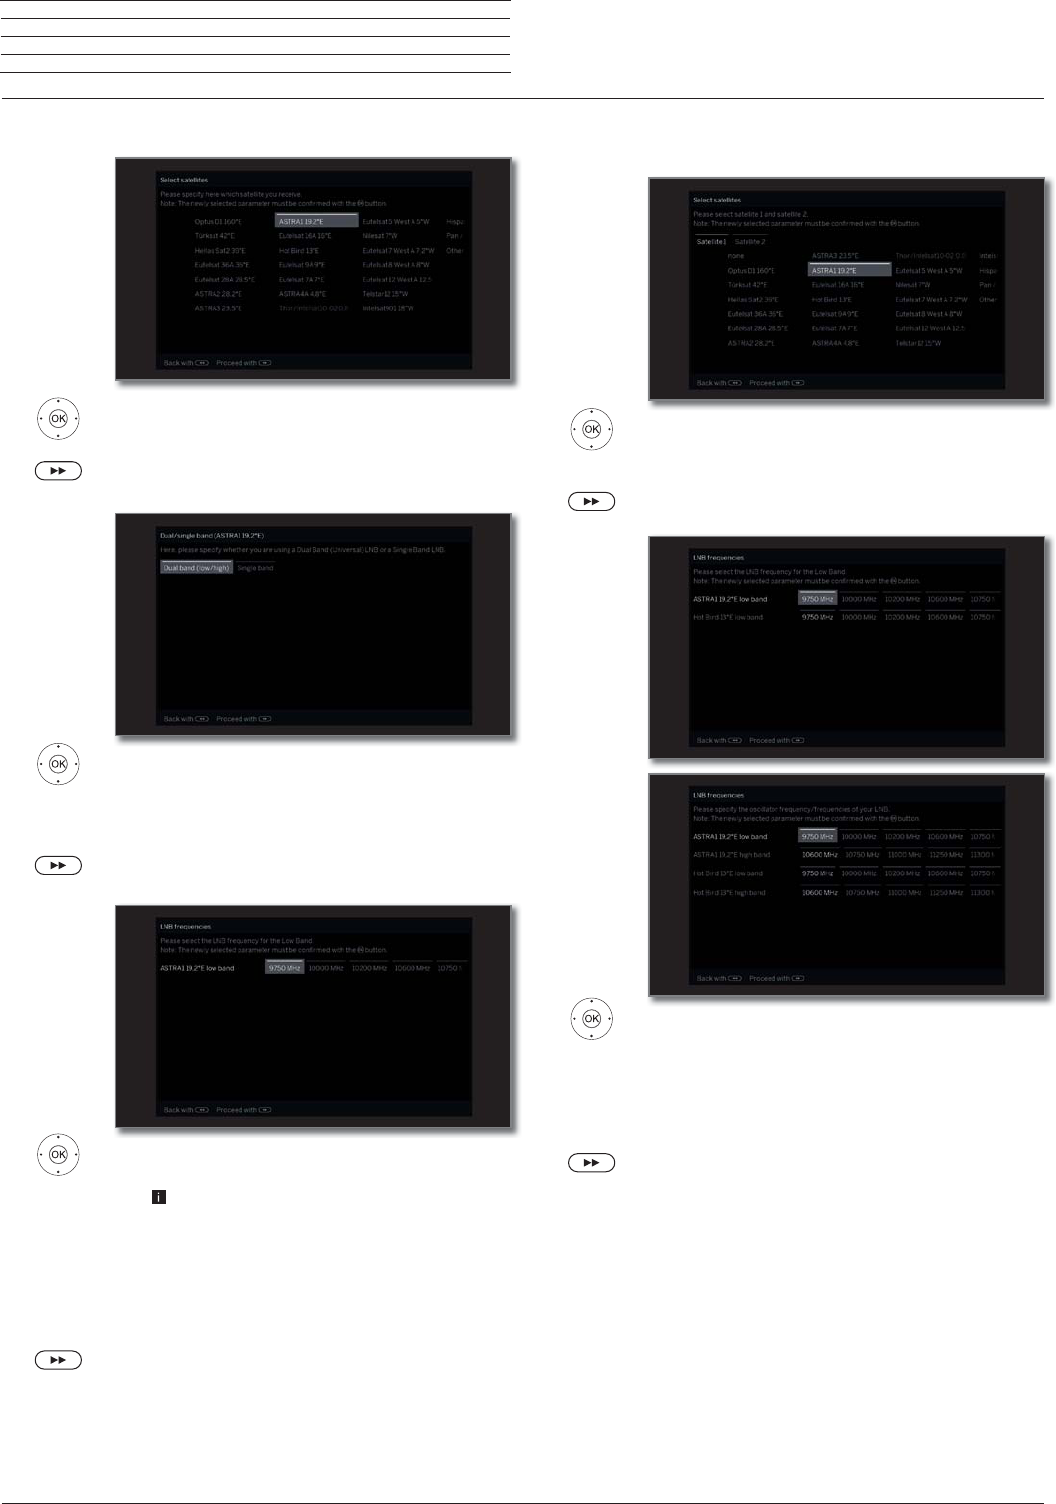
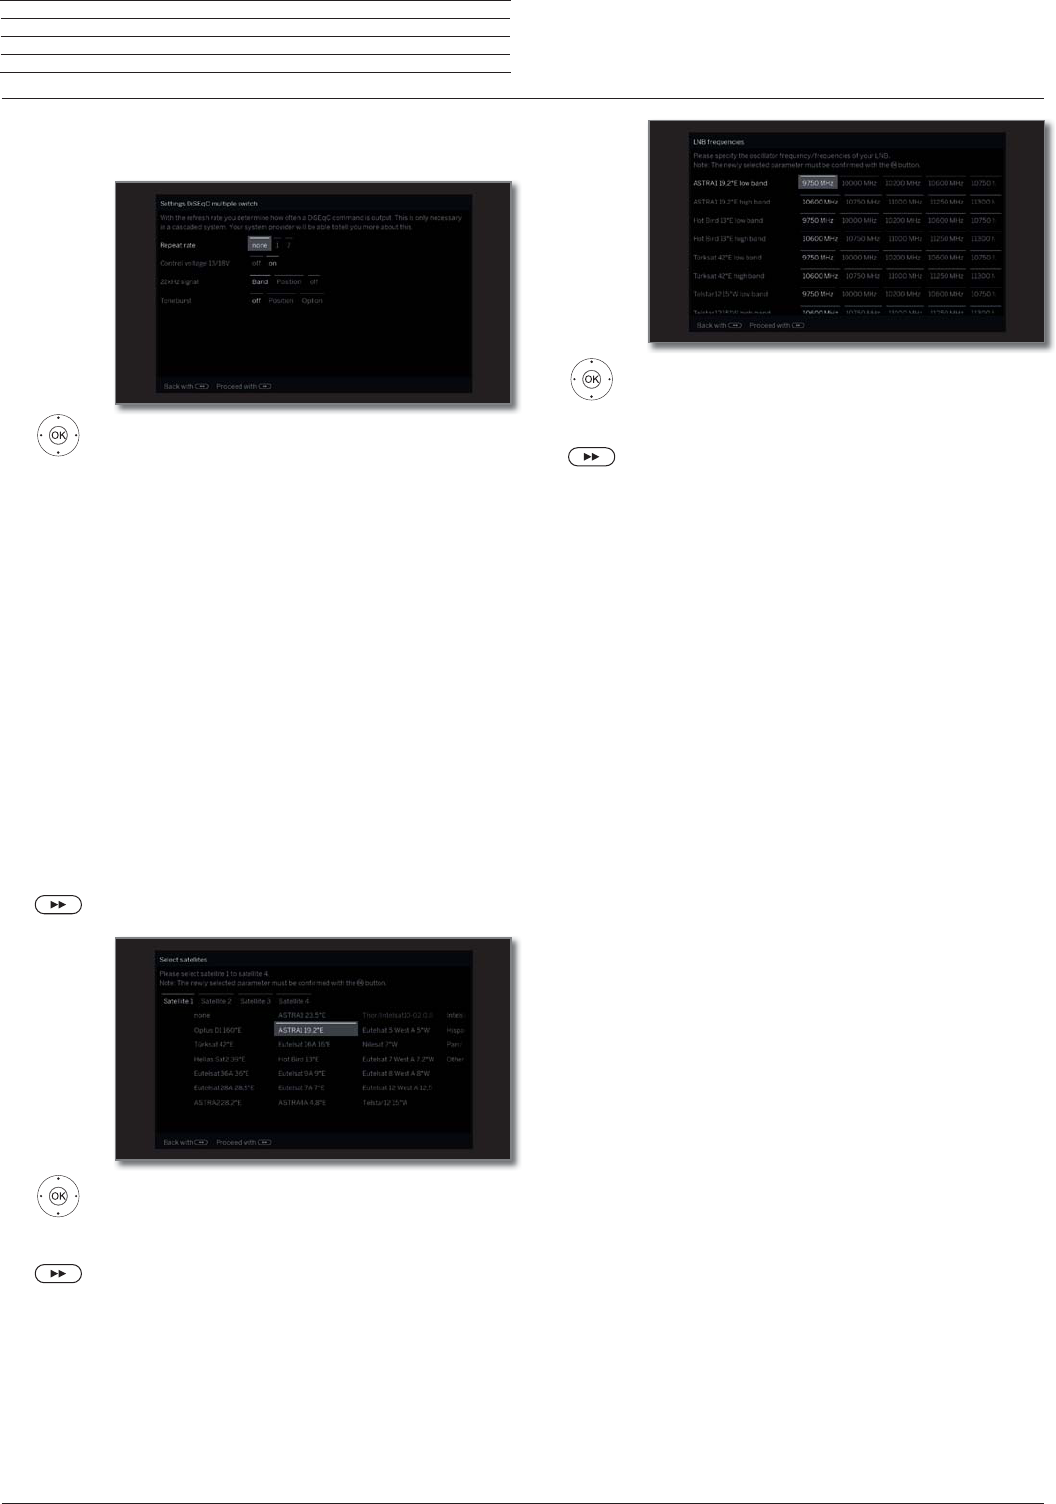
System settings (continuation) ..............................................113
Loewe bild 5 oled / bild 4 oled
User handbook
5
Welcome
Thank you,
for choosing a Loewe product and having placed your trust in us.
With Loewe you have not simply decided on a modern and technically
innovative TV set, but for timeless design, sharp picture quality, brilliant
sound for movies and music as well as intuitive operation with the
Loewe remote control unit, smart phone or tablet. In short, Loewe is
perfect for home entertainment – Made in Germany.
We look forward to welcome you as our customer and hope that you
enjoy your Premium Home Entertainment made by Loewe.
Many features, one result:
perfect Home Entertainment.
Just more entertainment.
The Loewe os user interface is intuitive and graphically
optimised. This is how you quickly find your desired content
– from TV set to online.
See chapter: Home view.
Perfectly networked.
Thanks to its numerous connections, your Loewe TV
becomes your entertainment centre. Connect it to the
Internet, DVD/Blu-ray player, external speakers, etc.
Hard disk for your TV archive.
Record the TV programme or pause it and continue watching
it at a later date. With DR+ (Digital Recording), all this is no
problem for your Loewe TV set.
See chapter: Digital Recorder.
Your contact person.
We are happy to help you with any questions regarding your
TV set and other Loewe products.
In the user handbook refer to Service.
Customer
Care
Center
Delivery specification
TV set
Instruction manual 1
Rotation unit (only with bild 5 set variant and bild 4oled)
Table stand base plate (only with bild 5 set variant and bild 4 oled)
Welcome Box:
Remote control assist with two alkaline batteries type AAA
Mains cable
Antenna cable
Operating instructions 2 (these instructions)
Table stand mounting instructions (only with bild 5 set variant
and bild 4 oled)
Velcro cable ties
Screws for assembly option (only with bild 5 set variants and
bild 4 oled)
Tool set for mounting of the installation option
About this user handbook
For best results regarding safety and the longevity of the set, we
recommend you read the chapter For your safety before switching
the TV set on for the first time.
The chapter glossary gives explanations of certain terms used in the
TV set and the user handbook.
Paragraphs which begin with the symbol
indicate important
instructions, tips or conditions for the following settings.
Terms which you will find in the menus or printed on the remote control
or TV set are written in bold type.
The necessary control elements are shown in the descriptions to the
left of the text containing the instructions for action.
Depending on the connected accessory equipment the menus in the
TV set can differ from those described here. The screen graphic dis-
played is only an example. Depending on the device type, the available
hardware/software components may be different.
All the station names, programme contents, the illustrated photos,
titles, albums and album covers in this user handbook are examples.
In addition to the remote control, a PC keyboard can be connected to
one of the USB ports on your TV and then used to control your TV set.
In the user handbook, this symbol indicates places in
which the use of a keyboard is particularly advantageous.
The operating manual and the user handbook for your TV set
are updated at irregular intervals. We recommend an occasional
examination on the Support Portal of the Loewe homepage.
General information on the operation of the
TV set
For further information on the user interface and the general operation
of your TV set see chapter General information on the operation.
Interactive data services
In some countries the stations also broadcast interactive data services
with their programmes, leading to the functions of individual keys not
being available or only so to a limited extent. You can find out more
about this in chapter TV, section HbbTV/MediaText.
Important information
Loewe does not accept any liability for the nature and content of
receivable Internet services. This also applies to the Loewe MediaNet
portal. With its devices, Loewe provides the technical platform that
fundamentally enables such material to be received. Loewe cannot
make any guarantees regarding changes in scope and content,
particularly with regard to the future and after going to press. The
receivable online services are not included in the delivery and can vary
depending on the product and country.
Loewe bild 5 oled / bild 4 oled
User handbook
6
Safety/Warning
For your safety, and to avoid unnecessary damage to your unit, please
read and follow the safety instructions below.
Key
This symbol indicates risks caused by high voltages.
This symbol indicates dangers caused by the development
of fire.
This symbol should alert the user to other, more specific risks.
This symbol indicates dangers caused by sharp edges.
Do not remove set rear panel
Warning: When opening or removing the rear panel, there is the dan-
ger of electric shock and the risk of serious injury from high voltages.
Never open the rear panel yourself. Leave repairs and servicing work
on your TV set to qualified, authorised television technicians.
Please contact your dealer or our customer service.
Intended use and environmental conditions
This TV set is intended exclusively for the reception and
playback of picture and sound signals.
The TV set is designed for dry rooms (living rooms and office
spaces). It must not be operated in spaces with high humidity
(for example, near or in a bath or sauna).
We point out that our TV sets can react sensitively to dust and
soot particles in the ambient air.
Excessive amounts of these can lead to damage to the set, up
to loss of function.
Ensure a clean environment, so that your set will not be
damaged.
High humidity and dust concentrations lead to power leaks in
the set. This can lead to danger of injury and damage to the set
by electric tensions or a fire.
If the set is used outdoors, make sure therefore that it is
protected against moisture (rain, dripping or splashing water
or condensation).
If you’ve brought the set from the cold into a warm environment,
leave it off for around an hour due to the formation of
condensation.
Do not place objects filled with liquid on the
set. Protect the set from dripping and
splashing water.
Candles and other open flames must be
kept away from the set at all times, to pre-
vent the spread of fire..
ATTENTION
ELECTRIC SHOCK DANGER–
DO NOT OPEN
Transport
Improper handling during transportation can lead to damage
to the display and risks of injury.
The OLED screen consists of glass or plastic and can break if
handled improperly.
Only transport the set in a vertical position.
Only handle the TV set at the display corners. The correct
handling is shown in the operating instructions 1.
Do not place it on the lower edge so as to reduce the danger of
damage and contamination.
Mains cable/power supply
Incorrect voltages can damage the set.
This set may only be connected to a mains power supply with
the voltage and frequency indicated on the rating plate using
the enclosed mains cable.
The mains power plug of the TV set must be easily accessible
so that the set can be disconnected from the mains at any time.
When pulling the mains power plug out, do not pull the cable
but the plug housing. The cables in the mains power plug could
be damaged and cause a short circuit when plugged in again.
A mains power cable with a damaged insulation can lead to
electric shock and presents a fire hazard. Never use a damaged
mains cable.
Lay the mains cables so that they cannot be damaged. Do not
tread on the mains cable.
The mains cable must not be kinked or laid over sharp edges.
Air circulation and high temperatures
Like any electronic device, your TV set requires air for cooling.
If air circulation is impeded, it may result in a fire.
The ventilation slots on the rear panel of
the set must therefore remain free.
Please do not cover the set.
Wall mounting: Leave at least 10 cm of
space all around the set at the side,
above and below.
Table / stand foot: Leave at least 10 cm
clear space around the set at the side
and at the top.
Foreign bodies
Foreign bodies inside of the set can lead to short circuits and
fires.
Danger of injury and damage exists
Therefore avoid metal parts, needles, paper clips, liquids, wax
or similar passing through the ventilation slits of the rear
panel into the interior of the set.
Should something get into the interior of the appliance, im-
mediately pull out the mains power plug of the set and inform
the customer service department for checking.
Safety/Warning
Loewe bild 5 oled / bild 4 oled
User handbook
7
Safety/Warning
Installation
Opting for an incorrect or wrongly mounted installation can
lead to danger of accidents Rolling or falling sets can cause
injuries or damage.
Loewe TV sets are specified for Loewe accessories. We strongly
recommend the use of original Loewe installation options.
Do not use any installation options that are not approved for
your TV set.
Note the instructions regarding the mounting for the different
possible installation options. A corresponding documentation
is included with every Loewe product.
Check before the installation of the set, whether the final loca-
tion with regard to the surface (pressure sensitivity) and stabil-
ity (static) is designed for the load from the set. This applies in
particular to high-gloss lacquered surfaces and surfaces made
of real wood, real wood veneer and plastic surfaces.
Only place the TV set on a levelled, stable, horizontal base with
table or stand foot. The set should especially not protrude at
the front when installing in or on furniture.
The usual usage position of the TV set should be followed. The
TV set can only be operated horizontally upright
A
. The
inclination can amount to a maximum of 10 degrees for wall
mounting
B
. The TV set must never be operated in portrait
orientation,
C
, horizontal
D
or overhead on the ceiling
E
.
Position the set so that it is not exposed to direct sunlight and
additional heating from radiators.
Do not place the TV in a location where vibrations can arise.
This can lead to damage.
In the case of installation options for third-party manufacturers
with a motor drive, it is to be ensured that the adjustment of the
TV set does not occur manually. It is generally not advisable to
use the installation options of other manufacturers with locking
devices in certain positions.
When using accessories from third-party manufacturers, it is
to be ensured that the TV set is easily adjusted for the respec-
tive installation option.
When adjusting the TV set, ensure that
the pressure applied to the set frame
is not too great. Especially in large
format displays, there is the danger
of damaging the display.
The mounting of a TV set on a On a holder according to the
VESA standard requires mandatory use of the VESA adapter
bolts. Otherwise, damage to the TV may result.
The Vesa adapter bolts must be attached to the TV set with a
torque of circa 4 Nm. You can obtain these from your Loewe
dealer (you can find further information in chapter Miscellane-
ous, section VESA standard).
±10°
D
AB
C
E
D
Supervision
Do not let unsupervised children handle the TV set nor let them
play immediately around the TV set.
The set could be knocked over, moved or pulled down from the
stand surface and injure people.
Do not leave the TV set when switched on unattended.
Volume
Loud music can lead to hearing damage. Avoid extreme sound
volume, especially over extended periods of time and when
using headphones.
Thunderstorms
During thunderstorms, pull out the mains power plug and all
connected antenna cables from the TV set.
Over-voltages due to lightning strike can damage the set both
via the antenna system and via the mains power supply.
Even in the case of prolonged absence, the mains power plug
and all connected antenna cables should be disconnected from
the TV set.
Cleaning and care/chemicals
Before cleaning, switch the TV set off using the mains power
switch.
Damages caused by chemicals can lead to adverse effects and
development of fire.
Never expose the set or accessories to aggressive (for example,
corrosive) chemicals such as alkalis or acids.
Only clean the TV set, the front screen and the remote control
with a damp, soft, clean and colour neutral cloth, without any
aggressive or scouring cleaning agents.
The loudspeaker panel of your TV set is textile-covered. Hoover
the surface regularly with a soft brush attachment.
For contaminations or stains:
Moisten a soft, colour neutral cloth with detergent solution or
commercially available stain remove and rub the stain gently
away. You can also treat the stain directly with a commercial
dry stain remover spray (hoover up the dust).
Do not moisten the covering fabric directly with detergent solu-
tion or stain remover (risk of stain circle formation). Do not use
solvents to clean the fabric.
Note the usage instructions of the manufacturer when using
stain remover.
When cleaning loudspeaker panels which have been exposed
to nicotine, there is an increased risk of stain circle formation.
Loewe bild 5 oled / bild 4 oled
User handbook
8
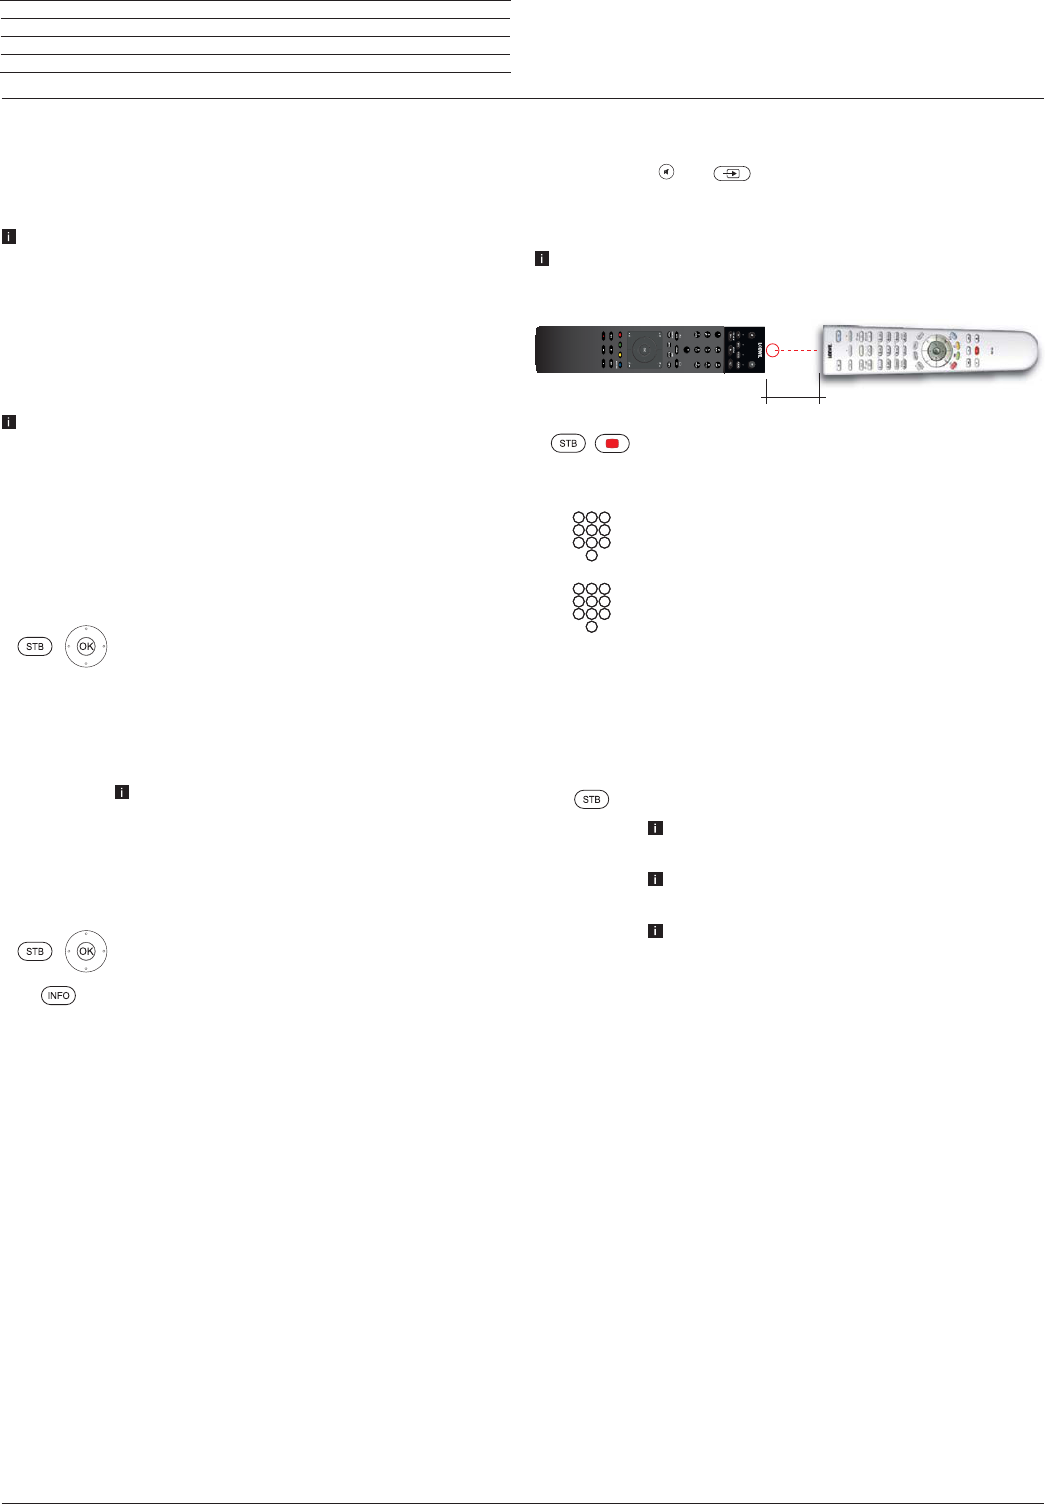
Remote control
(1
The assignment of these keys can be changed. The description refers to the standard setting. The factory setting of the keys can vary depending on the firmware version
of the remote control.
(2
Depending on the settings HbbTV mode on/off, start behaviour of HbbTV station (System Settings
ט
Control
ט
more ...
ט
HbbTV)
.
(3
In case of device type bild 4 oled to an externally connected USB hard disk.
Remote control button mapping
Depending on the selected operating mode (TV/Video/Audio/Photo/Apps) and function (e.g. DR+, EPG, PIP, Teletext, HbbTV, etc.), the key assignment
may differ from the assignment described here (see the corresponding chapter).
1
Sound mute/on.
2
LED display for currently operated device.
3
Call the TV mode.
4
Reassign remote control to SetTop-Box
(1
(presetting: Apple TV).
5
Pressing briefly
: Open the DR+ archive.
P
ressing longer
: Call timer.
6
Pressing briefly
: Add current object to Homefavourites.
P
ressing longer
: Open App Gallery. (standard assignment)
(1
7
EPG (Electronic Programme Guide) on/off.
8
Teletext/MediaText
(2
on/off.
9
Pressing briefly
: Call function list for the active operating mode.
P
ressing longer
: Call System settings.
10
V+/V- increase/reduce volume.
11
Pressing briefly
:
Call station list.
Pressing longer
: Call
expanded station list.
In the menu: confirm/call up.
12
Green coloured key: screen on/off in Audio/Radio mode.
13
Red coloured key: call preferred value-added network service, if available
(
2
.
14
Pressing briefly: skip backwards.
Pressing longer: winding backwards.
15
Pressing briefly: direct recording (with determination of recording duration)
(
3
.
Pressing longer: One Touch Recording
(
3
.
16
Pause / Start/pause the timeshift television
(
3
.
17
Stop / End timeshift (return to live image)
(
3
.
18
Pressing briefly: skip forwards.
Pressing longer: winding forwards.
19
Play / Start/continue timeshift television
(
3
.
20
Blue coloured key: call station function list
(selection of language/sound, subtitles or channel/video track).
21
Pressing briefly: Yellow coloured key: call history.
Pressing longer: Yellow coloured key: call last station.
22
Navigation on the user interface, select objects.
In the menu / lists: select/set.
23
P+/P– next/previous station.
24
Pressing briefly: step / level back.
Pressing long: close all displays.
25
Press briefly during an on-screen display: info display. Info text appropriate to the content
that can assist you further, should you have any questions about your TV set.
Press briefly, without on-screen display: access status display. With status display open
and repeatedly pressing the key call the detailed information on the broadcast.
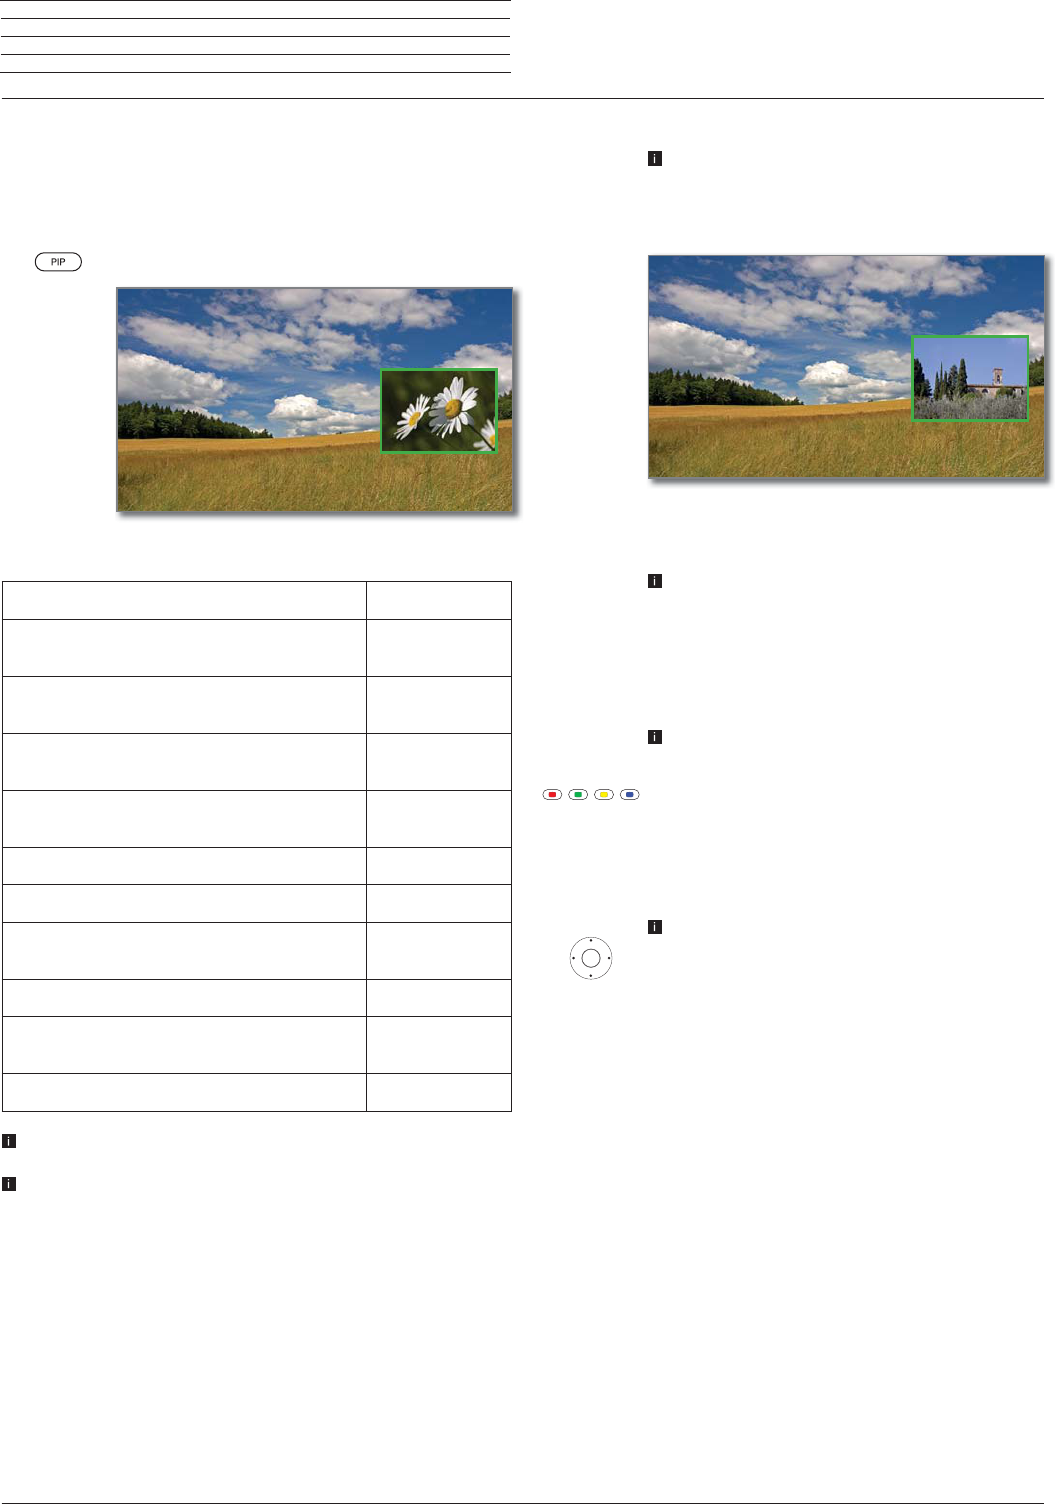
Press longer: show Explanation of keys.
26
PIP (picture in picture) on/off.
27
Call up the Homeview.
28
Select stations with numeric buttons directly.
In the menu: enter numbers or letters
29
Call Sources.
30
Reassign remote control to video device
(1
(presetting: BluTech Vision 3D).
31
Call radio mode (standard assignment)
(1
.
32
Switches the TV set on (mains switch must be turned on) or switches to standby mode.
Press briefly while TV set is switched on: TV set and all CEC-enabled devices connected to
the HDMI ports will be switched off to standby (System Standby).
1
2
3
4
5
6
7
8
9
10
11
12
13
14
15
16
31
18
19
20
21
22
23
24
25
26
27
28
29
30
32
17
Loewe bild 5 oled / bild 4 oled
User handbook
9
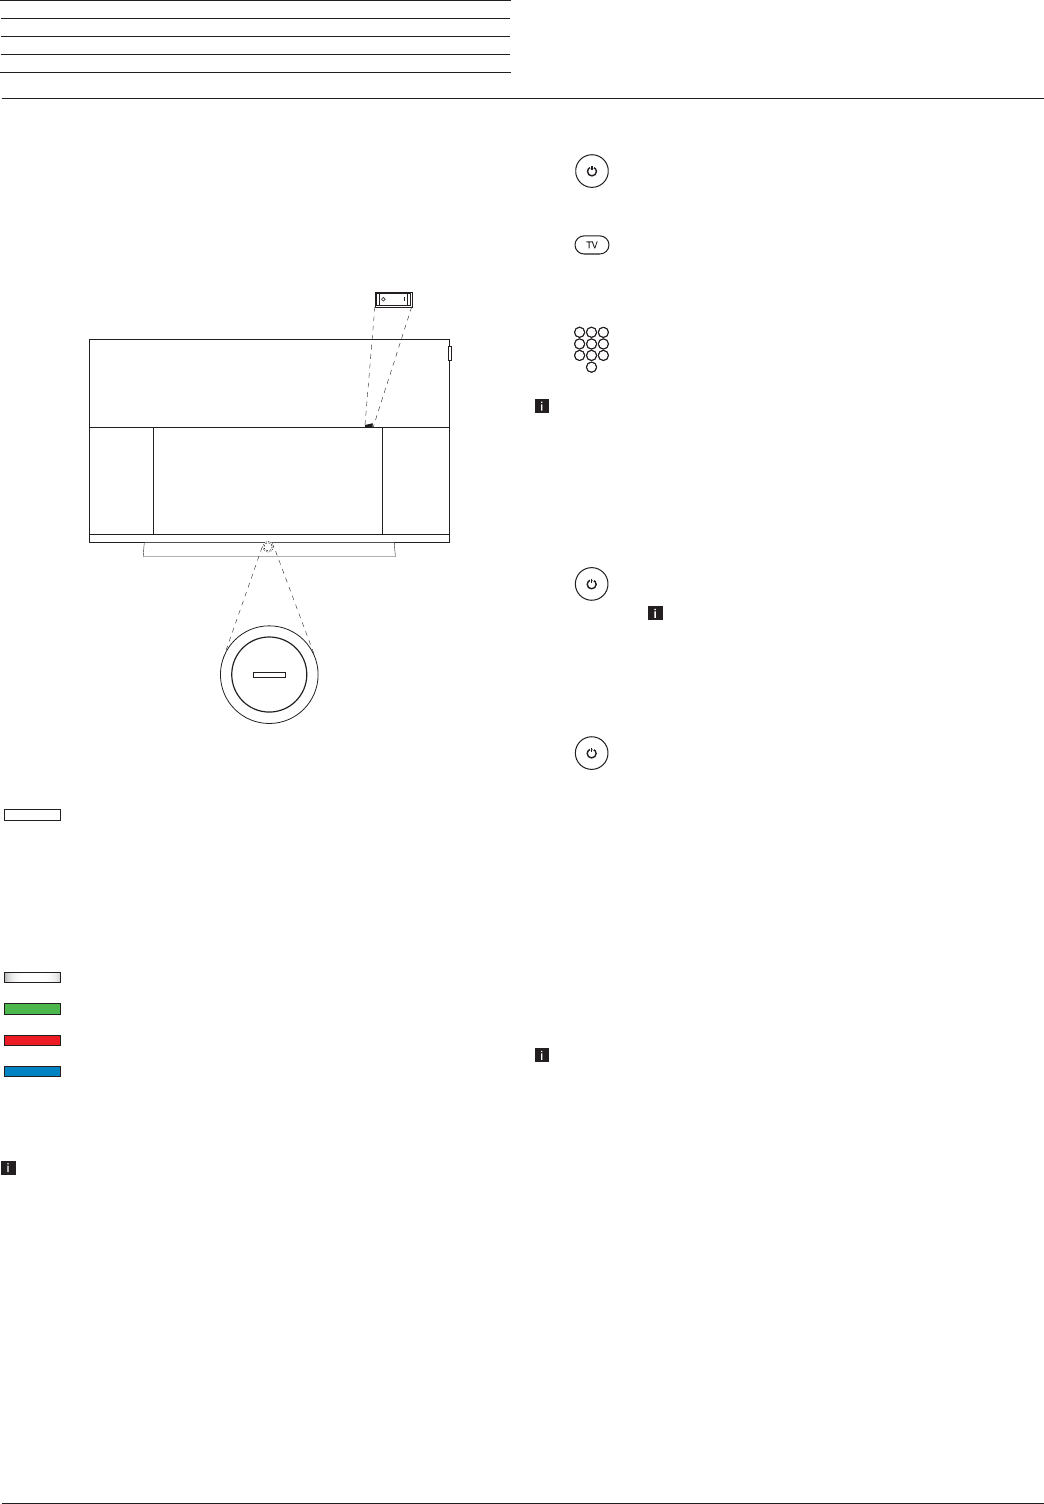
1
Mains switch:
The mains switch is located on the backside of the set.
Always return the TV set to Standby mode before switching it off
with the main switch.
2
Display:
white: TV set in standby.
Depending on the ambient brightness, the
white LED display is dimmed
(1
and lights
up with a different degree of brightness.
If the TV set is in quick start mode, the
white LED display is not dimmable and
starts with full brightness.
white, intermittent:
TV set starts.
green: TV set switched on.
red: timer recording active.
blue:
TV set in standby and background operation active (EPG
data updating, software update or DR+ streaming server
function, OLED calibration).
3
IR receiver:
Infrared receiver for receiving the remote control commands.
Operating controls on the TV set
Operating controls on the TV set
(1
Automatic dimming depending on the room brightness (OPC) must be activated (see chapter System settings,sectionPicture).
3
2
1
Loewe bild 5 oled / bild 4 oled
User handbook
10
5
6
8
9
15
7
12
19
18
16
17
2 1
13
14
20
10
11
21
22
3 4
K
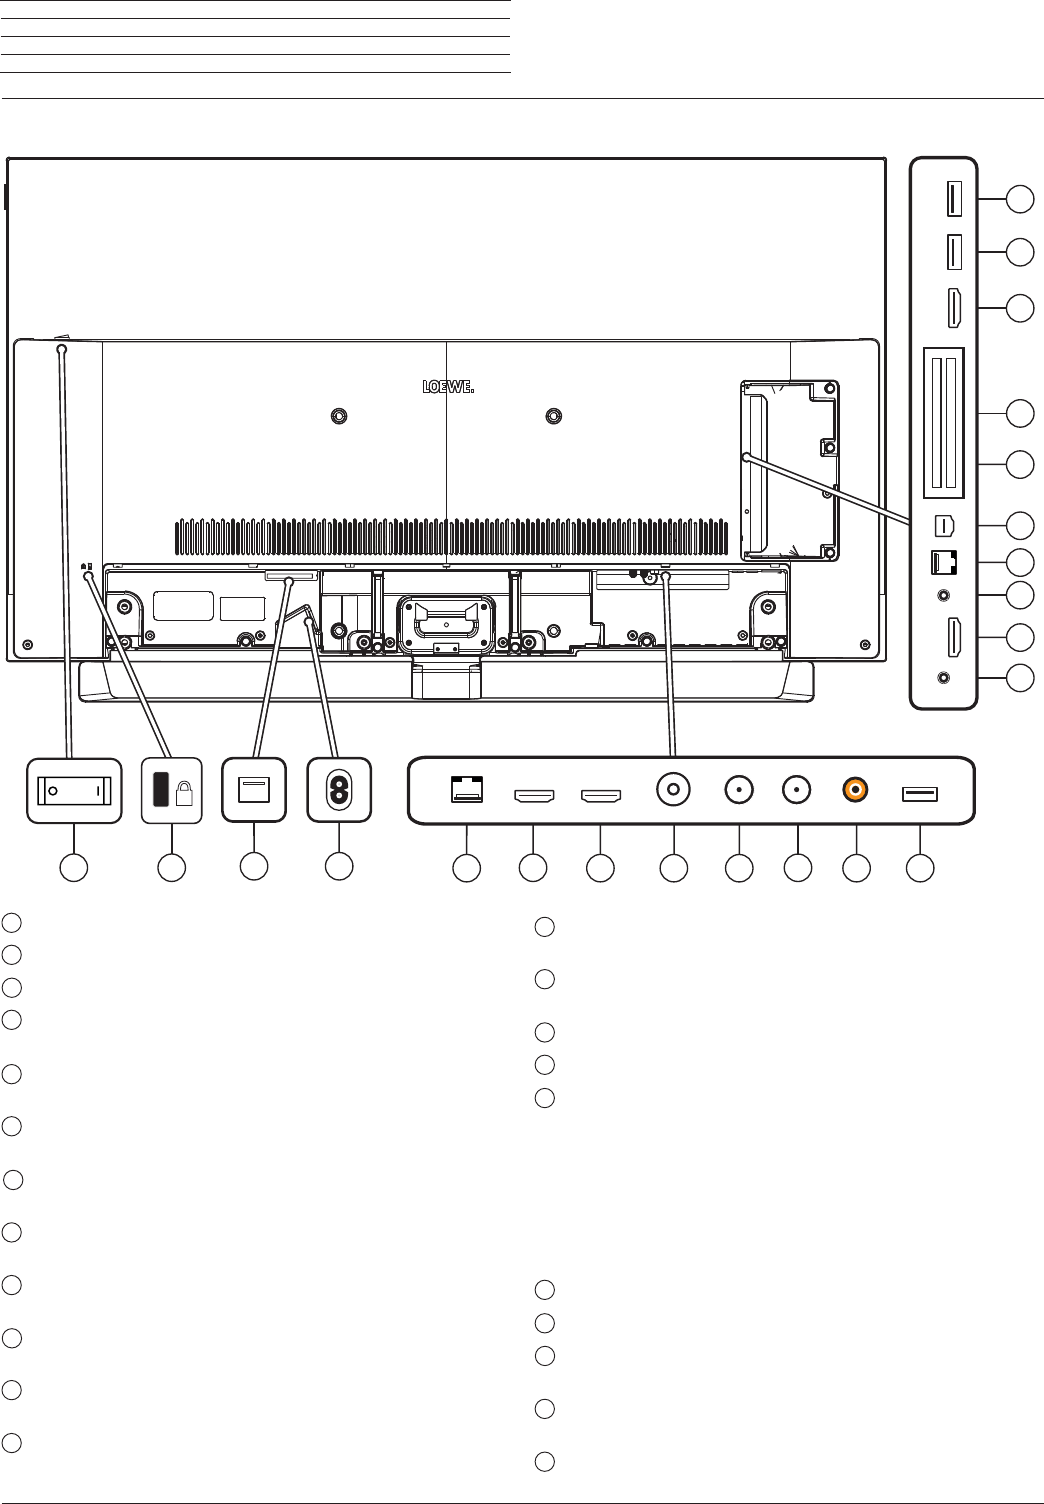
Connections rear side of the device
Position and function of the connections
(1
The adaptor is available as an accessory from your dealer.
(2
HDMI sources that provide UHD AND HDR or Dolby Vision content should be connected to this port.
Mains switch
Slot for Kensington lock
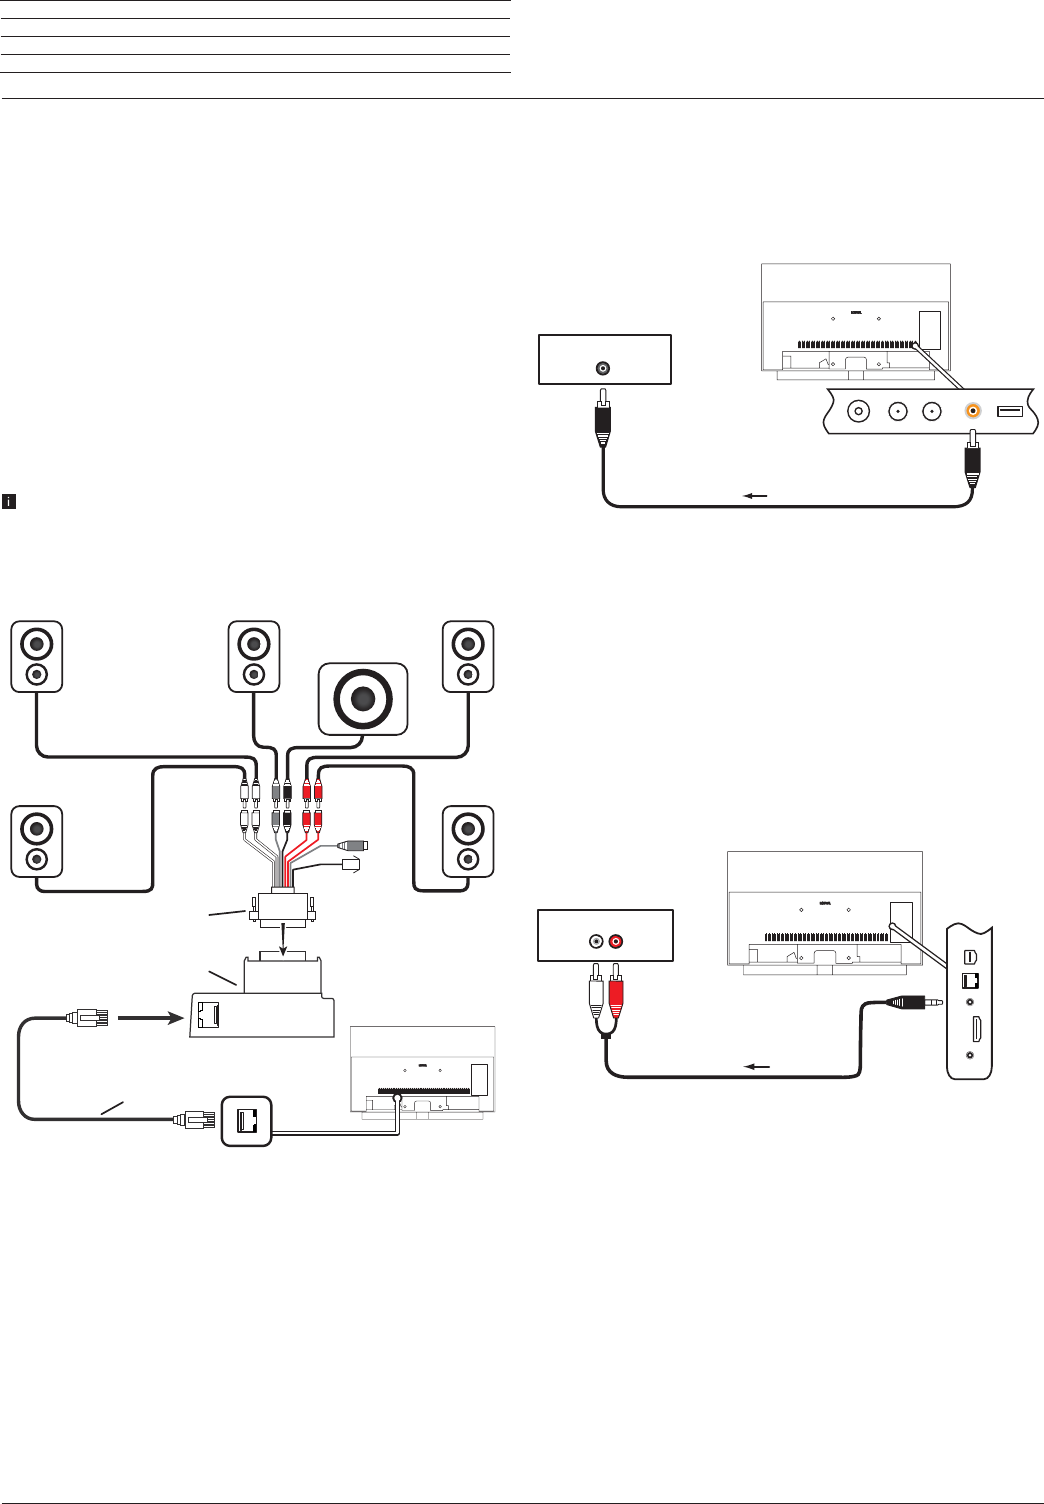
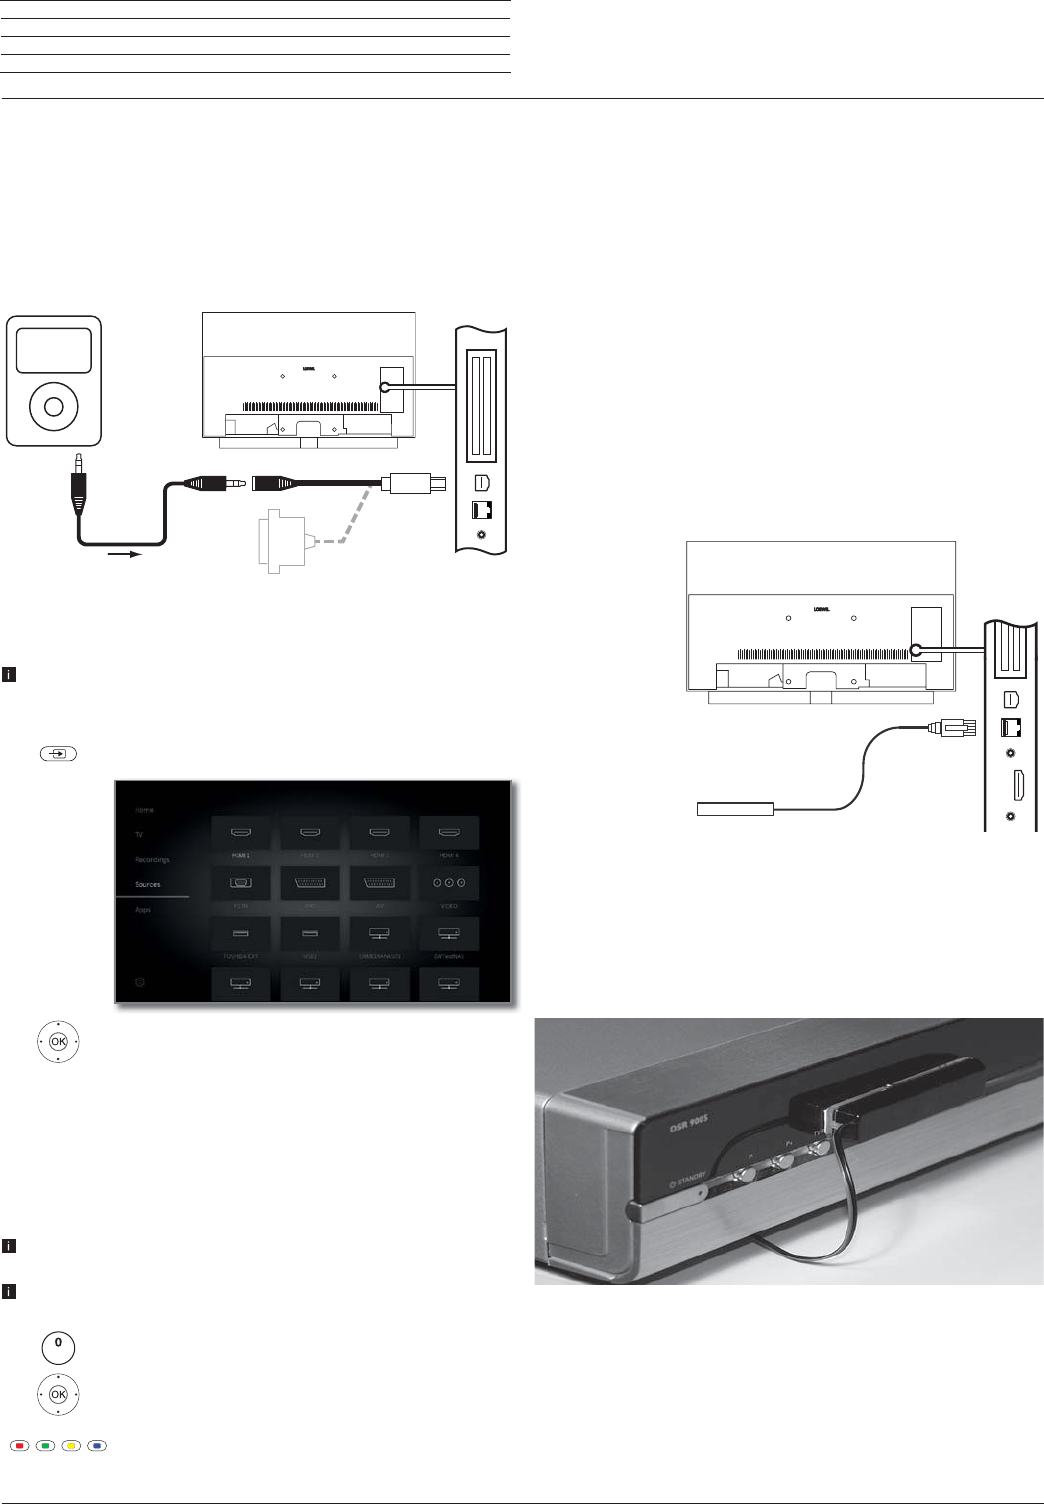
DIGITAL AUDIO LINK - Surround audio outputs (digital) – (RJ45)
The energy consumption per year is calculated on the basis of a daily four-hour operation of the TV set on 365 days. The actual energy consumption will depend on the
way the TV set is used. On-Mode (home) values less than 100 W must have decimal places (,0).
(2
For the playability of the individual formats no guarantee can be given.
Technical Data
Loewe bild 5 oled / bild 4 oled
User handbook
130
Technical Data
Technical data
Changes of technical data and design of the equipment reserved.
Loewe device type:
bild 4.55 oled
Part number:57441W90
EU energy efficiency class:
see enclosed energy label or under www.loewe.tv/int/my-loewe
Screen diagonal:139 cm / 55 inch
Power consumption On-Mode (max.)
(Audio output 1/8 of the maximum value):
348 W
Power consumption On-Mode (home)
(1
:
Annual energy consumption
(1
:
see enclosed energy label or under www.loewe.tv/int/my-loewe
Power consumption Standby Mode:
Power consumption when set is switched off:
0,49 W
0 W
Resolution / Picture format:Ultra HD 3840 x 2160 px / 16:9
Display technology:OLED (WRGB Pixel)
Viewing angle (horizontal / vertical):120° / 120°
Device dimensions without stand (W x H x D):
123,0 x 76,2 x 6,4 cm
Weight without stand (approximate):
21,3 kg
Ambient temperature:5° C – 35° C
Relative humidity (non-condensing):20 – 80%
Air pressure:800 – 1114 hPa (0 – 2000 m above sea level)
The energy consumption per year is calculated on the basis of a daily four-hour operation of the TV set on 365 days. The actual energy consumption will depend on
the way the TV set is used. On-Mode (home) values less than 100 W must have decimal places (,0).
(2
For the playability of the individual formats no guarantee can be given.
Loewe bild 5 oled / bild 4 oled
User handbook
131
Technical Data
(1
With VGA-Adapter to AV connection.
Signals via AV (PC IN) / HDMI
The following table shows the compatible signals which may be
represented by your TV set using the appropriate adapter at the AV
connection (PC IN) or at the HDMI connections (HDMI1, HDMI2,
HDMI3, HDMI 4 UHD).
Set the output signal on your device so that it matches one of the
signals in the table.
Please note that not all signals may be represented at every HDMI
socket or at AV (PC IN).
FormatHorizontal
x Vertical
Frame
frequency
Connection
480i60720 x 480i60HzPC IN
576i50720 x 576i50HzPC IN
480p60720 x 480p60HzPC IN, HDMI 1-4
576p50720 x 576p50HzPC IN, HDMI 1-4
720p501280 x 720p50HzPC IN, HDMI 1-4
720p601280 x 720p60HzPC IN, HDMI 1-4
1080i501920 x 1080i50HzPC IN, HDMI 1-4
1080i601920 x 1080i60HzPC IN, HDMI 1-4
1080p241920 x 1080p24HzPC IN, HDMI 1-4
1080p251920 x 1080p25HzPC IN, HDMI 1-4
1080p301920 x 1080p30HzPC IN, HDMI 1-4
1080p501920 x 1080p50HzPC IN, HDMI 1-4
1080p601920 x 1080p60HzPC IN, HDMI 1-4
VGA640 x 48060HzPC IN, HDMI 1-4
SVGA800 x 60060HzPC IN, HDMI 1-3
XGA1024 x 76860HzPC IN, HDMI 1-3
WXGA1360 x 76860HzHDMI 1-3
SXGA1280 x 102460HzPC IN, HDMI 1-3
UHD3840 x 2160p24HzHDMI 1-4
UHD3840 x 2160p25HzHDMI 1-4
UHD3840 x 2160p30HzHDMI 1-4
UHD3840 x 2160p50Hz( 4: 2: 0) HDMI 1-4
UHD3840 x 2160p60Hz( 4: 2: 0) HDMI 1-4
UHD3840 x 2160p50HzHDMI 4
UHD3840 x 2160p60HzHDMI 4
Signal input groups
In your TV set the signals are sorted in various signal input groups
according to their source. In addition to the source, the type of signal
is also distinguished.
For each signal input group, there are individual values for the picture
settings.
Signal
group name
Signal source/Signal type
SD Analog
cable analogue, interfaces AV, AVS, PC IN
(1
(SD)
SD Digital
DVB (SD), DR+ (SD), MPEG-Encoder
SD Media
Player
full screen display of SD videos via USB, Network,
VOD and media centre (incl. HbbTV media centre)
SD HDMI
Playback of SD video via HDMI, e.g., DVD player
HD Analog
PC IN
(1
(HD)
HD Digital
DVB (HD), DR+ (HD)
HD Media
Player
full screen display of HD videos via USB, Network,
VOD and media centre (incl. HbbTV media centre)
HD HDMI
Playback of HD videos via HDMI, e.g., Blu-Ray player
Photo Player
Playback of Photos via USB and network
Browser
Display of Web sites in the Browser (incl. Media apps)
VGA
PC IN
(1
(PC) or HDMI (PC)
Loewe bild 5 oled / bild 4 oled
User handbook
132
Accessories
App
Loewe App
The Loewe app replaces the two existing Smart Assist and Smart
tv2move applications and combines the functionality of both apps.
The Loewe app turns your tablet into a second TV. Completely in-
dependent of your TV set, you can use the app on your tablet to zap
through the TV channels, to program recordings or to watch archive
recordings from the DR + hard disk recorder. Or browse the electronic
program guide (EPG) on your smartphone and find out about the du-
ration and content of the current program. By clicking on the desired
content, it will be displayed on your Loewe TV.
You are completely flexible in terms of space. Whether you are in the
bedroom, in the kitchen or on the terrace - as long as you are con-
nected to your home network via WLAN.
You can download the Loewe app for free in the Playstore or App Store
and install it on your tablet and / or smartphone.
With Loewe Mobile Recording, you can now easily and comfortably
program your desired broadcasts from the road in conjunction with
the Loewe App. All you need is an Internet-enabled smartphone with
the Loewe app.
The Smartphone can be used with the Loewe App as a remote control
for the TV set.
You can download the Loewe app from the Playstore or App Store and
install it on your tablet and / or smartphone.
Requirements:
Suitable for tablets and smartphones from Android 4.1.1 and Apple
iOS 8.
On the TV side, a chassis from SL2xx with the latest software version
is required.
A personal channel list must be available. If not, create personal
channel list under:
System settingsט Stations ט Station lists TV ט New personal
list.
Open DR+ archive for other devices:
System settings ט Control ט more ... ט DR+ ט DR+ Streaming
ט Share DR+ archive with other devices ט yes.
Ensure that your tablet and the Loewe TV are registered in the same
logical network.
System settings ט Multimedia / Network ט Network settings.
Select whether the TV is to be connected to the Internet via LAN
(wired) or wireless.
We recommend to connect the TV via LAN to the router / switch.
When connected via WLAN or Powerline, it can not always
be ensured that a sufficiently large data rate is available for
transmission.
Connect TV to app
Start the Loewe app and agree to the data privacy protection.
After you select your country, the language settings will be auto-
matically transferred to your smartphone/tablet.
The application automatically searches for compatible TV sets
in the home network. A list of the Loewe TV devices found in the
Gebruikershandleiding.com neemt misbruik van zijn services uitermate serieus. U kunt hieronder aangeven waarom deze vraag ongepast is. Wij controleren de vraag en zonodig wordt deze verwijderd.
Product:
Spelregels forum
Om tot zinvolle vragen te komen hanteren wij de volgende spelregels:
lees eerst de handleiding door;
controleer of uw vraag al eerder door iemand anders is gesteld;
probeer uw vraag zo duidelijk mogelijk te stellen;
heeft u een probleem en al geprobeerd om dit op te lossen, vermeld dit erbij aub;
heeft u een oplossing gekregen van een bezoeker dan horen wij dat graag in dit forum;
wilt u een reactie geven op een vraag of antwoord, gebruik dan niet dit formulier maar klik op de knop 'reageer op deze vraag';
uw vraag wordt direct op de website gezet; vermijd daarom persoonlijke gegevens in te vullen;
Belangrijk! Als er een antwoord wordt gegeven op uw vraag, dan is het voor de gever van het antwoord nuttig om te weten als u er wel (of niet) mee geholpen bent! Wij vragen u dus ook te reageren op een antwoord.
Belangrijk! Antwoorden worden ook per e-mail naar abonnees gestuurd. Laat uw emailadres achter op deze site, zodat u op de hoogte blijft. U krijgt dan ook andere vragen en antwoorden te zien.
Abonneren
Abonneer u voor het ontvangen van emails voor uw Loewe Bild 5.55 set bij:
nieuwe vragen en antwoorden
nieuwe handleidingen
U ontvangt een email met instructies om u voor één of beide opties in te schrijven.
Ontvang uw handleiding per email
Vul uw emailadres in en ontvang de handleiding van Loewe Bild 5.55 set in de taal/talen: Engels als bijlage per email.
De handleiding is 7,03 mb groot.
U ontvangt de handleiding per email binnen enkele minuten. Als u geen email heeft ontvangen, dan heeft u waarschijnlijk een verkeerd emailadres ingevuld of is uw mailbox te vol. Daarnaast kan het zijn dat uw internetprovider een maximum heeft aan de grootte per email. Omdat hier een handleiding wordt meegestuurd, kan het voorkomen dat de email groter is dan toegestaan bij uw provider.
Uw handleiding is per email verstuurd. Controleer uw email
Als u niet binnen een kwartier uw email met handleiding ontvangen heeft, kan het zijn dat u een verkeerd emailadres heeft ingevuld of dat uw emailprovider een maximum grootte per email heeft ingesteld die kleiner is dan de grootte van de handleiding.
Er is een email naar u verstuurd om uw inschrijving definitief te maken.
Controleer uw email en volg de aanwijzingen op om uw inschrijving definitief te maken
U heeft geen emailadres opgegeven
Als u de handleiding per email wilt ontvangen, vul dan een geldig emailadres in.
Uw vraag is op deze pagina toegevoegd
Wilt u een email ontvangen bij een antwoord en/of nieuwe vragen? Vul dan hier uw emailadres in.