Little tikes 621109M Endless Adventures Lookout Swing Set Handleiding
1
Verklein
Vergroot
Pagina terug
1/18
Pagina verder
ENGLISH
ENDLESS ADVENTURES™ LOOKOUT SWING SET
Ages: 3 - 8 years
Please save sales receipt for proof of purchase.
WARNING:
ADULT ASSEMBLY REQUIRED.
Two adults are required for assembly.
• Keep these instructions for future reference.
• Prior to assembly, this package contains small parts: hardware which is a
choking hazard and may contain sharp edges and sharp points. Keep away
from children until assembled.
• To prevent serious injury, children must not use the equipment until properly
installed.
• Falls onto hard surfaces can result in head or other serious injuries. Never
place on concrete, asphalt, wood, packed earth, grass or other hard surfaces.
Carpet over hard oors may not prevent injury. Always use protective
surfacing on the ground under and surrounding the playground equipment
according to the enclosed “Consumer Information Sheet for Playground
Surfacing Materials.” Maximum fall height protection up to 6 feet (2 m)
required.
• Adult supervision required. Do not leave children unattended.
• This product is intended for use by children ages 3 - 8 years.
• Climber: Maximum weight per child: 81 lbs. (37 kg). Limit 4 children. Swing
extension: Maximum weight per child: 81 lbs. (37 kg). Limit 1 child per
swing.
• Shoes must be worn at all times.
• This product is intended for outdoor domestic family use only.
• Observing the following statements and warnings reduces the likelihood of
serious or fatal injury.
• Place this product on level ground and at least 6' (2 m) away from any object.
Objects to be avoided include, but are not limited to, fences, buildings,
overhead branches, laundry lines or electrical wires.
• It is recommended that the orientation of the assembled product be such
that direct sunlight is minimized on surfaces intended for standing or sitting.
• Instruct children on proper use of this product, only after properly placed,
and not in a manner other than intended.
• Do not allow children to climb on product when product is wet.
• Instruct children not to attach items to the product that are not specically
designed for use with the product such as, but not limited to, jump
ropes, clotheslines, pet leashes, cables and chains, as they may cause a
strangulation hazard.
• Instruct children to remove their bike or other sports helmet before playing
on this product.
• Dress children appropriately: do not allow children to wear loose-tting
clothing including ponchos, scarves and garments with drawstrings. Well-
tting shoes must be worn at all times.
• The swing set extension is intended to be used with this product only and
should not be attached to any other structure.
• Protect your eyes. Always wear safety glasses when using a hammer.
621109M
631009M
1
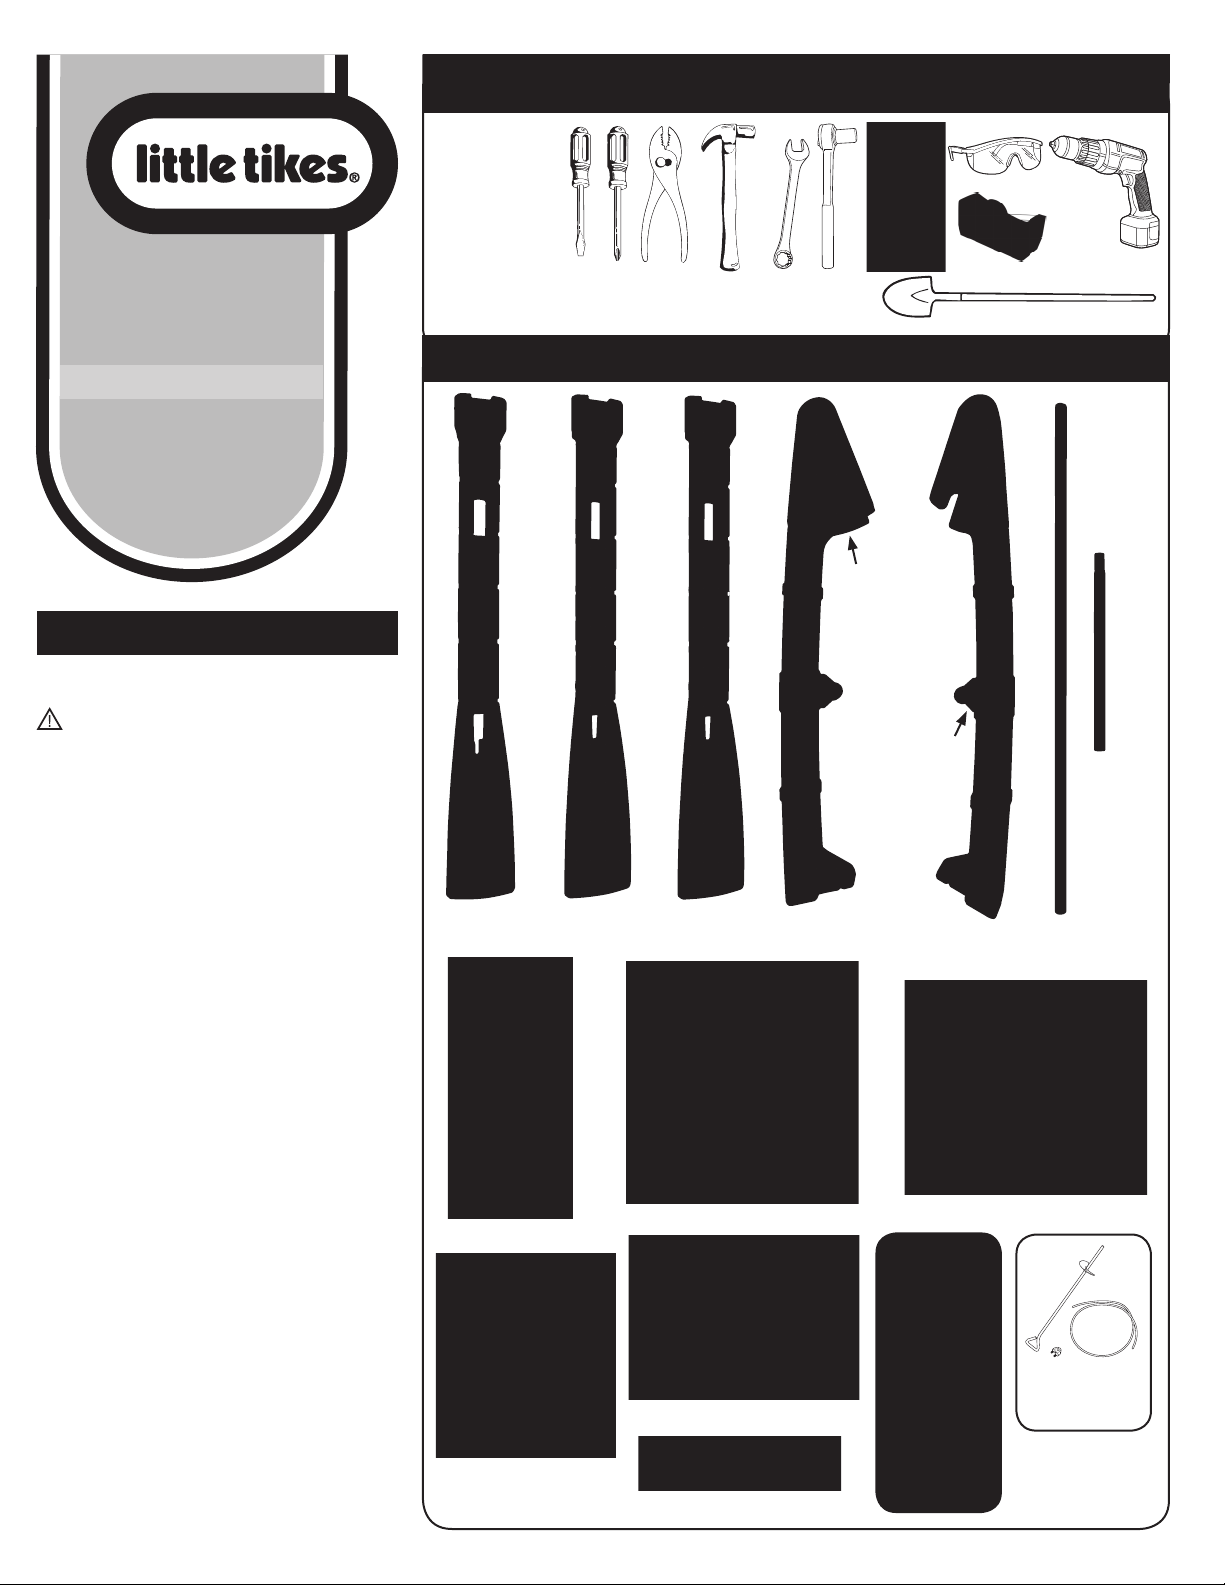
Tools required
(Not included):
Outils Requis
(Ne sont pas inclus):
Herramientas Requeridas
(No se incluye):
Adult assembly required / Le montage devra être effectué par un adulte /
Debe ser armado por un adulto
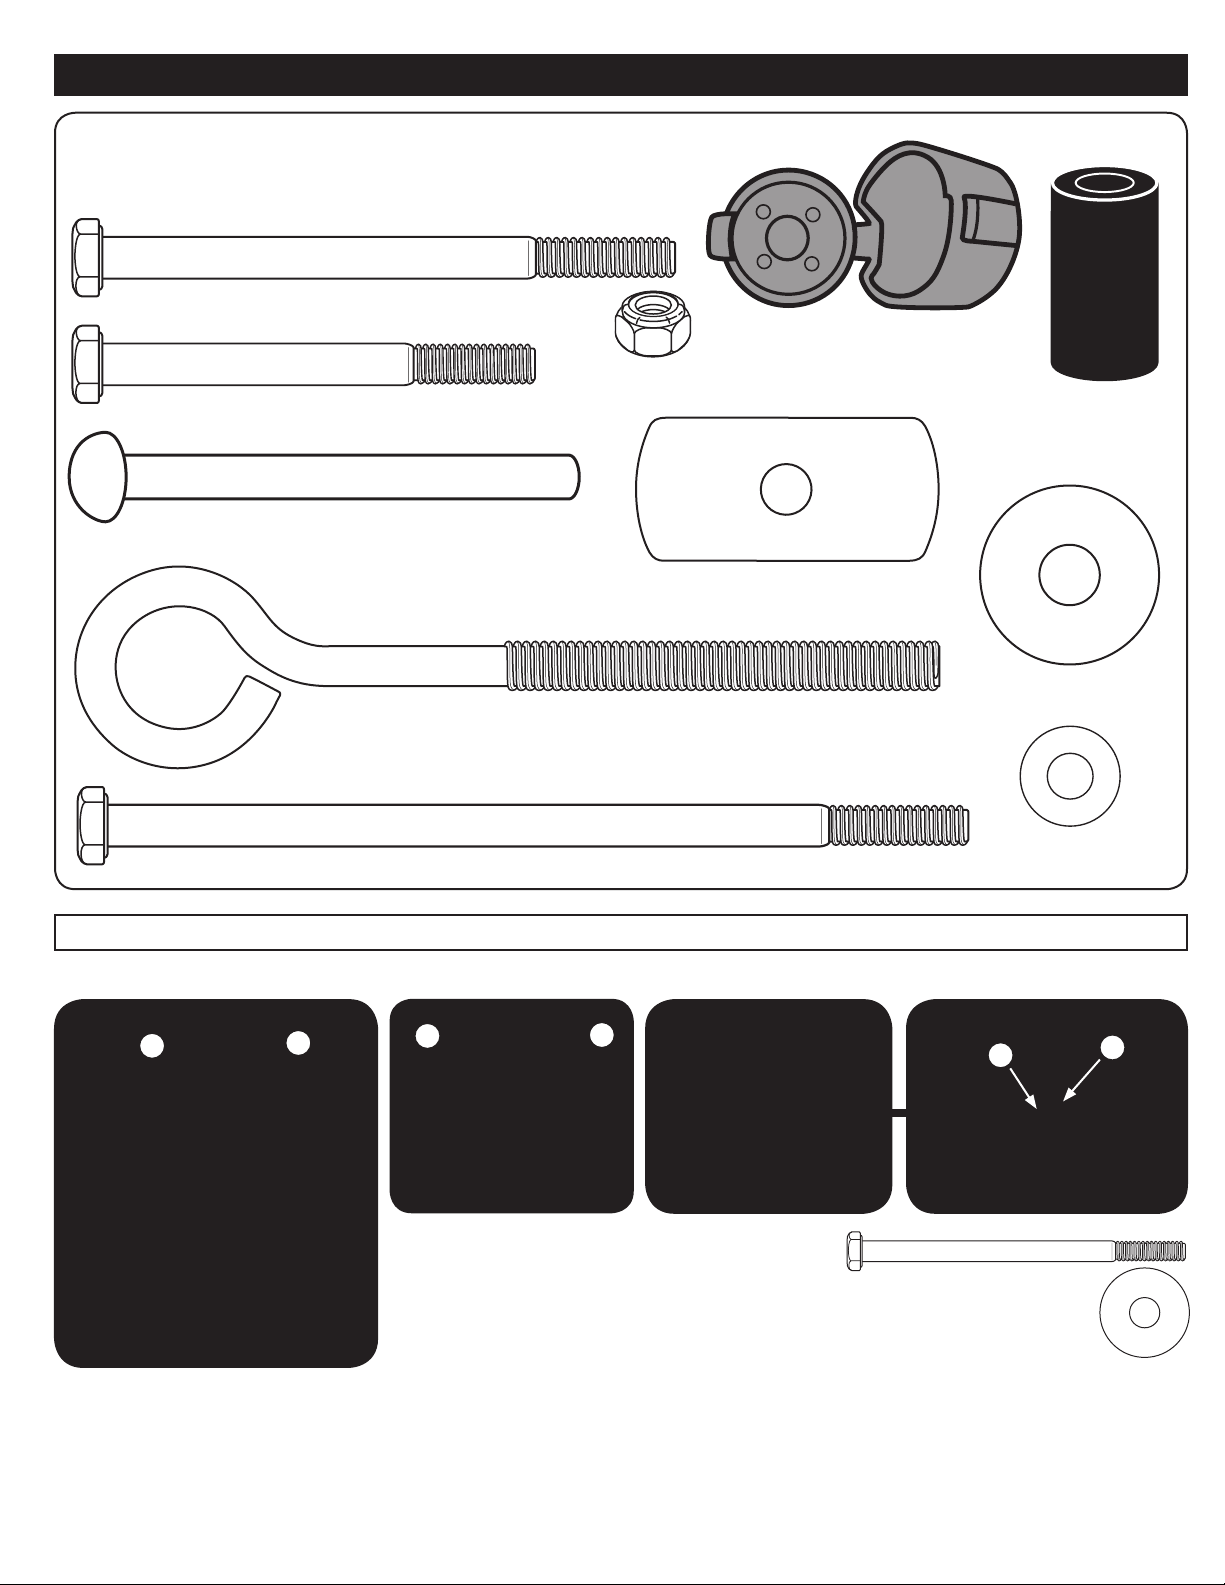
Q
R-1
Q. Steering Wheel
Gouvernail
Volante
R-1. Bolt
Boulon
Perno
XIM621109-R2 - 8/12
www.littletikes.com
www.littletikes.co.uk
www.littletikes.fr
www.littletikes.nl
www.littletikes.pl
Parts List / Liste des Pieces / Lista de Partes
L. Platform / Plateforme / Plataforma
K. Slide / Toboggan/ Tobogán
A. Pillar (A/D)
Colonne (A/D)
Pilar (A/D)
B. Pillar (B/E)
Colonne (B/E)
Pilar (B/E)
C. Pillar (C/F)
Colonne (C/F)
Pilar (C/F)
G. Swingset Extension
Extension de portique
Extensión del juego de
columpios
H. Swingset Extension
Extension de portique
Extensión del juego de
columpios
I. Swingset Pole
Poteau de portique
Poste del juego de columpios
J. Transition
Pole
Poteau de
transition
Poste de
empalme
M. Roof / Toit / Techo
Two (2) people are recommended for this assembly.
Nous conseillons que deux (2) personnes eectuent cet assemblage.
Se recomiendan dos (2) personas para el montaje.
N. Climbing Wall
Mur d’escalade
Pared para trepar
O. Side Rail /Rampe latérale
Baranda lateral
P. Crossbrace / Entretoise / Refuerzo transversal
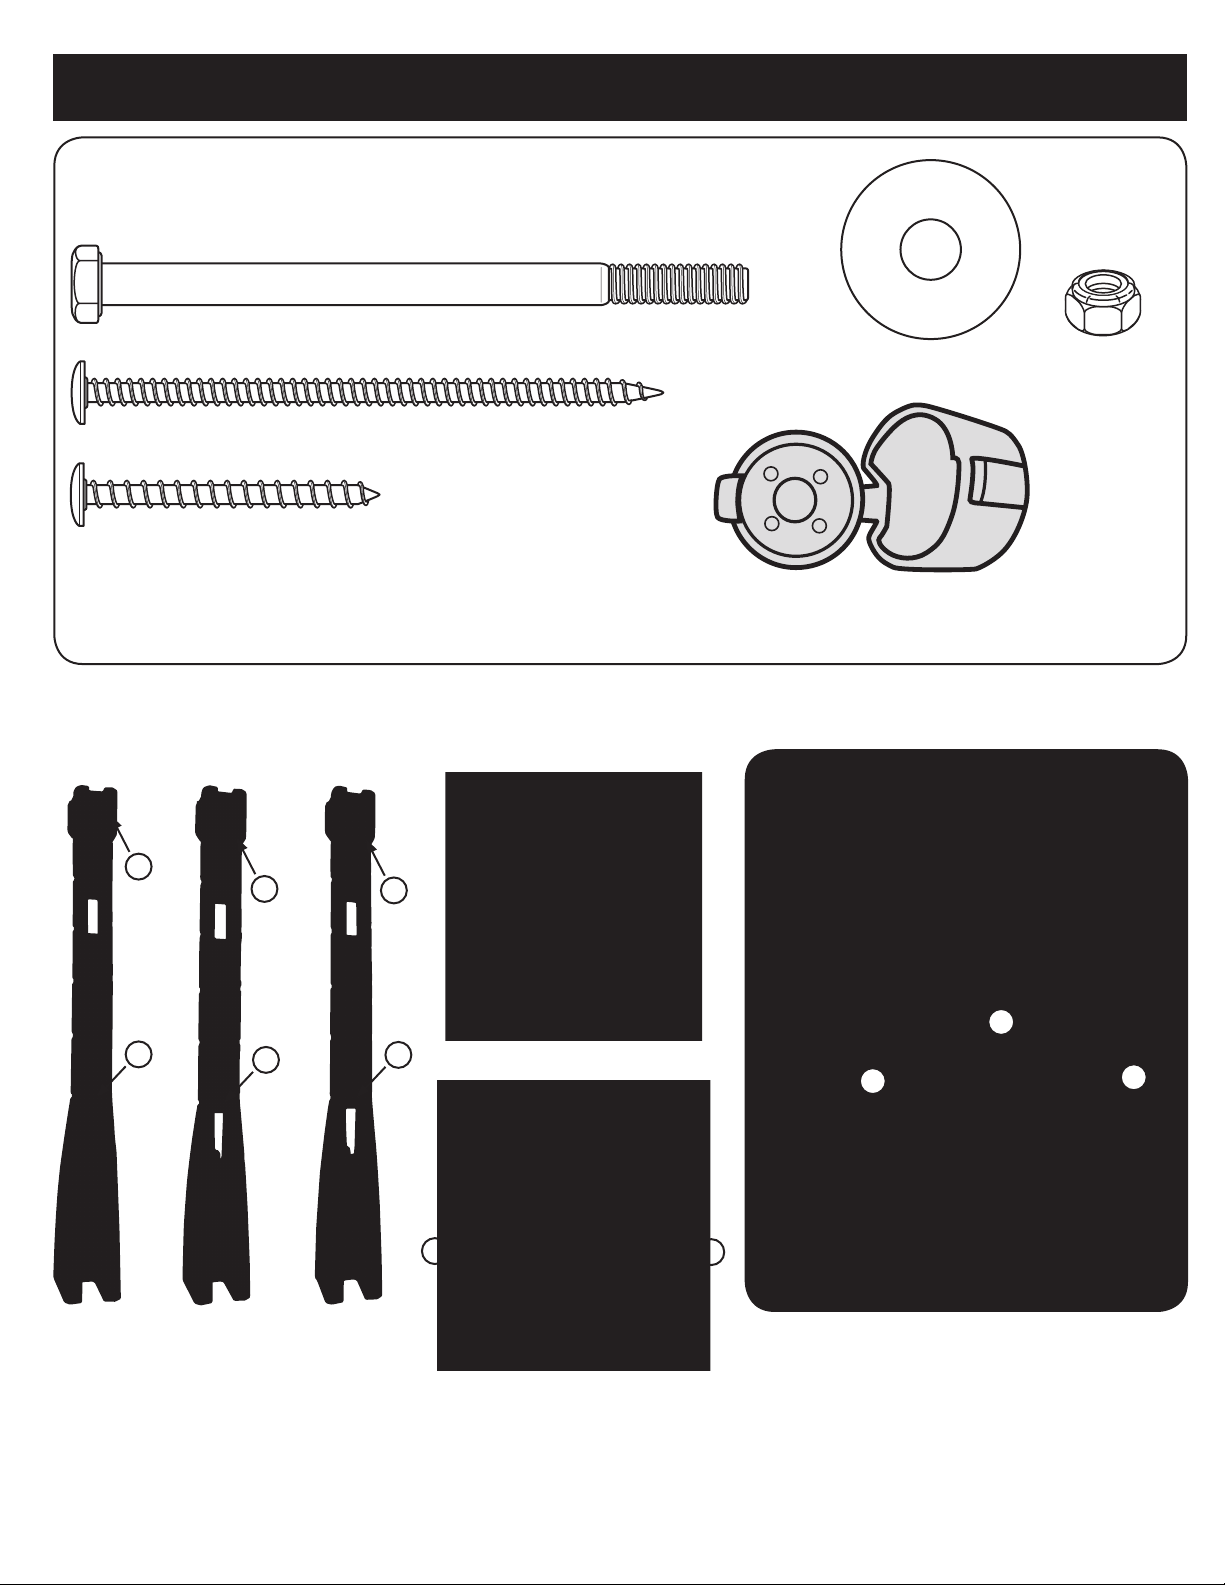
Anchor Kit
Kit d’ancrage
Juego de soportes
1/2" (1.27 cm) socket
Clé à douille de 1,27 cm
Llave tubular de 1,27 cm (1/2")
R-2
R-2. Hub Pin
Goujon de
moyeu
Clavija de
cubo
(4)(4)
(4)
Attaching Platform and Side Rail to Pillars / Fixation de la plateforme et de la rampe latérale aux colonnes
Instalación de la plataforma y barandas laterales en los pilares
Subpack
Sous-paquet
Paquete pequeño1Use for steps 1 - 8
Utiliser pour les étapes 1 - 8
Utilice para los pasos 1 - 8
V x4 41/2" Bolt / Boulon de 11.43 cm (41/2 po) / Perno de 11.43 cm (41/2")
U x4
Nut / Écrou / Tuerca
AA x8
Washer / Rondelle / Arandela
X x6 4" Screw / Vis de 10.16 cm (4 po) / Tornillo de 10.16 cm (4")
Z x3 2" Screw / Vis de 5.08 cm (2 po) / Tornillo de 5.08 cm (2")
BB x4
Grey Bolt Cover / Capuchon de boulon gris
Cubierta de perno gris
1
AB
C
D
A
E
BC
F
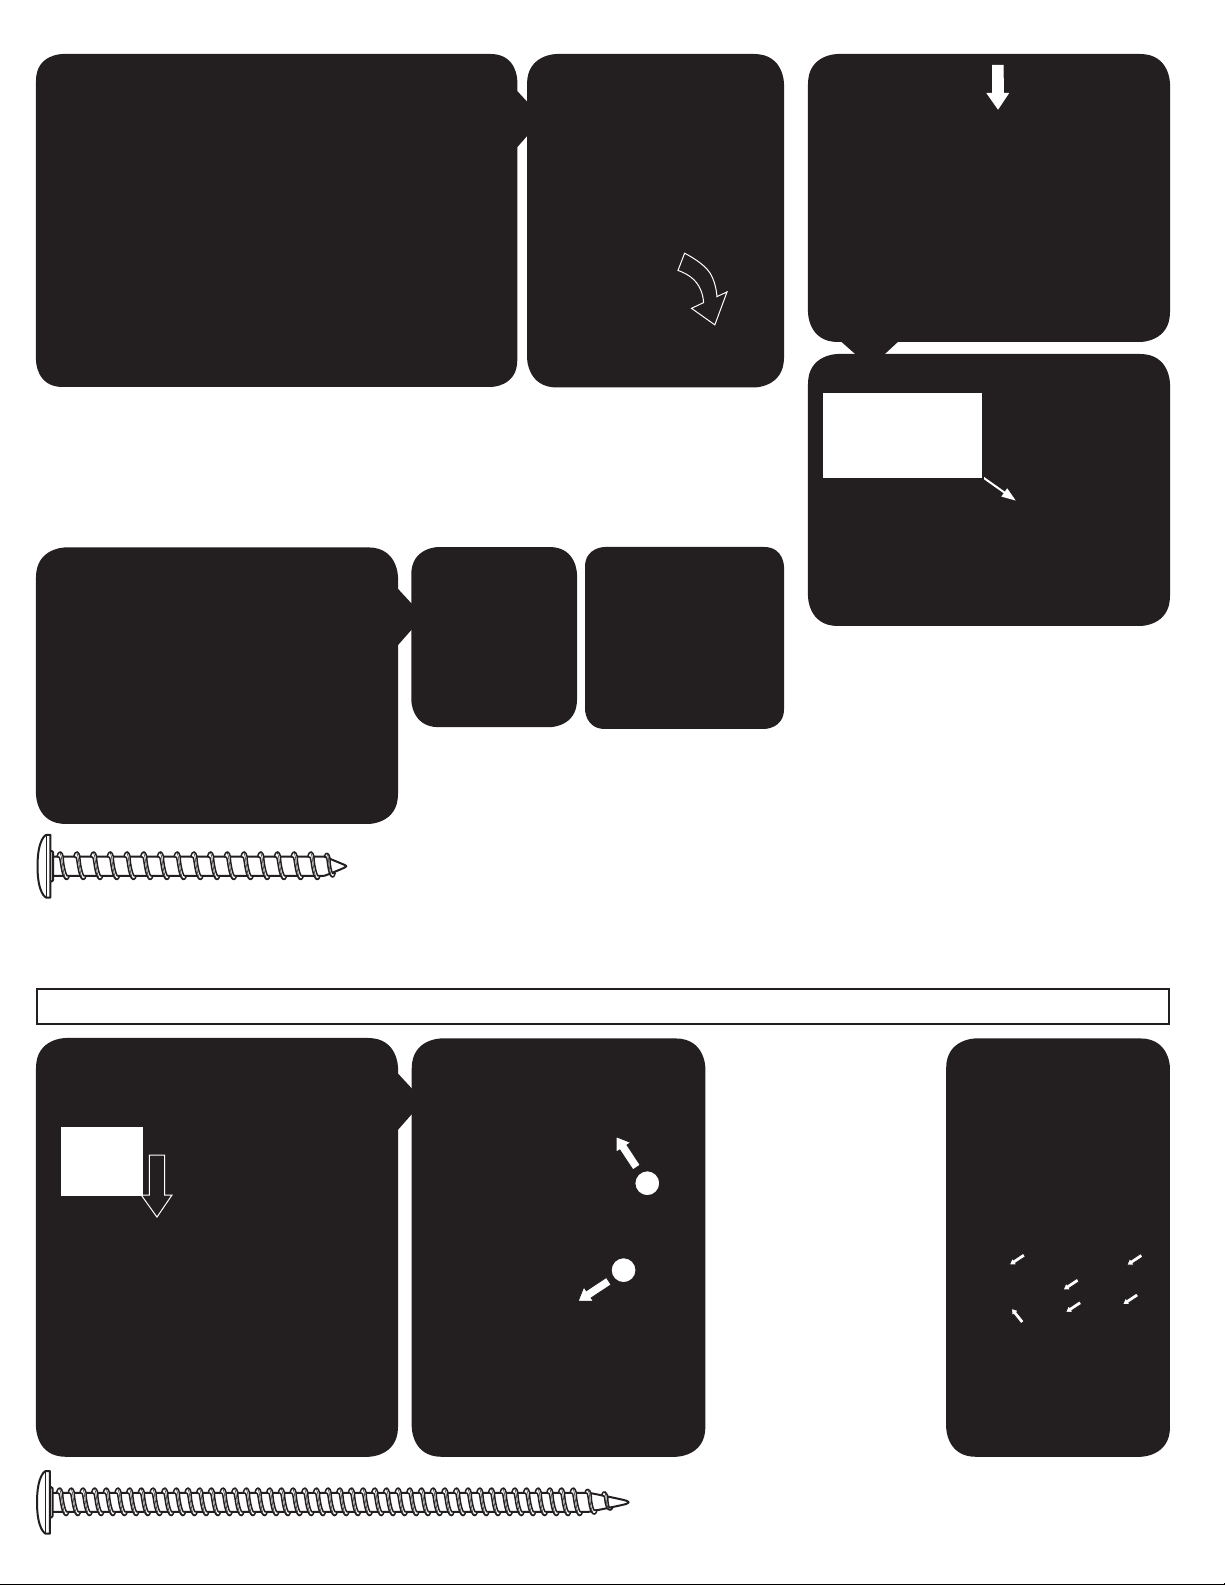
2
L. Platform / Plateforme / Plataforma
Identify embossed letters on each pillar. Identify embossed
letters on the underside of platform.
Repérez les lettres en relief sur chaque colonne. Repérez les lettres en relief
sur le dessous de la plateforme.
Identique las letras grabadas en cada pilar. Identique las letras grabadas
debajo de la plataforma.
Stand pillars upright in the order shown.
Mettez les colonnes debout, dans l’ordre illustré.
Ponga los pilares verticales en el orden que se muestra.
Reference 1 • Référence n° 1 • Referencia 1
C
B
A
Underneath platform
En dessous de la plateforme
Debajo de la plataforma
2
1. Position platform (L) to line up with corresponding letters on inside of each pillar (see reference 1).
2. Insert platform notch into the designated pillar and press down to secure.
1. Positionnez la plateforme (L) de manière à l’aligner avec les lettres correspondantes gurant sur le côté intérieur de chaque colonne (voir
référence n° 1).
2. Insérez l’encoche de la plateforme dans la colonne désignée et appuyez dessus pour une mise en place sécuritaire.
1. Coloque la plataforma (L) de manera que coincida con las letras correspondientes en el interior de cada pilar (ver referencia 1).
2. Inserte la muesca de la plataforma en el pilar correspondiente y empújela hacia abajo para asegurarla.
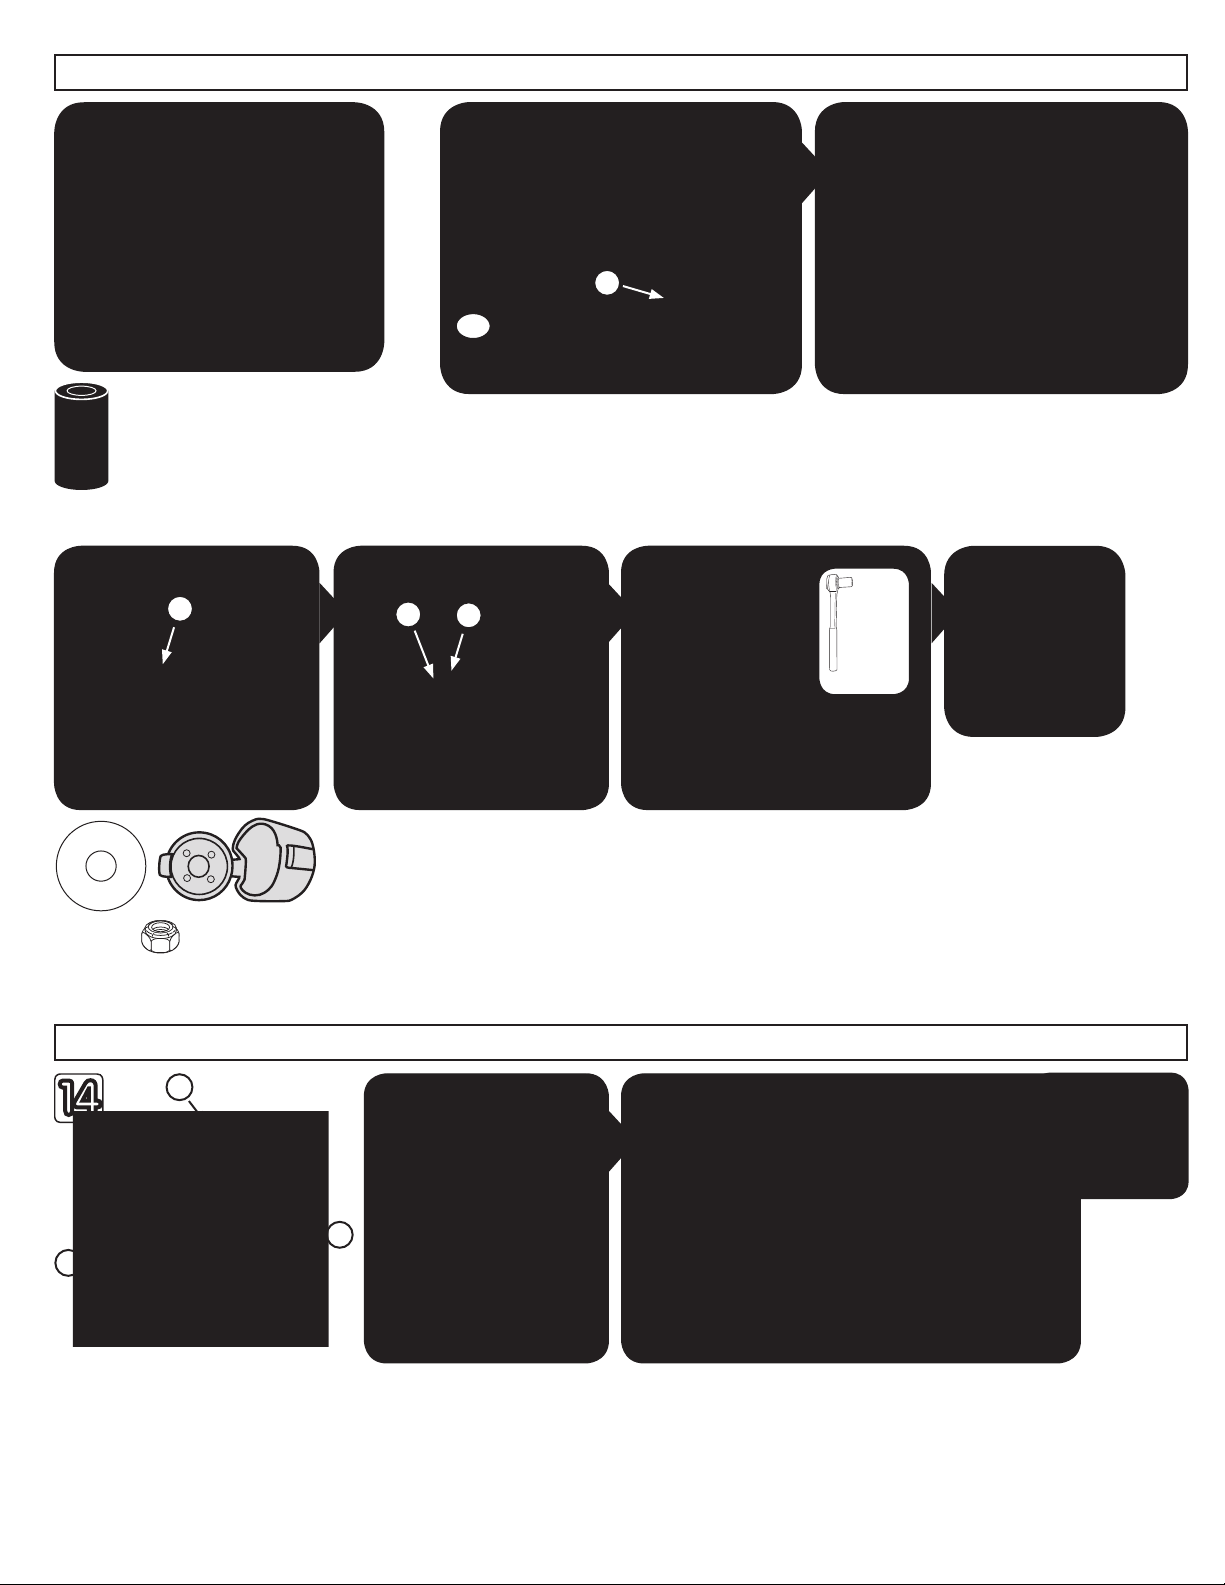
4
Install screw (Z) x3 into center of each pillar groove as shown.
Installez la vis (Z) x 3 dans le centre de la rainure de chaque colonne, comme illustré.
Fije 3 tornillos (Z) en el centro de la ranura de los 3 pilares tal y como se muestra.
x3
Z x3 - 2" (5.08 cm)
5
X x6 - 4" (10.16 cm)
x3
1
2
Person 1: MUST PRESS DOWN on
platform as screws are installed.
Person 2: Install screw (X) x2 per
pillar (6 total) into the locations
shown.
1re personne : VOUS DEVEZ
POUSSER SUR la plateforme pendant
que les vis sont installées.
2e personne : installez les vis (X) (2
vis par colonne; 6 vis au total) dans
les endroits illustrés.
Persona 1: DEBE EMPUJAR la plataforma
HACIA ABAJO mientras se jan los tornillos.
Persona 2: Fija 2 tornillos (X) por pilar
(un total de 6) en los lugares indicados.
3
2 people are required for this step. • Ces étapes requièrent deux personnes. • Se requieren 2 personas para estos paso.
Press Down
Pousser dessus
Empujar hacia
abajo
3
Each notch of the platform must be hammered down into its
designated pillar. Note: platform is in correct position once
notch is past bump in pillar as shown.
Chaque encoche de la plateforme doit être martelée pour l’insérer dans
la colonne qui lui est désignée. Remarque : la plateforme se trouve dans
la bonne position une fois que l’encoche passe à travers la bosse dans la
colonne, comme illustré.
Cada muesca de la plataforma debe martillarse en el pilar
correspondiente. Nota: La plataforma está en la posición correcta una vez
que la muesca haya pasado el saliente en el pilar tal y como se muestra.
Hammer past bump
Martelez l’encoche jusqu’à ce
qu’elle passe à travers la bosse
Martillar pasado el saliente
Screw should be tighten so that there is no gap larger than the
width of a screwdriver.
Les vis doivent être bien serrées de sorte que le jeu ne soit pas plus grand
que la largeur d’un tournevis.
Los tornillos deben ajustarse para que no quede un espacio mayor que el
ancho de un destornillador.
6
Person 1: Insert left side of side rail (O) into pillar B/E.
1re personne : installez le côté gauche de la rampe latérale (O) dans la colonne B/E.
Persona 1: Coloca el lado izquierdo de la baranda lateral (O) en el pilar B/E.
Person 2: Pull back on pillar C/F to t right side of rail (O) into pillar.
2e personne : tirez la colonne C/F vers l’arrière pour insérer dans celle-ci le côté droit de la rampe (O).
Persona 2: Tira hacia atrás el pilar C/F para acomodar el lado derecho de la baranda (O) en el pilar. w
2 people are required for this step. • Ces étapes requièrent deux personnes. • Se requieren 2 personas para estos paso.
HINT: Before starting step 6, align holes in
side rail to holes in pillar.
CONSEIL : avant de passer à l’étape 6,
alignez les trois dans la rampe latérale sur
les trous dans la colonne.
CONSEJO: Antes de comenzar el paso 6 alinee los
oricios de la baranda lateral con los del pilar..
7
8
BB x4
V x4 - 41/2" (11.43 cm)
CÔTÉ INTÉRIEUR DE LA RAMPE : enlez une rondelle (AA) x 4 sur chaque boulon (V) x 4. Insérez chaque boulon avec sa rondelle dans la rampe latérale (O), comme
illustré. Pour faciliter l’assemblage, utilisez un marteau pour insérer les boulons.
INTERIOR DE LA BARANDA: Coloque 4 arandelas (AA) en 4 pernos (V). Inserte el perno con arandela por la baranda lateral (O) tal y como se muestra. Para facilitar
el montaje puede usarse un martillo para insertar los pernos.
AA x4
4
AA
V
Inside of Side Rail • Côté intérieur de la rampe•Interior de la baranda lateral
Outside of Side Rail • Côté extérieur de la rampe • Exterior de la baranda lateral
x4
x4x4
INSIDE RAIL: Place washer (AA) x4 onto bolt (V) x4. Insert bolt with washer through
side rail (O) as shown. For ease of assembly, hammer may be used to insert bolt.
OUTSIDE RAIL: In order, place washer (AA) x4, then
grey bolt cover (BB) x4 onto bolt (V) x4.
CÔTÉ EXTÉRIEUR DE LA RAMPE : dans l’ordre, enlez
une rondelle (AA) x 4, puis le capuchon de boulon gris
(BB) x 4 sur le boulon (V) x 4.
EXTERIOR DE LA BARANDA: En orden coloque primero
4 arandelas (AA) y luego 4 cubiertas de perno grises
(BB) en los 4 pernos (V).
AA x4
AABB
Pull Back
Tirer vers l’arrière
Tirar hacia atrás
Person 1: Hold inside bolt with pliers.
Person 2: Tighten locking nut (U) x4 .
1re personne : maintenez en place le boulon
intérieur avec une pince.
2e personne : serrez l’écrou de blocage (U) x 4.
Persona 1: Sostiene con pinzas el perno adentro.
Persona 2: Ajusta las 4 tuercas de retención (U).
U x4
x4
U
Ratchet wrench
1
/
2
" (1.27 cm)
socket
Douille de clé à
rochet de ½ po
(1,27 cm)
Llave de trinquete
con casquillo de 1,27
cm (½")
1
/
2
" (1.27 cm)
wrench
Clé de ½ po
(1,27 cm)
Llave de
1,27 cm (½")
OR
Push bolt
cover closed.
Fermez le capuchon de boulon en appuyant
dessus.
Empuje la cubierta del perno para cerrarla.
Person 1 / Personne 1 / Persona 1 Person 2 / Personne 2 / Persona 2
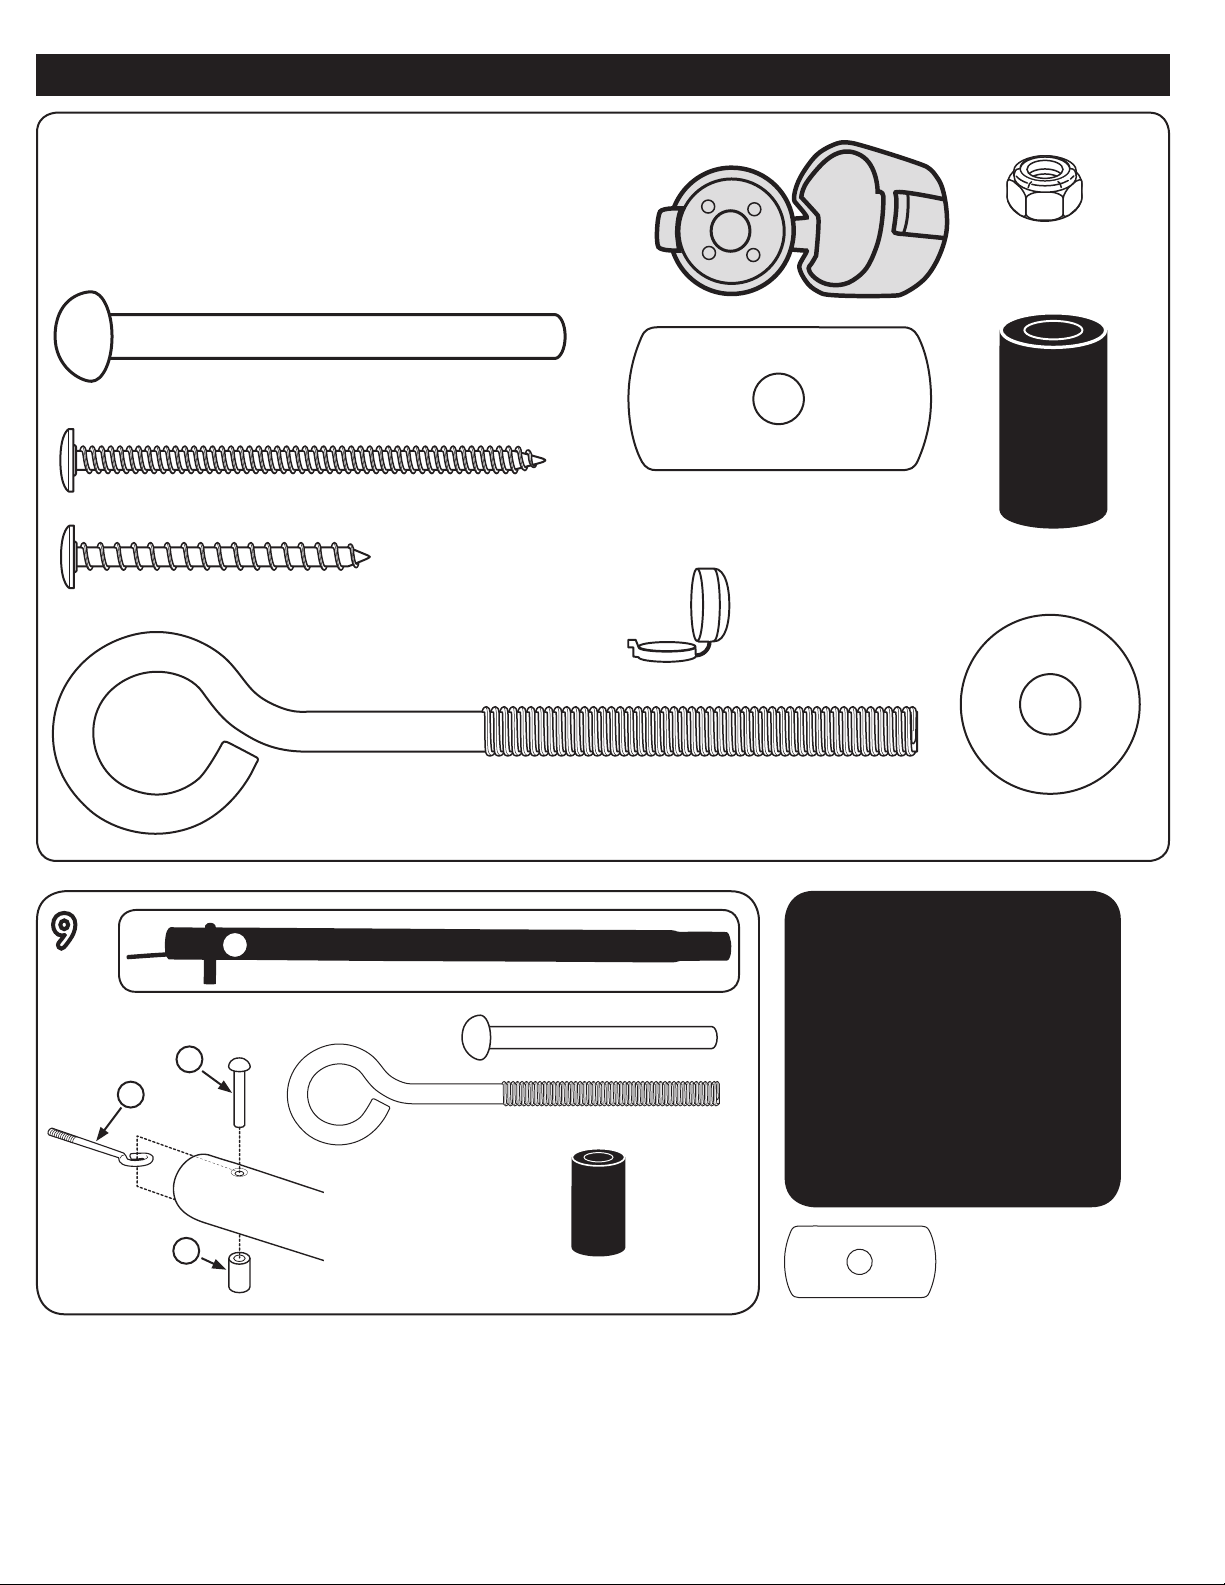
9
In order: insert eye bolt (II) x1 into transition pole (J) and hold, insert 31/4" rivet (HH) x1 through hole on top of transition pole,
thread through the center of the eye bolt, then through the bottom hole in transition pole as shown in diagram. You will need
to add extrusion (EE) x1 onto the bottom of rivet when assembling to the pillar.
Dans l’ordre : insérez le boulon à œil (II) x 1 dans le poteau de transition (J) et maintenez-le en place; insérez le rivet de 3 ¼ po (8,26
cm) (HH) x 1 dans le trou supérieur du poteau de transition; letez-le à travers le centre du boulon à œil, puis à travers le trou inférieur
dans le poteau de transition, comme illustré dans le diagramme. Vous devrez ajouter l’extrusion (EE) x 1 à la partie inférieure du rivet
lorsque vous assemblerez le tout avec la colonne.
En orden inserte 1 perno con anilla (II) en el poste de empalme (J) y sosténgalo. Inserte 1 remache de 8,26 cm (3 ¼") (HH) por el oricio
encima del poste de empalme, páselo por el centro del perno con anilla y luego por el oricio inferior del poste tal y como se muestra
en el diagrama. Deberá agregar 1 extrusión (EE) abajo del remache cuando lo monte en el pilar.
Place washer (FF) x1 onto end of
eyebolt. Tape in place with scotch
tape as shown.
Placez une rondelle (FF) x 1 sur
l’extrémité du boulon à œil.
Assujettissez la rondelle à l’aide d’un
ruban adhésif, comme illustré.
Coloque 1 arandela (FF) en el extremo
del perno con anilla. Asegúrela con cinta
adhesiva tal y como se muestra.
Attaching Roof /Fixation du toit / Instalación del techo
Subpack
Sous-paquet
Paquete pequeño2Use for steps 9 - 16
Utiliser pour les étapes 9 - 16
Utilice para los pasos 9 - 16
U x1
Nut / Écrou / Tuerca
AA x1
Washer / Rondelle / Arandela
BB x1
Grey Bolt Cover
Capuchon de boulon gris
Cubierta de perno gris
HH x1 31/4" Rivet / Rivet de 3 1/4 po (8,26 cm) / Remache de 8,26 cm (31/4")
II x1 6" Eye Bolt / Boulon à œil de 6 po (15,24 cm) / Perno con anilla de 15,24 cm (6")
FF x1
Rectangle Washer / Rondelle rectangulaire
Arandela rectangular
EE x1
Extrusion / Extrusion
Extrusión
5
HH
EE
II
10
Y x2 31/4" Screw / Vis de 8.26cm (31/4 po) / Tornillo de 8.26 cm (31/4")
Z x2 2" Screw / Vis de 5.08 cm (2 po) / Tornillo de 5.08 cm (2")W x1
Small Cap Cover
Petit capuchon
Cubierta pequeña
J
II x1 - 6" (15.24 cm)
HH x1 - 31/4" (8.26 cm)
EE x1
FF x1
6
1. Position roof (M) to line up with corresponding letters located on the inside of each pillar.
2. Insert pillar notches into the designated notch in roof. You will have to thread already assembled transition pole (J) into the designated opening in
roof.
1. Positionnez le toit (M) de manière à l’aligner avec les lettres correspondantes gurant sur le côté intérieur de chaque colonne.
2. Insérez les encoches de la colonne dans l’encoche désignée du toit. Vous devez leter le poteau de transition (J) déjà assemblé dans le trou désigné du toit.
1. Coloque el techo (M) de manera que coincida con las letras correspondientes en el interior de cada pilar.
2. Inserte las muescas del pilar en las muescas correspondientes en el techo. Tendrá que pasar el poste de empalme (J) ya ensamblado por la abertura correspondiente en el
techo.
13
Identify embossed letters on the underside
of roof (M).
Repérez les lettres en relief sur le dessous du toit (M).
Identique las letras grabadas debajo del techo
(M).
F
D
E
M. Roof / Toit / Techo
Insert assembled eye bolt (II) through upper opening in pillar A/D. As you insert eye bolt assembly through be sure
extrusion remains on rivet as shown.
Insérez le boulon à œil assemblé (II) à travers le trou supérieur dans la colonne A/D. Lorsque vous passez l’assemblage du boulon à œil à
travers ce trou, veillez à ce que l’extrusion reste en place sur le rivet, comme illustré.
Inserte el perno con anilla (II) ensamblado en la abertura superior del pilar A/D. Mientras inserta el conjunto de perno con anilla asegúrese
que la extrusión se mantenga en el remache tal y como se muestra.
EE
12
Push bolt cover closed.
Fermez le capuchon de boulon
en appuyant dessus.
Empuje la cubierta del perno
para cerrarla.
BB x1
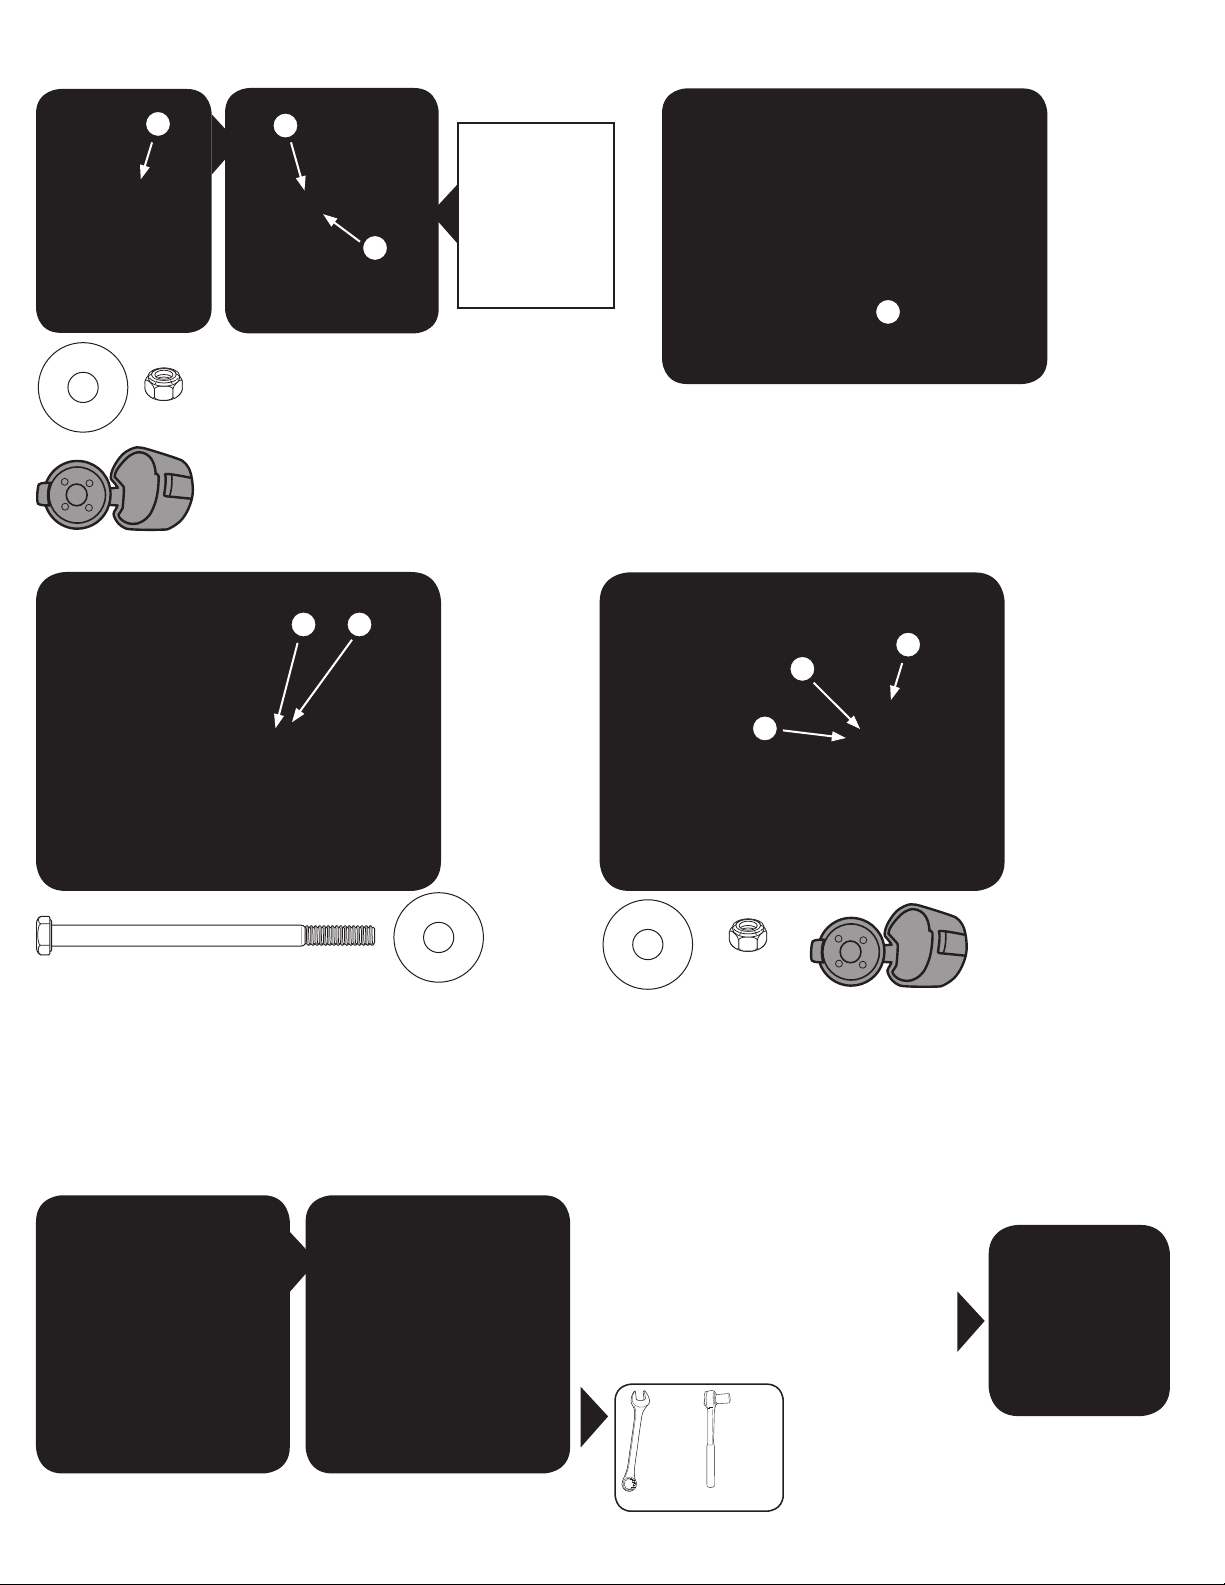
In order, place washer (AA) x1, then grey bolt cover
(BB) x1 onto eye bolt. Hand tighten locking nut
(U) x1 to secure.
Dans l’ordre, enlez la rondelle (AA) x 1, puis le
capuchon de boulon gris (BB) x 1 sur le boulon
à œil. Serrez à la main l’écrou de blocage (U) x 1
pour le xer en place.
AA x1
U x1
2 people are required for this step. • Ces étapes requièrent deux personnes. • Se requieren 2 personas para estos paso.
Fully tighten locking nut (U) using a rachet wrench 1/2"
(1.27 cm) socket .
Serrez fermement l’écrou de blocage (U) à l’aide d’une
douille de clé à rochet de ½ po (1,27 cm).
Ajuste la tuerca de retención (U) por completo con una
llave de trinquete con casquillo de 1,27 cm (½").
Ratchet wrench
1
/
2
" (1.27 cm)
socket
Douille de clé à
rochet de ½ po
(1,27 cm)
Llave de trinquete
con casquillo de
1,27 cm (½ ")
14
AABB
U
En orden coloque primero 1 arandela (AA) y luego 1 cubierta de perno
gris (BB) en el perno con anilla. Ajuste a mano 1 tuerca de retención
(U) para asegurarla.
A/D
EE x1
11
Add extrusion (EE) x1 onto bottom of rivet as
shown.
Ajoutez l’extrusion (EE) x 1 à l’extrémité inférieure
du rivet, comme illustré.
Agregue 1 extrusión (EE) abajo del remache tal y
como se muestra.
2 people are required for this step. • Ces étapes requièrent deux personnes. • Se requieren 2 personas para estos paso.
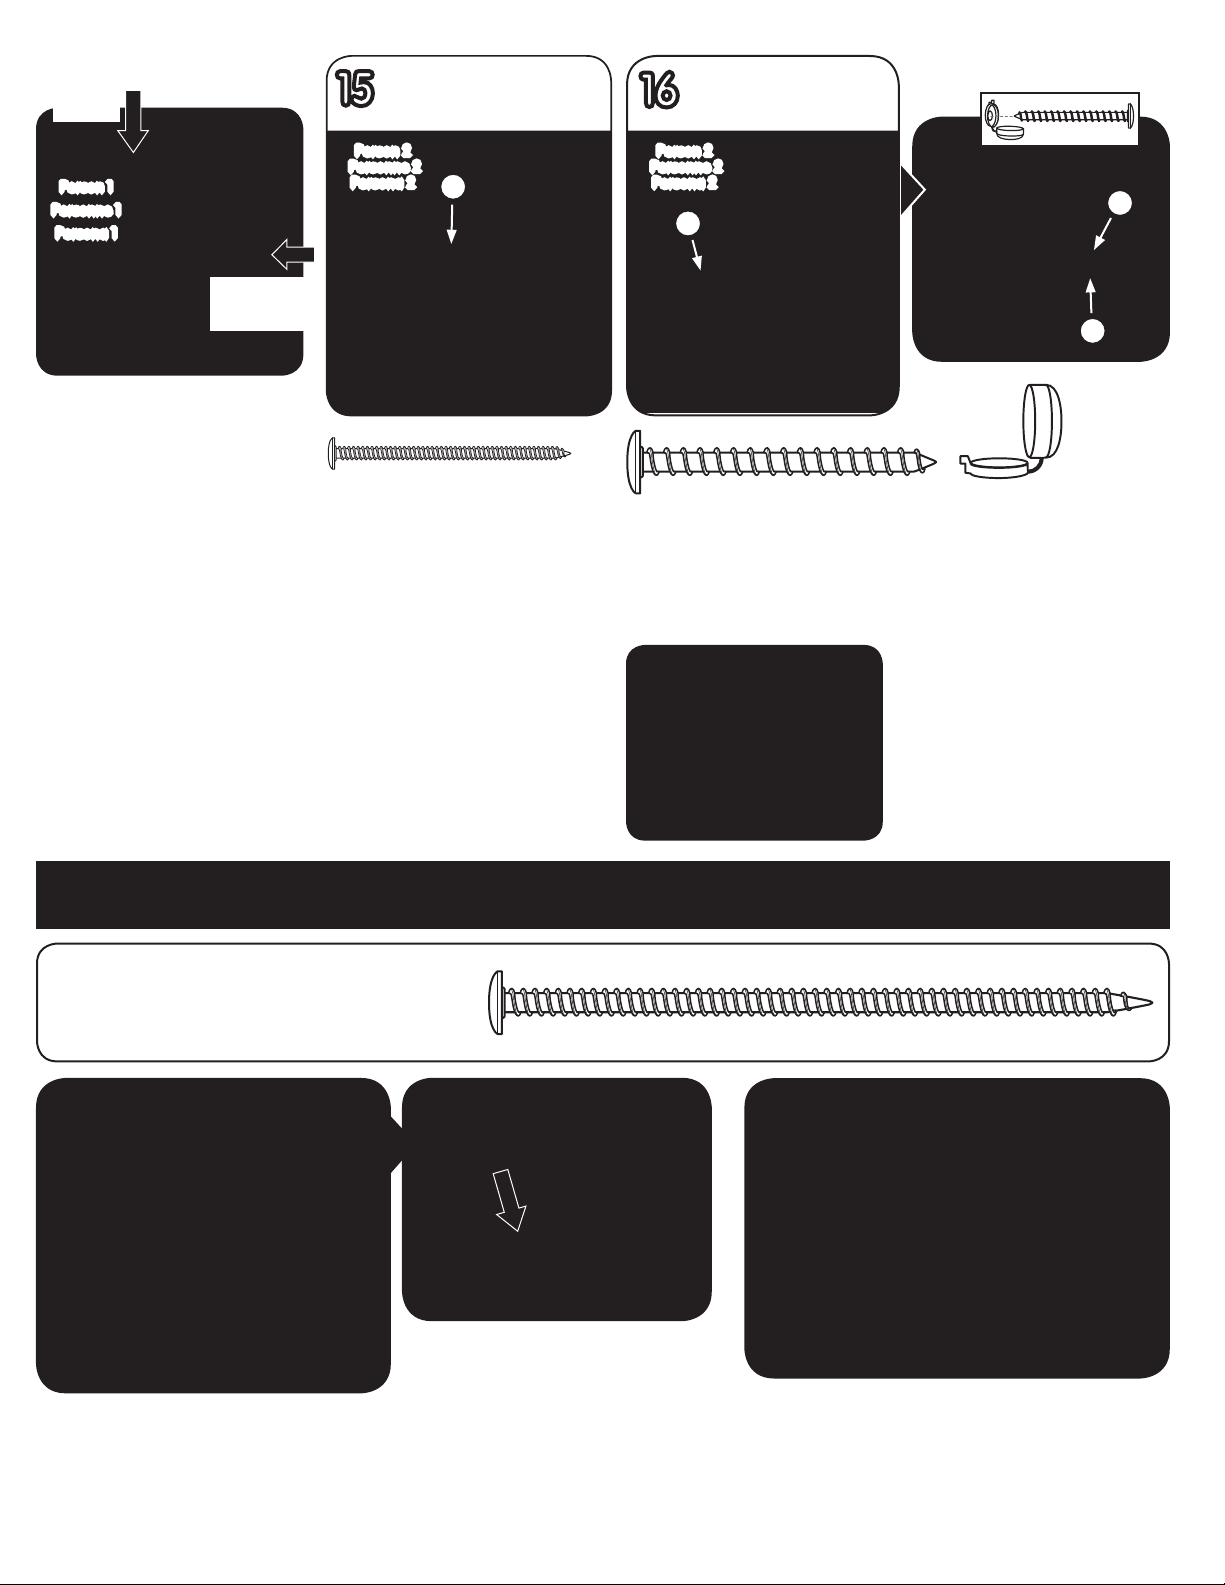
7
15
Person 2: Install screw (Y) x1 in each pillar B/E and
C/F in location shown.
2e personne : installez une vis (Y) x 1 dans chacune
des colonnes B/E et C/F, aux endroits
illustrés.
Persona 2: Fija 1 tornillo (Y) en cada pilar B/E y C/F
donde se indica.
Attaching Climbing Wall and Slide / Fixation du mur d’escalade et du toboggan
Instalación de la pared para trepar y del tobogán
Subpack
Sous-paquet
Paquete pequeño3Use for steps 17 - 22
Utiliser pour les étapes 17 - 22
Utilice para los pasos 17 - 22
17
Inside pillars B/E and C/F
Côté intérieur des colonnes B/E et C/F
Interior de los pilares B/E y C/F
Y x2 - 31/4" (8.26 cm)
Inside pillar A/D
Côté intérieur de la colonne (A/D)
Interior del pilar A/D
Person 1: MUST PRESS DOWN on roof and
PUSH IN on pillar as screws are
installed.
1re personne : VOUS DEVEZ POUSSER SUR le
toit tout en POUSSANT VERS
L’INTÉRIEUR la colonne pendant
que les vis sont installées.
Persona 1: DEBE EMPUJAR el techo HACIA
ABAJO y EMPUJAR el pilar HACIA
DENTRO mientras se jan los
tornillos.
Press Down
Pousser dessus
Empujar hacia
abajo
Push In
Pousser vers l’intérieur
Empujar hacia dentro
Person 2: Install screw (Z) x1 in left side of pillar A/D. Thread small cap cover (W) onto screw (Z)
x1 and install on right side of pillar A/D as shown.
2e personne : installez une vis (Z) x 1 sur le côté gauche de la colonne A/D. Filetez le petit capuchon (W) sur la
vis (Z) x 1 et installez-la sur le côté droit de la colonne A/D, comme illustré.
Persona 2: Fija 1 tornillo (Z) en el lado izquierdo del pilar A/D. Enrosca la cubierta pequeña (W) en 1 tornillo
(Z) y los ja en el lado derecho del pilar A/D tal y como se muestra.
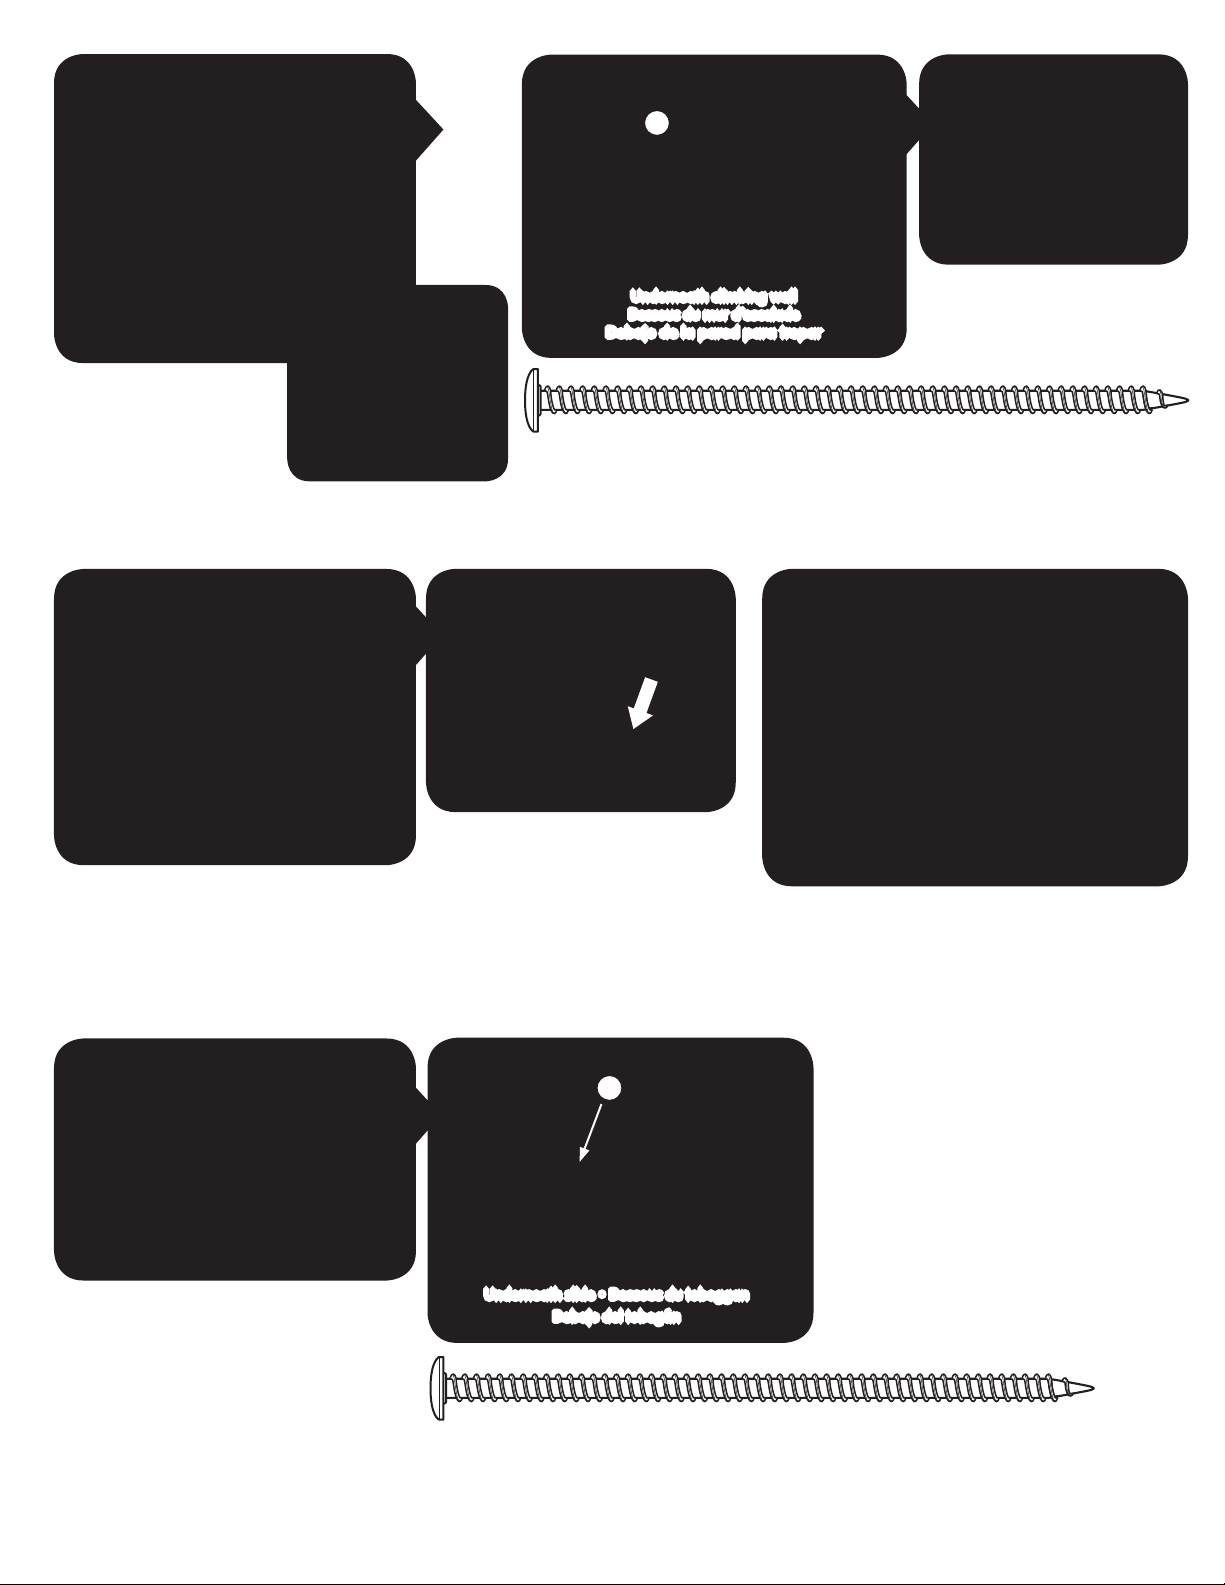
Person 1: Hold up the end of climbing wall (N) for person 2.
1re personne : maintenez le mur d’escalade vers le haut (N) pour
aider la personne 2.
Persona 1: Sostiene el extremo de la pared para trepar (N) para
la persona 2.
Person 2: Guide top of climbing wall (N) into
openings in platform.
2e personne : glissez le haut du mur d’escalade (N) dans
les ouvertures de la plateforme.
Persona 2: Guía la parte superior de la pared para trepar
(N) por las aberturas en la plataforma.
Person 1
Personne 1
Persona 1
Person 2
Personne 2
Persona 2
W x1
Person 2
Personne 2
Persona 2
Z x2 - 2" (5.08 cm)
ZZ
W
Y
Push bolt cover closed.
Fermez le capuchon de boulon
en appuyant dessus.
Empuje la cubierta del perno
para cerrarla.
KK x2 41/2" Bolt / Boulon de 11.43 cm (41/2 po)/ Perno de 11.43 cm (41/2")
18
Lift climbing wall up and down in a rocking motion to t tightly into
platform.
Soulevez le mur d'escalade puis abaissez-le. Faites ainsi un mouvement de
va-et-vient an de xer le mur fermement à la plateforme.
Levante la pared hacia arriba y hacia abajo de forma oscilante para que quede
bien ajustada en la plataforma.
16
8
19
20
Person 1: Hold up the end of slide (K).
1re personne : maintenez le bas du toboggan (K) vers le haut.
Persona 1: Sostiene el extremo del tobogán (K).
Person 2: Guide top of slide (K) into slide openings in
platform.
2e personne : glissez le haut du toboggan (K) dans les
ouvertures de la plateforme.
Persona 2: Guía la parte superior del tobogán (K) por las
aberturas en la plataforma.
21
Lift slide up and down in a rocking motion to t tightly into platform.
Soulevez le toboggan puis abaissez-le d'un mouvement de va-et-vient an de
le xer fermement à la plateforme.
Levante el tobogán hacia arriba y hacia abajo de forma oscilante para que
quede bien ajustado en la plataforma.
22
Install screw (KK) x1 underneath slide in location shown.
Installez la vis (KK) x 1 en dessous du toboggan à l’endroit illustré.
Fije 1 tornillo (KK) debajo del tobogán donde se indica.
KK
Underneath climbing wall
Dessous du mur d’escalade
Debajo de la pared para trepar
Underneath slide • Dessous du toboggan
Debajo del tobogán
KK x1 - 41/2" (11.43 cm)
IMPORTANT: before installing screw, be sure slide is tightly
tted to platform.
IMPORTANT : avant d’installer la vis, veillez à ce que le toboggan
soit fermement xé à la plateforme.
IMPORTANTE: Antes de jar el tornillo asegúrese que el tobogán
esté bien ajustado en la plataforma.
IMPORTANT: before installing screw,
be sure climbing wall is tightly
tted to platform.
IMPORTANT : avant d’installer la vis,
veillez à ce que le mur d’escalade soit
fermement xé à la plateforme.
IMPORTANTE: Antes de jar el tornillo asegúrese que la pared para
trepar esté bien ajustada en la plataforma.
Install screw (KK) x1 underneath climbing wall in location shown.
Installez la vis (KK) x 1 en dessous du mur d’escalade à l’endroit illustré.
Fije 1 tornillo (KK) debajo de la pared para trepar donde se indica.
KK x1 - 41/2" (11.43 cm)
KK
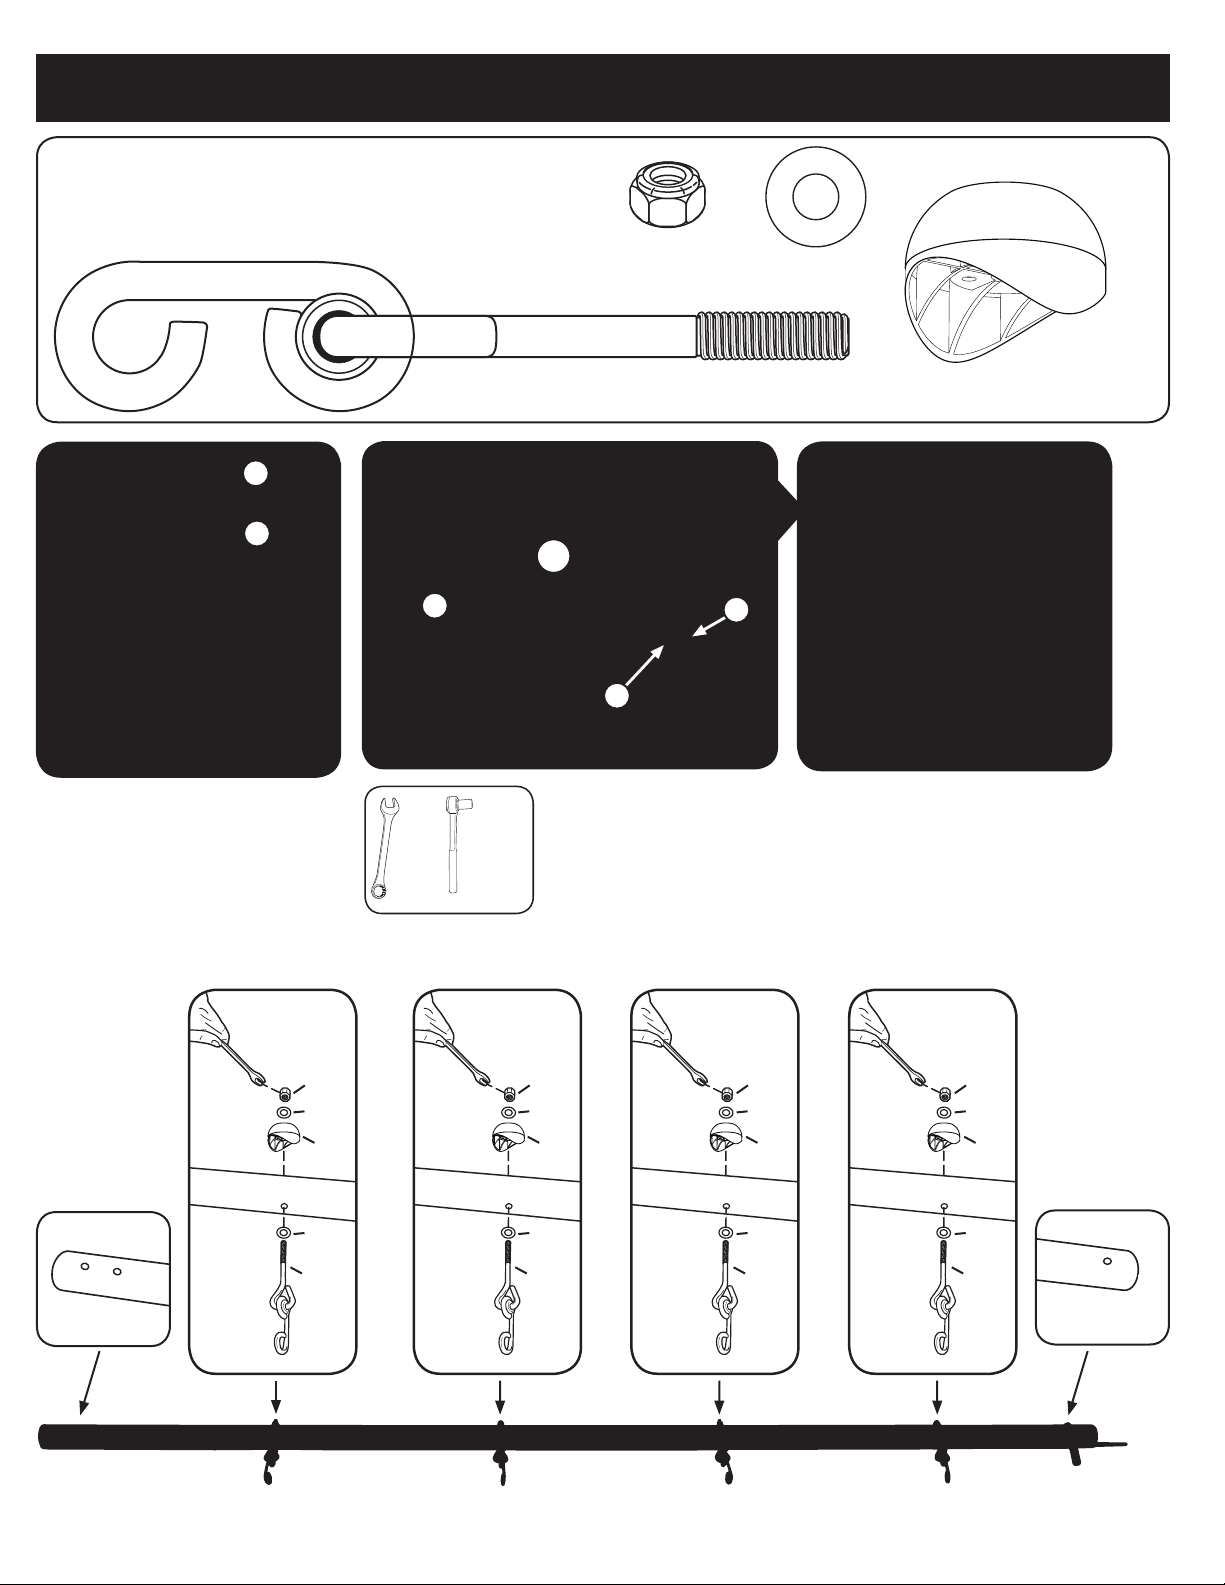
Attaching Swing Hardware / Fixation de la boulonnerie de portique
Instalación de las piezas de montaje de los columpios
Maintenez en place le boulon intérieur (JJ) avec une pince. Serrez
fermement l’écrou de blocage (U) à l’aide d’une douille de clé à
rochet de ½ po (1,27 cm).
Sostenga con pinzas el perno (JJ) adentro. Ajuste la tuerca
de retención (U) por completo con una llave de trinquete con
casquillo de 1,27 cm (½").
27
CC x1
Outside of Swing Extension • Côté extérieur de l’extension de portique • Exterior de la extensión de columpios
OUTSIDE SWING EXTENSION: In order, place washer (AA) x1, then brown
bolt cover (CC) x1 onto bolt (GG) x1. Hand tighten locking nut (U) x1 to
secure.
À L'EXTÉRIEUR DE L’EXTENSION DE PORTIQUE : dans l’ordre, enlez la
rondelle (AA) x 1, puis le capuchon de boulon brun (CC) x 1 sur le boulon
(GG) x 1. Serrez à la main l’écrou de blocage (U) x 1 pour le xer en place.
EXTERIOR DE LA EXTENSIÓN DE COLUMPIOS: En orden coloque primero 1
arandela (AA) y luego 1 cubierta de perno marrón (CC) en 1 perno (GG).
Ajuste a mano 1 tuerca de retención (U) para asegurarla.
AA x1
AACC
U x1
U
INSIDE SWING EXTENSIONS:
Place washer (AA) x1 onto bolt (JJ) x1. Insert bolt with washer through
assembled swing extensions (G & H) as shown.
À L’INTÉRIEUR DES EXTENSIONS DE PORTIQUE : enlez une rondelle (AA) x 1 sur le
boulon (JJ) x 1. Insérez le boulon muni de la rondelle dans les extensions de portique
(G & H), comme illustré.
INTERIOR DE LA EXTENSIÓN DE COLUMPIOS: Coloque 1 arandela (AA) en 1 perno (JJ).
Inserte el perno con arandela por las extensiones de columpios ensambladas (G y H)
tal y como se muestra.
JJ x2 - 3" (7.62 cm)
AA x2
x2
CC x2
AA x2U x2
OUTSIDE SWING EXTENSION: In order, place washer (AA) x1, then brown bolt cover (CC) x1 onto bolt (GG)
x1. Hand tighten locking nut (U) x2 to secure. Repeat for other side.
À L'EXTÉRIEUR DE L’EXTENSION DE PORTIQUE : dans l’ordre, enlez la rondelle (AA) x 1, puis le capuchon
de boulon brun (CC) x 1 sur le boulon (GG) x 1. Serrez à la main l’écrou de blocage (U) x 2 pour le xer en
place. Répétez cette étape sur l'autre côté.
EXTERIOR DE LA EXTENSIÓN DE COLUMPIOS: En orden coloque primero 1 arandela (AA) y luego 1 cubierta
de perno marrón (CC) en 1 perno (GG). Ajuste a mano 2 tuercas de retención (U) para asegurarla. Repita
en el otro lado.
P
Push bolt cover closed.
Fermez le capuchon de boulon en
appuyant dessus.
Empuje la cubierta del perno para
cerrarla.
GGAACC
AA
N
x2
Ratchet wrench
1
/
2
" (1.27 cm)
socket
Douille de clé à
rochet de ½ po
(1,27 cm)
Llave de trinquete
con casquillo de 1,27
cm (½")
1
/
2
" (1.27 cm)
wrench
Clé de ½ po
(1,27 cm)
Llave de
1,27 cm (½")
OR
STOP! Do not
completely tighten
until after Step 39
ARRÊT! Ne serrez pas
complètement qu'après
l'étape 39
DETÉNGASE! No apriete
completamente hasta
después de la etapa 39
12
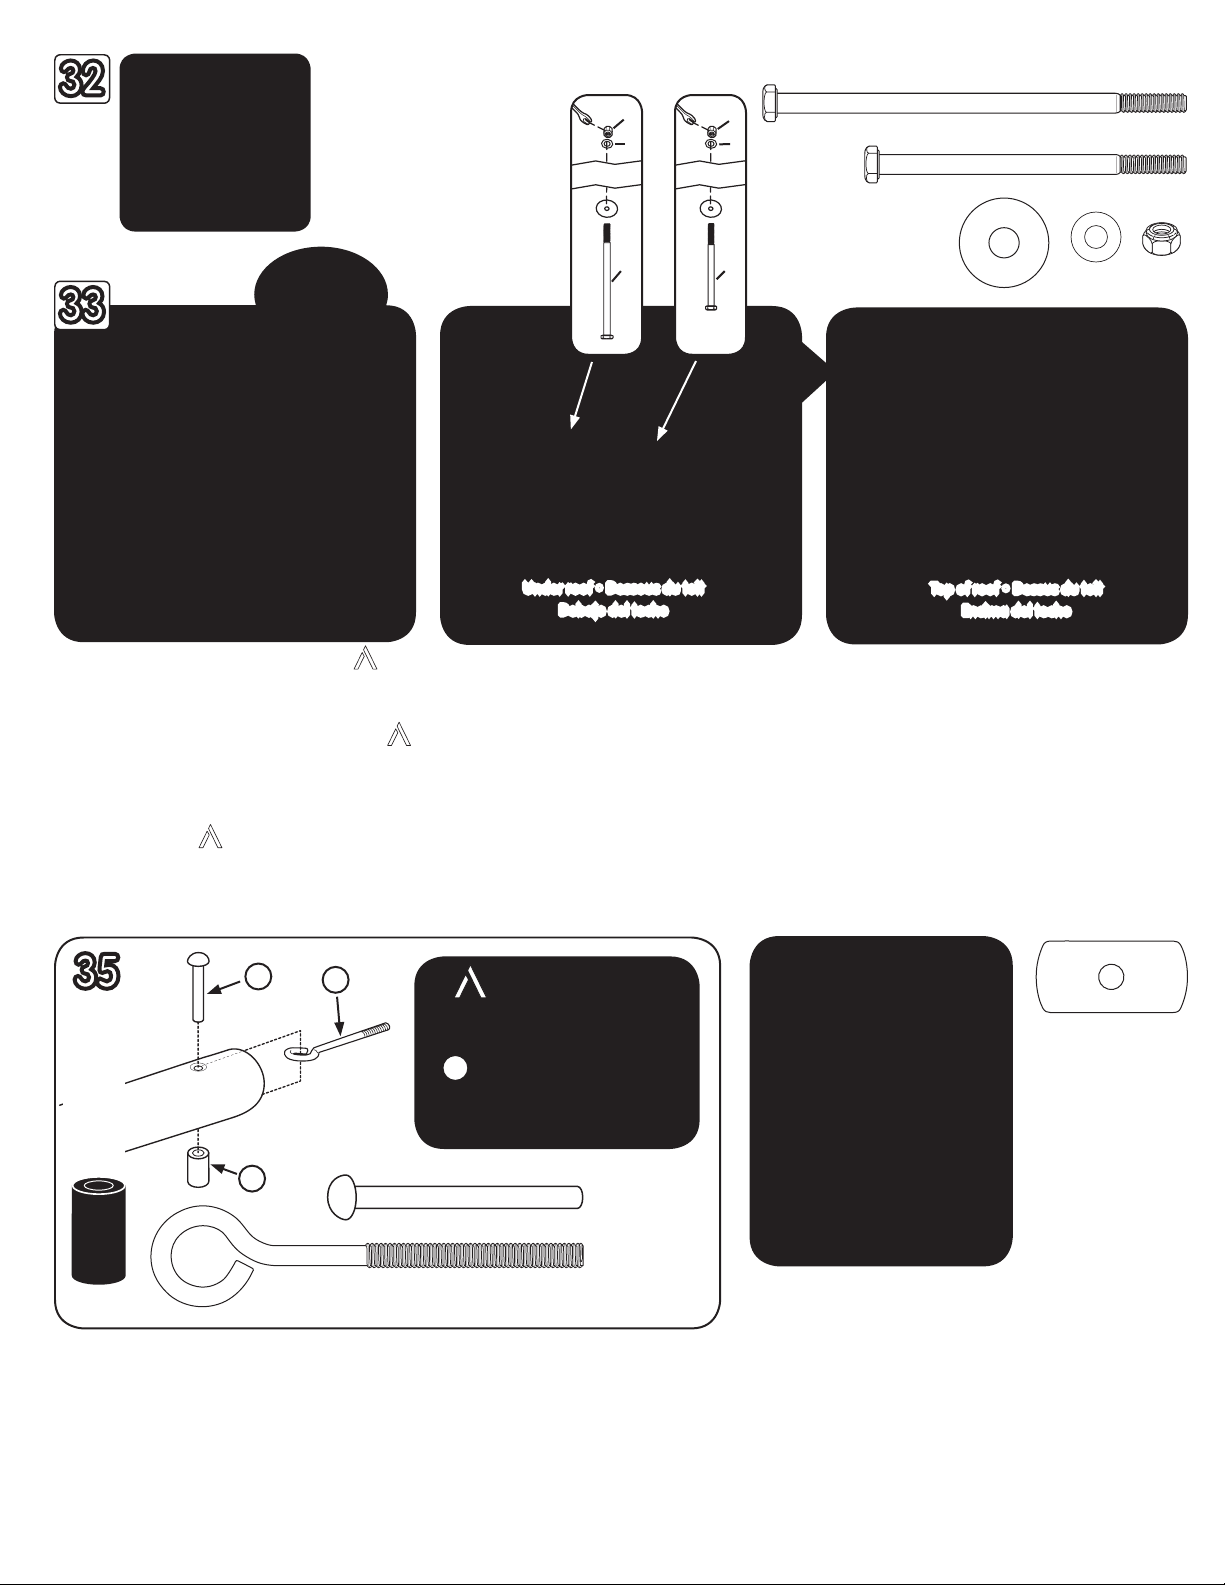
35
In order: insert eye bolt (II) x1 into swingset pole (I) and hold, insert 31/4" rivet (HH) x1 through hole on top of swingset pole, thread through the center of the eye bolt, then
through the bottom hole in swingset pole as shown in diagram. You will need to add extrusion (EE) x1 onto the bottom of rivet when assembling to the swingset extension.
Dans l’ordre : insérez le boulon à œil (II) x 1 dans le poteau de portique (I) et maintenez-le en place; insérez le rivet de 3 ¼ po (8,26 cm) (HH) x 1 dans le trou supérieur du poteau de
portique; letez-le à travers le centre du boulon à œil, puis à travers le trou inférieur dans le poteau de portique, comme illustré dans le diagramme. Vous devrez ajouter l’extrusion (EE)
x 1 à la partie inférieure du rivet lorsque vous assemblerez le tout avec l’extension de portique.
En orden inserte 1 perno con anilla (II) en el poste del juego de columpios (I) y sosténgalo. Inserte 1 remache de 8,26 cm (31/4") (HH) por el oricio encima del poste del juego de
columpios, páselo por el centro del perno con anilla y luego por el oricio inferior del poste tal y como se muestra en el diagrama. Deberá agregar 1 extrusión (EE) abajo del remache
cuando lo monte en la extensión del juego de columpios.
II x1 - 6" (15.24 cm)
HH x1 - 31/4" (8.26 cm)
HH
EE
II
EE x1
Person 1: Hold swingset pole (I) marked with symbol
parallel to the ground.
Person 2: Inserts opposite end of swingset pole (I) into transition
pole (J).
1re personne : maintenez le poteau de portique (I) avec le symbole
parallèle au sol.
2e personne : insérez l’extrémité opposée du poteau de portique (I) dans le
poteau de transition (J).
Persona 1: Sostiene el poste del juego de columpios (I) marcado
con el símbolo paralelo al suelo.
Persona 2: Inserta el extremo opuesto del poste del juego de columpios (I)
en el poste de empalme (J)..
32
I
Before starting step 35, align holes in swingset pole to
holes in installed transition pole.
Avant de passer à l’étape 35, alignez les trous
dans le poteau de portique sur les trous du
poteau déjà installé.
Antes de comenzar el paso 35, alinee los
oricios del poste del juego de columpios
con los del poste de empalme ya instalado.
UNDER ROOF: Place washer (AA) x1 onto bolt (LL) x1 and place
washer (AA) x1 onto bolt (GG) x1. Insert bolt (s) with washer
through assembled swingset poles in locations referenced in
diagrams.
EN DESSOUS DU TOIT : glissez une rondelle (AA) x 1 sur le boulon
(LL) x 1 et une rondelle (AA) x 1 sur le boulon (GG) x 1. Insérez
le(s) boulon(s) avec la(les) rondelle(s) à travers les poteaux de
portique assemblés, aux endroits illustrés dans les diagrammes de
référence.
DEBAJO DEL TECHO: Coloque 1 arandela (AA) en 1 perno (LL)
y 1 arandela (AA) en 1 perno (GG). Inserte el(los) perno(s) con
arandela(s) en los postes de extensión del juego de columpios ya
ensamblados según se indica en los diagramas.
GG x1 - 4" (15.24 cm)
T x1
TOP OF ROOF: Place washer (T) x1, then a locking nut (U) x1 onto
end of each bolt. Hand tighten locking nut (U) x1 to secure. Fully
tighten using a ratchet wrench 1/2" (1.27 cm) socket.
AU-DESSUS DU TOIT : glissez une rondelle (T) x 1, puis un écrou de
blocage (U) x 1 sur l’extrémité de chaque boulon. Serrez à la main
l’écrou de blocage (U) x 1 pour le xer en place. Serrez fermement
l’écrou à l’aide d’une douille de clé à rochet de ½ po (1,27 cm).
ENCIMA DEL TECHO: Coloque 1 arandela (T) y luego 1 tuerca de
retención (U) en el extremo de cada perno. Ajuste a mano 1 tuerca
de retención (U) para asegurarla. Ajústela por completo con una
llave de trinquete con casquillo de 1,27 cm (½").
AA x1U x1
Top of roof • Dessus du toit
Encima del techo
Under roof • Dessous du toit
Debajo del techo
T
U
AA
LL
U
T
AA
GG
LL x1 - 6" (15.24 cm)
34
Place washer (FF) x1 onto end
of eyebolt. Tape in place with
scotch tape as shown.
Placez une rondelle (FF) x 1 sur
l’extrémité du boulon à œil.
Assujettissez la rondelle à l’aide
d’un ruban adhésif, comme
illustré.
Coloque 1 arandela (FF) en el
extremo del perno con anilla.
Asegúrela con cinta adhesiva tal
y como se muestra.
36
FF x1
33
13
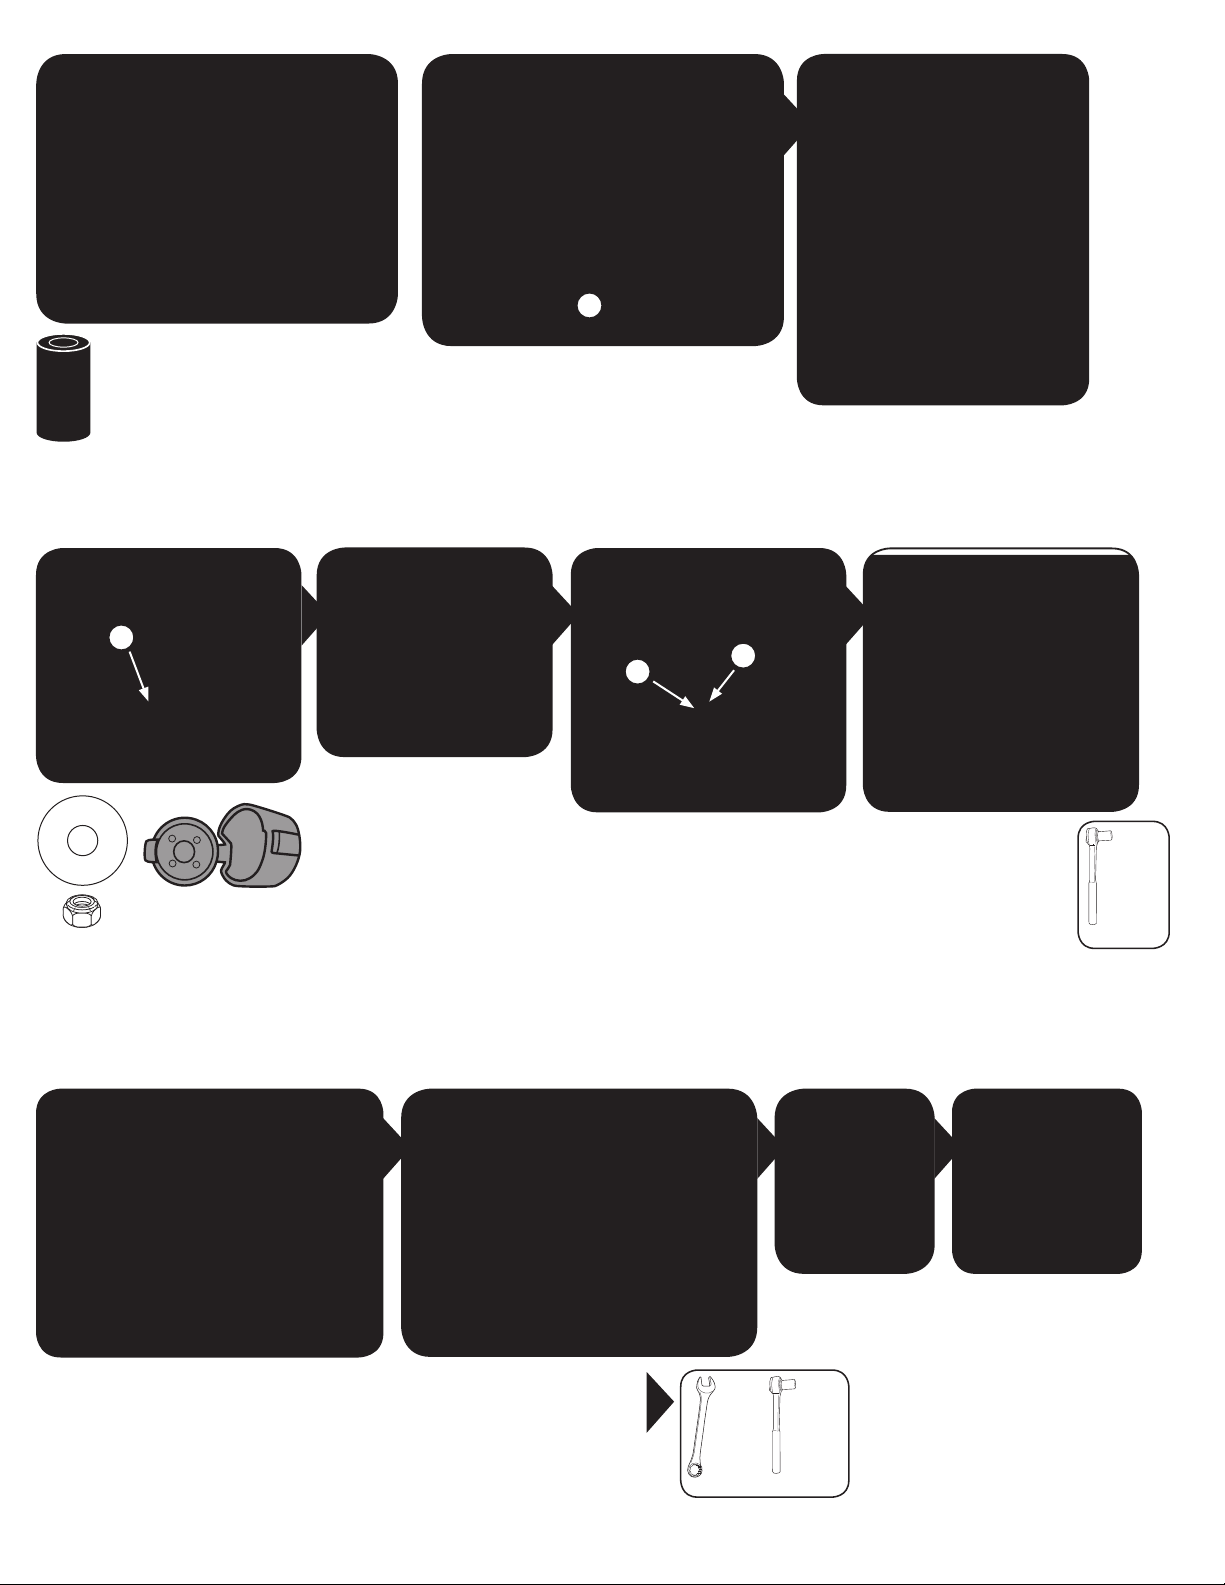
39
Insert assembled eye bolt (II) through upper opening in
assembled swingset extension G/H. As you insert eye bolt
assembly through be sure extrusion remains on rivet
as shown.
Insérez le boulon à œil assemblé (II) à travers le trou supérieur dans l’extension de portique assemblée G/H. Lorsque vous passez
l’assemblage du boulon à œil à travers ce trou, veillez à ce que l’extrusion reste en place sur le rivet, comme illustré.
Inserte el perno con anilla (II) ensamblado en la abertura superior de la extensión del juego de columpios G/H ya ensamblada. Mientras
inserta el conjunto de perno con anilla asegúrese que la extrusión se mantenga en el remache tal y como se muestra.
EE
38
CC x1
U x1
AA
AA x1
CC
U
Fully tighten locking nut (U) x1 using
a rachet wrench 1/2" (1.27 cm) socket.
Serrez fermement l’écrou de blocage
(U) x 1 à l’aide d’une douille de clé à
rochet de ½ po (1,27 cm).
Ajuste 1 tuerca de retención (U) por
completo con una llave de trinquete
con casquillo de 1,27 cm (½").
Hold extensions tightly together while installing
locking nut.
Maintenez fermement ensemble les extensions
pendant que vous installez l’écrou de blocage.
Mantenga las extensiones bien unidas mientras ja la
tuerca de retención.
In order, place washer (AA) x1, then brown bolt cover (CC) x1 onto eye
bolt.
Dans l’ordre, enlez la rondelle (AA) x 1, puis le capuchon de boulon
brun (CC) x 1 sur le boulon à œil.
En orden coloque primero 1 arandela (AA) y luego 1 cubierta de perno
marrón (BB) en el perno con anilla.
Ratchet wrench
1
/
2
" (1.27 cm)
socket
Douille de clé à
rochet de ½ po
(1,27 cm)
Llave de trinquete
con casquillo de
1,27 cm (½ ")
EE x1
37
Add extrusion (EE) x1 onto bottom of rivet as shown.
Ajoutez l’extrusion (EE) x 1 à l’extrémité inférieure du rivet,
comme illustré.
Agregue 1 extrusión (EE) abajo del remache tal y como se
muestra.
Person 1: Hold inside bolt (GG) with pliers.
Person 2: Fully tighten locking nut (U) using a rachet wrench 1/2" (1.27 cm) socket.
1re personne : maintenez en place le boulon intérieur (GG) avec une pince.
2e personne : serrez fermement l’écrou de blocage (U) à l’aide d’une douille de clé à rochet de ½ po (1,27 cm).
Persona 1: Sostiene con pinzas el perno (GG) adentro.
Persona 2: Ajusta la tuerca de retención (U) por completo con una llave de trinquete con casquillo de 1,27 cm (½").
Push bolt covers closed.
Fermez le capuchon de boulons en appuyant dessus.
Empuje la cubierta del pernos para cerrarla.
Ratchet wrench
1
/
2
" (1.27 cm)
socket
Douille de clé à
rochet de ½ po
(1,27 cm)
Llave de trinquete
con casquillo de 1,27
cm (½")
1
/
2
" (1.27 cm)
wrench
Clé de ½ po
(1,27 cm)
Llave de
1,27 cm (½")
OR
40
Hand tighten locking nut (U) x1 to secure.
Serrez à la main l’écrou de blocage (U) x 1 pour le
xer en place.
Ajuste a mano 1 tuerca de retención (U) para
asegurarla.
14
Anchoring / Ancrage / Anclaje
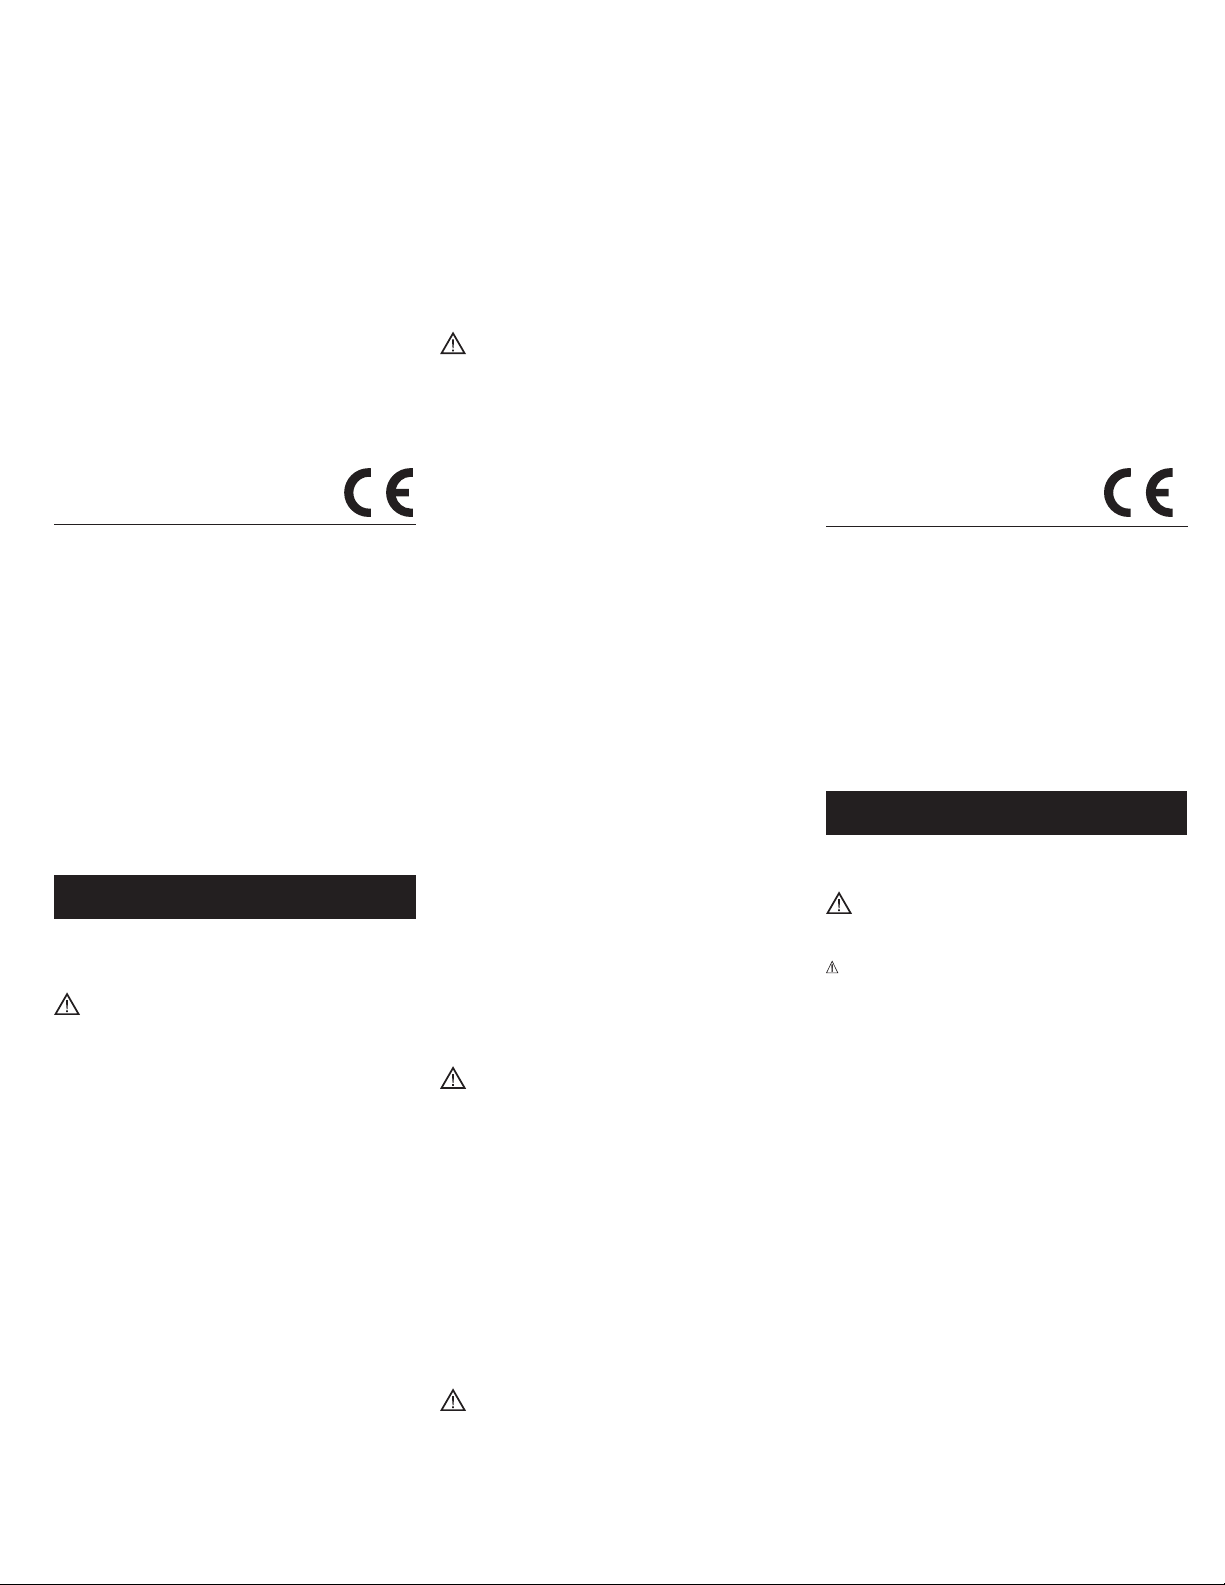
43
4Fill in all holes with dirt and make sure anchors are completely covered.
Remplissez tous les trous de terre et veillez à ce que les pièces d’ancrage soient complètement
recouvertes.
Llene todos los agujeros con tierra y asegúrese que los soportes estén completamente cubiertos.
1Dig hole wider at bottom so anchors can be placed
directly underneath the anchor hole in the product
(as shown). This is especially needed in sandy soil
conditions.
Creusez un trou qui est plus large à sa partie inférieure pour
que les pièces d’ancrage puissent être placées directement
en dessous du trou d’ancrage du portique (comme illustré). Il
est très important de respecter cette précaution si le terrain
est sablonneux.
Excave los agujeros de manera que queden más anchos en la
base para que los soportes puedan colocarse directamente
debajo de los agujeros de soportes que están en el producto
(como se muestra). Esto es especialmente necesario en suelo
arenoso.
2ANCHOr LOCATIONS
3Fasten steel cable clamp
so that steel cable is
tight.
Fixez les clips du câble de
manière à bien serrer le
dernier.
Ajuste la abrazadera del
cable para que el cable de
acero quede tirante.
4" - 6"
(10-15 cm)
47"
(1.19 m)43"
(1.09 m)
88"
(2.23 m)
88"
(2.23 m)
Loop steel cable through anchor holes in locations shown.
Passez le câble en acier dans les trous d’ancrage aux endroits illustrés à l’étape 43.
Pase el cable de acero a través de los agujeros de soportes en los lugares indicados
en el paso 43.
Attaching Steering Wheel / Fixation du gouvernail / Colocación del volante
41
Insert bolt (R-1) through opening on outside of side rail (O).
Threaded end should appear on the inside of side rail (O).
Insérez le boulon (R-1) dans le trou sur le côté extérieur de la
rampe (O). L’embout leté doit sortir sur le côté intérieur de la
rampe (O).
Inserte el perno (R-1) en el oricio del lado exterior de la baranda
lateral (O). El extremo roscado debe asomarse del lado interior de
la baranda lateral (O).
42
Place steering wheel (Q) onto threaded end of bolt (R-1). Secure using
hub pin (R-2) by turning until tight.
Placez le gouvernail (Q) sur l'embout leté du boulon (R-1).
Assujettissez le goujon de moyeu (R-2) en le tournant jusqu’à ce qu’il
soit bien serré.
Coloque el volante (Q) en el extremo roscado del perno (R-1).
Asegúrelo enroscando una clavija de cubo (R-2) hasta que quede
ajustada.
Fully tighten hub pin (R-2) using the end of a at washer (as shown)
or a phillips screwdriver.
Serrez à fonds le goujon de moyeu (R-2) en utilisant l'extrémité
d’une rondelle plate (comme illustré) ou un tournevis cruciforme.
Ajuste por completo la clavija de cubo (R-2) con el extremo de una
arandela plana (como se muestra) o con un destornillador Phillips.
R-1R-2
15
SWING
WARNING:
The Swing Seat is designed as a replacement for seats on a swing set and is not
intended to be attached to any other structures. The chain on the swing seat should
attach to hardware on the swing set that has a nylon bushing where the hook will
pivot. If this hardware is not present on your set, you must add hooks with this
bushing.
CAUTION: The Swing Seat chain should not be hung on a stationary hook (without
a nylon bushing). The metal chain will rub against the metal hook and result in
premature wear.
• Swing seat should be hung no lower than 8” (20 cm) from the ground.
• The seat should be hung at least 15” (38 cm) from the side of the swing set or
from other swings. It is recommended that the orientation of the assembled
product be such that direct sunlight is minimized on surfaces intended for
standing or sitting.
• Attachment points should be 18” apart from each other.
• Swing seat should not swing to within 6’ (2 m) of any object in front of or
behind it. Objects to be avoided include, but are not limited to, fences,
buildings, garages, houses, overhead branches, laundry lines or electrical
wires.
• Do not attach this product to other to-fro swinging components such as,
but not limited to, swings, trapeze bars, trapeze rings, gliders or upper body
components such as horizontal ladders.
• Only one rider should be allowed on the swing at one time.
• Instruct children on proper swing use for their safety:
• Do not twist chains. Do not swing empty seats.
• Children should keep hands free of objects, inside of swing, and hold
onto the ropes.
• Do not get o the swing while it is in motion.
• Do not walk too close to, in front of, behind, or between moving items.
• Always wear well-tting shoes while swinging.
• Always sit with full weight in the center of the seat.
• Do not twist chains or ropes or loop them over the top support bar since
this may reduce their strength.
• Do not use the equipment in a manner other than intended.
• Do not allow children to climb on product when product is wet.
• Instruct children not to attach items to the product that are not specically
designed for use with the product such as, but not limited to, jump
ropes, clotheslines, pet leashes, cables and chains, as they may cause a
strangulation hazard.
ANCHOR KIT SWING / SLIDE
WARNING:
Failure to follow these warnings could result in serious injury.
• Inspect product at regular intervals for wear or loose hardware. Remove from
service if any abnormal conditions such as cracks or breaks exist. Failure to
perform periodic checks could cause the anchored product to overturn or
cause a fall.
• Anchors must be used on level ground.
• Anchors must be installed entirely below ground level to prevent children
from tripping.
1. Dig hole wider at bottom so anchors can be placed directly underneath
the anchor hole in product (as shown). This is especially needed in sandy
soil conditions.
2. Loop steel cable through anchor holes in locations shown in step 43
3. Fasten cable clamp so that steel cable is tight.
4. Fill in all holes with dirt and make sure anchors are completely covered.
MAINTENANCE
WARNING:
Failure to follow these warnings could result in serious injury.
Failure to perform periodic checks could cause this product to overturn or cause
a fall.
The following checks should be performed at the beginning and end of each
season and twice monthly during the usage period:
• Reinstall any plastic parts, such as swing seats or any other items that
were removed for the cold season.
• Tighten all hardware.
• Lubricate all metallic moving parts at the beginning of the play season
and twice per month during the play season.
• Check all protective coverings on bolts, pipes, edges, and corners.
Replace if they are loose, cracked, or missing.
• Check all moving parts including swing seats, ropes, cables, and chains
for wear, rust, or other deterioration. Replace if any of these conditions
exist.
• Check metal parts for rust. If found, sand and repaint using a nonlead-
based paint meeting the requirements of 16 CFR 1303.
• Rake and check depth of loose ll protective surfacing materials to
prevent compaction and to maintain appropriate depth. Replace as
necessary.
• Take this product indoors or do not use when temperatures fall below 0°F/-
18°C.
DISPOSAL
• Disassemble and dispose of equipment in such a manner that no hazardous
conditions such as, but not limited to, small parts and sharp edges exist at
Gebruikershandleiding.com neemt misbruik van zijn services uitermate serieus. U kunt hieronder aangeven waarom deze vraag ongepast is. Wij controleren de vraag en zonodig wordt deze verwijderd.
Product:
Spelregels forum
Om tot zinvolle vragen te komen hanteren wij de volgende spelregels:
lees eerst de handleiding door;
controleer of uw vraag al eerder door iemand anders is gesteld;
probeer uw vraag zo duidelijk mogelijk te stellen;
heeft u een probleem en al geprobeerd om dit op te lossen, vermeld dit erbij aub;
heeft u een oplossing gekregen van een bezoeker dan horen wij dat graag in dit forum;
wilt u een reactie geven op een vraag of antwoord, gebruik dan niet dit formulier maar klik op de knop 'reageer op deze vraag';
uw vraag wordt direct op de website gezet; vermijd daarom persoonlijke gegevens in te vullen;
Belangrijk! Als er een antwoord wordt gegeven op uw vraag, dan is het voor de gever van het antwoord nuttig om te weten als u er wel (of niet) mee geholpen bent! Wij vragen u dus ook te reageren op een antwoord.
Belangrijk! Antwoorden worden ook per e-mail naar abonnees gestuurd. Laat uw emailadres achter op deze site, zodat u op de hoogte blijft. U krijgt dan ook andere vragen en antwoorden te zien.
Abonneren
Abonneer u voor het ontvangen van emails voor uw Little tikes 621109M Endless Adventures Lookout Swing Set bij:
nieuwe vragen en antwoorden
nieuwe handleidingen
U ontvangt een email met instructies om u voor één of beide opties in te schrijven.
Ontvang uw handleiding per email
Vul uw emailadres in en ontvang de handleiding van Little tikes 621109M Endless Adventures Lookout Swing Set in de taal/talen: Nederlands, Duits, Engels, Frans, Spaans, Pools als bijlage per email.
De handleiding is 3.95 mb groot.
U ontvangt de handleiding per email binnen enkele minuten. Als u geen email heeft ontvangen, dan heeft u waarschijnlijk een verkeerd emailadres ingevuld of is uw mailbox te vol. Daarnaast kan het zijn dat uw internetprovider een maximum heeft aan de grootte per email. Omdat hier een handleiding wordt meegestuurd, kan het voorkomen dat de email groter is dan toegestaan bij uw provider.
Stel vragen via chat aan uw handleiding
Stel uw vraag over deze PDF
Uw handleiding is per email verstuurd. Controleer uw email
Als u niet binnen een kwartier uw email met handleiding ontvangen heeft, kan het zijn dat u een verkeerd emailadres heeft ingevuld of dat uw emailprovider een maximum grootte per email heeft ingesteld die kleiner is dan de grootte van de handleiding.
Er is een email naar u verstuurd om uw inschrijving definitief te maken.
Controleer uw email en volg de aanwijzingen op om uw inschrijving definitief te maken
U heeft geen emailadres opgegeven
Als u de handleiding per email wilt ontvangen, vul dan een geldig emailadres in.
Uw vraag is op deze pagina toegevoegd
Wilt u een email ontvangen bij een antwoord en/of nieuwe vragen? Vul dan hier uw emailadres in.