693633
15
Verklein
Vergroot
Pagina terug
1/62
Pagina verder
0•1
90-20-0370 - C (For use with Helix Rack Firmware 2.00) ©2016 Line 6, Inc.
2.0 OWNER’S MANUAL
2
Contents
Welcome to Helix 4
What’s In the Box? 4
Common Terminology 4
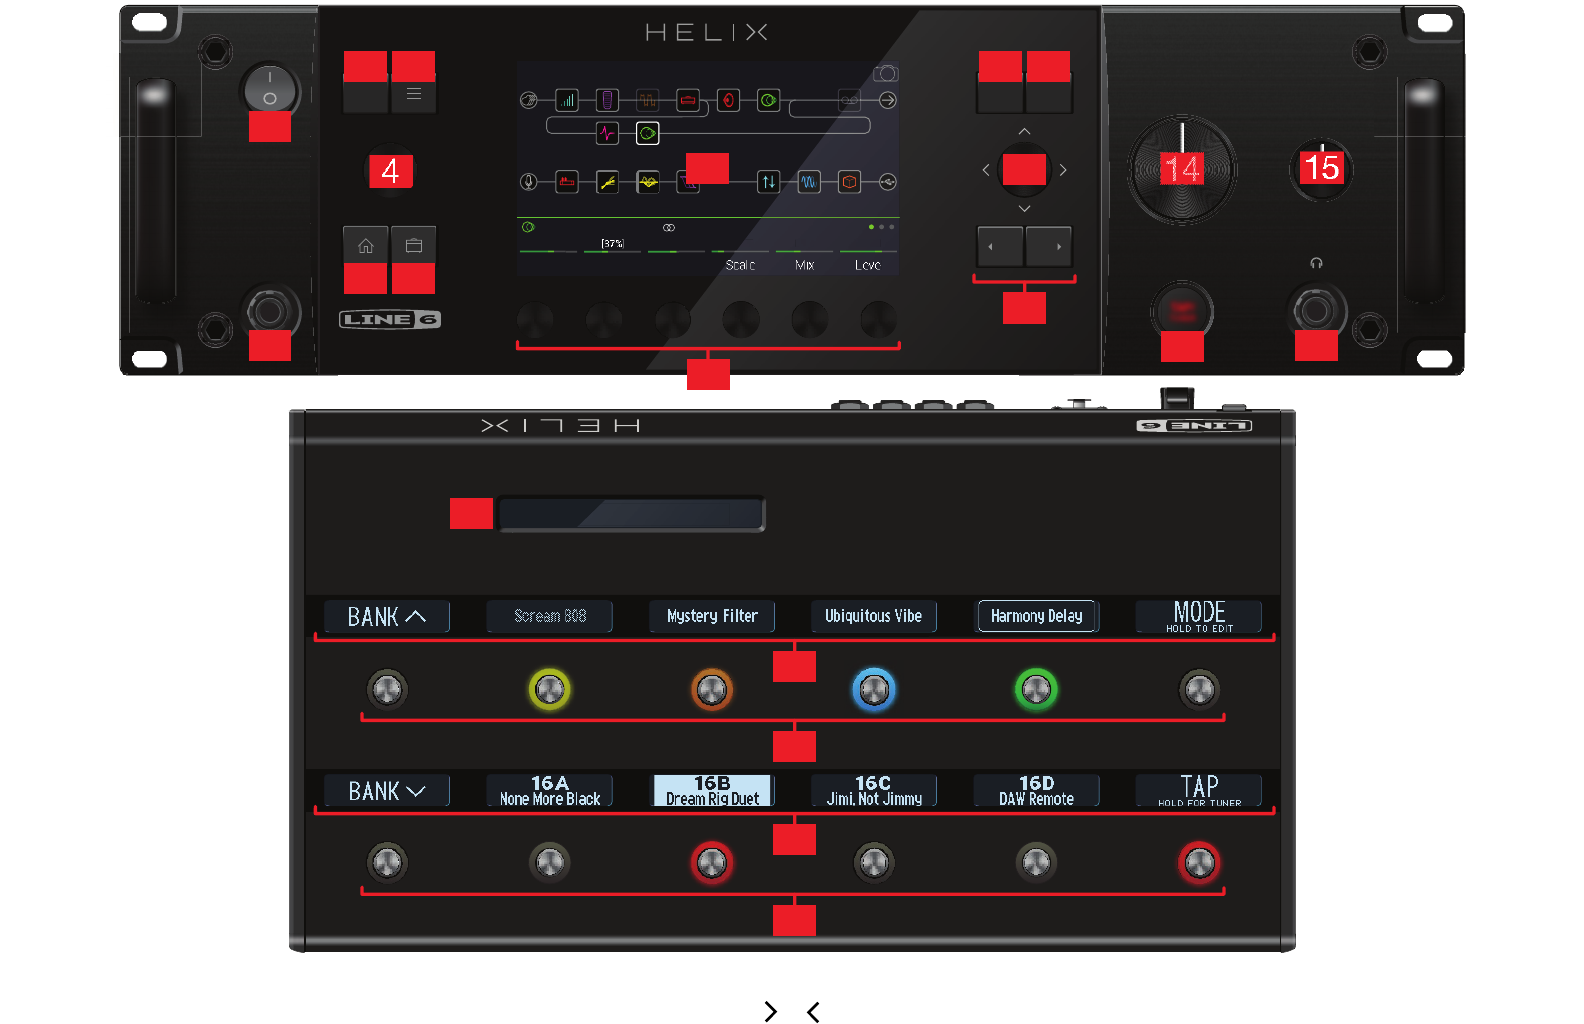
Helix Rack Front Panel / Helix Control Top Panel 6
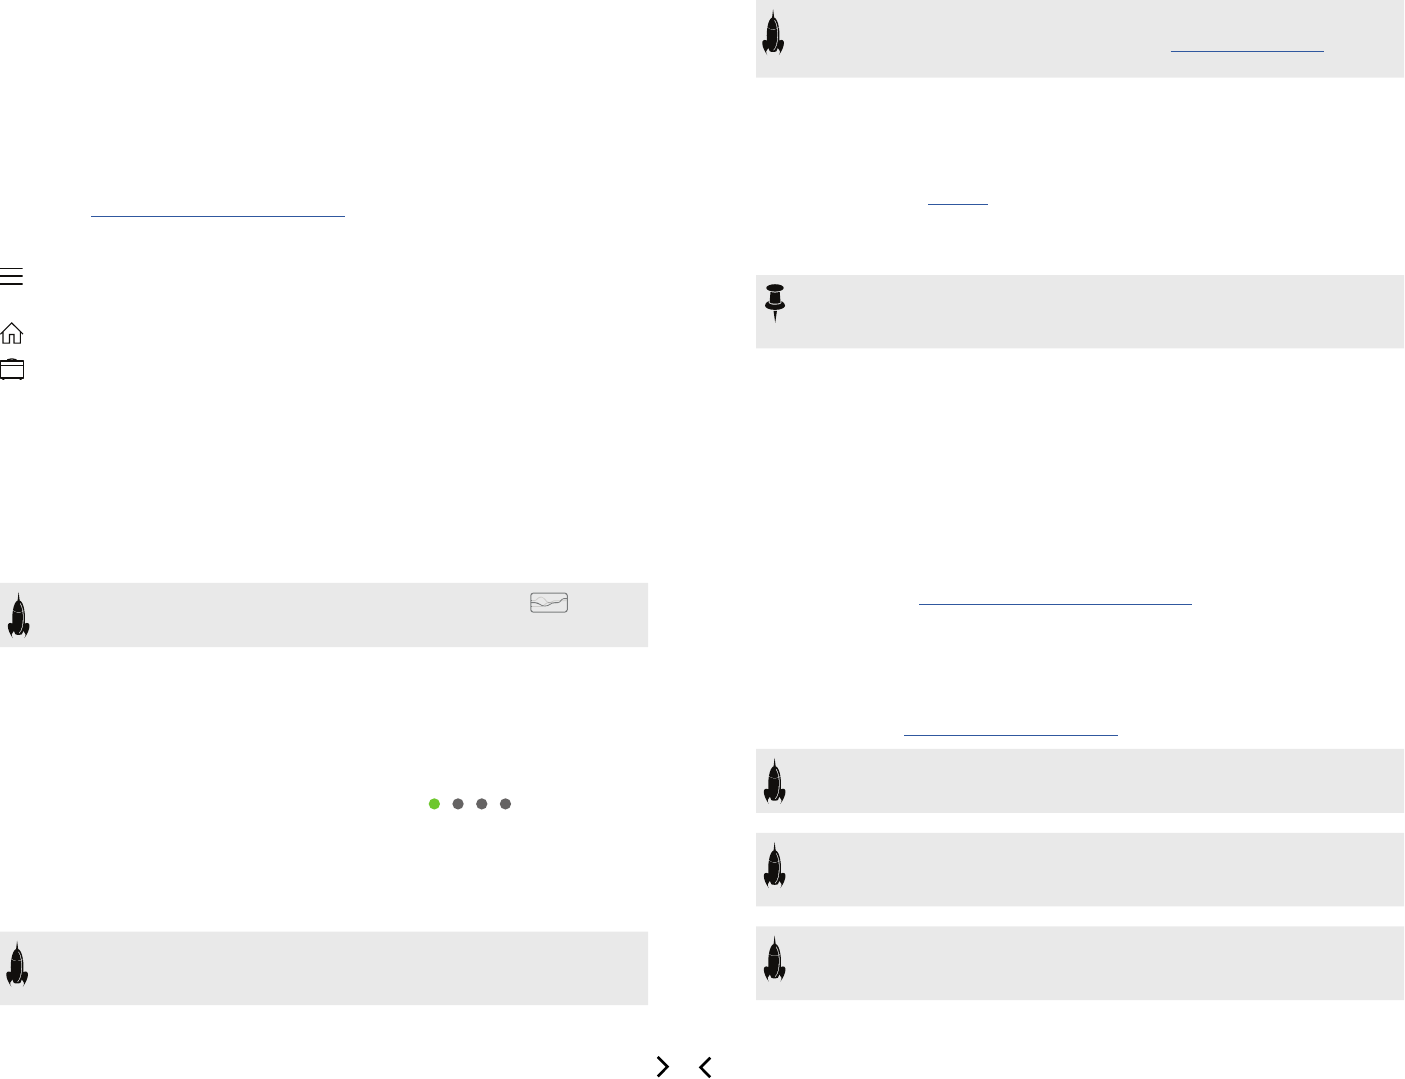
Helix Rack / Helix Control Back Panel 8
Home Screen 10
Quick Start 11
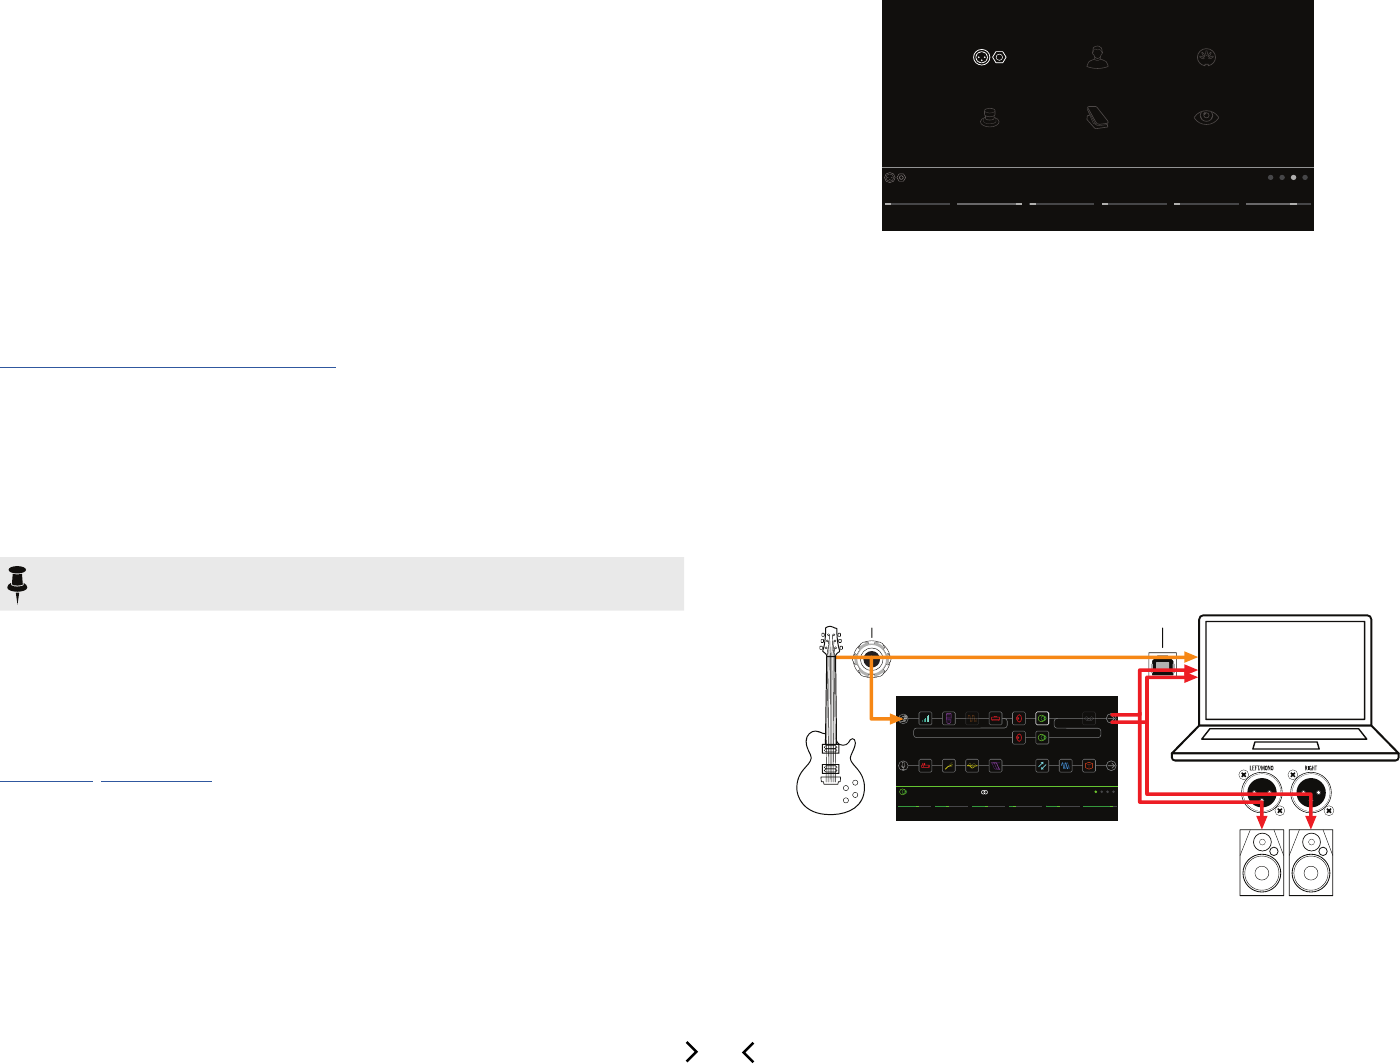
Connect Helix Rack and Helix Control 11
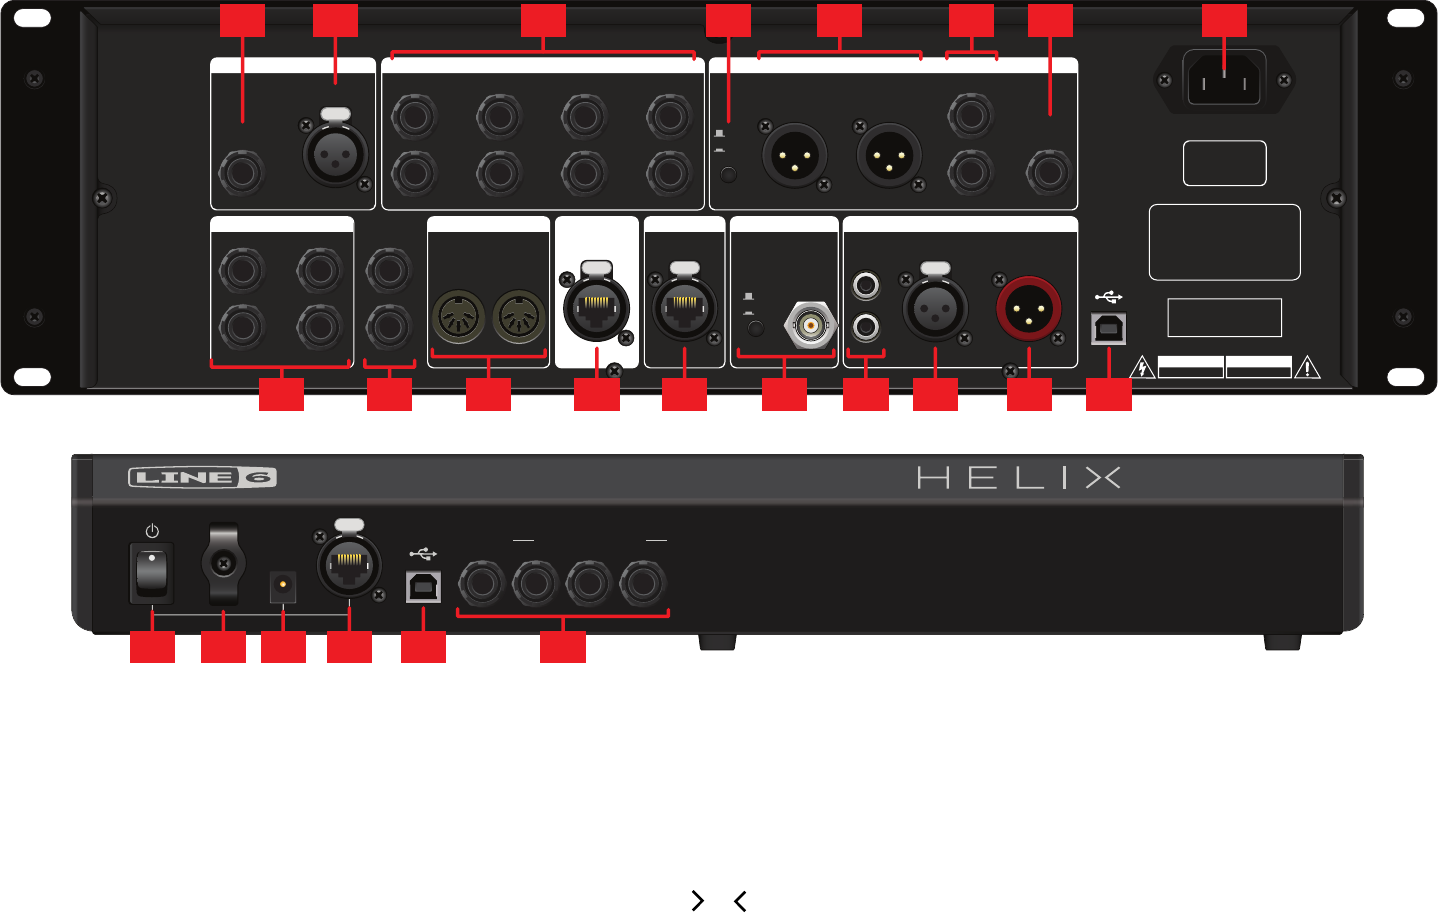
Setting Proper Output Levels 11
Selecting Presets and Setlists 12
Preset Footswitch Mode 13
Stomp Footswitch Mode 13
Snapshot Footswitch Mode 14
Looper Footswitch Mode 14
Pedal Edit Mode 15
Selecting Blocks/Adjusting Parameters 16
Bypassing a Block 16
Choosing a Block's Model 16
Choosing an Input 17
Choosing an Output 17
Moving Blocks 18
Copying and Pasting a Block 18
Clearing a Block 18
Clearing All Blocks 18
Saving/Naming a Preset 19
Serial vs. Parallel Routing 19
Removing Parallel Path B 20
Moving Split & Merge Blocks for More Parallel
Routings 20
Dynamic DSP 22
Block Order and Stereo Imaging 22
What is Variax? 23
The Blocks 24
Input 24
Output 25
Eects 26
Amp+Cab 29
Amp 30
Preamp 30
Cab 31
Impulse Response (IR) 32
Send/Return 33
Looper 34
Split 34
Merge 34
Tuner 36
Tuner Settings 36
Snapshots 37
Snapshots > Block Bypass 37
Snapshots > Parameter Control 38
Snapshots > Command Center 39
Using Snapshots 39
Copying/Pasting a Snapshot 40
Swapping Snapshots 40
Renaming a Snapshot 40
Saving Snapshots 41
Determining Snapshot Edit Behavior 41
Arranging Preset, Snapshot, and Stomp Switches 41
Bypass Assign 43
Quick Bypass Assign 43
Manual Bypass Assign 43
Customizing a Footswitch Label 44
Customizing a Footswitch Color 44
Swapping Footswitches 44
Controller Assign 45
Quick Controller Assign 45
Manual Controller Assign 45
Clearing a Block's Controller Assignment(s) 47
Clearing All Controller Assignments 47
Customizing a Controller Footswitch Label 47
Command Center 48
Assigning a Command 48
Copying and Pasting a Command 50
Copying and Pasting All Commands 50
Clearing a Command 50
Clearing All Commands 50
Customizing a Command Footswitch Label 50
Customizing a Command Footswitch Color 50
Global EQ 51
Resetting Global EQ 51
Global Settings 52
Resetting All Global Settings 52
Global Settings > Ins/Outs 53
Global Settings > Preferences 54
Global Settings > MIDI/Tempo 54
Global Settings > Footswitches 55
Global Settings > EXP Pedals 55
Global Settings > Displays 55
Hardware Monitoring vs. DAW Software Monitoring 57
DIRecordingandRe-amplication 57
ASIO
®
Driver Settings (Windows
®
only) 59
Core Audio Driver Settings (Mac
®
OS X only) 59
MIDI 60
MIDI Bank/Program Changes 60
MIDI CC 60
3
Please Note: Line 6, POD, StageSource and Variax are trademarks of Line 6, Inc. registered in the U.S. and other countries. L6 LINK, DT25, DT50, and Helix are trademarks of
Line 6, Inc. All rights reserved. James Tyler is a registered trademark of James Tyler, used under license. Apple, Mac, OS X, iPad, iPhone, Logic, GarageBand, and iTunes are
trademarks of Apple, Inc. registered in the U.S. and other countries. Apple is not responsible for the operation of this device or its compliance with safety and regulatory stan-
dards. iOS is a trademark or registered trademark of Cisco in the U.S. and other countries and is used under license. Windows is a registered trademark of Microsoft Corporation
in the United States and/or other countries. YouTube is a trademark of Google, Inc. Cubase and ASIO are trademarks and software of Steinberg Media Technologies GmbH. Pro
Tools is a registered trademark of Avid Technology, Inc.
4
Welcome to Helix
Thank you for purchasing Helix Rack,oneofthemostpowerfulandexibleaudiopro-
cessors ever created. We hope it helps drive your search for tonal bliss and spawns
years of creativity, both on stage and in the studio.
As Helix Rack and Helix Control (purchased separately) are designed to be used to-
gether, this manual covers both.
What Have I Gotten Myself Into?
AlthoughHelixmayappearcomplicatedatrstglance,it'sdesignedinsuchaway
that once you learn a few basic concepts and shortcuts, you'll be able to construct
both simple and complex tones at nearly the speed of thought, with very little menu
diving required.
Although you’re likely anxious to rip open the plastic and plug in, wait! At the very
least, check out the big color Helix Rack/Control Cheat Sheet that came in the box,
and keep it handy. Then read the "Quick Start" chapter of this manual and we’ll have
you up and shredding in no time.
NOTE: If you prefer to edit tones from your Mac
®
or PC, download the free Helix
editor application from line6.com/software.
TIP: Be sure to also visit line6.com/videos where we're always adding new
video tutorials covering the latest Line 6 gear!
Whats In the Box?
Helix Rack
• Line 6 Helix Rack
• Full-color Helix Rack/Control Cheat Sheet(readthatonerst!)
• USB ash drive containing the Helix Rack/Control Owner's Manual you’re
reading right now
• AC power cable
• USB cable
• Warranty card
Helix Control
• 25-foot CAT-5 cable for communication with and power from Helix Rack
• Warranty card
Common Terminology
While reading this manual, you may encounter several unfamiliar terms. It’s important
to know what they mean. Don’t worry—there’s no math.
Home
The Home screen is your primary workspace for creating and editing
tones. If you ever get lost, press to return to the Home screen.
Block
Blocks are objects that represent various elements of a preset, such
as amps, cabs, eects, splits, loopers, inputs, outputs, and impulse
responses.
Path
A pathrepresentsthesignalowofyourtone.Helixhastwoseparate
paths, 1 and 2, each with its own input(s) and output(s). Paths can be
serial (single) or parallel (dual). Path 1 can be routed into path 2 for
more sophisticated tones.
Preset
A preset is your tone. It consists of all blocks on the Home screen, foot-
switch assignments, controller assignments, and Command Center
messages.
Setlist
A setlist is a collection of presets. Helix has eight setlists containing
128 presets each.
Model
Each processing block can accommodate one model (or in some
cases, two models). Helix includes 45 guitar amp models, 7 bass amp
models,30cabmodels,16micmodels,and93eectsmodels.
Controller
Controllers are used to adjust various parameters in real time. For ex-
ample, the expression pedal can be used to control wah, or the tone
knob on a Variax guitar can be used to control amp gain and reverb
depth.
Send/
Return
Sends and Returns are used to connect additional equipment to Helix
for eects loops or processing multiple instruments simultaneously.
Helix has four mono sends and returns, but adjacent pairs can be se-
lected for stereo operation.
IR
IRs (Impulse Responses) are mathematical functions representing the
sonic measurements of audio systems (for Helix, speaker cabinet and
microphone combinations). Helix can store up to 128 custom or third-
party IRs at a time. See "Impulse Response (IR)"
Variax
®
Variax isn't just a great guitar, it also contains special electronics that
recreatethesoundofotherspecicguitarsandinstruments,andallow
for instant retuning of each string. Helix and Variax communicate with
one another in unique and powerful ways. See "What is Variax?"
L6 LINK™
L6 LINK provides easy, single-cable, digital audio connectivity between
Helix and Line 6 StageSource
®
monitorsand/orDT-Seriesampliers.
See "L6 LINK Output"
5
FRFR
FRFR (Full Range, Flat Response) speakers, such as Line 6 Stage-
Source monitors, have the ability to amplify a modeler without adverse-
lyaectingitstone,ensuringgreatdetail,awidesweetspot,predict-
ability, and consistency from studio to stage. You could almost think of
FRFR monitors as very loud, gig-ready studio monitors.
DAW
DAW (Digital Audio Workstation) refers to any computer (or iPad) used
for audio recording. The components of a DAW include an audio in-
terface, audio recording software (such as Cubase
®
, Logic, Garage-
Band, Pro Tools
®
,etc.),andmonitoring system(amplier& speakers
or headphones). Helix functions as a high-performance USB 2.0 audio
interface with all major DAW software - See "USB Audio"
6
Helix Rack Front Panel / Helix Control Top Panel
16B Dream Rig Duet
FeedbackTime
1/16
Delay Harmony Delay
Key
0.0dB40%MinorD
1
0
.0
d
B
4
0
%
nor
1
PRESET
PHONESVOLUME
BYPASS
SAVE
ACTION
PAGE
PAGE
TAP/
TUNER
GUITAR IN
16B Dream Rig Duet
eam
am
CONTROL
1
4
5 6
7 8
9
10 11
12
13
14
15
16
17
18
19
20
19
20
2
3
7
Helix Rack
1. Main Display This large color LCD is your window into the power of Helix.
2. Power Switch It's alive!
3. GUITAR IN Connect your primary guitar or bass guitar here. This jack provides
impedance selection and a switchable pad.
4. PRESET Turn this knob to select a preset. Press the knob to open the Setlist
menu. See "Selecting Presets and Setlists"
5. SAVE Press this button to rename and save changes to a preset.
6. PressthisbuttontodiveabitdeeperintoHelix,andyou'llndCommand
Center, Global EQ, Global Settings, and other menus.
7. If you ever get lost, press this button to return to the main Home screen.
8. Press this button once, or multiple times, to quickly jump to the tonestack
parameters (Gain, Bass, Mid, Treble, etc.) of any Amp+Cab, Amp, and Preamp
models in the current preset.
9. Joystick Move the joystick to navigate the main display. On the Home screen,
move the joystick to select a block. Press ACTION and move the joystick to move
the selected block. Turn the joystick to change the selected block’s model. Press
the joystick to open the model list. Yeah, the joystick does a lot.
10. BYPASS Pressthisbuttontoturntheselectedblockonando.
SHORTCUT: Press and hold BYPASS to turn Global EQ on ( icon ap-
pearsintheupperrightcorneroftheLCD)ando.
11. ACTION Press this button to open the action panel for the selected block
or screen. From the Home screen, the action panel lets you move, copy, paste,
and clear blocks. Other screens may have unique action panels; for example, the
Global Settings action panel lets you reset all global settings at once.
12. <PAGE/PAGE> If the selected block or item has more than one page of pa-
rameters, dots appear to the right of the item’s name. Press < PAGE or
PAGE > to view more parameters.
13. Knobs 1-6 Turn one of the six knobs below the main display to adjust the
parameter's value above; press the knob to reset the parameter's value. If a rect-
angular button appears above a knob, press the knob to engage its function.
SHORTCUT: For most time-based parameters such as delay time or modu-
lation speed, press the knob to toggle between setting the value in ms or Hz
and note divisions (1/4-note, dotted 1/8-note, etc.).
SHORTCUT: Controllers can be assigned to most parameters. Press and
hold a parameter’s knob to quickly jump to the "Controller Assign" page for
that parameter.
14. VOLUME Turn this knob to control the Helix main output volume.
15. PHONES Turn this knob to control volume from the PHONES output.
16. TAP/TUNER Press this button two or more times to set the Helix tempo. Press
and hold to open the "Tuner".
17. PHONES Out (12Ω) Connect stereo headphones here; turn the top panel
PHONES knob to adjust volume.
NOTE: Helix provides plenty of gain for high impedance headphones. With
lower impedance headphones, you may notice a bit of distortion if the
PHONES knob is turned all the way up. This is normal.
Helix Control
18. Main Display This 20-character LCD displays the current preset number and
name. Press and hold Footswitch 12 (TAP) to engage the tuner display on both
Helix Control and Helix Rack.
19. Scribble Strips The twelve LCD scribble strips tell each footswitch's cur-
rent assignment, so there are never any surprises during a show. If a particular
footswitch has more than one block or item assigned, the scribble strip may read
“MULTIPLE (X)," where X is the number of assignments. You can custom label
scribble strips - see "Customizing a Footswitch Label"
20. Footswitches The capacitive, touch-sensitive footswitches have colored
LED rings that tell you the current state of the assigned block or item. While in
Stomp footswitch mode, touch (but don't press) a footswitch to quickly select the
assigned block or item. Touch the switch repeatedly to cycle through multiple as-
signed items. See "Stomp Footswitch Mode"
SHORTCUT: While in Stomp footswitch mode, touch (but don’t press) a
footswitch for two seconds to assign that switch to the selected block.
SHORTCUT: While in Stomp footswitch mode, touch and hold (but don’t
press) two switches to swap the assignments between them (including any
custom scribble strip names or LED colors).
SHORTCUT:Touch(butdon’tpress)TAPtobrieydisplaythetempopanel.
Thisletsyouquicklyne-tunethecurrenttempowithoutnavigatingtothe
Global Settings > MIDI/Tempo menu.
8
Helix Rack / Helix Control Back Panel
USB
AUX IN
MIC IN
OUT/THRUIN
AES/EBU INS/PDIF AES/EBU OUT
L6 LINK
GUITAR THRU
(BUFFERED)
IN
OUT
LEFT/MONORIGHT
XLR OUT 1/4" OUT
SEND RETURN SEND RETURN
GND
LIFT
OFF
ON
IN
— 1
— 2 —
— 3
— 4 —
L/MONO
RIGHT
EXP2EXP1
EXP TOE SWITCH
EXP3
EXT AMP 1(TIP)/
2(RING)
CV OUT
WARNING / AVIS:
SHOCK HAZARD DO NOT OPEN. RISQUE
DE CHOC ÉLECTRIQUE NE PAS OUVRIR.
TO REDUCE THE RISK OF FIRE OR
ELECTRIC SHOCK DO NOT EXPOSE THIS
EQUIPMENT TO RAIN OR MOISTURE. TO
REDUCE THE RISK OF ELECTRIC SHOCK
DO NOT REMOVE COVER. NO USER
SERVICEABLE PARTS INSIDE. REFER
SERVICING TO QUALIFIED SERVICE
PERSONNEL.
THIS EQUIPMENT HAS BEEN TESTED AND
FOUND TO COMPLY WITH THE LIMITS FOR
A CLASS B DIGITAL DEVICE PURSUANT
TO PART 15 OF THE FCC RULES.
OPERATION IS SUBJECT TO THE
FOLLOWING TWO CONDITIONS: (1) THIS
DEVICE MAY NOT CAUSE HARMFUL
INTERFERENCE, AND (2) THIS DEVICE
MUST ACCEPT ANY INTERFERENCE
RECEIVED, INCLUDING INTERFERENCE
THAT MAY CAUSE UNDESIRABLE
OPERATION.
100-240V
~
50 - 60Hz
100W Max
POWER REQUIREMENTS
PRUDENCECAUTION
RISQUE D’ELECTROCUTION-
NE PAS OUVRIR
RISK OF ELECTRIC SHOCK
DO NOT OPEN
SERIAL NUMBER
ETL LABEL
VARIAXMIDI
DIGITAL
SENDS / RETURNS
WORDCLOCKEXPRESSION PEDAL
ANALOG INPUTS
HELIX
CONTROL
TERMINATOR
PUSH
PUSH
P
U
SH
P
USH
EXP 1 EXP 2 EXP 3
EXPRESSION PEDALUSB
HOST
DC IN
EXP TOE
SWITCH
PUSH
CONTROL
37 38
28
36
3531
23 2522 24 2721
3433
323029
26
444342414039
9
Helix Rack
21. AUX IN (10kΩ) Connect a secondary, active-pickup equipped guitar or bass
here.
22. MIC IN Plug your microphone in here for processing your vocals or recording
to your computer via USB. This XLR jack provides 48V phantom power for studio
condensermicsandavariablelowcutlter.
23. SENDS/RETURNS 1-4 These 1/4” ins and outs can be used as FX loops for
inserting external stompboxes into your tone or as additional inputs and outputs
for connecting keyboards, drum machines, mixers, and other gear. See "Send/
Return"
24. Ground Lift Switch If you are experiencing hums and buzzes, press this
button in to eliminate ground loops between your equipment.
25. XLR OUT Use balanced XLR cables to connect to your studio gear or the
house mixer, PA or FRFR speaker(s) when playing live. When using a mono play-
back system, connect only the LEFT/MONO XLR jack.
IMPORTANT! Never connect Helix Rack's XLR outputs to a device whose
XLR inputs have 48V phantom power enabled!
26. 1/4” OUT Use unbalanced 1/4" TS cables to connect to your guitar amp, FRFR
speaker(s), studio monitors, or other playback system. When using a single amp
or speaker, connect only the LEFT/MONO 1/4” jack.
27. GUITAR THRU OUT Passes the signal received at the front panel Guitar In
with no A/D/A conversion.
28. AC In Connect Helix to a grounded AC power outlet.
29. Expression 1/2/3/Toe Switch Move a connected expression pedal to
controlvolume,wah,oracombinationofampand/oreectsparameters.(Option-
ally, expression pedals and a remote switch can be connected to Helix Control
- see item #44).
30. EXT AMP 1/2, CV/Expression Out Connect EXT AMP to your traditional
guitaramptoswitchitschannelsorturnitsreverbonando.UseaTRScablefor
dual operation (1=tip, 2=ring). Connect CV OUT to the expression pedal input on
stompboxes or CV (Control Voltage) input on vintage pedals or synths.
31. MIDI IN, OUT/THRU Connect Helix to your MIDI gear for sending and re-
ceiving program changes, continuous controllers, and other MIDI messages.
32. HELIX CONTROL Connect Helix Rack to Helix Control's HOST port via a
CAT-5 or Ethercon cable.
33. VARIAX Input Thisinputprovidespower,digitalaudio,eectscontrol,and
instant recall between Helix and a Line 6 Variax guitar. See "What is Variax?"
34. WORDCLOCK IN Receives a clock signal from an external audio interface or
digital mixer, synchronizing the Helix digital output to your system. If Helix is the
last device in your BNC wordclock chain, press the TERMINATOR switch in (ON).
35. S/PDIF IN/OUT Digitally connect Helix to your studio equipment via S/PDIF
(75-ohm RCA) cables.
36. AES/EBU IN Digitally connect Helix to your studio equipment via AES/EBU
(110ΩXLR)cables.
NOTE: S/PDIF and AES/EBU cannot be active at the same time. See "Global
Settings > Ins/Outs" on page 53 for more information.
37. AES/EBU OUT, L6 LINK L6 LINK provides easy digital audio connectiv-
itybetweenHelixandLine6StageSourcemonitorsand/orDT-Seriesampliers.
Alternatively, digitally connect Helix to your studio equipment via an AES/EBU
(110ΩXLR)cable.See"L6 LINK Output"
38. USB Helix also functions as a high quality, multi-in/out, 24-bit/96kHz audio
interface for Mac
®
and Windows
®
computers, with DI, Re-amping and MIDI func-
tionality built right in. Helix can also record to an Apple iPad (with optional Apple
Camera Connection Kit). Use of a USB 2.0 or 3.0 port is required - Do not use an
external USB hub. See "USB Audio"
Helix Control
39. POWER Switch If Helix Control is left switched on, you may switch both on
andofromHelixRack'spowerswitch.
40. DC Cable Tie Reserved for potential future use.
41. DC IN Reserved for potential future use; for very long cable lengths, use a Line
6 DC-3G adapter (purchased separately).
42. HOST Port Connect Helix Control to Helix Rack via a CAT-5 (included with
Helix Control) or Ethercon cable.
43. USB Reserved for potential future use.
44. Expression 1/2/3/Toe Switch Move a connected expression pedal to
controlvolume,wah,oracombinationofampand/oreectsparameters.
NOTE: Adding a Wah or Pitch Wham block automatically assigns it to EXP
1. Adding a Volume Pedal or Pan block automatically assigns it to EXP 2.
10
Home Screen
90% of your daily tone building is accomplished from the Home screen.
Press at any time to return to the main Home screen.
Turn the joystick to select
a model; press the joystick
to open the model list.
indicates a stereo model
Each of the two signal
paths can be either parallel
(A and B) or serial (A only)
Turn PRESET to
select a preset
Use the joystick or
touch a switch top
to select a block
(outlined in white)
Split block (only
visible when
selected); move
down to create
a duplicate input
block
"E" appears if
the preset has
been edited
Merge block
(only visible when
selected); move
down to create a
duplicate output
block
Press BYPASS to
turn block on and
o(bypassed
blocks appear
dim)
Press <PAGE/PAGE> to
view more parameters for
the selected block. This
block has four pages
Press PRESET and then
turn Knob 5 (Select
Snapshot) to choose
one of eight snapshots
Select an output block and
turn the joystick to route the
signal to back panel jacks,
Path 2, or your computer via
USB. Each path can have
one or two output blocks
Select an input block
and turn the joystick to
set the input source.
Each path can have one
or two input blocks
Value appears white and
in brackets if a controller
or snapshot is assigned
to it
Press knob to return
Levels to unity (0.0dB)
and Pans to center
Press knob to toggle
between note value
and ms (or Hz)
Turn knobs 1-6 to adjust parameters
for the selected block
PATH 1
PATH 2
16B Dream Rig Duet
FeedbackTime
[37%]
Delay Harmony Delay
LevelMixKeyScale
0.0dB40%MinorD1/8
1
A
A
B
Hold BYPASS to
turn Global EQ
onando;Icon
appears when
Global EQ is on
11
Quick Start
Connect Helix Rack and Helix Control
1. Using the CAT-5 cable (included with Helix Control), connect
Helix Rack's HELIX CONTROL port to Helix Control's HOST
port.
NOTE: Helix Control receives power from Helix Rack. Helix Control's DC IN
jack may be required for very long CAT-5 cable runs. In such case, use only
a Line 6 DC-3G power supply (purchased separately - see the Line 6 Store).
2. Turn on both Helix Rack and Helix Control.
IfHelix Controlisleftswitched on, you may switch both onandofromHelix
Rack's power switch.
Setting Proper Output Levels
1. Make sure the VOLUME and PHONES knobs are turned down.
PHONES
2. Connect a guitar to the Helix GUITAR IN jack.
3. Connect the Helix outputs to your playback system.
OR
The Helix 1/4” and XLR output levels must be set to match your playback system.
If you’re only using headphones for now, skip to step 9.
4. Press to open the Menu.
5. Press Knob 6 (Global Settings).
The Global Settings screen appears:
Ins/Outs
MIDI/T
emp
o
D
i
sp
l
ays
Footsw
i
tc
h
es
Global Settings
Pre
f
erences
EXP Pe
d
a
l
s
Firmware Version 2.00.0
Mic In
48V Phantom
Off0dBOff
Off
Mic In
Low Cut
Mic In
Gain
Guitar In
Pad
Ins/Outs
0.0dBMulti
USB In 1/2
Trim
USB In 1/2
Destination
Ins/Outs
6. If necessary, move the joystick to select the Ins/Outs submenu.
7. Press PAGE > to select .
12
8. Using Knobs 1 and 2 under the display, set levels according to
the table below:
Output Are you connecting to...? Then do this:
1/4”
Guitar pedal or the front of a guitar
amp
Set 1/4” Outputs to
“Instrument”
Powered speakers with unbalanced
inputs or digital recorder
Set 1/4” Outputs to “Line”
XLR
Mic inputs on mixer or standalone
mic preamps
Set XLR Outputs to “Mic”
PA/FRFR speakers or studio monitors
with balanced inputs
Set XLR Outputs to “Line”
9. Slowly turn up the VOLUME knob.
If you’re listening on headphones, slowly turn up the PHONES knob.
PHONES
Selecting Presets and Setlists
1. Turn PRESET to select presets within the current setlist.
Helix stores eight setlists, each containing 32 banks of four presets (A, B, C, and
D). As we promised, no math - that’s a grand total of 1,024 preset locations. If
that's not enough, your cover band should be asking for more money.
2. Press PRESET to open the Setlist menu:
Rename
Setlist
Rename
Preset
Reorder
Preset
Select
Snapshot
Rename
Snapshot
CC32: 007
PC: 005
CC69: 000
SNAPSHOT 1
1 FACTORY 1
2 FACTORY 2
3 USER 1
4 USER 2
5 USER 3
6 USER 4
7 USER 5
8 TEMPLATES
15A
15B
15C
15D
16A
16B
16C
16D
Cold Shot
Hey Joe
Tom Sawyer
Untitled Streets
Have a Cigar
Bottle Message
Mad House
Run Like
1 FACTORY 1 16B Bottle Message
Navigating the Setlist menu is straightforward:
Turn the joystick (or move it up and down) to select items in a list.
From the Setlist column, press the joystick (or move it right) to load its rst
preset.
From the Preset column, move the joystick left to go back to the Setlist col-
umn.
Turn Knob 3 (Reorder Preset) to move the selected preset up and down the
list.
3. Use the joystick to select Setlist 8 TEMPLATES > Preset 01A
Quick Start.
TIP: The dark text above Knob 2 displays the required MIDI messages for
recalling setlists, presets, and/or snapshots from external MIDI devices or
software. In the illustration above, the FACTORY 1 setlist is recalled with a
CC32 message of 007, the 16B Bottle Message preset is recalled with a
PC (program change) message of 005, and SNAPSHOT 1 is recalled with
a CC69 message of 000.
4. Press to return to the Home screen.
You should see something like this:
01A Quick Start
Ch VolPresenceBass MidDriveTreble
8.02.04.45.05.15.0
Amp+Cab US Deluxe Nrm
1
13
Preset Footswitch Mode
Preset mode is used to navigate presets in the current setlist.
1. If not already there, press FS6 (MODE) to select Preset mode.
The middle eight switches display two banks of presets and the active preset ap-
pears with a red LED ring and white scribble strip:
BANK
BANK
DAW Remote
01D
Jimi, Not Jimmy
01C
Dream Rig+Vocals
01B
None More Black
01A
TAP
H O L D F O R T U N E R
The Bishop Game
02D
Starsburn
02C
HechoDeEstrellas
02B
Powercore
02A
MODE
H O L D T O E D I T
2. Press BANK or BANK to choose the desired banks.
Thebanks’presetsash,indicatingthey’rereadytoload.
3. Press one of the eight preset switches to load the preset.
NOTE: Footswitch behavior can be customized. See "Global Settings > Foot-
switches"
Stomp Footswitch Mode
While in Stomp mode, each of the middle eight footswitches can do a number of
things:
• Toggleoneormoreblocksonando
• Toggle between two values of one or more parameters
• Generate a MIDI, External Amp control, or CV/Expression message
• All of the above, even simultaneously
If not already there, press FS6 (MODE) to select Stomp mode.
The middle eight footswitches display blocks' model names, parameter names, Com-
mand Center messages, and/or customized labels:
Ubiquitous VibeMystery Filter
Mi
notau
r
Harmony Delay
BANK
BANK
LooperMULTIPLE (3)OctoTeemah!
TAP
H O L D F O R T U N E R
MODE
H O L D T O E D I T
NOTE: If a switch is assigned to multiple blocks or items, its scribble strip reads
"MULTIPLE (X)," where X is the number of assignments, and stepping on the
switchturnsthemallonando.Ifsomeblocksareonandsomearebypassed,
stepping on the switch toggles each block's bypass state.
NOTE: While in Stomp mode, stepping on BANK or BANK temporar-
ily enters Preset mode. Once you’ve selected a preset, Helix returns to Stomp
mode.
14
Snapshot Footswitch Mode
Similar to the snapshots feature in some high end digital mixers, each of the Helix
eight snapshots stores and recalls the state of certain elements in the current preset,
including:
• Block Bypass—The bypass (on/o) state of all processing blocks (except
Looper), independent of any footswitch assignments. Also see "Snapshots >
Block Bypass")
• Parameter Control—The values of any parameters assigned to controllers
(up to 64 per preset). Also see "Snapshots > Parameter Control"
• Command Center—The values of any instant MIDI CC, Bank/Prog, MMC,
and CV Out messages, plus the state (dim or lit) of any CC Toggle, CV Toggle,
and Ext Amp messages. Also see "Command Center"
Tempo—The current system tempo, if "Global Settings > MIDI/Tempo" >
Tempo Select is set to "Per Snapshot." (By default, it's set to "Per Preset")
1. Press BANK and BANK simultaneously to enter Snapshot
mode.
Themiddleeightswitchesash,indicatingasnapshotisreadytobeselected.
BANK
BANK
TAP
H O L D F O R T U N E R
CANCEL
SNAPSHOT 1
1
SNAPSHOT 5
5
SNAPSHOT 2
2
SNAPSHOT 6
6
SNAPSHOT 3
3
SNAPSHOT 7
7
SNAPSHOT 4
4
SNAPSHOT 8
8
2. Press one of the eight snapshot switches to select it.
NOTE: Snapshots are powerful enough to warrant their own chapter. See "Snap-
shots" for more information.
NOTE: If you don’t want Snapshot footswitches to disappear after selecting one,
set "Global Settings > Footswitches" > Knob 4 (Snapshot Mode Switches) to
“Manual Return.” In this case, Helix stays in Snapshot footswitch mode until you
press FS6 (CANCEL).
Looper Footswitch Mode
Looper mode is only available if a Looper block has been assigned to a footswitch
in Stomp mode. Nearly all factory presets in Helix have a Looper block assigned to a
footswitch, but your custom presets may not.
Looper Type Max. Loop Length (1/2 Speed) Max. Loop Length (Full Speed)
Mono
120 seconds 60 seconds
Stereo
60 seconds 30 seconds
1. From Stomp mode, press the footswitch labeled “Looper” (if
available).
Looper mode appears:
BANK
BANK
TAP
H O L D F O R T U N E R
O
N
C
E
EXIT
L O O P E R
REV
FWD
FULL
S P E E D
1/2
Switch Description
Step on to start recording a loop. Step on to end the loop and
immediately start playback. Step on to overdub additional parts. Step
on again to stop playback.
If you make a mistake on your last overdub, step on UNDO to erase it.
Step on to play the recorded loop once through.
Recording at full speed and then switching to 1/2 speed will also drop
the loop down one octave. Recording at 1/2 speed will double your
looping memory and switching to full speed will cause the loop to play
at double speed (up an octave).
Step on REV/FWD to hear your loop backwards.
NOTE: If you press while loop playback is stopped, this will always record a
new loop, and any previous recording will be discarded.
15
IMPORTANT! You may change presets while looping, but loop playback will
stop unless the preset you select includes the same type of looper block (mono
or stereo) on the same path (1 or 2) and is assigned to a footswitch.
NOTE: While in Looper mode, stepping on BANK or BANK temporar-
ily enters Preset mode. Once you’ve selected a preset, Helix returns to Looper
mode.
2. To return to the previous mode, press FS6 (EXIT).
Pedal Edit Mode
Mostblockscanbeeditedwithouttakingyourhandsotheguitar;ifyouhatehaving
to reach down and twist knobs, Pedal Edit mode will be your new best friend. Although
Pedal Edit is not intended to replace proper controller assignment, in a pinch, it can
also be used to tweak one parameter at a time during a performance.
1. Hold FS6 (MODE) for two seconds.
Thepreset'sprocessingblocksappearonthefootswitches,ashing:
A/BWhoWatt 100Mystery FilterVolume Pedal
Minotaur
1x12 US Deluxe
Adriatic DelayFX Loop 1/2OctoverbUbiquitous Vibe
EXIT
H O L D T O S A V E + E X I T
MORE...
If the preset has more than ten processing blocks, you may not see the block you
want. Press FS6 (MORE...) one or more times until you do.
NOTE: Selecting a block in Pedal Edit mode has no correlation to any foot-
switch assignment it may have.
2. Press the footswitch displaying the block you want to edit.
Theblock'srstpageofparametersappearatFS1—FS6.
Mod Speed Mod DepthFeedbackTime Mod Phas
eM
ix
EXIT
PAGEBACK VALUE– VALUE+
P
A
GE
H O L D T O S A V E + E X I T
2 5 %0 °8 4 %2 0 H z5 0 %5 0 0 m s
If the block has more than one page of parameters, press FS8 (<PAGE) or FS9
(PAGE>) until you nd the parameter.
3. Press the footswitch displaying the parameter you want to ad-
just.
Press and hold a Time or Speed switch to toggle between setting the value in ms
or Hz and note divisions (1/4-note, dotted 1/8-note, etc.).
4. Use the expression pedal to adjust the parameter.
For ne adjustment, press FS10 (VALUE–) and FS11 (VALUE+). Hold FS10
(VALUE–) or FS11 (VALUE +) for faster adjustments.
Toselectadierentblock,press FS7 (BACK).
5. When nished, press FS12 (EXIT).
If you want to save any changes made to the preset, hold FS12 (EXIT) for two
seconds.
16
Selecting Blocks/Adjusting Parameters
Blocks are objects that represent various elements of a preset, such as amps, cabs,
eects,splits,loopers,andeveninputsandoutputs.
1. From Stomp footswitch mode, briey touch (but don’t press)
the footswitch assigned to the desired block.
The selected block appears with a white box on both the main LCD and the
scribble strip:
Harmony Delay
If multiple blocks are assigned to a footswitch, its scribble strip reads “MUL-
TIPLE (X).” Touch the top of the switch repeatedly until the desired block is
selected.
NOTE: Repeatedly touching a "MULTIPLE (X)" switch may jump to complete-
lydierentscreens,dependingonitsassignments.Forexample,ifaswitch
isassignedtoaneectblock,aneectparameter,and a Command Center
MIDI message, repeated touches will cycle through all three items on the
Home, Controller Assign, and Command Center screens, respectively. Basi-
cally, anything on the switch is only a touch away.
Alternatively, move the joystick to select a block.
SHORTCUT: Press to quickly select the Amp+Cab, Amp, or Preamp
block and its tonestack parameters (Gain, Bass, Mid, Treble, etc.) appear.
If a preset has more than one of these blocks, press repeatedly to cycle
through all tonestacks.
2. Turn Knobs 1-6 below the screen.
Some blocks have more than one page of parameters, in which case dots on the
right side of the inspector indicate the current page. For example, the dots below
indicate that page 1 parameters are visible (the colored dot) and a total of four
pages of parameters are available:
3. Press <PAGE/PAGE> to access more parameters (if available).
Bypassing a Block
If a footswitch is assigned to the block, press the switch.
Alternatively, select the block and press BYPASS to toggle the
block on and off.
Bypassed blocks appear semitransparent and, if assigned to a footswitch, its LED ring
dims and scribble strip label grays out:
H
armon
y
D
e
l
a
y
NOTE:Theswitch'sLEDringandscribblestriplabelreectthecolorandbypass
state of its most recently selected block or item, even if other blocks assigned to
the same switch are enabled.
MULTIPLE
(3)
Choosing a Block's Model
To change an existing block’s model, select the block and turn the
joystick.
To create a new block, select an empty location and turn the joy-
stick.
Selecting models within the same category can be very quick. However, as Helix has
hundreds of items to choose from, using this method to, say, change a mono distor-
tion block (beginning of the list) into a stereo FX Loop block (end of the list) is very
slow. Instead, you should open the model list:
1. Press the joystick to open the model list:
FeedbackTime
[37%]
Delay Harmony Delay
LevelMixKey Scale
0.0dB50%MinorA1/8
Mono
Stereo
None
Distortion
Dynamics
EQ
Modulation
Delay
Reverb
Pitch/Synth
Multitap 6
Ping Pong
Sweep Echo
Ducked Delay
Reverse Delay
Vintage Digital
Transistor Tape
Harmony Delay
17
Mostmodelcategoriesincludesubcategories.Forexample,eectscangenerally
be mono or stereo (stereo models display the icon). Amp+Cab and Amp mod-
els have Guitar and Bass subcategories. Cab models have single and dual sub-
categories.
Turn the joystick (or move it up and down) to select items in a list.
Press the joystick (or move it right) to view a category or subcategory’s con-
tents.
Move the joystick left to go back one column.
IMPORTANT! If you encounter items in the list that are grayed out or un-
available, this means the current path (1 or 2) cannot accommodate that
category, subcategory, or model. See "Dynamic DSP"
2. Using the joystick, select the desired category, subcategory,
and model.
NOTE: Amp+Cab and Cab > Dual blocks are special in that they repre-
sent two models within a single block. To change the amp model in an
Amp+Cab block, press <PAGE until the amp icon is white and turn the
joystick. To change the cab model, press PAGE> until the cab icon is
white and turn the joystick.
To change the rst cab model in a Cab > Dual block, press <PAGE until
the left cab icon is white and turn the joystick. To change the second
cab model, press PAGE> until the right cab icon is white and turn the
joystick.
3. To close the model list, select an item in the far right column
and press the joystick again (or press ).
Choosing an Input
Move the joystick left to select an Input block and turn the joy-
stick.
Normally you should select “Multi,” which includes three simultaneous inputs: Guitar,
Aux, and Variax.
TIP: To view a list of available inputs, press the joystick.
SHORTCUT: From any Input block, joystick left to jump to the Output block.
From any Output block, joystick right to jump to the Input block. We call this the
"Pac Man Shortcut."
Choosing an Output
Move the joystick right to select an Output block and turn the joy-
stick.
Normally you should select “Multi,” which includes four simultaneous pairs of outputs:
1/4", XLR, Digital, and USB 1/2.
If Path 1 doesn't have enough block locations or DSP to accommodate your tone, it
can be routed to Path 2:
Select Path 1’s output block and turn the joystick to select Path
2A.
Path 2’s Input block displays an arrow, indicating it is being fed by Path 1.
18
If Path 2 has two input blocks, you may select either Path 2A or 2B, or even split your
signal further to both 2A and 2B. See "2 into 1" for an example.
TIP: To view a list of available outputs, press the joystick.
Moving Blocks
1. Select any block (other than Input or Output) and press ACTION.
The block appears “picked up” and the action panel appears. The inspector's
icon shows you the directions in which the block can be moved.
Use joystick to move block; move down to create Path B
Clear
Block
Clear All
Blocks
Copy
Block
P
aste
Bl
oc
k
2. Move the joystick left or right to move the block.
Moving the joystick down moves the block to a new parallel B path. See "Serial
vs. Parallel Routing" for details.
NOTE: A block on Path 1 cannot be moved to Path 2 (and vice versa). You
can, however, copy and paste a block from one path to the other. See next
section.
3. Press ACTION again (or ) to close the action panel.
Copying and Pasting a Block
Blocks from one path can be copied and then pasted into the same path, the other
path,orapathinanentirelydierentpreset.
1. Select the block you wish to copy and press ACTION.
2. Press Knob 1 (Copy Block).
3. Select the location you wish to paste the block—even in a dif-
ferent preset—and press ACTION.
4. Press Knob 2 (Paste Block).
NOTE: Inputs, Outputs, Splits, Merges, and Loopers can also be copied and
pasted. However, if you, for example, try pasting the Looper into the Split
block's location, Knob 2 (Paste Block) will be grayed out. Furthermore, if the
destination path’s DSP cannot accommodate the copied block, the header
willbrieyread“CannotPaste—Path1[or2]DSPfull!”See"Dynamic DSP"
C
l
ear
B
l
oc
k
Clear All
Blocks
Copy
Bl
oc
k
Paste
Block
Cannot Paste—Path 1 DSP Full!
Clearing a Block
1. Select the block you wish to clear and press ACTION.
2. Press Knob 3 (Clear Block).
Clearing All Blocks
Clearing all blocks removes all processing blocks (including the Looper) and resets
bothPath1and2toserial.ItdoesnotaectPath1AorPath2AInputandOutput
blocks,nordoesitaectthe"Command Center"
1. Press ACTION.
2. Press Knob 4 (Clear All Blocks).
The following dialog appears:
OKCancel
Clear all blocks?
3. Press Knob 6 (OK).
19
Saving/Naming a Preset
1. Press SAVE to open the Save Preset screen:
Cancel Delete Insert
Replace 1 FACTORY 1 > 26A M’Lady Neckbeard
Setlist
1
Destination
26A
Save Preset
Save
M‘ Lady
Ne c
kbeard
L
N
O
P
J
K
Move the joystick left or right to move the cursor.
Turn the joystick (or move it up/down) to change the selected character.
Press Knob 2 (Delete) to delete the selected character and shift all following
characters to the left.
Press Knob 3 (Insert) to insert a space and shift all following characters to
the right.
SHORTCUT:PressthejoysticktocyclethroughA,a,0,and[SPACE].
2. Turn Knob 4 (Setlist) and Knob 5 (Destination) to choose the
Setlist and Preset location you wish to overwrite.
Any of the Helix 1,024 presets can be overwritten.
3. Press SAVE again or Knob 6 (Save).
Serial vs. Parallel Routing
Formanyguitartones,aserial(onestereopath)signalowismorethanadequate.
For example, our 8 TEMPLATES > 01A Quick Start preset has a volume pedal, wah
pedal, Amp+Cab, reverb, and looper, but there's still room for distortion, modulation,
and delay blocks:
Formoresophisticatedtones,aparallel(twostereopaths)signalowcanbecreated.
This lets one split the signal into two stereo paths, process them separately, and mix
the two paths back together.
1. Select the Amp+Cab block and press ACTION to pick it up.
2. Move the joystick down.
The Amp+Cab block is moved to a newly created parallel path B (lower).
In the illustration above:
Our guitar signal goes into the Volume and Wah blocks.
The signal is split to path 1A (upper) and path 1B (lower).
Stereo path 1A (upper) is sent to the Reverb and Looper blocks and Stereo path
1B (lower) is sent to the Amp+Cab block.
Stereo paths 1A and 1B are merged together after the Looper block and sent to
the Multi Output.
3. Press ACTION again to drop the Amp+Cab block.
This preset probably doesn't sound ideal. A more appropriate tone may have paths 1A
and 1B each with an Amp+Cab block, only to merge again before the Reverb...
20
...or maybe a single Amp block splitting into two separate Cab blocks...
...or two separate Amp and two separate Cab blocks...
...or two separate Amp blocks merging into a Cab > Dual block.
Remember, this is only half of your tone. You still have Paths 2A and 2B to play with!
Removing Parallel Path B
To remove path B, simply clear any blocks on path B (lower) or
move them all back up to path A (upper).
Moving Split & Merge Blocks for More
Parallel Routings
1. Use the joystick to select the point where paths A and B split
or merge.
"Split" and "Merge" blocks only appear when selected, but can be adjusted and
moved like any other processing block.
2. Press ACTION to pick up the Split or Merge block for moving.
Choose one of the following parallel routing options:
2 into 1
Move the Split block down to path B.
The Split block shifts left and a duplicate Input block is created:
ThisnewInputblockcanbeassignedtoacompletelydierentinput.Thisrouting
can be used for mixing a guitar and vocal, or the models and magnetic pickups in a
connected Variax guitar, each with their own processing blocks.
1 into 2
Move the Merge block down to path B.
The Merge block shifts right and a duplicate Output block is created:
In this example, the Input block is split to paths A and B, each with its own Output
block. Path A could be routed to the 1/4” outputs while path B could be routed to
the XLRs.
21
True Parallel
Move both the Split and the Merge blocks down to path B.
Duplicate Input and Output blocks are created:
In this routing, a guitar and vocal could be processed independently, each with its
owninput,stereopath,processingblocks,andoutputs.Alternatively,twodierent
band members could be processed independently.
Super Serial
A serial path has eight processing block locations. If that’s not enough, you can use
parallel path B to create one big “super serial” path.
1. Move the Merge block down to path 1B.
A duplicate Output block is created.
2. Move the Split block all the way to the right, past the last
processing block on path 1A.
3. Select the Output block on path 1A and turn Knob 2 (Level)
all the way down.
That way, you’re only hearing Output 1B.
In the illustration above, our signal is processed by the eight blocks on path 1A and
processed further by the three blocks on path 1B.
Ofcourse,ifthisstillisn’tenough,youcouldalwaysduplicatetheabovesignalow
with path 2 and then route path 1B’s output block to path 2A for one gigantic serial
tone with up to 32 block locations (DSP permitting - See "Dynamic DSP"):
22
Dynamic DSP
Like nearly all modern audio processors, the Helix engine is based on DSP (Digital
Signal Processing). Some models require many times more DSP horsepower than
others, so it makes logical sense that fewer of those models could exist in a tone. To
work around this, some processors restrict you to one amp, one reverb, one delay, etc.
With Helix, we feel it's important to let you keep adding whatever you want to your
tone, even if you may eventually run out of DSP.
That said, there are some rules governing the number of certain types of blocks you
can add to a preset:
Amp+Cab, Amp, or Preamp blocks
Any combination, up to four (two per path)
Cab blocks (includes Amp+Cab
blocks)
Up to four (two per path; Cab > Dual blocks
are considered two)
Impulse Response blocks
Up to four 1024-point IRs (two per path) or
two 2048-point IRs (one per path)
Looper block
One
To see which models can be added to the current path, press the
joystick to open the Model List.
Grayed out items cannot be accommodated and are skipped over - See "Selecting
Blocks/Adjusting Parameters":
Modulation Chorus
ToneDepthPredelaySpeed WavShape
50%0.0Triangle5.02.02.5
Mix
Mono
S
tere
o
Optical Trem
60s Bias Trem
Tremolo
Harmon
i
c Tremo
lo
Script Mod Phase
U
bi
qu
i
tous V
ibe
De
l
uxe P
h
ase
r
Gray Flanger
None
Distortion
Dynamics
EQ
Modulation
Delay
R
ever
b
P
i
tc
h
/Synt
h
Tips to Optimize DSP
• Each of the Helix two primary paths utilizes its own DSP. If all of your blocks
are on paths 1A and 1B, you're only using half of the Helix device's horse-
power! If you plan on creating tones with two or more amps and more than a
handfulofeects,expecttousebothpaths1and2
• Some block types use much more DSP than others, such as amps, cabs, IRs,
and pitch shifters. Not surprisingly, the Amp+Cab block uses the most. EQ,
Dynamics, Volume/Pan, and Send/Return blocks use relatively little
• Some models may use more DSP than others in the same category. This is
especially true with amp models
• Instead of a parallel path with two Amp+Cab blocks or two separate Amps
and Cabs, try adding a single Amp block followed by a single Cab > Dual block
(mixingtwodierentCabscanprovidesomesubstantialvariations)
• ThestereoversionofaneectsblockwilluseroughlytwiceasmuchDSPasa
mono version of the same block. Likewise, the dual version of a cab block will
use roughly twice as much DSP as the single version
• Some model categories have “Simple” blocks, which utilize less DSP than
others
• Insteadoftogglingbetweentwoofthesameamporeectsblocks(withdif-
ferent settings), use controllers or snapshots to instantly adjust parameters
within a single block.
Block Order and Stereo Imaging
MostoftheHelixeectsmodelshavebothmonoandstereoversions.Astereoblock
displays after its model name in the inspector. The stereo imaging—or how wide
your tone appears with stereo speakers or headphones—is highly dependent on the
type of blocks you add and in what order.
Keep the following things in mind when building tones:
• All Amp+Cab, Amp, and Preamp blocks are mono, so any stereo signal sent
into these will be collapsed to mono. As such, it’s a good idea to add only
mono blocks before amps and preamps
• Addingamonoeectsblockwillcollapseanyprecedingstereoblocksonthe
same path to mono
• If you’re only ever connecting Helix to the front of a single guitar amp or PA/
FRFR speaker, there may be no need to use stereo models at all (except, of
course,formodelsthatareonlyoeredasstereo!)
23
What is Variax?
Line 6 Variax guitarsfeaturespecialelectronicsthatmodelthesoundofotherspecic
guitars and instruments, as well as allow for instant retuning of each string. Helix and
Variaxworktogetherinpowerfulandexibleways.Youcan:
• Store Variax model, tuning, and/or volume and tone knob positions with a
Helix preset or snapshot and recall them instantly
• Toggle between two Variax models and/or tunings via footswitch or MIDI CC
• Turn the Variax volume and/or tone knobs to remotely control one or more
Helixampandeectsparameters.YoucouldalmostthinkofthemasEXP4
and EXP 5
• Split Variax modeled and magnetic signals, process them separately through
independent signal paths, and either mix them together or route them to dif-
ferent Helix outputs
• Power the Variax modeling engine via a VDI (CAT-5 or Ethercon) cable, elimi-
nating the need for the removable battery.
24
The Blocks
Input
Each preset can have up to four Input blocks (one or two per path).
I0I
0II
None
Disables (mutes) the input block. Only available on Path 2.
Multi
Guitar, Aux, and Variax inputs are all active simultaneously.
Normally, you should choose Multi.
Guitar
Guitar in only.
Aux
Aux in only. (10kΩ)inputforanactive-pickupequippedguitaror
bass.)
Variax
With a James Tyler
®
Variax
®
(JTV) or Variax
®
Standard guitar, the
"Variax" Input source receives the Model or Magnetic signal,
depending on the guitar's Model switch setting.
Variax Magnetics
Receives only the JTV or Variax Standard's magnetic pickup
signal.
Mic
Mic in only.
Return 1, 2, 3, 4,
1/2, 3/4
Returns 1, 2, 3, and 4 can act as additional mono input blocks.
Returns 1/2 and 3/4 can act as additional stereo input blocks
for processing keyboards, drum machines, or even other
modelers. If a Return or FX Loop processing block exists in
the preset, the utilized Return input will be non-selectable. See
"Send/Return"
Digital (S/PDIF or
AES/EBU)
S/PDIF or AES/EBU digital in only. If a Variax input (or Multi
input, which includes Variax) exists on another Input block
within the preset, S/PDIF and AES/EBU in will be non-select-
able.
USB 3/4, 5/6,
7/8
USB inputs 3/4, 5/6, and 7/8 can all be used for processing
tracks from your Mac
®
or Windows
®
DAW software. See "USB
Audio"
Helix also receives input from USB 1/2, but it's dedicated for
monitoring audio from your computer (or iPad) and bypasses all
processing blocks. As such, it's not available as an input block
source.
All input blocks have a dedicated noise gate. Threshold and Decay parameters are
grayed out unless the Input Gate parameter is turned on:
Guitar In-Z
Auto
Input Multi (Guitar, Aux, Variax)
Input Gate
D
eca
y
Th
res
h
o
l
d
5
00 ms–48.0
d
BOff
Input > Multi and Input > Guitar blocks have an additional Guitar In-Z parameter. Helix
hasanimpedancecircuitonitsGuitarInputthataectstoneandfeelbyloadingyour
guitar'spickupsastheywouldbyaneectpedaloramplier.Alowervaluewilltypi-
cally result in some high frequency attenuation, lower gain, and an overall "softer" feel.
A higher value provides full frequency response, higher gain, and an overall "tighter"
feel.
Multi and Variax input blocks have additional pages for Variax parameters:
James Tyler Variax or Variax Standard
Page Knob Parameter Description
1 Variax Settings
Determines whether Variax settings are applied per
preset or globally
2 Variax Model
Selects the Variax model and pickup position set-
ting. When set to "Don't Force," Helix respects the
Variax current setting.
3
Variax Vol
Knob
Remotely sets the Variax volume knob setting.
When set to "Don't Force," Helix respects the cur-
rent Variax Volume knob position.
4
Variax Tone
Knob
Remotely sets the Variax tone knob setting. When
set to "Don't Force," Helix respects the current
Variax Tone knob position.
5
Lock Variax
Controls
When set to "Unlocked," the Variax tone knob,
volume knob, and toggle switch remain active.
When locked, the Variax knobs and/or switches
no longer control the local functions on the guitar.
Turning the Variax model knob resets all to "Un-
locked."
6 Variax Tuning
When set to "Don't Force," Helix respects the
Variax current tuning. When set to "Custom," Helix
engages any custom tuning on Page .
25
Page Knob Parameter Description
1 Variax String 6
Choose the amount of half-steps, positive or nega-
tive, for which you want to raise or lower the pitch
of the selected string. The note labels displayed
assume the guitar is tuned to standard pitch (E,
A, D, G, B, E), with the A using a 440 Hz reference
pitch.
2 Variax String 5
3 Variax String 4
4 Variax String 3
5 Variax String 2
6 Variax String 1
Output
Each preset can have up to four Output blocks (one or two per path).
Multi
1/4", XLR, Digital, and USB 1/2 outputs are all active simultaneously.
Normally, you should choose Multi.
Path 2A,
2B, or
2A+B
These outputs only appear for Path 1 output blocks, and are used to
route Path 1 into Path 2.
1/4"
1/4" outs only.
XLR
XLR outs only.
Send 1/2,
Send 3/4
Send 1/2 and 3/4 can act as additional output blocks.
Digital
S/PDIF,
AES/EBU,
L6 LINK
Only one digital output can be active at a time; choose S/PDIF or
AES/EBU and the desired sample rate in the "Global Settings > Ins/
Outs". The Global Ins/Outs settings are not necessary for L6 LINK - see
"L6 LINK Output" for more info.
USB 1/2,
USB 3/4,
USB 5/6
USB 1/2, 3/4, and 5/6 can act as additional output blocks for routing
paths to your computer, iPad, or iPhone (with optional Apple Camera
Connection Kit). USB 7 and 8 are dedicated for re-amping, and are not
available as output block destinations. See "USB Audio" for details.
All output blocks display Knob 1 (Pan) and Knob 2 (Level):
Pan
Center
Level
0.0dB
Output Multi (1/4”, XLR, Digital, USB 1/2)
SHORTCUT: Press Knob 1 (Pan) to return Pan to center. Press Knob 2 (Level) to
return Level to unity (0.0dB).
TIP: Use Knob 2 (Level) to set the path's overall level, which is important to
ensure all of your presets maintain a consistent volume throughout your set.
L6 LINK Output
Alternatively,thedigitalXLRconnectorcanbeusedforL6LINKoutput(useofa110Ω
XLR cable is recommended). L6 LINK provides easy digital audio connectivity between
Helix and Line 6 StageSource speakers and/or DT-Seriesampliers. Two StageSource
speakers or DT amps can also be connected in series via L6 LINK and your stereo
Helixsignalisintelligentlysplit,withtheleftchannelgoingtotherstStageSource/DT
and the right channel to the second. If you have one StageSource/DT connected, the
Helix output is collapsed to mono and fed to the StageSource/DT.
Connecting an L6 LINK device to Helix automatically disables S/PDIF out and routes
audio out the digital XLR connector - no adjustments of the Global Settings > Ins/Outs
> Digital Audio or Sample Rate options are necessary.
TIP: With an L6 LINK connection to a DT-Series amp, often the Helix Preamp
modelsareabetterchoicethanAmporAmp+Cabmodels.Manuallycongure
the analog power amp options on the DT amp for more sonic possibilities!
TIP: It is possible to use Helix Rack to remotely control several parameters on
your DT-Series amp (channel select, power amp topology, reverb, etc.) via MIDI.
Connect a 5-pin MIDI cable from Helix Rack's MIDI Out to the DT amp's MIDI In
and use the Helix "Command Center"tocongurethedesiredMIDIcommands
for any preset.
Start by loading the Helix TEMPLATES > 04D DT25-DT50 Remote preset since
it has several handy DT commands already mapped to Helix switches for you.
You can customize this template and create your own sets of controls to add to
your Helix presets. Also see the DT MIDI Implementation Guide for a complete
list of MIDI commands, available from http://line6.com/support/manuals/
26
Effects
ManyHelixeectsblockscanbeeithermonoorstereo.Stereoeectsdisplay after
the model name.
Select an effects block and turn the joystick to change its model.
Distortion Models
Model Subcategories Based On*
Minotaur
Mono, Stereo Klon
®
Centaur
Teemah!
Mono, Stereo Paul Cochrane Timmy
®
Overdrive
Compulsive Drive
Mono, Stereo Fulltone
®
OCD
Valve Driver
Mono, Stereo Chandler Tube Driver
Top Secret OD
Mono, Stereo DOD
®
OD-250
Scream 808
Mono, Stereo Ibanez
®
TS808 Tube Screamer
®
Hedgehog D9
Mono, Stereo MAXON
®
SD9 Sonic Distortion
Vermin Dist
Mono, Stereo Pro Co RAT
KWB
Mono, Stereo Benadrian Kowloon Walled Bunny Distortion
Arbitrator Fuzz
Mono, Stereo Arbiter
®
FuzzFace
®
Triangle Fuzz
Mono, Stereo Electro-Harmonix
®
BigMuπ
®
Industrial Fuzz
Mono, Stereo Z.Vex Fuzz Factory
Tycoctavia Fuzz
Mono, Stereo Tycobrahe
®
Octavia
Wringer Fuzz
Mono, Stereo Garbage's modded BOSS
®
FZ-2
Megaphone
Mono, Stereo Megaphone
Bitcrusher
Mono, Stereo Line 6 Original
Dynamics Models
Model Subcategories Based On*
Deluxe Comp
Mono, Stereo Line 6 Original
Red Squeeze
Mono, Stereo MXR
®
Dyna Comp
LA Studio Comp
Mono, Stereo Teletronix
®
LA-2A
®
Noise Gate
Mono, Stereo Line 6 Original
Hard Gate
Mono, Stereo Line 6 Original
EQ Models
Model Subcategories Based On*
Simple EQ
Mono, Stereo Line 6 Original
Low Cut/High Cut
Mono, Stereo Line 6 Original
Parametric
Mono, Stereo Line 6 Original
10-Band Graphic
Mono, Stereo MXR
®
10-Band Graphic EQ
Cali Q Graphic
Mono, Stereo MESA/Boogie
®
Mark IV Graphic EQ
Modulation Models
Model Subcategories Based On*
Optical Trem
Mono, Stereo Fender
®
optical tremolo circuit
60s Bias Trem
Mono, Stereo Vox
®
AC-15 Tremolo
Tremolo/Autopan
Mono, Stereo BOSS
®
PN-2
Harmonic Tremolo
Mono, Stereo Line 6 Original
Script Mod Phase
Mono, Stereo MXR
®
Phase 90
Ubiquitous Vibe
Mono, Stereo Shin-ei Uni-Vibe
®
Deluxe Phaser
Mono, Stereo Line 6 Original
Gray Flanger
Mono, Stereo MXR
®
117 Flanger
Harmonic Flanger
Mono, Stereo A/DA Flanger
Courtesan Flange
Mono, Stereo Electro-Harmonix
®
Deluxe EM
*See "U.S. Registered Trademarks" on page 35. All product names are trademarks of their respective owners, which are in no way associated or aliated with Line 6. These product names, descriptions
and images are provided for the sole purpose of identifying the specic products that were studied during Line 6’s sound model development.
27
Modulation Models
Model Subcategories Based On*
Dynamix Flanger
Mono, Stereo Line 6 Original
Chorus
Mono, Stereo Line 6 Original
70s Chorus
Mono, Stereo BOSS
®
CE-1
Trinity Chorus
Stereo DyTronics Tri-Stereo Chorus
Bubble Vibrato
Mono, Stereo BOSS
®
VB-2 Vibrato
Vibe Rotary
Stereo Fender
®
Vibratone
122 Rotary
Stereo Leslie
®
122
145 Rotary
Stereo Leslie
®
145
AM Ring Mod
Mono, Stereo Line 6 Original
Pitch Ring Mod
Stereo Line 6 Original
Delay Models
Model Subcategories Based On*
Simple Delay
Mono, Stereo Line 6 Original
Mod Chorus Echo
Mono, Stereo Line 6 Original
Dual Delay
Stereo Line 6 Original
Multitap 4
Stereo Line 6 Original
Multitap 6
Stereo Line 6 Original
Ping Pong
Stereo Line 6 Original
Sweep Echo
Mono, Stereo Line 6 Original
Ducked Delay
Mono, Stereo TC Electronic
®
2290
Reverse Delay
Mono, Stereo Line 6 Original
Vintage Digital
Mono, Stereo Line 6 Original
Transistor Tape
Mono, Stereo Maestro
®
Echoplex EP-3
Harmony Delay
Stereo Line 6 Original
Bucket Brigade
Mono, Stereo BOSS
®
DM-2
Adriatic Delay
Mono, Stereo BOSS
®
DM-2 w/ Adrian Mod
Elephant Man
Mono, Stereo Electro-Harmonix
®
Deluxe Memory Man
Reverb Models
Model Subcategory Based On*
Plate
Stereo Line 6 Original
Room
Stereo Line 6 Original
Chamber
Stereo Line 6 Original
Hall
Stereo Line 6 Original
Echo
Stereo Line 6 Original
Tile
Stereo Line 6 Original
Cave
Stereo Line 6 Original
Ducking
Stereo Line 6 Original
Octo
Stereo Line 6 Original
63 Spring
Stereo Line 6 Original
Spring
Stereo Line 6 Original
Particle Verb
Stereo Line 6 Original
Pitch/Synth Models
Model Subcategories Based On*
Pitch Wham
Mono, Stereo Digitech Whammy
®
Twin Harmony
Mono, Stereo Eventide
®
H3000
Simple Pitch
Mono, Stereo Line 6 Original
Dual Pitch
Mono, Stereo
Line 6 Original
3 OSC Synth
Stereo Line 6 Original
Filter Models
Model Subcategories Based On*
Mutant Filter
Mono, Stereo Musitronics
®
Mu-Tron
®
III
Mystery Filter
Mono, Stereo Korg
®
A3
Autolter
Mono, Stereo Line 6 Original
*See "U.S. Registered Trademarks" on page 35. All product names are trademarks of their respective owners, which are in no way associated or aliated with Line 6. These product names, descriptions
and images are provided for the sole purpose of identifying the specic products that were studied during Line 6’s sound model development.
28
Wah Models
Model Subcategories Based On*
UK Wah 846
Mono, Stereo Vox
®
V846
Teardrop 310
Mono, Stereo Dunlop
®
Crybaby
®
Fasel model 310
Fassel
Mono, Stereo Dunlop
®
Cry Baby
®
Super
Weeper
Mono, Stereo Arbiter
®
Cry Baby
Chrome
Mono, Stereo Vox
®
V847
Chrome Custom
Mono, Stereo Modded Vox
®
V847
Throaty
Mono, Stereo RMC Real McCoy 1
Vetta Wah
Mono, Stereo Line 6 Original
Colorful
Mono, Stereo Colorsound
®
Wah-fuzz
Conductor
Mono, Stereo Maestro
®
Boomerang
Volume/Pan Models
Model Subcategories Based On*
Volume Pedal
Mono, Stereo Line 6 Original
Gain
Mono, Stereo Line 6 Original
Pan
Stereo Line 6 Original
Common FX Settings
Parameter Description
Drive
Adjusts the amount of overdrive, distortion, or fuzz.
Bass
Adjusts the bass level.
Mid
Adjusts the midrange level.
Treble
Adjusts the treble level.
Speed
Adjuststhespeedoftheeect,withhighersettingsprovidingfaster
rates. Press the knob to toggle between Hz and note values.
ChoosingaHzvalueprovidesaspecicmodulationspeedincycles
per second; choosing a note value provides a time based on the cur-
rent tempo. Not all Speed parameters can be synced to note values,
as they may be non-linear and highly interactive.
Parameter Description
Rate
Adjuststherateoftheeect,withhighersettingsprovidingfaster
rates. Press the knob to toggle between numeric and note values.
Not all Rate parameters can be synced to note values, as they may be
non-linear and highly interactive.
Time
Adjusts the delay/repeat time, with higher settings providing longer
delays. Press the knob to toggle between ms and note values.
Choosingamsvalueprovidesaspecictimeinmilliseconds;choos-
ing a Note Division value provides a time based on the current tempo.
With a note division value, this parameter’s value is retained when
changing models.
Depth
Adjusts the intensity of the modulation. Higher settings result in more
extremepitchbending,wobble,orthrob,dependingontheeect.
Feedback
Adjuststheamountofdelayedsignalfedbackintotheeect.Higher
settings can provide more dramatic textures.
Decay
Setsthelengthoftimethereverbeectsustains.
Predelay
Determinesthetimebeforethereverbeectisheard.
Headroom
Some mod and delay pedals' internal signal paths exhibit a bit of grit,
especially when placed after a high-gain amp block. Negative values
increase the perceived amount of grit; positive values clean things up
a bit. At 0dB, the model behaves like the original pedal.
Low Cut
Filters a portion of the block's bass and/or treble frequencies, which
can help remove rumble and/or high-end harshness.
High Cut
Mix
Blendstheeected"wet"signalvs.the"dry"signalpassedthrough
theblock.Whensetto0%,thepathbypassestheeectcompletely.
Whensetto100%,theentirepathisfedthroughtheeect,andno
dry thru signal is heard.
Level
Adjuststheoveralloutputleveloftheeectsblock.Becarefulnotto
boost this parameter too high on multiple blocks, as digital clipping
could occur. You should typically leave this at 0.0dB for most blocks.
Where the original pedal's level or volume knob behavior doesn't
really apply to dB values, 0.0-10 may be used.
Trails
Trails O: Any delay repeats or reverb decays are instantly muted
when the block is bypassed. Trails On: Any delay repeats or reverb
decays continue to decay naturally when the block is bypassed or a
dierentsnapshotisselected.
*See "U.S. Registered Trademarks" on page 35. All product names are trademarks of their respective owners, which are in no way associated or aliated with Line 6. These product names, descriptions
and images are provided for the sole purpose of identifying the specic products that were studied during Line 6’s sound model development.
29
Amp+Cab
Amp+Cab blocks are convenient in that when you select an Amp model, its matching
Cab model is automatically loaded.
To change the amp model in an Amp+Cab block, press <PAGE
until the amp icon is white and turn the joystick. To change the
cab model, press PAGE> until the cab icon is white and turn the
joystick.
The rst page of Amp+Cab parameters is called the tonestack, and represents the
knobs you would see on the real amp's panel:
Ch VolPresenceBass MidDriveTreble
102.53.45.02.53.4
Amp+Cab Stone Age 185
SHORTCUT: Press to quickly select the Amp+Cab, Amp, or Preamp block
and access its tonestack parameters (Gain, Bass, Mid, Treble, etc.). If a preset
has more than one of these blocks, press repeatedly to cycle through all
tonestacks.
Amp Models
Model Subcategory Based On*
WhoWatt 100
Guitar Hiwatt
®
DR-103 Brill
Soup Pro
Guitar Supro
®
S6616
Stone Age 185
Guitar Gibson
®
EH-185
Tweed Blues Nrm
Guitar Fender
®
Bassman
®
(normal channel)
Amp Models
Model Subcategory Based On*
Tweed Blues Brt
Guitar Fender
®
Bassman
®
(bright channel)
US Small Tweed
Guitar Fender
®
Champ
®
US Deluxe Nrm
Guitar Fender
®
Deluxe Reverb
®
(normal channel)
US Deluxe Vib
Guitar Fender
®
Deluxe Reverb
®
(vibrato channel)
US Double Nrm
Guitar Fender
®
Twin Reverb
®
(normal channel)
US Double Vib
Guitar Fender
®
Twin Reverb
®
(vibrato channel)
Mail Order Twin
Guitar Silvertone
®
1484
Divided Duo
Guitar ÷13 JRT 9/15
Interstate Zed
Guitar Dr Z
®
Route 66
Jazz Rivet 120
Guitar Roland
®
JC-120 Jazz Chorus
Essex A15
Guitar Vox
®
AC-15
Essex A30
Guitar Vox
®
AC-30 with top boost
A30 Fawn Nrm
Guitar Vox
®
AC-30 Fawn (normal channel)
A30 Fawn Brt
Guitar Vox
®
AC-30 Fawn (bright channel)
Matchstick Ch1
Guitar Matchless
®
DC30 (channel 1)
Matchstick Ch2
Guitar Matchless
®
DC30 (channel 2)
Matchstick Jump
Guitar Matchless
®
DC30 (jumped)
Mandarin 80
Guitar Orange
®
OR80
Brit J45 Nrm
Guitar Marshall
®
JTM-45 (normal channel)
Brit J45 Brt
Guitar Marshall
®
JTM-45 (bright channel)
Brit Plexi Nrm
Guitar Marshall
®
Super Lead 100 (normal channel)
Brit Plexi Brt
Guitar Marshall
®
Super Lead 100 (bright channel)
Brit Plexi Jump
Guitar Marshall
®
Super Lead 100 (jumped)
Brit P75 Nrm
Guitar Park
®
75 (normal channel)
Brit P75 Brt
Guitar Park
®
75 (bright channel)
Brit 2204
Guitar Marshall
®
JCM-800
*See "U.S. Registered Trademarks" on page 35. All product names are trademarks of their respective owners, which are in no way associated or aliated with Line 6. These product names, descriptions
and images are provided for the sole purpose of identifying the specic products that were studied during Line 6’s sound model development.
30
Amp Models
Model Subcategory Based On*
German Mahadeva
Guitar Bogner
®
Shiva
German Ubersonic
Guitar Bogner
®
Überschall
®
Cali IV Rhythm 1
Guitar MESA/Boogie
®
Mark IV (channel I)
Cali IV Rhythm 2
Guitar MESA/Boogie
®
Mark IV (channel II)
Cali IV Lead
Guitar MESA/Boogie
®
Mark IV (lead channel)
Cali Rectire
Guitar MESA/Boogie
®
DualRectier
®
ANGL Meteor
Guitar ENGL
®
Fireball 100
Solo Lead Clean
Guitar Soldano SLO-100 (clean channel)
Solo Lead Crunch
Guitar Soldano SLO-100 (crunch channel)
Solo Lead OD
Guitar Soldano SLO-100 (overdrive channel)
PV Panama
Guitar Peavey
®
5150
®
Line 6 Elektrik
Guitar Line 6 Original
Line 6 Doom
Guitar Line 6 Original
Line 6 Epic
Guitar Line 6 Original
Line 6 2204 Mod
Guitar Line 6 Original
Line 6 Fatality
Guitar Line 6 Original
Tuck n' Go
Bass Ampeg
®
B-15NFPortaex
®
SV Beast Nrm
Bass Ampeg
®
SVT
®
(normal channel)
SV Beast Brt
Bass Ampeg
®
SVT
®
(bright channel)
Cali Bass
Bass MESA/Boogie
®
M9 Carbine
Cali 400 Ch1
Bass MESA/Boogie
®
Bass 400+ (channel 1)
Cali 400 Ch2
Bass MESA/Boogie
®
Bass 400+ (channel 2)
G Cougar 800
Bass Gallien-Krueger
®
GK 800RB
Tonestackand deeper amp parameters found on subsequentpagesmaydierde-
pending on the amp model selected.
Common Amp Settings
Parameter Description
Master
Adjusts the amount of power amp distortion. This parameter is highly
interactive with all other power amp parameters—the lower the Master
isset,thelesseecttheothercontrolswillhave.
Sag
LowerSagvaluesoera"tighter"responsivenessformetalanddjent
playing; higher values provide more touch dynamics & sustain for
bluesandclassicrockris.
Hum
Controls how much heater hum and AC ripple interacts with your tone.
At higher settings, things get freaky.
Ripple
Bias
Changes the Bias of the power tubes. Lower values achieve a "colder"
Class AB biasing. At maximum, the amp is operating in Class A.
Bias X
Determines how the power amp tubes' voicing reacts when pushed
hard. Set low for a tighter feel. Set high for more tube compression.
This parameter is highly reactive with the Drive and Master settings.
Amp
Amp blocks are identical to Amp+Cab blocks, except they contain no matched cab
model.
Preamp
We’ve also included a complete set of Preamp versions of each Amp model, which
provide the tone of just the preamp stage of the amp—recommended when feeding
Helixintoanexternalamplier(eithervia1/4"toyourtraditionalamporviaL6LINKto
a Line 6 DT25 or DT50).
Preamp blocks require less DSP than a full Amp block.
*See "U.S. Registered Trademarks" on page 35. All product names are trademarks of their respective owners, which are in no way associated or aliated with Line 6. These product names, descriptions
and images are provided for the sole purpose of identifying the specic products that were studied during Line 6’s sound model development.
31
Cab
There are two subcategories of Cab blocks—Single and Dual. Not surprisingly, dual
Cabs take twice as much DSP as single Cabs.
To change the first cab model in a Cab > Dual block, press <PAGE
until the left cab icon is white and turn the joystick. To change the
second cab, press PAGE> until the right cab icon is white and turn
the joystick.
Cab Models
Model Subcategories Based On*
Soup Pro Ellipse
Single, Dual 1 x 6x9" Supro
®
S6616
1x8 Small Tweed
Single, Dual 1x8" Fender
®
Champ
1x12 Field Coil
Single, Dual 1x12" Gibson
®
EH185
1x12 US Deluxe
Single, Dual 1x12" Fender
®
Deluxe Oxford
1x12 Celest 12H
Single, Dual 1x12" ÷13 JRT 9/15 G12 H30
1x12 Blue Bell
Single, Dual 1x12" Vox
®
AC-15 Blue
1x12 Lead 80
Single, Dual
1x12" Bogner
®
Shiva CL80
2x12 Double C12N
Single, Dual 2x12" Fender
®
Twin C12N
2x12 Mail C12Q
Single, Dual 2x12" Silvertone
®
1484
2x12 Interstate
Single, Dual 2x12" Dr Z
®
Z Best V30
2x12 Jazz Rivet
Single, Dual 2x12" Roland
®
JC-120
Cab Models
Model Subcategories Based On*
2x12 Silver Bell
Single, Dual 2x12" Vox
®
AC-30TB Silver
2x12 Blue Bell
Single, Dual 2x12" Vox
®
AC-30 Fawn Blue
4x10 Tweed P10R
Single, Dual 4x10" Fender
®
Bassman
®
P10R
4x12 WhoWatt 100
Single, Dual 4x12" Hiwatt
®
AP Fane
®
4x12 Mandarin EM
Single, Dual 4x12" Orange
®
Eminence
4x12 Greenback25
Single, Dual 4x12" Marshall
®
Basketweave G12 M25
4x12 Greenback20
Single, Dual 4x12" Marshall
®
Basketweave G12 M20
4x12 Blackback30
Single, Dual 4x12" Park
®
75 G12 H30
4x12 1960 T75
Single, Dual 4x12" Marshall
®
1960 AT75
4x12 Uber V30
Single, Dual 4x12" Bogner
®
Uberkab V30
4x12 Uber T75
Single, Dual 4x12" Bogner
®
Uberkab T75
4x12 Cali V30
Single, Dual 4x12" MESA/Boogie
®
4FB V30
4x12 XXL V30
Single, Dual 4x12" ENGL
®
XXL V30
4x12 SoloLead EM
Single, Dual 4x12" Soldano
1x15 Tuck n' Go
Single, Dual 1x15" Ampeg
®
B-15
2x15 Brute
Single, Dual 2x15" MESA/Boogie
®
2x15 EV
4x10 Rhino
Single, Dual 4x10" Ampeg
®
SVT
®
410HLF
6x10 Cali Power
Single, Dual 6x10" MESA/Boogie
®
Power House
8x10 SV Beast
Single, Dual 8x10" Ampeg
®
SVT
®
*See "U.S. Registered Trademarks" on page 35. All product names are trademarks of their respective owners, which are in no way associated or aliated with Line 6. These product names, descriptions
and images are provided for the sole purpose of identifying the specic products that were studied during Line 6’s sound model development.
32
Mic Models
Model Based On*
57 Dynamic
Shure
®
SM57
409 Dynamic
Sennheiser
®
MD 409
421 Dynamic
Sennheiser
®
MD 421-U
30 Dynamic
Heil Sound
®
PR 30
20 Dynamic
Electro-Voice
®
RE20
121 Ribbon
Royer
®
R-121
160 Ribbon
Beyerdynamic
®
M 160
4038 Ribbon
Coles 4038
414 Cond
AKG
®
C414 TLII
84 Cond
Neumann
®
KM84
67 Cond
Neumann
®
U67
87 Cond
Neumann
®
U87
47 Cond
Neumann
®
U47
112 Dynamic
AKG
®
D112
12 Dynamic
AKG
®
D12
7 Dynamic
Shure
®
SM7
Cab Settings
Knob Parameter Description
1 Mic
Selects one of the 16 available mic models.
2 Distance
Sets the distance (1 inch to 12 inches) between the mic and
the speaker grille.
3 Low Cut
Filters a portion of the cab's bass and/or treble frequencies,
which can help remove rumble and/or high-end harshness.
4 High Cut
5 EarlyRec
Setstheamountof"earlyreections."Highervaluesaddmore
reectiveroomsoundtoyourAmptone.
6 Level
Adjusts the overall output level of the Cab.
Impulse Response (IR)
Impulse Responses are mathematical functions representing the sonic measurements
ofspecicaudiosystems(forHelix,speakercabinetandmicrophonecombinations).
Helix can load and store up to 128 custom or third-party IRs at a time.
Loading Custom IRs
Loading custom impulse responses requires connecting to the Helix application in
your Mac
®
or Windows
®
computer. The Helix application is available as a free down-
load from line6.com/software.
1. Connect Helix to your computer via USB and open the Helix
application.
2. Click the Impulses tab.
3. Drag one or more IR les from the desktop or any Finder win-
dow directly into the Helix app's Impulses list.
The Helix app updates the Helix hardware's IR list automatically. Helix can load and
store up to 128 IRs at a time. 48kHz, 16-bit, mono, .WAV type IRs of up to 2,048
samples are natively supported. But the HelixappallowsyoutoimportIR.WAVles
ofdierentsamplerate,bitdepth,lengthandstereoformat,andtheappwillconvert
these attributes automatically before sending to the Helix hardware.
• Go to the Helix app's Preferences to set the preferred behavior for importing
Stereo WAV IRs - there you can choose to import the left or right channel data
ofthele,oramixofbothchannelsfortheHelix(mono)IR.
• The imported IR is automatically shortened (or lengthened) to 2,048 samples.
You may optionally choose a 1,024-sample version from the model list to
save DSP, which fades out the IR halfway through.
IMPORTANT!IRblocksreferenceanIRnumber,nottheactualIRle.For
example, if you happen to replace or delete "IR 12" from the Helix applica-
tion,itwillaectanypresetscontainingIRblockswith"IR12"selected.
*See "U.S. Registered Trademarks" on page 35. All product names are trademarks of their respective owners, which are in no way associated or aliated with Line 6. These product names, descriptions
and images are provided for the sole purpose of identifying the specic products that were studied during Line 6’s sound model development.
33
Impulse Response Settings
Knob Parameter Description
1 IR Select
Selects one of the 128 available IR locations. If a location con-
tains an IR, the inspector header displays its name; otherwise,
it reads "<EMPTY>."
2 Low Cut
Filters a portion of the IR's bass and/or treble frequencies,
which can help remove rumble and/or high-end harshness.
3 High Cut
4 Mix
Blends the IR signal with the dry signal passed through the IR
block. When set to 0%, the path bypasses the IR completely.
When set to 100%, the entire path is fed through the IR, and
no dry signal is heard.
5 Level
Adjusts the overall output level of the IR block.
Send/Return
Each of the Helix four sends and returns can be used independently, or used together
as an FX loop.
FXloopsletyoudynamicallyinsertyourfavoriteexternalstompboxes(orrackeects)
into any location in your tone.
NOTE: Each send and return pair can be set for instrument (for inserting stomp-
boxes) or line-level operation. See "Global Settings > Ins/Outs"
NOTE: Each return can be used only once in a preset. For example, if you add
a Return 1 block (or assign one of the input blocks to Return 1), Return 1/2, FX
Loop 1, and FX Loop 1/2 items will all appear grayed out in the model list, as they
also utilize Return 1.
Send Settings
Knob Parameter Description
1 Send
Adjusts the level sent to your external devices.
2 Dry Thru
Adjusts the level of the signal passed through the Send block,
independent of the Knob 1 (Send) level. Normally, this should
be set to 0.0dB.
Return Settings
Knob Parameter Description
1 Return
Adjusts the level received at the Return jack.
2 Mix
Blends the Return signal vs. the dry signal passed through the
Return block. When set to 0%, the path bypasses the Return
completely. When set to 100%, the entire signal is fed from the
Return, and no dry thru signal is heard.
FX Loop Settings
Knob Parameter Description
1 Send
Adjusts the level sent to your external device.
2 Return
Adjusts the level received at the Return jack.
3 Mix
Blends the FX loop signal vs. the dry signal passed through
the FX Loop block. When set to 0%, the path bypasses the
FX loop completely. When set to 100%, the entire path is fed
through the FX loop, and no dry thru signal is heard.
4 Trails
Trails O: An external stompbox would be instantly muted
when the FX Loop block is bypassed. Trails On: An external
delay or reverb stompbox would continue to decay naturally
whentheFXLoopblockisbypassedoradierentsnapshotis
selected.
34
Looper
Helix can add one mono or stereo Looper block per preset.
The Looper can exist anywhere on either Path 1 or Path 2. Also see "Looper Foot-
switch Mode" on page 14.
Looper Settings
Knob Parameter Description
1 Playback
Adjustslooperplaybacklevel.Youmaynditusefultoturn
this down a bit so your live guitar can be slightly louder.
2 Overdub
Relatively sets the level of your loop while overdubbing. For
example, if your Overdub Level is set to 90%, each time your
loop repeats, its volume will be reduced by 10%, sounding
quieter and quieter with each overdub pass.
3 Low Cut
Filters a portion of the loop's bass and/or treble frequencies,
which can improve the mix with your live guitar.
4 High Cut
Split
A Split block appears any time a parallel path is created, but is visible only when se-
lected:
HelixhasthreedierenttypesofSplitblocks:
Y
Both the left and right sides of the signal are sent evenly to Paths A
(upper) and B (lower). By default, a Split > Y appears any time a parallel
path is created. There are no settings to adjust.
A/B
ThesignalcanbesentindierentamountstoPathsA(upper)andB
(lower).
Crossover
Treble frequencies are sent to Path A (upper) and bass frequencies are
sent to Path B (lower).
Split > A/B Settings
Knob Parameter Description
1 Route To
Determines the amount of the signal sent to Path A vs. Path B.
Press the knob to set to Even Split.
Split > Crossover Settings
Knob Parameter Description
1 Frequency
Any signal above this frequency is sent to Path A (upper); any
signal below this frequency is sent to Path B (lower).
2 Reverse
When on, reverses the path assignments (any signal above
the crossover frequency is sent to Path B, any signal below
the crossover frequency is sent to Path A).
Merge
A Merge > Mixer block appears any time a parallel path is created, but is visible only
when selected:
Knob Parameter Description
1 A Level
Adjusts the output level of Path A (upper).
2 A Pan
Adjusts the left/right stereo balance of Path A.
3 B Level
Adjusts the output level of Path B (lower).
4 B Pan
Adjusts the left/right stereo balance of Path B.
5 B Polarity
Inverts the polarity of Path B. Typically, this should be set to
"Normal."
6 Level
Adjusts the overall output level of the Merge block.
35
U.S. Registered Trademarks
All product names are trademarks of their respective owners, which are in no way associated or aliated with Line 6. These product names, descriptions and images are pro-
vided for the sole purpose of identifying the specic products that were studied during Line 6’s sound model development.
Klon is a registered trademark of Klon, LLC. Timmy is a registered trademark of Paul Cochrane AKA PAULCAUDIO. Fulltone is a registered trademark of Fulltone Musical
Products, Inc. DOD, DigiTech Whammy and AKG are registered trademarks of Harman International Industries, Inc. Ibanez is a registered trademark of Hoshino, Inc. Tube
Screamer is a registered trademark of Hoshino Gakki Co. Ltd. MAXON is a registered trademark of Nisshin Onpa Co., Ltd. Tycobrahe is a registered trademark of Kurt Stier.
Leslie is a registered trademark of Suzuki Musical Instrument Manufacturing Co. Ltd. MXR, Uni-Vibe, Cry Baby, Fuzz Face and Dunlop are registered trademarks of Dunlop
Manufacturing, Inc. Teletronix and LA-2A are registered trademarks of Universal Audio, Inc. Vox is a registered trademark of Vox R&D Limited. Roland and BOSS are registered
trademarks of Roland Corporation U.S. TC Electronic is a registered trademark of MUSIC Group IP Ltd. Eventide is a registered trademark of Eventide Inc. Musitronics is a
registered trademark of Mark S. Simonsen. Mu-Tron is a registered trademark of Henry Zajac. Korg is a registered trademark of Korg, Inc. Electro-Harmonix and Big Mu π are
registered trademarks of New Sensor Corp. Arbiter is a registered trademark of Martin Costello Music, Ltd. Colorsound is a registered trademark of Sola Sound Limited Cor-
poration, UK. Maestro and Gibson are registered trademarks of Gibson Guitar Corp. Hiwatt is a registered trademark of Simon Giles and Justin Harrison. Supro is a registered
trademark of Absara Audio LLC. Fender, Twin Reverb, Bassman, Champ and Deluxe Reverb are registered trademarks of Fender Musical Instruments Corporation. Silvertone
is a registered trademark of Samick Music Corporation. Matchless is a registered trademark of Matchless, LLC. Dr. Z is a registered trademark of Dr. Z Amps, Inc. Orange is a
registered trademark of Orange Brand Services Limited. Marshall is a registered trademark of Marshall Amplication Plc. Bogner and Überschall are registered trademarks of
Bogner Amplication. Mesa/Boogie and Rectier are registered trademarks of Mesa/Boogie, Ltd. Engl is a registered trademark of Beate Ausug and Edmund Engl. Peavey
is a registered trademark of Peavey Electronics Corporation. 5150 is a registered trade¬mark of ELVH Inc. Gallien-Krueger is a registered trademark of Gallien Technology,
Inc. Park is a registered trademark of AMP RX LLC. Ampeg, Portaex, and SVT are registered trademarks of Loud Technologies Inc. Fane is a trademark of Fane International
Ltd. Shure is a registered trademark of Shure Inc. Sennheiser is a registered trademark of Sennheiser Electronic GmbH & Co. KG. Heil Sound is a registered trademark of Heil
Sound Ltd. Electro-Voice is a registered trademark of Bosch Security Systems, Inc. Royer is a registered trademark of Bulldog Audio, Inc. DBA Rover Labs. Beyerdynamic is
a registered trademark of Beyer Dynamic GmbH & Co. KG. Neumann is a registered trademark of Georg Neumann GmbH.
36
Tuner
1. On Helix Rack, hold TAP/TUNER until the Tuner screen ap-
pears:
Tuner
B
Output
Multi
Reference
440 Hz
Input
Multi Off
Offsets
+50–50
+3–3
On Helix Control, hold the TAP footswitch until the Tuner screen appears:
In tune
Sharp
Flat
2. Pluck an individual string on your guitar.
Whenaboxleftofcenterislitred,yourstringisat.Whenaboxrightofcenter
is lit red, your string is sharp. When the center box on the lower row is lit green,
the top row of smaller bars can be used for more precision. When both arrows are
illuminated, your string is perfectly in tune.
3. To exit the Tuner, step on any footswitch (or press ).
All tuner settings are global.
TIP: If you have a favorite pedal or rack tuner and wish to use it instead of
the Helix tuner, connect Send 1, 2, 3, or 4 to your tuner's input and turn
Knob 2 (Tuner Out) to select that Send. This way, every time you hold
the TAP footswitch, Helix will automatically route the signal to your favorite
tuner.
Tuner Settings
Page Knob Parameter Description
1 Tuner In
Determines which input the tuner will listen to. Normally, you should choose "Multi," which listens to the Guitar, Aux, and Variax inputs simultane-
ously.
2 Tuner Out
Determines the active output while the Tuner screen is active. If you prefer to hear nothing while tuning, choose "Mute." Normally, you should
choose "Multi," which routes the input to 1/4", XLR, Digital, and USB 1/2.
3 Reference
If you'd like to tune to a reference other than standard 440 Hz, select from 425 to 455 Hz.
6 Osets
EnablestheTunerosetsdisplayedonPage .
1 String 6 Oset
Someguitaristsfeelthattuningcertainstringsslightlysharporatinrelationtoconcerttuningcanimproveintonation.Stringosetscalibratethe
tunersothattheseslightlyout-of-tunepitchesappearasintune.String6islowEandString1ishighE.Tuningosetswon'tbeappliedunless
Knob6(Osets)onPage is turned on.
2 String 5 Oset
3 String 4 Oset
4 String 3 Oset
5 String 2 Oset
6 String 1 Oset
37
Snapshots
WithHelixrmware2.0orhigher,you’llseeacameraiconintheupperrightcornerof
the screen. The number indicates the current snapshot.
1
Why should I care about snapshots?
To be honest, maybe you shouldn’t. Ask yourself these questions:
• Hey self, when performing live, does the small gap when switching tones drive
me nuts?
• If my delay repeats and reverb trails don’t seamlessly spill over when switching
tones, does it drive me nuts?
• Do I secretly wish I were an octopus, so I can constantly change amp and ef-
fects settings throughout a song?
If you answered “M’eh” or “Huh?,” stop reading this now, go play guitar, completely
ignore the camera icon, and you’ll never have to worry about snapshots again. Seri-
ously. However, if you answered “Yes!” to any of these questions, keep reading.
Okay, I’m still reading
There’s always going to be a small audible gap when switching presets in any box
with the Helix device’s level of dynamic model allocation and routing complexity; that’s
just how advanced DSP works. However, snapshots allow for a surprising amount of
tonal control from within the same preset, and every change happens instantly and
seamlessly.
Similar to the snapshots feature in some high end digital mixers, each of the Helix
device's eight snapshots stores and recalls the state of certain elements in the current
preset, including:
• Block Bypass—The bypass (on/o) state of all processing blocks (except
Looper), independent of any footswitch assignments. Also see "Snapshots >
Block Bypass"
• Parameter Control—The values of any parameters assigned to controllers
(up to 64 per preset). Also see "Snapshots > Parameter Control"
• Command Center—The values of any instant MIDI CC, Bank/Prog, MMC,
and CV Out messages, plus the state (dim or lit) of any CC Toggle, CV Toggle,
and Ext Amp messages. Also see "Command Center"
• Tempo—The current system tempo, if "Global Settings > MIDI/Tempo" >
Tempo Select is set to "Per Snapshot." (By default, it's set to "Per Preset")
Depending on how you set them up, snapshots can act as eight variations of the
same tone, eight drastically dierent tones, or any combination thereof—all
within the same preset. In many cases, a single preset's snapshots may accommo-
date all the various tones required for a song.
Snapshots > Block Bypass
Snapshotsstoreandrecallthecurrentbypass(on/o)stateforallprocessingblocks.
For example, Snapshot 1—INTRO could have Distortion 1, Amp 1, Cab, Mod 1, and
Delay 1 on:
Snapshot 2—VERSE could have Dynamics, Distortion 2, Filter, FX Loop 1, Amp 2,
Cab, Delay 2, and Reverb on:
Snapshot 3—BRIDGE could have Dynamics, FX Loop 2, Amp 2, IR, EQ, Mod 2, and
Delay 2 on:
Snapshot 4—CHORUS could have everything on:
And Snapshot 5—INTERLUDE could just be Amp 1 and the IR:
Note that all snapshots in a particular preset share the same models; you cannot, for
example, add a US Deluxe Amp block in Snapshot 1 and switch its model to Essex
A30 in Snapshot 2. However, if Helix has enough available DSP, you can load both
amps into the same preset and snapshots can enable neither, one, or both of them.
IMPORTANT! Snapshots make it easy for multiple blocks assigned to the same
footswitch to end up in unexpected states. For example, if FS2 toggles be-
tween Delay (ON) and Reverb (OFF) blocks and a snapshot turns the Reverb
on,FS2willsuddenlyturnbothblocksonandotogether.
See "Using Snapshots" for more information.
38
Snapshots > Parameter Control
Inaddition,parameterscanbesettojumptospecicvalueswitheachsnapshot.
Here’s an example where seven parameters (out of a possible 64) are updated in-
stantly with each snapshot:
Snapshot
Variax
Model
Amp
Gain
Delay
Mix
Split A/B Pitch
IR
Select
Output
Level
1 INTRO
Spank-1 4.5 35% Path A 100 0 #27 -7.2dB
2 VERSE
Spank-1 4.5 35% Path A 100 +5 #27 0.0dB
3 BRIDGE
Lester-5 5.2 43% Path B 100 +3 #103 +0.8dB
4 CHORUS
Lester-5 4.5 50% Path B 100 0 #103 +1.5dB
5 INTERLUDE
Spank-1 3.9 8% Even Split +5 #27 0.0dB
6 SOLO
Lester-5 8.7 72% Path B 100 +12 #103 +2.6dB
7 BREAKDOWN
Acous-3 2.0 46% Path B 47 -12 #12 0.0dB
8 OUTRO
Spank-1 4.5 35% Path A 100 0 #41 -3.6dB
In the table above, we see that when switching from Snapshot 2—VERSE to Snap-
shot 3—BRIDGE:
• The connected Variax guitar switches from the Spank-1 guitar model to the
Lester-5 guitar model
• The Amp block’s gain increases from 4.5 to 5.2
• The Delay block’s Mix increases from 35% to 43%
• The Split block routes your guitar from Path A to Path B
• The Pitch block’s Interval lowers from +5 to +3 semitones
• The IR changes from #27 to #103
• The Output block’s Level increases from 0.0dB to +0.8dB
If you want a parameter to be automatically updated with each snapshot, a controller
(suchastheSnapshotscontroller)mustrstbeassignedtoit.
Quick Assigning the Snapshots Controller
To adjust a parameter AND have it automatically update per snap-
shot, press and turn the knob.
The parameter's value appears white and in brackets, indicating a controller's as-
signed to it—in this case, the Snapshots controller:
Feedback
[37%]
To adjust a parameter WITHOUT it automatically updating per
snapshot, just turn the knob like you normally would.
As long as a parameter is not assigned to any controller, its value is maintained across
snapshots.
SHORTCUT: Hold BYPASS and press a parameter knob to quickly remove any
controller assignment (including the Snapshots controller). The value appears
without brackets, indicating no controller is assigned to it.
See "Using Snapshots" for more information.
Manually Assigning the Snapshots Controller
1. From the Home screen, press and hold the knob for the pa-
rameter you want to update with each snapshot.
Helix jumps to the Controller Assign page and displays your parameter above
Knob 1 (Parameter).
2. Turn Knob 2 (Controller) to select "Snapshots."
NOTE: Actually, it doesn't matter which controller you assign the param-
eter to, as all controller-assigned parameters automatically update with each
snapshot. The exception is any parameters controlled by EXP Pedal 1, 2,
or 3 (such as Volume, Wah, and Pitch Wham), which are only updated per
snapshot if "Global Settings > EXP Pedals" > EXP 1/2/3 Pedal Position is
set to "Per Snapshot."
3. Press to return to the Home screen.
NOTE: Each preset can have up to 64 controller assignments, including pa-
rameters controlled by Snapshots. If you attempt to add a 65th, "Too many
controller assignments!" appears in the header:
Too many controller assignments!
FeedbackTime
[37%]
LevelMixKeyScale
0.0 dB[40%][Minor][D][1/8]
In this case, you must clear some controllers to free up assignments. See
"Clearing a Block's Controller Assignment(s)" or "Clearing All Controller As-
signments"
39
Snapshots > Command Center
Snapshots also store and recall the following MIDI, CV, and Ext Amp messages sent
to external devices from the Command Center:
• The value of any Instant MIDI CC, Bank/Prog, MMC, and CV Out messages
• The state (dim value or lit value) of any CC Toggle or CV Toggle messages as-
signed to footswitches
• The state (dim or lit ) of any Ext Amp messages assigned to footswitches
For example, say you have a MIDI-controllable reverb pedal connected to the Helix
MIDI OUT, an external guitar amp connected to EXT AMP jack, and DAW software
connected via USB.
Snapshot
External
Reverb Type
(Instant CC)
External
Reverb Mix
(CC Toggle)
Amp Channel
(Ext Amp)
DAW Control
(Instant MMC)
1 INTRO
Swell 50% 1 Play
2 VERSE
Swell 50% 1 Play
3 BRIDGE
Shimmer 40% 2 Play
4 CHORUS
Shimmer 40% 2 Play
5 INTERLUDE
Bloom 50% 1 Play
6 SOLO
Shimmer 40% 2 Play
7 BREAKDOWN
Bloom 40% 1 Play
8 OUTRO
Swell 50% 2 Stop
In the table above, we see that when switching from Snapshot 7—BREAKDOWN to
Snapshot 8—OUTRO:
• Theexternalreverbpedal'seecttypeswitchesfromBloomtoSwell
• The external reverb pedal's mix increases from 40% to 50%
• The external amp switches from Channel 1 to Channel 2
• The connected DAW software's playback stops
NOTE: A Command Center message is only transmitted if its value changes.
In the table above, Helix is smart enough to not transmit duplicate MMC > Play
messages for every snapshot; it will, however, transmit MMC with Snapshot 8,
because its value changes from Play to Stop.
For more information, see "Command Center".
Using Snapshots
Okay, sick of reading and ready to jump into snapshots? Here we go...
1. Press BANK and BANK simultaneously to enter Snapshot
footswitch mode.
Themiddleeightswitches ash,indicatinga snapshotisreadytobeselected.
The current snapshot's footswitch lights red and its camera lens appears inverted.
BANK
BANK
TAP
H O L D F O R T U N E R
CANCEL
SNAPSHOT 1
1
SNAPSHOT 5
5
SNAPSHOT 2
2
SNAPSHOT 6
6
SNAPSHOT 3
3
SNAPSHOT 7
7
SNAPSHOT 4
4
SNAPSHOT 8
8
2. Press one of the eight snapshot switches to select a dierent
snapshot.
NOTE: If you don’t want snapshot footswitches to disappear after select-
ing one, set "Global Settings > Footswitches" > Knob 4 (Snapshot Mode
Switches) to “Manual Return.” In this case, Helix stays in Snapshot foot-
switch mode until you press FS6 (CANCEL).
Alternatively, press the PRESETS knob and turn Knob 5 (Select Snapshot).
NOTE: If you select a snapshot that hasn’t yet been altered, it appears the
same as the snapshot you came from. As soon as you alter a new snapshot
(say,by enabling or bypassing an amp or eect block), the snapshot be-
comes "active" and remembers any changes.
3. Adjust the preset by doing one or more of the following:
• Turnseveralblocksonorobypressingstompmodefootswitchesand/orthe
BYPASS button
• Push-turn a few knobs to automatically assign their parameters to the Snap-
shots controller (their values appear white and in brackets)
• On the Command Center page, adjust the values of any Instant messages
or press a footswitch assigned to CC Toggle, CV Toggle, or Ext Amp
4. Switch back to the snapshot you started with.
Helix instantly and seamlessly returns to its previous state.
NOTE: If you've changed "Global Settings > Preferences" > Snapshot Edits
to"Discard,"youmustsavethepresetbeforeselectingadierentsnapshot;
otherwise any edits will be discarded!
40
Copying/Pasting a Snapshot
Instead of creating a new snapshot from scratch, you may want to copy an existing
one to another snapshot location and tweak just a few things. There are actually two
ways to do this:
Quick Copy/Paste Snapshot from Footswitches
1. Press BANK and BANK simultaneously to enter Snapshot
footswitch mode.
2. While touch-holding the footswitch for the snapshot you want
to copy, briey touch and release the footswitch for the snap-
shot you want to overwrite.
A dialog panel appears:
OKCancel
Copy Snapshot 4 to Snapshot 5?
3. Press Knob 6 (OK).
Copying/Pasting a Snapshot from the Front Panel
1. Press PRESETS to open the Setlist menu and turn Knob 5
(Select Snapshot) to select the snapshot you want to copy.
2. Press ACTION and then Knob 1 (Copy Snapshot).
Helix returns to the Setlist menu.
3. Turn Knob 5 (Select Snapshot) to choose the snapshot you
want to overwrite.
4. Press ACTION and then Knob 2 (Paste Snapshot).
A dialog panel appears:
OKCancel
Copy Snapshot 4 to Snapshot 5?
5. Press Knob 6 (OK).
Swapping Snapshots
1. Touch (but don't press) the two snapshot switches you want to
swap until the following dialog appears:
OKCancel
Swap Snapshots 1 and 5?
2. Press Knob 6 (OK).
Renaming a Snapshot
Insteadofhavingtorememberthedierencebetween"SNAPSHOT1"and"SNAP-
SHOT 2," it's helpful to rename your snapshots something descriptive, such as
“VERSE,” “BIG SOLO,” or “D. IGLOO.”
1. Press PRESETS to open the Setlist menu.
2. Press Knob 6 (Rename Snapshot).
The Rename Snapshot screen appears:
Cancel Delete Insert
Rename Snapshot
OK
SNAP OTHS
1
R
T
U
V
P
Q
R
emov
e
Move the joystick left or right to move the cursor. Snapshot names are limited
to 10 characters.
Turn the joystick (or move it up/down) to change the selected character.
Press Knob 2 (Delete) to delete the selected character and shift all following
characters to the left.
Press Knob 3 (Insert) to insert a space and shift all following characters to
the right.
SHORTCUT:PressthejoysticktocyclethroughA,a,0,and[SPACE].
Press Knob 4 (Remove) to remove the custom name. Remove is grayed out
until a custom name is applied.
3. Press Knob 6 (OK).
Snapshot names are only retained if you save the preset. See below.
41
Saving Snapshots
Press SAVE twice to save the preset.
Saving a preset stores all of its 8 snapshots automatically.
NOTE: Selecting a preset recalls the Snapshot that was active when the preset
was saved.
Determining Snapshot Edit Behavior
Say you’re on Snapshot 2 (VERSE) and you change a few things—switch a delay block
on,switchamodblocko, tweakan Amp’sGainparameterfromyourVariaxTone
knob, etc. If you switch to Snapshot 4 (CHORUS) and then back to Snapshot 2 for
the second verse, should Helix recall those changes or return Snapshot 2 to its state
when the preset was last saved? There’s no right answer, and Helix lets you choose.
1. Press and then Knob 6 (Global Settings).
2. Move the joystick to select the Preferences submenu.
Ins/Outs
MIDI/T
emp
o
D
i
sp
l
ays
Footsw
i
tc
h
es
Global Settings
Pre
f
erences
EXP Pe
d
a
l
s
Firmware Version 2.00.0
Preferences
01A-32D
Preset
Numbering
Authentic
Tap Tempo
Pitch
Snapshot
Edits
Recall
Preferences
3. Turn Knob 1 (Snapshot Edits) to set snapshot edit behavior:
• Recall—Any snapshot edits are recalled when jumping from snapshot to snap-
shot, and appear as you last left them (the default)
• Discard—Any snapshot edits are discarded when jumping from snapshot to
snapshot, and appear as the preset was last saved. If you want to save chang-
es made to a snapshot while Snapshot Edits is set to “Discard,” press SAVE
twice before selecting another snapshot
The camera icon on the home screen shows you the Snapshot Edits setting at a
glance—When set to “Recall,” the camera is gray; when set to “Discard,” the camera
is red.
1 1
SHORTCUT: At any time, hold BYPASS and press SAVE to toggle this setting.
Arranging Preset, Snapshot, and Stomp
Switches
1. Press and then Knob 6 (Global Settings).
2. Move the joystick to select the Footswitches submenu.
Ins/Outs
MIDI/T
emp
o
D
i
sp
l
ays
Footsw
i
tc
h
es
Global Settings
Pre
f
erences
EXP Pe
d
a
l
s
Firmware Version 2.00.0
Stomp Mode
Switches
Footswitches
8 Switches8 PresetsOn
Snapshot Mode
Switches
Auto Return
Preset Mode
Switches
Banks
Up/Down
Switches
Touch Select
Footswitches
3. Turn Knob 2 (Preset Mode Switches) to customize the middle
eight switches:
• 8 Presets—Two banks of presets (the default)
• Preset/Stomp—One bank of presets on the top row, switches from stomp
mode on the bottom row
• Stomp/Preset—Switches from stomp mode on the top row, one bank of pre-
sets on the bottom row
• Preset/Snap—One bank of presets on the top row, Snapshots 1-4 on the
bottom row
42
• Snap/Preset—Snapshots 1-4 on the top row, one bank of presets on the
bottom row
• Snap/Stomp—Snapshots 1-4 on the top row, switches from stomp mode on
the bottom row (see image below)
• Stomp/Snap—Switches from stomp mode on the top row, Snapshots 1-4 on
the bottom row
• 8 Snapshots—Snapshots 1-8
SNAPSHOT
SNAPSHOT
TAP
H O L D F O R T U N E R
CANCEL
Teemah! Dual Pitch Tremolo/Autopan Start Reaper
SNAPSHOT 1
1
SNAPSHOT 2
2
SNAPSHOT 3
3
SNAPSHOT 4
4
4. Turn Knob 5 (Up/Down Switches) to customize FS1 and FS7 on
the far left.
Select Banks (Bank Queue), Presets, or Snapshots (see image above).
SHORTCUT: At any time, press and hold both FS1 and FS7 to cycle through
BANK / , PRESET / , and SNAPSHOT / .
Tips for Creative Snapshot Use
• Theobvioususecaseforsnapshotsisdesignatingthemtospecicsections
of your song. For example, Snapshot 1 would be the Intro, Snapshot 2 would
be Verse 1, Snapshot 3 might be the Chorus, and so on
• Turn any Delay, Reverb, and/or FX Loops blocks' Trails parameter to "On" for
seamless spillover between snapshots
• "SNAPSHOT (X)" on the scribble strip isn't very descriptive. Don't forget to
name your snapshots—See "Renaming a Snapshot"
• Worried that further tweaking might make your tone worse, not better? Snap-
shots are a great way to compare minor changes between tones without
havingtotakeyourhandsotheguitar.
• Want to switch channels on your external amp but don’t want to waste a
stomp footswitch on it? Command Center MIDI, CV, and Ext Amp Instant
messages are automatically transmitted when a Snapshot is recalled.
• Set dierent keys in Harmony Delay blocks or intervals in Pitch blocks per
snapshot
• SetdierentVariaxmodels(ortuning!)persnapshot
• Having diculty maintaining consistent volume throughouta song? Set the
Output block's Level parameter per snapshot
43
Bypass Assign
Quick Bypass Assign
1. From the Home screen, use the joystick to select the block you
wish to assign to a footswitch.
Input, Output, Split > Y, and Merge blocks cannot be assigned to footswitches.
Split > A/B or Split > Crossover blocks can be assigned to a footswitch; when
bypassed, they behave exactly like Split > Y.
2. Step on FS6 (MODE) to select Stomp mode (if not already
there).
3. Touch and hold (but don’t press) the desired footswitch until
the following dialog appears:
OKCancel
Assign footswitch to bypass selected block?
Type
Latching
Assign
Merge
C
ustom
i
z
e
If you want to replace any other blocks that may already be assigned to the foot-
switch, turn Knob 4 (Assign) to "Replace." Otherwise, leave it set to "Merge,"
which allows for multiple blocks to be assigned to the same switch.
If you want to change the way the switch behaves, turn Knob 5 (Type) to "Mo-
mentary" or "Latching."
Momentary
The block is bypassed (or enabled, if already bypassed) for as long
as you hold the switch.
Latching
The block is bypassed (or enabled, if already bypassed) every time
you press the switch. This is the default.
4. Press Knob 6 (OK).
Manual Bypass Assign
The Bypass Assign screen is where you manually assign blocks to (and un-assign
blocks from) Stomp mode footswitches.
1. Press to open the Menu.
2. Press Knob 1 (Bypass Assign).
The Bypass Assign screen looks very similar to the Home screen:
16B Dream Rig+Vocals
Delay Harmony Delay
None
Footswitch
Bypass Assign
1
C
ustom
i
z
e
3. Move the joystick to select the block you want to bypass from
a footswitch.
Input, Output, Split > Y, and Merge blocks cannot be assigned to footswitches.
Split > A/B or Split > Crossover blocks can be assigned when bypassed, they
behave exactly like Split > Y.
4. Turn Knob 1 (Footswitch) to select footswitch 1, 2, 3, 4, 5, 7, 8,
9, 10, 11, or Exp Toe.
NOTE: Footswitch 1 and 7 can be assigned at any time, but they only appear
if the Stomp Mode Switches option is set to "10 switches" (see "Global Set-
tings > Footswitches"). Otherwise, FS1 and FS7 appear as BANK and
BANK .
NOTE: Adding a Volume Pedal, Pan, Wah, or Pitch Wham block automati-
cally assigns it to "Exp Toe".
NOTE: Each footswitch can have up to 8 assignments. If you attempt to
add a ninth, "Can't assign any more blocks to this footswitch!" appears in
the header:
Can’t assign any more blocks to this footswitch!
Customize
Type
Latching2
Footswitch
Selecting any footswitch (other than Exp Toe) displays Knob 2 (Type):
Delay Harmony Delay
Type
Latching2
Footswitch Customize
44
5. Turn Knob 2 (Type) to select "Latching" or "Momentary."
Momentary
The block is bypassed (or enabled, if already bypassed) for as
long as you hold the switch.
Latching
The block is bypassed (or enabled, if already bypassed) every time
you press the switch. This is the default.
NOTE: Footswitch type (momentary or latching) is determined per foot-
switch, not per assignment.
Customizing a Footswitch Label
1. From the Bypass Assign screen, use the joystick to select a
block whose bypass is assigned to a footswitch and press
Knob 6 (Customize).
The Customize screen appears:
16B Dream Rig+Vocals
Cancel Delete Insert
Customize
OK
M
O
P
Q
K
L
Remove Switch LED
Auto Color
No
tu
at La nch
Move the joystick left or right to move the cursor.
Turn the joystick (or move it up/down) to change the selected character.
Press Knob 2 (Delete) to delete the selected character and shift all following
characters to the left.
Press Knob 3 (Insert) to insert a space and shift all following characters to
the right.
SHORTCUT:PressthejoysticktocyclethroughA,a,0,and[SPACE].
Press Knob 4 (Remove) to remove the custom label, after which the foot-
switch label displays its normal assignment. Remove is grayed out until a cus-
tom name is applied.
2. Press Knob 6 (OK).
SHORTCUT: Once any item has been assigned to a footswitch, touch and
hold (but don't press) the footswitch, and a duplicate Customize button ap-
pears above Knob 5.
NOTE: Footswitches can also be customized from the "Command Center"
screen (or Helix editor application!).
Customizing a Footswitch Color
1. From the Customize screen, turn Knob 5 (Switch LED) to select
the desired color (or turn it o).
Normally, you should leave this set to "Auto Color."
2. Press Knob 1 (Cancel) or to exit.
Swapping Footswitches
If you want to change the location of Stomp mode footswitches (especially those
with multiple items assigned or custom labels and LED ring colors), instead of manu-
ally reassigning everything, you can quickly swap all assignments between two foot-
switches.
1. Touch (but don't press) any two Stomp mode footswitches
until the following dialog appears:
OKCancel
Swap all assignments between footswitches 2 and 8?
2. Press Knob 6 (OK).
45
Controller Assign
Helix provides a wide variety of tools for controlling your tone during a performance.
The most obvious one is the built-in expression pedal (often assigned to wah or
volume), but you may also assign footswitches to toggle between two values of a
given parameter or parameters, control a parameter from an external MIDI device, or
the volume and tone knobs on a James Tyler Variax or Variax Standard guitar. You can
evenhave parametersinstantlychange when selectingdierentsnapshotswithin a
preset.
If a controller has been assigned to a parameter, the value appears white and in brack-
ets:
Feedback
[37%]
NOTE: Adding a Wah or Pitch Wham block automatically assigns it to be con-
trolled by EXP 1. Adding a Volume Pedal or Pan block automatically assigns it to
be controlled by EXP 2.
NOTE: Each preset can have up to 64 controller assignments. If you attempt to
add a 65th, "Too many controller assignments!" appears in the header:
Learn
Controller
Parameter
Feedback
Controller
None
Too many controller assignments!
In this case, you must clear some controllers to free up assignments. See "Clear-
ing a Block's Controller Assignment(s)" or "Clearing All Controller Assignments".
Quick Controller Assign
1. From the Home screen, press and hold the knob for the pa-
rameter you wish to control.
Helix jumps to the Controller Assign page and displays your parameter above
Knob 1 (Parameter).
2. Press Knob 6 (Learn Controller).
The button’s brain icon glows blue and the header reads “Move/use controller to
learn...”:
Learn
Controller
Parameter
Feedback
Controller
None
L
Move/use controller to learn...
3. Move the expression pedal, turn the Volume or Tone knob on
a connected Variax, step on a Stomp mode footswitch, send a
MIDI CC message from your keyboard, etc.
The controller name appears above Knob 2 (Controller).
NOTE: HelixhasreservedspecicMIDICCmessagesforglobalfunctions;
these CCs cannot be used as controllers. If you attempt to learn a CC mes-
sage reserved for global functions, the following dialog appears:
Learn
Controller
Parameter
Feedback
Controller
None
L
This MIDI CC# is reserved for global functions!
See "MIDI" for more information.
4. Press to return to the Home screen.
SHORTCUT: To assign a parameter to the Snapshots controller, it's even
easier—just push and turn the parameter's knob. The value appears white
and in brackets, indicating it's now assigned to a controller.
SHORTCUT: Hold BYPASS and press a parameter knob to quickly remove
any controller assignment (including the Snapshots controller). The value
appears without brackets, indicating no controller is assigned to it.
Manual Controller Assign
The Controller Assign screen is where you manually assign parameters to be adjusted
in real time by controllers.
1. Press to open the Menu.
46
2. Press Knob 2 (Controller Assign).
The Controller Assign screen looks very similar to the Home screen:
Delay Harmony Delay
Level
0.0 dB
Parameter
Time
Controller
None
Learn
Controller
Controller Assign
1
3. Move the joystick to select the block containing the parameter
to which you want to assign a controller.
The most recently accessed parameter appears above Knob 1 (Parameter).
NOTE: Amp+Cab and Cab > Dual blocks are special in that they represent
two models within a single block. To assign controllers to the amp param-
eters in an Amp+Cab block, press <PAGE until the amp icon is white.
To assign controllers to the cab parameters, press PAGE> until the cab
icon is white.
To assign controllers to the rst cab's parameters in a Cab > Dual block,
press <PAGE until the left cab icon is white. To assign controllers to the
second cab's parameters, press PAGE> until the right cab icon is white.
4. Turn Knob 1 (Parameter) to select the parameter you wish to
control.
5. Turn Knob 2 (Controller) to select the desired controller.
None
Removes the controller assignment.
Exp Pedal
1, 2, or 3
The most common type of controller. Used to control volume, wah,
Pitch Wham, etc.
Variax Vol,
Variax Tone
If you have a James Tyler Variax or Variax Standard guitar, its
volume and tone knobs can be used to adjust a wide variety of
parameters in Helix.
Footswitch
1-5, 7-11
Stepping on a Stomp mode footswitch can toggle between a pa-
rameter's min and max values.
If a footswitch is assigned to one parameter only (no blocks, Com-
mand Center messages, or other parameters), the parameter
name appears in the scribble strip:
Feedback
Selecting Footswitch 1-5 or 7-11 will display Knob 3 (Type). Turn
knob 3 to select "Momentary" or "Latching." Momentary means
the value will change for as long as you hold the switch. Latching
toggles between Min and Max values every time you press the
switch.
Footswitches can be customized from the "Command Center"
screen.
MIDI CC Selecting "MIDI CC" will display Knob 3 (MIDI CC#). Turn Knob 3
to select the desired MIDI CC number.
Snapshots
Although all controller-assigned parameters are updated per snap-
shot, an additional "Snapshots" controller is available when other
controllers are already used.
NOTE: Footswitch 1 and 7 can be assigned at any time, but they only appear
if the Stomp Mode Switches option is set to "10 switches" (see "Global Set-
tings > Footswitches"). Otherwise, FS1 and FS7 appear as BANK and
BANK .
NOTE: Footswitch type (momentary or latching) is determined per foot-
switch, not per assignment.
NOTE: Some CC#s cannot be selected, as they are reserved for the Helix
global functions. See "MIDI" for more information.
6. If desired, turn Knob 4 (Min Value) and Knob 5 (Max Value) to
set the range you wish to control.
TIP: To reverse controller behavior, swap the min and max values.
47
Tips for Creative Controller Assignment
• If you assign a footswitch to more than one controller or other item, "MUL-
TIPLE (X)" on the scribble strip isn't very descriptive. Don't forget to custom
label it - See "Customizing a Command Footswitch Label"
• By default, a parameter's Min and Max values will be pretty extreme. It pays to
play pretty conservative here, as subtle parameter adjustments go a long way
• To smoothly blend between the tone on parallel paths A and B, select a Split
> A/B block and assign the Route To parameter to an expression pedal. By
default, a heel-down position means the signal passes fully through Path A.
Moving the pedal toward the toe-down position will gradually crossfade into
Path B. Alternatively, assign a footswitch to control the Route To parameter, for
instantly switching back and forth
• If you're looking for a gritty boost for a solo, instead of adding a Distortion
block, try assigning a footswitch to increase both the Mid and Channel Volume
parameters of an Amp+Cab, Amp, or Preamp block
• If you're looking for an ultra-clean boost, instead of adding a Volume/Pan >
Gain block, try assigning a footswitch to increase the Level parameter of a
Merge > Mixer or Output block
• If you have a favorite delay or reverb pedal, use an FX Loop block to insert
it into your tone. Assign EXP 1, 2, or 3 to control the block's Mix parameter,
which will smoothly blend the pedal into your tone
• For extreme psychedelic dub delay squeals, assign a footswitch to both in-
crease a Delay's feedback and decrease its time
• Assign a footswitch to toggle between two Delay > Time parameter values,
such as 1/4 and 1/8 dotted
• Assign the tone knob on your JTV Variax or Variax Standard guitar to a Pitch
Wham block's Position parameter. Watch guitarists in the audience try to
gureouthowaknobonyourguitargenerateshugedivebombeects
• Assign multiple Amp+Cab parameters to a single switch. With enough as-
signments, you could almost treat the switch as an A/B amp channel switcher
• Assign Mic or IR Select to a footswitch. Set the two mic models or IRs as min
and max values. Now you can instantly toggle between two mics or two IRs
Clearing a Block's Controller Assignment(s)
1. From the Controller Assign screen, select the block whose
controller assignments you want to clear and press ACTION.
2. Press Knob 1 (Clear Controllers).
Clearing All Controller Assignments
1. From the Controller Assign screen, press ACTION.
2. Press Knob 2 (Clear All Controllers).
The following dialog appears:
OKCancel
Clear all controller assignments from every block?
3. Press Knob 6 (OK).
IMPORTANT! Clearing All Controller Assignments also removes the Wah
and Volume assignments from EXP 1 and EXP 2. Use this function with
caution!
Customizing a Controller Footswitch Label
As there's no room for a dedicated Customize button on the Controller Assign page,
customizing scribble strips for footswitches only assigned to one or more controllers
must be done from the "Command Center" page.
SHORTCUT: Once any item has been assigned to a footswitch, touch and hold
the footswitch (but don't press), and a Customize button appears above Knob 5.
48
Command Center
Helix Rack also just so happens to be a world-class master remote control for your
entire touring or studio rig. Each of its Stomp mode footswitches and expression
pedals can be used to send a variety of MIDI, CV/expression, or External Amp com-
mands to your guitar amps, vintage pedals, synths, or even other modelers. In addi-
tion, up to six "Instant" commands can be transmitted automatically when a Helix
preset is recalled, for starting your DAW, triggering a MIDI-controlled lighting system,
or switching presets on external gear.
All Command Center assignments are stored per preset, but they can be copied and
pasted to other presets. See "Copying and Pasting a Command"
NOTE: The Value parameters of any instant MIDI CC, Bank/Prog, MMC, and CV
Out messages, plus the state (dim or lit) of any CC Toggle, CV Toggle, and Ext
Amp messages are automatically recalled when selecting a snapshot.
NOTE: All MIDI-based Command Center messages are transmitted via MIDI and
USB simultaneously.
Assigning a Command
1. Press to open the Menu.
2. Press Knob 3 (Command Center).
Any switches, pedals or instant locations with commands assigned appear with
turquoise triangles above them:
Instant 2
CC#MIDI Ch
007Base (1)
Value
072
Command
MIDI CC
Command Center
3. Move the joystick to select the footswitch, pedal, Variax knob,
or instant location you wish to use to send the command.
4. Turn Knob 1 (Command) to select the type of command you
wish to transmit.
Not all command sources can send the same types of commands.
Select "None" to remove any command assignment.
5. Turn Knobs 2-5 to adjust the command's settings, which are
determined by the type of command:
MIDI CC (Continuous Controller)
Knob Parameter Description
2
MIDI Ch
Sets the CC message's MIDI channel (1-16). When set to
"Base", Helix follows the Global MIDI channel, which is set
from the "Global Settings > MIDI/Tempo" page.
3
CC #
Sets the CC number (0-127).
4
Value [Min
Value]
Sets the CC number's value (0-127). For EXP 1-3 and Variax
Volume/Tone Knob, sets the minimum CC value controlled
by the pedal or knob.
5
[Max Value]
For EXP 1-3 and Variax Volume/Tone Knob, sets the maxi-
mum CC value controlled by the pedal or knob.
CC Toggle
Knob Parameter Description
2
MIDI Ch
Sets the CC messages' MIDI channel (1-16). When set to
"Base", Helix follows the Global MIDI channel, which is set
from the "Global Settings > MIDI/Tempo" page.
3
CC #
Sets the CC number (0-127).
4
Dim Value
Sets the CC number's value (0-127) when the footswitch
ring is dim. For Footswitches 7 (MODE) and 12 (TAP), ap-
pears as "Initial Val."
5
Lit Value
Sets the CC number's value (0-127) when the footswitch
ring is lit. For Footswitches 7 (MODE) and 12 (TAP), appears
as "Toggle Val."
NOTE: For CC Toggle commands, one of two values is automatically trans-
mitted upon preset recall, determined by the footswitch's state (dim or lit)
when the preset was saved. Subsequent presses of the footswitch toggle
between the two states' CC values—Knob 4 (Dim Value) and Knob 5 (Lit
Value).
49
Bank/Prog
Knob Parameter Description
2
MIDI Ch
Sets the Bank/Program message's MIDI channel (1-16).
When set to "Base", Helix follows the Global MIDI channel,
which is set from the "Global Settings > MIDI/Tempo" page.
3
Bank
CC00
SetstheCC#00(BankMSB)value.Select"O"ifthereceiv-
ing device shouldn't respond to Bank MSB.
4
Bank CC32
SetstheCC#32(BankLSB)value.Select"O"ifthereceiv-
ing device shouldn't respond to Bank LSB.
5
Program
Sets the Program Change (PC) value. Select "O" if you
only want to send a Bank MSB and/or Bank LSB message.
Note On
Knob Parameter Description
2
MIDI Ch
Sets the note's MIDI channel (1-16). When set to "Base,"
Helix follows the Global MIDI channel, which is set from the
"Global Settings > MIDI/Tempo" page.
3
Note
Sets the MIDI note value (C-1 ~ G9). Middle C is C3.
4
Velocity
Sets the MIDI note's velocity (0-127).
5
Note O
Determines whether the MIDI note sustains until pressing
the switch again (Latching) or sustains only while the switch
is held (Momentary).
MMC (MIDI Machine Control)
Knob Parameter Description
2
Message
Determines the message type.
Ext Amp
Knob Parameter Description
2
Select
Determines the Ext Amp connection [1 (Tip-to-sleeve), 2
(Ring-to-sleeve), or both] for switching an external amp's
channel, reverb, or other functions.
IMPORTANT!ConnectEXTAMP1/2onlytoampliersthatutilize"short-
to-sleeve" footswitch inputs. Connecting to any other sort of input could
cause permanent damage to both your amp and Helix! If you're not sure if
your amp has short-to-sleeve inputs, contact the manufacturer.
IMPORTANT! The Helix device's ability to control external amp channel
and/or reverb switching has been tested with many popular amps and
heads. Unfortunately this does not guarantee compatibility with all prod-
ucts. Note that, depending on the circuitry of the channel switching jack in
the guitar amp used, the EXT Amp function may not operate as expected.
NOTE: When an Ext Amp command is assigned to Instant 1-6, the connec-
tion determined by Knob 2 (Select) is made when the preset is loaded. When
an Ext Amp command is assigned to a footswitch, the footswitch's current
state (dim or lit) determines whether or not the External Amp connection is
made when the preset is loaded; when dim, no connection is made; when lit,
the connection determined by Knob 2 (Select) is made. Subsequent presses
ofthefootswitchtoggletheconnectionon(LEDlit)ando(LEDdark).
CV (Control Voltage) Out
Knob Parameter Description
2
CV Value
[CV Min
Val]
Sets the CV value (1-100) appearing at the Helix device's
CV/Expression jack. For EXP 1-3 and Variax Volume/Tone
Knob, sets the minimum CV value controlled by the pedal
or knob.
3
[CV Max
Val]
For EXP 1-3 and Variax Volume/Tone Knob, sets the maxi-
mum CV value controlled by the pedal or knob.
CV (Control Voltage) Toggle
Knob Parameter Description
2
Dim Value
Sets the CV value (0-100) when the footswitch ring is dim.
For Footswitches 7 (MODE) and 12 (TAP), appears as "Initial
Val."
3
Lit Value
Sets the CV value (0-100) when the footswitch ring is lit. For
Footswitches 7 (MODE) and 12 (TAP), appears as "Toggle
Val."
NOTE: For CV Toggle commands, one of two CV values appears at the CV/
Expression output, automatically transmitted upon preset recall, determined
by the footswitch's state (dim or lit) when the preset was saved. Subsequent
presses of the footswitch toggle between the two states' CV values—Knob
4 (Dim Value) and Knob 5 (Lit Value).
50
Copying and Pasting a Command
1. Select the location containing the command you wish to copy
and press ACTION.
2. Press Knob 1 (Copy Command).
3. Select the location to which you want to paste the command—
even in a dierent preset—and press ACTION.
4. Press Knob 3 (Paste Command).
Copying and Pasting All Commands
Setting up the same or similar set of commands across multiple presets can quickly
become tiresome. Fortunately, Helix lets you quickly copy and paste all commands to
another preset.
1. From the Command Center page, press ACTION.
2. Press Knob 2 (Copy All Commands).
3. Select the preset to which you want to paste the commands
and press ACTION.
4. Press Knob 3 (Paste All Commands).
Clearing a Command
1. Select the location containing the command you want to clear
and press ACTION.
2. Press Knob 4 (Clear Command).
Clearing All Commands
1. From the Command Center page, press ACTION.
2. Press Knob 5 (Clear All Commands).
The following dialog appears:
OKCancel
Clear all Command Center assignments?
3. Press Knob 6 (OK).
Customizing a Command Footswitch Label
1. From the Command Center screen, select Footswitch 1-5,
7-11, or Exp Toe with a command assigned and press Knob 6
(Customize).
The Customize screen appears:
16B Dream Rig+Vocals
Cancel Delete Insert
Customize
OK
M
O
P
Q
K
L
Remove Switch LED
Auto Color
No
tu
at La nch
Move the joystick left or right to move the cursor.
Turn the joystick (or move it up/down) to change the selected character.
Press Knob 2 (Delete) to delete the selected character and shift all following
characters to the left.
Press Knob 3 (Insert) to insert a space and shift all following characters to
the right.
SHORTCUT:PressthejoysticktocyclethroughA,a,0,and[SPACE].
Press Knob 4 (Remove) to remove the custom label, after which the foot-
switch displays its normal assignment. Remove is grayed out until a custom
name is applied.
2. Press Knob 6 (OK).
NOTE: Footswitches can also be customized from the "Bypass Assign"
screen (or Helix editor application!)
Customizing a Command Footswitch Color
1. From the Customize screen, turn Knob 5 (Switch LED) to select
the desired color (or turn it o).
Normally, you should leave this set to "Auto Color."
2. Press Knob 1 (Cancel) or to exit.
51
Global EQ
The Helix Global EQ has three fully parametric bands plus variable low and high cut
lters,andisusedforcompensatingforthewidedisparityinacousticenvironments
on tour or when traveling from studio to studio. Global EQ is applied to all setlists and
presets, and can be heard from the 1/4" outputs, XLR outputs, or both.
NOTE: Global EQ is never heard from Send, Digital, or USB outputs.
When Global EQ is active, the Home screen shows the Global EQ icon to the left of
the snapshots icon:
1
1. Press to open the Menu.
2. Press Knob 5 (Global EQ).
The Global EQ screen appears:
Mid Gain
0.0 dB
Mid QMid Freq
2.5 kHz
5.0
Low Freq
180 Hz
Low Q
5.0
Low Gain
0.0 dB
Press BYPASS to turn Global EQ on/off
Global EQ
3. Press BYPASS to turn Global EQ on and o.
SHORTCUT: From the Home screen, press and hold BYPASS to turn Global EQ
onandowithouthavingtonavigatetotheGlobalEQpage.
TIP: Press PAGE> to view and turn Knob 1 (Apply EQ) to set whether
Global EQ is applied to only the 1/4" outputs, only the XLR outputs, or both.
Resetting Global EQ
ResettingtheGlobalEQreturnsitssettingstofactorydefault(at).
1. From the Global EQ screen, press ACTION.
2. Press Knob 1 (Reset Global EQ).
The following dialog appears:
OKCancel
Reset Global EQ?
3. Press Knob 6 (OK).
52
Global Settings
The Global Settings menu contains additional parameters that apply to all setlists
and presets, such as input and output levels, custom footswitch mode settings, etc.
The upper right corner displays the Helix Rackdevice'scurrentrmwareversion.Visit
line6.com/supportforinformationonthelatestHelixrmwareupdates.
1. Press to open the Menu.
2. Press Knob 6 (Global Settings).
The Global Settings screen appears:
Ins/Outs
MIDI/T
emp
o
D
i
sp
l
ays
Footsw
i
tc
h
es
Global Settings
Pre
f
erences
EXP Pe
d
a
l
s
Firmware Version 2.00.0
Mic In
48V Phantom
Off0dBOff
Off
Mic In
Low Cut
Mic In
Gain
Guitar In
Pad
Ins/Outs
0.0dBMulti
USB In 1/2
Trim
USB In 1/2
Destination
Ins/Outs
3. Move the joystick to select one of the six submenus.
If necessary, press <PAGE/PAGE> to view more parameters.
Resetting All Global Settings
Resetting the Helix Global Settings returns them to factory default. Performing this
resetdoesnotaectanypresetsyoumayhavecreated.
1. From any Global Settings submenu, press ACTION.
2. Press Knob 1 (Factory Settings).
The following dialog appears:
OKCancel
Restore Global Settings to factory defaults?
3. Press Knob 6 (OK).
53
Global Settings > Ins/Outs
Page Knob Parameter Description
1 Guitar In Pad
If your guitar or bass has active or really loud pickups, you may want to turn this on. There's really no rule; use what sounds best.
2 Mic In 48V Phantom
When on, Helix provides 48V from the XLR Mic In jack to power studio condenser microphones.
3 Mic In Gain
Sets analog gain for the XLR Mic In jack.
4 Mic In Low Cut
SetsthefrequencyoftheMicIn'sdedicated,variablelow-cutlter.Turnfullycounterclockwise(orpush)todisable.
5 USB In 1/2 Destination
If you like to jam along with iTunes
®
, YouTube™ or your DAW, this setting determines from which of the Helix outputs your computer
or iPad primary stereo audio stream will be heard. USB In 1/2 bypasses all Helix processing; USB 3/4, 5/6, and 7/8 can be selected as
input blocks for processing DAW tracks or re-amping. Normally, you should choose "Multi," which sends USB In 1/2 directly to the 1/4",
XLR, and Digital outputs. See "USB Audio".
6 USB In 1/2 Trim
Sets the level of incoming audio from USB 1/2, which bypasses all Helix processing. Normally, this should be left at 0.0dB.
1 1/4" Outputs
Choose "Instrument" when connecting the Helix 1/4" outputs to stompboxes or the front of guitar amps; choose "Line" when connect-
ing to mixers, studio monitors, or standalone recorders. When using a single amp or speaker, connect only the LEFT/MONO 1/4” jack.
2 XLR Outputs
Choose "Mic" when connecting the Helix XLR outputs to standalone mic preamps or the XLR mic inputs on mixers; choose "Line"
when connecting to studio monitors or the line inputs on mixers. When using a mono playback system, connect only the LEFT/MONO
XLR jack.
3 Send/Return 1
Choose "Instrument" when using a Send/Return pair as an FX loop for stompboxes; choose "Line" when using a Send/Return pair as
an FX loop for line-level rack processors, or as additional inputs and outputs for connecting keyboards, drum machines, mixers, and
other gear.
4 Send/Return 2
5 Send/Return 3
6 Send/Return 4
1 Re-amp Src (USB 7)
USB out 7 and 8 are dedicated for recording a DI signal which can be used for re-amping; choose which two inputs will be sent dry
(unprocessed) to your DAW. See "USB Audio".
2 Re-amp Src (USB 8)
3 Volume Knob Controls
Determineswhichoutput(s)areaectedwhenturningthetoppanelVOLUMEknob.Forexample,youmaywanttocontrolthelevelsent
fromthe1/4"outputstoyourstagemonitorwithoutaectingtheXLRlevelsenttothefront-of-housemixer.
4 Headphones Monitor
Determines which signal(s) are heard from the PHONES output. Normally you would set this to Multi (1/4"+XLR+Digital+USB 1/2), but
theremaybeasituationwhereyouonlywanttohearwhat'ssentfromthe1/4"orXLRouts,particularlyiftheyarebeingfeddierent
signals (or band members!)
5 Digital In/Out
One digital output can be active at a time; choose S/PDIF or AES/EBU. Connecting an L6 LINK device to Helix automatically disables
S/PDIFout.USBaudioisnotaectedbythissetting.Alsosee"Output".
6 Digital Out Level
Sets the S/PDIF and AES/EBU output level. Normally, this should be left at 0.0dB.
1 Sample Rate
Determines the sample rate of the Helix S/PDIF and AES/EBU outputs; choose 44.1 kHz (the default), 48 kHz, 88.2 kHz, or 96 kHz.
When connecting to another device’s S/PDIF or AES/EBU input, make sure both units are set to the same sample rate. Note that this
settingdoesnotaectHelixUSBaudiosamplerateoperation.
2 Clock Source
Determines whether the S/PDIF and AES/EBU outputs resolve to the Helix device's internal clock or an external clock generator connected to the
Wordclock In. Make sure both units are set to the same sample rate.
54
Global Settings > Preferences
Knob Parameter Description
1 Snapshot Edits
Determineswhetherornotanyeditsmadetoasnapshot(blockon/o,parametercontrol,CommandCenter,tempo)arerememberedwhenreturningto
that snapshot. When set to "Recall," any snapshot edits are recalled when jumping from snapshot to snapshot, and appear as you last left them. When
set to "Discard," any snapshot edits are discarded when jumping from snapshot to snapshot, and appear as the preset was last saved. If you want to save
changes made to a snapshot while Snapshot Edits is set to "Discard,” press SAVE twice before selecting another. The camera icon on the home screen
shows you the Snapshot Edits setting at a glance—When set to "Recall," the camera is gray; when set to "Discard," the camera is red. At any time, hold
BYPASS and press SAVE to toggle this setting. Also see "Determining Snapshot Edit Behavior"
2
Tap Tempo
Pitch
DetermineshowdelayrepeatsbehavewhenrepeatedlypressingTAP."Accurate"respectsthenaturalpitchuctuationsinherentwhenchangingareal
delay pedal's time knob; "Transparent" minimizes these artifacts.
3
Preset Num-
bering
Determines whether each setlist's presets appear as 32 banks of four (A B C D) or are numbered 000-127 (convenient when recalling presets via MIDI
program change messages).
Global Settings > MIDI/Tempo
Knob Parameter Description
1
MIDI Base
Channel
Sets the system base MIDI channel that Helix uses for both receiving and sending MIDI communication via MIDI and USB. Note that MIDI messages as-
signed from the Command Center page can be set to any MIDI channel.
2 MIDI Thru
When on, MIDI OUT also acts as a MIDI THRU; that is, it passes through any MIDI messages received at the MIDI IN jack.
3
MIDI Over
USB
When on, Helix receives and transmits MIDI data via USB in the same capacity as its MIDI jacks.
4
MIDI PC
Send/Receive
DetermineswhetherornotHelixautomaticallysendsMIDIprogramchange(PC)messageswhenselectingpresets.ThissettingdoesnotaectanyMIDI
commands manually assigned from the Command Center page. Also determines whether or not Helix responds to program changes.
5 Tempo Select
The “Speed” or “Time” parameters of all tempo-based FX can be set to a note value that follows Tap Tempo or the tempo set with Knob 6 (Snapshot
BPM/Preset BPM/Global BPM). Choose whether the Helix tempo is stored and recalled with each snapshot, recalled with each preset, or is applied glob-
ally across all presets and snapshots.
6
Snapshot
BPM/Preset
BPM/Global
BPM
This is an alternative way to set the Helix tempo, as opposed to stepping repeatedly on the TAP footswitch. Depending on the Knob 5 (Tempo Select)
setting, this value is saved per snapshot, per preset, or globally. The Helix device's tempo has a resolution of 0.1 BPM (beats per minute). You can also
quicklyaccessthisparameteratanytimebybrieytouchingtheTAPfootswitch.
55
Global Settings > Footswitches
Knob Parameter Description
1 Touch Select
If you don't want Helix to automatically select assigned blocks or items when you touch a switch top, or engage Quick Bypass Assign when you touch a
switchtopfor2seconds,setthisto"O."Ifyouplaybarefoot,youmightwanttoturnthisoaswell.
2
Preset Mode
Switches
By default, Preset footswitch mode displays eight presets (four on each row). Choose from "8 Presets," "Preset/Stomp" (one bank of presets on the top
row, switches from stomp mode on the bottom row), "Stomp/Preset" (switches from stomp mode on the top row, one bank of presets on the bottom
row), "Preset/Snap" (one bank of presets on the top row, Snapshots 1-4 on the bottom row), "Snap/Preset" (Snapshots 1-4 on the top row, one bank of
presets on the bottom row), "Snap/Stomp" (Snapshots 1-4 on the top row, switches from stomp mode on the bottom row), "Stomp/Snap" (switches from
stomp mode on the top row, Snapshots 1-4 on the bottom row), and "8 Snapshots" (Snapshots 1-8).
3
Stomp Mode
Switches
When set to "10 switches," FS1 (BANK ) and FS7 (BANK ) are re-purposed as additional Stomp switches. This is only for Stomp footswitch mode;
while in Preset, Snapshot, or Looper footswitch modes, BANK and BANK are retained.
4
Snapshot
Mode Switches
When set to "Auto Return," Helix returns to the previous footswitch mode after selecting a snapshot. When set to "Manual Return," Helix stays in Snapshot
footswitch mode until you press FS6 (CANCEL).
5
Up/Down
Switches
When set to "Presets" or "Snapshots," FS1 (BANK ) and FS7 (BANK ) change to PRESET / or SNAPSHOT / , where pressing either switch
instantlyselectsthenext/previouspresetorsnapshot,withoutabankqueue.Thisisusefulifyou'veprogrammedaxedsetlistforyourshow,andjust
want to increment through all your presets or snapshots. You can also cycle through all three switch types by pressing and holding both the and
switches for two seconds. At any time, press and hold both FS1 and FS7 to cycle through BANK / , PRESET / , and SNAPSHOT / .
Global Settings > EXP Pedals
Knob Parameter Description
1 EXP 1 Polarity
lf your external expression pedal appears to work backwards—for example, a Volume pedal block is loudest with the heel all the way down—set this to
"Inverted."
2 EXP 2 Polarity
3 EXP 3 Polarity
4
EXP 1 Pedal
Position
Determines whether the Helix expression pedal positions are recalled per snapshot, per preset, or applied globally. If you want a Volume Pedal or Wah to
maintain its position when switching presets, set this to "Global."
5
EXP 2 Pedal
Position
6
EXP 3 Pedal
Position
Global Settings > Displays
Knob Parameter Description
1
LED Ring
Brightness
DetermineswhethertheStompmodefootswitches'coloredLEDringsappeardimwhenbypassed,orowhenbypassed.Whenplayinginbrightsun-
light,youmaywanttosettothisto"O/Bright"toincreasecontrast.
2 Tap Tempo LED
Ifyou'dprefertonotseetheFS12(TAP)redLEDconstantlyashing,youcanturnito.
56
USB Audio
Helix functions as a USB 2.0, multiple-input/output, 24-bit - 96kHz, low-latency audio
interface for Windows
®
and Mac
®
computers, as well as for iPad and iPhone
(with
optional Apple Camera Connection Kit adapter), and is compatible with all major DAW
software.
NOTE: For USB audio operation on Windows
®
computers, it is necessary to
download and install the Line 6 Helix ASIO
®
driver (see page 59). For Mac
®
computers, it is only necessary to download and install the Line 6 Mac
®
Core
Audio driver if you desire audio sample rate operation at rates other than 48kHz
(see page 59). These drivers are available from line6.com/software. There is no
driver installation necessary for an Apple iPad or iPhone.
With the Helix default "Multi" Input and Output block settings in use, you'll automati-
cally hear audio software playback on USB 1/2 routed directly to the Helix XLR, 1/4"
and Phones outputs. This lets you jam along with YouTube™, iTunes
®
, or your DAW
trackswithouthearingthemprocessedthroughabunchofampsandeects.
If you set your DAW software track to record from Helix USB 1/2, you'll capture your
Helix-processed input signal in the DAW track - with zero-latency monitoring, since
you are hearing your input from the Helix hardware outputs before it is routed through
your software.
The additional Helix USB Inputs and Outputs are available within the Helix Input and
Output blocks, and within your DAW software track menus, which can be utilized for
numerousroutingcongurations,allwithoutpatchingextracables-seethefollowing
examples.
P
USH
P
U
SH
DIGITAL
S/PDIF
AES/EBU
L6 LINK OUT
HELIX OUTPUTS
USB OUTPUTS
1/2 3/4 5/6 7/8
USB INPUTS
1 2 3 4 5 6 7 8
HELIX INPUTS
16B Dream Rig+Vocals
Ch VolPresenceBass MidDriveTreble
102.53.45.02.53.4
Amp+Cab Stone Age 185
S
S
INPUT
ROUTING
OUTPUT
ROUTING
In 3/4 5/6 7/8
In 1/2
Out 1/2 3/4 5/6
Out 7 Out 8
Jamming with
YouTube
TM
, iTunes
®
, etc.
DI (Dry) Signal
for Re-amping
57
Hardware Monitoring vs. DAW Software
Monitoring
Use of the Helix default "Multi" settings for both the Input and Output blocks provides
hardware monitoring, which allows you to hear your live input signal at all times, in-
dependent of your DAW software's monitor settings. Hardware monitoring can be
desirable since it allows you to hear your live guitar or mic input with Helix processing
added and essentially "latency-free," since the monitor signal is not routed through
your DAW software.
In some DAW recording scenarios, it may be preferable to utilize your recording ap-
plication's "input monitoring" or "software monitoring" feature, which routes your live
input signal through the armed recording track, thus allowing you to monitor the input
eectedbyanyplug-insyoumay haveinserted onthetrack.Theonedownsideof
DAW software monitoring, however, is that your live input signal will be delayed slightly
due to being routed through the software and back to the Helix outputs, which is re-
ferred to as "latency." Helix is designed to provide very low latency operation - see
"ASIO® Driver Settings (Windows® only)" for info and settings.
When a DAW track's software monitoring is active, you'll likely not want to simulta-
neously hear the Helix hardware monitoring signal. To achieve this, you can set the
Helix Output block to USB Out 3/4 or 5/6. These Output block options will route your
Helix-processed, stereo signal out to your DAW software without also providing the
Helix hardware monitoring to USB 1/2. You'll then need to set your DAW track to re-
ceive from the same selected Helix USB Out to record the Helix-processed signal into
the track - or, you can optionally set the DAW track input to Helix USB 7 or USB 8 to
record a dry DI signal - see the next section.
NOTE: Keep the Helix Input block set to "Multi" and your DAW software's main,
Master output to Helix USB 1/2 to also hear playback of your full DAW mix.
DI Recording and Re-amplification
A common DAW recording technique is to record a dry DI (Direct Input) signal, such
as the unprocessed signal from your guitar, Variax or mic, along with your mic'ed or
processed tone. This allows you to process the DI track later with plug-ins (such as the
Line 6 POD
®
Farm Plug-In), and/or "re-amplify" the DI track through an amp or other
outboard gear. Helix has handy options built right in for recording DI tracks, as well as
foreasyre-amplicationofDItracksbackthroughyourownHelixtones,allwithout
extra hardware or cabling!
HelixoerstwospecialDIoutputs,USBOuts7and8,whichappearasavailableop-
tions within your DAW software track input menus. These two dedicated USB Outs
aretappeddirectlyfromtheHelixinputsourcesofyourchoice.ToconguretheHelix
input source for each, go to Global Settings > Ins/Outs > Re-amp Src (USB 7) and
Re-amp Src (USB 8), where you can select Guitar, Aux, Variax, Variax Mags or Mic:
16B Dream Rig Duet
1
Ins/Outs
MIDI/T
emp
o
D
i
sp
l
ays
Footsw
i
tc
h
es
Global Settings
Pre
f
erences
EXP Pe
d
a
l
s
Firmware Version 2.00.0
Volume Knob
Controls
S/PDIFMultiMultiMic
Guitar
Digital
Output
Headphones
Monitor
Reamp Src
(USB 7)
Reamp Src
(USB 8)
Ins/Outs
0.0 dB
Digital
Out Level
Ins/Outs
Recording a Dry DI Track
For this example, we'll record guitar into two DAW tracks simultaneously, with one
capturing the Helix-processed tone and the other the unprocessed DI guitar.
1. In the Helix Global Settings>Ins/Outs>Page 3 screen, set
Re-amp Src (USB 7) to "Guitar" (as shown above).
2. Dial in your desired Helix tone, while keeping the Helix Input
and Output blocks both set to the default "Multi" setting.
3. Create two new audio tracks in your DAW software project:
Create one mono track to record the dry DI guitar, and set the track's input
to Helix USB 7.
Create one stereo track to record your full, stereo Helix-processed tone and
set the track's input to Helix USB 1/2.
GUITAR IN
USB
DRY DI GUITAR
PROCESSED GUITAR
TRACK 1 (Dry DI Guitar)
TRACK 2 (Processed Guitar)
16B Dream Rig Duet
FeedbackTime
[37%]
Delay Harmony Delay
LevelMixKeyScale
0.0 dB40%MinorD1/8
58
4. Set both tracks' outputs, as well as the DAW Master output,
to Helix USB 1/2 to allow all tracks to play back through Helix.
NOTE: Setting the stereo track's output to Helix USB 1/2 allows you to hear
your Helix-processed tone via the Helix hardware monitoring while record-
ing.Forthisconguration,disablesoftwaremonitoringonallDAWtracks.
5. Arm both these DAW audio tracks, hit the Record button and
start laying down your guitar performance!
Now you have your Helix-processed track to hear with the project, and a separate DI
track with which you can further experiment at any time with DAW plug-ins and/or re-
amping (see the next section).
Re-amping Through Helix
If your DAW software provides options for routing individual audio tracks to outputs
other than just the main Helix USB Out 1/2, then you can use these steps for re-amp-
ing a dry recorded DI track back through Helix.
1. In your DAW software, set the DI track's Output setting to a
Helix stereo USB Out other than USB Out 1/2. For this example
we'll use Helix USB Out 3/4.
2. Create a new stereo track in your DAW project and set this
track's Input and Output both to USB 1/2 - Let's name this
track "Re-amped." Arm the track for recording.
NOTE: In some DAW software it may be necessary to also activate the
software monitoring feature on this "re-amped" track to monitor the Helix-
processed signal when playing back your project. See your software's docu-
mentation.
3. On Helix, select the Input block and set it to receive from the
same USB stereo pair (USB In 3/4) and keep the Output block
set to "Multi." Load your choice of amps and eects on the
current Helix preset.
16B Dream Rig Duet
FeedbackTime
[37%]
Delay Harmony Delay
LevelMixKeyScale
0.0 dB40%MinorD1/8
DRY DI GUITAR
USB
RE-AMPED GUITAR
TRACK 1 (Dry DI Guitar)
T
RA
C
K
2
(
Processed
G
uitar
)
TRACK 3 (Re-amped Guitar)
4. Now play your DAW project and you'll hear the DI track "re-
amped" through your Helix! Adjust the DI track's volume slider
to make sure the signal feeding into Helix is not too hot. Tweak
your Helix amp & eects as desired while listening with the
playback of your project mix.
5. Once you have your re-amplied guitar tone they way you like
it, Solo both the DI and re-amped tracks, rewind to the start of
the project and hit the DAW Record button, allowing it to cap-
ture the signal into the new re-amped track in real-time.
Allow the DI track to play to the end, stop recording and you've created your new re-
amped guitar track!
TIP: Note that you still have your original Guitar DI track, and you can repeat this
processtocreateadditionalre-ampedtrackswithdierentHelixsettings,add
plug-ins, blend with your original guitar track and more.
59
ASIO
®
Driver Settings (Windows
®
only)
When using Helix as an audio interface for Windows
®
DAW applications, it is highly
recommendedtocongurethesoftwaretoutilizethe"ASIO
®
" Helix driver. The Line
6 ASIO
®
driveroersthesuperior,low-latencyaudioperformancerequiredforDAW
recording. This driver selection is typically found in your DAW software's Preferences
or Options dialog - see your software's documentation.
NOTE: Download and install the latest Line 6 Helix ASIO
®
driver from
line6.com/software.
Once the ASIO
®
Helix driver has been selected in your DAW software, you'll also see a
button in the same dialog for "ASIO
®
Settings" (or with a similar title). Press this button
to launch the Helix Control Panel, which is where you make the following Helix driver
settings.
Sound
Control
Panel
This button launches the Windows
®
Sound Control Panel, which is
whereyoucanoptionallycongureHelixtobetheaudioplayback
device for multi-media applications (such as Windows
®
Media
Player, iTunes
®
, etc.) These settings are not relevant for your DAW
software, since these applications utilize the standard Windows
®
driver.
Default Bit
Depth
Select the Bit Depth at which Helix will operate for recording and
playback with your DAW software. 24 bit or 32 bit are recommend-
ed for quality audio production.
ASIO
®
Buer Size
Your goal is to achieve the lowest latency possible in your DAW
software,butwithglitch-freeaudioperformance.Smallerbuer
size results in lower latency, however, also increases the demands
on your computer, which can result in clicks, pops or other audio
artifacts. Start with a lower slider setting here and, if you encounter
audio performance issues, come back to this panel and move this
slider to the right incrementally to remedy the problem.
Click the Apply and OK buttons when your Helix Control Panel settings are complete
to return to your DAW software. Please also refer to your DAW software's documenta-
tionformoreaboutitsownspecicaudiodevice,buerandprojectsettings.
Core Audio Driver Settings (Mac
®
OS X
only)
To use Helix as an audio interface for Mac
®
applications, it is not necessary to install
any additional driver. Helix will utilize the Mac
®
computer's "Class Compliant" USB
driver automatically simply by connecting to your USB port. Helix will then appear
as a selectable Core Audio device within the Mac
®
Utilities > Audio MIDI Setup panel
and/or directly within your audio and multimedia applications. However, note that this
Apple Class Compliant driver oers strictly 48kHz native sample rate operation. If
youprefertouseadierentnativesamplerate(orifyourparticularDAWapplication
requires it), you can optionally download and install the Line 6 Mac
®
Core Audio driver
from line6.com/software.This Line 6 driver oers 44.1kHz,48kHz,88kHzor96kHz
sample rate operation.
60
MIDI
NOTE: Helix transmits and responds to MIDI messages over USB in the same
manner as via its MIDI connectors. For USB MIDI operation on Windows
®
com-
puters, it is necessary to download and install the Line 6 Helix ASIO
®
driver,
available from line6.com/software. There is no driver installation necessary for an
Apple Mac
®
computer, iPad or iPhone.
MIDI Bank/Program Changes
Helix responds to traditional MIDI CC and Program change messages from an external
MIDI device (or from MIDI software via USB) and will recall setlists, presets, and/or
snapshots accordingly.
Remotely Selecting a Setlist, Preset, and/or Snapshot
Press PRESETS to open the Setlist menu:
Rename
Setlist
Rename
Preset
Reorder
Preset
Select
Snapshot
Rename
Snapshot
CC32: 007
PC: 005
CC69: 000
SNAPSHOT 1
1 FACTORY 1
2 FACTORY 2
3 USER 1
4 USER 2
5 USER 3
6 USER 4
7 USER 5
8 TEMPLATES
15A
15B
15C
15D
16A
16B
16C
16D
Cold Shot
Hey Joe
Tom Sawyer
Untitled Streets
Have a Cigar
Bottle Message
Mad House
Run Like
1 FACTORY 1 16B Bottle Message
The dark text above Knob 2 displays the required MIDI messages for recalling
setlists, presets, and/or snapshots from external MIDI devices or software. In the
illustration above, the FACTORY 1 setlist is recalled with a CC32 message of 007,
the 16B Bottle Message preset is recalled with a PC (program change) message
of 005, and Snapshot 1 is recalled with a CC69 message of 000.
NOTE: When navigating Presets from the Helix hardware (PRESETS encoder,
preset footswitches, PRESET / PRESET , etc.), Helix automatically trans-
mits a MIDI Program Change message corresponding to the selected preset. If
you'd prefer Helix to not automatically transmit or receive PC messages, turn
"Global Settings > MIDI/Tempo">Knob4(MIDIPCSend/Receive)o.
MIDI CC
HelixhasreservedspecicMIDICCmessagesforglobalfunctions;theseCCscannot
be used as controllers. If you attempt to learn a CC message reserved for global func-
tions (see "Controller Assign"), the following dialog appears:
Learn
Controller
Parameter
Feedback
Controller
None
L
This MIDI CC# is reserved for global functions!
MIDI CC# Value Function
Pedal and Footswitch Assignments
1
0-127 Emulates EXP 1 Pedal
2
0-127 Emulates EXP 2 Pedal
3
0-127 Emulates EXP 3 Pedal
49
0-127 Emulates Stomp footswitch mode's FS1
50
0-127 Emulates Stomp footswitch mode's FS2
51
0-127 Emulates Stomp footswitch mode's FS3
52
0-127 Emulates Stomp footswitch mode's FS4
53
0-127 Emulates Stomp footswitch mode's FS5
54
0-127 Emulates Stomp footswitch mode's FS7
55
0-127 Emulates Stomp footswitch mode's FS8
56
0-127 Emulates Stomp footswitch mode's FS9
57
0-127 Emulates Stomp footswitch mode's FS10
58
0-127 Emulates Stomp footswitch mode's FS11
59
0-127 Emulates EXP Toe switch
Looper Controls
60
0-63: Overdub;
64-127: Record
Looper Record/Overdub switch (FS8)
61
0-63: Stop;
64-127: Play
Looper Play/Stop switch (FS9)
62
64-127 Looper Play Once switch (FS3)
63
64-127 Looper Undo switch (FS2)
65
0-63: Forward;
64-127: Reverse
Looper Forward/Reverse switch (FS11)
61
MIDI CC# Value Function
66
0-63: Full;
64-127: Half
Looper Full/Half Speed switch (FS10)
67
0-63:O;
64-127: On
Looperblockon/o(ifavailable);alsoenters/exits
Looper footswitch mode
Additional Controls
0
0-7 Bank MSB
32
0-7 Bank LSB—Setlist select
64
64-127 Tap Tempo
68
0-127 Tunerscreenon/o
69
0-7 Snapshot select
70
0-127
Additional global MIDI commands (reserved for future
use)
71
0-127
72
0-127
73
0-127
74
0-127
75
0-127
76
0-127
128
0-63: Oh;
64-127: Nooo
Helix achieves self-awareness and starts poking fun of
that face you make during the solo
62
15

Hulp nodig? Stel uw vraag in het forum

Spelregels

Misbruik melden

Gebruikershandleiding.com neemt misbruik van zijn services uitermate serieus. U kunt hieronder aangeven waarom deze vraag ongepast is. Wij controleren de vraag en zonodig wordt deze verwijderd.

Product:

Bijvoorbeeld antisemitische inhoud, racistische inhoud, of materiaal dat gewelddadige fysieke handelingen tot gevolg kan hebben.

Bijvoorbeeld een creditcardnummer, een persoonlijk identificatienummer, of een geheim adres. E-mailadressen en volledige namen worden niet als privégegevens beschouwd.

Spelregels forum

Om tot zinvolle vragen te komen hanteren wij de volgende spelregels:

Belangrijk! Als er een antwoord wordt gegeven op uw vraag, dan is het voor de gever van het antwoord nuttig om te weten als u er wel (of niet) mee geholpen bent! Wij vragen u dus ook te reageren op een antwoord.

Belangrijk! Antwoorden worden ook per e-mail naar abonnees gestuurd. Laat uw emailadres achter op deze site, zodat u op de hoogte blijft. U krijgt dan ook andere vragen en antwoorden te zien.

Abonneren

Abonneer u voor het ontvangen van emails voor uw Line 6 Helix Control bij:


U ontvangt een email met instructies om u voor één of beide opties in te schrijven.


Ontvang uw handleiding per email

Vul uw emailadres in en ontvang de handleiding van Line 6 Helix Control in de taal/talen: Engels als bijlage per email.

De handleiding is 12,4 mb groot.


U ontvangt de handleiding per email binnen enkele minuten. Als u geen email heeft ontvangen, dan heeft u waarschijnlijk een verkeerd emailadres ingevuld of is uw mailbox te vol. Daarnaast kan het zijn dat uw internetprovider een maximum heeft aan de grootte per email. Omdat hier een handleiding wordt meegestuurd, kan het voorkomen dat de email groter is dan toegestaan bij uw provider.

Stel vragen via chat aan uw handleiding

Stel uw vraag over deze PDF

Andere handleiding(en) van Line 6 Helix Control

Line 6 Helix Control Gebruiksaanwijzing - Nederlands - 63 pagina's


Uw handleiding is per email verstuurd. Controleer uw email

Als u niet binnen een kwartier uw email met handleiding ontvangen heeft, kan het zijn dat u een verkeerd emailadres heeft ingevuld of dat uw emailprovider een maximum grootte per email heeft ingesteld die kleiner is dan de grootte van de handleiding.

Er is een email naar u verstuurd om uw inschrijving definitief te maken.

Controleer uw email en volg de aanwijzingen op om uw inschrijving definitief te maken

U heeft geen emailadres opgegeven

Als u de handleiding per email wilt ontvangen, vul dan een geldig emailadres in.

Uw vraag is op deze pagina toegevoegd

Wilt u een email ontvangen bij een antwoord en/of nieuwe vragen? Vul dan hier uw emailadres in.


Info