645943
229
Verklein
Vergroot
Pagina terug
1/242
Pagina verder
11) When you have finished editing the curve, click anywhere on the workspace to deselect the
curve and stop editing points.
Edit Points tools
With reference to Figure 261, the tools available on the Edit Points toolbar allow you to edit and
change the shape of a Bézier curve and are explained as follows:
Points – allows you to activate or deactivate the edit mode for Bézier objects. In the edit
mode, individual points of the drawing object can be selected.
Move Points – activates a mode in which you can move points. The mouse pointer
displays a small empty square when resting on a point. Drag that point to another location.
The curve on both sides of the point follows the movement; the section of the curve
between points changes shape. Point at the curve between two points or within a closed
curve and drag the mouse to shift the entire curve without distorting the form.
Insert Points – activates the insert mode and allows you to insert points. You can also
move points, just as in the move mode. If, however, you click at the curve between two
points and move the mouse a little while holding down the mouse button you insert a new
point. The point is a smooth point, and the lines to the control points are parallel and remain
so when moved. If you wish to create a corner point you must first insert either a smooth or
a symmetrical point which is then converted to a corner point by using Corner Point.
Delete Points – deletes one or several selected points. If you wish to select several points,
click the appropriate points while holding down the Shift key. First select the points to be
deleted, and then click this icon or press Delete key.
Split Curve – splits a curve into two or more curves. Select the point or points where you
want to split the curve, then click.
Convert To Curve – converts a curve into a straight line or converts a straight line into a
curve. If you select a single point, the curve before the point will be converted. If two points
are selected, the curve between both points will be converted. If you select more than two
points, each time you click this icon, a different portion of the curve will be converted. If
necessary, round points are converted into corner points and corner points are converted
into round points. If a section of the curve is straight, the end points of the line have a
maximum of one control point each. They cannot be modified to control points unless the
straight line is converted back to a curve.
Corner Point – converts the selected point or points into corner points (Figure 263).
Corner points have two movable control points, which are independent from each other. A
curved line, therefore, does not go straight through a corner point, but forms a corner.
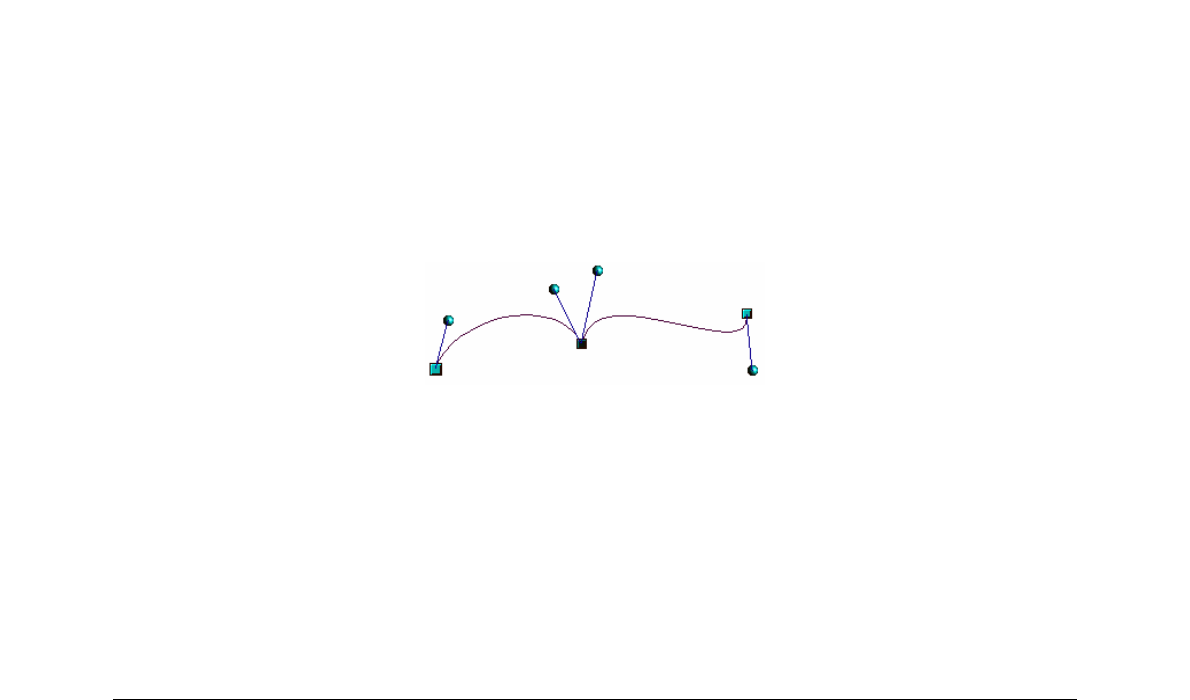
Figure 263: Corner point
Smooth Transition – converts a corner point or symmetrical point into a smooth point
(Figure 264). Both control points of the corner point are aligned in parallel and can only be
moved simultaneously. The control points may differ in length, allowing you to vary the
degree of curvature.
Chapter 11 Advanced Draw Techniques 229
229

Hulp nodig? Stel uw vraag in het forum

Spelregels

Misbruik melden

Gebruikershandleiding.com neemt misbruik van zijn services uitermate serieus. U kunt hieronder aangeven waarom deze vraag ongepast is. Wij controleren de vraag en zonodig wordt deze verwijderd.

Product:

Bijvoorbeeld antisemitische inhoud, racistische inhoud, of materiaal dat gewelddadige fysieke handelingen tot gevolg kan hebben.

Bijvoorbeeld een creditcardnummer, een persoonlijk identificatienummer, of een geheim adres. E-mailadressen en volledige namen worden niet als privégegevens beschouwd.

Spelregels forum

Om tot zinvolle vragen te komen hanteren wij de volgende spelregels:

Belangrijk! Als er een antwoord wordt gegeven op uw vraag, dan is het voor de gever van het antwoord nuttig om te weten als u er wel (of niet) mee geholpen bent! Wij vragen u dus ook te reageren op een antwoord.

Belangrijk! Antwoorden worden ook per e-mail naar abonnees gestuurd. Laat uw emailadres achter op deze site, zodat u op de hoogte blijft. U krijgt dan ook andere vragen en antwoorden te zien.

Abonneren

Abonneer u voor het ontvangen van emails voor uw LibreOffice Draw 4.3 bij:


U ontvangt een email met instructies om u voor één of beide opties in te schrijven.


Ontvang uw handleiding per email

Vul uw emailadres in en ontvang de handleiding van LibreOffice Draw 4.3 in de taal/talen: Engels als bijlage per email.

De handleiding is 10,45 mb groot.


U ontvangt de handleiding per email binnen enkele minuten. Als u geen email heeft ontvangen, dan heeft u waarschijnlijk een verkeerd emailadres ingevuld of is uw mailbox te vol. Daarnaast kan het zijn dat uw internetprovider een maximum heeft aan de grootte per email. Omdat hier een handleiding wordt meegestuurd, kan het voorkomen dat de email groter is dan toegestaan bij uw provider.

Uw handleiding is per email verstuurd. Controleer uw email

Als u niet binnen een kwartier uw email met handleiding ontvangen heeft, kan het zijn dat u een verkeerd emailadres heeft ingevuld of dat uw emailprovider een maximum grootte per email heeft ingesteld die kleiner is dan de grootte van de handleiding.

Er is een email naar u verstuurd om uw inschrijving definitief te maken.

Controleer uw email en volg de aanwijzingen op om uw inschrijving definitief te maken

U heeft geen emailadres opgegeven

Als u de handleiding per email wilt ontvangen, vul dan een geldig emailadres in.

Uw vraag is op deze pagina toegevoegd

Wilt u een email ontvangen bij een antwoord en/of nieuwe vragen? Vul dan hier uw emailadres in.


Info