670926
3
Verklein
Vergroot
Pagina terug
1/193
Pagina verder
CX820, CX827
User's Guide
October 2017 www.lexmark.com
Machine type(s):
7563
Model(s):
136, 137
Contents
Safety information........................................................................................ 6
Conventions.......................................................................................................................................................... 6
Product statements............................................................................................................................................. 6
Learning about the printer...........................................................................9
Finding information about the printer.............................................................................................................9
Selecting a location for the printer................................................................................................................ 10
Printer configurations.........................................................................................................................................11
Attaching cables.................................................................................................................................................12
Using the control panel.....................................................................................................................................14
Understanding the status of the power button and indicator light.......................................................15
Using the home screen.....................................................................................................................................15
Menu map.............................................................................................................................................................16
Printing a menu settings page........................................................................................................................18
Setting up and using the home screen applications..............................19
Customizing the home screen........................................................................................................................19
Setting up Forms and Favorites..................................................................................................................... 19
Setting up Card Copy........................................................................................................................................19
Using Shortcut Center..................................................................................................................................... 20
Setting up Scan Center....................................................................................................................................20
Managing contacts........................................................................................................................................... 20
Setting up and using the accessibility features..................................... 23
Enabling Magnification mode.........................................................................................................................23
Activating Voice Guidance..............................................................................................................................23
Adjusting the Voice Guidance speech rate................................................................................................23
Enabling spoken passwords or personal identification numbers........................................................ 23
Navigating the screen using gestures.........................................................................................................24
Using the keyboard on the display...............................................................................................................24
Loading paper and specialty media......................................................... 25
Setting the size and type of the specialty media......................................................................................25
Configuring Universal paper settings.......................................................................................................... 25
Loading trays......................................................................................................................................................25
Contents 2
Loading the multipurpose feeder..................................................................................................................27
Linking trays........................................................................................................................................................28
Printing.........................................................................................................29
Printing from a computer.................................................................................................................................29
Printing forms..................................................................................................................................................... 29
Printing from a mobile device........................................................................................................................29
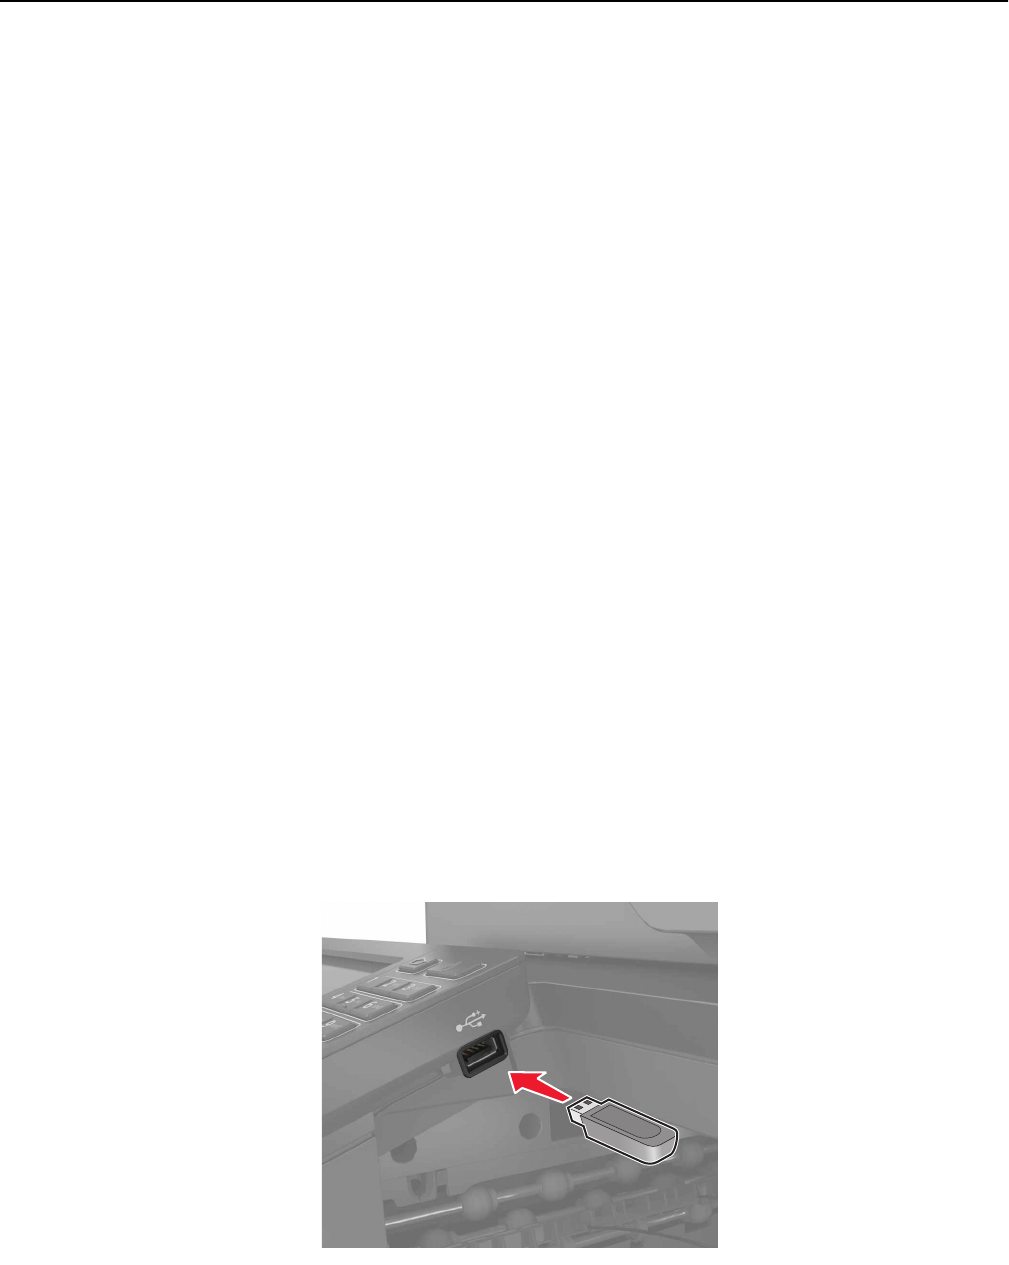
Printing from a flash drive............................................................................................................................... 30
Supported flash drives and file types............................................................................................................31
Configuring confidential jobs......................................................................................................................... 32
Printing held jobs...............................................................................................................................................32
Printing a font sample list................................................................................................................................ 33
Canceling a print job.........................................................................................................................................33
Copying........................................................................................................34
Making copies.................................................................................................................................................... 34
Copying photos..................................................................................................................................................34
Copying on letterhead..................................................................................................................................... 34
Copying on both sides of the paper.............................................................................................................34
Reducing or enlarging copies........................................................................................................................35
Collating copies................................................................................................................................................. 35
Placing separator sheets between copies................................................................................................. 35
Copying multiple pages onto a single sheet............................................................................................. 35
Creating a copy shortcut................................................................................................................................. 35
E-mailing...................................................................................................... 36
Setting up the email function........................................................................................................................36
Configuring email settings.............................................................................................................................36
Sending an e-mail..............................................................................................................................................36
Creating an e-mail shortcut.............................................................................................................................37
Faxing...........................................................................................................38
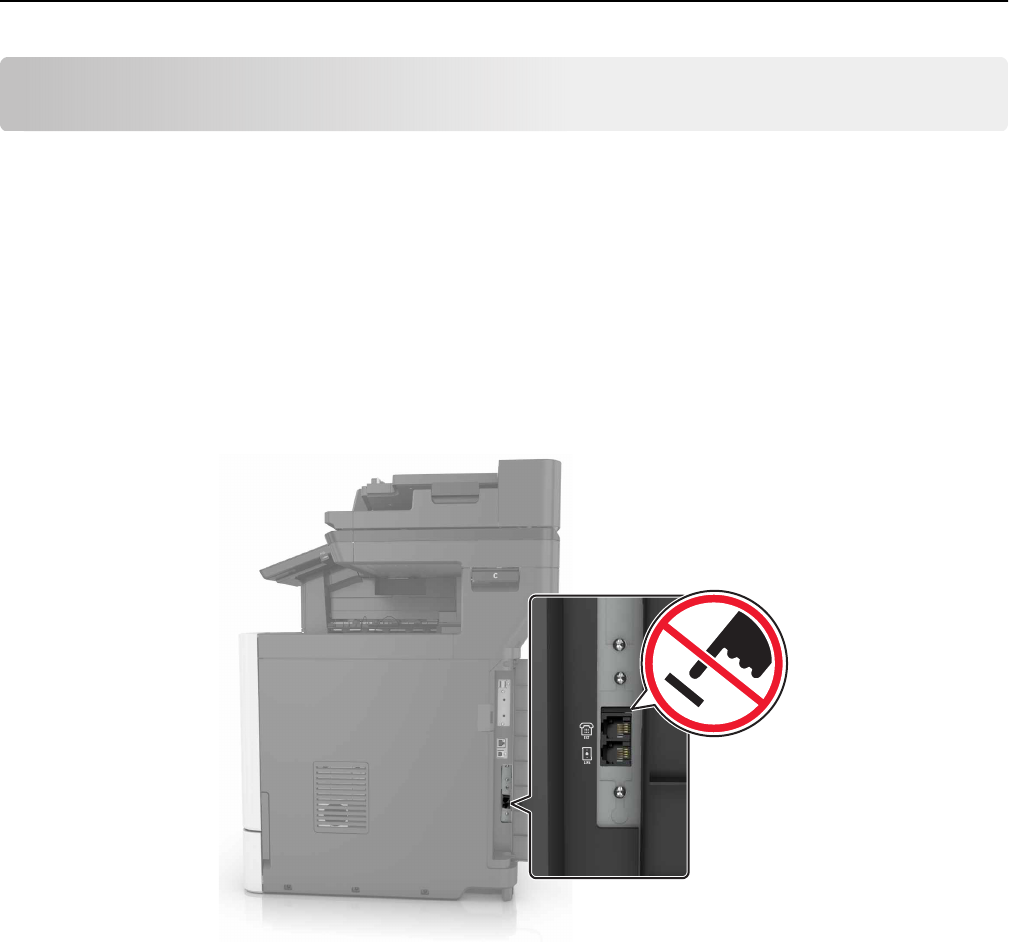
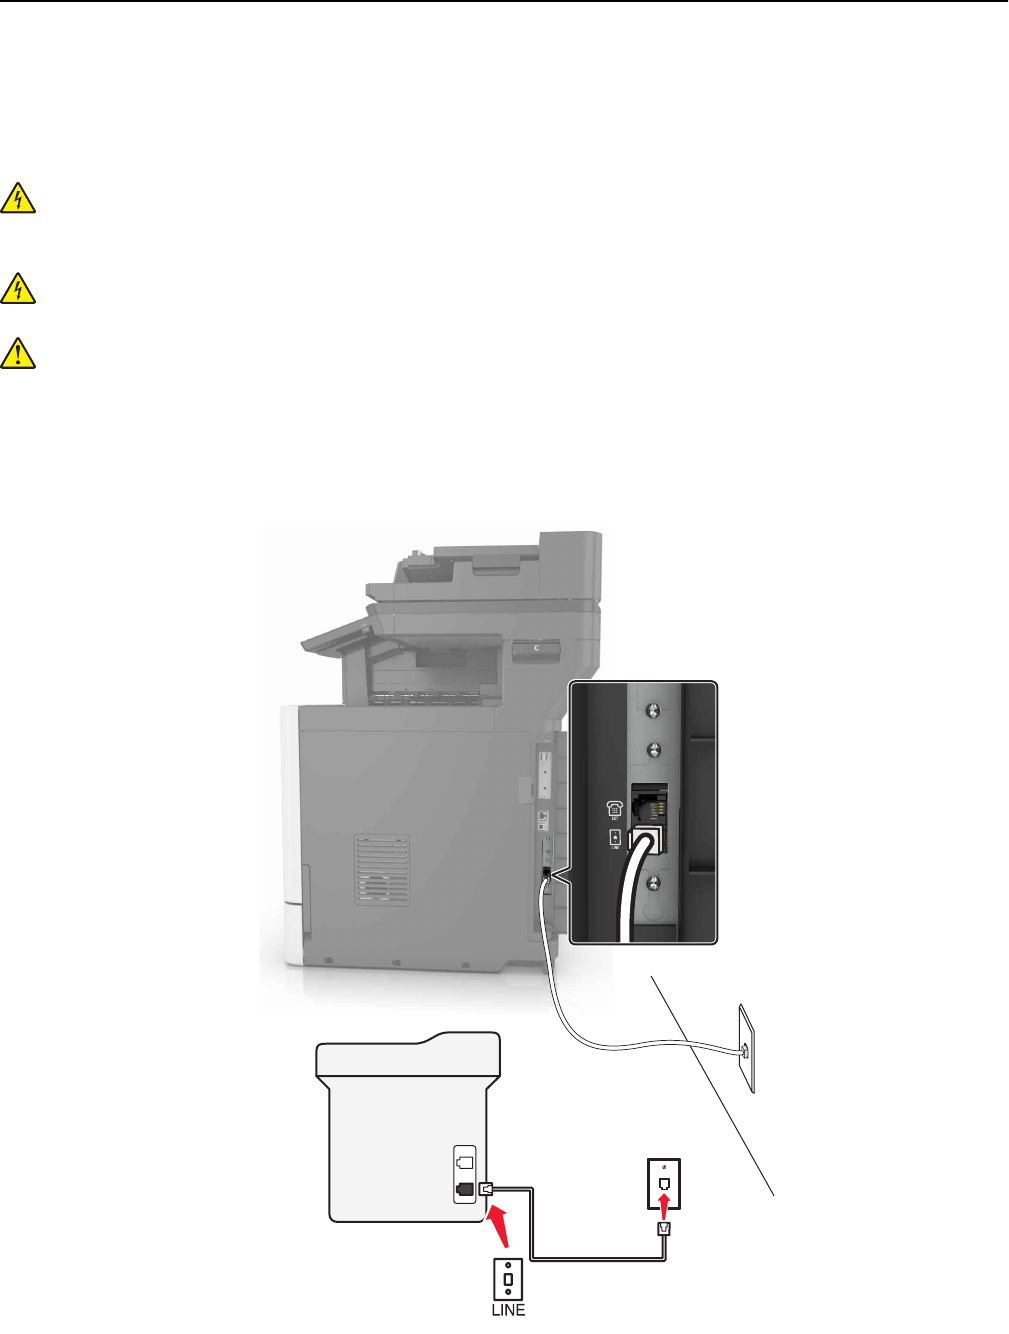
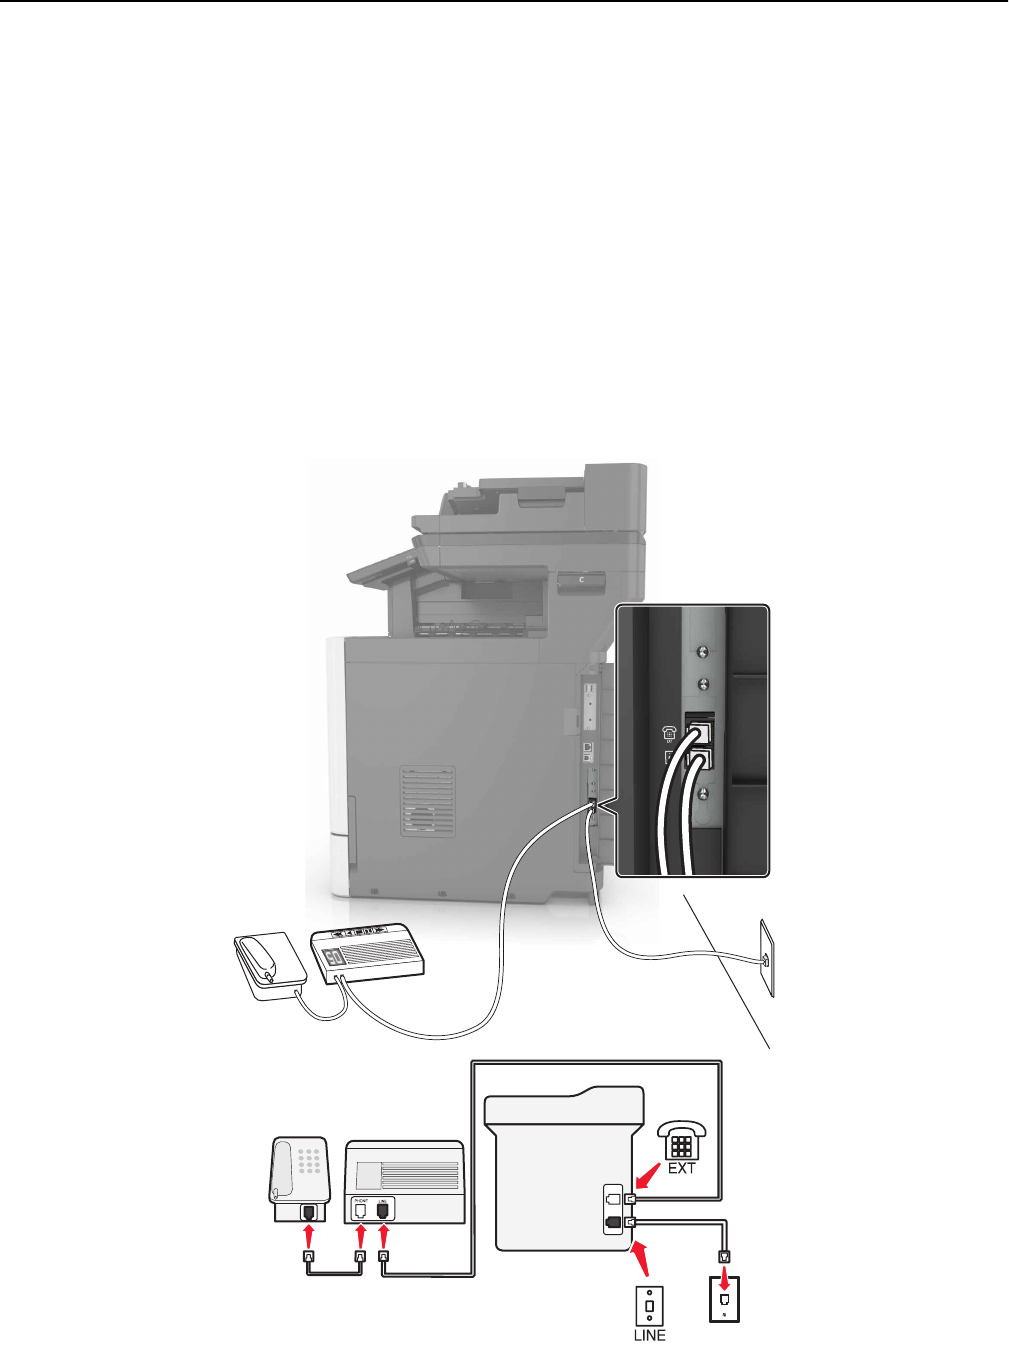
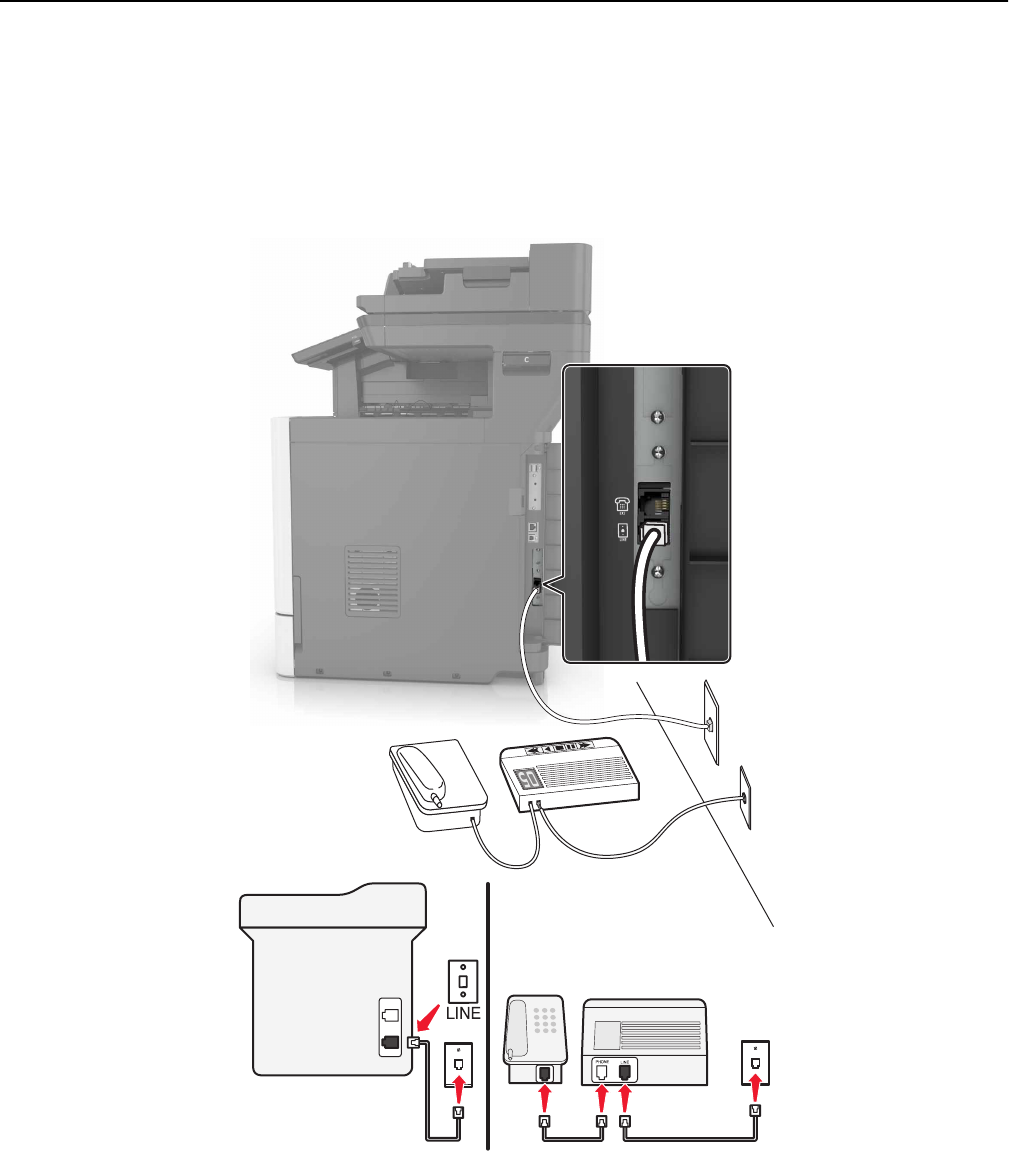
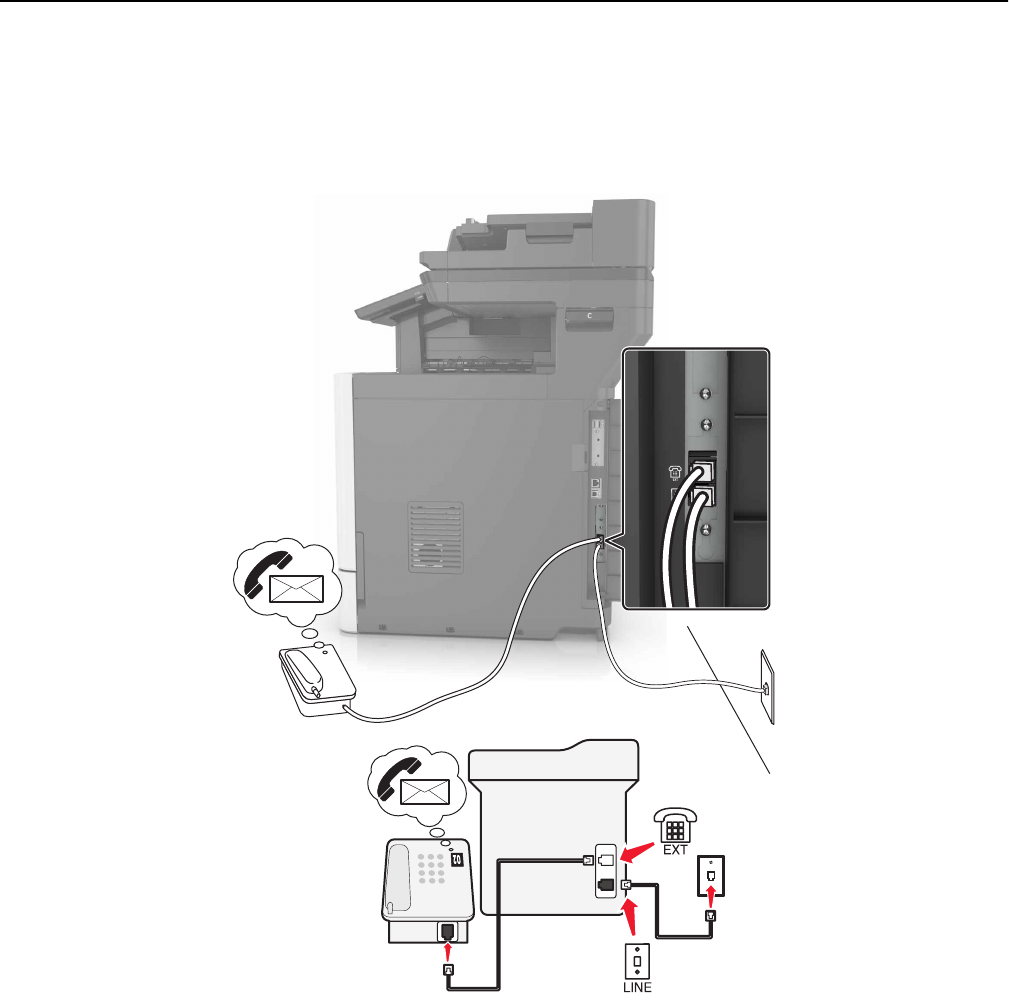
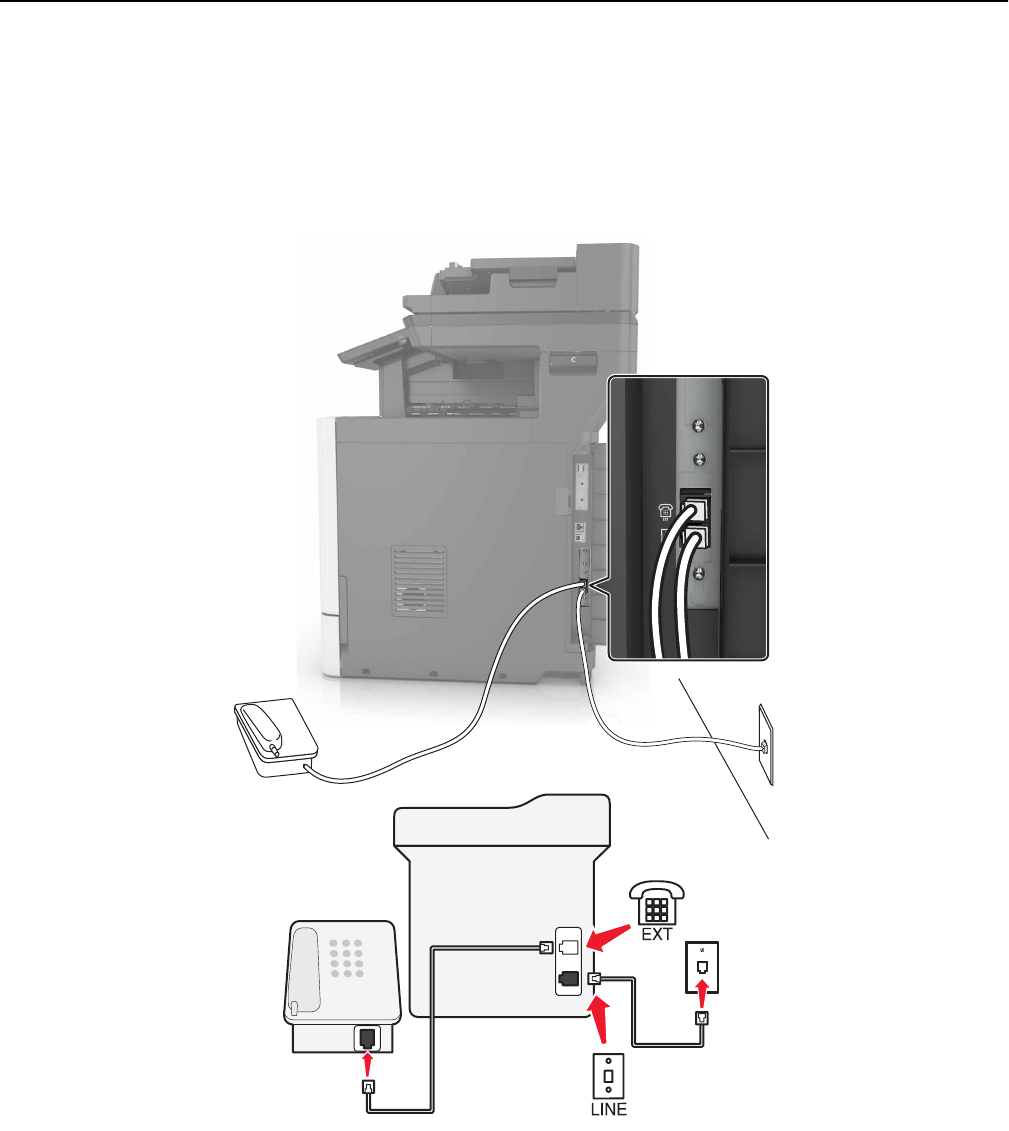
Setting up the printer to fax............................................................................................................................38
Sending a fax.......................................................................................................................................................51
Scheduling a fax................................................................................................................................................ 52
Creating a fax destination shortcut.............................................................................................................. 52
Changing the fax resolution........................................................................................................................... 52
Contents 3
Adjusting the fax darkness............................................................................................................................. 52
Viewing a fax log............................................................................................................................................... 53
Blocking junk faxes...........................................................................................................................................53
Holding faxes......................................................................................................................................................53
Forwarding a fax................................................................................................................................................53
Scanning...................................................................................................... 54
Scanning to an FTP server..............................................................................................................................54
Creating an FTP shortcut.................................................................................................................................54
Scanning to a flash drive.................................................................................................................................54
Sending scanned documents to a computer.............................................................................................55
Securing the printer................................................................................... 56
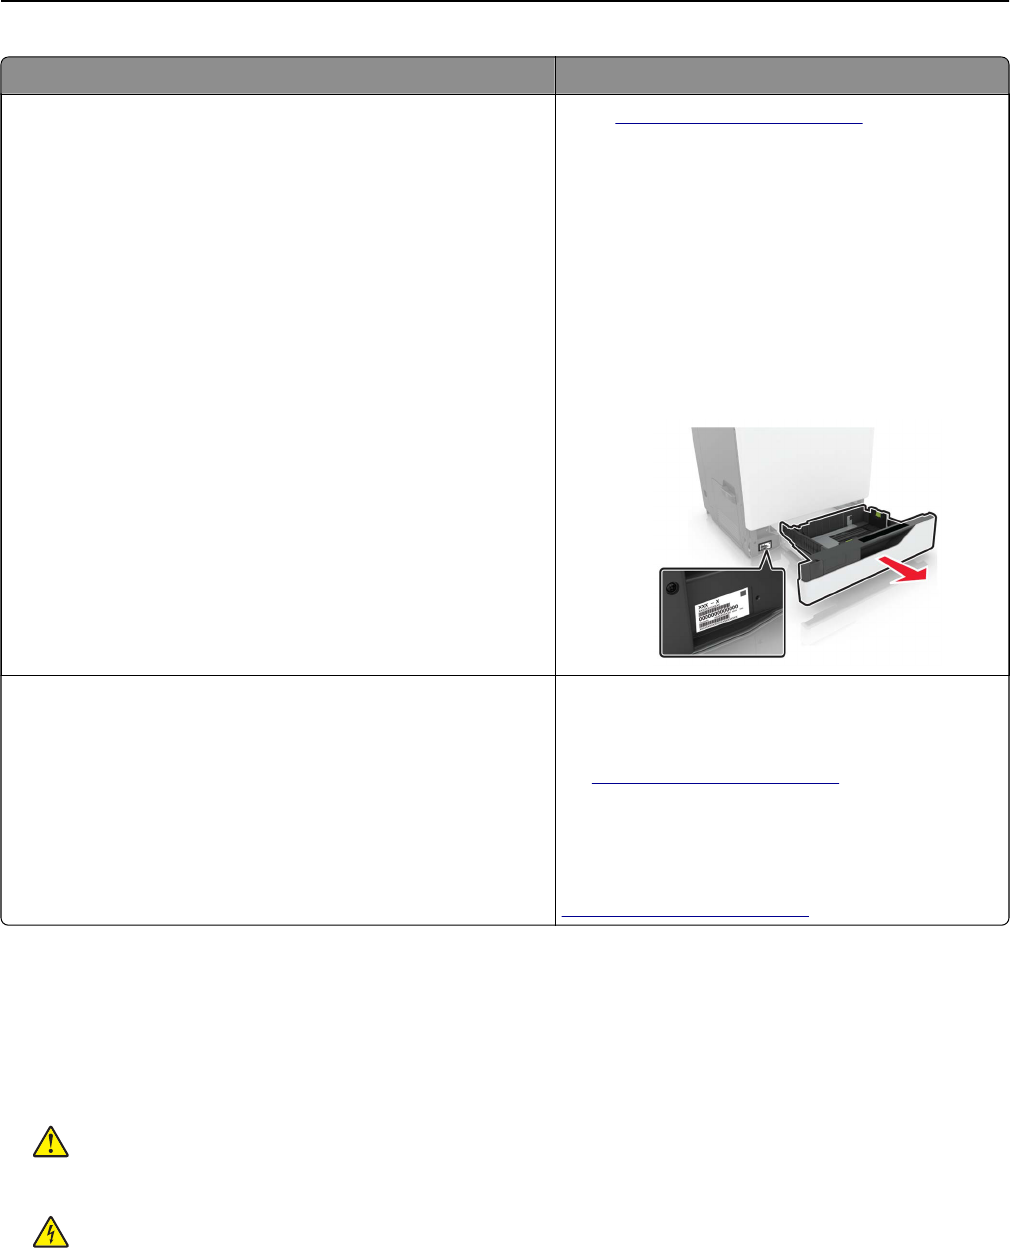
Locating the security slot................................................................................................................................ 56
Erasing printer memory................................................................................................................................... 56
Erasing printer hard disk memory.................................................................................................................56
Configuring printer hard disk encryption.................................................................................................... 57
Restoring factory default settings................................................................................................................. 57
Statement of Volatility.......................................................................................................................................57
Maintaining the printer.............................................................................. 59
Adjusting the speaker volume.......................................................................................................................59
Networking......................................................................................................................................................... 60
Setting up serial printing (Windows only).....................................................................................................61
Cleaning printer parts...................................................................................................................................... 62
Ordering parts and supplies...........................................................................................................................67
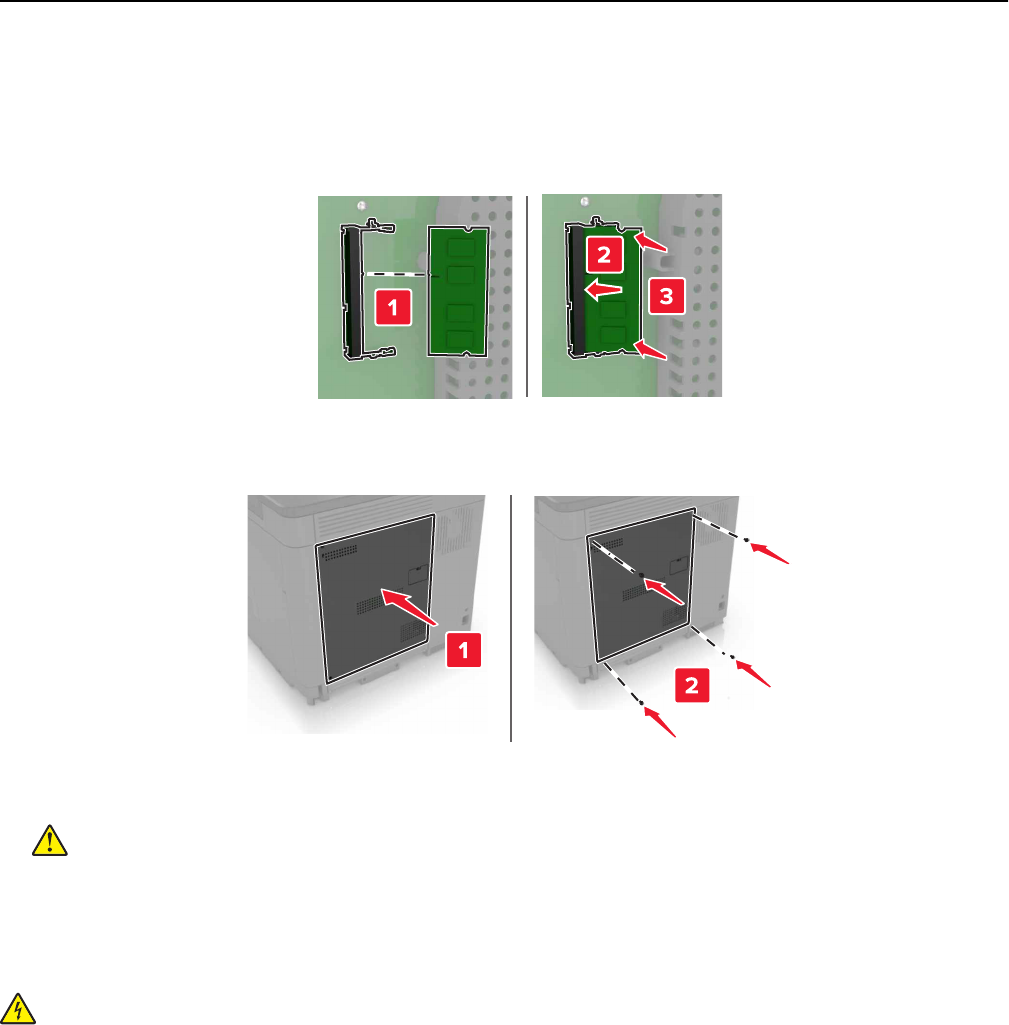
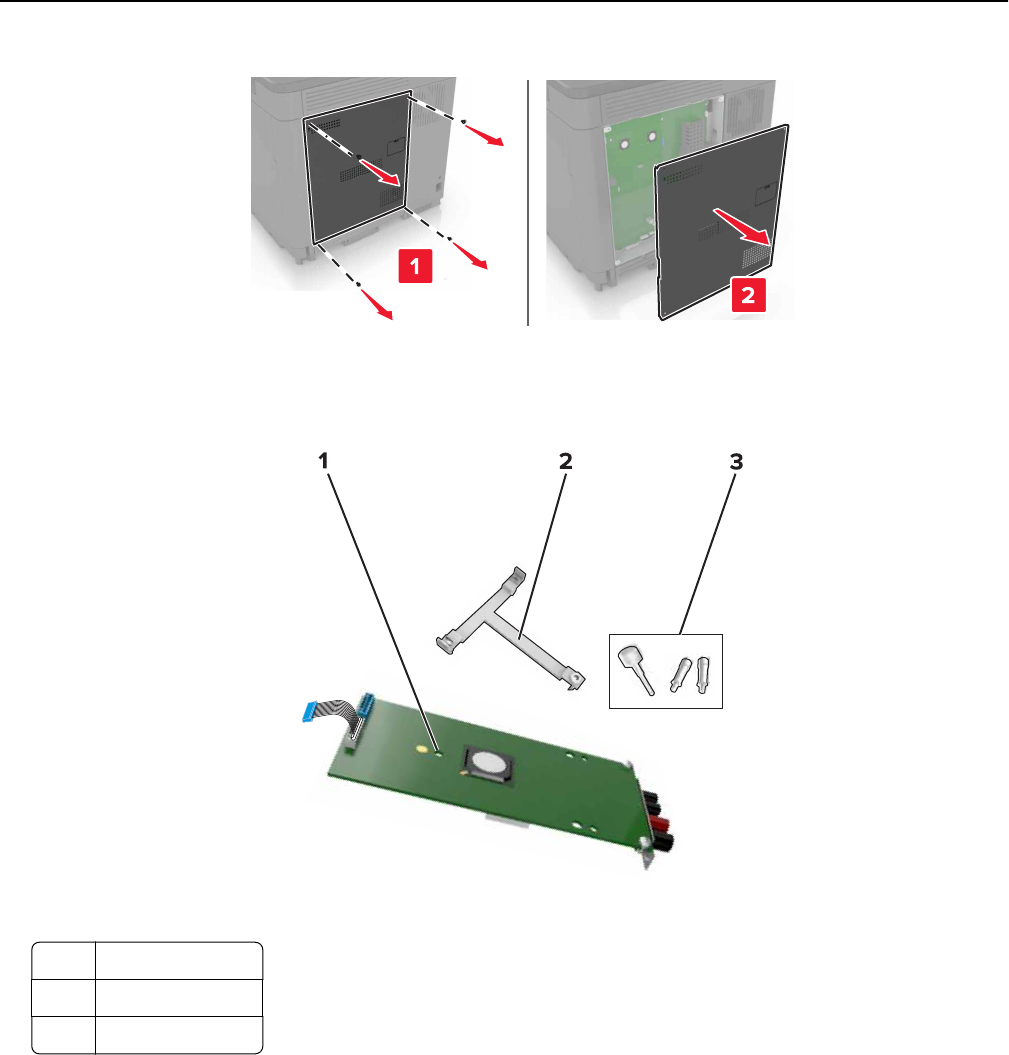
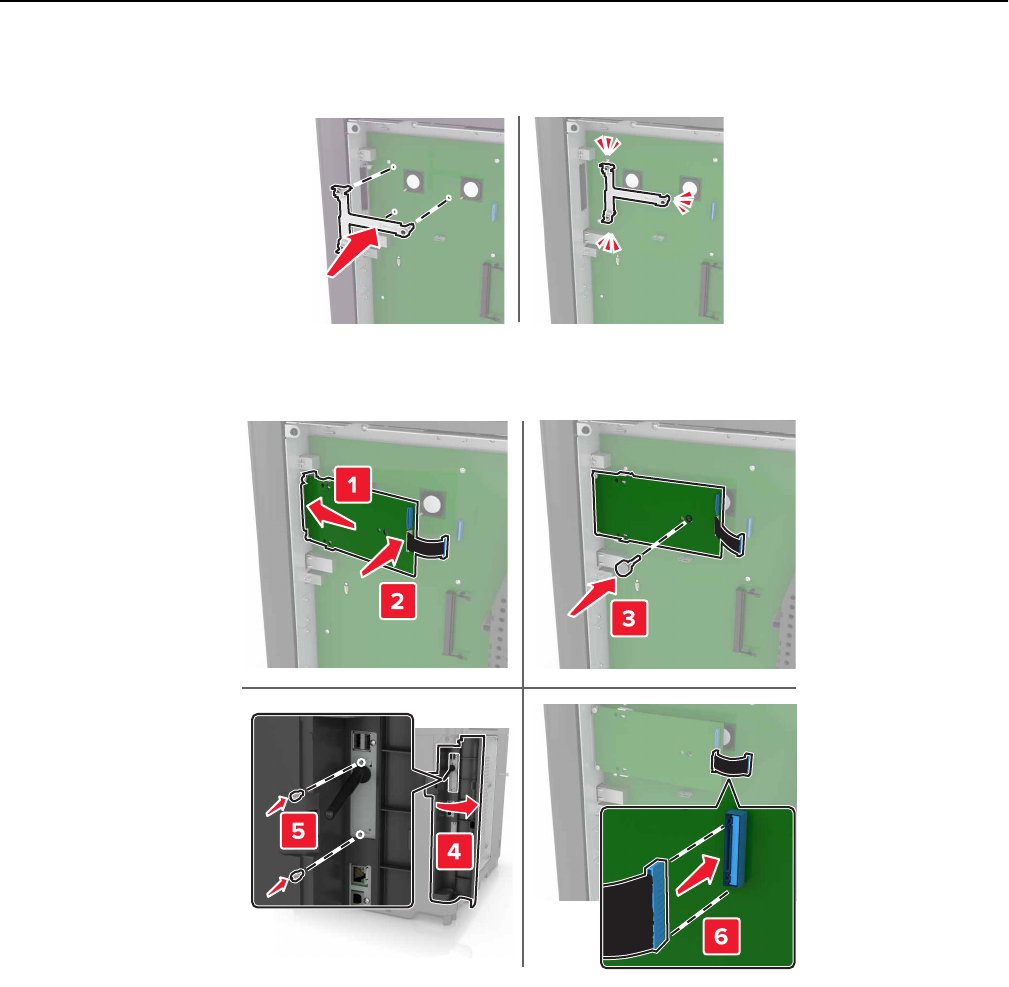
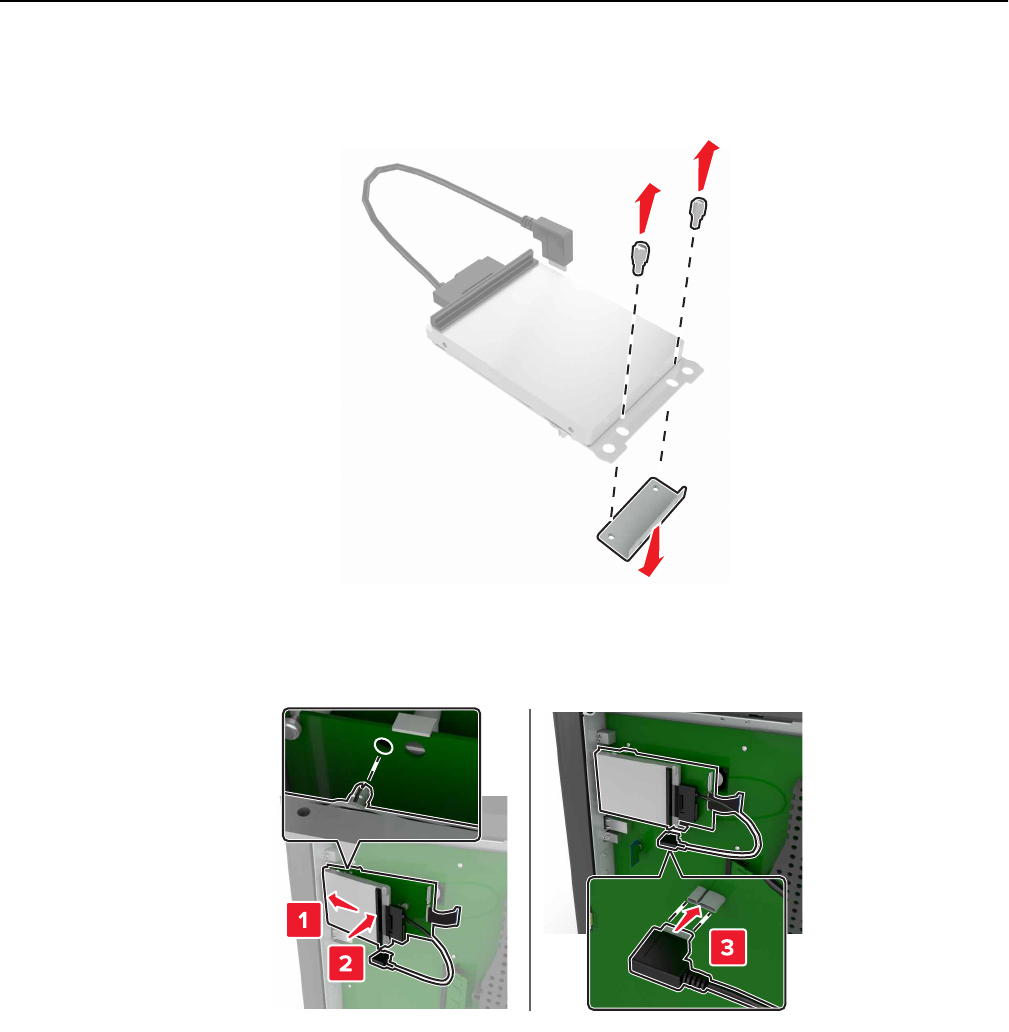
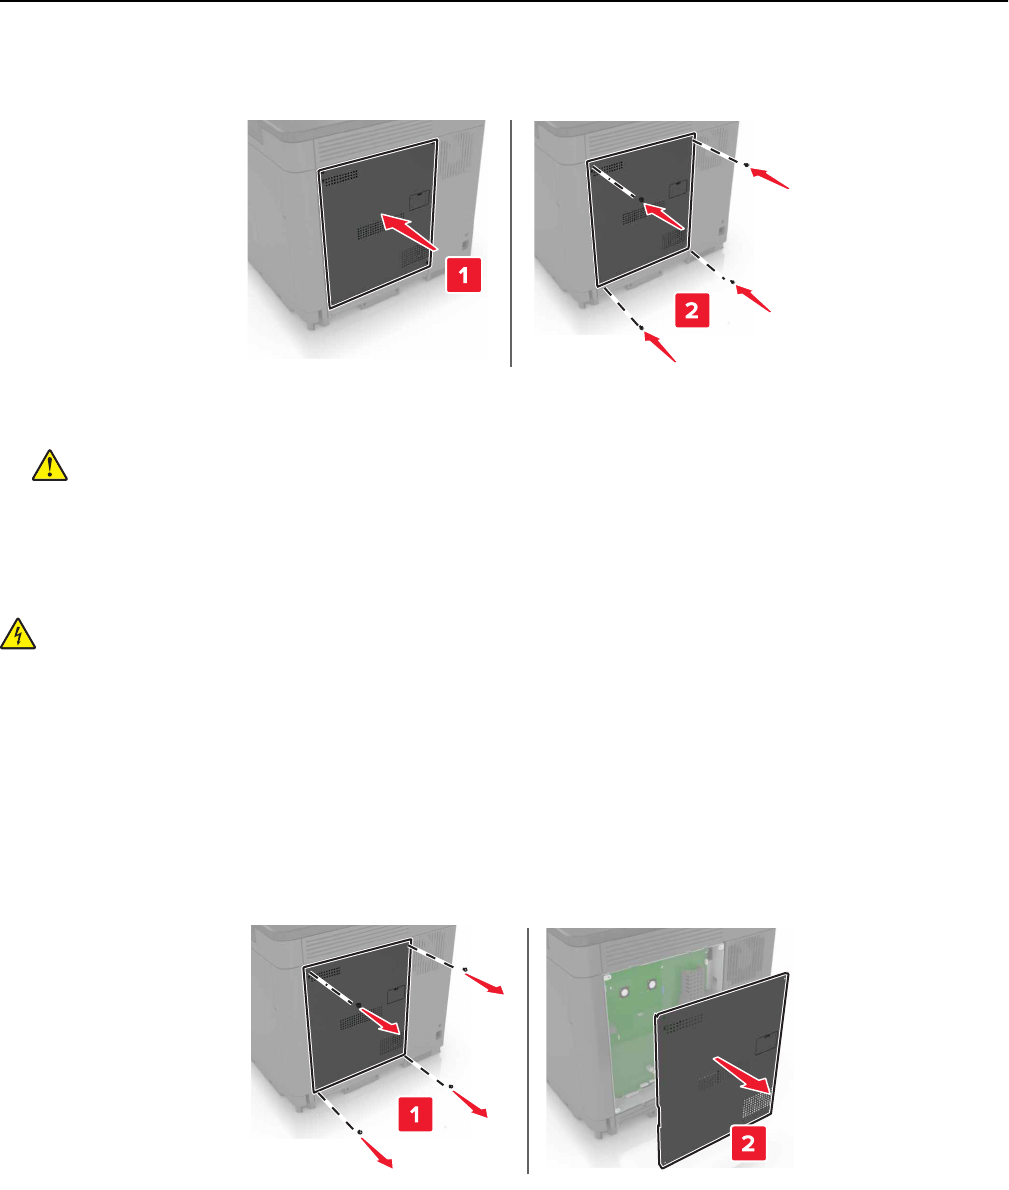
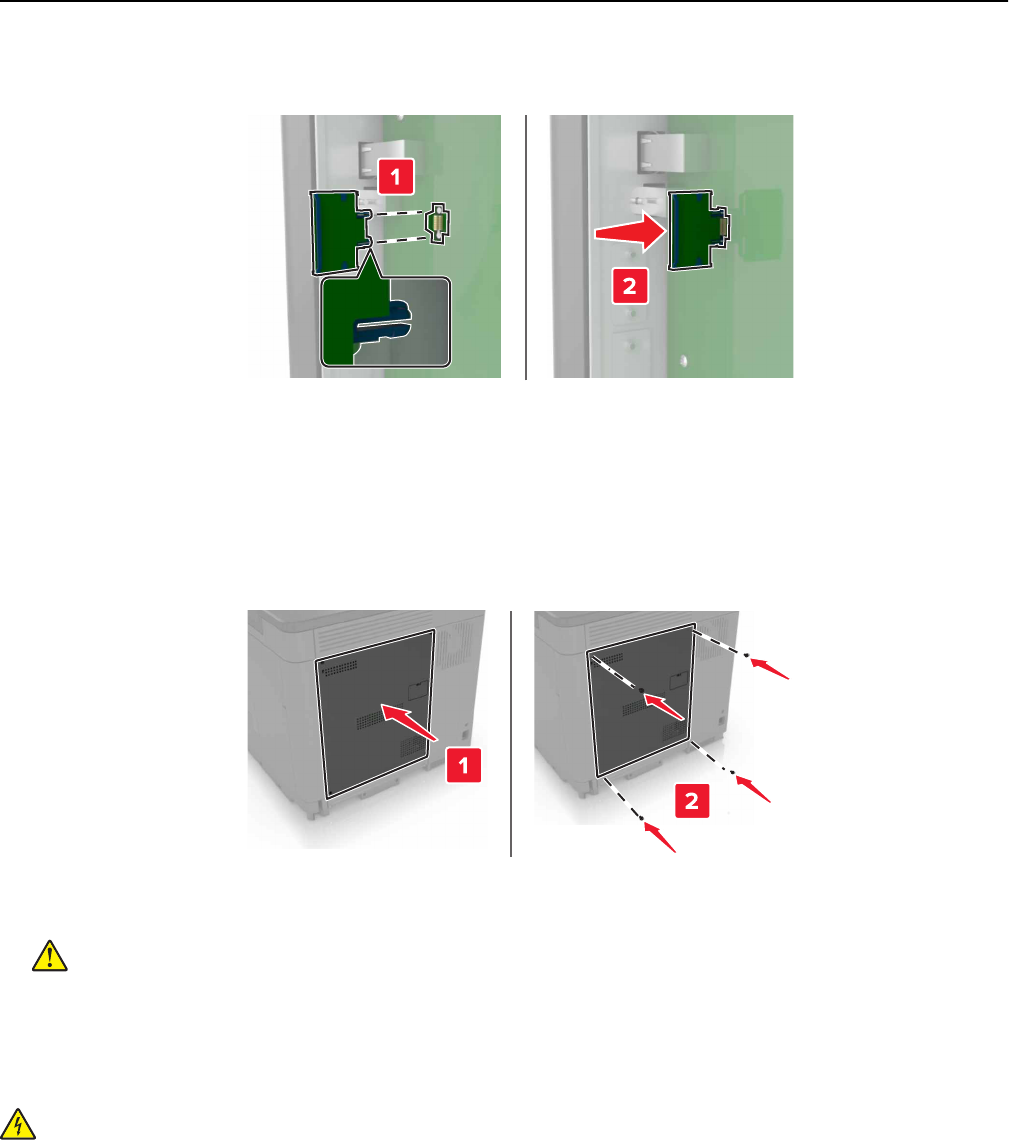
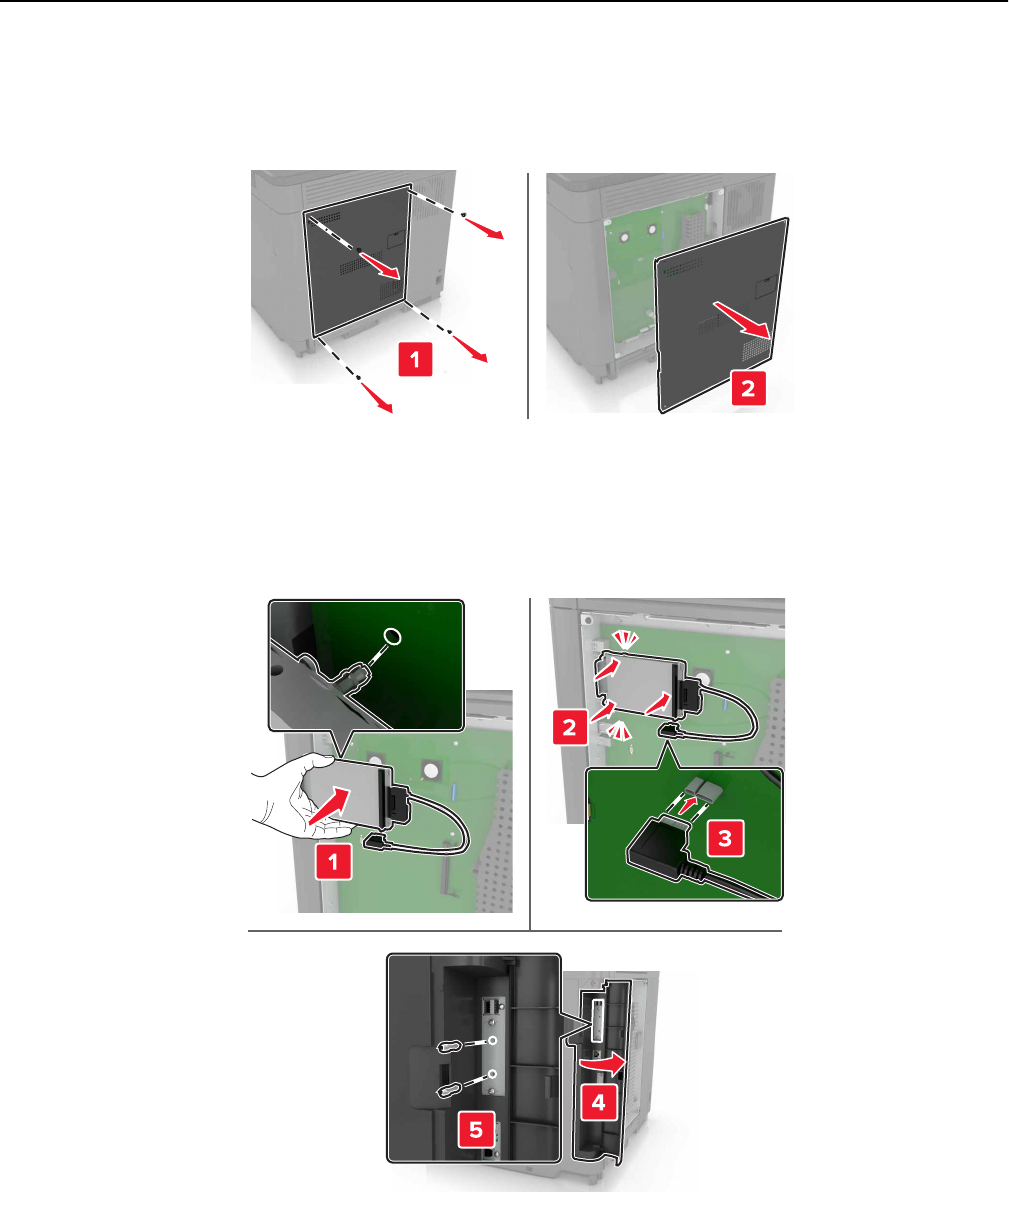
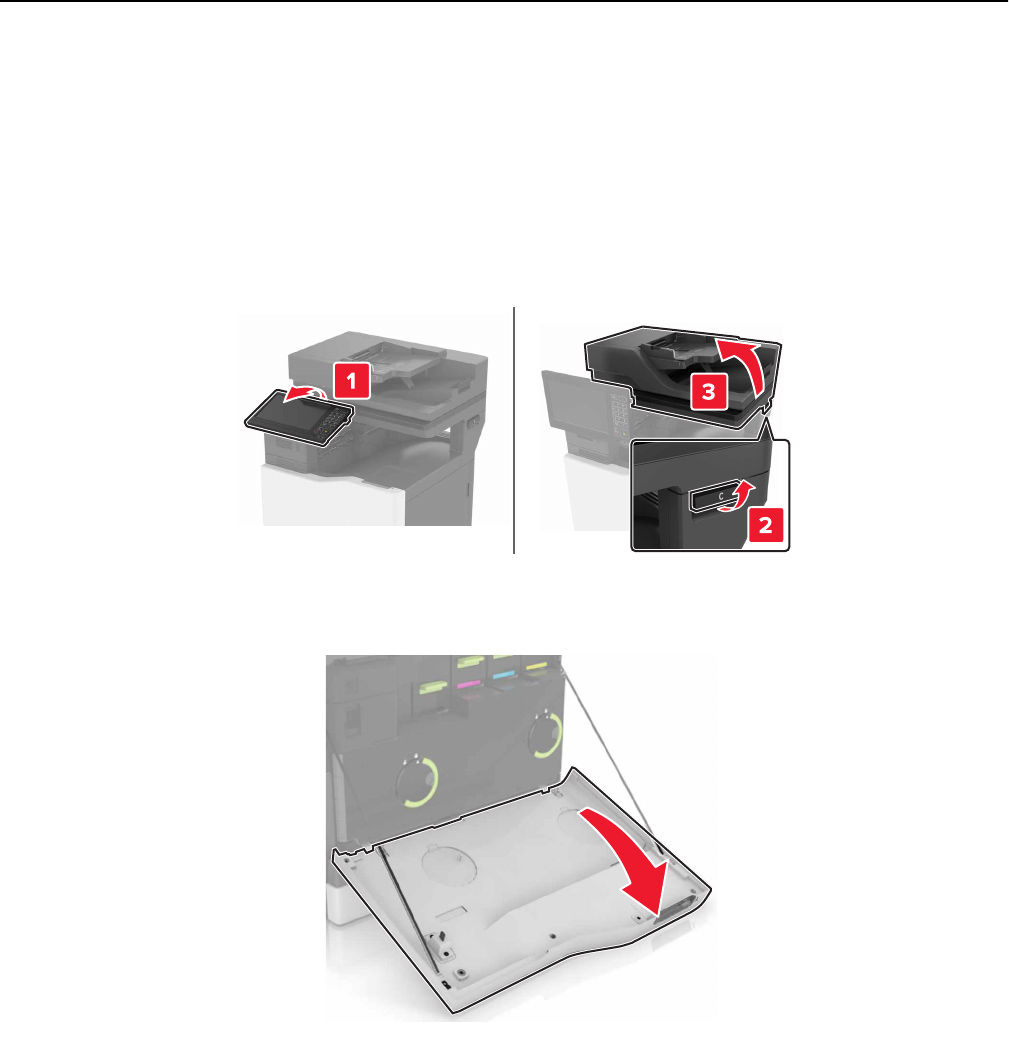
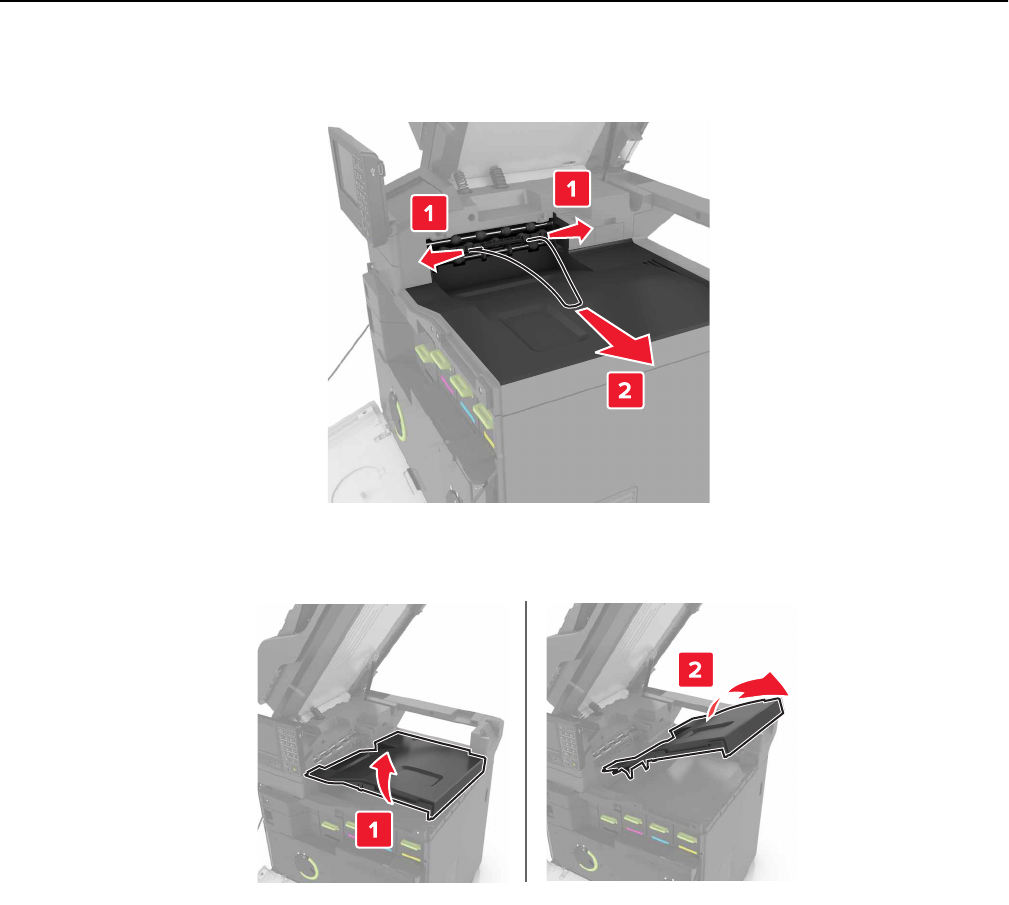
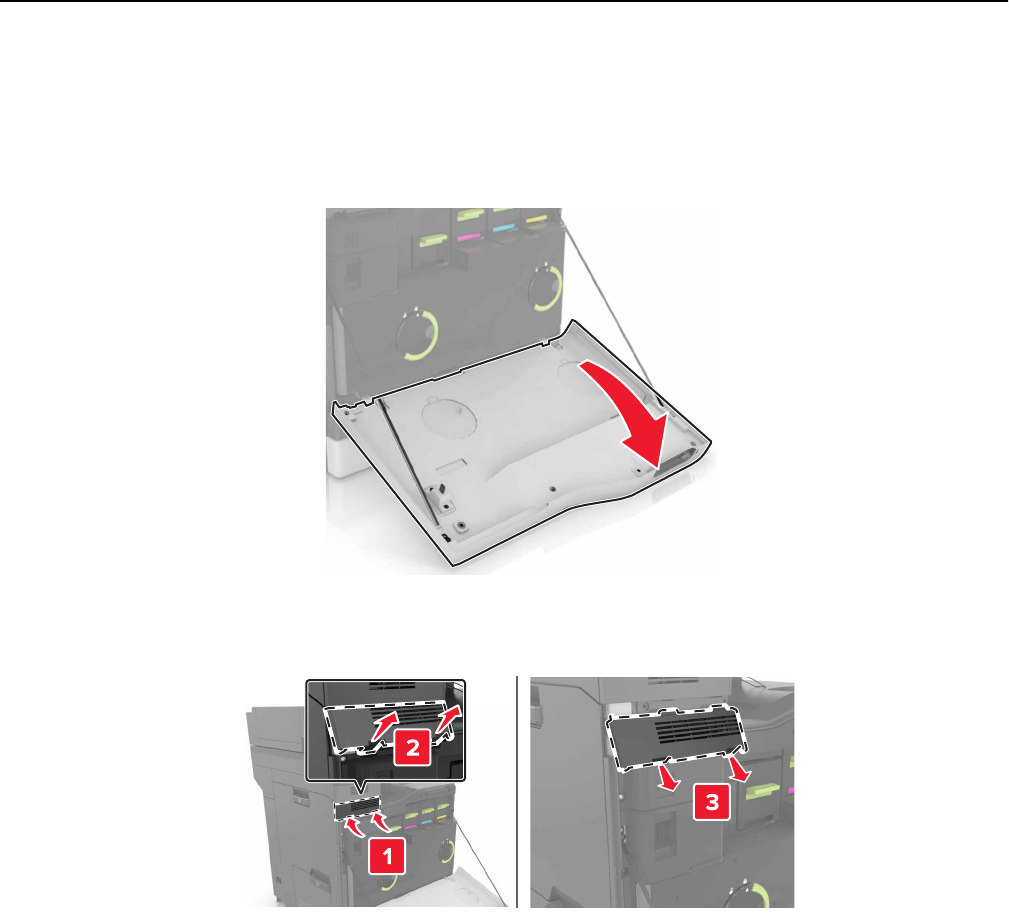
Replacing parts and supplies......................................................................................................................... 70
Storing supplies................................................................................................................................................102
Moving the printer........................................................................................................................................... 102
Saving energy and paper.............................................................................................................................. 103
Recycling............................................................................................................................................................104
Clearing jams.............................................................................................106
Avoiding jams................................................................................................................................................... 106
Identifying jam locations................................................................................................................................ 107
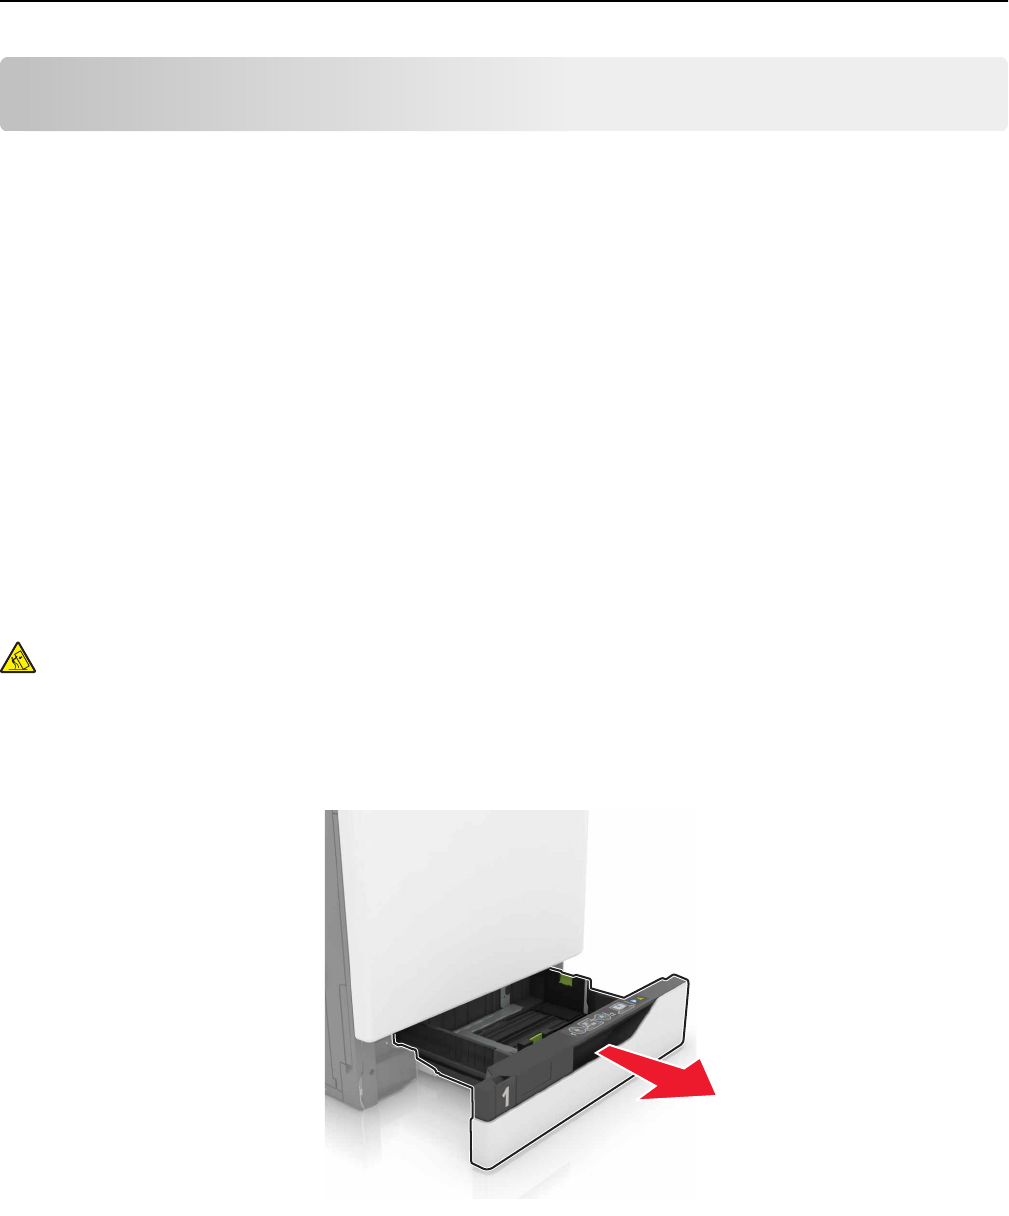
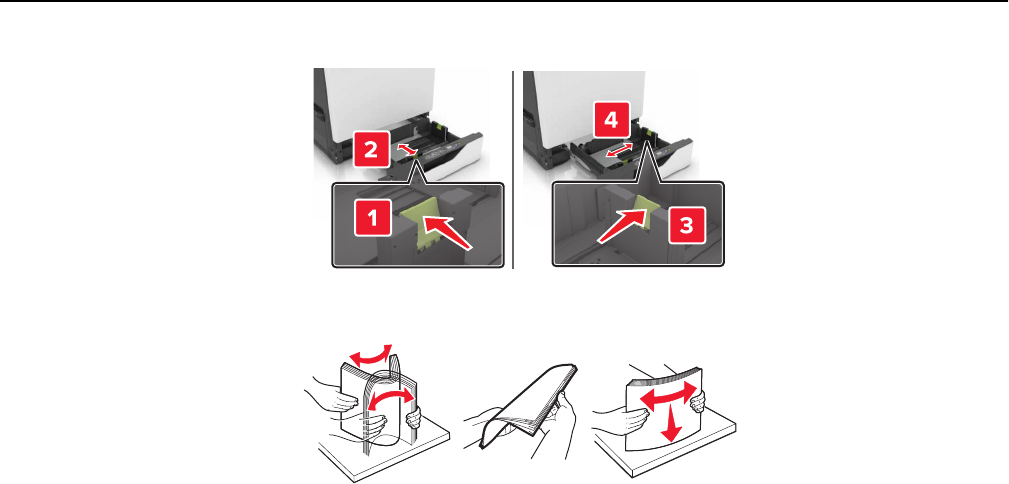
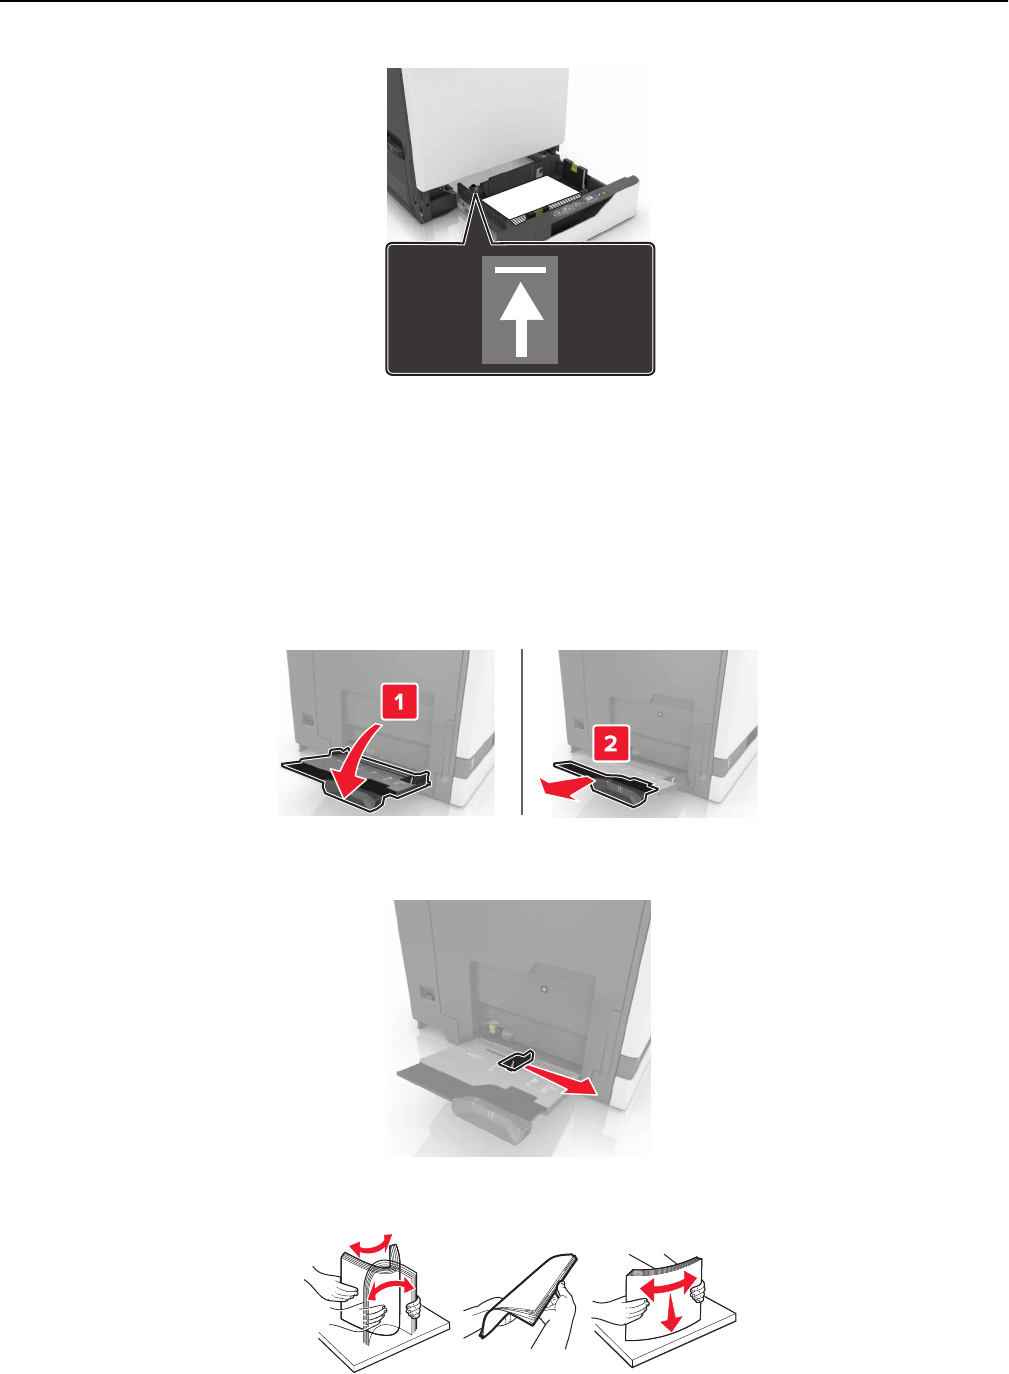
Paper jam in trays............................................................................................................................................ 108
Paper jam in the multipurpose feeder........................................................................................................109
Contents 4
Paper jam in the automatic document feeder............................................................................................111
Paper jam in the standard bin........................................................................................................................113
Paper jam in door B..........................................................................................................................................113
Paper jam in the finisher bin...........................................................................................................................117
Staple jam in door G.........................................................................................................................................119
Troubleshooting........................................................................................ 123
Network connection problems.....................................................................................................................123
Hardware options problems......................................................................................................................... 125
Issues with supplies.........................................................................................................................................127
Paper feed problems...................................................................................................................................... 129
Printing problems.............................................................................................................................................133
Color quality problems...................................................................................................................................155
Faxing problems.............................................................................................................................................. 158
Scanning problems...........................................................................................................................................161
Contacting customer support.......................................................................................................................165
Upgrading and migrating.........................................................................166
Hardware........................................................................................................................................................... 166
Software............................................................................................................................................................. 182
Firmware............................................................................................................................................................ 182
Notices........................................................................................................184
Index........................................................................................................... 188
Contents 5
Safety information
Conventions
Note: A note identifies information that could help you.
Warning: A warning identifies something that could damage the product hardware or software.
CAUTION: A caution indicates a potentially hazardous situation that could injure you.
Dierent types of caution statements include:
CAUTION—POTENTIAL INJURY: Indicates a risk of injury.
CAUTION—SHOCK HAZARD: Indicates a risk of electrical shock.
CAUTION—HOT SURFACE: Indicates a risk of burn if touched.
CAUTION—TIPPING HAZARD: Indicates a crush hazard.
CAUTION—PINCH HAZARD: Indicates a risk of being caught between moving parts.
CAUTION—ROTATING FAN BLADES: Indicates a risk of laceration from moving fan blades.
Product statements
CAUTION—POTENTIAL INJURY: To avoid the risk of fire or electrical shock, connect the power cord to
an appropriately rated and properly grounded electrical outlet that is near the product and easily
accessible.
CAUTION—POTENTIAL INJURY: To avoid the risk of fire or electrical shock, use only the power cord
provided with this product or the manufacturer's authorized replacement.
CAUTION—POTENTIAL INJURY: Do not use this product with extension cords, multioutlet power strips,
multioutlet extenders, or UPS devices. The power capacity of these types of accessories can be easily
overloaded by a laser printer and may result in a risk of fire, property damage, or poor printer
performance.
CAUTION—POTENTIAL INJURY: To reduce the risk of fire, use only a 26 AWG or larger
telecommunications (RJ-11) cord when connecting this product to the public switched telephone
network. For users in Australia, the cord must be approved by the Australian Communications and Media
Authority.
CAUTION—POTENTIAL INJURY: Only a Lexmark Inline Surge Protector that is properly connected
between the printer and the power cord provided with the printer may be used with this product. The
use of non-Lexmark surge protection devices may result in a risk of fire, property damage, or poor
printer performance.
CAUTION—SHOCK HAZARD: To avoid the risk of electrical shock, do not place or use this product near
water or wet locations.
Safety information 6
CAUTION—SHOCK HAZARD: To avoid the risk of electrical shock, do not set up this product or make
any electrical or cabling connections, such as the power cord, fax feature, or telephone, during a
lightning storm.
CAUTION—POTENTIAL INJURY: Do not cut, twist, bind, crush, or place heavy objects on the power
cord. Do not subject the power cord to abrasion or stress. Do not pinch the power cord between objects
such as furniture and walls. If any of these things happen, a risk of fire or electrical shock results. Inspect
the power cord regularly for signs of such problems. Remove the power cord from the electrical outlet
before inspecting it.
CAUTION—SHOCK HAZARD: To avoid the risk of electrical shock, make sure that all external
connections (such as Ethernet and telephone system connections) are properly installed in their marked
plug-in ports.
CAUTION—SHOCK HAZARD: To avoid the risk of electrical shock, if you are accessing the controller
board or installing optional hardware or memory devices sometime after setting up the printer, then turn
the printer o, and unplug the power cord from the electrical outlet before continuing. If you have any
other devices attached to the printer, then turn them o as well, and unplug any cables going into the
printer.
CAUTION—SHOCK HAZARD: To avoid the risk of electrical shock, do not use the fax feature during a
lightning storm.
CAUTION—SHOCK HAZARD: To avoid the risk of electrical shock when cleaning the exterior of the
printer, unplug the power cord from the electrical outlet and disconnect all cables from the printer before
proceeding.
CAUTION—POTENTIAL INJURY: If the printer weight is greater than 18 kg (40 lb), then it requires two or
more trained personnel to lift it safely.
CAUTION—POTENTIAL INJURY: When moving the printer, follow these guidelines to avoid personal
injury or printer damage:
Make sure that all doors and trays are closed.
Turn o the printer, and then unplug the power cord from the electrical outlet.
Disconnect all cords and cables from the printer.
If the printer has separate floor-standing optional trays or output options attached to it, then disconnect
them before moving the printer.
If the printer has a caster base, then carefully roll it to the new location. Use caution when passing over
thresholds and breaks in
flooring.
If the printer does not have a caster base but is configured with optional trays or output options, then remove
the output options and lift the printer
o
the trays. Do not try to lift the printer and any options at the same
time.
Always use the handholds on the printer to lift it.
Any cart used to move the printer must have a surface able to support the full footprint of the printer.
Any cart used to move the hardware options must have a surface able to support the dimensions of the
options.
Keep the printer in an upright position.
Avoid severe jarring movements.
Make sure that your fingers are not under the printer when you set it down.
Make sure that there is adequate clearance around the printer.
Safety information 7
CAUTION—TIPPING HAZARD: Installing one or more options on your printer or MFP may require a
caster base, furniture, or other feature to prevent instability causing possible injury. For more information
on supported configurations, see
www.lexmark.com/multifunctionprinters.
CAUTION—TIPPING HAZARD: To reduce the risk of equipment instability, load each tray separately.
Keep all other trays closed until needed.
CAUTION—HOT SURFACE: The inside of the printer might be hot. To reduce the risk of injury from a hot
component, allow the surface to cool before touching it.
CAUTION—PINCH HAZARD: To avoid the risk of a pinch injury, use caution in areas marked with this
label. Pinch injuries may occur around moving parts, such as gears, doors, trays, and covers.
CAUTION—ROTATING FAN BLADES: To avoid the risk of laceration from moving fan blades, turn o the
printer and unplug the power cord from the electrical outlet before accessing areas marked with this
symbol.
CAUTION—POTENTIAL INJURY: This product uses a laser. Use of controls or adjustments or
performance of procedures other than those specified in the User’s Guide may result in hazardous
radiation exposure.
CAUTION—POTENTIAL INJURY: The lithium battery in this product is not intended to be replaced.
There is a danger of explosion if a lithium battery is incorrectly replaced. Do not recharge, disassemble,
or incinerate a lithium battery. Discard used lithium batteries according to the manufacturer's instructions
and local regulations.
This product is designed, tested, and approved to meet strict global safety standards with the use of specific
manufacturer's components. The safety features of some parts may not always be obvious. The manufacturer
is not responsible for the use of other replacement parts.
Refer service or repairs, other than those described in the user documentation, to a service representative.
This product uses a printing process that heats the print media, and the heat may cause the media to release
emissions. You must understand the section in your operating instructions that discusses the guidelines for
selecting print media to avoid the possibility of harmful emissions.
This product may produce small amounts of ozone during normal operation, and may be equipped with a filter
designed to limit ozone concentrations to levels well below the recommended exposure limits. To avoid high
ozone concentration levels during extensive usage, install this product in a well-ventilated area and replace
the ozone and exhaust filters if instructed to do so in the product maintenance instructions. If there are no
references to filters in the product maintenance instructions, then there are no filters requiring replacement for
this product.
SAVE THESE INSTRUCTIONS.
Safety information 8
Learning about the printer
Finding information about the printer
What are you looking for? Find it here
Initial setup instructions:
Connecting the printer
Installing the printer software
See the setup documentation that came with the
printer or go to
http://support.lexmark.com.
More setup and instructions for using the printer:
Selecting and storing paper and specialty media
Loading paper
Configuring printer settings
Viewing and printing documents and photos
Setting up and using the printer software
Configuring the printer on a network
Caring for and maintaining the printer
Troubleshooting and solving problems
Information Center—Go to
http://infoserve.lexmark.com.
Help Menu Pages—Access the guides on the
printer
firmware
or go to
http://support.lexmark.com.
Touch Screen Guide—Go to
http://support.lexmark.com.
Product videos—Go to
http://infoserve.lexmark.com/idv/.
Information on setting up and configuring the accessibility
features of your printer
Lexmark Accessibility Guide—Go to
http://support.lexmark.com.
Help using the printer software Help for Microsoft® Windows® or Macintosh
operating systems—Open a printer software
program or application, and then click Help.
Click
?
to view contextsensitive information.
Notes:
Help is automatically installed with the printer
software.
Depending on the operating system, the
printer software is located in the printer
program folder or on the desktop.
Learning about the printer 9
What are you looking for? Find it here
The latest supplemental information, updates, and customer
support:
Documentation
Driver downloads
Live chat support
Email support
Voice support
Go to
http://support.lexmark.com.
Note: Select your country or region, and then
select your product to view the appropriate
support site.
Support contact information for your country or
region can be found on the website or on the
printed warranty that came with the printer.
Have the following information ready when you
contact customer support:
Place and date of purchase
Machine type and serial number
Safety information
Regulatory information
Warranty information
Environmental information
Warranty information varies by country or region:
In the U.S.—See the Statement of Limited
Warranty included with the printer, or go to
http://support.lexmark.com.
In other countries and regions—See the
printed warranty that came with the printer.
Product Information Guide—See the
documentation that came with the printer or go to
http://support.lexmark.com.
Selecting a location for the printer
When selecting a location for the printer, leave enough room to open trays, covers, and doors and to install
hardware options.
Set up the printer near an electrical outlet.
CAUTION—POTENTIAL INJURY: To avoid the risk of fire or electrical shock, connect the power cord
to an appropriately rated and properly grounded electrical outlet that is near the product and easily
accessible.
CAUTION—SHOCK HAZARD: To avoid the risk of electrical shock, do not place or use this product
near water or wet locations.
Make sure that airflow in the room meets the latest revision of the ASHRAE 62 standard or the CEN Technical
Committee 156 standard.
Provide a
flat,
sturdy, and stable surface.
Learning about the printer 10
Keep the printer:
Clean, dry, and free of dust.
Away from stray staples and paper clips.
Away from the direct airflow of air conditioners, heaters, or ventilators.
Free from direct sunlight and humidity extremes.
Observe the recommended temperatures and avoid
fluctuations:
Ambient temperature 10 to 32.2°C (50 to 90°F)
Storage temperature -40 to 43.3°C (-40 to 110°F)
Allow the following recommended amount of space around the printer for proper ventilation:
1 Top 330 mm (13 in.)
2 Right side 152 mm (6 in.)
3 Front 381 mm (15 in.)
4 Left side 457 mm (18 in.)
5 Rear 203 mm (8 in.)
Printer configurations
CAUTION—TIPPING HAZARD: Installing one or more options on your printer or MFP may require a
caster base, furniture, or other feature to prevent instability causing possible injury. For more information
on supported configurations, see
www.lexmark.com/multifunctionprinters.
You can configure your printer by adding an optional 2200sheet tray or a combination of up to three optional
550sheet trays or envelope trays.
Learning about the printer 11
1 Control panel
2 Staple finisher
3 Standard bin
4 Standard 550sheet tray
5 Optional 550sheet trays or envelope trays
6 Optional 2200sheet tray
7 Multipurpose feeder
Attaching cables
CAUTION—POTENTIAL INJURY: To avoid the risk of
fire
or electrical shock, connect the power cord to
an appropriately rated and properly grounded electrical outlet that is near the product and easily
accessible.
CAUTION—POTENTIAL INJURY: To avoid the risk of fire or electrical shock, use only the power cord
provided with this product or the manufacturer's authorized replacement.
CAUTION—POTENTIAL INJURY: To avoid the risk of electrical shock, do not set up this product or make
any electrical or cabling connections, such as the power cord, fax feature, or telephone, during a
lightning storm.
CAUTION—POTENTIAL INJURY: To reduce the risk of
fire,
use only a 26 AWG or larger
telecommunications (RJ-11) cord when connecting this product to the public switched telephone
network. For users in Australia, the cord must be approved by the Australian Communications and Media
Authority.
Warning—Potential Damage: To avoid loss of data or printer malfunction, do not touch the USB cable, any
wireless network adapter, or the printer in the areas shown while actively printing.
Learning about the printer 12
Use the To
1 EXT port Connect additional devices (telephone or answering machine) to the printer and the
telephone line. Use this port if you do not have a dedicated fax line for the printer and
if this connection method is supported in your country or region.
Note: Remove the plug to access the port.
2 LINE port Connect the printer to an active telephone line through a standard wall jack (RJ11), DSL
filter, VoIP adapter, or any other adapter that allows you to access the telephone line to
send and receive faxes.
3 USB printer port Connect the printer to a computer.
4 Ethernet port Connect the printer to an Ethernet network.
5 USB ports Attach a keyboard or any compatible options.
6 Power cord socket Connect the printer to a properly grounded electrical outlet.
Learning about the printer 13
Using the control panel
Use the To
1 Display
View the printer messages and supply status.
Set up and operate the printer.
2 Home button Go to the home screen.
3 Power button
Turn on or turn o the printer.
Note: To turn o the printer, press and hold the power button for five
seconds.
Set the printer to Sleep or Hibernate mode.
Wake the printer from Sleep or Hibernate mode.
4 Keypad Enter numbers or symbols in an input field.
5 Pause button Place a dial pause in a fax number.
6 Start button Start a job, depending on which mode is selected.
7 Clear all or Reset button Reset the default settings of a function such as copying, faxing, or scanning.
8 Stop or Cancel button Stop the current job.
9 Backspace button Move the cursor backward and delete a character in an input field.
10 Indicator light Check the status of the printer.
11 Volume buttons Adjust the volume of the headset or speaker.
12 Headset or speaker port Attach a headset or speaker.
Learning about the printer 14
Understanding the status of the power button and
indicator light
Indicator light Printer status
O The printer is o or in Hibernate mode.
Blue The printer is ready or processing data.
Red The printer requires user intervention.
Power button light Printer status
O The printer is o, ready, or processing data.
Solid amber The printer is in sleep mode.
Blinking amber The printer is in hibernate mode.
Using the home screen
Note: Your home screen may vary depending on your home screen customization settings, administrative
setup, and active embedded solutions.
Touch To
1 Copy Make copies.
2 Email Send emails.
3 Change Language Change the language on the printer display.
4 Fax Send fax.
5 Settings Access the printer menus.
6 Held Faxes Show all the current held fax jobs.
Note: If Held Faxes is hidden, then Release Held Faxes appears.
7 Shortcut Center Organize all shortcuts.
Learning about the printer 15
Touch To
8 Status/Supplies
Show a printer warning or error message whenever the printer requires intervention
to continue processing.
View more information on the printer warning or message, and on how to clear it.
Note: You can also access this setting by touching the top section of the home
screen.
9 Address Book Access, create, and organize contacts.
10 Scan Profiles Scan and save documents directly to the computer.
11 FTP Scan and save documents directly to an FTP server.
12 Bookmarks Organize all bookmarks.
13 Held Jobs Show all the current held print jobs
14 USB Drive View, select, or print photos and documents from a flash drive.
15 Job Queue Show all the current print jobs.
Note: You can also access this setting by touching the top section of the home
screen.
These settings may also appear on the home screen
Touch To
App Profiles Access application profiles.
Lock Device Prevent users from accessing any printer functions from the home screen.
Menu map
Device
Preferences
Remote Operator Panel
Notifications
Power Management
Information Sent to Lexmark
Accessibility
Restore Factory Defaults
Maintenance
Visible Home Screen Icons
About This Printer
Print
Layout
Finishing
Setup
Quality
Job Accounting
XPS
PDF
PostScript
PCL
HTML
Image
PPDS
Learning about the printer 16
Paper
Tray Conguration
Media
Configuration
Bin Configuration
Copy
Copy Defaults
Fax
Fax Mode
Analog Fax Setup
Fax Server Setup
Email
Email Setup
Email Defaults
Web Link Setup
Network/Ports
Network Overview
Wireless
AirPrint
Ethernet
TCP/IP
IPv6
SNMP
IPSec
LPD Configuration
HTTP/FTP Settings
ThinPrint
USB
Parallel [x]
Serial
Google Cloud Print
Wi-Fi Direct
FTP
FTP Defaults
USB Drive
Flash Drive Scan Flash Drive Print
Security
Login Methods
Schedule USB Devices
Security Audit Log
Login Restrictions
Confidential Print Setup
Disk Encryption
Erase Temporary Data Files
Solutions LDAP Settings
Miscellaneous
Option Card Menu
Note: This setting appears only when an optional card is installed.
Learning about the printer 17
Reports
Menu Settings Page
Device
Print
Shortcuts
Fax
Network
Help
Print All Guides
Color Quality Guide
Connection Guide
Copy Guide
Email Guide
Fax Guide
Information Guide
Media Guide
Moving Guide
Print Quality Guide
Scan Guide
Supplies Guide
Troubleshooting
Basic Print Quality Samples Advanced Print Quality Samples
Printing a menu settings page
From the home screen, touch Settings > Reports > Menu Settings Page.
Learning about the printer 18
Setting up and using the home screen
applications
Customizing the home screen
1 Open a web browser, and then type the printer IP address in the address field.
Notes:
View the printer IP address on the printer home screen. The IP address appears as four sets of
numbers separated by periods, such as 123.123.123.123.
If you are using a proxy server, then temporarily disable it to load the web page correctly.
2 Click Settings > Device > Visible Home Screen Icons.
3 Select the icons that you want to appear on the home screen.
4 Apply the changes.
Setting up Forms and Favorites
1 Open a Web browser, and then type the printer IP address in the address field.
Notes:
View the printer IP address on the printer home screen. The IP address appears as four sets of
numbers separated by periods, such as 123.123.123.123.
If you are using a proxy server, then temporarily disable it to load the Web page correctly.
2 Click Apps > Forms and Favorites > Configure.
3 Click Add, and then customize the settings.
Notes:
To make sure that the location settings of the bookmark are correct, type the IP address of the host
computer where the bookmark is located.
Make sure that the printer has access rights to the folder where the bookmark is located.
4 Apply the changes.
Setting up Card Copy
1 Open a Web browser, and then type the printer IP address in the address field.
Notes:
View the printer IP address on the printer home screen. The IP address appears as four sets of
numbers separated by periods, such as 123.123.123.123.
If you are using a proxy server, then temporarily disable it to load the Web page correctly.
2 Click Apps > Card Copy > Configure.
Setting up and using the home screen applications 19
3 Configure the output options and scan settings.
Notes:
When scanning a card, make sure that the scan resolution does not exceed 200 dpi for color and
400 dpi for black and white.
When scanning multiple cards, make sure that the scan resolution does not exceed 150 dpi for color
and 300 dpi for black and white.
You need a printer hard disk to scan multiple cards.
Make sure that the printer network and email settings are
configured.
4 Apply the changes.
Using Shortcut Center
1 From the home screen, touch Shortcut Center, and then select a printer function.
2 To uc h Create Shortcut, and then configure the settings.
3 Touc h Save, and then type a unique shortcut name.
4 Apply the changes.
Setting up Scan Center
1 From the home screen, touch Scan Center.
2 Select and create a destination, and then
configure
the settings.
Notes:
When creating a network destination, make sure to validate and adjust the settings until no errors
occur.
Only destinations created from the Embedded Web Server are saved. For more information, see the
documentation that came with the solution.
3 Apply the changes.
Managing contacts
Adding contacts
1 Open a web browser, and then type the printer IP address in the address
field.
Notes:
View the printer IP address on the printer home screen. The IP address appears as four sets of
numbers separated by periods, such as 123.123.123.123.
If you are using a proxy server, then temporarily disable it to load the web page correctly.
2 Click Address Book.
Setting up and using the home screen applications 20
3 From the Contacts section, add a contact.
Note: You can assign the contact to one or more groups.
4 If necessary, specify a login method to allow application access.
5 Apply the changes.
Adding groups
1 Open a web browser, and then type the printer IP address in the address field.
Notes:
View the printer IP address on the printer home screen. The IP address appears as four sets of
numbers separated by periods, such as 123.123.123.123.
If you are using a proxy server, then temporarily disable it to load the web page correctly.
2 Click Address Book.
3 From the Contact Groups section, add a group name.
Note: You can assign one or more contacts to the group.
4 Apply the changes.
Editing contacts or groups
1 Open a web browser, and then type the printer IP address in the address
field.
Notes:
View the printer IP address on the printer home screen. The IP address appears as four sets of
numbers separated by periods, such as 123.123.123.123.
If you are using a proxy server, then temporarily disable it to load the web page correctly.
2 Click Address Book.
3 Do either of the following:
From the Contacts section, click a contact name, and then edit the information.
From the Contact Groups section, click a group name, and then edit the information.
4 Apply the changes.
Deleting contacts or groups
1 Open a web browser, and then type the printer IP address in the address field.
Notes:
View the printer IP address on the printer home screen. The IP address appears as four sets of
numbers separated by periods, such as 123.123.123.123.
If you are using a proxy server, then temporarily disable it to load the web page correctly.
2 Click Address Book.
Setting up and using the home screen applications 21
3 Do either of the following:
From the Contacts section, select a contact that you want to delete.
From the Contact Groups section, select a group name that you want to delete.
Setting up and using the home screen applications 22
Setting up and using the accessibility features
Enabling Magnification mode
1 From the control panel, press and hold the 5 key until you hear a voice message.
2 Select
Magnification
.
3 Select OK.
For more information on navigating a magnified screen, see
“Navigating the screen using gestures” on
page 24.
Activating Voice Guidance
From the control panel
1 Press and hold the 5 key until you hear a voice message.
2 Select OK.
From the keyboard
1 Press and hold the 5 key until you hear a voice message.
2 Press Tab to navigate the focus cursor to the OK button, and then press Enter.
Notes:
Voice Guidance is also activated when you insert headphones into the headphone jack.
To adjust the volume, use the volume buttons at the bottom part of the control panel.
Adjusting the Voice Guidance speech rate
1 From the home screen, select Settings > Device > Accessibility > Speech Rate.
2 Select the speech rate.
Enabling spoken passwords or personal identification
numbers
1 From the home screen, select Settings > Device > Accessibility > Speak Passwords/PINs.
2 Enable the setting.
Setting up and using the accessibility features 23
Navigating the screen using gestures
Notes:
The gestures are applicable only when Voice Guidance is activated.
A physical keyboard is required for typing characters and adjusting certain settings.
Gesture Function
Doubletap Select an option or item on the screen.
Tripletap Zoom in or zoom out text and images.
Swipe right or swipe down Move to the next item on the screen.
Swipe left or swipe up Move to the previous item on the screen.
Pan Access parts of the zoomed image that are beyond the limits of the screen.
Note: This gesture requires the use of two
fingers
to drag across a zoomed
image.
Swipe up then left Exit an application and return to the home screen.
Swipe down then left
Cancel a job.
Go back to the previous setting.
Exit the screen that appears without changing any setting or value.
Swipe up then down Repeat a spoken prompt.
Using the keyboard on the display
Do one or more of the following:
Drag a
finger
over the key to announce the character.
Lift the
finger
to enter or type the character in the
field.
Press Backspace to delete characters.
To hear the content in the input field, press Tab, and then press Shift + Tab.
Setting up and using the accessibility features 24
Loading paper and specialty media
Setting the size and type of the specialty media
The trays automatically detect the size of plain paper. For specialty media like labels, card stock, or envelopes,
do the following:
1 From the home screen, navigate to:
Settings > Paper > Tray Conguration > Paper Size/Type > select a paper source
2 Set the size and type of the specialty media.
Configuring Universal paper settings
1 From the home screen, touch Settings > Paper > Media Configuration > Universal Setup.
2 Configure the settings.
Loading trays
CAUTION—TIPPING HAZARD: To reduce the risk of equipment instability, load each tray separately.
Keep all other trays closed until needed.
1 Pull out the tray.
Note: To avoid paper jams, do not remove trays while the printer is busy.
2 Adjust the guides to match the size of the paper that you are loading.
Note: Use the indicators on the bottom of the tray to position the guides.
Loading paper and specialty media 25
3 Flex, fan, and align the paper edges before loading.
4 Load the paper with the printable side faceup.
Note: Load envelopes only in the optional envelope tray.
Warning—Potential Damage: Do not use envelopes with stamps, clasps, snaps, windows, coated linings,
or selfstick adhesives in the optional envelope tray.
Notes:
Load letterhead faceup with the header on the left side of the tray for onesided printing.
Load letterhead facedown with the header on the right side of the tray for twosided printing.
Load letterhead faceup with the header on the right side of the tray for onesided print jobs that
require finishing.
Load letterhead facedown with the header on the left side of the tray for twosided print jobs that
require finishing.
Load prepunched paper with the holes toward the front or left side of the tray.
Load envelopes with the
flap
side down and against the back side of the tray. Load European
envelopes with the flap side down and against the left side of the tray.
Do not slide paper into the tray.
Make sure that the stack height is below the maximum paper fill indicator. Overfilling may cause
paper jams.
Loading paper and specialty media 26
5 Insert the tray.
If loading a paper type other than plain, set the paper size and paper type in the Paper menu to match the
paper loaded.
Loading the multipurpose feeder
1 Open the multipurpose feeder.
2 Adjust the guide to match the size of the paper you are loading.
3 Flex, fan, and align the paper edges before loading.
Loading paper and specialty media 27
4 Load the paper.
Load paper, card stock, and transparencies with the printable side facedown and the top edge entering
the printer
first.
Load envelopes with the
flap
side up and against the left side of the paper guide. Load European
envelopes with the flap side up and entering the printer first.
Warning—Potential Damage: Do not use envelopes with stamps, clasps, snaps, windows, coated
linings, or selfstick adhesives.
5 From the control panel, set the paper size and type to match the paper loaded in the tray.
Linking trays
1 Open a Web browser, and then type the printer IP address in the address field.
Notes:
View the printer IP address on the printer home screen. The IP address appears as four sets of
numbers separated by periods, such as 123.123.123.123.
If you are using a proxy server, then temporarily disable it to load the Web page correctly.
2 Click Settings > Paper.
3 Match the paper size and type for the trays you are linking.
Note: To unlink trays, make sure that no trays have the same paper size or type.
4 Save the settings.
Note: You can also change the paper size and type settings from the printer control panel.
Warning—Potential Damage: The temperature of the fuser varies according to the specified paper type. To
avoid printing issues, match the paper type settings in the printer with the paper loaded in the tray.
Loading paper and specialty media 28
Printing
CAUTION—PINCH HAZARD: To avoid the risk of a pinch injury, use caution in areas marked with this
label. Pinch injuries may occur around moving parts, such as gears, doors, trays, and covers.
Printing from a computer
Note: For labels, card stock, and envelopes, set the paper size and type in the printer before printing the
document.
1 From the document that you are trying to print, open the Print dialog.
2 If necessary, adjust the settings.
3 Print the document.
Printing forms
1 From the home screen, navigate to:
Forms and Favorites > select form > Print
2 If necessary, configure the print settings.
3 Send the print job.
Printing from a mobile device
Printing from a mobile device using Lexmark Mobile Print
Lexmark
TM
Mobile Print allows you to send documents and images directly to a supported Lexmark printer.
1 Open the document, and then send or share the document to Lexmark Mobile Print.
Note: Some thirdparty applications may not support the send or share feature. For more information, see
the documentation that came with the application.
2 Select a printer.
3 Print the document.
Printing from a mobile device using Google Cloud Print
Google Cloud Print
TM
is a mobile printing service that allows enabled applications on mobile devices to print
to any Google Cloud Printready printer.
1 From the home screen of your mobile device, launch an enabled application.
2 Tap Print, and then select a printer.
3 Print the document.
Printing 29
Printing from a mobile device using Mopria Print Service
Mopria® Print Service is a mobile printing solution for mobile devices running on Android version 4.4 or later. It
allows you to print directly to any Mopriacertified printer.
Note: Before printing, make sure that the Mopria Print Service is enabled.
1 From the home screen of your mobile device, launch a compatible application.
2 Tap Print, and then select a printer.
3 Print the document.
Printing from a mobile device using AirPrint
AirPrint is a mobile printing solution that allows you to print directly from Apple devices to an AirPrintcertified
printer.
Notes:
This application is supported only in some Apple devices.
This application is supported only in some printer models.
1 From the home screen of your mobile device, launch a compatible application.
2 Select an item to print, and then tap the share icon.
3 Tap Print, and then select a printer.
4 Print the document.
Printing from a flash drive
1 Insert a flash drive into the USB port.
Notes:
If you insert the
flash
drive when an error message appears, then the printer ignores the
flash
drive.
Printing 30
If you insert the flash drive while the printer is processing other print jobs, then Busy appears on the
display.
2 From the display, touch the document that you want to print.
If necessary, configure other print settings.
3 Send the print job.
To print another document, touch USB Drive.
Warning—Potential Damage: Do not touch the printer or the flash drive in the area shown while actively
printing, reading, or writing from the memory device. Loss of data or a malfunction can occur.
Supported flash drives and file types
Flash drives
Lexar JumpDrive S70 (16GB and 32GB)
SanDisk Cruzer (16GB and 32GB)
PNY Attaché (16GB and 32GB)
Notes:
The printer supports highspeed USB flash drives with fullspeed standard.
USB
flash
drives must support the File Allocation Table (FAT) system.
File types
Documents:
.doc or .docx
.xls or .xlsx
.ppt or .pptx
.pdf
.xps
Printing 31
Images:
.dcx
.gif
.jpeg or .jpg
.bmp
.pcx
.ti or .tif
.png
Configuring confidential jobs
1 From the home screen, touch Settings > Security > Confidential Print Setup.
2 Configure the settings.
Use To
Max Invalid PIN Limit the number of times an invalid PIN can be entered.
Note: When the limit is reached, the print jobs for that user name are deleted.
Confidential Job
Expiration
Set the amount of time before confidential jobs are automatically deleted from the printer
memory.
Note:
Confidential
held jobs are stored in the printer until you log in and release or
delete them manually.
Repeat Job
Expiration
Set the amount of time before repeat jobs are deleted from the printer memory.
Note: Repeat held jobs are stored so extra copies can be printed later.
Verify Job Expiration Set the amount of time before verify jobs are deleted from the printer memory.
Note: Verify jobs print one copy to check if it is satisfactory before printing the
remaining copies.
Reserve Job
Expiration
Set the amount of time before reserved jobs are deleted without being printed.
Note: Reserve held jobs are automatically deleted after printing.
Printing held jobs
1 From the document you are trying to print, open the Print dialog.
2 Select the printer, and then do the following:
For Windows users, click Properties or Preferences, and then click Print and Hold.
For Macintosh users, select Print and Hold.
3 Select the print job type.
4 If necessary, assign a user name.
5 Send the print job.
6 From the printer home screen, touch Held Jobs.
7 Send the print job.
Printing 32
Printing a font sample list
1 From the home screen, touch Settings > Reports > Print > Print Fonts.
2 To uc h PCL Fonts or PostScript Fonts.
Canceling a print job
From the printer control panel
1 From the home screen, touch Job Queue.
Note: You can also access this setting by touching the top section of the home screen.
2 Select the job to cancel.
From the computer
1 Depending on the operating system, do either of the following:
Open the printers folder, and then select your printer.
From the System Preferences in the Apple menu, navigate to your printer.
2 Select the job to cancel.
Printing 33
Copying
Making copies
1 Load an original document into the ADF tray or on the scanner glass.
Note: To avoid a cropped image, make sure that the original document and output have the same paper
size.
2 From the home screen, touch Copy, and then specify the number of copies.
If necessary, adjust the copy settings.
3 Copy the document.
Note: To make a quick copy, from the control panel, press
.
Copying photos
1 Place a photo on the scanner glass.
2 From the home screen, touch Copy > Content > Photo.
3 From the Content Source menu, select the setting that best matches the original photo.
4 Send the copy job.
Copying on letterhead
1 Load an original document into the ADF tray or on the scanner glass.
2 From the home screen, touch Copy, and then specify the size of the original document.
3 Touc h Copy to, and then select the tray that contains the specialty media.
If you are loading the specialty media into the multipurpose feeder, then navigate to:
Multipurpose Feeder > select the size of the specialty media > Letterhead
4 Send the copy job.
Copying on both sides of the paper
1 Load an original document into the ADF tray or on the scanner glass.
2 From the home screen, touch Copy > Paper Setup.
3 Adjust the settings.
4 Copy the document.
Copying 34
Reducing or enlarging copies
1 Load an original document into the ADF tray or on the scanner glass.
2 From the home screen, navigate to:
Copy > Scale > specify a scale value
Note: Changing the size of the original document or output after setting Scale restores the scale value to
Auto.
3 Copy the document.
Collating copies
1 Load an original document into the ADF tray or on the scanner glass.
2 From the home screen, touch Copy, and then set Collate to On.
3 Copy the document.
Placing separator sheets between copies
1 Load an original document into the ADF tray or on the scanner glass.
2 From the home screen, touch Copy > Separator Sheets.
3 Adjust the settings.
4 Send the copy job.
Copying multiple pages onto a single sheet
1 Load an original document into the ADF tray or on the scanner glass.
2 From the home screen, touch Copy > Pages per Side.
3 Adjust the settings.
4 Copy the document.
Creating a copy shortcut
1 From the home screen, touch Copy.
2 Adjust the settings, and then touch .
3 Enter a shortcut name.
4 Apply the changes.
Copying 35
E-mailing
Setting up the email function
1 From the home screen, touch Settings > Device > Preferences > Run Initial Setup.
2 Turn
o
the printer, wait for about 10 seconds, and then turn it back on.
3 From the Before You Begin screen, select Change the Settings and Continue with the Wizard.
4 From the Fax/Email Server Setup screen, enter the needed information.
5 Finish the setup.
Configuring email settings
1 Open a Web browser, and then type the printer IP address in the address field.
Notes:
View the printer IP address on the printer home screen. The IP address appears as four sets of
numbers separated by periods, such as 123.123.123.123.
If you are using a proxy server, then temporarily disable it to load the Web page correctly.
2 Click Settings > E-mail.
3 Enter the needed information.
4 Apply the changes.
Sending an e-mail
Using the control panel
1 Load an original document into the ADF tray or on the scanner glass.
2 From the home screen, touch E-mail, and then enter the needed information.
Note: You can also enter the recipient using the address book or shortcut number.
3 If necessary, configure the output file type settings.
4 Send the e-mail.
Using the shortcut number
1 From the control panel, press #, and then enter the shortcut number using the keypad.
2 Send the email.
E-mailing 36
Creating an e-mail shortcut
1 From the home screen, touch Email.
2
Configure
the settings, and then touch
.
3 Enter a shortcut name.
4 Apply the changes.
E-mailing 37
Faxing
Setting up the printer to fax
Notes:
The following connection methods are applicable only in some countries or regions.
During the initial printer setup, clear the fax function check box and any other function you plan to set up
later, and then touch Continue.
The indicator light may blink red if the fax function is enabled and not fully set up.
Warning—Potential Damage: Do not touch cables or the printer in the area shown while actively sending or
receiving a fax.
Setting up the fax function
1 From the home screen, touch Settings > Device > Preferences > Run Initial Setup.
2 Turn o the printer, wait for about 10 seconds, and then turn it back on.
3 From the Before You Begin screen, select Change the Settings and Continue with the Wizard.
4 From the Fax/Email Server Setup screen, enter the needed information.
5 Finish the setup.
Faxing 38
Choosing a fax connection
Setting up fax using a standard telephone line
CAUTION—SHOCK HAZARD: To avoid the risk of electrical shock, do not set up this product or make
any electrical or cabling connections, such as the power cord, fax feature, or telephone, during a
lightning storm.
CAUTION—SHOCK HAZARD: To avoid the risk of electrical shock, do not use the fax feature during a
lightning storm.
CAUTION—POTENTIAL INJURY: To reduce the risk of
fire,
use only a 26 AWG or larger
telecommunications (RJ-11) cord when connecting this product to the public switched telephone
network. For users in Australia, the cord must be approved by the Australian Communications and Media
Authority.
Setup 1: Printer is connected to a dedicated fax line
Faxing 39
1 Connect one end of the telephone cable to the line port of the printer.
2 Connect the other end of the cable to an active analog wall jack.
Notes:
You can set the printer to receive faxes automatically (Auto Answer On) or manually (Auto Answer O).
If you want to receive faxes automatically, then set the printer to pick up on a specified number of rings.
Setup 2: Printer is sharing the line with an answering machine
Note: If you subscribe to a distinctive ring service, then make sure that you set the correct ring pattern for
the printer. Otherwise, the printer does not receive faxes even if you have set it to receive faxes
automatically.
Connected to the same telephone wall jack
Faxing 40
1 Connect one end of the telephone cable to the line port of the printer.
2 Connect the other end of the cable to an active analog wall jack.
3 Connect the answering machine to the telephone port of the printer.
Connected to dierent wall jacks
1 Connect one end of the telephone cable to the line port of the printer.
2 Connect the other end of the cable to an active analog wall jack.
Notes:
If you have only one telephone number on your line, then set the printer to receive faxes automatically.
Faxing 41
Set the printer to pick up calls two rings after the answering machine. For example, if the answering
machine picks up calls after four rings, then set the printer Rings to Answer setting to six.
Setup 3: Printer is sharing the line with a telephone subscribed to voice mail service
1 Connect one end of the telephone cable to the line port of the printer.
2 Connect the other end of the cable to an active analog wall jack.
3 Connect the telephone to the telephone port of the printer.
Notes:
This setup works best if you are using voice mail more often than fax, and if you subscribe to a
distinctive ring service.
When you answer the telephone and you hear fax tones, press *9* or the manual answer code on the
telephone to receive the fax.
You can also set the printer to receive faxes automatically, but turn
o
the voice mail service when you
are expecting a fax.
Faxing 42
Setting up fax using digital subscriber line
CAUTION—SHOCK HAZARD: To avoid the risk of electrical shock, do not set up this product or make
any electrical or cabling connections, such as the power cord, fax feature, or telephone, during a
lightning storm.
CAUTION—SHOCK HAZARD: To avoid the risk of electrical shock, do not use the fax feature during a
lightning storm.
CAUTION—POTENTIAL INJURY: To reduce the risk of
fire,
use only a 26 AWG or larger
telecommunications (RJ-11) cord when connecting this product to the public switched telephone
network. For users in Australia, the cord must be approved by the Australian Communications and Media
Authority.
Digital subscriber line (DSL) splits your regular telephone line into two channels: voice and Internet. Telephone
and fax signals travel through the voice channel, and Internet signals pass through the other channel.
Faxing 43
To minimize interference between the two channels, ask for a DSL filter from your DSL provider.
1 Connect the line port of the DSL filter to the wall jack.
2 Connect one end of the telephone cable to the line port of the printer.
3 Connect the other end of the cable to the telephone port on the DSL filter.
Note: To connect a telephone to the printer, remove any installed adapter plug from the telephone port of
the printer, and then connect the telephone.
Setting up fax using VoIP telephone service
CAUTION—SHOCK HAZARD: To avoid the risk of electrical shock, do not set up this product or make
any electrical or cabling connections, such as the power cord, fax feature, or telephone, during a
lightning storm.
CAUTION—SHOCK HAZARD: To avoid the risk of electrical shock, do not use the fax feature during a
lightning storm.
CAUTION—POTENTIAL INJURY: To reduce the risk of
fire,
use only a 26 AWG or larger
telecommunications (RJ-11) cord when connecting this product to the public switched telephone
network. For users in Australia, the cord must be approved by the Australian Communications and Media
Authority.
Faxing 44
1 Connect one end of the telephone cable to the line port of the printer.
2 Connect the other end of the cable to the port labeled Phone Line 1 or Phone Port on the VoIP adapter.
Note: The port labeled Phone Line 2 or Fax Port is not always active. VoIP providers may charge extra
cost for the activation of the second telephone port.
3 Connect the telephone to the telephone port of the printer.
Notes:
To check if the telephone port on the VoIP adapter is active, plug an analog telephone into the port, and
then listen for a dial tone.
If you need two telephone ports for your devices, but do not want to pay extra cost, then use a phone
splitter. Plug the phone splitter into the port labeled Phone Line 1 or Phone Port, and then plug the
printer and telephone into the splitter.
To check the splitter, plug an analog telephone into the splitter, and then listen for a dial tone.
Faxing 45
Setting up fax using cable modem connection
CAUTION—SHOCK HAZARD: To avoid the risk of electrical shock, do not set up this product or make
any electrical or cabling connections, such as the power cord, fax feature, or telephone, during a
lightning storm.
CAUTION—SHOCK HAZARD: To avoid the risk of electrical shock, do not use the fax feature during a
lightning storm.
CAUTION—POTENTIAL INJURY: To reduce the risk of
fire,
use only a 26 AWG or larger
telecommunications (RJ-11) cord when connecting this product to the public switched telephone
network. For users in Australia, the cord must be approved by the Australian Communications and Media
Authority.
Setup 1: Printer is connected directly to a cable modem
1 Connect one end of the telephone cable to the line port of the printer.
2 Connect the other end of the cable to the port labeled Phone Line 1 or Phone Port on the cable modem.
Faxing 46
3 Connect your analog telephone to the telephone port of the printer.
Note: To check if the telephone port on the cable modem is active, connect an analog telephone, and then
listen for a dial tone.
Setup 2: Printer is connected to a wall jack; cable modem is installed elsewhere in the facility
1 Connect one end of the telephone cable to the line port of the printer.
2 Connect the other end of the cable to an active analog telephone wall jack.
3 Connect your analog telephone to the telephone port of the printer.
Faxing 47
Setting up fax in countries or regions with dierent telephone wall jacks and plugs
CAUTION—SHOCK HAZARD: To avoid the risk of electrical shock, do not set up this product or make
any electrical or cabling connections, such as the power cord, fax feature, or telephone, during a
lightning storm.
CAUTION—SHOCK HAZARD: To avoid the risk of electrical shock, do not use the fax feature during a
lightning storm.
CAUTION—POTENTIAL INJURY: To reduce the risk of
fire,
use only a 26 AWG or larger
telecommunications (RJ-11) cord when connecting this product to the public switched telephone
network. For users in Australia, the cord must be approved by the Australian Communications and Media
Authority.
The standard wall jack adopted by most countries or regions is RJ11. If the wall jack or equipment in your facility
is not compatible with this type of connection, then use a telephone adapter. An adapter for your country or
region may not come with your printer, and you may need to purchase it separately.
There may be an adapter plug installed in the telephone port of the printer. Do not remove the adapter plug
from the telephone port of the printer if you are connecting to a serial or cascaded telephone system.
Part name Part number
Lexmark adapter plug 40X8519
Faxing 48
Connecting the printer to a nonRJ11 wall jack
1 Connect one end of the telephone cable to the line port of the printer.
2 Connect the other end of the cable to the RJ11 adapter, and then connect the adapter to the wall jack.
3 If you want to connect another device with a nonRJ11 connector to the same wall jack, then connect it
directly to the telephone adapter.
Faxing 49
Connecting the printer to a wall jack in Germany
The German wall jack has two kinds of ports. The N ports are for fax machines, modems, and answering
machines. The F port is for telephones. Connect the printer to any of the N ports.
1 Connect one end of the telephone cable to the line port of the printer.
2 Connect the other end of the cable to the RJ11 adapter, and then connect the adapter to an N port.
3 If you want to connect a telephone and answering machine to the same wall jack, then connect the devices
as shown.
Faxing 50
Connecting to a distinctive ring service
A distinctive ring service lets you have multiple telephone numbers on one telephone line. Each telephone
number is assigned a dierent ring pattern.
1 From the home screen, touch Settings > Fax > Analog Fax Setup > Fax Receive Settings > Admin Controls
> Answer On.
2 Select the ring pattern.
3 Apply the changes.
Setting the fax date and time
1 From the home screen, touch Settings > Device > Preferences > Date and Time >
Configure
.
2 Configure the settings.
Configuring
daylight saving time
1 From the home screen, touch Settings > Device > Preferences > Date and Time >
Configure
.
2 In the Time Zone menu, select Custom.
3
Configure
the settings.
Sending a fax
Using the control panel
1 Load the original document into the ADF tray or on the scanner glass.
2 From the control panel, select Fax, and then enter the needed information.
3 If necessary,
configure
other fax settings.
4 Fax the document.
Using the computer
For Windows users
1
From the document that you are trying to fax, open the Print dialog.
2 Select the printer, and then click Properties, Preferences, Options, or Setup.
3 Click Fax > Enable fax, and then enter the recipient number.
4 If necessary, configure other fax settings.
5 Fax the document.
Faxing 51
For Macintosh users
1
With a document open, choose File > Print.
2 Select the printer, and then enter the recipient number.
3 If necessary, configure other fax settings.
4 Fax the document.
Scheduling a fax
1 Load the original document into the ADF tray or on the scanner glass.
2 From the home screen, navigate to:
Fax > enter the fax number > Send Time
3
Configure
the date and time to send the fax.
4 If necessary, configure other fax settings.
5 Send the fax job.
Creating a fax destination shortcut
1 From the home screen, touch Fax > To.
2 Enter the recipient number.
Note: To create a group of fax numbers, touch
, and then enter another fax number.
3 Touc h .
4 Enter a shortcut name.
5 Apply the changes.
Changing the fax resolution
1 Load an original document into the ADF tray or on the scanner glass.
2 From the home screen, touch Fax, and then enter the needed information.
3 Adjust the Resolution setting.
4 Send the fax job.
Adjusting the fax darkness
1 Load an original document into the ADF tray or on the scanner glass.
2 From the home screen, touch Fax, and then enter the needed information.
Faxing 52
3 Adjust the Darkness setting.
4 Send the fax job.
Viewing a fax log
1 Open a Web browser, and then type the printer IP address in the address field.
Notes:
View the printer IP address on the printer home screen. The IP address appears as four sets of
numbers separated by periods, such as 123.123.123.123.
If you are using a proxy server, then temporarily disable it to load the Web page correctly.
2 Click Settings > Reports > Fax.
3 Click Fax Job Log or Fax Call Log.
Blocking junk faxes
1 From the home screen, touch Settings > Fax > Analog Fax Setup > Fax Receive Settings > Admin Controls
> Block No Name Fax.
2 Apply the changes.
Holding faxes
1 From the home screen, touch Settings > Fax > Analog Fax Setup > Fax Receive Settings > Holding Faxes.
2 Select a mode.
Forwarding a fax
1 From the home screen, touch Settings > Fax > Analog Fax Setup > Fax Receive Settings > Admin Controls.
2
Configure
the Fax Forwarding, Forward To, and Forward to Shortcut settings.
3 Apply the changes.
Faxing 53
Scanning
Scanning to an FTP server
1 Load the original document into the ADF tray or on the scanner glass.
2 From the home screen, touch FTP, and then enter the needed information.
3 If necessary, configure other FTP settings.
4 Send the FTP job.
Creating an FTP shortcut
1 From the home screen, touch FTP.
2 Enter the FTP server address, and then touch .
3 Enter a shortcut name.
4 Apply the changes.
Scanning to a flash drive
1 Load an original document into the ADF tray or on the scanner glass.
2 Insert the flash drive.
3 Touc h Scan to USB and adjust the settings if necessary.
Note: If the USB Drive screen does not appear, then touch USB Drive on the home screen.
4 Scan the document.
Warning—Potential Damage: To avoid loss of data or printer malfunction, do not touch the
flash
drive or
the printer in the area shown while actively printing, reading, or writing from the memory device.
Scanning 54
Sending scanned documents to a computer
1 Load an original document into the ADF tray or on the scanner glass.
2 From the home screen, touch Scan Profiles > Scan To Computer.
3 Select the scan profile where you want to save the document.
Scanning 55
Securing the printer
Locating the security slot
The printer is equipped with a security lock feature. Attach a security lock compatible with most laptop
computers in the location shown to secure the printer in place.
Erasing printer memory
To erase volatile memory or buered data in your printer, turn o the printer.
To er a s e nonvolatile memory or individual settings, device and network settings, security settings, and
embedded solutions, do the following:
1 From the home screen, touch Settings > Device > Maintenance > Out of Service Erase.
2 Select the Sanitize all information on nonvolatile memory check box, and then touch ERASE.
3 Follow the instructions on the display.
Erasing printer hard disk memory
1 From the home screen, touch Settings > Device > Maintenance > Out of Service Erase.
2 Select the Sanitize all information on hard disk check box, and then touch ERASE.
3 Follow the instructions on the display.
Note: This process can take from several minutes to more than an hour, making the printer unavailable
for other tasks.
Securing the printer 56
Configuring printer hard disk encryption
1 From the home screen, touch Settings > Security > Disk Encryption > Start Encryption.
Note: Enabling disk encryption erases the contents of the hard disk. If necessary, back up important data
from the printer before starting the encryption.
2 Follow the instructions on the display.
Notes:
Do not turn o the printer during the encryption process. Loss of data can occur.
Disk encryption can take from several minutes to more than an hour, making the printer unavailable
for other tasks.
After encryption, the printer returns to the home screen.
Restoring factory default settings
From the home screen, touch Settings > Device > Restore Factory Defaults > Restore Settings > Restore all
settings > RESTORE > Start.
For more information, see
“Erasing printer memory” on page 56.
Statement of Volatility
Your printer contains various types of memory that can store device and network settings, and user data.
Type of memory Description
Volatile memory Your printer uses standard random access memory
(RAM) to temporarily buer user data during simple print
jobs.
Non-volatile memory Your printer may use two forms of non-volatile memory:
EEPROM and NAND (flash memory). Both types are used
to store the operating system, device settings, network
information and bookmark settings, and embedded
solutions.
Hard disk memory Some printers have a hard disk drive installed. The printer
hard disk is designed for printer-specific functionality.
This lets the printer retain buered user data from
complex print jobs, as well as form data, and font data.
Erase the content of any installed printer memory in the following circumstances:
The printer is being decommissioned.
The printer hard disk is being replaced.
The printer is being moved to a dierent department or location.
The printer is being serviced by someone from outside your organization.
The printer is being removed from your premises for service.
The printer is being sold to another organization.
Securing the printer 57
Disposing of a printer hard disk
Note: Some printer models may not have a printer hard disk installed.
In highsecurity environments, it may be necessary to take additional steps to make sure that confidential data
stored in the printer hard disk cannot be accessed when the printer—or its hard disk—is removed from your
premises.
Degaussing—Flushes the hard disk with a magnetic field that erases stored data
Crushing—Physically compresses the hard disk to break component parts and render them unreadable
Milling—Physically shreds the hard disk into small metal bits
Note: Most data can be erased electronically, but the only way to guarantee that all data are completely
erased is to physically destroy each hard disk where data is stored.
Securing the printer 58
Maintaining the printer
Warning—Potential Damage: Failure to maintain optimum printer performance, or to replace parts and
supplies, may cause damage to your printer.
Adjusting the speaker volume
Adjusting the default internal speaker volume
The speaker volume will reset to default value after the session is logged out, when the printer wakes from
Sleep or Hibernate mode, or after a poweron reset.
1 From the control panel, navigate to:
Settings > Device > Preferences > Audio Feedback
2 Select the volume.
Note: If Quiet Mode is enabled, then audible alerts are turned
o.
Adjusting the default headphones volume
Headphones volume will reset to default value after the session is logged out, when the printer wakes from
Sleep or Hibernate mode, or after a poweron reset.
1 From the control panel, select Settings > Device > Accessibility > Headphone Volume.
2 Select the volume.
Configuring
the fax speaker settings
Note: This feature is available only in some printer models.
1 From the home screen, select Settings > Fax > Analog Fax Setup > Speaker Settings.
2 Do the following:
Set the Speaker Mode to Always On.
Set the Speaker Volume to High.
Activate the Ringer Volume.
Maintaining the printer 59
Networking
Note: Purchase a MarkNet(TM) N8360 wireless network adapter
first
before setting up the printer on a
wireless network. For information on installing the wireless network adapter, see the setup sheet that came
with the adapter.
Connecting the printer to a wireless network using WiFi Protected Setup
(WPS)
Before you begin, make sure that:
The access point (wireless router) is WPScertified or WPScompatible. For more information, see the
documentation that came with your access point.
A wireless network adapter is installed in your printer. For more information, see the instructions that came
with the adapter.
Using the Push Button method
1
From the control panel, navigate to:
Settings > Network/Ports > Wireless > WiFi Protected Setup > Start Push Button Method
2 Follow the instructions on the display.
Using the personal
identification
number (PIN) method
1
From the control panel, navigate to:
Settings > Network/Ports > Wireless > WiFi Protected Setup > Start PIN Method
2 Copy the eightdigit WPS PIN.
3 Open a Web browser, and then type the IP address of your access point in the address field.
Notes:
View the printer IP address on the printer home screen. The IP address appears as four sets of
numbers separated by periods, such as 123.123.123.123.
If you are using a proxy server, then temporarily disable it to load the Web page correctly.
4 Access the WPS settings. For more information, see the documentation that came with your access
point.
5 Enter the eightdigit PIN, and then save the changes.
Maintaining the printer 60
Changing port settings after installing an internal solutions port
Notes:
If the printer has a static IP address, then do not change the configuration.
If the computers are configured to use the network name instead of an IP address, then do not change
the configuration.
If you are adding a wireless internal solutions port (ISP) to a printer previously configured for an Ethernet
connection, then disconnect the printer from the Ethernet network.
For Windows users
1
Open the printers folder.
2 From the shortcut menu of the printer with the new ISP, open the printer properties.
3 Configure the port from the list.
4 Update the IP address.
5 Apply the changes.
For Macintosh users
1
From System Preferences in the Apple menu, navigate to the list of printers, and then select + > IP.
2 Type the IP address in the address field.
3 Apply the changes.
Setting up serial printing (Windows only)
1 Set the parameters in the printer.
a From the control panel, navigate to the menu for the port settings.
b Locate the menu for the serial port settings, and then adjust the settings, if necessary.
c Apply the changes.
2 From your computer, open the printers folder, and then select your printer.
3 Open the printer properties, and then select the COM port from the list.
4 Set the COM port parameters in Device Manager.
Notes:
Serial printing reduces printing speed.
Make sure that the serial cable is connected to the serial port on your printer.
Maintaining the printer 61
Cleaning printer parts
Cleaning the printer
CAUTION—SHOCK HAZARD: To avoid the risk of electrical shock when cleaning the exterior of the
printer, unplug the power cord from the electrical outlet and disconnect all cables from the printer before
proceeding.
Notes:
Perform this task after every few months.
Damage to the printer caused by improper handling is not covered by the printer warranty.
1 Turn o the printer, and then unplug the power cord from the electrical outlet.
2 Remove paper from the standard bin and multipurpose feeder.
3 Remove any dust, lint, and pieces of paper around the printer using a soft brush or vacuum.
4 Wipe the outside of the printer with a damp, soft, lintfree cloth.
Notes:
Do not use household cleaners or detergents, as they may damage the finish of the printer.
Make sure that all areas of the printer are dry after cleaning.
5 Connect the power cord to the electrical outlet, and then turn on the printer.
CAUTION—POTENTIAL INJURY: To avoid the risk of fire or electrical shock, connect the power cord
to an appropriately rated and properly grounded electrical outlet that is near the product and easily
accessible.
Cleaning the scanner
1 Open the scanner cover.
Maintaining the printer 62
2 Using a damp, soft, lint-free cloth, wipe the following areas:
ADF glass
ADF glass pad
Scanner glass
Maintaining the printer 63
Scanner glass pad
3 Open door E.
Maintaining the printer 64
4 Wipe the following areas:
ADF glass in door E
Maintaining the printer 65
ADF glass pad in door E
5 Close the door, and then close the scanner cover.
Maintaining the printer 66
Ordering parts and supplies
To order parts and supplies in the U.S., contact 1-800-539-6275 for information about Lexmark authorized
supplies dealers in your area. In other countries or regions, go to
www.lexmark.com or contact the place where
you purchased the printer.
Note: All life estimates for printer supplies assume printing on letter or A4size plain paper.
Checking the status of parts and supplies
1 From the home screen, touch Status/Supplies.
2 Select the parts or supplies that you want to check.
Note: You can also access this setting by touching the top section of the home screen.
Using genuine Lexmark parts and supplies
Your Lexmark printer is designed to function best with genuine Lexmark parts and supplies. Use of third-party
supplies or parts may aect the performance, reliability, or life of the printer and its imaging components. It can
also aect warranty coverage. Damage caused by the use of third-party parts and supplies is not covered by
the warranty. All life indicators are designed to function with Lexmark parts and supplies, and may deliver
unpredictable results if third-party parts and supplies are used. Imaging component usage beyond the intended
life may damage your Lexmark printer or its associated components.
Ordering toner cartridges
Notes:
The estimated cartridge yield is based on the ISO/IEC 19798 standard.
Extremely low print coverage for extended periods of time may negatively aect actual yield and may
cause cartridge parts to fail before toner exhaustion.
CX820 Return Program cartridges
Item United States
and Canada
European
Economic
Area (EEA+)
Rest of
Europe,
Middle East,
and Africa
(RoEMEA)
Latin America
Distribution
(LAD)
Rest of Asia
Pacific (RoAP)
Australia and
New Zealand
(ANZ)
Return Program toner cartridges
Black 72K10K0 72K20K0 72K50K0 72K40K0 72K30K0 72K60K0
Cyan 72K10C0 72K20C0 72K50C0 72K40C0 72K30C0 72K60C0
Magenta 72K10M0 72K20M0 72K50M0 72K40M0 72K30M0 72K60M0
Yellow 72K10Y0 72K20Y0 72K50Y0 72K40Y0 72K30Y0 72K60Y0
High Yield Return Program toner cartridges
Cyan 82K1HC0 82K2HC0 82K5HC0 82K4HC0 82K3HC0 82K6HC0
Maintaining the printer 67
Item United States
and Canada
European
Economic
Area (EEA+)
Rest of
Europe,
Middle East,
and Africa
(RoEMEA)
Latin America
Distribution
(LAD)
Rest of Asia
Pacific (RoAP)
Australia and
New Zealand
(ANZ)
Magenta 82K1HM0 82K2HM0 82K5HM0 82K4HM0 82K3HM0 82K6HM0
Yellow 82K1HY0 82K2HY0 82K5HY0 82K4HY0 82K3HY0 82K6HY0
Extra High Yield Return Program toner cartridge
Black 72K1XK0 72K2XK0 72K3XK0 72K4XK0 72K5XK0 72K6XK0
CX820 Regular cartridges
Item Worldwide
High yield regular toner cartridges
Cyan 82K0H20
Magenta 82K0H30
Yellow 82K0H40
Extra high yield regular toner cartridge
Black 72K0X10
CX827 Return Program cartridges
Item United States
and Canada
European
Economic
Area (EEA+)
Rest of
Europe,
Middle East,
and Africa
(RoEMEA)
Latin America
Distribution
(LAD)
Rest of Asia
Pacific (RoAP)
Australia and
New Zealand
(ANZ)
Regular Program toner cartridges
Black 73B10K0 73B20K0 73B50K0 73B40K0 73B30K0 73B60K0
Cyan 73B10C0 73B20C0 73B50C0 73B40C0 73B30C0 73B60C0
Magenta 73B10M0 73B20M0 73B50M0 73B40M0 73B30M0 73B60M0
Yellow 73B10Y0 73B20Y0 73B50Y0 73B40Y0 73B30Y0 73B60Y0
CX827 Regular cartridges
Item Worldwide
Regular toner cartridges
Black 73B0010
Cyan 73B0020
Magenta 73B0030
Yellow 73B0040
Maintaining the printer 68
Ordering a photoconductor unit
Item Part number
Photoconductor unit (1 pack) 72K0P00
Photoconductor unit (3 pack) 72K0Q00
Ordering a developer and PC unit combo pack
Item All countries and regions
Return Program developer and PC unit combo pack
Black 72K0FK0
Color (CMY) 72K0FV0
Regular developer and PC unit combo pack
Black 72K0F10
Color (CMY) 72K0F50
Ordering developer units
Item Part number
Return Program developer units
Black developer unit 72K0DK0
Color (CMY) developer kit 72K0DV0
Cyan developer unit 72K0DC0
Magenta developer unit 72K0DM0
Yellow developer unit 72K0DY0
Regular developer units
Black developer unit 72K0D10
Color (CMY) developer kit 72K0D50
Cyan developer unit 72K0D20
Magenta developer unit 72K0D30
Yellow developer unit 72K0D40
Ordering staple cartridges
Item Part number
Staple cartridges 25A0013
Maintaining the printer 69
Ordering a waste toner bottle
Item Part number
Waste toner bottle 72K0W00
Configuring supply notifications
1 Open a web browser, and then type the printer IP address in the address field.
Notes:
View the printer IP address on the printer home screen. The IP address appears as four sets of
numbers separated by periods, such as 123.123.123.123.
If you are using a proxy server, then temporarily disable it to load the web page correctly.
2 Click Settings > Device > Notifications.
3 From the Supplies menu, click Custom Supply Notifications.
4 Select a notification for each supply item.
5 Apply the changes.
Replacing parts and supplies
Replacing a developer unit
1 Open door A.
Maintaining the printer 70
2 Remove the waste toner bottle.
3 Remove the imaging unit.
4 Remove the developer unit.
5 Unpack the new developer unit, and then remove the packing material.
Maintaining the printer 71
6 Insert the new developer unit.
7 Insert the imaging unit.
8 Insert the waste toner bottle.
9 Close door A.
Replacing the fuser
1 Turn o the printer.
2 Open door B.
CAUTION—HOT SURFACE: The inside of the printer might be hot. To reduce the risk of injury from a
hot component, allow the surface to cool before touching it.
Maintaining the printer 72
3 Remove the fuser.
4 Unpack the new fuser.
5 Clean the fuser lens using the cotton swab that came with the package.
Maintaining the printer 73
6 Insert the new fuser until it clicks into place.
7 Close door B.
8 Turn on the printer.
Replacing a photoconductor unit
1 Open door A.
Maintaining the printer 74
2 Remove the waste toner bottle.
3 Remove the imaging unit.
4 Remove the photoconductor unit.
Maintaining the printer 75
5 Unpack the new photoconductor unit, and then remove the packing material.
Warning—Potential Damage: Do not expose the photoconductor unit to direct light for more than 10
minutes. Extended exposure to light may cause print quality problems.
Warning—Potential Damage: Do not touch the photoconductor drum. Doing so may aect the print
quality of future print jobs.
6 Insert the new photoconductor unit.
7 Insert the imaging unit.
8 Insert the waste toner bottle.
9 Close door A.
Maintaining the printer 76
Replacing an imaging unit
1 Open door A.
2 Remove the waste toner bottle.
Maintaining the printer 77
3 Remove the imaging unit.
4 Unpack the new imaging unit, and then remove the packing material.
Warning—Potential Damage: Do not expose the photoconductor unit to direct light for more than 10
minutes. Extended exposure to light may cause print quality problems.
Warning—Potential Damage: Do not touch the photoconductor drum. Doing so may aect the print
quality of future print jobs.
5 Insert the new imaging unit.
Maintaining the printer 78
6 Insert the waste toner bottle.
7 Close door A.
Replacing a toner cartridge
1 Open door A.
2 Remove the toner cartridge.
3 Unpack the new toner cartridge.
Maintaining the printer 79
4 Insert the new toner cartridge until it clicks into place.
5 Close door A.
Replacing the pick roller
Replacing the pick roller in the 550sheet tray or envelope tray
1
Turn o the printer.
2 Remove the tray.
Maintaining the printer 80
3 Remove the pick roller.
4 Unpack the new pick roller.
Maintaining the printer 81
5 Insert the new pick roller until it clicks into place.
6 Insert the tray.
7 Turn on the printer.
Maintaining the printer 82
Replacing the pick roller in the 2200sheet tray
1
Turn o the printer.
2 Pull out, and then unlock the tray.
3 Remove the tray.
4 Remove the pick roller.
5 Unpack the new pick roller.
Maintaining the printer 83
6 Insert the new pick roller until it clicks into place.
7 Insert the tray.
8 Turn on the printer.
Maintaining the printer 84
Replacing the separator pad
1 Pull out the tray.
2 Remove the separator pad.
3 Unpack the new separator pad.
4 Insert the new separator pad until it clicks into place.
5 Insert the tray.
Maintaining the printer 85
Replacing the waste toner bottle
1 Open door A.
2 Remove the waste toner bottle.
3 Unpack the new waste toner bottle.
4 Insert the new waste toner bottle.
5 Close door A.
Maintaining the printer 86
Replacing the transfer belt
1 Turn
o
the printer.
2 Open door A.
3 Remove the waste toner bottle.
Maintaining the printer 87
4 Open door A1.
5 Remove the transfer belt.
6 Unpack the new transfer belt, and then remove the packing material.
Warning—Potential Damage: Do not expose the transfer belt to direct light for more than 10 minutes.
Extended exposure to light may cause print quality problems.
Warning—Potential Damage: Do not touch the transfer belt. Doing so may aect the print quality of
future print jobs.
Maintaining the printer 88
7 Insert the new transfer belt until it clicks into place.
8 Close door A1.
9 Insert the waste toner bottle.
10 Close door A .
11 Turn on the printer.
Maintaining the printer 89
Replacing the transfer roller
1 Open door B.
CAUTION—HOT SURFACE: The inside of the printer might be hot. To reduce the risk of injury from a
hot component, allow the surface to cool before touching it.
2 Remove the transfer roller.
3 Unpack the new transfer roller.
Note: Do not remove the white packing material.
Maintaining the printer 90
4 Insert the new transfer roller.
5 Remove the white packing material.
6 Close door B.
Maintaining the printer 91
Replacing the ADF pick roller
1 Turn
o
the printer.
2 Open door D.
3 Remove the ADF pick roller cover.
4 Remove the ADF pick roller.
Warning—Potential Damage: Some parts of the printer are easily damaged by static electricity. Before
touching any parts or components in an area marked with the staticsensitive symbol, touch a metal
surface in an area away from the symbol.
Maintaining the printer 92
5 Unpack the new ADF pick roller.
6 Insert the new ADF pick roller until it clicks into place.
Warning—Potential Damage: Some parts of the printer are easily damaged by static electricity. Before
touching any parts or components in an area marked with the staticsensitive symbol, touch a metal
surface in an area away from the symbol.
7 Insert the ADF pick roller cover until it clicks into place.
8 Close door D.
9 Turn on the printer.
Maintaining the printer 93
Replacing the ADF feed roller
1 Turn
o
the printer.
2 Open door D.
3 Remove the ADF pick roller cover.
4 Remove the ADF feed roller.
Warning—Potential Damage: Some parts of the printer are easily damaged by static electricity. Before
touching any parts or components in an area marked with the staticsensitive symbol, touch a metal
surface in an area away from the symbol.
Maintaining the printer 94
5 Unpack the new ADF feed roller.
6 Insert the new ADF feed roller until it clicks into place.
7 Insert the ADF pick roller cover until it clicks into place.
8 Close door D.
9 Turn on the printer.
Maintaining the printer 95
Replacing the ADF separator roller
1 Turn
o
the printer.
2 Open door D.
3 Remove the ADF separator roller cover.
4 Remove the ADF separator roller.
Warning—Potential Damage: Some parts of the printer are easily damaged by static electricity. Before
touching any parts or components in an area marked with the staticsensitive symbol, touch a metal
surface in an area away from the symbol.
Maintaining the printer 96
5 Unpack the new ADF separator roller.
6 Insert the new ADF separator roller until it clicks into place.
7 Insert the ADF separator roller cover until it clicks into place.
8 Close door D.
9 Turn on the printer.
Replacing the staple cartridge unit
Replacing the staple cartridge in the staple finisher
1 Open door C.
Maintaining the printer 97
2 Open door G.
3 Remove the staple cartridge.
4 Unpack the new staple cartridge.
Maintaining the printer 98
5 Insert the new staple cartridge until it clicks into place.
6 Close doors G and C.
CAUTION—PINCH HAZARD: To avoid the risk of a pinch injury, keep hands clear of the labeled area
when closing door C.
Replacing the staple cartridge holder in the staple finisher
1 Open door C.
Maintaining the printer 99
2 Open door G.
3 Pull out the staple cartridge holder.
Maintaining the printer 100
4 Remove the staple cartridge.
5 Unpack the new staple cartridge holder.
6 Insert the staple cartridge until it clicks into place.
Maintaining the printer 101
7 Insert the staple cartridge holder until it clicks into place.
8 Close doors G and C.
CAUTION—PINCH HAZARD: To avoid the risk of a pinch injury, keep hands clear of the labeled area
when closing door C.
Storing supplies
Choose a cool, clean storage area for the printer supplies. Store supplies right side up in their original packing
until you are ready to use them.
Do not expose supplies to:
Direct sunlight
Temperatures above 35°C (95°F)
High humidity above 80%
Salty air
Corrosive gases
Heavy dust
Moving the printer
Moving the printer to another location
CAUTION—POTENTIAL INJURY: If the printer weight is greater than 18 kg (40 lb), then it requires two or
more trained personnel to lift it safely.
CAUTION—POTENTIAL INJURY: To avoid the risk of
fire
or electrical shock, use only the power cord
provided with this product or the manufacturer's authorized replacement.
Maintaining the printer 102
CAUTION—POTENTIAL INJURY: When moving the printer, follow these guidelines to avoid personal
injury or printer damage:
Make sure that all doors and trays are closed.
Turn o the printer, and then unplug the power cord from the electrical outlet.
Disconnect all cords and cables from the printer.
If the printer has separate floor-standing optional trays or output options attached to it, then disconnect
them before moving the printer.
If the printer has a caster base, then carefully roll it to the new location. Use caution when passing over
thresholds and breaks in
flooring.
If the printer does not have a caster base but is configured with optional trays or output options, then remove
the output options and lift the printer
o
the trays. Do not try to lift the printer and any options at the same
time.
Always use the handholds on the printer to lift it.
Any cart used to move the printer must have a surface able to support the full footprint of the printer.
Any cart used to move the hardware options must have a surface able to support the dimensions of the
options.
Keep the printer in an upright position.
Avoid severe jarring movements.
Make sure that your fingers are not under the printer when you set it down.
Make sure that there is adequate clearance around the printer.
Note: Damage to the printer caused by improper moving is not covered by the printer warranty.
Shipping the printer
For shipping instructions, go to http://support.lexmark.com or contact customer support.
Saving energy and paper
Setting up power saver modes
EcoMode
1
From the home screen, touch Settings > Device > Power Management > EcoMode.
2 Select a setting.
Sleep mode
1
From the home screen, touch Settings > Device > Power Management > Timeouts > Sleep Mode.
2 Enter the number of minutes the printer stays idle before it enters Sleep mode.
Hibernate mode
1
From the home screen, touch Settings > Device > Power Management > Timeouts > Hibernate Timeout.
2 Select the amount of time before the printer enters hibernate mode.
Maintaining the printer 103
Notes:
Make sure to wake the printer from hibernate mode before sending a print job.
The Embedded Web Server is disabled when the printer is in hibernate mode.
Adjusting the brightness of the printer display
1 From the home screen, touch Settings > Device > Preferences > Screen Brightness.
2 Adjust the setting.
Conserving supplies
Print on both sides of the paper.
Note: Two-sided printing is the default setting in the print driver.
Print multiple pages on a single sheet of paper.
Use the preview feature to see how the document looks like before printing it.
Print one copy of the document to check its content and format for accuracy.
Recycling
Recycling Lexmark products
To return Lexmark products for recycling:
1 Go to www.lexmark.com/recycle.
2 Select the product you want to recycle.
Note: Printer supplies and hardware not listed in the Lexmark Collection and Recycling Program may be
recycled through your local recycling center.
Recycling Lexmark packaging
Lexmark continually strives to minimize packaging. Less packaging helps to ensure that Lexmark printers are
transported in the most ecient and environmentally sensitive manner and that there is less packaging to
dispose of. These eciencies result in fewer greenhouse emissions, energy savings, and natural resource
savings. Lexmark also oers recycling of packaging components in some countries or regions. For more
information, go to
www.lexmark.com/recycle, and then choose your country or region. Information on available
packaging recycling programs is included with the information on product recycling.
Lexmark cartons are 100% recyclable where corrugated recycling facilities exist. Facilities may not exist in your
area.
The foam used in Lexmark packaging is recyclable where foam recycling facilities exist. Facilities may not exist
in your area.
When you return a cartridge to Lexmark, you can reuse the box that the cartridge came in. Lexmark recycles
the box.
Maintaining the printer 104
Returning Lexmark cartridges for reuse or recycling
The Lexmark Cartridge Collection Program allows you to return used cartridges for free to Lexmark for reuse
or recycling. One hundred percent of the empty cartridges returned to Lexmark are either reused or
demanufactured for recycling. The boxes used to return the cartridges are also recycled.
To return Lexmark cartridges for reuse or recycling, do the following:
1 Go to www.lexmark.com/recycle.
2 Select the product that you want to recycle.
Maintaining the printer 105
Clearing jams
Avoiding jams
Load paper properly
Make sure that the paper lies flat in the tray.
Correct loading of paper Incorrect loading of paper
Do not load or remove a tray while the printer is printing.
Do not load too much paper. Make sure that the stack height is below the maximum paper fill indicator.
Do not slide paper into the tray. Load paper as shown in the illustration.
Make sure that the paper guides are positioned correctly and are not pressing tightly against the paper or
envelopes.
Push the tray
firmly
into the printer after loading paper.
Use recommended paper
Use only recommended paper or specialty media.
Do not load paper that is wrinkled, creased, damp, bent, or curled.
Clearing jams 106
Flex, fan, and align the paper edges before loading.
Do not use paper that has been cut or trimmed by hand.
Do not mix paper sizes, weights, or types in the same tray.
Make sure that the paper size and type are set correctly on the computer or printer control panel.
Store paper according to manufacturer recommendations.
Identifying jam locations
Notes:
When Jam Assist is set to On, the printer flushes blank pages or pages with partial prints after a jammed
page has been cleared. Check your printed output for blank pages.
When Jam Recovery is set to On or Auto, the printer reprints jammed pages.
Jam locations
1 Multipurpose feeder
2 Duplex unit
3 Fuser
4 Automatic document feeder (ADF)
Clearing jams 107
Jam locations
5 Standard bin
6 Door G
7 Door F
8 Trays
Paper jam in trays
1 Pull out the tray.
2 Remove the jammed paper.
Note: Make sure that all paper fragments are removed.
3 Insert the tray.
Clearing jams 108
4 Open the tray cover.
5 Remove the jammed paper.
Note: Make sure that all paper fragments are removed.
6 Close the tray cover.
Paper jam in the multipurpose feeder
1 Remove paper from the multipurpose feeder.
2 Remove the jammed paper.
Note: Make sure that all paper fragments are removed.
Clearing jams 109
3 Open door B, and then remove any paper fragments.
CAUTION—HOT SURFACE: The inside of the printer might be hot. To reduce the risk of injury from a
hot component, allow the surface to cool before touching it.
4 Close door B.
5 Flex, fan, and align the paper edges before loading.
6 Reload paper.
Clearing jams 110
Paper jam in the automatic document feeder
1 Remove all original documents from the ADF tray.
2 Open door D.
3 Remove the jammed paper.
Note: Make sure that all paper fragments are removed.
Warning—Potential Damage: Some parts of the printer are easily damaged by static electricity. Before
touching any parts or components in an area marked with the staticsensitive symbol, touch a metal
surface in an area away from the symbol.
4 Close door D.
Clearing jams 111
5 Open the scanner cover.
6 Open door E.
7 Remove the jammed paper.
Note: Make sure that all paper fragments are removed.
8 Close door E and the scanner cover.
Clearing jams 112
Paper jam in the standard bin
1 Remove the jammed paper.
Note: Make sure that all paper fragments are removed.
2 Open door B, and then remove any paper fragments.
CAUTION—HOT SURFACE: The inside of the printer might be hot. To reduce the risk of injury from a
hot component, allow the surface to cool before touching it.
3 Close door B.
Paper jam in door B
Paper jam in the fuser
1 Open door B.
CAUTION—HOT SURFACE: The inside of the printer might be hot. To reduce the risk of injury from a
hot component, allow the surface to cool before touching it.
Clearing jams 113
2 Remove the jammed paper.
Note: Make sure that all paper fragments are removed.
Clearing jams 114
3 Open the fuser access door.
4 Remove the jammed paper.
Note: Make sure that all paper fragments are removed.
5 Close door B.
Paper jam in the duplex unit
1 Open door B.
CAUTION—HOT SURFACE: The inside of the printer might be hot. To reduce the risk of injury from a
hot component, allow the surface to cool before touching it.
Clearing jams 115
2 Remove the jammed paper.
Note: Make sure that all paper fragments are removed.
3 Open the duplex cover.
4 Remove the jammed paper.
Note: Make sure that all paper fragments are removed.
Clearing jams 116
5 Close the duplex cover and door B.
Paper jam in the finisher bin
1 Remove the jammed paper.
Note: Make sure that all paper fragments are removed.
Clearing jams 117
2 Open door C.
3 Open door F.
4 Remove the jammed paper.
Note: Make sure that all paper fragments are removed.
Clearing jams 118
5 Close doors F and C.
CAUTION—PINCH HAZARD: To avoid the risk of a pinch injury, keep hands clear of the labeled area
when closing door C.
Staple jam in door G
1 Open door C.
Clearing jams 119
2 Open door G.
3 Pull out the staple cartridge holder.
Clearing jams 120
4 Lift the staple guard, and then remove the loose staples.
Note: Do not insert the staples that came out of the cartridge.
5 Close the staple guard.
Clearing jams 121
6 Insert the staple cartridge holder.
7 Close doors G and C.
CAUTION—PINCH HAZARD: To avoid the risk of a pinch injury, keep hands clear of the labeled area
when closing door C.
Clearing jams 122
Troubleshooting
Network connection problems
Cannot open Embedded Web Server
Action Yes No
Step 1
Check if you are using a supported browser:
Internet Explorer® version 9 or later
Safari version 8.0.3 or later
Google Chrome
TM
Mozilla Firefox
Is your browser supported?
Go to step 2. Install a supported
browser.
Step 2
Make sure that the printer IP address is correct.
View the printer IP address:
From the home screen
From the TCP/IP section in the Network/Ports menu
By printing a network setup page or menu settings page,
and then finding the TCP/IP section
Note: An IP address appears as four sets of numbers separated
by periods, such as 123.123.123.123.
Is the printer IP address correct?
Go to step 3. Type the correct
printer IP address in
the address
field.
Step 3
Check if the printer is on.
Is the printer on?
Go to step 4. Turn on the printer.
Step 4
Check if the network connection is working.
Is the network connection working?
Go to step 5. Contact your
administrator.
Step 5
Make sure that the cable connections to the printer and print server
are secure.
For more information, see the setup documentation that came with
the printer.
Are the cable connections secure?
Go to step 6. Secure the cable
connections.
Troubleshooting 123
Action Yes No
Step 6
Check if the web proxy servers are disabled.
Are the web proxy servers disabled?
Go to step 7. Contact your
administrator.
Step 7
Access the Embedded Web Server.
Did the Embedded Web Server open?
The problem is
solved.
Contact
customer
support.
Unable to read
flash
drive
Action Yes No
Step 1
Check if the flash drive is inserted into the front USB port.
Note: The flash drive does not work when it is inserted into the
rear USB port.
Is the
flash
drive inserted into the front USB port?
Go to step 2. The problem is
solved.
Step 2
Check if the flash drive is supported. For more information, see
“Supported flash drives and file types” on page 31
Does the error message still appear?
Go to step 3. The problem is
solved.
Step 3
Check if the front USB port is disabled. For more information, see
“Enabling the USB port” on page 124.
Does the error message still appear?
Contact
customer
support.
The problem is
solved.
Enabling the USB port
From the home screen, touch Settings > Network/Ports > USB > Enable USB Port.
Checking the printer connectivity
1 From the home screen, touch Settings > Reports > Network > Network Setup Page.
2 Check the first section of the network setup page, and confirm that the status is connected.
If the status is not connected, then the LAN drop may be inactive, or the network cable may be unplugged
or malfunctioning. Contact your administrator for assistance.
Troubleshooting 124
Hardware options problems
Cannot detect internal option
Action Yes No
Step 1
Turn o the printer, wait for about 10 seconds, and then turn it back
on.
Does the internal option operate correctly?
The problem is
solved.
Go to step 2.
Step 2
Print a menu settings page, and then check if the internal option
appears in the Installed Features list.
Is the internal option listed in the menu settings page?
Go to step 4. Go to step 3.
Step 3
Check if the internal option is properly installed in the controller
board.
a Turn o the printer, and then unplug the power cord from the
electrical outlet.
b Make sure that the internal option is installed in the appropriate
connector in the controller board.
c Connect the power cord to the electrical outlet, and then turn
on the printer.
CAUTION—POTENTIAL INJURY: To avoid the risk of fire
or electrical shock, connect the power cord to an
appropriately rated and properly grounded electrical outlet
that is near the product and easily accessible.
Does the internal option operate correctly?
The problem is
solved.
Go to step 4.
Step 4
a Check if the internal option is available in the print driver.
Note: If necessary, manually add the internal option in the
print driver to make it available for print jobs. For more
information, see
Adding available options in the print driver”
on page 182.
b Resend the print job.
Does the internal option operate correctly?
The problem is
solved.
Contact
customer
support.
Troubleshooting 125
Internal solutions port does not operate correctly
Action Yes No
Step 1
Print a menu settings page, and then check if the internal solutions
port (ISP) appears in the Installed Features list.
Is the ISP listed in the Installed Features list?
Go to step 3. Go to step 2.
Step 2
Remove, and then install the ISP. For more information, see
“Installing an internal solutions port” on page 167.
Note: Use a supported ISP.
Does the ISP operate correctly?
The problem is
solved.
Go to step 3.
Step 3
Check the cable and the ISP connection.
a Use the correct cable, and then make sure that it is securely
connected to the ISP.
b Check if the ISP solution interface cable is securely connected
into the receptacle of the controller board.
Does the ISP operate correctly?
The problem is
solved.
Contact
customer
support.
Parallel or serial interface card does not operate correctly
Action Yes No
Step 1
Print a menu settings page, and then check if the parallel or serial
interface card appears in the Installed Features list.
Is the parallel or serial interface card listed in the Installed Features
list?
Go to step 3. Go to step 2.
Step 2
Remove, and then install the parallel or serial interface card.
For more information, see
“Installing an internal solutions port” on
page 167.
Does the parallel or serial interface card operate correctly?
The problem is
solved.
Go to step 3.
Step 3
Check the connection between the cable and the parallel or serial
interface card.
Does the parallel or serial interface card operate correctly?
The problem is
solved.
Contact
customer
support.
Troubleshooting 126
Defective flash detected
Try one or more of the following:
Replace the defective flash memory.
From the printer control panel, select Continue to ignore the message and continue printing.
Cancel the current print job.
Not enough free space in
flash
memory for resources
Try one or more of the following:
From the printer control panel, select Continue to clear the message and continue printing.
Delete fonts, macros, and other data stored in the flash memory.
Install flash memory with larger capacity.
Note: Downloaded fonts and macros that are not previously stored in the
flash
memory are deleted.
Unformatted
flash
detected
Try one or more of the following:
From the control panel, select Continue to stop the defragmentation and continue printing.
Format the flash memory.
Note: If the error message remains, then the flash memory may be defective and needs to be
replaced.
Issues with supplies
Replace cartridge, printer region mismatch
To correct this problem, purchase a cartridge with the correct region that matches the printer region, or
purchase a worldwide cartridge.
The first number in the message after 42 indicates the region of the printer.
The second number in the message after 42 indicates the region of the cartridge.
Printer and toner cartridge regions
Region Numeric code
Worldwide or Undefined region 0
North America (United States, Canada) 1
European Economic Area, Western Europe, Nordic countries, Switzerland 2
Asia Pacific 3
Latin America 4
Rest of Europe, Middle East, Africa 5
Australia, New Zealand 6
Troubleshooting 127
Region Numeric code
Invalid region 9
Note: To find the region settings of the printer and toner cartridge, print the print quality test pages.
From the control panel, navigate to: Settings > Troubleshooting > Print Quality Test Pages.
NonLexmark supply
The printer has detected a nonLexmark supply or part installed in the printer.
Your Lexmark printer is designed to function best with genuine Lexmark supplies and parts. Use of third-
party supplies or parts may aect the performance, reliability, or life of the printer and its imaging
components.
All life indicators are designed to function with Lexmark supplies and parts and may deliver unpredictable
results if third-party supplies or parts are used. Imaging component usage beyond the intended life may
damage your Lexmark printer or associated components.
Warning—Potential Damage: Use of third-party supplies or parts can aect warranty coverage.
Damage caused by the use of third-party supplies or parts may not be covered by the warranty.
To accept any and all of these risks and to proceed with the use of non-genuine supplies or parts in your
printer, from the control panel, press and hold X and # simultaneously for 15 seconds.
If you do not want to accept these risks, then remove the third-party supply or part from your printer and
install a genuine Lexmark supply or part. For more information, see
“Using genuine Lexmark parts and
supplies” on page 67.
If the printer does not print after pressing and holding X and # simultaneously for 15 seconds, then reset
the supply usage counter.
1 From the control panel, navigate to:
Settings > Device > Maintenance >
Configuration
Menu > Supply Usage And Counters
2 Select the part or supply that you want to reset, and then select Start.
3 Read the warning message, and then select Continue.
4 Press and hold X and # simultaneously for 15 seconds to clear the message.
Note: If you are unable to reset the supply usage counters, then return the item to the place of
purchase.
Scanner maintenance required, use ADF Kit
The printer is scheduled for maintenance. For more information, go to http://support.lexmark.com or
contact your service representative, and then report the message.
Troubleshooting 128
Paper feed problems
Envelope seals when printing
Action Yes No
1 Use envelopes that have been stored in a dry environment.
Note: Printing on envelopes with high moisture content can seal the
flaps.
2 Resend the print job.
Does the envelope seal when printing?
Contact
customer
support.
The problem is
solved.
Collated printing does not work
Action Yes No
Step 1
a From the home screen, touch Settings > Print > Layout >
Collate.
b Set Collate to On.
c Print the document.
Are the pages collated correctly?
The problem is
solved.
Go to step 2.
Step 2
a From the document that you are trying to print, open the Print
dialog, and then select Collate.
b Print the document.
Are the pages collated correctly?
The problem is
solved.
Go to step 3.
Step 3
a Reduce the number of pages to print.
b Print the document.
Are the pages collated correctly?
The problem is
solved.
Contact
customer
support.
Troubleshooting 129
Paper curl
Action Yes No
Step 1
Move the paper guides in the tray to the correct position for the
paper loaded.
Is the paper still curled?
Go to step 2. The problem is
solved.
Step 2
a Depending on your operating system, specify the paper type
and weight from the Printing Preferences or Print dialog.
Notes:
Make sure that the settings match the paper loaded in
the tray.
You can also change the settings on the printer control
panel.
b Resend the print job.
Is the paper still curled?
Go to step 3. The problem is
solved.
Step 3
a Remove paper from the tray, and then turn it over.
b Resend the print job.
Is the paper still curled?
Go to step 4. The problem is
solved.
Step 4
a Load paper from a fresh package.
Note: Paper absorbs moisture due to high humidity. Store
paper in its original wrapper until you are ready to use it.
b Resend the print job.
Is the paper still curled?
Contact
customer
support.
The problem is
solved.
Tray linking does not work
Action Yes No
Step 1
a Check if the trays contain paper of the same size and type.
b Check if the paper guides are positioned correctly.
c Print the document.
Do the trays link correctly?
The problem is
solved.
Go to step 2.
Troubleshooting 130
Action Yes No
Step 2
a From the home screen, touch Settings > Paper > Tray
Configuration > Paper Size/Type.
b Set the paper size and type to match the paper loaded in the
linked trays.
c Print the document.
Do the trays link correctly?
The problem is
solved.
Contact
customer
support.
Check tray connection
Try one or more of the following:
Turn o the printer, wait for about 10 seconds, and then turn it back on.
If the error occurs a second time, then:
1 Turn o the printer.
2 Unplug the power cord from the electrical outlet.
3 Remove the indicated tray.
4 Insert the tray.
5 Connect the power cord to the electrical outlet.
CAUTION—POTENTIAL INJURY: To avoid the risk of fire or electrical shock, connect the
power cord to an appropriately rated and properly grounded electrical outlet that is near
the product and easily accessible.
6 Turn on the printer.
If the error occurs again, then:
1 Turn o the printer.
2 Unplug the power cord from the electrical outlet.
3 Remove the indicated tray.
4 Contact customer support.
From the control panel, select Continue to clear the message and resume printing.
Troubleshooting 131
Paper frequently jams
Action Yes No
Step 1
a Pull out the tray.
b Check if the paper is loaded correctly.
Notes:
Make sure that the paper guides are positioned correctly.
Make sure that the stack height is below the maximum
paper
fill
indicator.
Make sure to print on recommended paper size and type.
c Insert the tray.
d Print the document.
Do paper jams still occur frequently?
Go to step 2. The problem is
solved.
Step 2
a From the Paper menu on the control panel, check if the printer
is detecting the correct paper size.
b Resend the print job.
Do paper jams still occur frequently?
Go to step 3. The problem is
solved.
Step 3
a Load paper from a fresh package.
b Print the document.
Do paper jams still occur frequently?
Contact
customer
support.
The problem is
solved.
Jammed pages are not reprinted
Action Yes No
a From the home screen, touch Settings > Device > Notifications
> Jam Content Recovery.
b Select On or Auto.
c Apply the changes.
Are the jammed pages reprinted?
The problem is
solved.
Contact
customer
support.
Troubleshooting 132
Printing problems
Confidential and other held documents do not print
Action Yes No
Step 1
a From the control panel, check if the documents appear in the
Held Jobs list.
Note: If the documents are not listed, then print the
documents using the Print and Hold options.
b Print the documents.
Are the documents printed?
The problem is
solved.
Go to step 2.
Step 2
The print job may contain a formatting error or invalid data.
Delete the print job, and then send it again.
For PDF files, generate a new file, and then print the
documents.
Are the documents printed?
The problem is
solved.
Go to step 3.
Step 3
If you are printing from the Internet, then the printer may be reading
the multiple job titles as duplicates.
For Windows users
a Open the Printing Preferences dialog.
b From the Print and Hold section, select Keep duplicate
documents.
c Enter a PIN.
d Resend the print job.
For Macintosh users
a Save and name each job dierently.
b Send the job individually.
Are the documents printed?
The problem is
solved.
Go to step 4.
Step 4
a Delete some held jobs to free up printer memory.
b Resend the print job.
Are the documents printed?
The problem is
solved.
Go to step 5.
Troubleshooting 133
Action Yes No
Step 5
a Add printer memory.
b Resend the print job.
Are the documents printed?
The problem is
solved.
Contact
customer
support.
Slow printing
Action Yes No
Step 1
a Make sure that the printer is not in EcoMode and Quiet Mode.
b Print the document.
Is the printer printing slow?
Go to step 2. The problem is
solved.
Step 2
a Depending on your operating system, specify the paper type
from the Printing Preferences or Print dialog.
Notes:
Make sure that the setting matches the paper loaded in
the tray.
You can also change the setting on the printer control
panel.
b Print the document.
Is the printer printing slow?
Go to step 3. The problem is
solved.
Step 3
a Reduce the number of pages to print.
b Print the document.
Is the printer printing slow?
Go to step 4. The problem is
solved.
Step 4
a Remove held jobs.
b Print the document.
Is the printer printing slow?
Go to step 5. The problem is
solved.
Step 5
a Connect the printer cable securely to the printer and the
computer, print server, option, or other network device.
b Print the document.
Is the printer printing slow?
Go to step 6. The problem is
solved.
Troubleshooting 134
Action Yes No
Step 6
a From the Quality menu on the control panel, set the Print
Resolution to 4800CQ.
b Print the document.
Is the printer printing slow?
Go to step 7. The problem is
solved.
Step 7
a Make sure that the printer is not overheating.
Notes:
Allow the printer to cool down after a long print job.
Observe the recommended ambient temperature for the
printer. For more information, see
“Selecting a location
for the printer” on page 10.
b Print the document.
Is the printer printing slow?
Go to step 8. The problem is
solved.
Step 8
a Add more printer memory.
b Print the document.
Is the printer printing slow?
Contact
customer
support.
The problem is
solved.
Print jobs do not print
Action Yes No
Step 1
a From the document you are trying to print, open the Print
dialog, and then check if you have selected the correct printer.
b Resend the print job.
Is the document printed?
The problem is
solved.
Go to step 2.
Step 2
a Check if the printer is on.
b Resolve any error messages that appear on the display.
c Resend the print job.
Is the document printed?
The problem is
solved.
Go to step 3.
Troubleshooting 135
Action Yes No
Step 3
a Check if the ports are working and if the cables are securely
connected to the computer and the printer.
For more information, see the setup documentation that came
with the printer.
b Resend the print job.
Is the document printed?
The problem is
solved.
Go to step 4.
Step 4
a Turn o the printer, wait for about 10 seconds, and then turn it
back on.
b Resend the print job.
Is the document printed?
The problem is
solved.
Go to step 5.
Step 5
a Remove, and then reinstall the printer software.
Note: The printer software is available at
http://support.lexmark.com.
b Resend the print job.
Is the document printed?
The problem is
solved.
Contact
customer
support.
Print quality is poor
Blank or white pages
Note: Before solving the problem, print the quality sample pages to determine the missing color. From the
home screen, touch Settings > Troubleshooting > Basic Print Quality Pages.
Troubleshooting 136
Action Yes No
Step 1
a Remove, and then reinstall the imaging unit or imaging kit.
Warning—Potential Damage: Do not expose the imaging unit
or imaging kit to direct light for more than 10 minutes.
Extended exposure to light may cause print quality problems.
Warning—Potential Damage: To avoid damage, do not touch
the underside of the imaging unit or imaging kit.
b Print a document.
Is the printer still printing blank or white pages?
Go to step 2. The problem is
solved.
Step 2
a Replace the imaging unit or imaging kit.
Warning—Potential Damage: Do not expose the imaging unit
or imaging kit to direct light for more than 10 minutes.
Extended exposure to light may cause print quality problems.
Warning—Potential Damage: To avoid damage, do not touch
the underside of the imaging unit or imaging kit.
b Print a document.
Is the printer still printing blank or white pages?
Contact
customer
support.
The problem is
solved.
Dark print
Action Yes No
Step 1
a From the Quality menu on the control panel, select Color
Adjust.
b Resend the print job.
Is the print still too dark?
Go to step 2. The problem is
solved.
Troubleshooting 137
Action Yes No
Step 2
a Depending on your operating system, reduce the toner
darkness from the Printing Preferences or Print dialog.
Note: You can also change the settings on the printer control
panel.
b Resend the print job.
Is the print still too dark?
Go to step 3. The problem is
solved.
Step 3
a Depending on your operating system, specify the paper type,
texture, and weight from the Printing Preferences or Print
dialog.
Notes:
Make sure that the settings match the paper loaded in
the tray.
You can also change the settings on the printer control
panel.
b Resend the print job.
Is the print still too dark?
Go to step 4. The problem is
solved.
Step 4
Make sure that the paper has no texture or rough finishes.
Are you printing on textured or rough paper?
Change the texture
settings to match the
paper you are
printing on.
Go to step 5.
Step 5
a Load paper from a fresh package.
Note: Paper absorbs moisture due to high humidity. Store
paper in its original wrapper until you are ready to use it.
b Resend the print job.
Is the print still too dark?
Go to step 6. The problem is
solved.
Step 6
Replace the imaging unit or imaging kit, and then resend the print
job.
Is the print still too dark?
Contact
customer
support.
The problem is
solved.
Troubleshooting 138
Ghost images
ABCD
ABCD
ABCD
ABCD
Leading edge
Trailing edge
Action Yes No
Step 1
a Load the tray with the correct paper type and weight.
b Resend the print job.
Do ghost images still appear on prints?
Go to step 2. The problem is
solved.
Step 2
a Depending on your operating system, specify the paper type
and weight from the Printing Preferences or Print dialog.
Notes:
Make sure that the settings match the paper loaded in
the tray.
You can also change the settings on the printer control
panel.
b Resend the print job.
Do ghost images still appear on prints?
Go to step 3. The problem is
solved.
Step 3
a From the Quality menu on the control panel, select Color
Adjust.
b Resend the print job.
Do ghost images still appear on prints?
Contact customer
support.
The problem is
solved.
Gray background
ABCDE
ABCDE
ABCDE
Leading edge
Trailing edge
Troubleshooting 139
Action Yes No
Step 1
a From the home screen, touch Settings > Print > Quality.
b Adjust the toner darkness.
c Print the document.
Does gray background still appear on prints?
Go to step 2. The problem is
solved.
Step 2
a From the home screen, touch Settings > Print > Quality >
Advanced Imaging > Color Adjust.
b Start the process.
c Print the document.
Does gray background still appear on prints?
Go to step 3. The problem is
solved.
Step 3
a Remove, and then reinstall the imaging unit or imaging kit.
Warning—Potential Damage: Do not expose the imaging unit
or imaging kit to direct light for more than 10 minutes.
Extended exposure to light may cause print quality problems.
Warning—Potential Damage: To avoid damage, do not touch
the underside of the imaging unit or imaging kit.
b Print the document.
Does gray background still appear on prints?
Contact
customer
support.
The problem is
solved.
Horizontal dark lines
ABCDE
ABCDE
ABCDE
Note: If horizontal dark lines keep appearing on your prints, then see the “Repeating defects” topic.
Action Yes No
Step 1
a Depending on your operating system, specify the tray or feeder
from the Printing Preferences or Print dialog.
b Resend the print job.
Do horizontal dark lines still appear on prints?
Go to step 2. The problem is
solved.
Troubleshooting 140
Action Yes No
Step 2
a Depending on your operating system, specify the paper type
and weight from the Printing Preferences or from Print dialog.
Notes:
Make sure that the settings match the paper loaded in
the tray.
You can also change the settings on the printer control
panel.
b Resend the print job.
Do horizontal dark lines still appear on prints?
Go to step 3. The problem is
solved.
Step 3
a Load paper from a fresh package.
Note: Paper absorbs moisture due to high humidity. Store
paper in its original wrapper until you use it.
b Resend the print job.
Do horizontal dark lines still appear on prints?
Go to step 4. The problem is
solved.
Step 4
a Remove, and then reinstall the imaging unit or imaging kit.
Warning—Potential Damage: Do not expose the imaging unit
or imaging kit to direct light for more than 10 minutes.
Extended exposure to light may cause print quality problems.
Warning—Potential Damage: To avoid damage, do not touch
the underside of the imaging unit or imaging kit.
b Resend the print job.
Do horizontal dark lines still appear on prints?
Go to step 5. The problem is
solved.
Step 5
Replace the imaging unit or imaging kit, and then resend the print
job.
Do horizontal dark lines still appear on prints?
Contact
customer
support.
The problem is
solved.
Horizontal white lines
Leading edge
Trailing edge
Troubleshooting 141
Note: If horizontal dark lines keep appearing on your prints, then see the “Repeating defects” topic.
Action Yes No
Step 1
a Depending on your operating system, specify the paper type
and weight from the Printing Preferences or Print dialog.
Notes:
Make sure that the settings match the paper loaded in
the tray.
You can also change the settings on the printer control
panel.
b Resend the print job.
Do horizontal white lines still appear on prints?
Go to step 2. The problem is
solved.
Step 2
a Load the specified tray or feeder with the recommended paper
type.
b Resend the print job.
Do horizontal white lines still appear on prints?
Go to step 3. The problem is
solved.
Step 3
a Remove, and then reinstall the imaging unit or imaging kit.
Warning—Potential Damage: Do not expose the imaging unit
or imaging kit to direct light for more than 10 minutes.
Extended exposure to light can cause print quality problems.
Warning—Potential Damage: To avoid damage, do not touch
the underside of the imaging unit or imaging kit.
b Resend the print job.
Do horizontal white lines still appear on prints?
Go to step 4. The problem is
solved.
Step 4
Replace the imaging unit or imaging kit, and then resend the print
job.
Do horizontal white lines still appear on prints?
Contact
customer
support.
The problem is
solved.
Incorrect margins
ABCD
ABCD
ABCD
Troubleshooting 142
Action Yes No
Step 1
a Squeeze and slide the paper guides to the correct position for
the size of the paper you are loading.
b Resend the print job.
Are the margins correct?
The problem is
solved.
Go to step 2.
Step 2
a From the Paper menu on the control panel, check if the printer
is detecting the correct paper size.
b Resend the print job.
Are the margins correct?
The problem is
solved.
Go to step 3.
Step 3
a Depending on your operating system, specify the paper size
from the Printing Preferences or Print dialog.
Notes:
Make sure that the settings match the paper loaded in
the tray.
You can also change the settings on the printer control
panel.
b Resend the print job.
Are the margins correct?
The problem is
solved.
Contact
customer
support.
Jagged or uneven characters
Troubleshooting 143
Action Yes No
a Check if the printer supports the fonts that are installed on your
computer.
1 From the control panel, touch:
Settings > Reports > Print > Print Fonts
2 Select PCL Fonts or PS Fonts.
b If the font is not supported, then install a supported font. For
more information, contact your administrator.
c Resend the print job.
Do prints still contain jagged or uneven characters?
Contact
customer
support.
The problem is
solved.
Light print
Action Yes No
Step 1
a From the Quality menu on the control panel, select Color
Adjust.
b Resend the print job.
Is the print still too light?
Go to step 2. The problem is
solved.
Step 2
a Depending on your operating system, increase the toner
darkness from the Printing Preferences or Print dialog.
Note: You can also change the settings on the printer control
panel.
b Resend the print job.
Is the print still too light?
Go to step 3. The problem is
solved.
Troubleshooting 144
Action Yes No
Step 3
a Depending on your operating system, specify the paper type,
texture, and weight from the Printing Preferences or Print
dialog.
Notes:
Make sure that the settings match the paper loaded in
the tray.
You can also change the settings on the printer control
panel.
b Resend the print job.
Is the print still too light?
Go to step 4. The problem is
solved.
Step 4
Make sure that the paper has no texture or rough finishes.
Are you printing on textured or rough paper?
Change the texture
settings to match the
paper you are
printing on.
Go to step 5.
Step 5
a Load paper from a fresh package.
Note: Paper absorbs moisture due to high humidity. Store
paper in its original wrapper until you are ready to use it.
b Resend the print job.
Is the print still too light?
Go to step 6. The problem is
solved.
Step 6
Replace the imaging unit or imaging kit, and then resend the print
job.
Warning—Potential Damage: Do not expose the imaging unit or
imaging kit to direct light for more than 10 minutes. Extended
exposure to light can cause print quality problems.
Warning—Potential Damage: To avoid damage, do not touch the
underside of the imaging unit or imaging kit.
Is the print still too light?
Contact
customer
support.
The problem is
solved.
Mottled print and dots
ABC
DEF
Troubleshooting 145
Action Yes No
Step 1
Check the printer for leaked toner contamination.
Is the printer free of leaked toner?
Go to step 2. Contact
customer
support.
Step 2
a From the home screen, touch Settings > Device > Preferences.
b Check if the paper type and size settings match the paper type
and size set in the tray.
Do the settings match?
Go to step 4. Go to step 3.
Step 3
a Change the paper size and type in the Paper menu or adjust
the size settings in the tray.
b Print the document.
Is the print still mottled?
Go to step 4. The problem is
solved.
Step 4
a Replace the textured or rough paper loaded in the tray with
plain paper.
b Print the document.
Is the print still mottled?
Go to step 5. The problem is
solved.
Step 5
a Replace the imaging unit or imaging kit.
Warning—Potential Damage: Do not expose the imaging unit
or imaging kit to direct light for more than 10 minutes.
Extended exposure to light can cause print quality problems.
Warning—Potential Damage: To avoid damage, do not touch
the underside of the imaging unit or imaging kit.
b Print the document.
Is the print still mottled?
Contact
customer
support.
The problem is
solved.
Print crooked or skewed
) )
ABCDE
ABCDE
ABCDE
Troubleshooting 146
Action Yes No
Step 1
a Remove the tray.
b Remove the paper, and then load paper from a fresh package.
Note: Paper absorbs moisture due to high humidity. Store
paper in its original wrapper until you are ready to use it.
c Squeeze and slide the paper guides to the correct position for
the size of the paper you are loading.
d Insert the tray.
e Resend the print job.
Is the print still crooked or skewed?
Go to step 2. The problem is
solved.
Step 2
a Check if you are printing on a supported paper.
b Resend the print job.
Is the print still crooked or skewed?
Contact
customer
support.
The problem is
solved.
Repeating defects
)
)
)
Note: Before solving the problem, print the Maintenance Defect Ruler from the Troubleshooting section of
the Settings menu.
Action Yes No
Step 1
a Print the quality sample pages.
From the home screen, touch Settings > Troubleshooting >
Basic Print Quality Samples.
b Determine how many colors have defects.
Is only one color aected?
Go to step 2. Go to step 3.
Troubleshooting 147
Action Yes No
Step 2
a Using the Maintenance Defect Ruler, measure the distance
between the repeating defects on the aected color page.
b Replace the supply item that matches the measurement on the
aected
color page.
Photoconductor unit
125.70 mm (4.95 in.)
35.40 mm (1.39 in.)
Developer unit
42 mm (1.65 in.)
c Print the quality sample pages.
Do the defects still appear?
Take note of the
distance, and then
contact
customer
support or your
service
representative.
The problem is
solved.
Step 3
a Using the Maintenance Defect Ruler, measure the distance
between the repeating defects on the aected color page.
b Replace the supply item that matches the measurement on the
aected
color page.
Transfer roller
78.50 mm (3.09 in.)
Transfer module
47.10 mm (1.86 in.)
90 mm (3.54 in.)
Fuser
96.60 mm (3.80 in.)
127.60 mm (5.02 in.)
c Print the quality sample pages.
Do the defects still appear?
Take note of the
distance, and then
contact
customer
support or your
service
representative.
The problem is
solved.
Solid color or black images
Troubleshooting 148
Action Yes No
Step 1
a Remove, and then reinstall the imaging unit or imaging kit.
Warning—Potential Damage: Do not expose the imaging unit
or imaging kit to direct light for more than 10 minutes.
Extended exposure to light may cause print quality problems.
Warning—Potential Damage: To avoid damage, do not touch
the underside of the imaging unit or imaging kit.
b Resend the print job.
Is the printer still printing solid color or black images?
Go to step 2. The problem is
solved.
Step 2
Replace the imaging unit or imaging kit, and then resend the print
job.
Is the printer still printing solid color or black images?
Contact
customer
support.
The problem is
solved.
Text or images cut o
Leading edge
Trailing edge
ABCDE
ABCDE
ABCDE
Action Yes No
Step 1
a Move the paper guides in the tray to the correct position for the
paper loaded.
b Resend the print job.
Is the page or image still clipped?
Go to step 2. The problem is
solved.
Step 2
a Depending on your operating system, specify the paper size
from the Printing Preferences or Print dialog.
Notes:
Make sure that the settings match the paper loaded in
the tray.
You can also change the settings on the printer control
panel.
b Resend the print job.
Is the page or image still clipped?
Go to step 3. The problem is
solved.
Troubleshooting 149
Action Yes No
Step 3
a Remove, and then reinstall the imaging unit or imaging kit.
Warning—Potential Damage: Do not expose the imaging unit
or imaging kit to direct light for more than 10 minutes.
Extended exposure to light may cause print quality problems.
Warning—Potential Damage: To avoid damage, do not touch
the underside of the imaging unit or imaging kit.
b Resend the print job.
Is the page or image still clipped?
Contact
customer
support.
The problem is
solved.
Toner easily rubs o
Leading edge
Trailing edge
ABC
DEF
Action Yes No
1 Depending on your operating system, specify the
paper type, texture, and weight from the Printing
Preferences or Print dialog.
Notes:
Make sure that the settings match the paper
loaded in the tray.
You can also change the settings on the printer
control panel.
2 Resend the print job.
Does the toner still rub o?
Contact
customer
support.
The problem is solved.
Uneven print density
Troubleshooting 150
Action Yes No
Replace the imaging unit or imaging kit, and then resend the print
job.
Warning—Potential Damage: Do not expose the imaging unit or
imaging kit to direct light for more than 10 minutes. Extended
exposure to light can cause print quality problems.
Warning—Potential Damage: To avoid damage, do not touch the
underside of the imaging unit or imaging kit.
Is the print density uneven?
Contact
customer
support.
The problem is
solved.
Vertical dark lines or streaks
ABCDE
ABCDE
ABCDE
Leading edge
Trailing edge
Action Yes No
Step 1
a Depending on your operating system, specify the paper type,
texture, and weight from the Printing Preferences or Print
dialog.
Notes:
Make sure that the settings match the paper loaded in
the tray.
You can also change the settings on the printer control
panel.
b Resend the print job.
Do vertical dark lines or streaks still appear on prints?
Go to step 2. The problem is
solved.
Step 2
a Load paper from a fresh package.
Note: Paper absorbs moisture due to high humidity. Store
paper in its original wrapper until you use it.
b Resend the print job.
Do vertical dark lines or streaks still appear on prints?
Go to step 3. The problem is
solved.
Troubleshooting 151
Action Yes No
Step 3
a Remove, and then reinstall the imaging unit or imaging kit.
Warning—Potential Damage: Do not expose the imaging unit
or imaging kit to direct light for more than 10 minutes.
Extended exposure to light can cause print quality problems.
Warning—Potential Damage: To avoid damage, do not touch
the underside of the imaging unit or imaging kit.
b Resend the print job.
Do vertical dark lines or streaks still appear on prints?
Go to step 4. The problem is
solved.
Step 4
Replace the imaging unit or imaging kit, and then resend the print
job.
Do vertical dark lines or streaks still appear on prints?
Contact
customer
support.
The problem is
solved.
Vertical white lines
Leading edge
Trailing edge
Action Yes No
Step 1
a Depending on your operating system, specify the paper type
and weight from the Printing Preferences or Print dialog.
Notes:
Make sure that the settings match the paper loaded in
the tray.
You can also change the settings on the printer control
panel.
b Resend the print job.
Do vertical white lines still appear on prints?
Go to step 2. The problem is
solved.
Troubleshooting 152
Action Yes No
Step 2
Check if you are using the recommended paper type.
a Load the specified tray or feeder with the recommended paper
type.
b Resend the print job.
Do vertical white lines still appear on prints?
Go to step 3. The problem is
solved.
Step 3
a Remove, and then reinstall the imaging unit or imaging kit.
Warning—Potential Damage: Do not expose the imaging unit
or imaging kit to direct light for more than 10 minutes.
Extended exposure to light may cause print quality problems.
Warning—Potential Damage: To avoid damage, do not touch
the underside of the imaging unit or imaging kit.
b Resend the print job.
Do vertical white lines still appear on prints?
Go to step 4. The problem is
solved.
Step 4
Replace the imaging unit or imaging kit, and then resend the print
job.
Do vertical white lines still appear on prints?
Contact
customer
support.
The problem is
solved.
The printer is not responding
Action Yes No
Step 1
Connect the power cord to the electrical outlet.
CAUTION—POTENTIAL INJURY: To avoid the risk of fire or
electrical shock, connect the power cord to an appropriately
rated and properly grounded electrical outlet that is near the
product and easily accessible.
Is the printer responding?
The problem is
solved.
Go to step 2.
Step 2
Check if the electrical outlet is turned o by a switch or breaker.
Is the electrical outlet turned o by a switch or breaker?
Turn on the switch or
reset the breaker.
Go to step 3.
Step 3
Check if the printer is on.
Is the printer on?
Go to step 4. Turn on the printer.
Troubleshooting 153
Action Yes No
Step 4
Check if the printer is in sleep or hibernate mode.
Is the printer in sleep or hibernate mode?
Press the power
button to wake the
printer.
Go to step 5.
Step 5
Check if the cables connecting the printer and the computer are
inserted in the correct ports.
Are the cables inserted in the correct ports?
Go to step 6. Make sure to match
the following:
The USB cable
with the USB port
on the printer
The Ethernet
cable with the
Ethernet port on
the printer
Step 6
Turn o the printer, reinstall the hardware options, and then turn it
back on.
For more information, see the documentation that came with the
option.
Is the printer responding?
The problem is
solved
Go to step 7.
Step 7
Install the correct print driver.
Is the printer responding?
The problem is
solved
Go to step 8.
Step 8
Turn o the printer, wait for about 10 seconds, and then turn it back
on.
Is the printer responding?
The problem is
solved.
Contact
customer
support.
Job prints from the wrong tray or on the wrong paper
Action Yes No
Step 1
a Check if you are printing on a supported paper.
b Print the document.
Is the document printed from the correct tray or on the correct
paper?
The problem is
solved.
Go to step 2.
Troubleshooting 154
Action Yes No
Step 2
a Depending on your operating system, specify the paper size
from the Printing Preferences or Print dialog.
Notes:
Make sure that the settings match the paper loaded in
the tray.
You can also change the settings on the printer control
panel.
b Print the document.
Is the document printed from the correct tray or on the correct
paper?
The problem is
solved.
Go to step 3.
Step 3
a Check if the trays are not linked.
b Print the document.
Is the document printed from the correct tray or on the correct
paper?
The problem is
solved.
Contact
customer
support.
Color quality problems
Adjusting toner darkness
1 From the home screen, touch Settings > Print > Quality.
2 Adjust the toner darkness.
3 Apply the changes.
Modifying the colors in printed output
1 From the home screen, touch Settings > Print > Quality > Advanced Imaging > Color Correction > Manual.
2 From the Advanced Imaging menu, select Color Correction Content.
3 Choose the appropriate color conversion setting.
Troubleshooting 155
Object type Color conversion tables
RGB Image
RGB Text
RGB Graphics
Vivid—Produces brighter, more saturated colors and may be
applied to all incoming color formats.
sRGB Display—Produces an output that approximates the colors
displayed on a computer monitor. Black toner usage is optimized
for printing photographs.
DisplayTrue Black—Produces an output that approximates the
colors displayed on a computer monitor. This setting uses only
black toner to create all levels of neutral gray.
sRGB Vivid—Provides an increased color saturation for the sRGB
Display color correction. Black toner usage is optimized for
printing business graphics.
O
CMYK Image
CMYK Text
CMYK Graphics
US CMYK—Applies color correction to approximate the
Specifications
for Web
Oset
Publishing (SWOP) color output.
Euro CMYK—Applies color correction to approximate Euroscale
color output.
Vivid CMYK—Increases the color saturation of the US CMYK color
correction setting.
O
FAQ about color printing
What is RGB color?
RGB color is a method of describing colors by indicating the amount of red, green, or blue used to produce
a certain color. Red, green, and blue light can be added in various amounts to produce a large range of colors
observed in nature. Computer screens, scanners, and digital cameras use this method to display colors.
What is CMYK color?
CMYK color is a method of describing colors by indicating the amount of cyan, magenta, yellow, and black
used to reproduce a particular color. Cyan, magenta, yellow, and black inks or toners can be printed in various
amounts to produce a large range of colors observed in nature. Printing presses, inkjet printers, and color
laser printers create colors in this manner.
How is color specified in a document to be printed?
Software programs are used to specify and modify the document color using RGB or CMYK color
combinations. For more information, see the software program Help topics.
How does the printer know what color to print?
When printing a document, information describing the type and color of each object is sent to the printer and
is passed through color conversion tables. Color is translated into the appropriate amounts of cyan, magenta,
yellow, and black toner used to produce the color you want. The object information determines the application
of color conversion tables. For example, it is possible to apply one type of color conversion table to text while
applying a dierent color conversion table to photographic images.
Troubleshooting 156
What is manual color correction?
When manual color correction is enabled, the printer employs userselected color conversion tables to
process objects. Manual color correction settings are specific to the type of object being printed (text,
graphics, or images). It is also specific to how the color of the object is specified in the software program
(RGB or CMYK combinations). To apply a dierent color conversion table manually, see
“Modifying the colors
in printed output” on page 155.
If the software program does not specify colors with RGB or CMYK combinations, then manual color correction
is not useful. It is also not eective if the software program or the computer operating system controls the
adjustment of colors. In most situations, setting the Color Correction to Auto generates preferred colors for
the documents.
How can I match a particular color (such as a corporate logo)?
From the printer Quality menu, nine types of Color Samples sets are available. These sets are also available
from the Color Samples page of the Embedded Web Server. Selecting any sample set generates
multiplepage prints consisting of hundreds of colored boxes. Each box contains a CMYK or RGB combination,
depending on the table selected. The observed color of each box is obtained by passing the CMYK or RGB
combination labeled on the box through the selected color conversion table.
By examining Color Samples sets, you can identify the box with color closest to the color being matched.
The color combination labeled on the box can then be used for modifying the color of the object in a software
program. For more information, see the software program Help topics. Manual color correction may be
necessary to use the selected color conversion table for the particular object.
Selecting which Color Samples set to use for a particular colormatching problem depends on:
The Color Correction setting being used (Auto, O, or Manual)
The type of object being printed (text, graphics, or images)
How the color of the object is specified in the software program (RGB or CMYK combinations)
If the software program does not specify colors with RGB or CMYK combinations, then the Color Samples
pages are not useful. Additionally, some software programs adjust the RGB or CMYK combinations specified
in the program through color management. In these situations, the printed color may not be an exact match
of the Color Samples pages.
The print appears tinted
Action No Yes
Adjust the color balance.
a From the home screen, touch Settings > Print > Quality >
Advanced Imaging > Color Balance.
b Adjust the setting.
c Resend the print job.
Does the print still appear tinted?
The problem is
solved.
Contact
customer
support.
Troubleshooting 157
Faxing problems
Cannot send or receive faxes
Action Yes No
Step 1
Resolve any error messages that appear on the display.
Can you send or receive a fax?
The problem is
solved.
Go to step 2.
Step 2
Make sure that the cable connections for the following equipment
are secure:
Telephone
Handset
Answering machine
Can you send or receive a fax?
The problem is
solved.
Go to step 3.
Step 3
Check for a dial tone.
Call the fax number to check if it is working properly.
If you are using the On Hook Dial feature, then turn up the
volume to check if you hear a dial tone.
Can you hear a dial tone?
Go to step 5. Go to step 4.
Step 4
Check the telephone wall jack.
a Connect the analog telephone directly to the wall jack.
b Listen for a dial tone.
c If you do not hear a dial tone, then use a
dierent
telephone
cable.
d If you still do not hear a dial tone, then connect the analog
telephone to a
dierent
wall jack.
e If you hear a dial tone, then connect the printer to that wall jack.
Can you send or receive a fax?
The problem is
solved.
Go to step 5.
Troubleshooting 158
Action Yes No
Step 5
Check if the printer is connected to an analog phone service or to
the correct digital connector.
If you are using an Integrated Services for Digital Network
(ISDN) telephone service, then connect to an analog telephone
port of an ISDN terminal adapter. For more information, contact
your ISDN provider.
If you are using DSL, then connect to a DSL filter or router that
supports analog use. For more information, contact your DSL
provider.
If you are using a private branch exchange (PBX) telephone
service, then make sure that you are connecting to an analog
connection on the PBX. If none exists, then consider installing
an analog telephone line for the fax machine.
Can you send or receive a fax?
The problem is
solved.
Go to step 6.
Step 6
Temporarily disconnect other equipment and disable other
telephone services.
a Disconnect other equipment (such as answering machines,
computers, modems, or telephone line splitters) between the
printer and the telephone line.
b Disable call waiting and voice mail. For more information,
contact your telephone company.
Can you send or receive a fax?
The problem is
solved.
Go to step 7.
Step 7
Scan the original document one page at a time.
a Dial the fax number.
b Scan the document.
Can you send or receive a fax?
The problem is
solved.
Contact customer
support.
Troubleshooting 159
Can receive but not send faxes
Action Yes No
Step 1
Load the original document properly into the ADF tray or on the
scanner glass.
Can you send faxes?
The problem is
solved.
Go to step 2.
Step 2
Set up the shortcut number properly.
Check if the shortcut number is set for the telephone number
that you want to dial.
Dial the telephone number manually.
Can you send faxes?
The problem is
solved.
Contact
customer
support.
Can send but not receive faxes
Action Yes No
Step 1
Make sure that the tray or multipurpose feeder is not empty.
Can you receive faxes?
The problem is
solved.
Go to step 2.
Step 2
Check the ring count delay settings.
a From the home screen, touch Settings > Fax > Analog Fax
Setup > Fax Receive Settings > Rings to Answer.
b If necessary, configure the setting.
Can you receive faxes?
The problem is
solved.
Go to step 3.
Step 3
Replace the toner cartridge.
For more information, see the instruction sheet that came with the
supply.
Can you receive faxes?
The problem is
solved.
Contact
customer
support.
Troubleshooting 160
Poor fax print quality
Action Yes No
Step 1
Enhance the print quality.
a From the home screen, touch Settings > Print > Quality.
b Adjust the settings.
Is the fax print quality satisfactory?
The problem is
solved.
Go to step 2.
Step 2
Decrease the incoming fax transmission speed.
a From the home screen, touch Settings > Fax > Analog Fax
Setup > Fax Receive Settings > Admin Controls > Max Speed.
b Select a lower transmission speed.
Is the fax print quality satisfactory?
The problem is
solved.
Go to step 3.
Step 3
Replace the toner cartridge.
For more information, see the instruction sheet that came with the
supply.
Is the fax print quality satisfactory?
The problem is
solved.
Contact
customer
support.
Scanning problems
Adjusting scanner registration
1 From the control panel, navigate to:
Settings > Maintenance > Configuration Menu > Scanner Configuration > Scanner Manual Registration
2 From the Print Quick Test menu, touch Start.
3 Place the Print Quick Test page on the scanner glass, and then touch Flatbed Registration.
4 From the Copy Quick Test menu, touch Start.
5 Compare the Copy Quick Test page with the original document.
Note: If the margins of the test page are
dierent
from the original document, then adjust Left Margin and
Top Margin.
6 Repeat step 4 and step 5 until the margins of the Copy Quick Test page closely match the original document.
Troubleshooting 161
Adjusting ADF registration
1 From the control panel, navigate to:
Settings > Maintenance > Configuration Menu > Scanner Configuration > Scanner Manual Registration
2 From the Print Quick Test menu, touch Start.
3 Place the Print Quick Test page on the ADF tray.
4 Touc h Front ADF Registration or Rear ADF Registration.
Notes:
To align Front ADF Registration, place the test page faceup, short edge first into the ADF.
To align Rear ADF Registration, place the test page facedown, short edge first into the ADF.
5 From the Copy Quick Test menu, touch Start.
6 Compare the Copy Quick Test page with the original document.
Note: If the margins of the test page are dierent from the original document, then adjust Horizontal
Adjust and Top Margin.
7 Repeat step 5 and step 6 until the margins of the Copy Quick Test page closely match the original document.
Cannot scan from a computer
Action Yes No
Step 1
a Turn o the printer, wait for about 10 seconds, and then turn it
back on.
b Resend the scan job.
Can you send the scan job?
The problem is
solved.
Go to step 2.
Step 2
a Make sure that the cables between the printer and the print
server are secure.
For more information, see the setup documentation that came
with the printer.
b Resend the scan job.
Can you send the scan job?
The problem is
solved.
Contact
customer
support.
Troubleshooting 162
Partial copies of document or photo
Action Yes No
Step 1
a Make sure that the document or photo is loaded facedown on
the upper left corner of the scanner glass.
b Copy the document or photo.
Is the document or photo copied correctly?
The problem is
solved.
Go to step 2.
Step 2
a Match the paper size setting and the paper loaded in the tray.
b Copy the document or photo.
Is the document or photo copied correctly?
The problem is
solved.
Contact
customer
support.
Poor copy quality
Action Yes No
Step 1
a Clean the scanner glass and the ADF glass with a damp, soft,
lintfree cloth.
b Make sure that the document or photo is loaded facedown on
the upper left corner of the scanner glass.
c Copy the document or photo.
Is the copy quality satisfactory?
The problem is
solved.
Go to step 2.
Step 2
a Check the quality of the original document or photo.
b Adjust the scan quality settings.
c Copy the document or photo.
Is the copy quality satisfactory?
The problem is
solved.
Contact
customer
support.
Scan job was not successful
Action Yes No
Step 1
Check the cable connections.
a Make sure that the Ethernet or USB cable is securely connected
to the computer and the printer.
b Resend the scan job.
Is the scan job successful?
The problem is
solved.
Go to step 2.
Troubleshooting 163
Action Yes No
Step 2
Check the file you want to scan.
a Make sure that the file name is not already used in the
destination folder.
b Make sure that the document or photo you want to scan is not
open in another application.
c Resend the scan job.
Is the scan job successful?
The problem is
solved.
Go to step 3.
Step 3
a Make sure that the Append time stamp or the Overwrite
existing file check box is selected in the destination
configuration settings.
b Resend the scan job.
Is the scan job successful?
The problem is
solved.
Contact
customer
support.
Scanner does not close
Action Yes No
Remove obstructions that keep the scanner unit open.
Did the scanner unit close correctly?
The problem is
solved.
Contact
customer
support.
Scanning takes too long or freezes the computer
Action Yes No
Close all applications that are interfering with the scan.
Does scanning take too long or freeze the computer?
Contact
customer
support.
The problem is
solved.
Scanner does not respond
Action Yes No
Step 1
a Check if the printer is turned on.
b Resolve any error messages that appear on the display.
c Copy or scan the document.
Is the scanner responding?
The problem is
solved.
Go to step 2.
Troubleshooting 164
Action Yes No
Step 2
a Check if the power cord is connected properly to the printer
and the electrical outlet.
CAUTION—POTENTIAL INJURY: To avoid the risk of fire
or electrical shock, connect the power cord to an
appropriately rated and properly grounded electrical outlet
that is near the product and easily accessible.
b Copy or scan the document.
Is the scanner responding?
The problem is
solved.
Go to step 3.
Step 3
a Turn o the printer, wait for about 10 seconds, and then turn it
back on.
b Copy or scan the document.
Is the scanner responding?
The problem is
solved.
Contact
customer
support.
Contacting customer support
Before contacting customer support, make sure to have the following information:
Printer problem
Error message
Printer model type and serial number
Go to
http://support.lexmark.com to receive email or chat support, or browse through the library of manuals,
support documentation, drivers, and other downloads.
Technical support via telephone is also available. In the U.S. or Canada, call 1-800-539-6275. For other countries
or regions, go to
http://support.lexmark.com.
Troubleshooting 165
Upgrading and migrating
Hardware
Available internal options
Memory card
DDR3 DIMM
Flash memory
Fonts
Application cards
Forms and Bar Code
PRESCRIBE
IPDS
Lexmark Internal Solutions Port (ISP)
MarkNet
TM
N8360 (802.11 b/g/n/a wireless print server bundled with LEXM06001 Mobile Solutions
Module)
IEEE 1284B Parallel Card
RS232C Serial Card
Installing a memory card
CAUTION—SHOCK HAZARD: To avoid the risk of electrical shock, if you are accessing the controller
board or installing optional hardware or memory devices sometime after setting up the printer, then turn
the printer o, and unplug the power cord from the electrical outlet before continuing. If you have any
other devices attached to the printer, then turn them o as well, and unplug any cables going into the
printer.
1 Turn o the printer, and then unplug the power cord from the electrical outlet.
2 Using a flathead screwdriver, remove the controller board access cover.
Warning—Potential Damage: Controller board electronic components are easily damaged by static
electricity. Touch a metal surface on the printer before touching any controller board components or
connectors.
Upgrading and migrating 166
3 Unpack the memory card.
Warning—Potential Damage: Avoid touching the connection points along the edge of the card.
4 Insert the memory card until it clicks into place.
5 Reattach the access cover.
6 Connect the power cord to the electrical outlet, and then turn on the printer.
CAUTION—POTENTIAL INJURY: To avoid the risk of
fire
or electrical shock, connect the power cord
to an appropriately rated and properly grounded electrical outlet that is near the product and easily
accessible.
Installing an internal solutions port
CAUTION—SHOCK HAZARD: To avoid the risk of electrical shock, if you are accessing the controller
board or installing optional hardware or memory devices sometime after setting up the printer, then turn
the printer o, and unplug the power cord from the electrical outlet before continuing. If you have any
other devices attached to the printer, then turn them o as well, and unplug any cables going into the
printer.
1 Turn
o
the printer, and then unplug the power cord from the electrical outlet.
2 Using a flathead screwdriver, remove the controller board access cover.
Warning—Potential Damage: Controller board electronic components are easily damaged by static
electricity. Touch a metal surface on the printer before touching any controller board components or
connectors.
Upgrading and migrating 167
3 Unpack the internal solutions port (ISP) kit.
1 ISP
2 Mounting bracket
3 Thumbscrews
4 If necessary, remove the printer hard disk.
Upgrading and migrating 168
5 Insert the bracket into the board until it clicks into place.
6 Attach the ISP to the bracket.
Upgrading and migrating 169
7 If necessary, attach the hard disk to the ISP.
a Remove the hard disk bracket.
b Connect the hard disk to the ISP.
Warning—Potential Damage: Do not touch or press the center of the hard disk.
Upgrading and migrating 170
8 Reattach the access cover.
9 Connect the power cord to the electrical outlet, and then turn on the printer.
CAUTION—POTENTIAL INJURY: To avoid the risk of fire or electrical shock, connect the power cord
to an appropriately rated and properly grounded electrical outlet that is near the product and easily
accessible.
Installing an optional card
CAUTION—SHOCK HAZARD: To avoid the risk of electrical shock, if you are accessing the controller
board or installing optional hardware or memory devices sometime after setting up the printer, then turn
the printer o, and unplug the power cord from the electrical outlet before continuing. If you have any
other devices attached to the printer, then turn them o as well, and unplug any cables going into the
printer.
1 Turn o the printer, and then unplug the power cord from the electrical outlet.
2 Using a flathead screwdriver, remove the controller board access cover.
Warning—Potential Damage: Controller board electronic components are easily damaged by static
electricity. Touch a metal surface on the printer before touching any components or connectors.
3 Unpack the optional card.
Warning—Potential Damage: Avoid touching the connection points along the edge of the card.
Upgrading and migrating 171
4 Push the card firmly into place.
Note: The entire length of the connector on the card must touch and be flush against the controller
board.
Warning—Potential Damage: Improper installation of the card may cause damage to the card and the
controller board.
5 Reattach the access cover.
6 Connect the power cord to the electrical outlet, and then turn on the printer.
CAUTION—POTENTIAL INJURY: To avoid the risk of
fire
or electrical shock, connect the power cord
to an appropriately rated and properly grounded electrical outlet that is near the product and easily
accessible.
Installing a printer hard disk
CAUTION—SHOCK HAZARD: To avoid the risk of electrical shock, if you are accessing the controller
board or installing optional hardware or memory devices sometime after setting up the printer, then turn
the printer o, and unplug the power cord from the electrical outlet before continuing. If you have any
other devices attached to the printer, then turn them o as well, and unplug any cables going into the
printer.
1 Turn
o
the printer, and then unplug the power cord from the electrical outlet.
2 Using a flathead screwdriver, remove the controller board access cover.
Upgrading and migrating 172
Warning—Potential Damage: Controller board electronic components are easily damaged by static
electricity. Touch a metal surface on the printer before touching any controller board components or
connectors.
3 Unpack the hard disk.
4 Attach the hard disk to the controller board.
Warning—Potential Damage: Do not touch or press the center of the hard disk.
Upgrading and migrating 173
If an internal solutions port (ISP) is installed, then do the following:
a Remove the hard disk bracket.
b Attach the hard disk to the ISP.
Upgrading and migrating 174
5 Reattach the access cover.
6 Connect the power cord to the electrical outlet, and then turn on the printer.
CAUTION—POTENTIAL INJURY: To avoid the risk of fire or electrical shock, connect the power cord
to an appropriately rated and properly grounded electrical outlet that is near the product and easily
accessible.
Installing optional trays
CAUTION—SHOCK HAZARD: To avoid the risk of electrical shock, if you are accessing the controller
board or installing optional hardware or memory devices sometime after setting up the printer, then turn
the printer o, and unplug the power cord from the electrical outlet before continuing. If you have any
other devices attached to the printer, then turn them o as well, and unplug any cables going into the
printer.
CAUTION—TIPPING HAZARD: Installing one or more options on your printer or MFP may require a
caster base, furniture, or other feature to prevent instability causing possible injury. For more information
on supported configurations, see
www.lexmark.com/multifunctionprinters.
1 Turn o the printer.
2 Unplug the power cord from the electrical outlet, and then from the printer.
3 Unpack the optional tray, and then remove all packing material.
4 Lift the printer using the side and rear handles.
CAUTION—POTENTIAL INJURY: If the printer weight is greater than 18 kg (40 lb), then it requires
two or more trained personnel to lift it safely.
Upgrading and migrating 175
Note: If optional trays are already installed, then unlock them from the printer before lifting the printer. Do
not try to lift the printer and trays at the same time.
5 Align the printer with the optional tray, and then lower the printer until it clicks into place.
6 Connect the power cord to the printer, and then to the electrical outlet.
CAUTION—POTENTIAL INJURY: To avoid the risk of
fire
or electrical shock, connect the power cord
to an appropriately rated and properly grounded electrical outlet that is near the product and easily
accessible.
7 Turn on the printer.
If necessary, manually add the tray in the print driver to make it available for print jobs. For more information,
see
Adding available options in the print driver” on page 182.
When installing more than one hardware option, follow this order of installation.
Caster base
Optional 2200sheet tray
Optional 550sheet tray or envelope tray
Upgrading and migrating 176
Printer
Staple finisher
Installing the staple
finisher
1 Turn
o
the printer.
2 Open door C.
3 Open door A.
Upgrading and migrating 177
4 Remove the paper bail.
5 Remove the standard bin insert.
Upgrading and migrating 178
6 Remove the staple finisher connector cover.
7 Unpack the staple finisher, and then remove the packing material.
8 Insert the staple
finisher
until it clicks into place.
9 Close doors A and C.
CAUTION—PINCH HAZARD: To avoid the risk of a pinch injury, keep hands clear of the labeled area
when closing door C.
10 Turn on the printer.
Upgrading and migrating 179
Installing the keyboard tray
1 Turn
o
the printer.
2 Open door A.
3 Remove the keyboard attach cover.
4 Unpack the keyboard tray.
Upgrading and migrating 180
5 Attach the keyboard to the base.
6 Insert the keyboard tray.
7 Close door A.
8 Turn on the printer.
Upgrading and migrating 181
Software
Installing the printer software
1 Obtain a copy of the software installer package.
From the software CD that came with your printer.
Go to http://support.lexmark.com, and then select your printer and operating system.
2 Run the installer, and then follow the instructions on the computer screen.
3 For Macintosh users, add the printer.
Note: Obtain the printer IP address from the TCP/IP section in the Network/Ports menu.
Adding available options in the print driver
For Windows users
1 Open the printers folder.
2 Select the printer you want to update, and then do either of the following:
For Windows 7 or later, select Printer properties.
For earlier versions, select Properties.
3 Navigate to the Configuration tab, and then select Update Now Ask Printer.
4 Apply the changes.
For Macintosh users
1 From System Preferences in the Apple menu, navigate to your printer, and then select Options & Supplies.
2 Navigate to the list of hardware options, and then add any installed options.
3 Apply the changes.
Firmware
Exporting or importing a configuration file
You can export the configuration settings of your printer into a text file, and then import the file to apply the
settings to other printers.
1 Open a web browser, and then type the printer IP address in the address field.
Notes:
View the printer IP address on the printer home screen. The IP address appears as four sets of
numbers separated by periods, such as 123.123.123.123.
If you are using a proxy server, then temporarily disable it to load the web page correctly.
2 Export or import a configuration file for one or multiple applications.
Upgrading and migrating 182
For one application
a
From the Embedded Web Server, click Apps > the application that you want > Configure.
b Click Export or Import.
For multiple applications
a
From the Embedded Web Server, click Export Configuration or Import Configuration.
b Follow the instructions on the screen.
Updating firmware
Some applications require a minimum device firmware level to operate correctly.
For more information on updating the device firmware, contact your Lexmark representative.
1 From the Embedded Web Server, click Settings > Device > Update Firmware.
2 Browse to locate the required flash file.
3 Apply the changes.
Upgrading and migrating 183
Notices
Product information
Product name:
Lexmark CX820de, CX820dtfe, CX827de
Machine type:
7563
Model(s):
136, 137
Edition notice
October 2017
The following paragraph does not apply to any country where such provisions are inconsistent with local
law: LEXMARK INTERNATIONAL, INC., PROVIDES THIS PUBLICATION “AS IS” WITHOUT WARRANTY OF ANY
KIND, EITHER EXPRESS OR IMPLIED, INCLUDING, BUT NOT LIMITED TO, THE IMPLIED WARRANTIES OF
MERCHANTABILITY OR FITNESS FOR A PARTICULAR PURPOSE. Some states do not allow disclaimer of
express or implied warranties in certain transactions; therefore, this statement may not apply to you.
This publication could include technical inaccuracies or typographical errors. Changes are periodically made
to the information herein; these changes will be incorporated in later editions. Improvements or changes in the
products or the programs described may be made at any time.
References in this publication to products, programs, or services do not imply that the manufacturer intends to
make these available in all countries in which it operates. Any reference to a product, program, or service is
not intended to state or imply that only that product, program, or service may be used. Any functionally
equivalent product, program, or service that does not infringe any existing intellectual property right may be
used instead. Evaluation and
verification
of operation in conjunction with other products, programs, or services,
except those expressly designated by the manufacturer, are the user’s responsibility.
For Lexmark technical support, visit
http://support.lexmark.com.
For information on supplies and downloads, visit
www.lexmark.com.
© 2016 Lexmark International, Inc.
All rights reserved.
GOVERNMENT END USERS
The Software Program and any related documentation are "Commercial Items," as that term is
defined
in 48
C.F.R. 2.101, "Computer Software" and "Commercial Computer Software Documentation," as such terms are
used in 48 C.F.R. 12.212 or 48 C.F.R. 227.7202, as applicable. Consistent with 48 C.F.R. 12.212 or 48 C.F.R.
227.7202-1 through 227.7207-4, as applicable, the Commercial Computer Software and Commercial Software
Documentation are licensed to the U.S. Government end users (a) only as Commercial Items and (b) with only
those rights as are granted to all other end users pursuant to the terms and conditions herein.
Notices 184
Licensing notices
All licensing notices associated with this product can be viewed from the CD:\NOTICES directory of the
installation software CD.
Trademarks
Lexmark, the Lexmark logo, and MarkNet are trademarks or registered trademarks of Lexmark International,
Inc. in the United States and/or other countries.
Google Cloud Print and Google Chrome are trademarks of Google Inc.
Macintosh, the Mac logo, and Safari are trademarks of Apple Inc.
Microsoft, Windows, and Internet Explorer are either registered trademarks or trademarks of the Microsoft group
of companies in the United States and other countries.
Mopria®, the Mopria® logo, and the Mopria® Alliance logo are registered trademarks and service marks of Mopria
Alliance, Inc. in the United States and other countries. Unauthorized use is strictly prohibited.
PCL® is a registered trademark of the Hewlett-Packard Company. PCL is Hewlett-Packard Company’s
designation of a set of printer commands (language) and functions included in its printer products. This printer
is intended to be compatible with the PCL language. This means the printer recognizes PCL commands used
in various application programs, and that the printer emulates the functions corresponding to the commands.
PostScript is a registered trademark of Adobe Systems Incorporated in the United States and/or other countries.
All other trademarks are the property of their respective owners.
AirPrint and the AirPrint logo are trademarks of Apple, Inc.
Noise emission levels
The following measurements were made in accordance with ISO 7779 and reported in conformance with ISO
9296.
Note: Some modes may not apply to your product.
1-meter average sound pressure, dBA
Printing One-sided: 54 (mono), 55 (color); Two-
sided: 56 (mono), 56 (color)
Scanning 54 (mono); 55 (color)
Copying 57 (mono); 58 (color)
Ready 15
Values are subject to change. See www.lexmark.com for current values.
Notices 185
Static sensitivity notice
This symbol identifies static-sensitive parts. Do not touch the areas near these symbols without first touching
a metal surface in an area away from the symbol.
Temperature information
Operating temperature and relative humidity 10 to 32.2°C (50 to 90°F) and 15 to 80% RH
15.3 to 32.2°C (60 to 90°F) and 8 to 15% RH
Maximum wet bulb temperature: 22.8°C (73°F)
Shipping temperature -10 to 40°C (14 to 104°F)
Storage temperature and relative humidity -10 to 40°C (14 to 104°F)
8 to 80% RH
Laser notice
The printer is certified in the U.S. to conform to the requirements of DHHS 21 CFR, Chapter I, Subchapter J for
Class I (1) laser products, and elsewhere is certified as a Class I laser product conforming to the requirements
of IEC 60825-1: 2014.
Class I laser products are not considered to be hazardous. The printer contains internally a Class IIIb (3b) AlGaAs
laser that is nominally 20 milliwatts operating in the wavelength region of 755–800 nanometers and enclosed
in a non-serviceable printhead assembly. The laser system and printer are designed so there is never any human
access to laser radiation above a Class I level during normal operation, user maintenance, or prescribed service
conditions.
Laser advisory label
A laser notice label may be
axed
to this printer as shown:
Notices 186
DANGER - Invisible laser radiation when cartridges are removed and interlock defeated. Avoid exposure to laser beam.
PERIGO - Radiação a laser invisível será liberada se os cartuchos forem removidos e o lacre rompido. Evite a exposição aos feixes de laser.
Opasnost - Nevidljivo lasersko zračenje kada su kasete uklonjene i poništena sigurnosna veza. Izbjegavati izlaganje zracima.
NEBEZPEČÍ - Když jsou vyjmuty kazety a je odblokována pojistka, ze zařízení je vysíláno neviditelné laserové záření. Nevystavujte se působení laserového paprsku.
FARE - Usynlig laserstråling, når patroner ernes, og spærreanordningen er slået fra. Undgå at blive udsat for laserstrålen.
GEVAAR - Onzichtbare laserstraling wanneer cartridges worden verwijderd en een vergrendeling wordt genegeerd. Voorkom blootstelling aan de laser.
DANGER - Rayonnements laser invisibles lors du retrait des cartouches et du déverrouillage des loquets. Eviter toute exposition au rayon laser.
VAARA - Näkymätöntä lasersäteilyä on varottava, kun värikasetit on poistettu ja lukitus on auki. Vältä lasersäteelle altistumista.
GEFAHR - Unsichtbare Laserstrahlung beim Herausnehmen von Druckkassetten und oener Sicherheitssperre. Laserstrahl meiden.
ΚΙΝΔΥΝΟΣ - Έκλυση αόρατης ακτινοβολίας laser κατά την αφαίρεση των κασετών και την απασφάλιση της μανδάλωσης. Αποφεύγετε την έκθεση στην
ακτινοβολία laser.
VESZÉLY – Nem látható lézersugárzás fordulhat elő a patronok eltávolításakor és a zárószerkezet felbontásakor. Kerülje a lézersugárnak való kitettséget.
PERICOLO - Emissione di radiazioni laser invisibili durante la rimozione delle cartucce e del blocco. Evitare l´esposizione al raggio laser.
FARE – Usynlig laserstråling når kassettene tas ut og sperren er satt ut av spill. Unngå eksponering for laserstrålen.
NIEBEZPIECZEŃSTWO - niewidzialne promieniowanie laserowe podczas usuwania kaset i blokady. Należy unikać naświetlenia promieniem lasera.
ОПАСНО! Невидимое лазерное излучение при извлеченных картриджах и снятии блокировки. Избегайте воздействия лазерных лучей.
Pozor – Nebezpečenstvo neviditeľného laserového žiarenia pri odobratých kazetách a odblokovanej poistke. Nevystavujte sa lúčom.
PELIGRO: Se producen radiaciones láser invisibles al extraer los cartuchos con el interbloqueo desactivado. Evite la exposición al haz de láser.
FARA – Osynlig laserstrålning när patroner tas ur och spärrmekanismen är upphävd. Undvik exponering för laserstrålen.
- 当移除碳粉盒及互失效生看不的激光射,避免暴露在激光光束下。
危險 - 移除碳粉匣與安全連續開關失效時會生看不見的雷射輻射。請避免曝露在雷射光束下。
危険 - カートリッジが取り外され、内部ロックが無効になると、見えないレーザー光が放射されます。 このレーザー光に当たらないようにしてください。
Notices 187
Index
A
activating Voice Guidance 23
adapter plug 48
adding contacts 20
adding groups 21
adding hardware options
print driver 182
adding internal options
print driver 182
ADF feed roller
replacing 94
ADF pick roller
replacing 92
ADF separator roller
replacing 96
adjusting
ADF registration 162
scanner registration 161
adjusting speech rate
Voice Guidance 23
adjusting the brightness
printer display 104
adjusting the brightness of the
printer display 104
adjusting the default headphones
volume 59
adjusting the default speaker
volume 59
adjusting toner darkness 155
AirPrint
using 30
answering machine
setting up 39
attaching cables 12
available internal options 166
avoiding paper jams 106
B
blank pages 136
blocking junk faxes 53
C
canceling a print job
from the computer 33
from the printer control
panel 33
cannot open Embedded Web
Server 123
Card Copy
setting up 19
card stock
loading 27
changing port settings
internal solutions port 61
Check tray connection 131
checking the printer
connectivity 124
checking the status of parts and
supplies 67
cleaning
exterior of the printer 62
interior of the printer 62
scanner 62
cleaning the printer 62
collated printing does not
work 129
collating copies 35
Color Correction
manual 155
Color Correction Content 155
color quality, troubleshooting
print appears tinted 157
confidential
print jobs 32
configuring
fax speaker settings 59
configuring daylight saving
time 51
configuring
email settings 36
configuring port settings 61
configuring supply
notifications
70
connecting printer to distinctive
ring service 51
connecting to a wireless network
using PIN method 60
using Push Button method 60
conservation settings
EcoMode 103
hibernate mode 103
sleep mode 103
conserving supplies 104
contacting customer support 165
contacts
adding 20
deleting 21
editing 21
control panel
using 14
copy troubleshooting
partial copies of documents or
photos 163
poor copy quality 163
scanner does not respond 164
scanner unit does not close 164
copying
creating shortcuts 35
on both sides of the paper 34
copying dierent paper sizes 34
copying from
selected tray 34
copying multiple pages
onto a single sheet 35
copying on letterhead 34
copying photos 34
creating shortcuts
email 37
fax destination 52
customer support
contacting 165
D
date and time
fax settings 51
daylight saving time,
configuring 51
default headphones volume
adjusting 59
default speaker volume
adjusting 59
Defective flash detected 127
deleting contacts 21
deleting groups 21
developer and PC unit combo
pack
ordering 69
developer unit
ordering 69
replacing 70
dierent paper sizes, copying 34
digital subscriber line (DSL)
fax setup 43
Index 188
digital telephone service
fax setup 46
disposing of printer hard disk 57
distinctive ring service, fax
connecting to 51
documents, printing
from a computer 29
from a mobile device 29, 30
DSL filter 43
E
EcoMode setting 103
editing contacts 21
editing groups 21
emission notices 185
enabling Magnification mode 23
enabling personal identification
numbers 23
enabling spoken passwords 23
enabling the USB port 124
encrypting the printer hard
disk 57
enlarging copies 35
envelopes
loading 27
environmental setting
EcoMode 103
environmental settings
hibernate mode 103
sleep mode 103
erasing printer hard disk
memory 56
exporting a configuration file
using the Embedded Web
Server 182
email
creating shortcuts 37
setting up 36
emailing
configuring
email settings 36
using a shortcut number 36
using the address book 36
using the printer 36
F
FAQ about color printing 156
fax log
viewing 53
fax resolution
changing 52
fax setup
country or regionspecific 48
digital telephone service 46
DSL connection 43
standard telephone line
connection 39
VoIP 44
fax speaker settings
configuring 59
fax troubleshooting
cannot receive faxes 160
cannot send faxes 160
cannot send or receive
faxes 158
received fax has poor print
quality 161
faxing
adjusting darkness 52
blocking junk faxes 53
changing resolution 52
creating shortcuts 52
fax setup 38
forwarding faxes 53
holding faxes 53
setting the date and time 51
viewing a fax log 53
finding more information about
the printer 9
firmware
update 183
firmware card 166
flash drive
printing from 30
scanning to 54
font sample list
printing 33
forms
printing 29
Forms and Favorites
setting up 19
forwarding faxes 53
FTP address
creating shortcuts 54
FTP server, scanning to
using the control panel 54
fuser
replacing 72
G
Google Cloud Print
using 29
green settings
EcoMode 103
hibernate mode 103
sleep mode 103
groups
adding 21
deleting 21
editing 21
H
hardware options
installing 175
hardware options, adding
print driver 182
headphones
default volume 59
held jobs 32
printing from a Macintosh
computer 32
printing from Windows 32
held print jobs
printing from a Macintosh
computer 32
printing from Windows 32
hibernate mode
setting 103
holding faxes 53
home screen
customizing 19
showing icons 19
home screen icons
using 15
horizontal dark lines 140
I
icons on the home screen
showing 19
imaging unit
replacing 77
importing a
configuration
file
using the Embedded Web
Server 182
indicator light
printer status 15
installing a memory card 166
installing a printer hard disk 172
installing an internal solutions
port 167
installing an optional card 171
installing optional trays 175
Index 189
installing options
internal solutions port 167
printer hard disk 172
installing the keyboard tray 180
installing the printer software 182
installing the staple finisher 177
internal options 166
installing 171
memory card 166
internal options, adding
print driver 182
internal solutions port
installing 167
troubleshooting 126
J
jam, clearing
automatic document feeder 111
duplex unit 113
finisher bin 117
fuser 113
multipurpose feeder 109
standard bin 113
staple cartridge 119
trays 108
jams
avoiding 106
locating jam areas 107
locations 107
K
keyboard on the display
using 24
keyboard tray
installing 180
L
letterhead
copying on 34
Lexmark Mobile Print
using 29
line filter 43
linking trays 28
loading
card stock 27
envelopes 25
transparencies 27
trays 25
loading envelopes
multipurpose feeder 27
loading paper
multipurpose feeder 27
locating the security slot 56
M
Magnification mode
enabling 23
making copies 34
manual Color Correction
applying 155
memory
types installed on printer 57
memory card 166
installing 166
menu map 16
menu settings page
printing 18
mobile device
printing from 29, 30
Mopria Print Service
using 30
moving the printer 10, 102
multipurpose feeder
loading 27
N
navigating the screen
using gestures 24
navigating the screen using
gestures 24
noise emission levels 185
NonLexmark supply 128
nonvolatile memory 57
erasing 56
Not enough free space in
flash
memory for resources 127
notices 185, 186
O
optional card
installing 171
optional trays
installing 175
options
firmware cards 166
memory card 166
ordering
developer and PC unit combo
pack 69
developer unit 69
photoconductor unit 69
ordering supplies
staple cartridges 69
waste toner bottle 70
ordering toner cartridges 67
P
paper
Universal size setting 25
paper jam in door B 113
paper jam in the automatic
document feeder 111
paper jam in the finisher bin 117
paper jam in the multipurpose
feeder 109
paper jam in the standard bin 113
paper jam in trays 108
paper jam, clearing
automatic document feeder 111
duplex unit 113
finisher bin 117
fuser 113
multipurpose feeder 109
standard bin 113
trays 108
paper jams
avoiding 106
paper size
setting 25
paper type
setting 25
parallel interface card
troubleshooting 126
parts status
checking 67
personal identification number
method 60
personal identification numbers
enabling 23
phone splitter 44
photoconductor unit
ordering 69
replacing 74
photos
copying 34
pick roller
replacing 80
placing separator sheets
between copies
copying 35
port settings
configuring 61
Index 190
power button light
printer status 15
print driver
hardware options, adding 182
print job
canceling from the
computer 33
canceling from the printer
control panel 33
print quality
cleaning the scanner 62
print quality troubleshooting
blank pages 136
crooked print 146
dark print 137
ghost images appear on
prints 139
gray background 139
horizontal dark lines 140
horizontal white lines 141
jagged or uneven
characters 143
light print 144
mottled print and dots 145
repeating print defects 147
skewed print 146
solid color or black images 148
text or images cut o 149
toner easily rubs o 150
uneven print density 150
vertical dark lines or streaks
appear on prints 151
white lines 152
white pages 136
print troubleshooting
confidential and other held
documents do not print 133
envelope seals when
printing 129
incorrect margins on prints 142
jammed pages are not
reprinted 132
job prints from the wrong
tray 154
job prints on the wrong
paper 154
paper curl 130
paper frequently jams 132
print jobs do not print 135
slow printing 134
tray linking does not work 130
unable to read flash drive 124
printer
fully configured 11
minimum clearances 10
moving 10
selecting a location 10
shipping 103
printer configurations 11
printer display
adjusting the brightness 104
printer hard disk
disposing of 57
encrypting 57
printer hard disk encryption 57
printer hard disk memory
erasing 56
printer information
finding 9
printer is not responding 153
printer menus 16
printer messages
Check tray connection 131
Defective flash detected 127
NonLexmark supply 128
Not enough free space in flash
memory for resources 127
Replace cartridge, printer region
mismatch 127
Scanner maintenance required,
use ADF Kit 128
Unformatted flash detected 127
printer options troubleshooting
internal option is not
detected 125
internal solutions port 126
parallel interface card 126
serial interface card 126
printer ports 12
printer settings
restoring to factory defaults 57
printer software, installing 182
printing
font sample list 33
from a computer 29
from a flash drive 30
menu settings page 18
printing a font sample list 33
printing a menu settings page 18
printing a network setup
page 124
printing forms 29
printing from a computer 29
printing from a flash drive 30
printing held jobs
from a Macintosh computer 32
from Windows 32
Push Button method 60
R
recycling
Lexmark packaging 104
Lexmark products 104
toner cartridges 105
reducing copies 35
repeat print jobs 32
printing from a Macintosh
computer 32
printing from Windows 32
repeating print defects 147
Replace cartridge, printer region
mismatch 127
replacing
transfer belt 87
replacing a developer unit 70
replacing a photoconductor
unit 74
replacing a toner cartridge 79
replacing an imaging unit 77
replacing parts
ADF feed roller 94
ADF pick roller 92
ADF separator roller 96
pick roller 80
separator pad 85
replacing supplies
staple cartridge 97
staple cartridge holder 99
waste toner bottle 86
replacing the ADF feed roller 94
replacing the ADF pick roller 92
replacing the ADF separator
roller 96
replacing the fuser 72
replacing the pick roller 80
replacing the separator pad 85
replacing the staple cartridge
holder in the staple
finisher
99
replacing the staple cartridge in
the staple finisher 97
replacing the transfer belt 87
replacing the waste toner
bottle 86
replacing transfer roller 90
Index 191
reserve print jobs
printing from a Macintosh
computer 32
printing from Windows 32
resetting
supply usage counters 128
resetting the supply usage
counters 128
restoring factory default
settings 57
RJ11 adapter 48
S
safety information 7, 8
saving paper 35
saving toner 35
Scan Center
setting up 20
Scan to Computer
setting up 55
scan troubleshooting
cannot scan from a
computer 162
partial copies of documents or
photos 163
poor copy quality 163
scan job was not successful 163
scanner does not respond 164
scanner unit does not close 164
scanning freezes the
computer 164
scanning takes too long 164
scanner
cleaning 62
Scanner maintenance required,
use ADF Kit 128
scanning
to an FTP server 54
scanning to a computer 55
scanning to a
flash
drive 54
scanning to an FTP server
using the control panel 54
scheduling a fax 52
security slot
locating 56
selecting a location for the
printer 10
sending a fax
scheduled 52
using the computer 51
using the control panel 51
sending an email 36
separator pad
replacing 85
serial interface card
troubleshooting 126
serial printing
setting up 61
setting hibernate mode 103
setting sleep mode 103
setting the paper size 25
setting the paper type 25
setting the Universal paper
size 25
setting up email function 36
setting up fax
country or regionspecific 48
digital telephone service 46
DSL connection 43
standard telephone line
connection 39
VoIP connection 44
setting up fax function 38
setting up serial printing 61
shipping the printer 103
Shortcut Center
using 20
shortcuts, creating
copy screen 35
FTP address 54
showing icons on the home
screen 19
speaker
default volume 59
spoken passwords
enabling 23
staple cartridge
replacing 97
staple cartridge holder
replacing 99
staple cartridges
ordering 69
staple jam in door G 119
staple jam, clearing
door G 119
statement of volatility 57
storing
supplies 102
storing print jobs 32
supplies
conserving 104
storing 102
supplies status
checking 67
supplies, ordering
developer unit 69
photoconductor unit 69
staple cartridges 69
toner cartridges 67
waste toner bottle 70
supply notifications
configuring 70
supply usage counters
resetting 128
supported file types 31
supported flash drives 31
T
toner cartridge
replacing 79
toner cartridges
ordering 67
recycling 105
toner darkness
adjusting 155
transfer belt
replacing 87
transfer roller
replacing 90
transparencies
loading 27
trays
linking 28
loading 25
unlinking 28
troubleshooting
cannot open Embedded Web
Server 123
FAQ about color printing 156
printer is not responding 153
troubleshooting, color quality
print appears tinted 157
troubleshooting, copy
partial copies of documents or
photos 163
poor copy quality 163
scanner does not respond 164
scanner unit does not close 164
troubleshooting, fax
cannot receive faxes 160
cannot send faxes 160
cannot send or receive
faxes 158
received fax has poor print
quality 161
Index 192
troubleshooting, print
collated printing does not
work 129
confidential and other held
documents do not print 133
envelope seals when
printing 129
incorrect margins on prints 142
jammed pages are not
reprinted 132
job prints from the wrong
tray 154
job prints on the wrong
paper 154
paper curl 130
paper frequently jams 132
print jobs do not print 135
slow printing 134
tray linking does not work 130
troubleshooting, print quality
blank pages 136
crooked print 146
dark print 137
ghost images appear on
prints 139
gray background 139
horizontal dark lines 140
horizontal white lines 141
jagged or uneven
characters 143
light print 144
mottled print and dots 145
repeating print defects 147
skewed print 146
solid color or black images 148
text or images cut o 149
toner easily rubs o 150
uneven print density 150
vertical dark lines or streaks
appear on prints 151
white lines on a page 152
white pages 136
troubleshooting, printer options
internal option is not
detected 125
internal solutions port 126
troubleshooting, scan
cannot scan from a
computer 162
partial copies of documents or
photos 163
poor copy quality 163
scan job was not successful 163
scanner does not respond 164
scanner unit does not close 164
twosided copying 34
U
unable to read flash drive
troubleshooting, print 124
understanding the status of the
power button and indicator
light 15
uneven print density 150
Unformatted flash detected 127
Universal paper size
setting 25
unlinking trays 28
updating firmware
flash file 183
USB port
enabling 124
using
genuine Lexmark parts 67
genuine Lexmark supplies 67
using the ADF
copying 34
using the control panel 14
using the home screen 15
using the keyboard on the
display 24
using the scanner glass
copying 34
V
verify print jobs 32
printing from a Macintosh
computer 32
printing from Windows 32
vertical dark lines or streaks
appear on prints 151
vertical white lines appear 152
viewing a fax log 53
Voice Guidance
activating 23
speech rate 23
Voice Guidance speech rate
adjusting 23
voice mail
setting up 39
voice over Internet Protocol
(VoIP)
fax setup 44
VoIP adapter 44
volatile memory 57
erasing 56
volatility
statement of 57
W
waste toner bottle
ordering 70
replacing 86
white lines appear 152
white pages 136
wireless network
WiFi Protected Setup 60
WiFi Protected Setup
wireless network 60
Index 193
3

Hulp nodig? Stel uw vraag in het forum

Spelregels

Misbruik melden

Gebruikershandleiding.com neemt misbruik van zijn services uitermate serieus. U kunt hieronder aangeven waarom deze vraag ongepast is. Wij controleren de vraag en zonodig wordt deze verwijderd.

Product:

Bijvoorbeeld antisemitische inhoud, racistische inhoud, of materiaal dat gewelddadige fysieke handelingen tot gevolg kan hebben.

Bijvoorbeeld een creditcardnummer, een persoonlijk identificatienummer, of een geheim adres. E-mailadressen en volledige namen worden niet als privégegevens beschouwd.

Spelregels forum

Om tot zinvolle vragen te komen hanteren wij de volgende spelregels:

Belangrijk! Als er een antwoord wordt gegeven op uw vraag, dan is het voor de gever van het antwoord nuttig om te weten als u er wel (of niet) mee geholpen bent! Wij vragen u dus ook te reageren op een antwoord.

Belangrijk! Antwoorden worden ook per e-mail naar abonnees gestuurd. Laat uw emailadres achter op deze site, zodat u op de hoogte blijft. U krijgt dan ook andere vragen en antwoorden te zien.

Abonneren

Abonneer u voor het ontvangen van emails voor uw Lexmark CX827 bij:


U ontvangt een email met instructies om u voor één of beide opties in te schrijven.


Ontvang uw handleiding per email

Vul uw emailadres in en ontvang de handleiding van Lexmark CX827 in de taal/talen: Engels als bijlage per email.

De handleiding is 9,35 mb groot.


U ontvangt de handleiding per email binnen enkele minuten. Als u geen email heeft ontvangen, dan heeft u waarschijnlijk een verkeerd emailadres ingevuld of is uw mailbox te vol. Daarnaast kan het zijn dat uw internetprovider een maximum heeft aan de grootte per email. Omdat hier een handleiding wordt meegestuurd, kan het voorkomen dat de email groter is dan toegestaan bij uw provider.

Stel vragen via chat aan uw handleiding

Stel uw vraag over deze PDF

Andere handleiding(en) van Lexmark CX827

Lexmark CX827 Gebruiksaanwijzing - Nederlands - 194 pagina's

Lexmark CX827 Gebruiksaanwijzing - Deutsch - 200 pagina's


Uw handleiding is per email verstuurd. Controleer uw email

Als u niet binnen een kwartier uw email met handleiding ontvangen heeft, kan het zijn dat u een verkeerd emailadres heeft ingevuld of dat uw emailprovider een maximum grootte per email heeft ingesteld die kleiner is dan de grootte van de handleiding.

Er is een email naar u verstuurd om uw inschrijving definitief te maken.

Controleer uw email en volg de aanwijzingen op om uw inschrijving definitief te maken

U heeft geen emailadres opgegeven

Als u de handleiding per email wilt ontvangen, vul dan een geldig emailadres in.

Uw vraag is op deze pagina toegevoegd

Wilt u een email ontvangen bij een antwoord en/of nieuwe vragen? Vul dan hier uw emailadres in.


Info