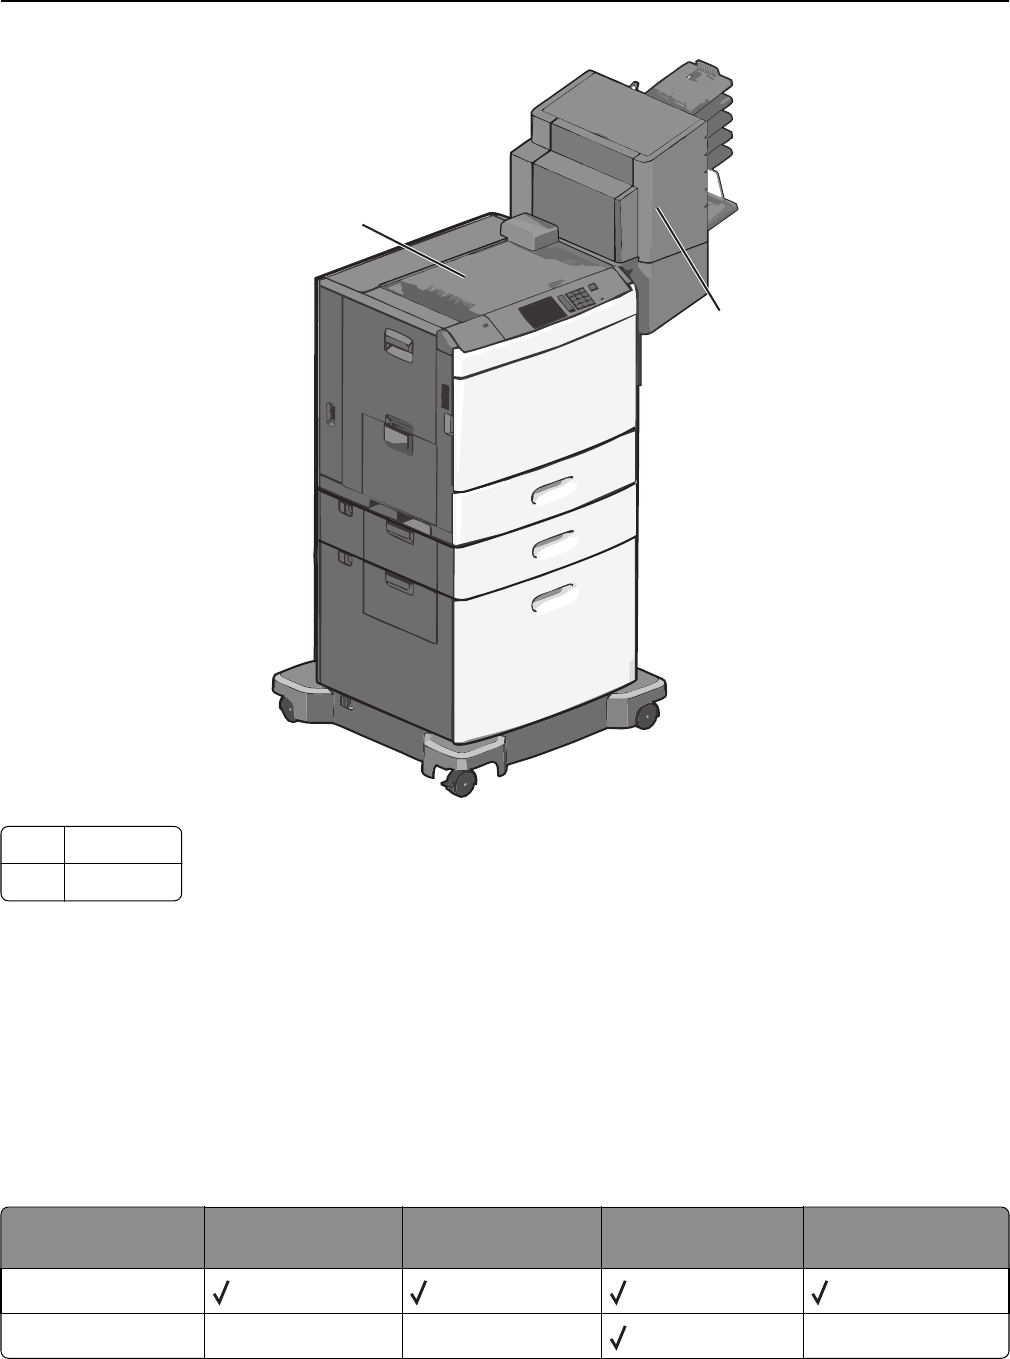
Order of installation................................................................................................................................39
Loading paper and specialty media............................................................57
Setting the paper size and type...............................................................................................................57
Configuring Universal paper settings......................................................................................................57
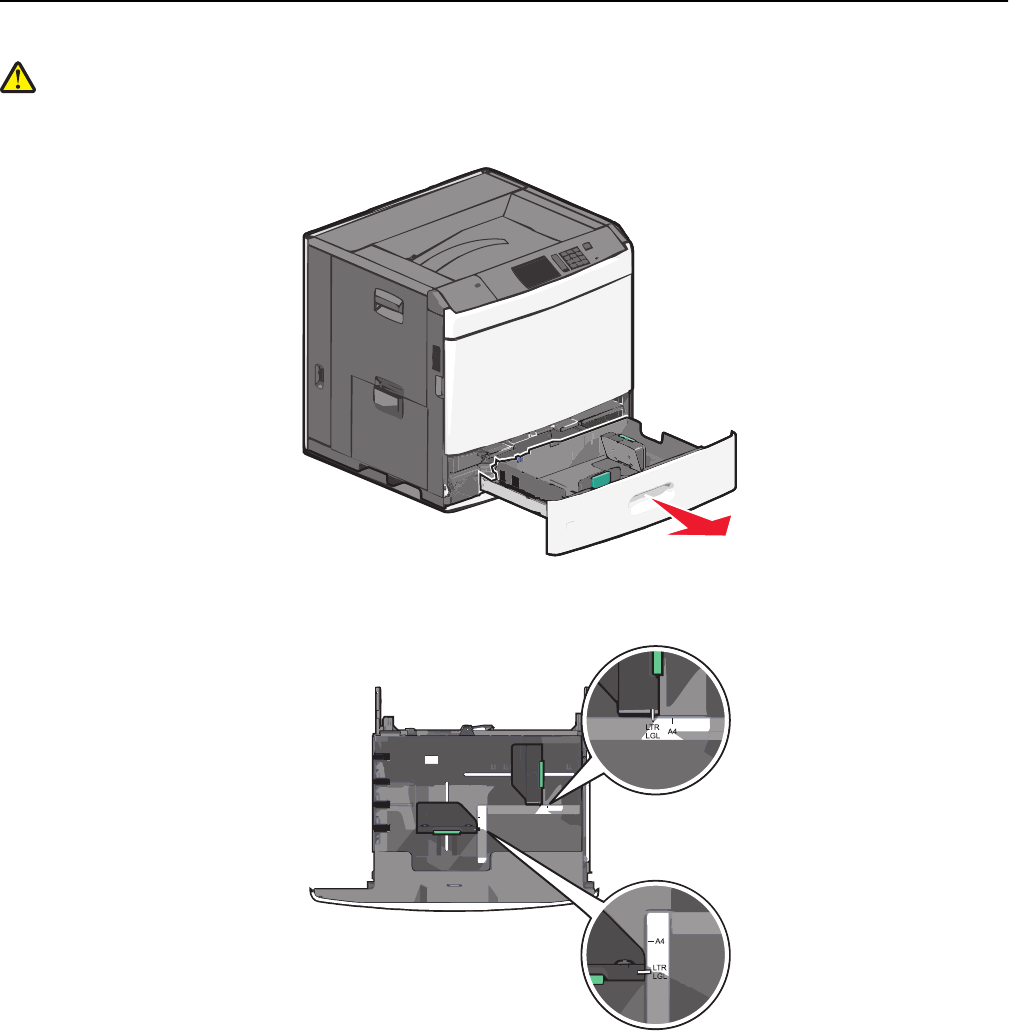
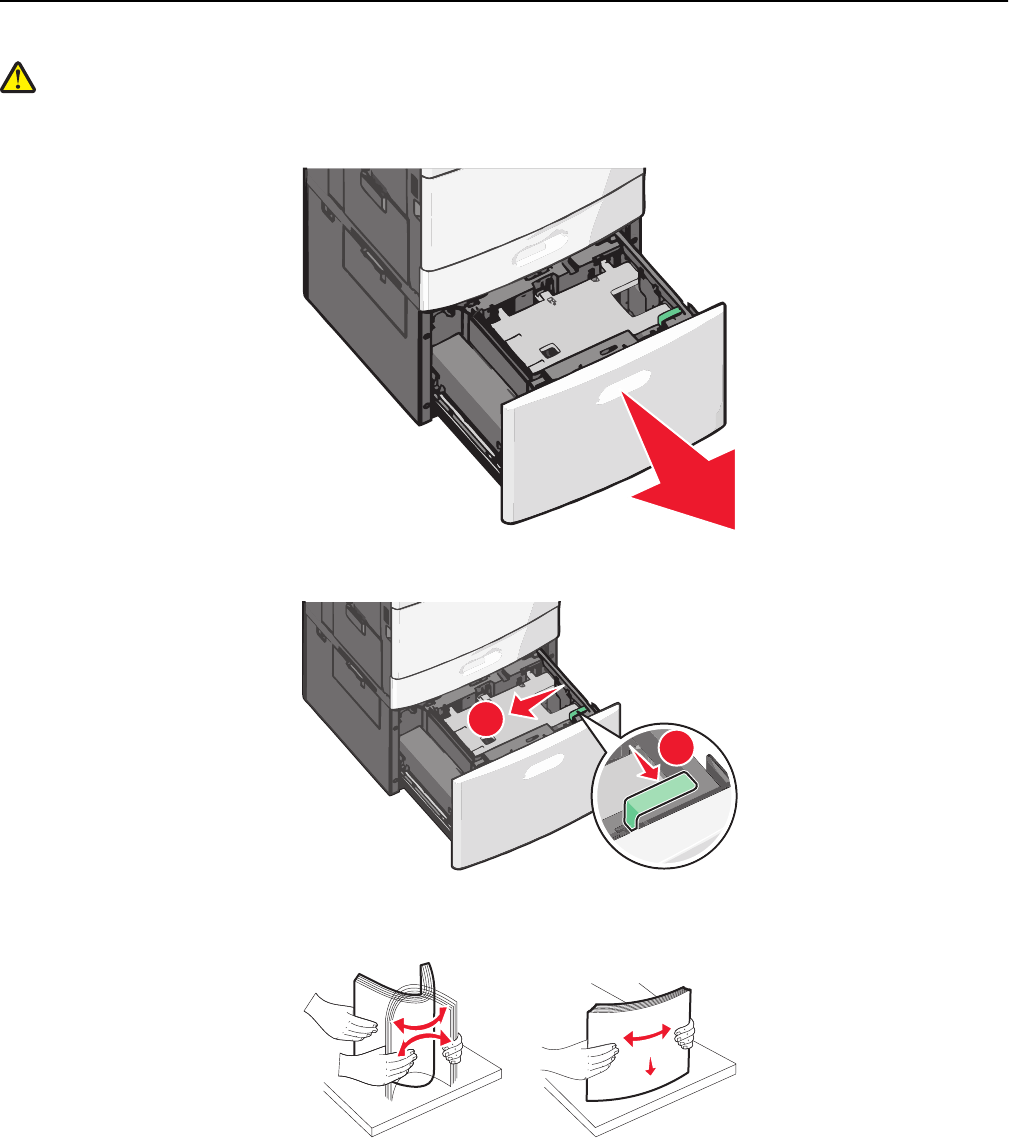
Loading the standard or optional 550‑sheet tray...................................................................................57
Loading the 2000‑sheet high‑capacity feeder.........................................................................................60
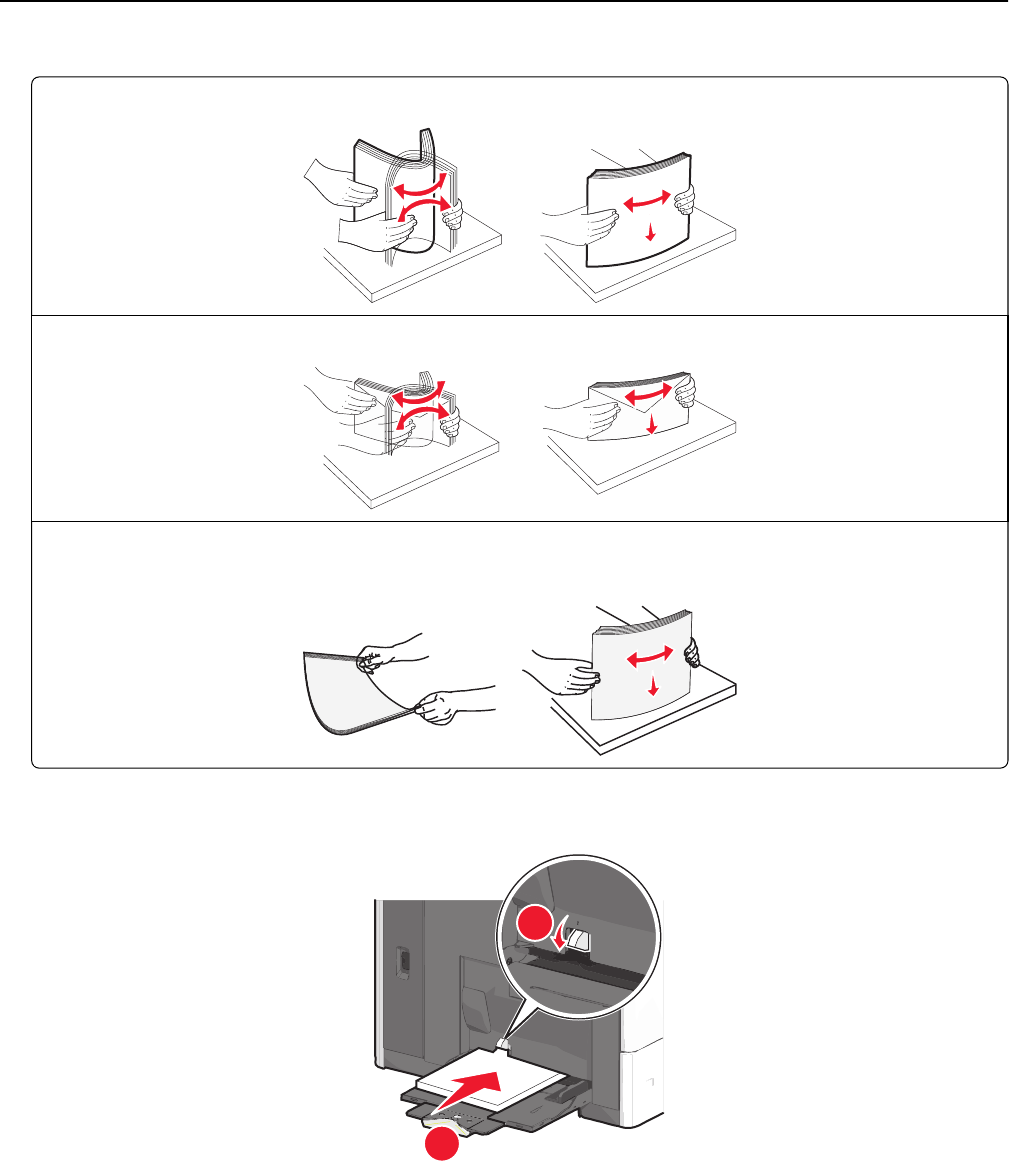
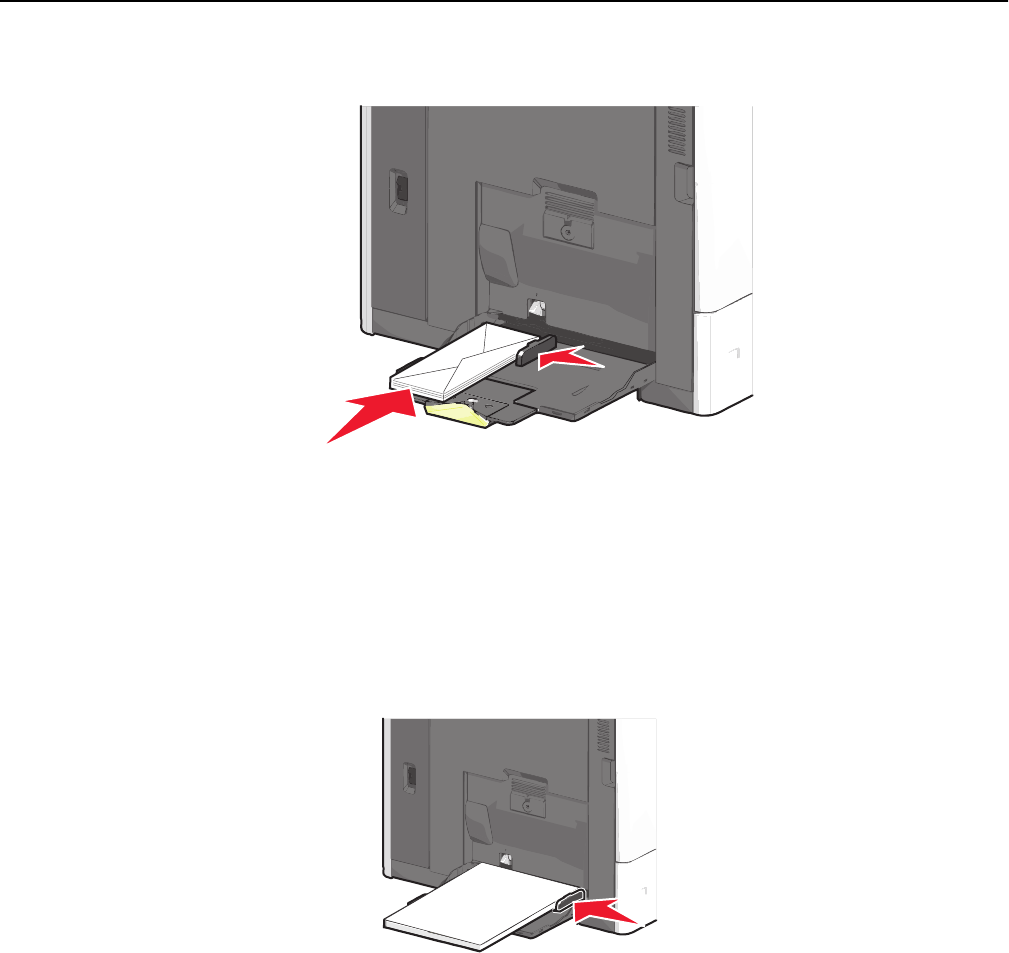
Loading the multipurpose feeder............................................................................................................63
Linking and unlinking trays......................................................................................................................65
Paper and specialty media guide................................................................68
Paper guidelines......................................................................................................................................68
Printing confidential and other held jobs................................................................................................79
Printing information pages......................................................................................................................80
Canceling a print job................................................................................................................................81
Understanding the printer menus..............................................................82
Paper menu.............................................................................................................................................84
Help menu.............................................................................................................................................133
Securing the memory before moving the printer......................................135
Statement of Volatility..........................................................................................................................135
Understanding jam numbers and locations..........................................................................................151
200 paper jam.......................................................................................................................................153
201 paper jam.......................................................................................................................................153
202–203 paper jams..............................................................................................................................154
230 paper jam.......................................................................................................................................155
231–239 paper jams..............................................................................................................................156
24x paper jam........................................................................................................................................156
250 paper jam.......................................................................................................................................157
400–403 and 460–461 paper jams........................................................................................................158
431–454, and 456–458 paper jams.......................................................................................................159
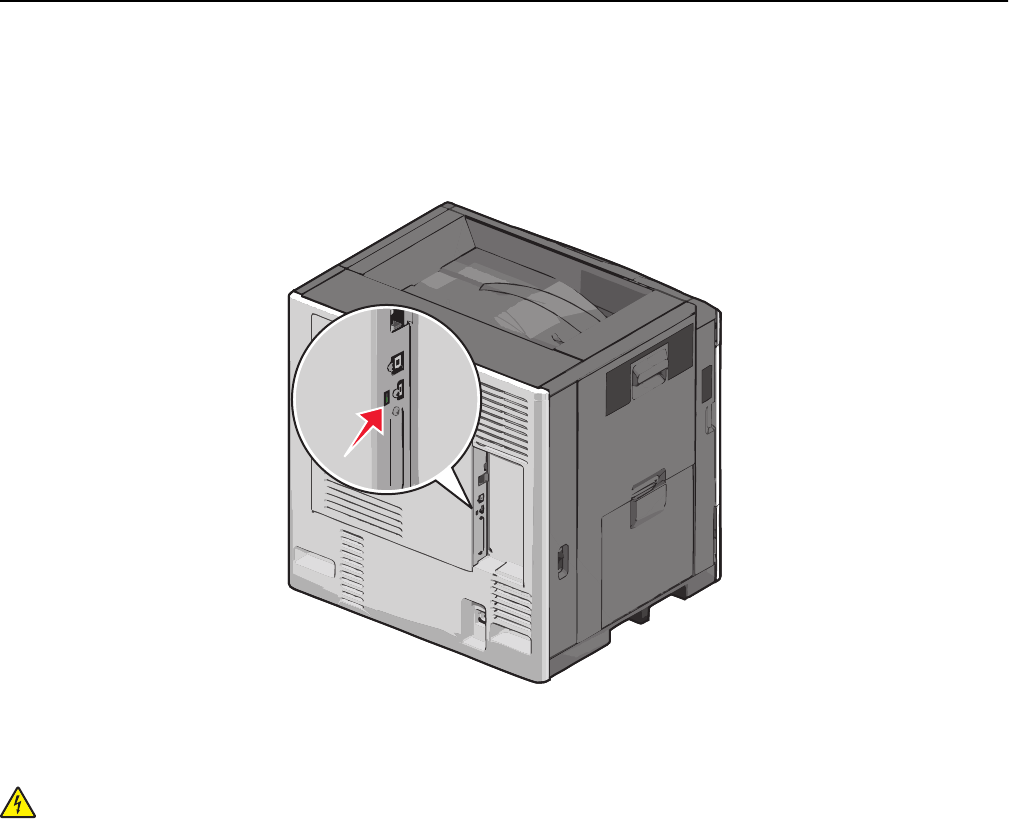
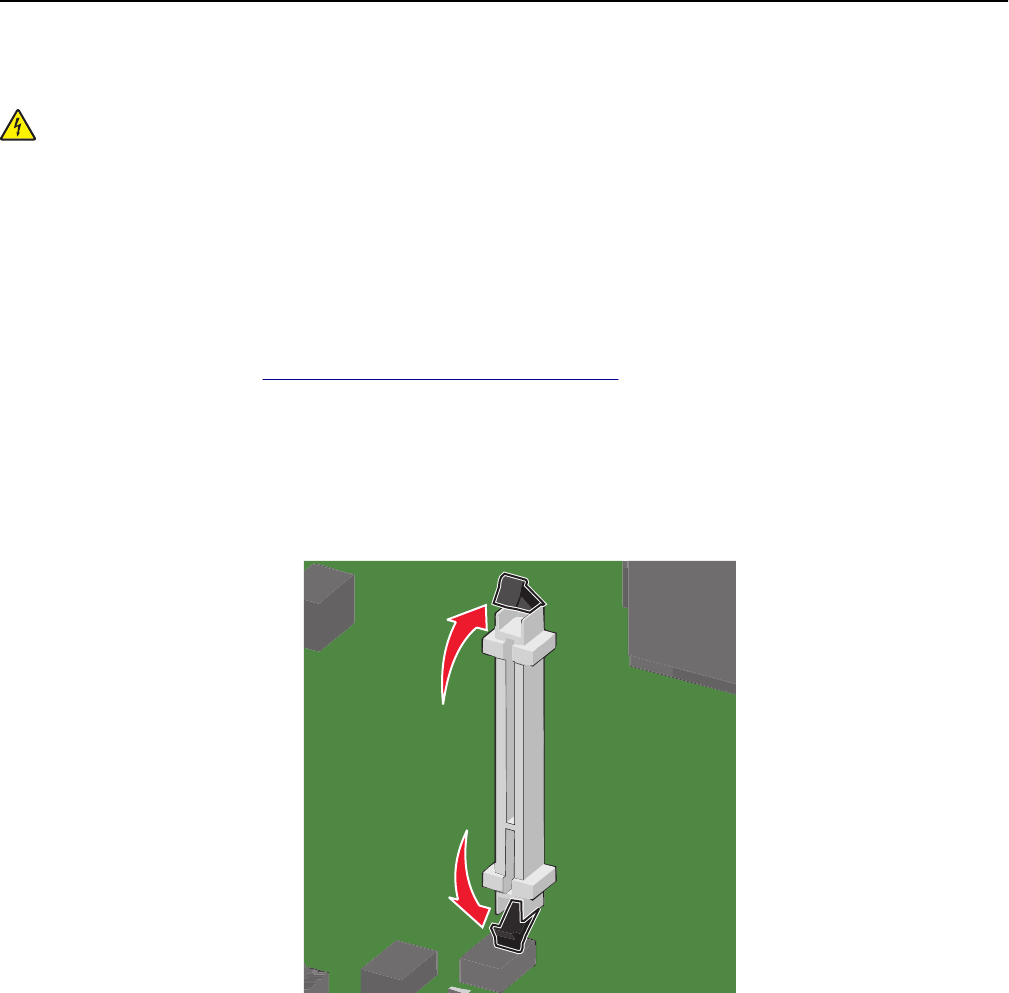
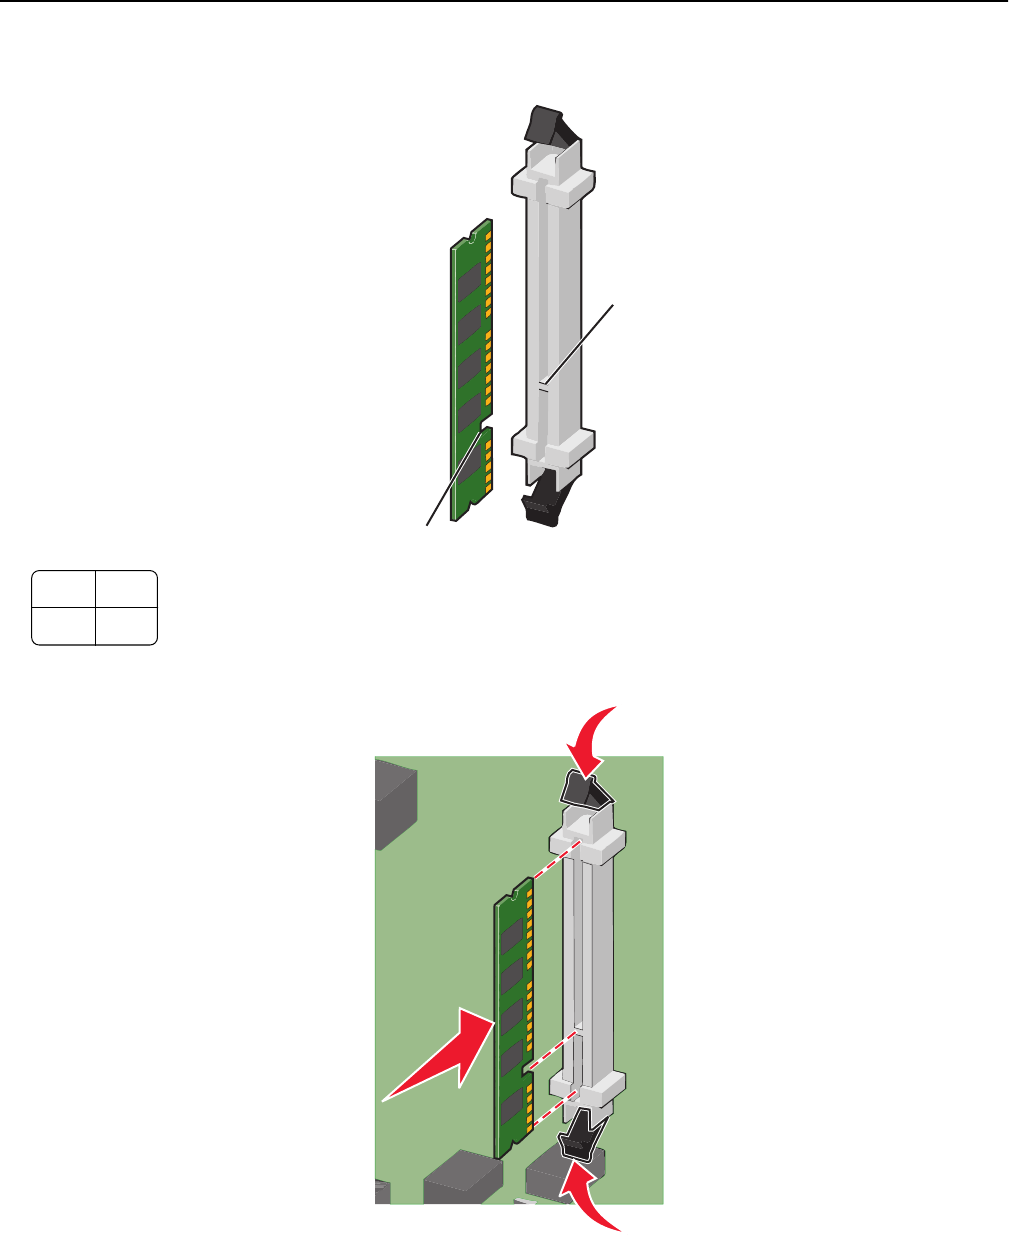
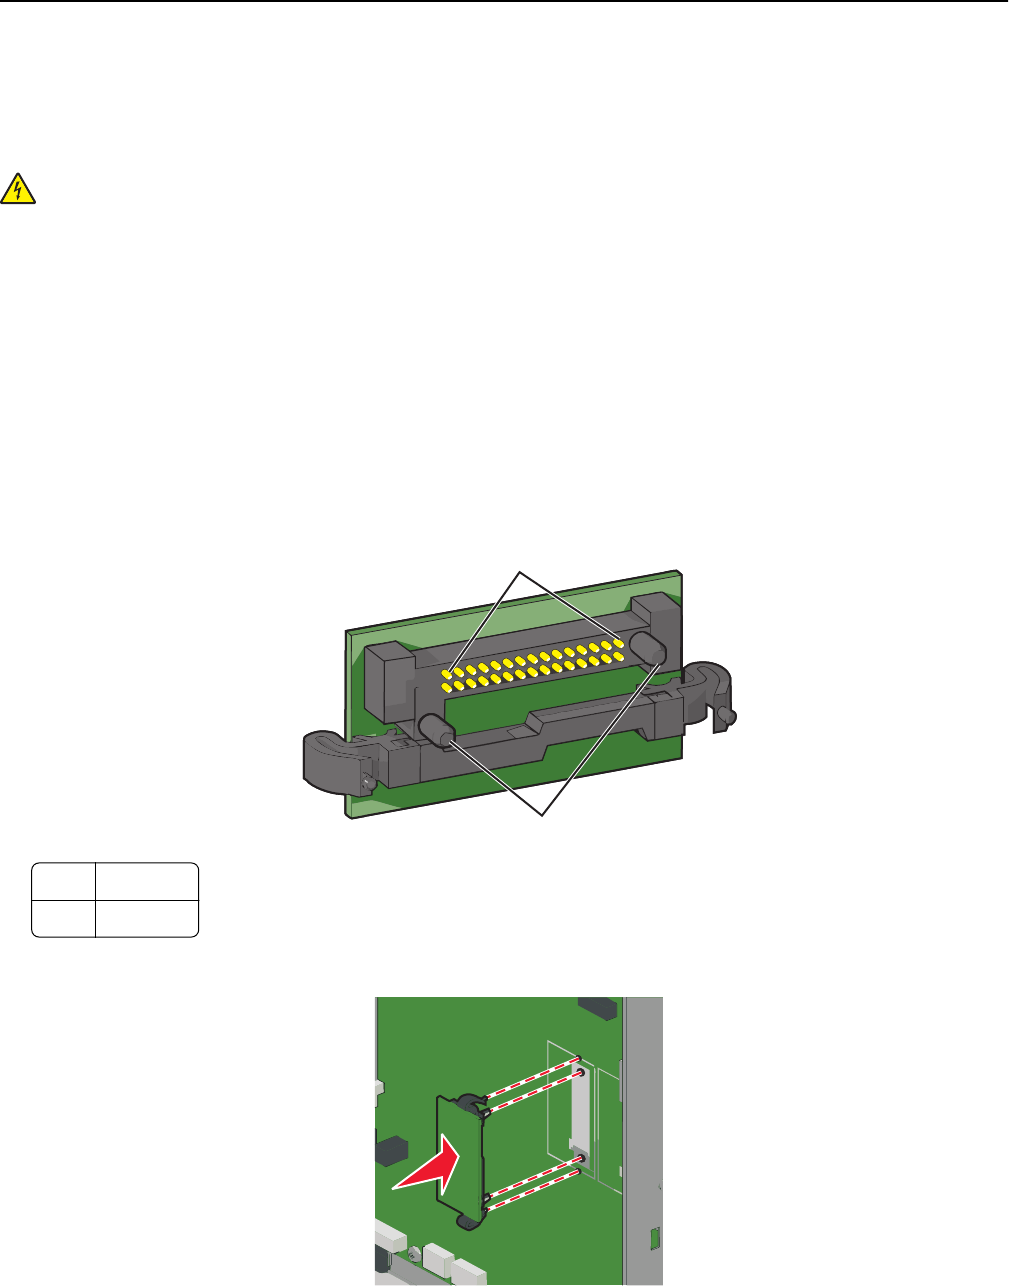
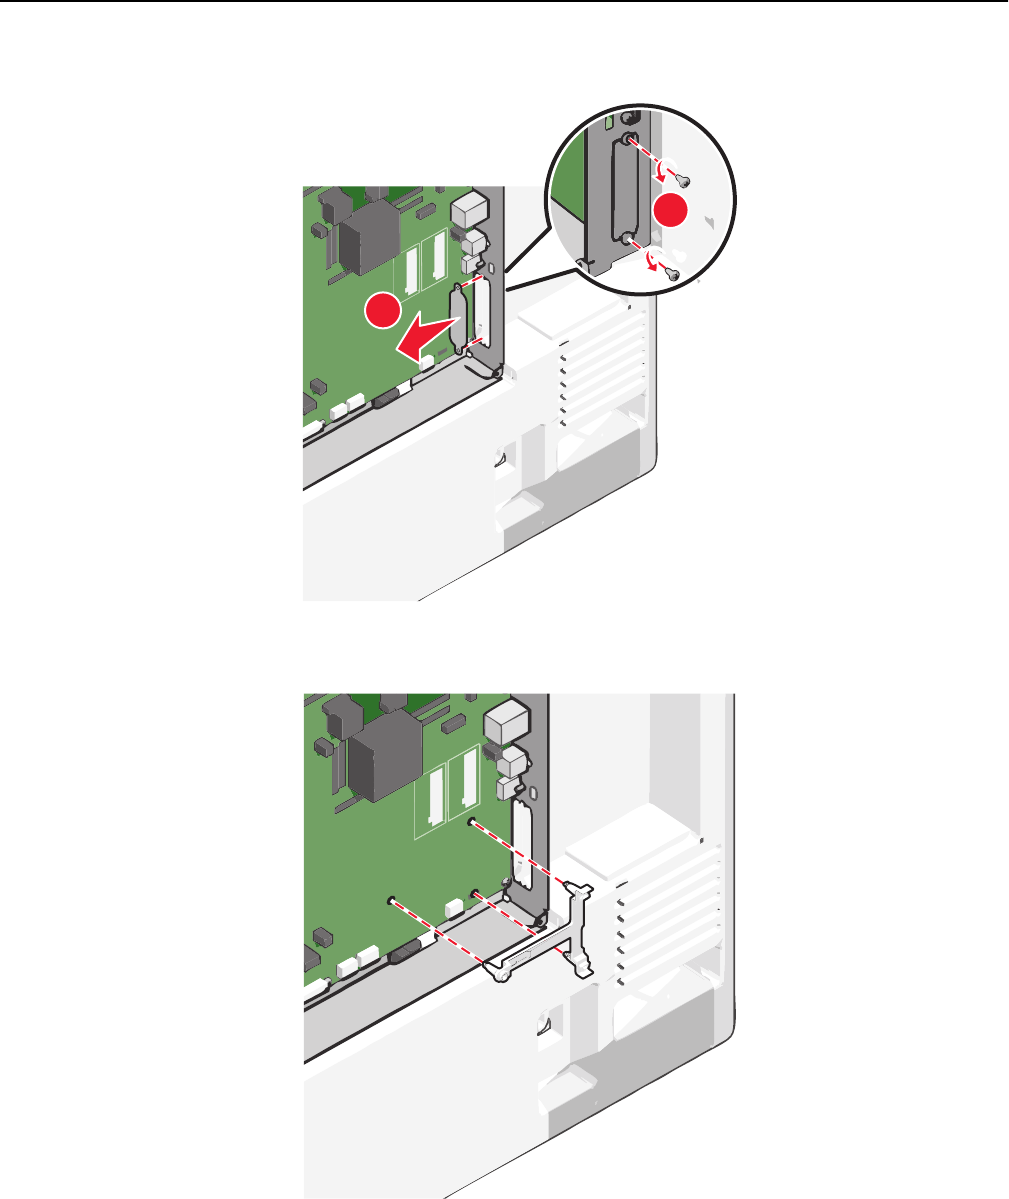
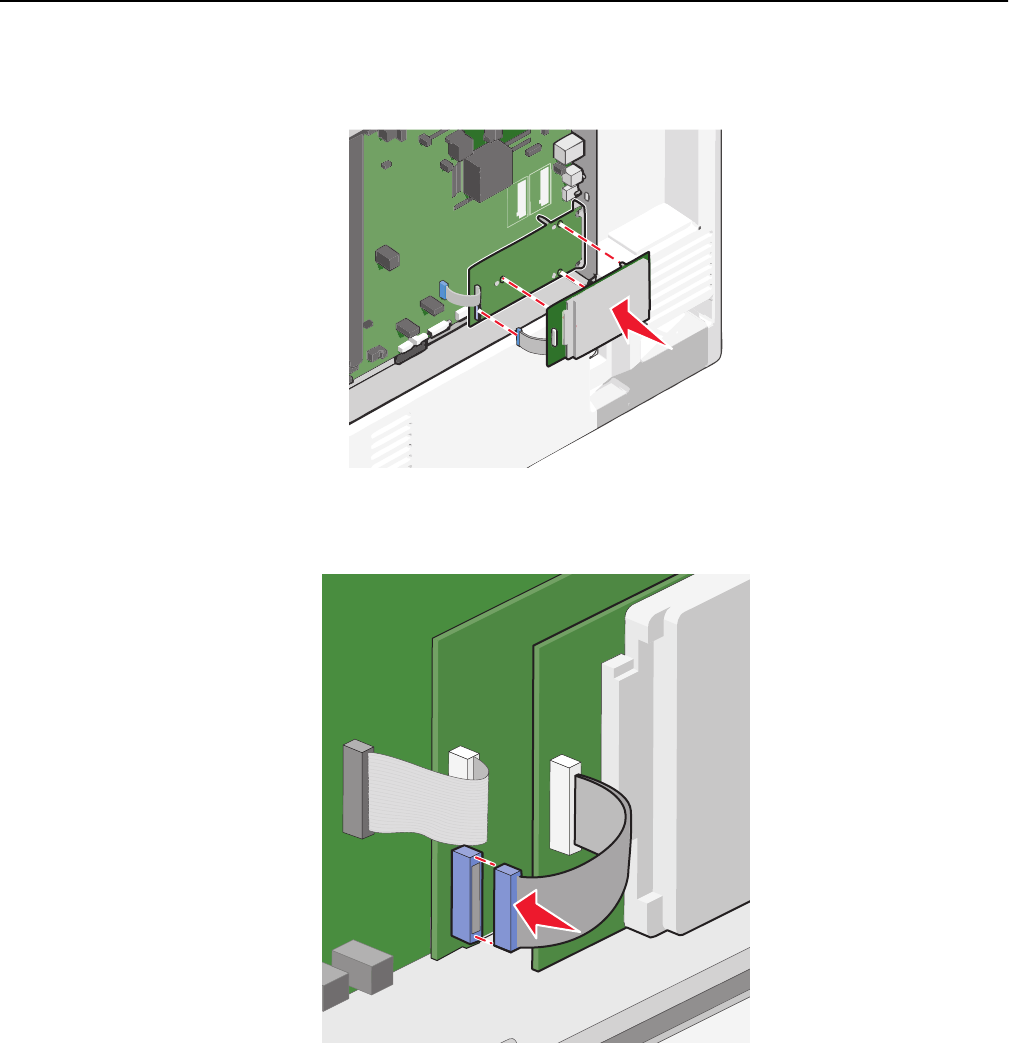
This symbol identifies static-sensitive parts. Do not touch in the areas near these symbols without first touching the
metal frame of the printer.
Notices204
ENERGY STAR
Any Lexmark product bearing the ENERGY STAR emblem on the product or on a start-up screen is certified to comply
with Environmental Protection Agency (EPA) ENERGY STAR requirements as configured when shipped by Lexmark.
Temperature information
Ambient operating temperature15.6 to 32.2°C (60 to 90°F)
Shipping and storage temperature-40 to 40°C (-40 to 104°F)
Laser notice
The printer is certified in the U.S. to conform to the requirements of DHHS 21 CFR Chapter I, Subchapter J for Class I
(1) laser products, and elsewhere is certified as a Class I laser product conforming to the requirements of IEC 60825-1.
Class I laser products are not considered to be hazardous. The printer contains internally a Class IIIb (3b) laser that is
nominally a 10 milliwatt gallium arsenide laser operating in the wavelength of 787-800 nanometers. The laser system
and printer are designed so there is never any human access to laser radiation above a Class I level during normal
operation, user maintenance, or prescribed service condition.
Laser advisory label
A laser notice label may be affixed to this printer as shown:
DANGER - Invisible laser radiation when cartridges are removed and interlock defeated. Avoid exposure to laser beam.
PERIGO - Radiação a laser invisível será liberada se os cartuchos forem removidos e o lacre rompido. Evite a exposição aos feixes de laser.
Opasnost - Nevidljivo lasersko zračenje kada su kasete uklonjene i poništena sigurnosna veza. Izbjegavati izlaganje zracima.
NEBEZPEČÍ - Když jsou vyjmuty kazety a je odblokována pojistka, ze zařízení je vysíláno neviditelné laserové záření. Nevystavujte se působení laserového paprsku.
FARE - Usynlig laserstråling, når patroner fjernes, og spærreanordningen er slået fra. Undgå at blive udsat for laserstrålen.
GEVAAR - Onzichtbare laserstraling wanneer cartridges worden verwijderd en een vergrendeling wordt genegeerd. Voorkom blootstelling aan de laser.
DANGER - Rayonnements laser invisibles lors du retrait des cartouches et du déverrouillage des loquets. Eviter toute exposition au rayon laser.
VAARA - Näkymätöntä lasersäteilyä on varottava, kun värikasetit on poistettu ja lukitus on auki. Vältä lasersäteelle altistumista.
GEFAHR - Unsichtbare Laserstrahlung beim Herausnehmen von Druckkassetten und offener Sicherheitssperre. Laserstrahl meiden.
VESZÉLY – Nem látható lézersugárzás fordulhat elő a patronok eltávolításakor és a zárószerkezet felbontásakor. Kerülje a lézersugárnak való kitettséget.
PERICOLO - Emissione di radiazioni laser invisibili durante la rimozione delle cartucce e del blocco. Evitare l´esposizione al raggio laser.
FARE – Usynlig laserstråling når kassettene tas ut og sperren er satt ut av spill. Unngå eksponering for laserstrålen.
NIEBEZPIECZEŃSTWO - niewidzialne promieniowanie laserowe podczas usuwania kaset i blokady. Należy unikać naświetlenia promieniem lasera.
Gebruikershandleiding.com neemt misbruik van zijn services uitermate serieus. U kunt hieronder aangeven waarom deze vraag ongepast is. Wij controleren de vraag en zonodig wordt deze verwijderd.
Product:
Spelregels forum
Om tot zinvolle vragen te komen hanteren wij de volgende spelregels:
lees eerst de handleiding door;
controleer of uw vraag al eerder door iemand anders is gesteld;
probeer uw vraag zo duidelijk mogelijk te stellen;
heeft u een probleem en al geprobeerd om dit op te lossen, vermeld dit erbij aub;
heeft u een oplossing gekregen van een bezoeker dan horen wij dat graag in dit forum;
wilt u een reactie geven op een vraag of antwoord, gebruik dan niet dit formulier maar klik op de knop 'reageer op deze vraag';
uw vraag wordt direct op de website gezet; vermijd daarom persoonlijke gegevens in te vullen;
Belangrijk! Als er een antwoord wordt gegeven op uw vraag, dan is het voor de gever van het antwoord nuttig om te weten als u er wel (of niet) mee geholpen bent! Wij vragen u dus ook te reageren op een antwoord.
Belangrijk! Antwoorden worden ook per e-mail naar abonnees gestuurd. Laat uw emailadres achter op deze site, zodat u op de hoogte blijft. U krijgt dan ook andere vragen en antwoorden te zien.
Abonneren
Abonneer u voor het ontvangen van emails voor uw Lexmark C 792 bij:
nieuwe vragen en antwoorden
nieuwe handleidingen
U ontvangt een email met instructies om u voor één of beide opties in te schrijven.
Ontvang uw handleiding per email
Vul uw emailadres in en ontvang de handleiding van Lexmark C 792 in de taal/talen: Engels als bijlage per email.
De handleiding is 3,16 mb groot.
U ontvangt de handleiding per email binnen enkele minuten. Als u geen email heeft ontvangen, dan heeft u waarschijnlijk een verkeerd emailadres ingevuld of is uw mailbox te vol. Daarnaast kan het zijn dat uw internetprovider een maximum heeft aan de grootte per email. Omdat hier een handleiding wordt meegestuurd, kan het voorkomen dat de email groter is dan toegestaan bij uw provider.
Uw handleiding is per email verstuurd. Controleer uw email
Als u niet binnen een kwartier uw email met handleiding ontvangen heeft, kan het zijn dat u een verkeerd emailadres heeft ingevuld of dat uw emailprovider een maximum grootte per email heeft ingesteld die kleiner is dan de grootte van de handleiding.
Er is een email naar u verstuurd om uw inschrijving definitief te maken.
Controleer uw email en volg de aanwijzingen op om uw inschrijving definitief te maken
U heeft geen emailadres opgegeven
Als u de handleiding per email wilt ontvangen, vul dan een geldig emailadres in.
Uw vraag is op deze pagina toegevoegd
Wilt u een email ontvangen bij een antwoord en/of nieuwe vragen? Vul dan hier uw emailadres in.