The Leventi ovens comply with the CE-norm. This can be
checked by means of the conformity declaration as
printed in the user manual.
1.2Maintenance
Maintenance and repairs to the ovens must be always
carried out by recognised specialists. Never remove side
panels components and other parts but always have your
service done by a qualified and recognised Leventi
service firm.
There are specific instructions for the installation of the
oven in the technical instruction manual. These
instructions are familiar to Leventi approved technicians.
A shortened version is included in this instruction
manual.
When carrying out repairs always us the original and by
Leventi provided spare parts. Should this not happen,
then there is chance on unnecessary damage to
equipment.
The activities such as described in the chapter
maintenance can be carried out by the end-user.
However, the oven should always be disconnected from
the power supply and it should have cooled down
sufficiently before you start with the small maintenance.
Incorrect installation, maintenance and repair can result
in consequential damage. Leventi is not responsible for
this damage if the conditions in this manual are not
observed.
1.3Intended use
This oven has only been intended for activities and food
product preparations as defined in this guide. The use of
the oven for any other aim is not been permitted.
1.4Removal of baking trays with products
When you remove a baking tray from the oven, it can tilt
due to the weight of the products. This can lead to hot
products, or the baking tray itself, falling onto you.
Consider your own safety and hold the tray securely
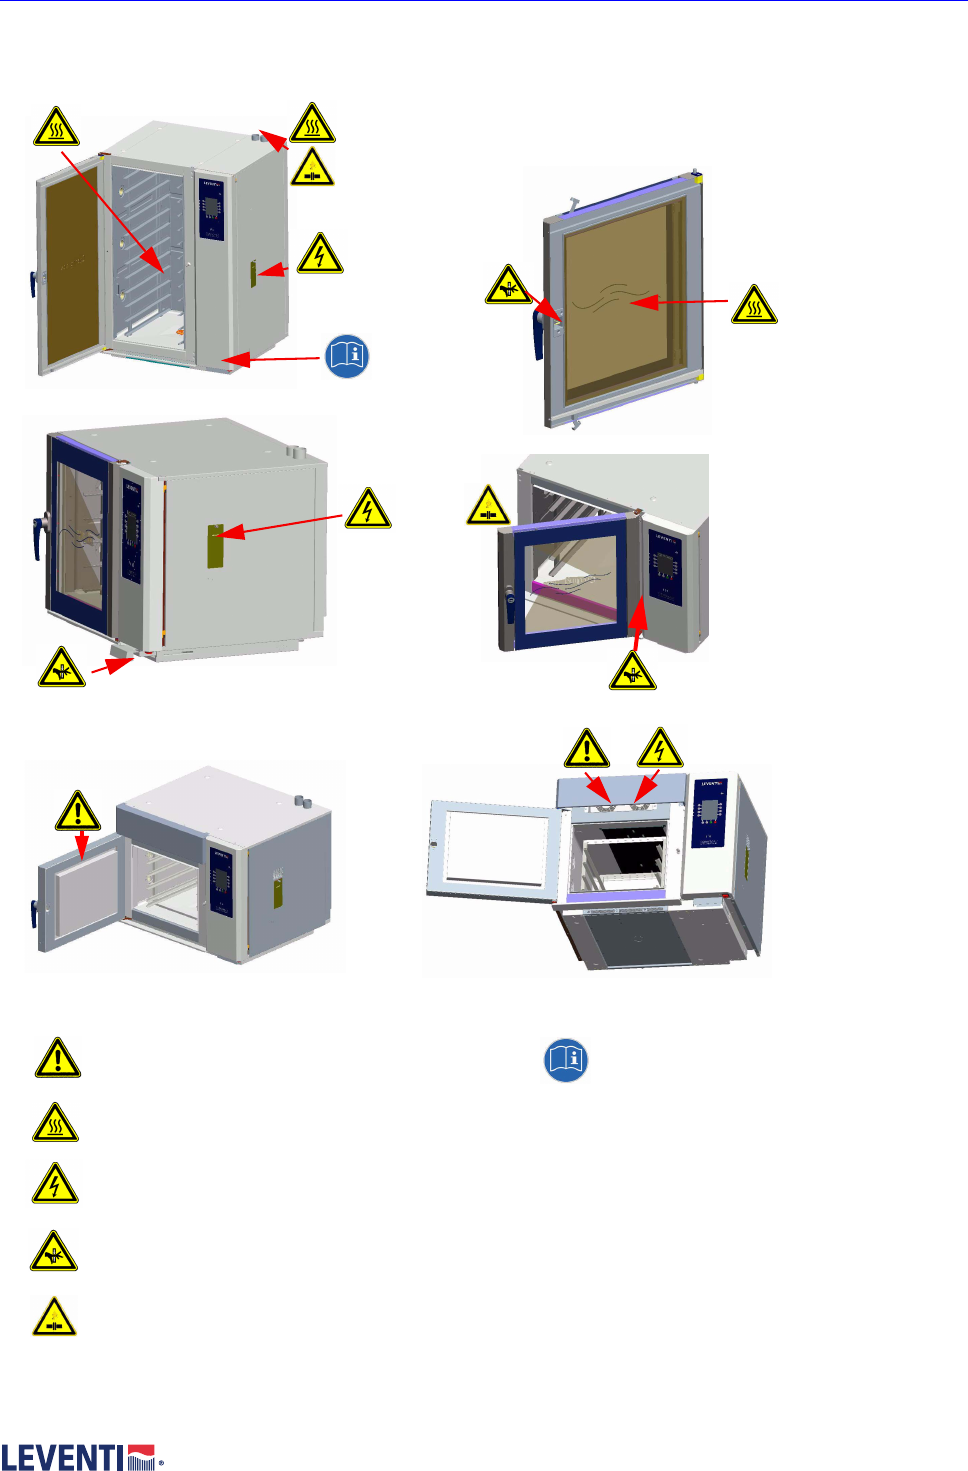
1.5High Voltage
The oven works on an electrical current of
380/415 or 220/240 Volts, depending on of
the model. When you open the side panels for
maintenance or cleaning then always pull out the plug
from the partition socket. That prevents accidents. The
most critical places have been marked with the indicated
sticker.
Check the power cables regularly. This cable should
never be damaged, nor conducted under the furnace and
should not cross a warm surface or should be led over
sharp edges.
When the cable and/or the plug is damaged, don’t use
the oven but firstly repair the faulty component by an
acknowledged electro technologist. The plug socket
must easily reachable so that in need the plug can be
disconnected from the power supply fast and easily.
Never put the oven in front of the socket but always
besides the socket.
Never plunge or bring the plug or socket into contact with
water or any other fluid. When this should happen then
short circuiting results are possible.
Twinge the plug in the wall socket entirely to prevent
overheating and catching fire of the connection plug and
the socket.
Never pull the plug from the socket by pulling at the cable.
The connection between the plug and the cable can be
damaged as a result.
1.6High temperatures
When you do maintenance on your oven, let it
cool down sufficiently first. The heating element
can reach a contact temperature of 550°C and
heats all components to high temperatures. Contact of
these hot components can cause burns. The most
critical places have been marked with the indicated
sticker.
You find this sticker among other things on the inner
window and on the front list at opened door. When you
open the oven door, steam can come out the oven
chamber. This steam will come outside and can be very
hot. This also possible when at closed door no steam in
the oven is visible. Leventi recommends oven mitts when
placing or removing objects from the oven. This prevents
burns. You can order oven mitts at Leventi.
1.7Working with Booster equipment
The Booster oven (with microwave-function) is equipped
with several safety features which prevent the continued
operation of the oven when the door is open.
7
Working safely with your oven
If you make use of the booster function, only do so when
there are products in the oven chamber. With an empty
oven, radiation may leak outside or the oven may suffer
technical damage. Although the amount of this radiation
falls well within international safety standards, we advise
against such use.
Do not make use of the booster function when making or
amending your own cleaning programme.
The inside of the door is equipped with a serrated metal
edge covered with foil. This edge ensures the closing of
the door. Take care that this metal edge does not bend!
1.7.1Booster safety instructions.
The Booster function is not intended to be used
independently but always supports the normal
preparation process. Do not use the Booster just to
warm a cup of water etc.
Do not use the oven if the door or door rubber is broken.
Allow this to be repaired by an authorised person.
Do not heat liquids and foodstuffs in sealed containers.
This creates the risk of explosion.
Use of the booster for the heating of drinks can lead to
delayed heating in which cooking can continue to occur
(even if the programme has finished). Beware of this
when removing drinks.
Liquids and drinks may not be heated in closed or sealed
containers. This prevents products from exploding.
Heating with microwaves can lead to irregular heating.
Always stir products such as drinks and baby food well
and afterwards check the temperature carefully. This
prevents the risk of burns.
When heating packaged products in the oven using the
microwave function look into the oven regularly. This is to
check for the occurrence of flames.
Boiled eggs and eggs in shells may not be heated using
the microwave function. These products explode. They
can still explode even once the heating programme has
finished.
1.8What to do in case of...
Fire
Bring yourself and others to safety. Call the fire
department. If you think you are able to fight the fire
yourself then shut off the oven immediately, disconnect it
from the power supply. When an extractor hood has
been installed or connected then shut these off
immediately.
Water nuisance
Water nuisance can arise by leakage or flood. Switch of
the oven from its power source and close the water
supply. Call the Customer Services Department for
recommendations.
Power failure
When the power shortly falls away then the motor
security of an electric oven can become effective. This
prevents damage of the motor. The thermal protection
must then be reset. The settings of the oven do not
change by a discontinuance of the power supply.
8
Working safely with your oven
WARNING: Use of the booster for the
heating of drinks can lead to delayed
heating in which cooking can continue to occur
(even if the programme has finished). Beware
of this when removing drinks.
WARNING: Do not heat liquids and
foodstuffs in sealed containers. This
prevents exploding products.
WARNING: Heating with microwaves can
lead to irregular heating. Always stir
products such as drinks and baby food well and
afterwards check the temperature carefully.
This prevents the risk of burns.
For Boosteroven only: Make a copy of this page, cut out the warnings and hang
it next to the oven in order to alert the user to the
dangers of unsuitable operation.
9
Brief description Leventi oven
2Brief description Leventi oven
2.1The oven
Your Leventi furnace is a convection oven.
Mastermind
The operation is menu-driven. The oven has a maximum
of 200 pre-programmed food preparation programmes.
You select a programmeprogramme on the operation
panel.
Mastermind with Booster function
The Combimat Mastermind type 1 can also be supplied
with a patented Microwave function. This is a process
which can speed up existing preparation methods.
The Booster function is not intended to be used
independently but always supports the normal
preparation process.
Digital
The operation is manually.
2.2Intended use
This oven is only allowed to be used for food preparations
as described in this manual. Using this oven for any other
purpose is not allowed.
2.3Models
There are four different types in this range. The data of
the different ovens are to be found elsewhere in this
manual.
2.4Switching on and off
Switch on the main switch (at plinth below the operation
panel).
To switch on the oven press the I-button on the operation
panel.
To switch off the oven press the 0-button on the
operation panel.
With the main switch on and the I/O switch of the display
will show a real time clock.
If you need to completeley switch off the oven, then switch
off the main siwtch off.
2.5Operating the oven
2.5.1Mastermind
The display is provided with push
buttons besides and under the
screen. The function of the buttons
is reflected in the display and can
vary per screen.
Softkeys
The functions of the keys are
explained in the display and can
vary! These buttons are called soft
keys. Sometimes symbols and
sometimes texts are used in the
display.
The symbols
The meaning of the softkeysymbols are:
Move cursor to the right.
Move cursor to the left.
Scroll up
Scroll down.
Increase the value (on the line).
Decrease the value (on the line).
Go one step back in the menu. Eventual changes
will not be saved.
Don’t show menu option.
Do show menu option.
The caption
Menu: start menu.
Options: possible choices.
Ready: confirm completed name or change.
OK: confirm character.
DEL: delete last character.
Continue: go to next screen in menu.
Back: go back to previous screen.
Start: start selected programme.
Stop: stop current running programme.
10
Brief description Leventi oven
With the softkeys, texts appear in the display of all kinds
of group names, product names, menu options,
confirmations en denials. Pressing a softkey will execute
the chosen demand in the screen literally.
Symbols in the display
Quantity of moist in the moist phase (ml)
Pre-heat temperature (°C)
Oven room temperature (°C)
Booster: capacity in microwave radiation in
percent.
Humidity level in percentages
Core temperature (°C)
programme time (hr, min, sec)
Delta T (difference between oven room
temperature and core temperature).
Fan speed (low, medium, high)
Flap position
2.5.2Digital
The display is provided with
push buttons besides and
under the screen. The function
of the buttons is related to the
displays aside.
The symbols
Next to the displays you find
symbols. The symbels
communicate what the displays
mean.
Core temperature or time (°C or hours:minutes)
Ovenroom temperature (°C)
Humidity setting (%)
The panel has different buttons:
Increase the value (on the line).
Decrease the value (on the line).
Choose between preparation on core
temperature or time.
red button: stop, short stop
green button: start
11
Brief description Leventi oven
2.6Brief explanation food preparing
2.6.1Mastermind
In the menus you can choose the various preparation
methods. Below you will find a short explanation hereof.
For a more detailed description of the preparation
methods and preparation tips please go to page 17.
Always bear in mind the following table when setting the
oven.
Preheat
The preheat phase will bring the oven to the right
temperature before the products are being loaded into
the oven. By using this phase it is possible to achieve a
higher temperature then necessary for the preparation,
this will compensate for the loss of temperature whilst
loading the oven.
The preheat phase will end when the set temperature
has been reached.
Moist phase / Steam phase
This phase is mainly used for preparing Bake-Off
products. With this phase you can set a certain amount
of moist (in ml) before you start the actual bake. Besides
that you can also add Boost, when you have an oven
equipped with Leventi’s Advanced Booster Technology.
You can end this phase with a pause time.
This phase has ended when the set amount of moist has
been injected and the pause time has elapsed.
Preparation based on time
Standard preparation method based on a specific time.
With a humidity level of 0% you can open or close the
valve. With all levels above 0% the valve will stay
automatically closed.
When you set the humidity level at 100% and
temperatures of 100°C or lower, special cooking
techniques are started.
This phase has ended when the set time has elapsed.
You may also use the Booster function of the Combimat
Mastermind Booster³ to support and speed up this
preparation method.
Preparation on core temperature
A standard preparation method where the core
temperature of a product is of importance.
With a humidity level of 0% you can open or close the
valve. With all levels above 0% the valve will stay
automatically closed.
When you set the humidity level at 100% and
temperatures of 100°C or lower, special cooking
techniques are started.
This phase has ended when the set core temperature
has been reached.
You may also use the Booster function of the Combimat
Mastermind Booster³ to support and speed up this
preparation method.
Preparation on Delta-T
This preparation is used when the core temperature of
the product is of importance. The room temperature is,
however, maximally Delta-T (Delta stands for difference,
T stands for temperature) higher than the core
temperature. This will enable a slow increase of the
temperature of the core of the product.
This phase has ended when the set core temperature
has been reached.
You may also use the Booster function of the Combimat
Mastermind Booster³ to support and speed up this
preparation method.
Regeneration
Preparation method mainly used for regenerating
prepared dishes. By using a special moist control there
is no dehydration and loss of taste.
This phase has ended when the set time has elapsed.
You may also use the Booster function of the Combimat
Mastermind Booster³ to support and speed up this
preparation method.
Preparation on Cook & Hold
Preparation method where the core temperature of the
product is of importance. The difference between the
room temperature and the core temperature will be
slowly decreased to the level of the set value. This will
enable a slow increase of the temperature of the
product.
Important: after reaching the set core temperature the
oven will retain the core temperature at the set value.
This phase will only end when you end the preparation.
This phase you can only use when this is the last or only
phase of the programme.
Table 1: settings
What do you require? settings
Convection: 0-300°C and 0% humidity
steaming (cooking control): 50-100°C and 100%
humidity
combisteam: 0-300°C and humidity <
100% and humidity > 0%
12
Brief description Leventi oven
You may also use the Booster function of the Combimat
Mastermind Booster³ to support and speed up this
preparation method.
2.6.2Digital
Always bear in mind the following table when setting the
oven.
Preparation based on time
Standard preparation method based on a specific time.
With a humidity level of 0% you can open or close the
valve. With all levels above 0% the valve will stay
automatically closed.
When you set the humidity level at 100% and
temperatures of 100°C or lower, special cooking
techniques are started.
This phase has ended when the set time has elapsed.
Preparation on core temperature
A standard preparation method where the core
temperature of a product is of importance.
With a humidity level of 0% you can open or close the
valve. With all levels above 0% the valve will stay
automatically closed.
When you set the humidity level at 100% and
temperatures of 100°C or lower, special cooking
techniques are started.
This phase has ended when the set core temperature
has been reached.
Table 2: settings
What do you require? settings
Convection: 0-300°C and 0% humidity
steaming (cooking control): 50-100°C and 100%
humidity
combisteam: 0-300°C and humidity <
100% and humidity > 0%
13
Quick start
3Quick start
3.1Switching on
Switch the oven on by using the main switch.
The main switch can be found on the bottom right hand
side of the oven.
The display will now show a clock.
To actually start working with the oven you should press
the I-button (below) on the operation panel.
Important: When you have an oven equipped with a boiler
then the boiler may be rinsed. This can take several
minutes and is necessary for a good operation of your
oven. The rinsing will be indicated in the display with the
needed time. After the rinsing you can start working with
the oven.
When the previous session with the oven has been
ended in the cleaning cycle by switching the oven off, then
the oven may start a rinsing cycle first. This is to prevent
that there are chemical residues still present in the oven
chamber when you start the preparation.
3.2Quick start with the Mastermind
3.2.1Select profile and start
The oven will always come up with the selection menu of
the various groups in the illuminated display on the
operation panel. Should you loose your way in the
computer, then press the red stop key as many times
untill you return in this screen.
Select the product group of your choice.
Select the profile of your choice.
Press the green start button.
3.3Manual control
You can set the oven to manual controls.
Choose menu / manual control
select menu / manual operation
Choose the preparation method
Set the desired values
Press Start.
3.4Quick start with the Digital
3.4.1Starting preparation
Choose with between
preparation on time or on core
temperature.
The display will (depending on your
choice) show you a time (0:00) or a
temperature (000).
Set the desired values for temperatures, time (or core
temperature) and humidity by using and/or
Start the preparation with the green start button.
Caution: when it is important to preheat the oven before
you load the products in the oven, then preheat the oven
on the desired temperature by using time preparation
before actually loading the oven.
Start the oven with the settings for the product you want
to prepare.
select product group
vegetables
bake-o
ff
menu
manual operation
extra
set preperation
start
+
+
+
-
-
-
-
00:00:00
180
60
+
-
20
14
Quick start
3.4.2Starting continuous operation
It is possible to let the oven work continuously. Act as
follows:
Set the desired temperature.
Keep the preparation time on 0:00.
Then press start.
The oven will now work on continuous preparation until
you press stop.
Timer during continuous preparation.
During the continuous preparation you can start the
cooking timer.
Act as follows:
Set the timer by using and
The set time will start counting down immediately. You do
not need to confirm your setting.
When the set time has expired then an acoustic signal
will sound.
The oven will operate continuously on the set
temperature. The time setting can be used again.
3.4.3Switching off
To switch off the oven you press the 0-button on the
operation panel. The clock will remain in the display.
When you want to disconnect the oven completely from
the power supply then you also switch off the main
switch. The mainswitch can be found on the bottom right
hand side of the oven.
15
Working with the Mastermind
4Working with the Mastermind
4.1Start a programme
Choose the desired group.
Choose the desired programme.
Press the green Start button.
4.2Stop running programme
You can stop a programme to resume afterwards, by
pressing the red stop button or
choose options / short stop
4.3End running programme
You can completely end a programme, by pressing the
red stop button for three seconds or
choose options / stop
Confirm your choice.
4.4Manual control
You can set the oven to manual control.
choose menu / manual operation
Choose the desired preparation method
Set the desired values
Press start
4.5Start delay of a programme
ou can also use a start-delay function on a programme.
Select the desired programme
choose start-delay
Set the time and date on which you want to start the
preparation
Confirm your settings
4.6Change settings during preparation
During preparation you can change the settings.
choose options / correction
Increase the value of (for example) the temperature (on
the line) with or decrease with
Confirm the settings by pressing OK.
4.7Table planner
During the preparation (also for manual control) you can
activate the cooking timer (table planner). With this
option you can set the cooking time for a product, plate
or tray in the oven. The table planner consists of eight
different independent cooking timers which you can start
during a preparation.
choose options / table planner
Now you can set eight different cooking timers
Select the desired cooking timer
Set the desired time
Press Start
Select in this way multiple cooking timers at your own
desires and set the preferred cooking times for each
product, dish, or tray.
You should remember yourself which timer corresponds
to which product, plate or tray.
4.7.1Default value of the table planner
You can set all cooking timers at the same value. When
you are preparing the same products with the same
preparation time (eg. 5 min. 30 sec.), this can be an
interesting option for you.
Start the table planner during preparation and
choose options / set default time
Set the default time and confirm your settings.
16
Programme management Mastermind
5Programme management
Mastermind
5.1Define groups and programmes
The programmes (preparation programmes) are divided
into groups. This will enable you to allocate the
programme to the right group and find the programme
of your choice easier.
The programme management can be protected by a
PIN. This will prevent that untrained or non authorised
persons can change your programmes.
5.2New group
The computer contains a maximum of eight groups. As
long as the maximum has not been reached you can add
new groups.
choose menu / programme management / new group
Set the name of the new group.
Act as follows:
Use the arrows left and right of the letter and number
ranges to select the desired characters and form a
name.
Confirm your choices with OK.
When the name is ready, confirm this with ready.
Tip: the space can be found at the end of the number
range only.
Group names that already exist are not allowed.
5.3Delete group
You can delete groups only when the group does not
contain any programmes
choose menu / programme management / delete
group
5.4Change programme
choose menu / programme management / change
programme
Choose the programme you want to change
You can change the name, add a phase, delete a phase
or amend a phase.
When you change a phase:
Choose the preparation method you want to change.
Or Choose just to change the settings for the phase with
retention of the preparation method.
Important: Cook & Hold is always the last phase of the
programme. The computer will ensure this condition.
5.5New programme
select menu / programme management / new
programme
Choose the group.
Set a new name.
Names that already exist in the computer are not
allowed.
Enter a maximum of six different phases for the new
programme.
5.6Copy programme
Programmes can be copied under another name. This
can be used to quickly copy a similar programme. This
often goes faster than creating a whole new programme.
choose menu / programme management / copy
programme
5.7Delete programme
Programmes can be deleted
select menu / programme management / delete
programme
Select accordingly the group and then programme you
want to delete.
5.8View programme
To view a programme use the Change programme
option without actually changing values or settings.
choose menu / programme management / change
programme
Choose the programme you want to view.
Choose to change a phase.
Choose just to change the settings for the phase with
retention of the preparation method.
Leave the menu without changing.
17
The mastermind and tag
6The mastermind and tag
6.1What is a tag
The tag is a memory card. On this tag you can save up to
40 programmes, take them with you to another oven and
save them there. This is rather easy for people who work
on several locations and still would like to use their own
way of working
6.2Using the tag
To use the tag, you should hold this next to the tag sign
on the operation panel. If you hold it left of this sign
then the oven will automatically recognise the presence
of the tag.
Important! Take the following rules into account.
• Before you can replace the programmes you need to
hold the tag in front of the sign long enough.
• Consequently follow all actions that you wish.
• For closing you need to hold the tag in front of the sign
again and choose ready.
• You cannot make a group division on the tag.
• When you remove the tag too soon during starting up
or closing down of the tag-session the oven will inform
you hereof, then it will ask you to place the tag in front
of the sign again.
• You cannot change programmes on the tag.
• To work with a tag, you should first copy the
programme to a group in the oven.
• For specific actions there is a double check if the
name already exists, if this is the case then it will
inform you hereof.
• When you place an unknown tag in front of the oven,
then you have the option to format the tag.
6.3The tag menu
In the tag menu you can choose the desired actions.
You can:
• Move programmes from the tag to the oven.
• Move programmes from the oven to the tag.
• Check the tag content
• Inform that you are ready in the tag menu.
6.4From tag to oven
6.4.1Copy programme to group
choose from tag to oven / programme to group
Select the group.
Select the programme you wish to copy.
Select the group you wish copy the programme to.
6.4.2Copy tag content to group
choose from tag to oven / tag content to group
Choose the group you wish to copy the tag content to.
6.5From oven to tag
6.5.1Copy programme to tag
choose from oven to tag / 1 programme to tag
Select the programme.
Select target group.
Confirm your choice.
The programme will be copied to the tag unless the
name already exists. In this case you need to change the
name of the programme in the oven first, or delete the
programme with the same name on the tag.
Select the next programme you want to copy to the tag
or return to the main menu by pressing Stop.
6.5.2Copy group to tag
choose from oven to tag / group to tag
Choose group to which you want to copy the group.
18
The mastermind and tag
6.6Tag maintance
6.6.1Memory status
You can check how much memory there is left on the tag.
choose tag content / memory status
The oven will show the number of programmes on the
tag and how many programmes you can still add.
6.6.2Delete programmes
You can delete programmes from the tag.
choose tag content / delete programmes
Select the programme you wish to delete and confirm
your choice.
Select the next programme you wish to delete or return
to the main menu by pressing the stop button
6.6.3Empty or formatting a tag
You can empty the tag in one go.
choose tag content / empty tag
6.7End tag sesssion without tag
You can end the tag session without keeping the tag at
the tag sign.
choose ready / no
There will be a message that the tag session will be
closed without updating the tag.
19
User settings
7User settings
As a user you can set the oven to your own desired
settings. This menu has been protected by a pincode.
7.1Mastermind
7.1.1Select language
There are three languages in the oven. When you choose
for one of these languages, then all display and menu
options will appear in the selected language. The names
of programmes will remain unchanged!
choose menu/ settings menu/ display language
Choose the desired language.
The oven confirms your choice (in the new choosen
language).
Return to the menu with Back (red button).
7.1.2Set date and time
The date and time in the display can be changed to your
local preferences.
select menu / settings menu / set date and time
Change the date and time.
Confirm your changes.
The oven will reconfirm your changes.
Return to the menu with back.
7.1.3Define start menu
By switching on the oven, it will show a start up menu,
standard a group choice menu will be shown. This start
up menu can be set to your desires.
You can select the following choice menus:
• Standard (all groups).
• 8 last chosen programmes.
• 8 most chosen programmes.
• Self selected programmes.
• Self selected groups.
choose menu / settings / define start menu
Choose the desired option in the choice menu
Follow the instructions on the display and set the menu
Per group or programme you will find the following
symbols:
With this button right next to it on the operation
panel you select the programme or group to be
shown in the display of your own start-up menu.
The name will be shown inverted if selected.
With this symbol you will deselect the choice. The
text will be shown regularly again if deselected.
Tip: Sometimes it can be usefull to show only one product
in the choice menu, then you are sure that the one
operating the oven will always make the right choice.
7.1.4PIN
Factory settings
The PINcode has been set as a standard at 0000.
Forgot your PIN?
When you forgot your PIN then call the Customer
Services department.
Enter PINcode
Some menus have been protected with a PINcode to
prevent unintended use. The PINcode is made up out of
4 digits from 0 to 7.
With a correct entering of the PINcode you will granted
access to the desired menus.
When you enter a wrong PINcode you are able to enter
the right PINcode or you leave the menu.
Change PINcode
You can change the PINcode
choose menu / pincode / change pincode
Enter the new PINcode by using the keys next to the
display
Repeat this
You will return in the menu.
When you do not repeat the correct PINcode, then you
start to enter the new PINcode again.
To stop changing the PINcode you press stop.
Disable PINcode
When you desire not to use a PINcode in all menus then
you set the PINcode one time at 1111. In this case the
user menus will not be blocked by a PINcode and all users
can access these menus.
(PINcode 1111 will disable all PINcodes!)
By chosing another value the PINcode will be activated
again.
20
User settings
7.1.5Set display
The contrast and backlight of the display can be set. This
will enhance the readability of the screen to your own
specific situation and location of the oven.
choose menu / menu settings / set display
7.1.6Comm. port function
The oven’s communication port has various functions.
Select the correct function.
Select menu/ settings menu / comm port function
Profile Composer: to load baking programmes into the
oven.
Scrolling display: for the automatic switching on of the
scrolling display
External Data Logging: for the storage of HACCP-
information. An external receiving computer or laptop is
required for this.
7.2Digital
7.2.1Set date and time
The date and time showed in the display can be set
differently.
Hold the two -buttons as indicated
simultaneously for three seconds.
Then use and to alter date and
time.
Confirm the new date and time with the green start
button.
21
Preparation methods Combimat
8Preparation methods Combimat
8.1Various preparation techniques
The basic techniques for the preparation of food in the
oven are:
Convection
Convection is the preparation of products in hot dry air.
This means a humidity level of 0%.
Steaming
When products are prepared in dry, very moist air this is
called steaming. This means a humidity level of 100%.
Combisteaming
When products are prepared in dry, moist are then this
is called combisteaming. This means a humidity level
from 10 to 90%.
Booster function
The booster function supports the stated preparation
method and can speed up the process by the addition of
energy via microwave radiation.
Always bear in mind the following table when setting the
oven.
8.2Preparing food in the oven
Regeneration (Mastermind)
Regeneration is the process of reheating products with
the aid of, convection/steam/ combisteam. The steam
percentage can be set in such a way that products can
be rethermalised without dehydrating.
Cook&Hold (Mastermind)
When using
Cook&Hold the
core temperature
of the product is of
importance. See
figure 1.
The oven will be
preheated after
the start up
(dotted line A) to
the set room-
temperature (C).
In the mean time the core temperature (line B) is being
measured. When that starts to rise (the product is
getting warmer), the oven chamber temperature will be
slowly led down. After a while the core temperature will
reached the desired and set value (point D). From that
moment on the temperature in the oven chamber will be
kept constant. This process doen’t end.
Delta T
When using Delta T the core temperature of the product
is of importance. The oven temperature will be held at a
user set temperature difference (delta T) above the core
temperature. If the core temperature rises 1°C, the oven
room temperature will rise the same value.
This process ends when the the core temperature
reaches the set value.
Core temperature
Also with the preparation with the core probe the core
temperature of the product is of importance. The
product will be heated until the desired/set value has
been reached. At that momen the oven will stop and will
confirm that the product is ready in the display.
When your oven is not equipped with a core probe
sensor then you can also use this method with a
separate core temperature probe, however you should
set the temperature of the oven chamber yourself.
Baking
Meat and fish that require a short preparation time and
an intensive coloring of the skin can best be baked at
180-250 °Celcius.
Operation:
Cover the products that you want to bake with browning
butter and add herbs. Cream butter for the taste is best
to be used after the preparation process.
You can simultanuously brown on both sides when you
use special silicone mats, then you donít need to turn the
product during the bake. The breaking of flat fishes will
also belong to the past this way, as the mats are flexible.
Also the most patisserie products can be baked best
Table 3: settings
What do you require? settings
Convection: 0-300°C and 0% humidity
steaming (cooking control): 50-100°C and 100%
humidity
combisteam: 0-300°C and humidity <
100% and humidity > 0%
time
Temp (°C)
temp set
A
B
C
D
figuur 1 Graphic Cook & Hold
plus
core set
22
Preparation methods Combimat
with convection heat.
Grilling
The combimat is perfectly suitable to grill products. This
is mostly done at convection (however preparation on
combisteam may result in even better end results).
Combigrilling.
This preparation technique is the most valuable power in
your kitchen. Combigrilling uses steam and convection at
the same time. Both techniques stimulate eachoter.
Stoving
Stoving is possible in one continuous operation in the
Leventi Combimat. You enable steam and convection.
You only have to add the sauce afterwards.
Cooking, steaming, and poaching
The steam boiler or the direct injection system of the
Leventi Combimat will supply you with sufficient steam for
steaming or poaching of products.
By also enable convection during cooking and steaming
much time can be gained. By enabeling convection the
oven will be drier, please keep this in mind.
When you cook or steam a lot (eg. Vegetables and
noodles) then a boiler equipped machine will be
preferable choice. This means a humidity level of 100%
and a temperature of 100 °Celcius or lower.
Grilling
In the Leventi Combimat you can grill perfectly. You place
the products on grills. You set the oven on convection,
between 230 and 250° Celcius. The optimalised air
circulation in the oven chamber will grill the product on all
sides.
To enhance the grill effect, you should preheat the oven
and the grills at 250° Celcius. The grills will give the
products the remarkable brown stripes.
Gratinate
Gratinating is giving the finishing color of the products.
This is done by using convection.
By high temperatures you can add steam to keep the
product more moist. An example of this is gratinating
mashed potatoes.
.
23
Maintenance and cleaning
9Maintenance and cleaning
This chapter is divided into Safety Indications, Cleaning
and Small Maintenance.
9.1Safety instructions
Maintenance and repairs on the ovens should always be
done by recognised specialists. Therefore never remove
side panels, parts and or other items, but always use a
recognised service firm.
The technical manual contains installation instructions
which must be strictly adhered to.
When carrying out repairs only the original Leventi parts
should be used. When this does not happen then there is
a chance of unneccesary damage to your equipment.
The activities such as described in the chapter
Maintenance may be carried out by the user. However
the oven should in this case always be taken of the power
supply, and should have cooled down sufficiently.
For more safety information see the Chapter Working
safely with your Quadro.
Read the indications on the packaging and on the
security sheets that have been delivered with your oven
and the cleaning agents you use.
Ignoring the conditions in this manual can lead to serious
damage. Leventi is not responsible for this damage if the
conditions in this manual are not observed.
9.2Cleaning
Cleaning and decalcify agents
You should always use the cleaning agents as prescribed
by Leventi. Read the indications on the packaging and on
the security sheets that have been delivered with your
oven and the cleaning agents you use.
General instructions
NEVER clean the oven with a pressure washer.
NEVER use abrasive materials or sponges or brushes to
clean the oven. This results in irreparable damage to the
oven.
After the preparation of products containing (high
amounts of) salt, such as fish and seafood, the oven must
be cleaned or thoroughly rinsed. This prevents deposits
and corrosion from the chloride elements in these
products.
Option handshower
Leventi can deliver the oven with an optional handshower.
When you use a handshower you will always have a water
supply at hand that you can easily use to clean or rinse
the oven chamber with. Ask your dealer for more
information about the Leventi handshowers.
There are various configurations with or without Fat
Separator, Soap Pump or Circulation Pump. This has
consequences for the operation of the operation of the
system.
Therefore follow the instructions in the display of the
oven accurately.
The total cleaning process will last about 1.5 hours. The
water consumption is about 20-25 liters of water and
80-400ml of cleaning detergent and 30ml of polishing
detergent. All depending on factors such as
waterpressure and the chosen intensity.
9.2.1Cleaning Mastermind
choose menu / cleaning / total cleaning
Only for systems with a soap pump
The oven will check if there is sufficient cleaning
detergent present for at least one cleaning cycle. When
the last cleaning cycle has been reached, the oven will
indicate this in the display. Should this happen then
change the empty Safepack with the cleaning fluid for a
new one. (specifications available at Leventi)
Set the desired cleaning intensity with and/or and
Confirm your choice.
Only for systems with Fat Separator
The oven will ask you to empty the fat separator. Empty
the fat separator. See for help page 25.
Then press Ready to start cleaning.
Consequently the oven will go through a cleaning cycle.
During the cleaning chemicals are active. Therefore keep
the door closed during this process!
Warming up or cooling down
In the first phase the oven will be warmed up or cooled
down to the correct cleaning temperature.
Only for systems with a circulation pump or no
pump
The oven will ask you to spray the cleaning fluid in the
oven. Open the door of the oven and poor half a liter of
cleaning fluid on the bottom and the inside walls of the
oven. Then close the door.
24
Maintenance and cleaning
The oven will go through a number of steps within the
cleaning process. There will be alternatingly cleaned (with
cleaning fluid) and rinsed.
End cleaning cycle
At the end of the cleaning cycle you open the door and
rinse the oven chamber with a handshower. As soon as
you close the door after the rinsing, then the cleaning
process is finished.
9.2.2Cleaning Digital
Press simultaneously both and
for 3 seconds.
Only for systems with a soap pump
The oven will check if there is sufficient cleaning deter-
gent present for at least one cleaning cycle.
If not the
display will show the code CE-1.
Should this happen then change the empty Safepack with
the cleaning fluid for a new one. (specifications available
at Leventi)
. The display will then show CE-2.
Press Start to continue.
C1-9: Set the intensity
The display will show the text C1-9.
Set the desired cleaning intensity by using and en
and confirm your choices by pressing the start button.
C2-9: Empty fat separator
Only for systems that are equipped with a fat separator.
The display will show the text C2-9.
Empty the fat separator. See for help page 12. Then
press the green start button to start the process.
C3-9 Heating up or cooling down
The oven will warm up or cool down to the cleaning
temperature.
The display will show the text C3-9 and will indicate the
temperature.
C4-9: Poor in detergent
Only for systems with circulation pump or without pump.
The display will show the text C4-9.
Open the door of the oven and poor half a liter of
detergent over the bottom and the side walls of the oven
cavity. Then close the door.
C5-9: Cleaning
The display shows the text C5-9.
Consequently the oven will go through a cleaning cycle.
During the cleaning cycle chemicals will be active.
Therefore leave the door closed!
C6-9: Rinsing
The display shows the text C6-9.
The oven will go through a couple of steps within the
cleaning process. Alternating there will be cleaning (with
cleaning detergent) and rinsing.
C7-9: Manually rinsing
The oven shows the text C7-9.
At the end of the cleaning cycle you will open the door and
spray the oven cavity with the hand shower.
Also clean the door rubber properly. Ensure that no
cleaning material remains on the rubber. This greatly
prolongs the life of the rubber.
C8-9: oven switch off
If you take too long to open the door, rinse and close the
door in the C7-9 situation (> 15 min), the oven will switch
itself off. This function was introduced in order to allow
the user to go home after beginning the cleaning
sequence. Switch the oven off and on with the I/O and
follow the instructions (C7-9).
C9-9: Clean and finish
As soon as you close the door after the rinsing, the
cleaning will be finished.
9.2.3Hold or abort cleaning
C0-0: Short stop
To shortly pause the cleaning, press stop.
Press start to resume the interrupted cleaning process
(at the beginning of the phase).
9.2.4End cleaning
To end the cleaning, press Stop.
Choose End to end the cleaning (via a rinse phase).
The oven will rinse away any eventual leftovers of the
cleaning detergent.
Caution: NEVER open the door during the rinsing process
(see display).
The oven will flush out the remains of the cleaning
detergent. Important: NEVER open the door during the
rinsing cycle (see display).
25
Maintenance and cleaning
9.2.5Detailed information for ACS
Safety instruction cleaning detergent
• The cleaning system uses a special cleaning
detergent. Other brands or sorts are not suitable.
• The cleaning detergent is a slightly perfumed, caustic
substance and contains substances that are harmfull
for your health. Therefore follow the indications on the
packing closely.
• The cleaning fluid can cause serious burning wounds.
When touched by skin or eyes rinse with abundant
water. Do this immediately and ask a general
practicioner for medical advise.
• Keep the cleaning fluid out of reach of children.
• When you spill cleaning fluid on your clothes then take
them off and rinse these immediately with abundant
water.
• Always make sure you have suitable plastic gloves
and protection for your eyes when you are working
with cleaning agents.
• Treat empty packages as chemical waste.
• When the Safepack with cleaning fluid is getting
empty there will be a notification in the display.
You can order the cleaning fluids at the Customer
Services Department.
Change Safepack
Read the indications on the packing
Use special gloves
Place the safepack outside the stand
Remove the empty safepack
Open the new and full safepack
Save the closing cap!
Attach the suction pump to the safepack
Place the full safepack back in the stand
Empty fat separator
Put a 10 liter bucket under the tap of the separator
Turn the tap of the fat separator to the open position and
let the water out of the fat separator drain into the
bucket
Open both closing clams of the fat separator
Slide the fat separator gently forward
And let the last bit of water drain into the bucket
Turn the tap to closed position
Option: when you want to clean the fat separator
completely, then you can remove this from the stand
Important: be carefull with the closing gasket of the fat
separator
Do not forget to clean the filter in the fat separator. For
the Type 4 also clean the fine filter.
9.2.6Cleaning additionals
Cleaning the stand and trolley
The stand and the trolley should be cleaned every week
by using a detergent and hot water.
Cleaning the extractor hood
The extractor hood should be cleaned every week by
using a detergent and hot water. Do not forget to also
clean the grid of the extractor hood.
Cleaning additionals
Aluminium baking trays should be cleaned with hot water
and detegent only. Important: NEVER use Ovenrein on
aluminium parts (baking trays, frying trays etc.) Should
you do this regardlessly then these parts may rust.
Grills and innerracks can be cleaned with Ovenrein. Then
they should be rinsed thoroughly with hot water. Place
grills and innerracks in the oven during the cleaning
process. This will save you time!
Silicone mats should be cleaned with a plastic dough
scratcher, every now and then you can also clean them
with hot water and detergent. Always rinse them off with
hot water! Be carefull to never fold, incise or cut silicone
mats!
Cleaning the drain grating
The drain grating on the bottom of the oven can be simply
removed by turning it, then you can simply clean it with
hot water and detergent. NEVER remove this part during
the cleaning of your oven, this to prevent that your drain
will be clogged by dirty water or large residue.
Cleaning drain
It is recommended to directly flush the drain with
abundant hot water after the preparation of products
that contain a lot of fat. You may add Leventi Ovenrein to
the water which gives a cleaning effect.
When the oven has already cooled down, then the fat in
the drain may have already coagulated. Then it will not
possible any more to remove this fat with hot water.
Important: with this treatment the water in the drain may
be hot (85° Celcius)!
Then you need to unscrew the backside of the drain
system on the oven and clean it from there.
Necessity
Regularly cleaning the oven is necessary to prevent it
from getting dirty, and will ensure the smooth operation
of your oven.
26
Maintenance and cleaning
Time saving: when you clean the oven on a regular and
daily basis, then it will never get too dirty and the cleaning
process can be done in a jiffy.
9.2.7Manually descaling the oven chamber
This chapter is mainly of use when you have an oven that
is equipped with a direct injection system. With these
ovens there may be a calcium residue (white) on your
oven chamber depending on the degree of your water.
This can be removed as follows:
Clean the oven as described in this manual.
Let the oven cool down to maximally 60° Celcius
Let the oven steam for 15 minutes at 60° Celcius
Then spray the oven chamber abundantly with Leventi
Ontkalker (decalcifier) and leave this for about 20
minutes to work.
TAKE CARE: ensure that you do not spray the door
sealing with de-scaler! This greatly prolongs the life of the
door sealing.
Then let the oven steam for 30 minutes at 100° Celcius
Clean the oven after the cleaning program by using a
handshower and or a moist cloth in order not to leave any
chemical residue behind. Also clean the door rubber!
9.3Maintenance of the boiler
This chapter is only applicable when your oven has been
equipped with a boiler.
Flushing the boiler
The boiler will be automatically flushed when the oven is
turned on. The computer will decide itself if this is
necessary. The flushing cycle will only take a couple of
minutes. When the oven is too hot then it needs to cool
(the boiler) down first.
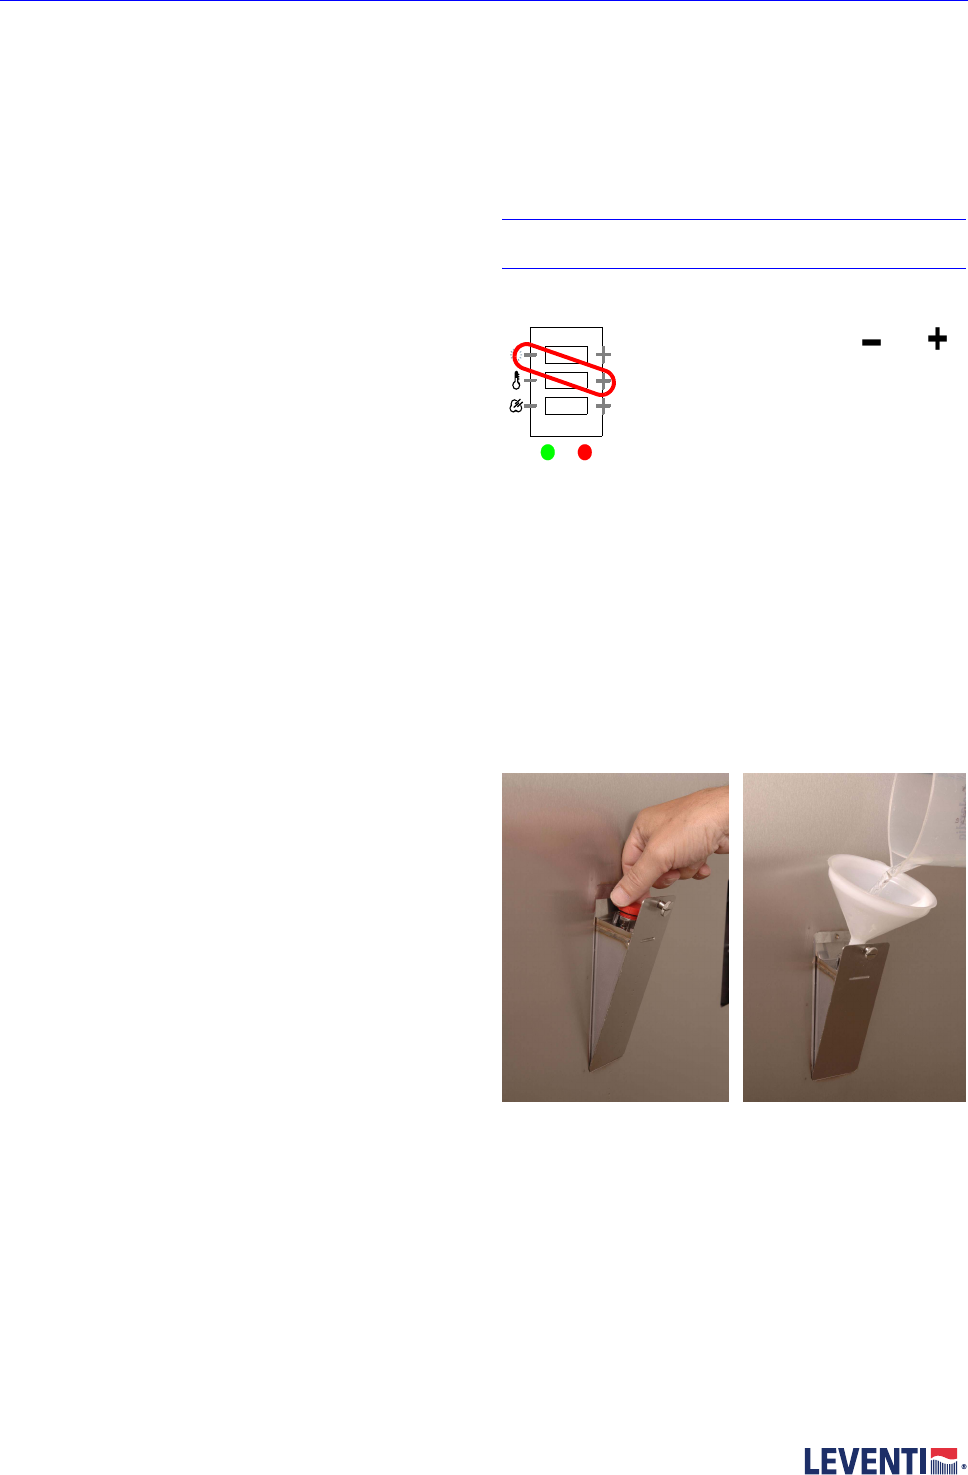
9.3.1Decalcifying the boiler
Depending on the use and the degree of your water the
boiler needs to be decalcified. On average this needs to
be done once every two weeks (with a maximal water
degree of 3°dh). The oven will indicate when this needs to
be done.
The Mastermind will show the message that the boiler
needs to be decalcified.
The Digital showa the code B1
You decide when you want to decalcify the boiler
(preferably at the end of the working day in respect to the
time this process takes). But you should decalcify as soon
as possible.
Also applicable here: when you regularly decalcify your
oven then this will never happen as a surprise during
busy opening hours.
Starting up decalsifying of the boiler
With the Mastermind:
choose menu / cleaning / decalcify boiler
With the Digital:
Press simultaneously both and
as indicated in the figure for 3 seconds
The oven will start up the decacifying programme.
The boiler will be flushed after a cooling down period.
The masterfy will notify this, the Digital shows the code
B1-4.
Then follow the instructions in the display. The oven will
ask you to insert the decalcifier in the boiler.
The Digital shows the code B2-4.
Poor the indicated amount of Leventi Ontkalker in the
opening on the right hand side of the oven. Use a funnel
to poor in the decalcifier.
Then press continue.
The Mastermind notifies that the process is running, the
Digital will show the code B3-4.
The decalcifying process takes approximately eight
hours. It is recommended to plan this in at the end of the
27
Maintenance and cleaning
day. You do not need to stay with the oven during this
process. You can easily go home.
When the decalcifying is ready, then all functions are
switched off.
The mastermind display will be empty.
The digital will show B4-4.
You can switch on the oven again by pressing the I-0
button on the display. When the decalcifying process has
been started, the whole programme needs to be followed
to the end.
9.4Maintenance water softener
Leventi advises to always apply a water softener. This will
prolong the lifespan of your oven (and particularly the
boiler versions).
When you have connected your oven to a water softener,
then on average this should be descaled at least every
two weeks to ensure a proper working. Therefore follow
the operation manual of your water softener.
Flushing the manual water softener
Below text is a short manual for the manual water
softener.
Important: NEVER remove the resin grains in your water
softener!
During the rinsing process
there is no water
connection to the
connected machine.
Keep this in mind.
Hang the end of the hose E
in a bucket.
Hang the end of the hose F
in a drain.
Turn the taps C and D (in
the direction of the arrows).
There will be water
pressure on hose E (max 2
liters).
Open the lid G
Fill the water softener with
one to one and a half kilos of
salt.
Close the lid G
Turn the tap C back (left,
according to the arrow).
There will be salt water
coming out of hose F
Wait for 2 hours.
Turn tap D back (left,
according to arrow).
The water softener is ready
for use.
Salt type: the salt will be used during the rinsing process
to clean the water softener. The salt should never be
present during normal use. Therefore use the two hour
period (50 liters of flushing water). After the rinsing
period the water coming out of hose F SHOULD be sweet
tasting.
9.5Small maintenance.
9.5.1Change the filter of the air cooler
The filter is located
at the shaft under
the operation panel.
This shaft contains a
filter for cooling the
air in the technical
area of the oven.
This filter should be
cleaned regularly. Check this filter at least every two
weeks.
9.5.2Changing the oven lighting
Type bulb, 12V,
20W,
max.res.300°
Celcius,
beamangel 38°.
Article code:
05001232000
E
F
1
C
D
B
A
F
G
H
1
k
g
B
R
O
X
O
2
3
4
28
Maintenance and cleaning
9.5.3Changing the door seals
A door seal will ensure a good closure between the door
seal and the oven cavity. The door seal is subject to wear
and tear. When you replace the seal then act as follows.
Advise: poke a couple of holes in the rubber (in the back
that you use to put into the oven). This prevents the
sticking of the door seal.
• Remove the old door seal.
• Make the dent where the door seal fits in clean of
dust and any other residue such as kit.
• Then you apply a small quantity of kit in the lower
corners. Small tubes are available under article code:
05001086000.
• Start in the left upper corner. Press the corner.
Stretch the rubber out to the right above corner and
also press this.
• Then press the rubber in the two upper corners.
• Also stretch the rubber out to the left below corner
and also press this.
• Continue this operation until it fits everywhere.
• Then also press the doorseal firmly with a hard but
blunt object.
9.5.4Reset after a power failure
You should never do this yourself. Let a specialised
service technician do this. In the switch board there are
many buttons and other parts which are under high
voltage. Wrong actions may lead to life threatening
situations.
29
Error notifications Mastermind
10Error notifications Mastermind
Error notifications will appear in the error screen
accompanied with an accoustic signal.
Mastermind
For all errors please follow the instructions in the display.
Digital
The Digital shows error codes only. Decide with help of
the tables in this chapter what to do.
Always confirm error notifications with the green button.
Here you will find an overview of the most common
errors.
10.1Maintenance messages
10.2User errors Mastermind
A user error will occur when you try to do something that
the oven is not capable of doing or is not allowed to do.
For example you cannot ad a phase after the Cook&Hold
phase. The oven will remind you hereof.
Table 4: Various messages
Report in the displayWhat’s happening
b 1Boiler needs to be descaledboiler needs to be
descaled asap
b 2Boiler needs to be descaledAt next start boiler will be
descaled
CE 1cleaner emptycleaning detergent is
finished.
C?-9variousAll C-codes are related to
cleaning.
C8-9variousSwitch oven off and on.
See manual for
instruction on cleaning.
b?-4variousAll B-codes are related to
descaling of the boiler
Table 5: Error Notifications
ReportError situation
There are no programmes
available
There are no programmes in
the group
There are no groups availableThere are no groups
Maximal table planner /
cooking timer time is 99
minutes
Maximal time that can be set
Memory is fullU wants to add a group or
programme whilst the memory
is full
There are no groupsThere are no groups
There are no programmesThere are no programmes
Programme name already
exists
Name programme already
exists
Group name already existsName group already exists
Important: core temperature
low in respect to previous
phase. This may result in
problems.
U define phase core
temperature after a phase with
a higher temperature
(therefore core already has the
temperature)
PINcode not twice the sameRe-enter the PINcode
Keep the tag in front of the sign
until the notification appears
that you can remove the tag
Tag is being removed too soon
during reading
Keep the tag in front of the sign
until the notification appears
that you can remove the tag
Tag is being removed too soon
during writing
Tag memory is fullTag full
Memory oven is fullComputer memory is full
Tag is being removed too soon
during reading
Keep the tag in front of the sign
until the notification appears
that you can remove the tag
Cook&Hold is only possible as
last phase
Cook&Hold cannot be used as
an intermediate phase
Starting of the programme is
not possible when the door is
open
Close the door and start over
again
Starting with an open door is
not possible
30
Error notifications Mastermind
10.3System errors
There can be system errors in the oven. When for
example the core probe has been damaged by placing it
between the door, the notification will appear that you
cannot use the core probe any longer. Programmes
such as Delta-T and Cook&Hold cannot be used when
this occurs.
10.4Fatal errors
Fatal errors will occur only seldomly, but will have as an
effect that due to an internal error the oven will no longer
be able to function properly. When such a fatal error,
then follow the instructions on the screen.
Always try to restart the oven before calling Leventi
Service.
Table 6: System errors
Report in the screenWhat should you do
102Core probe damaged. Only
preparation without core
probe.
You can continue to work,
however without the core
probe.
107Boiler damaged. When this
occurs again call the
Customer Services.
You can continue to work.
When this occurs again
call the Customer Services
108Condensor does not work
properly. When this occurs
again call the Customer
Services
You can continue to work.
When this occurs again
call the Customer Services
109No climate control
possible. Check the water
supply. Advise do not cook.
Call the Customer Services
You can continue to work
but possibly without
humidity programmes. Call
the Customer Services
110Valve is not functioning
properly. Call the
Customer Services
When this occurs again
call the Customer Services
111Oven is heating too slow.
Call the Customer Services
You can continue working
but report this to the
Customer Services
117Booster does not workRe-start oven or continue
to work without booster. If
this recurs call service.
116Boiler is not filling. Check
the water supply. When
this occurs again call the
Customer Services
You can continue to work.
When this occurs again
call the Customer Services
120Programme not suitable
for this oven configuration.
Choose another
programme.
This programme has been
made on another oven
configuration and is not (no
longer) feasible (for
example core probe
damaged).
123No contact with
Boosterprint.
Re-start oven or continue
to work without booster. If
this recurs call service.
126Incorrect configuration.
Boiler/ACS, no injection?
Degreaser, no condenser?
The configuration is set
incorrectly.
135No cleaning materialReplace Safepack
136No polishing materialReplace Safepack
137Door opened during water
check
Close door several
seconds after pushing
start button
139Pumping empty of boiler
unsuccessful.
Pumping empty of boiler
unsuccessful.
Check pump and drain
140Internal error: programme
not correct
Quickest solution: delete
baking programme and re-
program.
141Internal error: programme
not correct
Quickest solution: delete
baking programme and re-
program.
777A system error occured.
Confirm to go to
mainmenu.
Press the green button
Table 7: Fatal errors
NoNotification in the screen
103Security overheating active. Call the Customer Services
Department.
104Security overheating active. Call the Customer Services
Department.
105Security overheating active. Call the Customer Services
Department.
106Room temperature cannot be measured. When this
occurs again call the Customer Services Department.
118Oven does not work properly. Call the Customer
Services Department.
119Check, clean and or replace the filter.
121Print damaged
122Problems with the motor. When this occurs again call
the Customer Services Department.
124No water supply. Check the water supply! Are there
chemicals in the oven? Oven needs to be turned off.
Table 6: System errors
Report in the screenWhat should you do
31
Error notifications Mastermind
138Computer overloaded.
999A ftal error occured. The oven does not function
properly anymore. Confirm to switch off. Call the
Customer Services Department.
Table 7: Fatal errors
NoNotification in the screen
32
Technical sheet
11Technical sheet
This chapter gives a brief overview of the technical
specifications of the Combimat ovens.
This overview is not intended as an installation
instruction. The technical specifications set out here
have been included purely for reference.
11.1Power supply
11.2Location
The oven should be placed horizontally and level! Please
put your utmost care to this point.
The oven may be placed to the back wall. We advise you
nevertheless to keep a safety margin of at least 1
centimeter.
Stacked oven
When using stacked ovens a 10cm margin is necessary
at the back of the oven.
11.3Oven room space
1: 4 trays
2: 6 trays
3: 10 trays
4: 15 trays
11.4Measures and weight
11.5Water supply and drainage
Supply
Connection: aerated cold water tap, 3/4" water
Capacity: at least 2 Bar, no more than 5 Bar
The oven must be connected to cold water supply of
drinkable quality.
Always apply a water softener.
Drainage
Internal diameter drainage pipe: Ø 40 mm
Height of drainage point and breech: 50 mm
syphon is build in! Don’t use external syphon. Prevent
syphon working in the drain tube!
Extraction
The oven should prefarably be placed under an extraction
system. Leventi can deliver a standard extractor hood
(with or without a motor).
11.6Environmental data
The oven produces less then 70 dB (A) of noise.
The oven functions well between 0 and 35 °C in a non
condensing environment.
11.7Transport
The oven should always be transported with the top side
up, meaning never on its side, back or up side down.
Table 8: connection values
type
connection
V, Hz
conn. value
[kW]
consumption
[kW/h]
13×380, 50/609,54,5
23×380, 50/609,54,5
33×380, 50/6018,59
43×380, 50/603015
Table 9: measures and weights
Type
Width
(mm)
Height
(mm)
Depth
(mm)
Weight
(kg)
1970620810130
2970750810150
39701010810170
49701400810235
33
Support
12Support
Levens Cooking & Baking Systems BV
Broekakkerweg 27
NL - 5126 BD Gilze
The Netherlands
General Phone Numbers:
Tel: +31-(0)-161-459100
Fax: +31-(0)-161-459199
Website: www.leventi.com
E-mail: export@leventi.nl
Customer Services Department
Tel: +31-(0)-161-459191 (option 1)
Fax: +31-(0)-161-453695
E-mail: customerservices@leventi.nl
34
Support
35
CE conformiteitsverklaring (NL, BE)
The conformity declaration (UK, IE)
Déclaration CE de conformité (FR)
Ce Konformitätserklärung (DE, LU, AT)
Dichiarazione di conformaità CE (IT)
Declaração de conformidade (PT)
Declaración de conformidad de la CE (ES)
Prohlášení o shodČ (CZ)
EF-overensstemmelseserklæring (DK)
Överensstämmelseintyg för CE-märkning (SE)
Tõend CE nõuetele vastavuse kohta (EE)
Ce-vaatimustenmukaisuusvakuutus (FI)
ǻȒȜȦıȘʌȚıIJȩIJȘIJĮȢǼȀ (EL)
MegfelelĘségi nyilatkozat (HU)
ZiƼojums par atbilstƯbu (LV)
Atitikties deklaracija (LT)
Id-dikjarazzjoni ta’ konformita’ (MT)
Deklaracja zgodnoĞci CE (PL)
Prehlásenie o zhode (SK)
Ce izjava o soglasju (SI)
Ondergetekende, Undersigned, Le soussigné, Unterzeichner, Il sottoscritto, Abaixo assinado, El abajo firmante, Podepsán:Spoleþnost, Undertegnede, Undertecknad,
Allakirjutanu, Allekirjoittanut, ǾȣʌȠȖİȖȡĮµµȑȞȘİIJĮȚȡİȓĮ, Alulírott, ApakšƗ parakstƯjusies persona, Toliau pasirašiusi bendrovơ, Hawn taht iffirmat, NiĪej podpisany,
Podpísaný: SpoloþnosĢ, Podpisani
Levens Cooking & Baking Systems BV
Broekakkerweg 27
NL-5126 BD GILZE
The Netherlands
verklaart verantwoordelijk te zijn dat onderstaande machine: declares to be responsible for the machine below: déclare sous sa seule responsabilité que la
machine suivante: erklärt verantwortlich zu zeichnen, dass nachfolgende Maschine: dichiara che la macchina qui di seguito indicata: declara ser responsável pelo
aparelho a seguir: declara ser responsable de que la máquina siguiente: pĜebírá odpovČdnost za níže uvedené zaĜízení: påtager sig ved denne erklæring ansvaret for,
at nedenstående maskine: ansvarar för att nedanstående maskin: tõendab, et vastutab allpool nimetatud masina: vakuuttaa, että alla mainittu kone: įȘȜȫȞİȚȣʌİȪșȣȞĮ
ʌȦȢȘʌĮȡĮțȐIJȦ µȘȤĮȞȒ: ezzel felelĘsséget vállal az alábbi termékkel kapcsolatban: apliecina, ka turpmƗk tekstƗ minƝtƗ mašƯna: atsakingai pareiškia, kad toliau
nurodyta mašina: jiddikjara li huwa risponsabbli ghall-makna li qedgha tidher hawn taht: deklaruje z peáną odpowiedzialnoĞcią,Īe wymieniona maszyna: preberá
zodpovednosĢ za nižšie uvedené zariadenie: izjavlja, da jamþi, da je navedena naprava:
Combimat
in overeenstemming is met de richtlijnen: is in accordance with the directives: est conforme auxdispositions des directives: den Richtlinien entspricht: è conforme alle
seguenti direttive: encontra-se em conformidade com as directivas: está en conformidad con las directivas: a prohlašuje, že vyhovuje tČmto smČrnicím: er i
overensstemmelse med direktiverne: överensstämmer med riktlinjerna: vastavuse eest direktiividele: on seuraavien direktiivien mukainen:ıȣµµȠȡijȫȞİIJĮȚ µİIJȚȢ
ȠįȘȖȓİȢ: és kijelenti, hogy az megfelel a következĘ irányelveknek: atbilst direktƯvƗm: atitinka direktyvas: hija konformi mad-direttivi: speánia wymagania zawarte w
nastĊpujących dyrektywach: a prehlasuje, že vyhovuje týmto smerniciam: v soglasju z direktivo:
Algemeen directeur, General Director, président-directeurgénéral, Generaldirektor, Direttore generale, Director-geral, Director General, generální Ĝeditel, direktør,
verkställande direktör, Peadirektor, Johtaja, īİȞȚțȩȢǻȚİȣșȣȞIJȒȢ, vezérigazgató, ƧenerƗldirektors, bendrǐjǐ reikalǐ direktorius, Direttur Generali, Dyrektor Naczelny,
Gebruikershandleiding.com neemt misbruik van zijn services uitermate serieus. U kunt hieronder aangeven waarom deze vraag ongepast is. Wij controleren de vraag en zonodig wordt deze verwijderd.
Product:
Spelregels forum
Om tot zinvolle vragen te komen hanteren wij de volgende spelregels:
lees eerst de handleiding door;
controleer of uw vraag al eerder door iemand anders is gesteld;
probeer uw vraag zo duidelijk mogelijk te stellen;
heeft u een probleem en al geprobeerd om dit op te lossen, vermeld dit erbij aub;
heeft u een oplossing gekregen van een bezoeker dan horen wij dat graag in dit forum;
wilt u een reactie geven op een vraag of antwoord, gebruik dan niet dit formulier maar klik op de knop 'reageer op deze vraag';
uw vraag wordt direct op de website gezet; vermijd daarom persoonlijke gegevens in te vullen;
Belangrijk! Als er een antwoord wordt gegeven op uw vraag, dan is het voor de gever van het antwoord nuttig om te weten als u er wel (of niet) mee geholpen bent! Wij vragen u dus ook te reageren op een antwoord.
Belangrijk! Antwoorden worden ook per e-mail naar abonnees gestuurd. Laat uw emailadres achter op deze site, zodat u op de hoogte blijft. U krijgt dan ook andere vragen en antwoorden te zien.
Abonneren
Abonneer u voor het ontvangen van emails voor uw Leventi Combimat Mastermind 2008 bij:
nieuwe vragen en antwoorden
nieuwe handleidingen
U ontvangt een email met instructies om u voor één of beide opties in te schrijven.
Ontvang uw handleiding per email
Vul uw emailadres in en ontvang de handleiding van Leventi Combimat Mastermind 2008 in de taal/talen: Engels als bijlage per email.
De handleiding is 1,33 mb groot.
U ontvangt de handleiding per email binnen enkele minuten. Als u geen email heeft ontvangen, dan heeft u waarschijnlijk een verkeerd emailadres ingevuld of is uw mailbox te vol. Daarnaast kan het zijn dat uw internetprovider een maximum heeft aan de grootte per email. Omdat hier een handleiding wordt meegestuurd, kan het voorkomen dat de email groter is dan toegestaan bij uw provider.
Stel vragen via chat aan uw handleiding
Stel uw vraag over deze PDF
Uw handleiding is per email verstuurd. Controleer uw email
Als u niet binnen een kwartier uw email met handleiding ontvangen heeft, kan het zijn dat u een verkeerd emailadres heeft ingevuld of dat uw emailprovider een maximum grootte per email heeft ingesteld die kleiner is dan de grootte van de handleiding.
Er is een email naar u verstuurd om uw inschrijving definitief te maken.
Controleer uw email en volg de aanwijzingen op om uw inschrijving definitief te maken
U heeft geen emailadres opgegeven
Als u de handleiding per email wilt ontvangen, vul dan een geldig emailadres in.
Uw vraag is op deze pagina toegevoegd
Wilt u een email ontvangen bij een antwoord en/of nieuwe vragen? Vul dan hier uw emailadres in.