792951
6
Verklein
Vergroot
Pagina terug
1/76
Pagina verder
6
Turntable Assembly:
1. REMOVING FROM CARTON:
Carefully remove the main unit with the packing material intact from the box. Remove the packing material once the
unit has been removed from the shipping carton. Be sure to locate all the accessories located in the packing material.
2. 45 ADAPTER:
Locate and remove the 45-rpm adapter from the packing material and place it in the 45 adapter cutout on the top of
the main unit.
3. TURNTABLE PLATTER:
Remove the turntable platter from the packing material and gently insert the platter into the CENTER SPINDLE on the
base of the turntable unit.
4. SLIPMAT:
Remove the black slipmat from the packaging and place it on the PLATTER.
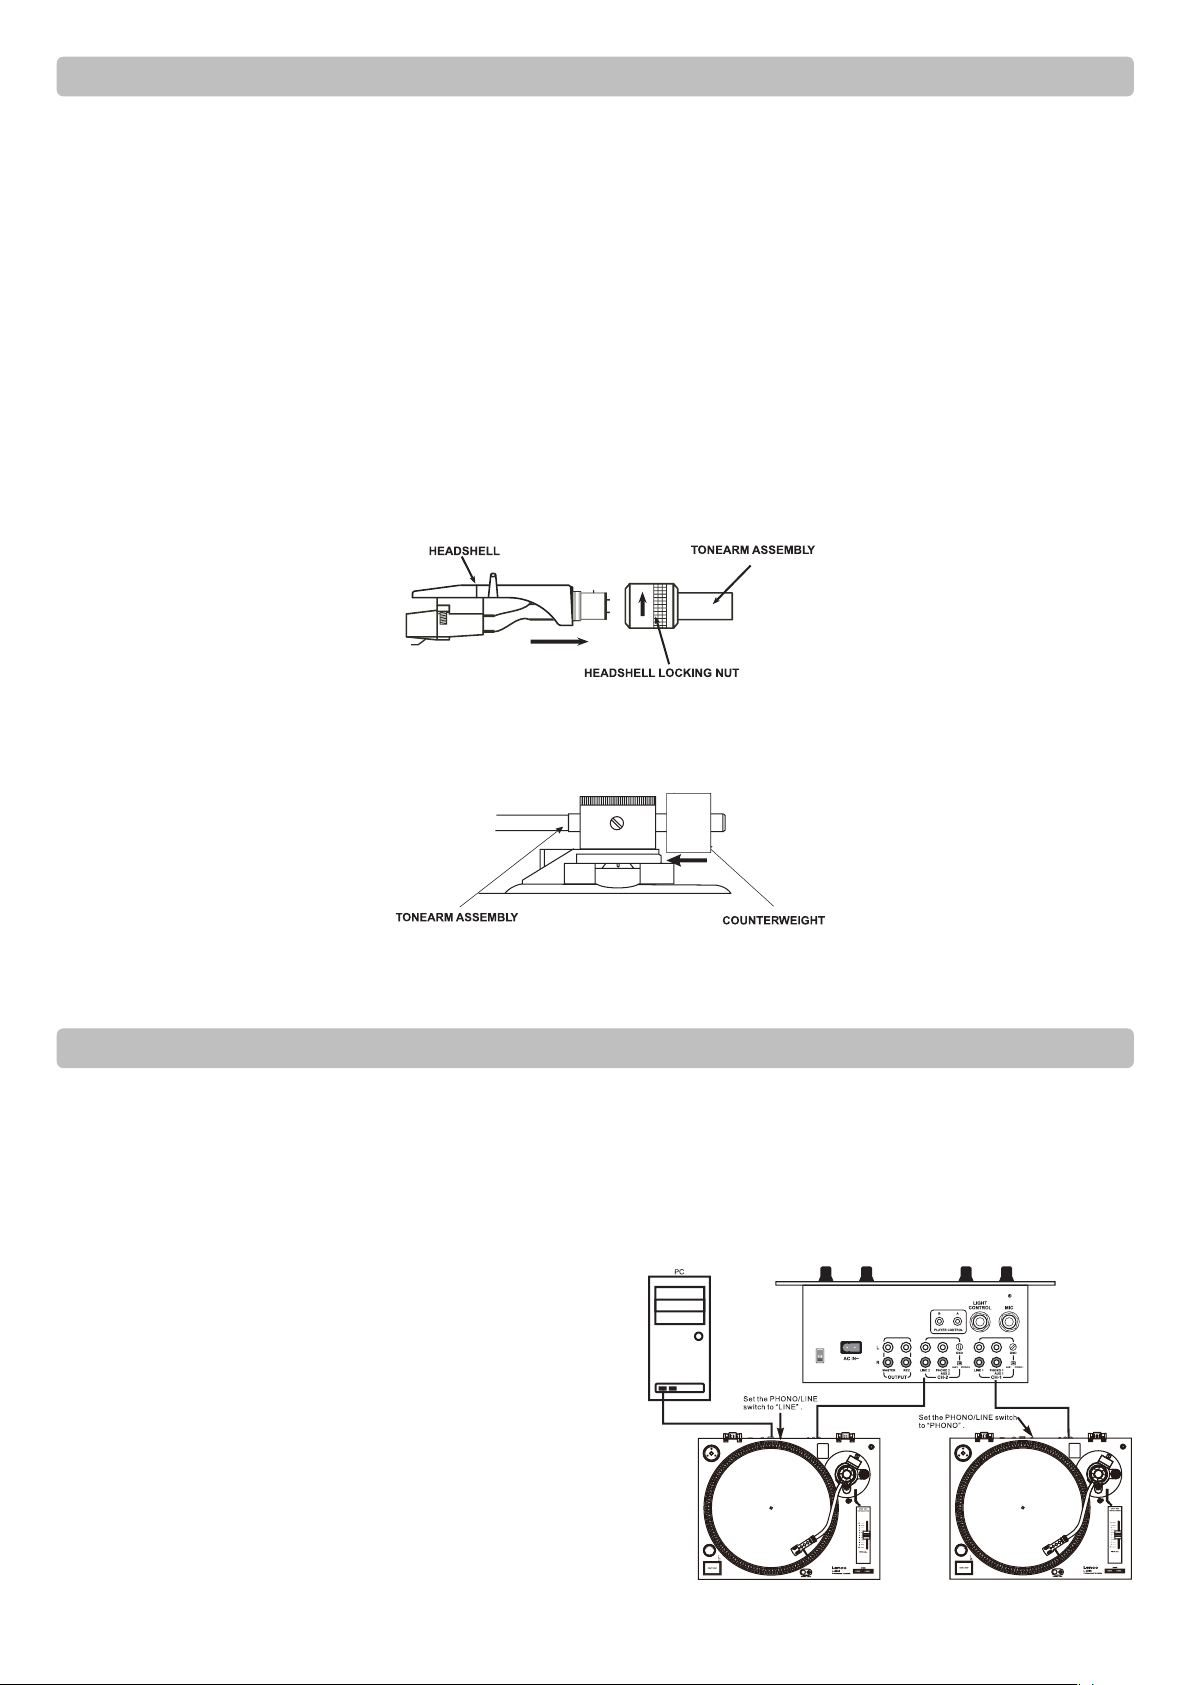
5. HEADSHELL:
Insert the HEADSHELL into the front end of the TONEARM ASSEMBLY. While holding HEADSHELL firmly into the front
end of the tonearm assembly, turn the HEADSHELL LOCKING NUT counter-clockwise to firmly secure the HEADSHELL
to TONEARM ASSEMBLY.
6. COUNTERWEIGHT:
Locate and remove the tonearm COUNTERWEIGHT from the packaging. Slide COUNTERWEIGHT onto the rear of the
TONEARM ASSEMBLY. Turn it lightly and it will screw onto the rear shaft of the tonearm.
Before connecting the unit it is advised that you also consult your current equipment instruction manual.
1. Be sure to turn off the audio device, such as a stereo system or an amplifier, before connection.
Be sure to make all the connections before you connect the Power adapter to a power outlet.
Note: To avoid noise interference, place the Power adapter body away from your turntable as far as possible.
2. Connect the RCA cable to the PHONO input of your AMPLIFIER when you set the PHONO/LINE switch to PHONO position.
You can also use a line input by setting the PHONO/LINE switch at the rear of the turntable to LINE.
Output terminals
L (White)
R (Red)
GND (Spade)
Amplifier (Receiver)
L Channel
R Channel
GND
NOTE: Be sure to connect the ground terminal firmly to the
amplifier or receiver.
If this connection is not made or is loose, a power
source "HUM" will result.
3. Connect PC via USB cord.
ASSEMBLY EN
CONNECTION
6

Hulp nodig? Stel uw vraag in het forum

Spelregels

Misbruik melden

Gebruikershandleiding.com neemt misbruik van zijn services uitermate serieus. U kunt hieronder aangeven waarom deze vraag ongepast is. Wij controleren de vraag en zonodig wordt deze verwijderd.

Product:

Bijvoorbeeld antisemitische inhoud, racistische inhoud, of materiaal dat gewelddadige fysieke handelingen tot gevolg kan hebben.

Bijvoorbeeld een creditcardnummer, een persoonlijk identificatienummer, of een geheim adres. E-mailadressen en volledige namen worden niet als privégegevens beschouwd.

Spelregels forum

Om tot zinvolle vragen te komen hanteren wij de volgende spelregels:

Belangrijk! Als er een antwoord wordt gegeven op uw vraag, dan is het voor de gever van het antwoord nuttig om te weten als u er wel (of niet) mee geholpen bent! Wij vragen u dus ook te reageren op een antwoord.

Belangrijk! Antwoorden worden ook per e-mail naar abonnees gestuurd. Laat uw emailadres achter op deze site, zodat u op de hoogte blijft. U krijgt dan ook andere vragen en antwoorden te zien.

Abonneren

Abonneer u voor het ontvangen van emails voor uw Lenco L-3828 bij:


U ontvangt een email met instructies om u voor één of beide opties in te schrijven.


Ontvang uw handleiding per email

Vul uw emailadres in en ontvang de handleiding van Lenco L-3828 in de taal/talen: Nederlands, Duits, Engels, Frans, Spaans als bijlage per email.

De handleiding is 3.12 mb groot.


U ontvangt de handleiding per email binnen enkele minuten. Als u geen email heeft ontvangen, dan heeft u waarschijnlijk een verkeerd emailadres ingevuld of is uw mailbox te vol. Daarnaast kan het zijn dat uw internetprovider een maximum heeft aan de grootte per email. Omdat hier een handleiding wordt meegestuurd, kan het voorkomen dat de email groter is dan toegestaan bij uw provider.

Stel vragen via chat aan uw handleiding

Stel uw vraag over deze PDF

loading

Uw handleiding is per email verstuurd. Controleer uw email

Als u niet binnen een kwartier uw email met handleiding ontvangen heeft, kan het zijn dat u een verkeerd emailadres heeft ingevuld of dat uw emailprovider een maximum grootte per email heeft ingesteld die kleiner is dan de grootte van de handleiding.

Er is een email naar u verstuurd om uw inschrijving definitief te maken.

Controleer uw email en volg de aanwijzingen op om uw inschrijving definitief te maken

U heeft geen emailadres opgegeven

Als u de handleiding per email wilt ontvangen, vul dan een geldig emailadres in.

Uw vraag is op deze pagina toegevoegd

Wilt u een email ontvangen bij een antwoord en/of nieuwe vragen? Vul dan hier uw emailadres in.


Info