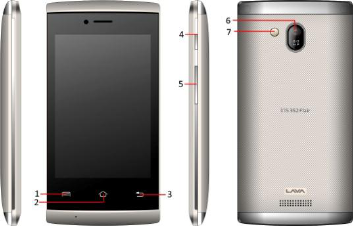
574385
13
Verklein
Vergroot
Pagina terug
1/29
Pagina verder
User Manual
iris 352 Flair
Content
Your phone & Key parts ................................................................ 1
Standby Screen & Icons ............................................................... 2
Getting Started .............................................................................. 3
Basic Function .............................................................................. 6
Phone ............................................................................... 8
Contacts ........................................................................... 8
Call Log ............................................................................ 8
Messaging ........................................................................ 8
Email ................................................................................ 9
Browser ............................................................................ 9
Calculator ......................................................................... 9
Calendar ........................................................................... 9
Clock ................................................................................ 9
Camera........................................................................... 10
FM Radio ........................................................................ 11
Music .............................................................................. 11
Sound Recorder ............................................................. 11
Video Player ................................................................... 11
You Tube ........................................................................ 11
Gallery ............................................................................ 11
File Manager .................................................................. 11
News & Weather............................................................. 12
Play Store ....................................................................... 12
SIM Toolkit ...................................................................... 12
Downloads ...................................................................... 12
Settings .......................................................................... 12
Frequently Asked Questions and Troubleshooting ...................... 17
Safety Information and Notices ................................................... 19
Service center number ................................................................ 24
1
©2014. All rights are reserved. No part of this document may be reproduced
without permission.
While all efforts have been made to ensure the accuracy of all the contents
in this manual, we assume no liability for errors or omissions or statements
of any kind in this manual, whether such errors or omissions or statements
resulting from negligence, accidents, or any other cause. The contents of
this manual are subject to change without notice.
Protect our environment! We strive to produce products in compliance with
global environmental standards. Please consult your local authorities for
proper disposal.
Note: User Manual is just to guide the user about the functionality of the
phone. It is not a certificate of technology. Some functions may vary due to
modifications and upgrade of software, or due to print mistake.
Your phone & Key parts
2
Label
Key
Description
1
Option Key
Obtain more operations
2
Home Key
Return Home screen
3
Back key
Press to return back to previous screen
4
Power Key/Lock
key
Press and hold to turn on/off phone
Press to lock/unlock the screen
5
Volume Key
Adjust the Volume
6
Camera
Camera Lens
7
Flash Light
Camera Flash light
Standby Screen & Icons
This phone provides multiple Standby screens. Through the instruction and
various icons on the screen, you can have the operating information needed.
Status Icon
Description
Signal indicator for SIM
Using headset
Mute
Vibrate mode
Alarm
Background playing / pausing
3
Memory card installed
Bluetooth on
Device connected via USB
EDGE
Airtel/ Airtel
Network carrier of Card 1/ Card 2
Getting Started
Please read the safety instructions in the "Safety Information and Notices"
section before use.
Inserting the SIM card and the Battery
Remove the back cover
Make sure the phone is switched off. You need to remove the back cover of
your phone before you can insert the SIM card. Hold the phone with the front
facing downwards; pull the battery cover downwards and lift the cover
upwards to remove it.
4
Remove the battery
Put your fingers on the black holder located at the bottom of the battery slot
and then lift the battery up to remove it.
Insert the SIM card
Make sure that the clipped corner of the SIM card is facing the correct
direction (clipped corner at top left) and the metallic contacts are facing
downwards. Slide the SIM card into the card slot until it stops.
Insert the battery
With the metallic contacts of the battery facing the metallic contacts in the
battery slot, press the battery down until it locks into place.
Replace the back cover
Align and hook the back cover to the top of the battery slot and then push
the cover upwards until it locks into place.
Inserting Micro SD card
With the metal contacts facing down, gently slide the micro SD card into the
5
slot marked SD ( near SIM1).
Switch On/Off
Long press the power key to switch on/off the phone.
After inserting the SIM card, the screen will show the notes in the following
order when the phone is switched on:
if you have already set the SIM code, Please type in PIN,.
Search the handset will be searching for proper network connection.
Unlock SIM Card
To avoid illegal use, the SIM card is enciphered with PIN (personal
identification number) as a protection. When this function is ON and you
have already set a PIN code, you need to type in PIN code every time, the
handset is switched on in order to unlock SIM card and use the handset.
You can turn off the SIM PIN code. Yet in this situation, the SIM card can't
prevent illegal use.
Input PIN code, press arrowhead icon to erase typing error and press OK to
end typing. For example, if the PIN code is set as 1234, then type "1234"
then press OK.
The SIM card will be locked if you type in wrong code for three times
continuously. The handset will inform you to type in PUK code.
Attention: Your network provider will set a standard PIN code (four to eight
numbers) for your SIM card. It is recommended that you change the code
into a personal code as soon as possible.
Connection to Network
When the SIM card is successfully unlocked, the handset will automatically
search for available network (the lock screen shows searching). The
handset will show the information of the network provider; the status bar will
show the signal strength and the network condition once the handset is
successfully connected to a network.
Note: If the lock screens shows "Emergency", it means that you're out of
6
network coverage (service coverage) or your card is not valid, yet you can
still have emergency calls based on signal strength.
Charging the Battery
Ensure the battery inserted in the handset. To charge the battery, plug in the
charger connector at the bottom of your phone (USB interface) and then
plug the other end into an AC power socket.
The battery symbol indicates the charging status. While charging, the
charge indicators will scroll. When all the scroll bars are steady, the battery
is fully charged.
Disconnect the charger from the phone.
Disconnect the charger from the AC power socket.
Note: If the battery is powerless, the battery icon will reappear after a few
minutes of charging.
Basic Function
Make Calls
When the network provider icon appears on the standby screen, you can call
out or answer calls. The indicator on the upper right part shall show the
signal strength.
Quality of connection will be greatly influenced by obstructions. So
movement in a small range may effectively improve the quality of
connection.
Make Domestic Calls
Use virtual keyboard to enter phone numbers and then press Dial icon to call.
If you need to change the phone number, please press the delete key on the
touch screen to delete. When the call is answered, the screen shall show the
connection status.
Call Extension Phone
Some of the extension phones can't be directly connected to. Use the virtual
7
keyboard, enter switchboard number, open the option menu and choose "
Add 2-sec pause", and then dial the extension phone number.
Type in as follows to call extension phone:
Zone description > switchboard number > Add 2-sec pause > extension
phone number › call
Make International Calls
If you need to make an international call, do a long press on the 0 key on the
virtual keyboard until there appears the sign "+" for international call prefix,
which helps you call from any country even if you don't know the
international call prefix of that country.
You can make an international call according to the following typing order:
+ country code › complete phone number › dialing icon (type in the prefix
code, and then continue to enter the country code and complete phone
number). Country code usually follows conventional practice: German is 49,
Britain 44, Sweden 46 and so on.
When making international phone calls, the "0" in the city code should be
emitted.
Make Listed Calls
Every dialed and received phone number is recorded in the call history list.
Recently dialed, answered and missed phone numbers are chronologically
(newest to oldest) listed in the "all" log. You can also choose and check
missed, answered and dialed list according to your need.
Listed phone numbers can be called out by pressing the respective log.
Press the small icon on the right side to enter the details interface of the log.
In the call history interface, users can do a long press to save or delete the
number. In the details interface, the phone number save function is preset.
Emergency Calls
You can call for emergency service as long as you are in the network
coverage (check the signal strength indication bar on the upper right side of
8
the handset screen). If your network provider doesn't provide roaming
service in this area, there will be "Emergency Calls " on the lock screen. If
you are in the network coverage, you can have emergency calls even
without a SIM card.
Answer Calls
Drag the icon to answer an incoming call. If your headphone is connected to
the handset, you can use the headphone key on the headphone answer
calls.
Attention: A short press of the headphone key will answer the call while a
long one will refuse to answer the phone.
Phone
Press the keyboard, enter the phone number, and press Dial icon.
Contacts
Entering the Contacts, you can check all the contacts, search for contacts or
add new contact. New contact means a newly added phone number that is
recorded in the SIM card or the handset.
When adding a new contact, you can type in the name, address, phone
number, other phone number, work place, other email address and so on.
You can also check contact group and favorites.
Call Log
Enter Call history interface, press and change the tagged pages on the
upper side of the screen, choose dial pad, call log and contact.
Use finger to scroll from down to up to select phone numbers. Short press of
the log can view the detail and show functions like add to contacts, dialing
number, video call, and send text message and so on.
Messaging
Compose new message
Press new message icon to get a new text message:
9
Click the edit frame, type in after a virtual keyboard pops out.
Press the number frame and enter number, or press add contact icon and
select stored contact number from Contacts.
Input contents into the typing frame on the touch screen. After editing, press
send icon to send the text.
Press menu key to Add subject, Discard, Insert quick text and more
operations.
Message Settings
Include storage settings, SMS settings, MMS settings, notification settings,
service message setting and so on.
Email
First you need to set the E-mail account.
Step 1: enter email address and password.
Step 2: select account type, choose OK to connect.
Browser
Select the Chrome browser icon to enter the browser interface and you can
search for websites.
Calculator
The handset is provided with a calculator with basic functions. You can carry
out the operation for plus, minus, multiply, and divide by pressing the screen.
You can use some functions in the advanced panel.
Note: The accuracy is limited and round-off error may occur.
Calendar
Enter the calendar menu and there shall appear a calendar on the screen
with the current date market out by background frame with a special color.
Press the touch screen to browse date and the calendar information on the
screen shall be correspondingly updated.
Clock
10
Enter the clock application, press alarm icon and press plus icon to add a
new alarm. Scroll the scrollbar to set alarm time. Press alarm of list to edit
the activation, Time, Ringtone, vibrate and label. If you want to delete the
alarm, long press on the list and choose the alarms that needs to be deleted
and click in Delete icon. .
Camera
Under viewing condition, press the bottom icons to do the following
operations.
1——Options icon.
2——Change the mode between camera mode , video mode or other mode.
3——Tap to switch the Capture mode.
4——Press the Capture icon to capture a picture.
5——Drag to change the focus.
6——Switch the flash light(Auto, off, on)
7——Switch the camera between front and back.
8——Turn on or off the sound of capturing picture.
9——Thumbnail icon shows the currently captured picture or video.
13

Hulp nodig? Stel uw vraag in het forum

Spelregels

Misbruik melden

Gebruikershandleiding.com neemt misbruik van zijn services uitermate serieus. U kunt hieronder aangeven waarom deze vraag ongepast is. Wij controleren de vraag en zonodig wordt deze verwijderd.

Product:

Bijvoorbeeld antisemitische inhoud, racistische inhoud, of materiaal dat gewelddadige fysieke handelingen tot gevolg kan hebben.

Bijvoorbeeld een creditcardnummer, een persoonlijk identificatienummer, of een geheim adres. E-mailadressen en volledige namen worden niet als privégegevens beschouwd.

Spelregels forum

Om tot zinvolle vragen te komen hanteren wij de volgende spelregels:

Belangrijk! Als er een antwoord wordt gegeven op uw vraag, dan is het voor de gever van het antwoord nuttig om te weten als u er wel (of niet) mee geholpen bent! Wij vragen u dus ook te reageren op een antwoord.

Belangrijk! Antwoorden worden ook per e-mail naar abonnees gestuurd. Laat uw emailadres achter op deze site, zodat u op de hoogte blijft. U krijgt dan ook andere vragen en antwoorden te zien.

Abonneren

Abonneer u voor het ontvangen van emails voor uw Lava Iris 352 Flair bij:


U ontvangt een email met instructies om u voor één of beide opties in te schrijven.


Ontvang uw handleiding per email

Vul uw emailadres in en ontvang de handleiding van Lava Iris 352 Flair in de taal/talen: Engels als bijlage per email.

De handleiding is 0,62 mb groot.


U ontvangt de handleiding per email binnen enkele minuten. Als u geen email heeft ontvangen, dan heeft u waarschijnlijk een verkeerd emailadres ingevuld of is uw mailbox te vol. Daarnaast kan het zijn dat uw internetprovider een maximum heeft aan de grootte per email. Omdat hier een handleiding wordt meegestuurd, kan het voorkomen dat de email groter is dan toegestaan bij uw provider.

Stel vragen via chat aan uw handleiding

Stel uw vraag over deze PDF

Uw handleiding is per email verstuurd. Controleer uw email

Als u niet binnen een kwartier uw email met handleiding ontvangen heeft, kan het zijn dat u een verkeerd emailadres heeft ingevuld of dat uw emailprovider een maximum grootte per email heeft ingesteld die kleiner is dan de grootte van de handleiding.

Er is een email naar u verstuurd om uw inschrijving definitief te maken.

Controleer uw email en volg de aanwijzingen op om uw inschrijving definitief te maken

U heeft geen emailadres opgegeven

Als u de handleiding per email wilt ontvangen, vul dan een geldig emailadres in.

Uw vraag is op deze pagina toegevoegd

Wilt u een email ontvangen bij een antwoord en/of nieuwe vragen? Vul dan hier uw emailadres in.


Info