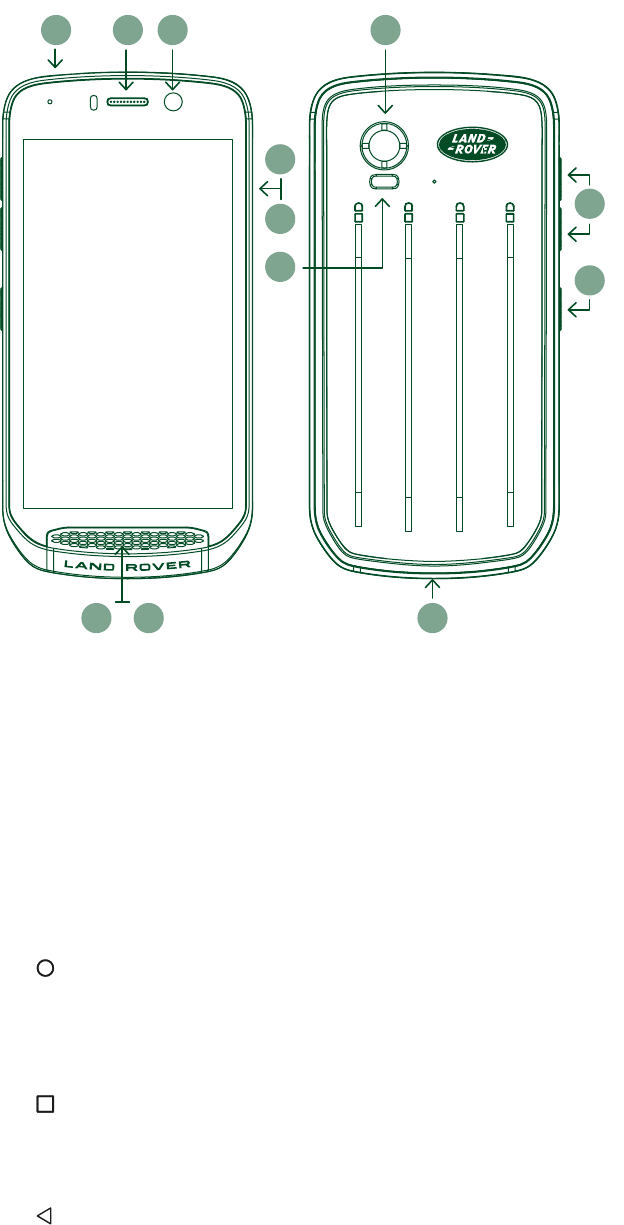
678725
760
Verklein
Vergroot
Pagina terug
1/762
Pagina verder
LAND ROVER EXPLORE: THE OUTDOOR PHONE
USER MANUAL
landroverexplore.com
1
ENGLISH 3
ČEŠTINA 40
DANSK 78
DEUTSCH 116
EESTI 154
ESPAÑOL 192
FRANÇAIS 230
ITALIANO 268
LATVIEŠU VALODA 306
LIETUVIŲ KALBA 344
NEDERLANDS 382
NORSK 420
POLSKI 458
PORTUGUÊS 496
SLOVENČINA 534
SLOVENŠČINA 572
SUOMI 610
SVENSKA 648
ΕΛΛΗΝΙΚΆ 686
العربية 724
CONTENTS
2
PLEASE READ BEFORE FIRST USE
SAFETY PRECAUTIONS
- Please read this manual and the recommended safety precautions carefully to ensure the correct use of this
device.
- Despite it’s durable nature; avoid hitting, throwing, crushing, puncturing or bending the Explore.
- If used in salt water, rinse the device afterwards to avoid salt corrosion.
- Donotattempttodisassemblethedeviceoritsaccessories.Onlyqualiedpersonnelcanserviceorrepairit.
- Do not switch on the device in a circumstance where the use of mobile phones is prohibited, or in a situation
where the device may cause interference or danger.
- Do not use the device whilst driving.
- Switch off the device near medical apparatus and follow the rules or regulations regarding mobile phone use
in hospitals and health care facilities.
- Switch off the device or activate aeroplane mode when situated in an aircraft, as it may cause interference to
the vessel’s control equipment.
- Switch off the device near high-precision electronic devices as it may affect their performance.
- Donotplacethedeviceoritsaccessoriesincontainerswithastrongelectromagneticeld.
- Do not put magnetic storage media near the device. Radiation from the device may erase the information
stored on them.
- Donotusethedeviceinanenvironmentwithammablegas,suchasagasstation.
- Do not place the device anywhere with high temperatures.
- Keep the device and its accessories away from young children.
- Do not allow children to use the device without guidance.
- Only use approved batteries and chargers to avoid the risk of explosion.
- Observe any laws or regulations on the use of wireless devices. Respect others’ privacy and legal rights when
using the wireless device.
- For medical implant patients (heart, joints, etc), keep the device 15cm away from the implant and, during a
phone call, keep the device positioned on the opposite side of the implant.
- Strictly follow the relevant instructions of this manual while using the USB power cable, otherwise it may cause
damage to your device or PC.
LEGAL NOTICE
Land Rover Workmark and Land Rover Oval Logo as well as corporate and product identity used herein, are
trademarks of Jaguar Land Rover Limited and may not be used without permission.
Bullitt Group Ltd is a licensee of Jaguar Land Rover Limited.
3
No part of this document may be reproduced or transmitted in any form or by any means without prior written
consent of Bullitt Mobile Ltd. or Jaguar Land Rover Limited.
The product described in this manual may include copyrighted software and possible licensors. Customers shall
not in any manner reproduce, distribute, modify, decompile, disassemble, decrypt, extract, reverse engineer,
lease, assign, or sublicense the said software or hardware, unless such restrictions are prohibited by applicable
laws or such actions are approved by respective copyright holders under licenses.
The Bluetooth
®
word mark and logos are registered trademarks owned by the Bluetooth SIG, Inc. and any use of
such marks by Bullitt Group is under license. All other third-party trademarks and trade names are those of their
respective owners.
Wi-Fi
®
is a registered trademark of Wi-Fi Alliance
®
.
Android and Google and other marks are trademarks of Google LLC.
NOTICE
Some features of the product and its accessories described herein rely on the software installed, capacities and
settings of local network, and may not be activated or may be limited by local network operators or network
service providers. Therefore, the descriptions in this manual may not exactly match the purchased product or its
accessories.
Themanufacturerreservestherighttochangeormodifyanyinformationorspecicationscontainedinthismanual
without prior notice or obligation.
The manufacturer is not responsible for the legitimacy and quality of any products that you upload or download
through this device including text, pictures, music, movies, and non-built-in software with copyright protection.
Any consequences arising from the installation or usage of the preceding products on this device is accountable
to you.
NO WARRANTY
The contents of this manual are provided “as is”. Except as required by applicable laws, no warranties of any kind,
eitherexpressorimplied,includingbutnotlimitedto,theimpliedwarrantiesofmerchantabilityandtnessfora
particular purpose, are made in relation to the accuracy, reliability or contents of this manual.
To the maximum extent permitted by applicable law, in no case shall the manufacturer be liable for any special,
incidental,indirect,orconsequentialdamages,orlostprots,business,revenue,data,goodwilloranticipated
savings.
IMPORT AND EXPORT REGULATIONS
Customers shall comply with all applicable export or import laws and regulations and will obtain all necessary
governmental permits and licenses in order to export, re-export or import the product mentioned in this manual
including the software and technical data therein.
4
CONTENTS
PLEASE READ BEFORE FIRST USE 2
LEGAL NOTICE 3
NOTICE 3
NO WARRANTY 3
IMPORT AND EXPORT REGULATIONS 3
WELCOME TO LAND ROVER EXPLORE: THE OUTDOOR PHONE 6
DESIGNED FOR THE OUTDOORS 6
SOFTWARE UNIQUE TO THE EXPLORE 7
THE EXPLORE AT A GLANCE 8
KEY FUNCTIONS 8
GETTING STARTED 9
CHARGING THE BATTERY 9
BATTERY PACKS 10
POWERING YOUR DEVICE ON/OFF 11
TOUCHSCREEN 11
DISPLAY 12
ENABLING NIGHT AND GLOVE MODES 13
HOME SCREEN APPS AND WIDGETS 14
FOLDERS 15
WALLPAPERS 15
USING AIRPLANE MODE 15
MAKING A PHONE CALL 16
CONTACTS 17
USING THE ON-SCREEN KEYBOARD 18
WI-FI
®
19
SMS AND MMS 19
BLUETOOTH
®
20
TAKING PHOTOS AND RECORDING VIDEOS 21
ENJOYING MUSIC 24
SYNCHRONISING INFORMATION 25
MANAGING ACCOUNTS 25
REMOVING AN ACCOUNT 26
USING OTHER APPLICATIONS 26
PERSONALISING THE DISPLAY 28
RINGTONES 29
5
SETTING PHONE SERVICES 29
PROTECTING YOUR DEVICE 30
MANAGING APPLICATIONS 30
RESETTING THE DEVICE 31
VIEWING THE REGULATORY E-LABEL 31
APPENDIX 31
ADVENTURE PACK DECLARATION OF CONFORMITY 36
LAND ROVER EXPLORE DECLARATION OF CONFORMITY 37
6
WELCOME TO
LAND ROVER EXPLORE:
THE OUTDOOR PHONE
The Land Rover Explore: Outdoor Phone has been made to help you explore further, for longer and with added
condence.Findnewroutes,tracks,trailsandpaths,stepoutandembracetheoutdoors.Waterproof,drop
tested, built to withstand temperatures from the mountain to the surf, and with a battery that won’t cut the day
short, the Explore will help you live your adventures to the fullest.
Use its enhanced location and sensor capabilities, viewed on a 5” full HD, sunlight-readable display to understand
your environment and local conditions. Get two days of typical use from one charge or enjoy a full day of outdoor
activities with the screen and GPS on, thanks to a powerful 4,000mAh battery. Get more out of the day and
explore for longer.
Battery life can be further improved, while on the move, by adding on the included Adventure Pack (3,620mAh).
DESIGNED FOR THE OUTDOORS
Land Rover Explore: The Outdoor Phone is stylish enough to accompany you during the day, but durable enough
to take the knocks. The Explore is reliable and robust enough to survive your active, outdoor and adventurous
lifestyle. IP68 rated, the Explore has been built to withstand real life outdoors. The hikes when temperatures rise.
The rides when trails are muddy and the clouds roll in. The long chairlift rides to snowy peaks when temperatures
drop well below zero. The Explore will be there working for you.
To let you keep exploring and discover more, Land Rover Explore The Outdoor Phone features a 5” full HD
Corning
®
Gorilla
®
glassscreenoptimisedforallconditions,24/7.Waterproofngertrackingensuresfunctionality
isn’t compromised when its snowing or raining. The Explore is also fully glove-friendly, meaning you can keep your
hands warm, dry and protected from the elements while using the phone.
7
PACKS
Extend the core functionality of the Explore with a range of unique add-on packs. Developed to suit any situation,
they give you more of what matters most; battery, connectivity, detailed maps and the ability to securely attach
the phone to your bike or bag. Each pack can be attached to the back of Explore while on the go, to enhance any
adventure and let you go further, and stay out longer. The included Adventure Pack gives you better connectivity
with a powerful GPS patch antenna and additional battery to nearly double your battery life. Access to detailed
premium topographic mapping with Skyline augmented reality courtesy of the ViewRanger app is automatically
available to enhance your understanding of your environment. You’ll also get a case to keep your outdoor phone
safe and carabiner to attach it to your bag or jacket for easy viewing.
Other packs available include a large 4,370mAh additional battery and a universal bike mount, all designed to
help you live your adventures to the fullest.
WHAT IS IN THE BOX
- Device - Pin Tool
- Adventure Pack - Carabiner
- Quick Start Guide - Protective Case
- USBpowercableandchargingpoweradapter - Factoryttedscreenprotectoralreadyonthedevice
SOFTWARE UNIQUE TO THE EXPLORE
DASHBOARD
Dashboard, unique to the Land Rover Explore, brings together relevant information about current conditions right
toyourngertips–whetherthat’sinformationfromtheExplore’ssensorsorweatherdatafromourpartnerWorld
Weather Online.
Always only one touch away, Dashboard helps you plan your adventure and plan the kit you may need, as well as
keep an eye on the weather as your journey progresses. Find more information on page 27.
VIEWRANGER
ViewRanger is the world number one smartphone mapping app and it got that position by offering the widest
range of maps (for over 24 countries) and having a huge range of routes for you to download and use to explore
the outdoors (over 200,000 currently). Equally important, ViewRanger premium mapping gives you the detail you
need when off road. The ViewRanger app comes pre-installed on the Land Rover Explore. Find more information
on page 27.
NIGHT MODE
LandRoverExploreintegratesa‘Night’red-lightlterthathelpsreducethetimeittakesforyoureyestoadjust
from the glare of a bright smart-phone display, to good natural night vision in dark or poorly lit environments. Find
more information on page 14.
THE EXPLORE HUB
A curated app discovery portal featuring a catalogue of apps handpicked and tested by the Explore team. It
includes a range of titles to help you uncover a host of different outdoor activities. Explore Hub is available from
the home screen.
8
THE EXPLORE AT A GLANCE
1. Headset Jack
2. 8MP Front Camera
3. Earpiece
4. Microphones
5. Speaker
6. SIM Card Slot
7. microSD
Card Slot
8. 16MP Rear Camera
9. Flash
10. USB Port
11. Volume Up/Down Key
12. Power Key
1
2
3
SIM microSD
/ SIM
4
DE
1
2
3
SIM microSD
/ SIM
4
DE
1 83
4 5
6
7
2
9
10
11
12
KEY FUNCTIONS
POWER KEY
- Press and hold to turn on the device.
- Press and hold to open the phone Options Menu.
- Press to lock or wake the screen when the device in idle.
HOME BUTTON
- Found along the bottom of the screen, in the centre. Press at any time to display the Home Screen.
- Hold down the Home button to use the Google Voice Search
service.
RECENT APPS BUTTON
- Found bottom right of the screen. Press at any time to open recently used apps.
BACK BUTTON
- Found bottom left of the screen. Press to go back to the previous screen.
- Press to close the on-screen keyboard.
VOLUME UP/DOWN KEY
- Press the top Volume Up key to increase the volume, or the bottom Volume Down key to decrease the
volume of the call, ringtone, media or alarm.
- To take a screenshot, press both Power and Volume Down keys simultaneously.
- When in the Camera app press either the Volume up/down keys to take photos.
9
GETTING STARTED
INSTALLING A NANO SIM CARD
1. Placeyourdeviceonaatsurfacewiththedisplay
facing upwards. Using the pin tool provided, gently
press the pin into the hole of the SIM door to
release the spring.
2. Pull out the tray, make a note of which way around
the tray came out.
3. Put the Nano SIM card in the SIM tray as indicated
on the tray guide with gold pins facing downwards.
4. Re-insert the tray the same way it was taken out.
NOTE
- EnsuretheSIMcardisxedsecurelyinthe
SIM tray.
- Push the SIM tray until it is fully inserted in the slot.
- To remove the Nano SIM card, use the pin tool
provided. Gently push the pin into the hole of the
SIM door to release the spring. Pull the tray out.
- Remove the nano SIM card.
- Your device can accept 2 Nano SIM’s or 1 Nano
SIM + microSD
card (variant dependant).
INSTALLING A MEMORY CARD
1. Placeyourdeviceonaatsurfacewiththedisplayfacingupwards.Usethepinprovidedtoopentheside
door.
2. As shown in the diagram above, insert a microSD card into the memory card slot with gold pins
facing upwards.
NOTE
- Push the memory card down gently until you hear a locking sound.
- To remove the microSD card, press against the edge of the memory card and release it.
- Do not force the microSD card as this could damage the memory card and slot.
REGISTERING YOUR LAND ROVER EXPLORE
Register your new Land Rover phone to become part of the Land Rover #ExploreMore community for the latest
news, updates and offers.
1. Tap the green Register app icon, found on the home page.
2. Follow the on screen instructions.
CHARGING THE BATTERY
Chargethebatterybeforeusingyourdeviceforthersttime.
1. Connect the USB power cable to the charging power adaptor.
2. Connect the USB power cable to your Land Rover Explore.
1
2
3
SIM microSD
/ SIM
4
DE
10
3. Plug the charger into the appropriate AC mains socket. A battery icon will appear, indicating the device is
now charging.
4. When the green light shows on the indication LED, your device is fully charged. First, unplug the USB
cable from the device, then unplug the charger from the mains socket.
NOTE
- Only use Land Rover approved chargers and cables. Unapproved equipment may cause damage to the
device or cause batteries to explode.
- Be careful not to use excessive force when connecting the USB cable and be aware of the correct orientation
of the plug.
- Damage can be caused by attempting to insert the connector incorrectly. Attempting to insert the connector
incorrectly may cause damage that will not be covered by the warranty.
BATTERY PACKS
The phone and packs are held together by magnets which allow the two to separate when dropped. Using
magnetswasadesignchoiceasitcanavoidpermanentdamagethatcanoccurfromxedattachments.
IMPORTANT INFORMATION REGARDING FUTURE USE OF BATTERY
If the battery is completely exhausted, your device may not power on immediately after charging starts. Before
attempting to turn it on, allow the battery to charge for a few minutes. The on-screen charge animation may not
be displayed during this period.
When the battery power level is low, your device displays an alert and a red light appears in the LED indicator.
When the battery power is almost exhausted, your device will power off automatically.
NOTE
- The time required to charge the battery depends on the environmental temperature and the age of the
battery.
CHARGING THE PHONE THROUGH AN ATTACHED PACK
The phone and the additional Adventure / battery packs can be charged together or separately.
To charge a pack and your phone together, attach the pack and plug the charging adaptor into the pack and not
the phone. The phone and the pack will be charged simultaneously until both are fully charged.
If the pack is attached to your phone and you plug the adaptor into the phone instead of the pack, only the phone
will be fully charged. The pack will remain uncharged.
Packscanbechargedseparatelyfromthephone.TheLEDindicatorlightwillashredwhilechargingandwill
turn green when charging is complete. It is not recommended to leave the battery plugged in after charging is
complete.
PACK LED COLOUR AND STATUS INDICATORS
ThepacksLEDindicatorlightwillashredwhilechargingandwillturngreenwhencharging
is complete. The packs LED colours indicate the current charge status of the pack itself.
Green 100-70% Red 40-10%
Amber 70-40% Flashing Red <10%
11
NOTE
- Some applications allow you to customise the colour of the Explore LED (found in the top right corner on the
front of the device) This will not affect the pack LED colours above.
GETTING THE MOST FROM YOUR PACKS
Tomakethemostefcientuseofthepack,fullychargeboththephoneandthepackandstartyouradventure
withthepackattached.ThepackbatterywilldrainrstuntilfullyemptybeforetheExplorephone’sinternal
battery takes over.
POWERING YOUR DEVICE ON/OFF
POWER ON
1. Press and hold the Power key. When you turn on your device, a welcome screen will be appear. Firstly, select
your preferred language and then tap GET STARTED to continue with the set-up process.
NOTE
- Ifpersonalidenticationnumber(PIN)protectionisenabledonyourSIMCard,youwillbeaskedtoenter
your PIN before the Welcome screen is displayed.
- A Wi-Fi
®
or Data connection is required. You can skip set-up and complete it at another time. A Google
account is required to use some of the Google services on this Android
device.
POWERING OFF
1. Press and hold the Power key to open the device Options menu.
2. Tap Power off.
TOUCHSCREEN
TOUCHSCREEN ACTIONS
- Tap:Useyourngertiptoselectanitem,conrmaselection,orstartanapplicationonthescreen.
- Tap and hold:Tapanitemwithyourngertipandcontinuetopressdownuntilthescreenresponds.For
example, to open the options menu for the active screen, tap the screen and hold down until the menu
appears.
- Swipe:Moveyourngeracrossthescreeneitherverticallyorhorizontally.Forexample,swipeleftorright
to switch between pictures.
- Drag:Ifyouwanttomoveanitem,tapandholditwithyourngertip.Nowdragtheitemtoanypartof
the screen.
HOME SCREEN
The Home Screen is the starting point for accessing your device’s features. It displays application icons, widgets,
shortcuts and more. It can be customised with different wallpapers and can be adjusted to display your preferred
items.
1. On the home screen, the launcher icon is a small white upward-facing arrow
, located in the middle of
the screen and slightly above the bottom row of icons. Swipe up over this icon to view and launch all installed
applications (apps).
12
NOTE
- A long press on an empty space on the Home Screen will launch the shortcut to wallpapers, widgets and
settings.
LOCKING AND UNLOCKING THE SCREEN
LOCKING THE SCREEN
1. If your device is turned on, press the Power key to lock the screen. You can still receive messages and calls,
even if the screen is locked.
2. If the device is left undisturbed for a certain period, the screen will lock automatically. You can adjust the
length of this period in settings.
UNLOCKING THE SCREEN
1. Press the Power key to wake up the screen. Then, drag the lock icon upwards to unlock the screen. You
may have to enter your pattern or PIN code if pre-set.
2. To launch the Camera app directly from the locked screen, drag the camera icon
upwards.
3. To launch the Google Voice Search
service (also known as ‘OK Google’) directly from the locked screen,
drag the mic icon upwards.
NOTE
- If you have set up a screen lock, there will be a prompt to unlock the screen. For details, refer to “Protecting
the device with a screen lock” on “Protecting your Device With A Screen Lock” on page 31.
DISPLAY
DISPLAY LAYOUT
NOTIFICATIONS AND STATUS INFORMATION
TheStatusbarappearsatthetopofeveryscreen.Thisdisplaysnoticationicons,suchasmissedcallorreceived
messages (on the left) and phone status icons, such as battery status (on the right), in addition to the current time.
NoticationsIcons Status Icons
13
STATUS ICONS
4G Connected to 4G mobile network No mobile network signal
LTE Connected to LTE mobile network
Vibrate mode
3G Connected to 3G mobile network
Location is found
G Connected to GPRS mobile network
Battery indicator, battery is full
E Connected to EDGE mobile network
Battery is charging
H Connected to HSDPA mobile network
FM radio is turned on
H+ Connected to HSPA+ mobile network
Aeroplane mode
R Roaming
Connected to a Wi-Fi network
Mobile network signal strength Connected to a Bluetooth device
NFC is enabled
Alarm is set
NOTIFICATIONS ICONS
New email message Missed call
New text message Speakerphone is activated
Upcoming event Phone microphone is muted
A screenshot is captured Downloading data
Data is syncing Headphones are connected
Problem with sign-in or sync
NOTIFICATION PANEL
Yourdevicewilllaunchanoticationwhenyoureceivenewmessages,haveamissedcall,ifthereisanupcoming
eventandmore.Openthenoticationpaneltoviewyournotications.
OPENING THE NOTIFICATION PANEL
1. Whenanewnoticationiconappearsonthenoticationbar,swipedownfromthetopofthescreento
dragopenandexpandthefullnoticationpanel.Youcandothiswhetherthephoneislockedorunlocked.
2. Fromalockedscreen,youcandoubletapanoticationmessagetoopenit.
3. Ifyouwanttocloseanotication(withoutviewingit),simplypressandholdthenoticationanddragitto
the left/right of the screen.
COLLAPSE THE NOTIFICATION PANEL
1. Toclosethenoticationpanel,slidethebottomofthepanelupwards.
14
ENABLING NIGHT AND GLOVE MODES
TURN ON NIGHT MODE
There are two different Night mode options to choose from:
Option One - Night Mode, when you need to go into night mode immediately.
1. UnlockthescreenandswipedownfromthetopofthescreentwicetofullyexpandtheNoticationpanel.
2. Tap Night once to activate Red Mode.
3. Tap again to activate Orange Mode .
Option Two - Night Light, to set timed night modes:
1. UnlockthescreenandswipedownfromthetopofthescreenoncetoexpandtheNoticationpanel.
2. Tap Settings
in the top right hand corner.
3. Scroll down and tap Night Light.
4. From this menu, you can create a schedule for when it should be activated or turn it on manually by tapping
the switch to the right (On)
. Tap again to turn it off.
TURN ON GLOVE MODE
To enable your screen for use when wearing gloves, enable Glove Mode:
1. UnlockthescreenandswipedownfromthetopofthescreenoncetoexpandtheNoticationpanel.
2. Tap Settings
in the top right hand corner.
3. Scroll down and tap Display Settings.
4. Tap Glove Mode to switch it on
. Tap again to turn it off.
HOME SCREEN APPS AND WIDGETS
ADDING A NEW HOME SCREEN ITEM
1. From the Home screen, swipe the small upward-facing arrow in an upward motion. Press and hold the
application you would like to add to your home screen.
2. DragtheapplicationiconuptotheHomescreen.Theremustbeenoughspacefortheicontotonthe
currentHomescreenpanel.Iftherstpageisfull,pulltheicontotherightofthescreenandontothenext
page.
MOVING A HOME SCREEN ITEM
1. Tap and hold an application icon on the Home screen until the icon enlarges.
2. Withoutliftingyournger,dragtheicontothedesiredpositiononthescreen,andthenreleaseit.
REMOVING A HOME SCREEN ITEM
1. Tap and hold an application icon on the Home screen until the icon enlarges.
2. Withoutliftingyournger,dragtheitemtothe‘Remove’titleatthetopandthenreleaseit.
WIDGETS
A widget lets you preview or use an application. Widgets can be placed on your Home screen as icons or preview
windows. Several widgets are installed by default on device and you can download additional widgets from the
Google Play
store.
15
ADDING A WIDGET
1. Tap and hold the Home screen.
2. Tap widgets to show available widgets.
3. Drag your desired widget to the Home screen.
REMOVING A WIDGET
1. Tap and hold the widget icon on the Home screen until the icon enlarges.
2. Withoutliftingyournger,dragtheitemtoRemove,thenreleaseit.
FOLDERS
CREATING A FOLDER
Drag the application icon or shortcut and release it on top of other applications.
RENAMING A FOLDER
1. Tap a folder to open it.
2. Enter a name for the new folder in the title bar.
3. Then press the Back button
.
WALLPAPERS
CHANGING THE WALLPAPER
1. Tap and hold anywhere on the Home screen but not over an app icon.
2. Tap Wallpapers.
3. Scroll through the available options.
4. Tap your favourite image, then press Set Wallpaper.
5. You can now choose whether to set it as the Lock Screen wallpaper, the Home Screen wallpaper or both.
TRANSFERRING MEDIA TO AND FROM YOUR DEVICE
Transfer your favourite music and pictures between your device and PC in the Media Device MTP mode.
1. Firstly, connect your device to a PC with the USB power cable.
2. ThenopenthenoticationpanelandtaptheUSBconnectionoptions.Taptransferlestoactivatethe
MTP mode.
3. Your device should be displayed as a removable device displaying the phone’s internal storage. If a
memorycardisinserted,themicroSDcardwillalsobevisible.Copythedesiredlesontothedevice.
NOTE
- If you are using an Apple
®
iMac
®
, the drivers must be downloaded from:
http://www.android.com/letransfer/
16
USING AIRPLANE MODE
Some locations may require you to switch off data connections. Instead of turning off your device, you can set it to
Airplane mode.
1. Press Power key.
2. SwipedownfromthetoptoopentheNoticationspanel.
3. Swipe right to left to access the second page of options. Tap Airplane mode. The icon will turn white to
indicate it is activated.
3. Or, using the Settings menu, you can select the More menu and slide the Airplane mode switch to the
right
.
MAKING A PHONE CALL
There are several ways to place a phone call:
1. Either, dial a number into the keypad.
2. Or, select a number from your contacts list, a Web page, or from a document that contains a phone number.
NOTE
- When you’re on a phone call, incoming phone calls can either be answered or sent to your voicemail.
- You can also set up conference calls with several participants.
MAKING A PHONE CALL WITH THE KEYPAD
1. From the Home screen, tap . Then tap to display the keypad.
2. Dial a phone number by tapping the numeric keys.
3. After you enter the number, or select the contact, tap .
Tip: Your device supports the SmartDial function. As you type a number into the keypad, the SmartDial function
automatically searches through your contact list and lists predictions for a contact that matches the number. You
can close the keypad to view more possible matches.
MAKING A PHONE CALL FROM CONTACTS
1. From the Home screen, swipe the small upward-facing arrow in an upward motion. Select Contacts .
to display the contact list. From the keypad, tap the tab to display the contact list.
2. In the list, select a contact.
3. Tap the phone number to call the contact.
MAKING A PHONE CALL FROM THE CALL LOG
1. From the Home screen, swipe the small upward-facing arrow in an upward motion. Go to and then .
The Call Log displays the latest calls you have made and received.
2. Select a contact from the list and tap to make a call.
ANSWERING AND REJECTING A PHONE CALL
When you receive a phone call, unless it is withheld, the incoming call screen will show the caller ID.
17
1. To answer a call, tap and drag it to the right .
2. To reject the call, tap and drag it to the left .
3. To reject the call and instead send a message directly to the caller, tap and drag it to upwards . Then
select one of the available template message options, or tap Write Your Own to compose a personal
message.
NOTE
- When you tap , it will disappear from the screen.
ENDING A PHONE CALL
During a phone call, tap to hang up.
MAKING A CONFERENCE CALL
In the conference calling feature, you can set up a call with multiple participants.
1. Toinitiateaconferencecall,dialthenumberoftherstparticipantandtap
to make the call.
2. Duringyourcallwiththerstparticipant,tap>Addcallandenterthephonenumberofthenext
participant.
3. Tap ,orselectacontactfromtheCallLogorContacts.Therstcallwillbeautomaticallyplacedonhold.
4. Oncetheadditionalcallhasbeenconnected,tap>Mergecalls.
5. To add more people, tap
and repeat steps 2 to 4.
6. To end the conference call and disconnect everyone, tap .
NOTE
- Contactyournetworkoperatortondoutifyourdevice’ssubscriptionsupportsconferencecallsandhow
many participants can be added.
SWITCHING BETWEEN PHONE CALLS
If you receive an incoming call during a current phone call, it is possible to switch between the two calls.
1. When both calls are in progress, tap the contact’s name or phone number in the lower left corner of the
screen.
2. Your current call will be placed on hold and you will be connected to the other call.
CONTACTS
The Contacts application allows you to save and manage information about your contacts.
OPENING AND VIEWING YOUR CONTACTS
To open the Contacts application and view all of your loaded contacts, do the following:
1. From the Home screen, swipe the small upward-facing arrow
in an upward motion. Select Contacts .
2. T ap ALL.
18
NOTE
- Your contacts will be displayed alphabetically in a scrolling list.
COPYING CONTACTS
You can copy your contacts saved in your Google account or from the SIM card, internal storage, or memory card.
1. In the contacts list, tap
followed by Import/Export.
2. Do one of the following:
TO IMPORT CONTACTS SAVED IN A GOOGLE ACCOUNT
1. Select the personal account and tap Next.
2. Specify where to import the contacts and tap Next.
3. Then select the desired contact(s) and tap OK.
TO IMPORT CONTACTS FROM THE SIM CARD
1. Tap USIM and tap Next.
2. Specify where to import the contacts to and tap Next.
3. Then select the desired contact(s) and tap OK.
TO IMPORT CONTACTS FROM THE INTERNAL STORAGE OR MEMORY CARD
1. Tap Internal shared storage or SD card.
2. Specify where to import the contacts and tap Next.
NOTE
- IfthereismorethanonevCardle,therewillbeoptionstoeitherimportonevCardle,multiplevCardles,
orallvCardles.
ADDING A CONTACT
1. In the contacts list, tap to add a new contact.
2. Once information is added tap add new contact to save the contact information.
ADDING A CONTACT TO YOUR FAVOURITES
1. Touch the contact you want to add to Favourites.
2. Touch
on the top left corner, and the icon turns solid white ( ).
DELETING A CONTACT
1. In your Contacts list, tap the contact you want to delete.
2. Tap
>Delete.
3. TapDeleteagaintoconrm.
19
USING THE ON-SCREEN KEYBOARD
DISPLAYING THE KEYBOARD PANEL
Someapplicationsopenthekeyboardautomatically.Inothers,tapatexteldtoopenthekeyboard.Pressthe
Back button hide the keyboard.
USING THE LANDSCAPE KEYBOARD
Ifyounditdifculttousethekeyboardinportraitorientation,simplyturnthedevicesideways.Thescreenwill
now display the keyboard in landscape orientation, providing you with a wider keyboard layout.
CUSTOMISING YOUR KEYBOARD SETTINGS
1. From the Home screen, swipe the small upward-facing arrow in an upward motion. Select Settings ,
then Languages & Input.
2. You can either:
- TaptheVirtualkeyboardtocongurethekeyboardsettings.
- Or, tap Physical keyboard to keep the virtual keyboard on-screen. This mode will also show available
keyboard shortcuts.
WI-FI
®
Access to wireless access points (hotspots) is required to use Wi-Fi on your device.
TURNING ON WI-FI AND CONNECTING TO A WIRELESS NETWORK
1. From the Home screen, swipe the small upward-facing arrow in an upward motion. Select Settings
2. In Wireless and Networks, tap Wi-Fi and set it to On . Choose A Wi-Fi network to connect to.
3. If you select an open network, the device will connect automatically. If you’re attempting to connect to a
securednetworkforthersttime,youmustenterthepassword,thentapConnect.
If you connect to a secured wireless network that you have already used, you will not be prompted to enter the
password again unless you reset your mobile phone to it’s default settings.
NOTE
- You will not have to re-enter the password for a secured network if you have connected to it before, unless
the device has been reset to it’s default settings or if the Wi-Fi password has been changed.
- Obstacles blocking the Wi-Fi signal will reduce its strength.
Tip: On the Wi-Fi settings screen, tap Add network to add a new Wi-Fi network.
SMS AND MMS
OPENING MESSAGING
To open the application, do one of the following:
20
- Tap on the Home screen.
- From the Home screen, swipe the small upward-facing arrow
in an upward motion. Select
CREATING AND SENDING A TEXT MESSAGE
You can create a new text message, or open an ongoing message thread.
1. Tap
to create a new text or multimedia message. If you want to open an existing message thread
simply tap it.
2. EnteraphonenumberintotheTypenameornumbereldortap to add a phone number from the
Contacts list. When you type the SmartDial will attempt to match it with the devices contacts. Either tap
a suggested recipient or continue to type.
3. Tap the text box to compose your message. If you press the Back button whilst composing a message,
it will save as a draft on the message list. Tap the message to resume.
4. When your message is ready to send, tap
.
NOTE
- As you view and send additional messages, a message thread is created.
CREATING AND SENDING A MULTIMEDIA MESSAGE
1. On the messaging screen, tap .
2. EnteraphonenumberintotheTypenameornumbereldortap to add a phone number from the
Contacts list.
3. Tap the text box to compose your message.
4. Tap
>Addsubjecttoaddthemessagesubject.
5. Once you’ve entered the subject, the device will be in multimedia message mode.
6. Tap andselectthetypeofmedialeyouwanttoattachtothemessage.
7. Once you are done, tap
.
OPENING AND REPLYING TO A MESSAGE
1. In the message list, tap a text or multimedia message thread to open it.
2. Tap the text box to compose a message.
3. Oncenished,tap
.
CUSTOMISING THE MESSAGE SETTINGS
In the message list, tap >Settingstocustomiseyourmessagesettings.SpecifythedefaultSMSapplication:
- Text Message (SMS):Congurethetextmessagesettings.
- Request delivery report: Check the check box to request a delivery report for each message you send.
- Manage SIM card messages: Messages stored on the SIM card.
- Edit quick text: Edit the message template.
- SMS Service Centre: Specify the phone number of the SMS Service Centre.
- SMS storage location: Specify where to store the text message.
MULTIMEDIA MESSAGE (MMS) CONFIGURE THE MULTIMEDIA MESSAGE
SETTINGS
- Group messaging: Check the box to use MMS and send a single message when there are multiple recipients.
- Request delivery report: Check the box to request a delivery report for message you send.
- Request read reports: Check the box to request a read report for each message you send.
- Send read reports: Check the box to send a read report if this is requested by the MMS sender.
21
- Auto-retrieve: Check the box to automatically retrieve messages.
- Roaming auto-retrieve: Check the box to automatically retrieve messages while roaming.
- Size Limit: Set the MMS maximum limit per conversation.
NOTIFICATIONS CONFIGURE THE NOTIFICATION SETTINGS
- Message notications:Checkthecheckboxtodisplayanewmessagenoticationonthestatusbar.
- Mute: Temporarily block the SMS or MMS.
- Sound: Set a ringtone for new messages.
- Vibrate: Check the check box to enable your device to vibrate when receiving new messages.
- Popup notication:Checkthecheckboxtodisplayapopupforpushnotications.
GENERAL CONFIGURE THE GENERAL MESSAGE SETTINGS
- Message font size: Specify the message font size.
- Delete old messages: Check the box to delete your old messages when limits are reached.
- Text message limit: Set the text message maximum limit per conversation.
- Multimedia message limit: Set the MMS maximum limit per conversation.
- Cell broadcast: Set the MMS maximum limit per conversation.
- Enable WAP PUSH: Check the box to enable you to receive service messages.
BLUETOOTH
®
Your Land Rover Explore has Bluetooth. It can create a wireless connection with other Bluetooth devices, so you
canshareleswithyourfriends,talkhands-freewithaBluetoothheadset,oreventransferphotosfromyour
device to a PC.
If you are using Bluetooth, remember to stay within 10 meters of the Bluetooth device you want to connect to. Be
aware that obstacles like walls or other electronic equipment may interfere with the Bluetooth connection.
TURNING ON BLUETOOTH
1. From the Home screen, swipe the small upward-facing arrow in an upward motion. Select Settings .
2. In Wireless & networks, tap Bluetooth and set it to On
.
WhenBluetoothison,theBluetoothiconwillappearinthenoticationbar.
PAIRING AND CONNECTING A BLUETOOTH DEVICE
Common uses for Bluetooth are:
- Using a hands-free Bluetooth device.
- Using a mono or stereo Bluetooth headset.
- Controlling what plays through the Bluetooth headset remotely.
Before you use Bluetooth, you need to pair your device with another Bluetooth device as follows:
1. Ensure that the Bluetooth function on your device is enabled.
2. The Land Rover Explore will then search for Bluetooth devices in range (or touch
>Refresh).
3. Tap the device you want to pair with.
4. Follow the on-screen instructions to complete the connection.
22
NOTE
Once a partnership has been created, you will no longer have to enter a password if you connect to that Bluetooth
device again.
SENDING FILES VIA BLUETOOTH
WithBluetooth,youcansharepictures,videos,ormusicleswithfamilyandfriends.TosendlesviaBluetooth:
1. Taptheleyouwanttosend.
2. Tap
>Bluetooth,andthenselectapaireddevice.
DISCONNECTING OR UNPAIRING A BLUETOOTH DEVICE
1. From the Home screen, swipe the small upward-facing arrow in an upward motion. Select Settings .
2. In Wireless and Networks, tap Bluetooth.
3. On the connected device option, tap
andthentapForgettoconrmthedisconnection.
TAKING PHOTOS AND RECORDING
VIDEOS
You can use your Land Rover Explore to shoot and share pictures and videos. Some the great features include
shooting in RAW, giving you absolute control of your photos in post-production, and capture video at 4K. The
camera has Face Detection capabilities, as well as Auto Scene Selection options, helping capture great photos of
your friends out and about with you.
OPENING YOUR CAMERA
It’s quick and easy to open the camera using one of the following methods:
- Tap
on the Home screen.
- From the Home screen, swipe the small upward-facing arrow in an upward motion. Select Camera .
- Quick press the power key twice, even from a locked screen, to launch the Camera app.
CLOSING YOUR CAMERA
- Press the Back or Home button to close the camera.
TAKING A PHOTO
1. From the Home screen, swipe the small upward-facing arrow in an upward motion. Select Camera .
By default, it opens in Camera mode.
2. Compose your photo within the photo capture screen before capturing the image. Select the round shutter
icon
, along the bottom of the screen (along the side if held in landscape), to take a photo.
Tip:
- You can also control the camera underwater, or when using gloves by using the either the Volume Up/Down
buttons when the Camera app is open.
- Capture up to 99 shots in sequence. Simply hold down the shutter icon
to capture multiple shots at once.
The counter along the bottom will count the shots as they are being captured.
23
NOTE
- Tapthescreentofocusonaspecicarea.
- Pinchwithtwongerstozoomin/outofthesubject.
- T ap
to change the camera settings such as select a scene mode, set a self-timer, adjust the white balance,
adjusttheimageproperties,adjusttheanti-ickerorsettheISOspeed.
PRESET SCENE MODES
- You can select individual Scene Modes which are preset to take the best shot in a variety of conditions. Tap
and then Scene Mode, tap the one you wish to use:
Night Theatre Candlelight
Sunset Beach Landscape
Party Snow
Portrait Fireworks
Sports Night Portrait
- Access Panoramic mode, for those wide open landscape shots. Select this from the A icon in the top left hand
corner.
- Tap HDR from the main camera screen to enable High Dynamic Range. This is ideal for scenes with extreme
light contrast like a bright window in a dark room.
MANUAL SETTINGS
- You can manually select ISO from 100 to 1600, or leave it in Auto mode, giving great control over light levels.
Access this by tapping
and then . Scroll to the bottom and select ISO. A lower number (i.e. 100) will
allow for more light to be captured. A higher number (i.e. 1600) allows for less light to be captured.
- Youcanmanuallychangetheexposurecompensationfrom–3to+3andtweakthewhitebalancefromseven
different settings. Access this by tapping and then Exposure. 0 will do nothing. -1 and -2 will remove light
from scenes that are too bright. + 1 and +2 will add light to the scene.
- Whitebalancecanhelpbalancethecoloursinascenelitbyarticiallighting.Accessthisbytapping and
then White Balance.
VIEWING PHOTOS
To view your photos, tap the round thumbnail of the latest captured photo in the bottom right corner.
NOTE
- To go back to Camera view, press the Back button
or swipe to the right until the capture screen appears
a gain.
EDIT AND SHARE PHOTOS
As you browse through your photos, the following options will become available:
- T une Image
Tap and edit your photos with the wide range of options available.
- Share
Tap to share your photos through various applications available on the device.
- Delete Tap to delete the photos you don’t want.
- View Information Tap to view the image information.
SHOOTING A VIDEO
1. From the Home screen, swipe the small upward-facing arrow in an upward motion. Select Camera .
2. Simple tap
and recording will start automatically.
24
3. Whilst you’re recording, do one of the following:
- Pinch to zoom in/out on the subject.
- Tap to pause the recording. When paused, the icon will appear as . To resume, tap it again.
- T ap
to stop recording.
VIEWING YOUR VIDEOS
To view a video after recording, tap the thumbnail of the latest recorded video at the bottom left of the screen.
Tap
to play your video.
NOTE
- Tap
to view all your photos and videos.
TAKING A PANORAMIC PHOTO
1. From the Home screen, swipe the small upward-facing arrow in an upward motion. Select Camera .
2. Enter the Modes menu by tapping the icon ‘A’ on the top left of the screen and select Panorama.
3. Tap
to start taking the photo.
4. Choose the direction you want to capture. Then slowly move your device towards your desired direction.
5. When the shooting guide reaches the end point, the shooting will end.
Tip: To cancel the shooting, simply tap
.
USING PHOTOS
The Photos application automatically searches for pictures and videos saved to your device or memory card.
Select the album/folder and play as a slideshow, or select items to share with other applications.
OPENING PHOTOS
From the Home screen, swipe the small upward-facing arrow in an upward motion. Select to open the
application. The Google Photos application categorises pictures and videos by storage location and categorises
theselesinfolders.Tapafoldertoviewyourpicturesorvideosinside.
VIEWING A PHOTO
1. In Photos, tap a folder to view the photos inside.
2. Tapthepicturetoviewitinfull-screenmode.Whenyouviewapictureinfull-screenmode,ickthepicture
left or right to view the previous or next picture.
3. Tozoominontheimage,pinchtwongersapartfromeachotheratthelocationofthescreenwhereyou
wanttozoomin.Inzoommode,swipeyourngerupordownandleftorright.
Tip: The picture viewer supports the automatic rotation function. When you rotate the device, the picture will
adjust itself to the rotation.
CROPPING A PICTURE IN PHOTOS
1. When viewing the picture you want to crop, tap tune .
2. Then tap Crop/Rotate
and use the cropping tool to select the portion of the picture to crop.
- Drag the image around, from the inside of the cropping box, to move it.
- Drag an edge or a corner of the cropping box to resize the image.
3. T ap Done and then Save to save your cropped picture.
- Tap Reset to discard your changes and start over or tap Back to Discard.
25
ENJOYING MUSIC
MusiclescanbetransferredfromaPContoyourLandRoverExploresoyoucanlistentomusicwhereveryou
are.
COPYING MUSIC TO YOUR DEVICE
1. Connect your device to a computer using the USB power cable supplied.
2. On the PC, navigate to the USB drive and open it.
3. Create a folder in the root directory of your device, (for example, Music).
4. Copy your music from the PC to the new folder.
5. TosafelyremoveyourdevicefromthePC,waituntilthemusichasnishedcopying,thenejectthedriveas
required by your PC’s operating system.
NOTE:
- You may get water in the headphone jack which can cause the inner contacts to behave as if headphones are
connectedwhentheyarenot.Ifthishappens,simplyickthewaterout,leaveittodryoutfor20minutes.If
youdroppeditinsaltwater,rinseoffwithcleanwaterrstbeforesettingasidetodry.
LISTENING TO FM RADIO
You can listen to FM radio stations in the FM Radio application.
TUNING THE FM RADIO
1. From the Home screen, swipe the small upward-facing arrow in an upward motion. Select FM Radio
Plug in the earphones to the audio jack.
Choose from the following options:
- To select a radio station, tap
and wait for the scan to complete. Tap the one you wish to listen to.
- To manually tune into a frequency, tap the side arrows .
- To add the current radio station to your Favourites list, tap
.
- T o mute the FM radio, tap
. Then to resume.
- To play out of the speaker, tap , then Speaker.
- To turn off the radio, simply disconnect your headset.
RECORDING THE FM RADIO
To start recording the radio:
- Tap
, then Start Recording.
- Tostoprecordingtheradio,tapStopRecording.DiscardorSavethele.
SYNCHRONISING INFORMATION
Some applications (for example, Gmail
webmail service) on your Land Rover Explore provide access to the same
information that you can add, view, and edit on a PC. If you add, change, or delete information in any of these
applications on the PC, the updated information will also appear on your device. This is made possible through
over-the-air data synchronisation; however the process will not interfere with the device. When your device is
synchronising,adatasynchronisationiconwillbeshowninthenoticationbar
.
26
MANAGING ACCOUNTS
Contacts, email, and other information on your device can be synchronised with multiple Google accounts or
other accounts, depending on the applications you have installed. For example, adding a personal Google
account can ensure that your personal email, contacts, and calendar entries are always available. You can also add
a work account so that your work- related emails, contacts and calendar entries are kept separate.
ADDING AN ACCOUNT
1. From the Home screen, swipe the small upward-facing arrow
in an upward motion. Select Settings .
2. ScrolldowntoAccounts>Addaccount.Thescreenwilldisplaythesynchronisationsettingsandalistof
your current accounts.
3. Tap Add Account to add a new account.
4. Follow the on-screen instructions to enter information about your account. Most accounts require a username
andpassword,butthedetailsdependonthekindofaccountandthecongurationoftheserviceitis
connecting to.
5. Whenyouarenished,youraccountwillbeaddedtothelistintheAccountssettingsscreen.
NOTE
- In some cases, account details may need to be obtained from your network administrator support. For
example, you may need to know the account’s domain or server address.
REMOVING AN ACCOUNT
An account can be removed and all information associated with it removed from your device, including email,
contacts,settings,andsoon.Someaccountshowever,cannotberemoved,suchastherstaccountyousigned
into on your device. If you attempt to remove certain accounts, be aware that all the personal information
associated with it will be deleted.
1. On the Accounts settings screen, tap the account type.
2. Tap the account you want to delete.
3. Tap
>Removeaccount.
4. TapRemoveaccounttoconrm.
CUSTOMISING ACCOUNT SYNCHRONISATION
Backgrounddatauseandsynchronisationoptionscanbeconguredforalltheapplicationsonyourdevice.You
canalsocongurethekindofdatasynchronisedforeachaccount.Someapplications,suchasContactsand
Gmail, can synchronise data from multiple applications. Synchronising is two-directional for some accounts and
changes made to the information on your device are made to the copy of that information on the web. Some
accounts support only one-way synchronisation and the information on your device is read-only.
CHANGING AN ACCOUNT’S SYNCHRONISATION SETTINGS
1. On the Accounts settings screen, tap the account type.
2. Tap an account to change its synchronisation settings. The data and synchronisation screen will open,
displaying a list of information that the account can synchronise.
3. To enable certain items to sync, slide the respective data switch to the right . To disable the data from
syncing automatically, slide the respective data switch to the left.
28
- Custom set the event colour to be more visible in your calendar, and add any notes or attachments.
3. After you have entered all the information for your event, tap Save.
SETTING AN EVENT REMINDER
1. On app calendar view, tap an event to view its details.
2. Tap to start editing the event.
3. Tap the reminder section to set a reminder for your event.
4. TapSavetosaveyourmodications.
NOTE
- TapNoNoticationtodeletethereminderforyourevent.
OPENING AND USING THE ALARM
You can set a new alarm or modify an existing alarm.
1. From the Home screen, swipe the small upward-facing arrow
in an upward motion. Select the Clock .
2. Tap the top left tab, labelled Alarm. On the alarm list screen tap
to add an alarm.
3. To set your alarm, do the following:
- Set the hour and minutes by navigating around the dial and tap OK.
- To set repeat mode, check the Repeat check box. Tap one or more weekdays.
- To set a ringtone, tap
and select an option.
- If you want your device to vibrate when the alarm sounds, tap the Vibrate check box.
- To add an alarm label, tap Label. Enter the label, then tap OK.
NOTE
- By default, the alarm is automatically activated. You can deactivate an alarm without erasing it by tapping
the slider on the right of the listed alarm.
OPENING AND USING THE CALCULATOR
Your Land Rover Explore is equipped with a calculator that has both a standard and advanced mode.
1. From the Home screen, swipe the small upward-facing arrow
in an upward motion. Select the Calculator
2. Turn the device into landscape mode to access the advanced calculator mode. Ensure the Auto-rotate is
enabled (see Setting The Display).
SETTING THE DATE AND TIME
Whenyourstturnonyourdevice,thereisanoptiontoupdatethedateandtimeautomatically,byusingthetime
provided by your network.
To manually adjust the date and time settings, do the following:
1. On the Settings screen, tap Date & Time.
2. Set the Automatic date & time setting to Off .
3. Tap the Automatic time zone switch to off, it will turn grey
.
4. TapSetdate.ThentypethedateandtapOKwhenthecongurationiscomplete.
5. TapSettime.Onthesettimescreen,tapthehourorminuteeldandnavigatearoundthedialtosetthe
time.TapOKwhenthecongurationiscomplete.
6. Tap Select time zone, and then select your time zone from the list.
29
7. Enable or disable the Use 24-hour format function to switch between 24-hour format and 12-hour format.
NOTE
- You cannot set the date, time, and time zone manually if you are using the automatic option.
PERSONALISING THE DISPLAY
ADJUSTING THE SCREEN BRIGHTNESS
1. On the Settings screen, tap Display and Brightness level.
2. Drag the slider left to make the screen darker, or right to make it brighter.
3. Whenyouliftyourngerofftheslider,yoursettingswillbesavedautomatically.
ADAPTIVE BRIGHTNESS
Toautomaticallytyourscreen’sbrightnesstothelightaroundyou,useAdaptivebrightness.Tap
(Settings)
then Display. Slide the Adaptive brightness switch to the right. You can still adjust your brightness level while
Adaptive brightness is on.
AUTO-ROTATE SCREEN
You can enable/disable your display from automatically rotating when you turn your device between landscape
andportrait.SwipedownfromthetopofthescreentopullopentheNoticationMenu.Swipedownagainto
expand it further. Third row down and in the middle, tap the Auto-rotate icon.
Auto rotation is enabled
Locked to Portrait
ADJUSTING THE TIME BEFORE THE SCREEN TURNS OFF
If your device is idle for a period, the screen will turn off to save battery power. You can set a longer or shorter idle
time by doing the following:
1. Tap
(Settings)fromthetopoftheNoticationsMenu,tapDisplay,thenSleep.
2. Select the duration you want your screen to be illuminated for before it turns off.
RINGTONES
SETTING DEVICE RINGTONE OR TURNING ON SILENT MODE
1. Press and hold the Power key. In the pop up menu, tap one of the following options:
Noticationssoundison.
Noticationssoundisoff(SilentMode).
Set to vibrate only.
30
ADJUSTING THE RINGTONE VOLUME
You can adjust the ringtone volume from the Home screen or from any application (except during a call, when you
are playing music or watching videos). Press the Volume up/down keys, on the left side of the phone, to adjust the
ringtone volume to your desired level. The ringtone volume can also be adjusted on the Settings screen.
1. Tap
(Settings)fromthetopoftheNoticationsMenu,tapSound.
2. In Ring volume, drag the slider left to make the volume quieter and right to make it louder.
CHANGING THE RINGTONE
1. Tap (Settings)fromthetopoftheNoticationsMenu,tapSound.
2. Tap Phone ringtone.
3. ChoosewhethertoimportthislefromeitheryourFileCommanderapporfromthedefaultMediaStorage.
4. Select your desired ringtone. A preview of the ringtone will play when you select it.
5. Tap OK.
SETTING THE DEVICE TO VIBRATE FOR INCOMING CALLS
1. Press and hold the Power key. In the pop up menu, tap to set to vibrate only.
2. Alternately, tap
(Settings)fromthetopoftheNoticationsMenu,tapSound.SlidetheAlsovibratefor
calls switch to the right
.
NOTE
- This can also be enabled by the Volume down key. Press it until the volume is at its lowest.
SETTING PHONE SERVICES
TURNING ON/OFF DATA ROAMING
1. Tap (Settings)fromthetopoftheNoticationsMenu,tapMore,thenCellularNetworks.
2. Slide the Data roaming switch to the right
. Tap again to turn it off.
NOTE
- Remember that accessing data services while roaming may incur considerable additional charges. Check
with your network service provider about data roaming fees.
DISABLE OR RESTRICT DATA SERVICE
1. To save on the amount of data your apps and phone consume, tap (Settings) from the top of the
NoticationsMenu.
2. Tap Data Usage and then Data Saver.
3. Slide the switch to On
.
Youcanalsosetadatausagewarningwhenyourappsandphonereachadenedlimit.
1. To set the data warning limit your apps and phone consume, tap
(Settings) from the top of the
NoticationsMenu.
2. Tap Data Usage and then the Usage heading ( in green).
3. Set the limit and tap OK.
31
PROTECTING YOUR DEVICE
PROTECTING YOUR DEVICE WITH A SCREEN LOCK
To keep the data on your Land Rover Explore more secure you can use a screen lock method.
1. Tap
(Settings)fromthetopoftheNoticationsMenu,tapSecurity>ScreenLock.
2. Select one of the available screen lock methods to unlock your device:
- Swipe: Swipe the lock icon to unlock the screen.
- Pattern: Trace the correct unlock pattern to unlock the screen.
- PIN: Enter a PIN number to unlock the screen.
- Password: Enter a password to unlock the screen.
3. Follow the on-screen instructions to complete your chosen screen lock method.
MANAGING APPLICATIONS
VIEWING AN INSTALLED APPLICATION (APP)
1. On the Settings screen, tap Apps.
2. In the applications list, you can do any of the following:
- Taptocongureappssettings.
- Tap
>Showsystemtodisplaysystemapps.
- Tap
>Resetapppreferences>Resetappstoresetappspreferencestotheirdefaultsettings.
- Tap an application to view its details directly.
REMOVING AN INSTALLED APPLICATION
1. Tap (Settings)fromthetopoftheNoticationMenu,tapApps.
2. TapanapplicationandthentapUninstall>OKtoremovetheapplicationfromyourdevice.
NOTE
- Some applications cannot be uninstalled.
RESETTING THE DEVICE
BACKING UP PERSONAL SETTINGS
Your personal settings can be backed up to Google servers with a Google account. If you replace your device, the
backed-upsettingswillbetransferredontoanewdevicethersttimeitissignedintofromaGoogleaccount.
1. Tap
(Settings)fromthetopoftheNoticationsMenu,tapBackup&Reset.
2. Tap Back up my data. Then tap the Back up my data switch to the right
.
RESTORING FACTORY DATA
Ifyourestorethefactorydata,yourdevicewillresettothesettingsthatwereconguredatthefactory.Allofyour
32
personal data from the internal device storage, including account information, the system and application settings,
and any downloaded applications will be erased. Resetting your device does not erase any system software
updatesthathavebeendownloadedoranylesonamicroSDcard,suchasmusicorphotos.
1. Tap
(Settings)fromthetopoftheNoticationsMenu,tapBackup&Reset>Factorydatareset.
2. When prompted, tap Reset phone, and then tap Erase Everything. Your device will reset its settings to the
original factory settings, and then restart.
HARDWARE RESET
This device has an internal battery and therefore you cannot reset the hardware by simply removing the battery. If
you need to reset the hardware, please follow the steps listed below. Please note that you may have to reset the
hardware if your device isn’t charging when it’s plugged into a wall socket.
1. Press and hold the Volume up and Power keys until your device powers down. After your device is reset, it will
restart automatically.
VIEWING THE REGULATORY E-LABEL
To view the regulatory information on this device, do the following:
1. From the Home screen, swipe the small upward-facing arrow
in an upward motion. Select Settings .
2. OntheSettingsscreen,tapAboutPhone>RegulatoryLabels.
3. The most recent e-label will be displayed on screen.
APPENDIX
WARNINGS AND PRECAUTIONS
This section contains important information pertaining to the operating instructions of your device. It also contains
information about how to use the device safely. Read this information carefully before using your device.
INGRESS PROTECTION - WATERPROOF
You may get water in the headphone jack which can cause the inner contacts to behave as if headphones are
connectedwhentheyarenot.Ifthishappens,simplyickthewaterout,leaveittodryoutfor20minutes.Ifyou
droppeditinsaltwater,rinseoffwithcleanwaterrstbeforesettingasidetodry.
ELECTRONIC DEVICE
Power off your device if using the device is prohibited. Do not use the device when using the device causes
danger or interference with electronic devices.
MEDICAL DEVICE
Follow rules and regulations set forth by hospitals and health care facilities. Do not use your device when using
the device is prohibited.
Pacemaker manufacturers recommend that a minimum distance of 15 cm be maintained between a device and a
pacemaker to prevent potential interference with the pacemaker. If you are using a pacemaker, use the device on
the opposite side of the pacemaker and do not carry the device in your front pocket.
33
POTENTIALLY EXPLOSIVE ATMOSPHERE
Power off your device in any area with a potentially explosive atmosphere, and comply with all signs and
instructions. Areas that may have potentially explosive atmospheres include the areas where you would normally
be advised to turn off your vehicle engine. Triggering of sparks in such areas could cause an explosion or a
re,resultinginbodilyinjuriesorevendeaths.Donotpoweronyourdeviceatrefuellingpointssuchasservice
stations. Comply with restrictions on the use of radio equipment in fuel depots, storage, and distribution areas,
and chemical plants. In addition, adhere to restrictions in areas where blasting operations are in progress. Before
using the device, watch out for areas that have potentially explosive atmospheres that are often, but not always,
clearly marked. Such locations include areas below the deck on boats, chemical transfer or storage facilities, and
areas where the air contains chemicals or particles such as grain, dust, or metal powders. Ask the manufacturers of
vehiclesusingliqueedpetroleumgas(suchaspropaneorbutane)whetherthisdevicecanbesafelyusedintheir
vicinity.
TRAFFIC SECURITY
- Observe local laws and regulations while using the device. In addition, if using the device while driving a
vehicle, comply with the following guidelines.
- Concentrateondriving.Yourrstresponsibilityistodrivesafely.
- Do not talk on the device while driving. Use hands-free accessories.
- When you have to make or answer a call, park the vehicle at the road side before using your device.
- RF signals may affect electronic systems of motor vehicles. For more information, consult the vehicle
manufacturer.
- In a motor vehicle, do not place the device over the air bag or in the air bag deployment area. Otherwise,
thedevicemayhurtyouowingtothestrongforcewhentheairbaginates.
- Donotuseyourdevicewhileyinginanaircraft.Poweroffyourdevicebeforeboardinganaircraft.
- Using wireless devices in an aircraft may cause danger to the operation of the aircraft and disrupt the
wireless telephone network. It may also be considered illegal.
OPERATING ENVIRONMENT
- Donotuseorchargethedeviceindusty,damp,anddirtyplacesorplaceswithmagneticelds.Otherwise,it
may result in a malfunction of the circuit.
- ThedevicecomplieswiththeRFspecicationswhenthedeviceisusednearyourearoratadistanceof
0.5 cm from your body. Ensure that the device accessories such as a device case and a device holster are not
composed of metal components. Keep your device 0.5 cm away from your body to meet the requirement
earlier mentioned.
- On a stormy day with thunder, do not use your device when it is being charged, to prevent any danger
caused by lightning.
- When you are on a call, do not touch the antenna. Touching the antenna affects the call quality and results
in increase in power consumption. As a result, the talk time and the standby time are reduced.
- While using the device, observe the local laws and regulations, and respect others’ privacy and legal rights.
- Keep the ambient temperature between 0°C and 40°C while the device is being charged. Keep the ambient
temperaturebetween–25°Cto50°Cforusingthedevicepoweredbyabattery.
PREVENTION OF HEARING DAMAGE
Using a headset at high volume can damage your hearing. To reduce the risk of damage to hearing, lower the
headset volume to a safe and comfortable level.
SAFETY OF CHILDREN
Comply with all precautions with regard to children’s safety. Letting a child play with your device or its accessories,
which may include parts that can be detached from the device, may be dangerous, as it may present a choking
hazard. Ensure that small children are kept away from the device and accessories.
34
ACCESSORIES
Choose only batteries, chargers, and accessories approved for use with this model by the device manufacturer.
The use of any other type of charger or accessory may invalidate any warranty for the device, may be in violation
of local rules or laws, and may be dangerous. Please contact your dealer for information about the availability of
approved batteries, chargers, and accessories in your area.
BATTERY AND CHARGER
- Unplug the charger from the electrical plug and the device when not in use.
- Adapter shall be installed near the equipment and shall be easily accessible.
- The plug considered as disconnect device of adapter.
- The battery can be charged and discharged hundreds of times before it eventually wears out.
- UsetheACpowersupplydenedinthespecicationsofthecharger.Animproperpowervoltagemaycause
areoramalfunctionofthecharger.
- If battery electrolyte leaks out, ensure that the electrolyte does not touch your skin and eyes. When the
electrolyte touches your skin or splashes into your eyes, wash your eyes with clean water immediately and
consult a doctor.
- If there is a case of battery deformation, colour change, or abnormal heating while you charge, to stop using
thedeviceimmediately.Otherwise,itmayleadtobatteryleakage,overheating,explosion,orre.
- If the power cable is damaged (for example, the cord is exposed or broken), or the plug loosens, stop using
thecableatonce.Otherwise,itmayleadtoanelectricshock,ashortcircuitofthecharger,orare.
- Donotdisposeofdeviceinreastheymayexplode.Batteriesmayalsoexplodeifdamaged.
- Do not modify or re-manufacture, attempt to insert foreign objects into the device, immerse or expose to
waterorotherliquids,exposetore,explosionorotherhazard.
- Avoid dropping the device. If the device is dropped, especially on a hard surface, and the user suspects
damage,takeittoaqualiedservicecentreforinspection.
- Improperusemayresultinare,explosionorotherhazard.
- Promptly dispose of used devices in accordance with local regulations.
- The device should only be connected to products that bear the USB-IF logo or have completed the USB-
IF compliance program.
- Output rating of charger DC 5V 2A.
CAUTION – RISK OF EXPLOSION IF BATTERY IS REPLACED BY AN INCORRECT TYPE. DISPOSE OF USED
BATTERIES ACCORDING TO THE INSTRUCTIONS.
CLEANING AND MAINTENANCE
- The charger is not water-resistant. Keep it dry. Protect the charger from water or vapour. Do not touch the
charger with wet hands, otherwise it may lead to a short circuit, a malfunction of the device and an electric
shock to the user.
- Do not place your device and charger in places where they can get damaged because of collision. Otherwise,
itmayleadtobatteryleakage,devicemalfunction,overheating,re,orexplosion.
- Donotplacemagneticstoragemediasuchasmagneticcardsandoppydisksnearthedevice.Radiation
from the device may erase the information stored on them.
- Do not leave your device and charger in a place with an extreme high or low temperature. Otherwise, they
maynotfunctionproperlyandmayleadtoareoranexplosion.Whenthetemperatureislowerthan0°C,
performance of the battery is affected.
- Do not place sharp metal objects such as pins near the earpiece. The earpiece may attract these objects
and hurt you when you are using the device.
- Before you clean or maintain the device, power off the device and disconnect it from the charger.
- Do not use any chemical detergent, powder, or other chemical agents (such as alcohol and benzene) to
cleanthedeviceandthecharger.Otherwise,partsofthedevicemaybedamagedorarecanbecaused.
You can clean the device with soft antistatic cloth.
- Do not dismantle the device or accessories. Otherwise, the warranty on the device and accessories is
invalid and the manufacturer is not liable to pay for the damage.
- If the device screen is broken by colliding with hard objects, do not touch or try to remove the broken part. In
t his case, stop using the device immediately, and then contact an authorized service centre.
35
PREVENTION OF HEARING LOSS
To prevent possible hearing damage, do not listen at high volume levels for long periods.
CE SAR COMPLIANCE
This device meets the EU requirements on the limitation of exposure of the general public to electromagnetic
eldsbywayofhealthprotection.
The limits are part of extensive recommendations for the protection of the general public. These
recommendationshavebeendevelopedandcheckedbyindependentscienticorganizationsthroughregular
andthoroughevaluationsofscienticstudies.TheunitofmeasurementfortheEuropeanCouncil’srecommended
limitformobiledevicesisthe“SpecicAbsorptionRate”(SAR),andtheSARlimitis2.0W/kgaveragedover10
grams of tissue. It meets the requirements of the International Commission on Non-Ionizing Radiation Protection
(ICNICP).
For body worn operation, this device has been tested and meets the ICNIRP exposure guidelines and the
European Standard EN 62311 and EN 62209-2, for use with dedicated accessories. Use of other accessories which
contain metals may not ensure compliance with ICNIRP exposure guidelines.
SARismeasuredwiththedeviceataseparationof0.5cmtothebody,whiletransmittingatthehighestcertied
output power level in all frequency bands of the mobile device. The distance of 0.5cm which shall be kept
between body and device.
The highest reported SAR values under the CE regulatory for the phone are list below:
Head SAR 0423 W/kg
Body SAR 1.476 W/kg
SPECTRUM AND POWER
Spectrum Power
GSM 900 33.00 dBm
GSM 1800 30.00 dBm
WCDMA B1 23.00 dBm
WCDMA B5 23.50 dBm
WCDMA B8 23.50 dBm
LTE B1 23.50 dBm
LTE B3 23.00 dBm
LTE B7 24.00 dBm
LTE B8 24.00 dBm
LTE B20 24.00 dBm
WIFI 2.4G 14.00 dBm
WIFI 5G Band1 14.00 dBm band2 14.00 dBm
Band 3 14.00dBm
EDR 8.00 dBm
BLE 0.5 dBm
NFC -5.39 dBu/A/m at 10m
EU COMPLIANCE STATEMENT
This device is restricted to indoor use only when operating in the 5150 to 5350 MHz frequency range.
Restrictions or Requirements in:
Belgium (BE), Bulgaria (BG), Czech Republic (CZ), Denmark (DK), Germany (DE), Estonia (EE), Ireland (IE), Greece
(EL), Spain (ES), France (FR), Croatia (HR), Italy(IT), Cyprus (CY), Latvia (LV), Lithuania (LT), Luxembourg (LU),
Hungary (HU), Malta (MT), Netherlands (NL), Austria (AT), Poland (PL), Portugal (PT), Romania (RO), Slovenia
36
(SI), Slovakia (SK), Finland (FI), Sweden (SE), United Kingdom (UK), Switzerland (CH), Norway (NO), Iceland (IS),
Liechtenstein (LI) and Turkey (TR).
EU REGULATORY CONFORMANCE
Hereby, the manufacturer declares that this device is compliant with the essential requirements and other relevant
provisions of Directive 2014/53/EU. For the declaration of conformity, visit the website:
www.landroverexplore.com/support
DISPOSAL AND RECYCLING INFORMATION
This symbol on the device (and any included batteries) indicates that they should not be disposed of
as normal household garbage. Do not dispose of your device or batteries as unsorted municipal waste.
Thedevice(andanybatteries)shouldbehandedovertoacertiedcollectionpointforrecyclingor
proper disposal at the end of their life.
Formoredetailedinformationabouttherecyclingofthedeviceorbatteries,contactyourlocalcityofce,the
household waste disposal service, or the retail store where you purchased this device.
The disposal of this device is subject to the Waste from Electrical and Electronic Equipment (WEEE) directive of
the European Union. The reason for separating WEEE and batteries from other waste is to minimize the potential
environmental impacts on human health of any hazardous substances that may be present.
REDUCTION OF HAZARDOUS SUBSTANCES
This device is compliant with the EU Registration, Evaluation, Authorization and Restriction of Chemicals (REACH)
Regulation (Regulation No 1907/2006/EC of the European Parliament and of the Council) and the EU Restriction
of Hazardous Substances (RoHS) Directive (Directive 2011/65/EU of the European Parliament and of the Council).
37
ADVENTURE PACK
DECLARATION OF CONFORMITY
MANUFACTURER
Name Bullitt Mobile Limited
Address One Valpy, Valpy Street, Reading, Berkshire, England RG1 1AR
EQUIPMENT
Model ADV01
Description Adventure Pack
Supplied Accessories and Components Carabiner, Protective Case, USB Cable
We, Bullitt Mobile Limited, declare the product has been tested with international standards and found in
conformity with the EMCD 2014/30/EU and LVD 2014/35/EU.
According to the following standards of the EMCD 2014/30/EU
1. Electromagnetic compatibility
Applied Standard(s)
- EN 55032 2015/AC2016
- EN 55035 2017
- EN 61000-3-2 2014
- EN 61000-3-3 2013
According to the following standards of the LVD 2014/35/EU
1. Safety
Applied Standard(s)
- EN 60950-12006+A112009+A12010+A122011+A22013
Signed for and on behalf of Bullitt Mobile Limited
Place One Valpy, Valpy Street, Reading, Berkshire, England RG1 1AR, Date March 26, 2018
Name Wayne Huang
Function Director of ODM Management
Signature
38
LAND ROVER EXPLORE
DECLARATION OF CONFORMITY
MANUFACTURER
Name Bullitt Mobile Limited
Address One Valpy, Valpy Street, Reading, Berkshire, England RG1 1AR
RADIO EQUIPMENT
Model Explore
Description Smartphone
Software Version Dual SIM radio version LTE_D0105121.0_Explore
Software version Single SIM radio version LTE_S0105121.0_Explore
Supplied Accessories and Components USB cable, Adapter, Battery, Earphone ,Module, Carabiner,
Protective Case
We, Bullitt Mobile Limited, declare under our sole responsibility that the product described above is in conformity
with the relevant Union harmonization legislations.
RE Directive (2014/53/EU)
The following harmonized standards and/or other relevant standards have been applied.
1. Health and Safety (Article 3.1(a) of the RE Directive)
- EN 623112008
- EN 505662017, EN 62209-22010
- EN 50360 2017/EN 62209-1 2016
- EN 60950-12006/A112009+A12010+A122011+A22013
- EN50332-12013/EN 50332-22013
2. Electromagnetic compatibility (Article 3.1 (b) of the RE Directive)
- Draft ETSI EN 301 489-1 V2.2.0,
- Final Draft ETSI EN 301 489-3 V2.1.1
- Draft ETSI EN 301 489-17 V3.2.0
- Draft ETSI EN 301 489-19 V2.1.0
- Draft ETSI EN 301 489-52 V1.1.0
- EN 55032 2015/AC2016
- EN 55035 2017
- EN 61000-3-2 2014
- EN 61000-3-3 2013
3. Radio frequency spectrum usage (Article 3.2 of the RE Directive)
- ETSI EN 301 908-1 V11.1.1, ETSI EN 301 908-2 V11.1.2, ETSI EN 301 908-13 V11.1.2
- ETSI EN 300 328 V2.1.1
- ETSI EN 301 893 V2.1.1
- ETSI EN 301 511 V12.5.1
- ETSI EN 303 413 V1.1.1
- Final Draft ETSI EN 303 345 V1.1.7
- ETSI EN 300 330 V2.1.1
Thenotiedbody(NameCETECOMGMBH,ID0680)performedtheconformityassessmentaccordingtoAnnex
IIIoftheREDirectiveandissuedtheEU-typeexaminationcerticate(Ref.No.M18-0447-01-TEC).
Signed for and on behalf of Bullitt Mobile Limited
Place One Valpy, Valpy Street, Reading, Berkshire, England RG1 1AR, Date March 19, 2018
Name Wayne Huang
Function Director of ODM Management
Signature
1
LAND ROVER EXPLORE: OUTDOOROVÝ TELEFON
UŽIVATELSKÁ PŘÍRUČKA
landroverexplore.com
2
PŘEČTĚTE SI PŘED PRVNÍM POUŽITÍM
BEZPEČNOSTNÍ OPATŘENÍ
- Vzájmuzajištěnísprávnéhopoužívánítohotozařízenísiprosímpečlivěpřečtětetutopříručkuadoporučená
bezpečnostníopatření.
- Navzdoryjehoodolnépovazesevyhnětenárazům,házení,mačkání,probodáváníneboohýbánízařízeníExplore.
- Pokudzařízenípoužijeteveslanévodě,následněhoopláchněte,abysůlnezpůsobilakorozi.
- Nepokoušejtesezařízeníanijehopříslušenstvírozebírat.Servisneboopravymohouprovádětpouzekvalikovaní
pracovníci.
- Nezapínejtezařízenívsituaci,kdejepoužívánímobilníchtelefonůzakázáno,nebovsituaci,kdezařízenímůže
způsobitrušeníčinebezpečí.
- Nepoužívejtezařízenípřiřízení.
- Vypnětezařízenívblízkostizdravotnickýchpřístrojůadodržujtepravidlanebopředpisytýkajícísepoužívání
mobilníchtelefonůvnemocnicíchazdravotnickýchzařízeních.
- VypnětezařízenínebonastavterežimVletadle,kdyžsenacházítevletadle,protožezařízenímůžezpůsobit
rušeníovládacíhovybaveníletadla.
- Vypnětezařízenívblízkostipřesnýchelektronickýchzařízení,protožebymohloovlivnitjejichvýkon.
- Neumisťujtezařízeníanijehopříslušenstvídoobalůsesilnýmelektromagnetickýmpolem.
- Nepokládejtedoblízkostizařízenímagnetickázáznamovámédia.Zářenívycházejícízezařízeníznichmůže
vymazatuloženéinformace.
- Nepoužívejtezařízenívprostředíshořlavýmplynem,jakojsoučerpacístanice.
- Neumisťujtezařízenídomístsvysokouteplotou.
- Zařízeníajehopříslušenstvíuchovávejtemimodosahmalýchdětí.
- Nedovolujtedětempoužívatzařízeníbezvedenídospěléosoby.
- Používejtepouzeschválenébaterieanabíječky,abystesevyhnulirizikuvýbuchu.
- Dodržujtevšechnyzákonyapředpisytýkajícísepoužíváníbezdrátovýchzařízení.Připoužíváníbezdrátového
zařízenírespektujtesoukromíaprávaostatních.
- Upacientůsimplantáty(srdce,kloubyatd.)udržujtezařízení15cmodimplantátuaběhemhovorudržtezařízení
naopačnéstraně,nežjeimplantát.
- PřipoužívánínapájecíhokabeluUSBpřísnědodržujtepříslušnépokynyvtétopříručce,jinakbymohlodojít
kpoškozenívašehozařízeníneboPC.
PRÁVNÍ UPOZORNĚNÍ
SlovníznačkaaoválnélogoLandRoverakorporátníaproduktováidentitapoužitávtomtodokumentujsou
ochrannéznámkyspolečnostiJaguarLandRoverLimitedanesmějíbýtpoužitybezpovolení.
BullittGroupLtdjedržitelemlicencespolečnostiJaguarLandRoverLimited.
3
Žádnoučásttohotodokumentunesmítežádnouformouaniprostředkyreprodukovatanipřenášetbezpředchozího
písemnéhosouhlasuspolečnostiBullittMobileLtd.neboJaguarLandRoverLimited.
Výrobekpopsanývtétopříručcemůžeobsahovatsoftwarechráněnýautorskýmprávemaprávadržitelůlicencí.
Zákaznícinesmějítakovýsoftwareanihardwarežádnýmzpůsobemreprodukovat,distribuovat,měnit,dekompilovat,
rozebírat,dešifrovat,rozbalovat,zpětněanalyzovat,pronajímat,postupovataninanějposkytovatdalšílicence,
pokudtakovéomezenínezakazujíplatnézákonynebotakovékonánínejsouvlicencipovolenypříslušnýmidržiteli
autorskýchpráv.
LogoaslovníznačkaBluetooth
®
jsouregistrovanýmiochrannýmiznámkamispolečnostiBluetoothSIG,Inc.
ajakékolipoužitítěchtoznačekzestranyspolečnostiBullittGrouppodléhálicenci.Ostatníochrannéznámky
aobchodnínázvytřetíchstranjsoumajetkempříslušnýchvlastníků.
Wi-Fi
®
jeregistrovanáochrannáznámkaspolečnostiWi-FiAlliance
®
.
Android,GoogleadalšíznámkyjsouochrannéznámkyspolečnostiGoogleLLC.
UPOZORNĚNÍ
Některézdepopsanéfunkcevýrobkuajehopříslušenstvízávisejínanainstalovanémsoftwaru,výkonuanastavení
místnísítěanemusejíbýtaktivoványnebomohoubýtmístnímioperátoryneboposkytovatelislužebomezeny.
Protopopisyvtétopříručcenemusípřesněodpovídatzakoupenémuproduktunebojehopříslušenství.
Výrobcesivyhrazujeprávoměnitneboupravovatjakékoliinformacenebotechnickéúdajeuvedenévtéto
příručce,atobezpředchozíhoupozorněnínebojakéhokolizávazku.
Výrobcenenesezodpovědnostzalegitimituanikvalitujakýchkoliproduktů,kterépřestotozařízeníodešletenebo
stáhnete,včetněautorskychráněnýchtextů,obrázků,hudby,lmůasoftwaru,kterýnenísoučástívýrobku.Zajakékoli
důsledkyvyplývajícízinstalacenebopoužitívýšeuvedenýchproduktůnatomtozařízeníjsteodpovědnívy.
BEZ ZÁRUKY
Obsahtétopříručkyjeposkytován„takjakje“.Svýjimkoupožadavkůplatnélegislativynejsouposkytoványžádné
výslovnéanipředpokládanézáruky,kromějinýchvčetněpředpokládanýchzárukprodejnostiavhodnostipro
konkrétníúčel,souvisejícíspřesností,spolehlivostíneboobsahemtétopříručky.
Vmaximálnímířepovolenéplatnýmizákonynenívýrobcevžádnémpřípadězodpovědnýzažádnéspeciální,
náhodné,nepříméanináslednéškody,ztrátuzisku,obchodníchpříležitostí,příjmů,dat,dobrépověstiani
předpokládanýchúspor.
PŘEDPISY PRO DOVOZ AVÝVOZ
Zákaznícijsoupovinnidodržovatvšechnyplatnézákonyapředpisyprovývozadovozazískatvšechnapotřebná
vládnípovoleníalicenceproexport,reexportneboimportproduktůpopsanéhovtétopříručce,včetněsoftwaru
atechnickýchúdajů.
4
OBSAH
PŘEČTĚTE SI PŘED PRVNÍM POUŽITÍM 2
PRÁVNÍ UPOZORNĚNÍ 2
UPOZORNĚNÍ 3
BEZ ZÁRUKY 3
PŘEDPISY PRO DOVOZ AVÝVOZ 3
VÍTÁ VÁS LAND ROVER EXPLORE: OUTDOOROVÝ TELEFON 6
URČEN PRO VENKOVNÍ PROVOZ 6
JEDINEČNÝ SOFTWARE PRO ZAŘÍZENÍ EXPLORE 7
EXPLORE V KOSTCE 8
HLAVNÍ FUNKCE 8
ZAČÍNÁME 9
NABITÍ BATERIE 9
PŘÍDAVNÉ BATERIE 10
ZAPNUTÍ/VYPNUTÍ ZAŘÍZENÍ 11
DOTYKOVÝ DISPLEJ 11
DISPLEJ 12
ZAPNUTÍ NOČNÍHO REŽIMU AREŽIMU PRO RUKAVICE 14
APLIKACE NA VÝCHOZÍ OBRAZOVCE AWIDGETY 14
SLOŽKY 15
TAPETY 15
POUŽITÍ REŽIMU VLETADLE 16
PROVEDENÍ TELEFONNÍHO HOVORU 16
KONTAKTY 17
POUŽÍVÁNÍ KLÁVESNICE NA OBRAZOVCE 19
WI-FI
®
19
SMS AMMS 19
BLUETOOTH
®
21
FOTOGRAFOVÁNÍ ANAHRÁVÁNÍ VIDEA 22
POSLECH HUDBY 25
SYNCHRONIZACE INFORMACÍ 25
SPRÁVA ÚČTŮ 26
ODEBRÁNÍ ÚČTU 26
PRÁCE SOSTATNÍMI APLIKACEMI 27
PŘIZPŮSOBENÍ ZOBRAZENÍ 29
VYZVÁNĚNÍ 29
5
NASTAVENÍ SLUŽEB TELEFONU 30
OCHRANA ZAŘÍZENÍ 31
SPRÁVA APLIKACÍ 31
RESETOVÁNÍ ZAŘÍZENÍ 31
ZOBRAZENÍ ŠTÍTKU E-LABEL 32
DODATEK 32
DOPLNĚK PRO AKTIVNÍ VYUŽÍVÁNÍ PROHLÁŠENÍ OSHODĚ 37
LAND ROVER EXPLORE PROHLÁŠENÍ OSHODĚ 38
6
VÍTÁ VÁS
LAND ROVER EXPLORE:
OUTDOOROVÝ TELEFON
LandRoverExplore:Outdoorovýtelefonbylvyrobenktomu,abystemohliobjevovatdále,déleasvětšíjistotou.
Naleznětenovétrasy,cesty,pěšinyastezky,vykročteaoddejtesepobytuvpřírodě.Tentotelefonjevodotěsný,
otestovanýavyrobenýtak,abyodolalteplotámvhoráchipřisurfováníaabyvámjehobaterienezkrátila
znenadáníden–telefonExploresvámprožijedobrodružstvínaplno.
Využijtejehovylepšenémožnostiurčovánípolohyasnímače,zobraztevšena5”obrazovcesrozlišenímfullHD
avýbornoučitelnostínaslunečnímsvětleaporozumějtetaksvémuprostředíamístnímpodmínkám.Díkysilné
4000mAhbateriivydržípřitypickémpoužívánídvadnynebosiužijtedenplnýoutdoorovýchaktivitsezapnutou
obrazovkouaGPS.Využijtesvůjdenlépeaobjevujtedéle.
ŽivotnostbaterienacestáchjdedálezlepšitpřidánímdodávanéhobaleníAdventurePack(3620mAh).
URČEN PRO VENKOVNÍ PROVOZ
LandRoverExplore:Outdoorovýtelefonjedostatečněstylový,abyvásdoprovodilkaždýden,aletakédostatečně
odolný,abyzvládltěžkédny.Explorejedostatečněspolehlivýarobustní,abypřežilvášaktivníadobrodružný
životnístylvpřírodě.SestupněmkrytíIP68byltelefonExplorevyroben,abyzvládnulskutečnýživotvpřírodě.
Výšlapy,kdyteplotaroste.Jízdy,kdyjsoupěšinkyblátivéapřidajísemraky.Dlouhécestylanovkounazasněžené
vrcholy,kdyteplotyklesajípodnulu.Exploretambudeabudefungovat.
Abystemohliobjevovataprozkoumávatvíce,outdoorovýtelefonLandRoverExplorenabízí5”obrazovku
srozlišenímfullHDasklemCorning
®
Gorilla
®
optimalizovanýmprovšechnypodmínky,neustále.Vodotěsné
sledováníprstuzajišťuje,žefunkčnosttelefonuneníomezenapřisněženínebodešti.Exploresitakévýborně
rozumísrukavicemi,cožznamená,žesimůžeteponechatrucevtepleachránitjepředživlypřiužívánítelefonu.
7
BALÍČKY
RozšiřtezákladnífunkčnosttelefonuExplorespaletoujedinečnýchpřídavnýchbalíčků.Jevyvinutýtak,aby
muvyhovovalalibovolnásituace.Získátevícetoho,načemnejvícezáleží:baterie,připojení,podrobnémapy
aschopnostbezpečněpřipnouttelefonnavašekolonebotašku.Každýbalíčekjemožnépřipevnitkzadnístraně
telefonuExplore,zatímcojstenacestě,aumožňujevámjítdále,déleasvětšíjistotou.ObsaženýAdventurePack
vámposkytnelepšípřipojenídíkyvýkonnéexterníanténěGPSadalšíbaterii,kterátéměřzdvojnásobíživotnost
vašíbaterie.PřístupkpodrobnýmprvotřídnímtopograckýmmapámsrozšířenourealitouSkylinejekdispozici
díkyaplikaciViewRangeraumožnívámlépeporozumětokolnímuprostředí.Získátetakéochrannýkrytakarabinu,
pomocíkterémůžetekrytpřipnoutnataškunebobundu.
Dalšídostupnébalíčkyzahrnujívelkou4370mAhpřídavnoubateriiauniverzálníúchytnahorskékolo.Všeje
navrženotak,abystesvédobrodružstvímohliprožítnaplno.
CO NALEZNETE VKRABICI
- zařízení - nástrojprovyjmutíkaretSIM
- doplněkproaktivnívyužívání - karabina
- stručnápříručka - ochrannýkryt
- napájecíkabelUSBanabíjecíadaptér - zvýrobynasazenáochrannáfólienazařízení
JEDINEČNÝ SOFTWARE PRO ZAŘÍZENÍ
EXPLORE
DASHBOARD
AplikaceDashboard,kterájekdispozicipouzenatelefonechLandRoverExplore,shromažďujerelevantní
informaceosoučasnýchpodmínkách,napříkladinformacezesnímačůzařízeníExploreneboúdajeopočasíod
našehopartneraWorldWeatherOnline.
Tutoaplikacimátevždyporuceapomůževámnaplánovatsvédobrodružstvíaurčit,jakévybaveníbudetepotřebovat,
aumožnívámdržetkrokspočasím.Dalšíinformacenaleznetenastraně27.
VIEWRANGER
ViewRangerješpičkováaplikacemapování,kterájeoblíbenádíkynejširšínabídcemap(přes24zemí)avelkým
rozsahemtras(vsoučasnostivícenež200000),kterémůžetestáhnoutapoužítnacestách.Prémiovémapování
aplikaceViewRangernabízívysocepodrobnémapy,kterévámpomohoupřiorientacivterénu.Aplikace
ViewRangerjenazařízeníLandRoverExplorepředinstalovaná.Dalšíinformacenaleznetenastraně27.
NOČNÍ REŽIM
ZařízeníLandRoverExploreintegrujenočníltrčervenéhosvětla,kterýpomáhásnížitčaspotřebnýktomu,aby
sevašeočiposledováníjasnéhodisplejechytréhotelefonupřizpůsobilypřirozenémunočnímuviděnívtmavých
nebošpatněosvětlenýchpodmínkách.Dalšíinformacenaleznetenastraně14.
EXPLORE HUB
Aplikaceportáluskatalogemaplikací,kterévybraliaotestovaličlenovétýmuExplore.Zahrnujeřaduaplikací,které
vámpomohouobjevitspousturůznýchoutdoorovýchčinností.AplikaceExploreHubjekdispozicinavýchozí
obrazovce.
8
EXPLORE V KOSTCE
1. konektorsluchátek
2. 8Mpxpřednífotoaparát
3. sluchátko
4. mikrofony
5. reproduktor
6. slotproSIMkartu
7. slotprokartumicroSD
8. 16Mpxzadnífotoaparát
9. blesk
10. portUSB
11. tlačítkoprozvýšení
asníženíhlasitosti
12. vypínač
1
2
3
SIM microSD
/ SIM
4
DE
1
2
3
SIM microSD
/ SIM
4
DE
1 83
4 5
6
7
2
9
10
11
12
HLAVNÍ FUNKCE
VYPÍNAČ
- Stisknutímapřidrženímzařízenízapnete.
- Stisknutímapřidrženímotevřetenabídkumožnostítelefonu.
- Stisknutímuzamkneteneboodemkneteobrazovku,kdyžjezařízenínečinné.
TLAČÍTKO DOMŮ
- Umístěnouprostředpoddisplejem.Stisknutímsekdykolivrátítenavýchozíobrazovku.
- StisknutímapřidrženímtlačítkaDomůspustítehlasové vyhledávání Google
.
TLAČÍTKO PŘEDCHOZÍCH APLIKACÍ
- Umístěnovpravémdolnímrohudispleje.Stisknutímkdykoliotevřetenedávnopoužitéaplikace.
TLAČÍTKO ZPĚT
- Umístěnovlevémdolnímrohudispleje.Stisknutímsevrátítenapředchozíobrazovku.
- Stisknutímzavřeteklávesnicinaobrazovce.
TLAČÍTKO PRO ZVÝŠENÍ ASNÍŽENÍ HLASITOSTI
- Stisknutímhorníhotlačítkaprozvýšeníhlasitostizvýšítehlasitost,spodnímtlačítkemsníženíhlasitostihlasitost
snížítehlasitosthovoru,vyzvánění,médiínebobudíku.
- Chcete-lipoříditsnímekobrazovky,stiskněteapodržtesoučasněvypínačatlačítkosníženíhlasitosti.
- Vaplikacifotoaparátupořídítestisknutímněkteréhoztlačítekprozměnuhlasitostifotograi.
9
ZAČÍNÁME
VLOŽENÍ KARTY NANOSIM
1. Umístětezařízenínarovnýpovrchdisplejemnahoru.
OpatrnězasuňtenástrojprovyjmutíkaretSIMdo
otvoruslotuSIM,dokudneuvolnítepružinu.
2. Vysuňtepřihrádkuavšimnětesijejíorientace.
3. Podlenávodunavodítkupřihrádkyvložtekartu
nanoSIMdopřihrádkytak,abyzlatékontakty
směřovalynahoru.
4. Zasuňtepřihrádkuzpátkydozařízenívpůvodní
orientaci.
POZNÁMKA
- Ujistětese,žejeSIMkartavpřihrádcebezpečně
upevněna.
- ZatlačtepřihrádkuSIM,dokudjizcelanezasunete
doslotu.
- Chcete-likartunanoSIMvyjmout,použijtedodaný
nástrojprovyjmutíkaretSIM.Opatrnězatlačte
nástrojdootvoruslotuSIM,dokudneuvolníte
pružinu.Vysuňtepřihrádku.
- VyjmětekartunanoSIM.
- Dozařízeníjemožnévložit2kartynanoSIMnebo
1kartunanoSIMakartumicroSD
(závislénavariantě).
VLOŽENÍ PAMĚŤOVÉ KARTY
1. Umístětezařízenínarovnýpovrchdisplejemnahoru.Pomocídodanéhonástrojeprovyjmutíkaretotevřete
postranníkryt.
2. PodlevýšeuvedenéhoobrázkuvložtekartumicroSDdoslotupropaměťovoukartuzlatýmikontaktysměrem
nahoru.
POZNÁMKA
- Jemnězatlačtepaměťovoukartudovnitř,dokudneuslyšítezacvaknutí.
- Chcete-likartumicroSDvyjmout,zatlačtenahranupaměťovékartyauvolněteji.
- NetlačtenakartumicroSDsilou,protožebystemohlipoškoditpaměťovoukartuaslot.
REGISTRACE ZAŘÍZENÍ LAND ROVER EXPLORER
RegistracísvéhonovéhotelefonuLandRoversestanetesoučástíkomunity#ExploreMoreabudetezískávat
nejnovějšízprávy,aktualizaceanabídky.
1. KlepnětenazelenouikonuaplikaceRegistrovatnadomovskéstránce.
2. Postupujtepodlepokynůnadispleji.
NABITÍ BATERIE
Předprvnímpoužitímzařízeníbateriinabijte.
1. PřipojtenapájecíkabelUSBknabíjecímuadaptéru.
2. PřipojtenapájecíkabelUSBkzařízeníLandRoverExplore.
1
2
3
SIM microSD
/ SIM
4
DE
10
3. Zapojtenabíječkudovhodnésíťovézásuvky.Zobrazíseikonabaterieoznačující,žesezařízenínabíjí.
4. KdyžzelenákontrolkaLEDsvítízeleně,zařízeníjeplněnabité.NejprveodpojtekabelUSBodzařízeníapotom
odpojtenabíječkuodzásuvky.
POZNÁMKA
- PoužívejtepouzenabíječkyakabelyschválenéspolečnostíLandRover.Neschválenévybavenímůžezařízení
poškoditnebozpůsobitexplozibaterií.
- PřipřipojeníkabeluUSBnepoužívejtenadměrnousíluadejtesipozornasprávnouorientacizástrčky.
- Pokudbystesepokoušelizapojitkonektornesprávně,mohlobydojítkpoškození.Pokusonesprávnézasunutí
konektorumůžezpůsobitpoškození,nakterésenevztahujezáruka.
PŘÍDAVNÉ BATERIE
Telefonabateriejsoupřipevněnymagnety,kteréjimumožňujísepřipáduoddělit.Účelemjezabráněnítrvalým
následkům,kekterýmbymohlodojítvpřípaděpevnéhopřipojení.
DŮLEŽITÉ INFORMACE OBUDOUCÍM VYUŽITÍ BATERIE
Je-libateriezcelavybitá,vašezařízenísenemusízapnouthnedpozahájenínabíjení.Dřívenežsezařízenípokusíte
zapnout,nechtebateriiněkolikminutnabíjet.Běhemtétodobysenadisplejinemusízobrazovatanimacenabíjení.
Kdyžjeúroveňnabitíbaterienízká,zařízenízobrazívýstrahuaLEDindikátorserozsvítíčerveně.Kdyžjebaterie
téměřvybitá,zařízeníseautomatickyvypne.
POZNÁMKA
- Dobanabíjeníbateriezávisínaokolníteplotěanastáříbaterie.
NABÍJENÍ TELEFONU PŘES PŘÍDAVNOU BATERII
Telefonapřídavnýdoplněkproaktivnívyužívánínebobateriilzenabíjetspolusezařízenímnebosamostatně.
Chcete-litelefonnabítspoluspřídavnoubaterií,připevnětepřídavnoubateriianabíjecíadaptérzasuňtedo
baterienamístotelefonu.Telefonabateriesebudounabíjetsoučasně,aždokudsezcelanenabijí.
Pokudjepřídavnábateriepřipojenaktelefonuaadaptérzapojítedotelefonu,nabijesepouzetelefon.Přídavná
bateriesenenabije.
Přídavnébaterielzenabíjetsamostatně.PřinabíjeníbudeLEDindikátorblikatčerveně,podokončenínabíjeníse
rozsvítízeleně.Nedoporučujemepřídavnébaterieponechatpřipojenépodokončenínabíjení.
BARVA LED INDIKÁTORU AUKAZATELE STAVU
PřinabíjeníbudeLEDindikátorpřídavnébaterieblikatčerveně,podokončenínabíjeníserozsvítí
zeleně.BarvyLEDindikátorunapřídavnébateriiznázorňujíaktuálnístavnabitípřídavnébaterie.
zelená 100–70% červená 40–10%
oranžová 70–40% blikáčerveně <10%
11
POZNÁMKA
- NěkteréaplikaceumožňujípřizpůsobitbarvuLEDindikátoruzařízeníExplore(kterýsenacházívpravém
hornímrohunapřednístranězařízení).TytoaplikacenemohouměnitbarvyLEDindikátorůpřídavnébaterie.
JAK ZPŘÍDAVNÝCH BATERIÍ VYUŽÍT CO NEJEFEKTIVNĚJI
Abystepřídavnoubateriivyužilicomožnánejefektivněji,zcelanabijtejaktelefon,takpřídavnoubaterii,avydejte
senacestuspřipojenoubaterií.Nejprvesevybijepřídavnábaterieapotésezačnevybíjetinterníbaterietelefonu
Explore.
ZAPNUTÍ/VYPNUTÍ ZAŘÍZENÍ
ZAPNUTÍ
1. Přidržtevypínačstisknutý.Kdyžzařízenípoprvézapnete,zobrazíseuvítacíobrazovka.Nejprvevybertepreferovaný
jazykapotéklepnutímnaZAČÍNÁMEpokračujtevprocesunastavení.
POZNÁMKA
- PokudjenaSIMkartězapnutaochranakódemPIN,požádávástelefonještěpředzobrazenímuvítacíobrazovky
ozadáníkóduPIN.
- JevyžadovánopřipojeníWi-Fi
®
nebodatovépřipojení.Nastavenímůžetepřeskočitadokončithojindy.Kvyužívání
některýchslužebGooglenatomtozařízeníAndroid
jenutnýúčetGoogle.
VYPNUTÍ
1. StisknutímapřidrženímvypínačeotevřetenabídkuMožnosti.
2. KlepnětenamožnostVypnout.
DOTYKOVÝ DISPLEJ
AKCE NA DOTYKOVÉM DISPLEJI
- Klepnutí: Konečkemprstumůžetevybratpoložku,potvrditvýběrnebospustitaplikaci.
- Klepnutí a podržení: Klepnětekonečkemprstunapoložkuadržtejistisknutou,dokuddisplejnezareaguje.
Chcete-linapříkladnaaktivníobrazovceotevřítnabídkumožností,klepnětenaobrazovkuadržtejistisknutou,
dokudtelefonnezobrazínabídku.
- Přijetí: Posuňteprstemsvislenebovodorovněpoobrazovce.Napříkladpropřechodmeziobrázkypřejeďte
vlevo nebo vpravo.
- etažení: Pokudchcetepřesunoutpoložku,klepnětenaniapodržteji.Potépoložkupřetáhnětenalibovolnou
částobrazovky.
VÝCHOZÍ OBRAZOVKA
Výchozíobrazovkajevýchozímbodempropřístupkfunkcímvašehozařízení.Zobrazujísenaníikonyaplikací,
widgety,zástupciadalší.Lzejipřizpůsobitrůznýmitapetamiaupravittak,abyzobrazovalavašepreferované
položky.
1. Ikonaspouštěčejemalábílášipka
uprostředdisplejenadspodnímřádkemikon.Přejetímpřestutoikonu
zobrazítevšechnynainstalovanéaplikace.
12
POZNÁMKA
- DlouhýmstisknutímprázdnéhomístanavýchozíobrazovcezobrazítezástupceaplikacíTapety,Widgety
aNastavení.
ZAMYKÁNÍ AODEMYKÁNÍ DISPLEJE
ZAMYKÁNÍ DISPLEJE
1. Pokudjevašezařízenízapnuté,stisknutímvypínačezamknetedisplej.Zprávyahovorymůžetepřijímatise
zamknutýmdisplejem.
2. Je-lizařízenípourčitoudobuvklidu,displejsezamkneautomaticky.Délkutétoprodlevymůžetenastavit
vNastavení.
ODEMYKÁNÍ DISPLEJE
1. Stisknutímvypínačeprobuďtedisplej.Potépřetáhněteikonuzámku nahoru,čímžobrazovkuodemknete.
MůžebýtnutnézadatsvůjobrazecnebokódPIN,pokudjstejenastavili.
2. Chcete-lispustitaplikaciFotoaparátpřímozezamčenéobrazovky,přetáhněteikonufotoaparátu
nahoru.
3. Chcete-lipoužíthlasové vyhledávání Google
(takéznámépodnázvem OKGoogle)přímozezamčenéobrazovky,
přetáhněteikonumikrofonu nahoru.
POZNÁMKA
- Pokudjstenastavilizámekdispleje,telefonvásvyzvekodemknutídispleje.Podrobnostinajdetevčásti
„Ochranamobilníhotelefonuzámkemdispleje“na“ProtectingyourDeviceWithAScreenLock”onstraně31.
DISPLEJ
ROZVRŽENÍ DISPLEJE
UPOZORNĚNÍ AINFORMACE OSTAVU
Vhorníčástivšechobrazovekjezobrazenstavovýřádek.Najdetenaněmikonyupozornění,napříkladnazmeškané
hovorynebopřijatézprávy(vlevo)aikonystavutelefonu,napříkladstavubaterie(vpravo),aaktuálníčas.
ikonyupozornění stavovéikony
13
STAVOVÉ IKONY
4G Připojenokmobilnísíti4G Žádnýsignálmobilnísítě
LTE PřipojenokmobilnísítiLTE
Vibračnírežim
3G Připojenokmobilnísíti3G
Polohanalezena
G PřipojenokmobilnísítiGPRS
Indikátorbaterie,bateriejeplněnabitá
E PřipojenokmobilnísítiEDGE
Bateriesenabíjí
H PřipojenokmobilnísítiHSDPA
JezapnutorádioFM
H+ PřipojenokmobilnísítiHSPA+
RežimVletadle
R Roaming
PřipojenoksítiWi-Fi
Sílasignálumobilnísítě PřipojenokzařízeníBluetooth
JezapnutáfunkceNFC
Jenastavenbudík
IKONY UPOZORNĚNÍ
Nová e-mailová zpráva Zmeškanýhovor
Nová textová zpráva Jezapnutreproduktor
Nadcházejícíudálost Mikrofontelefonujevypnut
Bylpořízensnímekobrazovky Stahovánídat
Synchronizacedat Jsoupřipojenasluchátka
Potížespřihlášenímnebosynchronizací
PANEL UPOZORNĚNÍ
Zařízenízobrazíupozornění,kdyžobdržítenovézprávy,mátezmeškanýhovor,blížísenadcházejícíudálostadalší.
Otevřenímpaneluupozorněnízobrazítesváupozornění.
OTEVŘENÍ PANELU UPOZORNĚNÍ
1. Kdyžsenařádkuupozorněníobjevíikonanovéhoupozornění,přetáhnutímprstuzhorníhookrajeobrazovky
otevřetecelýpanelupozornění.Tomůžeteprovéstbezohledunato,zdajetelefonuzamknutýneboodemknutý.
2. Zezamčenéobrazovkymůžeteupozorněníotevříttak,ženanějdvakrátklepnete.
3. Chcete-liupozorněnírovnouzavřít(bezprohlédnutí),přidržteupozorněníapřetáhnětehovlevonebovpravo.
SBALENÍ PANELU UPOZORNĚNÍ
1. Chcete-lizavřítpanelupozornění,posuňtespodníčástpanelusměremnahoru.
14
ZAPNUTÍ NOČNÍHO REŽIMU AREŽIMU
PRO RUKAVICE
ZAPNUTÍ NOČNÍHO REŽIMU
Kdispozicijsoudvěvariantynočníhorežimu:
První možnost – okamžitá aktivace nočního režimu.
1. Odemknětedisplejarozbaltepanelupozorněnídvojitýmpřetáhnutímprstuzhorníčástidispleje.
2. KlepnutímnaNoc aktivujetečervenýrežim.
3. Opětovnýmklepnutímaktivujeteoranžovýrežim .
Druhá možnost – noční světlo pro načasované noční režimy:
1. Odemknětedisplejarozbaltepanelupozorněnípřetáhnutímprstuzhorníčástidispleje.
2. KlepnětenaNastavení
vpravémhornímrohu.
3. PřejeďtedolůaklepnětenaNočnísvětlo.
4. Vtétonabídcemůžetevytvořitčasovýplánproaktivacitétofunkcenebojizapnoutmanuálněklepnutímna
přepínačvpravo
.Opětovnýmklepnutímfunkcivypnete.
ZAPNUTÍ REŽIMU PRO RUKAVICE
Chcete-lidisplejpoužívatsrukavicemi,zapněterežimprorukavice:
1. Odemknětedisplejarozbaltepanelupozorněnípřetáhnutímprstuzhorníčástidispleje.
2. KlepnětenaNastavení
vpravémhornímrohu.
3. PřejeďtedolůaklepnětenapoložkuNastavenízobrazení.
4. RežimzapneteklepnutímnamožnostRežimprorukavice
.Opětovnýmklepnutímfunkcivypnete.
APLIKACE NA VÝCHOZÍ OBRAZOVCE
AWIDGETY
PŘIDÁNÍ NOVÉ POLOŽKY NA VÝCHOZÍ OBRAZOVKU
1. Navýchozíobrazovcepřetáhnětemaloušipkusměřujícínahoru směremnahoru.Stiskněteapřidržteaplikaci,
kterouchcetepřidatnavýchozíobrazovku.
2. Přetáhněteikonuaplikacenahorunavýchozíobrazovku.Proumístěníikonynaaktuálnípanelvýchozíobrazovky
musíbýtkdispozicidostatekmísta.Pokudjeprvnístránkaplná,přetáhněteikonukpravémuokrajidispleje
aumístětejinadalšístránku.
PŘEMÍSTĚNÍ POLOŽKY NA VÝCHOZÍ OBRAZOVCE
1. Přidržteikonuaplikacenavýchozíobrazovce,dokudseikonanezvětší.
2. Nezvedejteprst,přetáhněteikonunapožadovanémístonaobrazovceauvolněteprst.
ODSTRANĚNÍ POLOŽKY NA VÝCHOZÍ OBRAZOVCE
1. Přidržteikonuaplikacenavýchozíobrazovce,dokudseikonanezvětší.
2. BezzvednutíprstupřetáhnětepoložkunanadpisOdstranitvhorníčástidisplejeapotéjiuvolněte.
WIDGETY
Widgetsloužíknáhleduaplikacenebojejímuspuštění.Widgetymůžetepřidávatnavýchozíobrazovkujakoikony
nebooknasnáhledem.Několikwidgetůjenainstalovánonazařízenívevýchozímnastaveníadalšíwidgetysi
můžetestáhnoutzobchodu Google Play
.
15
PŘIDÁNÍ WIDGETU
1. Stiskněteapodržtevýchozíobrazovku.
2. Klepnětenawidgetyprozobrazenídostupnýchwidgetů.
3. Přetáhnětepožadovanýwidgetnavýchozíobrazovku.
ODSTRANĚNÍ WIDGETU
1. Přidržteikonuwidgetunavýchozíobrazovce,dokudseikonanezvětší.
2. BezzvednutíprstupřetáhnětepoložkunaOdstranitapotéjiuvolněte.
SLOŽKY
VYTVOŘENÍ SLOŽKY
Přetáhněteikonunebozástupceaplikaceauvolnětejinaikonějinéaplikace.
PŘEJMENOVÁNÍ SLOŽKY
1. Klepnutímnasložkujiotevřete.
2. Zadejtenázevnovésložkyvzáhlaví.
3. PotéstisknětetlačítkoZpět
.
TAPETY
ZMĚNA TAPETY
1. Klepněteapřidržteprázdnémístonavýchozíobrazovce.
2. KlepnětenaTapety.
3. Procházejtedostupnémožnosti.
4. Klepnětenaobrázek,kterýsevámlíbí,astiskněteNastavittapetu.
5. Nynímůžetezvolit,zdahochcetenastavitjakotapetuzamykacíobrazovky,tapetuvýchozíobrazovkynebo
jakoobě.
PŘENÁŠENÍ MÉDIÍ ZVAŠEHO ZAŘÍZENÍ ANA NĚJ
OblíbenouhudbuaobrázkymůžetemezizařízenímapočítačempřenášetvrežimumediálníhozařízeníMTP.
1. NejprvepřipojtezařízeníkpočítačipomocínapájecíhokabeluUSB.
2. PotéotevřetepanelupozorněníaklepnětenamožnostipřipojeníUSB.Klepnětenapřenossouborůproaktivaci
režimuMTP.
3. Vašezařízeníbysemělozobrazitjakovyměnitelnézařízeníazobrazitvnitřníúložištětelefonu.Pokudjevložena
paměťovákartamicroSD,zobrazísetaké.Zkopírujtepožadovanésouborynazařízení.
POZNÁMKA
- PokudpoužívátepočítačApple
®
iMac
®
,jenutnéstáhnoutovladačezadresy:
http://www.android.com/letransfer/
16
POUŽITÍ REŽIMU VLETADLE
Naněkterýchmístechmůžebýtnutné,abystevypnulidatovápřipojení.Místovypnutízařízenínaněmmůžetenastavit
režimVletadle.
1. Stisknětevypínač.
2. Otevřetepanelupozorněnípřejetímzhorníčástidispleje.
3. Posunutímdopravazískátepřístupkedruhéstráncemožností.KlepnětenaRežimVletadle.Ikonasezvýrazníbíle.
4. PopřípaděmůžetepomocínabídkyNastavenívybratnabídkuDalšíaposunoutpřepínačrežimuVletadle
doprava
.
PROVEDENÍ TELEFONNÍHO HOVORU
Ztelefonumůžetevolatněkolikazpůsoby:
1. Buďmůžetezadatčíslonaklávesnici.
2. Nebomůžetečíslovybratvseznamukontaktů,nawebovéstráncenebovdokumentustelefonnímčíslem.
POZNÁMKA
- Kdyžhovoříte,příchozítelefonníhovorylzepřijmoutneboodeslatdohlasovéschránky.
- Můžeteuspořádatikonferenčníhovorysněkolikaúčastníky.
PROVEDENÍ TELEFONNÍHO HOVORU POMOCÍ KLÁVESNICE
1. Navýchozíobrazovceklepnětena .Potéklepnětena prozobrazeníklávesnice.
2. Zadejtetelefonníčíslonanumerickéklávesnici.
3. Pozadáníčíslanebovýběrukontaktuklepnětena .
Tip:VašezařízenípodporujefunkciinteligentníhovytáčeníSmartDial.Přizadáváníčíslanaklávesnicifunkce
SmartDialautomatickyprohledávávášseznamkontaktůazobrazujekontakty,kteréodpovídajízadanémučíslu.
Chcete-lizobrazitdalšímožnéshody,zavřeteklávesnici.
PROVEDENÍ TELEFONNÍHO HOVORU ZKONTAK
1. Navýchozíobrazovcepřetáhnětemaloušipkusměřujícínahoru směremnahoru.KlepnětenakartuKontakty
,čímžzobrazíteseznamkontaktů.Naklávesniciklepnětenakartu ,abystezobraziliseznamkontaktů.
2. Vseznamuvybertekontakt.
3. Klepnutímnatelefonníčíslozačnetekontaktuvolat.
PROVEDENÍ TELEFONNÍHO HOVORU ZVÝPISU VOLÁNÍ
1. Navýchozíobrazovcepřetáhnětemaloušipkusměřujícínahoru směremnahoru.Klepnětena apoténa
.Zobrazísevýpisvolánísposlednímiuskutečněnýmihovory.
2. Vybertekontaktzeseznamuazavolejtemuklepnutímnaikonu .
PŘIJÍMÁNÍ AODMÍTÁNÍ TELEFONNÍCH HOVORŮ
Kdyžvámněkdovolá,naobrazovcepříchozíhohovorusezobrazíidentikacevolajícího(není-liskryta).
17
1. Chcete-lihovorpřijmout,klepnětenaikonu apřetáhnětejidoprava .
2. Chcete-lihovorodmítnout,klepnětenaikonu apřetáhnětejidoleva .
3. Chcete-liodmítnouthovoramístotohovolajícímuodeslatzprávu,klepnětenaikonu apřetáhnětejinahoru .
PotévybertejednuzdostupnýchpřipravenýchzprávneboklepnětenamožnostNapsat vlastní,abystezprávu
napsalisami.
POZNÁMKA
- Kdyžklepnetenaikonu ,zmizízobrazovky.
UKONČENÍ TELEFONNÍHO HOVORU
Běhemhovorumůžetezavěsitklepnutímnaikonu .
USPOŘÁDÁNÍ KONFERENČNÍHO HOVORU
Díkyfunkcikonferenčníhovolánímůžetevytvořithovorsvíceúčastníky.
1. Chcete-lizahájitkonferenčníhovor,zadejtečísloprvníhoúčastníkaaklepnětenaikonu prouskutečněníhovoru.
2. Běhemhovorusprvnímúčastníkemklepnětena>Přidathovorazadejtetelefonníčíslodalšíhoúčastníka.
3. Klepnětena nebovybertekontaktzvýpisuvoláníneboseznamukontaktů.Prvníhovorbudeautomaticky
přidržen.
4. Pospojenídalšíhohovoruklepnětenamožnost>Spojithovory.
5. Chcete-lipřidatdalšíosoby,klepnětenaikonu
aopakujtekroky2až4.
6. Chcete-likonferenčníhovorukončitavšechnyúčastníkyodpojit,klepnětenaikonu .
POZNÁMKA
- Kontaktujtesvéhooperátorasítě,abystezjistili,zdasmlouvaprovašezařízenípodporujekonferenčníhovory
akolikúčastníkůlzepřidat.
PŘEPÍNÁNÍ MEZI TELEFONNÍMI HOVORY
Pokudobdržítepříchozíhovorběhemaktuálníhotelefonníhohovoru,jemožnémezitěmitodvěmahovorypřepínat.
1. Kdyžobahovoryprobíhají,klepnětenajménokontaktunebotelefonníčíslovlevémdolnímrohudispleje.
2. Vášaktuálníhovorbudepřidrženabudetespojenisdruhýmvolajícím.
KONTAKTY
AplikaceKontaktyumožňujeukládataspravovatinformaceokontaktech.
OTEVŘENÍ APROHLÍŽENÍ KONTAK
Chcete-liotevřítaplikaciKontaktyazobrazitvšechnynačtenékontakty,postupujtetakto:
1. Navýchozíobrazovcepřetáhnětemaloušipkusměřujícínahoru směremnahoru.Klepnětenakartu
Kontakty
.
2. KlepnětenaVŠE.
18
POZNÁMKA
- Vašekontaktysezobrazípodleabecedyvposuvnémseznamu.
KOPÍROVÁNÍ KONTAK
SvékontaktyuloženévúčtuGooglenebozeSIMkarty,vnitřnípamětinebopaměťovékartymůžetekopírovat.
1. Vseznamukontaktůklepnětenamožnost
apoténamožnostImport/Export.
2. Použijteněkterýznásledujícíchpostupů:
CHCETE-LI IMPORTOVAT KONTAKTY ULOŽENÉ VÚČTU GOOGLE:
1. VyberteosobníúčetaklepnětenatlačítkoDalší.
2. Určete,kamchcetekontaktyimportovat,aklepnětenatlačítkoDalší.
3. PotévybertepožadovanékontaktyaklepnětenatlačítkoOK.
IMPORT KONTAKTŮ ZE SIM KARTY:
1. KlepnětenaUSIMapoténatlačítkoDalší.
2. Určete,kamchcetekontaktyimportovat,aklepnětenatlačítkoDalší.
3. PotévybertepožadovanékontaktyaklepnětenatlačítkoOK.
IMPORT KONTAKTŮ ZVNITŘNÍ PAMĚTI NEBO PAMĚŤOVÉ KARTY:
1. KlepnětenavnitřnísdílenéúložištěnebokartuSD.
2. Určete,kamchcetekontaktyimportovat,aklepnětenatlačítkoDalší.
POZNÁMKA
- PokudexistujevícenežjedensouborvCard,budetemítmožnostbuďimportovatjedensouborvCard,více
souborůvCardnebovšechnysouboryvCard.
PŘIDÁNÍ KONTAKTU
1. Vseznamukontaktůklepnětenaikonu ,abystepřidalinovýkontakt.
2. Potéuložtekontaktníinformaceklepnutímnamožnostpřidánínovéhokontaktu .
PŘIDÁNÍ KONTAKTU DO OBLÍBENÝCH:
1. Klepnětenakontakt,kterýchcetepřidatkoblíbeným.
2. Klepnětenaikonu
vlevémhornímrohuaikona sevyplníbíle.
ODSTRANĚNÍ KONTAKTU
1. Vseznamukontaktůklepnětenakontakt,kterýchceteodstranit.
2. Klepnětena
>Odstranit.
3. ZnovuklepnětenaOdstranitpropotvrzení.
21
- Automaticky načítat: Zaškrtnětepolíčko,abysteautomatickynačítalizprávy.
- Automaticky načítat při roamingu: Zaškrtnětepolíčko,abysteautomatickynačítalizprávyběhemroamingu.
- Limit velikosti: NastavtemaximálnílimitMMSnakonverzaci.
UPOZORNĚNÍ KONFIGURACE NASTAVENÍ UPOZORNĚNÍ
- Upozornění na zprávy: Zaškrtnětepolíčko,abysenastavovélištězobrazovalaupozornění.
- Ztlumit: DočasnězablokujeSMSneboMMS.
- Zvuk: Nastavtevyzváněcítónpronovézprávy.
- Vibrace: Zaškrtnětepolíčko,abyzařízenípřipříjmunovézprávyvibrovalo.
- Vyskakovací upozornění: Zaškrtnětepolíčko,abysepropushupozorněnízobrazovalovyskakovacíokno.
OBECNÉ OBECNÉ NASTAVENÍ ZPRÁV
- Velikost písma zprávy: Zadejtevelikostpísmazprávy.
- Mazat staré zprávy: Zaškrtnětepolíčko,abysepřidosaženílimitůmazalystarézprávy.
- Limit textových zpráv: Nastavtemaximálnílimittextovýchzprávnakonverzaci.
- Limit multimediálních zpráv: NastavtemaximálnílimitMMSnakonverzaci.
- Informační služba: NastavtemaximálnílimitMMSnakonverzaci.
- Zapnout WAP PUSH: Zaškrtnětepolíčko,abystemohlipřijímatslužebnízprávy.
BLUETOOTH
®
ZařízeníLandRoverExplorejevybavenofunkcíBluetooth.Dokáževytvořitbezdrátovépřipojenísjinýmizařízeními
Bluetooth,takžemůžetesdíletsouboryspřáteli,hovořitsnáhlavníhands-freesoupravouBluetoothnebodokonce
ipřenášetfotograezvašehozařízenídoPC.
PokudpoužíváteBluetooth,mějtenapaměti,žejenutnésenacházetdo10metrůodzařízeníBluetooth,kekterému
sechcetepřipojit.SpojeníBluetoothmohourušitpřekážky,jakojsounapříkladstěny,nebojináelektronickázařízení.
ZAPNUTÍ FUNKCE BLUETOOTH
1. Navýchozíobrazovcepřetáhnětemaloušipkusměřujícínahoru směremnahoru.KlepnětenaNastavení .
2. VčástiBezdrátovépřipojeníasítěklepnětenamožnostBluetoothanastavtehodnotuZapnuto
.
KdyžjefunkceBluetoothzapnuta,zobrazujesenařádkuupozorněníikonaBluetooth.
PÁROVÁNÍ APŘIPOJOVÁNÍ KZAŘÍZENÍ BLUETOOTH
FunkceBluetoothseběžněpoužívák:
- připojeníhands-freezařízeníBluetooth,
- použitímononebostereosluchátekBluetooth,
- vzdálenéovládánípřehrávánípřesnáhlavnísoupravuBluetooth.
NežzačnetefunkciBluetoothpoužívat,musítenásledujícímpostupemspárovatsvézařízenísdruhýmzařízením
Bluetooth:
1. Zkontrolujte,zdajevzařízenízapnutafunkceBluetooth.
2. ZařízeníLandRoverExplorepakvyhledázařízeníBluetoothvdosahu(můžetetakéklepnoutnamožnost
>
Obnovit).
3. Klepnětenazařízení,kteréchcetespárovat.
4. Postupujtepodlepokynůnaobrazovce,abystepřipojenídokončili.
23
POZNÁMKA
- Klepnutímnaobrazovkumůžetezaostřitnaurčitouoblast.
- Chcete-lisubjektpřiblížitnebooddálit,roztáhnětenebostáhnětedisplejdvěmaprsty.
- Klepnutímnaikonu
můžetezměnitnastavenífotoaparátu,jakojerežimscény,nastavitsamospoušť,upravit
vyváženíbílé,upravitvlastnostisnímku,upravitredukciblikánínebonastavitcitlivostISO.
PŘEDNASTAVENÉ REŽIMY SCÉN
- Můžetevybratjednotlivérežimyscén,kteréjsoupřednastavenypropořízenítohonejlepšíhomožnéhosnímku
vrůznýchpodmínkách.Klepnětena
apoténaRežimscény.Vyberterežimscény,kterýchcetepoužít:
Noční  Divadlo Světlosvíčky
Západslunce Pláž Krajina
Párty Sníh
Portrét Ohňostroj
Sport Nočníportrét
- Panoramatickýrežimumožňujepořizovatširokésnímkyotevřenékrajiny.Tutofunkcimůžeteaktivovatpoklepnutí
naikonuAvlevémhornímrohu.
- KlepnutímnamožnostHDRnahlavníobrazovcefotoaparátuzapnetefunkciHighDynamicRange.Tajeideální
proscénysextrémnímikontrasty,jakojesvětléoknovtmavémístnosti.
MANUÁLNÍ NASTAVENÍ
- ISOmůžeteručněvybratvrozsahuod100do1600nebohoponechatvrežimuAuto,čímžzískátevětšíkontrolu
nadúrovníosvětlení.Klepnětenaikonu
apoténaikonu .PřejdětedolůavybertemožnostISO.Nižšíčíslo
(např.100)umožňujezachytitvícesvětla.Vyššíčíslo(např.1600)umožňujezachytitméněsvětla.
- Kompenzaciexpozicemůžetemanuálnězměnitvrozsahu–3až+3avyváženíbílémůžetezměnitv7různých
stupních.Klepnětenaikonu apoténamožnostExpozice.Hodnota0nebudemítúčinek.Hodnoty−1a−2
redukujísvětlovescénách,kteréjsoupřílišsvětlé.Hodnoty+1a+2přidajísvětlodoscény.
- Vyváženíbílépomáhávyvážitbarvyvescéněsumělýmosvětlením.Klepnětenaikonu apoténaVyváženíbílé.
PROHLÍŽENÍ FOTOGRAFIÍ
Chcete-liprohlížetfotograe,klepnětenakulatouikonunáhleduposledníhopořízenéhosnímkuvpravémdolnímrohu.
POZNÁMKA
- Chcete-lipřejítzpětnapohledfotoaparátu,stisknětetlačítkoZpět nebopřejeďtedoprava,dokudseobrazovka
snímáníznovunezobrazí.
ÚPRAVY ASDÍLENÍ FOTOGRAFIÍ
Připrocházenífotograemimátekdispozicinásledujícímožnosti:
- Ladění snímku
Poklepnutínatutomožnostmůžetefotograeupravovatpomocíceléškálydostupných
funkcí.
- Sdílet
Poklepnutínatutomožnostmůžetefotograesdíletvmnoharůznýchaplikacíchdostupnýchvzařízení.
- Odstranit Klepnutímnatototlačítkomůžeteodstranitfotograe,kteréjižnechcete.
- Zobrazit informace Klepnutímzobrazíteinformaceosnímku.
NAHRÁNÍ VIDEA
1. Navýchozíobrazovcepřetáhnětemaloušipkusměřujícínahoru směremnahoru.Klepnětenamožnost
Fotoaparát
.
2. Jednodušekliknětenatlačítko
anahráváníseautomatickyzahájí.
24
3. Běhemnahrávánímátenásledujícímožnosti:
- Zoommůžetenastavitposunutímprstůksoběneboodsebe.
- Klepnutímna nahrávánípozastavíte.Připozastavenísezobrazíikona .Chcete-lipokračovat,klepnětenani.
- Klepnutímna
nahráváníukončíte.
PROHLÍŽENÍ VIDEOSOUBORŮ
Chcete-lizobrazitvideoponahrávání,klepnětenaminiaturuzaznamenanéhovideavlevédolníčástidispleje.
Klepnutímna
svévideospustíte.
POZNÁMKA
- Klepnutímnamožnost
zobrazítevšechnysvéfotograeavidea.
POŘÍZENÍ PANORAMATICKÉ FOTOGRAFIE
1. Navýchozíobrazovcepřetáhnětemaloušipkusměřujícínahoru směremnahoru.Klepnětenamožnost
Fotoaparát
.
2. KlepnutímnaikonuAvlevéhorníčástiobrazovkyvstuptedonabídkyrežimůavybertePanorama.
3. Klepnutímna
začnetepořizovatfotograi.
4. Vybertesměr,vekterémchcetefotograizaznamenat.Potépomaluotáčejtezařízenípožadovanýmsměrem.
5. Kdyžprůvodcesnímánímdosáhnekoncovéhobodu,snímánískončí.
Tip:Chcete-lisnímánípřerušit,jednodušeklepnětena
.
POUŽITÍ FOTOGRAFIÍ
AplikaceFotograe automatickyvyhledáobrázkyavideauloženánavašemzařízenínebonapaměťovékartě.
Můžetevybratalbumnebosložkuapřehrátjejakoprezentacinebomůžetevybratpoložky,kteréchcetesdílet
sjinýmiaplikacemi.
OTEVÍRÁNÍ FOTOGRAFIÍ
Navýchozíobrazovcepřetáhnětemaloušipkusměřujícínahoru směremnahoru.Otevřeteaplikaciklepnutím
na
.AplikaceFotkyGooglerozdělujefotograeavideadokategoriípodlemístauloženíaukládátytosoubory
dosložek.Chcete-lizobrazitfotograeavideavesložce,klepnětenasložku.
ZOBRAZENÍ FOTOGRAFIE
1. Vefotograíchklepnětenasložku,abystezobrazilifotograeuvnitř.
2. Chcete-liněkteroufotograizobrazitnaceléobrazovce,klepnětenani.Přizobrazenínacelouobrazovku
můžetepřejetímdolevanebodopravazobrazitpředchozínebodalšífotograi.
3. Chcete-lifotograizvětšit,položtedvaprstynamísto,kteréchcetezvětšit,aposuňtejeodsebe.Vrežimu
zvětšenímůžetezobrazeníposouvatprstemnahoru,dolů,dolevanebodoprava.
Tip:Prohlížečfotograípodporujefunkciautomatickéhootáčení.Přiotočenízařízeníseobrázeksámpřizpůsobí
otočení.
OŘÍZNUTÍ OBRÁZKU VE FOTOGRAFIÍCH
1. Připrohlíženíobrázku,kterýchceteoříznout,klepnětena .
2. PotéklepnětenaOříznout/Otočit
apomocínástrojeprooříznutívybertečástfotograe,kterouchceteoříznout.
- Obrázekmůžetepřetahovatpouchopenízaoblastoříznutí.
- Přetaženímhranyneborohunástrojeprooříznutímůžeteměnitvelikostobrázku.
3. KlepnětenaHotovo>Uložituložíteoříznutýobrázek.
- Chcete-lizměnyzrušitazačítznovu,klepnětenatlačítkoObnovitnebonatlačítkoZpět .
25
POSLECH HUDBY
ZPCdovašehozařízeníLandRoverExploremůžetepřenésthudebnísoubory,abystemohliposlouchathudbu,aťuž
jstekdekoli.
KOPÍROVÁNÍ HUDBY DO ZAŘÍZENÍ
1. PřipojtezařízeníkpočítačipomocídodanéhonapájecíhokabeluUSB.
2. VpočítačipřejdětenajednotkuUSBaotevřeteji.
3. Vytvořtevhlavnímadresářizařízenísložku(napříkladHudba).
4. ZkopírujtehudbuzPCdonovésložky.
5. AbystezařízeníodPCbezpečněodpojili,počkejte,dokudsevšechnahudbanezkopíruje,apotéjednotku
odpojtepodlepožadavkůoperačníhosystémuPC.
POZNÁMKA:
- Dokonektoruprosluchátkamůžeproniknoutvoda,vdůsledkučehožsemohouvnitřníkontaktychovat,jako
bybylapřipojenasluchátka.Pokudktomudojde,jednoduševoduodstraňteprudkýmpohybemanechte
zařízení
uschnoutpodobu20minut.Pokudjstezařízeníupustilidoslanévody,nejprvehoomyjtečistouvodou
anechtehouschnout.
POSLECH RÁDIA FM
PomocíaplikacerádiaFMmůžeteposlouchatrozhlasovéstaniceFM.
LADĚNÍ RÁDIA FM
1. Navýchozíobrazovcepřetáhnětemaloušipkusměřujícínahoru směremnahoru.VyberteFMrádio
připojtesluchátkakekonektoruzvuku.
Použijteněkterouznásledujícíchmožností:
- Chcete-lizvolitrozhlasovoustanici,klepnětena
apočkejtenadokončenískenování.Klepnětenastanici,
kterouchceteposlouchat.
- Chcete-liručněnaladitfrekvenci,klepnětenašipky .
- Chcete-lipřidataktuálnírozhlasovoustanicidoseznamuoblíbenýchpoložek,klepnětena
.
- Chcete-lirádioFMztlumit,klepnětena
.Hlasitostobnovíteklepnutímna .
- Chcete-lipřehrávatrádiozreproduktoru,klepnětena >Reproduktor.
- Chcete-lirádiovypnout,odpojtenáhlavnísoupravu.
NAHRÁVÁNÍ RÁDIA FM
Chcete-lizačítnahrávatrádio:
- Klepnětenaikonu
azačnětenahrávatrádio.
- NahrávánírádiaukončíteklepnutímnatlačítkoUkončitzáznam.Souborzlikvidujtenebohouložte.
SYNCHRONIZACE INFORMA
Některéaplikace(napříkladGmail
)navašemzařízeníLandRoverExploreposkytujípřístupkestejnýminformacím,
jakélzepřidat,zobrazitaupravovatnaPC.Pokudpřidáte,změníteneboodstraníteinformacevkterékolitakové
aplikacinaPC,zobrazíseaktualizovanéinformaceivzařízení.Tojeumožněnobezdrátovousynchronizacídat;tento
procesnicméněnebudezasahovatdozařízení.Běhemsynchronizacezařízeníjenařádkuupozorněnízobrazena
ikonasynchronizacedat
.
27
PRÁCE SOSTATNÍMI APLIKACEMI
POUŽÍVÁNÍ APLIKACE DASHBOARD
AplikaceDashboard,kterájekdispozicipouzenatelefonechExplore,shromažďujeúdajezesnímačů
telefonuaodposkytovatelůinformacíopočasí.Tytoúdajevámpomohounaplánovatvašedobrodružství,
určit,jakévybaveníbudetepotřebovat,aumožnívámudržetsipřehlednadpočasímastatistikami.
- WidgetaplikaceDashboardlzespustitsoučasněslibovolnoujinouaplikací,takžekúdajůmbudetemítpřístup,
anižbystemuselimeziaplikacemipřepínat.
- Můžetevytvářetindividuálnířídicípanelyprojednotlivéaktivity.Klepnutímnaikonuvloženíobrázkuprolu
zobrazíteřídicípanely,kteréjstevytvořili,abudetemocivybratten,kterýchcetepoužít.
- Novýřídicípanelvytvoříteklepnutímnamožnost„Vytvořitnovýprol“.Potévybertečinnostnebomožnost
„odzačátku“,chcete-livytvořitprázdnýlist.
- Chcete-lipřidatnovýwidgetdokteréhokolizvašichřídicíchpanelů,klepnětenaikonu+avybertepoložku
zeseznamunástrojůneboseznamupočasí.Widgety,kterévyžadujíinformaceopoloze,lzenastavitnaaktuální
polohunebonaxnípolohuamůžetejichmítněkolik.
Přehled dostupných widgetů:
- SOS svítilnaumožňujepoužítbleskjakosignálvMorseověabecedě.Stačínamířitzadnístranutelefonusměrem,
vekterémchcetesignálvyslat.
- Sdílet polohuvámumožníodeslatsvouzeměpisnoušířku/délkuvpodoběodkazudoaplikacemapykterémukoli
zvašichkontaktů.Nouzováverzewidgetuumožňujepřednastavittelefonníčíslo,kterémumůžeteumístění
odeslatjedinýmklepnutím.
- Barometrická výškaumožňujevypočítatnadmořskouvýškupřesnějinežGPS.Vzájmuzajištěnívysoképřesnosti
jevšaknutnétutofunkcipravidelněkalibrovat.Toprovedeteklepnutímnawidgetanásledněnaikonutužky
.
- Pomocíwidgetukompasumůžeterychlezkontrolovatsvůjsměr.
- WidgetPředpověďposkytujepředpověďpočastínadalší3dny.Můžetevybrataktuálnípolohunebojinou
xnípolohu.
POUŽÍVÁNÍ APLIKACE VIEWRANGER
Chcete-linajítnovoutrasunebostezku:
1. Klepnětenaikonydvouznaček
vlevémhornímrohunavigačníhopanelu.Zobrazíseseznamtras,nakteré
můžeteklepnoutazobrazittakpodrobnéinformace.
2. VybertepožadovanoutrasuaklepnětenamožnostStáhnouttrasu.Chcete-liltrovatmožnosti,můžetepomocí
tlačítkavloženíaktivitvybratpožadovanéaktivityapomocíikonvpravovybratpožadovanouobtížnostadélku.
3. Ažbudetepřipraveni,začněteklepnutímnatlačítkoSpustittrasu.
PRÁCE SKALENDÁŘEM
AplikaceKalendářsloužíkvytvářeníasprávěudálostíaschůzek.Vzávislostinanastavenísynchronizacezůstává
kalendářvzařízenísynchronizovanýskalendářemnawebu.
SPUŠTĚNÍ APLIKACE KALENDÁŘ
1. Navýchozíobrazovcepřetáhnětemaloušipkusměřujícínahoru směremnahoru.VybertemožnostKalendář
.Klepnutímnamožnost zobrazíterůznémožnostizobrazeníanastavení.
VYTVOŘENÍ UDÁLOSTI
1. Vlibovolnémzobrazeníkalendářeklepnětenamožnost
>Událost,abystezačalipřidávatudálost.
2. Zadejtenázevudálosti,místo,čas,dataapřidejtekontakty,kteréchcetepozvat.
- Pokudjdeocelodenníudálost,přesuňtepřepínačCelýdendoprava
28
- Prolepšíorientacimůžetezměnitbarvuudálostiapřidatpoznámkynebopřílohy.
3. PozadánívšechinformacíprovašiudálostklepnětenatlačítkoUložit.
NASTAVENÍ PŘIPOMENUTÍ UDÁLOSTI
1. Vzobrazeníkalendářeklepnětenaudálost,abystezobrazilijejípodrobnosti.
2. Klepnutímmůžeteudálostupravit.
3. Klepnutímnačástpřipomenutínastavítepřipomenutíudálosti.
4. KlepnutímnaUložituložíteprovedenézměny.
POZNÁMKA
- KlepnutímnamožnostBezupozorněnípřipomenutíudálostiodstraníte.
POUŽÍVÁNÍ BUDÍKU
Vtelefonumůžetenastavitnovýbudíkneboupravitexistujícíbudík.
1. Navýchozíobrazovcepřetáhnětemaloušipkusměřujícínahoru směremnahoru.VybertemožnostHodiny .
2. KlepnětenakartuBudíkvlevonahoře.Vseznamubudíkůmůžetepřidatbudíkklepnutímnaikonu .
3. Chcete-linastavitbudík,postupujtenásledovně:
- NastavtehodinuaminutuposunutímciferníkuaklepnětenatlačítkoOK.
- Chcete-linastavitrežimopakování,zaškrtnětepolíčkoopakování.Klepnětenajedennebovícevšedníchdnů.
- Chcete-linastavitvyzváněcítón,klepnětena
avyberteněkteroumožnost.
- Pokudchcete,abyzařízenípřibuzenívibrovalo,zaškrtnětepolíčkoVibrace.
- Chcete-lipřidatnázev,klepnětenamožnostNázev.ZadejtenázevaklepnětenatlačítkoOK.
POZNÁMKA
- Přivýchozímnastavenísebudíkautomatickyaktivuje.Můžetehodeaktivovatpoklepánímnaposuvníknapravé
straněbudíku.
POUŽÍVÁNÍ KALKULAČKY
ZařízeníLandRoverExplorejevybavenokalkulačkou,kterámástandardníarozšířenýrežim.
1. Navýchozíobrazovcepřetáhnětemaloušipkusměřujícínahoru
směremnahoru.VybertemožnostKalkulačka
2. Otočtezařízenínašířku,abystezískalipřístupkpokročilémurežimukalkulačky.Ujistětese,žejezapnutéautomatické
otáčeníobrazovky(vizNastavenídispleje).
NASTAVENÍ DATA AČASU
Připrvnímzapnutízařízenívámbudenabídnutamožnostaktualizovatdatumačasautomatickypomocíčasu
poskytovanéhovašísítí.
Chcete-linastavenídataačasuupravitručně,postupujtetakto:
1. NaobrazovceNastaveníklepnětenamožnostDatumačas.
2. VypnětemožnostAutomatickédatumačas.
3. VypnětemožnostAutomatickéčasovépásmoklepnutímnapříslušnýpřepínač
.
4. KlepnětenamožnostNastavitdatum.PotézadejtedatumapodokončeníkonguraceklepnětenaOK.
5. KlepnětenamožnostNastavitčas.Naobrazovcenastaveníčasuklepnětenapolehodinnebominutapomocí
voličenastavtečas.PodokončeníkonguraceklepnětenaOK.
6. KlepnětenamožnostVybertečasovépásmoavybertevseznamusvéčasovépásmo.
29
7. ZapnutímnebovypnutímfunkcePoužívat24hodinovýformátmůžetepřepínatmezi24hodinovýma12hodinovým
formátem.
POZNÁMKA
- Připoužitíautomatickémožnostinelzedatum,časačasovépásmonastavitručně.
PŘIZPŮSOBENÍ ZOBRAZENÍ
NASTAVENÍ JASU DISPLEJE
1. NaobrazovceNastaveníklepnětenamožnostDisplej>Úroveňjasu.
2. Přetaženímposuvníkudolevadisplejztmavíte,přetaženímdopravahozesvětlíte.
3. Kdyžzvedneteprstzposuvníku,budenastaveníautomatickyuloženo.
ADAPTIVNÍ JAS
Chcete-liautomatickypřizpůsobitjasobrazovkydlesvětlakolemvás,použijtefunkciadaptivníhojasu.Klepněte
namožnost
(Nastavení)>Zobrazení.PřesuňtepřepínačAdaptivníjassměremvpravo.Úroveňjasulzenastavit,
ikdyžjezapnutAdaptivníjas.
AUTOMATICKÉ OTÁČENÍ DISPLEJE
Můžetenastavit,abysezobrazeníotáčelopřiotočenízařízenínašířkunebonavýšku.Otevřetenabídkuupozornění
přejetímzhorníčástidispleje.Rozšiřtenabídkuupozorněníopětovnýmpřejetímsměremdolů.Klepnětenaikonu
automatickéhootáčeníuprostředtřetíhořádkushora.
Automatickéotáčeníjezapnuté.
Zařízeníjeuzamčenonavýšku.
NASTAVENÍ DOBY DO VYPNUTÍ DISPLEJE
Je-livašezařízenípourčitoudobunečinné,displejsevypne,abyšetřilbaterii.Tutodobuneaktivitymůžete
prodloužitnebozkrátitpomocínásledujícíhopostupu:
1. Klepnětenaikonu
(Nastavení)vhorníčástinabídkyupozornění>Displej>Spánek.
2. Vybertedobu,pojejímžuplynutímáobrazovkazhasnout.
VYZVÁNĚNÍ
NASTAVENÍ VYZVÁNĚNÍ AZAPNUTÍ TICHÉHO REŽIMU
1. Přidržtevypínačstisknutý.Vnabídce,kteráseotevře,klepnětenajednuznásledujícíchmožností:
Zvukupozorněníbudezapnutý.
Zvukupozorněníbudevypnutý(tichýrežim).
Pouze vibrace.
31
OCHRANA ZAŘÍZENÍ
OCHRANA ZAŘÍZENÍ POMOCÍ ZÁMKU DISPLEJE
AbystedatavesvémzařízeníLandRoverExplorelépeochránili,můžetepoužítfunkcizámkudispleje.
1. Klepnětenaikonu
(Nastavení)vhorníčástinabídkyupozornění>Zabezpečení>Zámekdispleje.
2. Vybertejednuzmetododemčeníuzamčenéhodisplejevašehozařízení:
- Přejetí:Displejbudeteodemykatpřejetímsymboluzámku.
- Znak: Displejbudeteodemykatnakreslenímsprávnéhoodemykacíhovzorunadispleji.
- PIN: DisplejbudeteodemykatzadánímkóduPIN.
- Heslo: Displejbudeteodemykatzadánímhesla.
3. Dokončetevýběrtypuzámkudisplejepodlepokynůnaobrazovce.
SPRÁVA APLIKACÍ
ZOBRAZENÍ NAINSTALOVANÉ APLIKACE
1. NaobrazovceNastaveníklepnětenamožnostAplikace.
2. Vseznamuaplikacímůžetepoužítněkterýznásledujícíchpostupů:
- Klepnutímmůžetekongurovatnastaveníaplikací.
- Systémovéaplikacezobrazíteklepnutímna
>Zobrazitsystém.
- Klepnutímna
>Obnovitpředvolbyaplikací>Obnovitaplikaceobnovítevýchozínastavenípředvolebaplikací.
- Klepnutímnaaplikacizobrazítejejípodrobnéúdaje.
ODEBRÁNÍ NAINSTALOVANÉ APLIKACE
1. Klepnětenamožnost (Nastavení)vhorníčástinabídkyupozorněníapoténamožnostAplikace.
2. KlepnětenaaplikaciapoténamožnostOdinstalovat>OK,abysteaplikaciodebralizezařízení.
POZNÁMKA
- Některéaplikacenelzeodinstalovat.
RESETOVÁNÍ ZAŘÍZENÍ
ZÁLOHOVÁNÍ OSOBNÍHO NASTAVENÍ
VašeosobnínastavenílzezálohovatnaserveryGooglepomocíúčtuGoogle.Pokudsipořídítenovézařízení,
zálohovanénastavenísepřenesenanovézařízenípřiprvnímpřihlášeníkúčtuGoogle.
1. Klepnětenaikonu
(Nastavení)vhorníčástinabídkyupozornění>Zálohováníaobnovení.
2. KlepnětenamožnostZálohovatmojedata.PotéposuňtepřepínačZálohovatmojedatadoprava
.
OBNOVENÍ NASTAVENÍ ZVÝROBY
Pokudobnovítetovárnínastavení,vašezařízeníseresetujedonastavení,kterébylonakongurovánopřivýrobě.
Zvnitřníhoúložištězařízeníbudouodstraněnavšechnavašeosobnídatavčetněinformacíoúčtu,nastavení
32
systémuaaplikacíastaženýchaplikací.Resetovánízařízenínevymažežádnéstaženéaktualizacesoftwarusystému
anisouborynakartěmicroSD,jakojehudbaafotograe.
1. Klepnětenaikonu
(Nastavení)vhorníčástinabídkyupozornění>Zálohováníaobnovení>Obnovení
nastavenízvýroby.
2. PřivyzváníklepnětenamožnostObnovittelefonaklepnětenamožnostVymazatvše.Vašezařízeníseobnoví
dotovárníhonastaveníapotéserestartuje.
HARDWAROVÝ RESET
Totozařízenímávnitřníbateriiaprotonelzeprovésthardwarovýresetvyjmutímbaterie.Pokudchceterestartovat
hardware,použijtenásledujícípostup.Vezměteprosímnavědomí,žehardwaremůžebýttřebaresetovat,pokud
sevašezařízenínenabíjí,kdyžjezapojenodozásuvkyvezdi.
1. Stiskněteapodržtetlačítkoprozvýšeníhlasitostiavypínač,dokudsezařízenínevypne.Poresetovánísezařízení
automatickyznovuspustí.
ZOBRAZENÍ ŠTÍTKU E-LABEL
Chcete-lizobrazitinformaceopředpisechtýkajícíchsetohotozařízení,použijtenásledujícípostup:
1. Navýchozíobrazovcepřetáhnětemaloušipkusměřujícínahoru
směremnahoru.KlepnětenaNastavení .
2. NaobrazovceNastaveníklepnětenamožnostOtelefonu>Regulačníštítky.
3. NadisplejisezobrazínejnovějšíštítekE-label.
DODATEK
VAROVÁNÍ ABEZPEČNOSTNÍ OPATŘENÍ
Tatočástobsahujedůležitéinformaceapokynykprovozovánízařízení.Obsahujetakéinformaceobezpečném
používánízařízení.Nežzačnetezařízenípoužívat,sipozorněpřečtětetytoinformace.
STUPEŇ KRY VODOTĚSNÉ ZAŘÍZENÍ
Dokonektoruprosluchátkamůžeproniknoutvoda,vdůsledkučehožsemohouvnitřníkontaktychovat,jakobybyla
připojenasluchátka.Pokudktomudojde,jednoduševoduodstraňteprudkýmpohybemanechtezařízeníuschnout
podobu20minut.Pokudjstezařízeníupustilidoslanévody,nejprvehoomyjtečistouvodouanechtehouschnout.
ELEKTRONICKÉ ZAŘÍZENÍ
Kdyžjepoužívánízařízenízakázáno,vypněteho.Nepoužívejtezařízení,pokudzpůsobujerizikoproelektronická
zařízenínebojeruší.
ZDRAVOTNICKÝ PŘÍSTROJ
Dodržujtepravidlaapředpisystanovenénemocnicemiazdravotnickýmizařízeními.Nepoužívejtezařízení,pokud
jejehopoužitízakázáno.
Výrobcikardiostimulátorůdoporučují,abymezizařízenímakardiostimulátorembyladodržovánaminimální
vzdálenost15cm,abynedocházelokpotenciálnímurušeníkardiostimulátoru.Pokudpoužívátekardiostimulátor,
používejtezařízenínaopačnéstraně,nežmátekardiostimulátor,anenostehovpředníkapse.
33
PROSTŘEDÍ SNEBEZPEČÍM VÝBUCHU
Vprostředíchsnebezpečímvýbuchuzařízenívypínejteadodržujtevšechnyznačkyapokyny.Prostředísnebezpečím
výbuchujsoumimojináitamísta,kdejeobvykledoporučenovypínatmotorvozidla.Jiskřeníbymohlovtakovém
prostředízpůsobitvýbuchnebopožár,vedoucíkezraněnínebodokonceúmrtí.Nezapínejtezařízenínamístech,
kdesepracujespalivem,napříkladučerpacíchstanic.Dodržujteomezenípoužívánírádiovýchzařízeníveskladech
adistribučníchzávodechpalivaavchemickýchzávodech.Dodržujtetakéomezenívoblastech,kdeprobíhají
trhacípráce.Nežzačnetezařízenípoužívat,podívejtese,zdasenenacházítevprostředísnebezpečímvýbuchu.
Takovéoblastijsoučasto(nikolivšakvždy)zřetelněoznačeny.Patříknimnapříkladpalubylodí,chemickésklady
iproduktovodyaoblasti,kdesevevzduchuvyskytujíchemikálienebočásticejakojezrní,prachnebokovovýprášek.
Bezpečnostpoužívánízařízenívevozidlechnaplynovýpohon(LPG,napříkladpropannebobutan)avjejichokolísi
ověřteuvýrobcevozidla.
BEZPEČNOST NA CESTÁCH
- Připoužívánízařízenídodržujtemístnízákonyapředpisy.Pokudzařízenípoužívátepřiřízenívozidla,dodržujte
následujícípokyny.
- Soustřeďtesenařízení.Vašízodpovědnostíjenaprvnímmístěříditbezpečně.
- Přiřízenínemluvtedozařízení.Používejtehands-free.
- Kdyžmusítetelefonovatnebopřijmouthovor,nejprvevozidlozaparkujtenaokrajisilniceateprvepotézařízení
použijte.
- Radiofrekvenčnísignálymohouovlivnitelektronickésystémymotorovýchvozidel.Dalšíinformacezjistíte
uvýrobcevozidla.
- Vmotorovémvozidleneumisťujtezařízenínadairbagyanidoprostoru,kamseairbagyaktivují.Pokudtouděláte,
zařízeníbyvásmohlokvůlivelkýmsilámpřinafukováníairbaguzranit.
- Nepoužívejtezařízeníběhemletu.Vypnětehoještěpřednástupemdoletadla.
- Používáníbezdrátovýchzařízenívletadlechmůžeohrozitprovozletadlaarušitbezdrátovételefonnísítě.
Můžebýttaképovažovánozaprotiprávní.
PROVOZNÍ PROSTŘEDÍ
- Zařízenínepoužívejteaninenabíjejtevprašném,vlhkémaniznečištěnémprostředíanivprostředích
smagnetickýmipoli.Můžedojítkselháníobvodů.
- Zařízenísplňujeradiofrekvenčníspecikace,kdyžjeumístěnouuchanebovevzdálenosti0,5cmodtěla.
Zajistěte,abypříslušenství,napříkladpouzdra,neobsahovalokovovésoučásti.Vzájmusplněnívýšezmíněných
požadavkůudržujtezařízení0,5cmodtěla.
- Zabouřkynepoužívejtezařízení,je-lipřipojenoknabíječce.Zabránítetaknebezpečízpůsobenémubleskem.
- Kdyžtelefonujete,nedotýkejteseantény.Dotknutímseantényovlivnítekvalituhovoruazvýšítespotřebu
energie.Tozkracujemožnoudobuhovoruivýdržvpohotovostnímrežimu.
- Připoužívánízařízenídodržujtemístnízákonyapředpisyarespektujtesoukromíaprávaostatních.
- Přinabíjeníbyokolníteplotamělabýtvrozpětí0až+40°C.Připoužívánízařízenínapájenéhozbaterie
byteplotaokolímělabýtvrozpětí−25až+50°C.
OCHRANA SLUCHU PŘED POŠKOZENÍM
Vysokáhlasitostpřipoužívánínáhlavnísoupravymůžepoškoditsluch.Chcete-lirizikopoškozenísluchusnížit,
snižtehlasitostnáhlavnísoupravynabezpečnouapohodlnouúroveň.
BEZPEČNOST DĚTÍ
Dodržujtevšechnaopatřenítýkajícísebezpečnostidětí.Ponechánídětí,abysihrálysezařízenímnebojeho
příslušenstvím,kterémohouobsahovatmaléoddělitelnésoučásti,můžebýtnebezpečné,protožehrozíriziko
udušení.Zajistěte,abymalédětinemělypřístupktomutozařízeníanipříslušenství.
34
PŘÍSLUŠENST
Ktomutomodelupoužívejtepouzebaterie,nabíječkyapříslušenstvíschválenévýrobcemzařízení.Použití
jakéhokolijinéhotypunabíječkynebopříslušenstvímůžeukončitplatnostzárukynazařízení,můžebýtvrozporu
smístnílegislativouamůžetobýtnebezpečné.Informaceodostupnostischválenýchbaterií,nabíječek
apříslušenstvívevašíoblastizjistíteusvéhododavatele.
BATERIE ANABÍJEČKA
- Kdyžnabíječkunepoužíváte,odpojtejizelektrickézásuvkyiodzařízení.
- Adaptérmusíbýtnainstalovánvblízkostizařízeníamusíbýtsnadnopřístupný.
- Zástrčkajepovažovánazasamostatnézařízeníoddělenéodnabíjecíhoadaptéru.
- Bateriilzenabíjetavybíjetřádověvestovkáchcyklů,časemsealeopotřebuje.
- Používejtezdrojstřídavéhonapájeníspecikovanývtechnickýchúdajíchnabíječky.Nevhodnénapětímůže
způsobitpožárneboselhánínabíječky.
- Pokudzbaterieunikáelektrolyt,zabraňtejehokontaktuskůžíaočima.Pokudseelektrolytdostanedokontaktu
skůžínebosočima,neprodleněsivypláchnětečistouvodouakonzultujtesituacislékařem.
- Pokudjebateriedeformovaná,změníbarvuneboseběhemnabíjeníneobvyklezahřívá,okamžitěpřestaňte
zařízenípoužívat.Mohlobydojítkúnikuelektrolytu,přehřátíbaterie,výbuchunebopožáru.
- Pokudjepoškozennapájecíkabel(napříkladjsouobnaženyvodičenebojekabelzlomený)nebopokud
seuvolnízástrčka,okamžitěpřestaňtekabelpoužívat.Mohlobydojítkúrazuelektrickýmproudem,kezkratu
nabíječkynebokpožáru.
- Zařízenínelikvidujtevohni,mohlobyvybuchnout.Poškozenébateriemohoutakévybuchnout.
- Zařízeníneupravujte,nepokoušejtesedonějvložitcizípředměty,neponořujtehoaninevystavujtepůsobení
vodynebojinýchtekutin,nevystavujtehoohni,výbuchůmanijinýmrizikům.
- Chraňtezařízenípředpádem.Pokudzařízeníspadne,zvláštěnatvrdoupodložku,ajehouživatelmápodezření
najehopoškození,odnestehokekontroledokvalikovanéhoservisníhostřediska.
- Nesprávnépoužívánímůžezpůsobitpožár,výbuchnebojinárizika.
- Použitázařízeníneprodlenělikvidujtevsouladusmístnímipředpisy.
- ZařízenílzepřipojovatpouzekvýrobkůmslogemUSB-IFnebovýrobkům,kteréabsolvovalyprogramshody
USB-IF.
- Jmenovitývýstupnabíječky:5V=,2A.
POZOR – VPŘÍPADĚ VÝMĚNY BATERIE ZA NESPRÁVNÝ TYP BATERIE HROZÍ NEBEZPEČÍ VÝBUCHU.
POUŽITÉ BATERIE LIKVIDUJTE PODLE POKYNŮ.
ČIŠTĚNÍ AÚDRŽBA
- Nabíječkanenívoděodolná.Udržujtejivsuchu.Chraňtenabíječkupředvodouaparou.Nedotýkejtesenabíječky
mokrýmarukama,mohlobydojítkezkratu,selhánízařízeníčikúrazuelektrickýmproudem.
- Zařízeníanabíječkuneumisťujtenamísta,kdemohoubýtpoškozenynárazem.Mohlobydojítkúnikuelektrolytu,
selhánízařízení,přehřátíbaterie,výbuchunebopožáru.
- Nepřibližujtekzařízenímagnetickápaměťovámédia,jakojsoumagnetickékartyčidiskety.Zářenívycházející
zezařízeníznichmůževymazatuloženéinformace.
- Neponechávejtezařízeníaninabíječkuvmístechsextrémněvysokýminebonízkýmiteplotami.Zařízeníby
nemuselopracovatsprávněamohlobydojítkpožárunebovýbuchu.Přiteplotáchnižšíchnež0°Cjeovlivněn
výkonbaterie.
- Neumisťujtedoblízkostisluchátkaostrékovovépředměty,napříkladšpendlíky.Sluchátkomůžetytoobjekty
přitáhnoutatyvámmohoupřipoužitízařízeníublížit.
- Předúdržbouzařízenívypněteaodpojteodnabíječky.
- Kčištěnízařízeníanabíječkynepoužívejtechemickározpouštědla,práškyanijinéchemickélátky(například
alkoholabenzen).Mohlobydojítkpoškozenízařízenínebokpožáru.Zařízenímůžetečistitměkkým
antistatickýmhadříkem.
- Zařízeníanipříslušenstvínerozebírejte.Vopačnémpřípaděpřestaneplatitzárukanazařízeníapříslušenství
avýrobcenebudepovinenplatitškody.
- Pokudječástdisplejerozbitapokontaktustvrdýmipředměty,nedotýkejtesedisplejeanisenesnažte
poškozenoučástodstranit.Vtakovémpřípaděihnedpřestaňtezařízenípoužívataobraťtesenaautorizované
servisnístředisko.
37
DOPLNĚK PRO AKTIVNÍ VYUŽÍVÁNÍ
PROHLÁŠENÍ OSHODĚ
VÝROBCE
Název BullittMobileLimited
Adresa OneValpy,ValpyStreet,Reading,Berkshire,AnglieRG11AR
ZAŘÍZENÍ
Model ADV01
Popis Doplněkproaktivnívyužívání
Dodávané příslušenství asoučásti(karabina,ochrannýkryt,kabelUSB)
SpolečnostBullitMobileLimitedprohlašuje,ženášproduktbyltestovánasplňujepožadavkypředpisůEMCD
2014/30/EUaLVD2014/35/EU.
Podle následujících norem předpisu EMCD 2014/30/EU
1. Elektromagnetická kompatibilita
Použiténormy
- EN550322015/AC2016
- EN550352017
- EN61000-3-22014
- EN61000-3-32013
Podle následujících norem předpisu LVD 2014/35/EU
1. Bezpečnost
Použiténormy
- EN60950-12006+A112009+A12010+A122011+A22013
Podepsáno za ajménem: BullittMobileLimited
Místo:OneValpy,ValpyStreet,Reading,Berkshire,AnglieRG11AR,datum:26.březen2018
Jméno:WayneHuang
Funkce:ŘeditelsprávyODM
Podpis
3
Ingen del af dette dokument må gengives eller overføres i nogen form eller på nogen måde uden forudgående
skriftlig tilladelse fra Bullitt Mobile Ltd. eller Jaguar Land Rover Limited.
Produktet, som er beskrevet i denne vejledning, kan indeholde ophavsretligt beskyttet software og mulige
licensgivere.Kundermåpåingenmådegengive,distribuere,modicere,dekompilere,demontere,dekryptere,
uddrage, udføre reverse engineering på, udleje, overdrage eller udstede underlicens til omtalte software eller
hardware, medmindre sådanne restriktioner er forbudt ved gældende lov, eller disse handlinger er godkendt
af de respektive indehavere af ophavsretten under licenser.
Bluetooth
®
-mærket og -logoerne er registrerede varemærker ejet af Bluetooth SIG, Inc., og enhver Bullitt Group-
brug af sådanne mærker er under licens. Alle andre tredjeparters varemærker og handelsnavne tilhører deres
respektive ejere.
Wi-Fi
®
er et registreret varemærke tilhørende Wi-Fi Alliance
®
.
Android og Google og andre mærker er varemærker, der tilhører Google LLC.
BEMÆRK
Nogle af dette produkts og dets tilbehørs funktioner, som beskrevet her, afhænger af den installerede software,
kapaciteten og det lokale netværks indstillinger og kan ikke aktiveres eller kan være begrænset af lokale
netværksoperatører eller netværksudbydere. Derfor passer beskrivelserne i denne vejledning måske ikke helt
til det købte produkt eller dets tilbehør.
Producentenforbeholdersigrettilatændreellermodicerealleoplysningerellerspecikationeridenne
brugervejledning uden forudgående varsel eller efterfølgende forpligtelser.
Producenten er ikke ansvarlig for lovligheden eller kvaliteten af nogen produkter, som du uploader eller downloader
gennemdenneenhed,inklusivetekst,billeder,musik,lmsamtikke-indbyggetophavsretligtbeskyttetsoftware.
Eventuelle følger af installation eller brug af ovenstående produkter på denne enhed er dit ansvar.
INGEN GARANTI
Indholdet i denne brugervejledning gives "som beset". Med undtagelse af hvor det påkræves af gældende
love, gives der ingen garantier af nogen slags, hverken udtrykkelige eller underforståede, inklusive, men ikke
begrænset til en underforstået garanti for salgbarhed og egnethed til et særligt formål for så vidt angår præcision,
pålidelighed eller indhold af brugervejledningen.
I den maksimale udstrækning tilladt ifølge gældende lov er producenten ikke ansvarlig for nogen specielle,
tilfældige, indirekte tab eller følgetab samt tabt fortjeneste, forretning, omsætning, data, goodwill eller forventede
besparelser.
IMPORT- OG EKSPORTREGULATIVER
Kunderne skal overholde alle gældende love og regulativer for eksport eller import og skal indhente alle
nødvendigeofcielletilladelseroglicenserforatkunneeksportere,geneksportereellerimporteredeti
brugervejledningen omtalte produkt, inklusive dertil hørende software og tekniske data.
5
INDSTILLING AF TELEFONTJENESTER 30
BESKYTTELSE AF DIN ENHED 31
ADMINISTRATION AF PROGRAMMER 31
NULSTILLING AF ENHEDEN 31
VISNING AF LOVMÆSSIGT E-MÆRKE 32
APPENDIKS 32
ADVENTURE PACK KONFORMITETSERKLÆRING 37
LAND ROVER EXPLORE KONFORMITETSERKLÆRING 38
6
VELKOMMEN TIL
LAND ROVER EXPLORE:
DEN UDENDØRS TELEFON
Land Rover Explore: Udendørs telefon, der giver dig mulighed for trygt at tage ud på længere opdagelseseventyr.
Find nye ruter, spor, stier og veje ude i det fri. Explore er vandtæt, faldtestet, bygget til at modstå alle
temperaturer fra bjergene til brændingen og har et batteri, der ikke afkorter dagen, så du får hjælp til at nyde dine
eventyr til fulde.
Brugdensudvidedelokaliserings-ogsensorfunktionerpået5"displaymedfuldHD,derkanaæsesisollys,
for at få indsigt i dine omgivelser og de lokale forhold. Få to dages typisk brug fra én opladning, og nyd godt
af en hel dags udendørs aktiviteter med skærm og GPS, takket være det stærke 4.000 mAh batteri. Få mere ud
af dagen ved at gå på længere opdagelse.
Batteriets levetid kan forlænges yderligere på farten, hvis du tilføjer den medfølgende Adventure Pack (3.620 mAh).
DESIGNET TIL UDENDØRS BRUG
Land Rover Explore: Den udendørs telefon er tilpas stilig som din ledsager i hverdagen, men også robust nok
til at klare de hårde stød. Explore er pålidelig og robust nok til at overleve din aktive, udendørs og eventyrlystne
livsstil.DenerIP68-certiceret,såExploreersomskabttilatkunneklaredeudendørsrealiteter.Vandreture,når
temperaturen stiger. Rideturen, når stierne er mudrede, og skyerne trækker sig sammen. Den lange tur i stolelift
til snedækkede tinder, hvor temperaturen kommer langt under frysepunktet. Explore vil stadig virke for dig.
Med en 5" Corning
®
Gorilla
®
-glasskærm med fuld HD, som er optimeret til alle forhold, døgnet rundt, giver Land
RoverExplore-udendørstelefonenmulighedforatudforskeogopdagemere.Denvandtættengerregistrering
sikrer fortsat funktionalitet, også når det regner eller sner. Explore er også fuldt handskevenlig, så du kan holde
dine hænder varme, tørre og beskyttede mod elementerne, mens du bruger telefonen.
7
PAKKER
Udvid kernefunktionaliteten i Explore med et udvalg af unikke tilføjelsespakker. De er udviklet til enhver situation,
så du får endnu mere af det allervigtigste: batteri, tilslutning, detaljerede kort og muligheden for at fastgøre
telefonen til din cykel eller taske. Hver pakke kan fastgøres på bagsiden af Explore i farten, så du får en endnu
bedre og længere eventyroplevelse i den frie natur. Den inkluderede Adventure Pack giver dig bedre forbindelse
med en kraftig GPS-patch-antenne og ekstra batteri, der næsten fordobler dit batteris levetid. Adgang til detaljeret
førsteklassestopograskkortlægningmedvirkelighedstroSkyline-systemfraViewRanger-appenerautomatisk
tilgængelig, så du får en bedre forståelse af dine omgivelser. Du får også et omslag til sikker opbevaring af din
udendørs telefon og en karabinhage til fastgørelse på din taske eller jakke, så du nemt kan se den.
De andre tilgængelige pakker omfatter et stort 4.370 mAh ekstrabatteri og en universalholder til cyklen, så du
bedre kan få det fulde udbytte af dine eventyr.
HVAD ER DER I KASSEN
- Enhed - SIM-nål
- Adventure Pack - Karabinhage
- Lynvejledning - Beskyttelsesetui
- USB-strømkabel og strømadapter til opladning - Fabriksmonteret skærmbeskytter er allerede på enheden
UNIK SOFTWARE PÅ EXPLORE
DASHBOARD
Dashboard, som er en unik funktion på Land Rover Explore, indsamler relevante oplysninger om aktuelle forhold
ligevedngerspidserne–uansetomdeteroplysningerfraExploressensorerellervejrdatafravorespartner,
World Weather Online.
Dashboard er altid kun ét tryk væk og kan hjælpe dig med at planlægge dit eventyr og det udstyr, du skal bruge,
samt holde øje med vejret under selve turen. Se yderligere oplysninger på page 27.
VIEWRANGER
ViewRangererverdensbedstekortlægningsapptilsmartphones,fordidentilbyderdetbredesteudvalgafkort
(i over 24 lande) og et enormt udvalg af ruter, som du kan downloade og bruge til udendørsaktiviteter (i øjeblikket
over200.000).Desudenerdetvigtigt,atViewRangersførsteklasseskortlægninggiverdigdenødvendige
oplysninger,nårdusøgervækfrastierne.ViewRanger-appenerforudinstalleretpåLandRoverExplore.Se
yderligere oplysninger på page 27.
NATTILSTAND
LandRoverExploreerudstyretmedetrødtlysltertilbrugomnatten,somermedtilatreduceredentid,det
tager dine øjne at omstille sig fra lyset i smartphonedisplayet til et godt, naturligt nattesyn i mørke eller miljøer
med svag belysning. Se yderligere oplysninger på page 14.
EXPLORE HUB
Enudvalgtportaltilappfremndingmedetkatalogafapps,dererhåndplukketogtestetafExplore-teamet.Den
omfatterenrækketitler,derkanhjælpedigmedatndeenmasseforskelligeudendørsaktiviteter.ExploreHuber
tilgængelig på startskærmen.
8
OVERBLIK OVER EXPLORE
1. Hovedtelefonstik
2. 8 MP frontkamera
3. Ørestykke
4. Mikrofoner
5. Højttaler
6. SIM-kortstik
7. microSD
-kortstik
8. 16 MP bagsidekamera
9. Blitz
10. USB-port
11. Lydstyrke op/ned-tast
12. Tænd/sluk-knap
1
2
3
SIM microSD
/ SIM
4
DE
1
2
3
SIM microSD
/ SIM
4
DE
1 83
4 5
6
7
2
9
10
11
12
NØGLEFUNKTIONER
TÆND/SLUK-KNAP
- Tryk og hold nede for at tænde enheden.
- Tryk og hold nede for at åbne telefonens menu med valgmuligheder.
- Tryk for at låse skærmen eller vække den, når enheden er inaktiv.
HOME-KNAP
- Er placeret langs bunden af skærmen, i midten. Tryk på den når som helst for at se startskærmen.
- Hold Home-knappen nede for at bruge tjenesten Google stemmesøgning
.
KNAPPEN SENESTE APPS
- Er placeret nederst til højre på skærmen. Tryk efter behov for at åbne de senest brugte apps.
TILBAGEKNAP
- Er placeret nederst til venstre på skærmen. Tryk for at gå tilbage til forrige skærmbillede.
- Tryk for at lukke skærmtastaturet.
LYDSTYRKE OP/NED-TAST
- Tryk på lydstyrke op-tasten (øverst) for at øge lydstyrken eller lydstyrke ned-tasten (nederst) for at reducere
opkaldets lydstyrke, ringetone, medier eller alarm.
- Hvis du vil tage et skærmbillede, skal du trykke på tænd/sluk-knappen og lydstyrke ned-tasten samtidigt.
- I kameraappen skal du trykke på enten lydstyrke op- eller lydstyrke ned-tasten for at tage billeder.
16
BRUG AF FLYTILSTAND
Vissestederskalduafbrydedataforbindelser.Istedetforatslukkeenhedenkanduindstilledentilytilstand.
1. Tryk på tænd/sluk-knappen.
2. Strygnedfratoppenforatåbnenotikationspanelet.
3. Stryg til venstre for at få adgang til den anden side med funktioner. Tryk på Flytilstand.Ikonet bliver hvidt
for at angive, at det er aktiveret.
4. EllerbrugmenuenIndstillingertilatvælgemenuenMere,ogskubytilstandsknappentilhøjre
.
FORETAGELSE AF ET TELEFONOPKALD
Der er mange måder at foretage et telefonopkald på:
1. Du kan enten indtaste et nummer på tastaturet.
2. Eller vælge et nummer på kontaktlisten, en internetside eller et dokument, som indeholder et telefonnummer.
BEMÆRK
- Når du er midt i et telefonopkald, kan indgående telefonopkald enten besvares eller sendes til din telefonsvarer.
- Dukanogsåoprettekonferenceopkaldmederedeltagere.
FORETAGELSE AF ET TELEFONOPKALD MED TASTATURET
1. Tryk på startskærmen. Tryk derefter på for at få vist tastaturet.
2. Indtast et telefonnummer ved at trykke på de numeriske taster.
3. Når du har indtastet nummeret eller valgt kontakten, skal du trykke på .
Tip: Enheden understøtter funktionen SmartDial. Når du skriver et nummer på tastaturet, vil funktionen SmartDial
automatisk gennemsøge din kontaktliste og vise en liste over forudsigelser for en kontakt, der svarer til nummeret.
Dukanlukkedetnumerisketastaturforatseeremuligematches.
FORETAGELSE AF ET TELEFONOPKALD FRA KONTAKTER
1. Fra startskærmen skal du stryge den lille opadvendte pil opad.Vælgkontakter .
for at få vist listen over kontaktpersoner. På tastaturet skal du trykke på for at få vist listen over kontakter.
2. Vælgenkontaktpålisten.
3. Tryk på telefonnummeret for at ringe til kontakten.
TELEFONOPKALD FRA OPKALDSLOGGEN
1. Fra startskærmen skal du stryge den lille opadvendte pil opad. Gå til og derefter .
Opkaldsloggen viser de seneste opkald, du har foretaget og modtaget.
2. Vælgenkontaktpålisten,ogtrykpå for at foretage et opkald.
BESVARELSE OG AFVISNING AF ET TELEFONOPKALD
Når du modtager et telefonopkald, vil den indgående opkaldsskærm vise opkalds-id, medmindre det tilbageholdes.
17
1. For at besvare et opkald skal du trykke på og trække det til højre .
2. For at afvise opkaldet skal du trykke på og trække det til venstre .
3. For at afvise opkaldet og i stedet sende en besked direkte til den, der ringer op, skal du trykke på og trække
det opad . Derefter skal du vælge en af de tilgængelige beskedindstillinger eller trykke på Skriv din egen for
at oprette en personlig besked.
BEMÆRK
- Når du trykker på , forsvinder det fra skærmen.
AFSLUTNING AF TELEFONOPKALD
Under et telefonopkald skal du trykke på for at lægge på.
FORETAGELSE AF ET KONFERENCEOPKALD
Ifunktionenforkonferenceopkaldkanduopretteetopkaldmederedeltagere.
1. For at igangsætte et konferenceopkald skal du indtaste nummeret på den første deltager og trykke på
for
at foretage opkaldet.
2. Under samtalen med den første deltager skal du trykke på > Tilføj opkald og indtaste telefonnummeret
på den næste deltager.
3. Tryk , eller vælg en kontakt fra opkaldsloggen eller kontakter. Det første opkald sættes automatisk
i venteposition.
4. Når det næste opkald er tilsluttet, skal du trykke på > Flet opkald.
5. Hvisduviltilføjeerepersoner,skaldutrykkepå
og gentage trin 2 til 4.
6. For at afslutte konferenceopkaldet og afbryde alle skal du trykke på .
BEMÆRK
- Kontaktdinnetværksoperatørforatndeudaf,omdinenhedsabonnementunderstøtterkonferenceopkald,
og hvor mange deltagere der kan tilføjes.
SKIFT MELLEM TELEFONOPKALD
Hvis du modtager et indgående opkald under et igangværende telefonopkald, er det muligt at skifte mellem de
to opkald.
1. Når begge opkald er i gang, skal du trykke på kontaktens navn eller telefonnummer i nederste venstre hjørne
af skærmen.
2. Dit aktuelle opkald sættes i venteposition, og du vil blive forbundet til det andet opkald.
KONTAKTER
I appen Kontakter kan du gemme og administrere oplysninger om dine kontakter.
ÅBNING OG VISNING AF DINE KONTAKTPERSONER
Hvis du vil åbne appen Kontakter og se alle dine indlæste kontaktpersoner, skal du gøre følgende:
1. Fra startskærmen skal du stryge den lille opadvendte pil
opad.Vælgkontakter .
2. Tryk på ALLE.
18
BEMÆRK
- Dine kontakter vises alfabetisk på en rulleliste.
KOPIERING AF KONTAKTER
Du kan kopiere dine kontakter, der er gemt på din Google-konto eller fra SIM-kortet, det interne lager eller
hukommelseskortet.
1. På listen over kontakter skal du trykke på
efterfulgt af Importer/eksporter.
2. Gør et af følgende:
SÅDAN IMPORTERES KONTAKTER, DER ER GEMT PÅ EN GOOGLE-KONTO
1. Vælgdenpersonligekonto,ogtrykpåNæste.
2. Angiv, hvor du vil importere kontakterne til, og tryk på Næste.
3. Vælgderefterdenellerdeønskedekontakter,ogtrykpåOK.
SÅDAN IMPORTERES KONTAKTER FRA SIM-KORTET
1. Tryk på USIM, og tryk på Næste.
2. Angiv, hvor du vil importere kontakterne til, og tryk på Næste.
3. Vælgderefterdenellerdeønskedekontakter,ogtrykpåOK.
SÅDAN IMPORTERES KONTAKTER FRA DET INTERNE LAGER ELLER
HUKOMMELSESKORT
1. Tryk på det interne lager eller SD-kortet.
2. Angiv, hvor du vil importere kontakterne til, og tryk på Næste.
BEMÆRK
- HvisderermereendénvCard-l,vilderværemulighederforentenatimportereénvCard-l,erevCard-ler
ellerallevCard-ler.
TILFØJELSE AF EN KONTAKT
1. Tryk på listen over kontakter for at tilføje en ny kontakt.
2. Når oplysninger er tilføjet, skal du trykke på tilføjelse af ny kontakt for at gemme oplysningerne om
kontaktpersonen.
TILFØJELSE AF EN KONTAKT I DINE FAVORITTER
1. Tryk på den kontakt, du vil føje til favoritter.
2. Tryk
i øverste venstre hjørne, så ikonet bliver massivt hvidt ( ).
SLETNING AF EN KONTAKT
1. På listen over kontakter skal du trykke på den kontakt, du vil slette.
2. Tryk
> Slet.
3. Tryk på Slet igen for at bekræfte sletningen.




Bullitt Mobile Limited 
RG1 1AR Berkshire ReadingValpy StreetOne Valpy 

ADV01 
 
USB
EMCD  Bullitt Mobile Limited 
.LVD 2014/35/EU2014/30/EU 
 2014/30/EU  EMCD 



EN 55032 2015/AC2016 -
EN 55035 2017 -
EN 61000-3-2 2014 -
EN 61000-3-3 2013 -
 2014/35/EU  LVD 



EN 60950-12006+A112009+A12010+A122011+A22013 -
Bullitt Mobile Limited 
RG1 1AR  BerkshireReading Valpy Street One Valpy 
 
 

760

Hulp nodig? Stel uw vraag in het forum

Spelregels
1

Forum

LandRover-Explore

Misbruik melden

Gebruikershandleiding.com neemt misbruik van zijn services uitermate serieus. U kunt hieronder aangeven waarom deze vraag ongepast is. Wij controleren de vraag en zonodig wordt deze verwijderd.

Product:

Bijvoorbeeld antisemitische inhoud, racistische inhoud, of materiaal dat gewelddadige fysieke handelingen tot gevolg kan hebben.

Bijvoorbeeld een creditcardnummer, een persoonlijk identificatienummer, of een geheim adres. E-mailadressen en volledige namen worden niet als privégegevens beschouwd.

Spelregels forum

Om tot zinvolle vragen te komen hanteren wij de volgende spelregels:

Belangrijk! Als er een antwoord wordt gegeven op uw vraag, dan is het voor de gever van het antwoord nuttig om te weten als u er wel (of niet) mee geholpen bent! Wij vragen u dus ook te reageren op een antwoord.

Belangrijk! Antwoorden worden ook per e-mail naar abonnees gestuurd. Laat uw emailadres achter op deze site, zodat u op de hoogte blijft. U krijgt dan ook andere vragen en antwoorden te zien.

Abonneren

Abonneer u voor het ontvangen van emails voor uw LandRover Explore bij:


U ontvangt een email met instructies om u voor één of beide opties in te schrijven.


Ontvang uw handleiding per email

Vul uw emailadres in en ontvang de handleiding van LandRover Explore in de taal/talen: Alle talen als bijlage per email.

De handleiding is 11,86 mb groot.


U ontvangt de handleiding per email binnen enkele minuten. Als u geen email heeft ontvangen, dan heeft u waarschijnlijk een verkeerd emailadres ingevuld of is uw mailbox te vol. Daarnaast kan het zijn dat uw internetprovider een maximum heeft aan de grootte per email. Omdat hier een handleiding wordt meegestuurd, kan het voorkomen dat de email groter is dan toegestaan bij uw provider.

Stel vragen via chat aan uw handleiding

Stel uw vraag over deze PDF

Uw handleiding is per email verstuurd. Controleer uw email

Als u niet binnen een kwartier uw email met handleiding ontvangen heeft, kan het zijn dat u een verkeerd emailadres heeft ingevuld of dat uw emailprovider een maximum grootte per email heeft ingesteld die kleiner is dan de grootte van de handleiding.

Er is een email naar u verstuurd om uw inschrijving definitief te maken.

Controleer uw email en volg de aanwijzingen op om uw inschrijving definitief te maken

U heeft geen emailadres opgegeven

Als u de handleiding per email wilt ontvangen, vul dan een geldig emailadres in.

Uw vraag is op deze pagina toegevoegd

Wilt u een email ontvangen bij een antwoord en/of nieuwe vragen? Vul dan hier uw emailadres in.


Info