70 Index
Enable software compression 51
Function . . . . . . . . . . . . . . . . . .14
IPX . . . . . . . . . . . . . . . . . . . . . . .49
NetBIOS
. . . . . . . . . . . . . . . . . .50
Searching for Windows work-
groups . . . . . . . . . . . . . . . . . . .50
Security aspects
. . . . . . . . . . . 47
Server . . . . . . . . . . . . . . . . . . . .18
setup . . . . . . . . . . . . . . . . . . . . .47
TCP/IP
. . . . . . . . . . . . . . . . . . . 49
User name . . . . . . . . . . . . . . . . 48
Remote configuration . . . . . . . . . .31, 34
Remote configuration access
. . . . . . . 30
Remote configuration via ISDN . . . . . . 19
Reset connect charge protection. . . . 22
Reset switch
. . . . . . . . . . . . . . . . . . . . . .25
Resetting the configuration . . . . . . . . . 25
Restarting the device . . . . . . . . . . . . . . 25
Router
. . . . . . . . . . . . . . . . . . . . . . . . . . . . 13
Router function . . . . . . . . . . . . . . . . . . . . . 9
S
Searching for Windows workgroups .45
Security
Firewall wizard . . . . . . . . . . . .58
Security settings wizard
. . . . 57
Security checklist . . . . . . . . . . . . . . . . . .59
Security features . . . . . . . . . . . . . . . . . .14
Security settings
. . . . . . . . . . . . . . . . . . . 62
Setting up access to the Internet
. . . . 37
SIP PBX
. . . . . . . . . . . . . . . . . . . . . . . . . . 17
SIP provider
. . . . . . . . . . . . . . . . . . . . . . .15
SNMP
Protection of the configuration
59
Software installation
. . . . . . . . . . . . . . . 26
SSID
. . . . . . . . . . . . . . . . . . . . . . . . . . . . . 34
Stateful Inspection
. . . . . . . . . . . . . . . . .12
Stateful Inspection Firewall . . . . . . . . .58
Status displays
. . . . . . . . . . . . . . . . . . . .21
ADSL data
. . . . . . . . . . . . . . . .23
ADSL link
. . . . . . . . . . . . . . . . . 23
ISDN channel
. . . . . . . . . . . . . 24
ISDN status
. . . . . . . . . . . . . . .23
LAN . . . . . . . . . . . . . . . . . . . . . .24
Online . . . . . . . . . . . . . . . . . . . . 23
Power
. . . . . . . . . . . . . . . . . . . .22
VPN
. . . . . . . . . . . . . . . . . . . . . . 24
Statusanzeigen
Power . . . . . . . . . . . . . . . . . . . . 21
Switch
. . . . . . . . . . . . . . . . . . . . . . . . . . . 25
System preconditions . . . . . . . . . . . . . . 20
T
TCP
. . . . . . . . . . . . . . . . . . . . . . . . . . . . . . 60
TCP/IP
. . . . . . . . . . . . . . . . . . . . . . .20, 51
check connection . . . . . . . . . 46
Settings . . . . . . . . . .28, 31, 34
Settings to PCs in the LAN
. . 35
Windows size . . . . . . . . . . . . . 63
TCP/IP configuration
Automatic
. . . . . . . . . . . . . . . . 34
fully automatic . . . . . . . .28, 29
manual . . . . . . . . . . . . . . . 28, 29
TCP/IP filter
. . . . . . . . . . . . . .11, 19, 60
TCP/IP router
Settings
. . . . . . . . . . . . . . . . . . 43
Telephone . . . . . . . . . . . . . . . . . . . . . . . . . 9
Telephone answering device . . . . . . . . 9
Transfer protocol
. . . . . . . . . . . . . . . . . . 62
U
UDP
. . . . . . . . . . . . . . . . . . . . . . . . . . . . . 60
Upload . . . . . . . . . . . . . . . . . . . . . . . . . . . . 9
upstream
. . . . . . . . . . . . . . . . . . . . . . . . . . 9
V
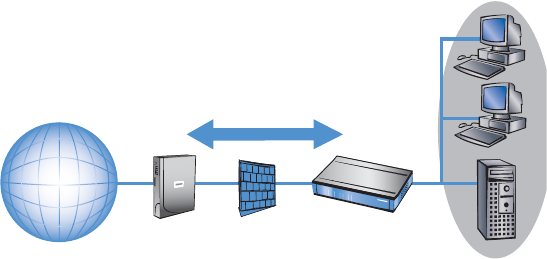
Virtual Private Network (VPN)
. . . 14, 18
Voice communication
. . . . . . . . . . . . . . 14
Voice frequencies
. . . . . . . . . . . . . . . . . . 9
Voice over IP . . . . . . . . . . . . . . . . . . . . . . 14
VoIP
. . . . . . . . . . . . . . . . . . . . . . . . . . . . . 14
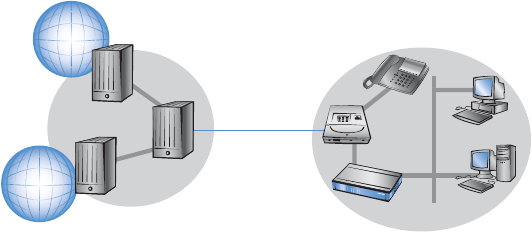
Connecting subsidiaries or home
offices
. . . . . . . . . . . . . . . . . . . . 16
Peer-to-peer
. . . . . . . . . . . . . . 17
Supplementing the ISDN PBX
15
VoIP PBX
. . . . . . . . . . . . . . . . . . . . . . . . . 17
VoIP softphone
. . . . . . . . . . . . . . . . . . . . 15
Voltage switch
. . . . . . . . . . . . . . . . . . . . 25
VPN client
. . . . . . . . . . . . . . . . . . . . . . . . 51
W
WAN connection
problems establishing the con-