Address: JK Imaging Ltd. 17239 South Main Street, Gardena, CA 90248, USA
JK Imaging Europe, 71 Clarendon road, Watford, WD17 1DS, UK
Company Website: www.kodakpixpro.com
About this Manual
JK Imaging Ltd. reserves all rights of this document. No part of this published manual may be reproduced, transmitted,
transcribed, stored in a retrieval system or translated into any language or computer language, in any form, by any means,
without the prior written permission of JK Imaging Ltd..
All trademarks mentioned in this manual are used for identification purposes only and are properties of their respective owners.
This manual will instruct you on how to operate the PIXPRO Remote Viewer. JK Imaging Ltd. has tried its utmost to ensure the
correctness of the user manual contents, but reserves the right to modify as necessary.
Throughout this manual, the following symbols are used to help you locate information quickly and easily:
Indicates useful information.
Matters Needing Attention
Before use, please confirm that your smart device is a smart phone with Android 2.3 or 4.x system, a tablet computer with
Android 4.x or is an iOS 6/7 system. If not, please upgrade your smart device before using the APP.
Please do not use in places having high intensity magnetic field, electrostatic and electric wave interference (for example near a
microwave oven), which may cause failure in receiving signals.
To maintain a connection, please keep the camera within 10 meters (32.8 feet) without signal shielding interference.
Please do not use Wi-Fi connection functionality on a plane.
The camera and the smart device can only be connected one to one.
2
Contents
Before You Start ..........................................................................................................................................1
Connect the Smart Device .......................................................................................................................5
Download and Install APP .................................................................................................................................................................................................5
Establish a connection ........................................................................................................................................................................................................5
Position Service Function .................................................................................................................................................................................................6
Description of screen icons in shooting mode ..................................................................................................................................................6
In movie mode ...............................................................................................................................................................................................6
In photo shooting mode ...............................................................................................................................................................................7
EV settings .....................................................................................................................................................................................................8
White Balance ...............................................................................................................................................................................................11
Take a photo ...................................................................................................................................................................................................15
Record a video ...............................................................................................................................................................................................15
The playback interface of the camera.................................................................................................................................................................17
Single playback .............................................................................................................................................................................................. 17
Index playback ............................................................................................................................................................................................... 21
The playback interface of the smart device .......................................................................................................................................................23
Index playback ............................................................................................................................................................................................... 23
Single playback .............................................................................................................................................................................................. 26
APP Home ...........................................................................................................................................................................................................................30
4
About ....................................................................................................................................................................................................................................30
KODAK PIXPRO S-1 Compact System Camera ...........................................................................................................................................................31
KODAK PIXPRO SL10 SMART LENS Camera ..............................................................................................................................................................32
KODAK PIXPRO SL25 SMART LENS Camera ..............................................................................................................................................................33
KODAK PIXPRO AZ651 Digital Camera ........................................................................................................................................................................34
KODAK PIXPRO AZ526 Digital Camera ....................................................................................................................................................................... 35
KODAK PIXPRO AZ525 Digital Camera .......................................................................................................................................................................36
KODAK PIXPRO SL5 SMART LENS Camera ................................................................................................................................................................37
5
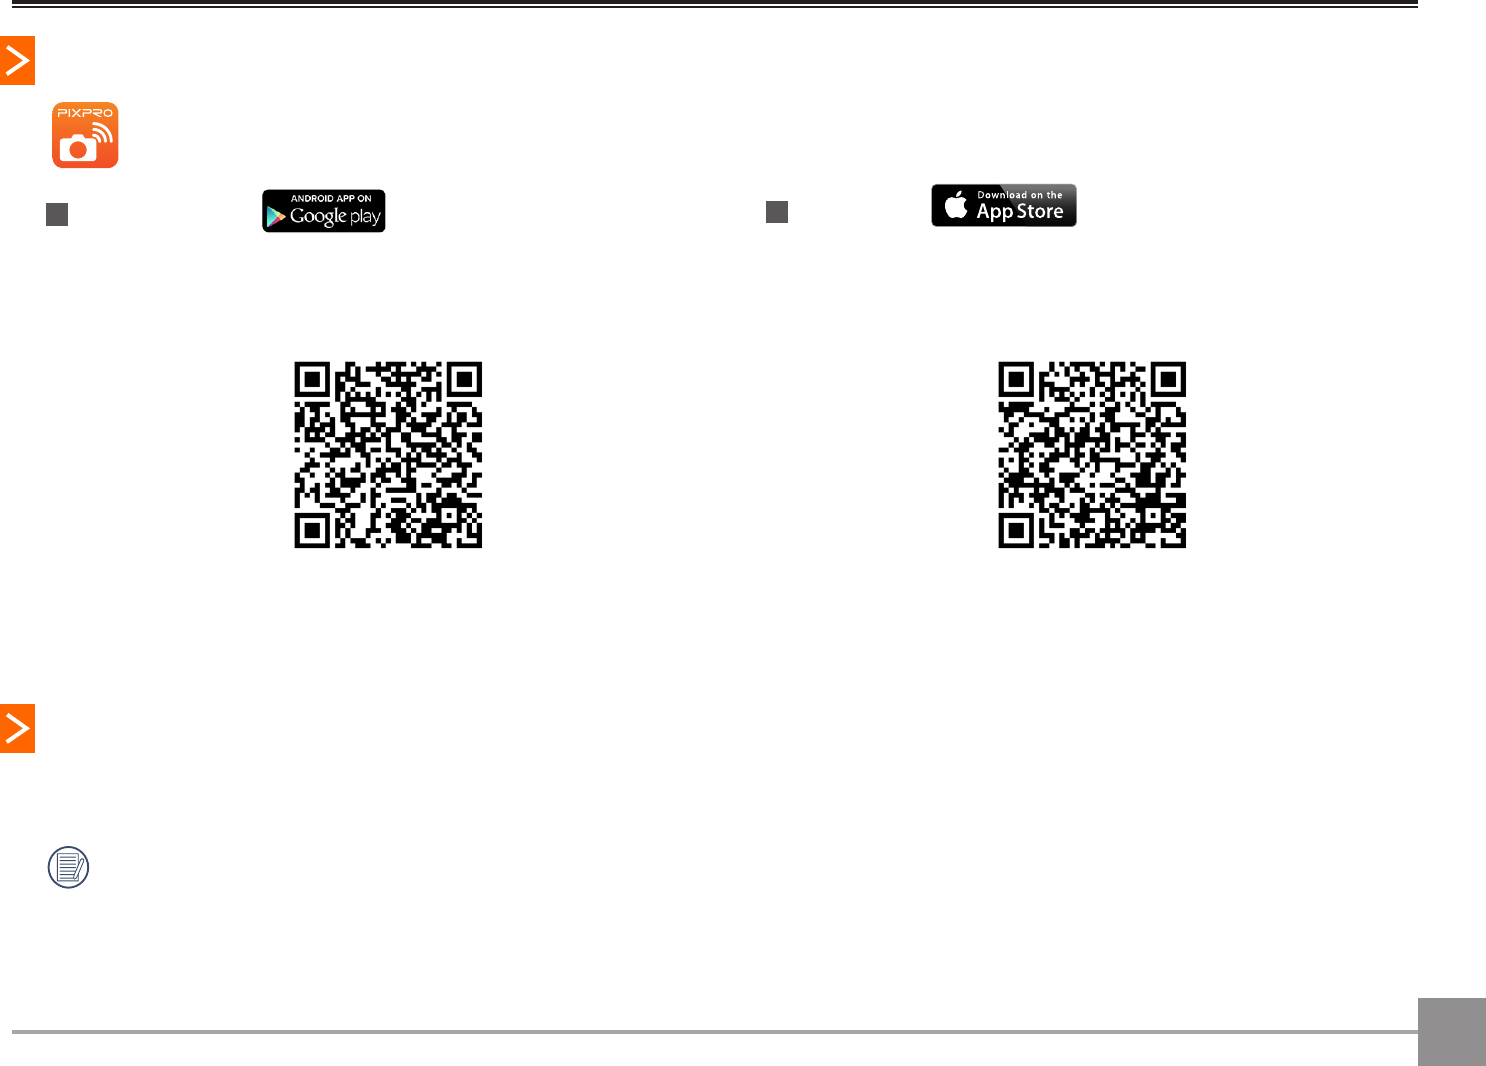
Download and Install APP
Please download APP installation package (APP name: PIXPRO Remote Viewer) to your smart device from the path below and
install it.
Android system
For Android devices, search and download the App “PIXPRO
Remote Viewer” in Google play, and install it following the
instructions on the interface.
Establish a connection
The different camera models may use different methods to connect with smart devices. Please refer to the User Manual for your camera
for specific instructions.
When the smart device judges the system to be out of memory, the APP will not be able to run normally. Please clean up the
memory of the smart device.
Connect the Smart Device
iOS system
For Apple devices, search and download the App “PIXPRO
Remote Viewer” in App store, and install it following the
instructions on the interface.
https://itunes.apple.com/us/app/
pixpro-remote-viewer/id833154167?mt=8
https://play.google.com/store/apps/
details?id=com.jkimaging.pixproremoteviewer
6
APP Operating Method
Position Service Function
When connected successfully, you can tap the App icon ( ) to start it. Enable the GPS function on the smart device by following the
prompts on the interface, PIXPRO Remote Viewer can record GPS location on picture files. This function is not available for video files.
Remote Viewfinder
After finishing setting position service, the APP will enter the viewfinder interface. Camera functions can be accessed from this screen.
Description of screen icons in shooting mode
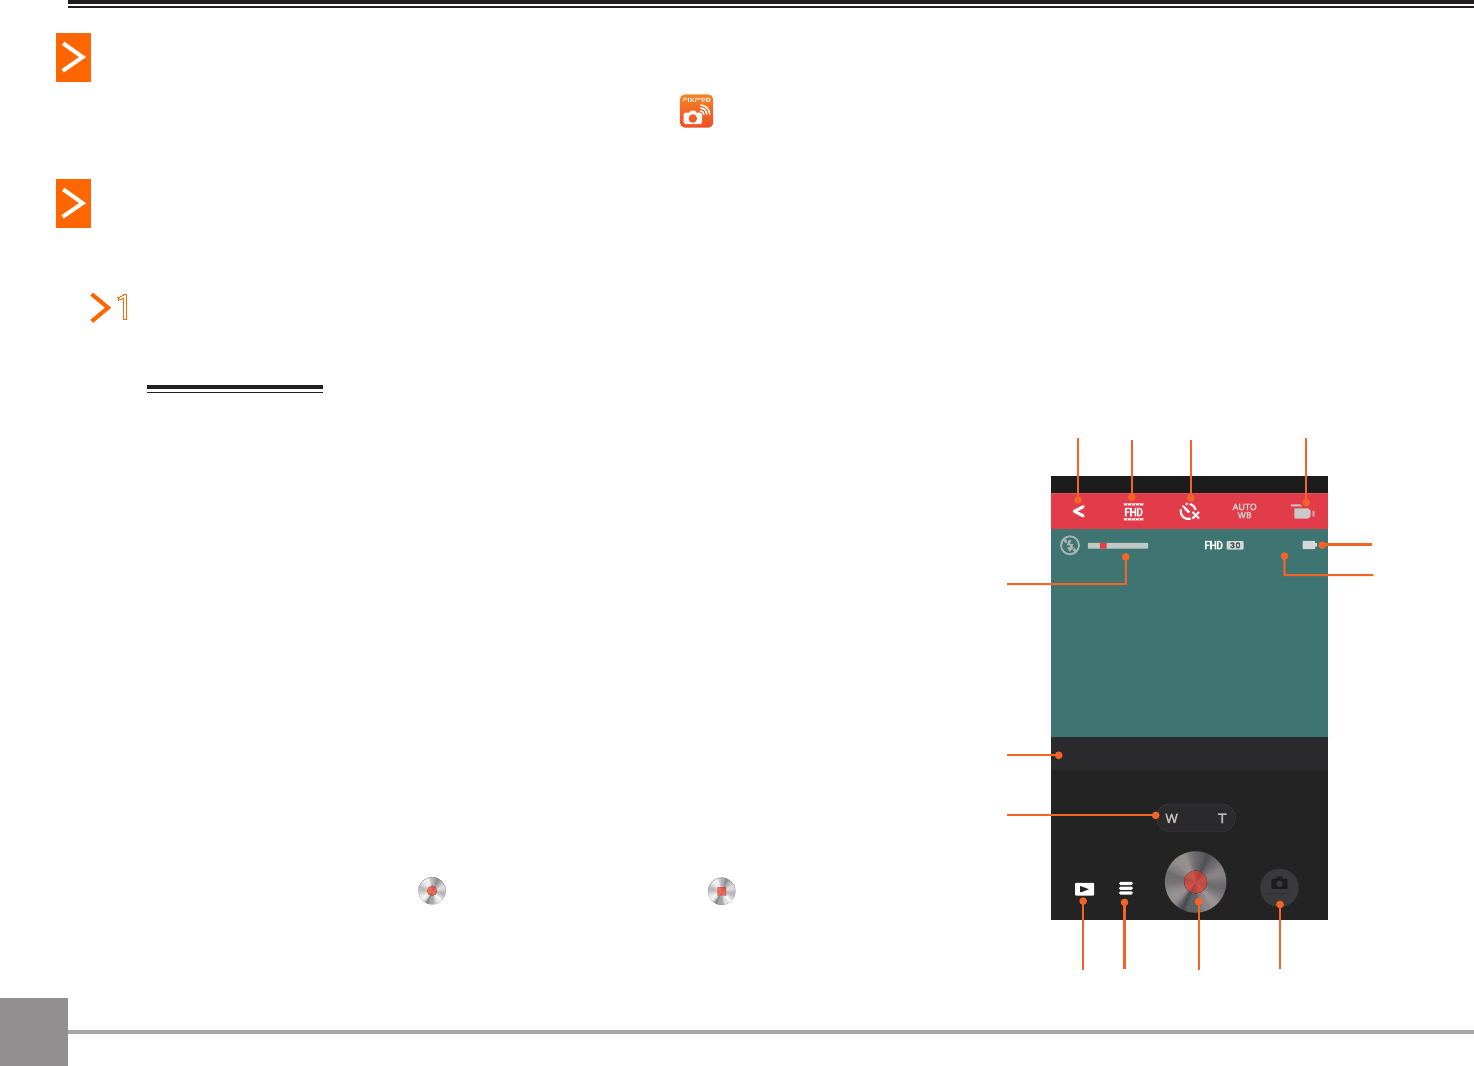
In movie mode
1. Zoom control
2. Exposure compensation
3. Zoom display bar
4. Enter the previous stage of interface or return to the APP home
5. Video size
6. Self-timer
7. Movie mode
8. Battery state
9. Record time
10. Switch record mode to shooting mode
11. Start video recording ( )/Stop video recording ( )
12. Menu
13. Playback
1
EV-3.0
00:00
P
hoto
1.2x
111213
1
2
3
4567
8
9
10
7
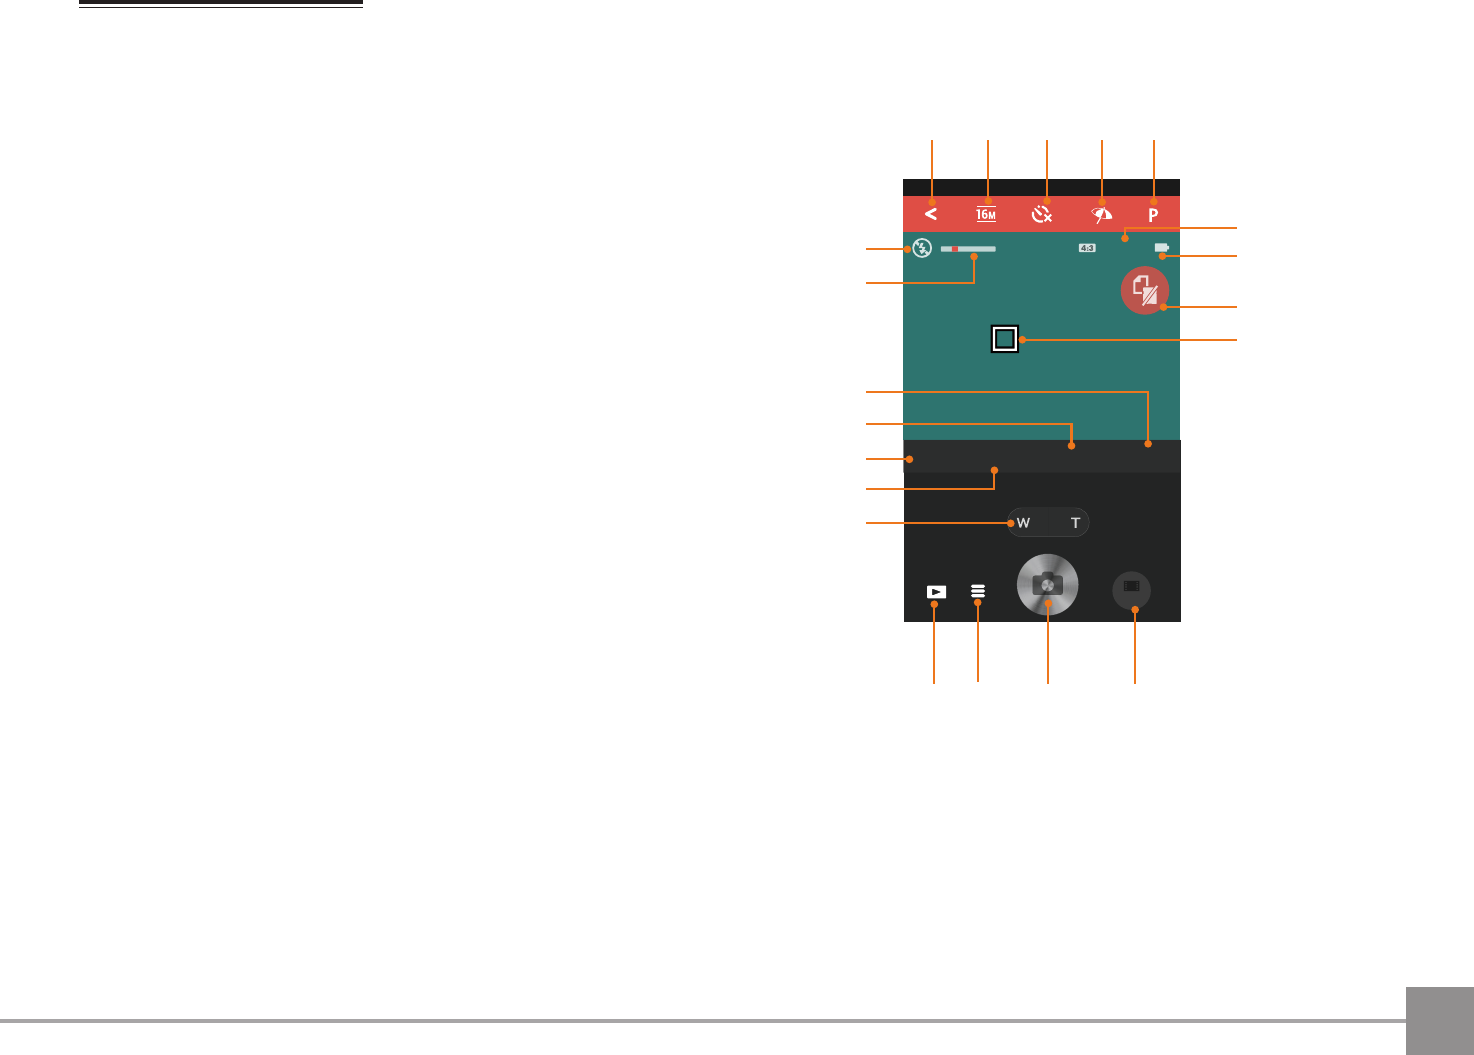
In photo shooting mode
1. Zoom control
2. ISO value
3. Exposure compensation
4. Aperture value
5. Shutter speed
6. Zoom display bar
7. Flash mode
8. Enter the previous stage of interface
or return to the APP home
9. Image size
10. Self-timer
11. White balance
12. Mode
13. Available shots
14. Battery state
15. No SD card in camera
16. Touch focus display
17. Switch shooting mode to record mode
18. Shoot photos
19. Menu
20. Playback
EV-3.0ISO200
Movie
F3.51/2000
12345
16M
1.2x
2019
2
3
4
5
6
7
89101112
13
14
15
16
1817
1
8
Parameter settings
The cameras of different models can set different parameters. Please refer to the detailed instructions for “Appendices” on
page
31.
Zoom control
Touch zoom ( ) adjust focus by touching W (amplifying) / T (zoom-out) of the screen. The screen displays focus display bar
(optical focus only) and zoom ratio.
By using the zoom lever on KODAK PIXPRO SMART LENS Camera to accelerate zoom in and zoom out.
The original lens of KODAK PIXPRO S-1 Compact System Camera cannot control focus by APP. The icon is gray ( ) if
APP does not support zoom function.
EV settings
The EV function menu includes functions, such as EV adjustment, ISO adjustment, Shutter adjustment, and Aperture adjustment.
Using the appropriate function settings can improve your pictures.
Activate the wheel to adjust the values for EV, ISO, Aperture and Shutter.
EV-3.0ISO200 F3.5 1/2000
123456
16M
EV-3.0ISO12800
ISO400
F12.31/1234
123456
16M
M
o
v
i
e
M
ov
ie
O200
200
2
9
EV value (Exposure compensation)
Adjust the brightness of framing interface. It is applied to the circumstance where the contrast of shot subject and background
brightness is relatively large.
ISO value
ISO allows you to set the sensitivity of the camera sensor. Higher ISO value is suggested in dark environment while low ISO value is
suggested where it is relatively bright.
Aperture value
Adjust the dimension of aperture. The large aperture is to highlight the object focused through blurring the background, while the
small aperture is for clear focusing on both the background and the object.
Shutter speed
The definition of motion of the shot subject in the framing picture can be represented by adjusting the shutter speed.
High-speed shutter can catch the action of the subject that moves quickly very clearly while low-speed shutter can shoot the
dynamic image of the subject that moves very quickly.
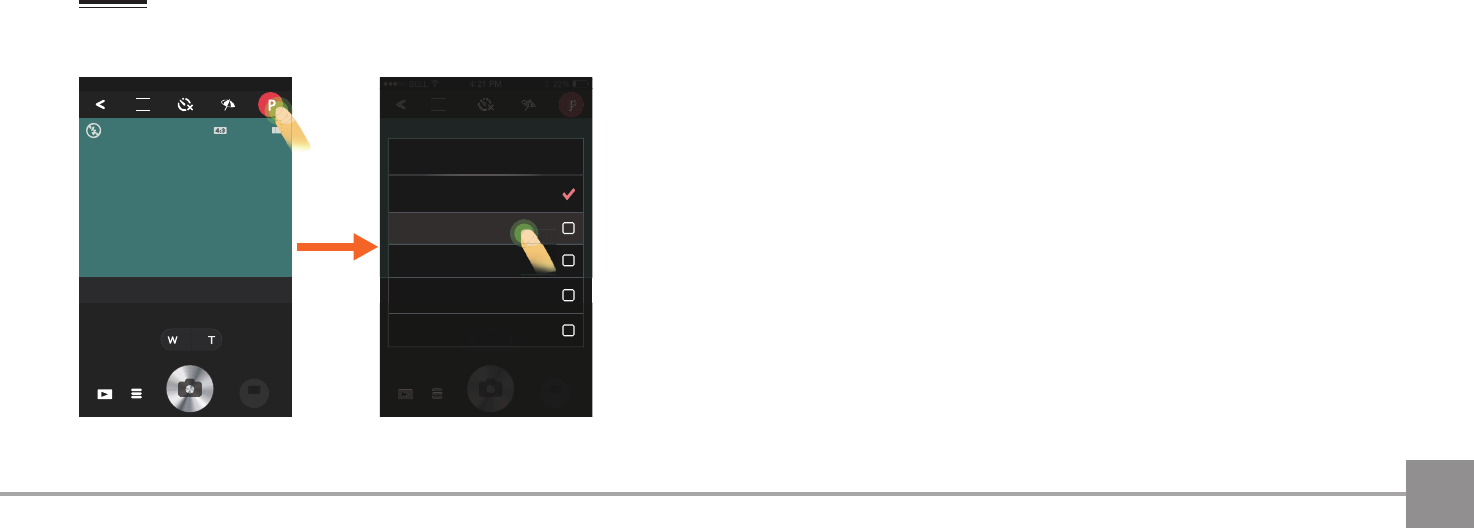
Mode
Select the most suitable mode to capture the best pictures.
EV-3.0ISO200F3.51/2000
12345
16M
16M
M
o
v
i
e
16
M
Aperture priority
Shutter priority
Manual Mode
Face Beautifier
Mode
Program AE
M
o
v
ie
16M
10
Program AEFor adjusting the EV and ISO values.
Aperture priorityFor adjusting the aperture size, EV and ISO values. It is generally used to shoot inanimate object and
control the view depth.
Shutter priorityFor adjusting the shutter speed, EV and ISO values. It is mostly used to shoot the moving object.
Manual ModeAperture, shutter speed and ISO value can be set manually to shoot static photos.
Face BeautifierThe camera is set to automatically adjust camera exposure for realistic portrayal of skin tones.
Auto SceneThe camera will automatically detect the most suitable scene (Auto, Landscape, Night and Macro) to
capture the best pictures.
AE Bracketing
It can take three photos continuously on an automatic basis by touching once: photos with original
brightness, relatively dark and bright photos.
Wide Dynamic
Range
When the camera detects that there is a big contrast in brightness between scenes and such scenes
are against the light, it will automatically adjust the brightness and saturation to capture an image that
better represents the scene.
HDRUse this setting to control wide dynamic image range when taking static pictures. Photos with extreme
contrast of bright and dark areas will still maintain distinguishable detail and depth.
Continuous ShotIt can take several photos at a time.
Cont. Shot-Fast For continuous shot with 4M pixels.
There are 4 shooting scenes under Auto Scene mode:
AutoThe camera will automatically adjust the exposure and focus to ensure the best possible pictures.
LandscapeFor landscapes, will automatically adjust the exposure to match the background.
MacroTo produce more detailed close-ups, will automatically engage the camera's Macro Mode and automatically focus
the lens.
NightFor night scenes, will automatically increase the ISO value to compensate for low light.
For KODAK PIXPRO AZ651 Digital Camera, the pixels in Cont. Shot-Fast mode is 2M.
11
White Balance
The WB function allows the user to adjust color temperatures under different light sources, so as to confirm that the color can be
presented properly.
AWBFor auto shooting based on lighting conditions.
DaylightFor shooting on a sunny day.
CloudyFor shooting on a cloudy day.
ShadowFor shooting under shadow on a sunny day.
FluorescentFor shooting under fluorescent lights.
Fluorescent HFor shooting under fluorescent H lights.
IncandescentFor shooting under incandescent lights.
Self-timer
Timing shooting is allowed by this function. There are only two options under Movie mode: Self-timer Off and Self-timer 10sec.
Self-timer OffDisables the Self-timer.
Self-timer 2secA photo will be shot in 2s.
Self-timer 10secA photo will be shot or a piece of video will begin to record in 10s.
12
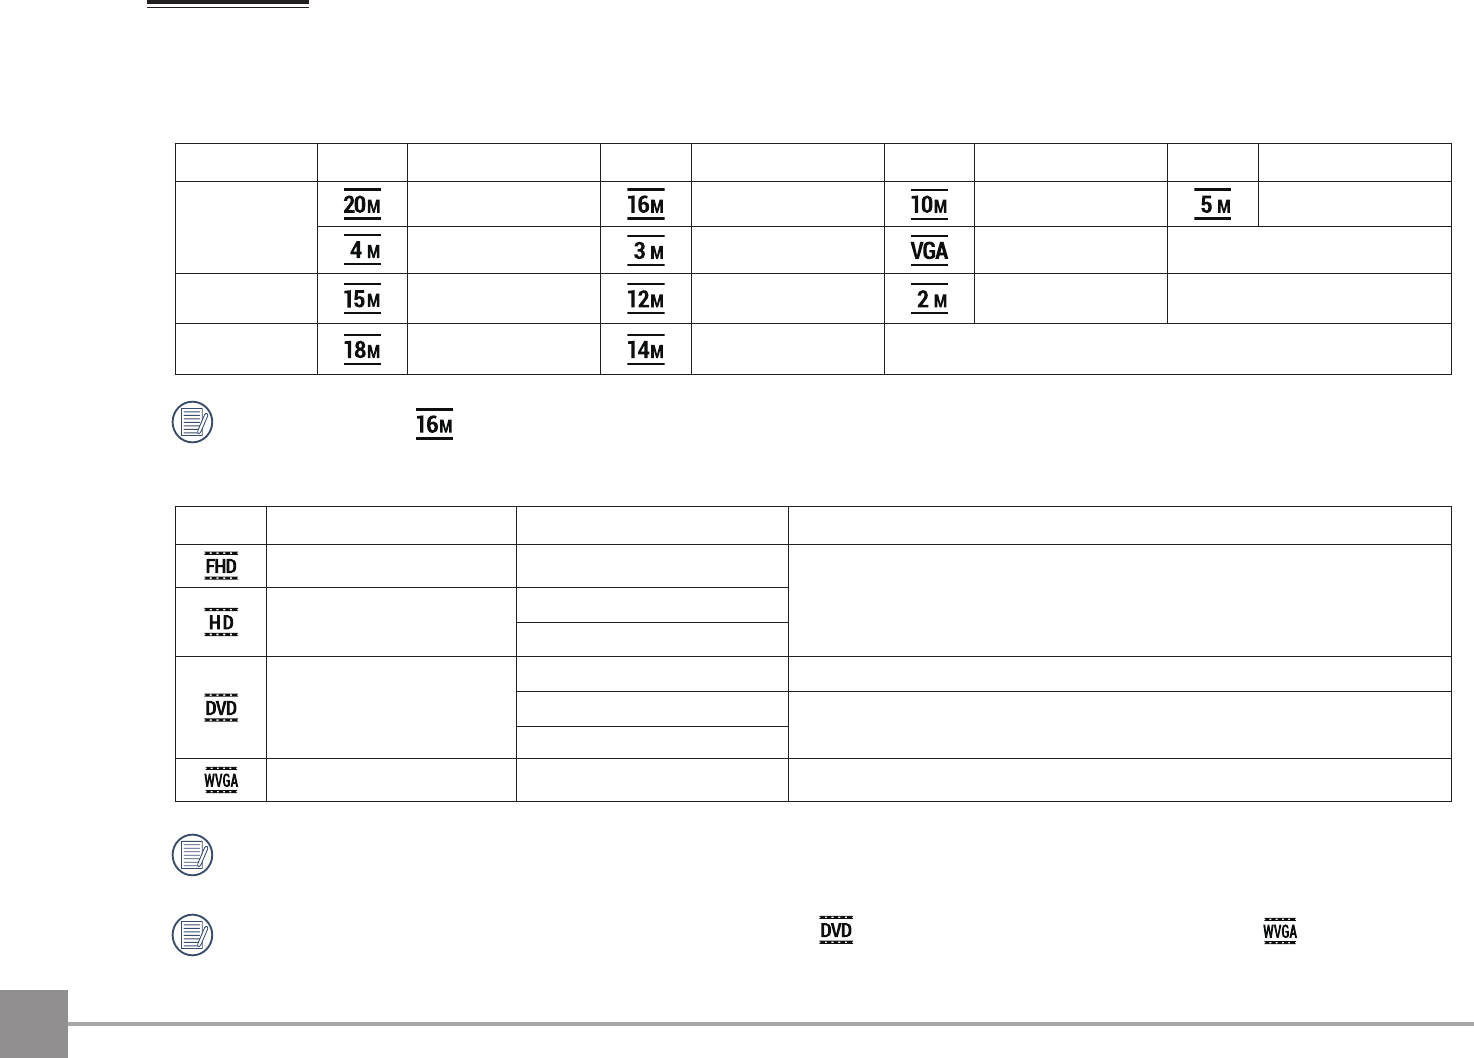
Shooting size
The setting value of shooting dimension is based on image pixel. The higher the pixel, the more the details contained in image and
the finer the image shot.
1. Image size
Pixel ratio IconImage PixelIconImage PixelIconImage PixelIconImage Pixel
4 : 3
5184 X 38884608 X 34563648 X 27362592 X 1944
2336 X 17522048 X 1536640 X 480
16 : 95120 X 28804608 X 25921920 X 1080
3 : 25184 X 34564608 X 3072
The image pixel of for KODAK PIXPRO S-1 Compact System Camera is: 4640 X 3480.
2. Movie size
IconMeaning Movie SizeRecording Time Restraint
Full high definition1920 X 1080 30fps
The maximum recordable time is 29 minutes.
High definition
1280 X 720 60fps
1280 X 720 30fps
Standard definition
640 X 480 30fpsNone
640 X 360 120fps
The maximum recordable time is 30 seconds.
640 X 480 120fps
Common definition848 X 480 120fpsThe maximum recordable time is 60 seconds.
When recording in higher pixel resolutions for extended periods of time, the camera may get warm. This is not a camera
malfunction.
Dynamic image can be shot with ultra-high speed video by (640x480 120fps/640x360 120fps) or (848
X
480
120fps) starting high-speed recording and it will be played back with normal 30fps speed in order to catch the moment that
is hard to distinguish by eyes.
13
Flash
The flash is mainly for supplementing light for the scene. The flash is usually used in shooting against the light to highlight the object
shot through lightening the object while darkening the background; it is also suitable for metering and shooting in darker scenes
through exposure.
Force OffFlash is turned off.
Flash AutoCamera flash goes off automatically based on existing light conditions.
Fill flashFor fill flash at the moment of taking a picture.
Menu
Such functions as resetting, formatting, password changing and power saving can be set by entering menu interface through
touching . Please set the functions according to the interface prompt and leave the menu after finishing setting by touching the
blank space beyond the menu.
Movie
EV-3.0ISO12800F12.31/1234
123456
16M
Format
Change Password
Power Saving
Menu
Reset
EV-3.0ISO200
Movie
F3.51/2000
12345
16M
Reset
Use this setting to restore the camera to its original default settings.
14
Format
Formatting enables you to delete all contents in the memory card, and the data is unrecoverable after the memory card is formatted.
Change Password
Change Wi-Fi password by following the steps below:
1. Touch「Change Password」to enter password changing interface;
2. Input the old password and then the new one according to the interface prompt and confirm the new password (inputting new
password again), touch「Apply」to finish this operation;
3. As Wi-Fi connection has been interrupted, please reconnect it (see User Manual of camera for the connection method).
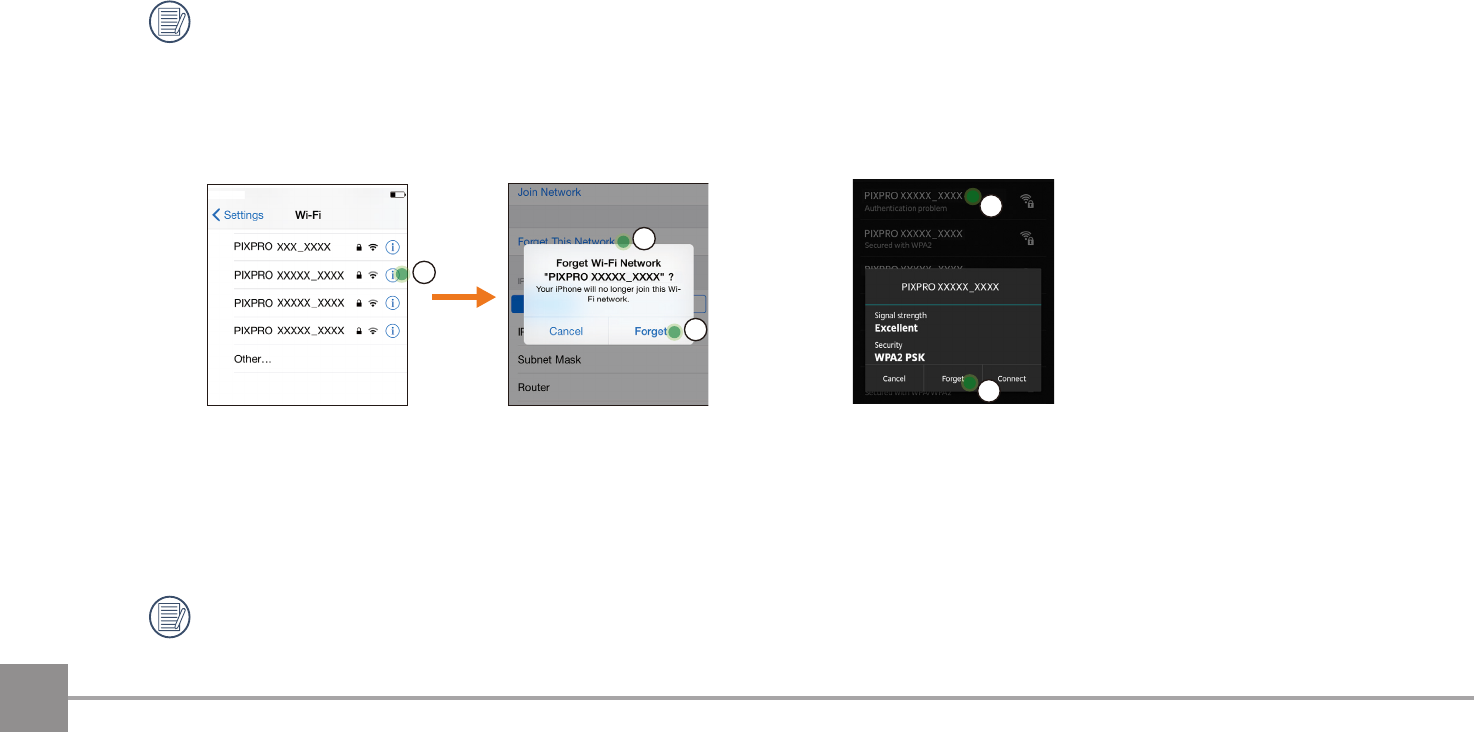
Please enter the new password on smart device after changing Wi-Fi password. Some models of smart device will remember
the Wi-Fi password previously entered, so please clear the old password on smart device manually before connection (For
different models, this operation may be varied, please subject to your user manual.)
Android systemiOS system
1
2
3
1
2
Power Saving
Set the time in which the APP will automatically timeout if there is no action.
There are 4 options: Off/ 3 min / 5 min / 10 min.
Only KODAK PIXPRO SMART LENS Cameras support the Power Saving function.
Gebruikershandleiding.com neemt misbruik van zijn services uitermate serieus. U kunt hieronder aangeven waarom deze vraag ongepast is. Wij controleren de vraag en zonodig wordt deze verwijderd.
Product:
Spelregels forum
Om tot zinvolle vragen te komen hanteren wij de volgende spelregels:
lees eerst de handleiding door;
controleer of uw vraag al eerder door iemand anders is gesteld;
probeer uw vraag zo duidelijk mogelijk te stellen;
heeft u een probleem en al geprobeerd om dit op te lossen, vermeld dit erbij aub;
heeft u een oplossing gekregen van een bezoeker dan horen wij dat graag in dit forum;
wilt u een reactie geven op een vraag of antwoord, gebruik dan niet dit formulier maar klik op de knop 'reageer op deze vraag';
uw vraag wordt direct op de website gezet; vermijd daarom persoonlijke gegevens in te vullen;
Belangrijk! Als er een antwoord wordt gegeven op uw vraag, dan is het voor de gever van het antwoord nuttig om te weten als u er wel (of niet) mee geholpen bent! Wij vragen u dus ook te reageren op een antwoord.
Belangrijk! Antwoorden worden ook per e-mail naar abonnees gestuurd. Laat uw emailadres achter op deze site, zodat u op de hoogte blijft. U krijgt dan ook andere vragen en antwoorden te zien.
Abonneren
Abonneer u voor het ontvangen van emails voor uw Kodak PIXPRO Remote Viewer bij:
nieuwe vragen en antwoorden
nieuwe handleidingen
U ontvangt een email met instructies om u voor één of beide opties in te schrijven.
Ontvang uw handleiding per email
Vul uw emailadres in en ontvang de handleiding van Kodak PIXPRO Remote Viewer in de taal/talen: Engels als bijlage per email.
De handleiding is 5,41 mb groot.
U ontvangt de handleiding per email binnen enkele minuten. Als u geen email heeft ontvangen, dan heeft u waarschijnlijk een verkeerd emailadres ingevuld of is uw mailbox te vol. Daarnaast kan het zijn dat uw internetprovider een maximum heeft aan de grootte per email. Omdat hier een handleiding wordt meegestuurd, kan het voorkomen dat de email groter is dan toegestaan bij uw provider.
Stel vragen via chat aan uw handleiding
Stel uw vraag over deze PDF
Andere handleiding(en) van Kodak PIXPRO Remote Viewer
Uw handleiding is per email verstuurd. Controleer uw email
Als u niet binnen een kwartier uw email met handleiding ontvangen heeft, kan het zijn dat u een verkeerd emailadres heeft ingevuld of dat uw emailprovider een maximum grootte per email heeft ingesteld die kleiner is dan de grootte van de handleiding.
Er is een email naar u verstuurd om uw inschrijving definitief te maken.
Controleer uw email en volg de aanwijzingen op om uw inschrijving definitief te maken
U heeft geen emailadres opgegeven
Als u de handleiding per email wilt ontvangen, vul dan een geldig emailadres in.
Uw vraag is op deze pagina toegevoegd
Wilt u een email ontvangen bij een antwoord en/of nieuwe vragen? Vul dan hier uw emailadres in.