The XD9 can work with up to two microphones connected to the dedicated front mic input. The Micro input is processed by the Vocalizer, name-
ly the effect with which the vocals can be naturally harmonized either according to the chords played, or a harmony track of a Midi file or the
notes played on the keyboard. What you need is a good microphone, a cable and the XD9. When you connect the microphone, adjust its gain
moving the Gain cursor until the sound starts becoming distorted, then reduce the Gain down to a level in which the distortion disappears. The
purpose of the Gain control is that of boosting the microphone signal to an ideal level. As default setting the XD9 keeps the microphone input
turned off to prevent any interference or noise from entering the internal audio path.
Once the microphone has been connected the inputs are to be enabled. Proceed as follows to do so:
●
Go to the main page of the display using the
EEXXIITT
push button.
●
Gain access to the editing menu of
FF22 EEffffeecctt//MMiiccrroo--VVooccaalliizzeerr
●
The display shows various options. Select
FF44 MMiiccrroo
and then enable the input pressing
FF1100 ((AAccttiivvee))..
●
To balance the volume of the microphone with that of the keyboard in general, select the parameter and adjust its value using the
VVAALLUUEE
++//--
push buttons:
FF11 LLEEVVEELL 11 VVAALLUUEE ++//--
●
To return to the main page of the display press the
EEXXIITT
push button.
At this stage you can use effects like reverb on the voice signal from the mic, which can be modified as desired. The versatility of the Vocalizer
of the XD9 is such that it can be used in various ways. First and foremost the XD9 is capable of identifying the pitch of the note that you are
singing so that it can be harmonized correctly and naturally. This function however depends on the operating mode chosen for the Vocalizer.
●
You can harmonize the voice according to the chords played on the left part of the keyboard or, in
PPiiaanniisstt
mode, over the whole keyboard.
This method of utilising the notes by the Vocalizer is called
AAuuttoommaattiicc CChhoorrdd
and includes the identification of the note sung via the
microphone input.
●
Using the
‘‘KKeeyybbooaarrdd HHaarrmmoonnyy’’
mode You can harmonize the voice according to the notes you play directly on the right part of the keyboard
rather than the note sung .i.e. the produced vocal harmonies are exactly the notes you play whatever your vocal note!
●
You can use a dedicated track of a Midi file, compatible with the Vocalizer in
MMIIDDII
mode, to control the harmonization.
●
You can use the Vocalizer as a normal
PPiittcchh SShhiifftteerr
, where the interval of the note generated stays fixed and moves in parallel with the note
sung in
FFiixxeedd IInntteerrvvaall
mode.
●
You can use the Vocalizer as an effects processor to create special effects with the voice, in
VVooccaall EEffffeecctt
mode.
●
With the microphone in use, from page
FF55 VVooccaalliizzee
of the
FF33 EEffffeecctt//MMiiccrroo--VVooccaalliizzee
, menu press the
FF1100
push button to set the parameter on
AAccttiivvee..
●
To enable a different mode to that set as default, select it using the function
FF33 MMOODDEESS
push button
●
A list with the settings programmed will appear in the centre of the display. To select one use the
CCUURRSSOORR ++//--
push buttons
●
To disable the Vocalizer, press the
FF1100
push button and select
IInnaaccttiivvee..
●
To return to the main page press the
EEXXIITT
push button.
To simplify the choice of the operational mode when playing live (when the Vocalizer is in use), you can immediately call up the Harmony Right
settings, which belong to the
KKeeyybbooaarrdd HHaarrmmoonnyy
mode using the A and C push buttons and
UUnniissoonn
,
iinn
the
FFiixxeedd IInntteerrvvaall
mode using the B
and D push buttons.
The XD9 also automatically identifies the track of the Midi file dedicated to the Vocalizer and enables it as soon as you start the playback.
NNoottee::
However during playback it is important not to touch the A, B, C and D push buttons otherwise the Vocalizer will disable the
MMIIDDII
mode
related to that Midi file and will activate the one assigned to one of the push buttons.
As you will see, there are many other parameters, but for a start these few tips should be sufficient.
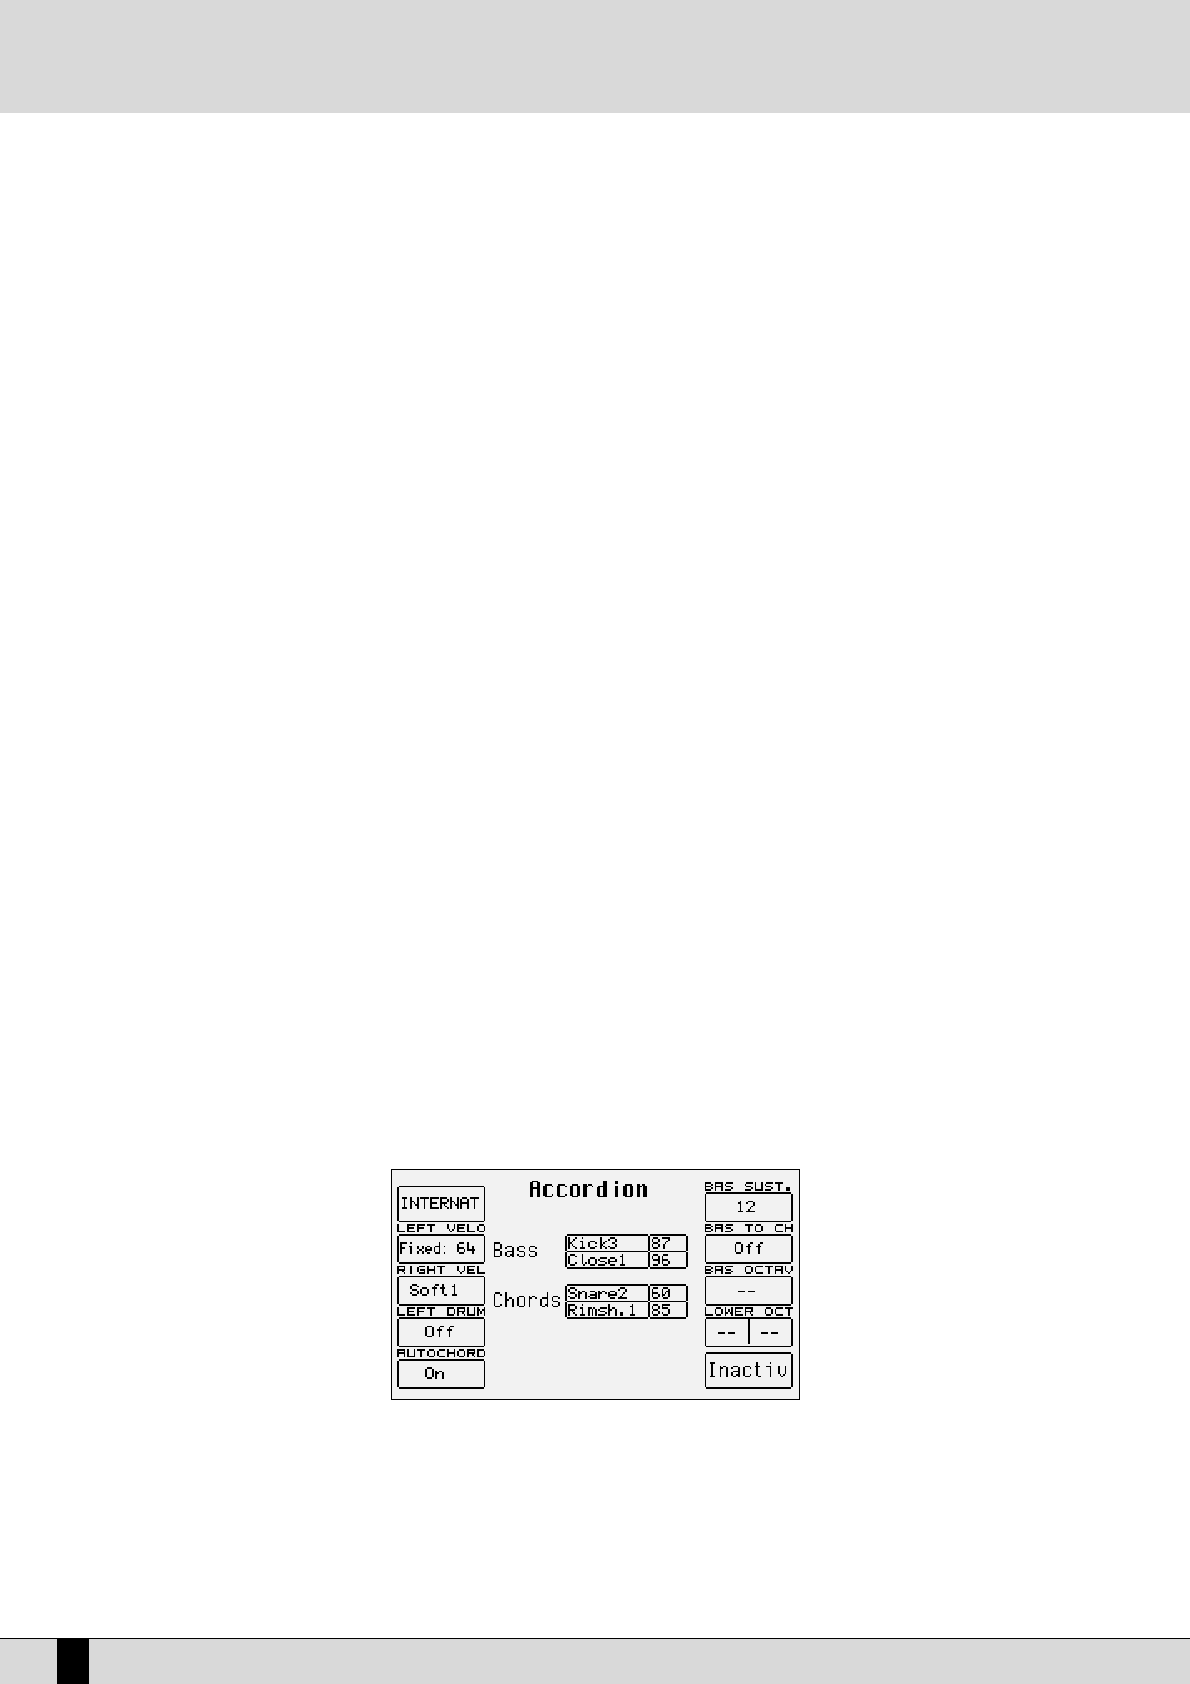
HOW TO USE A MIDI ACCORDION
Ketron has reserved a dedicated menu for the connection of accordions equipped with MIDI interface, which must exploit the MIDI In 2 input. To
reach the parameters required, from the main page shown on the display, access
FF33 UUTTIILLIITTYY
and from this page select
FF11 AACCCCOORRDDIIOONN
. Various
parameters to be modified are offered here. The most important however is the enabling of the MIDI accordion that is achieved by pressing
FF1100
that switches from
IInnaaccttiivvee
to
AAccttiivvee
. If you already own a MIDI accordion you most probably already know most of the parameters provided.
In any event the default settings should work efficiently with almost all types of MIDI accordions. It is important to remember that if your MIDI
accordion seems not to work you most probably have to work on the matching of the MIDI channels, which are accessed using the
FF66 MMIIDDII
menu.
When the
AAccccoorrddiioonn
mode is enabled, the XD9 does indeed automatically modify the MIDI settings that can be re-programmed at any time.
XD9-XD3
16
A guide on how to start playing