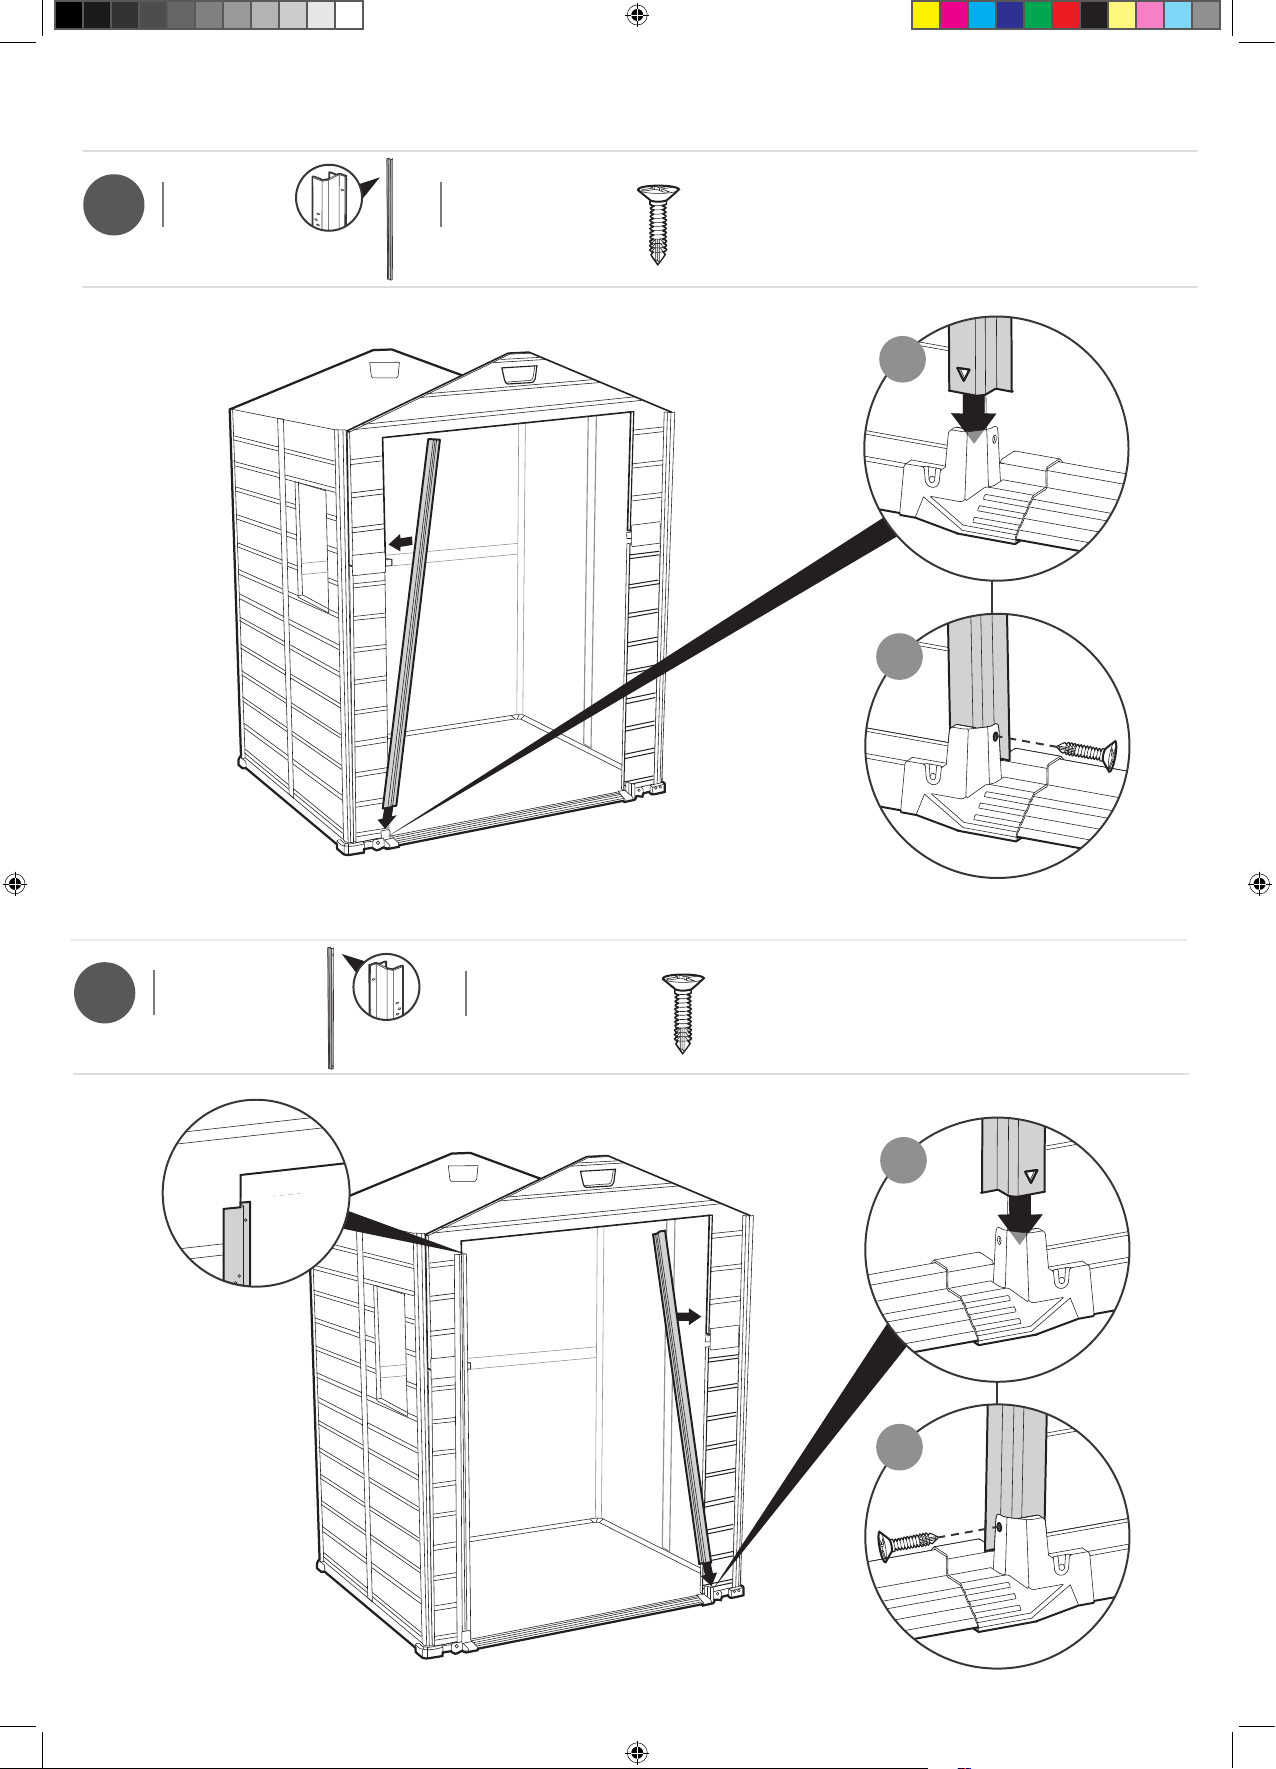
• Note: The roof fold line and the “This side down” label must be facing up as seen depicted in this figure
• La pliure du toit et l’étiquette « This Side Down » doivent être tournées vers le haut comme le montre cette figure
• La línea de doblez del techo y la etiqueta “This side down” deben estar hacia arriba como se puede ver en esta imagen
• Die Knickkante des Daches und der „This Side Down“-Aufkleber müssen wie im unteren Bild dargestellt nach oben zeigen
• De vouwlijn van het dak en het “This Side Down” label moeten naar boven liggen, zoals te zien is op de afbeelding
• La piega del tetto e l’etichetta “This Side Down” devono essere rivolti verso l’alto come Indicato In questa figura
• A Linha do Vinco do Telhado e a Etiqueta “This side down” Devem Estar Viradas Para Cima Como Ilustrado Nesta Figura
~3”
~7.5 cm
~3”
~7.5 cm
1
2
rc
rc
rc
e1b
e1a
rc
e1a
e1a
e1a
e1b
s26b
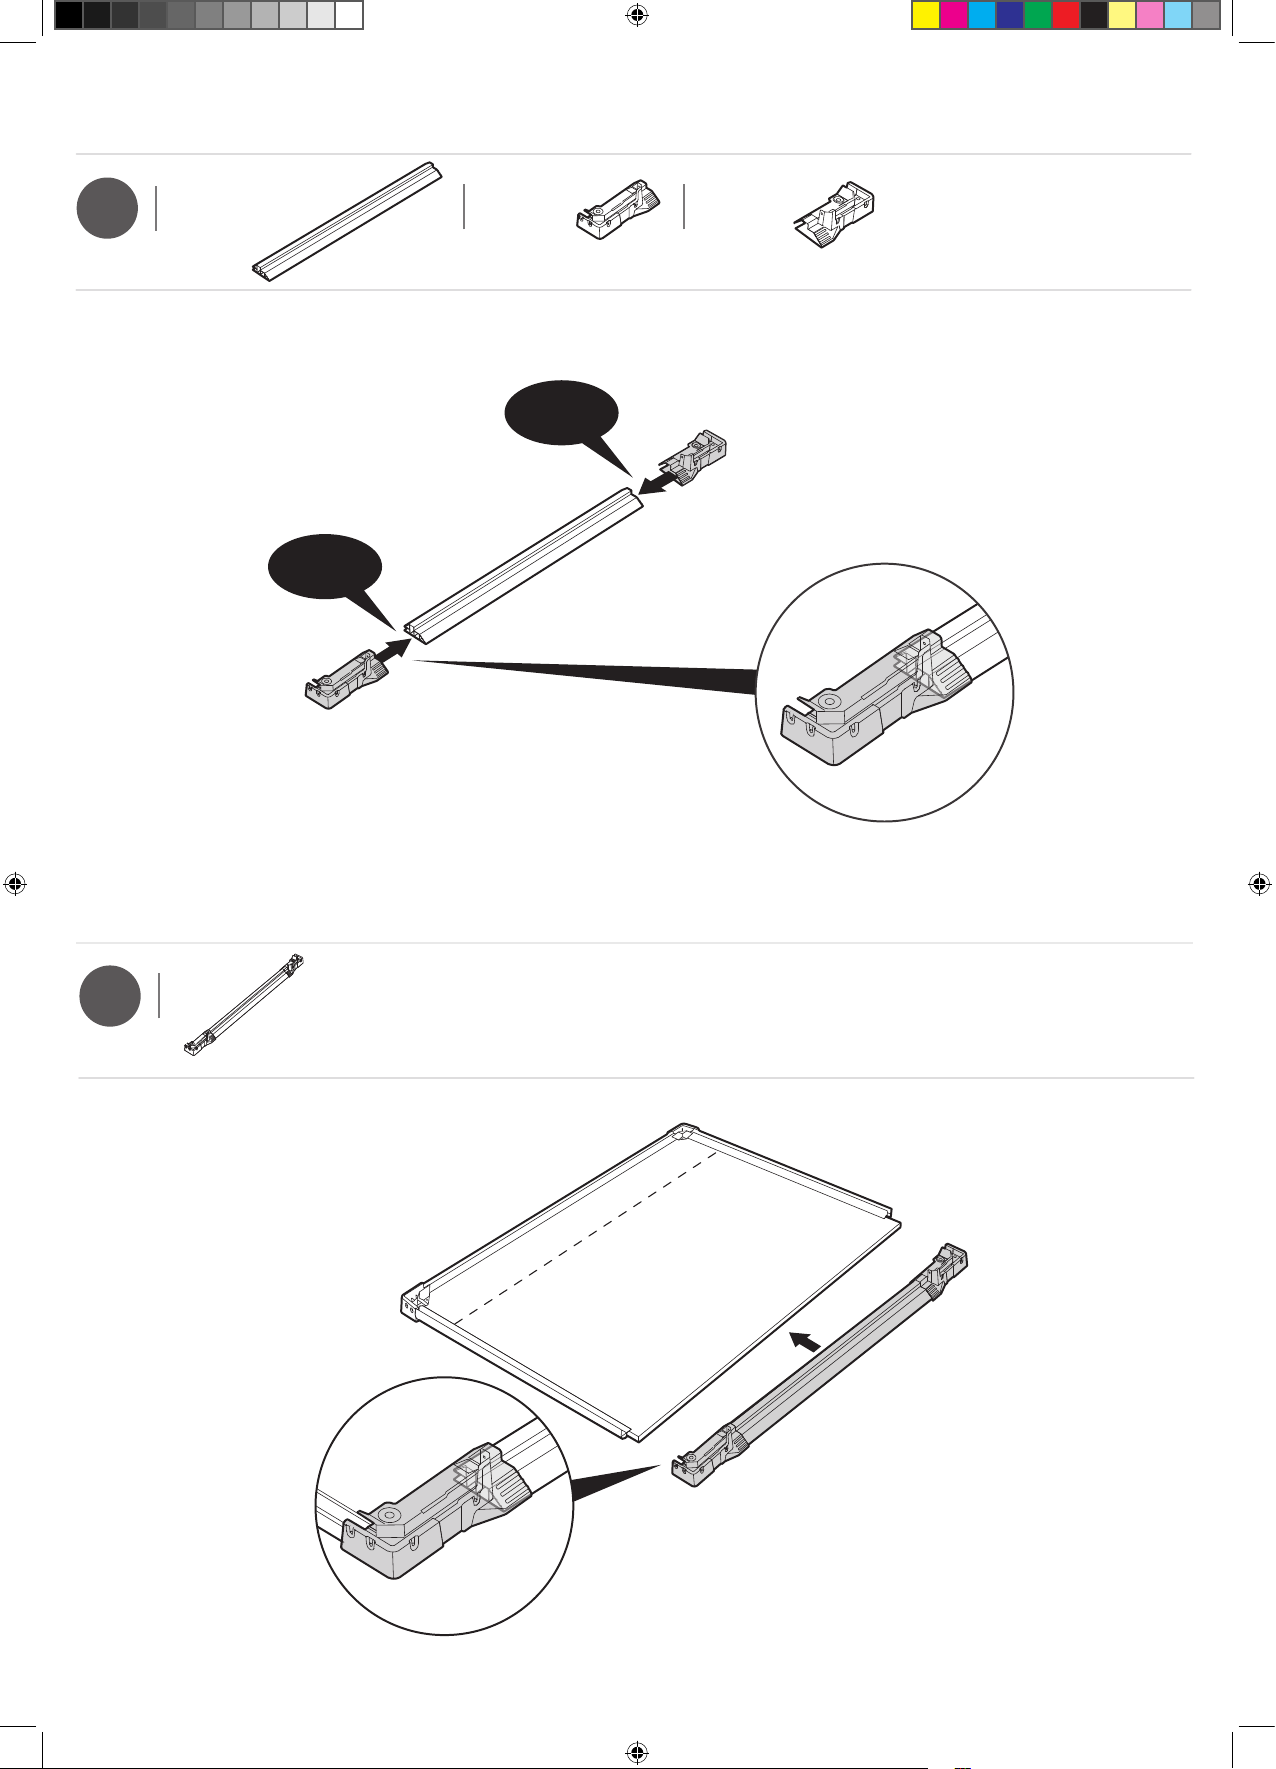
• Fully fit the panel inside the profile
• Fixez entièrement le panneau dans la
découpe
• Coloque completamente el panel
dentro del perfil
• Passen Sie das Panel genau und
akkurat in das Profil ein
• Plaats het paneel volledig in het profiel
• Inserire correttamente il pannello
all’interno delle guide
• Encaixe totalmente o painel dentro do
contorno
s26b (x8)
1”
26 mm
23
A-1275-8 583919 65DD.indd 2311.6.2017 12:22
s26b
35
34
• Turn over the roof panel
• Retourner le panneau supérieur
• Dele la vuelta al panel del techo
• Platte für das Dach umklappen
• Draai het dakpaneel om
• Capovolgi il pannello del tetto
• Volte o painel do telhado
s26b (x22)
1”
26 mm
s26b
• Fully fit the panel inside the profile
• Fixez entièrement le panneau dans la
découpe
• Coloque completamente el panel
dentro del perfil
• Passen Sie das Panel genau und
akkurat in das Profil ein
• Plaats het paneel volledig in het profiel
• Inserire correttamente il pannello
all’interno delle guide
• Encaixe totalmente o painel dentro do
contorno
This side
down
37
36
12
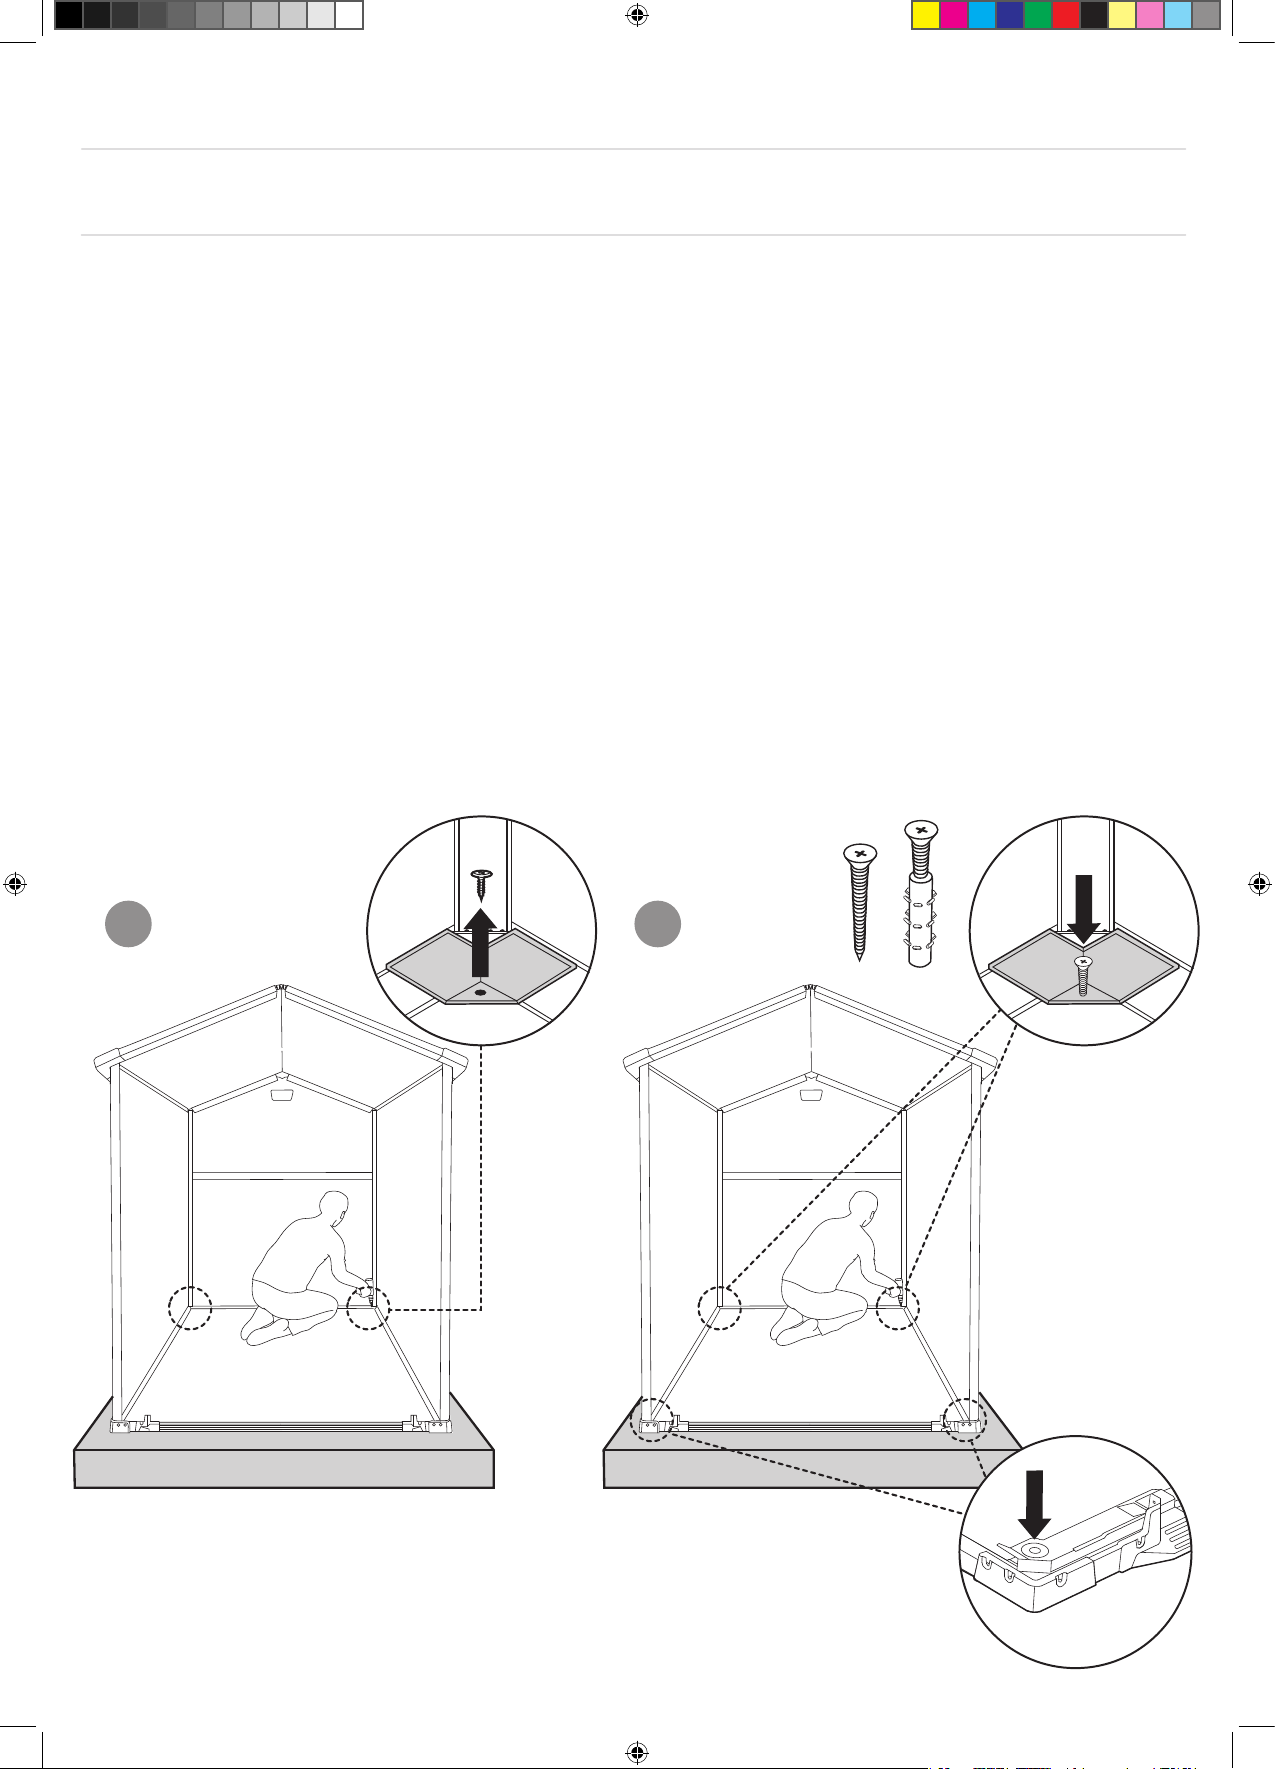
• Ensure roof is set fully down; use spatula as shown in the figure
• Assurez-vous que le toit est bien entièrement posé ; utilisez la spatule comme le montre la figure
• Asegúrese de que el techo esté completamente encajado abajo;
utilice la espátula como lo muestra la figura
• Vergewissern Sie sich, dass das Dach vollständig aufgesetzt ist
Benutzen Sie den Spachtel wie in der Zeichnung dargestellt
• Verzeker u ervan dat het dak volledig naar beneden is;
Gebruik het spatelwerktuig zoals getoond op de afbeelding
• Assicurati che il tetto sia completamente inserito fino in fondo. Usa la spatola come mostrato in Figura
• Certifique-se de que o telhado está completamente ajustado; Utilize a espátula como indicado na figura
24
A-1275-8 583919 65DD.indd 2411.6.2017 12:22
s26b
35
34
• Turn over the roof panel
• Retourner le panneau supérieur
• Dele la vuelta al panel del techo
• Platte für das Dach umklappen
• Draai het dakpaneel om
• Capovolgi il pannello del tetto
• Volte o painel do telhado
s26b (x22)
1”
26 mm
s26b
• Fully fit the panel inside the profile
• Fixez entièrement le panneau dans la
découpe
• Coloque completamente el panel
dentro del perfil
• Passen Sie das Panel genau und
akkurat in das Profil ein
• Plaats het paneel volledig in het profiel
• Inserire correttamente il pannello
all’interno delle guide
• Encaixe totalmente o painel dentro do
contorno
This side
down
37
36
12
• Ensure roof is set fully down; use spatula as shown in the figure
• Assurez-vous que le toit est bien entièrement posé ; utilisez la spatule comme le montre la figure
• Asegúrese de que el techo esté completamente encajado abajo;
utilice la espátula como lo muestra la figura
• Vergewissern Sie sich, dass das Dach vollständig aufgesetzt ist
Benutzen Sie den Spachtel wie in der Zeichnung dargestellt
• Verzeker u ervan dat het dak volledig naar beneden is;
Gebruik het spatelwerktuig zoals getoond op de afbeelding
• Assicurati che il tetto sia completamente inserito fino in fondo. Usa la spatola come mostrato in Figura
• Certifique-se de que o telhado está completamente ajustado; Utilize a espátula como indicado na figura
25
A-1275-8 583919 65DD.indd 2511.6.2017 12:22
38s26b (x16)
1”
26 mm
• Screw on the mark line
• Vissez sur la ligne dessinée
• Atornillar en la línea de la marca
• Auf der Markierungslinie festschrauben
• Schroef op de markering
• Avvita sulla linea guida
• Aparafuse na linha Marcada
s26b
up
up
40mdd (x2)dc (x5)
Left Door
Porte Gauche
Puerta Izquierda
Linke Tür
Linker Deur
Porta Sinistra
Porta Esquerda
Right Door
Porte Droite
Puerta Derecha
Rechte Tür
Rechter Deur
Porta Destra
Porta Direita
39
DOOR ASSEMBLY | MONTAGE DE LA PORTE| ARMADO DE LA PUERTA | MONTAGE DER TÜR|
DEURMONTAGE|MONTAGGIO DELLA PORTA| MONTAGEM DA PORTA
up
up
mdd
mdd
up
mdd (x2)
x5
26
A-1275-8 583919 65DD.indd 2611.6.2017 12:22
38s26b (x16)
1”
26 mm
• Screw on the mark line
• Vissez sur la ligne dessinée
• Atornillar en la línea de la marca
• Auf der Markierungslinie festschrauben
• Schroef op de markering
• Avvita sulla linea guida
• Aparafuse na linha Marcada
s26b
up
up
40mdd (x2)dc (x5)
Left Door
Porte Gauche
Puerta Izquierda
Linke Tür
Linker Deur
Porta Sinistra
Porta Esquerda
Right Door
Porte Droite
Puerta Derecha
Rechte Tür
Rechter Deur
Porta Destra
Porta Direita
39
DOOR ASSEMBLY | MONTAGE DE LA PORTE| ARMADO DE LA PUERTA | MONTAGE DER TÜR|
DEURMONTAGE | MONTAGGIO DELLA PORTA | MONTAGEM DA PORTA
up
up
mdd
mdd
up
mdd (x2)
x5
27
A-1275-8 583919 65DD.indd 2711.6.2017 12:22
up
41
mfr
mfr
mdr
mdr
mdl
mdl
mfl
mfl
mfr (x1)mdr (x1)mdl (x1)mfl (x1)
• Align edge of aluminum profile with edge of door panel
• Alignez le bord du profil en aluminium avec le bord du panneau de porte
• Alinee el borde del perfil de aluminio con el borde del panel de la puerta
• Die Kante des Aluminiumprofils an der Kante des Türblattes ausrichten
• Breng de rand van het aliminium profiel op één lijn met de rand van het
deurpaneel
• Allineare il bordo del profilo di alluminio con il bordo del pannello della
porta
• Alinhar a borda do perfil de alumínio com a borda do painel da porta
up
up
up
up
up
43
42
up
up
ldd
ldd
ldd
ldd21
• Turn over the door panel
• Retourner le vantail
• Dele la vuelta al panel de la puerta
• Türplatte umklappen
• Draai het deurpaneel om
• Capovolgi il pannello della porta
• Volte o painel da porta
Left Door
Porte Gauche
Puerta Izquierda
Linke Tür
Linker Deur
Porta Sinistra
Porta Esquerda
Left Door
Porte Gauche
Puerta Izquierda
Linke Tür
Linker Deur
Porta Sinistra
Porta Esquerda
Right Door
Porte Droite
Puerta Derecha
Rechte Tür
Rechter Deur
Porta Destra
Porta DireitaRight Door
Porte Droite
Puerta Derecha
Rechte Tür
Rechter Deur
Porta Destra
Porta Direita
up
ldd(x4)
28
A-1275-8 583919 65DD.indd 2811.6.2017 12:22
up
41
mfr
mfr
mdr
mdr
mdl
mdl
mfl
mfl
mfr (x1)mdr (x1)mdl (x1)mfl (x1)
• Align edge of aluminum profile with edge of door panel
• Alignez le bord du profil en aluminium avec le bord du panneau de porte
• Alinee el borde del perfil de aluminio con el borde del panel de la puerta
• Die Kante des Aluminiumprofils an der Kante des Türblattes ausrichten
• Breng de rand van het aliminium profiel op één lijn met de rand van het
deurpaneel
• Allineare il bordo del profilo di alluminio con il bordo del pannello della
porta
• Alinhar a borda do perfil de alumínio com a borda do painel da porta
up
up
up
up
up
43
42
up
up
ldd
ldd
ldd
ldd21
• Turn over the door panel
• Retourner le vantail
• Dele la vuelta al panel de la puerta
• Türplatte umklappen
• Draai het deurpaneel om
• Capovolgi il pannello della porta
• Volte o painel da porta
Left Door
Porte Gauche
Puerta Izquierda
Linke Tür
Linker Deur
Porta Sinistra
Porta Esquerda
Left Door
Porte Gauche
Puerta Izquierda
Linke Tür
Linker Deur
Porta Sinistra
Porta Esquerda
Right Door
Porte Droite
Puerta Derecha
Rechte Tür
Rechter Deur
Porta Destra
Porta DireitaRight Door
Porte Droite
Puerta Derecha
Rechte Tür
Rechter Deur
Porta Destra
Porta Direita
up
ldd (x4)
29
A-1275-8 583919 65DD.indd 2911.6.2017 12:22
44
up
ds2b
ds2b
Left Door
Porte Gauche
Puerta Izquierda
Linke Tür
Linker Deur
Porta Sinistra
Porta Esquerda
Right Door
Porte Droite
Puerta Derecha
Rechte Tür
Rechter Deur
Porta Destra
Porta Direita
ds2b
Self drill screw
ds2b (x8)
0.39”
10 mm
45Self drill screw
s10b (x20)
0.47”
12 mm
mbl (x1)mtl (x1)mpn(x2)
s10b
Right Door
Porte Droite
Puerta Derecha
Rechte Tür
Rechter Deur
Porta Destra
Porta Direita
s10b x 1
Left Door
Porte Gauche
Puerta Izquierda
Linke Tür
Linker Deur
Porta Sinistra
Porta Esquerda
12s10b
s10b
1
s10b
2
s10b x 1
mpn
mtl
mpn
mbl
30
A-1275-8 583919 65DD.indd 3011.6.2017 12:22
44
up
ds2b
ds2b
Left Door
Porte Gauche
Puerta Izquierda
Linke Tür
Linker Deur
Porta Sinistra
Porta Esquerda
Right Door
Porte Droite
Puerta Derecha
Rechte Tür
Rechter Deur
Porta Destra
Porta Direita
ds2b
Self drill screw
ds2b (x8)
0.39”
10 mm
45Self drill screw
s10b (x20)
0.47”
12 mm
mbl (x1)mtl (x1)mpn (x2)
s10b
Right Door
Porte Droite
Puerta Derecha
Rechte Tür
Rechter Deur
Porta Destra
Porta Direita
s10b x 1
Left Door
Porte Gauche
Puerta Izquierda
Linke Tür
Linker Deur
Porta Sinistra
Porta Esquerda
12s10b
s10b
1
s10b
2
s10b x 1
mpn
mtl
mpn
mbl
31
A-1275-8 583919 65DD.indd 3111.6.2017 12:22
46dh (x4)s13b (x28)
0.47”
12 mm
s13b
x4
1
s13b
x4
2
47smdp (x1)smdl (x1)
12
43
V (x2)
v
v
click
x2
49
48
s13b
smdl + smdp
smdb
s13b
smdl + smdp(x1)smdb (x1)s13b (x8)
0.47”
12 mm
32
A-1275-8 583919 65DD.indd 3211.6.2017 12:22
46dh (x4)s13b (x28)
0.47”
12 mm
s13b
x4
1
s13b
x4
2
47smdp (x1)smdl (x1)
12
43
V (x2)
v
v
click
x2
49
48
s13b
smdl + smdp
smdb
s13b
smdl + smdp(x1)smdb (x1)s13b (x8)
0.47”
12 mm
33
A-1275-8 583919 65DD.indd 3311.6.2017 12:22
kc
kc
s26b
21x2
click
50s26b (x4)
1”
26 mm
kc (x2)
WINDOW ASSEMBLY | MONTAGE DE LA FENÊTRE| VENTANA DEL TECHO | FENSTERHMONTAGE|
RAAMMONTAGE | MONTAGGIO DE LA FINESTRA | MONTAGEM DO JANELA
48f-out (x1)pls (x1)
1234
51
up
up
f-in (x1)
53
f-in
sc15
x7
sc15 (x7)
0.63”
16 mm
f-out
acw
52acw (x1)
34
A-1275-8 583919 65DD.indd 3411.6.2017 12:22
kc
kc
s26b
21x2
click
50s26b (x4)
1”
26 mm
kc (x2)
WINDOWASSEMBLY|MONTAGE DE LA FENÊTRE| VENTANA DEL TECHO | FENSTERHMONTAGE|
RAAMMONTAGE | MONTAGGIO DE LA FINESTRA| MONTAGEM DO JANELA
48f-out (x1)pls (x1)
1234
51
up
up
f-in (x1)
53
f-in
sc15
x7
sc15 (x7)
0.63”
16 mm
f-out
acw
52acw (x1)
35
A-1275-8 583919 65DD.indd 3511.6.2017 12:22
OPTION | OPCIÓN | OPTIE | OPZION | OPÇÃOE
SECURING THE SHED TO A FOUNDATION
Affix the shed to the foundation by drilling holes in the shed floor at the pre-marked locations and screwing it into the foundation using
appropriate screws (screws not included).
FIXER L’ABRI SUR UNE FONDATION
Fixez l’abri à la fondation en perçant des trous dans le sol aux endroits pré-marqués et en insérant des vis adéquates dans la fondation (vis
non fournies).
ASEGURAR EL COBERTIZO A UN CIMIENTO
Fije el cobertizo a los cimientos perforando agujeros en el suelo del cobertizo en los lugares previamente marcados y atorníllelo a los
cimientos utilizando los tornillos adecuados (los tornillos no están incluidos).
ABSICHERN DES SCHUPPENS AN EIN FUNDAMENT
Bringen Sie den Schuppen auf dem Fundament an, indem Sie an den Markierungen Löcher in den Schuppenboden bohren und diesen mit
passenden Schrauben auf dem Fundament festschrauben (Schrauben nicht enthalten).
HET SCHUURTJE OP HET FUNDAMENT VASTZETTEN
Bevestig het schuurtje aan de fundering door op de aangegeven plaatsen gaten te boren in de vloer van het schuurtje en het schuurtje aan de
fundering te schroeven met behulp van passende schroeven (schroeven niet inbegrepen).
ASSICURARE LA COPERTURA ALLE FONDAMENTA
Fissa il deposito attrezzi alle fondamenta facendo dei fori nel pavimento nelle posizioni pre-segnalate ed avvitandolo alle fondamenta
utilizzando apposite viti (viti non incluse).
FIXAR O ABRIGO NUMA FUNDAÇÃO
Afixe o abrigo à base abrindo buracos no chão nos locais previamente assinalados e aparafusando-o à mesma utilizando parafusos
adequados (os parafusos não estão incluídos).
21
sc15
CARE AND SAFETY GUIDELINES
•The shed is intended for storage purposes only. It is not designed for habitation.
•It is strongly recommended to secure the shed to an immovable object or anchor to the ground by drilling holes in the shed floor
(at the pre-marked locations) and inserting proper screws into the ground (screws are not included).
•Do not attempt assembly on windy or cold days.
•Periodically check the shed to ensure that it is stable and that the site is level.
•Be careful when handling parts with steel edges.
•When assembling or handling the shed, use only those tools listed in the user manual.
•Always wear work gloves, safety goggles and long sleeves when assembling or performing any maintenance on your shed.
•Avoid using a lawnmower or mechanical scythe near the shed.
•Wear safety goggles and always follow the manufacturer’s instructions when using power tools.
•Wash the shed with a garden hose or a mild detergent solution. Do not use a stiff brush or abrasive cleaners,
including degreasers and oil- or acetone-based cleaning materials, as these may stain or damage the shed.
•Do not store hot items, such as recently used grills and blowtorches, and volatile chemicals in the shed.
•Avoid placing heavy items against the walls, as this may cause distortion.
•Keep the roof clear of accumulated snow and leaves. Large amounts of snow on the roof can damage the shed, making it unsafe to enter.
•Wind direction is an important factor to consider when determining the location of the shed. Reduce exposure to the wind, in general,
and of the door side in particular. Keep doors closed and locked when the shed is not in use to prevent wind damage.
•Do not stand on the roof.
•Consult your local authorities to check if permits are required to erect the shed.
INSTRUCTIONS DE SÉCURITÉ ET D'ENTRETIEN
•L'abri a été conçu uniquement à des fins de stockage. Il n'a pas été conçu à des fins d'habitation.
•Il est fortement recommandé de sécuriser l'abri à un objet inamovible ou de le fixer au sol en creusant des trous dans le sol de l'abri
(aux emplacements marqués) et d'insérer les vis adaptées dans le sol (vis non incluses).
•N’essayez pas de réaliser le montage par jour venteux ou froid.
•Vérifiez de temps en temps la tenue de l'abri afin de garantir sa stabilité et la mise à niveau du site, sur lequel il est posé.
•Manipulez les pièces présentant des bords en acier avec précaution.
•Lors de l'assemblage ou de la manipulation de l'abri, utilisez seulement les outils listés dans le mode d'emploi.
•Portez toujours des gants de travail, des lunettes de protection et des vêtements à manches longues lors de l'assemblage ou de l'accomplissement
d'activités de maintenance sur votre abri.
•Évitez d'utiliser une tondeuse à gazon ou une faux mécanique à proximité de l'abri.
•Portez des lunettes de sécurité et suivez toujours les instructions du fabricant lors de l'utilisation d'outils électriques.
•Lavez l'abri à l'aide d'un tuyau d’arrosage de jardin ou d'un détergent non abrasif. N'utilisez pas une brosse dure ou de nettoyants abrasifs,
y compris les dégraissants et les solutions de nettoyage à base d'acétone ou d'huile, car ils peuvent tacher ou endommager l'abri.
•Ne stockez pas d'objets chauds, tels qu'un grill ou un chalumeau récemment utilisé, ou des produits chimiques volatiles dans l'abri.
•Évitez de placer des objets lourds contre les murs de votre abri, cela peut entraîner une déformation.
•
Entretenez le toit pour éviter l'accumulation de neige ou de feuilles. Une grande quantité de neige sur le toit peut endommager l'abri, rendant périlleux l'accès à l'intérieur.
•La direction du vent est un facteur important à prendre en compte lors du choix de la localisation de l'abri. Réduisez l'exposition au vent, en général,
et surtout pour le côté de la porte. Maintenant les portes fermées et verrouillées lorsque l'abri n'est pas utilisé, afin d'éviter tout dégât dû au vent.
•Ne montez pas sur le toit.
•Consultez les autorités de votre localité pour vérifier la nécessité de disposer d'un permis pour ériger l'abri.
ADVERTENCIA SOBRE EL CUIDADO Y LA SEGURIDAD
•La cobertizo está diseñada solo para el almacenamiento de productos. No está diseñada para habitar en ella.
•Se recomienda encarecidamente fijar la cobertizo a un objeto inamovible o anclarla al suelo taladrando agujeros en el suelo de la cobertizo
(en los lugares premarcadas para ello), e insertando tornillos adecuados en el suelo (los tornillos no están incluidos).
• No intente montarlo en días de viento o cuando haga frío.
• Compruebe la cobertizo periódicamente para asegurarse de que es estable y de que el lugar es uniforme.
• Tenga cuidado al manejar las partes con bordes de acero.
• Al montar o manipular la cobertizo, use solamente las herramientas enumeradas en el manual del usuario.
• Use siempre guantes de trabajo, anteojos protectores y mangas largas para armar el cobertizo o realizar cualquier tarea de mantenimiento en el mismo.
• Evite usar un cortacésped o un cortacésped cerca de la cobertizo.
• Lleve gafas de seguridad y siga siempre las instrucciones del fabricante al utilizar herramientas eléctricas.
• Lave la cobertizo con una manguera de jardín o con un detergente suave. No utilice un cepillo rígido ni limpiadores abrasivos,
incluyendo desengrasantes y materiales de limpieza basados en petróleo o acetona, ya que todos ellos pueden manchar o dañar la cobertizo.
• No guarde objetos calientes, como sopletes usados recientemente, ni elementos químicos volátiles.
• Evite situar objetos pesados contra las paredes, ya que esto puede causar deformación.
• Mantenga el techo limpio de nieve y hojas acumuladas. Una gran cantidad de nieve en el tejado puede dañar el cobertizo, haciendo que sea inseguro entrar.
• La dirección del viento es un factor importante a tener en cuenta al determinar la ubicación del cobertizo. Reduzca la exposición al viento en general
y al lateral de la puerta en particular. Mantenga las puertas cerradas y bloqueadas cuando no utilice el cobertizo para evitar daños del viento.
• Ne montez pas sur le toit.
• Consulte con sus autoridades locales y son necesariosNo se ponga de pie sobre el techo. permisos para levantar el cobertizo.
PFLEGE - UND SICHERHEITSHINWEISE
• Der Gartenschuppen dient einzig und allein der Lagerung von Gegenständen. Der Schuppen ist nicht für Wohnzwecke ausgelegt.
• Es wird dringend empfohlen, den Schuppen an einem unbeweglichen Gegenstand zu befestigen oder Mithilfe von Löchern im Schuppenboden im Boden zu verankern
(die Bohrungen müssen an den vormarkierten Stellen erfolgen), wobei geeignete Schrauben zu verwenden sind (Schrauben sind nicht im Lieferumfang enthalten).
• Führen Sie den Aufbau nicht an windigen oder kalten Tagen durch.
• Überprüfen Sie den Schuppen regelmäßig auf Stabilität und stellen Sie sicher, dass der Standort eben ist.
• Seien Sie vorsichtig, wenn Sie mit Teilen hantieren, die Stahlkanten aufweisen.
• Für Aufbau und Handhabung des Schuppens verwenden Sie bitte nur Werkzeuge, die in der Aufbauanleitung aufgelistet sind.
• Tragen Sie bei der Montage des Gartenschuppens oder Wartungsarbeiten stets Arbeitshandschuhe, eine Schutzbrille und Kleidungsstücke mit langen Ärmeln
• Vermeiden Sie den Einsatz von Rasenmäher und maschineller Sense im direkten Umfeld des Schuppens.
• Tragen Sie eine Schutzbrille und befolgen Sie bei Verwendung von Elektrowerkzeugen immer die Anweisungen des Herstellers.
• Reinigen Sie den Schuppen mit einem Gartenschlauch und einem milden Reinigungsmittel. Verwenden Sie auf keinen Fall eine harte Bürste und
Scheuer - oder Entfettungsmittel sowie Öl- oder Acetonhaltige Reinigungsmittel, da diese Flecken verursachen oder den Schuppen beschädigen könnten.
• Lagern Sie keine heißen Gegenstände im Schuppen, wie etwa kürzlich benutzte Grills oder Lötlampen und auch keine flüchtigen Chemikalien.
• Lehnen Sie keine schweren Gegenstände an die Wände des Schuppens, da sich dadurch der gesamte Schuppen verziehen könnte.
• Halten Sie das Dach frei von Schnee und angesammeltem Blattwerk. Große Mengen an Schnee können den Schuppen beschädigen und beim Betreten gefährlich werden
.
• Die Windrichtung ist ein wichtiger Faktor, der bei der Aufstellung des Schuppens unbedingt berücksichtigt werden muss.
Vermeiden Sie zu hohe Windbelastungen, insbesondere einen hohen Winddruck auf die Türen. Halten Sie die Türen immer geschlossen und verriegelt,
wenn der Schuppen nicht genutzt wird, um eine Beschädigung durch Windbelastungen zu vermeiden.
• Betreten Sie auf keinen Fall das Dach des Schuppens.
• Wenden Sie sich bitte an Ihre lokale Behörde und erkundigen Sie sich dort, ob zum Aufbau des Schuppens eine Genehmigung erforderlich ist.
RICHTLIJNEN VOOR ZORG EN VEILIGHEID
• Het tuinhuisje is uitsluitend bedoeld voor opslag. Het is niet ontworpen voor bewoning.
• Het wordt sterk aanbevolen om het tuinhuisje vast te maken aan een immobiel object of in de grond te verankeren door het boren van gaten in de vloer
(op de gemarkeerde plaatsen) en het met de geschikte schroeven in de grond te bevestigen (schroeven zijn niet inbegrepen).
• Probeer niet op stormachtige of koude dagen te monteren.
• Controleer het tuinhuisje regelmatig dat het stabiel en waterpas staat.
• Wees voorzichtig als u werkt met onderdelen met staalranden.
• Gebruik bij de montage of het hanteren van het tuinhuisje alleen de gereedschappen die in de handleiding vermeldt staan.
• Draag altijd werkhandschoenen, oogbescherming en lange mouwen als u uw schuurtje monteert of onderhoud
• Vermijd het gebruik van een grasmaaier of mechanische zeis in de buurt van het tuinhuisje.
• Draag een veiligheidsbril en volg altijd de instructies van de fabrikant als u elektrisch gereedschap gebruikt.
• Was het schuurtje met een tuinslang of een zacht schoonmaakmiddel. Gebruik geen harde borstel of schuurmiddelen,
met inbegrip van ontvetters en schoonmaakmiddelen op basis van olie of aceton, omdat die het tuinhuisje kunnen beschadigen of vlekken achterlaten.
• Zet geen hete voorwerpen, zoals een pas gebruikte grill of branders in de schuur, en bewaar er ook geen vluchtige stoffen.
• Plaats geen zware voorwerpen tegen de wanden, die daardoor misvormd kunnen raken.
• Houd het dak vrij van opgehoopte sneeuw en bladeren. Grotere hoeveelheden sneeuw op het dak kunnen het schuurtje beschadigen,
waardoor het betreden gevaarlijk kan zijn.
• De windrichting is een belangrijke factor bij het bepalen van de locatie van het tuinhuisje. Verminder blootstelling aan de wind, in het algemeen,
en bijzonder aan de deurzijde. Houd de deuren gesloten en vergrendeld wanneer het tuinhuisje niet in gebruik is om windschade te voorkomen.
• Ga niet op het dak staan.
• Raadpleeg uw plaatselijke autoriteiten om te controleren of een vergunning vereist is voor het plaatsen van het tuinhuisje.
LINEE GUIDA PER LA CURA E LA SICUREZZA
• Il prodotto va utilizzato solo per scopi di immagazzinamento. Non è progettato per abitarvi.
• Si raccomanda vivamente di fissare il prodotto su un piano inamovibile o ancorandolo al suolo tramite i fori nel pavimento
(nelle posizioni pre-segnalate) ed inserendo viti adeguate nel terreno (le viti non sono incluse).
• Non tentare il montaggio in giornate ventose o fredde.
• Controllate periodicamente il prodotto per accertarvi che sia stabile e che sia a livello del terreno.
• Fai attenzione quando maneggi parti con bordi in acciaio.
• Durante il montaggio o la manipolazione del prodotto, utilizzate solo gli strumenti elencati nel manuale utente.
• Indossare sempre guanti da lavoro, protezioni per gli occhi e maniche lunghe durante il montaggio o durante la manutenzione
• Evitate di utilizzare un tosaerba o una falce meccanica nei pressi del prodotto stesso.
• Indossate occhiali di sicurezza e seguite sempre le istruzioni del produttore quando utilizzate utensili elettrici.
• Lavate il prodotto con un tubo da giardino o una soluzione detergente delicata. Non utilizzate una spazzola dura o detergenti abrasivi,
né sgrassanti e materiali di pulizia per l'olio - o a base di acetone, in quanto questi possono macchiarlo o danneggiarlo.
• Non conservate oggetti caldi, come grill e lampade per saldature né sostanze chimiche evaporabili all’interno del prodotto.
• Evitate di posizionare oggetti pesanti contro le pareti, in quanto ciò potrebbe causare una deformazione del prodotto.
• Mantenete il tetto pulito dalla neve e dalle foglie accumulate. Grandi quantità di neve sul tetto possono danneggiare il prodotto, rendendone precaria la struttura.
• La direzione del vento è un fattore importante da considerare quando scegliete la posizione del prodotto. Riducete l'esposizione al vento,
in generale, in particolare della porta laterale. Tenete le porte chiuse e bloccate quando il prodotto non è in uso per prevenire i danni del vento.
• Non salite sul tetto.
• Consultate le autorità locali per verificare se sono necessari dei permessi per assemblare il prodotto.
DIRETRIZES SOBRE CUIDADOS E SEGURANÇA
• O abrigo destina-se apenas a fins de armazenamento. Não foi projetado para habitação.
• Recomenda-se vivamente a fixação do abrigo a um objeto imóvel ou fixá-lo no chão fazendo furos no piso do abrigo
(nos locais previamente marcados) e a inserção de parafusos adequados no chão (os parafusos não estão incluídos).
• Não tente fazer a montagem em dias ventosos ou frios.
• Verifique periodicamente o abrigo para garantir que está estável e que o sítio está nivelado.
• Tenha cuidado ao manusear peças com pontas em aço.
• Ao montar ou manipular o abrigo, utilize apenas as ferramentas indicadas no manual do utilizador.
• Utilize sempre luvas e óculos de protecção, assim como vestuário comprido ao montar ou efectuar qualquer procedimento de manutenção no seu abrigo.
• Evite a utilização de um cortador de relva ou foice mecânica perto do abrigo.
• Use óculos de segurança e siga sempre as instruções do fabricante ao utilizar ferramentas elétricas.
• Lave o abrigo com uma mangueira de jardim ou uma solução de detergente suave. Não use uma escova rija ou detergentes abrasivos incluindo
desengordurantes ou materiais de limpeza com base de óleo ou acetona, visto que estes podem manchar ou danificar o abrigo.
• Não guarde artigos quentes, como grelhas e maçaricos recentemente utilizados, e químicos voláteis no abrigo.
• Evite a colocação de artigos pesados contra as paredes, visto que isto pode causar distorção.
• Mantenha o telhado livre de acumulação de neve e folhas. Grandes quantidades de neve no telhado podem danificar o abrigo, tornando-o inseguro para entrar.
• A direção do vento é um fator importante a ter em consideração ao determinar a localização do abrigo. Reduza a exposição ao vento, em geral,
e em particular da porta lateral. Mantenhas as portas fechadas e trancadas quando o abrigo não estiver a ser utilizado para evitar danos causados pelo vento.
• Não fique no telhado.
• Consulte as autoridades locais para saber se são necessárias licenças para erguer o abrigo.
36
A-1275-8 583919 65DD.indd 3611.6.2017 12:22
OPTION|OPCIÓN | OPTIE | OPZION| OPÇÃOE
SECURING THE SHED TO A FOUNDATION
Affix the shed to the foundation by drilling holes in the shed floor at the pre-marked locations and screwing it into the foundation using
appropriate screws (screws not included).
FIXER L’ABRI SUR UNE FONDATION
Fixez l’abri à la fondation en perçant des trous dans le sol aux endroits pré-marqués et en insérant des vis adéquates dans la fondation (vis
non fournies).
ASEGURAR EL COBERTIZO A UN CIMIENTO
Fije el cobertizo a los cimientos perforando agujeros en el suelo del cobertizo en los lugares previamente marcados y atorníllelo a los
cimientos utilizando los tornillos adecuados (los tornillos no están incluidos).
ABSICHERN DES SCHUPPENS AN EIN FUNDAMENT
Bringen Sie den Schuppen auf dem Fundament an, indem Sie an den Markierungen Löcher in den Schuppenboden bohren und diesen mit
passenden Schrauben auf dem Fundament festschrauben (Schrauben nicht enthalten).
HET SCHUURTJE OP HET FUNDAMENT VASTZETTEN
Bevestig het schuurtje aan de fundering door op de aangegeven plaatsen gaten te boren in de vloer van het schuurtje en het schuurtje aan de
fundering te schroeven met behulp van passende schroeven (schroeven niet inbegrepen).
ASSICURARE LA COPERTURA ALLE FONDAMENTA
Fissa il deposito attrezzi alle fondamenta facendo dei fori nel pavimento nelle posizioni pre-segnalate ed avvitandolo alle fondamenta
utilizzando apposite viti (viti non incluse).
FIXAR O ABRIGO NUMA FUNDAÇÃO
Afixe o abrigo à base abrindo buracos no chão nos locais previamente assinalados e aparafusando-o à mesma utilizando parafusos
adequados (os parafusos não estão incluídos).
21
sc15
CARE AND SAFETY GUIDELINES
•The shed is intended for storage purposes only. It is not designed for habitation.
•It is strongly recommended to secure the shed to an immovable object or anchor to the ground by drilling holes in the shed floor
(at the pre-marked locations) and inserting proper screws into the ground (screws are not included).
•Do not attempt assembly on windy or cold days.
•Periodically check the shed to ensure that it is stable and that the site is level.
•Be careful when handling parts with steel edges.
•When assembling or handling the shed, use only those tools listed in the user manual.
•Always wear work gloves, safety goggles and long sleeves when assembling or performing any maintenance on your shed.
•Avoid using a lawnmower or mechanical scythe near the shed.
•Wear safety goggles and always follow the manufacturer’s instructions when using power tools.
•Wash the shed with a garden hose or a mild detergent solution. Do not use a stiff brush or abrasive cleaners,
including degreasers and oil- or acetone-based cleaning materials, as these may stain or damage the shed.
•Do not store hot items, such as recently used grills and blowtorches, and volatile chemicals in the shed.
•Avoid placing heavy items against the walls, as this may cause distortion.
•Keep the roof clear of accumulated snow and leaves. Large amounts of snow on the roof can damage the shed, making it unsafe to enter.
•Wind direction is an important factor to consider when determining the location of the shed. Reduce exposure to the wind, in general,
and of the door side in particular. Keep doors closed and locked when the shed is not in use to prevent wind damage.
•Do not stand on the roof.
•Consult your local authorities to check if permits are required to erect the shed.
INSTRUCTIONS DE SÉCURITÉ ET D'ENTRETIEN
•L'abri a été conçu uniquement à des fins de stockage. Il n'a pas été conçu à des fins d'habitation.
•Il est fortement recommandé de sécuriser l'abri à un objet inamovible ou de le fixer au sol en creusant des trous dans le sol de l'abri
(aux emplacements marqués) et d'insérer les vis adaptées dans le sol (vis non incluses).
•N’essayez pas de réaliser le montage par jour venteux ou froid.
•Vérifiez de temps en temps la tenue de l'abri afin de garantir sa stabilité et la mise à niveau du site, sur lequel il est posé.
•Manipulez les pièces présentant des bords en acier avec précaution.
•Lors de l'assemblage ou de la manipulation de l'abri, utilisez seulement les outils listés dans le mode d'emploi.
•Portez toujours des gants de travail, des lunettes de protection et des vêtements à manches longues lors de l'assemblage ou de l'accomplissement
d'activités de maintenance sur votre abri.
•Évitez d'utiliser une tondeuse à gazon ou une faux mécanique à proximité de l'abri.
•Portez des lunettes de sécurité et suivez toujours les instructions du fabricant lors de l'utilisation d'outils électriques.
•Lavez l'abri à l'aide d'un tuyau d’arrosage de jardin ou d'un détergent non abrasif. N'utilisez pas une brosse dure ou de nettoyants abrasifs,
y compris les dégraissants et les solutions de nettoyage à base d'acétone ou d'huile, car ils peuvent tacher ou endommager l'abri.
•Ne stockez pas d'objets chauds, tels qu'un grill ou un chalumeau récemment utilisé, ou des produits chimiques volatiles dans l'abri.
•Évitez de placer des objets lourds contre les murs de votre abri, cela peut entraîner une déformation.
•
Entretenez le toit pour éviter l'accumulation de neige ou de feuilles. Une grande quantité de neige sur le toit peut endommager l'abri, rendant périlleux l'accès à l'intérieur.
•La direction du vent est un facteur important à prendre en compte lors du choix de la localisation de l'abri. Réduisez l'exposition au vent, en général,
et surtout pour le côté de la porte. Maintenant les portes fermées et verrouillées lorsque l'abri n'est pas utilisé, afin d'éviter tout dégât dû au vent.
•Ne montez pas sur le toit.
•Consultez les autorités de votre localité pour vérifier la nécessité de disposer d'un permis pour ériger l'abri.
ADVERTENCIA SOBRE EL CUIDADO Y LA SEGURIDAD
•La cobertizo está diseñada solo para el almacenamiento de productos. No está diseñada para habitar en ella.
•Se recomienda encarecidamente fijar la cobertizo a un objeto inamovible o anclarla al suelo taladrando agujeros en el suelo de la cobertizo
(en los lugares premarcadas para ello), e insertando tornillos adecuados en el suelo (los tornillos no están incluidos).
• No intente montarlo en días de viento o cuando haga frío.
• Compruebe la cobertizo periódicamente para asegurarse de que es estable y de que el lugar es uniforme.
• Tenga cuidado al manejar las partes con bordes de acero.
• Al montar o manipular la cobertizo, use solamente las herramientas enumeradas en el manual del usuario.
• Use siempre guantes de trabajo, anteojos protectores y mangas largas para armar el cobertizo o realizar cualquier tarea de mantenimiento en el mismo.
• Evite usar un cortacésped o un cortacésped cerca de la cobertizo.
• Lleve gafas de seguridad y siga siempre las instrucciones del fabricante al utilizar herramientas eléctricas.
• Lave la cobertizo con una manguera de jardín o con un detergente suave. No utilice un cepillo rígido ni limpiadores abrasivos,
incluyendo desengrasantes y materiales de limpieza basados en petróleo o acetona, ya que todos ellos pueden manchar o dañar la cobertizo.
• No guarde objetos calientes, como sopletes usados recientemente, ni elementos químicos volátiles.
• Evite situar objetos pesados contra las paredes, ya que esto puede causar deformación.
• Mantenga el techo limpio de nieve y hojas acumuladas. Una gran cantidad de nieve en el tejado puede dañar el cobertizo, haciendo que sea inseguro entrar.
• La dirección del viento es un factor importante a tener en cuenta al determinar la ubicación del cobertizo. Reduzca la exposición al viento en general
y al lateral de la puerta en particular. Mantenga las puertas cerradas y bloqueadas cuando no utilice el cobertizo para evitar daños del viento.
• Ne montez pas sur le toit.
• Consulte con sus autoridades locales y son necesariosNo se ponga de pie sobre el techo. permisos para levantar el cobertizo.
PFLEGE - UND SICHERHEITSHINWEISE
• Der Gartenschuppen dient einzig und allein der Lagerung von Gegenständen. Der Schuppen ist nicht für Wohnzwecke ausgelegt.
• Es wird dringend empfohlen, den Schuppen an einem unbeweglichen Gegenstand zu befestigen oder Mithilfe von Löchern im Schuppenboden im Boden zu verankern
(die Bohrungen müssen an den vormarkierten Stellen erfolgen), wobei geeignete Schrauben zu verwenden sind (Schrauben sind nicht im Lieferumfang enthalten).
• Führen Sie den Aufbau nicht an windigen oder kalten Tagen durch.
• Überprüfen Sie den Schuppen regelmäßig auf Stabilität und stellen Sie sicher, dass der Standort eben ist.
• Seien Sie vorsichtig, wenn Sie mit Teilen hantieren, die Stahlkanten aufweisen.
• Für Aufbau und Handhabung des Schuppens verwenden Sie bitte nur Werkzeuge, die in der Aufbauanleitung aufgelistet sind.
• Tragen Sie bei der Montage des Gartenschuppens oder Wartungsarbeiten stets Arbeitshandschuhe, eine Schutzbrille und Kleidungsstücke mit langen Ärmeln
• Vermeiden Sie den Einsatz von Rasenmäher und maschineller Sense im direkten Umfeld des Schuppens.
• Tragen Sie eine Schutzbrille und befolgen Sie bei Verwendung von Elektrowerkzeugen immer die Anweisungen des Herstellers.
• Reinigen Sie den Schuppen mit einem Gartenschlauch und einem milden Reinigungsmittel. Verwenden Sie auf keinen Fall eine harte Bürste und
Scheuer - oder Entfettungsmittel sowie Öl- oder Acetonhaltige Reinigungsmittel, da diese Flecken verursachen oder den Schuppen beschädigen könnten.
• Lagern Sie keine heißen Gegenstände im Schuppen, wie etwa kürzlich benutzte Grills oder Lötlampen und auch keine flüchtigen Chemikalien.
• Lehnen Sie keine schweren Gegenstände an die Wände des Schuppens, da sich dadurch der gesamte Schuppen verziehen könnte.
• Halten Sie das Dach frei von Schnee und angesammeltem Blattwerk. Große Mengen an Schnee können den Schuppen beschädigen und beim Betreten gefährlich werden
.
• Die Windrichtung ist ein wichtiger Faktor, der bei der Aufstellung des Schuppens unbedingt berücksichtigt werden muss.
Vermeiden Sie zu hohe Windbelastungen, insbesondere einen hohen Winddruck auf die Türen. Halten Sie die Türen immer geschlossen und verriegelt,
wenn der Schuppen nicht genutzt wird, um eine Beschädigung durch Windbelastungen zu vermeiden.
• Betreten Sie auf keinen Fall das Dach des Schuppens.
• Wenden Sie sich bitte an Ihre lokale Behörde und erkundigen Sie sich dort, ob zum Aufbau des Schuppens eine Genehmigung erforderlich ist.
RICHTLIJNEN VOOR ZORG EN VEILIGHEID
• Het tuinhuisje is uitsluitend bedoeld voor opslag. Het is niet ontworpen voor bewoning.
• Het wordt sterk aanbevolen om het tuinhuisje vast te maken aan een immobiel object of in de grond te verankeren door het boren van gaten in de vloer
(op de gemarkeerde plaatsen) en het met de geschikte schroeven in de grond te bevestigen (schroeven zijn niet inbegrepen).
• Probeer niet op stormachtige of koude dagen te monteren.
• Controleer het tuinhuisje regelmatig dat het stabiel en waterpas staat.
• Wees voorzichtig als u werkt met onderdelen met staalranden.
• Gebruik bij de montage of het hanteren van het tuinhuisje alleen de gereedschappen die in de handleiding vermeldt staan.
• Draag altijd werkhandschoenen, oogbescherming en lange mouwen als u uw schuurtje monteert of onderhoud
• Vermijd het gebruik van een grasmaaier of mechanische zeis in de buurt van het tuinhuisje.
• Draag een veiligheidsbril en volg altijd de instructies van de fabrikant als u elektrisch gereedschap gebruikt.
• Was het schuurtje met een tuinslang of een zacht schoonmaakmiddel. Gebruik geen harde borstel of schuurmiddelen,
met inbegrip van ontvetters en schoonmaakmiddelen op basis van olie of aceton, omdat die het tuinhuisje kunnen beschadigen of vlekken achterlaten.
• Zet geen hete voorwerpen, zoals een pas gebruikte grill of branders in de schuur, en bewaar er ook geen vluchtige stoffen.
• Plaats geen zware voorwerpen tegen de wanden, die daardoor misvormd kunnen raken.
• Houd het dak vrij van opgehoopte sneeuw en bladeren. Grotere hoeveelheden sneeuw op het dak kunnen het schuurtje beschadigen,
waardoor het betreden gevaarlijk kan zijn.
• De windrichting is een belangrijke factor bij het bepalen van de locatie van het tuinhuisje. Verminder blootstelling aan de wind, in het algemeen,
en bijzonder aan de deurzijde. Houd de deuren gesloten en vergrendeld wanneer het tuinhuisje niet in gebruik is om windschade te voorkomen.
• Ga niet op het dak staan.
• Raadpleeg uw plaatselijke autoriteiten om te controleren of een vergunning vereist is voor het plaatsen van het tuinhuisje.
LINEE GUIDA PER LA CURA E LA SICUREZZA
• Il prodotto va utilizzato solo per scopi di immagazzinamento. Non è progettato per abitarvi.
• Si raccomanda vivamente di fissare il prodotto su un piano inamovibile o ancorandolo al suolo tramite i fori nel pavimento
(nelle posizioni pre-segnalate) ed inserendo viti adeguate nel terreno (le viti non sono incluse).
• Non tentare il montaggio in giornate ventose o fredde.
• Controllate periodicamente il prodotto per accertarvi che sia stabile e che sia a livello del terreno.
• Fai attenzione quando maneggi parti con bordi in acciaio.
• Durante il montaggio o la manipolazione del prodotto, utilizzate solo gli strumenti elencati nel manuale utente.
• Indossare sempre guanti da lavoro, protezioni per gli occhi e maniche lunghe durante il montaggio o durante la manutenzione
• Evitate di utilizzare un tosaerba o una falce meccanica nei pressi del prodotto stesso.
• Indossate occhiali di sicurezza e seguite sempre le istruzioni del produttore quando utilizzate utensili elettrici.
• Lavate il prodotto con un tubo da giardino o una soluzione detergente delicata. Non utilizzate una spazzola dura o detergenti abrasivi,
né sgrassanti e materiali di pulizia per l'olio - o a base di acetone, in quanto questi possono macchiarlo o danneggiarlo.
• Non conservate oggetti caldi, come grill e lampade per saldature né sostanze chimiche evaporabili all’interno del prodotto.
• Evitate di posizionare oggetti pesanti contro le pareti, in quanto ciò potrebbe causare una deformazione del prodotto.
• Mantenete il tetto pulito dalla neve e dalle foglie accumulate. Grandi quantità di neve sul tetto possono danneggiare il prodotto, rendendone precaria la struttura.
• La direzione del vento è un fattore importante da considerare quando scegliete la posizione del prodotto. Riducete l'esposizione al vento,
in generale, in particolare della porta laterale. Tenete le porte chiuse e bloccate quando il prodotto non è in uso per prevenire i danni del vento.
• Non salite sul tetto.
• Consultate le autorità locali per verificare se sono necessari dei permessi per assemblare il prodotto.
DIRETRIZES SOBRE CUIDADOS E SEGURANÇA
• O abrigo destina-se apenas a fins de armazenamento. Não foi projetado para habitação.
• Recomenda-se vivamente a fixação do abrigo a um objeto imóvel ou fixá-lo no chão fazendo furos no piso do abrigo
(nos locais previamente marcados) e a inserção de parafusos adequados no chão (os parafusos não estão incluídos).
• Não tente fazer a montagem em dias ventosos ou frios.
• Verifique periodicamente o abrigo para garantir que está estável e que o sítio está nivelado.
• Tenha cuidado ao manusear peças com pontas em aço.
• Ao montar ou manipular o abrigo, utilize apenas as ferramentas indicadas no manual do utilizador.
• Utilize sempre luvas e óculos de protecção, assim como vestuário comprido ao montar ou efectuar qualquer procedimento de manutenção no seu abrigo.
• Evite a utilização de um cortador de relva ou foice mecânica perto do abrigo.
• Use óculos de segurança e siga sempre as instruções do fabricante ao utilizar ferramentas elétricas.
• Lave o abrigo com uma mangueira de jardim ou uma solução de detergente suave. Não use uma escova rija ou detergentes abrasivos incluindo
desengordurantes ou materiais de limpeza com base de óleo ou acetona, visto que estes podem manchar ou danificar o abrigo.
• Não guarde artigos quentes, como grelhas e maçaricos recentemente utilizados, e químicos voláteis no abrigo.
• Evite a colocação de artigos pesados contra as paredes, visto que isto pode causar distorção.
• Mantenha o telhado livre de acumulação de neve e folhas. Grandes quantidades de neve no telhado podem danificar o abrigo, tornando-o inseguro para entrar.
• A direção do vento é um fator importante a ter em consideração ao determinar a localização do abrigo. Reduza a exposição ao vento, em geral,
e em particular da porta lateral. Mantenhas as portas fechadas e trancadas quando o abrigo não estiver a ser utilizado para evitar danos causados pelo vento.
• Não fique no telhado.
• Consulte as autoridades locais para saber se são necessárias licenças para erguer o abrigo.
37
A-1275-8 583919 65DD.indd 3711.6.2017 12:22
CARE AND SAFETY GUIDELINES
•The shed is intended for storage purposes only. It is not designed for habitation.
•It is strongly recommended to secure the shed to an immovable object or anchor to the ground by drilling holes in the shed floor
(at the pre-marked locations) and inserting proper screws into the ground (screws are not included).
•Do not attempt assembly on windy or cold days.
•Periodically check the shed to ensure that it is stable and that the site is level.
•Be careful when handling parts with steel edges.
•When assembling or handling the shed, use only those tools listed in the user manual.
•Always wear work gloves, safety goggles and long sleeves when assembling or performing any maintenance on your shed.
•Avoid using a lawnmower or mechanical scythe near the shed.
•Wear safety goggles and always follow the manufacturer’s instructions when using power tools.
•Wash the shed with a garden hose or a mild detergent solution. Do not use a stiff brush or abrasive cleaners,
including degreasers and oil- or acetone-based cleaning materials, as these may stain or damage the shed.
•Do not store hot items, such as recently used grills and blowtorches, and volatile chemicals in the shed.
•Avoid placing heavy items against the walls, as this may cause distortion.
•Keep the roof clear of accumulated snow and leaves. Large amounts of snow on the roof can damage the shed, making it unsafe to enter.
•Wind direction is an important factor to consider when determining the location of the shed. Reduce exposure to the wind, in general,
and of the door side in particular. Keep doors closed and locked when the shed is not in use to prevent wind damage.
•Do not stand on the roof.
•Consult your local authorities to check if permits are required to erect the shed.
INSTRUCTIONS DE SÉCURITÉ ET D'ENTRETIEN
•L'abri a été conçu uniquement à des fins de stockage. Il n'a pas été conçu à des fins d'habitation.
•Il est fortement recommandé de sécuriser l'abri à un objet inamovible ou de le fixer au sol en creusant des trous dans le sol de l'abri
(aux emplacements marqués) et d'insérer les vis adaptées dans le sol (vis non incluses).
•N’essayez pas de réaliser le montage par jour venteux ou froid.
•Vérifiez de temps en temps la tenue de l'abri afin de garantir sa stabilité et la mise à niveau du site, sur lequel il est posé.
•Manipulez les pièces présentant des bords en acier avec précaution.
•Lors de l'assemblage ou de la manipulation de l'abri, utilisez seulement les outils listés dans le mode d'emploi.
•Portez toujours des gants de travail, des lunettes de protection et des vêtements à manches longues lors de l'assemblage ou de l'accomplissement
d'activités de maintenance sur votre abri.
•Évitez d'utiliser une tondeuse à gazon ou une faux mécanique à proximité de l'abri.
•Portez des lunettes de sécurité et suivez toujours les instructions du fabricant lors de l'utilisation d'outils électriques.
•Lavez l'abri à l'aide d'un tuyau d’arrosage de jardin ou d'un détergent non abrasif. N'utilisez pas une brosse dure ou de nettoyants abrasifs,
y compris les dégraissants et les solutions de nettoyage à base d'acétone ou d'huile, car ils peuvent tacher ou endommager l'abri.
•Ne stockez pas d'objets chauds, tels qu'un grill ou un chalumeau récemment utilisé, ou des produits chimiques volatiles dans l'abri.
•Évitez de placer des objets lourds contre les murs de votre abri, cela peut entraîner une déformation.
•
Entretenez le toit pour éviter l'accumulation de neige ou de feuilles. Une grande quantité de neige sur le toit peut endommager l'abri, rendant périlleux l'accès à l'intérieur.
•La direction du vent est un facteur important à prendre en compte lors du choix de la localisation de l'abri. Réduisez l'exposition au vent, en général,
et surtout pour le côté de la porte. Maintenant les portes fermées et verrouillées lorsque l'abri n'est pas utilisé, afin d'éviter tout dégât dû au vent.
•Ne montez pas sur le toit.
•Consultez les autorités de votre localité pour vérifier la nécessité de disposer d'un permis pour ériger l'abri.
ADVERTENCIA SOBRE EL CUIDADO Y LA SEGURIDAD
•La cobertizo está diseñada solo para el almacenamiento de productos. No está diseñada para habitar en ella.
•Se recomienda encarecidamente fijar la cobertizo a un objeto inamovible o anclarla al suelo taladrando agujeros en el suelo de la cobertizo
(en los lugares premarcadas para ello), e insertando tornillos adecuados en el suelo (los tornillos no están incluidos).
• No intente montarlo en días de viento o cuando haga frío.
• Compruebe la cobertizo periódicamente para asegurarse de que es estable y de que el lugar es uniforme.
• Tenga cuidado al manejar las partes con bordes de acero.
• Al montar o manipular la cobertizo, use solamente las herramientas enumeradas en el manual del usuario.
• Use siempre guantes de trabajo, anteojos protectores y mangas largas para armar el cobertizo o realizar cualquier tarea de mantenimiento en el mismo.
• Evite usar un cortacésped o un cortacésped cerca de la cobertizo.
• Lleve gafas de seguridad y siga siempre las instrucciones del fabricante al utilizar herramientas eléctricas.
• Lave la cobertizo con una manguera de jardín o con un detergente suave. No utilice un cepillo rígido ni limpiadores abrasivos,
incluyendo desengrasantes y materiales de limpieza basados en petróleo o acetona, ya que todos ellos pueden manchar o dañar la cobertizo.
• No guarde objetos calientes, como sopletes usados recientemente, ni elementos químicos volátiles.
• Evite situar objetos pesados contra las paredes, ya que esto puede causar deformación.
• Mantenga el techo limpio de nieve y hojas acumuladas. Una gran cantidad de nieve en el tejado puede dañar el cobertizo, haciendo que sea inseguro entrar.
• La dirección del viento es un factor importante a tener en cuenta al determinar la ubicación del cobertizo. Reduzca la exposición al viento en general
y al lateral de la puerta en particular. Mantenga las puertas cerradas y bloqueadas cuando no utilice el cobertizo para evitar daños del viento.
• Ne montez pas sur le toit.
• Consulte con sus autoridades locales y son necesariosNo se ponga de pie sobre el techo. permisos para levantar el cobertizo.
PFLEGE - UND SICHERHEITSHINWEISE
• Der Gartenschuppen dient einzig und allein der Lagerung von Gegenständen. Der Schuppen ist nicht für Wohnzwecke ausgelegt.
• Es wird dringend empfohlen, den Schuppen an einem unbeweglichen Gegenstand zu befestigen oder Mithilfe von Löchern im Schuppenboden im Boden zu verankern
(die Bohrungen müssen an den vormarkierten Stellen erfolgen), wobei geeignete Schrauben zu verwenden sind (Schrauben sind nicht im Lieferumfang enthalten).
• Führen Sie den Aufbau nicht an windigen oder kalten Tagen durch.
• Überprüfen Sie den Schuppen regelmäßig auf Stabilität und stellen Sie sicher, dass der Standort eben ist.
• Seien Sie vorsichtig, wenn Sie mit Teilen hantieren, die Stahlkanten aufweisen.
• Für Aufbau und Handhabung des Schuppens verwenden Sie bitte nur Werkzeuge, die in der Aufbauanleitung aufgelistet sind.
• Tragen Sie bei der Montage des Gartenschuppens oder Wartungsarbeiten stets Arbeitshandschuhe, eine Schutzbrille und Kleidungsstücke mit langen Ärmeln
• Vermeiden Sie den Einsatz von Rasenmäher und maschineller Sense im direkten Umfeld des Schuppens.
• Tragen Sie eine Schutzbrille und befolgen Sie bei Verwendung von Elektrowerkzeugen immer die Anweisungen des Herstellers.
• Reinigen Sie den Schuppen mit einem Gartenschlauch und einem milden Reinigungsmittel. Verwenden Sie auf keinen Fall eine harte Bürste und
Scheuer - oder Entfettungsmittel sowie Öl- oder Acetonhaltige Reinigungsmittel, da diese Flecken verursachen oder den Schuppen beschädigen könnten.
• Lagern Sie keine heißen Gegenstände im Schuppen, wie etwa kürzlich benutzte Grills oder Lötlampen und auch keine flüchtigen Chemikalien.
• Lehnen Sie keine schweren Gegenstände an die Wände des Schuppens, da sich dadurch der gesamte Schuppen verziehen könnte.
• Halten Sie das Dach frei von Schnee und angesammeltem Blattwerk. Große Mengen an Schnee können den Schuppen beschädigen und beim Betreten gefährlich werden
.
• Die Windrichtung ist ein wichtiger Faktor, der bei der Aufstellung des Schuppens unbedingt berücksichtigt werden muss.
Vermeiden Sie zu hohe Windbelastungen, insbesondere einen hohen Winddruck auf die Türen. Halten Sie die Türen immer geschlossen und verriegelt,
wenn der Schuppen nicht genutzt wird, um eine Beschädigung durch Windbelastungen zu vermeiden.
• Betreten Sie auf keinen Fall das Dach des Schuppens.
• Wenden Sie sich bitte an Ihre lokale Behörde und erkundigen Sie sich dort, ob zum Aufbau des Schuppens eine Genehmigung erforderlich ist.
RICHTLIJNEN VOOR ZORG EN VEILIGHEID
• Het tuinhuisje is uitsluitend bedoeld voor opslag. Het is niet ontworpen voor bewoning.
• Het wordt sterk aanbevolen om het tuinhuisje vast te maken aan een immobiel object of in de grond te verankeren door het boren van gaten in de vloer
(op de gemarkeerde plaatsen) en het met de geschikte schroeven in de grond te bevestigen (schroeven zijn niet inbegrepen).
• Probeer niet op stormachtige of koude dagen te monteren.
• Controleer het tuinhuisje regelmatig dat het stabiel en waterpas staat.
• Wees voorzichtig als u werkt met onderdelen met staalranden.
• Gebruik bij de montage of het hanteren van het tuinhuisje alleen de gereedschappen die in de handleiding vermeldt staan.
• Draag altijd werkhandschoenen, oogbescherming en lange mouwen als u uw schuurtje monteert of onderhoud
• Vermijd het gebruik van een grasmaaier of mechanische zeis in de buurt van het tuinhuisje.
• Draag een veiligheidsbril en volg altijd de instructies van de fabrikant als u elektrisch gereedschap gebruikt.
• Was het schuurtje met een tuinslang of een zacht schoonmaakmiddel. Gebruik geen harde borstel of schuurmiddelen,
met inbegrip van ontvetters en schoonmaakmiddelen op basis van olie of aceton, omdat die het tuinhuisje kunnen beschadigen of vlekken achterlaten.
• Zet geen hete voorwerpen, zoals een pas gebruikte grill of branders in de schuur, en bewaar er ook geen vluchtige stoffen.
• Plaats geen zware voorwerpen tegen de wanden, die daardoor misvormd kunnen raken.
• Houd het dak vrij van opgehoopte sneeuw en bladeren. Grotere hoeveelheden sneeuw op het dak kunnen het schuurtje beschadigen,
waardoor het betreden gevaarlijk kan zijn.
• De windrichting is een belangrijke factor bij het bepalen van de locatie van het tuinhuisje. Verminder blootstelling aan de wind, in het algemeen,
en bijzonder aan de deurzijde. Houd de deuren gesloten en vergrendeld wanneer het tuinhuisje niet in gebruik is om windschade te voorkomen.
• Ga niet op het dak staan.
• Raadpleeg uw plaatselijke autoriteiten om te controleren of een vergunning vereist is voor het plaatsen van het tuinhuisje.
LINEE GUIDA PER LA CURA E LA SICUREZZA
• Il prodotto va utilizzato solo per scopi di immagazzinamento. Non è progettato per abitarvi.
• Si raccomanda vivamente di fissare il prodotto su un piano inamovibile o ancorandolo al suolo tramite i fori nel pavimento
(nelle posizioni pre-segnalate) ed inserendo viti adeguate nel terreno (le viti non sono incluse).
• Non tentare il montaggio in giornate ventose o fredde.
• Controllate periodicamente il prodotto per accertarvi che sia stabile e che sia a livello del terreno.
• Fai attenzione quando maneggi parti con bordi in acciaio.
• Durante il montaggio o la manipolazione del prodotto, utilizzate solo gli strumenti elencati nel manuale utente.
• Indossare sempre guanti da lavoro, protezioni per gli occhi e maniche lunghe durante il montaggio o durante la manutenzione
• Evitate di utilizzare un tosaerba o una falce meccanica nei pressi del prodotto stesso.
• Indossate occhiali di sicurezza e seguite sempre le istruzioni del produttore quando utilizzate utensili elettrici.
• Lavate il prodotto con un tubo da giardino o una soluzione detergente delicata. Non utilizzate una spazzola dura o detergenti abrasivi,
né sgrassanti e materiali di pulizia per l'olio - o a base di acetone, in quanto questi possono macchiarlo o danneggiarlo.
• Non conservate oggetti caldi, come grill e lampade per saldature né sostanze chimiche evaporabili all’interno del prodotto.
• Evitate di posizionare oggetti pesanti contro le pareti, in quanto ciò potrebbe causare una deformazione del prodotto.
• Mantenete il tetto pulito dalla neve e dalle foglie accumulate. Grandi quantità di neve sul tetto possono danneggiare il prodotto, rendendone precaria la struttura.
• La direzione del vento è un fattore importante da considerare quando scegliete la posizione del prodotto. Riducete l'esposizione al vento,
in generale, in particolare della porta laterale. Tenete le porte chiuse e bloccate quando il prodotto non è in uso per prevenire i danni del vento.
• Non salite sul tetto.
• Consultate le autorità locali per verificare se sono necessari dei permessi per assemblare il prodotto.
DIRETRIZES SOBRE CUIDADOS E SEGURANÇA
• O abrigo destina-se apenas a fins de armazenamento. Não foi projetado para habitação.
• Recomenda-se vivamente a fixação do abrigo a um objeto imóvel ou fixá-lo no chão fazendo furos no piso do abrigo
(nos locais previamente marcados) e a inserção de parafusos adequados no chão (os parafusos não estão incluídos).
• Não tente fazer a montagem em dias ventosos ou frios.
• Verifique periodicamente o abrigo para garantir que está estável e que o sítio está nivelado.
• Tenha cuidado ao manusear peças com pontas em aço.
• Ao montar ou manipular o abrigo, utilize apenas as ferramentas indicadas no manual do utilizador.
• Utilize sempre luvas e óculos de protecção, assim como vestuário comprido ao montar ou efectuar qualquer procedimento de manutenção no seu abrigo.
• Evite a utilização de um cortador de relva ou foice mecânica perto do abrigo.
• Use óculos de segurança e siga sempre as instruções do fabricante ao utilizar ferramentas elétricas.
• Lave o abrigo com uma mangueira de jardim ou uma solução de detergente suave. Não use uma escova rija ou detergentes abrasivos incluindo
desengordurantes ou materiais de limpeza com base de óleo ou acetona, visto que estes podem manchar ou danificar o abrigo.
• Não guarde artigos quentes, como grelhas e maçaricos recentemente utilizados, e químicos voláteis no abrigo.
• Evite a colocação de artigos pesados contra as paredes, visto que isto pode causar distorção.
• Mantenha o telhado livre de acumulação de neve e folhas. Grandes quantidades de neve no telhado podem danificar o abrigo, tornando-o inseguro para entrar.
• A direção do vento é um fator importante a ter em consideração ao determinar a localização do abrigo. Reduza a exposição ao vento, em geral,
e em particular da porta lateral. Mantenhas as portas fechadas e trancadas quando o abrigo não estiver a ser utilizado para evitar danos causados pelo vento.
• Não fique no telhado.
• Consulte as autoridades locais para saber se são necessárias licenças para erguer o abrigo.
10-YEAR LIMITED WARRANTY
Your Keter shed (“the Product”) was manufactured from high-quality, recyclable materials under rigorous control and supervision.
Should a problem occur with the Product, please address your claim to Keter customer service on our website (www.keter.com) or by phone.
This warranty covers product failure resulting from defects in manufacturing or materials for a period of 10 years from the date of original retail purchase. (The term
“defects" is defined as imperfections that impair the use of the Product).
This warranty does not cover defects resulting from normal wear and tear, including, but not limited to, scuffing, scratches or fractures caused during use,
discoloration or fading, rusting, unreasonable use, abuse, negligence, alterations, painting, moving, transporting or relocating the Product, “acts of Nature”, including,
but not limited to, hail, any type of storm, flood and fire, and consequential or incidental damages.
Assembly and handling not in accordance with the recommendations, guidelines and restrictions as described in the Product's user manual, and usage for
commercial or public applications, will void this warranty.
Keter is not responsible for any damage incurred by third parties or damage to or loss of objects inside or near the shed.
Upon submitting proof of purchase and evidence of the claimed product failure, and subject to reporting the failure in a timely manner, Keter, at its sole discretion, will
replace defective parts of the Product, or refund you a prorated portion of the purchase price on a straight line depreciated basis for the length of the warranty.
GARANTIE LIMITÉE DE 10 ANS
Votre abri de jardin Keter ("le Produit") a été fabriqué à partir de matériaux recyclables de grande qualité, en faisant l'objet de contrôles rigoureux et d'une
surveillance stricte.
Si un problème devait se présenter avec le produit, veuillez adresser votre réclamation au service clients de Keter sur notre site internet (www.keter.com) ou par
téléphone.
Cette garantie couvre les dommages du produit découlant d'un défaut de fabrication ou des matériaux pendant une durée de 10 ans à partir de la date d'achat. (Le
terme "défaut" est défini comme des imperfections qui nuisent à la bonne utilisation du produit).
Cette garantie ne couvre pas les défauts résultant d'une usure normale, y compris, mais non limitée aux rayures, aux éraflures ou aux bris provoqués par l'utilisation,
la décoloration ou l'estompement de la couleur, la rouille, l'utilisation déraisonnable, les abus, la négligence, les altérations, la peinture, les déplacements, le
transport ou la relocalisation du produit, les "conditions climatiques exceptionnelles", y compris, mais non limitée à, la grêle, tout type de tempête, les inondations et
incendies, et tous dégâts accidentels ou consécutifs qui y seraient liés.
Un assemblage et une manipulation non conformes aux recommandations, aux instructions et aux restrictions, telles que décrites dans le mode d'emploi du Produit,
ainsi que l'utilisation à des fins commerciales ou publiques, annuleront cette garantie.
Keter ne saurait être tenu responsable de tout dégât encouru par une tierce partie ou de tout dégât ou perte d'objets à l'intérieur ou à proximité de l'abri.
Après avoir soumis une preuve d'achat et une preuve du dommage sur le produit détérioré, et à condition d'avoir signalé le dommage dans les délais impartis, Keter, à
son absolue discrétion, remplacera les pièces défaillantes du Produit ou vous remboursera une partie du prix d'achat au prorata, amorti sur une base linéaire pour la
durée de la garantie.
GARANTÍA LIMITADA DE 10 AÑOS
Su cobertizo Keter (“El Producto”) ha sido fabricada con materiales reciclables de alta calidad bajo rigurosos controles y supervisión.
En caso de que aparezca un problema con el Producto, por favor, dirija su reclamación al servicio al cliente de Keter en nuestra página web (www.keter.com) o por
teléfono.
Esta garantía cubre errores fallos de producto por defectos de fabricación o de materiales durante un periodo de 10 años desde la fecha de la compra del producto.
(El término “defectos” se define como imperfecciones que afectan al uso del Producto).
Esta garantía no cubre defectos resultantes por el desgaste debido al uso, incluyendo, entre otros, arañazos, rasguños o roturas provocados durante su uso,
decoloración, oxidación, uso no razonable, maltrato, negligencia, alteraciones, pintado, mover, transportar o reubicar el Producto, “causas climatológicas“,
incluyendo, entre otros, granizo, cualquier tipo de tormenta, inundación e incendio y daños resultantes o accidentales.
El montaje y su manipulación sin seguir las recomendaciones, directrices y restricciones como se describen en el manual del usuario del Producto y su uso para
aplicaciones comerciales o públicas anularán esta garantía.
Keter no se hace responsable por ningún daño realizado por terceros o daños o pérdida de objetos dentro o cerca de la cobertizo.
Al entregar el ticket o factura de compra y prueba del presunto fallo del producto, y sujeto a informar del fallo de manera puntual, Keter, a su discreción, reemplazará
las piezas defectuosas del Producto o le reembolsará una parte prorrateada proporcional del precio de compra en función de los años de garantía consumidos.
AUF 10 JAHRE BEGRENZTE GEWÄHRLEISTUNG
Ihr Keter-Schuppen („das Produkt”) wurde unter genauer Kontrolle und strenger Aufsicht aus hochwertigen und recycelbaren Materialien hergestellt.
Falls Probleme am Produkt auftauchen sollten, adressieren Sie Ihre Ansprüche bitte an den Keter-Kundendienst auf unserer Webseite (www.keter.com) oder wenden
Sie sich per Telefon an uns.
Die auf 10 Jahre begrenzte Gewährleistung umfasst Herstellungs- oder Materialdefekte am Produkt und gilt ab dem Datum des ursprünglichen Erwerbs. (Der Begriff
„Defekte“ wird definiert als Beeinträchtigungen, die die Nutzung des Produktes herabsetzen).
Diese Gewährleistung umfasst keine Defekte, die aus normalem Gebrauch resultieren und schließen unter anderem durch die Nutzung des Produktes entstandenen
Abrieb, Kratzer oder Risse mit ein, sowie Verfärbungen, Rostansatz und Schäden aufgrund von unsachgemäßer Nutzung, Missbrauch, Unachtsamkeit, Abänderungen,
Bemalen, das Versetzen oder Transportieren des Produktes und „Naturereignisse“, wozu unter anderem Hagelschlag, jegliche Form von Sturm, Flut und Feuer
zählen, sowie mittelbare und damit verbundene Beschädigungen hierdurch.
Bei Aufbau und Handhabung, die nicht gemäß den Empfehlungen, Vorgaben und Beschränkungen durchgeführt werden, wie sie in der Gebrauchsanleitung zu dem
Produkt vermerkt sind, verliert diese Gewährleistung ihre Gültigkeit. Dies gilt auch für einen Gebrauch zu kommerziellen und öffentlichen Zwecken.
Keter ist nicht verantwortlich für Beschädigungen durch Dritte und Schäden an und Verlust von Gegenständen innerhalb oder in der Nähe des Schuppens.
Nach der Einreichung von Kaufnachweis und Beweismaterial für den beanstandeten Defekt am Produkt, vorbehaltlich einer zeitnahen Meldung des Defekts, wird
Keter während der gesamten Gewährleistungsdauer nach alleinigem Ermessen fehlerhafte Teile austauschen oder einen anteiligen Betrag des Kaufpreises auf Basis
der linearen Abschreibung zurückerstatten.
10-JAAR BEPERKTE GARANTIE
Uw Keter tuinhuisje ("het product") is vervaardigd uit hoogwaardige en recyclebare materialen, onder strenge controle en toezicht.
Mocht zich een probleem voordoen met het product, kunt u uw claim naar de klantendienst van Keter sturen via onze website (www.keter.com) of per telefoon.
Deze garantie dekt het product voor gebreken in de productie of materialen voor een periode van 10 jaar vanaf de datum van de oorspronkelijke aankoop. (De term
"gebreken" wordt gedefinieerd als onvolkomenheden die het gebruik van het product schaden).
Deze garantie geldt niet voor defecten die het gevolg zijn van normale slijtage, met inbegrip van, maar niet beperkt tot, schuren, krassen of breuken ontstaan tijdens
het gebruik, verkleuring of vervaging van de kleuren, roest, onredelijk gebruik, misbruik, nalatigheid, wijzigingen, verven, vervoeren of verplaatsen van het product,
"natuurlijke calamiteiten", met inbegrip van, maar niet beperkt tot, hagel, elke vorm van storm, overstroming en brand, en gevolg- of incidentele schade.
Bij assemblage en behandeling niet in overeenstemming met de aanbevelingen, richtlijnen en beperkingen zoals beschreven in de gebruiksaanwijzing van het product,
en gebruik voor commerciële of publieke toepassingen, vervalt deze garantie.
Keter is niet verantwoordelijk voor enige schade opgelopen door derden of schade aan of verlies van objecten binnen of in de buurt van het tuinhuisje.
Door het indienen van het aankoopbewijs en het bewijs van het geclaimde gebrek aan het product, en onder voorbehoud van een tijdige rapportage van de gebreken,
zal Keter, naar eigen goeddunken, defecte onderdelen van het product vervangen of een pro rata deel van de koopprijs terugbetalen van op basis van een lineair
afgeschreven bedrag over de duur van de garantie.
10 ANNI DI GARANZIA LIMITATA
Il tuo prodotto Keter (“il Prodotto”) è stato fabbricato con materiali riciclabili di alta qualità sotto un controllo ed una supervisione rigorosi.
In caso di problemi con il prodotto, cortesemente rivolgetevi al servizio clienti Keter sul nostro sito web (www.keter.com) o per telefono.
Questa garanzia copre il guasto del prodotto dovuto a difetti di fabbricazione o dei materiali per un periodo di 10 anni dalla data di acquisto originale. (Il termine
"difetti" è definito come imperfezioni che compromettono l'uso del prodotto).
Questa garanzia non copre i difetti derivanti da normale usura, inclusi, ma non limitati a, sfregamento, graffi o fratture createsi durante l'uso, scolorimento, ruggine,
uso irragionevole, abuso, negligenza, alterazione, pittura, movimento, trasporto o spostamento del prodotto, "eventi naturali", tra cui, ma non limitati a, grandine,
qualsiasi tipo di tempeste, inondazioni e incendi e danni conseguenti o accidentali.
L'assemblaggio e la manipolazione non in conformità con le raccomandazioni, le linee guida e le restrizioni descritte nel manuale utente del prodotto ed il loro utilizzo
per applicazioni commerciali o pubbliche renderà nulla questa garanzia.
Keter non è responsabile per eventuali danni subiti da terzi o per danni o smarrimenti di oggetti all'interno o nei pressi del prodotto stesso.
Dopo aver inviato la prova di acquisto e la prova del problema del prodotto, soggetto a dichiarazione tempestiva del problema, Keter, a sua esclusiva discrezione,
sostituirà le parti difettose, o rimborserà una parte proporzionale del prezzo di acquisto su una linea retta basata sull’ammortamento per la durata della garanzia.
GARANTIA LIMITADA DE 10 ANOS
O seu abrigo Keter (“o Produto”) foi fabricado manualmente a partir de materiais recicláveis de qualidade superior sob controlo e supervisão rigorosos.
Em caso de ocorrência de algum problema com o Produto, por favor, faça a sua reclamação para o serviço de apoio ao cliente Keter no nosso site (www.keter.com)
ou por telefone.
Esta garantia cobre falhas do produto resultantes de defeitos de fabrico ou materiais durante um período de 10 anos a partir da data da compra a retalho original.
(O termo “defeitos” é definido como imperfeições que comprometam a utilização do Produto).
Esta garantia não cobre defeitos resultantes da utilização e desgaste normais, incluindo, mas não limitado a, fricção, arranhões ou fraturas causadas durante a
utilização, descoloração ou desbotamento, oxidação, utilização pouco razoável, abuso, negligência, modificações, pintura, deslocação, transporte ou reposicionamento
do Produto, “atos da Natureza”, incluindo, mas não limitado a, granizo, qualquer género de tempestade, inundação e incêndio, e danos consequentes ou acidentais.
A montagem e manipulação que não estejam em conformidade com as recomendações, diretrizes e restrições de acordo com o descrito no manual do utilizador do
Produto, e a utilização para finalidades comerciais ou públicas, anularão esta garantia.
A Keter não se responsabiliza por quaisquer danos incorridos por terceiros ou danos e perdas dentro ou perto do abrigo.
Mediante a apresentação do comprovativo de compra e prova da falha do produto reclamado, e sujeito a reportar a falha do produto atempadamente, a Keter, ao seu
critério exclusivo, irá proceder à substituição das partes defeituosas do Produto, ou reembolsá-lo com uma parcela proporcional ao preço de compra numa base de
amortização linear relativa à duração da garantia.
38
A-1275-8 583919 65DD.indd 3811.6.2017 12:22
CARE AND SAFETY GUIDELINES
•The shed is intended for storage purposes only. It is not designed for habitation.
•It is strongly recommended to secure the shed to an immovable object or anchor to the ground by drilling holes in the shed floor
(at the pre-marked locations) and inserting proper screws into the ground (screws are not included).
•Do not attempt assembly on windy or cold days.
•Periodically check the shed to ensure that it is stable and that the site is level.
•Be careful when handling parts with steel edges.
•When assembling or handling the shed, use only those tools listed in the user manual.
•Always wear work gloves, safety goggles and long sleeves when assembling or performing any maintenance on your shed.
•Avoid using a lawnmower or mechanical scythe near the shed.
•Wear safety goggles and always follow the manufacturer’s instructions when using power tools.
•Wash the shed with a garden hose or a mild detergent solution. Do not use a stiff brush or abrasive cleaners,
including degreasers and oil- or acetone-based cleaning materials, as these may stain or damage the shed.
•Do not store hot items, such as recently used grills and blowtorches, and volatile chemicals in the shed.
•Avoid placing heavy items against the walls, as this may cause distortion.
•Keep the roof clear of accumulated snow and leaves. Large amounts of snow on the roof can damage the shed, making it unsafe to enter.
•Wind direction is an important factor to consider when determining the location of the shed. Reduce exposure to the wind, in general,
and of the door side in particular. Keep doors closed and locked when the shed is not in use to prevent wind damage.
•Do not stand on the roof.
•Consult your local authorities to check if permits are required to erect the shed.
INSTRUCTIONS DE SÉCURITÉ ET D'ENTRETIEN
•L'abri a été conçu uniquement à des fins de stockage. Il n'a pas été conçu à des fins d'habitation.
•Il est fortement recommandé de sécuriser l'abri à un objet inamovible ou de le fixer au sol en creusant des trous dans le sol de l'abri
(aux emplacements marqués) et d'insérer les vis adaptées dans le sol (vis non incluses).
•N’essayez pas de réaliser le montage par jour venteux ou froid.
•Vérifiez de temps en temps la tenue de l'abri afin de garantir sa stabilité et la mise à niveau du site, sur lequel il est posé.
•Manipulez les pièces présentant des bords en acier avec précaution.
•Lors de l'assemblage ou de la manipulation de l'abri, utilisez seulement les outils listés dans le mode d'emploi.
•Portez toujours des gants de travail, des lunettes de protection et des vêtements à manches longues lors de l'assemblage ou de l'accomplissement
d'activités de maintenance sur votre abri.
•Évitez d'utiliser une tondeuse à gazon ou une faux mécanique à proximité de l'abri.
•Portez des lunettes de sécurité et suivez toujours les instructions du fabricant lors de l'utilisation d'outils électriques.
•Lavez l'abri à l'aide d'un tuyau d’arrosage de jardin ou d'un détergent non abrasif. N'utilisez pas une brosse dure ou de nettoyants abrasifs,
y compris les dégraissants et les solutions de nettoyage à base d'acétone ou d'huile, car ils peuvent tacher ou endommager l'abri.
•Ne stockez pas d'objets chauds, tels qu'un grill ou un chalumeau récemment utilisé, ou des produits chimiques volatiles dans l'abri.
•Évitez de placer des objets lourds contre les murs de votre abri, cela peut entraîner une déformation.
•
Entretenez le toit pour éviter l'accumulation de neige ou de feuilles. Une grande quantité de neige sur le toit peut endommager l'abri, rendant périlleux l'accès à l'intérieur.
•La direction du vent est un facteur important à prendre en compte lors du choix de la localisation de l'abri. Réduisez l'exposition au vent, en général,
et surtout pour le côté de la porte. Maintenant les portes fermées et verrouillées lorsque l'abri n'est pas utilisé, afin d'éviter tout dégât dû au vent.
•Ne montez pas sur le toit.
•Consultez les autorités de votre localité pour vérifier la nécessité de disposer d'un permis pour ériger l'abri.
ADVERTENCIA SOBRE EL CUIDADO Y LA SEGURIDAD
•La cobertizo está diseñada solo para el almacenamiento de productos. No está diseñada para habitar en ella.
•Se recomienda encarecidamente fijar la cobertizo a un objeto inamovible o anclarla al suelo taladrando agujeros en el suelo de la cobertizo
(en los lugares premarcadas para ello), e insertando tornillos adecuados en el suelo (los tornillos no están incluidos).
• No intente montarlo en días de viento o cuando haga frío.
• Compruebe la cobertizo periódicamente para asegurarse de que es estable y de que el lugar es uniforme.
• Tenga cuidado al manejar las partes con bordes de acero.
• Al montar o manipular la cobertizo, use solamente las herramientas enumeradas en el manual del usuario.
• Use siempre guantes de trabajo, anteojos protectores y mangas largas para armar el cobertizo o realizar cualquier tarea de mantenimiento en el mismo.
• Evite usar un cortacésped o un cortacésped cerca de la cobertizo.
• Lleve gafas de seguridad y siga siempre las instrucciones del fabricante al utilizar herramientas eléctricas.
• Lave la cobertizo con una manguera de jardín o con un detergente suave. No utilice un cepillo rígido ni limpiadores abrasivos,
incluyendo desengrasantes y materiales de limpieza basados en petróleo o acetona, ya que todos ellos pueden manchar o dañar la cobertizo.
• No guarde objetos calientes, como sopletes usados recientemente, ni elementos químicos volátiles.
• Evite situar objetos pesados contra las paredes, ya que esto puede causar deformación.
• Mantenga el techo limpio de nieve y hojas acumuladas. Una gran cantidad de nieve en el tejado puede dañar el cobertizo, haciendo que sea inseguro entrar.
• La dirección del viento es un factor importante a tener en cuenta al determinar la ubicación del cobertizo. Reduzca la exposición al viento en general
y al lateral de la puerta en particular. Mantenga las puertas cerradas y bloqueadas cuando no utilice el cobertizo para evitar daños del viento.
• Ne montez pas sur le toit.
• Consulte con sus autoridades locales y son necesariosNo se ponga de pie sobre el techo. permisos para levantar el cobertizo.
PFLEGE - UND SICHERHEITSHINWEISE
• Der Gartenschuppen dient einzig und allein der Lagerung von Gegenständen. Der Schuppen ist nicht für Wohnzwecke ausgelegt.
• Es wird dringend empfohlen, den Schuppen an einem unbeweglichen Gegenstand zu befestigen oder Mithilfe von Löchern im Schuppenboden im Boden zu verankern
(die Bohrungen müssen an den vormarkierten Stellen erfolgen), wobei geeignete Schrauben zu verwenden sind (Schrauben sind nicht im Lieferumfang enthalten).
• Führen Sie den Aufbau nicht an windigen oder kalten Tagen durch.
• Überprüfen Sie den Schuppen regelmäßig auf Stabilität und stellen Sie sicher, dass der Standort eben ist.
• Seien Sie vorsichtig, wenn Sie mit Teilen hantieren, die Stahlkanten aufweisen.
• Für Aufbau und Handhabung des Schuppens verwenden Sie bitte nur Werkzeuge, die in der Aufbauanleitung aufgelistet sind.
• Tragen Sie bei der Montage des Gartenschuppens oder Wartungsarbeiten stets Arbeitshandschuhe, eine Schutzbrille und Kleidungsstücke mit langen Ärmeln
• Vermeiden Sie den Einsatz von Rasenmäher und maschineller Sense im direkten Umfeld des Schuppens.
• Tragen Sie eine Schutzbrille und befolgen Sie bei Verwendung von Elektrowerkzeugen immer die Anweisungen des Herstellers.
• Reinigen Sie den Schuppen mit einem Gartenschlauch und einem milden Reinigungsmittel. Verwenden Sie auf keinen Fall eine harte Bürste und
Scheuer - oder Entfettungsmittel sowie Öl- oder Acetonhaltige Reinigungsmittel, da diese Flecken verursachen oder den Schuppen beschädigen könnten.
• Lagern Sie keine heißen Gegenstände im Schuppen, wie etwa kürzlich benutzte Grills oder Lötlampen und auch keine flüchtigen Chemikalien.
• Lehnen Sie keine schweren Gegenstände an die Wände des Schuppens, da sich dadurch der gesamte Schuppen verziehen könnte.
• Halten Sie das Dach frei von Schnee und angesammeltem Blattwerk. Große Mengen an Schnee können den Schuppen beschädigen und beim Betreten gefährlich werden
.
• Die Windrichtung ist ein wichtiger Faktor, der bei der Aufstellung des Schuppens unbedingt berücksichtigt werden muss.
Vermeiden Sie zu hohe Windbelastungen, insbesondere einen hohen Winddruck auf die Türen. Halten Sie die Türen immer geschlossen und verriegelt,
wenn der Schuppen nicht genutzt wird, um eine Beschädigung durch Windbelastungen zu vermeiden.
• Betreten Sie auf keinen Fall das Dach des Schuppens.
• Wenden Sie sich bitte an Ihre lokale Behörde und erkundigen Sie sich dort, ob zum Aufbau des Schuppens eine Genehmigung erforderlich ist.
RICHTLIJNEN VOOR ZORG EN VEILIGHEID
• Het tuinhuisje is uitsluitend bedoeld voor opslag. Het is niet ontworpen voor bewoning.
• Het wordt sterk aanbevolen om het tuinhuisje vast te maken aan een immobiel object of in de grond te verankeren door het boren van gaten in de vloer
(op de gemarkeerde plaatsen) en het met de geschikte schroeven in de grond te bevestigen (schroeven zijn niet inbegrepen).
• Probeer niet op stormachtige of koude dagen te monteren.
• Controleer het tuinhuisje regelmatig dat het stabiel en waterpas staat.
• Wees voorzichtig als u werkt met onderdelen met staalranden.
• Gebruik bij de montage of het hanteren van het tuinhuisje alleen de gereedschappen die in de handleiding vermeldt staan.
• Draag altijd werkhandschoenen, oogbescherming en lange mouwen als u uw schuurtje monteert of onderhoud
• Vermijd het gebruik van een grasmaaier of mechanische zeis in de buurt van het tuinhuisje.
• Draag een veiligheidsbril en volg altijd de instructies van de fabrikant als u elektrisch gereedschap gebruikt.
• Was het schuurtje met een tuinslang of een zacht schoonmaakmiddel. Gebruik geen harde borstel of schuurmiddelen,
met inbegrip van ontvetters en schoonmaakmiddelen op basis van olie of aceton, omdat die het tuinhuisje kunnen beschadigen of vlekken achterlaten.
• Zet geen hete voorwerpen, zoals een pas gebruikte grill of branders in de schuur, en bewaar er ook geen vluchtige stoffen.
• Plaats geen zware voorwerpen tegen de wanden, die daardoor misvormd kunnen raken.
• Houd het dak vrij van opgehoopte sneeuw en bladeren. Grotere hoeveelheden sneeuw op het dak kunnen het schuurtje beschadigen,
waardoor het betreden gevaarlijk kan zijn.
• De windrichting is een belangrijke factor bij het bepalen van de locatie van het tuinhuisje. Verminder blootstelling aan de wind, in het algemeen,
en bijzonder aan de deurzijde. Houd de deuren gesloten en vergrendeld wanneer het tuinhuisje niet in gebruik is om windschade te voorkomen.
• Ga niet op het dak staan.
• Raadpleeg uw plaatselijke autoriteiten om te controleren of een vergunning vereist is voor het plaatsen van het tuinhuisje.
LINEE GUIDA PER LA CURA E LA SICUREZZA
• Il prodotto va utilizzato solo per scopi di immagazzinamento. Non è progettato per abitarvi.
• Si raccomanda vivamente di fissare il prodotto su un piano inamovibile o ancorandolo al suolo tramite i fori nel pavimento
(nelle posizioni pre-segnalate) ed inserendo viti adeguate nel terreno (le viti non sono incluse).
• Non tentare il montaggio in giornate ventose o fredde.
• Controllate periodicamente il prodotto per accertarvi che sia stabile e che sia a livello del terreno.
• Fai attenzione quando maneggi parti con bordi in acciaio.
• Durante il montaggio o la manipolazione del prodotto, utilizzate solo gli strumenti elencati nel manuale utente.
• Indossare sempre guanti da lavoro, protezioni per gli occhi e maniche lunghe durante il montaggio o durante la manutenzione
• Evitate di utilizzare un tosaerba o una falce meccanica nei pressi del prodotto stesso.
• Indossate occhiali di sicurezza e seguite sempre le istruzioni del produttore quando utilizzate utensili elettrici.
• Lavate il prodotto con un tubo da giardino o una soluzione detergente delicata. Non utilizzate una spazzola dura o detergenti abrasivi,
né sgrassanti e materiali di pulizia per l'olio - o a base di acetone, in quanto questi possono macchiarlo o danneggiarlo.
• Non conservate oggetti caldi, come grill e lampade per saldature né sostanze chimiche evaporabili all’interno del prodotto.
• Evitate di posizionare oggetti pesanti contro le pareti, in quanto ciò potrebbe causare una deformazione del prodotto.
• Mantenete il tetto pulito dalla neve e dalle foglie accumulate. Grandi quantità di neve sul tetto possono danneggiare il prodotto, rendendone precaria la struttura.
• La direzione del vento è un fattore importante da considerare quando scegliete la posizione del prodotto. Riducete l'esposizione al vento,
in generale, in particolare della porta laterale. Tenete le porte chiuse e bloccate quando il prodotto non è in uso per prevenire i danni del vento.
• Non salite sul tetto.
• Consultate le autorità locali per verificare se sono necessari dei permessi per assemblare il prodotto.
DIRETRIZES SOBRE CUIDADOS E SEGURANÇA
• O abrigo destina-se apenas a fins de armazenamento. Não foi projetado para habitação.
• Recomenda-se vivamente a fixação do abrigo a um objeto imóvel ou fixá-lo no chão fazendo furos no piso do abrigo
(nos locais previamente marcados) e a inserção de parafusos adequados no chão (os parafusos não estão incluídos).
• Não tente fazer a montagem em dias ventosos ou frios.
• Verifique periodicamente o abrigo para garantir que está estável e que o sítio está nivelado.
• Tenha cuidado ao manusear peças com pontas em aço.
• Ao montar ou manipular o abrigo, utilize apenas as ferramentas indicadas no manual do utilizador.
• Utilize sempre luvas e óculos de protecção, assim como vestuário comprido ao montar ou efectuar qualquer procedimento de manutenção no seu abrigo.
• Evite a utilização de um cortador de relva ou foice mecânica perto do abrigo.
• Use óculos de segurança e siga sempre as instruções do fabricante ao utilizar ferramentas elétricas.
• Lave o abrigo com uma mangueira de jardim ou uma solução de detergente suave. Não use uma escova rija ou detergentes abrasivos incluindo
desengordurantes ou materiais de limpeza com base de óleo ou acetona, visto que estes podem manchar ou danificar o abrigo.
• Não guarde artigos quentes, como grelhas e maçaricos recentemente utilizados, e químicos voláteis no abrigo.
• Evite a colocação de artigos pesados contra as paredes, visto que isto pode causar distorção.
• Mantenha o telhado livre de acumulação de neve e folhas. Grandes quantidades de neve no telhado podem danificar o abrigo, tornando-o inseguro para entrar.
• A direção do vento é um fator importante a ter em consideração ao determinar a localização do abrigo. Reduza a exposição ao vento, em geral,
e em particular da porta lateral. Mantenhas as portas fechadas e trancadas quando o abrigo não estiver a ser utilizado para evitar danos causados pelo vento.
• Não fique no telhado.
• Consulte as autoridades locais para saber se são necessárias licenças para erguer o abrigo.
10-YEAR LIMITED WARRANTY
Your Keter shed (“the Product”) was manufactured from high-quality, recyclable materials under rigorous control and supervision.
Should a problem occur with the Product, please address your claim to Keter customer service on our website (www.keter.com) or by phone.
This warranty covers product failure resulting from defects in manufacturing or materials for a period of 10 years from the date of original retail purchase. (The term
“defects" is defined as imperfections that impair the use of the Product).
This warranty does not cover defects resulting from normal wear and tear, including, but not limited to, scuffing, scratches or fractures caused during use,
discoloration or fading, rusting, unreasonable use, abuse, negligence, alterations, painting, moving, transporting or relocating the Product, “acts of Nature”, including,
but not limited to, hail, any type of storm, flood and fire, and consequential or incidental damages.
Assembly and handling not in accordance with the recommendations, guidelines and restrictions as described in the Product's user manual, and usage for
commercial or public applications, will void this warranty.
Keter is not responsible for any damage incurred by third parties or damage to or loss of objects inside or near the shed.
Upon submitting proof of purchase and evidence of the claimed product failure, and subject to reporting the failure in a timely manner, Keter, at its sole discretion, will
replace defective parts of the Product, or refund you a prorated portion of the purchase price on a straight line depreciated basis for the length of the warranty.
GARANTIE LIMITÉE DE 10 ANS
Votre abri de jardin Keter ("le Produit") a été fabriqué à partir de matériaux recyclables de grande qualité, en faisant l'objet de contrôles rigoureux et d'une
surveillance stricte.
Si un problème devait se présenter avec le produit, veuillez adresser votre réclamation au service clients de Keter sur notre site internet (www.keter.com) ou par
téléphone.
Cette garantie couvre les dommages du produit découlant d'un défaut de fabrication ou des matériaux pendant une durée de 10 ans à partir de la date d'achat. (Le
terme "défaut" est défini comme des imperfections qui nuisent à la bonne utilisation du produit).
Cette garantie ne couvre pas les défauts résultant d'une usure normale, y compris, mais non limitée aux rayures, aux éraflures ou aux bris provoqués par l'utilisation,
la décoloration ou l'estompement de la couleur, la rouille, l'utilisation déraisonnable, les abus, la négligence, les altérations, la peinture, les déplacements, le
transport ou la relocalisation du produit, les "conditions climatiques exceptionnelles", y compris, mais non limitée à, la grêle, tout type de tempête, les inondations et
incendies, et tous dégâts accidentels ou consécutifs qui y seraient liés.
Un assemblage et une manipulation non conformes aux recommandations, aux instructions et aux restrictions, telles que décrites dans le mode d'emploi du Produit,
ainsi que l'utilisation à des fins commerciales ou publiques, annuleront cette garantie.
Keter ne saurait être tenu responsable de tout dégât encouru par une tierce partie ou de tout dégât ou perte d'objets à l'intérieur ou à proximité de l'abri.
Après avoir soumis une preuve d'achat et une preuve du dommage sur le produit détérioré, et à condition d'avoir signalé le dommage dans les délais impartis, Keter, à
son absolue discrétion, remplacera les pièces défaillantes du Produit ou vous remboursera une partie du prix d'achat au prorata, amorti sur une base linéaire pour la
durée de la garantie.
GARANTÍA LIMITADA DE 10 AÑOS
Su cobertizo Keter (“El Producto”) ha sido fabricada con materiales reciclables de alta calidad bajo rigurosos controles y supervisión.
En caso de que aparezca un problema con el Producto, por favor, dirija su reclamación al servicio al cliente de Keter en nuestra página web (www.keter.com) o por
teléfono.
Esta garantía cubre errores fallos de producto por defectos de fabricación o de materiales durante un periodo de 10 años desde la fecha de la compra del producto.
(El término “defectos” se define como imperfecciones que afectan al uso del Producto).
Esta garantía no cubre defectos resultantes por el desgaste debido al uso, incluyendo, entre otros, arañazos, rasguños o roturas provocados durante su uso,
decoloración, oxidación, uso no razonable, maltrato, negligencia, alteraciones, pintado, mover, transportar o reubicar el Producto, “causas climatológicas“,
incluyendo, entre otros, granizo, cualquier tipo de tormenta, inundación e incendio y daños resultantes o accidentales.
El montaje y su manipulación sin seguir las recomendaciones, directrices y restricciones como se describen en el manual del usuario del Producto y su uso para
aplicaciones comerciales o públicas anularán esta garantía.
Keter no se hace responsable por ningún daño realizado por terceros o daños o pérdida de objetos dentro o cerca de la cobertizo.
Al entregar el ticket o factura de compra y prueba del presunto fallo del producto, y sujeto a informar del fallo de manera puntual, Keter, a su discreción, reemplazará
las piezas defectuosas del Producto o le reembolsará una parte prorrateada proporcional del precio de compra en función de los años de garantía consumidos.
AUF 10 JAHRE BEGRENZTE GEWÄHRLEISTUNG
Ihr Keter-Schuppen („das Produkt”) wurde unter genauer Kontrolle und strenger Aufsicht aus hochwertigen und recycelbaren Materialien hergestellt.
Falls Probleme am Produkt auftauchen sollten, adressieren Sie Ihre Ansprüche bitte an den Keter-Kundendienst auf unserer Webseite (www.keter.com) oder wenden
Sie sich per Telefon an uns.
Die auf 10 Jahre begrenzte Gewährleistung umfasst Herstellungs- oder Materialdefekte am Produkt und gilt ab dem Datum des ursprünglichen Erwerbs. (Der Begriff
„Defekte“ wird definiert als Beeinträchtigungen, die die Nutzung des Produktes herabsetzen).
Diese Gewährleistung umfasst keine Defekte, die aus normalem Gebrauch resultieren und schließen unter anderem durch die Nutzung des Produktes entstandenen
Abrieb, Kratzer oder Risse mit ein, sowie Verfärbungen, Rostansatz und Schäden aufgrund von unsachgemäßer Nutzung, Missbrauch, Unachtsamkeit, Abänderungen,
Bemalen, das Versetzen oder Transportieren des Produktes und „Naturereignisse“, wozu unter anderem Hagelschlag, jegliche Form von Sturm, Flut und Feuer
zählen, sowie mittelbare und damit verbundene Beschädigungen hierdurch.
Bei Aufbau und Handhabung, die nicht gemäß den Empfehlungen, Vorgaben und Beschränkungen durchgeführt werden, wie sie in der Gebrauchsanleitung zu dem
Produkt vermerkt sind, verliert diese Gewährleistung ihre Gültigkeit. Dies gilt auch für einen Gebrauch zu kommerziellen und öffentlichen Zwecken.
Keter ist nicht verantwortlich für Beschädigungen durch Dritte und Schäden an und Verlust von Gegenständen innerhalb oder in der Nähe des Schuppens.
Nach der Einreichung von Kaufnachweis und Beweismaterial für den beanstandeten Defekt am Produkt, vorbehaltlich einer zeitnahen Meldung des Defekts, wird
Keter während der gesamten Gewährleistungsdauer nach alleinigem Ermessen fehlerhafte Teile austauschen oder einen anteiligen Betrag des Kaufpreises auf Basis
der linearen Abschreibung zurückerstatten.
10-JAAR BEPERKTE GARANTIE
Uw Keter tuinhuisje ("het product") is vervaardigd uit hoogwaardige en recyclebare materialen, onder strenge controle en toezicht.
Mocht zich een probleem voordoen met het product, kunt u uw claim naar de klantendienst van Keter sturen via onze website (www.keter.com) of per telefoon.
Deze garantie dekt het product voor gebreken in de productie of materialen voor een periode van 10 jaar vanaf de datum van de oorspronkelijke aankoop. (De term
"gebreken" wordt gedefinieerd als onvolkomenheden die het gebruik van het product schaden).
Deze garantie geldt niet voor defecten die het gevolg zijn van normale slijtage, met inbegrip van, maar niet beperkt tot, schuren, krassen of breuken ontstaan tijdens
het gebruik, verkleuring of vervaging van de kleuren, roest, onredelijk gebruik, misbruik, nalatigheid, wijzigingen, verven, vervoeren of verplaatsen van het product,
"natuurlijke calamiteiten", met inbegrip van, maar niet beperkt tot, hagel, elke vorm van storm, overstroming en brand, en gevolg- of incidentele schade.
Bij assemblage en behandeling niet in overeenstemming met de aanbevelingen, richtlijnen en beperkingen zoals beschreven in de gebruiksaanwijzing van het product,
en gebruik voor commerciële of publieke toepassingen, vervalt deze garantie.
Keter is niet verantwoordelijk voor enige schade opgelopen door derden of schade aan of verlies van objecten binnen of in de buurt van het tuinhuisje.
Door het indienen van het aankoopbewijs en het bewijs van het geclaimde gebrek aan het product, en onder voorbehoud van een tijdige rapportage van de gebreken,
zal Keter, naar eigen goeddunken, defecte onderdelen van het product vervangen of een pro rata deel van de koopprijs terugbetalen van op basis van een lineair
afgeschreven bedrag over de duur van de garantie.
10 ANNI DI GARANZIA LIMITATA
Il tuo prodotto Keter (“il Prodotto”) è stato fabbricato con materiali riciclabili di alta qualità sotto un controllo ed una supervisione rigorosi.
In caso di problemi con il prodotto, cortesemente rivolgetevi al servizio clienti Keter sul nostro sito web (www.keter.com) o per telefono.
Questa garanzia copre il guasto del prodotto dovuto a difetti di fabbricazione o dei materiali per un periodo di 10 anni dalla data di acquisto originale. (Il termine
"difetti" è definito come imperfezioni che compromettono l'uso del prodotto).
Questa garanzia non copre i difetti derivanti da normale usura, inclusi, ma non limitati a, sfregamento, graffi o fratture createsi durante l'uso, scolorimento, ruggine,
uso irragionevole, abuso, negligenza, alterazione, pittura, movimento, trasporto o spostamento del prodotto, "eventi naturali", tra cui, ma non limitati a, grandine,
qualsiasi tipo di tempeste, inondazioni e incendi e danni conseguenti o accidentali.
L'assemblaggio e la manipolazione non in conformità con le raccomandazioni, le linee guida e le restrizioni descritte nel manuale utente del prodotto ed il loro utilizzo
per applicazioni commerciali o pubbliche renderà nulla questa garanzia.
Keter non è responsabile per eventuali danni subiti da terzi o per danni o smarrimenti di oggetti all'interno o nei pressi del prodotto stesso.
Dopo aver inviato la prova di acquisto e la prova del problema del prodotto, soggetto a dichiarazione tempestiva del problema, Keter, a sua esclusiva discrezione,
sostituirà le parti difettose, o rimborserà una parte proporzionale del prezzo di acquisto su una linea retta basata sull’ammortamento per la durata della garanzia.
GARANTIA LIMITADA DE 10 ANOS
O seu abrigo Keter (“o Produto”) foi fabricado manualmente a partir de materiais recicláveis de qualidade superior sob controlo e supervisão rigorosos.
Em caso de ocorrência de algum problema com o Produto, por favor, faça a sua reclamação para o serviço de apoio ao cliente Keter no nosso site (www.keter.com)
ou por telefone.
Esta garantia cobre falhas do produto resultantes de defeitos de fabrico ou materiais durante um período de 10 anos a partir da data da compra a retalho original.
(O termo “defeitos” é definido como imperfeições que comprometam a utilização do Produto).
Esta garantia não cobre defeitos resultantes da utilização e desgaste normais, incluindo, mas não limitado a, fricção, arranhões ou fraturas causadas durante a
utilização, descoloração ou desbotamento, oxidação, utilização pouco razoável, abuso, negligência, modificações, pintura, deslocação, transporte ou reposicionamento
do Produto, “atos da Natureza”, incluindo, mas não limitado a, granizo, qualquer género de tempestade, inundação e incêndio, e danos consequentes ou acidentais.
A montagem e manipulação que não estejam em conformidade com as recomendações, diretrizes e restrições de acordo com o descrito no manual do utilizador do
Produto, e a utilização para finalidades comerciais ou públicas, anularão esta garantia.
A Keter não se responsabiliza por quaisquer danos incorridos por terceiros ou danos e perdas dentro ou perto do abrigo.
Mediante a apresentação do comprovativo de compra e prova da falha do produto reclamado, e sujeito a reportar a falha do produto atempadamente, a Keter, ao seu
critério exclusivo, irá proceder à substituição das partes defeituosas do Produto, ou reembolsá-lo com uma parcela proporcional ao preço de compra numa base de
amortização linear relativa à duração da garantia.
39
A-1275-8 583919 65DD.indd 3911.6.2017 12:22
10-YEAR LIMITED WARRANTY
Your Keter shed (“the Product”) was manufactured from high-quality, recyclable materials under rigorous control and supervision.
Should a problem occur with the Product, please address your claim to Keter customer service on our website (www.keter.com) or by phone.
This warranty covers product failure resulting from defects in manufacturing or materials for a period of 10 years from the date of original retail purchase. (The term
“defects" is defined as imperfections that impair the use of the Product).
This warranty does not cover defects resulting from normal wear and tear, including, but not limited to, scuffing, scratches or fractures caused during use,
discoloration or fading, rusting, unreasonable use, abuse, negligence, alterations, painting, moving, transporting or relocating the Product, “acts of Nature”, including,
but not limited to, hail, any type of storm, flood and fire, and consequential or incidental damages.
Assembly and handling not in accordance with the recommendations, guidelines and restrictions as described in the Product's user manual, and usage for
commercial or public applications, will void this warranty.
Keter is not responsible for any damage incurred by third parties or damage to or loss of objects inside or near the shed.
Upon submitting proof of purchase and evidence of the claimed product failure, and subject to reporting the failure in a timely manner, Keter, at its sole discretion, will
replace defective parts of the Product, or refund you a prorated portion of the purchase price on a straight line depreciated basis for the length of the warranty.
GARANTIE LIMITÉE DE 10 ANS
Votre abri de jardin Keter ("le Produit") a été fabriqué à partir de matériaux recyclables de grande qualité, en faisant l'objet de contrôles rigoureux et d'une
surveillance stricte.
Si un problème devait se présenter avec le produit, veuillez adresser votre réclamation au service clients de Keter sur notre site internet (www.keter.com) ou par
téléphone.
Cette garantie couvre les dommages du produit découlant d'un défaut de fabrication ou des matériaux pendant une durée de 10 ans à partir de la date d'achat. (Le
terme "défaut" est défini comme des imperfections qui nuisent à la bonne utilisation du produit).
Cette garantie ne couvre pas les défauts résultant d'une usure normale, y compris, mais non limitée aux rayures, aux éraflures ou aux bris provoqués par l'utilisation,
la décoloration ou l'estompement de la couleur, la rouille, l'utilisation déraisonnable, les abus, la négligence, les altérations, la peinture, les déplacements, le
transport ou la relocalisation du produit, les "conditions climatiques exceptionnelles", y compris, mais non limitée à, la grêle, tout type de tempête, les inondations et
incendies, et tous dégâts accidentels ou consécutifs qui y seraient liés.
Un assemblage et une manipulation non conformes aux recommandations, aux instructions et aux restrictions, telles que décrites dans le mode d'emploi du Produit,
ainsi que l'utilisation à des fins commerciales ou publiques, annuleront cette garantie.
Keter ne saurait être tenu responsable de tout dégât encouru par une tierce partie ou de tout dégât ou perte d'objets à l'intérieur ou à proximité de l'abri.
Après avoir soumis une preuve d'achat et une preuve du dommage sur le produit détérioré, et à condition d'avoir signalé le dommage dans les délais impartis, Keter, à
son absolue discrétion, remplacera les pièces défaillantes du Produit ou vous remboursera une partie du prix d'achat au prorata, amorti sur une base linéaire pour la
durée de la garantie.
GARANTÍA LIMITADA DE 10 AÑOS
Su cobertizo Keter (“El Producto”) ha sido fabricada con materiales reciclables de alta calidad bajo rigurosos controles y supervisión.
En caso de que aparezca un problema con el Producto, por favor, dirija su reclamación al servicio al cliente de Keter en nuestra página web (www.keter.com) o por
teléfono.
Esta garantía cubre errores fallos de producto por defectos de fabricación o de materiales durante un periodo de 10 años desde la fecha de la compra del producto.
(El término “defectos” se define como imperfecciones que afectan al uso del Producto).
Esta garantía no cubre defectos resultantes por el desgaste debido al uso, incluyendo, entre otros, arañazos, rasguños o roturas provocados durante su uso,
decoloración, oxidación, uso no razonable, maltrato, negligencia, alteraciones, pintado, mover, transportar o reubicar el Producto, “causas climatológicas“,
incluyendo, entre otros, granizo, cualquier tipo de tormenta, inundación e incendio y daños resultantes o accidentales.
El montaje y su manipulación sin seguir las recomendaciones, directrices y restricciones como se describen en el manual del usuario del Producto y su uso para
aplicaciones comerciales o públicas anularán esta garantía.
Keter no se hace responsable por ningún daño realizado por terceros o daños o pérdida de objetos dentro o cerca de la cobertizo.
Al entregar el ticket o factura de compra y prueba del presunto fallo del producto, y sujeto a informar del fallo de manera puntual, Keter, a su discreción, reemplazará
las piezas defectuosas del Producto o le reembolsará una parte prorrateada proporcional del precio de compra en función de los años de garantía consumidos.
AUF 10 JAHRE BEGRENZTE GEWÄHRLEISTUNG
Ihr Keter-Schuppen („das Produkt”) wurde unter genauer Kontrolle und strenger Aufsicht aus hochwertigen und recycelbaren Materialien hergestellt.
Falls Probleme am Produkt auftauchen sollten, adressieren Sie Ihre Ansprüche bitte an den Keter-Kundendienst auf unserer Webseite (www.keter.com) oder wenden
Sie sich per Telefon an uns.
Die auf 10 Jahre begrenzte Gewährleistung umfasst Herstellungs- oder Materialdefekte am Produkt und gilt ab dem Datum des ursprünglichen Erwerbs. (Der Begriff
„Defekte“ wird definiert als Beeinträchtigungen, die die Nutzung des Produktes herabsetzen).
Diese Gewährleistung umfasst keine Defekte, die aus normalem Gebrauch resultieren und schließen unter anderem durch die Nutzung des Produktes entstandenen
Abrieb, Kratzer oder Risse mit ein, sowie Verfärbungen, Rostansatz und Schäden aufgrund von unsachgemäßer Nutzung, Missbrauch, Unachtsamkeit, Abänderungen,
Bemalen, das Versetzen oder Transportieren des Produktes und „Naturereignisse“, wozu unter anderem Hagelschlag, jegliche Form von Sturm, Flut und Feuer
zählen, sowie mittelbare und damit verbundene Beschädigungen hierdurch.
Bei Aufbau und Handhabung, die nicht gemäß den Empfehlungen, Vorgaben und Beschränkungen durchgeführt werden, wie sie in der Gebrauchsanleitung zu dem
Produkt vermerkt sind, verliert diese Gewährleistung ihre Gültigkeit. Dies gilt auch für einen Gebrauch zu kommerziellen und öffentlichen Zwecken.
Keter ist nicht verantwortlich für Beschädigungen durch Dritte und Schäden an und Verlust von Gegenständen innerhalb oder in der Nähe des Schuppens.
Nach der Einreichung von Kaufnachweis und Beweismaterial für den beanstandeten Defekt am Produkt, vorbehaltlich einer zeitnahen Meldung des Defekts, wird
Keter während der gesamten Gewährleistungsdauer nach alleinigem Ermessen fehlerhafte Teile austauschen oder einen anteiligen Betrag des Kaufpreises auf Basis
der linearen Abschreibung zurückerstatten.
10-JAAR BEPERKTE GARANTIE
Uw Keter tuinhuisje ("het product") is vervaardigd uit hoogwaardige en recyclebare materialen, onder strenge controle en toezicht.
Mocht zich een probleem voordoen met het product, kunt u uw claim naar de klantendienst van Keter sturen via onze website (www.keter.com) of per telefoon.
Deze garantie dekt het product voor gebreken in de productie of materialen voor een periode van 10 jaar vanaf de datum van de oorspronkelijke aankoop. (De term
"gebreken" wordt gedefinieerd als onvolkomenheden die het gebruik van het product schaden).
Deze garantie geldt niet voor defecten die het gevolg zijn van normale slijtage, met inbegrip van, maar niet beperkt tot, schuren, krassen of breuken ontstaan tijdens
het gebruik, verkleuring of vervaging van de kleuren, roest, onredelijk gebruik, misbruik, nalatigheid, wijzigingen, verven, vervoeren of verplaatsen van het product,
"natuurlijke calamiteiten", met inbegrip van, maar niet beperkt tot, hagel, elke vorm van storm, overstroming en brand, en gevolg- of incidentele schade.
Bij assemblage en behandeling niet in overeenstemming met de aanbevelingen, richtlijnen en beperkingen zoals beschreven in de gebruiksaanwijzing van het product,
en gebruik voor commerciële of publieke toepassingen, vervalt deze garantie.
Keter is niet verantwoordelijk voor enige schade opgelopen door derden of schade aan of verlies van objecten binnen of in de buurt van het tuinhuisje.
Door het indienen van het aankoopbewijs en het bewijs van het geclaimde gebrek aan het product, en onder voorbehoud van een tijdige rapportage van de gebreken,
zal Keter, naar eigen goeddunken, defecte onderdelen van het product vervangen of een pro rata deel van de koopprijs terugbetalen van op basis van een lineair
afgeschreven bedrag over de duur van de garantie.
10 ANNI DI GARANZIA LIMITATA
Il tuo prodotto Keter (“il Prodotto”) è stato fabbricato con materiali riciclabili di alta qualità sotto un controllo ed una supervisione rigorosi.
In caso di problemi con il prodotto, cortesemente rivolgetevi al servizio clienti Keter sul nostro sito web (www.keter.com) o per telefono.
Questa garanzia copre il guasto del prodotto dovuto a difetti di fabbricazione o dei materiali per un periodo di 10 anni dalla data di acquisto originale. (Il termine
"difetti" è definito come imperfezioni che compromettono l'uso del prodotto).
Questa garanzia non copre i difetti derivanti da normale usura, inclusi, ma non limitati a, sfregamento, graffi o fratture createsi durante l'uso, scolorimento, ruggine,
uso irragionevole, abuso, negligenza, alterazione, pittura, movimento, trasporto o spostamento del prodotto, "eventi naturali", tra cui, ma non limitati a, grandine,
qualsiasi tipo di tempeste, inondazioni e incendi e danni conseguenti o accidentali.
L'assemblaggio e la manipolazione non in conformità con le raccomandazioni, le linee guida e le restrizioni descritte nel manuale utente del prodotto ed il loro utilizzo
per applicazioni commerciali o pubbliche renderà nulla questa garanzia.
Keter non è responsabile per eventuali danni subiti da terzi o per danni o smarrimenti di oggetti all'interno o nei pressi del prodotto stesso.
Dopo aver inviato la prova di acquisto e la prova del problema del prodotto, soggetto a dichiarazione tempestiva del problema, Keter, a sua esclusiva discrezione,
sostituirà le parti difettose, o rimborserà una parte proporzionale del prezzo di acquisto su una linea retta basata sull’ammortamento per la durata della garanzia.
GARANTIA LIMITADA DE 10 ANOS
O seu abrigo Keter (“o Produto”) foi fabricado manualmente a partir de materiais recicláveis de qualidade superior sob controlo e supervisão rigorosos.
Em caso de ocorrência de algum problema com o Produto, por favor, faça a sua reclamação para o serviço de apoio ao cliente Keter no nosso site (www.keter.com)
ou por telefone.
Esta garantia cobre falhas do produto resultantes de defeitos de fabrico ou materiais durante um período de 10 anos a partir da data da compra a retalho original.
(O termo “defeitos” é definido como imperfeições que comprometam a utilização do Produto).
Esta garantia não cobre defeitos resultantes da utilização e desgaste normais, incluindo, mas não limitado a, fricção, arranhões ou fraturas causadas durante a
utilização, descoloração ou desbotamento, oxidação, utilização pouco razoável, abuso, negligência, modificações, pintura, deslocação, transporte ou reposicionamento
do Produto, “atos da Natureza”, incluindo, mas não limitado a, granizo, qualquer género de tempestade, inundação e incêndio, e danos consequentes ou acidentais.
A montagem e manipulação que não estejam em conformidade com as recomendações, diretrizes e restrições de acordo com o descrito no manual do utilizador do
Produto, e a utilização para finalidades comerciais ou públicas, anularão esta garantia.
A Keter não se responsabiliza por quaisquer danos incorridos por terceiros ou danos e perdas dentro ou perto do abrigo.
Mediante a apresentação do comprovativo de compra e prova da falha do produto reclamado, e sujeito a reportar a falha do produto atempadamente, a Keter, ao seu
critério exclusivo, irá proceder à substituição das partes defeituosas do Produto, ou reembolsá-lo com uma parcela proporcional ao preço de compra numa base de
amortização linear relativa à duração da garantia.
WWW.KETER.COM
For assistance with assembly, or to request replacement parts, log onto our website or call Customer Service.
DO NOT RETURN THE PRODUCT TO THE STORE.
Si vous avez besoin d’aide pour le montage, ou pour demander des pièces de rechange, connectez-vous sur notre site Web ou appelez le service à la clientèle.
NE RETOURNEZ PAS LE PRODUIT AU MAGASIN.
Para obtener ayuda sobre el montaje o para solicitar piezas de repuesto, conéctese a nuestra página web o llame a Atención al cliente.
NO DEVUELVA EL PRODUCTO A LA TIENDA.
Wenn Sie Hilfe beim Aufbau oder Ersatzteile benötigen, melden Sie sich auf unserer Webseite an oder rufen Sie unseren Kundenservice an.
GEBEN SIE DAS PRODUKT NICHT IM GESCHÄFT ZURÜCK.
Als u hulp nodig heeft bij de montage of vervangende onderdelen wilt bestellen, kunt u inloggen op onze website of bellen met de klantenservice.
BRENG HET PRODUCT NIET TERUG NAAR DE WINKEL.
Per assistenza al montaggio, o per richiedere pezzi di ricambio, accedi al nostro sito o chiama il servizio clienti.
NON RESTITUIRE IL PRODOTTO AL NEGOZIO.
Para obter ajuda na montagem, ou para solicitar peças de substituição, inicie a sessão no nosso sítio da Internet ou ligue para o Serviço de Apoio ao Cliente.
Gebruikershandleiding.com neemt misbruik van zijn services uitermate serieus. U kunt hieronder aangeven waarom deze vraag ongepast is. Wij controleren de vraag en zonodig wordt deze verwijderd.
Product:
Spelregels forum
Om tot zinvolle vragen te komen hanteren wij de volgende spelregels:
lees eerst de handleiding door;
controleer of uw vraag al eerder door iemand anders is gesteld;
probeer uw vraag zo duidelijk mogelijk te stellen;
heeft u een probleem en al geprobeerd om dit op te lossen, vermeld dit erbij aub;
heeft u een oplossing gekregen van een bezoeker dan horen wij dat graag in dit forum;
wilt u een reactie geven op een vraag of antwoord, gebruik dan niet dit formulier maar klik op de knop 'reageer op deze vraag';
uw vraag wordt direct op de website gezet; vermijd daarom persoonlijke gegevens in te vullen;
Belangrijk! Als er een antwoord wordt gegeven op uw vraag, dan is het voor de gever van het antwoord nuttig om te weten als u er wel (of niet) mee geholpen bent! Wij vragen u dus ook te reageren op een antwoord.
Belangrijk! Antwoorden worden ook per e-mail naar abonnees gestuurd. Laat uw emailadres achter op deze site, zodat u op de hoogte blijft. U krijgt dan ook andere vragen en antwoorden te zien.
Abonneren
Abonneer u voor het ontvangen van emails voor uw Keter Manor 6x5DD bij:
nieuwe vragen en antwoorden
nieuwe handleidingen
U ontvangt een email met instructies om u voor één of beide opties in te schrijven.
Ontvang uw handleiding per email
Vul uw emailadres in en ontvang de handleiding van Keter Manor 6x5DD in de taal/talen: Nederlands, Duits, Engels, Frans, Italiaans, Portugees, Spaans als bijlage per email.
De handleiding is 14,45 mb groot.
U ontvangt de handleiding per email binnen enkele minuten. Als u geen email heeft ontvangen, dan heeft u waarschijnlijk een verkeerd emailadres ingevuld of is uw mailbox te vol. Daarnaast kan het zijn dat uw internetprovider een maximum heeft aan de grootte per email. Omdat hier een handleiding wordt meegestuurd, kan het voorkomen dat de email groter is dan toegestaan bij uw provider.
Stel vragen via chat aan uw handleiding
Stel uw vraag over deze PDF
Uw handleiding is per email verstuurd. Controleer uw email
Als u niet binnen een kwartier uw email met handleiding ontvangen heeft, kan het zijn dat u een verkeerd emailadres heeft ingevuld of dat uw emailprovider een maximum grootte per email heeft ingesteld die kleiner is dan de grootte van de handleiding.
Er is een email naar u verstuurd om uw inschrijving definitief te maken.
Controleer uw email en volg de aanwijzingen op om uw inschrijving definitief te maken
U heeft geen emailadres opgegeven
Als u de handleiding per email wilt ontvangen, vul dan een geldig emailadres in.
Uw vraag is op deze pagina toegevoegd
Wilt u een email ontvangen bij een antwoord en/of nieuwe vragen? Vul dan hier uw emailadres in.