542979
12
Verklein
Vergroot
Pagina terug
1/22
Pagina verder
HANDLEIDING
Joy Sport
Relax Model 2010
Joy Sport Importeur
Fitness-Import
Timmermannsweg 46
5813 AP Ysselsteyn (LB)
info@joysport.nl
www.joysport.nl
Geachte klant,
Wij feliciteren u met de aankoop van dit JOY SPORT product.
Tevens wensen wij u veel sportplezier toe met uw goede keuze.
Volg aandachtig de montage handleiding.
Mocht u nog vragen hebben dan helpen wij u graag verder.
Garantie,
Deze garantie geldt gedurende 12 maanden voor elke fabricagefout aan uw JOY SPORT
product die door een JOY SPORT dealer werd verkocht.
Wanneer u garantie claimt bied JOY SPORT de mogelijkheid om naar eigen goeddunken
het defecte apparaat of het betreffende onderdeel te herstellen of te vervangen.
De transportkosten van en naar onze werkplaats worden uitgesloten van deze garantie, en
zijn dus voor rekening van de bezitter van het product.
Wanneer u aanspraak wenst te maken op garantie gaat u met het aankoopbewijs naar de
dealer waar u uw product heeft gekocht.
De dealer zal uw claim dan verder afhandelen.
Garantie uitsluitingen,
De garantie geldt niet voor: de normale slijtage, de gevolgen van een ondeskundige
handeling, of beschadiging door de koper of door derden zelf, en defecten die aan extreme
omstandigheden te wijten zijn.
De garantie kan ook niet worden geclaimd wanneer de originele constructie of uitrusting
werd gewijzigd, of wanneer geen originele JOY SPORT onderdelen voor de reparatie
werden gebruikt.
De fabrikant kan niet verantwoordelijk gesteld worden voor schade, verlies of kosten,
direct of indirect ten gevolg van gebruik van dit apparaat.
Fitness-Import
Timmermannsweg 46
5813 AP Ysselsteyn (LB)
info@joysport.nl
www.joysport.nl
1 Veiligheidsvoorschriften.
Waarschuwing: De loopband dient te worden opgeklapt en vastgezet voor u de
loopband verplaatst. Blijf van de vergrendeling tijdens het transport. Verplaats de
machine nooit als deze niet is opgeklapt en gezekerd.
Attentie: Lees deze voorschriften zorgvuldig en neem de volgende punten in acht.
De loopband dient binnen te worden opgesteld en u dient te zorgen dat er geen
vocht of ander materiaal in of op het apparaat komt.
Het bodemoppervlak dient vlak en waterpas te zijn en alle poten dienen goed op
de bodem te staan voordat met een oefening wordt begonnen.
Zorg dat het stopcontact waar u op aan sluit geaard en voldoende afgezekerd is.
Voorkom dat er meerdere apparaten op de zelfde groep zitten.
Draag sportkleding en geschikte schoenen tijdens gebruik en loop niet
blootvoets wat letsel kan veroorzaken.
Loop niet met meerdere personen gelijktijdig op de band en het maximale
gewicht van de verbruiker is 150 kg .
Ga niet op de band staan als u de loopband aanzet. Ga op de zijvlakken staan,
zet de band aan en stap dan op de lopende band.
Als u zich tijdens de oefening niet lekker begint te voelen stop dan direct met
de oefening en wacht totdat u zich weer in een betere conditie voelt.
De hartslagsensor is geen precisie instrument en kan door diverse oorzaken
afwijken. Deze dient alleen als indicatie om de resultaten te meten.
een hartpatient wordt aangeraden niet zonder toezicht het apparaat te gebruiken
en ook geen gebruik te maken van de automatische snelheidsregeling.
Gebruik een snelheid die past bij uw conditie.
Zet na gebruik de schakelaar uit zodat het apparaat niet nodeloos stroom
gebruikt.
Draag er zorg voor dat de omgeving van de loopband schoon is en er geen
voorwerpen liggen die bij een eventuele val letsel kunnen veroorzaken.
Kinderen dienen niet zonder begeleiding de loopband te gebruiken en verwijder
de stroomkabel zodat ze deze niet per ongeluk aan kunnen zetten.
Overbelasting zal schade aan de motor en de regeling veroorzaken, zorg dat de
band altijd vrij kan lopen en de weerstand tussen loopplank en band minimaal is.
Raak geen bewegende delen aan
2 TECHNISCHE GEGEVENS:
Vermogen:2.5 PK, PIEK 3 PK
Voltage:220V(50HZ of 60HZ)
Snelheid: 0.8--16(km/h)
Afstandsinstelling: 0000.000—9999.999(km)
Tijdsinstelling: 00:00--99:59(min:sec)
3 INTRODUCTIE
Dit is een luxe loopband voor thuisgebruikers.
Het beschikt over de volgende functies:
1. Drie manuele programma’s en vijf automatische variabele snelheidsprogramma’s.
2. Hartslagmeting op de handgrepen.
3.Vier knoppen voor directe snelheidsinstelling
4 Montage handleiding.
1. Verbind de stekker uit het hoofdframe met die uit de paal, zorg dat de verbinding
goed zit. Zet de palen op het frame en zet ze vast met de bouten M8 x 16.
2. Plaats het controlepaneel.
3. plaats de beschermkappen en zet ze vast met boutjes M4×12.
5. Beschrijving en functies van het controlepaneel.
1 Stopknop Als de loopband werkt kunt u hem met deze knop stilzetten, terwijl alle
gegevens behouden blijven. Tweede druk op de knop zet alle gegevens op nul. .
2 Start knop Als de band stilstaat kunnen we hiermee starten.
3 Setup knop Dient om de programma’s in te stellen.
4 Jack of safe knop Bij verwijdering zal band direct stoppen
5 Slow knop Als de band loopt zal de snelheid verminderen, in setup modus, kan
men de ingestelde snelheid lager stellen.
6 Fast knop Als de band loopt zal de snelheid verhogen.
in setup modus, kan men de ingestelde waarde verhogen
7 Vier knoppen, waarmee men direct vier snelheden kan instellen.
8 uitleesvenster calorie
9. Uitleesvenster hartslag
10. Uitleesvenster tijd
11. Uitleesvenster snelheid
12.Uitleesvenster afstand
13.Snelheidsinstelling
14.Hartslagsensoren
6. Opstarten.
1 Na montage,plaats de veiligheidsstop en de hartslagsensor op
de juiste plaats 2 Voor starten, controleer of de stroom
geschikt is en of de band vrij loopt zonder bijgeluiden. 3
Schakel de stroom in en alle gegevens in de vensters zullen nul
aangeven. De band staat stil. Druk op startknop en de band
begint te lopen met een snelheid van 0.8km/h, controleer of
alles normaal verloopt. 4 Druk op ‘fast’ en ‘slow’ om te
controleren of snelheidsinstelling werkt. 5 Druk‘stop’ om te
controleren of stoppen werkt.
7. Opklappen.
Druk op de vaszetklem en laat band gecontroleerd zakken.
8. Bediening.
1. Schakel stroom in: Steek stekker in stopcontact (geaard) plaats veiligheidsknop.
Alle vensters zullen oplichten en nul aangeven. Band is in stopstand.
2. Direct start: Druk start knop en band begint te lopen op de langzame snelheid.
Door drukken op de Fast knop zal de band sneller en door drukken op de slow knop
zal de band langzamer gaan lopen.
3. Program start: Druk de set knop, er zijn 8 programma’s die gekozen kunnen
worden. De eerste drie zijn manueel en de andere vijf (P1-P5) zijn automatische
programma’s. In de eerste twee programma’s is tijd en afstand in te stellen d.m.v.
de slow en fast knoppen als het betreffende venster knippert. Na het indrukken van
de startknop zullen deze data terugtellen en bij bereiken van nul zal een sein
gegeven worden dat doel is bereikt. In het derde programma kan hartslagcontrole
worden
P1-P5 zijn automatische programma’s, sporters kunnen kiezen uit de door hen
gewenste grafiek. Na drukken van de startknop zal de band beginnen te lopen
afhankelijk van de gekozen vorm met een aanpassing elke tweehonderd meter.
4. Slow en fast knop Hiermee kan men manueel de snelheid verhogen en verlagen.
De knoppen op de handsteunen hebben de zelfde functie
5 Pause en stop Indrukken als de band loopt zal deze stoppen en de ingegeven data
zullen blijven bewaard. Na start zal de band weer in hetzelfde programma verder
lopen. Een tweede keer drukken heeft tot gevolg dat alle data zullen worden gewist
en op nul komen.
6 Hartslag sensor Met twee handen op de sensoren op de
handvaten zal het venster de hartslag aangeven. ( Deze
gegevens zijn alleen als referentie er kan geen waarde aan
worden ontleend .)
7. Overall mileage venster: Druk de ‘SET’ knop langer dan 3
seconden als de band stilstaat. De total afgelegde afstand zal worden
aangegeven in de tijd en afstandvensters. Na drukken op stop knop
zal deze aanduiding verdwijnen.
9. Dagelijks onderhoud.
1. Band en loopplank
Schoonmaken, Met alleen een vochtige doek. Zorg dat er geen vocht onder de
band of in de machine komt.
2. Smeren: De band moet na een bepaalde gebruiksperiode gesmeerd worden.
Richtlijn: Band wordt tot 3 uur per week gebruikt een keer per half jaar. Meer dan 6
uur per week een keer in de 3 maanden. Meer dan 6 uur per week elke maand.
Zorg voor minimale smering, te veel smering trekt stof aan en verbeterd de werking
niet.
3. Weerstand: Controleer af en toe de weerstand tussen band en plaat. De band moet
met de voet op de plaat gedraaid kunnen worden.
4. Adjust flab or tight belt All running belt are adjusted before the treadmill leaving
the factory or after assembling, but after a period of time of use, the belt will
become flab, for example: the user will have a feeling of stop when they are using
it. When this kind of phenomenon appears, adjust the running belt adjustable bolts
clockwise and make the two sides equable, adjust them semicycle once This
circumstance is out of guarantee to keep it good repair. The user adjusts it by
oneself, the flabby belt will cause slippage between belt and roller, but more tightly
belt perhaps harms the motor, roller and itself.
9. Stellen loopband.
Alle loopbanden zijn in de fabriek afgesteld maar kunnen na verloop van tijd of
scheef lopen of losliggen. Dit kan meerdere oorzaken hebben.:
(1) Het frame staat niet vlak.
(2) De gebruiker loopt niet in het midden van de band.
(3) De gebruiker loopt niet gelijk.
Als de oorzaak bij de gebruiker ligt zal de band vaak al centreren door deze een paar
minuten onbelast te laten lopen.
Wanneer de loopband niet uit zichzelf centreerd kunnen we dit handmatig doen
door middel van de inbusschroeven achter op het frame. Als de band naar links
loopt, draai de rechterbout kloksgewijs een halve slag zie afb. a. Als de band naar
rechts loopt draai dan de linkerbout een halve slag kloksgewijs zie afb. b.
7 Band zit te los: Na een betaalde periode kan het zijn dat de band iets opgerekt is
waardoor men af en toe het gevoel heeft dat de band slipt. Als men dit merkt kan men
de twee bouten beide iets aandraaien. Het beste is dit te doen met een lopende band en
nooit meer dan een halve slag per keer en dan eerst te testen of het geholpen heeft.
Waak er voor om de band te strak te zetten, want hij zal dan te zwaar gaan lopen en
sneller op gaan rekken. Als hij net niet slipt is voldoende.
10. Stellen motorsnaar.
Alle snaren zijn op de fabriek gespannen maar kunnen na verloop van tijd iets
oprekken. De gebruiker kan deze zelf nastellen.
handelwijze:
1 Draai de motorbouten los.
2 Draai de stelbout aan
3 Controleer de spanning van de snaar
4 Draai de motorbouten weer vast.
11
Paklijst:
NO benaming verpakking aantal
1 Hoofdframe SET 1
2 paneelsteunen set 2
3 controlepaneel stuk 1
4 bouten M8×16 stuks 4
5 parkers M4×12 stuks 6
6 beschermkappen stuks 2
7 veiligheidskabel stuk 1
8 gereedschap set 1
9 handleiding 1
10 Silicon olie flesje 1
12 Storingsmelding en oplossing
symptoom Mogelijke oorzaak oplossing
Als hoofdschakelaar wordt
aangezet reageert scherm niet
1. de stekker zit er niet
goed in. 2 .de stekker in de
steun is niet goed
bevestigd of losgegaan.
1. controleer stekker. 2.
controleer de stekkertjes in
de steun.
Al de vensters flikkeren
De veiligheidskabel is niet
of niet goed geplaatst
Plaats de veiligheidskabel
Band stopt uit zichzelf en
vensters geven normale
waarden aan.
Automatische
systeembescherming.
1. Druk de ‘STOP’ knop, dan
start knop. 2 .Schakel
hoofdschakelaar uit en na 1
minuut weer in.
De band werkt niet De stroom is te laag
Controleer of voltage
volgens data band is.
Draait onbelast goed en belast
niet
Controleer of de band
spanning goed is.
Breng de band op de juiste
spanning
Controlepaneel werkt niet of
niet goed
Schakel de stroom uit en
probeer het na 1 minuut
opnieuw..
Door allerhande redenen kunnen de parameters wat afwijken. U mag dit niet zien als een maatstaf
voor uw gezondheid maar enkel als een referentie.
USER MANUAL
Joy Sport
Relax Model 2010
Joy Sport Importer
Fitness-Import
Timmermannsweg 46
5813 AP Ysselsteyn (LB)
info@joysport.nl
www.joysport.nl
Dear customer,
We want to thank you for having chosen a JOY SPORT product, and wish you a lot of fun
and success during training with your JOY SPORT exercisers.
Please note and follow the enclosed safety and assembly instructions carefully.
If you have questions please do not hesitate to contact us.
Guarantee,
This guarantee covers all manufacturing and material flaws on JOY SPORT products
purchased from an authorized JOY SPORT dealer for a period of 12 months from
purchase.
If you wish to make a claim under the guarantee, JOY SPORT shall be entitled to repair or
replace the defective unit or part at its discretion.
The owner of the unit must pay for the transport costs and any dealer's workshop costs.
To make a claim under the guarantee, take your guarantee card to your dealer.
The dealer will then take the necessary action.
If this is not possible, contact your national JOY SPORT importer.
The following are not covered by the guarantee : normal wear and tear and the
consequences of improper treatment or damage caused by the purchaser or third persons
and faults which are due to other circumstances.
Claims may not be made under the guarantee if modifications have been made to the
original construction or equipment or if JOY SPORT original parts were not used to repair
the unit.
In no event the manufacturer shall be liable for incidental or
consequential losses, damages or expenses in connection with exercise products.
Fitness-Import
Timmermannsweg 46
5813 AP Ysselsteyn (LB)
info@joysport.nl
www.joysport.nl
SAFETY CONSIDERATION
Special Warning:The treadmill must be folded and locked before moving or carrying it, don’t touch
the safe lock when you carry the treadmill. Carrying machine is strictly prohibited as it is unfolded
or unlocked. Attention: Please read this manual carefully before you use this treadmill and notice
the follows:
The treadmill should be put inside of room and avoid aquosity, water on the treadmill is
prohibited and any object is forbiden to be put on or inserted into treadmill.
The ground should be level, confirm it is steady to put the treadmillall feet must land
before use.
The plug must land, try hard to avoid using other electric apparatuses on the same supply
line.
Wear sportswear and appropriate sports shoes while using the treadmill , barefeet is
forbidden while using the machine.
Do not allow two or more persons on the treadmill at the same time,and the machine’s
biggest supporting value is 150kg.
Do not start the machine when you are standing on the running belt, you should stand on the
regulars and grip the armrests before doing exercises. You can exercises on the machine when it is
started normally.
At you feel incompatibility any or have abnormal condition in using, press STOP or pull out
SAFE KEY or adopt the emergency method: While you are griping the handles and shoring up the
body, put your feet on the regulars, and get off the treadmill from one side.
The sensor of heart rate is not a medical apparatus, a lot of reasons can be caused and
measured inaccurately, it is only for reference to measure the result.
The heart disease patient should not use the treadmill alone,and should not use the automatic
speed change function,either.
Please confirm the speed according to your physical condition. The patient
should use the machine under the direction of the doctor.
Please shut off the treadmill power in time after finishing using it.
The treadmill should be laid in the comparatively spacious place, forbid put
ting incidentals around, guarantee that there is the security area of 2m *1m.
The children should not use the machine alone,they should under the ward ofthe adult if they
want to use.
Please pluck the power cord and put it on the place where the children can
not find,in order to avoid the children starting the machine accidently.
Overload operation will cause the motor and controller become damaged, andmake the
bearing , the running board and the running board ageing quickly, so we must avoid long time
overload operation.
The dust covered on the sensor will affect its sensitivity, so we must reduce the dust in our
house.
Static electricity will disturb the operation of the electricity table , even damage it ,so we
must keep the room wet in winter.
Do not touch any parts which are moving
The runner must keep the body center of gravity on the forward 1/3 or 1/2part of the running
belt when running. If we do this, we will operate theelectricity table easily. The location of the
runner must near the front of the machine to aviod dangerous.
Long hair user should tie the hair to avoid the accidents occur when we arerunning.
TECHNOLOGICAL DATA
HORSE POWER:2.5HP PEAK 3HP
Input Voltage:220V(50HZ or 60HZ)
Speed scope:0.8--16(km/h)
Distance scope:0000.000—9999.999(km)
Time scope:00:00--99:59(min:sec)
THE INTRODUCTION OF THE PRODUCT
This a kind of luxury home use motorized treadmill. It possesses the functions
asfollows:
1. With three kinds of manual programs and five kinds of automatic variable
speed running programs.
1 With measuring heart and adjusting speed function by griping.
2 With four direct speed keys to choose.
INSTALLATION GUIDE:
ASSEMBLE STEPS: 1 Stop key
1. Insert the connect line with the outlet of mainframe, and then tighten the poling and
main frame with panhead bolt with M8×16.
3. Connect the electronic meter and armrest with self-tapping bolts M4×12.
2. Plug the air outlet into electronic meter, connect pulse sensor and the plug of speed
sensor . (Note: Must aim at the gap of the plug, then plug it tightly.)
4. Fix the covers of gage stand with bolts M4×12.
THE PARTS NAME&FUNCTION OF CONTROL METER
1 When the treadmill is working, first press of this key will make the machine stop
running, keep all the data; Second press of this key will make all the data become
zero.
2 Start key When the treadmill is in stop state ,the treadmill begins to work if we
press this key; When the machine is in set state, press this key, all the revised data
is confirmed and the machine begins to work.
3 Setup key Make the electronic monitor enter manual program forms or automatic
program agility run forms.
4 Jack of safe key
The treadmill will stop working when you pull out the safe key.
5 Slow key When the machine runs, press this key, the speed will become slow; in
setup state, press this key, the amended data will decrease.
6 Fast key
When the machine runs, press this key, the speed will become fast; in setup state,
press this key, the amended data will increase.
7 Four kinds of speed direct choose keys: We can directly choose the speed that is
suitable for us.
8 Window of calorie
9. Window of pulse
10.Window of time
11.Window of speed
12.Window of distance
1 Timing switch
2 Handle pulse sensor
DEBUGGING GUIDE
1 After finish assembling, insert safe key and pulse sensor into
the corresponding jack. 2 Before start, checking whether the
voltage is normal, 3-core cable has a good earth and pull the
running belt to check whether it moves well and if there is
exceptional noise. 3 Switch on the power and then all data in
the windows should be zero, the running belt is at rest state,
press start key, the belt will run at lower speed of 0.8km/h,
here observing if every part of treadmill is normal. 4 Press
‘fast’ key and ‘slow’ key to check whether they are normal. 5
Press ‘stop’ key to check whether the machine stop running
normally.
FOLD OPERATION
Tread the fold locking switch, and set down the main frame slowly.
OPERATING GUIDE
1. Switch on power: Insert three poles plug into socket (note: it must have a complete
earthing); and insert safe key, then switch on power, the monitor will moo, and all
data become zero, here the treadmill is in stop state.
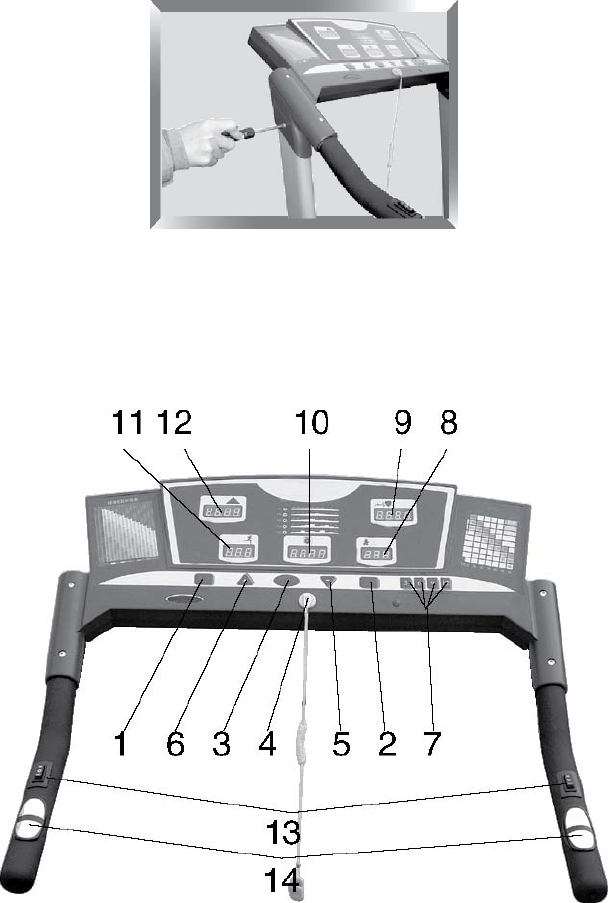
2. Direct start: Press start key when the treadmill is in stop state and all showed data
are zero, it run at the lowest speed; press fast key, the speed will increase; press
slow key, the speed will decrease.
3. Program start: Press the program setup key continuously , there are 8
kinds of programs to choose: the former three ones need manual
programs, the other 5 kinds (P1-P5) are automatic programs. Under
the first and second form are time and distance setup, press the slow
and fast key to amend the aim data of time and distance when the
relevant windows flicker (if the aim data is zero, the data is not set),
if we press the start key, the set data will be accepted, and will be
decreased after starting the machine, the console will be moo when
the data become zero, then the data will be increased. Under the
third form is pulse control speed setup: at this time, the pulse
window begin to flicker, the aim data is 100 times per minute, the
data of speed is 2.8km/h, press slow and fast key can amend the aim
data of pulse(if the pulse aim data is not changed, it will be
considered that this function is not set). At this time, press the start
key, the data will be accepted and adjust the speed according to
compare the runner’s pulse with set pulse, thereby make the runner’s
fact pulse keep on the aim data. Note: many factors influence the
testing of pulse, so the testing data is for reference only. The max
speed of this mode is 6km/h, and there is no use of direct speed
choice key. The scale of pulse control speed is from 50 times per
minute to 160 times per minute. Under the condition of pulse control
speed is not set, if one or two of time ad distance is set, after starting
can speed up, speed down and use the direct speed choice key;
Under the condition of pulse control speed is set, if one or two of
time ad distance is set, after starting can use fast key speed up to 6km/h and can’t
use the direct speed choice key.
P1-P5 is automatic program forms, sporters can choose the form of motion fit for
themselves according to icons. Press the start key, the treadmill begin to run, the
speed will change automatically according to chosen form every 200 metres.
4. Slow and fast key It is manual adjust speed keys, we can change the speed by
pressing the two keys. The handle adjust speed switch has the same function as this.
5 Pause and stop During treadmill runs, first press stop key, the treadmill will stop
and keep all data, if here press start key, the treadmill will run as per original state;
if press stop key in second time, all data in the windows will become to zero.
6 Handle pulse sensor Two hands hold the pulse sensor, pulse
window display the instant pulse. ( The data has definite
differences according to individual habitus, this data is only for
reference.)
7. Overall mileage window: Press the ‘SET’ key exceeds 3 seconds
when the machine is in the stop state. The overall mileage will be
appeared in the time and distance windows, showing the distance
scope of 0000.000---9999.999km,press ‘stop’ key to exit.
DAILY MAINTENCE
1. Running board and running belt
Brief:motorized treadmill use imported running belt, it’s with lower friction
coefficient, higher intensity of tension, the running board is specially with double
shock absorption system, it’s special smoothness and abrasion prevention.
Clean Keep cleanness of treadmill, it can prolong treadmill’s life, please usually
clean the exposed running board both side of the running belt and foot board. Clean
the running belt by dipped soap water; please note not to let water flow into
machine and under the running belt.
2. Lubricating The running board/belt must be lubricated by special lubrication after
a period of use, suggestion: Treadmill works no more than 3 hours every week. It’s
lubricated one time every half of year. Treadmill works 3 to 6 hours every week.
It’s lubricated one time every 3 months. Treadmill works more than 6 hours every
week. It’s lubricated one time every month. Superfluous lubrication is not ok, it’s
not good with more lubrication, please remember: reasonable lubricating is a
important factor for prolonging treadmill’s life!
3. Clean Please eliminate the dust regularly after a period of use, to keep the power
panel and the head of the sensor clean.
4. Evaluation of friction The friction between running belt and board will be
increased as dust or reduced lubrication, this perhaps can harm motor, controller
increased friction is with following character:
(1) When shut off power of treadmill, the running belt can’t be moved or it’s difficult
for user to move by foot.
(2) Causing harm of motor of controller, open circuit and the fuse blows.
5. Adjust flab or tight belt All running belt are adjusted before the treadmill leaving
the factory or after assembling, but after a period of time of use, the belt will
become flab, for example: the user will have a feeling of stop when they are using
it. When this kind of phenomenon appears, adjust the running belt adjustable bolts
clockwise and make the two sides equable, adjust them semicycle once This
circumstance is out of guarantee to keep it good repair. The user adjusts it by
oneself, the flabby belt will cause slippage between belt and roller, but more tightly
belt perhaps harms the motor, roller and itself.
6. Adjust slanted running belt
All running belt are adjusted before the treadmill leaving the factory, but after a
period of time of using, the belt will become slanting, it may caused by the
following reasons:
(1) The engine frame is not steady.
(2) The user’s feet are not in the middle of the running belts when they are using it.
(3) The force on the feet is not even. If the running belt is slanted by the user, it can
return to normal after running without anyone for a few minutes.
If the running belt can not return to normal by itself, we can adjust the running belt
regulator with the inner hexagon spanner, adjust it semicycle once. If the running
belt is near the left side, adjust the left bolt clockwise or adjust the right bolt
counter clockwise.(look at picture a) If the running belt is near the right side, adjust
the right bolt clockwise or adjust the left bolt counter clockwise.(look at picture b)
7 Adjust flab or tight belt After a period of using, the running belt will become a
little longer and give us some feeling of stopping when we are running. When this
kind of phenomenon appears, adjust the running belt adjustable bolts clockwise and
make the two sides equable, adjust them semicycle once.(look at picture
c).Continue to do this until the running belt is not skid or slanted. The adjustment
should not exceed 2---3circles every time, and it should not too tight , avoiding the
running belt damaged permanently.
8. Adjust motor belt
All motor belts are adjusted before the treadmill leaving the factory, but after a period
of time of use, the belt will become flab, the users adjust it by oneself.
Adjusting steps:
1 Loosen the screw of the motor.
2 Turn the adjustment screw in order with spanner.
3 Adjust it until the belt doesn’t slip.
4 After adjusting ,locking all the bolts.
LIST OF ITEM IN THE PACKAGE:
NO DESCRIPTION UNIT QUANTITY
1 Mainframe SET 1
2 Poling SUIT 1
3 Electrical Head PC 1
4 Panhead Bolt M8×16 PC 4
5 Self-tapping Screw M4×12 PC 6
6 Plastic Lump PCS 2
7 Safety Switch PC 1
8 Special Purpose Tools SUIT 1
9 Specification PAD 1
10 Silicon Oil BOTTLE 1
COMMON FAULT AND THE PROCESSING METHOD
Fault Symptom Possible Causes Solution
When turning on switch
power, the treadmill can not
display when the electric
power is connected.
1. The attaching plug is
not inserted well. 2 .The
electrical head’s attaching
plug is not inserted well.
1. Insert it again. 2. Connect
it once more.
All the display windows
ficker.
The safety switch is not
settled well or damaged.
Put the safety switch on the
correct place or mend it.
It stops by itself when it is
working. And all the displays
are normal.
The automatic system
protection.
1. Press the ‘STOP’ key, then
start it. 2 .Turn off the power
switch, and start it in one
minute.
The running belt can not work
normally, and it has buzz,
with displaying normally.
The enter voltage is too
low.
Please input the voltage
according to the demand.
It is regular when it is running
by itself ,and disordered when
someone walking on it.
Check whether the running
belt is too loose.
Please adjust the running belt
according to the right
method.
It can not display normally or
can not display.
The electrical head can not
work because of the
external disturbance .
Turn off the power switch,
then turn on it in one minute.
Because of some reasons, the technical parameter may has a little difference. So we can not take it as
criterion to measure our state of health, all the data is just as a reference.
Please forgive our not informing the change because of the innovation of the technique.
Please cut off the power immediately and contact with our agents when there is special fault
symptom. We will provide you the best service in time.
12

Hulp nodig? Stel uw vraag in het forum

Spelregels

Misbruik melden

Gebruikershandleiding.com neemt misbruik van zijn services uitermate serieus. U kunt hieronder aangeven waarom deze vraag ongepast is. Wij controleren de vraag en zonodig wordt deze verwijderd.

Product:

Bijvoorbeeld antisemitische inhoud, racistische inhoud, of materiaal dat gewelddadige fysieke handelingen tot gevolg kan hebben.

Bijvoorbeeld een creditcardnummer, een persoonlijk identificatienummer, of een geheim adres. E-mailadressen en volledige namen worden niet als privégegevens beschouwd.

Spelregels forum

Om tot zinvolle vragen te komen hanteren wij de volgende spelregels:

Belangrijk! Als er een antwoord wordt gegeven op uw vraag, dan is het voor de gever van het antwoord nuttig om te weten als u er wel (of niet) mee geholpen bent! Wij vragen u dus ook te reageren op een antwoord.

Belangrijk! Antwoorden worden ook per e-mail naar abonnees gestuurd. Laat uw emailadres achter op deze site, zodat u op de hoogte blijft. U krijgt dan ook andere vragen en antwoorden te zien.

Abonneren

Abonneer u voor het ontvangen van emails voor uw Joy Sport Relax Model 2010 loopband bij:


U ontvangt een email met instructies om u voor één of beide opties in te schrijven.


Ontvang uw handleiding per email

Vul uw emailadres in en ontvang de handleiding van Joy Sport Relax Model 2010 loopband in de taal/talen: Nederlands, Engels als bijlage per email.

De handleiding is 0,85 mb groot.


U ontvangt de handleiding per email binnen enkele minuten. Als u geen email heeft ontvangen, dan heeft u waarschijnlijk een verkeerd emailadres ingevuld of is uw mailbox te vol. Daarnaast kan het zijn dat uw internetprovider een maximum heeft aan de grootte per email. Omdat hier een handleiding wordt meegestuurd, kan het voorkomen dat de email groter is dan toegestaan bij uw provider.

Stel vragen via chat aan uw handleiding

Stel uw vraag over deze PDF

Uw handleiding is per email verstuurd. Controleer uw email

Als u niet binnen een kwartier uw email met handleiding ontvangen heeft, kan het zijn dat u een verkeerd emailadres heeft ingevuld of dat uw emailprovider een maximum grootte per email heeft ingesteld die kleiner is dan de grootte van de handleiding.

Er is een email naar u verstuurd om uw inschrijving definitief te maken.

Controleer uw email en volg de aanwijzingen op om uw inschrijving definitief te maken

U heeft geen emailadres opgegeven

Als u de handleiding per email wilt ontvangen, vul dan een geldig emailadres in.

Uw vraag is op deze pagina toegevoegd

Wilt u een email ontvangen bij een antwoord en/of nieuwe vragen? Vul dan hier uw emailadres in.


Info