4 Appuyez sur pour faire les réglages, puis appuyez sur
.
Heure Minute
5 Appuyez sur pour choisir
[CLOCK FORMAT]
, puis appuyez sur
.
6 Appuyez sur pour choisir
[12H]
ou
[24H]
, puis appuyez sur
.
Pour régler la date
7 Appuyez sur pour choisir
[DATE SET]
, puis appuyez sur
.
8 Appuyez sur pour faire les réglages, puis appuyez sur
.
Jour Mois Année
9 Appuyez sur pour quitter.
Pour retourner à l’option de réglage précédente, appuyez sur .
1
Faites les réglages de base
1
Maintenez enfoncée .
2 Appuyez sur pour sélectionner un élément (voir le tableau
suivant), puis appuyez sur
.
3 Répétez l’étape 2 jusqu’à ce que l’élément souhaité soit sélectionné ou
activé.
4 Appuyez sur pour quitter.
Pour retourner à l’option de réglage précédente, appuyez sur .
Défaut:
XX
SYSTEM
KEY BEEP
(Non applicable quand la transition 3 voies est sélectionnée.)
ON
:Met en service la tonalité des touches.;
OFF
:Met hors service la fonction.
SOURCE SELECT
AM SRC
*
ON
:Met en service AM dans la sélection de la source.;
OFF
:Hors service.
( 7)
BUILT-IN AUX
*
ON
:Met en service AUX dans la sélection de la source.;
OFF
:Hors service.
( 18)
F/W UPDATE
UPDATE SYSTEM/UPDATE DAB1/UPDATE DAB2
F/W UP xxxx/
F/W UP xxxxx/
F/W UP Vxxx
YES
:Démarrer la mise à niveau du micrologiciel.;
NO
:Annulation (la mise à niveau n’est pas activée).
Pour en savoir plus sur la mise à niveau du micrologiciel, référez-vous à:
<http://www.jvc.net/cs/car/>.
FACTORY RESETYES
:Réinitialise les réglages aux valeurs par défaut (sauf la station mémorisée).;
NO
:Annulation.
*
Pas d’affichage quand la source correspondante est sélectionnée.
3
2
JS_JVC_KD_DB98BT_E_FR.indd 4JS_JVC_KD_DB98BT_E_FR.indd 46/12/2016 9:28:09 AM6/12/2016 9:28:09 AM
FRANÇAIS
5
Data Size: B6L (182 mm x 128 mm)
Book Size: B6L (182 mm x 128 mm)
PRISE EN MAIN
CLOCK
TIME SYNC
ON
:L’horloge est réglée automatiquement à l’aide des données
d’horloge (CT) du signal DAB.;
OFF
:Annulation.
CLOCK DISPLAYON
:L’horloge apparaît sur l’affichage même quand l’appareil est
hors tension.;
OFF
:Annulation.
ENGLISH
Sélectionnez la langue d’affichage pour le menu et l’information
sur le morceau si elle est disponible.
Par défaut,
ENGLISH
est sélectionné.
РУССКИЙ
ESPANOL
RADIO NUMÉRIQUE
À propos du DAB (Digital Audio Broadcasting)
DAB est l’un des systèmes de radio numérique disponibles aujourd’hui. Il peut offrir un son de qualité
numérique sans toutes les interférences gênantes ni les distorsions des signaux. De plus, il peut transporter
des textes, des images et des données.
Contrairement aux émissions FM, où chaque programme est émis sur sa propre fréquence, les émissions
DAB combinent plusieurs programmes (appelés “services”) pour former un “ensemble”.
La “composante primaire” (station radio principale) est parfois accompagnée d’une “composante
secondaire” qui peut contenir des programmes supplémentaires ou d’autres informations.
Préparation:
1 Connectez une antenne DAB à la prise d’antenne DAB.
( 30)
2 Appuyez sur DAB pour choisir DAB directement.
3 Maintenez enfoncée DAB pour démarrer la mise à jour de la Liste des services.
“DAB SORTING” apparaît et la mise à jour démarre.
La mise à jour prend un maximum de 3 minutes. Aucune interruption (telle que des informations
routières) n’est possible pendant la mise à jour.
• Pour annuler la mise à jour de la Liste des service:
Maintenez de nouveau enfoncée
DAB
.
Recherche d’un ensemble
1
Appuyez sur DAB pour choisir DAB directement.
2 Appuyez sur pour rechercher un ensemble automatiquement.
(ou)
Maintenez en enfoncé jusqu’à ce que “M” clignote, puis appuyez
répétitivement dessus pour rechercher un ensemble manuellement.
3 Appuyez sur pour choisir le service (primaire ou secondaire) que vous
souhaitez écouter.
JS_JVC_KD_DB98BT_E_FR.indd 5JS_JVC_KD_DB98BT_E_FR.indd 56/12/2016 9:28:11 AM6/12/2016 9:28:11 AM
FRANÇAIS
6
Data Size: B6L (182 mm x 128 mm)
Book Size: B6L (182 mm x 128 mm)
Autres paramètres
1
Maintenez enfoncée .
2 Appuyez sur pour sélectionner un élément
(
voir le tableau
suivant
)
, puis appuyez sur .
3 Répétez l’étape 2 jusqu’à ce que l’élément souhaité soit sélectionné/
activé ou suivez les instructions données pour l’élément sélectionné.
4 Appuyez sur pour quitter.
Pour retourner à l’option de réglage précédente, appuyez sur .
Défaut:
XX
TUNER SETTING
RADIO TIMER
Met la radio sous tension à une heure spécifique quelle que soit la source actuelle.
1
ONCE
/
DAILY
/
WEEKLY
/
OFF
:Sélectionnez la fréquence de mise en service de la
minuterie.
2
FM
/
AM
/
DAB
:Sélectionner la source.
3
01
à
18
(pour FM)/
01
à
06
(pour AM)/
01
à
18
(pour DAB):Sélectionnez la station
préréglée.
4
Réglez l’heure et le jour
*
de mise en service.
“
M
” s’allume quand le réglage est terminé.
La minuterie de radio ne se met pas en service dans les cas suivants.
•
L’appareil est mis hors tension.
•
[OFF]
est sélectionné pour
[AM SRC]
dans
[SOURCE SELECT]
après la sélection de la
minuterie de radio pour AM.
( 4)
*
Sélectionnable uniquement quand
[ONCE]
ou
[WEEKLY]
est choisi à l’étape
1
.
AF SETON
:
Lors de l’écoute de la bande DAB...
Commute automatiquement sur la station FM diffusant le même programme si le signal DAB
devient faible. Il retourne sur le son DAB quand le signal devient de nouveau fort.
Lors de l’écoute de la bande FM...
Commute automatiquement sur la source DAB diffusant le même programme (si disponible).;
OFF
:Annulation.
RADIO NUMÉRIQUE
Réglages en mémoire
Vous pouvez mémoriser un maximum de 18 services.
Mémorisez un service
Pendant l’écoute d’un service....
Maintenez pressée une des touches numériques (1à5).
(ou)
1 Maintenez enfoncé jusqu’à ce que “PRESETMODE” clignote.
2 Appuyez sur pour choisir un numéro de préréglage, puis
appuyez sur
.
Le numéro de préréglage clignote et “MEMORY” apparaît.
Sélectionnez un service mémorisé
Appuyez sur l’une des touches numériques (1à5).
(ou)
1 Appuyez sur .
2 Appuyez sur pour choisir un numéro de préréglage, puis
appuyez sur
.
Choisissez un service
1
Appuyez sur DAB pour entrer en mode de recherche de service.
2 Appuyez sur pour sélectionner un service, puis appuyez sur
.
Pour annuler le mode de recherche de service, appuyez sur ou
DAB
.
Sélectionnez un service par son nom
1
Appuyez sur DAB pour entrer en mode de recherche de service.
2 Appuyez sur pour sélectionner le caractère à chercher.
3 Appuyez sur pour sélectionner un service, puis appuyez sur
.
JS_JVC_KD_DB98BT_E_FR.indd 6JS_JVC_KD_DB98BT_E_FR.indd 66/12/2016 9:28:11 AM6/12/2016 9:28:11 AM
FRANÇAIS
7
Data Size: B6L (182 mm x 128 mm)
Book Size: B6L (182 mm x 128 mm)
TION
:Permet à l’appareil de commuter temporairement sur les informations routières si elles
sont disponibles (“TI” s’allume).;
OFF
:Annulation.
PTY SEARCH
Sélectionnez un code PTY (voir ci-dessous).
S’il y a une station diffusant un programme du code PTY que vous avez choisi, la station est
accordée.
DAB
ANNOUCMNT
TRAVEL
,
WARNINGS
,
NEWS
,
WEATHER
,
EVENT
,
SPECIAL
,
RAD INFO
,
SPORTS
,
FINANCE
: Appuyez sur pour faire un choix, puis appuyez sur
.
“
*
” apparaît devant le type d’annonce activé.
Commute automatiquement, à partir de n’importe quelle source, sur des ensembles de radio
numérique diffusant un type d’annonce activé.
•
Plusieurs annonces peuvent être activées simultanément.
•
Pour désactiver, appuyez à nouveau sur (“
*
” s’éteint).
LIST UPDATEUPDATE AUTO
:Met à jour automatiquement la liste des services DAB quand l’appareil est
mis sous tension.;
UPDATE MANUAL
:Maintenez enfoncée
DAB
pour mettre à jour la
liste des services DAB.
PTY WATCH
L’appareil commute automatiquement, à partir de n’importe quelle source, sur des ensembles
de radio numérique diffusant le type de programme sélectionné. (Voir le type de programme
ci-dessous.)
OFF
:Annulation.
DAB L-BANDON
:
Reçoit un ensemble L-BAND pendant la réception audio numérique.
;
OFF
:
Annulation.
DAB ANT
POWER
ON
:
Fournit une alimentation à l’antenne DAB.
;
OFF
:
Ne fournit pas d’alimentation. Lors de
l’utilisation d’une antenne passive sans amplificateur.
RELATED SERVON
:Activez la fonction Soft-Link pour commuter sur un service alternatif qui offre un
programme audio différent du programme audio actuel.;
OFF
:Désactivé.
Code PTY/Type de programme:
NEWS
,
AFFAIRS
,
INFO
,
SPORT
,
EDUCATE
,
DRAMA
,
CULTURE
,
SCIENCE
,
VARIED
,
POP
M
(musique),
ROCK M
(musique),
EASY M
(musique),
LIGHT M
(musique),
CLASSICS
,
OTHER M
(musique),
WEATHER
,
FINANCE
,
CHILDREN
,
SOCIAL
,
RELIGION
,
PHONE IN
,
TRAVEL
,
LEISURE
,
JAZZ
,
COUNTRY
,
NATION M
(musique),
OLDIES
,
FOLK M
(musique),
DOCUMENT
RADIO NUMÉRIQUERADIO ANALOGIQUE
“ST” s’allume lors de la réception d’une émission FM stéréo avec un signal suffisamment
fort.
Recherchez une station
1
Appuyez répétitivemenent sur pour sélectionner FM ou AM.
2 Appuyez sur pour rechercher une station automatiquement.
(ou)
Maintenez en enfoncé jusqu’à ce que “M” clignote,
puis appuyez répétitive ment dessus pour rechercher une station
manuellement.
Réglages en mémoire
Vous pouvez mémoriser un maximum de 18 stations pour FM et de 6 stations pour AM.
Mémorisez une station
Pendant l’écoute d’une station....
Maintenez pressée une des touches numériques (1 à 5).
(ou)
1 Maintenez enfoncé jusqu’à ce que “PRESETMODE” clignote.
2 Appuyez sur pour choisir un numéro de préréglage, puis
appuyez sur
.
Le numéro de préréglage clignote et “MEMORY” apparaît.
JS_JVC_KD_DB98BT_E_FR.indd 7JS_JVC_KD_DB98BT_E_FR.indd 76/12/2016 9:28:12 AM6/12/2016 9:28:12 AM
FRANÇAIS
8
Data Size: B6L (182 mm x 128 mm)
Book Size: B6L (182 mm x 128 mm)
NEWS SET
*
ON
:L’appareil commute temporairement sur le programme d’information s’il est disponible.;
OFF
:Annulation.
REGIONAL
*
ON
: Commute sur une autre station uniquement dans la région spécifiée, à l’aide de la
commande “AF”.;
OFF
:Annulation.
AF SET
*
ON
: Recherche automatiquement une autre station diffusant le même programme dans le
même réseau Radio Data System mais qui possède une meilleure réception quand la réception
actuelle est mauvaise.;
OFF
: Annulation.
TI
*
ON
: Permet à l’appareil de commuter temporairement sur les informations routières si elles
sont disponibles (“TI” s’allume). ;
OFF
:Annulation.
•
[TI]
pour la bande AM permet l’interruption en cas d’information routière pour la source
DAB uniquement.
PTY SEARCH
*
Sélectionnez un code PTY.
( 7)
S’il y a une station diffusant un programme du code PTY que vous avez choisi, la station est
accordée.
*
Uniquement pour la source FM.
Sélectionnez une station mémorisée
Appuyez sur l’une des touches numériques (1à5).
(ou)
1 Appuyez sur .
2 Appuyez sur pour choisir un numéro de préréglage, puis
appuyez sur
.
Autres paramètres
1
Maintenez enfoncée .
2 Appuyez sur pour sélectionner un élément
(
voir le tableau
suivant
)
, puis appuyez sur .
3 Répétez l’étape 2 jusqu’à ce que l’élément souhaité soit sélectionné/
activé ou suivez les instructions données pour l’élément sélectionné.
4 Appuyez sur pour quitter.
Pour retourner à l’option de réglage précédente, appuyez sur .
Défaut:
XX
TUNER SETTING
RADIO TIMER(
6)
SSM
SSM 01–06
/
SSM 07–12
/
SSM 13–18
: Prérègle automatiquement un maximum de
18 stations pour FM. “SSM” s’arrête de clignoter quand les 6 premières stations sont mémorisées.
Sélectionnez
SSM 07–12
/
SSM 13–18
pour mémoriser les 12 stations suivantes.
LOCAL SEEKON
:Recherche uniquement les stations FM avec une bonne réception.;
OFF
:Annulation.
•
Les réglages réalisés sont applicables uniquement à la source/station sélectionnée. Si vous
changez la source/station, vous devez refaire les réglages.
IF BANDAUTO
:Augmente la sélectivité du tuner pour réduire les interférences des stations FM
adjacentes. (L’effet stéréo peut être perdu.);
WIDE
:Il y a des interférences des stations FM
adjacentes, mais la qualité du son n’est pas dégradée et l’effet stéréo est conservé.
MONO SETON
:Améliore la réception FM mais l’effet stéréo sera perdu.;
OFF
:Annulation.
RADIO ANALOGIQUE
JS_JVC_KD_DB98BT_E_FR.indd 8JS_JVC_KD_DB98BT_E_FR.indd 86/12/2016 9:28:12 AM6/12/2016 9:28:12 AM
FRANÇAIS
9
Data Size: B6L (182 mm x 128 mm)
Book Size: B6L (182 mm x 128 mm)
CD/USB/iPod/ANDROID
PourSur la façade
Recherche rapide vers
l’arrière/vers l’avant
*
3
Maintenez enfoncée .
Sélectionnez une plage
ou un fichier
Appuyez sur
.
Sélectionnez un dossier
*
4
Appuyez sur .
Répéter la lecture
*
5
Appuyez répétitivement sur .
TRACK REPEAT
/
ALL REPEAT
: CD Audio
TRACK REPEAT
/
FOLDER REPEAT
/
ALL REPEAT
: Fichier MP3/WMA/AAC/WAV/FLAC
ONE REPEAT
/
ALL REPEAT
/
REPEAT OFF
: iPod ou ANDROID
Lecture aléatoire
*
5
Appuyez répétitivement sur .
ALL RANDOM
/
RANDOM OFF
: CD Audio
FOLDER RANDOM
/
ALL RANDOM
/
RANDOM OFF
: Fichier MP3/WMA/AAC/WAV/FLAC
SONG RANDOM
/
ALL RANDOM
/
RANDOM OFF
: iPod ou ANDROID
*
1
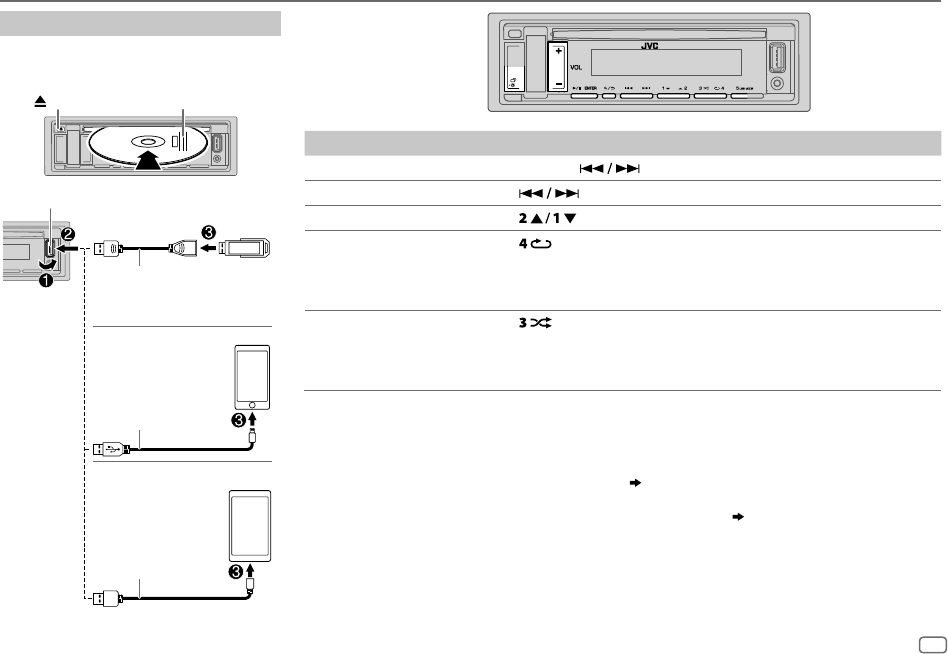
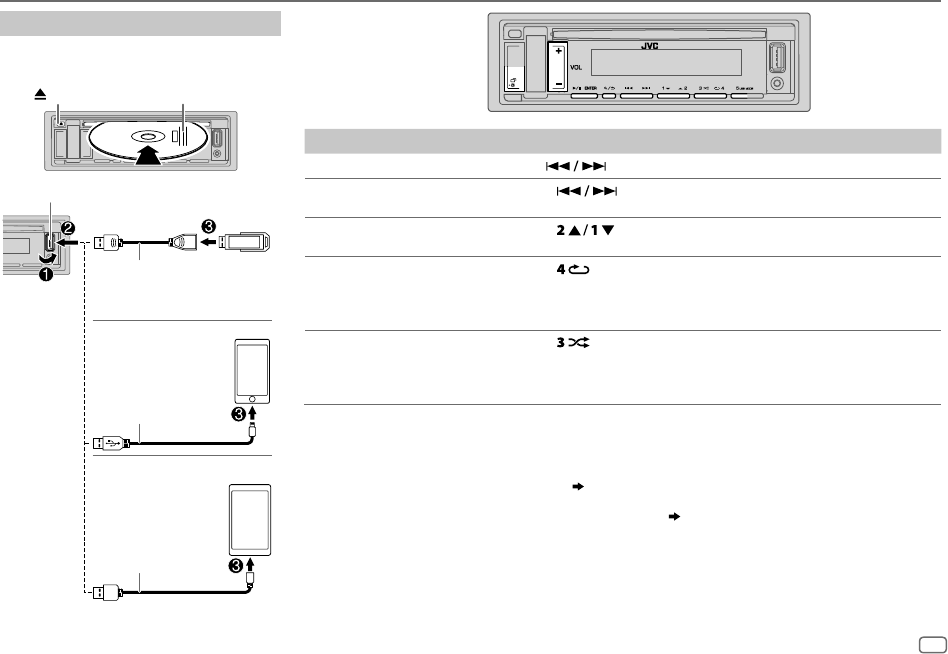
Ne laissez pas le câble à l’intérieur de la voiture quand il n’est pas utilisé.
*
2
Lors de la connexion d’un périphérique Android, “Press [VIEW] to install JVC MUSIC PLAY APP” apparaît. Suivez les instructions pour installer l’application. Vous
pouvez aussi intaller la dernière version de l’application JVC MUSIC PLAY sur votre périphérique Android avant la connexion. Pour plus d’informations, consultez
<http://www.jvc.net/cs/car/>.
*
3
Pour ANDROID: Fonctionne uniquement quand
[AUTO MODE]
est sélectionné.
( 10)
*
4
Pour CD: Uniquement pour les fichiers MP3/WMA/AAC. Cela ne fonctionne pas pour l’iPod/ANDROID.
*
5
Pour iPod/ANDROID: Fonctionne uniquement quand
[HEAD MODE]
/
[AUTO MODE]
est sélectionné.
( 10)
Démarrez la lecture
La source change automatiquement et le lecture
démarre.
CD
Éjectiez le disque
Face portant l’étiquette
Prise d’entrée USB
Câble USB 2.0
*
1
(en vente dans le commerce)
Câble Micro USB 2.0
*
1
(en vente dans le commerce)
USB
ANDROID
*
2
Accessoire du
iPod/iPhone
*
1
iPod/iPhone
JS_JVC_KD_DB98BT_E_FR.indd 9JS_JVC_KD_DB98BT_E_FR.indd 96/12/2016 9:28:13 AM6/12/2016 9:28:13 AM
FRANÇAIS
10
Data Size: B6L (182 mm x 128 mm)
Book Size: B6L (182 mm x 128 mm)
Sélectionnez le mode de commande
Quand la source est iPodUSB, appuyez répétitivement sur .
HEAD MODE
: Commande l’iPod à partir de cet appareil.
IPHONE MODE
: Commande l’iPod en utilisant l’iPod lui-même. Cependant, vous pouvez
encore utiliser la lecture/pause ou le saut de fichier de cet appareil.
Quand la source est ANDROID, appuyez répétitivement sur .
AUTO MODE
: Commandez le périphérique Android à partir de cet appareil via
l’application JVC MUSIC PLAY installée sur le périphérique Android.
AUDIO MODE
: Commandez le périphérique Android en utilisant le périphérique
Android lui-même via une autre application multimédia installée sur
le périphérique Android. Cependant, vous pouvez encore utiliser la
lecture/pause ou le saut de fichier de cet appareil.
Sélectionnez le lecteur de musique
Quand la source est USB, appuyez répétitivement sur .
Les morceaux mémorisés dans le lecture suivant seront lus.
•
Mémoire sélectionnée interne ou externe d’un smartphone (Mass Storage Class).
•
Lecteur sélectionné parmi plusieurs lecteurs.
Réglages pour utiliser JVC Remote application
L’application JVC Remote est conçue pour commander l’autoradio JVC à partir de
l’iPhone/iPod (via la prise d’entrée USB).
Préparation:
Installez la dernière version de l’application JVC Remote sur votre périphérique avant la
connexion. Pour plus d’informations, consultez <http://www.jvc.net/cs/car/>.
Vous pouvez réaliser les réglages de la même façon que la connexion via Bluetooth.
( 17)
Sélectionnez un fichier à partir d’un dossier/liste
Pour iPod/ANDROID, applicable uniquement quand
[HEAD MODE]
/
[AUTO MODE]
est
sélectionné.
1 Appuyez sur .
2 Appuyez surpour sélectionner un dossier/liste, puis appuyez
sur
.
3 Appuyez surpour choisir un fichier, puis appuyez sur
.
Recherche rapide
(applicable uniquement pour la source CD, USB et
ANDROID)
Si vous avez beaucoup de fichiers, vous pouvez effectuer une recherche rapide
parmi eux.
Maintenez pressée pour parcourir la liste rapidement.
Recherche alphabétique
(applicable uniquement pour la source iPod
USB et ANDROID)
Vous pouvez rechercher un fichier en fonction du premier caractère.
Pour la source iPod USB
Appuyez sur
pour choisir la caractère souhaité (A à Z, 0à9,
et OTHERS).
•
Sélectionnez “OTHERS” si le premier caractère est autre que AàZ, 0à9.
Pour la source ANDROID
1 Appuyez sur pour entrer en recherche de caractères.
2 Appuyez sur pour choisir le caractère souhaité.
^A^ : Majuscules (A à Z)
_A_ : Minuscules (a à z)
-0- : Nombres (0 à 9)
-
OTHERS
-
: Caractères autre que A à Z, 0 à 9
3 Appuyez sur pour démarrer la recherche.
•
Pour retourner à l’option de réglage précédente, appuyez sur .
•
Pour annuler, maintenez enfoncée .
CD/USB/iPod/ANDROID
JS_JVC_KD_DB98BT_E_FR.indd 10JS_JVC_KD_DB98BT_E_FR.indd 106/12/2016 9:28:14 AM6/12/2016 9:28:14 AM
FRANÇAIS
11
Data Size: B6L (182 mm x 128 mm)
Book Size: B6L (182 mm x 128 mm)
Faites le pairage et connectez un périphérique Bluetooth pour la première fois
1
Appuyez sur pour mettre l’appareil sous tension.
2 Cherchez et sélectionnez “KD-DB9BT” sur le périphérique Bluetooth.
“BTPAIRING” clignote sur l’affichage.
• Pour certains périphériques Bluetooth, il se peut que vous ayez besoin d’entrer le code PIN (numéro
d’identification personnel) immédiatement après la recherche.
3 Réalisez (A) ou (B) en fonction de ce qui apparait sur l’affichage.
Pour certains périphériques Bluetooth, la séquence de pairage peut varier en fonction des étapes décrites ci-
dessous.
(A) “[Nom du périphérique]” “XXXXXX” “ENTER–YES” “BACK–NO”
“XXXXXX” est un code à 6 chiffres généré aléatoirement pendant chaque pairage.
Assurez-vous que les codes qui apparaissent sur l’appareil et le périphérique Bluetooth sont les mêmes.
Appuyez sur pour valider le code.
Utilisez le périphérique Bluetooth pour valider le code.
(B) “[Nom du périphérique]” “ENTER–YES” “BACK–NO”
Appuyez sur pour démarrer le pairage.
• Si “PAIRING” “PIN 0000” défile sur l’affichage, entrez le code PIN “0000” sur le périphérique Bluetooth.
Vous pouvez choisir le code PIN souhaité avant le pairage.
( 15)
• Si seul “PAIRING” apparaît, utilisez le périphérique Bluetooth pour confirmer le pairage.
“PAIRING COMPLETED” apparaît quand le pairage est terminé et “
” s’allume quand la connexion Bluetooth est établie.
•
Cet appareil prend en charge le Pairage simple sécurisé (SSP).
•
Un maximum de cinq appareils peuvent être enregistrés (appariés) en tout.
•
Une fois que le pairage est termine, le périphérique Bluetooth reste enregistré sur l’appareil même si vous réinitialisez
l’appareil. Pour supprimer un périphérique apparié,
15
,
[DEVICE DELETE]
.
•
Un maximum de deux téléphones Bluetooth et un périphérique audio Bluetooth peuvent être connecté en même
temps.
Cependant, quand la source est BT AUDIO, vous pouvez vous connecter à cinq périphériques audio Bluetooth et
commuter parmi ces cinq périphériques.
( 16)
•
Certains périphériques Bluetooth peuvent ne pas se connecter automatiquement au système après le pairage.
Connectez le périphérique à l’appareil manuellement.
•
Référez-vous au manuel d’instructions de votre périphérique Bluetooth pour en savoir plus.
BLUETOOTH®
BLUETOOTH — Connexion
Profiles Bluetooth pris en charge
–
Hands-Free Profile — Profile mains libres (HFP)
–
Advanced Audio Distribution Profile — Profile de
distribution audio avancé (A2DP)
–
Audio/Video Remote Control Profile — Profile de
télécommande audio/vidéo (AVRCP)
–
Serial Port Profile — Profile de port série (SPP)
–
Phonebook Access Profile — Profile d’accès au
répertoire d’adresses (PBAP)
Codecs Bluetooth pris en charge
–
Codec Sous-bande (SBC)
–
Codage audio avancé (AAC)
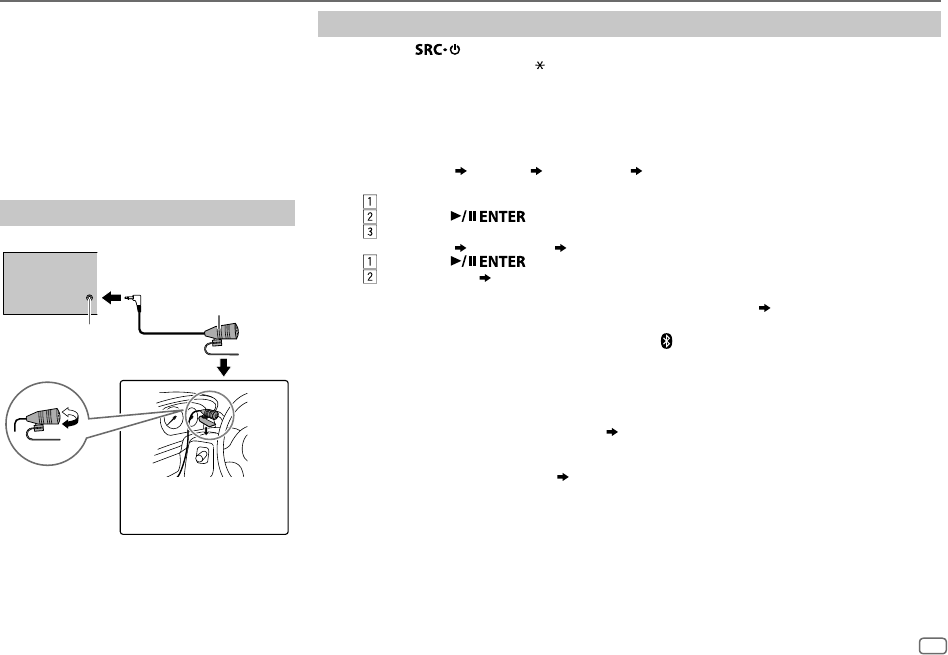
Connectez le microphone
Ajustez l’angle
du microphone
Fixez si nécessaire en utilisant des
serre-câbles (non fourni).
Prise d’entrée du microphone
Microphone (fourni)
Panneau arrière
JS_JVC_KD_DB98BT_E_FR.indd 11JS_JVC_KD_DB98BT_E_FR.indd 116/12/2016 9:28:15 AM6/12/2016 9:28:15 AM
FRANÇAIS
12
Data Size: B6L (182 mm x 128 mm)
Book Size: B6L (182 mm x 128 mm)
Pairage automatique
Quand vous connectez un périphérique iPhone/iPod touch/
Android à la prise d’entrée USB, la demande de pairage (via
Bluetooth) est activée automatiquement.
Appuyez sur pour faire le pairage une
fois que vous avez validé le nom de périphérique.
La demande de pairage automatique est activée uniquement
si:
–
La fonction Bluetooth du périphérique connecté est
activée.
–
[AUTO PAIRING]
est réglé sur
[ON]
.
( 15)
–
L’application JVC MUSIC PLAY est installée sur le
périphérique Android
( 9)
et
[AUTO MODE]
est
sélectionné
( 10)
.
BLUETOOTH — Téléphone portable
Réception d’un appel
Quand il y a un appel entrant:
•
La touche symbolique clignote dans la couleur que vous avez sélectionnée dans
[RING COLOR]
.
( 13)
•
L’appareil répond automatiquement à l’appel si
[AUTO ANSWER]
sur une heure sélectionnée.
( 13)
Pendant un appel:
•
La touche symbolique s’arrête de clignoter et s’allume dans la couleur que vous avez sélectionnée dans
[RING COLOR]
.
( 13)
•
Si vous mettez hors tension l’appareil ou détachez la façade, la connexion Bluetooth est déconnectée.
Les opérations suivantes peuvent différer ou peuvent ne pas être disponibles en fonction du téléphone connecté.
PourSur la façade
Premier appel entrant...
Répondre à un appel
Appuyez sur
ou .
Refuser un appel
Maintenez enfoncé
ou .
Fin d’un appel
Maintenez enfoncé
ou .
Pendant que vous parlez pour le premier appel entrant...
Répondez à un autre appel entrant et
mettez en attente l’appel actuel
Appuyez sur
ou .
Refusez un autre appel entrant
Maintenez enfoncé
ou .
BLUETOOTH®
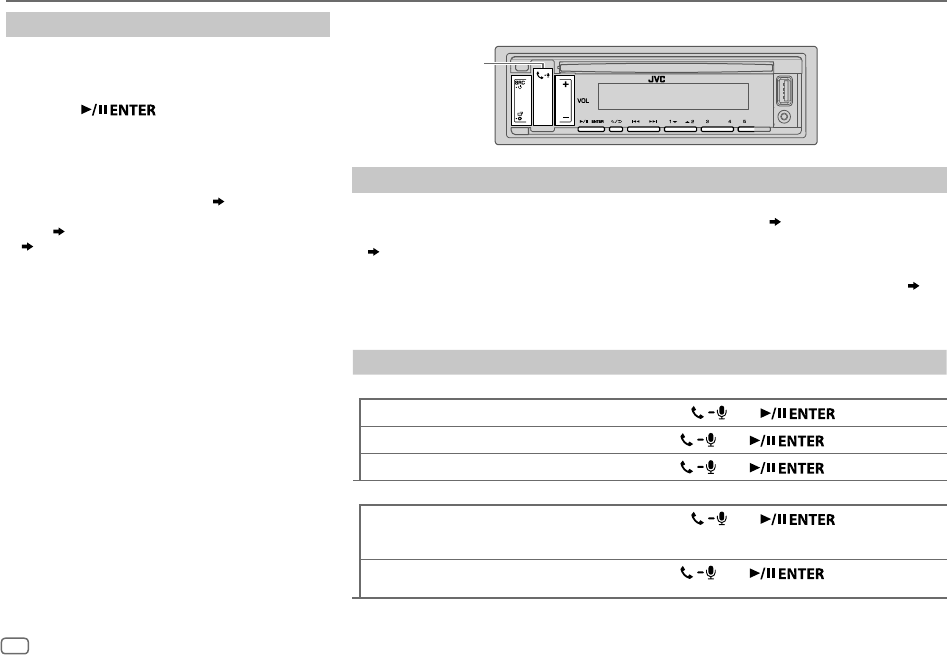
Touche symbolique
JS_JVC_KD_DB98BT_E_FR.indd 12JS_JVC_KD_DB98BT_E_FR.indd 126/12/2016 9:28:15 AM6/12/2016 9:28:15 AM
FRANÇAIS
13
Data Size: B6L (182 mm x 128 mm)
Book Size: B6L (182 mm x 128 mm)
PourSur la façade
Quand vous avez deux appels actifs...
Terminez l’appel actuel et activez
l’appel en attente
Maintenez enfoncé
ou .
Commutez entre l’appel actuel et
l’appel en attente
Appuyez sur
.
Ajustez le volume du téléphone
*
1
[00]
à
[35]
(Défaut:
[15]
)
Appuyez sur pendant un appel.
Commute entre le mode mains libres
et le mode de conversation privée
*
2
Appuyez sur pendant un appel.
*
1
Cet ajustement n’affecte pas le volume des autres sources.
*
2
Les opérations peuvent différer en fonction du périphérique Bluetooth connecté.
Amélioration de la qualité des voix
Quand vous parlez au téléphone....
1 Maintenez enfoncée .
2 Appuyez sur pour sélectionner un élément
(
voir le tableau suivant
)
,
puis appuyez sur
.
3 Répétez l’étape 2 jusqu’à ce que l’élément souhaité soit sélectionné ou activé.
4 Appuyez sur pour quitter.
Pour retourner à l’option de réglage précédente, appuyez sur .
Défaut:
XX
MIC GAINLEVEL –10
à
LEVEL +10
(
LEVEL –04
): La sensibilité du microphone augmente quand le numéro
augmente.
NR LEVELLEVEL –05
à
LEVEL +05
(
LEVEL 00
): Ajustez le niveau de réduction de bruit jusqu’à ce qu’un
minimum de bruit soit entendu pendant une conversation téléphonique.
ECHO CANCELLEVEL –05
à
LEVEL +05
(
LEVEL 00
): Ajustez le temps de retard d’annulation de l’écho jusqu’à ce
que le dernier écho est entendu pendant une conversation téléphonique.
BLUETOOTH®
Réalise les réglages de réception d’un appel
1
Appuyez sur pour entrer en mode Bluetooth.
2 Appuyez sur pour sélectionner un élément
(
voir le
tableau suivant
)
, puis appuyez sur .
3
Répétez l’étape 2 jusqu’à ce que l’élément souhaité soit
sélectionné ou activé.
Pour retourner à l’option de réglage précédente, appuyez sur .
Défaut:
XX
SETTINGS
AUTO ANSWER
01 SEC
à
30 SEC
:L’appareil répond au téléphone entrant automatiquement
pendant le temps sélectionné (secondes).;
OFF
:Annulation.
RING COLORCOLOR 01
à
COLOR 49
(
COLOR 08
): Sélectionne la couleur d’éclairage
pour la touche symbolique comme notification quand il y a un appel entrant et
pendant un appel.;
OFF
:Annulation.
JS_JVC_KD_DB98BT_E_FR.indd 13JS_JVC_KD_DB98BT_E_FR.indd 136/12/2016 9:28:16 AM6/12/2016 9:28:16 AM
FRANÇAIS
14
Data Size: B6L (182 mm x 128 mm)
Book Size: B6L (182 mm x 128 mm)
Faire un appel
Vous pouvez faire un appel à partir de l’historique, du répertoire d’adresses ou composer le numéro. Un
appel par commande vocale est possible si votre téléphone portable possède cette fonction.
1 Appuyez sur pour entrer en mode Bluetooth.
“(Nom du premier périphérique)” apparaît.
• Si deux téléphones Bluetooth sont connectés, appuyez de nouveau sur pour connecter sur
un autre téléphone.
“(Nom du deuxième périphérique)” apparaît.
2 Appuyez sur pour sélectionner un élément
(
voir le tableau suivant
)
, puis
appuyez sur
.
3 Répétez l’étape 2 jusqu’à ce que l’élément souhaité soit sélectionné/activé ou suivez les
instructions données pour l’élément sélectionné.
Pour retourner à l’option de réglage précédente, appuyez sur .
RECENT CALL
(Applicable uniquement quand le téléphone prend en charge PBAP.)
1
Répétez pour sélectionner un nom ou un numéro de téléphone.
• “<” indique l’appel reçu, “>” indique un appel passé, “M” indique un appel manqué.
• “NO HISTORY” apparaît s’il n’y a pas d’historique d’appels enregistré ou de numéro d’appel.
2
Appuyez sur pour appeler.
PHONEBOOK
(Applicable uniquement quand le téléphone prend en charge PBAP.)
1
Appuyez sur pour choisir la lettre souhaitée (A à Z, 0à9, et OTHERS).
• “OTHERS” apparaît si le premier caractère est autre que Aà Z, 0 à 9.
2
Appuyez sur pour sélectionner un nom, puis appuyez sur .
3
Appuyez sur pour sélectionner un numéro de téléphone, puis appuyez sur pour
appeler.
•
Le répertoire d’adresse du téléphone connecté est transféré automatiquement sur l’appareil lors du pairage.
•
Cet appareil peut uniquement afficher les lettres non accentuées. (Les lettres accentuées telles que “Ú” sont affichées
comme “U”.)
DIAL NUMBER
1
Appuyez sur pour sélectionner un numéro (0 à 9) ou un caractère (, #, +).
2
Appuyez sur pour déplacer la position d’entrée.
Répétez les étapes
1
et
2
jusqu’à ce que vous terminiez d’entrer le numéro de téléphone.
3
Appuyez sur pour appeler.
VOICE
Dites le nom du contact que vous souhaitez appeler ou la commande vocale pour commander les fonctions du
téléphone.
( Faites au appel en utilisant la reconnaissance vocale)
BLUETOOTH®
Faites au appel en utilisant la reconnaissance
vocale
1
Maintenez pressé pour activer le téléphone
connecté.
2 Dites le nom du contact que vous souhaitez appeler ou
la commande vocale pour commander les fonctions du
téléphone.
•
Les fonctions de reconnaissance vocale prises en charge varient
pour chaque téléphone. Référez-vous au mode d’emploi du
téléphone connecté pour les détails.
•
L’appareil prend aussi en charge la fonction d’assistant personnel
intelligent de l’iPhone.
Réglages en mémoire
Stockage d’un contact en mémoire
Vous pouvez mémoriser un maximum de 5 contacts sur les touches
numériques (
1
à
5
).
1 Appuyez sur pour entrer en mode Bluetooth.
2 Appuyez sur pour sélectionner
[RECENT CALL]
,
[PHONEBOOK]
ou
[DIAL NUMBER]
, puis appuyez
.
3 Appuyez sur pour sélectionner un contact ou
un numéro de téléphone.
Si un contact est sélectionné, appuyez sur pour
afficher le numéro de téléphone.
4 Maintenez pressée une des touches numériques (1 à 5).
“MEMORY P(numéro préréglé sélectionné)” apparaît quand les
contacts sont mémorisés.
Pour supprimer un contact de la mémoire préréglée, choisissez
[DIAL NUMBER]
à l’étape
2
et mémorisé un numéro vide.
Pour passer un appel à partir de la mémoire
1
Appuyez sur pour entrer en mode Bluetooth.
2 Appuyez sur l’une des touches numériques (1 à 5).
3 Appuyez sur pour appeler.
“NO PRESET” apparaît s’il n’y a pas de contact mémorisé.
JS_JVC_KD_DB98BT_E_FR.indd 14JS_JVC_KD_DB98BT_E_FR.indd 146/12/2016 9:28:16 AM6/12/2016 9:28:16 AM
FRANÇAIS
15
Data Size: B6L (182 mm x 128 mm)
Book Size: B6L (182 mm x 128 mm)
Réglages du mode Bluetooth
1
Maintenez enfoncée .
2 Appuyez surpour sélectionner un élément
(
voir le tableau suivant
)
, puis
appuyez sur
.
3 Répétez l’étape 2 jusqu’à ce que l’élément souhaité soit sélectionné/activé ou suivez les
instructions données pour l’élément sélectionné.
4 Appuyez sur pour quitter.
Pour retourner à l’option de réglage précédente, appuyez sur .
Défaut:
XX
BT MODE
PHONE SELECT
*
Permet de sélectionner le téléphone ou le périphérique audio à connecter ou déconnecter.
“
” apparaît devant le nom de l’appareil quand il est connecté.
“
” apparaît devant le périphérique de lecture audio actuel.
AUDIO SELECT
*
DEVICE DELETE
1
Appuyez sur pour sélectionner un périphérique à supprimer, puis appuyez sur
.
2
Appuyez sur pour choisir
[YES]
ou
[NO]
, puis appuyez sur .
PIN CODE EDIT
(0000)
Change le code PIN (6 chiffres maximum).
1
Appuyez sur pour sélectionner un numéro.
2
Appuyez sur pour déplacer la position d’entrée.
Répétez les étapes
1
et
2
jusqu’à ce que le code PIN soit entré complètement.
3
Appuyez sur pour valider.
RECONNECTON
:L’appareil se reconnecte automatiquement quand le dernier périphérique Bluetooth connecté est dans la
plage.;
OFF
:Annulation.
AUTO PAIRINGON
:L’appareil apparie automatiquement le périphérique Bluetooth pris en charge (iPhone/iPod touch/périphérique
Android) quand il est connecté par la prise d’entrée USB.En fonction du système d’exploitation du périphérique
connecté, il se peut que cette fonction ne fonctionne pas. ;
OFF
:Annulation.
INITIALIZEYES
:Initialise tous les réglages Bluetooth (y compris le pairage mémorisé, le répertoire téléphonique, etc.).;
NO
:Annulation.
INFORMATIONMY BT NAME
: Affiche le nom de l’appareil (“KD-DB9BT”).;
MY ADDRESS
: Affiche l’adresse de cet appareil.
*
Vous pouvez connecter un maximum de deux téléphones Bluetooth et un périphérique audio Bluetooth en même temps.
Mode de vérification de la compatibilité
Bluetooth
Vous pouvez vérifier la connectivité du profile pris en charge entre le
périphérique Bluetooth et l’appareil.
•
Assurez-vous qu’il n’y aucun périphérique Bluetooth apparié.
1 Maintenez enfoncée .
“BLUETOOTH” “CHECK MODE” apparaît. “SEARCH NOW
USING PHONE”
“PIN IS 0000” défile sur l’affichage.
2 Cherchez et sélectionnez “KD-DB9BT” sur le
périphérique Bluetooth avant 3 minutes.
3 Réalisez (A), (B) ou (C) en fonction de ce qui apparait sur
l’affichage.
(A)“PAIRING”“XXXXXX”(code de 6 chiffres)
:
Assurez-vous que le même code apparaît sur l’appareil et
le périphérique Bluetooth, puis utilisez le périphérique
Bluetooth pour valider le code.
(B)“PAIRING”“PIN IS 0000”
: Entrez “0000” sur le
périphérique Bluetooth.
(C)“PAIRING”
: Utilisez le périphérique Bluetooth pour valider
le pairage.
Quand le pairage a réussi, “PAIRING OK”
“[Nom du périphérique]”
apparaît et la vérification de la compatibilité Bluetooth démarre.
Si “CONNECT NOW USING PHONE” apparaît, utilisez le périphérique
Bluetooth pour autoriser l’accès au répertoire d’adresse et continuer.
“TESTING” clignote sur l’affichage.
BLUETOOTH®
JS_JVC_KD_DB98BT_E_FR.indd 15JS_JVC_KD_DB98BT_E_FR.indd 156/12/2016 9:28:17 AM6/12/2016 9:28:17 AM
FRANÇAIS
16
Data Size: B6L (182 mm x 128 mm)
Book Size: B6L (182 mm x 128 mm)
Le résultat de la connectivité clignote sur l’affichage.
“PAIRING OK” et/ou “HANDS-FREE OK”
*
1
et/ou
“AUD.STREAM OK”
*
2
et/ou “PBAP OK”
*
3
: Compatible
*
1
Compatible avec le Profile mains libres (HFP)
*
2
Compatible avec le Profile de distribution audio avancé (A2DP)
*
3
Compatible avec le Profile d’accès au répertoire d’adresses (PBAP)
Après 30 secondes, “PAIRING DELETED” apparaît pour indiquer
que le pairage a été supprimé, et l’appareil qui le mode de
vérification.
•
Pour annuler, maintenez pressée pour mettre
l’appareil hors tension, puis mettez de nouveau l’appareil sous
tension.
BLUETOOTH — Audio
Lecteur audio via Bluetooth
1
Appuyez répétitivement sur pour sélectionner BTAUDIO.
• Appuyer sur permet d’accéder directement à BT AUDIO.
2 Commandez le lecture audio Bluetooth pour démarrer la lecture.
PourSur la façade
Lecture/pause
Appuyez sur
.
Choisissez un groupe ou un
dossier
Appuyez sur
.
Saut vers l’arrière/saut vers
l’avant
Appuyez sur
.
Recherche rapide vers l’arrière/
vers l’avant
Maintenez enfoncée
.
Lecture répétéeAppuyez répétitivement sur
.
TRACK REPEAT
,
ALL REPEAT
,
REPEAT OFF
Lecture aléatoire
Appuyez répétitivement sur
.
GROUP RANDOM
,
ALL RANDOM
,
RANDOM OFF
Sélectionnez un fichier à partir
d’un dossier/liste
Reportez-vous à “Sélectionnez un fichier à partir d’un dossier/liste” à
la page 10.
Commutation entre les
périphériques audio Bluetooth
Appuyez sur
5.
*
*
Appuyer sur la touche “Play” directement sur le périphérique connecté permet aussi de commuter sur la sortie sonore du périphérique.
Les opérations et les indications de l’affichage peuvent différer en fonction de leur disponibilité sur le
périphérique connecté.
BLUETOOTH®
Quand la source est BT AUDIO,
vous pouvez vous connecter à cinq
périphériques audio Bluetooth
et commuter parmi ces cinq
périphériques.
JS_JVC_KD_DB98BT_E_FR.indd 16JS_JVC_KD_DB98BT_E_FR.indd 166/12/2016 9:28:18 AM6/12/2016 9:28:18 AM
FRANÇAIS
17
Data Size: B6L (182 mm x 128 mm)
Book Size: B6L (182 mm x 128 mm)
Réglages pour utiliser JVC Remote application
L’application JVC Remote est conçue pour commander l’autoradio JVC à partir de
l’iPhone/iPod (via Bluetooth ou via la prise d’entrée USB) ou le smartphone Android
(via Bluetooth).
Préparation:
Installez la dernière version de l’application JVC Remote sur votre périphérique avant la
connexion. Pour plus d’informations, consultez <http://www.jvc.net/cs/car/>.
1 Maintenez enfoncée .
2 Appuyez sur pour sélectionner un élément
(
voir le tableau
suivant
)
, puis appuyez sur .
3 Répétez l’étape 2 jusqu’à ce que l’élément souhaité soit sélectionné ou
activé.
4 Appuyez sur pour quitter.
Pour retourner à l’option de réglage précédente, appuyez sur .
Défaut:
XX
REMOTE APP
SELECT
Sélectionnez le périphérique (IOS ou ANDROID) pour utiliser l’application.
IOSYES
:Sélectionnez iPhone/iPod pour utiliser l’application via Bluetooth ou connecté via la prise
d’entrée USB.;
NO
:Annulation.
Si IOS est sélectionné, sélectionnez la source iPod BT (pour iPod USB si votre iPhone/iPod est
connecté via la prise d’entrée USB) pour activer l’application.
•
La connectivité del’application est interrompue ou déconnectée si :
– Vous changez la source de iPod BT à n’importe quelle source de lecture connectée via la
prise d’entrée USB.
– Vous passez de la source iPod USB a la source iPod BT.
ANDROIDYES
:Sélectionnez le smartphone Android pour utiliser l’application via Bluetooth.;
NO
:Annulation.
ANDROID LIST
*
:Sélectionnez le smartphone Android à utiliser dans la liste.
*
Affiché uniquement quand
[ANDROID]
de
[SELECT]
est réglé sur
[YES]
.
STATUS
Montre l’état du périphérique sélectionné.
IOS CONNECTED
: Vous pouvez utiliser l’application à l’aide de l’iPhone/iPod connecté via
Bluetooth ou par la prise d’entrée USB.
IOS NOT CONNECTED
: Aucun périphérique IOS n’est connecté pour utiliser l’application.
ANDROID CONNECTED
: Vous pouvez utiliser l’application à l’aide du smartphone Android
connecté via Bluetooth.
ANDROID NOT CONNECTED
: Aucun périphérique Android n’est connecté pour utiliser
l’application.
Écoute de l’iPhone/iPod via Bluetooth
Vous pouvez écouter des morceaux sur l’iPhone/iPod via le Bluetooth de cet appareil.
Appuyez répétitivement sur pour sélectionner iPodBT.
•
Vous pouvez commander iPod/iPhone de la même façon que iPod/iPhone via prise
d’entrée USB.
( 9)
•
Si vous branchez un iPhone/iPod sur la prise d’entrée USB pendant l’écoute d’une
source iPodBT, la source change automatiquement sur iPod USB. Appuyez
pour sélectionner iPodBT si le périphérique est toujours connecté via Bluetooth.
BLUETOOTH®
JS_JVC_KD_DB98BT_E_FR.indd 17JS_JVC_KD_DB98BT_E_FR.indd 176/12/2016 9:28:19 AM6/12/2016 9:28:19 AM
FRANÇAIS
18
Data Size: B6L (182 mm x 128 mm)
Book Size: B6L (182 mm x 128 mm)
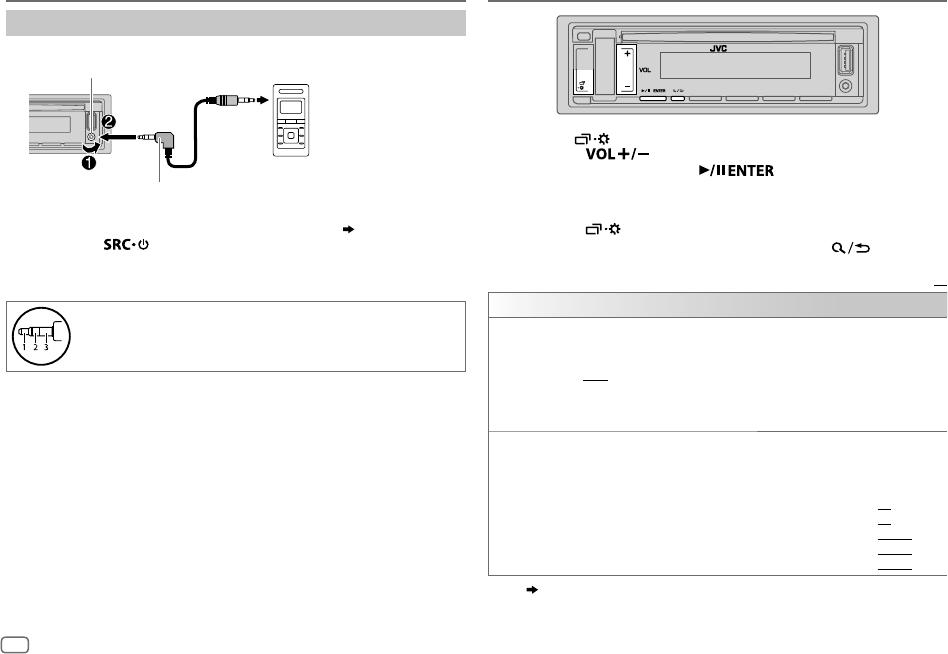
Utilisation d’un lecteur audio portable
1
Connectez un lecteur audio portable (en vente dans le commerce).
2 Sélectionnez
[ON]
pour
[BUILT-IN AUX]
dans
[SOURCE SELECT]
.
( 4)
3 Appuyez répétitivement sur pour sélectionner AUX.
4 Mettez sous tension le lecteur audio portable et démarrez la lecture.
Utilisez une mini fiche stéréo munie d’une fiche à 3 connecteurs pour
obtenir une sortie audio optimum.
Mini fiche stéréo de 3,5 mm avec connecteur
en forme de “L” (en vente dans le commerce)
Lecteur audio portable
Prise d’entrée auxiliaire
AUXRÉGLAGES AUDIO
1 Maintenez enfoncée .
2 Appuyez sur pour sélectionner un élément (voir le tableau
suivant), puis appuyez sur
.
3 Répétez l’étape 2 jusqu’à ce que l’élément souhaité soit sélectionné/
activé ou suivez les instructions données pour l’élément sélectionné.
4 Appuyez sur pour quitter.
Pour retourner à l’option de réglage précédente, appuyez sur .
Défaut:
XX
EQ SETTING
PRESET EQ
Sélectionne un égaliseur préréglé adapté à votre genre de musique.
•
Sélectionnez
[USER]
pour utiliser les réglages réalisés dans
[EASY EQ]
ou
[PRO EQ]
.
FLAT
/
DRVN 3
/
DRVN 2
/
DRVN 1
/
HARD ROCK
/
HIP HOP
/
JAZZ
/
POP
/
R&B
/
USER
/
CLASSICAL
L’égaliseur Drive (
DRVN 3
/
DRVN 2
/
DRVN 1
) accentue des fréquences spécifiques du
signal audio pour réduire le bruit entendu de l’extérieur de la voiture ou le bruit roulement
des pneus.
EASY EQ
Ajustez vos propres ajustements sonores.
•
Les réglages sont mémorisés dans
[USER]
.
•
Les réglages réalisés peuvent affecter les réglages actuels de
[PRO EQ]
.
SUB.W SP
*
1
*
2
:
00
à
+06
(Défaut:
03
SUB.W
*
1
:
–50
à
+10 00
BASS
:
LVL–09
à
LVL+09 LVL 00
MID
:
LVL–09
à
LVL+09 LVL 00
TRE
:
LVL–09
à
LVL+09 LVL 00
)
*
1
,
*
2
:
( 19)
JS_JVC_KD_DB98BT_E_FR.indd 18JS_JVC_KD_DB98BT_E_FR.indd 186/12/2016 9:28:19 AM6/12/2016 9:28:19 AM
FRANÇAIS
19
Data Size: B6L (182 mm x 128 mm)
Book Size: B6L (182 mm x 128 mm)
RÉGLAGES AUDIO
BALANCE
*
3
POSITION L15
à
POSITION R15
(
POSITION 00
):Règle la balance de sortie
des enceintes gauche et droite.
VOLUME ADJUSTLEVEL –15
à
LEVEL +06
(
LEVEL 00
):Préréglez le niveau de volume initial de
chaque source (en comparaison avec le niveau de volume FM). Avant un ajustement,
choisissez la source que vous souhaitez ajuster.
AMP GAINLOW POWER
:Limite le volume maximum à 25. (Choisissez ce réglage si la puissance
maximum de chaque enceinte est inférieure à 50 W pour éviter tout dommage des
enceintes.);
HIGH POWER
:Le niveau de volume maximum est de 35.
SPK/PRE OUT
(Non applicable quand la transition 3 voies est sélectionnée.)
En fonction de la méthode de connexion des enceintes, sélectionner le réglage approprié
pour obtenir la sortie souhaitée.
( 20, Réglages de sortie d’enceinte)
SPEAKER SIZE
En fonction du type de transition que vous avez sélectionné (
[X ' OVER TYPE]
),
les options de réglage pour transition 2 voies ou transition 3 voies apparaîtront.
( 21, Réglages de transition)
Par défaut, le type de transition 2 voies est sélectionné.
X ' OVER
DTA SETTINGS
Pour les réglages,
22, Réglages de l’alignement temporel
numérique
.
CAR SETTINGS
X ' OVER TYPEPrécautions
: Ajustez le volume avant de changer le
[X ' OVER TYPE]
pour éviter
l’augmentation ou la diminution soudaine du niveau de sortie.
2-WAY
(Affiché uniquement quand
[3-WAY]
est sélectionné.)
YES
:Sélectionne le type de transition deux voies.;
NO
:Annulation.
3-WAY
(Affiché uniquement quand
[2-WAY]
est sélectionné.)
YES
:Sélectionne le type de transition trois voies.;
NO
:Annulation.
*
1
Affiché uniquement quand
[SUBWOOFER SET]
est réglé sur
[ON]
.
*
2
Pour la transition 2 voies: Affiché uniquement quand
[SPK/PRE OUT]
est réglé sur
[SUB.W/SUB.W]
.
( 20)
*
3
L’ajustement ne peut pas affecter la sortie du caisson de grave.
PRO EQ
Ajustez vos propres ajustements sonores.
•
Les réglages sont mémorisés dans
[USER]
.
•
Les réglages réalisés peuvent affecter les réglages actuels de
[EASY EQ]
.
62.5HZ
LEVEL –09
à
LEVEL +09 (LEVEL 00)
: Réglez le niveau à mémoriser pour chaque source.
(Avant de réaliser un ajustement, choisissez la source que vous souhaitez ajuster.)
ON
:Met en service les graves étendus.;
OFF
:Annulation.
100HZ
/
160HZ
/
250HZ
/
400HZ
/
630HZ
/
1KHZ
/
1.6KHZ
/
2.5KHZ
/
4KHZ
/
6.3KHZ
/
10KHZ
/
16KHZ
LEVEL –09
à
LEVEL +09 (LEVEL 00)
:
Réglez le niveau à mémoriser pour chaque source.
(Avant de réaliser un ajustement, choisissez la source que vous souhaitez ajuster.)
Q FACTOR1.35
/
1.50
/
2.00
:Règle le facteur de qualité.
AUDIO CONTROL
BASS BOOST
LEVEL +01
à
LEVEL +05
: Choisit votre niveau préféré d’accentuation des
graves.;
OFF
:Annulation.
LOUDNESSLEVEL 01
/
LEVEL 02
:Accentue les basses ou hautes fréquences pour produire un
son plus équilibré aux faibles niveaux de volume.;
OFF
:Annulation
SUB.W LEVEL
*
1
SPK-OUT
*
2
(Non applicable quand la transition 3 voies est sélectionnée.)
SUB.W 00
à
SUB.W +06
(
SUB.W +03
):Ajuste le
niveau de sortie du caisson de grave connecté par le câble
d’enceinte.
( 30)
PRE-OUT
SUB.W –50
à
SUB.W +10
(
SUB.W 00
):Ajuste le
niveau de sortie du caisson de grave connecté aux prises de sortie
de ligne (SW) via un amplificateur extérieur.
( 30)
SUBWOOFER SET
ON
: Met en service la sortie du caisson de grave.;
OFF
: Annulation.
FADER
(Non applicable quand la transition 3 voies est sélectionnée.)
POSITION R15
à
POSITION F15
(
POSITION 00
):Règle la balance de
sortie des enceintes avant et arrière.
JS_JVC_KD_DB98BT_E_FR.indd 19JS_JVC_KD_DB98BT_E_FR.indd 196/12/2016 9:28:19 AM6/12/2016 9:28:19 AM
FRANÇAIS
20
Data Size: B6L (182 mm x 128 mm)
Book Size: B6L (182 mm x 128 mm)
RÉGLAGES AUDIO
SOUND EFFECT
SPACE ENHANCE
(Ne s’applique pas à la source FM/AM et à la source DAB.)
SMALL/MEDIUM/LARGE
: Améliore virtuellement l’espace sonore.;
OFF
:Annulation.
SND RESPONSELEVEL1
/
LEVEL2
/
LEVEL3
: Rend virtuellement le son plus réaliste.;
OFF
:Annulation.
SOUND LIFTLOW
/
MIDDLE
/
HIGH
: Ajuste virtuellement la position sonore entendue par les
enceintes.;
OFF
:Annulation.
VOL LINK EQON
:Accentue la fréquence pour réduire le bruit entendu de l’extérieur de la voiture ou le
bruit roulement des pneus.;
OFF
:Annulation.
K2 TECHNOLOGY
(Ne s’applique pas à la source FM/AM, à la source DAB et à la source AUX.)
ON
:Pour améliorer la qualité du son de la musique compressée.;
OFF
:Annulation.
Réglages de sortie d’enceinte
[SPK/PRE OUT]
(Applicable uniquement si [X ' OVER TYPE ] est réglé sur [2-WAY]) (
19)
Sélectionnez le réglage de sortie pour les enceintes
[SPK/PRE OUT]
,
sur la base de la
méthode de connexion des enceintes.
Connexion via les prises de sortie de ligne
Pour les connexions via un amplificateur extérieur.
( 30)
Réglage sur
[SPK/PRE OUT]
Signal audio via la prise de sortie de ligne
FRONTREARSW
REAR/REAR
(défaut)
Sortie des enceintes avantSortie des enceintes arrièreSortie de caisson de
grave
SUB.W/SUB.W
Sortie des enceintes avantL (gauche): Sortie de caisson
de grave
R (droite): (Sourdine)
Sortie de caisson de
grave
Connexion via les câbles d’enceinte
Pour les connexions sans utiliser un amplificateur extérieur. Cependant, avec ces
réglages vous pouvez aussi profiter de la sortie du caisson de grave.
( 30)
Réglage sur
[SPK/PRE OUT]
Signal audio via le fil de l’enceinte arrière
L (gauche)R (droite)
REAR/REAR
Sortie des enceintes arrièreSortie des enceintes arrière
SUB.W/SUB.W
Sortie de caisson de grave(Sourdine)
Si
[SUB.W/SUB.W]
est sélectionné:
–
[120HZ]
est sélectionné dans
[SUBWOOFER LPF]
et
[THROUGH]
n’est pas disponible.
–
[POSITION R02]
est sélectionné dans
[FADER]
et la plage sélectionnable est de
[POSITION R15]
à
[POSITION 00]
.
JS_JVC_KD_DB98BT_E_FR.indd 20JS_JVC_KD_DB98BT_E_FR.indd 206/12/2016 9:28:20 AM6/12/2016 9:28:20 AM
FRANÇAIS
21
Data Size: B6L (182 mm x 128 mm)
Book Size: B6L (182 mm x 128 mm)
RÉGLAGES AUDIO
Options de réglage de la transition 2 voies
SPEAKER SIZE
FRONTSIZE
8CM/10CM/12CM/13CM/16CM/17CM/18CM
/
4×6
/
5×7
/
6×8
/
6×9
/
7×10
TWEETER
SMALL
/
MIDDLE
/
LARGE
/
NONE
(non connecté)
REAR
*
1
8CM/10CM/12CM/13CM/16CM/17CM/18CM
/
4×6
/
5×7
/
6×8
/
6×9
/
7×10
/
NONE
(non connecté)
SUBWOOFER
*
2
16CM/20CM/25CM/30CM/38CM OVER
/
NONE
(non connecté)
X ' OVER
TWEETERFRQ
1KHZ
/
1.6KHZ
/
2.5KHZ
/
4KHZ
/
5KHZ
/
6.3KHZ
/
8KHZ
/
10KHZ
/
12.5KHZ
GAIN LEFT
–08DB
à
00DB
GAIN RIGHT
–08DB
à
00DB
FRONT HPFF-HPF FRQ
30HZ
/
40HZ
/
50HZ
/
60HZ
/
70HZ
/
80HZ
/
90HZ
/
100HZ
/
120HZ
/
150HZ
/
180HZ
/
220HZ
/
250HZ
/
THROUGH
F-HPF SLOPE
–06DB
/
–12DB
/
–18DB
/
–24DB
F-HPF GAIN
–08DB
à
00DB
REAR HPF
*
1
R-HPF FRQ30HZ
/
40HZ
/
50HZ
/
60HZ
/
70HZ
/
80HZ
/
90HZ
/
100HZ
/
120HZ
/
150HZ
/
180HZ
/
220HZ
/
250HZ
/
THROUGH
R-HPF SLOPE
–06DB
/
–12DB
/
–18DB
/
–24DB
R-HPF GAIN
–08DB
à
00DB
SUBWOOFER
LPF
*
2
SW LPF FRQ30HZ
/
40HZ
/
50HZ
/
60HZ
/
70HZ
/
80HZ
/
90HZ
/
100HZ
/
120HZ
/
150HZ
/
180HZ
/
220HZ
/
250HZ
/
THROUGH
SW LPF SLOPE
–06DB
/
–12DB
/
–18DB
/
–24DB
SW LPF PHASE
REVERSE
(180°)/
NORMAL
(0°)
SW LPF GAIN–08DB
à
00DB
*
1
,
*
2
:
( 22)
Réglages de transition
Voici les options de réglage disponibles pour la transition 2 voies et la transition
3 voies.
Précautions
Sélectionnez un type de transition en fonction de la connexion de vos enceintes.
( 30)
Si vous sélectionnez une mauvais type:
•
Les enceintes peuvent être endommagées.
•
Le niveau sonore de sortie peut être extrêmement élevé ou faible.
SPEAKER SIZE
La sélection est faite en fonction de la taille de l’enceinte connectée permettant
d’obtenir les performances optimales.
•
Les réglages de la fréquence et de la pente sont réalisés automatiquement pour
la transition de l’enceinte sélectionnée.
•
Quand l’option de transition 2 voies est sélectionnée, si
[NONE]
est sélectionné
pour
[TWEETER]
de
[FRONT]
,
[REAR]
et
[SUBWOOFER]
pour
[SPEAKER SIZE]
, le
réglage
[X ‘ OVER]
de l’enceinte sélectionnée n’est pas disponible.
•
Quand l’option de transition 3 voies est sélectionnée, si
[NONE]
est sélectionné
pour
[WOOFER]
de
[SPEAKER SIZE]
, le réglage
[X ‘ OVER]
de
[WOOFER]
n’est pas
disponible.
X ‘ OVER (transition)
• [FRQ]
/
[F-HPF FRQ]
/
[R-HPF FRQ]
/
[SW LPF FRQ]
/
[HPF FRQ]
/
[LPF FRQ]
: Ajuste la
fréquence de transition pour les enceintes sélectionnées (filtre passe haut ou
filtre passe bas).
Si
[THROUGH]
est sélectionné, tous les signaux sont envoyés aux enceintes
sélectionnées.
• [SLOPE]
/
[F-HPF SLOPE]
/
[R-HPF SLOPE]
/
[SW LPF SLOPE]
/
[HPF SLOPE]
/
[LPF SLOPE]
:
Ajuste la pente de transition.
Peut être uniquement sélectionné si un réglage autre que
[THROUGH]
est choisi
pour la fréquence de transition.
• [SW LPF PHASE]
/
[PHASE]
:
Sélectionne la phase de la sortie de l’enceinte à
synchroniser avec la sortie des autres enceintes.
•
[GAIN LEFT]
/
[GAIN RIGHT]
/
[F-HPF GAIN]
/
[R-HPF GAIN]
/
[SW LPF GAIN]
/
[GAIN]
:
Ajuste le volume de sortie de l’enceinte sélectionnée.
JS_JVC_KD_DB98BT_E_FR.indd 21JS_JVC_KD_DB98BT_E_FR.indd 216/12/2016 9:28:20 AM6/12/2016 9:28:20 AM
FRANÇAIS
22
Data Size: B6L (182 mm x 128 mm)
Book Size: B6L (182 mm x 128 mm)
RÉGLAGES AUDIO
Options de réglage de la transition 3 voies
SPEAKER SIZE
TWEETER
SMALL/MIDDLE/LARGE
MID RANGE
8CM/10CM/12CM/13CM/16CM/17CM/18CM
/
4×6
/
5×7
/
6×8
/
6×9
WOOFER
*
2
16CM/20CM/25CM/30CM/38CM OVER
/
NONE
(non connecté)
X ' OVER
TWEETERHPF FRQ
1KHZ
/
1.6KHZ
/
2.5KHZ
/
4KHZ
/
5KHZ
/
6.3KHZ
/
8KHZ
/
10KHZ
/
12.5KHZ
SLOPE
–06DB
/
–12DB
PHASE
REVERSE
(180°)/
NORMAL
(0°)
GAIN–08DB
à
00DB
MID RANGEHPF FRQ
30HZ
/
40HZ
/
50HZ
/
60HZ
/
70HZ
/
80HZ
/
90HZ
/
100HZ
/
120HZ
/
150HZ
/
180HZ
/
220HZ
/
250HZ
/
THROUGH
HPF SLOPE
–06DB
/
–12DB
LPF FRQ
1KHZ
/
1.6KHZ
/
2.5KHZ
/
4KHZ
/
5KHZ
/
6.3KHZ
/
8KHZ
/
10KHZ
/
12.5KHZ
/
THROUGH
LPF SLOPE
–06DB
/
–12DB
PHASE
REVERSE
(180°)/
NORMAL
(0°)
GAIN–08DB
à
00DB
WOOFER
*
2
LPF FRQ30HZ
/
40HZ
/
50HZ
/
60HZ
/
70HZ
/
80HZ
/
90HZ
/
100HZ
/
120HZ
/
150HZ
/
180HZ
/
220HZ
/
250HZ
/
THROUGH
SLOPE
–06DB
/
–12DB
PHASE
REVERSE
(180°)/
NORMAL
(0°)
GAIN–08DB
à
00DB
*
1
Affiché uniquement quand
[SPK/PRE OUT]
est réglé sur
[REAR/REAR]
.
( 20)
*
2
Affiché uniquement quand
[SUBWOOFER SET]
est réglé sur
[ON]
.
( 19)
Réglages de l’alignement temporel numérique
L’alignement temporel numérique règle la temporisation de la sortie d’enceinte pour
créer un environnement qui convient mieux à votre véhicule.
•
Pour plus d’informations,
23, Déterminez la valeur pour [DISTANCE] et [GAIN] de
[DTA SETTINGS]
.
DTA SETTINGS
POSITION
Sélectionne votre position d’écoute (point de référence).
ALL
:Sans compensation;
FRONT RIGHT
: Siège avant droit;
FRONT LEFT
:Siège avant gauche;
FRONT ALL
:Siège avant
•
[FRONT ALL]
est affiché uniquement quand
[X ' OVER TYPE]
est réglé sur
[2-WAY]
.
( 19)
DISTANCE
*
1
0CM
à
610CM
:Ajuste avec précision la distance de compensation.
GAIN
*
1
–8DB
à
0DB
:Ajuste avec précision le volume de sortie de l’enceinte sélectionnée.
DTA RESETYES
:Réinitialise les réglages (
[DISTANCE]
et
[GAIN]
) du réglage
[POSITION]
sélectionné au réglages par défaut.;
NO
:Annulation.
CAR SETTINGS
Identifiez votre type de voiture et l’emplacement des enceintes arrière afin de réaliser
les ajustement pour
[DTA SETTINGS]
.
CAR TYPECOMPACT
/
FULL SIZE CAR
/
WAGON
/
MINIVAN
/
SUV
/
MINIVAN(LONG)
:Sélectionne le type de véhicule.;
OFF
: Sans compensation.
R-SP LOCATION
*
2
Sélectionne l’emplacement des enceintes arrières de votre véhicule pour calculer la
distance la plus loin de la position d’écoute sélectionnée (point de référence).
•
DOOR
/
REAR DECK
:Sélectionnable uniquement quand
[CAR TYPE]
est
sélectionné pour
[OFF]
,
[COMPACT]
,
[FULL SIZE CAR]
,
[WAGON]
ou
[SUV]
.
•
2ND ROW
/
3RD ROW
:Sélectionnable uniquement quand
[CAR TYPE]
est
sélectionné pour
[MINIVAN]
ou
[MINIVAN(LONG)]
.
*
1
,
*
2
:
( 23)
JS_JVC_KD_DB98BT_E_FR.indd 22JS_JVC_KD_DB98BT_E_FR.indd 226/12/2016 9:28:20 AM6/12/2016 9:28:20 AM
FRANÇAIS
23
Data Size: B6L (182 mm x 128 mm)
Book Size: B6L (182 mm x 128 mm)
RÉGLAGES AUDIO
Déterminez la valeur pour [DISTANCE] et [GAIN] de [DTA SETTINGS]
Si vous spécifiez la distance à partir du centre de la positon d’écoute
actuellement réglée sur n’importe quel réglage, la temporisation
est calculée automatiquement et réglée.
1
Détermine le centre de la position d’écoute actuellement
réglée comme point de référence.
2
Mesure la distance entre la position de référence et les
enceintes.
3
Calcule la différence entre la distance de l’enceinte la plus loin
(enceinte arrière) et les autres enceintes.
4
Règle
[DISTANCE]
calculé à l’étape
3
pour les enceintes
individuelles.
5
Ajuste
[GAIN]
pour les enceintes individuelles.
Exemple: Quand
[FRONT ALL]
est sélectionné comme position
d’écoute
*
1
Avant de réaliser un ajustement, choisissez l’enceinte:
Quand la transition 2 voies est sélectionnée:
FRONT LEFT
/
FRONT RIGHT
/
REAR LEFT
/
REAR RIGHT
/
SUBWOOFER
–
[REAR LEFT]
,
[REAR RIGHT]
et
[SUBWOOFER]
est sélectionnable uniquement si un autre réglage que
[NONE]
est sélectionné pour
[REAR]
ou
[SUBWOOFER]
de
[SPEAKER SIZE]
.
( 21)
Quand la transition 3 voies est sélectionnée:
TWEETER LEFT
/
TWEETER RIGHT
/
MID LEFT
/
MID RIGHT
/
WOOFER
–
[WOOFER]
est sélectionnable uniquement si un autre réglage que
[NONE]
est sélectionné pour
[WOOFER]
de
[SPEAKER SIZE]
.
( 22)
*
2
Affiché uniquement quand
[X ' OVER TYPE]
est réglé sur
[2-WAY]
( 19)
et si un autre réglage que
[NONE]
est sélectionné pour
[REAR]
de
[SPEAKER SIZE]
.
( 21)
RÉGLAGES D’AFFICHAGE
1 Maintenez enfoncée .
2 Appuyez surpour sélectionner un élément (voir le
tableau suivant), puis appuyez sur
.
3 Répétez l’étape 2 jusqu’à ce que l’élément souhaité soit sélectionné/
activé ou suivez les instructions données pour l’élément sélectionné.
4 Appuyez sur pour quitter.
Pour retourner à l’option de réglage précédente, appuyez sur .
Défaut:
XX
DISPLAY
DIMMER
Assombrit l’éclairage.
OFF
:Le gradateur est désactivé. La luminosité change sur le réglage
[DAY]
.
ON
:Le gradateur est activé. La luminosité change sur le réglage
[NIGHT]
.
(
24
,
[BRIGHTNESS]
)
DIMMER TIME
:Réglez l’heure de mise en et hors service du gradateur.
1
Appuyez sur pour régler l’heure de mise en service
[ON]
, puis appuyez
sur
.
2
Appuyez sur pour régler l’heure de mise en service
[OFF]
, puis appuyez
sur
.
(Défaut:
[ON]
:
18:00
;
[OFF]
:
6:00
)
DIMMER AUTO
:Le gradateur est activé et désactivé automatiquement quand vous
éteignez ou allumez les feux de la voiture.
*
1
*
1
La connexion du fil de commande de l’éclairage est requise.
( 30)
Touche symbolique
JS_JVC_KD_DB98BT_E_FR.indd 23JS_JVC_KD_DB98BT_E_FR.indd 236/12/2016 9:28:20 AM6/12/2016 9:28:20 AM
FRANÇAIS
24
Data Size: B6L (182 mm x 128 mm)
Book Size: B6L (182 mm x 128 mm)
BRIGHTNESS
Réglez la luminosité séparément pour le jour et la nuit.
1
DAY
/
NIGHT
:Choisissez le jour ou la nuit.
2
Choisissez une zone.
( 23)
3
LEVEL 00
à
LEVEL 31
: Réglez le niveau de luminosité.
(Défaut:
BUTTON ZONE
:
[DAY]
:
LEVEL 25
;
[NIGHT]
:
LEVEL 09
DISP ZONE
:
[DAY]
:
LEVEL 31
;
[NIGHT]
:
LEVEL 12
)
TEXT SCROLL
*
2
SCROLL ONCE
:Fait défiler une fois les informations de l’affichage.;
SCROLL AUTO
:Répète le défilement à 5 secondes d’intervalle.;
SCROLL OFF
:Annulation.
COLOR
(pour la touche symbolique uniquement)
PRESET
Sélectionnez une couleur d’éclairage pour la touche symbolique.
Couleur par défaut:
[COLOR FLOW01]
•
COLOR 01
à
COLOR 49
•
USER
: La couleur que vous avez créée pour
[DAY COLOR]
ou
[NIGHT COLOR]
apparaît.
•
COLOR FLOW01
à
COLOR FLOW03
: La couleur change à une vitesse différente.
•
Couleur préréglée:
CRYSTAL
,
FLOWER
,
FOREST
,
GRADATION
,
OCEAN
,
SUNSET
,
RELAX
DAY COLOR
Mémorisez vos propres couleurs d’éclairage du jour et de la nuit pour la touche symbolique.
Couleur par défaut:
[RED 31]
,
[GREEN 31]
,
[BLUE 23]
1
RED
/
GREEN
/
BLUE
:Choisissez une couleur primaire.
2
00
à
31
:Sélectionnez le niveau.
Répétez les étapes
1
et
2
pour toutes les couleurs primaires.
•
Votre réglages est mémorisé sur
[USER]
dans
[PRESET]
.
•
[NIGHT COLOR]
ou
[DAY COLOR]
est changé quand vous allumez ou éteignez les
feux de la voiture.
NIGHT COLOR
MENU COLOR
ON
: La couleur de l’éclairage de la touche symbolique change sur blanc quand vous êtes en
mode de menu ou lors de la sélection d’un fichier musical à partir d’un dossier ou d’une liste.;
OFF
:Annulation.
*
2
Certains caractères ou symboles n’apparaissent pas correctement (ou un blanc apparaît à leur place).
RÉGLAGES D’AFFICHAGE
Entretien
Nettoyage de l’appareil
Essuyez la saleté de la façade avec un chiffon sec au silicone ou un chiffon doux.
Nettoyage du connecteur
Détachez la façade et nettoyez le connecteur à l’aide d’un coton
tige en faisant attention de ne pas endommager le connecteur.
Manipulation des disques:
•
Ne pas toucher la surface d’enregistrement du disque.
•
Ne pas coller de ruban adhésif, etc. sur les disques et ne pas utiliser de disque avec du ruban adhésif collé dessus.
•
N’utilisez aucun accessoire pour le disque.
•
Nettoyer le disque en partant du centre vers l’extérieur.
•
Nettoyez le disque avec un chiffon sec au silicone ou un chiffon doux. N’utilisez aucun solvant.
•
Pour retirer les disques de cet appareil, tirez-les horizontalement.
•
Retirez les ébarbures du bord du trou central du disque avant d’insérer un disque.
Plus d’informations
Pour: – Les dernières mise à jour du micrologiciel et la liste de compatibilité la plus récente
– Application originale JVC
– Autres informations récentes
Consultez <http://www.jvc.net/cs/car/>.
Généralités
•
Cet appareil ne peut lire que les CD suivants:
•
Lecture de disques à double face:
La face non DVD d’un disque à “DualDisc” n’est pas compatible avec le
standard “Compact Disc Digital Audio”. Par conséquent, l’utilisation de la face non DVD d’un disque à double face sur
cet appareil ne peut pas etre recommandée.
•
Pour des informations détaillées et des remarques sur les fichiers audio compatibles, reportez-vous à
<http://www.jvc.net/cs/car/>.
Connecteur (sur la face arrière
de la façade)
RÉFÉRENCES
JS_JVC_KD_DB98BT_E_FR.indd 24JS_JVC_KD_DB98BT_E_FR.indd 246/12/2016 9:28:21 AM6/12/2016 9:28:21 AM
FRANÇAIS
25
Data Size: B6L (182 mm x 128 mm)
Book Size: B6L (182 mm x 128 mm)
RÉFÉRENCES
Fichiers pouvant être lus
•
Fichier audio reproductible:
Pour les disques: MP3 (.mp3), WMA (.wma), AAC (.aac)
Pour les périphériques USB à mémoire de grande capacité: MP3 (.mp3), WMA (.wma), AAC (.aac), WAV (.wav),
FLAC (.flac)
•
Supports de disque compatibles: CD-R/CD-RW/CD-ROM
•
Formats de fichiers de disques compatibles: ISO 9660 Niveau 1/2, Joliet, Nom de fichier étendu
•
Systèmes de fichier de périphérique USB compatibles: FAT12, FAT16, FAT32
Même quand les fichiers audio sont conformes aux normes établies ci-dessus, il est possible que la lecture ne soit pas
possible suivant le type ou les conditions du support ou périphérique.
Un fichier AAC (.m4a) dans un périphérique USB ou un CD codé par iTunes ne peut pas être lu sur cet appareil.
Disques ne pouvant pas être lus
•
Disques qui ne sont pas ronds.
•
Disques avec des colorations sur la surface d’enregistrement ou disques sales.
•
Disques enregistrables/réinscriptibles qui n’ont pas été finalisés.
•
CD de 8 cm. Essayer d’insérer un disque à l’aide d’un adaptateur peut entraîner un dysfonctionnement de l’appareil.
À propos des périphériques USB
•
Vous ne pouvez pas connecter un périphérique USB via un hub USB.
•
La connexion d’un câble dont la longueur totale dépasse 5 m peut avoir pour conséquence un fonctionnement
anormal de la lecture.
•
Cet appareil ne peut pas reconnaître les périphériques USB dont l’alimentation n’est pas de 5 V et dépasse 1,5A.
Lassen Sie bei Nichtgebrauch nicht das Kabel im Auto liegen.
*
2
Wenn ein Android-Gerät angeschlossen wird, wird “Press [VIEW] to install JVC MUSIC PLAY APP” angezeigt. Gehen Sie zur Installation der Anwendung gemäß den
Anweisungen vor. Sie können auch vor dem Verbinden die neueste Version der JVC MUSIC PLAY-Anwendung auf Ihrem Android-Gerät installieren. Für die neueste
Information besuchen Sie <http://www.jvc.net/cs/car/>.
*
3
Bei ANDROID: Trifft nur zu, wenn
[AUTO MODE]
gewählt ist.
( 10)
*
4
Bei CD: Nur für MP3/WMA/AAC-Dateien. Dies funktioniert nicht bei iPod/ANDROID.
Gebruikershandleiding.com neemt misbruik van zijn services uitermate serieus. U kunt hieronder aangeven waarom deze vraag ongepast is. Wij controleren de vraag en zonodig wordt deze verwijderd.
Product:
Spelregels forum
Om tot zinvolle vragen te komen hanteren wij de volgende spelregels:
lees eerst de handleiding door;
controleer of uw vraag al eerder door iemand anders is gesteld;
probeer uw vraag zo duidelijk mogelijk te stellen;
heeft u een probleem en al geprobeerd om dit op te lossen, vermeld dit erbij aub;
heeft u een oplossing gekregen van een bezoeker dan horen wij dat graag in dit forum;
wilt u een reactie geven op een vraag of antwoord, gebruik dan niet dit formulier maar klik op de knop 'reageer op deze vraag';
uw vraag wordt direct op de website gezet; vermijd daarom persoonlijke gegevens in te vullen;
Belangrijk! Als er een antwoord wordt gegeven op uw vraag, dan is het voor de gever van het antwoord nuttig om te weten als u er wel (of niet) mee geholpen bent! Wij vragen u dus ook te reageren op een antwoord.
Belangrijk! Antwoorden worden ook per e-mail naar abonnees gestuurd. Laat uw emailadres achter op deze site, zodat u op de hoogte blijft. U krijgt dan ook andere vragen en antwoorden te zien.
Abonneren
Abonneer u voor het ontvangen van emails voor uw JVC KD-DB98BT bij:
nieuwe vragen en antwoorden
nieuwe handleidingen
U ontvangt een email met instructies om u voor één of beide opties in te schrijven.
Ontvang uw handleiding per email
Vul uw emailadres in en ontvang de handleiding van JVC KD-DB98BT in de taal/talen: Duits, Engels, Frans als bijlage per email.
De handleiding is 1,78 mb groot.
U ontvangt de handleiding per email binnen enkele minuten. Als u geen email heeft ontvangen, dan heeft u waarschijnlijk een verkeerd emailadres ingevuld of is uw mailbox te vol. Daarnaast kan het zijn dat uw internetprovider een maximum heeft aan de grootte per email. Omdat hier een handleiding wordt meegestuurd, kan het voorkomen dat de email groter is dan toegestaan bij uw provider.
Uw handleiding is per email verstuurd. Controleer uw email
Als u niet binnen een kwartier uw email met handleiding ontvangen heeft, kan het zijn dat u een verkeerd emailadres heeft ingevuld of dat uw emailprovider een maximum grootte per email heeft ingesteld die kleiner is dan de grootte van de handleiding.
Er is een email naar u verstuurd om uw inschrijving definitief te maken.
Controleer uw email en volg de aanwijzingen op om uw inschrijving definitief te maken
U heeft geen emailadres opgegeven
Als u de handleiding per email wilt ontvangen, vul dan een geldig emailadres in.
Uw vraag is op deze pagina toegevoegd
Wilt u een email ontvangen bij een antwoord en/of nieuwe vragen? Vul dan hier uw emailadres in.