TO CUSTOMERS: PLEASE MAKE SURE TO READ THIS CAREFULLY
BEFORE INSTALLING OR USING THE SOFTWARE PROGRAM
NAMED "DIGITAL PHOTO NAVIGATOR" ("Program") ON YOUR PC.
The right to use the Program is granted by Victor Company of Japan,
Limited ("JVC") to You only on the condition that You agree to the follow-
ing.
Should You not agree to the terms hereof, You may not install or use the
Program. HOWEVER, INSTALLING OR USING THE PROGRAM INDI-
CATES YOUR ACCEPTANCE OF THESE TERMS AND CONDITIONS.
1
COPYRIGHT; OWNERSHIP
You acknowledge that all copyrights and other intellectual property rights
in the Program are owned by JVC and its licensor, and remain vested in
JVC and such licensor. The Program is protected under the copyright law
of Japan and other countries, and related Conventions.
2
GRANT OF LICENCE
① Subject to the conditions of this Agreement, JVC grants to You a
non-exclusive right to use the Program. You may install and use the
Program on a HDD or other storage devices incorporated in Your
PC.
② You may make one (1) copy of the Program solely for your personal
backup or archival purposes.
3
RESTRICTION ON THE PROGRAM
① You may not reverse engineer, decompile, disassemble, revise or
modify the Program, except to the extent that expressly permitted
by applicable law.
② You may not copy or use the Program, in whole or in part, other
than as expressly specified in this Agreement.
③ You have no right to grant a licence to use the Program, and may
not distribute, rent, lease or transfer the Program to any third party
or otherwise let them use the Program.
4
LIMITED WARRANTY
JVC warrants that any media in which the Program is embodied are free
from any defects in materials and workmanship for a period of thirty (30)
days from the date of Your purchasing any our products accompanying
the Program. JVC’s entire liability and your exclusive remedy in connec-
tion with the Program shall be replacement of such defective media. EX-
CEPT FOR THE EXPRESS WARRANTIES STATED HEREIN AND TO
THE EXTENT PERMITTED BY APPLICABLE LAW, JVC AND ITS LI-
CENSORS DISCLAIM ANY OTHER WARRANTIES, EITHER EXPRESS
OR IMPLIED, INCLUDING BUT NOT LIMITED TO IMPLIED WARRAN-
TIES OF MERCHANTABILITY AND FITNESS FOR A PARTICULAR
PURPOSE IN REGARD TO THE PROGRAM AND THE ACCOMPANY-
ING PRINTED MATERIALS. SHOULD THERE BE ANY PROBLEM
ARISING FROM OR CAUSED BY THE PROGRAM, YOU SHOULD
SETTLE ALL SUCH PROBLEM AT YOUR OWN COST AND EXPENSE.
5
LIMITED LIABILITY
TO THE EXTENT PERMITTED BY APPLICABLE LAW, IN NO EVENT
SHALL JVC AND ITS LICENSORS BE LIABLE FOR ANY INDIRECT,
SPECIAL, INCIDENTAL OR CONSEQUENTIAL DAMAGES WHATSO-
EVER, REGARDLESS OF THE FORM OF ACTION WHETHER IN CON-
TRACT, TORT OR OTHERWISE ARISING OUT OF OR IN CONNEC-
TION WITH THE USE OF OR INABILITY TO USE THE PROGRAM,
EVEN IF JVC HAS BEEN ADVISED OF THE POSSIBILITY OF SUCH
DAMAGES. YOU WILL INDEMNIFY AND HOLD HARMLESS JVC
FROM ANY LOSS, LIABILITY OR COST ARISING OUT OF OR IN ANY
WAY CONNECTED TO CLAIMS FROM ANY THIRD PARTY RELATING
TO THE USE OF THE PROGRAM.
6
TERM
This Agreement will become effective on the date when You install and
use the Program on Your machine, and continue to be in effect until the
termination under the following provision.
Should You breach any provision of this Agreement, JVC may terminate
this Agreement without giving any notice to You. In this event, JVC may
claim against You for any damages caused by Your breach. Should this
Agreement be terminated, You must immediately destroy the Program
stored in Your machine (including the erasing from any memory in Your
PC), and no longer own such Program.
Copying
41
7
EXPORT CONTROL
You agree that You will not ship, transfer or export the Program or under-
lying information and technology to any countries to which Japan and oth-
er relevant countries have initiated an embargo on such goods.
8
U.S. GOVERNMENT USER
If You are an agency of the United States of America (the "Government"),
You acknowledge JVC's representation that the Program is a "Commer-
cial Item" as defined in Federal Acquisition Regulation (FAR) part 2.101
(g) consisting unpublished "Commercial Computer Software" as those
items are used at FAR part 12.212 and is only licenced to You with the
same use rights JVC grants all commercial end users pursuant to the
terms of this Agreement.
9
GENERAL
① No modification, change, addition, deletion or other alternation of or
to this Agreement will be valid unless reduced to writing and signed
by an authorized representative of JVC.
② If any part of this Agreement is held invalid by or in conflict with any
law having jurisdiction over this Agreement, the remaining provi-
sions will remain in full force and effect.
③ This Agreement shall be governed by and interpreted under the
laws of Japan. The Tokyo District Court has jurisdiction over all dis-
putes which may arise with respect to the execution, interpretation
and performance of this Agreement.
Victor Company of Japan, Limited
Memo:
●
If You acquired the Program in Germany, the provisions of Sections 4
(Limited Warranty) and 5 (Limited Liability) provided above will be re-
placed with those of the German version of this Agreement.
CAUTION:
●
Operate this equipment according to the operating procedures descri-
bed in this manual.
●
Use only the provided CD-ROM. Never use any other CD-ROM to run
this software.
●
Do not attempt to modify this software.
●
Changes or modifications not approved by JVC could void user's au-
thority to operate the equipment.
How to handle a CD-ROM:
●
Take care not to soil or scratch the mirror surface (opposite to the prin-
ted surface). Do not write anything or put a sticker on either the front or
back surface. If the CD-ROM gets dirty, gently wipe it with a soft cloth
outward from the center hole.
●
Do not use conventional disc cleaners or cleaning spray.
●
Do not bend the CD-ROM or touch its mirror surface.
●
Do not store your CD-ROM in a dusty, hot or humid environment. Keep
it away from direct sunlight.
You can find the latest information (in English) on the provided software
program at our world wide web server at
http://www.jvc-victor.co.jp/english/global-e.html
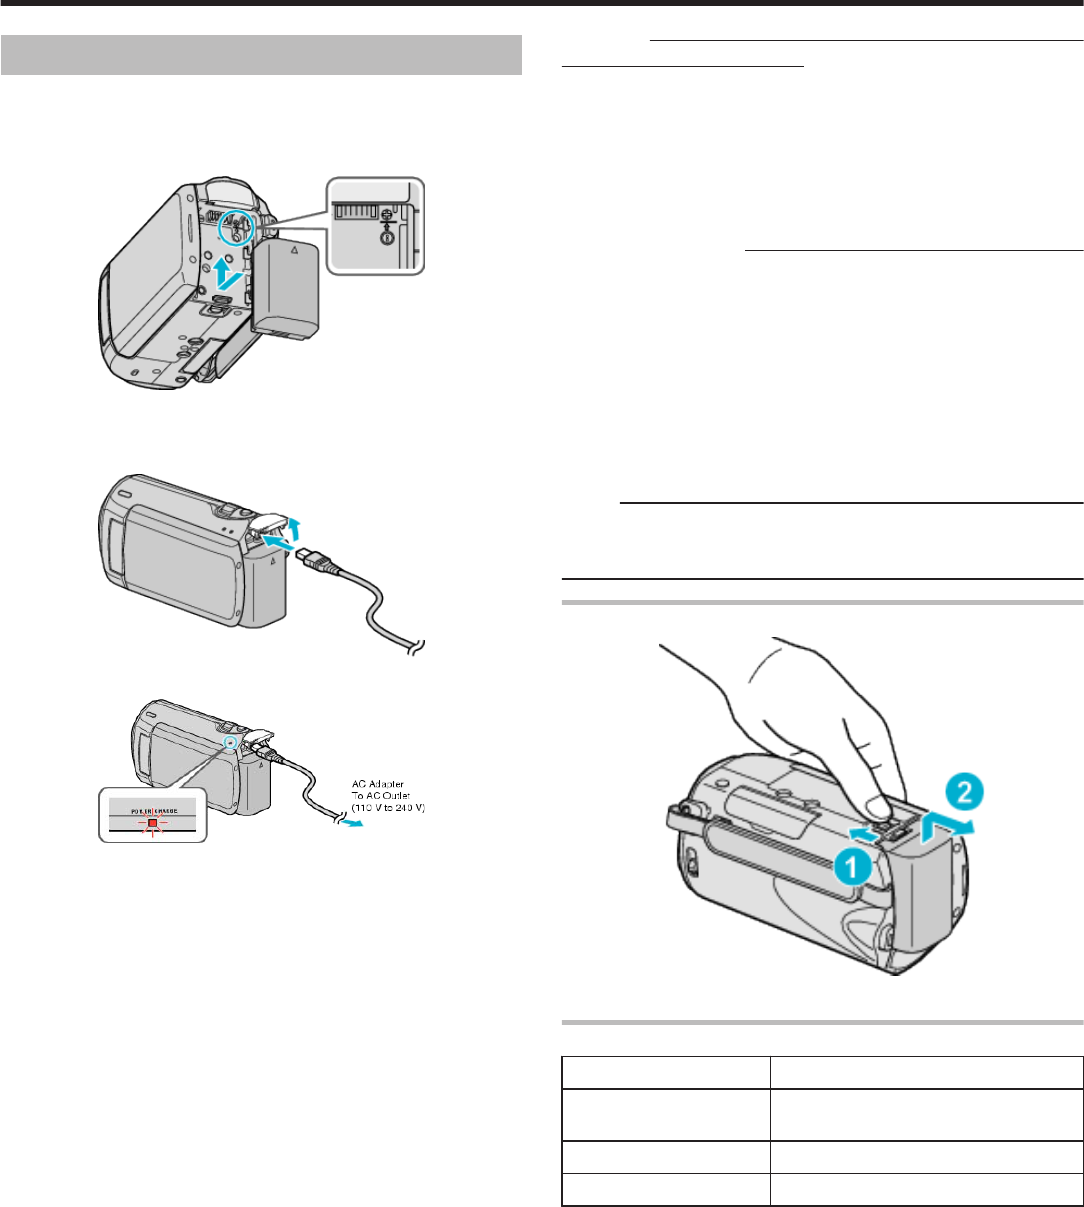
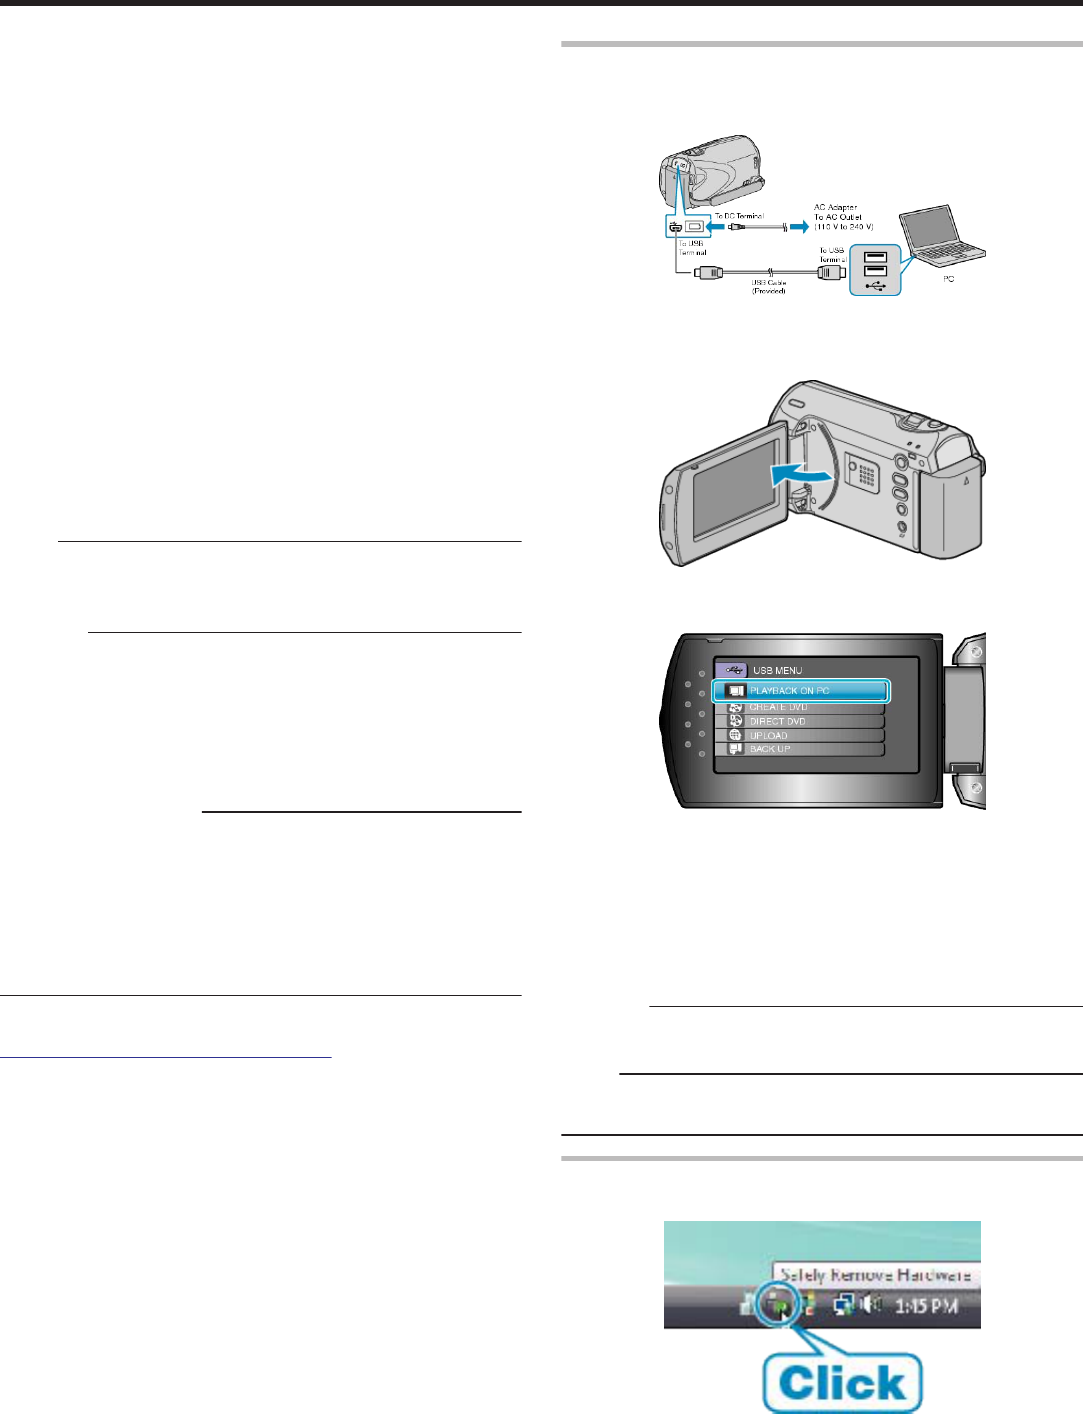
Backing Up Files Without Using Provided Software
Copy the files to a PC using the following method.
1
Connect the USB cable and AC adapter.
.
① Connect the AC adapter to this unit.
② Connect using the provided USB cable.
2
Open the LCD monitor.
.
●
The USB MENU appears.
3
Select “PLAYBACK ON PC” and touch C.
.
●
Close the Everio MediaBrowser program, if it starts.
●
The subsequent operations are to be performed on the PC.
4
Select "Computer" (Windows Vista) / "My Computer" (Windows XP)
from the start menu, then click on the EVERIO_HDD or EVERIO_SD
icon.
●
The folder opens.
5
Copy the files to any folder in the PC (desktop, etc).
CAUTION:
●
When the folders or files are deleted/moved/renamed in the computer,
they cannot be played back on this unit anymore.
Memo:
●
To edit the files, use a software that supports MOD/JPEG files.
●
The above operations on PC may vary with the system used.
Disconnecting this Unit from PC
1
Click “Safely Remove Hardware”.
.
2
Click “Safely Remove USB Mass Storage Device”.
3
(For Windows Vista) Click “OK”.
4
Disconnect the USB cable and close the LCD monitor.
Copying
42
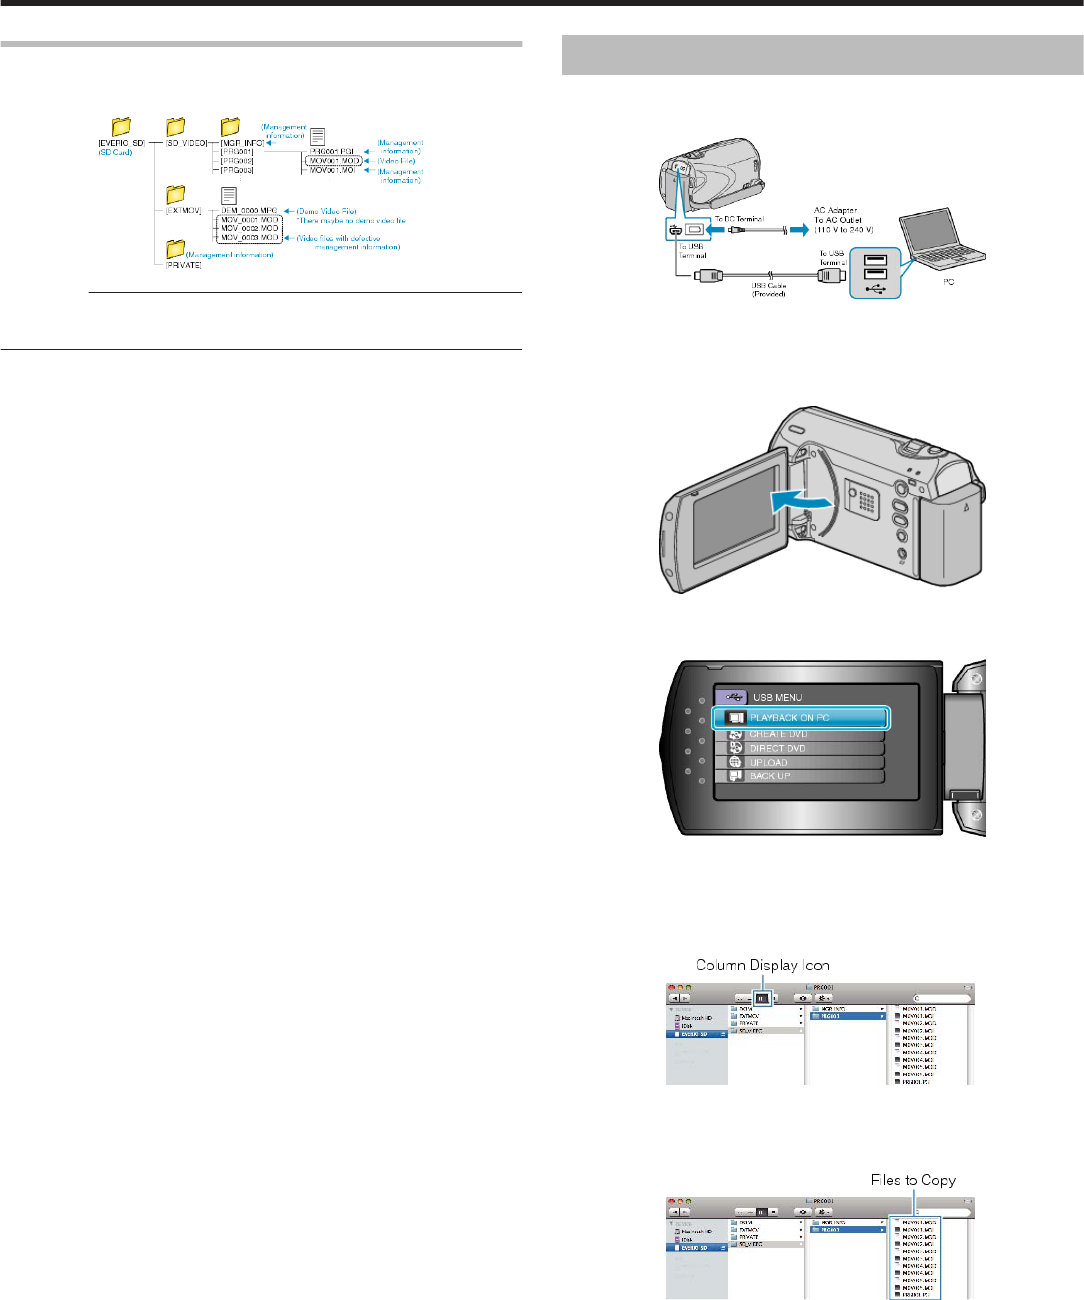
List of Files and Folders
Folders and files are created in the SD card as shown below.
They are created only when necessary.
.
CAUTION:
●
When the folders or files are deleted/moved/renamed in the computer,
they cannot be played back on this unit anymore.
Copying to Mac Computer
Copy the files to a Mac computer using the following method.
1
Connect the USB cable and the AC adapter.
.
① Connect the AC adapter to this unit.
② Connect using the provided USB cable.
●
The provided software is not required for this process.
2
Open the LCD monitor.
.
●
The USB MENU appears.
3
Select “PLAYBACK ON PC” and press OK.
.
●
The subsequent operations are to be performed on the PC.
4
Click on the “EVERIO_SD” icon on the desktop.
●
The folder opens.
5
Click on the column display icon.
.
●
Search the folder with the desired files.
"List of Files and Folders" (A P.43)
6
Copy the files to any folder in the PC (desktop, etc).
.
Copying
43
CAUTION:
●
When the folders or files are deleted/moved/renamed in the computer,
they cannot be played back on this unit anymore.
●
MOD files that are copied to a Mac computer cannot be imported to iM-
ovie.
To use MOD files with iMovie, import the files using iMovie.
Memo:
●
To edit the files, use a software that supports MOD files.
●
When removing this unit from the PC, drag&drop the “EVERIO_SD”
icon on the desktop to the trash bin.
iMovie
You can import files from this unit to a PC using Apple’s iMovie'08 or '09.
To verify the system requirements, select “About This Mac” from the Ap-
ple menu. You can determine the operating system version, processor
and amount of memory.
●
For the latest information on iMovie, refer to the Apple website.
●
For details on how to use iMovie, refer to the help file of the software.
●
There is no guarantee that the operations will work with all computer
environments.
Copying
44
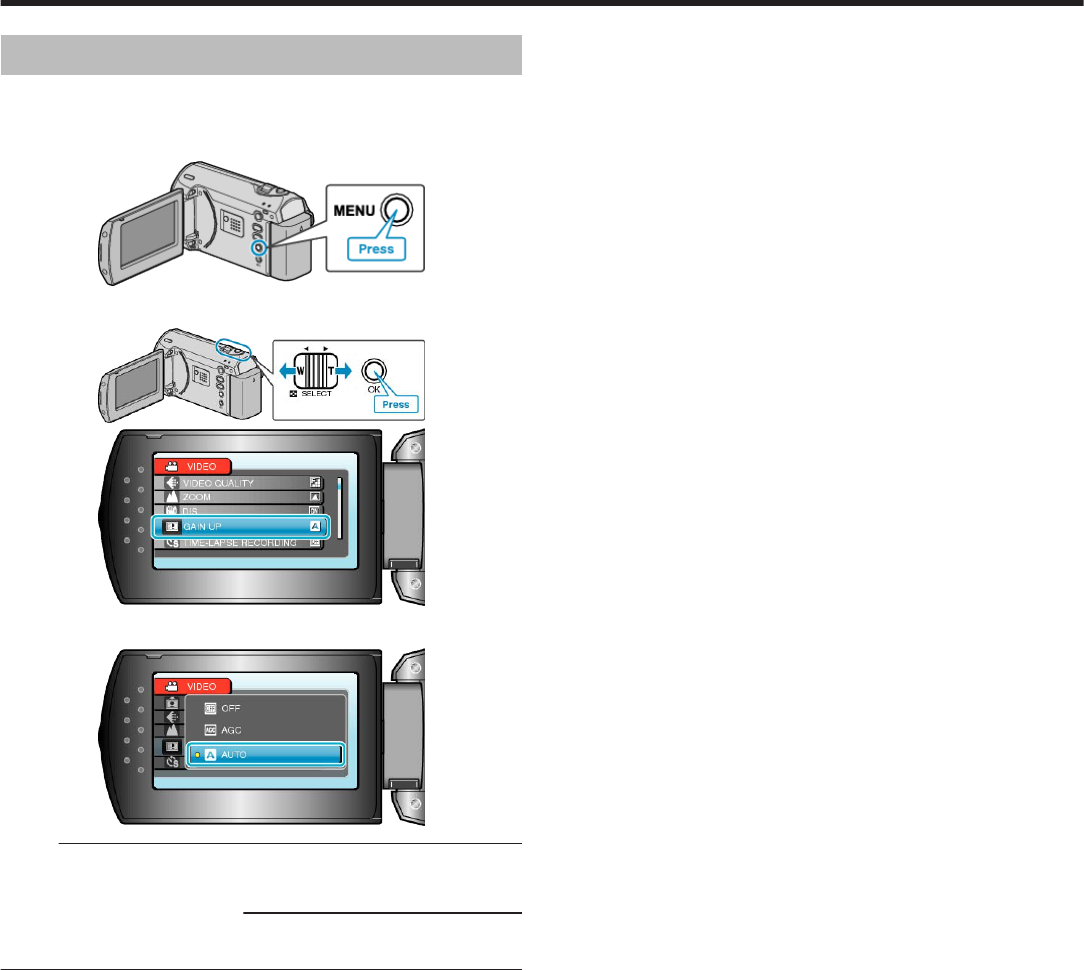
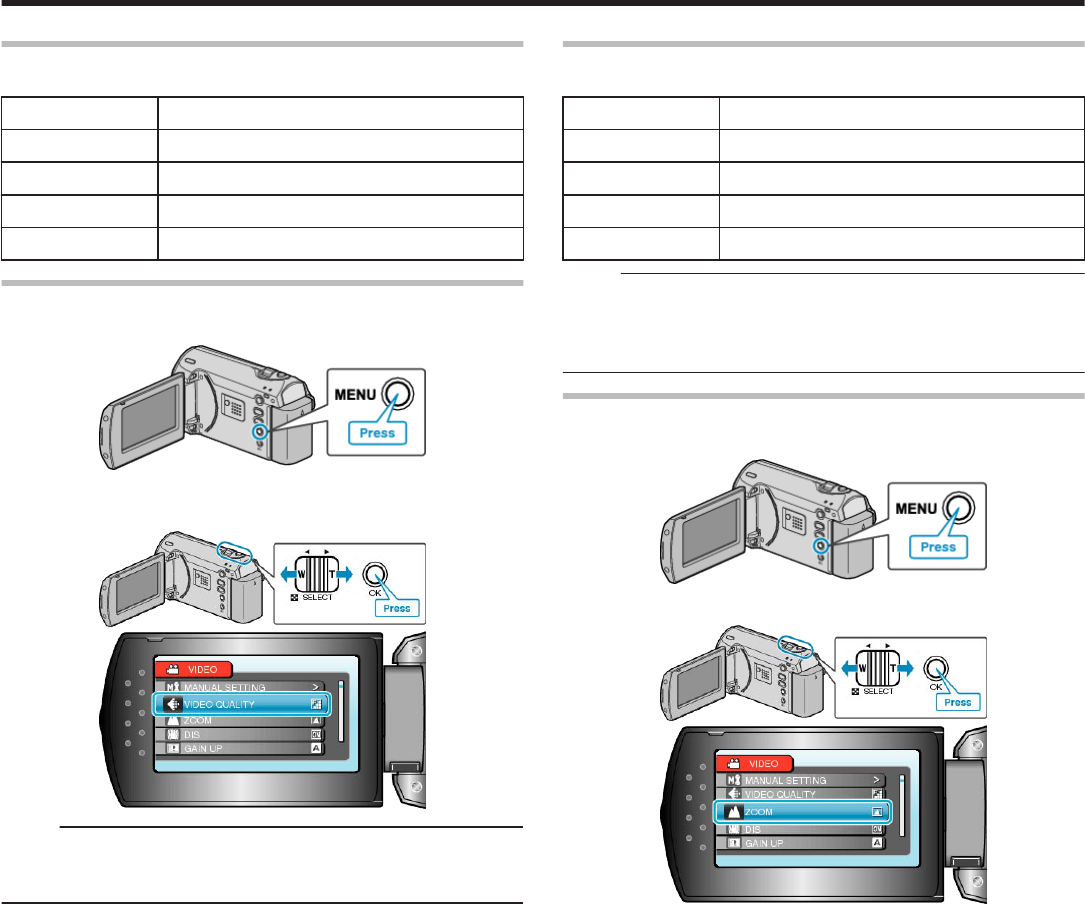
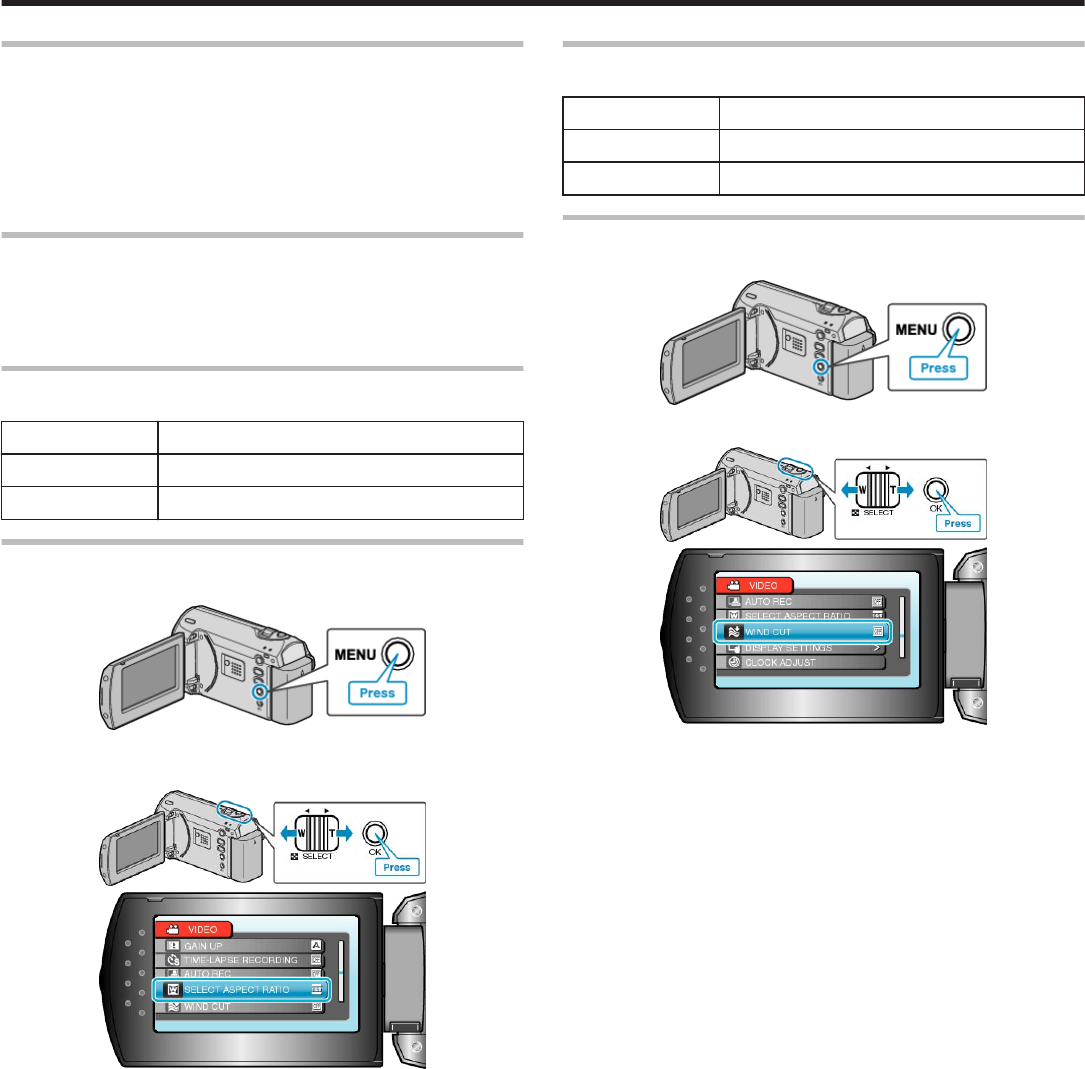
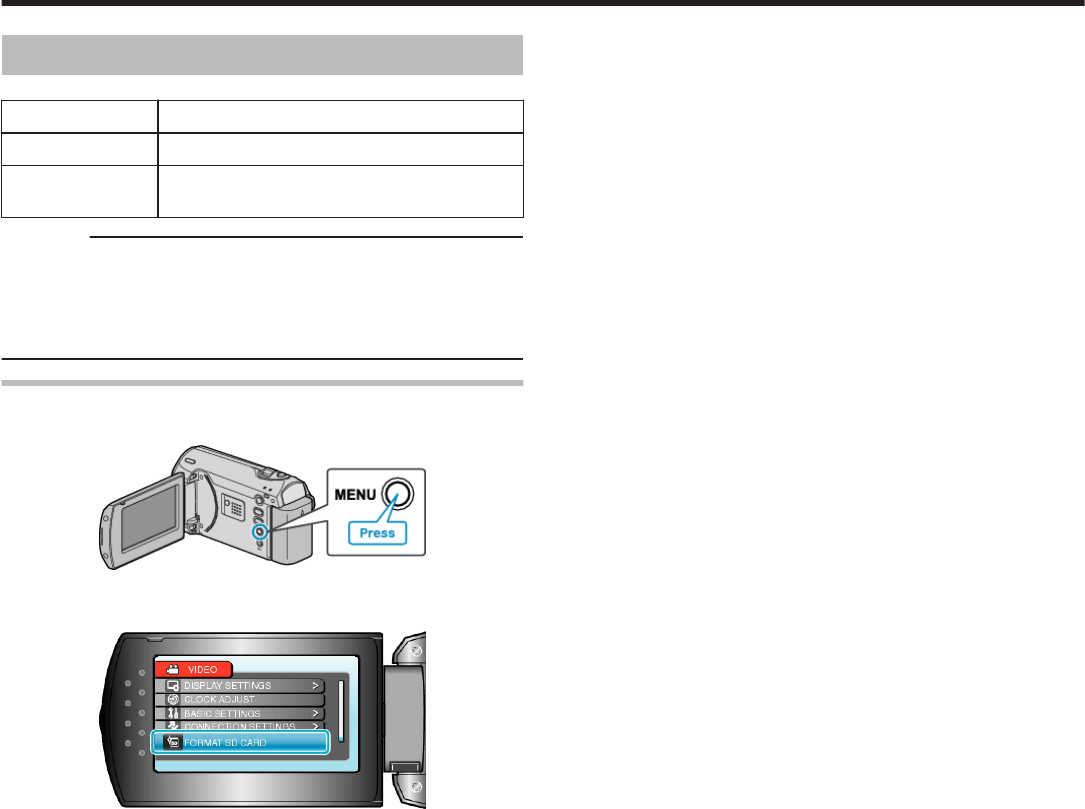
Operating the Menu
Use the ZOOM/SELECT lever and OK button to set the menu.
●
The menu differs according to the mode in use.
1
Press MENU to display the menu.
.
2
Select the desired menu with the ZOOM/SELECT lever and press OK.
.
.
3
Select the desired setting and press OK.
.
Memo:
●
To return to the previous screen, press MENU.
●
To close the menu, press MENU a few times.
Returning All Settings to Default:
●
Set using “FACTORY PRESET” in the camera settings menu.
"FACTORY PRESET" (A P.57)
Menu Settings
45
Recording Menu
You can adjust various settings, such as brightness and white balance, to suit the subject or purpose. You can also change settings such as picture
quality and gain.
SettingDetails
MANUAL SETTINGRecording settings can be adjusted manually.
●
They are displayed only when recording in the manual mode.
"Manual Recording" (A P.19)
VIDEO QUALITYSets the video quality.
"VIDEO QUALITY" (A P.47)
ZOOMSets the maximum zoom ratio.
"ZOOM" (A P.47)
DISCamera shake during recording can be effectively reduced.
"DIS" (A P.48)
GAIN UPMakes the subject appear bright automatically when recording in dark places.
"GAIN UP" (A P.48)
TIME-LAPSE RECORDINGEnables the changes of a scene that occur slowly over a long period to be shown within a short time by
taking frames of it at a certain interval.
"Recording at Intervals (TIME-LAPSE RECORDING)" (A P.26)
AUTO RECEnables the unit to start or stop recording automatically by sensing the changes in brightness within the
red frame displayed on the LCD monitor.
"Recording Automatically by Sensing Movements (AUTO REC)" (A P.28)
SELECT ASPECT RATIORecording with aspect ratio 16:9 or 4:3 can be performed.
"SELECT ASPECT RATIO" (A P.49)
WIND CUTReduces the noise caused by wind.
"WIND CUT" (A P.49)
Menu Settings
46
VIDEO QUALITY
Sets the video quality.
SettingDetails
ULTRA FINEEnables recording in the best picture quality.
FINEEnables recording in high picture quality.
NORMALEnables recording in standard quality.
ECONOMYEnables long recordings.
Displaying the Item
1
Press MENU to display the menu.
.
2
Select “VIDEO QUALITY” with the ZOOM/SELECT lever and press
OK.
.
.
Memo:
●
You can also change the video quality from the remaining recording
time display.
Select the video quality with the slider and press OK.
ZOOM
Sets the maximum zoom ratio.
SettingDetails
39x/OPTICALEnables zooming up to 39x.
45x/DYNAMICEnables zooming up to 45x.
90x/DIGITALEnables zooming up to 90x.
800x/DIGITALEnables zooming up to 800x.
Memo:
●
You can expand the zoom area without degrading the image quality by
using dynamic zoom.
●
When digital zoom is used, the image becomes grainy as it is digitally
enlarged.
Displaying the Item
1
Press MENU to display the menu.
.
2
Select “ZOOM” with the ZOOM/SELECT lever and press OK.
.
.
Menu Settings
47
DIS
Camera shake during recording can be effectively reduced.
SettingDetails
OFFDeactivates image stabilizer.
ONActivates image stabilizer.
ON(A.I.S.)Reduces camera shake more effectively when
shooting bright scenes on the wide angle end.
*Only on the wide angle end (approx. 5x)
Memo:
●
It is recommended to set this mode to “OFF” when using a tripod and
recording a subject with little movement.
●
Complete stabilization may not be possible if camera shake is exces-
sive.
Displaying the Item
1
Press MENU to display the menu.
.
2
Select “DIS” with the ZOOM/SELECT lever and press OK.
.
.
GAIN UP
Makes the subject appear bright automatically when recording in dark
places.
SettingDetails
OFFDeactivates the function.
AGCElectrically brightens the scene when it is dark.
AUTOAutomatically brightens the scene when it is
dark.
Memo:
●
Although “AUTO” brightens the scene more than “AGC”, movements of
the subject may become unnatural.
Displaying the Item
1
Press MENU to display the menu.
.
2
Select “GAIN UP” with the ZOOM/SELECT lever and press OK.
.
.
Menu Settings
48
TIME-LAPSE RECORDING
This function enables the changes of a scene that occur slowly over a
long period to be shown within a short time by taking frames of it at a cer-
tain interval.
This is useful for making observations such as the opening of a flower
bud.
Operating Details
"Recording at Intervals (TIME-LAPSE RECORDING)" (A P.26)
AUTO REC
Records automatically by sensing the changes in brightness.
Operating Details
"Recording Automatically by Sensing Movements (AUTO REC)" (A
P.28)
SELECT ASPECT RATIO
Recording with aspect ratio 16:9 or 4:3 can be performed.
SettingDetails
16:9Sets the aspect ratio to 16:9.
4:3Sets the aspect ratio to 4:3.
Displaying the Item
1
Press MENU to display the menu.
.
2
Select “SELECT ASPECT RATIO” with the ZOOM/SELECT lever and
press OK.
.
.
WIND CUT
Reduces the noise caused by wind.
SettingDetails
OFFDeactivates the function.
ONActivates the function.
Displaying the Item
1
Press MENU to display the menu.
.
2
Select “WIND CUT” with the ZOOM/SELECT lever and press OK.
.
.
Menu Settings
49
Manual Settings Menu
Recording settings can be adjusted manually.
Memo:
●
They are displayed only when recording in the manual mode.
SettingDetails
SCENE SELECTSettings to suit the shooting condition can be selected.
"Scene Selection" (A P.20)
FOCUSFocus can be adjusted manually.
"Adjusting Focus Manually" (A P.21)
BRIGHTNESS ADJUSTAdjusts the overall brightness of the screen.
"Adjusting Brightness" (A P.22)
SHUTTER SPEEDShutter speed can be adjusted.
"Setting Shutter Speed" (A P.23)
WHITE BALANCEAdjusts the color according to the light source.
"Setting White Balance" (A P.24)
BACKLIGHT COMP.Corrects the image when the subject appears dark due to backlight.
"Setting Backlight Compensation" (A P.24)
METERING AREA/ TYPEEnables you to adjust the brightness in the desired area.
"Setting Metering Area" (A P.25)
TELE MACROEnables close-up shots when using the telephoto (T) end of the zoom.
"Taking Close-up Shots" (A P.25)
SCENE SELECT
Settings to suit the shooting condition can be selected.
Operating Details
"Scene Selection" (A P.20)
FOCUS
Focus can be adjusted automatically or manually.
Operating Details
"Adjusting Focus Manually" (A P.21)
BRIGHTNESS ADJUST
Adjusts the overall brightness of the screen.
Operating Details
"Adjusting Brightness" (A P.22)
SHUTTER SPEED
Shutter speed can be adjusted.
Operating Details
"Setting Shutter Speed" (A P.23)
WHITE BALANCE
Adjusts the color according to the light source.
Operating Details
"Setting White Balance" (A P.24)
BACKLIGHT COMP.
Corrects the image when the subject appears dark due to backlight.
Operating Details
"Setting Backlight Compensation" (A P.24)
METERING AREA/TYPE
Enables you to adjust the brightness in the desired area.
Operating Details
"Setting Metering Area" (A P.25)
TELE MACRO
Enables close-up shots when using the telephoto (T) end of the zoom.
Operating Details
"Taking Close-up Shots" (A P.25)
Menu Settings
50
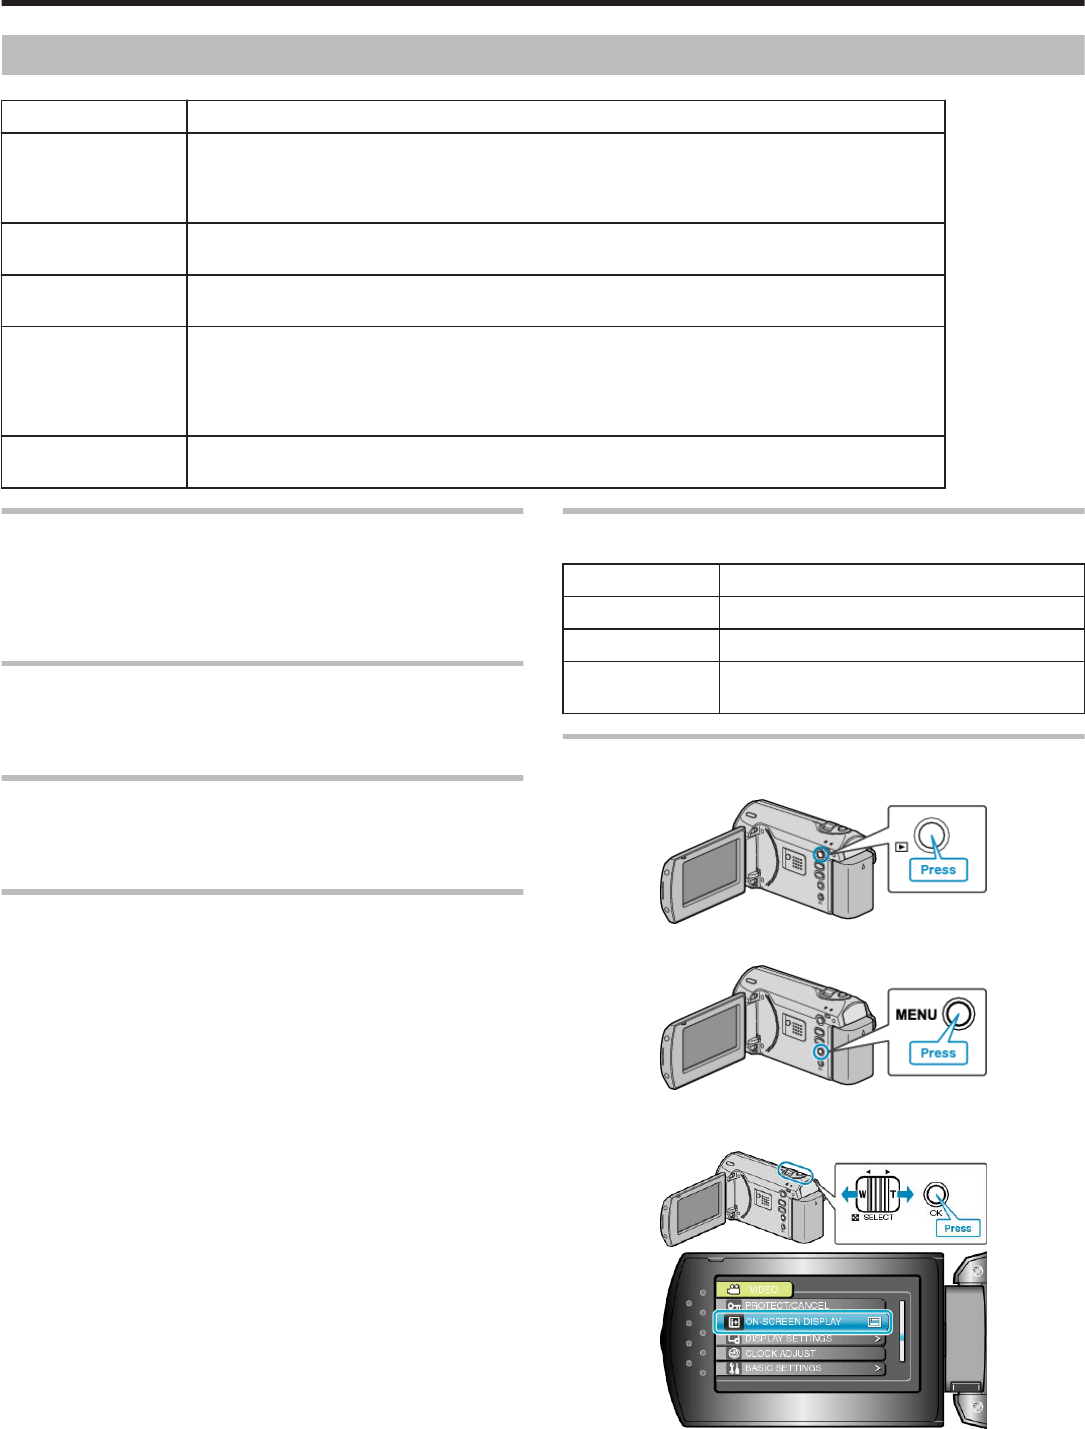
Playback Menu
You can delete or look for specific videos.
SettingDetails
DELETEDeletes unwanted videos.
"Deleting the Currently Displayed File" (A P.33)
"Deleting Selected Files" (A P.33)
"Deleting All Files" (A P.34)
SEARCHYou can search and play videos according to recording dates.
"Searching for a Specific Video Image" (A P.31)
PLAYBACK MPG FILEPlays videos with defective management information.
"Playing a Video with Defective Management Information" (A P.31)
PROTECT/CANCELProtects files from being deleted accidently.
"Protecting the Currently Displayed File" (A P.35)
"Protecting Selected Files" (A P.36)
"Protecting All Files" (A P.36)
"Releasing Protection of All Files" (A P.37)
ON-SCREEN DISPLAYSets whether to show on-screen displays such as icons during playback.
"ON-SCREEN DISPLAY" (A P.51)
DELETE
Deletes unwanted videos.
Operating Details
"Deleting the Currently Displayed File" (A P.33)
"Deleting Selected Files" (A P.33)
"Deleting All Files" (A P.34)
SEARCH
You can search and play videos according to recording dates.
Operating Details
"Searching for a Specific Video Image" (A P.31)
PLAYBACK MPG FILE
Plays videos with defective management information.
Operating Details
"Playing a Video with Defective Management Information" (A P.31)
PROTECT/CANCEL
Protects files from being deleted accidently.
Operating Details
"Protecting the Currently Displayed File" (A P.35)
"Protecting Selected Files" (A P.36)
"Protecting All Files" (A P.36)
"Releasing Protection of All Files" (A P.37)
ON-SCREEN DISPLAY
Sets whether to show on-screen displays such as icons during playback.
SettingDetails
OFFNo display at all.
DISPLAY ALLDisplays everything.
DISPLAY DATE
ONLY
Displays the date only.
Displaying the Item
1
Select the playback mode.
.
2
Press MENU to display the menu.
.
3
Select “ON-SCREEN DISPLAY” with the ZOOM/SELECT lever and
press OK.
.
.
Menu Settings
51
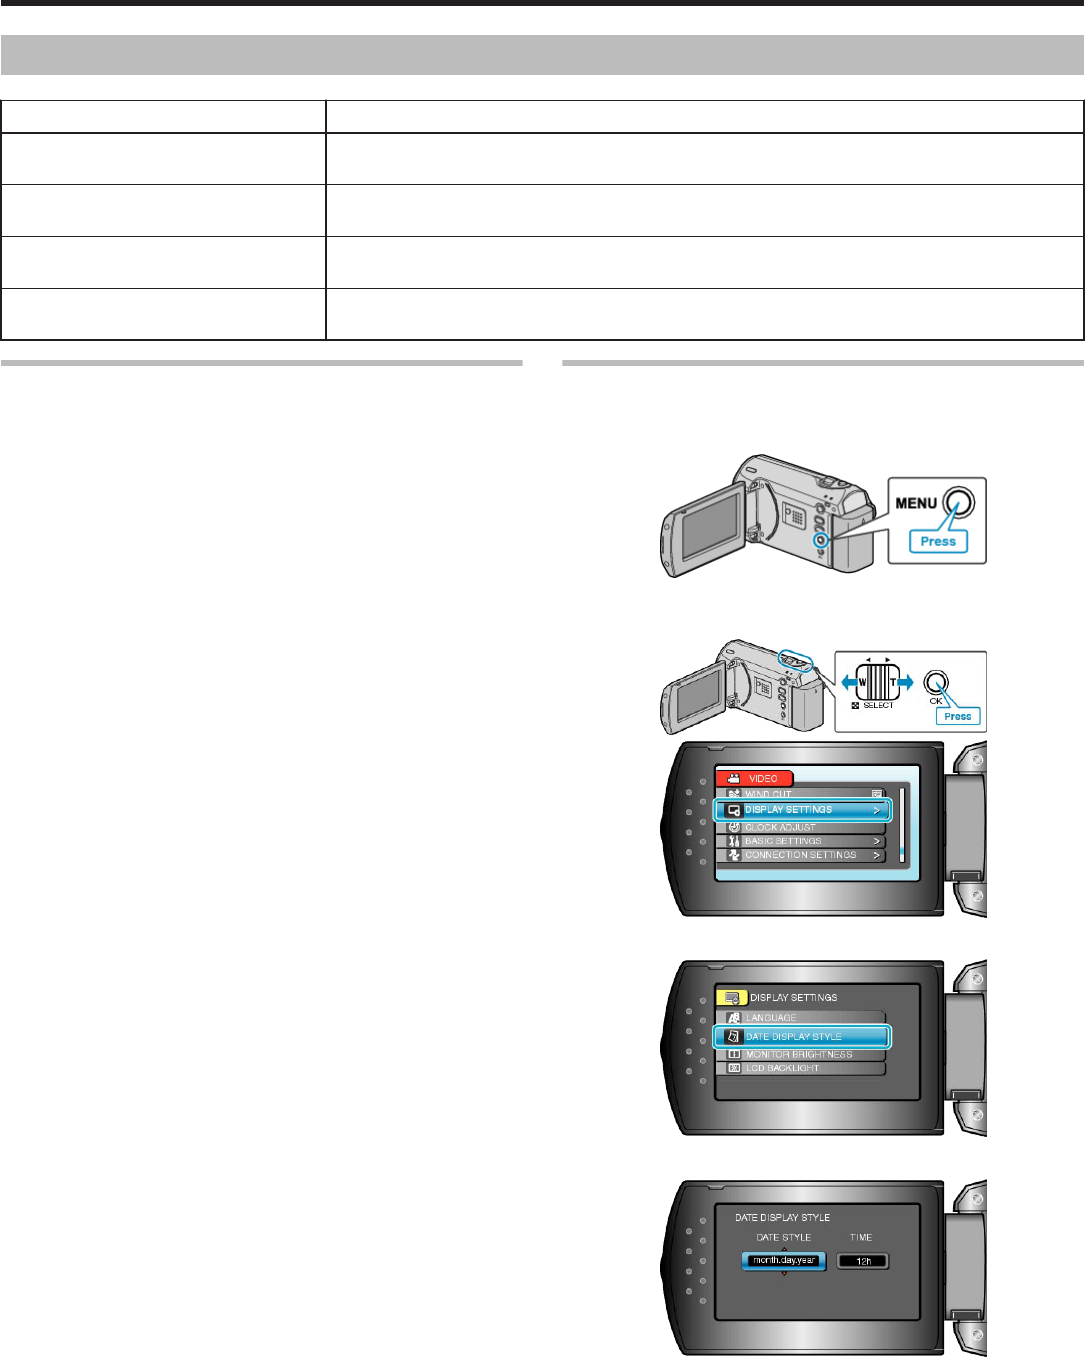
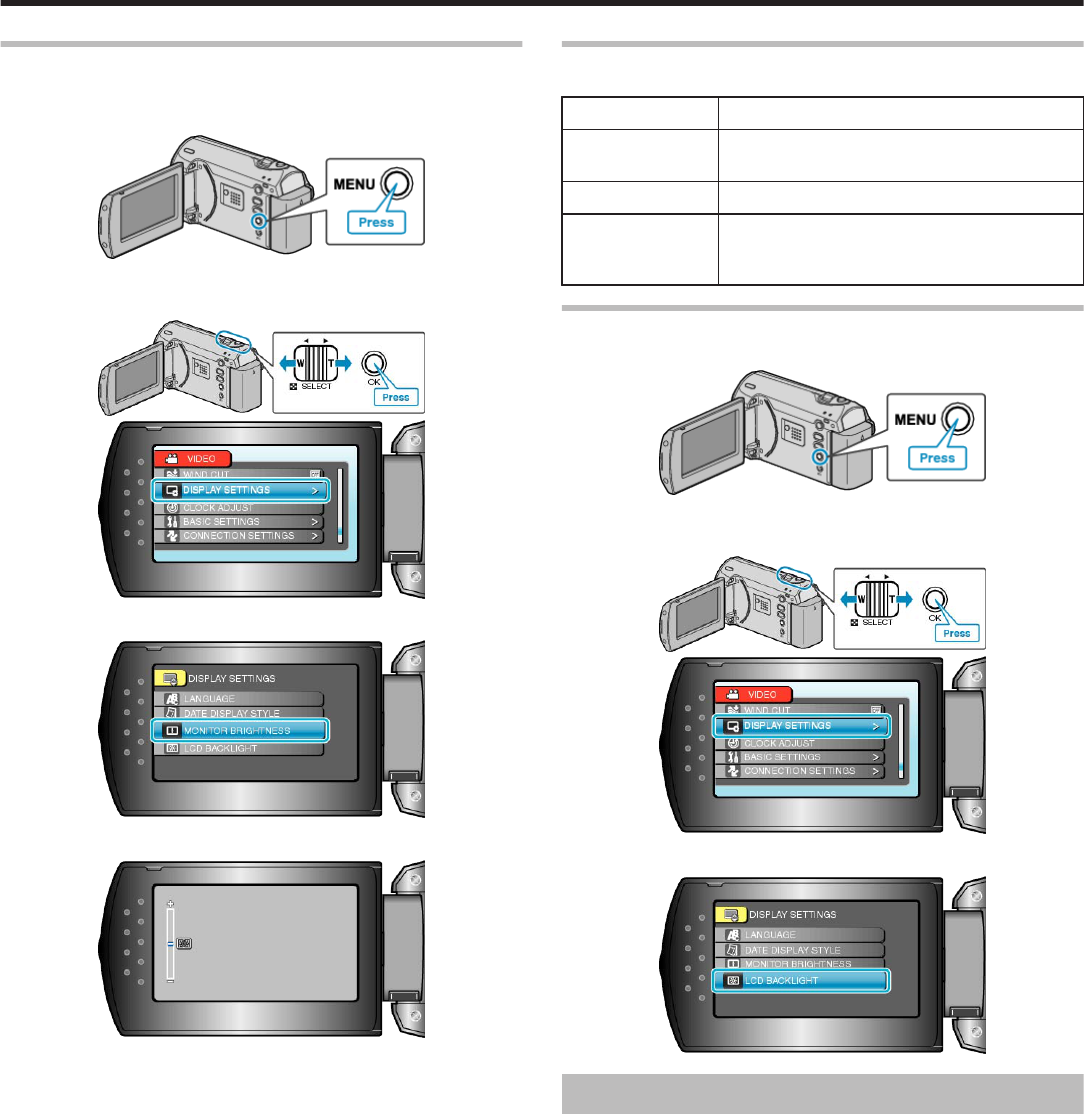
Display Settings Menu
You can adjust various display settings such as the LCD monitor's brightness, etc.
SettingDetails
LANGUAGEThe language on the display can be changed.
"Changing the Display Language" (A P.15)
DATE DISPLAY STYLESets the order of year, month, day and the time display format (24H/12H).
"DATE DISPLAY STYLE" (A P.52)
MONITOR BRIGHTNESSSets the brightness of the LCD monitor.
"MONITOR BRIGHTNESS" (A P.53)
LCD BACKLIGHTSets the brightness of the backlight of the monitor.
"LCD BACKLIGHT" (A P.53)
LANGUAGE
The language on the display can be changed.
Operating Details
"Changing the Display Language" (A P.15)
DATE DISPLAY STYLE
Sets the order of year, month, day and the time display format (24H/12H).
1
Press MENU to display the menu.
.
2
Select “DISPLAY SETTINGS” with the ZOOM/SELECT lever and
press OK.
.
.
3
Select “DATE DISPLAY STYLE” and press OK.
.
4
Set the style of date and time display.
.
●
For date display, set to any format from “month.day.year”,
“year.month.day”, and “day.month.year”.
●
For time display, set to any format from “12h” and “24h”.
●
Use the ZOOM/SELECT lever to move the cursor and press the +/-
buttons to make changes.
●
After setting, press OK.
Menu Settings
52
MONITOR BRIGHTNESS
Sets the brightness of the LCD monitor.
1
Press MENU to display the menu.
.
2
Select “DISPLAY SETTINGS” with the ZOOM/SELECT lever and
press OK.
.
.
3
Select “MONITOR BRIGHTNESS” and press OK.
.
4
Adjust the brightness of the monitor.
.
●
Press + to increase the brightness.
●
Press - to decrease the brightness.
●
After setting, press OK.
LCD BACKLIGHT
Sets the brightness of the backlight of the monitor.
SettingDetails
BRIGHTERBrightens the backlight of the monitor regardless
of the surrounding conditions.
STANDARDHelps to save battery life when selected.
AUTOSets the brightness automatically to “BRIGHT-
ER” when using outdoors and to “STANDARD”
when using indoors.
Displaying the Item
1
Press MENU to display the menu.
.
2
Select “DISPLAY SETTINGS” with the ZOOM/SELECT lever and
press OK.
.
.
3
Select “LCD BACKLIGHT” and press OK.
.
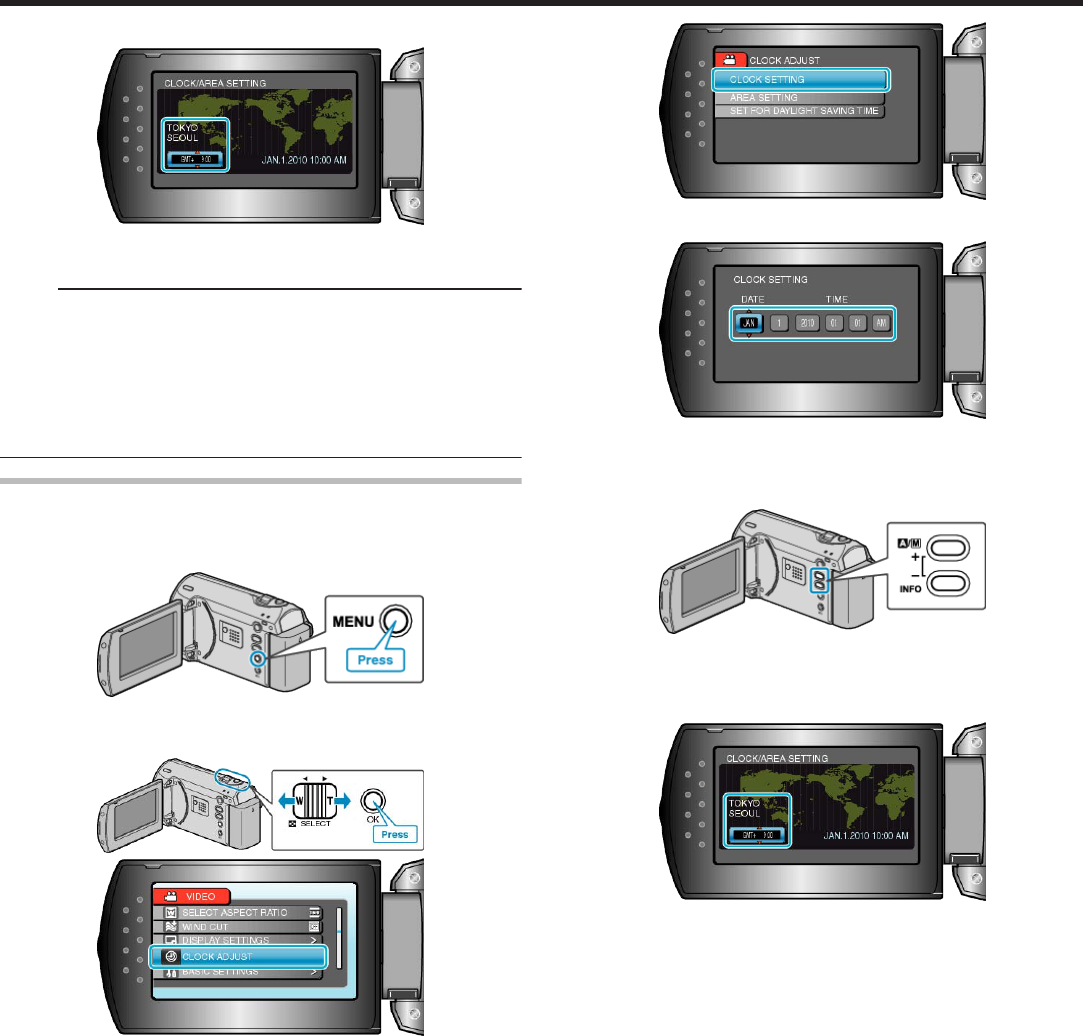
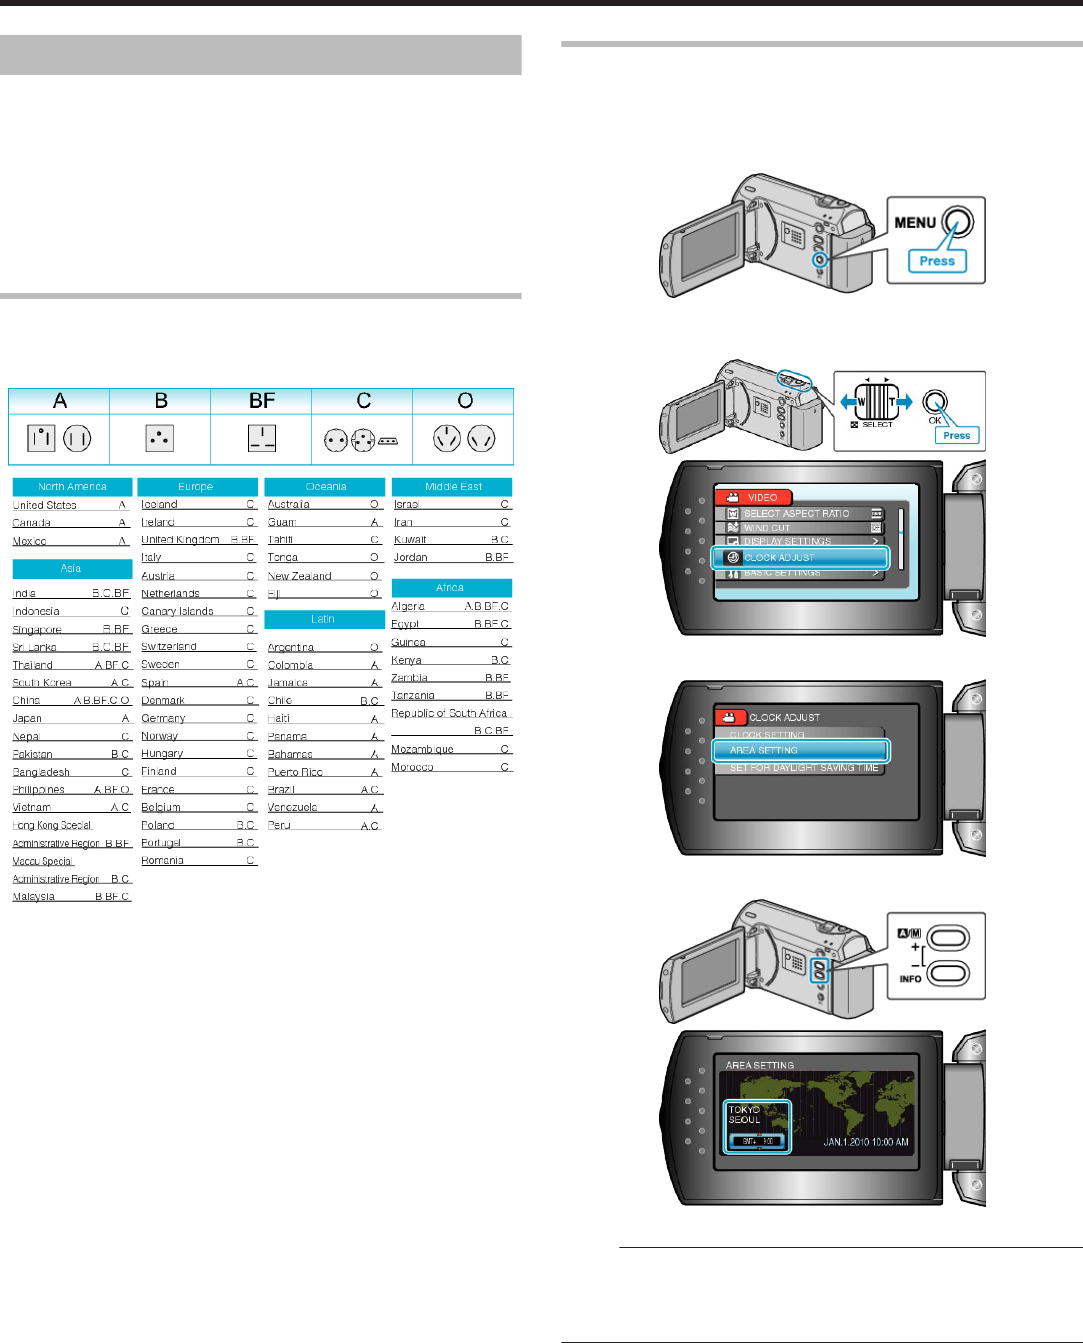
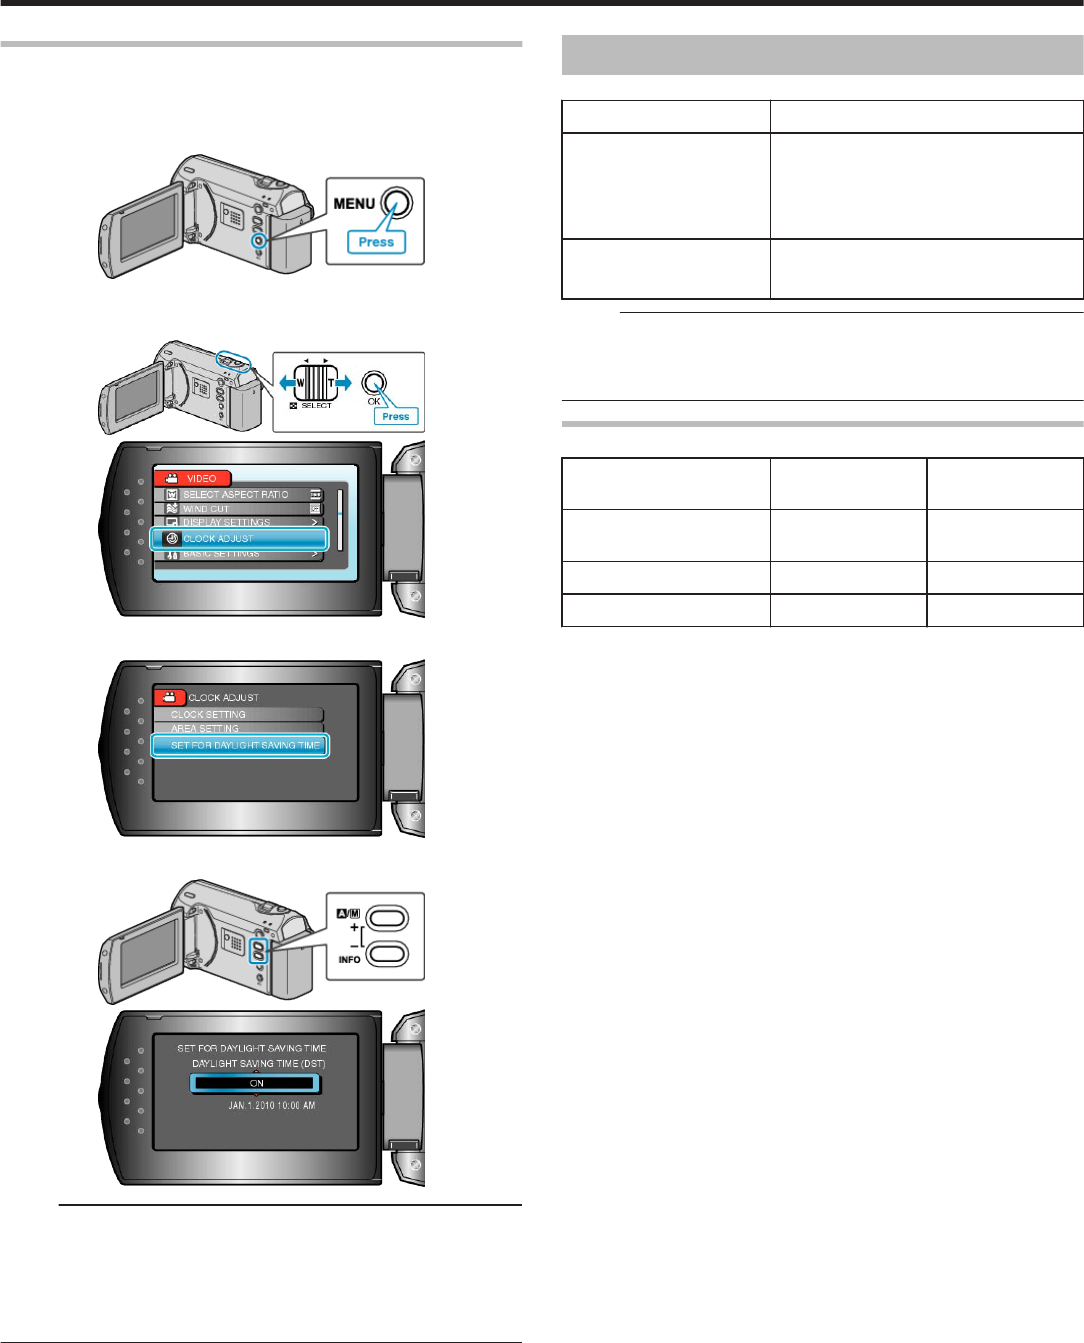
CLOCK ADJUST
Resets the current time or sets to the local time when using this unit over-
seas.
Operating Details
"Clock Setting" (A P.13)
"Setting the Clock to Local Time when Traveling" (A P.16)
"Setting Daylight Saving Time" (A P.17)
Menu Settings
53
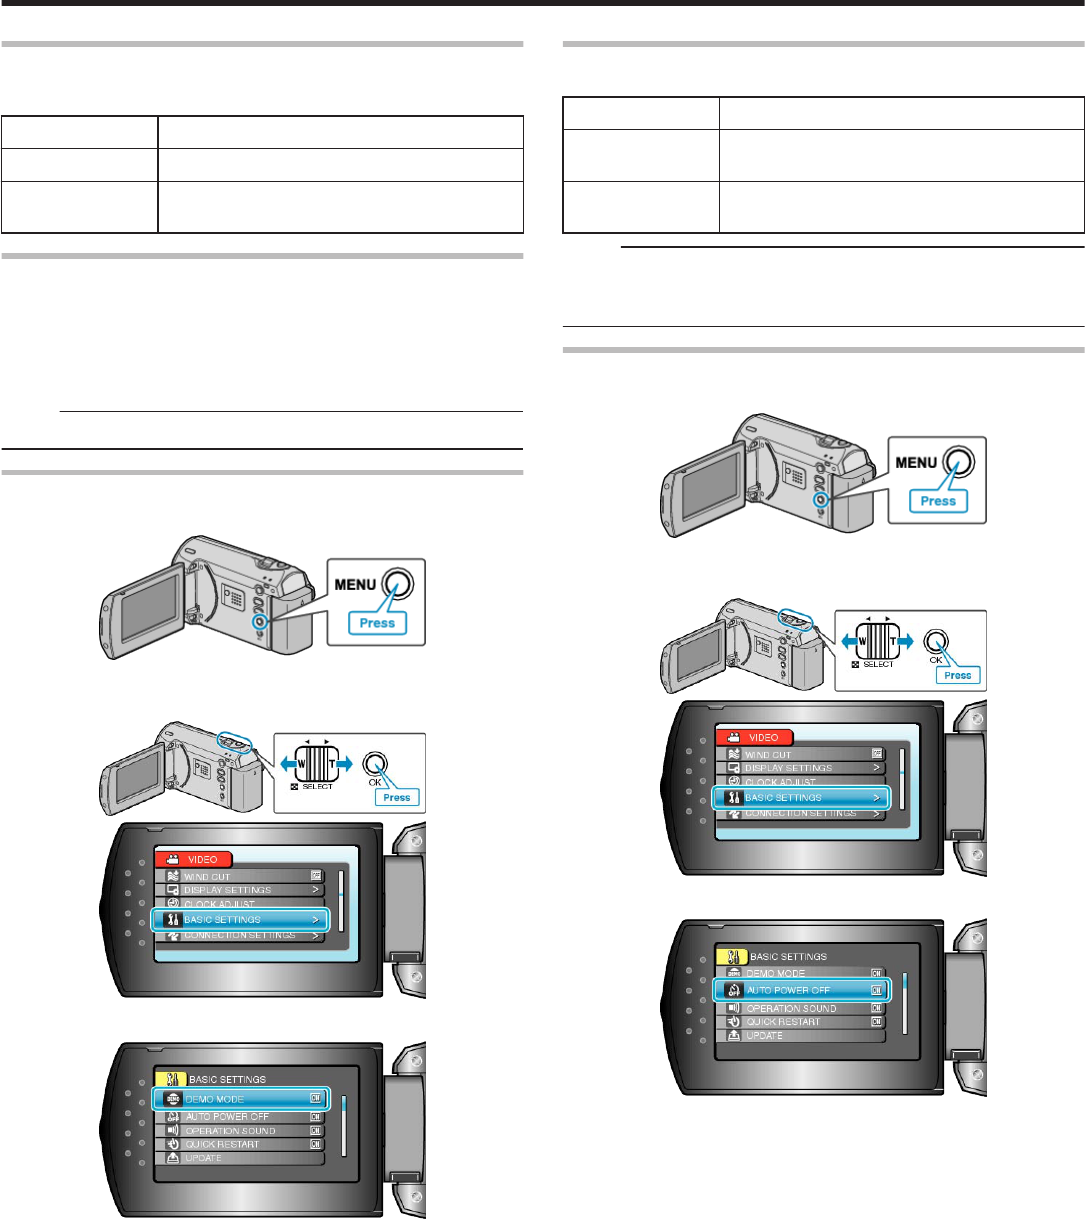
Basic Settings Menu
You can adjust various camera settings such as operation sound, etc.
SettingDetails
DEMO MODEIntroduces the special features of this unit in digest form.
"DEMO MODE" (A P.55)
AUTO POWER OFFPrevents the situation of forgetting to turn off the power when this is set.
"AUTO POWER OFF" (A P.55)
OPERATION SOUNDTurns on or off the operation sound.
"OPERATION SOUND" (A P.56)
QUICK RESTARTReduces the power consumption within 5 minutes after the LCD monitor is closed to 1/3 of that used
during recording.
"QUICK RESTART" (A P.56)
UPDATEUpdates the functions of this unit to the latest version.
"UPDATE" (A P.57)
FACTORY PRESETReturns all the settings to their default values.
"FACTORY PRESET" (A P.57)
Menu Settings
54
DEMO MODE
Starts playback of the demo mode which introduces the features of this
unit.
SettingDetails
OFFDeactivates the function.
ONPlays a demonstration of the special features of
this unit.
Displaying Demo Mode
① Remove the battery pack and SD card.
② Connect the AC adapter.
③ Open the LCD monitor and turn on the power.
●
Demonstration starts playing after 3 minutes.
●
To stop playback, press OK.
Memo:
●
This mode is not available in the playback mode.
Displaying the Item
1
Press MENU to display the menu.
.
2
Select “BASIC SETTINGS” with the ZOOM/SELECT lever and press
OK.
.
.
3
Select “DEMO MODE” and press OK.
.
AUTO POWER OFF
Prevents the situation of forgetting to turn off the power when this is set.
SettingDetails
OFFPower is not turned off even if this unit is not op-
erated for 5 minutes.
ONTurns off the power automatically if this unit is
not operated for 5 minutes.
Memo:
●
When using battery, power is turned off automatically if this unit is not
operated for 5 minutes.
●
When using the AC adapter, this unit goes into standby mode.
Displaying the Item
1
Press MENU to display the menu.
.
2
Select “BASIC SETTINGS” with the ZOOM/SELECT lever and press
OK.
.
.
3
Select “AUTO POWER OFF” and press OK.
.
Menu Settings
55
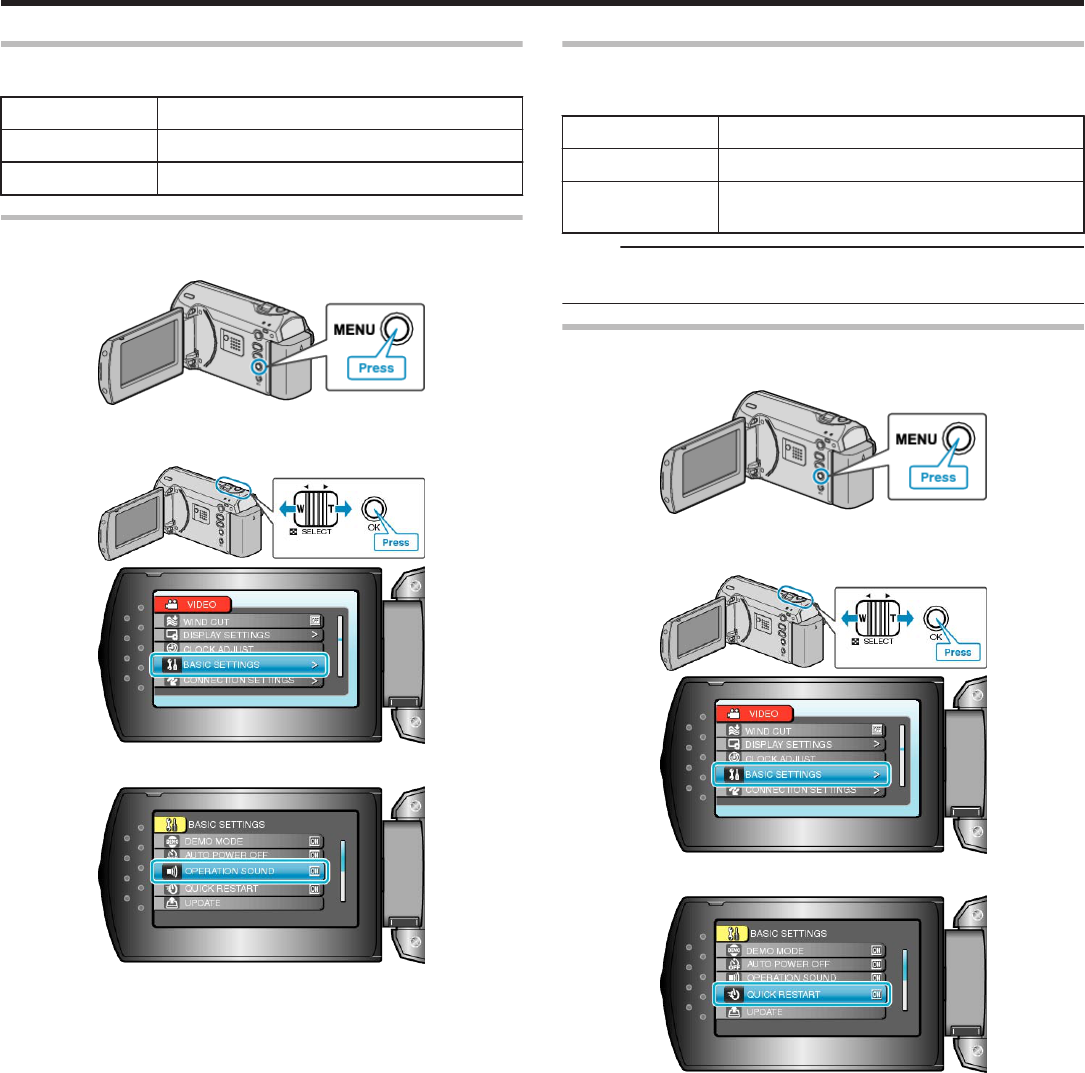
OPERATION SOUND
Turns on or off the operation sound.
SettingDetails
OFFTurns off the operation sound.
ONTurns on the operation sound.
Displaying the Item
1
Press MENU to display the menu.
.
2
Select “BASIC SETTINGS” with the ZOOM/SELECT lever and press
OK.
.
.
3
Select “OPERATION SOUND” and press OK.
.
QUICK RESTART
Enables recording to be performed immediately when the LCD monitor is
opened.
SettingDetails
OFFDeactivates the function.
ONEnables the power to turn on quickly when the
LCD monitor is opened again within 5 minutes.
Memo:
●
The power consumption within 5 minutes after the LCD monitor is
closed is reduced to 1/3 of that used during recording.
Displaying the Item
1
Press MENU to display the menu.
.
2
Select “BASIC SETTINGS” with the ZOOM/SELECT lever and press
OK.
.
.
3
Select “QUICK RESTART” and press OK.
.
Menu Settings
56
UPDATE
Updates the functions of this unit to the latest version.
For details, refer to the JVC homepage.
(When no program to update the software of this unit is available, nothing
will be provided on the homepage.)
FACTORY PRESET
Returns all the settings to their default values.
1
Press MENU to display the menu.
.
2
Select “BASIC SETTINGS” with the ZOOM/SELECT lever and press
OK.
.
.
3
Select “FACTORY PRESET” and press OK.
.
4
Select “YES” and press OK.
.
●
All settings return to their default values.
Menu Settings
57
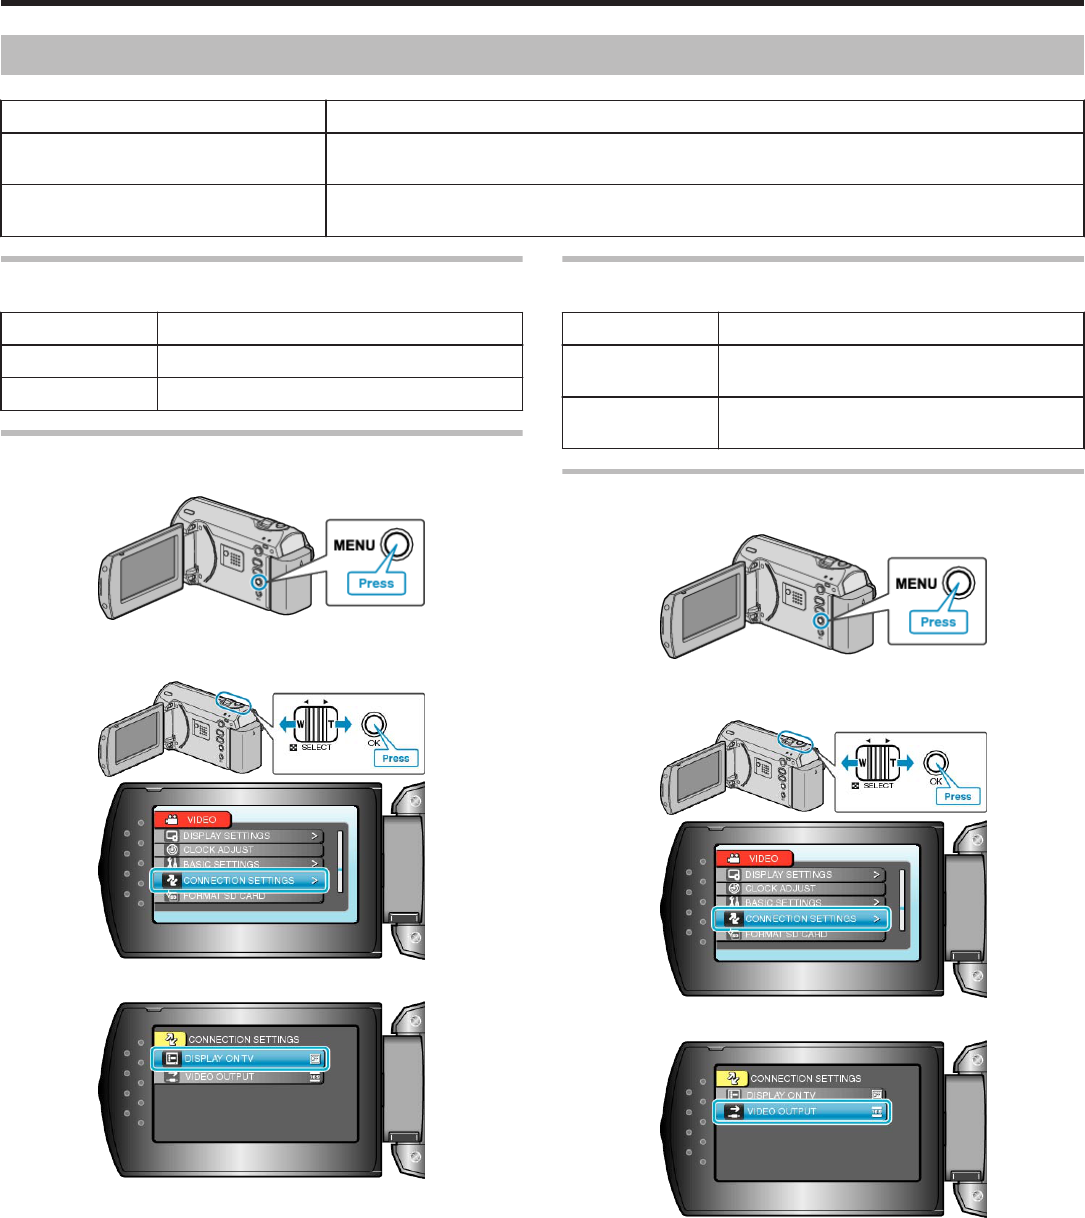
Connection Settings Menu
You can adjust various settings for connecting to a TV or DVD recorder.
SettingDetails
DISPLAY ON TVDisplays icons and date/time on a TV screen.
"DISPLAY ON TV" (A P.58)
VIDEO OUTPUTSets the aspect ratio (16:9 or 4:3) according to the connecting TV.
"VIDEO OUTPUT" (A P.58)
DISPLAY ON TV
Displays icons and date/time on a TV screen.
SettingDetails
OFFDoes not display icons and date/time on TV.
ONDisplays icons and date/time on TV.
Displaying the Item
1
Press MENU to display the menu.
.
2
Select “CONNECTION SETTINGS” with the ZOOM/SELECT lever and
press OK.
.
.
3
Select “DISPLAY ON TV” and press OK.
.
VIDEO OUTPUT
Sets the aspect ratio (16:9 or 4:3) according to the connecting TV.
SettingDetails
16:9Select this when connecting to a widescreen TV
(16:9).
4:3Select this when connecting to a conventional
TV (4:3).
Displaying the Item
1
Press MENU to display the menu.
.
2
Select “CONNECTION SETTINGS” with the ZOOM/SELECT lever and
press OK.
.
.
3
Select “VIDEO OUTPUT” and press OK.
.
Menu Settings
58
FORMAT SD CARD
Deletes all files on the SD card.
SettingDetails
FILEDeletes all files on the SD card.
FILE + MANAGE-
MENT NO
Deletes all files on the SD card and resets the
folder and file numbers to "1".
CAUTION:
●
Not available for selection when no SD card is inserted.
●
All data on the card will be deleted when it is formatted.
Copy all files on the card to a PC before formatting.
●
Make sure that the battery pack is fully charged or connect the AC
adapter as the formatting process may take some time.
Displaying the Item
1
Press MENU to display the menu.
.
2
Select “FORMAT SD CARD” with the ZOOM/SELECT lever and press
OK.
.
Menu Settings
59
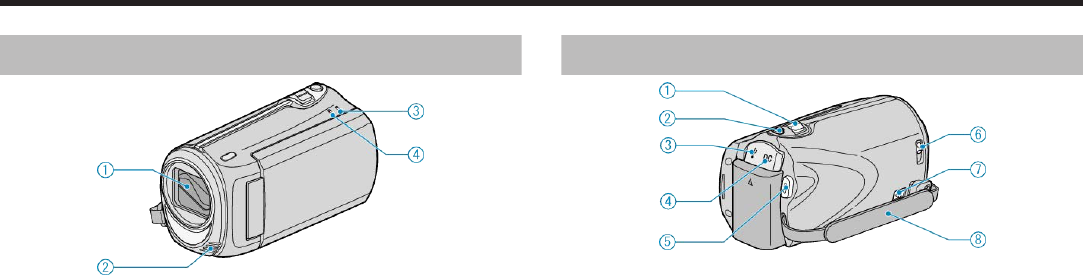
Front
.
1
Lens/Lens Cover
●
Do not touch the lens and lens cover.
2
Monaural Microphone
●
Do not cover the microphone with your fingers during video recording.
3
POWER/CHARGE Lamp
●
Lights up: Power "ON"
●
Blinks: Charging in progress
●
Goes out: Charging finished
4
ACCESS Lamp
●
Recording or playback is in progress when the lamp lights up or blinks.
Do not remove the battery pack, AC adapter, or SD card.
Rear
.
1
ZOOM/SELECT Lever
●
During shooting: Adjusts the shooting range.
●
During playback: Performs forward search/reverse search.
●
Selects item or file from the menu or index screen.
2
OK Button
●
During playback: Starts/pauses the playback of videos.
●
Confirms the selected item or file from the menu or index screen.
3
USB Terminal
●
Connects to PC using a USB cable.
4
DC Terminal
●
Connects to an AC adapter to charge the battery.
5
START/STOP (Video recording) Button
●
During recording: Starts/stops video recording.
●
During playback: Starts/pauses the playback of videos.
6
Lens Cover Switch
●
Opens and closes the lens cover.
7
Grip Belt Release Lever
●
Allows the grip belt to be removed and used as a hand strap.
8
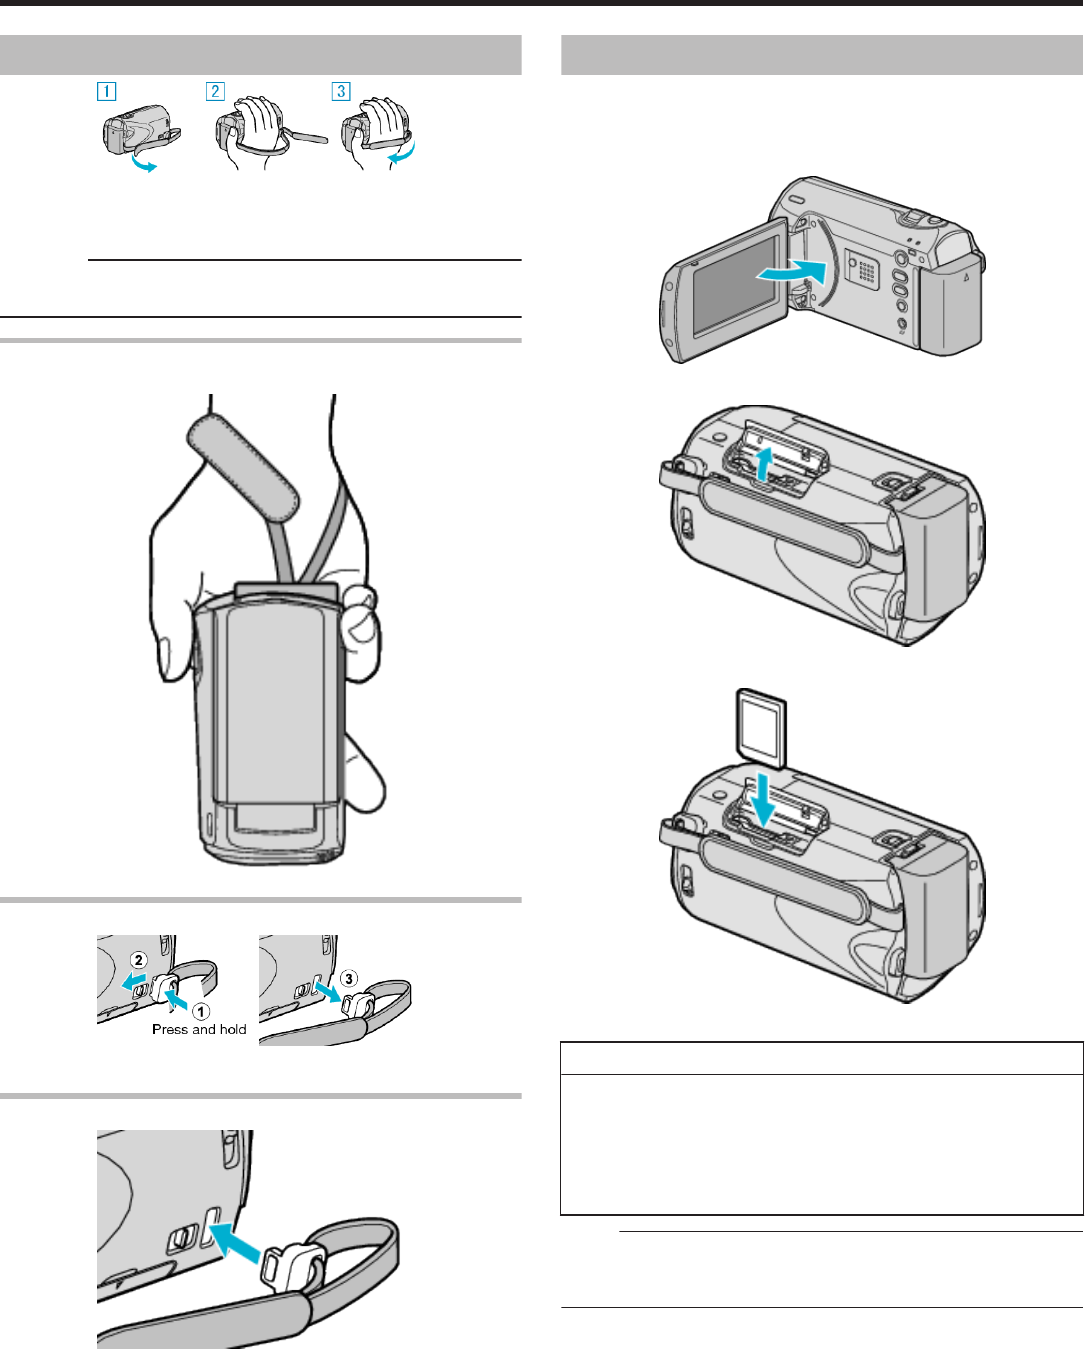
Grip Belt
●
Pass your hand through the grip belt to hold this unit firmly.
"Grip Adjustment" (A P.12)
Name of Parts
60
Bottom
.
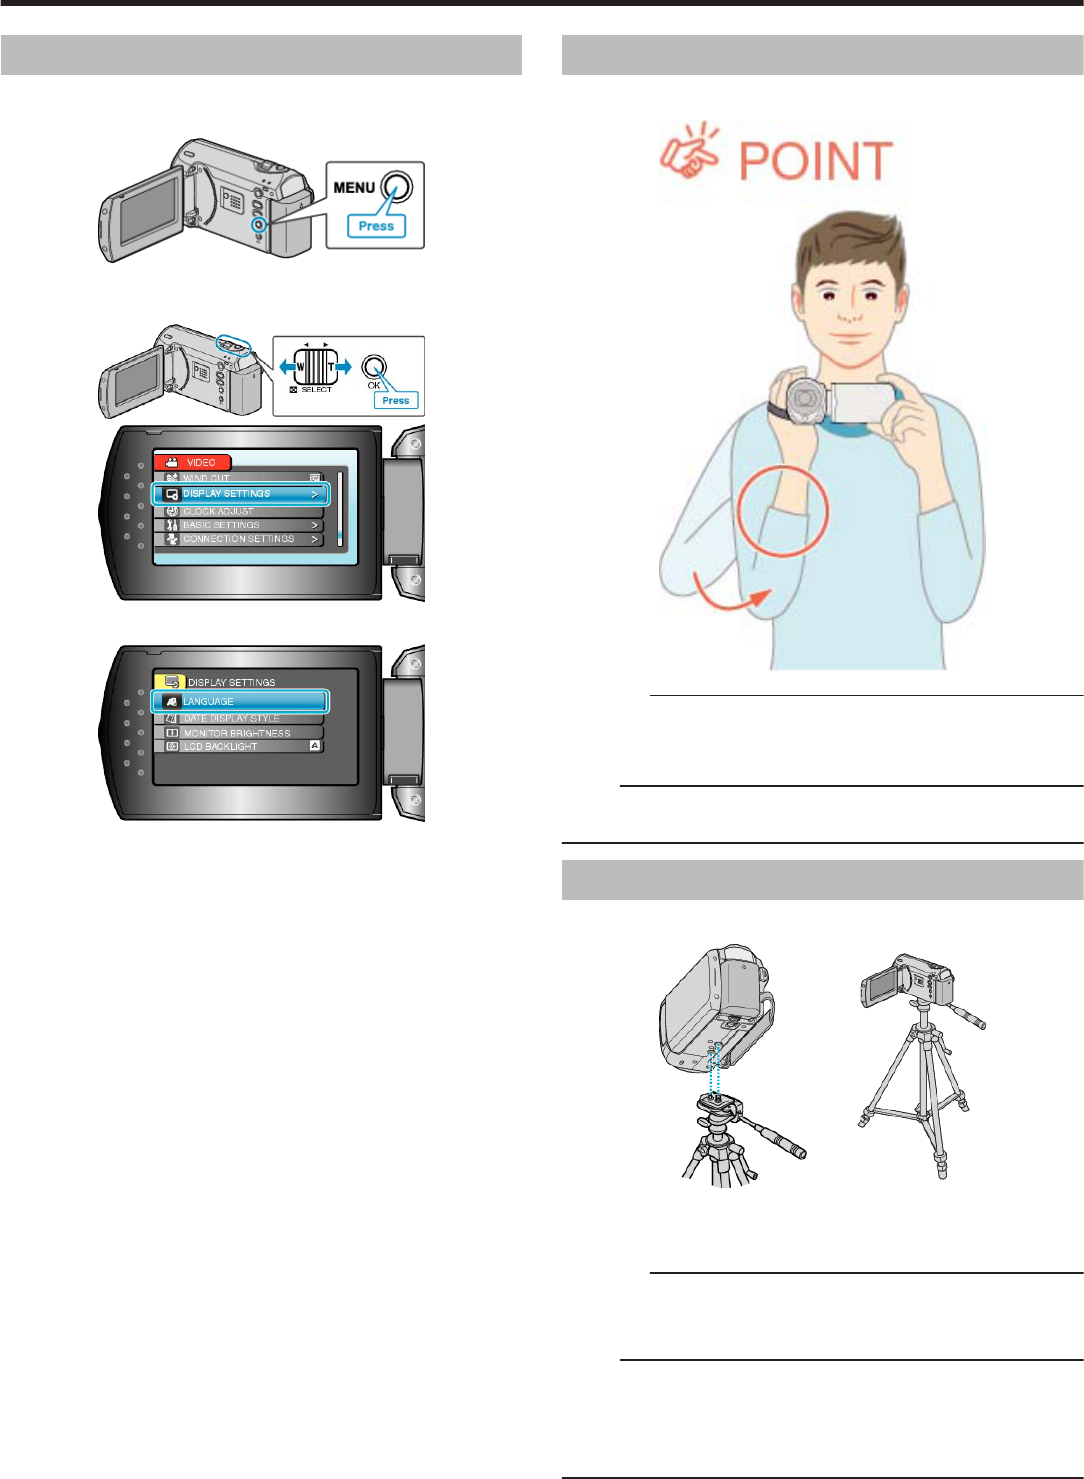
1
Tripod Mounting Hole
"Tripod Mounting" (A P.15)
2
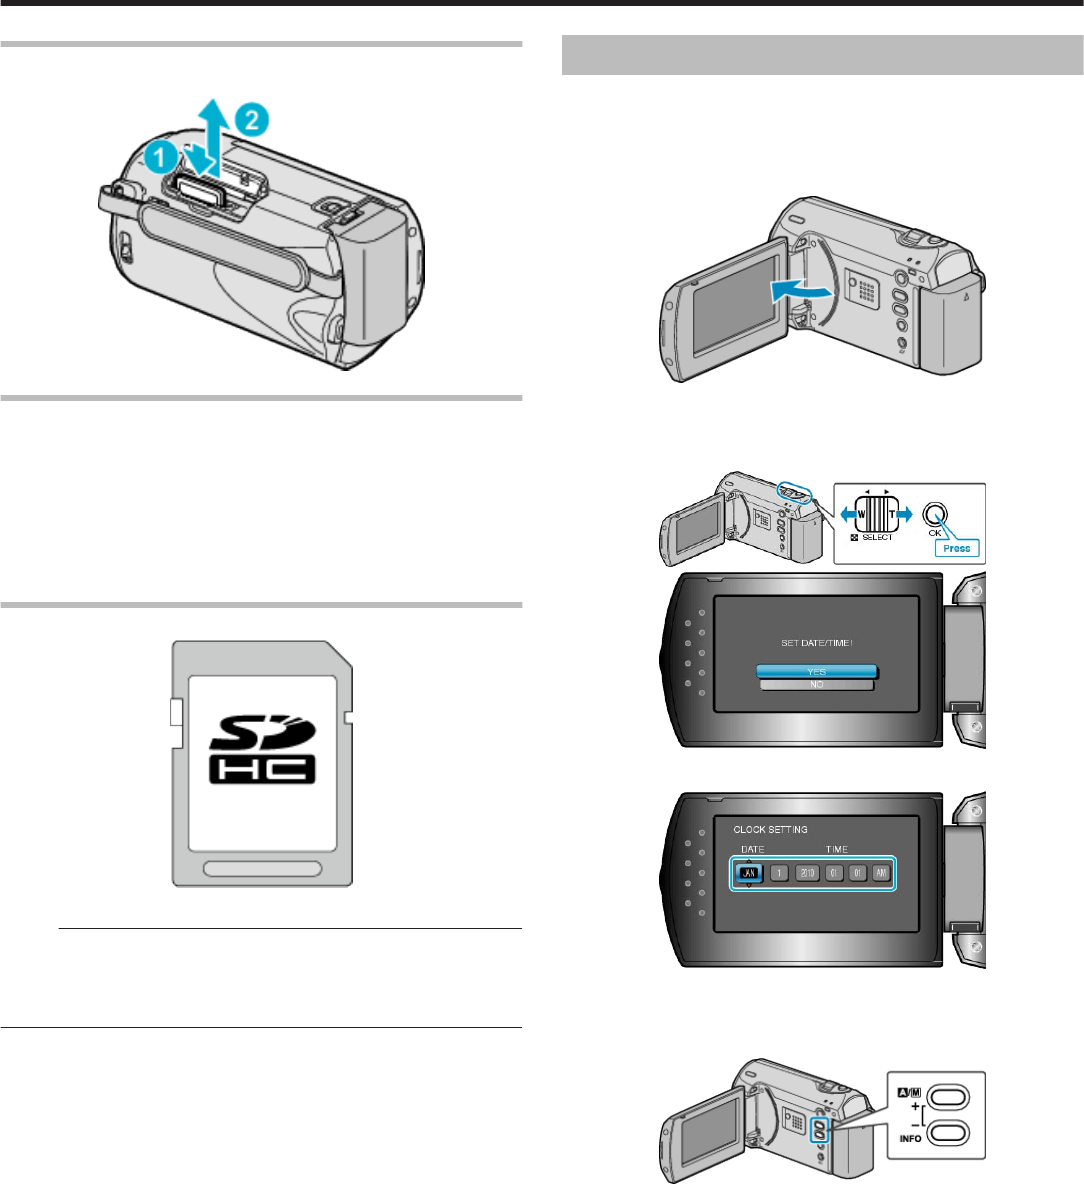
SD Card Slot
●
Insert an optional SD card.
"Inserting an SD Card" (A P.12)
"Types of Usable SD Card" (A P.13)
3
Battery Release Lever
"Charging the Battery Pack" (A P.11)
4
Battery Mount
Interior
.
1
Speaker
●
Outputs audio sound during video playback.
2
L (Play) Button
●
Switches between the recording and playback modes.
3
G / H (Recording Mode) / + Button
●
During recording: Switches the recording mode (Auto/Manual).
●
During playback: Increases the volume.
4
INFO (Information)/ - Button
●
During recording: Displays the remaining time and battery power.
●
During playback: Decreases the volume.
●
During playback: Displays file information such as recording date.
5
MENU Button
●
Displays the settings menu.
6
AV Terminal
●
Connects to a TV.
7
LCD Monitor
●
Turns the power on/off by opening and closing.
●
Enables self-portraits to be taken by rotating the monitor.
.
CAUTION:
●
Do not press against the surface with force or subject it to strong im-
pact.
Doing so may damage or break the screen.
Name of Parts
61
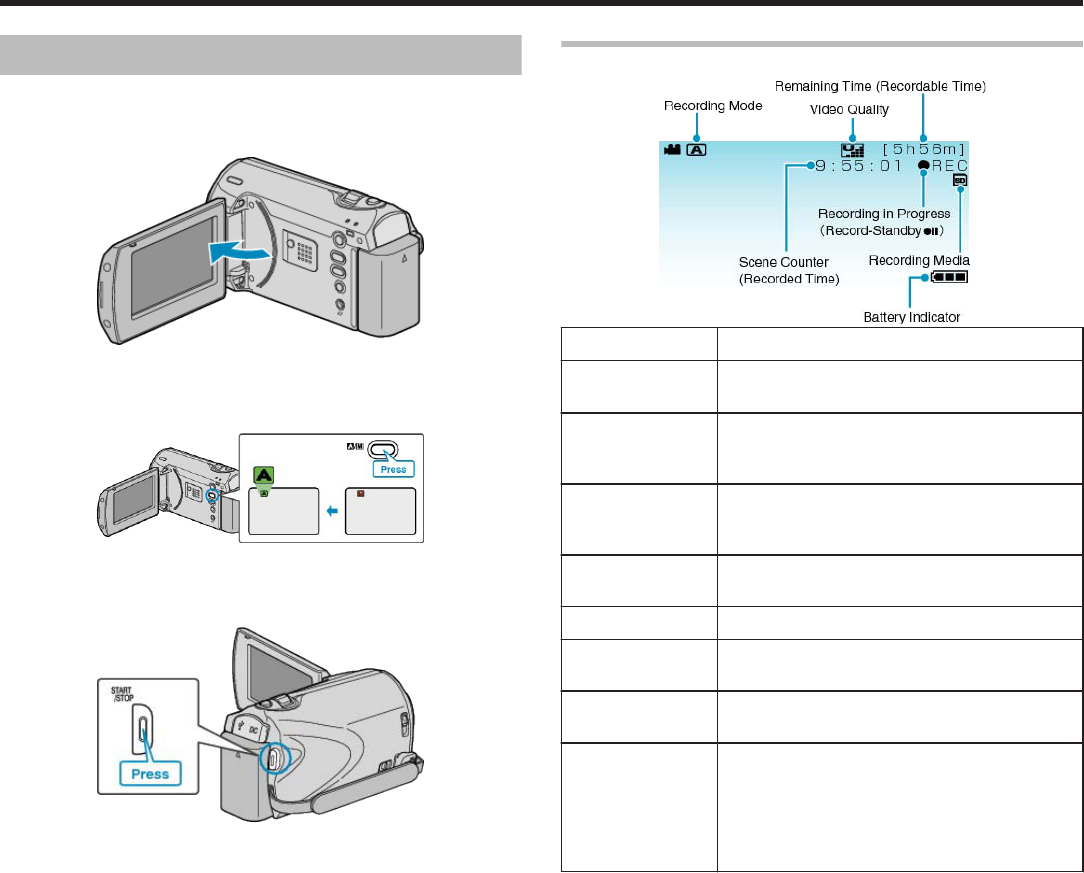
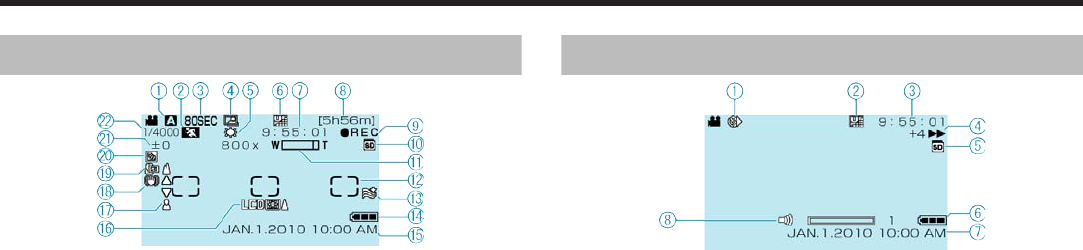
Recording
.
1
Recording Mode
"Taking Videos in Auto Mode" (A P.18)
"Manual Recording" (A P.19)
2
Scene Select
"Scene Selection" (A P.20)
3
Time-Lapse Recording
"Recording at Intervals (TIME-LAPSE RECORDING)" (A P.26)
4
Auto REC
"Recording Automatically by Sensing Movements (AUTO REC)" (A
P.28)
5
White Balance
"Setting White Balance" (A P.24)
6
Video Quality
"VIDEO QUALITY" (A P.47)
7
Scene Counter
8
Remaining Recording Time
9
Recording in Progress
"Taking Videos in Auto Mode" (A P.18)
10
Media
11
Zoom
"ZOOM" (A P.47)
12
Metering Area “SPOT”
"Setting Metering Area" (A P.25)
13
Wind Cut
"WIND CUT" (A P.49)
14
Battery Indicator
"Remaining Recording Time/Battery Power" (A P.29)
15
Date/Time
"Clock Setting" (A P.13)
16
Monitor Backlight
"LCD BACKLIGHT" (A P.53)
17
Focus
"Adjusting Focus Manually" (A P.21)
18
DIS
"DIS" (A P.48)
19
Tele Macro
"Taking Close-up Shots" (A P.25)
20
Backlight Compensation
"Setting Backlight Compensation" (A P.24)
21
Brightness
"Adjusting Brightness" (A P.22)
22
Shutter Speed
"Setting Shutter Speed" (A P.23)
Playback
.
1
Time-Lapse Recording
"Recording at Intervals (TIME-LAPSE RECORDING)" (A P.26)
2
Video Quality
"VIDEO QUALITY" (A P.47)
3
Scene Counter
4
Operation Indicator
"Playing Back Videos" (A P.30)
5
Media
6
Battery Indicator
"Remaining Recording Time/Battery Power" (A P.29)
7
Date/Time
"Clock Setting" (A P.13)
8
Speaker Volume Adjustment
Indications on the LCD Monitor
62
Battery Pack
Unable to turn on the power when using the battery pack.
Recharge the battery pack.
If the terminal of this unit or the battery pack is dirty, wipe it with a cotton
swab or something similar.
If you use any other battery packs besides JVC battery packs, safety and
performance can not be guaranteed. Be sure to use JVC battery packs.
Short usage time even after charging.
Battery deterioration occurs when a battery pack is charged repeatedly.
Replace the battery pack with a new one.
Unable to charge the battery pack.
If the terminal of this unit or the battery pack is dirty, wipe it with a cotton
swab or something similar.
Using a non-original battery pack may result in damage to this unit. Be
sure to use an original battery pack.
The remaining battery display is not correct.
Remaining battery power is not displayed when the AC adapter is con-
nected.
If this unit is used for long periods of time in high or low temperatures, or
if the battery pack is repeatedly charged, the amount of remaining battery
may not be displayed correctly.
Recording
Recording cannot be performed.
Set to the recording mode with the
Recording stops automatically.
Recording stops automatically as it cannot be performed for 12 or more
consecutive hours according to specifications. (It may take some time to
resume recording.)
Turn off the power, wait for a while, and start recording again. (This unit
stops automatically to protect the circuit when the temperature rises.)
The focus is not adjusted automatically.
If you are recording in a dark place or a subject that has no contrast be-
tween dark and light, adjust the focus manually.
Wipe the lens with a lens cleaning cloth.
Cancel manual focus on the manual recording menu.
The zoom does not work.
Zoom operation is not available in time-lapse recording.
(Image stabilizer is also not available.)
To use digital zoom, set
Card
Cannot insert the SD card.
Make sure not to insert the card in the wrong direction.
Unable to copy to SD card.
To use cards that have been used on other devices, it is necessary to for-
mat (initialize) the card using
Playback
Sound or video is interrupted.
Sometimes playback is interrupted at the connecting section between two
scenes. This is not a malfunction.
The same image is displayed for a long time.
Replace the SD card. (When the SD card is damaged, difficulty in reading
the data occurs. This unit will try to play back as much as possible, but it
will stop eventually if the condition persists.)
Execute
The motion is choppy.
Replace the SD card. (When the SD card is damaged, difficulty in reading
the data occurs. This unit will try to play back as much as possible, but it
will stop eventually if the condition persists.)
Execute
Cannot find a recorded file.
Cancel date search functions.
Select
No date/time display.
Set
Set
Images are projected vertically on the TV.
Set
Adjust the TV's screen accordingly.
The image displayed on TV is too small.
Set
Unable to delete file.
Files that are protected cannot be deleted. Release protection before de-
leting the file.
PC
Unable to copy files to the PC’s HDD.
Connect the USB cable correctly.
If the provided software "Everio MediaBrowser" is not installed, some
functions may not work properly.
Before making backup, make sure that enough free space is left in the
PC's hard disk (HDD).
Unable to copy files to DVD with a PC.
To record to discs, a recordable DVD drive is required for the PC in use.
Cannot upload the file to YouTube.
Check if you have created an account with YouTube. (You need a You-
Tube account to upload files to YouTube.)
Troubleshooting
63
Refer to "Q&A", "Latest Information", "Download Information", etc. in
"Click for Latest Product Info" in the help file of the provided Everio Me-
diaBrowser software.
Screen/Image
The LCD monitor is difficult to see.
The LCD monitor may be difficult to see if used in bright areas such as
under direct sunlight.
A band or a ball of bright light appears on the LCD monitor.
Change the direction of this unit to prevent the light source from coming
into view. (A band or a ball of bright light may appear when there is a
bright light source near this unit, but this is not a malfunction.)
The recorded subject is too dark.
Use backlight compensation when the background is bright and the sub-
ject is dark.
Use
Use
Set
The recorded subject is too bright.
Set the backlight compensation to
Set
The color looks strange. (Too bluish, too reddish, etc.)
Wait for a while until natural colors are achieved. (It may take some time
for white balance to be adjusted.)
Set
Other Problems
The unit operates slowly when switching the power on or
off.
It is recommended that you copy all videos onto your PC, and erase the
files from this unit.
(If there are many recorded files on this unit, it takes time for the unit to
respond.)
The image is grainy.
When digital zoom is used, the image becomes grainy as it is digitally en-
larged.
The unit heats up.
This is not a malfunction. (This unit may become warm when used for a
long time.)
Make a backup of important recorded data.
It is recommended to copy your important recorded data to a DVD or oth-
er recording media for storage. JVC will not be responsible for any lost
data.
Troubleshooting
64
Error Message?
CHECK LENS COVER
Open the lens cover.
COMMUNICATION ERROR
Reconnect the USB cable.
Turn off this unit and the devices connected to it, and turn them on again.
Reattach the battery pack.
FORMAT ERROR!
Check the operating procedure, and perform once again.
Turn off this unit, and turn it on again.
MEMORY CARD ERROR!
Turn off this unit, and turn it on again.
Remove and re-insert the SD card after detaching the AC adapter and
battery pack.
Remove any dirt from the SD card terminals.
If the above does not solve the problem, back up your files and execute
NOT FORMATTED
Select “OK”, then select “YES” on the "DO YOU WANT TO FORMAT?"
screen.
RECORDING FAILURE
Turn off this unit, and turn it on again.
VIDEO MANAGEMENT FILE IS DAMAGED, RECOVERY IS
REQUIRED TO RECORD/PLAYBACK, RECOVER?
Select
UNSUPPORTED SCENE!
Use files recorded with this unit. (Files recorded with other devices may
not be playable.)
THIS FILE IS PROTECTED
Switch off the protect function in
CHECK CARD’S WRITE PROTECTION SWITCH
Set the write protect switch of the SD card to off.
INSUFFICIENT AVAILABLE SPACE
Delete files, or move files to a PC or other devices.
Replace the SD card with a new one.
MAXIMUM QUANTITY RECORDING FOLDERS/FILES HAS
BEEN REACHED
A Move the files or folders to a PC or other device. (Back up your files.)
B Select “FILE + MANAGEMENT NO” in “FORMAT SD CARD”. (All data
on the SD card will be deleted.)
NUMBER OF FOLDERS OVERFLOW
A Move the files or folders to a PC or other device. (Back up your files.)
B Select “FILE + MANAGEMENT NO” in “FORMAT SD CARD”. (All data
on the SD card will be deleted.)
FILE QUANTITY LIMIT EXCEEDED
A Move the files or folders to a PC or other device. (Back up your files.)
B Select “FILE + MANAGEMENT NO” in “FORMAT SD CARD”. (All data
on the SD card will be deleted.)
Troubleshooting
65
Perform regular maintenance of this unit to enable it to be used for a long time.
CAUTION:
●
Be sure to detach the battery pack, AC adapter, and power plug before performing any maintenance.
Camcorder
●
Wipe this unit with a dry, soft cloth to remove any dirt.
●
When it is extremely dirty, soak the cloth in a solution of neutral detergent, wipe the body with it, and then use a clean cloth to remove the detergent.
CAUTION:
●
Do not use benzene or thinner. Doing so may cause damage to the unit.
●
When using a chemical cloth or cleaner, be sure to observe the warning labels and instructions of the product.
●
Do not leave the device in contact with rubber or plastic products for a long time.
Lens/LCD Monitor
●
Use a lens blower (commercially available) to remove any dust, and a cleaning cloth (commercially available) to wipe off any dirt.
Mold may form if the lens is left dirty.
Maintenance
66
Camera
ItemDetails
Power supplyUsing AC adapter: DC 5.2 V
Using battery pack: DC 3.6 V
Power consump-
tion
1.5 W (when “LCD BACKLIGHT” is set to
“STANDARD”)
Dimensions (mm)52 x 62 x 110 (2-1/8" x 2-1/2" x 4-3/8") (W x H x
D: excluding grip belt)
MassApprox. 195 g (0.43 lbs) (camera only),
Approx. 220 g (0.49 lbs) (including supplied bat-
tery pack)
Operating environ-
ment
Allowable operating temperature: 0°C to 40°C
(32°F to 104°F)
Allowable storage temperature: -20°C to 50°C (–
4°F to 122°F)
Allowable operating humidity: 35 % to 80 %
Image pickup de-
vice
1/6" 800.000 pixels
Recording area410.000 pixels (optical zoom)
410.000 to 550.000 pixels (dynamic zoom)
LensF1.8 to F4.3, f= 2.2 mm to 85.8 mm
(35 mm conversion: 41.5 mm to 1,619 mm)
Lowest illumination3 lux (Shutter speed: AUTO + AGC)
1 lux (NIGHT EYE mode)
ZoomOptical zoom: Up to 39x
Dynamic zoom: Up to 45x
Digital zoom: Up to 800x
LCD monitor2.7" wide, 12.3 megapixels, polysilicon color
Gebruikershandleiding.com neemt misbruik van zijn services uitermate serieus. U kunt hieronder aangeven waarom deze vraag ongepast is. Wij controleren de vraag en zonodig wordt deze verwijderd.
Product:
Spelregels forum
Om tot zinvolle vragen te komen hanteren wij de volgende spelregels:
lees eerst de handleiding door;
controleer of uw vraag al eerder door iemand anders is gesteld;
probeer uw vraag zo duidelijk mogelijk te stellen;
heeft u een probleem en al geprobeerd om dit op te lossen, vermeld dit erbij aub;
heeft u een oplossing gekregen van een bezoeker dan horen wij dat graag in dit forum;
wilt u een reactie geven op een vraag of antwoord, gebruik dan niet dit formulier maar klik op de knop 'reageer op deze vraag';
uw vraag wordt direct op de website gezet; vermijd daarom persoonlijke gegevens in te vullen;
Belangrijk! Als er een antwoord wordt gegeven op uw vraag, dan is het voor de gever van het antwoord nuttig om te weten als u er wel (of niet) mee geholpen bent! Wij vragen u dus ook te reageren op een antwoord.
Belangrijk! Antwoorden worden ook per e-mail naar abonnees gestuurd. Laat uw emailadres achter op deze site, zodat u op de hoogte blijft. U krijgt dan ook andere vragen en antwoorden te zien.
Abonneren
Abonneer u voor het ontvangen van emails voor uw JVC GZ-MS150 Everio bij:
nieuwe vragen en antwoorden
nieuwe handleidingen
U ontvangt een email met instructies om u voor één of beide opties in te schrijven.
Ontvang uw handleiding per email
Vul uw emailadres in en ontvang de handleiding van JVC GZ-MS150 Everio in de taal/talen: Engels als bijlage per email.
De handleiding is 4,83 mb groot.
U ontvangt de handleiding per email binnen enkele minuten. Als u geen email heeft ontvangen, dan heeft u waarschijnlijk een verkeerd emailadres ingevuld of is uw mailbox te vol. Daarnaast kan het zijn dat uw internetprovider een maximum heeft aan de grootte per email. Omdat hier een handleiding wordt meegestuurd, kan het voorkomen dat de email groter is dan toegestaan bij uw provider.
Uw handleiding is per email verstuurd. Controleer uw email
Als u niet binnen een kwartier uw email met handleiding ontvangen heeft, kan het zijn dat u een verkeerd emailadres heeft ingevuld of dat uw emailprovider een maximum grootte per email heeft ingesteld die kleiner is dan de grootte van de handleiding.
Er is een email naar u verstuurd om uw inschrijving definitief te maken.
Controleer uw email en volg de aanwijzingen op om uw inschrijving definitief te maken
U heeft geen emailadres opgegeven
Als u de handleiding per email wilt ontvangen, vul dan een geldig emailadres in.
Uw vraag is op deze pagina toegevoegd
Wilt u een email ontvangen bij een antwoord en/of nieuwe vragen? Vul dan hier uw emailadres in.