Still images that are captured during video recording or video playback are saved at a size of 1920 x 1080.
Recording
65
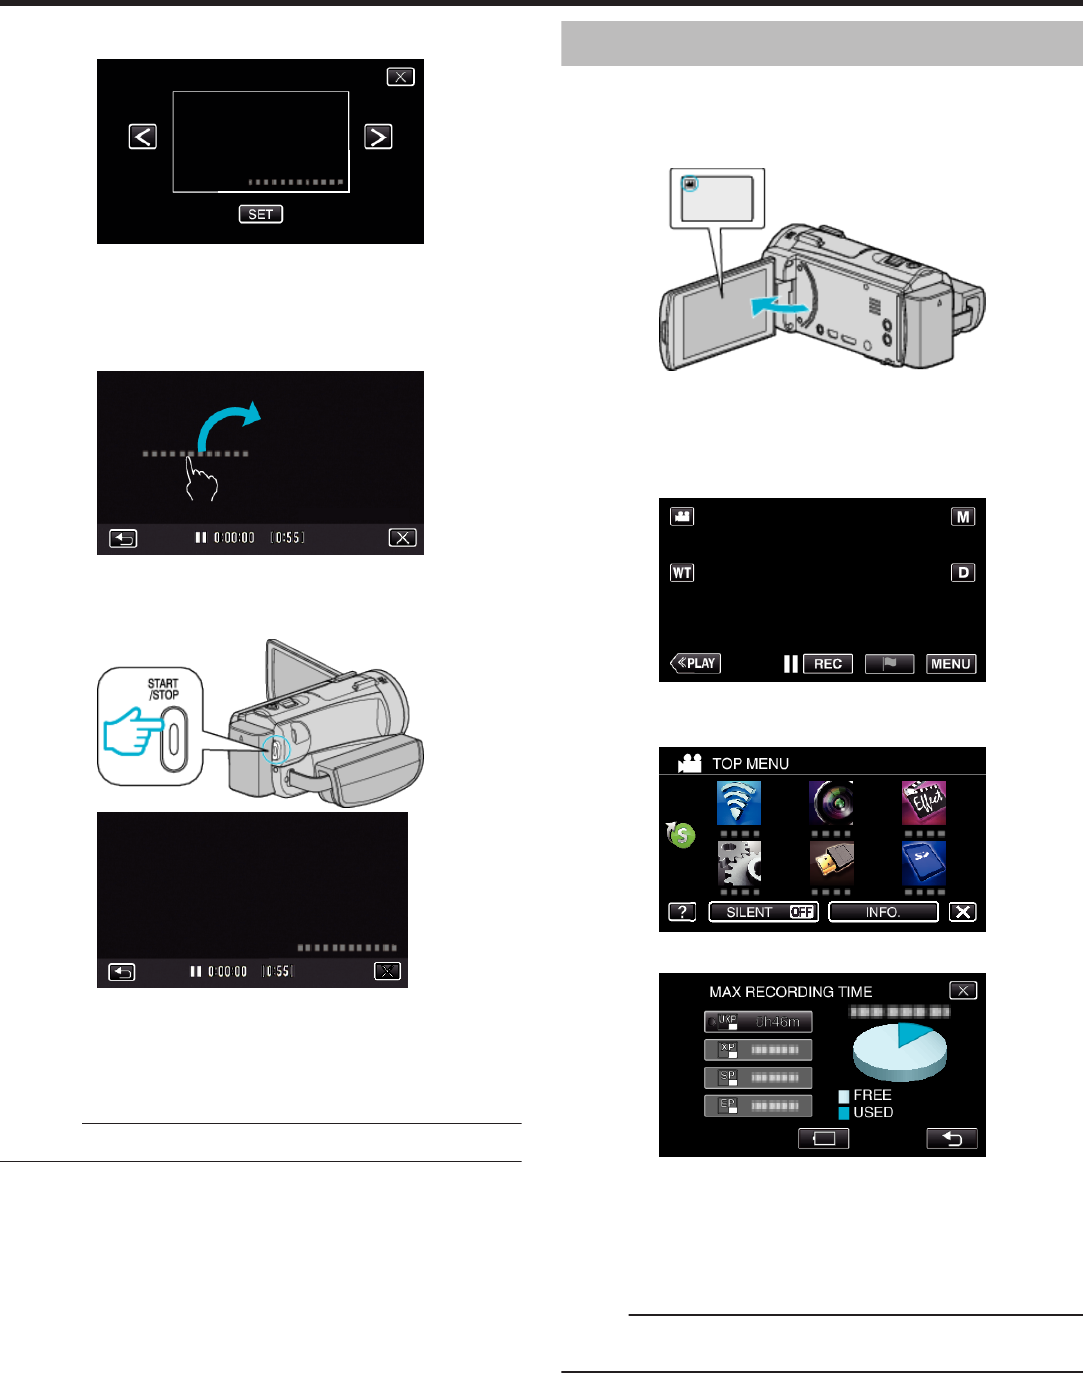
Approximate Recording Time (Using Battery)
o
60i mode (GZ-EX555/GZ-EX515)
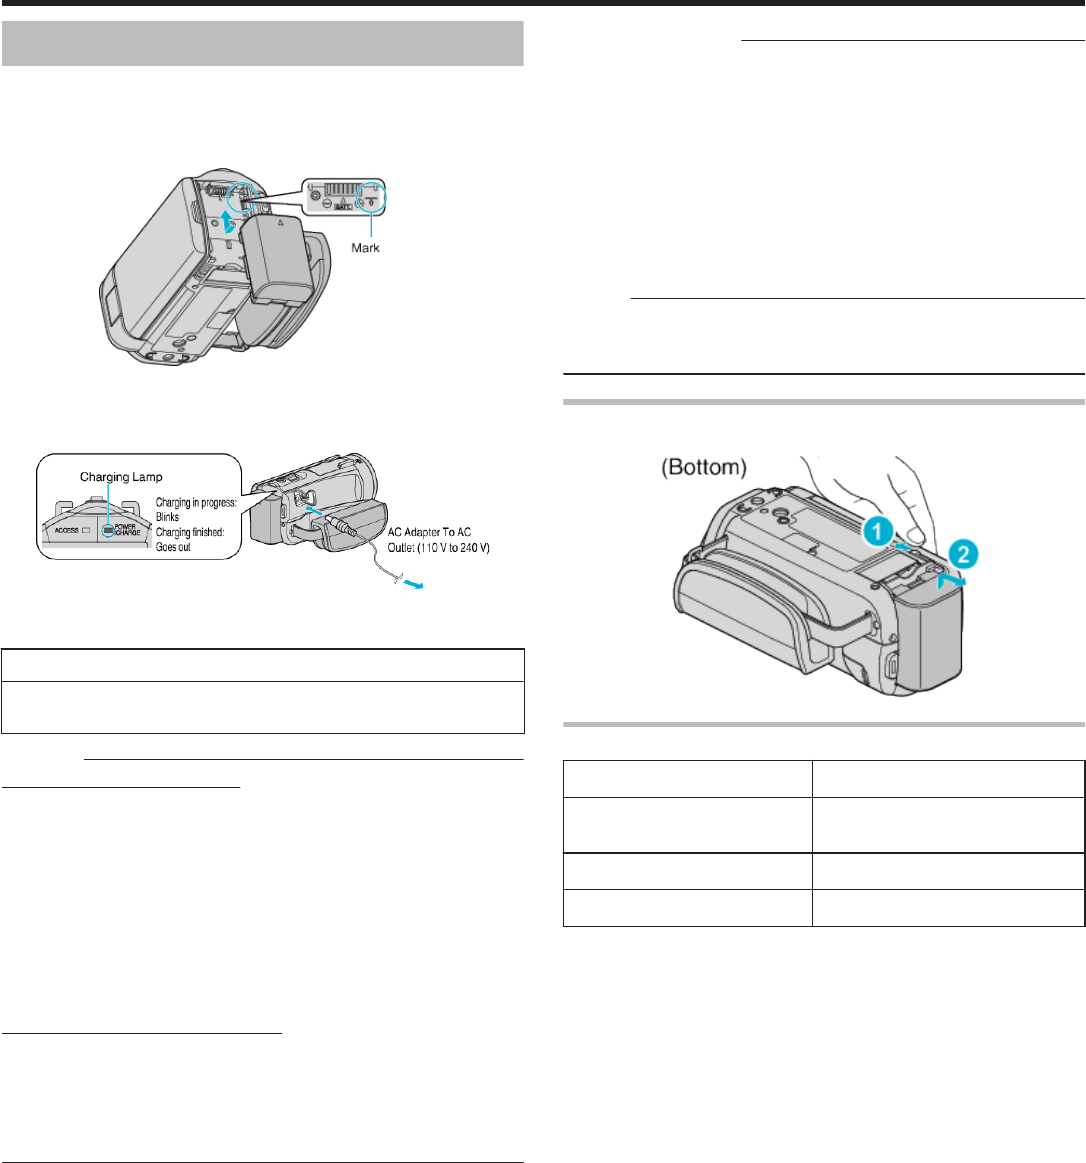
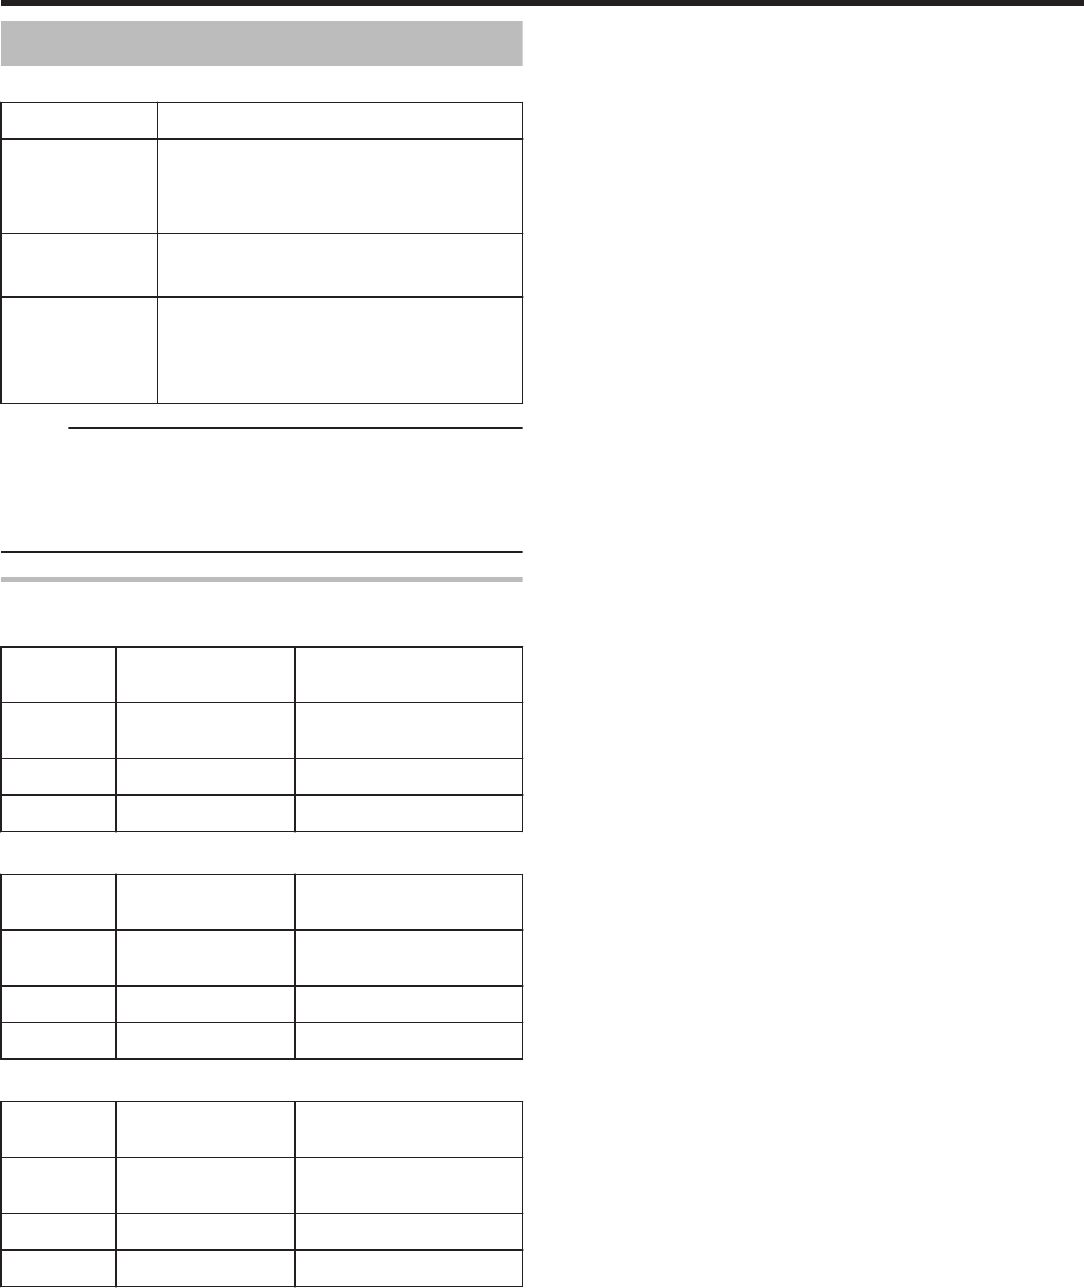
Battery PackActual recording timeContinuous recording time
(Maximum Recording Time)
BN-VG114U
(Supplied)
1 h1 h 50 m
BN-VG121U1 h 30 m2 h 45 m
BN-VG138U2 h 40 m4 h 55 m
o
60p mode (GZ-EX555/GZ-EX515)
Battery PackActual recording timeContinuous recording time
(Maximum Recording Time)
BN-VG114U
(Supplied)
45 m1 h 25 m
BN-VG121U1 h 10 m2 h 10 m
BN-VG138U2 h 5 m3 h 50 m
o
GZ-E505
Battery PackActual recording timeContinuous recording time
(Maximum Recording Time)
BN-VG114U
(Supplied)
1 h1 h 50 m
BN-VG121U1 h 35 m2 h 50 m
BN-VG138U2 h 50 m5 h 5 m
0
The above are values when “LIGHT” is set to “OFF” and “MONITOR BRIGHTNESS” is set to “3” (standard).
0
The actual recording time is an estimate in case that such operations as zooming is used or recording is stopped repeatedly. It may be shorter in the actual
usage. (It is recommended to prepare battery packs ready for three times the expected recording time.)
0
Recording time may differ depending on the shooting environment and usage.
0
When the battery life is reached, the recording time becomes shorter even if the battery pack is fully charged. (Replace the battery pack with a new one.)
Recording
66
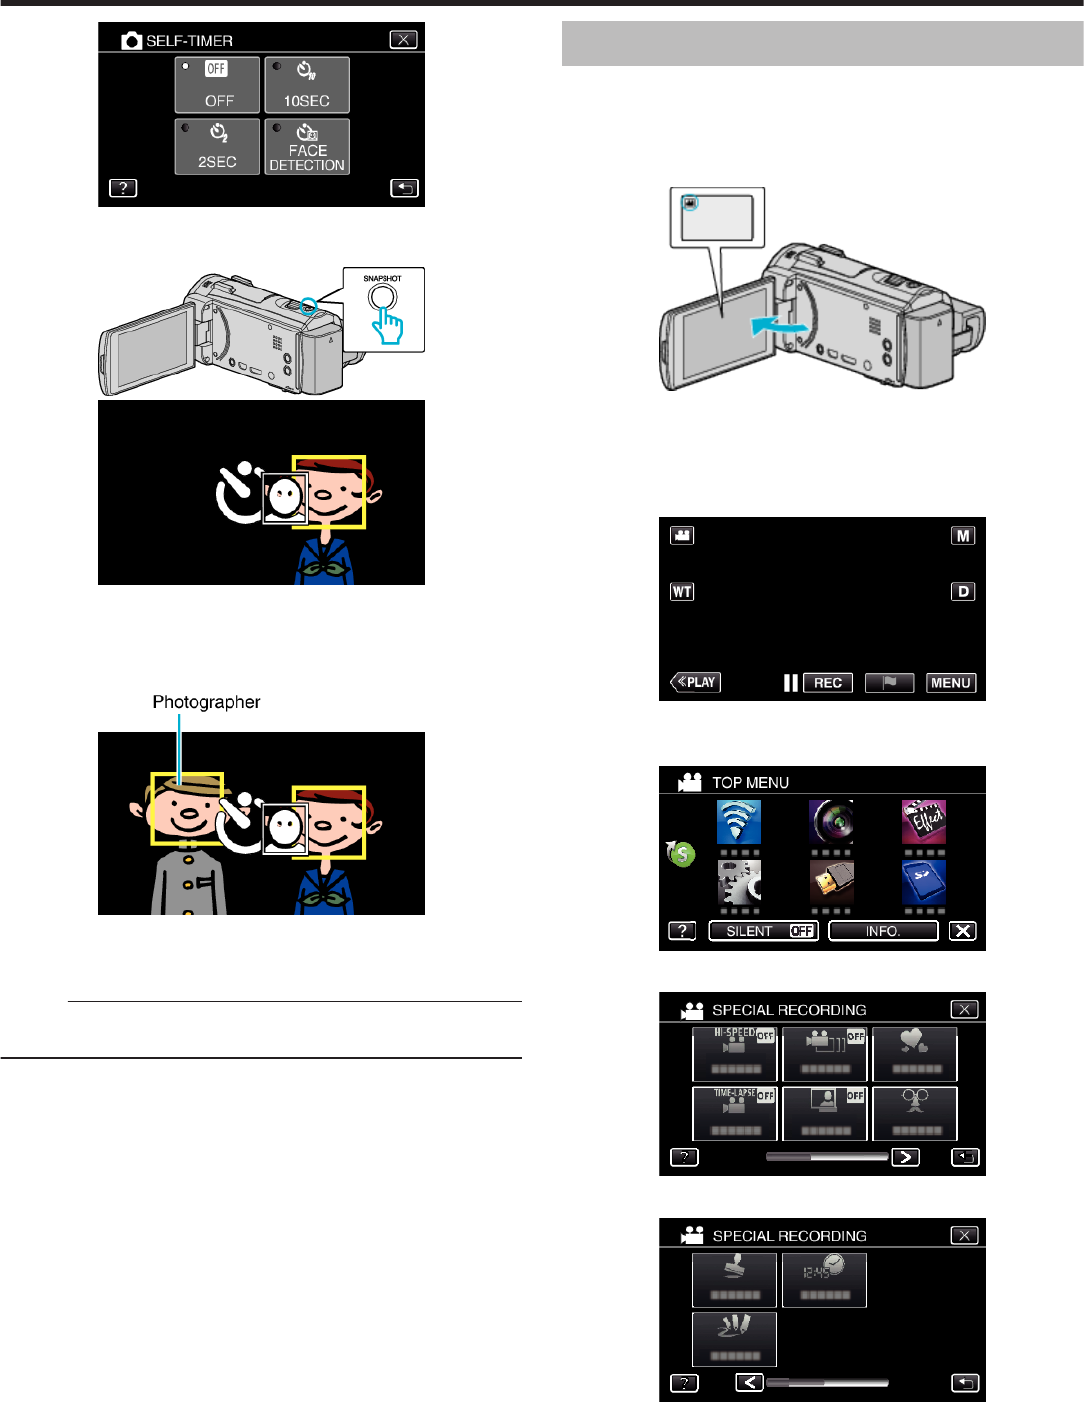
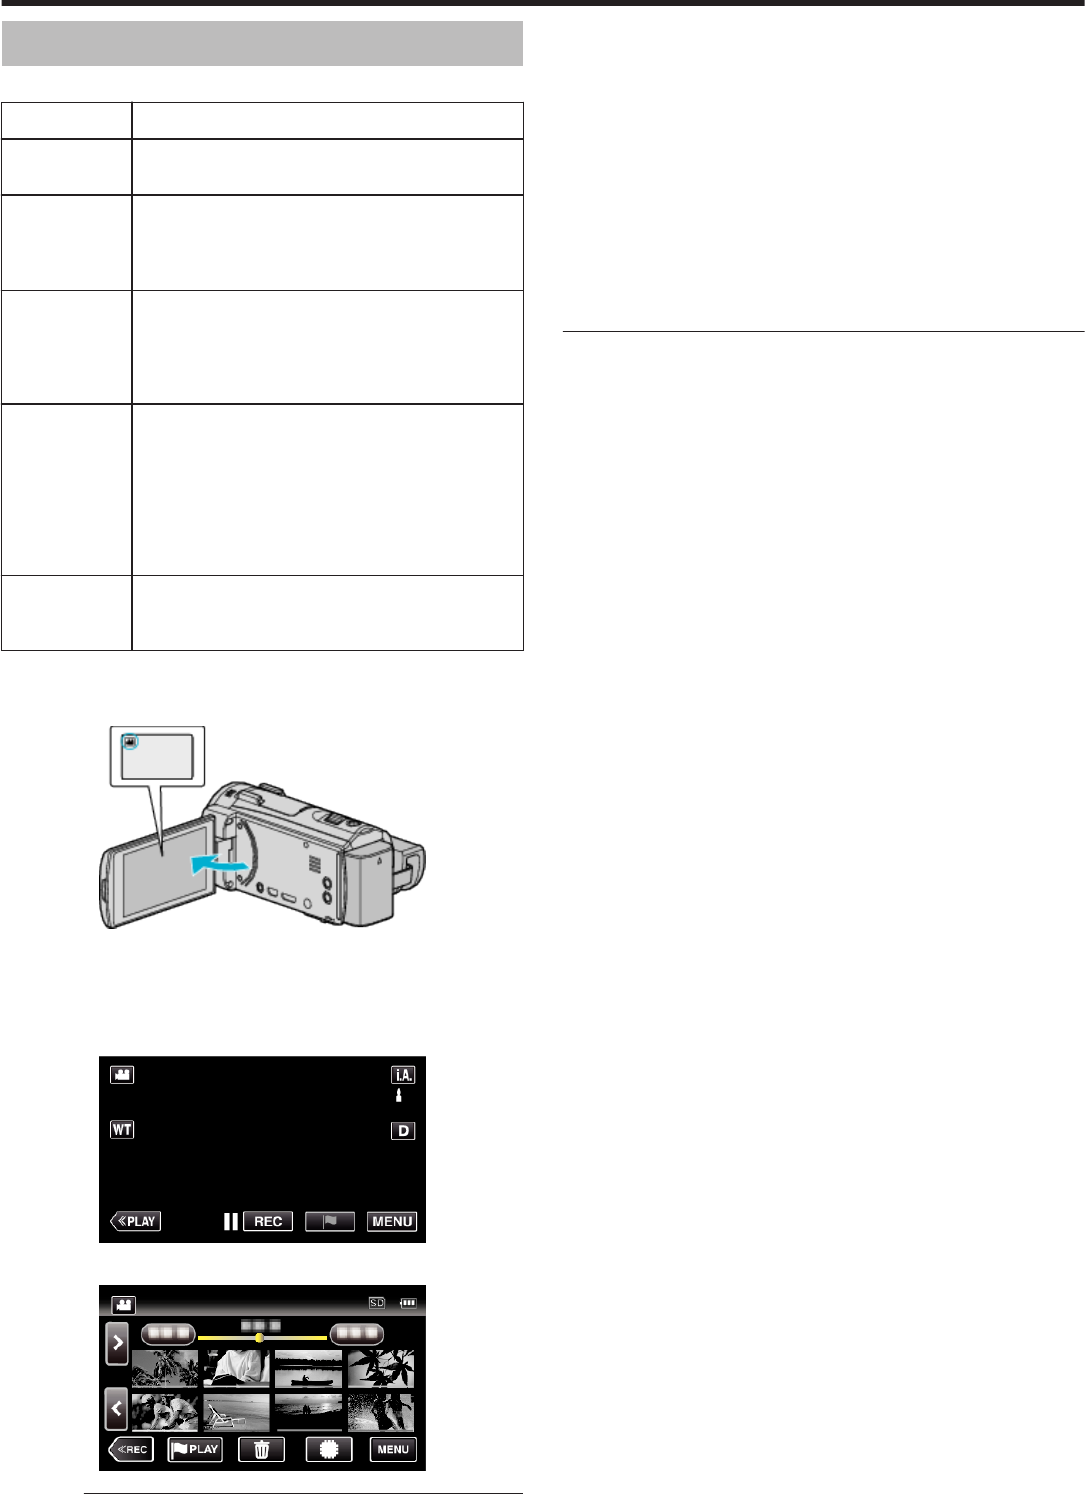
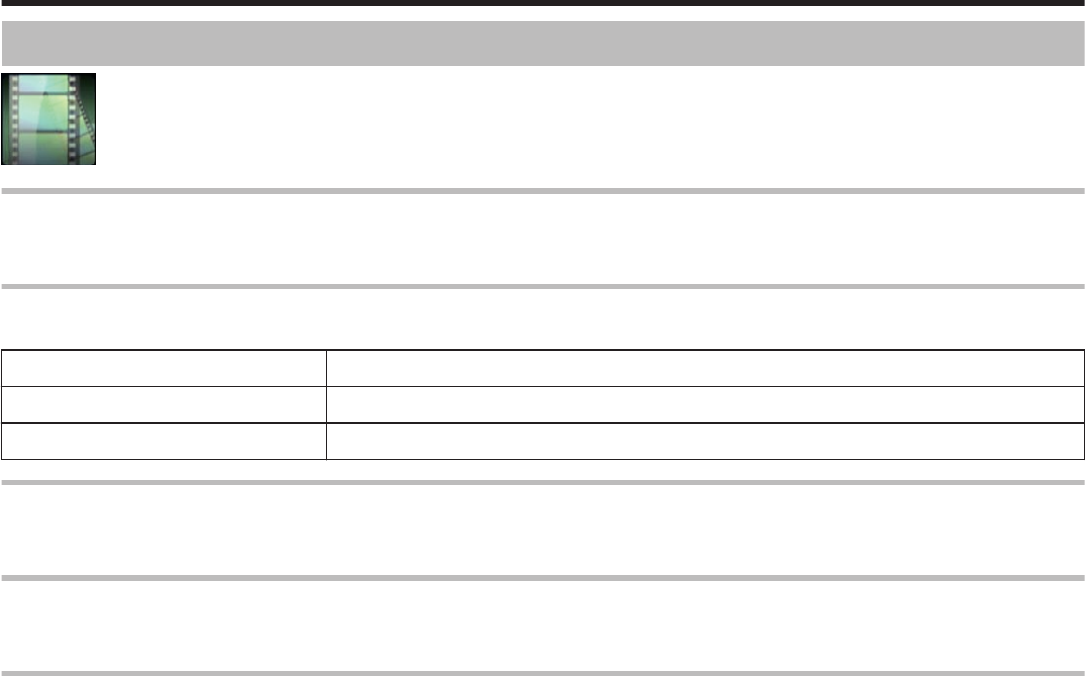
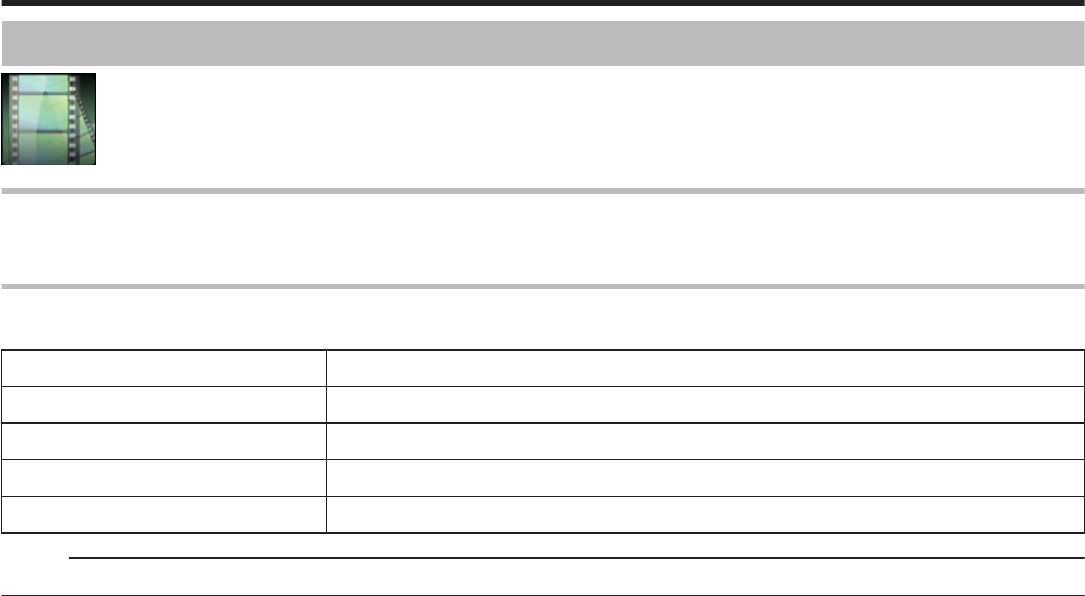
Playing Back Videos
The followings are the types of playback that can be performed by this unit.
ItemDescription
Normal
Playback
Plays back the recorded videos.
Mark Playback
(Mark playback/
game playback)
Scenes that are marked while recording the video can
be extracted and played back.
To start, tap J on the playback screen.
“Game Score Settings” (A p. 173)
The scenes marked while recording the video can be
searched.
Also, marked scenes can be extracted for playback;
extracted scenes can be saved as a playlist.
To start, tap J on the playback screen.
DIGEST
PLAYBACK
From the recorded video, scenes with a smile
detected, scenes with a person whose face is
registered, and scenes that are marked manually are
extracted and pieced together for a digest playback.
When “AUTO” is selected, recorded video is digested
in the pre-set length of time.
Start the playback from “DIGEST PLAYBACK” in the
“PLAYBACK SETTING” menu.
PLAYBACK
PLAYLIST
Plays back the playlists that you have created.
Start the playback from “PLAYBACK PLAYLIST” in the
“PLAYBACK SETTING” menu.
o
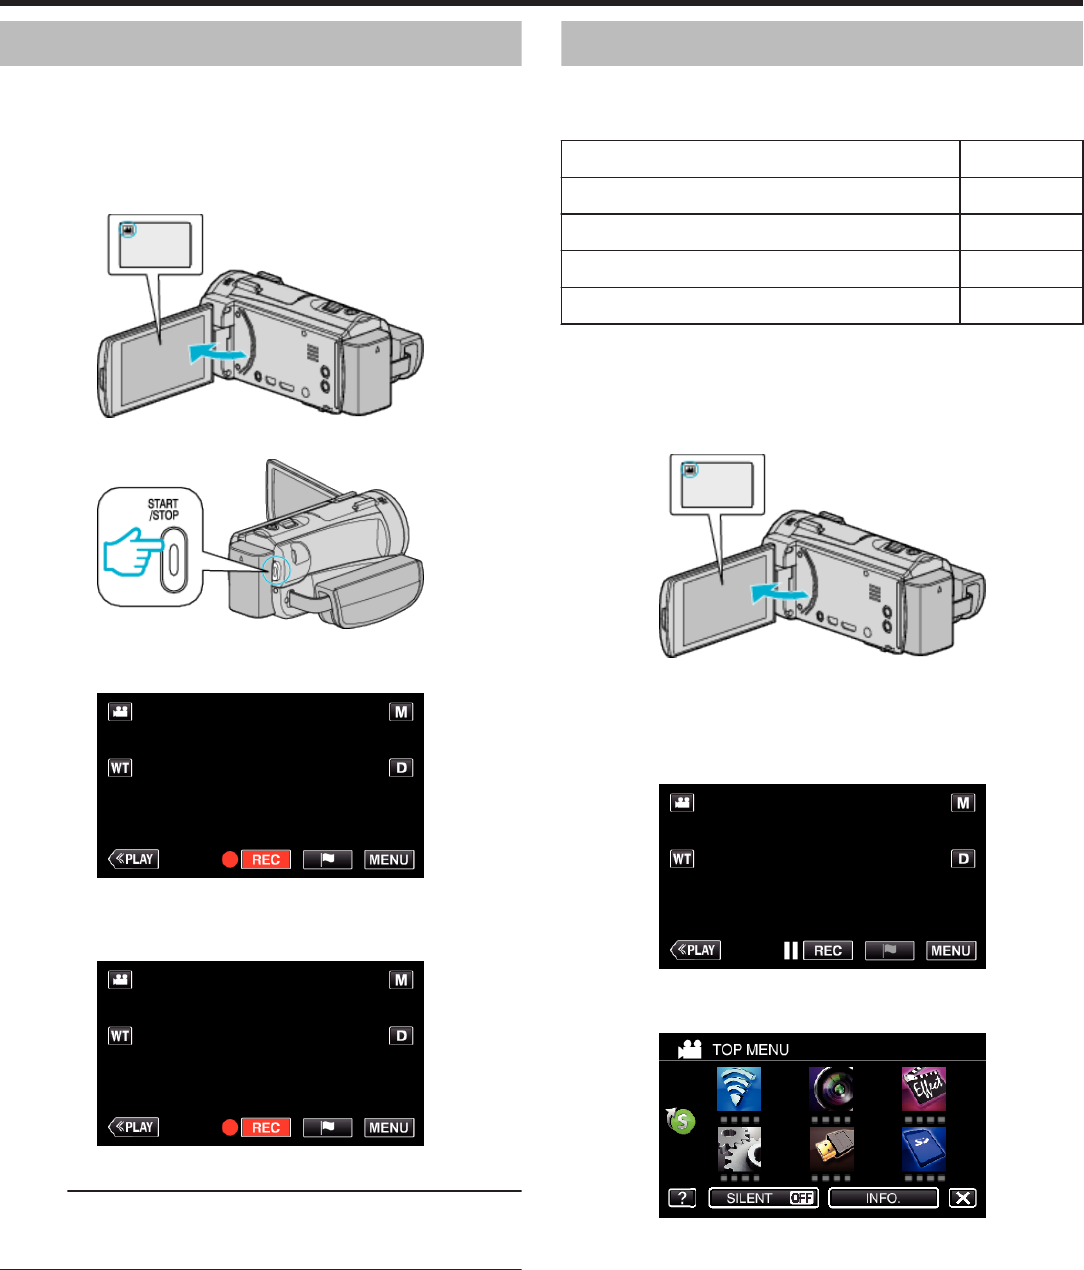
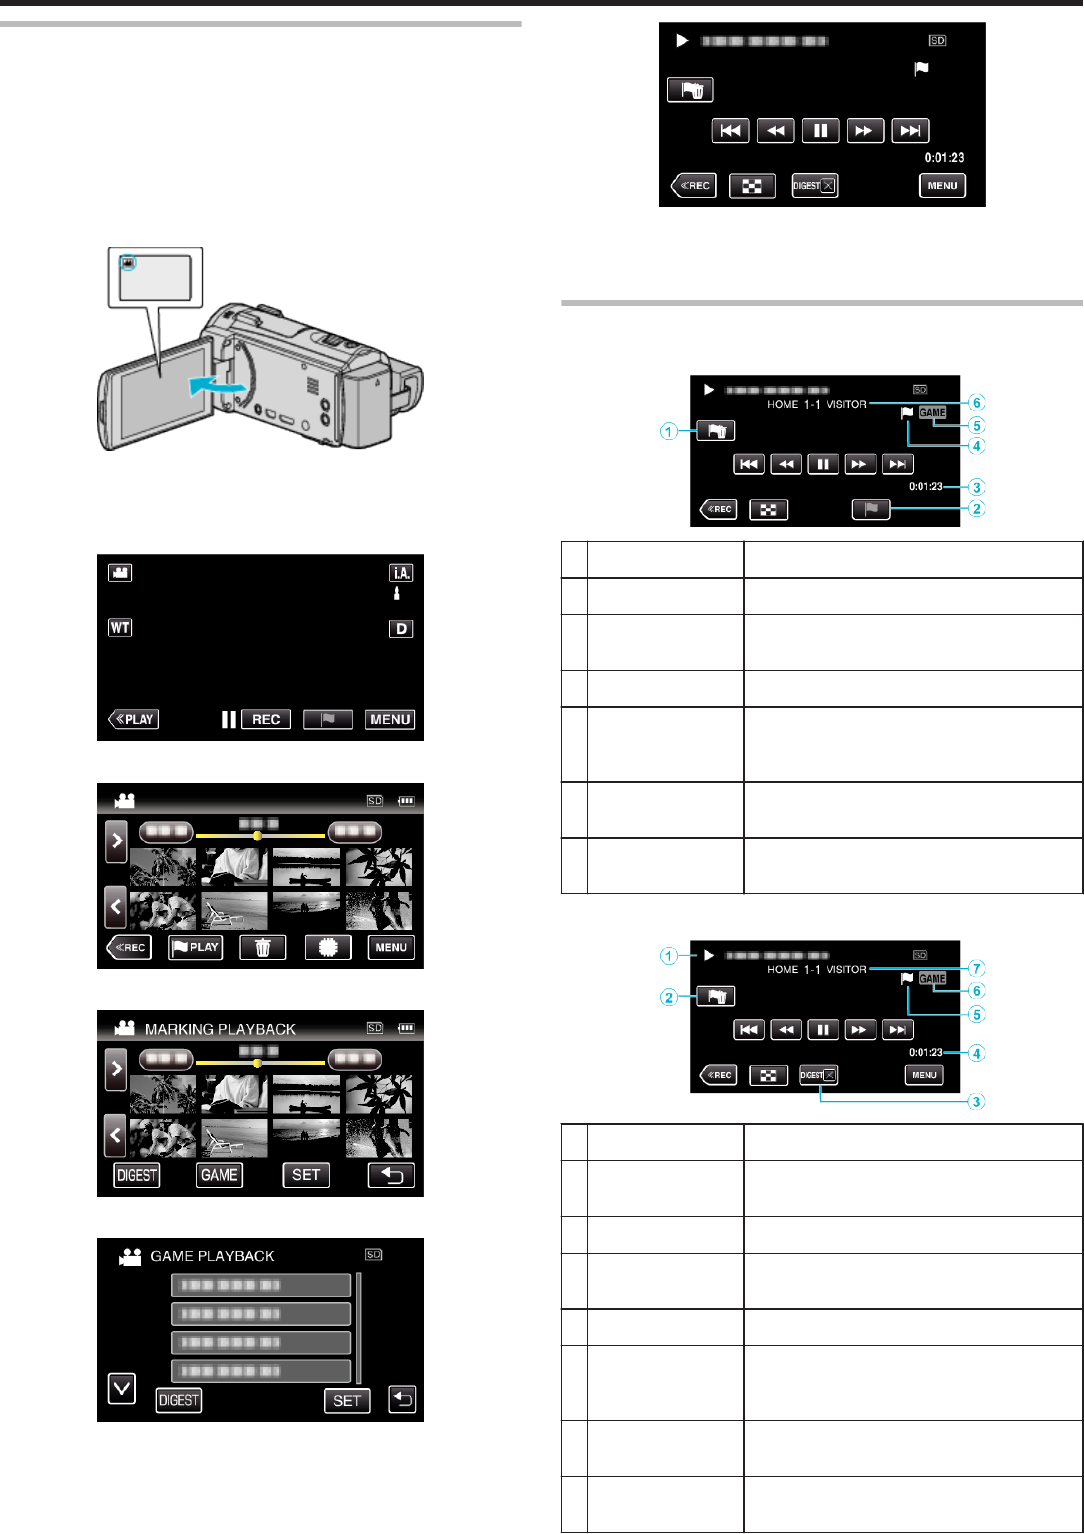
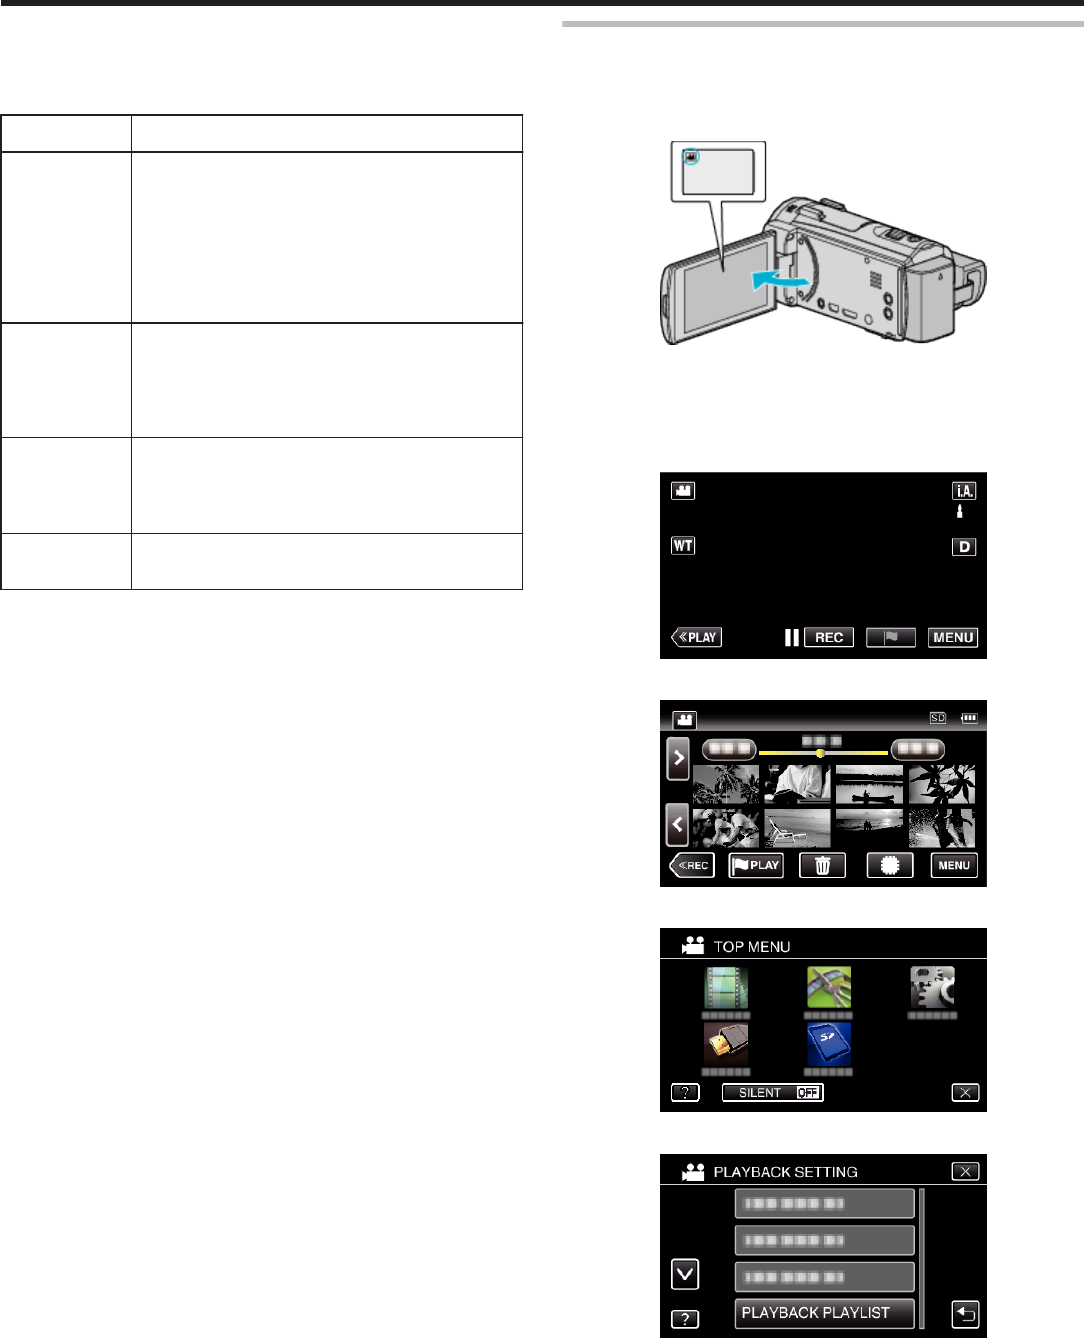
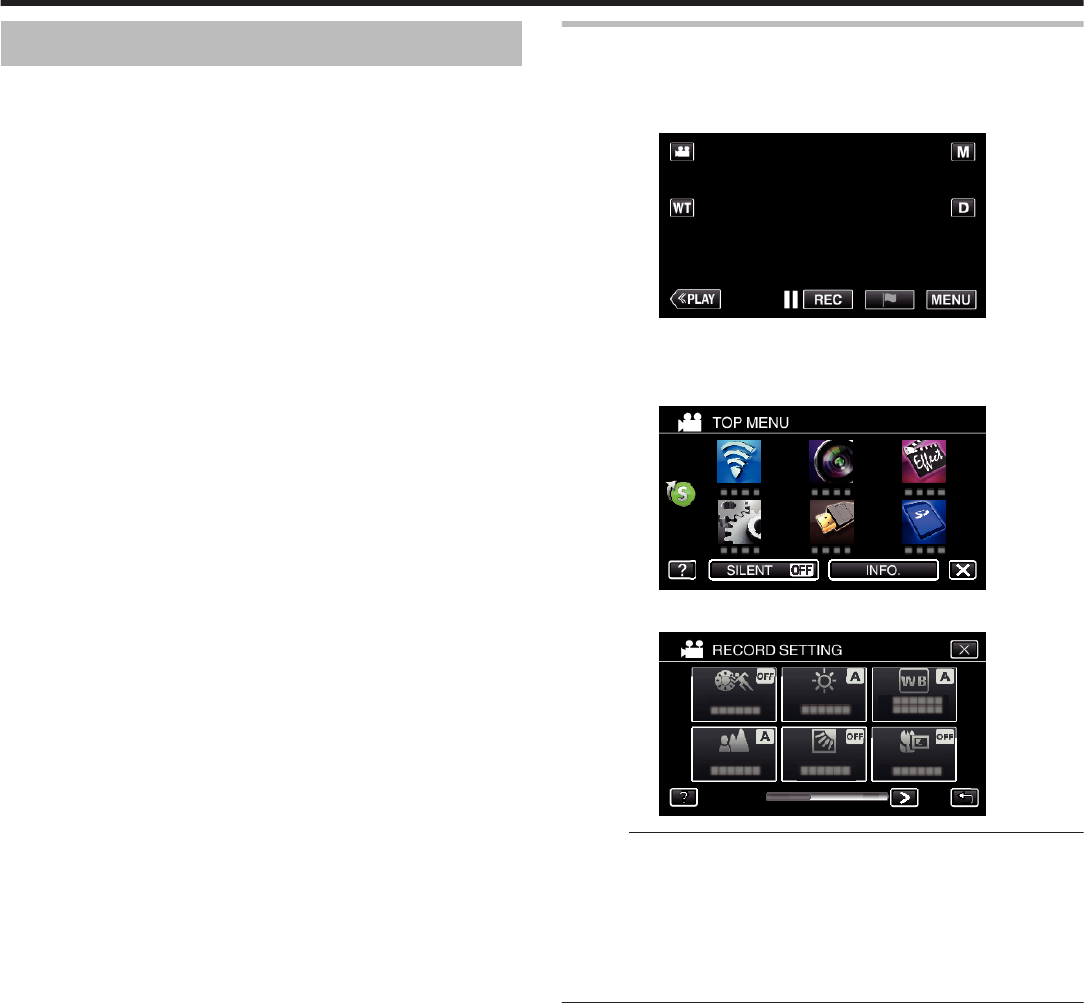
Switching to the video playback screen
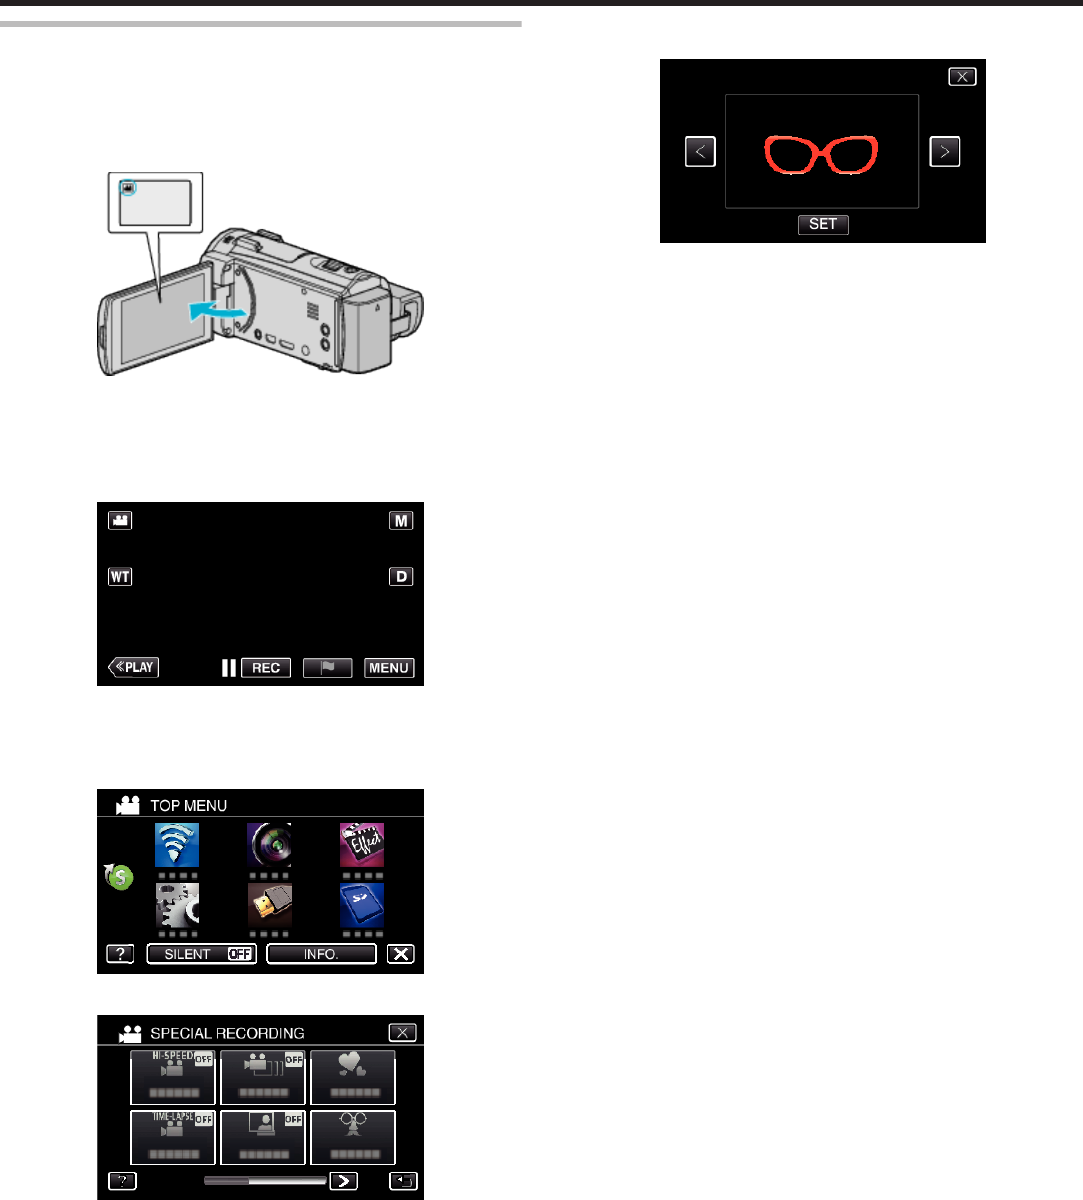
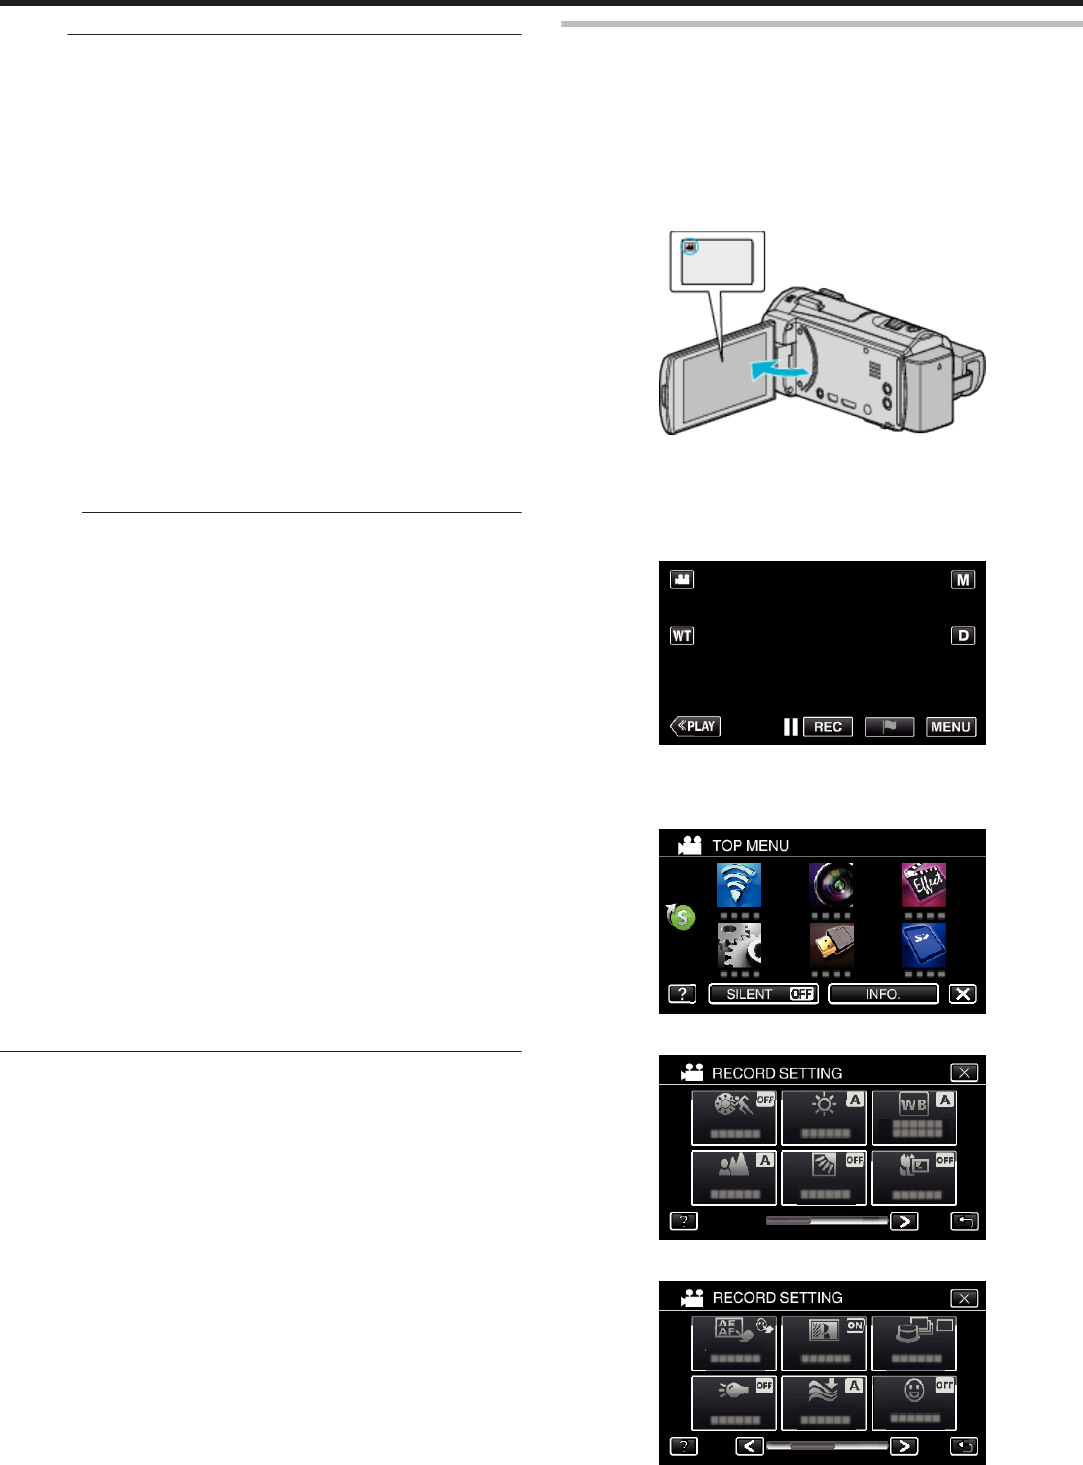
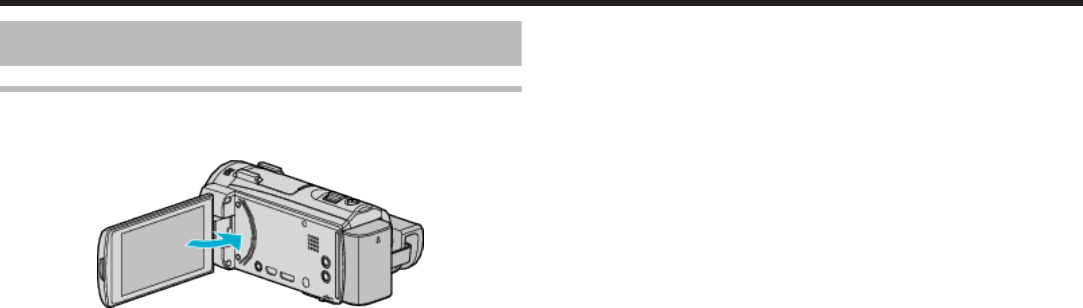
1
Open the LCD monitor.
.
0
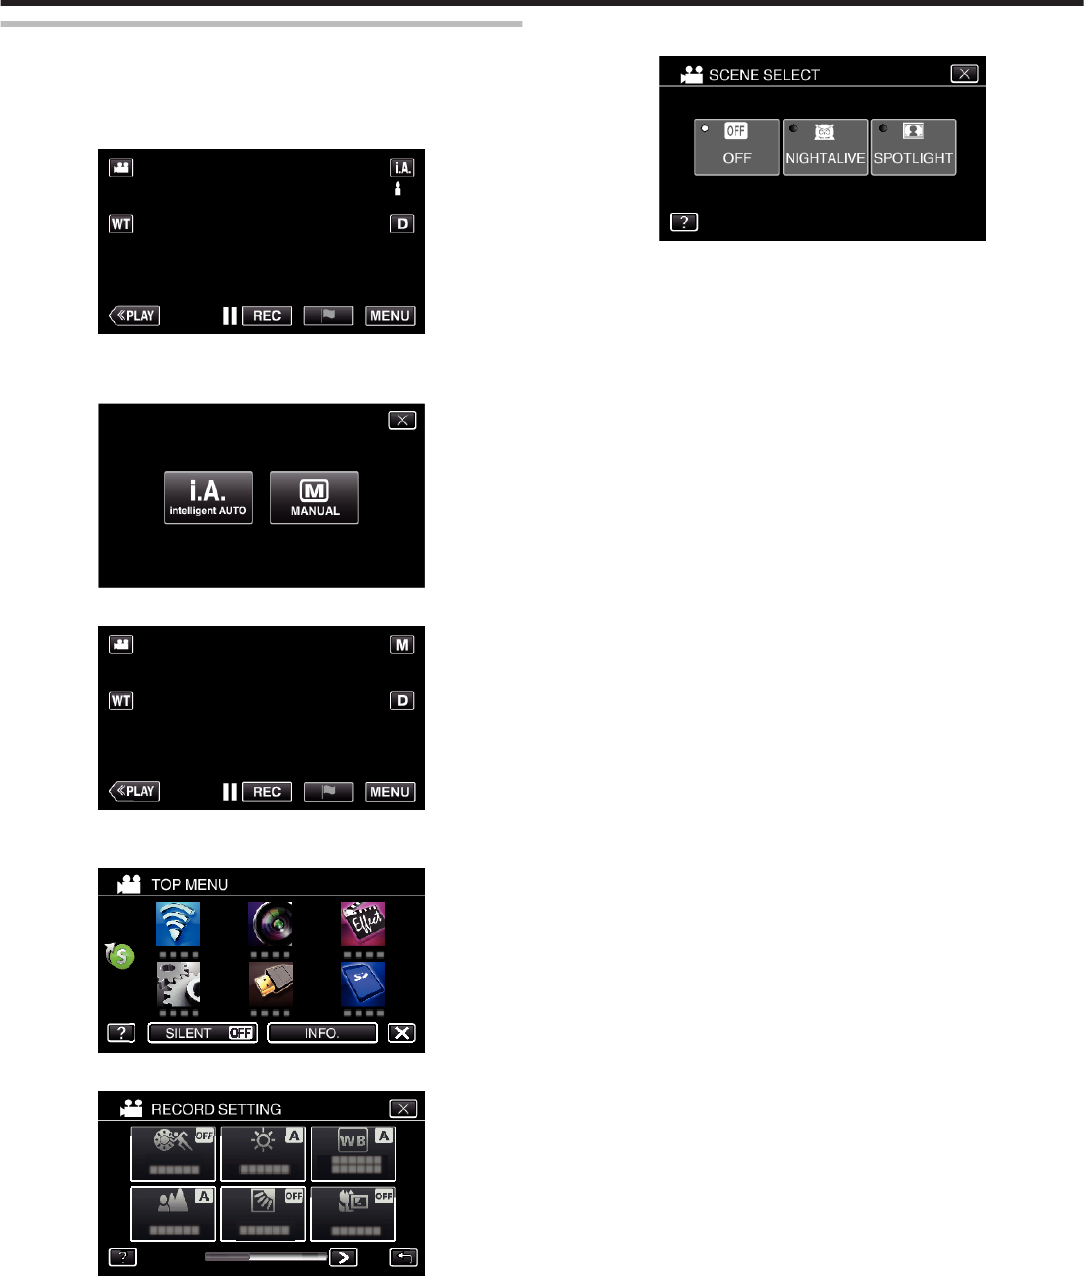
Check if the recording mode is A.
0
If the mode is
B
still image, tap
B
on the recording screen to display
the mode switching screen.
Tap
A
to switch the mode to video.
2
Tap “<<PLAY” to select the playback mode.
.
3
The video playback screen is displayed.
.
Caution :
0
Make a backup of important recorded data.
It is recommended to copy your important recorded data to a DVD or other
recording media for storage.
0
This unit is a microcomputer-controlled device. Electrostatic discharge,
external noise and interference (from a TV, a radio, etc.) might prevent it
from functioning properly. In such a case, turn off the power, then remove
the AC adapter and battery pack. This unit will be reset.
0
Disclaimer
- We shall not be held responsible for loss of recorded contents when
recording videos/audio or playback cannot be operated due to
malfunctions in this unit, provided parts, or SD card.
- Once deleted, recorded contents (data), including data loss due to
malfunctions in this unit, cannot be restored. Please be forewarned.
- JVC will not be responsible for any lost data.
- In order for quality improvement, defective recording medium is subject
to be analyzed. Therefore, it may not be returned.
Playback
67
Normal Playback
Plays back the recorded videos.
*The following is a screen of the model with the built-in memory.
1
Open the LCD monitor.
.
0
Check if the recording mode is A.
0
If the mode is
B
still image, tap
B
on the recording screen to display
the mode switching screen.
Tap
A
to switch the mode to video. (You can also use the
A
/
B
button
on this unit.)
2
Tap “<<PLAY” to select the playback mode.
.
3
Tap on the file to start playback.
.
0
Tap I/J to select the media for playback and change the index
screen (thumbnail display). (GZ-EX555)
0
Tap e to pause.
0
Tap u to return to the index screen.
0
L appears on the last image played back.
0
Lines in different colors are displayed under the thumbnail display to
distinguish the recording date.
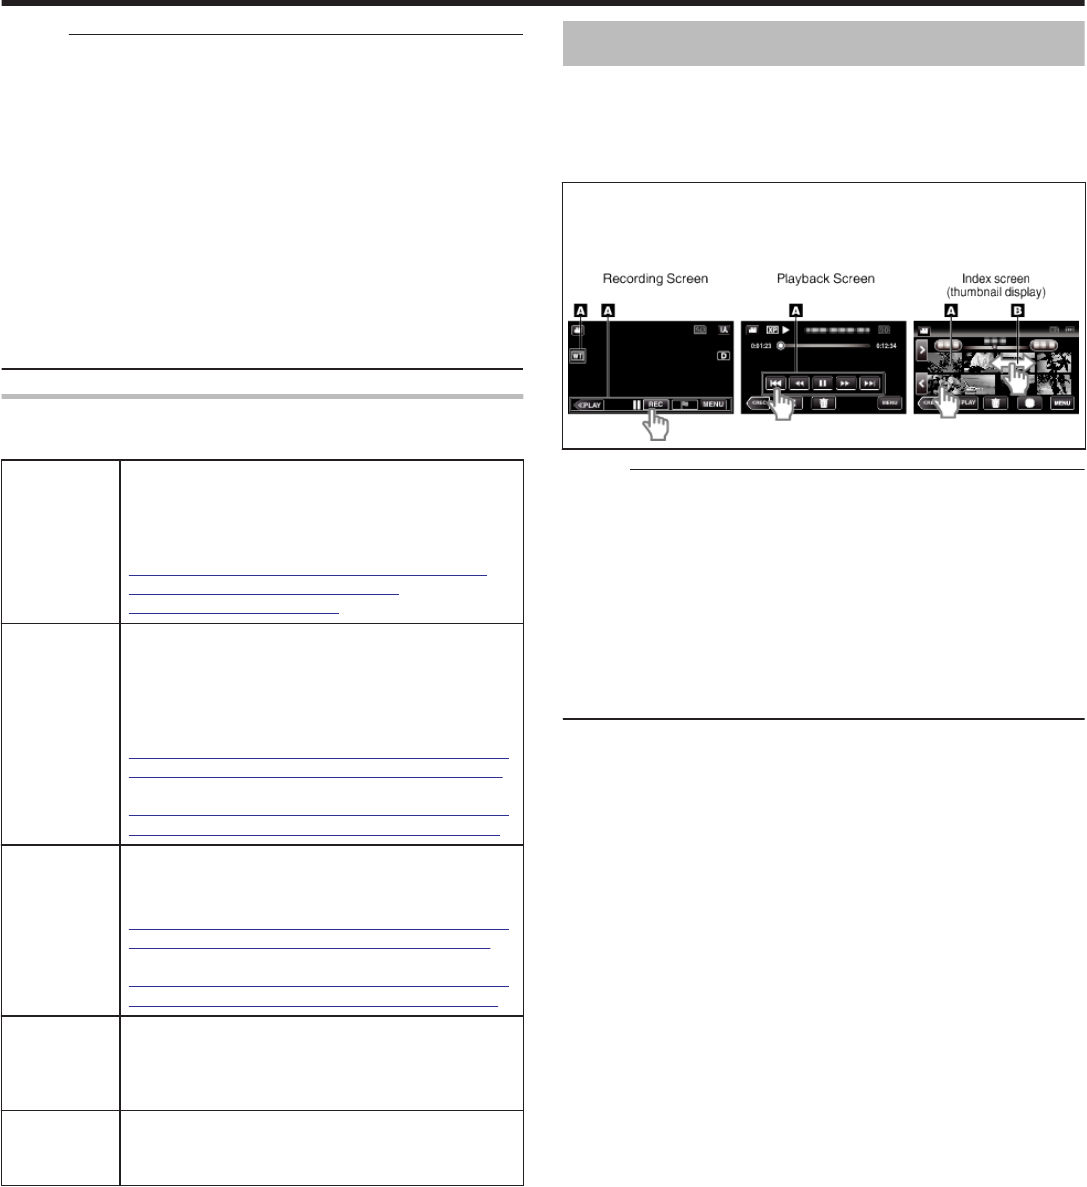
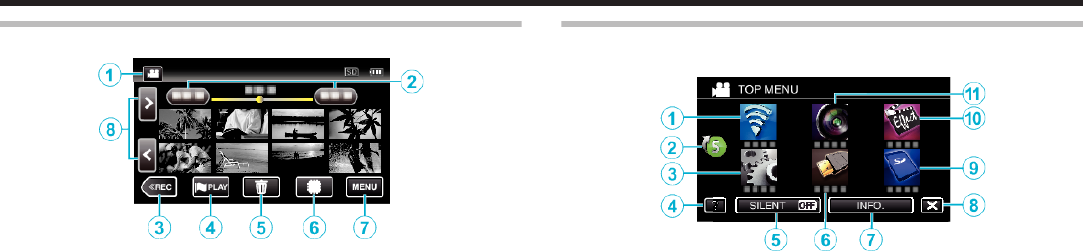
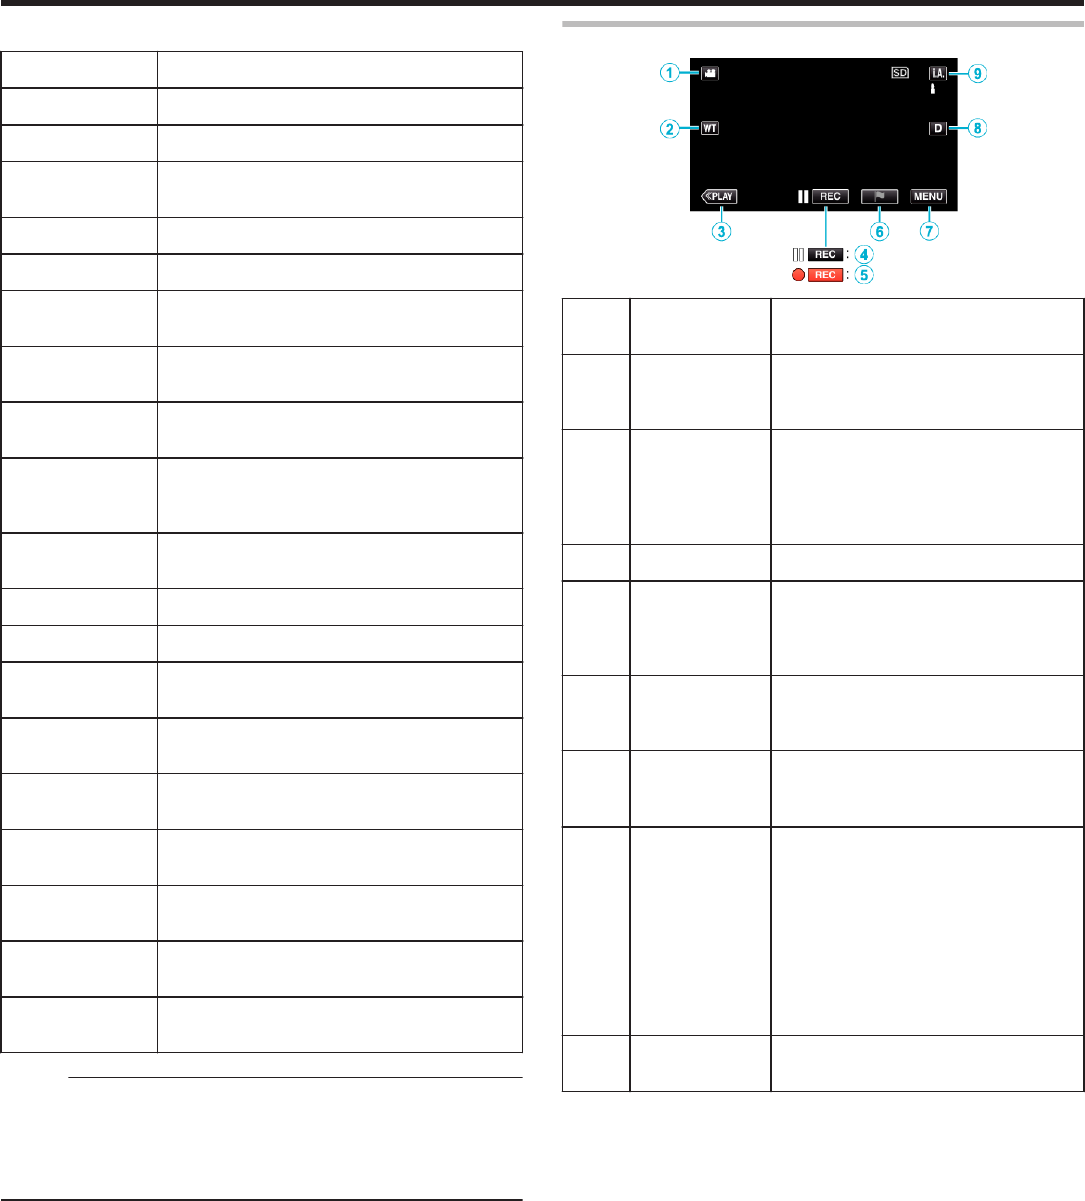
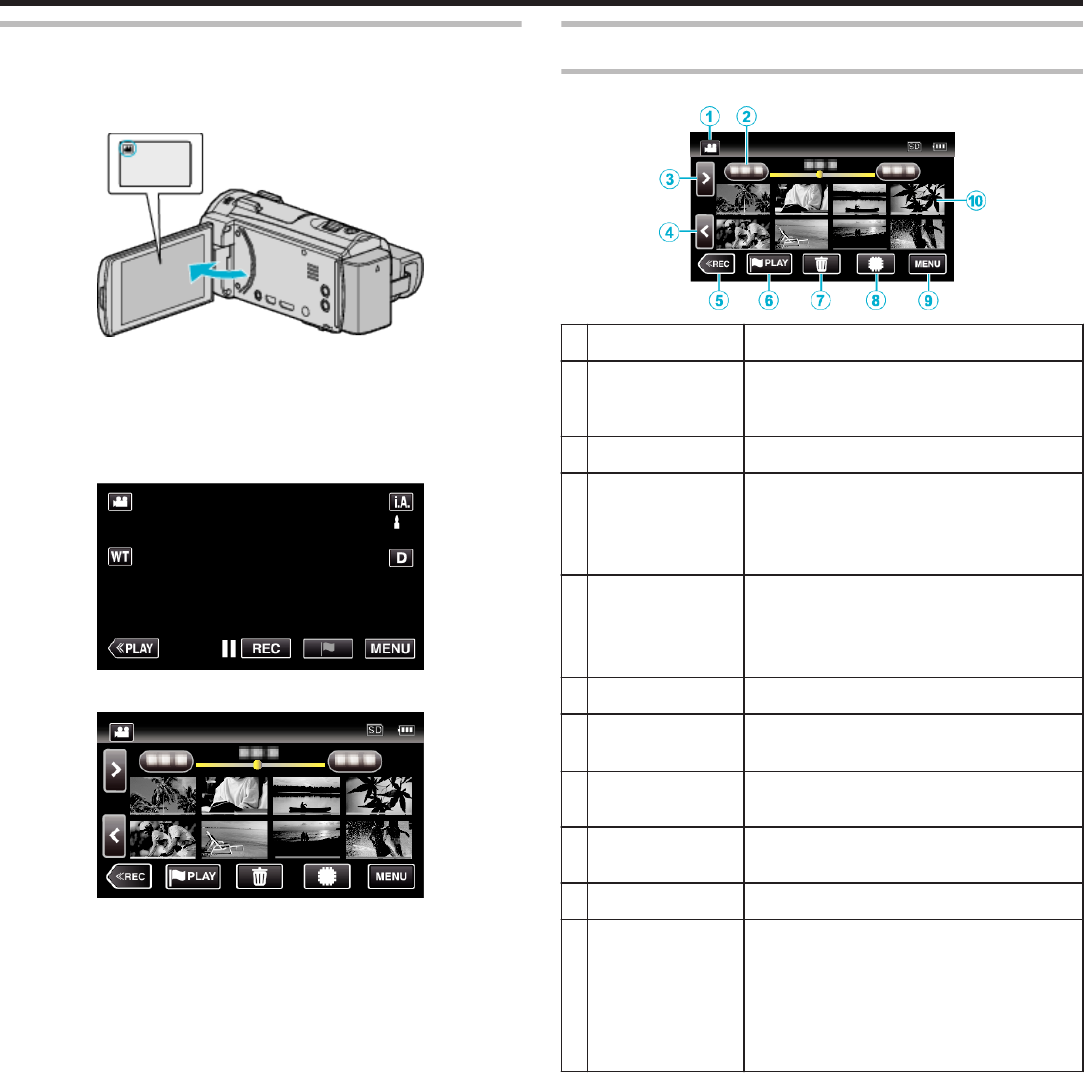
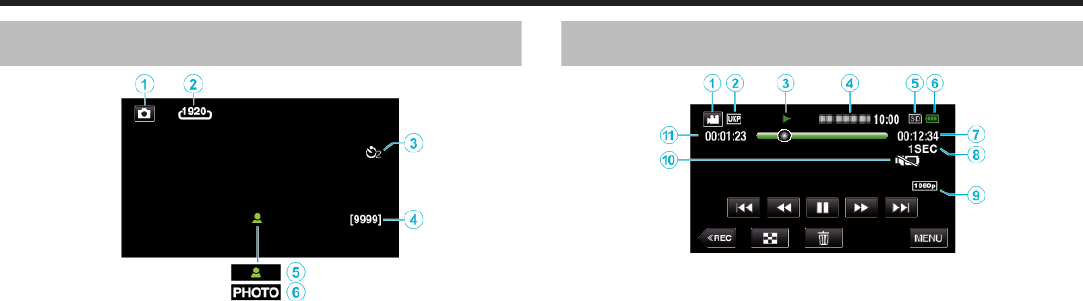
Operation Buttons for Video Playback
During Index Screen Display
.
DisplayDescription
A
Video/Still Image
Mode
A/B
Switches between video and still image
modes.
B
DateMoves to the previous/next date
C
>Displays the next index screen (thumbnail
display)
0
You can perform the same operation with the
zoom lever.
D
<Displays the previous index screen (thumbnail
display)
0
You can perform the same operation with the
zoom lever.
E
<<RECSwitches to the recording mode.
F
J
Moves to the mark playback mode.
“ MARKING PLAYBACK ” (A p. 70)
G
R
Displays the index screen (thumbnail display)
to perform deletion
H
I/JSwitches between the index screen of the built-
in memory and SD card (GZ-EX555)
I
MENUDisplays the menu screen
J
Thumbnail (File)Tap on thumbnail - Starts playback
Drag to right - Scrolls to the right to show the
previous index screen (thumbnail display)
Drag to left - Scrolls to the left to show the next
index screen (thumbnail display)
Images with the same underlined color
indicates the same recording date.
Playback
68
During Video Playback
.
0
Operations buttons on the touch screen disappear if the unit is not
operated for about 5 seconds. Tap on the screen to display the operation
buttons again.
DisplayDescription
A
Video/Still Image
Mode
A/B
Switches between video and still image
modes.
B
Timeline BarTap on a random position - Moves to the
tapped position
Drag playback point to the left or right - Starts
playback from the new position
Tap on a random position - Moves to the
tapped position
C
PointerDisplays the current estimated playback
position within the scene
D
h
Returns to the beginning of the scene Returns
to the previous scene if tapped at the beginning
of a scene.
0
Allows the same functions as the zoom lever
to be performs while pausing playback.
E
j
Reverse search (speed increases with each
tap)
E
l
Reverse slow-motion / Press and hold to start
reverse slow playback
F
d / ePlayback/pause
G
i
Forward search (speed increases with each
tap)
G
k
Forward slow-motion / Press and hold to start
slow playback
H
g
Advances to the next scene
0
Allows the same functions as the zoom lever
to be performs while pausing playback.
I
<<RECSwitches to the recording mode.
J
u
Stop (returns to index screen)
K
R
Deletes the currently displayed video.
L
MENUDisplays the menu screen
Memo :
0
Tap or drag on the operation area of the touch screen.
0
You can search for a specific file by the recording date.
“Searching for a Specific Video/Still Image by Date” (A p. 80)
0
The recording date and time can be displayed on the screen during
playback.
“ DISPLAY DATE/TIME ” (A p. 219)
0
Displays the approximate remaining battery power during use.
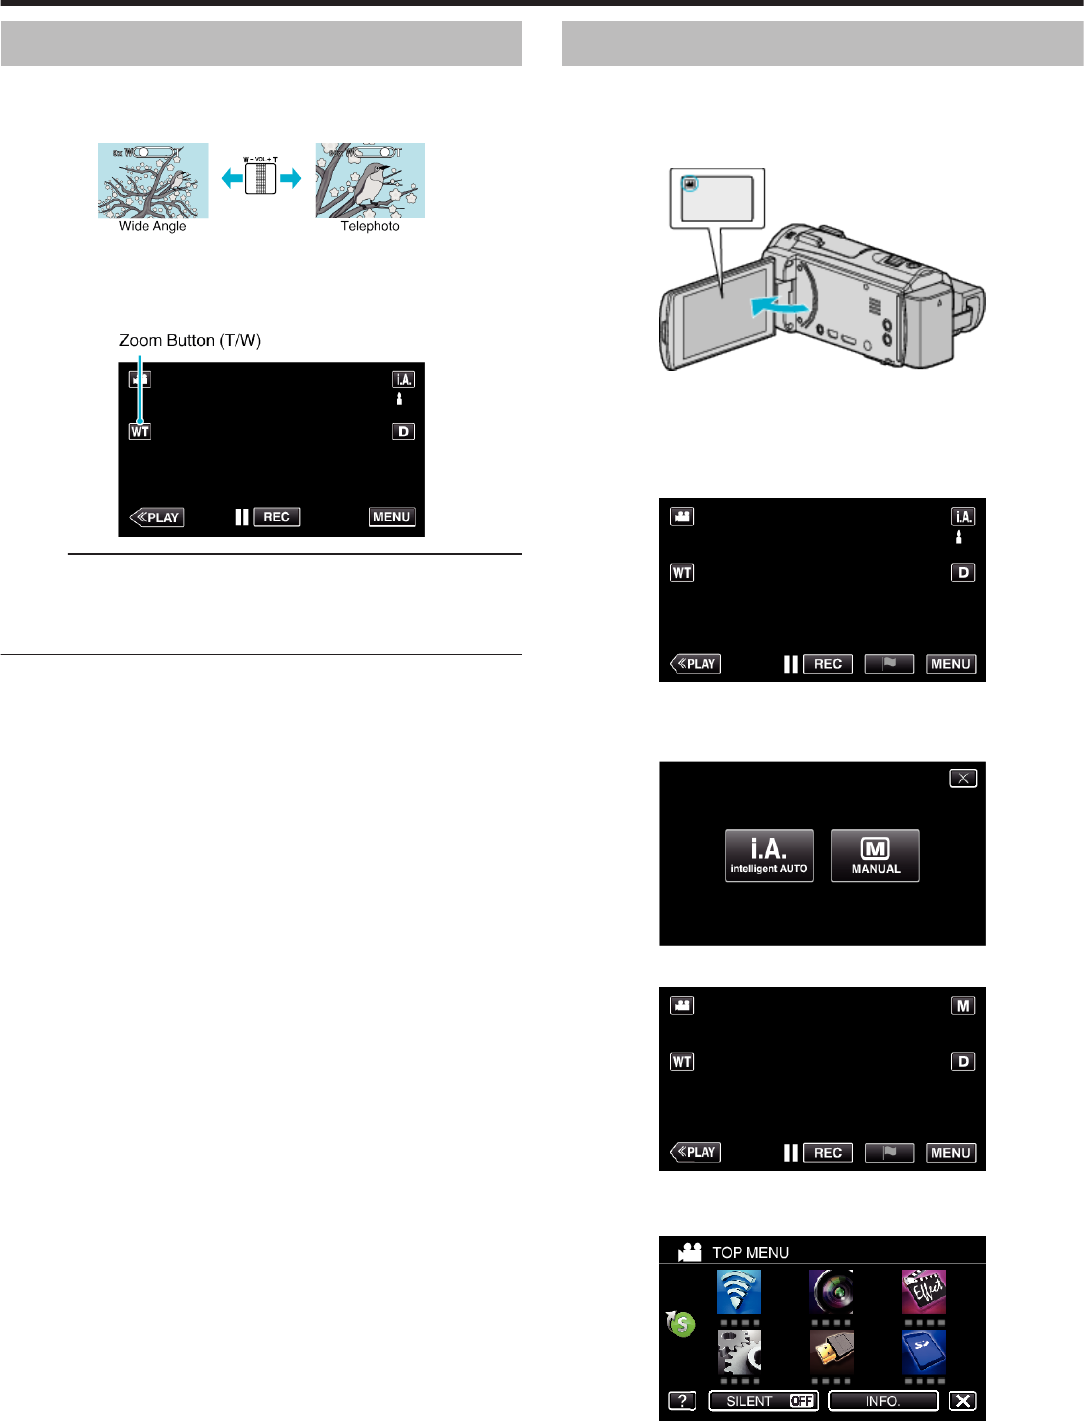
Adjusting the Volume of Videos
You can use the zoom/volume lever to control the volume.
.
Playback
69
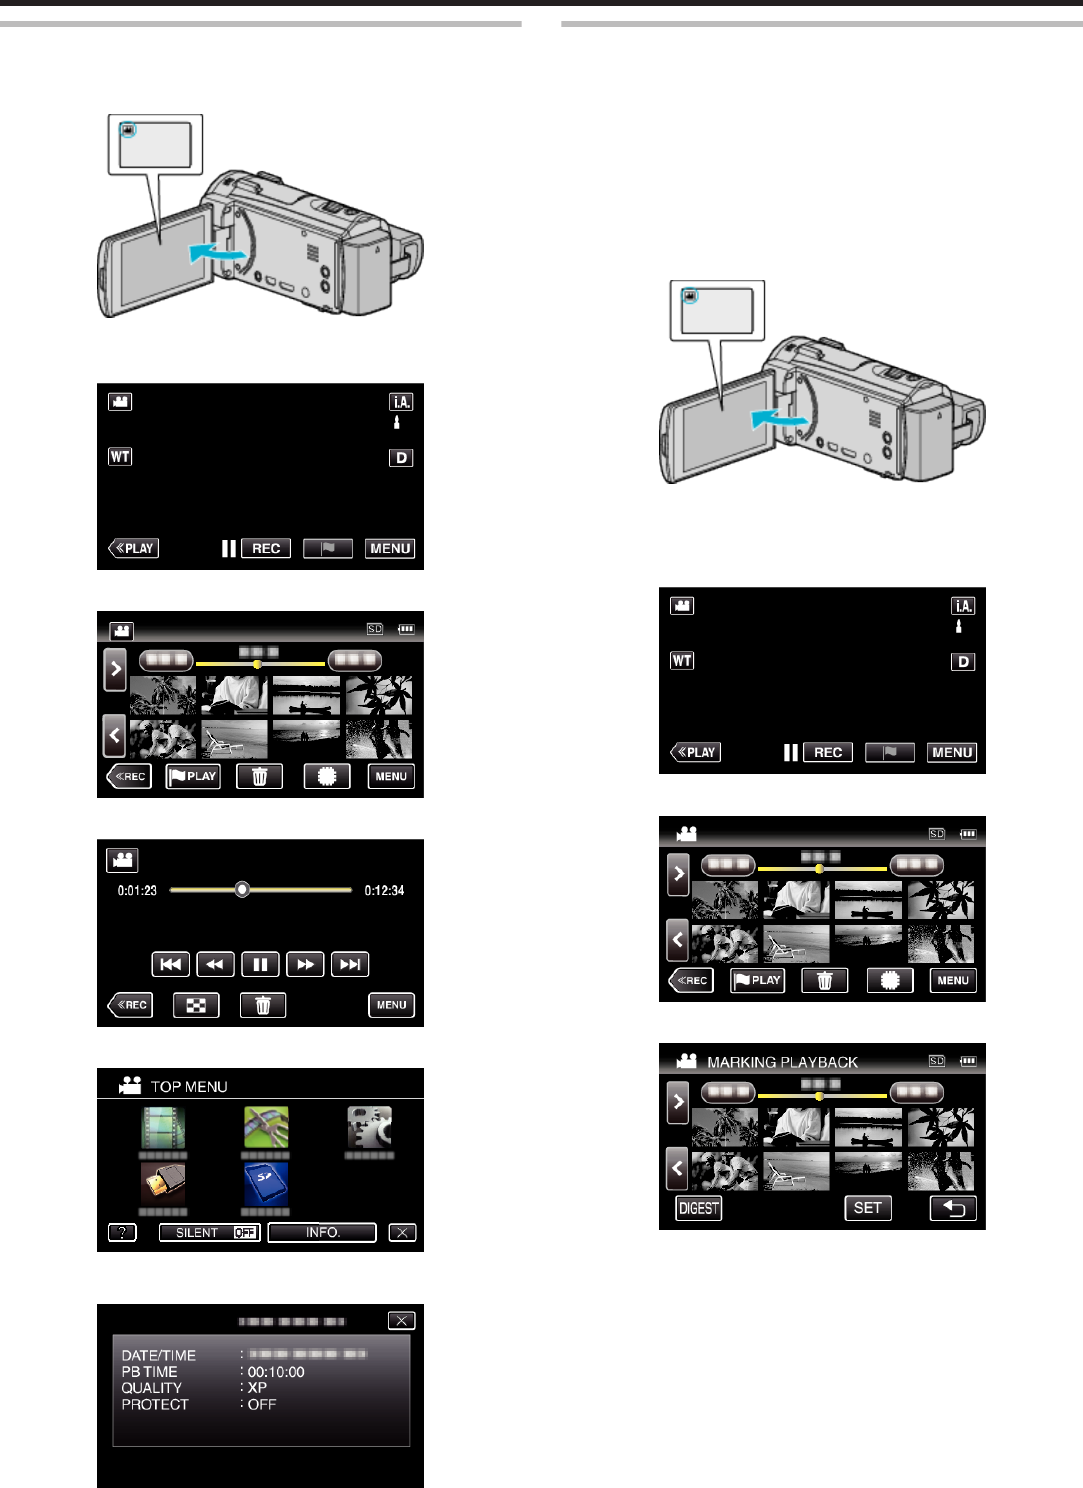
Checking the Recording Date and Other Information
You can see the recording information of the recorded videos.
1
Open the LCD monitor.
.
0
Tap A or B to select the video or still image mode.
2
Tap “<<PLAY” to select the playback mode.
.
3
Tap on the file to start playback.
.
4
Tap “MENU”.
.
5
Tap “INFO.”.
.
0
Tap L to exit the menu.
You can display the recording date and duration of the selected file.
.
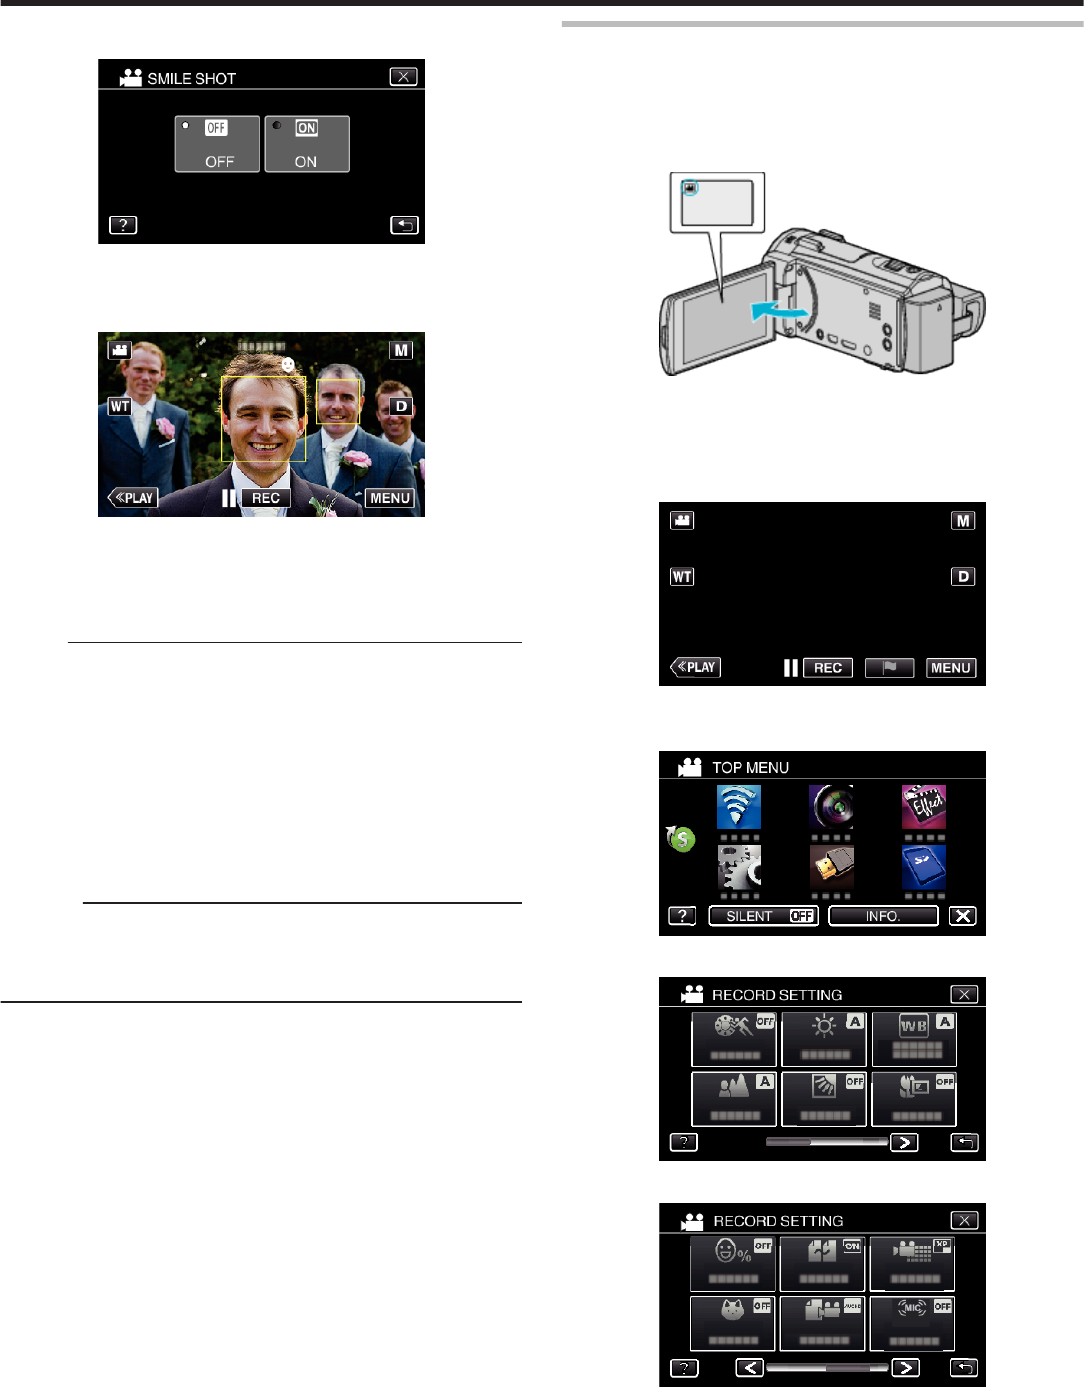
MARKING PLAYBACK
0
The scenes marked while recording the video and the scoring scenes
recorded in the game recording mode (by using the smartphone
application) can be searched.
Also, marked scenes and goal scenes can be extracted for playback;
extracted scenes can be saved as a playlist.
0
Switch to the mark playback mode by tapping J on the video playback
screen.
*The following is a screen of the model with Wi-Fi functions and built-in
memory.
1
Open the LCD monitor.
.
0
If the mode is B still image, tap B on the recording screen to display
the mode switching screen.
Tap
A
to switch the mode to video.
2
Tap “<<PLAY” to select the playback mode.
.
3
Tap J to open the mark playback mode.
.
4
Tap “DIGEST” to select the DIGEST/Mark Playback mode.
.
0
When the thumbnail display is tapped directly (without tapping the
“DIGEST” button), normal playback (additional marks can be added)
starts.
0
Tap “SET” to adjust the playback time per scene and the playback
position.
“Adjusting the Marked Playback Position” (A p. 73)
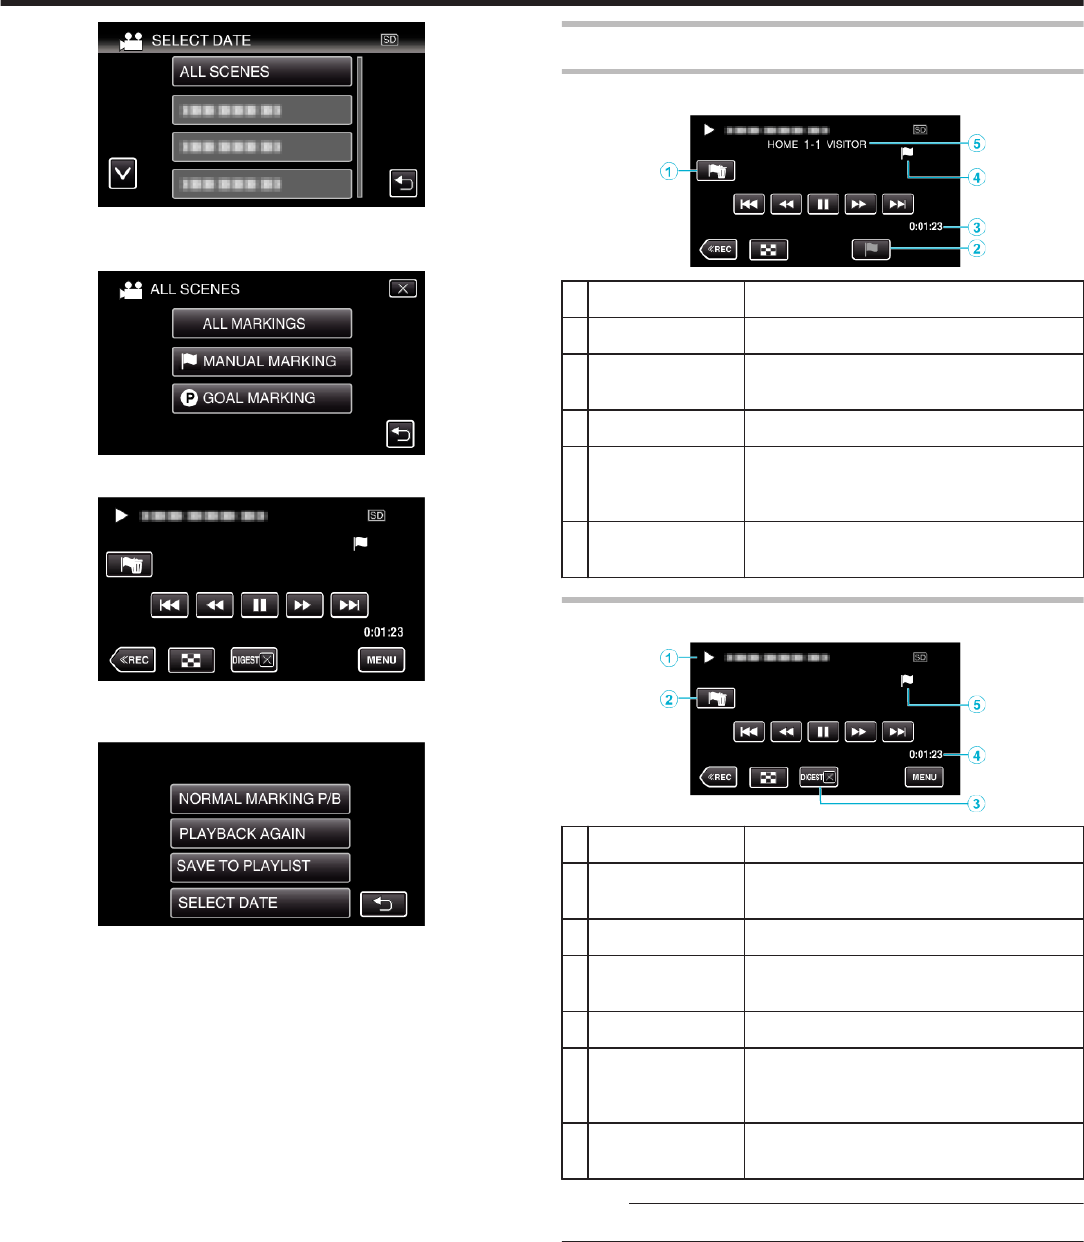
5
Select the recording date of the video that you want to playback.
Playback
70
.
0
Tap “ALL SCENES” to playback all scenes.
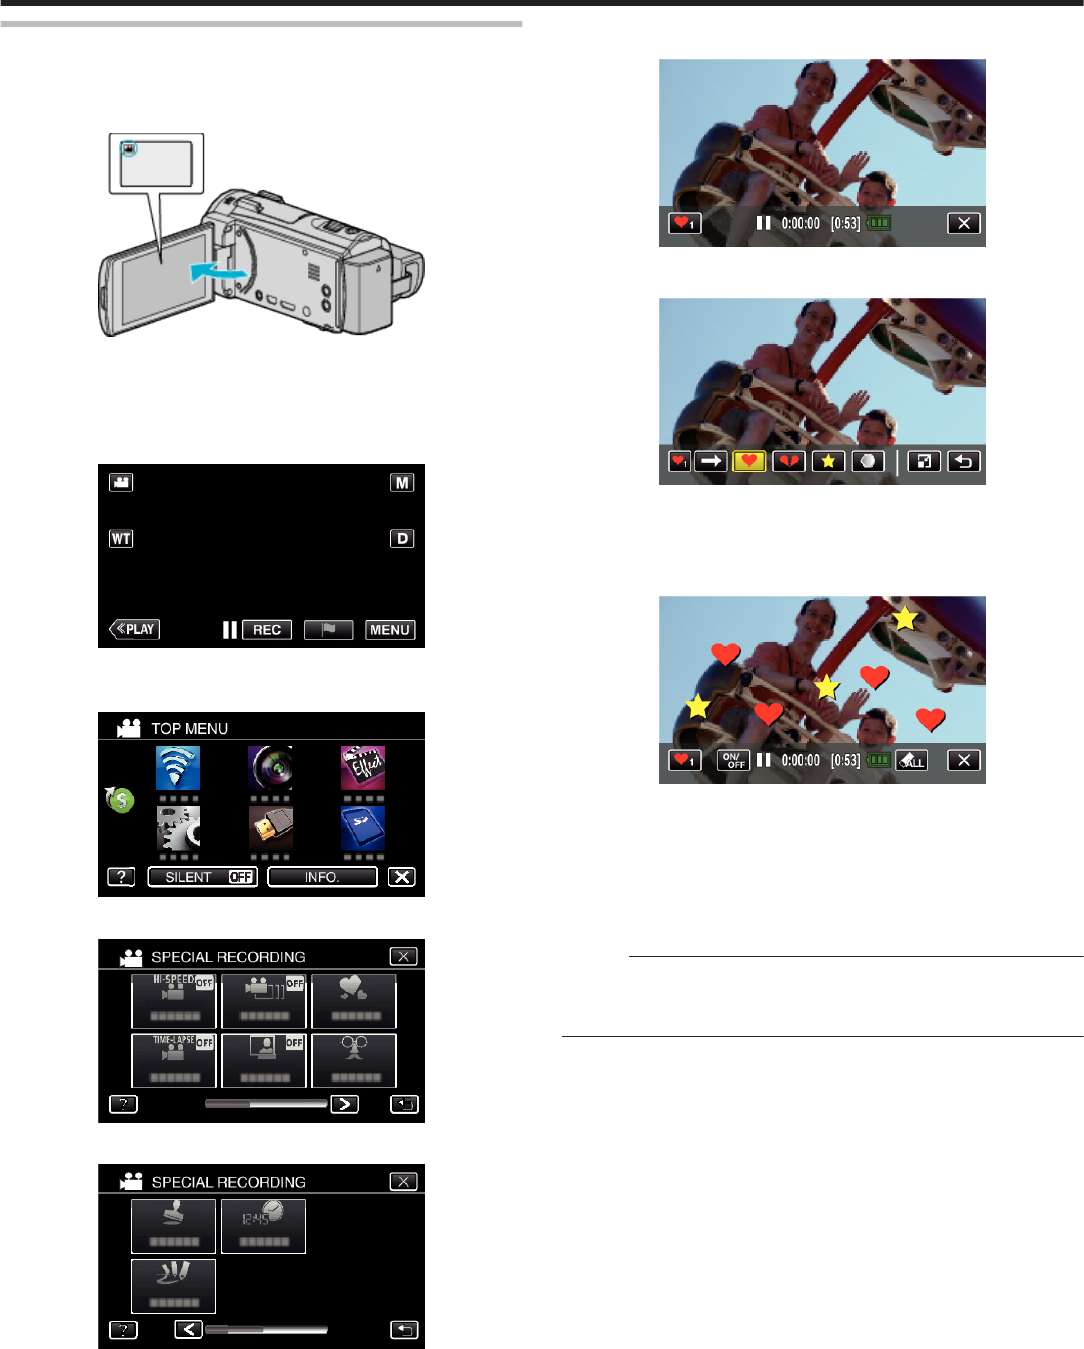
6
Select the type of the “MARK”.
.
7
Digest Playback starts.
.
8
Digest playback stops automatically, or display the next screen by
tapping “MENU”.
.
0
NORMAL MARKING P/B: start normal marking playback.
0
PLAYBACK AGAIN: start the digest playback again.
0
SAVE TO PLAYLIST: save the digest playback images to the playlist.
“ PLAYBACK PLAYLIST ” (A p. 76)
0
SELECT DATE: return to step 5.
Indications during the Marking Playback
During the Normal Marking Playback
.
DisplayDescription
A
Mark Delete buttonDeletes the mark that is currently displayed.
B
Playback Mark
Button
Enter a mark while playback is in progress.
C
Elapsed TimeDisplayed the playback time of the video.
D
“D” icon displayed
“P” icon displayed
Indicates that the current scene is marked.
Indicates that recording of the score is in
progress.
E
ScoreDisplays the score of the game (displayed only
if the score is registered.)
During the DIGEST/Mark Playback
.
DisplayDescription
A
Date and time
display
-
B
Mark Delete buttonDeletes the mark that is currently displayed.
C
DIGEST Playback
Cancel Button
Moves to the normal mark playback.
D
Elapsed TimeDisplayed the playback time of the video.
E
“D” icon displayed
“P” icon displayed
Indicates that the current scene is marked.
Indicates that recording of the score is in
progress.
F
ScoreDisplays the score of the game (displayed only
if the score is registered.)
Memo :
0
Once a scene is marked, the next mark won’t be made within 5 seconds.
Playback
71
GAME PLAYBACK
0
Game playback is a function to playback the goal scenes and/or marked
scene that is recorded by the smartphone application Everio sync. 2.
0
To start, tap J on the playback screen.
0
For the game recording mode, refer to “Game Score Settings”
(A p. 173) .
*The following is a screen of the model with Wi-Fi functions and built-in
memory.
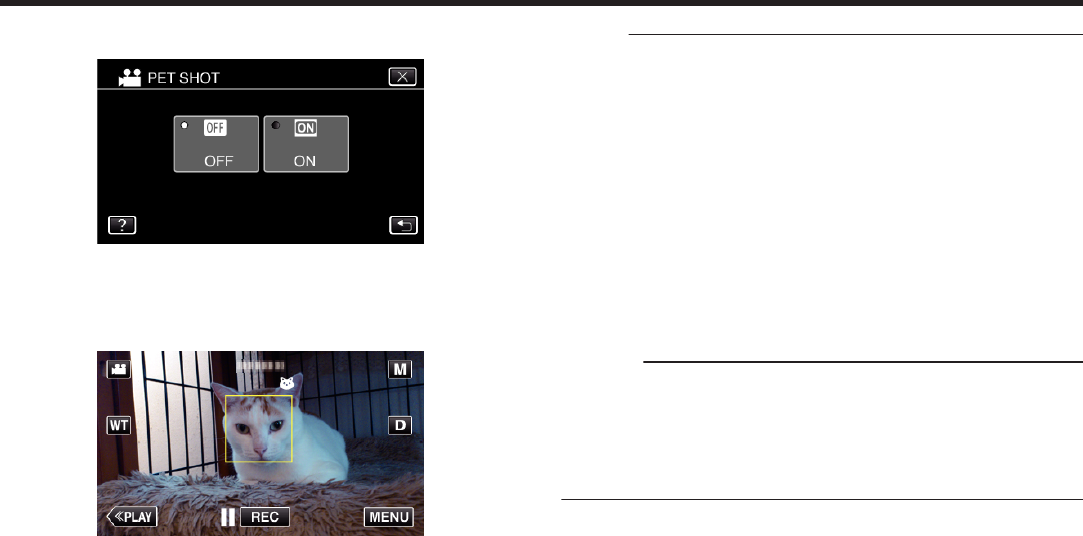
1
Open the LCD monitor.
.
0
If the mode is B still image, tap B on the recording screen to display
the mode switching screen.
Tap
A
to switch the mode to video.
2
Tap “<<PLAY” to select the playback mode.
.
3
Tap J to open the mark playback mode.
.
4
Tap “GAME” to select the game playback mode.
.
5
Tap the recorded game.
.
0
Tap the list of the game to playback all the scenes of the game.
0
Tap DIGEST to extract the score and marked scenes from the game,
and to start a DIGEST playback.
6
Marked scenes are played back automatically.
.
0
Playback stops after all the scenes are played back.
0
Tap DIGESTL during DIGEST playback to exit the Mark/DIGEST
playback and to switch to the normal mark playback.
Indications during the Game Playback
o
During the Normal Game Playback
.
DisplayDescription
A
Mark Delete buttonDeletes the mark that is currently displayed.
B
Playback Mark
Button
Enter a mark while playback is in progress.
C
Recorded timeDisplays the time that the video is recorded.
D
“D” icon displayed
“P” icon displayed
Indicates that the current scene is marked.
Indicates that recording of the score is in
progress.
E
Game playback
mode
Indicates that the game playback is in
progress.
F
ScoreDisplays the score of the game (displayed only
if the score is registered.)
o
During the DIGEST/Game Playback
.
Display
Description
A
Date and time
display
-
B
Mark Delete buttonDeletes the mark that is currently displayed.
C
DIGEST Playback
Cancel Button
Moves to the normal mark playback.
D
Recorded timeDisplays the time that the video is recorded.
E
“D” icon displayed
“P” icon displayed
Indicates that the current scene is marked.
Indicates that recording of the score is in
progress.
F
Game playback
mode
Indicates that the game playback is in
progress.
G
ScoreDisplays the score of the game (displayed only
if the score is registered.)
Playback
72
Memo :
0
Once a scene is marked, the next mark won’t be made within 5 seconds.
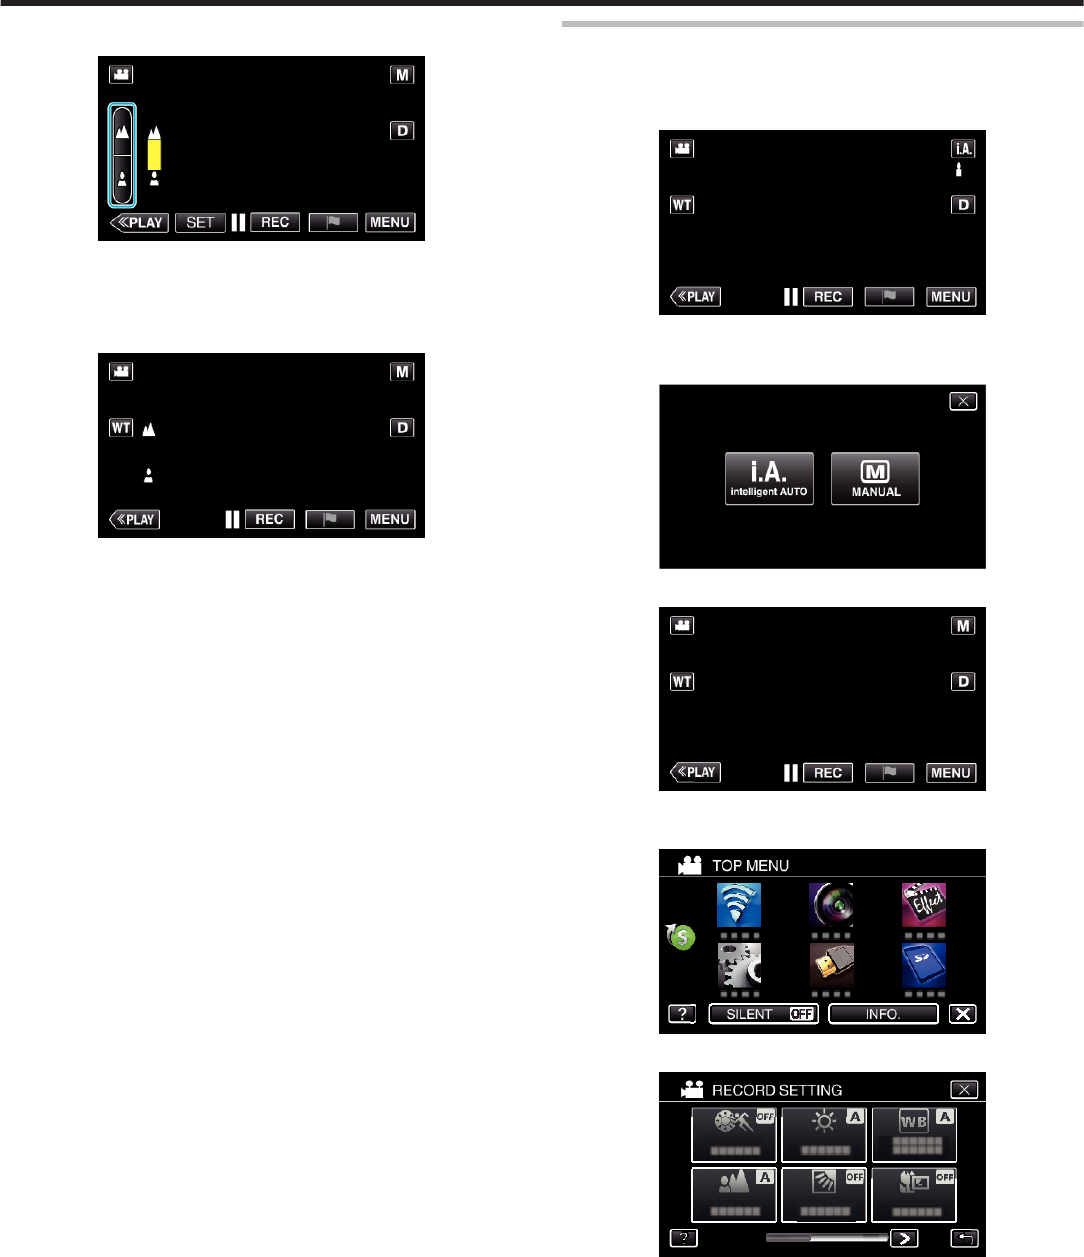
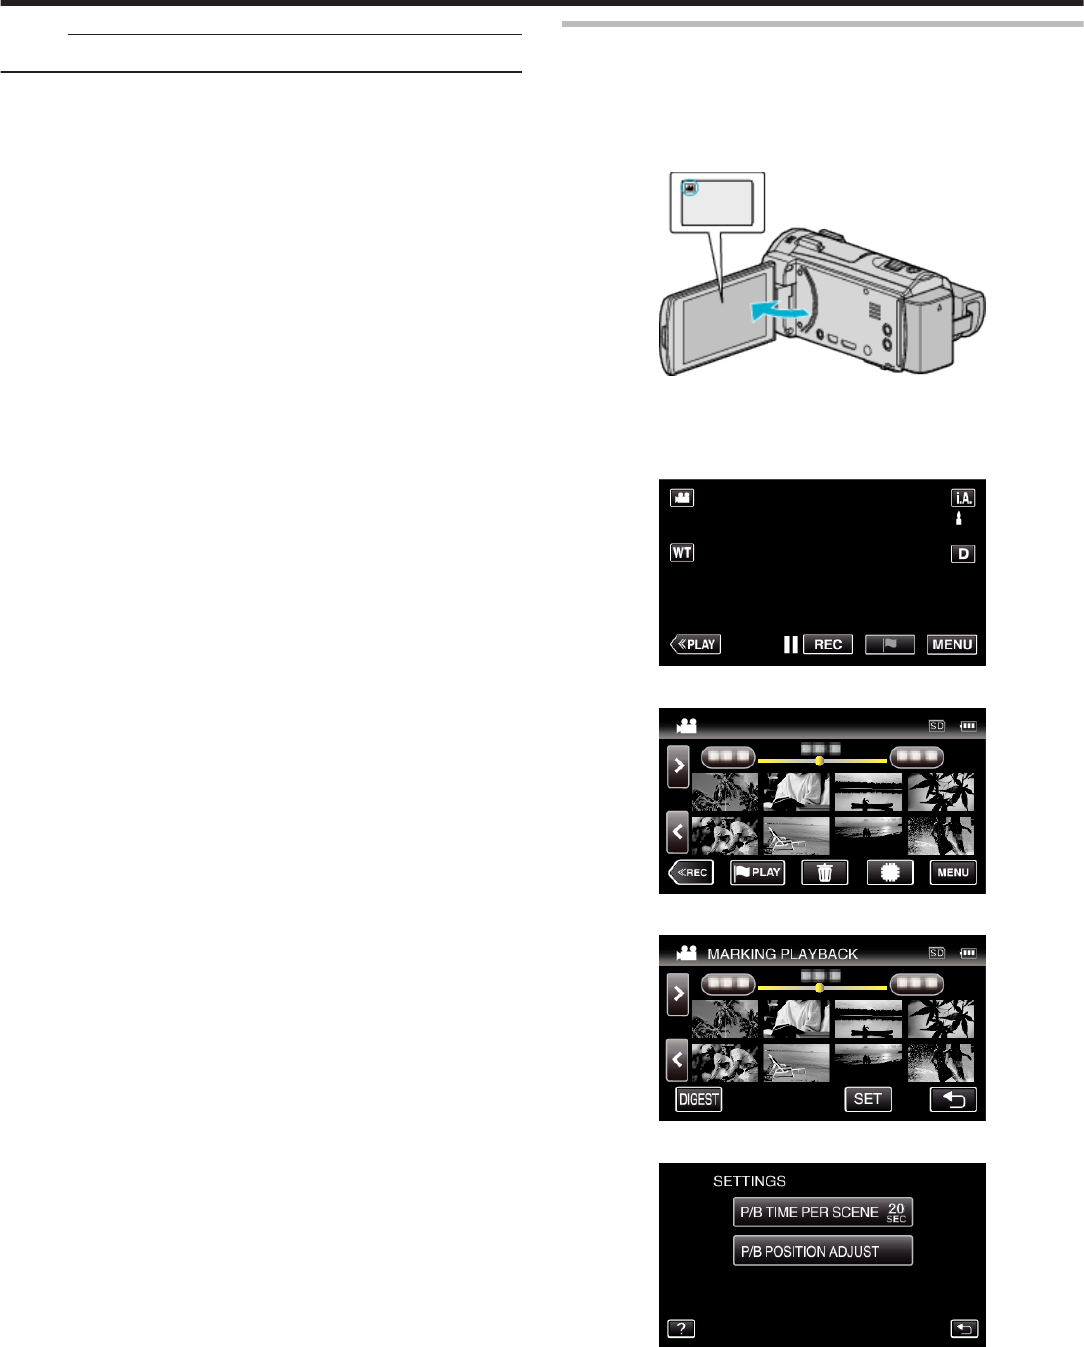
Adjusting the Marked Playback Position
Specify the length of time before and after the marked position for playing
back the marked video. The maximum length of playback time per mark is
20 seconds.
*The following is a screen of the model with Wi-Fi functions.
1
Open the LCD monitor.
.
0
If the mode is B still image, tap B on the recording screen to display
the mode switching screen.
Tap
A
to switch the mode to video.
2
Tap “<<PLAY” to select the playback mode.
.
3
Tap J to open the mark playback mode.
.
4
Tap “SET”.
.
5
Select the items for setting.
.
0
Proceed to Step 6 if “P/B TIME PER SCENE” is selected, and proceed
to Step 7 if “P/B POSITION ADJUST” is selected.
Playback
73
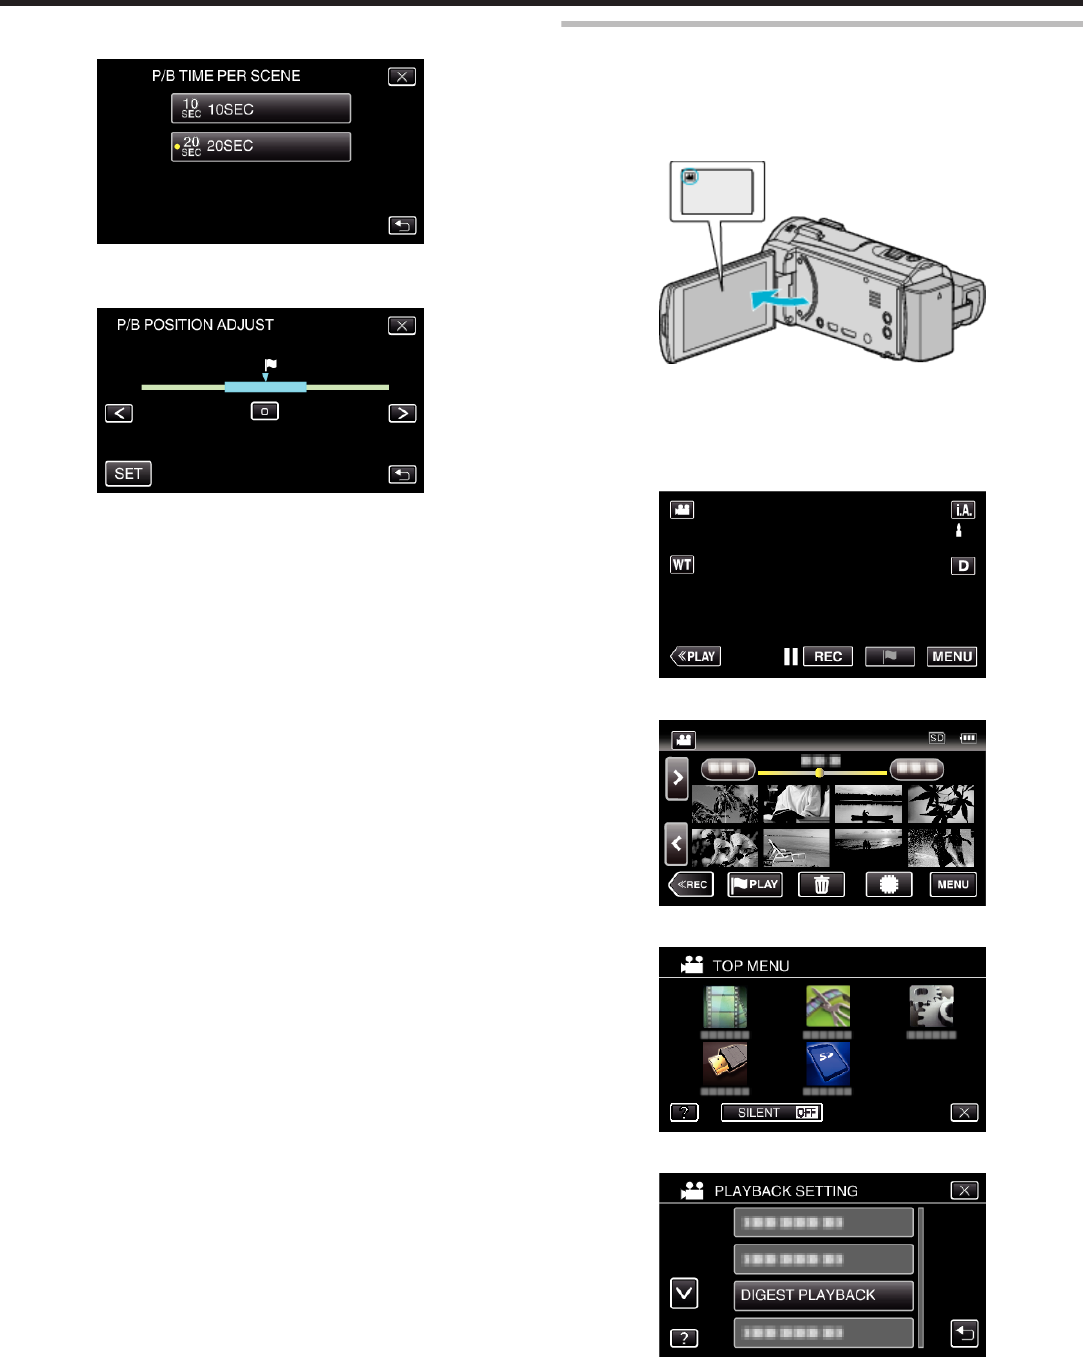
6
Select the playback time per scene.
.
0
Tap J to return to the previous screen.
7
Adjust the playback position.
.
0
Shift the playback position back and forth. Playback time that is set
in step 6 is unchanged.
0
Adjust by using 0 or 1, then tap “SET”.
0
Tap J to return to the previous screen.
0
Tap L to exit the menu.
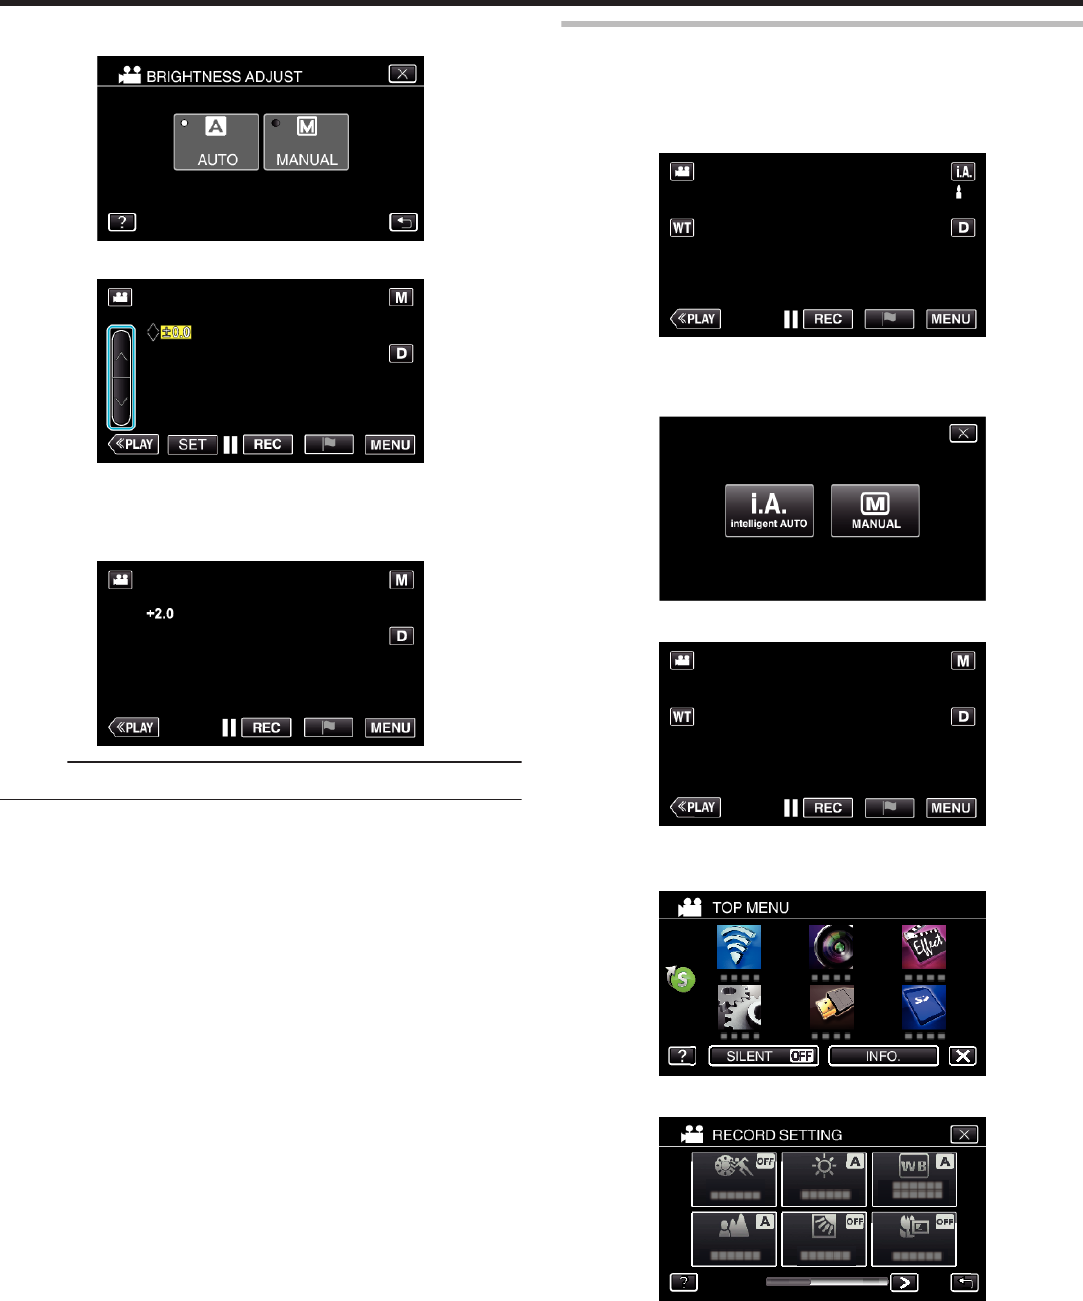
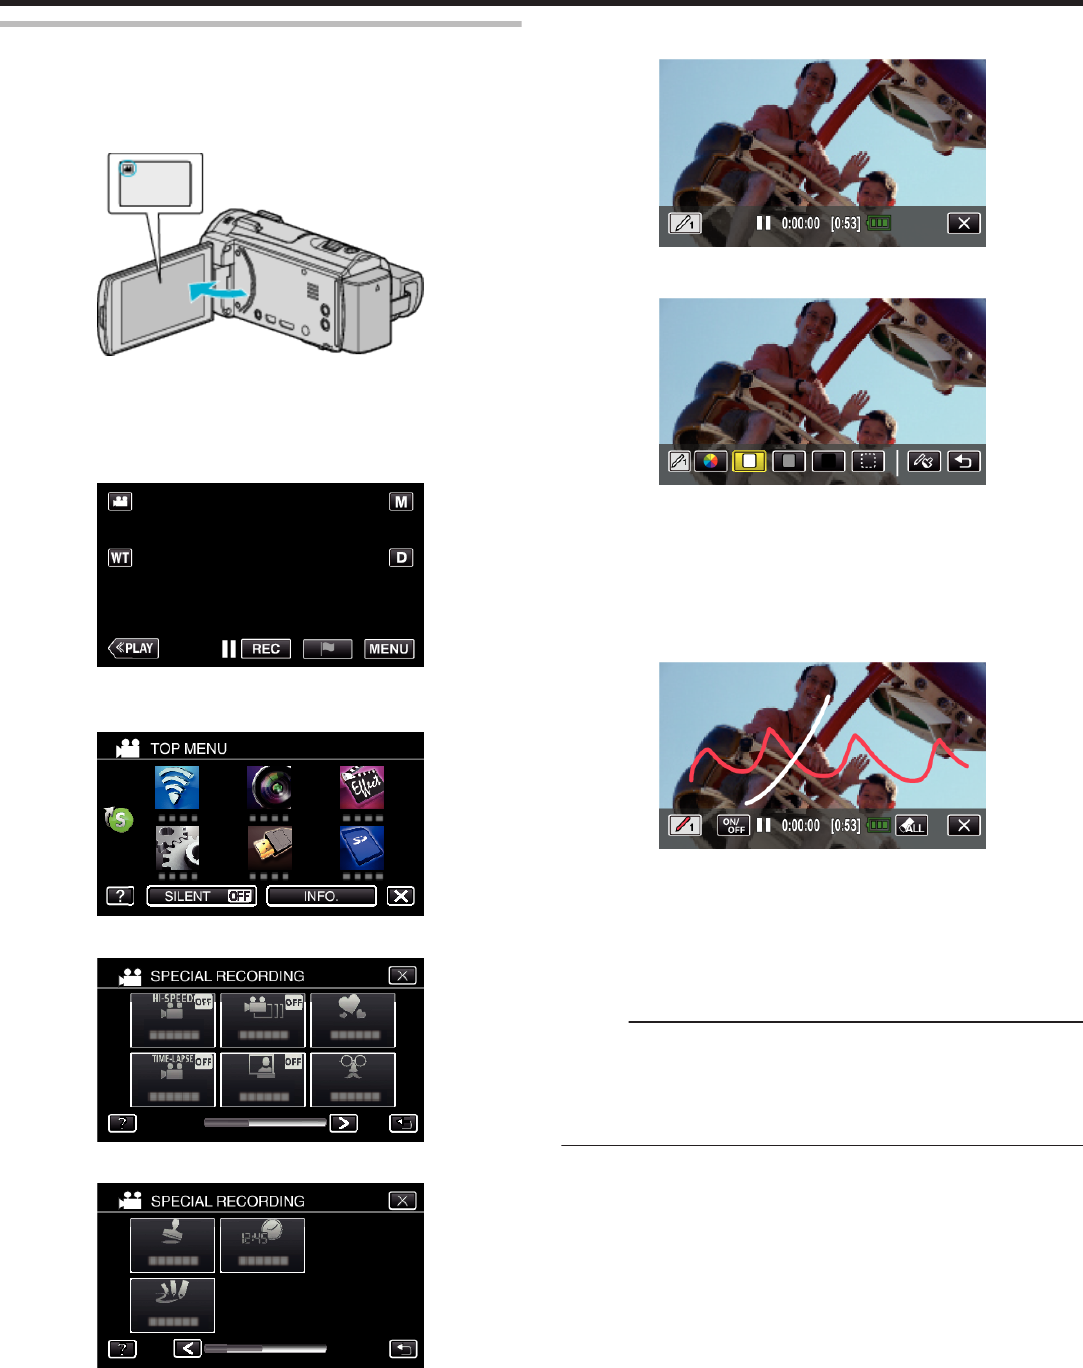
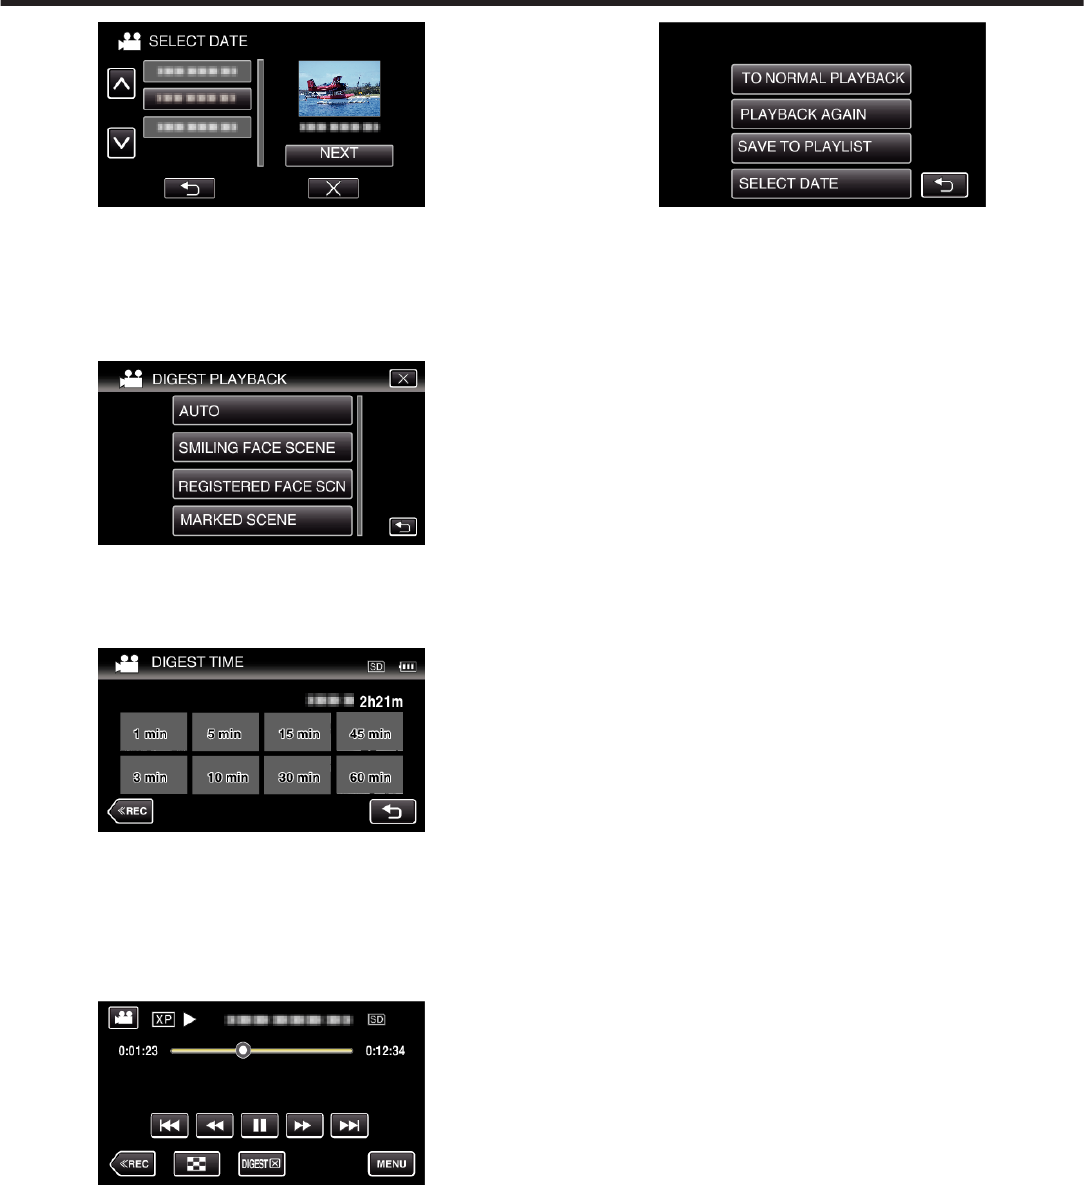
DIGEST PLAYBACK
You can play back a digest of the recorded videos (Digest Playback).
This is useful for checking the content of the videos quickly.
0
*The following is a screen of the model with the built-in memory.
1
Open the LCD monitor.
.
0
Check if the recording mode is A.
0
If the mode is
B
still image, tap
B
on the recording screen to display
the mode switching screen.
Tap
A
to switch the mode to video.
2
Tap “<<PLAY” to select the playback mode.
.
3
Tap “MENU”.
.
4
Tap “PLAYBACK SETTING”.
.
5
Tap “DIGEST PLAYBACK”.
.
6
Tap to select a date for Digest Playback.
Playback
74
.
0
After selecting a date, tap “NEXT”.
0
When “ALL” is tapped, Digest Playback will be performed for all the
dates.
0
Tap L to exit the menu.
0
Tap
J
to return to the previous screen.
7
Tap to select a scene for Digest Playback.
.
0
Error message is displayed if no scene is found. Select another
scene, or tap “AUTO”.
8
Select the Digest Playback time
(Only when “AUTO” is selected in Step 7)
.
0
The time display of Digest Playback varies according to the recording
time.
0
When it takes time (more than 2 seconds) for “DIGEST PLAYBACK”
to start after selecting Digest Playback time, a progress status will be
displayed.
0
The Digest Playback time is only a guide.
9
Digest Playback starts.
.
0
Tap e to pause.
0
Tap u to return to the index screen.
0
Tap “DIGESTL“ to return to the normal playback screen.
0
Operations During Video Playback
“Operation Buttons for Video Playback” (A p. 68)
10
Digest playback stops automatically, or display the next screen by
tapping “MENU”.
.
0
TO NORMAL PLAYBACK: start normal playback.
0
PLAYBACK AGAIN: start the digest playback again.
0
SAVE TO PLAYLIST: save the digest playback images to the playlist.
“ PLAYBACK PLAYLIST ” (A p. 76)
0
SELECT DATE: return to step 5.
Playback
75
o
Types of Digest Playback
Select the types of Digest Playback from the following. When “AUTO” is
selected, playback is performed by shortening the video to the pre-set length
of time.
ItemDetails
AUTOPlayback is performed by shortening the video to the
pre-set length of time.
Depending on the recording time of the video,
playback time can be selected from: 1 minute, 3
minutes, 5 minutes, 10 minutes, 15 minutes, 30
minutes, 45 minutes and 60 minutes. All the recorded
parts (recording time is less than 1 minute) are played
back.
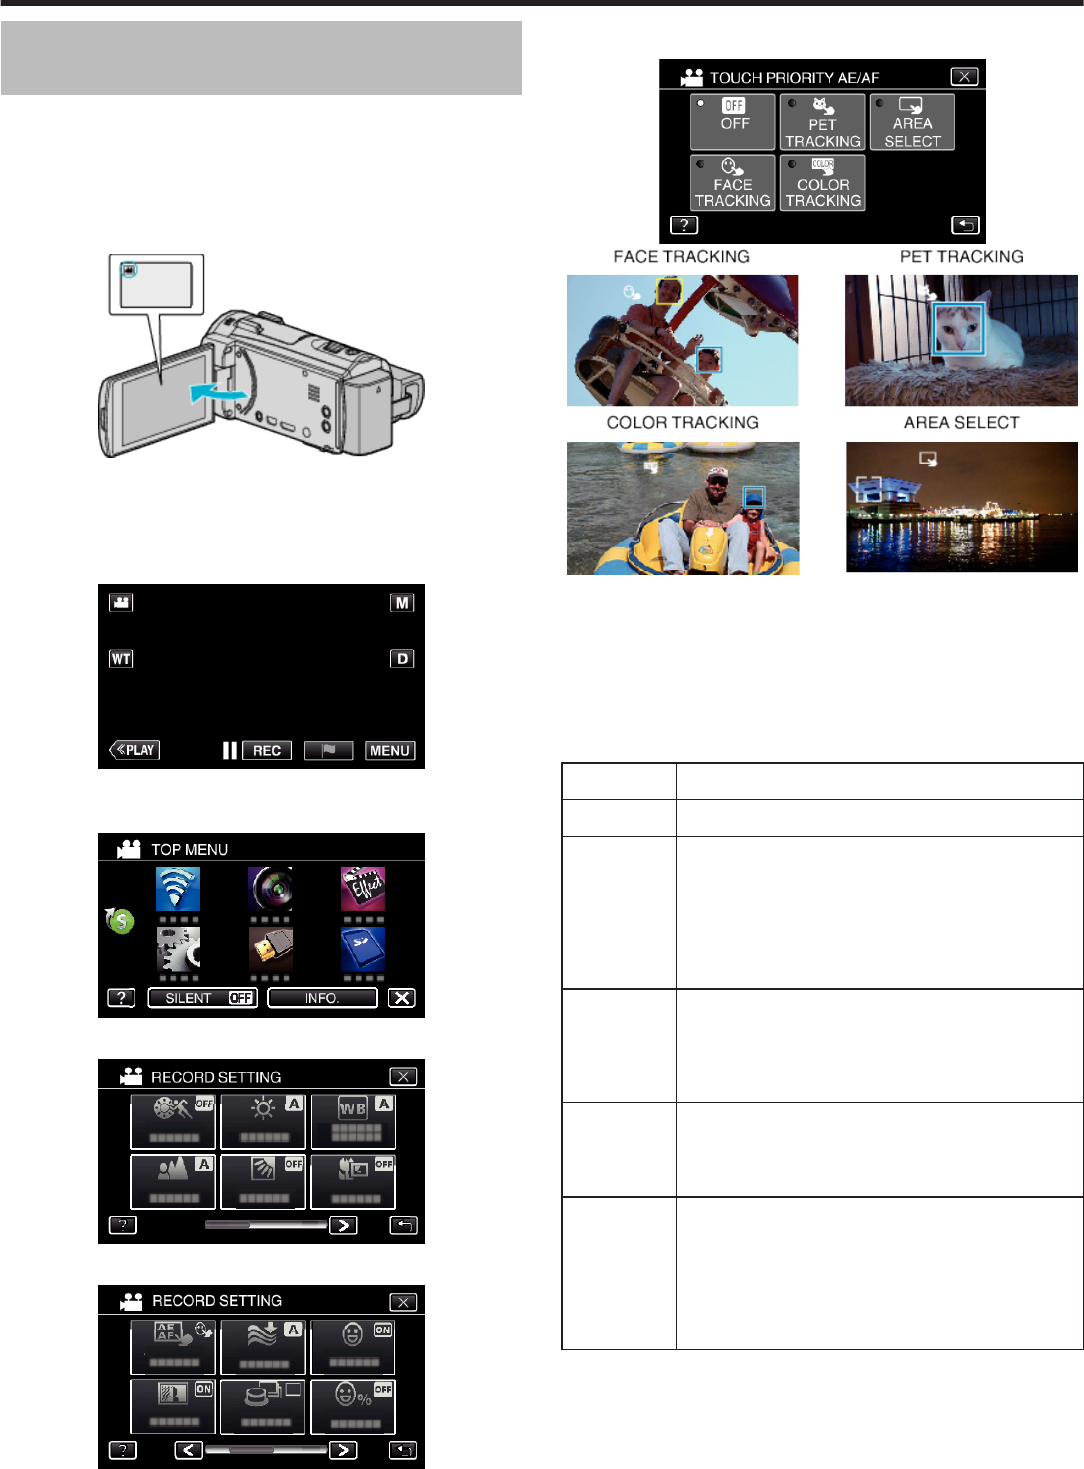
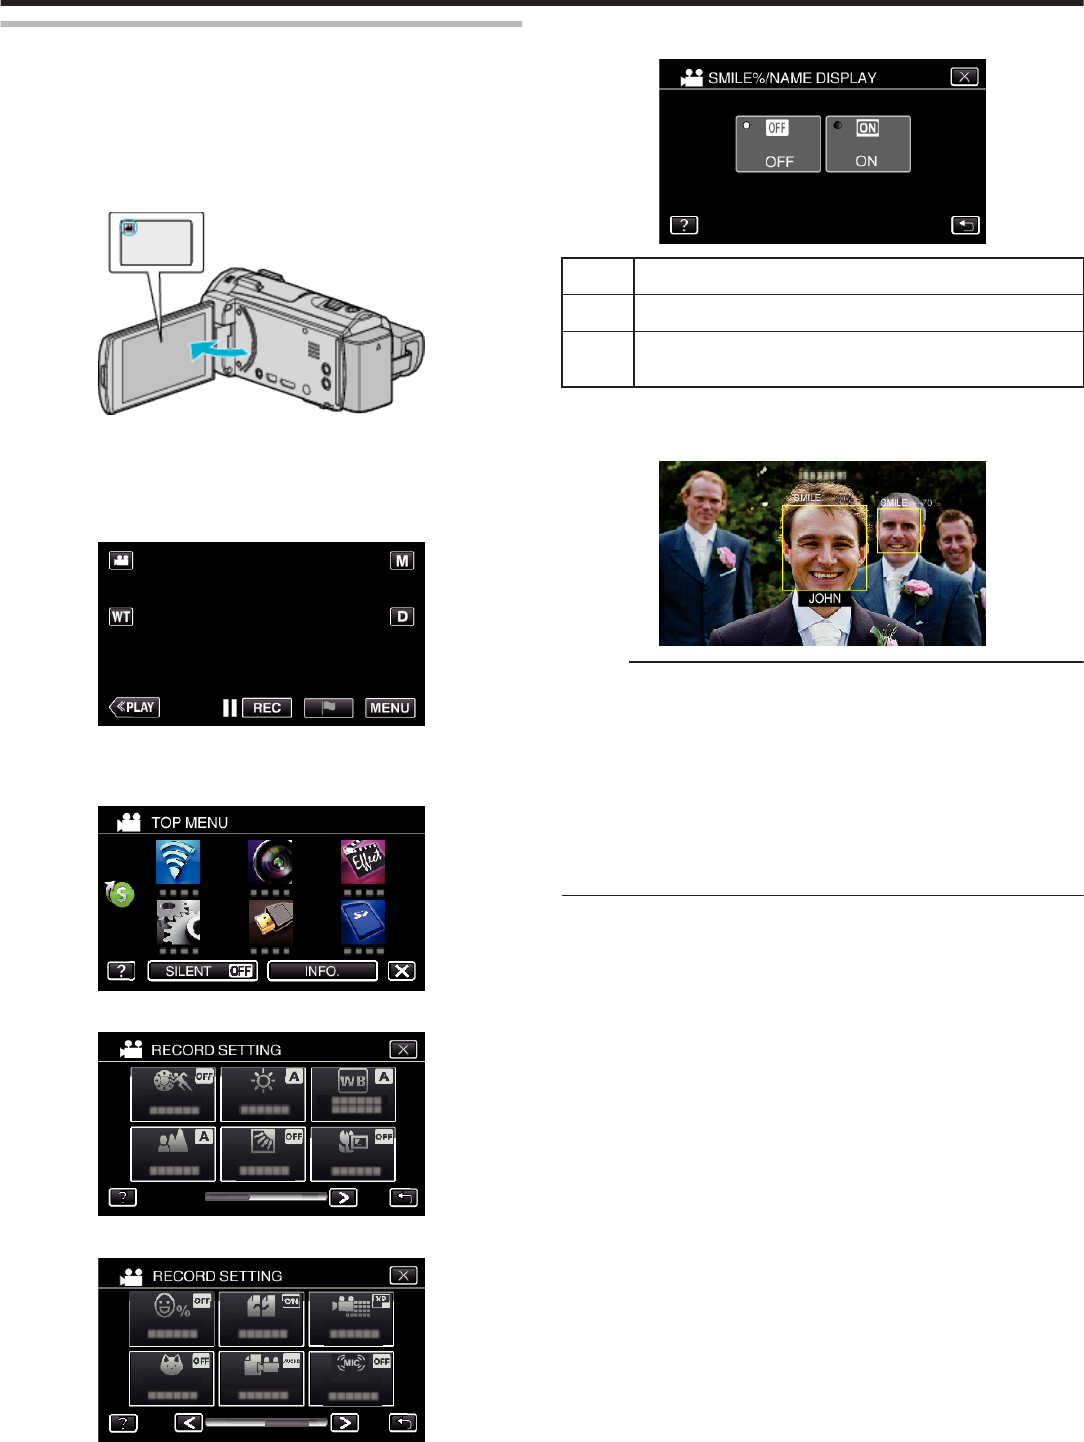
SMILING FACE
SCENE
Playback the scenes with detected smiles as a digest.
It is necessary to set “SMILE SHOT” in “RECORD
SETTING” to “ON” and record in advance.
“Capturing Smiles Automatically (SMILE SHOT)”
(A p. 48)
REGISTERED
FACE SCN
Playback the scenes mainly with a person whose face
is registered
“Registering Human Face Personal Authentication
Information” (A p. 51)
MARKED
SCENE
Start a digest playback by piecing the scenes that are
marked during recording.
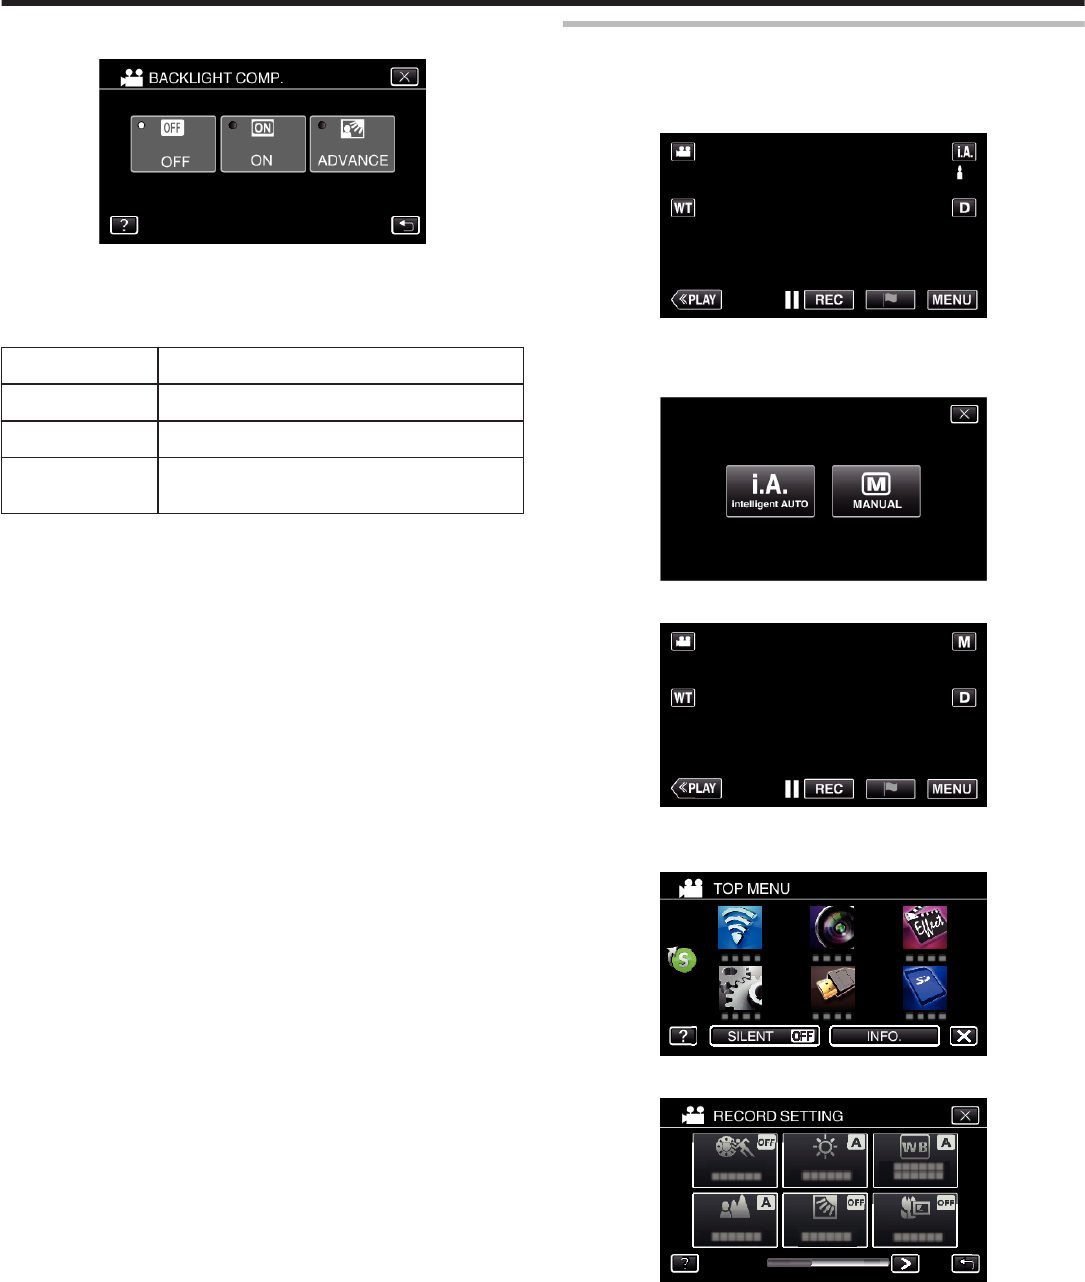
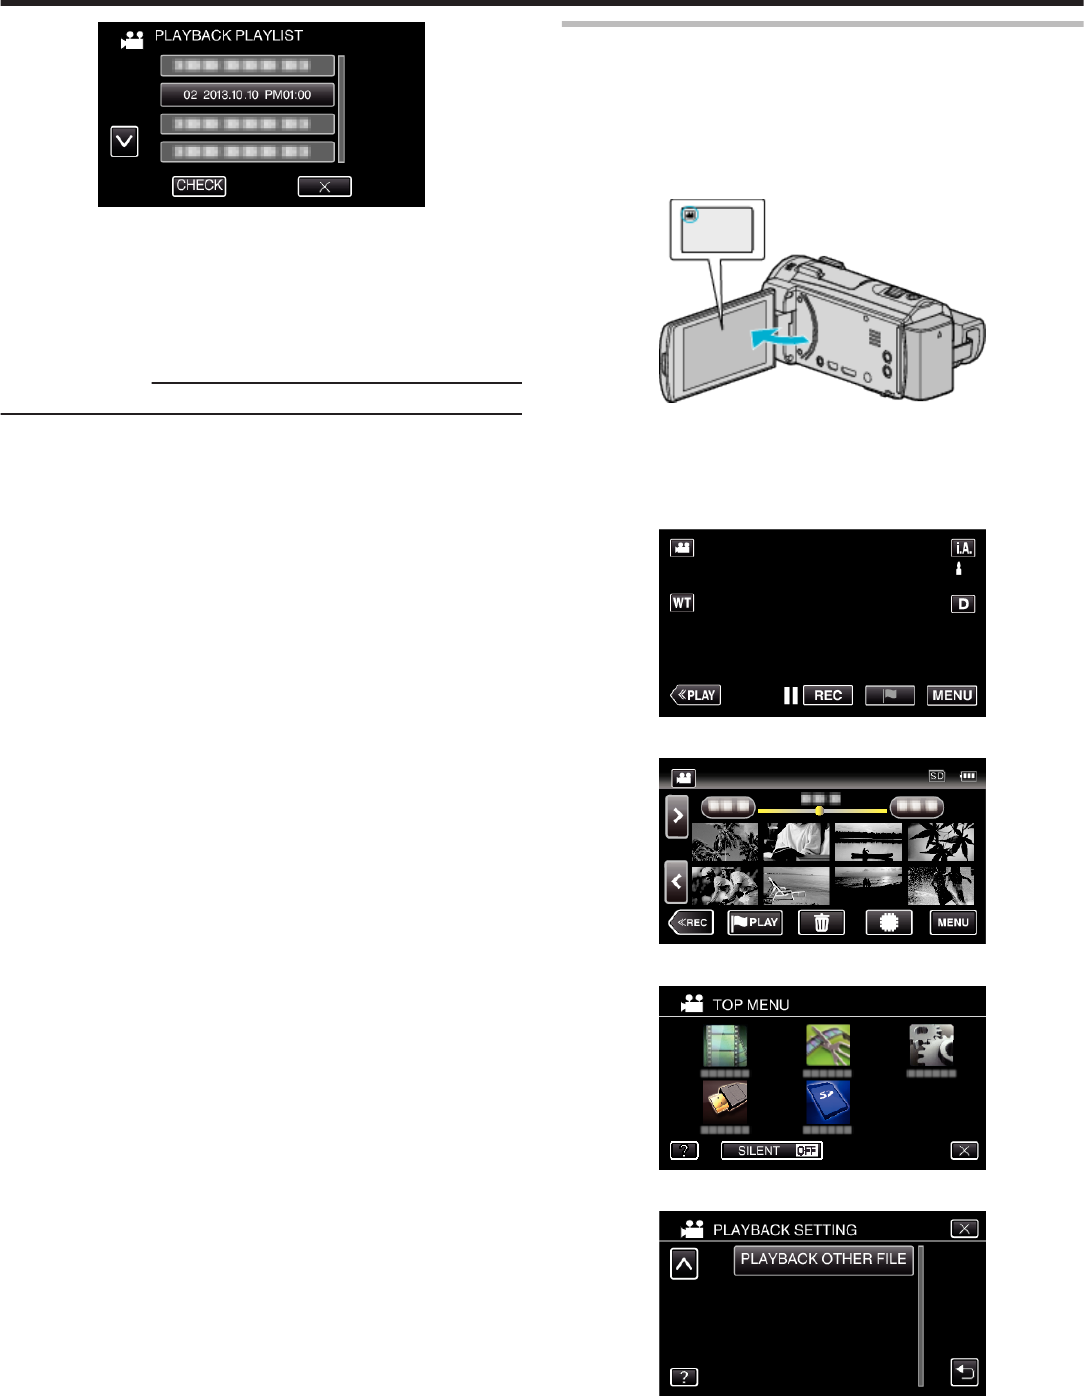
PLAYBACK PLAYLIST
Plays back the playlists that you have created.
0
*The following is a screen of the model with the built-in memory.
1
Open the LCD monitor.
.
0
Check if the recording mode is A.
0
If the mode is
B
still image, tap
B
on the recording screen to display
the mode switching screen.
Tap
A
to switch the mode to video.
2
Tap “<<PLAY” to select the playback mode.
.
3
Tap “MENU”.
.
4
Tap “PLAYBACK SETTING”.
.
5
Tap “PLAYBACK PLAYLIST”.
.
6
Tap to select a playlist.
Playback
76
.
0
Playback of the playlist starts.
“Operation Buttons for Video Playback” (A p. 68)
0
Tap u to return to the index screen.
0
Tap “CHECK” and select a playlist to check its content. After
checking, tap J.
0
Playlists with a O (Digest Playback) icon are the playlists created
during Digest Playback.
Creating Playlists:
“Creating Playlists from the Recorded Videos” (A p. 88)
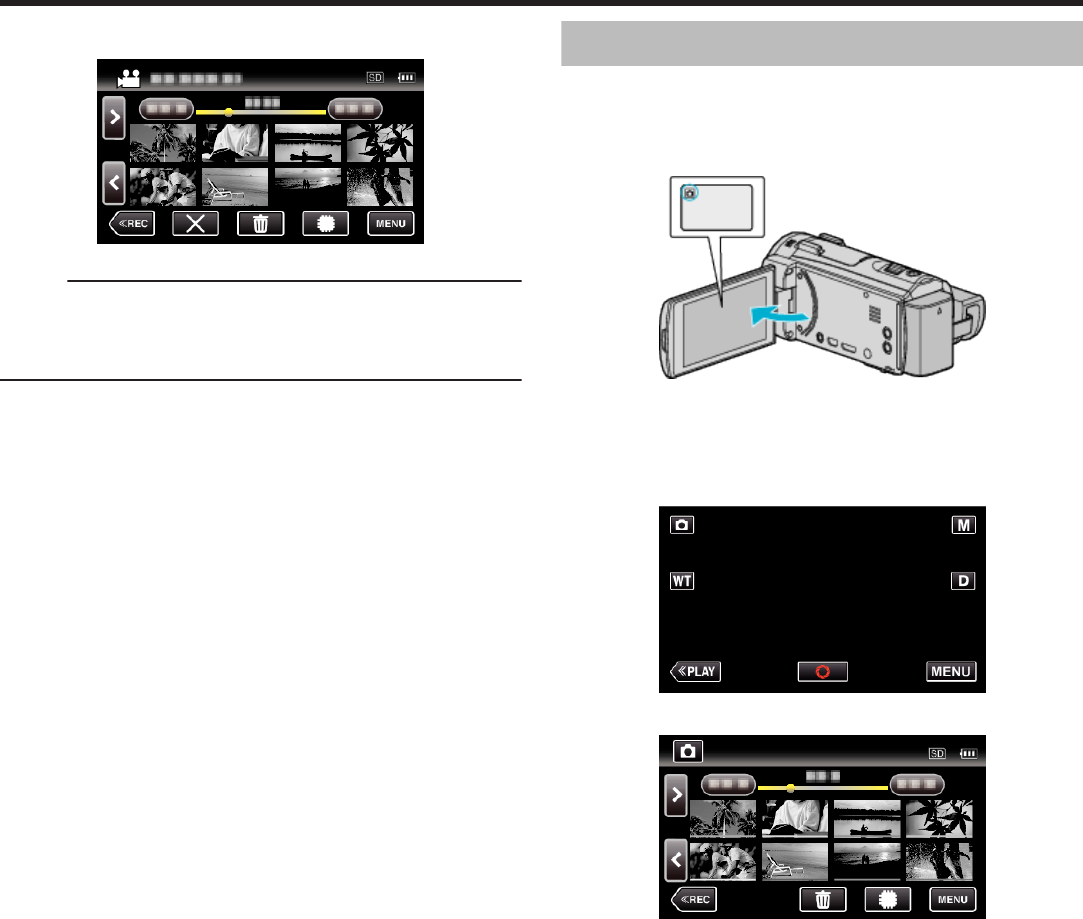
PLAYBACK OTHER FILE
The management information of a video may be damaged if recording is not
performed correctly, such as turning off the power in the middle of recording.
You can perform the following operations to play back the videos with
defective management information.
0
*The following is a screen of the model with the built-in memory.
1
Open the LCD monitor.
.
0
Check if the recording mode is A.
0
If the mode is
B
still image, tap
B
on the recording screen to display
the mode switching screen.
Tap
A
to switch the mode to video.
2
Tap “<<PLAY” to select the playback mode.
.
3
Tap “MENU”.
.
4
Tap “PLAYBACK SETTING”.
.
5
Tap “PLAYBACK OTHER FILE”.
.
Playback
77
6
Tap on the file to start playback.
.
“Operation Buttons for Video Playback” (A p. 68)
Memo :
0
An MTS file is created in the EXTMOV folder when management
information is corrupted.
0
Depending on the condition of the damaged file, playback might fail or
may not run smoothly.
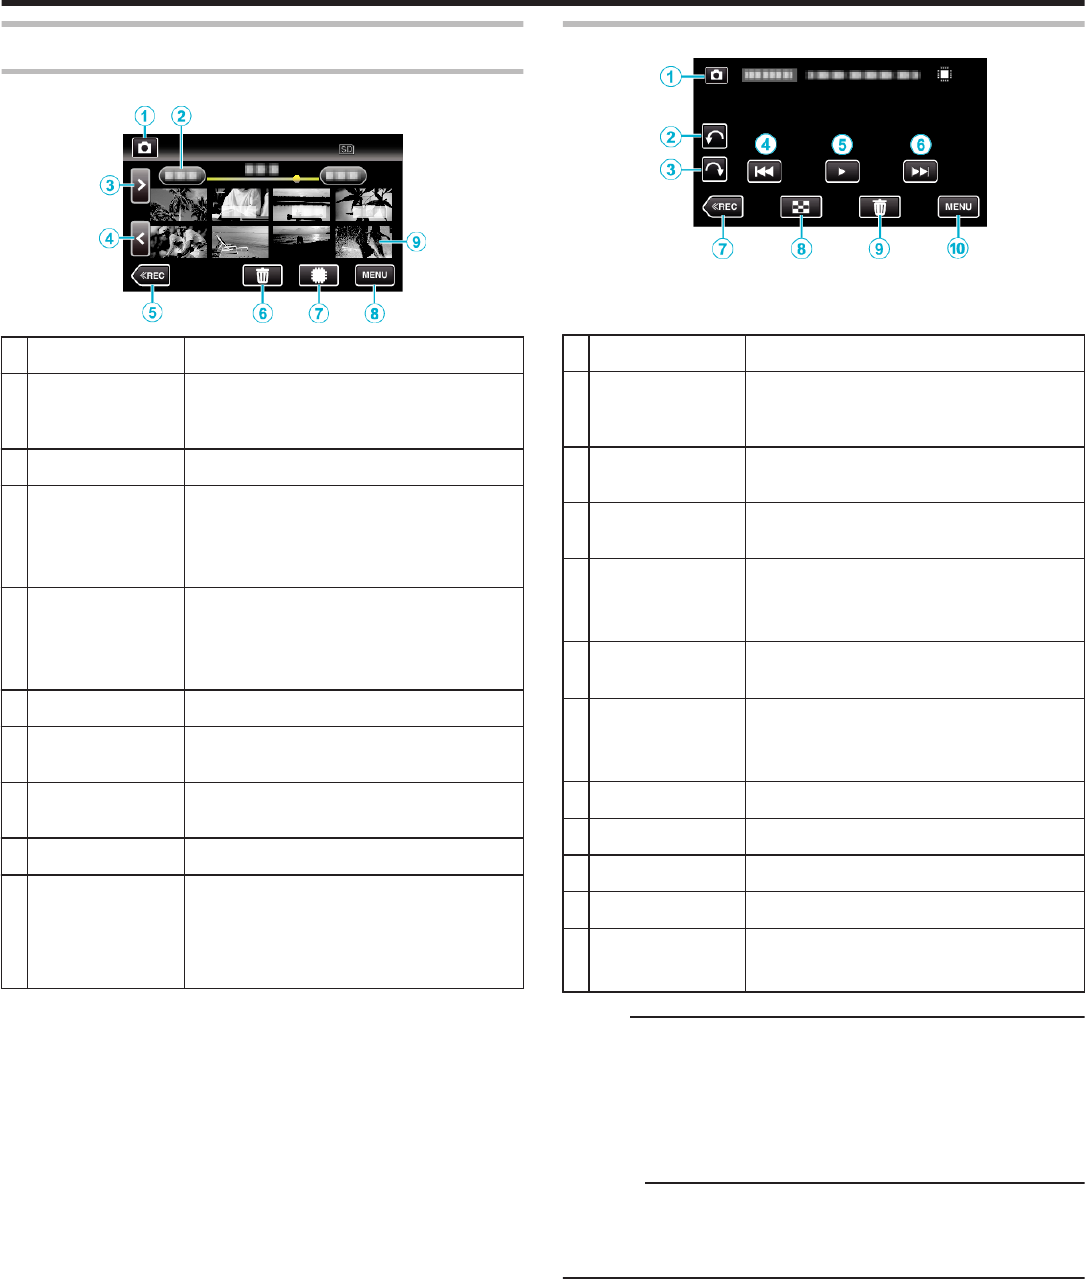
Playing Back Still Images
You can select and play back the recorded still images from an index screen
(thumbnail display).
0
*The following is a screen of the model with the built-in memory.
1
Open the LCD monitor.
.
0
Check if the recording mode is B.
0
If the mode is
A
video, tap
A
on the recording screen to display the
mode switching screen.
Tap
B
to switch the mode to still image.
2
Tap “<<PLAY” to select the playback mode.
.
3
Tap on the file to start playback.
.
0
Tap I/J to select the media for playback and change the index
screen (thumbnail display).
0
Tap u to return to the index screen.
0
L appears on the last image played back.
0
Lines in different colors are displayed under the thumbnail display to
distinguish the recording date.
Playback
78
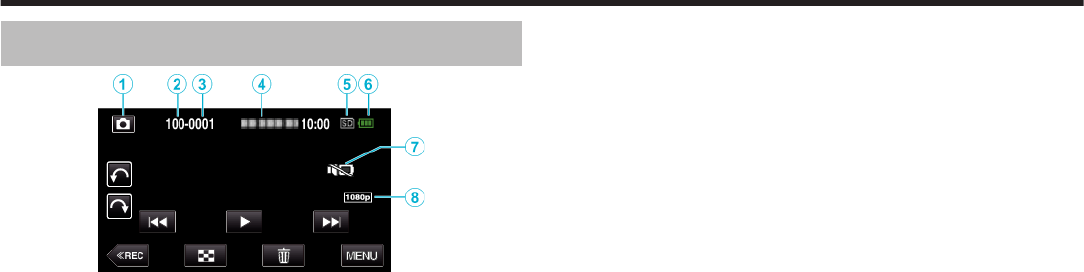
Operation Buttons for Still Image Playback
During Index Screen Display
.
DisplayDescription
A
Video/Still Image
Mode
A/B
Switches between video and still image
modes.
B
DateMoves to the previous/next date
C
>Displays the next index screen (thumbnail
display)
0
You can perform the same operation with the
zoom lever.
D
<Displays the previous index screen (thumbnail
display)
0
You can perform the same operation with the
zoom lever.
E
<<RECSwitches to the recording mode.
F
R
Displays the index screen (thumbnail display)
to perform deletion
G
I/JSwitches between the index screen of the built-
in memory and SD card (GZ-EX555)
H
MENUDisplays the menu screen
I
File (Still Image)Tap on thumbnail - Starts playback
Drag to right - Scrolls to the right to show the
previous index screen (thumbnail display)
Drag to left - Scrolls to the left to show the next
index screen (thumbnail display)
During Still Image Playback
.
0
Operations buttons on the touch screen disappear if the unit is not
operated for about 5 seconds. Tap on the screen to display the operation
buttons again.
DisplayDescription
A
Video/Still Image
Mode
A/B
Switches between video and still image
modes.
B
R
Rotates to the left (rotates by -90° with each
tap)
C
S
Rotates to the right (rotates by 90° with each
tap)
D
h
Returns to the previous still image
0
You can perform the same operation with the
zoom lever.
E
d / eStarts/pauses slideshow
“Slideshow Playback” (A p. 80)
F
g
Advances to the next still image
0
You can perform the same operation with the
zoom lever.
G
<<RECSwitches to the recording mode.
H
u
Returns to index screen
I
R
Deletes the currently displayed still image.
J
MENUDisplays the menu screen
-
H
Starts reverse playback.
0
Displayed during slideshow playback.
Memo :
0
Tap or drag on the operation area of the touch screen.
0
You can rotate a still image 90° to the right or left during playback.
Rotation applies to the on-screen display only.
0
You can search for a specific file by the recording date.
This is useful when searching from a large number of files.
“Searching for a Specific Video/Still Image by Date” (A p. 80)
Caution :
0
This unit is a microcomputer-controlled device. Electrostatic discharge,
external noise and interference (from a TV, a radio, etc.) might prevent it
from functioning properly. In such a case, turn off the power, then remove
the AC adapter and battery pack. This unit will be reset.
Playback
79
Slideshow Playback
Still images can be played back in a slideshow.
Tap I during still image playback to start the slideshow.
.
“Operation Buttons for Still Image Playback” (A p. 79)
Memo :
0
Effects can be added to the transitions in slideshow playback.
“ SLIDE SHOW EFFECTS ” (A p. 221)
Searching for a Specific Video/Still Image by
Date
When there is a large number of recorded videos and still images, it is difficult
to look for the desired file from the index screen.
Use the search function to find the file you want.
You can search and play videos or still images according to recording dates.
0
*The following is a screen of the model with the built-in memory.
1
Tap “MENU”.
.
0
Tap I/J to select the media for playback. (GZ-EX555)
0
Searching can be performed in both the video and still image modes.
*The image shows the video mode.
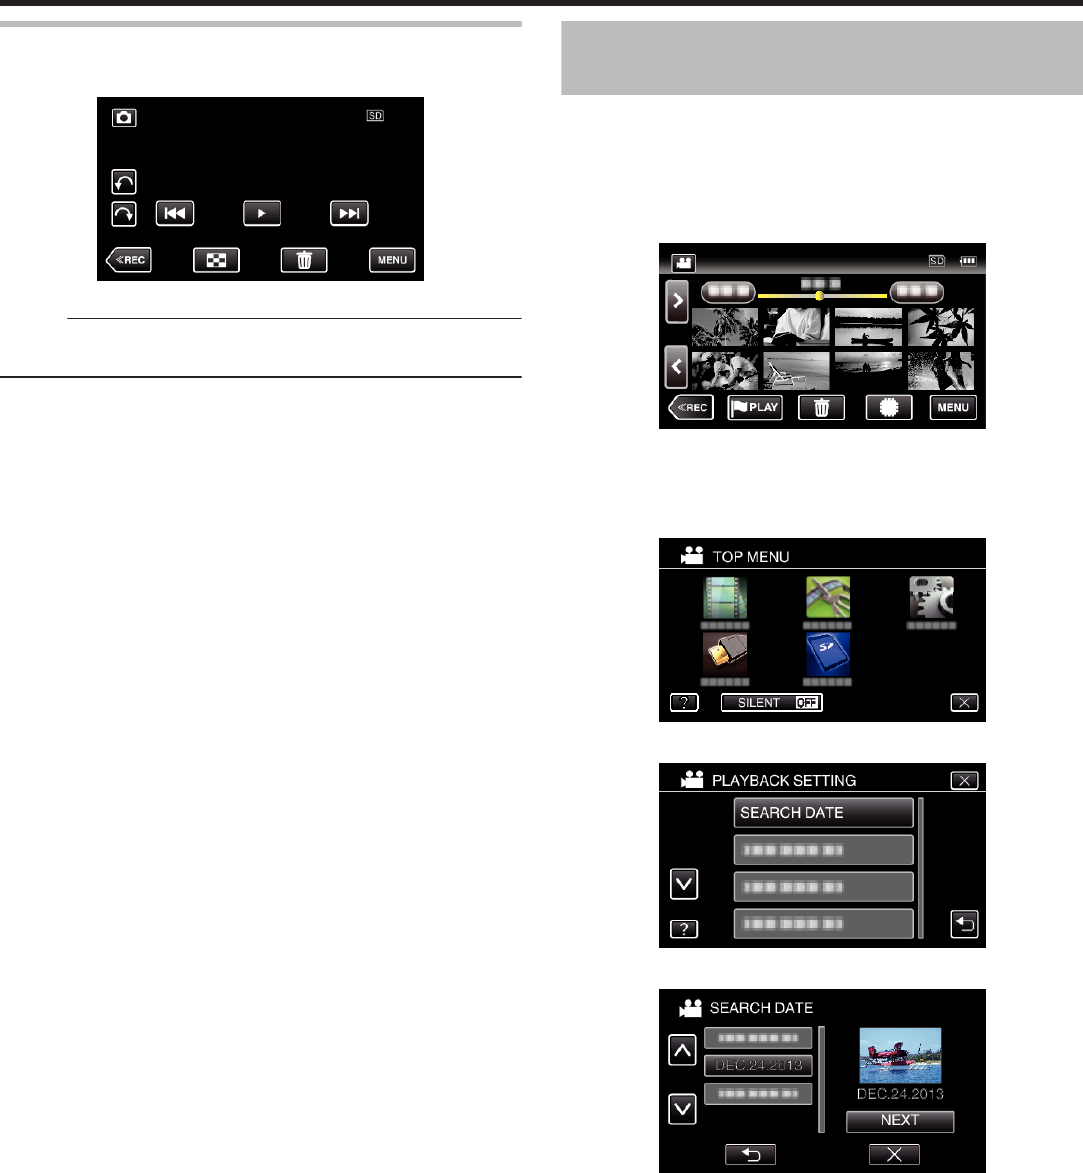
2
Tap “PLAYBACK SETTING”.
.
3
Tap “SEARCH DATE”.
.
4
Tap a recording date, then tap “NEXT”.
.
0
Tap again to cancel the selected date.
Playback
80
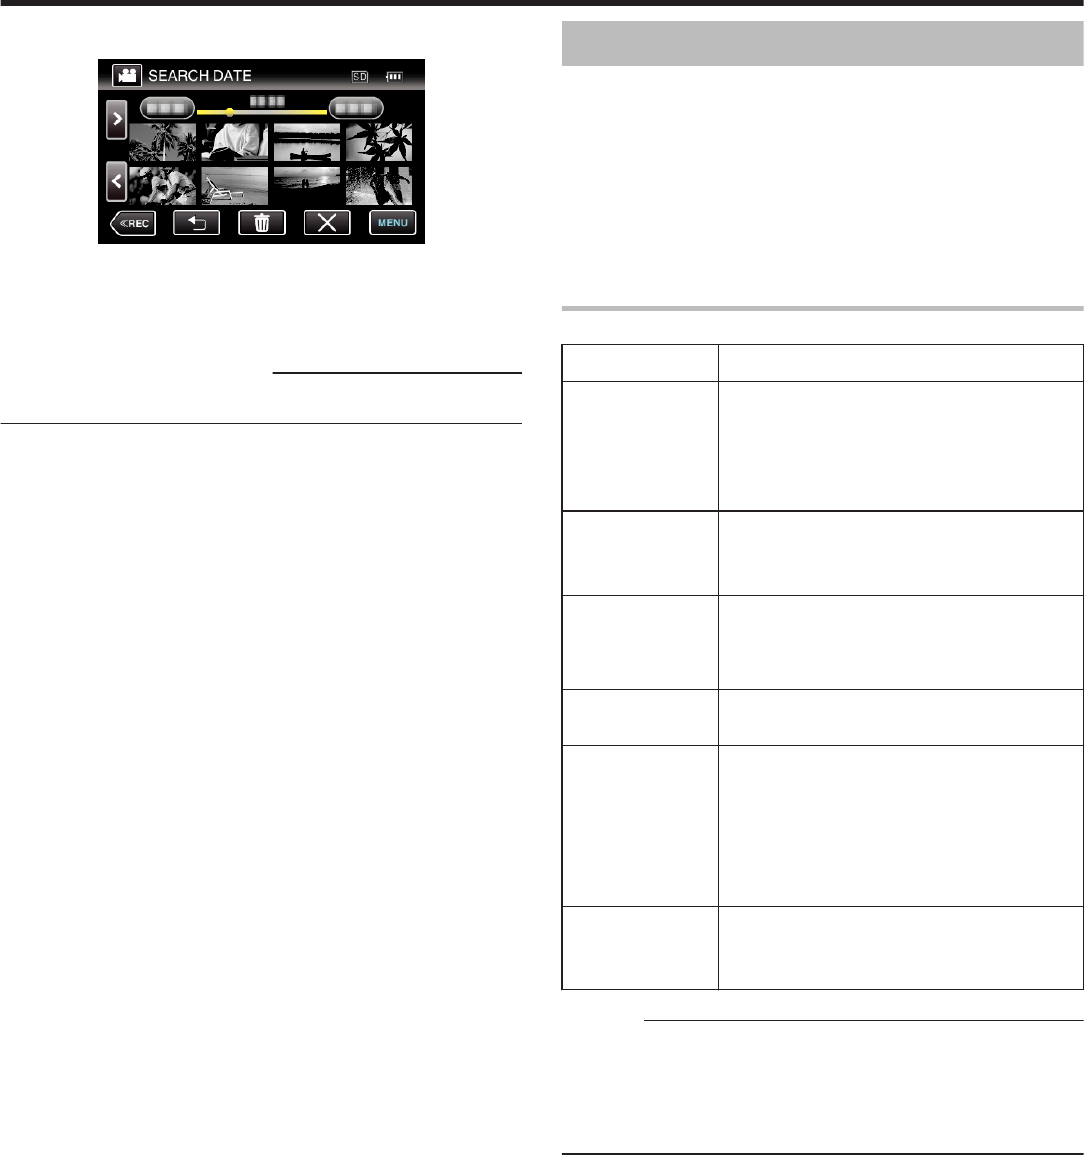
5
Tap on the file to start playback.
.
0
You can select videos in the video mode and still images in the still
image mode.
0
Only the files recorded on the selected date are displayed.
0
Tap L to stop searching and return to the index screen (thumbnail
display).
Deleting Files of a Selected Date:
Tap R on the index screen (thumbnail display) to delete unwanted files.
“Deleting Unwanted Files” (A p. 84)
Connecting to and Viewing on TV
You can connect this unit to a TV for playback. The image quality on TV
varies with the type of TV and the connecting cable. Select the connector
that best suits your TV.
0
Refer also to the instruction manual of the TV in use.
“Connecting via the HDMI Mini Connector” (A p. 82)
“Connecting via the AV Connector” (A p. 83)
0
To display the date and time on TV, set both “DISPLAY DATE/TIME” and
“DISPLAY ON TV” to “ON”.
“ DISPLAY DATE/TIME ” (A p. 219)
“ DISPLAY ON TV ” (A p. 225)
Unnatural Displays on TV
TroubleAction
Images do not
appear on the TV
properly.
0
Disconnect the cable and connect again.
0
Turn off and on this unit again.
0
Images may not appear properly when the
remaining battery power is low. Use an AC
adapter.
Images are
projected vertically
on the TV.
0
Set “VIDEO OUTPUT” in the “CONNECTION
SETTINGS” menu to “4:3”.
“ VIDEO OUTPUT ” (A p. 225)
Images are
projected
horizontally on the
TV.
0
Adjust the TV's screen accordingly.
The color of images
looks strange.
0
Adjust the TV's screen accordingly.
HDMI-CEC
functions do not
work properly, and
the TV does not
work in conjunction
with this unit.
0
TVs may operate differently depending on the
specifications, even if they are HDMI-CEC
compliant. Therefore, the HDMI-CEC functions
of this unit cannot be guaranteed to operate in
combination with all the TVs. In such cases, set
“HDMI CONTROL” to “OFF”.
“ HDMI CONTROL ” (A p. 225)
The language on
the display
changed.
0
It may occur when you connect this unit to a TV
with different language setting using an HDMI
mini cable.
Caution :
0
Do not remove the recording medium or perform any other operation (such
as turning off the power) while accessing files. Also, be sure to use the
provided AC adapter, as the data on the recording medium may be
corrupted if the battery becomes exhausted during operation. If the data
on the recording medium becomes corrupted, format the recording
medium to use the medium again.
Playback
81
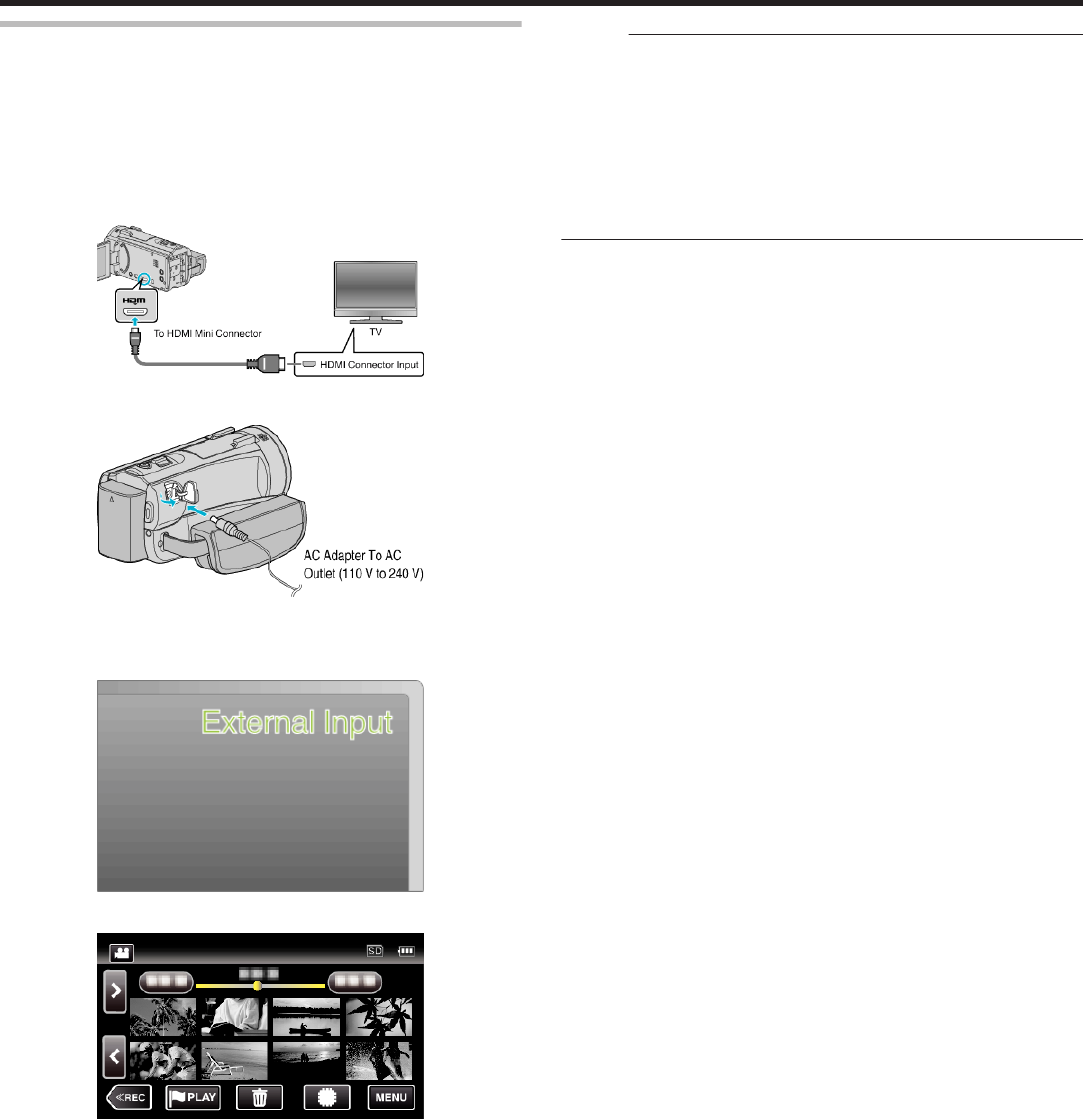
Connecting via the HDMI Mini Connector
If you are using an HDTV, you can play back in HD quality by connecting to
the HDMI mini connector.
0
Use a High Speed HDMI mini cable as the HDMI mini cable.
0
Refer also to the instruction manual of the TV in use.
0
*The following is a screen of the model with the built-in memory.
1
Connect to a TV.
.
2
Connect the AC adapter to this unit.
.
0
The unit turns on automatically.
3
Press the external input button on the TV to switch to the input from this
unit via the connected connector.
.
4
Play back a file.
.
“Playing Back Videos” (A p. 67)
“Playing Back Still Images” (A p. 78)
Memo :
0
Change the settings in “HDMI OUTPUT” according to the connection.
“ HDMI OUTPUT ” (A p. 225)
0
When connected to the TV via the HDMI mini cable, images and sounds
may not be output properly depending on the TV connected.
In such cases, perform the following operations.
1) Disconnect the HDMI mini cable and connect it again.
2) Turn off and on this unit again.
0
For questions about the TV or method of connection, contact your TV's
manufacturer.
Playback
82
Operating in Conjunction with TV via HDMI
Connecting this unit to an HDMI-CEC enabled TV using the HDMI mini cable
allows linked operations with the TV to be performed.
0
HDMI-CEC (Consumer Electronics Control) is an industry standard that
enables interoperability between HDMI-CEC compliant devices that are
connected via HDMI cables.
Memo :
0
Not all HDMI control devices comply with the HDMI-CEC standard. The
HDMI control function of this unit will not work when connected to these
devices.
0
This unit is not guaranteed to operate with all HDMI-CEC enabled devices.
0
Depending on the specifications of each HDMI-CEC enabled device,
some functions may not work with this unit. (For details, refer to the
instruction manual of your TV.)
0
Unintended operations may occur with some connected devices. In these
cases, set “HDMI CONTROL” to “OFF”.
“ HDMI CONTROL ” (A p. 225)
Preparations
0
Connect an HDMI mini cable between this unit and the TV.
“Connecting via the HDMI Mini Connector” (A p. 82)
0
Turn on the TV and set the HDMI-CEC related setting to “ON”. (For details,
refer to the instruction manual of the TV.)
0
Set “HDMI CONTROL” in the CONNECTION SETTINGS menu to “ON”.
“ HDMI CONTROL ” (A p. 225)
Operation Method 1
1
Turn on this unit.
2
Select the playback mode.
3
Connect the HDMI mini cable.
0
TV turns on automatically and switches to HDMI input mode when
this unit is turned on.
Operation Method 2
1
Turn off the TV.
0
This unit turns off automatically.
Memo :
0
Depending on the TV connected, the display language of this unit will
automatically switch to the language that is selected for the TV when this
unit is turned on.
(This is applicable only if this unit supports the language selected for the
TV.) To use this unit with a language that differs from the display language
of the TV, set “HDMI CONTROL” to “OFF”.
0
The display language of the TV will not switch automatically, even if the
display language of this unit is changed.
0
These functions may not work correctly when devices such as amplifier
and selector are connected. Set “HDMI CONTROL” to “OFF”.
0
If HDMI-CEC does not work properly, turn off and on this unit again.
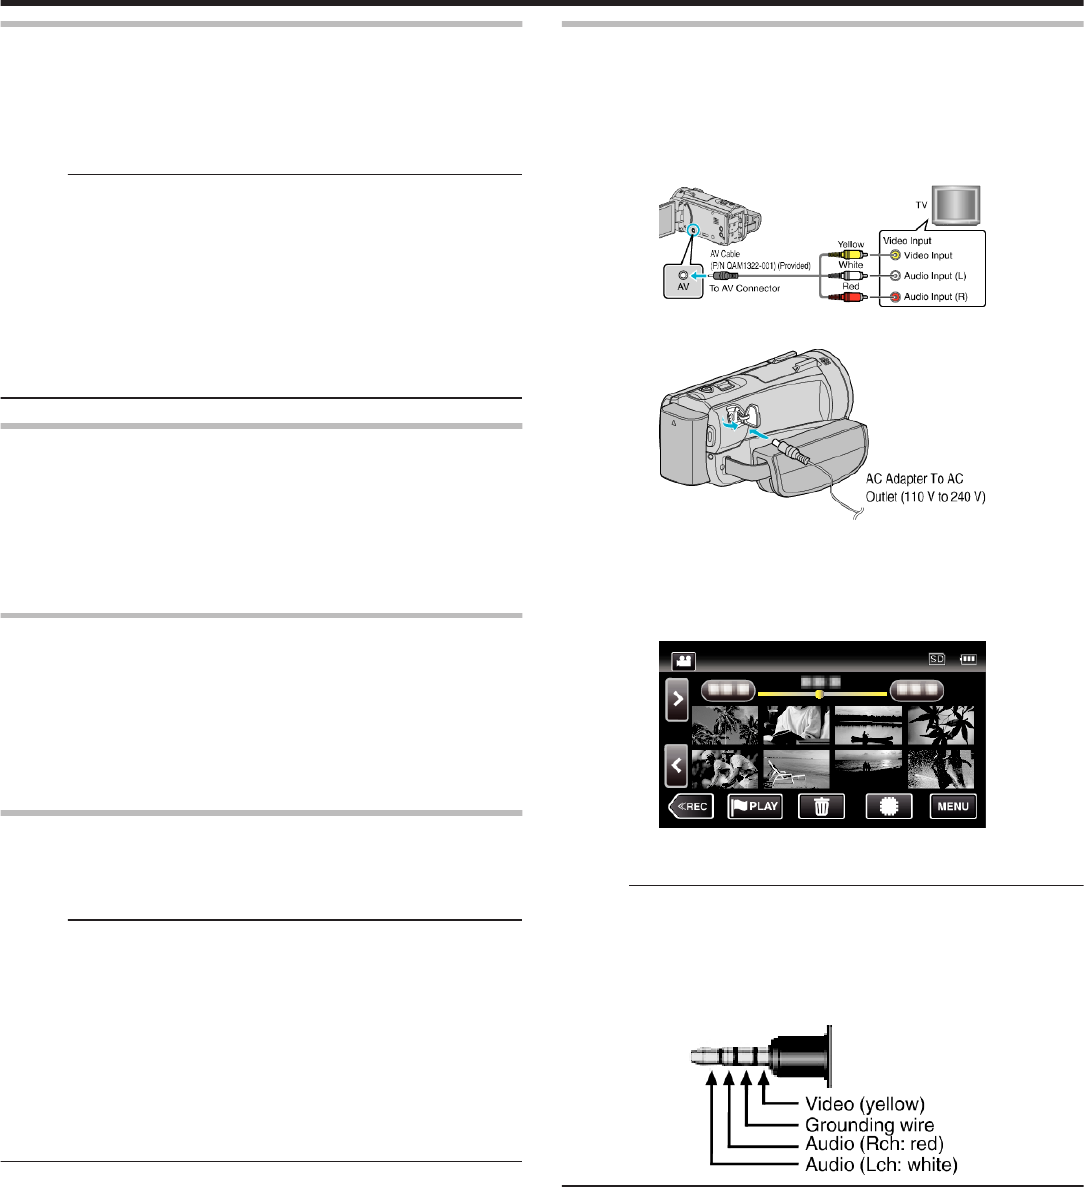
Connecting via the AV Connector
To playback videos on TV, connect the provided AV cable (P/N
QAM1322-001) to the AV terminal of this unit.
0
Refer also to the instruction manual of the TV in use.
0
*The following is a screen of the model with the built-in memory.
1
Connect to a TV.
.
2
Connect the AC adapter to this unit.
.
0
The unit turns on automatically.
3
Press the external input button on the TV to switch to the input from this
unit via the connected connector.
4
Play back a file.
.
“Playing Back Videos” (A p. 67)
“Playing Back Still Images” (A p. 78)
Memo :
0
For questions about the TV or method of connection, contact your TV's
manufacturer.
0
AV cable (P/N: QAM1322-001)
Wiring specifications (for video/audio) of the 4-pole mini plug are described
in the following.
For purchasing, consult your nearest JVC service center.
.
Playback
83
Deleting Unwanted Files
Delete unwanted videos and still images when the space in the recording
media is running out.
Doing so frees up more space in the recording media.
“Deleting the Currently Displayed File” (A p. 84)
Memo :
0
Deleted files cannot be restored.
0
When files in a playlist are deleted, the playlist changes.
0
Files that are protected cannot be deleted.
Release protection before deleting the file.
“Protecting Files” (A p. 84)
0
Be sure to back up important files on a computer.
“Backing Up Files” (A p. 101)
“Backing Up All Files” (A p. 108)
Deleting the Currently Displayed File
Deletes the currently displayed file.
Caution :
0
Deleted files cannot be restored.
1
Tap R.
.
0
While the video mode is shown in the image, the same operations
apply for the still image mode.
2
Tap “YES”.
.
0
Tap h / g to select the previous or next file.
0
When no file remains, the screen returns to the index screen.
Protecting Files
Prevent important videos/still images from being deleted accidently by
protecting them.
“Protecting/Releasing Protection of the Currently Displayed File”
(A p. 84)
“Protecting/Releasing Protection of Selected Files” (A p. 85)
Caution :
0
When the recording media is formatted, even the protected files will be
deleted.
Protecting/Releasing Protection of the Currently Displayed
File
Protects or releases protection of the currently displayed file.
1
Tap “MENU”.
.
2
Tap “EDIT”.
.
3
Tap “PROTECT/CANCEL”.
.
4
Tap “YES”.
.
0
Tap h / g to select the previous or next file.
0
After setting, tap “OK”.
Editing
84
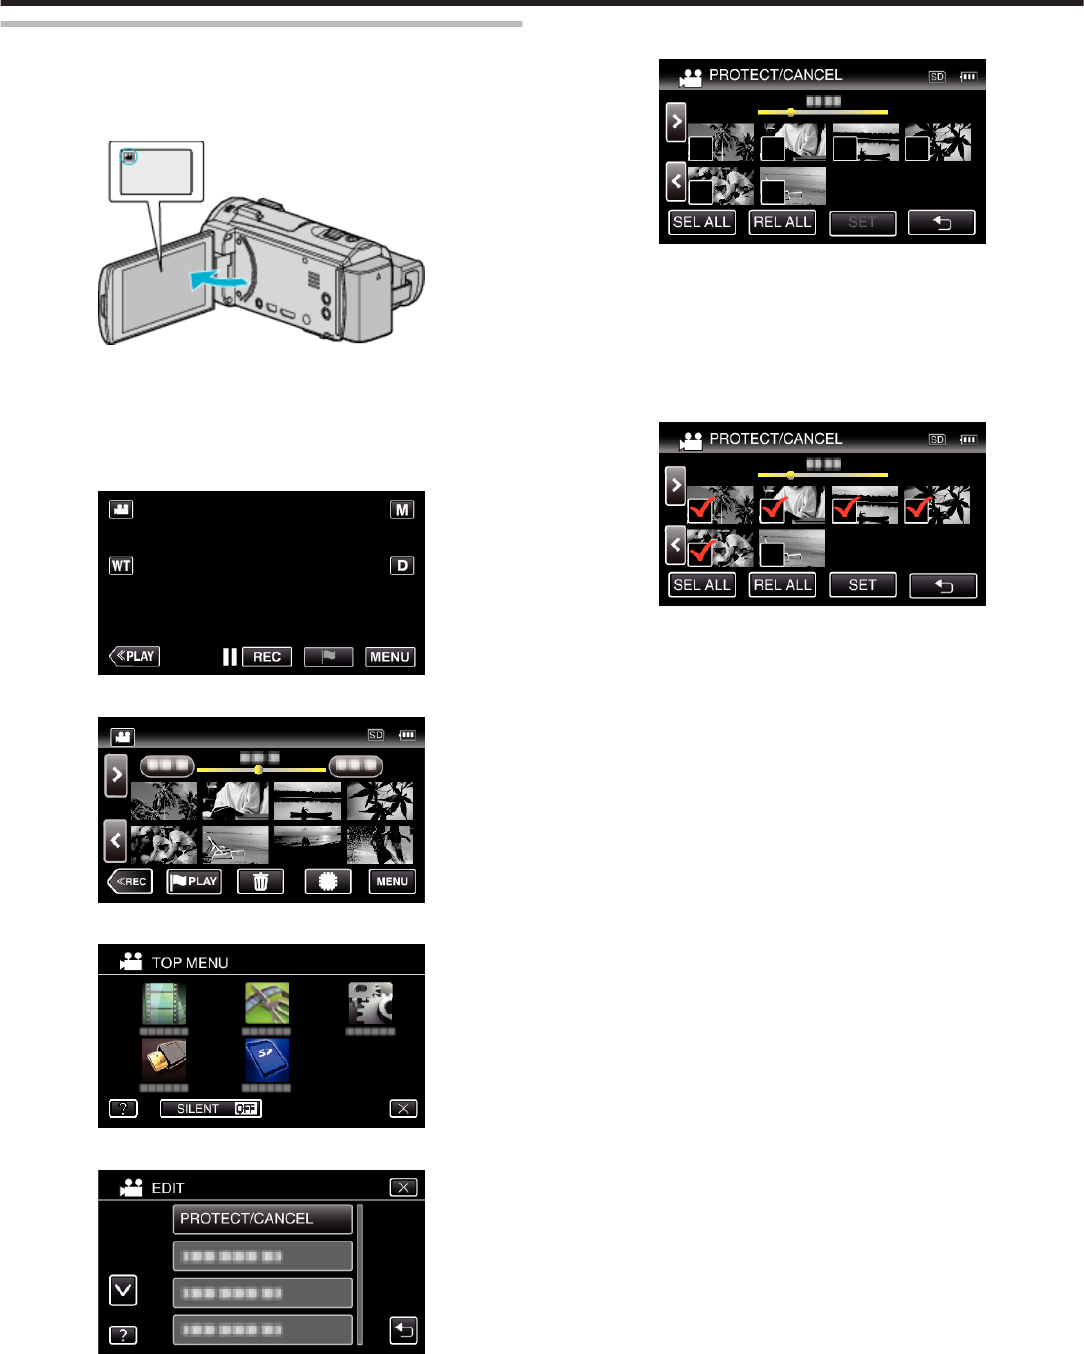
Protecting/Releasing Protection of Selected Files
Protects or releases protection of the selected files.
0
*The following is a screen of the model with the built-in memory.
1
Open the LCD monitor.
.
0
Tap A or B to select the video or still image mode.
0
Tap
B
or
A
on the recording screen to display the mode switching
screen.
Tap
A
to switch to the video mode
A
.
Tap
B
to switch to the still image mode
B
.
2
Tap “<<PLAY” to select the playback mode.
.
3
Tap “MENU”.
.
4
Tap “EDIT”.
.
5
Tap “PROTECT/CANCEL”.
.
6
Tap on the files to protect or release protection of.
.
0
P appears on the selected files.
To remove P from a file, tap on the file again.
0
I
and
P
are displayed on the files that are already protected.
To release protection of a file, tap on the file such that P is removed.
0
Tap “SEL ALL” to select all files.
0
Tap “REL ALL” to release all selections.
7
Tap “SET” to complete the setting.
.
0
Protect marks I appear on the selected files.
Protect marks I disappear from the deselected files.
Editing
85
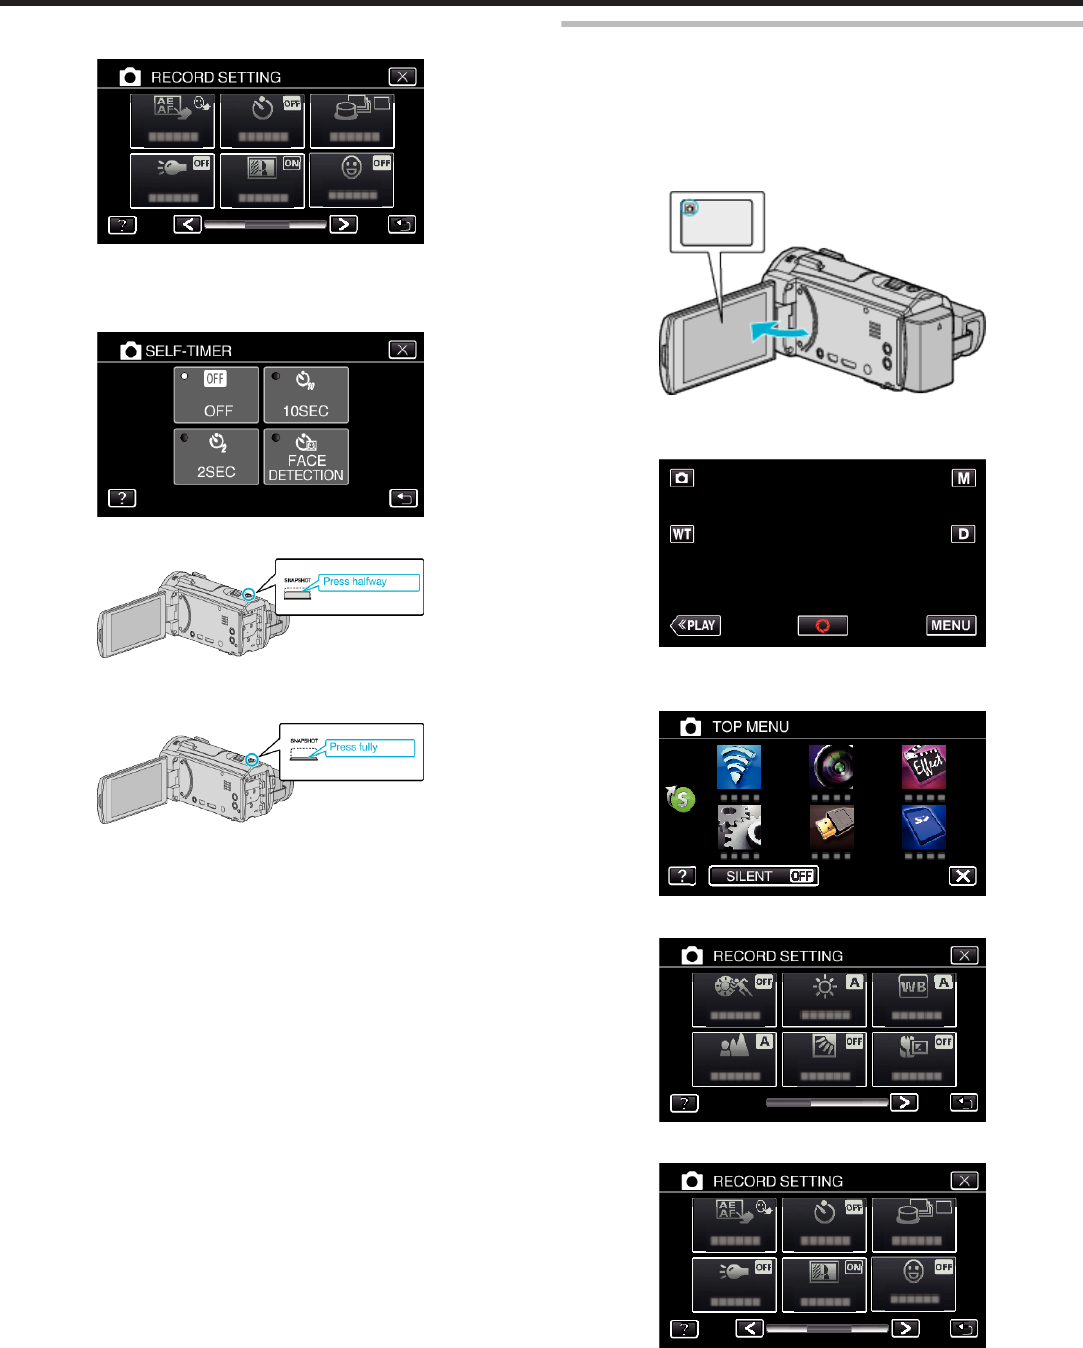
Capturing a Still Image in the Video During
Playback
You can capture still images of the scenes you like in the recorded videos.
0
*The following is a screen of the model with the built-in memory.
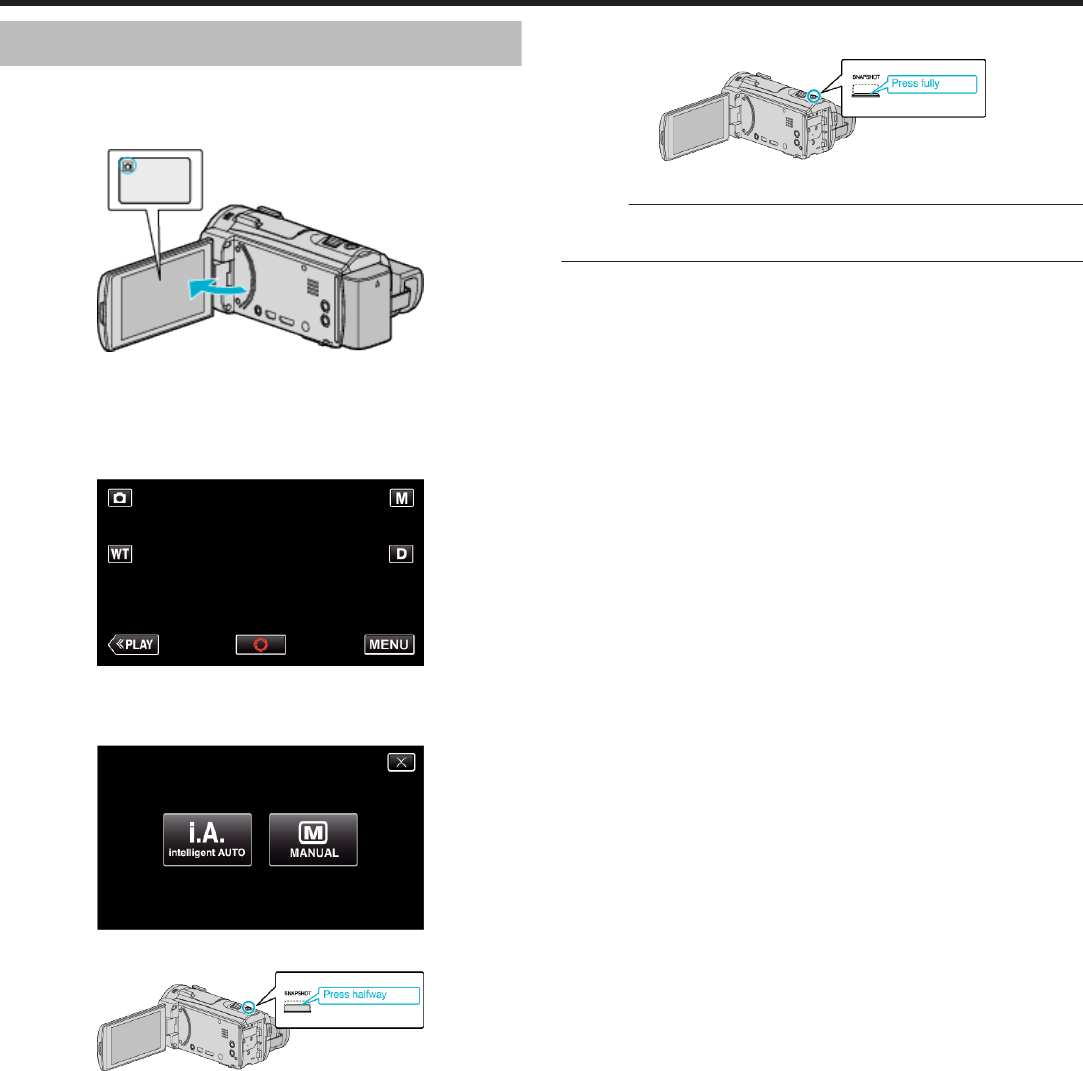
1
Open the LCD monitor.
.
0
Check if the recording mode is A.
0
If the mode is
B
still image, tap
B
on the recording screen to display
the mode switching screen.
Tap
A
to switch the mode to video.
2
Tap “<<PLAY” to select the playback mode.
.
3
Tap on the desired video.
.
4
Tap pause e at the desired scene during playback.
.
0
After pausing the video, you can fine-tune the point to capture by
tapping forward slow-motion k and reverse slow-motion l.
5
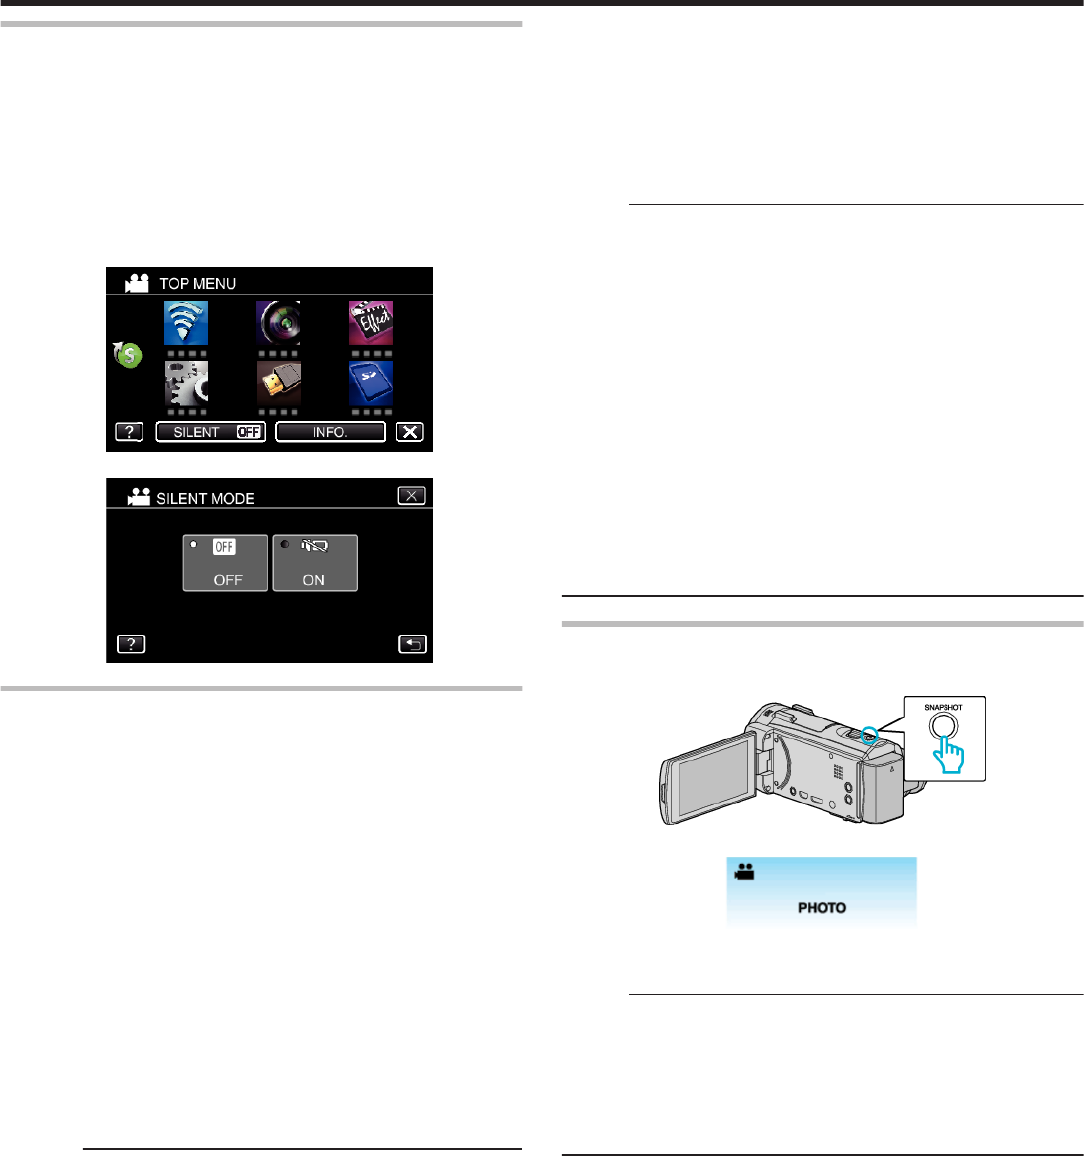
Press the SNAPSHOT button.
.
Memo :
0
Still images are captured with a size of 1920×1080.
0
Captured still images are stored in the media where the video is being
played back from.
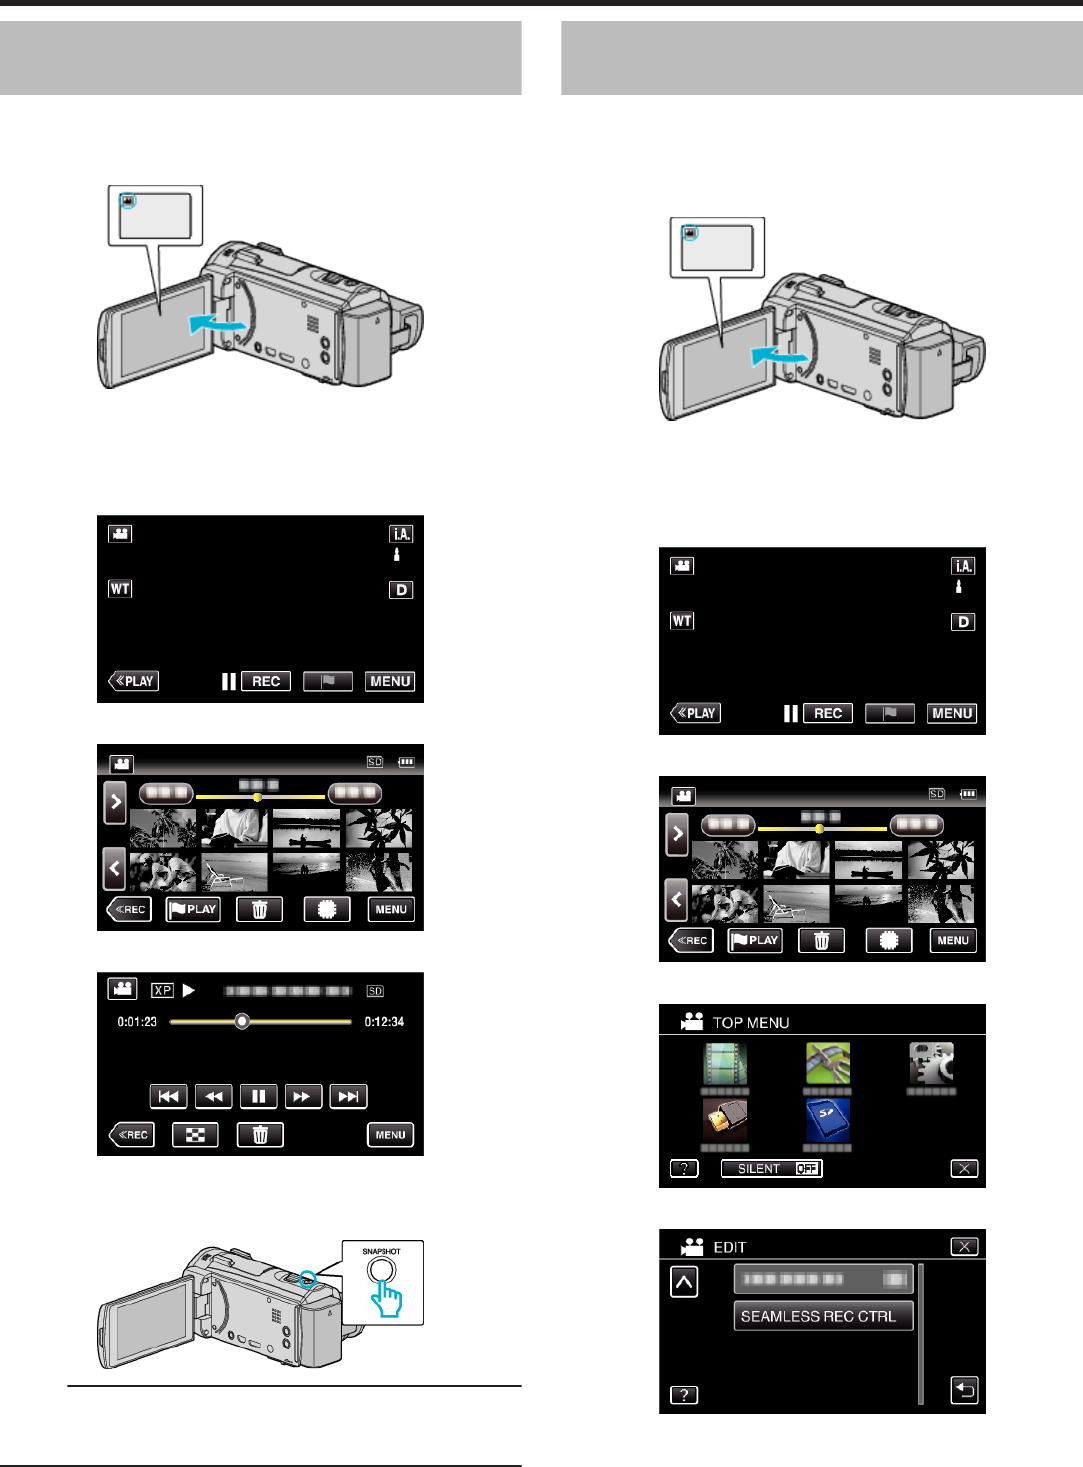
Combining Videos Recorded by Seamless
Recording (GZ-EX555)
Videos that are recorded on two separate media and with “SEAMLESS
RECORDING” in the video recording menu enabled can be combined into
a single video.
“SEAMLESS RECORDING (GZ-EX555)” (A p. 212)
1
Open the LCD monitor.
.
0
Check if the recording mode is A.
0
If the mode is
B
still image, tap
B
on the recording screen to display
the mode switching screen.
Tap
A
to switch the mode to video.
2
Tap “<<PLAY” to select the playback mode.
.
3
Tap “MENU”.
.
4
Tap “EDIT”.
.
5
Tap “SEAMLESS REC CTRL”.
.
Editing
86
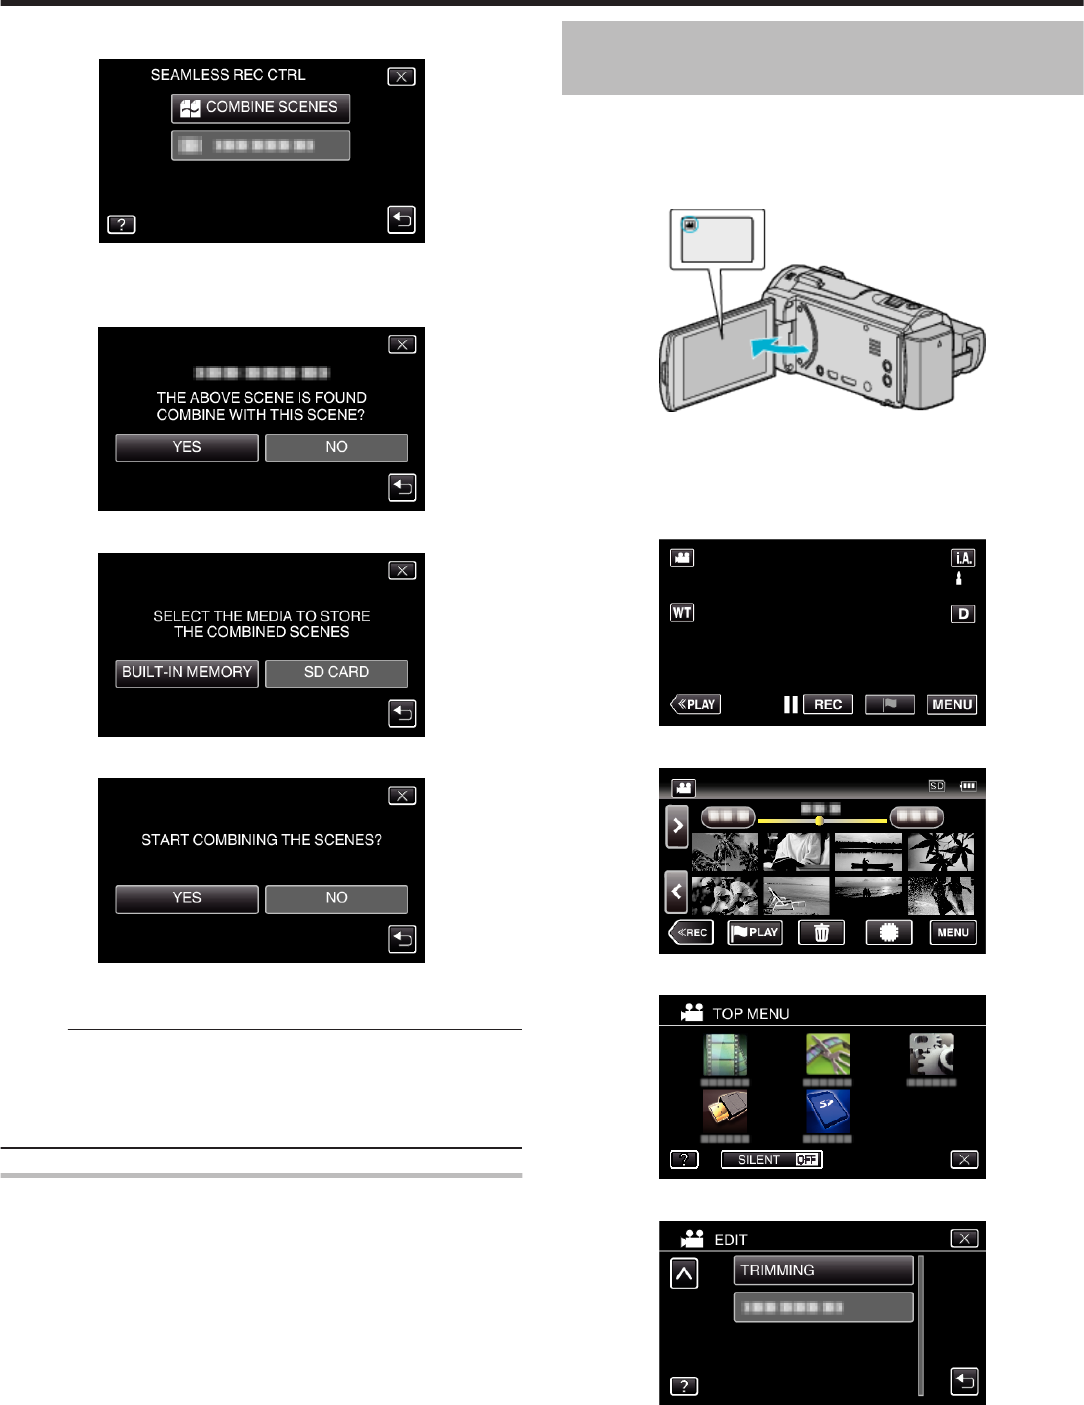
6
Tap “COMBINE SCENES”.
.
0
This unit starts a search to detect seamless videos.
Combining cannot be performed if no seamless videos are found.
7
Tap “YES”.
.
8
Tap the media to store to.
.
9
Tap “YES”.
.
0
Combining of the videos starts.
0
After videos are combined, tap “OK”.
Memo :
0
Seamless videos cannot be combined if there is not enough free space in
the built-in memory or SD card. Check the amount of remaining free space
before combining.
0
Seamless recording can not be performed if the video recording format is
iFrame.
How to Enable Seamless Video Recording Again
To start seamless recording again after the previous session is complete, it
is necessary to combine seamless videos, or delete the combination
information of the seamless videos.
To delete the combination information of seamless videos, select “DEL
COMBINED SCENES” in step 6.
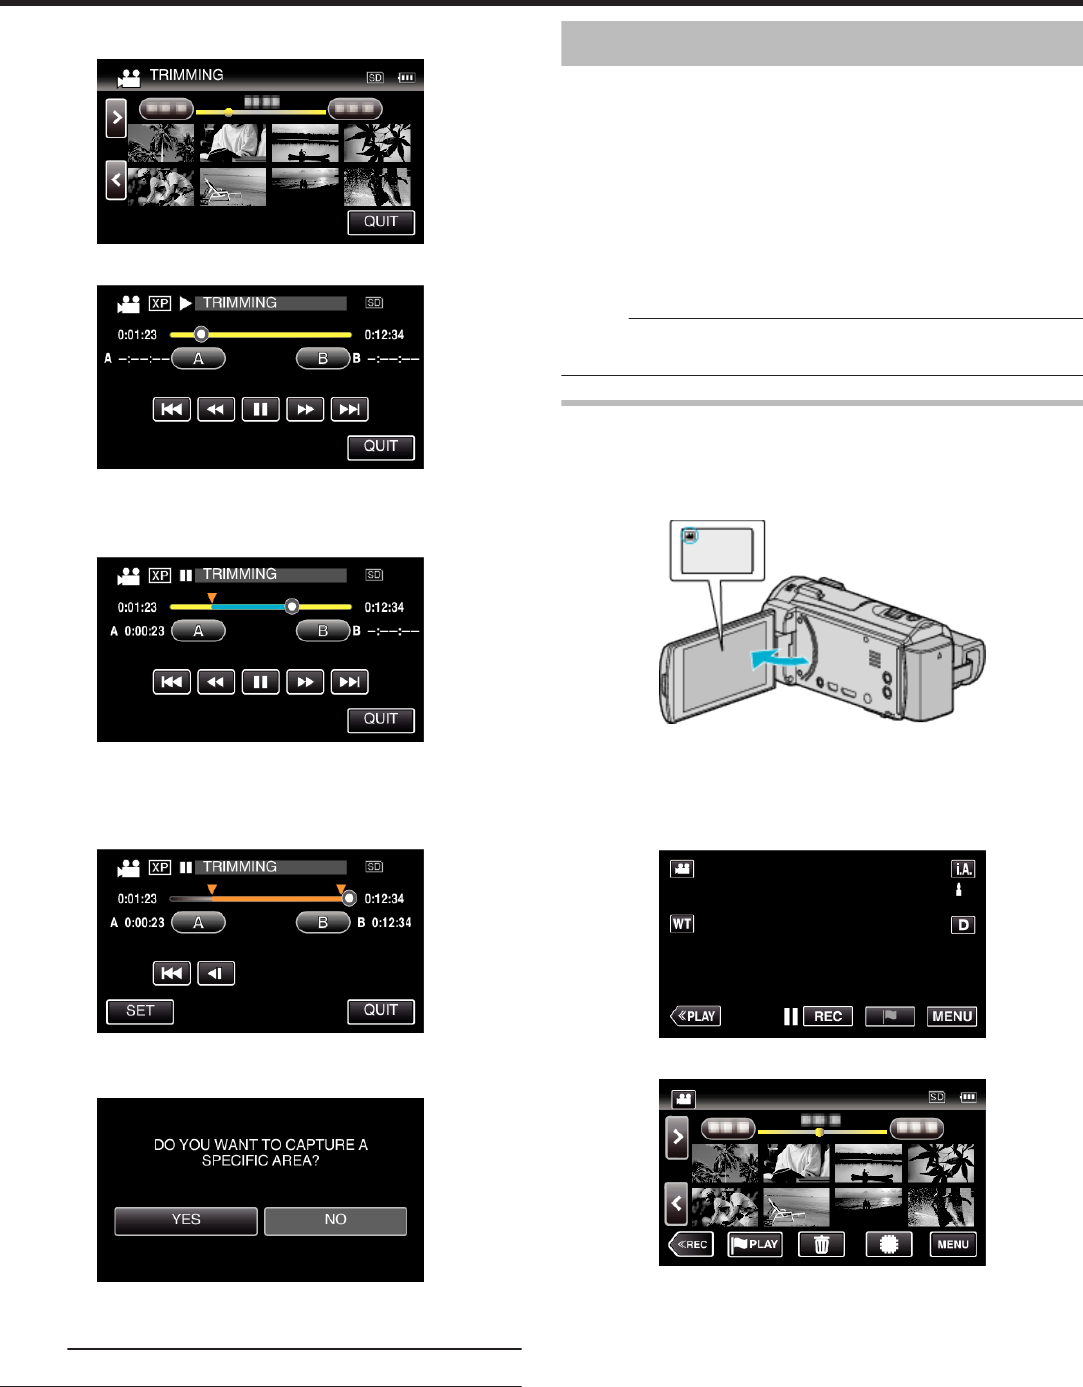
Capturing a Required Part in the Video
(TRIMMING)
Select the required part of a video and save it as a new video file.
0
The original video remains in its existing location.
0
*The following is a screen of the model with the built-in memory.
1
Open the LCD monitor.
.
0
Check if the recording mode is A.
0
If the mode is
B
still image, tap
B
on the recording screen to display
the mode switching screen.
Tap
A
to switch the mode to video.
2
Tap “<<PLAY” to select the playback mode.
.
3
Tap “MENU”.
.
4
Tap “EDIT”.
.
5
Tap “TRIMMING”.
.
Editing
87
6
Tap the video to edit.
.
7
Tap e to pause playback at the desired start point, then tap “A”.
.
0
When “A” is tapped, the start point is set.
0
After setting the start point, tap d to continue playback.
8
Tap e to pause playback at the desired end point, then tap “B”.
.
0
When “B” is tapped, the end point is set.
0
To reset the start or end point, tap “A” or “B” at the desired scene
(position).
9
Tap “SET”.
.
0
When “SET” is tapped, the trimming area is confirmed.
10
Tap “YES”.
.
0
After copying, tap “OK”.
0
When copying finishes, the copied file is added to the index screen.
Memo :
0
The division point may deviate slightly from the selected scene.
Creating Playlists from the Recorded Videos
A list created by selecting your favorite videos from the recorded ones is
called a playlist.
By creating a playlist, you can play back only your favorite videos in the order
you like.
The original video file remains even when it is registered to a playlist.
0
To create a new playlist
“Creating Playlists with Selected Files” (A p. 88)
“Creating Playlists by Date” (A p. 90)
0
To edit or delete a created playlist
“Editing Playlists” (A p. 91)
“Deleting Playlists” (A p. 93)
Memo :
0
When a video file is deleted or moved, the same file will be removed from
the playlist.
Creating Playlists with Selected Files
Create a playlist by arranging the files one by one.
0
*The following is a screen of the model with the built-in memory.
1
Open the LCD monitor.
.
0
Check if the recording mode is A.
0
If the mode is
B
still image, tap
B
on the recording screen to display
the mode switching screen.
Tap
A
to switch the mode to video.
2
Tap “<<PLAY” to select the playback mode.
.
3
Tap “MENU”.
.
Editing
88
4
Tap “EDIT”.
.
5
Tap “EDIT PLAYLIST”.
.
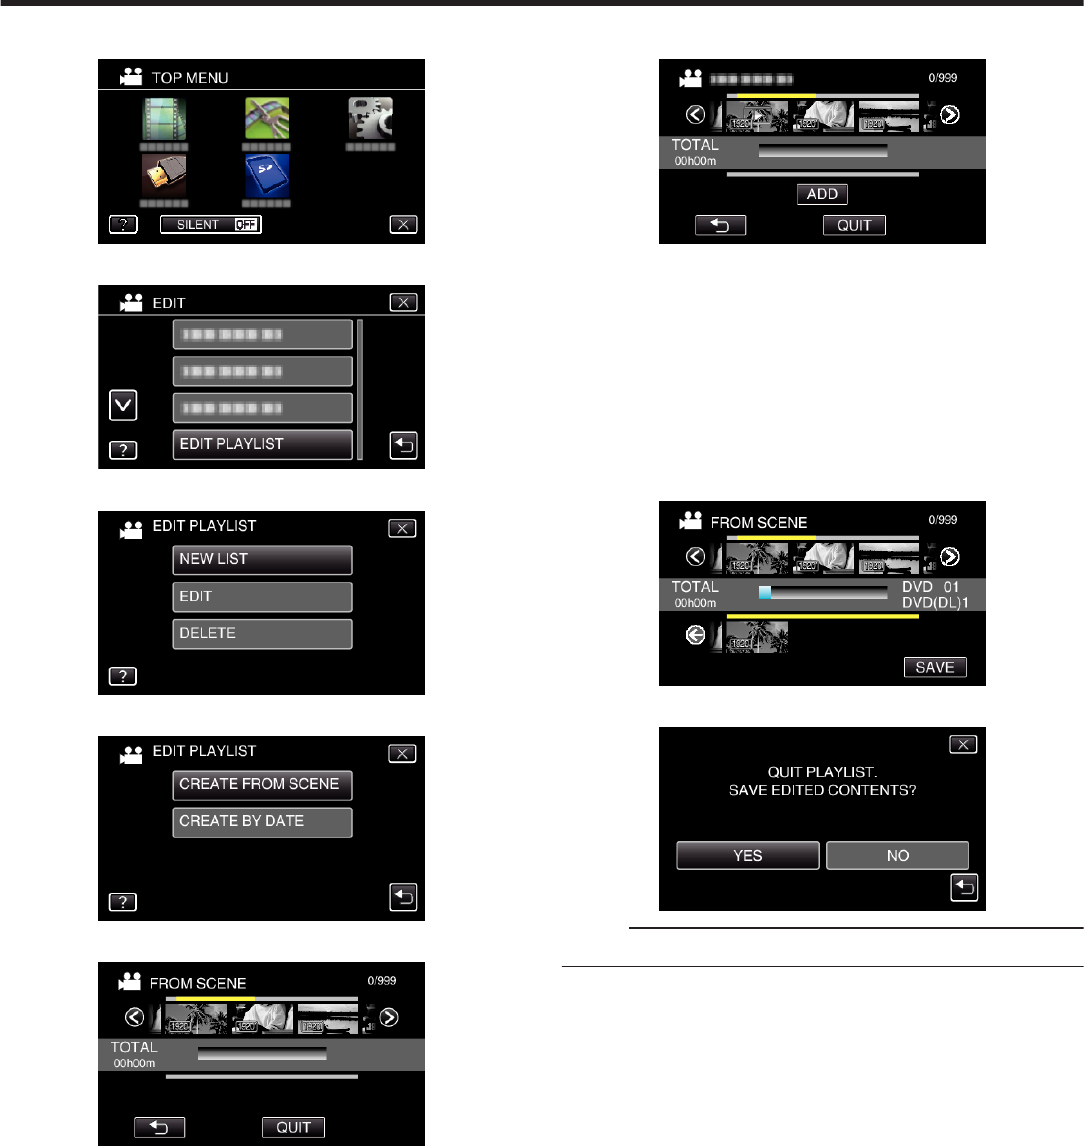
6
Tap “NEW LIST”.
.
7
Tap “CREATE FROM SCENE”.
.
8
Tap on the video to add to playlist.
.
0
d appears on the selected video. Tap J to deselect.
0
Tap on the selected video again to check the video. After checking, tap
J.
0
Tap 0/1 or move the zoom lever to display the previous/next video.
0
X indicates the size of the video.
9
Tap “ADD”, and insert the video image.
.
0
Repeat steps 8-9 and arrange the videos in the playlist.
0
To change the position of a video in the playlist (lower row), select the
insertion point with
E
/
F
after step 8 and tap “ADD”.
0
d
appears when the inserted video is selected.
Tap
J
to deselect.
0
Tap on the selected video again to check the video. After checking, tap
J
.
0
To delete of a video in the playlist (lower row), tap the video, then tap
“CANCEL”.
0
X
indicates the size of the video.
10
After arranging, tap “SAVE”.
.
11
Tap “YES”.
.
Memo :
0
Tap L on each screen to exit the menu.
Editing
89
Creating Playlists by Date
Create a playlist by arranging multiple files according to recording date.
0
*The following is a screen of the model with the built-in memory.
1
Open the LCD monitor.
.
0
Check if the recording mode is A.
0
If the mode is
B
still image, tap
B
on the recording screen to display
the mode switching screen.
Tap
A
to switch the mode to video.
2
Tap “<<PLAY” to select the playback mode.
.
3
Tap “MENU”.
.
4
Tap “EDIT”.
.
5
Tap “EDIT PLAYLIST”.
.
6
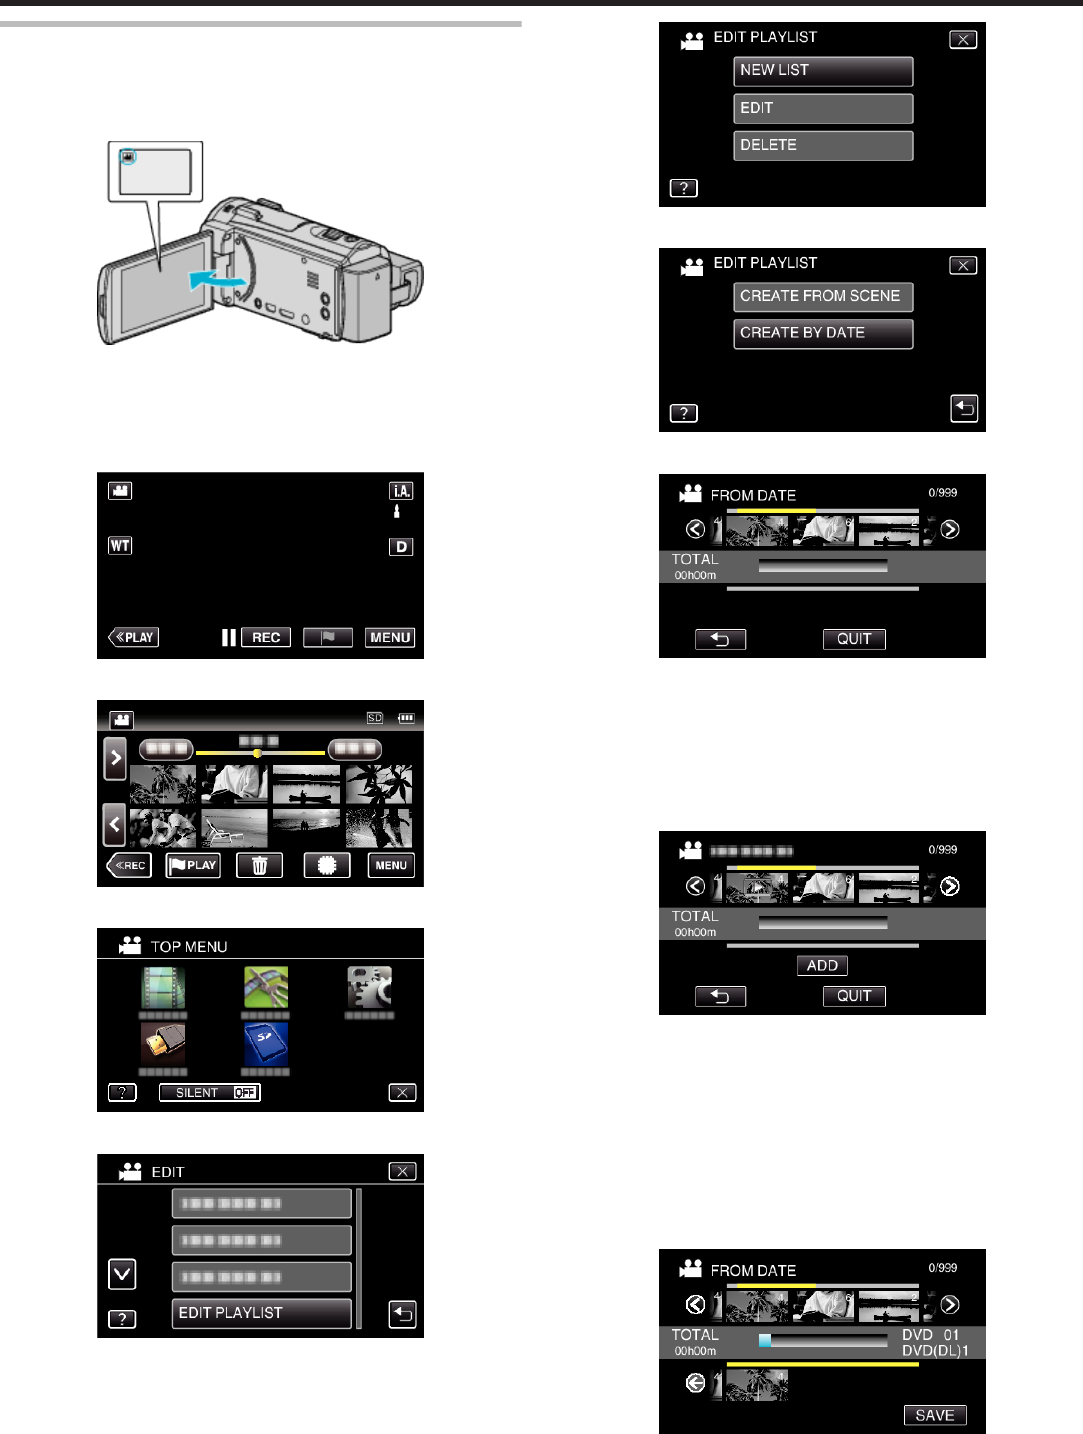
Tap “NEW LIST”.
.
7
Tap “CREATE BY DATE”.
.
8
Tap on the video of the date to add to playlist.
.
0
d appears on the selected video. Tap J to deselect.
0
Tap on the selected video again to check all the videos of the same
date. After checking, tap J.
0
Tap 0/1 or move the zoom lever to display the previous/next video.
0
The number on the video indicates the number of videos recorded on
the same day.
9
Tap “ADD”, and insert the video image.
.
0
Repeat steps 8-9 and arrange the videos in the playlist.
0
To change the position of a video in the playlist (lower row), select the
insertion point with E/F after step 8 and tap “ADD”.
0
d appears when the inserted video is selected.
Tap J to deselect.
0
Tap on the selected video again to check all the videos of the same
date. After checking, tap J.
0
To delete of a video in the playlist (lower row), tap the video, then tap
“CANCEL”.
10
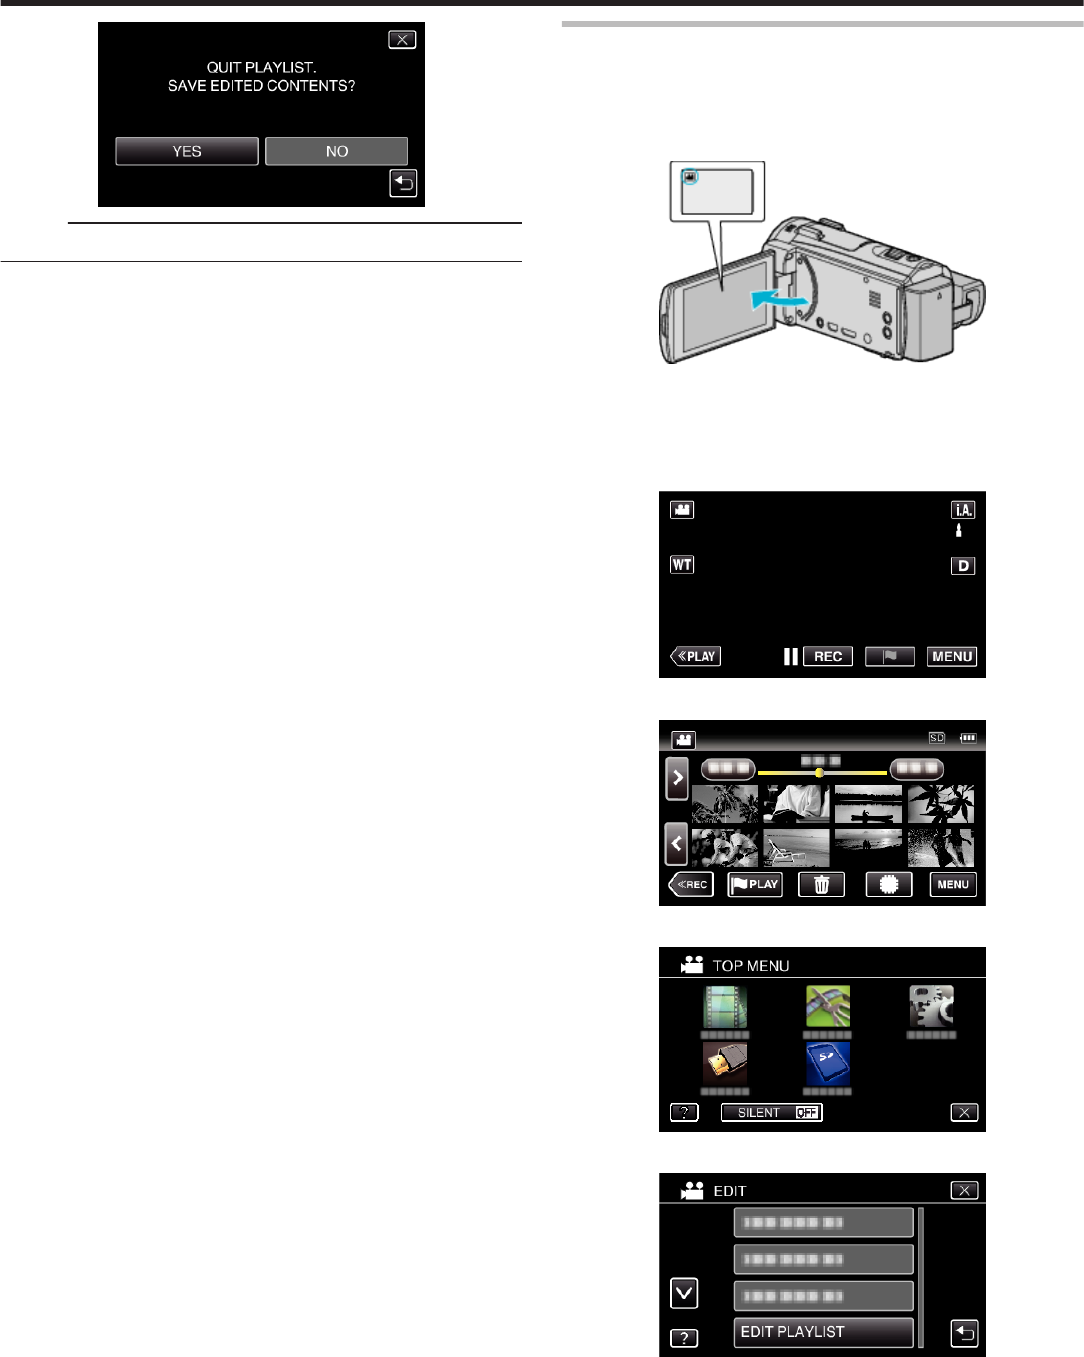
After arranging, tap “SAVE”.
.
11
Tap “YES”.
Editing
90
.
Memo :
0
Tap L on each screen to exit the menu.
Editing Playlists
You can change the content of a created playlist.
However, the playlists created from Digest Playback cannot be changed.
0
*The following is a screen of the model with the built-in memory.
1
Open the LCD monitor.
.
0
Check if the recording mode is A.
0
If the mode is
B
still image, tap
B
on the recording screen to display
the mode switching screen.
Tap
A
to switch the mode to video.
2
Tap “<<PLAY” to select the playback mode.
.
3
Tap “MENU”.
.
4
Tap “EDIT”.
.
5
Tap “EDIT PLAYLIST”.
.
Editing
91
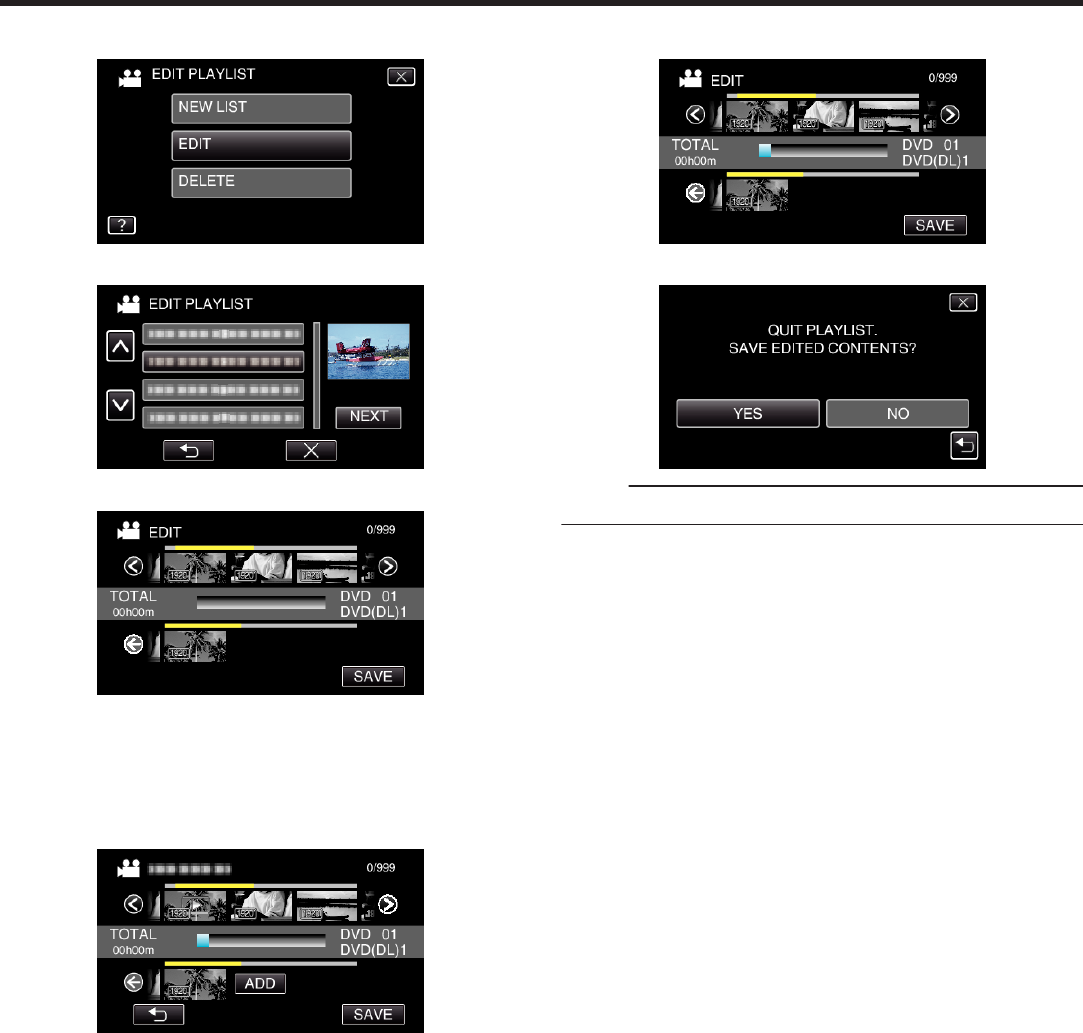
6
Tap “EDIT”.
.
7
Tap on the playlist to edit, and tap “NEXT”.
.
8
Tap on the video (upper row) to arrange in the playlist.
.
0
d appears on the selected video. Tap J to deselect.
0
Tap on the selected video again to check the video. After checking, tap
J.
0
Tap 0/1 or move the zoom lever to display the previous/next video.
0
X indicates the size of the video.
9
Tap “ADD”, and insert the video image.
.
0
Repeat steps 8-9 and arrange the videos in the playlist.
0
To change the position of a video in the playlist (lower row), select the
insertion point with E/F after step 8 and tap “ADD”.
0
d appears when the inserted video is selected.
Tap J to deselect.
0
Tap on the selected video again to check the video. After checking, tap
J.
0
To delete of a video in the playlist (lower row), tap the video, then tap
“CANCEL”.
0
X indicates the size of the video.
10
After arranging, tap “SAVE”.
.
11
Tap “YES”.
.
Memo :
0
Tap L on each screen to exit the menu.
Editing
92
Deleting Playlists
Delete the playlists that you have created.
0
*The following is a screen of the model with the built-in memory.
1
Open the LCD monitor.
.
0
Check if the recording mode is A.
0
If the mode is B still image, tap B on the recording screen to display
the mode switching screen.
Tap A to switch the mode to video.
2
Tap “<<PLAY” to select the playback mode.
.
3
Tap “MENU”.
.
4
Tap “EDIT”.
.
5
Tap “EDIT PLAYLIST”.
.
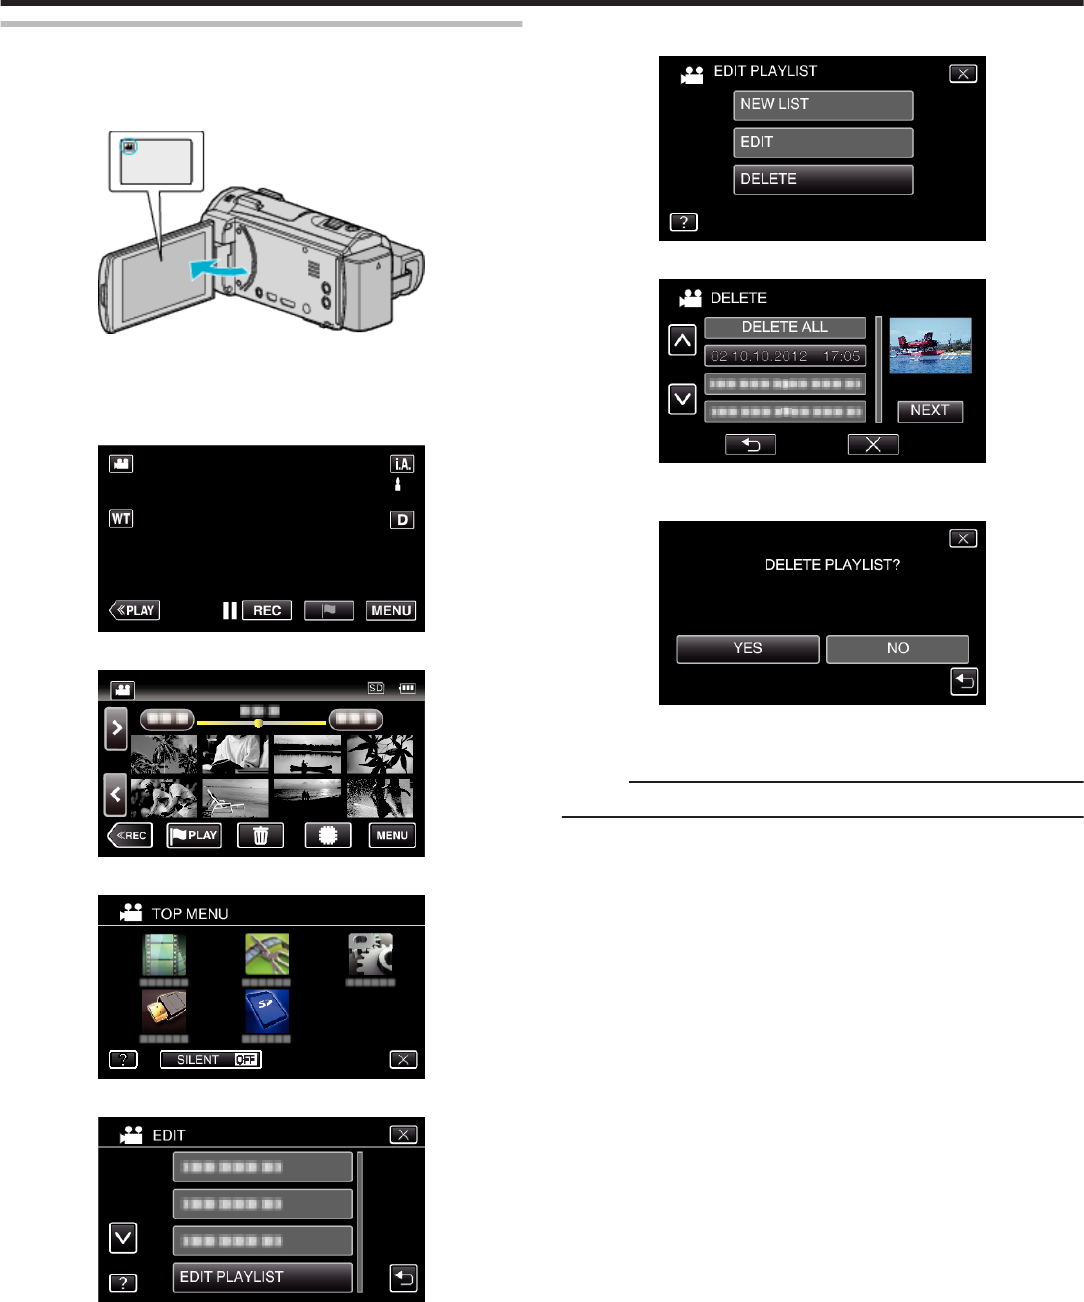
6
Tap “DELETE”.
.
7
Tap on the playlist to delete, and tap “NEXT”.
.
0
All created playlists will be deleted when “DELETE ALL” is selected.
8
Tap “YES” to confirm the deletion.
.
0
After deleting, tap “OK”.
0
After deleting is complete, the screen returns to the delete playlist
selection screen.
Memo :
0
Tap L on each screen to exit the menu.
Editing
93
Creating a Disc Using a Connected Blu-ray
Recorder
You can create discs using a Blu-ray recorder by connecting it to this unit
using a USB cable.
0
*The following is a screen of the model with the built-in memory.
1
Remove the AC adapter and battery pack from this unit.
2
Open the LCD monitor.
.
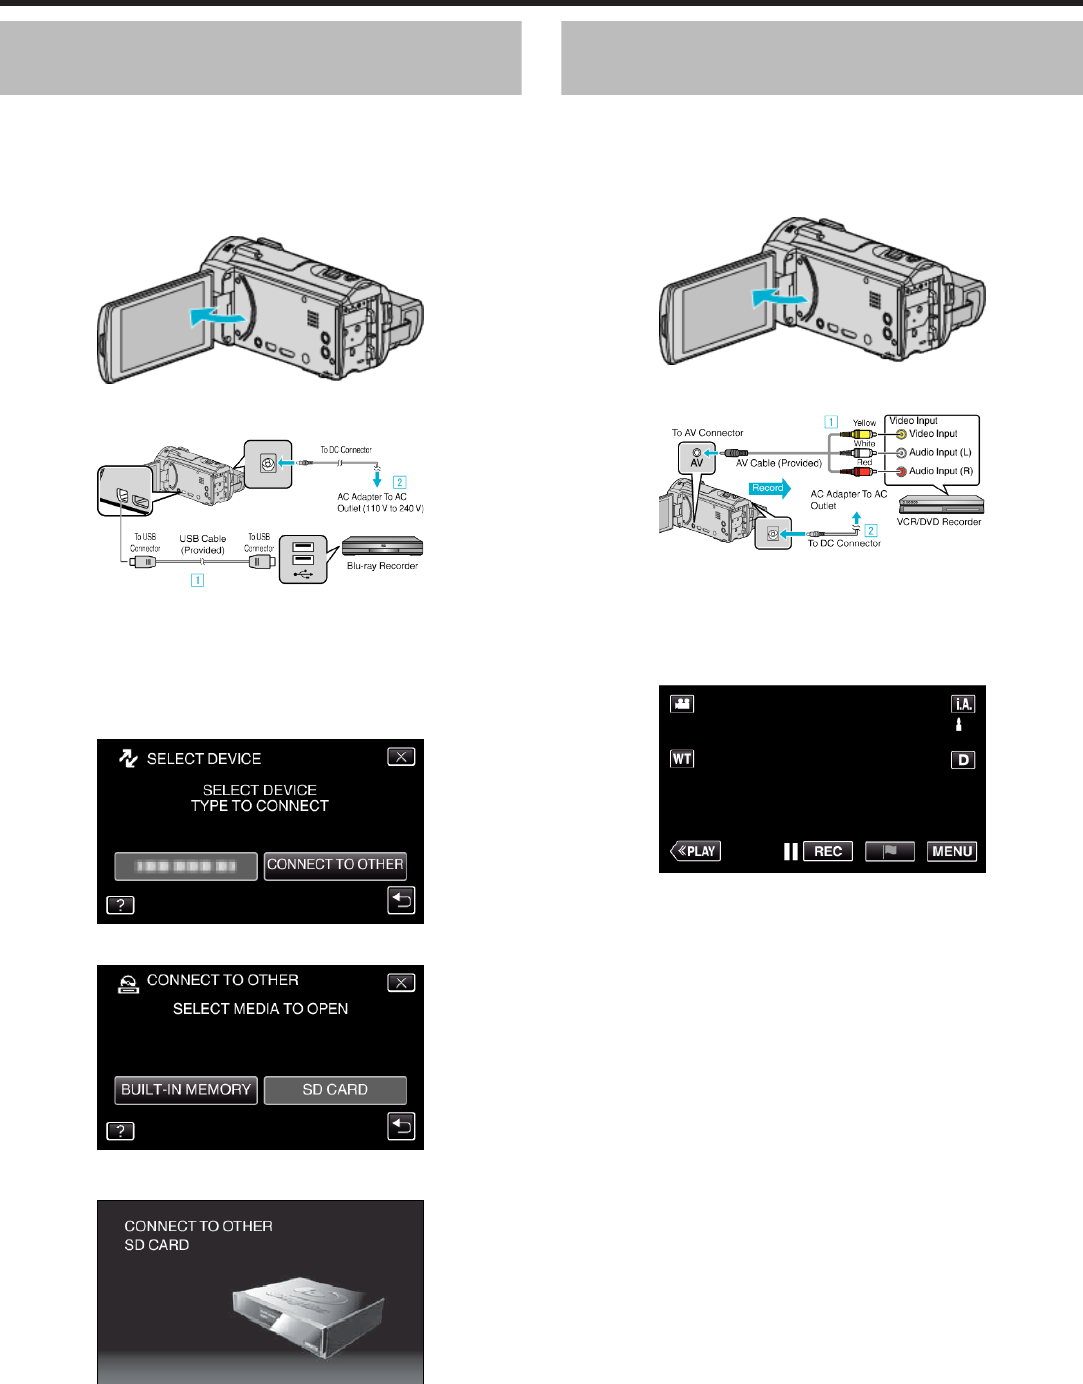
3
Connect to a Blu-ray recorder.
.
A Connect using the provided USB cable.
B Connect the AC adapter to this unit.
0
This unit powers on automatically when the AC adapter is connected,
and the “SELECT DEVICE” screen is displayed.
0
Be sure to use the supplied AC adapter.
4
Tap “CONNECT TO OTHER”.
.
5
Tap the desired media.
.
0
The following screen is displayed after the camera operation is
completed.
.
0
Operations are to be performed on the Blu-ray recorder after the
screen switches.
6
Perform dubbing on the Blu-ray recorder.
0
Refer also to the instruction manual of the Blu-ray recorder.
0
After dubbing is complete, disconnect the USB cable. Operations
cannot be performed on this unit until the USB cable is disconnected.
Dubbing Files to a Disc by Connecting to a
DVD Recorder
You can dub videos in standard quality by connecting to a DVD recorder.
0
Refer also to the instruction manuals of the TV and DVD recorder.
1
Remove the AC adapter and battery pack from this unit.
2
Open the LCD monitor.
.
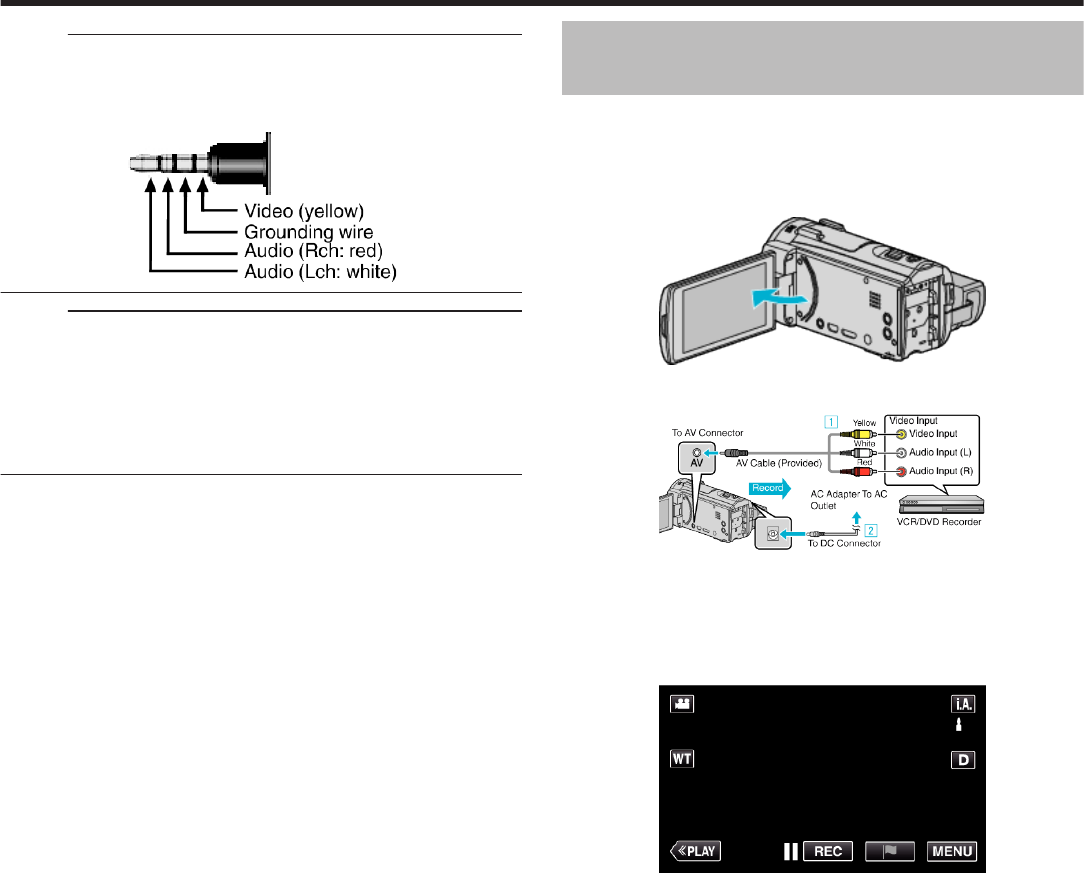
3
Connect to a DVD recorder.
.
A Connect using the provided AV cable.
B Connect the AC adapter to this unit.
0
This unit powers on automatically when the AC adapter is connected.
0
Be sure to use the supplied AC adapter.
4
Tap “<<PLAY” to select the playback mode.
.
5
Prepare the TV/DVD recorder for recording.
0
Switch to a compatible external input.
0
Insert a disc (DVD-R, etc.) into the DVD recorder.
6
Prepare this unit for playback.
0
Set “VIDEO OUTPUT” in the “CONNECTION SETTINGS” menu to
the aspect ratio (“4:3” or “16:9”) of the connecting TV.
“ VIDEO OUTPUT ” (A p. 225)
7
Start recording.
0
Start playback on this unit and press the record button on the
recorder.
“Playing Back Videos” (A p. 67)
0
After playback is complete, stop the recording.
Copying
94
Memo :
0
AV cable (P/N: QAM1322-001)
Wiring specifications (for video/audio) of the 4-pole mini plug are described
in the following.
For purchasing, consult your nearest JVC service center.
.
Memo :
0
When there are many videos to dub, you can create a playlist in advance
and play it back so that all your favorite videos can be dubbed at once.
“Creating Playlists with Selected Files” (A p. 88)
“ PLAYBACK PLAYLIST ” (A p. 76)
0
To include the recording date and time during dubbing, set “DISPLAY
DATE/TIME” in the “PLAYBACK SETTING” menu to “ON”. Or, set
“DISPLAY ON TV” in the “CONNECTION SETTINGS” menu to “ON”.
Dubbing Files to a VHS Tape by Connecting
to a VCR
You can dub videos in standard quality by connecting to a VCR.
0
Refer also to the instruction manuals of the TV and VCR.
1
Remove the AC adapter and battery pack from this unit.
2
Open the LCD monitor.
.
3
Connect to a VCR/DVD recorder.
.
A Connect using the provided AV cable.
B Connect the AC adapter to this unit.
0
This unit powers on automatically when the AC adapter is connected.
0
Be sure to use the supplied AC adapter.
4
Tap “<<PLAY” to select the playback mode.
.
5
Prepare the TV/VCR for recording.
0
Switch to a compatible external input.
0
Insert a video tape.
6
Prepare this unit for playback.
0
Set “VIDEO OUTPUT” in the “CONNECTION SETTINGS” menu to
the aspect ratio (“4:3” or “16:9”) of the connecting TV.
“ VIDEO OUTPUT ” (A p. 225)
7
Start recording.
0
Start playback on this unit and press the record button on the
recorder.
“Playing Back Videos” (A p. 67)
0
After playback is complete, stop the recording.
Copying
95
Memo :
0
AV cable (P/N: QAM1322-001)
Wiring specifications (for video/audio) of the 4-pole mini plug are described
in the following.
For purchasing, consult your nearest JVC service center.
.
Memo :
0
When there are many videos to dub, you can create a playlist in advance
and play it back so that all your favorite videos can be dubbed at once.
“Creating Playlists with Selected Files” (A p. 88)
“ PLAYBACK PLAYLIST ” (A p. 76)
0
To include the recording date and time during dubbing, set “DISPLAY
DATE/TIME” in the “PLAYBACK SETTING” menu to “ON”. Or, set
“DISPLAY ON TV” in the “CONNECTION SETTINGS” menu to “ON”.
Copying Files to an SD Card (GZ-EX555)
You can copy videos and still images from the built-in memory to SD card.
Copying still images to cards makes it convenient to bring them to the shop
for printing (developing).
Caution :
0
Make sure that there is enough space left in the destination medium.
0
Videos in the SD card cannot be copied to the built-in memory.
1
Open the LCD monitor.
.
0
Tap A or B to select the video or still image mode.
2
Tap “<<PLAY” to select the playback mode.
.
0
The mode changes between recording and playback with every tap.
3
Tap “MENU”.
.
4
Tap “EDIT”.
.
5
Tap “COPY”.
.
Copying
96
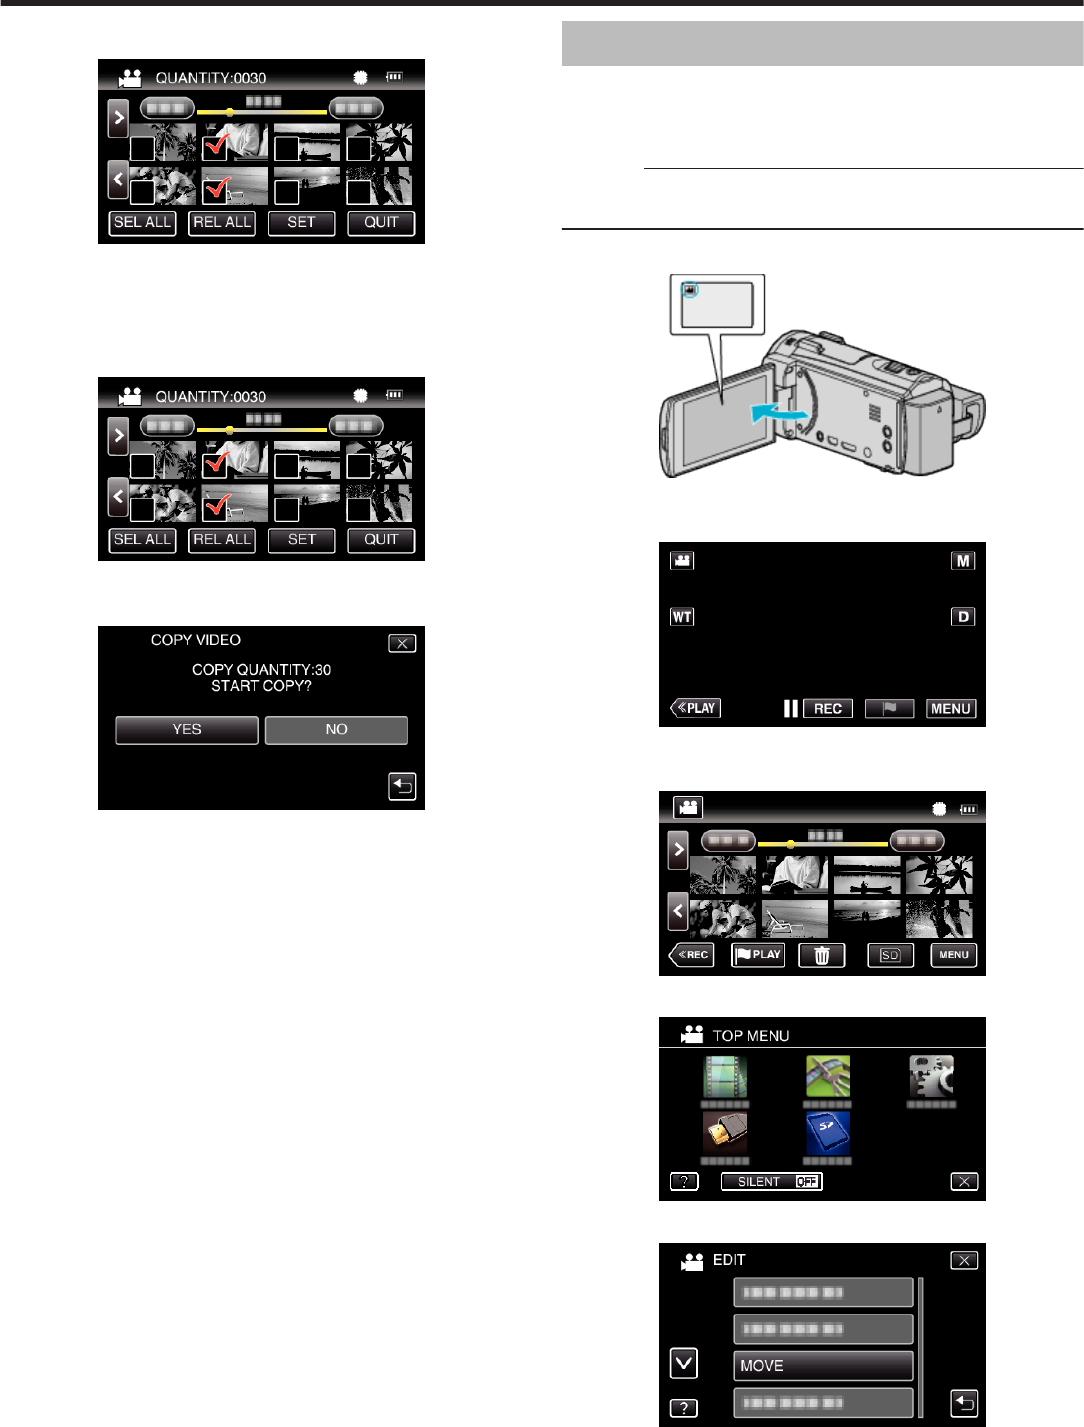
6
Tap on the files to copy.
.
0
P appears on the selected files.
To remove P from a file, tap on the file again.
0
Tap “SEL ALL” to select all files.
0
Tap “REL ALL” to release all selections.
7
Tap “SET”.
.
0
“SET” is deactivated when no file is selected.
8
Tap “YES”.
.
0
Copying starts.
0
After copying, tap “OK”.
Moving Files to an SD Card (GZ-EX555)
You can move videos and still images from the built-in memory to SD card.
Files that are moved will be deleted from the built-in memory.
Moving still images to SD cards makes it convenient to bring them to the
shop for printing (developing).
Caution :
0
Make sure that there is enough space left in the destination medium.
0
Videos in the SD card cannot be moved to the built-in memory.
1
Open the LCD monitor.
.
0
Tap A or B to select the video or still image mode.
2
Tap “<<PLAY” to select the playback mode.
.
0
The mode changes between recording and playback with every tap.
3
Tap “MENU”.
.
4
Tap “EDIT”.
.
5
Tap “MOVE”.
.
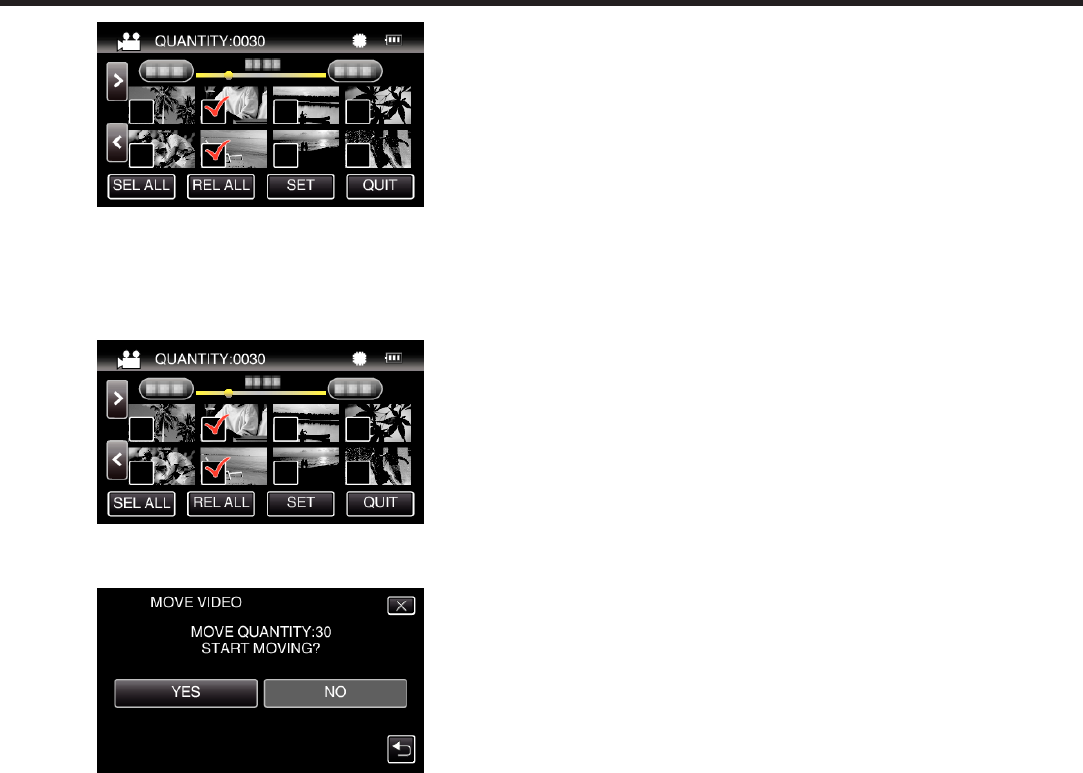
6
Tap on the files to move.
Copying
97
.
0
P appears on the selected files.
To remove P from a file, tap on the file again.
0
Tap “SEL ALL” to select all files.
0
Tap “REL ALL” to release all selections.
7
Tap “SET”.
.
0
“SET” is deactivated when no file is selected.
8
Tap “YES”.
.
0
Moving of files starts.
0
After moving, tap “OK”.
Copying
98
Copying to Windows PC (GZ-EX555/GZ-EX515)
You can copy files to a computer using the provided software.
Discs can also be created using the computer’s DVD or Blu-ray drive.
If the provided software is not installed, this unit will be recognized as an external storage when connected.
Memo :
0
To record to discs, a recordable DVD or Blu-ray drive is required for the computer in use.
0
Still images cannot be recorded to discs using the provided software.
0
Videos recorded in the iFrame format can not be copied.
0
In order to record on the Blu-ray disc, it is necessary to upgrade to the paid version of LoiLoFit for Everio.
For details, refer to the following link.
http://loilo.tv/us/product/33/page/27
0
Backing up of files using other softwares is not supported.
Trouble with Using the Provided Software LoiLoFit for Everio
Consult the customer service center below.
http://loilo.tv/us/product/LoiLoFit_for_Everio
0
For details on how to upload to YouTube, refer to “Help” in LoiLoFit for Everio.
Verifying System Requirements (Guideline)
Right-click on “Computer” (or “My Computer”) in the “Start” menu and select “Properties” to check the following items.
Windows Vista/Windows 7
0
Refer to the operating instructions found in the animation on the Detailed User Guide.
Windows XP
0
Refer to the operating instructions found in the animation on the Detailed User Guide.
Windows Vista/Windows 7Windows XP
OSWindows Vista 32/64-bit
Home Basic or Home Premium
(Pre-installed versions only) Service Pack 2
Windows 7 32/64-bit
Home Premium
(Pre-installed versions only) Service Pack 1
Windows XP
Home Edition or Professional
(Pre-installed versions only) Service Pack 3
CPUIntel Core 2 Duo, CPU 2 GHz or higher
RAMAt least 2 GB
Graphics(during playback/backing up):
Intel 965 or later, NVIDIA Geforce 6000 series or later, ATI Radeon 9600 or later
(during video editing/creating a disc/converting video/uploading):
Intel G45 or later, NVIDIA Geforce 8000 series or later (except for 8800GTX and 8300), ATI Radeon HD2000 series or later (except for
2900)
o
Other requirements
0
VRAM: 256MB or higher
0
Microsoft .NET Framework 3.5 SP1 needs to be installed.
0
To edit/playback videos, the use of a computer with Intel Core i7 (4 core) CPU is recommended.
Memo :
0
If your PC does not meet the above system requirements, operations of the provided software cannot be guaranteed.
0
Depending on the PC environment, even if the operating environment is adequate, 1 frame per second may be reduced during video playback.
0
Since the standard specification of Windows XP does not support UDF2.5, AVCHD disc cannot be played back.
Depending on the operating environment, UDF2.5 driver may be already installed. If the disc cannot be played back, either purchase a commercially-
available software for playing back the disc, or use a AVCHD-compatible device (such as Blu-ray recorder, etc) for playback.
0
For more information, contact your PC's manufacturer.
Copying
99
Installing the Provided Software
You can display the recorded images in calendar format and perform editing using the provided software.
Windows Vista/Windows 7
0
Refer to the operating instructions found in the animation on the Detailed User Guide.
Windows XP
0
Refer to the operating instructions found in the animation on the Detailed User Guide.
Copying
100
Backing Up Files
Before making backup, make sure that enough free space is left in the
computer's hard disk (HDD).
Backup will not start if there is not enough free space.
1
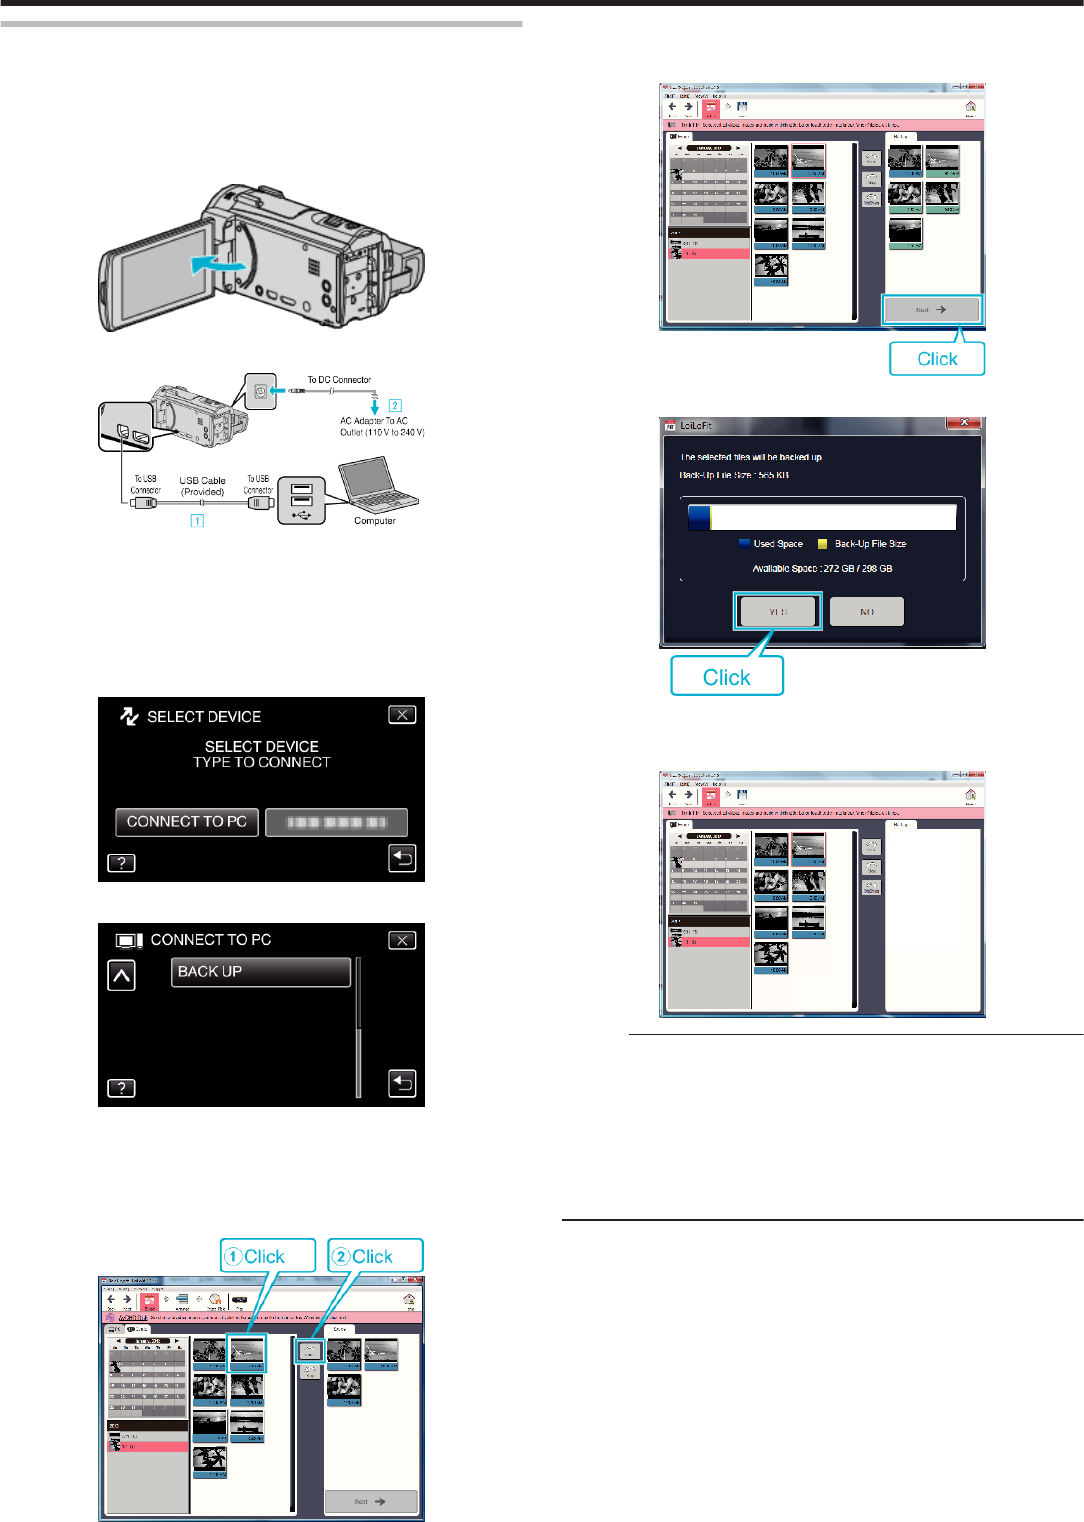
Remove the AC adapter and battery pack from this unit.
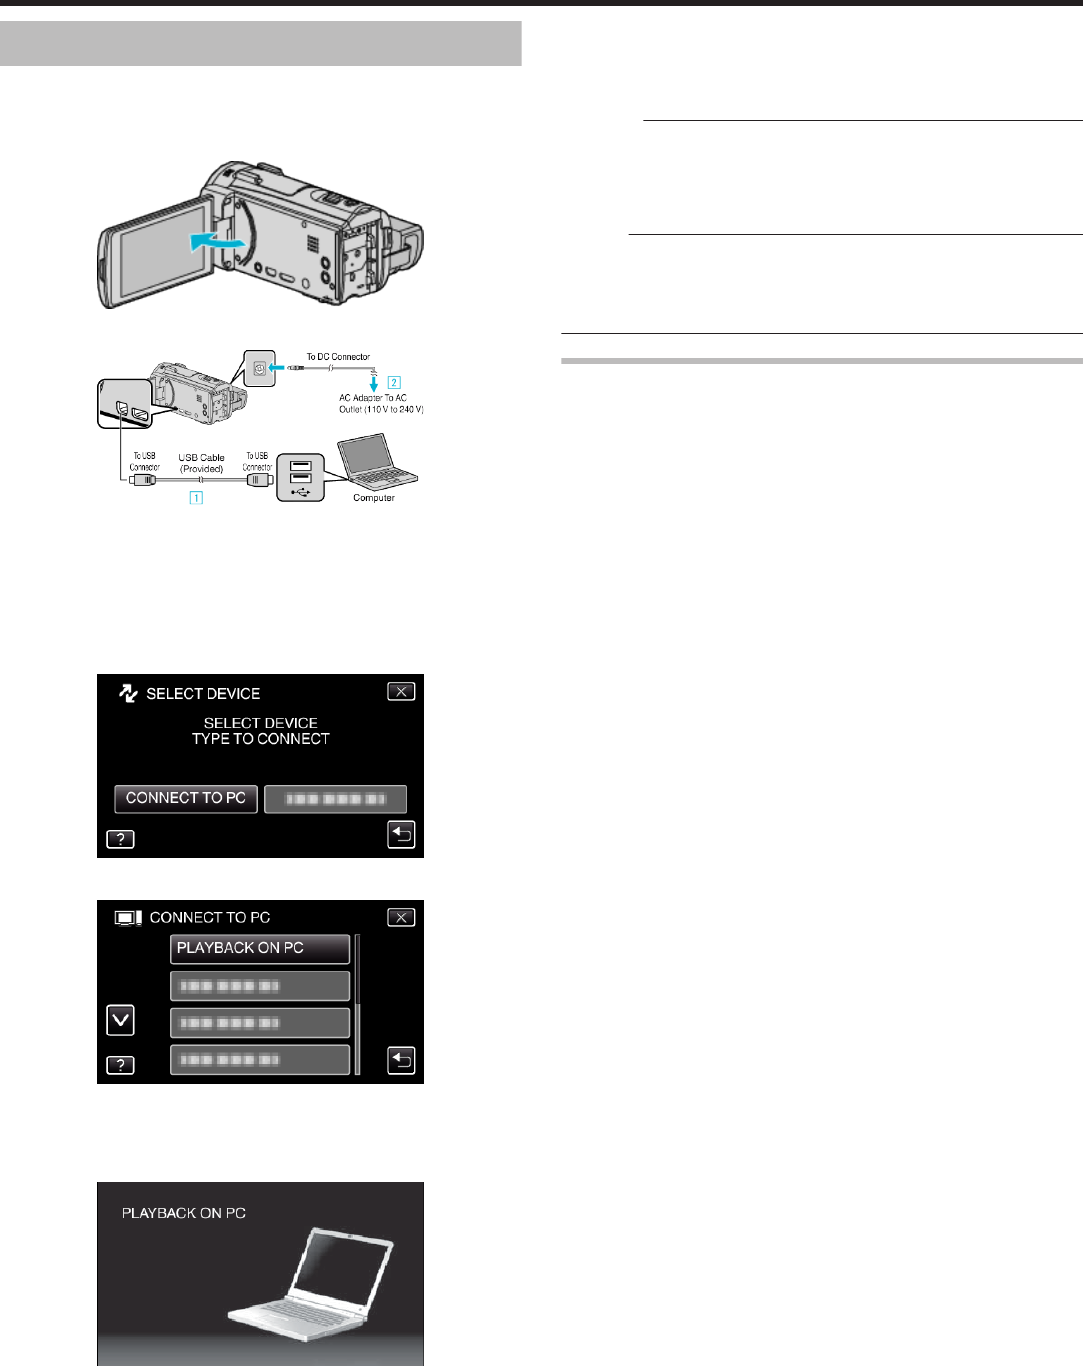
2
Open the LCD monitor.
.
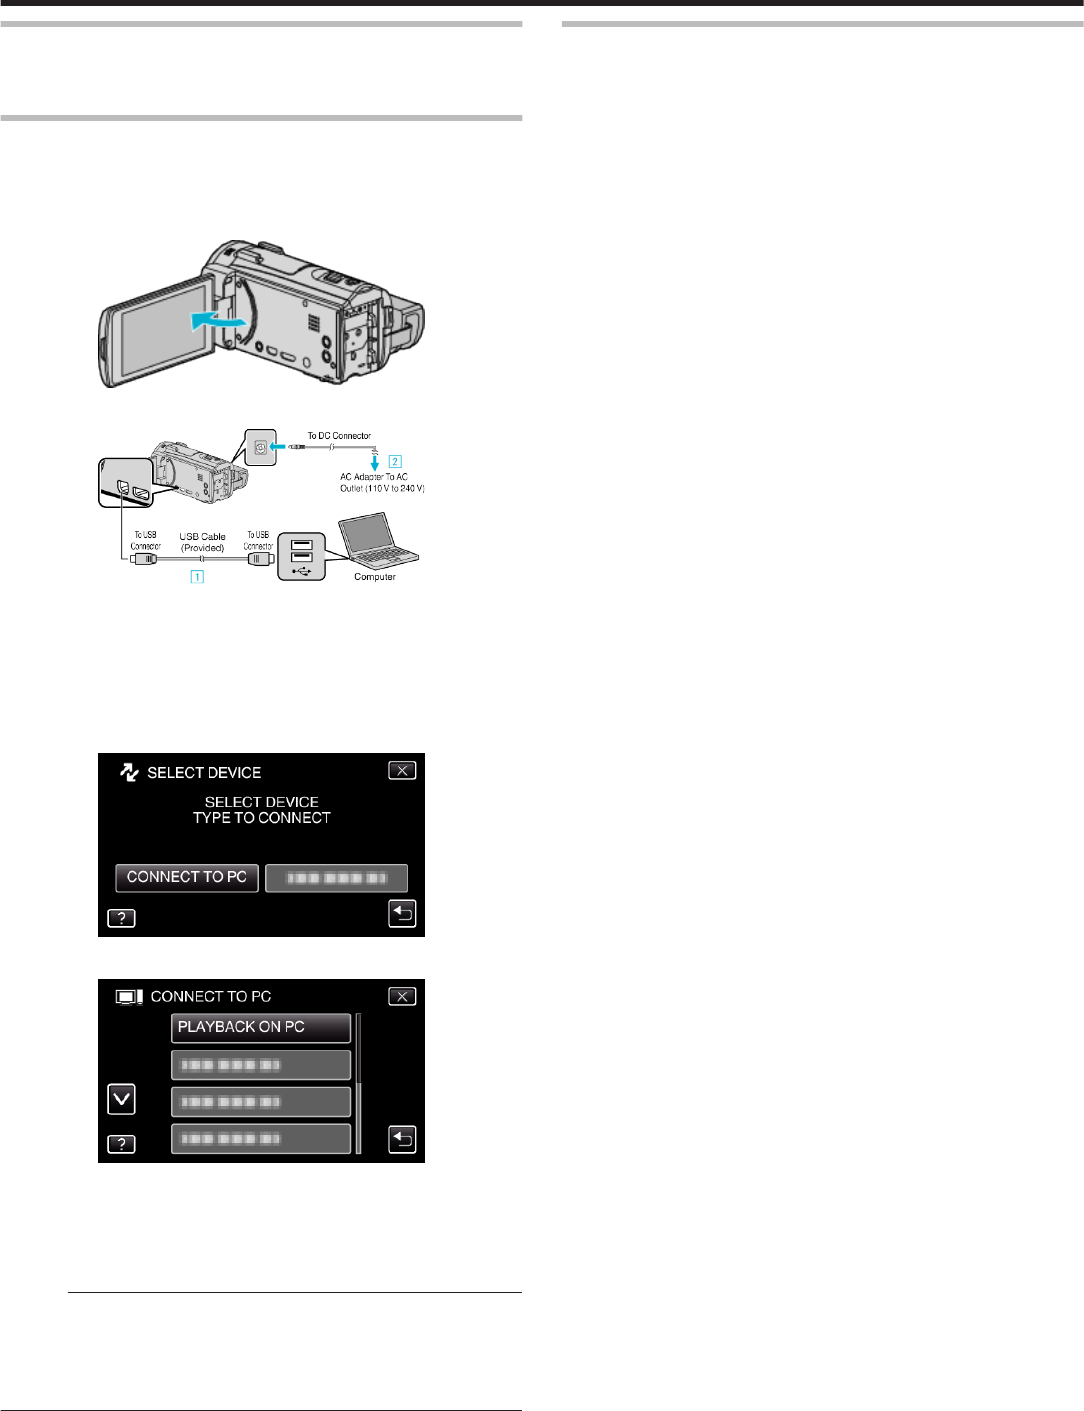
3
Connect the USB cable and the AC adapter.
.
A Connect using the provided USB cable.
B Connect the AC adapter to this unit.
0
This unit powers on automatically when the AC adapter is connected.
0
Be sure to use the supplied AC adapter.
C The “SELECT DEVICE” menu appears.
4
Tap “CONNECT TO PC”.
.
5
Tap “BACK UP”.
.
0
Tap L to exit the menu.
0
Tap J to return to the previous screen.
0
The provided software LoiLoFit for Everio starts up on the computer.
The subsequent operations are to be performed on the computer.
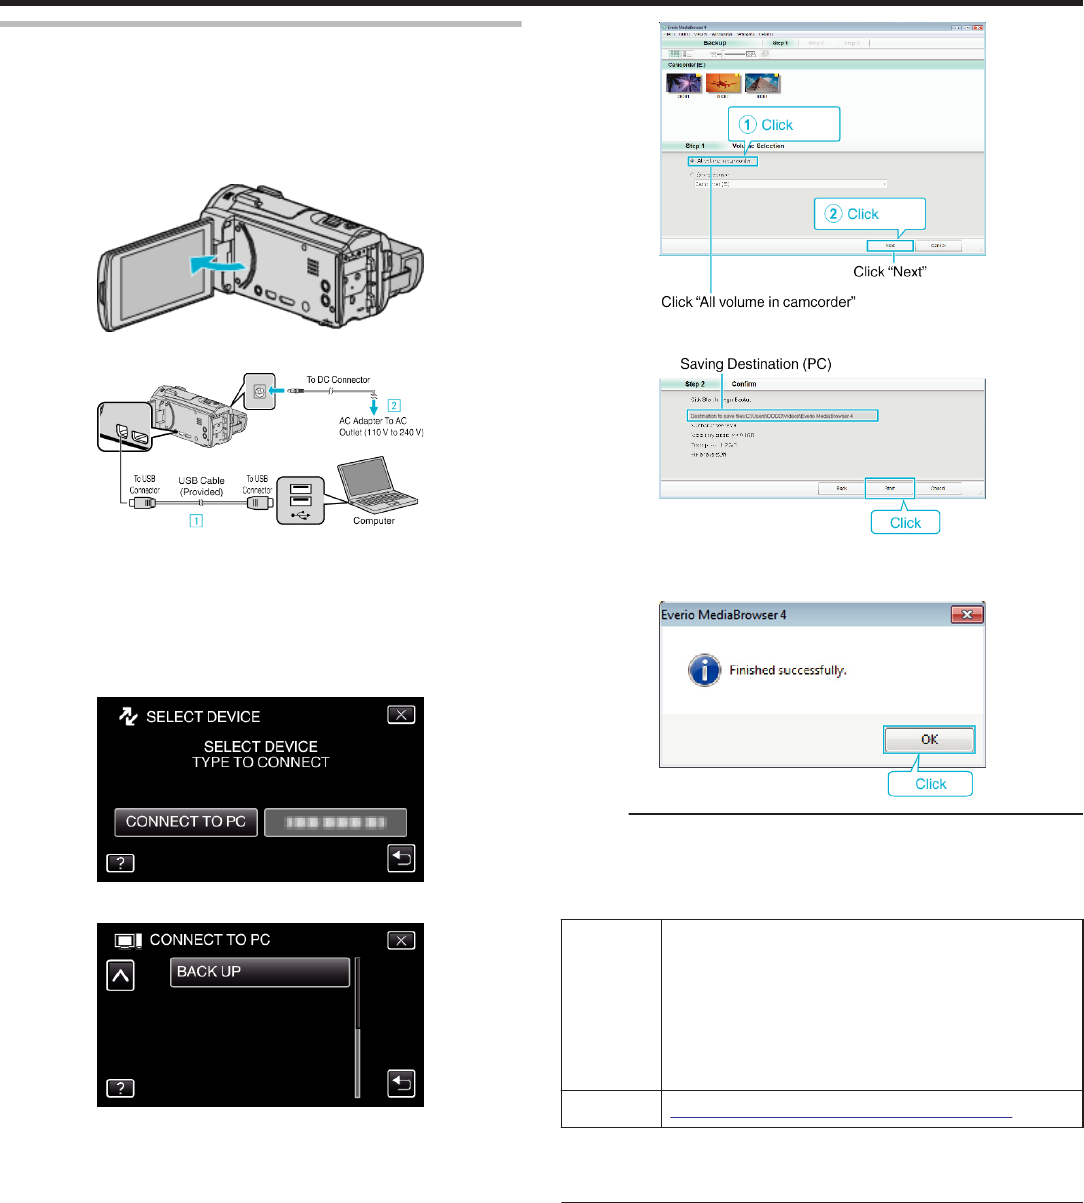
6
Select the files to back up.
.
0
Click “Select all” to select all the files at once.
7
After selecting, click “Next”.
.
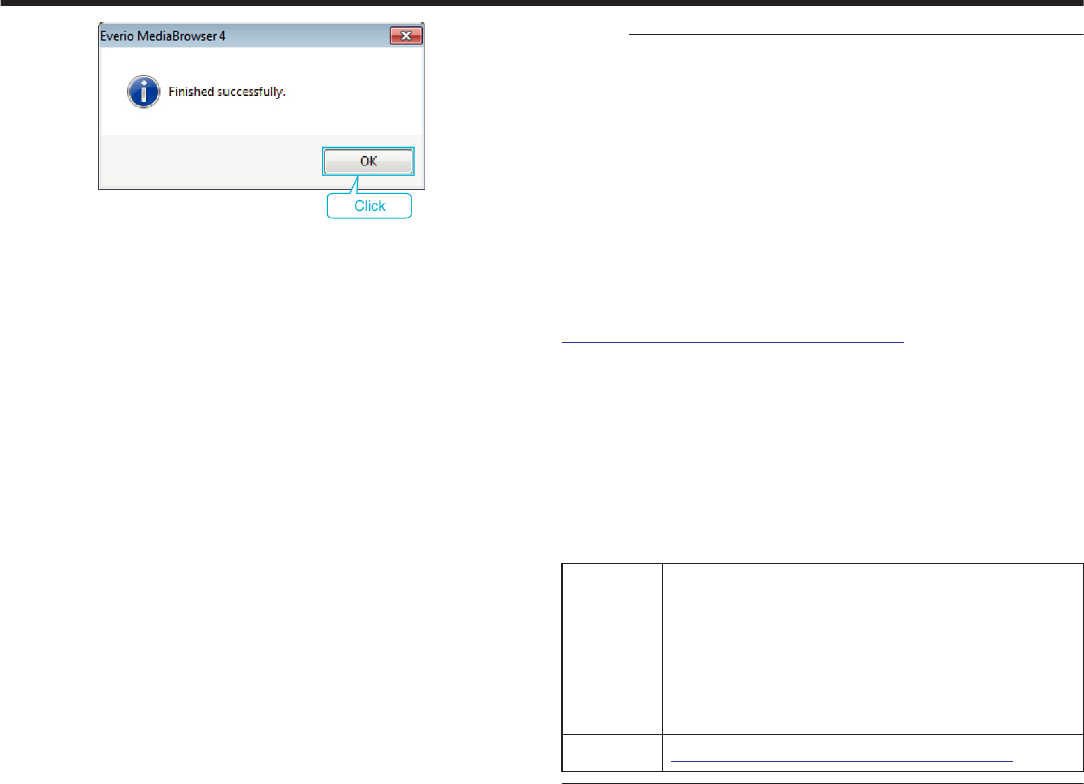
8
Click “Yes” to start backup.
.
0
Backup starts.
0
The tab on the right side becomes blank when the backup is
completed.
.
Memo :
0
Videos recorded in the iFrame format can not be copied.
0
Before making backup, load the SD card in which the videos and still
images are stored on this unit.
0
After backing up your files using the provided software, they cannot be
restored to this unit.
0
Delete unwanted videos before making backup.
It takes time to back up many videos.
“Deleting Unwanted Files” (A p. 84)
Copying
101
Disconnecting this Unit from Computer
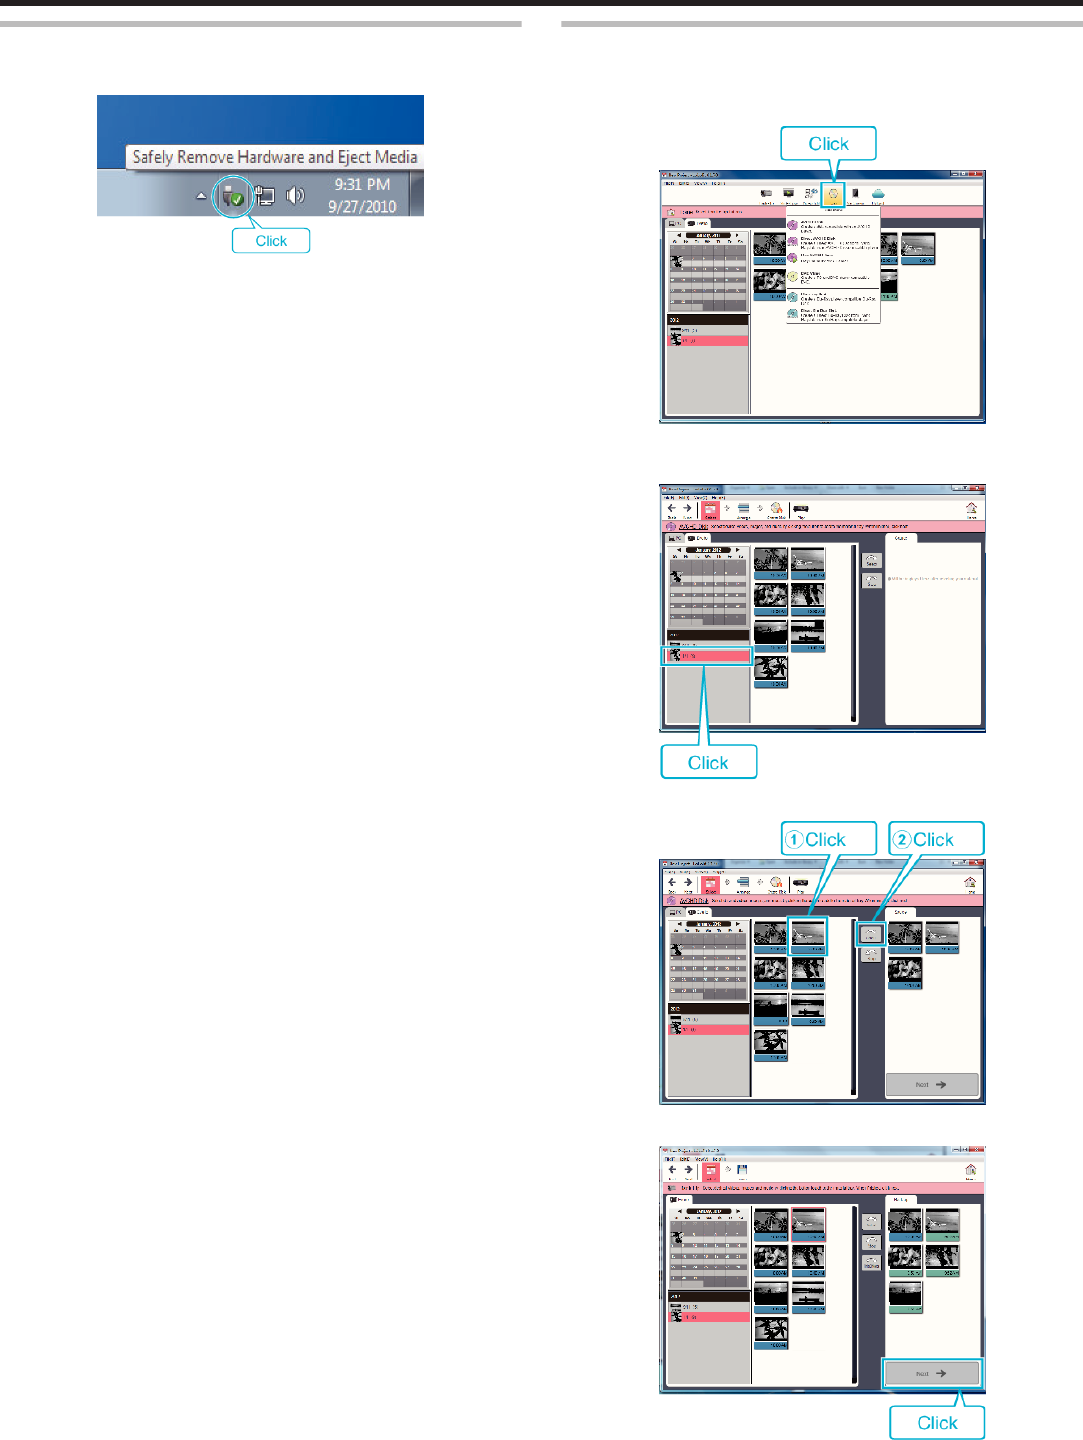
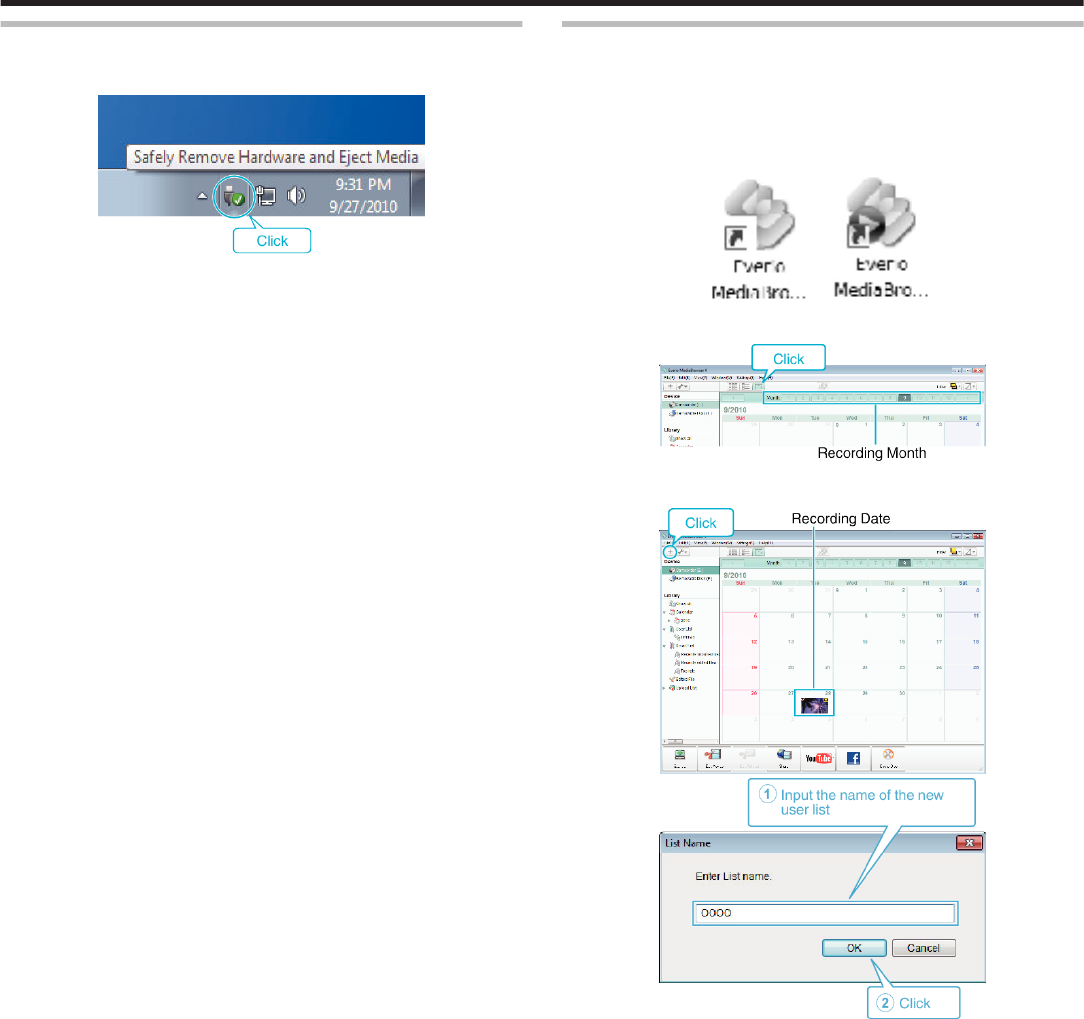
1
Click “Safely Remove Hardware and Eject Media”.
.
2
Click “Safely Remove USB Mass Storage Device”.
3
(For Windows Vista) Click “OK”.
4
Disconnect the USB cable and close the LCD monitor.
Recording Videos to Discs
1
Insert a new disc into the PC's recordable DVD or Blu-ray drive.
2
Click “Disk” to select the disc type.
.
3
Select the date that the desired videos for saving on the disc was
recorded.
.
4
Select the files to save.
.
5
Click “Next”.
.
Copying
102
6
Sort the files in your desired order.
.
7
Click “Create Disk”.
.
8
After copying, click “Cancel”.
.
0
Click “Cancel” to end creating the disc.
Memo :
0
The following types of discs can be used on the provided software LoiLoFit
for Everio.
DVD-R
DVD-R DL
DVD-RW
0
In order to record on the Blu-ray disc, it is necessary to upgrade to the paid
version of LoiLoFit for Everio.
For details, refer to the following link.
http://loilo.tv/us/product/33/page/27
0
Videos recorded in the iFrame format can not be copied.
0
Depending on the PC environment, even if the operating environment is
adequate, 1 frame per second may be reduced during video playback.
0
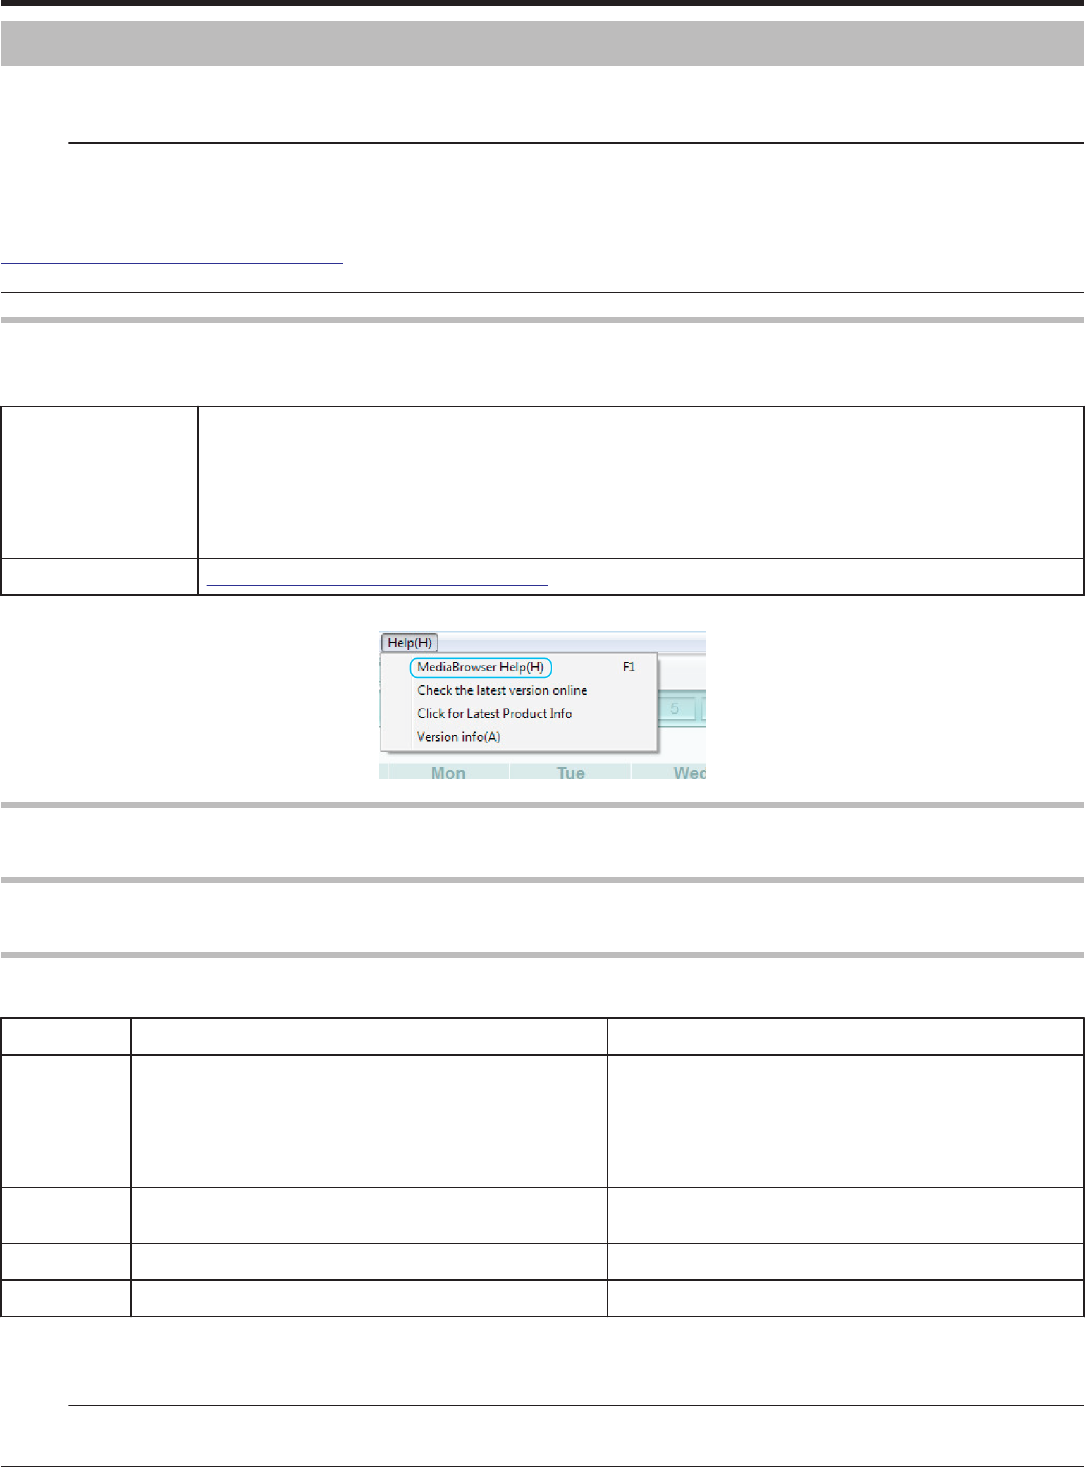
To view the help file of LoiLoFit for Everio, select “Help” from the LoiLoFit
for Everio’s menu bar or press F1 on the keyboard.
0
If you are unable to activate while creating a disc, complete activation by
following the instruction on the screen.
Copying
103
Backing Up Files Without Using Provided Software
Copy the files to a computer using the following method.
1
Remove the AC adapter and battery pack from this unit.
2
Open the LCD monitor.
.
3
Connect the USB cable and the AC adapter.
.
A Connect using the provided USB cable.
B Connect the AC adapter to this unit.
0
This unit powers on automatically when the AC adapter is connected.
0
Be sure to use the supplied AC adapter.
C The “SELECT DEVICE” menu appears.
4
Tap “CONNECT TO PC”.
.
5
Tap “PLAYBACK ON PC”.
.
0
Tap L to exit the menu.
0
Tap J to return to the previous screen.
0
Close the LoiLoFit for Everio program, if it starts.
0
The following screen is displayed after the camera operation is
completed.
.
0
Operations are to be performed on the computer after the screen
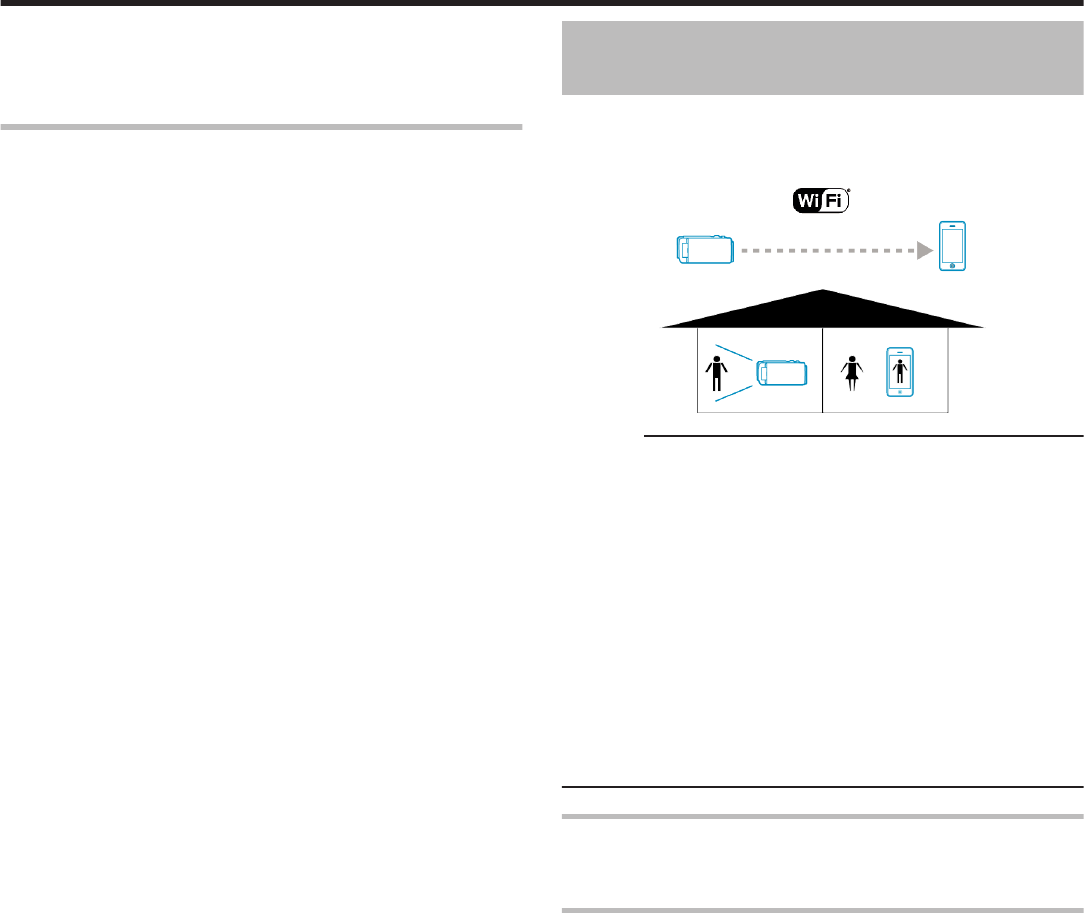
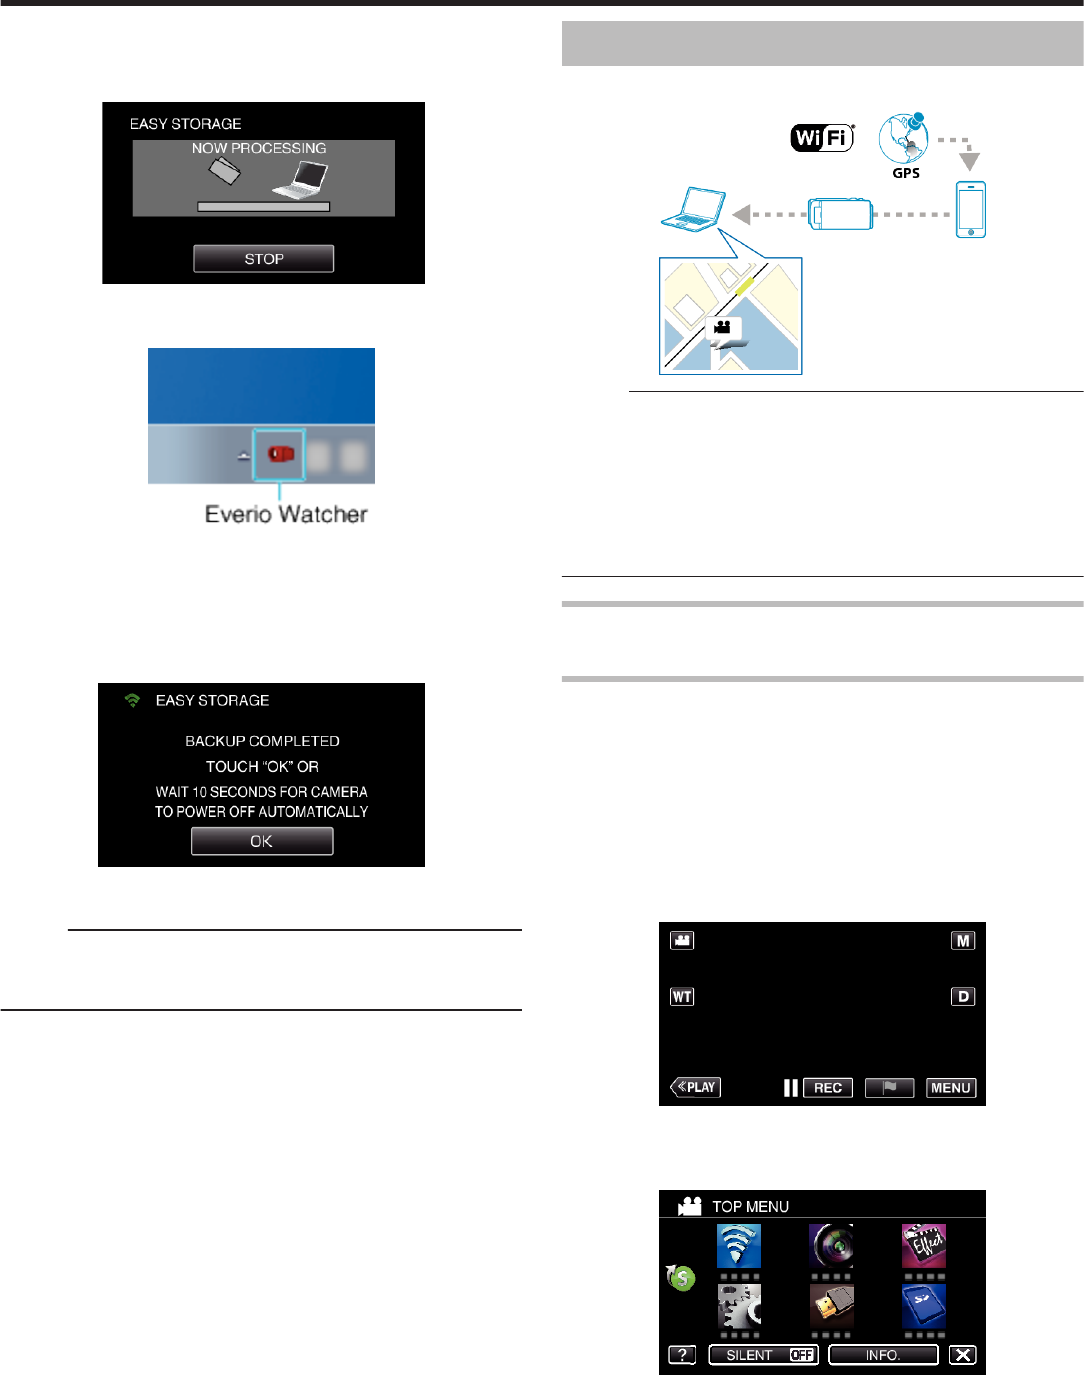
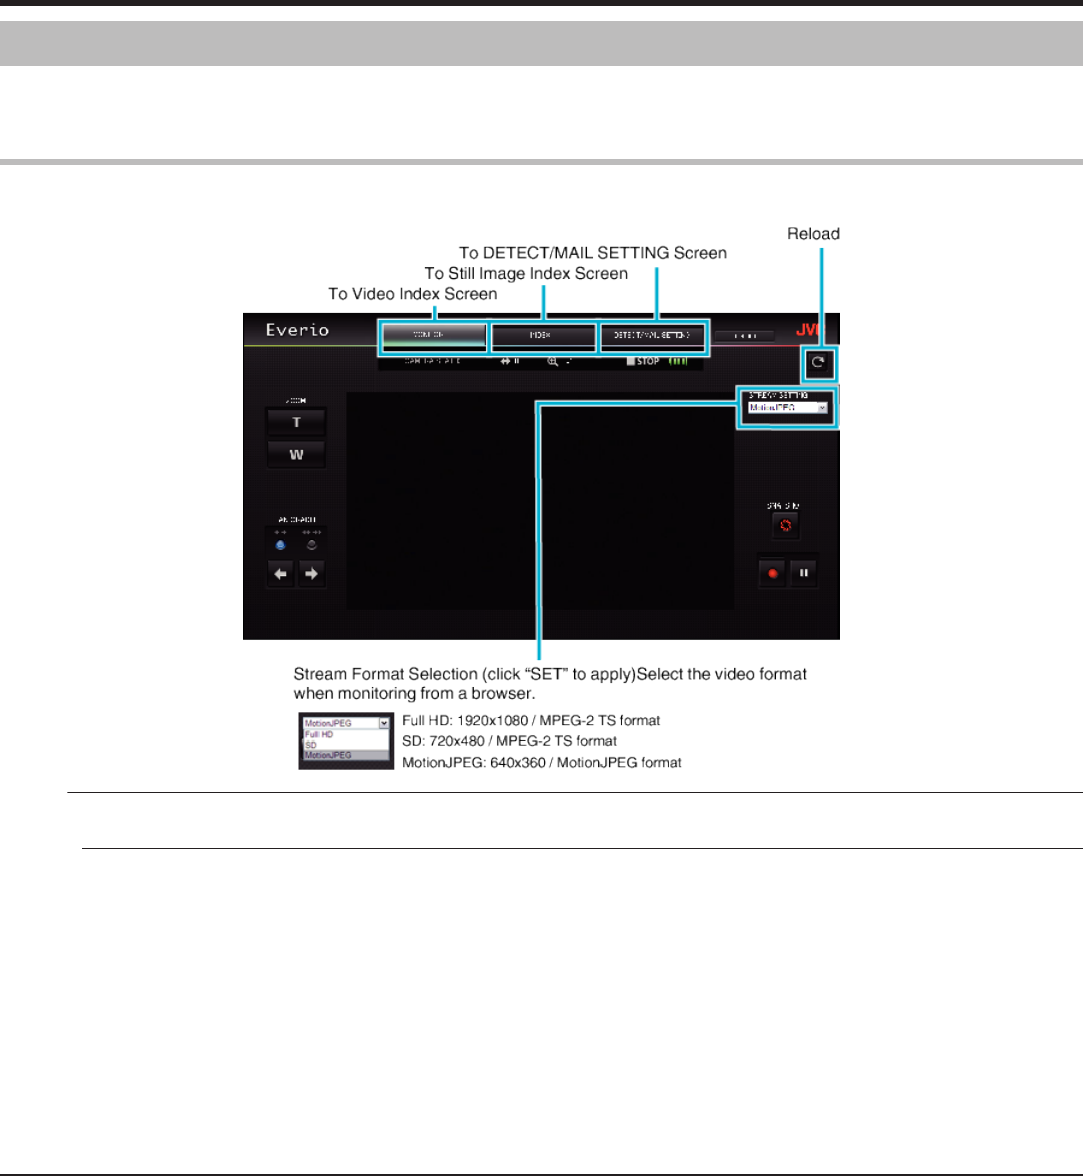
You can monitor images being captured by Everio to your smartphone or
PC. While you are busy, you can monitor your baby who is sleeping in the
room next door.
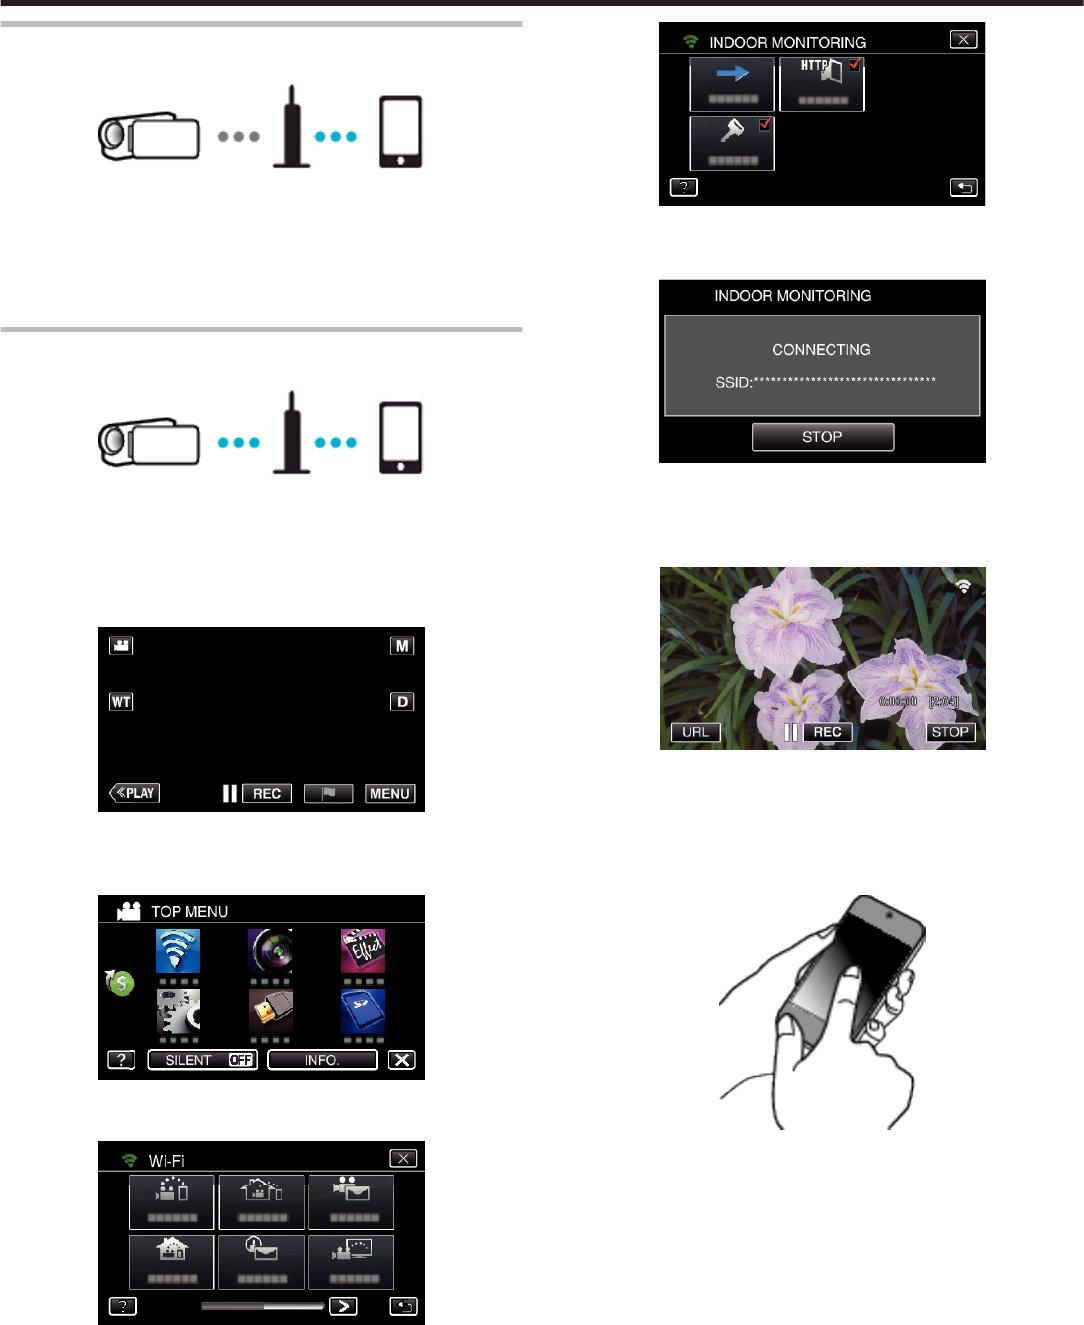
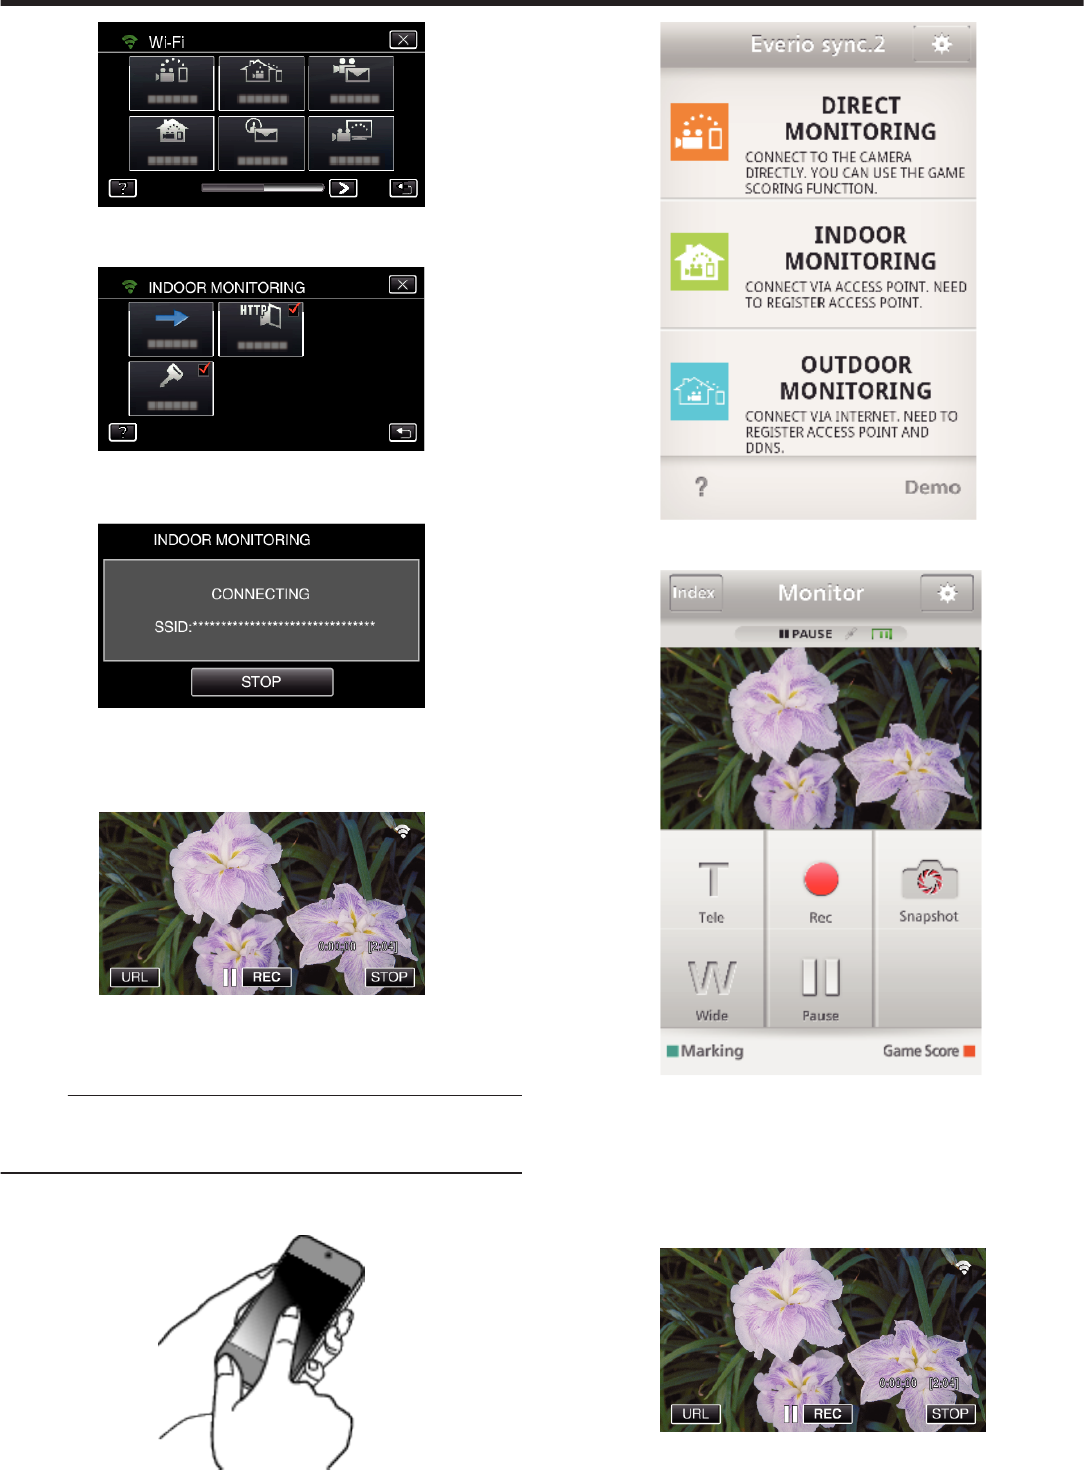
INDOOR MONITORING
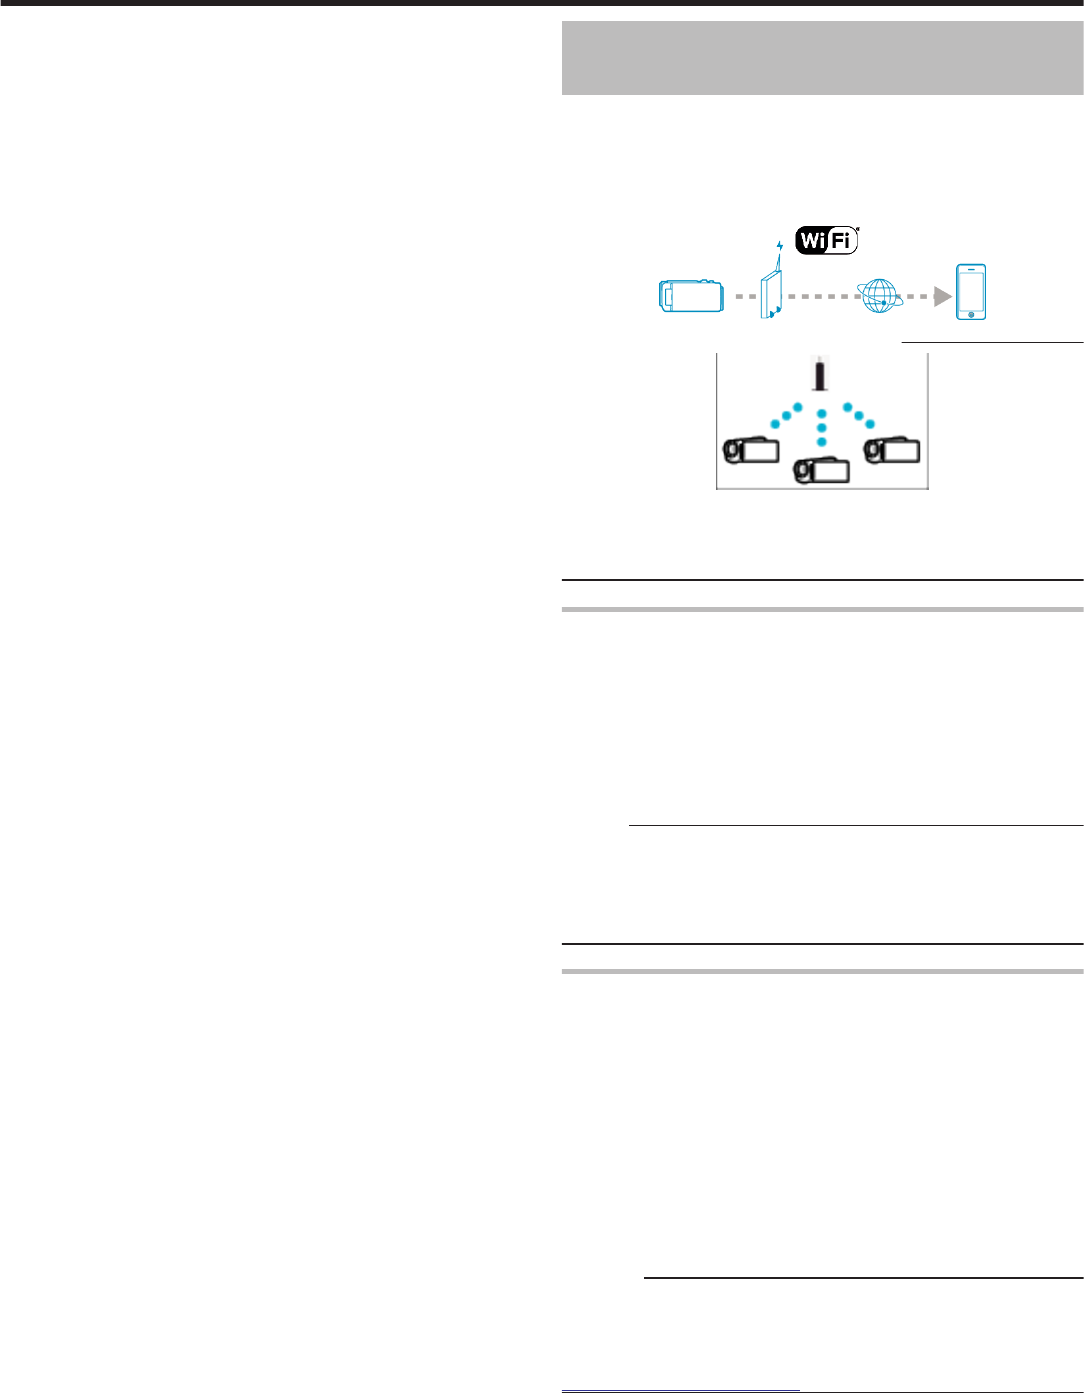
Images being captured by Everio can be set to your PC or smartphone when
your children return home, via the wireless LAN router.
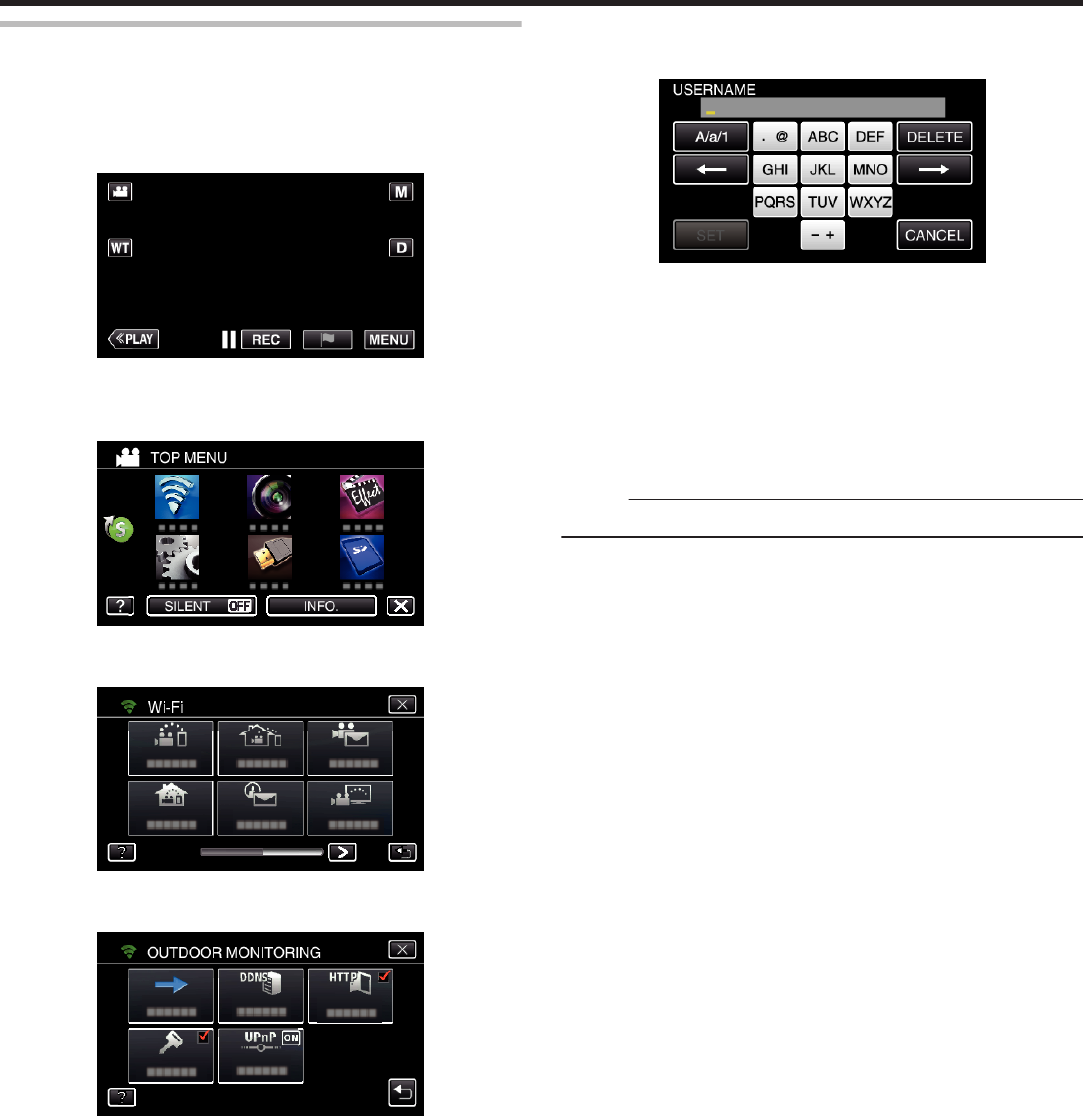
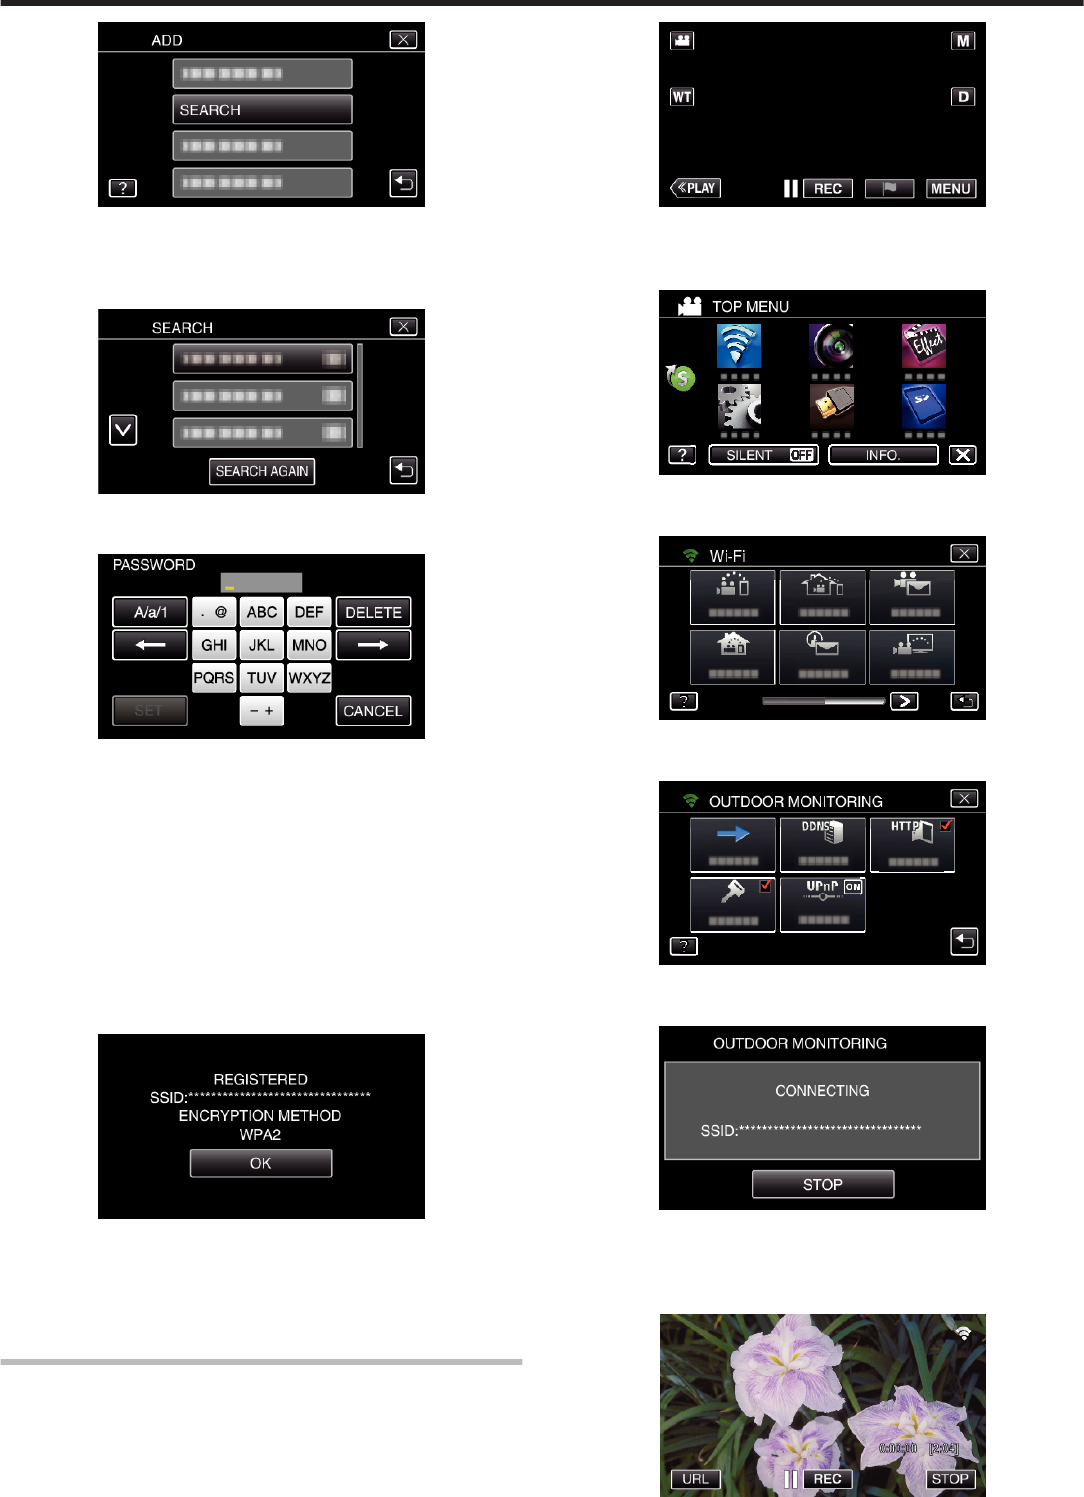
OUTDOOR MONITORING
Images being captured by Everio can be sent to the grandparents’ PC or
smartphone, by the wireless LAN (Wi-Fi spot) via the Internet.
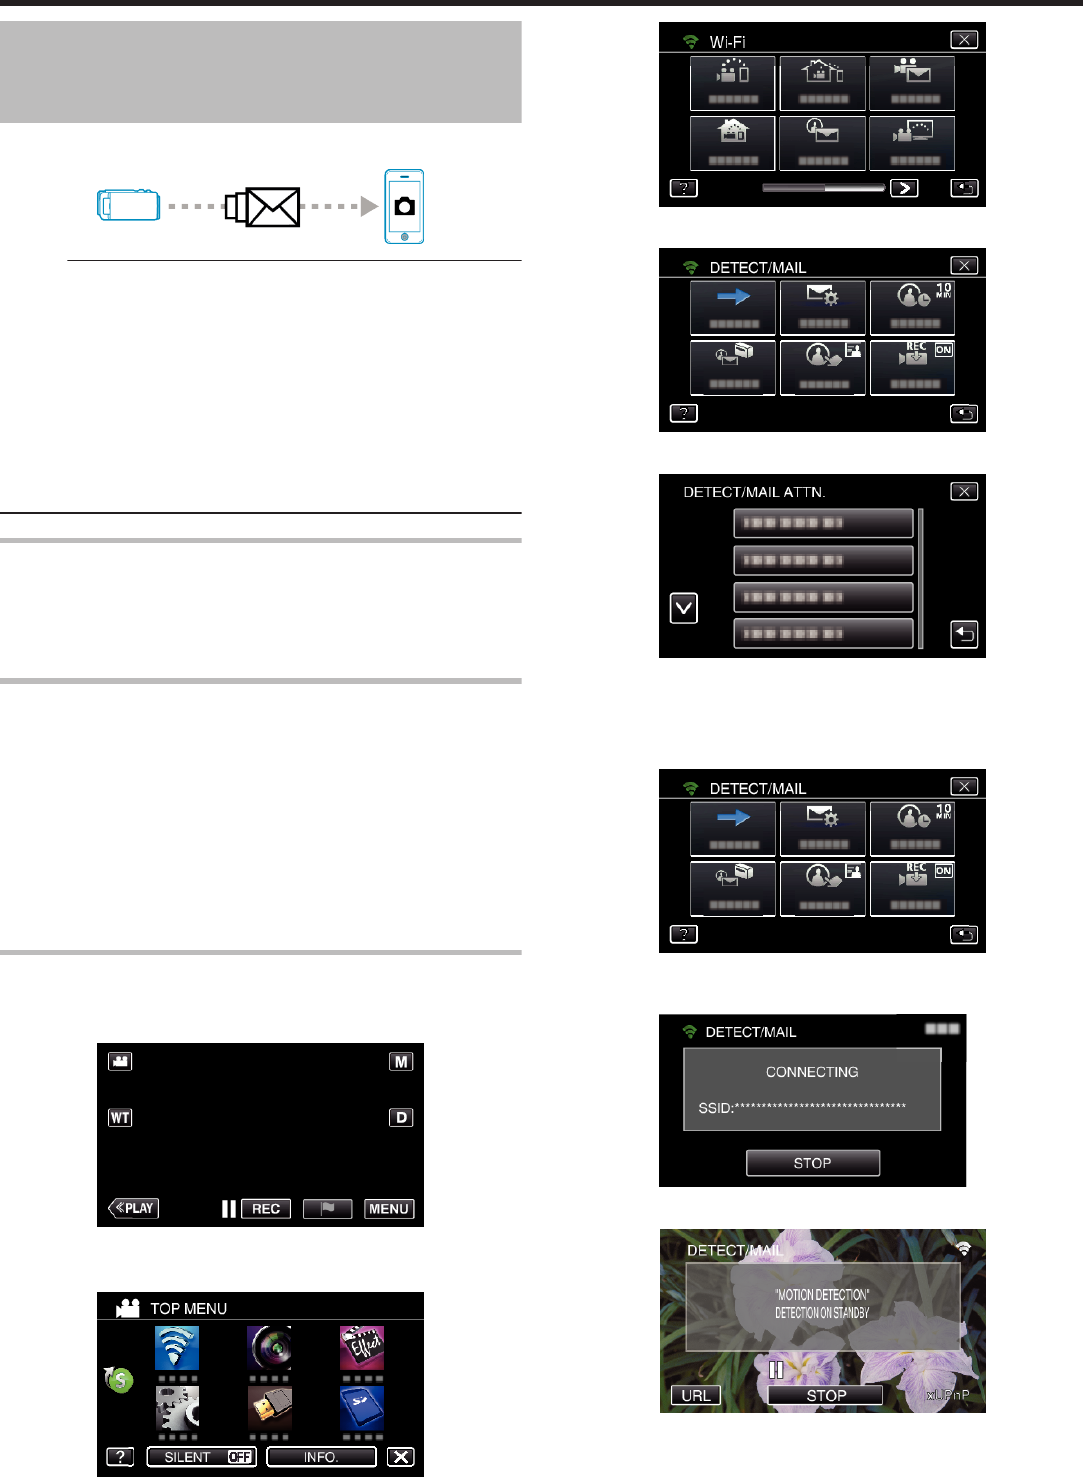
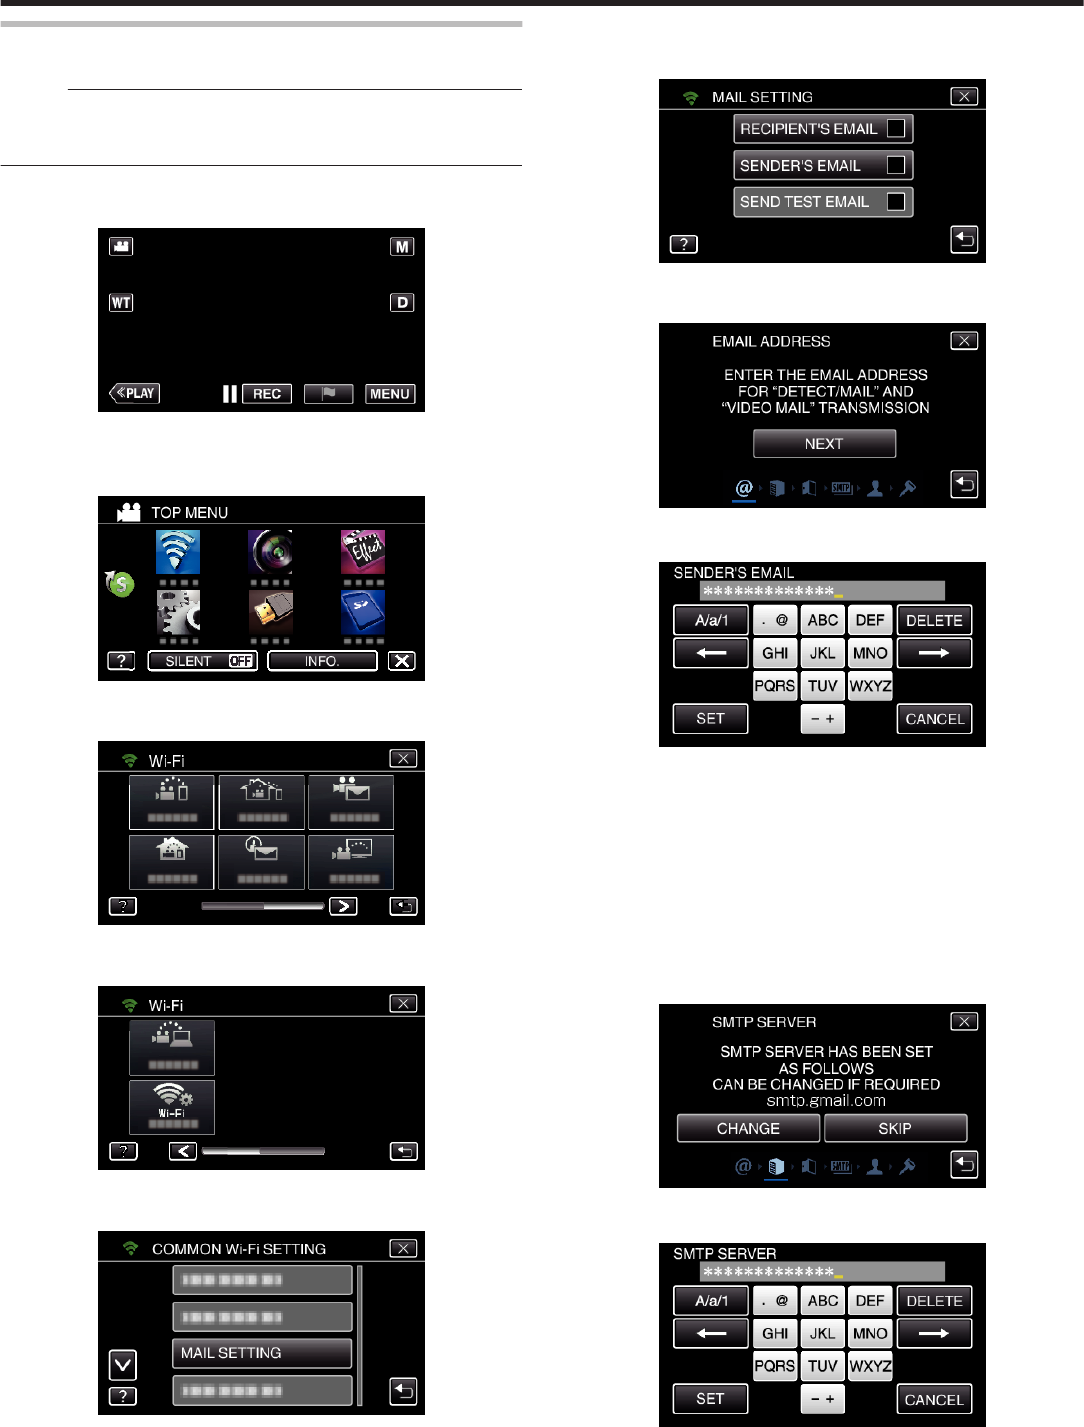
DETECT/MAIL
When your child returns home while you are away, a still image is sent to you
by e-mail.
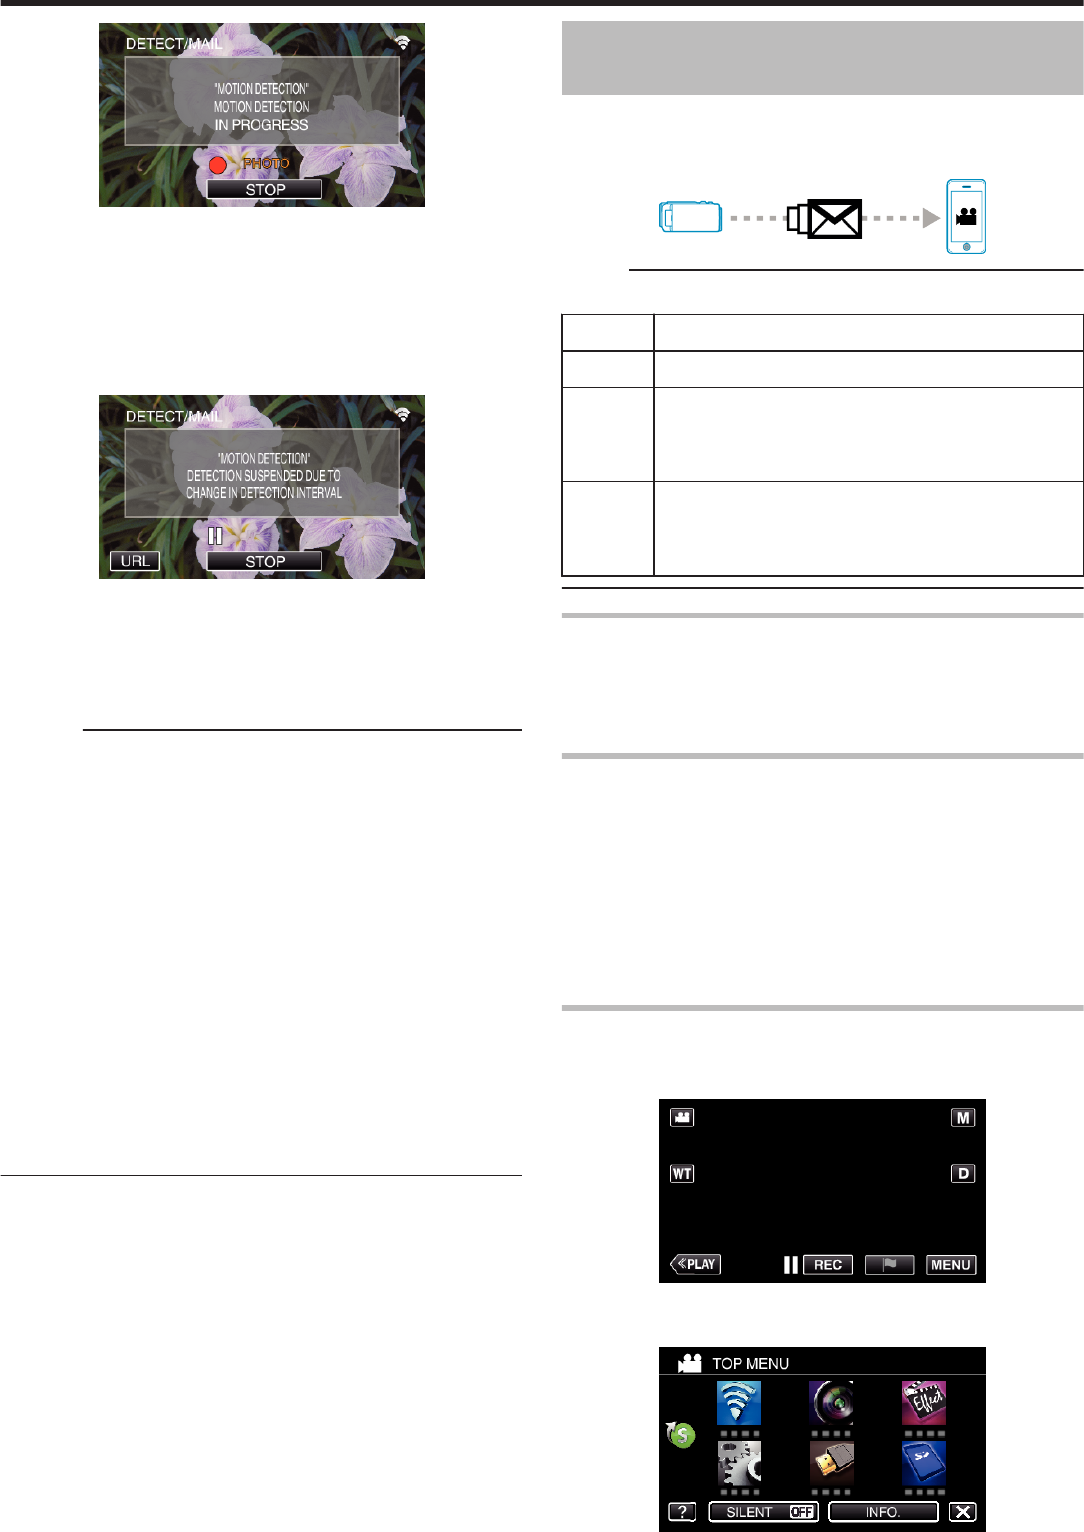
VIDEO MAIL
Let’s send video messages (Good morning, Good night) to your father or
husband who is on the business trip.
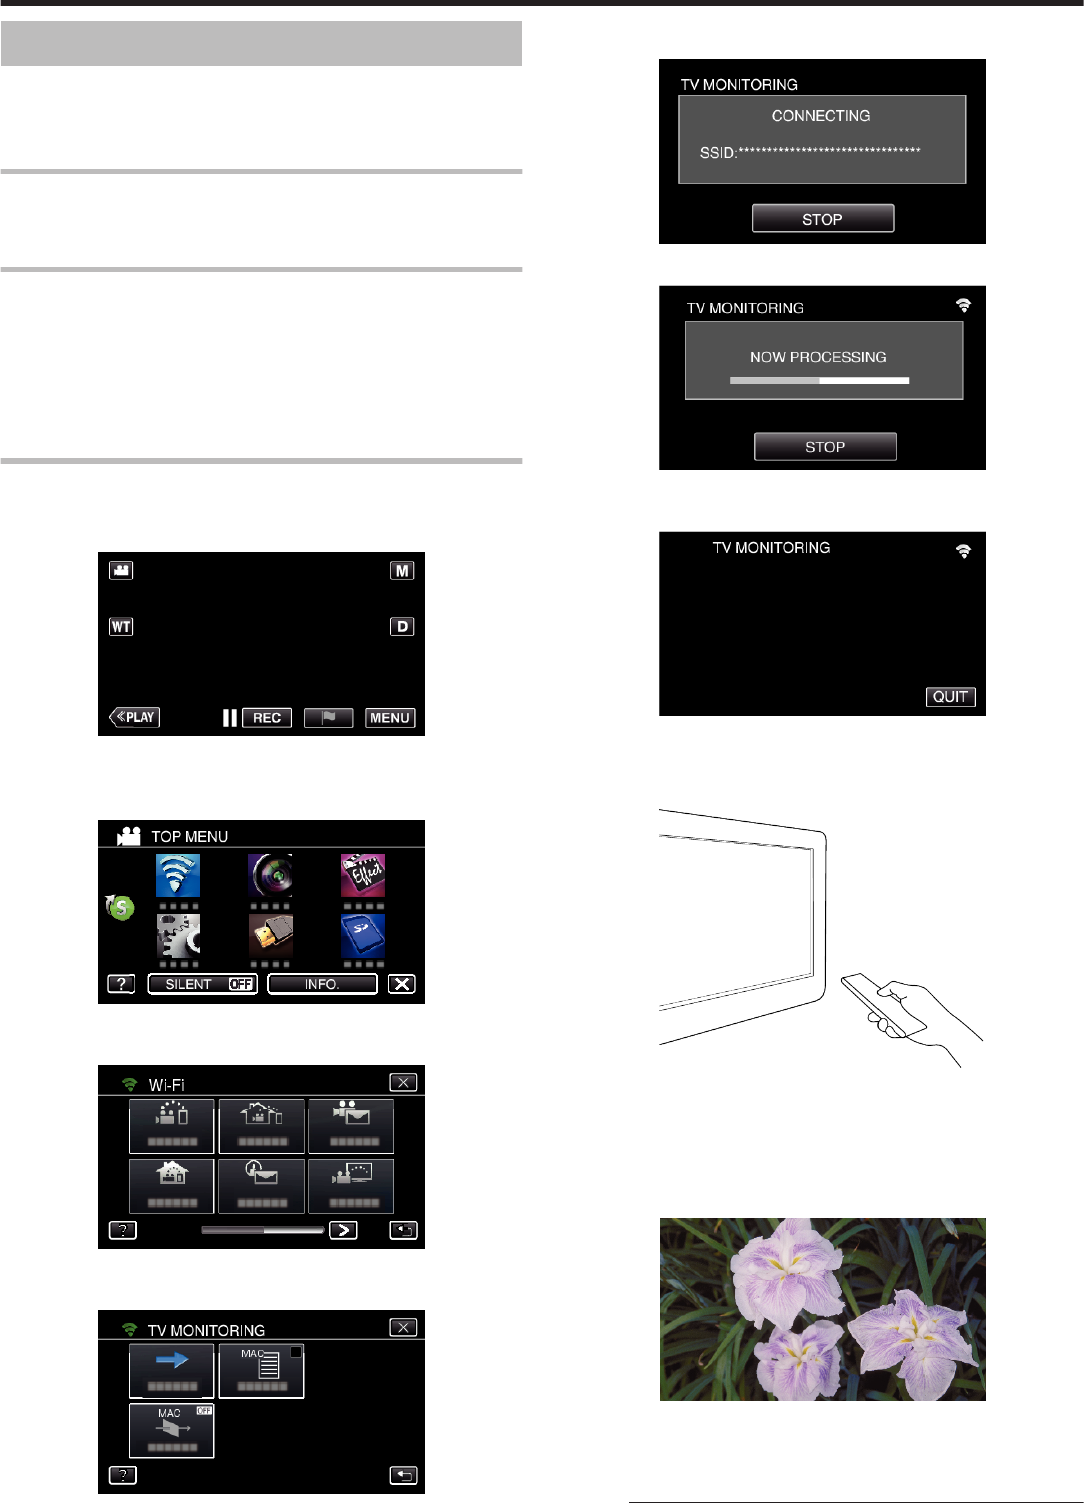
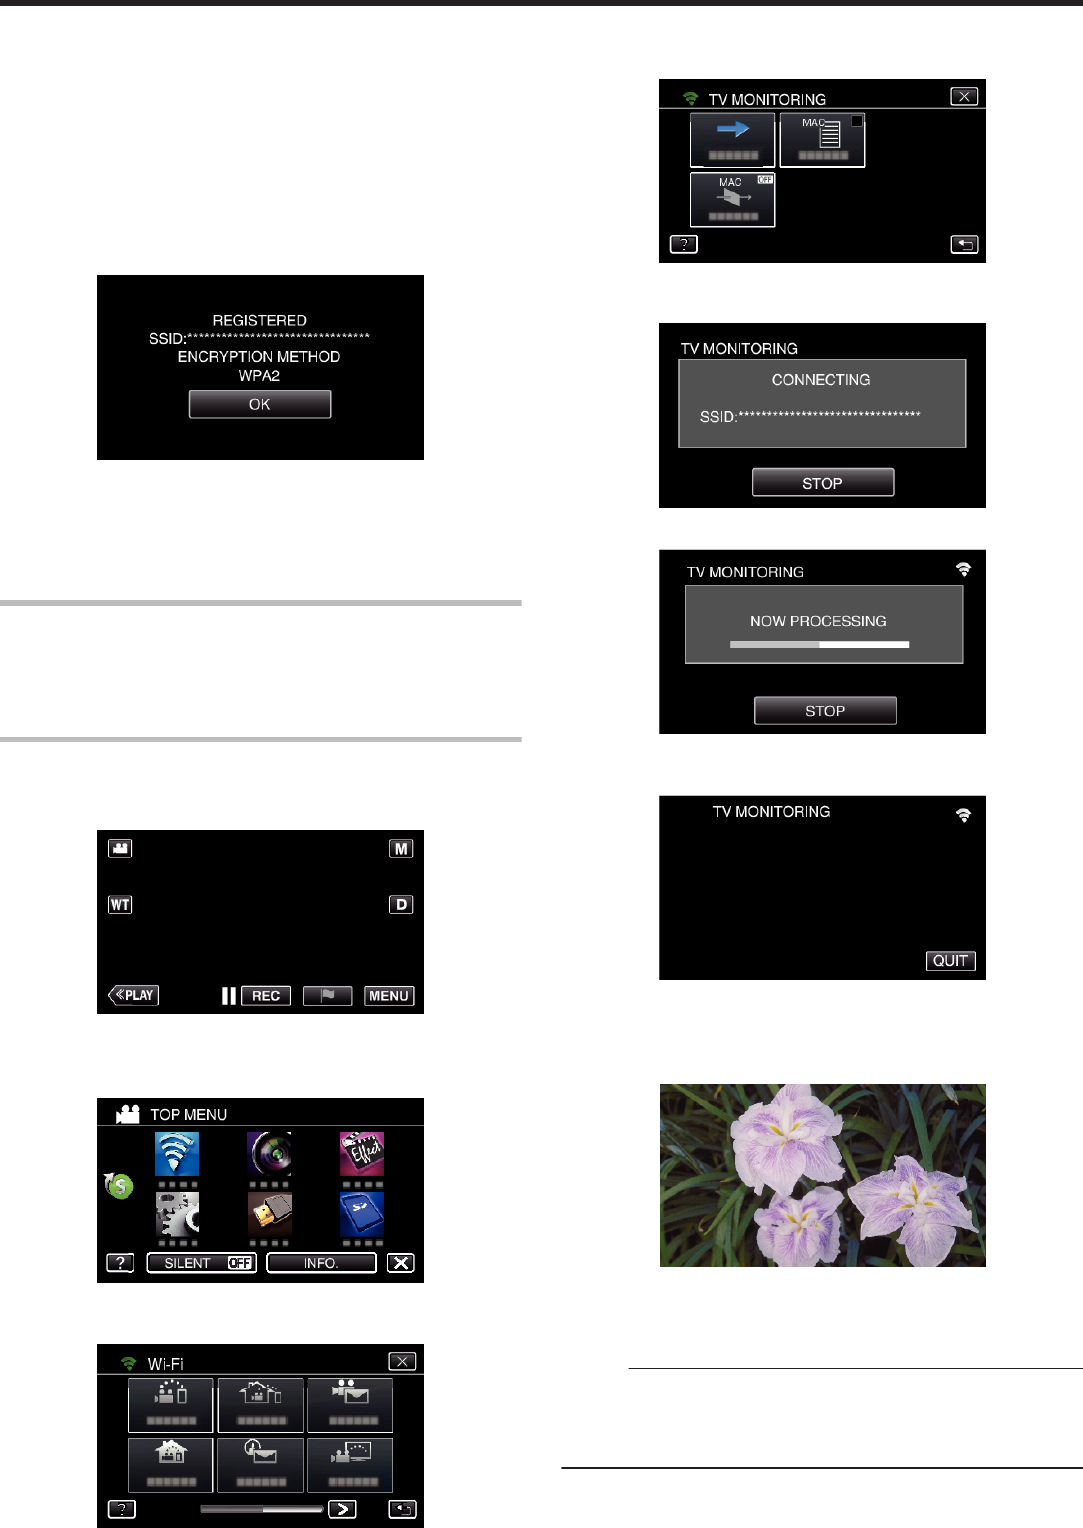
TV MONITORING
A DLNA compatible TV may be used to display and play back the images.
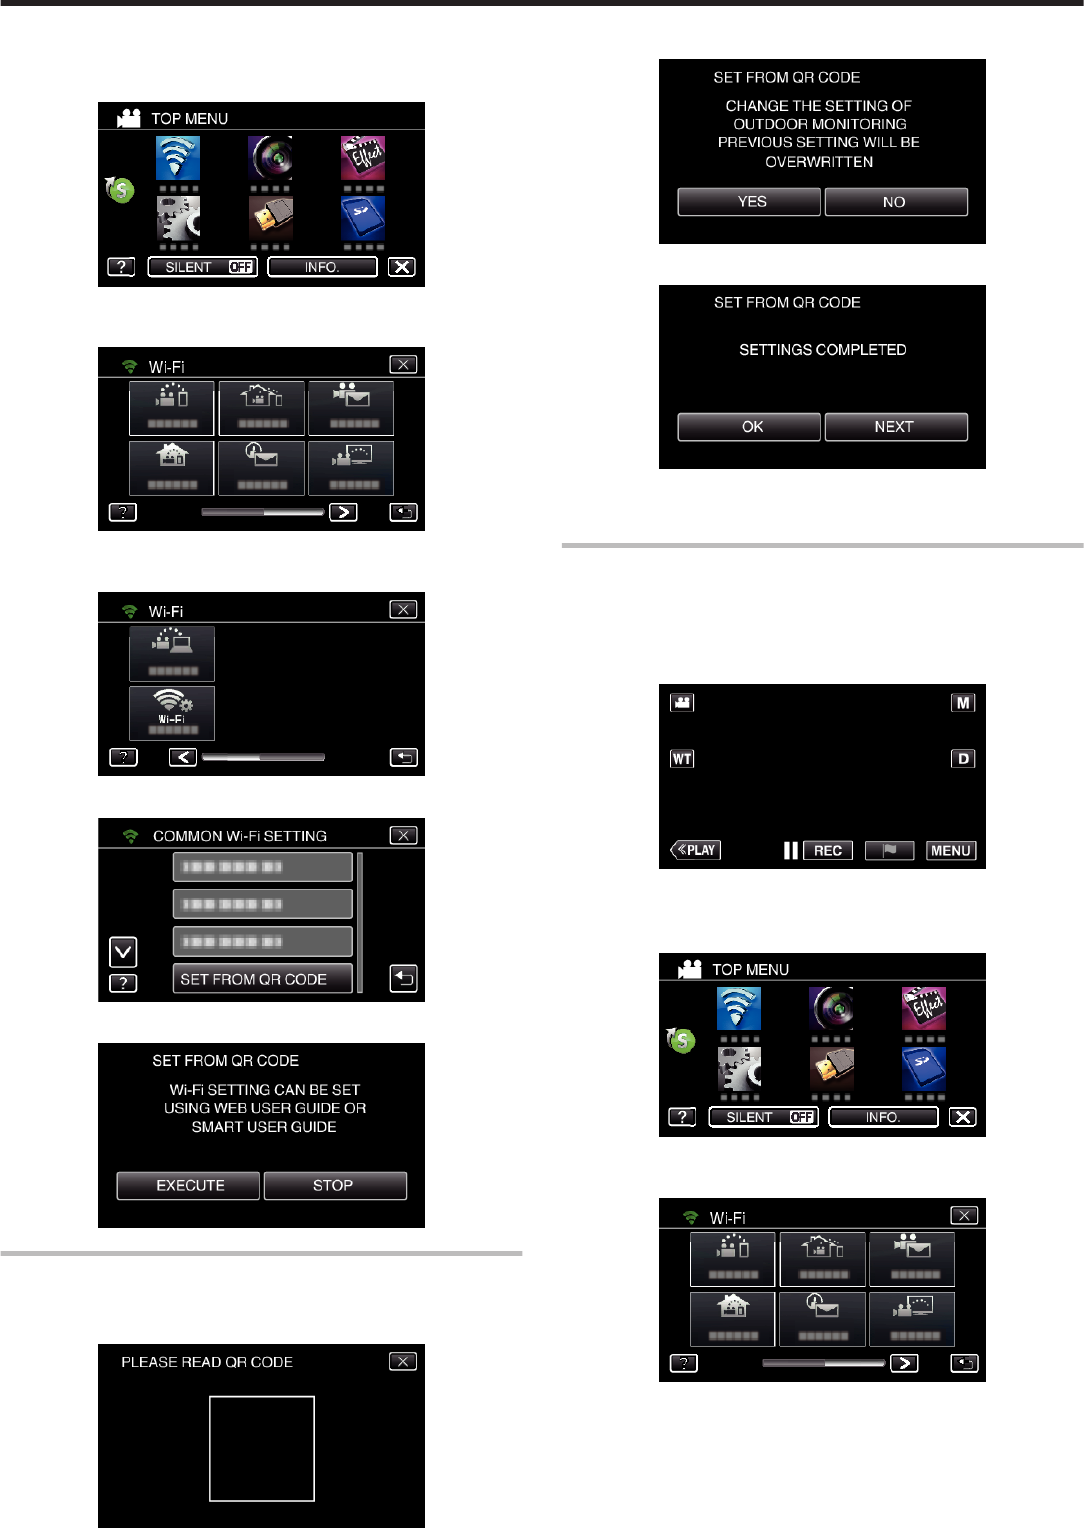
Using Wi-Fi by Creating a QR Code (GZ-EX555/GZ-EX515)
183
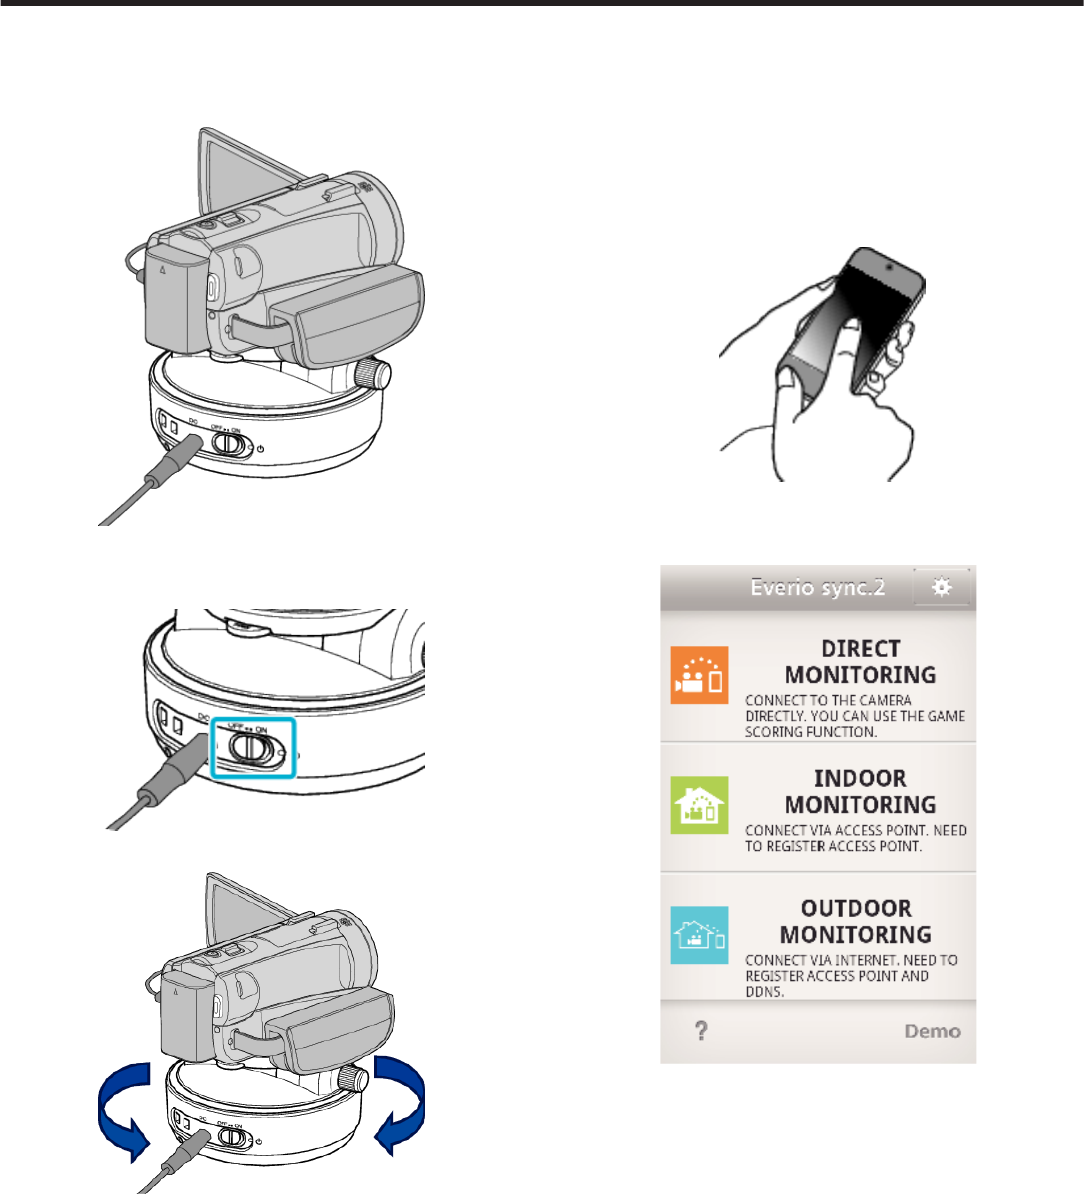
DIRECT MONITORING
o
Setting (Once setting is done, start from the “Regular
Operation” below)
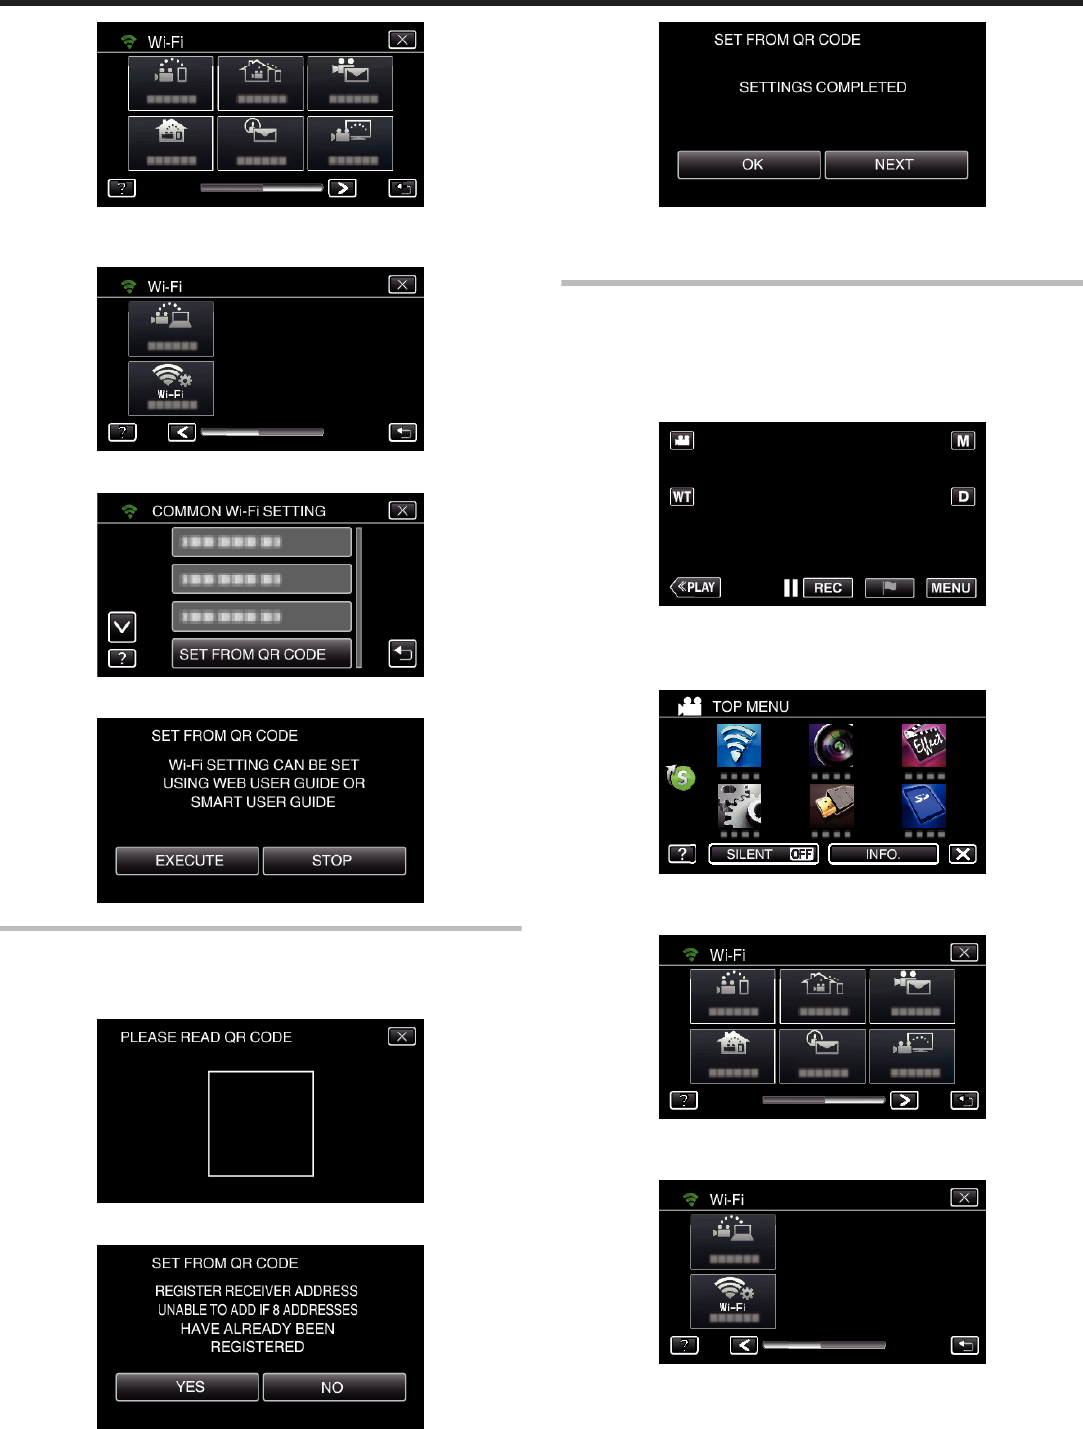
Create a QR code.
o
Enter values in the required items for direct monitoring.
0
Password: set a password to connect this camera to the device by direct
monitoring. (8 to 63 characters (64 characters in case of hexadecimal))
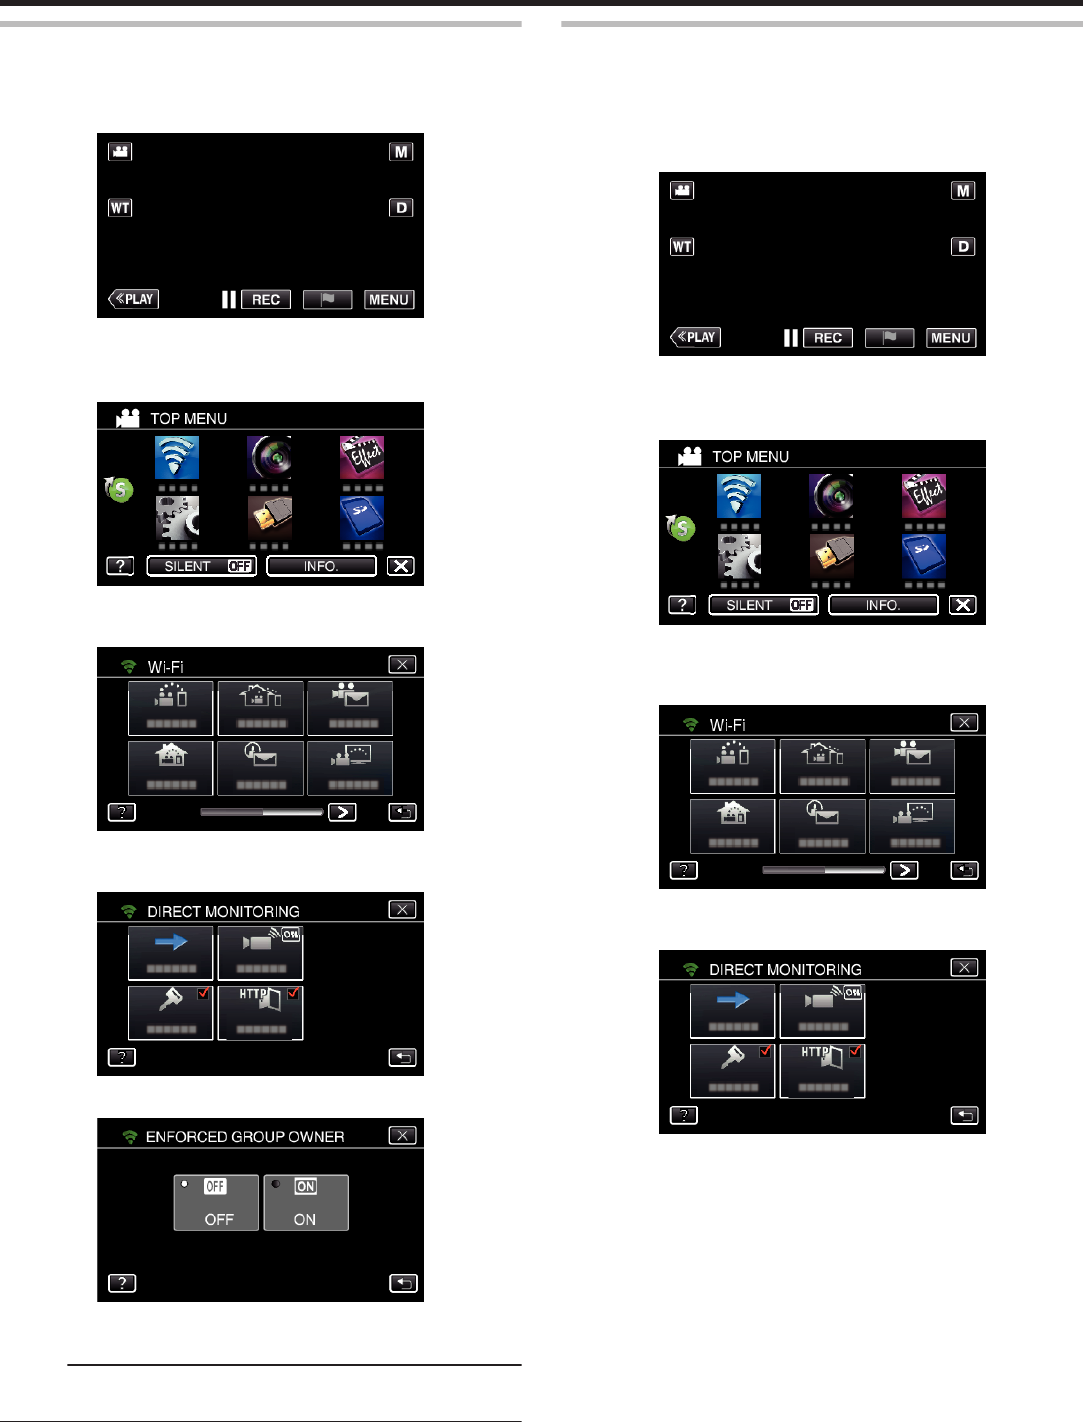
0
Enforced Group Owner: setting used to enable a connection with a device
that does not support Wi-Fi Direct. Normally set to “ON”.
0
HTTP Port: Normally set to “80”.
Display the screen for reading the QR code.
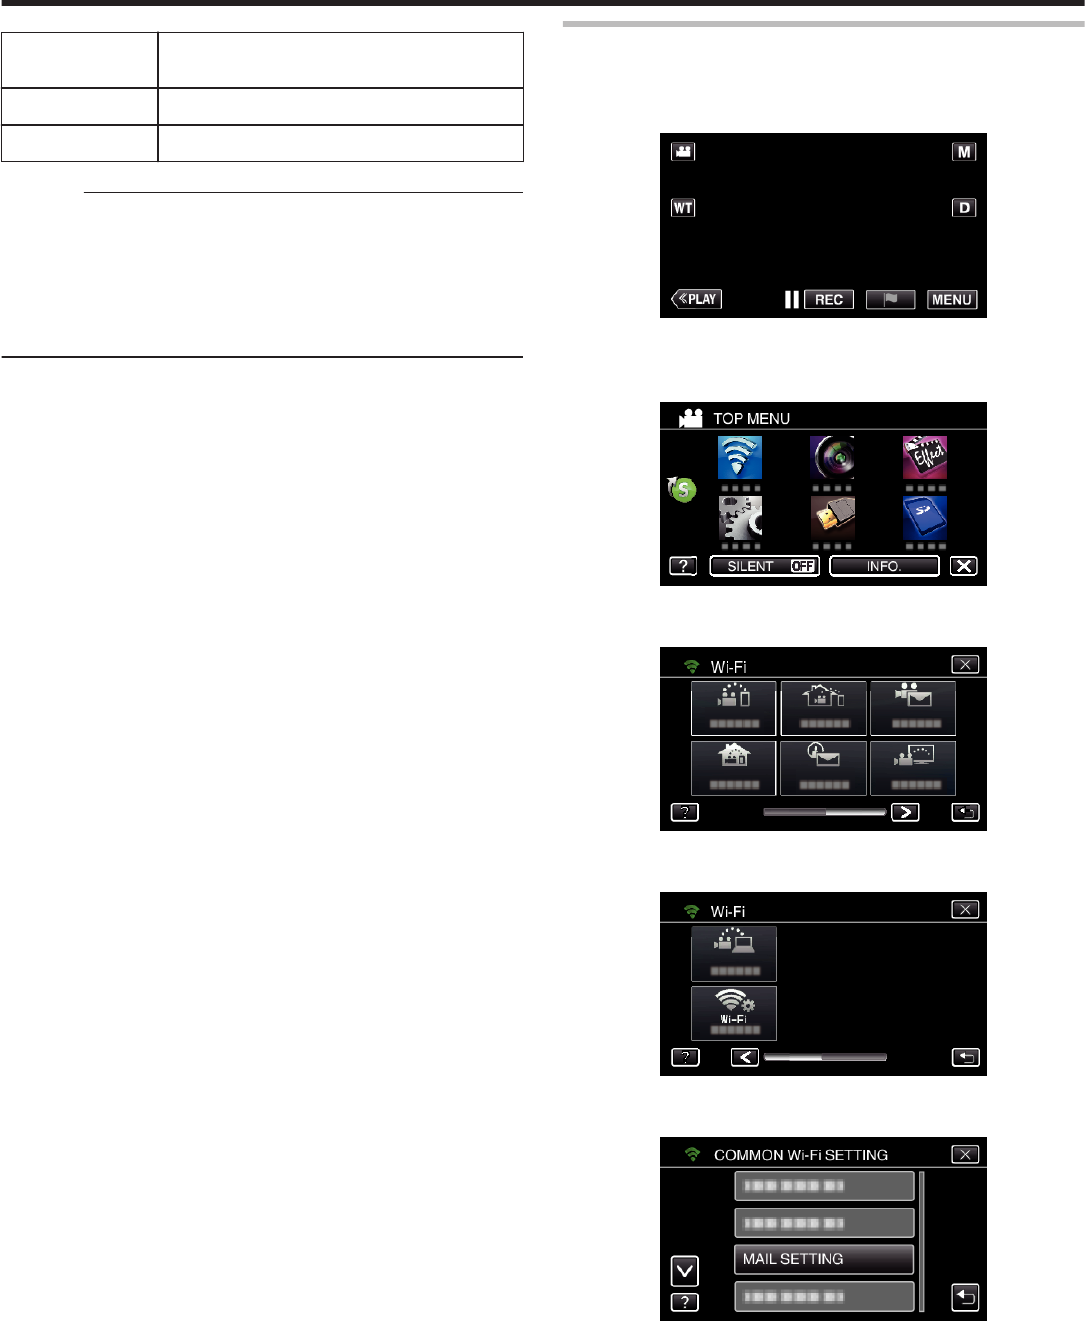
1
Tap “MENU”.
(Operation on this camera)
.
0
The top menu appears.
2
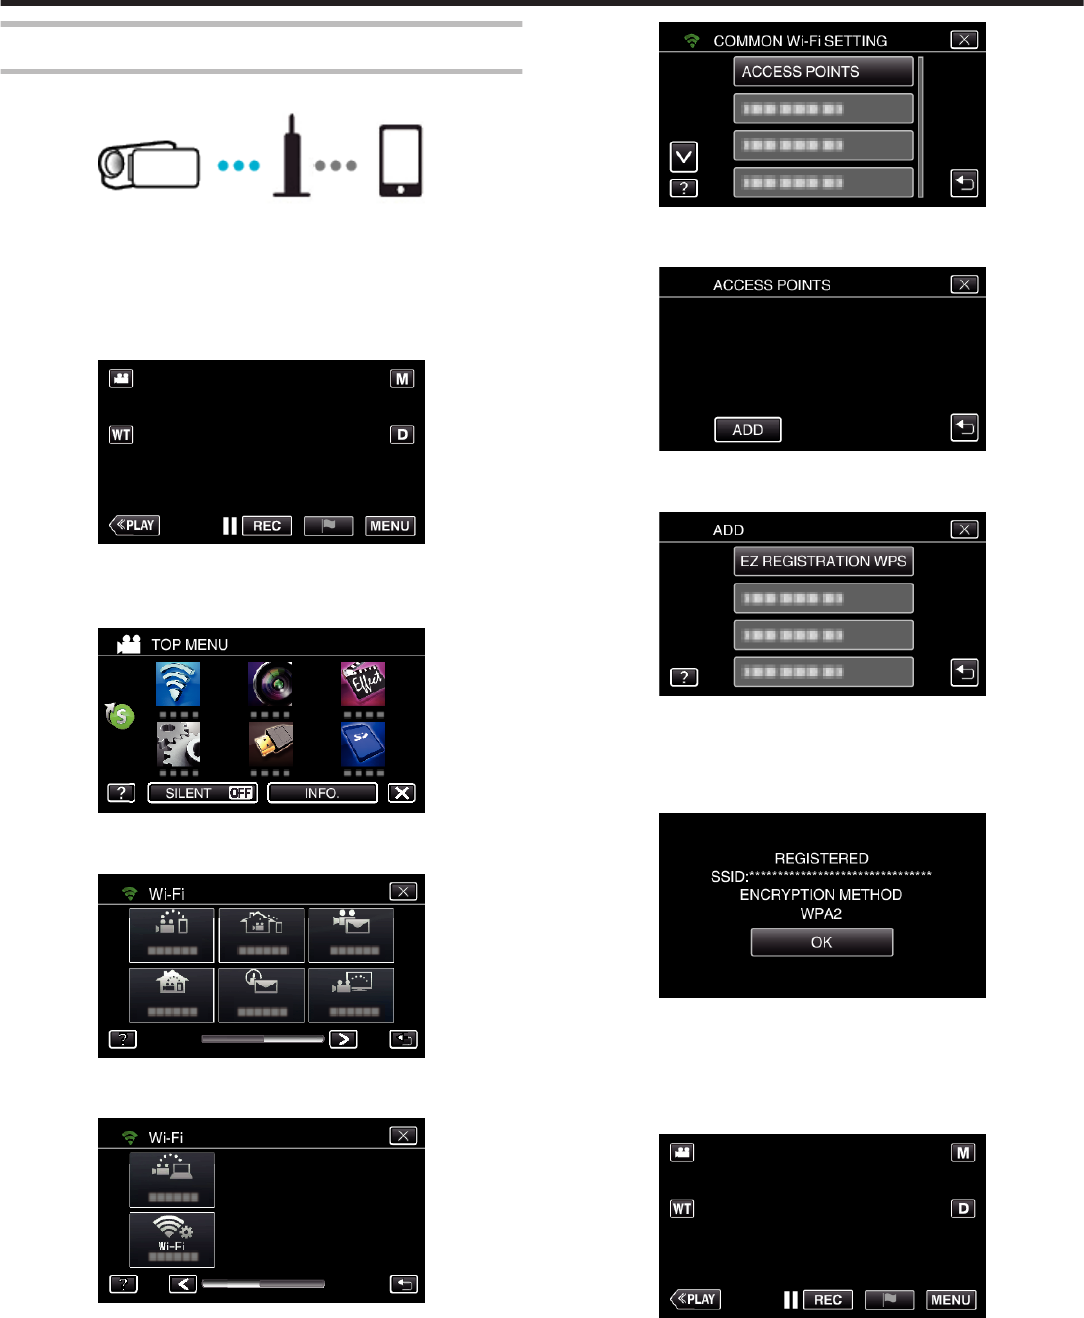
Tap the “Wi-Fi” (
Q
) icon.
(Operation on this camera)
.
3
Tap 1 on the lower right of the screen.
(Operation on this camera)
.
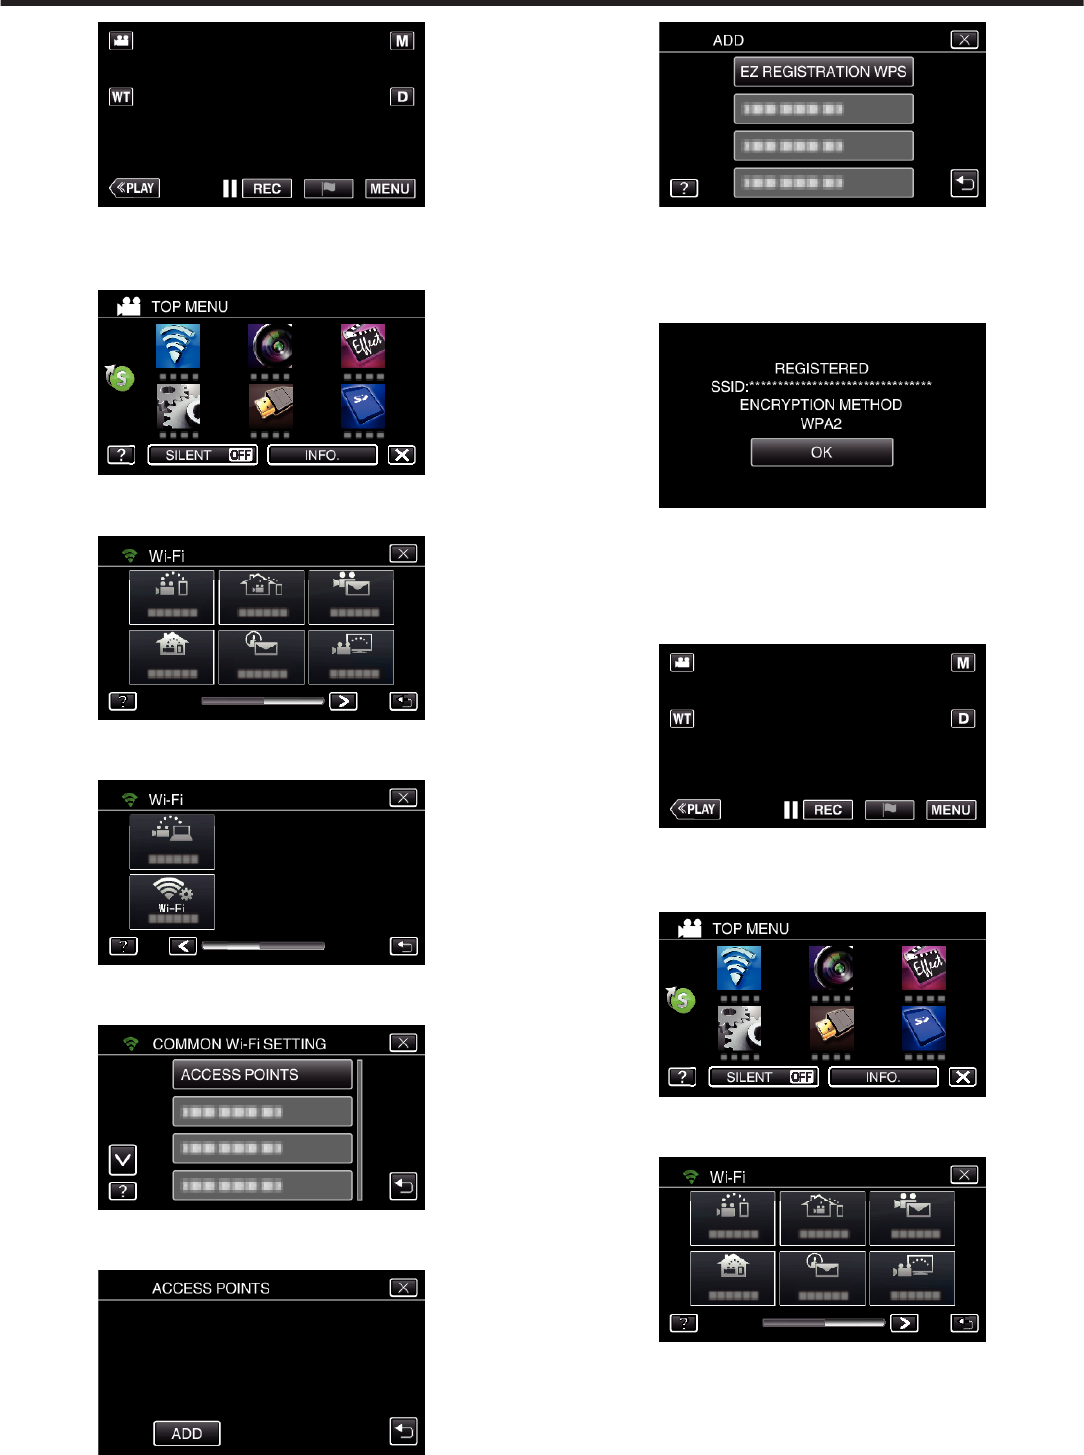
4
Tap “COMMON Wi-Fi SETTING”.
(Operation on this camera)
.
5
Tap “SET FROM QR CODE”.
.
6
Tap “EXECUTE”.
.
Read a QR code.
1
Read a QR code.
(Operation on this camera)
.
2
Tap “YES”.
.
3
Tap “OK”.
.
0
Tap “NEXT” to return to the screen to read the QR code.
0
Set contents are saved.
Using Wi-Fi by Creating a QR Code (GZ-EX555/GZ-EX515)
184
o
Regular Operation
Connecting the Smartphone to the Camera Wirelessly
o
Connection by entering the Wi-Fi password
1
Tap “MENU”.
(Operation on this camera)
Set the camera to the recording mode.
.
0
The top menu appears.
2
Tap the “Wi-Fi” (Q) icon.
(Operation on this camera)
.
3
Tap the “DIRECT MONITORING” (N) icon in the “Wi-Fi” menu.
(Operation on this camera)
.
4
Tap “START” (I).
(Operation on this camera)
.
0
When iFrame is selected for “VIDEO REC FORMAT”, the following
display appears and recording mode is switched to the 60i mode in
AVCHD.
0
This display disappears automatically after approximately 3 seconds,
but disappears immediately if the screen is tapped.
.
5
Check the SSID and the PASS being displayed on the screen of the
camera.
.
6
Select the SSID in step 5 from the Wi-Fi network selection screen of your
smartphone, and enter the PASS on the password screen.
(Operation on the smartphone (or computer))
.
0
For details on connecting your smartphone (or computer) to a Wi-Fi
network, please refer to the instruction manual of the phone terminal
in use.
7
A connection is established and Q appears on the camera’s screen.
.
o
Connection by Wi-Fi Protected Setup (WPS)
1
Tap “MENU”.
(Operation on this camera)
Set the camera to the recording mode.
.
0
The top menu appears.
2
Tap the “Wi-Fi” (Q) icon.
(Operation on this camera)
.
3
Tap the “DIRECT MONITORING” (N) icon in the “Wi-Fi” menu.
(Operation on this camera)
Using Wi-Fi by Creating a QR Code (GZ-EX555/GZ-EX515)
185
.
4
Tap “START” (I).
(Operation on this camera)
.
0
When iFrame is selected for “VIDEO REC FORMAT”, the following
display appears and recording mode is switched to the 60i mode in
AVCHD.
0
This display disappears automatically after approximately 3 seconds,
but disappears immediately if the screen is tapped.
.
5
Tap “WPS”.
(Operation on this camera)
.
6
Activate WPS on the smartphone (or computer) within 2 minutes.
(Operation on the smartphone (or computer))
.
0
To activate WPS, refer to the instruction manual of the device in use.
7
A connection is established and Q appears on the camera’s screen.
.
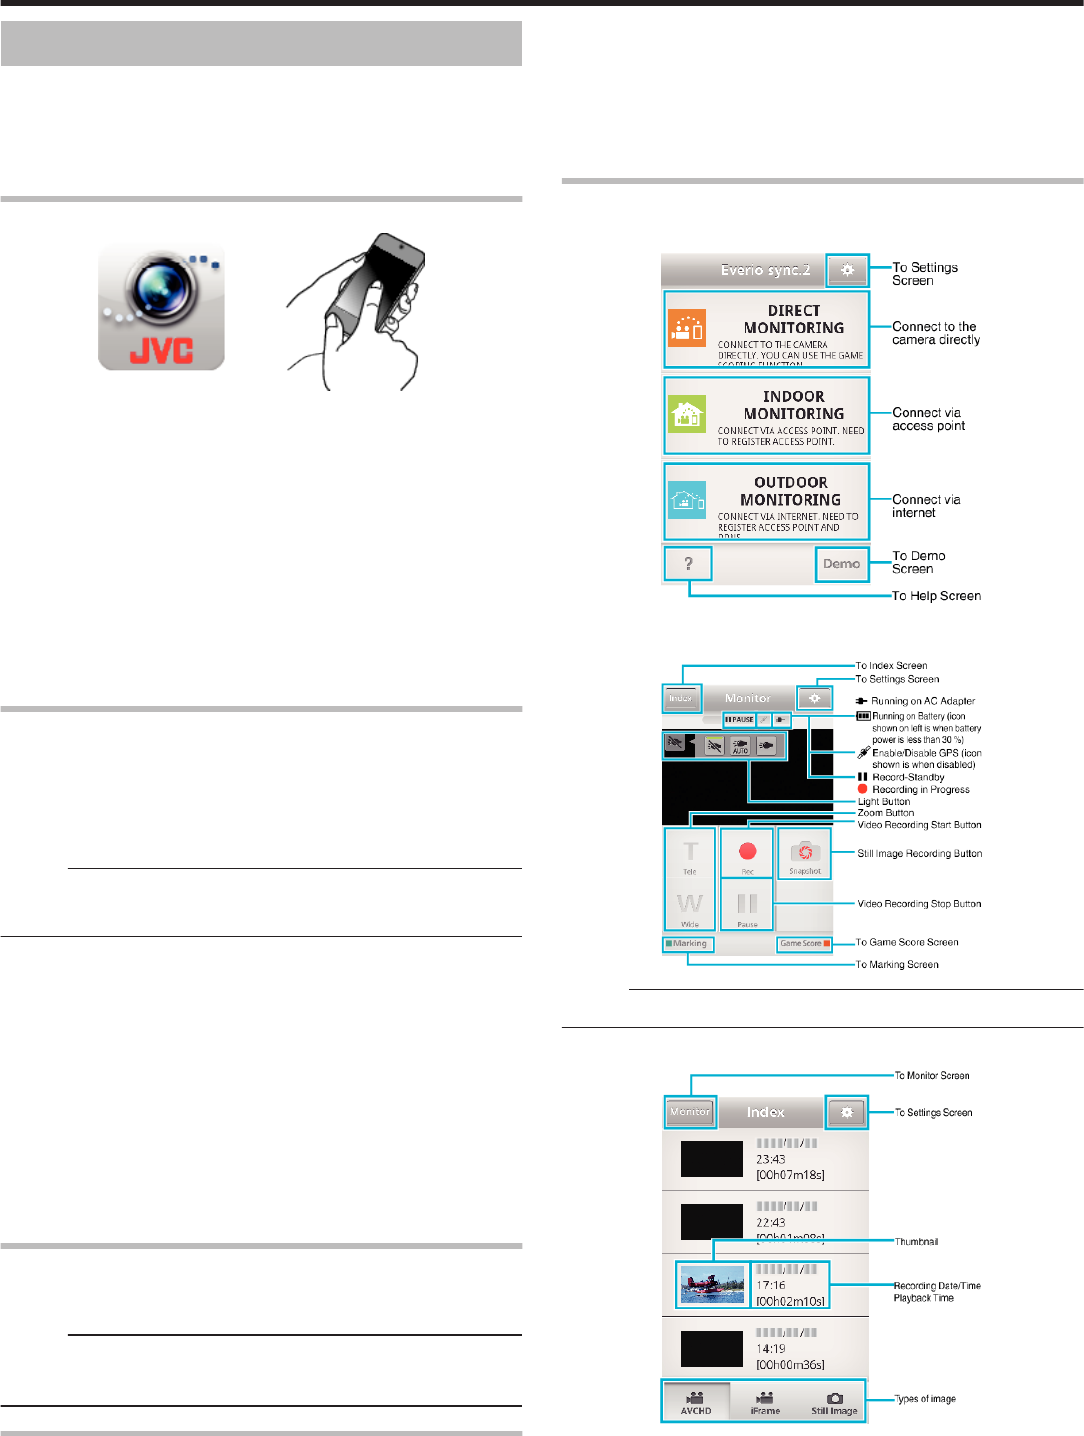
Monitoring the Images from a Smartphone (or Computer)
o
Smartphone (Android / iPhone)
Memo :
0
Prior to use this function, a smartphone application needs to be installed
on the smartphone.
“Installing Smartphone Applications” (A p. 161)
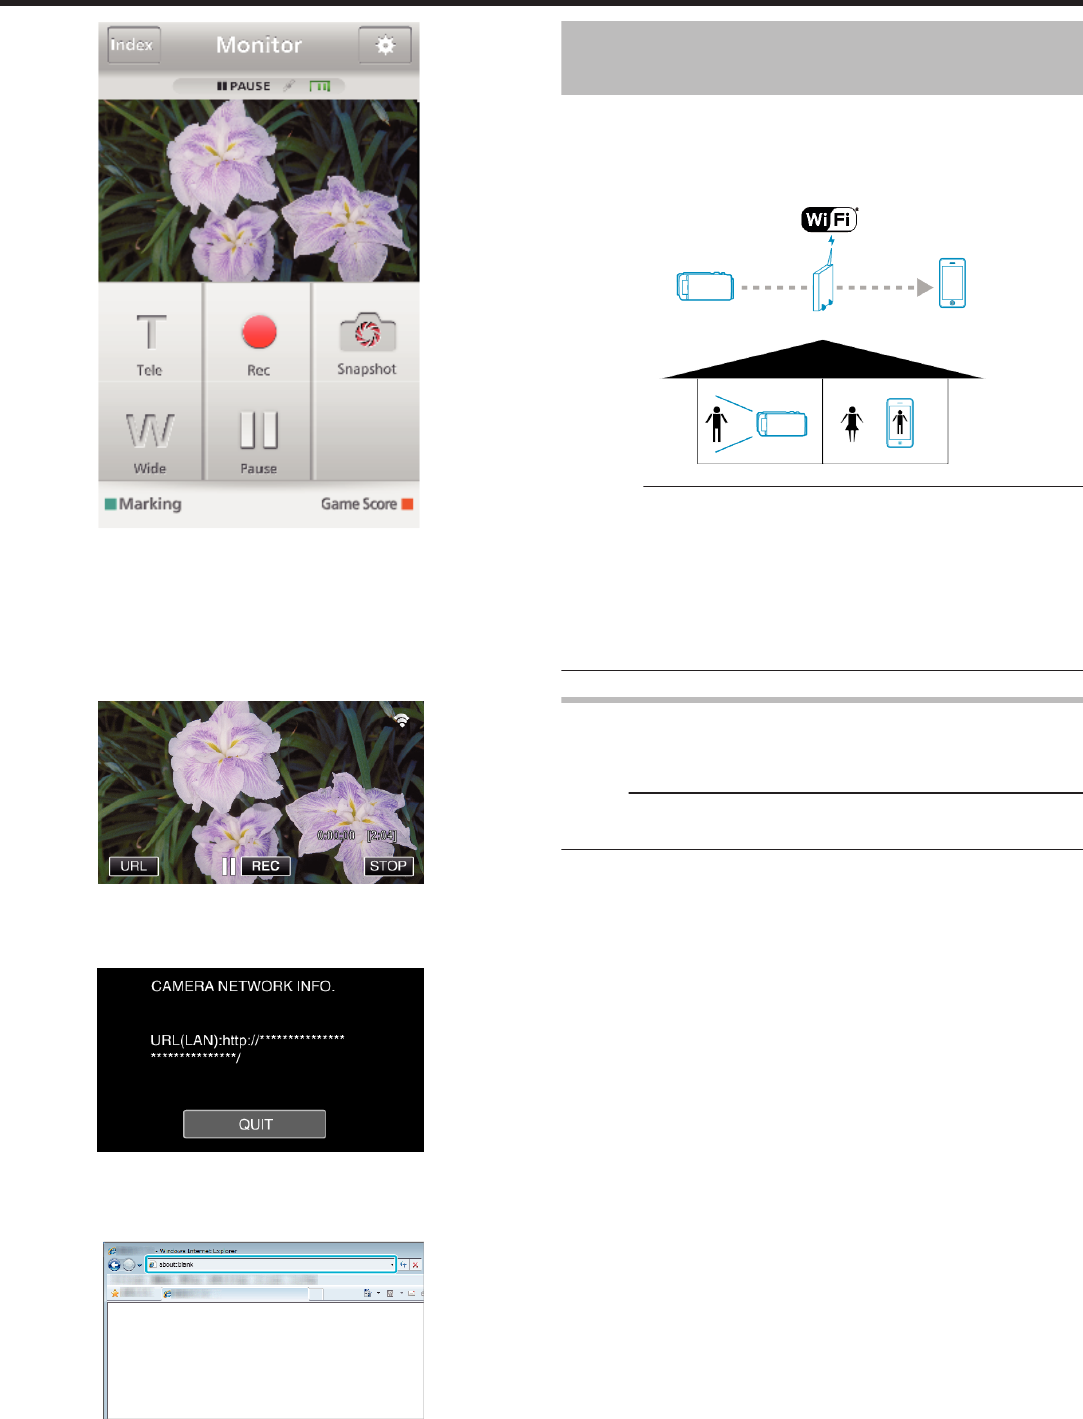
1
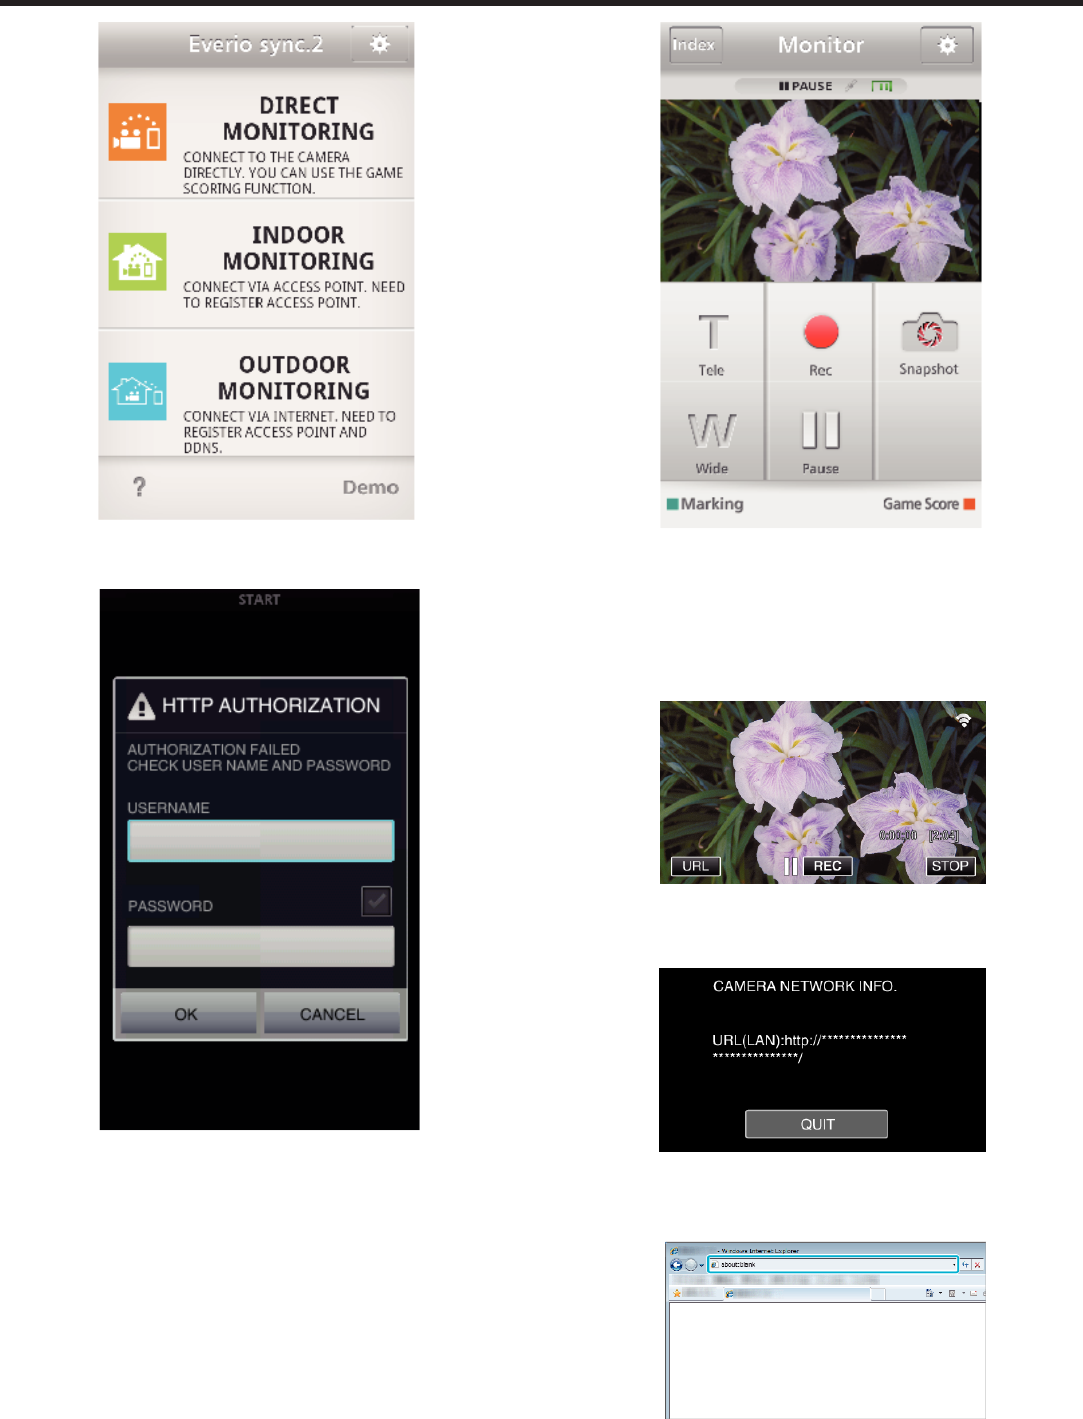
Start “Everio sync. 2” on the smartphone after setting DIRECT
MONITORING.
.
2
Tap “DIRECT MONITORING”.
.
3
The recording screen is displayed.
Using Wi-Fi by Creating a QR Code (GZ-EX555/GZ-EX515)
186
.
4
Operate from a smartphone
.
0
How to operate from a smartphone
“Using Smartphone Applications” (A p. 161)
o
Computer (Windows 7)
1
Tap the URL button shown on the camera’s screen.
(displayed when the computer and the camera are connected
wirelessly.)
.
0
The URL for the computer to connect to appears.
2
Check the URL being displayed on the camera screen, which starts from
“http://”.
.
0
After checking the URL, tap “QUIT” to return to the previous screen.
3
Start Internet Explorer (web browser) on the computer and enter the
URL.
.
Using Wi-Fi by Creating a QR Code (GZ-EX555/GZ-EX515)
187
INDOOR MONITORING
o
Setting (Once setting is done, start from the “Regular
Operation” below)
Create a QR code.
o
Enter values in the required items for indoor monitoring.
0
Password: set a password to connect this camera to the device via access
point. (Not more than 8 characters)
0
HTTP Port: Normally set to “80”.
Display the screen for reading the QR code.
1
Tap “MENU”.
(Operation on this camera)
.
0
The top menu appears.
2
Tap the “Wi-Fi” (
Q
) icon.
(Operation on this camera)
.
3
Tap 1 on the lower right of the screen.
(Operation on this camera)
.
4
Tap “COMMON Wi-Fi SETTING”.
(Operation on this camera)
.
5
Tap “SET FROM QR CODE”.
.
6
Tap “EXECUTE”.
.
Read a QR code.
1
Read a QR code.
(Operation on this camera)
.
2
Tap “YES”.
.
3
Tap “OK”.
.
0
Tap “NEXT” to return to the screen to read the QR code.
0
Set contents are saved.
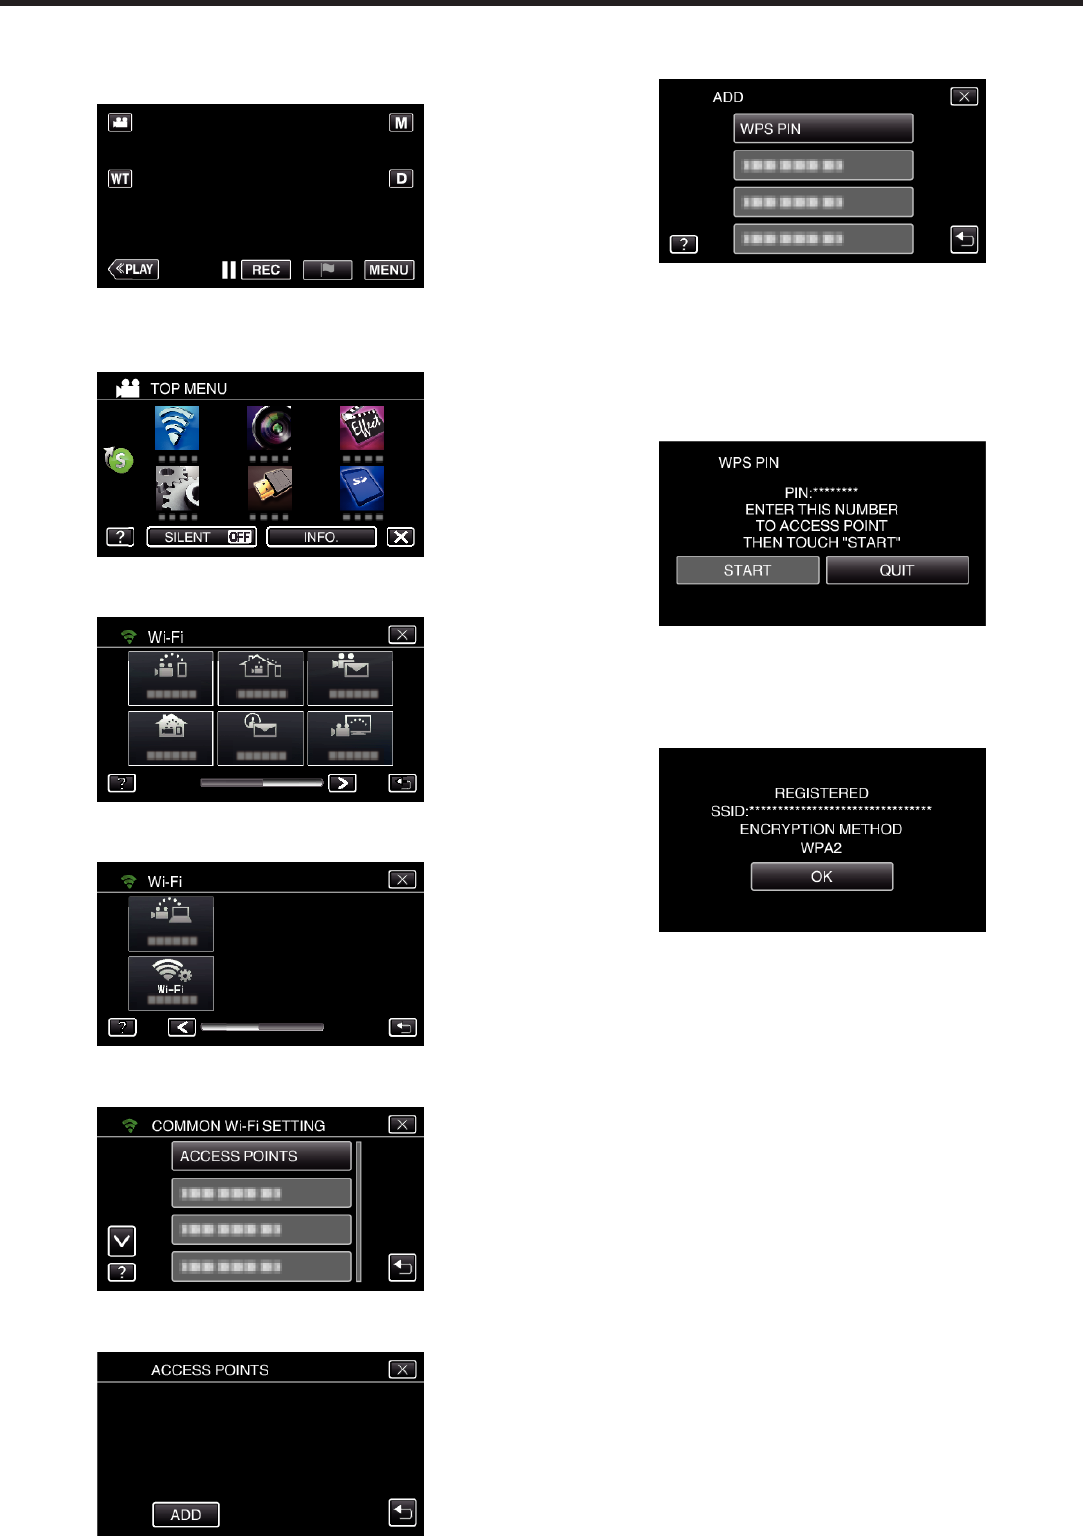
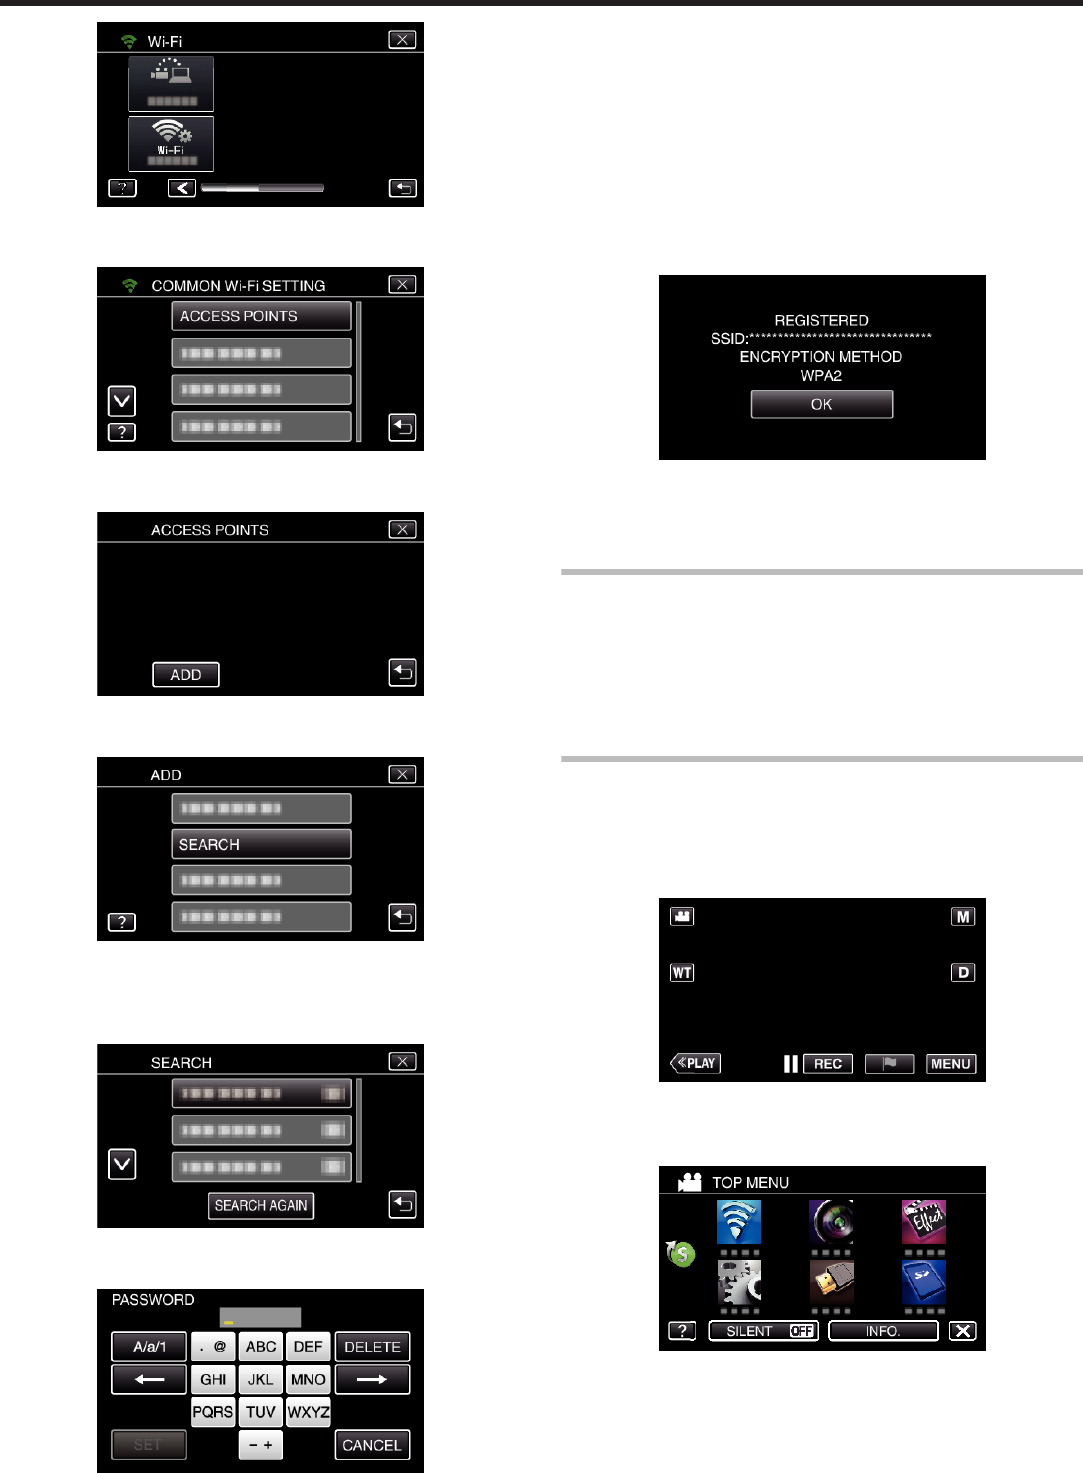
Registering the access points (wireless LAN router) to this
unit
o
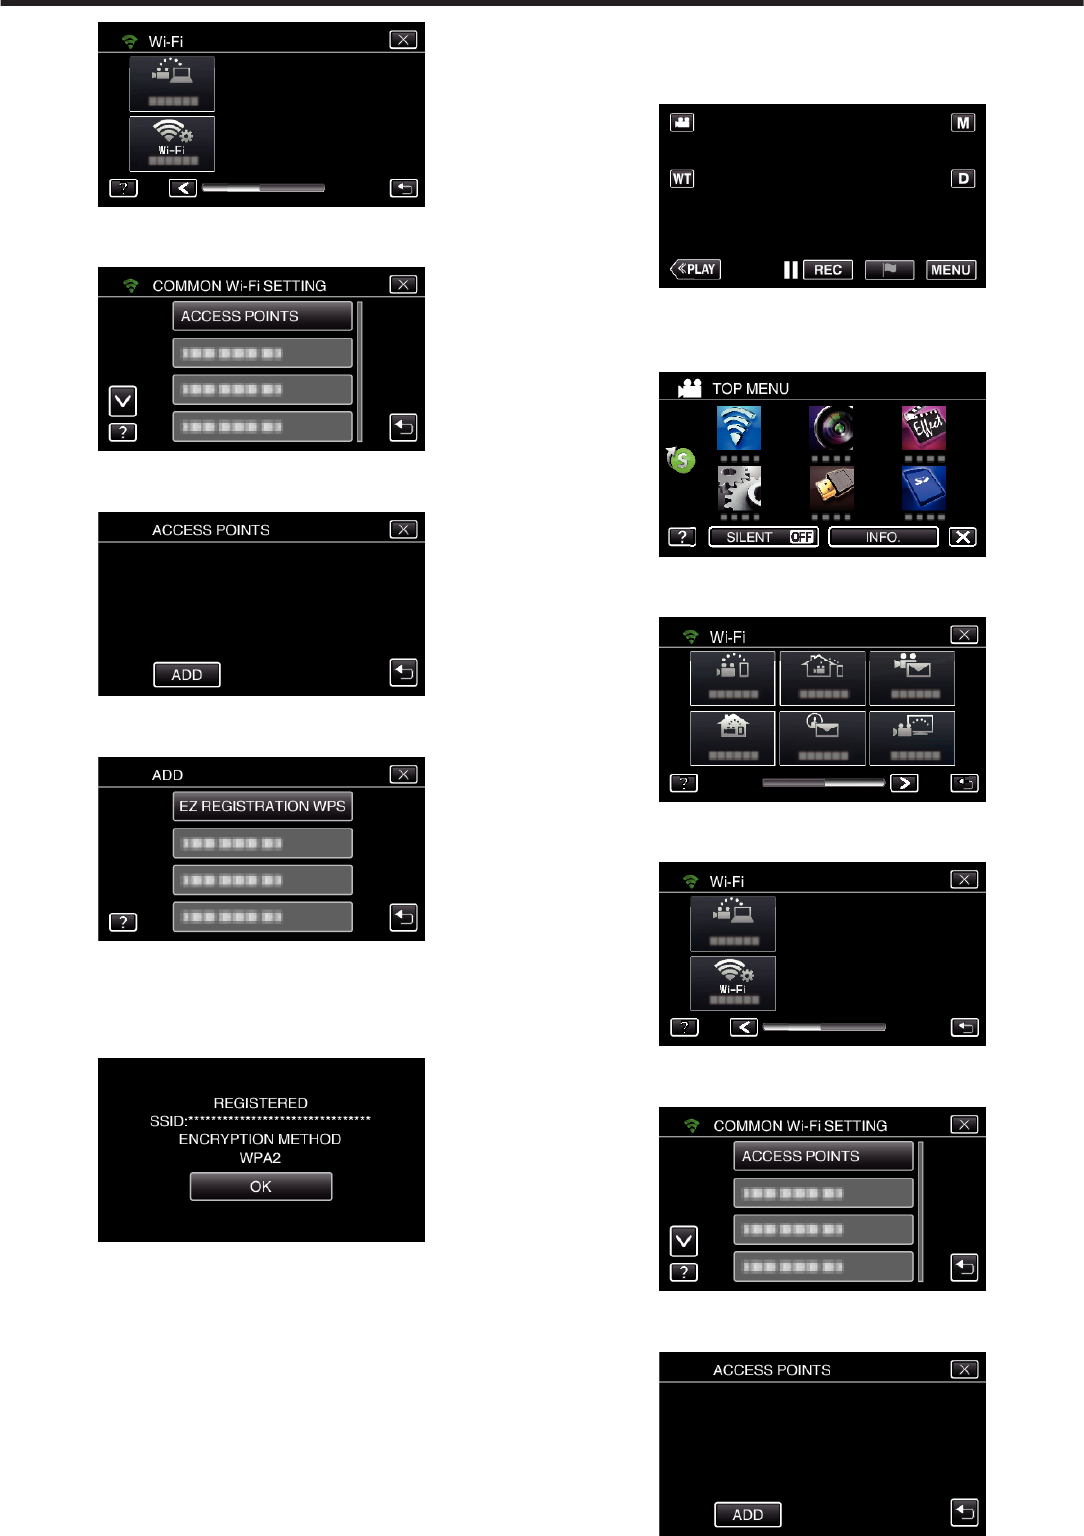
Wi-Fi Protected Setup (WPS) Registration
1
Tap “MENU”.
(Operation on this camera)
Using Wi-Fi by Creating a QR Code (GZ-EX555/GZ-EX515)
188
.
0
The top menu appears.
2
Tap the “Wi-Fi” (Q) icon.
(Operation on this camera)
.
3
Tap 1 on the lower right of the screen.
(Operation on this camera)
.
4
Tap “COMMON Wi-Fi SETTING”.
(Operation on this camera)
.
5
Tap “ACCESS POINTS”.
(Operation on this camera)
.
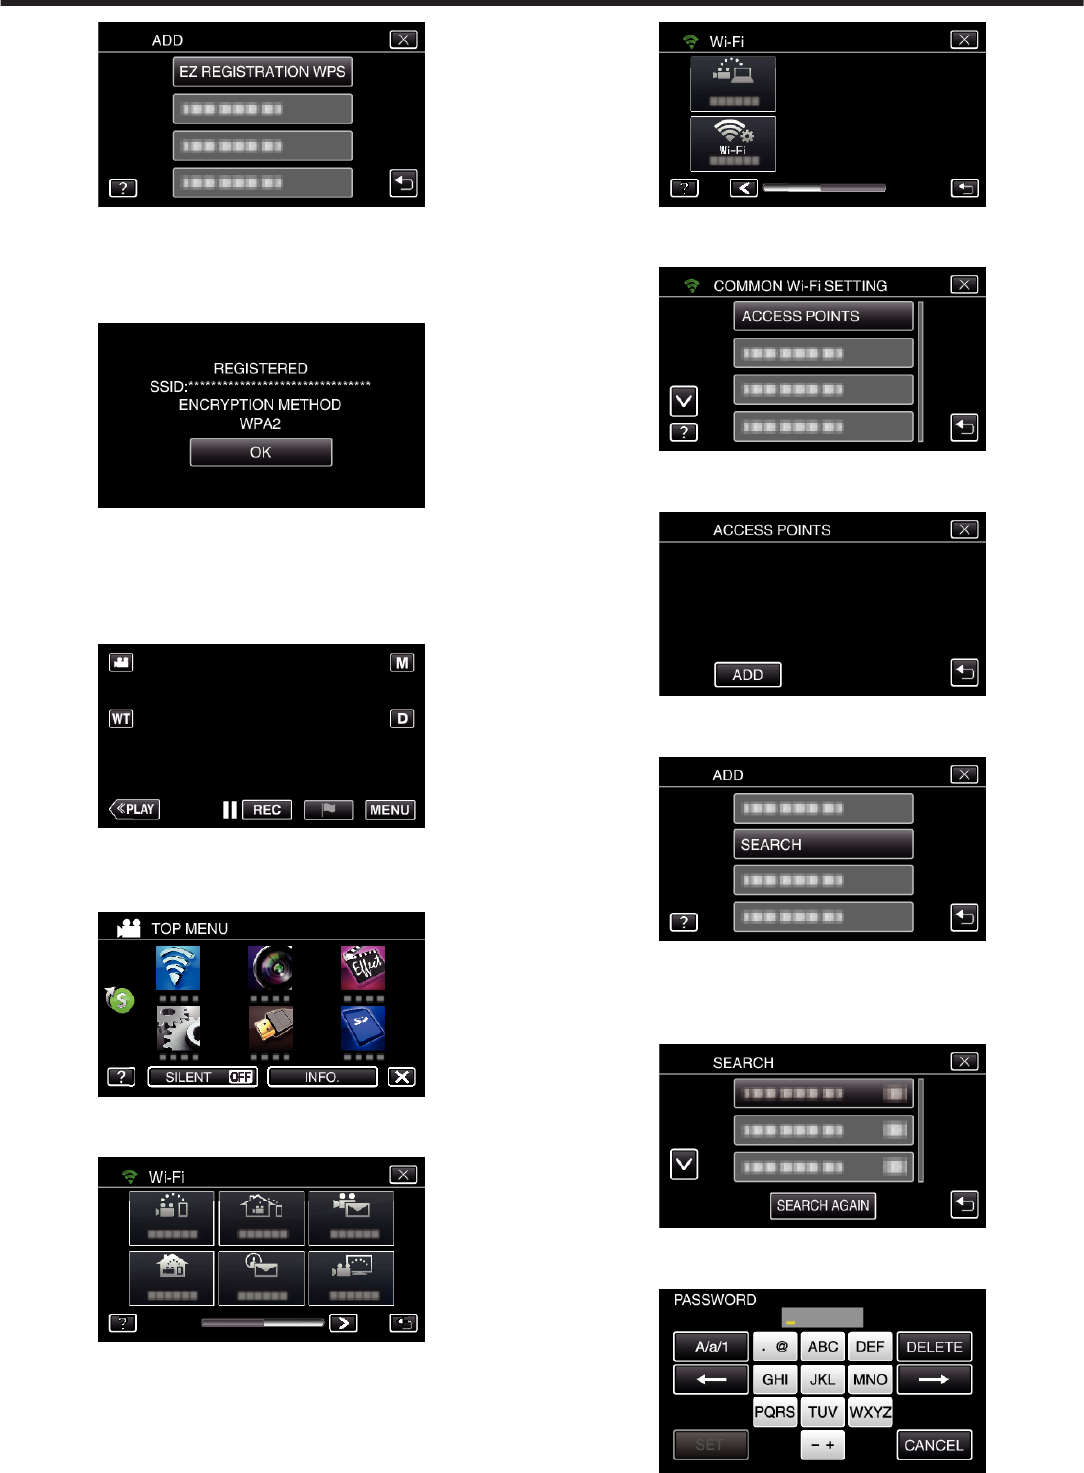
6
Tap “ADD”.
(Operation on this camera)
.
7
Tap “EZ REGISTRATION WPS”.
(Operation on this camera)
.
8
Activate WPS of the access point (wireless LAN router) within 2 minutes.
0
To activate WPS, refer to the instruction manual of the device in use.
9
After registration is complete, tap “OK” on the camera’s screen.
(Operation on this camera)
.
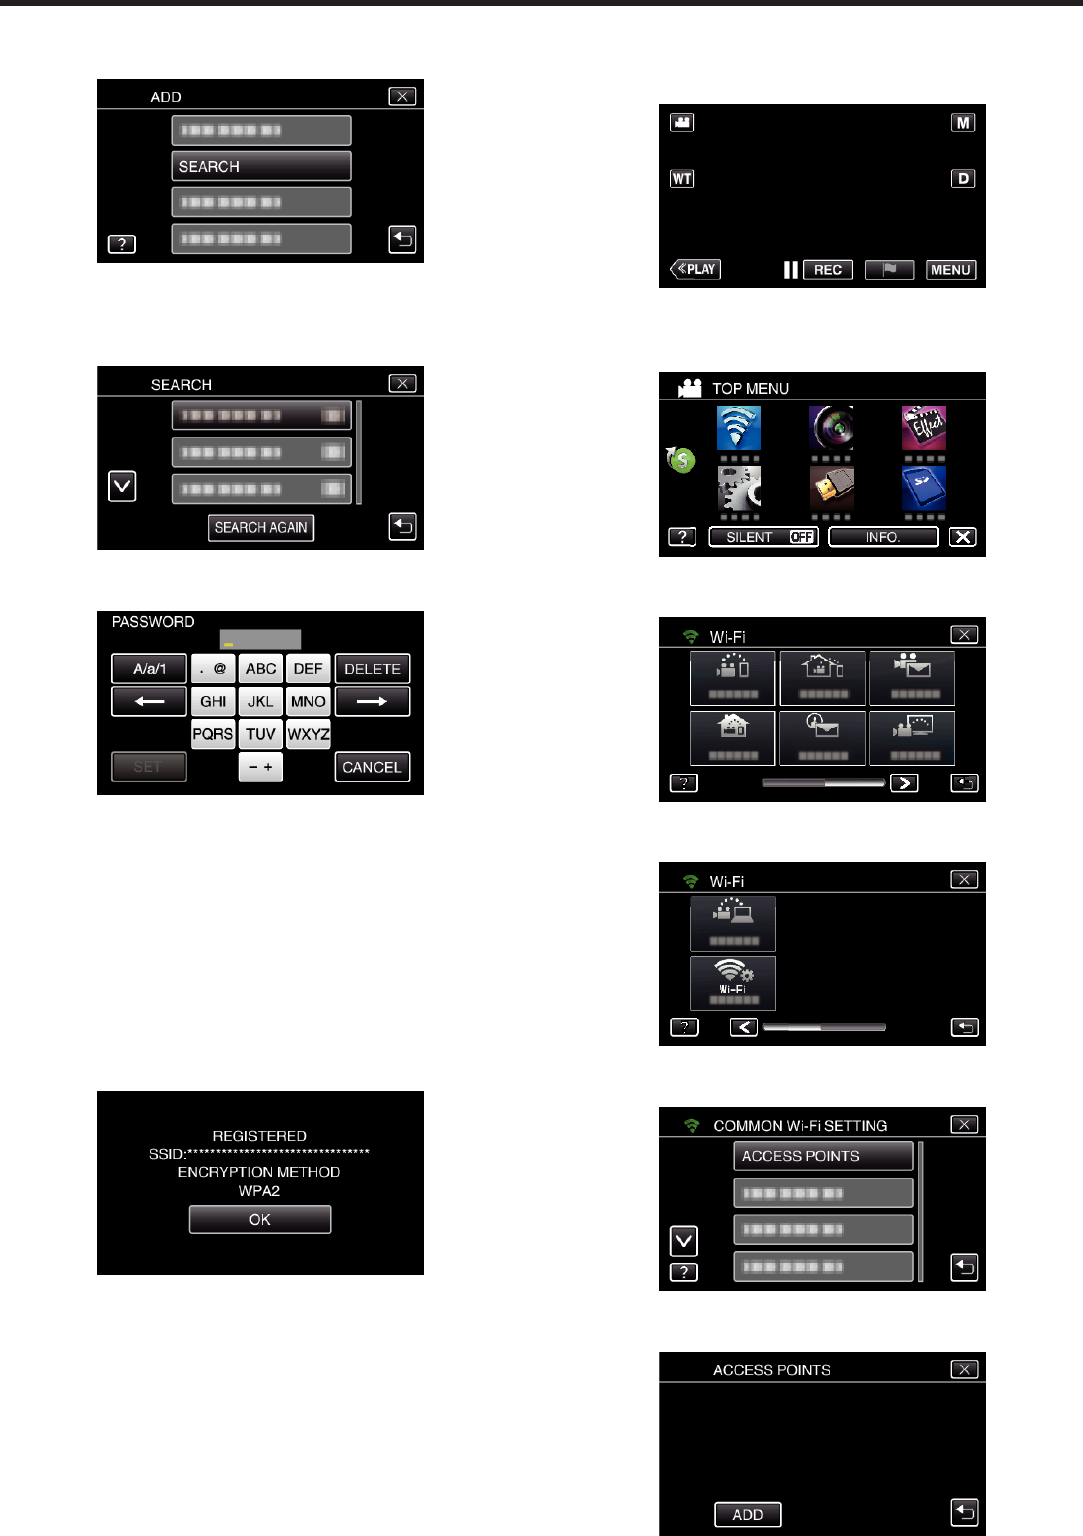
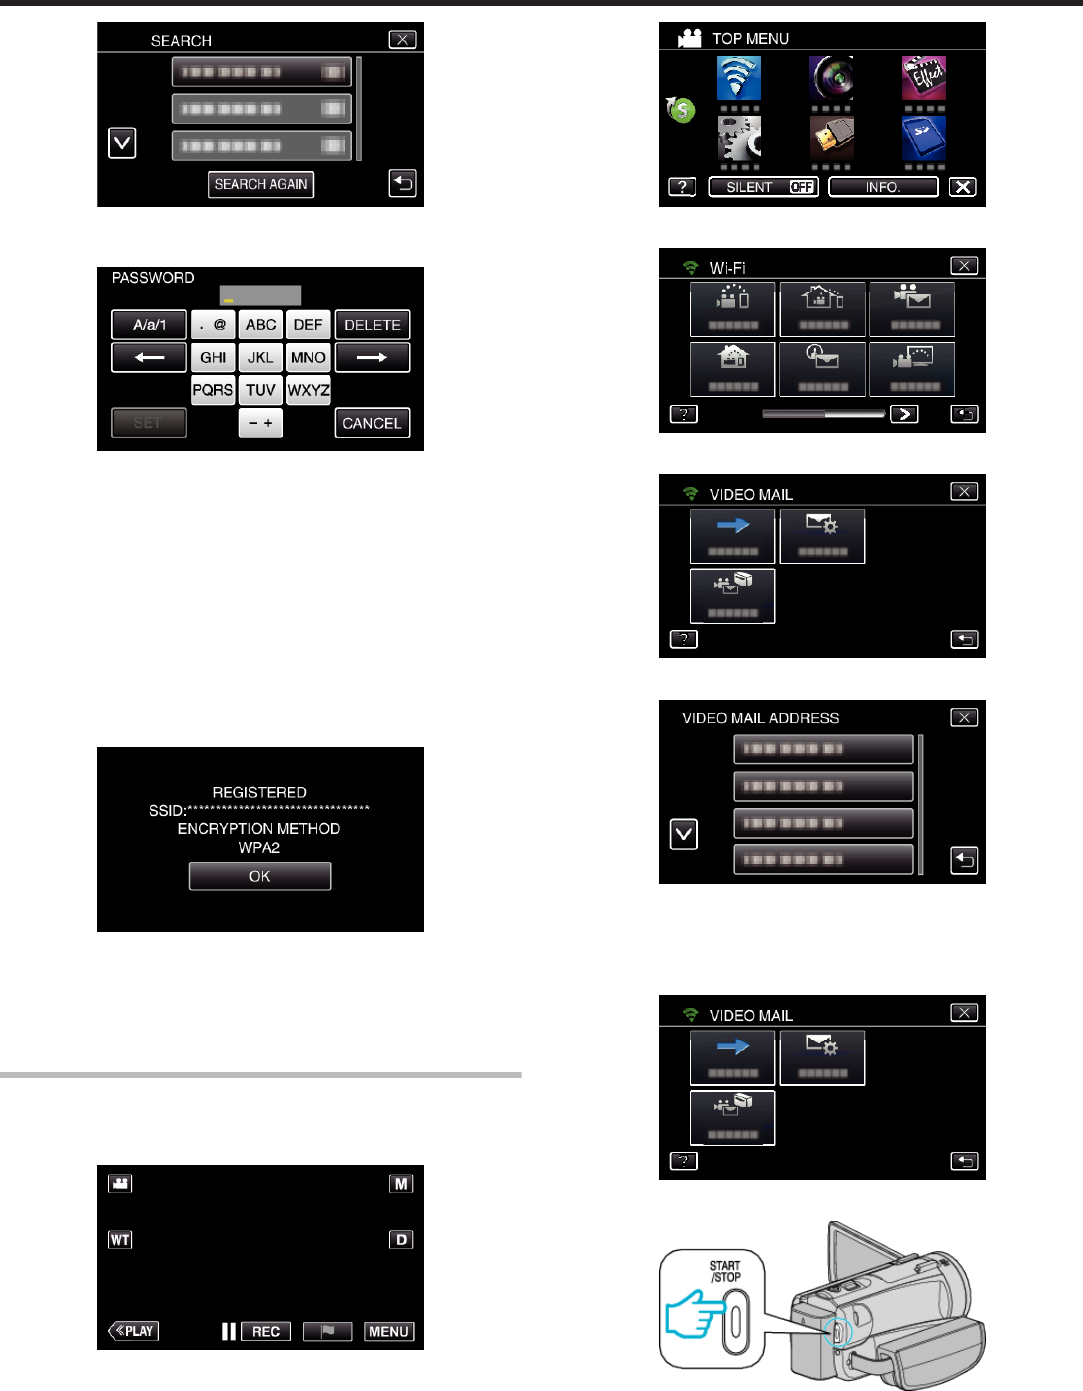
o
Search the access point, and select from the list.
Set the name (SSID) of the access point (wireless LAN router) and the
password beforehand.
1
Tap “MENU”.
(Operation on this camera)
.
0
The top menu appears.
2
Tap the “Wi-Fi” (
Q
) icon.
(Operation on this camera)
.
3
Tap 1 on the lower right of the screen.
(Operation on this camera)
.
4
Tap “COMMON Wi-Fi SETTING”.
(Operation on this camera)
Using Wi-Fi by Creating a QR Code (GZ-EX555/GZ-EX515)
189
.
5
Tap “ACCESS POINTS”.
(Operation on this camera)
.
6
Tap “ADD”.
(Operation on this camera)
.
7
Tap “SEARCH”.
(Operation on this camera)
.
0
The search results appear on the camera’s screen.
8
Tap the name (SSID) of the desired access point from the list of search
results.
(Operation on this camera)
.
9
Register a password.
(Operation on this camera)
.
0
Tap on the on-screen keyboard to enter characters. The character
changes with every tap.
“ABC”, for example, enter “A” by tapping once, “B” by tapping twice,
or “C” by tapping 3 times.
0
Tap “DELETE” to delete a character.
0
Tap “CANCEL” to exit.
0
Tap “A/a/1” to select character input type from upper case letter, lower
case letter, and number.
0
Tap E or F to move one space to the left or right.
0
The password is not required if the wireless LAN router is not security
protected.
10
After registration is complete, tap “OK” on the camera’s screen.
(Operation on this camera)
.
0
Other methods, such as “Manual Registration” and “WPS PIN
Registration” are also available. Refer to the following link for details.
“Registering the Access Points of the Camera to Connect (ACCESS
POINTS)” (A p. 150)
Connecting the smartphone (or computer) to the access point
(wireless LAN router)
0
Connect the smartphone (or computer) to the access point (wireless LAN
router) at home.
0
This setting is unnecessary if the smartphone (or computer) has already
been connected to the access point (wireless LAN router) at home.
o
Regular Operation
Monitoring the images by connecting the smartphone and the
camera
o
Operation on this camera
1
Tap “MENU”.
(Operation on this camera)
.
0
The top menu appears.
2
Tap the “Wi-Fi” (
Q
) icon.
(Operation on this camera)
.
3
Tap “INDOOR MONITORING” (O).
(Operation on this camera)
Using Wi-Fi by Creating a QR Code (GZ-EX555/GZ-EX515)
190
.
4
Tap “START” (I).
(Operation on this camera)
.
5
Start making a connection.
(Operation on this camera)
.
0
Name (SSID) of the access point (wireless LAN router) in connection
is displayed.
6
The following is displayed when the camera is connected to the access
point.
.
0
Tap “URL” to display the URL required for connecting the camera
from browser.
o
Operation on the smartphone
Memo :
0
Prior to use this function, a smartphone application needs to be installed
on the smartphone.
“Installing Smartphone Applications” (A p. 161)
1
Start “Everio sync. 2” on the smartphone after setting “INDOOR
MONITORING”.
.
0
Tap “START” in INDOOR MONITORING on the camera to start.
2
Tap “INDOOR MONITORING”.
.
3
The recording screen is displayed.
.
0
How to operate from a smartphone
“Using Smartphone Applications” (A p. 161)
o
Monitoring from the computer (Windows7)
1
Tap the URL button shown on the camera’s screen.
(displayed when the computer and the camera are connected
wirelessly.)
.
0
The URL for the computer to connect to appears.
2
Check the URL being displayed on the camera screen, which starts from
“http://”.
Using Wi-Fi by Creating a QR Code (GZ-EX555/GZ-EX515)
191
.
0
After checking the URL, tap “QUIT” to return to the previous screen.
3
Start Internet Explorer (web browser) on the computer and enter the
URL.
.
4
Log in with your username and password.
0
The username is “everio” and the default password is “0000”.
“Changing the Settings” (A p. 139)
0
Operations from the Web browser
“Using the Wi-Fi Function from a Web Browser” (A p. 174)
OUTDOOR MONITORING
o
Setting (Once setting is done, start from the “Regular
Operation” below)
Obtaining a Dynamic DNS Account
By obtaining a dynamic DNS account, this unit may be used on the web as
usual even if the IP address changes when making an access to this unit via
internet.
0
Only the JVC dynamic DNS service can be set on this camera.
To obtain (register) an account, perform the following steps.
1
Access the following URL from a browser and register for an account.
(Operation on a computer or smartphone)
https://dd3.jvckenwood.com/user/
Set your e-mail address as the username.
2
Check that you have received a confirmation e-mail to the address used
in registration, and access the URL stated in the e-mail.
(Operation on a computer or smartphone)
3
Set the username and password used in registration on the camera.
(Operation on this camera)
“Setting Dynamic DNS on this Camera (OUTDOOR MONITORING)”
(A p. 144)
4
Execute OUTDOOR MONITORING.
(Operation on this camera)
If “OUTDOOR MONITORING” is executed while dynamic DNS settings
are enabled, the camera will access the dynamic DNS server.
5
Tap “CAMERA NETWORK INFO.” to check that the URL (WAN) is
displayed.
(Registration complete)
“Image Monitoring via the Internet (OUTDOOR MONITORING)”
(A p. 125)
Caution :
0
Registration will be canceled if you do not access the dynamic DNS server
from the camera within 3 days.
Perform the registration again in this case.
0
Registration will not be complete if the username and password set on this
camera are incorrect. Be sure to check that they are correct.
0
Successful registration will be canceled too if you do not access the
dynamic DNS server for 1 year.
Create a QR code.
o
Enter values in the required items for outdoor monitoring.
0
Password: set a password to connect this camera to the device via access
point. (Not more than 8 characters)
0
DDNS: Set the connection environment to the internet. Normally set to
“ON”.
0
User name (DDNS): set an user name for the obtained DDNS account.
0
Password (DDNS): set a password for the obtained DDNS account.
0
UPnP: Set to “ON” if the UPnP protocol may be used to connect the device
to the network.
0
HTTP Port: Set the port number for connecting to the internet. Normally
set to “80”.
Display the screen for reading the QR code.
1
Tap “MENU”.
(Operation on this camera)
.
Using Wi-Fi by Creating a QR Code (GZ-EX555/GZ-EX515)
192
0
The top menu appears.
2
Tap the “Wi-Fi” (Q) icon.
(Operation on this camera)
.
3
Tap
1
on the lower right of the screen.
(Operation on this camera)
.
4
Tap “COMMON Wi-Fi SETTING”.
(Operation on this camera)
.
5
Tap “SET FROM QR CODE”.
.
6
Tap “EXECUTE”.
.
Read a QR code.
1
Read a QR code.
(Operation on this camera)
.
2
Tap “YES”.
.
3
Tap “OK”.
.
0
Tap “NEXT” to return to the screen to read the QR code.
0
Set contents are saved.
Registering the access points (wireless LAN router) to this
unit
o
Wi-Fi Protected Setup (WPS) Registration
1
Tap “MENU”.
(Operation on this camera)
.
0
The top menu appears.
2
Tap the “Wi-Fi” (
Q
) icon.
(Operation on this camera)
.
3
Tap 1 on the lower right of the screen.
(Operation on this camera)
.
4
Tap “COMMON Wi-Fi SETTING”.
(Operation on this camera)
Using Wi-Fi by Creating a QR Code (GZ-EX555/GZ-EX515)
193
.
5
Tap “ACCESS POINTS”.
(Operation on this camera)
.
6
Tap “ADD”.
(Operation on this camera)
.
7
Tap “EZ REGISTRATION WPS”.
(Operation on this camera)
.
8
Activate WPS of the access point (wireless LAN router) within 2 minutes.
0
To activate WPS, refer to the instruction manual of the device in use.
9
After registration is complete, tap “OK” on the camera’s screen.
(Operation on this camera)
.
o
Search the access point, and select from the list.
Set the name (SSID) of the access point (wireless LAN router) and the
password beforehand.
1
Tap “MENU”.
(Operation on this camera)
.
0
The top menu appears.
2
Tap the “Wi-Fi” (Q) icon.
(Operation on this camera)
.
3
Tap 1 on the lower right of the screen.
(Operation on this camera)
.
4
Tap “COMMON Wi-Fi SETTING”.
(Operation on this camera)
.
5
Tap “ACCESS POINTS”.
(Operation on this camera)
.
6
Tap “ADD”.
(Operation on this camera)
.
7
Tap “SEARCH”.
(Operation on this camera)
Using Wi-Fi by Creating a QR Code (GZ-EX555/GZ-EX515)
194
.
0
The search results appear on the camera’s screen.
8
Tap the name (SSID) of the desired access point from the list of search
results.
(Operation on this camera)
.
9
Register a password.
(Operation on this camera)
.
0
Tap on the on-screen keyboard to enter characters. The character
changes with every tap.
“ABC”, for example, enter “A” by tapping once, “B” by tapping twice,
or “C” by tapping 3 times.
0
Tap “DELETE” to delete a character.
0
Tap “CANCEL” to exit.
0
Tap “A/a/1” to select character input type from upper case letter, lower
case letter, and number.
0
Tap E or F to move one space to the left or right.
0
The password is not required if the wireless LAN router is not security
protected.
10
After registration is complete, tap “OK” on the camera’s screen.
(Operation on this camera)
.
0
Other methods, such as “Manual Registration” and “WPS PIN
Registration” are also available. Refer to the following link for details.
“Registering the Access Points of the Camera to Connect (ACCESS
POINTS)” (A p. 150)
o
Regular Operation
Connect this camera to a smartphone (or computer).
1
Tap “MENU”.
(Operation on this camera)
.
0
The top menu appears.
2
Tap the “Wi-Fi” (Q) icon.
(Operation on this camera)
.
3
Tap “OUTDOOR MONITORING” (
M
).
(Operation on this camera)
.
4
Tap “START” (I).
(Operation on this camera)
.
5
Start making a connection.
(Operation on this camera)
.
0
Name (SSID) of the access point (wireless LAN router) in connection
is displayed.
6
The following is displayed when the camera is connected to the access
point.
.
0
The URL (WAN) for the smartphone to connect to appears.
Using Wi-Fi by Creating a QR Code (GZ-EX555/GZ-EX515)
195
(Does not appear if DDNS is not set or set incorrectly.)
0
“LUPnP” is displayed when UPnP cannot be used.
7
Check the URL (WAN).
.
0
After checking the URL, tap “QUIT” to return to the previous screen.
0
“LUPnP” is displayed when UPnP cannot be used.
o
Operation on the smartphone
Memo :
0
Prior to use this function, a smartphone application needs to be installed
on the smartphone.
“Installing Smartphone Applications” (A p. 161)
1
Start “Everio sync. 2” on the smartphone after setting OUTDOOR
MONITORING.
.
0
Tap “START” in OUTDOOR MONITORING on the camera to start.
2
Tap “OUTDOOR MONITORING”.
.
3
Log in with your username and password.
(if authentication cannot be achieved)
.
0
The username is “everio” and the default password is “0000”.
“Changing the Settings” (A p. 139)
4
The recording screen is displayed.
.
5
Operate from a smartphone
.
0
How to operate from a smartphone
“Using Smartphone Applications” (A p. 161)
Using Wi-Fi by Creating a QR Code (GZ-EX555/GZ-EX515)
196
o
Monitoring from the computer (Windows7)
1
On the Internet Explorer (web browser), enter the URL (WAN) that is
checked by “Operation on this camera”.
.
2
Log in with your username and password.
0
The username is “everio” and the default password is “0000”.
“Changing the Settings” (A p. 139)
0
Operations from the Web browser
DETECT/MAIL
o
Setting (Once setting is done, start from the “Regular
Operation” below)
Create a QR code.
Memo :
0
Perform operations in step 2 and 3 after creating a QR code, and read the
QR code one by one by the camera.
o
Enter values in the required items for setting the recipient’s
e-mail address.
0
E-mail address: set the recipient’s e-mail address.
0
E-mail function: set the function of the e-mail that is transmitted to the
recipient’s e-mail address.
0
Up to 8 e-mail addresses can be set.
0
Start reading from (1) if multiple e-mail addresses are set. Click the number
or “<”, “>”.
o
Enter values in the required items for setting the sender’s
e-mail address.
0
E-mail address: set the sender’s e-mail address.
o
Enter values in the required items for setting the e-mail
server (SMTP server).
0
SMTP server: set the name of the e-mail server (SMTP server) from which
an e-mail account is obtained.
0
SMTP port number: set according to the condition when the e-mail
account is obtained. Normally set to “25”.
0
SMTP authentication method: set according to the condition when the e-
mail account is obtained.
0
User name: set if the SMTP authentication method is set to other than
“None”. (same as the registered user name (account name) when the e-
mail account is obtained)
0
Password: set if the SMTP authentication method is set to other than
“None”. (same as the registered password when the e-mail account is
obtained)
o
Enter values in the required items for setting notification
mails.
0
Detection method: set the detection method of when to start recording
video for notification e-mails.
0
Detecting interval: select the time period to enable detection again after
the previous one.
0
Self recording: specify whether to save the detected video on the camera
(ON) or not (OFF).
Display the screen for reading the QR code.
1
Tap “MENU”.
(Operation on this camera)
.
0
The top menu appears.
2
Tap the “Wi-Fi” (
Q
) icon.
(Operation on this camera)
Using Wi-Fi by Creating a QR Code (GZ-EX555/GZ-EX515)
197
.
3
Tap 1 on the lower right of the screen.
(Operation on this camera)
.
4
Tap “COMMON Wi-Fi SETTING”.
(Operation on this camera)
.
5
Tap “SET FROM QR CODE”.
.
6
Tap “EXECUTE”.
.
Read a QR code.
1
Read a QR code.
(Operation on this camera)
.
2
Tap “YES”.
.
0
Contents of the screen vary depending on the QR code that is read
by this unit.
3
Tap “OK”.
.
0
Tap “NEXT” to return to the screen to read the QR code.
0
Set contents are saved.
Registering the access points (wireless LAN router) to this
unit
o
Wi-Fi Protected Setup (WPS) Registration
1
Tap “MENU”.
(Operation on this camera)
.
0
The top menu appears.
2
Tap the “Wi-Fi” (
Q
) icon.
(Operation on this camera)
.
3
Tap 1 on the lower right of the screen.
(Operation on this camera)
.
4
Tap “COMMON Wi-Fi SETTING”.
(Operation on this camera)
Using Wi-Fi by Creating a QR Code (GZ-EX555/GZ-EX515)
198
.
5
Tap “ACCESS POINTS”.
(Operation on this camera)
.
6
Tap “ADD”.
(Operation on this camera)
.
7
Tap “EZ REGISTRATION WPS”.
(Operation on this camera)
.
8
Activate WPS of the access point (wireless LAN router) within 2 minutes.
0
To activate WPS, refer to the instruction manual of the device in use.
9
After registration is complete, tap “OK” on the camera’s screen.
(Operation on this camera)
.
o
Search the access point, and select from the list.
Set the name (SSID) of the access point (wireless LAN router) and the
password beforehand.
1
Tap “MENU”.
(Operation on this camera)
.
0
The top menu appears.
2
Tap the “Wi-Fi” (Q) icon.
(Operation on this camera)
.
3
Tap 1 on the lower right of the screen.
(Operation on this camera)
.
4
Tap “COMMON Wi-Fi SETTING”.
(Operation on this camera)
.
5
Tap “ACCESS POINTS”.
(Operation on this camera)
.
6
Tap “ADD”.
(Operation on this camera)
.
7
Tap “SEARCH”.
(Operation on this camera)
Using Wi-Fi by Creating a QR Code (GZ-EX555/GZ-EX515)
199
.
0
The search results appear on the camera’s screen.
8
Tap the name (SSID) of the desired access point from the list of search
results.
(Operation on this camera)
.
9
Register a password.
(Operation on this camera)
.
0
Tap on the on-screen keyboard to enter characters. The character
changes with every tap.
“ABC”, for example, enter “A” by tapping once, “B” by tapping twice,
or “C” by tapping 3 times.
0
Tap “DELETE” to delete a character.
0
Tap “CANCEL” to exit.
0
Tap “A/a/1” to select character input type from upper case letter, lower
case letter, and number.
0
Tap E or F to move one space to the left or right.
0
The password is not required if the wireless LAN router is not security
protected.
10
After registration is complete, tap “OK” on the camera’s screen.
(Operation on this camera)
.
0
Other methods, such as “Manual Registration” and “WPS PIN
Registration” are also available. Refer to the following link for details.
“Registering the Access Points of the Camera to Connect (ACCESS
POINTS)” (A p. 150)
o
Regular Operation
Sending a Notification Mail.
1
Tap “MENU”.
Set the camera to the recording mode.
.
0
The top menu appears.
2
Tap the “Wi-Fi” (Q) icon.
.
3
Tap “DETECT/MAIL” (
P
).
.
4
Tap “DETECT/MAIL ATTN.”.
.
5
Select “DETECT/MAIL ATTN.”, then tap J.
.
0
To display the P icon, tap the e-mail address.
0
To cancel the e-mail address, press the icon one more time.
0
Up to 8 e-mail addresses can be selected.
6
Tap “START” (I).
.
7
Start making a connection.
Using Wi-Fi by Creating a QR Code (GZ-EX555/GZ-EX515)
200
.
8
DETECT/MAIL detection standby
.
0
Detection is suspended for the first 5 seconds.
9
DETECT/MAIL detection in progress (an e-mail is automatically sent out
after detection is completed)
.
0
The “PHOTO” icon appears on the screen for about 2 seconds upon
detection.
0
Images are captured automatically when moving subjects or human
faces appear on the camera’s screen. (The PHOTO icon appears on
the screen upon detection.)
0
The captured still images will be sent via e-mail to the selected
recipients.
10
Detection suspended
.
0
Until the next detection is made, detection is suspended for the pre-
set length of time.
0
“DETECTION INTERVAL” can be selected from 15 seconds, 1
minute, 3 minutes, 10 minutes, 30 minutes and 60 minutes.
“Setting the Detection Interval of this Camera (DETECT/MAIL
SETTING)” (A p. 149)
Check the incoming e-mail.
VIDEO MAIL
o
Setting (Once setting is done, start from the “Regular
Operation” below)
Create a QR code.
Memo :
0
Perform operations in step 2 and 3 after creating a QR code, and read the
QR code one by one by the camera.
o
Enter values in the required items for setting the recipient’s
e-mail address.
0
E-mail address: set the recipient’s e-mail address.
0
E-mail function: set the function of the e-mail that is transmitted to the
recipient’s e-mail address.
0
Up to 8 e-mail addresses can be set.
0
Start reading from (1) if multiple e-mail addresses are set. Click the number
or “<”, “>”.
o
Enter values in the required items for setting the sender’s
e-mail address.
0
E-mail address: set the sender’s e-mail address.
o
Enter values in the required items for setting the e-mail
server (SMTP server).
0
SMTP server: set the name of the e-mail server (SMTP server) from which
an e-mail account is obtained.
0
SMTP port number: set according to the condition when the e-mail
account is obtained. Normally set to “25”.
0
SMTP authentication method: set according to the condition when the e-
mail account is obtained.
0
User name: set if the SMTP authentication method is set to other than
“None”. (same as the registered user name (account name) when the e-
mail account is obtained)
0
Password: set if the SMTP authentication method is set to other than
“None”. (same as the registered password when the e-mail account is
obtained)
Display the screen for reading the QR code.
1
Tap “MENU”.
(Operation on this camera)
.
0
The top menu appears.
2
Tap the “Wi-Fi” (
Q
) icon.
(Operation on this camera)
.
3
Tap 1 on the lower right of the screen.
(Operation on this camera)
Using Wi-Fi by Creating a QR Code (GZ-EX555/GZ-EX515)
201
.
4
Tap “COMMON Wi-Fi SETTING”.
(Operation on this camera)
.
5
Tap “SET FROM QR CODE”.
.
6
Tap “EXECUTE”.
.
Read a QR code.
1
Read a QR code.
(Operation on this camera)
.
2
Tap “YES”.
.
0
Contents of the screen vary depending on the QR code that is read
by this unit.
3
Tap “OK”.
.
0
Tap “NEXT” to return to the screen to read the QR code.
0
Set contents are saved.
Registering the access points (wireless LAN router) to this
unit
o
Wi-Fi Protected Setup (WPS) Registration
1
Tap “MENU”.
(Operation on this camera)
.
0
The top menu appears.
2
Tap the “Wi-Fi” (
Q
) icon.
(Operation on this camera)
.
3
Tap 1 on the lower right of the screen.
(Operation on this camera)
.
4
Tap “COMMON Wi-Fi SETTING”.
(Operation on this camera)
.
5
Tap “ACCESS POINTS”.
(Operation on this camera)
Using Wi-Fi by Creating a QR Code (GZ-EX555/GZ-EX515)
202
.
6
Tap “ADD”.
(Operation on this camera)
.
7
Tap “EZ REGISTRATION WPS”.
(Operation on this camera)
.
8
Activate WPS of the access point (wireless LAN router) within 2 minutes.
0
To activate WPS, refer to the instruction manual of the device in use.
9
After registration is complete, tap “OK” on the camera’s screen.
(Operation on this camera)
.
o
Search the access point, and select from the list.
Set the name (SSID) of the access point (wireless LAN router) and the
password beforehand.
1
Tap “MENU”.
(Operation on this camera)
.
0
The top menu appears.
2
Tap the “Wi-Fi” (
Q
) icon.
(Operation on this camera)
.
3
Tap 1 on the lower right of the screen.
(Operation on this camera)
.
4
Tap “COMMON Wi-Fi SETTING”.
(Operation on this camera)
.
5
Tap “ACCESS POINTS”.
(Operation on this camera)
.
6
Tap “ADD”.
(Operation on this camera)
.
7
Tap “SEARCH”.
(Operation on this camera)
.
0
The search results appear on the camera’s screen.
8
Tap the name (SSID) of the desired access point from the list of search
results.
(Operation on this camera)
Using Wi-Fi by Creating a QR Code (GZ-EX555/GZ-EX515)
203
.
9
Register a password.
(Operation on this camera)
.
0
Tap on the on-screen keyboard to enter characters. The character
changes with every tap.
“ABC”, for example, enter “A” by tapping once, “B” by tapping twice,
or “C” by tapping 3 times.
0
Tap “DELETE” to delete a character.
0
Tap “CANCEL” to exit.
0
Tap “A/a/1” to select character input type from upper case letter, lower
case letter, and number.
0
Tap E or F to move one space to the left or right.
0
The password is not required if the wireless LAN router is not security
protected.
10
After registration is complete, tap “OK” on the camera’s screen.
(Operation on this camera)
.
0
Other methods, such as “Manual Registration” and “WPS PIN
Registration” are also available. Refer to the following link for details.
“Registering the Access Points of the Camera to Connect (ACCESS
POINTS)” (A p. 150)
o
Regular Operation
Record videos to send a video mail.
1
Tap “MENU”.
Set the camera to the recording mode.
.
0
The top menu appears.
2
Tap the “Wi-Fi” (
Q
) icon.
.
3
Tap “VIDEO MAIL” (L).
.
4
Tap “VIDEO MAIL ADDRESS”.
.
5
Select “VIDEO MAIL ADDRESS”, then tap J.
.
0
To display the L icon, tap the e-mail address.
0
To cancel the e-mail address, press the icon one more time.
0
Up to 8 e-mail addresses can be selected.
6
Tap “START” (I).
.
7
Press the START/STOP button to start recording.
.
0
Or, tap the REC on screen.
8
Recording starts after the 5-second countdown.
Using Wi-Fi by Creating a QR Code (GZ-EX555/GZ-EX515)
204
.
0
You can allow the recording to be performed for 15 seconds or press
the START/STOP button to stop.
9
Tap “SEND”.
.
0
Sending of the video mail starts.
0
To check the file, tap “PLAY TO CHECK”.
0
When it is complete, tap “OK”.
Check the incoming e-mail.
TV MONITORING
o
Setting (Once setting is done, start from the “Regular
Operation” below)
Create a QR code.
o
Enter values in the required items for the TV monitor.
0
MAC address filter: set to “ON” if monitoring images with a specific TV
device.
0
Add the MAC address: register the physical address when monitoring
images with a specific TV device. (Up to 8 addresses can be registered)
Display the screen for reading the QR code.
1
Tap “MENU”.
(Operation on this camera)
.
0
The top menu appears.
2
Tap the “Wi-Fi” (
Q
) icon.
(Operation on this camera)
.
3
Tap 1 on the lower right of the screen.
(Operation on this camera)
.
4
Tap “COMMON Wi-Fi SETTING”.
(Operation on this camera)
.
5
Tap “SET FROM QR CODE”.
Using Wi-Fi by Creating a QR Code (GZ-EX555/GZ-EX515)
205
.
6
Tap “EXECUTE”.
.
Read a QR code.
1
Read a QR code.
(Operation on this camera)
.
2
Tap “YES”.
.
3
Tap “OK”.
.
0
Tap “NEXT” to return to the screen to read the QR code.
0
Set contents are saved.
Registering the access points (wireless LAN router) to this
unit
o
Wi-Fi Protected Setup (WPS) Registration
1
Tap “MENU”.
(Operation on this camera)
.
0
The top menu appears.
2
Tap the “Wi-Fi” (Q) icon.
(Operation on this camera)
.
3
Tap 1 on the lower right of the screen.
(Operation on this camera)
.
4
Tap “COMMON Wi-Fi SETTING”.
(Operation on this camera)
.
5
Tap “ACCESS POINTS”.
(Operation on this camera)
.
6
Tap “ADD”.
(Operation on this camera)
.
7
Tap “EZ REGISTRATION WPS”.
(Operation on this camera)
Using Wi-Fi by Creating a QR Code (GZ-EX555/GZ-EX515)
206
.
8
Activate WPS of the access point (wireless LAN router) within 2 minutes.
0
To activate WPS, refer to the instruction manual of the device in use.
9
After registration is complete, tap “OK” on the camera’s screen.
(Operation on this camera)
.
o
Search the access point, and select from the list.
Set the name (SSID) of the access point (wireless LAN router) and the
password beforehand.
1
Tap “MENU”.
(Operation on this camera)
.
0
The top menu appears.
2
Tap the “Wi-Fi” (
Q
) icon.
(Operation on this camera)
.
3
Tap 1 on the lower right of the screen.
(Operation on this camera)
.
4
Tap “COMMON Wi-Fi SETTING”.
(Operation on this camera)
.
5
Tap “ACCESS POINTS”.
(Operation on this camera)
.
6
Tap “ADD”.
(Operation on this camera)
.
7
Tap “SEARCH”.
(Operation on this camera)
.
0
The search results appear on the camera’s screen.
8
Tap the name (SSID) of the desired access point from the list of search
results.
(Operation on this camera)
.
9
Register a password.
(Operation on this camera)
.
0
Tap on the on-screen keyboard to enter characters. The character
changes with every tap.
Using Wi-Fi by Creating a QR Code (GZ-EX555/GZ-EX515)
207
“ABC”, for example, enter “A” by tapping once, “B” by tapping twice,
or “C” by tapping 3 times.
0
Tap “DELETE” to delete a character.
0
Tap “CANCEL” to exit.
0
Tap “A/a/1” to select character input type from upper case letter, lower
case letter, and number.
0
Tap E or F to move one space to the left or right.
0
The password is not required if the wireless LAN router is not security
protected.
10
After registration is complete, tap “OK” on the camera’s screen.
(Operation on this camera)
.
0
Other methods, such as “Manual Registration” and “WPS PIN
Registration” are also available. Refer to the following link for details.
“Registering the Access Points of the Camera to Connect (ACCESS
POINTS)” (A p. 150)
o
Regular Operation
Connect the TV to the access point.
0
Connect the DLNA compatible TV to the access point (this function is
available for a connection via cables as well)
0
For details on connecting your TV to a Wi-Fi network, please refer to the
instruction manual of the TV in use.
Connecting This Camera to the TV
1
Tap “MENU”.
(Operation on this camera)
.
0
The top menu appears.
2
Tap the “Wi-Fi” (
Q
) icon.
(Operation on this camera)
.
3
Tap “TV MONITORING” (K).
(Operation on this camera)
.
4
Tap “START” (I).
(Operation on this camera)
.
5
Start making a connection.
(Operation on this camera)
.
6
Connection in progress
.
7
After the connection is completed, wait for the DLNA device to start up.
(Operation on this camera)
.
0
If a considerable number of videos/still images are recorded in the
camera, it may take some time to start.
8
Images appear on the monitor of the DLNA device
(Operation on DLNA device)
.
0
From the following instructions, perform operations on the DLNA
device.
For details on using the TV, refer to the instruction manual of the TV
in use.
Memo :
0
If no image is displayed during TV monitoring, tap “STOP” to start from
step 1.
0
If the DLNA compatible TV in use cannot detect Everio, tap “STOP” to start
from the step 1 again.
Using Wi-Fi by Creating a QR Code (GZ-EX555/GZ-EX515)
208
Operating the Menu
There are two types of menus in this unit.
0
TOP MENU: Menu that contains all the items specific to the video
recording, still image recording, video playback, and still image playback
modes respectively.
0
SHORTCUT MENU: Menu that contains the recommended functions for
video/still image recording.
Operating the Top Menu
You can configure various settings using the menu.
*The following is a screen of the model with Wi-Fi functions.
1
Tap “MENU”.
.
0
The top menu appears.
0
The menu differs according to the mode in use.
2
Tap the desired menu.
.
3
Tap the desired setting.
.
Memo :
0
To display the previous/next menu
Tap 0 or 1.
0
To exit the screen
Tap L (quit).
0
To display the help file
Tap K (help) and tap the item.
Help file may not be available for some items.
Settings Menu
209
Operating the Shortcut Menu
.
You can configure various settings of the recommended functions in the
video/still image recording mode using the shortcut menu.
*The following is a screen of the model with Wi-Fi functions.
1
Tap “MENU”.
.
2
Tap the shortcut icon (F).
.
0
The shortcut menu appears.
3
Tap the desired menu and setting.
<Shortcut Menu During Video Recording Mode>
.
0
Allows settings of “EASY STORAGE”, “ANIMATION EFFECT”,
“DECORATE FACE EFFECT”, “SMILE SHOT”, “SMILE%/NAME
DISPLAY” and “BACKLIGHT COMP. (manual mode only) ”.
<Shortcut Menu During Still Image Recording Mode>
.
0
Allows settings of “SMILE SHOT”, “SMILE%/NAME DISPLAY” and
“BACKLIGHT COMP. (manual mode only) ”.
Memo :
0
To return to the top menu
Tap J (return).
0
To exit the screen
Tap L (quit).
0
To display the help file
Tap K (help) and tap the item.
Settings Menu
210
RECORD SETTING Menu (video)
.
SCENE SELECT
Settings to suit the shooting condition can be selected.
“Shooting According to Scene (Subject)” (A p. 35)
*Displayed only in the manual recording mode.
FOCUS
Focus can be adjusted manually.
“Adjusting Focus Manually” (A p. 36)
*Displayed only in the manual recording mode.
BRIGHTNESS ADJUST
Adjusts the overall brightness of the screen.
“Adjusting Brightness” (A p. 37)
*Displayed only in the manual recording mode.
BACKLIGHT COMP.
Corrects the image when the subject appears dark due to backlight.
“Setting Backlight Compensation” (A p. 38)
*Displayed only in the manual recording mode.
WHITE BALANCE
Adjusts the color according to the light source.
“Setting White Balance” (A p. 39)
*Displayed only in the manual recording mode.
TELE MACRO
Enables close-up shots when using the telephoto (T) end of the zoom.
“Taking Close-up Shots” (A p. 40)
*Displayed only in the manual recording mode.
TOUCH PRIORITY AE/AF
Automatically adjusts focus and brightness based on the subjects’ faces or selected area.
“Capturing Subjects Clearly (TOUCH PRIORITY AE/AF)” (A p. 47)
LIGHT
Turns on/off the light.
SettingDetails
OFFDoes not light up.
AUTOLights up automatically when the surrounding is dark.
ONLights up at all times.
GAIN UP
Makes the subject appear bright automatically when recording in dark places.
Setting
Details
OFFDeactivates the function.
ONElectrically brightens the scene when it is dark.
AUTO SLOW-SHUTTERSlows down the shutter speed to brighten the scene when it is dark.
Memo :
0
Although “AUTO SLOW-SHUTTER” brightens the scene more than “ON”, movements of the subject may become unnatural.
Settings Menu
211
WIND CUT
Reduces the noise caused by wind.
SettingDetails
OFFDeactivates the function.
ONActivates the function.
AUTOActivate the function automatically.
SHUTTER MODE
Continuous shooting settings can be adjusted.
SettingDetails
RECORD ONE SHOTRecords one still image.
CONTINUOUS SHOOTINGRecords still images continuously while the SNAPSHOT button is pressed.
Memo :
0
The size of the still image that is captured in the video mode is 1,920 x 1,080.
0
Some SD cards may not support continuous shooting.
0
The continuous shooting speed will drop if this function is used repeatedly.
SMILE SHOT
Automatically captures a still image upon detection of a smile.
“Capturing Smiles Automatically (SMILE SHOT)” (A p. 48)
SMILE%/NAME DISPLAY
Displays the names and smile levels (%) when faces are detected.
“Setting SMILE%/NAME DISPLAY” (A p. 53)
PET SHOT
Automatically captures a still image upon detection of the face of a pet, such as dogs or cats.
“Capturing Pets Automatically (PET SHOT)” (A p. 49)
SEAMLESS RECORDING (GZ-EX555)
Continues recording on the SD card without stopping when the remaining space on the built-in memory runs out.
SettingDetails
OFFDoes not switch recording media automatically.
ONSwitches recording media automatically.
Memo :
0
Seamless recording cannot be performed if there is not enough free space in the SD card.
0
q appears if seamless recording cannot be performed.
0
To start seamless recording again after the previous session is complete, it is necessary to combine seamless videos, or delete the combination information
of the seamless videos.
0
Seamless recording can not be performed if the video recording format is iFrame.
“Combining Videos Recorded by Seamless Recording (GZ-EX555)” (A p. 86)
VIDEO REC FORMAT (GZ-EX555/GZ-EX515)
Select the recording format from “AVCHD”, or “iFrame” which is suitable for importing to “iMovie”.
Setting
Details
AVCHDRecords in AVCHD format.
iFrameRecord in iFrame format, which is suitable for importing to iMovie.
VIDEO QUALITY
Sets the video quality.
Setting
Details
Settings Menu
212
(if the video recording format is AVCHD)
UXPEnables recording in the best picture quality.
0
Applies to Blu-ray discs only. Videos taken in high-definition quality cannot be saved to DVDs.
XPEnables recording in high picture quality.
SPEnables recording in standard quality.
EPEnables long recordings.
SSWEnables recording in SD quality.
SEWEnables recording in SD quality for a long period of time.
(If the video recording format is iFrame) (GZ-EX555/GZ-EX515)
iFrame(1280x720)Records videos that are suitable for editing in 1280x720 resolution.
iFrame(960x540)Records videos that are suitable for editing in 960x540 resolution.
Memo :
0
Set to “UXP” or “XP” mode when recording fast-moving scenes or scenes with extreme changes of brightness to avoid noise.
0
You can change to the desired “VIDEO QUALITY” by tapping on it from the remaining recording time display.
ZOOM
Sets the maximum zoom ratio.
SettingDetails
38x OPTICALEnables recording with 1 - 38x optical zoom. Set this when digital zoom is not desired.
65x DYNAMIC
(62x DYNAMIC)
Enables recording with 1 - 38x optical zoom and 39 - 65x dynamic zoom, when the image stabilizer is set to
off.
Enables recording with 1 - 38x optical zoom and 39 - 62x dynamic zoom, when the image stabilizer is in
normal mode.
Enables recording with 1 - 38x optical zoom and 39 - 59x dynamic zoom, when the image stabilizer is in
active mode.
130x DIGITALEnables recording with 1 - 38x optical zoom and 39 - 130x digital zoom.
200x DIGITALEnables recording with 1 - 38x optical zoom and 39 - 200x digital zoom.
Memo :
0
When digital zoom is used, the image becomes grainy as it is digitally enlarged.
0
The angle of view changes when the image stabilizer is turned on or off.
ZOOM MIC
Sets the zoom microphone.
SettingDetails
OFFDeactivates the zoom microphone.
ONRecords audio sounds in the same direction as the zoom operation.
MIC LEVEL
Make the adjustments such that “MIC LEVEL” does not turn red.
Setting
Details
OFFHides display of microphone input level.
ONShows display of microphone input level.
MIC LEVEL SETTING
Sets the microphone level.
Make the adjustments such that “MIC LEVEL” does not turn red.
Setting
Details
Settings Menu
213
+2Increases the microphone input level.
+1Increases the microphone input level slightly.
0The microphone input level is not changed.
-1Decreases the microphone input level slightly.
-2Decreases the microphone input level.
HEADPHONE VOL. ADJ.
Sets the volume level of the connected headphones.
0
To turn up the volume, tap + on the touch screen.
0
To turn down the volume, tap - on the touch screen.
Adjusting the Volume Level of Headphones During Playback:
0
To turn up the volume, set the zoom lever to the T end.
0
To turn down the volume, set the zoom lever to the W end.
K2 TECHNOLOGY
Reduces the degradation of sound quality caused by digital signal processing, and records a sound quality close to the original.
SettingDetails
OFFDeactivates K2 TECHNOLOGY.
ONActivates K2 TECHNOLOGY.
Settings Menu
214
SPECIAL RECORDING Menu (video)
.
HIGH SPEED RECORDING
You can record videos in slow-motion by increasing the recording speed to emphasize the movements, and play back the slow-motion video smoothly.
This is a handy function for checking movements, such as golf swings.
“Slow-motion (High-speed) Recording” (A p. 56)
TIME-LAPSE RECORDING
This function enables the changes of a scene that occur slowly over a long period to be shown within a short time by taking frames of it at a certain interval.
This is useful for making observations such as the opening of a flower bud.
“Recording at Intervals (TIME-LAPSE RECORDING)” (A p. 57)
STOP-MOTION REC
By pressing the SNAPSHOT button, 2 frames of still images are recorded, and stop-motion videos are created by piecing these images together.
“Recording Stop-Motion Videos (STOP-MOTION REC)” (A p. 59)
AUTO REC
Starts recording automatically by sensing the changes in subject’s movement (brightness) within the red frame displayed on the LCD monitor.
“Recording Automatically by Sensing Movements (AUTO REC)” (A p. 60)
ANIMATION EFFECT
Records videos with animation effects.
“Recording with Animation Effects (ANIMATION EFFECT)” (A p. 42)
DECORATE FACE EFFECT
Detects faces and enables decorations such as crowns or sunglasses to be added.
“Recording with Face Decorations (DECORATE FACE EFFECT)” (A p. 44)
STAMP
Records videos with various decorative stamps.
“Recording with Decorative Stamps (STAMP)” (A p. 45)
HANDWRITING EFFECT
Records videos with your personal handwriting or drawing.
If the writings and drawings appear to be misaligned, correct the touch position.
“Recording with Personal Handwriting (HANDWRITING EFFECT)” (A p. 46)
DATE/TIME RECORDING
You can record videos together with the date and time.
Set this when you want to save the file with date and time display.
(The date and time cannot be deleted after recording.)
“Recording Videos with Date and Time” (A p. 63)
Settings Menu
215
RECORD SETTING Menu (still image)
.
SCENE SELECT
Settings to suit the shooting condition can be selected.
“Shooting According to Scene (Subject)” (A p. 35)
*Displayed only in the manual recording mode.
FOCUS
Focus can be adjusted manually.
“Adjusting Focus Manually” (A p. 36)
*Displayed only in the manual recording mode.
BRIGHTNESS ADJUST
Adjusts the overall brightness of the screen.
“Adjusting Brightness” (A p. 37)
*Displayed only in the manual recording mode.
BACKLIGHT COMP.
Corrects the image when the subject appears dark due to backlight.
“Setting Backlight Compensation” (A p. 38)
*Displayed only in the manual recording mode.
WHITE BALANCE
Adjusts the color according to the light source.
“Setting White Balance” (A p. 39)
*Displayed only in the manual recording mode.
TELE MACRO
Enables close-up shots when using the telephoto (T) end of the zoom.
“Taking Close-up Shots” (A p. 40)
*Displayed only in the manual recording mode.
TOUCH PRIORITY AE/AF
Automatically adjusts focus and brightness based on the subjects’ faces or selected area.
“Capturing Subjects Clearly (TOUCH PRIORITY AE/AF)” (A p. 47)
LIGHT
Turns on/off the light.
SettingDetails
OFFDoes not light up.
AUTOLights up automatically when the surrounding is dark.
ONLights up at all times.
SELF-TIMER
Use this when taking a group photo.
“Taking Group Shots (Self-timer)” (A p. 61)
GAIN UP
Makes the subject appear bright automatically when recording in dark places.
Setting
Details
OFFDeactivates the function.
ONElectrically brightens the scene when it is dark.
Memo :
Settings Menu
216
0
Setting can be adjusted separately for videos.
“GAIN UP (Video)” (A p. 211)
SHUTTER MODE
Continuous shooting settings can be adjusted.
SettingDetails
RECORD ONE SHOTRecords one still image.
CONTINUOUS SHOOTINGRecords still images continuously while the SNAPSHOT button is pressed.
Memo :
0
Continuous shooting is not available when image size is set to 3840x2160.
0
Some SD cards may not support continuous shooting.
0
The continuous shooting speed will drop if this function is used repeatedly.
SMILE SHOT
Automatically captures a still image upon detection of a smile.
“Capturing Smiles Automatically (SMILE SHOT)” (A p. 48)
SMILE%/NAME DISPLAY
Displays the names and smile levels (%) when faces are detected.
“Setting SMILE%/NAME DISPLAY” (A p. 53)
PET SHOT
Automatically captures a still image upon detection of the face of a pet, such as dogs or cats.
“Capturing Pets Automatically (PET SHOT)” (A p. 49)
IMAGE SIZE
Sets the image size (number of pixels) for still images.
SettingDetails
3840X2160(8M)
1920X1080(2M)
Takes still images with aspect ratio 16:9.
0
The sides of still images recorded in 16:9 aspect ratio may be cut off when printed.
1440X1080(1.5M)
640X480(0.3M)
Takes still images with aspect ratio 4:3.
Settings Menu
217
SPECIAL RECORDING Menu (still image)
.
AUTO REC
Starts recording automatically by sensing the changes in subject’s movement (changes in brightness) within the red frame displayed on the LCD monitor.
“Recording Automatically by Sensing Movements (AUTO REC)” (A p. 60)
Settings Menu
218
PLAYBACK SETTING Menu (video)
.
SEARCH DATE
Narrows down the video index screen according to recording dates.
“Searching for a Specific Video/Still Image by Date” (A p. 80)
DISPLAY DATE/TIME
Sets whether to display the recording date and time during video playback.
SettingDetails
OFFDoes not display the date and time during playback.
ONDisplays the date and time during playback.
DIGEST PLAYBACK
Plays back a digest of the recorded videos.
“ DIGEST PLAYBACK ” (A p. 74)
PLAYBACK PLAYLIST
Plays back the playlists that you have created.
“ PLAYBACK PLAYLIST ” (A p. 76)
PLAYBACK OTHER FILE
Plays videos with defective management information.
“ PLAYBACK OTHER FILE ” (A p. 77)
Settings Menu
219
EDIT Menu (video)
.
PROTECT/CANCEL
Protects files from being deleted accidently.
“Protecting/Releasing Protection of the Currently Displayed File” (A p. 84)
“Protecting/Releasing Protection of Selected Files” (A p. 85)
COPY
Copies files from the built-in memory to the SD card.
“Copying Files to an SD Card (GZ-EX555)” (A p. 96)
MOVE
Moves files from the built-in memory to the SD card. Files that are moved will be deleted from the built-in memory.
“Moving Files to an SD Card (GZ-EX555)” (A p. 97)
EDIT PLAYLIST
A list in which your favorite videos are arranged is called a playlist.
By creating a playlist, you can play back only your favorite videos in the order you like.
The original video file remains even when it is registered to a playlist.
“Creating Playlists with Selected Files” (A p. 88)
“Creating Playlists by Date” (A p. 90)
“Editing Playlists” (A p. 91)
TRIMMING
Select the required part of a video and save it as a new video file.
The original video remains in its existing location.
“Capturing a Required Part in the Video (TRIMMING)” (A p. 87)
SEAMLESS REC CTRL (GZ-EX555)
Videos that are recorded on two separate media and with “SEAMLESS RECORDING” in the video recording menu enabled can be combined into a single
video.
“Combining Videos Recorded by Seamless Recording (GZ-EX555)” (A p. 86)
Settings Menu
220
PLAYBACK SETTING Menu (still image)
.
SEARCH DATE
Narrows down the still image index screen according to recording dates.
“Searching for a Specific Video/Still Image by Date” (A p. 80)
SLIDE SHOW EFFECTS
Sets the transition effects in slideshow playback.
SettingDetails
SLIDESwitches the screen by sliding in from right to left.
BLINDSSwitches the screen by dividing into vertical strips.
CHECKERBOARDSwitches the screen by changing through a checkered pattern.
RANDOMSwitches the screen with a random effect from SLIDE, “BLINDS”, and “CHECKERBOARD”.
Memo :
0
Slideshow effects are not available when playing back still images in external devices (such as USB external hard disk drives).
Settings Menu
221
EDIT Menu (still image)
.
PROTECT/CANCEL
Protects files from being deleted accidently.
“Protecting/Releasing Protection of the Currently Displayed File” (A p. 84)
“Protecting/Releasing Protection of Selected Files” (A p. 85)
COPY
Copies files from the built-in memory to the SD card.
“Copying Files to an SD Card (GZ-EX555)” (A p. 96)
MOVE
Moves files from the built-in memory to the SD card. Files that are moved to the SD card will be deleted from the built-in memory.
“Moving Files to an SD Card (GZ-EX555)” (A p. 97)
Settings Menu
222
SETUP (video/still image)
.
Mobile User Guide
Displays the QR code to access the Mobile User Guide.
.
0
The portal site appears when the QR code has been read correctly.
Select the model name of your camera to display its Mobile User Guide.
Memo :
0
To read the QR code, a relevant application is required. Enter the URL in the internet browser manually if the QR code cannot be read.
0
The Mobile User Guide is supported by Android devices and iPhone. You can view it on standard browsers such as Google Chrome (Android) and Mobile
Safari (iPhone).
0
QR Code is a registered trademark of Denso Wave Incorporated.
CLOCK ADJUST
Resets the current time or sets to the local time when using this unit overseas.
“Clock Setting” (A p. 21)
“Setting the Clock to Local Time when Traveling” (A p. 25)
“Setting Daylight Saving Time” (A p. 25)
DATE DISPLAY STYLE
Sets the order of year, month, day and the time display format (24H/12H).
Sorting OrderTime Display
month.day.year12h
year.month.day24h
day.month.year-
LANGUAGE
The language on the display can be changed.
“Changing the Display Language” (A p. 23)
FACE REGISTRATION (recording only)
Registers the faces of people who are often shot with this unit.
“Registering Human Face Personal Authentication Information” (A p. 51)
MONITOR BRIGHTNESS
Sets the brightness of the LCD monitor.
Setting
Details
AUTOSets the brightness automatically to “4” when using outdoors and to “3” when using indoors.
4Brightens the backlight of the monitor regardless of the surrounding conditions.
3Sets to the standard brightness.
2Darkens the backlight of the monitor regardless of the surrounding conditions.
1Sets to dim brightness.
Helps to save battery life when selected.
Settings Menu
223
OPERATION SOUND
Turns on or off the operation sound.
SettingDetails
OFFTurns off the operation sound.
ONTurns on the operation sound.
AUTO POWER OFF
Prevents the situation of forgetting to turn off the power when this is set.
SettingDetails
OFFPower is not turned off even if this unit is not operated for 5 minutes.
ONTurns off the power automatically if this unit is not operated for 5 minutes.
Memo :
0
When using battery, power is turned off automatically if this unit is not operated for 5 minutes.
0
When using the AC adapter, this unit goes into standby mode.
QUICK RESTART
Enables the power to turn on quickly when the LCD monitor is opened again within 5 minutes.
SettingDetails
OFFDeactivates the function.
ONEnables the power to turn on quickly when the LCD monitor is opened again within 5 minutes.
Memo :
0
The power consumption within 5 minutes after the LCD monitor is closed is reduced.
DEMO MODE
Plays a demonstration of the special features of this unit.
SettingDetails
OFFDeactivates the function.
ONPlays a demonstration of the special features of this unit.
Memo :
0
This mode is not available in the playback mode.
0
“SMILE%/NAME DISPLAY” is set to “ON” when the demo mode is activated.
“Setting SMILE%/NAME DISPLAY” (A p. 53)
TOUCH SCREEN ADJUST
Adjusts the response position of the buttons on the touch screen.
“Adjusting the Touch Panel” (A p. 18)
FACTORY PRESET
Returns all the settings to their default values.
FIRMWARE UPDATE
Updates the functions of this unit to the latest version.
For details, refer to the JVC homepage.
(When no program to update the software of this unit is available, nothing will be provided on the homepage.)
Gebruikershandleiding.com neemt misbruik van zijn services uitermate serieus. U kunt hieronder aangeven waarom deze vraag ongepast is. Wij controleren de vraag en zonodig wordt deze verwijderd.
Product:
Spelregels forum
Om tot zinvolle vragen te komen hanteren wij de volgende spelregels:
lees eerst de handleiding door;
controleer of uw vraag al eerder door iemand anders is gesteld;
probeer uw vraag zo duidelijk mogelijk te stellen;
heeft u een probleem en al geprobeerd om dit op te lossen, vermeld dit erbij aub;
heeft u een oplossing gekregen van een bezoeker dan horen wij dat graag in dit forum;
wilt u een reactie geven op een vraag of antwoord, gebruik dan niet dit formulier maar klik op de knop 'reageer op deze vraag';
uw vraag wordt direct op de website gezet; vermijd daarom persoonlijke gegevens in te vullen;
Belangrijk! Als er een antwoord wordt gegeven op uw vraag, dan is het voor de gever van het antwoord nuttig om te weten als u er wel (of niet) mee geholpen bent! Wij vragen u dus ook te reageren op een antwoord.
Belangrijk! Antwoorden worden ook per e-mail naar abonnees gestuurd. Laat uw emailadres achter op deze site, zodat u op de hoogte blijft. U krijgt dan ook andere vragen en antwoorden te zien.
Abonneren
Abonneer u voor het ontvangen van emails voor uw JVC GZ-EX555 bij:
nieuwe vragen en antwoorden
nieuwe handleidingen
U ontvangt een email met instructies om u voor één of beide opties in te schrijven.
Ontvang uw handleiding per email
Vul uw emailadres in en ontvang de handleiding van JVC GZ-EX555 in de taal/talen: Engels als bijlage per email.
De handleiding is 13,89 mb groot.
U ontvangt de handleiding per email binnen enkele minuten. Als u geen email heeft ontvangen, dan heeft u waarschijnlijk een verkeerd emailadres ingevuld of is uw mailbox te vol. Daarnaast kan het zijn dat uw internetprovider een maximum heeft aan de grootte per email. Omdat hier een handleiding wordt meegestuurd, kan het voorkomen dat de email groter is dan toegestaan bij uw provider.
Stel vragen via chat aan uw handleiding
Stel uw vraag over deze PDF
Uw handleiding is per email verstuurd. Controleer uw email
Als u niet binnen een kwartier uw email met handleiding ontvangen heeft, kan het zijn dat u een verkeerd emailadres heeft ingevuld of dat uw emailprovider een maximum grootte per email heeft ingesteld die kleiner is dan de grootte van de handleiding.
Er is een email naar u verstuurd om uw inschrijving definitief te maken.
Controleer uw email en volg de aanwijzingen op om uw inschrijving definitief te maken
U heeft geen emailadres opgegeven
Als u de handleiding per email wilt ontvangen, vul dan een geldig emailadres in.
Uw vraag is op deze pagina toegevoegd
Wilt u een email ontvangen bij een antwoord en/of nieuwe vragen? Vul dan hier uw emailadres in.