7.Do not block any ventilation openings.Install in accordance with manufacturer's instructions.
8.Do not install near any heat sources such as radiators,heat registers,stoves or other apparatus that produce heat.
9.Do not defeat the safety purpose of the grounding type plug.A polarized plug has two blades with one wider
than the other.A grounding type plug has two blades and a third grounding prong.The wide blade or the third
prong is provided for your safety.If the provided plug does not fit into your outlet,consult an electrician for
replacement of the obsolete outlet.
10.Protect the power cord from being walked on or pinched particularly at plugs,convenience receptacle and the
point where the power cord connects to the apparatus.
11.Only use attachments/accessories specified by the manufacturer.
12.Unplug this apparatus during lightning storms or when unused for long periods of time.
13.Refer all servicing to qualified service personnel.Servicing is required when the apparatus has been damaged
in any way,including:power-supply cord or plug is damaged,liquid has been spilled or objects have fallen into the
apparatus,the apparatus has been exposed to rain or moisture,does not operate normally,or has been dropped.
14.The appliance coupler of the power supply cord is used as the ultimate disconnect device from the mains.
The appliance coupler shall remain readily operable.
15.The apparatus shall be connected to mains socket outlet with a protective earthing connection.
WARNING
To reduce the risk of fire or electrical shock,do not expose the apparatus to rain or moisture.The apparatus shall not
be exposed to dripping or splashing and no objects filled with liquids,such as vases,shall be placed on the apparatus.
As with any electronic product,use care not to spill liquids into any part of the system.Liquids can cause a failure
and/or a fire hazard.
The lightning flash with the arrowhead symbol,within an equilateral triangle,is to alert the user to the
presence of insulated “dangerous voltage”within the products enclosure that may be of sufficient
magnitude to constitute a risk of electric shock to humans.
CAUTION!
TO REDUCE THE RISK OF ELECTRONIC SHOCK - DO NOT REMOVE COVER.NO USER
SERVICEABLE PARTS INSIDE.REFER SERVICING TO QUALIFIED PERSONNEL.DO NOT
EXPOSE THIS APPARATUS TO RAIN OR MOISTURE.
Control2.UsersGuide.0708 7/30/08 5:04 PM Page 2
3
Contents
Thank You for Purchasing the JBL Control 2P Compact Powered Monitor
The Control 2P Compact Powered Reference Monitor System combines legendary JBL loudspeaker
design with powerful amplification to deliver rich,accurate performance for demanding audio
applications.The compact design,rugged enclosure,and professional feature-set make the Control 2P
Compact Powered Reference Monitor ideal for desk-top recording and video production,audio visual
presentations,professional broadcast applications,and monitoring of electronic musical instruments.
FEATURES
•Studio Quality Transducers for accuracy,and rich bass response
• 35 Watt Dual Channel Power Amplifier and high-sensitivity drivers produce exceptional output
• Balanced XLR / 1/4" Neutrik®* Combo,and unbalanced RCA inputs allow connection to a wide
range of signal sources
• Stereo Headphone Jack allows monitoring using headphones
• Side-mounted Volume Control simultaneously controls Left and Right speakers
• High Frequency Adjust Control allows fine-tuning of High Frequency response for application requirements
• Magnetically-Shielded Transducers for use near CRT monitors and magnetically-sensitive equipment
• Internal Peak Limiter and Overload Protection circuit protects the system from continuous over-driving
• Wall-mount capable using optional MTC-2P Mounting Kit
• Included Snap-On Pedestals optimize the listening angle for desk top applications
WHAT IS INCLUDED
CONTROL 2P Stereo Pair (C2PS) Includes:
• One Control 2P powered Master Speaker
• One Control 2P Extension Speaker
• Extension Speaker Wire with right-angle plug.
• Universal Power Supply
• Two Snap-On Pedestals
• User's Guide
CONTROL 2P Master Speaker (C2PM) Includes:
• One Control 2P powered Master Speaker
• One Universal Power Supply
• One Snap-On Pedestal
• User's Guide
OPTIONAL ACCESSORIES
MTC-2P Wall Mount KitIncludes:
• Two Wall Mount Brackets
• Wrench
• One Power Supply Holder instructions.
• User's Guide Conventions:
Except where noted,all instructions in this manual apply to the C2PS and C2PM models.
The use of the word “speakers”(plural) also applies to the single C2PM model speaker.
*Neutrikand the names of Neutrik products referenced herein are either trademarks and/or service marks of Neutrik.
ENGLISH
Control2.UsersGuide.0708 7/30/08 5:04 PM Page 3
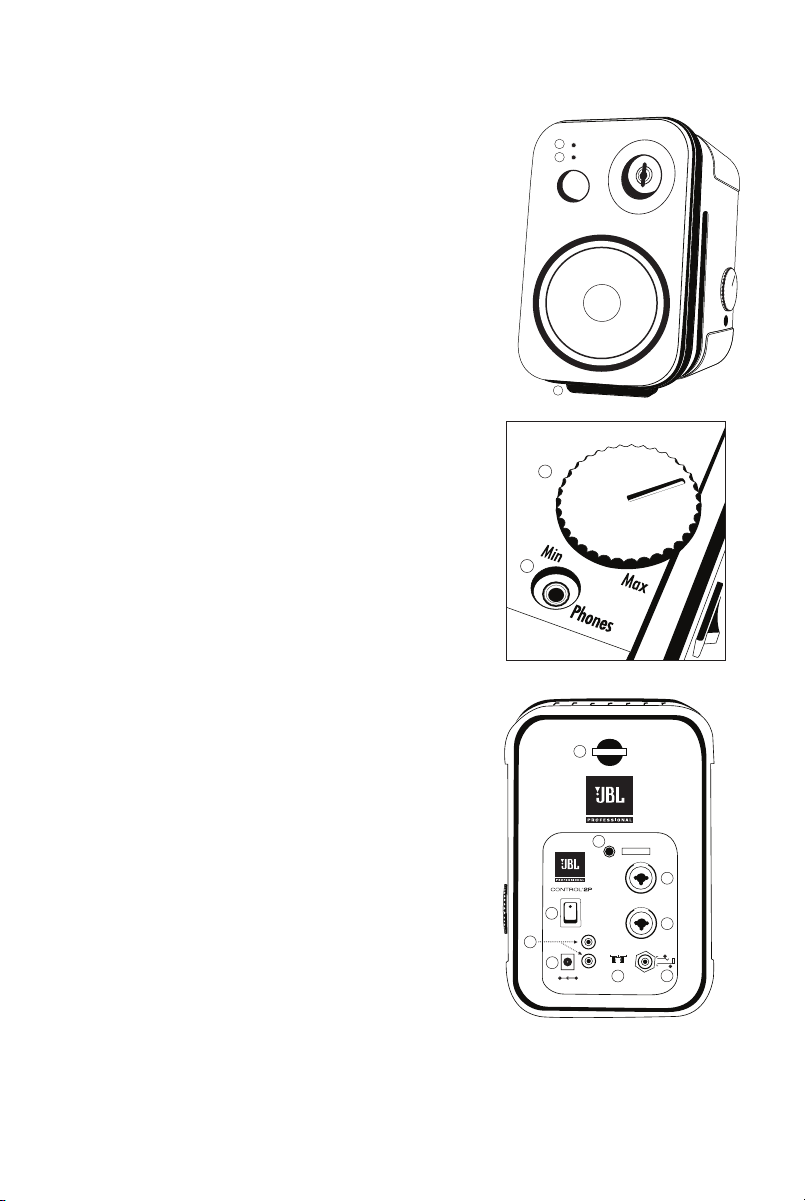
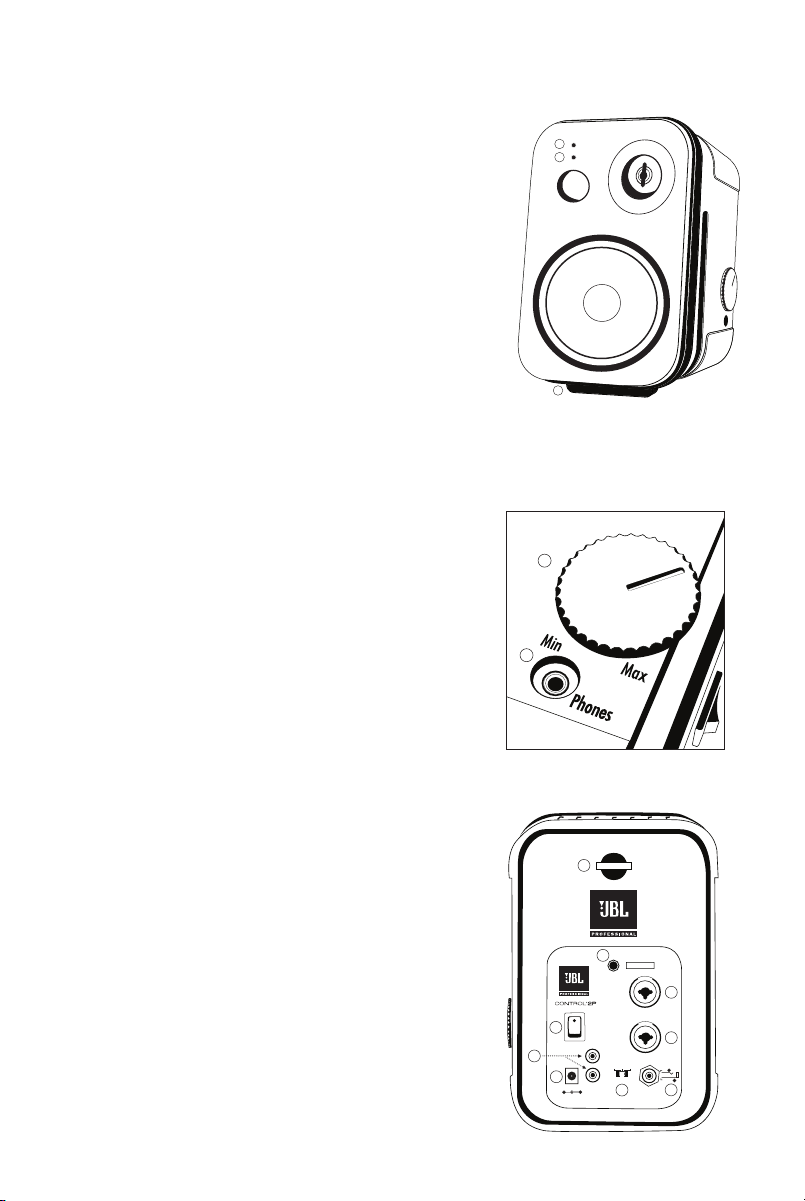
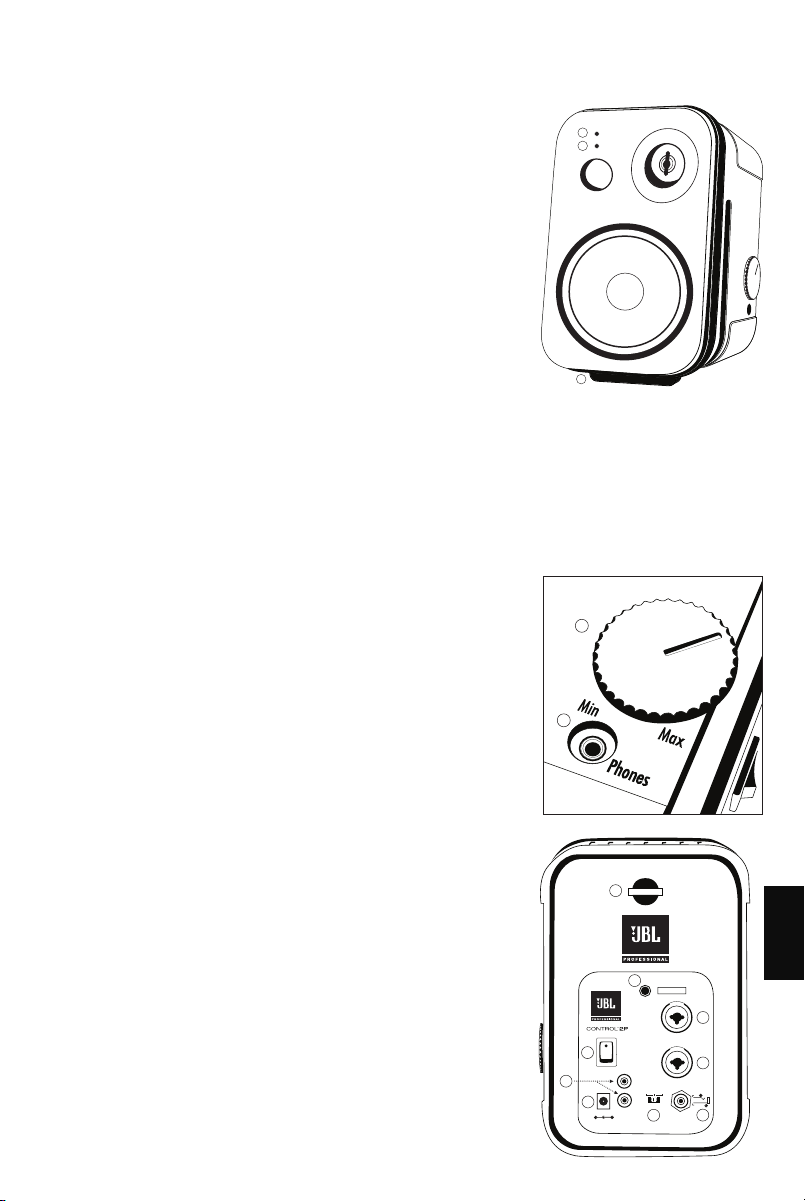
FRONT VIEW
1.WHITE LED- Illuminates when the Control 2P is connected to a power
source and the POWER SWITCH is set to ON.
2.RED LED- Flashes intermittently when the Control 2P approaches thermal
protect mode.When the Red LED is flashing,system volume should be
reduced.When the Red LED glows continuously,the Control 2P should be
turned-off and allowed to cool before re-powering the system.
3.SNAP-ON PEDESTAL- Use these adapters to adjust the vertical coverage
angle of the Control 2P for optimum performance in desk-top applications.
SIDE VIEW
4.VOLUME CONTROL- Adjusts the volume output of the Control 2P and
connectedextension speaker.
5.HEADPHONE JACK- 3.5 mm (1/8") stereo jack for headphones.
When headphones are connected to this jack,the speakers are automatically
muted.CAUTION:listening to music at high volume levels using head-
phones may lead to hearing damage.
REAR VIEW
6.POWER SWITCH- Turns the Control 2P system OFF and ON.
7.MOUNTING BRACKET ATTACHMENT POINT- This 1/4"x 20 TPI
(threads per inch) fitting allows attachment of the optional MTC-2P
wall mounting bracket.*
8.SAFETY HOOK- Attach suitable safety cable to this hook when
mounting speakers.*
9.MASTER XLR/1/4" INPUT- A combination XLR and TRS balanced
line-level input.3-pin XLR or 1/4"TRS connectors can be connected to
this jack.Note:if a signal is connected to this jack only,sound will only
emanate from the Control 2P Master loudspeaker.Signal will not be fed
to both loudspeakers.
10.EXTENSION SPEAKER XLR/1/4"INPUT- A combination XLR and
TRS balanced line-level input.3-pin XLR or 1/4"TRS connectors can be
connected to this jack.NOTE:If a signal is connected to this jack only,
sound will only emanate from the Control 2P Extension loudspeaker.
Signal will not be fed to both loudspeakers.
11.DC POWER INPUT- Input connector for the external power supply.
12.RCA INPUTS- Unbalanced input jacks for RCA style connectors.
NOTE:if a signal is connected to the red RCA input jack,sound will
only emanate from the Control 2P Master loudspeaker.If a signal is
connected to the white RCA input jack,sound will only emanate from the
Control 2P Extension loudspeaker.NOTE:Do not simultaneously connect
sources to the RCA inputs and the XLR/1/4" inputs.Doing so may
compromise performance.
13.HF ADJUST SWITCH- Use this switch to adjust the amount of high
frequency produced by the loudspeaker(s).The 0 dB setting is the normal
setting.Use the -2 dB setting to decrease the amount of high frequency
produced by the speakers.Use the +2 dB setting to increase the amount
of high frequency produced by the speakers.
14.EXTENSION SPEAKER JACK- 1/4" output jack for connection of the Control 2P Extension loudspeaker
to the Control 2P Master loudspeaker.When the extension speaker cable plug (included) is removedfrom this jack,
the extension speaker amplifier channel is automatically muted.
15.SAFETY BAR- An attachment point for connection of an optional safety cable or lanyard from an
independent secured mount point.*
4
Features
PHONES
Max
Min
2
1
3
P O WER SWITCH
ON
Extentsion
Spea k er
EXTENTION
SPEAKER
Extention
Spea k er
T ip
-2dB 0dB +2dB
Slee v e
Master
19 VCD
3.4A
UNBALANCED
IMPUTS
P O WER
HF Adjust
Master
Serial Number:
BALANCED INPUTS
1/4 ” T .R.S./XLR
8
7
6
10
9
11
12
1314
4
5
Control2.UsersGuide.0708 7/30/08 5:04 PM Page 4
• For desk-top applications,attach a supplied angle pedestal to the bottom of each speaker as shown.
• Position speakers on a desk-top or secure surface.The Control 2P can be wall-mounted using optional MTC-2P mounting kit.*
• Connect the C2P extension speaker to the master speaker using the supplied extension speaker wire as
illustrated.To ensure proper polarity,connect wire with red sleeve to the red speaker terminal.
• Connect the Control 2P power supply to the Control 2P Master Loudspeaker Power Connector.
• Connect the signal source to the inputs of the Control 2P Master Loudspeaker.Do not simultaneously connect sources to the
RCA inputs and the XLR/1/4" inputs.Doing so may compromise performance.
• Set the POWER SWITCH to the ON position.
• With the sound source producing signal,set the volume control to achieve a suitable listening level.
5
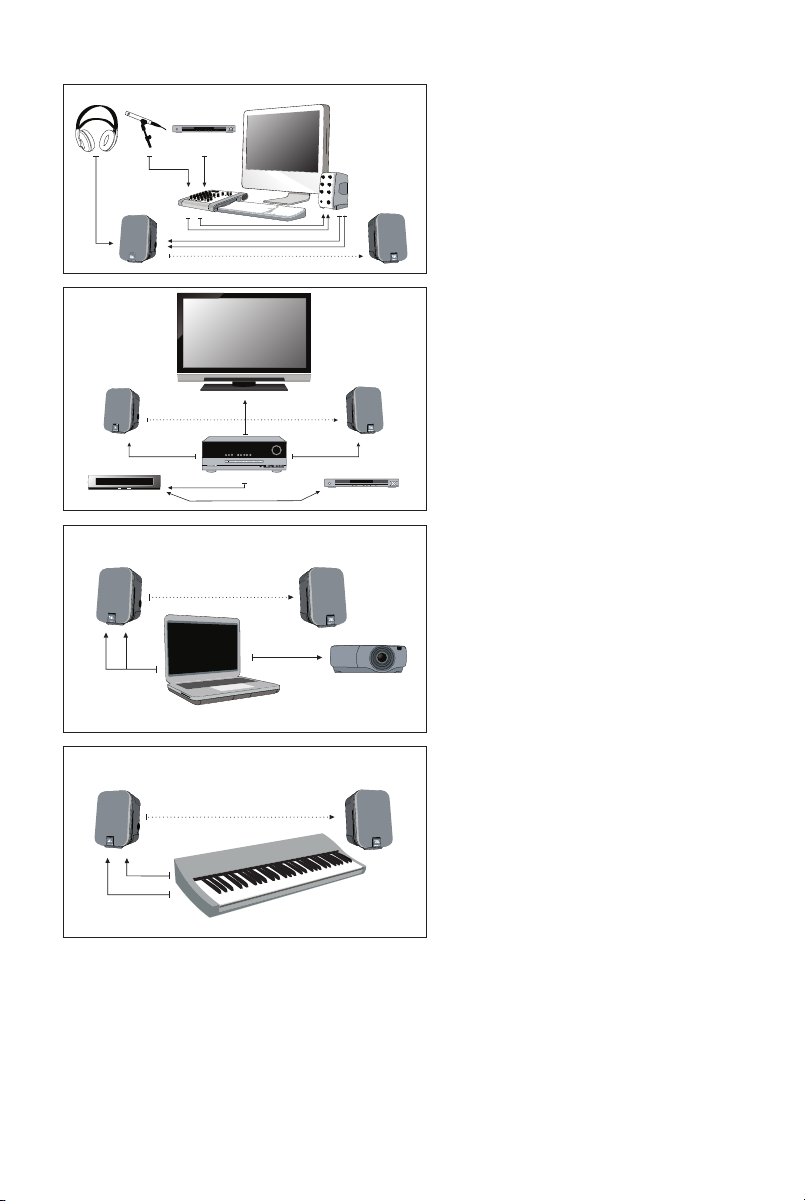
Applications
Extension Speaker
Master Speaker
R
RL
CD Player
HeadphonesMicrophone
CONTROL
CONTROL
2P
2P
2P
CONTROL
CONTR
Set Top BoxDVD Player
Mounted with Optional MTC-2PMounted with Optional MTC-2P
Receiver
Video Connection
Extension Speaker
Master Speaker
CONTRO
CONTROL
2P
2P
2P
2P
CONTROL
CONTROL
Projector
Laptop
VGA Cable
Mounted with Optional MTC-2PMounted with Optional MTC-2P
Extension Speaker
Master Speaker
CONTRO
CONTROL
2P
2P
Keyboard
2P
2P
CONTROL
CONTROL
Mounted with Optional MTC-2PMounted with Optional MTC-2P
Extension Speaker
Master Speaker
CONTRO
CONTROL2P
Recording/ Video Production
The Control 2P adds accurate monitoring to
professional desk-top recording and video production
systems.Connect a pair of headphones to the master
speaker headphone jack for private monitoring.
Electronic Musical Instruments
The Control 2P has the input connectors and the
power to reproduce a wide range of signal sources
including electronic Musical Instruments.
AV Presentations
A pair of Control 2P compact powered monitors,
a portable projector and a laptop computer,make
a “go-anywhere”presentation system.
Entertainment Installation
With the optional MTC-2P kit,the Control 2P can be
wall-mounted to provide professional quality
audio for home and office entertainment installations.
ENGLISH
Control2.UsersGuide.0708 7/30/08 5:04 PM Page 5
6
If there is no sound from your speakers,check these settings on the C2P Master Speaker:
• Make sure a signal source is connected and producing sound
• Make sure the white power ON LED is illuminated on the front of the speaker.
• Confirm the included power supply is connected and the power switch is set to the ON position.
• Make sure the volume control is not set to the full counter clockwise position
• If the C2P Extension Speaker does not produce sound,make sure the extension speaker wire 1/4" plug is
connected to the EXTENSION SPEAKER 1/4" output connector.Make sure the bare-wire end of the cable is
connected to the extension speaker wire terminals.
• If the system sounds as if it lacks low frequency (bass) performance,confirm the bare wire is connected so
the RED wire is connected to the RED speaker wire terminal,and the other wire is connected to the
BLACK speaker wire terminal.
If the above measures do not correct the problem,please contact JBL Professional
NOTE:If the red LED on the front of the speaker flashes due to continuous over-driving of the system,overload-protection may be
activated and no sound will be heard.To resume operation,reduce system volume,turn the power switch OFF and then ON again.
Trouble Shooting
Frequency Response (+/- 3dB):100 Hz – 18 kHz
Frequency Range (-10dB):80 Hz - 20 kHz
Maximum Peak SPL
C2PM Master Only1:111 dB (1)
Maximum Peak SPL Per-Pair1:115 dB (1)
LF Transducer:135 mm (5.25 in) low frequency loudspeaker
HF Transducer:19 mm (.75 in) polycarbonate dome tweeter
Overload Protection:Internal Peak Limiter and Overload Protection
Crossover Frequency:4.2 kHz
Signal Input Connectors (x2):Balanced Neutrik®2Combo XLR 1/4"TRS; Unbalanced RCA
Input Sensitivity:+4 dBu XLR / 1/4"; 0 dBu RCA
Amplifier Power:35 Watts continuous per-channel
Power Requirements:19 VDC / 3.42 A - use only supplied power supply
Headphone Jack:3.5 mm (1/8")
Enclosure Material:Polypropylene Structural Foam
Finish:Black
Dimensions (H x W x D):235 x 159 x 143 mm (9.3 x 6.3 x 5.6 in)
Net Weight Master Speaker:2.6 kg (5.5 lb)
Net Weight Extension Speaker:2.2 kg (4.5 lb)
Shipping Weight per Pair:12.5 lb / 5.8 Kg
Optional Accessories:MTC-2P Mounting Kit3
1IEC Pink Noise at 1 meter.
2Neutrikand the names of Neutrik products referenced herein are either trademarks and/or service marks of Neutrik.
3CAUTION:Unsafe mounting or overhead suspension of any heavy load can result in serious injury and equipment damage.Mounting of speakers
should be done by qualified persons in accordance with all applicable local safetyand construction standards.Be certain to follow the instructions
provided by the manufacturer of the mounting bracket.Before selecting a mounting bracket,be certain that it is capable of supporting the weight of the
speakerto be mounted.
Specifications
Control2.UsersGuide.0708 7/30/08 5:04 PM Page 6
Consignes de sécurité importantes
1.Lisez ces instructions.
2.Conservez ces instructions.
3.Respectez tous les avertissements.
4.Suivez toutes les instructions.
5.N'utilisez pas cet appareil à proximité d'eau.
6.Nettoyez uniquement avec un chiffon sec.
7.Ne bouchez aucun orifice de ventilation.Installez en respectant les instructions du fabricant.
8.N'installez pas à proximité d'une source de chaleur telle qu'un radiateur,une bouche de chaleur,
une cuisinière ou tout autre appareil dégageant de la chaleur.
9.Ne supprimez pas la mise à la terre de la fiche secteur.Une fiche polarisée possède deux lames dont
une est plus large que l'autre.Une fiche de terre possède deux lames plus une broche de terre.
La lame large ou la broche de terre sert à votre sécurité.Si la fiche fournie ne rentre pas dans votre
prise électrique,consultez un électricien pour remplacer la prise obsolète.
10.Protégez le cordon secteur contre tout écrasement ou pincement,particulièrement au niveau de la fiche,
de la prise électrique et de l'endroit où le cordon secteur est relié à l'appareil.
11.Utilisez uniquement des accessoires indiqués par le fabricant.
12.Débranchez l'appareil en cas d'orage ou de longue période sans utilisation.
13.Faites réaliser toute réparation par un technicien qualifié.Une réparation est nécessaire lorsque
l'appareil est endommagé de quelque façon:le cordon ou la fiche secteur est endommagé,
un liquide ou un objet s'est introduit à l'intérieur de l'appareil,l'appareil a été exposé à la pluie
ou à la moisissure,il ne fonctionne pas normalement ou il a subi une chute.
14.Le connecteur du cordon d'alimentation constitue le moyen ultime pour débrancher l'appareil de
la tension secteur.Le connecteur d'alimentation doit rester facile d'accès.
15.L'appareil doit être branché à une prise de terre.
AVERTISSEMENT
•Pour réduire le risque d'incendie ou de choc électrique,n'exposez pas l'appareil à la pluie ou à la moisissure.
•N'exposez pas l'appareil à un ruissellement ou à des éclaboussures et ne placez pas d'objet contenant
un liquide tel un vase sur l'appareil.Comme pour tout produit électronique,veillez à ne pas renverser
de liquide à l'intérieur du système.Les liquides peuvent entraîner une panne et/ou un risque d'incendie.
Le symbole en forme d'éclair à pointe de flèche à l'intérieur d'un triangle équilatéral
avertit l'utilisateur de la présence d'une tension dangereuse non isolée à l'intérieur du
produit qui peut être suffisante pour constituer un risque d'électrocution des personnes.
ATTENTION
POUR RÉDUIRE LE RISQUE DE CHOC ÉLECTRIQUE,NE RETIREZ PAS LE COUVERCLE.AUCUNE PIÈCE À L'INTÉRIEUR
N'EST RÉPARABLE PAR L'UTILISATEUR.POUR TOUTE RÉPARATION,FAITES APPEL À DU PERSONNEL QUALIFIÉ.
N'EXPOSEZ PAS CET APPAREIL À LA PLUIE OU À LA MOISISSURE.
FRANÇAIS
Control2.UsersGuide.0708 7/30/08 5:04 PM Page 7
8
Table des matières
Merci d'avoir fait l'acquisition du moniteur amplifié compact Control 2P JBL.
Le moniteur amplifié compact de référence Control 2P JBL combine la conception légendaire des enceintes JBL et
une amplification puissante pour des performances sonores riches et précises destinées aux applications audio
exigeantes.Avec sa conception compacte,son châssis solide et son ensemble de caractéristiques professionnelles,le
moniteur amplifié compact de référence Control 2P est la solution idéale pour les environnements d'enregistrement et
de production vidéo,le broadcasting professionnel et l'écoute d'instruments de musique électroniques.
CARACTÉRISTIQUES
•Transducteurs de qualité studio pour une réponse basse précise et riche.
•Amplificateur de puissance de 35 watts à deux canaux et moteurs à haute sensibilité pour une
puissance de sortie exceptionnelle:115 dB SPL crête la paire.
•Entrées sur combos Neutrik®* XLR / jack symétriques et sur connecteurs RCA asymétriques pour
le raccordement de sources audio variées.
•Sortie casque stéréo pour l'écoute au casque.
•Réglage de volume logé sur le côté contrôlant simultanément les baffles gauche et droit.
•Réglage d'ajustement des hautes fréquences pour la correction précise des aigus en fonction de l'application.
•Transducteurs à blindage magnétique pour l'utilisation à proximité d'un écran à tube et d'équipements
sensibles au rayonnement magnétique.
•Limiteur de crêtes interne et circuit de protection pour protéger le système contre les surcharges continues.
•Possibilité de montage mural avec le kit optionnel MTC-2P.
•Socles d'ange enfichables inclus pour optimiser l'angle d'écoute avec une station de mixage.
CE QUI EST INCLUS
La paire stéréo CONTROL 2P (C2PS) comprend:
• Un baffle maître Control 2P amplifié
• Un baffle d'extension Control 2P
• Un câble pour baffle d'extension avec connecteur à angle droit.
• Un bloc d'alimentation universel
• Deux socles enfichables
• Un manuel de l'utilisateur
Le baffle maître CONTROL 2P (C2PM) comprend:
• Un baffle maître Control 2P amplifié
• Un bloc d'alimentation universel
• Un socle enfichable
• Un manuel de l'utilisateur
ACCESSOIRES OPTIONNELS
Kit de montage mural MTC-2P comprenant deux supports muraux,une clé,un support pour bloc d'alimentation et
des instructions.
Conventions du manuel de l'utilisateur :sauf précision contraire,toutes les instructions de ce manuel concernent
les modèles C2PS et C2PM.L'utilisation du mot « baffles » (pluriel) désigne aussi le moniteur C2PM seul.
* Neutrik et les noms des produits Neutrik mentionnés ici sont des marques et/ou des marques de service de Neutrik.
Control2.UsersGuide.0708 7/30/08 5:04 PM Page 8
9
Table des matières
VUE AVANT,BAFFLES CONTROL 2P
1.LED BLANCHE - S'allume quand le Control 2P est relié à la tension
secteur et le commutateur POWER est en position ON.
2.LED ROUGE - Clignote quand le Control 2P approche du mode de
protection thermique.Quand la LED rouge clignote,il est conseillé de
baisser le volume du système.Quand la LED rouge reste continuellement
allumée,il est conseillé d'éteindre le Control 2P et de laisser refroidir le
système avant de le rallumer.
3.SOCLE ENFICHABLE - Utilisez ces adaptateurs afin de régler l'angle
de la couverture sonore verticale du Control 2P pour des performances
optimales avec chaque station de travail.
VUE LATÉRALE,BAFFLE MAÎTRE CONTROL 2P
4.RÉGLAGEDE VOLUME - Règle le volume de sortie du Control 2P et du
baffle d'extension connecté.
5.SORTIE CASQUE - Sortie stéréo sur mini-jack de 3,5 mm (1/8") pour casque.Lorsqu'un casque est raccordé à
cette sortie,les baffles sont automatiquement « mutés » (muets).Attention:écouter de la musique à fort volume
avec un casque peut endommager le système auditif.
VUE ARRIÈRE,BAFFLE MAÎTRE CONTROL 2P
6.COMMUTATEUR POWER - Allume (ON) et éteint (OFF) le système Control 2P.
7.POINT DE FIXATION DU KIT DE MONTAGE - Ce logement d'un quart
de pouce avec 20 filets par pouce permet de fixer le support mural
MTC-2P optionnel.*
8.CROCHET DE SÉCURITÉ - Attachez un câble de sécurité approprié
à ce crochet quand vous montez les baffles.*
9.ENTRÉE BAFFLE MAÎTRE SUR XLR / JACK DE 6,35 MM - Entrée
de niveau ligne combinant XLR et jack symétrique.Ce connecteur peut
recevoir un XLR 3 broches ou un jack 3 points de 6,35 mm.Note :
si seul ce connecteur est alimenté par un signal,le son sortira uniquement
par le baffle maître Control 2P.Le signal n'alimentera pas les deux baffles.
10.ENTRÉE BAFFLE D'EXTENSION SUR XLR / JACK DE 6,35 MM
Entrée de niveau ligne combinant XLR et jack symétrique.Ce connecteur
peut recevoir un XLR 3 broches ou un jack 3 points de 6,35 mm.Note:si
seul ce connecteur est alimenté par un signal,le son sortira uniquement par
le baffle d'extension Control 2P.Le signal n'alimentera pas les deux baffles.
11.ENTRÉE POWER DC -Connecteur pour le bloc d'alimentation externe.
12.ENTRÉES RCA - Entrées asymétriques pour connecteurs de type RCA.
Note :si seule l'entrée RCA rouge est alimentée par un signal,le son sortira
uniquement par le baffle maître Control 2P.Si seule l'entrée RCA blanche est
alimentée par un signal,le son sortira uniquement par le baffle d'extension
Control 2P.Note :Ne raccordez pas simultanément de sources aux entrées
RCA et aux entrées XLR / jack.Cela peut altérer les performances.
13.SÉLECTEUR HF ADJUST - Utilisez ce sélecteur pour ajuster le montant
des hautes fréquences produites par le(s) baffle(s).La position 0 dB est le
réglage normal.Utilisez la position -2 dB pour réduire le montant des hautes
fréquences produites par les baffles.Utilisez la position +2 dB pour
augmenter le montant des hautes fréquences produites par les baffles.
14.CONNECTEUR POUR BAFFLE D'EXTENSION - Sortie sur jack de 6,35
mm pour le raccordement du baffle d'extension Control 2P au baffle maître
Control 2P.Lorsque le câble pour baffle d'extension (fourni) est débranché de
ce connecteur,le canal de l'amplificateur pour le baffle d'extension est
automatiquement « muté » (muet).
PHONES
Max
Min
2
1
3
P O WER SWITCH
ON
Extentsion
Spea k er
EXTENTION
SPEAKER
Extention
Spea k er
T ip
-2dB 0dB +2dB
Slee v e
Master
19 VCD
3.4A
UNBALANCED
IMPUTS
P O WER
HF Adjust
Master
Serial Number:
BALANCED INPUTS
1/4 ” T .R.S./XLR
8
7
6
10
9
11
12
1314
4
5
FRANÇAIS
Control2.UsersGuide.0708 7/30/08 5:04 PM Page 9
• Pour les applications avec une table de travail,fixez un socle d'angle fourni à la base du baffle.
• Placez les baffles sur la station de travail ou une surface sûre.Le Control 2P peut être monté sur un mur à l'aide du kit de
montage MTC-2P optionnel.*
• Raccordez le baffle d'extension C2P au baffle maître à l'aide du câble pour baffle d'extension fourni.Pour une polarité
correcte,connectez le câble avec la gaine rouge à la borne rouge du baffle.
• Raccordez le bloc d'alimentation du Control 2P au connecteur Power du baffle maître Control 2P.
• Reliez le signal source aux entrées du baffle maître Control 2P.Ne raccordez pas simultanément de sources aux
entrées RCA et aux entrées XLR / jack.Cela peut altérer les performances.
• Placez le commutateur POWER en position ON.
• Pendant que la source sonore produit un signal,utilisez le réglage de volume pour obtenir le niveau d'écoute adéquat.
10
Applications
Extension Speaker
Master Speaker
R
RL
CD Player
HeadphonesMicrophone
CONTROL
CONTROL
2P
2P
2P
CONTROL
CONTR
Set Top BoxDVD Player
Mounted with Optional MTC-2PMounted with Optional MTC-2P
Receiver
Video Connection
Extension Speaker
Master Speaker
CONTRO
CONTROL
2P
2P
2P
2P
CONTROL
CONTROL
Projector
Laptop
VGA Cable
Mounted with Optional MTC-2PMounted with Optional MTC-2P
Extension Speaker
Master Speaker
CONTRO
CONTROL
2P
2P
Keyboard
2P
2P
CONTROL
CONTROL
Mounted with Optional MTC-2PMounted with Optional MTC-2P
Extension Speaker
Master Speaker
CONTRO
CONTROL2P
Enregistrement / Production vidéo
Le Control 2P permet une écoute précise au sein
d'une station d'enregistrement et d'un système de
production vidéo professionnels.Branchez un
casque audio à la sortie casque du baffle maître
pour une écoute « en privé ».
Présentations audiovisuelles
Une paire de moniteurs amplifiés compacts Control
2P,un projecteur portable et un ordinateur
constituent un système de présentation adapté à
toutes les situations.
Instruments de musique électroniques
Le Control 2P possède les connecteurs d'entrée et
la puissance nécessaires pour diffuser une vaste
gamme de sources sonores,notamment les instru-
ments de musique électroniques.
Installation de divertissement
Avec le kit optionnel MTC-2P,le Control 2P peut être
monté sur un mur pour fournir un son de qualité
professionnelle aux applications de divertissement à
la maison et au bureau.
Control2.UsersGuide.0708 7/30/08 5:04 PM Page 10
11
Dépannage
Si aucun son ne sort de vos baffles,vérifiez les réglages suivants sur le baffle maître C2P:
• Vérifiez qu'un signal source est connecté et produit un son.
• Vérifiez que la LED ON blanche de la face avant du baffle est allumée.
• Vérifiez que le bloc d'alimentation fourni est connecté et que le commutateur Power est en position ON.
• Vérifiez que le réglage de volume n'est pas en butée gauche.
• Si le baffle d'extension C2P ne produit aucun son,vérifiez que le jack de 6,35 mm du câble pour baffle d'ex
tension est connecté à la sortie EXTENSION SPEAKER.Vérifiez que l'extrémité dénudée du câble est
branchée aux bornes du baffle d'extension.
• Si les performances du système semblent altérées dans le bas du spectre (fréquences graves),vérifiez que
l'extrémité dénudée du câble est branchée correctement,c'est à dire que le câble ROUGE est connecté à la
borne ROUGE et le câble NOIR à la borne NOIRE.
Si les vérifications ci-dessus ne résolvent pas le problème,veuillez contacter JBL Professional.
NOTE:si la LED rouge de la face avant du baffle clignote en raison d'une surcharge continue du système,le circuit de protection
peut se déclencher,auquel cas aucun son ne sera audible.Pour reprendre l'utilisation,réduisez le volume sonore,placez le
commutateur Power sur OFF puis à nouveau sur ON.
Réponse en fréquence (+/- 3dB):100 Hz - 18 kHz
Bande passante (-10dB):80 Hz - 20 kHz
Niveau crête SPL maximal,
C2PM Master uniquement1:111 dB (1)
Niveau crête SPL maximal,la paire1:115 dB (1)
Transducteur basse fréquence:woofer de 135 mm (5,25")
Transducteur haute fréquence:tweeter à dôme en polycarbonate de 19 mm (0,75")
Protection contre les surcharges:limiteur de crêtes plus protection contre les surchauffes intégrés
Fréquence du filtre:4.2 kHz
Connecteurs d'entrée (x2):combos Neutrik®2XLR / jack de 6,35 mm symétriques; RCA asymétriques
Sensibilité d'entrée:+4 dBu XLR / jack ; 0 dBu RCA
Puissance de l'ampli:35 watts continus par canal
Alimentation électrique:19 V DC / 3,3 A - utiliser uniquement le bloc d'alimentation fourni
Sortie casque:mini-jack stéréo de 3,5 mm (1/8")
Matériau de la caisse:mousse de polypropylène moulée
Finition:noire
Dimensions:235 x 159 x 143 mm (9,3" x 6,3" x 5,6")
Poids net,baffle maître:2,6 kg (5,5 lb)
Poids net,baffle d'extension:2,2 kg (4,5 lb)
Poids au transport,la paire:5,8 kg / 12,5 lb
Accessoires optionnels:kit de montage MTC-2P3
1 Mésuré avec bruit rose IEC à 2 mètres.
2 Neutrik et les noms des produits Neutrik mentionnés ici sont des marques et/ou des marques de service de Neutrik.
3 ATTENTION:Un montage ou une suspension incorrects peuvent causer des blessures graves et des dommages matériels.Le montage de baffles doit être
réalisé par une personne qualifiée en respect de toutes les normes de sécurité et de construction locales.Suivez toujours les instructions fournies par le
fabricant du support de montage.Avant de choisir un support de montage,assurez-vous qu'il est capable de supporter le poids du baffle.
Spécifications
FRANÇAIS
Control2.UsersGuide.0708 7/30/08 5:04 PM Page 11
Wichtige Sicherheitshinweise
1.Lesen Sie diese Hinweise.
2.Bewahren Sie diese Hinweise auf.
3.Beachten Sie alle Warnhinweise.
4.Befolgen Sie alle Bedienungshinweise.
5.Betreiben Sie das Gerät nicht in der Nähe von Wasser.
6.Reinigen Sie das Gerät ausschließlich mit einem trockenen Tuch.
7.Blockieren Sie keine Lüftungsöffnungen.Beachten Sie beim Einbau die Hinweise des Herstellers.
8.Stellen Sie das Gerät nicht in der Nähe von Wärmequellen auf,wie z.B.Heizkörper,Herde oder anderen
Wärme erzeugenden Geräten.
9.Entfernen Sie in keinem Fall die Sicherheitsvorrichtung eines Zweipol- oder geerdeten Netzsteckers.
10.Schützen Sie das Netzkabel vor Tritten und scharfen Kanten,besonders im Bereich der Stecker,Buchse,
und an der Stelle,an der das Netzkabel mit dem Gerät verbunden wird.
11.Verwenden Sie nur vom Hersteller empfohlene Zusatzgeräte/Zubehörteile.
12.Ziehen Sie den Netzstecker bei Gewitter oder wenn Sie das Gerät längere Zeit nicht benutzen heraus.
13.Lassen Sie alle Wartungsarbeiten nur von qualifiziertem Service-Personal ausführen.Eine Wartung ist
notwendig wenn das Gerät in irgendeiner Weise beschädigt wurde (z.B.Beschädigung des Netzkabels oder
Steckers),Flüssigkeit oder Gegenstände in das Geräteinnere gelangt sind,das Gerät Regen oder Nässe ausg
setzt oder fallen gelassen wurde,oder das Gerät nicht ordnungsgemäß funktioniert.
14.Die Netzbuchse für das Netzkabel stellt die ultimative Trennung vom Stromnetz dar und soll daher immer
funktionstüchtig bleiben.
15.Das Gerät soll nur an einer geerdeten Steckdose mit intaktem Schutzleiter angeschlossen werden.
WARNHINWEISE
• Um eine Gefährdung durch Feuer oder Stromschlag auszuschließen,darf das Gerät weder Regen
noch Feuchtigkeit ausgesetzt werden.
• Das Gerät keine tropfende oder spritzende Flüssigkeit aussetzen.Stellen Sie keine mit Flüssigkeiten
gefüllten Gegenstände,wie z.B.Vasen,auf das Gerät.Wie mit jedem elektrischen Produkt,darf keine
Flüssigkeit in das Gerät gelangen.Flüssigkeit kann zu Defekten führen und Brandgefahren verursachen.
Das Blitzschlag-Symbol innerhalb eines gleichseitigen Dreiecks verweist auf das Vorhandensein einer nicht isolierten
und gefährlichen Spannung im Innern des Gehäuses,der stark genug sein könnte,um für Menschen eine Gefahr durch
Stromschlag darzustellen.
ACHTUNG
UM EINE GEFÄHRDUNG DURCH STROMSCHLAG AUSZUSCHLIESSEN,DARF DAS GEHÄUSE NICHT
GEÖFFNET WERDEN.ES BEFINDEN SICH KEINE VOM ANWENDER REPARIERBAREN TEILE IM INNERN DES
GERÄTES.REPARATUREN DÜRFEN NUR VON QUALIFIZIERTEM PERSONAL AUSGEFÜHRT WERDEN.
SCHÜTZEN SIE DAS GERÄT VOR REGEN ODER FEUCHTIGKEIT.
12
Control2.UsersGuide.0708 7/30/08 5:04 PM Page 12
Danke für Ihren Kauf des JBL Control 2P Kompakter Aktiv-Monitor.
Das Control 2P Kompakter Referenz Aktiv-Monitor System vereint legendäre JBL Lautsprecherdesign
mit leistungsfähiger Verstärkung,um Ihnen vollen,akkuraten Sound für anspruchsvolle
Audioanwendungen zu liefern.Mit seiner kompakten Bauweise,seinem robusten Gehäuse und seinen
professionellen Features,ist der Control 2P Kompakter Referenz Aktiv-Monitor ideal für Desktop-
Recording,Videoproduktion,Multimedia-Präsentationen,professionelle Sendeanwendungen und als
Abhöre für elektronische Musikinstrumente.
FEATURES
•Wandler in Studioqualität für akkurate,tiefenreiche Wiedergabe
•Zweikanal 35-Watt Endstufe und Treiber mit hoher Kenschallempfindlichkeit liefern eine außergewöhnliche
Leistung:115 dB SPL (Spitze) pro Paar
•Symmetrische Neutrik®* Combo XLR / 1/4"- sowie asymmetrische Cinch-Eingänge ermöglichen den
Gebruikershandleiding.com neemt misbruik van zijn services uitermate serieus. U kunt hieronder aangeven waarom deze vraag ongepast is. Wij controleren de vraag en zonodig wordt deze verwijderd.
Product:
Spelregels forum
Om tot zinvolle vragen te komen hanteren wij de volgende spelregels:
lees eerst de handleiding door;
controleer of uw vraag al eerder door iemand anders is gesteld;
probeer uw vraag zo duidelijk mogelijk te stellen;
heeft u een probleem en al geprobeerd om dit op te lossen, vermeld dit erbij aub;
heeft u een oplossing gekregen van een bezoeker dan horen wij dat graag in dit forum;
wilt u een reactie geven op een vraag of antwoord, gebruik dan niet dit formulier maar klik op de knop 'reageer op deze vraag';
uw vraag wordt direct op de website gezet; vermijd daarom persoonlijke gegevens in te vullen;
Belangrijk! Als er een antwoord wordt gegeven op uw vraag, dan is het voor de gever van het antwoord nuttig om te weten als u er wel (of niet) mee geholpen bent! Wij vragen u dus ook te reageren op een antwoord.
Belangrijk! Antwoorden worden ook per e-mail naar abonnees gestuurd. Laat uw emailadres achter op deze site, zodat u op de hoogte blijft. U krijgt dan ook andere vragen en antwoorden te zien.
Abonneren
Abonneer u voor het ontvangen van emails voor uw JBL Control 2P bij:
nieuwe vragen en antwoorden
nieuwe handleidingen
U ontvangt een email met instructies om u voor één of beide opties in te schrijven.
Ontvang uw handleiding per email
Vul uw emailadres in en ontvang de handleiding van JBL Control 2P in de taal/talen: Duits, Engels, Frans, Spaans als bijlage per email.
De handleiding is 1.9 mb groot.
U ontvangt de handleiding per email binnen enkele minuten. Als u geen email heeft ontvangen, dan heeft u waarschijnlijk een verkeerd emailadres ingevuld of is uw mailbox te vol. Daarnaast kan het zijn dat uw internetprovider een maximum heeft aan de grootte per email. Omdat hier een handleiding wordt meegestuurd, kan het voorkomen dat de email groter is dan toegestaan bij uw provider.
Stel vragen via chat aan uw handleiding
Stel uw vraag over deze PDF
Uw handleiding is per email verstuurd. Controleer uw email
Als u niet binnen een kwartier uw email met handleiding ontvangen heeft, kan het zijn dat u een verkeerd emailadres heeft ingevuld of dat uw emailprovider een maximum grootte per email heeft ingesteld die kleiner is dan de grootte van de handleiding.
Er is een email naar u verstuurd om uw inschrijving definitief te maken.
Controleer uw email en volg de aanwijzingen op om uw inschrijving definitief te maken
U heeft geen emailadres opgegeven
Als u de handleiding per email wilt ontvangen, vul dan een geldig emailadres in.
Uw vraag is op deze pagina toegevoegd
Wilt u een email ontvangen bij een antwoord en/of nieuwe vragen? Vul dan hier uw emailadres in.