686580
27
Verklein
Vergroot
Pagina terug
1/29
Pagina verder
299
NLA
(299NL) SPA (JET + BUBBLE) ENGLISH 7.5” X 10.3” PANTONE 295U 05/10/2017
English
OWNER’S MANUAL
PureSpa™
SJB-HS-20-1G / SJB-HS-22-1G
SJB-HS-30-1G / SJB-HS-33-1G
IMPORTANT
SAFETY RULES
Please read, understand, and follow
all instructions carefully before
installing and using this product.
Keep for future reference.
299NL-*A*-R0-1807
Do not forget to try these other ne Intex products: pools, pool
accessories, in-home toys, airbeds and boats available at ne
retailers or visit our website.
Due to a policy of continuous product improvement, Intex reserves
the right to change speci cations and appearance, which may
result in updates to the instruction manual without notice.
For illustrative purposes only.
©2017 Intex Marketing Ltd. - Intex Development Co. Ltd. - Intex Trading Ltd.
- Intex Recreation Corp.
All rights reserved/Tous droits réservés/Todos los derechos reservados/Alle Rechte
vorbehalten. Printed in China/Imprimé en Chine/Impreso en China/Gedruckt in China.
®™ Trademarks used in some countries of the world under license from/®™ Marques utilisées dans certains pays sous licence de/
Marcas registradas utilizadas en algunos países del mundo bajo licencia de/Warenzeichen verwendet in einigen Ländern der Welt in
Lizenz von/Intex Marketing Ltd. to/à/a/an Intex Trading Ltd., Intex Development Co. Ltd., G.P.O Box 28829, Hong Kong & Intex
Recreation Corp., P.O. Box 1440, Long Beach, CA 90801 • Distributed in the European Union by/Distribué dans l’Union Européenne
par/Distribuido en la unión Europea por/Vertrieb in der Europäischen Union durch/Intex Trading B.V., Venneveld 9, 4705 RR
Roosendaal – The Netherlands
www.intexcorp.com
299
NLA
S AVE THESE INSTRUCTIONS
(299NL) SPA (JET + BUBBLE) ENGLISH 7.5” X 10.3” PANTONE 295U 05/10/2017
English
Page 2
Warning.......................................................................................... 3-5
Parts............................................................................................... 6-7
Product Information & Speci cations........................................ 8
Set-up............................................................................................. 8-12
Salt Level Information.................................................................. 13
Operation....................................................................................... 14-15
LED Code Chart............................................................................. 16
Maintenance and Chemicals........................................................ 17-24
Storage........................................................................................... 24
Troubleshooting............................................................................ 25-27
Filter pump motor disassembly................................................... 28
Warranty......................................................................................... 29
TABLE OF CONTENTS
299
NLA
S AVE THESE INSTRUCTIONS
(299NL) SPA (JET + BUBBLE) ENGLISH 7.5” X 10.3” PANTONE 295U 05/10/2017
English
Page 3
IMPORTANT SAFETY RULES
When installing and using this electrical equipment, basic safety precautions should always be followed, including the following.
READ AND FOLLOW ALL INSTRUCTIONS
The spa electrical appliance should be supplied through a residual current device (RCD) having a
rated residual operating current not exceeding 30 mA.
The spa electrical appliance comprises a portable residual current device (PRCD) having a rated
residual operating current not exceeding 10 mA. If a leakage current of more than 10 mA is detected,
the PRCD will operate and cut-off the power supply, in such case, unplug and stop using the spa at
once. You must contact the local service center for assistance and/or repair of the product.
Parts containing live parts, except parts supplied with safety extra-low voltage not exceeding 12V,
must be inaccessible to a person in the spa.
Electrical installation shall ful ll the requirements of local national standards.
Parts incorporating electrical components, except remote control devices, must be located or xed so
that they cannot fall into the spa.
To reduce the risk of injury, do not permit children to use this product unless they are closely
supervised at all times.
Children should not use spas or hot tubs without adult supervision.
To reduce the risk of child drowning, supervise children at all times. Attach and lock spa cover after
each use.
To reduce the risk of injury:
a) The water in a spa should never exceed 40°C (104°F). Water temperatures between 38°C (100°F)
and 40°C (104°F) are considered safe for a healthy adult. Lower water temperatures are
recommended for young children and when spa use exceeds 10 minutes.
b) Since excessive water temperatures have a high potential for causing fetal damage during the early
months of pregnancy, pregnant or possibly pregnant women should limit spa water temperatures
to 38°C (100°F).
c) Before entering a spa or hot tub, the user should measure the water temperature with an accurate
thermometer since the tolerance of water temperature-regulating devices varies.
d) The use of alcohol, drugs, or medication before or during spa use may lead to unconsciousness with
the possibility of drowning.
e) Obese persons and persons with a history of heart disease, low or high blood pressure, circulatory
system problems, or diabetes should consult a physician before using a spa.
DANGER
WARNING
Risk of Accidental Drowning. Extreme caution must be exercised to prevent unauthorized access by
children. To avoid accidents, ensure that children cannot use this spa unless they are supervised at
all times.
Risk of drowning. Inspect the spa cover regularly for leaks, premature wear and tear, damage, or
signs of deterioration. Never use a worn or damaged cover: it will not provide the level of protection
required to prevent unsupervised access to the spa by a child.
Risk of injury. Replace damaged cord immediately. Do not bury cord.
Never use an extension cord.
Risk of Electric Shock. Do not permit any electric appliance, such as a light, telephone, radio, or
television, within 3.5 m (11.5 feet) of a spa or hot tub.
Risk of Electric Shock. Do not use and unplug the spa when it is raining, thundering or lightning.
299
NLA
S AVE THESE INSTRUCTIONS
(299NL) SPA (JET + BUBBLE) ENGLISH 7.5” X 10.3” PANTONE 295U 05/10/2017
English
Page 4
f) Persons using medication should consult a physician before using a spa since some medication may
induce drowsiness while other medication may affect heart rate, blood pressure, and circulation.
g) People using medications and/or having an adverse medical history should consult a physician
before using a spa or hot tub.
h) Check with a doctor before use if pregnant, diabetic, in poor health, or under medical care.
People with infectious diseases should not use a spa or hot tub.
To avoid injury exercise care when entering or existing the spa or hot tub.
Do not use drugs or alcohol before or during the use of a spa or hot tub to avoid unconsciousness
and possible drowning.
Pregnant and possible pregnant women should consult a physician before using a spa or hot tub.
Water temperature in excess of 38°C degree may be injurious to your health.
Do not use a spa or hot tub immediately following strenuous exercise.
Prolonged immersion in a spa or hot tub may be injurious to your health.
When pregnant, soaking in hot water for long periods can harm your fetus. Measure the water
temperature before entering. Do not enter spa if water is hotter than 38°C (100°F). Do not stay in
spa for longer than 10 minutes.
Spa heat in conjunction with alcohol, drugs, or medication can cause unconsciousness.
Exit immediately if uncomfortable, dizzy, or sleepy. Spa heat can cause hyperthermia and
unconsciousness.
The causes, symptoms, and effects of hyperthermia may be described as follows: Hyperthermia
occurs when the internal temperature of the body reaches a level several degrees above the normal
body temperature of 37°C (98.6°F). The symptoms of hyperthermia include an increase in the
internal temperature of the body, dizziness, lethargy, drowsiness, and fainting. The effects of
hyperthermia include failure to perceive heat; failure to recognize the need to exit spa or hot tub;
unawareness of impending hazard; fetal damage in pregnant women; physical inability to exit the spa
or hot tub; and unconsciousness resulting in the danger of drowning.
The use of alcohol, drugs, or medication can greatly increase the risk of fatal hyperthermia in hot tubs
and spas.
Always add chemicals to water, never add water to chemicals. Adding water to chemicals may cause
strong fumes or violent reactions and hazardous chemical spray.
Never jump or dive into a spa or any shallow body of water.
Assembly and disassembly by adults only.
This appliance can be used by children aged from 8 years and above and persons with reduced
physical, sensory or mental capabilities or lack of experience and knowledge if they have been given
supervision or instruction concerning use of the appliance in a safe way and understand the hazards
involved. Children shall not play with the appliance. Cleaning and maintenance must be performed
by an adult above 18 years old, and who is familiar with the risk of electric shock.
No part of the electrical appliance is to be located above the bath during use.
Keep the plug of this product more than 4m away from the spa and at a height of 1.2m at least.
Always unplug this product from the electrical outlet before removing, cleaning, servicing or making
any adjustment to the product, and on raining days.
Do not bury the electrical cord. Locate the cord where it will not be damaged by lawn mowers, hedge
trimmers and other equipment.
If the supply cord is damaged, it must be replaced by the manufacturer, its service agent or similarly
quali ed persons in order to avoid a hazard. Use only identical replacement parts when servicing.
WARNING
299
NLA
S AVE THESE INSTRUCTIONS
(299NL) SPA (JET + BUBBLE) ENGLISH 7.5” X 10.3” PANTONE 295U 05/10/2017
English
Page 5
CAUTION
Maintain water chemistry in accordance with manufacturer’s instructions.
1. Press the RESET button on the RCD.
2. Turn on the spa electrical equipment.
3. Press the TEST button on the RCD. The RCD indicator should
turn off and the electrical equipment should shut off. If the RCD
indicator does not turn off, and the electrical equipment does not
shut off, the RCD is faulty. Do not use the spa. Contact a quali ed
electrician to correct the fault.
4. Press the RESET button on the RCD. The indicator on the RCD
should turn on. If the RCD indicator does not turn on, the RCD is
faulty. Do not use the spa. Contact a quali ed electrician
immediately to correct the fault.
WARNING
TEST
RESET
RESET
TEST
TEST
RESET
RESET
TEST
TEST
Always keep plug dry, plug in with wet plug is de nitely forbidden!
The plug of SPA must be directly connected only to a earthed socket-outlet from a xed electrical
installation.
To reduce the risk of electric shock
and re
, do not use extension cords, timers, plug adaptors or
converter plugs to connect unit to electrical supply; provide a properly located outlet.
Do not attempt to plug in or unplug this product while standing in water or when your hands are wet.
Do not leave the spa empty for extended period of time. Do not expose the spa to direct sunlight for
extended period of time.
When the appliance is not in use for long period of time, such as in the winter, the spa set should be
disassembled and stored indoor.
Do not allow the water in the spa to freeze. Do not turn on the spa when the water is frozen.
Do not use the spa if damaged in delivery and/or malfunctioning in any fashion. Contact the Intex
service center for further direction.
Never use the spa alone or allow others to use the spa alone.
Never pour water with a temperature higher than 40°C (104°F) into the spa directly.
Keep all pets away from spa to avoid any damage.
Do not add bath oil or bath salt to the spa water.
The spa must be setup on a level, at and smooth surface that is capable of supporting the maximum
load of the lled spa with four adult occupants: weight 2500 lbs (1136 kg); six adults: 3500 lbs (1592 kg).
Provide adequate drainage system around the spa to deal with over ow water and splashes.
WARNING
This product is provided with a RCD located at the end of the power cord. The RCD must be tested
before each use. Do not use the spa if the RCD does not function properly.
Disconnect the power cord until the fault has been identi ed and corrected. Contact a quali ed
electrician to correct the fault. Do not bypass the RCD. There are no serviceable parts inside the
RCD. Opening the RCD will void the warranty.
299
NLA
S AVE THESE INSTRUCTIONS
(299NL) SPA (JET + BUBBLE) ENGLISH 7.5” X 10.3” PANTONE 295U 05/10/2017
English
Page 6
PARTS
Before assembling your product, please take a few minutes to check the contents
and become familiar with all the parts.
NOTE: Drawings for illustration purpose only. Actual product may vary. Not to scale.
10
5
8
21
1
6
3
4
1213
16
11
14
26
22
A
B
C
A
B
C
15
23
30
29
28
20
31 32 33
2
D
27
9
24
35
34 7
18
17
19
25
299
NLA
S AVE THESE INSTRUCTIONS
(299NL) SPA (JET + BUBBLE) ENGLISH 7.5” X 10.3” PANTONE 295U 05/10/2017
English
Page 7
When ordering parts, be sure to quote the model number and part numbers.
PARTS (continued)
Before assembling your product, please take a few minutes to check the contents
and become familiar with all the parts.
REF. NO. DESCRIPTION QTY. PART NO.
4 ADULTS 6 ADULTS
1 CONTROL BASE 1 12338 12342
2 SPA FILTER MOTOR 1 11888 11888
3 CONTROL PANEL (INCLUDED #4) 1 11949 11949
4 CONTROL PANEL BOLT 3 11996 11996
5 AIR PRESSURE RELEASE VALVE CORE 1 12589D 12589D
6 CONTROL PANEL BOLT WRENCH 1 11053 11053
7 SPA INFLATION HOSE 1 11830 11830
8 SPA CONTROL INLET/OUTLET O-RING 2 11788 11788
9 CONTROL BASE INFLATION CAP 1 11991 11991
10 SPA DRAIN PLUG 1 11995 11995
11 SPA DRAIN VALVE ADAPTOR 1 11718 11718
12 FILTER CARTRIDGE HOUSING 1 11798 11798
13 FILTER CARTRIDGE 3 11692 11692
14 FILTER CARTRIDGE HOUSING LID 1 11797 11797
15 INLET PLUG 1 11739 11739
16 SPA TUB 1 12090 12116
17 SPA COVER 1 11951 12117
18
SPA COVER INFLATABLE BLADDER (PRE-INSTALLED IN SPA COVER)
1 11884 12114
19 GROUND CLOTH 1 11933 12110
20 ELECTROLYTIC CELL NUT WRENCH 1 11854 11854
21 TEST STRIPS 1 11855 11855
22 WRENCH 1 11742 11742
23 OUTLET PLUG 2 11782 11782
24 INFLATION HOSE ADAPTOR 1 11829 11829
25 MALE BUCKLE 8 11994 11994
26 FEMALE BUCKLE 8 11993 11993
27 SPA CONTROL AIR INLET O-RING 1 11687 11687
28 ELECTROLYTIC CELL COVER SCREW 4 11712 11712
29 ELECTROLYTIC CELL COVER 1 11890 11890
30 ELECTROLYTIC CELL COVER O-RING 1 11897 11897
31 ELECTROLYTIC CELL NUT 1 11852 11852
32 ELECTROLYTIC CELL 1 11851 11851
33 ELECTROLYTIC CELL O-RING 1 11853 11853
34 DEFLATION OUTLET CAP 1 11992 11992
35 DEFLATION HOSE ADAPTOR 1 11935 11935
299
NLA
S AVE THESE INSTRUCTIONS
(299NL) SPA (JET + BUBBLE) ENGLISH 7.5” X 10.3” PANTONE 295U 05/10/2017
English
Page 8
PRODUCT SPECIFICATIONS
SET UP
Cord-connected spa with pump, heater, water jet, blower, control panel, built-in hard water treatment, and
sanitation system.
This product requires a minimum of 13 Amps. If the circuit breaker trips, please check that no other
appliances or other large loads are on the same circuit as the spa.
Site preparation and requirements
The spa can be installed indoor or outdoor. For household use only.
Make sure the area is free of sharp objects under or around the spa.
Provide a properly located power outlet to connect the spa and allow easy access for periodic testing of the cord
mounted RCD.
Make sure there is enough clearance around the spa for full access to the spa equipment for maintenance and/or
service.
The area shall facilitate draining purposes during long term spa storage.
Additional requirements for indoor installation
Make sure the oor can support the full weight of the lled spa with the maximum number of occupants. Check with a
quali ed contractor or a structural engineer to verify this requirement.
Make sure the oor is water resistant and non-slip surface. Do not install the spa on carpet or other materials that will be
damaged by moisture, condensation.
Do not install the spa indoors on a second oor above nished living space due to the possibility of water and humidity
damage.
Humidity is a natural side effect of indoor spa installation. The room shall be properly ventilated to allow moisture to
escape. Install a ventilating system to prevent excess condensation, moisture in the room.
Additional requirements for outdoor installation
Spa owners may need to comply with local or states laws relating to childproof fencing, safety barriers, lighting, and
other safety requirements. Contact your local building code enforcement of ce for further details.
Make sure the surface is level, at, smooth and strong enough to support the full weight of the lled spa.
Do not setup the spa on grass or dirt, as this increases the amount of debris entering the spa, and damage the spa oor.
Do not expose the spa to direct sunlight for extended period of time.
It is possible to install and leave the spa outside at a temperature not lower than 4°C (39°F) provided the water
temperature inside the spa is higher than 4°C (39°F) and the water inside the circulation system, pump, pipe are not
frozen. Put a “temp barrier mat” between the spa oor and the ground to prevent heat loss from the bottom of the spa
and to provide better heat retention.
Maximum seating capacity: 4 adults 6 adults
Water capacity: 210 gal (795 L) 290 gal (1098 L)
Inner/outer diameter: 59/79 in (150/201 cm) 66/86 in (168/218 cm)
Height: 28 in (71 cm)
Jet pump: 0.9 HP / 220-240 V / 50 Hz 0.95 HP / 220-240 V / 50 Hz
Bubble air blower: 1.1 HP / 220-240 V / 50 Hz
Filter pump ow rate: 460 gal/hr (1,741 L/hr)
Heater power: 2,200 Watts / 220-240 V / 50 Hz
Temperature range: 20ºC – 40ºC (68ºF – 104ºF)
Temperature rise: 1.5-2.5ºC/hr (3ºF – 4.5ºF/hr) 1-2ºC/hr (2ºF – 3.5ºF/hr)
Number of Water Jet Nozzles: 4 6
Number of Bubble Jets: 120 140
Spa tub recommended working air pressure: 0.083 bar (1.2 psi)
299
NLA
S AVE THESE INSTRUCTIONS
(299NL) SPA (JET + BUBBLE) ENGLISH 7.5” X 10.3” PANTONE 295U 05/10/2017
English
Page 9
SET UP (continued)
Setup the spa with at least 2 persons.
1. Move the entire package to the selected site. Do not drag the spa tub across the ground as this can
cause damage and leakage.
Open the carton carefully as this carton can be used to store the spa during long term storage or when
not in use.
2. Lay out all the parts on the ground and make sure all the parts are accounted for. For missing or
damaged parts contact the appropriate Intex Service Center listed in the separate “Authorized service
Centers” sheet.
Spa Control Unit Assembly
1. Connect the control panel (3) cable plug into the receptacle on top of the spa control base and screw in
the plug cover rmly by hand (see drawing 1). Note: Spread the ground cloth with the bubbles facing
down over the cleared area where you intend to setup your spa.
2. Screw the control panel bolts (4) with the provided bolt wrench (6) to secure the control panel (see
drawing 2).
3. Plug the spa control unit into an electrical outlet.
For indoor in ation:
In ate the Spa Tub Wall
1. Take out the ground cloth (19) and spread it over the cleared area. Then spread out the spa liner over
the ground cloth and point the drain valve towards a suitable draining area.
NOTE: Spread the ground cloth with the bubbles facing down over the cleared area where you intend
to setup your spa.
2. Unscrew the control base in ation cap (9) to reveal the air blower in ation outlet, insert one end of the
in ation hose (7) into the outlet and turn to the right to lock it (see drawing 3).
3. Unscrew the air valve cap to reveal the stem in the up position for in ation. Insert the other end of the
in ation hose (7) into the valve and turn to the right to lock it in position (see drawing 4).
4
6
2
4
7
1 2
3
9
24
1
3
1
2
299
NLA
S AVE THESE INSTRUCTIONS
(299NL) SPA (JET + BUBBLE) ENGLISH 7.5” X 10.3” PANTONE 295U 05/10/2017
English
Page 10
SET UP (continued)
In ate the Spa Cover Air Bladder
1. Open the in ation valve and insert the in ation
hose
(7) into the valve; press to in ate
until it is rm to the touch but not hard (see
drawing 6).
2. Disconnect the in ation hose (7) from the air
blower in ation outlet and the valve.
3. Replace the control base in ation cap (9) back;
close and recess the in ation valve.
NOTE: If there is a need to add some air to the spa tub wall or spa cover air bladder after they have been
setup, refer to above “In ate the Spa Tub Wall” and “In ate the Spa Cover Air Bladder” sections. The cover
air bladder is preinstalled inside the spa cover. If it needs to be reinstalled, place the unin ated air bladder
inside the spa cover lip before in ating the bladder.
4. Press the button to turn on the control unit panel
buttons rst. Press the button to in ate the
spa tub wall for 8 to 10 minutes until it is rm to the
touch but not hard (see drawing 5).
IMPORTANT: Do not over in ate or use high pressure
air compressor to in ate.
5. Press the button again to turn it off.
6. Replace the air valve cap back.
NOTE: The cap is designed to be screwed on and
off. Never exert force as this could cause the complete
internal in ation system of the valve to come loose.
See “Spa Tub Air Valve Fastening” for valve maintenance.
6
7
5
299
NLA
S AVE THESE INSTRUCTIONS
(299NL) SPA (JET + BUBBLE) ENGLISH 7.5” X 10.3” PANTONE 295U 05/10/2017
English
Page 11
SET UP (continued)
The spa tub in ation/de ation valve incorporates an “air pressure release” function that automatically
releases excess air when the spa tub internal pressure is between 1.5 - 2.5 psi (0.103 - 0.172 bar).
Air pressure release valve.
Colder temperatures at night
cause the spa to seem less
in ated.
NOTE: If there is a need to replace the spa tub air pressure
release valve core (5) due to wear and tear, use the included
wrench (22) to unscrew the core from the valve base.
Replace a new air pressure release valve core back. Make
sure the core is securely tightened (see drawing 7).
Air expands in the midday
heat and correct air
pressure is restored.
Air expands in the midday heat.
Air pressure release valve kicks
in and releases excess air.
In ation of spa in the morning.
IMPORTANT
7
22
5
299
NLA
S AVE THESE INSTRUCTIONS
(299NL) SPA (JET + BUBBLE) ENGLISH 7.5” X 10.3” PANTONE 295U 05/10/2017
English
Page 12
SET UP (continued)
De ation
For Spa Tub Wall:
1. Unscrew the cap to reveal the stem, push the stem in
and turn 90 degree right to secure it in the down
position
(see drawing 8).
2. Once the de ation is completed, push the stem in and
turn 90 degree left to return it to the in ation position.
3. Replace the cap back.
For Cover Air Bladder:
1. Pull valve cap out and squeeze the valve at its base
until de ated.
2. Close and recess the valve back.
Spa Control Unit Installation
1. Connect the spa control unit to the spa tub (see drawing 9). Hand-tighten the connectors securely.
Do not use tools to tighten.
CAUTION: Do not sit, lean, cover or place any objects over the spa control unit.
2. Attach the lter cartridge housing assembly to the inside of the spa tub outlet grid (marked “B”) (see
drawing 10). In ate the spa tub rst before installing lter pump ttings.
3. Before lling with water ensure the bottom drain valve caps are securely closed on the inside and outside.
4. Fill the spa tub with freshwater to a level between MIN and MAX marked on the inside of the spa wall. Do
not over ll the spa. Never move the spa tub with water inside and/or with the control base attached to the
spa as the spa or control base may be damaged.
WARNING: Never pour water with a temperature higher than 40°C (104°F) into the spa
directly. It is recommended to ll the spa tub with lukewarm water for quick heating and
energy saving.
5. Place the spa cover and spa air bladder (pre-installed in spa cover) over the spa tub, and make sure the
spa cover buckles are locked using the key provided after pulling the buckled straps tight.
IMPORTANT: Inspect the spa cover regularly for leak, premature wear and tear or deterioration. Never
use a damaged spa cover.
6. Ensure the spa is plugged into an electrical socket and press the button to turn on the control unit
panel buttons rst. Press the button on the control panel to activate the heater, see “Spa Control Unit
Panel” operation section.
IMPORTANT: The following conditions will lead to slow water heating:
The ambient temperature is lower than 50ºF (10ºC).
Outdoor wind speed is above 8-12 mph (3.5-5.4 m/s).
The jet function is activated when heating the spa water.
The spa is not properly covered with the spa cover when the water is heating.
8
10
B
B
C
A
A
C
B
9
299
NLA
S AVE THESE INSTRUCTIONS
(299NL) SPA (JET + BUBBLE) ENGLISH 7.5” X 10.3” PANTONE 295U 05/10/2017
English
Page 13
The spa comes with a built-in saltwater sanitation system. Common salt (sodium chloride) is
made up of two elements, sodium and chloride. During the installation of the device, a
measured quantity of salt is dissolved in the SPA water to make it slightly salty. The SPA water
ows through the sanitation system’s electrolytic cell to produce chlorine. The chlorine dissolves
in the water and instantly starts destroying bacteria and algae. It also oxidizes all other organic
materials.
Which kind of salt to use:
Use only Sodium Chloride Salts
Use only sodium chloride (NaCl) salt that is at least 99.9% pure. It is also acceptable to use water
conditioning salt pellets (the compressed forms of evaporated salt). However, it will take a longer
time for them to dissolve. Do not use iodized or yellow (yellow prussiate of soda) colored
salt. Salt is added to the SPA water and the electrolytic cell uses the salt to create chlorine. The
purer the salt the better the performance of the electrolytic cell.
Optimum Salt Levels
The ideal salt level in the SPA water is between 2000-3000 ppm (parts per million). The optimal
level is 2500 ppm.
A too low salt level will reduce the ef ciency of the sanitation system and result in low chlorine
production. Too high a salt level may damage the power supply and cause corrosion to metal
xtures and accessories. The salt in the SPA is constantly recycled. The loss of salt is due only to
SPA water being physically removed from the SPA. Salt is not lost due to evaporation.
• Adding Salt
1. Switch the JET pump on to start the water circulation.
2. Keep the sanitation system turned off.
3. Evenly spread 4.4 lbs / 2 kg (for 4 adults’) of salt around the inside perimeter of the SPA. For
six adults’: 5.5 lbs / 2.5 kg of salt.
4. Brush the SPA bottom to speed up the dissolving process. Do not allow salt to pile up on the
bottom of the SPA. Run the JET pump for one hour to thoroughly dissolve the salt.
5. When all the salt is dissolved, press the sanitizer button to activate the sanitation system
(see “Sanitation System Operating Instructions” section), code “003H” is ashing and set the
sanitation system to desired operating hours. NOTE: DO NOT press any other buttons on the
control panel, and attach the spa cover during the sanitizing process.
Removing Salt if Salt Level is too high
If too much salt has been added, the unit will beep and display “E92” (see “LED Code Chart”). If
this happens, turn off the sanitation system by pressing the ON/OFF button , and unplug the
spa. You will need to lower the salt concentration. The only way to do so is to partially drain the
SPA and re ll it with fresh water. Drain and re ll approximately 25% of the SPA water until the “E92”
alarm code disappears.
Adding Salt if Salt Level is too low
If not enough salt has been added, the unit will beep and display “E91” (see “LED Code Chart”).
If this happens, turn off the sanitation system by pressing the ON/OFF button , unplug the
spa and wait 10 seconds. Plug and turn on the spa, add 1.1 lbs / 0.5 kg increment of salt until the
“E91” alarm code disappears (see “Adding Salt” section).
SALT LEVEL INFORMATION
299
NLA
S AVE THESE INSTRUCTIONS
(299NL) SPA (JET + BUBBLE) ENGLISH 7.5” X 10.3” PANTONE 295U 05/10/2017
English
Page 14
OPERATION
On/Off Button: Once the unit is plugged in, use this button to active the control unit panel buttons. The
light next to the button is green when activated. Press this button to turn off all currently activated functions.
NOTE: The On/Off button may appear as a black button in the center of the control panel.
Heat Button: Use this button to activate the heating system. The pump will heat the spa water until the
water temperature reaches the set temperature. When the spa water temperature drops 1-2°C (1.8-3.6°F)
below the set temperature the heating system will restart. When the ame icon on the display is red, the
heating system is activated. When the ame icon turns green, the water is at the set temperature. The
heating system is at rest and the ltration system will continue working nonstop.
NOTE: To stop the ltration system while the heater is at rest mode, press the ame button rst and then
the lter button. Pressing the ame button only while the heater is at rest mode will turn off the heating
system only and the ltration system will operate for another 24 hours before it turns off automatically.
Celsius/Fahrenheit Toggle button:
The temperature can be displayed in either Fahrenheit or Celsius. The system’s default is Celsius.
CAUTION: NEVER use the spa if indicated water temperature is more than 40°C (104ºF).
Temperature Adjustment Buttons: Pressing the Temperature Increase or Decrease buttons will
cause the LED to ash. When ashing you can adjust to the desired temperature setting. If you hold these
buttons down the values will rapidly increase or decrease. The new and desired temperature setting will
remain on the LED display for 5 seconds to con rm the new value.
NOTE: The default temperature is 20°C (68°F).
NOTE: Temperature adjustment ranges from 20°C (68°F) to 40°C (104°F).
Water Filter Button:
This button turns the lter pump on and off. If the heating system is activated the ltration system will
automatically start.
The water lter icon on the display is green when activated.
Water Jet Button: Use this button to activate the jet massage system. After 30 minutes of continues
use, the jet massage system will automatically turn off. The water jet icon on the displays is green when
activated. The angle of the water jet nozzles inside the spa tub wall can be adjusted manually.
WARNING: Do not run jet system when the cover is attached, air pressure may accumulate inside the spa
and cause irreparable damage and bodily harm.
Bubble Button: Use this button to activate the massage system, which has a 30-minute auto-shutoff
feature. The bubble icon on the displays is green when activated.
WARNING: Do not run Bubble system when the cover is attached, air can accumulate inside the spa and
cause irreparable damage and bodily harm.
Sanitizer Button: Use this button to activate and set operating hours for the sanitation system.
LED Display: Once plugged in the LED displays the current water temperature automatically.
NOTE: The built-in hard water treatment function works automatically in conjunction with the ltration system.
Jet Nozzle Adjustment
The amount of water and pressure coming out from the jet nozzles can be adjusted by turning the jet
nozzle rim clockwise (maximum water output), counterclockwise (low water output) or anything in between.
Closing one or 2 jet nozzles will divert more water pressure to the other jet nozzles.
A: Heat Button
B: Celsius/Fahrenheit Toggle Button
C: Temperature Increase Button
D: Temperature Decrease Button
E: Water Filter Button
F: Water Jet Button
G: Sanitizer button
H: LED Display
I: On/Off Button
J: Bubble Button
SPA CONTROL UNIT PANEL
 )
F
J
D
C
B
A
H
GI
E
-+
40 C
o
299
NLA
S AVE THESE INSTRUCTIONS
(299NL) SPA (JET + BUBBLE) ENGLISH 7.5” X 10.3” PANTONE 295U 05/10/2017
English
Page 15
SANITATION SYSTEM OPERATING INSTRUCTIONS
1. Activate the sanitation system:
Press the sanitizer button on the control panel, this will
activate the sanitation system as well as the lter pump. The
sanitizer icon and the lter icon turn green. Flashing code “003H”
appears on the control panel’s LED, indicating that the unit is ready
to be programmed.
2. Set operating hours for the sanitation system:
With the minimum preset hours (code “003H”) ashing, press the
sanitizer button to increase the time from 003H, 005H to 008H
hours (see “LED CODE CHART” section). Pressing the button
after the maximum number of hours (code “008H”) will deactivate
the sanitation function and the LED panel will display the spa water
temperature. If you have selected too many hours keep pressing to
repeat the cycle. Once the operating time is set, the display LED
panel will stop ashing after 10 seconds and the sanitation system
starts working. For rst time use of the spa, set the operating hours
to “008H”. During the sanitation, the information displayed on the
LED panel alternates between the spa water temperature and the
remaining hours of sanitation.
After the cycle is completed the LED panel displays the water
temperature. Test the water with the included test strips, and make sure the free chlorine
level is between 2-4 ppm.
Note: DO NOT press any other buttons on the control panel, and attach the spa cover during
the sanitizing process.
3. Readjust operating time if necessary:
During the sanitizing process, the operating hours can be re-adjusted if necessary. Press the
sanitizer button, the LED code “003H” will ash. Repeat step 2.
4. Turn off the sanitation system manually if necessary:
During the sanitizing process, you can turn off the sanitation system manually. Simply press
the ON/OFF button on the control panel. The sanitation system will stop and the
sanitizer icon light will disappear.
5. Restart the sanitation system:
When the programmed cycle ends, the LED panel displays the water temperature, the unit
will stop sanitizing and the sanitizer icon light disappears. To restart the sanitation system,
following the above steps.
6. Test the SPA water regularly:
The free chlorine level in the SPA water may vary depending on the number of occupants,
local water condition and sunlight intensity exposure (outdoor use). During the initial use of
the spa, test the spa water at least 2 times per day with the included test strips to maintain
the free chlorine between 2-4 ppm. After the free chlorine level appears to be stabilized, test
the SPA water every week to maintain optimal sanitizing level.
299
NLA
S AVE THESE INSTRUCTIONS
(299NL) SPA (JET + BUBBLE) ENGLISH 7.5” X 10.3” PANTONE 295U 05/10/2017
English
Page 16
LED CODE CHART
LED Reading De nitions
001H Operating Hour (1 hour remaining)
002H Operating Hours (2 hours remaining)
003H Operating Hours (3 hours remaining)
004H Operating Hours (4 hours remaining)
005H Operating Hours (5 hours remaining)
006H Operating Hours (6 hours remaining)
007H Operating Hours (7 hours remaining)
008H Operating Hours (8 hours remaining)
E90 No water ow
E91 Alarm Code (Low Salt Level)
E92 Alarm Code (High Salt Level)
E94 Water temperature too low
E95 Water temperature is around 50°C (122°F)
E96 System Error
E97 Dry- re Protection
E99 Water temperature sensor broken
END
After 72 hours of continuous heating operation, the pump will hibernate
automatically. The rapid heating and water ltration functions are
disabled.
299
NLA
S AVE THESE INSTRUCTIONS
(299NL) SPA (JET + BUBBLE) ENGLISH 7.5” X 10.3” PANTONE 295U 05/10/2017
English
Page 17
MAINTENANCE AND CHEMICALS
Water Sanitation
The spa owner must regularly check and keep the spa water sanitized with scheduled maintenance (daily, if
necessary). Adding sanitizer and other chemical will control bacteria and viruses present in the spa water.
The maintenance of a proper water balance through appropriate use of sanitizers is the single most important
factor in maximizing the life and appearance of the spa tub as well as ensuring clean, healthy and safe water.
Proper technique is important for water testing and treating the spa water. See your pool/spa professional for
chemical, sanitizer, test kits and testing procedures questions.
CATUTION: ALWAYS FOLLOW THE CHEMICAL MANUFACTURER’S DIRECTIONS, AND
THE HEALTH AND HAZARD WARNINGS.
Do not add chemicals if the spa is occupied. This can cause skin or eye irritation. Concentrated chlorine
solutions can damage the spa tub. In no event is Intex Recreation Corp., Intex Development Co. Ltd., their
related companies, authorized agents and service centers, retailers or employees liable to the buyer or any
other party for costs associated with the loss of spa water, chemicals or water damage.
WARNING
Always unplug this product from the electrical outlet before removing, cleaning, servicing or
making any adjustment to the product.
SPA WATER CHEMISTRY AND BALANCE
Preferred Water Chemistry Reading
Minimum Ideal Maximum
Free Chlorine 2 ppm 2 - 4 ppm 5 ppm
pH 7.2 7.2 - 7.6 7.8
Total Alkalinity (TA) 60 ppm 80 ppm 120 ppm
Calcium Hardness (CaCO3)100 ppm 150–250 ppm 350 ppm
Saturation Index (SI) –0.3 0 +0.3
Water Temperature 20ºC / 68ºF 20–40ºC / 68–104ºF 40ºC / 104ºF
Free chlorine: is the chlorine residual present in the spa water.
Result if too low – Inadequate level of disinfection.
Result if too high – cause odor problem, skin & eye irritation, corroded metals and other materials.
pH: a value that indicates how acidic or basic the spa water is.
Result if too low – Corroded metals, eye & skin irritation, and destruction of total alkalinity.
Result if too high – Scale formation, cloudy water, shorter lter/heater runs, eye & skin irritation, poor chlorine
ef ciency.
Total Alkalinity (TA): indicates the degree of the water’s resistance to pH change. It determines the speed
and ease of pH change, so always adjust total alkalinity before adjusting the pH level.
Result if too low – Corroded metals, eye & skin irritation. Low alkalinity will cause the pH to be unstable.
Result if too high – Scale formation, cloudy water, shorter lter/heater runs, eye & skin irritation, high chlorine
demand.
299
NLA
S AVE THESE INSTRUCTIONS
(299NL) SPA (JET + BUBBLE) ENGLISH 7.5” X 10.3” PANTONE 295U 05/10/2017
English
Page 18
Calcium Hardness (CaCO3): refers to the amount of calcium and magnesium dissolved in the water.
Result if too low – Dif culty balancing water, corrosion of metal components, eye & skin irritation and water
foaming.
Result if too high – Scale formation, cloudy water, eye & skin irritation, dif culty balancing water and lter/
heater inef ciency.
Saturation Index (SI): temperature, calcium hardness concentration, total alkalinity and pH represent the
main factors in uencing scale formation. The tendency of water to either form scale or corrode is indicated by
the Saturation Index (SI):
SI = pH+TF+CF+AF-12.1
*Where: TF = Temperature Factor; CF = Calcium Hardness Factor; AF = Total Alkalinity Factor
SPA WATER CHEMISTRY AND BALANCE (continued)
Water Temperature TF Calcium
Hardness (ppm) CF Total
Alkalinity (ppm) AF
(ºC) (ºF)
8 46 0.2 75 1.5 50 1.7
12 54 0.3 100 1.6 75 1.9
16 61 0.4 150 1.8 100 2.0
19 66 0.5 200 1.9 150 2.2
24 75 0.6 250 2.0 200 2.3
29 84 0.7 300 2.1 300 2.5
34 93 0.8 400 2.2 400 2.6
40 104 0.9 500 2.3 -- --
-- -- -- 1000 2.6 -- --
Test the water pH, Temperature, Calcium Hardness and Total Alkalinity levels. Use the equivalent Factors in
the SI equation.
SI = 0, Balance
If SI > 0, Scaling or cloudy water condition.
If SI < 0, Corrosive to metals or eye & skin irritating condition.
The SI is considered satisfactory if the value is within -0.3 to +0.3 range. Zero being perfect.
SPA Water Adjustment
How to adjust the spa water chemistry when the levels are off the range. CAUTION: Always follow the
chemical manufacturer’s directions, and the health and hazard warnings.
Total Alkalinity (TA) Adjustment
Remove the spa cover to aerate the water and use the included test strips to check the chemistry level.
Ensure the chlorine level in the water is between 2-4 ppm rst, as chlorine will affect the TA test result.
If the TA level (and not the pH) is higher than 120 ppm, to lower the TA level, you add muriatic acid (hydrochloric
acid) or sodium bisulfate.
If the TA level is lower than 60 ppm, you add sodium bicarbonate.
For example (for 4 adults’), if the TA level is 180 ppm, the desired decrease is 60 ppm, from below chart, you
need to add 0.269 Lb (121 g) of sodium bisulfate or 0.101 qt (96 ml) of muriatic acid
If the test strip color is between 180 ppm and 240 ppm, and close to 180 ppm, you can also add 0.269 Lb
(121 g) of sodium bisulfate or 0.101 qt (96 ml) of muriatic acid.
If the reading is more than 240 ppm, you can add sodium bisulfate or muriatic acid to the water drop by drop
until the test strip indicates a 240 ppm reading, then add 0.528 Lb (238 g) of sodium bisulfate or 0.202 qt
(192 ml) of muriatic acid.
NOTE: After adjustment, retest the water after 24 hours and adjust again if necessary.
299
NLA
S AVE THESE INSTRUCTIONS
(299NL) SPA (JET + BUBBLE) ENGLISH 7.5” X 10.3” PANTONE 295U 05/10/2017
English
Page 19
SPA WATER CHEMISTRY AND BALANCE (continued)
Lowering Total Alkalinity
Amount of Sodium Bisulfate to lower Total Alkalinity
Raising Total Alkalinity
Amount of Sodium Bicarbonate to raise Total Alkalinity
Amount of Muriatic Acid to lower Total Alkalinity
(Muriatic acid: 31.45%)
pH Adjustment
After the total alkalinity has been lowered to 120 ppm or raised to 80 ppm and the pH is still high or low, you
can adjust it using the following chart.
Lowering pH
Lowering pH Using Muriatic Acid
Lowering pH Using Sodium Bisulfate
Desired level 60 ppm 80 ppm 100 ppm 120 ppm 140 ppm
Volume:
210 gal / 795 L
0.269 Lb 0.358 Lb 0.448 Lb 0.528 Lb 0.627 Lb
121 g 161 g 202 g 238 g 283 g
Volume:
290 gal / 1098 L
0.368 Lb 0.492 Lb 0.614 Lb 0.737 Lb 0.860 Lb
168 g 224 g 279 g 335 g 391 g
Desired level 60 ppm 80 ppm 100 ppm 120 ppm 140 ppm
Volume:
210 gal / 795 L
0.101 qt 0.135 qt 0.169 qt 0.202 qt 0.234 qt
96 mL 128 mL 160 mL 192 mL 223 mL
Volume:
290 gal / 1098 L
0.139 qt 0.185 qt 0.232 qt 0.278 qt 0.324 qt
132 mL 176 mL 220 mL 264 mL 308 mL
Desired level 20 ppm 40 ppm 60 ppm 80 ppm
Volume:
210 gal / 795 L
0.059 Lb 0.118 Lb 0.178 Lb 0.237 Lb
27 g 53 g 80 g 107 g
Volume:
290 gal / 1098 L
0.081 Lb 0.162 Lb 0.244 Lb 0.326 Lb
37 g 74 g 111 g 148 g
Volume 210 gal (795 L) 290 gal (1098 L)
Total Alkalinity 120 ppm 80 ppm 120 ppm 80 ppm
FromTo
8.47.2 0.028 qt 0.018 qt 0.038 qt 0.025 qt
26 mL 18 mL 36 mL 24 mL
7.87.2 0.019 qt 0.013 qt 0.026 qt 0.017 qt
18 mL 12 mL 22 mL 16 mL
Volume 210 gal (795 L) 290 gal (1098 L)
Total Alkalinity 120 ppm 80 ppm 120 ppm 80 ppm
FromTo
8.47.2 0.071 Lb 0.047 Lb 0.095 Lb 0.063 Lb
32 g 21 g 43 g 29 g
7.87.2 0.047 Lb 0.032 Lb 0.064 Lb 0.043 Lb
21 g 14 g 29 g 20 g
299
NLA
S AVE THESE INSTRUCTIONS
(299NL) SPA (JET + BUBBLE) ENGLISH 7.5” X 10.3” PANTONE 295U 05/10/2017
English
Page 20
SPA WATER CHEMISTRY AND BALANCE (continued)
WARNING
Muriatic acid is a caustic chemical and liquid solution of sodium bisulfate (NaHSO4)
is highly acidic. Handle all chemicals with care and wear extra personnel protective
equipment including goggle and gloves. It is very important not to splash acid onto
your skin or clothing, or into your eyes.
Calcium Hardness Adjustment
Use the included test strips to check the water hardness level and adjust it following below chart.
Lowering Calcium Hardness
If your household water supply is treated with a softener, mix the spa hard water with the soft water
according to the water volume ratio chart to lower the calcium hardness:
Initial level 1000 ppm 500 ppm 350 ppm 250 ppm
Desired level:
100 ppm
Water Volume Ratio (Vhard water:Vsoft water)
1:9 1:4 2:5 2:3
Lowering Calcium Hardness Using Soft Water
Raising pH
Raising pH Using Sodium Bicarbonate
Volume 210 gal (795 L) 290 gal (1098 L)
Total Alkalinity 120 ppm 80 ppm 120 ppm 80 ppm
FromTo 6.87.2 0.541 Lb 0.361 Lb 0.737 Lb 0.491 Lb
243 g 163 g 335 g 224 g
Raising Calcium Hardness
If the calcium hardness level in the spa water is lower than 100 ppm, add calcium chloride into the spa
water.
Volume 210 gal (795 L) 290 gal (1098 L)
m (CaCl2) 0.197 Lb 89 g 0.269 Lb 122 g
299
NLA
S AVE THESE INSTRUCTIONS
(299NL) SPA (JET + BUBBLE) ENGLISH 7.5” X 10.3” PANTONE 295U 05/10/2017
English
Page 21
MAINTENANCE
IMPORTANT
Unplug the power cord before cleaning the system. Cover the water inlet and outlet with
the plugs to prevent water spillage. After completing all maintenance tasks, you must
plug the power cord back in and remove the plugs.
Electrolytic Cell Cleaning
The electrolytic cell has a self cleaning function incorporated into the electronic control's programming. In
most cases this self cleaning action will keep the cell working at optimum ef ciency. In some regions, the
SPA water is hard (high mineral content) which varies depending on the local water condition, this would
cause deposits on the titanium plate and affect the sanitizing ef ciency, so the cell may require periodic
manual cleaning. To maintain maximum performance, we recommend that you open and visually inspect
the electrolytic cell every two weeks for SPA water (Calcium hardness < 100 ppm) or weekly for SPA water
(Calcium hardness > 350 ppm).
The following steps provide instructions on how to clean the cell.
Inspection and cleaning:
1. Turn off the spa and unplug the power cord from the electrical socket.
2. Unscrew the lter cartridge assembly from the spa tub wall, and use the included plugs (15 & 23) to
cover the water inlet and outlet ttings from inside of the spa tub to prevent water from owing out.
3. Remove the four screws from the transparent cover using a Phillips screwdriver (not included) and
remove the cover from the spa control unit.
Maintenance of Spa Water and Cartridge
Protect all the spa occupants from possible water-related illnesses by keeping the spa water clean and
sanitized. Always practice good hygiene. To ensure proper spa water quality follow these procedures:
1. Inspect and clean the lter cartridge every day, and change the lter
cartridge every 3 days.
a. Unscrew the cartridge housing assembly from the spa tub wall
and remove the cartridge (see drawing 11).
b. Use a garden hose to rinse off the cartridge. If the cartridge
remains soiled and discolored it should be replaced. Keep spare
cartridges on hand.
c. Reinstall the clean cartridge back into the cartridge housing and
replace the cartridge housing assembly back onto the spa tub wall.
2. Change the spa water every 2 weeks. See “Spa Tub Drainage” and
“Spa Tub Cleaning” sections for details.
3. Use spa chemicals to maintain proper water chemistry. Spa damage
resulting from misuse of chemicals and mismanagement of spa water
is not covered by the warranty.
4. All occupants must shower before entering the spa.
11
14
12
13
299
NLA
S AVE THESE INSTRUCTIONS
(299NL) SPA (JET + BUBBLE) ENGLISH 7.5” X 10.3” PANTONE 295U 05/10/2017
English
Page 22
MAINTENANCE (continued)
5. Pull out the electrolytic cell and place it in a container, pour kitchen grade vinegar into the container to
soak the titanium plate for about one hour until no deposits remain.
6. Remove the electrolytic cell and ush the titanium plate with fresh water. Be careful: Keep the
electrolytic cell receptacle completely dry, do not let it come into contact with the vinegar and water.
7. Reverse the above steps to reinstall the electrolytic cell.
NOTE: Ensure the notch on the electrolytic cell is aligned with the ridge on the electrolytic cell housing.
The Test Strips can test the “Free Chlorine”, “pH”, “Total Alkalinity” and “Calcium Hardness” levels at the
same time. We recommend that you test the water chemistry weekly, and maintain the chlorine
concentration at 2-4 ppm.
Directions and Use
1. Dip the entire strip into the water and remove immediately.
2. Hold the strip level for 15 seconds. Do not shake excess water from the strip.
3. Now compare the strip pad to the color chart on the packaging label. If necessary, adjust the chemical
level in the spa water. It is very important, to use the proper technique when testing the water's
chemical level. Read and follow the written strip instructions carefully.
INTEX® TEST STRIPS (PACKED WITH THE PRODUCT)
4. Unplug the electrolytic cell cord. Unscrew the electrolytic cell nut in a counter-clockwise motion using the
included electrolytic cell nut wrench (20).
299
NLA
S AVE THESE INSTRUCTIONS
(299NL) SPA (JET + BUBBLE) ENGLISH 7.5” X 10.3” PANTONE 295U 05/10/2017
English
Page 23
Spa Tub Drainage
1. Turn off and unplug the spa control unit.
2. Connect the drain valve adaptor to a garden hose and point the other end
of the garden hose to a suitable draining area (see drawing 12).
3. Remove the drain valve cap from outside of the spa tub and attach the
drain valve adaptor to the drain valve (see drawing 12).
4. From inside of the spa tub, open the drain valve cap, water will start
owing out from the garden hose.
5. When the water stops draining, disconnect the spa control unit from
the spa tub wall. Lift the spa tub wall from the side opposite the drain,
leading any remaining water to the drain and emptying the spa completely
(see drawing 13).
6. Turn over the spa tub to empty any remaining water (see drawing 14).
7. Unscrew the drain valve on the spa control unit side using a coin to drain
out any water (see drawing 15).
8. Use a clean towel to wipe up any remaining water and moisture on the
spa tub and spa control unit.
9. Ensure the spa tub and spa control unit are thoroughly dried.
NOTE: The enclosed plugs (15 & 23) can be used to cover the water
inlet and outlet connectors from the inside of the spa tub to prevent water
from owing out.
Spa Tub Cleaning
If dirt is visible in the water or water becomes cloudy and proper water
chemistry does not clear it up, change the water and clean the spa tub.
See “Spa Tub Drainage” section on how to drain the spa.
While empty, remove the cartridge housing from inside of the spa tub wall,
clean and/or replace the lter cartridge. Use a sponge and mild soap solution
to wipe away any soil or stains on the inside of the spa wall. Rinse thoroughly
before re lling with clean water.
IMPORTANT: Do not use steel wool, hard brushes or abrasive cleaners.
Spa Tub Air Valve Fastening
Check the spa tub air valve for leakage and tightness before use. If air is leaking
from the air valve, use the provided wrench (22) to tighten the air valve as follow:
1. Make sure the spa tub is de ated, open the air valve cap and insert the
wrench
(22) into the air valve body (see drawing 16).
2. With one hand, hold the backside of the air valve base from the inside of
the spa tub wall and turn the wrench (22) clockwise.
IMPORTANT: Never adjust the air valve base when the spa is in use or
lled with water. Only use the air valve wrench if the air valve is loose or there is leakage around air valve
base. Do not over tighten the air valve: over tightening can damage the valve. Just ensure the air valve is
snug and not leaking.
Spa Cover
The attachment buckles of the cover are locking buckles. Two keys are provided in the plastic bag with the
manual and other accessories. Each buckle is marked with “locked” and “unlocked” symbols for easy operation:
put the key into the slot on the buckle and turn it to the appropriate position to lock or unlock the buckle
respectively.
To assure safety from unauthorized access, always put the cover on when spa is not in use and lock all buckles.
Always keep the keys out of reach of children. In case you misplace the keys, you can use any similar size at
screwdriver to lock or unlock the buckles.
Inspect the spa cover regularly for leaks, premature wear and tear, damage, or signs of deterioration. Never use
a worn or damaged cover: it will not provide the level of protection required to prevent unsupervised access to the
spa by a child.
MAINTENANCE (continued)
16
22
14
15
12
1
2
3
11
13
299
NLA
S AVE THESE INSTRUCTIONS
(299NL) SPA (JET + BUBBLE) ENGLISH 7.5” X 10.3” PANTONE 295U 05/10/2017
English
Page 24
MAINTENANCE (continued)
STORAGE
Spa Tub and Cover Air Bladder Repair
Use the enclosed repair patch to repair any puncture:
Clean and dry the area to be repaired thoroughly.
Remove the patch backing paper and press patch rmly over the puncture. Smooth out the surface to
remove any air bubbles under the patch.
1. Drain and clean the spa following the “Spa Tub Drainage” and “Spa Tub Cleaning” sections.
2. Reverse set up instructions to de ate and disassemble the spa tub, spa control unit and spa cover air
bladder.
3. To de ate the tub and the cover air bladder:
a) Open the de ation outlet cap (34) with the included bolt
wrench
(6) (see drawing 17).
b) Insert de ation hose adaptor (35) into the de ation outlet.
c) Insert in ation hose (7) over the de ation hose adaptor (35).
d) Insert the other end of the in ation hose into the tub air valve
or cover air bladder valve.
e) Press the air bubble button to de ate.
f) When de ation is completed reverse above steps and
ensures the de ation outlet cap (34) is securely fastened.
Caution: Only use for the purpose described in this manual.
Keep the in ation hose away from water or small objects when the
de ation function is activated to avoid damage to the blower motor.
4. Make sure all the spa components and accessories are thoroughly
clean and dry before storage. Air-dry the spa tub in the sun for an
hour before folding.
5. Fold the spa tub loosely and avoid any sharp corners to prevent
damage or leakage to the spa tub liner.
6. Prepare additional new cartridges for next time use.
7. Store the spa tub and accessories in a dry, temperature controlled, between 0º – 40ºC (32º – 104ºF),
storage location.
8. The original packing can be used for storage.
17
6
24
35
1
2
3
34
299
NLA
S AVE THESE INSTRUCTIONS
(299NL) SPA (JET + BUBBLE) ENGLISH 7.5” X 10.3” PANTONE 295U 05/10/2017
English
Page 25
TROUBLESHOOTING
PROBLEM CAUSE SOLUTION
NO DISPLAY/SPA
CONTROL UNIT
DOES NOT WORK
Spa is unplugged or off.
Control panel cable plug loose.
• Power failure.
• RCD tripped.
• RCD broken.
Ensure the spa is plugged and switched on.
Ensure the control panel cable plug is rmly
attached to the control base receptacle.
Check power source.
Reset the RCD.
Contact Intex Service Center.
HOUSEHOLD
CIRCUIT BREAKER
TRIPPED
Circuit breaker under rated.
Overloaded circuit breaker.
An electrical fault in the line.
Ensure correct circuit breaker rating.
Provide a dedicated circuit breaker feeding the
spa electrical outlet only.
Contact a qualify electrician to correct the
electrical fault.
NOT HEATING
PROPERLY
Temperature set too low.
• Dirty lter cartridge.
Water temperature decreasing during
heater STANDBY mode.
Heating element failed.
Increase the temperature and attach the spa
cover.
Clean or replace the lter cartridge in time.
If heater is in STANDBY mode, press the ame
button twice to heat up the water to the set
temperature.
Contact Intex Service Center.
JET FUNCTION
DOES NOT WORK
Jet pump is too hot. Turn off and unplug the spa. Let it cool down and
restart all over again.
If problem persists contact Intex Service Center.
JETS OUTPUT ARE
WEAK
Low water level.
Obstruction in the suction inlet inside
the tub.
Jet nozzles clogged or dirty.
Jet nozzles plumbing pipes damaged.
Add water between MIN and MAX level.
Ensure suction inlet is not covered or blocked.
Clean any dirt inside the jet nozzles.
Contact Intex Service Center.
JET AIR CONTROL
KNOB NOT
WORKING
Jet nozzles clogged or dirty.
• Jet air ow plumbing inside the spa tub
damaged.
Clean any dirt inside the jet nozzles.
Contact Intex Service Center.
FILTRATION PUMP
NOT WORKING
• Dirty lter cartridge.
Filtration inlet and/or outlet clogged.
Filter pump motor failed.
Clean or replace the lter cartridge in time.
Check and clean ltration inlet and outlet
regularly.
Contact Intex Service Center.
WATER NOT CLEAN Cartridge assembly not properly
attached.
• Insuf cient ltering time.
• Dirty lter cartridge.
Improper water maintenance.
Filtration inlet and outlet clogged.
Ensure the cartridge assembly is properly
attached.
• Increase ltration time.
Clean or replace the lter cartridge in time.
Keep the spa water properly sanitized. Refer to
the chemical manufacturer’s instructions.
Check and clean ltration inlet and outlet
regularly.
PUMP
CONNECTORS ARE
NOT LEVEL
WITH THE SPA
CONNECTORS
One characteristic of PVC is that
it changes shape, which is normal.
Elevate the pump with wood or another type of
insulated material to bring the pump’s connectors
level with the spa’s connectors.
299
NLA
S AVE THESE INSTRUCTIONS
(299NL) SPA (JET + BUBBLE) ENGLISH 7.5” X 10.3” PANTONE 295U 05/10/2017
English
Page 26
TROUBLESHOOTING (continued)
PROBLEM CAUSE SOLUTION
TUB HAS A
STRANGE SHAPE
Expanded internal air pressure by
strong sunshine.
Do not expose the spa to direct sunlight for
extended period of time.
Check the air pressure and release air if
necessary. During very hot weather, you must
check to see whether it is necessary to release
some air. This is to avoid any possible damage
to the tub.
TUB LOSES AIR
PRESSURE
Air valve cap loose.
Air valve base loose.
Hole, cut or split on spa tub.
Ensure air valve cap is securely closed.
Fill up the spa tub with air then make sure the
air valve base is tighten, see “Spa Tub Air Valve
Fastening” section.
Put liquid soap and water in a squirt bottle and
spray on seams. If there is a leak it will bubble.
After you nd the leak, clean and dry the leaking
area, then apply the repair patch that comes with
your spa.
LEAKING BETWEEN
SPA TUB
CONNECTORS AND
CONTROL UNIT
CONNECTORS
Spa control base inlet/outlet
connections not securely tight.
Spa control base inlet/outlet o-ring
missing/dirty.
Tighten inlet and outlet connections.
Coat the o-ring with petroleum jelly for water
proof.
Remove grid from inside spa with a screwdriver,
ensure inlet/outlet O-ring is in place, clean and
not damaged.
SPA IS TOO NOISY
IN FILTRATION
MODE ONLY
Control base components not
securely attached.
Control base ground not level and
rm.
• Spa lter motor failed.
Ensure control panel, back cover and all
inlet/outlet are securely connected.
Ensure ground is level, rm and smooth.
Replace the failed lter motor with a new one.
INSUFFICIENT
CHLORINE
• Insuf cient operating time of the
sanitation system and/or heater is
running at the same time.
Chlorine loss due to intense
sunlight exposure.
The bather load has increased.
Clogged or dirty electrolytic cell.
Increase the sanitation system operating time
and ensure the heater is off during the
sanitation process. See “Sanitation System
Operating Instructions”.
Use a SPA cover when the SPA is not in use
and/or when the sanitation system is operating.
Increase the sanitation system operating time
and test the water using the test strips. See
“Sanitation System Operating Instructions”.
Check and clean the cell if necessary. See
“Maintenance”.
BUBBLE AIR
BLOWER DOES NOT
WORK
Air blower pump is too hot. Turn off and unplug the spa. Let it cool down and
restart all over again.
If problem persists contact Intex Service Center.
IMPORTANT
If you continue to experience dif culty, please contact our Consumer Service Department for
assistance. See separate “Authorized Service Centers” sheet.
299
NLA
S AVE THESE INSTRUCTIONS
(299NL) SPA (JET + BUBBLE) ENGLISH 7.5” X 10.3” PANTONE 295U 05/10/2017
English
Page 27
TROUBLESHOOTING (continued)
LED PANEL
CODE PROBLEM SOLUTION
LED Panel Code Flash & Alarm On (NOTE: Always turn off the power before cleaning and servicing).
E90
No water ow.
Turn off and unplug the control unit.
Ensure the outlet cover grid is clean and free from obstructions.
Clean or replace the cartridge, see Maintenance and Storage section.
Ensure the in/outlet connections on the spa tub and lter pump are not
blocked.
Keep the spa water properly sanitized to ensure a clean and unclogged
lter cartridge.
Press the button to turn off the unit. Release trapped air by
unscrewing the drain valve cap on the control base side with a coin.
Air has been release once a steady stream of water is owing out from
the drain valve. Wait for 15 seconds and screw the drain valve cap
back. Press the button to activate the control panel buttons, and
then run the lter function by pressing the button to push out any
remaining air in the system.
If problem persists, contact Intex Service Center.
E91
Dirt or scale on titanium plates.
Low salt level / No salt.
Electrolytic cell cord is loose.
Possible electrolytic cell failure.
Remove the electrolytic cell for inspection. Clean it if necessary. See
“Maintenance”.
Add salt. See “Salt Level Information”.
Ensure that the cell cord is plugged rmly into the cell receptacle.
Contact Intex Service Center. Replace the cell if needed.
E92 High salt level.
Partially drain the pool and re ll it with fresh water. See “Salt Level
Information”.
E94
Water temperature too low.
If the ambient temperature is below 4°C (39°F), we recommend not to
use the spa.
Turn off and unplug the control unit, add some warm water to raise the
spa water temperature above 5°C (41°F), then press the button to
heat up the water to the desired temperature.
If problem persists, contact Intex Service Center.
E95
Water temperature is
around 50°C (122°F).
Turn off and unplug the control unit. When the water has cooled down,
plug the RCD and restart all over again.
Turn the heater off, then press the lter and jet buttons to lower the
water temperature.
If problem persists, contact Intex Service Center.
E96
System Error.
Turn off and unplug the control unit, use the cap to stop the water
from owing out of the tub, disassemble and drain out the control unit.
Reassemble the control unit back to the tub. Plug the RCD and restart
all over again.
If problem persists, contact Intex Service Center.
E97 Dry- re Protection.
Contact Intex Service Center.
E99
Water temperature sensor broken.
Contact Intex Service Center.
END
After 72 hours of continuous
heating operation, the pump will
hibernate automatically. The
rapid heating and water ltration
functions are disabled.
Press the button to re-active the lter pump.
299
NLA
S AVE THESE INSTRUCTIONS
(299NL) SPA (JET + BUBBLE) ENGLISH 7.5” X 10.3” PANTONE 295U 05/10/2017
English
Page 28
IMPORTANT: You must drain out any remaining water inside the piping system of the control base
before replacing any parts.
Tools required: One adjustable wrench and one Philip screwdriver.
NOTE: The “special wrench tool” is included with the new lter pump motor replacement and not
with the spa set.
FILTER PUMP MOTOR DISASSEMBLY
123
456
299
NLA
S AVE THESE INSTRUCTIONS
(299NL) SPA (JET + BUBBLE) ENGLISH 7.5” X 10.3” PANTONE 295U 05/10/2017
English
Page 29
WARRANTY
Your PureSpa has been manufactured using the highest quality materials and workmanship. All Intex
products have been inspected and found free of defects prior to leaving the factory. This limited
warranty applies only to the PureSpa only.
This limited warranty is in addition to, and not a substitute for, your legal rights and remedies. To the
extent that this warranty is inconsistent with any of your legal rights, they take priority. For example,
consumer laws across the European Union provide statutory warranty rights in addition to the
coverage you receive from this limited warranty: for information on EU-wide consumer laws, please
visit the European Consumer Center website at http://ec.europa.eu/consumers/ecc/contact_en/htm.
The provisions of this limited warranty apply only to the original purchaser and are not transferable.
This limited warranty is valid for a period of one (1) year from the date of the initial retail purchase.
Keep your original sales receipt with this document, as proof of purchase will be required and must
accompany warranty claims or the limited warranty will be invalid.
PureSpa Warranty – 1 Year
If you nd a manufacturing defect in the PureSpa during the warranty period, please contact the
appropriate Intex Service Center listed in the separate “Authorized Service Centers” sheet. If the item
is returned as directed by the Intex Service Center, the Service Center will inspect the item and
determine the validity of the claim. If the item is covered by the provisions of the warranty, the item will
be repaired or replaced, with the same or comparable item (at Intex’s choice) at no charge to you.
Other than this warranty, and other legal rights in your country, no further warranties are implied. To
the extent possibly in your country, in no event shall Intex be liable to you or any third party for direct
or consequential damages arising out of the use of your PureSpa, or Intex or its agents’ and
employees’ actions (including the manufacture of the product). If your country does not allow the
exclusion or limitation of incidental or consequential damages, this limitation or exclusion does not
apply to you.
You should note that this limited warranty does not apply in the following circumstances:
If the PureSpa is subject to negligence, abnormal use or application, accident, improper operation,
improper voltage or current contrary to operating instructions, improper maintenance or storage;
If the PureSpa is subject to damage by circumstances beyond Intex’s control, including but not
limited to, ordinary wear and tear and damage caused by exposure to re, ood, freezing, rain, or
other external environmental forces;
If the PureSpa is used for any commercial purposes;
To parts and components not sold by Intex; and/or.
To unauthorized alterations, repairs or disassembly to the PureSpa by anyone other than Intex
Service Center personnel.
The costs associated with the loss of pool water, chemicals or water damage are not covered by this
warranty. Injury or damage to any property or person is not covered by this warranty.
Read the owner’s manual carefully and follow all instructions regarding proper operation and
maintenance of your PureSpa. Always inspect your product prior to use. This limited warranty will be
void if use instructions are not followed.
27

Hulp nodig? Stel uw vraag in het forum

Spelregels
1

Forum

Intex-PureSpa-SJB-HS-20-1G
  • Hallo
    Hoe controleer ik of de voeding van de filterpomp stuk is of de pomp zelf
    De voeding is ws niet te repareren maar de pomp kan ik vervangen Gesteld op 15-11-2024 om 15:06

    Reageer op deze vraag Misbruik melden
  • als ik op t vlam icoontje druk om te verwarmen dan doet hij t niet Gesteld op 31-5-2022 om 12:16

    Reageer op deze vraag Misbruik melden
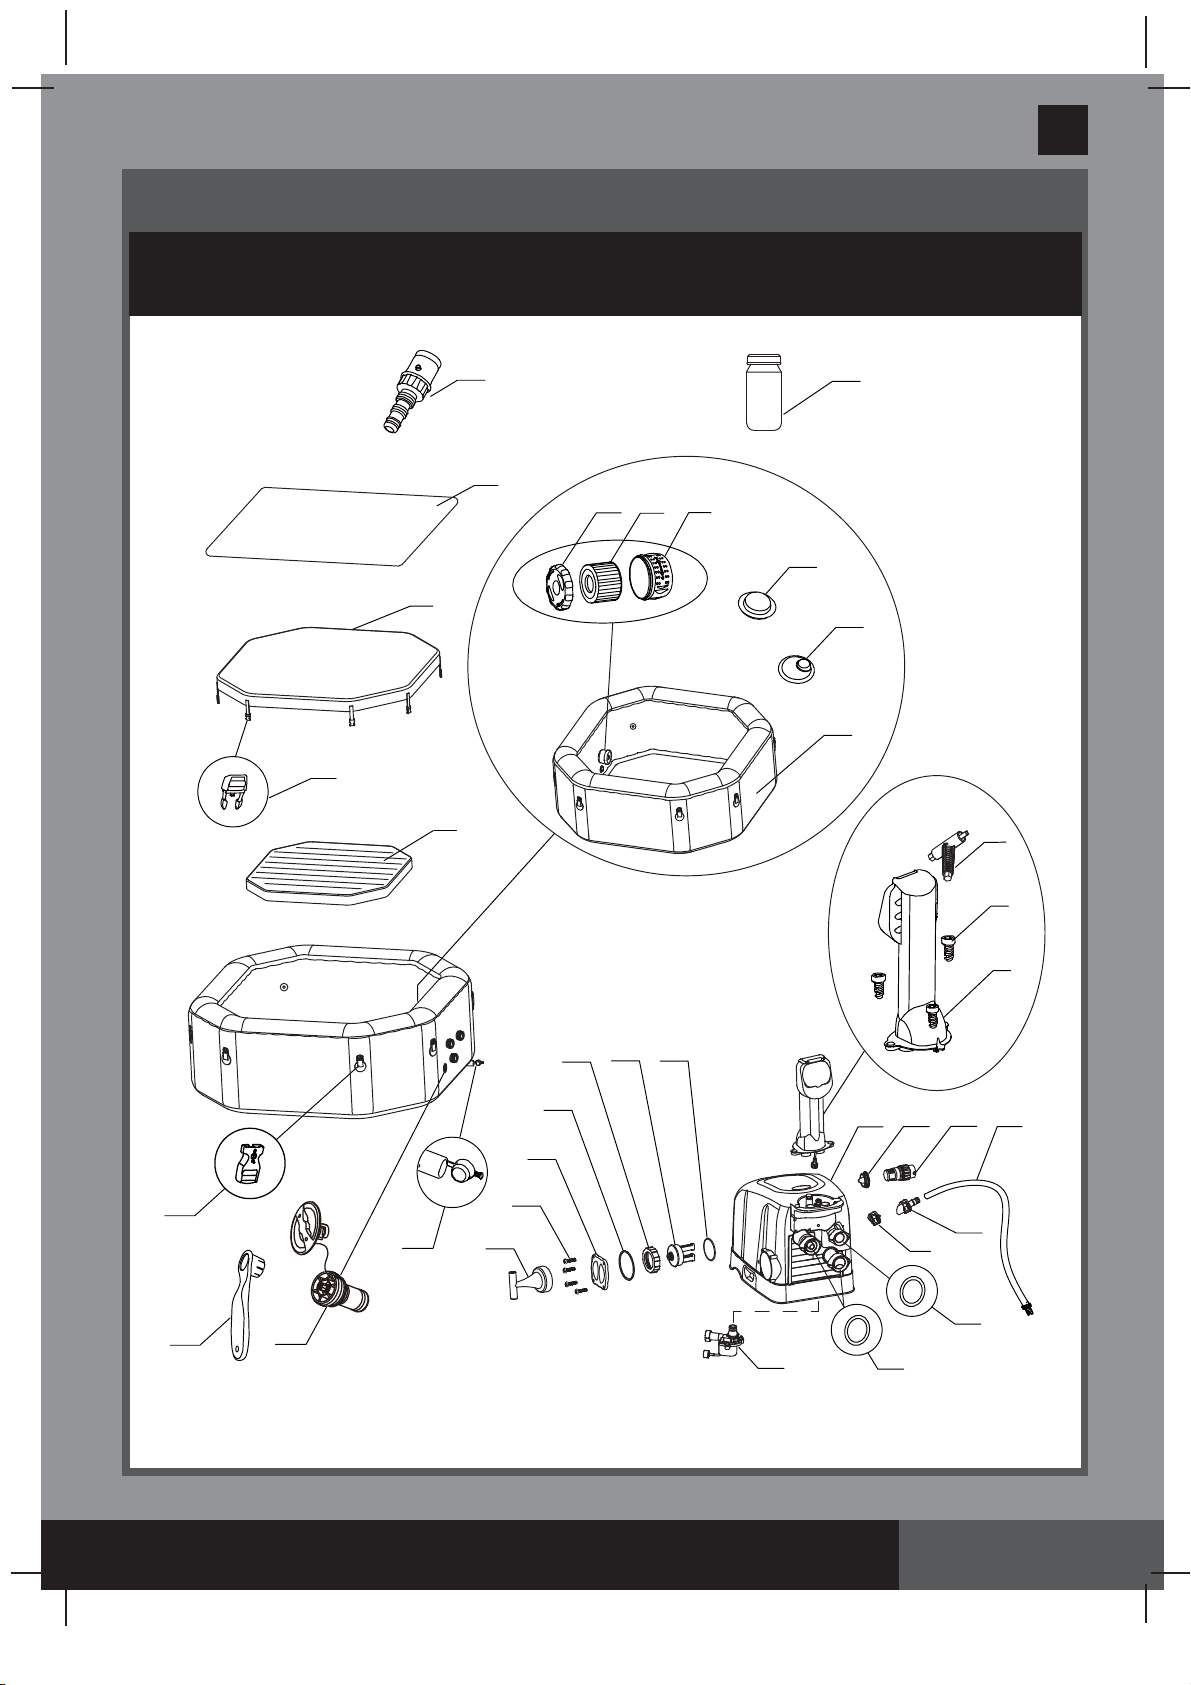
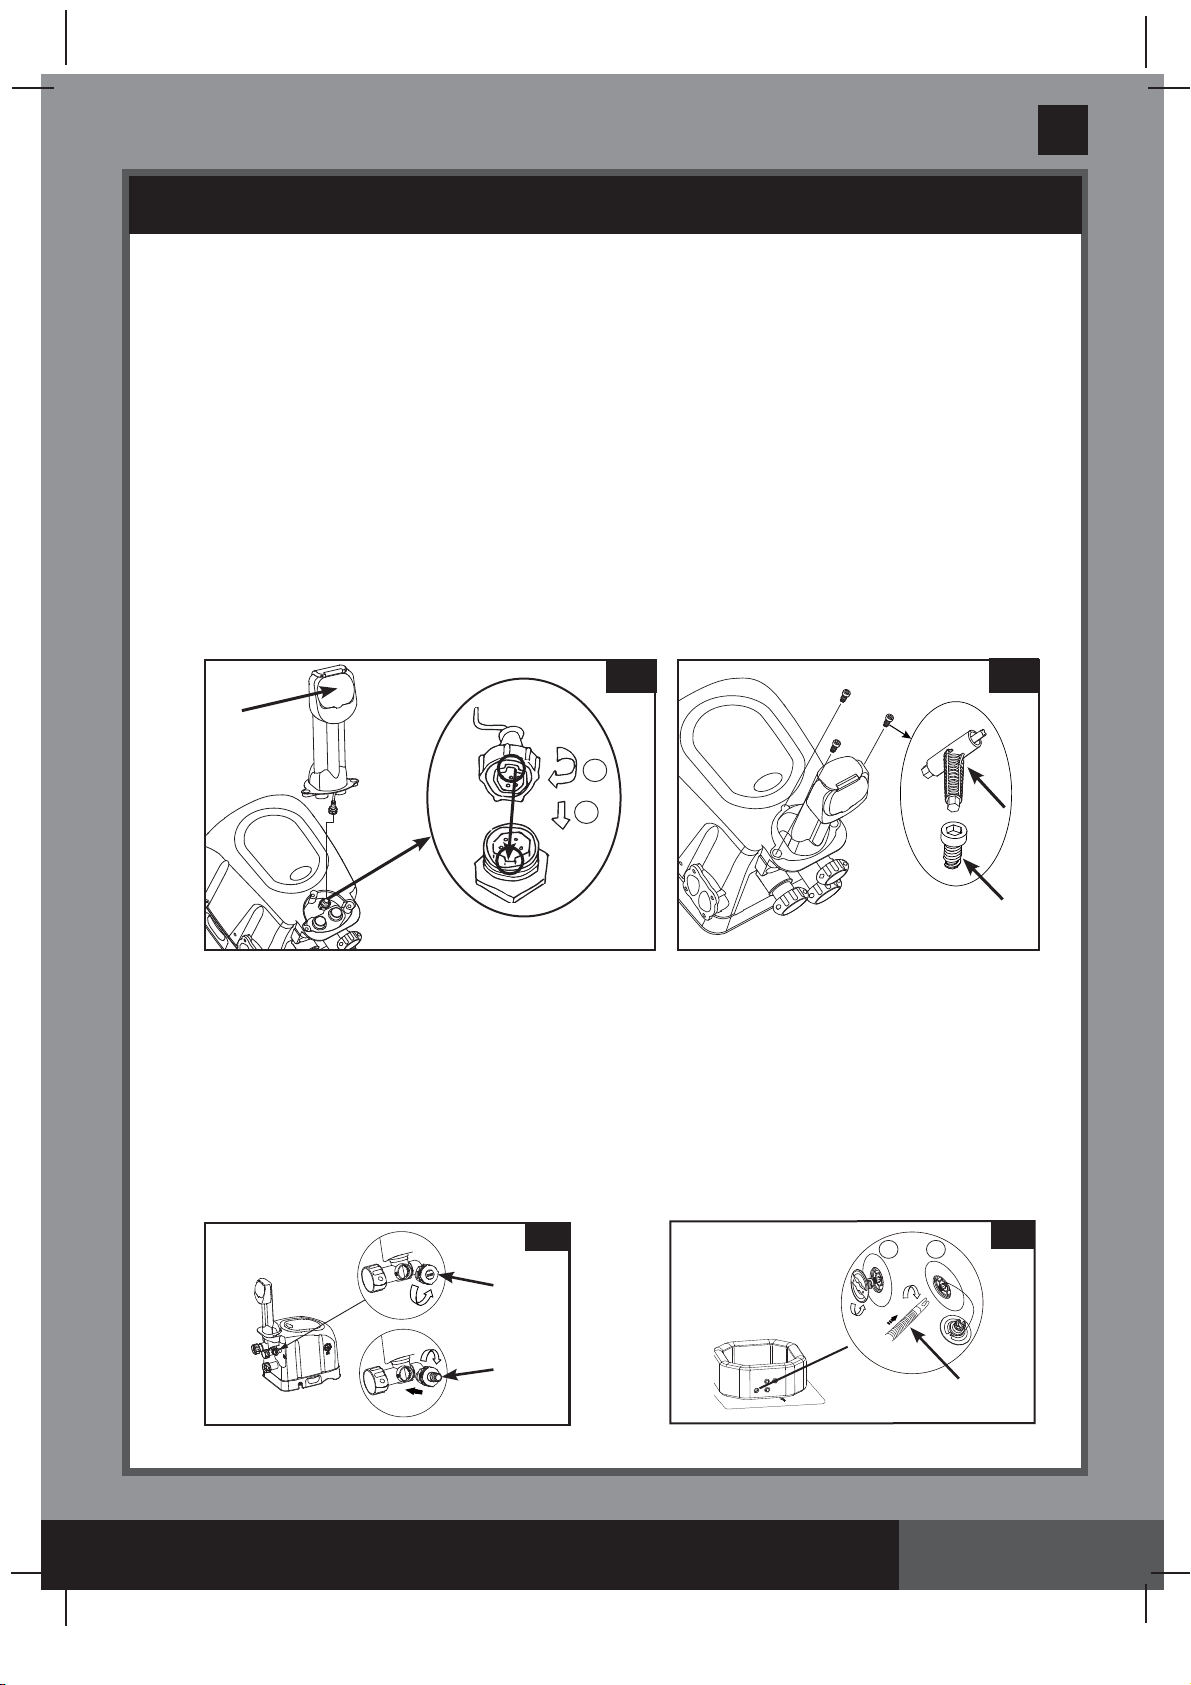
  • moet een nieuwe opblaasslang bestellen maar weet niet welke en waar te bestellen Gesteld op 1-5-2022 om 12:01

    Reageer op deze vraag Misbruik melden
    • Deze kan je bestellen bij
      Intex Service Benelux in Roosendaal
      Artikel nr :11830
      €8.95
      Als je op de site zit, gewoon menu volgen.
      Dan op reserven onderdelen klikken. dan kom je er vanzelf. Vandaag besteld,dinsdag in huis. Prima service daar. Succes Geantwoord op 1-5-2022 om 12:46

      Waardeer dit antwoord Misbruik melden
  • goedemorgen,
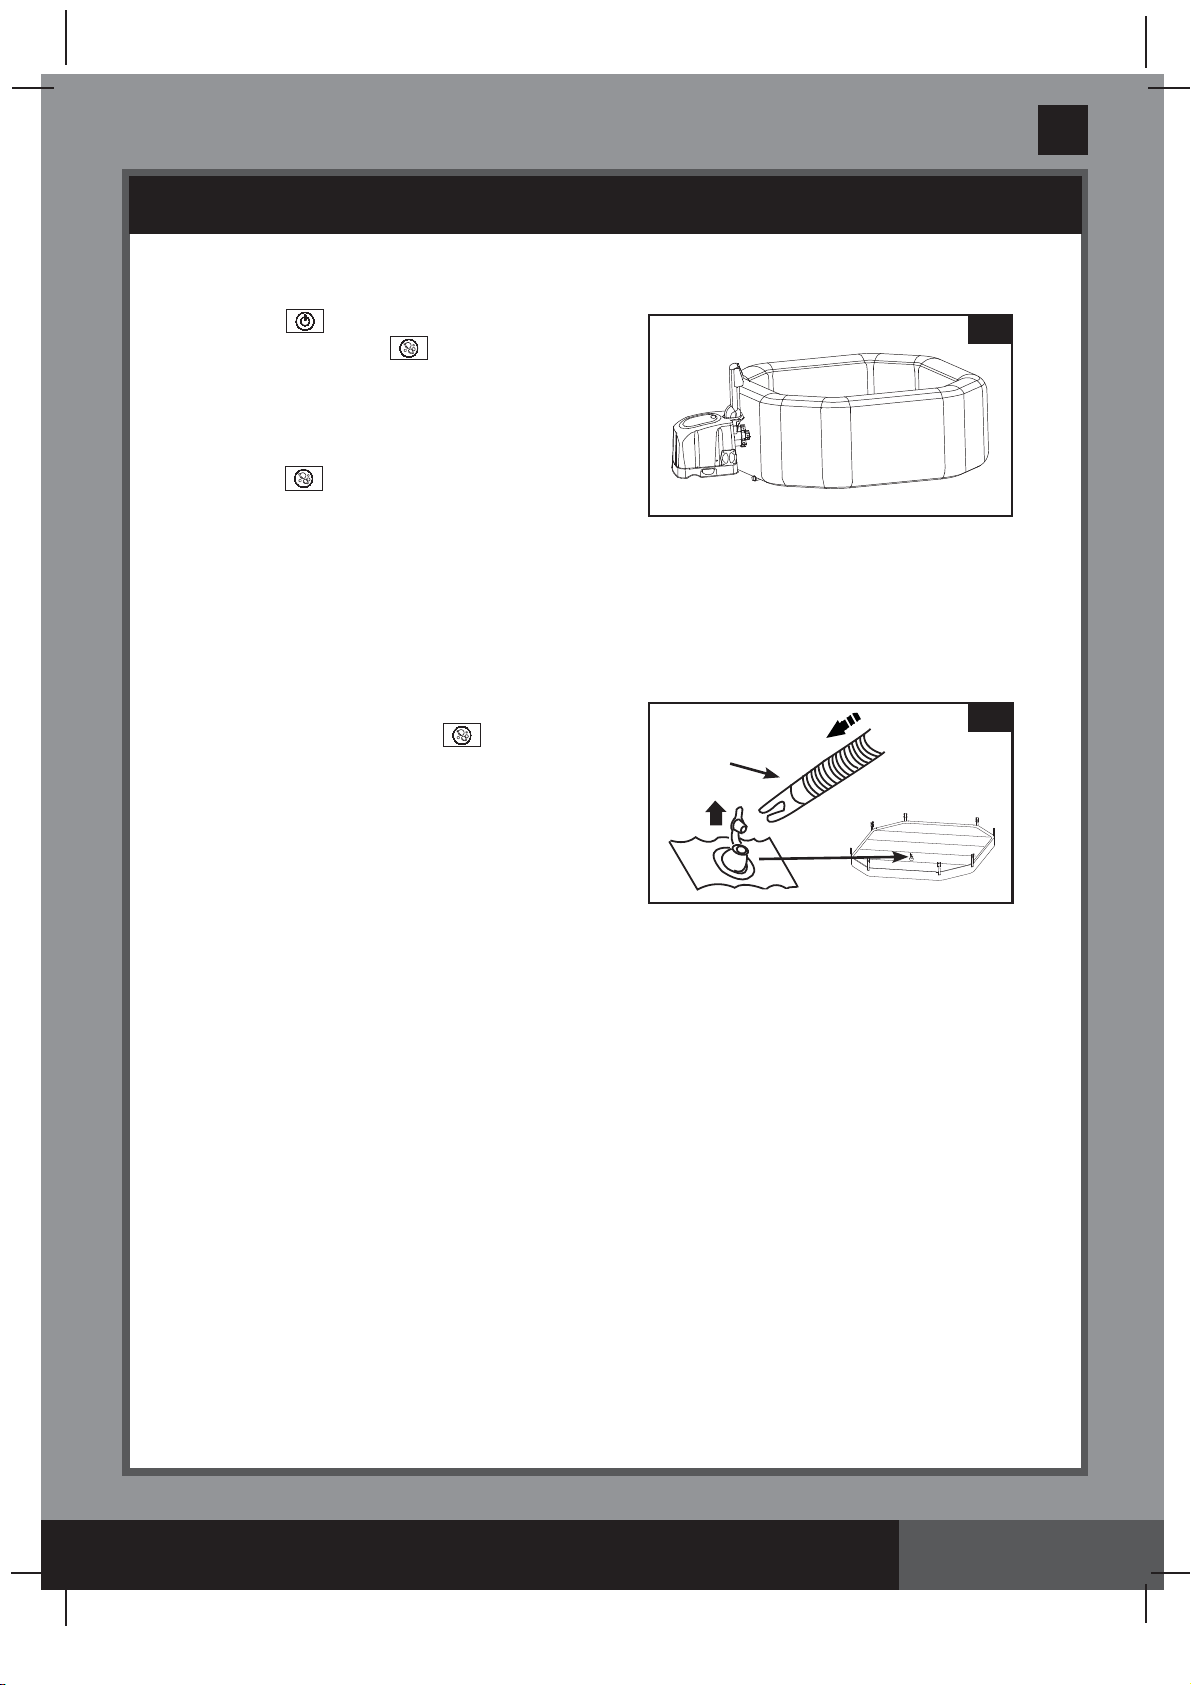
    Na vullen van jacuzzi loopt hij langszaam leeg tot aan de jetstreams.
    geen lekkage bij de 3 aansluitingen.
    Wat kan mogelijk het probleem zijn? Gesteld op 17-1-2022 om 11:40

    Reageer op deze vraag Misbruik melden
  • mijn spa blijft foutcode E90 geven.
    nu word er gezegd dat het ook in het zeefje van de in en uitlaat kan zitten.nu is mijn vraagkan ik deze eruit halen als mijn bad vol zit
    vr gr john Gesteld op 18-12-2020 om 18:37
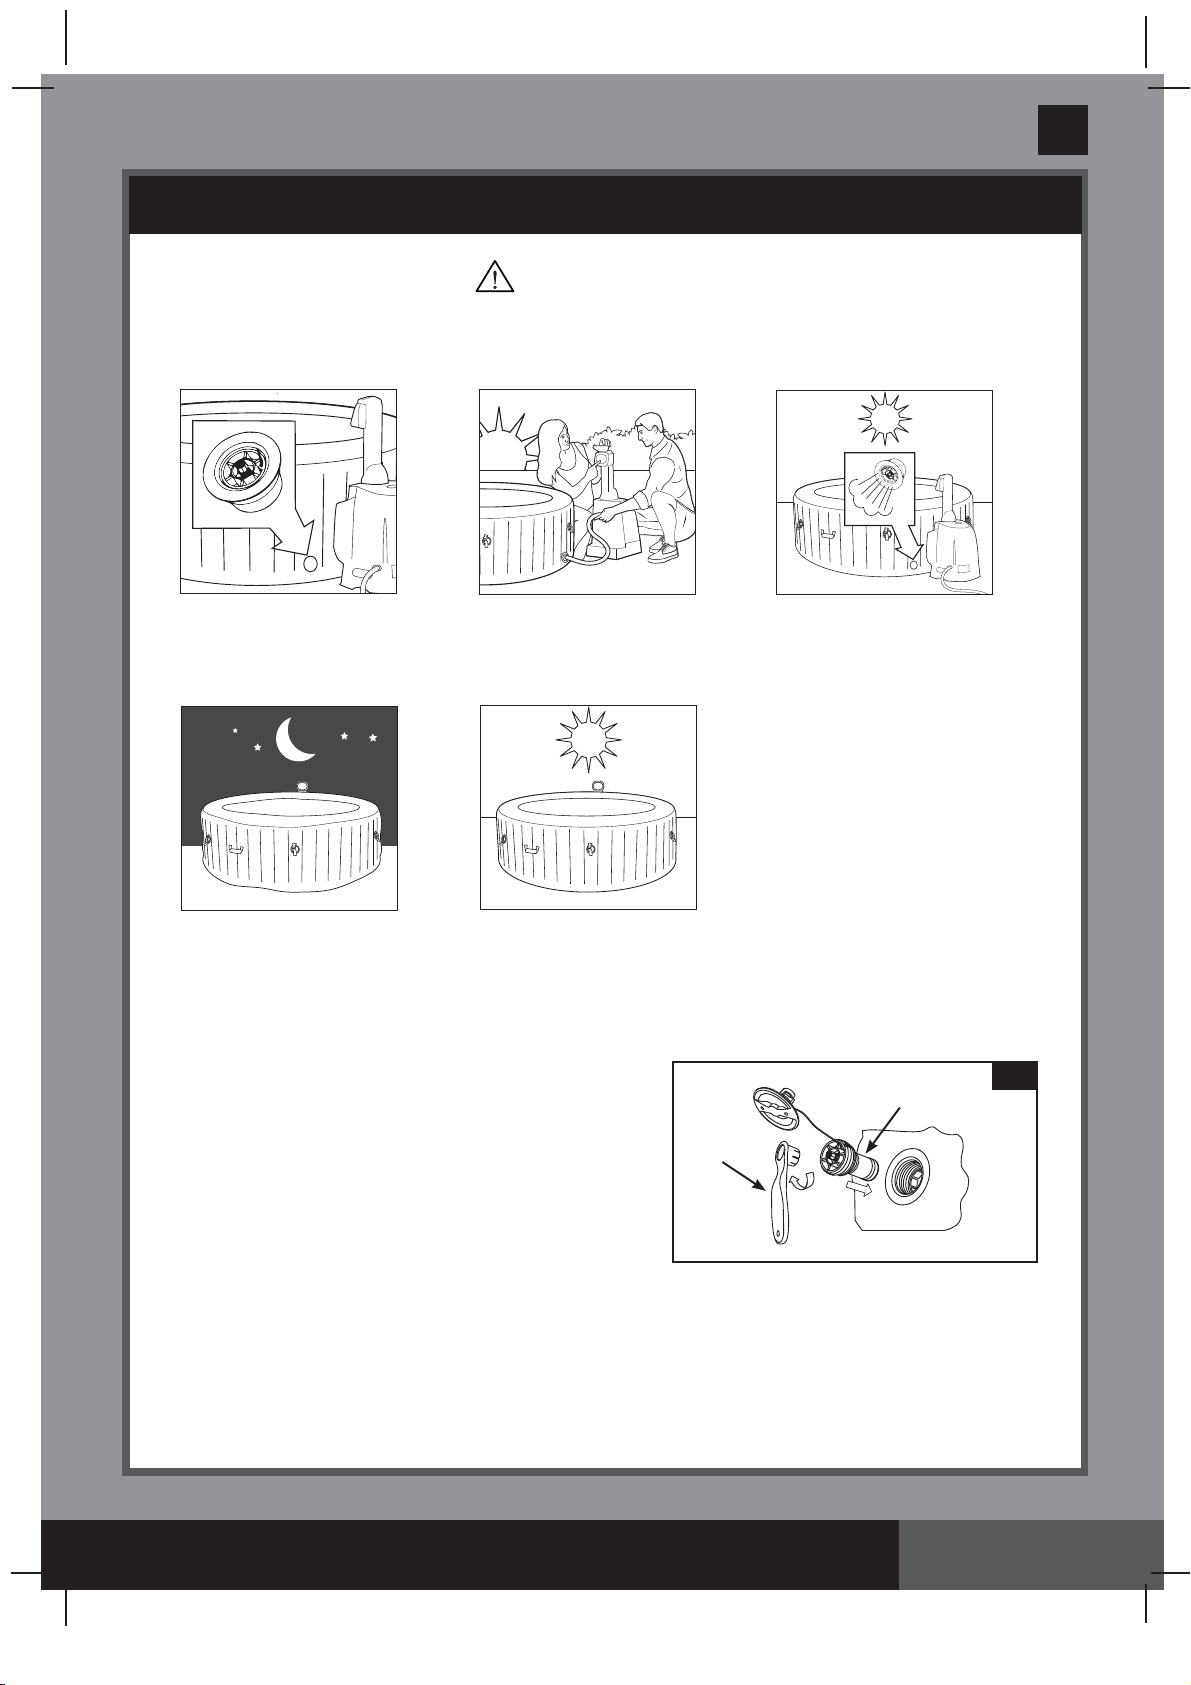
    Reageer op deze vraag Misbruik melden
  • Jets doen het niet
    Lampje branden wel
    Hoor de motor klikken maar hij slaat niet aan
    Wat is er aan de hand Gesteld op 15-6-2020 om 20:07

    Reageer op deze vraag Misbruik melden
6
  • we hebben de spa weer uit de kast gehaald en met het aanzetten blijft de temperatuur tussen de 88 en 100 graden. dit betekent de de kachel niet aanspringt waardoor het water niet op kan warmen. Wat kan ik hier aan doen? Gesteld op 31-5-2020 om 12:49

    Reageer op deze vraag Misbruik melden
  • De jacuzzi geeft code c90 aan als we hem opzetten wat moeten we nu verder doen om het probleem op te lossen dank u Gesteld op 19-2-2020 om 15:42

    Reageer op deze vraag Misbruik melden

Misbruik melden

Gebruikershandleiding.com neemt misbruik van zijn services uitermate serieus. U kunt hieronder aangeven waarom deze vraag ongepast is. Wij controleren de vraag en zonodig wordt deze verwijderd.

Product:

Bijvoorbeeld antisemitische inhoud, racistische inhoud, of materiaal dat gewelddadige fysieke handelingen tot gevolg kan hebben.

Bijvoorbeeld een creditcardnummer, een persoonlijk identificatienummer, of een geheim adres. E-mailadressen en volledige namen worden niet als privégegevens beschouwd.

Spelregels forum

Om tot zinvolle vragen te komen hanteren wij de volgende spelregels:

Belangrijk! Als er een antwoord wordt gegeven op uw vraag, dan is het voor de gever van het antwoord nuttig om te weten als u er wel (of niet) mee geholpen bent! Wij vragen u dus ook te reageren op een antwoord.

Belangrijk! Antwoorden worden ook per e-mail naar abonnees gestuurd. Laat uw emailadres achter op deze site, zodat u op de hoogte blijft. U krijgt dan ook andere vragen en antwoorden te zien.

Abonneren

Abonneer u voor het ontvangen van emails voor uw Intex PureSpa SJB-HS-20-1G bij:


U ontvangt een email met instructies om u voor één of beide opties in te schrijven.


Ontvang uw handleiding per email

Vul uw emailadres in en ontvang de handleiding van Intex PureSpa SJB-HS-20-1G in de taal/talen: Engels als bijlage per email.

De handleiding is 2,67 mb groot.


U ontvangt de handleiding per email binnen enkele minuten. Als u geen email heeft ontvangen, dan heeft u waarschijnlijk een verkeerd emailadres ingevuld of is uw mailbox te vol. Daarnaast kan het zijn dat uw internetprovider een maximum heeft aan de grootte per email. Omdat hier een handleiding wordt meegestuurd, kan het voorkomen dat de email groter is dan toegestaan bij uw provider.

Stel vragen via chat aan uw handleiding

Stel uw vraag over deze PDF

Andere handleiding(en) van Intex PureSpa SJB-HS-20-1G

Intex PureSpa SJB-HS-20-1G Gebruiksaanwijzing - Nederlands - 30 pagina's

Intex PureSpa SJB-HS-20-1G Gebruiksaanwijzing - Deutsch - 29 pagina's


Uw handleiding is per email verstuurd. Controleer uw email

Als u niet binnen een kwartier uw email met handleiding ontvangen heeft, kan het zijn dat u een verkeerd emailadres heeft ingevuld of dat uw emailprovider een maximum grootte per email heeft ingesteld die kleiner is dan de grootte van de handleiding.

Er is een email naar u verstuurd om uw inschrijving definitief te maken.

Controleer uw email en volg de aanwijzingen op om uw inschrijving definitief te maken

U heeft geen emailadres opgegeven

Als u de handleiding per email wilt ontvangen, vul dan een geldig emailadres in.

Uw vraag is op deze pagina toegevoegd

Wilt u een email ontvangen bij een antwoord en/of nieuwe vragen? Vul dan hier uw emailadres in.


Info