619359
4
Verklein
Vergroot
Pagina terug
1/682
Pagina verder
Memory 2 Move
Long Manual
V1.2
DE - 1
INHALT
1. Produktübersicht ........................................................................................................................................................ 4
2. Produktfunktionen ...................................................................................................................................................... 4
3. Lieferumfang ............................................................................................................................................................... 6
4. Technische Daten........................................................................................................................................................ 6
5. Mindestanforderungen ............................................................................................................................................... 6
6. Produktansicht ............................................................................................................................................................ 7
7. Vorhandene Anschlüsse .............................................................................................................................................. 7
7.1 RJ45 WAN Port ............................................................................................................................................................ 7
7.2 Micro USB 3.0 Interface .............................................................................................................................................. 7
7.3 LED Anzeige ................................................................................................................................................................ 8
8. Nutzung eines PC’s oder MAC .................................................................................................................................... 9
8.1 Herstellen einer Wireless LAN Verbindung mit einem PC .......................................................................................... 9
8.2 PC Client Software .................................................................................................................................................... 10
8.2.1 Mein Speicher ........................................................................................................................................................... 11
8.3 Herstellen einer Wireless LAN Verbindung mit einem MAC ..................................................................................... 12
8.3.1 MAC WiFi Finder ....................................................................................................................................................... 13
8.3.2 Mein Speicher ........................................................................................................................................................... 15
8.4 Konfiguration des WiFi Gerätes ................................................................................................................................ 16
9. Nutzung von mobilen Geräten .................................................................................................................................. 20
9.1 iOS Memory 2 Move App Installation ....................................................................................................................... 20
9.2 Kabellose Verbindung mit Ihrem iPhone/iPad .......................................................................................................... 21
9.3 Benutzeranmeldung (iOS) ......................................................................................................................................... 22
9.4 Android Memory 2 Move App Installation ............................................................................................................... 23
9.5 Kabellose Verbindung mit Ihrem Android Gerät....................................................................................................... 23
9.6 Benutzer Anmeldung (Android) ................................................................................................................................ 25
10. Grundfunktionen ...................................................................................................................................................... 26
10.1 Anwendung für iOS Geräte ....................................................................................................................................... 26
10.2 Anwendung für Android Geräte ............................................................................................................................... 28
DE - 2
10.3 WI-Fi Einstellungen (iOS und Android)...................................................................................................................... 30
10.3.1 Wi-Fi Einstellungen Interface .................................................................................................................................... 30
10.3.2 Ändern des Gerätenamens ....................................................................................................................................... 30
10.3.3 Sicherheit .................................................................................................................................................................. 31
10.3.4 Internet Zugänge ...................................................................................................................................................... 31
10.4 Musik-/Audiowiedergabe ......................................................................................................................................... 33
10.4.1 iOS ............................................................................................................................................................................. 33
10.4.2 Android ..................................................................................................................................................................... 35
10.5 Video-/Filmwiedergabe ............................................................................................................................................ 36
10.5.1 iOS ............................................................................................................................................................................. 36
10.5.2 Android ..................................................................................................................................................................... 38
10.6 Wiedergabe von Bilddateien .................................................................................................................................... 39
10.6.1 iOS ............................................................................................................................................................................. 39
10.6.2 Android ..................................................................................................................................................................... 42
10.7 Teilen von Bilddateien .............................................................................................................................................. 45
10.7.1 iOS ............................................................................................................................................................................. 45
10.7.2 Android ..................................................................................................................................................................... 46
10.8 Öffnen/Anzeigen von Dokumenten .......................................................................................................................... 47
10.8.1 iOS ............................................................................................................................................................................. 47
10.8.2 Android ..................................................................................................................................................................... 50
10.9 Kopieren, Löschen, Download und Upload von Dateien (iOS und Android) ............................................................. 51
10.10 Downloaden von Dateien auf Ihr iOS/Android Gerät ............................................................................................... 53
10.11 Uploaden von Dateien auf die Wi-Fi Festplatte (iOS und Android) .......................................................................... 55
10.12 Löschen von Dateien (iOS und Android) ................................................................................................................... 57
10.13 Übersicht und Status Ihrer Uploads/Downloads ...................................................................................................... 58
10.14 Beenden der Memory 2 Move App.......................................................................................................................... 58
10.14.1 iOS ............................................................................................................................................................................. 58
10.14.2 Android ..................................................................................................................................................................... 59
10.15 Deinstallation der „Memory 2 Move“ App ............................................................................................................... 59
10.15.1 iOS ............................................................................................................................................................................. 59
DE - 3
10.15.2 Android ..................................................................................................................................................................... 60
11. WEB Management Funktionen ................................................................................................................................. 61
11.1 Explorer Funktion ..................................................................................................................................................... 62
11.2 Kontext Menü (nicht für Mac) .................................................................................................................................. 63
11.3 Tastaturkürzel ........................................................................................................................................................... 66
11.4 Drag and Drop ........................................................................................................................................................... 66
11.5 Informationen ........................................................................................................................................................... 66
11.5.1 Geräteinformationen ................................................................................................................................................ 66
11.5.2 Speicherinformation ................................................................................................................................................. 67
11.5.3 Netzwerkinformation................................................................................................................................................ 67
11.6 Einstellungen ............................................................................................................................................................ 68
11.6.1 Administrator ............................................................................................................................................................ 68
11.6.2 Laufwerk ................................................................................................................................................................... 68
11.7 Netzwerk Einstellungen ............................................................................................................................................ 69
11.7.1 Host Name ................................................................................................................................................................ 69
11.7.2 Wi-Fi & LAN ............................................................................................................................................................... 70
11.7.3 DHCP Server .............................................................................................................................................................. 71
11.7.4 Internetzugriff ........................................................................................................................................................... 72
11.8 Dienste ...................................................................................................................................................................... 73
11.8.1 Samba ....................................................................................................................................................................... 73
11.8.2 Media Server ............................................................................................................................................................. 74
11.9 System ...................................................................................................................................................................... 75
11.9.1 Zeit Einstellungen ..................................................................................................................................................... 75
11.9.2 Sichern der Einstellungen ......................................................................................................................................... 76
11.9.3 Firmware Update ...................................................................................................................................................... 77
11.9.4 Zurücksetzen auf die Werkseinstellungen ................................................................................................................ 79
12. Lizenzinformation für GNU/GPL ............................................................................................................................... 80
DE - 4
1. PRODUKTÜBERSICHT
Memory 2 Move ermöglicht Ihnen einen kabellosen Zugang zu Ihren Videos, Musik, Fotos
und Daten, um Sie auf Ihrem iPad®, iPhone®, Tablet PC, Smartphone und Notebook zu
streamen ohne unnötigen Kabelsalat.
Dank der integrierten Festplatte brauchen Sie sich keine Sorgen mehr um limitierten
Speicherplatz auf Ihren mobilen Geräten zu machen und der eingebaute USB 3.0 Anschluss
erlaubt einen schnellen und einfachen Datentransfer.
Für eine bestmögliche Mobilität verfügt Memory 2 Move über einen wiederaufladbaren
Akku. Um den Akku aufzuladen, können Sie das Gerät einfach mit einem freien USB
Anschluss Ihres Computers verbinden und gleichzeitig Ihre Dateien auf die Festplatte
kopieren. Im Handumdrehen ist das Gerät für Sie einsatzbereit. Während des Ladevorgangs
kann auf Memory 2 Move zugegriffen werden.
2. PRODUKTFUNKTIONEN
Streaming von Mediendateien über eine Wi-Fi Verbindung für bis zu 5 Benutzer
gleichzeitig.
Zugang zu Ihren Musik-, Video-, und Fotodateien über die kostenfreie App für iOS
und Android.
Batterielaufzeit von bis zu 5 Stunden*.
Internetzugriff über die optionale RJ45 Verbindung (LAN-Anschluss) oder kabellos
mit 802.11 b/g/n Standard
Unterstützt NTFS und FAT32 Formatierung
Unterstützt plattformübergreifenden Datenaustausch über LAN-Verbindung zwischen
Windows, Mac,iOS und Linux.
Unterstützt Nutzeranwendungen auf den verschiedensten Plattformen, inkl.
Windows/Mac/Linux/iPad/iPhone/Android
*Die genaue Batterielaufzeit ist abhängig von den genutzten Anwendungen und
Einstellungen.
DE - 5
Nutzung als externe Festplatte: Verbinden Sie hierzu die ausgeschaltete Memory 2 Move
ganz einfach per USB Anschluss mit Ihrem Computer. Der Computer erkennt die „Neue
Hardware“ und installiert den Treiber automatisch. Warten Sie bis die Treiberinstallation
abgeschlossen ist. Im „Arbeitsplatz“ steht nun ein weiteres Laufwerk mit der Bezeichnung
„Intenso“ zur Verfügung.
Nutzung per LAN-Verbindung: Verbinden Sie hierzu ein Ende Ihres RJ45 Kabels mit Memory
2 Move und das andere Ende mit einem freien Port an Ihrem Router. Nun aktivieren Sie die
DHCP Funktion an Ihrem Memory 2 Move für eine automatische Vergabe der IP Adresse.
Kabellose Nutzung: Verbinden Sie Memory 2 Move mit Ihrem kabellosen Router wie in der
nachfolgenden Anleitung beschrieben, um per Wi-Fi auf das Internet zugreifen zu können.
DE - 6
3. LIEFERUMFANG
Memory 2 Move USB 3.0 Kabel
CD
Bedienungsanleitung
Netzteil (KTEC KSAS0060500100VEU 5V / 1A)
4. TECHNISCHE DATEN
Abmessungen 127.3mm (L) X 80mm (B) X 25mm (H)
Wi-Fi:
o Standard: 802.11 b/g/n,
o Frequenz: 2.4 GHZ
o Übertragungsraten: 72Mbps (20MHz) / 150Mbps (40MHz)
Netzwerk Interface: 100Mbps Ethernet RJ45
USB Anschluss: Micro USB 3.0, für Datentransfer und Aufladen des
Akkus
Akkukapazität: 3000mAh
Betriebstemperatur: Die optimale Betriebstemperatur liegt zwischen 5°C und
35°C
5. MINDESTANFORDERUNGEN
Internetverbindung
Systemanforderungen:
o Windows: XP/Vista/Windows 7/8
o Mac: OS X 10.6.0 und höher
o Weitere: Fedora 12 (Linux) und höher
PC Internet Browser
o Windows: Unterstützt Internet Explorer 7.0 und höher
o Mac: Unterstützt Safari 3.0 und höher
o Weitere: Firefox 3.5 und höher
Router oder Switch
DE - 7
6. PRODUKTANSICHT
7. VORHANDENE ANSCHLÜSSE
7.1 RJ45 WAN PORT
A. Router Modus: Die Memory 2 Move funktioniert wie ein handelsüblicher Router und
kann IP Adressen an Rechner vergeben, welche über WLAN verbunden sind.
B. Bridge Modus: Ermöglicht die Herstellung einer Netzwerkverbindung zu einem
bereits bestehenden Netzwerk.
7.2 MICRO USB 3.0 INTERFACE
Der eingebaute USB 3.0 Anschluss ermöglicht einen schnellen Datentransfer und kann
die interne Batterie aufladen, sobald die Memory 2 Move mit einem Computer oder
Netzteil verbunden ist. Um die Memory 2 Move mit dem PC zu verbinden, schalten Sie
das Gerät aus und verbinden es dann mit dem PC.
DE - 8
7.3 LED ANZEIGE
Power LED:
- Leuchtet nicht: Das Gerät ist ausgeschaltet.
- Leuchtet durchgehend grün: Die Batterie ist komplett geladen.
- Schnell blinkend - grün: Das Gerät wird ausgeschaltet.
- Langsam blinkend - grün: Das Gerät wird geladen.
- Ständig leuchtend - rot: Akkuladung unter 30%
- Schnell blinkend - rot: Akkuladung kritisch
HDD LED:
- Ständig weiß leuchtend: Bereitschaftsmodus
- Weiß blinkend: Aktive Schreib- / Lesevorgänge
- Über USB Port verbunden:
o Ständig leuchtend in blau: Verbunden über USB 3.0
o Ständig leuchtend in weiß: Verbunden über USB 2.0
Wi-Fi LED - blau:
- Flackernd: Der Initialisierungsprozess wird gestartet.
- LED leuchtet nicht: Das Gerät ist ausgeschaltet oder bekommt
keinen Strom
- Ständig leuchtend:
o Initialisierungsprozess abgeschlossen
o Bereitschaftsmodus - Geräte können verbunden werden.
Internet LED:
- Router Modus
o Blaue Farbe: gute Signalqualität
o Blau/Rot im Wechsel: schlechte Signalqualität
o Led leuchtet nicht: keine Internetverbindung
- Bridge Funktion
o Blaue Farbe: gute Signalqualität
o Led leuchtet nicht: keine Internetverbindung
DE - 9
8. NUTZUNG EINES PCS ODER MAC
8.1 HERSTELLEN EINER WIRELESS LAN VERBINDUNG MIT EINEM PC
1.) Schalten Sie das WiFi Get durch Drücken des Power Knopfes auf der Vorderseite des
Gerätes an.
2.) Aktivieren Sie die WLAN Funktion an Ihrem PC und klicken Sie in der Taskleiste unten
rechts auf das WLAN Symbol. Es öffnet sich folgende Anzeige:
3.) Wählen Sie das Netzwerk mit dem Namen „Memory2Move-XXXX“ aus.
Hinweis: Das voreingestellte Passwort lautet im Auslieferungszustand „intenso1“. Bitte
geben Sie nach erfolgreich hergestellter Verbindung zu Ihrer eigenen Sicherheit ein neues
Passwort ein.
4.) Nachdem Sie erfolgreich eine Verbindung zu Ihrem WiFi Gerät hergestellt haben,
starten Sie bitte die mitgelieferte Client Software auf Ihrem PC oder MAC.
DE - 10
8.2 PC CLIENT SOFTWARE
Bitte starten Sie die Anwendung mit einem Doppelklick auf die Verknüpfung „WiFi Finder“.
Die Software sucht automatisch im verbundenen Netzwerk nach Memory 2 Move (siehe
Screenshot).
Hinweis: Sollte „M2M“ nicht in der Liste der verbundenen Netzwerk Clients zu finden
sein, drücken Sie bitte auf „Refresh“, um erneut nach dem Wi-Fi Gerät zu suchen.
1.) Bitte wählen Sie Memory 2 Move im Menü aus und drücken Sie auf „ Log In“, um sich
mit der Web Administrationsoberfläche zu verbinden (siehe Screenshot).
DE - 11
2.) Bitte geben Sie den Benutzernamen und das zugehörige Passwort ein:
Benutzername: admin
Passwort: 00000
Hinweis: Bitte geben Sie nach erfolgreich hergestellter Verbindung, zu Ihrer eigenen
Sicherheit, ein neues Passwort ein.
3.) Wenn Sie den Menüpunkt „Mein Speicher“ auswählen, wird Ihnen der aktuelle
Speicherinhalt der Memory 2 Move angezeigt. Um sich erfolgreich zu verbinden,
müssen Sie sich als Administrator mit zugehörigem Passwort verbinden.
8.2.1 MEIN SPEICHER
Wenn Sie den Menüpunkt „My Storage“ oder „Mein Speicher auswählen, wird Ihnen das
unten stehende Bild angezeigt. Um sich erfolgreich zu verbinden, nutzen Sie die folgenden
Log In Details:
Benutzername: admin
Passwort: 00000
Hinweis: Bitte geben Sie nach erfolgreich hergestellter Verbindung, zu Ihrer eigenen
Sicherheit, ein neues Passwort ein.
DE - 12
8.3 HERSTELLEN EINER WIRELESS LAN VERBINDUNG MIT EINEM MAC
Schalten Sie das Wi-Fi Gerät durch Drücken des Power Knopfes auf der Vorderseite des
Gerätes an. Warten Sie einige Minuten, bis die LED Leuchte aufhört zu blinken. Aktivieren Sie
die WLAN Funktion an Ihrem PC und klicken Sie in der Taskleiste unten rechts auf das WLAN
Symbol. Wählen Sie das Netzwerk mit dem Namen „Memory2Move-XXXX“ aus.
Hinweis: Das voreingestellte Passwort lautet im Auslieferungszustand „intenso1“. Bitte
geben Sie nach erfolgreich hergestellter Verbindung zu Ihrer eigenen Sicherheit ein neues
Passwort ein.
Nachdem Sie erfolgreich eine Verbindung zu Ihrem Wi-Fi Gerät hergestellt haben,
installieren Sie bitte die mitgelieferte Client Software wie folgt:
Als Voraussetzung, um das verbundene Wi-Fi Gerät mit Ihrem Computer zu verbinden,
nutzen Sie bitte das inkludierte Software Tool „WiFi Finder“ von der beigelegten Treiber CD.
Die Software sucht für Sie automatisch das verbundene Wi-Fi Gerät in Ihrem Netzwerk.
Klicken Sie einfach per Doppelklick auf das Icon und folgen Sie den Anweisungen auf dem
Bildschirm.
DE - 13
8.3.1 MAC WIFI FINDER
Bitte starten Sie mit einem Doppelklick auf die Verknüpfung die Anwendung „WiFi Finder“.
Die Software sucht automatisch im verbundenen Netzwerk nach Memory 2 Move (siehe
Screenshot).
Hinweis: Sollte „M2M“ nicht in der Liste der verbundenen Netzwerk Clients zu finden sein,
drücken Sie bitte auf „Refresh“, um erneut nach dem Wi-Fi Gerät zu suchen.
1.) Bitte wählen Sie Memory 2 Move im Menü aus und drücken Sie auf „ Log In“, um sich
mit der Web Administrationsoberfläche zu verbinden (siehe Screenshot).
DE - 14
2.) Bitte geben Sie den Benutzernamen und das zugehörige Passwort ein:
Benutzername: admin
Passwort: 00000
Hinweis: Bitte geben Sie nach erfolgreich hergestellter Verbindung, zu Ihrer eigenen
Sicherheit, ein neues Passwort ein.
3.) Wenn Sie den Menüpunkt „Explorer“ auswählen, wird Ihnen der aktuelle
Speicherinhalt der Memory 2 Move angezeigt. Um sich erfolgreich zu verbinden,
müssen Sie sich als Administrator mit zugehörigem Passwort verbinden.
DE - 15
8.3.2 MEIN SPEICHER
Wenn Sie den Menüpunkt „My Storage“ oder „Explorer auswählen, wird Ihnen das unten
stehende Bild angezeigt. Um sich erfolgreich zu verbinden, nutzen Sie die folgenden Log In
Details:
Benutzername: admin
Passwort: 00000
Hinweis: Bitte geben Sie nach erfolgreich hergestellter Verbindung, zu Ihrer eigenen
Sicherheit, ein neues Passwort ein.
Sie können die Verzeichnisse und Ordner auf der Memory 2 Move erstellen, löschen,
kopieren, editieren, umbenennen oder hin-und herschieben.
Des Weiteren können Daten zwischen Ihrem MAC und der Memory 2 Move beidseitig
ausgetauscht werden (upload/download).
DE - 16
8.4 KONFIGURATION DES WIFI GERÄTES
Bitte nutzen Sie die PC Client Software wie oben beschrieben, um eine Verbindung zum
WiFi Gerät herzustellen und loggen Sie sich als Administrator auf der Web-
Administrationsoberfläche ein. Sie können nun Ihr Gerät konfigurieren.
1.) Während der ersten Nutzung des Gerätes startet nach erfolgter Anmeldung ein
sogenannter „Start-Assistent“, der es Ihnen ermöglicht, alle wichtigen Einstellungen
einfach vorzunehmen.
Hinweis: Wenn Sie auf das X (oben rechts im Assistenten) drücken, verlassen Sie den
Start-Assistenten und alle Werkseinstellungen werden als Standard Einstellungen
übernommen.
2.) Bitte drücken Sie auf den „Weiter“ Button, um Ihr Gerät zu konfigurieren.
3.) Einrichten des Internetzugriffs
.. durch Herstellung einer Verbindung zu einem weiteren verfügbaren Netzwerk
DE - 17
Sie haben folgende Optionen:
A) Wi-Fi-Modus: Die Memory 2 Move stellt bei dieser Einstellung einen
Zugangspunkt für andere drahtlose Geräte dar, damit diese über eine weitere
verfügbare drahtlose Verbindung in das Internet gelangen können. Dieses ist die
Standardeinstellung. Hierzu müssen Sie folgende Einstellungen vornehmen:
SSID: Geben Sie den SSID Namen ihres Netzwerkes ein oder klicken
Sie auf „Neuer Scan, um automatisch nach allen verfügbaren
Netzwerken zu suchen.
Passwort: Bitte geben Sie das Passwort für das gewählte lokale drahtlose
Netzwerk ein.
IP Adresse: 1. Bei Auswahl von „Automatisch“ stellt das Netzwerk
Ihnen automatisch eine IP Adresse zur Verfügung.
2. Bei Auswahl von „Statische IP“ müssen Sie selber Ihre IP
Adresse für das Netzwerk, mit dem Sie sich verbinden wollen,
eingeben.
B) LAN-Modus: Direkter Anschluss des Gerätes mit einem LAN Kabel an einen
vorhandenen Router. Bitte nutzen Sie hierzu einen freien Steckplatz für ein LAN
Kabel an Ihrem Router. Bei dieser Konfiguration schließen Sie das WiFi Gerät per
Netzwerkkabel an ein weiteres verfügbares Netzwerk an.
Auswahl der LAN Optionen
In der Grundeinstellung ist „Dynamische IP“ ausgewählt. Sie können manuell eine IP
Adresse vergeben, indem Sie auf den gelben Pfeil klicken und die Option „Statische
IP“ auswählen.
Hinweis: Durch Klicken auf das X (links oben) können Sie das WAN Optionsmenü
verlassen.
Hinweis: Sollten Sie keine Verbindung mit einem weiteren Netzwerk herstellen
können, fragen Sie bitte Ihren Netzwerk Administrator nach den für Sie gültigen
Richtlinien!
DE - 18
4.) Klicken Sie auf „Weiter“, um mit der Konfiguration des Gerätes fortzufahren. Sie
nehmen nun die WiFi Einstellungen vor.
- SSID: Bitte tragen Sie hier den Namen Ihres Netzwerkes ein. In der
Grundeinstellung steht hier „Memory2Move-XXXX“. 32 Zeichen sind
maximal für den SSID Namen möglich.
- Kanal: Bitte tragen Sie hier den Kanal ein, auf dem das WiFi Gerät senden und
empfangen soll. Die Grundeinstellung ist „Auto“. Der Kanal wird in
diesem Fall automatisch vom Gerät festgelegt. Sie können aber auch
manuell festlegen, auf welchem Kanal empfangen und gesendet
werden soll. Es stehen die Kanäle 1 bis 14 zur Verfügung.
- Wi-Fi-Modus: Der voreingestellte drahtlose Netzwerkstandard lautet:
802.11/b/g/n. Sie können ebenfalls manuell die Modi 11Mbps
(802.11b), 54 Mbps (802.11g) oder 150Mbps (802.11n) einstellen.
- Sicherheit: Im Auslieferungszustand ist Mixed WPA/WPA2-PSK ausgewählt. Sie
haben die Wahl zwischen folgenden Verschlüsselungstypen:
WPA-PSK,WPA2-PSK, Mixed WPA/WPA2-PSK.
- Passwort: Es muss, je nach ausgewähltem Verschlüsselungstyp, ein Passwort mit
mindestens 8 und höchstens 63 Zeichen eingegeben werden.
- IP Adresse: Die voreingestellte IP Adresse lautet: 10.10.10.254 mit der
Subnetmaske 255.255.255.0 Diese IP Adresse können Sie manuell
verändern.
DE - 19
5.) Klicken sie auf „Weiter“, um das Administrator Passwort festzulegen. Sollten Sie auf
„Überspringen“ drücken, verzichten Sie auf die Festlegung eines neuen Passwortes
und übernehmen das Voreingestellte.
Nach Beendigung des Start-Assistenten startet das System neu. Dieser Vorgang dauert
ca. 2 Minuten. Den aktuellen Status können Sie den Benachrichtigung entnehmen.
DE - 20
9. NUTZUNG VON MOBILEN GERÄTEN
9.1 IOS MEMORY 2 MOVE APP INSTALLATION
1. Klicken Sie auf das App Store Icon auf Ihrem Homescreen, wie auf folgendem Bild zu
sehen. Suchen Sie nach der kostenfreien „Memory 2 Move App und folgen Sie den
Anweisungen zur Installation auf dem Bildschirm.
Sobald die Installation erfolgreich beendet wurde, ist die „Memory 2 Move” App auf dem
Homescreen Ihres Gerätes zu finden (siehe folgendes Bild).
DE - 21
9.2 KABELLOSE VERBINDUNG MIT IHREM IPHONE/IPAD
1. Schalten Sie die Memory 2 Move an. Warten Sie ein paar Minuten, bis die
Initialisierung des Geräts abgeschlossen ist. Dies ist erkennbar an der blauen Wi-Fi
LED, die nach Abschluss der Initialisierung aufhört zu blinken.
2. Klicken Sie auf das Icon für „Einstellungen”, wie in folgendem Bild zu sehen.
3. Klicken Sie auf den Menüpunkt “Wlan”. In der Liste der vorhandenen Wi-Fi
Netzwerke sollte das Netzwerk „Memory2Move-XXXX” angezeigt werden.
Klicken Sie auf dieses Netzwerk, wie in folgendem Bild zu sehen. Falls Sie in Schritt
8.4. unter „Wi-Fi & Lan Einstellungen“ ein Passwort festgelegt haben, geben Sie dies
nun an.
Sobald „Memory2Move-XXXX” ausgewählt wurde, erscheint ein Haken vor der SSID und das
Wi-Fi Logo in der linken oberen Ecke des Geräts wird angezeigt.
DE - 22
9.3 BENUTZERANMELDUNG (IOS)
Klicken Sie auf das „Memory 2 MoveLogo um die Anwendung zu starten, wie in folgendem
Bild zu sehen.
Geben Sie das Administrator Passwort ein, welches Sie während der Konfiguration vergeben
haben (Werkseinstellung: 00000). Das Passwort ist nur für die erste Anmeldung erforderlich.
Das Gerät speichert Ihre Eingabe, sodass bei der 2. Anmeldung keine Eingabe mehr
erforderlich ist.
Sobald Sie das Passwort korrekt eingegeben haben, werden Sie automatisch in das Menü
Memory 2 Move“ geführt. Dies ist Ihr direkter Zugriff auf die Wi-Fi Festplatte.
DE - 23
9.4 ANDROID MEMORY 2 MOVE APP INSTALLATION
1. Öffnen Sie „Google Playstore“ oder das „App Center“ und suchen Sie nach der
kostenfreien „Memory 2 Move“ App.
2. Folgen Sie den Installationsanweisungen auf dem Bildschirm, wie auf dem
nachfolgenden Bild zu sehen.
3. Sobald die Installation erfolgreich beendet wurde, ist die „Memory 2 Move” App auf
dem Homescreen Ihres Gerätes zu finden (siehe folgendes Bild).
9.5 KABELLOSE VERBINDUNG MIT IHREM ANDROID GERÄT
1. Schalten Sie Memory 2 Move an. Warten Sie ein paar Minuten, bis die Initialisierung
des Geräts abgeschlossen ist. Dies ist erkennbar an der blauen Wi-Fi LED, die nach
Abschluss der Initialisierung aufhört zu blinken.
DE - 24
2. Klicken Sie auf das Icon für „Einstellungen” wie in folgendem Bild zu sehen.
3. Schalten Sie die Wi-Fi Funktion ein, indem Sie den“ virtuellen Schalter “ beim
Menüpunkt Wlan nach rechts schieben.
In der Liste der vorhandenen Wi-Fi Netzwerke sollte das Netzwerk „Memory2Move-
XXXX” angezeigt werden. Klicken Sie auf dieses Netzwerk, wie in folgendem Bild zu
sehen. Falls Sie in Schritt 8 unter „Wi-Fi & Lan Einstellungen“ ein Passwort festgelegt
haben, geben Sie dieses nun an.
4. Wenn das Gerät erfolgreich mit der Wi-Fi Festplatte verbunden wurde, erscheint das
Wort “Verbunden” unter der SSID.
DE - 25
9.6 BENUTZER ANMELDUNG (ANDROID)
1. Klicken Sie auf das “Memory 2 Move App Logo, um die App zu starten (siehe
nachfolgendes Bild).
2. Geben Sie das Administrator Passwort ein, welches Sie während der Konfiguration
vergeben haben (Werkseinstellung: 00000). Das Passwort ist nur für die erste
Anmeldung erforderlich. Das Gerät speichert Ihre Eingabe, sodass bei der 2.
Anmeldung keine Eingabe mehr erforderlich ist.
3. Sobald Sie das Passwort korrekt eingegeben haben, werden Sie automatisch in das
Menü „Memory 2 Move“ geführt. Dies ist Ihr direkter Zugriff auf die Wi-Fi Festplatte.
DE - 26
10. GRUNDFUNKTIONEN
10.1 ANWENDUNG FÜR IOS GERÄTE
Sobald Sie sich erfolgreich mit der Memory 2 Move verbunden haben, werden Sie
automatisch in das Menü „Memory 2 Move” geführt. Dies ist Ihr direkter Zugriff auf die Wi-Fi
Festplatte. Das Mein GerätMenü ist für Ihren Zugriff auf das Gerät, welches Sie aktuell für
die Verbindung mit der Memory 2 Move nutzen.
Folgende Unterpunkte sind in den Menüs auswählbar:
Mein Gerät Hauptmenü r die Organisation Ihrer Dateien stehen Ihnen hier
standardmäßig die Ordner „Dokumente”, „Musik”, „Fotos”, „Videos” und „iPad”/ iPhone”
zur Verfügung.
Memory 2 Move Hauptmenü Zugriff auf die Dateien auf Memory 2 Move.
DE - 27
Home Taste Führt Sie zurück in das Hauptmenü.
Ansichtstaste Führt Sie in die Miniatur- oder Listenübersicht.
Setup Führt Sie in das Einstellungsmenü der Wi-Fi Festplatte.
Zurück Taste Führt Sie zurück zum vorherigen Menü.
Verwalten Taste Zum Auswählen mehrerer Dateien, die man
entweder uploaden oder downloaden kann sowie löschen.
Erledigt Taste Diese wird benötigt, um nach Fertigstellung
wieder in das Hauptmenü Zurückzukehren.
Memory 2 Move Zugriff auf die Wi-Fi Festplatte.
Mein Gerät Zugriff auf das Gerät, welches Sie aktuell für die
Verbindung mit der Wi-Fi Festplatte nutzen.
Status Taste Führt Sie zur Statusübersicht Ihrer
Downloads/Uploads, zeigt die Versionsnummer an und den
zuletzt abgespielten Titel.
DE - 28
10.2 ANWENDUNG FÜR ANDROID GERÄTE
Sobald Sie sich erfolgreich mit der Memory 2 Move verbunden haben, werden Sie
automatisch in das Menü „Memory 2 Movegeführt, dies ist Ihr direkter Zugriff auf die Wi-Fi
Festplatte. Das „Mein Gerät” Menü ist für Ihren Zugriff auf das Gerät, welches Sie aktuell für
die Verbindung mit der Memory 2 Move nutzen.
Folgende Unterpunkte sind in den Menüs anwählbar:
„Mein Gerät“ Hauptmenü Für die Organisation Ihrer Dateien stehen Ihnen hier
standardmäßig die Ordner “Dokumente”, “Musik”, “Fotos”, “Videos” und “SDCard” zur
Verfügung.
Memory 2 Move” Hauptmenü Zugriff auf die Dateien auf Memory 2 Move.
DE - 29
Home Taste Führt Sie zurück in das Hauptmenü.
Ansichtstaste Führt Sie in die Miniatur- oder
Listenübersicht.
Einstellungstaste Führt Sie in das Einstellungsmenü der
Wi-Fi Festplatte.
Zurück Taste Führt Sie zurück zum vorherigen Menü.
Verwalten Taste Zum Auswählen mehrerer Dateien, die
man entweder uploaden oder downloaden kann sowie
zum Löschen.
Erledigt Taste Diese wird benötigt, um nach
Fertigstellung wieder in das Hauptmenü zurückzukehren.
Memory 2 Move Zugriff auf die Wi-Fi Festplatte.
Mein Gerät Zugriff auf das Gerät, welches Sie aktuell für
die Verbindung mit der Wi-Fi Festplatte nutzen.
Status Taste Führt Sie zur Statusübersicht Ihrer
Downloads/Uploads, Ihrer aktuellen Lieder-
/Videowiedergabe und Sie können die App beenden.
DE - 30
10.3 WI-FI EINSTELLUNGEN (IOS UND ANDROID)
10.3.1 WI-FI EINSTELLUNGEN INTERFACE
Klicken Sie auf , um die Wi-Fi Einstellungen zu ändern. Diese Eigenschaft erscheint
nur dann, wenn Sie auf „Mein Gerät“ gehen.
10.3.2 ÄNDERN DES GERÄTENAMENS
Klicken Sie auf den Button, um den Namen zu ändern.
Nachdem Sie einen neuen Namen eingegeben haben, erscheint oben rechts der Sichern
Button, klicken Sie diesen, um die Änderung zu speichern.
DE - 31
10.3.3 SICHERHEIT
Unter dem Menüpunkt „Sicherheits Setup“ erscheinen die Sicherheitsoptionen: Die Wi-Fi
Festplatte unterstützt folgende Sicherheitsformate : WPA-PSK, WPA2-PSK, gemischt
WPA/WPA2-PSK.Wenn Sie einen neuen Sicherheitscode hinzufügen möchten, werden Sie
nach einem kabellosen Passwort gefragt.
Danach wählen Sie oben rechts den „Set“ oder „Einfügen“ Button, um die Einstellung und
das Passwort zu speichern.
10.3.4 INTERNET ZUGÄNGE
Unter Interneteinstellungen werden Ihnen die Internetzugänge aufgezeigt. Sie können
zwischen kabelgebundenem (wired) und kabellosem (W-Lan) Zugang wählen. Die kabellose
Verbindung finden Sie unter Interneteinstellungen in der Mitte des folgenden Bildes:
DE - 32
Wählen Sie die kabelgebundene Variante, so muss erst das Netzwerk, auf dem Sie sich
eingewählt haben, konfiguriert werden.
Nachdem Sie Ihre Auswahl getroffen haben, klicken Sie auf „Sichern“, danach werden Sie
aufgefordert einen „Neustart“ zu starten, indem Sie auf „OK“ klicken.
DE - 33
10.4 MUSIK-/AUDIOWIEDERGABE
10.4.1 IOS
Tipp: Es ist empfehlenswert, einen oder mehrere Ordner für Ihre gesamten Musik-
/Audiodateien zu erstellen. Dies erleichtert die Nutzung und Organisation im Menü.
Die Musik- oder Audiodateien können unabhängig vom aktuellen Menü und
Speicherort („über Memory 2 Move” oder „Mein Gerät”) wiedergegeben werden.
Hierzu müssen Sie lediglich nach der Datei suchen. Durch einen Klick auf die
gewünschte Datei wird diese automatisch wiedergegeben.
Hinweis: Für weitere Informationen zu den unterstützten Dateiformaten konsultieren
Sie bitte die Bedienungsanleitung Ihres iOS Gerätes.
- Klicken Sie auf diese Taste, um die aktuell wiedergegebene Audiodatei von
vorn zu beginnen. Bei zweimaligem Klicken wird die vorherige Audiodatei
wiedergegeben.
- Klicken Sie auf diese Taste, um zur nächsten Audiodatei zu gelangen.
- Klicken Sie auf diese Taste, um die Wiedergabe der Audiodatei zu starten.
Klicken Sie auf die Pause Taste , um die Wiedergabe zu pausieren/stoppen.
DE - 34
Es gibt 5 Wiedergabemodi:
a. - Einmal abspielen: Die Datei wird einmal abgespielt. Danach stoppt die
Wiedergabe.
b. - Wiederholung der aktuellen Datei: Die aktuell wiedergegebene Datei
wird
wiederholt
c. - Zufallswiedergabe aller Audiodateien, die sich im aktuellen Ordner
befinden.
d. - Wiedergabe des aktuellen Ordners: Die Audiodateien werden der Reihe
nach abgespielt und nicht wiederholt.
e. - Wiederholung des Ordners: Alle Audiodateien im Ordner werden der Reihe
nach abgespielt und dann wiederholt.
Hinweis: Halten Sie den Knopf der Fortschrittsanzeige gedrückt und schieben Sie
diesen nach rechts oder links, um innerhalb einer Audiodatei vor- oder
zurückzuspulen.
Tipp: Sie können die Oberfläche des Music Players jederzeit über die „Zurück Taste“
verlassen. Die Wiedergabe Ihrer Audiodateien wird im Hintergrund fortgesetzt.
DE - 35
10.4.2 ANDROID
Tipp: Es ist empfehlenswert, einen oder mehrere Ordner für Ihre gesamten Musik-
/Audiodateien zu erstellen. Dies erleichtert die Nutzung und Organisation im Menü.
Die Musik- oder Audiodateien können unabhängig vom aktuellen Menü und
Speicherort („über Memory 2 Move” oder „Mein Gerät”) wiedergegeben werden.
Hierzu müssen Sie lediglich nach der Datei suchen. Durch einen Klick auf die
gewünschte Datei wird diese automatisch wiedergegeben.
Hinweis: Die Bedienung und Einstellungsmöglichkeiten der Audiowiedergabe
variieren je nachdem welcher Audio Player auf Ihrem Androidgerät installiert ist.
Bitte konsultieren Sie die Bedienungsanleitung Ihres jeweiligen Audio Players für
Informationen zur Bedienung.
DE - 36
10.5 VIDEO-/FILMWIEDERGABE
10.5.1 IOS
Tipp: Es ist empfehlenswert, einen oder mehrere Ordner für Ihre gesamten Video-
/Filmdateien zu erstellen. Dies erleichtert die Nutzung und Organisation im Menü.
Die Video- oder Filmdateien können unabhängig vom aktuellen Menü und Speicherort
(„über Memory 2 Move” oder „Mein Gerät”) wiedergegeben werden.
Hierzu müssen Sie lediglich nach der Datei suchen. Durch einen Klick auf die gewünschte
Datei wird diese automatisch wiedergegeben.
Hinweis: Für weitere Informationen zu den unterstützten Dateiformaten, konsultieren Sie
bitte die Bedienungsanleitung Ihres iOS Gerätes.
DE - 37
Standardmäßig ist die Videowiedergabe im Querformat. Folgende Auswahlmöglichkeiten
haben Sie:
1. - Klicken Sie auf diese Taste, um die Wiedergabe der aktuellen Videodatei
zu stoppen und den Movie Player zu schließen.
2. - Klicken Sie auf diese Taste, um das Wiedergabeformat an die
Bildschirmgröße anzupassen.
3. - Halten Sie den Knopf der Fortschrittsanzeige gedrückt und schieben
Sie diesen nach rechts/links, um die Videodatei vor- oder zurückzuspulen.
4. - Halten Sie den Knopf der Lautstärkeregelung gedrückt und
schieben Sie diesen nach rechts/links, um die Lautstärke zu verändern.
5. - Halten Sie diese Taste gedrückt, um die Videodatei während der
Wiedergabe zurück zu spulen.
6. - Halten Sie diese Taste gedrückt, um die Videodatei während der
Wiedergabe vor zu spulen.
7. - Klicken Sie diese Taste, um die Wiedergabe der Videodatei zu
starten/fortzusetzen.
8. - Klicken Sie diese Taste, um die Wiedergabe der Videodatei zu pausieren.
DE - 38
10.5.2 ANDROID
Tipp: Es ist empfehlenswert, einen oder mehrere Ordner für Ihre gesamten Video-
/Filmdateien zu erstellen. Dies erleichtert die Nutzung und Organisation im Menü.
Die Video- oder Filmdateien können unabhängig vom aktuellen Menü und Speicherort
(„über Memory 2 Move” oder „Mein Gerät”) wiedergegeben werden.
Hierzu müssen Sie lediglich nach der Datei suchen. Durch einen Klick auf die gewünschte
Datei wird diese automatisch wiedergegeben.
Hinweis: Die Bedienung und Einstellungsmöglichkeiten der Videowiedergabe variieren je
nachdem welcher Movie Player auf Ihrem Android-Gerät installiert ist.
Bitte konsultieren Sie die Bedienungsanleitung Ihres jeweiligen Movie Players für
Informationen zur Bedienung.
DE - 39
10.6 WIEDERGABE VON BILDDATEIEN
10.6.1 IOS
Tipp: Es ist empfehlenswert, einen oder mehrere Ordner für Ihre gesamten Bilddateien
auf den Datenträgern anzulegen. Dies erleichtert die Nutzung und Organisation im Menü.
Hinweis Memory 2 Move unterstützt die Wiedergabe der folgenden Bildformate: .jpg,
.tiff, .gif und .bmp
Die unterstützten Bilddateien können entweder in einer Miniaturübersicht oder als Liste
angezeigt werden, wie in folgenden Bildern zu sehen.
Alle Bilder in nichtunterstützten Formaten werden als exemplarische Miniaturansicht
oder als Icon angezeigt.
Miniaturansicht Listenansicht
Klicken Sie auf eine beliebige Bilddatei, um die automatische Diashow zu öffnen. Sollte
die Menüleiste sich nicht direkt öffnen, klicken Sie ein 2. Mal auf das Bild, damit diese
erscheint (siehe oben im nachfolgenden Bild).
DE - 40
Folgende Funktionen stehen Ihnen in der Diashow zur Auswahl:
Wischen Sie mit dem Finger über den Bildschirm von rechts nach links oder von links nach
rechts, um die Anzeige der Diashow manuell zu steuern oder klicken Sie auf die Play Taste
,um die Diashow automatisch ablaufen zu lassen.
Klicken Sie auf die Pause Taste ,um die Diashow zu pausieren. Durch erneutes Drücken
der Pause Taste setzen Sie die Diashow fort.
Klicken Sie auf ,um die Diashow fortzusetzen und nach dem letzten Bild von vorn zu
beginnen.
Klicken Sie auf ,um die Diashow einmalig durchlaufen zu lassen. Die Wiedergabe stoppt
nach der letzten Bilddatei.
Klicken Sie auf die Zurück Taste ,um zum vorherigen Menüpunkt zurückzukehren.
Sie können die Diashow auch mit Hintergrundmusik ablaufen lassen. Klicken Sie hierfür auf
die Musik Taste wie in folgendem Bild zu sehen.
DE - 41
Stopp/Wiedergabe fortsetzen: Klicken Sie hier, um die Hintergrundmusik zu stoppen oder
fortzuführen.
Auswahl: Klicken Sie hier, um Audiodateien für die Hintergrundmusik zu suchen und
auszuwählen. Klicken Sie auf die Taste ,um zur Diashow zurückzukehren, wie auf
folgendem Bild zu sehen:
Wiederholungstaste: Wenn diese Taste aktiviert ist, werden für die Hintergrundmusik
dieselben Audiodateien wiederholt. Standardmäßig ist diese Option deaktiviert.
DE - 42
10.6.2 ANDROID
Tipp: Es ist empfehlenswert, einen oder mehrere Ordner für Ihre gesamten Bilddateien
auf den Datenträgern anzulegen. Dies erleichtert die Nutzung und Organisation im Menü.
Hinweis Memory 2 Move unterstützt die Wiedergabe der folgenden Bildformate: .jpg,
.tiff, .gif und .bmp
Die unterstützten Bilddateien können entweder in einer Miniaturübersicht oder als Liste
angezeigt werden, wie in folgenden Bildern zu sehen.
Alle Bilder in nicht-unterstützten Formaten werden als exemplarische Miniaturansicht
oder als Icon angezeigt.
Miniaturansicht Listenansicht
Klicken Sie auf eine beliebige Bilddatei, um die automatische Diashow zu öffnen. Sollte
die Menüleiste sich nicht direkt öffnen, klicken Sie ein 2. Mal auf das Bild damit diese
erscheint (siehe oben rechts im nachfolgenden Bild).
DE - 43
Folgende Funktionen stehen Ihnen in der Diashow zur Auswahl:
Wischen Sie mit dem Finger über den Bildschirm von rechts nach links oder von links
nach rechts, um die Anzeige der Diashow manuell zu steuern oder klicken Sie auf die Play
Taste um die Diashow automatisch ablaufen zu lassen.
1. Klicken Sie auf die Pause Taste ,um die Diashow zu pausieren. Durch erneutes
Drücken der Pause Taste setzen Sie die Diashow fort.
2. Klicken Sie auf ,um die Diashow fortzusetzen und nach dem letzten Bild von
vorn zu beginnen.
3. Klicken Sie auf ,um die Diashow einmalig durchlaufen zu lassen. Die
Wiedergabe stoppt nach der letzten Bilddatei.
4. Klicken Sie auf die Zurück Taste , um zum vorherigen Menüpunkt zurückzukehren.
Sie können die Diashow auch mit Hintergrundmusik ablaufen lassen. Klicken Sie hierfür
auf die Musik Taste wie in folgendem Bild zu sehen.
DE - 44
Stop/Wiedergabe fortsetzen: Klicken Sie hier, um die Hintergrundmusik zu stoppen
oder fortzuführen.
Auswahl: Klicken Sie hier, um Audiodateien für die Hintergrundmusik zu suchen und
auszuwählen. Klicken Sie auf die Taste ,um zur Diashow zurückzukehren, wie
auf folgendem Bild zu sehen:
Wiederholungstaste: Wenn diese Taste aktiviert ist, werden für die Hintergrundmusik
dieselben Audiodateien wiederholt. Standardmäßig ist diese Option deaktiviert.
DE - 45
10.7 TEILEN VON BILDDATEIEN
10.7.1 IOS
Sie haben verschiedene Möglichkeiten, Ihre Bilddateien mit Ihrer Familie und Ihren
Freunde zu teilen, z.B. per E-Mail, durch Speichern im Fotoalbum des verwendeten
Geräts oder durch ein Upload auf Facebook.
Hinweis: Für das Teilen von Bilddateien per E-Mail oder Social Media Networks
benötigen Sie eine Internetverbindung.
Klicken Sie auf in der oberen rechten Ecke des Bildschirms, um die drei
Möglichkeiten zum Teilen von Bilddateien anzuzeigen. Klicken Sie auf „Zurück“ ,
um zum vorherigen Menü zurückzukehren.
DE - 46
1) E-Mail - Klicken Sie hier, um die Standard E-Mail App zu starten und wählen
Sie die gewünschte Bilddatei als Anhang aus.
2) Zum Album hinzufügen: Klicken Sie auf diese Option um die ausgewählte Bilddatei
zum Fotoalbum des verwendeten Geräts hinzuzufügen.
3) Facebook Upload: Klicken Sie auf diese Option und Sie werden automatisch zum
Facebook Login geführt. Hierfür muss die Facebook App auf Ihrem Gerät installiert
sein. Eine Facebook Konto ist ebenfalls erforderlich.
10.7.2 ANDROID
Die verschiedenen Möglichkeiten zum Teilen Ihrer Bilddateien hängen von den
verschiedenen Apps ab, die auf Ihrem Gerät installiert sind.
Hinweis: Für das Teilen von Bilddateien per E-Mail oder Social Media Networks benötigen
Sie eine Internetverbindung.
DE - 47
Das Symbol in der rechten oberen Ecke des Bildschirms wählen, um die
verschiedenen Möglichkeiten zum Teilen der Bilddateien anzuzeigen. Klicken Sie auf die
“Zurück” Taste, um zum vorherigen Menü zurückzukehren. Klicken Sie auf
1. Teilen Klicken Sie auf die “Freigeben” Taste, um eine Liste der installierten Apps auf
Ihrem Android Gerät anzuzeigen (Beispiel siehe nachfolgendes Bild). Wählen Sie hier
die App aus, über die Sie die Bilddatei teilen möchten.
2. Foto Speichern Wählen Sie diese Taste, um die Bilddatei von den Datenträgern in
die Galerie Ihres Android Gerätes zu speichern.
10.8 ÖFFNEN/ANZEIGEN VON DOKUMENTEN
10.8.1 IOS
Die „Memory 2 Move“ App unterstützt Keynote-, Numbers-, Page-, Excel-, PowerPoint und
Word-Dateien, sowie .pdf und .txt Dateien.
DE - 48
Um diese Dateien zu öffnen und anzuschauen, klicken Sie ganz einfach auf die gewünschte
Datei. Unterstützte Formate werden automatisch geöffnet. Klicken Sie auf die „Zurück“ Taste
,um zum vorherigen Menü zurückzukehren oder klicken Sie auf die Taste ,um die
Bilddatei per E-Mail zu verschicken, wie in folgendem Bild zu sehen.
Hinweis: Für das Senden von E-Mails wird eine Internetverbindung benötigt.
Klicken Sie auf die “E-Mail” Taste. Die Standard E-Mail App wird automatisch gestartet und
das ausgewählte Dokument kann als Anhang versendet werden.
DE - 49
Sobald die E-Mail verschickt wurde, erscheint in der linken unteren Ecke des Bildschirms die
Nachricht „E-Mail versendet“. Dies ist die Bestätigung, dass Ihre E-Mail erfolgreich versandt
wurde.
Wenn die Nachricht “E-Mail Versand abgebrochen” in der linken unteren Ecke des
Bildschirms erscheint, konnte die E-Mail nicht erfolgreich versandt werden (vgl.
nachfolgendes Bild).
DE - 50
10.8.2 ANDROID
Um Dokumente auf Ihrem Android Gerät zu öffnen, berühren Sie ganz einfach die
gewünschte Datei. Diese wird automatisch mit einem Standardprogramm oder einer von
Ihnen installierten App geöffnet (vgl. nachfolgendes Bild).
Um das Dokument als Anhang zu versenden, konsultieren Sie bitte die Anleitung des
Programmes, mit dem Sie die Datei öffnen.
Hinweis: Für das Senden von E-Mails wird eine Internetverbindung benötigt.
DE - 51
10.9 KOPIEREN, LÖSCHEN, DOWNLOAD UND UPLOAD VON DATEIEN (IOS UND
ANDROID)
Sie können jederzeit auf die Taste klicken, um Ihre Dateien zu löschen,
herunterzuladen und hochzuladen. Wie in den folgenden Bildern zu sehen, erscheint am
oberen Rand im Menü das Symbol , sobald die Taste betätigt wurde.
Bildschirmansicht iOS Bildschirmansicht Android
Am unteren Rand des Bildschirms finden Sie nun neue Icons. Folgende Funktionen stehen
nun zur Auswahl:
- Klicken Sie auf dieses Icon, um alle Dateien auszuwählen. Das Icon färbt sich nun weiß
und neben allen Dateien erscheint ein Häkchen.
- Klicken Sie erneut auf dieses Icon, um Markierung aller Dateien aufzuheben. Die
Häkchen neben den Dateien verschwinden wieder.
Tipp: Sie können auch nur eine oder mehrere Dateien auswählen, indem Sie einfach auf die
Miniaturansicht klicken. Sie können eine Datei auch einfach per Drag&Drop bearbeiten.
DE - 52
Hierzu berühren und halten Sie einfach die Miniaturansicht der gewünschten Datei und
ziehen diese auf das Icon für Download , Upload oder Löschen .
- Wenn Sie sich im Menü „Memory 2 Move” befinden, können Sie über dieses Icon eine
oder mehrere Dateien von der Memory 2 Move, auf Ihr iOS/Android Gerät herunterladen.
- Über dieses Icon können Sie eine oder mehrere Dateien von Ihrem iOS/Android Gerät
auf die Memory 2 Move hochladen. Bitte drücken Sie dazu den Button „Verwalten“.
- Klicken Sie auf dieses Icon, um die Übersicht aller aktuellen Up-/Downloads in der
Warteschlange zu sehen. Zudem ist hier eine Liste aller erfolgreich übertragenen Dateien
einsehbar.
- Klicken Sie auf dieses Icon, um alle ausgewählten Dateien zu löschen.
DE - 53
10.10 DOWNLOADEN VON DATEIEN AUF IHR IOS/ANDROID GERÄT
Wenn Sie drahtlos mit dem Gerät verbunden sind, können Sie eine oder mehrere Dateien
auf Ihr iOS/ Android Gerät downloaden.
1. Klicken Sie auf das Symbol .
2. Wählen Sie nun eine oder mehrere Dateien aus, die Sie downloaden möchten oder
klicken Sie auf um alle Dateien zu markieren.
3. Klicken Sie nun auf das Feld .
4. Wählen und bestätigen Sie aus der Übersicht den Ordner aus, in welchen Sie die
Dateien downloaden wollen.
DE - 54
Um einen neuen Ordner für Ihre Dateien zu erstellen, klicken Sie einfach auf das Feld „Neuen
Ordner erstellen“. Geben Sie dann den Namen für den Ordner ein und klicken Sie auf
„Erstellen“, wie in folgendem Bild sichtbar. Die Ordnerbezeichnung muss zwischen
mindestens 2 und maximal 26 Zeichen lang sein. Klicken Sie auf Abbrechen“, um den
Vorgang abzubrechen.
5. Klicken Sie auf Auswählen, um den Kopier-/ Übertragungsvorgang zu starten.
Folgendes Fenster öffnet sich:
Hinweis: Erfolgreich heruntergeladene Dateien werden in dem unteren Fenster
“Erfolgreiche Downloads” angezeigt (vgl. oberes Bild). Klicken Sie auf „Liste leeren“, um
die Dateien von der Liste zu löschen.
6. Klicken Sie auf einen beliebigen Bereich des Bildschirms und Sie werden zum
vorherigen Menü zurückgeführt. Klicken Sie dann auf ,um das Menü zu
schließen.
DE - 55
10.11 UPLOADEN VON DATEIEN AUF DIE WI-FI FESTPLATTE (IOS UND ANDROID)
Überprüfen Sie, ob Sie sich im Menü “Mein Gerät” befinden.
1. Klicken Sie auf das Symbol .
2. Wählen Sie nun eine oder mehrere Dateien aus, die Sie hochladen möchten
oder klicken Sie auf ,um alle Dateien zu markieren.
3. Klicken Sie nun auf das Feld .
4. Wählen Sie aus der Übersicht den Ordner aus, in welchen Sie die Dateien
hochladen wollen.
DE - 56
Um einen neuen Ordner für Ihre Dateien zu erstellen, klicken Sie einfach auf das Feld „Neuen
Ordner erstellen“. Geben Sie dann den Namen für den Ordner ein und klicken Sie auf
„Erstellen“, wie in folgendem Bild sichtbar. Die Ordnerbezeichnung muss zwischen
mindestens 2 und maximal 26 Zeichen lang sein. Klicken Sie auf „Abbrechen, um den
Vorgang abzubrechen.
5. Klicken Sie auf “Auswählen”, um den Upload zu starten. Folgendes Fenster sollte sich
öffnen:
Hinweis: Erfolgreich kopierte/übertragene Dateien werden in dem unteren Fenster
„Erfolgreiche Downloads” angezeigt (vgl. oberes Bild). Klicken Sie auf „Liste leeren“, um
die Dateien von der Liste zu löschen.
6. Klicken Sie auf einen beliebigen Bereich des Bildschirms und Sie werden zum
vorherigen Menü zurückgeführt. Klicken Sie dann auf ,um das Menü zu
schließen.
DE - 57
10.12 LÖSCHEN VON DATEIEN (IOS UND ANDROID)
Sie können ganz einfach eine oder mehrere Dateien im „Mein Gerät“ oder „Memory 2
Move“ Menü löschen.
1. Um eine oder mehrere Dateien zu löschen, klicken Sie zunächst auf das Symbol .
2. Sie können nun die zu löschenden Dateien auswählen oder auf klicken, um alle
Dateien auszuwählen.
3. Klicken Sie nun auf das Symbol ,um die markierten Dateien zu löschen. Ein
Warnhinweis erscheint auf dem Bildschirm, um den Löschvorgang zu bestätigen (vgl.
nachfolgendes Bild). Klicken Sie auf OK, wenn Sie die Dateien wirklich löschen wollen.
Wenn Sie die Dateien nicht löschen wollen, können Sie den Vorgang mit einem Klick
auf „Abbrechen“ stoppen.
DE - 58
10.13 ÜBERSICHT UND STATUS IHRER UPLOADS/DOWNLOADS
Wenn Sie eine oder mehrere Dateien von der Memory 2 Move kopiert/ übertragen haben,
können Sie mit einem Klick auf überprüfen, welche Dateien sich noch in der
Warteschlange befinden und welche Dateien bereits erfolgreich übertragen wurden. Sie
können im Hauptmenü auch auf klicken, um den genauen Status Ihrer aktuellen Down-
/Uploads zu überprüfen.
10.14 BEENDEN DER MEMORY 2 MOVE APP
10.14.1 IOS
Um die Memory 2 Move App zu verlassen, drücken Sie einfach die “Home” Taste ihres
iPhone/ iPad Gerätes.
Um die App zu beenden, drücken Sie die “Home” Taste zweimal und eine Liste mit
verschiedenen Apps wird am unteren Bildschirmrand angezeigt. Klicken und halten Sie das
Icon der App gedrückt bis ein Minuszeichen (-) erscheint. Klicken Sie nun auf dieses
Minuszeichen, um die App zu beenden (vgl. nachfolgendes Bild).
DE - 59
10.14.2 ANDROID
Um die Memory 2 Move App zu verlassen, klicken Sie ganz einfach auf das Feld und
wählen dann „Verlassen“. Ein Warnhinweis wird nun angezeigt, mit der Bitte, die Auswahl zu
bestätigen. Klicken Sie auf „OK“, um die App zu beenden oder auf „Abbrechen“, um zu der
App zurückzukehren.
10.15 DEINSTALLATION DER MEMORY 2 MOVE APP
10.15.1 IOS
Um die „Memory 2 Move“ App von Ihrem Apple Gerät zu deinstallieren, klicken Sie auf das
Memory 2 Move App Logo und halten Sie es gedrückt. Ein „X“ erscheint nun an allen Icons
der installierten Apps, wie in folgendem Bild zu sehen. Klicken Sie einfach auf das „X“ an der
oberen linken Ecke des Memory 2 Move App Icons, um die App von Ihrem Apple Gerät zu
entfernen.
DE - 60
10.15.2 ANDROID
Um die Memory 2 Move App von Ihrem Android Gerät zu deinstallieren, führen Sie bitte
nachfolgende Schritte aus.
Hinweis: Der Deinstallationsvorgang kann je nach Android Gerät abweichen. Bitte
konsultieren Sie vor der Deinstallation die Bedienungsanleitung Ihres Android Gerätes.
1. Klicken Sie im Hauptmenü auf das Icon „Einstellungen”.
2. Gehen Sie zum Punkt „Apps”.
3. Suchen Sie nach der Memory 2 Move App und wählen Sie diese aus.
4. Klicken Sie auf das Feld “Deinstallieren”.
5. Ein Warnhinweis wird nun angezeigt, mit der Bitte, die Auswahl zu bestätigen. Klicken
Sie auf „OK“, um die App zu deinstallieren oder auf „Abbrechen“, um zum
Einstellungsmenü zurückzukehren.
DE - 61
11. WEB MANAGEMENT FUNKTIONEN
Um das WiFi-Gerät zu konfigurieren, nutzen Sie bitte die Software „WiFi Finder“, um sich mit
der Memory 2 Move zu verbinden. Sie können alternativ Ihren Web Browser öffnen und in
die Adresszeile die IP Adresse 10.10.10.254 eingeben, sofern die werksseitig voreingestellte
Adresse nicht geändert wurde.
Ansicht des Hauptmenüs:
Verfügbare Untermenüs:
Hier können Sie das Administrator Passwort ändern.
Anzeige der relevanten Speicherinformationen.
Hier können Sie Netzwerkeinstellungen verändern.
Aktivierung des Windows File Dienstes.
Hier können Sie die Systemeinstellungen ändern.
Hier können sie mit Hilfe des Einstellungs-Assistenten ihr Gerät Schritt
für Schritt konfigurieren.
DE - 62
11.1 EXPLORER FUNKTION
Sie können über diese Aministrationsoberfläche Daten auf die Memory 2 Move kopieren
sowie auch von der Memory 2 Move Dateien auf den von Ihnen genutzten PC kopieren. Des
Weiteren können Sie Verzeichnisse anlegen, kopieren, umbenennen oder löschen, ganz wie
Sie es von Ihrem Computer gewohnt sind.
Aktualisieren klicken Sie auf diesen Button, um die Bildschirmansicht zu
aktualisieren.
Hochladen klicken Sie auf diesen Button, um Dateien auf das Gerät
hochzuladen.
Erstellen um ein Verzeichnis auf der Memory 2 Move zu erstellen. Der
Verzeichnisname darf maximal 26 Zeichen enthalten.
Kopieren um Dateien in einen anderen Ordner zu kopieren.
Verschieben- um eine Datei an einen anderen Speicherort zu verschieben.
Öffnen / Herunterladen Klicken Sie auf diesen Button, um Dateien zu öffnen
oder auf Ihren PC zu kopieren. Sollten Sie auf Ihrem PC kompatible Software
installiert haben, startet etwa die Musikwiedergabe automatisch. Ansonsten
werden Sie gefragt, ob Sie die Datei herunterladen möchten. Verzeichnisse
können nicht heruntergeladen werden. Sie müssen immer mind. eine Datei
zum Download auswählen.
Löschen um Dateien vom Gerät zu entfernen.
DE - 63
Umbenennen um Veränderungen am Dateinamen vorzunehmen.
Fotobetrachter Um Fotos anzuzeigen wird dieser Button benutzt.
11.2 KONTEXT MENÜ (NICHT FÜR MAC)
1. Im Dateimenü können Sie durch Klicken mit der rechten Maustaste auf eine Datei oder
ein Verzeichnis das Kontextmenü aufrufen. In diesem „Pop-Up“ Menü haben Sie
folgenden Auswahlpunkte: Kopieren, Ausschneiden, Löschen, Umbenennen oder
Herunterladen (siehe Screenshot).
2. Im Verzeichnismenü können Sie ebenfalls das Kontextmenü aufrufen. Hier haben Sie die
Auswahlmöglichkeit zwischen Öffnen, Kopieren, Ausschneiden, Löschen oder
Umbenennen (siehe Screenshot).
3. Wenn Sie mehrere Dateien auswählen (dies funktioniert indem Sie Strg“ gedrückt
halten und gleichzeitig die ausgewählten Dateien mit Linksklick markieren) und mit
DE - 64
Rechtsklick das Kontextmenü aufrufen, haben Sie die Möglichkeit, Kopieren,
Ausschneiden oder Löschen auszuwählen.
4. Wenn Sie mit der Maus per Rechtsklick auf eine leere Stelle im Verzeichnis klicken,
stehen Ihnen die Funktionen Einfügen, Erstellen oder Upload zur Verfügung.
DE - 65
Funktionserklärung:
- Öffnen: Wählen Sie ein Verzeichnis aus und öffnen Sie mit der rechten Maustaste
das Kontextmenü. Wählen Sie hier „Öffnen“ aus und Ihnen wird der Inhalt des
Verzeichnisses angezeigt.
- Kopieren: Wählen Sie ein Verzeichnis oder eine oder mehrere Dateien aus und
öffnen Sie mit der rechten Maustaste das Kontextmenü. Wählen Sie hier
„Kopieren“, um das oder die ausgewählten Elemente zu kopieren.
- Ausschneiden: Wählen Sie Verzeichnisse oder Dateien aus und öffnen Sie mit der
rechten Maustaste das Kontextmenü. Wählen Sie hier „Ausschneiden“, um die
Dateien vom aktuellen Speicherplatz auszuschneiden.
- Einfügen: Nachdem Sie entweder „Kopieren“ oder „Ausschneiden“ ausgewählt
haben, können Sie nun einen neuen Speicherplatz für die ausgewählten Elemente
suchen. Um die Elemente im neuen Speicherplatz einzufügen, klicken Sie mit der
rechten Maustaste auf eine leere Stelle im Verzeichnis und rufen Sie das
Kontextmenü auf. Hier wählen Sie „Einfügen“, um die Elemente am neuen
Speicherplatz einzufügen.
- Löschen: Wählen Sie eine Datei aus und öffnen Sie mit der rechten Maustaste das
Kontextmenü. Wählen Sie hier „Löschen“ aus, um das ausgewählte Element zu
löschen.
- Erstellen: Klicken Sie mit rechten Maustaste auf eine leere Stelle im Verzeichnis
und rufen Sie das Kontextmenü auf. Wählen Sie „Erstellen“ aus, um ein neues
Verzeichnis anzulegen.
- Umbenennen: Klicken Sie mit der rechten Maustaste auf das Verzeichnis oder die
Datei, die Sie umbenennen chten und im Kontextmenü auf den Menüeintrag
„Umbenennen“. Nun können Sie das Verzeichnis oder die Datei umbenennen.
Nachdem Sie die gewünschten Änderungen vorgenommen haben, klicken Sie
bitte auf „Speichern“, um die gemachten Änderungen zu übernehmen.
- Upload: Klicken Sie mit der rechten Maustaste auf eine leere Stelle im Verzeichnis
und rufen Sie das Kontextmenü auf. Wählen Sie „Upload“ aus, um neue Dateien
hochzuladen.
- Öffnen / Herunterladen: Klicken Sie mit der rechten Maustaste auf das
Verzeichnis oder die Datei, die Sie herunterladen möchten und im Kontextmenü
auf den Menüeintrag Herunterladen“. Sollten Sie auf Ihrem PC kompatible
Software installiert haben, startet etwa die Musikwiedergabe automatisch.
Ansonsten werden Sie gefragt, ob Sie die Datei herunterladen möchten.
Verzeichnisse können nicht heruntergeladen werden.
DE - 66
11.3 TASTATURKÜRZEL
Die Web Administrationsoberfläche unterstützt Tastatureingaben und Tastaturkürzel. Es
werden unter anderem die folgenden Kürzel unterstützt: Tab Taste, Enter Taste, Home
Taste, PGUP, PGDN, Ende Taste, Pfeil nach oben Taste, Pfeil nach unten Taste, Pfeil nach
links Taste, Pfeil nach rechts Taste und die Entf Taste.
Windows: STRG + c = Kopieren STRG + v = Einfügen
Mac: CTRL + c = Kopieren CTRL + v = Einfügen
11.4 DRAG AND DROP
Sie können eine einzelne Datei per Drag and Drop (ziehen und loslassen) verschieben. Halten
und ziehen Sie einfach eine Datei auf ein anderes verfügbares Verzeichnis und lassen Sie die
Datei los.
11.5 INFORMATIONEN
Hier werden Detailinformationen über die Hardware, den Netzwerkstatus und den
Speicherplatz angezeigt.
11.5.1 GERÄTEINFORMATIONEN
Hier werden Informationen wie Gerätename, Seriennummer, Hersteller, Modellnummer und
CPU Auslastung angezeigt.
DE - 67
11.5.2 SPEICHERINFORMATION
Hier erhalten Sie Informationen über das eingebaute Laufwerk, wie etwa die
Gesamtkapazität, den Festplattenhersteller und den verfügbaren Speicherplatz.
11.5.3 NETZWERKINFORMATION
Es werden detaillierte Informationen über den aktuellen Netzwerkstatus angezeigt, wie etwa
die Netzwerkadresse, der Internetstatus oder der aktuelle Wi-Fi Netzwerkname (SSID).
DE - 68
11.6 EINSTELLUNGEN
11.6.1 ADMINISTRATOR
Klicken Sie im Einstellungsmenü auf die „Benutzer“ Verknüpfung, um die Administrator
Einstellungen zu ändern. Das Passwort muss aus mind. 5 und höchsten 32 Zeichen bestehen.
Mit Klick auf den „Sichern“ Button werden die Änderungen übernommen.
Im Auslieferungszustand lautet das Administrator Passwort: 00000
11.6.2 LAUFWERK
Klicken Sie im Einstellungsmenü auf die Verknüpfung , um detaillierte
Informationen über das Speichermedium zu bekommen, wie etwa die Firmware Version, die
Kapazität oder die Seriennummer.
DE - 69
Das Laufwerksmenü beinhaltet Informationen über das genutzte Dateisystem sowie die
gesamte und verfügbare Speicherkapazität.
11.7 NETZWERK EINSTELLUNGEN
Klicken Sie im Einstellungsmenü auf die Verknüpfung , um die
Netzwerkinformationen aufzurufen.
11.7.1 HOST NAME
Der Host Name gehört zu einem Gerät, welches in ein Netzwerk eingebunden ist. Dieser
Name kann frei gewählt werden. Einzige Voraussetzung ist, dass der Name mit einem
Buchstaben beginnt, gefolgt von einer Kombination von Buchstaben und Zahlen. Es werden
mind. 2 Zeichen benötigt und es sind maximal 8 Zeichen erlaubt.
DE - 70
11.7.2 WI-FI & LAN
Alle Netzwerkeinstellungen können nach Ihren Bedürfnissen gestaltet werden. Folgende
Optionen stehen zur Auswahl:
- SSID: Bitte tragen Sie hier den Namen Ihres Netzwerkes ein. In der
Grundeinstellung steht hier „Memory2Move-XXXX. 32 Zeichen sind
maximal für den SSID Namen möglich.
- Wi-Fi Kanal: Bitte tragen Sie hier den Kanal ein, auf dem das Wi-Fi Gerät senden
und empfangen soll. Die Grundeinstellung ist „Auto“. Der Kanal wird
in diesem Fall automatisch vom Gerät festgelegt. Sie können aber auch
manuell festlegen, auf welchem Kanal empfangen und gesendet
werden soll. Es stehen die Kanäle 1 bis 13 zur Verfügung.
- Wi-Fi Modus: Der voreingestellte drahtlose Netzwerkstandard lautet:
802.11/b/g/n. Sie können ebenfalls manuell die Modi 11Mbps
(802.11b), 54 Mbps (802.11g oder 150Mbps (802.11n) einstellen.
- Sicherheit: Im Auslieferungszustand ist kein Sicherheitstyp ausgewählt. Sie haben
die Wahl zwischen folgenden Verschlüsselungstypen: keine
Verschlüsselung, WPA-PSK, WPA2-PSK, Mixed WPA/WPA2-PSK.
- Passwort: Es muss, je nach ausgewähltem Verschlüsselungstyp, ein Passwort mit
mindestens 8 und höchstens 63 Zeichen eingegeben werden.
- IP Adresse: Die voreingestellte IP Adresse lautet: 10.10.10.254 mit der
Subnetmaske 255.255.255.0 Diese IP Adresse können Sie manuell
abändern.
DE - 71
11.7.3 DHCP SERVER
Das Dynamic Host Configuration Protocol (DHCP) ist eine Netzwerk Protokoll, welches einem
Server erlaubt, dynamisch IP Adressen an verbundene Rechner zu vergeben. In der
Grundeinstellung ist das DHCP Protokoll aktiviert. Diese Option kann bei Bedarf deaktiviert
werden und IP Adressen können manuell vergeben werden.
Klicken Sie auf Button „DHCP-Liste und es wird eine Liste mit allen aktuell verbundenen
Geräten angezeigt.
DE - 72
11.7.4 INTERNETZUGRIFF
Einrichten des Internetzugriffs
... durch Herstellung einer Verbindung zu einem weiteren verfügbaren Netzwerk
a) Wi-Fi-Modus:
Die Memory 2 Move stellt bei dieser Einstellung einen Zugangspunkt für andere drahtlose
Geräte dar, damit diese, über eine weitere verfügbare drahtlose Verbindung, in das Internet
gelangen können. Dies ist die Standardeinstellung.
SSID: Geben Sie den SSID Namen ihres Netzwerkes ein oder klicken
Sie auf „Neuer Scan“, um automatisch nach allen verfügbaren
Netzwerken zu suchen.
Passwort: Bitte geben Sie das Passwort für das gewählte lokale drahtlose
Netzwerk ein.
IP Adresse: Bei Auswahl von „Automatisch“ stellt das Netzwerk Ihnen
automatisch eine IP Adresse zur Verfügung. Bei Auswahl von
„Statische IP“ müssen Sie selber Ihre IP Adresse für das
Netzwerk, mit dem Sie sich verbinden wollen, eingeben.
DE - 73
b) LAN-Modus
Direkter Anschluss des Gerätes mit einem LAN Kabel an einen vorhandenen
Router. Bitte nutzen Sie hierzu einen freien Steckplatz für ein LAN Kabel an Ihrem
Router.
In der Grundeinstellung ist „Dynamische IP“ ausgewählt. Sie können manuell eine IP Adresse
vergeben, indem Sie auf den gelben Pfeil klicken und die Option „Statische IP“ auswählen.
Hinweis: Durch Klicken auf das X (rechts oben) können Sie das LAN Optionsmenü
verlassen.
11.8 DIENSTE
11.8.1 SAMBA
Der Zugriff und der Datenaustausch sind mit dem Samba Service sehr einfach. Schon im
Auslieferungszustand ist dieser Dienst aktiviert (siehe Screenshot).
DE - 74
11.8.2 MEDIA SERVER
Funktionen:
1)
Aktivieren oder deaktivieren Sie den Media Server.
2)
Legt den im Netzwerk angezeigten Namen fest.
3)
Geben Sie den Ordnernamen an, welcher über den Media Server zur Verfügung
gestellt werden soll.
4)
Ändert das Verzeichnis der Freigabe auf der Memory 2 Move.
5)
Hier können die vorgenommenen Einstellungen gespeichert werden.
DE - 75
11.9 SYSTEM
11.9.1 ZEIT EINSTELLUNGEN
Sie haben dazu die Möglichkeit sowohl eine Zeitzone manuell auszuwählen, als auch eine
automatische Zeit-Synchronisation durchzuführen.
Wenn Sie sich für die manuelle Auswahl einer Zeitzone entschieden haben, klicken Sie
einfach auf den gelben Pfeil neben dem Kästchen „Zeitzone und wählen Sie aus dem
Menüpunkt, je nach Standort, die gewünschte Zeitzone aus.
Wählen Sie die automatische Zeit Synchronisation aus, so wird die Uhrzeit jedes Mal
aktualisiert, wenn Sie mit dem Internet verbunden sind.
Optionen für Uhrzeit Synchronisation:
Frequenz: Täglich, alle 2 Tage, alle 3 Tage, .. Sie können Synchronisationsintervalle von bis zu
7 Tagen auswählen.
Die automatische Synchronisation der Uhrzeit kann jederzeit ausgestellt werden und die
Option „Übernahme der PC Zeit“ stattdessen gewählt werden. In diesem Fall wird die
aktuelle Uhrzeit Ihres PCs übernommen, sodass beide Geräte die gleiche Uhrzeit anzeigen.
DE - 76
11.9.2 SICHERN DER EINSTELLUNGEN
Um eine Sicherung (Backup) der Wi-Fi System Konfiguration zu erstellen, klicken Sie bitte auf
den SichernButton. Es wird eine Datei mit der Endung .bin.gz erzeugt, mit der Sie später
bei Bedarf die Systemeinstellungen wieder herstellen können. Diese Datei speichern Sie bitte
auf Ihrem Rechner.
Um eine System Wiederherstellung auszuführen, klicken Sie bitte auf den Button
„Wiederherstellung“. Suchen und öffnen Sie Ihre gespeicherte Sicherungsdatei und klicken
Sie dann bitte auf „Sichern“ unten rechts im Fenster.
DE - 77
Während des Wiederherstellungsprozesses erscheint eine Warnmeldung, die Ihnen Auskunft
über den aktuellen Status des Wiederherstellungsprozesses gibt.
Nach erfolgreicher Wiederherstellung der Systemkonfiguration startet das Gerät
automatisch neu und es wird der Login Bildschirm angezeigt.
11.9.3 FIRMWARE UPDATE
Sollte ein Firmware Update auf www.intenso.de zur Verfügung stehen, folgen Sie bitte den
nächsten Schritten, um das Softwareupdate durchzuführen.
DE - 78
1.) Laden Sie die Firmware auf ihren Rechner herunter.
2.) Bitte klicken Sie auf den „Update“ Button und suchen Sie das heruntergeladene
Firmware Update auf Ihrem PC. Wählen Sie die Datei aus und klicken Sie auf „Öffnen“,
um fortzufahren.
3.) Unterhalb des „Update“ Buttons wird nun die Firmware Versionsnummer angezeigt,
auf die das Gerät aktualisiert werden wird. Bitte klicken Sie auf „Sichern“ unten rechts
im Bild, um mit dem Firmware Updatevorgang zu starten.
4.) Während des Updates erscheint eine Warnmeldung, die Ihnen Auskunft über den
aktuellen Status des Updateprozesses gibt.
Nach erfolgreichem Update startet das Gerät automatisch neu und es wird der Login
Bildschirm angezeigt.
DE - 79
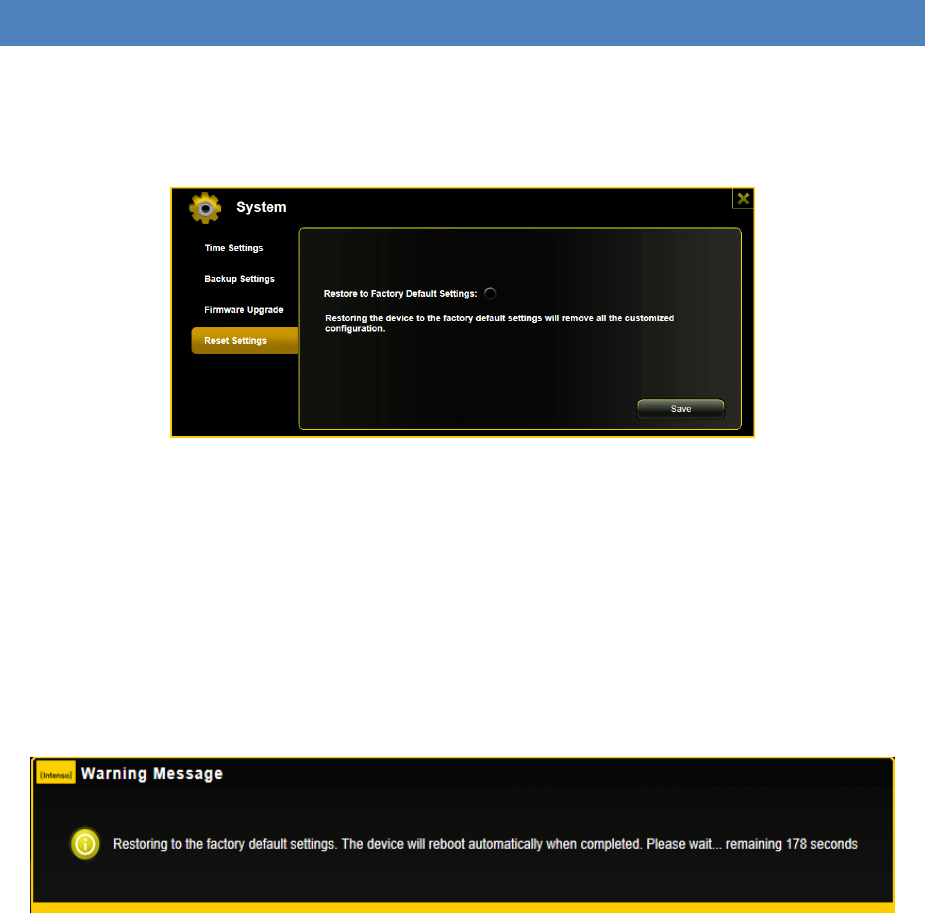
11.9.4 ZURÜCKSETZEN AUF DIE WERKSEINSTELLUNGEN
Wenn Sie Ihr Gerät auf die Werkseinstellungen zurücksetzen, werden alle vorgenommenen
Einstellungen gelöscht und die im Auslieferungszustand geltenden Einstellungen werden
wieder aktiviert.
Um das Zurücksetzen auf die Werkseinstellungen auszuwählen, klicken Sie bitte auf den
runden Button. Klicken Sie bitte auf den SichernButton, um den Vorgang zu starten. Um
Missverständnisse auszuschließen, bestätigen Sie Ihre Wahl bitte in den darauffolgenden
Warnhinweisen.
Der folgende Hinweis erscheint während des aktiven Prozesses und gibt Informationen über
den aktuellen Fortschritt.
Hinweis: Nachdem das Gerät zurückgesetzt wurde, wird das Administrator Passwort
ebenfalls zurückgesetzt. Es gilt also das Passwort aus dem Auslieferungszustand.
DE - 80
12. LIZENZINFORMATION
HINWEIS!
Sehr geehrte Kundin, sehr geehrter Kunde,
bei Interesse können Sie und jeder Dritte den Quelltext der verwendeten GPL/LGPL von der
Intenso Homepage http://www.intenso.de herunterladen. Der Quelltext des gesuchten
Produkts ist für jeden zugänglich über Auswahl der gültigen Produktkategorie und des
gewünschten Gerätes. In den Produktdetails finden Sie den Menüpunkt „Treiber“. Öffnen
Sie dieses Menü, um den zugehörigen GPL/LGPL Quelltext herunterzuladen. Gegen eine
Kostenpauschale von 15 € ist es ebenfalls möglich diesen Quelltext per Postzustellung zu
erhalten.
Gerne können Sie uns auch telefonisch zu dem Thema erreichen unter der kostenpflichtigen
Rufnummer 0900-1504030 (0,39€/Minute aus dem deutschen Festnetz. Mobilfunkpreise
können abweichen.) oder per Mail an support@intenso.de
Weitere Informationen über die GPL/LGPL-Lizenzen finden Sie unter www.gnu.org
GNU GENERAL PUBLIC LICENSE
Version 2, June 1991
Copyright (C) 1989, 1991 Free Software Foundation, Inc.
51 Franklin Street, Fifth Floor, Boston, MA 02110-1301, USA
Everyone is permitted to copy and distribute verbatim copies
of this license document, but changing it is not allowed.
Preamble
The licenses for most software are designed to take away your freedom to share and change
it. By contrast, the GNU General Public License is intended to guarantee your freedom to
share and change free software--to make sure the software is free for all its users. This
General Public License applies to most of the Free Software Foundation's software and to
any other program whose authors commit to using it. (Some other Free Software Foundation
DE - 81
software is covered by the GNU Lesser General Public License instead.) You can apply it to
your programs, too.
When we speak of free software, we are referring to freedom, not price. Our General Public
Licenses are designed to make sure that you have the freedom to distribute copies of free
software (and charge for this service if you wish), that you receive source code or can get it if
you want it, that you can change the software or use pieces of it in new free programs; and
that you know you can do these things.
To protect your rights, we need to make restrictions that forbid anyone to deny you these
rights or to ask you to surrender the rights. These restrictions translate to certain
responsibilities for you if you distribute copies of the software, or if you modify it.
For example, if you distribute copies of such a program, whether gratis or for a fee, you must
give the recipients all the rights that you have. You must make sure that they, too, receive or
can get the source code. And you must show them these terms so they know their rights.
We protect your rights with two steps: (1) copyright the software, and (2) offer you this
license which gives you legal permission to copy, distribute and/or modify the software.
Also, for each author's protection and ours, we want to make certain that everyone
understands that there is no warranty for this free software. If the software is modified by
someone else and passed on, we want its recipients to know that what they have is not the
original, so that any problems introduced by others will not reflect on the original authors'
reputations.
Finally, any free program is threatened constantly by software patents. We wish to avoid the
danger that redistributors of a free program will individually obtain patent licenses, in effect
making the program proprietary. To prevent this, we have made it clear that any patent
must be licensed for everyone's free use or not licensed at all.
The precise terms and conditions for copying, distribution and modification follow.
TERMS AND CONDITIONS FOR COPYING, DISTRIBUTION AND MODIFICATION
0. This License applies to any program or other work which contains a notice placed by the
copyright holder saying it may be distributed under the terms of this General Public License.
The "Program", below, refers to any such program or work, and a "work based on the
Program" means either the Program or any derivative work under copyright law: that is to
say, a work containing the Program or a portion of it, either verbatim or with modifications
and/or translated into another language. (Hereinafter, translation is included without
limitation in the term "modification".) Each licensee is addressed as "you".
DE - 82
Activities other than copying, distribution and modification are not covered by this License;
they are outside its scope. The act of running the Program is not restricted, and the output
from the Program is covered only if its contents constitute a work based on the Program
(independent of having been made by running the Program). Whether that is true depends
on what the Program does.
1. You may copy and distribute verbatim copies of the Program's source code as you receive
it, in any medium, provided that you conspicuously and appropriately publish on each copy
an appropriate copyright notice and disclaimer of warranty; keep intact all the notices that
refer to this License and to the absence of any warranty; and give any other recipients of the
Program a copy of this License along with the Program.
You may charge a fee for the physical act of transferring a copy, and you may at your option
offer warranty protection in exchange for a fee.
2. You may modify your copy or copies of the Program or any portion of it, thus forming a
work based on the Program, and copy and distribute such modifications or work under the
terms of Section 1 above, provided that you also meet all of these conditions:
a) You must cause the modified files to carry prominent notices stating that you changed the
files and the date of any change.
b) You must cause any work that you distribute or publish, that in whole or in part contains
or is derived from the Program or any part thereof, to be licensed as a whole at no charge to
all third parties under the terms of this License.
c) If the modified program normally reads commands interactively when run, you must
cause it, when started running for such interactive use in the most ordinary way, to print or
display an announcement including an appropriate copyright notice and a notice that there
is no warranty (or else, saying that you provide a warranty) and that users may redistribute
the program under these conditions, and telling the user how to view a copy of this License.
(Exception: if the Program itself is interactive but does not normally print such an
announcement, your work based on the Program is not required to print an announcement.)
These requirements apply to the modified work as a whole. If identifiable sections of that
work are not derived from the Program, and can be reasonably considered independent and
separate works in themselves, then this License, and its terms, do not apply to those
sections when you distribute them as separate works. But when you distribute the same
sections as part of a whole which is a work based on the Program, the distribution of the
whole must be on the terms of this License, whose permissions for other licensees extend to
the entire whole, and thus to each and every part regardless of who wrote it.
DE - 83
Thus, it is not the intent of this section to claim rights or contest your rights to work written
entirely by you; rather, the intent is to exercise the right to control the distribution of
derivative or collective works based on the Program.
In addition, mere aggregation of another work not based on the Program with the Program
(or with a work based on the Program) on a volume of a storage or distribution medium
does not bring the other work under the scope of this License.
3. You may copy and distribute the Program (or a work based on it, under Section 2) in
object code or executable form under the terms of Sections 1 and 2 above provided that you
also do one of the following:
a) Accompany it with the complete corresponding machine-readable source code, which
must be distributed under the terms of Sections 1 and 2 above on a medium customarily
used for software interchange; or,
b) Accompany it with a written offer, valid for at least three years, to give any third party, for
a charge no more than your cost of physically performing source distribution, a complete
machine-readable copy of the corresponding source code, to be distributed under the terms
of Sections 1 and 2 above on a medium customarily used for software interchange; or,
c) Accompany it with the information you received as to the offer to distribute
corresponding source code. (This alternative is allowed only for noncommercial distribution
and only if you received the program in object code or executable form with such an offer, in
accord with Subsection b above.)
The source code for a work means the preferred form of the work for making modifications
to it. For an executable work, complete source code means all the source code for all
modules it contains, plus any associated interface definition files, plus the scripts used to
control compilation and installation of the executable. However, as a special exception, the
source code distributed need not include anything that is normally distributed (in either
source or binary form) with the major components (compiler, kernel, and so on) of the
operating system on which the executable runs, unless that component itself accompanies
the executable.
If distribution of executable or object code is made by offering access to copy from a
designated place, then offering equivalent access to copy the source code from the same
place counts as distribution of the source code, even though third parties are not compelled
to copy the source along with the object code.
4. You may not copy, modify, sublicense, or distribute the Program except as expressly
provided under this License. Any attempt otherwise to copy, modify, sublicense or distribute
the Program is void, and will automatically terminate your rights under this License.
DE - 84
However, parties who have received copies, or rights, from you under this License will not
have their licenses terminated so long as such parties remain in full compliance.
5. You are not required to accept this License, since you have not signed it. However,
nothing else grants you permission to modify or distribute the Program or its derivative
works. These actions are prohibited by law if you do not accept this License. Therefore, by
modifying or distributing the Program (or any work based on the Program), you indicate your
acceptance of this License to do so, and all its terms and conditions for copying, distributing
or modifying the Program or works based on it.
6. Each time you redistribute the Program (or any work based on the Program), the recipient
automatically receives a license from the original licensor to copy, distribute or modify the
Program subject to these terms and conditions. You may not impose any further restrictions
on the recipients' exercise of the rights granted herein. You are not responsible for enforcing
compliance by third parties to this License.
7. If, as a consequence of a court judgment or allegation of patent infringement or for any
other reason (not limited to patent issues), conditions are imposed on you (whether by court
order, agreement or otherwise) that contradict the conditions of this License, they do not
excuse you from the conditions of this License. If you cannot distribute so as to satisfy
simultaneously your obligations under this License and any other pertinent obligations, then
as a consequence you may not distribute the Program at all. For example, if a patent license
would not permit royalty-free redistribution of the Program by all those who receive copies
directly or indirectly through you, then the only way you could satisfy both it and this License
would be to refrain entirely from distribution of the Program.
If any portion of this section is held invalid or unenforceable under any particular
circumstance, the balance of the section is intended to apply and the section as a whole is
intended to apply in other circumstances.
It is not the purpose of this section to induce you to infringe any patents or other property
right claims or to contest validity of any such claims; this section has the sole purpose of
protecting the integrity of the free software distribution system, which is implemented by
public license practices. Many people have made generous contributions to the wide range
of software distributed through that system in reliance on consistent application of that
system; it is up to the author/donor to decide if he or she is willing to distribute software
through any other system and a licensee cannot impose that choice.
This section is intended to make thoroughly clear what is believed to be a consequence of
the rest of this License.
8. If the distribution and/or use of the Program is restricted in certain countries either by
patents or by copyrighted interfaces, the original copyright holder who places the Program
DE - 85
under this License may add an explicit geographical distribution limitation excluding those
countries, so that distribution is permitted only in or among countries not thus excluded. In
such case, this License incorporates the limitation as if written in the body of this License.
9. The Free Software Foundation may publish revised and/or new versions of the General
Public License from time to time. Such new versions will be similar in spirit to the present
version, but may differ in detail to address new problems or concerns.
Each version is given a distinguishing version number. If the Program specifies a version
number of this License which applies to it and "any later version", you have the option of
following the terms and conditions either of that version or of any later version published by
the Free Software Foundation. If the Program does not specify a version number of this
License, you may choose any version ever published by the Free Software Foundation.
10. If you wish to incorporate parts of the Program into other free programs whose
distribution conditions are different, write to the author to ask for permission. For software
which is copyrighted by the Free Software Foundation, write to the Free Software
Foundation; we sometimes make exceptions for this. Our decision will be guided by the two
goals of preserving the free status of all derivatives of our free software and of promoting
the sharing and reuse of software generally.
NO WARRANTY
11. BECAUSE THE PROGRAM IS LICENSED FREE OF CHARGE, THERE IS NO WARRANTY FOR
THE PROGRAM, TO THE EXTENT PERMITTED BY APPLICABLE LAW. EXCEPT WHEN
OTHERWISE STATED IN WRITING THE COPYRIGHT HOLDERS AND/OR OTHER PARTIES
PROVIDE THE PROGRAM "AS IS" WITHOUT WARRANTY OF ANY KIND, EITHER EXPRESSED OR
IMPLIED, INCLUDING, BUT NOT LIMITED TO, THE IMPLIED WARRANTIES OF
MERCHANTABILITY AND FITNESS FOR A PARTICULAR PURPOSE. THE ENTIRE RISK AS TO THE
QUALITY AND PERFORMANCE OF THE PROGRAM IS WITH YOU. SHOULD THE PROGRAM
PROVE DEFECTIVE, YOU ASSUME THE COST OF ALL NECESSARY SERVICING, REPAIR OR
CORRECTION.
12. IN NO EVENT UNLESS REQUIRED BY APPLICABLE LAW OR AGREED TO IN WRITING WILL
ANY COPYRIGHT HOLDER, OR ANY OTHER PARTY WHO MAY MODIFY AND/OR REDISTRIBUTE
THE PROGRAM AS PERMITTED ABOVE, BE LIABLE TO YOU FOR DAMAGES, INCLUDING ANY
GENERAL, SPECIAL, INCIDENTAL OR CONSEQUENTIAL DAMAGES ARISING OUT OF THE USE
OR INABILITY TO USE THE PROGRAM (INCLUDING BUT NOT LIMITED TO LOSS OF DATA OR
DATA BEING RENDERED INACCURATE OR LOSSES SUSTAINED BY YOU OR THIRD PARTIES OR
A FAILURE OF THE PROGRAM TO OPERATE WITH ANY OTHER PROGRAMS), EVEN IF SUCH
HOLDER OR OTHER PARTY HAS BEEN ADVISED OF THE POSSIBILITY OF SUCH DAMAGES.
END OF TERMS AND CONDITIONS
DE - 86
How to Apply These Terms to Your New Programs
If you develop a new program, and you want it to be of the greatest possible use to the
public, the best way to achieve this is to make it free software which everyone can
redistribute and change under these terms.
To do so, attach the following notices to the program. It is safest to attach them to the start
of each source file to most effectively convey the exclusion of warranty; and each file should
have at least the "copyright" line and a pointer to where the full notice is found.
one line to give the program's name and an idea of what it does.
Copyright (C) yyyy name of author
This program is free software; you can redistribute it and/or
modify it under the terms of the GNU General Public License
as published by the Free Software Foundation; either version 2
of the License, or (at your option) any later version.
This program is distributed in the hope that it will be useful,
but WITHOUT ANY WARRANTY; without even the implied warranty of
MERCHANTABILITY or FITNESS FOR A PARTICULAR PURPOSE. See the
GNU General Public License for more details.
You should have received a copy of the GNU General Public License
along with this program; if not, write to the Free Software
Foundation, Inc., 51 Franklin Street, Fifth Floor, Boston, MA 02110-1301, USA.
Also add information on how to contact you by electronic and paper mail.
If the program is interactive, make it output a short notice like this when it starts in an
interactive mode:
Gnomovision version 69, Copyright (C) year name of author
Gnomovision comes with ABSOLUTELY NO WARRANTY; for details
DE - 87
type `show w'. This is free software, and you are welcome
to redistribute it under certain conditions; type `show c'
for details.
The hypothetical commands `show w' and `show c' should show the appropriate parts of the
General Public License. Of course, the commands you use may be called something other
than `show w' and `show c'; they could even be mouse-clicks or menu items--whatever suits
your program.
You should also get your employer (if you work as a programmer) or your school, if any, to
sign a "copyright disclaimer" for the program, if necessary. Here is a sample; alter the
names:
Yoyodyne, Inc., hereby disclaims all copyright
interest in the program `Gnomovision'
(which makes passes at compilers) written
by James Hacker.
signature of Ty Coon, 1 April 1989
Ty Coon, President of Vice
EN- 1
TABLE OF CONTENT
1. PRODUCT OVERVIEW ........................................................................................................................................... 4
2. PRODUCT FEATURES ............................................................................................................................................. 4
3. CONTENT OF PACKAGE ......................................................................................................................................... 6
4. PRODUCT SPECIFICATION ..................................................................................................................................... 6
5. MINIMUM HARDWARE REQUIREMENTS .............................................................................................................. 6
6. PRODUCT VIEW .................................................................................................................................................... 7
7. INTERFACE ............................................................................................................................................................ 7
7.1 RJ45 WAN PORT ................................................................................................................................................... 7
7.2 MICRO USB 3.0 INTERFACE ................................................................................................................................... 7
7.3 LED PANEL ............................................................................................................................................................ 8
8. USING PC OR MAC ................................................................................................................................................ 9
8.1 LIAISE A WIRELESS LAN CONNECTION WITH THE PC .............................................................................................. 9
8.2 PC WIFI FINDER ................................................................................................................................................... 10
8.2.1 MY STORAGE ....................................................................................................................................................... 11
8.3 LIAISE A WIRELESS LAN CONNECTION WITH MAC ................................................................................................ 12
8.3.1 MAC WIFI FINDER ................................................................................................................................................ 13
8.3.2 MY STORAGE ....................................................................................................................................................... 14
8.4 “MEMORY 2 MOVE” CONFIGURATION ................................................................................................................ 15
9. USING MOBILE DEVICES ....................................................................................................................................... 20
9.1 IOS CLIENT APP INSTALLATION ............................................................................................................................ 20
9.2 WIRELESSLY CONNECTING YOUR IPHONE/IPAD ................................................................................................... 21
9.3 IOS USER LOGIN ................................................................................................................................................... 22
9.4 ANDROID CLIENT APP INSTALLATION .................................................................................................................. 23
9.5 WIRELESSLY CONNECTING YOUR ANDROID DEVICES ........................................................................................... 23
9.6 ANDROID USER LOGIN ......................................................................................................................................... 25
10. BASIC FUNCTIONALITY ......................................................................................................................................... 26
10.1 IOS DEVICE CLIENT........................................................................................................................................... 26
EN- 2
10.2 ANDROID DEVICE CLIENT ............................................................................................................................... 28
10.3 WI-FI SETTINGS (IOS AND ANDROID) ............................................................................................................. 30
10.3.1 WI-FI SETTING INTERFACE .............................................................................................................................. 30
10.3.2 MODIFY DEVICE NAME .................................................................................................................................. 30
10.3.3 SECURITY ......................................................................................................................................................... 31
10.3.4 INTERNET MODE .............................................................................................................................................. 31
10.4 PLAYING MUSIC/AUDIO (IOS AND ANDROID) ................................................................................................... 33
10.5 PLAYING MOVIE/VIDEO ................................................................................................................................. 35
10.5.1. IOS................................................................................................................................................................... 35
10.5.2 ANDROID ......................................................................................................................................................... 37
10.6 VIEWING/PLAYING PHOTOS ............................................................................................................................. 38
10.6.1 IOS ................................................................................................................................................................... 38
10.6.2 ANDROID ......................................................................................................................................................... 41
10.7 SHARING PHOTOS/IMAGES .............................................................................................................................. 44
10.7.1 IOS ................................................................................................................................................................... 44
10.7.2 ANDROID ......................................................................................................................................................... 45
10.8 OPENING/VIEWING DOCUMENTS .................................................................................................................... 47
10.8.1 IOS ................................................................................................................................................................... 47
10.8.2 ANDROID ......................................................................................................................................................... 48
10.9 COPY, DELETE, DOWNLOAD, UPLOAD FUNCTIONS (IOS AND ANDROID) ........................................................ 49
10.10 DOWNLOADING FILES TO YOUR DEVICE (IOS AND ANDROID) ........................................................................ 51
10.11 UPLOADING FILES TO YOUR “MEMORY2MOVE”(IOS AND ANDROID) ............................................................... 53
10.12 DELETE/ERASING A SINGLE OR MULTIPLE FILES (IOS AND ANDROID) ............................................................. 55
10.13 UPLOAD/DOWNLOAD HISTORY AND STATUS ................................................................................................... 56
10.14 CLOSE “MEMORY 2 MOVE” APP ....................................................................................................................... 56
10.14.1 IOS .................................................................................................................................................................. 56
10.14.2 ANDROID ........................................................................................................................................................ 57
10.15 UNINSTALL “MEMORY 2 MOVE” APP (IOS AND ANDROID) .............................................................................. 57
EN- 3
10.15.1 IOS .................................................................................................................................................................. 57
10.15.2 ANDROID ........................................................................................................................................................ 58
11. WEB MANAGEMENT FUNCTIONS ................................................................................................................... 59
11.1 EXPLORER FUNCTION .................................................................................................................................... 60
11.2 CONTEXT MENU (NOT FOR MAC) ................................................................................................................... 61
11.3 KEYBOARD SHORTCUTS ................................................................................................................................. 64
11.4 DRAG AND DROP ........................................................................................................................................... 64
11.5 INFORMATION ............................................................................................................................................... 64
11.5.1 DEVICE INFORMATION .................................................................................................................................. 64
11.5.2 STORAGE INFORMATION ............................................................................................................................... 65
11.5.3 NETWORK INFORMATION ............................................................................................................................. 65
11.6 SETTINGS ....................................................................................................................................................... 66
11.6.1 USER SETTINGS .............................................................................................................................................. 66
11.6.2 DISK SETTINGS ............................................................................................................................................... 66
11.7 NETWORK SETTINGS ...................................................................................................................................... 67
11.7.1 HOST NAME ................................................................................................................................................... 67
11.7.2 WI-FI & LAN ................................................................................................................................................... 68
11.7.3 DHCP SERVER ................................................................................................................................................ 69
11.7.4 INTERNET SETTINGS ....................................................................................................................................... 70
11.8 NETWORK SERVICES ...................................................................................................................................... 71
11.8.1 WINDOWS SHARING SERVICES ...................................................................................................................... 71
11.8.2 MEDIA SERVER .............................................................................................................................................. 72
11.9 SYSTEM SETTINGS .......................................................................................................................................... 73
11.9.1 TIME SETTINGS .............................................................................................................................................. 73
11.9.2 BACKUP SETTINGS ......................................................................................................................................... 74
11.9.3 FIRMWARE UPGRADE .................................................................................................................................... 75
11.9.4 RESETTING TO FACTORY DEFAULTS ............................................................................................................... 77
12. LICENCEINFORMATION ABOUT GNU/LGPL .................................................................................................... 78
EN- 4
1. PRODUCT OVERVIEW
“Memory 2 Move” allows to wirelessly access your videos, music, photos, data and stream it
to your iPad®, iPhone®, tablets, smartphones, and notebooks no cords or cables to tangle.
With the internal hard drive storage, there is no need to worry about running out of space on
your mobile devices and the built-in USB 3.0 port makes the file transfer easier and much
faster.
For maximum portability, the WiFi HDD device has a built-in rechargeable battery. Simply plug
it into any available USB port on your computer to charge and copy your files. As simple as 1-
2-3, you are ready to enjoy your device and no waiting needed. “Memory 2 Move can be
accessed while the battery is charging.
2. PRODUCT FEATURES
Stream media over WiFi enabled devices up to 5 users simultaneously
Access and stream your music, videos, photos and data using the free custom mobile
app supporting iOS and Android operating systems
Up to 5 Hours of continuous battery life*
Search function to locate and access your file much faster.
Internet access capability via the optional RJ45 or wireless, supporting 802.11 b/g/n
speeds
Supports NTFS, exFAT, FAT and FAT32
Supports LAN data-shares and cross-platforms including Windows, Mac, Linux, iOS and
Android.
Support multiple NSA, including samba/webdav
Support multiple platform client tools, including
Windows/Mac/Linux/iPad/iPhone/Android
*Battery life subject to normal usage conditions and configurations.
EN- 5
To function as an external HDD, simply connect “Memory 2 Move” into the computer’s
available USB port. “Memory 2 Move” will automatically mount on your desktop or inside the
“My Computer”. The “Memory 2 Move” works as an external hard drive and charges the
internal battery.
Wired mode, connect the RJ45 cable into the available port on the back of your router, then
enable the DHCP feature of “Memory 2 Move” to automatically assign an IP address.
Wireless mode; wirelessly connect “Memory 2 Move” to your existing wireless router
to have internet access as illustrated below.
EN- 6
3. CONTENT OF PACKAGE
Memory 2 Move USB 2.0 cable
CD
Manual
Power Supply (KTEC KSAS0060500100VEU 5V / 1A)
4. PRODUCT SPECIFICATION
Dimensions 127.3mm (L) X 80mm (B) X 25mm (H)
Wi-Fi:
Standard: 802.11 b/g/n,
Frequency: 2.4 GHZ
Speed: 72Mbps at 20MHz
150Mbps at 40MHz
Network Interface: 100Mbps Ethernet RJ45
USB Interface Micro USB 3.0, for data transfer and charging
Battery Capacity 3000mAh
Operating temperature: The normal operating temperature of the device is
between 5-35 Degrees Celsius.
5. MINIMUM HARDWARE REQUIREMENTS
Internet Connection
PC Operating System Requirements
Windows: XP/Vista/Windows 7/8
Mac: OS X 10.6.0 and later
Others: Fedora 12 (Linux) and later
PC Web Browser
Windows: Supports Internet Explorer 7.0 and higher version
Mac: Supports Safari 3.0 and higher version
Others: Firefox 3.5 and higher version
Router or Switch
EN- 7
6. PRODUCT VIEW
7. INTERFACE
7.1 RJ45 WAN PORT
A. Router Mode. “Memory 2 Move” will serve as router. With the built-in DHCP function,
it can assign IP address to connect devices through Wi-Fi.
B. Bridge ModeAllows to access another existing network.
7.2 MICRO USB 3.0 INTERFACE
The built-in USB 3.0 port allows for fast data transfer and can charge the internal
battery when the memory 2 Move is connected to a computer or power adapter. To
connect the memory 2 Move to the PC, turn off the device and then connect it to the
PC.
EN- 8
7.3 LED PANEL
Power LED:
- LED Off: The device is switched-off or no power
Green Color:
- Off: Battery is fully charged
- Slowly Blinking: Battery charging
- Blinking Fast: Device Shutting-Down
Red Color:
- Steady Light: Less than 30% available power
- Blinking Fast: Will soon shut-down, must be charged
immediately
HDD LED:
- Blinking: Read/Write activities
- Steady Light blue: Connected with USB 3.0
- Steady Light green: Connected with USB 2.0
Wi-Fi LED:
Blue Color:
- LED Off: The device is switched-off or no power
- Blinking: Starts the Initialization process
- Steady Light: Initialization process completed
Ready to use, Wi-Fi signal is normal
Internet LED: Router Mode:
- Blue Color: Good signal
- Red/ blue in chage: Bad connection
- No LED: No connection established
Bridge Mode:
- Blue Color: Good signal
- No LED: No connection established
EN- 9
8. USING PC OR MAC
8.1 LIAISE A WIRELESS LAN CONNECTION WITH THE PC
Switch-on “Memory 2 Move” by pressing the power button at the front panel.
Wait for few minutes until the Wireless LED stops flashing. Enable the Wi-Fi feature on
your PC and open the Wireless Network Connection. Select the “Memory 2 Move”
wireless connection (default wireless SSID: Memory2Move-XXXX and password:
intenso1).
Note: For your own safety, please change your password after successful connection.
Once you have successfully connected to “Memory 2 Move”, you may now run the
“WiFi Finder” to search for your device and complete the configuration process.
Our included “WiFi Finder” is the only software that you will need to install on your
computer. This software utility allows you to easily search and look for your “Memory
2 Move” that is connected from your home network. The software must not be
installed.
Simply click on the WiFi Finder Icon which is part of CD content.
EN- 10
8.2 PC WIFI FINDER
Double-click the “WiFi Finder” icon to start the software. This utility will search for all the
connected devices in your network as mentioned on below screenshot.
If you do not find the Memory 2 Move on the list of devices connected in your network, click
on the “Refresh” button to update the device list.
1.) Select the Memory 2 Move on the list, and then click on the “Log In” button to enter
the web interface.
EN- 11
Default user name: admin
Default password: 00000
Click on the “Log In” button to access the Web Management Interface.
Note: For your own safety, please change the password after successful connection.
2.) You may transfer the data between PC and Memory 2 Move, such as upload the data
from PC into the WiFi Disk, or download the data from the WiFi Disk into PC.
8.2.1 MY STORAGE
Click “My Storage” button. The above shown window will appear.
After input the correctly user name (admin) and password (00000), you may access
the Memory 2 Move.
For your own safety, please change the password after successful connection.
You may transfer the data between PC and Memory 2 Move, such as upload the data
from PC into the WiFi Disk, or download the data from the WiFi Disk into PC.
EN- 12
8.3 LIAISE A WIRELESS LAN CONNECTION WITH MAC
Switch-on the “Memory 2 Move” by pressing the power button at the front panel. Wait for
few minutes until the Wireless LED stops flashing. Enable the Wi-Fi feature on your MAC and
open the Wireless Network Connection. Select the Memory 2 Move wireless connection
(default wireless SSID: Memory2Move-XXXX and password: intenso1). Once you have
successfully connected to “Memory 2 Move”, you may now run the “WiFi Finder” to search
for your device and complete the configuration process.
Our included “WiFi Finder” is the only software that you will need to install on your computer.
This software utility allows you to easily search and look for your “Memory 2 Move” that is
connected from your home network. The software must not be installed.
Simply click on the WiFi Finder Icon which is part of CD content.
EN- 13
8.3.1. MAC WIFI FINDER
Double-click the “WiFi Finder” icon on your desktop. The software utility will search all the
connected devices in your network. If you do not find the Memory 2 Move on the list of
devices connected in your network, click on the “Refresh” button to refresh the device list.
1.) Select the Memory 2 Move on the list, and then click on the “Log In” button to enter
the web interface.
EN- 14
Default user name: admin
Default password: 00000
Click on the “Log In” button to access the Web Management Interface.
Note: For your own safety, please change the password after successful connection.
2.) You may transfer the data between PC and Memory 2 Move, such as upload the data
from PC into the WiFi Disk, or download the data from the WiFi Disk into PC.
8.3.2. MY STORAGE
Select the Memory 2 Move and click “My Storage” button. A pop-up window appears.
After input the correctly user name (admin) and password (00000), you may access
the Memory 2 Move by samba.
EN- 15
You may operate all files and directories on the Memory 2 Move by samba, such as:
create, edit, delete, copy, move, rename. Furthermore you can transfer the data
between MAC and the Memory 2 Move, such as upload the data from MAC into the
WiFi Storage, or download the data from the WiFi Storage into MAC.
8.4 MEMORY 2 MOVE CONFIGURATION
When you are connected successfully to the Memory 2 Move, your Web-Browser
opens. You have to log in to the web interface.
Default user name: admin
Default password: 00000
Click on the “Log In” button to access the Web Management Interface.
Once your Wi-Fi enabled-PC is successfully connected to the “Memory 2 Move”, using
the “WiFi Finder” will allow you to access our built-in Web Management Interface and
configure your device.
EN- 16
Startup Wizard
During the initial setup, our Wizard will automatically run and will guide you through the step-
by-step process on configuring the “Memory 2 Move” as seen on the screenshot above. You
may cancel this process by clicking on the “X” at the top right corner of the window. If you
cancel the Wizard, it will keep the factory default settings of your “Memory 2 Move”. Click on
the “Next” button to continue.
Internet Setting
… through another connection with an available network
You can choose between two available Internet Access options By default Wireless Access is
selected (as you can see on the picture).
A. Wireless Access: Connecting the “M2M” device to another wireless network to have
internet access.
B. Wired Access: Directly connecting the “M2M” to the available port on the back of the
router to connect to another network.
EN- 17
Selecting Wireless Access
SSID: Type-in the SSID name or click on the “Rescan” button to automatically search
for the available wireless networks.
Password: Type-in the correct password to join the selected wireless network
connection.
IP Address: Select either DHCP or manually assign an IP address
o By selecting DHCP, the host will provide an automatic IP address to connect to
the internet.
o By selecting Manual, you have to manually assign an IP address to connect to the
internet.
Selecting Wired Access
Note: If you cannot connect with
another network, ask your network
administrator for the guidelines
applicable to you!
EN- 18
By selecting Wired Access, the Dynamic IP is selected as the default setting. You can manually
assign your own IP address by clicking on the green arrow and select the Static IP option.
Click on the “X” button if you wish to cancel and exit this window.
Click on the “Next” button to continue the process. The next step is to configure the WiFi and
LAN settings.
WiFi & LAN Setting
SSID: Type-in a combination of letters and numbers only. 32 characters is the
maximum allowable SSID length.
Channel The default setting is set to Auto. There are 14 channels available to choose
from.
Modes: The default setting is 802.11b/g/n. You can also manually set the modes to
11Mbps (802.11b), 54MBPS (802.11G), and 150Mbps (802.11n).
Security The WPA-PSK, WPA2-PSK , Mixed WPA/WPA2-PSK (default) are available.
Password Minimum 8 (Maximum 63) characters.
IP Address The default IP address is set to 10.10.10.254 with subnet mask of
255.255.255.0. The IP address can be changed.
Click on the “Next” button to change the admin default password. Click on the “Next” button
once the password has been modified. You may click on the “Skip” button to keep the default
password.
EN- 19
After finishing the startup wizard the system will start rebooting.
This process will take 2 minutes (see picture below)
EN- 20
9. USING MOBILE DEVICES
9.1 IOS CLIENT APP INSTALLATION
1. Click on the “App Store” icon on the Home screen as seen on the following image.
Search and locate the free “Memory 2 Move” app and follow the on-screen
installation instructions.
2. Once the installation process has been completed, the “Memory 2 Move” app can
be found on the home screen as seen on the image.
EN- 21
9.2 WIRELESSLY CONNECTING YOUR IPHONE/IPAD
1. Turn-on the “Memory 2 Move”. Wait for a few minutes to complete the
initialization process. The blue Wi-Fi LED on the device should remain solid
indicating that the initialization process has been completed.
2. Click on the “Settings” icon on the desktop as seen on the screenshot.
3. Click on “Wi-Fi”. Inside the Wi-Fi Networks, the “Memory2Move-XXXX” should
appear on the list. Click on the “Memory2Move-XXXX”. Enter the password
(default: intenso1)
4. Once the “Memory2Move-XXXX” is selected, a check mark will appear before the
SSID and the Wi-Fi logo will appear after the device name on the top left of the
display.
EN- 22
9.3 IOS USER LOGIN
1. Click on the “Memory 2 Move” icon to launch the app as seen on the image.
2. Enter the Admin password that you assigned during the configuration process
(00000). The password is only required during the first login. The device
remembers the password and there is no need to enter it again the second time
you login.
3. Once the password has been entered correctly, you will be automatically
connected into the “Memory 2 Move”.This is your direct access to the connected
data carriers that are connected to the device.
EN- 23
9.4 ANDROID CLIENT APP INSTALLATION
1. Download the Client App called “Memory 2 Move” from the official website
(Google Play Store, Android Market) as seen on the screenshot.
2. Click on the “Install” button and follow the on-screen instructions.
3. Once the Client App is successfully installed, the “Memory 2 Move” icon can be
found on your desktop as seen on the image.
9.5 WIRELESSLY CONNECTING YOUR ANDROID DEVICES
1. Turn-on the “Memory 2 Move”. Wait for a few minutes to complete the
initialization process. The blue Wi-Fi LED on the device should remain solid
indicating that the initialization process has been completed.
EN- 24
2. Click on the “Settings” icon on your desktop as seen on the screenshot.
3. Switch the Wi-Fi to ON position. Inside the Wi-Fi networks, the “Memory2Move-
XXXX” should appear on the list. Click on the “Memory2Move-XXXX” and enter
your password (default: intenso1).
4. The word “Connected” will appear under the SSID name of which is an indication
that the Android Device is connected to the “Memory 2 Move”
EN- 25
9.6 ANDROID USER LOGIN
1. Click on the “Memory 2 Move” icon to launch the app as seen on the image below.
2. Enter the Admin password that you assigned during the configuration process
(default: 00000). The password is only required during the first login. The device
remembers the password and there is no need to enter it again the second time
you login.
3. Once the password has been entered correctly, you will be automatically
connected into the “Memory 2 Move” menu.
EN- 26
10. BASIC FUNCTIONALITY
10.1 IOS DEVICE CLIENT
Once you have successfully connected to the “Memory 2 Move”, by default, you will
be inside the “Memory 2 Move” menu. This is your direct access to the connected
data carriers. Via the menu “My Device“ you can access the data carriers. Few buttons
that can be found inside the Main Screen as listed below.
My Device Main Screen View By default, the Documents folder, Music folder, Photos
Folder, Videos folders and iPad (or iPhone) folder are available to easily organize your
files inside the My Device.
“Memory 2 Move” Main Screen View
EN- 27
Home Button back to the main screen.
View Button - change to List or Thumbnail view.
Settings Button change the “Memory 2 Move”
configuration.
Back Button back to previous screen
Manage Button to choose one or more files
“Memory 2 Move” – the Remote Storage
My device access to the device that you are presently using
for connecting to the Memory 2 Move.
Status Button to view the download/upload status list.
EN- 28
10.2 ANDROID DEVICE CLIENT
Once you have successfully connected to the “Memory 2 Move”, by default, you will be inside
the “Memory 2 Move” menu. This is your direct access to the connected data carriers. Via the
menu “My Device“ you can access the data carriers. Few buttons that can be found inside the
Main Screen as listed below.
My Device Main Screen View By default, the Documents folder, Music folder, Photos
Folder, Videos folders and SDCard folder are available to easily organize your files
inside the My Device.
“Memory 2 Move” Main Screen View
EN- 29
Home Button back to the main screen.
View Button - change to List or Thumbnail view.
Settings Button change the “Memory 2 Move”
configuration.
Back Button back to previous screen
Manage Button to choose one or more files
“Memory 2 Move” – the Remote Storage
My device access to the device that you are presently using
for connecting to the Memory 2 Move.
Status Button to view the download/upload status list.
EN- 30
10.3 WI-FI SETTINGS (IOS AND ANDROID)
10.3.1 WI-FI SETTING INTERFACE
Click on to change the Wi-Fi Disk configuration. This feature only appears when switched to
My Wi-Fi Device.
10.3.2 MODIFY DEVICE NAME
Please press on icon to modify the device name. After input the new device name, the Set
button appears, click on the Set button to save the new device name.
EN- 31
10.3.3 SECURITY
Under WiFi HDD Settings the security options appear. The Wi-Fi Disk supports the following
security
ModesNone, WPA-PSK, WA2-PSK, Mixed WPA/WPA2-PSK. If you want to select a new
security mode (except "Disabled"), you have to ask for putting the new wireless password in;
click on set button to save the new security mode and password.
10.3.4 INTERNET MODE
Under Internet Settings you will find the internet access. The Wi-Fi Disk supports the following
internet access:, Wireless Mode and Wired Mode. Wireless Mode is AP Client that access
internet by wireless to connect wireless router, Wired Mode is WAN or LAN Router that
access internet by Ethernet port to connect wired router. After select the internet mode, click
on “Save” to save the new mode.
Below please find the picture showing the wireless access:
EN- 32
By selecting wired mode, you have to configure the network first as seen on the screenshot.
After selecting “Save” button, below picture will appear, click on “OK” to reboot.
Click “Back“ button to return to Wi-Fi settings interface.
EN- 33
10.4 PLAYING MUSIC/AUDIO (IOS AND ANDROID)
Tip: It is highly recommended to create a folder or folders where to copy all your media files
into the “Memory 2 Move” for ease of use and file organization. The Music or Audio files can
be played regardless if you are inside the “Memory 2 Move” or “My Device. Simply locate the
music or audio file that you would like to play. Click on the file and your music will
automatically play.
Note: Please consult your device manual to check whether it will support the
music/audio files that you would like to play.
- When clicked it will play the previous music
- When clicked, it will play the next song.
- When clicked, it will start playing the music or audio file. Click again, the will
pause/stop playing the music.
EN- 34
Five play modes:
a. - Play current song: the music ends after playing current song
b. - Repeat current song: the player will always play the current song, and it will only
stop playing when the button is clicked.
c. - Shuffle all songs: the music or the audio files will be played randomly.
d. - Play current folder: the music or the audio files will be played and not repeated.
e. - Repeat all songs: the music or the audio files will be played in sequence and
repeated.
Note: You can click and hold, then slide the music progress button to fast-forward or
rewind the music.
Tip: You can exit the Music Player Interface at any time and will continue to play the
music or audio file in the background.
EN- 35
10.5 PLAYING MOVIE/VIDEO
10.5.1. IOS
Tip: It is highly recommended to create a folder or folders where to copy all your movie files
into the “Memory 2 Move” for ease of use and file organization.
The movie or video files can be played regardless if you are inside the “Memory 2 Move” or
“My Device”.
Simply locate the movie or video file that you would like to play. Click on the file and your
movie will automatically play as seen on the screenshot below.
Note: Please consult your device manual to check whether it will support the movie or video
files that you would like to play.
EN- 36
By default, the video playback is in the landscape mode. See the button functionalities below.
1. - When clicked, the movie that is currently playing will stop and will exit the
Movie Player Interface.
2. - When clicked, this will scale your movie according to the screen size.
3. - Click, hold and slide the progress button to fast-forward or rewind the
movie.
4. - Click, hold and slide the volume control to increase or lower the volume.
5. Press and hold to fast-rewind the movie while playing.
6. Press and hold to fast-forward the movie while playing.
7. When clicked, it will start playing or resume playing the movie.
8. When clicked, it will pause the movie from playing.
EN- 37
10.5.2 ANDROID
Tip: It is highly recommended to create a folder or folders where to copy all your
movie files into the “Memory 2 Move” for ease of use and file organization.
The movie or video files can be played regardless if you are inside the “Memory 2
Move” or “My Device.
Simply locate the movie or video file that you would like to play. Click on the file and
the list of movie player will appear as seen on the screenshot below.
Note: The control panel will vary depending on the movie player installed on your Android
devices. Please consult the movie player’s user guide on how to control the movie.
EN- 38
10.6 VIEWING/PLAYING PHOTOS
10.6.1 IOS
Tip: It is highly recommended to create a folder or folders where to copy all your
pictures into the “Memory 2 Move” for simply use and file organization.
Note: The “Memory 2 Move” currently supports .jpg, tiff, gif and .bmp images.
The supported images can be viewed as thumbnails or as a list as seen on the screenshot
below. Any images that are not supported can be viewed as a generic thumbnail or icon.
Click on any pictures or images and it will automatically play. Afterwards the menu bar shall
appear as shown on the picture below.
EN- 39
There are few functions available to control the slideshow. You can swipe your finger across
the screen to manually view the pictures or images or click the button, to automatically
play the slideshow.
Click the button to stop the slideshow from playing and press again to continue
playing
Click the button to restart or to replay the slideshow.
Click the button to play the slideshow once and it will stop at the last image or
photo.
Click the button to return from the previous screen.
Background music can be added while playing the slideshow. Click the button as seen on
the screenshot below.
EN- 40
Stop/Continue playing button - to stop or continue playing the background music.
Select button - search and locate the file or files that you would like to play as the
background music. Click on the to return to the slideshow as seen on the
screenshot below.
Repeat button the background music will continue playing the same music when it is
switched-on. By default, this option is switched-off.
EN- 41
10.6.2. ANDROID
Tip: It is highly recommended to create a folder or folders where to copy all your pictures
into the “Memory 2 Move” for simply use and file organization.
Note: Please consult your device manual to check whether it will support the photo
files that you would like to play. The supported images can be viewed as thumbnails or
as a list as seen on the screenshot below. Any images that are not supported can be
viewed as a generic thumbnail or icon.
Click on any pictures or images and it will automatically play. Afterwards the menu bar
shall appear as shown on the picture below.
EN- 42
There are few functions that are available to control the slideshow. You can swipe
your index finger across the screen to manually view the pictures or images or click the
button, to automatically play the slideshow.
Click the button to stop the slideshow from playing and press again to continue
playing
Click the button to restart or to replay the slideshow.
Click the button to play the slideshow once and it will stop at the last image or
photo.
Click the button to return from the previous screen.
Background music can be added while playing the slideshow. Click the button as
seen on the screenshot below.
EN- 43
Stop/Continue playing button - to stop or continue playing the background music.
Select button - search and locate the file or files that you would like to play as the
background music. Click on the to return to the slideshow as seen on the
screenshot below.
Repeat button the background music will continue playing the same music when it is
switched-on. By default, this option is switched-off.
EN- 44
10.7 SHARING PHOTOS/IMAGES
10.7.1 IOS
There are few options to share photos/image to your friends and family; by email,
saving to the device Photo Album and upload to Facebook.
Note: Internet connection is required to share photos/images via email or accessing
any social media network.
Click on the button located at the top right of the screen to show the three
options available to share your photos/images. Click the button to return from
the previous screen.
E-Mail button this button will launch the default e-Mail app to send the photo as an
attachment.
EN- 45
Add to photo when selected, the selected photo/image will be saved into the Photo
Album of the device.
Upload to Facebook when selected, you will be directed to the Facebook login
screen. The Facebook app must be installed on your device. Facebook login and
password is required.
10.7.2 ANDROID
Sharing photos/images using your Android device will vary depending on the apps installed on
your device.
Note: Internet connection is required to share photos/images via email or accessing any social
media networks.
EN- 46
Click the button to return from the previous screen or to exit. Click the
button located at the top right of the screen to show the 2 options available to share
your photos/images.
Share button when selected, a list of app installed on your Android will appear as
seen on the screenshot below. You may select from the list which app to launch.
Save Photo button - when selected, the selected photo/image will be saved into the
device Photo Gallery.
EN- 47
10.8 OPENING/VIEWING DOCUMENTS
10.8.1 IOS
The device client app supports keynote, numbers, page, Excel, Word, .pdf, .txt and ppt
files.
To open or view any documents, simply click on the file. This will automatically open the
supported file. Click the button to return from the previous screen or click the
button to send the file via email as seen on the screenshot below.
Note: Internet connection is required to send emails.
EN- 48
Click the “E-Mail” button, the default email app will launch automatically and the
selected document will be sent as an attachment.
Once the email is sent, there will be a message “Mail Sent” located at the lower-left corner of
the screen. This is an indication that the email was sent successfully.
10.8.2 ANDROID
To open/view a document using your Android device, simply click on the file that you wish to
open/view. This will automatically open the file using the default viewer or the installed app
on your Android device as seen on the screenshot.
Note: Internet connection is required to send emails.
EN- 49
10.9 COPY, DELETE, DOWNLOAD, UPLOAD FUNCTIONS (IOS AND ANDROID)
You may click on the button at any time to share, delete, download, and upload files.
As seen on the screenshots below, the will appear at the top as part of the menu once
the is clicked.
At the bottom of the screen, there are new icons. See below for their functions.
- Click once, all the files will be selected. The icon will turn into yellow color and a
check mark will appear on every file.
- Click once again, all the files will be unselected. The check marks are invisible.
Tip: You may select a single or multiple files by clicking on the thumbnail. As well, you may
click and hold on the thumbnail for few seconds and drag it to the icon to download, to
the icon to upload, or to the icon to delete a file or files.
EN- 50
- Download files from the Memory 2 Move
- Upload files from “My Device”
- When clicked, the list of files that are in queue for uploads/downloads will
appear as well as the list of files that were copied/transferred successfully.
- When clicked, any selected files will be deleted.
EN- 51
10.10 DOWNLOADING FILES TO YOUR DEVICE (IOS AND ANDROID)
Once you get connected into the “Memory 2 Move”, you can download a single or
multiple files into the local storage (My Device).
Click on .
Use your finger to tap and select one or more files. You may use the to select all
files to be download to your device.
Click on .
Select the folder where you want to download the files.
EN- 52
A new folder may be created to download the selected file or files. To create a new
folder, simply click on the “Create Folder” button. Enter the new folder name inside
the box and click the “Done” button as seen on the screenshot below. The folder
name can be minimum 1 characters in length and maximum of 26 characters. Click the
“Cancel” button to exit.
Click on the “Confirm” button to start downloading files as seen on the screenshot
below.
Note: Successfully copied/transferred files will be listed below inside the “Successful
Transfers” window as seen on the left screenshot. Click on the “Clear” button to
remove or clear the list
Click anywhere on the screen or “x” button, you will return to the previous screen.
Once done, click on the to exit.
EN- 53
10.11 UPLOADING FILES TO YOUR MEMORY2MOVE(IOS AND ANDROID)
Once you get connected into the “Memory 2 Move”, you can upload single or multiple
files into the storage of the Memory 2 Move.
Click on .
Use your index finger to select one or more files. You may use the to select all
files to be copied/transferred.
Click on .
Select the folder where you want the files to be copied or transferred.
EN- 54
A new folder may be created to copy/transfer the selected file or files. To create a new
folder, simply click on the “New Folder” button. Enter the new folder name inside the
box and click the “Create” button as seen on the screenshot below. The folder name
can be minimum 1 character in length and maximum of 26 characters. Click the
“Cancel” button to exit.
Click on the “Confirm” button to start copying/transferring files as seen on the
screenshot below into the “Memory 2 Move”.
Click anywhere on the screen or “x” button, you will return to the previous screen.
Once done, click on the to exit.
EN- 55
10.12. DELETE/ERASING A SINGLE OR MULTIPLE FILES (IOS AND ANDROID)
One or more files can be easy deleted/erased whether you are in “My Device” or in
“Memory 2 Move”.
To delete files, click on the .
Use your index finger to select a single or multiple files. You may click on the to
select all files to delete/erase.
Click on the to delete or erase the selected file or files. A warning message will
appear on the screen to confirm file deletion as seen on the screenshot below. Click
OK to continue deleting files.
EN- 56
10.13 UPLOAD/DOWNLOAD HISTORY AND STATUS
If you have uploaded or download multiple files from/to the “Memory 2 Move” to your local
storage (My Device), simply click the to check the files on the queue or files that were
successfully copied/transferred. You may also click on the on the main screen to check on
the status.
10.14 CLOSE MEMORY 2 MOVE APP
10.14.1 IOS
To exit from using the “Memory 2 Move” App on iPhone/ iPad devices, simply press the Home
key on your Apple Device.
To close the app, click on the Home key twice and the list of app will appear at the bottom of
your device. Click and hold the application icon until the minus “-“ sign appears at the top
corner of the app icon. Click on the minus “-“ sign to remove the app as seen on the
screenshot below.
EN- 57
10.14.2 ANDROID
To exit from using the “Memory 2 Move” App Android mobile devices, simply click on
the and select the “Exit” button. A warning “Are you sure you want to exit this
applet?” message will appear. Click “OK” to continue existing or click “Cancel”.
10.15 UNINSTALL MEMORY 2 MOVE APP (IOS AND ANDROID)
10.15.1 IOS
To uninstall the app from your Apple Mobile Devices, click and hold the “Memory 2
Move” app for few seconds. An “X” mark will appear on all the icons on your mobile
device as seen on the screenshot. Simple click on the “X” located at the top-left corner of
the “Memory 2 Move” icon and this will remove the app from your Apple device.
EN- 58
10.15.2 ANDROID
To uninstall the “Memory 2 Move” app from your Android mobile devices, see the
instructions below.
Note: Uninstalling app on the Android devices will vary. Please consult your mobile device
manual prior to removing any application.
1. Click on the Settings icon from your desktop.
2. Go into the application manager.
3. Locate and select the “Memory 2 Move” app.
4. Click on the “Uninstall” button.
5. A warning appears: “Memory 2 Move. This application will be uninstalled.” Click the
“OK” button to continue uninstalling the app or click on the “Cancel” button.
EN- 59
11. WEB MANAGEMENT FUNCTIONS
Our built-in Web Management software is a unique web-based utility stored inside our
“Memory 2 Move” product. No software is needed to install on your Personal Computer to
use this utility. Simply launch our “WiFi Finder” or open your web browser and enter the
10.10.10.254 IP address.
Available sub menus:
Allows the user to change the admin password.
Provides information of the internal hard disk drive.
Networking Settings allow the user to make modifications and changes to Host
Name, Wi-Fi and LAN, DHCP Server and Internet
Allows the users to enable and disable the Win File Services.
Allows the user to make modifications and changes to the Time Settings,
Create System Backup, Firmware Upgrade and Resetting to the factory default
setup.
EN- 60
This will guide the user through a step-by-step process to configure the device.
11.1 EXPLORER FUNCTION
Our user-friendly web based utility allows the user to upload files to the device, create
folders, copy, cut, delete and rename folders and file names. We provide similar
functionalities as the windows explorer of which makes our interface much easier to
use.
Refresh button - to refresh the display
Upload button - to upload file or files into a specific folder.
Create Folder - to create a new folder. Maximum folder name is 26 characters
in length.
Copy button - to copy file or files and paste them into another folder.
EN- 61
Move button - to move a file or files from one location to another
Open / Download button - to open or download a file or files into a specific
location. If the software installed on your computer supports a specific file
type, this file will automatically open. Otherwise, it will ask you to download
the file into a specific location. Downloading a folder or folders is currently not
supported.
Delete button - to delete a file or files.
Renaming button - to make name modification or changing the file name.
Photo Viewer to show pictures
11.2 CONTEXT MENU (NOT FOR MAC)
On the file level, you can right-click using your mouse and a pop-menu will appear. You may
Copy, Cut, Delete, Rename or Download as seen on the screenshot below.
On the folder level, you can right-click using your mouse and a pop-up menu will appear. You
may Open, Copy, Cut, Delete or Rename the folder as seen on the screenshot below.
EN- 62
Selecting multiple files and right-click on the mouse will allow the user to either Copy, Cut or
Delete the files as seen on the screenshot below.
Right-clicking at the bottom of the window as seen below will allow the user to either Paste,
Create or Upload file or files.
Function Overview:
- Open Command: Select a folder and right-click. Inside the pop-up menu, select
“Open” to view the contents or open the folder.
- Copy Command: Select a folder or a file and then right-click. Inside the pop-up menu,
select “Copy” to make a copy of the entire folder or a file and paste into another
location or folder.
- Cut Command: Select multiple files or folders and then right-click. Inside the pop-up
menu, select “Cut” and then paste the files or folders into another folder.
- Paste Command: After using the Cut or Copy command, right-click to launch the pop-
up menu and then select “Paste” to place the file or folder into another location.
- Delete Command: Right-click and then select “Delete” to erase single, multiple files or
folders.
EN- 63
- Create Command: Right-click on the blank area inside the window and a pop-up menu
will appear. Select “Create”. Enter the folder name inside the Create Folder window
and click on Save.
- Rename Command: Right-click on the folder or the file name and select “Rename”.
This allows the user to make changes on the folder or file name. Click on the “Save”
after the name has been changed.
- Upload Command: Right-click the empty area inside the window. Select “Upload”
inside the pop-up menu and browse for the file to be uploaded inside the current
location.
- Download Command: Select and right-click on the file to be downloaded. From the
pop-up menu, select “Download”. The file will automatically open if any installed
software supports this file type otherwise, it will ask you to download the file into a
specific location. Downloading a folder or folders is currently not supported.
EN- 64
11.3 KEYBOARD SHORTCUTS
Our built-in Web Management Interface supports keyboard commands and shortcuts such as
the following:
Tab Key, Enter Key, Home Key, PGUP, PGDN,, End Key, Up Arrow, Down Arrow, Left, Arrow
Right Arrow, and Delete Key
Windows Ctrl+C = Copy; Ctrl+V = Paste
Mac CMD+C = Copy; CMD+V = Past
11.4 DRAG AND DROP
A single file drag and drop is supported by our built-in Web Management Interface,
simply click and hold on the file inside the main window and drag it to any folders
available inside the Folders tree.
11.5 INFORMATION
Provides detail information regarding the hardware condition, network status and
storage information.
11.5.1 DEVICE INFORMATION
Information about CPU, Model and Hostname
EN- 65
11.5.2 STORAGE INFORMATION
Here you will receive information on the connected data carriers as well as about the WiFi-
device (overall capacity of hard disc, hard disc manufacturer, available memory space).
11.5.3 NETWORK INFORMATION
Information about IP address, gateway etc.
EN- 66
11.6 SETTINGS
11.6.1 USER SETTINGS
Click on the “User” thumbnail. This window will allow you to modify the admin password as
seen on the screenshot below. The password should be at minimum of 5 characters to
maximum 32 characters in length. Click on the “Save” button the password has been changed.
The default User Name is admin and the password is “00000”. Click on the “X” to cancel and
exit.
11.6.2 DISK SETTINGS
Click on the “Disk” thumbnail. This window provides information regarding the internal hard
drive as seen on the screenshot below. It provides detailed information including firmware
version, serial number, disk total capacity, temperature, and more.
EN- 67
As seen on the screenshot below, the Volume screen provides information regarding the File
System used to format the internal hard disk drive, total and available capacity.
Click on the “X” to exit.
11.7 NETWORK SETTINGS
11.7.1 HOST NAME
The Hostname is a name that is assigned to a device connected to a computer network. It
must begin with a letter and followed by a combination of letters and numbers. Length must
be between 2 and 8 characters.
EN- 68
11.7.2 WI-FI & LAN
The settings inside the WiFi & LAN can be modified based on your needs. See the screenshot
below for the available options.
SSID: Type-in the combination of letters and numbers only. 32 characters is
the maximum
allowable SSID length
Channel The default setting is set to Auto. There are 14 available channels to
choose from.
Modes: The default setting is 802.11b/g/n. You can also manually set the modes
to 11Mbps
(802.11b), 54MBPS (802.11G), and 150Mbps (802.11n).
Security: The WPA-PSK, WPA2-PSK, Mixed WPA/WPA2-PSK (default) are
available.
Password: WPA-PSK , WPA2-PSK , Mixed WPA-PSK/WPA2-PSK: Minimum 8
(Maximum 63)
characters.
IP Address: The default IP address is set to 10.10.10.254 with subnet mask of
255.255.255.0.
The IP address can be changed.
Click the “Save” button to save changes. Click the “X” to exit and cancel.
EN- 69
11.7.3 DHCP SERVER
The DHCP or Dynamic Host Configuration Protocol is a network protocol that allows a
server to automatically assign an IP address to a computer connected into a network.
By default, the DHCP Server option is enabled. This option can be disabled if needed
and the IP address can be manually assigned.
Click the “Save” button after making any changes. Click on the “X” to exit and cancel.
Click the “DHCP List” button and it will provide a list of all the computers and devices
connected to your “Memory 2 Move” Device. Please see the screenshot below.
EN- 70
11.7.4 INTERNET SETTINGS
… through another connection with an available network
You can choose between two available Internet Access options By default Wireless
Access is selected (as you can see on the picture).
A. Wireless Access: Connecting the “M2M” device to another wireless network to have
internet access.
B. Wired Access: Directly connecting the “M2M” to the available port on the back of the
router to connect to another network.
Selecting Wireless Access
SSID: Type-in the SSID name or click on the “Rescan” button to automatically
search for the available wireless networks.
Password: Type-in the correct password to join the selected wireless network
connection.
IP Address: Select either DHCP or Manually assign an IP address
By selecting DHCP, the host will provide an automatic IP address to
connect to the internet.
By selecting Manual, you have to manually assign an IP address to
connect to the internet.
EN- 71
Selecting Wired Access
By selecting Wired Access, the Dynamic IP is selected as the default setting. You can manually
assign your own IP address by clicking on the green arrow and select the Static IP option.
Click on the “X” button if you wish to cancel and exit this window.
Note: If you cannot connect with another network, ask your network administrator for the
guidelines applicable to you!
11.8 NETWORK SERVICES
11.8.1 WINDOWS SHARING SERVICES
Data sharing and accessing the “Memory 2 Move” product makes it simple by enabling the
Samba Services. By default, this feature is already enabled as seen on the screenshot below.
EN- 72
11.8.2 MEDIA SERVER
Functions:
(1)
Activate or deactivate the Media Server.
(2)
Defines the name displayed in the network.
(3)
State the complete folder name that is to be provided via the Media Server.
(4)
Changes the sharing directory on the Memory 2 Move.
(5)
Here you can save the new settings.
EN- 73
11.9 SYSTEM SETTINGS
11.9.1 TIME SETTINGS
The time settings can be changed based on your current time-zone. You can choose to
synchronize time with the Internet or the time on your PC.
Click on the drop-down list and select the region you are located and switch-on the
“Automatically synchronize with an Internet Time Server”. This will automatically update the
time when the “Memory 2 Move” is connected to the internet.
The “Time Sync Frequency” can be set to every day, every 2 days, every 3 days, up to every 7
days.
The automatic time synchronization can be switched-off and apply the PC time instead.
Applying the PC time will automatically adjust the time and date based on the PC time. See
the image below.
Click on the “X” button to exit and cancel the Time Settings.
EN- 74
11.9.2 BACKUP SETTINGS
Creating a backup as seen on the screenshot below can save the “Memory 2 Move” system
configuration. Please note that this process will not create a backup of the “Memory 2 Move”
contents.
Simply click on the “Save” button to create the backup. This process will create a .bin.gz or
.bin file of which can be used to restore the current settings of the “Memory 2 Move”.
Click the “Save” button to save the backup file on your computer as seen on the screenshot
below.
EN- 75
To restore the backup, click the folder icon. Locate and select the .bin or .bin.gz file. The
backup file will appear below the folder as seen on the screenshot below. Click default the
“Save” button to restore.
A warning message will appear as seen on the screenshot below.
The device will reboot automatically once the restore process has been completed and will
return to login screen.
11.9.3 FIRMWARE UPGRADE
The device firmware can be upgraded by following the simple steps below.
EN- 76
Download and save the latest firmware version on your computer.
Click on the folder icon, search and locate the firmware file on your computer and
then click on the “Open” button as seen on the screenshot below.
The latest firmware update file will appear at the bottom of the folder. Click on the
“Save” button to continue updating the firmware.
Once the firmware has been installed, the warning message as seen on the screenshot
below will appear and the device will automatically reboot and will go back into the
login screen.
EN- 77
11.9.4 RESETTING TO FACTORY DEFAULTS
Resetting to factory defaults will reset all your customized settings or whatever changes you
made back to its original settings.
Simply click on the round button after the “Restore to Factory Default Settings:” Click on the
“Save” button to continue.
The Warning Message window will appear. The “Memory 2 Move” will automatically reboot
once the restoring to the factory default settings have been completed. See the screenshot
below.
Note: This process will reset the Wi-Fi SSID, and the password including the admin password.
EN- 78
12. LICENCEINFORMATION ABOUT GNU/LGPL
Notice of GNU GENERAL PUBLIC LICENSE and LESSER GENERAL PUBLIC LICENCE
Dear Customer,
If interested, you and any third party can download the source code of used GPL / LGPL from
Intenso Webpage http://www.intenso.de . The source code of the desired product is available
to anyone on the selection of valid product category and the desired device. In the product
details you will find the entry "drivers". Open this menu to download the corresponding GPL /
LGPL code. For a fee of 35 € (delivery to another country as Germany), it is also possible to
obtain this code by postal delivery. More information about the GPL/LGPL-Licence can you
nd on following website www.gnu.org
GNU GENERAL PUBLIC LICENSE
Version 2, June 1991
Copyright (C) 1989, 1991 Free Software Foundation, Inc.
51 Franklin Street, Fifth Floor, Boston, MA 02110-1301, USA
Everyone is permitted to copy and distribute verbatim copies
of this license document, but changing it is not allowed.
Preamble
The licenses for most software are designed to take away your freedom to share and change
it. By contrast, the GNU General Public License is intended to guarantee your freedom to
share and change free software--to make sure the software is free for all its users. This
General Public License applies to most of the Free Software Foundation's software and to any
other program whose authors commit to using it. (Some other Free Software Foundation
software is covered by the GNU Lesser General Public License instead.) You can apply it to
your programs, too.
When we speak of free software, we are referring to freedom, not price. Our General Public
Licenses are designed to make sure that you have the freedom to distribute copies of free
EN- 79
software (and charge for this service if you wish), that you receive source code or can get it if
you want it, that you can change the software or use pieces of it in new free programs; and
that you know you can do these things.
To protect your rights, we need to make restrictions that forbid anyone to deny you these
rights or to ask you to surrender the rights. These restrictions translate to certain
responsibilities for you if you distribute copies of the software, or if you modify it.
For example, if you distribute copies of such a program, whether gratis or for a fee, you must
give the recipients all the rights that you have. You must make sure that they, too, receive or
can get the source code. And you must show them these terms so they know their rights.
We protect your rights with two steps: (1) copyright the software, and (2) offer you this
license which gives you legal permission to copy, distribute and/or modify the software.
Also, for each author's protection and ours, we want to make certain that everyone
understands that there is no warranty for this free software. If the software is modified by
someone else and passed on, we want its recipients to know that what they have is not the
original, so that any problems introduced by others will not reflect on the original authors'
reputations.
Finally, any free program is threatened constantly by software patents. We wish to avoid the
danger that redistributors of a free program will individually obtain patent licenses, in effect
making the program proprietary. To prevent this, we have made it clear that any patent must
be licensed for everyone's free use or not licensed at all.
The precise terms and conditions for copying, distribution and modification follow.
TERMS AND CONDITIONS FOR COPYING, DISTRIBUTION AND MODIFICATION
0. This License applies to any program or other work which contains a notice placed by the
copyright holder saying it may be distributed under the terms of this General Public License.
The "Program", below, refers to any such program or work, and a "work based on the
Program" means either the Program or any derivative work under copyright law: that is to
say, a work containing the Program or a portion of it, either verbatim or with modifications
and/or translated into another language. (Hereinafter, translation is included without
limitation in the term "modification".) Each licensee is addressed as "you".
Activities other than copying, distribution and modification are not covered by this License;
they are outside its scope. The act of running the Program is not restricted, and the output
EN- 80
from the Program is covered only if its contents constitute a work based on the Program
(independent of having been made by running the Program). Whether that is true depends on
what the Program does.
1. You may copy and distribute verbatim copies of the Program's source code as you receive
it, in any medium, provided that you conspicuously and appropriately publish on each copy an
appropriate copyright notice and disclaimer of warranty; keep intact all the notices that refer
to this License and to the absence of any warranty; and give any other recipients of the
Program a copy of this License along with the Program.
You may charge a fee for the physical act of transferring a copy, and you may at your option
offer warranty protection in exchange for a fee.
2. You may modify your copy or copies of the Program or any portion of it, thus forming a
work based on the Program, and copy and distribute such modifications or work under the
terms of Section 1 above, provided that you also meet all of these conditions:
a) You must cause the modified files to carry prominent notices stating that you changed the
files and the date of any change.
b) You must cause any work that you distribute or publish, that in whole or in part contains or
is derived from the Program or any part thereof, to be licensed as a whole at no charge to all
third parties under the terms of this License.
c) If the modified program normally reads commands interactively when run, you must cause
it, when started running for such interactive use in the most ordinary way, to print or display
an announcement including an appropriate copyright notice and a notice that there is no
warranty (or else, saying that you provide a warranty) and that users may redistribute the
program under these conditions, and telling the user how to view a copy of this License.
(Exception: if the Program itself is interactive but does not normally print such an
announcement, your work based on the Program is not required to print an announcement.)
These requirements apply to the modified work as a whole. If identifiable sections of that
work are not derived from the Program, and can be reasonably considered independent and
separate works in themselves, then this License, and its terms, do not apply to those sections
when you distribute them as separate works. But when you distribute the same sections as
part of a whole which is a work based on the Program, the distribution of the whole must be
on the terms of this License, whose permissions for other licensees extend to the entire
whole, and thus to each and every part regardless of who wrote it.
EN- 81
Thus, it is not the intent of this section to claim rights or contest your rights to work written
entirely by you; rather, the intent is to exercise the right to control the distribution of
derivative or collective works based on the Program.
In addition, mere aggregation of another work not based on the Program with the Program
(or with a work based on the Program) on a volume of a storage or distribution medium does
not bring the other work under the scope of this License.
3. You may copy and distribute the Program (or a work based on it, under Section 2) in object
code or executable form under the terms of Sections 1 and 2 above provided that you also do
one of the following:
a) Accompany it with the complete corresponding machine-readable source code, which must
be distributed under the terms of Sections 1 and 2 above on a medium customarily used for
software interchange; or,
b) Accompany it with a written offer, valid for at least three years, to give any third party, for
a charge no more than your cost of physically performing source distribution, a complete
machine-readable copy of the corresponding source code, to be distributed under the terms
of Sections 1 and 2 above on a medium customarily used for software interchange; or,
c) Accompany it with the information you received as to the offer to distribute corresponding
source code. (This alternative is allowed only for noncommercial distribution and only if you
received the program in object code or executable form with such an offer, in accord with
Subsection b above.)
The source code for a work means the preferred form of the work for making modifications to
it. For an executable work, complete source code means all the source code for all modules it
contains, plus any associated interface definition files, plus the scripts used to control
compilation and installation of the executable. However, as a special exception, the source
code distributed need not include anything that is normally distributed (in either source or
binary form) with the major components (compiler, kernel, and so on) of the operating
system on which the executable runs, unless that component itself accompanies the
executable.
If distribution of executable or object code is made by offering access to copy from a
designated place, then offering equivalent access to copy the source code from the same
place counts as distribution of the source code, even though third parties are not compelled
to copy the source along with the object code.
EN- 82
4. You may not copy, modify, sublicense, or distribute the Program except as expressly
provided under this License. Any attempt otherwise to copy, modify, sublicense or distribute
the Program is void, and will automatically terminate your rights under this License. However,
parties who have received copies, or rights, from you under this License will not have their
licenses terminated so long as such parties remain in full compliance.
5. You are not required to accept this License, since you have not signed it. However, nothing
else grants you permission to modify or distribute the Program or its derivative works. These
actions are prohibited by law if you do not accept this License. Therefore, by modifying or
distributing the Program (or any work based on the Program), you indicate your acceptance of
this License to do so, and all its terms and conditions for copying, distributing or modifying the
Program or works based on it.
6. Each time you redistribute the Program (or any work based on the Program), the recipient
automatically receives a license from the original licensor to copy, distribute or modify the
Program subject to these terms and conditions. You may not impose any further restrictions
on the recipients' exercise of the rights granted herein. You are not responsible for enforcing
compliance by third parties to this License.
7. If, as a consequence of a court judgment or allegation of patent infringement or for any
other reason (not limited to patent issues), conditions are imposed on you (whether by court
order, agreement or otherwise) that contradict the conditions of this License, they do not
excuse you from the conditions of this License. If you cannot distribute so as to satisfy
simultaneously your obligations under this License and any other pertinent obligations, then
as a consequence you may not distribute the Program at all. For example, if a patent license
would not permit royalty-free redistribution of the Program by all those who receive copies
directly or indirectly through you, then the only way you could satisfy both it and this License
would be to refrain entirely from distribution of the Program.
If any portion of this section is held invalid or unenforceable under any particular
circumstance, the balance of the section is intended to apply and the section as a whole is
intended to apply in other circumstances.
It is not the purpose of this section to induce you to infringe any patents or other property
right claims or to contest validity of any such claims; this section has the sole purpose of
protecting the integrity of the free software distribution system, which is implemented by
public license practices. Many people have made generous contributions to the wide range of
software distributed through that system in reliance on consistent application of that system;
EN- 83
it is up to the author/donor to decide if he or she is willing to distribute software through any
other system and a licensee cannot impose that choice.
This section is intended to make thoroughly clear what is believed to be a consequence of the
rest of this License.
8. If the distribution and/or use of the Program is restricted in certain countries either by
patents or by copyrighted interfaces, the original copyright holder who places the Program
under this License may add an explicit geographical distribution limitation excluding those
countries, so that distribution is permitted only in or among countries not thus excluded. In
such case, this License incorporates the limitation as if written in the body of this License.
9. The Free Software Foundation may publish revised and/or new versions of the General
Public License from time to time. Such new versions will be similar in spirit to the present
version, but may differ in detail to address new problems or concerns.
Each version is given a distinguishing version number. If the Program specifies a version
number of this License which applies to it and "any later version", you have the option of
following the terms and conditions either of that version or of any later version published by
the Free Software Foundation. If the Program does not specify a version number of this
License, you may choose any version ever published by the Free Software Foundation.
10. If you wish to incorporate parts of the Program into other free programs whose
distribution conditions are different, write to the author to ask for permission. For software
which is copyrighted by the Free Software Foundation, write to the Free Software Foundation;
we sometimes make exceptions for this. Our decision will be guided by the two goals of
preserving the free status of all derivatives of our free software and of promoting the sharing
and reuse of software generally.
NO WARRANTY
11. BECAUSE THE PROGRAM IS LICENSED FREE OF CHARGE, THERE IS NO WARRANTY FOR THE
PROGRAM, TO THE EXTENT PERMITTED BY APPLICABLE LAW. EXCEPT WHEN OTHERWISE
STATED IN WRITING THE COPYRIGHT HOLDERS AND/OR OTHER PARTIES PROVIDE THE
PROGRAM "AS IS" WITHOUT WARRANTY OF ANY KIND, EITHER EXPRESSED OR IMPLIED,
INCLUDING, BUT NOT LIMITED TO, THE IMPLIED WARRANTIES OF MERCHANTABILITY AND
FITNESS FOR A PARTICULAR PURPOSE. THE ENTIRE RISK AS TO THE QUALITY AND
PERFORMANCE OF THE PROGRAM IS WITH YOU. SHOULD THE PROGRAM PROVE DEFECTIVE,
YOU ASSUME THE COST OF ALL NECESSARY SERVICING, REPAIR OR CORRECTION.
EN- 84
12. IN NO EVENT UNLESS REQUIRED BY APPLICABLE LAW OR AGREED TO IN WRITING WILL
ANY COPYRIGHT HOLDER, OR ANY OTHER PARTY WHO MAY MODIFY AND/OR REDISTRIBUTE
THE PROGRAM AS PERMITTED ABOVE, BE LIABLE TO YOU FOR DAMAGES, INCLUDING ANY
GENERAL, SPECIAL, INCIDENTAL OR CONSEQUENTIAL DAMAGES ARISING OUT OF THE USE OR
INABILITY TO USE THE PROGRAM (INCLUDING BUT NOT LIMITED TO LOSS OF DATA OR DATA
BEING RENDERED INACCURATE OR LOSSES SUSTAINED BY YOU OR THIRD PARTIES OR A
FAILURE OF THE PROGRAM TO OPERATE WITH ANY OTHER PROGRAMS), EVEN IF SUCH
HOLDER OR OTHER PARTY HAS BEEN ADVISED OF THE POSSIBILITY OF SUCH DAMAGES.
END OF TERMS AND CONDITIONS
How to Apply These Terms to Your New Programs
If you develop a new program, and you want it to be of the greatest possible use to the
public, the best way to achieve this is to make it free software which everyone can
redistribute and change under these terms.
To do so, attach the following notices to the program. It is safest to attach them to the start of
each source file to most effectively convey the exclusion of warranty; and each file should
have at least the "copyright" line and a pointer to where the full notice is found.
one line to give the program's name and an idea of what it does.
Copyright (C) yyyy name of author
This program is free software; you can redistribute it and/or
modify it under the terms of the GNU General Public License
as published by the Free Software Foundation; either version 2
of the License, or (at your option) any later version.
This program is distributed in the hope that it will be useful,
but WITHOUT ANY WARRANTY; without even the implied warranty of
MERCHANTABILITY or FITNESS FOR A PARTICULAR PURPOSE. See the
GNU General Public License for more details.
EN- 85
You should have received a copy of the GNU General Public License
along with this program; if not, write to the Free Software
Foundation, Inc., 51 Franklin Street, Fifth Floor, Boston, MA 02110-1301, USA.
Also add information on how to contact you by electronic and paper mail.
If the program is interactive, make it output a short notice like this when it starts in an
interactive mode:
Gnomovision version 69, Copyright (C) year name of author
Gnomovision comes with ABSOLUTELY NO WARRANTY; for details
type `show w'. This is free software, and you are welcome
to redistribute it under certain conditions; type `show c'
for details.
The hypothetical commands `show w' and `show c' should show the appropriate parts of the
General Public License. Of course, the commands you use may be called something other than
`show w' and `show c'; they could even be mouse-clicks or menu items--whatever suits your
program.
You should also get your employer (if you work as a programmer) or your school, if any, to
sign a "copyright disclaimer" for the program, if necessary. Here is a sample; alter the names:
Yoyodyne, Inc., hereby disclaims all copyright
interest in the program `Gnomovision'
(which makes passes at compilers) written
by James Hacker.
signature of Ty Coon, 1 April 1989
Ty Coon, President of Vice
FR - 1
SOMMAIRE
1. Aperçu du produit.................................................................................................................................................... 4
2. Fonctions du Produit ............................................................................................................................................... 4
3. Volume de livraison ................................................................................................................................................. 5
4. Caractéristiques techniques .................................................................................................................................... 6
5. Configuration matérielle minimum ......................................................................................................................... 6
6. Description du produit ............................................................................................................................................. 7
7. Raccords existants ................................................................................................................................................... 7
7.1 Port WAN RJ45 ........................................................................................................................................................ 7
7.2 Interface micro USB 3.0 ........................................................................................................................................... 7
7.3 Affichage LED ........................................................................................................................................................... 8
8. Utilisation d’un PC ou d’un MAC ............................................................................................................................. 9
8.1 Création d’une connexion Wireless LAN avec un PC ............................................................................................... 9
8.2 WiFi Finder sur PC .................................................................................................................................................. 10
8.2.1 Ma mémoire .......................................................................................................................................................... 11
8.3 Création d’une connexion Wireless LAN avec un MAC .......................................................................................... 12
8.3.1 WiFi Finder sur MAC .............................................................................................................................................. 13
8.3.2 Ma mémoire .......................................................................................................................................................... 15
8.4 Configuration de Memory 2 Move ........................................................................................................................ 16
9. Utilisation d’appareils mobiles .............................................................................................................................. 20
9.1 Installation de l’app iOS Memory 2 Move ............................................................................................................. 20
9.2 Connexion sans fil à votre iPhone / iPad ............................................................................................................... 21
9.3 Connexion de l’Utilisateur iOS ............................................................................................................................... 22
9.4 Installation de l’App Android Memory 2 Move ..................................................................................................... 23
9.5 Connexion sans fil à votre appareil Android .......................................................................................................... 23
9.6 Connexion de l’utilisateur (Android) ...................................................................................................................... 25
10. Fonctions de base .................................................................................................................................................. 26
10.1 Utilisation pour appareils iOS ................................................................................................................................ 26
10.2 Utilisation pour appareils Android ........................................................................................................................ 28
FR - 2
10.3 Réglages WI-Fi (iOS et Android) ............................................................................................................................. 30
10.3.1 Réglages Wi-Fi Interface ........................................................................................................................................ 30
10.3.2 Modification du nom de l’appareil ........................................................................................................................ 30
10.3.3 Sécurité .................................................................................................................................................................. 31
10.3.4 Accès Internet ........................................................................................................................................................ 31
10.4 Restituer des fichiers de musique / audios (IOS / Android) ................................................................................... 33
10.5 Restituer des films / vidéos ................................................................................................................................... 35
10.5.1 iOS ......................................................................................................................................................................... 35
10.5.2 Android .................................................................................................................................................................. 37
10.6 Restitution de fichiers photos ................................................................................................................................ 38
10.6.1 iOS ......................................................................................................................................................................... 38
10.6.2 Android .................................................................................................................................................................. 41
10.7 Partage de fichiers photos ..................................................................................................................................... 44
10.7.1 iOS ......................................................................................................................................................................... 44
10.7.2 Android .................................................................................................................................................................. 45
10.8 Ouvrir / Afficher des documents ........................................................................................................................... 47
10.8.1 iOS ......................................................................................................................................................................... 47
10.8.2 Android .................................................................................................................................................................. 48
10.9 Copier, effacer, charger et télécharger des fichiers (iOS et Android) .................................................................... 49
10.10 Chargement de fichiers sur votre appareil iOS / Android ...................................................................................... 51
10.11 Chargement de fichiers sur le disque dur Wi-Fi (iOS etAndroid) .......................................................................... 53
10.12 Effacer des fichiers (iOS et Android) ...................................................................................................................... 55
10.13 Aperçu et statut de vos chargements / téléchargements ..................................................................................... 56
10.14 Quitter l’app Memory 2 Move ............................................................................................................................... 56
10.14.1 iOS ......................................................................................................................................................................... 56
10.14.2 Android .................................................................................................................................................................. 57
10.15 Désinstallation de l’app “Memory 2 Move“ .......................................................................................................... 57
10.15.1 iOS ......................................................................................................................................................................... 57
10.15.2 Android .................................................................................................................................................................. 58
11. Fonctions de management WEB ............................................................................................................................ 59
FR - 3
11.1 Fonction Explorateur ............................................................................................................................................. 60
11.2 Menu Contexte (pas pour Mac) ............................................................................................................................. 61
11.3 Raccourcis clavier .................................................................................................................................................. 64
11.4 Drag and Drop ....................................................................................................................................................... 64
11.5 Informations .......................................................................................................................................................... 64
11.5.1 Informations sur l’appareil .................................................................................................................................... 64
11.5.2 Information sur la mémoire ................................................................................................................................... 65
11.5.3 Information sur le réseau ...................................................................................................................................... 65
11.6 Réglages ................................................................................................................................................................. 66
11.6.1 Utilisateur .............................................................................................................................................................. 66
11.6.2 Disque .................................................................................................................................................................... 66
11.7 Réseau ................................................................................................................................................................... 67
11.7.1 Nom de l’hôte ........................................................................................................................................................ 67
11.7.2 Wi-Fi & LAN ........................................................................................................................................................... 68
11.7.3 Serveur DHCP......................................................................................................................................................... 69
11.7.4 Accès Internet ........................................................................................................................................................ 70
11.8 Services .................................................................................................................................................................. 71
11.8.1 Samba .................................................................................................................................................................... 71
11.8.2 Media Server ......................................................................................................................................................... 72
11.9 système.................................................................................................................................................................. 73
11.9.1 Réglages de l’heure ............................................................................................................................................... 73
11.9.2 Sauvegarder ........................................................................................................................................................... 74
11.9.3 Mise à jour du micrologiciel................................................................................................................................... 75
11.9.4 Reset ...................................................................................................................................................................... 77
12. Licence information ............................................................................................................................................... 78
FR - 4
1. APERÇU DU PRODUIT
« Memory 2 Move » vous permet l’accès sans fil à vos vidéos, à votre musique, à vos photos et vos
données pour les diffuser sur votre iPad®, iPhone®, tablette PC, Smartphone et ordinateur portable
sans salade de câbles inutile.
Grâce au disque dur intégré, vous n’avez plus besoin de vous faire de soucis au sujet d’une mémoire
limitée sur vos appareils mobiles et le port USB 3.0 intégré permet un transfert de données rapide
et simple.
Pour une mobilité la meilleure possible, Memory 2 Move est équipé d’un accu rechargeable. Pour
recharger l’accu, vous pouvez simplement connecter l’appareil à l’un des ports USB disponibles de
votre ordinateur et copier en même temps vos fichiers sur le disque dur. L’appareil est
immédiatement prêt à fonctionner. µLors de l’opération de charge, vous pouvez accéder à Memory
2 Move.
2. FONCTIONS DU PRODUIT
Diffusion de fichiers de médias via une connexion Wi-Fi, pour jusqu’à 5 utilisateurs
simultanément.
Accès à vos fichiers musique, vidéo et photos via l’application gratuite pour iOS et Android.
Jusqu’à 5 heures de batterie en autonomie*
Accès à Internet via la connexion optionnelle RJ45 (connexion LAN) ou sans fil avec standard
802.11 b/g/n
Supporte le formatage NTF et FAT32
Supporte le partage des données via une connexion LAN entre Windows, Mac, iOS et Linux
Supporte des applications clients sur différentes plates-formes, y compris
Windows/Mac/Linux/iPad/iPhone/Android
*La durée de vie précise de la batterie est fonction des applications utilisées et des réglages.
Utilisation comme disque dur externe : Le raccord USB 3.0 intégré permet un transfert de données
rapide et peur recharger la batterie interne dès que le Memory 2 Move est relié à un ordinateur ou
à un bloc d’alimentation. Ceci fonctionne uniquement lorsque l’appareil est éteinte.
FR - 5
Le « Memory 2 Move » fonctionne en tant que disque dur externe et charge la batterie interne.
Mode par connexion LAN : Pour ce faire, connectez une extrémité de votre câble RJ45 à Memory 2
Move et l’autre extrémité à un port libre de votre routeur. Activez maintenant la fonction DHCP sur
votre Memory 2 Move pour l’allocation automatique de l’adresse IP.
Utilisation sans fil : Connectez le Memory 2 Move à votre routeur sans fil tel que décrit dans le
mode d’emploi suivant pour avoir accès à Internet par la Wi-Fi.
3. VOLUME DE LIVRAISON
Câble USB 3.0 Memory 2 Move
CD
Mode d’emploi
Bloc d’alimentation (KTEC KSAS0060500100VEU 5V / 1A)
FR - 6
4. CARACTERISTIQUES TECHNIQUES
Dimensions : 127.3mm (L) X 80mm (L) X 25mm (H)
Wi-Fi : Taux de transfert : 72Mbps (20MHz) / 150Mbps (40MHz)
o Standard : 802.11 b/g/n,
o Fréquence : 2.4 GHZ
Interface réseau : 100Mbps Ethernet RJ45
Branchement USB Micro USB 3.0, pour le transfert de données et la charge de l’accu
Capacité de l’accu 3000mAh
Température de service : La température de service optimale se situe entre 5 °C et 35 °C.
5. CONFIGURATION MATERIELLE MINIMUM
Connexion Internet
Système d’exploitation
o Windows : XP/Vista/Windows 7/8
o Mac : OS X 10.6.0 et versions supérieures
o Autres : Fedora 12 (Linux) et versions supérieures
Navigateur Internet PC
o Windows : Supporte Internet Explorer 7.0 et versions supérieures
o Mac : Supporte Safari 3.0 et versions supérieures
o Autres : Firefox 3.5 et versions supérieures
Routeur ou switch
FR - 7
6. DESCRIPTION DU PRODUIT
7. RACCORDS EXISTANTS
7.1. PORT WAN RJ45
A. Mode routeur : Le Memory 2 Move fonctionne comme un routeur habituel et peut allouer
des adresses IP à des ordinateurs reliés via WLAN.
B. Mode WAN : Permet la création d’une connexion réseau avec un réseau déjà existant.
7.2. INTERFACE MICRO USB 3.0
Le raccord USB 3.0 intégré permet un transfert de données rapide et peur recharger la batterie
interne dès que le Memory 2 Move est relié à un ordinateur ou à un bloc d’alimentation. Ceci
fonctionne uniquement lorsque l’appareil est éteinte.
FR - 8
7.3 AFFICHAGE LED
LED Power :
- Est éteinte : L’appareil est coupé.
- Est allumée en permanence vert : La batterie est entièrement chargée.
- Clignote rapidement vert : L’appareil est en cours de coupure.
- Clignote lentement vert : L’appareil est en opération de charge.
- Est allumée en permanence rouge : Charge de l’accu inférieure à 30 %
- Clignote rapidement rouge : Charge de l’accu critique
LED HDD :
- Est allumée en permanence en blanc : Mode d’attente
- Clignote en blanc : Opérations d’écriture / lecture actives
- Connectée via le port USB :
o Est allumée en permanence en bleu : Connectée via USB 3.0
o Est allumée en permanence en blanc : Connectée via USB 2.0
LED Wi-Fi bleue :
- Vacillante : Le processus d’initialisation est en cours de démarrage.
- La LED est éteinte : L’appareil est coupé ou ne reçoit pas de courant
- Est allumée en permanence :
o Processus d’initialisation terminé
o Mode d’attente les appareils peuvent être connectés.
LED Internet :
- Mode routeur
o Couleur bleue : Bonne qualité de signal
o Bleu / rouge en alternance : Mauvaise qualité de signal
o La LED ne s’allume pas : Pas de connexion Internet
- Fonction Bridge
o Couleur bleue : Bonne qualité de signal
o La LED ne s’allume pas : Pas de connexion Internet
FR - 9
8. UTILISATION DUN PC OU DUN MAC
8.1 CREATION DUNE CONNEXION WIRELESS LAN AVEC UN PC
Enclenchez l’appareil Wi-Fi en appuyant sur le bouton Power sur la face avant de l’appareil.
Activez la fonction WLAN sur votre PC et cliquez dans la barre de tâches en bas à droite sur le
symbole WLAN. L’affichage suivant s’ouvre :
Sélectionnez le réseau nommé « Memory2Move-XXXX ».
Remarque : Le mot de passe préréglé est « intenso1 » à la livraison. Pour votre propre sécurité,
veuillez saisir un nouveau mot de passe après la réalisation réussie de la connexion.
Lorsque vous avez créé avec succès une connexion avec votre appareil Wi-Fi, veuillez installer le
logiciel Client fourni comme décrit ci-dessous :
La condition préalable pour connecter l’appareil Wi-Fi connecté avec votre ordinateur, veuillez
utiliser l’outil de logiciel intégré « WiFi Finder » du CD de driver. Le logiciel recherche pour vous
automatiquement l’appareil Wi-Fi connecté dans votre réseau.
Faites simplement un double clic sur l’icône et suivez les instructions à l’écran.
FR - 10
8.2 WIFI FINDER SUR PC
Double-cliquez sur l’icône « WiFi Finder » pour démarrer le logiciel. Le logiciel cherche
automatiquement Memory 2 Move dans le réseau connecté (voir Screenshot).
Remarque : Si vous ne trouvez pas « M2M » dans la liste des clients connectés au réseau, veuillez
cliquer sur le bouton « Refresh » pour chercher à nouveau l’appareil Wi-Fi.
1.) Veuillez sélectionner Memory 2 Move dans le menu et cliquez sur "Log in" pour vous
connecter en tant qu´administrateur (voir photo écran).
FR - 11
2.) Pour vous connecter avec succès, utilisez les détails de Log In suivants :
Nom d’utilisateur : admin
Mot de passe : 00000
Remarque : Pour votre propre sécurité, veuillez saisir un nouveau mot de passe après la
réalisation réussie de la connexion.
Vous pouvez créer, effacer, copier, éditer, renommer les répertoires et dossiers sur Memory 2
Move ou les déplacer.
8.2.1 MA MEMOIRE
Lorsque vous cliquez sur le bouton « My Storage » ou « Ma mémoire », la fenêtre présentée ci-
dessus s’affiche. Pour vous connecter avec succès, utilisez les détails de Log In suivants :
Nom d’utilisateur : admin
Mot de passe : 00000
Remarque : Pour votre propre sécurité, veuillez saisir un nouveau mot de passe après la
réalisation réussie de la connexion.
FR - 12
8.3 CREATION DUNE CONNEXION WIRELESS LAN AVEC UN MAC
Enclenchez l’appareil Wi-Fi en appuyant sur le bouton Power sur la face avant de l’appareil.
Activez la fonction WLAN sur votre PC et cliquez dans la barre de tâches en bas à droite sur le
symbole WLAN. L’affichage suivant s’ouvre :
Sélectionnez le réseau nommé « Memory2Move-XXXX ».
Remarque : Le mot de passe préréglé est « intenso1 » à la livraison. Pour votre propre sécurité,
veuillez saisir un nouveau mot de passe après la réalisation réussie de la connexion.
Lorsque vous avez créé avec succès une connexion avec votre appareil Wi-Fi, veuillez installer le
logiciel Client fourni comme décrit ci-dessous :
Lorsque vous avez créé avec succès une connexion avec votre appareil Wi-Fi, veuillez installer le
logiciel Client fourni comme décrit ci-dessous :
La condition préalable pour connecter l’appareil Wi-Fi connecté avec votre ordinateur, veuillez
utiliser l’outil de logiciel intégré « WiFi Finder » du CD de driver. Le logiciel recherche pour vous
automatiquement l’appareil Wi-Fi connecté dans votre réseau.
Faites simplement un double clic sur l’icône et suivez les instructions à l’écran.
FR - 13
8.3.1 WIFI FINDER SUR MAC
Double-cliquez sur l’icône « WiFi Finder » pour démarrer le logiciel. Le logiciel cherche
automatiquement Memory 2 Move dans le réseau connecté (voir Screenshot).
Remarque : Si vous ne trouvez pas « M2M » dans la liste des clients connectés au réseau,
veuillez cliquer sur le bouton « Actualiser » pour chercher à nouveau l’appareil Wi-Fi.
1.) Veuillez sélectionner Memory 2 Move dans le menu et cliquez sur "Log in" pour vous
connecter en tant qu´administrateur (voir photo écran).
FR - 14
2.) Pour vous connecter avec succès, utilisez les détails de Log In suivants :
Nom d’utilisateur : admin
Mot de passe : 00000
Remarque : Pour votre propre sécurité, veuillez saisir un nouveau mot de passe après la
réalisation réussie de la connexion.
Vous pouvez créer, effacer, copier, éditer, renommer les répertoires et dossiers sur Memory 2
Move ou les déplacer.
FR - 15
8.3.2 MA MEMOIRE
Lorsque vous cliquez sur le bouton « My Storage » ou « Ma mémoire », la fenêtre présentée ci-
dessus s’affiche. Pour vous connecter avec succès, utilisez les détails de Log In suivants :
Nom d’utilisateur : admin
Mot de passe : 00000
Remarque : Pour votre propre sécurité, veuillez saisir un nouveau mot de passe après la
alisation réussie de la connexion.
Vous pouvez créer, effacer, copier, éditer, renommer les répertoires et dossiers sur Memory 2
Move ou les déplacer.
De plus, vous pouvez transférer les données entre votre MAC et Memory 2 Move (télécharger /
charger).
FR - 16
8.4 CONFIGURATION DE MEMORY 2 MOVE
Veuillez utiliser le logiciel Client tel que décrit ci-dessus pour réaliser une connexion avec l’appareil
Wi-Fi et connectez-vous comme administrateur à l’interface d’administration Web. Vous pouvez
maintenant configurer votre appareil.
Assistant de Démarrage
Lors de la première utilisation de l’appareil, un « Assistant de démarrage » s’exécute après
l’inscription réussie et vous permet de réaliser aisément tous les réglages importants.
Remarque : Lorsque vous cliquez sur le « X » (en haut à droite dans l’assistant), vous quittez
l’assistant de démarrage et tous les réglages d’usines seront conservés en tant que réglages
standards.
Veuillez cliquer sur le bouton « Suivant » pour configurer votre appareil.
Réalisation de l’accès Internet
grâce à la réalisation d’une connexion avec un autre réseau disponible.
Vous avez le choix entre deux options d’accès à Internet disponibles. En réglage standard, l’accès
par fil est préréglé (comme affiché sur l’image ci-dessus).
FR - 17
A. Accès sans Fil (WLAN) :
Connexion de l’appareil « M2M » à un autre routeur WLAN pour avoir accès à internet.
B. Accès avec fil (LAN) :
Connexion directe du « M2M » au port disponible à l’arrière de votre routeur pour vous
connecter à un autre réseau.
Accès LAN
En réglage de base, « IP dynamique » est sélectionné. Vous pouvez allouer manuellement une
adresse IP en cliquant sur la flèche jaune et en sélectionnant l’option « IP statique ».
Accès WLAN :
SSID : Saisissez le nom SSID de votre réseau ou cliquez sur « Nouveau Scan » pour
rechercher automatiquement tous les réseaux disponibles.
Mot de passe : Veuillez saisir le mot de passe pour le réseau local sans fil sélectionné.
Adresse IP : - Lorsque vous sélectionnez « Automatique », le réseau met
automatiquement une adresse IP à votre disposition.
- Lorsque vous sélectionnez « IP statique », vous devez saisir vous-même votre
adresse IP pour le réseau auquel vous voulez vous connecter.
Remarque : En cliquant sur le « X » (en haut à droite), vous pouvez quitter le menu d’option LAN.
Remarque : Si vous ne pouvez pas vous connecter à un autre réseau, questionnez votre
fournisseur d’accès pour obtenir les directives qui s’appliquent à votre cas !
FR - 18
Cliquez sur le bouton « Suivant » pour continuer la configuration de Memory 2 Move. L’étape
suivant consiste à configurer les réglages Wi-Fi et LAN.
Réglages WiFi & LAN
SSID: Veuillez saisir ici le nom de votre réseau. En réglage de base, il s’appelle
« Memory2Move-XXXX ». 32 caractères sont possibles au maximum pour le
nom SSID.
Canal Veuillez saisir ici le canal sur lequel l’appareil Wi-Fi doit émettre et recevoir. Le
réglage de base est Auto. Dans ce cas, le canal est déterminé
automatiquement par l’appareil. Vous pouvez toutefois aussi déterminer
manuellement le canal sur lequel il faut émettre et recevoir. Entre 1 et 13
canaux sont disponibles.
Mode Wi-Fi : Le standard de réseau sans fil préréglé est 802.11b/g/n. Vous pouvez aussi
régler manuellement les modes 11Mbps (802.11b), 54 MBPS (802.11G), ou
150Mbps (802.11n).
Sécurité A la livraison, Mixed WPA/WPA2-PSK est sélectionné. Vous avez le choix entre
les types de codage suivants : Pas de codage, WPA-PSK, WPA2-PSK , Mixed
WPA/WPA2-PSK.
Mot de passeEn fonction du type de codage, il faut saisir un mot de passe comprenant au
moins 8 caractères et 63 au maximum.
Adresse IP L’adresse IP préréglée est 10.10.10.254 avec le masque de sous-réseau
255.255.255.0. Vous pouvez modifier manuellement cette adresse IP.
FR - 19
Cliquez sur le bouton « Suivant » pour déterminer le mot de passe de l’administrateur. Si vous
cliquez sur le bouton « Sauter », vous renoncez à la détermination d’un nouveau mot de passe et
vous gardez le mot de passe préréglé.
Après avoir terminé l’assistant de démarrage, le système redémarre.
Cette opération dure 2 minutes. Vous pouvez consulter le statut actuel dans le message.
FR - 20
9. UTILISATION DAPPAREILS MOBILES
9.1 INSTALLATION DE LAPP IOS MEMORY 2 MOVE
1. Cliquez sur l’icône « App Store » sur l’écran d’accueil comme l’image suivant le montre. Cherchez
l’application gratuite « Memory 2 Move » et suivez les instructions d’installation qui s’affichent à
l’écran.
2. Une fois l’installation terminée, l’application « Memory 2 Move » se trouve sur l’écran d’accueil
de votre appareil (voir l’image ci-dessous).
FR - 21
9.2 CONNEXION SANS FIL A VOTRE IPHONE / IPAD
1. Activez le « Memory 2 Move ». Attendez quelques minutes la fin du processus
d’initialisation de l’appareil. La LED Wi-Fi bleue sur l’appareil doit arrêter de clignoter,
indiquant que le processus d’initialisation est terminé.
2. Cliquez sur l’icône « Réglages » comme indiqué sur l’image suivante.
3. Cliquez sur le point de menu « Wi-Fi ». Dans la liste des réseaux Wi-Fi disponibles, le
réseau « Memory2Move-XXXX » devrait apparaître. Cliquez sur « Memory2Move-XXXX
». Entrez le mot de passe (intenso1 par défaut)Si vous avez saisi un mot de passe tel que
décrit au point 8.4. sous « Réglages Wi-Fi & LAN », saisissez-le maintenant.
Une fois le « Memory2Move-XXXX » a été sélectionné, une coche apparaîtra avant le SSID et le logo
Wi-Fi apparaît dans le coin haut à gauche de l’écran.
FR - 22
9.3 CONNEXION DE LUTILISATEUR IOS
Cliquez sur le logo « Memory 2 Move » pour lancer l’application tel que le montre l’image ci-
dessous.
Entrez le mot de passe d’administrateur que vous avez alloué pendant la configuration (réglage
d’usine 00000). Le mot de passe n’est requis que pour la première connexion. L’appareil enregistre
votre saisie, ainsi, une nouvelle saisie n’est pas nécessaire à la 2
ème
connexion.
Dès que vous avez saisi correctement le mot de passe, vous arrivez automatiquement dans le menu
« Memory 2 Move ». Ceci est votre accès direct au disque dur Wi-Fi.
FR - 23
9.4 INSTALLATION DE LAPP ANDROID MEMORY 2 MOVE
1. Ouvrez « Google Play Store » ou le « App Center » et recherchez l’app gratuite « Memory 2
Move ».
2. Suivez les instructions d’installation à l’écran tel que montré sur l’image suivante.
3. Dès que l’installation a été terminée avec succès l’app « Memory 2 Move » se trouve sur
l’écran d’accueil de votre appareil (voir l’image suivante).
9.5 CONNEXION SANS FIL A VOTRE APPAREIL ANDROID
1. Activez le « Memory 2 Move ». Attendez quelques minutes la fin du processus d’initialisation
de l’appareil. La LED Wi-Fi bleue sur l’appareil doit arrêter de clignoter, indiquant que le
procédé d’installation est terminé.
FR - 24
2. Cliquez sur l’icône « Réglages » tel que montré dans l’image suivante.
3. Activez la fonction Wi-Fi en glissant le « commutateur virtuel » vers la droite. Dans la liste
des réseaux Wi-Fi disponibles, le réseau « Memory2Move-XXXX » devrait apparaître. Cliquez
sur ce réseau tel que montré dans l’image suivante. Si vous avez déterminé un mot de passe
au point 8 sous « Réglages Wi-Fi & LAN », saisissez-le maintenant.
4. Le mot « Connecté » apparaît sous le nom SSID lorsque l’appareil a été connecté avec succès
au disque dur Wi-Fi.
FR - 25
9.6 CONNEXION DE LUTILISATEUR (ANDROID)
1. Cliquez sur le logo de l’app « Memory 2 Move » pour lancer l’application (voir l’image ci-
dessous).
2. Saisissez le mot de passe d’administrateur que vous avez alloué pendant la configuration
(réglage d’usine 00000). Le mot de passe n’est requis que pour la première connexion. L’appareil
enregistre votre saisie, ainsi, une saisie n’est pas nécessaire lors de la connexion 2
ème
connexion.
3. Dès que vous avez saisi correctement le mot de passe, vous arrivez automatiquement dans le
menu « Memory 2 Move ». Ceci est votre accès direct au disque dur Wi-Fi.
FR - 26
10. FONCTIONS DE BASE
10.1 UTILISATION POUR APPAREILS IOS
Dès que vous vous êtes connecté avec succès au « Memory 2 Move »,vous arrivez
automatiquement dans le menu « Memory 2 Move ». Ceci est votre accès direct au disque dur
Wi-Fi.
Les sous-menus suivants peuvent être sélectionnés dans les menus :
Menu principal « Mon appareil » Pour l’organisation de vos fichiers, vous avez ici à votre
disposition en standard les dossiers « Documents », « Musique », « Photos », « Vidéos » et « iPad »
/ « iPhone ».
Menu principal « Memory 2 Move » L'accès aux fichiers Memory 2 Move.
FR - 27
BoutonPage d'accueil Vous ramène dans le menu principal.
Bouton Affichage –Vous ramène dans l’aperçu des miniatures ou
des listes.
Bouton de réglage Vous ramène dans le menu de réglage du
disque dur Wi-Fi.
Bouton Retour Vous ramène au menu précédent.
Bouton Gestionnaire de fichier Pour sélectionner plusieurs
fichiers que l’on peut charger ou télécharger ainsi qu’effacer.
Memory 2 Move L’accès à Wi-Fi HDD.
Mon appareil Accès à l’appareil que vous utilisez actuellement
pour la connexion au disque dur Wi-Fi.
Bouton Transfert Vous ramène à l’aperçu de vos chargements
/ téléchargements, affiche le numéro de version et le titre
restitué en dernier lieu.
FR - 28
10.2 UTILISATION POUR APPAREILS ANDROID
Dès que vous vous êtes connecté avec succès au « Memory 2 Move »,vous arrivez
automatiquement dans le menu « Memory 2 Move », ceci est votre accès direct au disque dur Wi-
Fi.
Les sous-menus suivants peuvent être sélectionnés dans les menus :
Menu principal « Mon appareil » Pour l’organisation de vos fichiers, vous avez ici à votre
disposition en standard les dossiers « Documents », « Musique », « Photos », « Vidéos » et « Carte
SD ».
Menu principal « Memory 2 Move » L'accès aux fichiers Memory 2 Move.
FR - 29
Bouton Page d'accueil Vous ramène dans le menu principal.
Bouton Affichage Vous ramène dans l’aperçu des miniatures
ou des listes.
Bouton de réglage Vous ramène dans le menu de réglage du
disque dur Wi-Fi.
Bouton Retour Vous ramène au menu précédent.
Bouton Administrer Pour sélectionner plusieurs fichiers que
l’on peut charger ou télécharger ainsi qu’effacer.
Memory 2 Move L’accès à Wi-Fi HDD.
Mon appareil Accès à l’appareil que vous utilisez actuellement
pour la connexion au disque dur Wi-Fi.
Bouton Transfert Vous ramène à l’aperçu de vos chargements
/ téléchargements, à votre restitution actuelle de chansons /
vidéos et vous pouvez terminer l’app.
FR - 30
10.3 REGLAGES WI-FI (IOS ET ANDROID)
10.3.1 REGLAGES WI-FI INTERFACE
Cliquez sur pour modifier les réglages Wi-Fi. Cette caractéristiques apparaît uniquement si
vous allez sur « Mon appareil Wi-Fi ».
10.3.2 MODIFICATION DU NOM DE LAPPAREIL
Cliquez sur le bouton pour modifier le nom.
Lorsque vous avez saisi un nouveau nom, le bouton « Insérer » / « Set » apparaît en haut o droite.
Cliquez dessus pour enregistrer la modification.
FR - 31
10.3.3 SECURITE
Sous les réglages Wi-Fi HDD apparaissent les options de sécurité : Le disque dur Wi-Fi supporte les
formats de sécurité suivants : WPA-PSK, WPA2-PSK, mixed WPA/WPA2-PSK. Si vous désirez ajouter
un nouveau code de sécurité, on vous demandera un mot de passe sans fil.
Ensuite, sélectionnez en haut à droite le bouton « Set » ou « Insérer » pour enregistrer le réglage et
le mot de passe.
10.3.4 ACCES INTERNET
Sous Réglages Internet, les accès Internet vous sont présentés. Vous pouvez choisir entre accès à fil
(wired) et accès sans fil (wireless). Vous trouverez la connexion sans fil sous Réglages Internet au
milieu de l’image suivante :
FR - 32
Si vous choisissez la variante à fil, il faut tout d’abord configurer le réseau auquel vous vous êtes
connecté.
Lorsque vous avez fait votre choix, cliquez sur « Sauvegarder », ensuite vous serez invité à démarrer
un « reboot » en cliquant sur « OK ».
Si vous cliquez sur « Retour », vous arrivez dans le menu Réglages Wi-Fi.
FR - 33
10.4 RESTITUER DES FICHIERS DE MUSIQUE / AUDIOS (IOS / ANDROID)
Tuyau : Il est recommandé de créer un ou plusieurs dossiers pour tous vos fichiers de musique /
vidéos. Ceci facilite l’utilisation et l’organisation de votre disque dur WiFi.
Les fichiers de musique ou vidéos peuvent être restitués indépendamment du menu actuel et du
lieu d’enregistrement (« Memory 2 Move » ou « Mon appareil »).
Pour ce faire, vous devez simplement rechercher le fichier. En cliquant sur le fichier désiré, celui-ci
est restitué automatiquement.
Remarque : Pour d’autres informations concernant les formats de fichiers supportés, veuillez
consulter le mode d’emploi de votre appareil iOS.
- Cliquez sur ce bouton pour recommencer le fichier audio dès le début. Au deuxième
clic, le fichier audio précédent est restitué.
- Cliquez sur ce bouton pour arriver au fichier audio suivant.
- Cliquez sur ce bouton pour démarrer la restitution du fichier audio. Cliquez sur la
touche Pause pour interrompre / arrêter la restitution.
- Cliquez sur ce bouton pour fermer le lecteur.
FR - 34
Il existe 5 modes de restitution :
a. - Restituer une fois : Le fichier est lu une fois. Ensuite, la restitution s’arrête.
b. - Répétition du fichier actuel : Le fichier restitué actuellement est répété. On
l’interrompt en actionnant .
c. - Restitution aléatoire de tous les fichiers audio se trouvant dans le dossier actuel.
d. - Restitution du dossier actuel : Les fichiers audio sont restitués les unes après les
autres et ne sont pas répétés.
e. Répétition du dossier : Tous les fichiers audio du dossier sont restitués l’un après
l’autre et sont ensuite répétés.
Remarque : Maintenez le bouton de l’affichage d’avancement appuyé et glissez-le vers la
droite ou la gauche pour avancer ou reculer dans un fichier audio.
Tuyau : Vous pouvez quitter à tout moment l’interface du lecteur de musique. La restitution
de vos fichiers audio continue en arrière-plan.
FR - 35
10.5 RESTITUER DES FILMS / VIDEOS
10.5.1 IOS
Tuyau : Il est recommandé de créer un ou plusieurs dossiers pour tous vos fichiers vidéos / films. Ceci
facilite l’utilisation et l’organisation de votre disque dur WiFi.
Les fichiers vidéo / ou de films peuvent être restitués indépendamment du menu actuel et du lieu
d’enregistrement (« Memory 2 Move » ou « Mon appareil »).
Pour ce faire, vous devez simplement rechercher le fichier. En cliquant sur le fichier désiré, celui-ci
est restitué automatiquement.
Remarque : Pour d’autres informations concernant les formats de fichiers supportés, veuillez
consulter le mode d’emploi de votre appareil iOS.
FR - 36
En standard, la restitution vidéo est en format transversal. Vous avez les possibilités de sélection
suivantes :
1. - Cliquez sur cette touche pour arrêter la restitution du fichier vidéo actuel et
pour fermer le Movie Player.
2. - Cliquez sur cette touche pour adapter le format de restitution à la taille de
l’écran.
3. - Maintenez le bouton de l’affichage d’avancement appuyé et glissez-le vers
la droite ou la gauche pour avancer ou reculer dans un fichier vidéo.
4. - Maintenez le bouton de réglage du volume et glissez-le vers la droite /
la gauche pour modifier le volume.
5. - Maintenez cette touche appuyée pour rembobiner le fichier vidéo pendant la
restitution.
6. - Maintenez cette touche appuyée pour faire avancer le fichier vidéo pendant la
restitution.
7. - Cliquez sur cette touche pour démarrer / continuer la restitution du fichier vidéo.
8. - Cliquez sur cette touche pour interrompre la restitution du fichier vidéo.
FR - 37
10.5.2 ANDROID
Tuyau : Il est recommandé de créer un ou plusieurs dossiers pour tous vos fichiers vidéos / films.
Ceci facilite l’utilisation et l’organisation de votre disque dur WiFi.
Les fichiers vidéo / ou de films peuvent être restitués indépendamment du menu actuel et du lieu
d’enregistrement (« Memory 2 Move » ou « Mon appareil »).
Pour ce faire, vous devez simplement rechercher le fichier. En cliquant sur le fichier désiré, celui-ci
est restitué automatiquement.
Remarque : La commande et les possibilités de réglage de la restitution vidéo varient en fonction du
Movie Player installé sur votre appareil Android.
Pour d’autres informations concernant la commande, veuillez consulter le mode d’emploi de votre
Movie Player.
FR - 38
10.6 RESTITUTION DE FICHIERS PHOTOS
10.6.1 IOS
Tuyau : Il est recommandé de créer un ou plusieurs dossiers pour tous vos fichiers photos sur le
Memory 2 Move. Ceci facilite l’utilisation et l’organisation de votre disque dur WiFi.
Remarque Le disque dur Wi-Fi supporte la restitution des formats d’images suivants : .jpg, .tiff, .gif
et .bmp
Les fichiers photos supportés peuvent être affichés soit dans un aperçu de miniatures, soit sous
forme de liste, tel que montré dans les images suivantes.
Toutes les photos en formats non supportés sont affichées comme aperçu de miniatures exemplaire
ou comme icône.
Aperçu de miniatures Aperçu en liste
Cliquez sur n’importe quel fichier photo pour ouvrir le diaporama automatique. Si la barre de
menu ne s’ouvre pas directement, cliquez une 2
ème
fois sur la photo afin qu’elle apparaisse (voir
en haut dans la photo suivante).
FR - 39
Vous avez le choix entre les fonctions suivantes dans le diaporama :
Passez avec le doigt sur l’écran de la droite vers la gauche ou de la gauche vers la droite pour
commander manuellement l’affichage du diaporama ou cliquez sur la touche Play ,pour
faire défiler le diaporama automatiquement.
Cliquez sur la touche Pause pour interrompre le diaporama. En appuyant une nouvelle
fois sur la touche Pause, vous continuez le diaporama.
Cliquez sur pour continuer le diaporama et pour recommencer dès le début après la
dernière photo.
Cliquez sur pour faire défiler une seule fois le diaporama. La restitution s’arrête après le
dernier fichier photos.
Cliquez sur la touche Retour pour retourner au point de menu précédent.
Vous pouvez également faire défiler le diaporama avec une musique en arrière-plan. Pour ce
faire, cliquez sur la touche Musique tel que montré dans l’image suivante.
FR - 40
Continuer Arrêt / Restitution : Cliquez ici pour arrêter ou continuer la musique d’arrière-
plan.
Sélection : Cliquez ici pour rechercher et sélectionner des fichiers audio pour la musique
d’arrière-plan. Cliquez sur la touche pour retourner au diaporama tel que montré dans
l’image suivante :
Touche de répétition : Lorsque cette touche est activée, les mêmes fichiers audio sont
répétés pour la musique d’arrière-plan. En standard, cette option est désactivée.
FR - 41
10.6.2 ANDROID
Tuyau : Il est recommandé de créer un ou plusieurs dossiers pour tous vos fichiers photos. Ceci
facilite l’utilisation et l’organisation de votre disque dur WiFi.
Remarque Le disque dur Wi-Fi supporte la restitution des formats d’images suivants : .jpg, .tiff, .gif
et .bmp
Les fichiers photos supportés peuvent être affichés soit dans un aperçu de miniatures, soit sous
forme de liste, tel que montré dans les images suivantes.
Toutes les photos en formats non supportés sont affichées comme aperçu de miniatures exemplaire
ou comme icône.
Aperçu de miniatures Aperçu en liste
Cliquez sur n’importe quel fichier photo pour ouvrir le diaporama automatique. Si la barre de menu
ne s’ouvre pas directement, cliquez une 2
ème
fois sur la photo afin qu’elle apparaisse (voir en haut
dans la photo suivante).
FR - 42
Vous avez le choix entre les fonctions suivantes dans le diaporama :
Passez avec le doigt sur l’écran de la droite vers la gauche ou de la gauche vers la droite pour
commander manuellement l’affichage du diaporama ou cliquez sur la touche Play ,pour
faire défiler le diaporama automatiquement.
Cliquez sur la touche Pause pour interrompre le diaporama. En appuyant une nouvelle
fois sur la touche Pause, vous continuez le diaporama.
Cliquez sur pour continuer le diaporama et pour recommencer dès le début après la
dernière photo.
Cliquez sur pour faire défiler une seule fois le diaporama. La restitution s’arrête après le
dernier fichier photos.
Cliquez sur la touche Retour pour retourner au point de menu précédent.
Vous pouvez également faire défiler le diaporama avec une musique en arrière-plan. Pour ce
faire, cliquez sur la touche Musique tel que montré dans l’image suivante.
FR - 43
Continuer Arrêt / Restitution : Cliquez ici pour arrêter ou continuer la musique d’arrière-
plan.
Sélection : Cliquez ici pour rechercher et sélectionner des fichiers audio pour la musique
d’arrière-plan. Cliquez sur la touche pour retourner au diaporama tel que montré dans
l’image suivante:
Touche de répétition : Lorsque cette touche est activée, les mêmes fichiers audio sont
répétés pour la musique d’arrière-plan. En standard, cette option est désactivée.
FR - 44
10.7 PARTAGE DE FICHIERS PHOTOS
10.7.1 IOS
Vous avez différentes possibilités pour partager vos fichiers photos avec votre famille et vos amis,
par ex. par E-mail, en les enregistrant dans l’album photo de l’appareil utilisé ou au moyen d’un
téléchargement sur Facebook.
Remarque : Pour le partage de fichiers photos par E-mail ou sur les réseaux sociaux, vous avez
besoin d’une connexion Internet.
Cliquez sur dans le coin en haut à droite de l’écran pour afficher les trois possibilités
de partage de fichiers photos. Cliquez sur « Retour » pour retourner dans le menu
précédent.
FR - 45
1) E-mail - Cliquez ici pour démarrer l’app E-mail standard et sélectionnez le fichier désiré
comme pièce jointe.
2) Ajouter à l’album : Cliquez sur cette option pour ajouter le fichier photos sélectionné dans
l’album photo de l’appareil utilisé.
3) Facebook Upload : Cliquez sur cette option et vous êtes amené automatiquement vers le
Facebook Login. Pour ce faire, l’app Facebook doit être installée sur votre appareil. Un
compte Facebook est également nécessaire.
10.7.2 ANDROID
Les différents possibilités de partage de vos fichiers photos dépendent des différentes apps
installées sur votre appareil.
Remarque : Pour le partage de fichiers photos par E-mail ou sur les réseaux sociaux, vous avez
besoin d’une connexion Internet.
FR - 46
Sélectionner le symbole dans le coin en haut à droite de l’écran pour afficher les
différentes possibilités de partage des fichiers photos. Cliquez sur la touche « Retour »
pour retourner au menu précédent. Cliquez sur
1. Partager Cliquez sur la touche « Autoriser » pour afficher une liste des apps installées sur
votre appareil (exemple, voir l’image suivante). Sélectionnez ici l’app au moyen de laquelle
vous voulez partager le fichier photo.
2. Enregistrer la photo Choisissez la touche pour enregistrer le fichier photo de votre disque
dur Wi-Fi dans la galerie de votre appareil Android.
FR - 47
10.8 OUVRIR / AFFICHER DES DOCUMENTS
10.8.1 IOS
L’app « Memory 2 Move » supporte les fichiers Keynote, Numbers, Page, Excel, PowerPoint et Word
ainsi que les fichiers .pdf et .txt.
Pour ouvrir et regarder ces fichiers, cliquez simplement sur le fichier désiré. Les formats supportés
sont ouverts automatiquement. Cliquez sur la touche « Retour » pour retourner au menu
précédent ou cliquez sur la touche pour envoyer le fichier photos par E-mail, tel que montré
dans l’image suivante.
FR - 48
Remarque : Pour l’envoi d’E-mails, vous avez besoin d’une connexion Internet.
Cliquez sur la touche « E-mail ». L’app E-mail standard est démarrée automatiquement et le
document sélectionné peut être envoyé en tant que pièce jointe.
10.8.2 ANDROID
Pour ouvrir des documents sur votre appareil Android, touchez simplement le fichier désiré. Celui-ci
est ouvert automatiquement avec un programme standard ou une app installée par vos soins (cf.
image suivante).
Pour envoyer le document en tant que pièce jointe, veuillez consulter le mode d’emploi du
programme avec lequel vous ouvrez le fichier.
Remarque : Pour l’envoi d’E-mails, vous avez besoin d’une connexion Internet.
FR - 49
10.9 COPIER, EFFACER, CHARGER ET TELECHARGER DES FICHIERS (IOS ET ANDROID)
Vous pouvez à tout moment cliquer sur la touche pour effacer vos fichiers, les charger et les
télécharger. Comme montré dans les images suivantes, le symbole apparaît en haut du menu
dès que la touche a été actionnée.
Vue de l’écran iOS Vue de l’écran Android
Au bas de l’écran, vous trouvez maintenant de nouvelles icônes. Les fonctions suivantes sont
maintenant à votre disposition :
- Cliquez sur cette icône pour sélectionner tous les fichiers. L’icône devient blanche et une
coche s’affiche à côté de tous les fichiers.
- - Cliquez à nouveau sur cette icône pour annuler le marquage de tous les fichiers. Les
coches à côté des fichiers disparaissent.
FR - 50
Tuyau : Vous pouvez également sélectionner seulement un ou plusieurs fichiers en cliquant
simplement sur les miniatures. Vous pouvez également traiter un fichier simplement par
Drag&Drop. Pour ce faire, touchez et maintenez simplement la miniature du fichier désiré et tirez
celle-ci sur l’icône de chargement , téléchargement ou effacer .
- Lorsque vous vous trouvez dans le menu « Memory 2 Move », vous pouvez, via cette icône,
charger un ou plusieurs fichiers du disque dur Wi-Fi sur votre appareil iOS / Android.
- Lorsque vous vous trouvez dans le menu « Mon appareil », vous pouvez, via cette icône,
charger un ou plusieurs fichiers de votre appareil iOS / Android sur le disque dur Wi-Fi. Pour ce
faire, veuillez appuyer sur le bouton « Gérer ».
- Cliquez sur cette icône pour voir l’aperçu de tous les chargements / téléchargements de la
file d’attente. En outre, une liste peut être consultée comprenant tous les fichiers transférés avec
succès.
- Cliquez sur cette icône pour effacer tous les fichiers sélectionnés.
FR - 51
10.10 CHARGEMENT DE FICHIERS SUR VOTRE APPAREIL IOS / ANDROID
Lorsque vous êtes connecté au disque dur Wi-Fi, vous pouvez charger un ou plusieurs fichiers sur
votre appareil iOS / Android.
1. Cliquez sur le symbole .
2. Sélectionnez maintenant un ou plusieurs fichiers que vous désirez télécharger ou cliquez sur
pour sélectionner tous les fichiers.
1. Cliquez sur le champ
2. A partir de l’aperçu, sélectionnez et confirmez le dossier dans lequel vous voulez charger les
fichiers.
FR - 52
Pour créer un nouveau dossier pour vos fichiers, cliquez simplement sur le champ « Créer un
nouveau dossier ». Saisissez ensuite le nom pour le dossier et cliquez sur « Créer » tel que
montré dans l’image suivante. Le nom du dossier doit comprendre entre 2 et 26 caractères.
Cliquez sur « Quitter » pour interrompre l’opération.
1. Cliquez sur « Sélectionner » pour démarrer l’opération de copiage / transfert. La fenêtre
suivante s’ouvre :
Remarque : Les fichiers téléchargés avec succès sont affichés dans la fenêtre inférieure
« Téléchargements réussis » (cf. l’image ci-dessus). Cliquez sur « Vider la liste »pour effacer les
fichiers de la liste.
2. Cliquez sur une zone quelconque de l’écran et vous serez ramené au menu précédent.
Cliquez ensuite sur pour fermer le menu.
FR - 53
10.11 CHARGEMENT DE FICHIERS SUR LE DISQUE DUR WI-FI (IOS ET ANDROID)
Vérifiez si vous vous trouvez dans le menu « Mon appareil ».
1. Cliquez sur le symbole .
2. Sélectionnez maintenant un ou plusieurs fichiers que vous voulez télécharger ou cliquez
sur pour sélectionner tous les fichiers.
3. Cliquez maintenant sur le champ
4. A partir de l’aperçu, sélectionnez le dossier à partir duquel vous voulez télécharger les
fichiers.
FR - 54
Pour créer un nouveau dossier pour vos fichiers, cliquez simplement sur le champ « Créer un
nouveau dossier ». Saisissez ensuite le nom pour le dossier et cliquez sur « Créer » tel que
montré dans l’image suivante. Le nom du dossier doit comprendre entre 2 et 26 caractères.
Cliquez sur « Quitter » pour interrompre l’opération.
5. Cliquez sur « Sélectionner » pour démarrer le téléchargement. La fenêtre suivante devrait
s’ouvrir :
Remarque : Les fichiers téléchargés avec succès sont affichés dans la fenêtre inférieure
« Opérations de copiage réussies » (cf. l’image ci-dessus). Cliquez sur « Vider la liste »pour effacer
les fichiers de la liste.
5. Cliquez sur une zone quelconque de l’écran et vous serez ramené au menu précédent.
Cliquez ensuite sur pour fermer le menu.
FR - 55
10.12 EFFACER DES FICHIERS (IOS ET ANDROID)
Vous pouvez aisément effacer un ou plusieurs fichiers dans le menu « Mon appareil » ou « Memory
2 Move ».
1. Pour effacer un ou plusieurs fichiers, cliquez tout d’abord sur le symbole .
2. Vous pouvez maintenant sélectionner les fichiers à effacer ou cliquer sur pour
sélectionner tous les fichiers.
3. Cliquez maintenant sur le symbole pour effacer les fichiers sélectionnés. Un message
d’avertissement apparaît à l’écran pour confirmer l’opération d’effacement (cf. l’image
suivante). Cliquez sur OK si vous voulez vraiment effacer les fichiers. Si vous ne voulez pas
effacer les fichiers, vous pouvez arrêter l’opération en cliquant sur « Quitter ».
FR - 56
10.13 APERÇU ET STATUT DE VOS CHARGEMENTS / TELECHARGEMENTS
Lorsque vous avez copié / transféré un ou plusieurs fichiers de ou sur votre Memory 2 Move, vous
pouvez vérifier au moyen d’un clic sur les fichiers qui se trouvent encore dans la file
d’attente et les fichiers qui ont déjà été transférés avec succès. Dans le menu principal, vous pouvez
également cliquer sur pour vérifier le statut précis de vos chargements / téléchargements
actuels.
10.14 QUITTER LAPP MEMORY 2 MOVE
10.14.1 IOS
Pour quitter l’app Memory 2 Move, appuyez simplement sur la touche « Page d'accueil » de votre
appareil iPhone / iPad.
Pour quitter l’app, appuyez deux fois sur la touche « Page d'accueil » et une liste de différentes apps
est affichée au bas de l’écran. Cliquez et maintenez l’icône de l’app jusqu’à ce qu’un moins (-)
s’affiche. Cliquez maintenant sur ce moins pour quitter l’app (cf. l’image suivante).
FR - 57
10.14.2 ANDROID
Pour quitter l’app Memory 2 Move, cliquez simplement sur le champ et sélectionnez ensuite
« Quitter ». Un message d’avertissement est alors affiché vous demandant de confirmer le choix.
Cliquez sur « OK » pour quitter l’app ou sur « Interrompre » pour retourner à l’app.
10.15 DESINSTALLATION DE LAPP MEMORY 2 MOVE
10.15.1 IOS
Pour désinstaller l’app « Memory 2 Move » de votre appareil Apple, cliquez sur le logo Memory 2
Move App et maintenez-le enfoncé. Un « X » apparaît maintenant sur toutes les icônes des apps
installées, comme montré dans l’image suivante. Cliquez simplement sur le « X » dans le coin en
haut à gauche de l’icône du Memory 2 Move App pour retirer l’app de votre appareil.
FR - 58
10.15.2 ANDROID
Pour désinstaller l’app Memory 2 Move de votre appareil Android, veuillez effectuer les étapes
suivantes.
Remarque : L’opération de désinstallation peut différer en fonction de l’appareil Android. Avant la
désinstallation, veuillez consulter le mode d’emploi de votre appareil Android.
1. Dans le menu principal, cliquez sur l’icône « Réglages ».
2. Allez au point « Applications ».
3. Recherchez l’app Memory 2 Move et sélectionnez-la.
4. Cliquez sur le champ « Désinstaller ».
5. Un message d’avertissement apparaît alors vous demandant de confirmer la sélection.
Cliquez sur « OK » pour désinstaller l’app ou sur « Annuler » pour retourner au menu de
réglages.
FR - 59
11. FONCTIONS DE MANAGEMENT WEB
Pour configurer l’appareil Wi-Fi, veuillez utiliser le logiciel « WiFi Finder » pour vous connecter au
Memory 2 Move. En alternative, vous pouvez ouvrir votre browser et saisir, dans la ligne d’adresse,
l’adresse IP 10.10.10.254 si l’adresse préréglée à l’usine n’a pas été modifiée.
Vue du menu principal :
Sous-menus disponibles :
Ici, vous pouvez modifier le mode passé utilisateur.
Affichage des informations de mémoire importantes.
Ici, vous pouvez modifier les réglages de réseau.
Activation du service Windows File.
Ici, vous pouvez modifier les réglages du système.
Ici, vous pouvez configurer pas à pas votre appareil à l’aide de l’assistant
de réglage.
FR - 60
11.1 FONCTION EXPLORATEUR
Via cette interface d’administrateur, vous pouvez copier des données sur le Memory 2 Move ainsi
que des fichiers du Memory 2 Move sur le PC que vous utilisez. Vous pouvez en outre créer des
répertoires, les copier, renommer ou effacer tout comme vous en avez l’habitude avec votre PC.
Actualiser cliquez sur ce bouton pour actualiser la vue de l’écran.
Télécharger cliquez sur ce bouton pour charger des fichiers sur l’appareil.
Créer pour créer un répertoire sur le Memory 2 Move. Le nom du répertoire
doit comporter au maximum 26 caractères.
Copier pour copier des fichiers dans un autre dossier.
Déplacer pour déplacer un fichier dans un autre endroit de la mémoire.
Ouvrir / télécharger Cliquez sur ce bouton pour ouvrir des fichiers ou pour les
copier sur votre PC. Si vous avez installé un logiciel compatible sur votre PC, la
FR - 61
restitution de la musique par exemple démarre automatiquement. Dans le cas
contraire, on vous demande si vous voulez télécharger le fichier. Les
répertoires ne peuvent pas être téléchargés. Vous devez toujours sélectionner
au moins un fichier à télécharger.
Effacer pour retirer des fichiers de l’appareil.
Renommer pour effectuer des modifications du nom de fichier.
Lecteur de photos Ce bouton est utilisé pour afficher des photos.
11.2 MENU CONTEXTE (PAS POUR MAC)
Dans le menu Fichier, vous pouvez, en cliquant avec le bouton droit de la souris sur un fichier ou un
répertoire, appeler le menu Contexte. Dans ce menu « Pop-Up », vous avez les choix suivants :
Copier, couper, effacer, renommer ou télécharger (voir Screenshot).
Dans le menu Répertoire, vous pouvez également appeler le menu Contexte. Ici, vous avez le
choix entre ouvrir, copier, couper, effacer ou renommer (voir Screenshot).
FR - 62
Si vous sélectionnez plusieurs fichiers (ceci fonctionne lorsque vous appuyez sur « ctrl » et que
vous sélectionnez en même temps les fichiers choisis au moyen d’un clic gauche) et si vous
appelez avec un clic droit le menu Contexte, vous avez le choix entre copier, couper ou effacer.
Si vous faites un clic droit avec la souris sur un endroit vide du répertoire, vous disposez des
fonctions Insérer, Créer ou Télécharger.
FR - 63
Explication des fonctions :
- Ouvrir : Sélectionnez un répertoire et ouvrez le menu Contexte avec le bouton droit de la
souris. Ici, sélectionnez « Ouvrir » et le contenu du répertoire est affiché.
- Copier : Sélectionnez un répertoire ou un ou plusieurs fichiers et ouvrez le menu
Contexte avec le bouton droit de la souris. Sélectionnez « Copier » pour copier le ou les
éléments sélectionnés.
- Couper : Sélectionnez des répertoires ou des fichiers et ouvrez le menu Contexte avec le
bouton droit de la souris. Ici, sélectionnez « Couper » pour couper les fichiers de
l’emplacement de mémoire actuel.
- Insérer : Lorsque vous avez sélectionné « Copier » ou « Couper », vous pouvez chercher
un nouvel emplacement de mémoire pour les éléments sélectionnés. Pour insérer les
éléments dans le nouvel emplacement de mémoire, cliquez avec le bouton droit de la
souris sur un endroit vide du répertoire et appelez le menu Contexte. Ici, sélectionnez
« Insérer » pour insérer les éléments dans le nouvel emplacement de mémoire.
- Effacer : Sélectionnez un fichier et ouvrez le menu Contexte avec le bouton droit de la
souris. Ici, sélectionnez « Effacer » pour effacer l’élément sélectionné.
- Créer : Cliquez avec le bouton droit de la souris sur un endroit vide du répertoire et
appelez le menu Contexte. Sélectionnez « Créer » pour créer un nouveau répertoire.
- Renommer : Cliquez avec le bouton droit de la souris sur le répertoire ou le fichier que
vous voulez renommer et, dans le menu Contexte, sur le point de menu « Renommer ».
Vous pouvez maintenant renommer le répertoire ou le fichier. Lorsque vous avez
effectué les modifications désirées, veuillez cliquer sur « Enregistrer » pour conserver les
modifications effectuées.
- Télécharger : Cliquez avec le bouton droit de la souris sur un endroit vide du répertoire
et appelez le menu Contexte. Sélectionnez « Télécharger » pour charger un nouveau
fichier.
- Ouvrir / Charger : Cliquez avec le bouton droit de la souris sur le pertoire ou le fichier
que vous voulez charger et, dans le menu Contexte, sur « Charger ». Si vous avez installé
un logiciel compatible sur votre PC, la restitution de la musique par exemple démarre
automatiquement. Dans le cas contraire, on vous demande si vous voulez télécharger le
fichier. Les répertoires ne peuvent pas être téléchargés.
FR - 64
11.3 RACCOURCIS CLAVIER
L’interface d’administration Web supporte les saisies du clavier et les raccourcis clavier. Les
raccourcis suivants sont supportés entre autres : touche Tab, touche Enter, touche Home, PGUP,
PGDN, touche Fin, touche Flèche vers le haut, touche Flèche vers le bas, touche Flèche vers la
gauche, touche Flèche vers la droite et la touche Suppr.
Windows : CTRL+ c = copier CTRL + v = insérer
Mac : CTRL + c = copier CTRL + v = insérer
11.4 DRAG AND DROP
Vous pouvez déplacer un seul fichier par Drag and Drop (tirer et lâcher). Maintenez et tirez
simplement le fichier vers un autre répertoire disponible et lâchez le fichier.
11.5 INFORMATIONS
Ici sont affichées des informations de détail concernant le matériel, le statut du réseau et la
mémoire.
11.5.1 INFORMATIONS SUR LAPPAREIL
Ici sont affichées des informations telles que le nom de l’appareil, le numéro de série, le fabricant, le
numéro de modèle et la charge CPU.
FR - 65
11.5.2 INFORMATION SUR LA MEMOIRE
Ici, vous recevez des informations sur le lecteur intégré, telles que par exemple la capacité totale, le
fabricant du disque dur et la mémoire disponible.
11.5.3 INFORMATION SUR LE RESEAU
Des informations détaillées sur le statut actuel du réseau, telles que par exemple l’adresse du
réseau, le statut Internet ou le nom actuel du réseau Wi-Fi (SSID) sont affichées ici.
FR - 66
11.6 REGLAGES
11.6.1 UTILISATEUR
Dans le menu Réglages, cliquez sur la liaison pour modifier les réglages de l’administrateur. Le mot
de passe doit comprendre au moins 5 et au plus 32 caractères. En cliquant sur le bouton
« Enregistrer », les modifications sont conservées.
A la livraison, le mot de passe administrateur est : 00000
11.6.2 DISQUE
Dans le menu Réglages, cliquez sur la liaison pour avoir des informations détaillées
sur la mémoire telles que par exemple la version du micrologiciel, la capacité ou le numéro de série.
FR - 67
Le menu du lecteur contient des informations sur le système de fichiers utilisé ainsi que sur la
capacité totale et disponible de la mémoire.
Cliquez sur le « X » pour fermer le menu
11.7 RESEAU
Dans le menu Réglages, cliquez sur la liaison pour appeler les informations sur le
réseau.
11.7.1 NOM DE LHOTE
Le nom de l’hôte appartient à un appareil intégré dans un réseau. C nom peut être choisi librement.
La seule condition est que le nom commence par une lettre suivie d’une combinaison de lettres et
de chiffres. Il faut au moins 2 caractères et 8 caractères au maximum sont autorisés.
FR - 68
11.7.2 WI-FI & LAN
Tous les réglages de réseau peuvent être effectués selon vos besoins. Les options suivantes sont
disponibles :
- SSID: Saisissez ici le nom de votre réseau. Dans le réglage de base, il est
« Memory2Move-XXXX » . 32 signes sont possibles au maximum pour le nom SSID.
- Canal Wi-Fi : Veuillez saisir ici le canal sur lequel l’appareil Wi-Fi doit émettre et recevoir.
Le réglage de base est Auto. Dans ce cas, le canal est déterminé automatiquement par
l’appareil. Vous pouvez toutefois aussi déterminer manuellement le canal sur lequel il
faut émettre et recevoir. Entre 1 et 13 canaux sont disponibles.
- Mode Wi-Fi : Le standard de réseau sans fil préréglé est 802.11b/g/n. Vous pouvez aussi
régler manuellement les modes 11Mbps (802.11b), 54 MBPS (802.11G), ou 150Mbps
(802.11n).
- Sécurité : A la livraison, Mixed WPA/WPA2-PSK est sélectionné. Vous avez le choix
entre les types de codage suivants : Pas de codage, WPA-PSK, WPA2-PSK, Mixed
WPA/WPA2-PSK.
- Mot de passe En fonction du type de codage, il faut saisir un mot de passe
comprenant au moins 8 caractères et 63 au maximum.
- Adresse IP L’adresse IP préréglée est 10.10.10.254 avec le masque de sous-réseau
255.255.255.0. Vous pouvez modifier manuellement cette adresse IP.
FR - 69
11.7.3 SERVEUR DHCP
Le Dynamic Host Configuration Protocol (DHCP) est un protocole de réseau qui permet à un serveur
d’allouer dynamiquement des adresses IP à des ordinateurs connectés. Dans le réglage de base, le
protocole DHCP est activé. En cas de besoin, cette option peut être désactivée et les adresses IP
peuvent être allouées manuellement.
Cliquez sur le bouton « Liste DHCP » et une liste des appareils actuellement connectés sera affichée.
FR - 70
11.7.4 ACCES INTERNET
Réalisation de l’accès Internet
... grâce à la création d’une connexion à un autre réseau disponible
Vous avez la possibilité de choisir entre 2 options d’accès Internet disponibles. Dans le réglage
standard, l’accès par fil est préréglé (tel que montré dans l’image ci-dessus).
Accès sans fil (WLAN) : Connectez le M2M à un autre routeur WLAN pour obtenir une connexion
Internet.
Accès par fil (LAN) : Connectez leM2M directement à un port disponible sur la face arrière de votre
routeur pour être connecté à un autre réseau.
Accès LAN :
Dans le réglage de base, « IP dynamique » est sélectionné. Vous pouvez allouer manuellement une
adresse IP en cliquant sur la flèche jaune et en sélectionnant l’option « IP statique ».
Accès WLAN :
FR - 71
SSID : Saisissez le nom SSID de votre réseau ou cliquez sur « Nouveau Scan » pour
rechercher automatiquement tous les réseaux disponibles.
Mot de passe : Veuillez saisir le mot de passe pour le réseau local sans fil sélectionné.
Adresse IP : Lorsque vous sélectionnez « Automatique », le réseau met automatiquement
une adresse IP à votre disposition.
Lorsque vous sélectionnez « IP statique », vous devez saisir vous-même votre
adresse IP pour le réseau auquel vous voulez vous connecter.
Remarque : Si vous ne pouvez pas vous connecter à un autre réseau, questionnez votre fournisseur
d’accès pour obtenir les directives qui s’appliquent à votre cas !
11.8 SERVICES
11.8.1 SAMBA
L’accès et l’échange de données sont très simples avec le Samba Service. Ce service est déjà activé à
la livraison (voir Screenshot).
FR - 72
11.8.2 MEDIA SERVER
Fonctions :
(1)
Activez ou désactivez le Média Server.
(2)
Identifie le nom affiché dans le réseau.
(3)
Indiquez le nom du dossier par lequel le Média Server doit être appelé.
(4)
Modifie l'indexe de la validation de la Memory 2 Move.
(5)
Les paramètres réglés peuvent être enregistrés ici
FR - 73
11.9 SYSTEME
11.9.1 REGLAGES DE LHEURE
Pour ce faire, vous avez la possibilité de sélectionner aussi bien manuellement une zone horaire que
d’effectuer une synchronisation automatique de l’heure.
Si vous avez opté pour la sélection manuelle d’une zone horaire, cliquez simplement sur la flèche
jaune à côté de la case « Fuseau horaire » et sélectionnez, en fonction du site, dans le point de
menu, la zone horaire désirée.
Si vous choisissez la synchronisation automatique de l’heure, l’heure est actualisée chaque fois que
vous êtes connecté à Internet.
Options pour la synchronisation de l’heure :
Fréquence : Tous les jours, tous les 2 jours, tous les 3 jours, .. Vous pouvez choisir les intervalles de
synchronisation jusqu’à 7 jours.
La synchronisation automatique de l’heure peut être coupée à tout moment et l’option « Reprise de
l’heure PC » peut être choisie à sa place. Dans ce cas, l’heure actuelle de votre PC est reprise, de
façon à ce que les deux appareils affichent la même heure.
FR - 74
11.9.2 SAUVEGARDER
Pour créer une sauvegarde (Backup) de la configuration Wi-Fi du système, veuillez cliquer sur le
bouton « Sauvegarder ». Un fichier se terminant par.bin.gz est créé, avec lequel vous pouvez
restaurer ultérieurement les réglages du système en cas de besoin. Veuillez enregistrer ce fichier sur
votre ordinateur.
FR - 75
Pour effectuer une restauration du système, veuillez cliquer sur le bouton « Restauration ».
Recherchez et ouvrez votre fichier de sauvegarde et cliquez ensuite sur « Sauvegarder » en bas à
droite de la fenêtre.
Pendant le processus de restauration, un message d’alerte apparaît qui vous donne des
informations sur le statut actuel du processus de restauration.
Après la restauration réussie de la configuration du système, l’appareil redémarre
automatiquement et l’écran Login est affiché.
11.9.3 MISE A JOUR DU MICROLOGICIEL
Si une mise à jour du micrologiciel est disponible sur www.intenso.de, veuillez effectuer les pas
suivants pour effectuer la mise à jour du logiciel.
FR - 76
1.) Téléchargez le micrologiciel sur votre ordinateur.
2.) Veuillez cliquer sur le bouton « Mise à jour » et recherchez la mise à jour du logiciel que vous
avez téléchargée sur votre PC. Sélectionnez le fichier et cliquez sur « Ouvrir » pour continuer.
3.) Sous le bouton « Mise à jour », le numéro de version du micrologiciel à laquelle l’appareil
sera actualisé est maintenant affiché. Veuillez cliquer sur « Sauvegarder » en bas à droite de
l’image pour démarrer l’opération de mise à jour du micrologiciel.
4.) Pendant la mise à jour, un message d’alerte apparaît qui vous donne des informations sur le
statut actuel du processus de mise à jour.
FR - 77
Après la mise à jour réussie, l’appareil redémarre automatiquement et l’écran Login/ Connexion est
affiché.
11.9.4 RESET
Si vous remettez votre appareil sur les réglages d’usine, tous les réglages effectués sont effacés et ls
réglages existant à la livraison sont réactivés.
Pour sélectionner la remise sur les réglages d’usine, veuillez cliquer sur le bouton rond. Veuillez
cliquer sur le bouton « Sauvegarder » pour démarrer l’opération. Afin d’exclure les malentendus,
confirmez votre choix dans les messages d’alerte suivants.
La remarque suivante apparaît pendant le processus actif et donne des informations sur
l’avancement actuel.
Remarque : Lorsque l’appareil a été remis à zéro, le mot de passe d’administrateur est également
remis à zéro. C’est donc le mot de passe existant à la livraison qui est en vigueur.
FR - 78
12. LICENCE INFORMATION
Notice of GNU GENERAL PUBLIC LICENSE and LESSER GENERAL PUBLIC LICENCE
Dear Customer,
If interested, you and any third party can download the source code of used GPL / LGPL from
Intenso Webpage http://www.intenso.de . The source code of the desired product is available to
anyone on the selection of valid product category and the desired device. In the product details you
will find the entry "drivers". Open this menu to download the corresponding GPL / LGPL code. For a
fee of 35 € (delivery to another country as Germany), it is also possible to obtain this code by postal
delivery. More information about the GPL/LGPL-Licence can you nd on following website
www.gnu.org
GNU GENERAL PUBLIC LICENSE
Version 2, June 1991
Copyright (C) 1989, 1991 Free Software Foundation, Inc.
51 Franklin Street, Fifth Floor, Boston, MA 02110-1301, USA
Everyone is permitted to copy and distribute verbatim copies
of this license document, but changing it is not allowed.
Preamble
The licenses for most software are designed to take away your freedom to share and change it. By
contrast, the GNU General Public License is intended to guarantee your freedom to share and
change free software--to make sure the software is free for all its users. This General Public License
applies to most of the Free Software Foundation's software and to any other program whose
authors commit to using it. (Some other Free Software Foundation software is covered by the GNU
Lesser General Public License instead.) You can apply it to your programs, too.
When we speak of free software, we are referring to freedom, not price. Our General Public
Licenses are designed to make sure that you have the freedom to distribute copies of free software
(and charge for this service if you wish), that you receive source code or can get it if you want it,
that you can change the software or use pieces of it in new free programs; and that you know you
can do these things.
FR - 79
To protect your rights, we need to make restrictions that forbid anyone to deny you these rights or
to ask you to surrender the rights. These restrictions translate to certain responsibilities for you if
you distribute copies of the software, or if you modify it.
For example, if you distribute copies of such a program, whether gratis or for a fee, you must give
the recipients all the rights that you have. You must make sure that they, too, receive or can get the
source code. And you must show them these terms so they know their rights.
We protect your rights with two steps: (1) copyright the software, and (2) offer you this license
which gives you legal permission to copy, distribute and/or modify the software.
Also, for each author's protection and ours, we want to make certain that everyone understands
that there is no warranty for this free software. If the software is modified by someone else and
passed on, we want its recipients to know that what they have is not the original, so that any
problems introduced by others will not reflect on the original authors' reputations.
Finally, any free program is threatened constantly by software patents. We wish to avoid the danger
that redistributors of a free program will individually obtain patent licenses, in effect making the
program proprietary. To prevent this, we have made it clear that any patent must be licensed for
everyone's free use or not licensed at all.
The precise terms and conditions for copying, distribution and modification follow.
TERMS AND CONDITIONS FOR COPYING, DISTRIBUTION AND MODIFICATION
0. This License applies to any program or other work which contains a notice placed by the
copyright holder saying it may be distributed under the terms of this General Public License. The
"Program", below, refers to any such program or work, and a "work based on the Program" means
either the Program or any derivative work under copyright law: that is to say, a work containing the
Program or a portion of it, either verbatim or with modifications and/or translated into another
language. (Hereinafter, translation is included without limitation in the term "modification".) Each
licensee is addressed as "you".
Activities other than copying, distribution and modification are not covered by this License; they are
outside its scope. The act of running the Program is not restricted, and the output from the Program
is covered only if its contents constitute a work based on the Program (independent of having been
made by running the Program). Whether that is true depends on what the Program does.
1. You may copy and distribute verbatim copies of the Program's source code as you receive it, in
any medium, provided that you conspicuously and appropriately publish on each copy an
appropriate copyright notice and disclaimer of warranty; keep intact all the notices that refer to this
License and to the absence of any warranty; and give any other recipients of the Program a copy of
this License along with the Program.
FR - 80
You may charge a fee for the physical act of transferring a copy, and you may at your option offer
warranty protection in exchange for a fee.
2. You may modify your copy or copies of the Program or any portion of it, thus forming a work
based on the Program, and copy and distribute such modifications or work under the terms of
Section 1 above, provided that you also meet all of these conditions:
a) You must cause the modified files to carry prominent notices stating that you changed the files
and the date of any change.
b) You must cause any work that you distribute or publish, that in whole or in part contains or is
derived from the Program or any part thereof, to be licensed as a whole at no charge to all third
parties under the terms of this License.
c) If the modified program normally reads commands interactively when run, you must cause it,
when started running for such interactive use in the most ordinary way, to print or display an
announcement including an appropriate copyright notice and a notice that there is no warranty (or
else, saying that you provide a warranty) and that users may redistribute the program under these
conditions, and telling the user how to view a copy of this License. (Exception: if the Program itself is
interactive but does not normally print such an announcement, your work based on the Program is
not required to print an announcement.)
These requirements apply to the modified work as a whole. If identifiable sections of that work are
not derived from the Program, and can be reasonably considered independent and separate works
in themselves, then this License, and its terms, do not apply to those sections when you distribute
them as separate works. But when you distribute the same sections as part of a whole which is a
work based on the Program, the distribution of the whole must be on the terms of this License,
whose permissions for other licensees extend to the entire whole, and thus to each and every part
regardless of who wrote it.
Thus, it is not the intent of this section to claim rights or contest your rights to work written entirely
by you; rather, the intent is to exercise the right to control the distribution of derivative or collective
works based on the Program.
In addition, mere aggregation of another work not based on the Program with the Program (or with
a work based on the Program) on a volume of a storage or distribution medium does not bring the
other work under the scope of this License.
3. You may copy and distribute the Program (or a work based on it, under Section 2) in object code
or executable form under the terms of Sections 1 and 2 above provided that you also do one of the
following:
FR - 81
a) Accompany it with the complete corresponding machine-readable source code, which must be
distributed under the terms of Sections 1 and 2 above on a medium customarily used for software
interchange; or,
b) Accompany it with a written offer, valid for at least three years, to give any third party, for a
charge no more than your cost of physically performing source distribution, a complete machine-
readable copy of the corresponding source code, to be distributed under the terms of Sections 1
and 2 above on a medium customarily used for software interchange; or,
c) Accompany it with the information you received as to the offer to distribute corresponding
source code. (This alternative is allowed only for noncommercial distribution and only if you
received the program in object code or executable form with such an offer, in accord with
Subsection b above.)
The source code for a work means the preferred form of the work for making modifications to it.
For an executable work, complete source code means all the source code for all modules it contains,
plus any associated interface definition files, plus the scripts used to control compilation and
installation of the executable. However, as a special exception, the source code distributed need
not include anything that is normally distributed (in either source or binary form) with the major
components (compiler, kernel, and so on) of the operating system on which the executable runs,
unless that component itself accompanies the executable.
If distribution of executable or object code is made by offering access to copy from a designated
place, then offering equivalent access to copy the source code from the same place counts as
distribution of the source code, even though third parties are not compelled to copy the source
along with the object code.
4. You may not copy, modify, sublicense, or distribute the Program except as expressly provided
under this License. Any attempt otherwise to copy, modify, sublicense or distribute the Program is
void, and will automatically terminate your rights under this License. However, parties who have
received copies, or rights, from you under this License will not have their licenses terminated so
long as such parties remain in full compliance.
5. You are not required to accept this License, since you have not signed it. However, nothing else
grants you permission to modify or distribute the Program or its derivative works. These actions are
prohibited by law if you do not accept this License. Therefore, by modifying or distributing the
Program (or any work based on the Program), you indicate your acceptance of this License to do so,
and all its terms and conditions for copying, distributing or modifying the Program or works based
on it.
6. Each time you redistribute the Program (or any work based on the Program), the recipient
automatically receives a license from the original licensor to copy, distribute or modify the Program
FR - 82
subject to these terms and conditions. You may not impose any further restrictions on the
recipients' exercise of the rights granted herein. You are not responsible for enforcing compliance
by third parties to this License.
7. If, as a consequence of a court judgment or allegation of patent infringement or for any other
reason (not limited to patent issues), conditions are imposed on you (whether by court order,
agreement or otherwise) that contradict the conditions of this License, they do not excuse you from
the conditions of this License. If you cannot distribute so as to satisfy simultaneously your
obligations under this License and any other pertinent obligations, then as a consequence you may
not distribute the Program at all. For example, if a patent license would not permit royalty-free
redistribution of the Program by all those who receive copies directly or indirectly through you, then
the only way you could satisfy both it and this License would be to refrain entirely from distribution
of the Program.
If any portion of this section is held invalid or unenforceable under any particular circumstance, the
balance of the section is intended to apply and the section as a whole is intended to apply in other
circumstances.
It is not the purpose of this section to induce you to infringe any patents or other property right
claims or to contest validity of any such claims; this section has the sole purpose of protecting the
integrity of the free software distribution system, which is implemented by public license practices.
Many people have made generous contributions to the wide range of software distributed through
that system in reliance on consistent application of that system; it is up to the author/donor to
decide if he or she is willing to distribute software through any other system and a licensee cannot
impose that choice.
This section is intended to make thoroughly clear what is believed to be a consequence of the rest
of this License.
8. If the distribution and/or use of the Program is restricted in certain countries either by patents or
by copyrighted interfaces, the original copyright holder who places the Program under this License
may add an explicit geographical distribution limitation excluding those countries, so that
distribution is permitted only in or among countries not thus excluded. In such case, this License
incorporates the limitation as if written in the body of this License.
9. The Free Software Foundation may publish revised and/or new versions of the General Public
License from time to time. Such new versions will be similar in spirit to the present version, but may
differ in detail to address new problems or concerns.
Each version is given a distinguishing version number. If the Program specifies a version number of
this License which applies to it and "any later version", you have the option of following the terms
and conditions either of that version or of any later version published by the Free Software
FR - 83
Foundation. If the Program does not specify a version number of this License, you may choose any
version ever published by the Free Software Foundation.
10. If you wish to incorporate parts of the Program into other free programs whose distribution
conditions are different, write to the author to ask for permission. For software which is
copyrighted by the Free Software Foundation, write to the Free Software Foundation; we
sometimes make exceptions for this. Our decision will be guided by the two goals of preserving the
free status of all derivatives of our free software and of promoting the sharing and reuse of
software generally.
NO WARRANTY
11. BECAUSE THE PROGRAM IS LICENSED FREE OF CHARGE, THERE IS NO WARRANTY FOR THE
PROGRAM, TO THE EXTENT PERMITTED BY APPLICABLE LAW. EXCEPT WHEN OTHERWISE STATED IN
WRITING THE COPYRIGHT HOLDERS AND/OR OTHER PARTIES PROVIDE THE PROGRAM "AS IS"
WITHOUT WARRANTY OF ANY KIND, EITHER EXPRESSED OR IMPLIED, INCLUDING, BUT NOT LIMITED
TO, THE IMPLIED WARRANTIES OF MERCHANTABILITY AND FITNESS FOR A PARTICULAR PURPOSE.
THE ENTIRE RISK AS TO THE QUALITY AND PERFORMANCE OF THE PROGRAM IS WITH YOU. SHOULD
THE PROGRAM PROVE DEFECTIVE, YOU ASSUME THE COST OF ALL NECESSARY SERVICING, REPAIR
OR CORRECTION.
12. IN NO EVENT UNLESS REQUIRED BY APPLICABLE LAW OR AGREED TO IN WRITING WILL ANY
COPYRIGHT HOLDER, OR ANY OTHER PARTY WHO MAY MODIFY AND/OR REDISTRIBUTE THE
PROGRAM AS PERMITTED ABOVE, BE LIABLE TO YOU FOR DAMAGES, INCLUDING ANY GENERAL,
SPECIAL, INCIDENTAL OR CONSEQUENTIAL DAMAGES ARISING OUT OF THE USE OR INABILITY TO
USE THE PROGRAM (INCLUDING BUT NOT LIMITED TO LOSS OF DATA OR DATA BEING RENDERED
INACCURATE OR LOSSES SUSTAINED BY YOU OR THIRD PARTIES OR A FAILURE OF THE PROGRAM TO
OPERATE WITH ANY OTHER PROGRAMS), EVEN IF SUCH HOLDER OR OTHER PARTY HAS BEEN
ADVISED OF THE POSSIBILITY OF SUCH DAMAGES.
END OF TERMS AND CONDITIONS
How to Apply These Terms to Your New Programs
If you develop a new program, and you want it to be of the greatest possible use to the public, the
best way to achieve this is to make it free software which everyone can redistribute and change
under these terms.
To do so, attach the following notices to the program. It is safest to attach them to the start of each
source file to most effectively convey the exclusion of warranty; and each file should have at least
the "copyright" line and a pointer to where the full notice is found.
one line to give the program's name and an idea of what it does.
FR - 84
Copyright (C) yyyy name of author
This program is free software; you can redistribute it and/or
modify it under the terms of the GNU General Public License
as published by the Free Software Foundation; either version 2
of the License, or (at your option) any later version.
This program is distributed in the hope that it will be useful,
but WITHOUT ANY WARRANTY; without even the implied warranty of
MERCHANTABILITY or FITNESS FOR A PARTICULAR PURPOSE. See the
GNU General Public License for more details.
You should have received a copy of the GNU General Public License
along with this program; if not, write to the Free Software
Foundation, Inc., 51 Franklin Street, Fifth Floor, Boston, MA 02110-1301, USA.
Also add information on how to contact you by electronic and paper mail.
If the program is interactive, make it output a short notice like this when it starts in an interactive
mode:
Gnomovision version 69, Copyright (C) year name of author
Gnomovision comes with ABSOLUTELY NO WARRANTY; for details
type `show w'. This is free software, and you are welcome
to redistribute it under certain conditions; type `show c'
for details.
The hypothetical commands `show w' and `show c' should show the appropriate parts of the
General Public License. Of course, the commands you use may be called something other than
`show w' and `show c'; they could even be mouse-clicks or menu items--whatever suits your
program.
FR - 85
You should also get your employer (if you work as a programmer) or your school, if any, to sign a
"copyright disclaimer" for the program, if necessary. Here is a sample; alter the names:
Yoyodyne, Inc., hereby disclaims all copyright
interest in the program `Gnomovision'
(which makes passes at compilers) written
by James Hacker.
signature of Ty Coon, 1 April 1989
Ty Coon, President of Vice
IT - 1
INDICE
1. Presentazione introduttiva del prodotto ........................................................................................................... 4
2. Funzioni del prodotto ........................................................................................................................................ 4
3. Dotazione ........................................................................................................................................................... 6
4. Dati tecnici ......................................................................................................................................................... 6
5. equisiti minimi ................................................................................................................................................... 6
6. Raffigurazione delle parti del prodotto .............................................................................................................. 7
7. Uscite disponibili ................................................................................................................................................ 7
7.1 Porta RJ45 WAN ................................................................................................................................................. 7
7.2 Interfaccia Micro USB 3.0 ................................................................................................................................... 7
7.3 Spia LED .............................................................................................................................................................. 8
8. Uso del PC o del MAC ......................................................................................................................................... 9
8.1 Stabilire una connessione WLAN con un PC ...................................................................................................... 9
8.2 Wi-Fi Finder per PC .......................................................................................................................................... 10
8.2.1 Il mio archivio ................................................................................................................................................... 11
8.3 Stabilire una connessione senza fili con un MAC ............................................................................................ 12
8.3.1 Wi-Fi Finder per MAC ....................................................................................................................................... 13
8.3.2 Il mio archivio ................................................................................................................................................... 15
8.4 Configurazione di Memory 2 Move ................................................................................................................. 16
9. Utilizzo di apparecchi mobili ............................................................................................................................ 20
9.1 Installazione della app Memory 2 Move per iOS ............................................................................................. 20
9.2 Connessione senza fili con iPhone/iPad ........................................................................................................... 21
9.3 Login dell’utente (iOS) ..................................................................................................................................... 22
9.4 Installazione della app Memory 2 Move per Android ...................................................................................... 23
9.5 Connessione senza fili con il vostro dispositivo Android ................................................................................. 23
9.6 Login utente (Android) ..................................................................................................................................... 25
10. Funzioni di base ............................................................................................................................................... 26
10.1 Utilizzo per dispositivi iOS ................................................................................................................................ 26
IT - 2
10.2 Utilizzo per dispositivi Android ........................................................................................................................ 28
10.3 Impostazioni Wi-Fi (iOS e Android) ................................................................................................................ 30
10.3.1 Interfaccia impostazioni Wi-Fi ......................................................................................................................... 30
10.3.2 Modifica del nome del dispositivo ................................................................................................................... 30
10.3.3 Protezione ........................................................................................................................................................ 31
10.3.4 Accessi Internet ................................................................................................................................................ 31
10.4 Esecuzione dei file musicali/audio (IOS / Android) .......................................................................................... 33
10.5 Esecuzione di filmati/video .............................................................................................................................. 35
10.5.1 iOS .................................................................................................................................................................... 35
10.5.2 Android ............................................................................................................................................................ 37
10.6 Visualizzazione di immagini ............................................................................................................................. 38
10.6.1 iOS .................................................................................................................................................................... 38
10.6.2 Android ........................................................................................................................................................... 41
10.7 Condivisione di immagini ................................................................................................................................. 44
10.7.1 iOS .................................................................................................................................................................... 44
10.7.2 Android ........................................................................................................................................................... 45
10.8 Aprire/visualizzare i documenti ....................................................................................................................... 47
10.8.1 iOS .................................................................................................................................................................... 47
10.8.2 Android ............................................................................................................................................................ 48
10.9 Copiare, cancellare, scaricare e caricare file (iOS e Android) .......................................................................... 49
10.10 Scaricare i file sul dispositivo iOS/Android ....................................................................................................... 51
10.11 Caricamento di file sul disco rigido Wi-Fi (iOS e Android) ................................................................................ 53
10.12 Cancellare file (iOS e Android) ......................................................................................................................... 55
10.13 Elenco e stato dei file caricati e scaricati ......................................................................................................... 56
10.14 Conclusione della app Memory 2 Move .......................................................................................................... 56
10.14.1 iOS .................................................................................................................................................................... 56
10.14.2 Android ............................................................................................................................................................ 57
10.15 Installazione della app Memory 2 Move .......................................................................................................... 57
10.15.1 iOS .................................................................................................................................................................... 57
IT - 3
10.15.2 Android ............................................................................................................................................................ 58
11. Funzioni WEB Management ............................................................................................................................. 59
11.1 Funzione Explorer ............................................................................................................................................ 60
11.2 Menu contestuale (non per Mac) .................................................................................................................... 61
11.3 Combinazioni di tasti ........................................................................................................................................ 64
11.4 Drag and drop .................................................................................................................................................. 64
11.5 Informazioni ..................................................................................................................................................... 64
11.5.1 Dispositivo ........................................................................................................................................................ 64
11.5.2 Archiviazione .................................................................................................................................................... 65
11.5.3 Rete .................................................................................................................................................................. 65
11.6 Impostazioni ..................................................................................................................................................... 66
11.6.1 Utente .............................................................................................................................................................. 66
11.6.2 Disco ................................................................................................................................................................. 66
11.7 Rete .................................................................................................................................................................. 67
11.7.1 Nome host........................................................................................................................................................ 67
11.7.2 Wi-Fi e LAN ....................................................................................................................................................... 68
11.7.3 Server DHCP ..................................................................................................................................................... 69
11.7.4 Accesso a Internet ............................................................................................................................................ 70
11.8 Servizi ............................................................................................................................................................... 71
11.8.1 Samba .............................................................................................................................................................. 71
11.8.2 Media Server .................................................................................................................................................... 72
11.9 Sistema ............................................................................................................................................................. 73
11.9.1 Impostazioni ora .............................................................................................................................................. 73
11.9.2 Salva ................................................................................................................................................................. 74
11.9.3 Aggiornamento firmware:................................................................................................................................ 75
11.9.4 Reset ................................................................................................................................................................ 77
12. Licenza informazione ....................................................................................................................................... 78
IT - 4
1. PRESENTAZIONE INTRODUTTIVA DEL PRODOTTO
Memory 2 Move vi consente di accedere in modalità senza fili ai vostri video, alla musica,
alle foto e ai dati per trasferirli in streaming sul vostro iPad®, iPhone®,tablet, smartphone e
notebook senza l’ingombro dei cavi.
Grazie al disco rigido integrato non dovrete più preoccuparvi dello spazio limitato sui vostri
dispositivi mobili. La porta USB 3.0, inoltre, permette un trasferimento dei dati semplice e
rapido.
Per garantire le migliori prestazioni in mobilità, Memory 2 Move dispone di un’accumulatore
ricaricabile. Per caricare l’accumulatore potete collegare il computer con una porta USB
libera del vostro computer e copiare al tempo stesso i vostri file sul disco rigido. In pochi
minuti il dispositivo è pronto all’uso. Durante le operazioni di ricarica è comunque possibile
accedere a Memory 2 Move.
2. FUNZIONI DEL PRODOTTO
Streaming di file multimediali tramite connessione senza fili fino a 5 utenti
simultaneamente.
Accesso a vostri file musicali, video e fotografici mediante la app gratuita per iOS e
Android.
Autonomia della batteria fino a 5 ore*.
Accesso a Internet mediante cavo RJ45 (rete LAN) oppure senza fili con lo standard
802.11g.
Supporta la formattazione NTFS e FAT32.
Supporta lo scambio di dati multipiattaforma mediante rete LAN tra Windows,
Mac,iOS e Linux.
Supporta le applicazioni utente sulle più svariate piattaforme, incl.
Windows/Mac/Linux/iPad/iPhone/Android
* l’autonomia precisa della batteria dipende dalle applicazioni utilizzate e dalle impostazioni.
Utilizzo come disco rigido esterno: La porta USB 3.0 consente di trasferire rapidamente i
dati e può essere utilizzata per caricare la batteria integrata, dopo il collegamento di
Memory 2 Move con un computer o un alimentatore. Questa funzione è operativa solo se il
dispositivo è spento.
IT - 5
Uso mediante la connessione LAN: collegate un’estremità del vostro cavo RJ45 a Memory 2
Move e l’altra estremità a un porta libera del vostro router. Ora attivate la funzione DHCP di
Memory 2 Move per un’assegnazione automatica dell’indirizzo IP.
Uso senza fili: collegate Memory 2 Move con il vostro router senza fili, come descritto nelle
seguenti istruzioni d’uso, per accedere a Internet in modalità Wi-Fi.
IT - 6
3. DOTAZIONE
Memory 2 Move cavo USB 3.0
CD
Istruzioni per l'uso
Alimentatore (KTEC KSAS0060500100VEU 5V / 1A)
4. DATI TECNICI
Dimensioni 127.3mm (L) X 80mm (L) X 25mm (A)
Wi-Fi:
o Standard: 802.11 b/g/n,
o Frequenza: 2.4 GHZ
o Velocità di trasmissione: 72Mbps (20MHz) / 150Mbps (40MHz)
Interfaccia di rete: 100Mbps Ethernet RJ45
Porta USB: micro USB 3.0, per trasferimento dati e carica
dell’accumulatore
Capacità dell’accumulatore: 3000mAh
Temperatura operativa: la temperatura operativa ottimale è compresa
tra 5°C e 35°C
5. EQUISITI MINIMI
Connessione Internet
Requisiti di sistema:
o Windows: XP/Vista/Windows 7/8
o Mac: OS X 10.6.0 e versioni più recenti
o Inoltre: Fedora 12 (Linux) e versioni più recenti
Browser:
o Windows: Internet Explorer 7.0 e versioni più recenti
o Mac: Safari 3.0 e versioni più recenti
o Inoltre: Firefox 3.5 e versioni più recenti
Router oppure switch
IT - 7
6. RAFFIGURAZIONE DELLE PARTI DEL PRODOTTO
7. USCITE DISPONIBILI
7.1 PORTA RJ45 WAN
A. Modalità router: Memory 2 Move funziona come un router normalmente in
commercio e può trasmettere indirizzi IP al computer, usufruendo della connessione
WLAN.
B. Modalità WLAN: consente la connessione a una rete già esistente.
7.2 INTERFACCIA MICRO USB 3.0
La porta USB 3.0 consente di trasferire rapidamente i dati e può essere utilizzata per caricare
la batteria integrata, dopo il collegamento di Memory 2 Move con un computer o un
alimentatore. Questa funzione è operativa solo se il dispositivo è spento.
IT - 8
7.3 SPIA LED
LED di alimentazione:
- Spento: il dispositivo è spento.
- Luce verde: la batteria è completamente carica.
- Luce verde lampeggiante
in modo rapido: è in corso lo spegnimento del dispositivo.
- Luce verde lampeggiante
in modo lento: è in corso la ricarica del dispositivo.
- Luce rossa: carica dell’accumulatore sotto il 30%
- Luce rossa lampeggiante
in modo rapido: l’ accumulatore è quasi scarico
LED HDD:
- Luce bianca: modalità stand-by
- Luce bianca lampeggiante: operazioni di lettura/scrittura in corso
- Collegamento tramite
la porta USB:
o Luce blu: il dispositivo è collegato tramite
la porta USB 3.0
o Luce bianca continua: il dispositivo è collegato tramite USB2.0
LED Wi-Fi blu:
- Tremolante: avvio del processo di inizializzazione.
- Il LED non è acceso: il dispositivo è spento o non riceve
corrente elettrica
- Sempre acceso:
o il processo di
inizializzazione è concluso
o Modalità stand-by: è possibile collegare dispositivi.
LED Internet:
- Modalità router:
o Colore blu: buona qualità del segnale.
o Blu/rosso in alternanza: cattiva qualità del segnale.
o Led non acceso: non connesso a Internet
- Funzione Bridge
o Colore blu: buona qualità del segnale.
o Led non acceso: non connesso a Internet
IT - 9
8. USO DEL PC O DEL MAC
8.1 STABILIRE UNA CONNESSIONE WLAN CON UN PC
Accendere il dispositivo Wi-Fi premendo il pulsante di accensione sul lato anteriore del
dispositivo stesso.
Attivare la funzione WLAN sul PC e nella barra delle applicazioni in basso a destra fare clic
sull’icona WLAN. Si visualizza ora il messaggio:
Selezionare la rete con il nome “Memory2Move-XXXX“.
Nota: la password predefinita è “intenso1“. Dopo aver stabilito la connessione, inserite
per la vostra sicurezza una nuova password.
Dopo aver stabilito la connessione al vostro dispositivo Wi-Fi, installate il software client in
dotazione nel seguente modo:
Per collegare il dispositivo Wi-Fi al vostro computer, utilizzate il tool in dotazione “Wi-Fi
Finder“ sul CD driver fornito. Il software cerca automaticamente il dispositivo Wi-Fi nella
vostra rete.
Basta fare doppio clic sull’icona e seguire le istruzioni sullo schermo.
IT - 10
8.2 WI-FI FINDER PER PC
Avviare l’applicazione con un doppio clic sul link “Wi-Fi Finder“. Il software cerca
automaticamente Memory 2 Move (vedere schermata) nella rete collegata.
Nota: se “M2M“ non dovesse essere presente nell’elenco delle reti collegate, fare clic
su “Aggiorna“ per effettuare una nuova ricerca del dispositivo Wi-Fi.
Selezionare il Memory 2 move dalla lista, poi cliccare su "log in" per entrare
nell'interfaccia web
IT - 11
Inserite il vostro nome utente e la password
Nome utente: admin
Password: 00000
Nota: Dopo aver stabilito la connessione, inserite per la vostra sicurezza una nuova
password.
8.2.1 IL MIO ARCHIVIO
Selezionando la voce del menu “Il mio archivio” si visualizza l’immagine qui sotto. Per
stabilire la connessione servitevi dei seguenti dati di accesso:
Nome utente: admin
Password: 00000
Nota: dopo aver stabilito la connessione, inserite per la vostra sicurezza una nuova
password.
IT - 12
8.3 STABILIRE UNA CONNESSIONE SENZA FILI CON UN MAC
Accendere il dispositivo Wi-Fi premendo il pulsante di accensione sul lato anteriore del
dispositivo stesso. Attendere alcuni minuti finché il LED smette di lampeggiare. Attivare la
funzione WLAN sul PC e, nella barra delle applicazioni in basso a destra, fare clic sull’icona
WLAN. Selezionare la rete con il nome “Memory2Move-XXXX“.
Nota: la password predefinita è “intenso1“. Dopo aver stabilito la connessione, inserite
per la vostra sicurezza una nuova password.
Dopo aver stabilito la connessione al vostro dispositivo Wi-Fi, installate il software client in
dotazione nel seguente modo:
Per collegare il dispositivo Wi-Fi al vostro computer, utilizzate il tool in dotazione “Wi-Fi
Finder“ sul CD driver fornito. Il software cerca automaticamente il dispositivo Wi-Fi nella
vostra rete.
Basta fare doppio clic sull’icona e seguire le istruzioni sullo schermo.
IT - 13
8.3.1 WI-FI FINDER PER MAC
Avviare l’applicazione con un doppio clic sul link “Wi-Fi Finder“. Il software cerca
automaticamente Memory 2 Move (vedere schermata) nella rete collegata.
Nota: se “M2M“ non dovesse essere presente nell’elenco delle reti collegate, fare clic su
“Aggiorna“ per effettuare una nuova ricerca del dispositivo Wi-Fi.
Selezionare il Memory 2 move dalla lista, poi cliccare su "log in" per entrare
nell'interfaccia web
IT - 14
Inserite il vostro nome utente e la password
Nome utente: admin
Password: 00000
Nota: Dopo aver stabilito la connessione, inserite per la vostra sicurezza una nuova
password.
IT - 15
8.3.2 IL MIO ARCHIVIO
Selezionando la voce del menu “Il mio archivio” si visualizza l’immagine qui sotto. Per
stabilire la connessione servitevi dei seguenti dati di accesso:
Nome utente: admin
Password: 00000
Nota: Dopo aver stabilito la connessione, inserite per la vostra sicurezza una nuova
password.
È possibile creare, cancellare, copiare, modificare, rinominare o spostare directory e cartelle
in Memory 2 Move.
Inoltre è possibile scambiare dati tra il MAC e Memory 2 Move (caricamento/scaricamento).
IT - 16
8.4 CONFIGURAZIONE DI MEMORY 2 MOVE
Utilizzare il software come sopra descritto per stabilire un collegamento con il dispositivo
Wi-Fi e accedere come amministratore all’interfaccia di connessione con il web. Ora è
possibile configurare il dispositivo.
Procedura guidata
In occasione del primo utilizzo del dispositivo, dopo l’accesso si visualizza una “Procedura
guidata” che vi consente di definire facilmente tutte le impostazioni.
Nota: premendo sulla X (a destra in alto) si esce dalla procedura guidata e vengono
rilevate tutte le impostazioni di fabbrica come impostazioni standard.
Fare clic sul pulsante “Successivo” per configurare il dispositivo.
Stabilire l’accesso a Internet
.. creando la connessione a un’altra rete disponibile.
IT - 17
Sono disponibili due opzioni di accesso a Internet. Nelle impostazioni standard è definito
l’accesso tramite cavo (vedere l’immagine in alto).
A. Accesso senza fili (WLAN)
Collegare M2M a un altro router WLAN per connettersi a Internet.
B. Accesso tramite cavo (LAN)
Collegare M2M a una porta disponibile sul lato posteriore del router per collegarsi a
un’altra rete.
Accesso cablato LAN:
Nelle impostazioni predefinite è stato selezionato “IP dinamico”. È quindi possibile assegnare
un indirizzo IP, con un clic sulla freccia gialla e selezionando l’opzione “IP statico”.
Accesso WLAN:
SSID: inserire il nome SSID della rete oppure fare clic su “Nuova scansione“ per
cercare automaticamente tutte le reti.
Password: inserire la password per la rete locale senza fili selezionata.
Indirizzo IP: -selezionando “Automatico” la rete assegna automaticamente un indirizzo IP.
-selezionando “IP statico” dovrete inserire manualmente la rete tramite la
quale desiderate collegarvi.
Nota: con un clic su X (in altro a destra) si esce dal menu LAN.
Nota: se non dovesse essere possibile stabilire un collegamento con un’altra rete, chiedete
al vostro amministratore di rete delucidazioni sulle direttive valide nel vostro caso!
IT - 18
Impostazioni Wi-Fi e LAN
SSID: inserire il nome della rete. Nelle impostazioni predefinite è indicata
“Memory2Move-XXXX“. Il nome SSID può comprendere al massimo 32
caratteri.
Canale: inserire qui il canale tramite il quale il dispositivo Wi-Fi deve
trasmettere e ricevere. L’impostazione predefinita è “Auto“. Il canale
viene definito automaticamente dal dispositivo. È possibile, tuttavia,
definire manualmente il canale di trasmissione e ricezione . Sono
disponibili da 1 a 13 canali.
Modalità Wi-Fi: la modalità standard predefinita per la connessione senza fili è:
802.11/b/g/n. È possibile anche stabilire manualmente le
modalità: 11Mbps (802.11b), 54 Mbps (802.11g) o 150Mbps
(802.11n).
Protezione: come default è selezionata la codifica “WPA/WPA2-PSK mista“.
È possibile scegliere tra le seguenti tipologie di codifica:
nessuna codifica,WPA-PSK,WPA2-PSK, WPA/WPA2-
PSK mista.
Password: a seconda del tipo di codifica è necessario inserire una password con
almeno 8 e al massimo 63 caratteri.
Indirizzo IP: l'indirizzo IP preimpostato è: 10.10.10.254 con
subnet mask 255.255.255.0. È possibile modificarlo manualmente .
IT - 19
Fare clic su “Successivo” per impostare la password di amministratore. Con un clic su
“Ignora” si rinuncia a definire una nuova password e si rileva quella esistente, predefinita.
Al termine della procedura guidata, viene riavviato il sistema. Questa procedura richiede due
minuti. La notifica vi informa dello stato attuale.
IT - 20
9. UTILIZZO DI APPARECCHI MOBILI
9.1 INSTALLAZIONE DELLA APP MEMORY 2 MOVE PER IOS
Fare clic sull'icona App Store sulla vostra schermata principale, come raffigurato
nell’immagine seguente. Ricercare la app gratuita “Memory 2 Move“ e seguire le istruzioni
per l’installazione.
Una volta conclusa l’installazione, l’icona della app “Memory 2 Move“ si visualizza
sulla schermata principale (vedere l’immagine seguente).
IT - 21
9.2 CONNESSIONE SENZA FILI CON IPHONE/IPAD
Accendere Memory 2 Move. Attendere qualche minuto fino alla conclusione
dell’inizializzazione del dispositivo. Il LED Wi-Fi blu smette di lampeggiare, una
volta terminata l’inizializzazione.
Fare clic sull’icona “Impostazioni”, come raffigurato nell'immagine seguente.
Fare clic sulla voce del menu "Wi-Fi". Nell’elenco delle reti Wi-Fi si dovrebbe ora
visualizzare la rete “Memory2Move-XXXX” .
Fare clic su questa rete, come raffigurato nell’immagine seguente. Se nel
procedimento 8.4. “Impostazioni Wi-Fi e Lan“ avete stabilito una password,
inseritela ora.
Una volta selezionata “Memory2Move-XXXX”, compare una casella di spunta in
corrispondenza di SSID e il logo Wi-Fi si visualizza nell’angolo in alto, a sinistra.
IT - 22
9.3 LOGIN DELLUTENTE (IOS)
Fare clic sul logo “Memory 2 Move” per avviare l’applicazione, come raffigurato
nell’immagine seguente.
Inserire la password di amministratore stabilita durante la configurazione (predefinita:
00000). La password è necessaria solo per il primo login. Il dispositivo memorizza
l’inserimento e nel secondo login non è necessario indicare nuovamente la password.
Una volta inserita correttamente la password si viene guidati automaticamente al menu
“Memory 2 Move“. Questo è l’accesso diretto al disco rigido.
IT - 23
9.4 INSTALLAZIONE DELLA APP MEMORY 2 MOVE PER ANDROID
Aprire “Google Playstore” oppure “App Center” e ricercare la app gratuita
“Memory 2 Move“.
Seguire le istruzioni per l’installazione, come rappresentato nell’immagine
seguente.
Una volta conclusa l’installazione, l’icona della app “Memory 2 Move“ si visualizza
sulla schermata principale (vedere l’immagine seguente).
9.5 CONNESSIONE SENZA FILI CON IL VOSTRO DISPOSITIVO ANDROID
Accendere Memory 2 Move. Attendere qualche minuto fino alla conclusione
dell’inizializzazione del dispositivo. Il LED Wi-Fi blu smette di lampeggiare, una
volta terminata l’inizializzazione.
IT - 24
Fare clic sull’icona “Impostazioni”, come raffigurato nell’immagine seguente.
Attivare la funzione Wi-Fi, spostando verso destra il “pulsante virtuale”.
Nell’elenco delle reti Wi-Fi si dovrebbe ora visualizzare la rete “Memory2Move-
XXXX”. Fare clic su questa rete, come raffigurato nell’immagine seguente. Se nel
procedimento 8. “Impostazioni Wi-Fi e Lan “ avete stabilito una password,
inseritela ora.
Una volta collegato il dispositivo con il disco rigido Wi-Fi, compare in SSID la
parola “Collegato”.
IT - 25
9.6 LOGIN UTENTE (ANDROID)
Fare clic sulla app con il logo “Memory 2 Move” per avviare l’applicazione, come
raffigurato nell’immagine seguente.
Inserire la password di amministratore stabilita durante la configurazione
(predefinita: 00000). La password è necessaria solo per il primo login. Il
dispositivo memorizza l’inserimento e nel secondo login non è necessario indicare
nuovamente la password.
Una volta inserita correttamente la password, si viene guidati automaticamente
al menu “Memory 2 Move“. Questo è l’accesso diretto al disco rigido.
IT - 26
10. FUNZIONI DI BASE
10.1 UTILIZZO PER DISPOSITIVI IOS
Una volta stabilito il collegamento, si viene guidati automaticamente al menu “Memory 2
Move“. Questo è l’accesso diretto al disco rigido. Il menu “Il mio dispositivo” ci consente di
accedere al dispositivo che si utilizza per connettersi a Memory 2 Move.
Sono disponibili per la selezione le seguenti voci del menu:
Menu principale “Il mio dispositivo” Per organizzare i vostri file sono a disposizione le
cartelle “Documenti”, “Musica”, “Foto”, “Video” e “iPad”/ “iPhone”.
Menu principale “Memory 2 Move” – Accesso ai file su Memory 2 Move.
IT - 27
Tasto Home Conduce al menu principale.
Tasto di visualizzazione Conduce alla panoramica delle miniature e
degli elenchi.
Tasto delle impostazioni - Conduce al menu delle impostazioni del
disco rigido Wi-Fi.
Tasto Indietro Conduce al menu precedente.
Tasto Gestione dati - Per selezionare più file che è possibile caricare,
scaricare o cancellare.
Memory 2 Move Accesso diretto al disco rigido Wi-Fi.
Il mio dispositivo - Accesso al dispositivo che si utilizza per
connettersi a Memory 2 Move.
Tasto Stato - Panoramica dello stato delle operazioni di
caricamento/scaricamento. Indica inoltre il numero della versione e
l’ultimo brano eseguito.
IT - 28
10.2 UTILIZZO PER DISPOSITIVI ANDROID
Una volta stabilito il collegamento, si viene guidati automaticamente al menu “Memory 2
Move“, con accesso diretto al disco rigido Wi-Fi. Il menu “Il mio dispositivo” ci consente di
accedere al dispositivo che si utilizza per connettersi a Memory 2 Move.
Sono disponibili per la selezione le seguenti voci del menu:
Menu principale “Il mio dispositivo” Per organizzare i vostri file sono a disposizione le
cartelle “Documenti”, “Musica”, “Foto”, “Video” e “iPad”/ “iPhone”.
Menu principale“Memory 2 Move” Accesso ai file su Memory 2 Move.
IT - 29
Tasto Home Conduce al menu principale.
Tasto di visualizzazione Conduce alla
panoramica delle miniature e degli elenchi.
Tasto delle impostazioni - Conduce al menu
delle impostazioni del disco rigido Wi-Fi.
Tasto Indietro Conduce al menu
precedente.
Tasto Gestione dati - Per selezionare più file
che è possibile caricare, scaricare o
cancellare.
Memory 2 Move Accesso diretto al disco
rigido Wi-Fi.
Il mio dispositivo - Accesso al dispositivo che
si utilizza per connettersi a Memory 2 Move.
Tasto Stato - Panoramica dello stato delle
operazioni di caricamento/scaricamento.
Indica inoltre il numero della versione e
l’ultimo brano eseguito.
IT - 30
10.3 IMPOSTAZIONI WI-FI (IOS E ANDROID)
10.3.1 INTERFACCIA IMPOSTAZIONI WI-FI
Fare clic su per modificare le impostazioni Wi-Fi: questa opzione compare con un
clic su “Il mio dispositivo Wi-Fi“ .
10.3.2 MODIFICA DEL NOME DEL DISPOSITIVO
Fare clic sul pulsante per modificare il nome.
Dopo aver inserito un nuovo nome, compare in alto a destra il pulsante “Incolla”/”Imposta”.
Fare clic su questo pulsante per salvare la modifica.
IT - 31
10.3.3 PROTEZIONE
Nelle impostazioni Wi-Fi HDD compaiono le opzioni di protezione: Il disco rigido Wi-Fi
supporta i seguenti formati per la protezione dei dati: WPA-PSK, WPA2-PSK, WPA/WPA2-PSK
mista. Se si desidera aggiungere un altro codice di sicurezza, vi viene richiesta una password
per la rete senza fili.
Selezionare quindi, in alto a destra, il pulsante “Imposta” oppure “Incolla” per memorizzare
la password.
10.3.4 ACCESSI INTERNET
Nella schermata delle impostazioni Internet si visualizzano gli accessi a Internet. È possibile
selezionare un accesso cablato (wired) oppure senza fili (wireless). Il collegamento senza fili
si trova al centro della seguente schermata delle impostazioni Internet:
IT - 32
Se selezionate la variante con accesso cablato, dovete prima configurare la rete di
connessione.
Dopo aver effettuato la selezione, fare clic su “Salva”. Il sistema chiede di effettuare il riavvio
con un clic su “OK”.
Con un clic su “Indietro” si ritorna al menu delle impostazioni Wi-Fi.
IT - 33
10.4 ESECUZIONE DEI FILE MUSICALI/AUDIO (IOS / ANDROID)
Suggerimento: vi consigliamo di creare alcune cartelle per salvare i file musicali/audio.
Questo facilita l’utilizzo e l’organizzazione del vostro disco rigido Wi-Fi.
I file musicali/audio possono essere eseguiti indipendentemente dal menu attuale e dalla
posizione in cui sono salvati (“Memory 2 Move” oppure “Il mio dispositivo”).
A questo scopo basta ricercare il file. Con un click sul file selezionato, questo viene eseguito.
Nota: per altre informazioni sui formati supportati consultate le istruzioni d’uso del
vostro dispositivo iOS.
- Fare clic su questo tasto per rieseguire dall’inizio il file audio. Con un doppio
clic viene eseguito il file audio precedente.
- Fare clic su questo tasto per passare al file audio successivo.
- Fare clic su questo tasto per eseguire il file audio. Fare clic sul tasto Pausa
per arrestare/interrompere temporaneamente l’esecuzione del file audio.
- Fare clic su questo tasto per chiudere il lettore.
IT - 34
Vi sono 5 modalità di esecuzione:
a. - Eseguire una volta: il file viene eseguito una volta. Poi la riproduzione si
ferma.
b. Ripetizione del file attuale: il file attualmente eseguito viene ripetuto. Si
interrompe l’esecuzione, premendo .
c. - Esecuzione casuale di tutti i file audio della cartella attuale.
d. - Esecuzione della cartella attuale. I file audio vengono eseguiti secondo la
sequenza e non ripetuti.
e. Ripetizione cartella: i file audio vengono eseguiti secondo la sequenza e poi
ripetuti.
Nota: tenere premuto il pulsante di avanzamento e spostatelo a destra o a sinistra
per avanzare o tornare indietro in un file audio.
Suggerimento: è possibile uscire dal lettore musicale in ogni momento. L’esecuzione
del file audio proseguirà in background.
IT - 35
10.5 ESECUZIONE DI FILMATI/VIDEO
10.5.1 IOS
Suggerimento: vi consigliamo di creare alcune cartelle per salvare i file video/i filmati.
Questo facilita l’utilizzo e l’organizzazione del vostro disco rigido Wi-Fi .
I file video/i filmati possono essere eseguiti indipendentemente dal menu attuale e dalla
posizione in cui sono salvati (“Memory 2 Move” oppure “Il mio dispositivo”).
A questo scopo basta ricercare il file. Con un clic sul file selezionato, questo viene eseguito.
Nota: per altre informazioni sui formati supportati consultate le istruzioni d’uso del
vostro dispositivo iOS.
IT - 36
Di norma l’esecuzione del video avviene con orientamento orizzontale. Le possibilità sono le
seguenti:
1. - Fare clic su questo tasto per arrestare il file video e chiudere il lettore.
2. - Fare clic su questo tasto per adeguare il formato di riproduzione alle
dimensioni dello schermo.
3. - Tenere premuto il pulsante di avanzamento e spostarlo a destra o a
sinistra per avanzare o tornare indietro in un file video.
4. - Tenere premuto il pulsante di regolazione del volume e
spostarlo a destra o a sinistra per modificare il volume.
5. - Tenere premuto questo tasto per ritornare indietro durante l’esecuzione
del file video.
6. - Tenere premuto questo tasto per avanzare durante l’esecuzione del file
video.
7. - Fare clic su questo tasto per eseguire il file video/proseguire l’esecuzione.
8. - Fare clic su questo tasto per interrompere l’esecuzione del file video.
IT - 37
10.5.2 ANDROID
Suggerimento: vi consigliamo di creare alcune cartelle per salvare i file video/i filmati.
Questo facilita l’utilizzo e l’organizzazione del vostro disco rigido Wi-Fi.
I file video/i filmati possono essere eseguiti indipendentemente dal menu attuale e dalla
posizione in cui sono salvati (“Memory 2 Move” oppure “Il mio dispositivo”).
A questo scopo basta ricercare il file. Con un clic sul file selezionato, questo viene eseguito.
Nota: l’utilizzo e le possibilità di impostazione per l’esecuzione dei file video dipendono dal
tipo di lettore di filmati installato sul vostro Android.
Consultate le istruzioni d’uso del vostro lettore di filmati per ottenere ulteriori
informazioni.
IT - 38
10.6 VISUALIZZAZIONE DI IMMAGINI
10.6.1 IOS
Suggerimento: vi consigliamo di creare alcune cartelle per salvare le immagini su Memory 2
Move. Questo facilita l’utilizzo e l’organizzazione del vostro disco rigido Wi-Fi.
Nota: il disco rigido Wi-Fi supporta i seguenti formati di immagine: .jpg, .tiff, .gif e .bmp
I file si visualizzano nella panoramica delle miniature oppure nell’elenco, come
rappresentato qui sotto.
Tutte le immagini in formati non supportati vengono visualizzate come miniature, a titolo di
esempio, o come icone.
Visualizzazione miniature Visualizzazione elenco
Fare clic su un file qualsiasi per aprire una presentazione di immagini in sequenza. Se il
menu non si apre direttamente, fare clic un’altra volta sull’immagine per visualizzarla
(vedere la raffigurazione qui sopra).
IT - 39
Per la presentazione sono a vostra disposizione le seguenti funzioni:
Passare con il dito sul display da destra a sinistra o da sinistra a destra per regolare
manualmente la visualizzazione e premere il tasto Play per avviare
automaticamente la presentazione.
Fare clic sul tasto Pausa per interrompere temporaneamente la presentazione.
Premere nuovamente il tasto Pausa per riprendere la presentazione.
Fare clic su per proseguire la presentazione e per riprodurre da capo la
sequenza dopo l’ultima immagine.
Fare clic su per riprodurre una volta la presentazione. La riproduzione si
interrompe dopo l’ultima immagine.
Fare clic sul tasto Indietro per ritornare alla voce precedente del menu.
È possibile anche abbinare alla presentazione un sottofondo musicale. Fare clic sul tasto
Musica come nella raffigurazione qui sotto.
IT - 40
Interrompi/Continua esecuzione: fare clic qui per arrestare o proseguire la musica di
sottofondo.
Seleziona: fare clic qui per ricercare e selezionare file audio per la musica di
sottofondo. Fare clic sul tasto per ritornare alla presentazione delle immagini
in sequenza, come rappresentato qui sotto.
Tasto Ripetizione: quando questo tasto è attivo vengono ripetuti gli stessi file audio
per la musica di sottofondo. Di norma questa opzione è disattivata.
IT - 41
10.6.2 ANDROID
Suggerimento: vi consigliamo di creare alcune cartelle per salvare le immagini. Questo
facilita l’utilizzo e l’organizzazione del vostro disco rigido Wi-Fi.
Nota: il disco rigido Wi-Fi supporta i seguenti formati di immagine: .jpg, .tiff, .gif e .bmp
I file si visualizzano nella panoramica delle miniature oppure nell’elenco, come
rappresentato qui sotto.
Tutte le immagini in formati non supportati vengono visualizzate come miniature, a titolo di
esempio, o come icone.
Visualizzazione miniature Visualizzazione elenchi
Fare clic su un file qualsiasi per aprire una presentazione di immagini in sequenza. Se il
menu non si apre direttamente, fare clic un’altra volta sull’immagine per visualizzarla
(vedere la raffigurazione qui sopra).
IT - 42
Per la presentazione sono a vostra disposizione le seguenti funzioni:
Passare con il dito sul display da destra a sinistra o da sinistra a destra per regolare
manualmente la visualizzazione e premere il tasto Play per avviare
automaticamente la presentazione.
Fare clic sul tasto Pausa per interrompere temporaneamente la presentazione.
Premere nuovamente il tasto Pausa per riprendere la presentazione.
Fare clic su per proseguire la presentazione e per riprodurre da capo la
sequenza dopo l’ultima immagine .
Fare clic su per riprodurre una volta la presentazione. La riproduzione si
interrompe dopo l’ultima immagine.
Fare clic sul tasto Indietro per ritornare alla voce precedente del menu.
È possibile anche abbinare alla presentazione un sottofondo musicale. Fare clic sul tasto
Musica come nella raffigurazione qui sotto.
IT - 43
Interrompi/Continua esecuzione: fare clic qui per arrestare o proseguire la musica di
sottofondo.
Seleziona: fare clic qui per ricercare e selezionare file audio per la musica di
sottofondo. Fare clic sul tasto per ritornare alla presentazione delle immagini
in sequenza, come rappresentato qui sotto.
Tasto Ripetizione: Quando questo tasto è attivo vengono ripetuti gli stessi file audio
per la musica di sottofondo. Di norma questa opzione è disattivata.
IT - 44
10.7 CONDIVISIONE DI IMMAGINI
10.7.1 IOS
Avete diverse possibilità di condividere le immagini con la vostra famiglia e i vostri amici, ad
es. per e-mail, memorizzandole nell’album fotografico del dispositivo utilizzato oppure
caricandole su Facebook.
Nota: per la condivisione delle immagini per e-mail o tramite i social media è necessario
disporre di un collegamento Internet.
Fare clic su nell’angolo in alto a destra della schermata per visualizzare le tre
possibilità di condivisione delle immagini. Fare clic su "Indietro" per ritornare
al menu precedente.
IT - 45
E-Mail - Fare clic qui per avviare la app standard per l’invio tramite e-mail e
selezionare le immagini da allegare.
Aggiungi a foto: fare clic su questa opzione per aggiungere l’immagine selezionata
all’album fotografico del dispositivo utilizzato.
Carica su Facebook: facendo clic su questa opzione si viene guidati automaticamente
alla schermata di accesso a Facebook. È necessario aver installato in precedenza la
app di Facebook sul dispositivo. Si deve disporre anche di un profilo Facebook.
10.7.2 ANDROID
Le diverse possibilità di condividere le immagini dipendono dalle varie app installate sul
vostro dispositivo.
Nota: per la condivisione delle immagini per e-mail o tramite i social media è necessario
disporre di un collegamento Internet.
IT - 46
Selezionare l’icona nell’angolo a destra in alto della schermata per visualizzare le
diverse possibilità di condivisione delle immagini. Fare clic sul tasto “Indietro” per
ritornare al precedente menu. Fare clic su
Condividere Fare clic sul tasto “Condividi” per visualizzare un elenco delle app
installate sul dispositivo Android (qui sotto). Selezionare la app tramite la quale si
vuole condividere l’immagine.
Salva foto Selezionare questo tasto per salvare l’immagine dal disco rigido Wi-Fi
nella raccolta del vostro dispositivo Android.
IT - 47
10.8 APRIRE/VISUALIZZARE I DOCUMENTI
10.8.1 IOS
La app “Memory 2 Move“ supporta i file Keynote, Numbers, Page, Excel, PowerPoint e Word,
nonché .pdf e .txt.
È sufficiente fare clic sul file per aprirlo e visualizzarlo. I formati supportati vengono aperti
automaticamente. Fare clic sul tasto “Indietro“ per ritornare al menu precedente
oppure fare clic sul tasto per inviare le immagini per e-mail, come qui sotto
raffigurato.
Nota: per l’invio di e-mail è necessaria una connessione Internet.
IT - 48
Fare clic sul tasto “E-mail”. La app standard per le e-mail viene avviata automaticamente e il
documento selezionato viene inviato come allegato.
10.8.2 ANDROID
Per aprire i documenti sul vostro dispositivo Android, è sufficiente sfiorare il file. Questo si
aprirà grazie a un programma standard o a una app da voi installata (cfr. l’immagine qui
sotto).
Per inviare il documento come allegato consultate le istruzioni del programma con il quale è
stato aperto il documento.
Nota: per l’invio di e-mail è necessaria una connessione Internet.
IT - 49
10.9 COPIARE, CANCELLARE, SCARICARE E CARICARE FILE (IOS E
ANDROID)
È possibile fare clic in ogni momento sul tasto per cancellare, scaricare e caricare i file.
Come si vede nelle seguenti immagini, compare, nell’angolo superiore del menu, l’icona
, quando si preme il tasto .
Schermata iOS Schermata Android
Nell’angolo in basso della schermata si visualizzano ora nuove icone. Sono a vostra
disposizione le seguenti funzioni:
- Fare clic su questa icona per visualizzare tutti i file. L’icona si colora ora di bianco e
vicino a tutti i file compare un segno di spunta.
- Fare clic di nuovo su questa icona per deselezionare tutti i file. Il segno di spunta
vicino ai file scompare subito dopo.
IT - 50
Suggerimento: è possibile selezionare uno o più file con un clic sulla miniatura. È anche
possibile elaborare un file mediante la funzione Drag&Drop. È sufficiente selezionare la
miniatura del file e trascinarla sull’icona Scarica , Carica o Cancella .
- Dal menu “Memory 2 Move” è possibile, mediante questa icona, scaricare uno o più
file dal disco rigido Wi-Fi nel vostro dispositivo iOS/Android.
- Dal menu “Memory 2 Move” è possibile, mediante questa icona, caricare uno o più
file dal disco rigido Wi-Fi nel vostro dispositivo iOS/Android. A questo scopo selezionare il
pulsante “Gestione dati“.
- Fare clic su questa icona per visualizzare l’elenco dei file in attesa di essere caricati
o scaricati. Inoltre si visualizza un elenco dei file trasferiti.
- Fare clic su questa icona per cancellare tutti i file selezionati.
IT - 51
10.10 SCARICARE I FILE SUL DISPOSITIVO IOS/ANDROID
Una volta stabilito il collegamento con il disco rigido Wi-FI, è possibile scaricare uno o più file
nel vostro dispositivo iOS/Android.
1. Fare clic sull’icona .
2. Selezionare uno o più file che si desidera scaricare e fare clic su per evidenziare
tutti i file.
3. Fare clic ora sul campo
4. Selezionare dall’elenco la cartella nella quale si desidera scaricare i file.
IT - 52
Per creare una nuova cartella per i file, fare clic sul campo “Crea nuova cartella”.
Inserire poi il nome per la cartella e fare clic su “Crea”. La denominazione della
cartella deve comprendere tra 2 e 26 caratteri. Fare clic su “Annulla” per
interrompere l’operazione.
5. Fare clic su “Seleziona” per avviare l’operazione di copia/trasferimento. Si aprirà
questa finestra:
Nota: i file correttamente scaricati si visualizzano nella finestra in basso “File scaricati” (cfr.
schermata qui sopra). Fare clic su “Cancella file elenco” per cancellare i file dall’elenco.
6. Fare clic su una porzione della schermata per ritornare al menu precedente. Fare clic
su ,per chiudere il menu.
IT - 53
10.11 CARICAMENTO DI FILE SUL DISCO RIGIDO WI-FI (IOS E ANDROID)
Verificare se ci si trova nel menu “Il mio dispositivo”.
1. Fare clic sull’icona .
2. Selezionare ora uno o più file che si desidera caricare e fare clic su per
evidenziare tutti i file.
3. Fare clic ora sul campo
4. Selezionare dall’elenco la cartella nella quale si desidera caricare i file.
IT - 54
Per creare una nuova cartella per i file, fare clic sul campo “Crea nuova cartella”.
Inserire poi il nome per la cartella e fare clic su “Crea”. La denominazione della
cartella deve comprendere tra 2 e 26 caratteri. Fare clic su “Annulla” per
interrompere l’operazione.
5. Fare clic su “Seleziona” per avviare l’operazione di caricamento. Si aprirà la seguente
finestra:
Nota: i file correttamente copiati/trasferiti si visualizzano nella finestra in basso “I file
correttamente copiati” (cfr. schermata qui sopra). Fare clic su “Svuota elenco” per
cancellare i file dall’elenco.
6. Fare clic su una porzione della schermata per ritornare al menu precedente. Fare clic
su ,per chiudere il menu.
IT - 55
10.12 CANCELLARE FILE (IOS E ANDROID)
Nel menu “Il mio dispositivo” o in “Memory 2 Move“ è possibile cancellare uno o più file.
1. Per cancellare uno o più file, fare clic sull’icona .
2. È possibile ora selezionare i file da cancellare oppure fare clic su per
selezionare tutti i file.
3. Fare clic ora sull’icona per cancellare i file evidenziati. Compare un messaggio
di avvertimento sullo schermo per confermare la cancellazione (cfr. schermata qui
sotto). Fare clic su Ok per confermare la cancellazione dei file. Se non si desidera
cancellare i file, interrompere l’operazione facendo clic su “Annulla”.
IT - 56
10.13 ELENCO E STATO DEI FILE CARICATI E SCARICATI
Una volta copiati/trasferiti uno o più file in Memory 2 Move, è possibile, con un clic su
, verificare quali file si trovano ancora in lista d’attesa e quali sono già stati trasferiti
correttamente. Nel menu principale è possibile fare clic su , per verificare lo stato dei file
caricati/scaricati.
10.14 CONCLUSIONE DELLA APP MEMORY 2 MOVE
10.14.1 IOS
Per uscire dalla app Memory 2 Move, fare clic sul tasto “Home” del proprio dispositivo
iPhone/iPad.
Per terminare la app, fare clic sul tasto “Home” due volte e si visualizza un elenco con
diverse app, sul bordo inferiore della schermata. Fare clic e tenere premuta l’icona della app
finché compare una segno meno (-). Fare clic ora su questo segno per terminare la app (cfr.
schermata qui sotto)
IT - 57
10.14.2 ANDROID
Per uscire dalla app Memory 2 Move fare clic sul campo e selezionare “Esci”. Si visualizza
un avvertimento con la richiesta di confermare la selezione. Cliccare su Ok“ per terminare la
app o Annulla“ per ritornare alla app.
10.15 INSTALLAZIONE DELLA APP MEMORY 2 MOVE
10.15.1 IOS
Per disinstallare la app “Memory 2 Move” dal dispositivo Apple, esercitare una pressione
prolungata sul logo Memory 2 Move, come raffigurato nella schermata seguente. Compare
una X su tutte le icone delle app installate, come raffigurato nella schermata seguente. A
questo punto per disinstallare la app “Memory 2 Move” dal dispositivo Apple, premere sulla
X in corrispondenza del logo Memory 2 Move, come raffigurato nella schermata seguente.
IT - 58
10.15.2 ANDROID
Per disinstallare la app “Memory 2 Move” dal dispositivo Android, eseguire le seguenti
operazioni.
Nota: la procedura di disinstallazione può essere diversa a seconda del dispositivo Android.
Prima della disinstallazione leggere le istruzioni d’uso del dispositivo Android.
1. A tale scopo cliccare sull'icona “Impostazioni” del menu principale.
2. Passare al punto “Applicazioni”.
3. Ricercare la app Memory 2 Move e selezionarla.
4. Fare clic sul campo “Disinstallare”.
5. Si visualizza un avvertimento con la richiesta di confermare la selezione. Fare clic su
“Ok“ per disinstallare la app oppure su “Annulla” per tornare al menu delle
impostazioni.
IT - 59
11. FUNZIONI WEB MANAGEMENT
Per configurare il dispositivo Wi-Fi, utilizzate il software “Wi-Fi Finder“ per collegarsi a
Memory 2 Move. In alternativa potete aprire il vostro browser e nella riga degli indirizzi
inserire l’IP 10.10.10.254, se l’indirizzo predefinito non è stato modificato.
Visualizzazione del menu principale:
Sottomenu disponibili:
Qui si modifica la password dell’amministratore.
Visualizzazione delle informazioni memorizzate.
Qui è possibile modificare le impostazioni di rete.
Attivazione del servizio Windows File.
Qui è possibile modificare le impostazioni del sistema.
Qui, con l’aiuto della guida di configurazione, è possibile configurare
il vostro dispositivo passo per passo.
IT - 60
11.1 FUNZIONE EXPLORER
Mediante questa interfaccia è possibile copiare i dati su Memory 2 Move e trasferire i file da
Memory 2 Move sul PC. Inoltre è possibile creare, copiare, denominare o cancellare cartelle,
proprio come su avviene normalmente sul PC.
Aggiorna - Fare clic su questo pulsante per aggiornare la schermata di
visualizzazione.
Carica - Fare clic su questo pulsante per caricare i file sul dispositivo.
Crea - Per creare una cartella su Memory 2 Move. Il nome della cartella può
contenere al massimo 26 caratteri.
Copia Per copiare i file in un’altra cartella.
Sposta - Per spostare un file in un’altra posizione.
Apri/Scarica - Fare clic su questo pulsante per aprire i file o copiarli sul PC. Se
sul PC dovesse essere installato un software compatibile, l’esecuzione dei brani
musicali avviene automaticamente. In caso contrario il sistema chiede se si
desidera scaricare il file. Non è possibile scaricare le cartella. Si deve sempre
selezionare almeno un file da scaricare.
IT - 61
Cancella - Per eliminare i file dal dispositivo.
Rinomina Per modificare il nome del file.
Visualizzatore foto - Per visualizzare le foto si utilizza questo pulsante.
11.2 MENU CONTESTUALE (NON PER MAC)
Nel menu dei file è possibile, con un clic mediante il tasto destro del mouse su un file o una
cartella, aprire il menu contestuale. In questo menu popup sono disponibili le seguenti
opzioni di selezione: Copia, Taglia, Cancella, Rinomina oppure Scarica (vedere la schermata).
Anche nel menu delle cartelle è possibile richiamare il menu contestuale. Qui esistono
possibilità di selezione: Apri, Copia, Taglia, Cancella o Rinomina (vedere la schermata).
IT - 62
Se si selezionano più file (tenendo premuto “control“ ed evidenziando i file selezionati
tramite il tasto sinistro del mouse) e si richiama con il tasto destro del mouse il menu
contestuale, esiste la possibilità di selezionare le opzioni Copia, Taglia o Cancella.
Se si fa clic con il tasto destro del mouse su una riga vuota della cartella sono disponibili
le funzioni Incolla, Crea o Carica.
IT - 63
Spiegazione delle funzioni
Apri: selezionare la cartella e aprire con il tasto destro del mouse il menu
contestuale. Selezionare “Apri” e si visualizza il contenuto della cartella.
Copia: selezionare la cartella oppure uno o più file e aprire con il tasto destro del
mouse il menu contestuale. Premere qui “Copia“ per copiare l’elemento o gli
elementi selezionati.
Taglia: selezionare la cartella oppure uno o più file e aprire con il tasto destro del
mouse il menu contestuale. Premere qui “Taglia“ per cancellare i file dall’attuale
posizione.
Incolla: dopo aver selezionato “Copia” o “Taglia”, potete ricercare una nuova
posizione di memorizzazione per gli elementi selezionati. Per incollare gli
elementi nella nuova posizione di memorizzazione, fare clic con il tasto destro del
mouse su una riga vuota della cartella e richiamare il menu contestuale. Qui
selezionare “Incolla” per incollare gli elementi nella nuova posizione di
memorizzazione.
Cancella: selezionare un file e aprire con il tasto destro del mouse il menu
contestuale. Premere qui “Cancella” per eliminare l’elemento selezionato.
Crea: fare clic con il tasto destro del mouse su una riga vuota della cartella e
richiamare il menu contestuale. Selezionare “Crea” per creare una nuova cartella.
Rinomina: fare clic con il tasto destro del mouse sulla cartella o sul file che si
desidera rinominare e nel menu contestuale sulla voce “Rinomina”. Ora è
possibile rinominare la cartella o il file. Dopo aver effettuato le modifiche, fare
clic su “Salva” per confermarle.
Carica: fare clic con il tasto destro del mouse su una riga vuota della cartella e
richiamare il menu contestuale. Selezionare “Carica” per caricare i nuovi file.
Apri/Scarica: fare clic con il tasto destro del mouse sulla cartella o sul file che si
desidera scaricare e nel menu contestuale sulla voce “Scarica”. Se sul PC dovesse
essere installato un software compatibile, l’esecuzione dei brani musicali avviene
automaticamente. In caso contrario il sistema chiede se si desidera scaricare il
file. Non è possibile scaricare le cartelle.
IT - 64
11.3 COMBINAZIONI DI TASTI
L’interfaccia supporta gli inserimenti tramite tastiera e le combinazioni di tasti. Tra gli altri
vengono supportati i seguenti tasti: tasto Tab, tasto Enter, tasto Home, Page up, Page down,
Tasto fine, Tasto freccia verso l’alto, Tasto freccia verso il basso, Tasto freccia verso sinistra,
Tasto freccia verso destra e Tasto Canc.
Windows: CTRL + c = Copia CTRL + v = Incolla
Mac: CTRL + c = Copia CTRL + v = Incolla
11.4 DRAG AND DROP
È possibile spostare mediante Drag and Drop (trascinare e rilasciare) un singolo file. Fare clic
su un file e trascinarlo in un’altra cartella esistente.
11.5 INFORMAZIONI
Qui sono disponibili informazioni sull’hardware, lo stato della rete e lo spazio in memoria.
11.5.1 DISPOSITIVO
Qui sono disponibili informazioni come il nome del dispositivo, il numero di serie, il fornitore,
il modello e la CPU.
IT - 65
11.5.2 ARCHIVIAZIONE
Qui sono disponibili informazioni sull’unità integrata, sulla capacità totale, sul produttore del
disco rigido e sulla capacità disponibile in memoria.
11.5.3 RETE
Qui sono disponibili informazioni dettagliate sullo stato attuale della rete, come l’indirizzo di
rete, lo stato Internet o il nome della rete attuale Wi-Fi (SSID).
IT - 66
11.6 IMPOSTAZIONI
11.6.1 UTENTE
Nel menu delle impostazioni fare clic sul link, per modificare le impostazioni per
l’amministratore. La password deve contenere almeno 5 e al massimo 32 caratteri. Con un
clic sul pulsante “Salva” si confermano le modifiche.
La password dell’amministratore predefinita è: 00000
11.6.2 DISCO
Sul menu delle impostazioni, fare clic sul link per ottenere informazioni
dettagliate sul dispositivo di memorizzazione, come la versione firmware, la capacità o il
numero di serie.
IT - 67
Il menu dell’unità contiene informazioni sul sistema e sulla capacità disponibile in memoria.
Fare clic su “X“ per chiudere il menu.
11.7 RETE
Nel menu delle impostazioni fare clic sul link , per modificare le informazioni
relative alla rete.
11.7.1 NOME HOST
Il nome host appartiene a un apparecchio che è collegato a una rete. Il nome può essere
scelto liberamente. L’unico requisito è che il nome cominci con una lettera, seguita da una
combinazione di lettere e numeri. Sono necessari almeno 2 e al massimo 8 caratteri.
IT - 68
11.7.2 WI-FI E LAN
Tutte le impostazioni di rete possono essere organizzate secondo le vostre esigenze. Sono
disponibili le seguenti opzioni:
SSID:
inserire il nome della rete. Nelle impostazioni predefinite è indicata
“Memory2Move-XXXX“. Per il nome SSID sono necessari 32 caratteri al massimo.
Canale Wi-Fi:
inserire qui il canale tramite il quale il dispositivo Wi-Fi deve
trasmettere e ricevere. L’impostazione predefinita è “Auto“. Il canale viene
definito automaticamente dal dispositivo. È possibile, tuttavia, definire
manualmente il canale di trasmissione e ricezione. Sono disponibili da 1 a 13
canali.
Modalità Wi-Fi:
la modalità standard predefinita per la connessione senza fili è: 802.11/b/g/n. È
possibile anche stabilire manualmente le modalità: 11Mbps (802.11b), 54 Mbps
(802.11g oppure 150Mbps (802.11n).
Protezione:
non è predefinito alcun tipo di protezione. È possibile scegliere tra le seguenti
tipologie di codifica: nessuna codifica, WPA-PSK, WPA2-PSK, Mixed WPA/WPA2-
PSK.
Password:
a seconda del tipo di codifica, è necessario inserire una password con almeno 8 e
al massimo 63 caratteri.
IT - 69
Indirizzo IP:
l’indirizzo IP preimpostato è: 10.10.10.254 con subnet mask 255.255.255.0. È
possibile modificarlo manualmente.
11.7.3 SERVER DHCP
Il Dynamic Host Configuration Protocol (DHCP) è un protocollo di rete che consente a un
server di assegnare indirizzi IP dinamici a computer collegati. Nelle impostazioni predefinite
è stato attivato Protocollo DHCP. Questa opzione può venire disattivata, se necessario, ed è
possibile assegnare manualmente gli indirizzi IP.
Fare clic sul pulsante “Elenco DHCP” e si visualizza un elenco con tutti i dispositivi attuali
collegati.
IT - 70
11.7.4 ACCESSO A INTERNET
Stabilire l’accesso a Internet
.. creando la connessione a un’altra rete disponibile.
Sono disponibili due opzioni di accesso a Internet. Nelle impostazioni standard è definito
l’accesso tramite cavo (vedere l’immagine in alto).
A. Accesso senza fili (WLAN)
Collegare M2M a un altro router WLAN per connettersi a Internet.
B. Accesso tramite cavo (LAN)
Collegare M2M a una porta disponibile sul lato posteriore del router per collegarsi a
un’altra rete.
Accesso cablato LAN:
nelle impostazioni predefinite è stato selezionato “IP dinamico”. È quindi possibile assegnare
un indirizzo IP, con un clic sulla freccia gialla e selezionando l’opzione “IP statico”.
Accesso WLAN:
IT - 71
SSID:
inserire il nome SSID della rete oppure fare clic su “Nuova scansione“ per cercare
automaticamente tutte le reti.
Password:
inserire la password per la rete locale senza fili selezionata.
Indirizzo IP:
- Selezionando “Automatico” la rete assegna
automaticamente un indirizzo IP.
-Selezionando “IP statico” dovrete inserire
manualmente la rete tramite la quale
desiderate collegarvi.
Nota: se non dovesse essere possibile stabilire un collegamento con un’altra rete, chiedete al
vostro amministratore di rete delucidazioni sulle direttive valide nel vostro caso.
11.8 SERVIZI
11.8.1 SAMBA
L’accesso e lo scambio di dati sono molto semplici grazie a Windows File Service | Samba
(Mac). Questo servizio è attivato per default (vedere la schermata).
IT - 72
11.8.2 MEDIA SERVER
Funzioni:
(1)
Attivare o disattivare Media Server.
(2)
Consente di impostare il nome visualizzato nella rete.
(3)
Inserire il nome della cartella, che sarà disponibile su Media Server.
(4)
Modifica della directory di condivisione su Memory 2 Move.
(5)
Qui possono essere salvate le impostazioni modificate.
IT - 73
11.9 SISTEMA
11.9.1 IMPOSTAZIONI ORA
Esiste la possibilità di impostare manualmente un fuso orario e di eseguire una
sincronizzazione temporale automatica.
Se avete deciso di eseguire la selezione manuale di un fuso orario, potete fare clic sulla
freccia gialla vicino alla casella "Fuso orario" e selezionare dalla voce del menu il fuso orario,
a seconda della località.
Se si seleziona la sincronizzazione temporale automatica, l’orario viene aggiornato ogni volta
che ci si collega a Internet.
Opzioni per la sincronizzazione dell’orario:
Frequenza: ogni giorno, ogni due giorni, ogni tre giorni.... È possibile scegliere intervalli di
sincronizzazione fino a 7 giorni.
È possibile rinunciare alla sincronizzazione oraria automatica in ogni momento e selezionare
invece l’opzione “Rileva ora PC”. In tal caso viene rilevata l’ora del vostro PC: i due dispositivi
visualizzano dunque la stessa ora.
IT - 74
11.9.2 SALVA
Per salvare (backup) la configurazione del sistema Wi-Fi fare clic sul pulsante “Salva”. Si crea
un file con l’estensione .bin.gz grazie al quale è possibile, in seguito, se necessario,
ripristinare le impostazioni del sistema. Salvate questo file sul vostro PC.
Per eseguire il ripristino del sistema, fare clic sul pulsante “Ripristina”. Cercare e aprire il file
di backup e poi fare clic su “Salva” in basso, a destra, nella finestra di dialogo.
IT - 75
Durante il processo di ripristino compare un nuovo messaggio di avvertimento che fornisce
informazioni sullo stato attuale del processo stesso.
Una volta avvenuto il ripristino della configurazione del sistema, il dispositivo viene riavviato
automaticamente e si visualizza la schermata di login.
11.9.3 AGGIORNAMENTO FIRMWARE:
Se sul sito www.intenso.de è disponibile l’aggiornamento del firmware vi preghiamo di
eseguire le seguenti operazioni.
IT - 76
1.) Scaricare il firmware sul proprio computer.
2.) Fare clic sul pulsante “Aggiorna” e cercare l’aggiornamento del firmware appena
scaricato sul PC. Selezionare il file “Apri” per proseguire.
3.) Sotto il pulsante “Aggiorna” si visualizza il numero della versione del firmware al quale
il dispositivo deve essere aggiornato. Fare clic su “Salva” in basso, a destra, nella
schermata per avviare la procedura di aggiornamento del firmware.
Nota: in caso abbiate scaricato un formato errato, compare il seguente messaggio di
errore:
4.) Durante il processo di aggiornamento compare un messaggio di avvertimento che
fornisce informazioni sullo stato attuale del processo stesso.
Una volta avvenuto l’aggiornamento, il dispositivo viene riavviato automaticamente e
si visualizza la schermata di login.
IT - 77
11.9.4 RESET
Una volta resettato il dispositivo alle impostazioni di fabbrica, tutte le impostazioni stabilite
vengono cancellate e si ripristinano nuovamente le impostazioni predefinite.
Per selezionare il reset alle impostazioni di fabbrica, fare clic sul pulsante rotondo. Fare clic
sul pulsante “Salva” per avviare la procedura. Per escludere fraintendimenti, confermare la
selezione nei seguenti messaggi di avvertimento.
Durante il processo compare il seguente messaggio che fornisce informazioni sullo stato del
processo stesso.
Nota: dopo il reset del dispositivo viene resettata anche la password dell’amministratore. Si
ripristina dunque la password predefinita.
IT - 78
12. LICENZA INFORMAZIONE
Notice of GNU GENERAL PUBLIC LICENSE and LESSER GENERAL PUBLIC LICENCE
Dear Customer,
If interested, you and any third party can download the source code of used GPL / LGPL from
Intenso Webpage http://www.intenso.de . The source code of the desired product is
available to anyone on the selection of valid product category and the desired device. In the
product details you will find the entry "drivers". Open this menu to download the
corresponding GPL / LGPL code. For a fee of 35 € (delivery to another country as Germany),
it is also possible to obtain this code by postal delivery. More information about the
GPL/LGPL-Licence can you nd on following website www.gnu.org
GNU GENERAL PUBLIC LICENSE
Version 2, June 1991
Copyright (C) 1989, 1991 Free Software Foundation, Inc.
51 Franklin Street, Fifth Floor, Boston, MA 02110-1301, USA
Everyone is permitted to copy and distribute verbatim copies
of this license document, but changing it is not allowed.
Preamble
The licenses for most software are designed to take away your freedom to share and change
it. By contrast, the GNU General Public License is intended to guarantee your freedom to
share and change free software--to make sure the software is free for all its users. This
General Public License applies to most of the Free Software Foundation's software and to
any other program whose authors commit to using it. (Some other Free Software
Foundation software is covered by the GNU Lesser General Public License instead.) You can
apply it to your programs, too.
When we speak of free software, we are referring to freedom, not price. Our General Public
Licenses are designed to make sure that you have the freedom to distribute copies of free
software (and charge for this service if you wish), that you receive source code or can get it if
you want it, that you can change the software or use pieces of it in new free programs; and
that you know you can do these things.
IT - 79
To protect your rights, we need to make restrictions that forbid anyone to deny you these
rights or to ask you to surrender the rights. These restrictions translate to certain
responsibilities for you if you distribute copies of the software, or if you modify it.
For example, if you distribute copies of such a program, whether gratis or for a fee, you must
give the recipients all the rights that you have. You must make sure that they, too, receive or
can get the source code. And you must show them these terms so they know their rights.
We protect your rights with two steps: (1) copyright the software, and (2) offer you this
license which gives you legal permission to copy, distribute and/or modify the software.
Also, for each author's protection and ours, we want to make certain that everyone
understands that there is no warranty for this free software. If the software is modified by
someone else and passed on, we want its recipients to know that what they have is not the
original, so that any problems introduced by others will not reflect on the original authors'
reputations.
Finally, any free program is threatened constantly by software patents. We wish to avoid the
danger that redistributors of a free program will individually obtain patent licenses, in effect
making the program proprietary. To prevent this, we have made it clear that any patent
must be licensed for everyone's free use or not licensed at all.
The precise terms and conditions for copying, distribution and modification follow.
TERMS AND CONDITIONS FOR COPYING, DISTRIBUTION AND MODIFICATION
0. This License applies to any program or other work which contains a notice placed by the
copyright holder saying it may be distributed under the terms of this General Public License.
The "Program", below, refers to any such program or work, and a "work based on the
Program" means either the Program or any derivative work under copyright law: that is to
say, a work containing the Program or a portion of it, either verbatim or with modifications
and/or translated into another language. (Hereinafter, translation is included without
limitation in the term "modification".) Each licensee is addressed as "you".
Activities other than copying, distribution and modification are not covered by this License;
they are outside its scope. The act of running the Program is not restricted, and the output
from the Program is covered only if its contents constitute a work based on the Program
(independent of having been made by running the Program). Whether that is true depends
on what the Program does.
1. You may copy and distribute verbatim copies of the Program's source code as you receive
it, in any medium, provided that you conspicuously and appropriately publish on each copy
an appropriate copyright notice and disclaimer of warranty; keep intact all the notices that
IT - 80
refer to this License and to the absence of any warranty; and give any other recipients of the
Program a copy of this License along with the Program.
You may charge a fee for the physical act of transferring a copy, and you may at your option
offer warranty protection in exchange for a fee.
2. You may modify your copy or copies of the Program or any portion of it, thus forming a
work based on the Program, and copy and distribute such modifications or work under the
terms of Section 1 above, provided that you also meet all of these conditions:
a) You must cause the modified files to carry prominent notices stating that you changed the
files and the date of any change.
b) You must cause any work that you distribute or publish, that in whole or in part contains
or is derived from the Program or any part thereof, to be licensed as a whole at no charge to
all third parties under the terms of this License.
c) If the modified program normally reads commands interactively when run, you must
cause it, when started running for such interactive use in the most ordinary way, to print or
display an announcement including an appropriate copyright notice and a notice that there
is no warranty (or else, saying that you provide a warranty) and that users may redistribute
the program under these conditions, and telling the user how to view a copy of this License.
(Exception: if the Program itself is interactive but does not normally print such an
announcement, your work based on the Program is not required to print an announcement.)
These requirements apply to the modified work as a whole. If identifiable sections of that
work are not derived from the Program, and can be reasonably considered independent and
separate works in themselves, then this License, and its terms, do not apply to those
sections when you distribute them as separate works. But when you distribute the same
sections as part of a whole which is a work based on the Program, the distribution of the
whole must be on the terms of this License, whose permissions for other licensees extend to
the entire whole, and thus to each and every part regardless of who wrote it.
Thus, it is not the intent of this section to claim rights or contest your rights to work written
entirely by you; rather, the intent is to exercise the right to control the distribution of
derivative or collective works based on the Program.
In addition, mere aggregation of another work not based on the Program with the Program
(or with a work based on the Program) on a volume of a storage or distribution medium
does not bring the other work under the scope of this License.
3. You may copy and distribute the Program (or a work based on it, under Section 2) in
object code or executable form under the terms of Sections 1 and 2 above provided that you
also do one of the following:
IT - 81
a) Accompany it with the complete corresponding machine-readable source code, which
must be distributed under the terms of Sections 1 and 2 above on a medium customarily
used for software interchange; or,
b) Accompany it with a written offer, valid for at least three years, to give any third party, for
a charge no more than your cost of physically performing source distribution, a complete
machine-readable copy of the corresponding source code, to be distributed under the terms
of Sections 1 and 2 above on a medium customarily used for software interchange; or,
c) Accompany it with the information you received as to the offer to distribute
corresponding source code. (This alternative is allowed only for noncommercial distribution
and only if you received the program in object code or executable form with such an offer, in
accord with Subsection b above.)
The source code for a work means the preferred form of the work for making modifications
to it. For an executable work, complete source code means all the source code for all
modules it contains, plus any associated interface definition files, plus the scripts used to
control compilation and installation of the executable. However, as a special exception, the
source code distributed need not include anything that is normally distributed (in either
source or binary form) with the major components (compiler, kernel, and so on) of the
operating system on which the executable runs, unless that component itself accompanies
the executable.
If distribution of executable or object code is made by offering access to copy from a
designated place, then offering equivalent access to copy the source code from the same
place counts as distribution of the source code, even though third parties are not compelled
to copy the source along with the object code.
4. You may not copy, modify, sublicense, or distribute the Program except as expressly
provided under this License. Any attempt otherwise to copy, modify, sublicense or distribute
the Program is void, and will automatically terminate your rights under this License.
However, parties who have received copies, or rights, from you under this License will not
have their licenses terminated so long as such parties remain in full compliance.
5. You are not required to accept this License, since you have not signed it. However,
nothing else grants you permission to modify or distribute the Program or its derivative
works. These actions are prohibited by law if you do not accept this License. Therefore, by
modifying or distributing the Program (or any work based on the Program), you indicate your
acceptance of this License to do so, and all its terms and conditions for copying, distributing
or modifying the Program or works based on it.
6. Each time you redistribute the Program (or any work based on the Program), the recipient
automatically receives a license from the original licensor to copy, distribute or modify the
IT - 82
Program subject to these terms and conditions. You may not impose any further restrictions
on the recipients' exercise of the rights granted herein. You are not responsible for enforcing
compliance by third parties to this License.
7. If, as a consequence of a court judgment or allegation of patent infringement or for any
other reason (not limited to patent issues), conditions are imposed on you (whether by court
order, agreement or otherwise) that contradict the conditions of this License, they do not
excuse you from the conditions of this License. If you cannot distribute so as to satisfy
simultaneously your obligations under this License and any other pertinent obligations, then
as a consequence you may not distribute the Program at all. For example, if a patent license
would not permit royalty-free redistribution of the Program by all those who receive copies
directly or indirectly through you, then the only way you could satisfy both it and this License
would be to refrain entirely from distribution of the Program.
If any portion of this section is held invalid or unenforceable under any particular
circumstance, the balance of the section is intended to apply and the section as a whole is
intended to apply in other circumstances.
It is not the purpose of this section to induce you to infringe any patents or other property
right claims or to contest validity of any such claims; this section has the sole purpose of
protecting the integrity of the free software distribution system, which is implemented by
public license practices. Many people have made generous contributions to the wide range
of software distributed through that system in reliance on consistent application of that
system; it is up to the author/donor to decide if he or she is willing to distribute software
through any other system and a licensee cannot impose that choice.
This section is intended to make thoroughly clear what is believed to be a consequence of
the rest of this License.
8. If the distribution and/or use of the Program is restricted in certain countries either by
patents or by copyrighted interfaces, the original copyright holder who places the Program
under this License may add an explicit geographical distribution limitation excluding those
countries, so that distribution is permitted only in or among countries not thus excluded. In
such case, this License incorporates the limitation as if written in the body of this License.
9. The Free Software Foundation may publish revised and/or new versions of the General
Public License from time to time. Such new versions will be similar in spirit to the present
version, but may differ in detail to address new problems or concerns.
Each version is given a distinguishing version number. If the Program specifies a version
number of this License which applies to it and "any later version", you have the option of
following the terms and conditions either of that version or of any later version published by
IT - 83
the Free Software Foundation. If the Program does not specify a version number of this
License, you may choose any version ever published by the Free Software Foundation.
10. If you wish to incorporate parts of the Program into other free programs whose
distribution conditions are different, write to the author to ask for permission. For software
which is copyrighted by the Free Software Foundation, write to the Free Software
Foundation; we sometimes make exceptions for this. Our decision will be guided by the two
goals of preserving the free status of all derivatives of our free software and of promoting
the sharing and reuse of software generally.
NO WARRANTY
11. BECAUSE THE PROGRAM IS LICENSED FREE OF CHARGE, THERE IS NO WARRANTY FOR
THE PROGRAM, TO THE EXTENT PERMITTED BY APPLICABLE LAW. EXCEPT WHEN
OTHERWISE STATED IN WRITING THE COPYRIGHT HOLDERS AND/OR OTHER PARTIES
PROVIDE THE PROGRAM "AS IS" WITHOUT WARRANTY OF ANY KIND, EITHER EXPRESSED OR
IMPLIED, INCLUDING, BUT NOT LIMITED TO, THE IMPLIED WARRANTIES OF
MERCHANTABILITY AND FITNESS FOR A PARTICULAR PURPOSE. THE ENTIRE RISK AS TO THE
QUALITY AND PERFORMANCE OF THE PROGRAM IS WITH YOU. SHOULD THE PROGRAM
PROVE DEFECTIVE, YOU ASSUME THE COST OF ALL NECESSARY SERVICING, REPAIR OR
CORRECTION.
12. IN NO EVENT UNLESS REQUIRED BY APPLICABLE LAW OR AGREED TO IN WRITING WILL
ANY COPYRIGHT HOLDER, OR ANY OTHER PARTY WHO MAY MODIFY AND/OR REDISTRIBUTE
THE PROGRAM AS PERMITTED ABOVE, BE LIABLE TO YOU FOR DAMAGES, INCLUDING ANY
GENERAL, SPECIAL, INCIDENTAL OR CONSEQUENTIAL DAMAGES ARISING OUT OF THE USE
OR INABILITY TO USE THE PROGRAM (INCLUDING BUT NOT LIMITED TO LOSS OF DATA OR
DATA BEING RENDERED INACCURATE OR LOSSES SUSTAINED BY YOU OR THIRD PARTIES OR
A FAILURE OF THE PROGRAM TO OPERATE WITH ANY OTHER PROGRAMS), EVEN IF SUCH
HOLDER OR OTHER PARTY HAS BEEN ADVISED OF THE POSSIBILITY OF SUCH DAMAGES.
END OF TERMS AND CONDITIONS
How to Apply These Terms to Your New Programs
If you develop a new program, and you want it to be of the greatest possible use to the
public, the best way to achieve this is to make it free software which everyone can
redistribute and change under these terms.
To do so, attach the following notices to the program. It is safest to attach them to the start
of each source file to most effectively convey the exclusion of warranty; and each file should
have at least the "copyright" line and a pointer to where the full notice is found.
one line to give the program's name and an idea of what it does.
IT - 84
Copyright (C) yyyy name of author
This program is free software; you can redistribute it and/or
modify it under the terms of the GNU General Public License
as published by the Free Software Foundation; either version 2
of the License, or (at your option) any later version.
This program is distributed in the hope that it will be useful,
but WITHOUT ANY WARRANTY; without even the implied warranty of
MERCHANTABILITY or FITNESS FOR A PARTICULAR PURPOSE. See the
GNU General Public License for more details.
You should have received a copy of the GNU General Public License
along with this program; if not, write to the Free Software
Foundation, Inc., 51 Franklin Street, Fifth Floor, Boston, MA 02110-1301, USA.
Also add information on how to contact you by electronic and paper mail.
If the program is interactive, make it output a short notice like this when it starts in an
interactive mode:
Gnomovision version 69, Copyright (C) year name of author
Gnomovision comes with ABSOLUTELY NO WARRANTY; for details
type `show w'. This is free software, and you are welcome
to redistribute it under certain conditions; type `show c'
for details.
The hypothetical commands `show w' and `show c' should show the appropriate parts of the
General Public License. Of course, the commands you use may be called something other
than `show w' and `show c'; they could even be mouse-clicks or menu items--whatever suits
your program.
IT - 85
You should also get your employer (if you work as a programmer) or your school, if any, to
sign a "copyright disclaimer" for the program, if necessary. Here is a sample; alter the
names:
Yoyodyne, Inc., hereby disclaims all copyright
interest in the program `Gnomovision'
(which makes passes at compilers) written
by James Hacker.
signature of Ty Coon, 1 April 1989
Ty Coon, President of Vice
PT - 1
ÍNDICE
1. Panorâmica geral do produto .................................................................................................................................. 4
2. Funções do produto................................................................................................................................................. 4
3. Material fornecido ................................................................................................................................................... 6
4. Especificações técnicas ............................................................................................................................................ 6
5. Requisitos mínimos.................................................................................................................................................. 6
6. Panorâmica do produto ........................................................................................................................................... 7
7. Ligações disponíveis ................................................................................................................................................ 7
7.1 RJ45 WAN Port ........................................................................................................................................................ 7
7.2 Interface Micro USB 3.0 ........................................................................................................................................... 7
7.3 Indicação LED ........................................................................................................................................................... 8
8. Utilização de um PC ou MAC ................................................................................................................................... 9
8.1 Estabelecimento de uma ligação Wireless LAN a um PC ......................................................................................... 9
8.2 PC WiFi Finder........................................................................................................................................................ 10
8.2.1 Meu armazenamento ............................................................................................................................................ 11
8.3 Estabelecimento de uma ligação Wireless LAN a um MAC ................................................................................... 12
8.3.1 MAC WiFi Finder .................................................................................................................................................... 13
8.3.2 Meu armazenamento ............................................................................................................................................ 15
8.4 Configuração do Memory 2 Move ......................................................................................................................... 16
9. Utilização de dispositivos móveis .......................................................................................................................... 20
9.1 Instalação da aplicação iOS Memory 2 Move ........................................................................................................ 20
9.2 Ligação sem fios ao iPhone/iPad ........................................................................................................................... 21
9.3 Login do utilizador (iOS)......................................................................................................................................... 22
9.4 Instalação da aplicação Android Memory 2 Move ................................................................................................ 23
9.5 Ligação sem fios a um dispositivo Android ............................................................................................................ 23
9.6 Login do utilizador (Android) ................................................................................................................................. 25
10. Funções básicas ..................................................................................................................................................... 26
10.1 Utilização para dispositivos iOS ............................................................................................................................. 26
10.2 Utilização para dispositivos Android ...................................................................................................................... 28
PT - 2
10.3 Definições Wi-Fi (iOS e Android) ............................................................................................................................ 30
10.3.1 Interface de definições Wi-Fi ................................................................................................................................. 30
10.3.2 Mudar o nome do dispositivo ................................................................................................................................ 30
10.3.3 Segurança .............................................................................................................................................................. 31
10.3.4 Acessos à Internet ................................................................................................................................................. 31
10.4 Reproduzir ficheiros de música / áudio (IOS / Android) ........................................................................................ 33
10.5 Reproduzir filmes / vídeos ..................................................................................................................................... 35
10.5.1 iOS ......................................................................................................................................................................... 35
10.5.2 Android .................................................................................................................................................................. 37
10.6 Reprodução de ficheiros de imagem ..................................................................................................................... 38
10.6.1 iOS ......................................................................................................................................................................... 38
10.6.2 Android .................................................................................................................................................................. 41
10.7 Partilha de ficheiros de imagem ............................................................................................................................ 44
10.7.1 iOS ......................................................................................................................................................................... 44
10.7.2 Android .................................................................................................................................................................. 45
10.8 Abrir/exibir documentos ....................................................................................................................................... 47
10.8.1 iOS ......................................................................................................................................................................... 47
10.8.2 Android .................................................................................................................................................................. 48
10.9 Copiar, apagar, carregar e descarregar ficheiros (iOS e Android) .......................................................................... 49
10.10 Download de ficheiros para o seu dispositivo iOS/Android ................................................................................... 51
10.11 Upload de ficheiros para o disco Wi-Fi (iOS e Android) ......................................................................................... 53
10.12 Apagar ficheiros (iOS e Android) ............................................................................................................................ 55
10.13 Vista geral e estado dos seus uploads/downloads ................................................................................................ 56
10.14 Terminar a aplicação Memory 2 Move .................................................................................................................. 56
10.14.1 iOS ......................................................................................................................................................................... 56
10.14.2 Android .................................................................................................................................................................. 57
10.15. Desinstalar a aplicação Memory 2 Move ............................................................................................................... 57
10.15.1 iOS ......................................................................................................................................................................... 57
10.15.2 Android .................................................................................................................................................................. 58
11. Funções de gestão WEB ......................................................................................................................................... 59
PT - 3
11.1 Função Explorer ..................................................................................................................................................... 60
11.2 Menu de contexto (exceto para Mac) ................................................................................................................... 61
11.3 Abreviaturas do teclado ........................................................................................................................................ 64
11.4 Drag and Drop ....................................................................................................................................................... 64
11.5 Informações ........................................................................................................................................................... 64
11.5.1 Informações sobre o dispositivo ............................................................................................................................ 64
11.5.2 Informações sobre a memória ............................................................................................................................... 65
11.5.3 Informações sobre a rede ...................................................................................................................................... 65
11.6 Definições .............................................................................................................................................................. 66
11.6.1 Utilizador ............................................................................................................................................................... 66
11.6.2 Disco ...................................................................................................................................................................... 66
11.7 Rede ....................................................................................................................................................................... 67
11.7.1 Host Name ............................................................................................................................................................. 67
11.7.2 Wi-Fi & LAN ........................................................................................................................................................... 68
11.7.3 Servidor DHCP ....................................................................................................................................................... 69
11.7.4 Acesso à Internet ................................................................................................................................................... 70
11.8 Serviços .................................................................................................................................................................. 71
11.8.1 Samba .................................................................................................................................................................... 71
11.8.2 Media Server ......................................................................................................................................................... 72
11.9 Sistema .................................................................................................................................................................. 73
11.9.1 Definições da hora ................................................................................................................................................. 73
11.9.2 Segurança .............................................................................................................................................................. 74
11.9.3 Atualização do firmware ........................................................................................................................................ 75
11.9.4 Reset ...................................................................................................................................................................... 77
12. Licença informação ................................................................................................................................................ 78
PT - 4
1. PANORÂMICA GERAL DO PRODUTO
O Memory 2 Move permite-lhe um acesso sem fios aos seus vídeos, músicas, fotos e dados,
com vista a transferi-los (stream) para o seu iPad®, iPhone®,Tablet PC, smartphone e portátil
sem um emaranhado de cabos desnecessário.
Graças ao disco rígido integrado deixa de se preocupar com o espaço limitado dos seus
dispositivos móveis e a porta USB 3.0 incorporada permite uma transferência de dados
rápida e simples.
Para assegurar a melhor mobilidade possível, o Memory 2 Move dispõe de uma bateria
recarregável. Para a carregar, pode simplesmente ligar o dispositivo ao seu computador
através de uma porta USB livre, ao mesmo tempo que copia os seus ficheiros para o disco
rígido. Num piscar de olhos o dispositivo estará pronto a usar. Mesmo durante o processo de
carregamento é possível aceder ao Memory 2 Move.
2. FUNÇÕES DO PRODUTO
Transferência de ficheiros mídia através de uma ligação Wi-Fi para até 5 utilizadores
em simultâneo.
Acesso aos seus ficheiros de música, vídeo e fotos através de uma aplicação gratuita
para iOS e Android.
Duração da bateria até 5 horas*.
Acesso à Internet através de ligação RJ45 opcional (ligação LAN) ou por rede sem fios
802.11 b/g/n padrão
Suporta formatação NTFS e FAT32
Suporta troca de dados multiplataforma através da ligação LAN entre Windows, Mac,
iOS e Linux.
Suporta aplicações do utilizador nas mais diferentes plataformas, incluindo
Windows/Mac/Linux/iPad/iPhone/Android
*A duração exata da bateria depende das aplicações e configurações usadas.
PT - 5
Utilização como disco externo: A porta USB 3.0 integrada permite uma transferência mais
rápida de dados e consegue carregar a bateria interna, desde que o Memory 2 Move esteja
conectado a um computador ou fonte de alimentação. No entanto, apenas funciona quando
o dispositivo está apagado.
Utilização através da ligação LAN: Para isso, ligue uma extremidade do seu cabo RJ45 ao
Memory 2 Move e a outra à porta livre do seu router. Agora, ative a função DHCP no seu
Memory 2 Move para uma atribuição automática do endereço IP.
Utilização sem fios: Ligue o Memory 2 Move ao seu router sem fios tal como é descrito no
manual que se segue, para conseguir aceder à Internet por Wi-Fi.
PT - 6
3. MATERIAL FORNECIDO
Cabo USB 3.0 Memory 2 Move
CD
Manual de instruções
Fonte de alimentação (KTEC KSAS0060500100VEU 5V / 1A)
4. ESPECIFICAÇÕES TÉCNICAS
Dimensões 127.3mm (C) X 80mm (L) X 25mm (A)
Wi-Fi:
o Padrão: 802.11 b/g/n,
o Frequência: 2.4 GHZ
o Taxas de transferência: 72Mbps (20MHz) / 150Mbps (40MHz)
Interface de rede: 100Mbps Ethernet RJ45
Porta USB: Micro USB 3.0, para transferência de dados e
carregamento da bateria
Capacidade da bateria: 3000mAh
Temperatura de serviço: A temperatura de serviço ideal encontra-se entre 5 °C e
35 °C
5. REQUISITOS MÍNIMOS
Ligação à Internet
Requisitos do sistema:
o Windows: XP/Vista/Windows 7/8
o Mac: OS X 10.6.0 e superior
o Outros: Fedora 12 (Linux) e superior
Navegador de Internet para PC
o Windows: Suporta Internet Explorer 7.0 e superior
o Mac: Suporta Safari 3.0 e superior
o Outros: Firefox 3.5 e superior
Router ou Switch
PT - 7
6. PANORÂMICA DO PRODUTO
7. LIGAÇÕES DISPONÍVEIS
7.1 RJ45 WAN PORT
A. Modo Router: O Memory 2 Move funciona como um router convencional e pode
atribuir endereços IP a computadores que estejam conectados por WLAN.
B. Modo WLAN: Permite uma ligação a uma rede já existente.
7.2 INTERFACE MICRO USB 3.0
A porta USB 3.0 integrada permite uma transferência mais rápida de dados e consegue
carregar a bateria interna, desde que o Memory 2 Move esteja conectado a um computador
ou fonte de alimentação. No entanto, apenas funciona quando o dispositivo está apagado.
PT - 8
7.3 INDICAÇÃO LED
LED de energia:
- Apagado: O dispositivo está desligado.
- Sempre aceso verde: A bateria está completamente carregada.
- A piscar rapidamente - verde: O dispositivo está a desligar.
- A piscar lentamente - verde: O dispositivo está a carregar.
- Sempre aceso - vermelho: Carga da bateria inferior a 30%
- A piscar rapidamente - vermelho: Carga da bateria crítica
LED HDD (disco):
- Sempre aceso em branco: Modo de prontidão
- A piscar em branco: Processo de leitura/escrita ativo
- Ligado através de porta USB:
o Sempre aceso em azul: Ligado na porta USB 3.0
o Sempre aceso em branco: Ligado na porta USB 2.0
LED Wi-Fi - azul:
- Intermitente: O processo de inicialização está a ser iniciado.
- LED não acende: O dispositivo está desligado ou sem
abastecimento de energia
- Sempre aceso:
o Processo de inicialização concluído
o Modo de prontidão - os dispositivos podem ser ligados.
LED de Internet:
- Modo Router
o Cor azul: Boa qualidade do sinal
o Azul/vermelho em alternância: Má qualidade do sinal
o LED não acende: Sem ligação à Internet
- Função Bridge
o Cor azul: Boa qualidade do sinal
o LED não acende: Sem ligação à Internet
PT - 9
8. UTILIZAÇÃO DE UM PC OU MAC
8.1 ESTABELECIMENTO DE UMA LIGAÇÃO WIRELESS LAN A UM PC
Ligue o dispositivo Wi-Fi premindo o botão Power (energia) na parte dianteira do dispositivo.
Ative a função WLAN no seu PC e clique no símbolo WLAN presente na parte inferior direita
da barra de tarefas. Abre-se a seguinte indicação:
Selecione a rede com o nome "Memory2Move-XXXX".
Nota: A senha predefinida na entrega do equipamento é "intenso1". Depois de a ligação
estar estabelecida, escolha uma nova senha por razões de segurança.
Depois de ter estabelecido com sucesso uma ligação ao seu dispositivo Wi-Fi, instale o Client
Software fornecido tal como indicado a seguir:
Para ligar ao seu computador o dispositivo Wi-Fi conectado é necessário usar a Software
Tool "WiFi Finder" fornecida que se encontra no CD do controlador em anexo. O software
procura automaticamente na sua rede o dispositivo Wi-Fi ligado.
Basta clicar duas vezes no ícone e seguir as instruções no ecrã.
PT - 10
8.2 PC WIFI FINDER
Inicie a aplicação clicando duas vezes na ligação "WiFi Finder". O software procura
automaticamente na rede conectada o Memory 2 Move (veja screenshot).
Nota: Se o "M2M" não aparecer na lista de clientes conectados na rede, clique em
"Atualizar", para procurar novamente o dispositivo Wi-Fi.
1.) Por favor, escolha Memória 2 Move no menu e clique em "Entrar" para se conectar à
interface de administração web.
PT - 11
2.) Digite o nome de usuário ea senha associada
Nome de utilizador: admin
Senha: 00000
Nota: Depois de a ligação estar estabelecida, escolha uma nova senha por razões de
segurança.
8.2.1 MEU ARMAZENAMENTO
Se selecionar o item do menu "My Storage" ou "Meu armazen.", será exibida a imagem que
se segue. Para se conectar corretamente, utilize os seguintes detalhes para login:
Nome de utilizador: admin
Senha: 00000
Nota: Depois de a ligação estar estabelecida, escolha uma nova senha por razões de
segurança.
PT - 12
8.3 ESTABELECIMENTO DE UMA LIGAÇÃO WIRELESS LAN A UM MAC
Ligue o dispositivo Wi-Fi premindo o botão Power (energia) na parte dianteira do dispositivo.
Aguarde alguns minutos, até o LED parar de piscar. Ative a função WLAN no seu PC e clique
no símbolo WLAN presente na parte inferior direita da barra de tarefas. Selecione a rede
com o nome "Memory2Move-XXXX".
Nota: A senha predefinida na entrega do equipamento é "intenso1". Depois de a ligação
estar estabelecida, escolha uma nova senha por razões de segurança.
Depois de ter estabelecido com sucesso uma ligação ao seu dispositivo Wi-Fi, instale o Client
Software fornecido tal como indicado a seguir:
Para ligar ao seu computador o dispositivo Wi-Fi conectado, é necessário usar a Software
Tool "WiFi Finder" fornecida que se encontra no CD do controlador em anexo. O software
procura automaticamente na sua rede o dispositivo Wi-Fi ligado.
Basta clicar duas vezes no ícone e seguir as instruções no ecrã.
PT - 13
8.3.1 MAC WIFI FINDER
Clique duas vezes na ligação para iniciar a aplicação "WiFi Finder". O software procura
automaticamente na rede conectada o Memory 2 Move (veja screenshot).
Nota: Se o "M2M" não aparecer na lista de clientes conectados na rede, clique em
"Atualizar", para procurar novamente o dispositivo Wi-Fi.
1.) Por favor, escolha Memória 2 Move no menu e clique em "Entrar" para se conectar à
interface de administração web.
PT - 14
2.) Digite o nome de usuário ea senha associada
Nome de utilizador: admin
Senha: 00000
Nota: Depois de a ligação estar estabelecida, escolha uma nova senha por razões de
segurança.
PT - 15
8.3.2 MEU ARMAZENAMENTO
Se selecionar o item do menu "My Storage" ou "Meu armazen.", será exibida a imagem que
se segue. Para se conectar corretamente, utilize os seguintes detalhes para login:
Nome de utilizador: admin
Senha: 00000
Nota: Depois de a ligação estar estabelecida, escolha uma nova senha por razões de
segurança.
Pode criar, apagar, copiar, editar, mudar o nome e deslocar diretórios e pastas no Memory 2
Move.
Além disso, é possível trocar dados (upload/download) entre o seu MAC e o Memory 2 Move
e vice-versa.
PT - 16
8.4 CONFIGURAÇÃO DO MEMORY 2 MOVE
Utilize o PC Client Software, como descrito anteriormente, para estabelecer uma ligação ao
dispositivo Wi-Fi e faça login como administrador na interface do administrador. Pode
configurar agora o seu dispositivo.
Assistente inicial
Durante a primeira utilização do dispositivo e após um login correto inicia-se o chamado
"Assistente de início", que lhe permite efetuar todas as configurações importantes com
maior facilidade.
Nota: Se clicar no X (no lado superior direito no Assistente), sai do Assistente de início e
todas as definições de fábrica serão assumidas como configurações padrão.
Clique no botão "Seguinte", para configurar o seu dispositivo.
Definição do acesso à Internet
. através do estabelecimento de uma ligação a uma outra rede disponível
PT - 17
Pode escolher entre 2 opções de acesso à internet disponíveis. Na configuração padrão está
predefinido o acesso por cabo (tal como é visível na imagem em cima).
A. Acesso sem fios (WLAN):
Ligue o M2M a um outro router WLAN, para conseguir uma ligação à Internet.
B. Acesso com fio (LAN):
Ligue o M2M diretamente a uma porta disponível na parte traseira do seu router,
para ligar a uma outra rede.
Acesso LAN:
Na configuração básica está selecionado o "IP dinâmico". Pode atribuir o endereço IP
manualmente, clicando na seta amarela e selecionando a opção "IP estático".
Acesso WLAN:
SSID: Introduza o nome do SSID da sua rede ou clique em "Nova
procura", para procurar automaticamente todas as redes
disponíveis
Senha: Introduza a senha para a rede sem fios local.
Endereço IP: -Se selecionar "Automático" a rede disponibiliza
automaticamente um endereço IP.
-Se selecionar "IP estático" deve introduzir o seu
endereço IP para a rede, à qual se pretende ligar.
Nota: Se clicar no X (do lado superior direito) pode sair do menu de opções LAN.
PT - 18
Nota: Se não conseguir estabelecer nenhuma ligação a uma outra rede, consulte o seu
administrador de rede sobre as diretivas em vigor para o seu caso!
Clique em "Seguinte", para prosseguir com a configuração do Memory 2 Move. Irá definir
agora as definições de Wi-Fi e de LAN.
Definições Wi-Fi & LAN
- SSID: Introduza aqui o nome da sua rede. Na configuração básica encontra-
se aqui "Memory2Move-XXXX". 32 caracteres são o máximo possível
para o nome SSID.
- Canal: Introduza aqui o canal, por onde o dispositivo Wi-Fi deve realizar
o envio e a receção. A configuração básica é "Auto"- O canal é, neste
caso, estabelecido automaticamente pelo dispositivo. Também pode
determinar manualmente, por que canal se deve receber e enviar.
Estão disponíveis os canais 1 a 13.
- Modo Wi-Fi: O padrão de rede sem fios predefinido é:
802.11/b/g/n. Também pode ajustar manualmente os modos 11Mbps
(802.11b), 54 Mbps (802.11g) ou 150Mbps (802.11n).
- Segurança: No estado de fornecimento está selecionado WPA/WPA2-PSK
combinada. Pode escolher entre os seguintes tipos de encriptação:
Nenhuma encriptação,WPA-PSK,WPA2-PSK, WPA/WPA2-
PSK combinada.
- Senha: De acordo com o tipo de encriptação, introduza uma senha com no
mínimo 8 e no máximo 63 caracteres.
PT - 19
- Endereço IP: O endereço IP predefinido é: 10.10.10.254 com a máscara de sub-
rede 255.255.255.0. Este endereço IP pode ser alterado manualmente.
Clique em "Seguinte", para determinar a senha do administrador. Se clicar em "Saltar",
desiste de determinar uma nova senha e assume o que foi predefinido.
Depois de terminar o assistente de início, o sistema reinicia. Este processo demora 2
minutos. Pode consultar o estado atual na informação.
PT - 20
9. UTILIZAÇÃO DE DISPOSITIVOS MÓVEIS
9.1 INSTALAÇÃO DA APLICAÇÃO IOS MEMORY 2 MOVE
1. Clique no ícone da aplicação no seu ecrã inicial, tal como se pode ver na seguinte
imagem. Procure a aplicação gratuita "Memory 2 Move" e siga as instruções de
instalação no ecrã.
Assim que a instalação tiver sido concluída com sucesso, irá encontrar a aplicação "Memory
2 Move" no ecrã inicial do seu dispositivo (veja a imagem seguinte).
PT - 21
9.2 LIGAÇÃO SEM FIOS AO IPHONE/IPAD
1. Ligue o Memory 2 Move. Aguarde alguns minutos até a inicialização do dispositivo ter
terminado. Isso é assinalado pelo LED Wi-Fi em azul, que começa a piscar depois de
terminada a inicialização.
2. Clique no ícone das "Definições", tal como se pode ver na seguinte imagem.
3. Clique na opção do menu "Wi-Fi". Na lista das redes Wi-Fi existentes deve ser
indicada a rede "Memory2Move-XXXX".
Clique nesta rede, tal como se pode ver na seguinte imagem. Se, no passo 8.4., em
"Definições Wi-Fi & Lan" tiver estabelecido uma senha, introduza-a agora.
Assim que selecionar "Memory2Move-XXXX" surge um visto antes de SSID e o logótipo Wi-Fi
é exibido no canto superior esquerdo do dispositivo.
PT - 22
9.3 LOGIN DO UTILIZADOR (IOS)
Clique no logótipo do "Memory 2 Move" para abrir a aplicação, tal como é indicado na
imagem.
Introduza a senha do administrador que atribuiu durante a configuração (definições de
fábrica: 00000). A senha apenas é necessária no primeiro início de sessão (login). O
dispositivo guarda a sua introdução de forma que no 2º login já não a solicita.
Assim que a senha tiver sido introduzida corretamente, entra automaticamente no menu
"Memory 2 Move". É o seu acesso direto ao disco Wi-Fi.
PT - 23
9.4 INSTALAÇÃO DA APLICAÇÃO ANDROID MEMORY 2 MOVE
1. Abra o "Google Playstore" ou o "App Center" e procure a aplicação gratuita "Memory
2 Move".
2. Siga as instruções de instalação no ecrã, tal como se pode ver na imagem que se
segue.
3. Assim que a instalação tiver sido concluída com sucesso, irá encontrar a aplicação
"Memory 2 Move" no ecrã inicial do seu dispositivo (veja a imagem seguinte).
9.5 LIGAÇÃO SEM FIOS A UM DISPOSITIVO ANDROID
1. Ligue o Memory 2 Move. Aguarde alguns minutos até a inicialização do dispositivo ter
terminado. Isso é assinalado pelo LED Wi-Fi em azul, que começa a piscar depois de
terminada a inicialização.
PT - 24
2. Clique no ícone das "Definições", tal como se pode ver na imagem que se segue.
3. Ative a função Wi-Fi, deslocando o “interruptor virtual“ para a direita.
Na lista de redes Wi-Fi existentes deve ser indicada a rede "Memory2Move-XXXX".
Clique nesta rede, tal como se pode ver na imagem que se segue. Se, no passo 8, em
"Definições Wi-Fi & Lan" tiver estabelecido uma senha, introduza-a agora.
4. Se o dispositivo tiver sido conectado com sucesso ao disco Wi-Fi, surgirá a palavra
“Ligado” no SSID.
PT - 25
9.6 LOGIN DO UTILIZADOR (ANDROID)
1. Clique no logótipo da aplicação “Memory 2 Move”, para iniciar a aplicação (veja a
imagem que se segue).
2. Introduza a senha do administrador que atribuiu durante a configuração (definições
de fábrica: 00000). A senha apenas é necessária no primeiro início de sessão (login).
O dispositivo guarda a sua introdução de forma que no 2º login já não a solicita.
3. Assim que a senha tiver sido introduzida corretamente, entra automaticamente no
menu "Memory 2 Move". É o seu acesso direto ao disco Wi-Fi.
PT - 26
10. FUNÇÕES BÁSICAS
10.1 UTILIZAÇÃO PARA DISPOSITIVOS IOS
Assim que se tiver conectado corretamente ao "Memory 2 Move", entra automaticamente
no menu "Memory 2 Move". É o seu acesso direto ao disco Wi-Fi. O menu "Meu Dispos"
destina-se ao seu acesso ao dispositivo, que é utilizado atualmente para a ligação ao
Memory 2 Move.
Pode selecionar os seguintes subpontos nos menus:
Menu principal "Meu Dispos" Para a organização dos seus ficheiros estão disponíveis de
fábrica as pastas "Documentos”, "Música”, "Fotos”, "Vídeos” e "iPad”/ "iPhone”.
Menu principal "Memory 2 Move" Acesso aos ficheiros no Memory 2 Move.
PT - 27
Tecla Home Volta ao menu principal.
Tecla de vista Entra na vista geral de
miniaturas ou listas.
Tecla de definições Entra no menu de
definições do disco Wi-Fi.
Tecla para retroceder Volta para o menu
anterior.
Tecla de gestão Para selecionar mais ficheiros
para carregar ou descarregar e apagar.
Memory 2 Move Acesso ao disco Wi-Fi.
Meu dispos Destina-se ao acesso ao dispositivo
utilizado atualmente para a ligação ao
dispositivo Wi-Fi.
Tecla de estado Entra na vista geral de estado
dos seus downloads/uploads, mostra o número
da versão e o último título reproduzido.
PT - 28
10.2 UTILIZAÇÃO PARA DISPOSITIVOS ANDROID
Assim que se tiver conectado corretamente ao Memory 2 Move, entra automaticamente no
menu "Memory 2 Move", sendo este o seu acesso direto ao disco Wi-Fi. O menu "Meu
Dispos" destina-se ao seu acesso ao dispositivo utilizado atualmente para a ligação ao
Memory 2 Move.
Pode selecionar os seguintes subpontos nos menus:
Menu principal "Meu Dispos" Para a organização dos seus ficheiros estão disponíveis de
fábrica as pastas "Documentos”, "Música”, "Fotos”, "Vídeos” e "CartãoSD”.
Menu principal "Memory 2 Move" Acesso aos ficheiros no Memory 2 Move.
PT - 29
Tecla Home Volta ao menu principal.
Tecla de vista Entra na vista geral de
miniaturas ou listas.
Tecla de definições Entra no menu de
definições do disco Wi-Fi.
Tecla para retroceder Volta para o menu
anterior.
Tecla de gestão Para selecionar mais
ficheiros para carregar ou descarregar e
apagar.
Memory 2 Move Acesso ao disco Wi-Fi.
Meu dispos Destina-se ao acesso ao
dispositivo utilizado atualmente para a
ligação ao dispositivo Wi-Fi.
Tecla de estado Entra na vista geral de
estado dos seus downloads/uploads, da sua
reprodução atual de musicas/vídeos e pode
fechar a aplicação.
PT - 30
10.3 DEFINIÇÕES WI-FI (IOS E ANDROID)
10.3.1 INTERFACE DE DEFINIÇÕES WI-FI
Clique em , para alterar as definições de Wi-Fi. Esta propriedade apenas surge
quando entra em "Meu dispositivo Wi-Fi“.
10.3.2 MUDAR O NOME DO DISPOSITIVO
Clique no botão , para alterar o nome.
Depois de atribuir um novo nome, surge no canto superior direito o botão “Definir“/“Set“,
no qual deve clicar para guardar a alteração.
PT - 31
10.3.3 SEGURANÇA
Nas definições Wi-Fi HDD surgem as opções de segurança: O disco Wi-Fi suporta os
seguintes formatos de segurança: WPA-PSK, WPA2-PSK, WPA/WPA2-PSK combinada. Se
desejar adicionar um novo código de segurança, será solicitado a introduzir uma senha da
ligação sem fios.
Em seguida, selecione no lado superior direito o botão "Set" ou "Definir", para guardar o
ajuste e a senha.
10.3.4 ACESSOS À INTERNET
Nas Definições de Internet são exibidos os acessos à Internet. Pode selecionar entre acesso
por cabo (wired) e sem fios (wireless). A ligação sem fios encontra-se nas Definições de
Internet, no centro da seguinte imagem:
PT - 32
Se selecionar a variante com fios, deve configurar primeiro a rede à qual se ligou.
Depois de ter feito a sua seleção, clique em "Guardar", em seguida será solicitado a
"reiniciar" o dispositivo, clique em "OK".
Se clicar em "Retroceder", chega ao menu das definições Wi-Fi.
PT - 33
10.4 REPRODUZIR FICHEIROS DE MÚSICA / ÁUDIO (IOS / ANDROID)
Dica: Recomenda-se a criação de uma ou mais pastas para todos os seus ficheiros de
música/áudio. Isso facilita a utilização e a organização do seu disco WiFi.
Os ficheiros de música ou de áudio podem ser reproduzidos independentemente do menu
atual e do local na memória ("Memory 2 Move” ou "Meu Dispos").
Para isso, basta procurar o ficheiro. Ao clicar no ficheiro desejado este é reproduzido
automaticamente.
Nota: Para outras informações sobre os formatos de ficheiro suportados consulte o
manual de instruções do seu dispositivo iOS.
- Clique neste botão para que o ficheiro atualmente em reprodução volte ao
início . Se clicar nele duas vezes, será reproduzido o ficheiro anterior.
- Clique neste botão para passar para o próximo ficheiro de áudio.
- Clique neste botão para iniciar a reprodução do ficheiro de áudio. Clique no
botão de pausa para interromper/pausar a reprodução.
- Clique neste botão para fechar o leitor
PT - 34
Existem 5 modos de reprodução:
a. - Reproduzir uma vez: o ficheiro é reproduzido uma vez. Em seguida, a
reprodução para.
b. - Repetição do ficheiro atual: o ficheiro atualmente em reprodução é
repetido. É interrompido se for acionado .
c. - Reprodução aleatória de todos os ficheiros áudio que se encontram na
pasta atual.
d. - Reprodução da pasta atual: os ficheiros de áudio são repetidos na sequência
e não são repetidos.
e. Repetição da pasta: os ficheiros de áudio presentes na pasta são repetidos na
sequência e depois repetidos.
Nota: Mantenha o botão da indicação de avanço premido e desloque-o para a direita
ou para a esquerda, para avançar ou retroceder dentro de um ficheiro de áudio.
Dica: Pode sair da interface do leitor de música quando quiser. A reprodução dos seus
ficheiros de áudio prossegue em segundo plano.
PT - 35
10.5 REPRODUZIR FILMES / VÍDEOS
10.5.1 IOS
Dica: Recomenda-se a criação de uma ou mais pastas para todos os seus ficheiros de
vídeo/filme. Isso facilita a utilização e a organização do seu disco Wi-Fi.
Os ficheiros de vídeo ou de filme podem ser reproduzidos independentemente do menu
atual e do local na memória ("Memory 2 Move” ou "Meu Dispos").
Para isso, basta procurar o ficheiro. Ao clicar no ficheiro desejado este é reproduzido
automaticamente.
Nota: Para outras informações sobre os formatos de ficheiro suportados consulte o
manual de instruções do seu dispositivo iOS.
PT - 36
Por padrão, está selecionada a reprodução de vídeo no formato de paisagem. Tem à sua
disposição as seguintes opções de seleção:
1. - Clique neste botão para parar a reprodução do ficheiro de vídeo atual e
para fechar o leitor de filmes.
2. - Clique neste botão para adaptar o formato de reprodução ao tamanho
do ecrã.
3. - Mantenha o botão da indicação de avanço premido e desloque-o
para a direita ou para a esquerda, para avançar ou retroceder dentro de um
ficheiro de áudio.
4. - Mantenha o botão da regulação do volume premido e
desloque-o para a direita ou para a esquerda, para alterar o volume.
5. - Mantenha este botão premido para retroceder o ficheiro de vídeo durante
a reprodução.
6. - Mantenha este botão premido para avançar o ficheiro de vídeo durante a
reprodução.
7. - Clique neste botão para iniciar/avançar a reprodução do ficheiro de vídeo.
8. - Clique neste botão para interromper a reprodução do ficheiro de vídeo.
PT - 37
10.5.2 ANDROID
Dica: Recomenda-se a criação de uma ou mais pastas para todos os seus ficheiros de
vídeo/filme. Isso facilita a utilização e a organização do seu disco Wi-Fi.
Os ficheiros de vídeo ou de filme podem ser reproduzidos independentemente do menu
atual e do local na memória ("Memory 2 Move” ou "Meu Dispos").
Para isso, basta procurar o ficheiro. Ao clicar no ficheiro desejado este é reproduzido
automaticamente.
Nota: A operação e opções de ajuste da reprodução do vídeo variam de acordo com o
leitor de filmes que está instalado no seu dispositivo Android.
Consulte o manual de instruções do seu leitor de filmes para saber informações sobre a
operação.
PT - 38
10.6 REPRODUÇÃO DE FICHEIROS DE IMAGEM
10.6.1 IOS
Dica: Recomenda-se a criação de uma ou mais pastas para todos os seus ficheiros de
imagem no Memory 2 Move. Isso facilita a utilização e a organização do seu disco Wi-Fi.
Nota O disco Wi-Fi suporta a reprodução dos seguintes formatos de imagem: .jpg, .tiff,
.gif e .bmp
Os ficheiros de imagem suportados podem ser indicados numa vista geral de miniaturas
ou numa lista, tal como se pode ver na imagem que se segue.
Todas as imagens em formatos não suportados são indicadas como vista de miniaturas
exemplar ou como ícone.
Vista de miniaturas Vista em lista
PT - 39
Clique num ficheiro de imagem à escolha, para abrir a exibição de slides automática. Se
a barra de menus não abrir imediatamente, clique uma 2ª vez na imagem, para que esta
surja (veja na parte de cima, na imagem que se segue).
Na exibição de slides encontra as seguintes funções à escolha:
Passe com o dedo por cima do ecrã, da direita para a esquerda, ou da esquerda para a
direita, para controlar manualmente a indicação da exibição de slides ou clique no botão
Play , para passar os slides automaticamente.
Clique no botão Pause para interromper a exibição de slides. A premir
novamente o botão Pause continua a exibição de slides.
Clique em para prosseguir com a exibição de slides e começar do início depois da
última imagem.
Clique em para passar os slides uma vez. A reprodução para depois do último
ficheiro de imagem.
Clique no botão para retroceder para retroceder para a opção de menu
anterior.
Pode passar a exibição de slides também com música de fundo. Para isso, clique na tecla
de música tal como se pode ver na imagem que se segue.
PT - 40
Parar/continuar a reprodução: Clique aqui para parar ou continuar a música de
fundo.
Seleção: Clique aqui para procurar e selecionar os ficheiros de áudio para a música de
fundo. Clique no botão para voltar para a exibição de slides, tal como se pode
ver na imagem que se segue:
Botão de repetição: Quando este botão está ativado, são repetidos os mesmos
ficheiros de áudio da música de fundo. Por padrão, esta opção está desativada.
PT - 41
10.6.2 ANDROID
Dica: Recomenda-se a criação de uma ou mais pastas para todos os seus ficheiros de
imagem. Isso facilita a utilização e a organização do seu disco Wi-Fi.
Nota O disco Wi-Fi suporta a reprodução dos seguintes formatos de imagem: .jpg, .tiff,
.gif e .bmp
Os ficheiros de imagem suportados podem ser indicados numa vista geral de miniaturas
ou numa lista, tal como se pode ver na imagem que se segue.
Todas as imagens em formatos não suportados são indicadas como vista de miniaturas
exemplar ou como ícone.
Vista de miniaturas Vista em lista
Clique num ficheiro de imagem à escolha para abrir a exibição de slides automática. Se a
barra de menus não abrir imediatamente, clique uma 2ª vez na imagem, para que esta
surja (veja na parte superior direita, na imagem que se segue).
PT - 42
Na exibição de slides encontra as seguintes funções à escolha:
Passe com o dedo por cima do ecrã, da direita para a esquerda, ou da esquerda para a
direita, para controlar manualmente a indicação da exibição de slides ou clique na tecla
Play , para passar os slides automaticamente.
Clique na tecla Pause para interromper a exibição de slides. A premir novamente
a tecla Pause continua a exibição de slides.
Clique em para prosseguir com a exibição de slides e começar do início depois
da última imagem.
Clique em para passar os slides uma vez. A reprodução para depois do último
ficheiro de imagem.
Clique na tecla para retroceder para retroceder para a opção de menu
anterior.
Pode passar a exibição de slides também com música de fundo. Para isso, clique na tecla
de música tal como se pode ver na imagem que se segue.
PT - 43
Parar/continuar reprodução: Clique aqui para parar ou continuar a música de fundo.
Seleção: Clique aqui para procurar e selecionar os ficheiros de áudio para a música de
fundo. Clique no botão para voltar para a exibição de slides, tal como se pode
ver na imagem que se segue:
Tecla de repetição: Quando esta tecla está ativada, são repetidos os mesmos
ficheiros de áudio para a música de fundo. Por padrão, esta opção está desativada.
PT - 44
10.7 PARTILHA DE FICHEIROS DE IMAGEM
10.7.1 IOS
Tem à sua disposição diferentes opções para partilhar as suas imagens com a sua família
e os seus amigos, como por ex. por e-mail, por armazenamento no álbum de fotos do
dispositivo utilizado ou através de um upload para o Facebook.
Nota: Para partilhar fotos por e-mail ou nas redes sociais necessita de uma ligação à
Internet.
Clique em no canto superior direito do ecrã, para indicar três opções de
partilha de ficheiros de imagem. Clique na tecla "Retroceder" para retroceder
para o menu anterior.
PT - 45
1) E-mail - Clique aqui, para iniciar a aplicação de e-mail padrão e selecionar o ficheiro
de imagem desejado como anexo.
2) Adicionar ao álbum: Clique nesta opção para adicionar o ficheiro de imagem
selecionado ao álbum de fotos do dispositivo usado.
3) Upload do Facebook: Clique nesta opção e será encaminhado automaticamente para
a página de login do Facebook. Para isso é necessário que a aplicação do Facebook
esteja instalada no seu dispositivo. E que tenha uma conta no Facebook.
10.7.2 ANDROID
As diferentes opções de partilha dos seus ficheiros de imagem dependem de diferentes
aplicações que estão instaladas no seu dispositivo.
Nota: Para partilhar fotos por e-mail ou nas redes sociais necessita de uma ligação à
Internet.
PT - 46
Selecione o símbolo no canto superior direito do ecrã, para indicar as diferentes
opções de partilha de ficheiros de imagem. Clique na tecla "Retroceder" para
retroceder para o menu anterior. Clique em
1. Partilhar Clique na tecla “Desbloquear”, para indicar uma lista das aplicações
instaladas no seu dispositivo Android (veja exemplo na imagem que se segue).
Selecione uma aplicação, através da qual deseje partilhar o ficheiro de imagem.
2. Guardar foto Selecione esta tecla para guardar o ficheiro de imagem do seu disco
Wi-Fi na galeria do seu dispositivo Android.
PT - 47
10.8 ABRIR/EXIBIR DOCUMENTOS
10.8.1 IOS
A aplicação "Memory 2 Move" suporta ficheiros de Keynote, Numbers, Page, Excel,
PowerPoint e Word, bem como .pdf e .txt.
Para abrir e visualizar estes ficheiros, basta clicar no ficheiro desejado. Os formatos
suportados são automaticamente abertos. Clique na tecla "Retroceder" para voltar
para o menu anterior ou clique na tecla para enviar o ficheiro de imagem por e-mail,
tal como se pode ver na imagem que se segue.
Nota: Para enviar e-mails é necessário uma ligação à Internet.
PT - 48
Clique na tecla "E-Mail". A aplicação padrão para e-mail inicia-se automaticamente e o
documento selecionado pode ser enviado como anexo.
10.8.2 ANDROID
Para abrir documentos no seu dispositivo Android, basta tocar no ficheiro desejado. Este
abre-se automaticamente com um programa padrão ou uma aplicação instalada por si
(comp. com a imagem que se segue).
Para enviar o documento como anexo, consulte o manual do programa, com o qual abre o
ficheiro.
Nota: Para enviar e-mails é necessário uma ligação à Internet.
PT - 49
10.9 COPIAR, APAGAR, CARREGAR E DESCARREGAR FICHEIROS (IOS E
ANDROID)
Sempre que quiser pode clicar na tecla , para apagar, carregar e descarregar os seus
ficheiros. Como pode ver na imagem que se segue, surge na margem superior do menu o
símbolo , assim que a tecla é acionada.
Vista de imagens iOS Vista de imagens Android
Na margem inferior do ecrã vê agora ícones novos. Tem agora as seguintes funções à sua
escolha:
- Clique neste ícone para selecionar todos os ficheiros. O ícone fica branco e ao lado
de todos os ficheiros surge um visto.
- - Clique novamente neste ícone para anular a seleção de todos os ficheiros. O visto
ao lado dos ficheiros desaparece novamente.
PT - 50
Dica: Também pode selecionar apenas um ou vários ficheiros, bastando para isso clicar na
vista de miniaturas. Também pode editar facilmente um ficheiro por Drag&Drop. Para isso,
basta tocar na vista de miniaturas do ficheiro desejado e arrastá-lo para o ícone de Carregar
, Transferir ou Apagar .
- Se se encontrar no menu "Memory 2 Move", pode descarregar através deste ícone
um ou mais ficheiros do disco Wi-Fi para o seu dispositivo iOS/Android.
- Se se encontrar no menu "Meu Dispos.", pode descarregar através deste ícone um ou
mais ficheiros do seu dispositivo iOS/Android para o disco Wi-Fi. Prima, para isso o botão
"Gerir".
- Clique neste ícone para visualizar todos os uploads/downloads atuais em fila de
espera. Além disso, pode ver aqui uma lista de todos os ficheiros transferidos com sucesso.
- Clique neste ícone para apagar todos os ficheiros selecionados.
PT - 51
10.10 DOWNLOAD DE FICHEIROS PARA O SEU DISPOSITIVO IOS/ANDROID
Quando estiver conectado ao disco Wi-Fi, pode descarregar um ou mais ficheiros para o seu
dispositivo iOS/Android.
1. Clique no símbolo .
2. Selecione agora um ou mais ficheiros que deseje descarregar ou clique em
para selecionar todos os ficheiros.
3. Clique agora no campo
4. Selecione e confirme a pasta na vista geral, para onde deseja descarregar os ficheiros.
PT - 52
Para criar uma nova pasta para estes ficheiros, basta clicar no campo "Criar nova
pasta". Nesse caso, introduza o nome da pasta e clique em "Criar“, tal como se pode
ver na imagem que se segue. A designação da pasta deve ter um comprimento entre
2 e 26 caracteres. Clique em "Cancelar" para cancelar o processo.
5. Clique em "Selecionar" para iniciar o processo de cópia/transferência. Abre-se a
seguinte janela:
Nota: Os ficheiros descarregados com sucesso são exibidos na janela inferior “Transfer
recentes” (comp. com imagem superior). Clique em "Apagar lista", para apagar os ficheiros
da lista.
6. Clique em qualquer zona do ecrã e será encaminhado para o menu anterior. Em
seguida, clique em ,para fechar o menu.
PT - 53
10.11 UPLOAD DE FICHEIROS PARA O DISCO WI-FI (IOS E ANDROID)
Verifique se está no menu “Meu Dispos.".
1. Clique no símbolo .
2. Selecione agora um ou mais ficheiros que deseje carregar ou clique em
para selecionar todos os ficheiros.
3. Clique agora no campo
4. Selecione e confirme a pasta na vista geral para onde deseja carregar os
ficheiros.
Para criar uma nova pasta para estes ficheiros, basta clicar no campo "Criar nova
pasta". Nesse caso, introduza o nome da pasta e clique em "Criar“, tal como se pode
PT - 54
ver na imagem que se segue. A designação da pasta deve ter um comprimento entre
2 e 26 caracteres. Clique em "Cancelar" para cancelar o processo.
5. Clique em "Selecionar" para iniciar o processo de carregar. Deve abrir-se a seguinte
janela:
Nota: Os ficheiros copiados/transferidos com sucesso são exibidos na janela inferior
Cópia bem sucedida” (comp. com imagem superior). Clique em "Apagar lista", para
apagar os ficheiros da lista.
6. Clique em qualquer zona do ecrã e será encaminhado para o menu anterior. Em
seguida, clique em ,para fechar o menu.
PT - 55
10.12 APAGAR FICHEIROS (IOS E ANDROID)
Pode simplesmente apagar um ou mais ficheiros em "Meu Dispos.“ ou no menu
"Memory 2 Move".
1. Para apagar um ou mais ficheiros, clique primeiro no símbolo .
2. Pode agora selecionar os ficheiros a apagar ou clique em , para selecionar
todos os ficheiros.
3. Clique agora no símbolo , para apagar os ficheiros selecionados. Surge um
aviso no ecrã, para que confirme a eliminação (comp. com a imagem que se segue).
Clique em OK, se tiver a certeza que quer apagar os ficheiros. Se não desejar apagar
os ficheiros, pode interromper o processo clicando em "Cancelar".
PT - 56
10.13 VISTA GERAL E ESTADO DOS SEUS UPLOADS/DOWNLOADS
Se tiver copiado/transferido um ou mais ficheiros de ou para o Memory 2 Move, pode
verificar com um clique em que ficheiros ainda se encontram em fila de espera e que
ficheiros já foram transferidos com sucesso. Também pode clicar no menu principal em ,
para verificar o estado exato dos seus downloads/uploads atuais.
10.14 TERMINAR A APLICAÇÃO MEMORY 2 MOVE
10.14.1 IOS
Para sair da aplicação Memory 2 Move, basta premir na tecla “Home” do seu
iPhone/iPad.
Para terminar a aplicação, prima na tecla “Home” duas vezes e será indicada uma lista
com diferentes aplicações na margem inferior do ecrã. Clique e mantenha pressionado o
ícone da aplicação até surgir um traço (-). Clique agora neste traço para terminar a
aplicação (comp. com a imagem que se segue.
PT - 57
10.14.2 ANDROID
Para sair da aplicação Memory 2 Move, basta clicar no campo e selecionar "Sair". É
exibido um aviso que o solicita a confirmar a seleção. Clique em "OK" para terminar a
aplicação ou em "Cancelar" para voltar para a aplicação.
10.15. DESINSTALAR A APLICAÇÃO MEMORY 2 MOVE
10.15.1 IOS
Para desinstalar a aplicação "Memory 2 Move" do seu dispositivo Apple, clique no logótipo
da aplicação Memory 2 Move e mantenha-o premido. Surge um "X" em todos os ícones das
aplicações instaladas, tal como se pode ver na imagem que se segue. Basta clicar neste "X"
no canto superior esquerdo do ícone da aplicação Memory 2 Move, para remover a
aplicação do seu dispositivo Apple.
PT - 58
10.15.2 ANDROID
Para desinstalar a aplicação Memory 2 Move do seu dispositivo Android, execute os
seguintes passos.
Nota: O processo de desinstalação pode divergir consoante o dispositivo Android. Antes da
desinstalação consulte o manual de instruções do seu dispositivo Android.
1. No menu principal clique no ícone "Definições".
2. Passe para o ponto "Aplicações”.
3. Procure a aplicação Memory 2 Move e selecione-a.
4. Clique no campo "Desinstalar".
5. É exibido um aviso que o solicita a confirmar a seleção. Clique em "OK", para
desinstalar a aplicação ou em "Cancelar" para voltar para o menu de definições.
PT - 59
11. FUNÇÕES DE GESTÃO WEB
Para configurar o dispositivo WiFi, utilize o software "WiFi Finder", para se conectar ao
Memory 2 Move. Em alternativa, pode abrir o seu navegador da Internet e introduzir na
barra de endereço o endereço IP 10.10.10.254, desde que o endereço definido de fábrica
não tenha sido alterado.
Vista do menu principal:
Submenus disponíveis:
Aqui pode alterar a senha do administrador.
Indicação das informações relevantes sobre a memória.
Aqui pode alterar as definições da rede.
Ativação do serviço Windows File.
Aqui pode alterar as definições do sistema.
Aqui pode configurar passo a passo o seu dispositivo com a ajuda do
assistente de configuração.
PT - 60
11.1 FUNÇÃO EXPLORER
Através desta interface do administrador pode copiar dados para o Memory 2 Move e copiar
ficheiros do Memory 2 Move para o PC utilizado. Além disso, pode criar, copiar, mudar o
nome ou apagar ficheiros da mesma forma que costuma fazer no seu computador.
Atualizar clique nesta tecla, para atualizar a vista do ecrã.
Carregar clique nesta tecla para carregar ficheiros para o dispositivo.
Criar para criar um diretório no Memory 2 Move. O diretório deve conter, no
máximo, 26 caracteres.
Copiar para copiar ficheiros para uma outra pasta.
Arrastar para arrastar um ficheiro para um outro local na memória.
Abrir / descarregar clique nesta tecla para abrir ficheiros ou copiá-los para o
seu PC. Se tiver software compatível instalado no seu PC, a reprodução da
música inicia-se automaticamente. Caso contrário, o sistema perguntará se
deseja descarregar o ficheiro. Não foi possível descarregar os diretórios. Deve
selecionar sempre, pelo menos, um ficheiro para download.
PT - 61
Apagar para remover ficheiros do dispositivo.
Mudar nome para alterar o nome do ficheiro.
Visualizador de fotos esta tecla é usada para visualizar fotos.
11.2 MENU DE CONTEXTO (EXCETO PARA MAC)
No menu do ficheiro pode aceder a um ficheiro ou a um diretório - o menu de contexto -
com um clique no botão direito do rato. Neste menu "Pop-Up" têm à disposição as
seguintes opções de menu: Copiar, cortar, apagar, mudar nome ou descarregar (veja
screenshot).
No menu de diretórios também pode aceder ao menu de contexto. Aqui pode escolher
entre abrir, copiar, cortar, apagar ou mudar o nome (veja screenshot).
PT - 62
Se selecionar vários ficheiros (isto funciona se mantiver premido "ctrl" e marcar o
ficheiro selecionado com um clique no botão esquerdo do rato) e aceder ao menu de
contexto com o botão direito do rato, conseguirá copiar, cortar ou apagar.
Se clicar com o botão direito do rato num espaço vazio no diretório, ficam disponíveis as
funções colar, criar ou carregar.
PT - 63
Explicação das funções:
- Abrir: Selecione um diretório e abra com o botão direito do rato o menu de
contexto. Selecione aqui "Abrir" e será indicado o conteúdo do diretório.
- Copiar: Selecione um diretório ou um ou vários ficheiros e abra com o botão
direito do rato o menu de contexto. Selecione aqui "Copiar", para copiar o ou os
elementos selecionados.
- Cortar: Selecione diretórios ou ficheiros e abra com o botão direito do rato o
menu de contexto. Selecione aqui "Cortar", para cortar os ficheiros do local da
memória atual.
- Colar: Depois de ter selecionado "Copiar" ou "Cortar", pode procurar um novo
local na memória para os elementos selecionados. Para colar os elementos no
novo local, clique com o botão direito do rato no espaço vazio no diretório e
aceda ao menu de contexto. Aqui selecione "Colar" para adicionar os elementos
ao novo local na memória.
- Apagar: Selecione um ficheiro e abra com o botão direito do rato o menu de
contexto. Selecione aqui "Apagar", para apagar o elemento selecionado.
- Criar: Clique com o botão direito do rato no espaço vazio no diretório e aceda ao
menu de contexto. Selecione "Criar" para criar um novo diretório.
- Mudar o nome: Clique com o botão direito do rato no diretório ou no ficheiro, ao
qual pretende mudar o nome e no menu de contexto na entrada do menu
"Mudar nome". Agora pode mudar o nome ao diretório ou ao ficheiro. Depois de
ter efetuado alterações, clique em "Guardar", para aceitar as alterações
efetuadas.
- Carregar: Clique com o botão direito do rato no espaço vazio no diretório e aceda
ao menu de contexto. Selecione "Carregar" para carregar novos ficheiros.
- Abrir / transferir: Clique com o botão direito do rato no diretório ou no ficheiro,
que pretende transferir e no menu de contexto na entrada do menu "Transferir".
Se tiver software compatível instalado no seu PC, a reprodução da música inicia-
se automaticamente. Caso contrário, o sistema perguntará se deseja descarregar
o ficheiro. Não foi possível descarregar os diretórios.
PT - 64
11.3 ABREVIATURAS DO TECLADO
A interface do administrador da internet suporta introduções pelo teclado e abreviaturas do
teclado. Entre outras, são suportadas as seguintes abreviaturas: tecla Tab, tecla Enter, tecla
Home, PGUP, PGDN, tecla End, seta para cima, seta para baixo, seta para a esquerda, seta
para a direita e tecla Del.
Windows: CTRL + c = copiar CTRL + v = colar
Mac: CTRL + c = copiar CTRL + v = colar
11.4 DRAG AND DROP
Pode arrastar um ficheiro individual por Drag and Drop (arrastar e largar). Basta tocar e
agarra um ficheiro para um outro diretório disponível e largá-lo.
11.5 INFORMAÇÕES
Aqui são exibidas informações detalhadas sobre o hardware, o estado da rede e o local na
memória.
11.5.1 INFORMAÇÕES SOBRE O DISPOSITIVO
Aqui são exibidas informações, tais como o nome do dispositivo, o número de série,
fabricante, número do modelo e carga da CPU.
PT - 65
11.5.2 INFORMAÇÕES SOBRE A MEMÓRIA
Aqui obtém informações sobre a unidade montada, tais como a capacidade total, o
fabricante do disco rígido e o local disponível na memória.
11.5.3 INFORMAÇÕES SOBRE A REDE
São indicadas informações pormenorizadas sobre o estado atual da rede, tais como o
endereço da rede, o estado da Internet ou o nome atual da rede Wi-Fi (SSID).
PT - 66
11.6 DEFINIÇÕES
11.6.1 UTILIZADOR
No menu definições clique na ligação, para alterar as definições do administrador. A senha
deve ter, no mínimo, 5 e, no máximo, 32 carateres. As alterações são assumidas quando
clicar no botão "Guardar".
No estado de fornecimento a senha do administrador é a seguinte: 00000
11.6.2 DISCO
No menu definições clique na ligação , para obter informações sobre o
dispositivo de armazenamento, tais como a versão do firmware, a capacidade ou o mero
de série.
PT - 67
O menu da unidade contém informações sobre o sistema de ficheiros usado, bem como a
capacidade total e a capacidade utilizada do disco.
Clique em "X" ,para fechar o menu.
11.7 REDE
11.7.1 HOST NAME
O Host Name pertence a um dispositivo, que está ligado a uma rede. Este nome fica à
escolha do utilizador. A única condição é o nome começar por uma letra, seguido por uma
combinação de letras e algarismos. São necessários, pelo menos, 2 e, no máximo, 8
carateres.
PT - 68
11.7.2 WI-FI & LAN
Todas as definições de rede podem ser modificadas de acordo com as suas necessidades.
Tem as seguintes opções à sua escolha:
- SSID: Introduza aqui o nome da sua rede. Na configuração básica encontra-
se aqui "Memory2Move-XXXX. 32 carateres é o
máximo possível para o nome SSID.
- Canal Wi-Fi: Introduza aqui o canal, por onde o dispositivo Wi-Fi deve realizar o
envio e a receção. A configuração básica é "Auto"- O canal é, neste
caso, estabelecido automaticamente pelo dispositivo. No entanto,
também pode determinar manualmente, por que canal se deve
receber e enviar. Estão disponíveis os canais 1 a 13.
- Modo Wi-Fi: O padrão de rede sem fios predefinido é:
802.11/b/g/n. Também pode ajustar manualmente os modos 11Mbps
(802.11b), 54 Mbps (802.11g ou 150Mbps (802.11n).
- Segurança: No estado de fornecimento não está selecionado nenhum tipo de
segurança. Pode escolher entre os seguintes tipos de encriptação:
nenhum
Encriptação, WPA-PSK, WPA2-PSK, WPA/WPA2-PSK combinada.
- Senha: De acordo com o tipo de encriptação, introduza uma senha com pelo
menos 8 e no máximo 63 caracteres.
- Endereço IP: O endereço IP predefinido é: 10.10.10.254 com a máscara de
sub-rede 255.255.255.0. Este endereço IP pode ser alterado
manualmente.
PT - 69
11.7.3 SERVIDOR DHCP
O Dynamic Host Configuration Protocol (DHCP) é um protocolo de rede, que permite a um
servidor, atribuir endereços IP dinâmicos a computadores conectados. Na configuração
básica, o protocolo DHCP está ativado. Se necessário, esta opção pode ser desativada e os
endereços IP podem ser atribuídos manualmente.
Clique na tecla "Lista DHCP" é será exibida uma lista com todos os dispositivos conectados
atualmente.
PT - 70
11.7.4 ACESSO À INTERNET
Definição do acesso à Internet
. através do estabelecimento de uma ligação a uma outra rede disponível
Tem a opção de escolher entre 2 opções de acesso à internet disponíveis. Na configuração
padrão está predefinido o acesso por cabo (tal como é visível na imagem em cima).
A. Acesso sem fios (WLAN):
Ligue oM2M a um outro router WLAN, para conseguir a ligação à Internet.
B. Acesso com fio (LAN):
Ligue o M2M diretamente a uma porta disponível na parte traseira do seu router,
para ligar a uma outra rede.
Acesso LAN:
Na configuração básica está selecionado o "IP dinâmico". Pode atribuir o endereço IP
manualmente, clicando na seta amarela e selecionando a opção "IP estático".
Acesso WLAN:
PT - 71
SSID: Introduza o nome do SSID da sua rede ou clique em "Nova
procura", para procurar automaticamente todas as redes
disponíveis
Senha: Introduza a palavra-passe para a rede sem fios local.
Endereço IP: Se selecionar "Automático" a rede disponibiliza
automaticamente um endereço IP.
Se selecionar "IP estático" deve introduzir o seu
endereço IP para a rede, à qual se pretende ligar.
Nota: Se não conseguir estabelecer nenhuma ligação a uma outra rede, consulte o seu
administrador de rede sobre as diretivas em vigor para o seu caso!
11.8 SERVIÇOS
11.8.1 SAMBA
O acesso e a transferência de dados são muito simples com o Windows File Service | Samba
(Mac) Service. Este serviço já vem ativado de fábrica (veja o screenshot).
PT - 72
11.8.2 MEDIA SERVER
Funções:
(1)
Activar ou desactivar o Media Server
(2)
Define o nome indicado na rede.
(3)
Especifique o nome da pasta a disponibilizar através do Media Server.
(4)
Modifica o diretório de partilha no Memory 2 Move.
(5)
Aqui pode guardar as definições efectuadas.
PT - 73
11.9 SISTEMA
11.9.1 DEFINIÇÕES DA HORA
Pode escolher selecionar manualmente o fuso horário ou efetuar uma sincronização
automática da hora.
Se escolher a seleção manual de um fuso horário, basta clicar na seta amarela ao lado da
caixa "Fuso horário" e selecionar na opção do menu o fuso horário correspondente ao local
de utilização.
Se selecionar a sincronização automática da hora, a hora é atualizada sempre que estiver
conectado à Internet.
Opções para sincronização da hora:
Frequência: diariamente, de 2 em 2 dias, de 3 em 3 dias, .. Pode selecionar intervalos de
sincronização até 7 dias.
A sincronização automática da hora pode ser desativada em qualquer momento e a opção
"Assumir hora PC" é selecionada em seu lugar. Neste caso, a hora atual do seu PC é
assumida de forma que ambos os dispositivos apresentam a mesma hora.
PT - 74
11.9.2 SEGURANÇA
Para assegurar (Backup) a configuração do sistema Wi-Fi, clique na tecla "Segurança". É
criado um ficheiro com a terminação .bin.gz, com o qual pode restaurar as definições do
sistema, se necessário. Guarde este ficheiro no seu computador.
Para restaurar um sistema clique na tecla "Restaurar". Procure e abra o seu ficheiro de
segurança guardado e, em seguida, clique em "Segurança" no lado inferior direito da janela.
PT - 75
Durante o processo de restauro surge um aviso, que lhe fornece informações sobre o estado
atual do processo.
Depois do restauro bem sucedido da configuração do sistema, o dispositivo reinicia
automaticamente e é exibido o ecrã de início de sessão (login).
11.9.3 ATUALIZAÇÃO DO FIRMWARE
Se estiver disponível uma atualização do firmware em www.intenso.de, siga os seguintes
passos, para executar a atualização do software.
PT - 76
1.) Descarregue o firmware para o seu computador.
2.) Clique na tecla "Actualizar" e procura a atualização do firmware que foi descarregada
para o seu PC. Selecione o ficheiro e clique em "Abrir", para continuar.
3.) Por baixo da tecla "Actualizar" é exibido o número da versão do firmware, para a qual
o dispositivo deve ser atualizado. Clique em "Guardar" no lado inferior direito da
imagem, para iniciar o processo de atualização do firmware.
Nota: Se tiver descarregado um formato errado, surge a seguinte mensagem de erro:
4.) Durante a atualização surge um aviso, que lhe fornece informações sobre o estado
atual do processo.
PT - 77
Depois da atualização bem sucedida, o dispositivo reinicia automaticamente e é exibido o
ecrã de início de sessão (login).
11.9.4 RESET
Se desejar restaurar as definições de fábrica no seu dispositivo, serão apagadas todas as
definições efetuadas e serão ativadas as definições válidas no estado de fornecimento.
Para selecionar o restauro das definições de fábrica, clique no botão redondo. Clique no
botão "Guardar" , para iniciar o processo. Para evitar enganos, confirme a sua escolha no
aviso que se seguirá.
A nota que se segue surge durante o processo ativo e fornece informações sobre o
progresso.
Nota: Depois de o dispositivo ter sido reposto nas definições de fábrica, a senha do
administrador também será restaurada. Ou seja, é válida a senha do estado de
fornecimento.
PT - 78
12. LICENÇA INFORMAÇÃO
Notice of GNU GENERAL PUBLIC LICENSE and LESSER GENERAL PUBLIC LICENCE
Dear Customer,
If interested, you and any third party can download the source code of used GPL / LGPL from
Intenso Webpage http://www.intenso.de . The source code of the desired product is
available to anyone on the selection of valid product category and the desired device. In the
product details you will find the entry "drivers". Open this menu to download the
corresponding GPL / LGPL code. For a fee of 35 € (delivery to another country as Germany),
it is also possible to obtain this code by postal delivery. More information about the
GPL/LGPL-Licence can you nd on following website www.gnu.org
GNU GENERAL PUBLIC LICENSE
Version 2, June 1991
Copyright (C) 1989, 1991 Free Software Foundation, Inc.
51 Franklin Street, Fifth Floor, Boston, MA 02110-1301, USA
Everyone is permitted to copy and distribute verbatim copies
of this license document, but changing it is not allowed.
Preamble
The licenses for most software are designed to take away your freedom to share and change
it. By contrast, the GNU General Public License is intended to guarantee your freedom to
share and change free software--to make sure the software is free for all its users. This
General Public License applies to most of the Free Software Foundation's software and to
any other program whose authors commit to using it. (Some other Free Software Foundation
software is covered by the GNU Lesser General Public License instead.) You can apply it to
your programs, too.
When we speak of free software, we are referring to freedom, not price. Our General Public
Licenses are designed to make sure that you have the freedom to distribute copies of free
software (and charge for this service if you wish), that you receive source code or can get it if
you want it, that you can change the software or use pieces of it in new free programs; and
that you know you can do these things.
PT - 79
To protect your rights, we need to make restrictions that forbid anyone to deny you these
rights or to ask you to surrender the rights. These restrictions translate to certain
responsibilities for you if you distribute copies of the software, or if you modify it.
For example, if you distribute copies of such a program, whether gratis or for a fee, you must
give the recipients all the rights that you have. You must make sure that they, too, receive or
can get the source code. And you must show them these terms so they know their rights.
We protect your rights with two steps: (1) copyright the software, and (2) offer you this
license which gives you legal permission to copy, distribute and/or modify the software.
Also, for each author's protection and ours, we want to make certain that everyone
understands that there is no warranty for this free software. If the software is modified by
someone else and passed on, we want its recipients to know that what they have is not the
original, so that any problems introduced by others will not reflect on the original authors'
reputations.
Finally, any free program is threatened constantly by software patents. We wish to avoid the
danger that redistributors of a free program will individually obtain patent licenses, in effect
making the program proprietary. To prevent this, we have made it clear that any patent
must be licensed for everyone's free use or not licensed at all.
The precise terms and conditions for copying, distribution and modification follow.
TERMS AND CONDITIONS FOR COPYING, DISTRIBUTION AND MODIFICATION
0. This License applies to any program or other work which contains a notice placed by the
copyright holder saying it may be distributed under the terms of this General Public License.
The "Program", below, refers to any such program or work, and a "work based on the
Program" means either the Program or any derivative work under copyright law: that is to
say, a work containing the Program or a portion of it, either verbatim or with modifications
and/or translated into another language. (Hereinafter, translation is included without
limitation in the term "modification".) Each licensee is addressed as "you".
Activities other than copying, distribution and modification are not covered by this License;
they are outside its scope. The act of running the Program is not restricted, and the output
from the Program is covered only if its contents constitute a work based on the Program
(independent of having been made by running the Program). Whether that is true depends
on what the Program does.
1. You may copy and distribute verbatim copies of the Program's source code as you receive
it, in any medium, provided that you conspicuously and appropriately publish on each copy
an appropriate copyright notice and disclaimer of warranty; keep intact all the notices that
PT - 80
refer to this License and to the absence of any warranty; and give any other recipients of the
Program a copy of this License along with the Program.
You may charge a fee for the physical act of transferring a copy, and you may at your option
offer warranty protection in exchange for a fee.
2. You may modify your copy or copies of the Program or any portion of it, thus forming a
work based on the Program, and copy and distribute such modifications or work under the
terms of Section 1 above, provided that you also meet all of these conditions:
a) You must cause the modified files to carry prominent notices stating that you changed the
files and the date of any change.
b) You must cause any work that you distribute or publish, that in whole or in part contains
or is derived from the Program or any part thereof, to be licensed as a whole at no charge to
all third parties under the terms of this License.
c) If the modified program normally reads commands interactively when run, you must
cause it, when started running for such interactive use in the most ordinary way, to print or
display an announcement including an appropriate copyright notice and a notice that there
is no warranty (or else, saying that you provide a warranty) and that users may redistribute
the program under these conditions, and telling the user how to view a copy of this License.
(Exception: if the Program itself is interactive but does not normally print such an
announcement, your work based on the Program is not required to print an announcement.)
These requirements apply to the modified work as a whole. If identifiable sections of that
work are not derived from the Program, and can be reasonably considered independent and
separate works in themselves, then this License, and its terms, do not apply to those
sections when you distribute them as separate works. But when you distribute the same
sections as part of a whole which is a work based on the Program, the distribution of the
whole must be on the terms of this License, whose permissions for other licensees extend to
the entire whole, and thus to each and every part regardless of who wrote it.
Thus, it is not the intent of this section to claim rights or contest your rights to work written
entirely by you; rather, the intent is to exercise the right to control the distribution of
derivative or collective works based on the Program.
In addition, mere aggregation of another work not based on the Program with the Program
(or with a work based on the Program) on a volume of a storage or distribution medium
does not bring the other work under the scope of this License.
3. You may copy and distribute the Program (or a work based on it, under Section 2) in
object code or executable form under the terms of Sections 1 and 2 above provided that you
also do one of the following:
PT - 81
a) Accompany it with the complete corresponding machine-readable source code, which
must be distributed under the terms of Sections 1 and 2 above on a medium customarily
used for software interchange; or,
b) Accompany it with a written offer, valid for at least three years, to give any third party, for
a charge no more than your cost of physically performing source distribution, a complete
machine-readable copy of the corresponding source code, to be distributed under the terms
of Sections 1 and 2 above on a medium customarily used for software interchange; or,
c) Accompany it with the information you received as to the offer to distribute
corresponding source code. (This alternative is allowed only for noncommercial distribution
and only if you received the program in object code or executable form with such an offer, in
accord with Subsection b above.)
The source code for a work means the preferred form of the work for making modifications
to it. For an executable work, complete source code means all the source code for all
modules it contains, plus any associated interface definition files, plus the scripts used to
control compilation and installation of the executable. However, as a special exception, the
source code distributed need not include anything that is normally distributed (in either
source or binary form) with the major components (compiler, kernel, and so on) of the
operating system on which the executable runs, unless that component itself accompanies
the executable.
If distribution of executable or object code is made by offering access to copy from a
designated place, then offering equivalent access to copy the source code from the same
place counts as distribution of the source code, even though third parties are not compelled
to copy the source along with the object code.
4. You may not copy, modify, sublicense, or distribute the Program except as expressly
provided under this License. Any attempt otherwise to copy, modify, sublicense or distribute
the Program is void, and will automatically terminate your rights under this License.
However, parties who have received copies, or rights, from you under this License will not
have their licenses terminated so long as such parties remain in full compliance.
5. You are not required to accept this License, since you have not signed it. However,
nothing else grants you permission to modify or distribute the Program or its derivative
works. These actions are prohibited by law if you do not accept this License. Therefore, by
modifying or distributing the Program (or any work based on the Program), you indicate your
acceptance of this License to do so, and all its terms and conditions for copying, distributing
or modifying the Program or works based on it.
6. Each time you redistribute the Program (or any work based on the Program), the recipient
automatically receives a license from the original licensor to copy, distribute or modify the
PT - 82
Program subject to these terms and conditions. You may not impose any further restrictions
on the recipients' exercise of the rights granted herein. You are not responsible for enforcing
compliance by third parties to this License.
7. If, as a consequence of a court judgment or allegation of patent infringement or for any
other reason (not limited to patent issues), conditions are imposed on you (whether by court
order, agreement or otherwise) that contradict the conditions of this License, they do not
excuse you from the conditions of this License. If you cannot distribute so as to satisfy
simultaneously your obligations under this License and any other pertinent obligations, then
as a consequence you may not distribute the Program at all. For example, if a patent license
would not permit royalty-free redistribution of the Program by all those who receive copies
directly or indirectly through you, then the only way you could satisfy both it and this License
would be to refrain entirely from distribution of the Program.
If any portion of this section is held invalid or unenforceable under any particular
circumstance, the balance of the section is intended to apply and the section as a whole is
intended to apply in other circumstances.
It is not the purpose of this section to induce you to infringe any patents or other property
right claims or to contest validity of any such claims; this section has the sole purpose of
protecting the integrity of the free software distribution system, which is implemented by
public license practices. Many people have made generous contributions to the wide range
of software distributed through that system in reliance on consistent application of that
system; it is up to the author/donor to decide if he or she is willing to distribute software
through any other system and a licensee cannot impose that choice.
This section is intended to make thoroughly clear what is believed to be a consequence of
the rest of this License.
8. If the distribution and/or use of the Program is restricted in certain countries either by
patents or by copyrighted interfaces, the original copyright holder who places the Program
under this License may add an explicit geographical distribution limitation excluding those
countries, so that distribution is permitted only in or among countries not thus excluded. In
such case, this License incorporates the limitation as if written in the body of this License.
9. The Free Software Foundation may publish revised and/or new versions of the General
Public License from time to time. Such new versions will be similar in spirit to the present
version, but may differ in detail to address new problems or concerns.
Each version is given a distinguishing version number. If the Program specifies a version
number of this License which applies to it and "any later version", you have the option of
following the terms and conditions either of that version or of any later version published by
PT - 83
the Free Software Foundation. If the Program does not specify a version number of this
License, you may choose any version ever published by the Free Software Foundation.
10. If you wish to incorporate parts of the Program into other free programs whose
distribution conditions are different, write to the author to ask for permission. For software
which is copyrighted by the Free Software Foundation, write to the Free Software
Foundation; we sometimes make exceptions for this. Our decision will be guided by the two
goals of preserving the free status of all derivatives of our free software and of promoting
the sharing and reuse of software generally.
NO WARRANTY
11. BECAUSE THE PROGRAM IS LICENSED FREE OF CHARGE, THERE IS NO WARRANTY FOR
THE PROGRAM, TO THE EXTENT PERMITTED BY APPLICABLE LAW. EXCEPT WHEN
OTHERWISE STATED IN WRITING THE COPYRIGHT HOLDERS AND/OR OTHER PARTIES
PROVIDE THE PROGRAM "AS IS" WITHOUT WARRANTY OF ANY KIND, EITHER EXPRESSED OR
IMPLIED, INCLUDING, BUT NOT LIMITED TO, THE IMPLIED WARRANTIES OF
MERCHANTABILITY AND FITNESS FOR A PARTICULAR PURPOSE. THE ENTIRE RISK AS TO THE
QUALITY AND PERFORMANCE OF THE PROGRAM IS WITH YOU. SHOULD THE PROGRAM
PROVE DEFECTIVE, YOU ASSUME THE COST OF ALL NECESSARY SERVICING, REPAIR OR
CORRECTION.
12. IN NO EVENT UNLESS REQUIRED BY APPLICABLE LAW OR AGREED TO IN WRITING WILL
ANY COPYRIGHT HOLDER, OR ANY OTHER PARTY WHO MAY MODIFY AND/OR REDISTRIBUTE
THE PROGRAM AS PERMITTED ABOVE, BE LIABLE TO YOU FOR DAMAGES, INCLUDING ANY
GENERAL, SPECIAL, INCIDENTAL OR CONSEQUENTIAL DAMAGES ARISING OUT OF THE USE
OR INABILITY TO USE THE PROGRAM (INCLUDING BUT NOT LIMITED TO LOSS OF DATA OR
DATA BEING RENDERED INACCURATE OR LOSSES SUSTAINED BY YOU OR THIRD PARTIES OR
A FAILURE OF THE PROGRAM TO OPERATE WITH ANY OTHER PROGRAMS), EVEN IF SUCH
HOLDER OR OTHER PARTY HAS BEEN ADVISED OF THE POSSIBILITY OF SUCH DAMAGES.
END OF TERMS AND CONDITIONS
How to Apply These Terms to Your New Programs
If you develop a new program, and you want it to be of the greatest possible use to the
public, the best way to achieve this is to make it free software which everyone can
redistribute and change under these terms.
To do so, attach the following notices to the program. It is safest to attach them to the start
of each source file to most effectively convey the exclusion of warranty; and each file should
have at least the "copyright" line and a pointer to where the full notice is found.
one line to give the program's name and an idea of what it does.
PT - 84
Copyright (C) yyyy name of author
This program is free software; you can redistribute it and/or
modify it under the terms of the GNU General Public License
as published by the Free Software Foundation; either version 2
of the License, or (at your option) any later version.
This program is distributed in the hope that it will be useful,
but WITHOUT ANY WARRANTY; without even the implied warranty of
MERCHANTABILITY or FITNESS FOR A PARTICULAR PURPOSE. See the
GNU General Public License for more details.
You should have received a copy of the GNU General Public License
along with this program; if not, write to the Free Software
Foundation, Inc., 51 Franklin Street, Fifth Floor, Boston, MA 02110-1301, USA.
Also add information on how to contact you by electronic and paper mail.
If the program is interactive, make it output a short notice like this when it starts in an
interactive mode:
Gnomovision version 69, Copyright (C) year name of author
Gnomovision comes with ABSOLUTELY NO WARRANTY; for details
type `show w'. This is free software, and you are welcome
to redistribute it under certain conditions; type `show c'
for details.
The hypothetical commands `show w' and `show c' should show the appropriate parts of the
General Public License. Of course, the commands you use may be called something other
than `show w' and `show c'; they could even be mouse-clicks or menu items--whatever suits
your program.
PT - 85
You should also get your employer (if you work as a programmer) or your school, if any, to
sign a "copyright disclaimer" for the program, if necessary. Here is a sample; alter the
names:
Yoyodyne, Inc., hereby disclaims all copyright
interest in the program `Gnomovision'
(which makes passes at compilers) written
by James Hacker.
signature of Ty Coon, 1 April 1989
Ty Coon, President of Vice
ES - 1
ÍNDICE DE CONTENIDO
1. VISIÓN GENERAL DEL PRODUCTO .......................................................................................................... 4
2. FUNCIONES DEL PRODUCTO .................................................................................................................. 4
3. VOLUMEN DE SUMINISTRO ................................................................................................................... 6
4. DATOS TÉCNICOS ................................................................................................................................... 6
5. REQUISITOS MÍNIMOS ........................................................................................................................... 6
6. VISTA DEL PRODUCTO ............................................................................................................................ 7
7. CONEXIONES DISPONIBLES .................................................................................................................... 7
7.1 PUERTO WAN RJ45 ................................................................................................................................. 7
7.2 INTERFAZ MICRO USB 3.0 ...................................................................................................................... 7
7.3 INDICADORES LED .................................................................................................................................. 8
8. UTILIZACIÓN DE UN PC O MAC .............................................................................................................. 9
8.1 ESTABLECIMIENTO DE UNA CONEXIÓN DE RED DE ÁREA LOCAL (LAN) INALÁMBRICA A UN PC .......... 9
8.2 WIFI FINDER PARA PC ........................................................................................................................... 10
8.2.1 MI MEMORIA ....................................................................................................................................... 11
8.3 ESTABLECIMIENTO DE UNA CONEXIÓN DE RED DE ÁREA LOCAL (LAN) INALÁMBRICA A UN MAC ..... 12
8.3.1 WIFI FINDER PARA MAC ....................................................................................................................... 13
8.3.2 MI MEMORIA ....................................................................................................................................... 15
8.4 CONFIGURACIÓN DEL MEMORY 2 MOVE ............................................................................................ 16
9. UTILIZACIÓN DE DISPOSITIVOS PORTÁTILES ........................................................................................ 20
9.1 INSTALACIÓN DE LA APLICACIÓN «MEMORY 2 MOVE» PARA IOS ...................................................... 20
9.2 CONEXIÓN INALÁMBRICA A SU IPHONE/IPAD ..................................................................................... 21
9.3 INICIO DE SESIÓN DE USUARIO (IOS) ................................................................................................... 22
9.4 INSTALACIÓN DE LA APLICACIÓN «MEMORY 2 MOVE» PARA ANDROID ............................................ 23
9.5 CONEXIÓN INALÁMBRICA A SU DISPOSITIVO ANDROID ...................................................................... 23
9.6 INICIO DE SESIÓN DE USUARIO (ANDROID) ......................................................................................... 25
10. FUNCIONES BÁSICAS ............................................................................................................................ 26
10.1 APLICACIÓN PARA DISPOSITIVOS IOS .................................................................................................. 26
ES - 2
10.2 APLICACIÓN PARA DISPOSITIVOS ANDROID ........................................................................................ 28
10.3 CONFIGURACIÓN WI-FI (IOS Y ANDROID) ............................................................................................ 30
10.3.1 INTERFAZ DE CONFIGURACIÓN WI-FI .................................................................................................. 30
10.3.2 CAMBIO DEL NOMBRE DEL DISPOSITIVO ............................................................................................. 30
10.3.3 SEGURIDAD .......................................................................................................................................... 31
10.3.4 ACCESOS A INTERNET ........................................................................................................................... 31
10.4 REPRODUCCIÓN DE ARCHIVOS DE MÚSICA/SONIDO (IOS / ANDROID) ............................................... 33
10.5 REPRODUCIR PELÍCULAS / VÍDEOS ....................................................................................................... 35
10.5.1 IOS ........................................................................................................................................................ 35
10.5.2 ANDROID .............................................................................................................................................. 37
10.6 REPRODUCCIÓN DE ARCHIVOS DE IMAGEN ........................................................................................ 38
10.6.1 IOS ........................................................................................................................................................ 38
10.6.2 ANDROID .............................................................................................................................................. 41
10.7 COMPARTIR ARCHIVOS DE IMAGEN .................................................................................................... 44
10.7.1 IOS ........................................................................................................................................................ 44
10.7.2 ANDROID .............................................................................................................................................. 45
10.8 ABRIR/VISUALIZAR DOCUMENTOS ...................................................................................................... 47
10.8.1 IOS ........................................................................................................................................................ 47
10.8.2 ANDROID .............................................................................................................................................. 48
10.9 COPIAR, BORRAR, DESCARGAR Y CARGAR ARCHIVOS (IOS Y ANDROID) ............................................. 49
10.10 DESCARGA DE ARCHIVOS A SU DISPOSITIVO IOS/ANDROID ................................................................ 51
10.11 CARGAR ARCHIVOS AL DISCO DURO WI-FI (IOS Y ANDROID) .............................................................. 53
10.12 BORRAR ARCHIVOS (IOS Y ANDROID) .................................................................................................. 56
10.13 VISTA GENERAL Y ESTADO DE SUS CARGAS/DESCARGAS .................................................................... 57
10.14 SALIR DE LA APLICACIÓN MEMORY 2 MOVE ....................................................................................... 57
10.14.1 IOS ........................................................................................................................................................ 57
10.14.2 ANDROID .............................................................................................................................................. 58
10.15 DESINSTALACIÓN DE LA APLICACIÓN «MEMORY 2 MOVE» ................................................................ 58
10.15.1 IOS ........................................................................................................................................................ 58
ES - 3
10.15.2 ANDROID .............................................................................................................................................. 59
11. FUNCIONES DE ADMINISTRACIÓN WEB ............................................................................................... 60
11.1 FUNCIÓN EXPLORER ............................................................................................................................. 61
11.2 MENÚ CONTEXTUAL (NO EN MAC) ...................................................................................................... 62
11.3 ATAJOS DE TECLADO ............................................................................................................................ 65
11.4 ARRASTRAR Y SOLTAR .......................................................................................................................... 65
11.5 INFORMACIÓN ..................................................................................................................................... 65
11.5.1 INFORMACIÓN SOBRE EL APARATO ..................................................................................................... 65
11.5.2 INFORMACIÓN SOBRE LA MEMORIA ................................................................................................... 66
11.5.3 INFORMACIÓN SOBRE LA RED ............................................................................................................. 66
11.6 AJUSTES ................................................................................................................................................ 67
11.6.1 USUARIO............................................................................................................................................... 67
11.6.2 DISCO.................................................................................................................................................... 67
11.7 RED ....................................................................................................................................................... 68
11.7.1 NOMBRE DE HOST ................................................................................................................................ 68
11.7.2 WI-FI Y LAN ........................................................................................................................................... 69
11.7.3 SERVIDOR DHCP ................................................................................................................................... 70
11.7.4 ACCESO A INTERNET ............................................................................................................................ 71
11.8 SERVICIOS ............................................................................................................................................. 72
11.8.1 SAMBA .................................................................................................................................................. 72
11.8.2 MEDIA SERVER ..................................................................................................................................... 73
11.9 SISTEMA ............................................................................................................................................... 74
11.9.1 CONFIGURACIÓN DE LA HORA ............................................................................................................. 74
11.9.2 CREAR RESPALDO ................................................................................................................................. 75
11.9.3 ACTUALIZACIÓN DE FIRMWARE ........................................................................................................... 76
11.9.4 RESTAURAR .......................................................................................................................................... 78
12. LA LICENCIA INFORMACIÓN ................................................................................................................. 79
ES - 4
1. VISIÓN GENERAL DEL PRODUCTO
«Memory 2 Move» le posibilita el acceso inalámbrico a sus contenidos de vídeo, música,
fotos y datos para difundirlos a través de su iPad®, iPhone®, tableta, smartphone y
ordenador portátil, sin el uso de cables innecesario y fastidioso.
Gracias al disco duro integrado, ya no tendrá que preocuparse por las limitaciones de
espacio de memoria en sus dispositivos portátiles, y el puerto USB 3.0 integrado permite la
transferencia de datos rápida y sencilla.
A fin de proporcionarle la máxima movilidad, Memory 2 Move incorpora una batería
recargable. Para cargar la batería, tan solo tiene que conectar el dispositivo a un puerto USB
libre de su ordenador, por ejemplo para copiar sus archivos al disco duro. En muy poco
tiempo, el dispositivo estará listo para su uso. Durante el proceso de carga puede accederse
al Memory 2 Move.
2. FUNCIONES DEL PRODUCTO
Transmisión mediante flujo continuo de datos (streaming) de medios a través de una
conexión Wi-Fi para hasta cinco usuarios simultáneamente.
Acceso a sus archivos de música, vídeo y fotos mediante la aplicación gratuita para
iOS y Android.
Duración de la batería de hasta cinco horas*.
Acceso a Internet mediante la conexión RJ45 opcional (conexión LAN) o
inalámbricamente mediante el estándar 802.11 b/g/n.
Compatible con los tipos de formato NTFS y FAT32.
Admite el intercambio multiplataforma de datos vía conexión LAN entre Windows,
Mac, iOS y Linux.
Admite aplicaciones de usuario en las más diversas plataformas, incluidos
Windows/Mac/Linux/iPad/iPhone/Android.
*La duración exacta de la batería depende de las aplicaciones y la configuración utilizadas.
ES - 5
Utilización como disco duro externo: El puerto USB 3.0 incorporado posibilita la
transferencia rápida de datos y puede cargar la batería interna al conectar el Memory 2
Move a un ordenador o una fuente de alimentación, respectivamente. Esto sólo funciona
cuando el dispositivo está apagado.
Utilización mediante conexión LAN: Para ello, conecte un extremo de su cable RJ45 al
Memory 2 Move y el otro extremo a un puerto libre de su enrutador. A continuación active
la función DHCP en su Memory 2 Move para obtener la asignación automática de la
dirección IP.
Utilización inalámbrica: Conecte el Memory 2 Move a su enrutador inalámbrico tal como se
explica en las siguientes instrucciones, para poder acceder a Internet por vía Wi-Fi.
ES - 6
3. VOLUMEN DE SUMINISTRO
Memory 2 Move con cable USB 3.0
CD
Manual de manejo
Fuente de alimentación (KTEC KSAS0060500100VEU 5V / 1A)
4. DATOS TÉCNICOS
Dimensiones 127,3 mm (L) X 80 mm (An) X 25 mm (Al)
Wi-Fi:
o Estándar: 802.11 b/g/n,
o Frecuencia: 2,4 GHz
o Tasas de transferencia: 72 Mbps (20 MHz) / 150 Mbps (40 MHz)
Interfaz de red: 100 Mbps Ethernet RJ45
Conexión USB: Micro USB 3.0, para transferencia de datos y
carga de la batería
Capacidad de la batería: 3.000 mAh
Temperatura de funcionamiento: La temperatura de funcionamiento óptima se
sitúa entre 5 °C y 35 °C
5. REQUISITOS MÍNIMOS
Conexión a Internet
Requisitos del sistema:
o Windows: XP/Vista/Windows 7/8
o Mac: OS X 10.6.0 y superior
o Otros: Fedora 12 (Linux) y superior
Navegador de Internet en el PC
o Windows: Compatible con Internet Explorer 7.0 y superior
o Mac: Compatible con Safari 3.0 y superior
o Otros: Firefox 3.5 y superior
Enrutador o conmutador (switch)
ES - 7
6. VISTA DEL PRODUCTO
7. CONEXIONES DISPONIBLES
7.1 PUERTO WAN RJ45
A. Modo de enrutador: El Memory 2 Move funciona como un enrutador convencional y
puede asignar direcciones IP a ordenadores que estén conectados mediante red de
área local inalámbrica (WLAN).
B. Modo WAN (red de área amplia): Permite establecer una conexión de red a una red
ya existente.
7.2 INTERFAZ MICRO USB 3.0
El puerto USB 3.0 incorporado posibilita la transferencia rápida de datos y puede cargar
la batería interna al conectar el Memory 2 Move a un ordenador o una fuente de
alimentación, respectivamente. Esto sólo funciona cuando el dispositivo está apagado.
ES - 8
7.3 INDICADORES LED
LED de alimentación:
- Apagado: El dispositivo está apagado.
- Permanece encendido (verde): La batería está completamente cargada.
- Parpadea rápidamente (verde): Se está apagando el dispositivo.
- Parpadea lentamente (verde): Se está cargando el dispositivo.
- Permanece encendido (rojo): Carga de la batería inferior al 30%.
- Parpadea rápidamente (rojo): Nivel de carga de la batería crítico.
LED HDD:
- Permanece encendido en blanco: El dispositivo está listo para funcionar.
- Parpadea en blanco: Procesos de lectura/escritura activos.
- Conectado mediante el puerto USB:
o Permanece encendido en azul: Conectado mediante USB 3,0
o Permanece encendido en blanco: Conectado mediante USB 2.0
LED Wi-Fi (azul):
- Parpadea: Se está iniciando el proceso de inicialización.
- El LED no se ilumina: El dispositivo está apagado o no recibe corriente.
- Permanece encendido:
o Proceso de inicialización completado.
o Listo para funcionar - pueden conectarse dispositivos.
LED de Internet:
- Modo de enrutador
o Color azul: Buena calidad de señal.
o Alternando azul/rojo: Mala calidad de señal.
o El LED no se ilumina: Sin conexión a Internet.
- Función de puente
o Color azul: Buena calidad de señal.
o El LED no se ilumina: Sin conexión a Internet.
ES - 9
8. UTILIZACIÓN DE UN PC O MAC
8.1 ESTABLECIMIENTO DE UNA CONEXIÓN DE RED DE ÁREA LOCAL (LAN)
INALÁMBRICA A UN PC
Encienda el dispositivo Wi-Fi pulsando el botón de alimentación situado en la parte frontal
del dispositivo.
Active la función WLAN en su PC y haga clic en el símbolo WLAN en la barra de tareas, en la
parte inferior derecha. Se mostrará el siguiente mensaje:
Seleccione la red con el nombre «Memory2Move-XXXX».
Nota: El dispositivo se suministra con la contraseña predefinida «intenso1». Por su propia
seguridad, introduzca una nueva contraseña después de haber establecido con éxito la
conexión.
Una vez que haya establecido con éxito una conexión a su dispositivo Wi-Fi, instale el
software cliente suministrado siguiendo el proceso explicado a continuación:
Como requisito para poder conectar a su ordenador el dispositivo Wi-Fi conectado, debe
instalar la herramienta de software incluida «WiFi Finder» desde el CD de controladores
suministrado. Esta aplicación buscará automáticamente en su red el dispositivo Wi-Fi
conectado.
Tan solo tiene que hacer doble clic sobre el icono y seguir las instrucciones que se mostrarán
en la pantalla.
ES - 10
8.2 WIFI FINDER PARA PC
Inicie la aplicación haciendo doble clic en el icono «WiFi Finder». La aplicación buscará
automáticamente el dispositivo Memory 2 Move en la red conectada (véase la captura de
pantalla).
Nota: En caso de que no se encontrara «M2M» en la lista de los clientes de red conectados,
haga clic en el botón «Actualizar» para realizar una nueva búsqueda del dispositivo Wi-Fi.
1.) Por favor eliga en el menu Memory 2 Move y pulse „Log In, para conectarse con
el Web Administrador (ver Screenshot).
ES - 11
2.) Por favor introduzca Nombre y la contraseña:
Nombre de usuario: admin
Contraseña: 00000
Atencion: Por favor introduzca despues de conectarse para su seguridad una nueva
contraseña.
8.2.1 MI MEMORIA
Al seleccionar la opción de menú «My Storage» o «Mi memoria», se le mostrará el cuadro de
diálogo reproducido más abajo. Para poder conectarse correctamente, introduzca los
siguientes datos de inicio de sesión:
Nombre de usuario: admin
Contraseña: 00000
Nota: Por su propia seguridad, introduzca una nueva contraseña después de haber
establecido con éxito la conexión.
ES - 12
8.3 ESTABLECIMIENTO DE UNA CONEXIÓN DE RED DE ÁREA LOCAL (LAN)
INALÁMBRICA A UN MAC
Encienda el dispositivo Wi-Fi pulsando el botón de alimentación situado en la parte frontal
del dispositivo. Espere unos minutos hasta que el indicador LED deje de parpadear. Active la
función WLAN en su PC y haga clic en el símbolo WLAN en la barra de tareas, en la parte
inferior derecha. Seleccione la red con el nombre «Memory2Move-XXXX».
Nota: El dispositivo se suministra con la contraseña predefinida «intenso1». Por su propia
seguridad, introduzca una nueva contraseña después de haber establecido con éxito la
conexión.
Una vez que haya establecido con éxito una conexión a su dispositivo Wi-Fi, instale el
software cliente suministrado siguiendo el proceso explicado a continuación:
Como requisito para poder conectar a su ordenador el dispositivo Wi-Fi conectado, debe
instalar la herramienta de software incluida «WiFi Finder» desde el CD de controladores
suministrado. Esta aplicación buscará automáticamente en su red el dispositivo Wi-Fi
conectado.
Tan solo tiene que hacer doble clic sobre el icono y seguir las instrucciones que se mostrarán
en la pantalla.
ES - 13
8.3.1 WIFI FINDER PARA MAC
Inicie la aplicación «WiFi Finder» haciendo doble clic en el icono. La aplicación buscará
automáticamente el dispositivo Memory 2 Move en la red conectada (véase la captura de
pantalla).
Nota: En caso de que no se encontrara «M2M» en la lista de los clientes de red conectados,
haga clic en el botón «Actualizar» para realizar una nueva búsqueda del dispositivo Wi-Fi.
1.) Por favor eliga en el menu Memory 2 Move y pulse „Log In, para conectarse con
el Web Administrador (ver Screenshot).
ES - 14
2.) Por favor introduzca Nombre y la contraseña:
Nombre de usuario: admin
Contraseña: 00000
Atencion: Por favor introduzca despues de conectarse para su seguridad una nueva
contraseña.
ES - 15
8.3.2 MI MEMORIA
Al seleccionar la opción de menú «My Storage» o «Mi memoria», se le mostrará el cuadro de
diálogo reproducido más abajo. Para poder conectarse correctamente, introduzca los
siguientes datos de inicio de sesión:
Nombre de usuario: admin
Contraseña: 00000
Nota: Por su propia seguridad, introduzca una nueva contraseña después de haber
establecido con éxito la conexión.
Puede crear, eliminar, copiar, editar, renombrar o mover los directorios y las carpetas
contenidos en el dispositivo Memory 2 Move.
Además pueden intercambiarse bilateralmente datos entre su MAC y el Memory 2 Move
(carga/descarga).
ES - 16
8.4 CONFIGURACIÓN DEL MEMORY 2 MOVE
Utilice el software cliente para PC de la manera anteriormente descrita para establecer una
conexión con el dispositivo Wi-Fi, e inicie sesión como administrador en la interfaz de
administración web. Ahora puede configurar su dispositivo.
Asistente de inicio
La primera vez que utilice el dispositivo, una vez iniciada la sesión se abrirá un denominado
«Asistente de inicio», que le permitirá llevar a cabo fácilmente todos los ajustes importantes.
Nota: Si hace clic en la X (en el ángulo superior derecho del asistente), se cerrará el
asistente de inicio y se adoptarán como configuración predeterminada todos los ajustes
de fábrica.
Pulse el botón «Siguiente» para configurar su dispositivo.
Configuración del acceso a Internet
.. mediante el establecimiento de una conexión a otra red disponible
ES - 17
Puede escoger entre dos opciones de acceso a Internet disponibles. En la configuración
estándar está predeterminado el acceso mediante conexión por cable (como se muestra en
la figura superior).
A. Acceso inalámbrico (WLAN):
Conecte el M2M a otro enrutador WLAN, a fin de establecer una conexión a Internet.
B. Acceso mediante conexión por cable (LAN):
Conecte el M2M directamente a un puerto disponible en la parte posterior de su
enrutador para establecer la conexión con otra red.
Acceso por cable:
En la configuración predeterminada está seleccionada la opción «IP dinámica». Puede
asignar manualmente una dirección IP: para ello haga clic en la flecha amarilla y seleccione la
opción «IP estática».
Acceso inalámbrico:
SSID: Introduzca el nombre SSID de su red o haga clic en «Actualizar lista» para buscar
automáticamente todas las redes disponibles.
Contraseña: Introduzca la contraseña para la red inalámbrica local seleccionada.
Dirección IP:
-Si se ha seleccionado «Automática», la red le asigna automáticamente una dirección IP.
-Si se ha seleccionado «IP estática», deberá introducir usted mismo su dirección IP para la
red a la que desee conectarse.
Nota: Haga clic en la X (ángulo superior derecho) para salir del menú de opciones LAN.
Nota: ¡En caso de que no pueda establecer una conexión a otra red, consulte a su
proveedor de servicios de red para averiguar las directrices aplicables en su caso!
ES - 18
Haga clic en «Siguiente» para continuar con la configuración del Memory 2 Move. El
siguiente paso consiste en configurar los parámetros Wi-Fi y LAN.
Configuración Wi-Fi y LAN
- SSID: Introduzca aquí el nombre de su red. El parámetro predeterminado en este caso es
«Memory2Move-XXXX». Pueden introducirse un máximo de 32 caracteres para el nombre
SSID.
- Canal: Indique aquí el canal por el que el dispositivo Wi-Fi deberá transmitir y recibir. El
parámetro predeterminado es «auto». En este caso, el dispositivo establece
automáticamente el canal. Pero también puede especificar manualmente el canal por el
cual se recibirán y transmitirán datos. Están disponibles los canales 1 hasta el 13.
- Acceso inalámbrico: El estándar de red inalámbrica predeterminado es:
802.11/b/g/n. También puede seleccionar manualmente los modos de 11 Mbps
(802.11b), 54 Mbps (802.11g) o 150 Mbps (802.11n).
- Seguridad: La configuración de seguridad predeterminada es mixta WPA/WPA2-PSK.
Puede escoger entre los siguientes tipos de cifrado:
Sin cifrado, WPA-PSK, WPA2-PSK o mixta WPA/WPA2-PSK.
- Contraseña: Dependiendo del tipo de cifrado seleccionado, debe introducirse una
contraseña con un mínimo de 8 y un máximo de 63 caracteres.
- Dirección IP: La dirección IP predeterminada es: 10.10.10.254 con la máscara de subred
255.255.255.0. Puede modificar manualmente esta dirección IP.
ES - 19
Haga clic en «Siguiente» para introducir la contraseña de administrador. Si hace clic en
«Omitir» renunciará a establecer una nueva contraseña y adoptará la contraseña
predeterminada.
Al completarse el asistente de inicio, el sistema se reiniciará. Este proceso dura dos minutos.
A continuación se le mostrará un mensaje que le informa sobre el estado actual.
ES - 20
9. UTILIZACIÓN DE DISPOSITIVOS PORTÁTILES
9.1 INSTALACIÓN DE LA APLICACIÓN «MEMORY 2 MOVE» PARA IOS
1. Haga clic en el icono de App Store en su pantalla de inicio, tal como se muestra en la
siguiente figura. Busque la aplicación gratuita «Memory 2 Move» y siga las
instrucciones que aparecen en pantalla para su instalación.
2. Una vez completada correctamente la instalación, encontrará la aplicación «Memory
2 Move» en la pantalla de inicio de su dispositivo (véase la siguiente figura).
ES - 21
9.2 CONEXIÓN INALÁMBRICA A SU IPHONE/IPAD
1. Encienda el dispositivo Memory 2 Move. Espere un par de minutos hasta que haya
concluido la inicialización del dispositivo. Esto se indica mediante el LED Wi-Fi azul,
que deja de parpadear al completarse la inicialización.
2. Haga clic en el icono «Ajustes», como se muestra en la siguiente imagen.
3. Haga clic en la opción de menú «Wi-Fi». En la lista de redes Wi-Fi disponibles debería
aparecer la red «Memory2Move-XXXX».
Haga clic en esta red, tal como se muestra en la siguiente imagen. En caso de que
haya establecido una contraseña en el paso 8.4. en «Configuración de Wi-Fi y LAN»,
introduzca ahora dicha contraseña.
Una vez haya seleccionado «Memory2Move-XXXX», aparece una marca de verificación
delante de la SSID y se muestra el logo Wi-Fi en el ángulo superior izquierdo del dispositivo.
ES - 22
9.3 INICIO DE SESIÓN DE USUARIO (IOS)
Haga clic en el logo «Memory 2 Move» para iniciar la aplicación, tal como se muestra en la
siguiente imagen.
Introduzca la contraseña de administrador que haya establecido durante la configuración
(contraseña predeterminada: 00000). La contraseña tan solo es necesaria para el primer
inicio de sesión. El dispositivo memoriza su contraseña, de modo que ya no tendrá que
introducirla la próxima vez que inicie sesión.
Una vez que haya introducido la contraseña correcta, accederá automáticamente al menú
«Memory 2 Move». Éste es su acceso directo al disco duro Wi-Fi.
ES - 23
9.4 INSTALACIÓN DE LA APLICACIÓN «MEMORY 2 MOVE» PARA ANDROID
1. Acceda a «Google Playstore» o al «App Center» y busque la aplicación gratuita
«Memory 2 Move».
2. Sigas las instrucciones de instalación que aparecerán en la pantalla, tal como se
muestra en la siguiente imagen.
3. Una vez completada correctamente la instalación, encontrará la aplicación «Memory
2 Move» en la pantalla de inicio de su dispositivo (véase la siguiente figura).
9.5 CONEXIÓN INALÁMBRICA A SU DISPOSITIVO ANDROID
1. Encienda el dispositivo Memory 2 Move. Espere un par de minutos hasta que haya
concluido la inicialización del dispositivo. Esto se indica mediante el LED Wi-Fi azul,
que deja de parpadear al completarse la inicialización.
ES - 24
2. Haga clic en el icono «Ajustes», como se muestra en la siguiente imagen.
3. Active la función Wi-Fi deslizando el «interruptor virtual» hacia la derecha.
En la lista de redes Wi-Fi disponibles debería aparecer la red «Memory2Move-XXXX».
Haga clic en esta red, tal como se muestra en la siguiente imagen. En caso de que
haya establecido una contraseña en el paso 8 en «Configuración de Wi-Fi y LAN»,
introduzca ahora dicha contraseña.
4. Una vez que el dispositivo se haya conectado con éxito al disco duro Wi-Fi, aparecerá
la palabra «Conectado» bajo la SSID.
ES - 25
9.6 INICIO DE SESIÓN DE USUARIO (ANDROID)
1. Haga clic en el logo «Memory 2 Move» para iniciar la aplicación (véase la siguiente
imagen).
2. Introduzca la contraseña de administrador que haya establecido durante la
configuración (contraseña predeterminada: 00000). La contraseña tan solo es
necesaria para el primer inicio de sesión. El dispositivo memoriza su contraseña, de
modo que ya no tendrá que introducirla la próxima vez que inicie sesión.
3. Una vez que haya introducido la contraseña correcta, accederá automáticamente al
menú «Memory 2 Move». Éste es su acceso directo al disco duro Wi-Fi.
ES - 26
10. FUNCIONES BÁSICAS
10.1 APLICACIÓN PARA DISPOSITIVOS IOS
En cuanto se haya conectado con éxito al Memory 2 Move, será conducido
automáticamente al menú «Memory 2 Move», que constituye su acceso directo al disco
duro Wi-Fi. El menú «Mi dispositivo» le permite acceder al dispositivo que esté utilizando
actualmente para conectarse al Memory 2 Move.
En los menús pueden seleccionarse las siguientes opciones:
Menú principal «Mi dispositivo» Aquí están disponibles las carpetas predeterminadas
«Documentos», «Música», «Fotos», «Vídeos» e «iPad»/«iPhone» para la organización de sus
archivos.
Menú principal «Memory 2 Move» Acceso a los archivos contenidos en Memory 2 Move.
ES - 27
Tecla Inicio Le lleva de vuelta al menú principal.
Tecla Vista Le lleva a la vista de miniaturas o de lista.
Tecla Ajustes Le conduce al menú de configuración del disco
duro Wi-Fi.
Tecla Atrás Le devuelve al menú anterior.
Tecla Administrar Para seleccionar varios archivos que se
pueden cargar y descargar, así como eliminar.
Memory 2 Move Acceso al disco duro Wi-Fi.
Mi dispositivo Acceso al dispositivo que está utilizando
actualmente para conectarse al disco duro Wi-Fi.
Tecla de estado Le lleva al resumen de estado de sus
descargas/cargas, indica el número de versión y el último título
reproducido.
ES - 28
10.2 APLICACIÓN PARA DISPOSITIVOS ANDROID
En cuanto se haya conectado con éxito al Memory 2 Move, será conducido
automáticamente al menú «Memory 2 Move», que constituye su acceso directo al disco
duro Wi-Fi. El menú «Mi dispositivo» le permite acceder al dispositivo que esté utilizando
actualmente para conectarse al Memory 2 Move.
En los menús pueden seleccionarse las siguientes opciones:
Menú principal «Mi dispositivo» Aquí están disponibles las carpetas predeterminadas
«Documentos», «Música», «Fotos», «Vídeos» y «SDCard» para la organización de sus
archivos.
Menú principal «Memory 2 Move» Acceso a los archivos contenidos en Memory 2 Move.
ES - 29
Tecla Inicio Le lleva de vuelta al menú principal.
Tecla Vista Le lleva a la vista de miniaturas o de lista.
Tecla Ajustes Le conduce al menú de configuración del disco duro
Wi-Fi.
Tecla Atrás Le devuelve al menú anterior.
Tecla Administrar Para seleccionar varios archivos que se pueden
cargar y descargar, así como eliminar.
Memory 2 Move Acceso al disco duro Wi-Fi.
Mi dispositivo Acceso al dispositivo que está utilizando
actualmente para conectarse al disco duro Wi-Fi.
Tecla de estado Le lleva al resumen de estado de sus
descargas/cargas, a su reproducción de canciones/vídeos actual y le
permite cerrar la aplicación.
ES - 30
10.3 CONFIGURACIÓN WI-FI (IOS Y ANDROID)
10.3.1 INTERFAZ DE CONFIGURACIÓN WI-FI
Haga clic en para modificar la configuración Wi-Fi. Esta función aparece
únicamente cuando se accede a «Mi dispositivo Wi-Fi».
10.3.2 CAMBIO DEL NOMBRE DEL DISPOSITIVO
Hagla clic en el botón para cambiar el nombre.
Después de haber introducido un nuevo nombre, en la parte superior derecha aparece el
botón «Establecer»/«Set», en el que deberá hacer clic para guardar el cambio.
ES - 31
10.3.3 SEGURIDAD
Entre los ajustes del disco duro Wi-Fi aparecen las opciones de seguridad: El disco duro Wi-Fi
admite los siguientes formatos de seguridad: WPA-PSK, WPA2-PSK, mixta WPA/WPA2-PSK.
Si desea añadir un nuevo código de seguridad, se le pedirá una contraseña inalámbrica.
A continuación, en la parte superior derecha haga clic en el botón «Set» o «Insertar» para
guardar la contraseña.
10.3.4 ACCESOS A INTERNET
En Configuración de Internet se le muestran los accesos a Internet. Puede escoger entre el
acceso por cable (wired) y el acceso inalámbrico (wireless). Hallará la conexión inalámbrica
bajo el encabezado Configuración de Internet, en el centro de la siguiente pantalla:
ES - 32
Si selecciona la modalidad conectada por cable, en primer lugar deberá configurar su
conexión de red.
Después de haber seleccionado la red, haga clic en «Guardar», y a continuación se le pedirá
que ejecute un reinicio haciendo clic en «Aceptar».
Al hacer clic en «Atrás» accederá de nuevo al menú de configuración Wi-Fi.
ES - 33
10.4 REPRODUCCIÓN DE ARCHIVOS DE MÚSICA/SONIDO (IOS / ANDROID)
Sugerencia: Es recomendable crear una o varias carpetas para todos sus archivos de
música/sonido. De este modo se facilita la utilización y la organización de su disco duro
WiFi.
Los archivos de música o de sonido pueden reproducirse independientemente del menú y de
la ubicación de almacenamiento actuales («Memory 2 Move» o «Mi dispositivo»).
Para ello, tan solo tiene que localizar el archivo. Al hacer clic sobre el archivo deseado, éste
se reproducirá automáticamente.
Nota: Para más información acerca de los formatos de archivo admitidos, consulte el
manual de manejo de su dispositivo iOS.
- Haga clic en este botón para reproducir desde el principio el archivo de sonido
que se esté reproduciendo actualmente. Si hace doble clic se reproducirá el archivo
de sonido anterior.
- Haga clic en este botón para pasar al siguiente archivo de sonido.
- Haga clic en este botón para iniciar la reproducción del archivo de sonido.
Haga clic en el botón de pausa para pausar/detener la reproducción.
- Haga clic en este botón para cerrar el reproductor.
ES - 34
Están disponibles cinco modos de reproducción:
a. - Reproducir una vez: el archivo se reproduce una vez, y a continuación se
detiene la reproducción.
b. - Repetición del archivo actual: Se repite el archivo reproducido actualmente.
La reproducción se pausa pulsando .
c. - Reproducción aleatoria de todos los archivos de sonido que se encuentran
en la carpeta actual.
d. - Reproducción de la carpeta actual: se reproducen sucesivamente los
archivos de sonido sin repetición.
e. Repetición de la carpeta: se reproducen sucesivamente todos los archivos de
sonido presentes en la carpeta y a continuación se repiten.
Nota: Mantenga pulsado el botón de la barra de progreso de la reproducción y
deslícelo hacia la derecha o la izquierda para avanzar o retroceder dentro de un
archivo de sonido.
Sugerencia: Puede salir en cualquier momento de la interfaz del reproductor
musical. La reproducción de sus archivos de sonido continuará en segundo plano.
ES - 35
10.5 REPRODUCIR PELÍCULAS / VÍDEOS
10.5.1 IOS
Sugerencia: Es recomendable crear una o varias carpetas para todos sus archivos de
vídeo/películas. De este modo se facilita la utilización y la organización de su disco duro
Wi-Fi.
Los archivos de vídeo o de películas pueden reproducirse independientemente del menú y
de la ubicación de almacenamiento actuales («Memory 2 Move» o «Mi dispositivo»).
Para ello, tan solo tiene que localizar el archivo. Al hacer clic sobre el archivo deseado, éste
se reproducirá automáticamente.
Nota: Para más información acerca de los formatos de archivo admitidos, consulte el
manual de manejo de su dispositivo iOS.
ES - 36
El ajuste predeterminado para la reproducción de vídeo es el formato apaisado. Dispone de
las siguientes funciones de manejo:
1. - Haga clic en este botón para detener la reproducción del archivo de
vídeo actual y cerrar el reproductor de películas.
2. - Haga clic en este botón para ajustar el formato de reproducción al
tamaño de la pantalla.
3. - Mantenga pulsado el botón de la barra de progreso de la
reproducción y deslícelo hacia la derecha o la izquierda para avanzar o retroceder
dentro del archivo de vídeo.
4. - Mantenga pulsado el botón del regulador de volumen de
sonido y deslícelo hacia la derecha o la izquierda ajustar el volumen de sonido.
5. - Mantenga pulsado este botón para retroceder en el archivo de vídeo
durante la reproducción.
6. - Mantenga pulsado este botón para avanzar en el archivo de vídeo durante
la reproducción.
7. - Haga clic en este botón para iniciar/reanudar la reproducción del archivo
de vídeo.
8. - Haga clic en este botón para pausar la reproducción del archivo de vídeo.
ES - 37
10.5.2 ANDROID
Sugerencia: Es recomendable crear una o varias carpetas para todos sus archivos de
vídeo/películas. De este modo se facilita la utilización y la organización de su disco duro
Wi-Fi.
Los archivos de vídeo o de películas pueden reproducirse independientemente del menú y
de la ubicación de almacenamiento actuales («Memory 2 Move» o «Mi dispositivo»).
Para ello, tan solo tiene que localizar el archivo. Al hacer clic sobre el archivo deseado, éste
se reproducirá automáticamente.
Nota: El manejo y las posibilidades de configuración de la reproducción de vídeo varían
dependiendo del reproductor de vídeo instalado en su dispositivo Android.
Consulte el manual de manejo de su reproductor de vídeo para informarse sobre su
manejo.
ES - 38
10.6 REPRODUCCIÓN DE ARCHIVOS DE IMAGEN
10.6.1 IOS
Sugerencia: Es recomendable crear en el dispositivo Memory 2 Move una o varias carpetas
para todos sus archivos de imagen. De este modo se facilita la utilización y la organización
de su disco duro Wi-Fi.
Nota: El disco duro Wi-Fi admite la reproducción de los siguientes formatos de imagen:
.jpg, .tiff, .gif y .bmp
Los archivos de imagen admitidos pueden mostrarse en una vista general de miniaturas o
bien en forma de lista, como puede verse en las siguientes imágenes.
Todas las imágenes en formatos no admitidos se muestran como vista en miniatura ejemplar
o como icono.
Vista de miniaturas Vista de lista
Haga clic en cualquier archivo de imagen para abrir la presentación automática de
diapositivas. En caso de que no se abra directamente la barra de menú, haga clic
nuevamente sobre la imagen para que aparezca la barra de menú (en la parte superior de la
imagen mostrada bajo estas líneas).
ES - 39
En la presentación de diapositivas dispone de las siguientes funciones:
Deslice el dedo sobre la pantalla de derecha a izquierda o de izquierda a derecha para
controlar manualmente la presentación de diapositivas, o bien haga clic en el botón de
reproducción para dejar que la presentación se ejecute automáticamente.
Haga clic en el botón de pausa para pausar la presentación de diapositivas. Para
reanudar la presentación de diapositivas, vuelva a hacer clic en el botón de pausa.
Haga clic en para reanudar la presentación de diapositivas y volver a empezar
desde el principio tras la última imagen.
Haga clic en para que la presentación de diapositivas se ejecute una sola vez. La
reproducción se detiene tras el último archivo de imagen.
Haga clic en el botón «Atrás» para volver a la opción de menú anterior.
También puede dejar que la presentación de diapositivas se ejecute con música de
fondo. Para ello, haga clic en el botón de música tal como se muestra en la siguiente
imagen.
ES - 40
Detener/Reanudar reproducción: Haga clic aquí para detener o reanudar la música de
fondo.
Selección: Haga clic aquí para buscar y seleccionar archivos de sonido para la música
de fondo. Haga clic en el botón para volver a la presentación de diapositivas, tal
como se muestra en la siguiente imagen:
Botón de repetición: Si está activado este botón, se repiten los mismos archivos de
sonido para la música de fondo. Esta opción está desactivada en la configuración
predeterminada.
ES - 41
10.6.2 ANDROID
Sugerencia: Es recomendable crear una o varias carpetas para todos sus archivos de
imagen. De este modo se facilita la utilización y la organización de su disco duro Wi-Fi.
Nota: El disco duro Wi-Fi admite la reproducción de los siguientes formatos de imagen:
.jpg, .tiff, .gif y .bmp
Los archivos de imagen admitidos pueden mostrarse en una vista general de miniaturas o
bien en forma de lista, como puede verse en las siguientes imágenes.
Todas las imágenes en formatos no admitidos se muestran como vista en miniatura ejemplar
o como icono.
Vista de miniaturas Vista de lista
Haga clic en cualquier archivo de imagen para abrir la presentación automática de
diapositivas. En caso de que no se abra directamente la barra de menú, haga clic
nuevamente sobre la imagen para que aparezca la barra de menú (en la parte superior
de la imagen mostrada bajo estas líneas).
ES - 42
En la presentación de diapositivas dispone de las siguientes funciones:
Deslice el dedo sobre la pantalla de derecha a izquierda o de izquierda a derecha para
controlar manualmente la presentación de diapositivas, o bien haga clic en el botón de
reproducción para dejar que la presentación se ejecute automáticamente.
Haga clic en el botón de pausa para pausar la presentación de diapositivas. Para
reanudar la presentación de diapositivas, vuelva a hacer clic en el botón de pausa.
Haga clic en para reanudar la presentación de diapositivas y volver a empezar
desde el principio tras la última imagen.
Haga clic en para que la presentación de diapositivas se ejecute una sola vez. La
reproducción se detiene tras el último archivo de imagen.
Haga clic en el botón «Atrás» para volver a la opción de menú anterior.
También puede dejar que la presentación de diapositivas se ejecute con música de
fondo. Para ello, haga clic en el botón de música tal como se muestra en la siguiente
imagen.
ES - 43
Detener/Reanudar reproducción: Haga clic aquí para detener o reanudar la música de
fondo.
Selección: Haga clic aquí para buscar y seleccionar archivos de sonido para la música
de fondo. Haga clic en el botón para volver a la presentación de diapositivas,
tal como se muestra en la siguiente imagen:
Botón de repetición: Si está activado este botón, se repiten los mismos archivos de
sonido para la música de fondo. Esta opción está desactivada en la configuración
predeterminada.
ES - 44
10.7 COMPARTIR ARCHIVOS DE IMAGEN
10.7.1 IOS
Dispone de diversas posibilidades para compartir sus archivos de imagen con su familia y sus
amigos, p. ej. por e-mail, guardándolos en el álbum de fotos del dispositivo utilizado o bien
subiéndolas a Facebook.
Nota: Necesita una conexión a Internet para compartir archivos de imagen por correo
electrónico o a través de redes sociales.
Haga clic en en el ángulo superior derecho de la pantalla para que se muestren
las tres posibilidades para compartir archivos de imagen. Haga clic en «Atrás»
para volver al menú anterior.
ES - 45
1) E-mail - Haga clic aquí para iniciar la aplicación de correo electrónico
predeterminada, y seleccione como adjunto el archivo de imagen deseado.
2) Añadir al álbum: Haga clic en esta opción para añadir el archivo de imagen deseado al
álbum de fotos del dispositivo utilizado.
3) Subir a Facebook: Al hacer clic en esta opción será conducido automáticamente a la
pantalla de inicio de sesión de Facebook. Para ello debe estar instalada en su
dispositivo la aplicación Facebook. También es necesario tener una cuenta de
Facebook.
10.7.2 ANDROID
Las opciones disponibles para compartir sus archivos de imagen dependen de las
diversas aplicaciones que estén instaladas en su dispositivo.
Nota: Necesita una conexión a Internet para compartir archivos de imagen por correo
electrónico o a través de redes sociales.
ES - 46
Haga clic en el símbolo en el ángulo superior derecho de la pantalla para que se
muestren las distintas posibilidades para compartir archivos de imagen. Haga clic en el
botón «Atrás» para volver al menú anterior. Haga clic en
1. Compartir Haga clic en el botón «Habilitar» para visualizar una lista de las
aplicaciones instaladas en su dispositivo Android (véase el ejemplo en la siguiente
imagen). Seleccione aquí la aplicación mediante la cual desea compartir el archivo de
imagen.
2. Guardar foto Pulse este botón para guardar el archivo de imagen desde su disco
duro Wi-Fi a la galería de su dispositivo Android.
ES - 47
10.8 ABRIR/VISUALIZAR DOCUMENTOS
10.8.1 IOS
La aplicación «Memory 2 Move» admite archivos de Keynote, Numbers, Page, Excel,
PowerPoint y Word, así como archivos .pdf y .txt.
Para abrir y visualizar estos archivos, tan solo tiene que hacer clic en el archivo deseado. Los
formatos admitidos se abrirán automáticamente. Haga clic en el botón «Atrás» para
volver al menú anterior, o bien haga clic en el botón para enviar el archivo de imagen
por correo electrónico, tal como se muestra en la siguiente imagen.
Nota: Para enviar correos electrónicos es preciso disponer de una conexión a Internet.
ES - 48
haga clic en el botón «Correo electrónico». Se iniciará automáticamente la aplicación de
correo electrónico predeterminada y se podrá enviar como adjunto el documento
seleccionado.
10.8.2 ANDROID
Para abrir documentos en su dispositivo Android, tan solo tiene que tocar el archivo
deseado. Éste se abrirá automáticamente mediante un programa predeterminado o una
aplicación instalada por usted (véase la siguiente imagen).
Para enviar el documento como archivo adjunto, consulte las instrucciones del programa
utilizado para abrir el archivo.
Nota: Para enviar correos electrónicos es preciso disponer de una conexión a Internet.
ES - 49
10.9 COPIAR, BORRAR, DESCARGAR Y CARGAR ARCHIVOS (IOS Y ANDROID)
Puede hacer clic en cualquier momento en el botón para borrar, descargar y cargar sus
archivos. Como se muestra en las siguientes imágenes, al pulsar el botón aparece el
símbolo en el menú del borde superior.
Vista de pantalla iOS Vista de pantalla Android
En el borde inferior de la pantalla se mostrarán ahora nuevos iconos. Ahora dispone de las
siguientes funciones:
- Haga clic en este icono para seleccionar todos los archivos. El icono aparece ahora en
color blanco, y se muestra una marca de verificación junto a todos los archivos.
- Haga clic nuevamente en este icono para anular la selección de todos los archivos. Al
hacerlo, desaparecerán las marcas de verificación junto a los archivos.
ES - 50
Sugerencia: También puede seleccionar únicamente uno o varios archivos, simplemente
haciendo clic sobre la correspondiente vista en miniatura. También puede manejar un
archivo fácilmente mediante el método de arrastrar y soltar. Para ello, tan solo tiene que
tocar la vista en miniatura del archivo deseado y arrastrarla hasta el icono de descargar
, cargar o borrar .
- Si se encuentra en el menú «Memory 2 Move», mediante este icono puede
descargar uno o varios archivos desde el disco duro Wi-Fi a su dispositivo iOS/Android.
- Si se encuentra en el menú «Mi dispositivo», mediante este icono puede cargar uno o
varios archivos desde su dispositivo iOS/Android al disco duro Wi-Fi. Para ello haga clic en el
botón «Administrar».
- Haga clic en este icono para ver una vista general de todas las cargas/descargas
actuales en la cola de espera. Además podrá ver aquí una lista de todos los archivos
transferidos con éxito.
- Haga clic en este icono para borrar todos los archivos seleccionados.
ES - 51
10.10 DESCARGA DE ARCHIVOS A SU DISPOSITIVO IOS/ANDROID
Si está conectado al disco duro Wi-Fi, puede descargar uno o varios archivos a su dispositivo
iOS/Android.
1. Haga clic en el símbolo .
2. A continuación seleccione uno o varios archivos que desee descargar o haga clic en
para seleccionar todos los archivos.
3. A continuación haga clic en el botón
4. Seleccione y confirme en la vista general la carpeta a la que desea descargar los
archivos.
ES - 52
Para crear una nueva carpeta para sus archivos, simplemente haga clic en el botón
«Crear nueva carpeta». A continuación introduzca el nombre de la carpeta y haga clic
en «Crear», tal como se muestra en la siguiente imagen. El nombre de la carpeta
debe tener un mínimo de 2 y un máximo de 26 caracteres. Haga clic en «Cancelar»
para cancelar el proceso.
5. Haga clic en «Seleccionar» para iniciar el proceso de copia/transferencia. Se abrirá la
siguiente ventana:
ES - 53
Nota: Los archivos descargados correctamente se muestran en la ventana inferior
«Descargas completadas» (véase la imagen superior). Haga clic en «Vaciar lista» para
eliminar los archivos de la lista.
6. Al hacer clic en una zona cualquiera de la pantalla, volverá al menú anterior. A
continuación haga clic en para cerrar el menú.
10.11 CARGAR ARCHIVOS AL DISCO DURO WI-FI (IOS Y ANDROID)
Compruebe si se encuentra en el menú «Mi dispositivo».
1. Haga clic en el símbolo .
2. A continuación seleccione uno o varios archivos que desee cargar o haga clic
en para seleccionar todos los archivos.
ES - 54
3. A continuación haga clic en el botón
4. Seleccione en la vista general la carpeta a la que desea cargar los archivos.
Para crear una nueva carpeta para sus archivos, simplemente haga clic en el botón
«Crear nueva carpeta». A continuación introduzca el nombre de la carpeta y haga clic
en «Crear», tal como se muestra en la siguiente imagen. El nombre de la carpeta
debe tener un mínimo de 2 y un máximo de 26 caracteres. Haga clic en «Cancelar»
para cancelar el proceso.
ES - 55
5. Haga clic en «Seleccionar» para iniciar el proceso de carga. Debería abrirse la
siguiente ventana:
Nota: Los archivos copiados/transferidos correctamente se muestran en la ventana
inferior «Procesos de copia completados» (véase la imagen superior). Haga clic en «Vaciar
lista» para eliminar los archivos de la lista.
6. Al hacer clic en una zona cualquiera de la pantalla, volverá al menú anterior. A
continuación haga clic en para cerrar el menú.
ES - 56
10.12 BORRAR ARCHIVOS (IOS Y ANDROID)
En el menú «Mi dispositivo» o «Memory 2 Move» puede borrar muy fácilmente uno o varios
archivos.
1. Para borrar uno o varios archivos, en primer lugar haga clic en el símbolo .
2. A continuación puede seleccionar los archivos que desee borrar, o puede seleccionar
todos los archivos haciendo clic en .
3. A continuación haga clic en el símbolo para borrar los archivos seleccionados.
Aparecerá en la pantalla un mensaje de advertencia pidiéndole que confirme el
proceso de borrado (véase la siguiente imagen). Haga clic en Aceptar si realmente
desea borrar los archivos. Si no desea borrar los archivos, puede detener el proceso
haciendo clic en «Cancelar».
ES - 57
10.13 VISTA GENERAL Y ESTADO DE SUS CARGAS/DESCARGAS
Si ha copiado/transferido uno o varios archivos a su dispositivo Memory 2 Move o desde
éste, puede hacer clic en para comprobar qué archivos se encuentran todavía en la
cola de espera y cuáles ya se han transferido correctamente. En el menú principal, también
puede hacer clic en para comprobar el estado exacto de sus descargas/cargas actuales.
10.14 SALIR DE LA APLICACIÓN MEMORY 2 MOVE
10.14.1 IOS
Para salir de la aplicación «Memory 2 Move», tan solo tiene que pulsar el botón «Inicio» de
su iPhone/iPad.
Para salir de la aplicación, pulse dos veces el botón «Inicio» y en el borde inferior de la
pantalla se le mostrará una lista de las diversas aplicaciones. Pulse y mantenga pulsado el
icono de la aplicación hasta que aparezca un signo «menos» (-). A continuación haga clic en
este signo «menos» para cerrar la aplicación (véase la siguiente imagen).
ES - 58
10.14.2 ANDROID
Para salir de la aplicación «Memory 2 Move», tan solo tiene que pulsar el icono y a
continuación seleccionar «Salir». Se le mostrará entonces un mensaje de advertencia que le
pedirá confirmar la selección. Haga clic en «Aceptar» para salir de la aplicación o en
«Cancelar» para volver a la aplicación.
10.15 DESINSTALACIÓN DE LA APLICACIÓN «MEMORY 2 MOVE»
10.15.1 IOS
Para desinstalar la aplicación «Memory 2 Move» de su dispositivo Apple, pulse el icono de la
aplicación «Memory 2 Move» y manténgalo pulsado. Aparecerá entonces una «X» en todos
los iconos de las aplicaciones instaladas, como se muestra en la siguiente imagen.
Simplemente haga clic en la «X» en el ángulo superior izquierdo del icono de la aplicación
«Memory 2 Move» para eliminar la aplicación de su dispositivo Apple.
ES - 59
10.15.2 ANDROID
Para desinstalar la aplicación «Memory 2 Move» de su dispositivo Android, ejecute los
siguientes pasos.
Nota: El proceso de desinstalación puede variar dependiendo del dispositivo Android
concreto. Antes de proceder a la desinstalación, consulte el manual de manejo de su
dispositivo Android.
1. En el menú principal, pulse el icono «Ajustes».
2. Acceda a la opción «Aplicaciones».
3. Localice la aplicación «Memory 2 Move» y selecciónela.
4. Pulse el botón «Desinstalar».
5. Se le mostrará entonces un mensaje de advertencia que le pedirá confirmar la
selección. Haga clic en «Aceptar» para desinstalar de la aplicación o en «Cancelar»
para volver al menú de configuración.
ES - 60
11. FUNCIONES DE ADMINISTRACIÓN WEB
Para configurar el dispositivo Wi-Fi, utilice la aplicación «Wi-Fi Finder» para conectarse al
Memory 2 Move. Alternativamente, puede abrir su navegador web e introducir la dirección
IP 10.10.10.254 en la línea de dirección, siempre y cuando no se haya modificado la
dirección predeterminada de fábrica.
Vista del menú principal:
Submenús disponibles:
Aquí puede modificar la contraseña de administrador.
Muestra la información relevante sobre el disco.
Aquí puede modificar la configuración de red.
Activación del servicio Windows File.
Aquí puede modificar los ajustes del sistema.
Aquí puede configurar su dispositivo paso a paso con ayuda del asistente
de configuración.
ES - 61
11.1 FUNCIÓN EXPLORER
Esta interfaz de administración le permite copiar archivos al «Memory 2 Move», así como
copiar archivos desde el «Memory 2 Move» al PC que esté utilizando. Además puede crear,
copiar, renombrar o borrar carpetas, tal como está acostumbrado a hacerlo en su
ordenador.
Actualizar haga clic en este botón para actualizar la vista de pantalla.
Cargar haga clic en este botón para cargar archivos al dispositivo.
Crear para crear una carpeta en el dispositivo «Memory 2 Move». El nombre
de la carpeta no debe superar los 26 caracteres.
Copiar para copiar archivos a otra carpeta.
Mover - para mover un archivo a otra ubicación de memoria.
Abrir / Descargar haga clic en este botón para abrir archivos o para copiarlos
a su PC. En caso de que tenga software compatible instalado en su PC, por
ejemplo la reproducción de música se inicia automáticamente. De lo contrario
ES - 62
se le preguntará si desea descargar el archivo. No se pueden descargar
carpetas. Debe seleccionar siempre como mínimo un archivo para la descarga.
Eliminar para eliminar archivos del dispositivo.
Renombrar para modificar el nombre de un archivo.
Visualizador de fotografías este botón se utiliza para visualizar fotografías.
11.2 MENÚ CONTEXTUAL (NO EN MAC)
Para acceder al menú contextual, haga clic con el botón derecho del ratón en un archivo
o en una carpeta en el menú de archivos. En este menú desplegable dispone de las
siguientes opciones: Copiar, Cortar, Eliminar, Cambiar nombre o Descargar (véase la
captura de pantalla).
En el menú de carpetas también puede acceder al menú contextual. Aquí dispone de las
opciones Abrir, Copiar, Cortar, Eliminar o Cambiar nombre (véase la captura de
pantalla).
ES - 63
Si selecciona varios archivos (para ello mantenga pulsada la tecla «Ctrl» y seleccione al
mismo tiempo los archivos deseados haciendo clic con el botón izquierdo del ratón) y
accede al menú contextual con el botón derecho del ratón, tiene la posibilidad de copiar,
cortar o eliminar.
Si hace clic con el botón derecho del ratón en un área vacía de la carpeta, tendrá a su
disposición las funciones Pegar, Crear o Cargar.
ES - 64
Explicación de las funciones:
- Abrir: Seleccione una carpeta y abra el menú el contextual haciendo clic con el botón
derecho del ratón. Seleccione aquí «Abrir» y se le mostrará el contenido de la carpeta.
- Copiar: Seleccione una carpeta o bien uno o varios archivos y abra el menú el contextual
haciendo clic con el botón derecho del ratón. Seleccione aquí «Copiar» para copiar el
elemento o los elementos seleccionados.
- Cortar: Seleccione carpetas o archivos y abra el menú el contextual haciendo clic con el
botón derecho del ratón. Seleccione aquí «Cortar» para eliminar los archivos de su
ubicación de memoria actual.
- Pegar: Después de haber seleccionado «Copiar» o «Cortar», ahora puede buscar una
nueva ubicación de memoria para los elementos seleccionados. Para pegar los elementos
en la nueva ubicación de memoria, haga clic con el botón derecho del ratón en un área
vacía de la carpeta y acceda al menú contextual. Seleccione aquí «Pegar» para insertar los
elementos en la nueva ubicación de memoria.
- Eliminar: Seleccione un archivo y abra el menú el contextual haciendo clic con el botón
derecho del ratón. Seleccione aquí «Eliminar» para eliminar el elemento seleccionado.
- Crear: Haga clic con el botón derecho del ratón en un área vacía de la carpeta y acceda al
menú contextual. Seleccione «Crear» para crear una nueva carpeta.
- Cambiar nombre: Haga clic con el botón derecho del ratón en la carpeta o el archivo que
desee renombrar y, una vez en el menú contextual, seleccione la opción «Cambiar
nombre». A continuación puede cambiar el nombre de la carpeta o del archivo. Una vez
que haya realizado los cambios deseados, haga clic en «Guardar» para adoptar los
cambios realizados.
- Cargar: Haga clic con el botón derecho del ratón en un área vacía de la carpeta y acceda al
menú contextual. Seleccione «Cargar» para cargar nuevos archivos.
- Abrir / Descargar: Haga clic con el botón derecho del ratón en la carpeta o el archivo que
desee descargar y, una vez en el menú contextual, seleccione la opción «Descargar». En
caso de que tenga software compatible instalado en su PC, por ejemplo la reproducción
de música se inicia automáticamente. De lo contrario se le preguntará si desea descargar
el archivo. No se pueden descargar carpetas.
ES - 65
11.3 ATAJOS DE TECLADO
La interfaz de administración web admite entradas por teclado y atajos de teclado. Se
admiten, entre otros, los siguientes atajos: tecla Tab, tecla Intro, tecla Inicio, RePag, AvPág,
tecla Fin, tecla de fecha arriba, tecla de fecha abajo, tecla de flecha izquierda, tecla de flecha
derecha y la tecla Supr.
Windows: Ctrl + c = copiar Ctrl + v = pegar
Mac: Ctrl + c = copiar Ctrl + v = pegar
11.4 ARRASTRAR Y SOLTAR
Puede mover un archivo individual mediante la función «Drag and Drop» (arrastrar y soltar).
Simplemente seleccione y arrastre un archivo a otra carpeta disponible y suelte allí el
archivo.
11.5 INFORMACIÓN
Aquí se muestra información detallada sobre el hardware, el estado de red y el espacio en
disco.
11.5.1 INFORMACIÓN SOBRE EL APARATO
Aquí se muestran informaciones tales como el nombre del aparato, el número de serie, el
fabricante, el número de modelo y el uso de CPU.
ES - 66
11.5.2 INFORMACIÓN SOBRE LA MEMORIA
Aquí obtendrá información sobre la unidad de disco instalada, como por ejemplo la
capacidad total, el fabricante del disco duro y el espacio de memoria disponible.
11.5.3 INFORMACIÓN SOBRE LA RED
Se muestran datos detallados sobre el estado de red actual, como por ejemplo la dirección
de red, el estado de Internet o el nombre de la red Wi-Fi actual (SSID).
ES - 67
11.6 AJUSTES
11.6.1 USUARIO
En el menú Ajustes, haga clic en el icono para modificar los ajustes del administrador. La
contraseña debe constar de un mínimo de 5 y un máximo de 32 caracteres. Al hacer clic en
el botón «Guardar» se adoptan los cambios.
El dispositivo se entrega con la contraseña de administrador predeterminada: 00000
11.6.2 DISCO
En el menú Ajustes, haga clic en el icono para obtener información
detallada sobre el soporte de memoria, como por ejemplo la versión de firmware, la
capacidad o el número de serie.
ES - 68
El menú de la unidad contiene información sobre el sistema de archivos utilizados, así como
sobre la capacidad de memoria total y disponible.
Haga clic en la «X» para cerrar el menú.
11.7 RED
En el menú Ajustes, haga clic en el icono para acceder a la información sobre la
red.
11.7.1 NOMBRE DE HOST
El nombre de host pertenece a un dispositivo conectado a una red. Este nombre puede
escogerse libremente. El único requisito es que el nombre empiece por una letra, seguida de
una combinación de letras y números. Se requieren 2 caracteres como mínimo y se admiten
8 caracteres como máximo.
ES - 69
11.7.2 WI-FI Y LAN
Puede configurar todos los ajustes de red conforme a sus necesidades. Pueden seleccionarse
las siguientes opciones:
- SSID: Introduzca aquí el nombre de su red. El parámetro predeterminado en
este caso es «Memory2Move-XXXX». Pueden introducirse un máximo de 32
caracteres para el nombre SSID.
- Canal Wi-Fi: Indique aquí el canal por el que el dispositivo Wi-Fi deberá transmitir
y recibir. El parámetro predeterminado es «auto». En este caso, el dispositivo
establece automáticamente el canal. Pero también puede especificar
manualmente el canal por el cual se recibirán y transmitirán datos. Están
disponibles los canales 1 hasta el 13.
- Acceso inalámbrico: El estándar de red inalámbrica predeterminado es:
802.11/b/g/n. También puede seleccionar manualmente los modos de 11 Mbps
(802.11b), 54 Mbps (802.11g) o 150 Mbps (802.11n).
- Seguridad: El dispositivo se suministra sin ningún tipo de seguridad
predeterminado. Puede escoger entre los siguientes tipos de cifrado: sin cifrado,
WPA-PSK, WPA2-PSK o mixta WPA/WPA2-PSK.
- Contraseña: Dependiendo del tipo de cifrado seleccionado, debe
introducirse una contraseña con un mínimo de 8 y un máximo de 63 caracteres.
- Dirección IP: La dirección IP predeterminada es: 10.10.10.254 con la máscara de
subred 255.255.255.0. Puede modificar manualmente esta dirección IP.
ES - 70
11.7.3 SERVIDOR DHCP
El Dynamic Host Configuration Protocol (DHCP) es un protocolo de red que permite a un
servidor asignar dinámicamente direcciones IP a ordenadores conectados. En la
configuración predeterminada está activado el protocolo DHCP. En caso necesario se puede
desactivar esta opción y se pueden asignar manualmente direcciones IP.
Al hacer clic en el botón «Lista de clientes» se mostrará una lista con todos los dispositivos
actualmente conectados.
,
ES - 71
11.7.4 ACCESO A INTERNET
Configuración del acceso a Internet
... mediante el establecimiento de una conexión a otra red disponible
Puede escoger entre dos opciones de acceso a Internet disponibles. En la configuración
estándar está predeterminado el acceso mediante conexión por cable (como se muestra en
la figura superior).
A. Acceso inalámbrico (WLAN):
Conecte el M2M a otro enrutador WLAN, a fin de establecer una conexión a Internet.
B. Acceso mediante conexión por cable (LAN):
Conecte el M2M directamente a un puerto disponible en la parte posterior de su
enrutador para establecer la conexión con otra red.
SSID: Introduzca el nombre SSID de su red o haga clic en «Actualizar lista»
para buscar automáticamente todas las redes disponibles.
Contraseña: Introduzca la contraseña para la red inalámbrica local seleccionada.
Dirección IP:
-Si se ha seleccionado «Automática», la red le asigna automáticamente
una dirección IP.
-Si se ha seleccionado «IP estática», deberá introducir usted mismo su
dirección IP para la red a la que desee conectarse.
Acceso por cable:
En la configuración predeterminada está seleccionada la opción «IP dinámica». Puede
asignar manualmente una dirección IP: para ello haga clic en la flecha amarilla y seleccione la
opción «IP estática».
ES - 72
Acceso inalámbrico:
Nota: ¡En caso de que no pueda establecer una conexión a otra red, consulte a su
proveedor de servicios de red para averiguar las directrices aplicables en su caso!
11.8 SERVICIOS
11.8.1 SAMBA
El acceso y el intercambio de datos resultan muy sencillos mediante el Windows File Service
| Samba (Mac) Service. EL dispositivo se entrega con este servicio ya activado (véase la
captura de pantalla).
ES - 73
11.8.2 MEDIA SERVER
Functions:
(1)
Activate or deactivate the Media Server.
(2)
Defines the name displayed in the network.
(3)
State the complete folder name that is to be provided via the Media Server.
(4)
Changes the sharing directory on the Memory 2 Move.
(5)
Here you can save the new settings.
ES - 74
11.9 SISTEMA
11.9.1 CONFIGURACIÓN DE LA HORA
Para ello tiene la posibilidad de seleccionar manualmente una zona horaria, así como de
ejecutar una sincronización horaria automática.
Si ha optado por configurar manualmente una zona horaria, tan solo tiene que hacer clic en
la flecha amarilla junto a la casilla «Zona horaria» y seleccione en el menú desplegable la
zona horaria deseada según su ubicación.
Si selecciona Sincronización automática de la hora, se actualizará la hora cada vez que se
conecte a Internet.
Opciones de sincronización de la hora:
Frecuencia: Todos los días, cada 2 días, cada 3 días, .. Puede seleccionar intervalos de
sincronización de hasta 7 días.
Puede desactivarse en cualquier momento la sincronización automática de la hora para
seleccionar en su lugar la opción «Aplicar hora del PC». En este caso se adopta la hora actual
de su PC, de modo que ambos dispositivos indiquen la misma hora.
ES - 75
11.9.2 CREAR RESPALDO
Para realizar una copia de seguridad (respaldo) de la configuración del sistema Wi-Fi, haga
clic en el botón «Crear respaldo». Se creará un archivo con la extensión .bin.gz, mediante el
cual más adelante podrá restablecer la configuración del sistema si fuera necesario. Es
aconsejable que guarde este archivo en su ordenador.
Para ejecutar la restauración del sistema, haga clic en el botón «Restaurar». Localice y abra
su archivo de respaldo guardado y a continuación haga clic en «Guardar» en la parte inferior
derecha de la ventana.
ES - 76
Durante el proceso de restauración se muestra un mensaje de advertencia que le informa
sobre el estado actual del proceso de restauración.
Una vez completada la restauración de la configuración del sistema, el dispositivo se
reiniciará automáticamente y se mostrará la pantalla de inicio de sesión.
11.9.3 ACTUALIZACIÓN DE FIRMWARE
En caso de que esté disponible una actualización de firmware en www.intenso.de , siga los
pasos descritos a continuación para llevar a cabo la actualización del software.
Descargue el firmware a su ordenador.
ES - 77
Haga clic en el botón «Actualizar» y localice en su PC la actualización de firmware
descargada. Seleccione el archivo y haga clic en «Abrir» para continuar.
Bajo el botón «Actualizar» se mostrará entonces el número de versión del firmware al
que se actualizará el dispositivo. Haga clic en «Guardar» en la parte inferior derecha
de la ventana para iniciar el proceso de actualización del firmware.
Nota: En caso de que haya descargado un formato incorrecto, se le mostrará el siguiente
mensaje de error:
Durante la actualización se muestra un mensaje de advertencia que le informa sobre
el estado actual del proceso de actualización.
Una vez completada la actualización, el dispositivo se reiniciará automáticamente y se
mostrará la pantalla de inicio de sesión.
ES - 78
11.9.4 RESTAURAR
Si restaura su dispositivo a la configuración de fábrica, se eliminarán todos los ajustes
realizados y se reactivarán los ajustes del dispositivo predeterminados.
Para seleccionar la restauración de la configuración predeterminada, haga clic en el botón
redondo. Haga clic en el botón «Guardar» para iniciar el proceso. Para evitar malentendidos,
confirme su selección en los mensajes de advertencia que aparecerán a continuación.
Mientras el proceso está activo se muestra el siguiente mensaje, que proporciona
información sobre el progreso actual.
Nota: Una vez restaurado el dispositivo, se restaura también la contraseña del
administrador. Por lo tanto, se aplica la contraseña predeterminada del dispositivo.
ES - 79
12. LA LICENCIA INFORMACIÓN
Notice of GNU GENERAL PUBLIC LICENSE and LESSER GENERAL PUBLIC LICENCE
Dear Customer,
If interested, you and any third party can download the source code of used GPL / LGPL from
Intenso Webpage http://www.intenso.de . The source code of the desired product is
available to anyone on the selection of valid product category and the desired device. In the
product details you will find the entry "drivers". Open this menu to download the
corresponding GPL / LGPL code. For a fee of 35 € (delivery to another country as Germany),
it is also possible to obtain this code by postal delivery. More information about the
GPL/LGPL-Licence can you nd on following website www.gnu.org
GNU GENERAL PUBLIC LICENSE
Version 2, June 1991
Copyright (C) 1989, 1991 Free Software Foundation, Inc.
51 Franklin Street, Fifth Floor, Boston, MA 02110-1301, USA
Everyone is permitted to copy and distribute verbatim copies
of this license document, but changing it is not allowed.
Preamble
The licenses for most software are designed to take away your freedom to share and change
it. By contrast, the GNU General Public License is intended to guarantee your freedom to
share and change free software--to make sure the software is free for all its users. This
General Public License applies to most of the Free Software Foundation's software and to
any other program whose authors commit to using it. (Some other Free Software Foundation
software is covered by the GNU Lesser General Public License instead.) You can apply it to
your programs, too.
When we speak of free software, we are referring to freedom, not price. Our General Public
Licenses are designed to make sure that you have the freedom to distribute copies of free
software (and charge for this service if you wish), that you receive source code or can get it if
you want it, that you can change the software or use pieces of it in new free programs; and
that you know you can do these things.
To protect your rights, we need to make restrictions that forbid anyone to deny you these
rights or to ask you to surrender the rights. These restrictions translate to certain
responsibilities for you if you distribute copies of the software, or if you modify it.
ES - 80
For example, if you distribute copies of such a program, whether gratis or for a fee, you must
give the recipients all the rights that you have. You must make sure that they, too, receive or
can get the source code. And you must show them these terms so they know their rights.
We protect your rights with two steps: (1) copyright the software, and (2) offer you this
license which gives you legal permission to copy, distribute and/or modify the software.
Also, for each author's protection and ours, we want to make certain that everyone
understands that there is no warranty for this free software. If the software is modified by
someone else and passed on, we want its recipients to know that what they have is not the
original, so that any problems introduced by others will not reflect on the original authors'
reputations.
Finally, any free program is threatened constantly by software patents. We wish to avoid the
danger that redistributors of a free program will individually obtain patent licenses, in effect
making the program proprietary. To prevent this, we have made it clear that any patent
must be licensed for everyone's free use or not licensed at all.
The precise terms and conditions for copying, distribution and modification follow.
TERMS AND CONDITIONS FOR COPYING, DISTRIBUTION AND MODIFICATION
0. This License applies to any program or other work which contains a notice placed by the
copyright holder saying it may be distributed under the terms of this General Public License.
The "Program", below, refers to any such program or work, and a "work based on the
Program" means either the Program or any derivative work under copyright law: that is to
say, a work containing the Program or a portion of it, either verbatim or with modifications
and/or translated into another language. (Hereinafter, translation is included without
limitation in the term "modification".) Each licensee is addressed as "you".
Activities other than copying, distribution and modification are not covered by this License;
they are outside its scope. The act of running the Program is not restricted, and the output
from the Program is covered only if its contents constitute a work based on the Program
(independent of having been made by running the Program). Whether that is true depends
on what the Program does.
1. You may copy and distribute verbatim copies of the Program's source code as you receive
it, in any medium, provided that you conspicuously and appropriately publish on each copy
an appropriate copyright notice and disclaimer of warranty; keep intact all the notices that
refer to this License and to the absence of any warranty; and give any other recipients of the
Program a copy of this License along with the Program.
You may charge a fee for the physical act of transferring a copy, and you may at your option
offer warranty protection in exchange for a fee.
ES - 81
2. You may modify your copy or copies of the Program or any portion of it, thus forming a
work based on the Program, and copy and distribute such modifications or work under the
terms of Section 1 above, provided that you also meet all of these conditions:
a) You must cause the modified files to carry prominent notices stating that you changed the
files and the date of any change.
b) You must cause any work that you distribute or publish, that in whole or in part contains
or is derived from the Program or any part thereof, to be licensed as a whole at no charge to
all third parties under the terms of this License.
c) If the modified program normally reads commands interactively when run, you must
cause it, when started running for such interactive use in the most ordinary way, to print or
display an announcement including an appropriate copyright notice and a notice that there
is no warranty (or else, saying that you provide a warranty) and that users may redistribute
the program under these conditions, and telling the user how to view a copy of this License.
(Exception: if the Program itself is interactive but does not normally print such an
announcement, your work based on the Program is not required to print an announcement.)
These requirements apply to the modified work as a whole. If identifiable sections of that
work are not derived from the Program, and can be reasonably considered independent and
separate works in themselves, then this License, and its terms, do not apply to those
sections when you distribute them as separate works. But when you distribute the same
sections as part of a whole which is a work based on the Program, the distribution of the
whole must be on the terms of this License, whose permissions for other licensees extend to
the entire whole, and thus to each and every part regardless of who wrote it.
Thus, it is not the intent of this section to claim rights or contest your rights to work written
entirely by you; rather, the intent is to exercise the right to control the distribution of
derivative or collective works based on the Program.
In addition, mere aggregation of another work not based on the Program with the Program
(or with a work based on the Program) on a volume of a storage or distribution medium
does not bring the other work under the scope of this License.
3. You may copy and distribute the Program (or a work based on it, under Section 2) in
object code or executable form under the terms of Sections 1 and 2 above provided that you
also do one of the following:
a) Accompany it with the complete corresponding machine-readable source code, which
must be distributed under the terms of Sections 1 and 2 above on a medium customarily
used for software interchange; or,
b) Accompany it with a written offer, valid for at least three years, to give any third party, for
a charge no more than your cost of physically performing source distribution, a complete
ES - 82
machine-readable copy of the corresponding source code, to be distributed under the terms
of Sections 1 and 2 above on a medium customarily used for software interchange; or,
c) Accompany it with the information you received as to the offer to distribute
corresponding source code. (This alternative is allowed only for noncommercial distribution
and only if you received the program in object code or executable form with such an offer, in
accord with Subsection b above.)
The source code for a work means the preferred form of the work for making modifications
to it. For an executable work, complete source code means all the source code for all
modules it contains, plus any associated interface definition files, plus the scripts used to
control compilation and installation of the executable. However, as a special exception, the
source code distributed need not include anything that is normally distributed (in either
source or binary form) with the major components (compiler, kernel, and so on) of the
operating system on which the executable runs, unless that component itself accompanies
the executable.
If distribution of executable or object code is made by offering access to copy from a
designated place, then offering equivalent access to copy the source code from the same
place counts as distribution of the source code, even though third parties are not compelled
to copy the source along with the object code.
4. You may not copy, modify, sublicense, or distribute the Program except as expressly
provided under this License. Any attempt otherwise to copy, modify, sublicense or distribute
the Program is void, and will automatically terminate your rights under this License.
However, parties who have received copies, or rights, from you under this License will not
have their licenses terminated so long as such parties remain in full compliance.
5. You are not required to accept this License, since you have not signed it. However,
nothing else grants you permission to modify or distribute the Program or its derivative
works. These actions are prohibited by law if you do not accept this License. Therefore, by
modifying or distributing the Program (or any work based on the Program), you indicate your
acceptance of this License to do so, and all its terms and conditions for copying, distributing
or modifying the Program or works based on it.
6. Each time you redistribute the Program (or any work based on the Program), the recipient
automatically receives a license from the original licensor to copy, distribute or modify the
Program subject to these terms and conditions. You may not impose any further restrictions
on the recipients' exercise of the rights granted herein. You are not responsible for enforcing
compliance by third parties to this License.
7. If, as a consequence of a court judgment or allegation of patent infringement or for any
other reason (not limited to patent issues), conditions are imposed on you (whether by court
order, agreement or otherwise) that contradict the conditions of this License, they do not
ES - 83
excuse you from the conditions of this License. If you cannot distribute so as to satisfy
simultaneously your obligations under this License and any other pertinent obligations, then
as a consequence you may not distribute the Program at all. For example, if a patent license
would not permit royalty-free redistribution of the Program by all those who receive copies
directly or indirectly through you, then the only way you could satisfy both it and this License
would be to refrain entirely from distribution of the Program.
If any portion of this section is held invalid or unenforceable under any particular
circumstance, the balance of the section is intended to apply and the section as a whole is
intended to apply in other circumstances.
It is not the purpose of this section to induce you to infringe any patents or other property
right claims or to contest validity of any such claims; this section has the sole purpose of
protecting the integrity of the free software distribution system, which is implemented by
public license practices. Many people have made generous contributions to the wide range
of software distributed through that system in reliance on consistent application of that
system; it is up to the author/donor to decide if he or she is willing to distribute software
through any other system and a licensee cannot impose that choice.
This section is intended to make thoroughly clear what is believed to be a consequence of
the rest of this License.
8. If the distribution and/or use of the Program is restricted in certain countries either by
patents or by copyrighted interfaces, the original copyright holder who places the Program
under this License may add an explicit geographical distribution limitation excluding those
countries, so that distribution is permitted only in or among countries not thus excluded. In
such case, this License incorporates the limitation as if written in the body of this License.
9. The Free Software Foundation may publish revised and/or new versions of the General
Public License from time to time. Such new versions will be similar in spirit to the present
version, but may differ in detail to address new problems or concerns.
Each version is given a distinguishing version number. If the Program specifies a version
number of this License which applies to it and "any later version", you have the option of
following the terms and conditions either of that version or of any later version published by
the Free Software Foundation. If the Program does not specify a version number of this
License, you may choose any version ever published by the Free Software Foundation.
10. If you wish to incorporate parts of the Program into other free programs whose
distribution conditions are different, write to the author to ask for permission. For software
which is copyrighted by the Free Software Foundation, write to the Free Software
Foundation; we sometimes make exceptions for this. Our decision will be guided by the two
goals of preserving the free status of all derivatives of our free software and of promoting
the sharing and reuse of software generally.
ES - 84
NO WARRANTY
11. BECAUSE THE PROGRAM IS LICENSED FREE OF CHARGE, THERE IS NO WARRANTY FOR
THE PROGRAM, TO THE EXTENT PERMITTED BY APPLICABLE LAW. EXCEPT WHEN
OTHERWISE STATED IN WRITING THE COPYRIGHT HOLDERS AND/OR OTHER PARTIES
PROVIDE THE PROGRAM "AS IS" WITHOUT WARRANTY OF ANY KIND, EITHER EXPRESSED OR
IMPLIED, INCLUDING, BUT NOT LIMITED TO, THE IMPLIED WARRANTIES OF
MERCHANTABILITY AND FITNESS FOR A PARTICULAR PURPOSE. THE ENTIRE RISK AS TO THE
QUALITY AND PERFORMANCE OF THE PROGRAM IS WITH YOU. SHOULD THE PROGRAM
PROVE DEFECTIVE, YOU ASSUME THE COST OF ALL NECESSARY SERVICING, REPAIR OR
CORRECTION.
12. IN NO EVENT UNLESS REQUIRED BY APPLICABLE LAW OR AGREED TO IN WRITING WILL
ANY COPYRIGHT HOLDER, OR ANY OTHER PARTY WHO MAY MODIFY AND/OR REDISTRIBUTE
THE PROGRAM AS PERMITTED ABOVE, BE LIABLE TO YOU FOR DAMAGES, INCLUDING ANY
GENERAL, SPECIAL, INCIDENTAL OR CONSEQUENTIAL DAMAGES ARISING OUT OF THE USE
OR INABILITY TO USE THE PROGRAM (INCLUDING BUT NOT LIMITED TO LOSS OF DATA OR
DATA BEING RENDERED INACCURATE OR LOSSES SUSTAINED BY YOU OR THIRD PARTIES OR
A FAILURE OF THE PROGRAM TO OPERATE WITH ANY OTHER PROGRAMS), EVEN IF SUCH
HOLDER OR OTHER PARTY HAS BEEN ADVISED OF THE POSSIBILITY OF SUCH DAMAGES.
END OF TERMS AND CONDITIONS
How to Apply These Terms to Your New Programs
If you develop a new program, and you want it to be of the greatest possible use to the
public, the best way to achieve this is to make it free software which everyone can
redistribute and change under these terms.
To do so, attach the following notices to the program. It is safest to attach them to the start
of each source file to most effectively convey the exclusion of warranty; and each file should
have at least the "copyright" line and a pointer to where the full notice is found.
one line to give the program's name and an idea of what it does.
Copyright (C) yyyy name of author
This program is free software; you can redistribute it and/or
modify it under the terms of the GNU General Public License
as published by the Free Software Foundation; either version 2
of the License, or (at your option) any later version.
This program is distributed in the hope that it will be useful,
ES - 85
but WITHOUT ANY WARRANTY; without even the implied warranty of
MERCHANTABILITY or FITNESS FOR A PARTICULAR PURPOSE. See the
GNU General Public License for more details.
You should have received a copy of the GNU General Public License
along with this program; if not, write to the Free Software
Foundation, Inc., 51 Franklin Street, Fifth Floor, Boston, MA 02110-1301, USA.
Also add information on how to contact you by electronic and paper mail.
If the program is interactive, make it output a short notice like this when it starts in an
interactive mode:
Gnomovision version 69, Copyright (C) year name of author
Gnomovision comes with ABSOLUTELY NO WARRANTY; for details
type `show w'. This is free software, and you are welcome
to redistribute it under certain conditions; type `show c'
for details.
The hypothetical commands `show w' and `show c' should show the appropriate parts of the
General Public License. Of course, the commands you use may be called something other
than `show w' and `show c'; they could even be mouse-clicks or menu items--whatever suits
your program.
You should also get your employer (if you work as a programmer) or your school, if any, to
sign a "copyright disclaimer" for the program, if necessary. Here is a sample; alter the
names:
Yoyodyne, Inc., hereby disclaims all copyright
interest in the program `Gnomovision'
(which makes passes at compilers) written
by James Hacker.
signature of Ty Coon, 1 April 1989
Ty Coon, President of Vice
PL - 1
SPIS TREŚCI
1. Opis wyrobu ........................................................................................................................................... 4
2. Funkcje wyrobu ...................................................................................................................................... 4
3. Zakres dostawy ....................................................................................................................................... 6
4. Dane techniczne ..................................................................................................................................... 6
5. Wymagania minimalne .......................................................................................................................... 6
6. Wygląd wyrobu ...................................................................................................................................... 7
7. Występujące przyłącza ........................................................................................................................... 7
7.1 Port RJ45 WAN ....................................................................................................................................... 7
7.2 Interfejs Micro USB 3.0 .......................................................................................................................... 7
7.3 Sygnalizacja LED ..................................................................................................................................... 8
8. Używanie komputera osobistego lub MAC ............................................................................................ 9
8.1 Tworzenie połączenia bezprzewodowego LAN z komputerem osobistym ............................................ 9
8.2 PC WiFi Finder ...................................................................................................................................... 10
8.2.1 Moja pamięć ......................................................................................................................................... 11
8.3 Utworzenie bezprzewodowego połączenia LAN z MAC ....................................................................... 12
8.3.1 MAC WiFi Finder .................................................................................................................................. 13
8.3.2 Moja pamięć ......................................................................................................................................... 15
8.4 Konfiguracja Memory 2 Move .............................................................................................................. 16
9. Używanie urządzeń przenośnych ......................................................................................................... 20
9.1 Instalowanie aplikacji iOS Memory 2 Move ......................................................................................... 20
9.2 Bezprzewodowe połączenie z Państwa iPhone/iPad ........................................................................... 21
9.3 Logowanie użytkownika (iOS) .............................................................................................................. 22
9.4 Instalowanie aplikacji Android Memory 2 Move ................................................................................. 23
9.5 Bezprzewodowe połączenie z Państwa urządzeniem Android ............................................................ 23
9.6 Logowanie użytkownika (Android) ....................................................................................................... 25
10. Funkcje podstawowe ........................................................................................................................... 26
10.1 Zastosowanie dla urządzeń iOS ............................................................................................................ 26
PL - 2
10.2 Wymagania wobec urządzeń Android ................................................................................................. 28
10.3 Ustawienia WI-Fi (iOS oraz Android) .................................................................................................... 30
10.3.1 Interfejs ustawień Wi-Fi ....................................................................................................................... 30
10.3.2 Zmiana nazwy urządzenia .................................................................................................................... 30
10.3.3 Bezpieczeństwo .................................................................................................................................... 31
10.3.4 Dostęp do internetu ............................................................................................................................. 31
10.4 Odtwarzanie plików muzycznych/audio (IOS / Android) ..................................................................... 33
10.5 Odtwarzanie filmów / wideo ................................................................................................................ 35
10.5.1 iOS ........................................................................................................................................................ 35
10.5.2 Android ................................................................................................................................................. 37
10.6 Odtwarzanie plików graficznych .......................................................................................................... 38
10.6.1 iOS ........................................................................................................................................................ 38
10.6.2 Android ................................................................................................................................................. 41
10.7 Wysyłanie plików graficznych .............................................................................................................. 44
10.7.1 iOS ........................................................................................................................................................ 44
10.7.2 Android ................................................................................................................................................. 45
10.8 Otwarcie/prezentacja dokumentów .................................................................................................... 47
10.8.1 iOS ........................................................................................................................................................ 47
10.8.2 Android ................................................................................................................................................. 48
10.9 Kopiowanie, usuwanie, pobieranie i wysyłanie plików (iOS i Android) ................................................ 49
10.10 Pobieranie plików na Państwa urządzenie iOS/Android ...................................................................... 51
10.11 Wysyłanie plików na twardy dysk Wi-Fi (iOS oraz Android) ................................................................. 53
10.12 Usuwanie plików (iOS oraz Android) .................................................................................................... 55
10.13 Widok i status Państwa wysyłania/pobierania ..................................................................................... 56
10.14 Zakończenie aplikacji Memory 2 Move ................................................................................................ 56
10.14.1 iOS ........................................................................................................................................................ 56
10.14.2 Android ................................................................................................................................................. 57
10.15 Deinstalowanie aplikacji „Memory 2 Move“ ........................................................................................ 57
10.15.1 iOS ........................................................................................................................................................ 57
PL - 3
10.15.2 Android ................................................................................................................................................. 58
11. Funkcje WEB Management .................................................................................................................. 59
11.1 Funkcja Explorer ................................................................................................................................... 60
11.2 Menu kontekstowe (nie dla Mac) ........................................................................................................ 61
11.3 Skróty klawiaturowe ............................................................................................................................ 63
11.4 Drag and Drop ...................................................................................................................................... 63
11.5 Informacje ............................................................................................................................................ 64
11.5.1 Informacje o sprzęcie ........................................................................................................................... 64
11.5.2 Informacja o pamięci ............................................................................................................................ 64
11.5.3 Informacje o sieci ................................................................................................................................. 65
11.6 Ustawienia ............................................................................................................................................ 65
11.6.1 Użytkownik ........................................................................................................................................... 65
11.6.2 Dysk ...................................................................................................................................................... 66
11.7 Sieć ....................................................................................................................................................... 66
11.7.1 Nazwa Host .......................................................................................................................................... 67
11.7.2 Wi-Fi & LAN .......................................................................................................................................... 67
11.7.3 Serwer DHCP ........................................................................................................................................ 68
11.7.4 Dostęp do internetu ............................................................................................................................. 69
11.8 Usługi .................................................................................................................................................... 71
11.8.1 Samba ................................................................................................................................................... 71
11.8.2 Serwer multimedialny .......................................................................................................................... 71
11.9 System .................................................................................................................................................. 72
11.9.1 Ustawienia czasowe ............................................................................................................................. 72
11.9.2 Zabezpieczanie ..................................................................................................................................... 73
11.9.3 Aktualizacja Firmware .......................................................................................................................... 75
11.9.4 Reset..................................................................................................................................................... 76
12. Licencja informacja .............................................................................................................................. 78
PL - 4
1. OPIS WYROBU
Memory 2 Move umożliwia Państwu bezprzewodowy dostęp do wideo, muzyki, fotografii i
danych w celu medialnego transmitowania internetowego, czyli ich przesyłania
strumieniowego na Państwa iPad®, iPhone®, tablet PC, smartfon i laptop bez konieczności
stosowania kabli.
Dzięki zintegrowanemu twardemu dyskowi nie muszą się już Państwo martwić ograniczoną
pamięcią na urządzeniach przenośnych, a zintegrowane przyłącze USB 3.0 pozwala na szybki
i prosty transfer danych.
Celem osiągnięcia maksymalnej mobilności, Memory 2 Move dysponuje akumulatorkiem z
możliwością ładowania. Aby naładować akumulatorek mogą Państwo po prostu połączyć
urządzenie z wolnym przyłączem USB swego komputera i jednocześnie skopiować swe pliki
na twardy dysk. W ten prosty sposób urządzenie jest gotowe do działania. Podczas procesu
ładowania istniej możliwość dostępu na Memory 2 Move.
2. FUNKCJE WYROBU
Przesyłanie strumieniowe plików medialnych poprzez połączenie Wi-Fi dla
maksymalnie 5 użytkowników jednocześnie.
Dostęp do plików muzycznych, wideo, fotograficznych za pośrednictwem bezpłatnej
aplikacji dla iOS i Android.
Czas działania baterii do 5 godzin*.
Dostęp do internetu przez opcjonalne połączenie RJ45 (przyłącze LAN) lub
bezprzewodowo za pomocą 802.11 b/g/n Standard.
Obsługuje NTFS i formatowanie FAT32.
Obsługuje wymianę danych między platformami poprzez połączenie LAN między
Windows, Mac,iOS i Linux.
Obsługuje zastosowania użytkownika na najróżniejszych platformach, włącznie z
Windows/Mac/Linux/iPad/iPhone/Android
*Dokładny czas działania baterii zależny jest od używanych zastosowań i ustawień.
PL - 5
Użytkowanie jako zewnętrzny twardy dysk: Zintegrowane przyłącze USB 3.0 umożliwia
szybki transfer danych i jest w stanie naładować wewnętrzny akumulatorek, o ile Memory 2
Move połączone jest z komputerem lub zasilaczem sieciowym. Działa to tylko wtedy, gdy
urządzenie jest wyłączone.
Użytkowanie przez połączenie LAN: Proszę połączyć jeden koniec Państwa kabla RJ45 z
Memory 2 Move i drugi koniec z wolnym portem w Państwa routerze. Teraz proszę
aktywować funkcję DHCP w swym Memory 2 Move w celu automatycznego przydzielenia
adresu IP.
Użytkowanie bezprzewodowe: Proszę połączyć Memory 2 Move ze swym bezprzewodowym
routerem zgodnie z poniższym opisem w celu umożliwienia sobie dostępu do internetu za
pośrednictwem Wi-Fi.
PL - 6
3. ZAKRES DOSTAWY
Memory 2 Move USB 3.0 z kablem
Płyta CD
Instrukcja obsługi
Zasilacz sieciowy (KTEC KSAS0060500100VEU 5V / 1A)
4. DANE TECHNICZNE
Wymiary 127.3mm (L) X 80mm (B) X 25mm (H)
Wi-Fi:
o standard: 802.11 b/g/n,
o częstotliwość: 2.4 GHZ
o prędkość transmisji: 72 Mbps (20 MHz) / 150 Mbps (40 MHz)
Interfejs sieciowy: 100 Mbps Ethernet RJ45
Przyłącze USB: Micro USB 3.0, dla transferu danych i ładowania
akumulatorka
Pojemność akumulatorka: 3000 mAh
Temperatura pracy: Optymalna temperatura pracy leży w przedziale od 5°C
do 35°C
5. WYMAGANIA MINIMALNE
Połączenie internetowe
Wymagania systemowe:
o Windows: XP/Vista/Windows 7/8
o Mac: OS X 10.6.0 i wyżej
o Pozostałe: Fedora 12 (Linux) i wyżej
Przeglądarka internetowa PC
o Windows: Obsługuje Internet Explorer 7.0 i wyżej
o Mac: Obsługuje Safari 3.0 i wyżej
o Dalsze: Firefox 3.5 i wyżej
Router lub switch
PL - 7
6. WYGLĄD WYROBU
7. WYSTĘPUJĄCE PRZYŁĄCZA
7.1 PORT RJ45 WAN
A. Tryb routera: Memory 2 Move działa jak dostępny w handlu router i może przydzielać
adresy IP na komputer, które są połączone poprzez WLAN.
B. Tryb WAN: umożliwia utworzenie połączenia sieciowego do już istniejącej sieci.
7.2 INTERFEJS MICRO USB 3.0
Zintegrowane przyłącze USB 3.0 umożliwia szybki transfer danych i jest w stanie
naładować wewnętrzny akumulatorek, o ile Memory 2 Move połączone jest z
komputerem lub zasilaczem sieciowym. Działa to tylko wtedy, gdy urządzenie jest
wyłączone.
PL - 8
7.3 SYGNALIZACJA LED
LED zasilania:
- Nie świeci się: Urządzenie jest wyłączone.
- Świeci się stale na zielono: Akumulatorek jest całkowicie naładowany.
- Miga szybko na zielono: Urządzenie zostanie wyłączone.
- Miga powoli na zielono: Urządzenie jest ładowane.
- Świeci się stale na czerwono: Stan naładowania akumulatorka poniżej 30%
- Miga szybko na czerwono: Krytycznie niski stan naładowania
LED HDD:
- Świeci się stale na biało: Tryb gotowości
- Miga na biało: Aktywne procesy pisania / czytania
- Połączone przez port USB:
o Świeci się stale na niebiesko: Połączenie przez USB 3.0
o Świeci się stale na biało: Połączenie przez USB 2.0
LED niebieska dla Wi-Fi:
- Migocząco: Uruchamiany proces inicjalizowania.
- LED nie świeci się: Urządzenie wyłączone lub nie otrzymuje zasilania
elektrycznego
- Świeci się ciągle:
o Zakończony proces inicjalizacji
o Tryb gotowości - urządzenia można połączyć.
LED internetu:
- Tryb routera:
o Kolor biały: Dobra jakość sygnału
o Niebieski/czerwony na przemian: Zła jakość sygnału
o LED nie świeci się: Brak połączenia internetowego
- Funkcja Bridge
o Kolor niebieski: Dobra jakość sygnału
o LED nie świeci się: Brak połączenia internetowego
PL - 9
8. UŻYWANIE KOMPUTERA OSOBISTEGO LUB MAC
8.1 TWORZENIE POŁĄCZENIA BEZPRZEWODOWEGO LAN Z KOMPUTEREM
OSOBISTYM
Proszę ączyć urządzenie Wi-Fi przez naciśnięcie przycisku zasilania znajdującego się na
przedzie urządzenia.
Proszę aktywować funkcję WLAN na swym komputerze osobistym i kliknąć na belce narzędzi
na dole po prawej stronie na symbol WLAN. Otworzy się następujący komunikat:
Proszę wybrać sieć o nazwie „Memory2Move-XXXX.
Informacja: Ustawione hasło w stanie dostawy brzmi „intenso1. Proszę po prawidłowym
wykonaniu połączenia wczytać dla własnego bezpieczeństwa nowe hasło.
Po prawidłowym wykonaniu połączenia do swego urządzenia Wi-Fi proszę w następujący
sposób zainstalować dostarczone przez nas oprogramowanie dla klienta:
Warunkiem prawidłowego połączenia urządzenia Wi-Fi z Państwa komputerem jest
skorzystanie z narzędzi oprogramowania „WiFi Finder“ z dostarczonej przez nas płyty CD.
Oprogramowanie szuka dla Państwa automatycznie połączone urządzenie Wi-Fi z Państwa
siecią.
Proszę kliknąć podwójnie na ikonę i postępować zgodnie z instrukcjami na ekranie.
PL - 10
8.2 PC WIFI FINDER
Proszę rozpocząć stosowanie za pomocą podwójnego kliknięcia na symbol „WiFi Finder“.
Oprogramowanie automatycznie w połączonej sieci szuka urządzenia Memory 2 Move (patrz
zrzut ekranu).
Informacja: Jeżeli urządzenie „M2M“ nie znajduje się na liście urządzeń połączonych
z siecią klienta, wtedy proszę nacisnąć na „Odśwież“ w celu ponownego szukania
urządzenia Wi-Fi.
1.) Wybierz Memory 2 Move z menu i kliknij "Zaloguj się" przycisk, aby połączyć się z
interfejsem administracyjnym internetowej.
PL - 11
2.) Wprowadź nazwę użytkownika oraz hasło:
Nazwa użytkownika: admin
Hasło: 00000
Informacja: Po prawidłowo wykonanym połączeniu proszę dla własnego bezpieczeństwa
wczytać nowe hasło.
8.2.1 MOJA PAMIĘĆ
Po wybraniu punktu menu „Moja pamięć“ zostanie przedstawiona Państwu następująca
maska. W celu prawidłowego połączenia się proszę użyć następujących danych logowania:
Nazwa użytkownika: admin
Hasło: 00000
Informacja: Po prawidłowo wykonanym połączeniu proszę dla własnego bezpieczeństwa
wczytać nowe hasło.
PL - 12
8.3 UTWORZENIE BEZPRZEWODOWEGO POŁĄCZENIA LAN Z MAC
Proszę włączyć urządzenie Wi-Fi przez naciśnięcie przycisku zasilania znajdującego się na
przedzie urządzenia. Proszę odczekać kilka minut, aż kontrolka LED skończy migać. Proszę
aktywować funkcję WLAN na swym PC i kliknąć na symbol WLAN na belce narzędzi u dołu po
prawej stronie. Proszę wybrać sieć o nazwie „Memory2Move-XXXX“.
Informacja: Ustawione hasło w stanie dostawy brzmi „intenso1“. Po prawidłowym
wykonaniu połączenia proszę dla własnego bezpieczeństwa wczytać nowe hasło.
Po prawidłowym wykonaniu połączenia z Państwa urządzeniem Wi-Fi, proszę w następujący
sposób zainstalować dostarczone przez nas oprogramowanie dla klienta:
Warunkiem prawidłowego połączenia urządzenia Wi-Fi z Państwa komputerem jest
skorzystanie z oprogramowania „WiFi Finder“ z dostarczonej przez nas płyty CD.
Oprogramowanie szuka dla automatycznie Państwa połączonego urządzenia Wi-Fi z Państwa
siecią.
Proszę kliknąć podwójnie na ikonę i postępować zgodnie z instrukcjami na ekranie.
PL - 13
8.3.1 MAC WIFI FINDER
Proszę rozpocząć podwójnym kliknięciem na symbol aplikacji „WiFi Finder“.
Oprogramowanie w połączonej sieci szuka automatycznie urządzenia Memory 2 Move (patrz
zrzut ekranu).
Informacja: Jeżeli „M2M“ nie można odnaleźć na liście połączonej sieci klienta, wtedy proszę
nacisnąć na przycisk „Odśwież” w celu ponownego poszukiwania urządzenia Wi-Fi.
1.) Wybierz Memory 2 Move z menu i kliknij "Zaloguj się" przycisk, aby połączyć się z
interfejsem administracyjnym internetowej.
PL - 14
2.) Wprowadź nazwę użytkownika oraz hasło:
Nazwa użytkownika: admin
Hasło: 00000
Informacja: Po prawidłowo wykonanym połączeniu proszę dla własnego bezpieczeństwa
wczytać nowe hasło.
PL - 15
8.3.2 MOJA PAMIĘĆ
Po wybraniu punktu menu dla „Moja pamięć“ zostanie przedstawiona Państwu następująca
maska. W celu prawidłowego połączenia się proszę użyć następujących danych do
logowania:
Nazwa użytkownika: admin
Hasło: 00000
Informacja: Po prawidłowo wykonanym połączeniu proszę dla własnego
bezpieczeństwa wczytać nowe hasło.
Na Memory 2 Move mogą Państwo sporządzać, usuwać, kopiować, edytować, zmieni
nazwy i przemieszczać katalogi i foldery.
Oprócz tego, można obustronnie wymieniać dane między Państwa MAC i Memory 2 Move
(wysyłanie / pobieranie).
PL - 16
8.4 KONFIGURACJA MEMORY 2 MOVE
Proszę skorzystać z oprogramowania PC klienta według powyższego opisu w celu utworzenia
połączenia z urządzeniem Wi-Fi i zalogować się jako administrator na sieciowym poziomie
administratora. Teraz mogą Państwo skonfigurować swe urządzenie.
Asystent startu
Podczas pierwszego użytkowania urządzenia, po prawidłowym zalogowaniu uruchamia się
tak zwany „Asystent startu, który umożliwia Państwu w łatwy sposób wykonanie wszystkich
ważnych ustawień.
Informacja: Jeżeli nacisną Państwo na X (u góry po prawej stronie w asystencie), wtedy
wychodzą Państwo z asystenta startu i wszystkie ustawienia fabryczne zostaną przejęte
jako ustawienia standardowe.
Proszę nacisnąć na przycisk kontynuacji „Dalejw celu skonfigurowania urządzenia.
Ustawianie dostępu do internetu
.. przez utworzenie połączenia do dalszej, dostępnej sieci
PL - 17
Mają Państwo tu możliwość wyboru między 2 możliwymi opcjami dostępu do internetu. W
ustawieniu standardowym ustawiony został wstępnie dostęp poprzez połączenie kablowe
(jak widać na powyższej ilustracji).
A. Dostęp bezprzewodowy (WLAN):
Proszę połączyć M2M z innym routerem WLAN w celu wywołania połączenia z
internetem.
B. Dostęp przez połączenie kablowe (LAN):
Proszę bezpośrednio połączyć M2M z dostępnym portem z tyłu Państwa routera w
celu umożliwienia połączenia z inną siecią.
Dostęp LAN:
W ustawieniu podstawowym wybrano „Dynamiczne IP“. Mogą Państwo ręcznie nadać adres
IP poprzez kliknięcie na żółtą strzałkę i wybranie opcji „Statyczne IP“.
Dostęp WLAN:
SSID: Proszę podać nazwę SSID swej sieci lub kliknąć na „Nowy skan
w celu automatycznego poszukiwania wszystkich dostępnych
sieci.
Hasło: Proszę wczytać hasło dla wybranej lokalnej sieci
bezprzewodowej.
Adres IP: -Przy wyborze opcji „Automatycznie“, sieć wydaje
Państwu automatycznie adres IP.
-Przy wyborze opcji „Statyczne IP“ muszą Państwo sami wczytać
swój adres IP dla sieci z którą chcą się połączyć.
Informacja: Poprzez kliknięcie na X (po prawej stronie u góry) mogą Państwo wyjść z
menu opcji LAN.
PL - 18
Informacja: Jeżeli nie mogą Państwo utworzyć połączenia z następną siecią, wtedy proszę
zapytać swego administratora sieci o aktualne zasady, które Państwa dotyczą!
Proszę kliknąć na kontynuację „Dalej w celu kontynuowania konfiguracji Memory 2 Move.
Dokonują teraz Państwo ustawień Wi-Fi oraz LAN.
Ustawienia Wi-Fi & LAN
- SSID: Proszę nanieść tutaj nazwę Państwa sieci. W ustawieniu
podstawowym Memory2Move-XXXX dla nazwy SSID
możliwe są maksimum 32 znaki.
- Kanał: Proszę tutaj nanieść kanał na którym urządzenie Wi-Fi ma nadawać i
odbierać. Ustawieniem podstawowym jest automatyka „Auto“. Kanał
jest w takim przypadku ustalany przez urządzenie w sposób
automatyczny. Mogą Państwo jednak ustalić ręcznie, na którym kanale
ma być nadawanie i odbiór. Do dyspozycji są kanały od 1 do 13.
- Tryb Wi-Fi: Ustawiony bezprzewodowy standard sieciowy brzmi:
802.11/b/g/n. Mogą Państwo ustawić również ręcznie tryb 11 Mbps
(802.11b), 54 Mbps (802.11g) lub 150 Mbps (802.11n).
- Bezpieczeństwo: W stanie dostawy wybrano Mixed WPA/WPA2-PSK. Mają
Państwo wybór między następującymi typami szyfrowania:
Brak szyfrowania, WPA-PSK,WPA2-PSK, Mixed WPA/WPA2-
PSK.
- Hasło: Należy w zależności od typu szyfrowania wczytać hasło z co najmniej 8
znakami i maksymalnie 63 znakami.
-
PL - 19
- Adres IP: Ustawiony adres IP brzmi: 10.10.10.254 z maską podsieci
255.255.255.0 Ten adres IP mogą Państwo zmienić ręcznie.
Proszę kliknąć na „Dalej w celu ustawienia hasła dla administratora. Jeśli nacisną Państwo
na Przeskocz“, wtedy rezygnują z ustalenia nowego hasło i przejmują wcześniej ustawione.
Po zakończeniu pracy z asystentem startu system uruchamia się ponownie. Proces ten trwa 2
minuty. O aktualnym statusie mogą Państwo dowiedzieć się z komunikatu.
PL - 20
9. UŻYWANIE URZĄDZEŃ PRZENOŚNYCH
9.1 INSTALOWANIE APLIKACJI IOS MEMORY 2 MOVE
1. Proszę kliknąć na ikonę App Store na Państwa ekranie Home, jak przedstawiono na
poniższej ilustracji. Proszę poszukać bezpłatnej aplikacji „Memory 2 Move i
postępować zgodnie z instrukcjami w celu zainstalowania na ekranie.
Po tym, gdy instalowanie zakończono pomyślnie można znaleźć aplikację „Memory 2 Move”
na ekranie Home Państwa urządzenia (patrz poniższa ilustracja).
PL - 21
9.2 BEZPRZEWODOWE POŁĄCZENIE Z PAŃSTWA IPHONE/IPAD
1. Proszę włączyć Memory 2 Move. Proszę odczekać kilka minut, aż inicjalizacja
urządzenia zakończy się. Widać to będzie po niebieskiej LED dla Wi-Fi, która po
zakończeniu inicjalizacji zakończy miganie.
2. Proszę kliknąć na ikonę „Ustawienia” zgodnie z poniższą ilustracją.
3. Proszę kliknąć na punkt menu “Wi-Fi”. Na liście istniejących sieci Wi-Fi powinna
pokazać się sieć „Memory2Move-XXXX.
Proszę kliknąć na tę sieć zgodnie z poniższą ilustracją. Jeżeli w kroku 8.4. pod
Ustawienia Wi-Fi & Lan“ ustalili Państwo hasło, to proszę je teraz podać.
O ile wybrano Memory2Move-XXXXpokaże się haczyk przed SSID oraz pokazane zostanie
logo Wi-Fi w lewym górnym rogu urządzenia.
PL - 22
9.3 LOGOWANIE UŻYTKOWNIKA (IOS)
Proszę kliknąć na logo „Memory 2 Movezgodnie z poniższą ilustracją w celu uruchomienia
aplikacji.
Proszę wczytać hasło administratora, które nadali Państwo podczas konfigurowania
(ustawienie fabryczne: 00000). Hasło konieczne jest tylko przy pierwszym logowaniu.
Urządzenie zapisuje Państwa wpisy, zatem przy drugim logowaniu podawanie hasła nie jest
konieczne.
Jeśli Państwo prawidłowo wczytali hasło, wtedy zostaną automatycznie zaprowadzeni do
menu „Memory 2 Move“. Jest to Państwa bezpośrednie dojście do twardego dysku Wi-Fi.
PL - 23
9.4 INSTALOWANIE APLIKACJI ANDROID MEMORY 2 MOVE
1. Proszę otworzyć Google Playstore lub „App Center“ i poszukać bezpłatnej aplikacji
Memory 2 Move.
2. Proszę postępować zgodnie z instrukcjami instalowania na ekranie, tak jak to
pokazuje poniższa ilustracja.
3. Po pomyślnym zakończeniu instalowania można znaleźć aplikację „Memory 2 Move”
na ekranie Home (patrz poniższa ilustracja).
9.5 BEZPRZEWODOWE POŁĄCZENIE Z PAŃSTWA URZĄDZENIEM ANDROID
1. Proszę włączyć Memory 2 Move. Proszę odczekać kilka minut, aż inicjalizacja
urządzenia zakończy się. Będzie to widoczne po niebieskiej LED dla Wi-Fi, która po
zakończeniu inicjalizacji przestaje migać.
2. Proszę kliknąć na ikonę ustawień Ustawienia tak jak to przedstawiono na poniższej
ilustracji.
PL - 24
3. Proszę włączyć funkcję Wi-Fi poprzez przesunięcie „włącznika wirtualnego” w prawo.
Na liście istniejących sieci Wi-Fi powinna zostać zaprezentowana sieć
„Memory2Move-XXXX”. Proszę kliknąć na tę sieć zgodnie z poniższą ilustracją. Jeżeli
w kroku 8 pod Ustawienia Wi-Fi & Lan“ ustalili Państwo hasło, to należy je teraz
podać.
4. Jeśli urządzenie zostało prawidłowo podłączone do twardego dysku Wi-Fi, wtedy pod
SSID pokaże się “Połączone”.
PL - 25
9.6 LOGOWANIE UŻYTKOWNIKA (ANDROID)
1. Proszę kliknąć na logo aplikacji „Memory 2 Move w celu uruchomienia aplikacji
(patrz ilustracja poniżej).
2. Proszę wczytać hasło administratora, które nadali Państwo podczas konfigurowania
(ustawienie fabryczne: 00000). Hasło konieczne jest tylko przy pierwszym logowaniu.
Urządzenie zapisuje Państwa wpisy, zatem przy drugim logowaniu podawanie hasła
nie jest konieczne.
3. Po prawidłowym podaniu hasła zostaną Państwo automatycznie zaprowadzeni do
menu Memory 2 Move“. Jest to Państwa bezpośredni dostęp do twardego dysku
Wi-Fi.
PL - 26
10. FUNKCJE PODSTAWOWE
10.1 ZASTOSOWANIE DLA URZĄDZEŃ IOS
Po prawidłowym podaniu hasła zostaną Państwo automatycznie zaprowadzeni do menu
„Memory 2 Move“. Jest to Państwa bezpośredni dostęp do twardego dysku Wi-Fi. Menu
Moje urządzeniejest dla Państwa dostępem do urządzenia, które Państwo aktualnie
używają do połączenia z Memory 2 Move.
W menu można wybrać następujące podpunkty:
Menu główne „Moje urządzenie” Dla organizacji Państwa plików, standardowo do
dyspozycji są foldery „Dokumenty”, „Muzyka”, „Fotografie”, „Wideooraz „iPad”/ „iPhone”.
Menu główne „Memory 2 Move Dostęp do plików na 2 Move.
PL - 27
Przycisk Home Zaprowadzi Państwo z powrotem do
menu głównego.
Przycisk widoku Zaprowadzi Państwo do przeglądu
miniatur lub list.
Przycisk ustawiania Zaprowadzi Państwo do menu
ustawień twardego dysku Wi-Fi.
Przycisk powrotu Zaprowadzi Państwo z powrotem
do poprzedniego menu.
Przycisk zarządzania – Do wybierania wielu plików,
które można albo wysłać, albo pobrać, względnie
usunąć.
Memory 2 Move Dostęp do twardego dysku Wi-Fi..
Moje urządzenie – Dostęp do urządzenia, którego
używają Państwo aktualnie do połączenia z twardym
dyskiem Wi-Fi.
Przycisk statusu Zaprowadzi Państwa do
pobierania/usuwania, pokazuje numer wersji i
ostatnio odegrany tytuł.
PL - 28
10.2 WYMAGANIA WOBEC URZĄDZEŃ ANDROID
Po prawidłowym połączeniu się z Memory 2 Move zostaną Państwo automatycznie
zaprowadzeni do menu Memory 2 Move”, jest to Państwa bezpośredni dostęp do twardego
dysku Wi-Fi. Menu „Moje urządzenie” stanowi Państwa dostęp na urządzenie, które
aktualnie używają Państwo do połączenia z Memory 2 Move.
W menu można wybrać następujące podpunkty:
Menu główne „Moje urządzenie W celu organizowania Państwa plików, do dyspozycji są
standardowo foldery “Dokumenty”, “Muzyka”, “Fotografie”, “Wideooraz “SDCard”.
Menu główne „Memory 2 Move Dostęp do plików na Memory 2 Move.
PL - 29
Przycisk Home Zaprowadzi Państwa z
powrotem do menu głównego
Przycisk widoku Zaprowadzi Państwa do
przeglądu miniatur lub list.
Przycisk ustawień – Zaprowadzi Państwo do
menu ustawień twardego dysku Wi-Fi.
Przycisk powrotu Zaprowadzi Państwo do
poprzedniego menu.
Przycisk zarządzania – Do wybierania wielu
plików, które można albo wysyłać, albo
pobierać, względnie usuwać.
Memory 2 Move Dostęp do twardego
dysku Wi-Fi.
Moje urządzenie – Dostęp do urządzenia,
którego aktualnie używają Państwo do
połączenia z twardym dyskiem Wi-Fi.
Przycisk statusu Zaprowadzi Państwo do
widoku statusu Państwa
pobierania/wysyłania, aktualnego
odtwarzania piosenek/wideo i mogą
Państwo zakończyć aplikację.
PL - 30
10.3 USTAWIENIA WI-FI (IOS ORAZ ANDROID)
10.3.1 INTERFEJS USTAWIEŃ WI-FI
Proszę kliknąć na , w celu zmiany ustawienia Wi-Fi. Właściwość ta pojawia się tylko
wtedy, gdy wchodzą Państwo na „Moje urządzenie Wi-Fi”.
10.3.2 ZMIANA NAZWY URZĄDZENIA
Proszę kliknąć na przycisk w celu zmiany nazwy.
Po wczytaniu nowej nazwy, u góry po prawej stronie pojawia się przycisk „Dołącz”/”Ustaw”,
proszę kliknąć na niego w celu zapisania zmiany.
PL - 31
10.3.3 BEZPIECZEŃSTWO
Pod ustawieniami Wi-Fi HDD pojawiają się opcje bezpieczeństwa: twardy dysk Wi-Fi
obsługuje następujące formaty bezpieczeństwa: WPA-PSK, WPA2-PSK, Mixed WPA/WPA2-
PSK. Jeśli chcą Państwo dołączyć nowy kod bezpieczeństwa, wtedy zostaną zapytani o
bezprzewodowe hasło.
Następnie proszę wybrać u góry po prawej stronie „Ustawlub „Dołącz” w celu zapisania
ustawienia i hasła.
10.3.4 DOSTĘP DO INTERNETU
Pod ustawieniami internetowymi zaprezentowane zostaną Państwu dostępy do Internetu.
Mogą Państwo wybierać między dostępem przewodowym (wired) i bezprzewodowym
(wireless). Połączenie bezprzewodowe znajdą Państwo pod ustawieniami internetowymi
pośrodku poniższej maski:
PL - 32
Jeśli wybiorą Państwo wariant przewodowy, wtedy należy najpierw skonfigurować sieć na
którą Państwo dokonali wyboru.
Po dokonaniu wyboru proszę kliknąć na „Zabezpiecz”, a następnie zostaną Państwo wezwani
do uruchomienia „Rebootujpoprzez kliknięcie na „OK“.
PL - 33
Jeżeli klikną Państwo na „Powrót”, wtedy przechodzą do menu ustawień Wi-Fi.
10.4 ODTWARZANIE PLIKÓW MUZYCZNYCH/AUDIO (IOS / ANDROID)
Uwaga: Zaleca się utworzenie jednego lub kilka folderów dla Państwa wszystkich plików
muzycznych / audio. Ułatwia to użytkowanie i organizację Państwa twardego dysku WiFi.
Pliki muzyczne lub audio można odtwarzać niezależnie od aktualnego menu i miejsca pamięci
(„Memory 2 Movelub „Moje urządzenie”).
W tym celu powinni Państwo jedynie poszukać pliku. Poprzez kliknięcie na żądany plik
zostaje on automatycznie odtworzony.
PL - 34
Informacja: Celem uzyskania dalszych informacji w kwestii obsługiwanych formatów
plików proszę zapoznać się z instrukcją obsługi swego urządzenia iOS.
- Proszę kliknąć na ten przycisk rozpoczęcia od początku aktualnie odtwarzanego
pliku audio. Przy podwójnym kliknięciu odtwarzany będzie poprzedni plik audio.
- Proszę kliknąć na ten przycisk w celu przejścia do następnego pliku audio.
- Proszę kliknąć na ten przycisk w celu rozpoczęcia odtwarzania pliku audio.
Proszę kliknąć na przycisk przerwy w celu przerwania/zatrzymania odtwarzania.
- Proszę kliknąć na ten przycisk, aby zamknąć odtwarzacz.
Istnieje 5 sposobów odtwarzania:
a. - Odgrywanie jednokrotne. Plik zostanie odegrany jednokrotnie. Po tym
odtwarzanie zatrzymuje się.
b. - Powtórzenie aktualnego pliku: Aktualnie odtwarzany plik zostanie
powtórzony.
Przerwa nastąpi po naciśnięciu .
c. - Przypadkowe odtwarzanie wszystkich plików audio, które znajdują się w
folderze.
d. - Odtwarzanie bieżącego folderu: pliki audio będą odtwarzane po kolei i bez
powtarzania.
e. Powtórzenie folderu: wszystkie pliki audio w folderze będą odtworzone po
kolei, a następnie powtórzone.
Informacja: Proszę uchwycić guzik sygnalizacji postępu realizacji i przesuwać go w
prawo lub w lewo w celu umożliwienia sobie przewijania pliku audio w przód lub w
tył.
Uwaga: Mogą Państwo w każdej chwili wyjść z poziomu odtwarzacza muzycznego.
Odtwarzanie Państwa plików wideo odbywać się będzie dalej w tle.
PL - 35
10.5 ODTWARZANIE FILMÓW / WIDEO
10.5.1 IOS
Uwaga: Zaleca się utworzenie jednego lub kilka folderów dla Państwa wszystkich plików
wideo / filmowych. Ułatwia to użytkowanie i organizację Państwa twardego dysku WiFi.
Pliki filmowe lub wideo można odtwarzać niezależnie od aktualnego menu i miejsca
pamięci („Memory 2 Move” lub „Moje urządzenie”).
W tym celu powinni Państwo jedynie poszukać pliku. Poprzez kliknięcie na żądany plik
zostaje on automatycznie odtworzony.
Informacja: W celu uzyskania dalszych informacji o obsługiwanych formatach plików
proszę zapoznać się z instrukcją obsługi Państwa urządzenia iOS.
Standardowo, odtwarzanie jest w formacie poziomym. Mają Państwo następujące
możliwości wyboru:
1. - Proszę kliknąć na przycisk w celu zatrzymania odtwarzania aktualnego
pliku wideo i zamknięcia odtwarzacza filmowego.
PL - 36
2. - Proszę kliknąć na ten przycisk w celu dopasowania formatu
odtwarzania do wielkości ekranu.
3. - Proszę uchwycić guzik sygnalizacji postępu realizacji i przesuwać go
w prawo lub w lewo w celu przewijania w przód lub w tył pliku wideo.
4. - Proszę uchwycić guzik regulacji głośności i przesuwać go w
prawo lub w lewo w celu zmiany siły głosu.
5. - Proszę przytrzymać ten przycisk w stanie wciśnięcia w celu przewinięcia w
tył pliku wideo podczas jego odtwarzania.
6. - Proszę przytrzymać ten przycisk w stanie wciśnięcia w celu przewinięcia w
przód pliku wideo podczas jego odtwarzania.
7. - Proszę kliknąć na ten przycisk w celu uruchomienia/kontynuacji
odtwarzania pliku wideo.
8. - Proszę kliknąć na ten przycisk w celu przerwania odtwarzania pliku wideo.
PL - 37
10.5.2 ANDROID
Uwaga: Zaleca się utworzenie jednego lub kilka folderów dla Państwa wszystkich plików
wideo / filmowych. Ułatwia to użytkowanie i organizację Państwa twardego dysku WiFi.
Pliki filmowe lub wideo można odtwarzać niezależnie od aktualnego menu i miejsca pamięci
(„Memory 2 Move” lub „Moje urządzenie”).
W tym celu powinni Państwo jedynie poszukać pliku. Poprzez kliknięcie na żądany plik
zostaje on automatycznie odtworzony.
Informacja: Możliwości obsługi i ustawień odtwarzania wideo zmienia się w zależności od
tego, jaki odtwarzacz filmowy został zainstalowany na Państwa urządzeniu Android.
W sprawie informacji o obsłudze proszę zapoznać się z instrukcję eksploatacji danego
odtwarzacza filmowego.
PL - 38
10.6 ODTWARZANIE PLIKÓW GRAFICZNYCH
10.6.1 IOS
Uwaga: Zaleca się sporządzić jeden lub więcej folderów dla wszystkich Państwa plików
graficznych na Memory 2 Move. Ułatwi to użytkowanie i organizację Państwa twardego
dysku Wi-Fi.
Informacja Twardy dysk Wi-Fi obsługuje odtwarzanie następujących formatów
graficznych: .jpg, .tiff, .gif oraz .bmp
Obsługiwane pliki graficzne mogą być prezentowane albo jako przegląd miniatur, albo w
formie listy, tak jak to przedstawiono na poniższych ilustracjach. Wszelka grafika w
nieobsługiwanych formatach zostanie przedstawiona w formie przeglądu miniatur lub
jako ikona.
Przegląd miniatur Przegląd w formie listy
Proszę kliknąć na dowolny plik graficzny w celu otwarcia automatycznego pokazu
obrazów. Jeżeli belka menu nie otwiera się bezpośrednio, wtedy należy kliknąć drugi raz
na obraz i wtedy się pokaże (patrz na górną część poniższego obrazu).
PL - 39
Podczas pokazu obrazów można wybrać następujące funkcje:
Proszę przeciągnąć palcem po ekranie z prawa na lewo lub z lewa na prawo w celu
ręcznego sterowania prezentacją obrazów i kliknąć na przycisk włączenia odtwarzania
w celu uruchomienia automatycznego pokazu obrazów.
Proszę kliknąć na przycisk przerwy w celu przerwania pokazu obrazów. Przez
ponowne naciśnięcie przycisku przerwy powoduje się kontynuację pokazu obrazów.
Proszę kliknąć na w celu kontynuacji pokazu obrazów i po wyświetleniu
ostatniego obrazu rozpoczęcia pokazu od początku.
Proszę kliknąć na w celu uruchomienia jednorazowego pokazu obrazów.
Odtwarzanie zatrzymuje po wyświetleniu ostatniego pliku graficznego.
Proszę w celu powrotu kliknąć na przycisk co pozwoli na powrót do
poprzedniego punktu menu.
Mogą Państwo również zaaranżować pokaz obrazów z muzyką w tle. Proszę w tym celu
kliknąć na przycisk muzyki tak jak to zaprezentowano na poniższej ilustracji.
PL - 40
Zatrzymanie/kontynuacja odtwarzania: proszę kliknąć tutaj w celu zatrzymania lub
kontynuacji muzyki w tle.
Wybór: Proszę kliknąć tutaj w celu poszukania plików audio do muzyki w tle i
wybrania jej. Proszę nacisnąć na przycisk w celu powrotu do pokazu obrazów
tak jak to przedstawiono na poniższej ilustracji:
Przycisk powtarzania: Jeśli aktywowany jest ten przycisk, wtedy dla danej muzyki w
tle odtwarzane są te same pliki audio. Standardowo, opcja ta jest nieaktywna.
PL - 41
10.6.2 ANDROID
Uwaga: Zaleca się sporządzić jeden lub więcej folderów dla wszystkich Państwa plików
graficznych. Ułatwi to użytkowanie i organizację Państwa twardego dysku Wi-Fi.
Informacja Twardy dysk Wi-Fi obsługuje odtwarzanie następujących formatów
graficznych: .jpg, .tiff, .gif oraz .bmp
Obsługiwane pliki graficzne mogą być prezentowane albo jako przegląd miniatur, albo w
formie listy, tak jak to przedstawiono na poniższych ilustracjach. Wszelka grafika w
nieobsługiwanych formatach zostanie przedstawiona w formie przeglądu miniatur lub
jako ikona.
Przegląd miniatur Przegląd w formie listy
Proszę kliknąć na dowolny plik graficzny w celu otwarcia automatycznego pokazu
obrazów. Jeżeli belka menu nie otwiera się bezpośrednio, wtedy należy kliknąć drugi raz
na obraz i wtedy się on pokaże (patrz na górną część poniższego obrazu).
PL - 42
Podczas pokazu obrazów można wybrać następujące funkcje:
Proszę przeciągnąć palcem po ekranie z prawa na lewo lub z lewa na prawo w celu
ręcznego sterowania prezentacją obrazów i kliknąć na przycisk odtwarzanie w celu
uruchomienia automatycznego pokazu obrazów.
Proszę kliknąć na przycisk przerwy w celu przerwania pokazu obrazów. Przez
ponowne naciśnięcie przycisku przerwy powoduje się kontynuację pokazu obrazów.
Proszę kliknąć na w celu kontynuacji pokazu obrazów i po wyświetleniu
ostatniego obrazu rozpoczęcia pokazu od początku.
Proszę kliknąć na w celu uruchomienia jednorazowego pokazu obrazów.
Odtwarzanie zatrzymuje po wyświetleniu ostatniego pliku graficznego.
Proszę w celu powrotu kliknąć na przycisk , co pozwoli na powrót do
poprzedniego punktu menu.
Mogą Państwo również zaaranżować pokaz obrazów z muzyką w tle. Proszę w tym celu
kliknąć na przycisk muzyki tak jak to zaprezentowano na poniższej ilustracji.
PL - 43
Zatrzymanie/kontynuacja odtwarzania: proszę kliknąć tutaj w celu zatrzymania lub
kontynuacji muzyki w tle.
Wybór: Proszę kliknąć tutaj w celu poszukania plików audio do muzyki w tle i
wybrania jej. Proszę nacisnąć na przycisk w celu powrotu do pokazu obrazów
tak jak to przedstawiono na poniższej ilustracji:
Przycisk powtarzania: Jeśli aktywowany jest ten przycisk, wtedy dla danej muzyki w
tle odtwarzane są te same pliki audio. Standardowo, opcja ta jest nieaktywna
PL - 44
10.7 WYSYŁANIE PLIKÓW GRAFICZNYCH
10.7.1 IOS
Stworzono Państwu różne możliwości podzielenia się swymi plikami graficznymi z rodziną
i przyjaciółmi, na przykład pocztą elektroniczną, przez zapisanie w albumie
fotograficznym używanego urządzenia lub poprzez wysłanie na Facebook.
Informacja: W celu wysłania plików graficznych pocztą elektroniczną lub portale
społecznościowe muszą mieć Państwo połączenie internetowe.
Proszę kliknąć na w górnym, prawym rogu ekranu w celu wyświetlenia trzech
możliwości wysyłania plików graficznych. Proszę kliknąć na „Powrót” w celu
powrotu do poprzedniego menu.
PL - 45
1) Poczta elektroniczna - proszę kliknąć tutaj w celu uruchomienia standardowej
aplikacji poczty elektronicznej i wybrać żądany plik graficzny jako załącznik.
2) Dołączanie do albumu: Proszę kliknąć na tę opcję w celu dołączenia wybranego pliku
graficznego do albumu fotograficznego stosowanego urządzenia.
3) Wysyłanie na Facebook: Proszę kliknąć na tę opcję i zostaną Państwo automatycznie
zaprowadzeni do loginu Facebooka. W tym celu musi być zainstalowana aplikacja
Facebooka na Państwa urządzeniu. Wymagane jest również konto Facebooka.
10.7.2 ANDROID
Różnorakie możliwości wysyłania Państwa plików graficznych zależą od różnych aplikacji,
które są zainstalowane na Państwa urządzeniu.
Informacja: W celu wysyłania plików graficznych pocztą elektroniczną lub portalami
społecznościowymi muszą mieć Państwo połączenie z Internetem.
PL - 46
Proszę wybrać symbol w prawym górnym rogu ekranu w celu wyświetlenia
różnych możliwości wysyłania plików graficznych. Proszę kliknąć na przycisk „Powrót”
w celu powrotu do poprzedniego menu. Proszę kliknąć na
1. Wyślij – proszę kliknąć na przycisk „Uwolnij” w celu wyświetlenia listy
zainstalowanych aplikacji na Państwa urządzeniu Android (przykład-patrz na poniższą
ilustrację) Proszę teraz wybrać aplikację za pomocą której chcą Państwo wysłać plik
graficzny.
2. Zapisywanie fotografii proszę wybrać ten przycisk w celu zapisania pliku graficznego
ze swego twardego dysku Wi-Fi do galerii w Państwa urządzeniu Android.
PL - 47
10.8 OTWARCIE/PREZENTACJA DOKUMENTÓW
10.8.1 IOS
Aplikacja „Memory 2 Move“ obsługuje pliki Keynote, Numbers, Page, Excel, PowerPoint
oraz Word, a także pliki .pdf oraz .txt.
W celu otwarcia i przedstawienia tych plików proszę kliknąć na żądany plik. Obsługiwane
formaty otwierane są automatycznie. Proszę kliknąć na przycisk „Powrót” w celu
powrotu do poprzedniego menu lub kliknąć na przycisk aby plik graficzny wysłać
pocztą elektroniczną, co widać na poniższej ilustracji.
Informacja: W celu wysyłania emaili konieczne jest posiadania połączenia internetowego.
PL - 48
Proszę kliknąć na przycisk “E-Mail”. Uruchamia się standardowa aplikacja emailowa i
wybrany dokument można wysłać jako załącznik.
10.8.2 ANDROID
W celu otwarcia dokumentów na Państwa urządzeniu Android proszę dotknąć żądany plik.
Zostanie on otwarty automatycznie programem standardowym lub zainstalowaną przez
Państwo aplikacją (patrz ilustracja poniżej).
W celu wysłania dokumentu jako załącznika proszę zapoznać się z instrukcją programu przy
pomocy którego otworzyli Państwo plik.
Informacja: W celu wysyłania emaili muszą mieć Państwo połączenie internetowe.
PL - 49
10.9 KOPIOWANIE, USUWANIE, POBIERANIE I WYSYŁANIE PLIKÓW (IOS I
ANDROID)
W każdej chwili mogą Państwo kliknąć na przycisk w celu usunięcia, pobierania lub
wysyłania swych plików. Zgodnie z prezentacjami na poniższych ilustracjach, przy górnej
krawędzi ekranu w menu pokazuje się symbol , o ile naciśnięto na przycisk .
Widok ekranu iOS Widok ekranu Android
Przy dolnej krawędzi ekranu znajdą teraz Państwo nowe ikony. Teraz mają Państwo do
dyspozycji następujące funkcje:
- Proszę kliknąć na tę ikonę w celu wybrania wszystkich plików. Ikona zabarwi się teraz
na biało i obok wszystkich plików pokaże się haczyk.
- - Proszę ponownie kliknąć na tę ikonę w celu dokonania zaznaczenia wszystkich
plików. Haczyki obok plików znikną.
PL - 50
Uwaga: Mogą Państwo również wybrać tylko jeden lub kilka plików, przy czym należy po
prostu kliknąć na prezentację miniaturową. Mogą Państwo również opracowywać plik po
prostu przez Drag&Drop. W tym celu należy dotknąć i trzymać prezentację miniaturową
żądanego pliku i przeciągnąć na ikonę dla pobierania , wysyłania lub usuwania
.
- Jeśli znajdują się Państwo w menu „Memory 2 Move”, wtedy mogą poprzez tę ikonę
pobrać jeden lub więcej plików z twardego dysku Wi-Fi na swoje urządzenie iOS/Android.
- Jeżeli znajdują się Państwo w menu „Moje urządzenie”, wtedy mogą poprzez tę ikonę
przesłać jeden lub więcej plików ze swego urządzenia iOS/Android na twardy dysk Wi-Fi .
Proszę nacisnąć przy tym przycisk „Zarządzaj”.
- Proszę kliknąć na tę ikonę w celu zobaczenia widoku wszystkich aktualnych
wysłań/pobrań stojących w kolejce do przetransferowania. Do tego, można zobaczyć tutaj
listę wszystkich z powodzeniem przetransferowanych plików.
- Proszę kliknąć na tę ikonę w celu usunięcia wszystkich wybranych plików.
PL - 51
10.10 POBIERANIE PLIKÓW NA PAŃSTWA URZĄDZENIE IOS/ANDROID
Jeśli są Państwo połączeni z twardym dyskiem Wi-Fi, wtedy mogą pobrać jeden lub więcej
plików na swoje urządzenia iOS/Android.
1. Proszę kliknąć na symbol .
2. Proszę wybrać teraz jeden lub więcej plików, które chcą Państwo pobrać lub kliknąć
na w celu zaznaczenia wszystkich plików.
3. Proszę kliknąć na pole
4. Proszę wybrać z widoku i potwierdzić folder do którego chcą Państwo pobrać pliki.
PL - 52
W celu sporządzenia nowego folderu dla Państwa plików proszę kliknąć na pole
„Utwórz nowy folder”. Proszę następnie nadać nazwę folderowi i kliknąć na
„Utwórz”, co widać na poniższej ilustracji. Nazwa folderu musi składać się z od 2 do
26 znaków. Proszę kliknąć na „Przerwij” w celu przerwania procesu.
5. Proszę kliknąć na „Wybierz” w celu uruchomienia procesu kopiowania/transmisji.
Otworzy się następujące okienko:
Informacja: Prawidłowo pobrane pliki prezentowane są w dolnym okienku Prawidłowo
pobrane pliki” (patrz powyższa ilustracja). Proszę kliknąć na „Opróżnij listę” w celu
usunięcia plików z listy.
6. Proszę kliknąć na dowolny fragment ekranu, a zostaną Państwo zaprowadzeni do
poprzedniego menu. Proszę kliknąć następnie na w celu zamknięcia menu.
PL - 53
10.11 WYSYŁANIE PLIKÓW NA TWARDY DYSK WI-FI (IOS ORAZ ANDROID)
Proszę sprawdzić, czy znajdują się Państwo w menu „Moje urządzenie”.
1. Proszę kliknąć na symbol .
2. Proszę teraz wybrać jeden lub więcej plików, które chcą Państwo wysłać lub
kliknąć na w celu zaznaczenia wszystkich plików.
3. Proszę kliknąć na pole
4. Proszę z widoku wybrać folder do którego chcą Państwo przesłać pliki.
W celu sporządzenia nowego folderu dla Państwa plików proszę kliknąć na pole
„Utwórz nowy folder”. Proszę następnie nadać nazwę folderowi i kliknąć na
„Utwórz”, co widać na poniższej ilustracji. Nazwa folderu musi składać się z od 2 do
PL - 54
26 znaków. Proszę kliknąć na „Przerwij” w celu przerwania procesu
5. Proszę kliknąć na „Wybierz” w celu uruchomienia wysyłania. Otworzy się następujące
okienko:
Informacja: Prawidłowo skopiowane/przetransmitowane prezentowane są w dolnym
okienku „Pomyślnie wykonane procesy kopiowania” (patrz powyższa ilustracja). Proszę
kliknąć na „Opróżnij listę” w celu usunięcia plików z listy.
PL - 55
6. Proszę kliknąć na dowolny fragment ekranu, a zostaną Państwo zaprowadzeni do
poprzedniego menu. Proszę kliknąć następnie na w celu zamknięcia menu
10.12 USUWANIE PLIKOW (IOS ORAZ ANDROID)
Mają Państwo teraz możliwość w łatwy sposób usunąć jeden lub kilka plików w menu
„Moje urządzenie” lub „Memory 2 Move.
1. W celu usunięcia jednego lub więcej plików należy kliknąć na symbol .
2. Mogą teraz Państwo wybrać pliki do usunięcia lub kliknąć na w celu wybrania
wszystkich plików.
3. Proszę teraz kliknąć na symbol w celu usunięcia zaznaczonych plików. Na
ekranie pokaże się ostrzeżenie w celu potwierdzenia procesu usuwania (patrz
ilustracja poniżej). Proszę kliknąć na OK, jeśli chcą faktycznie dokonać usunięcia.
Proszę kliknąć na OK, jeśli chcą Państwo faktycznie usunąć pliki. Jeśli usunięcie plików
nie jest Państwa zamiarem, wtedy można zatrzymać proces przez kliknięcie na
„Przerwij”.
PL - 56
10.13 WIDOK I STATUS PAŃSTWA WYSYŁANIA/POBIERANIA
Jeżeli Państwo z lub do swego Memory 2 Nove przekopiowali lub przetransmitowali jeden
lub więcej plików, wtedy jednym kliknięciem na mogą sprawdzić, jakie pliki jeszcze
czekają w kolejce do transmisji, a jakie pliki zostały już przetransmitowane. Mogą Państwo w
menu głównym również kliknąć na w celu sprawdzenia dokładnego statusu Państwa
pobierania/wysyłania.
10.14 ZAKOŃCZENIE APLIKACJI MEMORY 2 MOVE
10.14.1 IOS
W celu wyjścia z aplikacji Memory 2 Move proszę raz nacisnąć przycisk „Home” swego
urządzenia iPhone/iPad.
W celu zakończenia aplikacji proszę dwa razy nacisnąć przycisk „Home”, a przy dolnej
krawędzi ekranu pokaże się lista z różnymi aplikacjami. Proszę kliknąć i przytrzymać
wciśniętą ikonę aplikacji aż pokaże się znak minus (-). Proszę teraz kliknąć na ten znak minus
w celu zakończenia aplikacji (patrz ilustracja poniżej).
PL - 57
10.14.2 ANDROID
W celu wyjścia z aplikacji Memory 2 Move proszę kliknąć na pole , a następnie wybrać
„Wyjdź”. Pokaże się teraz ostrzeżenie z prośbą o potwierdzenie wyboru. Proszę kliknąć na
„OK” w celu zakończenia aplikacji lub na „Przerwij” w celu powrotu do aplikacji.
10.15 DEINSTALOWANIE APLIKACJI MEMORY 2 MOVE
10.15.1 IOS
W celu zdeinstalowania aplikacji „Memory 2 Move“ z Państwa urządzenia Apple proszę
kliknąć na logo aplikacji Memory 2 Move i trzymać je wciśnięte. Pokaże się teraz znak „X“
przy wszystkich ikonach zainstalowanych aplikacji, tak jak to widać na poniższej ilustracji.
Proszę kliknąć na znak „X“ w górnym lewym rogu ikony aplikacji Memory 2 Move w celu
usunięcia aplikacji ze swego urządzenia Apple.
PL - 58
10.15.2 ANDROID
W celu zdeinstalowania aplikacji Memory 2 Move z Państwa urządzenia Android proszę
wykonać następujące czynności.
Informacja: Proces deinstalowania może być w zależności od urządzenia Android
zróżnicowany. Przed deinstalowaniem proszę zapoznać się z instrukcją obsługi swego
urządzenia Android.
1. Proszę w menu głównym kliknąć na ikonę „Ustawienia”.
2. Proszę przejść do punktu „Aplikacje”.
3. Proszę odszukać aplikację Memory 2 Move i wybrać ją.
4. Proszę kliknąć na pole „Deinstaluj”.
5. Pokaże się teraz ostrzeżenie z prośbą o potwierdzenie wyboru. Proszę kliknąć na
„OK“ w celu zdeinstalowania aplikacji lub na „Przerwij” w celu powrotu do menu
ustawień.
PL - 59
11. FUNKCJE WEB MANAGEMENT
W celu skonfigurowania urządzenia WiFi proszę użyć oprogramowania „WiFi Finder“, co
pozwoli na połączenie się z Memory 2 Move. Mogą Państwo alternatywnie otworzyć swą
przeglądarkę sieciową w wierszu adresowym wczytać adres IP 10.10.10.254, o ile fabrycznie
ustawiony adres nie został zmieniony.
Widok menu głównego:
Dostępne podmenu:
Tutaj można zmienić hasło administratora.
Prezentacja istotnych informacji w pamięci.
Tu można dokonać zmiany ustawień sieciowych.
Aktywacja usług Windows File.
Tutaj można zmienić ustawienia systemowe.
Tutaj, przy pomocy asystenta ustawień można skonfigurować
urządzenie krok po kroku.
PL - 60
11.1 FUNKCJA EXPLORER
Mogą tu Państwo poprzez ten poziom administratora kopiować dane na Memory 2 Move
oraz także kopiować dane z Memory 2 Move na używany przez Państwo komputer osobisty.
Oprócz tego mogą Państwo zakładać, kopiować, przemianowywać lub usuwać katalogi,
zupełnie jak jest to możliwe w Państwa komputerze.
Aktualizuj proszę kliknąć na ten przycisk w celu zaktualizowania widoku
ekranu.
Wyślij proszę kliknąć na ten przycisk w celu wysłania plików na urządzenie.
Utwórz w celu utworzenia katalogu na Memory 2 Move. Nazwa katalogu
powinna zawierać maksymalnie 26 znaków.
Kopiuj w celu skopiowanie plików w innym folderze.
Przesuń- w celu przesunięcia pliku do innego miejsca jego zapisu.
Otwórz / Pobierz proszę kliknąć na ten przycisk w celu otwarcia plików i
skopiowania ich na Państwa komputerze osobistym. Jeżeli na komputerze
osobistym zainstalowano kompatybilne oprogramowanie, wtedy odtwarzanie
muzyki rozpoczyna się automatycznie. W przeciwnym razie postawione
zostanie Państwu pytanie, czy chcą pobrać plik. Katalogów pobrać się nie da.
Muszą Państwo wybrać co najmniej jeden plik do pobrania.
PL - 61
Usuń w celu usunięcia plików z urządzenia.
Przemianuj w celu dokonania zmiany nazwy pliku.
Obserwator fotografii w celu prezentacji fotografii używany jest ten przycisk.
11.2 MENU KONTEKSTOWE (NIE DLA MAC)
W menu plików mogą Państwo poprzez kliknięcie na plik lub katalog prawym klawiszem
myszy wywołać menu kontekstowe. W tym menu „Pop-Up“ mają Państwo dyspozycji
punkty do wyboru: kopiuj, wytnij, usuń, przemianuj lub wyślij (patrz zrzut ekranu).
W menu katalogów mogą Państwo również wywołać menu kontekstowe. Tutaj również
jest możliwość wyboru między otwórz, kopiuj, wytnij, usuń lub przemianuj (patrz zrzut
ekranu).
PL - 62
Jeśli wybierają Państwo kilka plików (działa to, jeśli naciśnięty i przytrzymany zostanie
klawisz „strg“ i jednocześnie wybrane pliki zaznaczone zostaną lewym klawiszem myszy) i
wywołują menu kontekstowe prawym klawiszem myszy, wtedy mają możliwość
wybrania kopiowania, wycinania lub usuwania.
Jeżeli Państwo klikną prawym klawiszem myszy na puste miejsce w katalogu, wtedy do
dyspozycji będą funkcje dołącz, utwórz lub wyślij.
Objaśnienie działania funkcji:
- Otwórz: Proszę wybrać katalog i otworzyć menu kontekstowe prawym klawiszem
myszy. Proszę wybrać tutaj „Otwórz” i przedstawiona zostanie Państwu treść
katalogu.
- Kopiuj: Proszę wybrać katalog lub jeden albo więcej plików i otworzyć prawym
klawiszem myszy menu kontekstowe. Proszę wybrać tutaj „Kopiuj” w celu
skopiowania wybranego elementu lub elementów.
- Wytnij: Proszę wybrać katalogi lub pliki oraz otworzyć prawym klawiszem myszy
menu kontekstowe. Proszę wybrać „Wytnij” w celu wycięcia plików z aktualnego
miejsca ich zapisu.
- Dołącz: Po wybraniu albo „Kopiuj” albo „Wytnij” mogą Państwo teraz poszukać
nowego miejsca zapisu dla wybranych elementów. W celu dołączenia elementów
do nowego miejsca zapisu proszę kliknąć prawym klawiszem myszy na jakieś
puste miejsce w katalogu i wywołać menu kontekstowe. Tutaj proszę wybrać
„Dołącz” w celu dołączenia elementów do nowego miejsca ich zapisu.
- Usuń: Proszę wybrać plik i prawym klawiszem myszy otworzyć menu
kontekstowe. Proszę tutaj wybrać „Usuń” w celu usunięcia wybranych
elementów.
PL - 63
- Utwórz: Proszę prawym klawiszem myszy kliknąć na jakieś puste miejsce w
katalogu i wywołać menu kontekstowe. Proszę wywołać „Utwórz” w celu
założenia nowego katalogu.
- Przemianuj: Proszę kliknąć prawym klawiszem myszy na katalog lub na plik który
ma zostać przemianowany oraz w menu kontekstowym na opcję menu
„Przemianuj”. Teraz mogą Państwo przemianować katalog lub plik. Po dokonaniu
żądanych zmian proszę kliknąć na „Zapisz” w celu zatwierdzenia dokonanych
zmian.
- Wyślij: Proszę kliknąć prawym klawiszem myszy na jakieś puste miejsce w
katalogu i wywołać menu kontekstowe. Proszę wybrać „Wyślij” w celu wysłania
nowych plików.
- Otwórz / Pobierz: Proszę kliknąć prawym klawiszem myszy na katalog lub plik,
które mają być pobrane oraz w menu kontekstowym na opcję menu „Pobierz”.
Jeżeli zainstalowali Państwo na swym komputerze osobistym kompatybilne
oprogramowanie, wtedy odtwarzanie muzyki rozpoczyna się automatycznie. W
przeciwnym razie zostanie Państwu postawione pytanie, czy chcą Państwo pobrać
plik. Katalogów pobrać się nie da.
11.3 SKRÓTY KLAWIATUROWE
Poziom administratora sieci obsługuje wczytywania klawiaturowe i skróty klawiaturowe.
Obsługiwane są między innymi następujące skróty: przycisk Tab, przycisk Enter, przycisk
Home, PGUP, PGDN, przycisk Koniec, przycisk strzałki w górę, przycisk strzałki w dół, przycisk
strzałki w lewo, przycisk strzałki w prawo i przycisk Usuń.
Windows: STRG + c = kopiuj STRG + v = dołącz
Mac: CTRL + c = kopiuj CTRL + v = dołącz
11.4 DRAG AND DROP
Mogą Państwo przesuwać poszczególne pliki za pomocą Drag and Drop (ciągnij i puść).
Proszę po prostu chwytać i przeciągać plik do innego wolnego katalogu i puścić plik.
PL - 64
11.5 INFORMACJE
Tutaj prezentowane są szczegółowe informacje o sprzęcie, statusie sieci i miejscu
zapisywania.
11.5.1 INFORMACJE O SPRZĘCIE
Tutaj prezentowane są informacje takie jak nazwa urządzenia, numer seryjny, producent, i
obciążenie CPU.
11.5.2 INFORMACJA O PAMIĘCI
Tutaj otrzymają Państwo informacje na temat wbudowanego napędu, czyli o pojemności
całkowitej, producencie twardego dysku i wielkości pamięci.
PL - 65
11.5.3 INFORMACJE O SIECI
Prezentowane szczegółowe informacje o aktualnym statusie sieci, jak na przykład adresie
sieciowym, strusie internetowym lub aktualnej nazwie sieciowej Wi-Fi (SSID).
11.6 USTAWIENIA
11.6.1 UŻYTKOWNIK
W menu ustawień proszę kliknąć na pole aktywujące w celu zmiany ustawień
administratora. Hasło powinno zawierać od 5 do maksymalnie 32 znaków. Poprzez kliknięcie
na przycisk „Zapisz” nastąpi przejęcie zmian.
W stanie dostawy hasło administratora brzmi: 00000
PL - 66
11.6.2 DYSK
W menu ustawień proszę kliknąć na pole aktywujące w celu otrzymania
szczegółowych informacji na temat medium pamięci, jak na przykład wersja firmowa,
pojemność lub numer seryjny.
Menu napędu zawiera informacje na temat używanego systemu plików oraz na temat
dostępnej pojemności całkowitej.
Proszę kliknąć na „X“ w celu zamknięcia menu.
11.7 SIEĆ
W menu ustawień proszę kliknąć na pole aktywacyjne w celu wywołania
informacji sieciowych.
PL - 67
11.7.1 NAZWA HOST
Nazwa Host należy do urządzenia, które jest włączone do sieci. Nazwa ta jest dowolna.
Jedynym warunkiem jest to, aby nazwa rozpoczynała się od litery i dalej była zbudowana z
kombinacji liter i cyfr. Wymaga się co najmniej 2 i maksymalnie 8 znaków.
11.7.2 WI-FI & LAN
Wszystkie ustawienia sieciowe można zaaranżować według Państwa potrzeb. Do wyboru są
następujące opcje:
- SSID: Proszę nanieść tu nazwę Państwa sieci. W ustawieniu
podstawowym występuje tutaj „Memory2Move-XXXX. Dla
nazwy SSID możliwe maksymalnie 32 znaki.
- Kanał Wi-Fi: Proszę nanieść tutaj kanał na którym urządzenie Wi-Fi ma
nadawać i odbierać. Ustawienie podstawowe to „Auto“. Kanał
zostanie w takim przypadku ustawiony przez urządzenie w
PL - 68
sposób automatyczny. Mogą jednak Państwo ustalić ręcznie na
jaki kanale ma odbywać się nadawanie i odbiór. Do dyspozycji
jest od 1 do 13 kanałów.
- TRyb Wi-Fi: Ustawiony wstępnie bezprzewodowy standard sieciowy brzmi:
802.11/b/g/n. Mogą Państwo również ręcznie ustawić tryb
(802.11b), 54 Mbps (802.11g lub 150 Mbps (802.11n)
- Bezpieczeństwo: W stanie dostawy nie wybrano typu bezpieczeństwa.
Mają Państwo wybór między następującymi typami kodowania:
brak kodowania, WPA-PSK, WPA2-PSK, Mixed WPA/WPA2-
PSK.
- Hasło: W zależności od wybranego typu kodowania należy wczytać
hasło zawierające co najmniej 8 i maksymalnie 63 znaki.
- Adres IP: Wstępnie ustawiony adres IP brzmi: 10.10.10.254 z maską
podsieci 255.255.255.0 Ten adres IP mogą Państwo zmienić
ręcznie.
11.7.3 SERWER DHCP
Dynamic Host Configuration Protocol (DHCP) jest protokołem sieciowym, który pozwala
serwerowi przekazywać dynamicznie adresy IP do połączonych z nim komputerów. W
ustawieniu podstawowym protokół DHCP jest aktywny. Opcję tę można aktywować według
potrzeb i adresy IP można przydzielać ręcznie.
Proszę kliknąć na przycisk Lista DHCP“, pokaże się lista wszystkich aktualnie podłączonych
urządzeń.
PL - 69
11.7.4 DOSTĘP DO INTERNETU
Ustawianie dostępu do internetu
... przez wykonanie połączenia do jakiejś dostępnej sieci
Mają Państwo tu wybór między 2 dyspozycyjnymi opcjami dostępu do internetu. W
ustawieniu standardowym ustawiono wstępnie dostęp kablowy (jak widać na powyższej
ilustracji).
A. Dostęp bezprzewodowy (WLAN):
Proszę połączyć M2M z innym routerem WLAN w celu utworzenia połączenia z
internetem.
B. Dostęp przewodowy (LAN):
Proszę połączyć bezpośrednio M2M z dyspozycyjnym portem z tyłu Państwa routera
w celu utrzymania połączenia z inną siecią.
PL - 70
Dostęp LAN:
W ustawieniu podstawowym wybrano „Dynamiczne IP“. Mogą Państwo przydzielić ręcznie
adres IP poprzez kliknięcie na żółtą strzałkę i wybranie opcji „Statyczne IP”.
Dostęp WLAN:
SSID: Proszę wczytać nazwę SSID swej sieci lub kliknąć na „Nowy
skan” w celu automatycznego poszukiwania wszystkich
dostępnych sieci.
Hasło: Proszę wczytać hasło dla wybranej lokalnej sieci
bezprzewodowej.
Adres IP: Przy wyborze „Automatyczniesieć daje Państwu
automatycznie do dyspozycji adres IP.
Przy wyborze „Statyczne IP” muszą Państwo sami wczytać swój
adres IP dla sieci z którą chcą się połączyć.
Informacja: Jeżeli nie da się utworzyć połączenia z jakąś inną siecią, wtedy proszę zapytać o
to swego administratora o aktualne wytyczne dla Państwa!
PL - 71
11.8 USŁUGI
11.8.1 SAMBA
Dostęp i wymiana danych Windows File Service | Samba (Mac) Service są bardzo łatwe.
Usługa ta jest już aktywowana w stanie dostawy (patrz zrzut ekranu).
11.8.2 SERWER MULTIMEDIALNY
PL - 72
Funkcje:
(1)
Proszę aktywować lub dezaktywować serwer multimedialny.
(2)
Proszę ustalić nazwę, która ma się pojawiać w sieci.
(3)
Proszę podać nazwę folderu, który ma być dostępny poprzez serwer
multimedialny.
(4)
Zmiana udostępnianego folderu na Memory 2 Move.
(5)
Tu można zapisać wybrane ustawienia.
11.9 SYSTEM
11.9.1 USTAWIENIA CZASOWE
Mają Państwo do tego możliwość zarówno ręcznego ustawienia strefy czasowej, jak również
przeprowadzenie automatycznej synchronizacji czasowej.
Jeśli zdecydowali się Państwo na ręczny wybór strefy czasowej to proszę kliknąć na żółtą
strzałkę obok kwadracika „Strefa czasowa” i wybrać z punktu menu, w zależności od swej
lokalizacji, odpowiednią strefę czasową.
Proszę wybrać automatyczną synchronizację czasu, co spowoduje że nastąpi aktualizacja
godziny po tym, gdy połączą się Państwo z internetem.
PL - 73
Opcje dla synchronizacji godziny zegarowej:
Częstotliwość: codziennie, co 2 dni, co 3 dni, ….Mogą Państwo wybierać interwały
synchronizacji do co 7 dni.
Automatyczną synchronizację godziny zegarowej można znieść w każdej chwili i wybrać
zamiast niej opcję „Przejście godziny z PC”. W takim przypadku aktualna godzina zegarowa
przejmowana będzie z Państwa komputera osobistego, zatem oba urządzenia będą
pokazywały tą samą godzinę.
11.9.2 ZABEZPIECZANIE
W celu dokonania zabezpieczenia (Backup) konfiguracji systemu Wi-Fi proszę kliknąć na
przycisk „Zabezpiecz”. Utworzony zostanie plik z końcówką .bin.gz za pomocą którego będą
mogli Państwo według potrzeby wykonać ponownie ustawienia systemowe. Plik ten proszę
zapisać w swym komputerze.
PL - 74
W celu ponownego utworzenia systemu proszę kliknąć na przycisk Przywróć”. Proszę
poszukać i otworzyć swój zapisany plik zabezpieczający i kliknąć na „Zabezpiecz” w oknie na
dole po prawej stronie.
Podczas procesu przywracania pokazuje się ostrzeżenie, które daje Państwu informację o
aktualnym statusie tego procesu.
PL - 75
Po pomyślnym przywróceniu konfiguracji systemu urządzenie na nowo startuje
automatycznie i prezentowany jest ekran loginu.
11.9.3 AKTUALIZACJA FIRMWARE
Jeżeli aktualizacja Firmware jest dostępna na www.intenso.de wtedy w proszę postępować
zgodnie z procedurami w celu uaktualnienia oprogramowania.
Proszę pobrać Firmware na swój komputer.
Proszę kliknąć na przycisk „Aktualizuj” i poszukać pobraną aktualizację Firmware w
swym PC. Proszę wybrać plik i kliknąć na „Otwórz” w celu kontynuowania.
Poniżej przycisku „Aktualizuj” pokazywany jest teraz numer wersji Firmware na
podstawie którego urządzenie jest aktualizowane. Proszę kliknąć na „Zabezpiecz” na
dole po prawej stronie maski w celu uruchomienia procesu aktualizacji Firmware.
PL - 76
Podczas aktualizacji pokazuje się ostrzeżenie informujące Państwo o aktualnym
statusie procesu aktualizacji.
Po pomyślnej aktualizacji urządzenie na nowo startuje automatycznie i prezentowany jest
ekran loginu.
11.9.4 RESET
Jeśli Państwo zresetują urządzenie na ustawienia fabryczne, wtedy wszystkie dokonane w
nim ustawienia zostaną usunięte i aktywowane ponownie będą ustawienia właściwe dla
stanu dostawy.
PL - 77
W celu wybrania zresetowania na ustawienia fabryczne proszę kliknąć na okrągły przycisk.
Proszę kliknąć na przycisk „Zabezpiecz” w celu uruchomienia procesu. W celu wykluczenia
nieporozumień, proszę potwierdzić swój wybór na pojawiającym się następnie ostrzeżeniu.
Poniższa informacja pojawia się podczas aktywnego procesu i podaje komunikaty o bieżącym
stanie zaawansowania.
Informacja: Po tym, gdy urządzenie zostało zresetowane następuje również zresetowanie
hasła administratora. Aktualnym staje się hasło takie, jak w stanie dostawy.
PL - 78
12. LICENCJA INFORMACJA
Notice of GNU GENERAL PUBLIC LICENSE and LESSER GENERAL PUBLIC LICENCE
Dear Customer,
If interested, you and any third party can download the source code of used GPL / LGPL from
Intenso Webpage http://www.intenso.de . The source code of the desired product is
available to anyone on the selection of valid product category and the desired device. In the
product details you will find the entry "drivers". Open this menu to download the
corresponding GPL / LGPL code. For a fee of 35 € (delivery to another country as Germany),
it is also possible to obtain this code by postal delivery. More information about the
GPL/LGPL-Licence can you nd on following website www.gnu.org
GNU GENERAL PUBLIC LICENSE
Version 2, June 1991
Copyright (C) 1989, 1991 Free Software Foundation, Inc.
51 Franklin Street, Fifth Floor, Boston, MA 02110-1301, USA
Everyone is permitted to copy and distribute verbatim copies
of this license document, but changing it is not allowed.
Preamble
The licenses for most software are designed to take away your freedom to share and change
it. By contrast, the GNU General Public License is intended to guarantee your freedom to
share and change free software--to make sure the software is free for all its users. This
General Public License applies to most of the Free Software Foundation's software and to
any other program whose authors commit to using it. (Some other Free Software Foundation
software is covered by the GNU Lesser General Public License instead.) You can apply it to
your programs, too.
When we speak of free software, we are referring to freedom, not price. Our General Public
Licenses are designed to make sure that you have the freedom to distribute copies of free
software (and charge for this service if you wish), that you receive source code or can get it if
you want it, that you can change the software or use pieces of it in new free programs; and
that you know you can do these things.
To protect your rights, we need to make restrictions that forbid anyone to deny you these
rights or to ask you to surrender the rights. These restrictions translate to certain
responsibilities for you if you distribute copies of the software, or if you modify it.
PL - 79
For example, if you distribute copies of such a program, whether gratis or for a fee, you must
give the recipients all the rights that you have. You must make sure that they, too, receive or
can get the source code. And you must show them these terms so they know their rights.
We protect your rights with two steps: (1) copyright the software, and (2) offer you this
license which gives you legal permission to copy, distribute and/or modify the software.
Also, for each author's protection and ours, we want to make certain that everyone
understands that there is no warranty for this free software. If the software is modified by
someone else and passed on, we want its recipients to know that what they have is not the
original, so that any problems introduced by others will not reflect on the original authors'
reputations.
Finally, any free program is threatened constantly by software patents. We wish to avoid the
danger that redistributors of a free program will individually obtain patent licenses, in effect
making the program proprietary. To prevent this, we have made it clear that any patent
must be licensed for everyone's free use or not licensed at all.
The precise terms and conditions for copying, distribution and modification follow.
TERMS AND CONDITIONS FOR COPYING, DISTRIBUTION AND MODIFICATION
0. This License applies to any program or other work which contains a notice placed by the
copyright holder saying it may be distributed under the terms of this General Public License.
The "Program", below, refers to any such program or work, and a "work based on the
Program" means either the Program or any derivative work under copyright law: that is to
say, a work containing the Program or a portion of it, either verbatim or with modifications
and/or translated into another language. (Hereinafter, translation is included without
limitation in the term "modification".) Each licensee is addressed as "you".
Activities other than copying, distribution and modification are not covered by this License;
they are outside its scope. The act of running the Program is not restricted, and the output
from the Program is covered only if its contents constitute a work based on the Program
(independent of having been made by running the Program). Whether that is true depends
on what the Program does.
1. You may copy and distribute verbatim copies of the Program's source code as you receive
it, in any medium, provided that you conspicuously and appropriately publish on each copy
an appropriate copyright notice and disclaimer of warranty; keep intact all the notices that
refer to this License and to the absence of any warranty; and give any other recipients of the
Program a copy of this License along with the Program.
You may charge a fee for the physical act of transferring a copy, and you may at your option
offer warranty protection in exchange for a fee.
PL - 80
2. You may modify your copy or copies of the Program or any portion of it, thus forming a
work based on the Program, and copy and distribute such modifications or work under the
terms of Section 1 above, provided that you also meet all of these conditions:
a) You must cause the modified files to carry prominent notices stating that you changed the
files and the date of any change.
b) You must cause any work that you distribute or publish, that in whole or in part contains
or is derived from the Program or any part thereof, to be licensed as a whole at no charge to
all third parties under the terms of this License.
c) If the modified program normally reads commands interactively when run, you must
cause it, when started running for such interactive use in the most ordinary way, to print or
display an announcement including an appropriate copyright notice and a notice that there
is no warranty (or else, saying that you provide a warranty) and that users may redistribute
the program under these conditions, and telling the user how to view a copy of this License.
(Exception: if the Program itself is interactive but does not normally print such an
announcement, your work based on the Program is not required to print an announcement.)
These requirements apply to the modified work as a whole. If identifiable sections of that
work are not derived from the Program, and can be reasonably considered independent and
separate works in themselves, then this License, and its terms, do not apply to those
sections when you distribute them as separate works. But when you distribute the same
sections as part of a whole which is a work based on the Program, the distribution of the
whole must be on the terms of this License, whose permissions for other licensees extend to
the entire whole, and thus to each and every part regardless of who wrote it.
Thus, it is not the intent of this section to claim rights or contest your rights to work written
entirely by you; rather, the intent is to exercise the right to control the distribution of
derivative or collective works based on the Program.
In addition, mere aggregation of another work not based on the Program with the Program
(or with a work based on the Program) on a volume of a storage or distribution medium
does not bring the other work under the scope of this License.
3. You may copy and distribute the Program (or a work based on it, under Section 2) in
object code or executable form under the terms of Sections 1 and 2 above provided that you
also do one of the following:
a) Accompany it with the complete corresponding machine-readable source code, which
must be distributed under the terms of Sections 1 and 2 above on a medium customarily
used for software interchange; or,
b) Accompany it with a written offer, valid for at least three years, to give any third party, for
a charge no more than your cost of physically performing source distribution, a complete
PL - 81
machine-readable copy of the corresponding source code, to be distributed under the terms
of Sections 1 and 2 above on a medium customarily used for software interchange; or,
c) Accompany it with the information you received as to the offer to distribute
corresponding source code. (This alternative is allowed only for noncommercial distribution
and only if you received the program in object code or executable form with such an offer, in
accord with Subsection b above.)
The source code for a work means the preferred form of the work for making modifications
to it. For an executable work, complete source code means all the source code for all
modules it contains, plus any associated interface definition files, plus the scripts used to
control compilation and installation of the executable. However, as a special exception, the
source code distributed need not include anything that is normally distributed (in either
source or binary form) with the major components (compiler, kernel, and so on) of the
operating system on which the executable runs, unless that component itself accompanies
the executable.
If distribution of executable or object code is made by offering access to copy from a
designated place, then offering equivalent access to copy the source code from the same
place counts as distribution of the source code, even though third parties are not compelled
to copy the source along with the object code.
4. You may not copy, modify, sublicense, or distribute the Program except as expressly
provided under this License. Any attempt otherwise to copy, modify, sublicense or distribute
the Program is void, and will automatically terminate your rights under this License.
However, parties who have received copies, or rights, from you under this License will not
have their licenses terminated so long as such parties remain in full compliance.
5. You are not required to accept this License, since you have not signed it. However,
nothing else grants you permission to modify or distribute the Program or its derivative
works. These actions are prohibited by law if you do not accept this License. Therefore, by
modifying or distributing the Program (or any work based on the Program), you indicate your
acceptance of this License to do so, and all its terms and conditions for copying, distributing
or modifying the Program or works based on it.
6. Each time you redistribute the Program (or any work based on the Program), the recipient
automatically receives a license from the original licensor to copy, distribute or modify the
Program subject to these terms and conditions. You may not impose any further restrictions
on the recipients' exercise of the rights granted herein. You are not responsible for enforcing
compliance by third parties to this License.
7. If, as a consequence of a court judgment or allegation of patent infringement or for any
other reason (not limited to patent issues), conditions are imposed on you (whether by court
order, agreement or otherwise) that contradict the conditions of this License, they do not
PL - 82
excuse you from the conditions of this License. If you cannot distribute so as to satisfy
simultaneously your obligations under this License and any other pertinent obligations, then
as a consequence you may not distribute the Program at all. For example, if a patent license
would not permit royalty-free redistribution of the Program by all those who receive copies
directly or indirectly through you, then the only way you could satisfy both it and this License
would be to refrain entirely from distribution of the Program.
If any portion of this section is held invalid or unenforceable under any particular
circumstance, the balance of the section is intended to apply and the section as a whole is
intended to apply in other circumstances.
It is not the purpose of this section to induce you to infringe any patents or other property
right claims or to contest validity of any such claims; this section has the sole purpose of
protecting the integrity of the free software distribution system, which is implemented by
public license practices. Many people have made generous contributions to the wide range
of software distributed through that system in reliance on consistent application of that
system; it is up to the author/donor to decide if he or she is willing to distribute software
through any other system and a licensee cannot impose that choice.
This section is intended to make thoroughly clear what is believed to be a consequence of
the rest of this License.
8. If the distribution and/or use of the Program is restricted in certain countries either by
patents or by copyrighted interfaces, the original copyright holder who places the Program
under this License may add an explicit geographical distribution limitation excluding those
countries, so that distribution is permitted only in or among countries not thus excluded. In
such case, this License incorporates the limitation as if written in the body of this License.
9. The Free Software Foundation may publish revised and/or new versions of the General
Public License from time to time. Such new versions will be similar in spirit to the present
version, but may differ in detail to address new problems or concerns.
Each version is given a distinguishing version number. If the Program specifies a version
number of this License which applies to it and "any later version", you have the option of
following the terms and conditions either of that version or of any later version published by
the Free Software Foundation. If the Program does not specify a version number of this
License, you may choose any version ever published by the Free Software Foundation.
10. If you wish to incorporate parts of the Program into other free programs whose
distribution conditions are different, write to the author to ask for permission. For software
which is copyrighted by the Free Software Foundation, write to the Free Software
Foundation; we sometimes make exceptions for this. Our decision will be guided by the two
goals of preserving the free status of all derivatives of our free software and of promoting
the sharing and reuse of software generally.
PL - 83
NO WARRANTY
11. BECAUSE THE PROGRAM IS LICENSED FREE OF CHARGE, THERE IS NO WARRANTY FOR
THE PROGRAM, TO THE EXTENT PERMITTED BY APPLICABLE LAW. EXCEPT WHEN
OTHERWISE STATED IN WRITING THE COPYRIGHT HOLDERS AND/OR OTHER PARTIES
PROVIDE THE PROGRAM "AS IS" WITHOUT WARRANTY OF ANY KIND, EITHER EXPRESSED OR
IMPLIED, INCLUDING, BUT NOT LIMITED TO, THE IMPLIED WARRANTIES OF
MERCHANTABILITY AND FITNESS FOR A PARTICULAR PURPOSE. THE ENTIRE RISK AS TO THE
QUALITY AND PERFORMANCE OF THE PROGRAM IS WITH YOU. SHOULD THE PROGRAM
PROVE DEFECTIVE, YOU ASSUME THE COST OF ALL NECESSARY SERVICING, REPAIR OR
CORRECTION.
12. IN NO EVENT UNLESS REQUIRED BY APPLICABLE LAW OR AGREED TO IN WRITING WILL
ANY COPYRIGHT HOLDER, OR ANY OTHER PARTY WHO MAY MODIFY AND/OR REDISTRIBUTE
THE PROGRAM AS PERMITTED ABOVE, BE LIABLE TO YOU FOR DAMAGES, INCLUDING ANY
GENERAL, SPECIAL, INCIDENTAL OR CONSEQUENTIAL DAMAGES ARISING OUT OF THE USE
OR INABILITY TO USE THE PROGRAM (INCLUDING BUT NOT LIMITED TO LOSS OF DATA OR
DATA BEING RENDERED INACCURATE OR LOSSES SUSTAINED BY YOU OR THIRD PARTIES OR
A FAILURE OF THE PROGRAM TO OPERATE WITH ANY OTHER PROGRAMS), EVEN IF SUCH
HOLDER OR OTHER PARTY HAS BEEN ADVISED OF THE POSSIBILITY OF SUCH DAMAGES.
END OF TERMS AND CONDITIONS
How to Apply These Terms to Your New Programs
If you develop a new program, and you want it to be of the greatest possible use to the
public, the best way to achieve this is to make it free software which everyone can
redistribute and change under these terms.
To do so, attach the following notices to the program. It is safest to attach them to the start
of each source file to most effectively convey the exclusion of warranty; and each file should
have at least the "copyright" line and a pointer to where the full notice is found.
one line to give the program's name and an idea of what it does.
Copyright (C) yyyy name of author
This program is free software; you can redistribute it and/or
modify it under the terms of the GNU General Public License
as published by the Free Software Foundation; either version 2
of the License, or (at your option) any later version.
PL - 84
This program is distributed in the hope that it will be useful,
but WITHOUT ANY WARRANTY; without even the implied warranty of
MERCHANTABILITY or FITNESS FOR A PARTICULAR PURPOSE. See the
GNU General Public License for more details.
You should have received a copy of the GNU General Public License
along with this program; if not, write to the Free Software
Foundation, Inc., 51 Franklin Street, Fifth Floor, Boston, MA 02110-1301, USA.
Also add information on how to contact you by electronic and paper mail.
If the program is interactive, make it output a short notice like this when it starts in an
interactive mode:
Gnomovision version 69, Copyright (C) year name of author
Gnomovision comes with ABSOLUTELY NO WARRANTY; for details
type `show w'. This is free software, and you are welcome
to redistribute it under certain conditions; type `show c'
for details.
The hypothetical commands `show w' and `show c' should show the appropriate parts of the
General Public License. Of course, the commands you use may be called something other
than `show w' and `show c'; they could even be mouse-clicks or menu items--whatever suits
your program.
You should also get your employer (if you work as a programmer) or your school, if any, to
sign a "copyright disclaimer" for the program, if necessary. Here is a sample; alter the
names:
Yoyodyne, Inc., hereby disclaims all copyright
interest in the program `Gnomovision'
(which makes passes at compilers) written
by James Hacker.
signature of Ty Coon, 1 April 1989
Ty Coon, President of Vice
RU - 1
1.  ..................................................................................................... 4
2.  ............................................................................................................................. 4
3.  ............................................................................................................................... 6
4.  ............................................................................................................... 6
5.  .................................................................................................................. 6
6.  ...................................................................................................................... 7
7.  ............................................................................................................................... 7
7.1  ...................................................................................................................................... 7
7.2 Micro USB 3.0 ..................................................................................................................... 7
7.3  .................................................................................................................... 8
8.  ........................................................................................... 9
8.1  .......................................................... 9
8.2  .......................................................................................................... 10
8.2.1  ................................................................................................................... 11
8.3  .................................................... 12
8.3.1 MAC WiFi Finder .................................................................................................................................. 13
8.3.2  .................................................................................................................... 15
8.4  ......................................................................................................... 16
9.  .............................................................................................. 20
9.1  ............................................................................... 20
9.2  ......................................................................................... 21
9.3  ..................................................................................................................... 22
9.4  ........................................................................ 23
9.5  ................................................. 23
9.6  ............................................................................................................. 25
10.  ............................................................................................................................. 26
10.1  ...................................................... 26
10.2  ....................................................................... 28
RU - 2
10.3 - ......................................................................................................... 30
10.3.1 -Fi .................................................................................................................. 30
10.3.2  ........................................................................................................... 30
10.3.3  ....................................................................................................................................... 31
10.3.4  .......................................................................................................................... 31
10.4  ..................................................................... 33
10.5  ......................................................................................................... 35
10.5.1 iOS ........................................................................................................................................................ 35
10.5.2 Android ................................................................................................................................................. 37
10.6  ............................................................................................ 38
10.6.1 iOS ........................................................................................................................................................ 38
10.6.2 Android ................................................................................................................................................. 41
10.7  .......................................................................................................... 44
10.7.1 iOS ........................................................................................................................................................ 44
10.7.2 Android ................................................................................................................................................. 45
10.8  ...................................................................................................... 47
10.8.1 iOS ........................................................................................................................................................ 47
10.8.2 Android ................................................................................................................................................. 48
10.9 ........................................... 49
10.10  ............................................................. 51
10.11 Wi- ................................................................. 53
10.12  ...................................................................................................... 55
10.13  ............................................................................................. 56
10.14  ........................................... 56
10.14.1 iOS ........................................................................................................................................................ 56
10.14.2 Android ................................................................................................................................................. 57
10.15  ........................................................ 57
10.15.1 iOS ........................................................................................................................................................ 57
10.15.2 Android ................................................................................................................................................. 58
11. - ................................................................................................................... 59
RU - 3
11.1  ................................................................................................................................ 60
11.2  ........................................................................................................ 61
11.3  .............................................................................................................................. 64
11.4  .................................................................................................................................. 64
11.5  ....................................................................................................................................... 64
11.5.1  ............................................................................................................... 64
11.5.2  ....................................................................................................................... 65
11.5.3  ........................................................................................................................... 65
11.6  ............................................................................................................................................ 66
11.6.1  ...................................................................................................................................... 66
11.6.2  ..................................................................................................................................................... 66
11.7  ...................................................................................................................................................... 67
11.7.1  ............................................................................................................................................. 67
11.7.2 Wi-AN ........................................................................................................................................... 68
11.7.3 DHCP-  ....................................................................................................................................... 69
11.7.4  ............................................................................................................................. 70
11.8  ................................................................................................................................................ 71
11.8.1 Samba ................................................................................................................................................... 71
11.8.2 - ..................................................................................................................................... 72
11.9  ............................................................................................................................................... 73
11.9.1  ............................................................................................................................. 73
11.9.2  ......................................................................................................................................... 74
11.9.3  ............................................................................................................ 76
11.9.4  .................................................................................................................... 78
12. 

 ....................................................................................................................... 79
RU - 4
1.


 .
 
-




 

2.
-

- - 




 
 


(Local Area Net 

id.

RU - 5
 -




 
 



 
 -Fi.
RU - 6
3.

CD

 KSAS0060500100VEU 5V / 1A)
4.
: 
Wi-Fi:
o  802.11 b/g/n,
o  
o  
 
 Micro USB 

 -
 
°C
5. 


o Windows: XP/Vista/Windows 7/8
o Mac: 
 

o Windows:  Internet Explorer 7.0 
o Mac: 
 

RU - 7
6. 
7.
7.1
A. 

B. -Area Network - 

7.2 3.0
-


RU - 8
7.3 

-  
-  
-  
-  
-  
-  
:
-  
-  
- 
o  -
o  -
 -Fi (Wi-Fi LED):
-  
-  
- 
o 
o  

- 
o  
o  
o  
- 
o  
o  
RU - 9
8.
8.1
-
 


-XXXX».
Указание: предварительно заданный пароль в состоянии поставки: «intenso1».
Пожалуйста, после успешно выполненного соединения в целях собственной
безопасности задайте новый пароль.
-


-


-

RU - 10
8.2 PC WIFI FINDER



Указание: 

Wi-
1.) Memory 2 Move 
-
RU - 11
2.)  :
: admin
: 00000
Указание: 

8.2.1 M


 admin
 00000
Указание: 

RU - 12
8.3
-


-XXXX».
Указание: предварительно заданный пароль в состоянии поставки: «intenso1».
Пожалуйста, после успешно выполненного соединения в целях собственной
безопасности задайте новый пароль.
-


-

-

RU - 13
8.3.1 MAC WIFI FINDER



Указание: 
-Fi

1.) Memory 2 Move 
-
RU - 14
2.)  :
: admin
: 00000
Указание: 

RU - 15
8.3.2 M
Storage», 

 admin
 00000
Указание: 




).
RU - 16
8.4 2 MOVE

Wi--

Start-Assistent 

-Assistent» (

Указание: если нажать на Х (вверху справа в Assistent), происходит выход из Start-
Assistent, и все заводские настройки сохраняются в качестве стандартных.
.


RU - 17



A. 


B. 


LAN-
IP». 
.
WLAN-
 ,


 

 

- 


Указание: щелкнув по Х (вверху справа), можно покинуть опционное меню LAN.


RU - 18

-
 Wi-
-  
-

-  -Fi 
».



- -Fi: 
 
(802.11b), 54 (802.11n).
-  -PSK.

 WPA-PSK,WPA2-
WPA/WPA2-PSK.
-  

- 

RU - 19
        
      

-


RU - 20
9.
9.1
1. 




RU - 21
9.2
1.  
-

2. 
3. «Wi--
-XXXX».

-

-
 Wi-Fi 
RU - 22
9.3 OS)



00000
-

-
RU - 23
9.4 MOVE
1.  Google Playstore  App Center    
 «Memory 2 Move».
2. 

3. 

9.5
ANDROID
1. 
-

RU - 24
2. 
3. -
--XXXX».

Wi-
4. -Fi 
 «
RU - 25
9.6 NDROID)
1. 

2. 
00000
-

3. 
-
RU - 26
10. 
10.1

- 
 
Memory 2 Move.

» 

 
RU - 27
 
 

 
-
 

 


Memory 2 Move -

 

-
 



RU - 28
10.2

-
«» 


 

 
RU - 29
 

 

 
-
 

 


Memory 2 Move -

 

-
 




RU - 30
10.3 -
10.3.1 I-FI
 -
-.
10.3.2
 
          ,

RU - 31
10.3.3
--
-PSK, WPA2-
WPA/WPA2-



10.3.4
  



RU - 32



«e
-Fi.
RU - 33
10.4 NDROID)
Совет: Рекомендуется создать одну или несколько папок для всех музыкальных и
аудиофайлов. Это облегчит их использование и систематизацию на WiFi жестком
диске.

 »).


Указание: Дополнительную информацию относительно поддерживаемого
формата файлов можно получить из руководства по эксплуатации
соответствующего устройства на платформе iOS.
- 


- 
- 
  

- 
RU - 34

a. - 

b. - 
 .
c. - 

d. - 

e. 

Указание: держивайте метку индикатора выполнения задания нажатой и
сдвигайте ее вправо или влево, чтобы прокрутить аудиофайл вперед или
назад.
Совет: графический интерфейс музыкального плеера можно закрыть в любое
время. Воспроизведение аудиофайла продолжается при экранной заставке.
RU - 35
10.5
10.5.1 IOS
Совет: рекомендуется создать одну или несколько папок для всех фильмов и
видеофайлов. Это облегчит их использование и систематизацию на Wi-Fi
жестком диске.

»).


Указание: дополнительную информацию относительно поддерживаемого
формата файлов можно получить из руководства по эксплуатации
соответствующего устройства на платформе iOS.
RU - 36


1. - 

2. - 

3. - 

4. - 

5. - 

6. - 

7. - 

8. - 

RU - 37
10.5.2 ANDROID

-


»).






  .
RU - 38
10.6
10.6.1 IOS
Совет: рекомендуется создать одну или несколько папок для всех графических
файлов на Memory 2 Move. Это облегчит их использование и систематизацию на
Wi-Fi жестком диске.
Указание: Wi-Fi жесткий диск поддерживает воспроизведение графических
файлов в следующих форматах: .jpg, .tiff, .gif und .bmp




 

-

RU - 39
-

-
, -
» -
-
 -

 -

» 

-
» 
RU - 40



 -




RU - 41
10.6.2 ANDROID
Совет: рекомендуется создать одну или несколько папок для всех графических
файлов. Это облегчит их использование и систематизацию на Wi-Fi жестком
диске.
Указание: Wi-Fi жесткий диск поддерживает воспроизведение графических
файлов в следующих форматах: .jpg, .tiff, .gif und .bmp




 

-


RU - 42
-

-
-
» -
-
 -

 -

» 

- 
» 
RU - 43



 -




RU - 44
10.7
10.7.1 IOS




.
 
» ,

RU - 45
1) «Em 


2) «

3) 
. 


10.7.2 ANDROID



.
RU - 46
 
»

1. » ,



2. » -

RU - 47
10.8
10.8.1 IOS

-, PowerPoint- -
.pdf und .txt.


«»  ,



RU - 48
m
 

10.8.2 ANDROID






Указание: для отправки по электронной почте необходима связь с интернетом.
RU - 49
10.9
ANDROID)
 

  .
 


- 

- - 

RU - 50



   
 .
- 
-
iOS/Android.
- 
-
, ».
- 

- 
RU - 51
10.10
Wi-

1.  .
2. 
 
3. 
4. 
RU - 52




5. 

 
«

6. 
 
RU - 53
10.11 I-
».
1.  .
2. 
 
3. 
4. 
RU - 54




5. 




6. 
 
RU - 55
10.12


1.  .
2.  ,

3.  



».
RU - 56
10.13

 


10.14
MOVE
10.14.1 IOS




 -


RU - 57
10.14.2 ANDROID




10.15 MORY 2 MOVE
10.15.1 IOS


 


RU - 58
10.15.2 ANDROID


Указание: процесс деинсталляции может отличаться в зависимости от модели
Android устройства. Пожалуйста, для получения информации относительно
деинсталляции ознакомьтесь с руководством по применению Android устройства.
1. ».
2. 
3. 
4. .
5. 
»,

RU - 59
11. -
WiFi-
-











RU - 60
11.1




« 

«» 

«» 

«» 
«» 
« 



 

RU - 61
« 
« - 
«» - 

11.2







RU - 62

ctrl




RU - 63

- : 


- : 
»,

- : 


-  
 


«
- : 

- : 


- : 
 
«». 

«
-  

.
- : 
 
«». 



RU - 64
11.3
-

», 


«».
Windows: CTRL  CTRL 
Mac:  
11.4


11.5

11.5.1


RU - 65
11.5.2
         
          

11.5.3
         
-
RU - 66
11.6
11.6.1
         
    
«

11.6.2
         


RU - 67
        


11.7
11.7.1
           

           

RU - 68
11.7.2 WI-
        

-  
-XXXX». 32  

- Wi--




- -Fi: 802.11/b/g/n.


-  

-PSK, WPA2--PSK.
-  

- 

RU - 69
11.7.3 DHCP-
DHCP 


   «       

RU - 70
11.7.4





A. 


B. 


LAN-

.
RU - 71
WLAN-
 »,


 

 -  

- 




11.8
11.8.1 SAMBA
  Windows File
   

RU - 72
11.8.2 -

(1)
-
(2)

(3)
-
(4)

(5)

RU - 73
11.9
11.9.1
       


 

        


          


      

RU - 74
11.9.2
      - 
        
         

       .
        
«
RU - 75
        



RU - 76
11.9.3
www.intenso.de

1.)  .
2.)  


RU - 77
3.) 


 

4.)         



RU - 78
11.9.4 ET)









Указание: после того, как на устройстве произведен системный сброс, пароль
администратора тоже стирается. Снова действует пароль, который был в
состоянии поставки.
RU - 79
12.
Notice of GNU GENERAL PUBLIC LICENSE and LESSER GENERAL PUBLIC LICENCE
Dear Customer,
If interested, you and any third party can download the source code of used GPL / LGPL from
Intenso Webpage http://www.intenso.de . The source code of the desired product is
available to anyone on the selection of valid product category and the desired device. In the
product details you will find the entry "drivers". Open this menu to download the

it is also possible to obtain this code by postal delivery. More information about the
GPL/LGPL-Licence can you nd on following website www.gnu.org
GNU GENERAL PUBLIC LICENSE
Version 2, June 1991
Copyright (C) 1989, 1991 Free Software Foundation, Inc.
51 Franklin Street, Fifth Floor, Boston, MA 02110-1301, USA
Everyone is permitted to copy and distribute verbatim copies
of this license document, but changing it is not allowed.
Preamble
The licenses for most software are designed to take away your freedom to share and change
it. By contrast, the GNU General Public License is intended to guarantee your freedom to
share and change free software--to make sure the software is free for all its users. This
General Public License applies to most of the Free Software Foundation's software and to
any other program whose authors commit to using it. (Some other Free Software Foundation
software is covered by the GNU Lesser General Public License instead.) You can apply it to
your programs, too.
When we speak of free software, we are referring to freedom, not price. Our General Public
Licenses are designed to make sure that you have the freedom to distribute copies of free
software (and charge for this service if you wish), that you receive source code or can get it if
you want it, that you can change the software or use pieces of it in new free programs; and
that you know you can do these things.
RU - 80
To protect your rights, we need to make restrictions that forbid anyone to deny you these
rights or to ask you to surrender the rights. These restrictions translate to certain
responsibilities for you if you distribute copies of the software, or if you modify it.
For example, if you distribute copies of such a program, whether gratis or for a fee, you must
give the recipients all the rights that you have. You must make sure that they, too, receive or
can get the source code. And you must show them these terms so they know their rights.
We protect your rights with two steps: (1) copyright the software, and (2) offer you this
license which gives you legal permission to copy, distribute and/or modify the software.
Also, for each author's protection and ours, we want to make certain that everyone
understands that there is no warranty for this free software. If the software is modified by
someone else and passed on, we want its recipients to know that what they have is not the
original, so that any problems introduced by others will not reflect on the original authors'
reputations.
Finally, any free program is threatened constantly by software patents. We wish to avoid the
danger that redistributors of a free program will individually obtain patent licenses, in effect
making the program proprietary. To prevent this, we have made it clear that any patent
must be licensed for everyone's free use or not licensed at all.
The precise terms and conditions for copying, distribution and modification follow.
TERMS AND CONDITIONS FOR COPYING, DISTRIBUTION AND MODIFICATION
0. This License applies to any program or other work which contains a notice placed by the
copyright holder saying it may be distributed under the terms of this General Public License.
The "Program", below, refers to any such program or work, and a "work based on the
Program" means either the Program or any derivative work under copyright law: that is to
say, a work containing the Program or a portion of it, either verbatim or with modifications
and/or translated into another language. (Hereinafter, translation is included without
limitation in the term "modification".) Each licensee is addressed as "you".
Activities other than copying, distribution and modification are not covered by this License;
they are outside its scope. The act of running the Program is not restricted, and the output
from the Program is covered only if its contents constitute a work based on the Program
(independent of having been made by running the Program). Whether that is true depends
on what the Program does.
1. You may copy and distribute verbatim copies of the Program's source code as you receive
it, in any medium, provided that you conspicuously and appropriately publish on each copy
an appropriate copyright notice and disclaimer of warranty; keep intact all the notices that
refer to this License and to the absence of any warranty; and give any other recipients of the
Program a copy of this License along with the Program.
RU - 81
You may charge a fee for the physical act of transferring a copy, and you may at your option
offer warranty protection in exchange for a fee.
2. You may modify your copy or copies of the Program or any portion of it, thus forming a
work based on the Program, and copy and distribute such modifications or work under the
terms of Section 1 above, provided that you also meet all of these conditions:
a) You must cause the modified files to carry prominent notices stating that you changed the
files and the date of any change.
b) You must cause any work that you distribute or publish, that in whole or in part contains
or is derived from the Program or any part thereof, to be licensed as a whole at no charge to
all third parties under the terms of this License.
c) If the modified program normally reads commands interactively when run, you must
cause it, when started running for such interactive use in the most ordinary way, to print or
display an announcement including an appropriate copyright notice and a notice that there
is no warranty (or else, saying that you provide a warranty) and that users may redistribute
the program under these conditions, and telling the user how to view a copy of this License.
(Exception: if the Program itself is interactive but does not normally print such an
announcement, your work based on the Program is not required to print an announcement.)
These requirements apply to the modified work as a whole. If identifiable sections of that
work are not derived from the Program, and can be reasonably considered independent and
separate works in themselves, then this License, and its terms, do not apply to those
sections when you distribute them as separate works. But when you distribute the same
sections as part of a whole which is a work based on the Program, the distribution of the
whole must be on the terms of this License, whose permissions for other licensees extend to
the entire whole, and thus to each and every part regardless of who wrote it.
Thus, it is not the intent of this section to claim rights or contest your rights to work written
entirely by you; rather, the intent is to exercise the right to control the distribution of
derivative or collective works based on the Program.
In addition, mere aggregation of another work not based on the Program with the Program
(or with a work based on the Program) on a volume of a storage or distribution medium
does not bring the other work under the scope of this License.
3. You may copy and distribute the Program (or a work based on it, under Section 2) in
object code or executable form under the terms of Sections 1 and 2 above provided that you
also do one of the following:
a) Accompany it with the complete corresponding machine-readable source code, which
must be distributed under the terms of Sections 1 and 2 above on a medium customarily
used for software interchange; or,
RU - 82
b) Accompany it with a written offer, valid for at least three years, to give any third party, for
a charge no more than your cost of physically performing source distribution, a complete
machine-readable copy of the corresponding source code, to be distributed under the terms
of Sections 1 and 2 above on a medium customarily used for software interchange; or,
c) Accompany it with the information you received as to the offer to distribute
corresponding source code. (This alternative is allowed only for noncommercial distribution
and only if you received the program in object code or executable form with such an offer, in
accord with Subsection b above.)
The source code for a work means the preferred form of the work for making modifications
to it. For an executable work, complete source code means all the source code for all
modules it contains, plus any associated interface definition files, plus the scripts used to
control compilation and installation of the executable. However, as a special exception, the
source code distributed need not include anything that is normally distributed (in either
source or binary form) with the major components (compiler, kernel, and so on) of the
operating system on which the executable runs, unless that component itself accompanies
the executable.
If distribution of executable or object code is made by offering access to copy from a
designated place, then offering equivalent access to copy the source code from the same
place counts as distribution of the source code, even though third parties are not compelled
to copy the source along with the object code.
4. You may not copy, modify, sublicense, or distribute the Program except as expressly
provided under this License. Any attempt otherwise to copy, modify, sublicense or distribute
the Program is void, and will automatically terminate your rights under this License.
However, parties who have received copies, or rights, from you under this License will not
have their licenses terminated so long as such parties remain in full compliance.
5. You are not required to accept this License, since you have not signed it. However,
nothing else grants you permission to modify or distribute the Program or its derivative
works. These actions are prohibited by law if you do not accept this License. Therefore, by
modifying or distributing the Program (or any work based on the Program), you indicate your
acceptance of this License to do so, and all its terms and conditions for copying, distributing
or modifying the Program or works based on it.
6. Each time you redistribute the Program (or any work based on the Program), the recipient
automatically receives a license from the original licensor to copy, distribute or modify the
Program subject to these terms and conditions. You may not impose any further restrictions
on the recipients' exercise of the rights granted herein. You are not responsible for enforcing
compliance by third parties to this License.
7. If, as a consequence of a court judgment or allegation of patent infringement or for any
other reason (not limited to patent issues), conditions are imposed on you (whether by court
RU - 83
order, agreement or otherwise) that contradict the conditions of this License, they do not
excuse you from the conditions of this License. If you cannot distribute so as to satisfy
simultaneously your obligations under this License and any other pertinent obligations, then
as a consequence you may not distribute the Program at all. For example, if a patent license
would not permit royalty-free redistribution of the Program by all those who receive copies
directly or indirectly through you, then the only way you could satisfy both it and this License
would be to refrain entirely from distribution of the Program.
If any portion of this section is held invalid or unenforceable under any particular
circumstance, the balance of the section is intended to apply and the section as a whole is
intended to apply in other circumstances.
It is not the purpose of this section to induce you to infringe any patents or other property
right claims or to contest validity of any such claims; this section has the sole purpose of
protecting the integrity of the free software distribution system, which is implemented by
public license practices. Many people have made generous contributions to the wide range
of software distributed through that system in reliance on consistent application of that
system; it is up to the author/donor to decide if he or she is willing to distribute software
through any other system and a licensee cannot impose that choice.
This section is intended to make thoroughly clear what is believed to be a consequence of
the rest of this License.
8. If the distribution and/or use of the Program is restricted in certain countries either by
patents or by copyrighted interfaces, the original copyright holder who places the Program
under this License may add an explicit geographical distribution limitation excluding those
countries, so that distribution is permitted only in or among countries not thus excluded. In
such case, this License incorporates the limitation as if written in the body of this License.
9. The Free Software Foundation may publish revised and/or new versions of the General
Public License from time to time. Such new versions will be similar in spirit to the present
version, but may differ in detail to address new problems or concerns.
Each version is given a distinguishing version number. If the Program specifies a version
number of this License which applies to it and "any later version", you have the option of
following the terms and conditions either of that version or of any later version published by
the Free Software Foundation. If the Program does not specify a version number of this
License, you may choose any version ever published by the Free Software Foundation.
10. If you wish to incorporate parts of the Program into other free programs whose
distribution conditions are different, write to the author to ask for permission. For software
which is copyrighted by the Free Software Foundation, write to the Free Software
Foundation; we sometimes make exceptions for this. Our decision will be guided by the two
goals of preserving the free status of all derivatives of our free software and of promoting
the sharing and reuse of software generally.
RU - 84
NO WARRANTY
11. BECAUSE THE PROGRAM IS LICENSED FREE OF CHARGE, THERE IS NO WARRANTY FOR
THE PROGRAM, TO THE EXTENT PERMITTED BY APPLICABLE LAW. EXCEPT WHEN
OTHERWISE STATED IN WRITING THE COPYRIGHT HOLDERS AND/OR OTHER PARTIES
PROVIDE THE PROGRAM "AS IS" WITHOUT WARRANTY OF ANY KIND, EITHER EXPRESSED OR
IMPLIED, INCLUDING, BUT NOT LIMITED TO, THE IMPLIED WARRANTIES OF
MERCHANTABILITY AND FITNESS FOR A PARTICULAR PURPOSE. THE ENTIRE RISK AS TO THE
QUALITY AND PERFORMANCE OF THE PROGRAM IS WITH YOU. SHOULD THE PROGRAM
PROVE DEFECTIVE, YOU ASSUME THE COST OF ALL NECESSARY SERVICING, REPAIR OR
CORRECTION.
12. IN NO EVENT UNLESS REQUIRED BY APPLICABLE LAW OR AGREED TO IN WRITING WILL
ANY COPYRIGHT HOLDER, OR ANY OTHER PARTY WHO MAY MODIFY AND/OR REDISTRIBUTE
THE PROGRAM AS PERMITTED ABOVE, BE LIABLE TO YOU FOR DAMAGES, INCLUDING ANY
GENERAL, SPECIAL, INCIDENTAL OR CONSEQUENTIAL DAMAGES ARISING OUT OF THE USE
OR INABILITY TO USE THE PROGRAM (INCLUDING BUT NOT LIMITED TO LOSS OF DATA OR
DATA BEING RENDERED INACCURATE OR LOSSES SUSTAINED BY YOU OR THIRD PARTIES OR
A FAILURE OF THE PROGRAM TO OPERATE WITH ANY OTHER PROGRAMS), EVEN IF SUCH
HOLDER OR OTHER PARTY HAS BEEN ADVISED OF THE POSSIBILITY OF SUCH DAMAGES.
END OF TERMS AND CONDITIONS
How to Apply These Terms to Your New Programs
If you develop a new program, and you want it to be of the greatest possible use to the
public, the best way to achieve this is to make it free software which everyone can
redistribute and change under these terms.
To do so, attach the following notices to the program. It is safest to attach them to the start
of each source file to most effectively convey the exclusion of warranty; and each file should
have at least the "copyright" line and a pointer to where the full notice is found.
one line to give the program's name and an idea of what it does.
Copyright (C) yyyy name of author
This program is free software; you can redistribute it and/or
modify it under the terms of the GNU General Public License
as published by the Free Software Foundation; either version 2
of the License, or (at your option) any later version.
This program is distributed in the hope that it will be useful,
RU - 85
but WITHOUT ANY WARRANTY; without even the implied warranty of
MERCHANTABILITY or FITNESS FOR A PARTICULAR PURPOSE. See the
GNU General Public License for more details.
You should have received a copy of the GNU General Public License
along with this program; if not, write to the Free Software
Foundation, Inc., 51 Franklin Street, Fifth Floor, Boston, MA 02110-1301, USA.
Also add information on how to contact you by electronic and paper mail.
If the program is interactive, make it output a short notice like this when it starts in an
interactive mode:
Gnomovision version 69, Copyright (C) year name of author
Gnomovision comes with ABSOLUTELY NO WARRANTY; for details
type `show w'. This is free software, and you are welcome
to redistribute it under certain conditions; type `show c'
for details.
The hypothetical commands `show w' and `show c' should show the appropriate parts of the
General Public License. Of course, the commands you use may be called something other
than `show w' and `show c'; they could even be mouse-clicks or menu items--whatever suits
your program.
You should also get your employer (if you work as a programmer) or your school, if any, to
sign a "copyright disclaimer" for the program, if necessary. Here is a sample; alter the
names:
Yoyodyne, Inc., hereby disclaims all copyright
interest in the program `Gnomovision'
(which makes passes at compilers) written
by James Hacker.
signature of Ty Coon, 1 April 1989
Ty Coon, President of Vice
4

Hulp nodig? Stel uw vraag in het forum

Spelregels

Misbruik melden

Gebruikershandleiding.com neemt misbruik van zijn services uitermate serieus. U kunt hieronder aangeven waarom deze vraag ongepast is. Wij controleren de vraag en zonodig wordt deze verwijderd.

Product:

Bijvoorbeeld antisemitische inhoud, racistische inhoud, of materiaal dat gewelddadige fysieke handelingen tot gevolg kan hebben.

Bijvoorbeeld een creditcardnummer, een persoonlijk identificatienummer, of een geheim adres. E-mailadressen en volledige namen worden niet als privégegevens beschouwd.

Spelregels forum

Om tot zinvolle vragen te komen hanteren wij de volgende spelregels:

Belangrijk! Als er een antwoord wordt gegeven op uw vraag, dan is het voor de gever van het antwoord nuttig om te weten als u er wel (of niet) mee geholpen bent! Wij vragen u dus ook te reageren op een antwoord.

Belangrijk! Antwoorden worden ook per e-mail naar abonnees gestuurd. Laat uw emailadres achter op deze site, zodat u op de hoogte blijft. U krijgt dan ook andere vragen en antwoorden te zien.

Abonneren

Abonneer u voor het ontvangen van emails voor uw Intenso Memory 2 Move 2.5 - USB 3.0 bij:


U ontvangt een email met instructies om u voor één of beide opties in te schrijven.


Ontvang uw handleiding per email

Vul uw emailadres in en ontvang de handleiding van Intenso Memory 2 Move 2.5 - USB 3.0 in de taal/talen: Duits, Engels, Frans, Italiaans, Spaans, Pools als bijlage per email.

De handleiding is 34,47 mb groot.


U ontvangt de handleiding per email binnen enkele minuten. Als u geen email heeft ontvangen, dan heeft u waarschijnlijk een verkeerd emailadres ingevuld of is uw mailbox te vol. Daarnaast kan het zijn dat uw internetprovider een maximum heeft aan de grootte per email. Omdat hier een handleiding wordt meegestuurd, kan het voorkomen dat de email groter is dan toegestaan bij uw provider.

Stel vragen via chat aan uw handleiding

Stel uw vraag over deze PDF

Andere handleiding(en) van Intenso Memory 2 Move 2.5 - USB 3.0

Intenso Memory 2 Move 2.5 - USB 3.0 Snelstart handleiding - Nederlands - 26 pagina's

Intenso Memory 2 Move 2.5 - USB 3.0 Gebruiksaanwijzing - Deutsch - 87 pagina's


Uw handleiding is per email verstuurd. Controleer uw email

Als u niet binnen een kwartier uw email met handleiding ontvangen heeft, kan het zijn dat u een verkeerd emailadres heeft ingevuld of dat uw emailprovider een maximum grootte per email heeft ingesteld die kleiner is dan de grootte van de handleiding.

Er is een email naar u verstuurd om uw inschrijving definitief te maken.

Controleer uw email en volg de aanwijzingen op om uw inschrijving definitief te maken

U heeft geen emailadres opgegeven

Als u de handleiding per email wilt ontvangen, vul dan een geldig emailadres in.

Uw vraag is op deze pagina toegevoegd

Wilt u een email ontvangen bij een antwoord en/of nieuwe vragen? Vul dan hier uw emailadres in.


Info