669827
16
Verklein
Vergroot
Pagina terug
1/18
Pagina verder
250 Pro Getting Started
Guide
International edition
Rev 1.0 - Dec 2015
Every Vortex 250 Pro is flight tested before
leaving the factory.
Flight Tested By:
WARNING
Congratulations on your purchase of one of the hobby’s first ARF pure-bred racing quadcopters.
A product designed by FPV Racers, for FPV Racers.
Do not expect it to fly like a DJI Phantom™ . It does not have a return-to-home feature, no GPS,
and it does not have stabilization features that will allow your little brother to fly.
Take it easy if you are new to the world of FPV racing, try to avoid slamming the quad into the
first wall before you have mastered slaloming through the trees on the way to the wall.
Acro mode is something that should be learned as soon as possible, flying any other mode is a
bit like driving a Lamborghini around a parking-lot in reverse… not exactly what you bought the
Lambo for. 
Please carefully read the recommendations in this getting started guide, as far as
equipment/battery selection, and how to run the Vortex 250 Pro Wizard.
REMOVE PROPS
Mini-quad props can do serious damage when coming in contact with human skin, risk of deep
cuts and lacerations should be avoided at all cost.
So when you are working on a quad with the battery connected, it is highly recommended to
REMOVE ALL PROPS, unless you are just about to fly. Keep in mind that when setting up
mini-quads, there is always a remote chance that a configuration change can spin up motors
unexpectedly.
ImmersionRC accepts no responsibility, or liability, for any injury, or damage, to persons or
property, caused by the use of the Vortex.
INSTALL ANTENNA
The Video Transmitter included in the Vortex may be damaged permanently if run without the
supplied SpiroNET Antenna. Please take care to install this antenna before every flight, and
when powering up the Vortex for even a short time period.
ImmersionRC accepts no responsibility for damage caused to the Vortex by operating without a
suitable Tx antenna installed.
2
4 Steps: Unboxing to Racing
To get your ARF Vortex ready to race, follow the simple 4-step process below.
1) Install Compatible R/C Receiver
2)Install suitable battery
3) Setup the video link
4) Run the wizard
3
1) Install Compatible R/C Receiver
The Vortex 250 Pro is shipped with three receiver interface cables, one for CPPM, one for S-Bus,
and one for the Spektrum receivers.
Cleanflight provides a list of receivers stated as working, so please check if yours is listed
here: https://github.com/cleanflight/cleanflight/blob/master/docs/Rx.md
CPPM
As it ships, the CPPM cable is pre-installed in the quad. If a CPPM receiver is to be used (such
as the EzUHF, or other CPPM receivers on 2.4GHz) the receiver can simply be attached to the
rear mounting plate, and the cable connected. No other cabling is required.
CPPM sends all PPM channels down a single cable, and eliminates the mass of wiring that
most mini-quads have to contend with.
Note that the Vortex 250 Pro is not compatible with standard R/C receivers with multiple
channels of PWM, each connected via a separate cable.
The receiver should be mounted on the rear of the quad, on the shelf provided. A velcro strap, or
a piece of double-sided tape is the best way to mount the a receiver.
SBus, or Spektrum
To support one of these receivers, a cable must be installed in the quad, which does require
removing a few screws to access the connector.
1) Remove the screws pointed to below:
4
2) Also remove the two screws at the bottom of the right-hand side-plate, and remove the
side-plate.
3) Remove the installed CPPM cable.
4) Looking in the right side of the quad, a white connector is visible on the fusion (flight
controller) board.
Install the included S-Bus, or Spektrum cable, as required. Note that the fact that the top plate
screws are removed on the rear of the quad means that the top plate can be eased up a few
millimeters to allow the connector to be installed. Don’t force the two apart too much, or risk
damaging the PDB.
Notes on Receiver Selection
One critical parameter to keep to a minimum in a race quad setup is latency. Latency from what
the camera sees to the display device, and also from the control stick to the flight controller.
For minimum latency, with reasonable range, the Spektrum™ radios and satellite receivers are a
great choice. Another good (and quite common) choice is the FrSky Taranis radio with a
matched S-Bus receiver (X4R for example).
For longer-range FPV, the EzUHF system is a good choice. Due to the close proximity of the
electronics and Video Transmitter on a mini-quad, and the lack of a suitable ground-plane, a
diversity receiver, with dipole antennas is highly recommended.
Note: An update to all existing EzUHF systems will be available early Dec. 2015, which will enable
an S-Bus output, as opposed to the more traditional PPM. This will greatly reduce latency.
5
Receiver Auto-Detection
A unique feature of the Vortex family of quadcopters is that the receiver type is auto-detected by
the OSD when running the wizard.
With the Vortex 250 Pro, it is no longer necessary to manually specify the receiver type with the
ImmersionRC Tools before running the wizard.
R/C Transmitter Configuration
Depending upon the R/C transmitter in use, certain parameters need to be modified in order to
ensure compatibility with the Vortex 250 Pro, and more importantly with the Cleanflight Flight
Controller firmware.
In all cases, during the wizard setup, the current ‘PPM Value’ is shown on-screen beside each
control. This value must be as close as possible to a min. of 1000, center of 1500, and max. of
2000.
It is highly recommended to start with a ‘clean’ configuration (new model) for all radios.
Spektrum™ Radios
Spektrum radios need the following configuration:
- Two channels need reversing, AIL, and RUD.
- Map channel 5 to a 2 or 3-position switch to control flight mode (Acro/Horiz or
Acro/Level/Horiz).
- Verify that the endpoints are 1000/1500/2000 as described above.
FrSky Taranis Radio
- Map channel 5 to a 3-position switch to control flight mode (Acro/Level/Horiz).
- Verify that the endpoints are 1000/1500/2000 as described above.
Futaba S-Bus Radios
- Map channel 5 to a 3-position switch to control flight mode (Acro/Level/Horiz).
- Reverse channels ELE and THR
- Change subtrim to -31 for THR, AIL, ELE, RUD
- Change travel to +/- 119 on all channels.
- Verify that the endpoints are 1000/1500/2000 as described above.
6
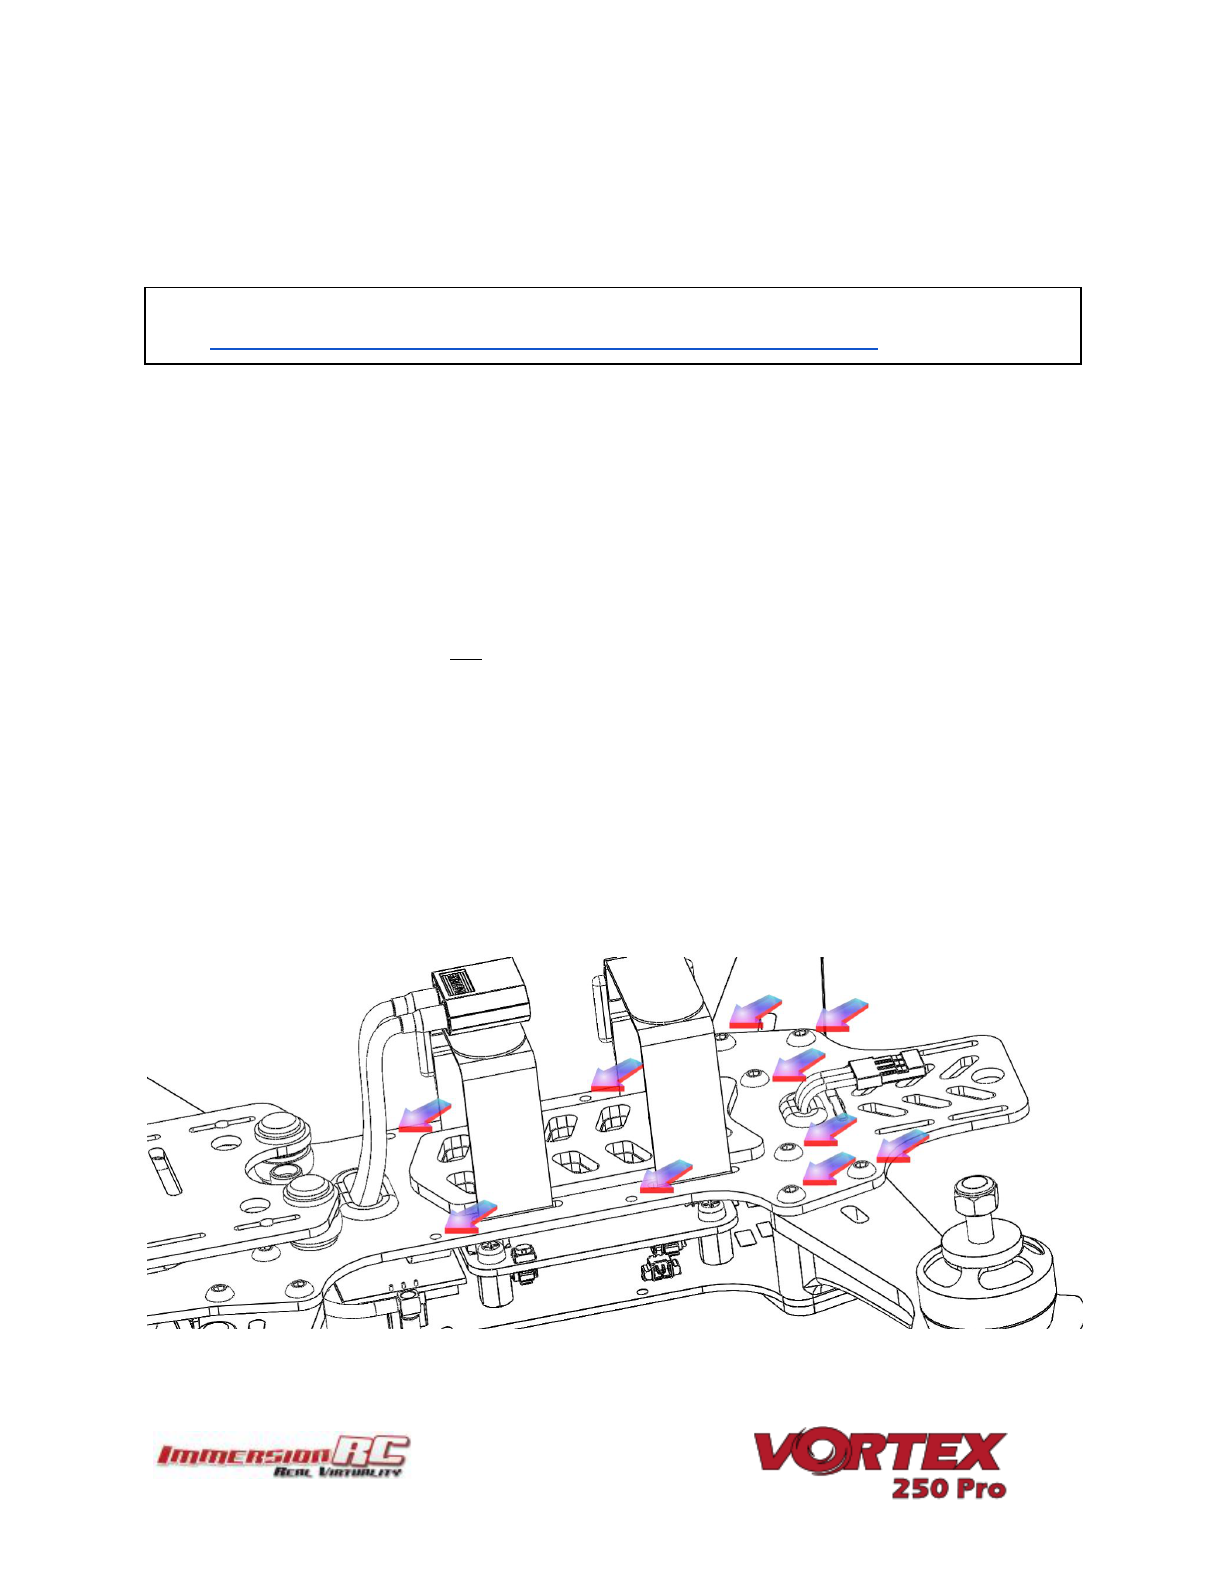
2) Install a Suitable Battery
The Vortex has a flexible battery mounting system, and uses an industry-standard XT-60
connector. This allows it to use a wide range of different batteries.
To help select a suitable battery for your flying-style, read this section carefully:
Voltage
First things first, voltage. For starting out with the Vortex, a 3s (11.1V) pack is recommended.
A Vortex running 4s (14.8V) is an extremely fast race-quad, which can easily get a pilot into
trouble.
A 3s pack calms things down a bit, and is a good way to ease into the hobby, hence novice
pilots should certainly start out on 3s.
Note that the 20A ESCs installed in the Vortex 250 Pro do support ‘LiHV’ packs, with a cell voltage
of 4.35V as opposed to the standard 4.20V cell voltage with LiPo packs.
Capacity
For capacity, there are a few things to remember. Firstly, keeping weight down on a mini-quad is
the best way to increase crash survivability as well as improve acceleration, climb speed and
general agility of the quad.
Also remember that most races are just a few laps, so a huge capacity battery is just dead
weight, and will never be drained in the typical race.
1300mAh packs, or similar, are ImmersionRC’s choice for racing. 3s for beginners, 4s for pros.
‘C’ Rating
For ‘C’ rating, the Vortex in stock setup, with 5045 props, can pull over 80 Amps during fast
pull-outs. A 1300mAh pack, with a 25C rating, is good for about 32A, and will have it’s usable life
reduced when pulling much more than that.
These packs have been tested for the 3s configuration
- Turnigy nano-tech 1300mAh 3S 45~90C Lipo Pack
- Lumenier 1300mAh 3s 60c Lipo Battery (XT60)
And these for the 4s
- Turnigy nano-tech 1300mAh 4S 45~90C Lipo Pack
- Lumenier 1300mAh 4s 60c Lipo Battery (XT60)
- ReadyMadeRC ‘Orange Series’, 60C 1300mAh, 4s
7
- Aerial Visions Inc, 4s 1300mAh 60C
When installing the selected battery, pay attention to the Center of Gravity mark on the bottom
of the Vortex. The COG is not that critical on a quad of this class, but it doesn’t hurt to respect it
if possible, especially when racing.
The addition of a heavy GoPro, on the nose of the quad may need a heavier battery to re-balance
the quad.
Note that the largest battery that can be installed safely on the Vortex is approx. 86mm long, by
50mm wide. These larger packs are not generally recommended, due to the damage that the
extra mass can do in a crash.
NOTE: Ensure that the battery is securely mounted on the anti-slip pad, with at least two
battery straps installed. The battery should not be able to move around in flight. Also make
sure the plastic liner on the anti-slip pad is removed!
ANOTHER NOTE: Ensure that your main battery cables, and also the balance leads are
secured in the straps, and cannot, under any circumstances, touch the props.
Sliced battery cables and/or balance leads are a cause of expensive shorts, fires, and
crashes!
8
3) Setup the Video Link
To avoid the traditional ‘dip-switch chaos’ at race events, the Vortex does not use a DIP switch
to define Video Tx channels. Instead, the OSD is responsible for setting the channel, and band.
The Vortex ships with a default Tx frequency of 5740MHz, which corresponds to
ImmersionRC/FatShark frequencies, Channel 1.
If you are running ImmersionRC receivers, or a FatShark headset using the standard 5.8GHz
module, just select Channel 1, and the wizard image should be shown.
If you are running non-ImmersionRC/FatShark gear which cannot tune to 5740MHz, it may be
necessary to switch bands on the Vortex before the wizard image is displayed. To do this, set
your receiver to Channel 1, and use the button on the LED board (rear of the quad).
To switch bands, press the button on the LED board for approx. 2 seconds until you hear the
first beep, and release. .
The Vortex will beep a number of times, representing the band number. Each time the button is
pressed, the band number will be incremented.
The band/beep order is as follows:
Band 1: IRC/FS (5740MHz)
Band 2: RaceBand (5658MHz)
Band 3: Band E (5705MHz)
Band 4: Band B (5733MHz)
Band 5: Band A (5865MHz)
For a full list of channel frequencies for each band, please refer to the full Instruction Manual.
9
4) Run the Wizard
In the world of R/C, there is little standardization between equipment manufacturers as far as
control stick to channel mapping. There is also little agreement between users as to which of
the 4 control modes should be used.
Since in the Vortex, both the OSD, and the Flight Controller need to know the channel mappings,
a ‘Tx Setup Wizard’ is included to greatly simplify the process.
This wizard also configures various flight controller parameters which would normally require a
personal computer, with a USB connection to the quad copter.
NOTE: The wizard should allow a brand-new, unconfigured Vortex, to be removed from its
shipping box at a race event, and prepared for flight in less than a minute, with no tools, or
USB hookups required.
For the techies, there is a full description of the configuration steps performed near the end of the
full user’s manual, under ‘Appendix A: The Wizard - Details’.
The first time the Vortex is powered up, the Tx Setup Wizard is presented, as shown after the
mode 1/mode 2 control descriptions below.
Following the instructions on-screen, 5 simple steps, will configure the 4 flight channels, and
one auxiliary control (CH5) which will control the flight mode.
10
Mode 2 Controls
Mode 2, arguably the most common stick mode, is common in the USA, and is a natural fit to
helis, and multirotors.
A Mode 2 transmitter is easily identified with the un-sprung (i.e. doesn’t return to center) throttle
control on the left stick.
For this mode, the multi-rotor controls are typically as follows:
Throttle
Pitch
Yaw
Roll
Mode 1 Controls
Mode 1 is common in Europe.
A Mode 1 transmitter is easily identified with the un-sprung (i.e. doesn’t return to center) throttle
control on the right stick.
For this mode, the multi-rotor controls are typically as follows:
Pitch
Throttle
Yaw
Roll
Note: Modes 3 and 4 are intentionally left out of this abbreviated Getting Started guide. It is
assumed that pilots flying these more ‘uncommon’ modes, are already very familiar with their
remote, and their control mapping.
11
Following the Wizard
The wizard is used primarily to let the Vortex learn the flight channel order, and R/C Tx mode (1,
2, 3, 4). ‘Left’ refers to moving the stick left, and ‘Back’ refers to moving the stick back towards
you.
Follow the prompts,
ensuring that the correct
stick is moved each time.
As each control is
recognized, it’s name will
appear to the left of the
servo bar.
Take your time with this step, if the wrong stick movements are fed to the wizard, it will be
difficult to navigate the OSD to complete the setup.
Once the four primary flight
controls have been learned,
place the quad on a flat and
level surface and move the
right stick back. This will
calibrate the
accelerometer.
It is important that the quad
is level when this step is
performed, or the auto-level
flight modes will not
function correctly.
12
NOTE: Use the value displayed beside the bar to adjust the endpoints of your R/C transmitter
to have min@1000, center@1500, and max@2000. This is critical for correct OSD and
flight-controller operation.
NOTE: To restart the wizard at
anytime, power up the quad, press
and hold the button on the led
board until vortex beeps 2 times
(first beep after ~3 seconds,
second beep after ~5 seconds).
Alternatively you can also enter tx
Wizard via OSD menu
Once the wizard is finished,
various Cleanflight settings will
be configured, including enabling
oneshot, motor_stop, and
failsafe.
Another setting which is automatically made is the assignment of CH5 to the flight mode, Acro,
Horiz, and Angle. To complete the setup, configure your R/C Tx to link CH5 to a 3-position
switch.
Ensure that the switch correctly switches between the three flight modes, reflected in the
top-right corner of the OSD main landscape .
Note that It is highly recommended to attempt the maiden flight in either Angle, or Horiz mode.
Acro takes a little getting used to.
NOTE: Even though the flight controller failsafe has been set by the wizard, it is important to
also set the R/C Rx failsafe.
see https://github.com/cleanflight/cleanflight/blob/master/docs/Failsafe.md for cleanflight
specific failsafe test procedure.
On the EzUHF this is as easy as setting the controls in a ‘safe’ position (very low throttle for
example) and holding down the bind button on the EzUHF Tx until a beep is heard.
Flyaways with mini-quads are almost always caused by incorrect failsafe settings!
13
NOTE: Currently there is no ‘servo reverse’ feature in Cleanflight. This means that if one of
the R/C transmitter channels is reversed, the wizard will not complete correctly.
It is highly recommended to start the wizard with a ‘new’ profile in the R/C radio, without any
channel reversing, and also without any expo. Expo is all handled within the Pro-Tuning
profiles.
All Done, Time To Fly
At this point in the Getting Started manual, the Vortex should be ready for its maiden flight.
The Wizard has setup the flight controller with our default Pro-Tune, generated by one of our
expert team pilots. PIDs and gains are unlikely to require major changes to achieve precise
flight.
If the props were removed during setup (as we highly recommend), please re-install taking care
of the prop directions below:
Take it easy for the first few LiPos, and get used to your new Vortex.
P.S. To arm the flight controller after running the wizard, for mode 2, move the throttle stick
down and to the right. See ‘Flight Controller Stick Commands’ in the main manual.
14
The ImmersionRC Team wishes you many hours of enjoyment with your new Race Quad, and
welcome any feedback that you may have at: feedback@immersionrc.com
The Getting Started Manual should have got you airborne. It is a good idea to read the full
Instruction Manual also, which contains many more details than this abbreviated manual.
Note: The default ‘pro-Tune’ loaded is a ‘beginner’ tune created by Bewweb. For experienced
racers, who require more ‘crisp’ flight characteristics, it is recommended to load the more
advanced tunes by UmmaGawd, or BorisB, each with different characteristics.
Specifications
Flight Controller
IMU
Invensense 6050, 3 axis Gyro, 3 axis Accelerometer
Altimeter
Bosch BMP180
CPU
STM32F303 32-bit ARM processor
Firmware
Cleanflight compatible (with API version matching that of the OSD)
OSD
CPU
STM32F373 32-bit ARM processor
Resolution
440H x 280V
Style
White, with black surround around all pixels
Output
Programmable Black/White levels
Video Tx Features
Transmitter Module
Socketed, Custom NexWaveRF 5.8GHz module
Channels
40 Initially, programmed via OSD
Bands
5, including the ImmersionRC/FatShark bands, and RaceBand
Frequency, IRC/FS
5740, 5760, 5780, 5800, 5820, 5840, 5860, 5880 MHz
*
Frequency, RaceBand,
CH1..8
5658, 5695, 5732, 5769, 5806, 5843, 5880, 5917 MHz 
*
Frequency, ‘A’ Band, CH1..8
5865, 5845, 5825, 5805, 5785, 5765, 5745, 5725 MHz 
*
Frequency, ‘B’ Band, CH1..8
5733, 5752, 5771, 5790, 5809, 5828, 5847, 5866 MHz 
*
Frequency, ‘E’ Band, CH1..8
5705, 5685, 5665, 5645, 5885, 5905, 5925, 5945 MHz
*
Power Output
350mW +/- 1dB (25mW module available for License Free EU use)
Audio
Stereo, Right channel used for Telemetry, Left channel unused
Recommended Antenna
Supplied SpiroNET Omni, Skew Planar, 4 leaf
15
Power Train
Standard Prop
Gemfan 5045BN
Maximum Prop Size
6” without a GoPro, 5” with a GoPro, optional arms for 6” with a GoPro.
Race Motors
OEM 2204-2300kV, single-strand, 3mm axle
Recommended Battery
1300mAh 3S 45~90C, or 1300mAh 4S 45~90C
ESC
Type
ImmersionRC EzESC 20A
Rating
20A continuous, 25A peak
Features
OneShot125, and Motor Braking
Processor
32-bit ARM running custom ImmersionRC ESC Firmware
R/C Receiver
Channels Required
Absolute minimum four. Five recommended to support mode switch.
Interfaces
3.3v-5v PPM Sum, SBUS, Spektrum, XBus, SumD, SumH
Receiver Power
+5V or +3.3V @ 200mA max.
Flight Characteristics
Flight Time
Depends upon battery, and flight style
Maximum Range
Highly dependent on battery, and flying style
Maximum Speed
TBD (Fast!)
Camera Support
Onboard GoPro Supply
+5v at 1A
Video Standard
Composite, PAL or NTSC, switchable using a camera-mounted jumper
Weight and Size
Weight, as Shipped, ARF
~415g
Size
250mm between diagonal motors
* 
Note: Certain 5.8GHz channels may be restricted depending upon the target region, and reseller
requirements.
16
Support
First line of support is handled by the reseller. If you encounter any problems with your
ImmersionRC product please contact them first.
For Warranty, and non-Warranty repairs, email repairs@immersionrc.com . We have repair
centers in the UK, US, and Australia.
Peer support is available in several places:
https://www.facebook.com/groups/ImmersionrcVortex/
http://fpvlab.com/forums/forumdisplay.php?22-ImmersionRC
We actively monitor these groups/forums and provide support here.
Regulatory notice 
The use of this product may be prohibited in your country/region/state, please verify that the RF
output power and frequencies used by this transmitter comply with local rules and regulations,
this product may require a license to operate.
Directions on safety
ImmersionRC advocates the safe use of their products, always make sure you equipment is in
proper working order, is checked prior to every flight and that your are familiar with and respect
the equipment's capabilities and limitations. Do NOT fly recklessly, do NOT fly near airports,
freeways, towns, people, etc, basically anywhere where a equipment failure or pilot error can
result in injury or damage to people and/or property.
Even a lightweight mini-quad, when travelling at high speed, can do some serious damage to
property, or persons, please always consider what could possibly go wrong and plan your flight
and selection of location responsibly.
Warranty
For warranty claims or repair requests please consult the retailer that you purchased this
product from, they will be able to help you with your warranty claim or repair request.
17
Social Networks
Like Us
We would like thank you for purchasing this ImmersionRC product.
Like ImmersionRC’s Facebook page and be kept up-to-date with news, product releases,
firmware updates, tips and tricks, and other information relevant to the FPV hobbyist.
http://www.facebook.com/ImmersionRC
You can also follow us on Google Plus 
google.com/+immersionrc
We have even been known to Tweet on occasion
https://twitter.com/@immersionrc
18
16

Hulp nodig? Stel uw vraag in het forum

Spelregels

Misbruik melden

Gebruikershandleiding.com neemt misbruik van zijn services uitermate serieus. U kunt hieronder aangeven waarom deze vraag ongepast is. Wij controleren de vraag en zonodig wordt deze verwijderd.

Product:

Bijvoorbeeld antisemitische inhoud, racistische inhoud, of materiaal dat gewelddadige fysieke handelingen tot gevolg kan hebben.

Bijvoorbeeld een creditcardnummer, een persoonlijk identificatienummer, of een geheim adres. E-mailadressen en volledige namen worden niet als privégegevens beschouwd.

Spelregels forum

Om tot zinvolle vragen te komen hanteren wij de volgende spelregels:

Belangrijk! Als er een antwoord wordt gegeven op uw vraag, dan is het voor de gever van het antwoord nuttig om te weten als u er wel (of niet) mee geholpen bent! Wij vragen u dus ook te reageren op een antwoord.

Belangrijk! Antwoorden worden ook per e-mail naar abonnees gestuurd. Laat uw emailadres achter op deze site, zodat u op de hoogte blijft. U krijgt dan ook andere vragen en antwoorden te zien.

Abonneren

Abonneer u voor het ontvangen van emails voor uw ImmersionRC Vortex 250 Pro bij:


U ontvangt een email met instructies om u voor één of beide opties in te schrijven.


Ontvang uw handleiding per email

Vul uw emailadres in en ontvang de handleiding van ImmersionRC Vortex 250 Pro in de taal/talen: Engels als bijlage per email.

De handleiding is 2,79 mb groot.


U ontvangt de handleiding per email binnen enkele minuten. Als u geen email heeft ontvangen, dan heeft u waarschijnlijk een verkeerd emailadres ingevuld of is uw mailbox te vol. Daarnaast kan het zijn dat uw internetprovider een maximum heeft aan de grootte per email. Omdat hier een handleiding wordt meegestuurd, kan het voorkomen dat de email groter is dan toegestaan bij uw provider.

Stel vragen via chat aan uw handleiding

Stel uw vraag over deze PDF

Andere handleiding(en) van ImmersionRC Vortex 250 Pro

ImmersionRC Vortex 250 Pro Gebruiksaanwijzing - English - 65 pagina's


Uw handleiding is per email verstuurd. Controleer uw email

Als u niet binnen een kwartier uw email met handleiding ontvangen heeft, kan het zijn dat u een verkeerd emailadres heeft ingevuld of dat uw emailprovider een maximum grootte per email heeft ingesteld die kleiner is dan de grootte van de handleiding.

Er is een email naar u verstuurd om uw inschrijving definitief te maken.

Controleer uw email en volg de aanwijzingen op om uw inschrijving definitief te maken

U heeft geen emailadres opgegeven

Als u de handleiding per email wilt ontvangen, vul dan een geldig emailadres in.

Uw vraag is op deze pagina toegevoegd

Wilt u een email ontvangen bij een antwoord en/of nieuwe vragen? Vul dan hier uw emailadres in.


Info