12752
46
Verklein
Vergroot
Pagina terug
1/48
Pagina verder
iC- r8500
COMMUNICATIONS RECEIVER
INSTRUCTION MANUAL
Versions of the IC-R8500 which display the “CE”
symbol on the serial number seal, comply with
the essential requirements of the European
Radio and Telecommunication Terminal Directive
1999/5/EC, and that any applicable Essential Test Suite
measurements have been performed.
UNPACKING
PRECAUTIONS
IMPORTANT
READ THIS INSTRUCTION MANUAL
CAREFULLY before attempting to operate the
receiver.
SAVE THIS INSTRUCTION MANUAL. This
instruction manual contains important safety and oper-
ating instructions for the IC-R8500.
EXPLICIT DEFINITIONS
RINDOOR USE ONLY! NEVER expose the
IC-R8500 or AC adapter to rain, snow or any liquids.
RNEVER connect the receiver to an AC outlet
directly. This may pose a fire hazard or result in an
electric shock. Always use the supplied AC adapter or
connect to a 13.8 V DC power source.
RNEVER connect to an AC outlet that exceeds the
suggested voltage for each AC adapter version. This
could cause a fire or ruin the AC adapter and/or
receiver.
RNEVER use non-rated fuses. Non-rated fuses
could cause a fire or ruin the receiver.
NEVER let metal, wire or other objects touch any
internal part or connectors on the rear panel of the
receiver. This will cause electric shock.
AVOID using or placing the receiver in areas with tem-
peratures below –10°C (+14°F) or above +50°C
(+122°F).
AVOID placing the receiver in excessively dusty envi-
ronments or in direct sunlight.
AVOID placing the receiver against walls or putting
anything on top of the receiver. This will obstruct heat
dissipation.
RESPECT other people’s privacy. Information over-
heard but not intended for you cannot lawfully be used
in any way.
i
Accessories included with the IC-R8500:
Qty.
q AC adapter (AD-55A)*........................................... 1
w DC power cable (OPC-023C) ................................ 1
e Mini plug (2-conductor, 3.5d) ................................. 1
r Phono (RCA) plugs ...............................................2
t Fuse (FGMB 125 V 3 A; internal use) ................... 1
y Fuses (FGB 3 A; for DC cable) .............................2
u Screws (M4 × 12 for optional MB-23) ..................... 2
i Screws (C0 3 × 8 for optional MB-23 feet) ............. 4
o Allen bolts (M5 × 8 for optional IC-MB12) ..............4
*Some versions are not supplied with an AC adapter.
q
w
e
rt y u i
o
WORD DEFINITION
RWARNING
Personal injury, fire hazard or electric
shock may occur.
CAUTION
Equipment damage may occur.
NOTE
If disregarded, inconvenience only. No risk
of personal injury, fire or electric shock.
TABLE OF CONTENTS
IMPORTANT ............................................................. i
EXPLICIT DEFINITIONS .......................................... i
PRECAUTIONS ........................................................ i
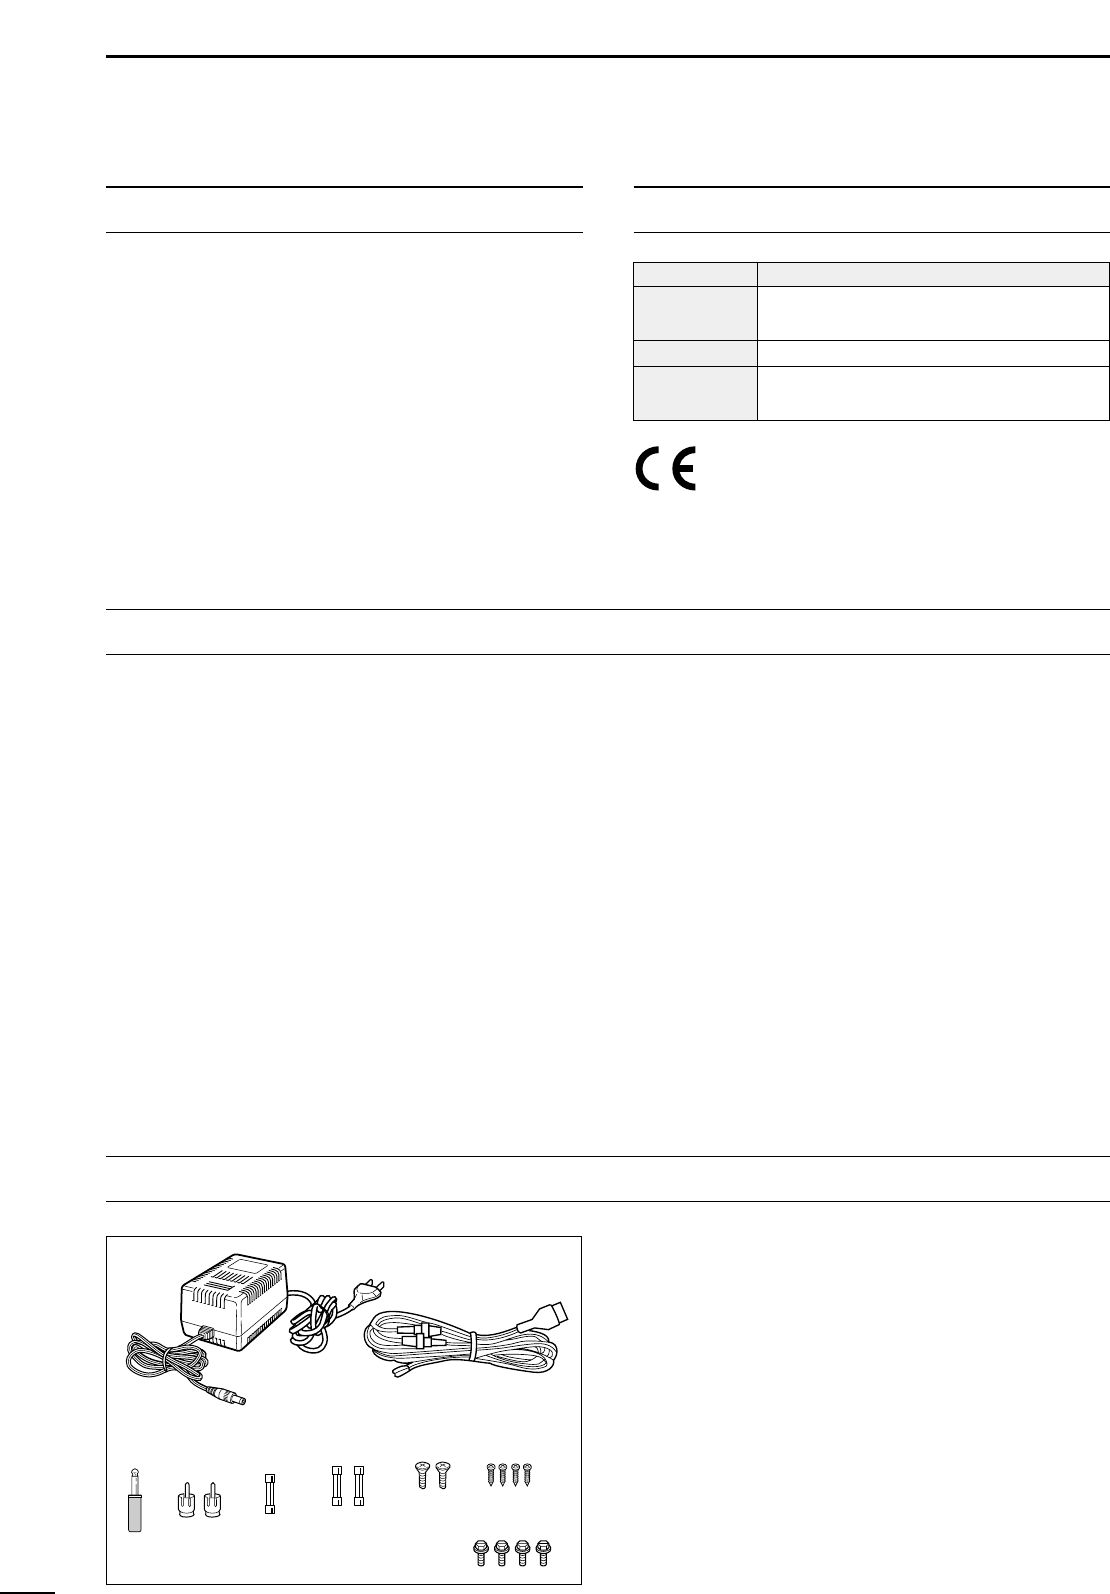
UNPACKING............................................................. i
TABLE OF CONTENTS ............................................ ii
1 PANEL DESCRIPTION .....................................1–6
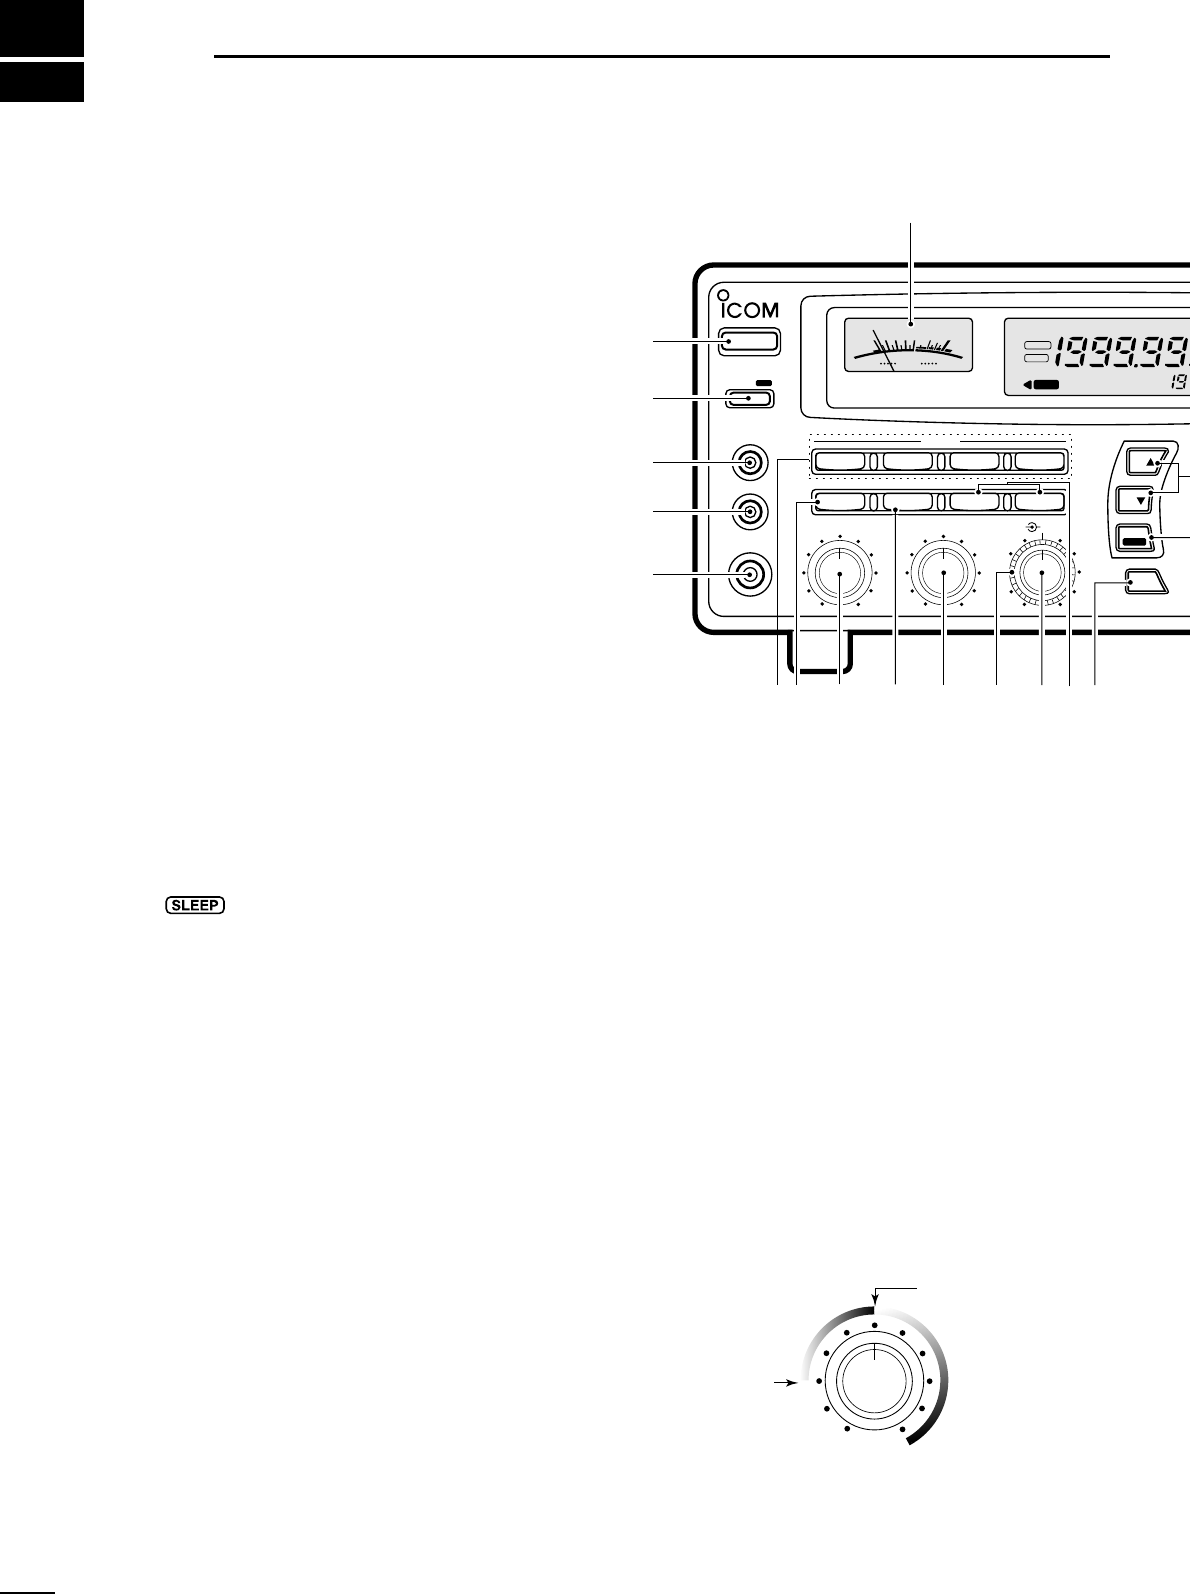
Front panel ................................................................... 1
Rear panel ...................................................................5
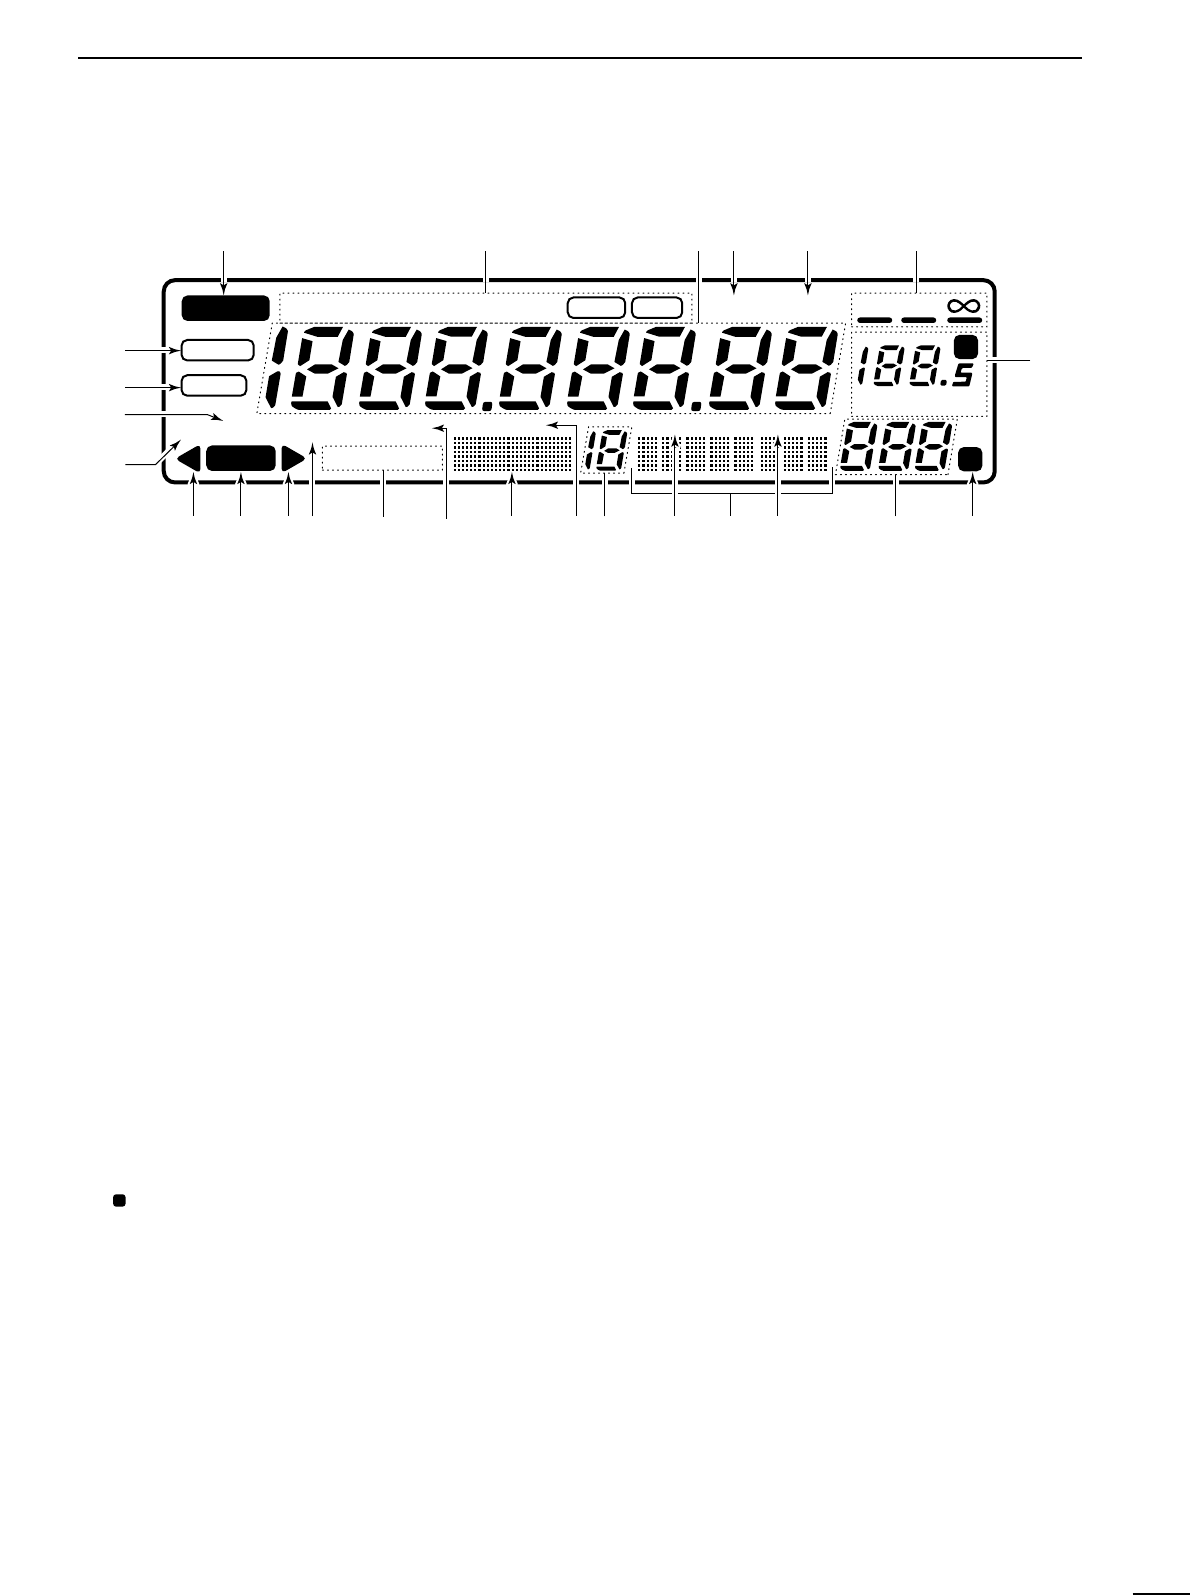
Function display ...........................................................6
2 CONNECTIONS ..............................................7–10
Mounting installation ....................................................7
Required connections ..................................................8
Antenna connection .....................................................9
Grounding ....................................................................9
Tape recorder connections ........................................ 10
Transceive function .................................................... 10
Connecting to a PC ................................................... 10
Data demodulation terminal ....................................... 10
3 FREQUENCY SETTING ................................ 11–12
Read me first .............................................................. 11
Using the keypad ....................................................... 11
Using the main dial ....................................................12
Lock function .............................................................. 12
4 RECEIVE FUNCTIONS ................................. 13–16
Initial settings .............................................................13
Mode selection ........................................................... 13
Squelch function ........................................................ 14
Functions for FM ........................................................ 14
Functions for SSB/CW ............................................... 14
Data communications .................................................16
5 MEMORY CHANNELS ..................................17–22
General ......................................................................17
Bank selection ........................................................... 17
Channel selection ...................................................... 18
Programming .............................................................19
Copy and paste (memory editing) .............................. 19
Clearing ..................................................................... 19
Channel/bank names ................................................. 20
Assigning channels numbers .....................................21
6 SCANS ..........................................................23–28
Operation ...................................................................23
Mode select function .................................................. 25
Specifying skip channel and frequency ..................... 25
Automatic bank limit/skip functions ............................ 26
Voice scan control function ........................................ 26
Programming scan edge frequencies ........................ 27
Scan speed/delay functions ....................................... 27
7 SLEEP TIMER .....................................................29
8 SET MODE ..........................................................30
General ......................................................................30
Quick set mode items ................................................ 31
Initial set mode items ................................................. 31
9 CONNECTOR INFORMATION ...................... 33– 34
10 CONTROL COMMANDS ............................ 35–36
Command table ......................................................... 35
Data format ................................................................35
11 MAINTENANCE ................................................. 37
Disassembly .............................................................. 37
Fuse replacement ......................................................37
Level adjustments ...................................................... 37
Memory backup ......................................................... 37
CPU resetting ............................................................ 37
Cleaning ..................................................................... 37
12 OPTIONAL INSTALLATIONS ..................... 38– 39
UT-102
VOICE SYNTHESIZER UNIT
................................ 38
FL-52A
CW NARROW FILTER
........................................ 38
CR-293
HIGH STABILITY CRYSTAL UNIT
......................... 39
13 TROUBLESHOOTING ................................. 40–41
14 SPECIFICATIONS .............................................42
15 OPTIONS ........................................................... 43
16 DOC ...................................................................44
ii
q POWER SWITCH [POWER]
Turns power ON and OFF.
w SLEEP/SET SWITCH [SLEEP/SET]
Push momentarily to set the sleep timer (p. 29).
Selectable times are 30, 60, 90, 120 min. or OFF.
” appears in the function display when the
sleep timer is set.
Push for 1 sec. to enter quick set mode (p. 30).
Use the [M-CH] selector and main dial to select items
and contents, respectively.
e
RECORDER REMOTE JACK [REC REMOTE] (p. 10)
Controls the running of a tape recorder for record-
ing. Connects to the REMOTE jack on a tape
recorder.
r RECORDER JACK [REC OUT] (p. 10)
Outputs an audio signal. Connect to the AUX or
LINE IN jack on a tape recorder.
t HEADPHONE JACK [PHONES]
Accepts headphones with 4–16 impedance.
When headphones are connected, no receive audio comes
from the speaker.
Stereo headphones can be connected, however, output
is monaural.
y MODE SWITCHES [WFM]/[FM]/[AM]/[SSB/CW]
(p. 13)
Push to select an operating mode.
The following keys toggle between several modes:
[FM] .................FM, FM narrow
[AM] .................AM, AM narrow, AM wide
[SSB/CW] ........USB, LSB, CW, optional CW narrow
When SSB/CW mode is selected, push [SSB/CW]
for 1 sec. to adjust the BFO frequency. (p. 15).
u NOISE BLANKER/AFC SWITCH [NB]/[AFC]
Activates the noise blanker function or automatic fre-
quency control function.
The noise blanker is used for removing pulse-type noise
when SSB, CW or AM mode is selected (p. 15).
The automatic frequency control tunes the displayed fre-
quency automatically when an off-center frequency is re-
ceived. It activates when FM or WFM is selected (p. 14).
i AUDIO FREQUENCY GAIN CONTROL
[AF GAIN] (p. 13)
Rotate clockwise to increase the audio output; rotate
counterclockwise to decrease the audio output.
o AUTOMATIC GAIN CONTROL [AGC] (p. 15)
Toggles the time constant of the AGC circuit be-
tween “slow” and “fast.”
When “fast” is selected, “AGC-F” appears.
Cannot be used in FM or WFM modes.
!0 SQUELCH CONTROL [SQUELCH] (p. 14)
Varies the squelch threshold level (to mute noise
when receiving no signal).
!1 IF SHIFT CONTROL [IF SHIFT] (p. 14)
Shifts the center frequency of the receiver’s IF pass-
band to reject interfering signals.
Cannot be used in FM, WFM and AM modes.
1
1
PANEL DESCRIPTION
MODE
WFM
NB/AFC AGC 10dB 20dB
FM AM
APF
TS
TS
SPCH
SSB/CW
AF GAIN SQUELCH
PHONES
REC OUT
SLEEP/
REC
REMOTE
IF SHIFTAPF
SET
LOCK
COMMUNICATION RECEIVER
iC- r8500
POWER
SIGNAL
S
13579
+
20dB
+
60dB
@0
q
w
e
r
t
yio!0 !1 !2 !3 !4u
FM
RECV
BANK
10-ATT-20
APF-NAGC-FAFCNB
SLEEP
LOCK
ICOM
S-meter squelch
threshold
Noise squelch
threshold (not
available in SSB,
CW, WFM and
AM narrow modes)
Signals below the
S-meter level
are muted.
Front panel
2
1
PANEL DESCRIPTION
!2 AUDIO PEAK FILTER CONTROL [APF] (p. 15)
Adjusts the audio peak lter setting to pick up a de-
sired audio frequency. Only valid when the [APF]
switch is ON.
Clockwise rotation adjusts the lter setting higher; coun-
terclockwise rotation adjusts the lter setting lower.
!3
ATTENUATOR SWITCHES [10dB]/[20dB]
Push to activate one of the attenuators.
Push [10dB] to activate the 10 dB attenuator.
Push [20dB] to activate the 20 dB attenuator.
Push [10dB] + [20dB] to activate the 30 dB attenuator.
10 dB and 30 dB attenuator cannot be used below 500 kHz.
!4 AUDIO PEAK FILTER SWITCH [APF] (p. 15)
Push momentarily to toggle the audio peak lter
circuit ON and OFF.
Use the [APF] control to adjust the center of the audio
peak passband.
When the audio peak lter circuit is ON, push for
1 sec. to toggle the lter setting between normal
and narrow.
•‘Narrow is available for SSB, CW and AM only.
!5
SPEECH/LOCK SWITCH [SPCH/LOCK]
Push momentarily to activate the voice synthesiz-
er function and have the displayed frequency
announced.
An optional UT-102
SPEECH SYNTHESIZER UNIT
is nec-
essary to activate the voice synthesizer function (p.38).
Automatic announcement at signal detection during
scan is available. Refer to the REC SPCH item on
p. 31 for details.
Push for 1 sec. to activate the lock function (p. 12).
Push for 1 sec. again to cancel the lock function.
The lock function action can be selected in set mode
to cover the main dial only, or to cover both the main
dial and front panel switches.
!6
TUNING STEP SWITCHES [TS]/[TS] (p. 12)
Select the tuning step for the main dial. Push [TS]
to select a larger tuning step; push [TS] to select
a smaller tuning step.
10 Hz, 50 Hz, 100 Hz, 1 kHz, 2.5 kHz, 5 kHz, 9 kHz, 10
kHz, 12.5 kHz, 20 kHz, 25 kHz, 100 kHz and 1 MHz are
selectable.
Programmable tuning steps can be set between 0.5 and
199.5 kHz.
To set programmable tuning steps, enter the desired
steps via the keypad, then push [TSY]or [TSZ].
!7
MAIN DIAL
Changes the operating frequency, set mode contents,
etc.
!8 BRAKE ADJUSTMENT SCREW
Adjusts the main dial tension.
!9 FUNCTION DISPLAY (p. 6)
Shows the selected frequency, mode, memory
name, etc.
@0 S-METER
Shows the strength of the received signal.
Shows the squelch threshold level when the
[SQUELCH] is rotated past the center position.
MEMO
SEL SKIP VSC
DLY
SCAN/
NAME
SCAN SET
PROG AUTO PRIO
M-SET BANK
M-CL MW
DELAY/SPEEDM-CH
D/S
1 QZ
GHI
PRS TUV WXY
ENT
BANK
BANK
JKL MNO
ABC DEF
.
;
,
4
78
0CE
ENT
M-CH
.
9
56
23
!9
!5
!6
!8
!7
SEL-CH SKIP-CH
OFF
kHz
DLY
M
IC-R8500
Center frequency
is shifted up.
Center frequency
is shifted down.
@1 MEMORY SET SWITCH [M-SET] (p. 19)
Used to copy and paste the displayed frequency
into another memory channel.
The rst push is used to copy ( appears), and the sec-
ond push is used to paste ( disappears).
Frequency, mode, tuning step, memory name, etc. can
be programmed into a temporary memory.
@2
MEMORY CLEAR SWITCH [M-CL] (p. 19)
Push and hold to clear the contents of the displayed
memory.
Bank names cannot be cleared.
@3
MEMORY WRITE SWITCH [MW] (p. 19)
Push and hold to store the displayed frequency,
mode, tuning step, etc. into the selected memory
channel.
@4 BANK SWITCH [BANK] (p. 17)
Push momentarily to toggle the bank limit func-
tion ON and OFF (p. 18).
While BANK appears, only memory channels within
the selected bank can be selected via the [M-CH] se-
lector.
Push for 1 sec. to increase/decrease the number of
memory channels in the selected bank (p. 21).
@5 MEMORY CHANNEL SELECTOR [M-CH] (p. 18)
Selects a memory channel in normal use.
Clockwise rotation selects higher memory channel
numbers; counterclockwise rotation selects lower
memory channel numbers.
Selects a set mode item when quick set mode or
initial set mode is selected (p. 30).
@6 DELAY/SPEED CONTROL [DELAY/SPEED] (p. 28)
Adjusts the scan delay time or scan speed depend-
ing on the [DLY ] switch setting.
When scan delay time is assigned, this control adjusts
the scan delay time (scan pausing interval) during signal
reception. This setting is effective when “” is
selected for the scan resume condition.
When scan speed is assigned, this control adjusts the
scan speed. In this case, scan delay time is determined
while setting.
@7
SCAN SWITCHES [SCAN ]
All of these switches are related to the scan function
in some way as follows:
[MEMO] (p. 23)
Push momentarily to start/stop memory scan.
Push numeral keys, then this key to start memo-
ry scan in the specied bank.
Push this key, then a mode switch to activate
mode select scan function.
Push for 1 sec. to set automatic bank and skip
functions.
The bank limit function and/or memory skip functions
are activated automatically when AUTO is selected
and scan is started.
[SEL] (p. 23)
Push momentarily to start/stop memory select
scan.
Push for 1 sec. to set the memory channel as a
select channel.
[PROG] (p. 24)
Push momentarily to start/stop programmed scan.
Push numeral keys, before or after pushing this
key to start programmed scan using the specied
scan edge group.
10 scan edge groups are available.
Push for 1 sec. to program scan edges for pro-
grammed scan.
M
M
3
1
PANEL DESCRIPTION
4
1
PANEL DESCRIPTION
[SKIP] (p. 25)
Push momentarily to toggle the skip function ON
and OFF for any scan.
Automatic skip activation is available with the [MEMO]
switch.
Push for 1 sec. to set the memory channel as a skip
channel.
[AUTO] (p. 24)
Push momentarily to start/stop auto write scan.
Push for 1 sec. to select the written memories
condition for the auto write scan.
Two conditions are available, clear auto-written mem-
ories before scan starts; and, keep auto written mem-
ories before scan start.
[VSC] (p. 26)
Push to toggle the voice scan control function ON
and OFF.
The VSC function resumes the scan when a detected sig-
nal does not contain voice components.
•“VSC appears while the voice scan control function is
activated.
[PRIO] (p. 25)
Push momentarily to start/stop priority scan.
Priority scan can be used in combination with other
scans.
Push for 1 sec. to enter the priority channel pro-
gramming condition.
[DLY ] (p. 27)
Push momentarily to select a scan resume condi-
tion.
OFF is underscored: scan pauses on a signal until it
disappears, then resumes 3 sec. after that.
DLY is underscored: scan resumes according to the
[DELAY/SPEED] control setting. When a signal dis-
appears, scan resumes 3 sec. later.
is underscored: scan is cancelled when receiving
a signal.
Push for 1 sec. to enter the delay time/scan speed
setting condition.
The function of the [DELAY/SPEED] control can be se-
lected.
@8
KEYPAD
The keypad can be used for several functions as below:
Keypad then [ENT] (then [MW])
Direct frequency input.
Keypad then [M-CH]
Memory channel selection.
[CE
NAME] then keypad
Alphanumeric input for memory, bank names, etc.
Keypad then [TSY] or [TSZ]
Arbitrary tuning step setting.
Keypad then [MEMO] or [SEL]
Specify memory bank then start memory scan or se-
lect memory scan.
Keypad then [PROG] or [AUTO]
Specify scan edge group, then start programmed
scan or auto write scan.
MEMO
SEL SKIP VSC
DLY
SCAN/
NAME
SCAN SET
PROG AUTO PRIO
M-SET BANK
M-CL MW
DELAY/SPEEDM-CH
D/S
1 QZ
GHI
PRS TUV WXY
ENT
BANK
BANK
JKL MNO
ABC DEF
.
;
,
4
78
0CE
ENT
M-CH
.
9
56
23
@2 @3@1 @4 @5 @6
@7
@8
SEL-CH SKIP-CH
OFF
kHz
DLY
M
IC-R8500
5
1
PANEL DESCRIPTION
Rear panel
q
RS-232C CONNECTOR (p. 10)
Connects an RS-232C cable. An RS-232C cable
can be used to connect the IC-R8500 to a PC. In this
way commands can be sent to the receiver via the
PC.
w CI-V REMOTE CONTROL JACK (p. 10)
Allows connection to an Icom CI-V system trans-
ceiver or another receiver for the transceive function.
Also connects to a PC with several receivers for
command control via an optional CT-17
CI
-
V LEVEL
CONVERTER
.
e IF OUT JACK
Outputs a 10.7 MHz IF signal with 9 V DC for an ex-
ternal equipment.
r AGC JACK (p. 16)
This jack has functions which are selectable through
internal receiver settings.
Outputs an AGC signal for an external equipment (de-
fault).
Outputs audio detected signal without de-emphasis for
9600 bps data detection (FM mode only).
t DC 13.8 V JACK (p. 8)
Plug in the jumper connector here when using the
supplied* AC adapter.
Connects to a 13.8 V DC power source using the
supplied DC cable when the AC adapter is not
connected.
*Not supplied with some versions.
y EXTERNAL SPEAKER JACK
Connects an 8 external speaker.
When an external speaker is connected, the internal
speaker does not function.
u DC IN JACK (p. 8)
Connects the supplied* AC adapter.
A regulator circuit has been designed between this con-
nector and the DC 13.8 V jack.
Be sure the jumper connector is connected to the DC
13.8 V jack.
*Not supplied with some versions.
i HF 50 ANTENNA CONNECTOR (p. 8)
Connects an antenna to cover the frequency range
below 30 MHz.
Use a coaxial cable and a PL-259 connector.
Be sure this connector is selected in quick set mode
(p. 31).
o GROUND TERMINAL (p. 9)
Connect this terminal to a ground.
!0 HF 500 ANTENNA CONNECTOR (p. 8)
When a 500 long wire antenna is used for HF band
receiving, this connector is used instead of the 50
antenna connector.
Set the HF ANT item to 500 to use this connector
(p. 31).
!1 VHF/UHF ANTENNA CONNECTOR (p. 8)
Connects an antenna to cover the frequency range
over 30 MHz.
Use a coaxial cable and type-N connector.
q w e r y u
t
o
i
!0!1
6
1
PANEL DESCRIPTION
Function display
q
REMOTE INDICATOR (p. 35)
Appears when a level control command is received from a
PC via CI-V data.
When this indicator appears, the control knobs setting is
ignored.
This indicator will disappear when the control knob is rotated.
w MODE INDICATORS (p. 13)
Show the operating mode.
e FREQUENCY READOUT
Shows the operating frequency.
r SKIP INDICATOR (p. 25)
Appears when the skip function is activated.
Flashes during scan when the skip function is ac-
tivated by the auto skip function.
t VSC INDICATOR (p. 26)
Appears when the voice scan control function is
activated.
y
SCAN RESUME CONDITION INDICATORS (p. 27)
Show the selected scan resume condition.
u TUNING STEP INDICATORS (p. 12)
Show the selected tuning step.
“” appears when a programmable tuning step is selected.
i TEMPORARY MEMORY INDICATOR (p. 19)
Appears when [M-SET] is pushed to indicate that
a frequency is being temporarily saved.
Disappears when the temporary memory is past-
ed into another memory channel.
o MEMORY CHANNEL READOUT (p. 17)
Shows the selected memory channel number.
!0 SKIP CHANNEL INDICATOR (p. 25)
Appears when the selected memory channel is set
as a skip channel.
!1 MEMORY NAME INDICATORS (p. 20)
Display names programmed into a memory, or scan
group.
!2 SELECT CHANNEL INDICATOR (p. 23)
Appears when the selected memory channel is set
as a select channel.
!3 BANK NUMBER INDICATOR (p. 17)
Shows the selected memory bank number.
!4 BANK INDICATOR (p. 18)
Appears when the bank limit function is activated.
Flashes during scan when the bank limit function
is activated by the auto bank function.
!5 BANK NAME INDICATOR (p. 20)
Displays names programmed into a bank.
!6 AUDIO PEAK FILTER INDICATOR (p. 15)
APF or APF-N appears when the audio peak l-
ter function is activated.
!7 ATTENUATOR INDICATORS
Appear when the RF attenuator is activated.
!8 AUTOMATIC GAIN CONTROL INDICATOR (p. 15)
AGC-F appears when AGC fast is selected; no indi-
cation appears when AGC slow is selected.
!9 RECEIVE INDICATOR
Appears while receiving.
@0 FM CENTER INDICATORS (p. 14)
Appear when the received signal is not tuned to its
center frequency.
@1 NOISE BLANKER INDICATOR (p. 15)
Appears when the noise blanker circuit is activated.
@2 AFC INDICATOR (p. 14)
Appears when the automatic frequency control
function is activated in either FM or WFM modes.
@3 LOCK INDICATOR (p. 12)
Appears when the main dial or front panel switches
are locked.
@4 SLEEP INDICATOR (p. 29)
Appears when the sleep timer is set.
P
REMOTE
WFM
RECV
AMUSBLSBCW
BANK
10-ATT-20
APF-NAGC-FAFCNB
SEL-CH SKIP-CH
WIDE NAR
SKIP VSC
OFF
MHz kHz
DLY
SLEEP
LOCK
M
P
qwerty
u
io!0!1!2!3!4!5!6!7!8!9@0 @0
@1
@2
@3
@4
7
2
CONNECTIONS
Mounting installation
D Location
Select a location for the receiver that allows adequate
air circulation and access to the front and rear panels.
Do not place in areas subject to extreme heat, cold, or
vibrations, or near TV sets, radios and electromagnetic
sources.
Be careful of the internal temperature of the receiver.
Installation into a rack or other enclosed area may in-
crease the internal temperature over the useable tem-
perature range. Specifications are not guaranteed
under such conditions.
D Receiver stand
The base of the IC-R8500 has an adjustable stand for
desktop use. Set the stand to one of two angles de-
pending on your operating conditions.
D Optional bracket and carrying handle
Mounting bracket
An optional mounting bracket is available to install the
radio under a table, on a wall, in a vehicle, etc.
Select an area to mount the receiver keeping in mind
that the weight of the IC-R8500 is approx. 7 kg.
Carrying handle
An optional handle allows you to easily carry and
transport the receiver.
Attach the MB-23
CARRYING HANDLE
with the supplied
rubber feet as shown.
CAUTION: The screws supplied with the MB-23
cannot be used with the IC-R8500. Use the screws
supplied with the IC-R8500 when attaching the
MB-23.
Flat washer
Spring
washer
Allen bolt
supplied with
the IC-R8500.
43
15
OPTIONS
AH-7000
SUPER WIDEBAND
OMNIDIRECTIONAL
ANTENNA
SP-21 EXTERNAL SPEAKER
MB-23 CARRYING HANDLE
IC-MB12 MOBILE MOUNTING BRACKET
CT-17 CI-V LEVEL CONVERTER
AD-55/A/V AC ADAPTER
CR-293 HIGH STABILITY CRYSTAL UNIT
Provides improved frequency stability.
Frequency stability: ± 5 ppm (0°C+60°C; 32°F+140°F)
FL-52A CW NARROW FILTER
(455 kHz; 500Hz/6 dB)
UT-102 VOICE SYNTHESIZER UNIT
Frequency coverage:
Receive 251300 MHz
Transmit 50, 144, 430, 900,
1200 MHz bands
Type of antenna: Discone
Weight: 1 kg
Carrying handle, convenient for portable operation. Use
the screws supplied with the IC-R8500; DO NOT use the
screws supplied with the MB-23.
For remote control of up to 4 receivers from 1 PC. You can
set memory contents, including names, as well as read
data from the receivers.
Designed for base station
operation.
Input impedance: 8
Max. input power: 5 W
Receiver mounting bracket for mobile operation.
Not available in European countries due to local regulations.
Provides AC operation.
(AD-55 Europe version only)
46

Hulp nodig? Stel uw vraag in het forum

Spelregels

Misbruik melden

Gebruikershandleiding.com neemt misbruik van zijn services uitermate serieus. U kunt hieronder aangeven waarom deze vraag ongepast is. Wij controleren de vraag en zonodig wordt deze verwijderd.

Product:

Bijvoorbeeld antisemitische inhoud, racistische inhoud, of materiaal dat gewelddadige fysieke handelingen tot gevolg kan hebben.

Bijvoorbeeld een creditcardnummer, een persoonlijk identificatienummer, of een geheim adres. E-mailadressen en volledige namen worden niet als privégegevens beschouwd.

Spelregels forum

Om tot zinvolle vragen te komen hanteren wij de volgende spelregels:

Belangrijk! Als er een antwoord wordt gegeven op uw vraag, dan is het voor de gever van het antwoord nuttig om te weten als u er wel (of niet) mee geholpen bent! Wij vragen u dus ook te reageren op een antwoord.

Belangrijk! Antwoorden worden ook per e-mail naar abonnees gestuurd. Laat uw emailadres achter op deze site, zodat u op de hoogte blijft. U krijgt dan ook andere vragen en antwoorden te zien.

Abonneren

Abonneer u voor het ontvangen van emails voor uw Icom IC-R8500 bij:


U ontvangt een email met instructies om u voor één of beide opties in te schrijven.


Ontvang uw handleiding per email

Vul uw emailadres in en ontvang de handleiding van Icom IC-R8500 in de taal/talen: Engels als bijlage per email.

De handleiding is 1,52 mb groot.


U ontvangt de handleiding per email binnen enkele minuten. Als u geen email heeft ontvangen, dan heeft u waarschijnlijk een verkeerd emailadres ingevuld of is uw mailbox te vol. Daarnaast kan het zijn dat uw internetprovider een maximum heeft aan de grootte per email. Omdat hier een handleiding wordt meegestuurd, kan het voorkomen dat de email groter is dan toegestaan bij uw provider.

Stel vragen via chat aan uw handleiding

Stel uw vraag over deze PDF

Uw handleiding is per email verstuurd. Controleer uw email

Als u niet binnen een kwartier uw email met handleiding ontvangen heeft, kan het zijn dat u een verkeerd emailadres heeft ingevuld of dat uw emailprovider een maximum grootte per email heeft ingesteld die kleiner is dan de grootte van de handleiding.

Er is een email naar u verstuurd om uw inschrijving definitief te maken.

Controleer uw email en volg de aanwijzingen op om uw inschrijving definitief te maken

U heeft geen emailadres opgegeven

Als u de handleiding per email wilt ontvangen, vul dan een geldig emailadres in.

Uw vraag is op deze pagina toegevoegd

Wilt u een email ontvangen bij een antwoord en/of nieuwe vragen? Vul dan hier uw emailadres in.


Info