509868
9
Verklein
Vergroot
Pagina terug
1/29
Pagina verder
Smart Phone
Quick Start Guide
2
3
Warnings! Please Read Before Operating your Device
THE DEVICE IS NOT CHARGED WHEN YOU TAKE
IT OUT OF THE BOX. (For information, see Step 2:
Charge the battery below)
DO NOT REMOVE THE BATTERY PACK WHEN THE
DEVICE IS CHARGING.
WHEN INSERTING YOUR SIM CARD, MAKE SURE
THE DEVICE IS POWERED-OFF, THEN CLICKS IT
INTO PLACE. (For more information, see Step 1:
Insert the SIM card below)
YOUR WARRANTY IS INVALIDATED IF YOU OPEN OR
TAMPER WITH THE DEVICE’s OUTER CASING. (For
more information, see the enclosed warranty card)
Congratulations on the purchase of your New Windows® Pow ered
Smartphone 2003 ! This information will help you set up your
phone so you can begin using it.
1
To use your Smartphone, press and hold the
Power button for 3 seconds to turn it on.
2
To turn off your Smartphone, press and hold the
Power button until the phone screen is off.
Safeguards
2
3
Contents
n Setting Up
n The Basics
n Navigating
n Using for the First Time
4
5
Setting Up
Step 1 : Insert the SIM card
Follow the steps outlined below to set up your phone and get it
ready to synchronize with your PC:
1 Lift up the SIM card case and insert the SIM. Push it
forward and pull back to secure the SIM.
2 Replace the back panel by inserting the top  rst.
3 Clip it into place with the bottom.
DON’T FORGET TO SECURE THE SIM BEFORE
PROCEEDING.
F
4
5
Step 2 : Charge the Battery
You can charge your Smartphone in the following ways:
Option 1
1 Insert the AC adapter into the back of the cradle, and
then plug into the mains.
2 Dock your phone in its cradle and fully charge for 3
hours. A steady amber LED indicates charging; solid
green fully charged.
Setting Up
6
7
Setting Up
Step 2 : Charge the Battery (Cont’d)
Option 2
You can plug the AC adapter into the optional USB/Serial cable head
and then connect your phone directly to an external power source.
1 To your Smartphone.
2 USB synchronization cable.
3 Plug the AC adapter into a socket.
Option 3
You can plug the AC adapter into the optional DC Converter and then
connect your phone directly to an external power source.
1 To AC adapter.
2 To your Smartphone.
1
2
3
1
2
6
7
Power Button
Step 3 : Switching on and Entering your PIN
Once you have Started to charge your device, you can switch it on.
First time, it is however recommended that you fully charge your
device about 1 hour - before switching it on.
1 Press the power button indicated as the right for about 3
seconds wait for your operator and Microsoft screens
to load.
2 Active your PIN as set out by your operator.
3 Enter your PIN and press the left soft key below Done.
Setting Up
8
9
Step 4 : Installing ActiveSync
Using Microsoft® ActiveSync® you can synchronize information on
your desktop computer with the information on your phone. ActiveSync
compares the information on your phone with the information on your
desktop computer and updates all locations, keeping you up-to-date
with the most recent information.
Before you can begin synchronization with your desktop PC, you must
install ActiveSync on your desktop computer from the Smartphone 2003
Companion CD. ActiveSync is already installed on your phone.
Hardware Connection
Dock your Smartphone in its cradle and plug the USB/Serial to your
desktop PC for synchronizaton.
Software Installation
1 Insert the Smartphone 2003 Companion CD into the
CD-ROM drive of your desktop computer.
2 Follow the directions on the screen when you PC Start
to run the CD program.
Setting Up
8
9
Setting Up
To Create a Partnership
After the installation is completed, the New Part ner ship
Wizard will helps you set up a partnership be tween your
phone and your desk top com put er so that you can Start
syn chro niz ing in for ma tion and cus tom iz ing your syn chro -
ni za tion set tings.
To prevent synchronization problems, it is
important that you select Synchronise with
this desktop in the New Partnership Wizard
options.
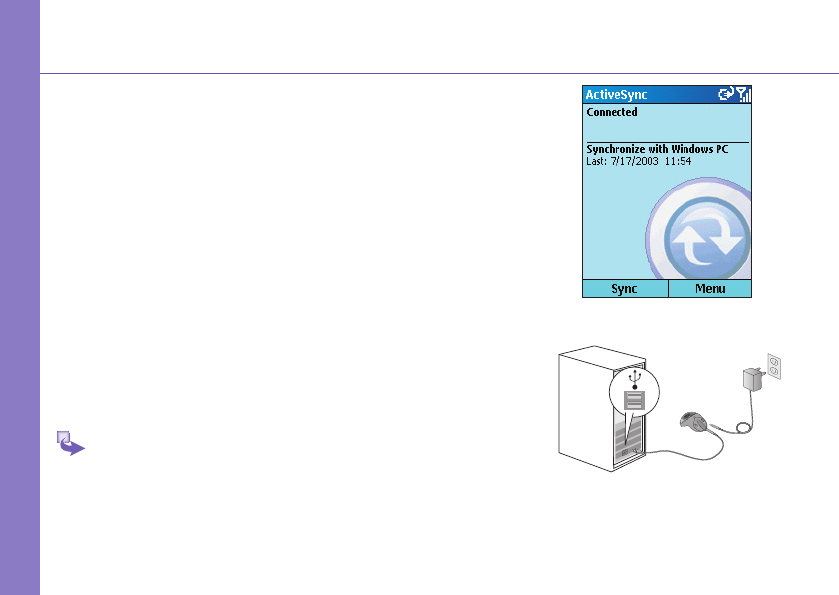
Synchronizing Information
Select the information you would like to snychrozine with you
PC (optional items are Calendar, Inbox, Contacts, Tasks),
then your rst synchronization process will au to mat i cal ly
begin when you Finish using the wizard. After the  rst syn-
chronization, you will notice that your Out look in for ma tion
now appears on your phone.
9

Hulp nodig? Stel uw vraag in het forum

Spelregels

Misbruik melden

Gebruikershandleiding.com neemt misbruik van zijn services uitermate serieus. U kunt hieronder aangeven waarom deze vraag ongepast is. Wij controleren de vraag en zonodig wordt deze verwijderd.

Product:

Bijvoorbeeld antisemitische inhoud, racistische inhoud, of materiaal dat gewelddadige fysieke handelingen tot gevolg kan hebben.

Bijvoorbeeld een creditcardnummer, een persoonlijk identificatienummer, of een geheim adres. E-mailadressen en volledige namen worden niet als privégegevens beschouwd.

Spelregels forum

Om tot zinvolle vragen te komen hanteren wij de volgende spelregels:

Belangrijk! Als er een antwoord wordt gegeven op uw vraag, dan is het voor de gever van het antwoord nuttig om te weten als u er wel (of niet) mee geholpen bent! Wij vragen u dus ook te reageren op een antwoord.

Belangrijk! Antwoorden worden ook per e-mail naar abonnees gestuurd. Laat uw emailadres achter op deze site, zodat u op de hoogte blijft. U krijgt dan ook andere vragen en antwoorden te zien.

Abonneren

Abonneer u voor het ontvangen van emails voor uw I-mate SP2 bij:


U ontvangt een email met instructies om u voor één of beide opties in te schrijven.


Ontvang uw handleiding per email

Vul uw emailadres in en ontvang de handleiding van I-mate SP2 in de taal/talen: Engels als bijlage per email.

De handleiding is 2,81 mb groot.


U ontvangt de handleiding per email binnen enkele minuten. Als u geen email heeft ontvangen, dan heeft u waarschijnlijk een verkeerd emailadres ingevuld of is uw mailbox te vol. Daarnaast kan het zijn dat uw internetprovider een maximum heeft aan de grootte per email. Omdat hier een handleiding wordt meegestuurd, kan het voorkomen dat de email groter is dan toegestaan bij uw provider.

Stel vragen via chat aan uw handleiding

Stel uw vraag over deze PDF

Uw handleiding is per email verstuurd. Controleer uw email

Als u niet binnen een kwartier uw email met handleiding ontvangen heeft, kan het zijn dat u een verkeerd emailadres heeft ingevuld of dat uw emailprovider een maximum grootte per email heeft ingesteld die kleiner is dan de grootte van de handleiding.

Er is een email naar u verstuurd om uw inschrijving definitief te maken.

Controleer uw email en volg de aanwijzingen op om uw inschrijving definitief te maken

U heeft geen emailadres opgegeven

Als u de handleiding per email wilt ontvangen, vul dan een geldig emailadres in.

Uw vraag is op deze pagina toegevoegd

Wilt u een email ontvangen bij een antwoord en/of nieuwe vragen? Vul dan hier uw emailadres in.


Info