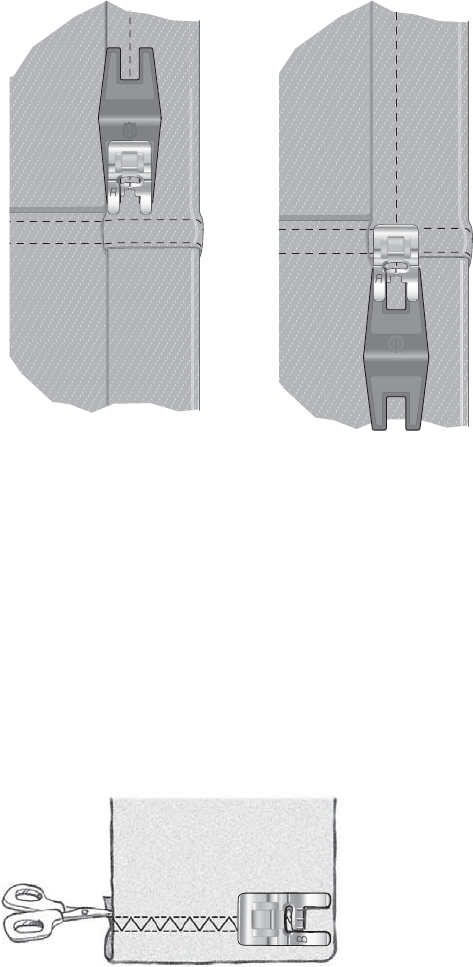
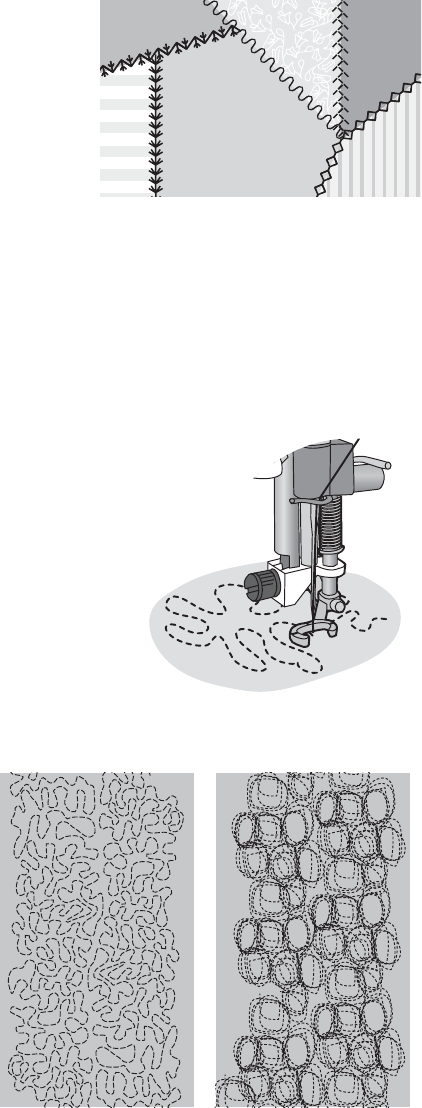
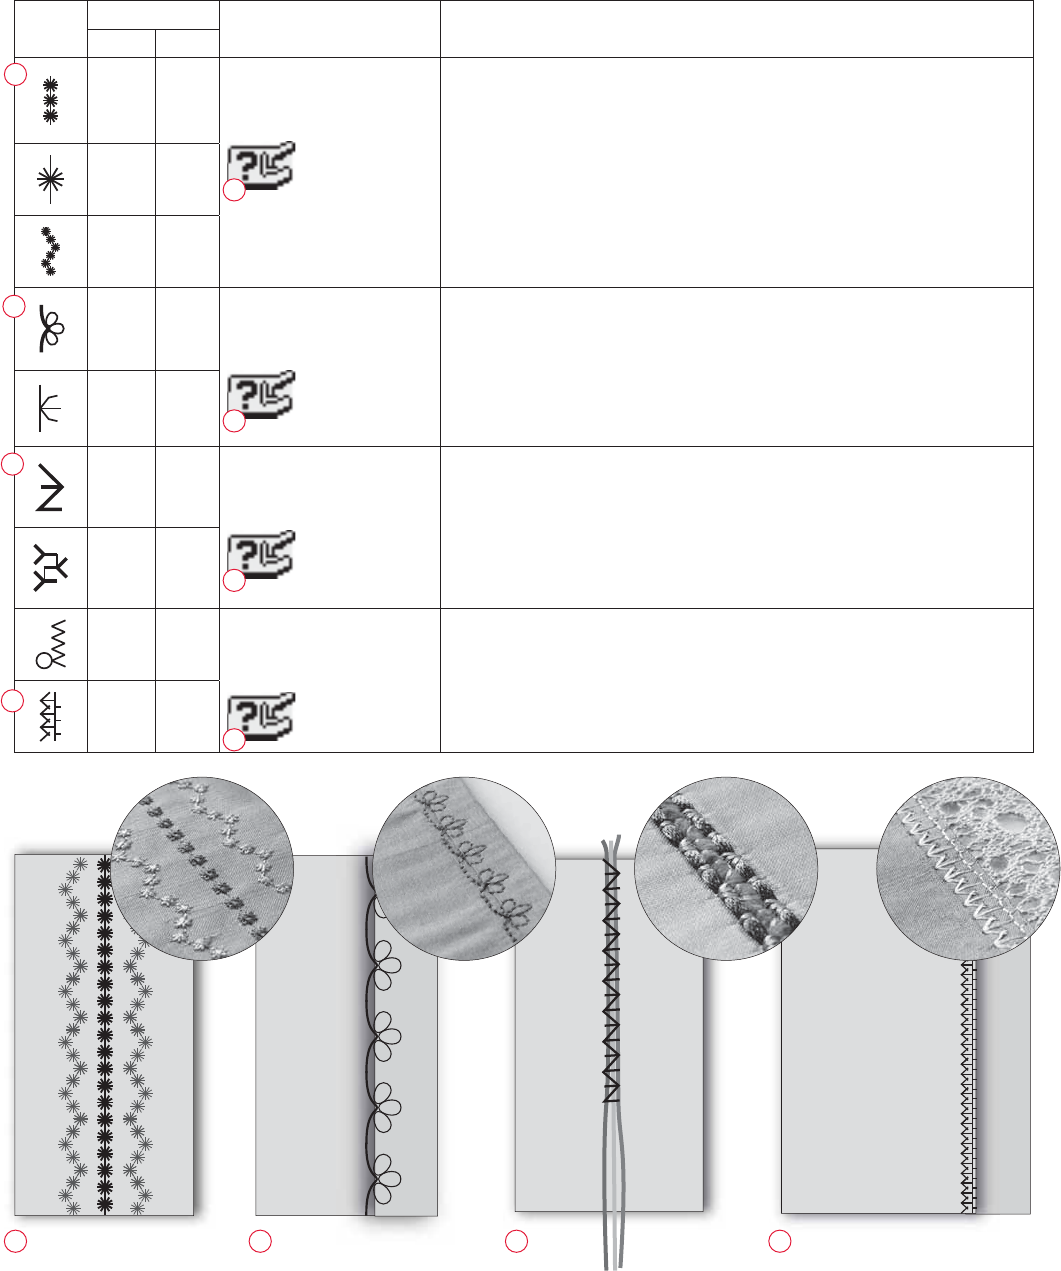
2018Bridging StitchA/BFor joining two pieces of fabric with fi nished edges and for elastic shirring.
21–Darning Stitch
(side to side)
AFor mending small tears.
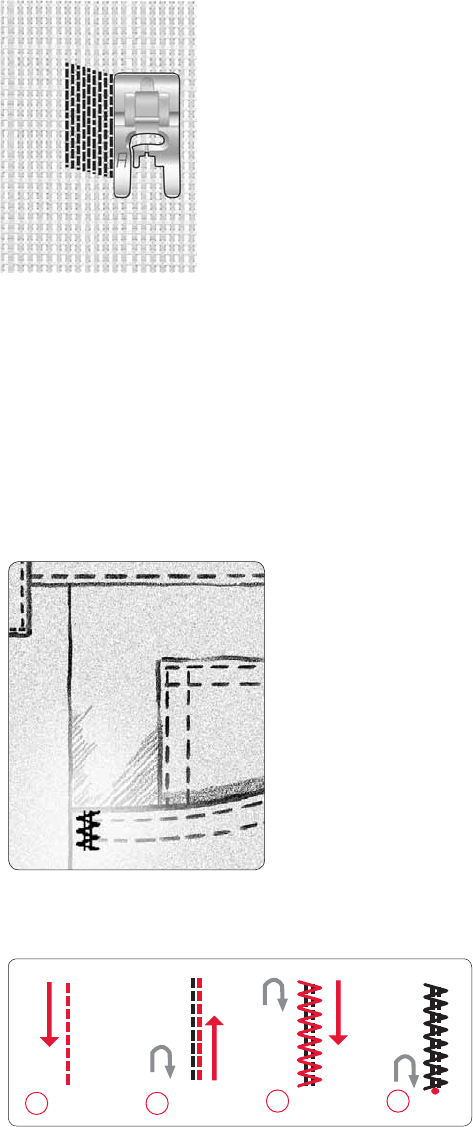
2219Darning Stitch (for-
ward and backward)
A/BDarn and mend small holes in work clothes, jeans, tablecloths and more. Stitch over
the hole, press reverse for continuous darning and auto stop.
2320Bartack
(manual)
A/BReinforce pockets, shirts openings, belt loops as well as at lower end of a zipper.
24–Belt Loop StitchAFor securing belt loops.
2521Bartack ButtonholeSensor
One-Step
Buttonhole
Foot/C
Standard buttonhole for most fabric weights.
2622Round End
Buttonhole
Sensor
One-Step
Buttonhole
Foot/C
For blouses and children’s garments.
2723Medium Reinforced
Buttonhole
CFor medium and heavy fabrics
2824Heirloom
Buttonhole
Sensor
One-Step
Buttonhole
Foot/C
For “hand look” on fi ne and delicate fabrics.
Tip: For jeans buttonholes, increase length and width of the buttonhole. Use thicker thread.
2925Keyhole
Buttonhole
Sensor
One-Step
Buttonhole
Foot/C
For tailored jackets, coats, etc.
3026Heavy Duty
Buttonhole
Sensor
One-Step
Buttonhole
Foot/C
With reinforced bartacks.
3127Leather Straight
Stitch Buttonhole
A/BFor leather and suede.
3228EyeletBFor belts, laces, etc.
3329Automatic Button
Sewing
No presser footFor sewing on buttons. Set the number of stitches on the GraphicDisplay/
TouchScreen.
3430Satin stitch, narrowBFor appliqués, sewing on laces and trims. For light and medium fabrics.
3531Satin stitch,
medium
BFor appliqués, sewing on laces and trims. For light and medium fabrics.
3632Satin stitch, wideBFor appliqués, sewing on laces and trims. For heavy fabrics.
8 – Overview
Brush Line (670)
Block (670/650)
Cyrillic and Hiragana (670/650)
Russian and Japanese fonts. See the fonts on the
GraphicDisplay/TouchScreen of your sewing machine.
FONTSSTITCH OVERVIEW
670650
GETTING READY TO SEW
10 – Getting Ready to Sew
UNPACKING
1. Place the machine on a sturdy, fl at surface, remove the packaging and lift off the cover.
2. Remove the packing material and the foot control.
3. The machine is delivered with an accessory bag, a power cord and a foot control cord.
4. Wipe the machine, particularly around the needle and stitch plate to remove any soil before sewing.
Note: Your HUSQVARNA VIKING
®
OPAL™ sewing machine is adjusted to provide the best stitch result at normal room temperature.
Extreme hot or cold temperatures can affect the sewn result.
PACKING AWAY AFTER SEWING
1. Press the ON/OFF switch to OFF.
2. Unplug the cord from the wall socket and then from the machine.
3. Unplug the foot control cord from the machine. Wind the foot control cord and place it inside the space on the underside of
the foot control.
4. Check to ensure that all accessories are in the accessory box. Slide the box on to the machine, behind the free arm.
5. Place the foot control in the space above the free arm.
6. Put on the cover.
ACCESSORY TRAY
Store presser feet, bobbins, needles and other accessories in
the accessory tray so that they are easily accessible.
Keep the accessory tray on the machine to provide a larger,
fl at work surface.
USING THE FREE ARM
Slide the accessory box to the left when you wish to remove it
and use the free arm.
Use the free arm to facilitate sewing trouser legs and sleeve
hems.
To replace the accessory box, slide it onto the machine until it
fi ts in place.
1
2
123
Getting Ready to Sew – 11
CONNECTING THE FOOT CONTROL CORD
Among the accessories you will fi nd the foot control cord and
the power cord. Connecting the foot control cord to the foot
control is only necessary the very fi rst time you are going to
use the machine.
1. Take out the foot control cord. Turn the foot control over.
Connect the cord to the socket inside the space of the foot
control. Push fi rmly to make sure it is properly connected.
2. Lay the cord in the slot on the underside of the foot
control.
CONNECT THE POWER CORD
AND FOOT CONTROL
On the underside of the machine you will fi nd information
about the power supply voltage (V) and the frequency (Hz).
Before plugging in the foot control, check to ensure that it is
of type “FR2” (see underside of foot control).
1. Connect the foot control cord to the front socket on the
bottom right side of the machine.
2. Connect the power cord to the rear socket on the bottom
right side of the machine.
3. Press the ON/OFF switch to ON to turn on power and
light.
For the USA and Canada
This sewing machine has a polarized plug (one blade wider
than the other). To reduce the risk of electric shock, this
plug is intended to fi t in a polarized outlet only one way. If
the plug does not fi t fully in the outlet, reverse the plug. If
it still does not fi t, contact a qualifi ed electrician to install
the proper outlet. Do not modify the plug in any way.
A
12 – Getting Ready to Sew
LOWER THE FEED TEETH
The feed teeth are lowered when you move the switch on the
front of the free arm to the right. Move the switch to the left
if you wish to raise the feed teeth. The feed teeth will raise
as you begin to sew. The feed teeth should be lowered when
sewing on buttons and for free motion sewing.
PRESSER FOOT PRESSURE
Normal presser foot pressure is around fi ve. The higher the
number the more pressure the foot puts on the fabric. Knit
and soft fabrics should be sewn at lower pressure.
The presser foot pressure is adjusted with the dial found under
the lid. When adjusting the pressure lower the presser foot
fi rst.
RAISE AND LOWER THE PRESSER FOOT
The presser foot is raised and lowered with the presser foot
lever (A). The presser foot must be lowered when sewing.
By raising the presser foot lever and then pressing it farther
upwards, the lift height of the presser foot is increased to an
extra height allowing you to slide very thick projects under the
foot.
CHANGING THE PRESSER FOOT
Press the ON/OFF switch to OFF.
1. Make sure the needle is in the highest position and the
presser foot is lifted. Pull the presser foot towards you.
2. Line up the cross pin on the foot with the gap in the
presser foot ankle. Push back until the foot snaps into
place.
1
2
AB
Getting Ready to Sew – 13
CHANGING THE NEEDLE
Press the ON/OFF switch to OFF.
1. Loosen the screw in the needle clamp with the screwdriver.
2. Remove the needle.
3. Push the new needle upwards with the fl at side away from
you until it will go no further.
4. Use the screwdriver to tighten the screw properly.
NEEDLES
The sewing machine needle plays an important role in
successful sewing. To ensure you will get a quality needle, we
recommend needles of system 130/705H. The needle package
included with your machine contains needles of the most
frequently used sizes for sewing on woven and stretch fabrics.
Universal needle (A)
Universal needles have a slightly rounded point and come in a
variety of sizes. For general sewing in a variety of fabric types
and weights.
Stretch needle (B)
Stretch needles have a special scarf to eliminate skipped
stitches when there is a fl ex in the fabric. For knits, swimwear,
fl eece, synthetic suedes and leathers. Marked with a yellow
band.
Tip: Read more about different needles in the HUSQVARNA
VIKING Accessory User’s Guide at www.husqvarnaviking.com.
Note: Change the needle often. Always use a straight needle with a sharp
point (1). A damaged needle (2) can cause skipped stitches, breakage of
needles or snapping of thread. A damaged needle can also damage the
stitch plate.
A
B
14 – Getting Ready to Sew
SPOOL PINS AND SPOOL CAPS
Your sewing machine has two spool pins, a main spool pin and an auxiliary spool pin. The spool pins are designed for all types
of thread. The main spool pin is adjustable and can be used in a horizontal position (the thread reels off the stationary spool) or
in a vertical position (the thread spool rotates). Use the horizontal position for all regular sewing threads and the vertical position
for large spools or specialty threads.
Auxiliary Spool Pin
The auxiliary spool pin is used when winding a bobbin from
a second spool of thread or for a second spool when sewing
with a twin needle.
Lift the auxiliary spool pin up and to the left. Slide on a spool
cap. For spools smaller than the medium size spool cap, place
a felt pad under the thread spool to prevent the thread from
reeling off too fast. For larger spools, the felt pad shall not be
used.
Horizontal Position
Lift the spool pin up slightly from its horizontal position to
easily place the thread spool on the pin. The thread should reel
over the top, in a counterclockwise direction, as shown in the
picture. Slide on a spool cap and then move the spool pin back
to the horizontal position.
Each machine comes with two spool caps on the spool pin.
For medium sized thread spools, the medium sized cap (A) is
placed in front of the spool. For large thread spools, the large
cap (B) is placed in front of the spool.
The fl at side of the spool cap should be pressed fi rmly against
the spool. There should be no space between spool cap and
thread spool.
A small spool cap is included as an accessory for your
machine. The small spool cap can be used for small thread
spools.
Vertical Position
Lift the spool pin up and all the way to the right. Lock the
spool pin in the vertical position by slightly pressing it down.
Slide on the large spool cap. For spools smaller than the
medium size spool cap or when using specialty threads, place
a felt pad under the thread spool to prevent the thread from
reeling off too fast. For larger spools, the felt pad is not
needed.
Note: No spool cap should be placed on top of the spool as this prevents
the spool from rotating.
D
C
A
B
E
Getting Ready to Sew – 15
THREADING THE UPPER THREAD
Make sure the presser foot is raised and the needle is in the up
position
Press the ON/OFF switch to OFF.
1. Place the thread on the spool pin and the spool cap on the
spool pin as described on page 14.
2. Spool pin in horizontal position:
Bring the thread over and behind the pre-tension thread
guide (A) and under the thread guide (B).
Spool pin in vertical position:
Instead of bringing the thread into the pre-tension guide
(A), bring it directly under the thread guide (B).
3. Bring the thread down between the thread tension discs
(C).
4. Continue threading in the direction indicated by the arrows.
Bring the thread from the right into the slot on the take-up
lever (D).
5. Take the thread down and behind the last guide just above
the needle (E).
1.2.
3.
4.
A
B
C
5.
16 – Getting Ready to Sew
NEEDLE THREADER
The needle must be in the up position to use the built-in
needle threader. We also recommend lowering the presser foot.
1. Use the handle to pull the needle threader all the way
down, catching the thread under the guide (A).
2. Push back to bring the needle threader forward until the
metal fl anges cover the needle. A small hook will pass
through the needle eye (B).
3. Place the thread under the fl anges in front of the needle,
so the thread catches into the small hook (C).
4. Let the needle threader gently swing back. The hook pulls
the thread through the needle eye and forms a loop behind
the needle.
5. Pull the thread loop out behind the needle. Place the thread
under the presser foot.
Note: The needle threader is designed to be used for size 70-120 needles.
You cannot use the needle threader for size 60 needles or smaller, the wing
needle, twin needle, triple needle or when the Sensor One-Step Buttonhole
Foot is on. There are also some other optional accessories that require
manual threading of the needle.
When threading the needle manually, make sure that the needle
is threaded from front to back. The white presser foot ankle
makes it easy to see the eye of the needle. The bobbin case
cover can be used as a magnifying glass.
CUTTING THE THREAD
Once you have fi nished sewing, cut the threads by raising the
presser foot and pulling the threads from the front to the back
into the thread cutter on the left side of the machine.
A
B
D
C
Getting Ready to Sew – 17
THREADING FOR TWIN NEEDLE
Press the ON/OFF switch to OFF.
1. Insert a twin needle.
2. Use a second thread spool or wind a bobbin with the
thread you are going to use as the second upper thread.
3. Lift the spool pin up and all the way to the right. Lock
the spool pin in the vertical position by slightly pressing
it down. Slide on a spool cap. For spools smaller than the
medium size spool cap, place a felt pad under the thread
spool.
4. Place the fi rst thread spool on the spool pin. The spool
should rotate in a clockwise direction when the thread reels
off the spool.
5. Left needle: Thread the machine as described on page 13.
Check to ensure that the thread lies between the left thread
tension discs (A). Thread the left needle manually.
6. Pull out the auxiliary spool pin and slide on a spool cap.
For spools smaller than the medium size spool cap, place a
felt pad under the thread spool.
7. Place the second thread on the spool pin. The second
spool should rotate in a counterclockwise direction when the
thread reels off the spool.
8. Right needle: Thread the machine as before but this thread
should lie between the right thread tension discs (A) and
outside the needle thread guide (B). Thread the right needle
manually.
Note: If using specialty threads (such as metallic threads) its weight and
irreglular surface increases the thread tension. By reducing the tension, the
risk of needle breakage is prevented.
Note: Only use symmetrical twin needles (C).
Do not use this type of twin needle (D), since
it may damage your sewing machine.
C
A
B
C
D
D
18 – Getting Ready to Sew
WINDING THE BOBBIN WITH
THE MACHINE THREADED
Make sure that the presser foot is up and the needle is in the
highest position.
Note! Do not use a plastic presser foot when bobbin winding.
1. Place an empty bobbin on the bobbin spindle on the top
of the machine. The bobbin only fi ts on one way, with
the logo facing up. Use only original HUSQVARNA
VIKING
®
bobbins.
2. Pull the thread from the needle under the presser foot and
to the right through the thread guide (C).
3. Guide the thread through the hole in the bobbin (D) from
the inside to the outside.
Note: When using an earlier version of HUSQVARNA VIKING
®
bobbins that do not have a hole, wind several turns of thread on the
bobbin to get started.
4. Push the bobbin spindle to the right. A pop-up message
appears on the GraphicDisplay/TouchScreen. Hold the
end of the thread fi rmly when starting to wind. Press the
foot control to start winding. Once the bobbin begins to
wind, cut the excess thread. When the bobbin is full it will
stop rotating. Push the bobbin spindle back to the left,
remove the bobbin and cut off the thread on the thread
cutter.
WINDING THE BOBBIN USING
THE VERTICAL SPOOL PIN
1. Place an empty bobbin on the bobbin spindle on the top
of the machine. The bobbin only fi ts on one way, with
the logo facing up. Use only original HUSQVARNA
VIKING
®
bobbins.
2. Place the large spool cap and a felt pad under the spool on
the main spool pin set in the vertical position.
3. Bring the thread over and behind the pre-tension thread
guide (A) and down around the thread tension disc (B),
then through thread guide (C) as illustrated.
4. Guide the thread through the hole in the bobbin (D) from
the inside to the outside.
5. Push the bobbin spindle to the right. A pop-up message
appears on the GraphicDisplay/TouchScreen. Hold the
end of the thread fi rmly when starting to wind. Press the
foot control to start winding. Once the bobbin begins to
wind, cut the excess thread. When the bobbin is full it will
stop rotating. Push the bobbin spindle back to the left,
remove the bobbin and cut off the thread on the thread
cutter.
Note: When using an earlier version of HUSQVARNA VIKING
®
bobbins that do not have a hole, wind several turns of thread clockwise
on the bobbin to get started.
E
F
G
1.2.
3.4.
I
H
Getting Ready to Sew – 19
WINDING THE BOBBIN USING
THE AUXILIARY SPOOL PIN
1. Place an empty bobbin on the bobbin spindle on the top
of the machine. The bobbin only fi ts on one way, with
the logo facing up. Use only original HUSQVARNA
VIKING
®
bobbins.
2. Fold out the auxiliary spool pin. Place a spool cap and a
felt pad under the spool.
3. Bring the thread over and behind the pre-tension thread
guide (A) and down around the thread tension disc (B),
then through thread guide (C) as illustrated.
4. Guide the thread through the hole in the bobbin (D) from
the inside to the outside.
5. Push the bobbin spindle to the right. A pop-up message
appears on the GraphicDisplay/TouchScreen. Hold the
end of the thread fi rmly when starting to wind. Press the
foot control to start winding. Once the bobbin begins to
wind, cut the excess thread. When the bobbin is full it will
stop rotating. Push the bobbin spindle back to the left,
remove the bobbin and cut off the thread on the thread
cutter.
INSERTING THE BOBBIN
Press the ON/OFF switch to OFF.
1. Remove the bobbin cover by sliding it towards you.
2. Place the bobbin in the bobbin case. It drops in only one
way with the logo facing up. The thread unreels from the
left of the bobbin. The bobbin will then rotate counter-
clockwise when you pull the thread.
3. Place your fi nger on the bobbin to keep it from turning as
you pull the thread fi rmly to the right and then to the left
into the tension spring (E) until it “clicks” into place.
4. Continue threading around (F) and to the right of the
thread cutter (G). Slide on the bobbin cover (H). Pull the
thread to the left to cut (I).
A
B
C
D
1
2
3
20 – Getting Ready to Sew
THREAD TENSION, 650
Use the recommended top thread tension setting given on
the GraphicDisplay. You might need to adjust the top thread
tension for special threads, fabrics and/or techniques. To set
the tension, turn the numbered tension dial. The higher the
number the tighter the tension.
Normal top thread tension is set to 4-6. When sewing
buttonholes and decorative stitches set thread tension to
around 3. When topstitching with a heavy weight thread
in thick fabric, increase the tension to 7-9. Thread tension
recommendation is always given on the GraphicDisplay for
the selected stitch and fabric.
Make a few tests on a scrap piece of the fabric you are going
to sew and check the tension.
AUTOMATIC THREAD TENSION, 670
The 670 model automatically sets the best thread tension
for the selected stitch and fabric. The thread tension can be
adjusted for specialty thread, techniques or fabric. Touch + to
increase the thread tension and - to decrease it.
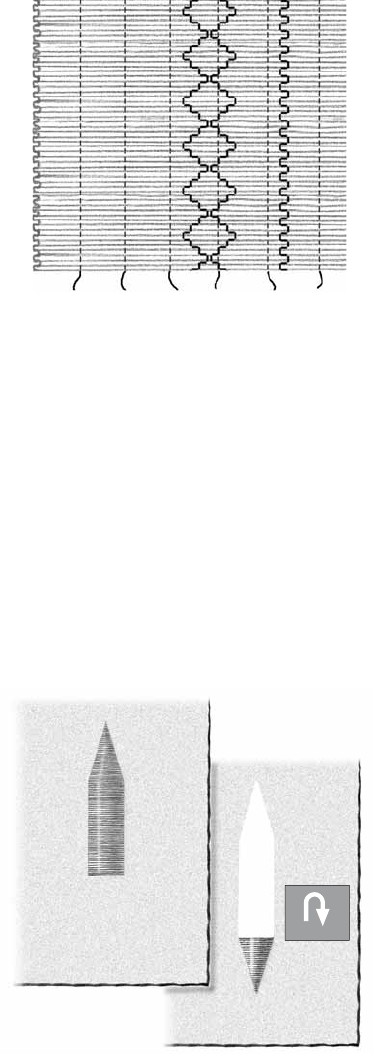
Correct and Incorrect Thread Tension
To understand the correct thread tension, sew a few sample
straight stitches at different settings.
1. Begin with a tension that is too loose, i.e. set at the lowest
number. The bobbin thread will lie straight and the top
thread will be drawn to the underside of the fabric.
2. If you set the tension at the highest number, the bobbin
thread will be visible on the top side of the fabric. The
seam may pucker and the top thread might break.
3. The correct thread tension is set when the threads interlock
in between both fabric layers or, in the case of decorative
stitches, on the underside.
STARTING TO SEW
A straight stitch is selected by default when you turn on the machine. Before starting to sew, select your fabric quality in the
Exclusive SEWING ADVISOR™ feature, and set yout machine according to the recommendations on the GraphicDisplay/
TouchScreen (page 46).
To start sewing, place top and bobbin thread under the presser foot and to the back. For best results when beginning at the
edge of the fabric, place a fi nger on the threads to hold them in place as you begin.
Place fabric in position under the presser foot. Lower the presser foot and step on the foot control to begin sewing. Guide the
fabric gently with your hands as the machine is feeding.
See page 26 (650)/35 (670) for reference on how to select another stitch or how to use the Exclusive SEWING ADVISOR™
feature (page 46).
OPERATING YOUR SEWING MACHINE
213
5
4
6
22 – Operating your Opal
™
650
1. STOP
STOP is used to conclude a stitch or to sew just one unit of
the stitch. Your sewing machine ties off the thread and stops
automatically when one stitch unit or stitch program has
been completed. STOP is cancelled once you have used the
function. Press again if you wish to activate it once more.
When activated, a STOP icon is visible on the GraphicDisplay.
STOP is also used to repeat the same size darning and bartack
stitch.
Tip: If you want to repeat the STOP function for a stitch unit several
times in a row you can save the stitch with a STOP at the end in a
program (see Programming, page 27).
2. FIX
By using the FIX function you can lock the stitch at the
beginning and/or at the end. Press FIX agian to turn off the
function.
When activated, a FIX icon is visible on the GraphicDisplay.
The FIX function is automatically activated when a stitch is
selected or when STOP has been used. You can turn off the
automatic FIX function in the SET Menu, see page 30.
The FIX function can be programmed (see page 27).
3. Needle Stop Up/Down
Press Needle Stop Up/Down to move the needle down or up.
The setting of the needle stop position is changed at the same
time.
An arrow pointing up or down, next to the needle on the
GraphicDisplay indicates if Needle Stop Up or Needle Stop
Down is selected.
You can also tap the foot control to raise or lower needle.
4. SPEED
All stitches in your sewing machine have a pre-set,
recommended sewing speed. Pres
s SPEED + or SPEED
–
to
increase or decrease the sewing speed. There are fi ve speed
levels. The speed level is shown on the GraphicDisplay. You
cannot select a higher speed than the default max speed for
the selected stitch.
5. START/STOP
Press START/STOP to run and stop the machine without the
foot control. Press once to begin sewing and press again to
stop sewing.
6. Reverse
Press Reverse while sewing and the machine will sew in
reverse until released. Then your sewing machine will sew
forward. For permanent reverse, press Reverse once before
starting to sew. Your sewing machine sews in reverse until you
press Reverse again.
When activated, a reverse icon is visible on the
GraphicDisplay.
Reverse is also used when sewing buttonholes, bartacks and
darning to step between the parts of the stitch.
FUNCTION PANEL, 650
Operating your Opal
™
650 – 23
FUNCTIONS ON THE TOUCH PANEL
7. ALT (Alternate View)
When you select a satin stitch the length and width settings
will be shown on the GraphicDisplay. By pressing ALT the
density setting will be shown instead of the length setting.
8. Stitch Length/Density
When you select a stitch, your machine automatically sets
the best stitch length. The stitch length is visible on the
GraphicDisplay. You can change the stitch length by pressing
–
or +.
If you have selected a buttonhole the GraphicDisplay will
show the density setting instead of the stitch length setting.
You will now be able to change the density setting by pressing
–
or +.
If you press the ALT the GraphicDisplay will show the density
setting for satin stitches. Use the
–
and + to change the setting.
9. Stitch Width/Needle position
The stitch width is set in the same manner as the stitch length.
The preset width is visible on the GraphicDisplay. The width
can be adjusted between 0 and 7 mm. Some stitches have a
limited stitch width.
If a straight stitch is selected,
–
and + are used to move the
needle to the left or right in 29 positions.
10. Mirror Side to Side
Press to mirror the selected stitch side to side. In straight
stitch, with a left needle position, touching this icon will move
the needle from the left to the right symmetrically across
the center position. If pressed in Sewing Mode for stitch
programs, the whole stitch program is mirrored. The change is
visible on the GraphicDisplay.
11. Navigator Arrows
Make your selections with the Navigator Arrows and confi rm
your selections or changes with OK.
Use the left/right Navigator Arrows to select stitches step by
step in numerical order within the selected stitch menu.
The Navigator Arrows are also used when programming to
select stitches within the program or to select letters to insert
in the program.
The up and down Navigator Arrows are also used to set the
size of a buttonhole and to set the number of stitches when
sewing on a button.
12. Stitch Selection Numbers
By pressing one digit or two digits in quick succession you will
be able to select a stitch from the selected stitch menu. If the
stitch number does not exist in the selected stitch menu, the
machine beeps.
13. Stitch Menu
Press to open the Stitch Selection Menu.
14. Font Menu
Press to open the Font Menu to select a font.
15. CLR (Clear)
Press CLR to delete a single stitch or all stitches in a stitch
program. Or use it to delete your saved stitches and stitch
programs in the My Stitches Menu.
16. Shift to Upper-Case, Lower-Case or Numbers
Press to shift to lower or upper-case or numbers when
programming letters.
17. PROG (Program Mode)
Press PROG to open the mode for programming. Press the
button again to exit the program mode.
18. Save to My Stitches
Press to open the menu where you can save your own personal
stitches or stitch programs. Press again to exit the My Stitches
mode.
12
10
13
987
14
1516
1718
19
20
11
12
13
14
24 – Operating your Opal
™
650
19. SET Menu
Press to open the menu for machine settings. Make changes and selections by using the Navigator Arrows (11). Press again to
exit the SET Menu. Read more about the settings made in the SET Menu on page 30.
20. Exclusive SEWING ADVISOR™
The Exclusive SEWING ADVISOR™ feature sets the best stitch, stitch length, stitch width and sewing speed for the
selected fabric and sewing technique. The stitch is shown on the GraphicDisplay with presser foot, presser foot pressure,
thread tension and needle recommendations. Press the symbols for the fabric you are using and the sewing technique you wish
to sew (see page 46).
SEWING MODE, 650
Sewing Mode is the fi rst view on the GraphicDisplay after you turn on the machine. Here you will fi nd all the basic information you
need to start sewing. This is also the menu where you adjust the settings of your stitch. Straight stitch is selected by default.
Note: When the value for stitch length/width/density or needle position is set to default the fi gures will be black. If you change the value, the fi gures
will be inverted on a black background.
Normal Sewing Mode, Straight stitch
Normal Sewing Mode, Decorative stitch
1
2
3
5
6
8
9
11
4
1. Recommended needle for the selected fabric. An arrow
next to the needle icon indicates if needle up/down is
selected.
2. Recommended thread tension for the selected fabric and
stitch.
3. Recommended presser foot for the selected stitch.
4. The sewing speed is indicated by fi ve levels shown on the
GraphicDisplay. Reduce or increase the speed by pressing
SPEED
+
or SPEED – (see page 22).
5. The fabric and sewing technique selected on the Exclusive
SEWING ADVISOR™ feature.
6. Recommended presser foot pressure.
7. The selected stitch, both illustrated and displayed by
number.
8. Stitch length. Reduce or increase the stitch length by
pressing – or
+
(see page 23).
9. Needle position is shown instead of stitch width when
straight stitch is selected. Change the needle position by
pressing
–
or + (see page 23).
10. Indicates that a Stretch 90 needle should be used.
11. Recommendation to use stabilizer under your fabric.
12. Recommendation to use self adhesive glide plates (see page
5).
13. Stitch width. Reduce or increase the stitch width by
pressing
–
or + (see page 23).
14. Indicates that the function Mirror Side to Side is activated.
10
7
Operating your Opal
™
650 – 25
Sensor One-Step Buttonhole
Manual Buttonhole
Sewing on button
17
18
16
20
21
15. When sewing buttonholes in stretch fabric we recommend
to cord the buttonhole for better durability, see page 51.
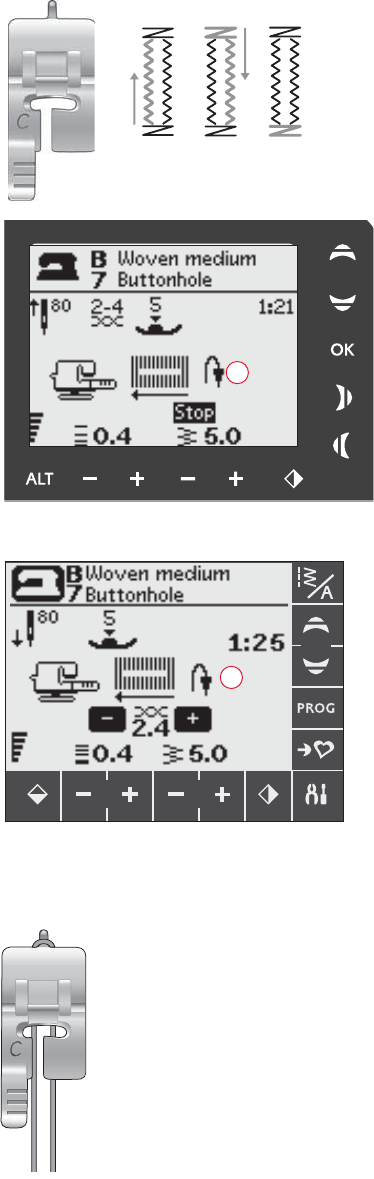
16. When sewing a manual buttonhole or the darning program
the reverse icon is shown to indicate that you need to press
Reverse when the buttonhole columns or the darning stitch
are sewn to the desired length.
17. Stitch density is shown instead of stitch length when a
buttonhole, bartack or darning stitch is selected or when
a satin stitch is selected and ALT is pressed. Reduce or
increase the stitch density by pressing Stitch Length
–
and +.
18. Buttonhole size indication when using the Sensor One-
Step Buttonhole Foot. Set the size of the button by
pressing the up and down Navigator Arrows. Confi rm with
OK.
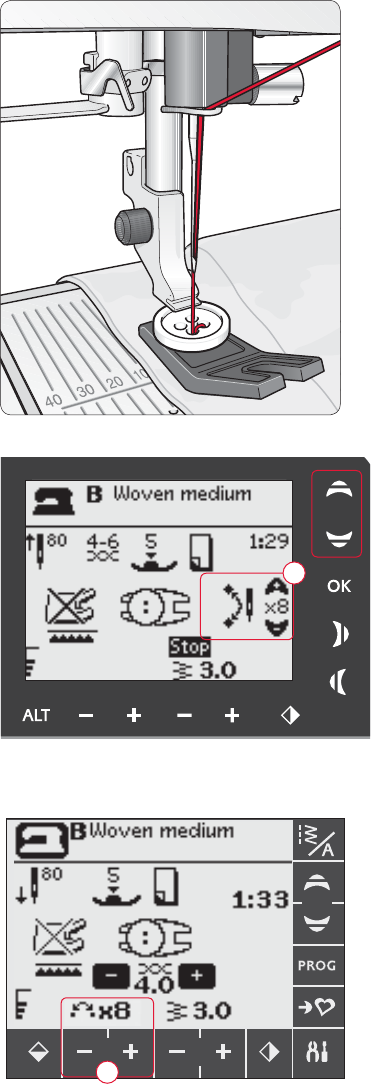
19. The icon for lowering the feed teeth is shown when sewing
on buttons is selected.
20. Set the number of stitches to sew on the button by
pressing the up and down Navigator Arrows.
21. Recommendation to use the multipurpose tool (optional
accessory, part number 4131056-01) when sewing on a
button. Place the thin end of the multipurpose tool under
the button when sewing on light fabrics. Use the thick end
for heavier fabrics.
15
19
213
45
A
B
26 – Operating your Opal
™
650
SELECTING A STITCH
Press Stitch Menu (A) to select a stitch menu. Use the Navigator
Arrows to select among the menus:
1. Utility stitches
2. Quilt stitches
3. Decorative stitches
4. Decorative stitches
5. My Stitches
The
name and number of the selected menu is shown at the
bottom of the display. The stitches are pictured inside the lid of
your machine with the menu numbers on the left and the stitch
numbers within the menus across the center.
When you have selected the menu, press the number of the stitch
you wish to use with the Stitch Selection Numbers, or press OK
and the fi rst stitch in the selected menu will be selected.
By pressing two digits in quick succession you will be able to
select a stitch from 10 and up from the selected stitch menu. If
the stitch number does not exist in the selected menu you will
hear a beep and the fi rst entered digit will be selected as a stitch.
Press Stitch Menu again to close the selection menu without
making any selection.
The selected stitch menu, stitch and stitch number will be visible
on the GraphicDisplay in Sewing Mode. To select another stitch
in the same menu just press the number of the stitch or use
the left and right Navigator Arrows to step stitch by stitch in
numerical order. To select a stitch in another menu you will fi rst
need to change stitch menu and then select the stitch.
SELECTING A FONT
Press Font Selection Menu (B) to show and select among the
different fonts. Use the Navigator Arrows to select among the
fonts:
Block, Cyrillic, Hiragana
Press OK, this automatically opens the mode for programming
letters, see page 27.
C
Operating your Opal
™
650 – 27
PROGRAMMING 650
The Programming function on your machine makes it possible
to create stitches with your own personal settings and to
combine stitches and letters into stitch programs. You can add
up to 20 stitches and letters in the same program. Save your
own stitches and programs in My Stitches and recall them any
time you like.
All stitches in your sewing machine are programmable except
for buttonholes, darning, button sewing and bartacks.
Create a Stitch Program
1. Press PROG (C) to open the mode for Programming.
2. The stitch menu which was previously selected will be kept
when entering the Programming mode. To change the
stitch menu see page 26.
3. Select the stitch you wish to use. The stitch will appear in
Programming Mode.
4. Select the next stitch and it will appear to the right of the
last entered stitch.
Note: Two numbers are displayed above the stitch program on the left side
of the GraphicDisplay.
The fi rst number is the position of the selected stitch in the program. The
second number, put in brackets, is the total number of stitches in the
program. The number above the stitch program on the right side of the
GraphicDisplay is the number of the selected stitch.
Add Letters
5. Select a font and press OK. The machine will show the
upper case alphabet in Programming Mode.
6. Use the Navigator Arrows to select a letter and press OK
to add the letter to the program.
7. To switch to a lower case alphabet or numbers press Shift
(see page 23).
About Programming Letters
Both upper and lower case letters will be stitched with a
7 mm stitch width. If there are letters going below the
baseline included in the program (e.g. j, p, y) the height of the
uppercase letters will be reduced.
All text to be sewn out on the same project should, if possible,
be in the same program to ensure the letters are sewn out in
the same height.
Programming Mode
“Husqvarna” and “VIKING” are in the same program.
“Husqvarna” and “VIKING” have been programmed separately.
28 – Operating your Opal
™
650
Add Stitches or Letters at other Positions
If you wish to add a stitch or letter at another position in the program, move the cursor by pressing the Navigator Arrows.
The stitch or letter will be inserted to the right of the cursor.
Note: When programming letters, press the down Naviagtor Arrow to activate the cursor in the stitch program instead of in the alphabet.
Add the Same Stitch Several Times
If you want to add the same stitch several times in a row you can just press OK directly after the fi rst stitch has been inserted.
The same stitch will be inserted each time you press OK.
You can also move the cursor to select another stitch and press OK. The selected stitch will be inserted once more to the right
of the selected stitch.
Delete Stitches or Letters
To delete a stitch in the program, select the stitch with the cursor by pressing the Navigator Arrows and press CLR.
To delete the whole program, move the cursor to the left of the fi rst position and press CLR. A pop-up will appear asking you
to verify the deletion. Select Yes or No with the Navigator Arrows and press OK.
Add commands
Adjust a single stitch or letter
Add Commands
The FIX and STOP functions can be added to the program. Each command
takes one memory space in the program. To add any of the above functions to
your program just press the corresponding function on the Function Panel (see
page 22)
Note
: If autofi x is activated on your machine you do not need to add a FIX in the beginning
of the program.
Join Two Stitch Programs Into One
You can add a previously saved program to a new one in Programming Mode.
Press Stitch Menu, select My Stitches and the program you wish to add. Press
OK and the program will be inserted in Programming Mode to the right of
the cursor.
Adjust a Single Stitch or Letter
To adjust the settings of a single stitch in a program you must select the stitch
in Programming Mode. You can adjust the stitch width, stitch length, density,
needle position or mirror the stitch. The settings for the selected stitch are
shown on the GraphicDisplay. Press ALT to toggle between different settings.
Adjust the Entire Stitch Program
Adjustments that affect the whole program and not just single stitches, are
done in Sewing Mode. Press PROG to leave Programming Mode and switch to
Sewing Mode. In Sewing Mode you can adjust the width and length or mirror
the whole program.
There are a few things you need to know when adjusting the stitch program in
Sewing Mode:
The adjustments you make to the program in Sewing Mode can be saved to My
Stitches. However, these adjustments cannot be brought back to Programming
Mode. If you have made adjustments in Sewing Mode and press PROG to go
back to Programming Mode, these adjustments will be cancelled. This will also
happen if you load a saved program from My Stitches to Programming Mode.
D
Operating your Opal
™
650 – 29
Sew out the Stitch Program
When you are done with your program press My Stitches to save it
(see below) or, if still in Programming Mode, press PROG or step on
the foot control to switch to Sewing Mode.
Once you are in Sewing Mode and step on the foot control the
machine will sew out your stitch program. The program will be sewn
continuously if no STOP is programmed. Press STOP to sew your
stitch program only once.
It is possible to start sewing at any stitch in the program. Use the left/
right Navigator Arrows to step through the program in Sewing Mode.
MY STITCHES MENU
My Stitches is your own personal menu where you can save and recall
your programs or favorite stitches with personal settings.
Model 650 has 4 memories. Each memory has a maximum space of
20 stitches.
Save a Stitch or a Program
Press My Stitches (D) from Programming or Sewing Mode. This will
open the My Stitches Menu. Select an empty memory by pressing the
up/down Navigator Arrows. Confi rm your selection by pressing OK.
If the selected memory is not empty, a pop-up message will appear
asking if you wish to overwrite the previously saved stitch/program
with the new one. Select Yes or No with the Navigator Arrows and
press OK. Press My Stitches again to return to Sewing Mode or
Programming Mode.
Load a Saved Stitch or Program
To load a saved stitch or program from My Stitches, press Stitch
Selection Menu and open the My Stitches Menu. Use the Navigator
Arrows to select the stitch or program and press OK. The stitch/
program will appear in Sewing Mode ready to be sewn.
Delete Saved Stitches or Programs
To delete a stitch or a program from My Stitches, press CLR when the
stitch/program is selected. A pop up will appear asking you to verify
the deletion. Select Yes or No with the Navigator Arrows and press
OK. Press My Stitches again to return to the previous menu.
Sewing Mode
E
30 – Operating your Opal
™
650
SET MENU
You can change the pre-set machine settings and make
manual adjustments to the automatic functions in the SET
Menu. Open the menu by pressing SET Menu (E). Select the
setting you wish to adjust by pressing the up/down Navigator
Arrows. To activate the function, press OK to place an X in
the box. To cancel the function, press OK again to leave the
box empty. Use the right/left Navigator Arrows to change
the number settings by toggling through the available options.
Press SET Menu again to close the SET Menu.
Note: When a number is set to default the fi gures will be black. If you
change the number the fi gures will be inverted on a black background.
FIX Auto
Press OK to turn on or off the automatic FIX function in the
beginning of each stitch. The setting will go back to default
when the machine is turned off.
Twin Needle
If you are using a twin needle, set the size of the needle to
limit the width of all stitches and prevent needle breakage.
Activate or deactivate the twin needle function with OK and
use the left/right Navigator Arrows to set the twin needle size.
Your setting will be saved also when the machine is turned off.
A pop-up message reminds you of the setting when you turn
on the machine. Close the pop-up message by pressing OK.
Note
: You cannot set the twin needle size if the Stitch Width Safety
is on, or turn on the Stitch Width Safety if the machine is set for twin
needle.
Stitch Width Safety
Use OK to turn on the Stitch Width Safety when using a
straight stitch needle plate or a straight stitch presser foot.
The stitch width will be limited to zero for all stitches to
prevent damage to the needle, presser foot and needle plate.
This setting is saved when the machine is turned off. A pop-
up message reminds you of the setting when you turn on the
machine. Close the pop-up message by pressing OK.
Buttonhole Balance
If the Sensor One-Step Buttonhole Foot is not connected or
if you select stitch 1:24, the columns in the buttonhole stitch
will be sewn in different directions. On some fabrics this may
cause the columns to appear with different density.
Use the left/right Navigator Arrows to balance the density
between -7 and 7.
The changes only affect the selected stitch. If another stitch is
selected or the same stitch is selected again, the value is reset
to the default value.
Audible Alarm
Turns on or off all alarm sounds of the machine. Default
setting is on. This setting is saved even if the machine is
turned off.
Contrast
Adjust the contrast of the GraphicDisplay by using the left/
right Navigator Arrows.
The value can be set between –20 to 20 in steps of 1. The
setting is stored even when the machine is turned off.
Language
Use the left/right Navigator Arrows to change the language
of all text in your machine.
The language setting is saved even if the machine is turned
off.
Software Version
The software version currently loaded for the sewing machine
is displayed.
OPERATING YOUR SEWING MACHINEOPERATING YOUR SEWING MACHINE
32 – Operating your Opal
™
670
1. STOP
STOP is used to conclude a stitch or to sew just one unit of
the stitch. Your sewing machine ties off the thread and stops
automatically when one stitch unit or stitch program has been
completed. The LED next to STOP is lit when the function is
activated. STOP is cancelled once you have used the function.
Press again if you wish to activate it once more.
STOP is also used to repeat the same size darning, bartack and
Automatic Tapering stitch with the same size.
Tip: If you want to repeat the STOP function for a stitch unit several
times in a row you can save the stitch with a STOP at the end in a
program (see Programming, page 25).
2. FIX
By using the FIX function you can lock the stitch at the
beginning and/or at the end. The LED next to FIX is lit when
FIX is activated. Press FIX to turn off the function.
The FIX function is automatically activated when a stitch is
selected or when STOP or the Thread Cutter has been used.
You can turn off the automatic FIX function in the SET
Menu, see page 30.
The FIX function can be programmed (see page 27).
3. Thread Cutter
Press the Thread Cutter and your machine ties off the threads
and cuts the top and bottom threads and activates the FIX
function for the next start. To cut threads at the end of a
stitch or stitch program, press the Thread Cutter while sewing.
The LED next to the Thread Cutter starts fl ashing indicating
that a cut is requested. When the stitch or stitch program is
completed, the upper thread and bobbin will be cut and the
thread ends are automatically pulled to the underside of the
fabric.
The Thread Cutter function can be programmed (see page 27).
4. Needle Stop Up/Down
Press to move the needle up or down. The setting of the
needle stop position is changed at the same time.
An arrow pointing up or down next to the needle on the
TouchScreen indicates if Needle Stop Up or Needle Stop
Down is selected.
You can also tap the foot control to raise or lower needle.
5. SPEED
All stitches in your sewing machine have a pre-set,
recommended sewing speed. Press SPEED + or SPEED
–
to
increase or decrease the sewing speed. There are fi ve speed
levels. The speed level is shown on the TouchScreen. You
cannot select a higher speed than the default max speed for
the selected stitch.
6. START/STOP
Press START/STOP to run and stop the machine without the
foot control. Press once to begin sewing and press again to
stop sewing.
Note: Press SPEED + or SPEED
–
to increase or decrease the sewing
speed.
7. Reverse
Press Reverse while sewing and the machine will sew in reverse
until released. Then your sewing machine will sew forward.
The LED next to Reverse is lit when reverse is activated.
For permanent reverse, press Reverse once before starting
to sew. Your sewing machine sews in reverse until you press
Reverse again.
Reverse is also used when sewing buttonholes, bartacks,
darning and automatic tapering stitches to step between the
parts of the stitch.
FUNCTIONS, 670
21354
6
7
Operating your Opal
™
670 – 33
FUNCTIONS ON THE TOUCHSCREEN
1. Exclusive SEWING ADVISOR™
The Exclusive SEWING ADVISOR™ feature sets the best
stitch, stitch length, stitch width, sewing speed and thread
tension for the selected fabric and sewing technique
(see page 46).
Touch the Fabric/Techniques tabs and make your selection
by touching the fabric/technique you want to use. Touch the
arrow in the upper left corner of the TouchScreen to exit the
Exclusive SEWING ADVISOR™ feature
The stitch is shown on the TouchScreen with presser foot,
presser foot pressure and needle recommendations.
2. Thread Tension
The best thread tension for the selected stitch and fabric is set
automatically. The thread tension can be adjusted for specialty
threads, techniques or fabric. Touch + to increase the thread
tension and – to decrease it.
3. Mirror End to End
Touch to mirror the selected stitch end to end. If touched in
Sew Out Mode for stitch programs, the whole stitch program
is mirrored. The change is visible on the TouchScreen.
4. Stitch Length/Density
When you select a stitch, your machine automatically sets
the best stitch length. The stitch length is visible on the
TouchScreen. You can change the stitch length by touching
the – or + icons.
If you have selected a buttonhole the TouchScreen will show
the density setting instead of the stitch length setting. You will
now be able to change the density setting by touching
–
or +.
If you press Alt (6) when a satin stitch is selected, the
TouchScreen will show the density setting. Touch
–
or + to
change the density.
5. Stitch Width/Needle position
The stitch width is set in the same manner as the stitch length.
The preset width is visible on the TouchScreen. The width can
be adjusted between 0 and 7 mm. Some stitches have a limited
stitch width.
If a straight stitch is selected,
–
and + are used to move the
needle to the left or right in 29 positions.
6. Alt (Alternate View)
Touch the Alt icon to show the stitch density instead of the
stitch length when a satin stitch is selected.
7. Mirror Side to Side
Touch to mirror the selected stitch side to side. In straight
stitch, with a left needle position, touching this icon will move
the needle from the left to the right symmetrically across
the center position. If touched in Sew Out Mode for stitch
programs, the whole stitch program is mirrored. The change is
visible on the TouchScreen.
8. Stitch/Font Menu
Touch the Stitch/Font Menu icon, to open the stitch selection
window. There are three tabs, Stitch Menu, My Stitches Menu
and Font Menu.
See page 35 for more information on how to select a stitch/
font.
9. Navigator Arrows
Use the up/down arrows to scroll up and down in a list of
selections.
10. Program Mode
Touch to open the mode for programming. Touch again to
exit the program mode.
11. Save to My Stitches
Touch to open the menu where you can save your own
personal stitches or stitch programs. Touch again to exit the
My Stitches menu.
12. SET Menu
Touch to open the menu for machine settings. Make changes
and selections by touching the boxes next to each function.
Scroll up and down with the Navigator arrows (9). Touch the
SET-Menu icon again to exit the SET Menu.
2
1
354
6
7
12
10
11
8
9
34 – Operating your Opal
™
670
SEWING MODE, 670
Sewing Mode is the fi rst view on the TouchScreen after you turn on the machine. Here you will fi nd all the basic information you
need to start sewing. This is also the menu where you adjust the settings of your stitch. Straight stitch is selected by default.
Sensor One-Step Buttonhole
Normal Sewing Mode, Straight stitch
Manual Buttonhole
Normal Sewing Mode, Decorative stitch
9
1. The fabric and sewing technique selected on the Exclusive SEWING
ADVISOR™ feature. Touch to change your selection.
2. Recommended needle for the selected fabric. An arrow indicates if
needle up/down is selected.
3. Recommended presser foot pressure.
4. Recommended presser foot for the selected stitch.
5. Thread tension setting for the selected fabric and stitch. Touch + or
–
to adjust the thread tension.
6. The sewing speed is indicated by fi ve levels shown on the
TouchScreen. Reduce or increase the speed by pressing SPEED + or
SPEED
–
.
7. Reduce or increase the stitch length by touching the Stitch Length –
and + icons.
8. The selected stitch, both illustrated and displayed by number.
9. When straight stitch is selected, change the needle position by
touching the Stitch Width – and + icons.
10. Recommendation to use stabilizer under your fabric.
11. When you select a satin stitch the length and width settings will be
shown on the TouchScreen. By touching Alt the density setting will
be shown instead of the length setting.
12. Recommendation to use self-adhesive glide plates (see page 5).
13. Reduce or increase the stitch width by touching the Stitch Width
–
and + icons.
14. Indicates that a Stretch 90 needle should be used.
15. Stitch density is shown instead of stitch length when a buttonhole,
bartack or darning stitch is selected or when a satin stitch is selected
and the Alt icon is touched. Reduce or increase the stitch density by
touching the Stitch Length
–
and + icons.
16. When sewing buttonholes in stretch fabric we recommend to cord
the buttonhole for better durability, see page 51.
17. When sewing a manual buttonhole, the darning program or
automatic tapering stitches, the reverse icon is shown to indicate that
you need to press Reverse when the buttonhole columns, the darning
stitch or the automatic tapering stitch are sewn to the desired length.
18. Buttonhole size indication when using the Sensor One-Step
Buttonhole Foot. Set the size of the button by touching
–
or +.
8
13
12
2
4
1
3
5
7
11
10
6
15
14
17
16
18
Operating your Opal
™
670 – 35
SELECTING A STITCH
The stitches available are pictured inside the lid of your machine with
the menu numbers on the left and the stitch numbers within the menus
across the center.
Touch the Stitch/Font Menu icon (A) to open the stitch/font selection
window. There are three tabs to choose from – Stitches, My Stitches and
Fonts. The last used tab is active when opening the Stitch/Font menu.
Touch the Stitches tab.
Touch to select any of the four menus. The number of the selected menu
is shown above the stitch menus.
SELECTING A FONT
Touch the Stitch/Font Menu icon to open the Stitch/Font selection
window. Touch the Font tab. Touch the font you wish to use, the mode
for programming letters is automatically opened, see page 36.
There are four fonts to choose from; Block, Brush Line, Cyrillic and
Hiragana.
Sewing on button
19. The icon for lowering the feed teeth is shown when sewing on
buttons is selected.
20. Set the number of stitches to sew on the button by touching the
–
and + icons.
21. Recommendation to use the multipurpose tool (optional accessory,
part number 4131056-01) when sewing on a button. Place the thin
end of the multipurpose tool under the button when sewing on light
fabrics. Use the thick end for heavier fabrics.
When you have selected a menu, select the stitch you wish to use by touching the corresponding number on the stitch selection
numbers (B). Touch delete (C) if you touch the wrong number. Confi rm your selection by touching OK. The stitch selection
menu is closed and the stitch is selected.
If you touch OK without making a stitch selection, the machine beeps indicating that you need to make a selection.
If no selection is made, close the stitch/font selection window again by touching the Stitch/Font menu icon.
If the stitch number entered does not exist in the selected menu you will hear a beep.
The selected stitch menu, stitch and stitch number will be visible on the TouchScreen in Sewing Mode. To select another stitch
in the same menu just touch the Navigator Arrows to move stitch by stitch in numerical order. You can also open the Stitch/
Font menu and make a direct selection by touching the corresponding digits on the screen. To select a stitch in another menu
you will fi rst need to change stitch menu and then select the stitch.
21
19
20
A
B
C
36 – Operating your Opal
™
670
PROGRAMMING 670
The Programming function on your machine makes it possible to create stitches with your own personal settings and to
combine stitches and letters into stitch programs. You can add up to 20 stitches and letters in the same program. Save your
own stitches and programs in My Stitches and recall them any time you like.
All stitches in your sewing machine are programmable except for buttonholes, darning, Automatic Tapering Stitches, button
sewing and bartacks.
Programming Mode
“Husqvarna” and “VIKING” are in the same program.
“Husqvarna” and “VIKING” have been programmed separately.
Create a Stitch Program
1. Touch the PROG icon to open the mode for
Programming.
2. The stitch menu which was previously selected will be kept
when entering the Programming mode. To change the
stitch menu, see page 35.
3. Select the stitch you wish to use. The stitch will appear on
the TouchScreen (A).
4. Select the next stitch and it will appear to the right of the
last entered stitch.
Note: Two numbers are displayed on the TouchScreen below the stitch
program between the selection arrows (B). The fi rst number is the position
of the selected stitch in the program. The second number, put in brackets,
is the total number of stitches in the program.
The number above the stitch program (C) on the right side of the
TouchScreen is the number of the selected stitch.
Add Letters
5. Select a font and the machine will show the upper case
alphabet in Programming Mode.
6. Touch to select a letter and to add the letter to the
program.
7. To switch to a lower case alphabet or numbers touch the
Navigator Arrows (F).
About Programming Letters
Both upper and lower case letters will be stitched with a
7 mm stitch width. If there are letters going below the
baseline included in the program (e.g. j, p, y) the height of the
uppercase letters will be reduced.
All text to be sewn out on the same project should, if possible,
be in the same program to ensure the letters are sewn out in
the same height.
Add Stitches or Letters at other Positions
If you wish to add a stitch or letter at another position in the
program, move the cursor by touching the arrow icons (D).
The stitch or letter will be inserted to the right of the cursor.
A. Stitch program
B. Position of selected stitch in the program/
total number of stitches in program
C. Selected stitch and stitch menu.
D. Selection arrows used to step through the
program
E. Delete the selected stitch
C
D
E
F
B
A
Operating your Opal
™
670 – 37
Delete Stitches or Letters
To delete a stitch in the program, select the stitch with the cursor by touching the arrow icons and then touch the delete
icon (E).
To delete the whole program, you can either touch and hold Delete (long touch) or move the cursor to the left of the fi rst
position and touch the delete icon. A pop-up will appear asking you to verify the deletion. Select Yes or No with a touch
and confi rm with OK.
Add commands
Adjust a single stitch or letter
Add Commands
The commands FIX, STOP and Thread Cut can be added to
the program. Each command takes one memory space in the
program. To add any of the above functions to your program
just press the corresponding function on the Function Panel
(see page 32).
Note: If autofi x is activated on your machine you do not need to add a
FIX at the beginning of the program.
Join Two Stitch Programs into One
You can add a previously saved program to a new one in
Programming Mode. Touch the Stitch/Font Menu icon, select
My Stitches and the program you wish to add. The program
will be inserted in Programming Mode to the right of the
cursor.
Adjust a Single Stitch or Letter
To adjust the settings of a single stitch in a program you must
select the stitch in Programming Mode. You can adjust the
stitch width, stitch length, density or mirror the stitch. The
settings for the selected stitch are shown on the TouchScreen.
Touch Alt to toggle between different settings.
Adjust the Entire Stitch Program
Adjustments that affect the whole program and not just single
stitches, are done in Sewing Mode. Touch the PROG icon
to leave Programming Mode and switch to Sewing Mode. In
Sewing Mode you can adjust the width and length or mirror
the whole program.
There are a few things you need to know when adjusting the
stitch program in Sewing Mode:
The adjustments you make to the program in Sewing Mode
can be saved to My Stitches. However, these adjustments
cannot be brought back to Programming Mode. If you have
made adjustments in Sewing Mode and touch the PROG icon
to go back to Programming Mode, these adjustments will be
cancelled. This will also happen if you load a saved program
from My Stitches to Programming Mode.
If you have programmed a STOP, FIX or Thread Cut and
mirror the program end to end, the commands will change
positions just as the stitches. This might not give the result you
intended.
38 – Operating your Opal
™
670
Sew Out the Stitch Program
When you are done with your program touch the My Stitches
icon to save it (see below) or, if still in Programming Mode,
touch the PROG icon or step on the foot control to switch to
Sewing Mode.
Once you are in Sewing Mode and step on the foot control the
machine will sew out your stitch program. The program will
be sewn continuously if no STOP is programmed. Press the
STOP button to sew your stitch program only once.
Step through your sequence by touching the arrow icons (A).
MY STITCHES MENU
My Stitches is your own personal menu where you can save
and recall your programs or favorite stitches with personal
settings.
Model 670 has 8 memories, each memory has a maximum
space of 20 stitches.
Save a Stitch or a Program
Touch the My Stitches icon from Programming or Sewing
Mode. This will open the My Stitches Menu. Touch to select
an empty memory. If the selected memory is not empty, a
pop-up message will appear asking if you wish to overwrite
the previously saved stitch/program with the new one. Touch
”
” to confi rm your selection. Touch ”” to exit and select
another position. Touch the My Stitches icon again to return
to Sewing Mode or Programming Mode.
Note: If you want to clear a memory, owerite by saving an empty
program.
Load a Saved Stitch or Program
To load a saved stitch or program from My Stitches, touch the
Stitch/Font Menu icon and touch the My Stitches tab. Scroll
up and down to view the memories using the navigator arrows.
Touch to select the saved stitch or program. The stitch/
program will appear in Sewing Mode ready to be sewn.
Sewing Mode
My Stitches menu
Load a saved stitch or program
from My Stitches menu
A
Operating your Opal
™
670 – 39
SET MENU
You can change the pre-set machine settings and make manual adjustments to the automatic functions in the SET Menu. Open
the menu by touching the SET Menu icon (A). To activate a function, touch to place an X in the box. To cancel the function,
touch again to leave the box empty. For some functions, a pop-up window opens for further selection. Touch the SET Menu icon
again to close the SET Menu.
Twin Needle
If you are using a twin needle, set the size of the needle to limit the
width of all stitches and prevent needle breakage.
Touch the twin needle function to open a pop-up window. Touch
the box next to the twin needle size you are using to make your
selection.
Your setting will be saved also when the machine is turned off. A
pop-up message reminds you of the setting when you turn on the
machine. Close the pop-up message by pressing OK.
Note: You cannot set the twin needle size if the Stitch Width Safety is on, or
turn on the Stitch Width Safety if the machine is set for twin needle.
Stitch Width Safety
Touch to turn on the Stitch Width Safety when using a straight
stitch needle plate or a straight stitch presser foot (optional
accessories).
The stitch width will be limited to zero for all stitches to prevent
damage to the needle, presser foot and needle plate. This setting is
saved when the machine is turned off. A pop-up message reminds
you of the setting when you turn on the machine.
FIX Auto
Touch to turn on or off the automatic FIX function in the
beginning of each stitch. The setting is saved even if the machine is
turned off.
Cut Auto
The Thread Cutter will automatically cut the threads after a
buttonhole or eyelet is sewn. Touch to turn off the cut function.
The setting is saved even if the machine is turned off.
Audible Alarm
Turns on or off all alarm sounds of the machine. Default setting is
on. The setting is saved even if the machine is turned off.
Contrast
Touch to open a window to adjust the contrast of the TouchSceen.
Confi rm the adjustment by touching OK
The value can be set between –20 to 20 in steps of 1. The setting is
stored even when the machine is turned off.
Language
Touch to open a pop-up window with language selections that will
change the language of all text in your machine. Scroll up and down
by touching the navigator arrows. Touch to select language and
confi rm by touching OK.
The language setting is saved even if the machine is turned off.
Buttonhole Balance
If the Sensor One-Step Buttonhole Foot is not
connected or if you select stitch 1:28, the columns in the
buttonhole stitch will be sewn in different directions. On
some fabrics this may cause the columns to appear with
different density.
Touch to open a window to adjust the buttonhole
balance. The changes only affect the selected stitch. If
another stitch is selected or the same stitch is selected
again, the value is reset to the default value.
Software Version
The software version currently loaded for the sewing
machine is displayed.
Calibrate TouchScreen
If you touch a function or menu on the TouchScreen
but it does not respond, or if the function next to it is
activated instead, the screen has to be calibrated.
You only need to calibrate the TouchScreen if there is a
precision problem when touching the screen.
Touch Calibrate TouchScreen to open a view for
calibration. Follow the instructions on the screen to
calibrate.
Note: When calibrating the screen, be sure to touch the calibration
areas only, as recommended. If other areas are touched, the screen
can be miscalibrated.
A
40 – Operating your Opal
™
670
POP-UP MESSAGES
42 – Pop-up Messages
POP-UP MESSAGES
Please Lower the Presser Foot
Your machine will not sew if the presser foot is in the up
position. Lower the presser foot. Close the pop-up message
with OK. You can also tap the foot control to close the pop-
up message.
Bobbin Winding On
This pop-up message appears when the bobbin winding
spindle is pushed to the right and bobbin winding is activated.
Machine Set forTwin Needle
When you have set the machine for twin needle in the SET
Menu, a pop-up message is shown to remind you of the
setting when you turn on your machine. Close the pop-up
message with OK.
Stitch Width Limited for Twin Needle
This message is shown when the machine is set for twin
needle and you try to adjust the stitch width to wider than
possible with the twin needle. Close the pop-up message with
OK.
This Stitch Cannot be Sewn with Twin Needle
This pop-up message appears when the machine is set for twin
needle and you select a stitch that cannot be sewn with twin
needle. Close the pop-up message with OK.
Machine Set for Straight Stitch
This message is shown when the stitch width safety is on and
you turn on the machine, select a wide stitch or adjust the
stitch width. Close the pop-up message with OK.
Pop-up Messages – 43
Main Motor Overload
If you are sewing on very heavy fabric or if the machine is blocked
when sewing, the main motor can get overloaded. The pop-up
message will close when the main motor and power supply is
secure.
Sensor One-Step Buttonhole Foot Line Up -
“Adjust White Area to White Line”
When you insert the fabric for sewing a buttonhole, the wheel
of the Sensor One-Step Buttonhole Foot might move. A pop-up
message prompts you to line up the white area with the white line.
Line up the white areas and close the pop-up message with OK.
Sensor One-Step Buttonhole Foot Connected
The Sensor One-Step Buttonhole Foot can only be used for the
buttonhole stitches recommended for the foot. If the Sensor One-
Step Buttonhole Foot is connected and you select a stitch that is
not possible to sew with the foot, this message will appear when
you start to sew. Remove the foot or select a buttonhole that can be
sewn with the Sensor One-Step Buttonhole Foot. Close the pop-up
message with OK.
Restart the Buttonhole?
If you are sewing a buttonhole and stop to adjust the length settings
you will get this question once you start sewing again. If you select
“”, the machine will restart and sew the buttonhole from the
beginning with the new settings. If you select “”, the change will
be cancelled and the machine will continue sewing the rest of the
buttonhole with the previous settings. On the 650, use the left/right
Navigator arrows to select “” or “” and confi rm with OK. On
the 670, touch “” or “” to make your selection.
The Stitch Cannot be Programmed
This message is shown if you try to program or add a buttonhole,
bartack or Automatic Tapering stitches (670) or the sew on button
stitch to a program. All stitches in your sewing machine are
programmable except for these. Close the pop-up message with
OK.
44 – Pop-up Messages
The Stitch Cannot be Saved
This message is shown if you try to save a buttonhole, bartack,
darning or Automatic Tapering stitches (670) or the sew on
button stitch to My Stitches. All stitches in your machine can
be saved in My Stitches except for these. Close the pop-up
message with OK..
Program too Long to Add More Stitches
If you try to add more than 20 stitches or letters in the same
program this message is shown. Close the pop-up message
with OK.
Note: If you add a FIX, STOP or a Thread Cut (670) to the program
these will each use one memory space in the program.
The Combination of Commands is Incorrect
If you are programming stitches or letters and try to insert any
of the functions STOP, FIX or Thread Cut (670) into a stitch
program in an order that is not allowed, this message will
appear. Close the pop-up message with OK.
Commands Removed from Program
If you try to insert a previously saved program into a new one
or if you are using the mirroring end to end function (670)
on the whole program, the result may be that the commands
are put in an order that is not allowed. To avoid this, the
commands will be removed from the program. Close the pop-
up message with OK.
Bobbin Thread Low (Only on 670)
Your machine stops when the bobbin is almost empty. Replace
the empty bobbin with a full one and close the pop-up
message with OK.
Note: Continue sewing without closing the pop-up message if you want all
thread on the bobbin to run out.
Remove Thread from Under Stitch
Plate And In Bobbin Area
(Only on 670)
When this pop-up message appears clean thread and lint from
the area under the stitch plate to allow the Automatic Thread
Cutter to cut properly. Close the pop-up message with OK.
SEWING
46 – Sewing
Woven fabricStretch (knit) fabric
EXCLUSIVE SEWING ADVISOR™
Your sewing machine has the Exclusive HUSQVARNA VIKING
®
SEWING ADVISOR™ feature. The Exclusive SEWING
ADVISOR™ feature automatically sets the best stitch, stitch length, stitch width, sewing speed and thread tension (670) for
your project. The stitch is displayed on the GraphicDisplay/TouchScreen with presser foot, presser foot pressure, thread
tension (650), and needle recommendations.
Select desired fabric type and sewing technique (see explanation on page 47).
EXCLUSIVE SEWING ADVISOR™ on 650
Press the symbols for the fabric you are using and the sewing
technique you wish to sew.
EXCLUSIVE SEWING ADVISOR™ on 670
Touch the Exclusive SEWING ADVISOR™ icon to open
the Exclusive SEWING ADVISOR™ feature. Touch the
Fabric/Techniques tabs and make your selection by touching
the fabric/technique you want to use. Touch the arrow in the
upper left corner of the TouchScreen to exit the Exclusive
SEWING ADVISOR™ feature.
Woven or Stretch (Knit)
The difference between woven and stretch (knit) fabric is the
way the threads are put together. Woven fabrics are made of
two thread systems, warp lengthwise and weft crosswise that
intersect at right angles. A knit fabric is made of one thread
system with interlaced stitches. A knit fabric usually has
stretch.
As a general rule, enter Woven for stable fabrics that have no
stretch and Stretch for fabrics that have stretch.
Leather/Vinyl
Leather is animal skin with the coat (fur) removed. Leather can
be smooth or sueded and has some give.
Vinyl is a synthetic material which often has a woven wrong
side. Vinyl can be smooth or patterned and some vinyl has
Gebruikershandleiding.com neemt misbruik van zijn services uitermate serieus. U kunt hieronder aangeven waarom deze vraag ongepast is. Wij controleren de vraag en zonodig wordt deze verwijderd.
Product:
Spelregels forum
Om tot zinvolle vragen te komen hanteren wij de volgende spelregels:
lees eerst de handleiding door;
controleer of uw vraag al eerder door iemand anders is gesteld;
probeer uw vraag zo duidelijk mogelijk te stellen;
heeft u een probleem en al geprobeerd om dit op te lossen, vermeld dit erbij aub;
heeft u een oplossing gekregen van een bezoeker dan horen wij dat graag in dit forum;
wilt u een reactie geven op een vraag of antwoord, gebruik dan niet dit formulier maar klik op de knop 'reageer op deze vraag';
uw vraag wordt direct op de website gezet; vermijd daarom persoonlijke gegevens in te vullen;
Belangrijk! Als er een antwoord wordt gegeven op uw vraag, dan is het voor de gever van het antwoord nuttig om te weten als u er wel (of niet) mee geholpen bent! Wij vragen u dus ook te reageren op een antwoord.
Belangrijk! Antwoorden worden ook per e-mail naar abonnees gestuurd. Laat uw emailadres achter op deze site, zodat u op de hoogte blijft. U krijgt dan ook andere vragen en antwoorden te zien.
Abonneren
Abonneer u voor het ontvangen van emails voor uw Husqvarna OPAL 670 bij:
nieuwe vragen en antwoorden
nieuwe handleidingen
U ontvangt een email met instructies om u voor één of beide opties in te schrijven.
Ontvang uw handleiding per email
Vul uw emailadres in en ontvang de handleiding van Husqvarna OPAL 670 in de taal/talen: Engels als bijlage per email.
De handleiding is 8 mb groot.
U ontvangt de handleiding per email binnen enkele minuten. Als u geen email heeft ontvangen, dan heeft u waarschijnlijk een verkeerd emailadres ingevuld of is uw mailbox te vol. Daarnaast kan het zijn dat uw internetprovider een maximum heeft aan de grootte per email. Omdat hier een handleiding wordt meegestuurd, kan het voorkomen dat de email groter is dan toegestaan bij uw provider.
Uw handleiding is per email verstuurd. Controleer uw email
Als u niet binnen een kwartier uw email met handleiding ontvangen heeft, kan het zijn dat u een verkeerd emailadres heeft ingevuld of dat uw emailprovider een maximum grootte per email heeft ingesteld die kleiner is dan de grootte van de handleiding.
Er is een email naar u verstuurd om uw inschrijving definitief te maken.
Controleer uw email en volg de aanwijzingen op om uw inschrijving definitief te maken
U heeft geen emailadres opgegeven
Als u de handleiding per email wilt ontvangen, vul dan een geldig emailadres in.
Uw vraag is op deze pagina toegevoegd
Wilt u een email ontvangen bij een antwoord en/of nieuwe vragen? Vul dan hier uw emailadres in.