522332
13
Verklein
Vergroot
Pagina terug
1/41
Pagina verder
19
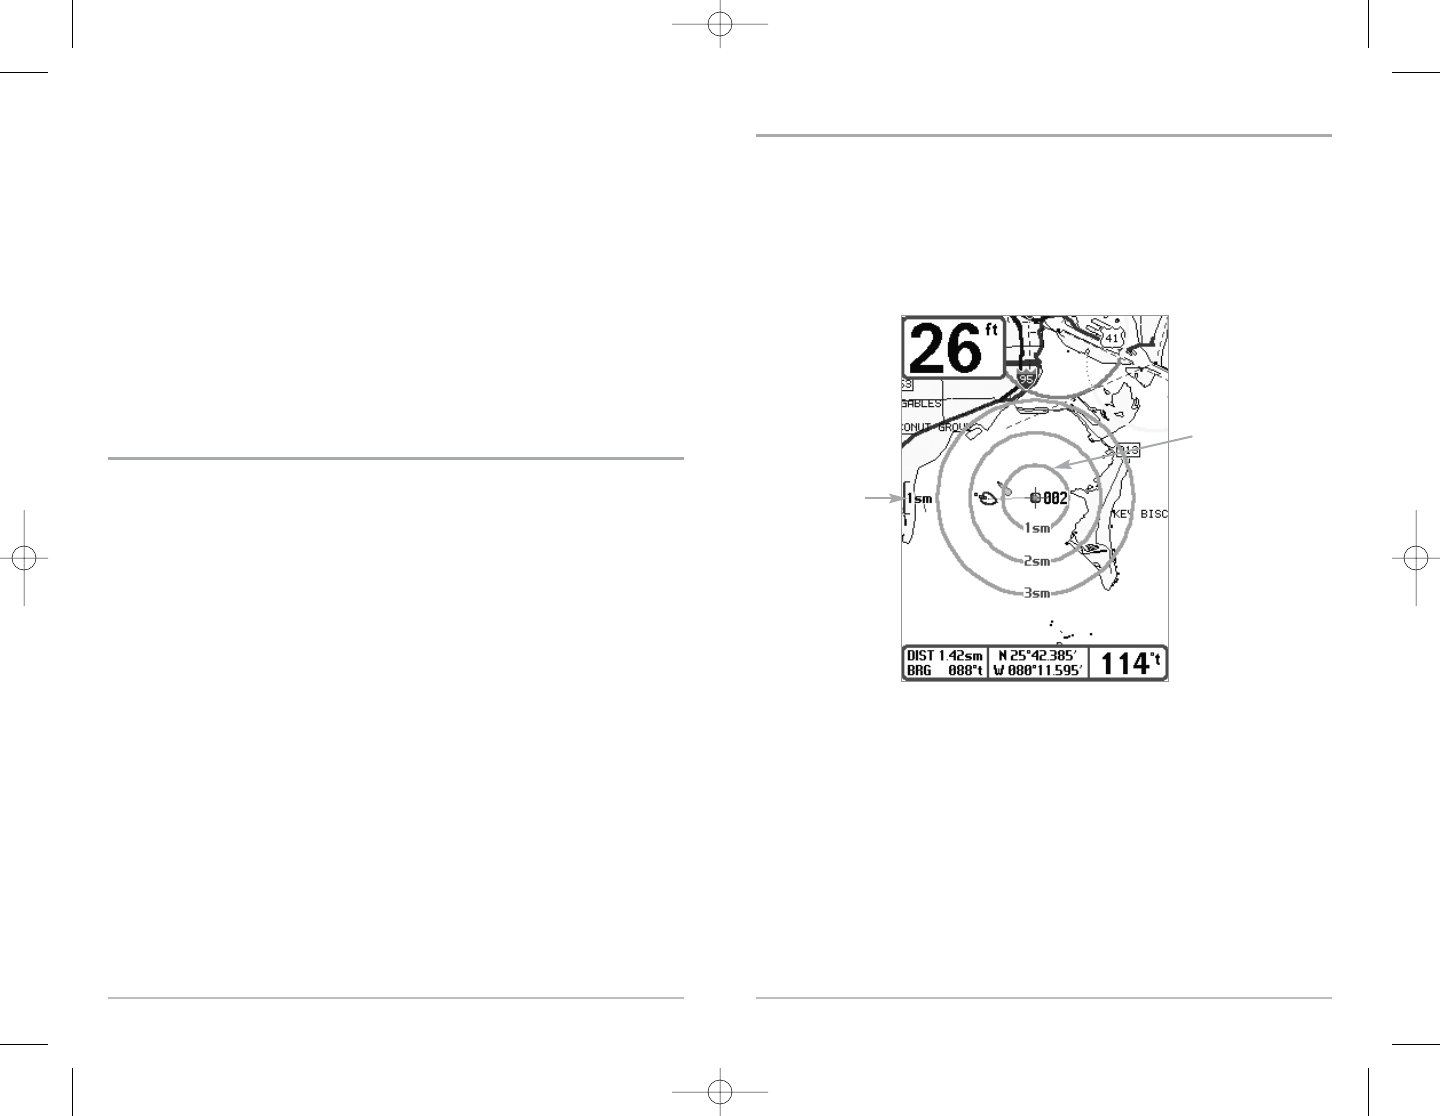
Add a Waypoint Target or Trolling Grid
Add or Remove a Waypoint Target: From the Waypoints submenu, select Target and press the
RIGHT Cursor key to display a list of waypoints. Select the waypoint you want to target. A target
consisting of concentric circles centered on the selected waypoint will appear on all of the
navigation views; the target shows various distance ranges from the targeted waypoint. To
remove the target, choose Remove Target from the Navigation X-Press™ Menu.
Chart View with Target
Map Scale
Waypoint Target
18
letters are available, as well as digits 0-9 and some punctuation characters. In the Waypoint Icon
field, use the UP and DOWN Cursor keys to change the icon used to represent the waypoint on the
Combo and Chart Views. You can exit these fields with the LEFT and RIGHT Cursor keys or by
pressing the EXIT key. Select Save and press the RIGHT Cursor key to save your changes.
To make it easier to select a waypoint, select Sort By and press the RIGHT or LEFT Cursor keys to
select a sort order:
Name shows the waypoints alphabetically
Time shows the most recently-created waypoint first
Distance shows the closest waypoint first.
Delete a waypoint: From the Waypoints submenu, select Delete and press the RIGHT Cursor key
to display a list of waypoints. Select the waypoint you want to delete, then press the RIGHT Cursor
key. You will be asked to confirm deletion before the waypoint is actually deleted.
Navigate to a Waypoint or Position
Navigate to the cursor position: From the Chart or Combo view, use the Cursor key to select a
position or waypoint to which you want to navigate. Press the GOTO key. Navigation will begin
immediately.
Navigate to a specified waypoint: Press the GOTO key, then choose the waypoint to which you
would like to navigate from the waypoint list and press the RIGHT Cursor key to select it.
NOTE:By repeating the previous instructions, you can add more waypoints to create a longer multi-
segment route.
Skipping a waypoint: From the Navigation X-Press™ Menu, select Skip Next Waypoint and press
the RIGHT Cursor key. If there is not another waypoint to skip to, navigation will be cancelled.
Cancel navigation: From the Navigation X-Press™ Menu, select Cancel Navigation and press the
RIGHT Cursor key. Canceling navigation removes the route and any waypoints created using the
GOTO key, but does not remove any saved routes from memory. You will be prompted to save the
current route when you cancel navigation.
FF595_Man_531385-1_A_PrfE.qxd 12/9/2004 2:40 PM Page 24
www.Busse-Yachtshop.de email: info@busse-yachtshop.de
13

Hulp nodig? Stel uw vraag in het forum

Spelregels

Misbruik melden

Gebruikershandleiding.com neemt misbruik van zijn services uitermate serieus. U kunt hieronder aangeven waarom deze vraag ongepast is. Wij controleren de vraag en zonodig wordt deze verwijderd.

Product:

Bijvoorbeeld antisemitische inhoud, racistische inhoud, of materiaal dat gewelddadige fysieke handelingen tot gevolg kan hebben.

Bijvoorbeeld een creditcardnummer, een persoonlijk identificatienummer, of een geheim adres. E-mailadressen en volledige namen worden niet als privégegevens beschouwd.

Spelregels forum

Om tot zinvolle vragen te komen hanteren wij de volgende spelregels:

Belangrijk! Als er een antwoord wordt gegeven op uw vraag, dan is het voor de gever van het antwoord nuttig om te weten als u er wel (of niet) mee geholpen bent! Wij vragen u dus ook te reageren op een antwoord.

Belangrijk! Antwoorden worden ook per e-mail naar abonnees gestuurd. Laat uw emailadres achter op deze site, zodat u op de hoogte blijft. U krijgt dan ook andere vragen en antwoorden te zien.

Abonneren

Abonneer u voor het ontvangen van emails voor uw Humminbird 595C bij:


U ontvangt een email met instructies om u voor één of beide opties in te schrijven.


Ontvang uw handleiding per email

Vul uw emailadres in en ontvang de handleiding van Humminbird 595C in de taal/talen: Engels als bijlage per email.

De handleiding is 0,89 mb groot.


U ontvangt de handleiding per email binnen enkele minuten. Als u geen email heeft ontvangen, dan heeft u waarschijnlijk een verkeerd emailadres ingevuld of is uw mailbox te vol. Daarnaast kan het zijn dat uw internetprovider een maximum heeft aan de grootte per email. Omdat hier een handleiding wordt meegestuurd, kan het voorkomen dat de email groter is dan toegestaan bij uw provider.

Uw handleiding is per email verstuurd. Controleer uw email

Als u niet binnen een kwartier uw email met handleiding ontvangen heeft, kan het zijn dat u een verkeerd emailadres heeft ingevuld of dat uw emailprovider een maximum grootte per email heeft ingesteld die kleiner is dan de grootte van de handleiding.

Er is een email naar u verstuurd om uw inschrijving definitief te maken.

Controleer uw email en volg de aanwijzingen op om uw inschrijving definitief te maken

U heeft geen emailadres opgegeven

Als u de handleiding per email wilt ontvangen, vul dan een geldig emailadres in.

Uw vraag is op deze pagina toegevoegd

Wilt u een email ontvangen bij een antwoord en/of nieuwe vragen? Vul dan hier uw emailadres in.


Info