dalla fabbrica o un irregolare collegamento elettrico,
una qualsiasi modifica elettomeccanica o idraulica della
macchina farà decadere la garanzia e solleverà il
costruttore ed il venditore da eventuali responsabilità.
Primo ciclo di lavaggio
Dopo linstallazione, prima delluso, effettuare un ciclo
di lavaggio con detersivo e senza biancheria impo-
stando il programma
.
Dati tecnici
Modello
ARTXD 149
Dimensioni
larghezza cm 40
altezza cm 85
profondità cm 60
Capacità
da 1 a 6 kg
Collegamenti
elettrici
vedi la targhetta caratteristiche
tecniche applicata sulla macchina
Collegamenti
idrici
pressione massima 1 MPa (10 bar)
pressione minima 0,05 MPa (0,5 bar)
capacità del cesto 42 litri
Velocità di
centrifuga
sino a 1400 giri al minuto
Programmi di
controllo secondo
la direttiva
1061/2010
programma (90°C);
temperatura 60°C e 40°C
(Premendo il tasto TEMPERATURA).
Questa apparecchiatura è conforme
alle seguenti Direttive Comunitarie:
- 2004/108/CE (Compatibilità
Elettromagnetica)
- 2002/96/CE
- 2006/95/CE (Bassa Tensione)
65 - 100 cm
4
I
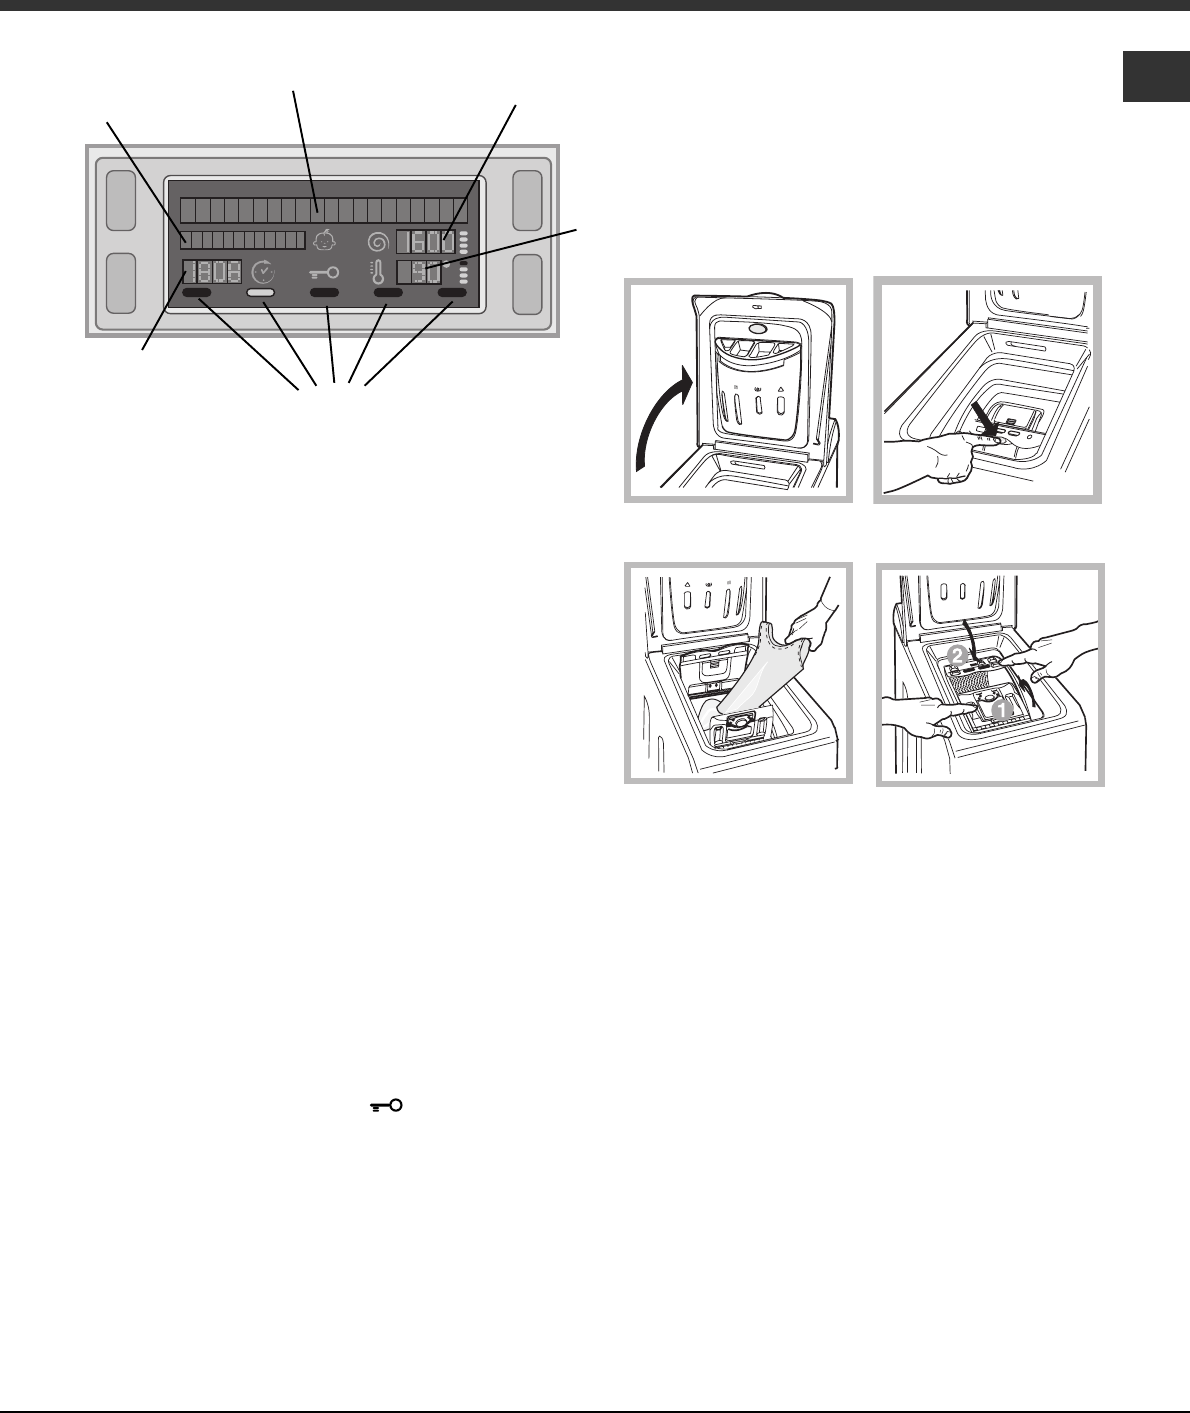
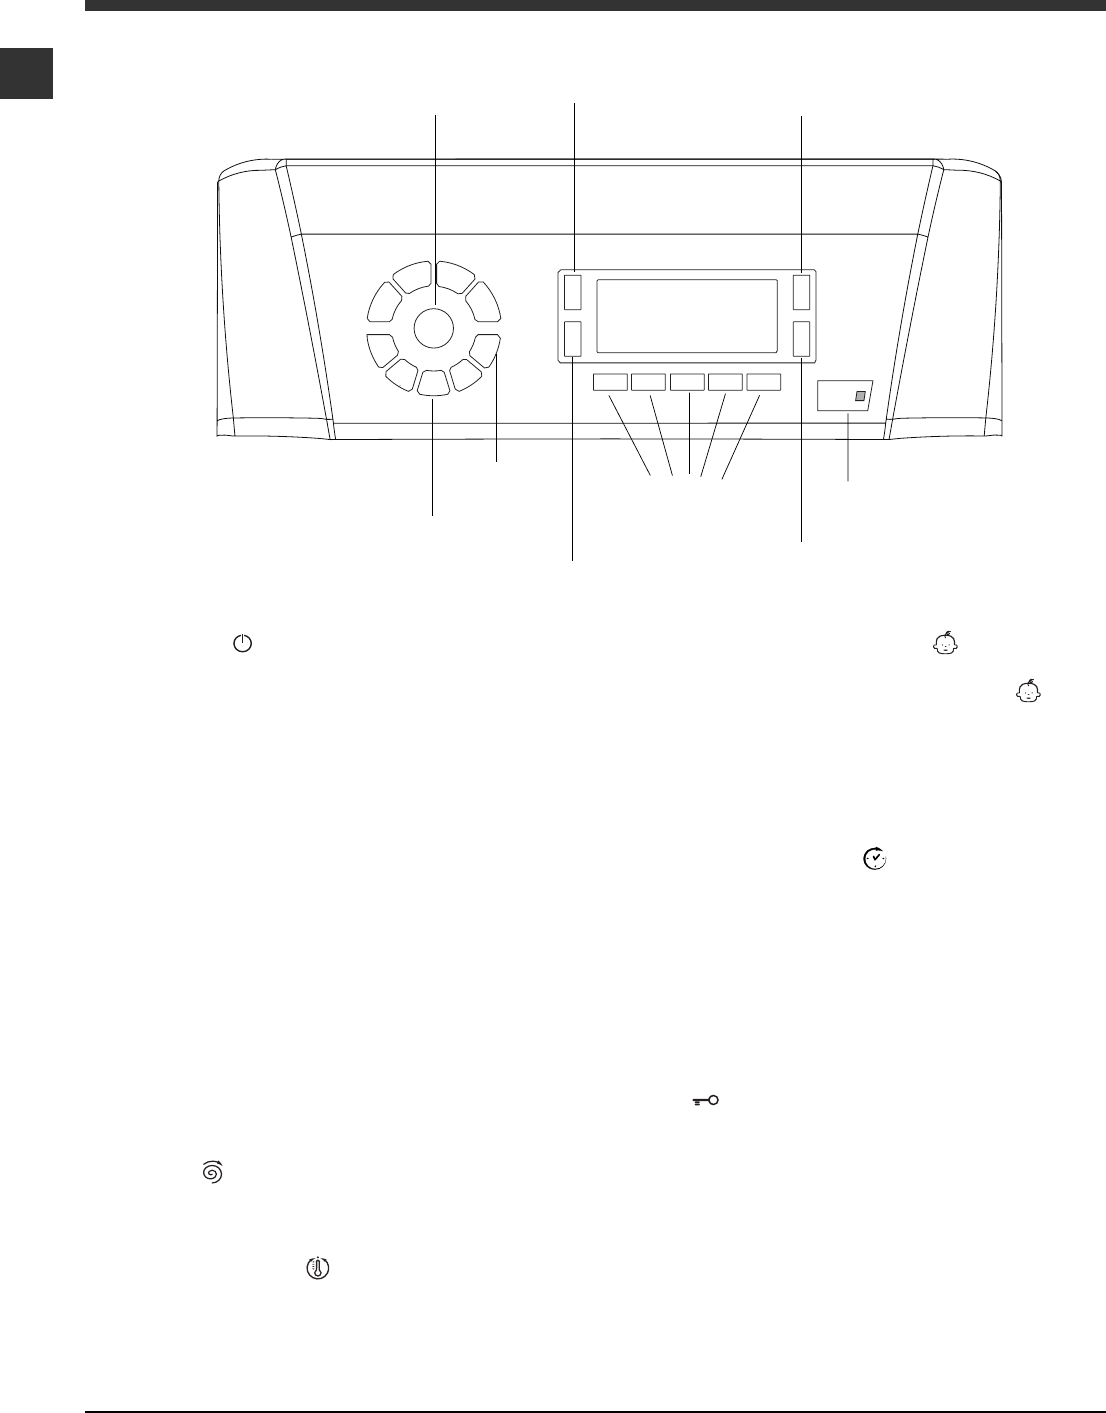
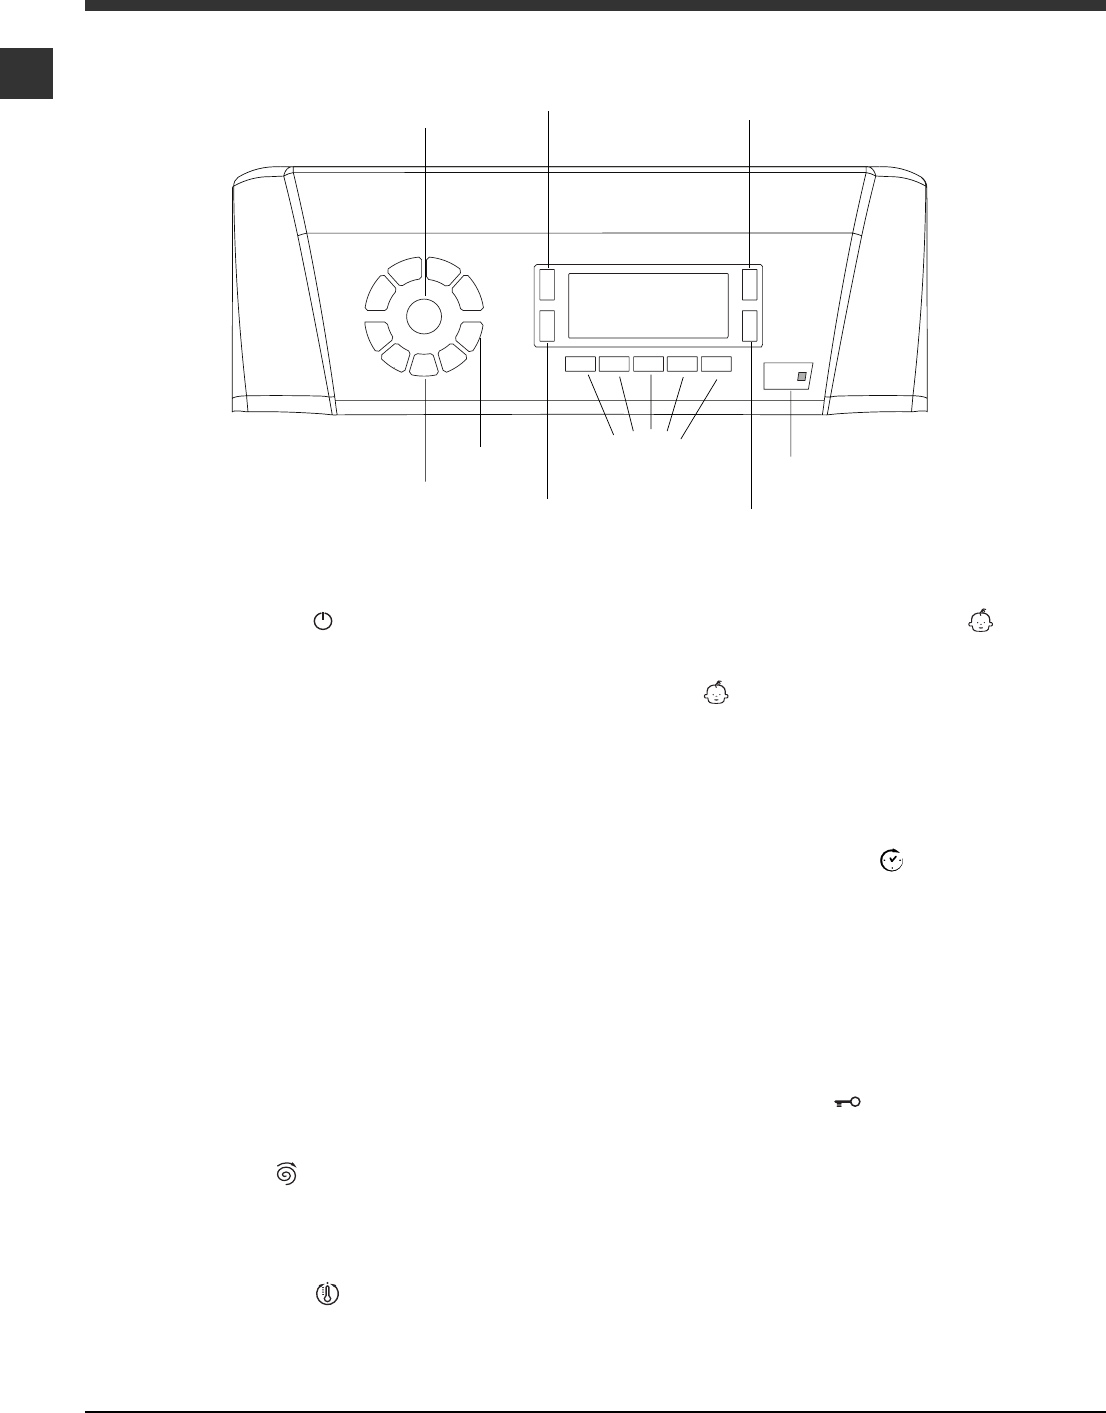
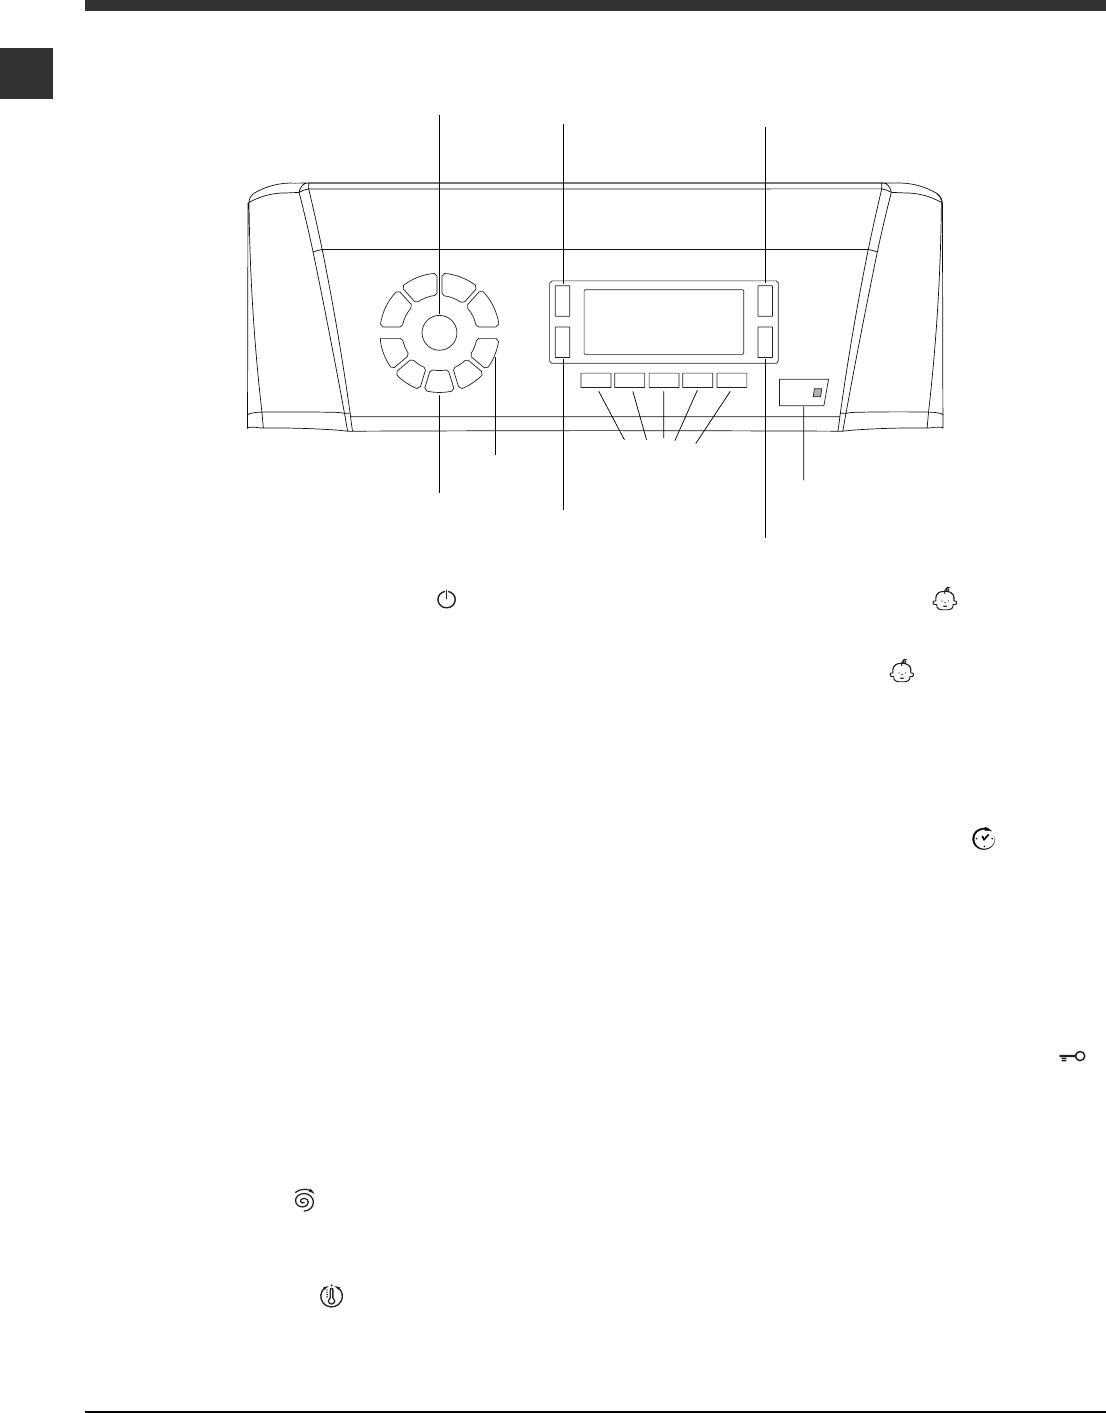
Pannello di controllo
Descrizione della lavabiancheria
Tasto
TEMPERATURA
Tasti
SELETTORE
PROGRAMMI
Tasti
FUNZIONE
Tasto
ACCENSIONE/
SPEGNIMENTO
Tasto
CENTRIFUGA
Tasto ACCENSIONE/SPEGNIMENTO : premere
brevemente il tasto per accendere o spegnere la
macchina. La spia START/PAUSE che lampeggia
lentamente di colore verde indica che la macchina è
accesa. Per spegnere la lavabiancheria durante il
lavaggio è necessario tenere premuto il tasto più a
lungo, circa 2 sec.; una pressione breve o accidenta-
le non permetterà lo spegnimento della macchina.
Lo spegnimento della macchina durante un lavaggio
in corso annulla il lavaggio stesso.
Tasti SELETTORE PROGRAMMI: per impostare il
programma desiderato (vedi Tabella dei programmi).
Tasto MEMO: tenere premuto il tasto per memoriz-
zare un ciclo e le proprie personalizzazioni preferite.
Per richiamare un ciclo precedentemente memorizza-
to premere il tasto MEMO.
Tasti FUNZIONE:premere il tasto per selezionare la
funzione desiderata. Sul display si illuminerà la spia
relativa.
Tasto CENTRIFUGA
: premere per ridurre o
escludere del tutto la centrifuga; il valore viene indica-
to nel display.
Tasto TEMPERATURA
: premere per ridurre la
temperatura; il valore viene indicato nel display.
Tasto BLOCCO TASTI
: per attivare il blocco del
pannello di controllo, tenere premuto il tasto per circa
2 secondi. Il simbolo
acceso indica che il pannello
di controllo è bloccato. In questo modo si
impediscono modifiche accidentali dei programmi,
soprattutto se in casa ci sono dei bambini.
Per disattivare il blocco del pannello di controllo,
tenere premuto il tasto per circa 2 secondi.
Tasto PARTENZA RITARDATA
: premere per
impostare una partenza ritardata del programma
prescelto; il ritardo viene indicato nel display.
Tasto con spia START/PAUSE: quando la spia verde
lampeggia lentamente, premere il tasto per avviare un
lavaggio. A ciclo avviato la spia diventa fissa. Per
mettere in pausa il lavaggio, premere nuovamente il
tasto; la spia lampeggerà con colore arancione. Se il
simbolo
non è illuminato, si potrà aprire Il coper-
chio. Per far ripartire il lavaggio dal punto in cui è
stato interrotto, premere nuovamente il tasto.
Modalità di stand by
Questa lavatrice, in conformità alle nuove normative
legate al risparmio energetico, è dotata di un sistema
di autospegnimento (stand by) che entra in funzione
dopo circa 30 minuti nel caso di non utilizzo. Premere
brevemente il tasto ACCENSIONE/SPEGNIMENTO e
attendere che la macchina si riattivi.
Tasto con spia
START/PAUSE
Tasto
BLOCCO
TASTI
DISPLAY
Tasto
PARTENZA
RITARDATA
Tasto
MEMO
5
I
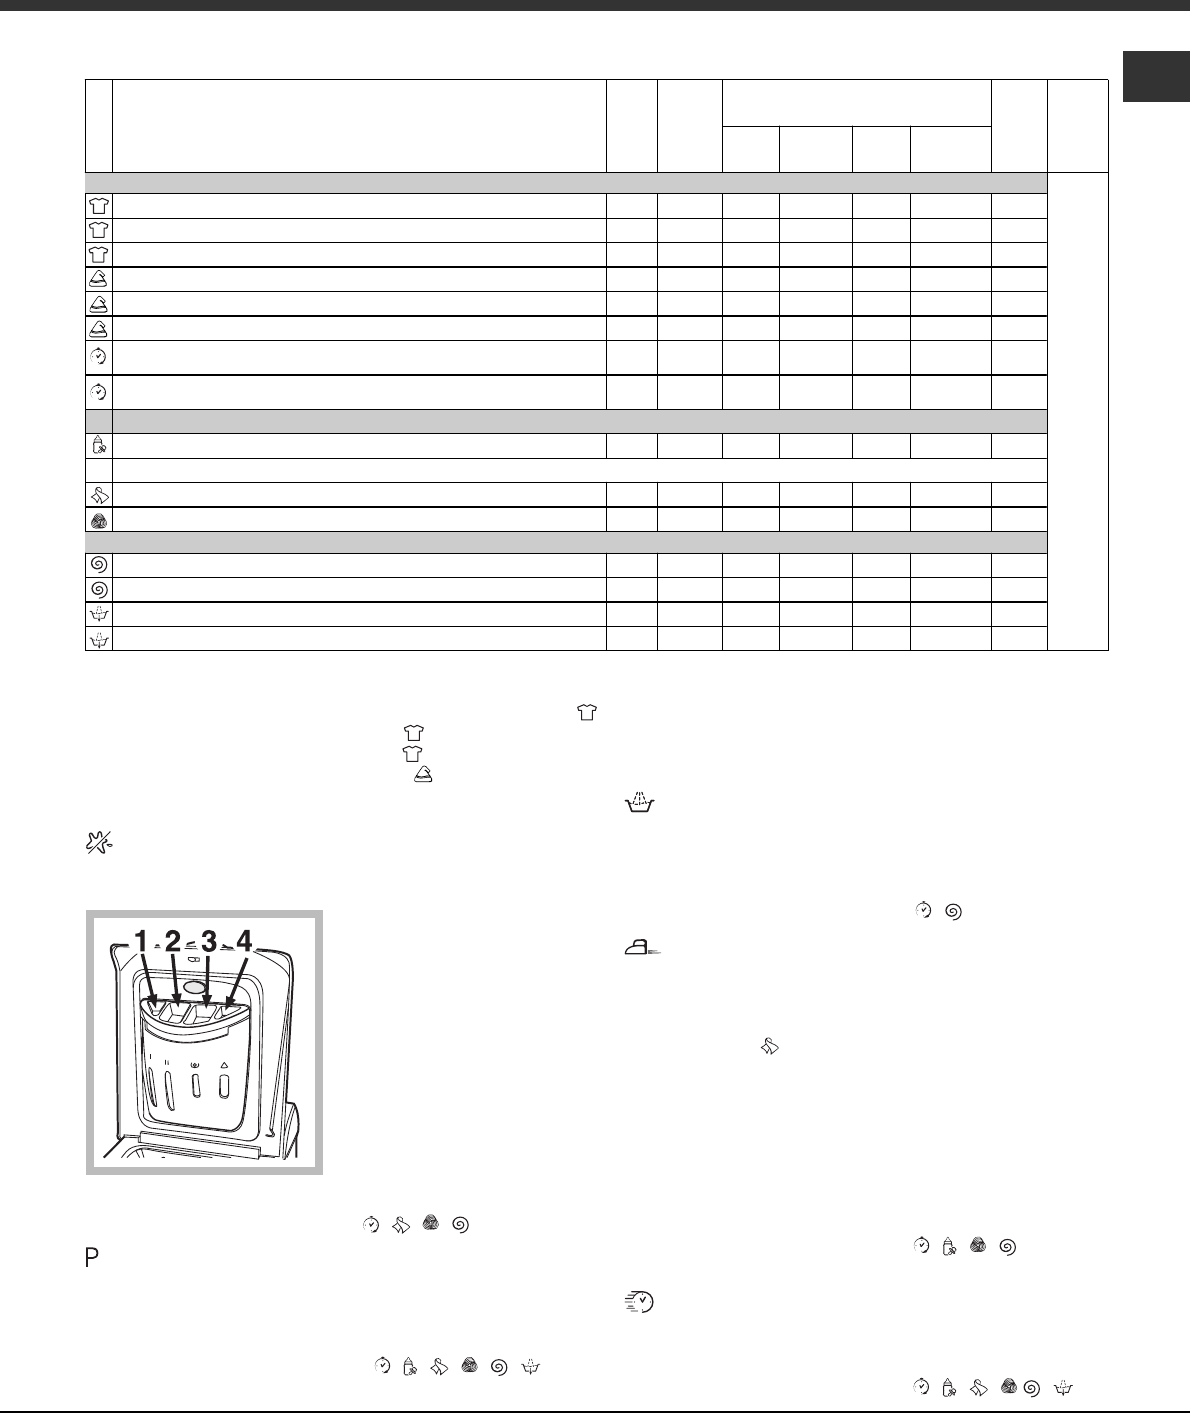
Fig. 1
Fig. 2
Fig. 3
Fig. 4
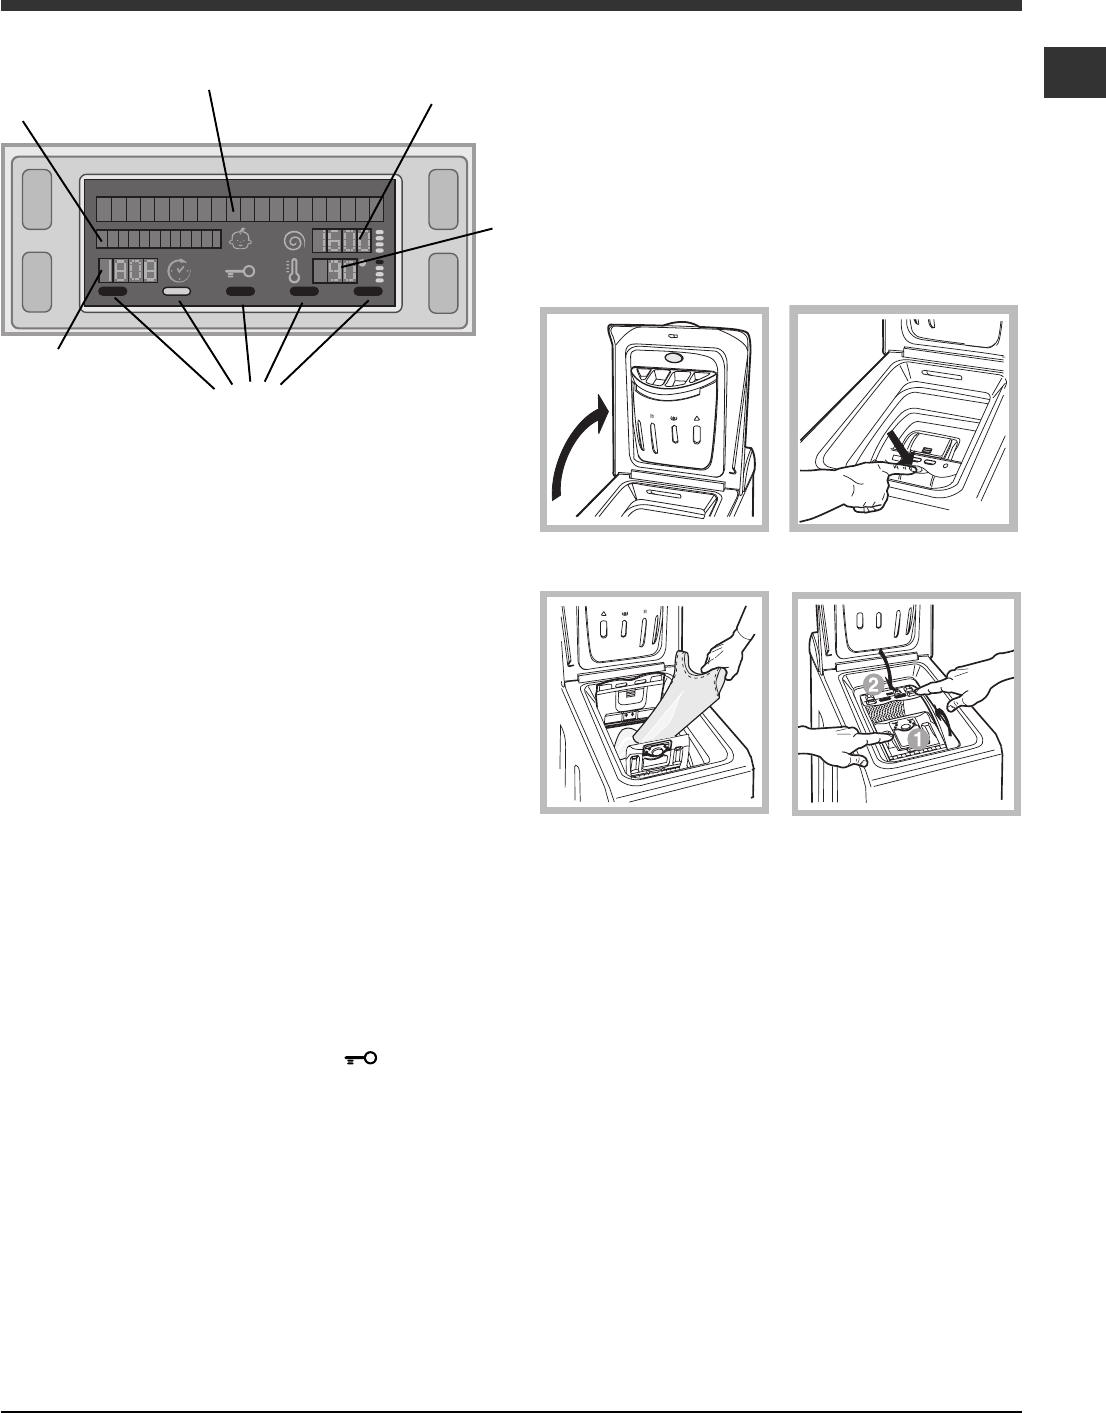
Display
A
B
C
D
E
F
Il display è utile per programmare la macchina e
fornisce molteplici informazioni.
Nelle due stringhe superiori A e B vengono visualizzati
il programma di lavaggio selezionato, la fase di lavag-
gio in corso e tutte le indicazioni relative allo stato
davanzamento del programma.
Nella stringa C viene visualizzato il tempo residuo alla
fine del ciclo di lavaggio in corso e nel caso fosse
stata impostata una PARTENZA RITARDATA, il tempo
mancante allavvio del programma selezionato.
Nella stringa D viene visualizzato il valore massimo
della velocità della centrifuga che la macchina può
effettuare in base al programma impostato; se il
programma non prevede la centrifuga la stringa resta
spenta.
Nella stringa E viene visualizzato il valore massimo
della temperatura che si può selezionare in base al
programma impostato; se il programma non prevede
limpostazione della temperatura la stringa resta
spenta.
Le spie F sono relative alle funzioni e si accendono
quando la funzione selezionata è compatibile con il
programma impostato.
Simbolo Coperchio bloccato
Il simbolo acceso indica che il coperchio è bloccato
per impedire aperture accidentali. Per evitare danni è
necessario attendere che il simbolo si spenga prima di
aprire il coperchio. L'attesa è di tre minuti circa.
N.B.: se è attiva la funzione PARTENZA RITARDATA il
coperchio non si può aprire, per aprirlo mettere la
macchina in pausa premendo il tasto START/PAUSE.
Alla prima accensione verrà richiesto di selezionare la
lingua ed il display entrerà automaticamente nel menu
di selezione lingua.
Per scegliere la lingua desiderata premere i tasti
TEMPERATURA e CENTRIFUGA, per confermare la
scelta premere il tasto BLOCCO TASTI. Se si vuole
selezionare unaltra lingua, spegnere la macchina,
premere contemporaneamente i tasti BLOCCO
TASTI + TEMPERATURA + CENTRIFUGA per 5
secondi, quindi ripetere le operazioni indicate
precedentemente.
Come aprire e chiudere il cestello
A) Apertura coperchio superiore (Fig. 1):
Sollevare il coperchio esterno ed aprirlo completamente.
B) Apertura cestello (Soft opening):
Con un dito premere il pulsante indicato nella fig. 2
ed il cestello si aprirà delicatamente.
C) Introduzione biancheria (Fig. 3).
D) Chiusura (Fig. 4):
- richiudere bene il cestello abbassando prima lo
sportello anteriore ed appoggiandovi quindi quello
posteriore;
- assicurarsi quindi che i ganci dello sportello anteriore
siano perfettamente alloggiati nella sede dello sportello
posteriore;
- dopo aver sentito il clac dellavvenuto aggancio,
esercitare una lieve pressione verso il basso su
entrambi gli sportelli che non devono sganciarsi;
- chiudere infine il coperchio esterno.
E) Arresto finale del cestello (Fig. 2):
Al termine del lavaggio il cestello si collocherà con gli
sportelli in alto per una facile apertura.
6
I
Come effettuare un ciclo di
lavaggio
1. ACCENDERE LA MACCHINA. Premere il tasto
, sul display comparirà la scritta OK; la spia
START/PAUSE lampeggerà lentamente di colore
verde.
2. CARICARE LA BIANCHERIA. Aprire il coperchio.
Caricare la biancheria facendo attenzione a non
superare la quantità di carico indicata nella tabella
programmi della pagina seguente.
3. DOSARE IL DETERSIVO. Versare il detersivo
nelle apposite vaschette come spiegato in
Detersivi e biancheria.
4. CHIUDERE IL COPERCHIO.
5. SCEGLIERE IL PROGRAMMA. Premere uno dei
tasti del SELETTORE PROGRAMMI per selezionare
il programma desiderato; il nome del programma
comparirà sul display; ad esso è associata una
temperatura e una velocità di centrifuga che
possono essere modificate. Sul display comparirà la
durata del ciclo.
6. PERSONALIZZARE IL CICLO DI LAVAGGIO.
Agire sugli appositi tasti:
Modificare la temperatura e/o la
centrifuga. La macchina seleziona
automaticamente la temperatura e la centrifuga
massime previste per il programma impostato e
non possono pertanto essere aumentate.
Premendo il tasto
si riduce progressivamente la
temperatura sino al lavaggio a freddo OFF.
Premendo il tasto
si riduce progressivamente la
centrifuga sino alla sua esclusione OFF.
Unulteriore pressione dei tasti riporterà i valori a
quelli massimi previsti.
Impostare una partenza ritardata.
Per impostare la partenza ritardata del programma
prescelto, premere il tasto relativo fino a
raggiungere il tempo di ritardo desiderato. Quando
tale opzione è attiva, sul display si illumina il simbolo
. Per rimuovere la partenza ritardata premere il
tasto fino a che sul display compare la scritta
OFF.
Modificare le caratteristiche
del ciclo.
Premere il tasto per attivare la funzione; la spia
corrispondente al pulsante si accenderà.
Premere nuovamente il tasto per disattivare la
funzione; la spia si spegnerà.
Se la funzione selezionata non è compatibile con il
programma impostato, la spia lampeggerà e la
funzione non verrà attivata.
Se la funzione selezionata non è compatibile con
unaltra precedentemente impostata, la spia relativa
alla prima funzione selezionata lampeggerà e verrà
attivata solo la seconda, la spia della funzione
attivata si illuminerà.
Le funzioni possono variare il carico raccomandato
e/o la durata del ciclo.
7. AVVIARE IL PROGRAMMA. Premere il tasto
START/PAUSE. La spia relativa si illuminerà di
colore verde fisso e il coperchio si bloccherà
(simbolo COPERCHIO BLOCCATO
acceso).
Durante il lavaggio, sul display comparirà il nome
della fase in corso. Per cambiare un programma
mentre un ciclo è in corso, mettere la
lavabiancheria in pausa premendo il tasto START/
PAUSE (la spia START/PAUSE lampeggerà
lentamente di colore arancione); selezionare quindi
il ciclo desiderato e premere nuovamente il tasto
START/PAUSE.
Per aprire il coperchio mentre un ciclo è in corso
premere il tasto START/PAUSE; se il simbolo
COPERCHIO BLOCCATO
è spenta sarà
possibile aprire il coperchio. Premere nuovamente il
tasto START/PAUSE per far ripartire il programma
dal punto in cui era stato interrotto.
8. FINE DEL PROGRAMMA. Viene indicata dalla
scritta FINE CICLO sul display, quando il simbolo
COPERCHIO BLOCCATO
si spegnerà sarà
possibile aprire il coperchio. Aprire il coperchio,
scaricare la biancheria e spegnere la macchina.
Se si desidera annullare un ciclo già avviato,
premere a lungo il tasto . Il ciclo verrà interrotto e la
macchina si spegnerà.
Sistema bilanciamento del carico
Prima di ogni centrifuga, per evitare vibrazioni
eccessive e per distribuire il carico in modo uniforme,
il cestello effettua delle rotazioni ad una velocità
leggermente superiore a quella del lavaggio. Se al
termine di ripetuti tentativi il carico non fosse ancora
correttamente bilanciato la macchina effettua la
centrifuga ad una velocità inferiore a quella prevista.
In presenza di eccessivo sbilanciamento la
lavabiancheria effettua la distribuzione anzichè la
centrifuga. Per favorire una migliore distribuzione del
carico e il suo corretto bilanciamento si consiglia di
mescolare capi grandi e piccoli.
7
I
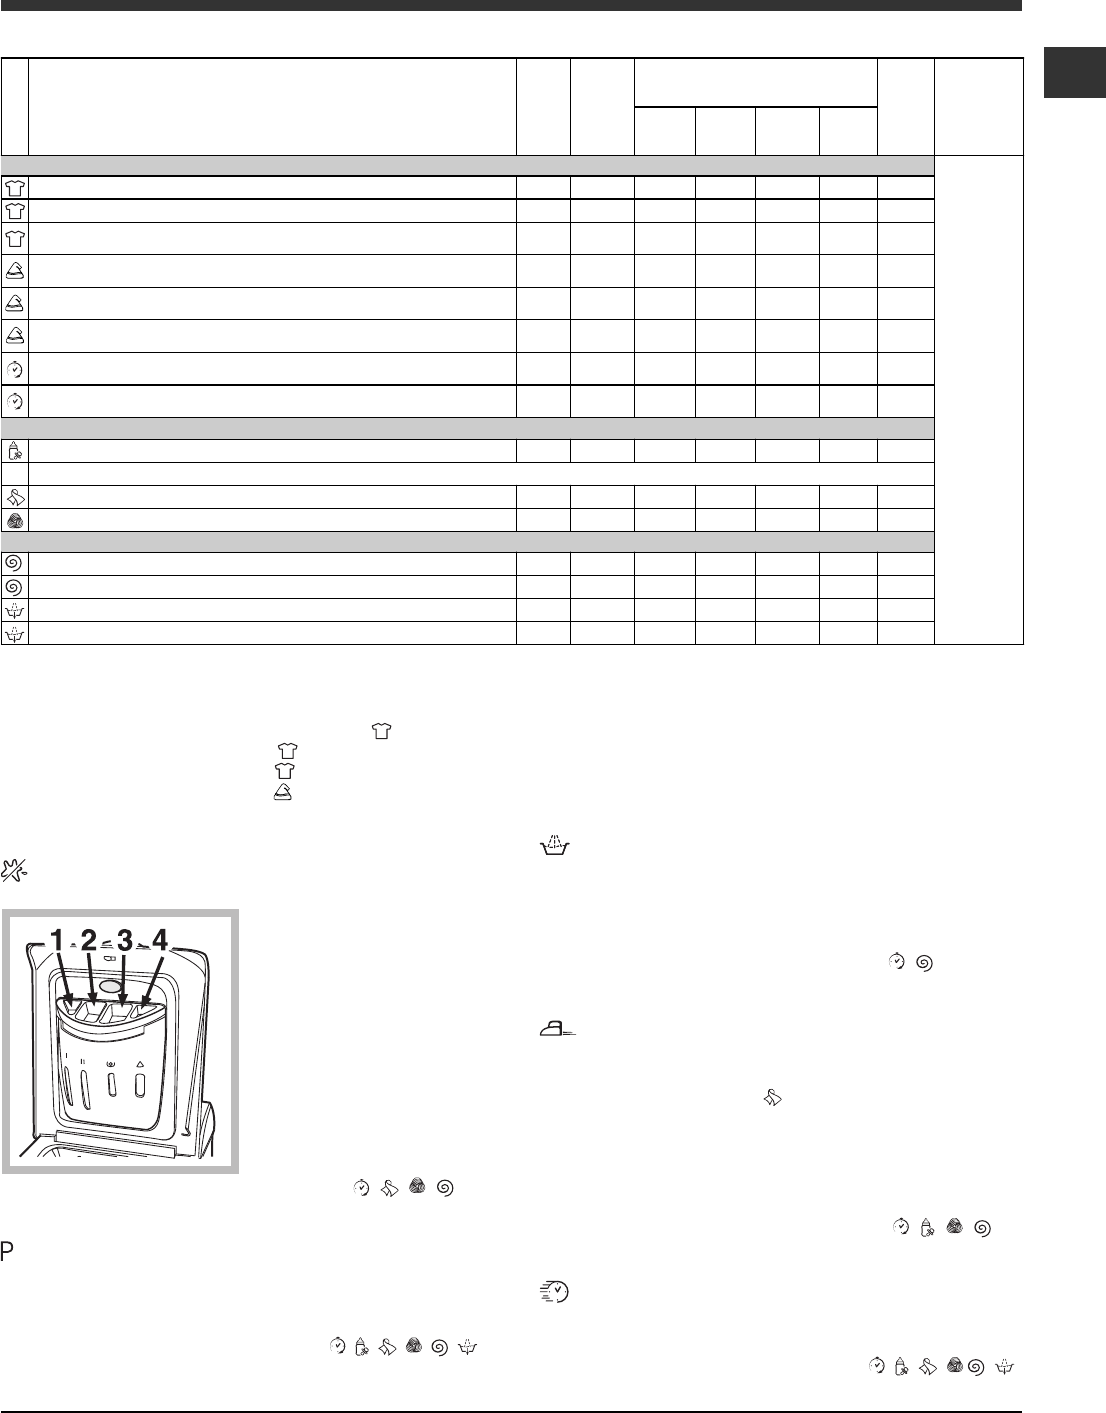
Programmi e funzioni
Descrizione del Programma
Temp.
max.
(°C)
Velocità
max.
(giri al
minuto)
Detersivi
Carico
max.
(Kg)
Durata
ciclo
Prela-
vaggio
Candeg
-
gina
Lavag
-
gio
Ammorbi
-
dente
Programmi Giornalieri
Cotone (1-2):
bianchi estremamente sporchi.
90°1400
llll
6
Cotone:
bianchi e colorati resistenti molto sporchi.
60°1400
llll
6
Cotone (3) :
bianchi e colorati delicati molto sporchi.
40°1400
llll
6
Sintetici
(1° pressione del tasto)
:
colori resistenti molto sporchi.
60°800
llll
2,5
Sintetici (4)
(1° pressione del tasto)
:
colori resistenti molto sporchi.
40°800
llll
2,5
Sintetici
(2° pressione del tasto)
:
colori resistenti poco sporchi.
40°800
llll
2,5
Mix 30'
(1° pressione del tasto)
:
per rinfrescare rapidamente capi poco
sporchi (non indicato per lana, seta e capi da lavare a mano).
30°800--
ll
3
Mix 15'
(2° pressione del tasto)
:
per rinfrescare rapidamente capi poco
sporchi (non indicato per lana, seta e capi da lavare a mano).
30°800--
ll
1,5
Programmi Speciali / Memo
Ciclo Baby:
colori delicati molto sporchi.
40°800-
lll
2
Memo:
permette di memorizzare un qualsiasi ciclo di lavaggio.
Seta/Tende:
per capi in seta, viscosa, lingerie.
30°0--
ll
1
Lana:
per lana, cachemire, ecc.
40°800--
ll
1
Programmi Parziali
Centrifuga
(1° pressione del tasto).
-1400----6
Centrifuga delicata
(2° pressione del tasto).
-800----2,5
Risciacquo
(1° pressione del tasto).
-1400-
l
-
l
6
Scarico
(2° pressione del tasto).
-0----6
Funzioni di lavaggio
Antimacchia
Questa funzione è utile per eliminare le macchie più
resistenti.
Per effettuare solo il
candeggio versare la
candeggina nella
vaschetta 4, impostare il
programma Risciacquo
e attivare la funzione
Antimacchia.
Per candeggiare durante
il lavaggio versare il
detersivo e gli additivi,
impostare il programma
desiderato e attivare la
funzione Antimacchia.
Non è attivabile sui programmi , , , , Scarico.
Prelavaggio
Selezionando questa funzione si effettua il
prelavaggio, utile per rimuovere macchie ostinate.
N.B.: Aggiungere il detersivo nell'apposito scomparto.
Non è attivabile sui programmi , , , , , .
Tabella dei programmi
Extra Risciacquo
Selezionando questa opzione si aumenta lefficacia
del risciacquo, e si assicura la massima rimozione del
detersivo. E utile per pelli particolarmente sensibili.
Non è attivabile sui programmi , e Scarico.
Stira facile
Selezionando questa funzione, il lavaggio e la
centrifuga saranno opportunamente modificati per
ridurre la formazione di pieghe.
Nei programmi
la macchina terminerà il ciclo con
la biancheria in ammollo, la spia della funzione STIRA
FACILE e quella di AVVIO/PAUSA lampeggeranno
(arancione) e la scritta "IDROSTOP" apparirà su
display.
Per scaricare lacqua e poter rimuovere il bucato sarà
necessario premere il tasto START/PAUSE o il tasto
STIRA FACILE.
Non è attivabile sui programmi , , , ,
Scarico.
Rapido
Per ridurre la durata del lavaggio, garantendo al
contempo un risparmio di acqua ed energia.
Non è attivabile sui programmi , , , ,, .
E' possibile controllare la durata dei programmi di
lavaggio sul display.
Programmi
M
Per tutti Test Institutes:
(1) Programma di controllo secondo la direttiva 1061/2010: impostare il programma
(90°C); temperaura di 60°C e 40°C (Premendo il tasto TEMPERATURA).
2) Programma cotone lungo: impostare il programma
(90°C); temperatura di 40°C (Premendo il tasto TEMPERATURA).
3) Programma cotone corto: impostare il programma
(40°C).
(4) Programma sintetico lungo: impostare il programma
(60°C) (1° pressione del tasto); temperatura di 40°C (Premendo il tasto TEMPERATURA).
La durata del ciclo indicata sul display o su questo libretto è una stima calcolata in base a condizioni standard. Il tempo effettivo può variare in base a numerosi fattori quali la temperatura e la pressione
dell'acqua in ingresso, la temperatura ambiente, la quantità di detersivo, la quantità ed il tipo di carico, il bilanciamento del carico, le opzioni aggiuntive selezionate.
8
I
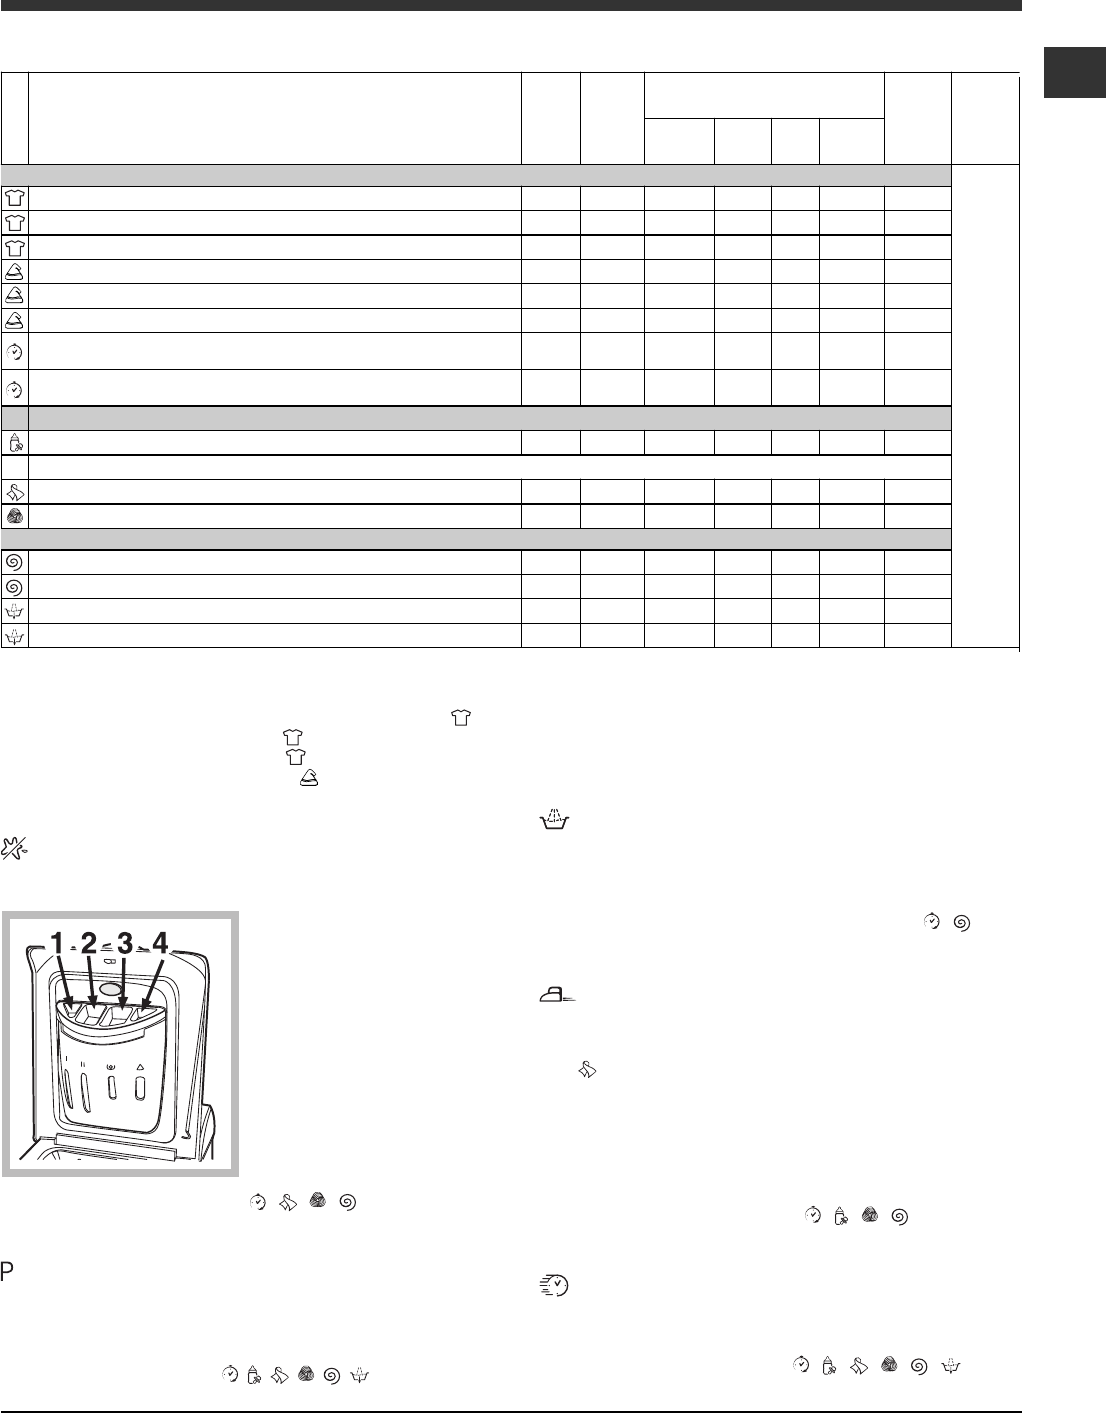
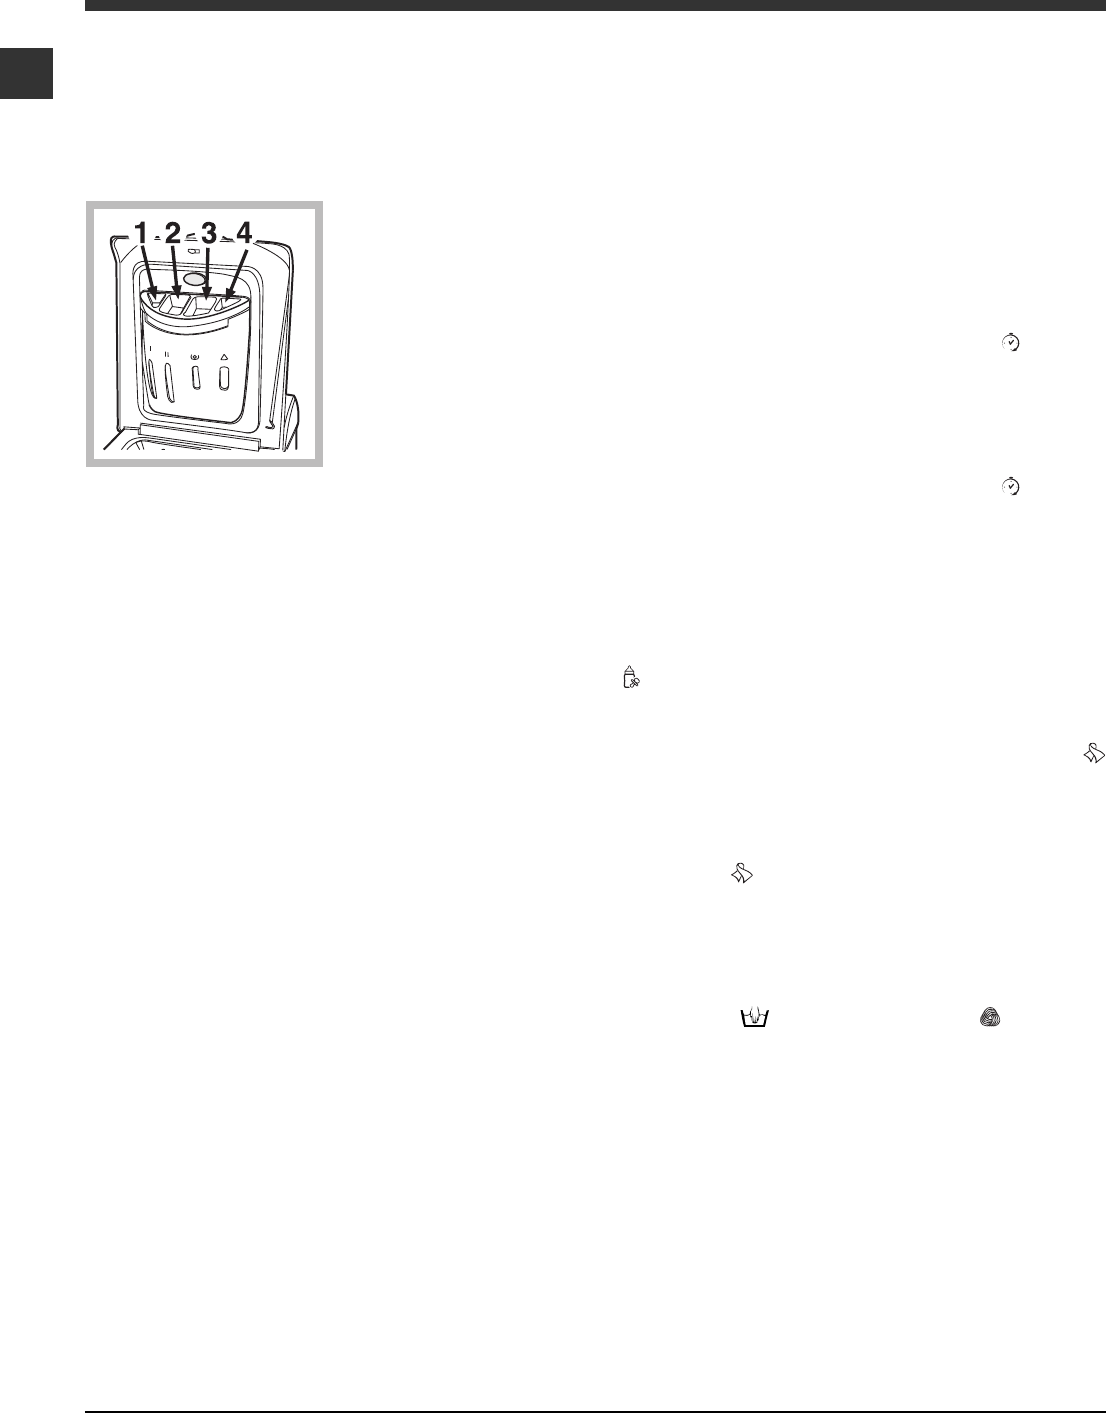
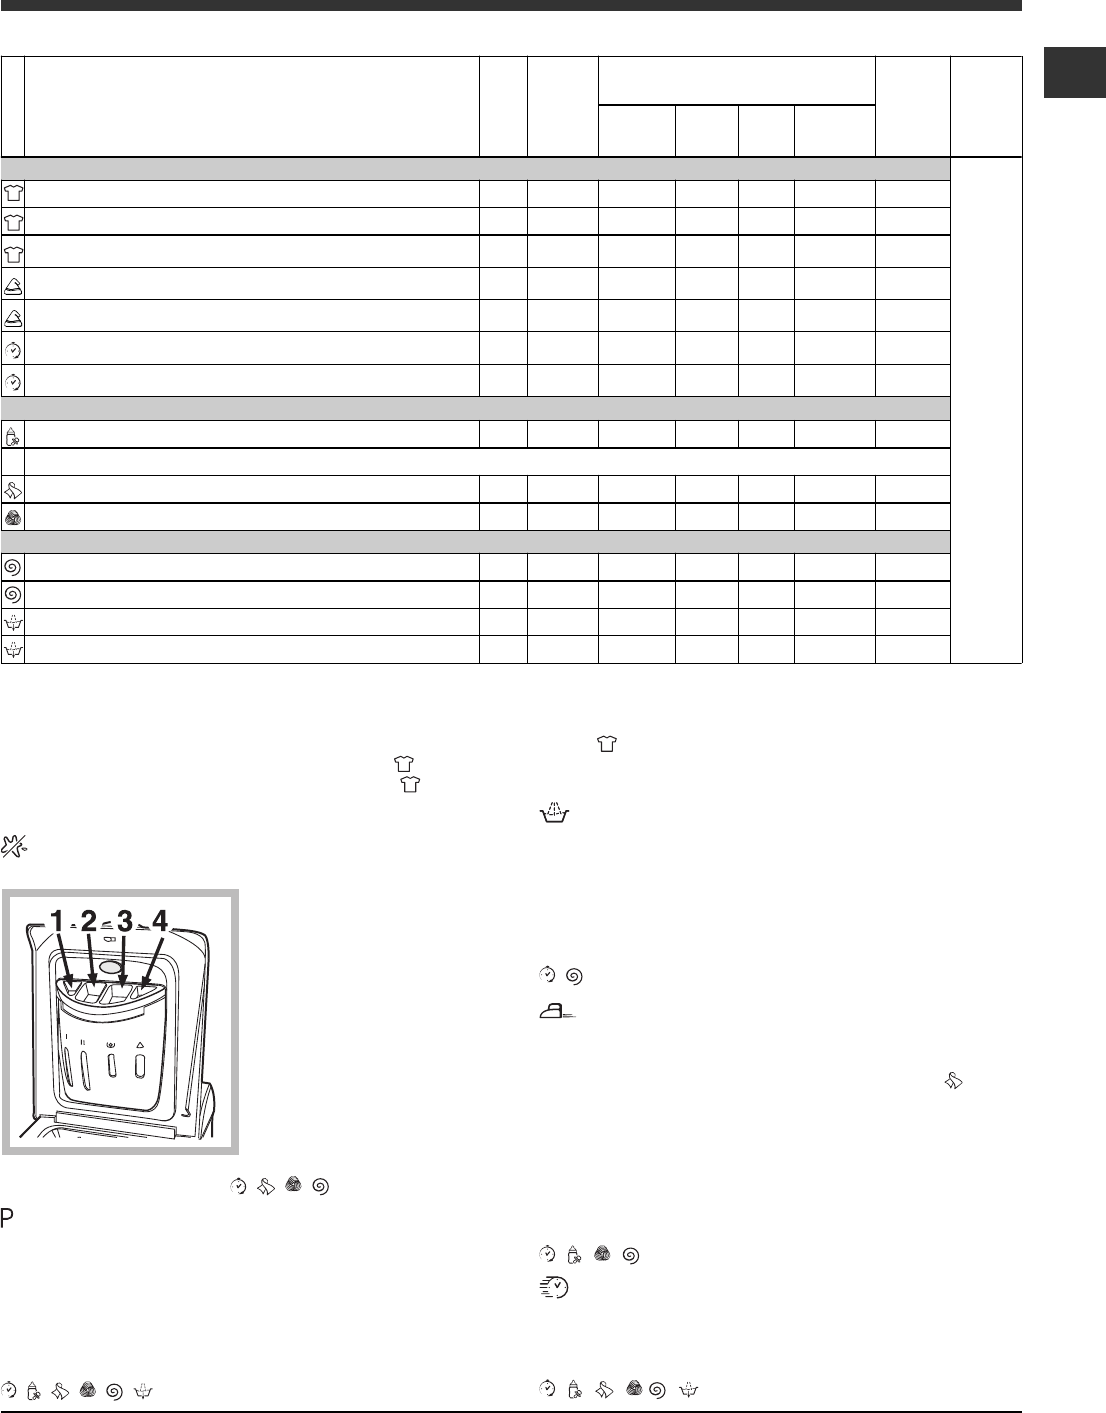
Cassetto dei detersivi
Il buon risultato del lavaggio dipende anche dal
corretto dosaggio del detersivo: eccedendo non si
lava in modo più efficace e si contribuisce a incrostare
le parti interne della lavabiancheria e a inquinare
lambiente.
Alzare il coperchio al di
sotto del quale è collo-
cato il cassetto dei
detersivi e inserire il
detersivo o ladditivo
come segue.
vaschetta 1: Detersivo per prelavaggio
(in polvere)
vaschetta 2: Detersivo per lavaggio
(in polvere o liquido)
E opportuno immettere direttamente il detersivo
liquido in vasca a mezzo dellapposita pallina.
vaschetta 3: Additivi (ammorbidente, ecc.)
Quando si versa lammorbidente nel comparto 3,
far attenzione a non superare il livello max indicato.
Lammorbidente viene automaticamente immesso
in macchina durante lultimo risciacquo. Al termine del
programma di lavaggio nello scomparto 3 rimane un
residuo dacqua. Questa serve per limmissione di
ammorbidenti molto densi, ovvero per diluire quelli
concentrati. Se nel comparto 3 rimanesse più acqua
del normale, ciò significa che il dispositivo di
svuotamento è intasato. Per la pulizia vedi Manuten-
zione e cura).
vaschetta 4: Candeggina
Preparare la biancheria
Suddividere la biancheria secondo:
- il tipo di tessuto / il simbolo sulletichetta.
- i colori: separare i capi colorati da quelli bianchi.
Vuotare le tasche e controllare i bottoni.
Non superare i valori indicati, riferiti al peso della
biancheria asciutta:
Tessuti resistenti: max 6 kg
Tessuti sintetici: max 2,5 kg
Tessuti delicati: max 2 kg
Lana: max 1 kg
Seta: max 1 kg
Quanto pesa la biancheria?
1 lenzuolo 400-500 gr.
1 federa 150-200 gr.
1 tovaglia 400-500 gr.
1 accappatoio 900-1.200 gr.
1 asciugamano 150-250 gr.
Programmi particolari
Mix 30': è studiato per lavare capi leggermente
sporchi in poco tempo: dura solo 30 minuti e fa così
risparmiare energia e tempo. Impostando il program-
ma (
a 30°C) è possibile lavare insieme tessuti di
diversa natura (esclusi lana e seta) con un carico
massimo di 3 kg.
Mix 15': è studiato per lavare capi leggermente
sporchi in poco tempo: dura solo 15 minuti e fa così
risparmiare energia e tempo. Impostando il program-
ma (
a 30°C) è possibile lavare insieme tessuti di
diversa natura (esclusi lana e seta) con un carico
massimo di 1,5 kg.
Baby: programma in grado di asportare lo sporco
tipico dei bambini garantendo la rimozione del
detersivo dai panni onde evitare allergie alla pelle
delicata dei bambini. Il ciclo
è stato studiato per
ridurre la carica batterica utilizzando una maggior
quantità di acqua e ottimizzando l'effetto di additivi
specifici igenizzanti aggiunti al detersivo.
Seta: utilizzare lapposito programma
per lavare
tutti i capi in seta. Si consiglia lutilizzo di un detersivo
specifico per capi delicati.
Tende:si raccomanda di piegarle e sistemarle dentro
una federa o un sacchetto a rete. Utilizzare il
programma
.
Lana: è lunica lavabiancheria ad aver ottenuto il
prestigioso riconoscimento Woolmark Platinum Care
(M.0508) da parte di The Woolmark Company, che
certifica il lavaggio in lavatrice di tutti i capi in lana,
anche quelli recanti letichetta solo lavaggio a mano
. Con il programma si ha quindi lassoluta
tranquillità di lavare in lavatrice tutti i capi in lana
(max. 1 kg) con la garanzia delle migliori performance.
Detersivi e biancheria
9
I
Precauzioni e consigli
La lavabiancheria è stata progettata e costruita in
conformità alle norme internazionali di sicurezza.
Queste avvertenze sono fornite per ragioni di
sicurezza e devono essere lette attentamente.
Sicurezza generale
Questo apparecchio è stato concepito esclusiva-
mente per un uso di tipo domestico.
L'apparecchio non deve essere utilizzato da
persone (bambini compresi) con capacità fisiche,
sensoriali o mentali ridotte e con esperienze e
conoscenze insufficienti, a meno che tale utilizzo
non avvenga sotto la supervisione o le istruzioni di
una persona responsabile della loro sicurezza. I
bambini devono essere sorvegliati per garantire
che non giochino con l'apparecchio.
La lavabiancheria deve essere usata solo da
persone adulte e secondo le istruzioni riportate
in questo libretto.
Non toccare la macchina a piedi nudi o con le
mani o i piedi bagnati o umidi.
Non staccare la spina dalla presa della corrente
tirando il cavo, bensì afferrando la spina.
Non toccare lacqua di scarico, che può
raggiungere temperature elevate.
Non forzare in nessun caso il coperchio: potrebbe
danneggiarsi il meccanismo di sicurezza che
protegge da aperture accidentali.
In caso di guasto, in nessun caso accedere ai
meccanismi interni per tentare una riparazione.
Controllare sempre che i bambini non si avvicinino
alla macchina in funzione.
Se devessere spostata, lavorare in due o tre
persone con la massima attenzione. Mai da soli
perché la macchina è molto pesante.
Prima di introdurre la biancheria controlla che il
cestello sia vuoto.
Smaltimento
Smaltimento del materiale di imballaggio:
attenersi alle norme locali, così gli imballaggi
potranno essere riutilizzati.
La direttiva Europea 2002/96/CE sui rifiuti di
apparecchiature elettriche ed elettroniche, preve-
de che gli elettrodomestici non debbano essere
smaltiti nel normale flusso dei rifiuti solidi urbani.
Gli apparecchi dismessi devono essere raccolti
separatamente per ottimizzare il tasso di recupero
e riciclaggio dei materiali che li compongono ed
impedire potenziali danni per la salute e l'ambiente.
Il simbolo del cestino barrato è riportato su
tutti i prodotti per ricordare gli obblighi di raccolta
separata. Per ulteriori informazioni, sulla corretta
dismissione degli elettrodomestici, i detentori
potranno rivolgersi al servizio pubblico preposto o ai
rivenditori.
Risparmiare e rispettare lambiente
Tecnologia a servizio dellambiente:
risparmiare detersivo, acqua,
energia e tempo
Per non sprecare risorse bisogna utilizzare la
lavabiancheria con il massimo carico. Un carico
pieno al posto di due mezzi fa risparmiare fino al
50% di energia.
Il prelavaggio è necessario solo per biancheria
molto sporca. Evitarlo fa risparmiare detersivo,
tempo, acqua e tra il 5 e il 15% di energia.
Trattando le macchie con uno scioglimacchia o
lasciandole in ammollo prima del lavaggio, si
riduce la necessità di lavare ad alte temperature.
Un programma a 60°C invece di 90°C o uno a
40°C invece di 60°C, fa risparmiare fino al 50% di
energia.
Dosare bene il detersivo in base alla durezza
dellacqua, al grado di sporco e alla quantità di
biancheria evita sprechi e protegge lambiente:
pur biodegradabili, i detersivi contengono elementi
che alterano lequilibrio della natura. Inoltre evitare
il più possibile lammorbidente.
Effettuando i lavaggi dal tardo pomeriggio fino alle
prime ore del mattino si collabora a ridurre il
carico di assorbimento delle aziende elettriche.
La funzione Partenza Ritardata aiuta molto a
organizzare i lavaggi in tal senso.
Se il bucato deve essere asciugato in un
asciugatore, selezionare unalta velocità di
centrifuga. Poca acqua nel bucato fa rispamiare
tempo ed energia nel programma di asciugatura.
10
I
Manutenzione e cura
Escludere acqua e corrente elettrica
Chiudere il rubinetto dellacqua dopo ogni
lavaggio. Si limita così lusura dellimpianto
idraulico della lavabiancheria e si elimina il pericolo
di perdite.
Staccare la spina della corrente quando si
pulisce la lavabiancheria e durante i lavori di
manutenzione.
Pulire la lavabiancheria
La parte esterna e le parti in gomma possono
essere puliti con un panno imbevuto di acqua
tiepida e sapone. Non usare solventi o abrasivi.
Curare Coperchio e cestello
Lasciare sempre socchiuso il coperchio per
evitare che si formino cattivi odori.
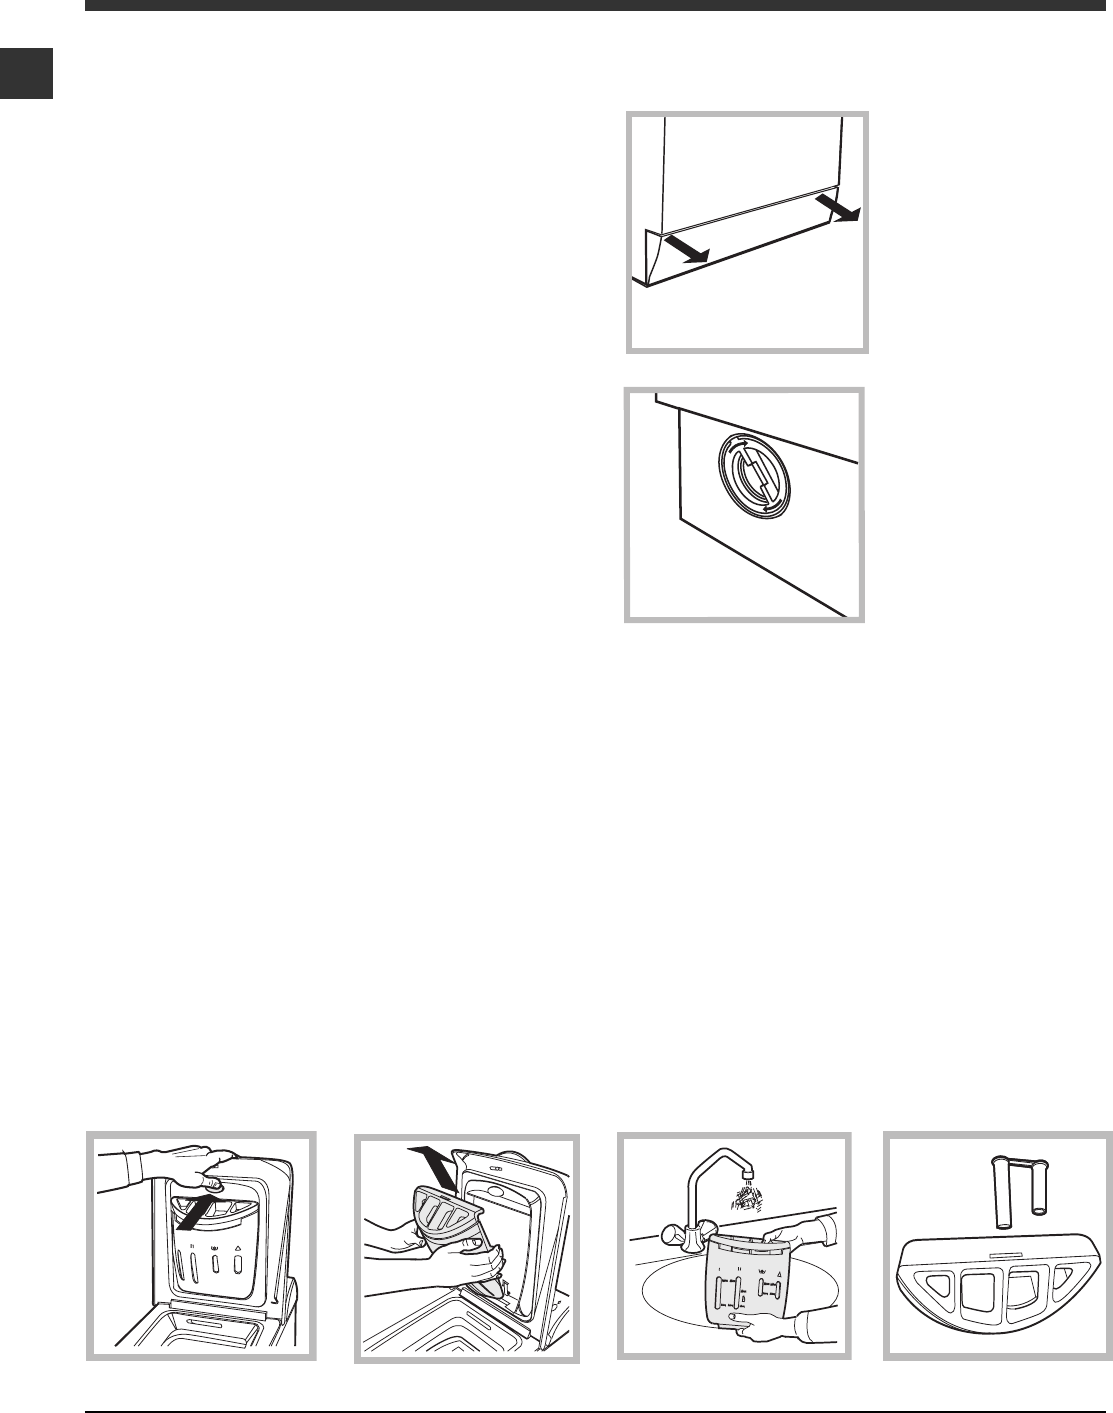
Pulire la pompa
La lavabiancheria è dotata di una pompa autopulente
che non ha bisogno di manutenzione. Può però
succedere che piccoli oggetti (monete, bottoni)
cadano nella precamera che protegge la pompa,
situata nella parte inferiore di essa.
Assicurarsi che il ciclo di lavaggio sia terminato e
staccare la spina.
Per recuperare eventuali oggetti caduti nella preca-
camera:
1. rimuovere il pannello
di copertura sul lato
anteriore della lava-
biancheria tirando con
le mani dai lati dello
zoccolo (vedifigura);
2. svitare il coperchio
ruotandolo in senso
antiorario (vedifigura):
è normale che fuori-
esca un pò dacqua;
3. pulire accuratamente
linterno;
4. riavvitare il coperchio;
5. rimontare il pannello
assicurandosi, prima di
spingerlo verso la
macchina, di aver
inserito i ganci nelle
apposite asole.
Controllare il tubo di alimentazione
dellacqua
Controllare il tubo di alimentazione almeno una volta
allanno. Se presenta screpolature e fessure va
sostituito: durante i lavaggi le forti pressioni potrebbe-
ro provocare improvvise spaccature.
Non utilizzare mai tubi già usati.
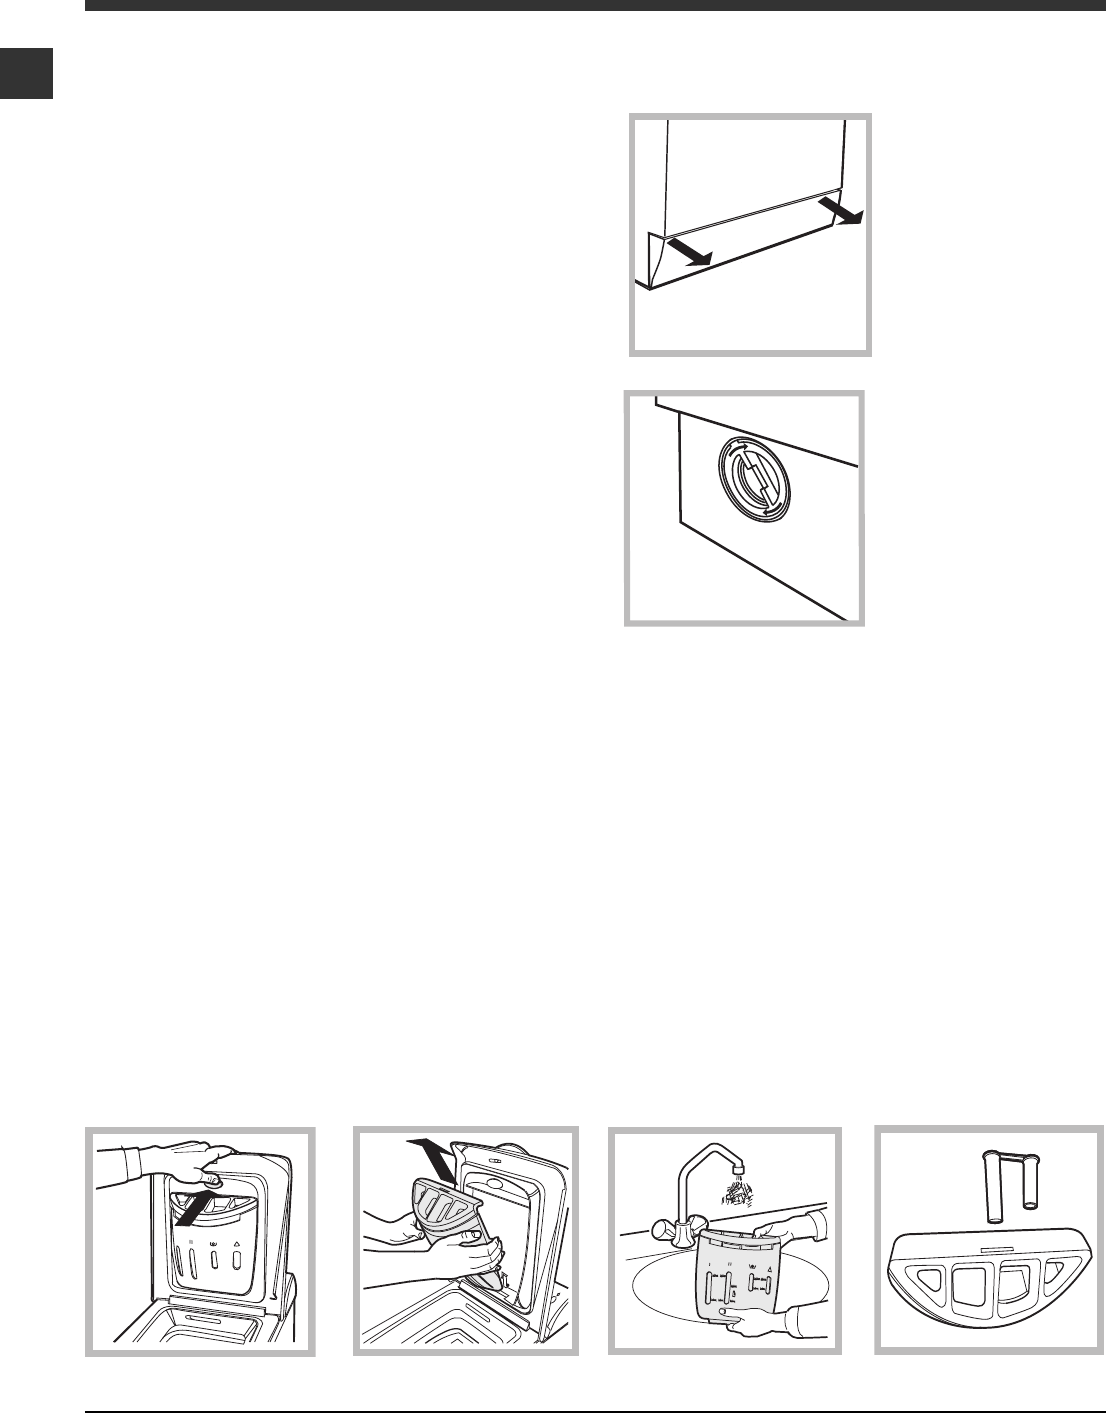
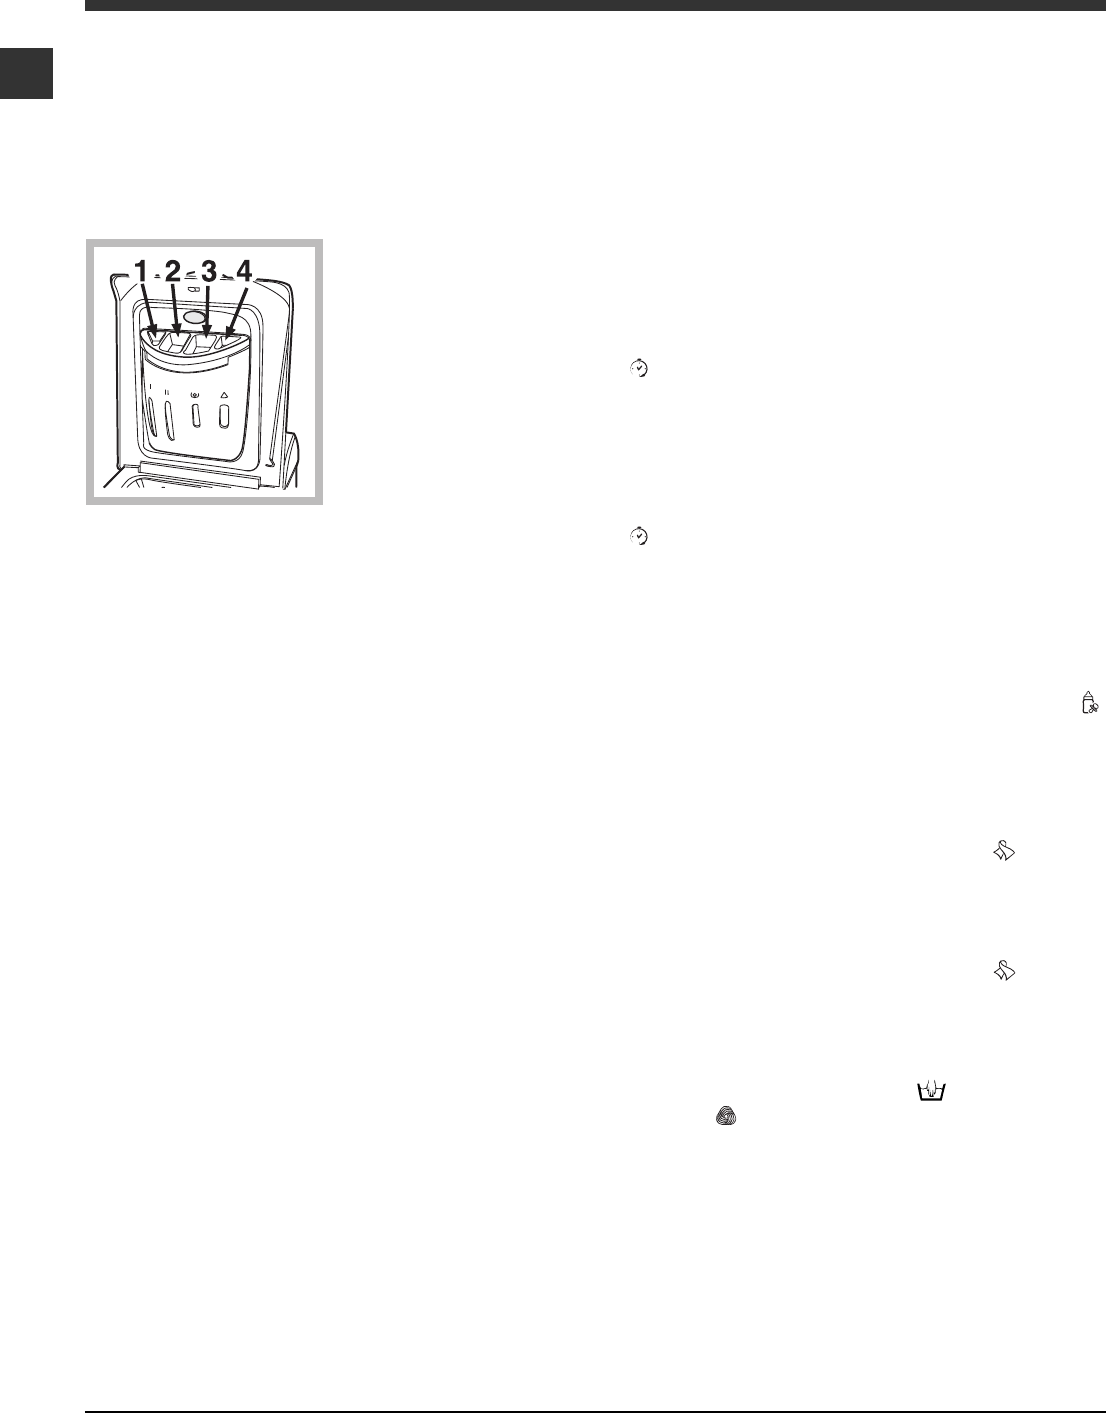
Come pulire la vaschetta del detersivo
Pulizia:
Pulire quindi il cassetto sotto il rubinetto (fig. 3) utilizzando
anche un semplice spazzolino da denti e, sfilata la coppia di
sifoncini inseriti nella parte superiore degli scomparti 1 e 2
(fig. 4), controllare che gli stessi non siano ostruiti e
risciacquarli.
Rimontaggio:
Non dimenticare di reinserire
la coppia di sifoncini negli
appositi alloggiamenti e
rimettere infine il cassetto
nella sua sede aggancian-
dolo (fig. 4, 2, 1).
Smontaggio:
Esercitare una leggera
pressione sul pulsante sulla
parte anteriore del cassetto
detersivo e tirarlo verso lalto
(fig. 1, 2).
Fig. 1Fig. 2
Fig. 3
Fig. 4
11
I
Anomalie e rimedi
Può accadere che la lavabiancheria non funzioni. Prima di telefonare allAssistenza (vedi Assistenza), controllare
che non si tratti di un problema facilmente risolvibile aiutandosi con il seguente elenco.
Anomalie:
La lavabiancheria
non si accende.
Il ciclo di lavaggio
non inizia.
La lavabiancheria non carica
acqua (nel display apparirà la
sctitta Manca lacqua, apri il
rubinetto).
La lavabiancheria carica e
scarica acqua di continuo.
La lavabiancheria non scarica
o non centrifuga.
La lavabiancheria vibra
molto durante la centrifuga.
La lavabiancheria perde acqua.
La macchina è bloccata, il display
lampeggia e segnala un codice di
anomalia (es.: F-01, F-..).
Si forma troppa schiuma.
Possibili cause / Soluzione:
La spina non è inserita nella presa della corrente, o non abbastanza
da fare contatto.
In casa non cè corrente.
Lo sportello non è ben chiuso.
Il tasto ACCENSIONE/SPEGNIMENTO non è stato premuto.
Il tasto AVVIO/PAUSA non è stato premuto.
Il rubinetto dellacqua non è aperto.
Si è impostato un ritardo sullora di avvio (PARTENZA RITARDATA,
vedi Come effettuare un ciclo di lavaggio).
Il tubo di alimentazione dellacqua non è collegato al rubinetto.
Il tubo è piegato.
Il rubinetto dellacqua non è aperto.
In casa manca lacqua.
Non cè sufficiente pressione.
Il tasto AVVIO/PAUSA non è stato premuto.
Il tubo di scarico non è installato fra 65 e 100 cm da terra (vedi Installazione).
Lestremità del tubo di scarico è immersa nellacqua (vedi Installazione).
Lo scarico a muro non ha lo sfiato daria.
Se dopo queste verifiche il problema non si risolve, chiudere il rubinetto
dellacqua, spegnere la lavabiancheria e chiamare lAssistenza. Se
labitazione si trova agli ultimi piani di un edificio, è possibile che si verifi-
chino fenomeni di sifonaggio, per cui la lavabiancheria carica e scarica
acqua di continuo. Per eliminare linconveniente sono disponibili in com-
mercio apposite valvole anti-sifonaggio.
Il programma non prevede lo scarico: con alcuni programmi occorre
avviarlo manualmente.
È attiva la funzione STIRA FACILE: per completare il programma
premere il tasto AVVIO/PAUSA (Programmi e funzioni).
Il tubo di scarico è piegato (vedi Installazione).
La conduttura di scarico è ostruita.
Il cestello, al momento dellinstallazione, non è stato sbloccato
correttamente (vedi Installazione).
La lavabiancheria non è in piano (vedi Installazione).
La lavabiancheria è stretta tra mobili e muro (vedi Installazione).
Il tubo di alimentazione dellacqua non è ben avvitato (vedi Installazione).
Il cassetto dei detersivi è intasato (per pulirlo vedi Manutenzione e cura).
Il tubo di scarico non è fissato bene (vedi Installazione).
Spegnere la macchina e togliere la spina dalla presa, attendere circa 1
minuto quindi riaccenderla.
Se lanomalia persiste, chiamare lAssistenza.
Il detersivo non è specifico per lavabiancheria (deve esserci la
dicitura per lavatrice, a mano e in lavatrice, o simili).
Il dosaggio è stato eccessivo.
12
I
Assistenza
Prima di contattare lAssistenza:
Verificare se lanomalia può essere risolta da soli (vedi Anomalie e rimedi).
Riavviare il programma per controllare se linconveniente è stato ovviato;
In caso negativo, contattare il Numero Unico 199.199.199*.
Non ricorrere mai a tecnici non autorizzati.
Comunicare:
il tipo di anomalia;
il modello della macchina (Mod.);
il numero di serie (S/N).
Queste informazioni si trovano sulla targhetta applicata nella parte posteriore della lavabiancheria.
Assistenza Attiva 7 giorni su 7
*
In caso di necessità dintervento chiamare il Numero Unico Nazionale 199.199.199*.
Un operatore sarà a completa disposizione per fissare un appuntamento con il Centro Assistenza Tecnico
Autorizzato più vicino al luogo da cui si chiama.
È attivo 7 giorni su 7, sabato e domenica compresi, e non lascia mai inascoltata una richiesta.
* Al costo di 14,25 centesimi di Euro al minuto (iva inclusa) dal Lun. al Ven. dalle 08:00 alle 18:30, il Sab. dalle 08:00 alle
13:00 e di 5,58 centesimi di Euro al minuto (iva inclusa) dal Lun. al Ven. dalle 18:30 alle 08:00, il Sab. dalle 13:00 alle 08:00
e i giorni festivi, per chi chiama da telefono fisso.
Per chi chiama da radiomobile le tariffe sono legate al piano tariffario delloperatore telefonico utilizzato.
Le suddette tariffe potrebbero essere soggette a variazione da parte delloperatore telefonico; per maggiori informazioni
consultare il sito www.aristonchannel.com.
GB
13
Contents
Installation, 14-15
Unpacking and levelling
Connecting the electricity and water supplies
The first wash cycle
Technical data
Description of the washing machine, 16-17
Control panel
Display
How to open and shut the drum
Running a wash cycle, 18
Load balancing system
Wash cycles and functions, 19
Table of wash cycles
Wash functions
Detergents and laundry, 20
Detergent dispenser drawer
Preparing the laundry
Special wash cycles
Precautions and tips, 21
General safety
Disposal
Saving energy and respecting the environment
Care and maintenance, 22
Cutting off the water or electricity supply
Cleaning your appliance
Caring for your appliance door and drum
Cleaning the pump
Checking the water inlet hose
How to clean the detergent dispenser
Troubleshooting, 23
Service, 24
ARTXD 149
Instructions for use
WASHING MACHINE
English
GB
14
GB
Installation
Keep this instruction manual in a safe place for
future reference. Should the appliance be sold,
transferred or moved, make sure the instruction
manual accompanies the washing machine to inform
the new owner as to its operation and features.
Read these instructions carefully: they contain vital
information on installation, use and safety.
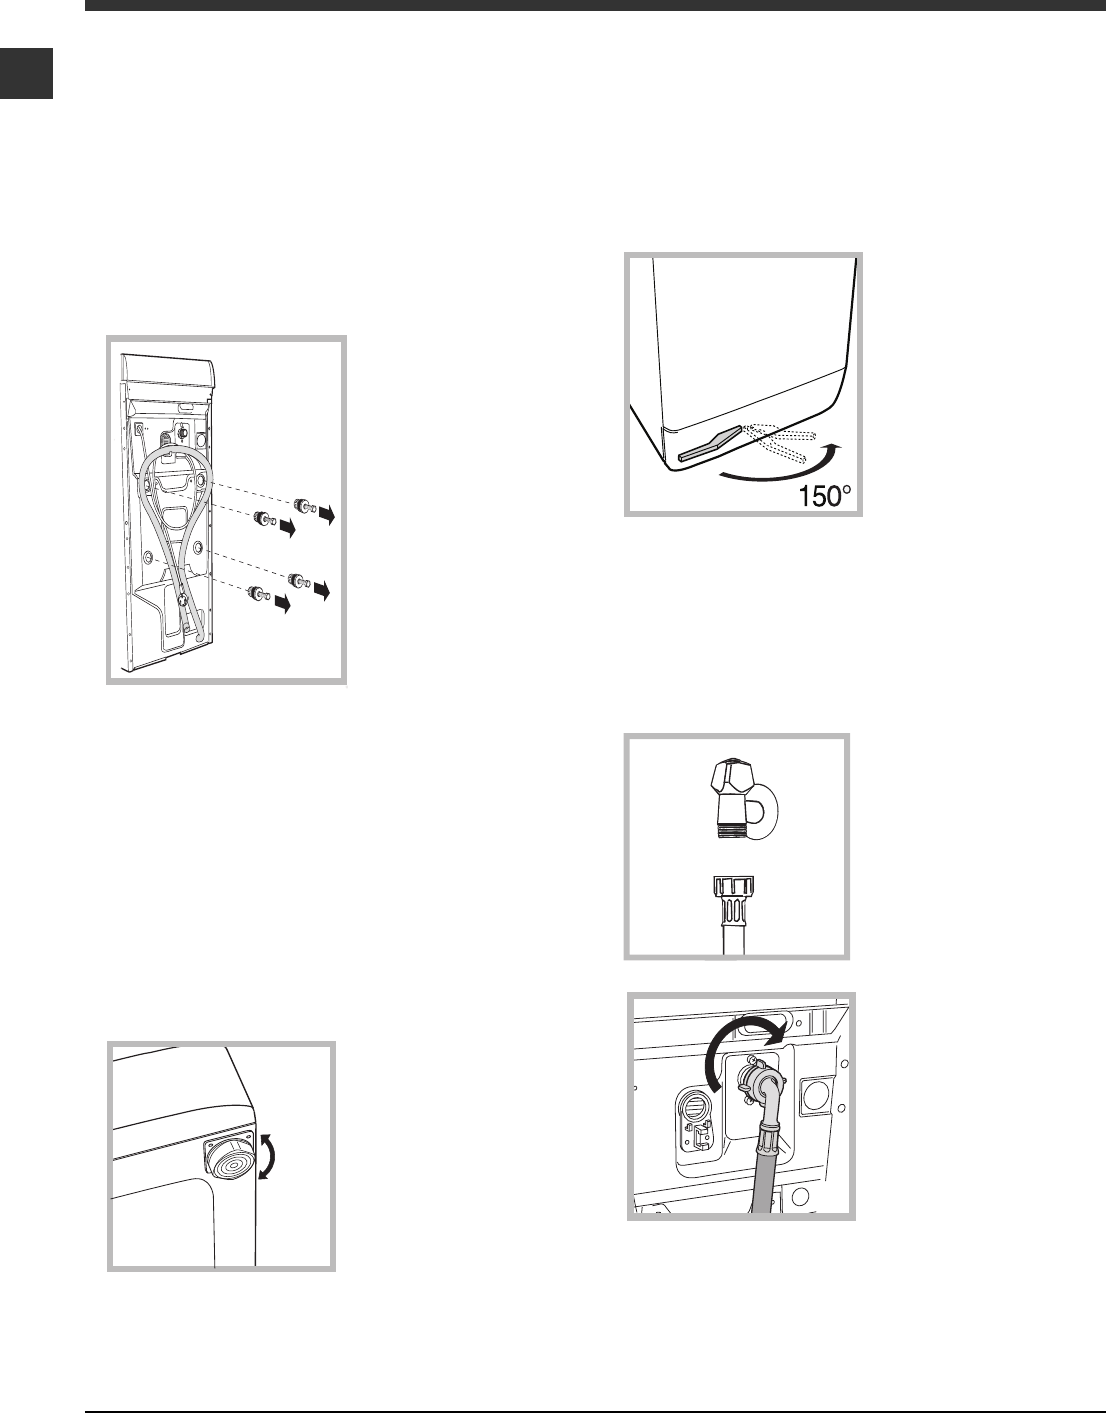
Unpacking and levelling
Unpacking
1. Unpack the
washing machine.
2. Check whether the
washing machine has
been damaged during
transport. If this is the
case, do not install it
and contact your
retailer.
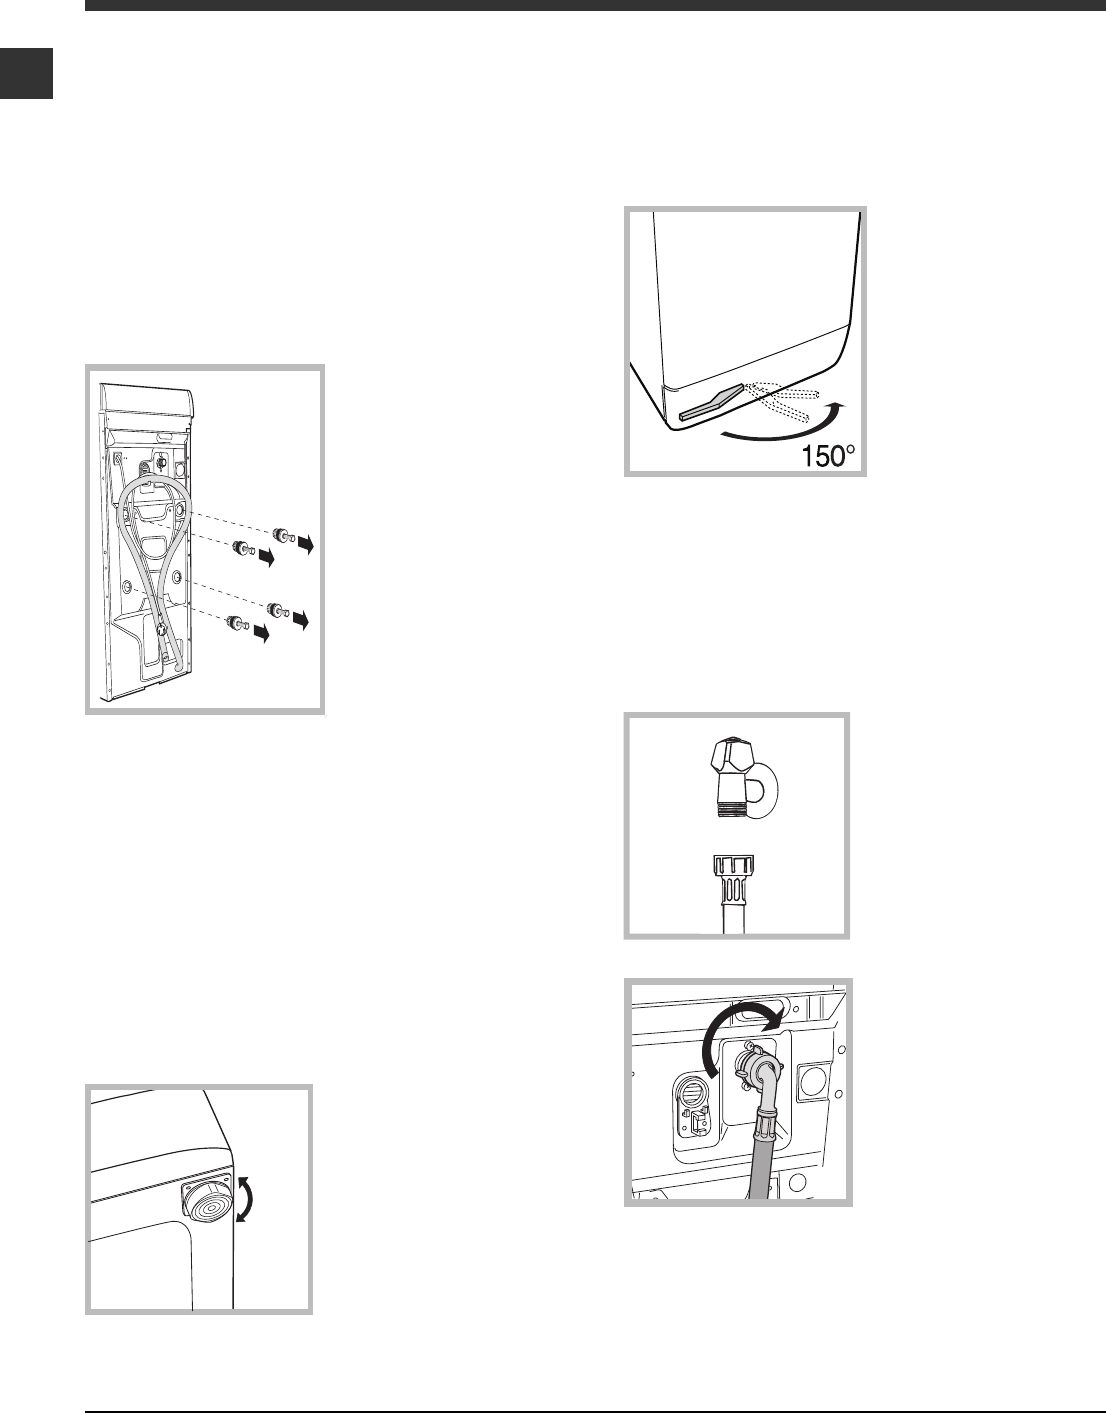
3. Remove the four
protective screws and
the rubber washer
with the respective
spacer, situated on
the rear of the
appliance (see figure).
4. Seal the gaps using the plastic plugs provided.
5. Keep all the parts: you will need them again if
the washing machine needs to be moved to
another location.
Warning: should the screws be re-used, make sure
you fasten the shorter ones at the top.
Packaging materials are not children's toys.
Levelling
Your machine may make a considerable amount of
noise if the two front feet have not been adjusted
correctly.
1. Install the washing
machine on a flat
sturdy floor, without
resting it up against
walls, furniture cabinets
or other.
2. If the floor is not
perfectly level, com-
pensate for any
unevenness by
tightening or loosening
the adjustable front feet (see figure); the angle of
inclination, measured according to the worktop,
must not exceed 2°.
Levelling your appliance correctly will provide it with
stability and avoid any vibrations, noise and shifting
during operation. If it is placed on a fitted or loose
carpet, adjust the feet in such a way as to allow
enough room for ventilation beneath the washing
machine.
Putting your appliance in place and moving it.
If your washing
machine is equipped
with a special set of
retractable wheels you
can easy move it. To
lower the wheels and
thus move the
appliance effortlessly,
just pull the lever,
situated on the left-
hand side beneath the
base. Once the
appliance is in the required position, put the lever
back in place. The washing machine is now firmly in
place (see figure).
Electric and water connections
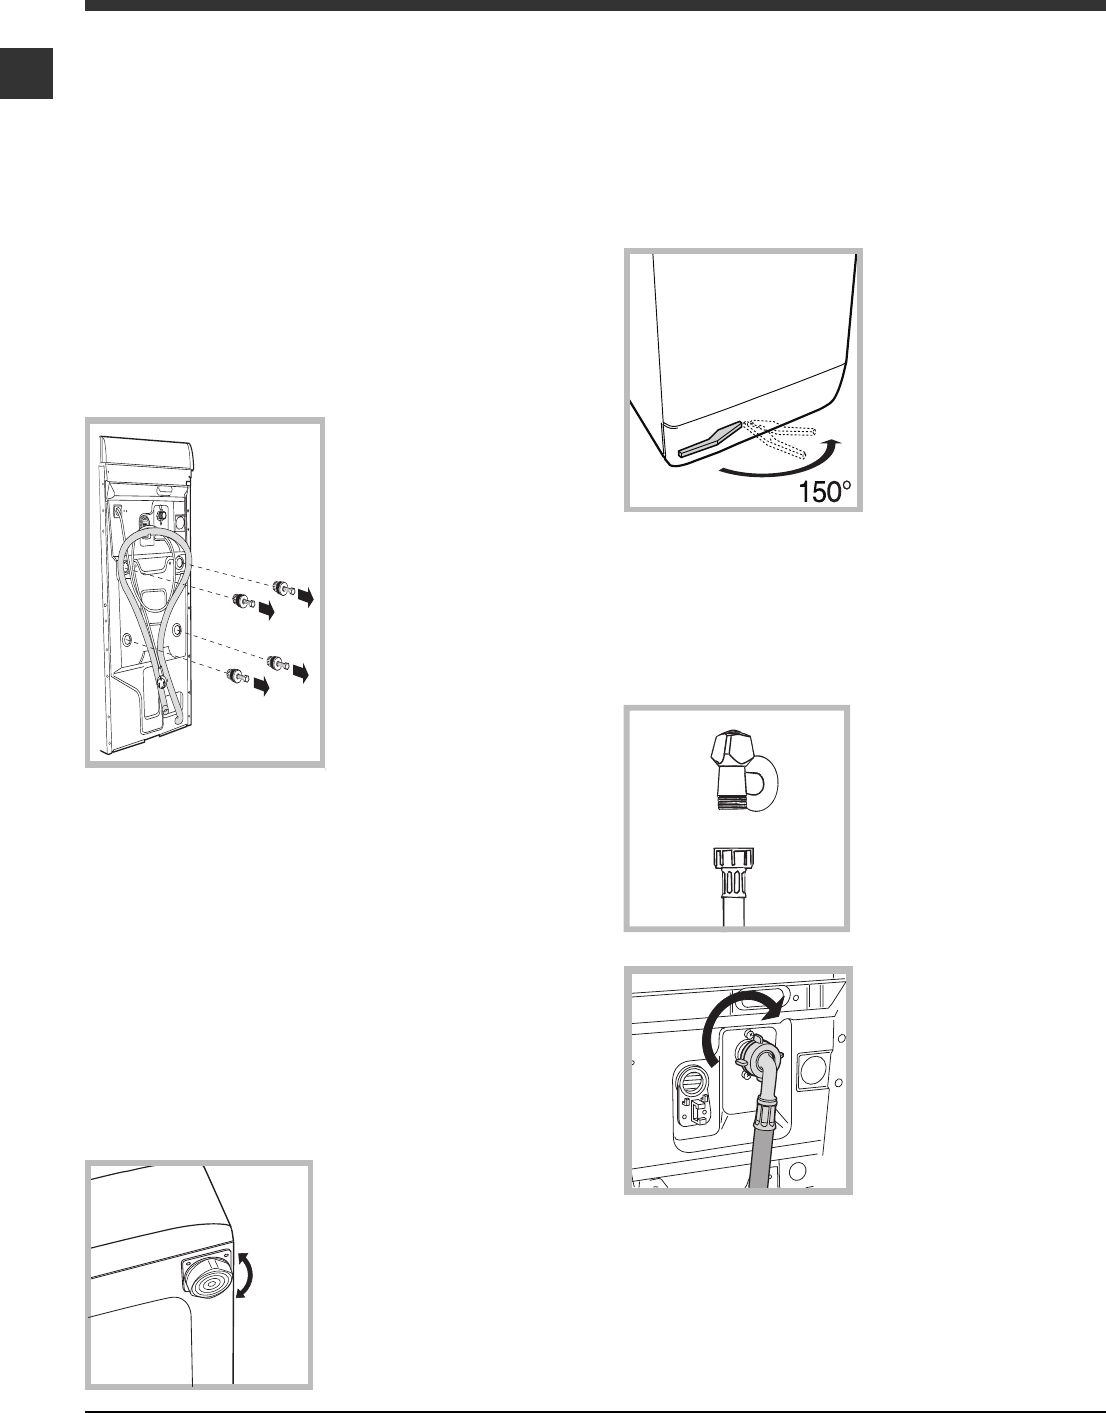
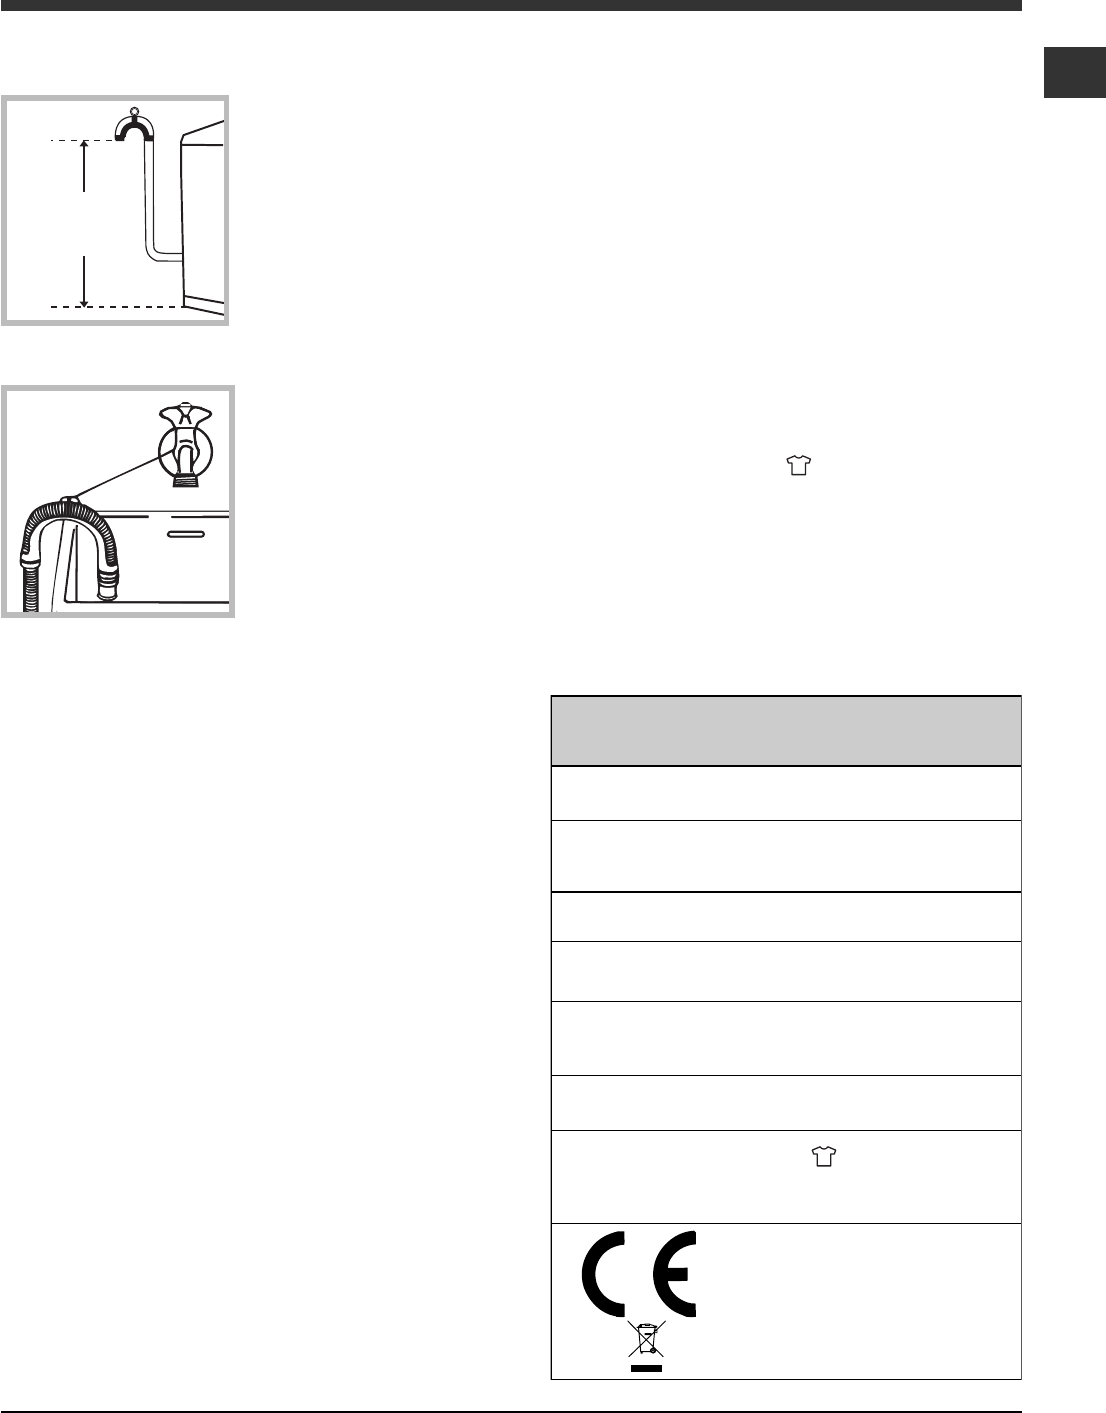
Connecting the water inlet hose
1. Connect the supply
pipe by screwing it to a
cold water tab using a ¾
gas threaded connection
(see figure).
Before performing the
connection, allow the
water to run freely until it
is perfectly clear.
2. Connect the other
end of the water inlet
hose to the washing
machine, screwing it
onto the appliance's
cold water inlet, situated
on the top right-hand
side on the rear of the
appliance (see figure).
3. Make sure there are no kinks or bends in the hose.
The water pressure at the tap must be within the
values indicated in the Technical details table
(on the next page).
If the water inlet hose is not long enough, contact
a specialist store or an authorised serviceman.
GB
15
Technical data
Model
ARTXD 149
Dimensions
width 40 cm
height 85 cm
depth 60 cm
Capacity
from 1 to 6 kg
Electrical
connections
please refer to the technical data
plate fixed to the machine
Water connections
maximum pressure 1 MPa (10 bar)
minimum pressure 0.05 MPa (0.5 bar)
drum capacity 42 litres
Spin speed
up to 1400 rotations per minute
Test Programmes
according to
1061/2010
programme
(90°C); temperature
60°C and 40°C
(By pressing the
TEMPERATURE button).
This appliance conforms to the
following EC Directives:
- 2004/108/CE (Electromagnetic
Compatibility)
- 2002/96/EC
- 2006/95/EC (Low Voltage)
65 - 100 cm
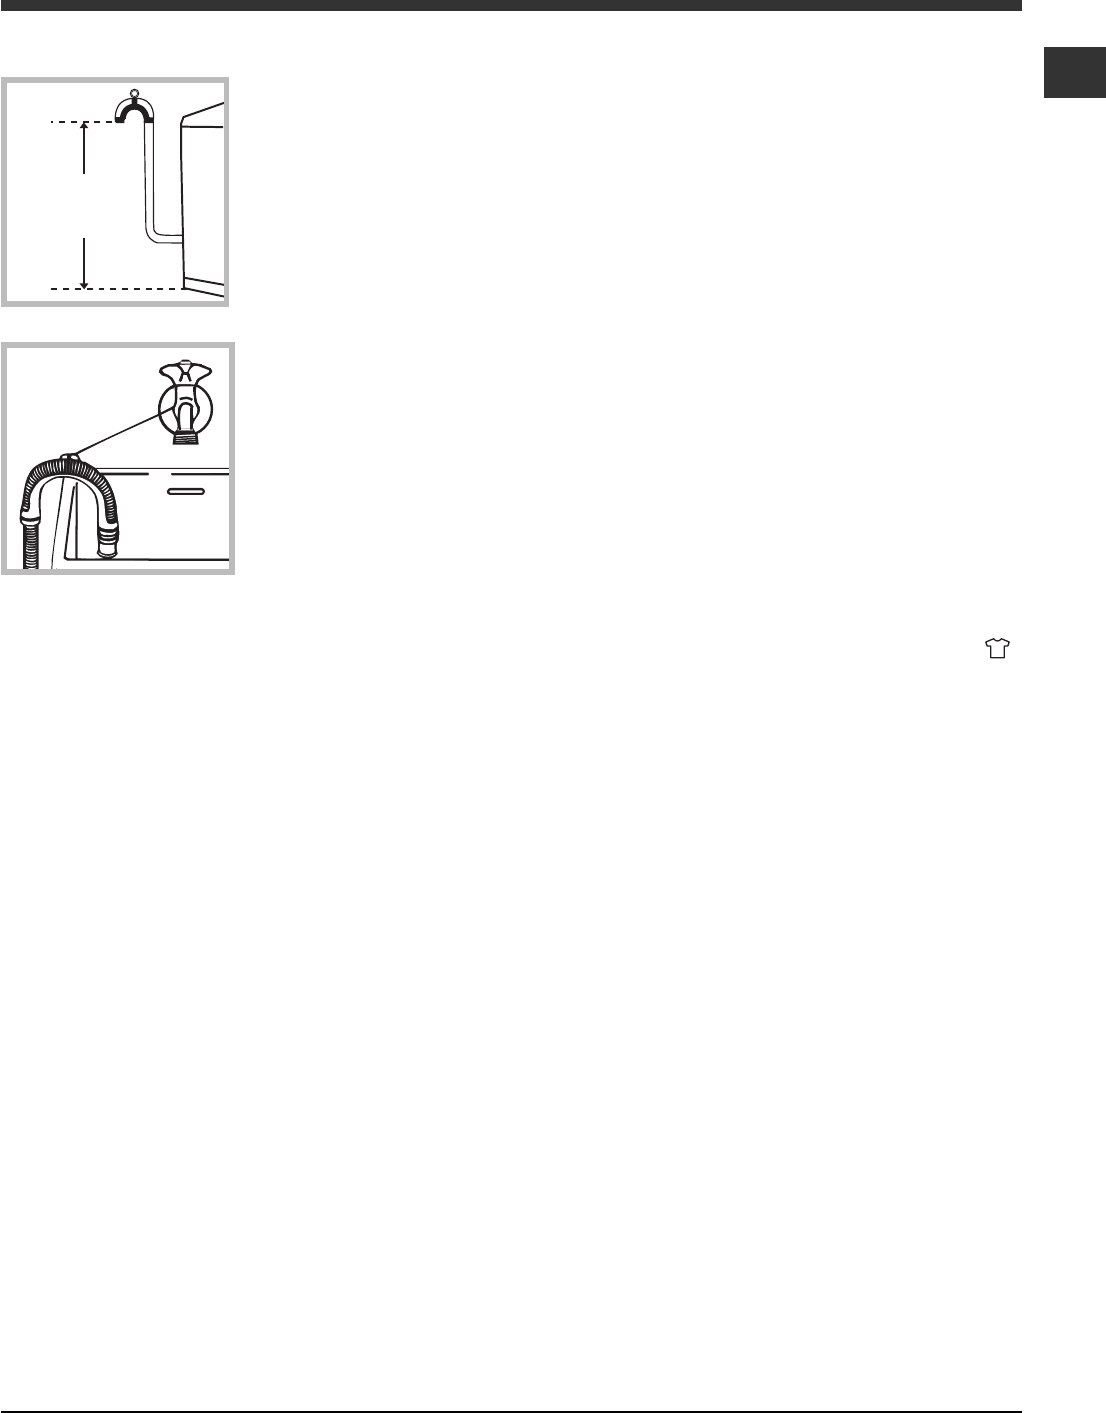
Connecting the drain hose
Connect the drain hose,
without bending it, to a
drainage duct or a wall
drain located at a height
between 65 and 100 cm
from the floor;
alternatively, rest it on
the side of a washbasin
or bathtub, fastening the
duct supplied to the tap
(see figure). The free end
of the hose should not
be underwater.
We advise against the use of hose extensions; if it is
absolutely necessary, the extension must have the
same diameter as the original hose and must not
exceed 150 cm in length.
Electrical connections
Before plugging the appliance into the electricity
socket, make sure that:
the socket is earthed and complies with all
applicable laws;
the socket is able to withstand the maximum power
load of the appliance as indicated in the Technical
data table (see opposite);
the power supply voltage falls within the values
indicated in the Technical data table (see opposite);
the socket is compatible with the plug of the
washing machine. If this is not the case, replace
the socket or the plug.
The washing machine must not be installed
outdoors, even in covered areas. It is extremely
dangerous to leave the appliance exposed to rain,
storms and other weather conditions.
When the washing machine has been installed, the
electricity socket must be within easy reach.
Do not use extension cords or multiple sockets.
The cable should not be bent or compressed.
The power supply cable must only be replaced by
authorised technicians.
Warning! The company shall not be held responsible
in the event that these regulations are not respected.
The first wash cycle
Once the appliance has been installed, and before
you use it for the first time, run a wash cycle with
detergent and no laundry, using the wash cycle
.
16
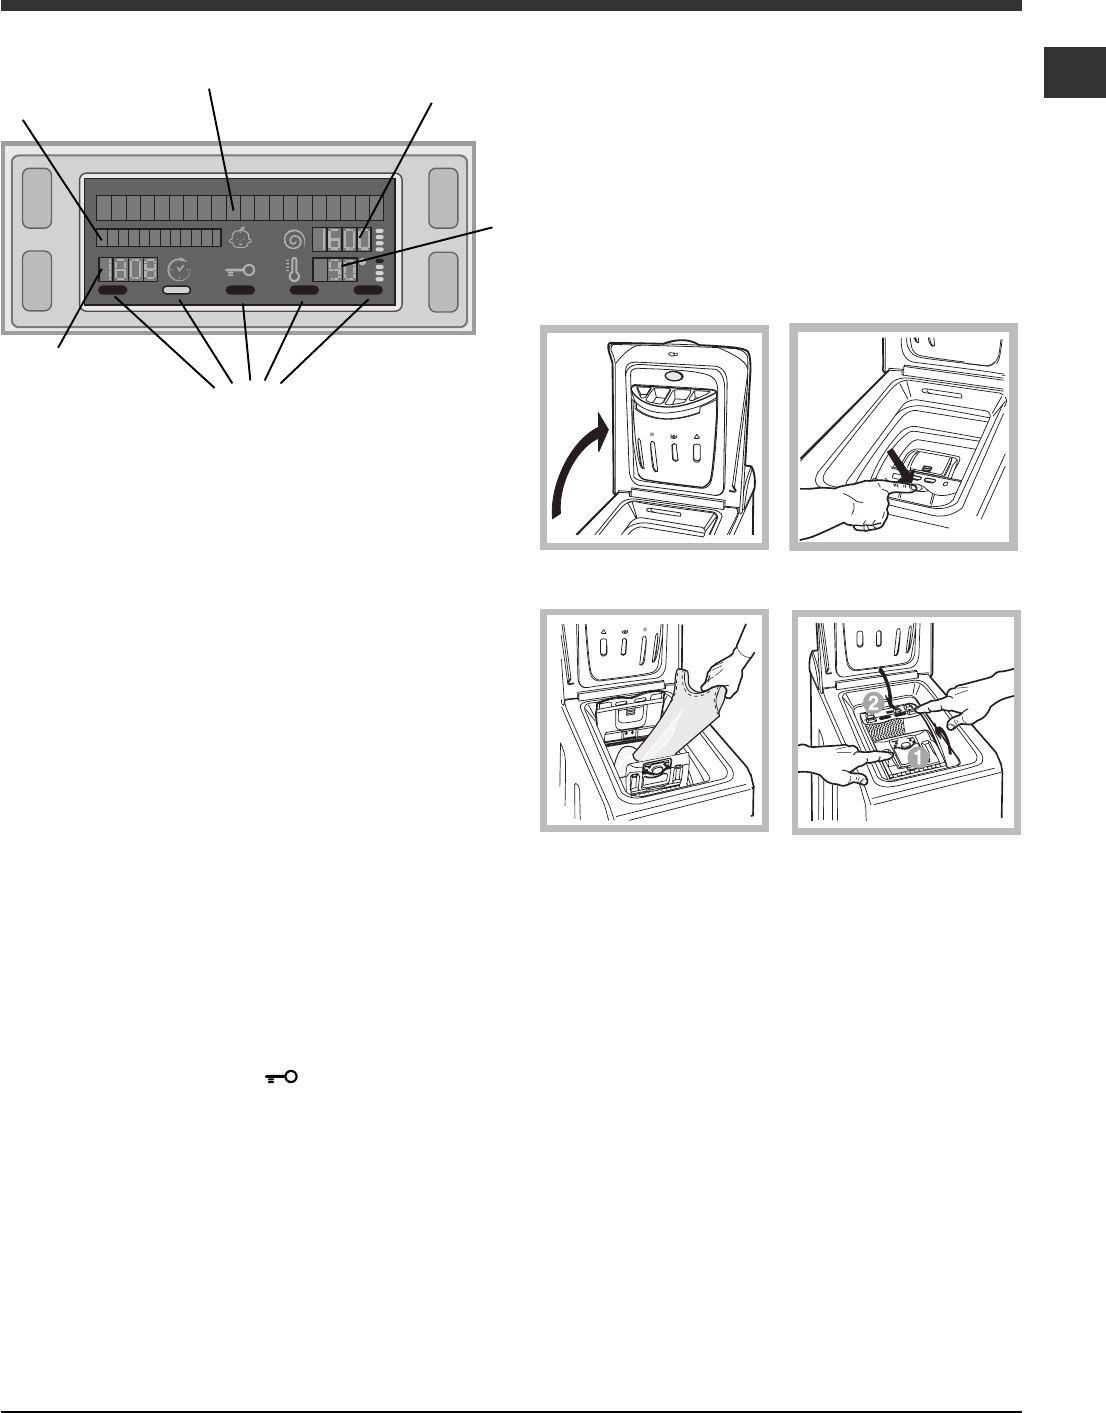
GB
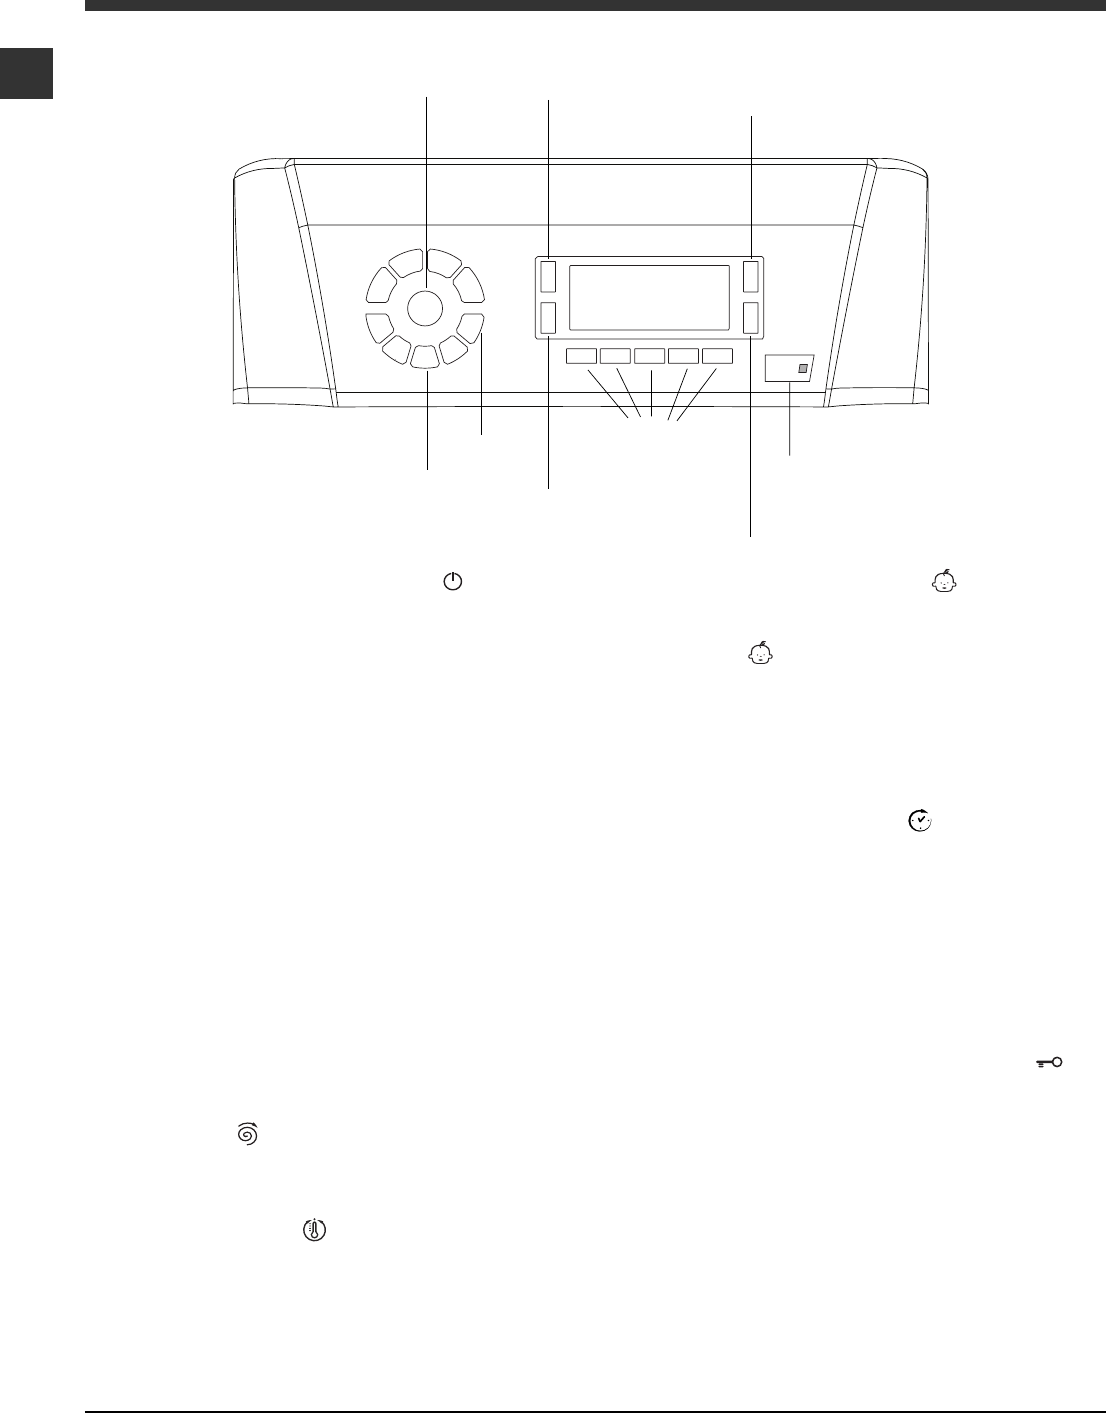
Control panel
TEMPERATURE
Button
WASH
CYCLE
SELECTOR
Buttons
FUNCTION
buttons
ON/OFF
button
SPIN SPEED
Button
START/PAUSE
button with indicator light
CONTROL
PANEL
LOCK
Button
DISPLAY
DELAYED
START
Button
MEMORY
Button
Description of the washing
machine
ON/OFF button : press this briefly to switch the
machine on or off. The START/PAUSE indicator light,
which flashes slowly in a green colour shows that the
machine is switched on. To switch off the washing
machine during the wash cycle, press and hold the
button for approximately 2 seconds; if the button is
pressed briefly or accidentally the machine will not
switch off. If the machine is switched off during a
wash cycle, this wash cycle will be cancelled.
WASH CYCLE SELECTOR buttons: used to set the
desired wash cycle (see "Table of wash cycles").
MEMORY button: press and hold the button to store
a cycle with your own set of preferences in the
memory of the machine. To recall a previously stored
cycle, press the MEMO button.
FUNCTION buttons:press the button to select the
desired function. The corresponding indicator light on
the display will switch on.
SPIN button
: press to reduce or completely
exclude the spin cycle - the value is indicated on the
display.
TEMPERATURE button
: press to decrease the
temperature: the value will be shown on the display.
CONTROL PANEL LOCK button
: to activate the
control panel lock, press and hold the button for
approximately 2 seconds. When the symbol
is
illuminated, the control panel is locked. This means it
is possible to prevent wash cycles from being modified
accidentally, especially where there are children in the
home. To deactivate the control panel lock, press
and hold the button for approximately 2 seconds.
DELAYED START button
: press to set a delayed
start time for the selected wash cycle. The delay time
will be shown on the display.
START/PAUSE button with indicator light: when the
green indicator light flashes slowly, press the button to
start a wash cycle. Once the cycle has begun the
indicator light will remain lit in a fixed manner. To
pause the wash cycle, press the button again; the
indicator light will flash in an orange colour. If the
symbol
is not illuminated, the door may be
opened. To start the wash cycle from the point at
which it was interrupted, press the button again.
Standby mode
This washing machine, in compliance with new
energy saving regulations, is fitted with an automatic
standby system which is enabled after about 30
minutes if no activity is detected. Press the ON-OFF
button briefly and wait for the machine to start up
again.
GB
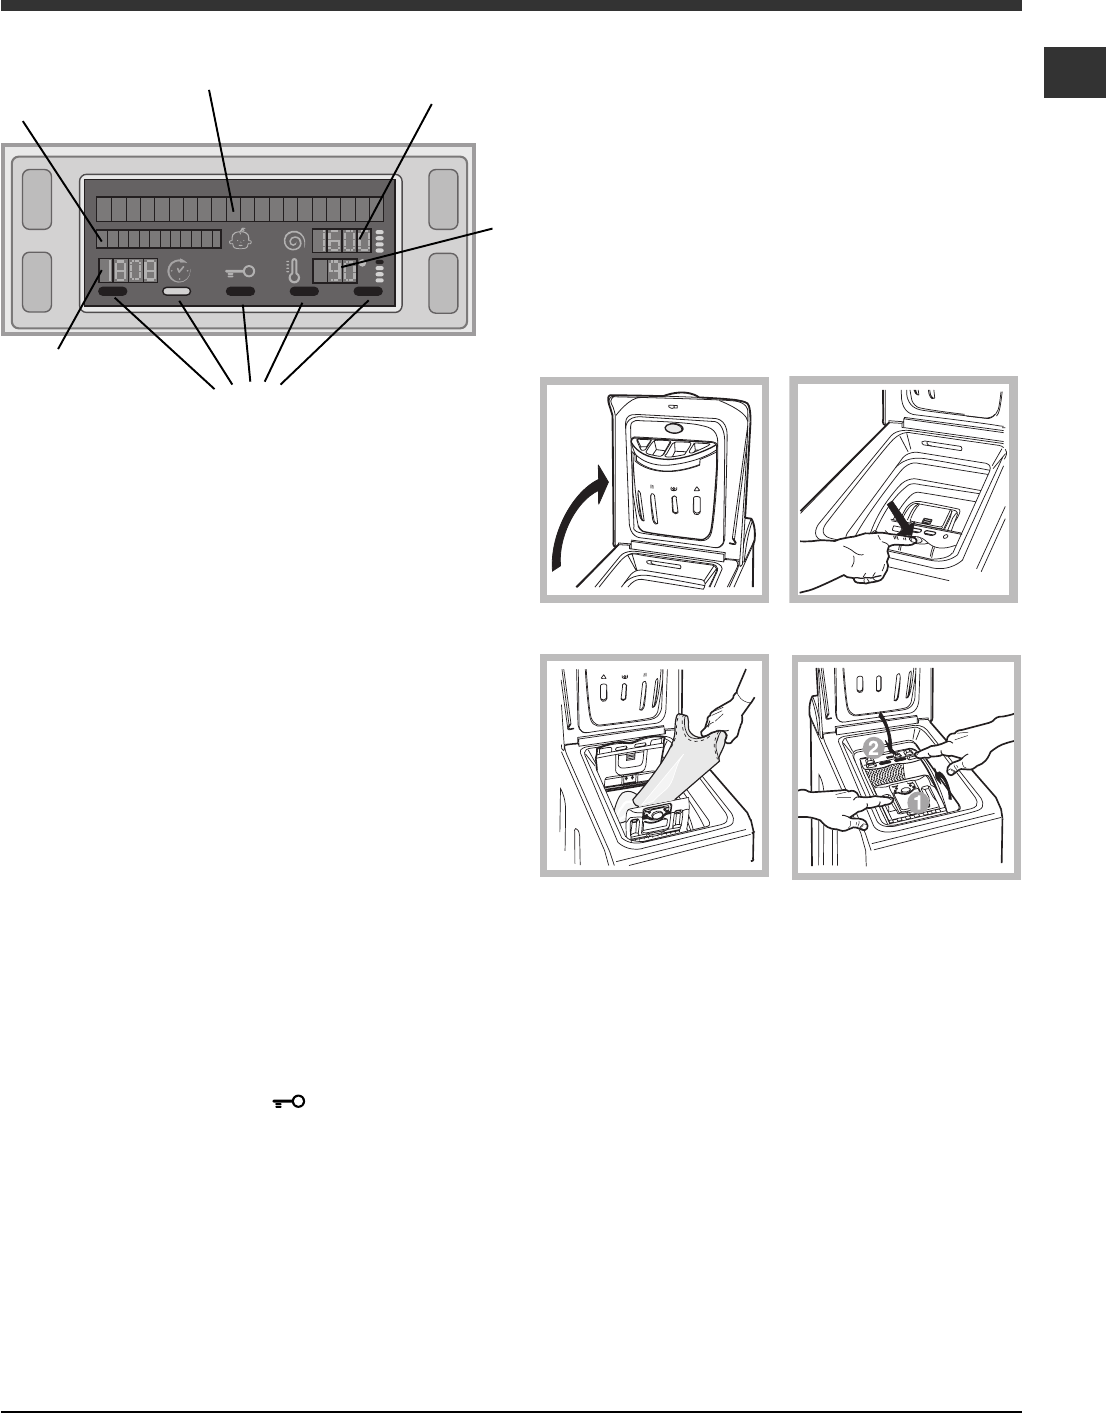
17
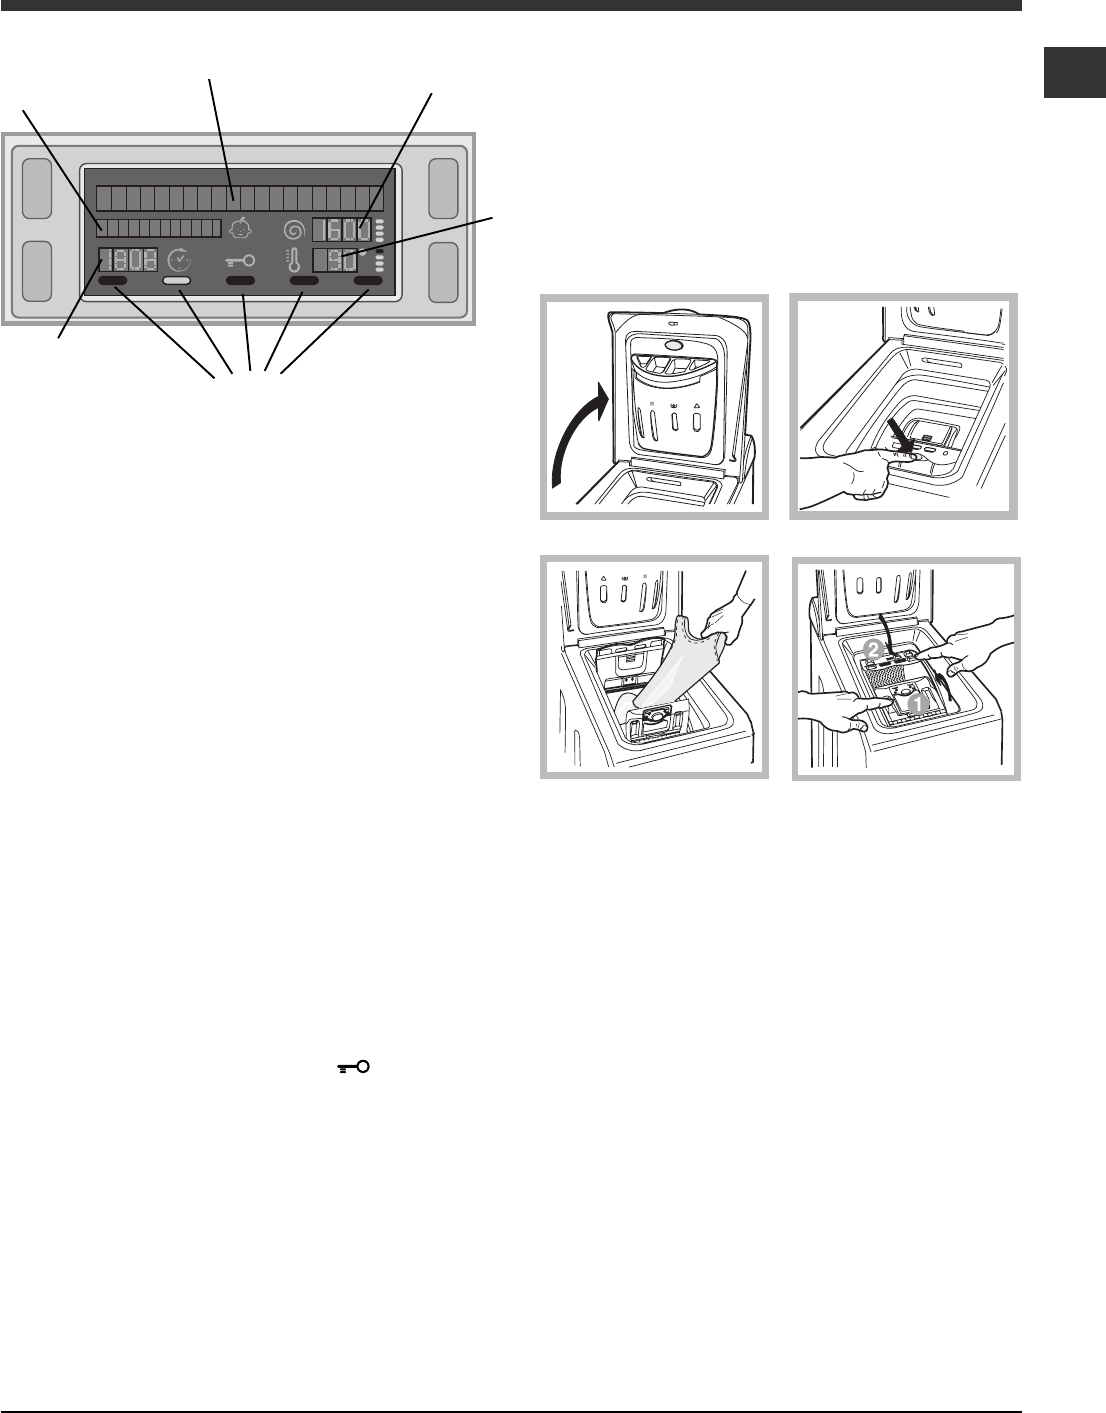
Fig. 1
Fig. 2
Fig. 3
Fig. 4
How to open and to close the drum
A) Opening (Fig. 1):
Lift the external lid and open it completely.
B) Opening the drum (Soft opening):
With one finger, push the button indicated in fig. 2
and the drum will open delicately.
C) Loading the washing machine (Fig. 3).
D) Shutting (Fig. 4):
- close the drum fully by first shutting the front door
followed by the rear one;
- then ensure the hooks on the front door are
perfectly housed within the seat of the rear door;
- after the hooks have clicked into position, press
both doors lightly downwards to make sure they do
not come loose;
- finally shut the external lid.
E) Drum End Stop (Fig. 2):
Once the wash cycle has been completed, the drum will
position itself with doors facing upward for ease pf opening.
The display is useful when programming the machine
and provides a great deal of information.
The two upper strings A and B provide details of the
wash cycle selected, the wash cycle phase in
progress and all information relating to the progress
status of the wash cycle.
String C shows the time remaining until the end of the
wash cycle in progress and, if a DELAYED START has
been set, the time remaining until the start of the
selected wash cycle.
String D shows the maximum spin speed value (this
depends on the selected wash cycle); if the wash
cycle does not include a spin cycle, the string remains
unused.
String E shows the maximum temperature value
which may be selected (this depends on the wash
cycle used); if the temperature of the wash cycle
cannot be modified, the string remains unused.
Indicator lights F correspond to the functions and light
up when the selected function is compatible with the
set wash cycle.
Door locked symbol
If the symbol is lit, this indicates that the washing
machine door is blocked to prevent it from being
opened accidentally. To prevent any damage from
occurring, wait for the symbol to switch itself off
before opening the appliance door (it will take about
three minutes).
N.B.: if the DELAYED START function has been
activated, the door cannot be opened; pauses the
machine by pressing the START/PAUSE button if you
wish to open it.
The first time the machine is switched on, you will
be asked to select the language and the display will
automatically show the language selection menu.
Display
A
B
C
D
E
F
To select the desired language press the
TEMPERATURE and SPIN buttons; to confirm the
selection press the CONTROL PANEL LOCK button.
If you wish to select another language, switch off the
machine, press and hold the CONTROL PANEL LOCK
+ TEMPERATURE + SPIN buttons simultaneously for
5 seconds, then repeat the steps listed above.
18
GB
Running a wash cycle
1. SWITCH THE MACHINE ON.Press the
button; the text WELCOME will appear on the
display and the START/PAUSE indicator light will
flash slowly in a green colour.
2. LOAD THE LAUNDRY. Open the porthole door.
Load the laundry, making sure you do not exceed
the maximum load value indicated in the table of
programmes on the following page.
3. MEASURE OUT THE DETERGENT. Pour the
detergent into the relevant compartments as
described in "Detergents and laundry".
4. CLOSE THE DOOR.
5. SELECT THE WASH CYCLE. Press one of the
WASH CYCLE SELECTOR buttons to select the
required wash cycle; the name of the wash cycle
will appear on the display. A temperature and spin
speed is set for each wash cycle; these may be
adjusted. The duration of the cycle will appear on
the display.
6.CUSTOMISE THE WASH CYCLE. Use the
relevant buttons:
Modifying the temperature and/or spin
speed.The machine automatically selects the
maximum temperature and spin speed set for the
selected wash cycle; these values cannot therefore
be increased. The temperature can be decreased
by pressing the
button, until the cold wash
"OFF" setting is reached. The spin speed may be
progressively reduced by pressing the
button,
until it is completely excluded (the "OFF" setting). If
these buttons are pressed again, the maximum
values are restored.
Setting a delayed start.
To set a delayed start for the selected programme,
press the corresponding button repeatedly until the
required delay period has been reached. When this
option is enabled, the
symbol lights up on the
display. To remove the delayed start function press
the button until the text "OFF" appears on the
display.
Modifying the cycle settings.
Press the button to enable the function; the
indicator light corresponding to the button will
switch on.
Press the button again to disable the function;
the indicator light will switch off.
If the selected function is not compatible with the
programmed wash cycle, the indicator light will
flash and the function will not be activated.
If the selected function is not compatible with
another function which has been selected
previously, the indicator light corresponding to the
first function selected will flash and only the second
function will be activated; the indicator light
corresponding to the enabled function will remain lit.
The functions may affect the recommended load
value and/or the duration of the cycle.
7. START THE PROGRAMME. Press the START/
PAUSE button. The corresponding indicator light will
become green, remaining lit in a fixed manner, and
the door will be locked (the DOOR LOCKED
symbol will be on). During the wash cycle, the
name of the phase in progress will appear on the
display. To change a wash cycle while it is in
progress, pause the washing machine using the
START/PAUSE button (the START/PAUSE indicator
light will flash slowly in an orange colour); then
select the desired cycle and press the START/
PAUSE button again.
To open the door while a cycle is in progress, press
the START/PAUSE button; if the DOOR LOCKED
symbol is switched off the door may be
opened. Press the START/PAUSE button again to
restart the wash cycle from the point at which it
was interrupted.
8.THE END OF THE WASH CYCLE.This will be
indicated by the text "END OF CYCLE" on the
display; when the DOOR LOCKED
symbol
switches off the door may be opened. Open the
door, unload the laundry and switch off the
machine.
If you wish to cancel a cycle which has already
begun, press and hold the
button. The cycle will be
stopped and the machine will switch off.
Load balancing system
Before every spin cycle, to avoid excessive vibrations
and to distribute the load in a uniform manner, the drum
rotates continuously at a speed which is slightly greater
than the washing rotation speed. If, after several at-
tempts, the load is not balanced correctly, the machine
spins at a reduced spin speed. If the load is excessively
unbalanced, the washing machine performs the distri-
bution process instead of spinning. To encourage im-
proved load distribution and balance, we recommend
small and large garments are mixed in the load.
GB
19
Description of the wash cycle
Max
.
temp.
(°C)
Max.
speed
(rpm)
Detergents
Max.
load
(kg)
Cycle
duration
PrewashBleachWash
Fabric
softener
Everyday wash cycles (Daily)
Cotton (1-2) :
extremely soiled whites.
90°1400
llll
6
Cotton :
heavily soiled whites and resistant colours.
60°1400
llll
6
Cotton (3) :
heavily soiled whites and delicate colours.
40°1400
llll
6
Synthetics
(1
st
press of the button)
:
heavily soiled resistant colours.
60°800
llll
2,5
Synthetics (4)
(1
st
press of the button)
:
heavily soiled resistant colours.
40°800
llll
2,5
Synthetics
(2
nd
press of the button)
:
lightly soiled resistant colours.
40°800
llll
2,5
Mix 30'
(1
st
press of the button)
:
to refresh lightly soiled garments quickly (not
suitable for wool, silk and clothes which require washing by hand).
30°800--
ll
3
Mix 15'
(2
nd
press of the button)
:
to refresh lightly soiled garments quickly (not
suitable for wool, silk and clothes which require washing by hand).
30°800--
ll
1,5
Special cycles / Memory
Baby cycle:
heavily soiled delicate colours.
40°800-
lll
2
Memory:
allows for any wash cycle to be stored.
Silk/Curtains:
for garments in silk and viscose, lingerie.
30°0--
ll
1
Wool:
for wool, cashmere, etc.
40°800--
ll
1
Partial wash cycles
Fast Spin
(1
st
press of the button)
-1400----6
Slow spin
(2
nd
press of the button)
-800----2,5
Rinse cottons
(1
st
press of the button)
-1400-
l
-
l
6
Pump out
(2
nd
press of the button)
-0----6
Wash cycles and functions
Wash functions
Stain removal
This function is particularly useful for the removal of
stubborn stains.
To run the bleach cycle on
its own, pour the bleach
into compartment 4, set
the "Rinse" programme
and activate the "Stain
removal" programme. To
bleach during a wash
cycle, pour in the detergent
and any fabric softener you
wish to use, set the desired
wash cycle and enable the
"Stain removal" function.
It cannot be used with the , , , and Pump
out programmes.
Prewash
If this function is selected, the pre-wash cycle will run;
this is useful for removing stubborn stains.
N.B.: put the detergent in the relevant compartment.
It cannot be used with the , , , , , programmes.
Table of wash cycles
Extra rinse
By selecting this option, the efficiency of the rinse is
increased and optimal detergent removal is guaranteed.
It is particularly useful for sensitive skin.
It cannot be used in conjunction with the , and
Pump out programmes.
Easy iron
By selecting this function, the wash and spin cycles will
be modified in order to reduce the formation of creases.
The
wash cycles ends with the laundry being left to
soak in the machine; the EASY IRON and START/PAUSE
indicator lights will flash (orange) and the text "STOP
WITH WATER" will appear on the display. To drain the
water so that the laundry may be removed, press the
START/PAUSE button or the EASY IRON button.
It may not be used with the , , , and Pump
out programmes.
Fast wash
Reduces the duration of the wash cycle, while
making it possible to save water and electricity.
It cannot be used with the , , , , ,
programmes.
The duration of the wash cycles can be checked
on the display.
Wash cycles
M
For all Test Institutes:
1) Test wash cycle in compliance with according to 1061/2010: set wash cycle
(90°C) with a temperature of 60°C and 40°C (By pressing the TEMPERATURE button).
2) Long wash cycle for cottons: set wash cycle
(90°C) with a temperature of 40°C (By pressing the TEMPERATURE button).
3) Short wash cycle for cottons: set wash cycle
(40°C).
4) Long wash cycle for synthetics: set wash cycle
(60°C) (1st press of the button); with a temperature of 40°C (By pressing the TEMPERATURE button).
The length of cycle shown on the display or in this booklet is an estimation only and is calculated assuming standard working conditions. The actual duration can vary according to factors such as water
temperature and pressure, the amount of detergent used, the amount and type of load inserted, load balancing and any wash options selected.
20
GB
Detergents and laundry
Detergent dispenser drawer
Good washing results also depend on the correct
dose of detergent: adding too much detergent won't
necessarily make for a more efficient wash, and may
in fact cause build up on the interior of your appliance
and even pollute the environment.
Open up the detergent
dispenser and pour in
the detergent and fabric
softener, as follows.
compartment 1: Detergent for pre-wash
compartment 2: Detergent for the wash cycle
(powder or liquid)
It is recommended that you place liquid detergent
directly into the compartment using the appropriate
dosing cup.
compartment 3: Additives (softener, etc.)
When pouring the softener in compartment 3, avoid
exceeding the "max" level indicated.
The softener is added automatically into the machine
during the last wash. At the end of the wash
programme, some water will be left in compartment
3. This is used for the inlet of denser fabric softeners
into the machine, i.e. to dilute the more concentrated
softeners. Should more than a normal amount of
water remain in compartment 3, this means the
emptying device is blocked. For cleaning instructions,
see Care and maintenance.
compartment 4: Bleach
Preparing the laundry
Divide the laundry according to:
- the type of fabric/the symbol on the label
- the colours: separate coloured garments from
whites.
Empty all garment pockets and check the buttons.
Do not exceed the listed values, which refer to the
weight of the laundry when dry:
Durable fabrics: max. 6 kg
Synthetic fabrics: max. 2,5 kg
Delicate fabrics: max. 2 kg
Wool: max. 1 kg
Silk: max. 1 kg
How much does your laundry weigh?
1 sheet 400-500 g
1 pillow case 150-200 g
1 tablecloth 400-500 g
1 bathrobe 900-1200 g
1 towel 150-250 g
Special wash cycles
Mix 30: this wash cycle was designed to wash
lightly soiled garments quickly: it lasts just 30 minutes
and therefore saves both energy and time. By
selecting this wash cycle (
at 30°C), it is possible to
wash different fabrics together (except for wool and
silk items), with a maximum load of 3 kg.
Mix 15: this wash cycle was designed to wash
lightly soiled garments quickly: it lasts just 15 minutes
and therefore saves both energy and time. By
selecting this wash cycle (
at 30°C), it is possible to
wash different fabrics together (except for wool and
silk items), with a maximum load of 1.5 kg.
Baby cycle: this wash cycle can be used to remove
the soiling typically caused by babies, while ensuring
that all detergent is removed from nappies in order to
prevent the delicate skin of babies from suffering
allergies. The cycle
has been designed to reduce
the amount of bacteria by using a greater quantity of
water and optimising the effect of special disinfecting
additives added to the detergent.
Silk: use special wash cycle
to wash all silk
garments. We recommend the use of special
detergent which has been designed to wash delicate
clothes.
Curtains:fold curtains and place them in a pillow
case or mesh bag. Use wash cycle
.
Wool: is the only washing machine manufacturer to
have been awarded the prestigious Woolmark
Platinum Care endorsement (M.0508) by the
Woolmark Company, which means that all woollen
garments may be washed in the washing machine,
even those which state hand wash only
on the
label. Wash cycle
therefore offers complete peace
of mind when washing woollen garments in the
washing machine (max. load 1 kg) and guarantees
optimal performance.
GB
21
Precautions and tips
This washing machine was designed and
constructed in accordance with international safety
regulations. The following information is provided for
safety reasons and must therefore be read carefully.
General safety
This appliance was designed for domestic use only.
This appliance is not intended for use by persons
(including children) with reduced physical, sensory
or mental capabilities, or lack of experience and
knowledge, unless they have been given
supervision or instruction concerning use of the
appliance by a person responsible for their safety.
Children should be supervised to ensure that they
do not play with the appliance.
The washing machine must only be used by adults,
in accordance with the instructions provided in this
manual.
Do not touch the machine when barefoot or with
wet or damp hands or feet.
Do not pull on the power supply cable when
unplugging the appliance from the electricity
socket. Hold the plug and pull.
Do not touch the drained water as it may reach
extremely high temperatures.
Never force the porthole door. This could damage
the safety lock mechanism designed to prevent
accidental opening.
If the appliance breaks down, do not under any
circumstances access the internal mechanisms in
an attempt to repair it yourself.
Always keep children well away from the appliance
while it is operating.
If the appliance has to be moved, work in a group
of two or three people and handle it with the utmost
care. Never try to do this alone, because the
appliance is very heavy.
Before loading laundry into the washing machine,
make sure the drum is empty.
Disposal
Disposing of the packaging materials: observe local
regulations so that the packaging may be re-used.
The European Directive 2002/96/EC on Waste
Electrical and Electronic Equipment, requires that
old household electrical appliances must not be
disposed of in the normal unsorted municipal waste
stream. Old appliances must be collected
separately in order to optimise the recovery and
recycling of the materials they contain and reduce
the impact on human health and the environment.
The crossed out "wheeled bin" symbol on the
product reminds you of your obligation, that when
you dispose of the appliance it must be separately
collected.Consumers should contact their local
authority or retailer for information concerning the
correct disposal of their old appliance.
Saving energy and respecting the
environment
Saving on detergent, water, energy and time
To avoid wasting resources, the washing machine
should be used with a full load. A full load instead
of two half loads allows you to save up to 50% on
energy.
The pre-wash cycle is only necessary on
extremely soiled garments. Avoiding it will save on
detergent, time, water and between 5 and 15%
energy.
Treating stains with a stain remover or leaving
them to soak before washing will cut down the
need to wash them at high temperatures. A
programme at 60°C instead of 90°C or one at
40°C instead of 60°C will save up to 50% on
energy.
Use the correct quantity of detergent depending
on the water hardness, how soiled the garments
are and the amount of laundry you have, to avoid
wastage and to protect the environment: despite
being biodegradable, detergents do contain
ingredients that alter the natural balance of the
environment. In addition, avoid using fabric
softener as much as possible.
If you use your washing machine from late in the
afternoon until the early hours of the morning, you
will help reduce the electricity board's peak load.
The DELAYED START option helps to organise
your wash cycles accordingly.
If your laundry has to be dried in a tumble dryer,
select a high spin speed. Having the least water
possible in your laundry will save you time and
energy in the drying process.
22
GB
Care and maintenance
Cutting off the water or electricity
supply
Turn off the water tap after every wash. This will
limit the wear of your appliance's water system
and also prevent leaks.
Unplug your appliance when cleaning it and during
all maintenance operations.
Cleaning your appliance
The exterior and rubber parts of your appliance can
be cleaned with a soft cloth soaked in lukewarm
soapy water. Do not use solvents or abrasives.
Caring for your appliance door and
drum
Always leave the appliance door ajar to prevent
unpleasant odours from forming.
Cleaning the pump
The washing machine is fitted with a self-cleaning
pump that does not require any maintenance.
Sometimes, small items (such as coins or buttons)
may fall into the pre-chamber that protects the
pump, situated in the lower part of the same.
Make sure the wash cycle has ended and unplug
the appliance.
How to clean the detergent dispenser
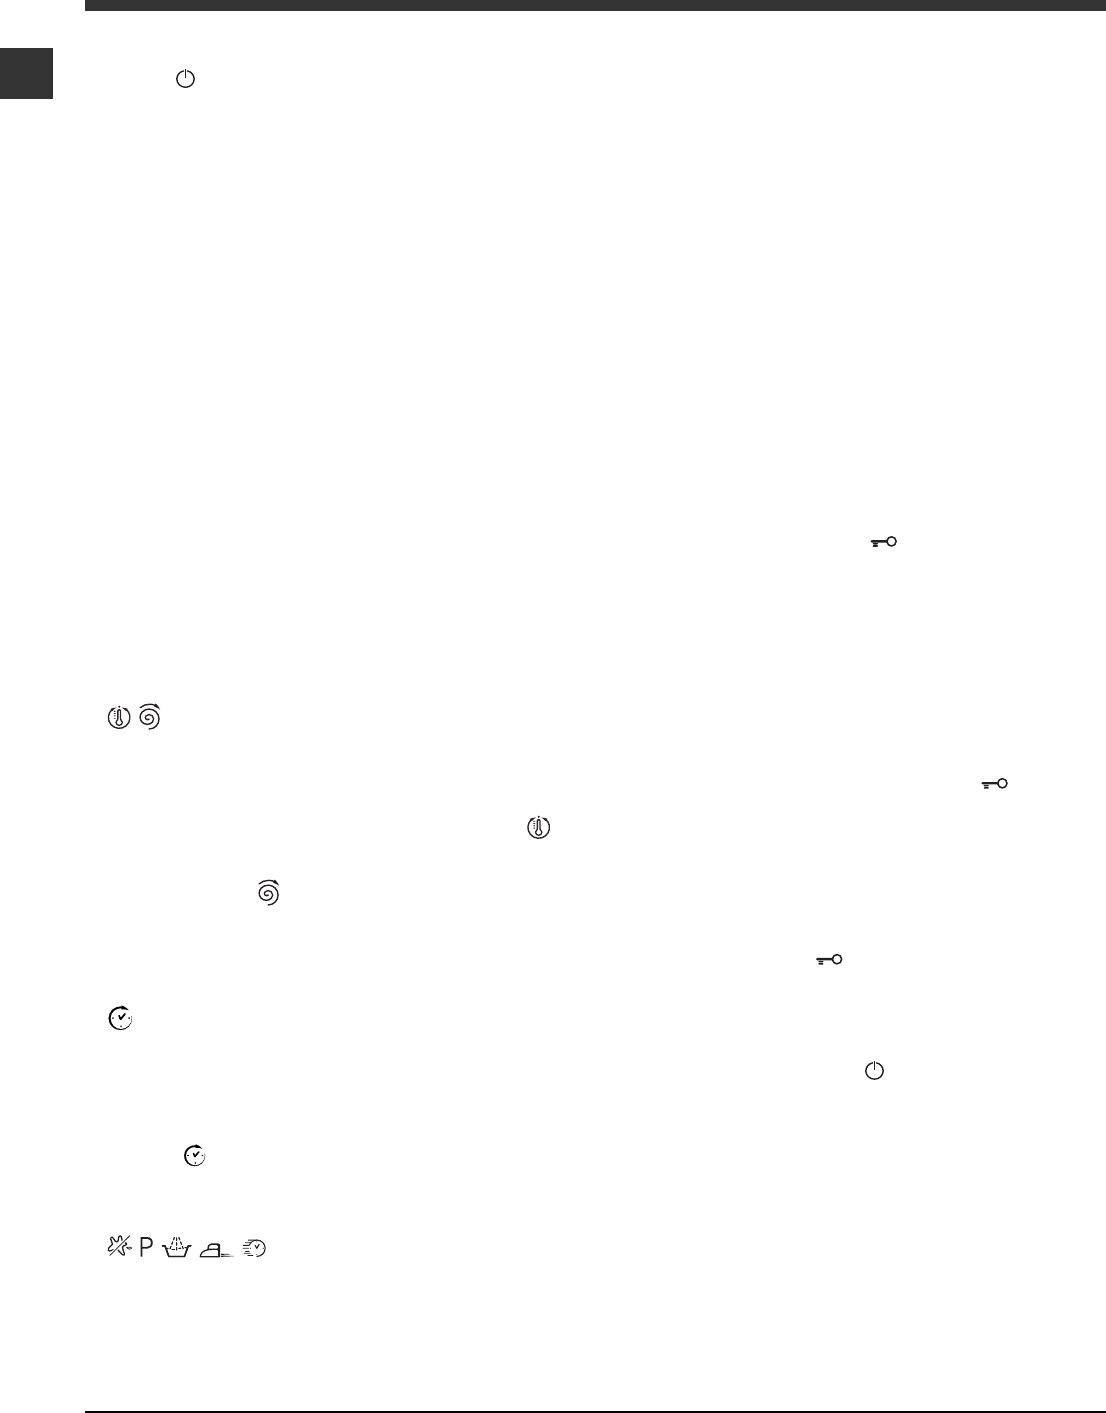
Cleaning:
Then clean the dispenser under a tap (fig. 3) using an
old toothbrush and, once the pair of siphons inserted in
the top of compartments 1 and 2 (fig. 4) have been pulled
out, check whether the same are not clogged and then
rinse them.
Reassembly:
Do not forget to reinsert the
pair of siphons into the spe-
cial housings and then to
replace the dispenser into
its seat, clicking it into place
(fig. 4, 2 and 1).
Disassembly:
Press lightly on the large
button on the front of the
detergent dispenser and
pull it upwards (fig. 1, 2).
To recover any objects that have fallen into the pre-
chamber:
1. remove the plinth at
the bottom on the front
side of the washing
machine by pulling from
the side with your
hands (see figure);
2. unscrew the lid
rotating it anticlock-
wise (see figure): a little
water may trickle out.
This is perfectly normal;
3. clean the interior
thoroughly;
4. screw the lid back on;
5. reposition the panel,
making sure the hooks
are securely in place
before you push it onto
the appliance.
Checking the water inlet hose
Check the water inlet hose at least once a year. If
you see any cracks, replace it immediately: during the
wash cycles, water pressure is very strong and a
cracked hose could easily split open.
Never use hoses that have already been used.
Fig. 1Fig. 2
Fig. 3
Fig. 4
GB
23
Troubleshooting
Your washing machine could fail to work. Before contacting the Technical Assistance Centre (see Assistance),
make sure that the problem cannot be not solved easily using the following list.
Problem:
The washing machine does not
switch on.
The wash cycle does not start.
The washing machine does not
take in water (the text "NO
WATER, CHECK SUPPLY"
appears on the display).
The washing machine
continuously takes in and
drains water.
The washing machine does not
drain or spin.
The washing machine vibrates a
lot during the spin cycle.
The washing machine leaks.
The machine is locked and the
display flashes, indicating an
error code (e.g. F-01, F-..).
There is too much foam.
Possible causes / Solutions:
The appliance is not plugged into the socket fully, or is not making contact.
There is no power in the house.
The appliance Lid is not shut properly.
The ON/OFF button has not been pressed.
The START/PAUSE button has not been pressed.
The water tap has not been opened.
A delayed start has been set (see Running a wash cycle).
The water inlet hose is not connected to the tap.
The hose is bent.
The water tap has not been opened.
There is no water supply in the house.
The pressure is too low.
The START/PAUSE button has not been pressed.
The drain hose is not fitted at a height between 65 and 100 cm from
the floor (see Installation).
The free end of the hose is under water (see Installation).
The wall drainage system is not fitted with a breather pipe.
If the problem persists even after these checks, turn off the water tap,
switch the appliance off and contact the Assistance Service. If the
dwelling is on one of the upper floors of a building, there may be problems
relating to water drainage, causing the washing machine to fill with water
and drain continuously. Special anti-draining valves are available in shops
and help to avoid this inconvenience.
The wash cycle does not include draining: some wash cycles require the
drain phase to be started manually (see Wash cycles and functions).
The EASY IRON function has been activated: To complete the wash
cycle, press the START/PAUSE button (see Wash cycles and functions).
The drain hose is bent (see Installation).
The drainage duct is clogged.
The drum was not unlocked correctly during installation (see Installation).
The washing machine is not level (see Installation).
The washing machine is trapped between cabinets and walls (see Installation).
The water inlet hose is not screwed on properly (see Installation).
The detergent dispenser drawer is blocked (for cleaning instructions, see Care
and maintenance).
The drain hose is not fixed properly (see Installation).
Switch off the machine and unplug it, wait for approximately 1 minute
and then switch it back on again.
If the problem persists, contact the Technical Assistance Service.
The detergent is not suitable for machine washing (it should display the
text for washing machines or hand and machine wash, or the like).
Too much detergent was used.
24
GB
Service
Before calling for Assistance:
Check whether you can solve the problem alone (see Troubleshooting);
Restart the programme to check whether the problem has been solved;
If this is not the case, contact an authorised Technical Assistance Centre using the telephone number
provided on the guarantee certificate.
Always request the assistance of authorised technicians.
Have the following information to hand:
the type of problem;
the appliance model (Mod.);
the serial number (S/N).
This information can be found on the data plate situated on the rear of the washing machine.
FR
25
Français
Sommaire
Installation, 26-27
Déballage et mise à niveau
Raccordements eau et électricité
Premier cycle de lavage
Caractéristiques techniques
Description du lave-linge, 28-29
Bandeau de commandes
Écran
Comment ouvrir et fermer le tambour
Comment faire un cycle de lavage, 30
Système déquilibrage de la charge
Programmes et fonctions, 31
Tableau des programmes
Fonctions de lavage
Produits lessiviels et linge, 32
Tiroir à produits lessiviels
Triage du linge
Programmes spéciaux
Précautions et conseils, 33
Sécurité générale
Mise au rebut
Economies et respect de l'environnement
Entretien et soin, 34
Coupure de larrivée deau et du courant
Nettoyage du lave-linge
Entretien du couvercle et du tambour
Nettoyage de la pompe
Contrôle du tuyau darrivée de leau
Comment nettoyer le tiroir à produits lessiviels
Anomalies et remèdes, 35
Assistance, 36
FR
ARTXD 149
Mode demploi
LAVE-LINGE
26
FR
Installation
Conservez ce mode d'emploi pour pouvoir le
consulter à tout moment. En cas de vente, de cession
ou de déménagement, veillez à ce qu'il suive toujours
le lave-linge pour que son nouveau propriétaire soit
informé sur son mode de fonctionnement et puisse
profiter des conseils correspondants.
Lisez attentivement les instructions: elles fournissent
d'importantes informations sur l'installation, l'utilisation
et la sécurité.
Déballage et mise à niveau
Déballage: enlever les 4 vis
1. Déballez le lave-linge.
2. Contrôlez que le
lave-linge n'a pas été
endommagé pendant le
transport. S'il est
abîmé, ne le raccordez
pas et contactez votre
revendeur.
3. Enlevez les quatre vis
de protection pour le
transport, le
caoutchouc et la cale,
placés dans la partie
arrière (voir figure).
4. Bouchez les trous à l'aide des bouchons plastique
fournis.
5. Conservez bien toutes ces pièces: il faudra les
remonter en cas de transport du lave-linge.
Attention: en cas de réutilisation, les vis plus
courtes doivent être montées dessus.
Les emballages ne sont pas des jouets pour enfants.
Mise à niveau
Votre appareil peut savérer bruyant si vous navez
pas bien réglé ses deux pieds avant.
1.Installez le lave-linge sur un sol plat et rigide, sans
l'appuyer contre des murs, des meubles ou autre.
2. Si le sol n'est pas
parfaitement horizontal,
vissez ou dévissez les
petits pieds avant (voir
figure) pour niveler
l'appareil; son angle
d'inclinaison, mesuré sur
le plan de travail, ne doit
pas dépasser 2°.
Une bonne mise à niveau garantit la stabilité de la
machine et évite qu'il y ait des vibrations, du bruit et
des déplacements en cours de fonctionnement. Si la
machine est posée sur de la moquette ou un tapis,
réglez les petits pieds de manière à ce qu'il y ait
suffisamment d'espace pour assurer une bonne
ventilation.
Mise en place, deplacements
Si votre lave-linge est
muni d'un chariot spécial
avec roues rétractiles,
vous pouvez le déplacer
facile-ment. Pour faire
descendre ce chariot et
pouvoir ainsi déplacer
sans effort votre lave-
linge, vous devez tirer le
levier situé en bas à
gauche, sous la base.
Une fois le lave-linge
déplacé, remettez-le
dans la position initiale. Le lave-linge est ainsi solidement
mis en place. Voir figure (seulement pour les modéles
prevues).
Raccordements hydrauliques et
électriques
Raccordement du tuyau d'arrivée de l'eau
1. Reliez le tuyau
d'alimentation en le
vissant à un robinet d'eau
froide à embout fileté 3/4
gaz (voir figure).
Faire couler leau jusquà
ce quelle soit limpide et
sans impuretés avant de
raccorder.
2. Raccordez le tuyau
d'alimentation au lave-
linge en le vissant à la
prise d'eau prévue, dans
la partie arrière en haut à
droite (voir figure).
3. Faites attention à ce
que le tuyau ne soit ni
plié ni écrasé.
La pression de l'eau doit être comprise entre les
valeurs indiquées dans le tableau des Caractéristiques
techniques (voir page ci-contre).
Si la longueur du tuyau d'alimentation ne suffit pas,
adressez-vous à un magasin spécialisé ou à un
technicien agréé.
FR
27
65 - 100 cm
Raccordement du tuyau de vidange
Raccorder le tuyau
dévacuation, sans le
plier, à un conduit
dévacuation ou à une
évacuation murale placés
à une distance du sol
comprise entre 65 et 100
cm;
ou bien laccrocher à un
évier ou à une baignoire,
dans ce cas, fixer le
support en plastique
fourni avec lappareil au
robinet (voir figure).
Lextrémité libre du tuyau
dévacuation ne doit pas
être plongée dans leau.
Lutilisation dun tuyau de rallonge est absolument
déconseillée mais si on ne peut faire autrement, il faut
absolument quil ait le même diamètre que le tuyau
original et sa longueur ne doit pas dépasser 150 cm.
Branchement électrique
Avant de brancher la fiche dans la prise de courant,
sassurer que:
la prise est bien reliée à la terre et est conforme aux
réglementations en vigueur;
la prise est bien apte à supporter la puissance
maximale de lappareil indiquée dans le tableau des
Caractéristiques techniques (voir ci-contre);
la tension dalimentation est bien comprise entre les
valeurs figurant dans le tableau des Caractéristiques
techniques (voir ci-contre);
la prise est bien compatible avec la fiche du lave-
linge. Autrement, remplacer la prise ou la fiche.
Le lave-linge ne doit pas être installé dehors, même
à labri, car il est très dangereux de le laisser exposé
à la pluie et aux orages.
Après installation du lave-linge, la prise de courant
doit être facilement accessible.
Nutiliser ni rallonges ni prises multiples.
Le câble ne doit être ni plié ni trop écrasé.
Le câble dalimentation ne doit être remplacé que
par des techniciens agréés.
Attention! Nous déclinons toute responsabilité en cas
de non-respect des normes énumérées ci-dessus.
Premier cycle de lavage
Avant la première mise en service de lappareil,
effectuer un cycle de lavage avec un produit lessiviel
mais sans linge et sélectionner le programme
.
Caractéristiques techniques
Modèle
ARTXD 149
Dimensions
largeur 40 cm
hauteur 85 cm
profondeur 60 cm
Capacité
de 1 à 6 kg
Raccordements
électriques
Voir la plaque signalétique appliquée
sur la machine
Raccordements
hydrauliques
pression maximale 1 MPa (10 bar)
pression minimale 0,05 MPa (0,5 bar)
capacité du tambour 42 litres
Vitesse
d'essorage
jusqu'à 1400 tours minute
Programmes
d'essais selon la
directive
1061/2010
programme (90°); température
60°C et 40°C; (appuyer sur la touche
TEMPÉRATURE).
Cet appareil est conforme aux
Directives Communautaires suivantes:
- 2004/108/CE (Compatibilité
électromagnétique)
- 2002/96/CE
- 2006/95/CE (Basse Tension)
28
FR
Description du lave-linge
Bandeau de commandes
Touche avec voyant
MISE
EN MARCHE/PAUSE
Touche
TEMPÉRATURE
Touches
SÉLECTEUR
PROGRAMMES
Touches
FONCTION
Touche
MARCHE/ARRÊT
Touche
ESSORAGE
Touche
VERROUILLAGE
TOUCHES
Écran
Touche
DÉPART
DIFFÉRÉ
Touche
MEMO
Tasto MARCHE/ARRÊT : appuyer brièvement sur
la touche pour allumer ou éteindre l'appareil. Le
voyant vert MISE EN MARCHE/PAUSE clignotant
lentement indique que la machine est allumée. Pour
éteindre le lave-linge en cours de lavage, appuyer sur
la touche pendant au moins 2 secondes de suite ;
une pression brève ou accidentelle n'entraîne pas
l'arrêt de l'appareil. L'arrêt de l'appareil pendant un
lavage annule le lavage en cours.
Touches SÉLECTEUR PROGRAMMES: pour
sélectionner le programme désiré (voir "Tableau des
programmes").
Touche MEMO: maintenir la touche enfoncée pour
mémoriser un cycle et les personnalisations préférées.
Pour retourner à un cycle précédemment mémorisé,
appuyer sur la touche MEMO.
Touches FONCTION:appuyer sur la touche pour
sélectionner la fonction désirée. Le voyant
correspondant s'affiche à l'écran.
Touche ESSORAGE
: appuyer sur cette touche
pour diminuer la vitesse de l'essorage ou pour le
supprimer complètement - la valeur correspondante
s'affiche à l'écran.
Touche TEMPERATURE
: appuyer pour diminuer
la température : la valeur correspondante est affichée
à l'écran.
Touche VERROUILLAGE TOUCHES
: pour
activer le verrouillage des commandes, garder la
touche enfoncée pendant environ 2 secondes. Le
symbole
allumé indique que le bandeau de
commandes est verrouillé. Ceci permet d'éviter toute
modification involontaire des programmes, surtout s'il
y a des enfants à la maison. Pour désactiver le
verrouillage des commandes, garder la touche
enfoncée pendant environ 2 secondes.
Touche DÉPART DIFFÉRÉ
: appuyer sur cette
touche pour sélectionner un départ différé pour le
programme choisi. Le retard est affiché à l'écran.
Touche avec voyant MISE EN MARCHE/PAUSE:
quand le voyant vert clignote lentement, appuyer sur
la touche pour démarrer un lavage. Une fois le cycle
lancé, le voyant passe à l'allumage fixe. Pour activer
une pause de lavage, appuyer à nouveau sur la
touche ; le voyant passe à l'orange et se met à
clignoter. Si le symbole
n'est pas allumé, il est
possible d'ouvrir le couvercle. Pour faire redémarrer le
lavage exactement à l'endroit de l'arrêt, appuyer une
nouvelle fois sur la touche.
Stand-by
Ce lave-linge, conformément aux nouvelles normes
en vigueur dans le domaine de léconomie dénergie,
est équipée dun système dextinction automatique
(veille) activé après environ 30 minutes dinutilisation.
Appuyez brièvement sur la touche MARCHE/ARRÊT
et attendre que la machine soit réactivée.
FR
29
Fig. 1
Fig. 2
Fig. 3
Fig. 4
A)Ouvrez le couvercle (Fig. 1):
Soulevez le Couvercle externe et ouvrez le
complètement.
B)
Ouverture douce du tambour (Fig. 2):
Appuyez d'un doigt sur le bouton comme illustré et
le tambour s'ouvrira délicatement.
C) Introduisez le linge (Fig. 3).
D)Fermer (Fig. 4):
refermez bien le tambour en baissant dabord la porte
antérieure et posez ensuite la porte postérieure;
faites attention à parfaitement positionner les
crochets de la porte antérieure dans leur siège
dans la porte postérieure;
vous entendrez un clac qui confirmera la
bonne fixation;
appuyez alors légèrement vers le bas sur les
deux portes qui ne doivent pas se décrocher;
fermez enfin le couvercle externe.
E)
Arrêt final du tambour (Fig. 2):
A la fin du lavage le tambour se rangera avec les
portes en haut prêtes pour une facile ouverture.
Comment ouvrir et fermer le tambour
Écran
A
B
C
D
E
F
L'écran est utile pour programmer la machine et
fournit de multiples renseignements.
Les deux chaînes supérieures A et B affichent : le
programme de lavage sélectionné, la phase de lavage
en cours et toutes les indications relatives au
déroulement du programme.
La chaîne C affiche le temps restant à la fin du cycle
de lavage en cours et si un DÉPART DIFFÉRÉ a été
sélectionné, le temps restant avant le démarrage du
programme sélectionné.
La chaîne D affiche la valeur maximum de la vitesse
d'essorage que la machine peut effectuer en fonction
du programme sélectionné ; si le programme ne
prévoit pas d'essorage, la chaîne reste éteinte.
La chaîne E affiche la valeur maximale de la
température qui peut être sélectionnée en fonction du
programme choisi ; si le programme ne prévoit pas la
sélection de la température, la chaîne reste éteinte.
Les voyants F correspondent aux fonctions et
s'allument quand la fonction programmée est
compatible avec le programme sélectionné.
Symbole verrouillage couvercle
Le symbole allumé indique que le couvercle est
verrouillé pour éviter toute ouverture accidentelle.
Pour éviter d'abîmer l'appareil, attendre que le
symbole s'éteigne avant d'ouvrir le couvercle (l'atten-
te est denviron trois minutes).
N.B.: si la fonction DÉPART DIFFÉRÉ est active, le
couvercle reste verrouillé, pour l'ouvrir mettre la
machine en pause en appuyant sur la touche MISE
EN MARCHE/PAUSE.
À la première mise en service, un message s'affiche
demandant de sélectionner la langue et l'écran entre
automatiquement dans le menu de sélection de la
langue.
Pour choisir la langue désirée, appuyer sur les
touches TEMPÉRATURE et ESSORAGE ; pour
confirmer la sélection, appuyer sur la touche
VERROUILLAGE TOUCHES. Pours sélectionner une
autre langue, éteindre lappareil, appuyer en même
temps sur les touches VERROUILLAGE TOUCHES +
TEMPÉRATURE + ESSORAGE pendant 5 secondes,
puis procéder comme indiqué plus haut.
30
FR
Comment faire un cycle de
lavage
1. METTRE L'APPAREIL SOUS TENSION.
Appuyer sur la touche
, l'inscription BIENVENU
s'affiche à l'écran ; le voyant de MISE EN
MARCHE/PAUSE passe au vert et clignote
lentement.
2. CHARGER LE LINGE. Ouvrir la porte couvercle.
Charger le linge en faisant attention à ne pas
dépasser la quantité indiquée dans le tableau des
programmes de la page suivante.
3. DOSER LE PRODUIT LESSIVIEL. Placer le
produit lessiviel dans les bacs correspondants
comme indiqué au paragraphe "Detersifs et linge".
4. FERMER LE COUVERCLE.
5. CHOISIR LE PROGRAMME. Appuyer sur l'une
des touches du SÉLECTEUR PROGRAMMES pour
sélectionner le programme désiré ; le nom du
programme est affiché à l'écran avec attribution
d'une température et d'une vitesse d'essorage qui
peuvent être modifiées. La durée du cycle s'affiche
sur l'écran.
6. PERSONNALISER LE CYCLE DE LAVAGE.
Appuyer sur les touches correspondantes :
Modifier la température et/ou la vitesse
d'essorage.L'appareil sélectionne
automatiquement la température et la vitesse
d'essorage maximales prévues pour le programme
sélectionné qui ne peuvent par conséquent pas être
augmentées. Par pression sur la touche
on peut
diminuer progressivement la température de lavage
jusqu'à un lavage à froid "OFF". Par pression sur la
touche
on peut diminuer progressivement la
vitesse d'essorage jusqu'à sa suppression totale
"OFF". Une autre pression sur les touches ramènera
les valeurs aux maximales prévues.
Sélectionner un départ différé.
Pour programmer le départ différé d'un programme
sélectionné, appuyer sur la touche correspondante
jusqu'à ce que le retard désiré soit atteint. Quand
cette option est active, le symbole
s'affiche à
l'écran. Pour annuler le départ différé, appuyer sur
la touche jusqu'à ce que l'inscription OFF s'affiche
à l'écran.
Modifier les caractéristiques
du cycle.
Appuyer sur la touche pour activer la fonction; le
voyant correspondant à la touche s'allume.
Appuyer de nouveau sur la touche pour
désactiver la fonction; le voyant s'éteint.
Si la fonction sélectionnée est incompatible avec
le programme sélectionné, le voyant se met à
clignoter et la fonction n'est pas activée.
Si la fonction sélectionnée est incompatible avec
une autre fonction précédemment sélectionnée, le
voyant correspondant à la première fonction se
met à clignoter et seule la deuxième fonction est
activée alors que le voyant de la fonction activée
s'allume.
Les fonctions permettent de modifier le
chargement conseillé et/ou la durée du cycle de
lavage.
7. DEMARRER LE PROGRAMME. Appuyer sur la
touche MISE EN MARCHE/PAUSE. Le voyant
correspondant s'allume en vert fixe et le couvercle
est verrouillé (symbole COUVERCLE VERROUILLÉ
allumé). Pendant le lavage, le nom de la phase
en cours s'affiche à l'écran. Pour modifier un
programme lorsqu'un cycle est en cours, mettre le
lave-linge en pause en appuyant sur la touche
MISE EN MARCHE/PAUSE (le voyant MISE EN
MARCHE/PAUSE passe à l'orange et clignote
lentement) ; sélectionner le cycle désiré et appuyer
de nouveau sur la touche MISE EN MARCHE/
PAUSE.
Pour ouvrir la porte tandis qu'un cycle est en
cours, appuyer sur la touche MISE EN MARCHE/
PAUSE ; si le symbole COUVERCLE VERROUILLÉ
est éteint, on peut ouvrir le couvercle. Pour
faire redémarrer le programme exactement à
l'endroit de l'arrêt, appuyer une nouvelle fois sur la
touche MISE EN MARCHE/PAUSE.
8. FIN DU PROGRAMME.Elle est signalée par
l'inscription "FIN DE CYCLE" qui s'affiche à l'écran;
quand le symbole COUVERCLE VERROUILLÉ
s'éteint, on peut ouvrir le couvercle. Ouvrir le
couvercle, vider le lave-linge et éteindre l'appareil.
Une pression prolongée sur la touche permet
d'annuler un cycle déjà lancé. Le cycle est
interrompu et la machine s'éteint.
Système déquilibrage de la charge
Avant tout essorage, pour éviter toute vibration
excessive et répartir le linge de façon uniforme, le
lave-linge fait tourner le tambour à une vitesse
légèrement supérieure à la vitesse de lavage. Si au
bout de plusieurs tentatives, la charge nest toujours
pas correctement équilibrée, lappareil procède à un
essorage à une vitesse inférieure à la vitesse
normalement prévue. En cas de déséquilibre excessif,
le lave-linge préfère procéder à la répartition du linge
plutôt quà son essorage. Pour une meilleure
répartition de la charge et un bon équilibrage, nous
conseillons de mélanger de grandes et petites pièces
de linge.
FR
31
Programmes et fonctions
Fonctions de lavage
Anti-taches
Cette fonction est très utile pour éliminer les taches les plus
résistantes.
Pour n'effectuer qu'un
blanchissage, verser l'eau de
Javel dans le bac 4,
sélectionner le programme
"Rinçage" et activer la
fonction "Anti-taches". Pour
blanchir en cours de lavage,
verser le produit lessiviel et
les additifs, sélectionner le
programme souhaité et
activer la fonction "Anti-
taches".
Cette fonction n'est pas activable avec les programmes
, ,, , Vidange.
Prélavage
Cette fonction est très utile pour éliminer les taches les plus
résistantes.
Cette fonction n'est pas activable avec les programmes
, , , , , .
Tableau des programmes
Super Rinçage
La sélection de cette option permet d'augmenter l'efficacité
du rinçage et d'éliminer totalement toute trace de lessive.
Elle est très utile pour les peaux particulièrement sensibles.
Cette fonction n'est pas activable avec les programmes
, , et Vidange.
Repassage facile
En cas de sélection de cette fonction, le lavage et l'essorage
seront dûment modifiés pour réduire la formation de plis. Pour
le programmes
l'appareil arrive au bout du cycle en laissant le
linge tremper, le voyant REPASSAGE FACILE clignote et celui
de MISE EN MARCHE/PAUSE se mettent à clignoter (orange),
l'inscription "ARRET CUVE PLEINE" s'affiche à l'écran. Pour
vidanger l'eau et sortir le linge, appuyer sur la touche MISE EN
MARCHE/PAUSE ou sur la touche REPASSAGE FACILE.
Cette option n'est pas activable avec les programmes ,
, , , et Vidange.
Rapide
Pour réduire la durée du cycle de lavage tout en permettant
de faire des économies d'eau et d'électricité.
Cette fonction n'est pas activable avec les programmes
, , , ,, .
La durée des programmes de lavage est contrôlable
sur l'afficheur.
Programmes
Description du Programme
Te m p.
maxi.
(°C)
Vitesse
maxi (tours
minute)
Produits lessiviels
Charge
maxi
(Kg)
Durée
cycle
Pr
é-
lavag
e
JavelLavage
Assou
-
plissant
Programmes pour tous les jours
Coton (1-2):
blancs extrêmement sales.
90°1400
llll
6
Coton:
blancs et couleurs résistantes très sales.
60°1400
llll
6
Coton (3)
(3° pression de la touche)
:
blancs et couleurs délicates très sales.
40°1400
llll
6
Synthetique
(1° pression de la touche)
:
couleurs résistantes très sales.
60°800
llll
2,5
Synthetique (4)
(1° pression de la touche)
:
couleurs résistantes très sales.
40°800
llll
2,5
Synthetique
(2° pression de la touche)
:
couleurs résistantes peu sales.
40°800
llll
2,5
Mix 30'
(1° pression de la touche
:
pour rafraîchir rapidement du linge peu sale
(ne convient pas pour la laine, la soie et le linge à laver à la main).
30°800--
ll
3
Mix 15'
(2° pression de la touche)
:
pour rafraîchir rapidement du linge peu sale
(ne convient pas pour la laine, la soie et le linge à laver à la main).
30°800--
ll
1,5
Programmes Spéciaux/ Memo
Cycle Bebe:
couleurs délicates très sales.
40°800-
lll
2
Memo:
permet de mémoriser un cycle de lavage quelconque.
Soie/Rideaux:
pour linge en soie, viscose, lingerie.
30°0--
ll
1
Laine:
pour laine, cachemire, etc.
40°800--
ll
1
Programmes partiaux
Essorage rapide
(1° pression de la touche)
-1400----6
Essorage délicat
(2° pression de la touche)
-800----2,5
Rinçage resistant
(1° pression de la touche)
-1400-
l
-
l
6
Vidange
(2° pression de la touche)
-0----6
M
Pour tous les instituts qui effectuent ces tests :
1) Programme de contrôle selon la directive 1061/2010: sélectionner le programme
(90°C) température 60°C et 40°C (appuyer sur la touche TEMPÉRATURE).
2) Programme coton long: sélectionner le programme
(90°C) température 40°C; (appuyer sur la touche TEMPÉRATURE).
3) Programme coton court: sélectionner le programme
(40°C).
4) Programme synthetique long: sélectionner le programme
(1° pression de la touche); température 40°C (appuyer sur la touche TEMPÉRATURE).
La durée du cycle indiquée sur lécran ou dans la notice représente une estimation calculée dans des conditions standard. Le temps effectif peut varier en fonction de nombreux facteurs tels que :
température et pression de leau en entrée, température ambiante, quantité de lessive, quantité et type de charge, équilibrage de la charge, options supplémentaires sélectionnées.
32
FR
Produits lessiviels et linge
Tiroir à produits lessiviels
Un bon résultat de lavage dépend aussi d'un bon
dosage de produit lessiviel: un excès de lessive ne
lave pas mieux, il incruste l'intérieur de votre lave-
linge et pollue l'environnement.
Sortez le tiroir à produits
lessiviels et versez la
lessive ou l'additif
comme suit.
bac 1: Lessive prélavage (en poudre)
bac 2: Lessive lavage (en poudre ou liquide)
En cas d'utilisation de lessive liquide, il est conseillé
d'introduire la boule doseuse directement dans la cuve.
bac 3: Additifs (adoucissant, etc.)
L'assouplissant ne doit pas déborder de la grille (max).
Le lave-linge prélève automatiquement lassouplissant
lors du dernier rinçage.
A la fin du programme de lavage il reste dans le bac 3
un résidu deau. Cette eau sert au prélèvement des
assouplissants très denses ou à dissoudre les
assouplissants concentrés. Si dans le bac 3 il reste un
peu plus deau que dhabitude, cela signifie que le
dispositif de vidange est bouché et empêche leffet
aspirant du dispositif.
bac 4: Eau de javel
Triage du linge
Trier correctement le linge daprès:
-le type de textile / le symbole sur létiquette.
-les couleurs: séparer le linge coloré du blanc.
Vider les poches et contrôler les boutons.
Ne pas dépasser les valeurs indiquées
correspondant au poids de linge sec :
Textiles résistants: 6 kg max.
Textiles synthétiques: 2,5 kg max.
Textiles délicats:2 kg max.
Laine: 1 kg max.
Soie: 1 kg max.
Combien pèse le linge ?
1 drap 400-500 g
1 taie doreiller 150-200 g
1 nappe 400-500 g
1 peignoir 900-1200 g
1 serviette éponge 150-250 g
Programmes spéciaux
Mix 30: spécialement conçu pour laver du linge peu
sale en un rien de temps: il ne dure que 30 minutes
et permet ainsi de faire des économies dénergie et
de temps. La sélection de ce programme (
à 30°C)
permet de laver ensemble des textiles différents (sauf
laine et soie) en ne dépassant pas 3 kg de charge.
Mix 15: spécialement conçu pour laver du linge peu
sale en un rien de temps: il ne dure que 15 minutes
et permet ainsi de faire des économies dénergie et
de temps. La sélection de ce programme (
à 30°C)
permet de laver ensemble des textiles différents (sauf
laine et soie) en ne dépassant pas 1,5 kg de charge.
Babè: programme spécial, idéal pour le lavage des
vêtements denfants souvent très sales, il élimine
toute trace de lessive du linge pour protéger leur peau
délicate et éviter tout risque dallergie. Spécialement
conçu pour diminuer la charge bactérienne, ce cycle
utilise une plus grande quantité deau et optimise
leffet des additifs désinfectants spécifiques ajoutés à
la lessive.
Soie: sélectionner le programme de lavage spécial
pour vêtements en soie. Il est conseillé dutiliser une
lessive spéciale pour linge délicat.
Rideaux:pliez-les bien et glissez-les dans une taie
d'oreiller ou dans un sac genre filet. Sélectionner le
programme
.
Laine: est le seul lave-linge à avoir obtenu le
prestigieux label Woolmark Platinum Care (M.0508)
délivré par The Woolmark Company qui garantit le
lavage à la machine de tous les vêtements en laine, y
compris ceux qui portent létiquette lavage à la main
uniquement
. Grâce au programme on peut
donc laver à la machine, en toute tranquillité, tous les
vêtements en laine (max.
1 kg) avec des performances de lavage optimales.
FR
33
Précautions et conseils
Ce lave-linge a été conçu et fabriqué conformément
aux normes internationales de sécurité. Ces
consignes sont fournies pour des raisons de sécurité,
il faut les lire attentivement.
Sécurité générale
Cet appareil est conçu pour un usage domestique.
Cet appareil nest pas destiné à être utilisé par des
personnes (enfants compris) dont les capacités
physiques, sensorielles ou mentales sont réduites
ou qui ne disposent pas des connaissances ou de
lexpérience nécessaires, à moins quelles naient
été formées et encadrées pour lutilisation de cet
appareil par une personne responsable de leur
sécurité. Surveiller les enfants pour sassurer quils
ne jouent pas avec lappareil.
Ce lave-linge ne doit être utilisé que par des adultes
en suivant les instructions reportées dans ce mode
demploi.
Ne jamais toucher lappareil si lon est pieds nus et
si les mains sont mouillées ou humides.
Ne jamais tirer sur le câble pour débrancher la fiche
de la prise de courant.
Ne pas toucher à leau de vidange, elle peut
atteindre des températures très élevées.
Ne pas forcer pour ouvrir le couvercle: le
verrouillage de sécurité qui protège contre les
ouvertures accidentelles pourrait sendommager.
En cas de panne, éviter à tout prix daccéder aux
mécanismes internes pour tenter une réparation.
Veiller à ce que les enfants ne sapprochent pas de
lappareil pendant son fonctionnement.
Deux ou trois personnes sont nécessaires pour
déplacer lappareil avec toutes les précautions
nécessaires. Ne jamais le déplacer tout seul car il
est très lourd.
Avant dintroduire le linge, sassurer que le tambour
est bien vide.
Mise au rebut
Mise au rebut du matériel demballage: se
conformer aux réglementations locales de manière
à ce que les emballages puissent être recyclés.
La Directive Européenne 2002/96/EC sur les
Déchets des Equipements Electriques et Electroni-
ques, exige que les appareils ménagers usagés ne
soient pas jetés dans le flux normal des déchets
municipaux. Les appareils usagés doivent être
collectés séparément afin d'optimiser le taux de
récupération et le recyclage des matériaux qui les
composent et réduire l'impact sur la santé humaine
et l'environnement.
Le symbole de la ''poubelle barrée'' est apposée
sur tous les produits pour rappeler les obligations de
collecte séparée. Les consommateurs devront
contacter les autorités locales ou leur revendeur
concernant la démarche à suivre pour l'enlèvement
de leur vieil appareil.
Economies et respect de l'environnement
Economie de produit lessiviel, d'eau, d'électri-
cité et de temps
Pour ne pas gaspiller de ressources, utilisez le lave-
linge à sa charge maximale. Mieux vaut une pleine
charge que deux demies, vous économiserez
jusqu'à 50% d'électricité.
Un prélavage n'est nécessaire qu'en cas de linge
très sale. S'en passer permet de faire des écono-
mies de produit lessiviel, de temps, d'eau et entre
5 et 15% d'électricité.
Si vous traitez les taches avec un produit
détachant ou si vous les laissez tremper avant de
les laver, vous éviterez d'avoir à laver à de hautes
températures. Un programme à 60°C au lieu de
90°C ou un à 40°C au lieu de 60°C, fait
économiser jusqu'à 50% d'électricité.
Bien doser la quantité de produit lessiviel en fonc-
tion de la dureté de l'eau, du degré de salissure et
de la quantité de linge à laver évite les gaspillages
et protège l'environnement: bien que biodégrada-
bles, les produits lessiviels contiennent des élé-
ments qui altèrent l'équilibre de la nature. Evitez le
plus possible l'utilisation d'assouplissant.
Effectuer ses lavages tard dans l'après-midi et
jusqu'aux premières heures du matin permet de
réduire la charge d'absorption des opérateurs
énergétiques. L'option Départ différé aide à mieux
organiser les lavages en ce sens.
Si le linge doit être séché dans un sèche-linge,
sélectionnez une haute vitesse d'essorage. Du
linge qui contient moins d'eau fait écomiser du
temps et de l'électricité dans le programme de
séchage.
34
FR
Entretien et soin
Comment nettoyer le tiroir à produits lessiviels
Nettoyage:
Nettoyez le tiroir sous le robinet (fig. 3) à l'aide par exemple
d'une vieille brosse à dents; tirez sur les deux petits si-
phons placés dans la partie supérieure des bacs 1 et 2
(fig. 4), contrôlez qu'ils ne soient pas bouchés et rincez-
les.
Remontage:
N'oubliez pas de replacez
les deux petits siphons dans
leurs emplacements spéci-
aux et remettez enfin le
tiroir dans son siège en le
fixant (fig. 4, 2, 1).
Démontage:
Appuyez légèrement sur la
grosse touche située sur la
partie antérieure du tiroir à
produits lessiviels et tirez
vers le haut (fig. 1, 2).
Coupure de l'arrivée d'eau et de courant
Fermez le robinet de l'eau après chaque
lavage: vous limiterez ainsi l'usure de l'installation
hydraulique de votre lave-linge et éliminerez le
danger de fuites.
Débranchez la fiche de la prise de courant quand
vous nettoyez votre lave-linge et pendant tous vos
travaux d'entretien.
Nettoyage du lave-linge
Pour nettoyer l'extérieur et les parties en caoutchouc,
utilisez un chiffon imbibé d'eau tiède et de savon.
N'utilisez ni solvants ni abrasifs.
Entretien du couvercle
et du tambour
Quand vous nutilisez pas votre lave-linge, laissez
toujours le couvercle entrouvert pour éviter la
formation de mauvaises odeurs.
Nettoyage de la pompe
Le lave-linge est équipé d'une pompe autonettoyante
qui n'exige aucune opération d'entretien. Il peut
toutefois arriver que de menus objets (pièces de
monnaie, boutons) tombent dans la préchambre qui
protège la pompe, placée en bas de cette dernière.
Contrôlez que le cycle de lavage est bien terminé et
débranchez la fiche.
Pour récupérer les objets qui pourraient être tombés
dans la préchambre :
1. déposez la base à
l'avant de votre lave-
linge en la saisissant
sur les côtés et en la
tirant des deux mains
(voir figure);
2. dévissez le cou
vercle en le faisant
tourner dans le sens
inverse des aiguilles
d'une montre (voir
figure): il est normal
qu'un peu d'eau
s'écoule;
3. nettoyez soigneuse-
ment à l'intérieur;
4. revissez le couvercle;
5. remontez le panneau
en veillant à bien enfiler
les crochets dans les
fentes prévues avant de
le pousser contre la
machine.
Contrôle du tuyau d'arrivée de l'eau
Contrôlez le tuyau d'alimentation au moins une fois par
an. Remplacez-le dès que vous remarquez des
craquèlements et des fissures: les fortes pressions subies
pendant le lavage pourraient provoquer des cassures.
N'utilisez jamais de tuyaux usés.
Fig. 1
Fig. 2Fig. 3Fig. 4
FR
35
Anomalies et remèdes
Il peut arriver que le lave-linge ne fonctionne pas bien. Avant dappeler le Service de dépannage (voir
Assistance), contrôler sil ne sagit pas par hasard dun problème facile à résoudre à laide de la liste suivante.
Anomalies:
Le lave-linge ne sallume pas.
Le cycle de lavage ne démarre
pas.
Il ny a pas darrivée deau (le
message "Pas d'eau, ouvrir
robinet" s'affiche à l'écran).
Le lave-linge prend leau et
vidange continuellement.
Le lave-linge ne vidange pas et
nessore pas.
Le lave-linge vibre beaucoup
pendant lessorage.
Le lave-linge a des fuites.
L'appareil est bloqué, l'écran
clignote et affiche un code d'ano-
malie (par ex. : F-01, F-).
Il y a un excès de mousse.
Causes / Solutions possibles:
La fiche nest pas branchée dans la prise de courant ou mal branchée.
Il y a une panne de courant.
Le couvercle n'est pas bien fermé.
La touche MARCHE/ARRÊT na pas été enfoncée.
La touche MISE EN MARCHE/PAUSE na pas été enfoncée.
Le robinet de leau nest pas ouvert.
Un départ différé a été sélectionné (voir Comment faire un cycle de
lavage).
Le tuyau darrivée de leau nest pas raccordé au robinet.
Le tuyau est plié.
Le robinet de leau nest pas ouvert.
Il y a une coupure deau.
La pression nest pas suffisante.
La touche MISE EN MARCHE/PAUSE na pas été enfoncée.
Le tuyau de vidange nest pas installé à une distance du sol comprise
entre 65 et 100 cm (voir Installation).
Lextrémité du tuyau de vidange est plongée dans leau (voir Installation).
Lévacuation murale na pas dévent.
Si après ces vérifications, le problème persiste, fermer le robinet de leau,
éteindre la machine et appeler le service Assistance. Si lappartement est
situé en étage dans un immeuble, il peut y avoir des phénomènes de
siphonnage qui font que le lave-linge prend et évacue leau
continuellement. Pour supprimer cet inconvénient, on trouve dans le
commerce des soupapes spéciales anti-siphonnage.
Le programme ne prévoit pas de vidange: pour certains programmes, il
faut la faire partir manuellement (Programmes et fonctions).
La fonction REPASSAGE FACILE est activée: pour compléter le programme,
appuyer sur la touche MISE EN MARCHE/PAUSE (Programmes et fonctions).
Le tuyau de vidange est plié (voir Installation).
La conduite dévacuation est bouchée.
Le tambour na pas été débloqué comme il faut lors de linstallation du
lave-linge (voir Installation).
Le lave-linge nest pas posé à plat (voir Installation).
Le lave-linge est coincé entre des meubles et le mur (voir Installation).
Le tuyau darrivée de leau nest pas bien vissé (voir Installation).
Le tiroir à produits lessiviels est bouché (pour le nettoyer voir Entretien et soin).
Le tuyau de vidange nest pas bien fixé (voir Installation).
Eteindre lappareil et débrancher la fiche de la prise de courant,
attendre 1 minute environ avant de rallumer.
Si lanomalie persiste, appeler le service dassistance.
Le produit de lavage utilisé nest pas une lessive spéciale machine (il faut quil y
ait linscription pour lave-linge, main et machine, ou autre semblable).
La quantité utilisée est excessive.
36
FR
Assistance
Avant dappeler le service après-vente:
Vérifier si on ne peut pas résoudre lanomalie par ses propres moyens (voir Anomalies et Remèdes);
Remettre le programme en marche pour contrôler si linconvénient a disparu;
Autrement, contacter le Centre dAssistance technique agréé au numéro de téléphone indiqué sur le
certificat de garantie.
Ne jamais sadresser à des techniciens non agréés.
Communiquer:
le type de panne;
le modèle de lappareil (Mod.);
son numéro de série (S/N).
Vous trouverez tous ces renseignements sur la plaquette signalétique située sur le panneau arrière de votre
lave-linge.
Consultation à tout moment
Pour toute demande concernant nos produits, nhésitez pas à contacter notre Service Consommateurs
0.825.05.44.44.
DE
37
Deutsch
INHALTSVERZEICHNIS
Installation 38-39
Auspacken und Aufstellen
Wasser- und Elektroanschlüsse
Erster Waschgang
Technische Daten
Beschreibung Ihres
Waschvollautomaten, 40-41
Bedienblende
Display
So öffnen und schließen Sie die Wäschetrommel
Durchführung eines Waschprogramms, 42
Unwuchtkontrollsystem
Programme und Funktionen, 43
Programmtabelle
Waschfunktionen
Waschmittel und Wäsche 44
Waschmittelschublade
Vorsortieren der Wäsche
Sonderprogramme
Vorsichtsmaßregeln und Hinweise 45
Allgemeine Sicherheit
Entsorgung
Energie sparen und Umwelt schonen
Reinigung und Pflege 46
Wasser- und Stromversorgung abstellen
Reinigung des Gerätes
Pflege der Gerätetür und Trommel
Reinigung der Pumpe
Kontrolle des Wasserzulaufschlauchs
So kann der Waschmittelbehälter gereinigt werden
Störungen und Abhilfe 47
Kundendienst 48
DE
ARTXD 149
Bedienungsanleitungen
WASCHVOLLAUTOMAT
38
DE
Installation
Es ist äußerst wichtig, diese Bedienungsanleitung
sorgfältig aufzubewahren, um sie jederzeit zu Rate
ziehen zu können. Sorgen Sie dafür, dass sie im Falle
eines Umzugs oder Übergabe an einen anderen
Benutzer das Gerät stets begleitet, damit auch der
neue Inhaber die Möglichkeit hat, diese zu Rate zu
ziehen.
Lesen Sie bitte folgende Hinweise aufmerksam
durch, sie liefern wichtige Informationen hinsichtlich
der Installation, dem Gebrauch und der Sicherheit.
Auspacken und Aufstellen
Auspacken
1. Gerät auspacken.
2. Sicherstellen, dass der
Waschvollautomat keine
Transportschäden erlitten
hat. Im Falle einer
Beschädigung Gerät bitte
nicht anschließen,
sondern den
Kundendienst anfordern.
3. Die vier Transport-
schutzschrauben
ausschrauben und das
an der Rückwand
befindliche Gummiteil
nebst entsprechendem
Distanzstück abnehmen (siehe Abbildung).
4. Die Löcher mittels der mitgelieferten Kunststoffstöpsel
schließen.
5. Sämtliche Teile aufbewahren: Sollte der Waschvoll-
automat erneut transportiert werden müssen, müssen
diese Teile wieder eingesetzt werden.
Zur Beachtung: Im Falle einer Wiederverwendung
sind die kurzeren Schrauben oben einzusetzen.
Verpackungsmaterial ist kein Spielzeug für Kinder
Standfläche
1. Der Waschvollautomat muss auf einem ebenen, festen
Untergrund aufgestellt werden, ohne ihn an Wände,
Möbelteile oder ähnliches anzulehnen.
2. Sollte der Boden nicht
perfekt eben sein, müssen
die Unebenheiten durch
An- bzw. Ausdrehen der
vorderen Stellfüße ausge-
glichen werden (siehe
Abbildung), der auf der
Arbeitsfläche zu ermitteln-
de Neigungsgrad darf 2°
nicht überschreiten.
Eine präzise Nivellierung verleiht dem Gerät die erforderliche
Stabilität, durch die Vibrationen, Betriebsgeräusche und ein
Verrücken des Gerätes vermieden werden. Bei Teppichbö-
den müssen die Stellfüße so reguliert werden, dass ein
ausreichender Freiraum zur Belüftung unter dem Wasch-
vollautomaten gewährleistet ist.
Aufstellen, Versetzen
Sollte Ihr Geraet mit
einem Spezialgestell mit
einzieh-baren Raedern
ausgestattet sein, kann
das Geraet muehelos
verschoben wer- den.
Um dieses Gestell
herunter zu lassen,
ziehen Sie den links unter
dem Sockel befindlichen
Hebel, und versetzen
dann die
Waschmaschine. Bringen
Sie das Radgestell anschließend wieder in die
ursprüngliche Stellung zurück. Das Gerätsteht so fest
und sicher auf demBoden (siehe Abbildung).
Wasser- und Elektroanschlüsse
Anschluss des Zulaufschlauches
1. Schrauben Sie den
Wasserschlauch an einen
Kaltwasserhahn mit ¾-
Zoll-Gewindeanschluss an
(siehe Abbildung).
Lassen Sie das Wasser vor
dem Anschluss so lange
auslaufen, bis klares
Wasser austritt.
2. Schließen Sie das
andere Ende des Schlau-
ches an den oben rechts
am Rückteil des Wasch-
vollautomaten befindli-
chen Wasseranschluss an
(siehe Abbildung).
3. Der Schlauch darf
hierbei nicht eingeklemmt
oder abgeknickt werden.
Der Wasserdruck muss innerhalb der Werte liegen,
die in der Tabelle der Technischen Daten
angegebenen sind (siehe nebenstehende Seite).
Sollte der Zulaufschlauch nicht lang genug sein,
dann wenden Sie sich bitte an einen Fachhändler
oder an einen autorisierten Fachmann.
DE
39
Technische Daten
Modell
ARTXD 149
Abmessungen
Breite 40 cm
Höhe 85 cm
Tiefe 60 cm
Fassungsvermögen
1 bis 6 kg
Elektroanschlüsse
siehe das am Gerät befindliche
Typenschil d
Wasseranschlüsse
Höchstdruck 1 MPa (10 bar)
Mindestdruck 0,05 MPa (0,5 bar)
Trommelvolumen 42 Liter
Schleudertouren
bis zu 1400 U/min.
Testprogramme
gemäß Richtlinie
1061/2010
Programm (90°C); Temperatur
60°C und 40°C (Drücken Taste
TEMPERATUR).
Dieses Gerät entspricht den
folgenden EG-Richtlinien:
- 2004/108/CE (elektromagnetische
Verträglichkeit)
- 2002/96/CE
- 2006/95/CE (Niederspannung)
65 - 100 cm
Anschluss des Ablaufschlauches
Schließen Sie den
Ablaufschlauch ohne ihn
dabei abzuknicken an
einen geeigneten Abfluss
an. Die Mindestablaufhöhe
beträgt 65 - 100 cm
(gemessen vom Boden),
oder hängen Sie diesen
mittels des Schlauchhalters
gesichert in ein Becken
oder Wanne ein;
Befestigen Sie diesen
mittels des mitgelieferten
Schlauchhalters z.B. an
einen Wasserhahn (siehe
Abbildung). Das freie
Ablaufschlauchende darf
nicht unter Wasser
positioniert werden.
Verlängerungsschläuche sollten nicht eingesetzt
werden. Sollte dies unvermeidlich sein, muss die
Verlängerung denselben Durchmesser des
Originalschlauchs aufweisen und darf eine Länge von
150 cm nicht überschreiten.
Stromanschluss
Vor Einfügen des Netzsteckers in die Steckdose ist
sicherzustellen, dass:
die Steckdose über eine normgerechte Erdung verfügt;
die Steckdose die in den Technischen Daten
angegebenen Höchstlast des Gerätes trägt (siehe
nebenstehende Tabelle);
die Stromspannung den in den Technischen Daten
angegebenen Werten entspricht (siehe
nebenstehende Tabelle);
die Steckdose mit dem Netzstecker des
Waschvollautomaten kompatibel ist. Andernfalls
muss der Netzstecker (oder die Steckdose) ersetzt
werden.
Der Waschvollautomat darf nicht im Freien installiert
werden, auch nicht, wenn es sich um einen
geschützten Platz handelt. Es ist gefährlich, das
Gerät Gewittern und Unwettern auszusetzen.
Die Steckdose sollte nach installiertem Gerät leicht
zugänglich sein.
Verwenden Sie bitte keine Verlängerungen oder
Mehrfachstecker.
Das Netzkabel darf nicht gebogen bzw.
eingeklemmt werden.
Das Versorgungskabel darf nur durch autorisierte
Fachkräfte ausgetauscht werden.
Achtung! Der Hersteller übernimmt keinerlei Haftung,
sollten diese Vorschriften nicht genau beachtet
werden.
Erster Waschgang
Lassen Sie nach der Installation bzw. vor erstmaligem
Gebrauch erst einen Waschgang (mit Waschmittel)
ohne Wäsche durchlaufen. Stellen Sie hierzu das
Waschprogramm
ein.
40
DE
Beschreibung Ihres Waschvollautomaten
Bedienblende
Taste mit Kontrollleuchte
START/PAUSE
Taste
TEMPERATUR
Tasten
FUNKTIONEN
Taste
EIN/AUS
Tasten
PROGRAMMWAHL
Taste
SCHLEUDERN
Taste
TASTENSPERRE
DISPLAY
Taste
STARTZEITVORWAHL
Taste
SPEICHER
Taste EIN/AUS : Drücken Sie kurz auf die Taste,
um das Gerät ein- bzw. auszuschalten. Die
Kontrollleuchte START/PAUSE, die langsam grün
blinkt, zeigt an, dass das Gerät eingeschaltet ist. Um
den Waschvollautomaten während eines Waschgangs
auszuschalten, muss die Taste etwas länger gedrückt
werden (ca. 2 Sekunden); ein kurzer oder ein
ungewollter Druck bewirkt kein Ausschalten des
Gerätes. Das Ausschalten des Gerätes während
eines laufenden Waschprogramms löscht den
gesamten Waschzyklus.
Tasten PROGRAMMWAHL: zur Einstellung des
gewünschten Programms (siehe "Programmtabelle").
Taste SPEICHER: Halten Sie die Taste gedrückt, um
einen Waschzyklus und die gewünschten
Individualisierungseinstellungen zu speichern. Um
einen bereits gespeicherten Zyklus abzurufen,
drücken Sie die Taste SPEICHER.
Tasten FUNKTIONEN:Drücken Sie die Taste, um
die gewünschte Funktion auszuwählen. Auf dem
Display schaltet sich die entsprechende
Kontrollleuchte ein.
Taste SCHLEUDERN
: Drücken Sie die Taste, um
die Schleudergeschwindigkeit herabzusetzen oder das
Schleudern ganz auszuschließen. Der Wert wird auf
dem Display angezeigt.
Taste TEMPERATUR
: Drücken Sie die Taste, um
die Temperatur herabzusetzen: Der Wert wird auf
dem Display angezeigt.
Taste TASTENSPERRE
: Zur Aktivierung der
Sperre der Bedienblende halten Sie die Taste ca. 2
Sekunden lang gedrückt. Das eingeschaltete Symbol
zeigt an, dass die Bedienblende gesperrt ist. Auf
diese Weise wird verhindert, dass ein Programm aus
Versehen geändert wird, vor allem, wenn kleine
Kinder im Hause sind. Zur Deaktivierung der Sperre
der Bedienblende halten Sie die Taste ca. 2
Sekunden lang gedrückt.
Taste STARTZEITVORWAHL
: Zur Vorwahl der
Startzeit des gewählten Programms drücken Sie bitte
diese Taste. Die Zeitverzögerung wird auf dem Display
angezeigt.
Taste mit Kontrollleuchte START/PAUSE: Sobald die
grüne Kontrollleuchte auf langsames Blinklicht
schaltet, drücken Sie die Taste, um den Waschgang
zu starten. Nach Ingangsetzung des Programms
schaltet die Kontrollleuchte auf Dauerlicht. Um den
Waschgang zu unterbrechen, drücken Sie erneut die
Taste; die Kontrollleuchte schaltet auf orangefarbenes
Blinklicht. Wenn das Symbol
nicht leuchtet, kann
die Gerätetür geöffnet werden. Um das Programm an
der Stelle, an der es unterbrochen wurde, wieder in
Gang zu setzen, drücken Sie die Taste erneut.
Funktion Standby
Zur Erfüllung der neuen Richtlinien zum
Energieverbrauch ist diese Waschmaschine mit einem
automatischen Ausschaltsystem (Standby)
ausgestattet, das nach 30 Minuten des
Nichtgebrauchs in Funktion tritt. Drücken Sie kurz die
Taste EIN/AUS und warten Sie, bis sich die Maschine
wieder einschaltet.
DE
41
So öffnen und schließen Sie die
Wäschetrommel
Abb. 1
Abb. 2
Abb. 3
Abb. 4
A) Öffnen (Abb. 1):
Öffnen Sie den äußeren Deckel ganz.
B)Öffnen der Trommel (Soft opening):
Drücken Sie mit einem Finger leicht auf die auf
der Abb. 2 ersichtlichen Taste; die Trommel
öffnet sich ganz sanft.
C) Einfüllen der Wäsche (Abb. 3).
D) Schliessen (Abb. 4):
- Schließen Sie sorgfältig die Wäschetrommel.
Schließen Sie zuerst den vorderen Flügel und
drücken Sie anschließend den hinteren Flügel auf;
- Stellen Sie sicher, dass sich die Haken des
vorderen Flügels ordnungsgemäß in den
entsprechenden Sitzen der hinteren Flügel befinden;
- Nach hörbarem Einrasten der Haken drücken Sie
leicht auf beide Türen; sie dürfen nicht aufspringen;
- Schließen Sie abschließend den äußeren Deckel.
E) Endposition der Trommel (Abb. 2):
Zum bequemen Be- und Entladen wird die
Trommel nach Abschluss des Waschgangs wieder
mit der Öffnung nach oben platziert.
Das Display dient nicht nur zur Programmierung des
Gerätes, sondern liefert auch zahlreiche Informationen.
In den beiden oberen Zeilenreihen A und B werden
das ausgewählte Waschprogramm, die laufende
Waschphase und alle Angaben zum
Programmfortschritt angezeigt.
In der Zeilenreihe C werden die Restzeit bis zum Ende
des laufenden Waschvorgangs und bei Einstellung
einer STARTZEITVORWAHL die bis zum Start des
ausgewählten Programms verbleibende Zeit angezeigt.
In der Zeilenreihe D wird der Höchstwert der
Schleudergeschwindigkeit angezeigt, die das Gerät
für das eingestellte Programm zulässt; wenn das
Programm keinen Schleudervorgang vorsieht, bleibt
die Zeilenreihe ausgeschaltet.
In der Zeilenreihe E wird der Höchstwert der
Temperatur angezeigt, der für das eingestellte
Programm ausgewählt werden kann; wenn das
Programm keine Temperatureinstellung vorsieht, bleibt
die Zeilenreihe ausgeschaltet.
Die Kontrollleuchten F sind den Funktionen zugeordnet
und leuchten, wenn die ausgewählte Funktion mit dem
eingestellten Programm kompatibel ist.
Symbol Gerätetür gesperrt
Durch Leuchten des Symbols meldet das Gerät, dass
die Gerätetür gesperrt ist, um ein versehentliches
Öffnen zu vermeiden. Zur Vermeidung einer evtl.
Beschädigung warten Sie bis das Symbol erlischt,
bevor Sie die Gerätetür öffnen (ungefähr 3 Minuten).
NB: Wenn die Funktion STARTZEITVORWAHL
aktiviert ist, kann die Gerätetür nicht geöffnet
werden. Zum Öffnen schalten Sie das Gerät mittels
der Taste START/PAUSE auf Pause.
Vor dem ersten Einschalten werden Sie zur Auswahl
der Sprache aufgefordert, und das Display blendet
Display
A
B
C
D
E
F
automatisch das Menü zur Sprachauswahl ein.
Wählen Sie die gewünschte Sprache mittels der Tasten
TEMPERATUR und SCHLEUDERN aus und drücken Sie
dann zum Bestätigen der Auswahl auf die Taste
TASTENSPERRE. Soll eine andere Sprache ausgewählt
werden, dann schalten Sie das Gerät aus, drücken
Sie gleichzeitig 5 Sekunden lang auf die Tasten
TASTENSPERRE + TEMPERATUR + SCHLEUDERN
und wiederholen Sie dann die oben angegebene
Vorgehensweise.
42
DE
Durchführung eines
Waschprogramms
1. EINSCHALTEN DES GERÄTES.Drücken Sie auf
die Taste
, woraufhin auf dem Display die
Meldung WILLKOMMEN erscheint; die
Kontrollleuchte START/PAUSE blinkt langsam grün.
2. EINFÜLLEN DER WÄSCHE. Öffnen Sie die
Gerätetür. Füllen Sie die Wäsche ein. Achten Sie
hierbei bitte darauf, die in der Programmtabelle (auf
der nächsten Seite) angegebene Wäschemenge
nicht zu überschreiten.
3. DOSIERUNG DES WASCHMITTELS. Füllen Sie
das Waschmittel in die entsprechenden Kammern
(siehe "Waschmittel und Wäsche").
4. SCHLIESSEN SIE DIE GERÄTETÜR.
5. WAHL DES WASCHPROGRAMMS. Wählen Sie
das gewünschte Programm mittels einer der
PROGRAMMWAHL-Tasten aus; die Bezeichnung
des Programms wird auf dem Display angezeigt;
dem Programm sind eine Temperatur und eine
Schleudergeschwindigkeit zugeordnet, die jedoch
geändert werden können. Auf dem Display wird die
Programmdauer angezeigt.
6. INDIVIDUALISIERUNG DES WASCHGANGS.
Verwenden Sie hierzu die entsprechenden Tasten:
Änderung der Temperatur und/oder
Schleudern.Das Gerät wählt automatisch die für
das eingestellte Programm vorgesehene maximale
Temperatur sowie die maximale
Schleudergeschwindigkeit. Diese können demnach
nicht erhöht werden. Durch Drücken der Taste
kann die Temperatur bis auf Kaltwäsche "OFF"
herabgesetzt werden. Durch Drücken der Taste
kann die Schleudergeschwindigkeit herabgesetzt oder
der Schleudervorgang auf "OFF" ausgeschlossen
werden. Ein weiterer Druck auf die Tasten bewirkt die
Einstellung der möglichen Maximalwerte.
Startzeitvorwahl.
Zur Vorwahl der Startzeit des eingestellten
Programms drücken Sie die entsprechende Taste
bis die gewünschte Zeitverschiebung angezeigt
wird. Sobald diese Zusatzfunktion aktiviert wird,
leuchtet auf dem Display das Symbol
auf. Um
die Startzeitvorwahl wieder zu deaktivieren,
drücken Sie die Taste bis auf dem Display der
Schriftzug "OFF" eingeblendet wird.
Änderung der Eigenschaften
des Waschgangs.
Drücken Sie die Taste zum Aktivieren der
Funktion; die der Taste entsprechende
Kontrollleuchte schaltet sich dabei ein.
Durch erneutes Drücken der Taste kann die
Funktion wieder ausgeschaltet werden; die
Kontrollleuchte erlischt.
Ist die gewählte Funktion nicht vereinbar mit dem
eingestellten Programm, schaltet die
Kontrollleuchte auf Blinklicht und die Funktion wird
nicht aktiviert.
Ist die gewählte Funktion mit einer anderen bereits
eingestellten nicht kompatibel, schaltet die der ersten
Funktion entsprechende Kontrollleuchte auf Blinklicht und
nur die zweite Funktion wird aktiviert, die Kontrollleuchte
der aktivierten Funktion schaltet auf Dauerlicht.
Die Funktionen können eine Änderung der empfohlenen
Beladungsmenge und/oder der Waschzeit bewirken.
7. STARTEN DES PROGRAMMS. Drücken Sie die
Taste START/PAUSE. Die zugehörige Kontrollleuchte
schaltet auf grünes Dauerlicht und die Gerätetür
wird gesperrt (Symbol GERÄTETÜR GESPERRT
leuchtet.) Während des Programmablaufs erscheint
auf dem Display die Bezeichnung der laufenden
Programmphase. Um ein Programm während eines
laufenden Waschgangs zu ändern, schalten Sie den
Waschvollautomat mittels der Taste START/PAUSE
auf Pause (die Kontrollleuchte START/PAUSE blinkt
nun langsam orangefarben); wählen Sie daraufhin
das gewünschte Programm aus und drücken Sie
erneut auf die Taste START/PAUSE.
Um während eines laufenden Programms die
Gerätetür zu öffnen, drücken Sie die Taste START/
PAUSE; wenn das Symbol GERÄTETÜR GESPERRT
erloschen ist, kann die Gerätetür geöffnet
werden. Drücken Sie die Taste START/PAUSE
erneut, um das Programm an der Stelle an der es
unterbrochen wurde, wieder in Gang zu setzen.
8. ENDE DES PROGRAMMS.Das Programmende
wird durch die Anzeige "PROGRAMMENDE" auf dem
Display angezeigt. Wenn das Symbol GERÄTETÜR
GESPERRT
erlischt, kann die Gerätetür geöffnet
werden. Öffnen Sie die Gerätetür, nehmen Sie die
Wäsche heraus und schalten Sie das Gerät aus.
Möchten Sie ein bereits in Gang gesetztes
Waschprogramm löschen, drücken Sie die Taste
etwas länger. Der Waschgang wird unterbrochen und
das Gerät schaltet sich aus.
Unwuchtkontrollsystem
Um starke Vibrationen oder eine Unwucht beim
Schleudern zu vermeiden, verfügt das Gerät über ein
Schleuderunwuchtsystem. Die Waschladung wird durch
eine erhöhte Rotation der Trommel als die des
WAschgangs ausbalanciert. Sollte die Wäscheladung
nach Ablauf mehrerer Versuche immer noch nicht korrekt
verteilt sein, schleudert das Gerät die Wäsche bei einer
niedrigeren Geschwindigkeit als die der vorgesehenen
Schleudergeschwindigkeit. Sollte die Wäsche extrem
ungleichmäßig verteilt sein, führt das Gerät anstelle des
Schleudergangs einen Wäscheverteilungs-Zyklus durch.
Um eine optimale Verteilung der Wäscheladung und somit
eine korrekte Auswuchtung zu fördern, sollten große und
kleine Wäscheteile gemischt eingefüllt werden.
DE
43
Programme und
Funktionen
Waschfunktionen
Fleckenstopp
Diese Funktion ermöglicht das Entfernen von hartnäckigen Flecken.
Wenn Sie nur bleichen möchten,
füllen Sie das Bleichmittel in die
Zusatzkammer 4 ein, stellen Sie
das Programm "Spülen" ein
und aktivieren Sie die Funktion
"Fleckenstopp".
Um während des Waschgangs
zu bleichen, geben Sie das
Waschmittel und die Zusätze
ein, stellen Sie das gewünschte
Programm ein und aktivieren
Sie die Funktion "Fleckenstopp".
Diese Funktion kann zu den Programmen
, , ,
und Abpumpen nicht zugeschaltet werden.
Vorwäsche
Beim Wählen dieser Funktion wird eine Vorwäsche aktiviert, so
dass auch hartnäckige Flecken beseitigt werden.
NB: Füllen Sie das Waschpulver in die entsprechende Kammer ein.
Diese Funktion kann zu den Programmen
, , , , , .
Programmtabelle
Beschreibung des Programms
Max.
Te m p -
eratur
(°C)
Max.
Schleu-
derGe-
schwin-
digkeit
(U/min)
Waschmittel
Max.
Belad-
ungs-
menge
(kg)
Programm
-
dauer
Vorwäs-
che
Bleich-
mittel
Haupt-
wäsche
Weich-
spüler
Programme für die tägliche Wäsche
Baumwolle (1-2):
stark verschmutzte Kochwäsche.
90°1400
llll
6
Baumwolle:
stark verschmutzte Weiß- und farbechte Buntwäsche.
60°1400
llll
6
Baumwolle (3):
leicht verschmutzte Weißwäsche und empfindliche
Buntwäsche.
40°1400
llll
6
Synthetik Robust:
(1° Drücken der Taste)
:
stark verschmutzte, farbechte
Buntwäsche.
60°800
llll
2,5
Synthetik Robust (4):
(1° Drücken der Taste)
:
stark verschmutzte,
farbechte Buntwäsche.
40°800
llll
2,5
Synthetik Fein
2° Drücken der Taste)
:
leicht verschmutzte farbechte
Buntwäsche.
40°800
llll
2,5
Mix 30'
(1° Drücken der Taste)
:
zum kurzen Auffrischen leicht verschmutzter
Wäsche (nicht geeignet für Wolle, Seide und Handwäsche).
30°800--
ll
3
Mix 15'
(3° Drücken der Taste)
:
zum kurzen Auffrischen leicht verschmutzter
Wäsche (nicht geeignet für Wolle, Seide und Handwäsche).
30°800--
ll
1,5
Spezialprogramme / Speicher
Baby Zyklus:
stark verschmutzte empfindliche Buntwäsche.
40°800-
lll
2
Speicher:
hiermit kann jede beliebige Art von Waschgang gespeichert werden
Seide/Gardinen:
kleidungsstücke aus Seide, Viskose und Feinwäsche.
30°0--
ll
1
Wolle:
wolle, Kaschmir usw.
40°800--
ll
1
Teilprogramme
Hauptschleudern (1° Drücken der Taste)
.
-1400----6
Schonschleudern (2° Drücken der Taste)
.
-800----2,5
Spülen (1° Drücken der Taste)
.
-1400-
l
-
l
6
Abpumpen (2° Drücken der Taste)
.
-0----6
Wasch-
programme
Die Waschzeitdauer kann auf dem Display
abgelesen werden.
M
Die auf dem Display und in der Bedienungsanleitung genannte Zyklusdauer wird ausgehend von Standardbedingungen berechnet. Die effektiv benötigte Zeit kann aufgrund zahlreicher Faktoren wie
Temperatur und Druck des Zulaufwassers, Raumtemperatur, Waschmittelmenge, Art, Menge und Verteilung der Waschladung sowie der gewählten Zusatzfunktionen variieren.
Für alle Testinstitute:
1) Prüfprogramm gemäß Richtlinie 1061/2010: Programm (90°C) und eine Temperatur von 60°C und 40°C einstellen (Drücken Taste TEMPERATUR).
2) Langes Baumwollprogramm: Programm
(90°C) und eine Temperatur von 40°C einstellen (Drücken Taste TEMPERATUR).
3) Kurzes Baumwollprogramm: Programm
(40°C).
4) Langes synthetikprogramm: Programm
(60°C) (1° Drücken der Taste); und eine Temperatur von 40°C einstellen (Drücken Taste TEMPERATUR).
Extraspülgang
Wählen Sie diese Zusatzfunktion, wird die Spülwirkung erhöht
und somit ein optimales Ausspülen des Waschmittels
garantiert. Dies ist besonders angezeigt bei sehr empfindlicher
Haut bzw. Waschmittelallergien.
Diese Funktion kann zu den Programmen
, und
Abpumpen nicht zugeschaltet werden.
Leichtbügeln
Bei Einstellung dieser Funktion wird zur Vermeidung einer
Knitterbildung der Wasch- und Schleudergang entsprechend
geändert. Beim Programmen bleibt am Ende des Zyklus das
Wasser in der Maschine, die Kontrollleuchte der Funktion
LEICHTBÜGELN und die der Taste START/PAUSE blinken (orange)
und auf dem Display wird "SPÜLSTOPP" angezeigt. Zum Abpumpen
des Wassers oder zur Entnahme der Wäsche muss die Taste
START/PAUSE oder die Taste LEICHTBÜGELN gedrückt werden.
Diese Funktion kann zu den Programmen , , ,
und Abpumpen nicht zugeschaltet werden.
Schnell
Zur Verkürzung des Waschgangs und gleichzeitiger
Einsparung von Wasser und Strom.
Diese Funktion kann zu den Programmen
, , , ,, .
44
DE
Waschmittel und Wäsche
Waschmittelschublade
Ein gutes Waschergebnis hängt auch von einer
korrekten Waschmitteldosierung ab: Eine zu hohe
Dosierung bedeutet nicht unbedingt reinere Wäsche,
sie trägt nur dazu bei, die Maschineninnenteile zu
verkrusten und die Umwelt zu belasten.
Schublade herausziehen
und Waschmittel oder
Zusätze wie folgt
einfüllen:
In Kammer 1: Waschpulver für die Vorwäsche
(kein Flüssigwaschmittel)
In Kammer 2: Waschmittel für die
Hauptwäsche (Waschpulver oder
Flüssigwaschmittel)
Flüssigwaschmittel nur kurz vor dem Start einfüllen.
Verwenden Sie keine Handwaschmittel, sie verursa-
chen eine zu hohe Schaumbildung.
Kammer 3: Zusätze (Weichspüler usw.)
Achten Sie bei Einfüllen des Weichspülers in die Kammer
3 darauf, dass Sie die angegebene Höchstmenge "max."
nicht überschreiten.Der Weichspüler wird beim letzten
Spülgang automatisch in die Wäschetrommel eingespült.
Nach Abschluss des Waschprogramms bleibt in Kammer
3 ein kleiner Rückstand an Wasser. Dieser ist zur
Einspülung sehr dickflüssiger bzw. zur Verdünnung
konzentrierter Weichspüler erforderlich. Sollte in der
Kammer 3 mehr Wasser als normal zurückbleiben, so ist
die Entnahmevorrichtung verstopft. Zur Reinigung
derselben verweisen wir auf Seite Reinigung und Pflege.
Zusätzliche Kammer 4: Bleichmittel
Vorsortieren der Wäsche
Sortieren Sie die Wäsche nach:
- Gewebeart / Waschetikettensymbol.
- und Farben: Buntwäsche von Weißwäsche trennen.
Entleeren Sie alle Taschen.
Das angegebene Gewicht, das sich auf die
maximale Ladung an Trockenwäsche bezieht, sollte
nicht überschritten werden:
Widerstandsfähige Gewebe: max 6 kg
Kunstfasergewebe: max 2,5 kg
Feinwäsche: max 2 kg
Wolle: max 1 kg
Seide: max 1 kg
Wie schwer ist Wäsche?
1 Betttuch 400-500 gr
1 Kissenbezug 150-200 gr
1 Tischdecke 400-500 gr
1 Bademantel 900-1.200 gr
1 Handtuch 150-250 gr
Sonderprogramme
Mix 30: Kurzprogramm für die tägliche Wäsche
leicht verschmutzter Teile: in nur 30 Minuten, zur
Einsparung von Zeit und Energie. Stellen Sie dieses
Waschprogramm (
bei 30°C) ein, dann können, bei
einer maximalen Lademenge von 3 kg, Gewebe
unterschiedlicher Art (mit Ausnahme von Wolle und
Seide) zusammen gewaschen werden.
Mix 15
: Kurzprogramm für die Wäsche leicht
verschmutzter Teile: in nur 15 Minuten, zur
Einsparung von Zeit und Energie. Stellen Sie dieses
Waschprogramm (
bei 30°C) ein, dann können, bei
einer maximalen Lademenge von 1,5 kg, Gewebe
unterschiedlicher Art (mit Ausnahme von Wolle und
Seide) zusammen gewaschen werden.
Baby Zyklus
: Dieses Programm ist in der Lage, die
durch Kinder verursachten, typischen Flecken zu
beseitigen, und die Waschmittel optimal auszuspülen,
um Allergien an der empfindlichen Kinderhaut zu
vermeiden. Dieser Zyklus
wurde konzipiert, um
Bakterienvorkommen zu reduzieren, dank des
Einsatzes einer erheblich größeren Wassermenge und
Optimierung spezifischer, hygienisierender
Waschmittelzusätze.
Seide: Wählen Sie das Spezialprogramm
zum
Waschen aller Kleidungs- bzw. Wäschestücke aus
Seide. Es empfiehlt sich der Einsatz von
Feinwaschmittel.
Gardinen:Gardinen zusammengefaltet in einem
Kissenbezug oder in einem netzartigen Beutel
waschen. Stellen Sie das Programma
ein.
Wolle: Der Waschvollautomat von ist der einzige, der
mit dem Woolmark Platinum Care-Siegel (M.0508)
von The Woolmark Company ausgezeichnet wurde.
Dieses bestätigt die schonende Maschinenwäsche
aller Kleidungsstücke aus Wolle, auch solcher, die das
Etikett nur Handwäsche
tragen. Mit dem
Programm
lässt sich also sämtliche Wollwäsche
(max. 1 kg) bedenkenlos waschen, wobei beste
Resultate gewährleistet sind.
DE
45
Vorsichtsmaßregeln
und Hinweise
Der Waschvollautomat wurde nach den strengsten
internationalen Sicherheitsvorschriften entworfen und
gebaut. Nachstehende Hinweise werden aus
Sicherheitsgründen geliefert und sollten aufmerksam
gelesen werden.
Allgemeine Sicherheit
Dieses Gerät wurde ausschließlich für den Einsatz
im privaten Haushalt konzipiert.
Dieses Gerät ist nicht zur Verwendung durch
Personen (einschließlich Kinder) mit eingeschränkten
körperlichen, geistigen oder sensorialen Fähigkeiten
oder ohne ausreichende Erfarhung und Kenntnis
geeignet, es sei denn, sie werden durch eine für ihre
Sicherheit verantwortliche Person beaufsichtigt und
eingewiesen. Kinder müssen beaufsichtigt werden,
um sicherzustellen, dass sie nicht mit dem Gerät
spielen.
Der Waschvollautomat darf nur von Erwachsenen
und gemäß den Anleitungen dieses Handbuchs
bedient werden.
Berühren Sie das Gerät nicht, wenn Sie barfuß
sind, und auch nicht mit nassen oder feuchten
Händen oder Füßen.
Ziehen Sie den Gerätestecker nicht am Kabel aus
der Steckdose, sondern nur am Netzstecker selbst.
Berühren Sie nicht das Ablaufwasser, es könnte
sehr heiß sein.
Öffnen Sie die Gerätetür nicht mit Gewalt: Der
Sicherheits-Schließmechanismus könnte hierdurch
beschädigt werden.
Bei etwaigen Störungen versuchen Sie bitte nicht,
Innenteile selbst zu reparieren.
Halten Sie Kinder stets von dem in Betrieb
befindlichen Gerät fern.
Muss das Gerät versetzt werden, sollten hierfür
zwei oder drei Personen verfügbar sein. Versetzen
Sie es niemals allein, das Gerät ist äußerst schwer.
Bevor Sie die Wäsche einfüllen, stellen Sie bitte
sicher, dass die Wäschetrommel leer ist.
Entsorgung
Entsorgung des Verpackungsmaterials: Befolgen Sie
die lokalen Vorschriften, Verpackungsmaterial kann
wiederverwertet werden.
Gemäß der Europäischen Richtlinie 2002/96/EC
über Elektro- und Elektronik-Altgeräte dürfen
Elektrohaushalts-Altgeräte nicht über den her-
kömmlichen Haushaltsmüllkreislauf entsorgt
werden. Altgeräte müssen separat gesammelt
werden, um die Wiederverwertung und das
Recycling der beinhalteten Materialien zu optimieren
und die Einflüsse auf die Umwelt und die
Gesundheit zu reduzieren.
Das Symbol durchgestrichene Mülltonne auf
jedem Produkt erinnert Sie an Ihre Verpflichtung,
dass Elektrohaushaltsgeräte gesondert entsorgt
werden müssen. Endverbraucher können sich an
Abfallämter der Gemeinden wenden, um mehr
Informationen über die korrekte Entsorgung ihrer
Elektrohaushaltsgeräte zu erhalten.
Energie sparen und Umwelt schonen
Waschmittel, Wasser, Energie und Zeit sparen
Verschwendung von Strom, Wasser, Waschmittel
und Zeit kann man vermeiden, indem man die
Waschmaschine mit der empfohlenen
Höchstwäschemenge benutzt. Bei einer vollen
Auslastung Ihres Waschvollautomaten können Sie
bis zu 50% Energie sparen.
Vorwäsche ist nur bei stark verschmutzter Wäsche
erforderlich. Durch Vermeidung einer solchen kann
Waschmittel, Zeit, Wasser und 5-15% Energie
gespart werden.
Flecken sollten mit einem Fleckenmittel
vorbehandelt werden, oder weichen Sie die
Wäsche vor der Wäsche ein. Hierdurch können
hohe Waschtemperaturen vermieden werden. Ein
60°C-Programm anstelle eines 90°C-Programms,
oder ein 40°C-Programm anstelle eines 60°C-
Programms hilft bis zu 50% Energie zu sparen.
Dosieren Sie Waschmittel sparsam je nach Wasser-
härte, Verschmutzungsgrad und Wäschemenge,
um die Umwelt nicht über Gebühr zu belasten:
obwohl sie biologisch abbaubar sind, beinhalten Sie
dennoch Stoffe, die die Umwelt belasten. Auch
Weichmacher sollten höchst sparsam eingesetzt
werden.
Waschen Sie am späten Nachmittag oder in den
ersten Morgenstunden, hierdurch tragen sie dazu
bei, die Belastung der Elektrizitätswerke zu
mindern.
Die Option Startzeitvorwahl hilft Ihnen in dieser
Hinsicht außerordentlich.
Soll die Wäsche in einem Wäschetrockner
getrocknet werden, dann stellen Sie eine hohe
Schleudergeschwindigkeit ein. Je trockener die
Wäsche geschleudert wird, desto niedriger ist der
zum Trocknen erforderliche Energieverbrauch.
46
DE
Reinigung und Pflege
Wasser- und Stromversorgung abstellen
Wasserhahn nach jedem Waschvorgang zudrehen.
Hierdurch wird der Verschleiß der Wasseranlage
verringert und Wasserlecks vorgebeugt.
Ziehen Sie den Stecker aus der Steckdose, bevor
Sie Ihren Waschvollautomaten reinigen.
Reinigung des Gerätes
Die Gehäuseteile und die Teile aus Gummi können mit
einem mit warmer Spülmittellauge angefeuchteten Tuch
gereinigt werden. Vermeiden Sie Löse- und Scheuer-
mittel.
Pflege der Gerätetür und Trommel
Lassen Sie die Füllfenstertür stets leicht offen stehen,
um die Bildung unangenehmer Gerüche zu vermeiden.
Reinigung der Pumpe
Ihr Gerät ist mit einer selbstreinigenden Pumpe ausge-
rüstet, eine Wartung ist demnach nicht erforderlich. Es
könnte doch einmal vorkommen, dass kleine Gegen-
stände (Münzen, Knöpfe) in die zum Schutz der Pumpe
dienende Vorkammer (befindlich unter der Pumpe)
fallen.
Vergewissern Sie sich, dass der Waschgang abge-
schlossen ist und ziehen Sie den Stecker heraus.
Zum Herausholen von in den Vorraum gefallenen
Gegenstaenden:
1. Die Abdeckung
(befindlich an der
Gerätefront) mit Hilfe
eines Schraubenziehers
abnehmen (siehe
Abbildung);
2.den Deckel gegen
den Uhrzeigersinn
abdrehen (siehe
Abbildung): es ist ganz
normal, wenn etwas
Wasser austritt;
3. das Innere gründlich
reinigen;
4. den Deckel wieder
aufschrauben;
5. die Abdeckung
wieder anbringen.
Stellen Sie hierbei
sicher, dass die Haken
in die Schlitze
eingreifen, bevor Sie die
Abdeckung fest andrücken.
Kontrolle des Wasserzulaufschlauchs
Kontrollieren Sie den Zulaufschlauch mindestens einmal
im Jahr. Weist er Risse bzw. Brüche auf, muss er
ausgetauscht werden. Der starke Druck während des
Waschprogramms könnte zu plötzlichem Platzen führen.
Verwenden Sie niemals bereits gebrauchte Schläuche.
So kann der Waschmittelbehälter gereinigt werden
Reinigen:
Reinigen Sie ihn unter fließendem Wasser (Abb.3),
eventuell unter Zuhilfenahme einer alten Zahnbürste,
ziehen Sie das im oberen Teil der Kammern 1 und 2
befindliche Siphonpaar heraus (Abb. 4) und kontrollieren
Sie, ob dieses verstopft ist. Spülen Sie es eventuell
gründlich aus.
Anbringen:
Vergessen Sie nicht, auch
das Siphonpaar wieder
einzusetzen, bevor Sie den
Waschmittelbehälter
wieder einhängen. (Abb. 4,
2. 1).
Abnehmen:
Drücken Sie leicht auf den
vorne im Behälter
befindlichen Knopf und
ziehen Sie den Behälter
dann nach oben heraus
(Abb. 1, 2).
Abb. 1Abb. 2
Abb. 3
Abb. 4
DE
47
Störungen und Abhilfe
Bei Funktionsstörung: Bevor Sie sich an den Technischen Kundendienst wenden (siehe Kundendienst),
vergewissern Sie sich zuerst, ob es sich nicht um eine Kleinigkeit handelt, die Sie selbst beheben können. Ziehen
Sie hierzu nachstehendes Verzeichnis zu Rate.
Störungen:
Der Waschvollautomat schaltet sich
nicht ein.
Der Waschgang startet nicht.
Der Waschvollautomat lädt kein
Wasser
(auf dem Display wird die
Meldung "WASSERZULAUF
PRÜFEN" eingeblendet).
Der Waschvollautomat lädt laufend
Wasser und pumpt es laufend ab.
Der Waschvollautomat pumpt nicht
ab und schleudert nicht.
Der Waschvollautomat vibriert zu
stark während des Schleuderns.
Der Waschvollautomat ist undicht.
Das Gerät ist blockiert, das Display
blinkt und zeigt einen Fehlercode
an (zum Beispiel: F-01, F-..).
Es bildet sich zu viel Schaum.
Mögliche Ursachen / Lösungen:
Der Stecker steckt nicht in der Steckdose, oder nicht so, dass der Kontakt
hergestellt wird.
Der Strom ist ausgefallen.
Die Gerätetür ist nicht richtig verschlossen.
Die EIN/AUS-Taste wurde nicht gedrückt.
Die Taste START/PAUSE wurde nicht gedrückt.
Der Wasserhahn ist nicht aufgedreht.
Es wurde ein verzögerter Start gewählt (siehe
Durchführung eines Waschprogramms).
Der Zufuhrschlauch ist nicht am Wasserhahn angeschlossen.
Der Schlauch ist geknickt.
Der Wasserhahn ist nicht aufgedreht.
Es ist kein Wasser da.
Der Druck ist unzureichend.
Die Taste START/PAUSE wurde nicht gedrückt.
Der Ablaufschlauch befindet sich nicht auf der vorgeschriebenen Höhe, d.h. 65 100 cm
vom Boden (siehe Installation).
Das Schlauchende liegt unter Wasser (siehe Installation).
Der Abfluss der Hausinstallation wurde nicht mit einer Entlüftungsöffnung versehen.
Konnte die Störung durch diese Kontrollen nicht behoben werden, dann drehen Sie den
Wasserhahn zu, schalten das Gerät aus und fordern den Kundendienst an. Falls Sie in
einer der obersten Etagen eines Gebäudes wohnen, kann es vorkommen, dass sich im
Syphon ein Vakuum bildet, und der Waschvollautomat ständig Wasser ansaugt und
wieder abpumpt. Zur Lösung dieser Probleme bietet der Handel spezielle Syphonventile.
Das Programm siehe kein Abpumpen vor: Bei einigen Programmen muss es
von Hand eingestellt werden (siehe
Programme und Funktionen).
Die Funktion Leichtbügeln wurde aktiviert: zur Beendung des Programms
Taste START/PAUSE drücken (siehe
Programme und Funktionen).
Der Ablaufschlauch ist geknickt (siehe Installation).
Die Ablaufleitung ist verstopft.
Die Trommel wurde bei der Installation nicht korrekt befreit (siehe Installation).
Der Waschvollautomat steht nicht eben (siehe Installation).
Der Waschvollautomat steht zu eng zwischen der Wand und einem Möbel
(siehe Installation).
Der Zulaufschlauch wurde nicht ordnungsgemäß aufgeschraubt (siehe Installation).
Die Waschmittelschublade ist verstopft (zur Reinigung siehe Wartung und Pflege).
Der Ablaufschlauch ist nicht korrekt befestigt (siehe Installation).
Schalten Sie das Gerät aus und ziehen Sie den Netzstecker; warten Sie
daraufhin ca. 1 Minute und schalten Sie es wieder ein.
Bleibt die Störung bestehen, kontaktieren Sie bitte den Kundendienst.
Das Waschmittel ist für Waschmaschinen nicht geeignet (es muss mit der Aufschrift
Für Waschmaschinen, Für Handwäsche und Waschmaschinen usw. versehen sein.
Es wurde zu hoch dosiert.
48
DE
Kundendienst
Bevor Sie sich an den Kundendienst wenden:
Sollten einige Kontrollen vorab selbst durchgeführt werden (siehe Störungen und Abhilfe);
Starten Sie daraufhin das Programm erneut, um sicherzustellen, dass die Störung auch wirklich behoben
wurde;
Ist dies nicht der Fall, dann kontaktieren Sie den autorisierten Kundendienst unter der auf dem
Garantieschein befindlichen Telefonnummer.
Wenden Sie sich auf keinen Fall an nicht autorisierte Techniker.
Geben Sie bitte Folgendes an:
die Art der Störung;
das Maschinenmodell (Mod.);
die Seriennummer (S/N).
Diese Daten entnehmen Sie bitte dem auf der Rückseite der Maschine befindlichen Typenschild.
ES
49
Español
Sumario
Instalación, 50-51
Desembalaje y nivelación
Conexiones hidráulicas y eléctricas
Primer ciclo de lavado
Datos técnicos
Descripción de la lavadora, 52-53
Panel de control
Pantalla
Cómo abrir y cerrar el cesto
Cómo efectuar un ciclo de lavado, 54
Sistema de equilibrado de la carga
Programas y funciones, 55
Tabla de programas
Funciones de lavado
Detergentes y ropa, 56
Contenedor de detergentes
Preparar la ropa
Programas particulares
Precauciones y consejos, 57
Seguridad general
Eliminaciones
Ahorrar y respetar el ambiente
Mantenimiento y cuidados, 58
Excluir agua y corriente eléctrica
Limpiar la lavadora
Cuidar la puerta y el cesto
Limpiar la bomba
Controlar el tubo de alimentación de agua
Cómo limpiar la cubeta de detergente
Anomalías y soluciones, 59
Asistencia, 60
ES
ARTXD 149
Manual de instrucciones
LAVADORA
50
ES
Instalación
Es importante conservar este manual para poder
consultarlo en cualquier momento. En caso de venta,
de cesión o de traslado, verifique que permanezca
junto con la lavadora para informar al nuevo propieta-
rio sobre el funcionamiento y brindar las correspon-
dientes advertencias.
Lea atentamente las instrucciones: ellas contienen
importante información sobre la instalación, el uso y la
seguridad.
Desembalaje y nivelación
Desembalaje
1. Desembale la
lavadora.
2. Controle que la
lavadora no haya sufrido
daños durante el
transporte. Si estuviera
dañada no la conecte y
llame al revendedor.
3. Quite los cuatro
tornillos de protección
para el transporte y la
arandela de goma con
el correspondiente
distanciador, ubicados
en la parte posterior
(ver la figura).
4. Cierre los orificios con los tapones de plástico
suministrados con el aparato.
5. Conserve todas las piezas: cuando la lavadora deba ser
transportada nuevamente, deberán volver a colocarse.
Atención: si vuelve a utilizar los tornillos más cortos,
se deben colocar arriba.
Los embalajes no son juguetes para los niños.
Nivelación
1. Instale la lavadora sobre un piso plano y rígido, sin
apoyarla en las paredes, muebles ni en ningún otro aparato.
2. Si el piso no está
perfectamente horizontal,
compense las irregularida-
des desenroscando o
enroscando los pies
delanteros (véase la
figura); el ángulo de
inclinación medido sobre la
superficie de trabajo, no
debe superar los 2º.
Una cuidadosa nivelación brinda estabilidad a la
máquina y evita vibraciones, ruidos y desplazamientos
durante el funcionamiento.
Cuando se instala sobre moquetas o alfombras,
regule los pies para conservar debajo de la lavadora
un espacio suficiente para la ventilación.
Instalación, desplazamientos
Si su lavadora està
dotada de un carro
especial con ruedas
retráctiles, se facilitarà
su desplazamiento.
Para hacer descender
este carro y poder
moverla sin esfuerzo, es
necesario tirar la
palanca, situada abajo a
la izquierda, debajo del
zócalo. Finalizado el
desplazamiento es necesario devolverla a su posición
inicial. A partir de ese momento, la máquina está
sólidamente colocada.
Conexiones hidráulicas y eléctricas
Conexión del tubo de alimentación de agua
1. Conectar el tubo de
tubo enroscándolo a un
grifo de agua fría con la
boca roscada de 3/4 gas
(ver la figura).
Antes de conectarlo,
haga correr el agua hasta
que esté límpida.
2. Conecte el tubo de
alimentación a la lavado-
ra enroscándolo en la
toma de agua correspon-
diente ubicada en la
parte posterior arriba y a
la derecha (véase la
figura).
3. Verifique que el tubo
no tenga pliegues ni
estrangulaciones.
La presión de agua del grifo debe estar comprendida
dentro de los valores contenidos en la tabla de Datos
técnicos (ver la página del costado).
Si la longitud del tubo de alimentación no fuera
suficiente, diríjase a una tienda especializada o a un
técnico autorizado.
No utilice nunca tubos ya usados.
ES
51
65 - 100 cm
Conexión del tubo de descarga
Conecte el tubo de
descarga, sin plegarlo, a
una tubería de descarga
o a una descarga de
pared colocadas a una
altura del piso entre 65 y
100 cm;
o apóyelo en el borde de
un lavamanos o de una
bañera, uniendo la guía
suministrada con el
aparato, al grifo (ver la
figura). El extremo libre
del tubo de descarga no
debe permanecer
sumergido en el agua.
No se aconseja utilizar tubos de prolongación, si
fuera indispensable hacerlo, la prolongación debe
tener el mismo diámetro del tubo original y no superar
los 150 cm.
Conexión eléctrica
Antes de enchufar el aparato, verifique que:
la toma tenga la conexión a tierra y haya sido
hecha según las normas legales;
la toma sea capaz de soportar la carga máxima de
potencia de la máquina indicada en la tabla de
Datos técnicos (ver al costado);
la tensión de alimentación esté comprendida dentro
de los valores indicados en la tabla de Datos
técnicos (ver al costado);
la toma sea compatible con el enchufe de la
lavadora. Si no es así, sustituya la toma o el
enchufe.
La lavadora no debe ser instalada al aire libre, ni
siquiera si el lugar está reparado, ya que es muy
peligroso dejarla expuesta a la lluvia o a las
tormentas.
Una vez instalada la lavadora, la toma de corriente
debe ser fácilmente accesible.
No utilice prolongaciones ni conexiones múltiples.
El cable no debe estar plegado ni sufrir
compresiones.
El cable de alimentación debe ser sustituido sólo
por técnicos autorizados.
¡Atención! La empresa fabricante declina toda
responsabilidad en caso de que estas normas no
sean respetadas.
Primer ciclo de lavado
Después de la instalación y antes del uso, realice un
ciclo de lavado con detergente y sin ropa,
seleccionando el programa
.
Datos técnicos
Modelo
ARTXD 149
Dimensiones
ancho 40 cm.
altura 85 cm.
profundidad 60 cm.
Capacidad
de 1 a 6 kg.
Conexiones
eléctricas
ver la placa de características
técnicas aplicada en la máquina
Conexiones
hídricas
presión máxima 1 MPa (10 bar)
presión mínima 0,05 MPa (0,5 bar)
capacidad del cesto 42 litros
Velocidad de
centrifugado
máxima 1400 r.p.m.
Programas de
prueba según la
directiva
1061/2010
programa (90°C); temperatura
60ºC y 40°; (Pulse el botón
TEMPERATURA).
Esta máquina cumple con lo
establecido por las siguientes
Directivas de la Comunidad:
- 2004/108/CE (Compatibilidad
Electromagnética)
- 2002/96/CE
- 2006/95/CE (Baja Tensión)
52
ES
Panel de control
Botón con piloto
PUESTA
EN MARCHA/PAUSA
Botón
TEMPERATURA
Botones
SELECTOR DE
PROGRAMAS
Botones
FUNCIÓN
Botón de
ENCENDIDO/
APAGADO
Botón
CENTRIFUGADO
Botón
BLOQUEO DE
BOTONES
PANTALLA
Botón
COMIENZO
RETRASADO
Botón
MEMORIA
Botón ENCENDIDO/APAGADO : presione breve-
mente el botón para encender o apagar la máquina.
El piloto PUESTA EN MARCHA/PAUSA que centellea
lentamente de color verde indica que la máquina está
encendida. Para apagar la lavadora durante el lavado,
es necesario mantener presionado el botón durante
más tiempo, aproximadamente 2 seg.; si se presiona
en forma más breve o accidental, la máquina no se
apagará. Si la máquina se apaga durante un lavado
en curso, dicho lavado se anulará.
Botones SELECTOR DE PROGRAMAS: para
seleccionar el programa deseado (ver "Tabla de
programas").
Botón MEMORIA: mantenga presionado el botón
para memorizar un ciclo y las personalizaciones
deseadas. Para llamar un ciclo precedentemente
memorizado, presione el botón MEMO.
Botones FUNCIÓN:presione el botón para
seleccionar la función deseada. En la pantalla se
iluminará el piloto correspondiente.
Botón CENTRIFUGADO
: presiónelo para disminuir
o excluir totalmente el centrifugado - el valor se indica
en la pantalla.
Botón TEMPERATURA
: presiónelo para disminuir
la temperatura: el valor se indica en la pantalla.
Botón BLOQUEO DE BOTONES
: para activar el
bloqueo del panel de control, mantenga presionado el
botón durante 2 segundos aproximadamente. El
símbolo
encendido indica que el panel de control
está bloqueado. De este modo, se evitan
modificaciones accidentales de los programas, sobre
todo si en la casa hay niños. Para desactivar el
bloqueo del panel de control, mantenga presionado el
botón durante 2 segundos aproximadamente.
Botón COMIENZO RETRASADO
: presiónelo
para seleccionar el comienzo retrasado del programa
elegido. El retraso se indicará en la pantalla.
Botón con piloto PUESTA EN MARCHA/PAUSA:
cuando el piloto verde centellea lentamente, presione
el botón para que comience el lavado. Una vez que el
ciclo ha comenzado, el piloto se mantiene fijo. Para
poner en pausa el lavado, presione nuevamente el
botón; el piloto centelleará con un color anaranjado.
Si el símbolo
no está iluminado, se podrá abrir la
puerta. Para que el lavado se reanude a partir del
momento en el cual fue interrumpido, presione
nuevamente el botón.
Modalidad de stand by
Esta lavasecadora está en conformidad con las
nuevas normativas vinculadas al ahorro energético.
Está dotada de un sistema de auto-apagado
(stand by) que, en caso de no funcionamiento, se
activa pasados aproximadamente 30 minutos.
Presionar brevemente el botón ENCENDIDO/
APAGADO y esperar que la máquina se active.
Descripción de la lavadora
ES
53
Cómo abrir y cerrar el cesto
Fig. 1
Fig. 2
Fig. 3
Fig. 4
A) Abertura (Fig. 1):
Levante la tapa externa y ábrala
completamente.
B) Abertura del cesto (Soft opening):
Pulse el botón indicado en la fig. 2 con un dedo y
el cesto se abrirá delicadamente.
C) IntroduccIón de la ropa (Fig. 3).
D) Cierre (Fig. 4):
- cierre bien el cesto bajando primero la puerta
delantera y apoyando luego la posterior;
- luego verifique que los ganchos de la puerta
delantera estén perfectamente alojados en la sede
de la puerta posterior;
- después de haber escuchado el "clac" correspondiente
al enganche, ejerza una leve presión hacia abajo sobre
ambas puertas que no se deben desenganchar;
- por último cierre la tapa externa.
E) Parada final del cesto (Fig. 2):
Al final del lavado el cesto se colocarà con las
puertas hacia arriba para su fàcil apertura
La pantalla es útil para programar la máquina y brinda
múltiple información.
En las dos series superiores A y B se visualizan el
programa de lavado seleccionado, la fase de lavado
en curso y todas las indicaciones correspondientes al
estado de avance del programa.
En la serie C se visualiza el tiempo que falta para que
finalice el ciclo de lavado en curso y, si se hubiera
fijado un COMIENZO RETRASADO, el tiempo que
falta para que comience el programa seleccionado.
En la serie D se visualiza el valor máximo de
velocidad de centrifugado que la máquina puede
desarrollar según el programa seleccionado; si el
programa no prevé el centrifugado, la serie
permanece apagada.
En la serie E se visualiza el valor máximo de tempera-
tura que se puede fijar según el programa
seleccionado; si el programa no prevé la selección de
temperatura, la serie permanece apagada.
Las series F corresponden a las funciones y se
encienden cuando la función seleccionada es
compatible con el programa elegido.
Símbolo Puerta bloqueada
El símbolo encendido indica que la puerta está
bloqueada para impedir aperturas accidentales. Para
evitar daños, se debe esperar que el símbolo se
apague, antes de abrir la puerta (la espera es de
aproximadamente 3 minutos).
Nota: si la función COMIENZO RETRASADO está
activada, la puerta no se puede abrir, para abrirla se
debe poner en pausa la máquina presionando el
botón PUESTA EN MARCHA/PAUSA.
La primera vez que se enciende, se solicitará la
elección del idioma y, para ello, la pantalla entrará
automáticamente en el menú de selección de idioma.
Pantalla
A
B
C
D
E
F
Para elegir el idioma deseado, presione los botones
TEMPERATURA y CENTRIFUGADO, para confirmar la
elección, presione el botón BLOQUEO DE
BOTONES.
Si se desea seleccionar otro idioma, apagar la
máquina, presione simultáneamente los botones
BLOQUEO DE BOTONES + TEMPERATURA +
CENTRIFUGADO durante 5 segundos, luego repita
las operaciones indicadas precedentemente.
54
ES
Cómo efectuar un ciclo de
lavado
1. ENCENDER LA MÁQUINA.Presione el botón ,
en la pantalla aparecerá la palabra BIENVENIDO;
el piloto PUESTA EN MARCHA/PAUSA centelleará
lentamente de color verde.
2. CARGAR LA ROPA. Abra la puerta. Cargue la ropa,
cuidando no superar la cantidad de carga indicada en
la tabla de programas de la página siguiente.
3. DOSIFICAR EL DETERGENTE. Vierta el
detergente en las cubetas correspondientes como
se explica en "Detergentes y ropa".
4. CERRAR LA PUERTA.
5. ELEGIR EL PROGRAMA. Presione uno de los
botones del SELECTOR DE PROGRAMAS para
seleccionar el programa deseado; el nombre del
programa aparecerá en la pantalla; a dicho
programa se le asociará una temperatura y una
velocidad de centrifugado que se pueden modificar.
En la pantalla aparecerá la duración del ciclo.
6. PERSONALIZAR EL CICLO DE LAVADO. Utilice
los botones correspondientes:
Modificar la temperatura y/o el
centrifugado.La máquina selecciona
automáticamente la temperatura y el centrifugado
máximos previstos para el programa seleccionado y,
por lo tanto, no se pueden aumentar. Presionando el
botón
se disminuye progresivamente la
temperatura hasta llegar al lavado en frío "OFF".
Presionando el botón
se disminuye
progresivamente el centrifugado hasta su exclusión
"OFF". Si se presionan una vez más los botones, se
volverá a los valores máximos previstos.
Seleccionar un comienzo retrasado.
Para seleccionar el comienzo retrasado del
programa elegido, presione el botón
correspondiente hasta alcanzar el tiempo de
retraso deseado. Cuando dicha opción está
activada, en la pantalla aparece el símbolo
.
Para eliminar el comienzo retrasado, presione el
botón hasta que aparezca el mensaje OFF.
Modificar las características
del ciclo.
Presione el botón para activar la función; el
piloto correspondiente al botón se encenderá.
Presione nuevamente el botón para desactivar
la función; el piloto se apagará.
Si la función seleccionada no es compatible con
el programa elegido, el piloto centelleará y la
función no se activará.
Si la función elegida no es compatible con otra
seleccionada precedentemente, el piloto
correspondiente a la primera función seleccionada
centelleará y se activará sólo la segunda, el piloto
de la función activada se iluminará.
Las funciones pueden variar la carga
recomendada y/o la duración del ciclo.
7. PONER EN MARCHA EL PROGRAMA. Presione
el botón PUESTA EN MARCHA/PAUSA. El piloto
correspondiente se iluminará de color verde fijo y la
puerta se bloqueará (símbolo PUERTA
BLOQUEADA
encendido). Durante el lavado,
en la pantalla aparecerá el nombre de la fase en
curso. Para cambiar un programa mientras un ciclo
está en curso, ponga la lavadora en pausa
presionando el botón PUESTA EN MARCHA/PAUSA
(el piloto PUESTA EN MARCHA/PAUSA centelleará
lentamente de color anaranjado); luego seleccione
el ciclo deseado y presione nuevamente el botón
PUESTA EN MARCHA/PAUSA.
Para abrir la puerta mientras un ciclo está en
curso, presione el botón PUESTA EN MARCHA/
PAUSA; si el símbolo PUERTA BLOQUEADA
está apagado, será posible abrir la puerta. Presione
nuevamente el botón PUESTA EN MARCHA/
PAUSA para reanudar el programa a partir del
momento en el que se había interrumpido.
8. FIN DEL PROGRAMA.En la pantalla aparecerá el
mensaje "FIN DEL CICLO", cuando el símbolo
PUERTA BLOQUEADA
se apague, será posible
abrir la puerta. Abra la puerta, descargue la ropa y
apague la máquina.
Si desea anular un ciclo que ya ha comenzado,
presione más tiempo el botón
. El ciclo se
interrumpirá y la máquina se apagará.
Sistema de equilibrado de la carga
Antes de cada centrifugado, para evitar vibraciones
excesivas y para distribuir la carga de modo uniforme,
el cesto realiza rotaciones a una velocidad
ligeramente superior a la del lavado. Si después de
varios intentos, la carga todavía no está
correctamente equilibrada, la máquina realiza el
centrifugado a una velocidad inferior a la prevista.
Cuando existe un excesivo desequilibrio, la lavadora
realiza la distribución antes que el centrifugado. Para
obtener una mejor distribución de la carga y su
correcto equilibrado, se aconseja mezclar prendas
grandes y pequeñas.
ES
55
Programas y funciones
Descripción del Programa
Te m p .
max.
(°C)
Velocidad
máx.
(r.p.m.)
Detergentes
Carga
máx.
(Kg.)
Duración
del ciclo
Prela-
vado
Blanque-
ador
Lavado
Suavi-
zante
Programas para todos los días
Algodón (1-2) :
blancos extremadamente sucios.
90°1400
llll
6
Algodón :
blancos y colores resistentes muy sucios.
60°1400
llll
6
Algodón (3) :
blancos y colores delicados muy sucios.
40°1400
llll
6
Sintético resistente
(1° presión del botón)
:
colores resistentes muy sucios.
60°800
llll
2,5
Sintético resistente (4)
(1° presión del botón)
:
colores resistentes muy sucios.
40°800
llll
2,5
Sintético delicado
(2° presión del botón)
:
colores resistentes poco sucios.
40°800
llll
2,5
Mix 30'
(1° presión del botón)
:
para refrescar rápidamente prendas poco sucias
(no se aconseja utilizarlo para lana, seda y prendas para lavar a mano).
30°800--
ll
3
Mix 15'
(2° presión del botón)
:
para refrescar rápidamente prendas poco sucias
(no se aconseja utilizarlo para lana, seda y prendas para lavar a mano).
30°800--
ll
1,5
Programas Especiales/ Memo
Baby:
colores delicados muy sucios.
40°800-
lll
2
Memoria:
permite memorizar cualquier tipo de lavado.
Seda/Cortinas:
para prendas de seda, viscosa, lencería.
30°0--
ll
1
Lana:
para lana, cachemira, etc.
40°800--
ll
1
Programas Parciales
Centrifugado Rápido
(1° presión del botón)
-1400----6
Centrifugado Delicado
(2° presión del botón)
-800----2,5
Aclarado Algodón
(1° presión del botón)
-1400-
l
-
l
6
Descarga
(2° presión del botón)
-0----6
Tabla de programas
Se puede controlar la duración de los programas de
lavado en la pantalla.
Programas
M
Funciones de lavado
Antimancha
Esta función es útil para eliminar las manchas más resistentes.
Para relizar sólo el
blanqueo, vierta el
blanqueador en la cubeta
4, seleccione el programa
"Aclarado" y active la
función "Antimancha".
Para blanquear durante el
lavado, vierta el
detergente y los aditivos,
seleccione el programa
deseado y active la
función "Antimancha".
No se puede activar con los programas , , ,
y Descarga.
Prelavado
Seleccionando esta función, se realiza el prelavado,
muy útil para eliminar manchas difíciles.
Nota: agregue el detergente en el compartimento
correspondiente.
No se puede activar con los programas , , , ,
, .
Aclarado Extra
Al elegir esta opción aumentará la eficacia del aclarado y
se asegurará la máxima eliminación del detergente. Es
útil para pieles particularmente sensibles.
No se puede activar con los programas , y
Descarga.
Fácil Planchado
Cuando se selecciona esta función, el lavado y el
centrifugado se modificarán oportunamente para
disminuir la formación de arrugas. En los programas
la máquina finalizará el ciclo con la ropa en remojo, el
indicador de la función FÁCIL PLANCHADO y la de
PUESTA EN MARCHA/PAUSA centellearán (naranja) y
el mensaje "DETENER CON AGUA" aparecerá en la
pantalla. Para descargar el agua y poder sacar la ropa,
es necesario presionar el botón PUESTA EN MARCHA/
PAUSA o el botón FÁCIL PLANCHADO.
No se puede activar con los programas , , ,
y Descarga.
Rápido
Para disminuir la duración del lavado y al mismo
tiempo garantizar un ahorro de agua y energía.
No se puede activar con los programas , , ,
,, .
La duración del ciclo que se indica en el visor o en el manual es una estimación calculada en base a condiciones estándar. El tiempo efectivo puede variar en función de numerosos factores como la
temperatura y la presión del agua de entrada, la temperatura ambiente, la cantidad de detergente, la cantidad y el tipo de carga, el equilibrado de la carga y las opciones adicionales seleccionadas.
Para todos los Test Institutes:
(1) Programa de control según la directiva 1061/2010: seleccione el
programa (90°C); temperatura 60ºC y 40°C (Pulse el botón TEMPERATURA).
(2)
Programa algodón largo:
seleccione el
programa (90°C); temperatura 40ºC (Pulse el botón TEMPERATURA).
(3)
Programa algodón corto:
seleccione el
programa (40°C).
(4)
Programa sintético largo:
seleccione el
programa (1° presión del botón); temperatura 40ºC (Pulse el botón TEMPERATURA).
56
ES
Detergentes y ropa
Cajón de detergentes
El buen resultado del lavado depende también de la
correcta dosificación del detergente: si se excede la
cantidad, no se lava de manera más eficaz, sino que
se contribuye a encostrar las partes internas de la
lavadora y a contaminar el ambiente.
Extraiga el cajón de
detergentes e introduz-
ca el detergente o el
aditivo de la siguiente
manera:
cubeta 1: Detergente para prelavado (en polvo)
cubeta 2: Detergente para lavado
(en polvo o líquido)
El detergente líquido es conveniente colocarlo directa-
mente en la cuba utilizando la correspondiente bola
de dosificación.
cubeta 3: Aditivos (suavizante, etc.)
Cuando vierta el suavizante en el compartimiento 3,
tenga cuidado de no superar el nivel "max" indicado.
El suavizante se introduce automáticamente
en la máquina durante el último aclarado. Al finalizar
el programa de lavado, en el compartimiento 3
permanece una cantidad residual de agua. La función
de la misma es la introducción de suavizantes muy
densos o diluir a aquellos concentrados. Si en el
compartimiento 3 permaneciera más agua de la
normal, esto significa que el dispositivo de vaciado
está obstruido. Para la limpieza, véase
Mantenimiento y cuidados.
cubeta 4: Blanqueador
Preparar la ropa
Subdivida la ropa según:
- el tipo de tejido / el símbolo en la etiqueta.
- los colores: separe las prendas de color y las
blancas.
Vacíe los bolsillos y controle los botones.
No supere los valores indicados, referidos al peso
de la ropa seca:
Tejidos resistentes: max 6 kg.
Tejidos sintéticos: max 2,5 kg.
Tejidos delicados: max 2 kg.
Lana: max 1 kg.
Seda: max 1 kg
¿Cuánto pesa la ropa?
1 sábana 400/500 g
1 funda 150/200 g
1 mantel 400/500 g
1 albornoz 900/1200 g
1 toalla 150/250 g
Programas particulares
Mix 30': fue estudiado para lavar prendas ligeramente
sucias y en poco tiempo: dura sólo 30 minutos y de
esa manera permite ahorrar energía y tiempo.
Seleccionando el programa (
a 30ºC) es posible lavar
conjuntamente tejidos de distinto tipo (excluidas lana y
seda), con una carga máxima de 3 kg.
Mix 15': fue estudiado para lavar prendas ligeramente
sucias y en poco tiempo: dura sólo 15 minutos y de
esa manera permite ahorrar energía y tiempo.
Seleccionando el programa (
a 30ºC) es posible lavar
conjuntamente tejidos de distinto tipo (excluidas lana y
seda), con una carga máxima de 1,5 kg.
Baby: programa capaz de eliminar la suciedad
característica de los niños pero garantizando la
eliminación del detergente de las prendas para evitar
problemas de alergia en la piel delicada de los niños.
El ciclo
ha sido estudiado para disminuir la carga
bacteriana utilizando una mayor cantidad de agua y
optimizando el efecto de aditivos específicos
higienizantes agregados al detergente.
Seda: utilice el programa correspondiente
para
lavar todas las prendas de seda. Se aconseja el uso
de un detergente específico para prendas delicadas.
Cortinas:pliéguelas y colóquelas dentro de una
funda o de una bolsa de red. Utilice el programa
.
Lana: es la única lavadora que ha obtenido el
prestigioso reconocimiento Woolmark Platinum Care
(M.0508) otorgado por The Woolmark Company que
certifica el lavado en lavadora de todas las prendas de
lana, incluidas aquellas que contienen la etiqueta sólo
lavado a mano
. En consecuencia, con el
programa
se puede utilizar la lavadora con total
tranquilidad para lavar todas sus prendas de lana (máx.
1 kg) garantizando la obtención de los mejores
resultados.
ES
57
Precauciones y consejos
La lavadora fue proyectada y fabricada en
conformidad con las normas internacionales de
seguridad. Estas advertencias se suministran por
razones de seguridad y deben ser leídas
atentamente.
Seguridad general
Este aparato ha sido fabricado para un uso de tipo
doméstico exclusivamente.
El aparato no debe ser empleado por personas
(niños incluidos) con capacidades físicas,
sensoriales o mentales reducidas y con
experiencias y conocimientos insuficientes, a menos
que dicho uso no se realice bajo la supervisión o las
instrucciones de una persona responsable de su
seguridad. Los niños deben ser vigilados para
asegurarse que no jueguen con el aparato.
La lavadora debe ser utilizada sólo por personas
adultas y siguiendo las instrucciones contenidas en
este manual.
No toque la máquina con los pies desnudos ni con
las manos o los pies mojados o húmedos.
No desenchufe la máquina tirando el cable, sino
tomando el enchufe.
No toque el agua de descarga porque puede
alcanzar temperaturas elevadas.
En ningún caso fuerce la puerta: podría dañarse el
mecanismo de seguridad que la protege de
aperturas accidentales.
En caso de avería, no acceda nunca a los
mecanismos internos para intentar una reparación.
Controle siempre que los niños no se acerquen a la
máquina cuando está en funcionamiento.
Si debe ser trasladada, deberán intervenir dos o
más personas, procediendo con el máximo
cuidado. La máquina no debe ser desplazada
nunca por una sola persona ya que es muy pesada.
Antes de introducir la ropa controle que el cesto
esté vacío.
Eliminaciones
Eliminación del material de embalaje: respete las
normas locales, de ese modo, los embalajes podrán
volver a ser utilizados.
En base a la Norma europea 2002/96/CE de
Residuos de aparatos Eléctricos y Electrónicos, los
electrodomésticos viejos no pueden ser arrojados
en los contenedores municipales habituales; tienen
que ser recogidos selectivamente para optimizar la
recuperación y reciclado de los componentes y
materiales que los constituyen, y reducir el impacto
en la salud humana y el medioambiente.
El símbolo del cubo de basura tachado se marca
sobre todos los productos para recordar al
consumidor la obligación de separarlos para la
recogida selectiva. El consumidor debe contactar
con la autoridad local o con el vendedor para
informarse en relación a la correcta eleminación de
su electrodoméstico viejo.
Ahorrar y respetar el medio ambiente
Tecnología a servicio del medio ambiente:
ahorrar detergente, agua, energía y tiempo
Para no derrochar recursos es necesario utilizar la
lavadora con la máxima carga. Una carga comple-
ta en lugar de dos medias cargas permite ahorrar
hasta el 50% de energía.
El prelavado es necesario sólo para ropa muy
sucia. Evitarlo permite ahorrar detergente, tiempo,
agua y entre el 5 y el 15% de energía.
Tratar las manchas con un quitamanchas o dejarlas
en remojo antes del lavado, disminuye la necesidad
de lavar a altas temperaturas. Un programa a 60ºC
en vez de 90ºC o uno a 40ºC en vez de 60ºC,
permite ahorrar hasta un 50% de energía.
Dosificar bien el detergente en base a la dureza del
agua, al grado de suciedad y a la cantidad de ropa
evita derroches y protege el ambiente: aún siendo
biodegradables, los detergentes contienen elemen-
tos que alteran el equilibrio de la naturaleza.
Además, si es posible, evite utilizar el suavizante.
Realizando los lavados desde el atardecer hasta las
primeras horas de la mañana se colabora para
reducir la carga de absorción de las empresas
eléctricas.
La opción COMIENZO RETRASADO ayuda
mucho a organizar los lavados en ese sentido.
Si el lavado debe ser secado en una secadora,
seleccione una velocidad de centrifugado alta.
Poca agua en el lavado, permite ahorrar tiempo y
energía en el programa de secado.
58
ES
Mantenimiento y cuidados
Excluir agua y corriente eléctrica
Cierre el grifo de agua después de cada lavado. De
este modo se limita el desgaste de la instalación
hidráulica de la lavadora y se elimina el peligro de
pérdidas.
Desenchufe la máquina cuando la deba limpiar y
durante los trabajos de mantenimiento.
Limpiar la lavadora
La parte externa y las partes de goma se pueden
limpiar con un paño embebido en agua tibia y jabón.
No use solventes ni productos abrasivos.
Cuidar la puerta y el cesto
Deje siempre semicerrada la puerta para evitar
que se formen malos olores.
Limpiar la bomba
La lavadora posee una bomba autolimpiante que no
necesita mantenimiento. Pero puede suceder que
objetos pequeños (monedas, botones) caigan en la
precámara que protege la bomba, situada en la parte
inferior de la misma.
Verifique que el ciclo de lavado haya terminado y
desenchufe la máquina.
Para recuperar los
objetos caídos en la
precámara:
1. quite el zócalo
ubicado en la parte
inferior delantera de la
lavadora tirando de los
costados con las
manos (ver la figura);
2. desenrosque la tapa
girándola en sentido
antihorario (ver la
figura); es normal que
se vuelque un poco de
agua;
3. limpie con cuidado el
interior;
4. vuelva a enroscar la
tapa;
5. vuelva a montar el
panel verificando, antes
de empujarlo hacia la
máquina, que los
ganchos se hayan introducido en las
correspondientes ranuras.
Controle el tubo de alimentación de agua
Controle el tubo de alimentación al menos una vez al
año. Si presenta grietas o rozaduras se debe sustituir:
durante los lavados, las fuertes presiones podrían
provocar roturas imprevistas.
No utilice nunca tubos ya usados.
Cómo limpiar la cubeta de detergente
Reinstalación:
No olvide volver a introducir
el par de sifones en sus
correspondientes alojamien-
tos y por último volver a colo-
car la cubeta en su lugar,
enganchándola (fig. 4, 2, 1).
Desmontaje:
Ejerza una ligera presión
sobre el botón grande en
la parte delantera de la
cubeta de detergente y
tírelo hacia arriba (fig. 1, 2).
Limpieza:
Limpie luego la cubeta bajo el grifo (fig. 3) utilizando un
viejo cepillo de dientes y, una vez extraído el par de sifones
ubicados en la parte superior de los compartimientos 1 y
2 (fig. 4), controle que los mismos no estén obstruidos y
enjuáguelos.
Fig. 1Fig. 2
Fig. 3
Fig. 4
ES
59
Anomalías y soluciones
Puede suceder que la lavadora no funcione. Antes de llamar al Servicio de Asistencia Técnica
(ver Asistencia),controle que no se trate de un problema de fácil solución utilizando la siguiente lista.
Anomalías:
La lavadora no se enciende.
El ciclo de lavado no comienza.
La lavadora no carga agua (En la
pantalla aparecerá el mensaje
"Sin agua, revisar suministro").
La lavadora carga y descarga
agua continuamente.
La lavadora no descarga o no
centrifuga.
La lavadora vibra mucho durante
la centrifugación.
La lavadora pierde agua.
La máquina está bloqueada, la
pantalla centellea e indica un código
de anomalía (por ej.: F-01, F-..).
Se forma demasiada espuma.
Posibles causas / Solución:
El enchufe no está introducido en la toma de corriente, o no hace contacto.
En la casa no hay corriente.
La puerta no está bien cerrada.
El botón ENCENDIDO/APAGADO no ha sido presionado.
El botón PUESTA EN MARCHA/PAUSA no ha sido presionado.
El grifo de agua no está abierto.
Se fijó un retraso de la hora de puesta en marcha (ver Cómo efectuar un
ciclo de lavado).
El tubo de alimentación de agua no está conectado al grifo.
El tubo está plegado.
El grifo de agua no está abierto.
En la casa no hay agua.
No hay suficiente presión.
El botón PUESTA EN MARCHA/PAUSA no ha sido presionado.
El tubo de descarga no está instalado entre los 65 y 100 cm. del suelo (ver Instalación).
El extremo del tubo de descarga está sumergido en el agua (ver Instalación).
La descarga de pared no posee un respiradero.
Si después de estas verificaciones, el problema no se resuelve, cierre el grifo
de agua, apague la lavadora y llame a la Asistencia. Si la vivienda se
encuentra en uno de los últimos pisos de un edificio, es posible que se
verifiquen fenómenos de sifonaje, por ello la lavadora carga y descarga agua
de modo continuo. Para eliminar este inconveniente se encuentran
disponibles en el comercio válvulas especiales que permiten evitar el sifonaje.
El programa no prevé la descarga: con algunos programas es necesario
ponerla en marcha manualmente (Programas y funciones).
Se puede utilizar la función FÁCIL PLANCHADO: para completar el programa,
pulse el botón PUESTA EN MARCHA/PAUSA (Programas y funciones).
El tubo de descarga está plegado (ver Instalación).
El conducto de descarga está obstruido.
El cesto, en el momento de la instalación, no fue desbloqueado
correctamente (ver Instalación).
La máquina no está instalada en un lugar plano (ver Instalación).
Existe muy poco espacio entre la máquina, los muebles y la pared (ver
Instalación).
El tubo de alimentación de agua no está bien enroscado (ver Instalación).
El contenedor de detergentes está obstruido (para limpiarlo ver
Mantenimiento y cuidados).
El tubo de descarga no está bien fijado (ver Instalación).
Apague la máquina y desenchúfela, espere aproximadamente 1 minuto
y luego vuelva a encenderla.
Si la anomalía persiste, llame al Servicio de Asistencia Técnica.
El detergente no es específico para la lavadora (debe contener algunas
de las frases para lavadora, a mano o en lavadora o similares).
La dosificación fue excesiva.
60
ES
Asistencia
Antes de llamar al Servicio de Asistencia Técnica:
Verifique si la anomalía la puede resolver Ud. solo (ver Anomalías y soluciones);
Vuelva a poner en marcha el programa para controlar si el inconveniente fue resuelto;
Si no es así, llame al Servicio de Asistencia técnica autorizado, al número de teléfono indicado en el
certificado de garantía.
No recurra nunca a técnicos no autorizados.
Comunique:
el tipo de anomalía;
el modelo de la máquina (Mod.);
el número de serie (S/N ).
Estas informaciones se encuentran en la placa que está fijada en la parte posterior de la lavadora.
La siguiente información es válida solo para España.
Para otros países de habla hispana consulte a su vendedor.
Ampliación de garantía
Llame al 902.363.539 y le informaremos sobre el fantástico plan de ampliación de garantía hasta 5 años.
Consiga una cobertura total adicional de
Piezas y componentes
Mano de obra de los técnicos
Desplazamiento a su domicilio de los técnicos
Y NO PAGUE AVERIAS NUNCA MAS
Servicio de asistencia técnica (SAT)
Llame al 902.133.133 y nuestros técnicos intervendrán con rapidez y eficacia, devolviendo el
electrodoméstico a sus condiciones óptimas de funcionamiento.
En el SAT encontrará recambios, accesorios y productos específicos para la limpieza y mantenimiento de
su electrodoméstico a precios competitivos.
ESTAMOS A SU SERVICIO
CIS
61
Ðóññêèé
CIS
)46:,"'
Ñîäåðæàíèå
Óñòàíîâêà, 62-63
Ðàñïàêîâêà è íèâåëèðîâêà
Ïîäêëþ÷åíèå ê âîäîïðîâîäó è ýëåêòðè÷åñòâó
Ïåðâûé öèêë ñòèðêè
Îïèñàíèå ñòèðàëüíîé ìàøèíû, 64-65
Ïàíåëü óïðàâëåíèÿ
Äèñïëåé
Êàê îòêðûòü è çàêðûòü áàðàáàí
Ïîðÿäîê âûïîëíåíèÿ öèêëà ñòèðêè, 66
Ñèñòåìà áàëàíñèðîâêè áåëüÿ
Ïðîãðàììû è ôóíêöèè, 67
Òàáëèöà ïðîãðàìì
Ôóíêöèè ñòèðêè
Ìîþùèå ñðåäñòâà è òèïû áåëüÿ, 68
Ðàñïðåäåëèòåëü ìîþùèõ ñðåäñòâ
Ïîäãîòîâêà áåëüÿ
Ñïåöèàëüíûå ïðîãðàììû
Ïðåäîñòîðîæíîñòè è ðåêîìåíäàöèè, 69
Îáùèå òðåáîâàíèÿ ê áåçîïàñíîñòè
Óòèëèçàöèÿ
Ýêîíîìèÿ ýíåðãèè è îõðàíà îêðóæàþùåé ñðåäû
Òåõíè÷åñêîå îáñëóæèâàíèå è óõîä, 70
Îòêëþ÷åíèå âîäû è ýëåêòðè÷åñòâà
Óõîä çà ñòèðàëüíîé ìàøèíîé
õîä çà äâåðöåé ìàøèíû è áàðàáàíîì
×èñòêà íàñîñà
Ïðîâåðêà çàëèâíîãî øëàíãà
Êàê ÷èñòèòü ðàñïðåäåëèòåëü ìîþùèõ ñðåäñòâ
Ïîèñê íåèñïðàâíîñòåé è ìåòîäû èõ
óñòðàíåíèÿ, 71
Ñåðâèñíîå îáñëóæèâàíèå, 72
Òåõíè÷åñêèå õàðàêòåðèñòèêè
Ðóêîâîäñòâî ïî
ýêñïëóàòàöèè
ÑÒÈÐÀËÜÍÀß ÌÀØÈÍÀ
62
CIS
Óñòàíîâêà
Ñîõðàíèòå äàííîå ðóêîâîäñòâî. Îíî äîëæíî áûòü
â êîìïëåêòå ñî ñòèðàëüíîé ìàøèíîé â ñëó÷àå
ïðîäàæè, ïåðåäà÷è îáîðóäîâàíèÿ èëè ïðè
ïåðååçäå íà íîâóþ êâàðòèðó, ÷òîáû íîâûé
âëàäåëåö îáîðóäîâàíèÿ ìîã îçíàêîìèòüñÿ ñ
ïðàâèëàìè åãî ôóíêöèîíèðîâàíèÿ è îáñëóæèâàíèÿ.
Âíèìàòåëüíî ïðî÷èòàéòå ðóêîâîäñòâî: â íåì
ñîäåðæàòñÿ âàæíûå ñâåäåíèÿ ïî óñòàíîâêå è
áåçîïàñíîé ýêñïëóàòàöèè ñòèðàëüíîé ìàøèíû.
Ðàñïàêîâêà è âûðàâíèâàíèå
Ðàñïàêîâêà
1.Ðàñïàêóéòå
ñòèðàëüíóþ ìàøèíó.
2. Óáåäèòåñü, ÷òî
îáîðóäîâàíèå íå áûëî
ïîâðåæäåíî âî âðåìÿ
òðàíñïîðòèðîâêè. Ïðè
îáíàðóæåíèè ïîâðåæäå-
íèé íå ïîäêëþ÷àéòå
ìàøèíó ñâÿæèòåñü ñ
ïîñòàâùèêîì
íåìåäëåííî.
3. Óäàëèòå ÷åòûðå
òðàíñïîðòèðîâî÷íûõ
âèíòà è ðåçèíîâûå
ïðîáêè ñ
ïðîêëàäêàìè,
ðàñïîëîæåííûå â çàäíåé ÷àñòè ñòèðàëüíîé
ìàøèíû (ñì. ðèñ.).
4. Çàêðîéòå îòâåðñòèÿ ïðèëàãàþùèìèñÿ
ïëàñòèêîâûìè çàãëóøêàìè.
5.Ñîõðàíÿéòå âñå äåòàëè: îíè Âàì ïîíàäîáÿòñÿ
ïðè ïîñëåäóþùåé òðàíñïîðòèðîâêå ñòèðàëüíîé
ìàøèíû.
áîëòû, ðåçèíîâûå øàéáû è áîëüøóþ ìåòàëëè÷åñ-
êóþ ïîïåðå÷íóþ ïëàíêó. Çàêðîéòå îáðàçîâàâøèåñÿ
îòâåðñòèÿ ïëàñòìàññîâûìè çàãëóøêàìè.
Íå ðàçðåøàéòå äåòÿì èãðàòü ñ óïàêîâî÷íûìè
ìàòåðèàëàìè.
Âûðàâíèâàíèå
1. Óñòàíîâèòå ñòèðàëüíóþ
ìàøèíó íà ðîâíîì è
ïðî÷íîì ïîëó, òàê ÷òîáû
îíà íå êàñàëàñü ñòåí,
ìåáåëè è ïðî÷èõ
ïðåäìåòîâ.
2. Ïîñëå óñòàíîâêè
ìàøèíû íà ìåñòî
îòðåãóëèðóéòå åå
óñòîé÷èâîå ïîëîæåíèå
ïóòåì âðàùåíèÿ ïåðåäíèõ íîæåê (ñì. ðèñ.). Äëÿ
ýòîãî ñíà÷àëà îñëàáüòå êîíòðãàéêó, ïîñëå çàâåð-
øåíèÿ ðåãóëèðîâêè êîíòðãàéêó çàòÿíèòå. Ïîñëå
óñòàíîâêè ìàøèíû íà ìåñòî ïðîâåðüòå ïî óðîâíþ
ãîðèçîíòàëüíîñòü âåðõíåé êðûøêè êîðïóñà,
îòêëîíåíèå ãîðèçîíòàëè äîëæíî áûòü íå áîëåå 2°.
Ïðàâèëüíîå âûðàâíèâàíèå îáîðóäîâàíèÿ ïîìîæåò
èçáåæàòü øóìà, âèáðàöèé è ñìåùåíèé âî âðåìÿ
ðàáîòû ìàøèíû.
Åñëè ñòèðàëüíàÿ ìàøèíà ñòîèò íà ïîëó, ïîêðûòîì
êîâðîì, óáåäèòåñü, ÷òî åå îñíîâàíèå âîçâûøàåò-
ñÿ íàä êîâðîì.  ïðîòèâíîì ñëó÷àå âåíòèëÿöèÿ
áóäåò çàòðóäíåíà èëè âîâñå íåâîçìîæíà.
Óñòàíîâêà ìàøèíû íà ìåñòî è ïåðåìåùåíèå
Âàøà ñòèðàëüíàÿ
ìàøèíà ìîæåò áûòü
îñíàùåíà ñïåöèàëüíû-
ìè óáèðàþùèìèñÿ êî-
ëåñàìè äëÿ îáëåã÷åíèÿ
åå ïåðåìåùåíèÿ.
×òîáû îïóñòèòü êîëåñà
è ïåðåäâèíóòü îáîðó-
äîâàíèå, ïðîñòî ïîòÿ-
íèòå çà ðû÷àã,
ðàñïîëîæåííûé ñëåâà
ïîä îñíîâàíèåì ìàøè-
íû. Ïîñëå óñòàíîâêè
îáîðóäîâàíèÿ â òðåáóåìîå ïîëîæåíèå âåðíèòå
ðû÷àã â èñõîäíîå ïîëî.
Ïîäêëþ÷åíèå ê âîäîïðîâîäíîé è
ýëåêòðè÷åñêîé ñåòè
Ïîäñîåäèíåíèå çàëèâíîãî øëàíãà
1. Ïðèêðóòèòå øëàíã
ïîäà÷è ê êðàíó õîëîäíîé
âîäû ñ ðåçüáîâûì
îòâåðñòèåì 3/4 gas (ñì.
ñõåìó).
Ïåðåä ïîäñîåäèíåíèåì
îòêðîéòå âîäîïðîâîäíûé
êðàí äî òåõ ïîð, ïîêà èç
íåãî íå ïîòå÷åò ÷èñòàÿ
âîäà.
2. Ïîäñîåäèíèòå çàëèâ-
íîé øëàíã ê ñòèðàëüíîé
ìàøèíå, íàâèíòèâ åãî
íà âîäîïðèåìíèê,
ðàñïîëîæåííûé â
çàäíåé âåðõíåé ÷àñòè
ñïðàâà (ñì. ðèñ.).
3.Óáåäèòåñü, ÷òî øëàíã
íå ïåðåêðó÷åí è íå
ïåðåæàò.
Äàâëåíèå âîäû äîëæíî áûòü â ïðåäåëàõ çíà÷å-
íèé, óêàçàííûõ â òàáëèöå Òåõíè÷åñêèõ õàðàêòå-
ðèñòèê (ñì. ñ. 63).
Åñëè äëèíà âîäîïðîâîäíîãî øëàíãà îêàæåòñÿ
íåäîñòàòî÷íîé, îáðàòèòåñü â Àâòîðèçîâàííûé
Ñåðâèñíûé öåíòð.
CIS
63
65 - 100 cm
Ïîäñîåäèíåíèå ñëèâíîãî øëàíãà
Ïîâåñüòå çàãíóòûé êîíåö
ñëèâíîãî øëàíãà íà êðàé
ðàêîâèíû, âàííû, èëè
ïîìåñòèòå â
ñïåöèàëüíûé âûâîä
êàíàëèçàöèè. Øëàíã íå
äîëæåí ïåðåãèáàòüñÿ.
Âåðõíÿÿ òî÷êà ñëèâíîãî
øëàíãà äîëæíà íàõî-
äèòüñÿ íà âûñîòå 65-100
ñì îò ïîëà. Ðàñïîëîæå-
íèå ñëèâíîãî øëàíãà
äîëæíî îáåñïå÷èâàòü
ðàçðûâ ñòðóè ïðè ñëèâå
(êîíåö øëàíãà íå
äîëæåí áûòü îïóùåí â
âîäó).
 ñëó÷àå êðåïëåíèÿ íà
êðàé âàííîé èëè ðàêîâè-
íû, øëàíã âåøàåòñÿ ñ
ïîìîùüþ íàïðàâëÿþùåé
(âõîäèò â êîìïëåêò
ïîñòàâêè), êîòîðàÿ
êðåïèòñÿ ê êðàíó (ðèñ.).
Íå ðåêîìåíäóåòñÿ ïðèìåíåíèå óäëèíèòåëåé äëÿ
ñëèâíîãî øëàíãà, ïðè íåîáõîäèìîñòè äîïóñêàåòñÿ
åãî íàðàùèâàíèå øëàíãîì òàêîãî æå äèàìåòðà è
äëèíîé íå áîëåå 150 ñì.
Ïîäñîåäèíåíèå ê ýëåêòðîñåòè
Âíèìàíèå! Îáîðóäîâàíèå îáÿçàòåëüíî äîëæíî áûòü
çàçåìëåíî!
1. Ìàøèíà ïîäêëþ÷àåòñÿ ê ýëåêòðè÷åñêîé ñåòè ïðè ïî-
Jest przydatne dla w³ókien szczególnie wra¿liwych.
Nie mo¿na jej uruchomiæ w programach , i
Wydalanie wody.
£atwe prasowanie
Po wybraniu tej funkcji, pranie oraz wirówka zostan¹ odpowiednio
zmienione w celu ograniczenia powstawania zgnieceñ.
W programie
maszyna zakoñczy cykl z bielizn¹
zamoczon¹, a kontrolka funkcji £ATWEGO
PRASOWANIA i START/PAUZA bêdzie pulsowa³a
(pomarañczowa), a napis ZATRZYMANIE WODY uka¿e
siê na wywietlaczu. W celu odprowadzenia wody i aby
mo¿na by³o móc wyj¹c pranie koniecznym jest
naciniêcie przycisku START/PAUZA lub przycisku
£ATWE PRASOWANIE.
Nie mo¿na go uruchomiæ w programach , , , i
Wydalanie wody.
Pranie szybkie
Umo¿liwia zmniejszenie czasu trwania prania,
zapewniaj¹c jednoczenie oszczêdnoæ wody i energii.
Nie mo¿na jej uruchomiæ w programach , , , ,, .
Czas trwania cyklu wskazany na wywietlaczu lub w instrukcji jest czasem oszacowanym dla standardowych warunków. Rzeczywisty czas trwania cyklu mo¿e siê
zmieniaæ w zale¿noci od wielu czynników, takich jak temperatura i cinienie wody na wlocie, temperatura otoczenia, iloæ detergentu, iloæ i rodzaj pranej odzie¿y,
wywa¿enie ³adunku, wybrane opcje dodatkowe.
Dla wszystkich Instytucji homologacyjnych:
1) Program kontrolny zgodny z dyrektyw¹ 1061/2010: wprowadziæ program
(90°C); temperatura 60°C i 40°C (Naciskaj¹c przycisk TEMPERATURY);
2) Program bawe³na, d³ugi: wprowadziæ program
(90°C); temperatura 40°C (Naciskaj¹c przycisk TEMPERATURY);
3) Program bawe³na, krótki: wprowadziæ program
(40°C);
4) Program syntetyczne, d³ugi: wprowadziæ program
(60°C) (1° naciniêcie przycisku); temperatura 40°C (Naciskaj¹c przycisk TEMPERATURY);
80
PL
rodki pior¹ce i bielizna
Szufladka na rodki pior¹ce
Dobre rezultaty prania zale¿¹ równie¿ od
w³aciwego dozowania rodka pior¹cego: wsypuj¹c
go za du¿o, wcale nie poprawia siê wydajnoci
prania, lecz przyczynia siê do odk³adania siê
nalotów na wewnêtrznych czeciach pralki i do
zanieczyszczania rodowiska.
Wysun¹æ szufladkê i
wsypaæ do niej rodki
pior¹ce i dodatkowe w
nastêpuj¹cy sposób
przegródka 1: rodek pior¹cy do prania
wstêpnego (w proszku)
przegródka 2: rodek pior¹cy
(w proszku lub w p³ynie)
rodek pior¹cy w p³ynie nale¿y w³o¿yæ
bezporednio do bêbna z zastosowaniem
odpowiedniej kulki dozuj¹cej.
przegródka 3: rodki dodatkowe (zmiêkczaj¹ce, itp.)
Gebruikershandleiding.com neemt misbruik van zijn services uitermate serieus. U kunt hieronder aangeven waarom deze vraag ongepast is. Wij controleren de vraag en zonodig wordt deze verwijderd.
Product:
Spelregels forum
Om tot zinvolle vragen te komen hanteren wij de volgende spelregels:
lees eerst de handleiding door;
controleer of uw vraag al eerder door iemand anders is gesteld;
probeer uw vraag zo duidelijk mogelijk te stellen;
heeft u een probleem en al geprobeerd om dit op te lossen, vermeld dit erbij aub;
heeft u een oplossing gekregen van een bezoeker dan horen wij dat graag in dit forum;
wilt u een reactie geven op een vraag of antwoord, gebruik dan niet dit formulier maar klik op de knop 'reageer op deze vraag';
uw vraag wordt direct op de website gezet; vermijd daarom persoonlijke gegevens in te vullen;
Belangrijk! Als er een antwoord wordt gegeven op uw vraag, dan is het voor de gever van het antwoord nuttig om te weten als u er wel (of niet) mee geholpen bent! Wij vragen u dus ook te reageren op een antwoord.
Belangrijk! Antwoorden worden ook per e-mail naar abonnees gestuurd. Laat uw emailadres achter op deze site, zodat u op de hoogte blijft. U krijgt dan ook andere vragen en antwoorden te zien.
Abonneren
Abonneer u voor het ontvangen van emails voor uw Hotpoint-Ariston artxd 149 eu bij:
nieuwe vragen en antwoorden
nieuwe handleidingen
U ontvangt een email met instructies om u voor één of beide opties in te schrijven.
Ontvang uw handleiding per email
Vul uw emailadres in en ontvang de handleiding van Hotpoint-Ariston artxd 149 eu in de taal/talen: Duits, Engels, Frans, Italiaans, Spaans als bijlage per email.
De handleiding is 2,87 mb groot.
U ontvangt de handleiding per email binnen enkele minuten. Als u geen email heeft ontvangen, dan heeft u waarschijnlijk een verkeerd emailadres ingevuld of is uw mailbox te vol. Daarnaast kan het zijn dat uw internetprovider een maximum heeft aan de grootte per email. Omdat hier een handleiding wordt meegestuurd, kan het voorkomen dat de email groter is dan toegestaan bij uw provider.
Stel vragen via chat aan uw handleiding
Stel uw vraag over deze PDF
Andere handleiding(en) van Hotpoint-Ariston artxd 149 eu
Uw handleiding is per email verstuurd. Controleer uw email
Als u niet binnen een kwartier uw email met handleiding ontvangen heeft, kan het zijn dat u een verkeerd emailadres heeft ingevuld of dat uw emailprovider een maximum grootte per email heeft ingesteld die kleiner is dan de grootte van de handleiding.
Er is een email naar u verstuurd om uw inschrijving definitief te maken.
Controleer uw email en volg de aanwijzingen op om uw inschrijving definitief te maken
U heeft geen emailadres opgegeven
Als u de handleiding per email wilt ontvangen, vul dan een geldig emailadres in.
Uw vraag is op deze pagina toegevoegd
Wilt u een email ontvangen bij een antwoord en/of nieuwe vragen? Vul dan hier uw emailadres in.