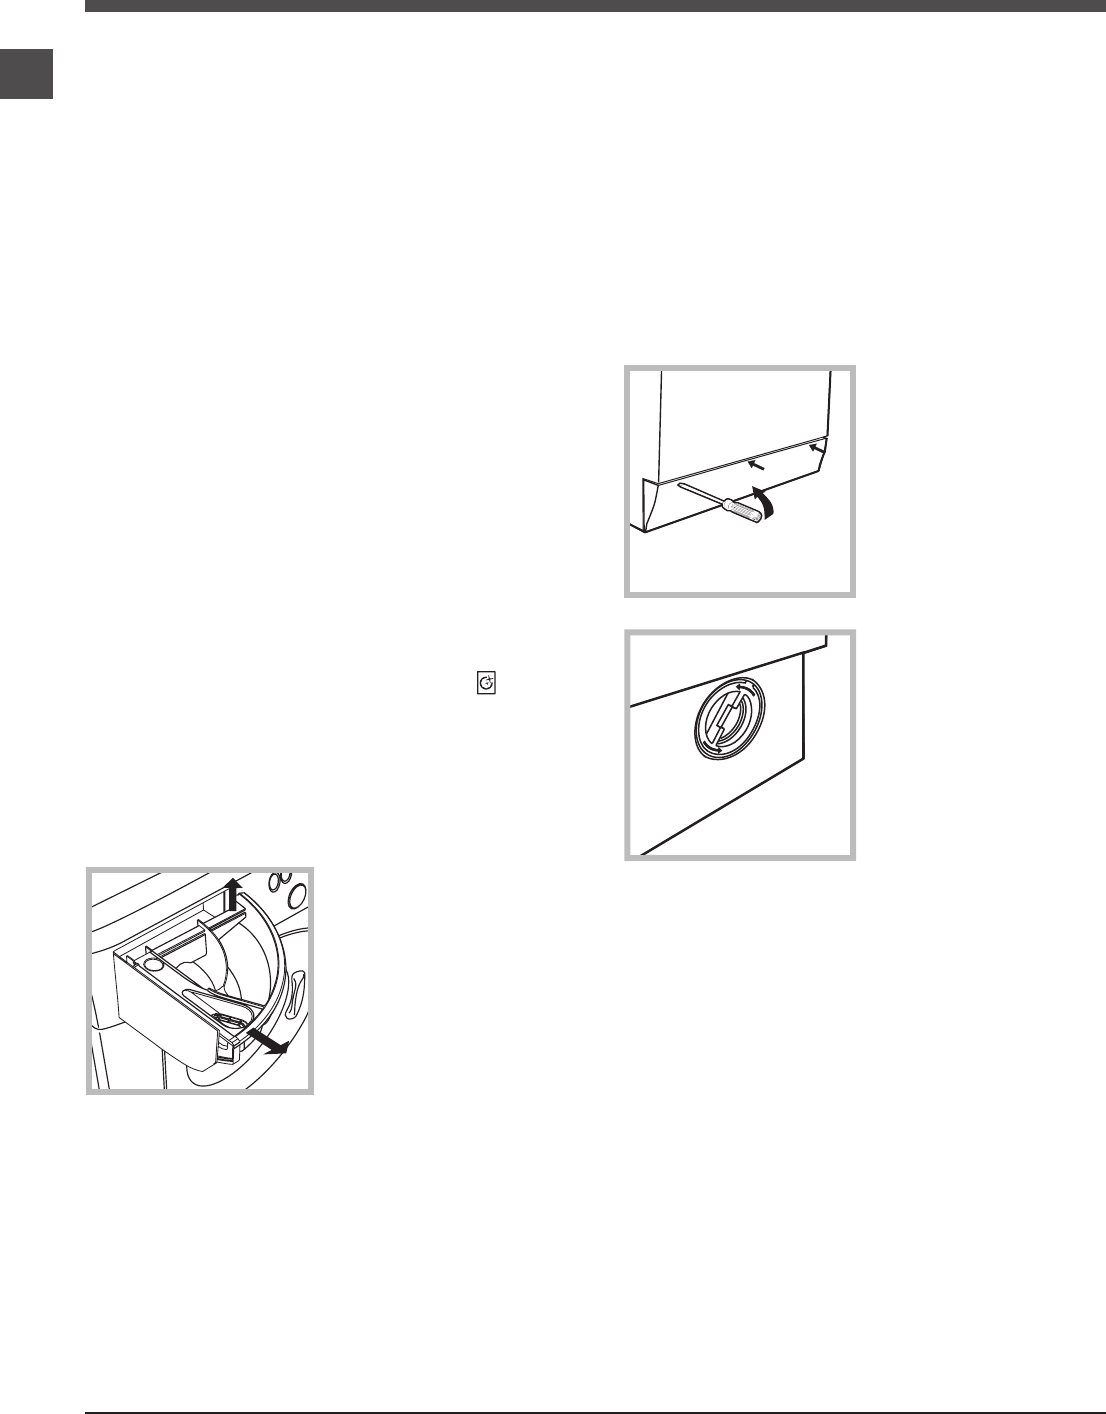
In rare cases an allergic reaction may be caused by prolonged contact between
seal and skin.
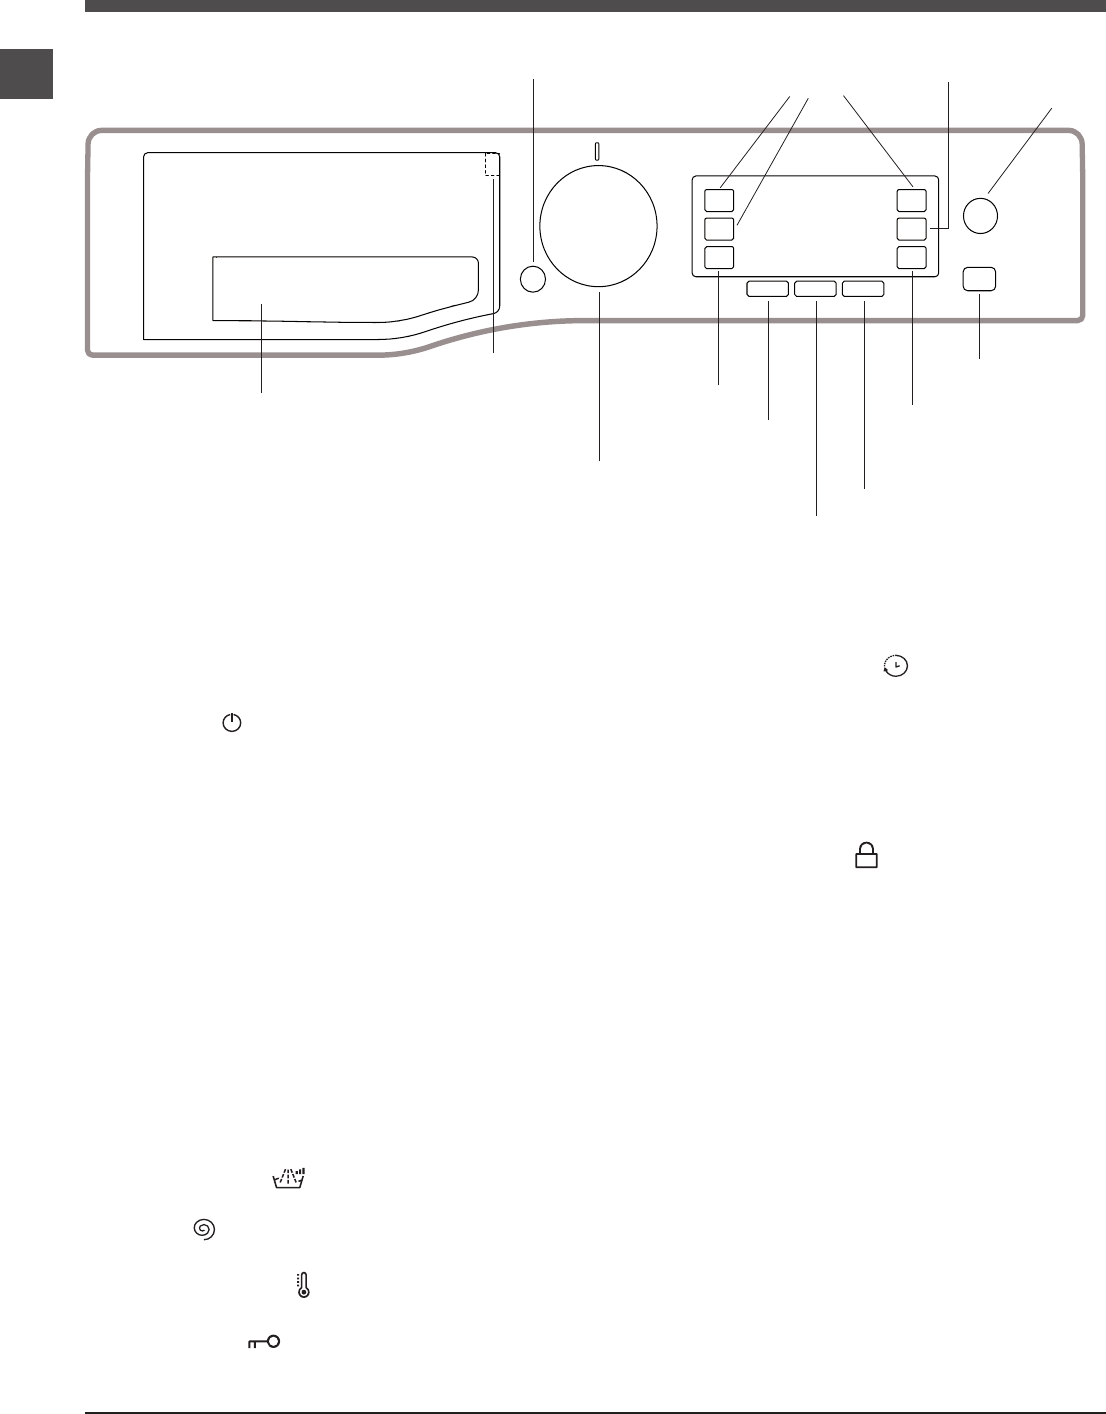
Description of the washing machine
Control panel
TEMPERATURE
button
Detergent dispenser drawer
FUNCTION
buttons
ON/OFF
button
SPIN
button
START/PAUSE
button with indicator light
KEY LOCK
button
DELAY
(DELAY
TIMER)
button
MULTI
RINSE
button
DISPLAY
AUTO
CLEAN
button
DIRECT
INJECTION
button
Programme
Key
WASH
CYCLE
SELECTOR
KNOB
GB
9
The display is useful when programming the machine and provides a great deal of information.
The following will appear in area A: the icon and selected washing programme, the washing phases and time remaining to
the end of the wash cycle.
Area B will include the two intensity levels relative to the DIRECT INJECTION option.
The indicator lights relative to the available functions appear in area C.
Area D will have the time remaining to the start of the selected programme if the DELAY (DELAY TIMER) function was set.
String E shows the maximum spin speed value (this depends on the selected wash cycle); if the programme does not inclu-
de the spin cycle, the dimly lit “--” symbol will appear in the area.
Area F will visualise the temperature value selectable on the basis of the set programme; if the temperature of the program-
me cannot be set, the area will show the symbol “--” dimly lit.
Door locked symbol
If the symbol is lit, this indicates that the washing machine door is blocked to prevent it from being opened accidentally. To
prevent any damage from occurring, wait for the symbol to switch itself off before opening the appliance door.
N.B.: if the DELAY (DELAY TIMER) function has been activated, the door cannot be opened; pauses the machine by pres-
sing the START/PAUSE button if you wish to open it.
! To change the language switch off the machine and press buttons G, H, Isimultaneously until an alarm is heard: the
language-selection menu will be displayed again.
To select the desired language press the X and Y buttons; to confirm the selection press the Z button.
! To change the display luminosity, which by default is set to the highest value, switch the machine off then simultaneously
press buttons G, L and M until the buzzer sounds. Press buttons X and Y to choose the desired level of luminosity then
confirm by pressing button Z.
! During the wash cycle or when the DELAY (DELAY TIMER) function has been enabled, if the user does not interact with the
display for 1 minute the “SCREEN SAVER” activates. To return to the previous window, simply press any button.
Display
H
G
Y
XZ
I
L
M
A
B
C
C
D
E
C
F
10
GB
Running a wash cycle
1. SWITCH THE MACHINE ON. Press the On/Off
button ; the text HOTPOINT will appear on the display
and the START/PAUSE indicator light will flash slowly in
a green colour.
2. LOAD THE LAUNDRY. Open the porthole door.
Load the laundry, making sure you do not exceed
the maximum load value indicated in the table of
programmes on the following page.
3. MEASURE OUT THE DETERGENT. Open the
detergent dispenser drawer and pour the detergent into
the relevant compartments as described in “Detergents
and laundry”.
4. CLOSE THE DOOR.
5. SELECT THE WASH CYCLE. Use the WASH CYCLE
SELECTOR knob to select the desired wash cycle; the
name of the wash cycle will appear on the display. A
temperature and spin speed is set for each wash cycle;
these may be adjusted. The duration of the cycle will
appear on the display.
6. CUSTOMISE THE WASH CYCLE. Use the relevant
buttons:
Modifying the temperature and/or spin speed.
The machine automatically selects the maximum
temperature and spin speed set for the selected wash
cycle; these values cannot therefore be increased.
The temperature can be decreased by pressing the
button, until the cold wash (the display will visualise the
“--” symbol) setting is reached. The spin speed may be
progressively reduced by pressing the button, until
it is completely excluded (the display will visualise the
“--” symbol). If these buttons are pressed again, the
maximum values are restored.
!Exception: if the 2 programme is selected, the
temperature can be increased up to a value of 40°C.
!Exception: if the 3 programme is selected, the
temperature can be increased up to a value of 90°C.
! Exception: if the 4 programme is selected, the
temperature can be increased up to a value of 60°C..
Setting a delayed start.
To set a delayed start for the selected programme,
press the corresponding button repeatedly until the
required delay period has been reached. To remove the
delayed start function press the button until the text
“-- h” appears on the display.
Set the rinse type.
Option makes it possible to select the desired
rinse type for sensitive skin. Press the button once for
the “Extra +1” level, which makes it possible to select
an additional rinse after the standard cycle rinse and
remove all traces of detergent. Press the button again
for the “Extra +2” level, which makes it possible to
select two additional rinses to the standard cycle rinses;
it is recommended for very sensitive skin. When the
button is pressed for the third time, the “Extra +3” level
is set, thus allowing the selection of 3 rinses in addition
to the standard cycle’s rinses. The option - started with
cycles at a temperature of 40°C - makes it possible to
remove major allergens such as pollen, cat and dog
hair. With cycles at a temperature higher than 40° a very
good level of antiallergic protection is achieved. Press
the button again to go back to the “Normal rinse” rinse
type. If the current adjustment can be neither set nor
changed, the display will show “No Selection” or “No
Change”.
Modifying the cycle settings.
• Press the button to enable the function; the relevant
indicator light on the display will light up.
• Press the button again to disable the function; the
relevant indicator light on the display will switch off.
! If the selected function is incompatible with the set
programme, the relevant indicator light will appear dimly
lit; in addition, the incompatibility will be signalled by a
buzzer (3 beeps) and the wording “No Selection” will
appear on the display.
! If the selected function is incompatible with another
previously set function, the wording “No Selection”
will appear on the display and the function will not be
enabled.
! The functions may affect the recommended load value
and/or the duration of the cycle.
7. START THE PROGRAMME. Press the START/
PAUSE button. The corresponding indicator light will
become green, remaining lit in a fixed manner, and the
door will be locked (the DOOR LOCKED symbol will
be on). During the wash cycle, the name of the phase in
progress will appear on the display. To change a wash
cycle while it is in progress, pause the washing machine
using the START/PAUSE button (the START/PAUSE
indicator light will flash slowly in an orange colour);
then select the desired cycle and press the START/
PAUSE button again. To open the door while a cycle
is in progress, press the START/PAUSE button; if the
DOOR LOCKEDsymbol is switched off the door
may be opened. Press the START/PAUSE button again
to restart the wash cycle from the point at which it was
interrupted.
8. THE END OF THE WASH CYCLE. This will be
indicated by the text “CYCLE END” on the display;
when the DOOR LOCKEDsymbol switches off
the door may be opened. Open the door, unload the
laundry and switch off the machine.
! If you wish to cancel a cycle which has already begun,
press and hold the button. The cycle will be stopped
and the machine will switch off.
Direct Injection
The washing machine is equipped with the innovative
technology «Direct Injection» which pre-mixes water and
detergent, thus immediately activating the detergent’s
cleaning principles. This active emulsion is directly
introduced into the drum of the washing machine and
penetrates the fibres with more efficacy in cleaning
even heavily soiled garments at low temperatures, fully
preserving colours and fabrics.
The mode «Power» ensures the best cleaning performance
and the mode «EcoEnergy» allows more energy saving.
GB
11
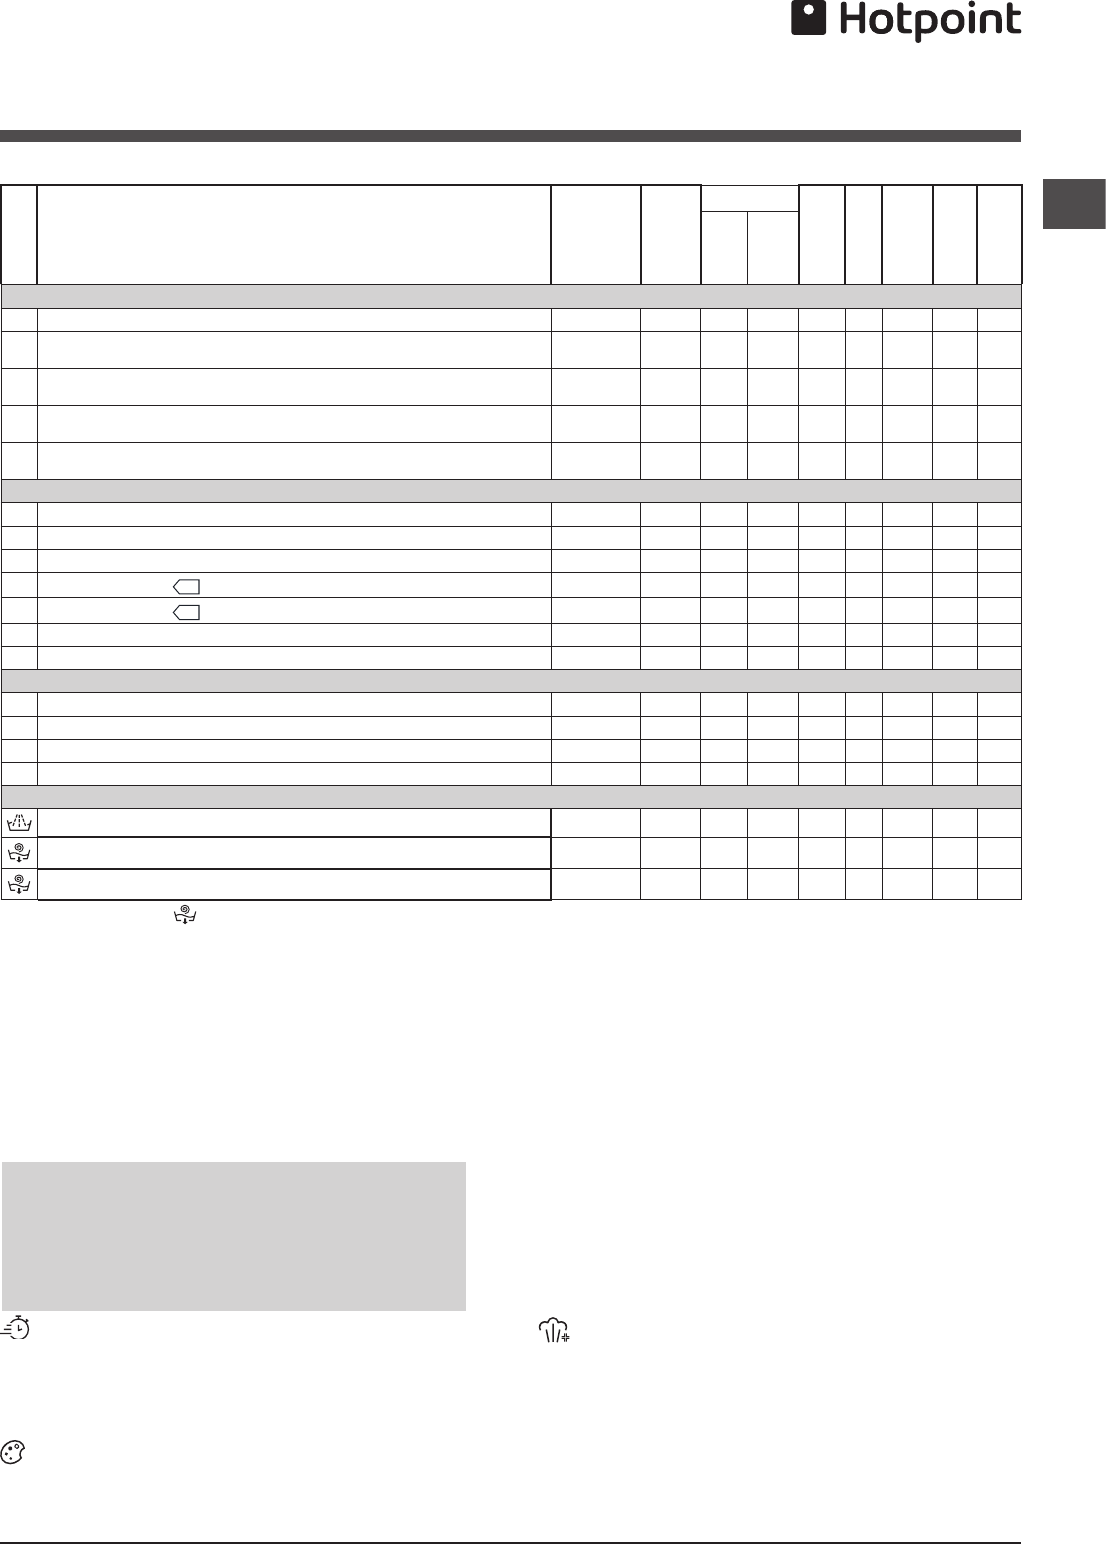
Wash cycles and functions
Table of wash cycles
Wash functions
! If the selected function is incompatible with the set program-
me, the relevant indicator light will appear dimly lit; in addition,
the incompatibility will be signalled by a buzzer (3 beeps) and
the wording “No Selection” will appear on the display.
! If the selected function is incompatible with another pre-
viously set function, the wording “No Selection” will appear
on the display and the function will not be enabled.
Time Saver
If you select this option, the wash cycle duration will be redu-
ced by up to 50%, depending on the selected cycle, thereby
guaranteeing simultaneous water and energy saving. Use this
cycle for lightly soiled garments.
Colour Care
Setting cycle 6 and selecting this function allows for choosing
among 3 different programmes specially designed for optimal-
ly preserving colour intensity and the brilliance of whites:
Colours: used to wash light coloured clothes. This program-
me is designed to maintain bright colours over time.
Darks: this programme is designed to maintain dark colours
over time. We recommend using a liquid detergent for best
results, preferably when washing dark-coloured garments.
Whites: this programme is designed to maintain the brightness of
white clothes over time. Use powder detergent for best results.
Steam Hygiene
This option enhances washing performance by generating
steam during the wash cycle to remove any bacteria from the
fibres, which are treated at the same time.
! The steam generated during the operation of the washing
machine may cause the porthole door to become hazy.
1) Test wash cycle in compliance with regulations 1061/2010: set wash cycle 9 with a temperature of 60°C.
This cycle is designed for cotton loads with a normal soil level and is the most efficient in terms of both electricity and water consumption; it should be used for garments
which can be washed at 60°C . The actual washing temperature may differ from the indicated value.
2) Test wash cycle in compliance with regulations 1061/2010: set wash cycle 9 with a temperature of 40°C.
This cycle is designed for cotton loads with a normal soil level and is the most efficient in terms of both electricity and water consumption; it should be used for garments
which can be washed at 40°C . The actual washing temperature may differ from the indicated value.
For all Test Institutes:
3) Long wash cycle for cottons: set programme 9 at temperature 40°C and press the DIRECT INJECTION button under “Power” mode.
4) Long wash cycle for synthetics: set wash cycle 4 with a temperature of 40°C.
* If you select programme and exclude the spin cycle, the machine will drain only.
The length of cycle shown on the display or in this booklet is an estimation only and is calculated assuming standard working conditions. The actual duration can vary accor-
ding to factors such as water temperature and pressure, the amount of detergent used, the amount and type of load inserted, load balancing and any wash options selected.
** The duration of the wash cycle can be checked on the display.
Wash
cycles
Description of the wash cycle
Max.
temp.
(°C)
Max.
speed
(rpm)
Detergents
Max. load
(kg)
Residual
dampness%
Energy
consum-
ptionkWh
Total water
lt
Cycle dura-
tion
Wash
Fabric
softener
DAILY CLEAN
1
Anti-Stain Power 20°C
20°1400
10 ---**
2Anti-Stain Turbo 45’
20°
(Max. 40°C)
1200
5,5 ---**
3
Cotton: lightly soiled resistant and delicate colours.
40°
(Max. 90°C)
1400
10 ---**
4
Synthetics (4):lightly soiled resistant colours.
40°
(Max. 60°C)
1000
5,5460,7579115’
5
Fast 30’: to refresh lightly soiled garments quickly (not suitable for wool, silk
and clothes which require washing by hand).
30°800
4710,575630’
SPECIALS
6
Colour Care (default) =>Colours40°1400
6---**
7
Ultradelicates (Ultra Delicates)30°
--
1---**
8
Wool: for wool, cashmere, etc.40° 800
2,5---**
9
Eco Cotton 60°C
60°/40°
(1): heavily soiled whites and resistant colours.
60°1400
10 530,9758,2220’
9
Eco Cotton 40°C
60°/40°
(2): lightly soiled resistant and delicate colours.
40°1400
10 530,9796220’
9
Cotton (3): lightly soiled resistant and delicate colours.40°1400
10 530,8096185’
10
Shirts
40°600
2---**
EXTRA
11
Baby
40°1000
6---**
12
Anti-Allergy
60°1400
10---**
13
Bed & Bath (Bed & Bath 7 Days): for bedlinen and towels.60°1400
2,5---**
14
Duvets: for down-stuffed garments.30°1000
3,5---**
Partial Programmes
Rinse
-1400-
10---**
Spin + Pump out
-1400--10---**
Pump out only *-
--
--10---**
12
GB
Detergent dispenser drawer
Good washing results also depend on the correct dose of
detergent: adding too much detergent will not necessarily
result in a more efficient wash, and may in fact cause a
build up on the inside of your appliance and contribute to
environmental pollution.
! Use powder detergent for white cotton garments, for
pre-washing, and for washing at temperatures over 60°C.
! Follow the instructions given on the detergent packaging.
! Do not use hand washing detergents because these
create too much foam.
Open the detergent di-
spenser drawer and pour
in the detergent or washing
additive, as follows.
! Do not pour detergent into
the middle compartment (*).
compartment 1: Deter-
gent for the wash cycle
(powder or liquid)
If liquid detergent is used,
it is recommended that the removable plastic partition A
(supplied) be used for proper dosage. If powder detergent
is used, place the partition into slot B.
compartment 2: Additives (fabric softeners, etc.)
The fabric softener should not overflow the grid.
Preparing the laundry
• Divide the laundry according to:
- the type of fabric/the symbol on the label
- the colours: separate coloured garments from whites.
• Empty all garment pockets and check the buttons.
• Do not exceed the listed values, which refer to the
weight of the laundry when dry: see “Table of wash
cycles”.
How much does your laundry weigh?
1 sheet 400-500 g
1 pillow case 150-200 g
1 tablecloth 400-500 g
1 bathrobe 900-1200 g
1 towel 150-250 g
Special wash cycles
Anti-Stain Power 20°C: this programme ensures ma-
ximum stain removal capacity with no need for pre-treat-
ment at low temperatures, preserving fabrics and colours.
Anti-Stain Turbo 45’: this cycle ensures excellent stain
removal capacity even at 20°C in just 45 minutes. The tem-
perature of this cycle can be increased up to 40°C.
Ultradelicates: use programme 7 to wash very delicate
garments having strasses or sequins.
We recommend turning the garments inside out before
washing and placing small items into the special bag for
washing delicates. Use liquid detergent on delicate gar-
ments for best results.
Wool - Woolmark Apparel Care - Green:
the wool wash cycle of this machine has been approved
by The Woolmark Company for the washing of wool gar-
ments labelled as “hand wash” provided that the products
are washed according to the instructions on the garment
label and those issued by the manufacturer of this washing
machine (M1135)
Shirts: use the special 10 wash cycle to wash shirts in
different fabrics and colours to guarantee they receive the
best possible care.
Baby: use the special wash cycle 11 to remove the remo-
ve the soiling typically caused by babies, while removing
all traces of detergent from nappies in order to prevent the
delicate skin of babies from suffering allergic reactions. The
cycle has been designed to reduce the amount of bacteria
by using a greater quantity of water and optimising the
effect of special disinfecting additives added to the deter-
gent.
Anti-Allergy: use programme 12 to remove major aller-
gens such as pollen, mites, cat’s and dog’s hair.
Bed & Bath: use programme 13 to wash bed linen and
towels in one single cycle: it optimises softener perfor-
mance and helps you save time and energy. We recom-
mend the use of powder detergent
Duvets: to wash double or single duvets (the weight of
which should not exceed 3,5 kg), cushions or clothes
padded with goose down such as puffa jackets, use the
special 14 wash cycle. We recommend that duvets are
placed in the drum with their edges folded inwards (see
figure) and that no more than ¾ of the total volume of
the drum is used. To achieve the best results, we recom-
mend that a liquid detergent is used and placed inside
the detergent dispenser drawer.
Load balancing system
Before every spin cycle, to avoid excessive vibrations and
to distribute the load in a uniform manner, the drum rotates
continuously at a speed which is slightly greater than the
washing rotation speed. If, after several attempts, the load
is not balanced correctly, the machine spins at a reduced
spin speed. If the load is excessively unbalanced, the
washing machine performs the distribution process instead
of spinning. To encourage improved load distribution and
balance, we recommend small and large garments are
mixed in the load.
Detergents and laundry
1
2
A
B
*
GB
13
Troubleshooting
Your washing machine could occasionally fail to work. Before contacting the Technical Assistance Service (see “ Service”),
make sure that the problem cannot be solved easily using the following list.
Problem:
The machine does not switch on.
The wash cycle does not start.
The washing machine does not
take in water (the text “NO WATER,
Turn tap on” appears on the di-
splay).
The machine continuously fills with
water and continually drains away
or Water left in the drum
or Stuck on wash.
The machine does not drain or spin
- (error lights flashing).
The machine does spin.
The machine does not heat or poor
wash results.
The programme takes too long.
The Display sticks at one ‘time to
end’ for more than 1 Minute or the
Display changes the estimated ‘Time
to End’ during the programme.
The machine vibrates a lot during
the spin cycle.
Possible causes / Solutions:
• The appliance is not plugged into the socket fully, or not enough to make contact.
• There is no power to the socket, or the fuse has blown in the mains plug.
• The door is not closed properly.
• The ON/OFF button has not been pressed.
• The START/PAUSE button has not been pressed.
• The water tap has not been turned on to allow water to flow into the machine.
• A delayed start has been set.
• The water inlet hose is kinked.
• The water inlet hose is not connected to the water supply.
• The water pressure is too low.
• The water tap has not been turned on to allow water to flow into the machine.
• There is no water supply to the house.
• The inlet valve filter is blocked.
• The START/PAUSE button has not been pressed.
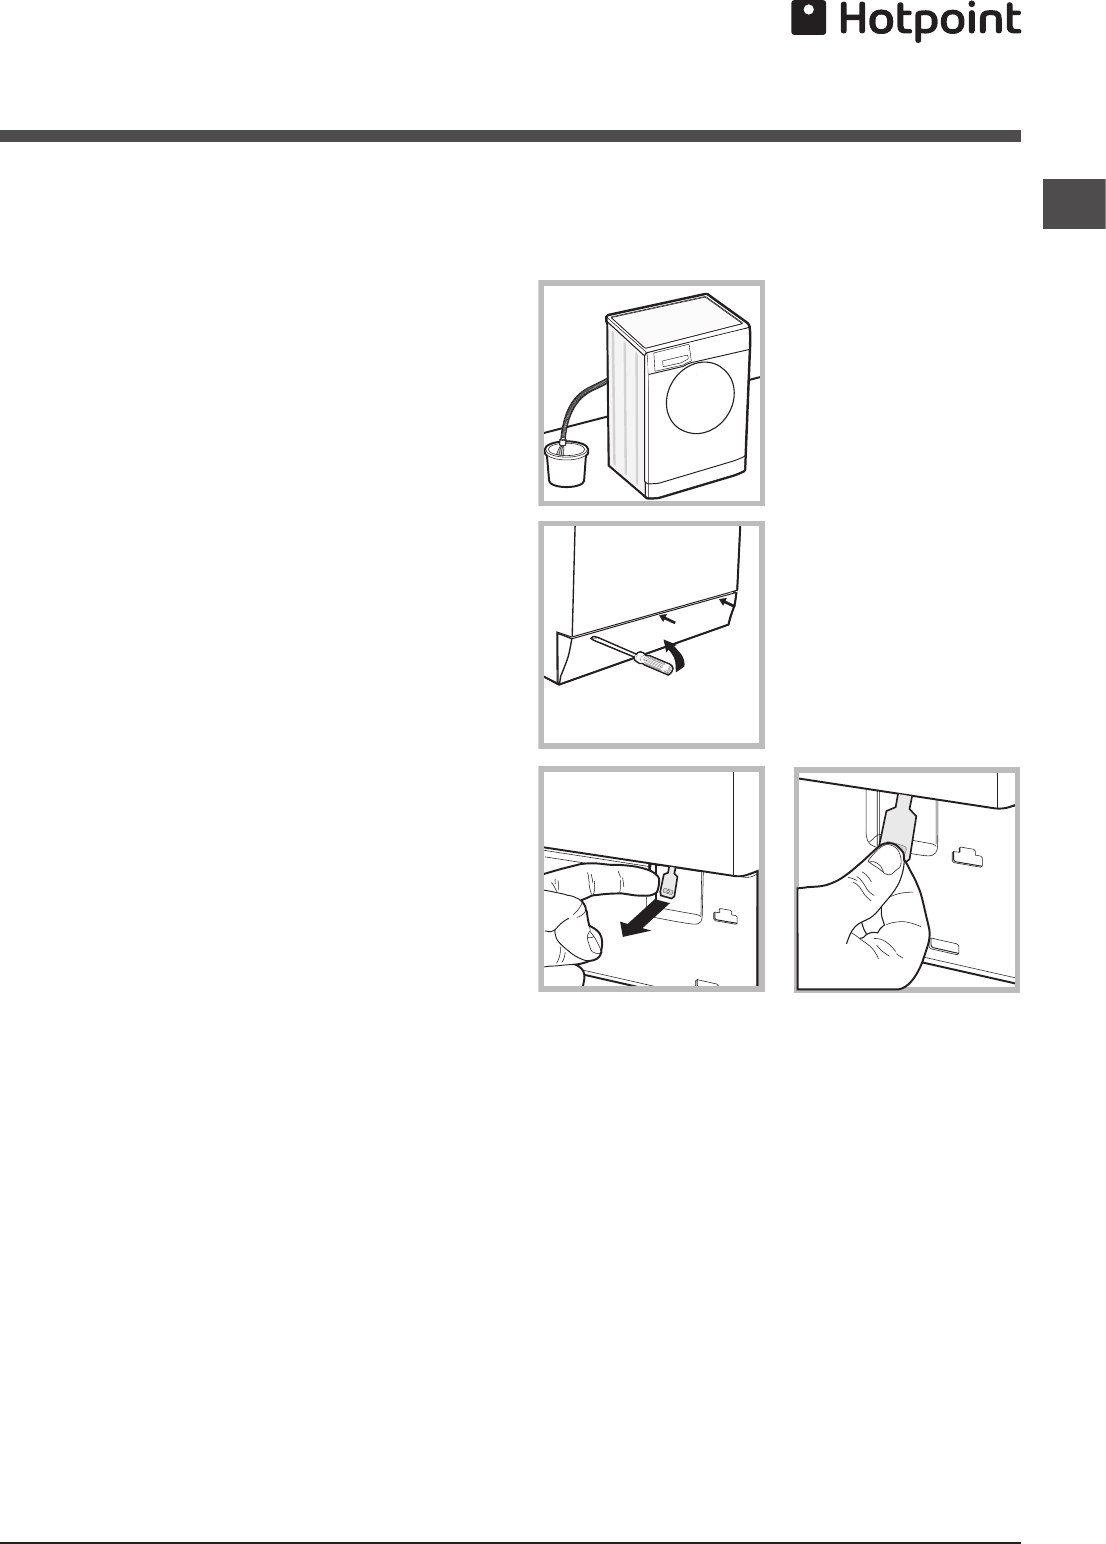
• The top of the drain hose is too low - It must be fitted at a height between 65
and 100 cm from the floor (see “Installation”).
• The drain hose is connected incorrectly to the sink trap allowing water to run
into the machine, the drain hose must be positioned higher than the bottom of
the sink to prevent water flowing down the drain hose.
• The end of the drain hose has been pushed too far down the standpipe, the
‘U’ bracket should be fitted 100 mm from the end of the drain hose.
• The Pump filter is blocked.
• The drain hose is kinked (see “Installation”).
• New Installation - The blanking cap or spigot has not been removed if
connected under a sink.
• The drain hose or sink trap is blocked.
• The Spin Speed is set to “--””.
• The ‘Temperature’ is set to “--”.
• Programme times will vary due to water pressure, the incoming water tempera-
ture and if the wash load goes out of balance. This will increase the programme
times accordingly (see ‘ The machine wont spin properly’ next page).
• The display time is for guidance only - it is not a precise time to finish and
may vary.
• The feet have not been adjusted, enabling the machine to rock.
• New Installation - Either the Transit Bolts including the plastic spacers, or the
Polystyrene Packaging have not been removed when installing the machine.
• The machine is trapped between cabinets and/or walls.
• The load is in a slight out of balance condition and machine is spinning, but at
a lower speed.
14
GB
The machine is noisy.
The machine wont spin properly.
The machine leaks from the
dispenser.
The machine leaks (other than
dispenser).
The option lights and the START/
PAUSE indicator light are flash
rapidly and an error code appears
on the display (eg F-01, F-..).
The machine smells.
The machine door cannot be
opened.
Door Seal damaged at the bottom.
The water level is too low when
the machine is washing.
There is too much foam.
After completing the programme,
or before starting a programme,
the machine has turned itself off
(no lights).
General.
• There will always be some motor, pump and drum noise during spin.
• Out of Balance detected when attempting to go into a spin cycle - If this
happens the machine will continue to try to repeat the distribution of the load
required before the machine will go into higher spin speeds - This will increase
the programme time accordingly. This is a safety feature to prevent damage.
Out of Balance can be caused by washing a single heavy item (eg duvet, quilt,
etc). - Try the programme again using a different load.
• The dispenser drawer is blocked with detergent and requires cleaning.
• The water pressure is too high and requires turning down - turn down the tap
on the water supply pipe slightly and try again.
• The machine is tilting forwards - It must be level when in its final position.
• The fill hose is loose, check both the cabinet and tap ends.
• The fill hose is tight but still leaks, if so replace the rubber washers, or the fill
hose is missing the rubber washer.
• The drain hose is not fixed in properly.
• Switch off the machine and unplug it, wait for approximately 1 minute and then
switch back on again. If the problem persists contact Technical Assistance
Centre.
• The machine requires a service wash. Run a auto clean wash cycle with deter-
gent and no laundry.
• The door will not open until the door lock indicator light goes out shortly after
the program has finished.
• If there is no power to the machine you need to perform the manual unlocking
procedure.
• The door seal has drainage holes at the bottom - This is normal.
• The water level is correct if it can be seen at the bottom of the door.
• The detergent is not suitable for machine washing (it should display the text
‘for washing machines’ or ‘hand and machine wash’ or the like).
• Too much detergent was used - less detergent is required in soft water.
• To comply with new energy saving regulations the machine is fitted with an
automatic standby system. Press ‘ON/OFF’ button for 3 seconds to activate
the machine, it can then either be switched off or a new programme selected.
• Your washing machine contains sensors that monitor progress during the wash
cycle (eg: Water Levels, Temperatures, Out of Balance loads, Wash time/progress).
Normally, if your machine successfully completes the cycle, there is unlikely to
be anything wrong!
Remember, you will be charged for a service call for problems caused by incorrect installation, as indica-
ted on pages 2 to 4.
Not emptying contents from pockets may cause pump or drain blockages, or may damage the machine.
Do not wash items which do not have a wash label, or wash items that are not intended as machine
washable.
GB
15
Product Guarantee and
Repair Information
Guarantee
12 Months Parts and Labour Guarantee
Your appliance has the benefit of our manufacturer’s
guarantee, which covers the cost of breakdown
repairs for twelve months from the date of purchase.
This gives you the reassurance that if, within that
time, your appliance is proven to be defective
because of either workmanship or materials, we will,
at our discretion, either repair or replace the appliance
at no cost to you:
This guarantee is subject to the following conditions:
- The appliance has been installed and operated
correctly and in accordance with our operating and
maintenance instructions.
- The appliance is used only on the electricity or gas
supply printed on the rating plate.
- The appliance has been used for normal domestic
purposes only.
- The appliance has not been altered, serviced,
maintained, dismantled, or otherwise interfered with
by any person not authorised by us.
- Any repair work must be undertaken by us or our
appointed agent.
- Any parts removed during repair work or any
appliance that is replaced become our property.
- The appliance is used in the United Kingdom or
Republic of Ireland.
The guarantee does not cover:
- Damage resulting from transportation, improper
use, neglect or interference or as a result of improper
installation.
- Replacement of any consumable item or accessory.
These include but are not limited to: plugs, cables,
batteries, light bulbs, fluorescent tubes and starters,
covers and filters.
- Replacement of any removable parts made of glass
or plastic.
THIS GUARANTEE WILL NOT APPLY IF THE
APPLIANCE HAS BEEN USED IN COMMERCIAL
OR NON-DOMESTIC PREMISES.
Recycling and Disposal Information
As part of Hotpoint’s continued commitment to
helping the environment, Hotpoint reserves the right
to use quality, recycled components to keep down
customer costs and minimise material wastage.
Please dispose of packaging and old appliances
carefully. To minimise the risk of injury to children,
remove the door, plug, and cut the mains cable
off flush with the appliance. Dispose of these parts
separately to ensure that the appliance can no longer
be plugged into mains socket, and the door cannot
be locked shut.
Repairs and After Sales
For product help and advice, repairs, spare parts or
accessories, we’re here to help.
For local repair engineers - 03448 111 606
ROI - 0818 313 413
UK standard local rate applies
ROI local Irish rate applies
For Parts and Accessories visit:
parts.hotpoint.co.uk/shop
Please remember to register your appliance at
www.hotpointservice.co.uk to activate your 10 year
Gebruikershandleiding.com neemt misbruik van zijn services uitermate serieus. U kunt hieronder aangeven waarom deze vraag ongepast is. Wij controleren de vraag en zonodig wordt deze verwijderd.
Product:
Spelregels forum
Om tot zinvolle vragen te komen hanteren wij de volgende spelregels:
lees eerst de handleiding door;
controleer of uw vraag al eerder door iemand anders is gesteld;
probeer uw vraag zo duidelijk mogelijk te stellen;
heeft u een probleem en al geprobeerd om dit op te lossen, vermeld dit erbij aub;
heeft u een oplossing gekregen van een bezoeker dan horen wij dat graag in dit forum;
wilt u een reactie geven op een vraag of antwoord, gebruik dan niet dit formulier maar klik op de knop 'reageer op deze vraag';
uw vraag wordt direct op de website gezet; vermijd daarom persoonlijke gegevens in te vullen;
Belangrijk! Als er een antwoord wordt gegeven op uw vraag, dan is het voor de gever van het antwoord nuttig om te weten als u er wel (of niet) mee geholpen bent! Wij vragen u dus ook te reageren op een antwoord.
Belangrijk! Antwoorden worden ook per e-mail naar abonnees gestuurd. Laat uw emailadres achter op deze site, zodat u op de hoogte blijft. U krijgt dan ook andere vragen en antwoorden te zien.
Abonneren
Abonneer u voor het ontvangen van emails voor uw Hotpoint-Ariston RPD 10457 J bij:
nieuwe vragen en antwoorden
nieuwe handleidingen
U ontvangt een email met instructies om u voor één of beide opties in te schrijven.
Ontvang uw handleiding per email
Vul uw emailadres in en ontvang de handleiding van Hotpoint-Ariston RPD 10457 J in de taal/talen: Engels als bijlage per email.
De handleiding is 1,09 mb groot.
U ontvangt de handleiding per email binnen enkele minuten. Als u geen email heeft ontvangen, dan heeft u waarschijnlijk een verkeerd emailadres ingevuld of is uw mailbox te vol. Daarnaast kan het zijn dat uw internetprovider een maximum heeft aan de grootte per email. Omdat hier een handleiding wordt meegestuurd, kan het voorkomen dat de email groter is dan toegestaan bij uw provider.
Stel vragen via chat aan uw handleiding
Stel uw vraag over deze PDF
Uw handleiding is per email verstuurd. Controleer uw email
Als u niet binnen een kwartier uw email met handleiding ontvangen heeft, kan het zijn dat u een verkeerd emailadres heeft ingevuld of dat uw emailprovider een maximum grootte per email heeft ingesteld die kleiner is dan de grootte van de handleiding.
Er is een email naar u verstuurd om uw inschrijving definitief te maken.
Controleer uw email en volg de aanwijzingen op om uw inschrijving definitief te maken
U heeft geen emailadres opgegeven
Als u de handleiding per email wilt ontvangen, vul dan een geldig emailadres in.
Uw vraag is op deze pagina toegevoegd
Wilt u een email ontvangen bij een antwoord en/of nieuwe vragen? Vul dan hier uw emailadres in.