580726
14
Verklein
Vergroot
Pagina terug
1/26
Pagina verder
2. Visually inspect the spark plug.
Discard it if the insulator is
cracked or chipped. Clean the
spark plug with a wire brush if it
is to be reused.
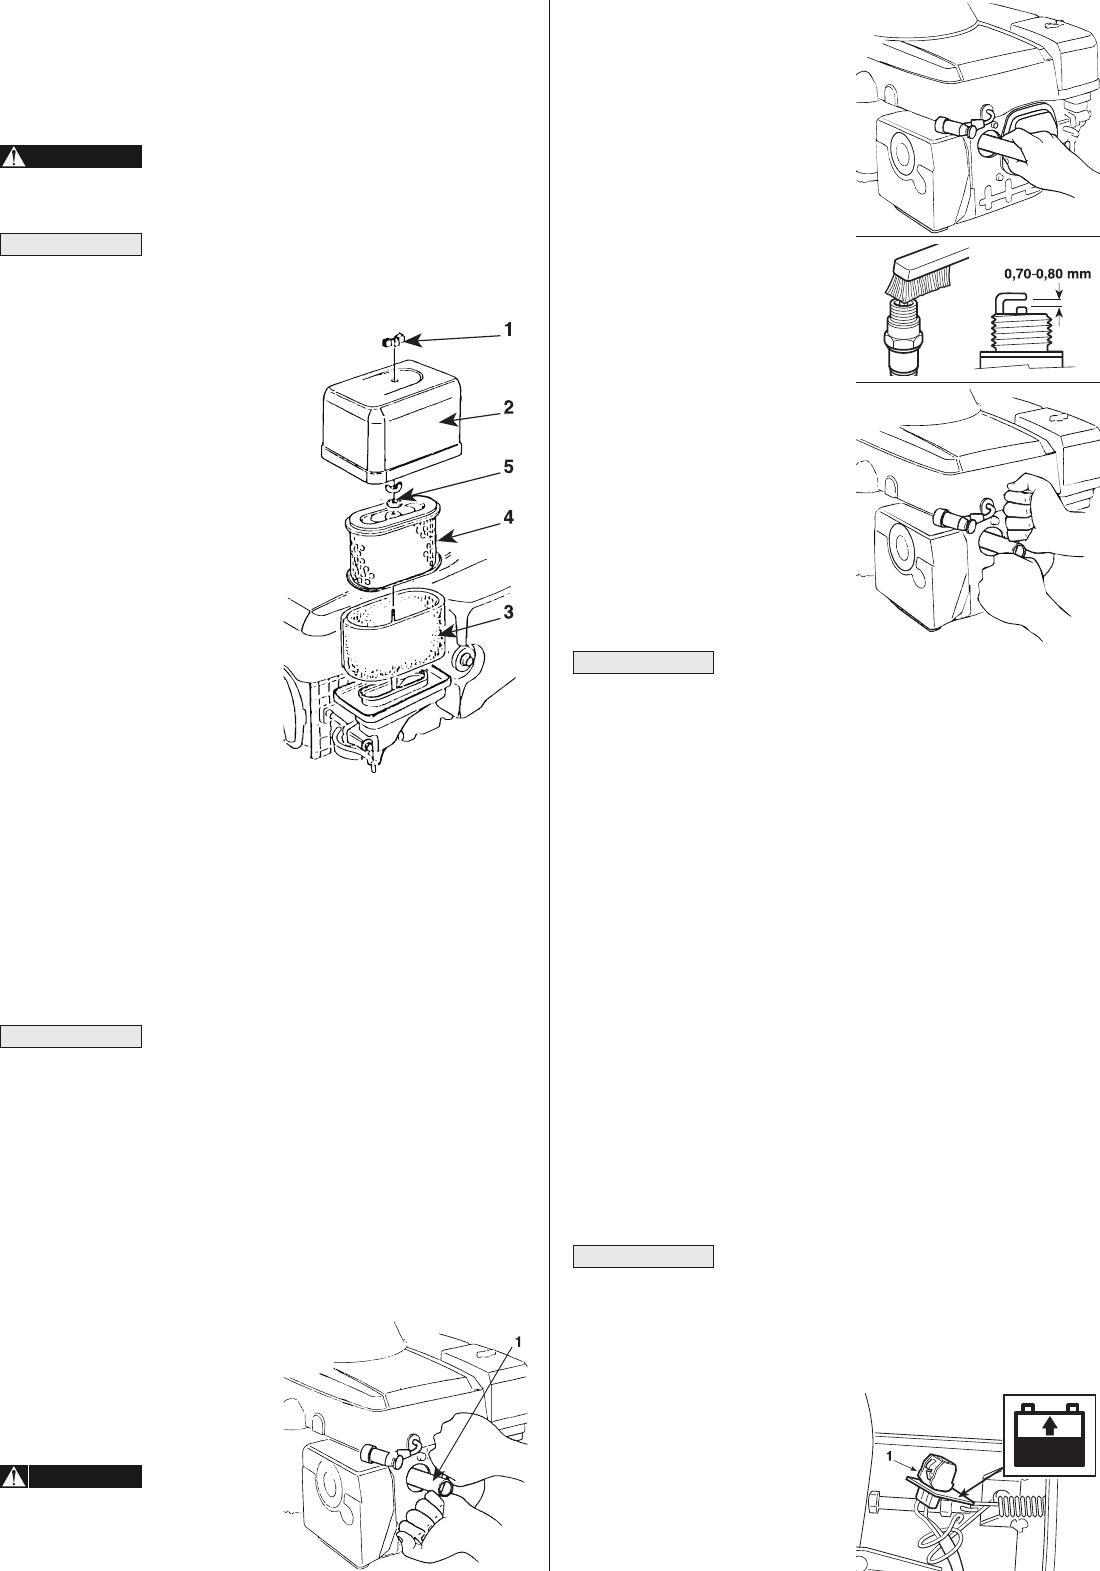
3. Measure the plug gap with a
feeler gauge. Correct as ne-
ces sary by bending the side
electrode. The gap should be:
0.70 - 0.80 mm.
4. Check that the spark plug
washer is in good condition and
thread the spark plug in by
hand to prevent cross-thread-
ing.
5. When installing a new spark
plug, tighten 1/2 turn after the
spark plug seats to compress
the washer. When reinstalling a
used spark plug, tighten 1/8 1/4
turn after the spark plug seats
to compress the washer.
The spark plug
must be securely tightened. An improperly tightened spark plug
can become very hot and may damage the engine.
REAR AXLE
These are permanently lubricated with grease that does not need
changing.
BATTERY
To ensure long life to the battery it is essential to keep it carefully
maintained.
The machine battery must always be charged:
– before using the machine for the first time after purchase;
– before leaving the machine for a prolonged period of disuse;
before starting up the machine after a prolonged period of disuse.
Carefully read and comply with the procedure for recharging de-
scribed in the booklet coming with the battery. If the procedure is not
followed or the battery is not charged, irreparable damage could be
caused to the elements inside the battery. A flat battery must be
recharged as soon as possible.
Recharging must be done by using the “CB01”
battery charger supplied wiith your machine. Other recharging sys-
tems can irreversibly damage the battery.
follow the instructions given in the relative instruction booklet,
– follow the instructions given in the battery booklet.
The machine has a connector (1)
for recharging, to be connected to
the corresponding connector of the
special “CB01” maintenance bat-
tery-charger.
IMPORTANT
IMPORTANT
14EN
AIR CLEANER SERVICE
A dirty air cleaner will restrict air flow to the carburetor. To prevent
carburetor malfunction, service the air cleaner regularly. Service
more frequently when operating the engine in extremely dusty
areas.
Never use ga so line or low flash point sol-
vents for cleaning the air clea ner element. A fire or explosion
could result.
Never run the engine without the air cleaner.
Rapid engine wear will result.
1. Remove the wing nut (1) and
the air cleaner cover (2). Re-
move the elements and sepa-
rate them. Carefully check both
elements for holes or tears and
replace if damaged.
2. Foam element (3): Clean in
warm soapy water, rince and
allow to dry thoroughly. Or
clean in high flash-point solvent
and allow to dry. Dip the ele-
ment in clean engine oil and
squeeze out all the excess. The
engine will smoke during initial
start-up if too much oil is felt in
the foam.
3. Paper element (4): Tap the element lightly several times on a hard
surface to remove excess dirt, or blow compressed air through
the filter from the inside out. Never try to brush the dirt off; brush-
ing will force dirt into the fibers. Replace the paper element if it
is excessively dirty. Clean in warm, soapy water and rinse. Dry
using compressed air blown from the inside out, or shake the el-
ement and allow it to air dry thoroughly. (Or clean in high flash
point solvent, remove immediately, and allow to dry.).
Remember to reinstall the air cleaner grommet
(5), replace the grommet if necessary.
SPARK PLUG SERVICE
RECOMMENDED SPARK PLUG: BPR5ES (NGK)
To ensure proper engine operation, the spark plug must be properly
gapped and free of deposits.
1. Remove the spark plug cap
and use the proper size spark
plug wrench (1) to remove the
spark plug.
If the engine
has been running, the muffler
will be very hot. Be careful not
to touch the muffler.
WARNING!
NOTE
IMPORTANT
WARNING!
14

Hulp nodig? Stel uw vraag in het forum

Spelregels
1

Forum

Honda-HF1211

Zoeken resetten

  • Honda HF1211 zitmaaier: om de startmotor te vervangen moet ik het vliegwiel eraf halen met poelietrekker? Vindt geen technische handleiding. Gesteld op 28-2-2023 om 17:44

    Reageer op deze vraag Misbruik melden
  • hoe kan ik maaidek demonteren van honda zitmaaier hf1211 Gesteld op 20-12-2022 om 08:29

    Reageer op deze vraag Misbruik melden
  • Aandrijfriem vervangen en de maaier er afhalen van Honda Gardenstar 20 pk 25 jaar oud.
    Ik zou graag weten hoe dat moet gebeuren
    Groetjes Frans Gesteld op 13-7-2021 om 21:53

    Reageer op deze vraag Misbruik melden
  • hoe haal ik de boddy van mijn zit maaier1211 af wil goed bij de motor komen Gesteld op 31-3-2020 om 17:36

    Reageer op deze vraag Misbruik melden
  • Hello heb zitmaaier 1211 problemen hapert .na vervangen van luchtfilter benzine benzinefilter bougie olie ververst carburater pot leeggemaakt start hij terug maar nu rookt hij zwart en stinkt het heel erg ik vermoedt carburater !!!! Of zie ik iets niet ???? Wie kan mij goede raad geven aub ??? Gesteld op 12-6-2017 om 19:51

    Reageer op deze vraag Misbruik melden

Misbruik melden

Gebruikershandleiding.com neemt misbruik van zijn services uitermate serieus. U kunt hieronder aangeven waarom deze vraag ongepast is. Wij controleren de vraag en zonodig wordt deze verwijderd.

Product:

Bijvoorbeeld antisemitische inhoud, racistische inhoud, of materiaal dat gewelddadige fysieke handelingen tot gevolg kan hebben.

Bijvoorbeeld een creditcardnummer, een persoonlijk identificatienummer, of een geheim adres. E-mailadressen en volledige namen worden niet als privégegevens beschouwd.

Spelregels forum

Om tot zinvolle vragen te komen hanteren wij de volgende spelregels:

Belangrijk! Als er een antwoord wordt gegeven op uw vraag, dan is het voor de gever van het antwoord nuttig om te weten als u er wel (of niet) mee geholpen bent! Wij vragen u dus ook te reageren op een antwoord.

Belangrijk! Antwoorden worden ook per e-mail naar abonnees gestuurd. Laat uw emailadres achter op deze site, zodat u op de hoogte blijft. U krijgt dan ook andere vragen en antwoorden te zien.

Abonneren

Abonneer u voor het ontvangen van emails voor uw Honda HF1211 bij:


U ontvangt een email met instructies om u voor één of beide opties in te schrijven.


Ontvang uw handleiding per email

Vul uw emailadres in en ontvang de handleiding van Honda HF1211 in de taal/talen: Engels als bijlage per email.

De handleiding is 1,49 mb groot.


U ontvangt de handleiding per email binnen enkele minuten. Als u geen email heeft ontvangen, dan heeft u waarschijnlijk een verkeerd emailadres ingevuld of is uw mailbox te vol. Daarnaast kan het zijn dat uw internetprovider een maximum heeft aan de grootte per email. Omdat hier een handleiding wordt meegestuurd, kan het voorkomen dat de email groter is dan toegestaan bij uw provider.

Stel vragen via chat aan uw handleiding

Stel uw vraag over deze PDF

loading

Andere handleiding(en) van Honda HF1211

Honda HF1211 Gebruiksaanwijzing - Nederlands - 25 pagina's

Honda HF1211 Gebruiksaanwijzing - Deutsch - 25 pagina's


Uw handleiding is per email verstuurd. Controleer uw email

Als u niet binnen een kwartier uw email met handleiding ontvangen heeft, kan het zijn dat u een verkeerd emailadres heeft ingevuld of dat uw emailprovider een maximum grootte per email heeft ingesteld die kleiner is dan de grootte van de handleiding.

Er is een email naar u verstuurd om uw inschrijving definitief te maken.

Controleer uw email en volg de aanwijzingen op om uw inschrijving definitief te maken

U heeft geen emailadres opgegeven

Als u de handleiding per email wilt ontvangen, vul dan een geldig emailadres in.

Uw vraag is op deze pagina toegevoegd

Wilt u een email ontvangen bij een antwoord en/of nieuwe vragen? Vul dan hier uw emailadres in.


Info