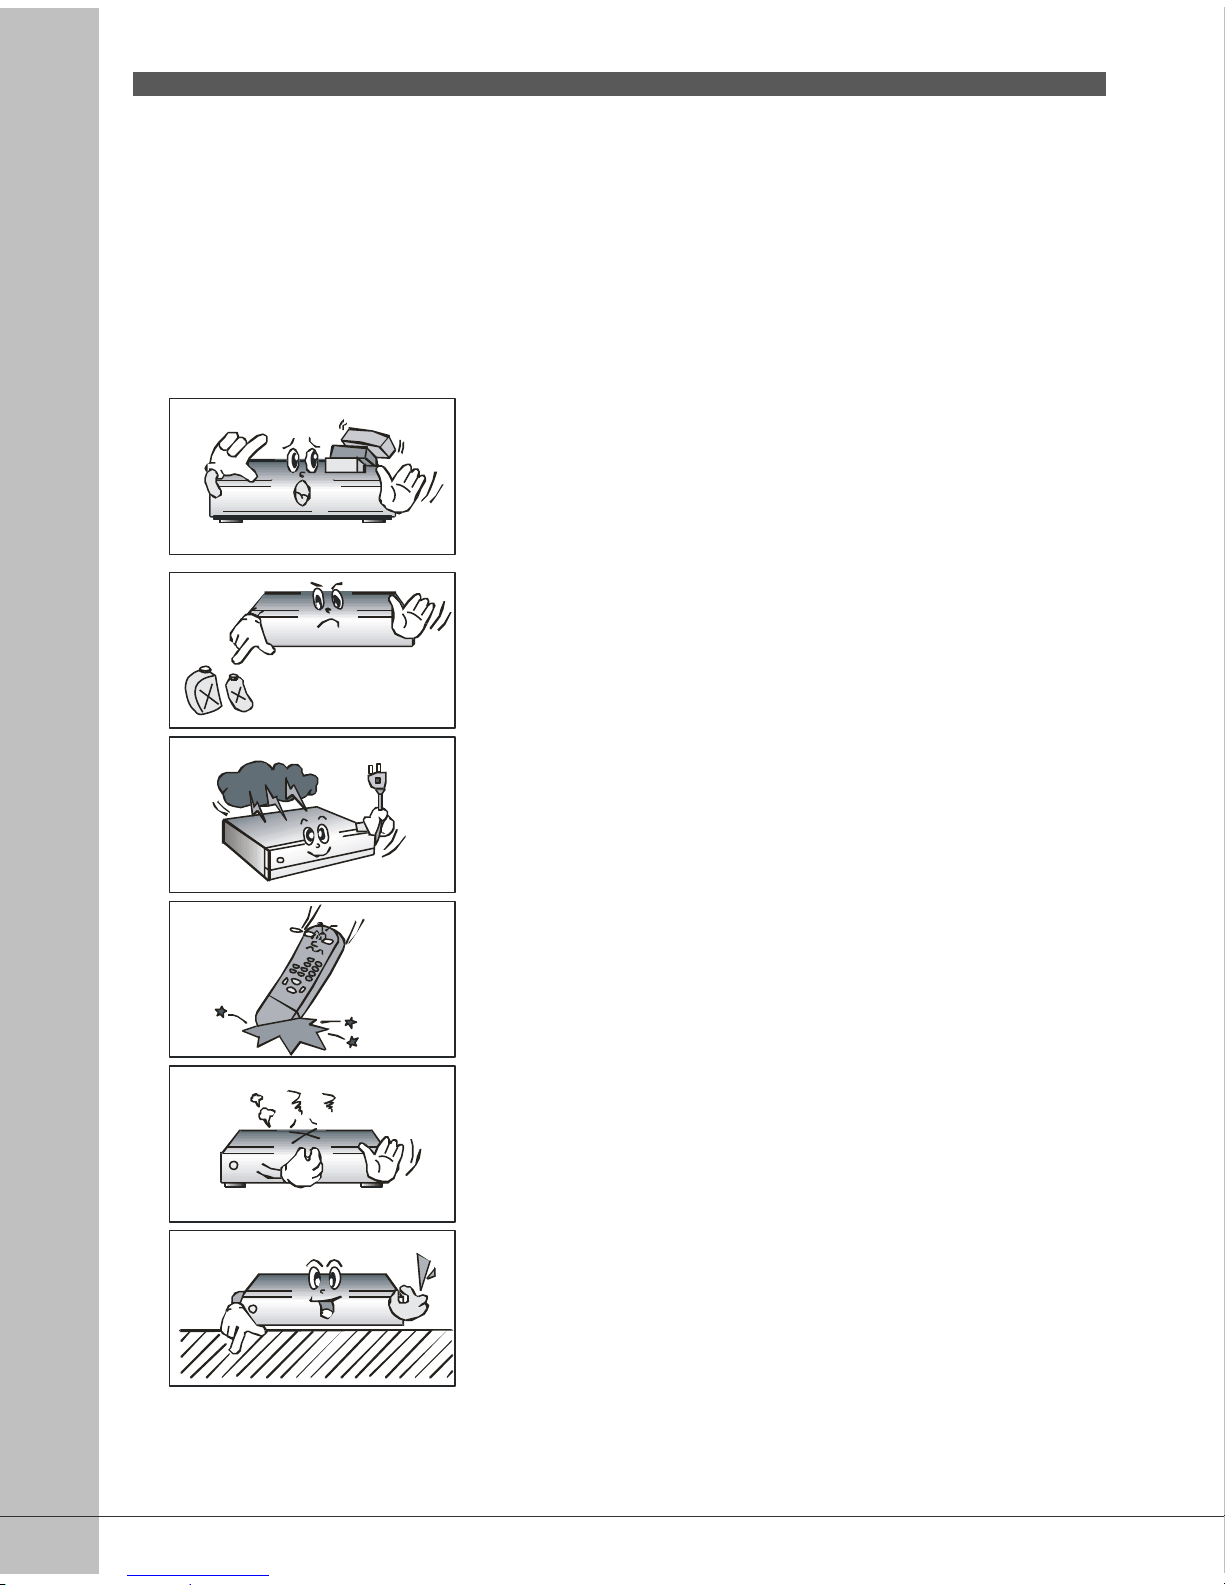
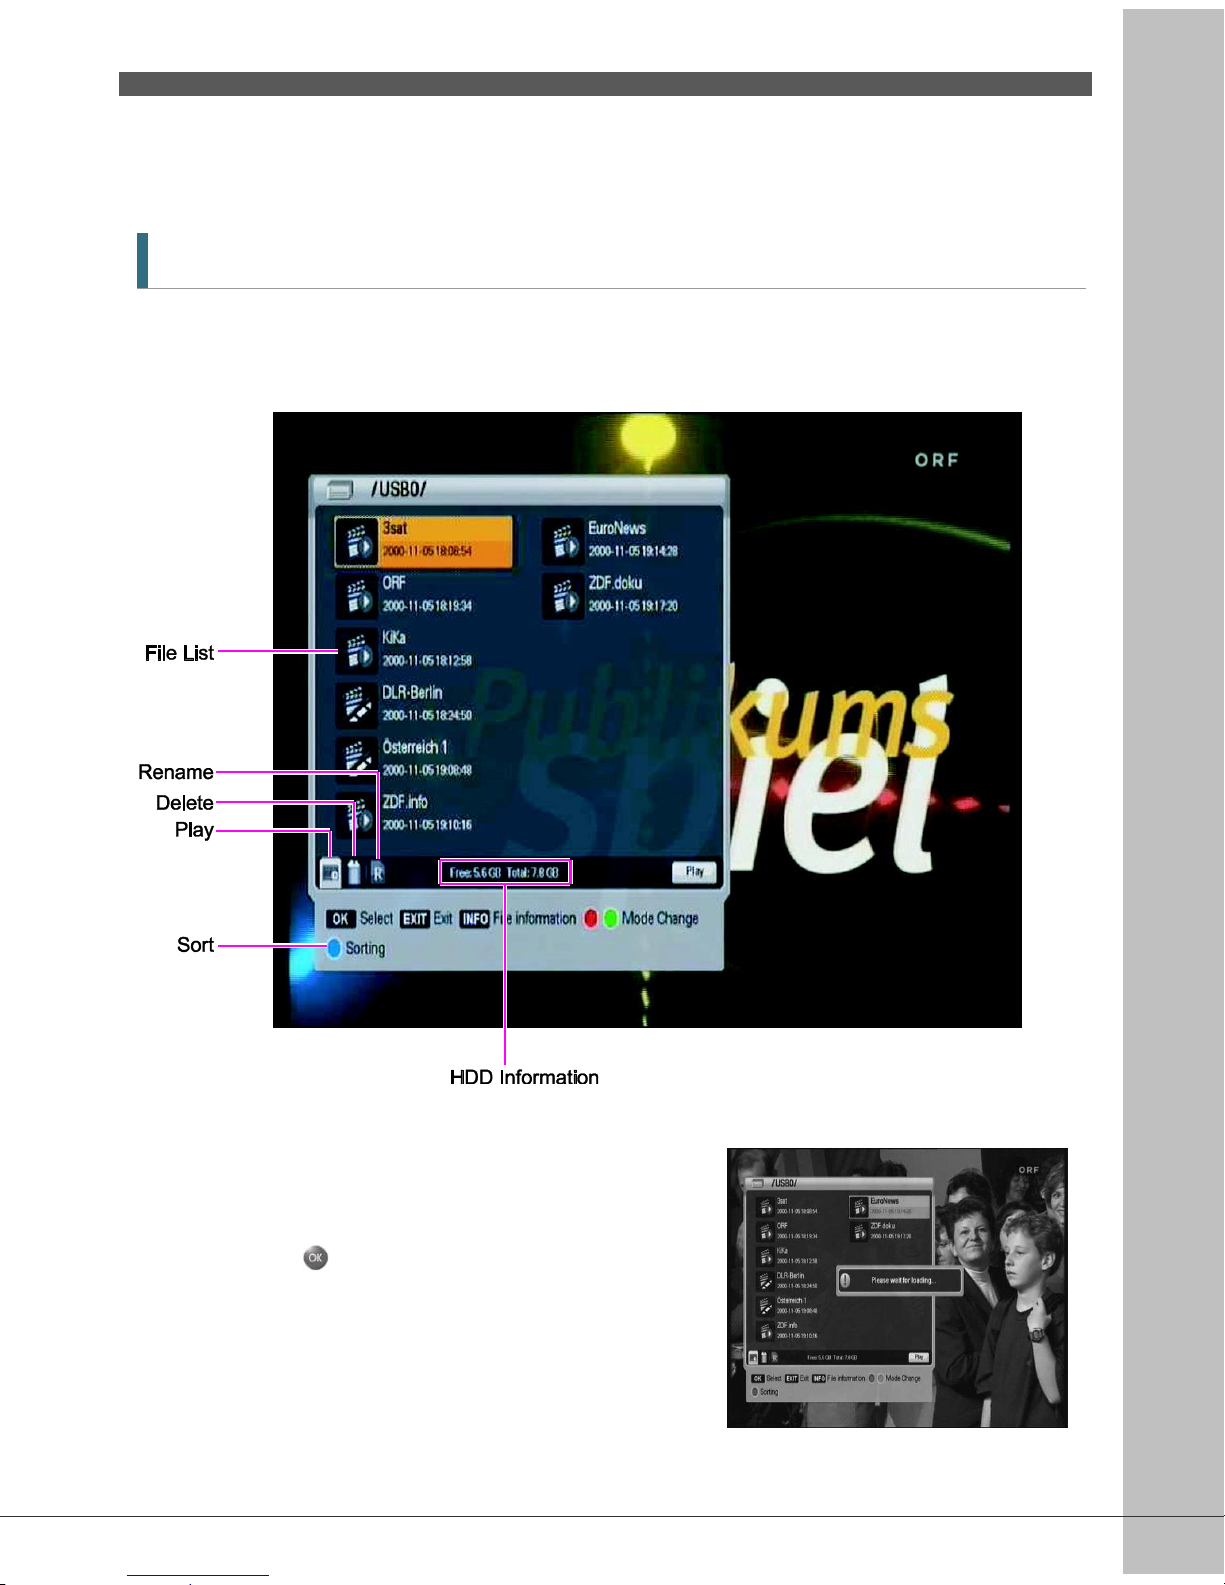
791729
13
Verklein
Vergroot
Pagina terug
1/55
Pagina verder
1
Downloaded from www.Manualslib.com manuals search engine
2
TABLE OF CONTENTS
Notice 4
License Notice 5
Safety Information 6
1. Before You Begin 8
1.1 Features 8
1.2 Accessories 9
2. Controls and Functions 10
2.1 Front Panel 10
2.2 Rear Panel 11
2.3 Remote Control Unit 12
3. Connections 14
3.1 Connecting to TV 14
3.2 Connecting to Dish 17
4. Menu Overview 19
4.1 Menu Instruction 19
4.2 Menu Help 19
4.3 Menu Structure 20
5. Menu Operation 22
5.1 First Installation 22
5.2 Installation 23
5.3 Option 28
5.4 Channel 31
5.5 Advanced 32
5.6 Status 34
Downloaded from www.Manualslib.com manuals search engine
3
5.7 PVR 35
6. Viewing General Information 36
6.1 Banner Information 36
6.2 TV & Radio changing 37
6.3 TV or Radio Channel Lists 37
6.4 Option 41
6.5 A/V+ 42
6.6 Fav 43
6.7 A-Z 43
6.8 EPG 44
7. PVR 45
7.1 File List 45
7.2 PVR Banner 47
Additional Information 51
A.1 Troubleshooting 51
A.2 Technical Specifications 52
A.3 Glossary of Terms 54
Downloaded from www.Manualslib.com manuals search engine
4
Notice
Read this manual carefully and make sure you understand the provided instructions. For
your safety, check what the result each action will be.
Warnings, Cautions and Notes
Throughout he whole manual, pay special attention to the following marks that indicate hazardous
situations.
Caution
Indicates a situation which, if not avoided, could damage the
equipment or apparatus.
Warnings
Indicates a hazardous situation which, if not avoided, could result in
serious injury.
Note
Indicates additional information to the user to make the user aware of
possible problems and information of any importance to help the user
to understand, to use and to maintain the installation.
Downloaded from www.Manualslib.com manuals search engine
5
License Notice
Manufactured under license from Dolby Laboratories.
Dolby, and the double-D symbol are trademarks of Dolby Laboratories.
HDMI, the HDMI logo and High-Definition Multimedia Interface are
trademarks or registered trademarks of HDMI licensing LLC.
ABOUT DIVX VIDEO: DivX® is a digital video format created by DivX,Inc.
This is an official DivX Certified device that plays DivX video. Visit
www.divx.com for more information and software tools to convert your
files into DivX video.
ABOUT DIVX VIDEO-ON-DEMAND: This DivX Certified® device must be
registered in order to play DivX Video-on-Demand (VOD) content. To
generate the registration code, locate the DivX VOD section in the device
setup menu. Go to vod.divx.com with this code to complete the
registration process and learn more about DivX VOD.
DivX Certified® to play DivX® video, including premium content
Downloaded from www.Manualslib.com manuals search engine
6
Safety Information
This digital satellite receiver has been manufactured to comply with international safety standards.
Please read the following safety precautions carefully.
Safety Instructions and Precautions
Avoid placing heavy things and blocking ventilation passage.
(Passage blocking can cause fire)
Avoid scrubbing the surface with Benzene or Volatile gasoline. Color
can be damaged.
Leave the power and the antenna off for the ling absence or during
thunder storm.
Avoid dropping and damaging Remote Control Unit.
If there is smoke or burning smell, turn off & un-plug the set
immediately. Contact your local repair center for advice.
Avoid placing the set on slippery and slant surface.
Downloaded from www.Manualslib.com manuals search engine
7
Keep away from the water.
Clear off the dust. Dust or Metallic particles inside the set can cause
fire and electric shock.
Avoid dissembling and assembling. Do not open the set.
Do not snatch the cable to plug out.
Do not move the set while power cord is plugged in.
Keep the distance from Magnetic items and Audio Speaker.
Place the set with the good ventilation and away from the direct
sunlight and humidity.
Avoid the temperature of over 30C and below 5C.
Downloaded from www.Manualslib.com manuals search engine
8
1. Before You Begin
1.1 Features
Brilliant On Screen Graphic
MPEG-2 Video(MP@ML), MPEG-1 Audio Layer1, Layer2, H.264/AVC, Dolby Digital
LNB Controlling Logic
SCPC/MCPC Receiver from C/Ku-Band Satellites
Digital Tuner with Loop-through
Wide Symbol Rate 1~45Mbps & Frequency Input 950~2150MHz
DiSEqC 1.2 Supported
S/PDIF Dolby Digital audio
User friendly OSD menu with full function
Vector Font and 256 color GUI(Graphic User Interface)
Multi-language menu
Variable aspect ratio(4:3, 16:9) with Pan Vector or Letter Box
EPG(Electronic Program Guide) for On-screen Channel Information
Teletext and Subtitle supported(VBI & OSD)
Installation by Easy Setup Guide
Capacity for storing multi channel (8000 channels, 1000 transponders)
Favorite Channel and Parental Lock Function
HDMI (High Definition Multimedia Interface) supported
DVB-S2 Supported (QPSK, NBC-QPSK, NBC-8PSK)
USB 2.0 Host supported
PVR capable with External HDD via USB 2.0 port
- Recording / Playback in STB or PC
- S/W / Channel data transfer through USB 2.0 port
- Bookmarking & jump function
Downloaded from www.Manualslib.com manuals search engine
9
1.2 Accessories
Component cable
HDMI cable
Operating Manual
Remote Control
AAA dry cell batteries x 2
Downloaded from www.Manualslib.com manuals search engine
10
2. Controls and Functions
2.1 Front Panel
2 4 6
1 3 5
Item
Description
1. Power Button
Turn the receiver On/Off.
2. Volume Up/Down Buttons
(/)
Increase & decrease the volume levels in viewing mode and changes
settings in menu mode.
3. CH Up/Down Buttons
(/)
Change channels in viewing mode and moves the cursor up/down in
menu mode.
4. MENU/OK Button
Show the Main menu in viewing mode. Activates the highlighted menu
item in menu mode.
5. Exit Button
Exit from the current menu or cancels the current progressing
operation if applicable.
Select the video resolution while watching the program.
6. Common Interface slot
Insert the Conditional Access Modules (CAM) when watching the
scrambled services
Downloaded from www.Manualslib.com manuals search engine
11
2.2 Rear Panel
Description
Connect the satellite dish.
Loop Out is an output port of the DISH IN signal.
Using standard A/V cables, these jacks connect Y/Pb/Pr(Green, Blue, Red) to
a TV or VCR that accepts HD component video input.
Using standard video cables, these jacks connect CVBS(Yellow) to Video of TV
or VCR.
Using standard stereo audio cables, these jacks connect L/R(White, Red) to
Audio of TV or VCR.
Connect HDMI input of TV or PC monitor
Connect the S/PDIF to a Dolby Digital decoder for Dolby Digital audio.
USB 2.0 Connector
Turn the STB ON/OFF
90~240V AC(Auto-selectable),50~60Hz. Make sure to check the power
specification.
Downloaded from www.Manualslib.com manuals search engine
12
2.3 Remote Control Unit
All receiver features can be controlled with the remote controller.
Button
Description
1. POWER
Turn the receiver On/Off.
TV/Rad
Switch between TV and Radio.
TV/STB
Switch between TV and STB
mode.
2. NUMERIC Buttons
( ~ )
Select channels or can use as an
alphabetic search key in the
sorted channel lists.
BACK
Move to the previous channel.
MUTE
Turn the sound on/off.
3. OPT( )
Select the option such as Audio
Language, Teletext Language and
Subtitle Language.
A/V+( )
Select video mode, audio mode
and resolution.
Favorite ( )
Select the group of satellite or
favorite.
A-Z ( )
Sort the channels automatically in
alphabetical order.
MENU
Display the main menu of the
receiver and come out from inner
level to viewing mode(Exit all).
EPG
Show the TV/Radio Channel
guide.
Information
Show the information of the
Banner and EPG.
Downloaded from www.Manualslib.com manuals search engine
13
Button
Description
4. / ( / )
Move left/right or change settings in menu mode.
/ ( / )
Move up/down in menu mode.
OK( )
Confirm the choices and/or selections the highlighted menu item. While
watching TV or listening to Radio, press the button and the channel list
will appear.
5. V+/-
Change the volume level in viewing mode.
P+/-
Change channels in viewing mode.
Selects other menu pages with sub-pages.
EXIT
Go back step or exit from the menu of the receiver.
6. PAUSE
Pause playing mode, recording mode and Time Shift.
PLAY
Play the recorded file.
7. REW
Rewind playback.
STOP
Stop playing mode, recording mode and Time Shift.
FF
Fast forward playback.
REC
Record the channel.
SLOW
Playback in slow mode
LIST
Display the filelist.
A-B
Set the block to repeat, copy and cut.
MARK
Set the bookmark.
JUMP
Jump to bookmarked point.
8. F1
Play the next DivX file in the DivX file list when playing a DivX content.
F2
Play the previous DivX file in the DivX list when playing a DivX content.
F3
No function
SLEEP
Turn the STB off after minutes set.
Downloaded from www.Manualslib.com manuals search engine
14
3. Connections
3.1 Connecting to TV
<Connecting to digital TV which can support HD resolution
(1080p,1080i,720p,576p and 576i) using YPbPr port>
1.
Connect STBs YPbPr out and audio L/R out to YPbPr in and audio L/R in of TV.
2.
Set STBs video output mode among 1080p, 1080i, 720p, 576p and 576i using
A/V+( ) key of remote controller.
Please check TVs user manual for detail connecting method of the YPbPr input port.
Downloaded from www.Manualslib.com manuals search engine
15
<Connecting to PC monitor or digital TV which has HDMI input port>
1.
Connect STBs HDMI out and to HDMI in of monitor or TV.
2.
Set STBs video output mode among 1080p, 1080i, 720p, 576p and 576i using
A/V+( ) key of remote controller.
For the best access to HD programming at the highest available resolution, use this connection
method.
Downloaded from www.Manualslib.com manuals search engine
16
<Connecting to A/V receiver (Dolby digital amplifier)>
1.
Connect STBs optical digital audio out to A/V receiver.
2.
Set STBs audio out mode to Digital Audio.
Downloaded from www.Manualslib.com manuals search engine
17
3.2 Connecting to Dish
<Dish>
Connect the Satellite antenna cable to DISH IN.
<Fixed Dishes Using a DiSEqC switch>
Connect the output of DiSEqC 1.0 to DISH IN of the receiver.
Downloaded from www.Manualslib.com manuals search engine
18
<Moved Dish Using DiSEqC 1.2>
Connect the output of DiSEqC 1.2 to DISH IN of the receiver.
Downloaded from www.Manualslib.com manuals search engine
19
4. Menu Overview
4.1 Menu Instruction
Press the MENU button to display the menu. You can select the sub menu using ///
button. The selected sub menu becomes highlighted.
When you have selected the sub menu you want, press the button.
When you want to return to the previous menu, press the button.
When you want to return to the live screen, press the Menu button.
4.2 Menu Help
In the menu, short information is displayed at the bottom of the screen.
: Using / button.
: Using P+/P- button.
: Using /button.
: Using button.
: Using Opt, A/V+, Fav button.
: Using button.
: Numerical button or Button.
Downloaded from www.Manualslib.com manuals search engine
20
4.3 Menu Structure
In the menu, short information is displayed at the bottom of the screen.
Installation
Dish : Select the dish and LNB Settings for channel search.
Auto Scan : Search the channel of the selected satellite automatically without inputting the
special parameters.
Manual Scan : Search the channel manually with user's inputting parameters.
Transponder Edit : Delete, edit, and add satellite or transponder parameters.
Option
TV Output : Select the video or audio output.
Language : Select the display language, audio language, and subtitle language.
Time Setting : Set the current time.
Parental Control : Change the password and select the censorship classification
OSD Display : Setting OSD display time and transparency.
Channel
Sorting : Sort the channel by Transponder, Network and CAS.
Reservation : Reserve the channels you want to record at your desired time.
Delete : Delete the channels such as Favorite, TV/Radio CAS, etc.
Advanced
Reset Factory Default : Restore the receiver to the default values.
OTA : Upgrade the receiver into the latest software version.
USB Transfer : Transfer the channel data or the system software between receiver and USB
drive.
DivX Key Registration : Register the initial DivX Key
DivX Key Deactivation : Deactivate the registered DivX key
Status
Information : Check the version of satellite receiver.
PowerSave Mode : Select the power save mode or not.
CI Slot 1 : Check the smartcard information of Slot 1.
Downloaded from www.Manualslib.com manuals search engine
21
PVR
HDD Information : Check the capacity of HDD
Format HDD : Format HDD permanently
Demount HDD : Use this function when you safely remove the external HDD from the STB.
Downloaded from www.Manualslib.com manuals search engine
22
5. Menu Operation
5.1 First Installation
You can install the receiver using First Installation for your convenience.
First Installation' allow you to set your receiver using simple procedure.
1.
Select the desired language using the /
button.
2.
Press the button to confirm and go to the
next step.
1. Select the desired antenna power using the /
button.
2. Press the button to confirm.
In step2 if you select Load Astra1 or Load Hotbird, you can make Default channels. Else
if you select Scan Others, you can choose other satellite and go to the next step.
Downloaded from www.Manualslib.com manuals search engine
23
5.2 Installation
5.2.1 Dish
1. Press the Menu button to display the main menu.
2. Press the button on the sub menu. The
password pop-up window appears. All sub menus
such as Dish, Auto Scan, Manual Scan, and
Transponder Edit on the Installation are locked by
password. The default password is 0000.
1. Use the / button, you can move upwards
and downwards in this mode. In any item, such
as Dish, Satellite, Transponder, etc. if you want to
check the detail view, use the / button.
1. Press the / button, the right screen shows
the pre-selected 32 satellite lists.
2. Select the desired satellite, and press the
button. Then satellite column changed by the
desired satellite name.
3. If you cant find the desired satellite, select any
satellite and press the button.
1. Press the / button to watch the satellite in
the pre-programmed lists. Press the button
to replace the current satellite with the selected
satellite.
Downloaded from www.Manualslib.com manuals search engine
24
1. Press the / button, the right screen shows
the transponder lists.
2. Press the button to select other transponder.
If you select one of the alternative satellite
names, the transponder list is changed
automatically according to the selected satellite
name.
1. Select one of the LNB Power types using the /
button. You can select LNB Power value as
13/18V normally or if the distance between
antenna and receiver is further than 60m, you
can select LNB Power value as 14/19V.
1. Select the LNB Type value. If you have selected
User Single or User Dual, enter LNB frequency
value directly, and press the button. If you
select LNB Type value as 9750/10600,
9750/10750 or User Dual, 22KHz value is fixed to
auto mode, in other case you can select a value
depending on usage of 22KHz tone switch box.
1. Select Switch Type if used.
2. If you use a DiSEqC 1.0 switch, select DiSEqC on
the Switch Type.
3. Select one of the DiSEqC inputs from the Option.
Downloaded from www.Manualslib.com manuals search engine
25
1. Select Switch Type.
2. If you use a DiSEqC 1.1 switch, select SMATV on
the Switch Type.
3. Enter a value with the numeric key. (950~2150).
1. Select Switch Type.
2. If you use a DiSEqC 1.2 motor, select the Motor
on the Switch Type.
3. Change position of your Motor through the
Option.
DiSEqC 1.2 Options :
Move West-East : Press the / button to move the motor.
Store Position : Press the button to save the current position.
Go to Position : Press the button to move the motor to the stored position.
Go to Reference : Press the button to move the motor to the 0 position.
Set West Limit : Press the button to fix West limit.
Set East Limit : Press the button to fix East limit.
Enable Limit : Press the button to change the limit.
(Set West Limit & Set East Limit can be available with Disable Limit status)
1. Select Switch Type.
2. If you use a USALS motor, select from the Switch
Type using the / button.
3. Change position of your USALS motor through
the Option.
Go to Position : Press the button to move the motor to the position calculated by
the longitude and latitude.
Downloaded from www.Manualslib.com manuals search engine
26
1. Jump To allows you to go to the Auto Scan
or Manual Scan mode directly.
2. Select Auto Scan or Manual Scan and
press the button.
5.2.2 Auto Scan
You can search the channels offered by the satellite for which your antenna has been configured.
1. Select the satellite for scanning using /
button and press the button.
2. The check mark indicates which satellite has been
marked for scanning.
3. Press the / button, select scan option using
/ button, and press the button.
4. If you want to scan the satellite move to Start
Scan and press the button.
1. Select Free+CAS or CAS using the ///
button.
2. Select the kind of CAS using the / button.
3. Press the button.
4. If you want to scan the satellite move to Start
Scan and press the button.
1. The left window shows TV channels and the right
window shows Radio channels during the
scanning process. White channel names are new
channels downloaded to your receiver. Black
channel names are already existing channels.
Downloaded from www.Manualslib.com manuals search engine
27
1. If you press the button when scanning for
channels, pop-up window appears.
2. When you complete scanning for channels, a
similar pop-up menu appears.
3. If you want to save the updated channels, select
Yes.
5.2.3 Manual Scan
1. Change to the specific values you want to scan.
2. Press the button to start the manual scan.
Dish : The target satellite for the manual scan.
Frequency : The frequency of the transponder you want to find manually.
Polarity : The polarity of the transponder you want to find.
Symbol Rate : The symbol rate of the transponder you want to find.
Modulation : The selection of modulation(DVB-S QPSK, DVB-S2 QPSK and DVB-S2 8PSK)
Pilot : The DVB-S2 parameter (DVB-S2 modulation mode only)
Code Rate : The code rate of the transponder you want to find.
Scan Mode : In the Free Channel mode, the receiver scans all channels without
scrambled service.
Service Type : The selection of TV, Radio and TV&Radio.
Network Search : When enable, the receiver searches for more transponders using the
network index table.
PID Search : Search using Auto PID, Manual Dec, Manual Hex.
1. When you select Manual Dec option, a pop-up
menu appears.
2. Enter the value of Video PID, Audio PID and PCR
PID with numeric keys.
3. Press the button to scan PIDs or press the
button to make the pop-up menu
disappeared.
Downloaded from www.Manualslib.com manuals search engine
28
1. When you select DVB-S2 Modulation (DVB-S2
QPSK & DVB-S28PSK), you can see Roll off
menu at the below.
2. Roll Offis the value of the transponder you
want to find, enter the value of Roll Off with
the red Opt button.
3. Press the button to make the pop-up window
disappeared.
5.2.4 Transponder Edit
1. Press the Opt button to select the satellite in the
left screen or the transponder in the right screen.
2. Select one of Delete, Edit or Add from the pop-up
window. (The satellite and transponder cannot be
deleted if the channels for that satellite have
already been downloaded)
3. If you press the button, the current
changing state will be saved and exit.
5.3 Option
5.3.1 TV Output Setup
1. Select the TV output options using the ///
button.
2. If you press the button, the changed state
will be saved and exit.
Downloaded from www.Manualslib.com manuals search engine
29
TV Screen : Select the screen format of your TV (4:3, 16:9).
TV Screen Format : Select the screen format through your STB (Auto, Pillar box, Pan &
Scan).
Dolby Digital : If you set it to the enable mode, you can listen Dolby Digital audio in
preference to other audio formats when the broadcasting contents are
encrypted with Dolby Digital audio format.
Digital Audio : If you set it to the enable mode, you can listen Dolby Digital audio
through Dolby Digital decoder connecting with RCA output.
5.3.2 Language
1. Select the language options using the ///
button.
2. Press the button to change the selected
language.
Display : Change the language used in the OSD and Menus.
Audio 1-2 : Change the language that you listen to audio in.
Subtitle 1-2 : Change the language that you watch the subtitle in.
5.3.3 Time Setting
1. Setting current time using the ///
button.
2. If you press the button, current changing
state will be saved and exit.
Time Mode (TDT, USER).
TDT : Receive the time from broadcaster.
USER : Set the time directly by user.
Offset : Set the time difference between GMT and the local time.
Day light saving : Day light saving will work only in case of 'Enable' mode.
Start day : Day light saving start day.
End day : Day light saving end day.
Downloaded from www.Manualslib.com manuals search engine
30
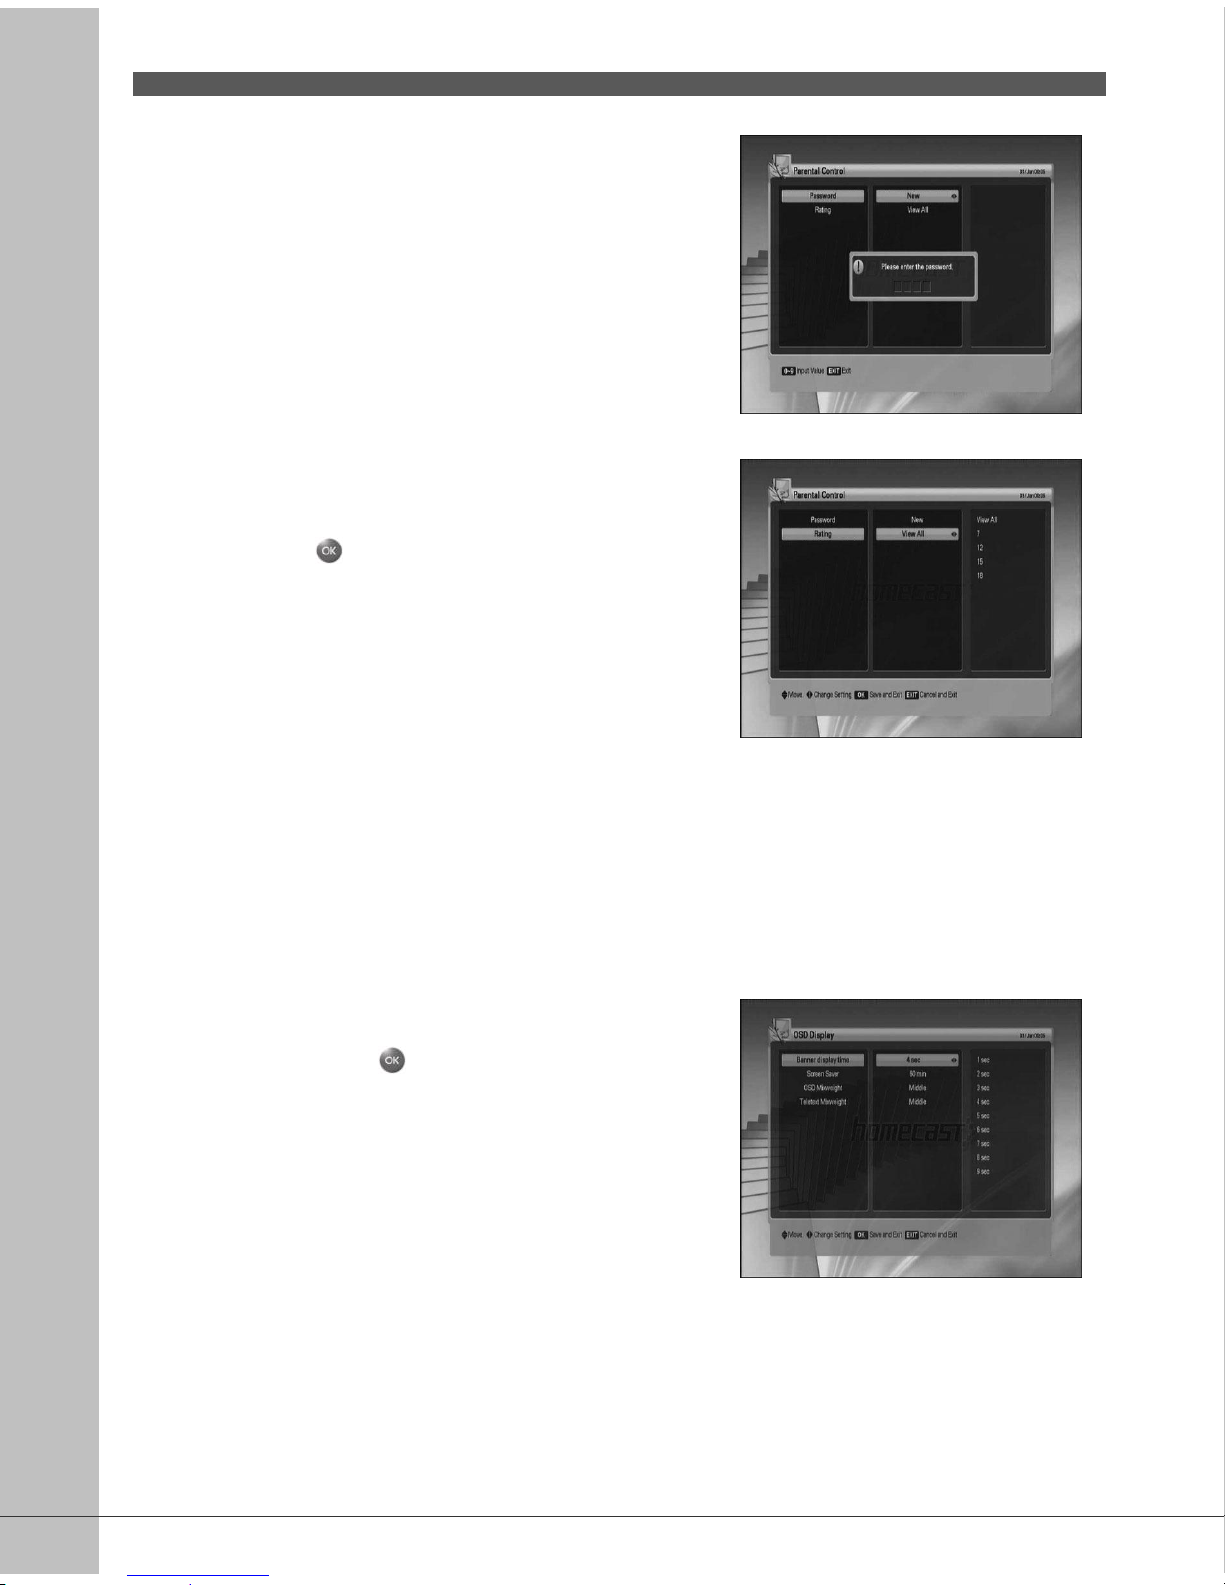
5.3.4 Parental Control
1. If you want to change the password, press the
/ button, following message requiring new
password will be displayed.
2. Change the password into new one by numeric
button.
3. To ensure your change, you are supposed to
input a password once more.
1. Select your desired rating level using the /
button.
2. Press the button to save and exit. Rating
mode allows you to block channel according to
the age level you have set.
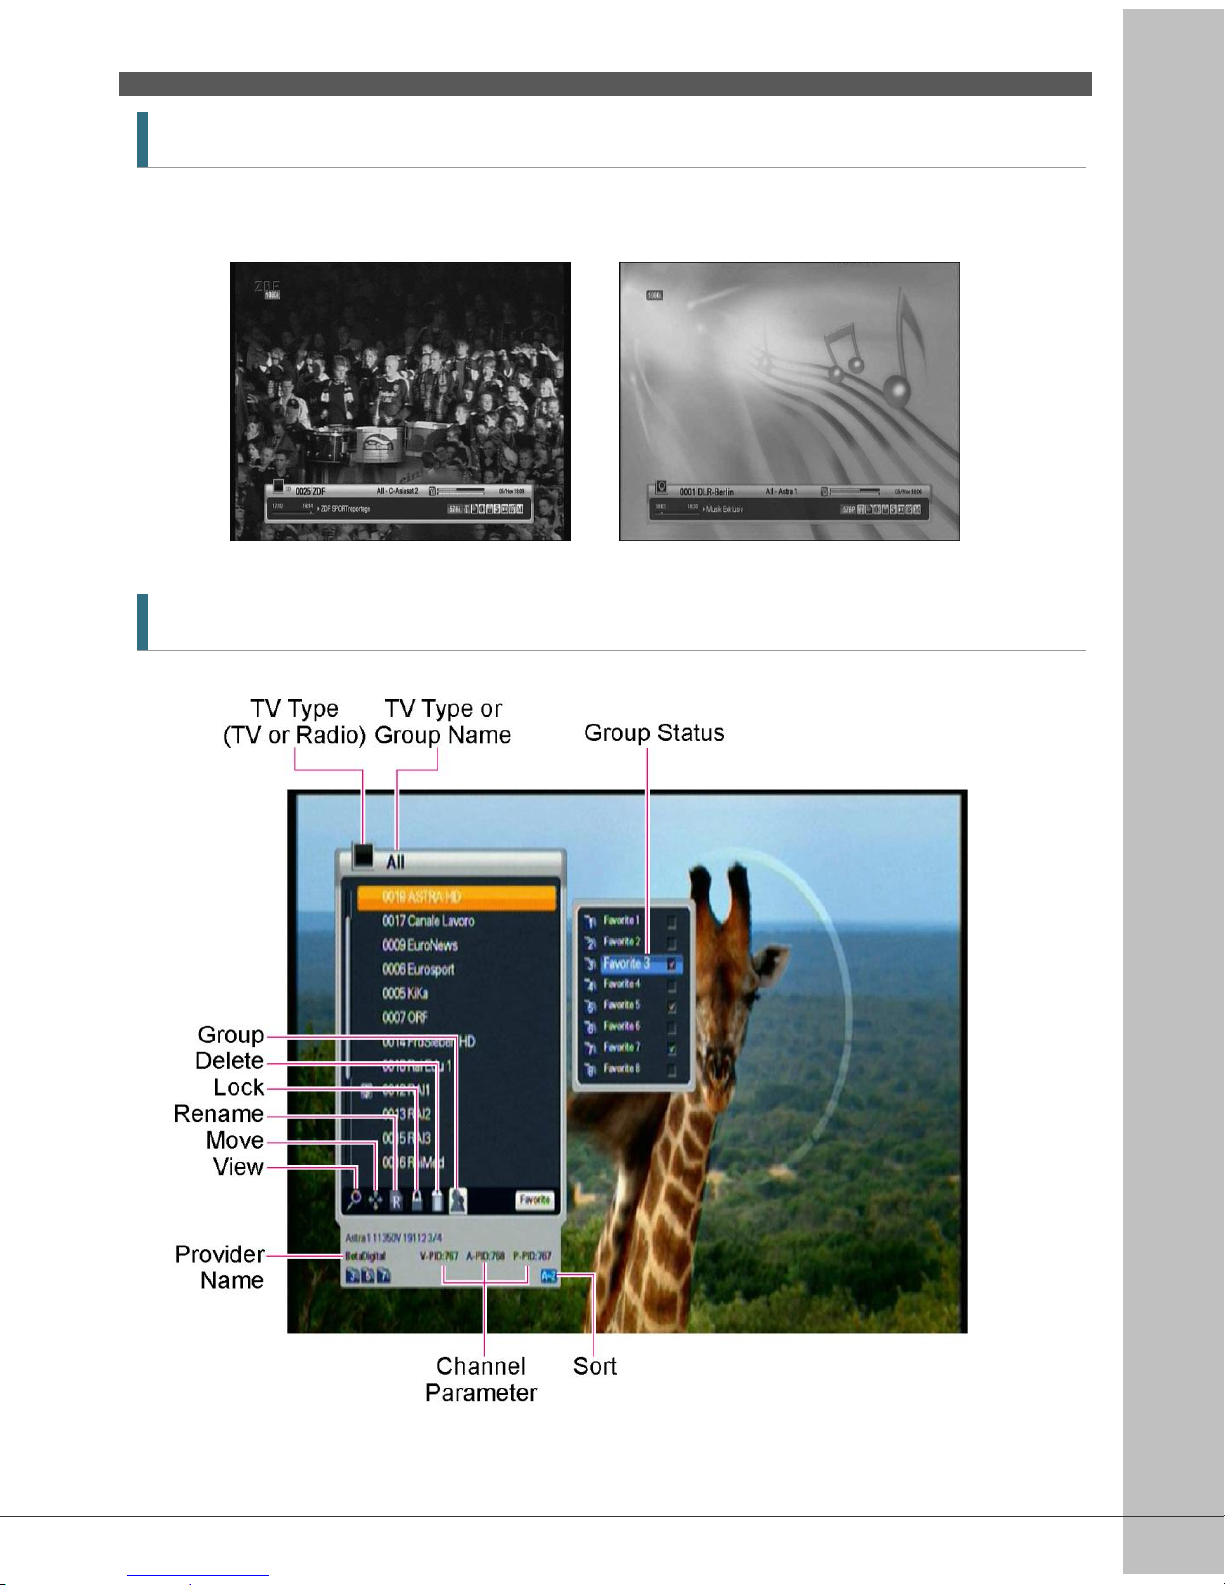
View All : All channels can be watched.
7 : Channels are blocked under the age of 7.
12 : Channels are blocked under the age of 12.
15 : Channels are blocked under the age of 15.
18 : Channels are blocked under the age of 18.
You have to enter password to watch the channels which is blocked by the age level.
5.3.5 OSD Display
1. Select the options using the /// button.
2. If you press the button, current changing
state will be saved and exit.
Banner display time : Banner will disappear after setting time passed.(1~9).
Screen Saver : Screen Saver is a function to protect your TV in case Radio status or in
Menu. (Disable, 5, 10, 20, 30, 60, 120 Minutes)
OSD Mixweight : Select the OSD transparent type. (Low, Middle, High).
Teletext Mixweight : Select the Teletext transparent type. (Low, Middle, High).
Downloaded from www.Manualslib.com manuals search engine
31
5.4 Channel
5.4.1 Sorting
1. Select Sort Type using the / button.
2. If you press the button, current changing
state will be saved and exit.
Transponder : Channels are sorted into transponder order.
Network : Channels are sorted into service provider order.
CAS : Channels are sorted into Scramble channels and Free channels order.
5.4.2 Reservation
You can reserve a Channel at your desired time. In this mode, you can reserve channels up to 8.
1. Press the Opt button to edit the reserved channel.
And then use the /// button to the
detail setting for your reservation.
5.4.3 Delete
You can delete channels. You can select not only Mode such as Channel and Favorite, but also
Option such as TV, Radio and etc.
1. Select the Mode and Option you want to delete
channels using the /// button.
2. Press the button to delete and exit.
Downloaded from www.Manualslib.com manuals search engine
32
5.5 Advanced
5.5.1 Reset Factory Default
1. If you want to change the set into the default
values, press the button. The following
confirmation window will appear.
2. If you select 'Yes', the system will be reset to the
primitive state like new receiver.
5.5.2 OTA
1. You can upgrade the latest software. The receiver
checks whether the new S/W is released when
you view channels or select this OTA menu.
2. If the new version is detected, the receiver will
be rebooted automatically and the download
screen will appear.
1. If any S/W can't be found, this following message
will appear.
5.5.3 USB Transfer
You can transfer the channel data or the system software between a set-top box and a
USB drive.
1. Select data type and the source & the target.
Downloaded from www.Manualslib.com manuals search engine
33
1. If the data exits in the target, the data will be
removed and the new data will be replaced.
1. The window will appear on the TV screen if the
data exists in the target.
1. If you select “Yes”, the data will transfer. The
window will appear while the data being
transferred. You should keep USB connection
until transferring is done.
1. The window will appear on the TV screen after
data transferring is done.
Downloaded from www.Manualslib.com manuals search engine
34
5.5.4 DivX key Registration
1. To watch your purchased DivX contents, you
must get the DivX key of the STB. With the
displayed DivX key on the screen, you can watch
them. For more information, please visit the
below website.
http://www.divx.com/vod
5.5.5 DivX key Deactivation
1. To transfer your purchased DivX contents to
another person, you must deactivate your initially
registered DivX key. Otherwise, he can not watch
the contents on his DivX certified device.
5.6 Status
5.6.1 Information
1. You can watch the system information such as
Model ID, Hardware version, Software version,
and Loader version.
5.6.2 PowerSave Mode
1. You can select the power save mode on or off.
If you select the power save mode on, the power
consumption will be much lower on the standby
mode. However, the STB can not automatically
check the new S/W on the standby mode.
Downloaded from www.Manualslib.com manuals search engine
35
5.6.3 CI slot 1
1. You can see not only Free To-Air services, but
also scrambled services, using the Conditional
Access Modules (CAM). If you want to see
scrambled services, contact your service provider
or distributor. Common Interface module and
smart card depend on the service provider.
5.7 PVR
5.7.1 HDD Information
1. You can see the capacity of HDD such as Total
size, Free size, Used size and the model name of
HDD.
5.7.2 Format HDD
1. If you press the button, you can delete all
files in HDD permanently.
5.7.3 Demount HDD
1. If you press the button, you can safely
remove the external HDD from the STBy.
Downloaded from www.Manualslib.com manuals search engine
36
6. Viewing General Information
6.1 Banner Information
1. Whenever you press the INFO button, the banner
information window appears for a few seconds.
* You can also find the output resolution at the righ
top side
1. If you press the INFO button again on the banner,
the detail EPG window appears.
2. If you press the button, information and EPG
window will disappear.
3. Press the P+- button and then you can change
the channel.
4. If '' exists on the Banner, press the /
button and then you can watch the next EPG.
Downloaded from www.Manualslib.com manuals search engine
37
6.2 TV & Radio changing
While watching TV or listening to Radio, you can select TV or Radio using the TV/Rad button.
6.3 TV or Radio Channel Lists
Downloaded from www.Manualslib.com manuals search engine
38
6.3.1 Watching Mode
While watching TV or listening to Radio, you can watch the channel list. Press the button
to display the channel list. You can watch several icons at the bottom of the channel list.
Each icon has a special and convenient function for user. If you want to change the mode, press
the Opt button to go to the desired icon.
1. Press the button or A-Z button. If you want
to view the sorted channel list, press the A-Z
button.
2. Press the / button to move the cursor.
3. Press the button to watch the desired
channel.
4. If you want to hide the channel list, press the
button.
When you want to sort the channels, press the A-Z button.
When you want to change the TV/Radio mode, press the TV/Rad button.
When you want to watch the next or previous channel page, press the P+- button.
1. If you know the correct channel-number to watch,
press the number using the numeric button.
1. If you want to go Alphabetic move, you must
change the channel list to the sorted status. To
become the sorted status, press the A-Z button
on the channel list or on the Live screen.
2. Press the numeric button. Then Alphabetic Pad
will appear.
3. You can select the Alphabet using the numeric
key(1-9)//// button.
4. Press the button. If the selected channel by
user input-letter not exists, there will be any
change.
Downloaded from www.Manualslib.com manuals search engine
39
6.3.2 Delete Mode
1. Select the Delete Icon using the Opt button.
2. Select channel you want to delete using the /
button. Press the button. Checked sign
will be marked on the right side of the channel
name.
3. Press the EXIT button to save and exit.
6.3.3 Move Mode
1. Select the Move Icon using the Opt button.
2. Select the channel which will be located in other
position.
3. Press the button, and then a sign which
indicates "move" will be marked on the right side
of the channel name.
4. Set the new position using the / button.
5. If you want to complete moving channel, press
the button. Then "move" sign will disappear
on the right side of the channel name.
6. Press the EXIT button to save and exit.
6.3.4 Rename Mode
1. Select Rename Icon using the Opt button.
2. Select the channel to rename and press the
button. And then a small editing name window
will be displayed.
3. You can write each letter of the channel name
using the /// button and the button.
4. After renaming is done, select Donetab.
5. Press the EXIT button to exit.
You can change the Favorite group name.
1. Select the desired group.
2. Change the name of group according to above
procedures.
Downloaded from www.Manualslib.com manuals search engine
40
<Remark>
It is impossible that Delete & Group function can be changed in grouping mode.
Space ( ) : Write between two characters.
Back ( ) : Delete characters.
Caps ( ) : Change between caps and lower case letter.
Done ( ) : To save the change.
Cancel ( ) : Exit rename mode.
6.3.5 Lock Mode
1. Select Lock Icon using the Opt button.
2. Select the channel to be locked and press the
button.
3. Set the password. Locking mark will appear on
the left side of the Channel name. To cancel it,
just press the button.
4. Press the EXIT button to save and exit.
6.3.6 Group Mode
You can make the group up to the 8th group. It can accommodate 100 Channels in one group.
So you can get 800 favorite channels.
1. Select Group Icon using the Opt button.
2. Select the channels that you want to make
favorite channel list.
3. Press the button, and then a small favorite
Window will appear on the right side of the
screen.
4. Choose the group number using the /
button and press the button. To cancel it,
just press the button again.
5. If you want to select other channel in current
group, press the / button. And then
highlighted channel will be showed on the
channel list.
6. Press the button to set the group with
selected group using the / button.
7. Press the EXIT button to save and exit.
Downloaded from www.Manualslib.com manuals search engine
41
6.4 Option
While watching TV or listening to Radio, press the Opt button. You can watch small pop-up
window. You can select a option.(Audio Language, Teletext Language, Subtitle Language) If
you want to change the option mode, press the / button.
6.4.1 Audio Language
1. Select the 'Audio' using the / button.
2. Press the / button to select a desired audio
language.
3. Press the button to change the audio
language.
6.4.2 Teletext Language
1. Select the 'Teletext' using the / button.
2. Press the / button to select a language.
3. Press the button.
4. You can watch the Teletext contents in the
language if it is available.
6.4.3 Subtitle Language
1. Select the 'Subtitle' using the / button.
2. Press the / button to select a language.
3. Press the button.
4. If the selected language is different from what is
available, you can't watch the subtitle.
Downloaded from www.Manualslib.com manuals search engine
42
6.5 A/V+
While watching TV or listening to Radio, press the A/V+ button. You can watch small pop-up
window. You can select an option.(Audio Mode, Video Mode) If you want to change the option
mode, press the / button.
6.5.1 Audio Mode
1. Select the 'Audio Mode' using the / button.
2. Press the / button to set the output
direction for speakers.
(STEREO, LEFT, RIGHT, JOINT)
3. Press the button to save and exit.
6.5.2 Video Mode
1. Select the 'Video Mode' using the / button.
2. Press the / button to set screen format of
your TV.
3. Press the button to save and exit.
6.5.3 Video Format
1. Select the 'Video format' sub-menu using the /
button.
2. Press the / button to set the video format
(576I, 576P, 720P, 1080I and 1080P)
3. Press the OK button to save and exit.
Downloaded from www.Manualslib.com manuals search engine
43
6.6 Fav
While watching TV or listening to Radio, press the Fav button. You can watch small pop-up
window. You can select a Favorite group.
6.6.1 Satellite
1. Select the 'Satellite' using the / button.
2. Press the / button to select a satellite.
3. Press the button, then you can watch the
channel list of selected satellite.
6.6.2 Favorite
1. Select the 'Favorite' using the / button.
2. Press the / button to select a group.
3. Press the button, then you can watch the
channel list of selected group.
6.7 A-Z
While watching TV or listening to Radio, press the A-Z button. You can watch sorted channel list.
Downloaded from www.Manualslib.com manuals search engine
44
6.8 EPG
Press the EPG button and the electronic channel guide appears if applicable.
Time intervals are arranged in a row and Channel lists are shown in a column.
6.8.1 EPG Information
1. Press the / button to change time interval.
2. Press the / button to watch the guide about
the channel, and then press the INFO button, the
detail EPG window will appear.
3. Press the button to exit.
Press the Opt button to reserve channels with event. If you want to know the detail
description about reservation, refer to the reservation description in chapter 5.4.2.
Downloaded from www.Manualslib.com manuals search engine
45
7. PVR
7.1 File List
7.1.1 Playback mode
1. Select the 'Playback mode' using the Opt button.
2. Select the recorded file using the / button.
3. Press the button and then the file will be
played.
4. Press the EXIT button to close the file list.
Downloaded from www.Manualslib.com manuals search engine
46
1. You can watch the detail file information.
2. Press the INFO button to watch the information
for the selected file.
3. Press the EXIT button to hide the information.
7.1.2 Delete mode
1. Select the 'Delete mode' using the Opt button.
2. Select the file you want to delete using the /
button.
3. If you decide to delete the file, press 'Yes' on the
pop-up window.
4. Press the EXIT button to exit.
7.1.3 Rename Mode
1. Select 'Rename mode' using the Opt button.
2. Select the file to rename and press the button.
And then a small editing name window will be
displayed.
3. You can write each letter of the file name using
the ////numeric button and the button.
4. After renaming are done, select 'Done' tab.
5. Press the EXIT button to exit.
Downloaded from www.Manualslib.com manuals search engine
47
7.2 PVR Banner
To access the PVR Banner, press the / button or the trick button such as PLAY( ),
FF( ▶▶), REW(◀◀ ), SLOW( ).
The description of icons
: Time Shift status
: Recording status
: Playback and trick status (색깔 변경 녹색)
: Time Shift playback
7.2.1 Time Shift
Time Shift function automatically records the current playing program temporarily.
1. If Time Shift function is set to enable in the PVR
menu. Time Shift is always working on air and
changing the channel. You can not stop Time
Shift function in enabled mode except the case
you choose to record the channel.
Downloaded from www.Manualslib.com manuals search engine
48
7.2.2 Record
1. Press the Record( ) button to record the
channel you're watching.
2. Record mode can't be canceled by any control
such as changing channel, etc. except pressing
the STOP( ) button.
Max duration time for recording is set to the default record time which set in Menu. If you
want to change the duration, press the / button.
(Minimum: 5Minutes, Maximum: 10Hours)
7.2.3 Playback
1. Press the LIST button to open the file list.
2. Select the file you want to watch using the /
button.
3. Press the or PLAY( ) button.
1. Press the EXIT button to exit from the file list.
2. Press the / button or trick button such as
REW, FF, etc., if you want to check the status of
playing.
1. Press the numeric button(0~9) in Playback mode.
2. Each number means the ratio of the number to
ten. If you press number 3, control position will
be located 30% progressed position.
Downloaded from www.Manualslib.com manuals search engine
49
Jump in playback mode
1. You can locate the control position to the desired
position using the / button.
2. By releasing the / button, playback
continues from this position.
Bookmark
For your convenience, the bookmark function enables you to set bookmarks within the media
file to continue or target a special position in media file.
1. Play the file you want to watch.
2. Move the control position to the favored position
using the / button. Then press the MARK
button and the white small bar will be placed at
that position.
3. To delete the Bookmark, move the control
position using the / button to the desired
Bookmark and then the color of the control
position turns black Just that time, press the
MARK button.
4. Press the JUMP button and the control position
will jump to the next bookmarked position and
playback starts from this point.
The maximum number of the Bookmark is twenty in a file.
The first Bookmark exists at the starting position of the file.
Downloaded from www.Manualslib.com manuals search engine
50
7.2.4 FF/REW/SLOW mode
These functions are available in Playback mode and Time Shift mode.
<Fast Forward / Speed : x2, x3, x4 >
1. Press the FF( ►►) button.
2. If you press the FF( ►►) button continuously,
speed will be increased up to 4 times.
: Fast forward icon on Playback mode.
: Fast forward icon on Time Shift mode.
<Rewind / Speed : x2, x3, x4>
1. Press the REW(◄◄ ) button.
2. If you press the REW(◄◄ ) button continuously,
speed will be increased up to 4 times.
<Slow : x1/2, x1/4>
1. Press the SLOW( ) button.
2. If you press he SLOW( ) button continuously,
speed will be decreased up to 1/4 times.
Downloaded from www.Manualslib.com manuals search engine
51
Additional Information
A.1 Troubleshooting
There may be various reasons behind receiver problems. Check the receiver according to the
procedures described below.
If you can’t solve your problem even after following the troubleshooting procedures, please
contact the dealer. Do not open the receiver cover. It may cause a dangerous situation.
Symptom
Cause
Remedy
The front panel doesnt
display any message.
The power cord is not plugged
in.
Check that the power cable is plugged in
to the wall outlet.
No picture or sound.
Wrong connection of the
Audio/Video output of the
receiver to TV.
Connect the Audio/Video output of the
receiver to TV correctly.
Wrong connection of the
antenna.
Connect the antennal cable correctly.
No or Bad signal message
appears.
Check other device connected between
Antenna and the receiver, or adjust the
antenna position.
Audio muting
Press the MUTE button
TV Power off.
Turn TV on.
No picture.
The receiver cant receive the
signal.
Check the antenna cable, replace the
cable, or connect the cable to the
receiver tightly.
Incorrect values of some tuner
parameters.
Set the values of tuner parameters
correctly. Refer to the Installation menu.
No or bad signal.
The satellite dish is not
pointing at the satellite.
Adjust the dish.
Satellite dish is too small.
Change to a larger dish.
The LNB is faulty.
Change the LNB.
The remote controller
does not operate.
The batteries of the remote
controller are not inserted or
exhausted.
Check whether the batteries are inserted
correctly in your remote controller.
Poor picture quality.
Low LNB power or signal loss
in cable.
Change the LNB power in dish set up
menu to 14v/19v.
Less channels in
scanning.
Downloaded from www.Manualslib.com manuals search engine
52
A.2 Technical Specifications
1. Tuner & Demodulator
Parameter
Specifications
Input Frequency Range
950MHz to 2150 MHz
RF Input Signal Level
-25 ~ -65dBm
RF Impedance
75
IF Bandwidth
55 Mhz/8MHz(Under 5Msps)
LNB Power
13/18DC, 14/19V +/-5%, 0.5Amax
LNB Tone Switch
22kHz +/-2kHz, 0.6Vpp +/-0.2V
DiSEqC Control
Version 1.2, Tone burst A/B
Demodulation
QPSK, NBC-QPSK, NBC-8PSK
Symbol Rate
1~45Msps/SCPC, MCPC
2. MPEG
Parameter
Specifications
Transport Stream
MPEG-2 ISO/IEC 13818 Transport Stream Specification
Input Rate
Max.15Mbit/s
Video
MPEG-2 MP@ML, H.264/AVC
Audio
MPEG-1/2 Audio Layer 1,2, Dolby Digital
Aspect ratio
4:3 or 16:9
Active Pixel
1920x1080i, 1280x720p, 720x576p, 720x576i
Audio Mode
Stereo, Dual channel, Joint stereo, Mono
Audio Sampling Frequency
32/44.1/48kHz
Downloaded from www.Manualslib.com manuals search engine
53
3. Connector
Port
Specifications
LNB IF input
Ftype, IEC 169-24 Female
LNB IF Loop-through Output
Ftype, IEC 169-24 Female
Video
RCA (CVBS)
Component (YPbPr)
HDMI
Audio
RCA (Audio L,R)
HDMI
SPDIF
USB2.0
Host 1ea
4. Conditional Access Interface
5. Environmental
Parameter
Specifications
Input Voltage
90~260VAC (SMPS)
Power consumption
Operation : 14W
Standby : 1W (when selecting PowerSave Mode on)
Operating temperature
0 ~ 45 C
Storage temperature
-10 C ~ +50 C
Storage humidity range
5 ~ 90% Rh
Non condensing
Operating humidity range
10 ~ 85% Rh
Non condensing
Weight
2.2Kg
Dimension (H x W x D)
55mm x 280mm x 240mm
Parameter
Specifications
PCMCIA
1 Slot Common Interface
Downloaded from www.Manualslib.com manuals search engine
54
A.3 Glossary of Terms
DiSEqC
Digital Satellite Equipment Control.
EPG
Electronic Program Guide. Software that enables viewers to navigate easily among the large
selection of channels provided by the digital technology and choose the service they desire.
FEC
Forward Error Correction. Correction of faulty bits in the received signal.
LNB(Low-Noise Block converter)
The LNB is an electronic unit mounted on the satellite dish. It receives the signals reflected by the
dish and converts them to signals that can be used by Satellite receiver.
Parental control
A feature that allows parents to lock programs that they consider unsuitable for their children. A
locked channel or program can only be unlocked with the password.
PIN code
Personal Identification Number. A four-digit code that is used for locking/unlocking channels and
programs, as in the parental control feature.
Polarization
Polarization allows several programs to be fitted into the same frequency band.
The signals from a satellite are transmitted either with linear (vertical or horizontal) polarization or
circular (right or left) polarization.
Satellite dish
A dish-shaped antenna to receive signals from a satellite. The dish focuses the signals into the
LNB.
Scrambled satellite TV program
Some satellite TV programs are transmitted in scrambled form. A CA module is needed to view
such programs.
Symbol rate
Size of the digital package transmission.
Downloaded from www.Manualslib.com manuals search engine
55
Downloaded from www.Manualslib.com manuals search engine
13

Hulp nodig? Stel uw vraag in het forum

Spelregels

Misbruik melden

Gebruikershandleiding.com neemt misbruik van zijn services uitermate serieus. U kunt hieronder aangeven waarom deze vraag ongepast is. Wij controleren de vraag en zonodig wordt deze verwijderd.

Product:

Bijvoorbeeld antisemitische inhoud, racistische inhoud, of materiaal dat gewelddadige fysieke handelingen tot gevolg kan hebben.

Bijvoorbeeld een creditcardnummer, een persoonlijk identificatienummer, of een geheim adres. E-mailadressen en volledige namen worden niet als privégegevens beschouwd.

Spelregels forum

Om tot zinvolle vragen te komen hanteren wij de volgende spelregels:

Belangrijk! Als er een antwoord wordt gegeven op uw vraag, dan is het voor de gever van het antwoord nuttig om te weten als u er wel (of niet) mee geholpen bent! Wij vragen u dus ook te reageren op een antwoord.

Belangrijk! Antwoorden worden ook per e-mail naar abonnees gestuurd. Laat uw emailadres achter op deze site, zodat u op de hoogte blijft. U krijgt dan ook andere vragen en antwoorden te zien.

Abonneren

Abonneer u voor het ontvangen van emails voor uw Homecast HS2100 CI CD bij:


U ontvangt een email met instructies om u voor één of beide opties in te schrijven.


Ontvang uw handleiding per email

Vul uw emailadres in en ontvang de handleiding van Homecast HS2100 CI CD in de taal/talen: Engels als bijlage per email.

De handleiding is 4.18 mb groot.


U ontvangt de handleiding per email binnen enkele minuten. Als u geen email heeft ontvangen, dan heeft u waarschijnlijk een verkeerd emailadres ingevuld of is uw mailbox te vol. Daarnaast kan het zijn dat uw internetprovider een maximum heeft aan de grootte per email. Omdat hier een handleiding wordt meegestuurd, kan het voorkomen dat de email groter is dan toegestaan bij uw provider.

Stel vragen via chat aan uw handleiding

Stel uw vraag over deze PDF

Andere handleiding(en) van Homecast HS2100 CI CD

Homecast HS2100 CI CD Gebruiksaanwijzing - Nederlands - 55 pagina's


Uw handleiding is per email verstuurd. Controleer uw email

Als u niet binnen een kwartier uw email met handleiding ontvangen heeft, kan het zijn dat u een verkeerd emailadres heeft ingevuld of dat uw emailprovider een maximum grootte per email heeft ingesteld die kleiner is dan de grootte van de handleiding.

Er is een email naar u verstuurd om uw inschrijving definitief te maken.

Controleer uw email en volg de aanwijzingen op om uw inschrijving definitief te maken

U heeft geen emailadres opgegeven

Als u de handleiding per email wilt ontvangen, vul dan een geldig emailadres in.

Uw vraag is op deze pagina toegevoegd

Wilt u een email ontvangen bij een antwoord en/of nieuwe vragen? Vul dan hier uw emailadres in.


Info