54299
48
Verklein
Vergroot
Pagina terug
1/52
Pagina verder
Users Guide
C32WF810N
C36WF810N
SCREEN
SCREEN
C36WF830N
ìntroduction
Dear HITACHI customer
Congratulations on your purchase of the very latest state of the art
technology. At Hitachi we pride ourselves on producing high quality televisions
with outstanding picture and audio capabilities, coupled with Hitachi’s
reputation for superior reliability. You should enjoy many years of trouble free
operation from your TV. Take some time to read this Users Guide thoroughly,
and if you encounter any difficulty, firstly refer to the Trouble Shooting Guide at
the rear of this manual. In the unlikely event of a problem occurring with your
TV, contact your dealer immediately.
...notes on digital sound
Your Hitachi television is capable of decoding advanced forms of digital
audio (such as Dolby Digital, DTS, MPEG and PCM) coding that makes it
possible to reproduce high-quality digital sound. Being the next step forward
from analogue sound, digital sounds sonic realism and listener involvement
will change the way you experience sound from your Hitachi television. Digital
sound works by delivering at maximum 5 separate audio channels - left,
right, centre, left surround, right surround and also a LFE (Low Frequency
Effects) channel. These independent channels allow for a more precise
localisation of sounds and a more convincing, realistic ambience.
Dolby Digital
Manufactured under license from Dolby Laboratories. “Dolby”, ”Pro Logic”
and the double-D symbol are trademarks of Dolby Laboratories. Confidential
Unpublished Works. ©1992 - 1997 Dolby Laboratories, Inc. All rights reserved.
DTS
Manufactured under license from Digital Theater Systems, Inc. US Pat. No.
5,451,942 and other world wide patents issues and pending. “DTS” and “DTS
Digital Surround” are trademarks of Digital Theater Systems, Inc. © 1996 Digital
Theater Systems, Inc. All rights reserved.
Software Notice
It is prohibited for the end user of this product to copy, reverse engineer
or reverse compile the software included therein save to the extent permitted
by law.
contents
contents
safety aspects
television safety ................................................................................4
battery safety and installation ............................................................5
set-up and tuning in
aerial and VCR installation ..................................................................6
aerial, satellite and VCR installation....................................................7
TV set up and automatic tuning procedure ......................................8
manual tuning procedure ..................................................................9
handset controls
program tuning ..................................................................................11
television operation ............................................................................12
teletext functions ..............................................................................13
program, sound and vision adjustment
picture controls ..................................................................................14
program swap....................................................................................15
program name change ......................................................................16
sound and language controls ............................................................17
audio and equaliser controls ..............................................................18
sound mode ......................................................................................20
speaker setup....................................................................................22
digital audio setup..............................................................................26
digital audio status - decode mode ..................................................27
digital audio status - display format ..................................................28
television features
wide screen viewing ..........................................................................29
sleep timer and default viewing controls............................................31
teletext operation ..............................................................................32
teletext dual page ............................................................................33
progressive scan and 100Hz picture..................................................34
multi-picture ......................................................................................35
other equipment connection
rear socket and scart details. ............................................................36
DVD, CD and laserdisc connection ....................................................37
external speaker socket details ........................................................38
external speaker setup ......................................................................39
audio visual setup ..............................................................................40
camcorder and computer connection ..............................................41
signal source entry ............................................................................42
front control panel details ..................................................................44
television information
trouble shooting guide - digital sound................................................45
trouble shooting guide - television operation ....................................47
guarantee ..........................................................................................48
Hitachi Environmental Notice ............................................................49
technical data ....................................................................................50
4
television safety
safety aspects
DO observe the manufacturers instructions when connecting extension leads to your TV. The fuse
should be a 5 Amp fuse with the safety symbols and displayed. If you are in any doubt
about the extension installation, please consult a competent electrician.
This television has been designed and manufactured to meet international
safety standards, but like any electrical equipment, care must be taken if
you are to obtain the best results and safety is to be assured.
DO NOT cut off the fitted mains plug as it may contain a special radio interference filter, the
removal of which could lead to impaired performance. If you wish to extend the lead, obtain
an appropriate extension lead or consult your dealer.
DO NOT continue to operate the equipment if you are in any doubt about it working
normally or if it is damaged in any way - switch off, withdraw the mains plug and consult
your dealer.
IF you intend placing this TV into a cabinet or a wall alcove, please ensure there is at least
a 100mm (10cm) gap to the sides, rear and top of the TV. This is to allow for adequate
ventilation during your TV's operation.
DO NOT leave equipment switched on when it is unattended unless it is specifically stated
that it is designed for unattended operation or has a stand-by mode. Switch off using the
switch on the equipment and show your family how to do this. Make special arrangements
for infirm or handicapped people.
DO NOT obstruct the ventilation of the equipment, for example with curtains or soft
furnishings. Overheating will cause damage and shorten the lifespan of your equipment.
DO NOT use makeshift stands and NEVER fix legs with wood screws - to ensure complete
safety, always fit the manufacturers approved stand or legs with the fixings provided
according to the instructions.
DO NOT allow electrical equipment to be exposed to rain or moisture.
NEVER let anyone, especially children, push anything into holes, slots, or
any other opening in the case - this could result in a fatal electrical shock.
NEVER guess or take chances with electrical equipment of any kind -
it is better to be safe than sorry!
DO be careful with any glass panels or doors on equipment.
DO consult your dealer if you are in any doubt about installation, operation or safety of your equipment.
DO place your TV on a flat surface, or if supplied, the stand accessory.
DO NOT remove any fixed cover as this may expose dangerous voltages.
DO ensure that all connections, (including the mains plug, extension leads and inter-connections
between the pieces of equipment), are properly made and in accordance with the manufacturers
instructions
. Switch off and withdraw the mains plug before making or changing connections.
DO NOT listen to headphones at high volume, as such use can permanently damage
your hearing.
DO read the operating instructions before you attempt to use the equipment.
DO NOT use equipment such as personal stereos or radios so that you are
distracted from the requirements of traffic safety. It is illegal to watch television whilst
DO NOT place hot objects such as candles or nightlights on, or close to, equipment.
High temperatures can melt plastic and lead to fires.
Should you require to replace the fuse in the moulded mains plug with a new fuse then please
replace with one of the same value, type and approval as the original. Ensure the fuse cover is
returned to its original position.
5
always
battery safety and installation
safety aspects
1. When inserting the batteries make sure the polarities are correct, that is, ‘+’ to ‘+’, ‘-’ to ‘-’.
2. Replace the batteries with the equivalent ‘AA’ type.
3. Discard old batteries safely, following the battery safety guidelines.
battery installation
1
2
Remove cover of handset by lifting up the cover at the recess.
Insert batteries into handset as shown and replace cover.
Take care to fit your batteries
correctly, observing the plus
‘+’ and minus ‘-’ marks on
the battery and appliance.
Incorrect fitting can cause
leakage, or in extreme
cases, fire or explosion.
always
Replace the whole set of
batteries at one time, taking
care not to mix old and new
batteries of different types,
since this can result in
leakage, or in extreme
cases, fire or explosion.
always
Store unused batteries in
their packaging and away
from metal objects which
may cause a short circuit
resulting in leakage, or in
extreme cases, fire or
explosion.
+
-
+
-
+
-
+
-
always
Remove dead batteries from
equipment, and all batteries
from equipment that is to be
left for long periods of time
without any use. Otherwise
the batteries may leak and
cause damage.
never!
Never dispose of batteries in
fire as this can cause an
explosion.
Respect the environment -
always dispose of batteries in
an environmentally friendly
manner.
never!
Never attempt to recharge
ordinary batteries, either in a
charger or by applying heat to
them. They may leak, cause
fire or even explode.
Rechargeable NiCAD batteries
and chargers can be
purchased from any good
High Street electrical retailer.
CHARGE
+
-
6
aerial and VCR installation
set-up and tuning in
aerial connection
2 X 15W 8
AV1
AV2
aerial and VCR connection
2 X 15W 8
AV1
AV2
connect VCR
‘out’ to
analogue TV
socket ‘in’
marked
scart leads are an
optional extra*
aerial wall socket
receiving aerial
connect aerial
connection lead to
the analogue‘in’
socket marked
1
2
connect aerial
connection lead to
the analogue‘in’ socket
marked
1
aerial wall socket
receiving aerial
Video
Cassette
Recorder
(this should be plugged
into a mains socket)
*IMPORTANT NOTE. The best way to connect your VCR to the television is via one of the
Audio Visual sockets. When you connect your VCR to your television, the Audio Visual value
has to be set correctly to ensure best picture quality - see other equipment
connection-audio visual setup.
7
connecting to the mains socket
aerial, satellite and VCR installation
set-up and tuning in
VHS video equipment should be connected to the AV1 scart socket located at the rear of your TV. A
dedicated program number may be assigned to AV1, allowing you easier access to view external
equipment broadcasts. How to assign an AV signal to dedicated program numbers is explained in
signal source sntry.
satellite and VCR installation
Please Note
- If you have not already done so, please read television safety
before connecting your television and external equipment.
insert plug...
...and switch on
*A scart lead should be fitted between your TV and VCR to enhance your picture and sound quality. Scart leads
are essential if you have a stereo TV and VCR and wish to obtain stereo sound from your equipment. These
leads can also be purchased from your Hitachi dealer or any good High Street electrical retailer.
connect VCR ‘out’ to analogue
TV socket ‘in’
marked
scart leads are an optional extra*
aerial wall socket
receiving aerial
Video
Cassette
Recorder
(this should be plugged
into a mains socket)
connect aerial
connection lead to
the analogue‘in’ socket
marked
1
3
Satellite
Decoder
(this should be
plugged
into a mains
socket)
connect Satellite ‘out’ to VCR
socket ‘in’ marked
2
Before you switch on your television, it is important that the external speakers supplied
with your television are connected. This can be seen in the sections
centre speaker and sub-woofer/external left and right speakers.
8
important note on VCR and satellite
Do not switch your TV on until all external equipment is connected. If you have a Video
Cassette Recorder or a Satellite receiver connected to this TV please ensure that they
are switched on before automatic tuning begins. In the case of a VCR, insert a
pre-recorded tape and begin playback of your equipment. With a Satellite receiver select
Sky News. These measures ensure that all your external equipment is tuned in during
the autotune procedure.
If you are satisfied all external equipment
has been connected, press the OK button
on your handset and AUTOTUNE will begin.
By using the up and down buttons you
can view all the programs found and
stored during AUTOTUNE.
To make your program tuning easier, HITACHI
have installed an automatic tuning procedure to
find the programs. Switch your TV on.
1
2
4
To finish the installation process and return to normal TV operation press the menu
button on your handset twice.
5
TV set-up and automatic tuning procedure
set-up and tuning in
Your TV will now search through the
frequencies, listing them into the following
order - 1.BBC1, 2.BBC2, 3.ITV
4.CH4/S4C, 5.CH5 (subject to availability)
6.Satellite.
Note: If there is no station name information on
broadcasting signal, the sorting order is decided on
signal strength.
3
9
manual tuning procedure
set-up and tuning in
Press and hold the MENU button for 5
seconds. The INSTALL option in the
MAIN MENU appears.
Press the cursor down button to select
INSTALL.
Once highlighted, accept selection.
Press the cursor down button to select
MANUAL SETUP.
Once highlighted, accept selection
Once highlighted, accept the selection to
change the frequency and you will see the
selection bar turn red
- it is ready to be changed.
Use the cursor keys to move the
selection bar over the program
FREQUENCY required to be adjusted.
entry method 1
The first option will be to fine tune the
chosen frequency either up or down.
1
2
3
4
5
6
7
Select your choice of FREQUENCY entry
method using the left/right cursor keys.
8
...notes on manual tuning
As well as an automatic tuning procedure your HITACHI television also allows you to input
broadcast frequencies through a number of different entry methods. Follow the below steps and
choose one of the 5 entry methods to input broadcast frequencies.
VCR should be tuned into Program 0.
10
manual tuning procedure
set-up and tuning in
Once the method of entry has been decided upon and the new frequency or channel
entered, this can then be stored in the TV's memory by pressing the confirmation
button.
To return to normal TV operation press the television button on your handset.
entry method 2
If the right cursor key is pressed,
autosearch becomes an option
- you can search either up or down.
9
10
entry method 3
If the right cursor key is pressed
again, you can enter a two digit channel
number (CH) using the buttons 0-9.
entry method 4
If the right cursor key is pressed
again, you can enter a two digit S-Band
number using the buttons 0-9.
entry method 5
If the right cursor key is pressed
again, you can manually input a five digit
frequency using the numbered handset
buttons 0-9.
If your TV is switched on but no broadcast signal is received, your TV will automatically
switch to standby mode after a period of 10 minutes.
11
program tuning
handset controls
This button is
used to return to the
previous on screen
menu you were
viewing, or to cancel a
selection.
Press this
button to leave the
menu you are on and
return to normal TV
operation.
This button is
used to enter the
main menu. This is
where your TV’s
features options are
displayed.
Use this button
to move the menu
selection box right.
Use this button
to move the menu
selection box down.
cursor down
cursor up
go back
accept
menu
exit
cursor right
The handset controls shown below are used when programming your TV
and to adjust the sound and picture features.
cursor left
Use this button to
move the menu
selection box left.
Use this button to
move the menu
selection box up.
This button is used
to confirm a
highlighted
selection.
Use these
buttons for control of
your VCR, Digital TV
and Set Top Box
receiver respectively.
other
equipment
When viewing an on-screen menu, there is a time delay of 20 seconds before the menu
clears. If no adjustments are made within this time, your TV will return to normal operation.
12
television operation
handset controls
This button allows you
to ‘freeze’ the picture being
viewed on your television.
freeze frame
When teletext is
available, use this
button to display the
current time on screen.
time
This button
allows you to switch
the TV’s sound on and
off.
sound mute
This allows you
to directly input known
broadcasting CH or
frequency numbers.
frequency
Press this
button to view the
current TV status.
Used to switch your TV
in and out of standby mode.
standby
Used to increase ‘+’ or
decrease ‘-’ your TV’s volume.
volume controls
This button
allows you to switch
between the various
wide screen features
of your TV.
16:9 button
Used to select a signal
source for external equipment.
AV input
Used to change
channels either up ‘+’
or down ‘-’
programme
controls
Use this button
to change the
scanning mode of your
TV - from 100Hz to
Progressive scan.
Progressive
Scan
info
Used to enter program
numbers or frequency/CH
entry in manual setup.
0-9 digit entry
If you are receiving a
stereo signal this button selects
between stereo and mono
channels, or different languages
if you are receiving dual
languages.
nicam/
language
This button is used to
return to the previous
screen you were viewing, or
to cancel a selection.
cancel
Use this button to display
subtitles from external equipment
which may be obscured when in
C16:9L, C14:9LS, or C14:9L letterbox
modes. Press again to enter subtitle
text mode.
subtitles
Used to display
all received
broadcasts on screen
(see television
features-multi-
picture)
multi-picture
The handset controls shown here are used when your TV is in normal
operation.
Note: Items marked
*
are not available on this model.
*
13
teletext functions
handset controls
The handset controls shown here are used when you are
operating Teletext.
(red, green,
yellow, blue)
On certain pages in
teletext, these will have
coded instructions i.e. a
shortcut to a teletext
page or title.
colours
Restores TV
picture whilst the TV is
l
ooking for the entered
Teletext page.
Use this to access a subtitle page
directly (subject to subtitle service
broadcasting).
Use this button
to expand the size of
the teletext page on
view.
Press this
button to return to
normal TV operations
when in the teletext
mode.
When in
Teletext mode, press
once to display the
current page and the
next in the magazine,
press again to view
current page and TV
picture.
Used in Teletext
mode to show hidden
information eg. quiz
pages answers.
reveal
dual page
television
expand
subtitles
Pressing this
button will take you to
the index page.
index
When in dual
teletext mode, this
acts as a copy button
to copy the right hand
side page to the left
and side.
OK
Use this to
‘freeze’ the teletext
page on display to
prevent the page
changing (press again
to continue).
hold
Press this
button to use the
Teletext services.
teletext
update
Use the menu
button to swap
between Fastext and
favourite page
options.
menu
In Teletext
toggles between the
last and current page.
(in TV mode returns
from your current
viewing channel to the
previous one).
swap
Use this to clear
the left and side page if
in dual teletext mode.
cancel
14
picture controls
program, sound and vision adjustment
Press the MENU button to obtain
MAIN MENU.
The MAIN MENU highlights the PICTURE
option automatically - press OK to select.
1
2
Select the picture control to be adjusted by
using the up / down cursor buttons.
Once highlighted, adjust the chosen
controls by pressing the right / left cursor
buttons.
3
4
To select MORE options use the up/down
buttons to highlight selection and then
press OK to confirm.
5
Select the picture control to be adjusted by
using the up/down cursor buttons.
Once highlighted, adjust the chosen controls
by pressing the right/left cursor buttons (for
explanation see below)
6
7
The values changed will remain until they are
next altered. Press the TV button on your
handset to return to normal TV operation.
8
For picture and sound values, moving the cursor
left will decrease
values, whilst moving
the cursor
right will increase
values. Also note that in the COLOUR adjustment the first two
steps of the control bar will have a dramatic effect. This is normal operation.
Noise Reduction
Helps reduce the noise interference visible on your television, especially in weaker signal reception areas.
White Point
NORMAL - gives an equally balanced spectrum of colour.
COOL - exaggerates the blue tones of your television picture.
WARM - this exaggerates the red tones of your television picture.
CTI
Colour Transient Improvement - This control lets you improve the clarity of your televisions colour edges.
Comb Filter
This control lets you remove ‘swirling’ cross colour when your picture contains close or small check patterns.
Black Stretch
This control turns all dark areas of your television picture black.
Hue
This option is only available when receiving a NTSC broadcast. Controls the colour ‘tint’ transmitted from your
picture.
15
program swap
program, sound and vision adjustment
Press and hold the MENU button for 5
seconds. The INSTALL option in the
MAIN MENU appears.
Press the cursor down button to select
INSTALL.
Once highlighted, accept selection.
The INSTALL menu highlights the MANUAL
SETUP option automatically - press OK to
select.
Once highlighted, accept the selection
and you will see the selection bar
turn red - it is ready to be swapped.
Using the up/down buttons again you can
move the selection to occupy a new
position of your choice.
Once this has been done, accept selection
and the chosen programs will now occupy
its new position - repeat if necessary.
To return to normal TV operation press the
television button on your handset.
Select your program to swap by moving
the selection bar using the
up/down cursor buttons over a channels
PR number, highlighted in blue.
1
2
3
4
5
6
7
8
9
When a channel has been selected, you also have the option to ‘hide’ a program - this
makes your TV skip the hidden channel when the program controls are used to change
channels. Press the ‘0’ digit on your handset and you will see the text within your chosen
selection turn red. Your selection is hidden. Pressing the ‘0’ button again to ‘unhide’ the
selection. If a hidden channel is to be viewed, this can be achieved by entering the channel
number with the handset digits 0 to 9.
the INSTALL menu highlights the MANUAL
SETUP option automatically - press OK to
select.
4
16
program name change
program, sound and vision adjustment
Press and hold the MENU button for 5
seconds. The INSTALL option in the
MAIN MENU appears.
Press the cursor down button to select
INSTALL.
Once highlighted, accept selection.
Once highlighted, accept the selection to
change the name and you will see the selection bar
turn red and the chosen character will flash
on and off - it is ready to be changed.
Note: Pressing the ‘0’
button will clear all the characters of the
chosen name.
You can input up to 5 characters
- to
change
each character use the
up/down cursor buttons.
To
move
from character to character
use the right/left cursor buttons.
Once the new NAME has been chosen and
entered, confirm your entry to be stored
and repeat if necessary.
To return to normal TV operation press the television button on your handset.
Use the cursor keys to move the
selection bar over the NAME
required to be adjusted.
1
2
3
5
6
7
8
9
10
...notes on program name change
Program name change can be very useful if you connect external equipment to your television.
For example, if you have a DVD player connected, you can allocate the name ‘DVD’ to the program
number allocated for that piece of external equipment.
If a mistake is made re-naming channel,
press CANCEL before pressing OK to return
to the original name.
17
sound and language controls
program, sound and vision adjustment
...notes on nicam features
Nicam is a method for transmitting and receiving stereo sound. If your TV is unable to receive
Nicam because of the wrong geography, climate etc., or when Nicam in not transmitted in your
location it will produce a monaural sound source.
stereo
This effect produces nicam digital
stereo sound from your TV. Use this mode for
the majority of TV viewing. When selected the
stereo symbol appears.
Use the button on your handset to switch
between stereo and monaural
monaural
In this mode the TV produces a single
sound source. The TV will automatically select
this sound when a mono signal is found. Some
stereo signals can be poor in adverse weather
conditions, and mono should be selected to
avoid poor sound.
Use the button on your handset to switch
between monaural and stereo.
The sound source, when chosen, will be stored with the program number being viewed.
channel 1
When this symbol is displayed, channel 1
of a dual language broadcast is being received.
Use the button to access this mode while
receiving a dual language broadcast.
channel 2
When this symbol is displayed, channel 2
of a dual language broadcast is being received.
Use the button to access this mode while
receiving a dual language broadcast.
...notes on dual language transmissions
A dual language transmission is where channel 1 and channel 2 of the Nicam stereo broadcast
carry completely separate information i.e. soundtracks in two different languages for a movie. A dual
language broadcast is denoted by a symbol ( or ) in the top right hand corner of the screen. This
can be seen on first entry to the channel by pressing the INFO button on your handset.
The user can select which of the two is heard through both the left and right television speakers by
using the button on your handset. In the case of a Nicam dual language broadcast, this will also
allow the mono FM broadcast to be selected.
18
audio and equaliser controls
program, sound and vision adjustment
Select the control to be adjusted by
using the up/down cursor buttons.
Once highlighted, adjust the chosen controls
by pressing the right/left cursor buttons.
You can view the EQUALIZER screen by
selecting ‘MORE’ using the up/down
cursor buttons.
Once highlighted, accept selection.
Press the MENU button to obtain
MAIN MENU.
Press the cursor down button to select
AUDIO.
Once highlighted, accept selection.
1
2
3
4
5
6
7
equalizer
The EQUALIZER menu is used to adjust the tonal ranges of your TV’s sound.
LFE Volume
Low Frequency Effects controls.
Only available when your TV is in Dolby Digital, DTS or MPEG
decode modes (see SOUND MODE) and receiving a dedicated LFE channel.
This adjusts the
contribution the LFE channel makes to your TV’s bass response.
Please Note: On broadcasts where there is no dedicated LFE channel, the
LFE VOLUME
option will
not be available in the A
UDIO
on-screen menu.
volume control
This control is used to increase, or decrease the sound from your TV's speakers. When exiting the
on-screen menu this will be the initial volume setting when the `TV is switched on.
19
audio and equaliser controls
program, sound and vision adjustment
Select the mode or sound frequency to be
adjusted by using the up/down cursor
buttons.
Once highlighted, adjust the chosen
controls by pressing the right/left cursor
buttons.
120Hz bass range
This range controls the bass sound from your television - if the bass sound from your TV is too
'boomy' turn this control down.
350Hz mid bass range
This range is the basis of your sound - if your televisions sound is to rich, or not rich
enough, adjust this control to enhance the TV's sound.
1kHz mid range
Use this control to adjust the mid-range voice area of your TV's sound.
3.5kHz mid high range
When this control is increased it emphasises the flute and string instruments of your TV's sound
- when decreased it has a soothing effect on the sound.
10kHz high range
The sharp sound of triangles and cymbals are emphasised if this control is increased.
To return to normal TV operation press the
television button on your handset.
8
9
10
mode
You have a choice of 3 individual ‘modes’ which can be adjusted to suit personal needs.
Set a complete range value (detailed below) and your TV will remember the settings in the
appropriate mode number.
20
sound mode
program, sound and vision adjustment
analogue options in sound mode
When the Audio signal source is analogue - that is, a television broadcast, a connection to
either the video in or audio in found on the front control panel, or if you have any equipment
connected to a scart input socket found at the rear of your television the sound mode gives you
two options to choose from - Dolby Pro logic or stereo.
Use up/down cursor buttons to select
your choice of sound mode.
Once highlighted, accept selection - when
you turn your TV off, by default this will be
the sound mode when it is switched back
on.
Dolby Pro Logic
In this mode surround sound can be created using the TV's internal amplifiers. This
mode is particularly suitable for films and programmes that display the Dolby Pro Logic
caption. This mode is recommended for the viewing movies.
stereo
When stereo mode is selected, your TV produces high quality stereo sound. Select
this mode when viewing general TV and music programs.
Press the MENU button to obtain
MAIN MENU.
Press the cursor down button to select
SOUND MODE.
Once highlighted, accept selection.
1
2
3
4
5
when using headphones
When the headphones are in use the only sound mode available will be the
STEREO option. When the headphones are removed your TV will remain in STEREO
mode.
...notes on sound mode
The Sound Mode menu is used to adjust and display the signal sources available from your TV’s
speakers, whether the output be analogue or digital.
21
sound mode
program, sound and vision adjustment
digital options in sound mode
When your television is switched to an AV scart input whose decode mode is set to
AUTO/DIGITAL and a digital signal source is connected and playing on the coaxial or optical
connectors, the options found in the SOUND MODE menu become dependant on the type of
digital signal being received.
Please note:
to enjoy the sound benefits of Dolby Digital, DTS etc.you will require software (eg.
DVD disc, in which Dolby-D, DTS etc. signals are recorded.) and suitable hardware (some form
of disc player, which can pick up a digital signal).
To return to normal TV operation press the television button on your handset.
6
DTS signal
options
DTS Digital x/y.z* -
Digital Theater Surround mode which gives the ambience
and presence of being in a theater.
Stereo -
Stereo mode which provides a downmix** of the above
through your televisions internal left and right speakers.
Dolby Digital signal
options
Dolby Digital x/y.z*-
In this mode surround sound can be created, with the
digital audio capabilities increasing the precise localisation of
sounds, improving the ambience experienced.
Dolby ProLogic -
In this mode surround sound can be created.
Stereo -
Stereo downmix** mode which inputs the Dolby Digital x/y.z
information through your televisions internal left and right
speakers.
MPEG signal
options
MPEG Multichannel -
In this mode surround sound can be created using
the five audio channels (from your left speaker, right speaker,
centre speaker, left surround speaker and right surround
speaker) and also the LFE channel.
MPEG Stereo -
Stereo mode which provides signals for your televisions internal
left and right speakers.
Stereo -
Stereo mode which provides a downmix** of the multi-channel
signal through your televisions internal left and right speakers.
44.1/48kHz PCM signal
options
Dolby Pro Logic -
In this mode surround sound can be created.
Stereo -
Stereo mode which provides signals for your televisions
internal left and right speakers.
96 KHz signals
Stereo -
A maximum audio sample rate in which stereo is the only
available option. No surround sound can be created when
you are receiving this signal. (Although Dolby Pro Logic is
diplayed in the Sound Mode menu, Dolby Pro Logic will not be
available).
Please note:
When the television is set to digital mode and no external equipment is
connected, your television will assume PCM mode and will offer the options listed above in
the PCM signal
options
. It must also be noted that the type of audio signal which will be
outputted can usually be found on your external equipment.
**Downmix -
this is when all the five multi-channels (left, right, surround left,
surround right, centre) are outputted through the televisions left and right speakers
*x/y.z
- display format of audio digital channels present which is explained in
greater detail in digital audio status section where
X = front channel Y = rear channel Z = sub woofer
22
speaker setup
program, sound and vision adjustment
speaker environment display
Select the speaker to be adjusted by
using the up/down cursor buttons.
Once highlighted, adjust the chosen
speaker by pressing the right/left
cursor buttons.
6
7
Press the cursor down button to select
SPEAKER SETUP.
Once highlighted, accept selection.
4
5
Press and hold the MENU button for 5
seconds. The INSTALL option in the
MAIN MENU appears.
Press the cursor down button to select
INSTALL
Once highlighted, accept selection.
1
2
3
The effect of your adjustments can be heard, and also seen by looking at
the display which accompanies your Speaker Setup menu. This diagram is a
representation of your living area and its contents are explained on the following
page.
...notes on speaker setup
The Speaker Setup menu allows you to customise the televisions audio performance to your
own requirements. These requirements might be the use of external amplifiers on one or more sound
channels, or to use alternative speakers. This menu can help you organise the bass (or ‘boom’) re-
direction by specifying whether large, small or no speaker at all has been connected. Whatever your
choice, this menu allows for greater flexibility and ultimately an improved sound performance.
sound sequencer
The sound sequencer is automatic when entering the Speaker Setup menu. This relays sound
in sequence amongst the available output channels. From this you can judge what speaker volume
has to be adjusted so you get the impression you are sitting within the centre of the sound.
23
speaker setup
program, sound and vision adjustment
To view other Speaker Setup options use
the up/down buttons to highlight MORE...
Once highlighted, accept selection.
8
9
...notes on speaker environment display
your TV and internal speakers
The other available Speaker Setup menus will also show an accompanying display and this
will also be affected by the adjustments you make to the available controls
To return to normal TV operation without
viewing other options press the television
button on your handset.
front right external speaker
front left external speaker
seating position see
...notes on seating
position
rear right external
speaker
rear left external speaker
no sound from speaker
sound from speaker
speaker setup
program, sound and vision adjustment
24
example 1
(showing top view)
Sub-Woofer Volume
The sub woofer channel carries the Bass or ‘Boom’ sound effect information.
If you have one connected, use this control to adjust your sub-woofers volume.
Centre Delay
If your environment is set up in such a way that external speakers (if connected) are behind your
television, increase the Centre Delay so that the sound from external speakers and your TV’s centre
speaker arrive at your seating position at the same time, ensuring no drop in sound quality.
Please Note:
For approximately each 30cm that your external speakers are placed behind your TV the
Centre Delay value should increase by 1ms - see diagram below.
Select the control to be adjusted by
using the up/down cursor buttons.
Once highlighted, adjust the chosen
controls by pressing the right/left
cursor buttons.
10
11
...notes on seating position
The seating position control accommodates the position of the speakers with regard to your
seating position, and so further creates an atmosphere where improved sound qualities are obtained
from your TV.
If you are seated near the front speakers, adjust the seating position to FRONT.
If you are seated between the front and rear speakers, but closer to the front speakers, adjust the
seating position to MID FRONT.
If you are seated between the front and rear speakers, but closer to the rear speakers, adjust the
seating position to MID REAR.
If you are seated at a position close to the rear speakers, adjust the seating position to REAR.
front
mid front
mid rear
rear
example 2
(showing top view)
30cm30cm
If speakers are placed 30cm behind TV,
Centre Delay value should be set to 1ms.
If speakers are placed 60cm behind TV,
Centre Delay value should be set to 2ms.
60cm
60cm
The Centre Delay value can be set to a maximum of 5ms. Therefore to enjoy the full sound capabilities
of your television do not place your external speakers more than 150cm behind the front of your TV.
speakers connected to rear of TV speakers connected to rear of TV
speaker setup
program, sound and vision adjustment
25
Select the control to be adjusted by
using the up/down cursor buttons.
Once highlighted, adjust the chosen
controls by pressing the right/left
cursor buttons.
14
15
Select the control to be adjusted by using the
up/down cursor buttons.
Once highlighted, adjust the chosen controls by
pressing the right/left cursor buttons.
18
19
To view other Speaker Setup options
use the up/down buttons to highlight
MORE...
Once highlighted, accept selection.
16
17
To return to normal TV operation without
viewing other options press the television
button on your handset.
...notes on speaker options
The speaker controls can be set to either SMALL or LARGE. This is to specify the type of
speaker connected. If your connected speakers low frequency response (the bass or ‘boom’ sound)
is poor adjust the chosen speaker value to SMALL. If the low frequency response is good set the
speaker value to LARGE - this allows the bass performance to be optimised. The Centre Speaker
and Surround Speaker(s) also have a setting of NONE. Use this as the setting if you have no
centre or surround speakers connected, or you do not want to hear the sound from these speakers.
To view other Speaker Setup options
use the up/down buttons to highlight
MORE...
Once highlighted, accept selection.
12
13
To return to normal TV operation without
viewing other options press the television
button on your handset.
...notes on amplifier options
This menu allows your TV’s own internal amplifiers to be switched off to prevent sound from
appearing from the appropriate speakers. This is useful if connecting external amplifier equipment to
the RCA phono line outputs of the TV.
26
digital audio setup
program, sound and vision adjustment
see also Sound Mode for effects
Press the cursor down button to select
DIGITAL AUDIO SETUP.
Once highlighted, accept selection.
4
5
Press and hold the MENU button for 5
seconds. The INSTALL option in the
MAIN MENU appears.
Press the cursor down button to select
INSTALL
Once highlighted, accept selection.
1
2
3
Select the control to be adjusted by
using the up/down cursor buttons.
Once highlighted, adjust the chosen
controls by pressing the right/left cursor
buttons.
6
7
decode mode
There are three possible decode modes...
Digital Your television ignores the analogue input on the selected AV and instead uses the optical or
coaxial input as its source.
Auto Your television will automatically select between digital and analogue sources. If both are present,
the digital source takes priority.
Analogue The television ignores the digital input in either the optical or coaxial connector and instead
uses the analogue information on the selected AV as its source.
digital input source
The digital audio setup menu allows the digital audio decoder in your television to be assigned to the
AV scart input that your DVD, CD player is connected to.
...notes on digital audio setup
The Digital Audio Setup menu allows you to control the sound output of any external equipment
you have connected through the Audio Visual sockets. For example, if the connection from your
external equipment to the television is via AV1, the Digital Audio source should be set as AV1.
listening mode
When listening to a Dolby Digital source with the television sound mode set to Dolby Digital this
control allows you to take advantage of special codes stored on the disc to reduce, or increase sound
effects.
Maximum makes the best use of the televisions dynamic range. It will enhance sound effects such
as explosions or screams
Standard is the normal listening mode. It does not make full use of your televisions dynamic range,
but is a good compromise for all day viewing/listening.
Night mode allows the audio to be reproduced in such a way that the impact of soundtrack
extremes (such as explosions) are reduced while quiet passages are ‘boosted’, allowing all the audio
information to be heard at a low volume level. As it’s name suggests, this mode is
intended for nightime viewing.
To return to normal TV operation press the television button on your handset.
8
digital audio status - decode mode
program, sound and vision adjustment
27
...notes on digital audio status
When your television is in its appropriate Audio Visual mode and a digital signal is being played
and applied through one of the Audio Digital in connections (either optical or coaxial), the input status
and incoming format will be displayed in the top right hand corner of the screen.
explanation
decode mode
PCM
(Pulse Code Modulation)
Dolby Digital
(Dolby D)
This is the decode mode for a digital signal encoded by PCM.
This is a two channel audio source which may, or may not be
encoded in Dolby Pro Logic - its encoding depends on the
source material. It can be regarded as a better quality version of
the left and right analogue audio signals heard from your TV
through a scart input connection. This format is used for
standard Audio CD’s.
This is the decode mode for a digital signal encoded by Dolby
Digital. This is capable of delivering a maximum of 5 main
channels (left, right, surround left, surround right and centre) and
a Low Frequency Effects (LFE) channel. Your television takes
advantage of data on the disc to tell you the number of different
channels available on the decoded track
DTS
(Digital Theater Systems)
This is the decode mode for a digital signal encoded by DTS. This
has the same capabilities as Dolby Digital and is displayed when
receiving a DTS encoded digital source.
MPEG
(Moving Pictures
Experts Group)
This is the decode mode for digital signals encoded by MPEG.
MPEG tracks are either encoded as stereo or as having 5 main
channels plus a LFE channel
digital input status
describes the type of incoming
digital audio signal
please see table below.
format
for explanation see
digital audio status -
display format
...notes on Laserdisc connection
A Laserdisc source with a Dolby Digital RF output cannot be connected to this TV directly.
Please obtain an adaptor from an electrical retailer.
Also note that when using a Laserdisc player in conjunction with an RF demodulator to decode Dolby
digital sound, Hitachi recommend putting the Decode mode to DIGITAL. This will avoid dropping in and
out of analogue sound while searching or pausing the disc that is playing.
Pressing the INFO button on your handset reveals the format of the incoming signal not the
way it is being processed i.e. pressing the INFO key on the handset might reveal Dolby D 3/2.1,
but your TV might be set to stereo mode - see digital audio setup. Also note only analogue output
is available for both AV2 and AV3 as a monitor out signal, even if digital audio has been selected.
digital audio status - display format
program, sound and vision adjustment
28
Display
Value
Front Left Front Right Centre Left Surround Right Surround
Low Frequency
Effects (LFE)
3/2.1
3/1.1
3/0.1
3/2.0
3/1.0
3/0.0
2/2.1
2/1.1
2/0.1
1/0.1
2/2.0
2/1.0
2/0.0
1/0.0
✓✓✓
Channels Present in Digital Input (for Dolby Digital and DTS)
Comments
Full multi-channel encoding, all active
Surround is mono in this case
No surround channels available
Main channels but no LFE channel
Surround mono in this case, no LFE channel
No surround or LFE channels available
All channels except centre
Left, Right, mono surround and LFE
Left, right and LFE only
Centre and LFE only
All channels except centre and LFE
Left, right and mono surround only
Left and right channels only
(may be encoded in ProLogic)
Centre channel only (mono)
This chart explains what sound channels are present when listening to the connected external
equipment which has a digital output. These values can be viewed by pressing the INFO button on
your handset when a digital signal is being received.
x/y.z
29
wide screen viewing
television features
14:9 format
16:9 format
auto format
The 14:9 format (right) is the medium between the 4:3
and 16:9 ratio signals. When this mode is selected thin
black bars appear to the sides of the screen.
The Auto format is also one which can be selected manually.
Auto mode automatically detects various screen formats that
are transmitted in either conventional (4:3) or wide screen
(16:9 or 14:9) format. After detecting which signal is being
transmitted the TV will automatically switch to the correct
screen ratio.
4:3 format
The conventional picture format for most broadcasts is the 4:3
ratio signal which gives black bars to the sides of the screen and
this is consistent with screen compression (see right).
...notes on aspect ratios for external equipment
Laserdisc and videotape players will normally provide either a full 4:3 or letterbox widescreen
format picture with black bands at the top and bottom. For viewing such widescreen picture formats,
Hitachi recommend the C16:9L mode. DVD players will normally give an option of either 4:3 or 16:9
output mode (dependant on player and software - please refer to player instructions) For a full 16:9
picture, Hitachi recommend using the 16:9 mode.
Note:
Your TV will automatically switch to 16:9 mode when it receives a true 16:9 Wide Screen Signal
through the external RF aerial or external AV sockets. You can override this change by pressing the
16:9 button on your handset to switch to the desired aspect ratio.
The picture (right) illustrates a true 16:9 wide screen picture
format. This type of picture fills the entire TV screen. The 16:9
mode can also be manually selected if desired by pressing the
button on your handset.
Note:
Your TV will automatically switch to 16:9 mode when it
receives a true 16:9 Wide Screen Signal through the external RF
aerial or external AV sockets. You can override this change by
pressing the 16:9 button on your handset to switch to the desired
aspect ratio.
...notes on wide screen features
Various broadcast stations now transmit movies and programs in true wide screen format. Your
TV can detect these signals and automatically switch to the correct format (when in AUTO mode).
However, some broadcasters do not transmit this automatic sensing signal, and so your TV will not
recognise which format is being transmitted. This situation can be overcome by simply
pressing the key on your handset.
30
wide screen viewing
television features
...notes on wide screen features
Your viewing format can be selected manually by simply pressing the key on your
handset to scroll through the viewing format options
See the examples below for the available viewing formats.
suggested TV
format
16:9
14:9L
panoramic
C16:9L
C14:9L
C14:9LS
result
result
broadcast
format
TV
format
4:3
4:3
4:3
This broadcast is a wide
screen picture format.
This type of picture fills
the entire TV screen.
The true 14:9 format is the
medium between the 4:3
and 16:9 ratio signals.
The 4:3 broadcast signal
gives black bars to the
sides of the screen which
is consistent with screen
compression.
16:9
14:9
4:3
4:3
4:3
C14:9L
C16:9L
This broadcast signal is
letterbox with black bars
at the top and bottom of
the screen.
C14:9L
This broadcast signal is
letterbox with black bars
at the top and bottom of
the screen, and also to
the sides.
C14:9L
This broadcast signal is
letterbox with black bars
at the top and bottom of
the screen, and also to
the sides.
31
sleep timer and default viewing controls
television features
...notes on Default Zoom
Various broadcast stations now transmit WSS (Wide Screen Signals) which identifies the picture format
movies and programs are broadcast in. Your TV can detect these Wide Screen Signals and automatically switches
your TV to the correct format (when in AUTO mode). However, some broadcasters do not transmit this WSS, and
so your TV will not recognise which format is being transmitted. Therefore, DEFAULT ZOOM is used to choose your
picture requirements when a Wide Screen Signal has not been sent or has not been detected.
...notes on Default 4:3
If your TV is receiving a 4:3 Wide Screen Signal, the viewing format displayed can be set using the default 4:3 .
...notes Auto WS Detect
Auto Wide Screen Detect, when switched ON (and there is no WSS signal) enables your TV to look for the
black bands at the top and bottom of the broadcast received and expands the picture in the appropriate aspect
ratio. If this is set to ‘OFF’, these black bands cannot be detected. Therefore the picture format will revert to the
setting specified in the DEFAULT ZOOM option if there is no WSS signal.
When watching some programs with Auto WS Detect ON, the C16:9L mode may result in unnecessary cropping at
the top and bottom of the picture resulting in lost subtitles etc. To overcome this, please use the 16:9 or subtitle
button on your handset.
When using external equipment with on-screen displays, incorrect operation of the Auto WS switching may occur
while performing certain operations. For example, while watching a 16:9 cinema scope format film on a DVD player,
pressing the pause button may result in the TV switching from the C16:9L mode to the default zoom. Visual forward
and rewind operations may result in similar results. This action will also show your DVD players software menus on
your television screen. This is normal operation.
Note: If you can see the screen format changing frequently after setting to ‘ON’ mode, set Auto WS Detect option to
‘OFF’ to stay at one fixed aspect ratio.
Use up/down cursor buttons to select
option to adjust.
Once highlighted, accept selection - when you turn your TV off, the TV will
memorise your adjustments
Press the MENU button to obtain
MAIN MENU.
Press the cursor down button to select
FEATURES.
Once highlighted, accept selection.
1
2
3
4
6
Use right/left buttons to adjust chosen
feature.
5
...notes on Default features
Your TV also has default features which can control the viewing format of your TV’s picture.
See above for entry into and adjustment of these features.These features and their settings will only be effective if
the widescreen picture format is set to AUTO.
...notes on Sleep Timer
This feature is used to automatically place your TV into standby mode after a set number of
minutes - use the right/left cursor buttons to set the timer between 5 and 120 minutes.When the timer
has only a minute left this will be shown on the screen as a countdown from 59 seconds to zero, after
which your TV’s status will be standby.
32
teletext operation
television features
...notes on Teletext
Teletext is an on screen information magazine and it is entered by pressing the teletext button
on your handset - a page similar to the one below will appear.Select the topic you want to view
by entering a three digit number on your handset corresponding to the page number eg. press 1,0,1
for the News Headlines. Alternately, press a coloured button which relates to one of the topics at the
bottom of the screen(the Fastext service) eg. press the green button on your handset for the sport
magazine. Also, your Hitachi television can store upto 100 Teletext pages (English, French, German,
Italian, Portugeuse, Spanish, Romanian, Swedish, Finnish, and Turkish are avaiable) which allows quick
and easy access to any page.
...notes on favourite pages
Your TV is capable of storing up to four of your favourite Teletext pages (per program) - maybe
the sports page, cookery page or gardening page - the choice is yours. These are accessed, like
Fastext, by pressing the colour coded buttons on your handset. Follow the steps below to enter your
favourite pages.
Enter Teletext by pressing the Teletext button.
Enter favourite page mode by pressing the menu button
(this allows you to swap between Fastext and favourite
page mode).
Press a colour coded key you wish to use as a
favourite page.
Repeat if necessary using a different coloured key, or
press the TV button to return to normal viewing.
Enter the 3-digit page number using the
buttons.
time
dateservice name
page number
page contents
Fastext/favourite pages
Once this number has been entered, press
and hold the same colour coded button until
the favourite page box turns white, then
returns to its original colour.
favourite page box
1
2
3
4
5
6
title
33
teletext dual page
television features
option 1
option 2
option 3
teletext page and TV viewing
An advance on the previous ‘mixing’ facility where a
transparent page overlaps the program on view, this option
splits the screen in half. Press the 16:9 button
twice on your handset (from option 1) to use this feature.
This option has the same function as the standard teletext
page
(see option 1)
but with the capacity to also view
the program being watched before Teletext was entered.
standard teletext
Standard teletext can be entered by pressing the teletext
button on your handset -
this screen must be
entered before any of the dual page
options can be used.
...notes on teletext dual page feature
At Hitachi we are committed to the constant development of our televisions capabilities. One of
the features developed for the benefit of you, the customer, is the expansion of the Teletext service
from a one page screen display to a feature that can be manipulated in a number of ways.
The instructions below show how to take advantage of this excellent feature whatever your viewing
environment or demands.
dual teletext page operation
This option splits the viewable screen area in half so that
two teletext pages can be viewed together - although only
one page can be changed at a time. This is achieved by
pressing the 16:9 button on your handset once. Pressing the
OK button on your handset places the right hand screen on
the left side and ‘freezes’ the page. When a new page
number is entered, the right hand
side will change while the left will remain the same.
Pressing the ‘X’ button on your handset will erase the left
hand page.
To return to normal TV operation press the television button on your handset.
34
standard 50Hz picture
1
2
3
4
5
6
1
2
3
4
5
6
+
=
1
2
3
4
5
6
In a standard 50Hz television the picture is created in two separate stages. For example, scan lines 1, 3, and
5 etc. are filled in first. Once this stage is complete scan lines 2, 4, and 6 etc. are filled. This means that after
these two stages all the lines on your television screen have been filled (625 in total) resulting in a complete
frame. This process is then repeated creating the picture you see on the screen of a conventional TV.
Note: a standard 50Hz picture is not available on your model
Progressive Scan
1
2
3
4
5
6
first stage
second stage
Hitachi’s Progressive Scan TV’s are constantly thinking ahead, filling in all the 625 scan lines in one
go to make up a complete frame. This progressive addition of extra line information produces a
picture that is brighter, more detailed than conventional televisions and displays the picture without
the line ‘flicker’ often associated with 50Hz sets.
progressive scan and 100Hz picture
television features
100Hz Natural Scan
Our 100Hz TV’s create double the number of images per second, compared to a conventional
50Hz set. This delivers sharper, clearer, more stable total pictures which are flicker free. Our 100Hz
sets also feature “Natural Scan” technology. This process eliminates the slight trembling of lines on the
picture that is visible on conventional TV sets giving a rock steady picture which is clear and detailed.
To switch between Progressive Scan and 100Hz press the button (displayed alongside the title) on
your handset.
35
...notes on multiple picture
By pressing the multiple picture button on the
handset ( ) your TV screen will step through and
display all channels received through your aerial
(depending on the display mode - see below).
Example on right shows a Display Mode of
multiple picture
television features
Note: If the Display Mode is set to and
you can only receive 10 channels, 6 of these will
be repeated.
Use up/down cursor buttons to select
MULTI PICTURE feature.
Press the MENU button to obtain
MAIN MENU.
Press the cursor down button to select
FEATURES.
Once highlighted, accept selection.
1
2
3
4
Press the OK button on your handset to
accept selection.
5
Use the up and down buttons to
select an option, use the left and
right keys to adjust values.
6
display
This determines the amount of
channels which can be
viewed at one time - either 4, 12, or 16.
To return to normal TV operation
press the television button
on your handset.
7
mode
Use this to show multi-pictures of different
channels (option ‘Single’), or multiple pictures of the
same channel (option ‘Multiple’).
speed
This is used to decide the time delay
between the pictures appearing on
your TV screen when in Multi Picture mode -
the pointer to the left means a slower speed
and so a longer delay, pointer to the right
means a faster speed and so a shorter delay.
36
2 X 15W 8
AV1
AV2
.
Use this socket to
connect ordinary VHS,
S-VHS or Hi8 equipment
to your TV.
AV1
AV2
2 X 15W 8
Use this to connect
digital video broadcasting
equipment, home
computers and home
entertainment systems to
your TV
This should be
permanently connected to
an RF source - i.e your aerial
antenna.
The DIN sockets are
used to connect two
external speakers for which
no amplifier is necessary.
R is for the right external
speaker, and L is for the
left external speaker.
Please Note
: Do not
connect supplied rear left
and rear right external
speakers to these sockets.
Obtain speakers with DIN
sockets from your HITACHI
dealer.
...notes on audio equipment
If you have purchased your TV complete with Hitachi’s power console please refer to the Users
Guide that is supplied with the equipment.
Your HITACHI dealer can also advise you on the correct amplifier and speaker choice for your TV.
AV2 scart input
AV1 scart input
RF aerial socket
DIN sockets
Before
connecting external
equipment, please
consult
audio visual
setup .
rear socket and scart details
other equipment connection
The 18V power
output socket is specifically
designed for HITACHI
accessories - under no
circumstances connect any
other accessory to this
socket as this could cause
irreparable damage to your
equipment.
18V socket
DVD, CD and laserdisc connection
other equipment connection
37
2 X 15W 8
AV1
AV2
...notes on disc playing equipment
The Audio Visual output of a Digital Versatile Disc, Compact Disc, or laser disc can be connected
to any of the 3 Audio Visual sockets of your TV, but for better quality it is recommended that they are
connected to either scart sockets AV1 or AV2.
If digital Audio, such as PCM, Dolby Digital, DTS or MPEG multichannel is to be employed, a special
connection will need to be made to your television. You have a choice of two formats when connecting
this type of equipment - an optical connection or a co-axial connection.
Only one connection should be made - if both the optical an co-axial
formats are connected, the optical link will take priority.
scart leads are an optional extra*
Disc playing
equipment
(this should be plugged
into a mains socket)
Remove the dust covers from the optical output of the external disc player you wish
to connect to your television.
Store these in a safe place.
Using a special optical lead
available from high street retailers make the connection between the two points. You are
now ready to view the contents of your chosen disc.
optical connection
If the coaxial connection is to be used, connect a 75 phono cable between
the coaxial output of your Digital Versatile Disc, Compact Disc or laser Disc and the
coaxial input of your television.
co-axial connection
television co-axial
and optical
connections
The Dolby Digital RF output of a laserdisc player cannot be
connected to the digital audio input directly. Please obtain an RF
demodulator from an electrical retailer. When using a Laserdisc
player in conjunction with an RF digital demodulator, ‘popping’ may
occur while carrying out various search operations with the player.
external speaker socket details
other equipment connection
38
2 X 15W 8
AV1
AV2
Please ensure that the speakers are of the correct impedance and power rating before
attempting to connect to any of the audio sockets (please refer to technical data)
Use one of these connections to connect
your TV to external equipment such as a DVD,
LaserDisc or Compact Disc player.
coaxial and optical digital connectors
The speaker terminals are used to connect
external speakers for which no amplifier is necessary
REAR RIGHT is for the rear right external speaker,
and REAR LEFT is for the rear left external speaker.
Connect the BLACK lead to the BLACK sockets
Connect the STRIPED lead to the RED sockets.
external speaker terminal block
These sockets are used in conjunction with an
external amplifier. Their volume output can be
controlled via the main volume control and also the
Speaker Setup menu - see Speaker Setup in the
program, sound and vision adjustment
section.
amplifier
The plastic dust cap protecting the optical
digital in socket has to be removed before
connection with external equipment.
DO NOT THROW THE DUST COVER AWAY.
KEEP THE DUST COVER AWAY FROM
YOUNG CHILDREN.
This is used to protect the optical digital
connection from foreign bodies.
plastic dust cap
Please Note:
The REAR LEFT and REAR
RIGHT speakers should have an impedance of 6 -
8. The FRONT LEFT and FRONT RIGHT speakers
should have an impedance of 8.
Use this button to switch between
your TV’s internal speakers and
connected external speakers
*not available on model C36WF810N
internal/external speaker switch*
external speaker setup
other equipment connection
39
...notes on external speaker setup
The external speaker equipment supplied with your television also comes with connecting cables. Use
these cables to connect the sockets at the rear of your speakers to those found at the rear of your television.
centre speaker
sub-woofer
rear left
rear right
optional optical
cable for digital
sound
DVD player (optional)
With your television you have been
supplied with external speakers. Use the
supplied cables to connect the speakers as
shown.
Connect the BLACK leads to the BLACK
sockets and the STRIPED leads to the
RED or WHITE sockets.
The centre speaker is responsible for
the dialog reproduced by your television.
This piece of equipment is triangular in shape.
NOTE:
The CENTRE speaker should be
positioned either on top of your television or
beneath it, to achieve the best audio results.
The sub woofer is responsible
for the bass sound reproduced by
your television. This piece of
equipment is rectangular in shape.
NOTE:
The position of the SUB
WOOFER speaker is less important
accoustically
TV
your seating
position
centre speaker
*
sub woofer
*
rear left speaker
rear right speaker
Please Note:
For the best audio
effects position the
external speakers
as close as
possible to the
positions shown.
C32WF810N
✓✓
optional optional
✓✓
rear right
external
rear left
external
front right
external
front left
external
centre
speaker
sub-
woofer
C36WF810N
✓✓
optional optional
✓✓
*
this equipment is built into model C32WF810N
separate
separate
integral
integral
audio visual setup
other equipment connection
40
Press and hold the MENU button for 5
seconds. The INSTALL option in the
MAIN MENU appears.
Press the cursor down button to select
INSTALL.
Once highlighted, accept selection.
Press the cursor down button to select
AV SETUP.
Once highlighted, accept selection.
1
2
3
4
5
Use the up/down cursor keys to select AV
to adjust.
Adjust chosen AV by using the left/right
cursor buttons.
6
7
Once highlighted, accept selection.
8
The AV SETUP menu is used as a means of instructing your television to recognise what
external equipment is being connected to your TV’s scart, S-VHS and/or phono sockets. If you have
any equipment connected to your TV (either permanently, like a VCR, or temporary, like a camcorder)
it is important that your TV recognises which kind of equipment is connected. For VCR’s, camcorders
and LaserDiscs the appropriate AV VCR mode should be set to ON in the menu. This helps to provide
a steady picture when playing back a recorded picture. If an S-VHS or Hi8 piece of equipment is to be
used, these should be connected to either AV2 or AV3.
...notes on using VCR’s, camcorders and LaserDiscs
played through AV input
important note
It is very important that the AV menu setup is adjusted correctly when connecting external
equipment to your TV - the incorrect setting may lead to picture breaking and splitting. It must
also be noted that when this external equipment is a VCR or camcorder, and your VCR mode
is set to ‘ON’ Progressive Scan is not an option during playback and your TV automatically
displays the picture at 100Hz.
camcorder and computer connection
other equipment connection
41
To use headphones with
your TV insert the headphone
jack plug (3.5mm) into the
corresponding socket.
Use this socket, along with
audio in right to obtain sound
from your external equipment
through your TV’s speakers.
Use this socket with an
S-VHS or Hi8 camera to view
your recordings.
Use this in conjunction
with a standard 8mm camera to
see the picture from your
equipment.
Use this socket, along with
audio in left to obtain sound
from your external equipment
through your TV’s speakers.
camcorder
Connecting a camcorder to
your TV is easy. First, identify the
type of camcorder and its
connecting sockets. If it is a
standard 8mm type camera then
this is likely to have 'RCA' type
sockets. If you have a S-VHS or
Hi8 camera you may have a S-
VHS socket. Open the front
control panel door and connect
your equipment as detailed here.
Switch your TV on and press the
TV/AV button on your
handset until AV3 is displayed on
your TV screen. Now begin
playback operation of your
equipment. Alternatively, you
could allocate an individual
channel number for your
camcorder equipment - see
signal source entry.
connecting to the mains socket
Important - Please read television safety before connecting your television and
external equipment.
headphone connection
S-VHS socket
audio in right
audio in left
video in
If digital video broadcasting equipment, computer equipment or video games are to be
connected to this TV, use the AV2 located on the rear of your TV for RGB input.
PLEASE NOTE: Prolonged use of computer equipment or games on this TV may cause permanent
damage to your picture tube. To avoid such damage, reduce the brightness and contrast to an
acceptable level and limit the duration of use of computer equipment.
Before connecting external
equipment, please consult
other equipment
connection - audio visual
setup.
The control panel illustrated
is that of model C32WF810N.
Although the control panel of
model C36WF810N has a
different layout the controls and
functions remain the same.
signal source entry
other equipment connection
42
Press and hold the MENU button for 5
seconds. The INSTALL option in the
MAIN MENU appears.
Press the cursor down button to select
INSTALL.
Once highlighted, accept selection.
Press the cursor down button to select
MANUAL SETUP.
Once highlighted, accept selection.
Use the cursor keys to move the
selection bar over the AV required
to be adjusted.
Select your method of signal source
entry using the up/down cursor buttons.
Once highlighted, accept the selection to
change your TV’s Audio Visual setting and
you will see the selection bar turn red - it is
ready to be changed.
option 1
AV1 is the signal source used when connecting
external equipment (eg. VCR) through a scart lead
to the AV1 socket at the rear of your TV.
1
2
3
4
5
6
7
8
...notes on signal source entry
Each piece of external equipment connected to your TV must have its own input socket. It
would also be easier, and more organised, if the external equipment connected also had its own
program number.
Signal Source entry allows us to tell the allocated program what equipment is
connected to which socket.
This would make the switching between normal operation and the
connected equipment much smoother.
For example, if you want to connect a games machine to your TV -
1. connect to socket AV2 via a scart lead.
2. give your games machine an empty program number of its own.
3. if desired change this program name.
4. give this channel the correct AV program source (in this case AV2).
43
signal source entry
other equipment connection
option 2
AV2 is the signal source used when connecting
external equipment such as home entertainment
systems and satellite decoders through a scart lead
to the AV2 socket at the rear of your TV.
option 3
AV3 is the signal source used when connecting
temporary equipment like a camcorder to your TV
through the audio/video sockets at the front of your TV.
option 4
RGB is the signal source used when connecting
digital video broadcasting equipment or home
entertainment systems to your TV through the
AV2 scart lead at the rear of your TV.
Once the signal source for each relevant
program number has been decided, this
can be stored in your TV's memory by
pressing the conformation button.
To return to normal TV operation press the
television button on your handset.
9
10
...notes on RF signal source
RF is the signal source used for standard
television broadcasting and this should be used as the
setting for programs BBC1, BBC2, ITV, CH4/S4C, and
CH5 (where available). This source appears blank.
44
front control panel details
other equipment connection
This will be lit when
your TV is on and when in
standby mode, and flash
when a function
from your remote control
is being sent to the TV.
This is for reading
commands sent
from your remote control
handset.
Use this to switch your TV on and
off.(when switched off using this button
your TV consumes no power - unlike
when in standby mode).
To use the controls push the door in and release.
These sockets are for
use with external equipment
This socket is for use
with external equipment.
Used with
headphones (3.5mm stereo
jack plug required).
Used to access your
on screen MAIN MENU for
TV features adjustment.
Used to change the TV
channel up ‘+’ or down ‘-’ (or
cursor up and down when using the
On Screen Display menus).
Used to increase ‘+’, or
decrease ‘-’ your TV's sound (or
cursor right and left when in On
Screen Display menus).
on/off button
TV mode light
infra-red lens
television controls door panel
headphone socket
S-VHS sockets
audio/video sockets
volume buttons
program buttons
menu button
The control
panel illustrated is
that of model
C32WF810N.
Although the
control panel of
model C36WF810N
has a different
layout the controls
and functions
remain the same.
45
trouble shooting guide - digital sound
television information
remedypossible cause
problem identification
1. No digital audio. Pressing
the info/recall button on your
handset doesn’t show Digital
audio modes or format in top
right hand corner of screen.
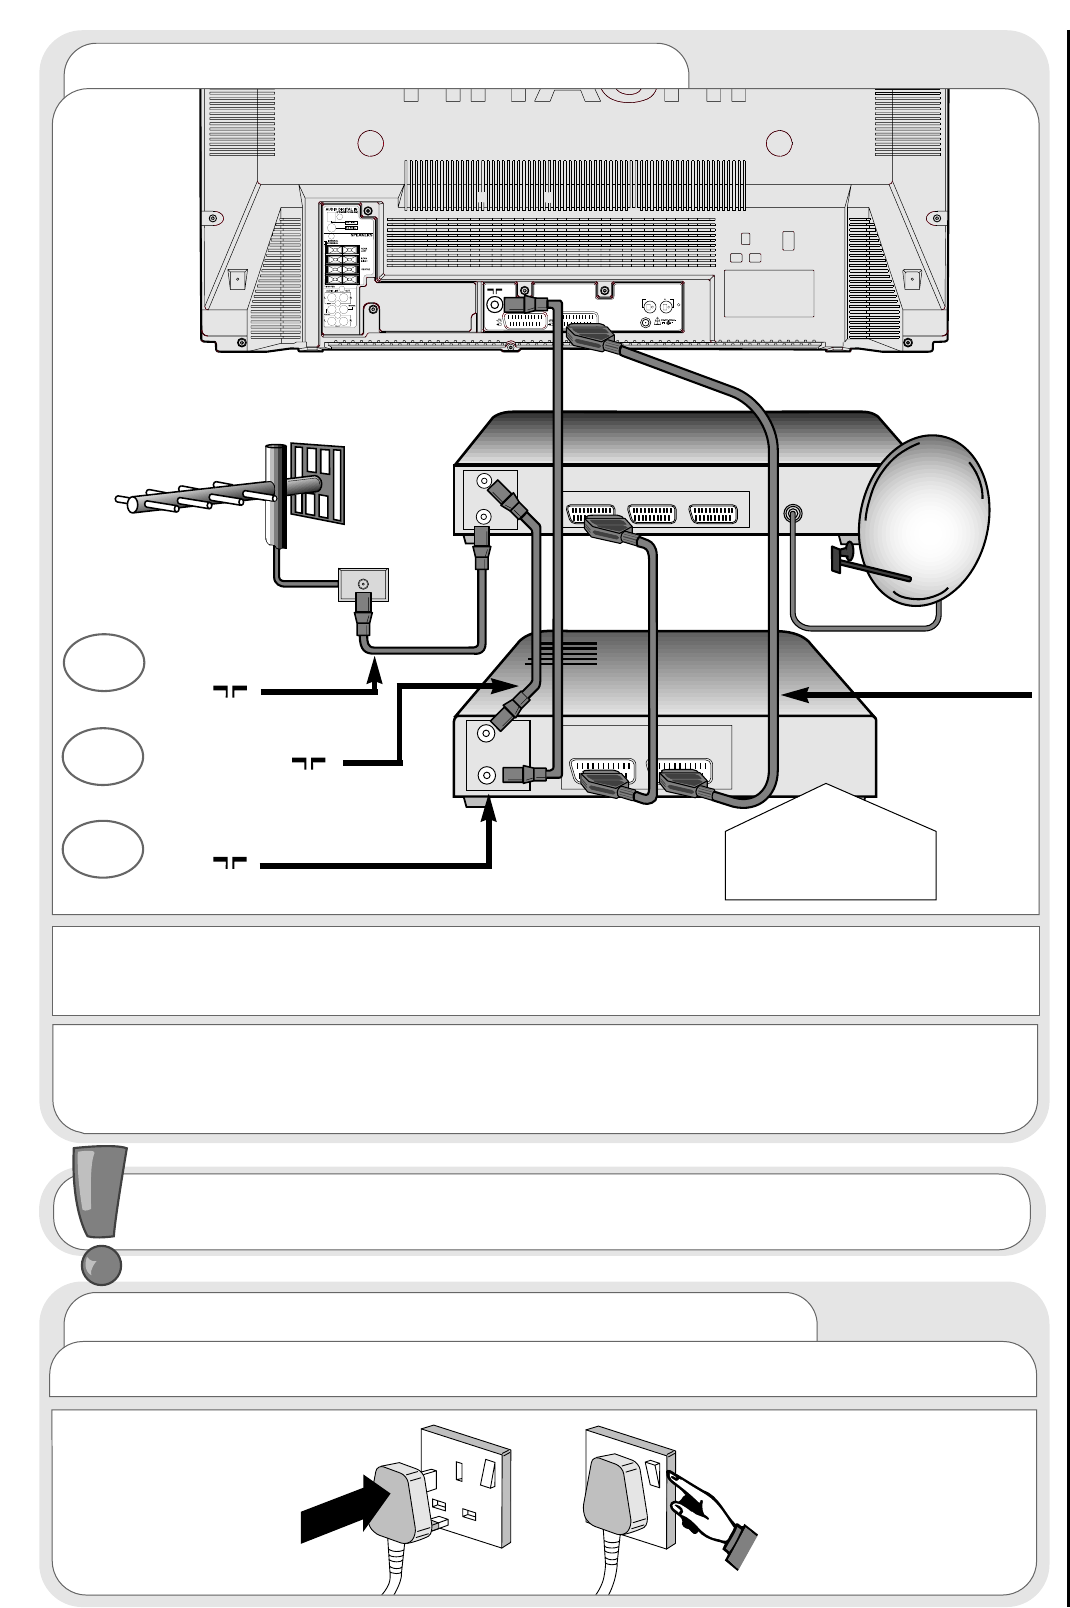
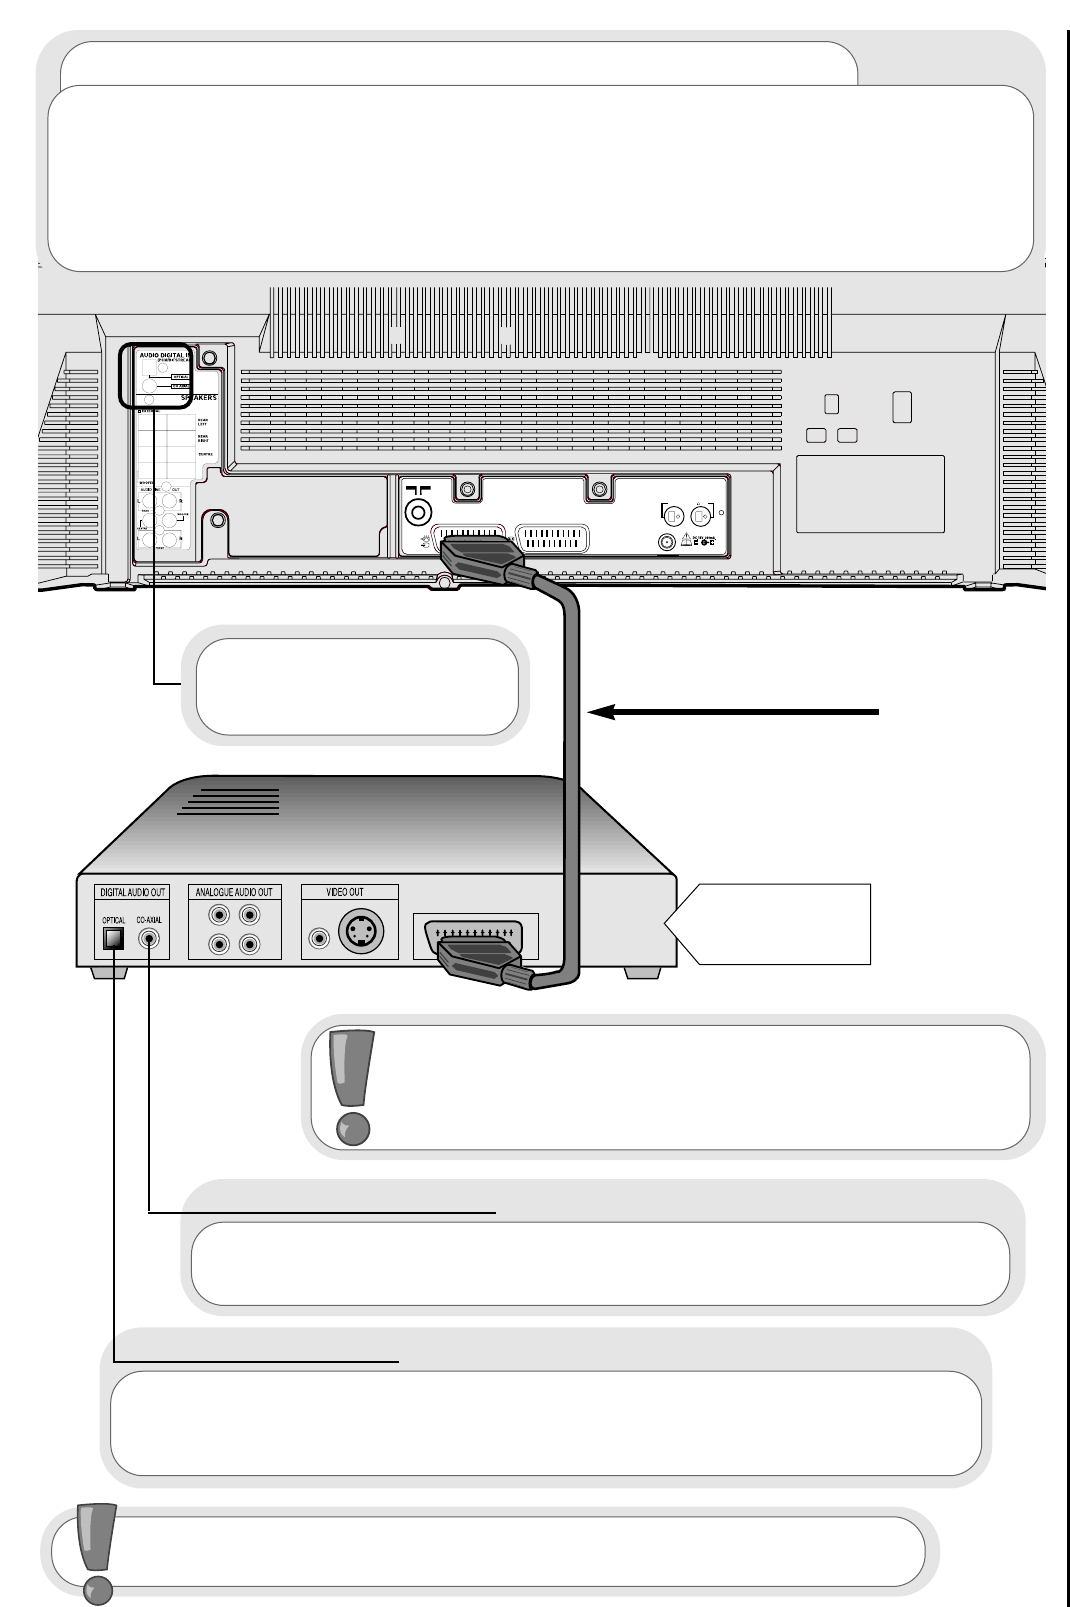
No or poor digital connection
between television and external
equipment
See ‘DVD, CD and LaserDisc
player connection’
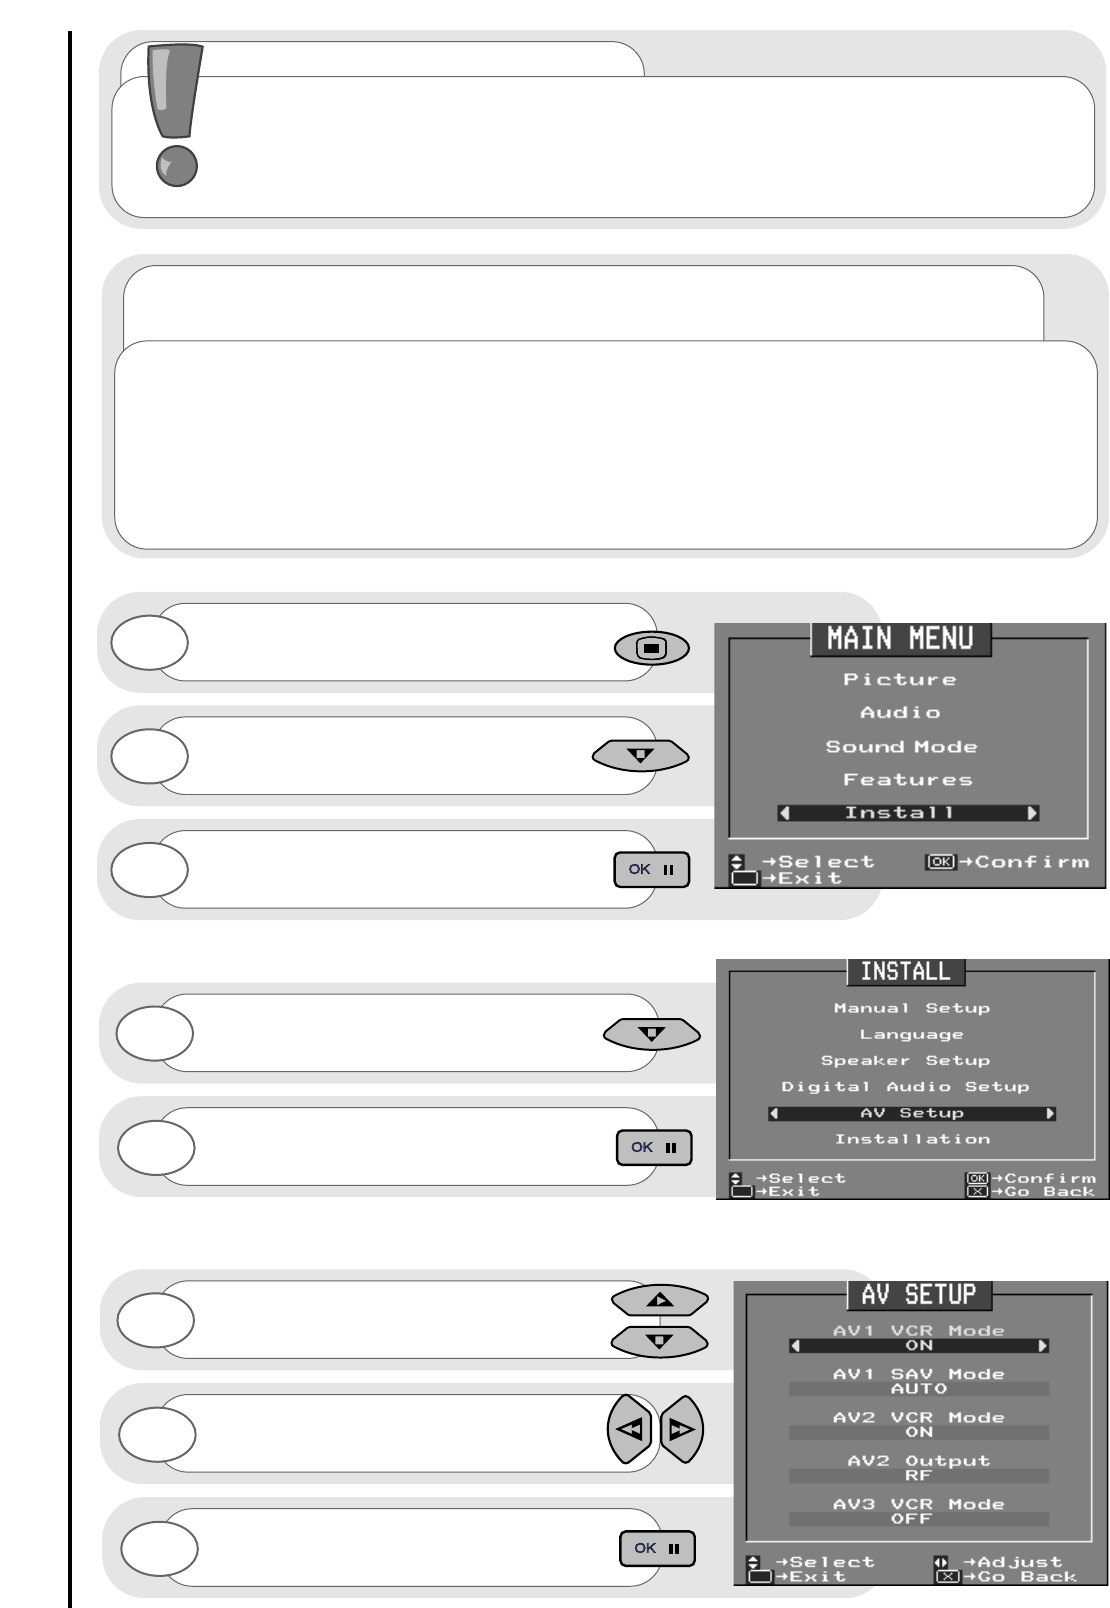
Incorrect Decode Mode
Set the Decode Mode to
correct AV (see Decode
Mode set up procedure)
Decode Mode is set for wrong
AV (you will have the correct
picture from your external
equipment but no sound)
Set the Decode Mode to
Digital or Auto (see ‘Digital
Audio Status - Decode Mode’
set up procedure)
Television is set to the wrong AV
(you will have the wrong picture
or no picture at all)
Use the Manual Setup
procedure to set the AV
correctly, or use the AV key
to cycle through the Audio
Visual options.
Player is not playing because it
has been switched off or placed
in ‘Pause’ mode.
Refer to external equipments
instructions
Invalid or damaged disc has been
placed in player.
Refer to external equipment
instructions. Is the disc
compatible with the external
equipment you are using?
Signal options not supported by
television.
See Digital Audio Status for list
of modes available.
Digital audio out has not been
enabled on player.
Refer to external equipment
instructions on how to enable
the digital audio output.
2. Digital audio works but
only PCM mode is available
even when playing a DTS,
Dolby Digital or MPEG
encoded disc.
Your external equipment has not
been configured to output a
digital bitstream, does not
support DTS, Dolby Digital or
MPEG output, or the correct
format is not enabled on the
external equipment.
3. No sound even at
maximum volume, although
the correct picture can be
seen.
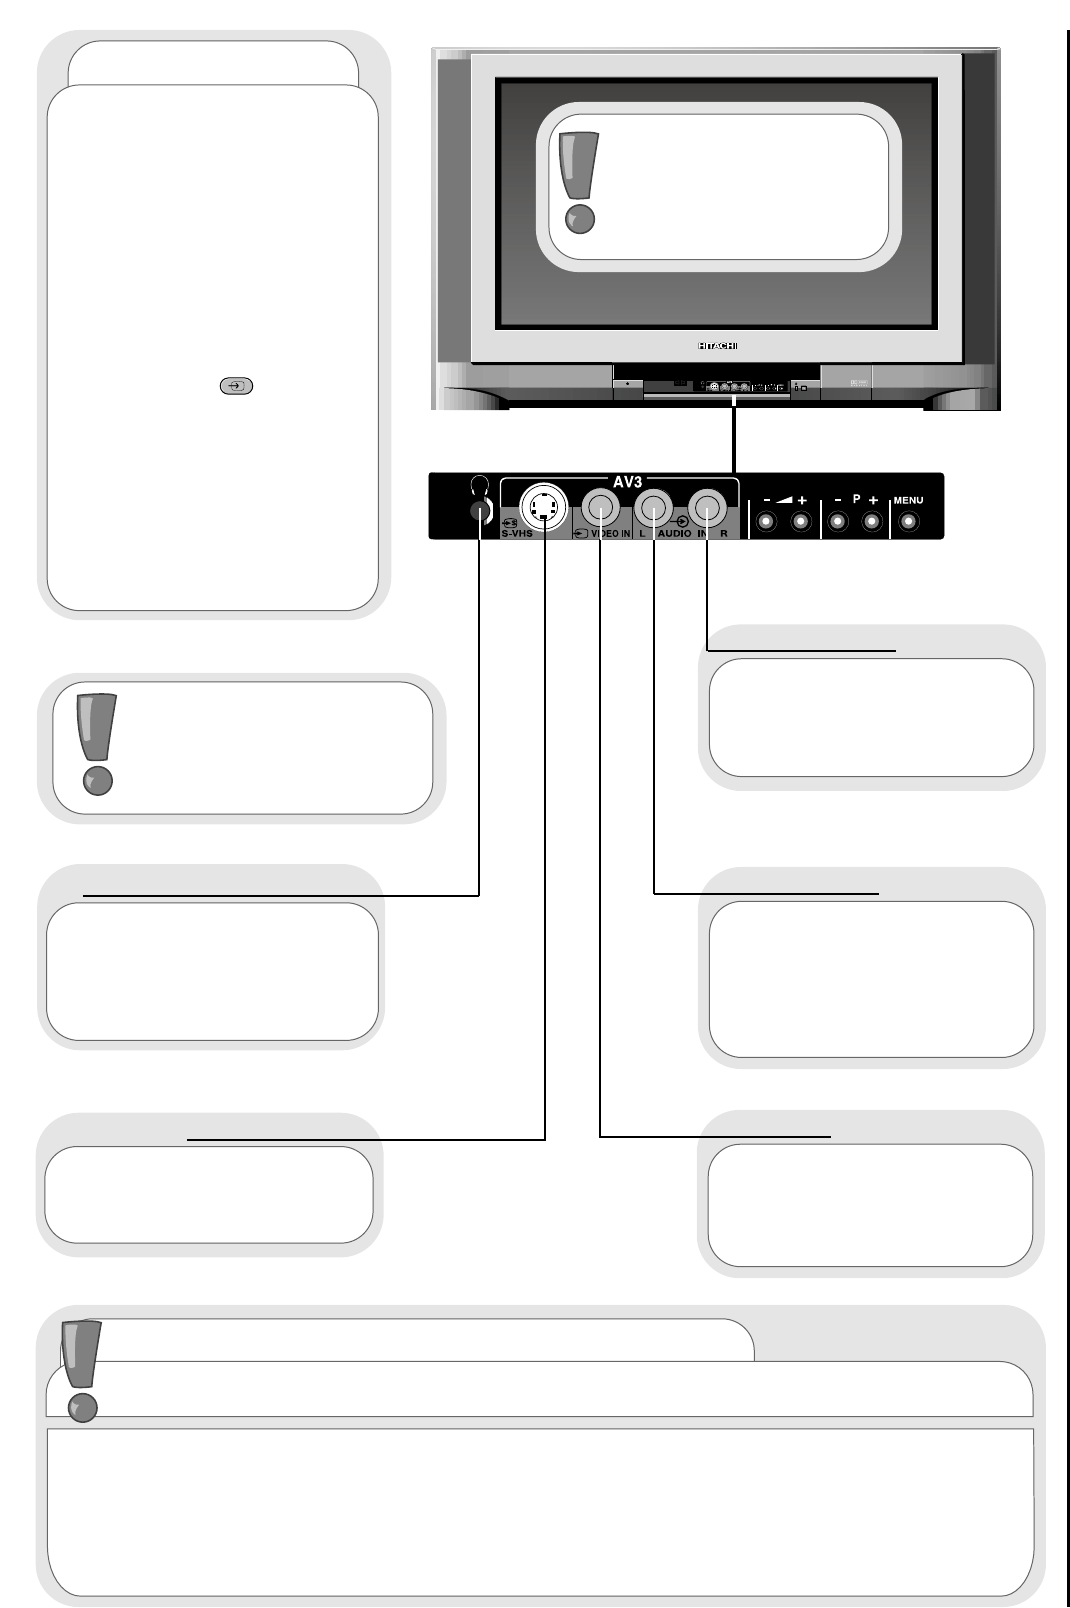
Amplifiers muted or set to ‘NONE’.
See the Speaker Setup menu.
Headphones have been inserted
into front control panel.
Remove headphones.
4. Picture is OK, but digital
audio is intermittent.
Poor connections.
Check your coaxial/optical
connections.
Faulty disc.
Try an alternative disc.
Faulty external equipment.
Try alternative equipment or
contact your equipments
supplier.
5. Picture and digital audio
are intermittent.
Has a scart lead connection been
made between TV and external
equipment?
Check quality of connection.
Faulty external equipment.
Try alternative equipment or
contact your equipments
supplier.
External/internal speaker switch
is in the incorrect position.
Place in correct position to use
appropriate speakers.
You have not selected a DTS,
Dolby Digital or MPEG track from
the DVD title menu
Refer to title menu on disc to
set audio format
Laserdisc with Dolby Digital RF
signal cannot be detected
Fit adaptor as described in
‘DVD, CD and LaserDisc
player connection’
Refer to external equipment
instructions for compatability.
46
trouble shooting guide - digital sound
television information
remedypossible cause
problem identification
6. One or more of the rear
channels is not working.
The disc placed in your external
equipment has no surround
information on it.
This is normal operation
The rear speakers are switched
off.
Check the Speaker Setup
menu.
The speaker cables are
connected incorrectly.
Check the speaker connections.
Use the noise sequencer in the
speaker setup menu to check
the speakers are positioned and
connected properly.
You are in Stereo mode.
Change the mode in the
Sound Mode menu.
The cables are connected
incorrectly.
Check the speaker
connections.
You have Surround Speakers set
to ‘NONE’ in the Speaker Setup
menu.
Check the Speaker Setup
menu.
You are playing a disc with an
incompatible sample rate.
This is normal operation
7. The sound from the
external speakers seems to
be coming from the wrong
source (ie. the left speaker
sound is coming from the
centre speaker).
The speaker cables are
connected incorrectly.
Check the speaker
connections.
Use the noise sequencer to
check the speakers are
positioned and connected
properly.
8. No digital mode options
available in Sound Mode
Menu.
Are headphones inserted into
front control panel?
Remove headphones to adjust
Surround Mode.
You are playing a disc with a high
sample rate.
This is normal operation.
9. Only left and right
speakers are working.
You are in stereo mode.
Change the mode in the Sound
Mode menu.
The Rear, Centre and Subwoofer
speakers are set to ‘NONE’ or
the Rear, Centre and Subwoofer
amplifiers are switched off.
Check the Speaker setup
menu
There is no surround/centre/ LFE
information encoded onto the
disc.
This is normal operation.
You have not selected a DTS,
Dolby Digital or MPEG track from
the DVD title menu
Refer to title menu on disc
to set audio format
Your external equipment has not
been configured to output a
digital bitstream, does not
support DTS, Dolby Digital or
MPEG output, or the correct
format is not enabled on the
external equipment.
You have not selected a DTS,
Dolby Digital or MPEG track from
the DVD title menu
Refer to title menu on disc to
set audio format
Your external equipment has not
been configured to output a
digital bitstream, does not
support DTS, Dolby Digital or
MPEG output, or the correct
format is not enabled on the
external equipment.
Refer to external equipment
instructions for compatability.
Refer to external equipment
instructions for compatability.
47
trouble shooting guide - television operation
television information
questions
answers
remedypossible cause
problem identification
snowy picture - poor sound
multiple images - sound O.K
intermittent interference
no picture or sound
Connection of aerial lead
to the TV is poor.
Corroded or poor aerial
connections.
Aerial has moved position.
Adverse weather conditions.
Transmitter problems.
Make new connection
and/or change aerial plug.
Make new connections
or renew lead.
Re-align aerial.
None.
Check with local Operator.
Transmitter problems.
Aerial has moved position.
TV not tuned correctly.
Adverse weather conditions.
Re-align aerial.
None.
Re-tune or fine tune TV.
Check with local Operator.
Magnetic interference from
electrical or mechanical
motors, fluorescent lights,
portable radios etc.
Check devices for shielding
and renew if necessary or
move further from TV.
TV may be in AV mode.
Picture/sound controls set to
minimum.
TV in standby mode.
Press television button
or to buttons on
your handset to return to
normal TV mode.
Check picture/sound
controls (go to MAIN
MENU).
press one of the
buttons to .
Why doesn't my remote control handset work?
Why won't my TV switch on?
Check that your plug is connected to the socket
and switched on,check fuse and make sure TV
is not in standby mode (see below)
Make sure there are no obstructions between
the handset and the TV's infra-red lens, or the
batteries may be exhausted - replace the whole
set of batteries.
AV Input not set correctly.
Check what external
equipment is connected
and check its scart AV
status.
If a problem still continues after referring to this guide contact your dealer immediately.
Under NO circumstances remove the rear cover of your TV.
48
Thank You for purchasing this Hitachi Television.
In the unlikely event that this product should develop a fault, we
undertake to repair or replace any part of the product which fails
due to a manufacturing defect within 12 months of the date of
purchase provided that...
1. the product has been installed and used only in accordance
with the instructions supplied with the product.
2. the product has not been repaired, maintained, or modified by
any person other than a Hitachi authorised dealer.
3. the product serial number has not been removed or altered.
•this guarantee does not apply to a product acquired second hand
or for commercial or communal use.
•this guarantee does not cover the replacement of exhausted
batteries, the adjustment of user controls, or aerial alignment.
•any parts replaced under this guarantee shall become the property
of Hitachi Home Electronics (Europe) Ltd,
•please note that evidence of the date of purchase will be required
before any service under this guarantee is carried out
Use the boxes provided below to record your TV’s Model and Serial
Number - these are found on the rating plate located on the rear of the TV.
Also, record where and when you purchased this T.V. This information will
help any future queries you may have and should be used in all
correspondence with Hitachi service centres.
SERIAL NUMBERMODEL DEALER/STORE DATE PURCHASED
This guarantee does not affect your statuary rights.
In all cases of difficulty please
consult your Hitachi dealer.
guarantee
television information
49
HITACHI Environmental Notice
television information
Hitachi are signatories to the commitment made by the
consumer electronics industry on reducing energy
consumption by televisions and video recorders on standby.
Even though your TV has a low power consumption, you can
reduce waste to zero if you switch off the set at the mains
after use. Your TV should certainly be switched off overnight
or when you are away from home. Other factors should also
be considered when operating your TV. Reducing volume
settings to sensible levels can reduce power consumption as
well as reducing noise pollution, and
reducing contrast can provide a more pleasing picture as
well as reducing power consumption.
Hitachi Home Electronics (Europe) Ltd. manufacturing site in
Wales is a BSI Registered Company, and has been assessed
to ISO 9001 Quality Management Standard, certificate
FM32366. Your television has been manufactured under the
Environmental Quality Management Standard ISO14001,
certificate EMS 36168.
The paper used for this Users Guide has been produced from
sustainable forests, part of Hitachi’s on going commitment to
the global environment.
Environmental Notice
50
S-VHS socket
television specification
Interlace..................................................................................................100Hz
Progressive Scan....................................................................................50Hz
Aerial Impedance....................................................................................75 unbalanced
Picture Tube ..........................................................................................C32WF810N = 76cm type
C36WF810N = 86cm type
Mains Voltage ........................................................................................220 - 240V AC 50 Hz
Internal Speakers....................................................................................6 x 12cm type x 2
Power Consumption ....................................................................................................C32WF810N = 126W (approx)
C36WF810N = 140W (approx)
Standby <6W (all models)
Weight............................................................................................................................C32WF810N = 59Kg (NET)
C36WF810N = 75Kg (NET)
Dimensions (W x D x H)....................................................................................................................................C32WF810N = 883x572x551 mm
C36WF810N = 956x580x623 mm
Remote Control Batteries............................................................................................2 X HITACHI UM-4
(equivalent ‘AA’)
scart socket AV1
scart socket AV2
21 19 17 15 13 11 9 7 5 3 1
20 18 16 14 12 10 8 6 4 2
21 19 17 15 13 11 9 7 5 3 1
20 18 16 14 12 10 8 6 4 2
AUDIO OUT (RIGHT)
AUDIO INPUT (RIGHT)
AUDIO OUT (LEFT)
GROUND (AUDIO)
NOT USED
AUDIO INPUT (LEFT)
NOT USED
SWITCHING INPUT
NOT USED
NOT USED
NOT USED
NOT USED
CHROMINANCE GROUND
NOT USED
CHROMINANCE INPUT S–VHS
NOT USED
GROUND (VIDEO)
GROUND (VIDEO)
COMPOSITE VIDEO OUTPUT
COMPOSITE VIDEO OR
COMPOSITE LUMINANCE S–VHS
GROUND
1
2
3
4
5
6
7
8
9
10
11
12
13
14
15
16
17
18
19
20
21
AUDIO OUT (RIGHT)
AUDIO INPUT (RIGHT)
AUDIO OUT (LEFT)
GROUND (AUDIO)
GROUND (BLUE)
AUDIO INPUT (LEFT)
BLUE INPUT
SWITCHING INPUT
GROUND (GREEN)
NOT USED
GREEN INPUT
NOT USED
GROUND (RED)
GROUND (BLANKING)
RED INPUT
STATUS (BLANKING) INPUT
GROUND (VIDEO)
GROUND (VIDEO)
COMPOSITE VIDEO OUTPUT
COMPOSITE VIDEO INPUT
GROUND
1
2
3
4
5
6
7
8
9
10
11
12
13
14
15
16
17
18
19
20
21
FUNCTION
Chrominance input
Luminance input
Chrominance ground
Luminance ground
Frame ground
PIN
1
2
3
4
5
1
2
4
5
3
technical data
television information
Due to the continual development of Hitachi products the features, functions and specifications
of the television models in this guide are subject to change without notice. Weights and dimensions
shown are approximate.
51
notes
Hitachi, Ltd. Tokyo, Japan
International Sales Division
THE HITACHI ATAGO BUILDING,
No. 15 12 Nishi Shinbashi, 2 Chome,
Minato – Ku, Tokyo 105-8430, Japan.
Tel: 03 35022111
HITACHI EUROPE LTD,
Whitebrook Park
Lower Cookham Road
Maidenhead
Berkshire
SL6 8YA
UNITED KINGDOM
Tel: 01628 643000
Fax: 01628 643400
Email: consumer-service@hitachi-eu.com
HITACHI EUROPE S.A.
364 Kifissias Ave. & 1, Delfon Str.
152 33 Chalandri
Athens
GREECE
Tel: 1-6837200
Fax: 1-6835964
Email: service.hellas@hitachi-eu.com
HITACHI EUROPE GmbH
Munich Office
Dornacher Strasse 3
D-85622 Feldkirchen bei München
GERMANY
Tel: +49-89-991 80-0
Fax: +49-89-991 80-224
Hotline: +49-180-551 25 51 (12ct/min)
Email: HSE-DUS.service@hitachi-eu.com
HITACHI EUROPE S.A.
Gran Via Carlos III, 86, planta 5
Edificios Trade - Torre Este
08028 Barcelona
SPAIN
Tel: 93 409 2550
Fax: 93 491 3513
Email: atencion.cliente@hitachi-eu.com
HITACHI EUROPE srl
Via Tommaso Gulli N.39, 20147
Milano, Italia
ITALY
Tel: +39 02 487861
Tel: +39 02 38073415 Servizio Clienti
Fax: +39 02 48786381/2
Email: customerservice.italy@hitachi-eu.com
HITACHI Europe AB
Box 77 S-164 94 Kista
SWEDEN
Tel: +46 (0) 8 562 711 00
Fax: +46 (0) 8 562 711 13
Email: csgswe@hitachi-eu.com
HITACHI EUROPE S.A.S
Lyon Office
B.P. 45, 69671 BRON CEDEX
FRANCE
Tel: 04 72 14 29 70
Fax: 04 72 14 29 99
Email: france.consommateur@hitachi-eu.com
HITACHI EUROPE LTD (Norway) AB
STRANDVEIEN 18
1366 Lysaker
NORWAY
Tel: 67 5190 30
Fax: 67 5190 32
Email: csgnor@hitachi-eu.com
HITACH EUROPE AB
Egebækgård
Egebækvej 98
DK-2850 Nærum
DENMARK
Tel: +45 43 43 6050
Fax: +45 43 60 51
Email: csgnor@hitachi-eu.com
HITACHI EUROPE AB
Neopoli / Niemenkatu 73
FIN-15140 Lahti
FINLAND
Tel : +358 3 8858 271
Fax: +358 3 8858 272
Email: csgnor@hitachi-eu.com
Hitachi Europe Ltd
Bergensesteenweg 421
1600 Sint-Pieters-Leeuw
BELGIUM
Tel: +32 2 363 99 01
Fax: +32 2 363 99 00
Email: sofie.van.bom@hitachi-eu.com
HITACHI EUROPE LTD
Na Sychrove 975/8
101 27 Pr aha 10 Bohdalec
CZECH REPUBLIC
Tel: +420 267 212 383
Fax: +420 267 212 385
Email: csgnor@hitachi-eu.com
www.hitachidigitalmedia.com
48

Hulp nodig? Stel uw vraag in het forum

Spelregels

Misbruik melden

Gebruikershandleiding.com neemt misbruik van zijn services uitermate serieus. U kunt hieronder aangeven waarom deze vraag ongepast is. Wij controleren de vraag en zonodig wordt deze verwijderd.

Product:

Bijvoorbeeld antisemitische inhoud, racistische inhoud, of materiaal dat gewelddadige fysieke handelingen tot gevolg kan hebben.

Bijvoorbeeld een creditcardnummer, een persoonlijk identificatienummer, of een geheim adres. E-mailadressen en volledige namen worden niet als privégegevens beschouwd.

Spelregels forum

Om tot zinvolle vragen te komen hanteren wij de volgende spelregels:

Belangrijk! Als er een antwoord wordt gegeven op uw vraag, dan is het voor de gever van het antwoord nuttig om te weten als u er wel (of niet) mee geholpen bent! Wij vragen u dus ook te reageren op een antwoord.

Belangrijk! Antwoorden worden ook per e-mail naar abonnees gestuurd. Laat uw emailadres achter op deze site, zodat u op de hoogte blijft. U krijgt dan ook andere vragen en antwoorden te zien.

Abonneren

Abonneer u voor het ontvangen van emails voor uw Hitachi C36WF830N bij:


U ontvangt een email met instructies om u voor één of beide opties in te schrijven.


Ontvang uw handleiding per email

Vul uw emailadres in en ontvang de handleiding van Hitachi C36WF830N in de taal/talen: Engels als bijlage per email.

De handleiding is 5,27 mb groot.


U ontvangt de handleiding per email binnen enkele minuten. Als u geen email heeft ontvangen, dan heeft u waarschijnlijk een verkeerd emailadres ingevuld of is uw mailbox te vol. Daarnaast kan het zijn dat uw internetprovider een maximum heeft aan de grootte per email. Omdat hier een handleiding wordt meegestuurd, kan het voorkomen dat de email groter is dan toegestaan bij uw provider.

Stel vragen via chat aan uw handleiding

Stel uw vraag over deze PDF

Uw handleiding is per email verstuurd. Controleer uw email

Als u niet binnen een kwartier uw email met handleiding ontvangen heeft, kan het zijn dat u een verkeerd emailadres heeft ingevuld of dat uw emailprovider een maximum grootte per email heeft ingesteld die kleiner is dan de grootte van de handleiding.

Er is een email naar u verstuurd om uw inschrijving definitief te maken.

Controleer uw email en volg de aanwijzingen op om uw inschrijving definitief te maken

U heeft geen emailadres opgegeven

Als u de handleiding per email wilt ontvangen, vul dan een geldig emailadres in.

Uw vraag is op deze pagina toegevoegd

Wilt u een email ontvangen bij een antwoord en/of nieuwe vragen? Vul dan hier uw emailadres in.


Info