or 200Hz. If the speaker’s crossover frequency is below 40Hz, select the first option,
“Large.” This setting doesn’t refer to the speaker’s physical size but to its frequency
response, which is also called “full range.”
NOTE: If you have Room EQ set to On, the crossover frequencies have been automatically
set by the AVR and cannot be adjusted.
Write down the settings in Table A6 in the Appendix.
When you have finished entering the settings, press the Back/Exit button to return to the
Manual Setup menu.
Select the “Speakers” menu again and note the Subwoofer setting: This setting depends
upon the Crossover setting you selected for the front left and right speakers.
• If you set the front speakers to a numeric crossover frequency, the subwoofer
setting will always be SUB. All low-frequency information will always be sent to the
subwoofer. If you don’t have a subwoofer, either upgrade to full-range front left and
right speakers or add a subwoofer at the earliest opportunity.
• If you set the front left/right speakers to LARGE, select one of the three following
settings for the subwoofer:
L/R+LFE: This setting sends all low-frequency information to the subwoofer,
including a) information that would normally be played through the front left and
right speakers and b) the special low-frequency effects (LFE) channel information.
OFF: Select this setting when no subwoofer is in use. All low-frequency information
will be sent to the front left and right speakers.
LFE: This setting plays low-frequency information contained in the left and right
program channels through the front left and right speakers, and directs only the
LFE-channel information to the subwoofer.
Distance
As described above in Step Two, when you measured the distances from each of your
speakers to the listening position, your AVR provides an adjustment that compensates
for the different distances so that the sound from each speaker will reach the listening
position at the proper time. This process will improve the clarity and detail of the sound.
On the Manual Setup menu, move the cursor to the Distance line and press the OK button
to display the Adjust Speaker Distance menu.
Enter the distance from each speaker to the listening position that you measured in Step
Two and recorded in Table A4 in the Appendix (see page 39). Select a speaker, then use
the Left/Right buttons to change the measurement. You can enter distances between 0
and 30 feet (9.1m). The default distance for all speakers is 10 feet (3m).
The default unit of measurement is feet. To change the unit to meters, select the Unit of
Measure line and press the Left or Right button to change the setting.
NOTE: If you set the Assigned AMP channels to Zone 2, you will not be able to adjust
their delay settings.
Step Four – Setting Channel Output Levels Manually
For a conventional stereo receiver, a simple balance control adjusts the stereo imaging
by varying the relative loudness of the left and right channels. In a home theater system
with up to seven main channels plus up to two subwoofers, achieving proper imaging
becomes both more critical and more complex. The goal is to ensure that each channel
is heard at the listening position with equal loudness (when signals of equal loudness
are played through them).
Your AVR’s EzSet/EQ calibration can handle this critical task for you simply and
automatically. However, the Output Adjust menu allows you to calibrate the levels
manually, either using the system’s built-in test tone or while playing source material.
From the Manual Setup menu select Output Adjust to display the speaker volume
adjustment menu.
All of the system’s speakers will appear with their current level settings. You can adjust
each speaker’s level between –10dB and +10dB in 1dB increments.
While making adjustments, you can measure the channel levels in one of these ways:
• Preferably, use a handheld SPL meter set to the C-weighting, slow scale. Adjust each
speaker so that the meter reads 75dB when the AVR’s built-in test noise is playing.
• By ear. Adjust the levels so that the test tone sounds equally loud to you when it plays
through each speaker.
To set your levels using the AVR’s internal test tone, select the menu’s Test Tone line and
use the Left/Right buttons to turn the test tone on. Then select the Test Tone SEQ line to
select between Auto and Manual:
Auto: The test tone will automatically circulate to all speakers, as indicated by the
highlight bar. Use the Left/Right buttons to adjust the level for any speaker when the test
tone is paused there. Use the Up/Down buttons to move the highlight bar to another line,
and the test tone will follow the bar. To stop the test tone, use the Up/Down buttons to
move the cursor out of the screen’s speaker listings area.
Manual: The test tone will stay on the selected speaker until you use the Up/Down
buttons to move it to another speaker. Use the Left/Right buttons to adjust the level for
the speaker through which the test tone is playing.
If you are using an external source to set your output levels, set Test Tone to Off, use the
Up/Down buttons to navigate to each speaker, and use the Left/Right buttons to adjust
the speaker’s level while the source plays.
NOTE: If you are using a handheld SPL meter with external source material, such as a
test disc or an audio selection, play it and adjust the AVR’s master volume control until
the meter measures 75dB. Then adjust the individual speaker levels.
Output Reset: To reset all levels to their factory defaults of 0dB, scroll down to this line
and press the OK button.
When you have finished adjusting the speaker levels, record the settings in Table A3 in
the Appendix. Then press the Back/Exit Button.
Advanced Functions
Troubleshooting
33
AVR
ENGLISH
Advanced Functions
Notes on Setting Speaker Volumes in Home Theater Systems:
While setting your system’s individual speaker volume levels is ultimately up to your
personal taste, here are some ideas you may find helpful:
• For films and video-music programs, your overall goal should be to create an
enveloping, realistic sound field that draws you into the film or music program
without drawing your attention away from the action on the screen.
• For multichannel music recordings, some music producers will create a sound field
that places the musicians all around you; others will create a sound field that places
the musicians in front of you, with more subtle ambience in the surround speakers
(as you would experience in a concert hall).
• In most 5.1-channel and 7.1-channel film soundtracks, the surround speakers are
not intended to be as loud or as active as the front speakers. Adjusting the surround
speakers so they are always as loud as the front speakers could make dialogue
difficult to understand and will make some sound effects sound unrealistically loud.
Notes on Setting Subwoofer Volume:
• Sometimes the ideal subwoofer volume setting for music is too loud for films, while
the ideal setting for films is too quiet for music. When setting the subwoofer volume,
listen to both music and films with strong bass content and find a “middle ground”
volume level that works for both.
• If your subwoofer always seems too loud or too quiet, you may want to place it in
a different location. Placing the subwoofer in a corner will always tend to increase
its bass output, while placing it away from any walls or corners will always tend to
reduce its bass output.
AVR 1710S/AVR 171S only: Listening in Zone 2
With the multizone system in use, you may enjoy an exciting 5.1-channel home theater
presentation in the main listening area, while others listen to an entirely different source in
another room. See Install a Multizone System, on page 19, for installation information.
You set up and activate the AVR’s multizone system from the on-screen Zone 2 menu.
Press the OSD/Menu button, and navigate to the Zone 2 line. Press the OK button to
display the Zone 2 menu.
Status: This line lets you turn Zone 2 on or off.
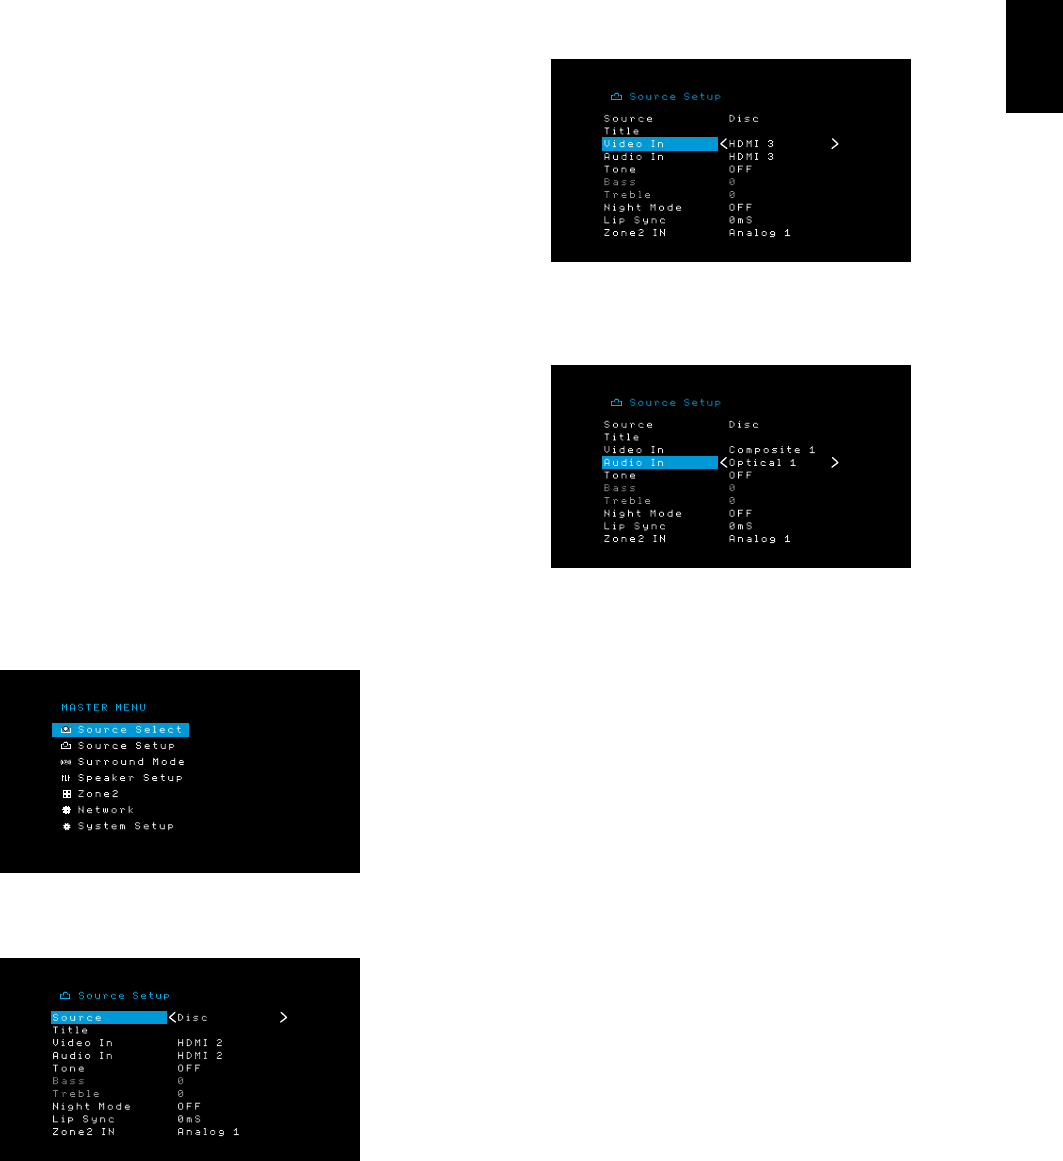
Source: This line lets you select the source input for Zone 2. You may select a different
source from the one currently operating in the main listening area. However, if the same
source has been selected for both the main listening area and Zone 2, listeners in both
areas will hear the same content.
Only analog audio sources are available to Zone 2. To hear digital devices such as a CD
player in Zone 2, follow these steps:
1. In addition to making a digital audio connection, connect the source device’s analog
audio outputs to the AVR. Make a note in Table A5 on page 39 to record which set of
analog inputs you used.
2. Use the AVR’s front-panel Audio Input button to select the analog audio input. (Leave
the Audio setting for the source device in the Source Setup menu set to the digital
input.)
Notes about listening in Zone 2:
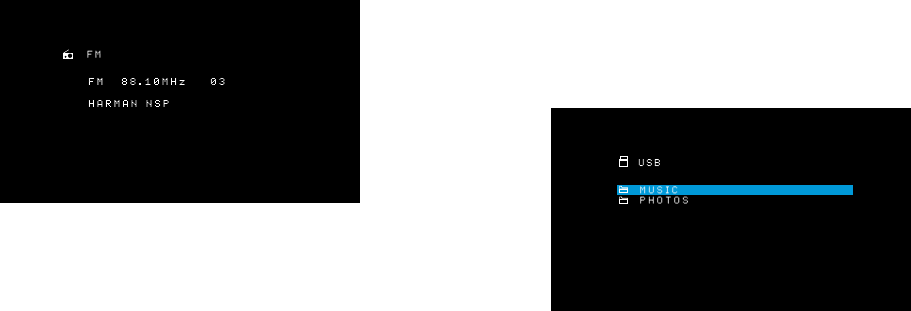
• Although you can listen to iPod or USB as a source in Zone 2, you cannot begin
iPod or USB playback from within Zone 2. You must initially select iPod or USB as a
source in Zone 1 and begin playback of a track or playlist from there. Then you can
select iPod as the Zone 2 source and control playback from within Zone 2 even if you
switch Zone 1 to a different source.
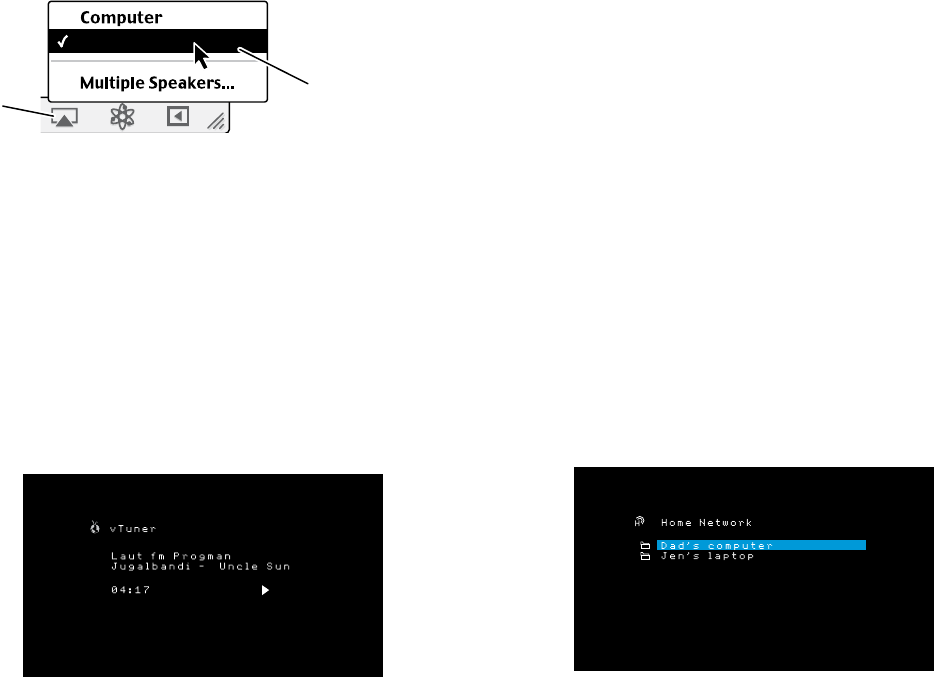
• Only one of the AVR’s internal sources (iPod, USB, vTuner, Network, AirPlay, DLNA
DMR) can be active at a time across both zones. For example, if you are listening
to vTuner as the source in Zone 1 and switch the source in Zone 2 to USB, it will
switch the source in Zone 1 to USB(and vice versa). To listen to different sources in
Zone 1 and Zone 2 at the same time, at least one source must be one of the AVR’s
configurable external sources (Cable/Sat, Disc, STB or TV) that is connected to one
of the AVR’s analog audio inputs, or one of the AVR’s terrestrial radio sources (FM
or AM).
Volume: Highlight this line, and use the Left/Right buttons to control the volume in Zone
2.
Assigned AMP: This line lets you assign the Assigned AMP channels to “Zone 2” for
multizone operation (see Number of Speakers, on page 31). When this line is set to Zone
2, you may configure the main listening room for only up to 5.1 channels.
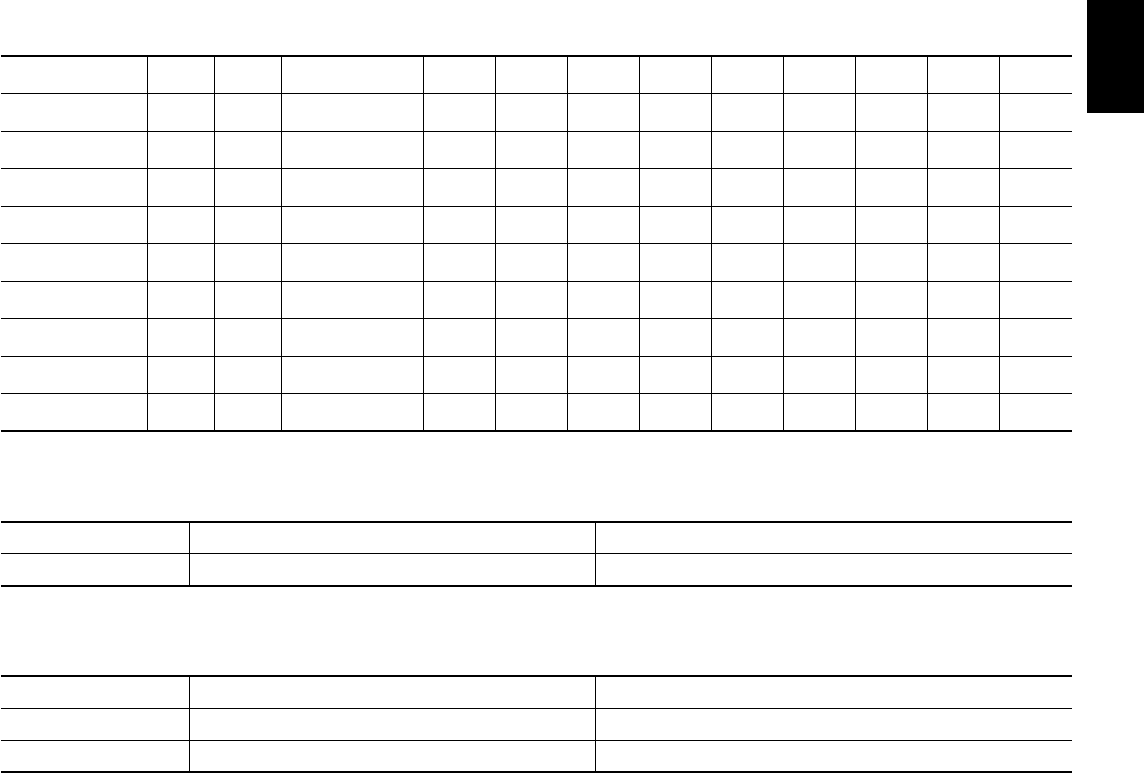
To use the remote to control the sound in Zone 2, press the remote’s Zone 2 button. The
volume, mute and source select buttons will control the sound in Zone 2 and the Zone 2
button will illuminate whenever you press a button to indicate that the remote is in the
Zone 2 control mode. Press the Zone 2 button again to return the remote to the main
listening area control mode.
34
AVR
System Settings
Appendix
System Settings
The AVR’s System Settings menu lets you customize in what way many of the AVR’s
features operate. Press the OSD/Menu button and navigate to the System line. Press the
OK button to display the System Settings menu.
Panel Timeout: This setting allows you to set the AVR’s front-panel display to automatically
turn off after remaining on for a predetermined time (3 – 10 seconds) each time you use
a control. Set this to “Off” to have the display remain on continually.
Auto Power Off: This setting allows you to set the AVR to automatically switch to the
Off mode after being in the Sleep mode for a predetermined time (1 – 8 hours). See
Power Indicator/Power Button, on page 4, for more information. It also allows the AVR
to automatically switch to the Sleep mode after being on for the predetermined amount
of time. Note that it will not transition to Sleep mode this way if the active source has
one of the Digital Audio Connectors selected as the Audio Input. See Source Setup, on
page 23, for more information.
Menu Timeout: This setting allows you to set the amount of time (20 – 50 seconds) a
menu screen will remain on after the last adjustment. Set this to “Off” to have the menus
remain on continually until you press the OSD/Menu button.
Status Message: When the AVR is turned on, the volume is adjusted, the source is
changed or a change in the input signal is detected, a status message will be displayed
on the TV screen. Select how long the message remains visible, from 2 to 10 seconds,
with a default of 3 seconds. Select “Off” if you do not wish to see the status messages on
the TV screen (they will still appear on the AVR’s front-panel display).
Volume Default and Default Volume Setting: These two settings are used together to
program the volume level when you turn on the AVR. Set Volume Default to On, and then
set the Default Volume Setting to the desired turn-on volume. When Volume Default is set
to Off, the AVR will turn on at the last-used volume setting from the previous listening
session.
HDMI Audio to TV: This setting determines whether HDMI audio signals are passed
through the HDMI Monitor Out connector to the video display. In normal operation, leave
this setting at Off, as audio will be played through the AVR. To use the TV by itself, without
the home theater system, turn this setting to On.
HDMI Link: This setting allows the communication of control information among the
HDMI devices in your system. Turn this setting to On to allow control communication
between the HDMI devices; turn the setting to Off to forbid control communication.
Software Update: If a software upgrade is released for your AVR, installation instructions
will be available in the Product Support section of the Web site or from Harman Kardon
customer service. At that time, you may use this submenu to install the upgrade
software.
IMPORTANT: During a software upgrade, do not power off the AVR or use any of its
controls. Doing so could permanently damage the AVR.
Sleep Timer
The sleep timer sets the AVR to play for up to 90 minutes and then turn off
automatically.
Press the Sleep button on the remote, and the time until turn-off will be displayed.
Each additional press of the Sleep button increases the play time by 10 minutes, with a
maximum of 90 minutes. The SLEEP OFF setting disables the sleep timer.
When the sleep timer has been set, the front-panel display will automatically dim to half
brightness.
If you press the Sleep button after the timer has been set, the remaining play time will be
displayed. Press the Sleep button again to change the play time.
The front-panel display will count down during the final 10 seconds before going to Sleep
mode. Pressing any button during this countdown will cancel the process and disable
the Sleep timer.
Processor Reset
If the AVR behaves erratically after a power surge, unplug the AC power cord for at least
3 minutes. Plug the cord back in and turn the AVR on. If this procedure doesn’t help, reset
the AVR’s processor as described below.
NOTE: A processor reset erases all user configurations, including speaker and level
settings and tuner presets. After a reset, reenter all of these settings from your entries in
the Appendix worksheets.
To reset the AVR’s processor:
1. Press the front-panel Power Button for more than three seconds to turn the AVR off (the
Power Indicator will turn amber).
2. Press and hold the front-panel Surround Mode Category button for at least 5 seconds
until the RESET message appears on the front-panel display.
NOTE: After performing a processor reset, wait at least 1 minute before pressing any
Source Selector buttons.
If the AVR does not function correctly after a processor reset, contact an authorized
Harman Kardon service center for assistance. Authorized service centers may be located
by visiting our Web site at www.harmankardon.com.
35
ENGLISH
AVR
Troubleshooting
SymptomCauseSolution
Unit does not function• No AC power• Ensure that the power cord is plugged into a live AC
power outlet
• Check if the AC outlet is switch-controlled
Front-panel display lights, but there’s no sound or picture• Intermittent input connection
• Mute is on
• Volume control is turned down
• Secure all input and speaker connections
• Press Mute button
• Turn up Volume control
No sound from any speaker•
is in protection mode due to possible short
circuit
•
is in protection mode due to internal
problems
• Check all speaker wires at speaker and AVR
connections for crossed wires
• Contact your local Harman Kardon service center
No sound from center or surround speakers• Incorrect surround mode
• Program material is monophonic
• Incorrect speaker
• Program material is stereo
• Select a surround mode other than stereo
• Mono programs contain no surround information
• Check the speaker in the setup menu
• The surround decoder may not create center- or
surround-channel information from nonencoded
programs
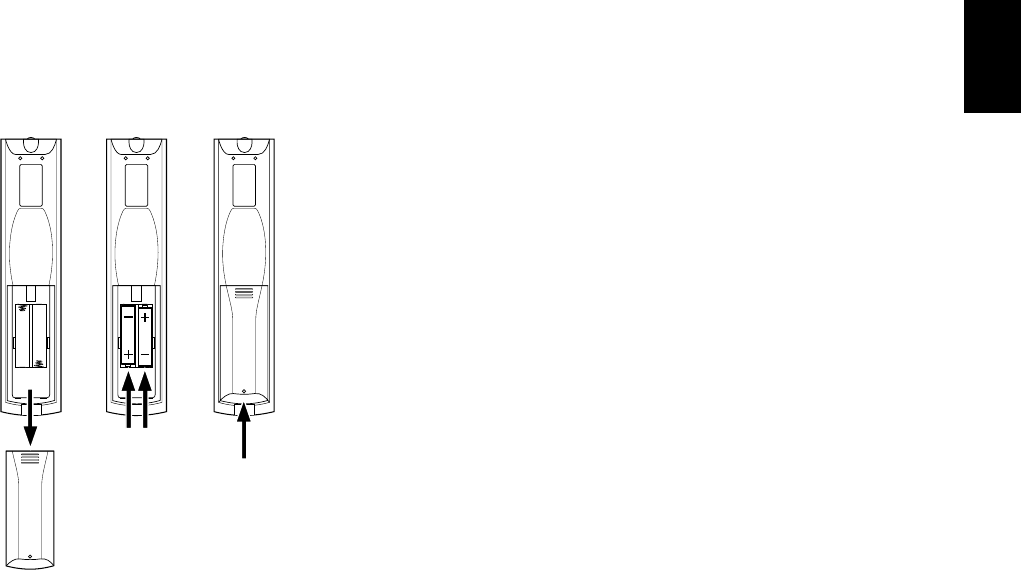
Unit does not respond to remote control commands• Weak batteries in remote
• Remote sensor is obscured
• Change batteries in remote
• Ensure that the AVR’s front-panel remote sensor is in
the line of sight of the remote
Intermittent buzzing in tuner• Local interference• Move the AVR or antenna away from computers,
fluorescent lights, motors or other electrical appliances
(AVR 1710S/AVR 171S only): Surround-back speaker
settings cannot be accessed, and the test tone does not
play through the surround back speakers
• Multi-zone operation has been selected/Assigned AMP
channels have been assigned to Zone 2
• Use the Speaker Setup menu to reassign the Assigned
AMP to the surround back left and right channels
Unable to activate remote control Programming mode• Source Selector button is not held for at least 3
seconds
• Be sure to hold the Source Selector button for at least
3 seconds
Remote buttons light, but AVR does not respond• Remote is in Zone 2 mode• Press Zone 2 button (button will not illuminate when
remote is in Zone 1 control mode).
Unable to establish network connection• AVR network programming requires rebooting• Cycle the AVR into the Off mode, and then turn it on
again
Additional information on troubleshooting possible problems with your AVR and installation-related issues may be found in the list of “Frequently Asked Questions,” which is located
in the Product Support section of our Web site: www.harmankardon.com
Troubleshooting
35
AVR
ENGLISH
Troubleshooting
35
ENGLISH
AVR
Troubleshooting
SymptomCauseSolution
Unit does not function• No AC power• Ensure that the power cord is plugged into a live AC
power outlet
• Check if the AC outlet is switch-controlled
Front-panel display lights, but there’s no sound or picture• Intermittent input connection
• Mute is on
• Volume control is turned down
• Secure all input and speaker connections
• Press Mute button
• Turn up Volume control
No sound from any speaker•
is in protection mode due to possible short
circuit
•
is in protection mode due to internal
problems
• Check all speaker wires at speaker and AVR
connections for crossed wires
• Contact your local Harman Kardon service center
No sound from center or surround speakers• Incorrect surround mode
• Program material is monophonic
• Incorrect speaker
• Program material is stereo
• Select a surround mode other than stereo
• Mono programs contain no surround information
• Check the speaker in the setup menu
• The surround decoder may not create center- or
surround-channel information from nonencoded
programs
Unit does not respond to remote control commands• Weak batteries in remote
• Remote sensor is obscured
• Change batteries in remote
• Ensure that the AVR’s front-panel remote sensor is in
the line of sight of the remote
Intermittent buzzing in tuner• Local interference• Move the AVR or antenna away from computers,
fluorescent lights, motors or other electrical appliances
(AVR 1710S/AVR 171S only): Surround-back speaker
settings cannot be accessed, and the test tone does not
play through the surround back speakers
• Multi-zone operation has been selected/Assigned AMP
channels have been assigned to Zone 2
• Use the Speaker Setup menu to reassign the Assigned
AMP to the surround back left and right channels
Unable to activate remote control Programming mode• Source Selector button is not held for at least 3
seconds
• Be sure to hold the Source Selector button for at least
3 seconds
Remote buttons light, but AVR does not respond• Remote is in Zone 2 mode• Press Zone 2 button (button will not illuminate when
remote is in Zone 1 control mode).
Unable to establish network connection• AVR network programming requires rebooting• Cycle the AVR into the Off mode, and then turn it on
again
Additional information on troubleshooting possible problems with your AVR and installation-related issues may be found in the list of “Frequently Asked Questions,” which is located
in the Product Support section of our Web site: www.harmankardon.com
Troubleshooting
36
AVR
Specifications
36
AVR
Specifications
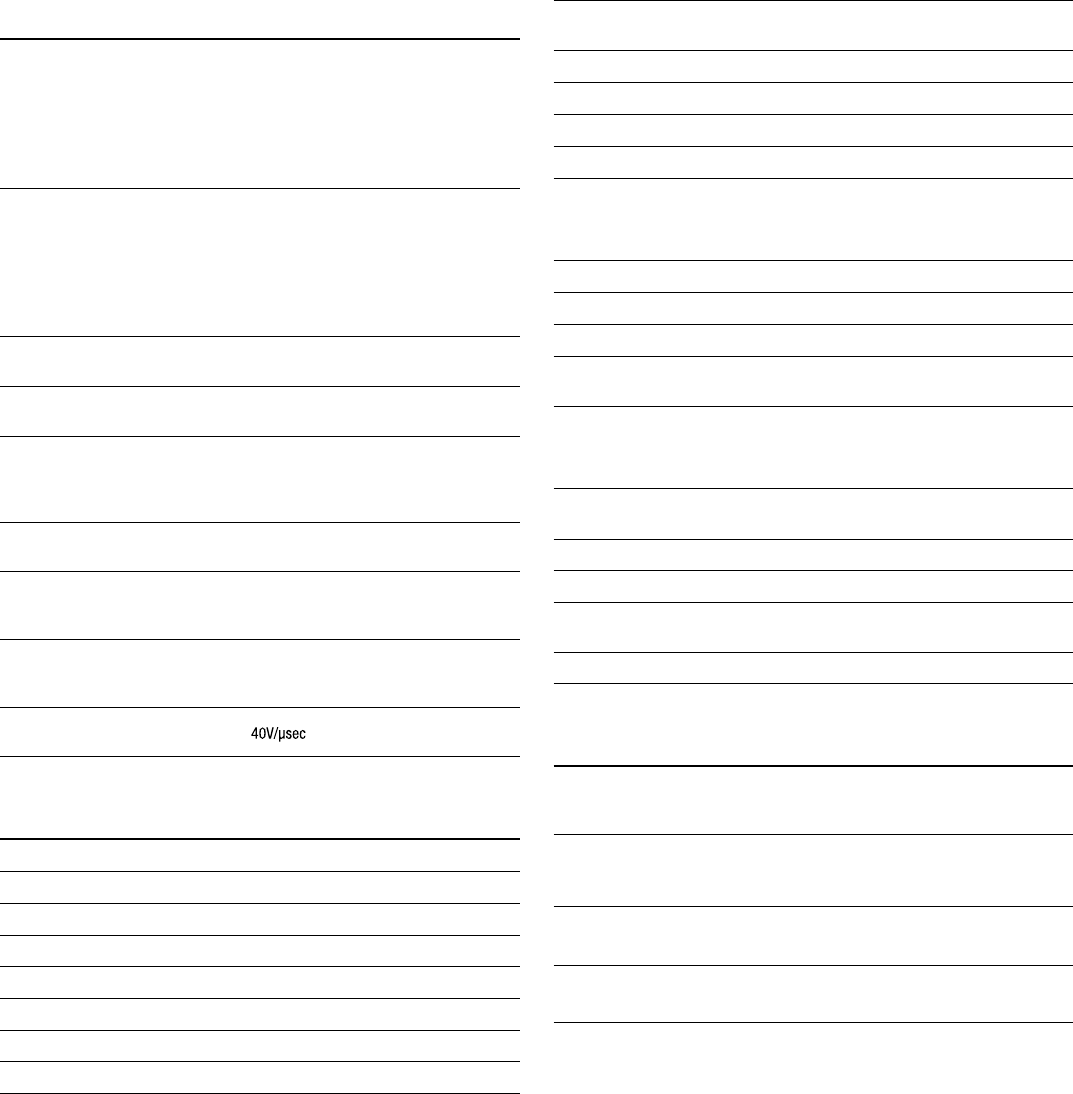
Specifications
Audio Section
Stereo power:
two channels driven @ 6/8 ohms, 1kHz,
<0.9% THD
channels driven @ 6/8 ohms, 1kHz, <0.9%
THD
Multichannel power:
two channels driven @ 6/8 ohms, 1kHz,
<0.9% THD
channels driven @ 6/8 ohms, 1kHz, <0.9%
THD
Input sensitivity/impedance:250mV/27k ohms
Signal-to-noise ratio (IHF-A):100dB
Surround system adjacent channel
separation:
Dolby Pro Logic/DPLII: 40dB
Dolby Digital: 55dB
DTS: 55dB
Frequency response (@ 1W):10Hz – 130kHz (+0dB/–3dB)
High instantaneous current
capability (HCC):
Transient intermodulation
distortion (TIM):
Unmeasurable
Slew rate:
FM Tuner Section
Frequency range:87.5 – 108.0MHz
Usable sensitivity IHF:1.3µV/13.2dBf
Signal-to-noise ratio (mono/stereo):70dB/68dB
Distortion (mono/stereo):0.2%/0.3%
Stereo separation:40dB @ 1kHz
Selectivity (±400kHz):70dB
Image rejection:80dB
IF rejection:80dB
AM Tuner Section
Frequency range:520 – 1710kHz (AVR 1710S/AVR 1610S)
522 – 1620kHz (AVR 170S/AVR 160S)
Signal-to-noise ratio:38dB
Usable sensitivity (loop):
500µV
Distortion (1kHz, 50% mod):1.0%
Selectivity (±10kHz):30dB
Bluetooth Section
Frequency range:2402MHz - 2480MHz
Transmitter power:0-4dBm
Modulation:
GFSK, π/4-DQPSK, 8-DPSK
Functions:Streaming audio play, supports Bluetooth
3.0, A2DP v1.2, AVRCP v1.4
Video Section
Television format:NTSC (AVR 1710S/AVR 1610S);
PAL (AVR 171S/AVR 161S)
Input level/impedance:1Vp-p/75 ohms
Output level/impedance:1Vp-p/75 ohms
Video frequency response (composite
video):
10Hz – 8MHz (–3dB)
HDMI:HDMI 1.4 with 4k x 2k bypass
General Specifications
Power requirement:120V AC/60Hz (AVR 1710S/AVR 1610S);
220V – 240V AC/50Hz – 60Hz (AVR 171S/
AVR 161S)
Power consumption:
<0.5W (standby);
510W maximum (AVR 1710S/AVR 171S);
450W maximum (AVR 1610S/AVR 161S)
Dimensions (W x H x D):
17-5/16" x 4-3/4" x 11-3/16"
(440mm x 121mm x 300mm)
Weight
(AVR 1710S/AVR 171S): 11 lb (5.1kg)
(AVR 1610S/AVR 161S): 10 lb (4.6kg)
Depth measurement includes knobs, buttons and terminal connections.
Height measurement includes feet and chassis.
AVR 1710S/AVR 171S: 100W per channel,
AVR 1610S/AVR 161S: 85W per channel, two
AVR 1710S/AVR 171S: 100W per channel,
AVR 1610S/AVR 161S: 85W per channel, two
±40 amps (AVR 1710S/AVR 171S);
±29 amps (AVR 1610S/AVR 161S)
37
AVR
ENGLISH
Appendix
36
AVR
Specifications
Specifications
Audio Section
Stereo power:
two channels driven @ 6/8 ohms, 1kHz,
<0.9% THD
channels driven @ 6/8 ohms, 1kHz, <0.9%
THD
Multichannel power:
two channels driven @ 6/8 ohms, 1kHz,
<0.9% THD
channels driven @ 6/8 ohms, 1kHz, <0.9%
THD
Input sensitivity/impedance:250mV/27k ohms
Signal-to-noise ratio (IHF-A):100dB
Surround system adjacent channel
separation:
Dolby Pro Logic/DPLII: 40dB
Dolby Digital: 55dB
DTS: 55dB
Frequency response (@ 1W):10Hz – 130kHz (+0dB/–3dB)
High instantaneous current
capability (HCC):
Transient intermodulation
distortion (TIM):
Unmeasurable
Slew rate:
FM Tuner Section
Frequency range:87.5 – 108.0MHz
Usable sensitivity IHF:1.3µV/13.2dBf
Signal-to-noise ratio (mono/stereo):70dB/68dB
Distortion (mono/stereo):0.2%/0.3%
Stereo separation:40dB @ 1kHz
Selectivity (±400kHz):70dB
Image rejection:80dB
IF rejection:80dB
AM Tuner Section
Frequency range:520 – 1710kHz (AVR 1710S/AVR 1610S)
522 – 1620kHz (AVR 170S/AVR 160S)
Signal-to-noise ratio:38dB
Usable sensitivity (loop):
500µV
Distortion (1kHz, 50% mod):1.0%
Selectivity (±10kHz):30dB
Bluetooth Section
Frequency range:2402MHz - 2480MHz
Transmitter power:0-4dBm
Modulation:
GFSK, π/4-DQPSK, 8-DPSK
Functions:Streaming audio play, supports Bluetooth
3.0, A2DP v1.2, AVRCP v1.4
Video Section
Television format:NTSC (AVR 1710S/AVR 1610S);
PAL (AVR 171S/AVR 161S)
Input level/impedance:1Vp-p/75 ohms
Output level/impedance:1Vp-p/75 ohms
Video frequency response (composite
video):
10Hz – 8MHz (–3dB)
HDMI:HDMI 1.4 with 4k x 2k bypass
General Specifications
Power requirement:120V AC/60Hz (AVR 1710S/AVR 1610S);
220V – 240V AC/50Hz – 60Hz (AVR 171S/
AVR 161S)
Power consumption:
<0.5W (standby);
510W maximum (AVR 1710S/AVR 171S);
450W maximum (AVR 1610S/AVR 161S)
Dimensions (W x H x D):
17-5/16" x 4-3/4" x 11-3/16"
(440mm x 121mm x 300mm)
Weight
(AVR 1710S/AVR 171S): 11 lb (5.1kg)
(AVR 1610S/AVR 161S): 10 lb (4.6kg)
Depth measurement includes knobs, buttons and terminal connections.
United States and other countries. Intel is a registered trademark of Intel Corporation. iOS is a registered trademark of Cisco Systems, Inc., and/or its
affiliates in the United States and certain other countries. Roku is a registered trademark of Roku, Inc. Roku Streaming Stick is a trademark of Roku, Inc.
All rights reserved. TiVo is a registered trademark of TiVo Inc. Series2 is a trademark of TiVo, Inc. Windows Media is a registered trademark of Microsoft
Corporation in the United States and/or other countries.
Features, specifications and appearance are subject to change without notice.
Spotify Connect feature may not be used in countries where Spotify service is not available.
Gebruikershandleiding.com neemt misbruik van zijn services uitermate serieus. U kunt hieronder aangeven waarom deze vraag ongepast is. Wij controleren de vraag en zonodig wordt deze verwijderd.
Product:
Spelregels forum
Om tot zinvolle vragen te komen hanteren wij de volgende spelregels:
lees eerst de handleiding door;
controleer of uw vraag al eerder door iemand anders is gesteld;
probeer uw vraag zo duidelijk mogelijk te stellen;
heeft u een probleem en al geprobeerd om dit op te lossen, vermeld dit erbij aub;
heeft u een oplossing gekregen van een bezoeker dan horen wij dat graag in dit forum;
wilt u een reactie geven op een vraag of antwoord, gebruik dan niet dit formulier maar klik op de knop 'reageer op deze vraag';
uw vraag wordt direct op de website gezet; vermijd daarom persoonlijke gegevens in te vullen;
Belangrijk! Als er een antwoord wordt gegeven op uw vraag, dan is het voor de gever van het antwoord nuttig om te weten als u er wel (of niet) mee geholpen bent! Wij vragen u dus ook te reageren op een antwoord.
Belangrijk! Antwoorden worden ook per e-mail naar abonnees gestuurd. Laat uw emailadres achter op deze site, zodat u op de hoogte blijft. U krijgt dan ook andere vragen en antwoorden te zien.
Abonneren
Abonneer u voor het ontvangen van emails voor uw Harman Kardon AVR 161S bij:
nieuwe vragen en antwoorden
nieuwe handleidingen
U ontvangt een email met instructies om u voor één of beide opties in te schrijven.
Ontvang uw handleiding per email
Vul uw emailadres in en ontvang de handleiding van Harman Kardon AVR 161S in de taal/talen: Engels als bijlage per email.
De handleiding is 6,53 mb groot.
U ontvangt de handleiding per email binnen enkele minuten. Als u geen email heeft ontvangen, dan heeft u waarschijnlijk een verkeerd emailadres ingevuld of is uw mailbox te vol. Daarnaast kan het zijn dat uw internetprovider een maximum heeft aan de grootte per email. Omdat hier een handleiding wordt meegestuurd, kan het voorkomen dat de email groter is dan toegestaan bij uw provider.
Uw handleiding is per email verstuurd. Controleer uw email
Als u niet binnen een kwartier uw email met handleiding ontvangen heeft, kan het zijn dat u een verkeerd emailadres heeft ingevuld of dat uw emailprovider een maximum grootte per email heeft ingesteld die kleiner is dan de grootte van de handleiding.
Er is een email naar u verstuurd om uw inschrijving definitief te maken.
Controleer uw email en volg de aanwijzingen op om uw inschrijving definitief te maken
U heeft geen emailadres opgegeven
Als u de handleiding per email wilt ontvangen, vul dan een geldig emailadres in.
Uw vraag is op deze pagina toegevoegd
Wilt u een email ontvangen bij een antwoord en/of nieuwe vragen? Vul dan hier uw emailadres in.